La página se está cargando...

Termostato diseñado para visualizar, controlar y regular aplicaciones de energía solar térmi-
ca en instalaciones de agua caliente sanitaria.
1432H701 Ed.01
Reguladores de energía solar
Solar energy controllers
E
MODELO FUNCIÓN RELÉ
ALIMENTACIÓN,
50/60 Hz
Termostato BOMBA: 8 A, 250 V, cos ϕ=1, SPST 230 V~
AKO-14327
Panelable Contacto de relé con tensión de 230V~ ±10%
Termostato BOMBA:16 A, 250 V, cos
ϕ=1, SPST 230 V~
AKO-15224
Raíl DIN Contacto de relé libre de tensión ±10%
1- Versiones y referencias
2- Datos técnicos
Rango de temperatura: . . . . . . . . . . . . . . . . . . . . -50.0 ºC a 99.9 ºC (-58.0 ºF a 211 ºF)
Resolución, ajuste y diferencial: 0,1 ó 1 ºC/ºF configurable por parámetro P9 (AKO-15224)
Entr
ada para sonda NTC: . . . . . . . . . . . . . . . . . . . . . . . . . . . . . . . . . . . . . . . .
AK
O-149XX
Precisión termométrica: . . . . . . . . . . . . . . . . . . . . . . . . . . . . . . . . . . . . . . . . . . . . . . ± 1 ºC
Tolerancia de la sonda a 25 ºC: . . . . . . . . . . . . . . . . . . . . . . . . . . . . . . . . . . . . . . ± 0,4 ºC
Potencia máxima absorbida: . . . . . . . . . . . . . . . . . . . . . . . . . . . . . . . . . . . . . . . . . . . . 3 VA
Temperatura ambiente de trabajo: . . . . . . . . . . . . . . . . . . . . . . . . . . . . . . . . . 5 ºC a 50 ºC
Temperatura ambiente de almacenaje:. . . . . . . . . . . . . . . . . . . . . . . . . . . . . -30 ºC a 70 ºC
Categoría de instalación: . . . . . . . . . . . . . . . . . . . . . . . . . . . . . . . . . . II según EN 61010-1
Grado de polución: . . . . . . . . . . . . . . . . . . . . . . . . . . . . . . . . . . . . . . II según EN 61010-1
Aislamiento doble entre alimentación, circuito secundario y salida relé.
GB
Thermostat designed to display, control and regulate thermal solar energy applications in
domestic hot water facilities.
MODEL FUNCTION RELAY POWER SUPPLY,
50/60 Hz
Controller PUMP: 8 A, 250 V, cos ϕ=1, SPST 230 V~
AKO-14327
Panel mounting Relay contact supply voltage: 230V~ ±10%
Controller PUMP: 16 A, 250 V, cos
ϕ=1, SPST 230 V~
AKO-15224
DIN Rail Voltage-free relay contact ±10%
1- Versions and references
2- Technical data
Temperature range: . . . . . . . . . . . . . . . . . . . . . . -50.0 ºC to 99.9 ºC (-58.0 ºF to 211 ºF)
Resolution, Set Point and differential: 0,1 or 1 ºC/ºF configurable by parameter P9 (AKO-15224)
Input for NTC probe: . . . . . . . . . . . . . . . . . . . . . . . . . . . . . . . . . . . . . . . . . . . AKO-149XX
Thermometric accuracy: . . . . . . . . . . . . . . . . . . . . . . . . . . . . . . . . . . . . . . . . . . . . . . ± 1 ºC
Probe tolerance at 25 ºC: . . . . . . . . . . . . . . . . . . . . . . . . . . . . . . . . . . . . . . . . . . . ± 0,4 ºC
Maximum input power:. . . . . . . . . . . . . . . . . . . . . . . . . . . . . . . . . . . . . . . . . . . . . . . . 3 VA
Working ambient temperature: . . . . . . . . . . . . . . . . . . . . . . . . . . . . . . . . . . . 5 ºC to 50 ºC
Storage ambient temperature: . . . . . . . . . . . . . . . . . . . . . . . . . . . . . . . . . . -30 ºC to 70 ºC
Installation category: . . . . . . . . . . . . . . . . . . . . . . . . . . . . . . II under EN 61010-1 standard
Pollution degree: . . . . . . . . . . . . . . . . . . . . . . . . . . . . . . . . . II under EN 61010-1 standard
Double insulation between the power supply, the secondary circuit and the relay output.
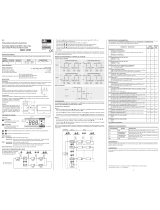
3- Installation
The controller should be installed in a place protected from vibrations, water and corrosive gases,
and where ambient temperature does not surpass the value specified in the technical data.
In order for the panel mounting units to be suitable having IP65 protection, the gasket
should be properly installed between the apparatus and the perimeter of the panel cut-out
where it is to be fitted.
In order to give a correct reading, the probe should be installed in a place without heat
influences other than the temperature that is to be measured or controlled.
3.1 Fastening units
3.2 Conexionado:
La sonda y su cable NUNCA deben instalarse
en una conducción junto con cables de poten-
cia, control o alimentación.
El circuito de alimentación debe estar provisto
de un interruptor para su desconexión
de mínimo 2 A, 230 V, situado cerca del apara-
to
.
El cable de alimentación será del tipo
H05VV-F 2x0.5 mm
2
o H05V-K 2x0.5 mm
2
.
Los cables para el conexionado del contacto del
relé, deberán tener una sección de 2.5 mm
2
.
3- Instalación
El controlador debe ser instalado en un sitio protegido de las vibraciones, del agua y de los gases
corrosivos, donde la temperatura ambiente no supere el valor reflejado en los datos técnicos.
Para que los controladores de fijación panelable tengan un grado de protección IP65, debe-
rá instalarse correctamente la junta entre el aparato y el perímetro del hueco del panel
donde deba montarse.
Para que la lectura sea correcta, la sonda debe ubicarse en un sitio sin influencias térmicas
ajenas a la temperatura que se desea medir o controlar.
4- Funciones del frontal
LED Bomba:
ON (AK
O-14327)
Led 4 (AK
O-15224)
P
ermanente:
Relé 1 de la bomba activ
ado
.
Intermitente: (AKO-14327) Fase de pro-
gr
amación.
LED Visualización sondas (AKO-14327)
Permanente: Visualización Sonda 1.
Desconectado: Visualización Sonda 2.
LED 1 (AKO-15224)
Permanente: Visualización Sonda 1.
LED 2 (AKO-15224)
Permanente: Visualización Sonda 2.
LED ºC (AK
O-15224)
Permanente: La visualización de tempe-
ratura es en ºC.
Intermitente: F
ase de progr
amación.
LED ºF (AKO-15224)
Permanente: La visualización de tempe-
ratur
a es en ºF
.
Tecla SUBIR
- Pulsando visualiza durante 5 segundos el
valor de la segunda sonda o el valor de la
primera sonda.
- En programación, sube el valor que se
está visualizando.
70,5
28,5
61,5
44
3
1
2
45
35
90
58
HUECO PANEL
PANEL CUT-OUT
máx. 18 mm.
Max. 18 mm.
3.1 Anclaje de equipos
Para montaje en panel:
For panel mounting:
Para fijación sobre raíl DIN:
For DIN rail mounting:
70,5
28,5
61,5
44
3
1
2
45
35
90
58
P
ar
a la fijación del apar
ato situar los anclajes
1 sobre las guías 2 en la posición de la figur
a.
Desplazar el anclaje en el sentido de la flecha. Presionando la pestaña 3 puede desplazarse el
anclaje en sentido contrario a la flecha.
T
o fix the unit,
place the fasteners
1 over the sliders 2 as shown in the figure
.
Move the faste
-
ners in the direction of the arrow. By pressing tab 3 fasteners may be moved in the opposite
direction of the arrow.
3.2 Connection:
T
he probe and its lead should
NEVER be insta
-
lled in ducting along with power, control or
power supply wiring.
The power supply circuit should be connected
with a minimum 2
A,
230
V
, switch located
close to the unit. Power supply cables should be
H05VV-F 2x0,5 mm
2
or H05V-K 2x0,5 mm
2
.
Section of connecting wires for relays contacts
should be 2,5 mm
2
.
1 23
S1
S2
8A cos
ϕ
=1 250V
230V~
AKO-14327
230V~
89
10 11
AKO-15224
9
10
11
4
5
230V~
±10% 50/60 Hz
In=22mA~
In=8.8mA~
13
12
18
17
16A cos
ϕ
=1 250V
S1
S2
BOMBA
PUMP
AK
O-14327
AK
O-15224
LED
V
isualización Sondas
Probes display LED
Tecla SUBIR
UP k
ey
Tecla SET
SET key
Tecla BAJAR
DOWN key
LED 1
LED 2 LED 4
LED ºC LED ºF
Tecla SUBIR
UP k
ey
T
ecla BAJAR
DOWN k
ey
LED ON
ON LED
4- Front panel functions
Pr
obes display LED
(AK
O-14327)
P
ermanent:
It displays Probe 1.
Disabled: It displays Probe 2.
LED 1 (AKO-15224)
Permanent: It displays Probe 1.
LED 2 (AK
O-15224)
P
ermanent:
It displays Probe 2.
LED ºC (AKO-15224)
Permanent: Degrees ºC indicator.
Flashing: Programming phase.
LED ºF (AKO-15224)
Permanent: Degrees ºF indicator.
UP key
- Press to display the value of the first or
second probe for five seconds.
- In programming, it makes the displayed
value increase.
LED Pump:
ON (AKO-14327) Led 4 (AKO-15224)
Permanent: Pump relay energised.
Flashing: (AKO-14327) Programming
phase.

5- Ajuste y configuración
Sólo deben realizarse por personal que conozca el funcionamiento y las posibilidades del
equipo donde se aplica.
5.1 Ajuste de temperatura
El valor de fábrica, de
AJUSTE DE TEMPERATURA SOLAR (SP) por defecto es de 2 ºC
.
- Pulse durante 3 segundos la tecla SET para visualizar AJUSTE Solar. Aparece el valor del
AJUSTE Solar ACTUAL (SP).
- Pulse las teclas o para VARIAR AJUSTE (SP) al valor deseado.
- Pulse simultáneamente las teclas + (AKO-14327) ó la tecla SET (AKO-15224) para
ACEPTAR EL NUEVO AJUSTE. La pantalla vuelve a la INDICACION de temperatura.
5.2 Configuración de parámetros
Nivel 1 Parámetros
- Pulse simultáneamente las teclas + (AKO-14327) ó SET (AKO-15224) durante 10
segundos, se ha entrado en programación de parámetros. En la pantalla aparece el primer
parámetro.
- Pulse la tecla para acceder al parámetro siguiente y la tecla para retroceder al anterior.
Nivel 2
Valores
- Para VISUALIZAR el VALOR ACTUAL de cualquier parámetro, sitúese en el que se desea y
pulse las teclas + simultáneamente (AKO-14327) ó la tecla SET (AKO-15224). Una
vez visualizado, si queire VARIAR VALOR pulse las teclas o .
- Pulse las teclas + simultáneamente (AKO-14327) ó la tecla
SET (AKO-15224) para
A
CEPTAR EL NUEVO. La programación vuelve a nivel 1 PARÁMETROS.
NOTA: Si no se pulsa tecla alguna durante 25 segundos en cualquiera de los pasos ante-
riores, el controlador volverá automáticamente a la situación de INDICACION TEMPERATU-
RA, sin modificar el valor de los parámetros.
Nos reserv
amos el derecho de suministrar materiales que pudieran diferir levemente de los
descritos en nuestras Hojas Técnicas. Información actualizada en nuestra web: www.ako.com.
A
v
. Roquetes, 30-38 | 08812 Sant Per
e de Ribes | Bar
celona | España
T
el. (34) 938 142 700 | Fax (34) 938 934 054 | e-mail: [email protected] |
www
.ako.com
Apar
tado (P
.O. Box), 5 | 08800 V
ilanova i la Geltrú | Barcelona | España
AKO ELECTROMECÀNICA, S.A.L.
351432701 REV
.00 2007
D.L.: B-
6- Descripción de parámetros y mensajes
Los valores de la columna Def. vienen programados de fábrica.
MENSAJES
AH
Intermitente con temp. Sonda 1
Sobretemperatura en Sonda 1 >95ºC (Temp. máx. paneles)
Intermitente con temp. Sonda 2
Sobretemperatura en Sonda 2 >P8
AL
Intermitente con temper
atura
T
emperatura baja en Sonda 1 <P6 (Temperatura antihielo paneles)
E1 Sonda 1 averiada (Circuito abierto, cruzado, temp. >110ºC ó temp. <-55ºC)
E2 Sonda 2 averiada (Circuito abierto, cruzado, temp. >110ºC ó temp. <-55ºC)
Nivel 1 Parámetros
Nivel 2 Descripción Valores Mín. Def. Máx.
P1
Sonda a visualizar (1= Sonda 1) (2= Sonda 2) 1 1 2
P2 Diferencial Solar (Hysteresis) (ºC/ºF) 1 2 5
P3 Calibración de la Sonda 1 (Offset) (ºC/ºF) -10 0 10
P4 Calibración de la Sonda 2 (Offset) (ºC/ºF) -10 0 10
P5 Función Antihielo Paneles (0= Desactivada) (1= Activada) 0 0 1
P6 Temperatura antihielo paneles (ºC/ºF) -9 5 9
P7
Función tempetarura máxima depósito por Sonda 2
0 0 1
(0= Desactivada) (1= Activada)
P8 Temperatura máxima depósito (ºC/ºF) 0 70 99
Modalidad de visualización de la temperatura (Sólo AKO-15224)
P9 (0=Enteros en ºC) (1=Un decimal en ºC) 0 0 3
(2=Enteros en ºF) (3=Un decimal en ºF)
P10
Transferir parámetros (Sólo AKO-15224)
0 0 2
(0= Desactivado) (1= Enviar) (2=Recibir)
P11 Dirección para equipos con comunicación (Sólo AKO-15224) 0 0 255
P12 Versión de programa (información) (Sólo AKO-15224)
EP Salida de programación
7- Mantenimiento
Limpie la superficie del controlador con un paño suave
,
agua y jabón.
No utilice detergentes
abrasivos, gasolina, alcohol o disolventes.
8- Advertencias
Utilizar el controlador no respetando las instrucciones del fabricante
,
puede alterar los requi-
sitos de seguridad del aparato.
Para el funcionamiento correcto del aparato solamente deberán utilizarse sondas del tipo
NTC de las suministradas por
AKO.
Entre -40ºC y +20ºC, si se prolonga la sonda NTC hasta 1.000 m con cable de mínimo 0,5 mm
2
,
la desviación máxima será de 0,25ºC (Cable para prolongación de sondas ref. AKO-15586).
Tecla BAJAR
- Pulsando durante 5 segundos se visuali-
za el punto de ajuste.
- En programación, baja el valor que se
está visualizando.
Tecla SET (AKO-15224)
- Pulsando durante 10 segundos visualiza
el primer parámetro.
- En programación, acepta el nuevo valor
programado.
9- Funcionamiento y control del relé R1
5- Adjustment and configuration
It should only be programmed or modified by personnel who are fully conversant with the
equipment operation and possibilities.
5.1 Set Point temperature
The factory SOLAR SET POINT default value is 2 ºC.
- Press SET key for at least 3 seconds to DISPLAY SOLAR SET POINT. It displays the CURRENT
SET POINT (SP) v
alue.
- Press or keys to CHANGE SET POINT into the required value.
- Pressing + simultaneously (AKO-14327) or SET KEY (AKO-15224) to ACCEPT the NEW
SET POINT. The display returns to the CURRENT TEMPERATURE.
5.2 Parameters configuration
Level 1 Parameters
- When the keys + (AKO-14327) or SET (AKO-15224) are pressed simultaneously for
at least 10 seconds, we are in the programming parameters. The first parameter is displa-
yed on the screen.
- Press key to access the next parameter and key to return to previous one.
Level 2 Values
- To DISPLAY the CURRENT VALUE of any parameter, select the required one and press +
simultaneously (AK
O-14327) or
SET k
ey (AKO-15224). Once it is displayed, you can
CHANGE VALUE, pressing or key.
- Press + keys simultaneously (AKO-14327) or
SET key (AKO-15224) to ACCEPT THE
NEW. The programming returns to level 1 PARAMETERS.
REMARK: If no key is pressed for 25 seconds in either of the previous steps, the controller
will automatically return to the CURRENT TEMPERATURE display status without modifying
any of the parameters values.
6- Description of parameters and menssages
Values in the Def. column are factory-set.
MENSSAGES
AH
Flashing with Probe 1 temp.
Over temperature in Probe 1 >95ºC (Max. temp. panels)
Flashing
with Pr
obe 2 temp
.
Over temper
ature in Probe 2 >P8
AL
Flashing with temperature
Low temerature in Probe 1 <P6 (De-icing Temperature in panels)
E1 Sensor 1 failure (Open circuit, crossed, temp. >110ºC or temp. <-55ºC)
E2 Sensor 2 failure (Open circuit,
crossed,
temp
. >110ºC or temp. <-55ºC)
Level 1 Parameters
Level 2 Description Values Min. Def. Max.
P1
Sensor to be displayed (1= Sensor 1) (2= Sensor 2)
112
P2 Solar Differential (Hysteresis)
(ºC/ºF) 1 2 5
P3 Sensor 1 calibration (Offset) (ºC/ºF) -10 0 10
P4 Sensor 2 calibration (Offset) (ºC/ºF) -10 0 10
P5 Panels De-icing function (0= Disabled) (1= Enabled) 0 0 1
P6 Panels De-icing temperature (ºC/ºF) -9 5 9
P7
Maximum tempetarure function in Tank through Probe 2
001
(0= Disabled) (1= Enabled)
P8 Maximum tempetarure in Tank (ºC/ºF) 0 70 99
Temperature display mode (Only AKO-15224)
P9 (0=Integers in ºC) (1=One decimal in ºC) 0 0 3
(2=Integers in ºF) (3=One decimal in ºF)
P10
Parameters transfer (Only AKO-15224)
002
(0= Disabled) (1= Send) (2=Receive)
P11 Address for units with communication (Only AKO-15224) 0 0 255
P12 Program version (information) (Only AKO-15224)
EP Exit programming
7- Maintenance
Clean the controller surface with a soft cloth, soap and water. Do not use abrasive deter-
gents, petrol, alcohol or solvents.
8- Warnings
The use of the unit without observing the manufacturer's instructions may alter its safety
qualification.
To ensure correct operation of the apparatus, only NTC type probes supplied by
AKO should
be used.
Between -40 ºC and +20 ºC, when the NTC probe is extended up to 1.000 m with minimum
0,5 mm2 cable
,
deviation will be less than 0.25 ºC (Probe extension cable ref.
AK
O-15586
).
DOWN key
- When pressed for at least 5 seconds, the
Set Point temperature is displayed.
- In programming, it makes the displayed
value reduce.
SET key (AKO-15224)
- When pressed for at least 10 seconds, it
displays the first parameter.
- In programming, accept the programmed
new value.
9- Operation and control of relay R1
R1
BOMBA
PUMP
Difer
encial solar
Solar differ
ential
R1
BOMBA
PUMP
R1
BOMBA
PUMP
R1
BOMBA
PUMP
T
emper
atur
a
máxima paneles
Maximum
temp
.
in panels
T
emper
atur
a
antihielo paneles
De-icing
temp
.
in panels
T
emper
atur
a
máxima depósito
Maximum
temp
.
in tank
∆T > SP R1=ON
∆T < SP–P2 R1=OFF
S1
> 95 R1=ON
S1
< 92 R1=XXX
S1
> P6–3
R1=XXX
S1
< P6 R1=ON
S2
> P8 R1=OFF
S2
< P8–3
R1=XXX
S1
S2
S1
∆T
(S1-S2)
SP–P2
SP
P6
P6–3
P8
P8–3
92
95
R1:
BOMBA
PUMP
S1
S2
R1
/