Magic Chef HMWC50ST El manual del propietario
- Categoría
- Enfriadores de bebidas
- Tipo
- El manual del propietario

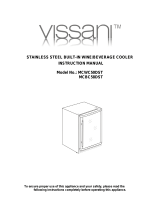
PLEASE READ THIS MANUAL CAREFULLY BEFORE USING YOUR
WINE AND BEVERAGE CENTER AND KEEP IT FOR FUTURE REFERENCE.
Wine and Beverage Center
User's Manual
Model HMWC50ST / HMBC58ST

ϭ
ϭ
*70=:H>D5>A?DA270B8=60$0682745J?A>3D2C*7458ABCBC4?C>?A>C42CH>DA=4F
?A>3D2C8BC>2><?;4C4C74?A>3D2CA468BCA0C8>=>=>DAF41B8C4
FFF<20??;80=242><A468BC4A*7414=458CB>5A468BC4A8=6H>DA?A>3D2C8=2;D34C74
5>;;>F8=6
&=240608=C70=:H>D5>A?DA270B8=60$0682745J?A>3D2C
(468BC4A8=6H>DA?A>3D2CF8;;0;;>FDBC>2>=C02CH>DA460A38=60B054CH=>C85820C8>=
>A?A>3D2CD?30C4
(468BC4A8=6H>DA?A>3D2CF8;;0;;>F5>A<>A44558284=CF0AA0=CHB4AE824?A>24BB8=6
F74=F0AA0=CHB4AE8248BA4@D8A43
(468BC4A8=6H>DA?A>3D2C2>D;302C0BH>DA?A>>5>5?DA270B48=C744E4=C>5
8=BDA0=24;>BB
!" %$"#$"$ KWz

2
TABLE OF CONTENTS
NAMES OF THE PARTS……………………………………………………… 3
SPECIFICATIONS…………………………………………………………….. 4
IMPORTANT SAFETY INSTRUCTIONS……………………………………. 5
INSTALLATION INSTRUCTIONS
BEFORE USING YOUR APPLIANCE…………………………..…… 6
FREE STANDING INSTALLATION….………………….…………… 6
BUILT-IN INSTALLATION………..…………………………………… 7
ELECTRICAL CONNECTION ……………….………………………. 7
APPLIANCE FEATURE
HMWC50ST: WINE COOLER ……………………………………...... 8
HMBC58ST: BEVERAGE COOLER ……………….………………... 8
OPERATING YOUR APPLIANCE
HMWC50ST: WINE COOLER …………….……………………….. 9
HMBC58ST: BEVERAGE COOLER ….…………………….……… 9
CHANGING THE INNER LIGHT …………………………………….. 10
AUTOMATIC DEFROST ………………………………………………. 10
CHANGING THE REVERSIBLE DOOR ……………………………………. 10
CARE AND MAINTENANCE
CLEANING YOUR APPLIANCE……………………………………… 11
VACATION TIME………………………………………………………. 11
MOVING YOUR APPLIANCE………………………………………… 11
ENERGY SAVING TIPS……………………….………..……………. 11
TROUBLESHOOTING GUIDE………………………………………………. 12
APPLIANCE WARRANTY…………………………….……………………… 13

3
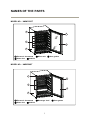
NAMES OF THE PARTS
MODEL NO.: HMWC50ST
MODEL NO.: HMBC58ST
① Electronic thermostat ② Wine rack ③ Door gasket
④ Glass door ⑤ Cabinet
① Electronic thermostat ② Beverage shelf ③ Door gasket
④ Glass door ⑤ Cabinet
1
3
4
2
5
1
3
4
2
5

4
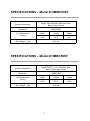
SPECIFICATIONS – Model # HMWC50ST
Product Description
Magic Chef 50 Bottle Stainless Steel
Built-In Wine Cooler
Model No.
HMWC50ST
Unit Dimensions
( inches )
Width
Height
Depth
23.4”
33.9” 24.3”
Net Weight ( lbs)
99.1 lbs
SPECIFICATIONS – Model # HMBC58ST
Product Description
Magic Chef 5.1 cu.ft. Stainless Steel
Built-In Beverage Cooler
Model No.
HMBC58ST
Unit Dimensions
( inches )
Width
Height
Depth
23.4”
33.9” 24.3”
Net Weight ( lbs)
95.2 lbs

5
IMPORTANT SAFETY INSTRUCTIONS
To reduce the risk of fire, electrical shock, or
injury follow these basic precautions when
using your refrigerator.
1) WA
RNING----Keep ventilation openings, in the appliance enclosure or in the built-in
structure, clear of obstruction.
2) WARNING----Do not use mechanical devices or other means to accelerate the
defrosting process, other than those recommended by the manufacturer.
3) WARNING----Do not damage the refrigerant tubing to increase the risk of a leak when
handle, move and use of refrigerator.
4) WARNING----Do not use electrical appliances inside the food storage compartments of
the appliances, unless they are of the type recommended by the manufacturer.
5) WARNING----DANGER: Never allow children to play with, operate, or crawl inside the
refrigerator. Risk of child entrapment. Before you throw away your old refrigerator or
freezer:
• Take off the doors
• Leave the shelves in place so that children may not easily climb inside.
6) The appliance has to be unplugged before carrying out user maintenance on the
appliance.
7) This appliance can be used by children age 8 years and above and persons with
reduced physical sensory or mental capabilities or lack of experience and knowledge if
they have been given supervision or instruction concerning use of the appliance in a safe
way and understand the hazards involved. Children should not play with the appliance.
Cleaning and maintenance should not be made by children without supervision.
8) If the component part is damaged, it must be replaced by the manufacturer, its service
agent or similar qualified persons in order to avoid a hazard.
9) Please abandon the refrigerator according to local regulations as the unit contains flam
mable blowing gas and refrigerant.
10) Follow local regulations regarding disposal of the appliance due to flammable refrigerant
and blowing gas. All refrigeration products contain refrigerants, which under the
guidelines of federal law must be removed before disposal. It is the consumer's
responsibility to comply with federal and local regulations when disposing of this product.
11) This appliance is intended to be used in household and similar environments; such as:
• staff ki
tchen areas in shops, offices and other working environments;
• farm houses and by clients in hotels, motels and other residential type environments;
• bed and breakfast type environments;
• catering and similar non-retail applications.
12) Do not store or use gasoline or any inflammable liquors and liquids inside or in the
vicinity of refrigerator.
13) Do not use an extension cord with this appliance. If the power cord is too short, have a
qualified electrician install an outlet near the appliance. Use of an extension can
negatively affect the unit”s performance.

6
IMPORTANT SAFETY INSTRUCTIONS
WARNING
To reduce the risk of fire, electrical shock,
or injury when using your appliance, follow
these basic precautions:
Read all instructions before using the wine or beverage cooler.
DANGER or WARNING: Risk of child entrapment.
To avoid the possibility of child entrapment, please take the following precautions
before throwing out the appliance.
- Remove all doors from the unit.
- Leave the shelves in place so that children may not easily climb inside.
Never allow children to operate, play with, or crawl inside the appliance.
Refrigerants: All refrigeration products contain refrigerants, which under the
guidelines of federal law must be removed before disposal of product. It is the
consumer’s responsibility to comply with federal and local regulations when
disposing of this product.
Never clean appliance parts with flammable fluids. The fumes can create a fire
hazard or explosion.
Do not store or use gasoline or any other flammable vapors and liquids in the vicinity
of this or any other appliance. The fumes can create a fire hazard or an explosion.
-Save these instructions-
INSTALLATION INSTRUCTIONS
Before Using Your Appliance
Remove the exterior and interior packing.
Before connecting the appliance to the power source, let it stand upright for approximately 4
hours. This will reduce the possibility of a malfunction in the cooling system from improper
handling during transportation.
Clean the interior surface with lukewarm water using a soft cloth. (Cleaning instruction on page 11)
Free-Standing Installation
This appliance is designed to be installed built-in or free standing.
Locate the appliance away from direct sunlight and sources of heat (stove, heater, radiator, etc.).
Direct sunlight may affect the acrylic coating and heat sources may increase electrical
consumption. Ambient temperature below 55°F (12.8°C) or above 77°F (25°C) will hinder the
performance of this appliance. This unit is not designed for use in a garage or any other
outside installation.
Avoid locating the appliance in moist areas.
Plug the appliance into dedicated, properly installed-grounded wall outlet. Do not under any
circumstances cut or remove the third (ground) prong from the power cord. Any questions
concerning power and/or grounding should be directed toward a certified electrician or an
authorized service center. This unit is not designed to be installed in an RV or used with an
inverter.
After plugging the appliance into a wall outlet, turn the unit on and allow the unit to cool down for 3
~ 4 hours under before placing wine bottles or beverages in the appliance.

7
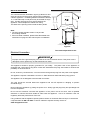
Built-In Installation
The cutout dimension illustrated in figure (A) allows for door
swing and access to the pull-out shelves when installed as
a built-in appliance. If installing between frameless cabinets,
a ½” wide filler strip or side panel may be needed on hinge
side. The filler strip will act as a spacer between the
appliance case and adjacent cabinet door swing.
The width of the opening must include the filter panels.
Note:
The door should protrude at least 1” beyond the
surrounding cabinets.
If door reversal is desired, please follow Reversible door
instructions on page 9 of this manual prior to installation.
Electrical Connection
This appliance should be properly grounded for your safety. The power cord of this appliance is
equipped with a three-prong plug which mates with standard three prong wall outlets to minimize the
possibility of electrical shock.
Do not, under any circumstances, cut or remove the third ground prong from the power cord supplied.
This appliance requires a standard 115 Volt A.C. /60Hz electrical outlet with three-prong ground.
This appliance is not designed to be used with an inverter.
The cord should be secured behind the appliance and not left exposed or dangling to prevent
accidental injury.
Never unplug the appliance by pulling the power cord. Always grip the plug firmly and pull straight out
from the receptacle.
Do not use an extension cord with this appliance. If the power cord is too short, have a qualified
electrician or service technician install an outlet near the appliance. Use of an extension cord can
negatively affect the performance of the unit.
If any problems with the appliance persist, please contact our Customer Service Dept. to consult with
a representative at 888 775-0202 or visit our website to request warranty service at
www.mcappliance.com.
WARNING
Improper use of the grounded plug can result in the risk of electrical shock. If the power cord is
damaged, have it replaced by an authorized service center.
Figure A
The cutout depth must be 24”.
34-1/2"~35"
6"Max.
24"Min.
24"Min.
Locate Outlet
23-2/5"
33-9/10"
20-4/5"
24-3/10"
Including door

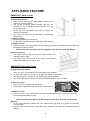
APPLIANCE FEATURE
HMWC50ST: Wine Cooler
Engaged Wine Shelves
There are five wine shelves of full depth in upper part of
cabinet to store wine bottles.
The second supporting guide (Counted from top, see
illustration “A”) is not designed for wine shelves. It is only
for beverage shelf.
All the top five wine shelve have tabs to engage the
cabinet on both sides.
Any of the wine shelve can be removed to accommodate
larger bottles.
To Remove a Shelf:
Remove all bottles from the shelves.
Lift the shelve upwards and then gently pull out the shelves.
To Replace a Shelf:
Place the sides of the shelves back onto the supporting guides of the cabinet and push back until
the shelf tabs slide into place.
NOTE: Ensure that the tabs are firmly engaged in place before storing any bottles.
Bottle Arrangement
The top five shelves each hold 8 bottles with the bottle necks
alternating front to back.
The bottom rack, which consist of two stories, each holds 6
bottles with bottle necks facing the front.
HMBC58ST: Beverage Cooler
Engaged Beverage Shelves
There are three Steel shelves to store beverage cans or bottles.
All three Steel shelves have tabs to engage the cabinet on both sides.
The
shelves
may
be
arranged
on
any
supporting
guide
as preferred.
To Remove a Shelf:
Remove all cans or bottles from the shelves.
To Replace a Shelf:
Place the sides of the shelves back onto the supporting guides of the cabinet and push back
until the shelf tabs slide into place.
NOTE: Ensure that the tabs are firmly engaged in place before storing any beverages.
Warning:
Do not press/jostle the circulation fan in the cabinet when you place in or remove the beverage
cans or bottles.
Properly store your beverages so that the cans or bottles do not hinder air circulation inside the
cabinet.
8
Any of the Steel shelves can be removed to accommodate larger cans or bottles.
Lift the shelve upwards and then gently pull out the shelves.

9
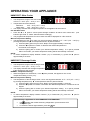
OPERATING YOUR APPLIANCE
HMWC50ST: Wine Cooler
The temperature range of the wine cooler
is for 41°F ~ 64°F (5°C ~ 18°C) +/- 5°F.
Temperature Recommendations:
Red Wine: 54°F ~ 61°F (12°C ~ 16°C)
White Wine: 43°F ~ 50°F (6°C ~ 10°C)
The display indicates the average temperature of the appliance at the moment.
Pre-Set Wine Zones
Press the ▲ or ▼ pads to choose preset storage conditions for either red or white wine. (The
indicator light “Red” or “White” will illuminate accordingly.)
The programmed temperature for red or white wine will be displayed for a few seconds.
Manual Temperature Setting
The temperature of the wine cooler can be set anywhere between 41°F ~ 64°F (5°C ~ 18°C) by
pressing temperature up▲ and temperature down ▼ pads as follows:
1) Press the [SET] pad until you hear a “Beep” sound (approximately 2 seconds).
2) Press the ▲▼ pads to increase or decrease the desired temperature in
increments of one degree.
3) Press the [SET] pad to confirm your desired temperature setting. If no pad is pressed
within 10 seconds, your select temperature setting will be automatically confirmed.
NOTE:
To select temperature display between Celsius (°C) or Fahrenheit (°F), press the ▲ pad for
approximately 2 seconds.
HMBC58ST: Beverage Cooler
The temperature range of the beverage cooler
is for 37°F ~ 54°F (3°C ~ 12°C). +/- 5°F.
The display indicates the average temperature
of the appliance at the moment.
NORMAL Temperature Setting
When the appliance is switched on, or the ▲pad is pressed, the appliance runs on the
temperature setting of 45°F (7°C) .
Manual Temperature Setting
The temperature of the beverage cooler can be set anywhere between 37°F ~ 54°F (3°C ~ 12°C)
by pressing temperature up ▲ and temperature down▼ pads as follows:
1) Press the [SET] pad until you hear a “Beep” sound (approximately 2 seconds).
2) Press the ▲▼pads to increase or decrease the desired temperature in increments of one
degree.
3) Press the [SET] pad to confirm your desired temperature setting. If no pad is pressed
within 10 seconds, your select temperature setting will be automatically confirmed.
NOTE:
To select temperature display between Celsius (°C) or Fahrenheit (°F), press the ▲ pad for
approximately 2 seconds.*
The following is applicable to both HMWC50ST and HMBC58ST:
The indicator will remain ON during refrigeration cycle and will be OFF
during idle cycle.
To switch the Interior light ON/OFF, press the pad.

10
Changing The Inner Light
Before removing the inner light, turn off the appliance first and then unplug the unit from the wall outlet.
Failure to do so could result in electrical shock or personal injury.
Remove two screws that fix the control box. While holding the control box, disconnect the LED
connector to the main PCB.
Remove the LED array by removing two screws.
Replace a new LED array and connect it to the main PCB.
Fix the LED array and
reinstall the control box.
Important: The replacement of LED lamp can only be performed by an authorized technician.
Automatic Defrost
There is no need for manual defrosting of this appliance due to automatic defrosting function.
The ice build-up on the inner back wall during compressor operation will be automatically
defrosted once the compressor cycle is off.
Defrost water will drain out passing through the drain outlet in the inner back wall into a drain pan
located above the compressor, from where it evaporates.
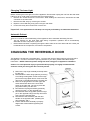
CHANGING THE REVERSIBLE DOOR
This appliance is built with a reversible door. You have the choice of either opening it from the left or
the right side. In order to reverse the opening direction of your door, please follow these simple
instructions. NOTE: If desired, please change the door swing prior to appliance installation.
Caution: To avoid personal injury to yourself and/or property, we highly recommend that
someone assist you during the door reversal process.
1)
Remove the top hinge assembly and keep them
for later use.
2) Disassemble the lower hinge plank by removing
2 hex flange locking bolts. Screw out the hinge
3) Remove the plug buttons from the upper left
holes and transfer them to the uncovered
holes on the right side. Be sure to press the
plug buttons firmly into the hole.
4) Re-install the top hinge assembly previously
removed in step 1 on the opposite side.
5)
Re-install the lower hinge plank (with the hinge
pin on the opposite hole) previously removed in
6) Re-install the door assembly with the door
handle on the opposite side. (Rotating the
door assembly 180°).
7) Ensure that the door assembly is properly
aligned with cabinet before tightening the
screws.
pin from the hinge plank and re-screw it into the
other hole on the plank and keep it for later use.
step 2 onto the opposite side.

11
CARE AND MAINTENANCE
Cleaning Your Appliance
Upon installation of your new appliance, it is recommended that it be cleaned thoroughly.
Turn off the appliance first and then unplug the unit from the wall outlet.
Remove all contents.
Wash the inside with a damp warm cloth soaked in lukewarm water and baking soda solution.
The solution should be about 2 tablespoons of baking soda to a quart of water.
Be sure to keep the door gasket (seal) clean to keep the unit running efficiently.
The outside of the appliance should be cleaned with mild detergent and warm water.
Dry the interior and exterior with a soft cloth.
Dust or anything else blocking the vent may hinder the cooling efficiency of the appliance.
Vacuum the vent if necessary.
Vacation Time
Turn off the appliance first and then unplug the unit from the wall outlet.
Remove all the contents.
Clean the appliance.
Leave the lid open slightly to avoid possible formation of condensation, mold, or odors.
Short vacations: Leave the appliance operating during vacations of less than three weeks.
Long vacations: If the appliance will not be used for several months, remove all content and
unplug the power cord. Clean and dry the interior thoroughly. To prevent odor and mold growth,
leave the door open slightly: blocking it open if necessary.
Moving Your Appliance
Turn off the appliance first and then unplug the unit from the wall outlet.
Remove all the contents.
Securely tape down all loose items inside your appliance.
Tape the doors shut.
Energy Saving Tips
The appliance should be located in the coolest area of the room, away from heat producing
appliances or heating ducts, and out of the direct sunlight.
Ensure that door is closed when the appliance is turned on.

12
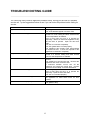
TROUBLESHOOTING GUIDE
You can solve many common appliance problems easily, saving you the cost of a possible
service call. Try the suggestions below to see if you can solve the problem before calling for
service.
PROBLEM
POSSIBLE CAUSE
Appliance does not operate.
Not plugged in.
The circuit breaker tripped or a blown fuse.
Temperature inside the appliance is too warm.
Temperature control is set too warm. Turn the
control to a cooler setting and allow several hours
for the temperature to stabilize.
Door is kept open too long or is opened too
frequently. Warm air enters the appliance every
time the door is opened. Open the door less
often.
The door is not closed completely.
The door gasket does not seal properly.
The appliance has recently been disconnected
for a period of time. 4 hours are required for the
appliance to cool down completely.
Temperature inside the appliance is too cold.
Temperature control is set too cold. Turn the
control to a warmer setting and allow several
hours for the temperature to stabilize.
Vibrations.
Check to assure that the appliance is on a level
surface.
The appliance is touching the wall. Re-level the
appliance and move it from the wall.
If continued vibration occurs, turn off the
appliance and unplug the power plug. Contact
Customer Service Dept. for further assistance.
Moisture forms on inside appliance walls.
Door is slightly open.
Door is kept open too long, or is opened too
frequently. Open the door less often.
The door is not sealed properly.
Moisture forms on outside of appliance.
Door is slightly open, causing cold air from inside
the appliance to meet warm moist air from
outside.
The door will not close properly.
The appliance is not on a level surface.
The gasket is dirty.

Ϯ
3
'""$)
$'""$)
$??;80=24>A?>A0C8>=F0AA0=CB4027=4FP-8=44E4A0644=C4AQC>145A445A><34542CB8=<0C4A80;
0=3F>A:<0=B78?0=306A44BC>A4<43H0=HBD2734542C>AC>5DA=8B70=4F?0ACB0CC742><?0=HOB>?C8>=
5>A0=H?0ACB>5C74D=8CC70C70B508;433DA8=6C74F0AA0=CH?4A8>3'0ACB0=3;01>A4G?4=B4B0A42>E4A43>=
C78BD=8C5>A0?4A8>3>5>=4H40A05C4AC7430C4>5?DA270B42>?H>5C7430C43B0;4BA4248?C8=E>8248B
A4@D8A43C>A4248E4F0AA0=CHB4AE824A4?;024<4=C>AA45D=3
!=0338C8>=$??;80=24>A?>A0C8>=F0AA0=CBC742><?A4BB>A?0ACB>=;HC>145A445A><34542CB8=
<0C4A80;0=3F>A:<0=B78?5>A0?4A8>3>558E4H40AB*742>=BD<4A8BA4B?>=B81;45>A0;;;01>A0=3
CA0=B?>AC0C8>=4G?4=B4BA4;0C43C>C743806=>B8B0=3A4?;024<4=C>5C742><?A4BB>A05C4AC748=8C80;>=4H40A
F0AA0=CH4G?8A4B!=C744E4=CC70CC74D=8CA4@D8A4BA4?;024<4=C>AA45D=3D=34AC74C4A<B>5C78BF0AA0=CH
C742>=BD<4A8BA4B?>=B81;45>A0;;CA0=B?>AC0C8>=4G?4=B4BC>A4CDA=C74D=8CC>>DA502C>AH?A8>AC>A4248E8=6
0A4?;024<4=CD=8C>AA45D=3A45D=3>AA4?;024<4=CF8;;148BBD430CC7438B2A4C8>=>5$??;80=24
>A?>A0C8>=
*78BF0AA0=CH2>E4AB0??;80=24B8=DB4F8C78=C742>=C86D>DB+=8C43)C0C4B;0B:0 0F088ĂŶĂĚĂ0=3'D4AC>
(82>dŚĞǁĂƌƌĂŶƚLJĚŽĞƐŶŽƚĐŽǀĞƌƚŚĞĨŽůůŽǁŝŶŐ͗
$$ # "#(%# #
'A>3D2CA4?08A8=022>A30=24F8C7C74C4A<B74A48=8BH>DAB>;40=34G2;DB8E4A4<43HD=34AC78B;8<8C43
F0AA0=CH=H0=30;;8<?;843F0AA0=C84B8=2;D38=6<4A270=C018;8CH0=358C=4BB5>A0?0AC82D;0A?DA?>B40A4
74A41H;8<8C43C>>=4H40A>AC74B7>AC4BC?4A8>30;;>F431H;0F$??;80=24>A?>A0C8>=8B=>C;801;45>A
8=2834=C0;>A2>=B4@D4=C80;30<064B0=3=>A4?A4B4=C0C8E4>A?4AB>=8B0DC7>A8I43C>0BBD<45>ADB0=H
>C74A;8018;8CH8=2>==42C8>=F8C7C74B0;4>5C78B?A>3D2C+=34A=>28A2D<BC0=24B8BC742>=BD<4A?4A<8CC43
C>A4CDA=C78BD=8CC>C74502C>AHF8C7>DCC74?A8>AFA8CC4=2>=B4=C>5$??;80=24>A?>A0C8>=
)><4BC0C4B?A>7818CC744G2;DB8>=>A;8<8C0C8>=>58=2834=C0;>A2>=B4@D4=C80;30<064B>A;8<8C0C8>=B>=
8<?;843F0AA0=C84B*78BF0AA0=CH68E4BH>DB?428582A867CB0=3H>D<0H0;B>70E4>C74AA867CBF7827E0AH
5A><BC0C4C>BC0C4
>A)4AE824>ABB8BC0=24?;40B420;; &AE8B8CDB>=C74F410C ???6-+9953+7-/-86 C>
A4@D4BCF0AA0=CHB4AE824>A>A34A?0ACB
R 0<064B3D4C>B78??8=630<064>A8<?A>?4A8=BC0;;0C8>=
R 0<064B3D4C><8BDB4>A01DB4
R 'D=2CDA4BC>C744E0?>A0C>ABHBC4<3D4C>8<?A>?4A345A>BC8=6>5C74D=8C
R >=C4=C;>BB4B3D4C>508;DA4>5C74D=8C
R (4?08AB?4A5>A<431HD=0DC7>A8I43B4AE824064=CB
R )4AE82420;;BC70C3>=>C8=E>;E434542CB8=<0C4A80;0=3F>A:<0=B78?BD270B8=BCAD2C8>=>=?A>?4ADB4>5C74?A>3D2C>A
8<?A>?4A8=BC0;;0C8>=
R (4?;024<4=C>AA4B4CC8=6>57>DB45DB4B>A28A2D8C1A40:4AB
R 08;DA4>5C78B?A>3D2C85DB435>A?DA?>B4B>C74AC70=8CB8=C4=343?DA?>B4
R 8B?>B0;2>BCB>5508;43D=8CB=>CA4CDA=43C>>DA502C>AH
R =H34;8E4AH>A8=BC0;;0C8>=2>BCB8=2DAA430BC74A4BD;C>50D=8CC70C508;BC>?4A5>A<0BB?4285843
R G?4=B4B5>ACA0E4;0=3CA0=B?>AC0C8>=5>A?A>3D2CB4AE82485H>DA0??;80=248B;>20C438=0A4<>C40A40F74A4B4AE8241H
0=0DC7>A8I43B4AE824C427=8280=8B=>C0E08;01;4
R *74A4<>E0;0=3A48=BC0;;0C8>=>5H>DA0??;80=24858C8B8=BC0;;438=0=8=0224BB81;4;>20C8>=>A8B=>C8=BC0;;438=
022>A30=24F8C7?D1;8B7438=BC0;;0C8>=8=BCAD2C8>=B
R (45D=3B5>A=>=A4?08A01;4?A>3D2CB0A4;8<8C43C>C74?A824?0835>AC74D=8C?4AC74B0;4BA4248?C
R *78BF0AA0=CH8B=>=CA0=B54A01;4 *78BF0AA0=CH0??;84B>=;HC>C74>A868=0;?DA270B4A0=33>4B=>C4GC4=3C>0=H
BD1B4@D4=C>F=4AB
8./5 !+:<;+,8: 869:/;;8:!+:<; 75@ $@9/80#/:>3-/
H$-ϱϬ^d
&=4.40A 8E4.40AB != ><4
H$ϱϴ^d
&=4.40A 8E4.40AB != ><4

CNA International, Inc. d/b/a MC Appliance Corporation. All rights reserved.
Magic Chef® is a registered trademark of CNA International, Inc.
www.mcappliance.com Printed in China

Modelo HMWC50ST / HMBC58ST
LEA ESTE MANUAL ANTES DE UTILIZAR SU CENTRO DE BEBIDAS Y VINOS Y
GUÁRDELO PARA FUTURA REFERENCIA.
Centro de bebidas y vinos
Manual del usuario

1
1
C24:2DA@C4@>AC2C6=AC@5F4E@$28:4967L=AC:>6CA2D@A2C2AC@E686CDF?F6G@
AC@5F4E@6D4@>A=6E2C=27@C>256C68:DEC24:]?6??F6DEC2A28:?2H63
HHH>42AA=:2?464@>C68:DE6C#@D36?67:4:@D56C68:DEC2CDFAC@5F4E@:?4=FJ6?=@
D:8F:6?E6
,?2G6K>VD8C24:2DA@C4@>AC2CF?AC@5F4E@>2C42$28:4967L
=C68:DEC2CDFAC@5F4E@?@DA6C>:E64@?E24E2C=6A2C2?@E:7:42C=656F?42>3:@56
D68FC:525@24EF2=:K24:]?56=AC@5F4E@
*:==682C22?646D:E2CD6CG:4:@32;@82C2?EY2C68:DEC2?5@DFAC@5F4E@?@DA6C>:E6
D6C>VD67:4:6?E66?AC@46D2C6=D6CG:4:@
?6=6G6?E@BF6FDE65E6?82F?2A6C5:52BF66DE24F3:6CE@A@CF?D68FC@
C68:DEC2?5@DFAC@5F4E@AF656D6CG:C4@>@ACF63256DF4@>AC2
!" B #"

2
INDICE DE MATERIAS
LOS NOMBRES DE LAS PARTES.............................................................. 3
ESPECIFICACIONES................................................................................... 4
LAS INSTRUCCIONES IMPORTANTES DE LA SEGURIDAD.................... 5
INSTRUCCIONES DE INSTALACIÓN
ANTES DE UTILIZAR SU APARATO............................................... 6
INSTALACIÓN INDEPENDIENTE …………………………………….. 6
INSTALACIÓN PARA EMPOTRAR ........................………….....…... 7
CONEXIÓN ELÉCTRICA……………….……………………………..... 7
CARACTERÍSTICA DEL APARATO
HMWC50ST: ENFRIADORA DE VINOS ……………………………... 8
HMBC58ST: ENFRIADORA DE BEBIDAS ………………………....... 8
OPERAR SU APARATO
HMWC50ST: ENFRIADORA DE VINOS ……………………………... 9
HMBC58ST: ENFRIADORA DE BEBIDAS ………………………....... 9
COMBIAR LA LUZ INTERNA …......…..................…………….......... 10
DESCONGELAMIENTO AUTOM TICO .......................................... 10
CAMBIAR LA PUERTA REVERSIBLE ……………………………………….. 10
CUIDE Y LA CONSERVACION
PARA LIMPIAR SU APARATO……………....................................... 11
EN LAS VACACIONES ..……………………………………..………… 11
PARA CAMBIAR DE LUGAR SU APARATO……............................. 11
RECOMENDACIONES PARA AHORRAR ENERGÍA………………. 11
GUÍA DE RESOLUCIÓN DE PROBLEMAS………………………………….. 12
GARANTIA DE APARATO ...........................................................................13

3
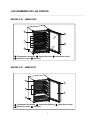
LOS NOMBRES DE LAS PARTES
MODELO Nº . HMWC50ST
MODELO Nº . HMBC58ST
① Termóstato electrónico ② Estante Del Vino ③ Junta De la Puerta
④ Puerta De cristal ⑤ Gabinete
① Termóstato electrónico ② Estante Del Bebidas ③ Junta De la Puerta
④ Puerta De cristal ⑤ Gabinete
1
3
4
2
5
1
3
4
2
5

4
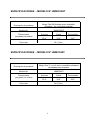
ESPECIFICACIONES - MODELO Nº HMWC50ST
Descripción de producto
Magic Chef 50 Botellas acero inoxidable
enfriadora de vinos para empotrar
Modelo No.
HMWC50ST
Dimensiones
(pulgadas) de unidad
Anchura
Altura
Profundidad
23.4”
33.9” 24.3”
Peso neto
99.1 ( lbs )
ESPECIFICACIONES - MODELO Nº HMBC58ST
Descripción de producto
Magic Chef 5.1 cu.ft. acero inoxidable enfriadora
de bebidas para empotrar
Modelo No.
HMBC58ST
Dimensiones
(pulgadas) de unidad
Anchura
Altura
Profundidad
23.4”
33.9” 24.3”
Peso neto
95.2 ( lbs )

5
LAS INSTRUCCIONES IMPORTANTES DE LA
SEGURIDAD
To Para reducir el riesgo de incendio,
choque eléctrico o lesiones, siga estas
precauciones básicas al usar su
refrigerador.
1) ADVERTENCIA---- mantenga las aberturas de ventilación, en el mismo aparato o en la
estructura integrada, libres de obstrucciones.
2) ADVERTENCIA----no utilice dispositivos mecánicos u otros medios para acelerar la
descongelación, más que los recomendados por el fabricante.
3) ADVERTENCIA----no dañe la tubería de refrigerante para aumentar el riesgo de una
fuga al manejar, mover y usar el refrigerador.
4) ADVERTENCIA----no utilice aparatos eléctricos dentro de los compartimientos de
almacenamiento de alimentos del aparato, a menos que sean del tipo recomendado por
el fabricante.
5) ADVERTENCIA----PELIGRO: Nunca permita que los niños jueguen, hagan funcionar o
se arrastren dentro del refrigerador. Existe el riesgo de que los niños queden atrapados.
Antes de desechar su refrigerador o congelador viejo:
• Quite las puertas
• Deje los estantes en su lugar para que los niños no puedan entrar con facilidad.
6) El aparato debe desconectarse antes de realizar mantenimiento del usuario en el
dispositivo.
7) Este aparato puede ser utilizado por niños de al menos 8 años y por personas con
discapacidades físicas, sensoriales o mentales, o con falta de experiencia y
conocimientos, bajo supervisión o si han recibido instrucciones sobre cómo usar el
dispositivo de manera segura y si comprenden los peligros implicados. Los niños no
deben jugar con el aparato. Los niños no deben realizar la limpieza o el mantenimiento
sin supervisión.
8) Si el componente está dañado, debe ser reemplazado por el fabricante, su agente de
servicio técnico o persona similar calificada para evitar cualquier peligro.
9) Deseche el refrigerador de acuerdo con las normas locales ya que la unidad contiene
refrigerante y gas inflamable.
10) Siga las normas locales con respecto a la eliminación del aparato debido al refrigerante
inflamable y el gas. Todos los aparatos de refrigeración contienen refrigerantes que,
bajo los lineamientos de la ley federal, deben ser eliminados antes de desecharlos. Es
responsabilidad del consumidor cumplir con los reglamentos federales y locales al
desechar este producto.
11) Este aparato está destinado al uso doméstico y en aplicaciones similares como:
• áreas de cocina en tiendas, oficinas y otros entornos laborales;
• casas rurales y para clientes en hoteles, moteles y otros entornos de tipo residencial;
• entornos de tipo hospedaje;
• servicios de comidas y otras aplicaciones no comerciales similares.
12) No almacene ni use gasolina o cualquier licor y líquidos inflamables dentro o en las
proximidades del refrigerador.
13) No utilice alargadores con este aparato. Si el cable de alimentación es demasiado corto,
haga que un electricista calificado instale un tomacorriente cerca del aparato. El uso de
una extensión puede afectar negativamente el rendimiento de la unidad.

6
LAS INSTRUCCIONES IMPORTANTES DE LA SEGURIDAD
ADVERTENCIA
Para reducir el riesgo de incendios, golpes
de corriente o lesiones cuando utilice su
aparato, sírvase tener en cuenta las
siguientes recomendaciones básicas:
Lea atentamente todas las instrucciones antes de usar el aparato.
El PELIGRO o ADVIRTIENDO: Riesgo de que los niños queden atrapados.
Para evitar este riesgo, sírvase observar las siguientes recomendaciones antes de
lanzar fuera del aparato.
- Retire la tapa del aparato.
- Deje los estantes en lugar de modo que los niños no puedan subir fácilmente
adentro.
No deje que los niños usen el aparato, jueguen con él o se introduzcan en el interior.
Refrigerantes: Todos los productos de la refrigeración contienen los refrigerantes,
que debajo de las pautas de la ley federal se deben quitar antes de la disposición
del producto. Es la responsabilidad del consumidor conformarse con regulaciones
federales y locales al disponer de este producto.
No limpie las partes del aparato con productos inflamables. Los vapores pueden
originar un incendio o explosión.
No almacene ni use gasolina ni ningún otro gas o líquido inflamable cuando se
encuentre cerca de este aparato u otro. Los vapores pueden originar un incendio o
explosión.
-Excepto estas instrucciones-
INSTRUCCIONES DE INSTALACIÓN
ANTES DE UTILIZAR SU APARATO
Retire el material de embalaje del exterior e interior.
Antes de conectar el aparato a la fuente de alimentación, déjelo en posición vertical durante 4 horas
aproximadamente. De esta forma, se reducirá la posibilidad de mal funcionamiento del sistema de
refrigeración debido a manipulación incorrecta durante el traslado.
Limpie la superficie interior con agua tibia y paño suave. (Limpiando la instrucción en la página 11)
INSTALACIÓN INDEPENDIENTE
Esta aplicación se diseña para ser incorporada instalado o libremente el estar parado.
Ubique el aparato fuera de la luz directa del sol y otras fuentes de calor (horno, calentador, radiador, etc.).
La luz directa del sol puede afectar la cubierta de acrílico y las fuentes de calor pueden aumentar el
consumo eléctrico. La temperatura ambiente debajo de 55°F (12.8°C) o sobre 77°F (25°C) obstaculizará
el funcionamiento de esta aplicación. Esta unidad no se diseña para el uso en un garage o ninguna
otra instalación exterior.
No coloque el Aparato en ambientes húmedos.
Enchufe el Aparato en un toma corriente con la debida descarga a tierra utilizado exclusivamente para
este aparato. No corte ni retire la tercera pata (descarga a tierra) del enchufe bajo ninguna circunstancia.
Cualquier duda relacionada con la red de electricidad y/o la descarga a tierra debe resolverse con un
electricista certificado o un centro de servicios autorizado. Esta unidad no se diseña para ser instalada
en un RV o para ser utilizada con un inversor.
Después de enchufar en el tomacorriente de pared, prende la unidad y permite la unidad enfríe durante 3
ó 4 horas antes de colocar alimentos en el interior.

7
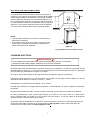
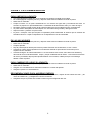
INSTALACIÓN PARA EMPOTRAR
La dimensión del recorte ilustrada en la figura (a) permite el
oscilación y el acceso de la puerta a los estantes de la retirada
cuando está instalada como aplicación incorporada. Si instala
entre los gabinetes frameless, tira ancha del llenador de un ½
la "o el panel lateral puede ser necesario en lado de la bisagra.
La tira del llenador actuará como espaciador entre la caja de la
aplicación y el oscilación adyacente de la puerta de gabinete.
La anchura de la abertura debe incluir los paneles del filtro.
NOTA:
La puerta debe resaltar por lo menos el 1"más allá de los
gabinetes circundantes.
Si se desea la revocación de la puerta, siga por favor las
instrucciones reversibles de la puerta en la página 9 de
este manual antes de la instalación.
CONEXIÓN ELÉCTRICA
El aparato debe estar adecuadamente conectado a tierra para su seguridad. El cable de electricidad de este
electrodoméstico cuenta con un enchufe de tres patas apto para los tomacorrientes de pared con tres patas
para minimizar las posibilidades de golpes de corriente.
No corte ni retire la tercera pata de descarga a tierra del enchufe bajo ninguna circunstancia.
Este equipo debe conectarse a un toma corriente de tres patas con descarga a tierra instalado en una red
estándar de electricidad con corriente 115 Volt A.C. ~/60Hz.
Este aparato no se diseña para ser utilizado con un inversor.
El cable debe mantenerse recogido detrás del Aparato; no debe dejarse a la vista ni colgando para prevenir
accidentes.
No desenchufar tirando del cable. Tome el enchufe con firmeza y tire en dirección opuesta al receptáculo.
No utilice prolongaciones para conectar este aparato. Si el cable es muy corto, llame a un electricista o
técnico calificado para que instale un toma corriente cerca del equipo. El uso de cables de prolongación
puede perjudicar el funcionamiento de la unidad.
Si persisten algunos problemas con la aplicación, entre en contacto con por favor nuestro departamento del
servicio de cliente para consultar con un representante en 888 775-0202 o visite nuestro Web site para
solicitar servicio de la garantía en www.mcappliance.com.
ADVERTENCIA
El uso indebido de la descarga a tierra puede causar golpes de corriente. Si el cable de
alimentación está dañado, hágalo reemplazar con un service autorizado.
Figure A
La
profundidad del recorte debe ser el 24".
34-1/2"~35"
6"Max.
24"Min.
24"Min.
Ubicación
tomacorriente
23-2/5"
33-9/10"
20-4/5"
24-3/10"
Incluyendo la manija

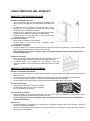
CARACTERÍSTICA DEL APARATO
HMWC50ST: ENFRIADORA DE VINOS
Estantes Contratados Del Vino
Hay cinco estantes del vino de profundidad completa en la
parte superior del gabinete para almacenar las botellas del
vino.
La segunda guía de soporte (contada de tapa, vea la
ilustración "A") no se diseña para los estantes del vino. Está
solamente para el estante de la bebida.
Todos los cinco superiores que el vino deja de lado tienen
lengüetas para contratar el gabinete en ambos lados.
Cualquiera del vino deja de lado se puede quitar para
acomodar botellas más grandes.
Para quitar un estante:
Quite todas las botellas de los estantes.
Levante dejan de lado hacia arriba y después sacan
suavemente los estantes.
Para substituir un estante:
Ponga los lados de los estantes detrás sobre las guías de soporte del gabinete y empuje detrás hasta
que las lengüetas del estante resbalan dentro de lugar.
NOTA: Asegúrese de que las lengüetas estén contratadas firmemente a lugar antes de almacenar
cualesquiera botellas.
Arreglo De la Botella
Los cinco estantes superiores botellas de cada asimiento 8 con los
cuellos de la botella que alternan el frente a la parte posteriora.
El estante inferior, que consisten en dos historias, cada uno
sostiene 6 botellas con los cuellos de la botella que hacen frente al
frente.
HMBC58ST: ENFRIADORA DE BEBIDAS
Estantes Contratados Del Bebidas
Hay tres estantes del acero de profundidad completa en la parte superior del gabinete para almacenar las
botellas o latas.
Los tres estantes de acero deja de lado tienen lengüetas para contratar el gabinete en ambos lados .
Los estantes se pueden arreglar en cualquier guía de soporte según lo preferido.
Cualquiera del acero deja de lado se puede quitar para acomodar botellas más grandes.
Para quitar un estante:
Quite todas las botellas o latas de los estantes.
Levante dejan de lado hacia arriba y después
sacan suavemente los estantes.
Para substituir un estante:
Ponga los lados de los estantes detrás sobre las guías de soporte del gabinete y empuje detrás hasta
que las lengüetas del estante resbalan dentro de lugar.
NOTA: Asegúrese de que las lengüetas estén contratadas firmemente a lugar antes de almacenar
cualesquiera bebidas.
Advertencia:
No press/empujón el ventilador de la circulación en el gabinete cuando usted coloca adentro o quita las
latas o las botellas de la bebida.
Almacene correctamente sus bebidas de modo que las latas o las botellas no obstaculicen la circulación
de aire dentro del gabinete.
8

9
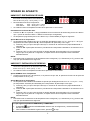
OPERAR SU APARATO
HMWC50ST: ENFRIADORA DE VINOS
La gama de temperaturas de funcionamiento
del control de la temperatura del enfriadora del
vino es del 41°F (4°C) ~ 64°F (18°C), +/- 5°F
Recomendaciones De la Temperatura:
Vino Rojo: 54°F ~ 61°F (12°C ~ 16°C)
Vino blanco: 43°F ~ 50°F (6°C ~ 10°C)
La exhibición indica la temperatura media de la aplicación en el momento.
Preestablezca Las Zonas Del Vino
Presione el ▲ o los cojines ▼ a elegir preestablecen las condiciones de almacenaje para el vino blanco
rojo o. (la luz de indicador "RED" o "WHITE" iluminará por consiguiente.)
La temperatura programada para el vino blanco rojo o será exhibida por algunos segundos.
Ajuste Manual De la Temperatura
La temperatura del enfriadora del vino se puede fijar dondequiera entre 41°F el ~ 64°F (5°C ~ 18°C) por
temperatura acuciante para arriba ▲ y de la temperature ▼ pads abajo como sigue:
1) Presione [ SET ] el cojín hasta que usted oye un sonido de la "señal sonora" (aproximadamente 2
segundos).
2) Presione ▲▼ cojines para aumentar o para disminuir la temperatura deseada en incrementos de un
grado.
3) Presione [ SET ] el cojín para confirmar su ajuste deseado de la temperatura. Si no se presiona
ningún cojín en el plazo de 10 segundos, su ajuste selecto de la temperatura será confirmado
automáticamente.
NOTA:
Para seleccionar la exhibición de la temperatura entre centígrado (°C) o Fahrenheit (el °F), presione "▲"
cojín por aproximadamente 2 segundos.
HMBC58ST: ENFRIADORA DE BEBIDAS
La gama de temperaturas de funcionamiento del
control de la temperatura del enfriadora del bebidas
es del 37°F (3°C) ~ 54°F (12°C), +/- 5°F.
La exhibición indica la temperatura media de la aplicación en el momento.
Ajuste NORMAL De la Temperatura
Cuando se enciende (con.) la aplicación, o se presiona el cojín ▲ , la aplicación funciona en el ajuste de
la temperatura de 45°F (7°C).
Ajuste Manual De la Temperatura
La temperatura del enfriadora del bebidas se puede fijar dondequiera entre 37°F el ~ 54°F (3°C ~ 12°C)
por temperatura acuciante para arriba ▲ y de la temperature ▼ pads abajo como sigue:
1) Presione [ SET ] el cojín hasta que usted oye un sonido de la "señal sonora" (aproximadamente 2
segundos).
2) Presione ▲▼ cojines para aumentar o para disminuir la temperatura deseada en incrementos de un
grado.
3) Presione [ SET ] el cojín para confirmar su ajuste deseado de la temperatura. Si no se presiona
ningún cojín en el plazo de 10 segundos, su ajuste selecto de la temperatura será confirmado
automáticamente.
NOTA:
Para seleccionar la exhibición de la temperatura entre centígrado (°C) o Fahrenheit (el °F), presione "▲"
cojín por aproximadamente 2 segundos.
Lo que sigue es aplicable a HMWC50ST y a HMBC58ST:
El indicador permanecerá ENCENDIDO durante ciclo de refrigeración y estará APAGADO
durante ciclo ocioso.
Para cambiar el CON./DESC. ligero interior, presione el cojín.

10
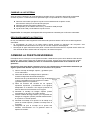
CAMBIAR LA LUZ INTERNA
Antes de quitar la bombilla, dé vuelta apagado al Aparato primero y después desenchufe la unidad del
enchufe de pared. La falta de hacer tan podía dar lugar a choque eléctrico o a daños corporales.
Quite los dos tornillos que fijan la caja de control. Manteniendo la caja de control,
desconecte el LED que conecta al PCB principal.
Quite dos tornillos para quitar la fila de LED.
Reemplacelo por una fila de LED nuevo y conectelo al PCB principal.
Fije la fila de LED y la reinstallar la caja de control.
Importante:
El reemplazo de lámpara LED sólo puede ser realizada por un técnico autorizado
DESCONGELAMIENTO AUTOM TICO
No hay necesidad de la descongelación manual de esta aplicación debido a la función de descongelación
automática.
La acumulación de hielo en la pared trasera interna durante la operación del compresor será
descongelada automáticamente una vez que el ciclo del compresor esté apagado.
Descongele el agua drenará fuera de pasar a través del enchufe del dren en la pared trasera interna en
una cacerola del dren situada sobre el compresor, de donde se evapora.
CAMBIAR LA PUERTA REVERSIBLE
Esta aplicación se construye con una puerta reversible. Usted tiene la opción de la abertura él del derecho
izquierdo o. Para invertir la dirección de abertura de su puerta, siga por favor estas instrucciones simples.
NOTA: Si está deseado, cambie por favor el oscilación de la puerta antes de la instalación de la
aplicación.
Precaución: Para evitar daños corporales a se y/o a la característica, recomendamos altamente que
alguien ayuda usted durante el proceso de la revocación de la puerta.
1)
Quite el montaje de bisagra superior y guárdelos para
un uso más último.
2)
Desmontar el tablón de bisagra inferior quitando 2
tornillos hexagonales de la brida de bloqueo .
3) Quite los botones del enchufe de los agujeros
izquierdos superiores y transfiéralos a los agujeros
destapados en el derecho. Sea seguro presionar los
botones del enchufe firmemente en el agujero.
4) Reinstale el montaje de bisagra superior quitado
previamente en el paso 1 en el lado opuesto.
5)
instalar el tablón de bisagra inferior ( con el pasador de
6) Reinstale el montaje de la puerta con la manija de la
puerta en el lado opuesto. (rotando el montaje 180° de
la puerta).
7) Asegúrese de que el montaje de la puerta esté
alineado correctamente con el gabinete antes de
apretar los tornillos.
Desenroscar el eje de articulación de la viga de bisagra
y volver a atornillarlo en el otro agujero en la tabla
y guardarla para su uso posterior.
bisagra en el agujero opuesto ) extraído anteriormente
en el paso 2 en el lado opuesto.

11
CUIDE Y LA CONSERVACION
PARA LIMPIAR SU APARATO
Una vez finalizada la instalación, se recomienda una limpieza completa de la unidad.
Dé vuelta apagado al aparato primero y después desenchufe la unidad del enchufe de pared.
Quite todo el contenido.
Limpie el interior con un paño humedecido en una solución de agua tibia y bicarbonato de soda. La
solución se prepara con aproximadamente 2 cucharadas de bicarbonato de soda y un cuarto de agua.
Recuerde mantener limpia la junta de la puerta (burlete) para que la unidad funcione correctamente.
La parte exterior del aparato se debe limpiar con una solución de agua tibia y detergente suave.
Seque el interior y exterior con paño suave.
El polvo o cualquier cosa que bloquea el respiradero puede obstaculizar la eficacia que se refresca del
enfriadora del vino. Limpie el respiradero con la aspiradora en caso de necesidad.
EN LAS VACACIONES
Dé vuelta apagado al aparato primero y después desenchufe la unidad del enchufe de pared.
Quite todo el contenido.
Limpie el aparato.
Deje la puerta apenas abierta para evitar la posible formación de condensación, moho u olores.
Vacaciones cortas: Deje el aparato en funcionamiento durante los períodos de vacaciones que no
superen las tres semanas.
Vacaciones largas: Si el electrodoméstico no se usa durante varios meses, retire todos los alimentos y
desconecte de la red de electricidad. Limpie y seque cuidadosamente el interior. Para evitar la formación
de olores y humedad, deje la puerta apenas abierta: si es necesario, trábela para que se mantenga
abierta o retire la puerta.
PARA CAMBIAR DE LUGAR SU APARATO
Dé vuelta apagado al aparato primero y después desenchufe la unidad del enchufe de pared.
Quite todo el contenido.
Asegure con cinta adhesiva los elementos sueltos en el interior del aparato.
Asegure la puerta con cinta adhesiva.
RECOMENDACIONES PARA AHORRAR ENERGÍA
El aparato se debe ubicar en el lugar más fresco de la habitación, alejado de las fuentes de calor y de
caños de calefacción, y protegido de la luz del sol directa.
Asegúrese de que la puerta sea cerrada cuando se gira el refrigerador del vino.

12
GUÍA DE RESOLUCIÓN DE PROBLEMAS
Usted puede resolver muchos de los inconvenientes comunes que se producen con el aparato y
ahorrarse el costo de llamar al servicio de mantenimiento. Intente las sugerencias a continuación
para ver si puede resolver los problemas antes de llamar al service.
PROBLEMA
CAUSA POSIBLE
El aparato no funciona.
No está enchufado.
Se activó el corta corriente o se quemó un
fusible.
La temperatura del interior del aparato es muy
elevada.
El control de temperatura está fijado a una
temperatura muy elevada. Fije el control a una
temperatura más baja y deje que la temperatura
se estabilice durante varias horas.
La puerta estuvo mucho tiempo abierta o se
abrió con mucha frecuencia. Cada vez que se
abre el aparato entra aire caliente. Abra la puerta
con menos frecuencia.
La puerta no está completamente cerrada.
La junta de la puerta no ajusta lo suficiente.
El aparato estuvo últimamente desconectado
durante un período de tiempo. Se requieren 4
horas para que el aparato se enfríe
completamente.
La temperatura del interior del aparato es muy
baja.
El control de temperatura está fijado a una
temperatura muy baja. Fije el control a una
temperatura más elevada y deje que la
temperatura se estabilice durante varias horas.
Vibraciones.
Verifique que el aparato esté sobre una
superficie nivelada.
El aparato está tocando la pared. Vuelva a
nivelar y retirar de la pared.
Si ocurre la vibración continuada, dé vuelta
apagado al refrigerador del vino y desenchufe el
enchufe de energía. Entre en contacto con el
departamento del servicio de cliente para la
ayuda adicional.
Se forma humedad en las paredes interiores del
aparato
La puerta está apenas abierta.
La puerta está mucho tiempo abierta o se abre
con mucha frecuencia. Abra la puerta con
menos frecuencia.
La junta de la puerta no ajusta lo necesario.
Se forma humedad en las paredes externas del
aparato
La puerta está apenas abierta y el aire frío del
interior se combina con el aire tibio del exterior.
La puerta no cierra convenientemente.
El aparato no está en una superficie nivelada.
La junta está sucia.

2
"A
"A"
$AA=:2?46@CA@C2E:@?82C2?E:K2BF64252?F6G26?EC@56363:52DJG:?@D42C646?5656764E@D56
>2E6C:2=6D?:56>2?@56@3C2J246AE2C6A2C2C4F2=BF:6C56764E@@AC@A@C4:@?2CF?C6AF6DE@?F6G@2
5:D4C64:]?56=24@>A2[Y2564F2=BF:6CA2CE656=2F?:525BF6AC6D6?E692J272==25@5FC2?E66=A6CY@5@56
82C2?EY2#@D82DE@D56C6AF6DE@DJ>2?@56@3C26DEV4F3:6CE@DA2C26DE2F?:5255FC2?E6F?A6CY@5@56F?
2[@2A2CE:C56=276492564@>AC2D?646D2C:@AC6D6?E2CF?24@A:256=C64:3@@724EFC2564@>AC24@?76492
A2C2@3E6?6C=@DD6CG:4:@D56=282C2?EY26=C66>A=2K@@6=C66>3@=D@
56>VD$AA=:2?46@CA@C2E:@?2FE@C:K26=4@>AC6D@CA:6K2DD@=2>6?E6A2C26DE2C=:3C65656764E@D6?
>2E6C:2=J=26;64F4:]?A@CF?A6CY@5@564:?4@2[@D=4@?DF>:5@C6DC6DA@?D23=656E@5@6=EC232;@J=@D
4@DE@D56=EC2?DA@CE6C6=24:@?25@D4@?=25:28?@D:DJ6=C66>A=2K@56=4@>AC6D@C56DAFXD56=2DF?@
82C2?EY2D:?:4:2=56=2[@92?6IA:C25@*:6?6=24@?E64:>:6?E@=2F?:525C6BF:6C66=C66>A=2K@@6=C66>3@=D@
32;@EXC>:?@D566DE282C2?EY26=4@?DF>:5@C6DC6DA@?D23=656E@5@D=@D4@DE@D56=EC2?DA@CE6G@=G6C=2
F?:5252?F6DEC27V3C:422?E6D56C64:3:CF?2F?:525@F?C66>3@=D@56=C66>A=2K@,?C66>3@=D@@
C66>A=2K@D6CV6>:E:5@2=25:D4C6E:]?56=$AA=:2?46@CA@C2E:@?
DE282C2?EY24F3C6=@D6=64EC@5@>XDE:4@D6?FD6?56?EC@56=@DDE25@D,?:5@D4@?E:8F@D=2D<2 2HV:J
'F6CE@):4@DE282C2?EY2?@4F3C6=@D:8F:6?E6
"! # !!&%#!!
#2C6A2C24:]?56=AC@5F4E@D68^?=@DEXC>:?@D56=AC6D6?E66DDFC64FCD@^?:4@J6I4=FD:G@32;@6DE282C2?EY2
=:>:E252+@52DJ4F2=BF:6C82C2?EY2:>A=Y4:E2:?4=F:52=24@>6C4:23:=:525J2AE:EF5A2C2F?7:?A2CE:4F=2CD6
=:>:E2?A@C=2AC6D6?E62F?2[@@6=A6CY@5@>6?@C2FE@C:K25@A@C=2=6J$AA=:2?46@CA@C2E:@??@6D
C6DA@?D23=656=@D52[@D:?4:56?E2=6D@4@?E:?86?E6DJ?:?8^?C6AC6D6?E2?E6@A6CD@?26DEV2FE@C:K2522
2DF>:C6??@>3C6?F6DEC@?:?8F?2C6DA@?D23:=:5256?C6=24:]?4@?=2G6?E2566DE6AC@5F4E@2;@?:?8F?2
4:C4F?DE2?4:26=4@?DF>:5@CAF65656G@=G6C6DE2F?:5252=27V3C:42D:?4@?E2C4@?=22FE@C:K24:]?AC6G:2A@C
6D4C:E@56$AA=:2?46@CA@C2E:@?
=8F?@D6DE25@DAC@9Y36?=26I4=FD:]?@=:>:E24:]?56=@D52[@D:?4:56?E2=6D@4@?E:?86?E6D@=2D=:>:E24:@?6D
@82C2?EY2D:>A=Y4:E2DDE282C2?EY2=65256C649@D=682=6D6DA64Y7:4@DJAF656?4@CC6DA@?56C@EC@D56C649@D
BF6G2CY6?56F?6DE25@2@EC@
'2C2D@=:4:E2CD6CG:4:@@2JF52==2>62= @G:DYE6?@D6? ;;;2)'551/'3)+)42 A2C2D@=:4:E2C6=
D6CG:4:@56=282C2?EY2@A65:CC6AF6DE@D
a 2[@D@4FCC:5@D5FC2?E66=EC2?DA@CE6@563:5@D2F?2:?DE2=24:]?:?2564F252
a 2[@D563:5@D2FD@:?563:5@@23FD@
a 'F?EFC2D2=D:DE6>256=6G2A@C25@C563:5@2=256D4@?86=24:]?:?4@CC64E256=2F?:525
a 'XC5:5256=@D4@?E6?:5@D563:5@272==256=2F?:525
a )6A2C24:@?6D6764EF252DA@C286?E6D56D6CG:4:@?@2FE@C:K25@D
a #=2>25@D2=D6CG:4:@56C6A2C24:]?BF6?@D65632?272==2D56>2E6C:2=6D@>2?@56@3C24@>@:?DECF44:@?6DD@3C66=
FD@2564F25@56=AC@5F4E@@:?DE2=24:]?:?2564F252
a 2>3:@@C6AC@8C2>24:]?567FD:3=6D@:?E6CCFAE@C6D564:C4F:E@D6=X4EC:4@D6?6=9@82C
a 2==256=AC@5F4E@D:D6FE:=:K2A2C2@EC@D7:?6D7F6C256=@D6DA64Y7:4@D
a @DE@D565:DA@D:4:]?A@CE@52F?:52572==252?@56GF6=E22=27V3C:42
a @DE@D566?GY@:?DE2=24:]? :?4FCC:5@D4@>@C6DF=E25@56F?2F?:525BF6?@7F?4:@?2D68^?=@6DA64:7:425@
a 2DE@D56G:2;6JEC2DA@CE6 A2C26=D6CG:4:@56=AC@5F4E@D:6=2A2C2E@6DEVF3:425@6?F?=F82CC6>@E@5@?566=D6CG:4:@
56F?EX4?:4@2FE@C:K25@?@6DEV5:DA@?:3=6
a =C6E:C@J=2:?DE2=24:]??F6G256=2A2C2E@D:=2:?DE2=24:]?6DEV6?F?=F82C:?2446D:3=6@?@6DEV:?DE2=25@D68^?=2D
:?DECF44:@?6D56:?DE2=24:]?AF3=:4252D
a #@DC6:?E68C@DA@CAC@5F4E@DBF6?@E:6?6?C6A2C24:]?D6=:>:E2?2=AC64:@A2825@A@C=2F?:525D68^?6=C64:3@56
4@>AC2
a DE282C2?EY26D:?EC2?D76C:3=6DE282C2?EY26DGV=:526I4=FD:G2>6?E6A2C26=4@>AC25@C@C:8:?2=J?@D66IE:6?562
?:?8^?@EC@AC@A:6E2C:@@AC@A:6E2C:@DDF3D:8F:6?E6D
4*+14
H$.50ST
'68+7=86'('04 4256+7465'68+7741'2+38+ "/54*+7+6:/)/4
Un año
Cinco años
En su casa
H$B58ST
Un año
Cinco años
En su casa
13

CNA International, Inc. realiza negocios bajo el nombre de MC Appliance
Corporation. Derechos reservados.
Magic Chef® es una marca registrada de CNA International, Inc.
www.mcappliance.com Impreso en China
-
 1
1
-
 2
2
-
 3
3
-
 4
4
-
 5
5
-
 6
6
-
 7
7
-
 8
8
-
 9
9
-
 10
10
-
 11
11
-
 12
12
-
 13
13
-
 14
14
-
 15
15
-
 16
16
-
 17
17
-
 18
18
-
 19
19
-
 20
20
-
 21
21
-
 22
22
-
 23
23
-
 24
24
-
 25
25
-
 26
26
-
 27
27
-
 28
28
-
 29
29
-
 30
30


Magic Chef HMWC50ST El manual del propietario
- Categoría
- Enfriadores de bebidas
- Tipo
- El manual del propietario
En otros idiomas
- English: Magic Chef HMWC50ST Owner's manual
Documentos relacionados
-
Magic Chef MCWC6B Manual de usuario
-
-
Magic Chef MCWBC24DST Manual de usuario
-
-
-
-
Magic Chef BTWB530ST Manual de usuario
-
-
-
Magic Chef BTWB530ST1 El manual del propietario
Otros documentos
-
Candy CCVB 30F/1 Manual de usuario
-
Candy RWCB 60/N Manual de usuario
-
Candy HWCB 60D/1 Manual de usuario
-
Hisense HBC54D6AS Manual de usuario
-
-
CORBERO CFMMB430BLGL Manual de usuario
-
Hisense WMS017M6XVE Manual de usuario
-
Philips CRP614/01 Product Datasheet
-
RCS Cooper Cooler HC01 Instrucciones de operación
-
 Vissani MCWC50DST Guía del usuario
