
For questions about features, operation/performance, parts or service, call:
1-877-465-3566
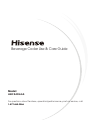
Model:
HBC54D6AS
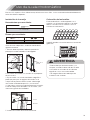
Beverage Cooler Use & Care Guide

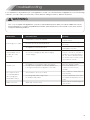
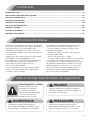
CAUTION
The CAUTION alert means a potentially
hazardous situation. Moderate or minor
injury may occur if not avoided.
WARNING
The WARNING alert means a potentially
hazardous situation. Serious injury or death
may occur if not avoided.
DANGER
The DANGER alert means an imminently
hazardous situation. Serious injury or death
may occur if not avoided.
2
Contents
Brief Introduction
........................................................................................................................................
2
Important Safety Instructions
..........................................................................................................................................
2
Installing Your New Appliance
...........................................................................................................................
6
Description Of The Appliance
...........................................................................................................................
7
Display Controls
...........................................................................................................................
8
Using Your Appliance
...........................................................................................................................
10
Cleaning And Care
...........................................................................................................................
13
Troubleshooting
...........................................................................................................................
14
Disposal Of The Appliance
...........................................................................................................................
15
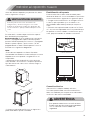
Brief Introduction
Thank you for choosing Hisense. We hope you find
your new appliance a pleasure to use. Before you
use the appliance, we recommend that you read
through these instructions carefully, which provide
details about its usage and functions.
Please ensure that all people using this appliance
are familiar with its operations and safety features.
It is important that you install the appliance correctly
and pay attention to the safety instructions carefully.
We recommend that you keep this user's manual
with the appliance for future reference and for any
future users.
This appliance is intended to be used in household
and similar applications such as:
• Kitchen- areas in shops, offices and other working
environments;
• Suites in hotels, motels and other residential types
of environment;
• Bed and breakfast environments.
• Catering and similar non-retail applications. If you feel
that the appliance is not operating correctly, please
check the Troubleshooting page for assistance. If still in
doubt contact the Hisense customer service help line for
assistance or to arrange a call out by an authorized
service technician.
Important Safety Instructions
The appliance is intended to
be used exclusively for the
storage of beverage as
explained in this instruction
booklet.
General safety and daily use

•This appliance is not intended for use by persons
(including children) with reduced physical, sensory
or mental capabilities, or lack of experience and
knowledge, unless they have been given
supervision or instruction concerning use of the
appliance by a person responsible for their safety.
Children should be supervised to ensure that they
do not play with the appliance.
•It is dangerous to alter the specifications or modify
this product in any way.
•Before any cleaning or maintenance work is carried
out, be sure to switch off and unplug the appliance.
•This appliance is heavy. Care should be taken
when moving it.
•Take utmost care when handling your appliance
so as not to cause any damage to the cooling unit
with consequent possible fluid leakages.
•The appliance must not be located close to
radiators or gas cookers.
•Avoid prolonged exposure of the appliance to
direct sunlight.
•There must be adequate ventilation around the
appliance and any damage to the refrigerant
circuit must be avoided.
•Do not use other electrical appliances inside of
the appliance.
•Do not store explosive substances such as aerosol
cans with a flammable propellant in this appliance.
•This appliance is intended to be used in
household and similar applications such as -staff
kitchen areas in shops ,offices and other working
environments ;-farm houses and by clients in hotels
motels and other residential type environments ;-bed
and breakfast type
environments ;-catering and similar non-retail applications.
•Keep burning candles, lamps and other items with
flames away from the appliance so that they do
not set the appliance on fire.
•The instructions shall also include information with
regard to the following (For built-in type):necessity
to allow disconnection of the appliance from the
supply after installation, unless the appliance
incorporates a switch complying with 24.3. The
disconnection may be achieved by having the
plug accessible or by incorporating a switch in the
fixed wiring in accordance with the wiring rules. The
instructions shall include information pertaining to
the installation, handling, servicing and disposal of
the appliance, it shall also contain the substance of
the following:
•Do not use extension cords or ungrounded (two
prong) adapters;
•If the cord is damaged, it must be replaced by
the manufacturer, its service agent or similar
qualified person in order to avoid hazard.
•Do not store explosive substances such as aerosol
cans with a flammable propellant in this appliance.
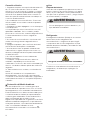
WARNING
3
WARNING
Do not use electrical appliances inside the
appliance, unless they are of the type
recommended by the manufacturer.
WARNING
Risk of child entrapment. Before you throw
away your old refrigerator or freezer:
• Take off the doors.
• Leave the shelves in place so that children
may not easily climb inside.
WARNING
Do not damage the refrigerant circuit.
WARNING
Keep all ventilation openings clear of
obstruction in the appliance enclosure and in
the cabinet enclosure.
WARNING
Do not use mechanical devices or other means
to accelerate the defrosting process, other than
those recommended by the manufacturer.

4
•Any electrical work required to install this appliance
should be carried out by a qualified electrician or
competent person.
This product should be serviced by an authorized
Service Center, and only genuine spare parts
should be used.
•Under no circumstances should you attempt to
repair the appliance yourself. Repairs carried out
by inexperienced persons may cause injury or more
serious malfunctioning. Refer to your local Service
Center, and always insist on genuine Hisense spare
parts.
•This appliance contains hydrocarbons in its cooling
unit; maintenance and recharging must therefore
only be carried out by authorized technicians.
Service/ Repair
This appliance employs Hydrocarbon Refrigerant
type R600a. It is hazardous for anyone other than an
Authorized Service Person to service this appliance.
Service Note
• The beverage cabinet is designed to be used
specifically for the storage of carbonated beverage
only.
•Best performance is obtained with ambient
temperature as follows:
The class of your appliance is shown on its rating
plate.
Note: If the ambient temperature is higher or lower
than the above listed, the energy consumption will
be affected accordingly.
•Do not place beverage directly against the rear
wall of compartment.
•The appliance manufacturer’s storage
recommendations should be strictly adhered to.
Refer to Using your appliance.
•The inner lining of the appliance has channels
through which the refrigerant passes. Should the
channels be punctured the unit could become
damaged beyond repair.
DO NOT USE SHARP INSTRUMENTS to scrape off frost or
ice. Frost may be removed by using a scraper period.
Under no circumstances should solid ice be forced
off the liner. Solid ice should be allowed to thaw by
defrosting the appliance.
Use
Important: For electrical connection carefully
follow the instructions given in specific paragraphs.
•Unpack the appliance and check if there is any
damage to it. Do not connect the appliance if it is
damaged. Report possible damage immediately to
the place of purchase. In this case retain all packing
materials.
•During normal operation, the compressor and/or
condenser at the back of the appliance heat up
considerably. For safety reasons, minimum
ventilation must be as shown in the instructions.
Installation
1. The appliance requires a single phase 115V/60Hz
power supply. It has a power cord that has a 3-prong
grounding plug that minimizes the possibility of
electrical shock. This appliance must be grounded.
Do not remove the grounding prong or modify the
power plug.
2. Do not modify the power plug. The power plug
must be accessible when the appliance is installed.
3. The appliance should not be turned off with a
switch or other device.
4. Make sure that the plug is not squashed or
damaged. Otherwise, it may cause short circuit,
electric shock or overheat and even cause a fire.
5. Do no insert the power plug if the socket is loose,
there is a risk of electric shock or fire.
Electrical Connection
•Care must be taken to ensure that the appliance
does not stand on the electrical supply cable.
Important: if the power cord is damaged, it must be
replaced by a special cord or assembly available
from the manufacture or its service agent.
•Do not use extension cords or ungrounded (two
prong) adapters.
•If the appliance is transported horizontally, it is
possible that the oil contained in the compressor
flows in the refrigerant circuit. It is advisable to wait at
least two hours before connecting the appliance to
allow the oil to flow back in the compressor.
•There are working parts in this product which heat
up. Always ensure that there is adequate ventilation
as a failure to do this will result in component failure
and possible loss. See installation instructions.
•Parts which heat up should not be exposed.
Wherever possible the back of the product should be
near the wall.
Attention:
Keep ventilation openings clear of obstruction.
Ambient Temperature Range
+12.8℃ (55℉) to + 32℃ (90℉)

The symbol is a warning and indicates the refriger-
ant and insulation blowing gas are flammable.
WARNING
Risk of fire/ flammable materials
This appliance does not contain gasses which could
damage the ozone layer, in either its refrigerant
circuit or insulation materials. The appliance should
not be discarded together with your local city
refuse and rubbish. The insulation foam contains
flammable gasses. The appliance should be disposed
of according to the applicable regulations of your
local government. Avoid damaging the cooling
unit, especially at the rear near the heat exchanger.
The materials used on this appliance marked by
the symbol are recyclable.
The refrigerant isobutene (R600a) is contained
within the refrigerant circuit of the appliance.
During transportation and installation of the
appliance, ensure that none of the components of
the refrigerant circuit becomes damaged.
Refrigerant
WARNING
Do not use detergents or abrasive powders,
as these will damage the finish.
6. Switch off the appliance and disconnect it from
the main power before you clean or move it.
7. Never unplug the appliance by pulling on the
electrical cord. Always grip the plug firmly and pull
straight out from the socket to prevent damaging
the power cord.
8. Do not operate the appliance without the cover
over the interior lighting.
9. Any electrical component must be replaced or
repaired by a qualified electrician or Hisense au-
thorized service technician. Only genuine replace-
ment parts should be used.
10. To avoid eye injury, do not look direct into the
LED light located in the refrigerator compartment. If
it is not functioning correctly, consult a qualified,
registered electrician or replace it in accordance
with the “cleaning and care” chapter.
Environment Protection
Cleaning the interior
Before using the appliance for the first time, wash
the interior and all internal accessories with luke-
warm water and some neutral soap so as to
remove the typical smell of a brand-new product,
and then dry naturally and thoroughly.
Use
5

Before using the appliance for the first time, you
should be informed of the following tips.
For this reason, sufficient clear space should be
available around the product.
Suggest: It is advisable for there to be at least l/2
inch of space from the back to the wall, at least l/2
inch from its top, and at least l/4 inch from its side
to the wall. As shown in the following diagrams.
•Position your appliance in a dry place to avoid
high moisture.
Note:
•Avoid locating the appliance in damp areas .Too
much moisture in the air will cause frost to form
quickly on the evaporator.
•Keep the appliance out of direct sunlight, rain or
frost. Position the product away from heat sources
such as stoves, fires or heaters.
6
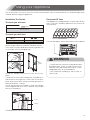
Installing your new appliance
VENTILATION OF APPLIANCE
In order to improve efficiency of the cooling
system and save energy, it is necessary to maintain
good ventilation around the appliance for the
dissipation of heat.
The appliance should be level in order to eliminate
vibration. We recommend that you level the appliance
by the following steps.
1. Put the appliance into the right place.
2. Turn the adjustable feet (with your fingers or a
suitable screw driver) until they touch the floor.
3. Tilt back the top backwards for about 10-15mm or
1 ° by turn the adjustable feet. This will allow the doors
to self-close providing a consistent closed seal.
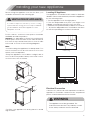
Leveling Of Appliance
Caution! Any electrical work required to install this
appliance should be carried out by a qualified
person or authorized service technician.
Electrical Connection
WARNING
This appliance must be grounded. The
manufacturer declines any liability should
these safety measures not be observed.
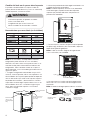
Cabinet leg
Cabinet leg
23.6in
23.4in
33.9in
45.8in
≥1/2in
≥1/2in
≥1/4in
≥1/4in

Note:
•The appliance can keep 140 cans of beverage at the same time, please place the beverage cans
as shown above.
•Can capacities, mentioned in this manual are based on standard 12ounces cans and standard
shelving.
•When the beverage cabinet is put in too many drinks once, and the internal temperature alarm is
normal. Don't worry.
•For the whole drink to cool more quickly and homogeneous , suggest not to accumulate too much
beverage in the fan n outlet.
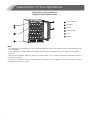
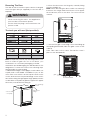
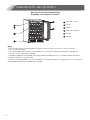
Description of the appliance
Equipped with metal shelves
Description of the appliance
7
1
2
3
4
5
6
Control panel
LED light
Shelves
Cabinet leg
Door
Handle
1
2
3
4
5
6

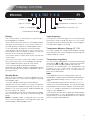
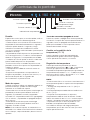
Display Controls
The control panel, shown above, is at the top of
the Refrigerator Chamber.
•Each time the power turns on, the display panel
will light everything for 3 seconds, beep for 1
second, and then enter the normal display status.
•Icons are always lit (until the screen activates).
•The display will activate the screen saver if no
button and no action is taken to open or close the
door for 60 seconds with the display on.
•Any button press or open door action will exit the
screen saver.
•Press the key in the screen saver state. Activate
the screen saver only. Do not change the settings.
•Each valid button press emits a short sound.
•The corresponding temperature setting is
reflected in the display, and the setting takes effect
and is stored after 10 seconds of operation without
pressing the key.
Display
When you do not plan to use this appliance for a
period of time, you can save energy by entering
the standby state.
•To enter standby mode, press and hold the
standby key for more than 3 seconds. The buzzer
will beep and the display board will show "OF". The
display is "OF" only one minute, and the display will
be out in after one minute
•To exit standby mode, press and hold the standby
key for more than 3 seconds. The buzzer rings will
beep.
NOTE: In standby mode, cooling will stop. If you do
not to use the appliance for a long time, take out
the beverage, and unplug the unit.
Standby Mode
You can turn the interior light on or off by pressing
this button. After closing the door for 10 seconds,
the light will turn off automatically, so beverage is
not exposed to light for too long.
"Light On/Off key"
A
B
C
D
E
F
G
You can change the temperature display setting
from Fahrenheit to Celsius degrees by pressing the
marked ,and vice versa.
Temperature Measure Change (°F / °C)
You can set the temperature you desire by pressing
the buttons " " or " ". When you press the button
for the first time, the LED readout will show the
previously set temperature. The temperature will
increase 1°C or 1°F each time you press the UP
button and will decrease 1°C or 1°F each time you
press the DOWN button.
NOTE:
•The appliance doesn’t work properly if the set
temperature is higher than the ambient temperature.
•The temperature range is from 1°C(34°F ) to 10°C
( 50°F).
•The temperature preset at the factory is 4°C(39°F).
•When you set a temperature, you set an average
temperature for the whole cabinet. There may be a
2°C to 3°C variance between the top and bottom
shelves of the appliance.
•The first time the product is filled with anaverages
the temperature of the anaverages will need a
longer time to set the temperature, which is about
20 hours, please wait patiently.
Temperature regulation
Standby key
°F and °C Change key
Light On/ Off key
Temperature Indicator
Cancel alarm key
Temperature control key -Down
Temperature control key -Up
8

9
In order to avoid a the temperature problem that
could affect the quality of the beverages, the
appliance has an over temperature alarm function.
When an over temperature alarm occurs, cancel the
alarm by pressing the Cancel Alarm Key and take
out the beverage, and contact customer service.
NOTE:
In the over temperature alarm state, press the Cancel
Alarm Key to exit the over temperature alarm, the
alarm tone stops, and the light ” ” will change from
blinking to constant, once the appliance cools to the
required temperature.
The first boot use or a one-off drop of drinks may cause
hyperthermal alarm. This is a normal phenomenon,
and users don't worry.
Over Temperature Alarm
The door alarm will sound once the fridge door is open
over 2 minutes. In case of door alarm, the buzzer will
sound 3 times per minute and will stop
automatically 8 minutes later. Closing the door will also
clear the door alarm.
To save energy, don’t keep the door open for a long
time when using beverages cooler.
Door Alarm
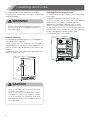
WARNING
If the LED light is broken, please DO NOT
CHANGE IT YOURSELF! Changing the light
yourself may cause injury or serious
malfunctioning. It must be replaced by a
qualified service technician in order to
avoid a hazard. Contact your local Service
Center for help. Before changing the LED
light, switch off the appliance and unplug
it, or pull the fuse or the circuit breaker.

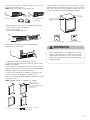
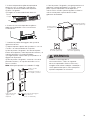
door
gasket
screw
handle
2.Find the handle and screws in the accessory
pack.
3.Attach the screw with a magnetic screwdriver so
that it passes through the screw hole in the door
body until the bottom. Keep a certain amount of
pressure and don’ t let go.
4.One hand holds the handle so that the handle
hole is aligned with the screw, and the other hand
turns the screwdriver.
WARNING
•To prevent the cans from rolling down and
being broken, there should not be more
than 14 cans placed at the bottom of the
refrigerate room as showed above.
•The maximum loading of each type of
shelf is 33lb.
10
This section tells you how to use most of the useful features. We recommend that you read through them
carefully before using the appliance.
Using your appliance
Before using the device, install the handle as follows:
1.First open the door and take the door gasket out
on one side of the nonhinged side.
5.Install another screw in the same way.
Installation The Handle
The appliance is equipped with 3 shelves with 42 slots
each. The cans should be placed on the shelves as
shown below.
You can also place cans in the bottom of the cabinet.
Placement Of Cans
The tools you will need
The parts you will need
Philips Screwdriver
(Not provided)
Handle (Provided)
1
Screw (Provided)
2

Screw hole
cover (left)
right upper
hinge
special flange
screws
door
grille
11
2. Move the door from the hinge by carefully lifting
the door straight up.
Note: When removing the door, watch for washer(s)
between the hinge and the bottom of the upper
door that may stick to the door. Do not lose these
washers.
3. Unscrew the grille cover fixing screws then lifting up
and pulling backwards, take the grille cover off the
cabinet.
Note: Take care of the screws. Record the screw’s
place of use and quantity.
2 screws here
The side at which the door opens can be changed,
from the right side (as supplied) to the left side, if
required.
Reversing The Door
The tools you will need (Not provided):
Note: If required you may lay the refrigerator on its
back in order to gain access to the base, you
should rest it on soft foam packaging or similar
material to avoid damaging the backboard of the
refrigerator. To reverse the door, the following steps
are generally recommended.
1.Stand the beverage cooler upright, close the door, use
a putty knife or thin-blade screwdriver to pry off the
screw hole cover which is at the top left corner of the
cooler, and unscrew the special flange screws which
are used for fixing the right upper hinge part by a 8mm
socket driver or a spanner (please support the upper
door with your hand when doing it).
WARNING
When reversing the door, the appliance
must not be connected to power.
Ensure that the plug is removed from the
power socket.
Not provided
8mm socket wrench
Phillips head screwdriver
Thin-blade Screwdriver
Adjustable Wrench 8mm wrench
The parts you will need (provided )
Bottom left hinge Screw hole cover (right) Top left axle hole part
1 1 1
Putty knife

12
WARNING
When disposing of your appliance, use an
approved disposal site. Remove the plug
and ensure that any locks or catches are
removed, to prevent young children being
trapped inside.
4.Unscrew the bottom right hinge screws as the
bottom left hinge screws.
Note: Keep the hinge for the future use.
8.Turn the door 180 degrees, put the door on the
cabinet using the hinge and screws, on the top left
side. Use screw hole cover (right) to hide the holes
on the top right side of the beverage cabinet.
5.Flip the grille cover from left to right as following:
1. Pull it out from the left side slot.
2. Turn it 180 degree.
3. Put it into the right side slot.
6.Reattach the grille cover to the beverage
cabinet as shown below.
7.Change the axle hole parts of as follows:
1. Pull out top right axle hole part by knife or thin
blade screwdriver.
2. Turn the door 180 degrees, face to the bottom of
the door and remove the reinforcement part and
magnet supporter with the screwdriver.
3. Put the top left axle hole part into the door hole.
4. Turn the door 180 degrees, Reattach the
reinforcement part and magnet supporter using
the same screws.
Note: Handle the door carefully. It is fragile.
Bottom left hinge Bottom right hinge
(as supplied)
Top left axle hole part
Top right axle hole part
(as supplied)
Screw hole cover (right) Screw hole cover (left)
1
3
2
4
grille
cover
bottom right
hinge screws
the reinforcement part
and Hole sleeve
and screws
magnet and
magnet supporter
grille
Screw hole
cover (right)
right upper hinge
and special flange
screw

To maintain good appearance of your appliance,
you should clean it regularly.
•Spray water onto the cleaning cloth instead of
spraying directly on the surface of the appliance. This
helps ensure an even distribution of moisture to the
surface.
•Clean the door with a mild detergent and then
wipe it dry with a soft cloth.
Exterior Cleaning
13
For hygienic reasons the appliance (including
exterior and interior accessories) should be
cleaned regularly.
Cleaning and Care
To clean the beverage cooler, you should follow
these steps:
-Unplug the appliance and remove the cans.
-Wash the inside with a warm water and baking
soda solution. The solution should be about 2
tablespoons of baking soda to 4 cups of water.
-Wash the shelves with a mild detergent solution.
-It may also be necessary to periodically wipe the
bottom part of the storage are ,as the beverage
cooler is designed to retain humidity, and
condensation may collect there.
Cleaning The Beverage Cooler
WARNING
Before cleaning, the appliance must be
powered off and unplugged. Danger of
electrical shock!
CAUTION
•Don’ t use sharp objects as they are likely
to scratch the surface.
•Don’ t use Thinner, Car detergent, Clorox,
oils, abrasive cleansers or organic solvents
such as Benzene for cleaning. They may
damage the surface of the appliance and
may cause fire.

14
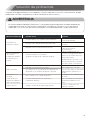
If you experience a problem with your appliance or are concerned that the appliance is not functioning
correctly, you can carry out some easy checks before calling for service, please see below.
Troubleshooting
WARNING
Don’ t try to repair the appliance yourself. If the problem persists after you have made the checks
mentioned below, contact a qualified electrician, authorized service technician or the store where
you purchased the product.
Malfunction Possible Cause Remedy
The beverage is too warm.
Temperature is not properly adjusted.
Door was open for an extended period.
The appliance is near a heat source.
This is normal, no error has occurred.
The setting temperature is higher than
the ambient temperature.
Water drain hole is blocked.
Unusual noises.
Water on the floor.
Heavy build up of frost,
possibly also on the
door seal.
The compressor does
not start immediately
after changing the
temperature setting.
Door seal is not air tight (possibly after changing
over the hinges).
Appliance is not level.
The appliance is touching the wall or other objects.
A component, e.g. a pipe, on rear of the appliance is
touching another part of the appliance or the wall
Please look in the "Display
controls" section.
Open the door only as long as
necessary.
Please refer to the "Installing your
new appliance" section.
Carefully warm the leaking
sections of the door seal with a
hair dryer (not hotter than approx.
50 ° C) . At the same time shape
the warmed door seal by hand
such that it sits correctly.
Please refer to the "Cleaning and
care" section.
Readjust the feet.
Move the appliance slightly.
If necessary, bend the
component out of the way
carefully.
The compressor starts after a
period of time.
Set the temperature lower than
the ambient temperature as you
want.

Packaging materials with the recycle symbol are recyclable. Dispose of the packaging into a suitable
waste collection container to recycle it.
Packaging Materials
1. Pull out the power cord from the power socket.
2. Cut off the power cord and discard.
Before Disposal Of The Appliance
It is prohibited to dispose of this appliance as household waste. Please check with your local government
for proper disposal procedures.
HBC54D6AS: 115V, 60Hz, R600a ;
HISENSE RONSHEN (GUANGDONG) FREEZER CO.,LTD.
NO.46 NORTH OF WENFENG ROAD AT RONGLI VILLAGE, SHUNDE
DISTRICT, FOSHAN CITY
Disposal of the appliance
WARNING
Refrigerators contain refrigerant and gases in the insulation. Refrigerant and gases must be disposed
of professionally as they may cause eye injuries or ignition. Ensure that tubing of the refrigerant
circuit is not damaged prior to proper disposal.
This symbol on the product or in its packing indicates that this product may not be treated
as household waste. Instead, it should be taken to the appropriate waste collection point
for the recycling of electrical and electronic equipment. By ensuring this product is disposed
of correctly, you will help prevent potential negative consequences for the environment
and human health, which could otherwise be caused by the inappropriate waste handling
of this product. For more detailed information about the recycling of this product, please
contact your local council your household waste disposal service, or the shop where you
purchased the product.
15
Correct Disposal of this product

©2019 Hisense Company Ltd. All Rights Reserved.
All material in this User's Operation Manual is the property of Hisense Company Ltd. and its subsidiaries, and
its protected under US, CANADA, MEXICO and international copyright and/or other intellectual property
laws. Reproduction or transmission of the materials, in whole or in part, in any manner, electronic, print, or
otherwise, without the prior written consent of the Hisense Company Ltd. is a violation of Hisense Company
Ltd. rights under the aforementioned laws.
No part of this publication may be stored, reproduced, transmitted or distributed, in whole or in part, in any
manner, electronic or otherwise, whether or not for a charge or other or no consideration, without the prior
written permission of Hisense Company Ltd.
Requests for permission to store, reproduce, transmit or distribute materials may be made to one or the fol-
lowing addresses:
USA: Hisense USA Corporation
7310 McGinnis Ferry Road
Suwanee, GA 30024
CANADA: Hisense Canada Co., Ltd.
2283 Argentia Road, Unit 16
Mississauga, ON, Canada
L5N 5Z2
MEXICO: Hisense Mexico S. de R.L. de C.V.
Blvd. Miguel de Cervantes Saavedra No 301
Torre Norte Piso 2, Col. Ampliación Granda
Miguel Hidalgo, Ciudad de México, C.P. 11520
Hisense, and any and all other Hisense product names, logo's, slogans or marks are
registered trademarks of Hisense Company Ltd. and its subsidiaries. All other trademarks
are the property of their respective holders.
Please be aware that the image shown here is indicative only. If there is any inconsistency
between the image and the actual product, the actual product shall govern.
16

Para consultas sobre las características, funcionamiento/rendimiento,
piezas o servicio, llame al:
1-877-465-3566
Modelo:
HBC54D6AS
Guía de uso y cuidado del enfriador
de bebidas

18
Contenido
Introducción breve
........................................................................................................................................
18
Instrucciones importantes de seguridad
..........................................................................................................................................
18
Instalar el aparato nuevo
...........................................................................................................................
22
Descripción del aparato
...........................................................................................................................
23
Controles de la pantalla
...........................................................................................................................
24
Uso de su electrodoméstico
...........................................................................................................................
26
Limpieza y cuidado
...........................................................................................................................
29
Solución de problemas
...........................................................................................................................
30
Eliminación del aparato
...........................................................................................................................
31
Introducción breve
Gracias por elegir Hisense. Esperamos que disfrute
de su nuevo electrodoméstico. Antes de utilizar el
electrodoméstico, le recomendamos leer
cuidadosamente todas estas instrucciones, las
mismas brindan detalles sobre el uso del producto
y sus funciones.
Asegúrese de que todas las personas que utilizan
este aparato estén familiarizadas con su
funcionamiento y sus funciones de seguridad. Es
importante que instale el electrodoméstico
correctamente y preste atención a las
instrucciones de seguridad.
Le recomendamos conservar este manual del
usuario con el electrodoméstico para futuras
consultas y futuros usuarios.
Este aparato ha sido diseñado para usarse en
aplicaciones domésticas y similares, como:
• Cocinas- áreas en tiendas, oficinas y otros
ambientes de trabajo;
• Estudios en hoteles, moteles y otros tipos de
entornos residenciales;
• Entornos de desayunos y hogar.
• Catering y aplicaciones similares no comerciales.
Si cree que el electrodoméstico no funciona
correctamente, consulte la página de resolución
de problemas para obtener ayuda. En caso de
duda, póngase en contacto con el servicio de
atención al cliente de Hisense para obtener
asistencia o para coordinar la llamada de un
técnico de servicio autorizado.
PELIGRO
PELIGRO significa una situación peligrosa
inminente. Pueden ocurrir lesiones graves o
la muerte si no se evitan.
ADVERTENCIA
ADVERTENCIA significa una situación
potencialmente peligrosa. Pueden ocurrir
lesiones graves o la muerte si no se evitan.
PRECAUCIÓN
PRECAUCIÓN significa una situación
potencialmente peligrosa. Pueden ocurrir
lesiones menores o leves si no se evitan.
Instrucciones importantes de seguridad
El electrodoméstico está
destinado a ser utilizado
exclusivamente para el
almacenamiento de bebidas
como se explica en este
manual de instrucciones.
Seguridad general y uso diario

•Este aparato no ha sido diseñado para que lo
utilicen personas (incluidos niños) con
capacidades físicas, sensoriales o mentales
reducidas, o con falta de experiencia o
conocimientos, a menos que estén supervisados o
reciban instrucciones acerca del uso del aparato
por parte de una persona responsable de su
seguridad. Los niños deben estar supervisados para
garantizar que no jueguen con el aparato.
•Es peligroso alterar las especificaciones o
modificar el producto de cualquier modo.
•Antes de realizar cualquier trabajo de limpieza o
mantenimiento, asegúrese de apagar y
desenchufar el electrodoméstico.
•El electrodoméstico es pesado. Tenga cuidado al
momento de moverlo.
•Tenga mucho cuidado al manipular su
electrodoméstico para no causar ningún daño a la
unidad de refrigeración con posibles fugas de
fluido.
•No se debe colocar el electrodoméstico cerca
de radiadores o cocinas de gas.
•Evite exponer el electrodoméstico a luz solar
directa por periodos de tiempo extensos.
•Debe haber una ventilación adecuada
alrededor del electrodoméstico y debe evitarse
cualquier daño al circuito de refrigerante.
•No utilice otros electrodomésticos dentro de
refrigerador de bebidas.
•No almacene sustancias explosivas, como latas
de aerosol con un propulso inflamable, en este
aparato.
Este aparato ha sido diseñado para usarse en
aplicaciones domésticas y similares,
como -cocinas para personal de tiendas, oficinas y
otros ambientes de trabajo;- granjas y clientes en
hoteles, moteles y otro tipo residencial;- entornos
para huéspedes;- aplicaciones de restauración y
no minoristas similares.
•Mantenga las velas, lámparas y otros artículos
con llamas lejos del electrodoméstico no causar un
incendio.
•En las instrucciones se incluirá también
información relativa a lo siguiente (Para el tipo
incorporado): necesidad de permitir la
desconexión del electrodoméstico del suministro
después de la instalación, a menos que el
aparato incorpore un interruptor conforme a 24.3.
La desconexión puede lograrse haciendo
accesible el enchufe o incorporando un
interruptor en el cableado fijo de acuerdo con las
reglas de cableado. Las instrucciones incluirán
información relativa a la instalación, la
manipulación, el mantenimiento y la eliminación
del electrodoméstico, y contendrán también la
siguiente información:
•No utilice cables de extensión ni adaptadores sin
conexión a tierra (de dos clavijas);
•Si el cable de alimentación está dañado, debe
sustituirlo el fabricante, su agente de
mantenimiento o personas cualificadas similares
para evitar riesgos.
•No almacene sustancias explosivas, como latas
de aerosol con un propulso inflamable, en este
aparato.
ADVERTENCIA
19
ADVERTENCIA
No utilice los dispositivos mecánicos u otros
medios para acelerar el proceso de
descongelación, con excepción de los
recomendados por el fabricante.
ADVERTENCIA
No utilice aparatos eléctricos dentro del
refrigerador de bebidas, a menos que sean
del tipo recomendado por el fabricante.
ADVERTENCIA
Riesgo de atrapamiento para niños. Antes de
descartar el refrigerador o congelador viejo:
• Retire las puertas.
• Deje los estantes colocados para que los niños
no puedan meterse fácilmente.
ADVERTENCIA
No dañe el circuito de refrigerante.
ADVERTENCIA
Mantenga todas las aberturas de
ventilación libres de obstrucciones en el
recinto del electrodoméstico y en el recinto
del gabinete.

20
•Cualquier trabajo eléctrico necesario para instalar
este aparato debe ser realizado por un electricista
cualificado o una persona competente.
Solo un centro de servicio autorizados debe realizar
el servicio de este producto y solo se pueden usar
piezas de recambio originales.
•Bajo ninguna circunstancia debe intentar reparar el
electrodoméstico usted mismo. Las reparaciones
llevadas a cabo por personas inexpertas pueden
causar daños o un peor funcionamiento. Consulte a
su Centro de Servicio local, e insista siempre en
obtener repuestos originales de Hisense.
•Este electrodoméstico contiene hidrocarburos en su
unidad de refrigeración; por lo tanto, el
mantenimiento y la recarga sólo deben ser
realizados por técnicos autorizados.
Servicio/ reparación
Este electrodoméstico emplea un refrigerante de
hidrocarburos del tipo R600a. Es peligroso que una
persona que no sea una persona de servicio
autorizada de servicio a este electrodoméstico.
Nota de servicio
•El gabinete de bebidas está diseñado para ser
usado específicamente para el almacenamiento
de bebidas carbonatadas solamente.
•El mejor rendimiento se puede obtener con una
temperatura ambiente de la siguiente manera:
La clase de su electrodoméstico se muestra en su
placa de características.
Nota Si la temperatura ambiente es más alta o más
baja que la indicada anteriormente, se verá
afectado el consumo de energía se verá.
• No coloque la bebida directamente contra la
pared trasera del compartimento.
• Se deben seguir estrictamente las
recomendaciones de almacenamiento del
fabricante del electrodoméstico. Consulte "Uso de su
electrodoméstico".
• El revestimiento interior del electrodoméstico tiene
canales por los que pasa el refrigerante. Si los
canales se perforan, la unidad podría dañarse sin
posibilidad de reparación.
Uso
Importante: Para la conexión eléctrica siga
cuidadosamente las instrucciones dadas en
párrafos específicos.
•Desembale el electrodoméstico y compruebe si
está dañado. No conecte el electrodoméstico si
está dañado. Informe de los posibles daños
inmediatamente al sitio dónde realizó la compra.
En este caso, conserve todos los materiales de
embalaje.
•Durante el funcionamiento normal, el compresor
y/o condensador de la parte trasera del
electrodoméstico se calienta considerablemente.
Por razones de seguridad, la ventilación mínima
debe ser la indicada en las instrucciones.
Instalación
•Hay que tener cuidado de que el
electrodoméstico no se apoye en el cable de
alimentación eléctrica.
Importante: si el cable de suministro está dañado,
debe ser reemplazado por un cable especial o por
un juego disponible del fabricante o su agente de
servicio.
•No utilice cables de extensión ni adaptadores sin
conexión a tierra (de dos clavijas).
•Si el electrodoméstico se transporta
horizontalmente, es posible que el aceite
contenido en el compresor fluya en el circuito de
refrigerante. Se aconseja esperar al menos dos
horas antes de conectar el electrodoméstico para
permitir que el aceite fluya hacia el compresor.
•Hay partes funcionales de este producto que se
calientan. Asegúrese siempre de que haya una
ventilación adecuada, ya que de lo contrario se
producirá un fallo de los componentes y una
posible pérdida. Vea las instrucciones de
instalación.
•Las piezas que se calientan no deben exponerse.
Siempre que sea posible, la parte trasera del
producto debe estar cerca de la pared.
Atención:
Mantenga los orificios de ventilación libres
de obstrucciones.
Rango de temperatura ambiente
+12,8℃ (55℉) a + 32℃ (90℉)
NO UTILICE INSTRUMENTOS AFILADOS para raspar la
congelación o el hielo. La congelación puede
eliminarse utilizando un raspador. Bajo ninguna
circunstancia se debe forzar el retiro de hielo sólido
del revestimiento. El hielo sólido debe descongelarse
descongelando el electrodoméstico.

ADVERTENCIA
No use detergentes o polvos abrasivos, ya
que dañarán el acabado.
Este electrodoméstico no contiene gases que
puedan dañar la capa de ozono, ni en su circuito
de refrigerante ni en los materiales de aislamiento.
El electrodoméstico no debe ser desechado junto
con la basura de la ciudad. La espuma aislante
contiene gases inflamables. El electrodoméstico
debe ser eliminado de acuerdo con las
regulaciones aplicables de su gobierno local. Evite
dañar la unidad de refrigeración, especialmente
en la parte posterior, cerca del intercambiador de
calor. Los materiales utilizados en este
electrodoméstico marcado con el símbolo son
reciclables.
1. El aparato requiere una fuente de alimentación
de 115 V/60 Hz de una fase. Tiene un cable
eléctrico con un enchufe de 3 clavijas y conexión
a tierra que minimiza la posibilidad de descargas
eléctricas. Este aparato debe tener conexión a
tierra. No quite la terminal a tierra ni modifique el
conector de alimentación.
2. No modifique el enchufe eléctrico. El enchufe
eléctrico debe ser accesible cuando el aparato
esté instalado.
3. El aparato no debe apagarse con un interruptor
u otro dispositivo.
4. Compruebe que el enchufe eléctrico no esté
aplastado ni dañado. De lo contrario, podría
provocar un cortocircuito, una descarga eléctrica
o sobrecalentamiento e incluso originar un
incendio.
5. No inserte el enchufe eléctrico si la toma está
suelta, existe riesgo de descarga eléctrica o
incendio.
6. Apague el aparato y desconéctelo de la red
eléctrica antes de limpiarlo o trasladarlo.
7. Nunca desenchufe el aparato estirando del
cable eléctrico. Agarre siempre el enchufe con
firmeza y extráigalo de la toma para evitar dañar
el cable eléctrico.
8. No utilice el aparato sin una cubierta de
iluminación interior.
9. Cualquier componente eléctrico debe ser
sustituido o reparado por un electricista
cualificado o un técnico de servicio autorizado por
Hisense. Solo deben utilizarse piezas de sustitución
originales.
10. Para evitar lesiones oculares, no mire directa-
mente
a la luz LED situada en el compartimento
del refrigerador. Si no funciona correctamente,
consulte a un electricista cualificado y registrado o
sustitúyala de acuerdo con el capítulo "limpieza y
cuidado".
Conexión eléctrica
El símbolo es una advertencia e indica que el
refrigerante y el aislante que sopla gas son
inflamables.
El refrigerante isobutano (R600a) se encuentra
dentro del circuito refrigerante del
electrodoméstico. Asegúrese de que ningún
componente del circuito refrigerante se haya
dañado durante el traslado y la instalación del
electrodoméstico.
Refrigerante
Protección del Medio Ambiente
Limpieza del interior
Antes de usar el aparato por primera vez, lave el
interior y todos los accesorios internos con agua
tibia y un poco de jabón neutro para eliminar el
olor típico de un producto nuevo, y luego séquelo
de forma natural y completa.
Uso
ADVERTENCIA
Riesgo de incendio/materiales inflamables
21

¡Precaución! Cualquier trabajo eléctrico
necesario para instalar este electrodoméstico
debe ser realizado por una persona calificada o
un técnico de servicio autorizado.
Antes de utilizar el aparato por primera vez, debe
leer los siguientes consejos.
Por esta razón, se debe dejar suficiente espacio
libre alrededor del refrigerador.
Recomendación: Es aconsejable que haya por lo
menos 1/2 pulgada de espacio desde la parte
posterior hasta la pared, por lo menos 1/2 pulgada
desde su parte superior y por lo menos 1/4 de
pulgada desde su lado hasta la pared. Como se
muestra en los siguientes diagramas.
•Coloque el electrodoméstico en un lugar seco
para evitar daños por la humedad.
Nota:
•Evite ubicar el aparato en áreas húmedas.
Demasiada humedad en el aire hará que se forme
rápidamente una capa de congelación en el
evaporador.
• Mantenga el electrodoméstico lejos de la luz
solar, la lluvia o la escarcha. Coloque el producto
lejos de fuentes de calor como estufas, fuegos o
calentadores.
22
Instalar el aparato nuevo
VENTILACIÓN DEL APARATO
Para mejorar la eficiencia del sistema de
refrigeración y ahorrar energía, es necesario
mantener una buena ventilación alrededor del
electrodoméstico para permitir la disipación del
calor.
El electrodoméstico debe estar nivelado para
eliminar la vibración. Le recomendamos que nivele
el electrodoméstico siguiendo los siguientes pasos.
1. Ponga el electrodoméstico en el lugar correcto.
2. Gire los pies ajustables (con los dedos o un
destornillador adecuado) hasta que toquen el
suelo.
3. Tilt back the top backwards for about 10-15mm
or 1° by turn the adjustable feet. Esto permitirá que
las puertas se cierun sellado consistente.ren por sí
solas, proporcionando un sellado consistente.
Estabilización del aparato
Conexión eléctrica
ADVERTENCIA
Este aparato debe tener conexión a tierra.
El fabricante declina toda responsabilidad
si no se observan estas medidas de
seguridad.
Patas de Gabinete
Patas de Gabinete
23.6in
23.4in
33.9in
45.8in
≥1/2in
≥1/2in
≥1/4in
≥1/4in

Nota:
•El electrodoméstico puede guardar 140 latas al mismo tiempo, por favor coloque las latas
como se muestra arriba.
•Las capacidades de las latas mencionadas en este manual se basan en las latas estándar de
12 onzas y en las estanterías estándar.
•Cuando el gabinete de bebidas tiene demasiadas bebidas a la vez, y la alarma detemperatura
interna es normal. No se preocupe.
•Para que toda la bebida se enfríe más rápido y homogéneamente, se sugiere que no se acumulen
demasiadas bebidas en la salida del ventilador.
Descripción del electrodoméstico
Equipado con estantes de metall
Descripción del aparato
23
1
2
3
4
5
6
Panel de control
Luz LED
Estantes
Patas de Gabinete
Puerta
Manilla
1
2
3
4
5
6

Controles de la pantalla
El panel de control, que se muestra arriba, está en
la parte superior de la cámara frigorífica.
•Cada vez que se enciende el electrodoméstico,
la pantalla se iluminará toda durante 3 segundos,
emitirá un pitido durante 1 segundo y luego
entrará en el estado de visualización normal.
•Los iconos siempre están iluminados (hasta que la
pantalla se activa).
•La pantalla activará el protector de pantalla si no
se toca ningún botón y no abre o cierra la puerta
durante 60 segundos con la pantalla encendida.
•Cualquier acción de pulsar un botón o abrir una
puerta saldrá del protector de pantalla.
•Presione la tecla en el estado de protector de
pantalla. Activar sólo el protector de pantalla. No
cambie los ajustes.
•Cada pulsación válida de un botón emite un
sonido corto.
•El ajuste de temperatura correspondiente se
refleja en la pantalla, y el ajuste surte efecto y se
almacena después de 10 segundos de
funcionamiento sin pulsar la tecla.
Pantalla
Cuando no piense utilizar este aparato durante un
período de tiempo, puede ahorrar energía
entrando en el estado de espera.
•Para entrar en el modo de espera, mantenga uto.
pulsada la tecla de espera durante más de 3
segundos. El zumbador sonará y la pantalla
mostrará "OF". La pantalla estará "OFF" (apagada)
sólo un minuto, y la pantalla se apagará después
de un minuto.
•Para salir del modo de espera, mantenga
pulsada la tecla de espera durante más de 3
segundos. El timbre sonará.
NOTA: En el modo de espera, el enfriamiento se
detendrá. Si no utiliza el electrodoméstico durante
mucho tiempo, saque la bebida y desenchufe el
aparato.
Modo de espera
Puede cambiar el ajuste de la pantalla de
temperatura de grados Fahrenheit a grados
Celsius pulsando las marcas y viceversa.
Cambio en la medición de la
temperatura (°F / °C)
Puede ajustar la temperatura que desee
presionando los botones “ ” o “ ” . Al presionar
el botón por primera vez, la lectura del LED
mostrará la temperatura previamente ajustada. La
temperatura aumentará 1°C o 1°F cada vez que
presione el botón SUBIR, y disminuirá 1°F o 1°F cada
vez que presione el botón BAJAR.
NOTA:
•El electrodoméstico no funciona correctamente si
la temperatura fijada es superior a la temperatura
ambiente.
• El rango de temperatura es de 1°C (34°F) a
10°C (50°F).
•La temperatura preestablecida en la fábrica es
de 4°C (39°F).
•Al ajustar una temperatura, se ajusta la
temperatura media de todo el armario. Puede
haber una variación de 2°C a 3°C entre la repisa
superior y la repisa inferior del electrodoméstico.
•La primera vez que se llene el producto con
bebidas, la temperatura de las bebidas
necesitará un tiempo más largo para fijar la
temperatura, que es de unas 20 horas, por favor
espere pacientemente.
Regulación de temperatura
Puede encender o apagar la luz interior pulsando
este botón. Después de cerrar la puerta durante 10
segundos, la luz se apagará automáticamente,
para que la bebida no esté expuesta a la luz
durante demasiado tiempo.
"Tecla de encendido/apagado de la luz"
A
B
C
D
E
F
G
Tecla de suspensión
Tecla de cambio °F y °C
Tecla de suspensión
Indicador de temperatura
Tecla de cancelar la alarma
Tecla de control de
temperatura -Bajar
Tecla de control de
temperatura - Aumentar
24

25
Para evitar un problema de temperatura que pueda
afectar a la calidad de las bebidas, el aparato tiene
una función de alarma de alta temperatura.
Cuando se produzca una alarma por exceso de
temperatura, cancele la alarma pulsando la tecla
Cancelar Alarma y saque el bebidas, y póngase en
contacto con el servicio de atención al cliente.
NOTA:
En el estado de alarma de exceso de temperatura,
presione la tecla Cancelar Alarma para salir de la
alarma de exceso de temperatura, el tono de la
alarma se detendrá y la luz " " cambiará de
parpadeante a constante, una vez que el
electrodoméstico se enfríe a la temperatura
requerida.
Alarma de sobre temperatura
La alarma de la puerta sonará una vez que la puerta
de la nevera esté abierta más de 2 minutos. En caso
de alarma de la puerta, el zumbador sonará 3 veces
por minuto y se detendrá automáticamente 8
minutos después. Cerrar la puerta también
desactivará la alarma de la puerta.
Para ahorrar energía, no mantenga la puerta
abierta durante mucho tiempo cuando use el
refrigerador de bebidas.
Alarma de la puerta
ADVERTENCIA
Si la luz LED está rota, por favor ¡NO LA
CAMBIE USTED MISMO! Cambiar la luz usted
mismo puede causar daños o un mal
funcionamiento grave. Debe ser
reemplazado por un técnico de servicio
calificado para evitar un peligro. Póngase
en contacto con su centro de servicio local
para obtener ayuda. Antes de cambiar la
luz LED, apague el aparato y desenchúfelo
o gire el fusible o el interruptor.

ADVERTENCIA
•Para evitar que las latas rueden y se
rompan, no debe haber más de 14 latas
colocadas en el fondo de la cámara
frigorífica como se muestra arriba.
•La carga máxima de cada tipo de
estante es de 33 libras.
26
Esta sección explica cómo utilizar la mayoría de funciones útiles. Se recomienda leerla detenidamente
antes de utilizar el aparato.
Uso de su electrodoméstico
Instalación de la manija
El electrodoméstico está equipado con 3
estantes con 42 ranuras cada uno. Las latas
deben colocarse en los estantes como se
muestra a continuación.
También puede colocar las latas en el fondo del
gabinete.
Colocación de las botellas
Herramientas que necesitarás
Destornillador Philips
No suministrado
junta de la
puerta
2. Encuentre la manilla y los tornillos en el paquete
de accesorios.
3. Fije el tornillo con un destornillador magnético
para que pase por el agujero del tornillo en el
cuerpo de la puerta hasta el fondo. Mantenga
una cierta cantidad de presión y no la suelte.
4. Una mano sostiene la manija para que el aguje-
ro de la manija esté alineado con el tornillo, y la
otra mano gira el destornillador.
Antes de usar el dispositivo, instale la manilla de la
siguiente manera:
1. Primero abra la puerta y saque la junta de la
puerta por un lado del lado no abisagrado.
5. Instale otro tornillo de la misma manera.
Piezas que necesitarás
Manilla (proporcionado)
1
Tornillo (proporcionado)
2
Tornillo
Manilla

27
Cubierta del
orificio del
tornillo(izquie
rdo)
bisagra superior
de la derecha
(tornillo)
tornillos de brida
especial
puerta
rejilla
2. Mueva la puerta desde la bisagra levantando con
cuidado la puerta hacia arriba.
Nota: Al retirar la puerta, observe si hay arandelas
entre la bisagra y la parte inferior de la puerta
superior que puedan adherirse a la puerta. No
pierda estas arandelas.
3. Desenrosque los tornillos de fijación de la tapa de
la rejilla, luego levántela y tire hacia atrás, saque la
tapa de la rejilla del gabinete.
Nota: Cuide los tornillos. Registre el lugar donde
coloco el tornillo y la cantidad.
2 tornillos aquí
Es posible cambiar el lado en el que se abre la
puerta, desde el lado derecho (como se suministra)
al lado izquierdo, si fuera necesario.
Cambio del lado en el que se abre la puerta
Herramientas que necesitará (no incluidas):
Nota: Si es necesario, usted puede inclinar el
refrigerador para obtener acceso a la base;
debería colocarlo sobre una espuma suave o un
material similar para evitar dañar el tablero del
refrigerador. Para cambiar el lado en el que se
abre la puerta, se recomiendan generalmente los
siguientes pasos.
1. Ponga el refrigerador de bebidas en posición
vertical, cierre la puerta, utilice una espátula o un
destornillador de hoja fina para quitar la tapa del
orificio del tornillo que está en la esquina superior
izquierda del enfriador, y desatornille los tornillos
especiales de la bisagra superior derecha con un
destornillador de 8 mm o una llave inglesa (por
favor, apoye la puerta superior con la mano
cuando lo haga).
WARNING
Al invertir la puerta, el aparato no debe
estar conectado a la.
Asegúrate de que el enchufe esté
desenchufado de la toma de corriente.
No suministrado
Llave de tubo de 8 mm
Destornillador Phillips
Destornillador plano
Llave ajustable Llave de 8 mm
Piezas que necesitará (incluida)
Bisagra inferior izquierda
Tapa del orificio del
tornillo (derecha)
Parte superior del agujero
del eje izquierdo
1 1 1
Espátula
4. Desenrosque los tornillos de la bisagra inferior
derecha como los tornillos de la bisagra inferior
izquierda.
Note: Guarde la bisagra para usarla en el futuro.
Bisagra inferior
izquierda
Bisagra inferior
derecha (como
se suministra)
tornillos de la
bisagra inferior
derecha

28
WARNING
Cuando se deshaga de su
electrodoméstico, utilice un lugar de
desecho aprobado. Retire el enchufe y
asegúrese de retirar cualquier cerradura o
cierre para evitar que los niños pequeños
queden atrapados en el interior.
8. Gire la puerta 180 grados, ponga la puerta en el
gabinete usando la bisagra y los tornillos, en la
parte superior izquierda. Use la tapa de los
orificios de los tornillos (derecha) para ocultar los
orificios de la parte superior derecha del
gabinete de bebidas.
Parte superior del
agujero del eje
izquierdo
Parte superior del agujero
del eje derecho
(como se suministra)
Cubierta del agujero
de tornillo (derecha)
Cubierta del agujero
de tornillo (izquierda)
1
3
2
4
la pieza de refuerzo y
el casquillo y tornillos
imán y soporte
de imán
5. Voltee la tapa de la rejilla de izquierda a
derecha como se indica a continuación:
1) Sáquelo de la ranura del lado izquierdo.
2) Gírelo 180 grados.
3) Póngalo en la ranura del lado derecho.
6. Vuelva a colocar la tapa de la rejilla en
gabinete de bebidas como se muestra a
continuación.
7. Cambie las partes del agujero del eje de la
siguiente manera:
1) Saque la parte superior del eje derecho con un
cuchillo o un destornillador de hoja fina.
2) Gire la puerta 180 grados, de cara a la parte
inferior de la puerta y retire la pieza de refuerzo y el
soporte del imán con el destornillador.
3) Ponga la parte superior del eje izquierdo en el
agujero de la puerta.
4) Gire la puerta 180 grados, vuelva a colocar la
pieza de refuerzo y el soporte del imán con los
mismos tornillos.
Nota: Maneja la puerta con cuidado. Es frágil.
tapa de
la rejilla
rejilla
Cubierta del agujero
de tornillo (derecha)
bisagra superior
de la derecha y
tornillo

Para mantener un buen aspecto del aparato, debe
limpiarlo periódicamente.
• Rocíe agua en el trapo de limpieza en lugar de
rociarla directamente en la superficie del aparato.
Esto ayudará a distribuir la humedad de manera
uniforme por la superficie.
•Limpie la puerta con un detergente suave y luego
séquela con un paño suave.
Limpieza exterior
29
Por razones de higiene, el electrodoméstico
(incluidos los accesorios exteriores e interiores)
debe limpiarse regularmente.
Limpieza y cuidado
Para limpiar el enfriador de bebidas, debes seguir
estos pasos:
-Desconecte el aparato y retire las latas.
-Lave el interior con una solución de agua caliente
y bicarbonato de sodio. La solución debe ser de
unas 2 cucharadas de bicarbonato de sodio por 4
tazas de agua.
-Lave los estantes con una solución de detergente
suave.
-También puede ser necesario limpiar
periódicamente la parte inferior del área de
almacenamiento, ya que el enfriador de bebidas
está diseñado para retener la humedad, y la
condensación puede acumularse allí.
Limpieza del enfriador de bebidas
ADVERTENCIA
Antes de limpiarlo, el electrodoméstico
debe ser apagado y desenchufado. ¡Existe
peligro de descarga eléctrica!
PRECAUCIÓN
• No utilice objetos filosos ya que pueden
rayar la superficie.
• No utilice diluyente, detergente para
autos, "Clorox", aceites, limpiadores
abrasivos o solventes orgánicos, como por
ejemplo benceno, para realizar la limpieza.
Podrían dañar la superficie del aparato y
provocar un incendio.

30
Si experimenta algún problema con el aparato o le preocupa que no funcione correctamente, puede
realizar estas sencillas comprobaciones antes de llamar al servicio técnico.
Solución de problemas
ADVERTENCIA
No intente reparar el aparato usted mismo. Si el problema persiste después de haber realizado las
comprobaciones que se mencionan a continuación, póngase en contacto con un electricista
cualificado, con un técnico de servicio autorizado o con la tienda donde compró el producto.
Mal funcionamiento Posible causa Remedio
La bebida está
demasiado caliente.
La temperatura no se ha ajustado adecuadamente.
La puerta estuvo abierta durante un periodo largo.
El aparato está cerca de una fuente de calor.
Esto es normal, no ha ocurrido ningún error.
La temperatura ajustada es más alta que la
temperatura ambiente.
El agujero de drenaje de agua está bloqueado.
Ruidos anormales.
Agua en el suelo.
Mucha acumulación
de escarcha,
posiblemente también
en el burlete de la
puerta.
El compresor no se
enciende
automáticamente
después de cambiar el
ajuste de temperatura.
El sello de la puerta no es hermético
(posiblemente después de cambiar las bisagras).
El aparato no está nivelado.
El aparato toca la pared u otros objetos.
Un componente, p. ej. una tubería, de la parte trasera
del aparato toca otra pieza del aparato o la pared.
Por favor, mire en la sección
"Controles de pantalla".
Abra la puerta solo durante el tiempo
necesario.
Por favor, consulte la sección "
Instalación de su nuevo
electrodoméstico".
Caliente cuidadosamente las
secciones con fugas del sello de la
puerta con un secador de pelo (no
más de aprox. 50°C) .
Simultáneamente, dé forma con la
mano al sello de puerta calentado
para que se ajuste correctamente.
Por favor, consulte la sección
"Limpieza y cuidado".
Reajuste las bases.
Mueva ligeramente el aparato.
Si es necesario, doble el componente
cuidadosamente para que no le
estorbe.
El compresor se encenderá al cabo
de un rato.
Ajuste la temperatura más baja que
la temperatura ambiente como
desee.

Los materiales de embalaje con el símbolo de reciclaje son reciclables. Arroje el embalaje al contenedor
de recogida de residuos adecuado para reciclarlo.
Material de embalaje
1. Saque el cable de alimentación de la toma de corriente.
2. Corte el cable de alimentación y deséchelo.
Antes de eliminar el aparato
Está prohibido eliminar este aparato con los residuos domésticos. Por favor, consulte con su gobierno local
para los procedimientos de eliminación adecuados.
HBC54D6AS: 115V, 60Hz, R600a ;
HISENSE RONSHEN(GUANGDONG) FREEZER CO.,LTD.
Nº 46 AL NORTE DE LA CARRETERA DE WENFENG EN LA ALDEA DE RONGLI, SHUNDE.
DISTRITO, CIUDAD DE FOSHAN
Eliminación del aparato
ADVERTENCIA
Los refrigeradores contienen refrigerante y gases en el aislamiento. El refrigerador y los gases tienen
que ser desechados de manera profesional ya que pueden causar lesiones a los ojos o la ignición.
Asegúrese de que la tubería del circuito de refrigerante no esté dañada antes de su desecho
adecuado.
Este símbolo en el producto o en su embalaje indica que no se debe tratar como residuos
domésticos. En su lugar, se debe llevar al punto de recogida de residuos adecuados para
reciclar el equipo eléctrico y electrónico. Al asegurarse de que este producto se elimina
correctamente, ayudará a prevenir las consecuencias negativas potenciales para el
entorno y la salud humana, que de lo contrario podrían ser causadas por la manipulación
inadecuada de los residuos de este producto. Para más información detallada acerca del
reciclaje de este producto, póngase en contacto con el servicio de eliminación de residuos
domésticos de su ayuntamiento o con la tienda donde compró el producto.
31
Eliminación correcta del producto

Declaración de Copyright © 2019 Hisense Company Ltd. Todos los derechos reservados.
Todo el material de este Manual de Operaciones del Usuario es propiedad de Hisense Company Ltd. y sus
subsidiarias, y está protegido por las leyes de derechos de autor y/u otras leyes de propiedad intelectual
de EE.UU., CANADÁ y MÉXICO. La reproducción o transmisión de los materiales, en su totalidad o en parte,
de cualquier manera, electrónica, impresa o de otro modo, sin el consentimiento previo por escrito de
Hisense Company Ltd. es una violación de los derechos de Hisense Company Ltd. en virtud de las leyes
mencionadas.
Ninguna parte de esta publicación puede ser almacenada, reproducida, transmitida o distribuida, en su
totalidad o en parte, de ninguna manera, electrónica o de otro modo, ya sea o no por un cargo u otra o
ninguna consideración, sin el permiso previo por escrito de Hisense Company Ltd.
Las solicitudes de autorización para almacenar, reproducir, transmitir o distribuir materiales pueden
hacerse a una de las siguientes direcciones:
USA: Hisense USA Corporation
7310 McGinnis Ferry Road
Suwanee, GA 30024
CANADA: Hisense Canada Co., Ltd.
2283 Argentia Road, Unit 16
Mississauga, ON, Canada
L5N 5Z2
MEXICO: Hisense Mexico S. de R.L. de C.V
Blvd. Miguel de Cervantes Saavedra No 301
Torre Norte Piso 2, Col. Ampliación Granda
Miguel Hidalgo, Ciudad de México, C.P. 11520
Hisense y todos los demás nombres de productos, logotipos, eslóganes o marcas de Hisense
son marcas registradas de Hisense Company Ltd. y sus filiales. Todas las demás marcas comerciales
son propiedad de sus respectivos titulares.
Tenga en cuenta que la imagen que se muestra aquí es sólo indicativa. Si hay alguna inconsistencia
entre la imagen y el producto real, el producto real gobernará.
32


-
 1
1
-
 2
2
-
 3
3
-
 4
4
-
 5
5
-
 6
6
-
 7
7
-
 8
8
-
 9
9
-
 10
10
-
 11
11
-
 12
12
-
 13
13
-
 14
14
-
 15
15
-
 16
16
-
 17
17
-
 18
18
-
 19
19
-
 20
20
-
 21
21
-
 22
22
-
 23
23
-
 24
24
-
 25
25
-
 26
26
-
 27
27
-
 28
28
-
 29
29
-
 30
30
-
 31
31
-
 32
32
-
 33
33
-
 34
34


en otros idiomas
- English: Hisense HBC54D6AS User manual
Artículos relacionados
Otros documentos
-
Frigidaire FFBC4622QS Guía del usuario
-
CORBERO CFMMB430BLGL Manual de usuario
-
Magic Chef HMWC50ST El manual del propietario
-
GE CCP06BP2PS1 El manual del propietario
-
Danby DBC434A1BSSDD El manual del propietario
-
Avanti BCF54S3S Guía del usuario
-
 Continental Electric CE23751 Manual de usuario
-
 Continental Electric CE23751 Manual de usuario

