COMFEE' MB-M25 Manual de usuario
- Categoría
- Pequeños electrodomésticos de cocina
- Tipo
- Manual de usuario

RICE COOKER
Instruction
Manual
Model: MB-M25
Please read the manual before operating
your rice cooker. Retain it for future reference.
Free 3 months
extension
of the
original limited warranty
period!* Simply text a
picture of your proof of
purchase to:
1-844-224-1614
*The warranty extension is for the
three months immediately following
the completion of the product’s
original warranty period.

2
TABLE OF CONTENTS
SAFETY PRECAUTIONS ...............................................3
Important Safety Instructions ....................................4
PRODUCT FEATURES ..................................................6
INSTALLATION INSTRUCTIONS ..................................7
Unpacking .................................................................7
Electrical Requirements ............................................7
Location Requirements .............................................8
OPERATING INSTRUCTIONS .......................................9
Controls ....................................................................9
Using the Rice Cooker ............................................ 11
RECIPES ......................................................................21
Sweet Rice..............................................................21
Hungarian Goulash .................................................22
Potato and Leek Soup ............................................23
Vegetable Stock ......................................................24
Oatmeal with Homemade Granola .........................25
Chicken Pho ...........................................................26
Shrimp Risotto ........................................................27
Bean Dip .................................................................28
CARE AND CLEANING ...............................................29
TROUBLESHOOTING..................................................32
WARRANTY .................................................................35

3
SAFETY PRECAUTIONS
To prevent injury to the user or other people and property damage, the following instructions must be followed. Incorrect operation
due to ignoring of instructions may cause harm or damage. The level of risk is shown by the following indications.
CAUTION
WARNINGWARNING
This symbol indicates the possibility of injury or damage to property.
This symbol indicates the possibility of death or serious injury.

IMPORTANT SAFETY INSTRUCTIONS
When using electrical appliances, basic safety precautions should always be followed including the following:
WARNING
•
Read all instructions before use.
•
Do not touch hot surfaces. Use potholders or oven mitts
when handling the cooking bowl or lid.
•
To avoid electrical shock do not immerse cord, plugs, or
the rice cooker housing in water or other liquid.
•
This appliance is not intended for use by persons
(including children) with reduced physical, sensory or
mental capabilities, or lack of experience and knowledge,
unless they have been given supervision or instruction
concerning the use of the appliance by a person
responsible for their safety.
•
Close supervision is necessary when any appliance is
used by or near children.
•
Keep appliance and cord away from children.
•
Unplug from electrical outlet when not in use and before
cleaning.
•
Allow appliance to cool before putting on or taking off
parts.
•
Read all instructions before use.
•
Do not touch hot surfaces. Use potholders or oven mitts
when handling the cooking bowl or lid.
•
To avoid electrical shock do not immerse cord, plugs, or
the rice cooker housing in water or other liquid.
4
WARNING
•
Do not operate any appliance with a damaged cord or
plug or after the appliance malfunctions or has been
damaged in any manner. Return appliance to the nearest
Authorized Service Center for examination, repair, or
adjustment.
•
Do not disassemble, repair or modify the rice cooker. For
any repair, consult a Comfee authorized Service Center.
•
Do not operate the rice cooker if any part of the unit is
damaged.
•
Spilled food can cause serious burns. Extreme caution
must be used when moving an appliance containing hot
liquids or hot oil.
•
Do not use appliance for other than intended use.
•
into a wall outlet.
•
A short power cord is used to reduce the risk resulting
from the cord being grabbed by children, or becoming
entangled in or tripping over a longer cord.

WARNING
•
•
Do not place on or near a hot gas or electric burner, or in
a heated oven.
•
Do not place near heat-sensitive curtains.
The total amount of food and water should NOT exceed
the MAX level marked on the cooking pot. Some foods
cooking pot over half way.
•
Ensure that the outside of the cooking pot is dry prior to
use. A wet pot may damage the cooker and cause it to
malfunction.
•
Do not touch, cover or obstruct the steam vent on the top
of the rice cooker as it is extremely hot and may cause
scalding.
5
CAUTION
To reduce the risk of Electric Shock, cook only in removable container.
SAVE THESE INSTRUCTIONS
THIS PRODUCT IS DESIGNED FOR HOUSEHOLD USE ONLY.
KEEP APPLIANCE AWAY FROM CHILDREN.
•
Do not use outdoors. Intended for indoor household use
only.
•
Do not let cord hang over edge of countertop, or touch hot
surfaces, including the top of the rice cooker. Never use
outlet below countertop, and never use with an extension
cord.
•
To disconnect, set all controls to “Off,” then remove plug
from wall outlet.
•
The use of accessory attachments not recommended by
Comfee may cause injuries.

6
PRODUCT FEATURES
Quick Rice
White Rice
Brown Rice
Chili
Pasta
Oatmeal
Soup
Stew
Slow Cook
Sauté
Steam
DIY
a
b
d
e
f
g
c
a Lid Release Button
b Lid
c Handle
d Steam Vent
e Condensation
Collector
f Digital Display
g Control Panel
ACCESSORIES
Serving Spatula Rice Measure
Steamer Basket Cooking Pot
SPECIFICATIONS
Power requirements 120 V ~ 60 Hz
Rated power 650W

7
INSTALLATION INSTRUCTIONS
Unpacking
Remove all packing materials.
Wash the cooking pot, steam vent and other accessories, and
then dry thoroughly before using.
NOTE: The cooking pot is dishwasher safe.
Electrical Requirements
WARNING - ELECTRICAL SHOCK HAZARD
•
Plug into a grounded 3 prong outlet.
•
Do not remove the ground prong from the power cord
plug.
•
Do not use an adapter.
•
Do not use an extension cord.
)DLOXUHWRGRVRFDQUHVXOWLQGHDWK¿UHRUHOHFWULFDOVKRFN
A 120 V, grounded electrical supply is required. It is
recommended that a separate circuit serving only the
rice cooker is used. Sharing the power supply with other
appliances will result in overheating.
Power Supply Cord
NOTE: This Rice Cooker has a 3-prong grounded plug.
7RUHGXFHWKHULVNRIHOHFWULFDOVKRFNWKHSOXJZLOO¿WLQWR
DQRXWOHWRQO\RQHZD\,IWKHSOXJGRHVQRW¿WLQWKHRXWOHW
FRQWDFWDTXDOL¿HGHOHFWULFLDQ'RQRWPRGLI\WKHSOXJ
A short power supply cord is used to reduce the risks of
becoming entangled in, or tripping over a longer cord, or of
the cord being grabbed by children.
,IWKHSRZHUVXSSO\FRUGLVWRRVKRUWKDYHDTXDOL¿HG
electrician or technician install an outlet near the appliance.
Do NOT use an extension cord.

8
Location Requirements
This rice cooker is designed for household use only; the
cooker should not be used for commercial use.
Use indoors on a stable, level, non-heat sensitive surface
such as a countertop in a location where the lid can be fully
opened; do NOT use outdoors.
Do not place the rice cooker on an area of the countertop that
is exposed to direct sunlight, or where it might be splashed
with cooking oil.
RECOMMENDED CLEARANCE
Steam and heat emitted from the rice cooker may damage or
discolor nearby walls or cabinets. It is recommended that the
rice cooker be placed a minimum distance of 12” (30.5 cm)
from walls or cabinets.
a
a At least 12"
(30.5 cm)

9
OPERATING INSTRUCTIONS
WARNING - FIRE/BURN HAZARD
Unplug immediately and do not use rice cooker if:
•
The power supply cord becomes abnormally hot during
use.
•
Smoke is emitted from the rice cooker or a burning odor
is detected.
•
The rice cooker is cracked or there are loose or rattling
parts.
•
The cooking pot, outer lid or inner lid is broken or
deformed.
)DLOXUHWRGRVRPD\UHVXOWLQ¿UHHOHFWULFVKRFNRULQMXU\
Controls
IMPORTANT: To select a cooking
SURJUDPWKHULFHFRRNHUPXVW¿UVW
be plugged into a grounded 3 prong
electrical outlet (ON).
NOTE: The rice cooker is powered ON,
but in standby mode (no heat).
COOKER CONTROLS
Stop/Keep Warm
Press the Stop/Keep Warm button to stop the
cooking process and to keep cooked food warm.
ON/OFF/START
Press the ON/OFF/START button to turn the
cooker on or off and to start the cooking process.
Delay Timer
Press the Delay Timer button to delay the start
of the cooking process for up to 24 hours. Use
the + and - buttons to adjust the length of time.
Decrease Time or Temp
Use the - button to subtract time or to raise or
lower the temperature.
Increase Time or Temp
Use the + button to add time or to raise the
temperature.
Temp
Press the Temp button to adjust the
temperature. Use the + and - buttons to raise or
lower the temperature.
Time
Press the Time button to adjust the cooking
times. Use the + and - buttons to add or subtract
time.

10
Digital Display
COOKING PROGRAMS
CONTROLS
The cooking programs set the
rice cooker time and temperature
automatically for the dish selected.
Quick Rice
The Quick Rice setting cooks white rice in a
shorter amount of time. It can also be used to
add cooking time at the end of a cycle.
White Rice
The White Rice setting cooks white and short
grained rice.
Brown Rice
The Brown Rice setting provides a longer
cooking time for brown and long grained rices.
Oatmeal
The Oatmeal setting cooks traditional rolled
oats and other varieties of oatmeal that need a
long slow cook time. Use with the delay timer to
have oatmeal ready to eat for breakfast.
Chili
The Chili setting cooks a pot of chili quickly and
easily.
Pasta
The Pasta setting cooks pasta quickly and
easily without having to use the stove.
Soup
The Soup setting provides a low temperature
simmer for soups.
Stew
The Stew setting provides a long slow simmer
for stews and other dishes that require a long
cooking time.
Slow Cook
The Slow Cook setting for dishes that require a
longer, slower cooking.
Sauté
The Sauté setting provides a high temperature
to quickly cook vegetables and brown meat.
Both the time and the temperature can be
adjusted.
Quick Rice
White Rice
Brown Rice
Chili
Pasta
Oatmeal
Soup
Stew
Slow Cook
Sauté
Steam
DIY

11
Steam
The Steam setting quickly steams foods. For
best results use with the provided steamer
accessory.
DIY
Use the DIY (Do It Yourself) program to create
a custom cooking time and temperature.
Using the Rice Cooker
INTRODUCTION
The Comfee
®
Rice Cooker provides 12 different digital
cooking programs to cook a variety of meals. There are three
rice programs that automatically adjust the time and cooking
temperature for the type and amount of rice added for perfect
results. Other cooking programs provide a suggested time
that can be adjusted as needed.
IMPORTANT:
•
Do NOT place anything on or over the rice cooker lid,
during use.
•
Do NOT touch the steam vent during cooking.
•
Do NOT place the interior cooking pot on a cooktop
burner; the high temperature will warp the pot. The
cooking pot is designed to be used only in the rice cooker.
•
Do not use a pot or container other than the cooking pot
(provided) in the rice cooker.
•
Do not insert any foreign objects into the air vent or gaps
at the bottom of the rice cooker.
•
Do not use metal cooking utensils. Metal utensils may
scratch or damage the non-stick coating.
MEASURING RICE
IMPORTANT: The total amount of rice and water should NOT
exceed the 6 cup MAX level marked inside the cooking pot.
NOTE: 7KH5LFH0HDVXUHLVVLJQL¿FDQWO\VPDOOHUWKDQWKH
standard U.S. cup measure.
•
To achieve the correct ratio of rice to water, use ONLY the
Rice Measure (cup provided).
•
Level the rice in the Rice Measure cup so that it is even
with the top.
•
)RUVRIWHURU¿UPHUULFHDGMXVWWKHUDWLRRIZDWHUWRULFH
accordingly.
•
If the rice requires rinsing before cooking, measure the
rice before you rinse it, Follow the rinsing directions for
WKDWVSHFL¿FW\SHRIULFH
RINSING RICE
Some types of rice are rinse-free and other types require
rinsing before use to remove excess starch which may make
the rice sticky. Also, cooking rice with starchy water may result
in the rice burning or being improperly cooked.
If the water should turn white or cloudy, when added to
rinse-free rice, drain and replace the water before cooking.
Many recipes recommend rinsing quickly so the rice does not
absorb water prior to cooking.
To Rinse Rice Quickly:
1. Place a colander inside a larger bowl.
2. Place the rice in the colander and rinse under cool running
water.

12
NOTE: Rinsing rice in hot water may prevent the rice from
cooking properly.
3. Using your hand stir the rice around 3 to 4 times to
separate the grains.
4. Continue to rinse until the water in the bowl is clear.
ADDING OTHER INGREDIENTS
If you wish to add other ingredients or seasonings to the rice,
do so after adding the water. The rice will not cook properly
DQGEHWRR¿UPLILQJUHGLHQWVDUHDGGHGEHIRUHWKHZDWHU
COOKING RICE
WARNING - ELECTRICAL SHOCK HAZARD
•
Plug into a grounded 3 prong outlet.
•
Do not remove the ground prong from the power cord
plug.
•
Do not use an adapter.
•
Do not use an extension cord.
)DLOXUHWRGRVRFDQUHVXOWLQGHDWK¿UHRUHOHFWULFDOVKRFN
NOTE: Cooking time will vary depending on the type of rice or
grain being cooked.
1. %HIRUHXVLQJIRUWKH¿UVWWLPHZDVKWKHFRRNLQJSRWVWHDP
vent, other accessories and attachments, and then dry
each thoroughly.
NOTE: The cooking pot is dishwasher safe.
2. Measure rice, and then rinse rice, if needed.
3. Add measured rice to the cooking pot.
4. Add water until it reaches the corresponding numbered
Water Line marked on the interior of the cooking pot. For
example, when cooking 3 measures of white rice, add
water to second line from the bottom of the pot.
To suit your personal preference, the amount of liquid
can be adjusted slightly (no more than
ПШЗ of the distance
between the lines).
Add Rice First
Water Line
2 2
4 4
8 8
6 6
10 10
5. Stir the rice into the water, so that each grain is immersed
in the water.
6. Place the cooking pot into the rice cooker.

13
7. Rotate the pot two to three times to ensure a solid contact
between the bottom of the cooking pot and the heating
plate.
a
a Cooking Pot
8. Close the lid, and then press downward until it clicks into
place.
9. Plug the power supply cord into a grounded 3 prong
electrical outlet.
NOTE: The rice cooker is powered ON, but in standby
mode (no heat).
10. Select desired cooking program. See “CONTROLS” for
explanation of options.
11. Press ON/OFF/START.
NOTE:'XULQJ¿UVWXVHWKHUHPD\EHDSODVWLFRGRUZKLFK
will dissipate after using.
12. When cooking is completed three beeps will sound. The
Keep Warm/Reheat light will illuminate.
13. Press the lid release button to open the lid, and then stir
the rice well before serving.
COOKING OTHER MEALS
The rice cooker offers a wide variety of cooking programs to
help create perfect dishes in a single pot.
WARNING - ELECTRICAL SHOCK HAZARD
•
Plug into a grounded 3 prong outlet.
•
Do not remove the ground prong from the power cord
plug.
•
Do not use an adapter.
•
Do not use an extension cord.
)DLOXUHWRGRVRFDQUHVXOWLQGHDWK¿UHRUHOHFWULFDOVKRFN
NOTE: Cooking time will vary depending on the type of dish
being cooked.
1. %HIRUHXVLQJIRUWKH¿UVWWLPHZDVKWKHFRRNLQJSRWLQQHU
lid, steam vent, other accessories and attachments, and
then dry each thoroughly.
NOTE: The cooking pot is dishwasher safe.
2. Add desired ingredients to the cooking pot.
3. Place the cooking pot into the rice cooker.
4. Close the lid, and then press downward until it clicks into
place.
5. Plug the power supply cord into a grounded 3 prong
electrical outlet.
NOTE: The rice cooker is powered ON, but in standby
mode (no heat).
6. Select desired cooking program. See “CONTROLS” for
explanation of options.
7. Press ON/OFF/START.

14
NOTE:'XULQJ¿UVWXVHWKHUHPD\EHDSODVWLFRGRUZKLFK
will dissipate after using.
8. When cooking is completed three beeps will sound. The
Stop/Keep Warm light will illuminate.
9. To stop the cooking process early, press the Stop/Keep
Warm button. This will stop the cooking process and keep
the food warm until ready to serve.
COOKING PROGRAMS
Average cooking time of rice is approximate; it will
automatically increase or decrease depending on the amount
being cooked. Cooking time of other cooking programs are
preset, but can be adjusted as necessary.
Keep Warm mode begins automatically at the end of each
cooking program. The timer displays from 0 to 24 hours. After
24 hours in Keep Warm mode has passed, the rice cooker will
return to the ON (standby) mode.
Quick Rice
Cooking Time: Approximately 65 minutes
1. Press the Quick Rice Button. The Quick Rice light
illuminates.
2. Press ON/OFF/START. The Digital Display shows scrolling
led lights.
•
The Quick Rice light remains lit during the cooking
process.
3. When cooking is completed, the rice cooker automatically
enters Keep Warm mode.
White Rice
Cooking Time: Approximately 70 minutes
1. Press the White Rice button. The White Rice light
illuminates.
2. Press ON/OFF/START. The Digital Display shows scrolling
led lights.
•
The White Rice light remains lit during the cooking
process.
3. When cooking is completed, the rice cooker automatically
enters Keep Warm mode.
Brown Rice
Cooking Time: Approximately 70 minutes
1. Press the Brown Rice button. The Brown Rice light
illuminates.
2. Press ON/OFF/START. The Digital Display shows scrolling
led lights.
•
The Brown Rice light remains lit during the cooking
process.
3. When cooking is completed, the rice cooker automatically
enters Keep Warm mode.
4. Press the lid release button to open the lid, and then stir
well before serving.

15
Oatmeal
Cooking Time: 60 minutes
1. Press the Oatmeal button. The Oatmeal light illuminates
and the digital display shows the suggested cooking time.
2. The cooking time can be adjusted if necessary. To adjust
the cooking time:
•
Press the Time button.
•
Press the + button to add time, press the - button to
subtract time.
3. Press ON/OFF/START. The countdown timer begins.
•
The Oatmeal light remains lit during the cooking
process.
4. When cooking is completed, the rice cooker automatically
enters Keep Warm mode.
Chili
Cooking Time: 90 minutes
1. Press the Chili button. The Chili light illuminates and the
digital display shows the suggested cooking time.
2. The cooking time can be adjusted if necessary. To adjust
the cooking time:
•
Press the Time button.
•
Press the + button to add time, press the - button to
subtract time.
3. Press ON/OFF/START. The countdown timer begins.
•
The Chili light remains lit during the cooking process.
4. When cooking is completed, the rice cooker automatically
enters Keep Warm mode.
Pasta
Cooking Time: 20 minutes
1. Press the Pasta button. The Pasta light illuminates and the
digital display shows the suggested cooking time.
2. The cooking time can be adjusted if necessary. To adjust
the cooking time:
•
Press the Time button.
•
Press the + button to add time, press the - button to
subtract time.
3. Press ON/OFF/START. The countdown timer begins.
•
The Pasta light remains lit during the cooking process.
4. When cooking is completed, the rice cooker automatically
enters Keep Warm mode.

16
Soup
Cooking Time: 120 minutes
1. Press the Soup button. The Soup light illuminates and the
digital display shows the suggested cooking time.
2. The cooking time can be adjusted if necessary. To adjust
the cooking time:
•
Press the Time button.
•
Press the + button to add time, press the - button to
subtract time.
3. Press ON/OFF/START. The countdown timer begins.
•
The Soup light remains lit during the cooking process.
4. When cooking is completed, the rice cooker automatically
enters Keep Warm mode.
Stew
Cooking Time: 60 minutes
1. Press the Stew button. The Stew light illuminates and the
digital display shows the suggested cooking time.
2. The cooking time can be adjusted if necessary. To adjust
the cooking time:
•
Press the Time button.
•
Press the + button to add time, press the - button to
subtract time.
3. Press ON/OFF/START. The countdown timer begins.
•
The Stew light remains lit during the cooking process.
4. When cooking is completed, the rice cooker automatically
enters Keep Warm mode.
Slow Cook
Cooking Time: 120 minutes
1. Press the Slow Cook button. The Slow Cook light
illuminates and the digital display shows the suggested
cooking time.
2. The cooking time can be adjusted if necessary. To adjust
the cooking time:
•
Press the Time button.
•
Press the + button to add time, press the - button to
subtract time.
3. Press ON/OFF/START. The countdown timer begins.
•
The Slow Cook light remains lit during the cooking
process.
4. When cooking is completed, the rice cooker automatically
enters Keep Warm mode.

17
Sauté
Cooking Time: 30 minutes, temperature 248°F
NOTE: Sauté provides a high temperature to quickly
cook vegetables and brown meat. Both the time and the
temperature can be adjusted.
1. Press the Sauté button. The Sauté light illuminates and
the digital display shows the suggested cooking time and
temperature.
2. The cooking time can be adjusted if necessary. To adjust
the cooking time:
•
Press the Time button.
•
Press the + button to add time, press the - button to
subtract time.
3. The temperature can be adjusted. To adjust the
temperature:
•
Press the Temp button.
•
Press the + button to raise the temperature, press the -
button to lower the temperature.
4. Press ON/OFF/START. The countdown timer begins.
•
The Sauté light remains lit during the cooking process.
5. When cooking is completed, the rice cooker automatically
enters Keep Warm mode.
Steam
Cooking Time: 20 minutes
NOTE: The rice cooker comes with a steamer accessory and
can be used to steam foods.
1. Place water in cooking pot.
2. Place cooking pot in the rice cooker.
3. Place ingredients in the steamer basket and place basket
in cooking pot.
4. Close the lid of the rice cooker.
5. Press the Steam button. The Steam light illuminates and
the digital display shows the suggested cooking time.
6. The cooking time can be adjusted if necessary. To adjust
the cooking time:
•
Press the Time button.
•
Press the + button to add time, press the - button to
subtract time.
7. Press ON/OFF/START. The countdown timer begins.
•
The Steam light remains lit during the cooking process.
8. When cooking is completed, the rice cooker automatically
enters Keep Warm mode.

18
DIY
Cooking Time: 30 minutes, temperature 194°F
NOTE: Use the DIY program to create a custom cooking time
and temperature.
1. Press the DIY button. The DIY light illuminates and the
digital display shows the suggested cooking time and
temperature.
2. The cooking time can be adjusted if necessary. To adjust
the cooking time:
•
Press the Time button.
•
Press the + button to add time, press the - button to
subtract time.
3. The temperature can be adjusted. To adjust the
temperature:
•
Press the Temp button.
•
Press the + button to raise the temperature, press the -
button to lower the temperature.
4. Press ON/OFF/START. The countdown timer begins.
•
The DIY Cook light remains lit during the cooking
process.
5. When cooking is completed, the rice cooker automatically
enters Keep Warm mode.
TIPS FOR GREAT RESULTS
•
Measure rice and water accurately.
•
)RUDGGHGÀDYRU\RXPD\VXEVWLWXWHPHDWVWRFNRUEURWK
for the water and chopped fresh herbs can be stirred into
the rice at the end of cooking before allowing to rest.
•
Some varieties of rice should be rinsed before cooking.
Enriched rice, commonly found in the U.S., is not rinsed
to preserve the added nutrients. If rinsing rice before
cooking, measure rice before rinsing and drain as much
water as possible.
•
After adding the rice and water to the cooking pot, spread
it evenly over the bottom.
•
Do not open the lid during cooking.
•
Most types of rice will be slightly undercooked at the end
of the cooking program. Allow the cooked rice to “rest” in
the cooking pot for 5 to 10 minutes to absorb the last bit of
moisture.

19
DELAY COOKING
The Delay Timer delays the start of cooking
programs except Pasta, Sauté and DIY. The start
of the cooking process can be delayed for up to
24 hours.
IMPORTANT
•
To maintain the quality of the rice, it is recommended that
you not set the delay timer for longer than 12 hours.
1. Place the ingredients in the cooking pot, place the pot in
the rice cooker and close the lid.
2. Select the desired cooking program.
3. Press the Delay Timer button. The Delay Timer display will
LOOXPLQDWHDQGWKH¿UVWWZRGLJLWVKRXUVZLOOÀDVK
4. Press the + and - buttons to set the desired number of
hours.
5. 3UHVV7LPH7KHODVWWZRGLJLWVZLOOÀDVKPLQXWHV
6. Press the + and - buttons to set the desired number of
minutes.
7. Press the ON/OFF/START button. The countdown timer
will start and the cooking process will begin when the
GHOD\KDV¿QLVKHG
STEAMING FOOD
In addition to the Steam program, food can be steamed during
the rice cooking process. The rice cooker may be used to
VWHDPIRRGVXFKDVYHJHWDEOHVPHDWRU¿VK
It takes approximately 70 minutes to cook a batch of white rice
and approximately 5 to 20 minutes (depending on the type
and quantity) to steam cleaned, cut vegetables.
1. Determine the time needed to steam the food. See
Steaming Guide.
2. At the appropriate time open the rice cooker.
3. Place the steamer basket with the cut vegetables arranged
in a single layer onto the rim of the cooking pot.
4. Close the lid and continue cooking for the remaining time.
5. Remove food immediately after steaming to avoid
overcooking.
NOTES:
•
,IVWHDPLQJPHDWRU¿VK¿UVWSODFHIRLORQWKHERWWRP
of the steamer basket to keep the meat juices from
seeping into the rice.
•
Vegetables should be cut to a size similar to that
indicated in the following chart.
•
Cooking times are approximate and will yield cooked
but crisp/tender vegetables. Add or decrease time if
you prefer softer or crisper vegetables.

20
STEAMING GUIDE
NOTE: While steaming, monitor your meat’s internal temperature with a meat thermometer to ensure the meat
you cook reaches a safe temperature.
FOOD AMOUNT PREPARATION COOKING TIME
Asparagus 4 oz. (~15 spears) trimmed and halved 8 min.
Baby Bok Choy 2 whole halved 17 min.
Broccoli 10 oz. ÀRUHWV 15 min.
Cabbage Leaves 4 leaves cored 6 min.
Carrots - Baby 12 oz. whole 18 min.
Carrots - Sliced 6 oz. (1½ c.) sliced ½" thick 16 min.
Green Beans 5 oz. trimmed 9 min.
Lettuce Leaves - Butter Variety 6 leaves cored 6 min.
Peas - Snow 4 oz. trimmed 8 min.
Potatoes - New 12 oz. quartered 16 min.
Potatoes - Yellow/Gold 12 oz. ¾" pieces 16 min.
Potatoes - Sweet 1 lb. ¾" cubes 17 min.
Squash - Summer/Zucchini 6 oz. (2 c. sliced) sliced ½" thick 8 min.
Chicken 1 lb. 2" strips 25 min.
Shrimp 1 lb. peeled and deveined 15 min.
)LVK6DOPRQ6ZRUG¿VK 12 oz. FXWWR¿WWUD\ 18 min.
Eggs Up to 12 pierce pinhole in bottom
of each egg
15 min. - soft cooked
24 min. - hard cooked

21
Sweet Rice
INGREDIENTS
T
1 cup jasmine rice, rinsed and drained
T
1 cup coconut milk
T
1 cup water
T
ПШЖ tsp salt
T
1 Salaam leaf or fresh curry leaf
T
ПШЖ tsp ground coriander
DIRECTIONS
1. Wash and drain rice.
2. Place rice, water, coconut milk, salt, Salaam leaf and ground coriander into the cooking pot
and place the pot in the cooker.
3. Close cooker lid, press the White Rice button and press ON/OFF/START.
4. Open lid and stir periodically, close lid and continue to cook until the cycle completes.
RECIPES

22
Hungarian Goulash
INGREDIENTS
T
2 onions quartered
T
5 oz ham diced
T
3 Tbsp oil
T
2 lbs beef stew meat, diced
T
2 cloves garlic, crushed
T
6ПШЖ cups of water divided
T
3 tsp beef bouillon powder
T
3 tsp vegetable bouillon powder
T
2 Tbsp ground paprika
T
2 large bay leaves
T
2 Tbsp tomato paste
T
7EVSÀRXU
DIRECTIONS
1. Place oil in the cooking pot and place the pot inside the cooker.
2. Press the Sauté button and press ON/OFF/START. Heat the cooking pot until the oil shimmers.
3. Place the onion and ham in the cooking pot and sauté until the onion is translucent, stirring
occasionally
4. Remove the onion and ham from the cooking pot.
5. In small portions add the beef to the cooking pot and brown.
6. When all of the beef has been browned, return the beef, onion and ham to the cooking pot.
7. Add 5ПШЖ cups of water, bouillon powders, ground paprika, bay leaves and tomato paste. Stir to
combine.
8. Close the cover and press the Chili button. Press ON/OFF/START.
9. 'LVVROYHÀRXULQFXSRIZDWHU:KHQWKHUHLV¿YHPLQXWHVOHIWLQWKHFRRNWLPHRSHQWKHOLG
and stir the mixture slowly into the goulash to thicken.
10. &ORVHWKHOLGDQGDOORZWRFRRNIRU¿YHPRUHPLQXWHV6HUYHRYHUERLOHGRUPDVKHGSRWDWRHV

23
Potato and Leek Soup
INGREDIENTS
T
2 Tbsp unsalted butter
T
4 medium leeks cleaned and chopped
T
1 small stalk celery, chopped
T
2 lbs potatoes peeled and diced
T
1 bay leaf
T
1 sprig fresh thyme
T
4 cups water
T
2 tsp salt
T
ПШЖ cup heavy cream
T
freshly ground pepper
T
minced chives, for garnish
DIRECTIONS
1. Place the cooking pot in the cooker and press Sauté to preheat.
2. Add the butter and heat until just foaming.
3. Add the leeks and celery and sauté until softened but not browned, 5 - 7 minutes.
4. Add the remaining ingredients, except cream and stir to combine.
5. Close the lid and press the Soup button. Press ON/OFF/START.
6. When cooking has completed, remove the bay leaf and thyme.
7. Blend the soup with a blender or immersion blender until smooth.
8. Stir in cream and season to taste. Serve and garnish with minced chives.

24
Vegetable Stock
INGREDIENTS
T
2 large onions upeeled, halved
T
4 stalks of celery chopped
T
2 large carrots peeled and chopped
T
7 oz button mushrooms, halved
T
1 head of garlic, halved crossways
T
1 tsp whole black peppercorns
T
1 bay leaf
T
2 sprigs fresh thyme
T
VSULJVÀDWOHDISDUVOH\
T
10 cups cold water
DIRECTIONS
1. Add all the ingredients to the cooking pot.
2. Close the lid and press the Slow Cook button. Press ON/OFF/START.
3. :KHQFRRNLQJKDVFRPSOHWHGOHWWKHVWRFNFRROXQWLOVDIHWRKDQGOHDQGVWUDLQWKURXJKD¿QH
mesh sieve.
4. Use immediately or refrigerate overnight. Stock can be frozen in small air-tight containers for
future use.

25
Oatmeal with Homemade Granola
INGREDIENTS
T
ПШЖ cup pecans or walnuts, coarsely chopped
T
ПШИ cup almonds, coarsely chopped
T
ПШМ cup shredded, unsweetened coconut
T
ПШМ cup pepitas (pumpkin seeds)
T
ПШМ FXSVXQÀRZHUVHHGV
T
1 Tbsp chia seeds
T
ПШИ cup maple syrup
T
2 Tbsp coconut oil
T
1 vanilla bean split, seeds scraped
T
7 oz wholegrain, traditional rolled oats
T
3ПШЗ cup water
T
6 Medjool dates, pitted, chopped
T
1 apple cored, chopped
DIRECTIONS
1. Preheat oven to 275°F
2. &RPELQHWKHQXWVFRFRQXWSHSLWDVVXQÀRZHUVHHGVDQGFKLDVVHHGVLQDVPDOOERZODQG
mix well.
3. Heat the maple syrup, coconut oil and vanilla bean in a small saucepan over low heat. Pour
over combined granola ingredients and stir to coat evenly.
4. Spread evenly over a sheet pan lined with parchment paper.
5. Bake for 20 - 30 minutes stirring occasionally. Granola should be mostly dry and toasted.
6. Place the oats, water, dates and apple in the cooking pot. Stir to combine.
7. Place the cooking pot in the cooker and close the lid. Press the Oatmeal button and press
ON/OFF/START.
8. When cooking has completed serve and top with granola.

26
Chicken Pho
INGREDIENTS
T
2 Tbsp vegetable oil
T
2 onions halved
T
2 inch piece of ginger, sliced
T
1 small bunch cilantro
T
3 star anise pods
T
1 cinnamon stick
T
4 cloves
T
1 tsp fennel seeds
T
1 tsp coriander seeds
T
ПШИ FXS¿VKVDXFH
T
1 Tbsp raw sugar
T
2 lbs chicken legs
T
5 cups chicken stock
T
4 servings prepared pho noodles
T
2 green onions thinly sliced
DIRECTIONS
1. Place the cooking pot in the cooker and press the Sauté button to preheat the pot.
2. Place the oil in the pot and heat until shimmering.
3. Add the onions and the ginger and cook until browned, about 5 minutes.
4. $GGWKHFLODQWURVWDUDQLVHFLQQDPRQFORYHVIHQQHOVHHGFRULDQGHUVHHG¿VKVDXFHVXJDU
and chicken stock. Stir to combine.
5. Close the lid, press the Soup button and press ON/OFF/START.
6. When cooking has completed, transfer chicken legs to a plate and shred.
7. 6WUDLQWKHEURWKWKURXJKD¿QHPHVKHGVLHYHDQGGLVFDUGLQJUHGLHQWV
8. 6NLPRIDQ\VROLGVIURPWKHWRSDQGVHDVRQWRWDVWHZLWK¿VKVDXFHDQGVXJDU
9. Place prepared noodles in individual bowls and top with shredded chicken and green onions.
10. Pour hot broth over the noodles and chicken and serve.

27
Shrimp Risotto
INGREDIENTS
T
2 Tbsp olive oil
T
1 cup celery chopped
T
1 cup white onion chopped
T
3 cloves garlic minced
T
1ПШЖ cup rice, uncooked
T
ПШЖ cup dry white wine
T
4 cups chicken broth
T
1 Tbsp Worchestershire sauce
T
1 lb cooked shrimp
DIRECTIONS
1. Add oil to the cooking pot. Place pot in cooker and press the White Rice button. Press ON/
OFF/START.
2. Add the celery, onion and garlic and sauté for 2 to 3 minutes.
3. Add the rice and continue cooking for 5 to 8 minutes.
4. Add the chicken broth and Worchestershire sauce and stir to combine.
5. Close the lid and continue cooking.
6. When the rice is done stir in shrimp and serve.

28
Bean Dip
INGREDIENTS
T
ПШИ cup red onions chopped
T
2 cloves garlic, minced
T
16 oz can refried beans
T
15 oz can black beans, rinsed and drained
T
1 cup canned corn drained
T
ПШИ tsp prepared mild salsa
T
ПШИ tsp ground cumin
T
1 avocado peeled and diced
T
ПШЖ cup cherry tomatoes, halved
DIRECTIONS
1. Add the oil, onions and garlic to the cooking pot.
2. Place the pot in the cooker and press the Sauté button, press ON/OFF/START and cook for
3 minutes.
3. Add the refried beans, black beans, corn, salsa and cumin.
4. Mix well and close the lid.
5. Cook until the bean dip is bubbly, about 8 to 10 minutes.
6. Spoon the dip into a serving bowl.
7. Add the avocado and tomatoes and stir gently.

29
CARE AND CLEANING
WARNING - BURN HAZARD
•
Wait until the rice cooker has cooled before cleaning.
Failure to do so may result in burns.
Unplug the rice cooker from the electrical outlet, allow it to
cool, and then clean and dry the cooker and all its parts after
each use to avoid odors and poor performance.
GENERAL CARE
IMPORTANT: Use only soft cloths with a mild dish soap
solution to clean the rice cooker. Do not wash the rice cooker
in the dishwasher.
NOTE: Only the cooking pot is dishwasher safe.
CLEANING THE COOKER EXTERIOR
IMPORTANT: Do NOT immerse the rice cooker in water.
Using a soft, damp cloth, clean the outer surfaces of the rice
cooker.
Using a soft, dry cloth thoroughly dry the outer surfaces.

30
Steam Vent
IMPORTANT:
•
Clean the steam vent frequently to ensure proper venting.
•
The rice cooker should be cool to the touch before
cleaning the steam vent.
1. With the cover of the rice cooker open, grasp the steam
vent and pull out.
a
a Steam Vent
2. Wash the steam vent with soap and water after every use.
Condensation Collector
1. Grasp the condensation collector and pull out.
a
a
Condensation Collector
2. Empty and rinse the condensation collector after each
cooker use.
3. Using a soft cloth, dry thoroughly.

31
CLEANING THE COOKER INTERIOR PARTS
Press down on the lid release button to open the rice cooker
lid.
Condensation
Condensation from steam will collect under the steam valve
vent.
1. Using a soft cloth, thoroughly dry the areas where
condensation collects.
Heating Plate
1. Using a steel wool pad, remove any residue burned onto
the metal heating plate.
2. Using a soft, damp cloth, wipe the heating plate, and then
dry thoroughly.
Cooking Pot
IMPORTANT:
•
The inside of the cooking pot has a non-stick coating that
can lose its non-stick properties if it becomes scratched or
damaged.
•
Do not use abrasive cleansers, vinegar, bleaching agents,
steel wool or other harsh scrubbing brushes to clean the
cooking pot.
•
Do not use metal cooking utensils.
•
Wash the cooking pot immediately after removing rice that
has been seasoned. Seasonings may damage the non-
stick coating of the cooking pot if left in contact for any
length of time.
1. Wash the cooking pot, using a soft cloth and a
nonabrasive cleanser or a mild solution of dish soap and
warm water.
NOTE: The cooking pot is dishwasher safe.
2. Using a soft cloth, dry both the interior and exterior of the
cooking pot.
3. Reassemble the parts.
a
b
c
d
a
Steamer Basket
b Cooking Pot
c Steam Vent
d Condensation Collector

32
TROUBLESHOOTING
Before calling for service, review the following tips. It may save you time and money.
This list includes common occurrences that are not the result of poor workmanship or defective materials.
WARNING - ELECTRICAL SHOCK HAZARD
•
Plug into a grounded 3 prong outlet.
•
Do not remove the ground prong from the power cord plug.
•
Do not use an adapter.
•
Do not use an extension cord.
)DLOXUHWRGRVRFDQUHVXOWLQGHDWK¿UHRUHOHFWULFDOVKRFN
PROBLEM POSSIBLE CAUSE SOLUTION
Rice cooker does not
operate
The power supply cord is not completely plugged
into a working 3 prong electrical outlet.
Plug the power supply cord into the electrical
outlet.
There has been a power failure. Reset the circuit breaker or replace the fuse
once power is restored.
Another appliance was plugged into the same
electrical outlet, which tripped the circuit breaker or
blown a household fuse.
Reset the circuit breaker or replace the fuse.
Plug power supply cord into a separate,
dedicated circuit.
Rice is mushy, sticky or
clumping
Rice was cooked with too much water. Stir the rice. Close lid and leave on Keep
Warm for 10 to 30 minutes. Stir frequently.
Rice was rinsed or soaked before cooking.
Pre-rinsing can cause the rice to crack and
become mushy and sticky during cooking.
Soaking before cooking softens the texture of rice.
If rinsing is required, rinse the rice quickly and
drain as much water as possible. Do not allow
rice to soak in liquid prior to cooking.

33
PROBLEM POSSIBLE CAUSE SOLUTION
Rice is hard or dry Rice was not cooked with enough water or it was
cooked with mineral water.
Use more water when cooking rice.
Soak the rice for a short time before cooking.
Add
ПШЖ to 1 cup of water and stir. Close the
lid and press the Quick Rice button. Stir and
check consistency.
Rice is scorched
NOTE: Rice turning a light
brown color is not a result
of rice cooker failure.
Other ingredients and/or seasonings were added
to the rice before cooking.
Cook only rice with the proper ratio of water.
Rice was soaked for too long. Soak rice for a shorter period of time.
Keep Warm mode was used too long. Stir rice frequently in Keep Warm mode.
Rice does not taste good Used wrong ratio of ingredients to water or wrong
cooking program for recipe.
Accurately measure the correct ratio of
ingredients to water.
The steam vent was not attached to the rice
cooker.
After cleaning replace the steam vent into the
rice cooker. See “Care and Cleaning.”
Unpleasant odor
NOTE: A plastic odor is
QRUPDOWKH¿UVWIHZWLPHV
the cooker is used.
Keep Warm mode was used too long. Do not allow rice to remain in Keep Warm
PRGHLQGH¿QLWHO\6HUYHULFHVRRQDIWHUWKH
10-minute resting period.
Rice left in the cooking pot after Keep Warm mode
has turned off.
Remove cooked rice from cooker.
The rice was not rinsed thoroughly. Rinse rice until the water runs clear.
The cooking pot and/or steam vent is dirty. Clean and dry parts thoroughly. See
“Cleaning.”
The plastic scoop was left in the cooking pot. Remove plastic scoop and all accessories
from the rice cooker before using.

34
PROBLEM POSSIBLE CAUSE SOLUTION
Rice is dry and has
turned color
Rice has been reheated repeatedly. Rice should be reheated only once to maintain
the quality. Sprinkle rice with water to help
keep it from drying out during reheating.
Steam vent is not attached correctly. After washing, attach the steam vent correctly
to the rice cooker. See “Cleaning.”
Rice cooker boiling over
and spattering
NOTE: It is normal for
moisture to appear on the
inner lid or cooking pot and
drip when the lid is opened.
Steam vent is not attached correctly. After washing, attach the steam vent correctly
to the rice cooker. See “Cleaning.”
The steam vent and/or temperature sensor is dirty. Clean the steam vent and temperature sensor.
The wrong program was unintentionally used to
cook rice.
Select the cooking program for the ingredients
you are cooking.
'LI¿FXOWWRFORVHWKH
cooker lid
Foreign substances in the lid latch well are
preventing the outer lid from latching.
Remove debris from the lid latch well.
Film on interior of
cooking pot
The starch in the rice will melt during cooking and
dry onto the interior of the cooking pot.
During washing, use a non-abrasive plastic
scouring pad or utensil to gently remove the
¿OP

35
1 YEAR LIMITED WARRANTY
This is the only express warranty for this product and is in lieu of any other warranty or condition.
This product is warranted to be free from defects in material and workmanship for a period of one (1) year from the date of original
purchase. During this period, your exclusive remedy is repair or replacement of this product or any component found to be
defective, at our option; however, you are responsible for all costs associated with returning the product to us and our returning the
product or component under this warranty to you. If the product or component is no longer available, we will replace with a similar
one of equal or greater value.
This warranty does not cover wear from normal use, and operation doesn't conformity with the instruction manuals, or damages to
the product resulting from accident, alteration, abuse, or misuse. This warranty extends only to the original consumer purchaser
or gift recipient. Keep the original sales receipt, as proof of purchase is required to make a warranty claim. This warranty is void if
SURGXFWLVXVHGIRURWKHUWKDQVLQJOHIDPLO\KRXVHKROGXVHRUVXEMHFWHGWRDQ\YROWDJHDQGZDYHIRUPRWKHUWKDQDVVSHFL¿HGRQWKH
label.
We exclude all claims for special, incidental, and consequential damages by breach of express or implied warranty. All liability is
limited to amount of the purchase price. Every implied warranty, including any statutory warranty or condition of merchantability
RU¿WQHVVIRUSDUWLFXODUSXUSRVHLVGLVFODLPHGH[FHSWWRWKHH[WHQWSURKLELWHGE\ODZLQZKLFKFDVHVXFKZDUUDQW\RUFRQGLWLRQLV
limited to the duration of this written warranty.
7KLVZDUUDQW\JLYHV\RXVSHFL¿FOHJDOULJKWV<RXPD\KDYHRWKHUOHJDOULJKWVWKDWYDU\GHSHQGLQJRQZKHUH\RXOLYH6RPHVWDWHVRU
provinces do not allow limitations on implied warranties or special, incidental consequential damages, so the foregoing limitations
may not apply to you.
Customer Service:
Midea America Corp
5 Sylvan Way, Suite 100
Parsippany, NJ 07054
Phone: 866 646 4332

OLLA ARROCERA
Manual de
instrucciones
Modelo: MB-M25
Lea el manual antes de operar su olla arrocera.
Consérvelo para referencias futuras.
¡Extensión gratuita
de 3 meses
del período
original de la garantía limitada!*
Simplemente envíe una foto de su
comprobante de compra al:
1-844-224-1614
*La extensión de la garantía es por los
tres meses inmediatamente posteriores
DOD¿QDOL]DFLyQGHOSHUtRGRGHOD
garantía original del producto.

2
ÍNDICE
MEDIDAS DE SEGURIDAD ...........................................3
Instrucciones Importantes de Seguridad ..................4
CARACTERÍSTICAS DEL PRODUCTO ........................6
INSTRUCCIONES DE INSTALACIÓN ...........................7
Desempacar .............................................................7
Requisitos eléctricos .................................................7
Requisitos de ubicación ............................................8
INSTRUCCIONES DE USO............................................9
Controles ..................................................................9
Uso de la olla arrocera............................................ 11
RECETAS .....................................................................22
Arroz dulce..............................................................22
Goulash húngaro ....................................................23
Sopa de puerro y patata .........................................24
Fondo de vegetales ................................................25
Avena con granola casera ......................................26
Pho de pollo ............................................................27
Risotto de camarones .............................................28
Salsa de frijoles ......................................................29
CUIDADO Y LIMPIEZA ................................................30
SOLUCIÓN DE PROBLEMAS .....................................33
1 AÑO DE GARANTÍA .................................................36

3
MEDIDAS DE SEGURIDAD
Para evitar lesiones al usuario u otras personas y daños a la propiedad, se deben seguir las siguientes instrucciones. El
funcionamiento incorrecto debido a ignorar las instrucciones puede causar lesiones o daños. El nivel de riesgo se muestra
mediante las siguientes indicaciones.
Este símbolo indica la posibilidad de lesiones o daños a la propiedad.
Este símbolo indica la posibilidad de muerte o heridas graves.
PRECAUCIÓN
ADVERTENCIA

Cuando se utilicen electrodomésticos, siempre se deben tomar precauciones básicas de seguridad, incluidas las siguientes:
ADVERTENCIA
•
Lea todas las instrucciones antes del uso.
•
guantes de cocina al manipular la cazuela de cocción o
la tapa.
•
Para evitar descargas eléctricas, no sumerja el cable, los
enchufes o la carcasa de la olla arrocera en agua u otro
líquido.
•
Este electrodoméstico no está diseñado para ser usado
por personas (incluidos los niños) con capacidades
físicas, sensoriales o mentales reducidas, o con falta de
experiencia o conocimiento, a menos que sean vigilados
e instruidos adecuadamente sobre el uso de este
electrodoméstico por parte de una persona responsable
de su seguridad.
•
Es necesario supervisar de cerca los electrodomésticos
cuando los utilicen niños o se utilicen cerca de ellos.
•
Mantenga el electrodoméstico y el cable fuera del
alcance de los niños.
•
Desenchufe el electrodoméstico cuando no esté en
funcionamiento y antes de limpiarlo.
•
Deje que se enfríe antes de poner o retirar cualquier
pieza.
•
Lea todas las instrucciones antes del uso.
•
guantes de cocina al manipular la cazuela de cocción o
la tapa.
4
ADVERTENCIA
•
Para evitar descargas eléctricas, no sumerja el cable,
los enchufes o la carcasa de la olla arrocera en agua u
otro líquido.
•
No utilice ningún electrodoméstico con un cable o
enchufe dañados o después de que el electrodoméstico
funcione incorrectamente o haya sufrido daños de
cualquier tipo. Devuelva el electrodoméstico al Servicio
Técnico Autorizado más cercano para su revisión,
reparación o ajuste.
•
cualquier reparación, consulte a un Centro de servicio
autorizado de Comfee.
•
La cantidad total de alimentos y agua NO debe exceder
el nivel máximo (MÁX) marcado en la cazuela de cocción.
Algunos alimentos, como el arroz, se expanden durante la
cocción y no deben llenar la cazuela de cocción más de la
mitad.
•
Los alimentos derramados pueden causar quemaduras
graves. Se debe tener extrema precaución al mover un
electrodoméstico que contenga líquidos calientes o aceite
caliente.
•
•
Conecte siempre el cable al electrodoméstico primero y, a
continuación, conecte el cable a una toma de pared.
INSTRUCCIONES IMPORTANTES DE SEGURIDAD

ADVERTENCIA
•
No opere la olla arrocera si alguna parte de la unidad
está dañada.
•
No utilizar al aire libre. Sólo para uso doméstico en
interiores.
•
No permita que el cable cuelgue del borde de la
la parte superior de la olla arrocera. Nunca use el
tomacorriente debajo de la encimera, y nunca la use
con un cable de extensión.
•
No la coloque sobre o cerca de una hornilla de gas o
eléctrica, ni de un horno caliente.
•
No la coloque cerca de cortinas sensibles al calor.
•
Se utiliza un cable de alimentación corto para reducir
el riesgo de que los niños lo agarren o se enreden o se
tropiecen con un cable más largo.
•
Para desconectarlo, gire todos los controles a “apagado” y
retire el enchufe de la toma de la pared.
•
El uso de accesorios no recomendados por Comfee puede
causar lesiones.
•
Asegúrese de que el exterior de la cazuela de cocción
esté seco antes de usarla. La cazuela húmeda puede
dañar la arrocera y provocar mal funcionamiento.
•
No toque, cubra u obstruya la válvula de vapor en la parte
superior de la olla arrocera, ya que está extremadamente
caliente y puede causar quemaduras.
5
PRECAUCIÓN
Para reducir el riesgo de descargas eléctricas, cocine solo en el recipiente extraíble.
GUARDE ESTAS INSTRUCCIONES
ESTE ELECTRODOMÉSTICO ES SOLO PARA USO DOMÉSTICO.
MANTENGA EL ELECTRODOMÉSTICO FUERA DEL ALCANCE DE LOS NIÑOS.

6
CARACTERÍSTICAS DEL PRODUCTO
Quick Rice
White Rice
Brown Rice
Chili
Pasta
Oatmeal
Soup
Stew
Slow Cook
Sauté
Steam
DIY
a
b
d
e
f
g
c
a Botón de apertura
de la tapa
b Tapa
c Asa
d Válvula de vapor
e Colector de
condensación
f Pantalla digital
g Panel de control
ACCESORIOS
Espátula para servir 0HGLGDGHDUUR]
Cesta de vapor &D]XHODGHFRFFLyQ
ESPECIFICACIONES
Requisitos de alimentación 9a+]
Potencia nominal 650W

7
INSTRUCCIONES DE INSTALACIÓN
Desempacar
Retire todos los materiales de embalaje
/DYHODFD]XHODGHFRFFLyQODYiOYXODGHYDSRU\RWURV
accesorios, y luego séquelos bien antes de usar.
NOTA: /DFD]XHODGHFRFFLyQHVDSWDSDUDODYDYDMLOODV
Requisitos Eléctricos
ADVERTENCIA - PELIGRO DE CHOQUE ELÉCTRICO
•
Enchufe en un tomacorriente de 3 clavijas con conexión
a tierra.
•
No quite la clavija de conexión a tierra del enchufe del
cable de alimentación.
•
No use un adaptador.
•
No utilice un cable de extensión.
El incumplimiento de estas instrucciones puede provocar la
muerte, incendio o descarga eléctrica.
Se requiere un suministro eléctrico a tierra de 120 V. Se
UHFRPLHQGDXWLOL]DUXQFLUFXLWRVHSDUDGRTXHVLUYDVRORDOD
olla arrocera. Compartir la fuente de alimentación con otros
dispositivos provocará sobrecalentamiento.
Cable de alimentación
NOTA: Esta olla arrocera tiene un enchufe con conexión
a tierra de 3 puntas. Para reducir el riesgo de descarga
eléctrica, el enchufe encajará en un tomacorriente en una
sola dirección. Si el enchufe no cabe en el tomacorriente,
FRPXQtTXHVHFRQXQHOHFWULFLVWDFDOL¿FDGR1RPRGL¿TXHHO
enchufe.
Se usa un cable de alimentación corto para reducir los
ULHVJRVGHHQUHGDUVHRWURSH]DUVHFRQXQFDEOHPiVODUJRR
de que los niños lo agarren.
Si el cable de alimentación es demasiado corto, haga que un
HOHFWULFLVWDRWpFQLFRFXDOL¿FDGRLQVWDOHXQDWRPDGHFRUULHQWH
cerca del electrodoméstico. NO utilice extensiones.

8
Requisitos de Ubicación
Esta olla arrocera está diseñada solo para uso doméstico; la
olla no debe usarse para uso comercial.
8VHHQLQWHULRUHVVREUHXQDVXSHU¿FLHHVWDEOHQLYHODGD\QR
sensible al calor, como una encimera en un lugar donde la
tapa se pueda abrir por completo; NO la use al aire libre.
1RFRORTXHODROODDUURFHUDHQXQD]RQDGHODHQFLPHUDTXH
HVWpH[SXHVWDDODOX]VRODUGLUHFWDRGRQGHSXHGDVDOSLFDUVH
con aceite de cocina.
DISTANCIAS RECOMENDADAS
El vapor y el calor emitidos por la olla arrocera pueden dañar
o decolorar las paredes o gabinetes cercanos. Se recomienda
que la olla arrocera se coloque a una distancia mínima de 12"
(30.5 cm) de las paredes o gabinetes.
a
a Al menos 12"
(30.5 cm)

9
INSTRUCCIONES DE USO
ADVERTENCIA -
PELIGRO DE INCENDIO/QUEMADURAS
Desenchufe inmediatamente y no use la olla arrocera si:
•
El cable de alimentación se calienta anormalmente
durante el uso.
•
La olla arrocera emite humo o se detecta olor a
quemado.
•
La olla arrocera está agrietada o hay partes sueltas o
ruidosas.
•
/DFD]XHODGHFRFFLyQODWDSDH[WHULRURODWDSDLQWHULRU
están rotas o deformadas.
De lo contrario, puede provocar un incendio, una descarga
eléctrica o lesiones.
Controles
IMPORTANTE: Para seleccionar un
programa de cocción, la olla arrocera
debe conectarse primero a un
tomacorriente de conexión a tierra de
3 terminales (ENCENDIDO).
NOTA: La olla arrocera está
ENCENDIDA, pero en modo de espera
(sin calor).
CONTROLES DE LA OLLA ARROCERA
Detener/Mantener caliente
Presione el botón Detener/Mantener caliente
para detener el proceso de cocción y mantener
calientes los alimentos cocinados.
ENCENDER/APAGAR/COMENZAR
Presione el botón ENCENDER/APAGAR/
COMENZAR para encender o apagar la olla y
FRPHQ]DUHOSURFHVRGHFRFFLyQ
Temporizador de retardo
3UHVLRQHHOERWyQ7HPSRUL]DGRUGHUHWDUGRSDUD
retrasar el inicio del proceso de cocción hasta
por 24 horas. Use los botones + y - para ajustar
el período de tiempo.
Disminuir tiempo o temperatura
Use el botón - para restar tiempo o subir o bajar
la temperatura.
Aumentar el tiempo o la temperatura
Use el botón + para agregar tiempo o subir la
temperatura.

10
Temperatura
Presione el botón Temperatura para ajustar la
temperatura. Use los botones + y - para subir o
bajar la temperatura.
Tiempo
Presione el botón Tiempo para ajustar los
tiempos de cocción. Use los botones + y - para
sumar o restar tiempo.
Pantalla digital
CONTROLES DE
PROGRAMAS DE COCCIÓN
Los programas de cocción
establecen el tiempo y la
temperatura de la olla arrocera
automáticamente para el plato
seleccionado.
Quick Rice
/DFRQ¿JXUDFLyQGH$UUR]UiSLGRFRFLQDDUUR]
blanco en menos tiempo. También se puede
XVDUSDUDDJUHJDUWLHPSRGHFRFFLyQDO¿QDOGH
un ciclo.
White Rice
/DFRQ¿JXUDFLyQGH$UUR]EODQFRFRFLQDDUUR]
blanco y de grano corto.
Brown Rice
/DFRQ¿JXUDFLyQGH$UUR]LQWHJUDOSURSRUFLRQD
un tiempo de cocción más prolongado para
arroces de grano largo e integral.
Oatmeal
/DFRQ¿JXUDFLyQGH$YHQDFRFLQDDYHQDHQ
rollos tradicional y otras variedades de avena
que necesitan un tiempo de cocción lento
\SURORQJDGRÒVHODFRQHOWHPSRUL]DGRU
de retardo para preparar la avena para el
desayuno.
Chili
/DFRQ¿JXUDFLyQGH&KLOHFRFLQDXQDROODGH
chile rápida y fácilmente.
Pasta
/DFRQ¿JXUDFLyQ3DVWDFRFLQDODSDVWDUiSLGD\
fácilmente sin tener que usar la estufa.
Soup
/DFRQ¿JXUDFLyQGH6RSDSURSRUFLRQDXQD
temperatura baja a fuego lento para las sopas.
Quick Rice
White Rice
Brown Rice
Chili
Pasta
Oatmeal
Soup
Stew
Slow Cook
Sauté
Steam
DIY

11
Stew
/DFRQ¿JXUDFLyQGH(VWRIDGRSURSRUFLRQD
una cocción lenta y prolongada para guisos y
otros platos que requieren un largo tiempo de
cocción.
Slow Cook
/DFRQ¿JXUDFLyQGH&RFFLyQOHQWDSDUDSODWRV
que requieren una cocción más larga y lenta.
Sauté
/DFRQ¿JXUDFLyQ6DOWHDGRSURSRUFLRQDXQD
temperatura alta para cocinar verduras y dorar
carnes rápidamente. Tanto el tiempo como la
temperatura se pueden ajustar.
Steam
/DFRQ¿JXUDFLyQ9DSRUYDSRUL]DUiSLGDPHQWH
los alimentos. Para mejores resultados, use
con el accesorio de vapor provisto.
DIY
Use el programa Hágalo usted mismo (DIY, por
sus siglas en inglés) para crear un tiempo y
WHPSHUDWXUDGHFRFFLyQSHUVRQDOL]DGRV
Uso de la olla arrocera
INTRODUCCIÓN
La olla arrocera Comfee
®
ofrece 12 programas de cocción
digitales diferentes para cocinar una variedad de comidas.
+D\WUHVSURJUDPDVGHDUUR]TXHDMXVWDQDXWRPiWLFDPHQWHHO
tiempo y la temperatura de cocción para el tipo y la cantidad
GHDUUR]DJUHJDGRSDUDREWHQHUUHVXOWDGRVSHUIHFWRV2WURV
programas de cocción proporcionan un tiempo sugerido que
se puede ajustar según sea necesario.
IMPORTANTE:
•
NO coloque nada obre la tapa de la olla arrocera, durante
el uso.
•
NO toque la válvula de vapor durante la cocción.
•
12FRORTXHODFD]XHODGHFRFFLyQLQWHULRUVREUHXQD
hornilla de la estufa; las altas temperatura deformarán la
FD]XHOD/DFD]XHODGHFRFFLyQHVWiGLVHxDGDSDUDXVDUVH
solo en la olla arrocera.
•
(QODROODDUURFHUDQRXVHXQDFD]XHODRUHFLSLHQWHTXH
QRVHDODFD]XHODGHFRFFLyQSURYLVWD
•
No inserte ningún objeto extraño en la válvula de aire o en
los espacios en el fondo de la olla arrocera.
•
No use utensilios de cocina de metal. Los utensilios
de metal pueden rayar o dañar el revestimiento
antiadherente.

12
MEDIR ARROZ
IMPORTANTE: La cantidad total de alimentos y agua NO
GHEHH[FHGHUHOQLYHOPi[LPR0È;GHWD]DVPDUFDGRHQ
ODFD]XHODGHFRFFLyQ
NOTA: /DPHGLGDGHODUUR]HVVLJQL¿FDWLYDPHQWHPiV
SHTXHxDTXHODPHGLGDHVWiQGDUGHODWD]DGH((88
•
3DUDORJUDUODSURSRUFLyQFRUUHFWDGHDUUR]DDJXDXVH
62/2OD0HGLGDGHDUUR]WD]DLQFOXLGD
•
1LYHOHHODUUR]HQODWD]DGHOD0HGLGDGHDUUR]SDUDTXH
quede parejo con la parte superior.
•
3DUDXQDUUR]PiVVXDYHRPiV¿UPHDMXVWHODSURSRUFLyQ
GHDJXDDDUUR]HQSURSRUFLyQ
•
6LHODUUR]UHTXLHUHVHUSDVDGRSRUDJXDDQWHVGH
FRFLQDUORPLGDHODUUR]DQWHVGHHQMXDJDUOR6LJDODV
LQVWUXFFLRQHVGHHQMXDJXHSDUDHVHWLSRHVSHFt¿FRGH
DUUR]
ENJUAGAR ARROZ
$OJXQRVWLSRVGHDUUR]QRQHFHVLWDQVHUHQMXDJDGRVFRQDJXD
y otros requieren ser enjuagados antes de usar para eliminar
HOH[FHVRGHDOPLGyQTXHSXHGHKDFHUTXHHODUUR]VHD
SHJDMRVR$GHPiVFRFLQDUDUUR]FRQDJXDDOPLGRQDGDSXHGH
SURYRFDUTXHHODUUR]VHTXHPHRVHFRFLQHLQFRUUHFWDPHQWH
Si el agua se vuelve blanca o turbia, cuando se agrega al
DUUR]VLQHQMXDJDUGUHQH\UHHPSODFHHODJXDDQWHVGH
FRFLQDUHODUUR]0XFKDVUHFHWDVUHFRPLHQGDQHQMXDJDUOR
UiSLGDPHQWHSDUDTXHHODUUR]QRDEVRUEDDJXDDQWHVGH
cocinarlo.
Para enjuagar el arroz rápidamente:
1. &RORTXHXQFRODGRUGHQWURGHXQWD]yQPiVJUDQGH
2. &RORTXHHODUUR]HQHOFRODGRU\HQMXiJXHORFRQDJXD
corriente fría.
NOTA: (QMXDJDUHODUUR]HQDJXDFDOLHQWHSXHGHHYLWDU
TXHHODUUR]VHFRFLQHFRUUHFWDPHQWH
3. 8VDQGRVXPDQRUHYXHOYDHODUUR]DOUHGHGRUGHD
4 veces para separar los granos.
4. &RQWLQ~HHQMXDJDQGRKDVWDTXHHODJXDHQHOWD]yQHVWp
limpia.
AGREGAR OTROS INGREDIENTES
6LGHVHDDJUHJDURWURVLQJUHGLHQWHVRFRQGLPHQWRVDODUUR]
KiJDORGHVSXpVGHDJUHJDUHODJXD(ODUUR]QRVHFRFLQDUi
FRUUHFWDPHQWH\VHUiGHPDVLDGR¿UPHVLVHDJUHJDQ
ingredientes antes del agua.
COCINANDO ARROZ
ADVERTENCIA - PELIGRO DE CHOQUE ELÉCTRICO
•
Enchufe en un tomacorriente de 3 clavijas con conexión
a tierra.
•
No quite la clavija de conexión a tierra del enchufe del
cable de alimentación.
•
No use un adaptador.
•
No utilice un cable de extensión.
El incumplimiento de estas instrucciones puede provocar la
muerte, incendio o descarga eléctrica.
NOTA: (OWLHPSRGHFRFFLyQYDULDUiVHJ~QHOWLSRGHDUUR]R
grano que se esté cocinando.

13
1. $QWHVGHXVDUODSRUSULPHUDYH]ODYHODFD]XHOD
de cocción, la válvula de vapor, otros accesorios y
acoplamientos, y luego séquelos bien.
NOTA: /DFD]XHODGHFRFFLyQHVDSWDSDUDODYDYDMLOODV
2. 0LGDHODUUR]\OXHJRHQMXiJXHORVLHVQHFHVDULR
3. $JUHJXHHODUUR]PHGLGRDODFD]XHODGHFRFFLyQ
4. Agregue agua hasta que alcance la línea de agua
numerada correspondiente marcada en el interior de
ODFD]XHODGHFRFFLyQ3RUHMHPSORFXDQGRFRFLQH
PHGLGDVGHDUUR]EODQFRDJUHJXHDJXDKDVWDOD
VHJXQGDOtQHDGHVGHHOIRQGRGHODFD]XHOD
Para adaptarse a sus preferencias personales, la cantidad
de líquido se puede ajustar ligeramente (no más de
ПШЗ de
la distancia entre las líneas).
Add Rice First
Water Line
2 2
4 4
8 8
6 6
10 10
5. 5HYXHOYDHODUUR]HQHODJXDGHPRGRTXHFDGDJUDQR
quede sumergido en el agua.
6. &RORTXHODFD]XHODGHFRFFLyQGHQWURGHODROODDUURFHUD
7. *LUHODFD]XHODGRVRWUHVYHFHVSDUDDVHJXUDUXQ
FRQWDFWRVyOLGRHQWUHHOIRQGRGHODFD]XHOD\ODSODFDGH
calentamiento.
a
a Cazuela de
cocción
8. Cierre la tapa y luego presione hacia abajo hasta que
encaje en su lugar.
9. Conecte el cable de alimentación a una toma de corriente
con conexión a tierra de 3 terminales.
NOTA: La olla arrocera está ENCENDIDA, pero en modo
de espera (sin calor).
10. Seleccione el programa de cocción deseado. Consulte
“CONTROLES” para obtener una explicación de las
opciones.
11. Presione ENCENDER/APAGAR/COMENZAR.
NOTA: Durante el primer uso, puede haber un olor a
plástico que se disipará después del uso.
12. Cuando se complete la cocción, sonarán tres pitidos. La
OX]0DQWHQHUFDOLHQWH5HFDOHQWDUVHLOXPLQDUi
13. Presione el botón de apertura de la tapa para abrir la tapa
\OXHJRUHYXHOYDELHQHODUUR]DQWHVGHVHUYLUOR

14
COCINAR OTRAS COMIDAS
La olla arrocera ofrece una amplia variedad de programas de
cocina para ayudar a crear platos perfectos en una sola olla.
ADVERTENCIA - PELIGRO DE CHOQUE ELÉCTRICO
•
Enchufe en un tomacorriente de 3 clavijas con conexión
a tierra.
•
No quite la clavija de conexión a tierra del enchufe del
cable de alimentación.
•
No use un adaptador.
•
No utilice un cable de extensión.
El incumplimiento de estas instrucciones puede provocar la
muerte, incendio o descarga eléctrica.
NOTA: El tiempo de cocción variará según el tipo de plato
que se esté cocinando.
1. $QWHVGHXVDUODSRUSULPHUDYH]ODYHODFD]XHOD
de cocción, la válvula de vapor, otros accesorios y
acoplamientos, y luego séquelos bien.
NOTA: /DFD]XHODGHFRFFLyQHVDSWDSDUDODYDYDMLOODV
2. $JUHJXHORVLQJUHGLHQWHVGHVHDGRVDODFD]XHODGH
cocción.
3. &RORTXHODFD]XHODGHFRFFLyQGHQWURGHODROODDUURFHUD
4. Cierre la tapa y luego presione hacia abajo hasta que
encaje en su lugar.
5. Conecte el cable de alimentación a una toma de corriente
con conexión a tierra de 3 terminales.
NOTA: La olla arrocera está ENCENDIDA, pero en modo
de espera (sin calor).
6. Seleccione el programa de cocción deseado. Consulte
“CONTROLES” para obtener una explicación de las
opciones.
7. Presione ENCENDER/APAGAR/COMENZAR.
NOTA: Durante el primer uso, puede haber un olor a
plástico que se disipará después del uso.
8. Cuando se complete la cocción, sonarán tres pitidos. La
OX]'HWHQHU0DQWHQHUFDOLHQWHVHLOXPLQDUi
9. Para detener el proceso de cocción de forma temprana,
presione el botón Detener/Mantener caliente. Esto
detendrá el proceso de cocción y mantendrá la comida
caliente hasta que esté lista para servir.
PROGRAMAS DE COCCIÓN
(OWLHPSRSURPHGLRGHFRFFLyQGHODUUR]HVDSUR[LPDGR
aumentará o disminuirá automáticamente según la cantidad
que se esté cocinando. El tiempo de cocción de otros
programas de cocción está preestablecido, pero se puede
ajustar según sea necesario.
(OPRGR0DQWHQHUFDOLHQWHFRPLHQ]DDXWRPiWLFDPHQWHDO
¿QDOGHFDGDSURJUDPDGHFRFFLyQ(OWHPSRUL]DGRUPXHVWUD
de 0 a 24 horas. Después de 24 horas en el modo Mantener
caliente, la olla arrocera volverá al modo ENCENDIDO (en
espera).
Quick Rice
Tiempo de cocción: aproximadamente 65 minutos
1. 3UHVLRQHHOERWyQ$UUR]UiSLGR/DOX]$UUR]UiSLGRVH
ilumina.

15
2. Presione ENCENDER/APAGAR/COMENZAR. La pantalla
GLJLWDOPXHVWUDOXFHV/('GHVSOD]DEOHV
•
/DOX]$UUR]UiSLGRSHUPDQHFHHQFHQGLGDGXUDQWHHO
proceso de cocción.
3. Cuando se completa la cocción, la olla arrocera ingresa
automáticamente al modo Mantener caliente.
White Rice
Tiempo de cocción: aproximadamente 70 minutos
1. 3UHVLRQHHOERWyQ$UUR]EODQFR/DOX]GHO$UUR]EODQFRVH
ilumina.
2. Presione ENCENDER/APAGAR/COMENZAR. La pantalla
GLJLWDOPXHVWUDOXFHV/('GHVSOD]DEOHV
•
/DOX]$UUR]UiSLGRSHUPDQHFHHQFHQGLGDGXUDQWHHO
proceso de cocción.
3. Cuando se completa la cocción, la olla arrocera ingresa
automáticamente al modo Mantener caliente.
Brown Rice
Tiempo de cocción: aproximadamente 70 minutos
1. 3UHVLRQHHOERWyQ$UUR]LQWHJUDO/DOX]GHO$UUR]LQWHJUDO
se ilumina.
2. Presione ENCENDER/APAGAR/COMENZAR. La pantalla
GLJLWDOPXHVWUDOXFHV/('GHVSOD]DEOHV
•
/DOX]$UUR]LQWHJUDOSHUPDQHFHHQFHQGLGDGXUDQWHHO
proceso de cocción.
3. Cuando se completa la cocción, la olla arrocera ingresa
automáticamente al modo Mantener caliente.
4. Presione el botón de apertura de la tapa para abrir la tapa
\OXHJRUHYXHOYDELHQHODUUR]DQWHVGHVHUYLUOR
Oatmeal
Tiempo de cocción: 60 minutos
1. 3UHVLRQHHOERWyQ$YHQD/DOX]GH$YHQDVHLOXPLQD\OD
pantalla digital muestra el tiempo de cocción sugerido.
2. El tiempo de cocción se puede ajustar si es necesario.
Para ajustar el tiempo de cocción:
•
Presione el botón Tiempo.
•
Presione el botón + para agregar tiempo, presione el
botón - para restar tiempo.
3. 3UHVLRQH(1&(1'(5$3$*$5&20(1=$5&RPLHQ]D
HOWHPSRUL]DGRUGHFXHQWDUHJUHVLYD
•
/DOX]GH$YHQDSHUPDQHFHHQFHQGLGDGXUDQWHHO
proceso de cocción.
4. Cuando se completa la cocción, la olla arrocera ingresa
automáticamente al modo Mantener caliente.

16
Chili
Tiempo de cocción: 90 minutos
1. 3UHVLRQHHOERWyQ&KLOH/DOX]GH&KLOHVHLOXPLQD\OD
pantalla digital muestra el tiempo de cocción sugerido.
2. El tiempo de cocción se puede ajustar si es necesario.
Para ajustar el tiempo de cocción:
•
Presione el botón Tiempo.
•
Presione el botón + para agregar tiempo, presione el
botón - para restar tiempo.
3. 3UHVLRQH(1&(1'(5$3$*$5&20(1=$5&RPLHQ]D
HOWHPSRUL]DGRUGHFXHQWDUHJUHVLYD
•
/DOX]GH&KLOHSHUPDQHFHHQFHQGLGDGXUDQWHHO
proceso de cocción.
4. Cuando se completa la cocción, la olla arrocera ingresa
automáticamente al modo Mantener caliente.
Pasta
Tiempo de cocción: 15 minutos
1. 3UHVLRQHHOERWyQ3DVWD/DOX]GH3DVWDVHLOXPLQD\OD
pantalla digital muestra el tiempo de cocción sugerido.
2. El tiempo de cocción se puede ajustar si es necesario.
Para ajustar el tiempo de cocción:
•
Presione el botón Tiempo.
•
Presione el botón + para agregar tiempo, presione el
botón - para restar tiempo.
3. 3UHVLRQH(1&(1'(5$3$*$5&20(1=$5&RPLHQ]D
HOWHPSRUL]DGRUGHFXHQWDUHJUHVLYD
•
/DOX]GH3DVWDSHUPDQHFHHQFHQGLGDGXUDQWHHO
proceso de cocción.
4. Cuando se completa la cocción, la olla arrocera ingresa
automáticamente al modo Mantener caliente.
Soup
Tiempo de cocción: 120 minutos
1. 3UHVLRQHHOERWyQ6RSD/DOX]GH6RSDVHLOXPLQD\OD
pantalla digital muestra el tiempo de cocción sugerido.
2. El tiempo de cocción se puede ajustar si es necesario.
Para ajustar el tiempo de cocción:
•
Presione el botón Tiempo.
•
Presione el botón + para agregar tiempo, presione el
botón - para restar tiempo.
3. 3UHVLRQH(1&(1'(5$3$*$5&20(1=$5&RPLHQ]D
HOWHPSRUL]DGRUGHFXHQWDUHJUHVLYD
•
/DOX]GH6RSDSHUPDQHFHHQFHQGLGDGXUDQWHHO
proceso de cocción.
4. Cuando se completa la cocción, la olla arrocera ingresa
automáticamente al modo Mantener caliente

17
Stew
Tiempo de cocción: 60 minutos
1. 3XOVHHOERWyQ(VWRIDGR/DOX]GH(VWRIDGRVHLOXPLQD\OD
pantalla digital muestra el tiempo de cocción sugerido.
2. El tiempo de cocción se puede ajustar si es necesario.
Para ajustar el tiempo de cocción:
•
Presione el botón Tiempo.
•
Presione el botón + para agregar tiempo, presione el
botón - para restar tiempo.
3. 3UHVLRQH(1&(1'(5$3$*$5&20(1=$5&RPLHQ]D
HOWHPSRUL]DGRUGHFXHQWDUHJUHVLYD
•
/DOX]GH(VWRIDGRSHUPDQHFHHQFHQGLGDGXUDQWHHO
proceso de cocción.
4. Cuando se completa la cocción, la olla arrocera ingresa
automáticamente al modo Mantener caliente.
Slow Cook
Tiempo de cocción: 120 minutos
1. 3UHVLRQHHOERWyQGH&RFFLyQOHQWD/DOX]GH&RFFLyQ
lenta se ilumina y la pantalla digital muestra el tiempo de
cocción sugerido.
2. El tiempo de cocción se puede ajustar si es necesario.
Para ajustar el tiempo de cocción:
•
Presione el botón Tiempo.
•
Presione el botón + para agregar tiempo, presione el
botón - para restar tiempo.
3. 3UHVLRQH(1&(1'(5$3$*$5&20(1=$5&RPLHQ]D
HOWHPSRUL]DGRUGHFXHQWDUHJUHVLYD
•
/DOX]GH&RFFLyQOHQWDSHUPDQHFHHQFHQGLGDGXUDQWH
el proceso de cocción.
4. Cuando se completa la cocción, la olla arrocera ingresa
automáticamente al modo Mantener caliente.
Sauté
Tiempo de cocción: 30 minutos, temperatura
248° F (120 ° C)
NOTA: /DFRQ¿JXUDFLyQ6DOWHDGRSURSRUFLRQDXQD
temperatura alta para cocinar rápidamente verduras y dorar
carnes. Tanto el tiempo como la temperatura se pueden
ajustar.
1. 3UHVLRQHHOERWyQ6DOWHDGR/DOX]6DOWHDGRVHLOXPLQD\
la pantalla digital muestra el tiempo y la temperatura de
cocción sugeridos.

18
2. El tiempo de cocción se puede ajustar si es necesario.
Para ajustar el tiempo de cocción:
•
Presione el botón Tiempo.
•
Presione el botón + para agregar tiempo, presione el
botón - para restar tiempo.
3. La temperatura puede ser ajustada. Para ajustar la
temperatura:
•
Pulse el botón Temperatura.
•
Presione el botón + para aumentar la temperatura,
presione el botón - para bajar la temperatura.
4. 3UHVLRQH(1&(1'(5$3$*$5&20(1=$5&RPLHQ]D
HOWHPSRUL]DGRUGHFXHQWDUHJUHVLYD
•
/DOX]GH6DOWHDGRSHUPDQHFHHQFHQGLGDGXUDQWHHO
proceso de cocción.
5. Cuando se completa la cocción, la olla arrocera ingresa
automáticamente al modo Mantener caliente.
Steam
Tiempo de cocción: 20 minutos
NOTA: La olla arrocera viene con un accesorio de vapor y se
puede usar para cocinar al vapor.
1. &RORTXHDJXDHQODFD]XHODGHFRFFLyQ
2. &RORTXHODFD]XHODGHFRFFLyQHQODROODDUURFHUD
3. Coloque los ingredientes en la canasta de vapor y coloque
ODFDQDVWDHQODFD]XHODGHFRFFLyQ
4. Cierre la tapa de la olla arrocera.
5. 3UHVLRQHHOERWyQ9DSRU/DOX]GHO9DSRUVHLOXPLQD\OD
pantalla digital muestra el tiempo de cocción sugerido.
6. El tiempo de cocción se puede ajustar si es necesario.
Para ajustar el tiempo de cocción:
•
Presione el botón Tiempo.
•
Presione el botón + para agregar tiempo, presione el
botón - para restar tiempo.
7. 3UHVLRQH(1&(1'(5$3$*$5&20(1=$5&RPLHQ]D
HOWHPSRUL]DGRUGHFXHQWDUHJUHVLYD
•
/DOX]GHOVapor permanece encendida durante el
proceso de cocción.
8. Cuando se completa la cocción, la olla arrocera ingresa
automáticamente al modo Mantener caliente
DIY
Tiempo de cocción: 30 minutos, temperatura
194° F (90° C)
NOTA: Use el programa Hágalo usted mismo (DIY, por sus
siglas en inglés) para crear un tiempo y temperatura de
FRFFLyQSHUVRQDOL]DGRV
1. 3UHVLRQHHOERWyQGH',</DOX]',<VHLOXPLQD\OD
pantalla digital muestra el tiempo y la temperatura de
cocción sugeridos.

19
2. El tiempo de cocción se puede ajustar si es necesario.
Para ajustar el tiempo de cocción:
•
Presione el botón Tiempo.
•
Presione el botón + para agregar tiempo,
presione el botón - para restar tiempo.
3. La temperatura puede ser ajustada. Para
ajustar la temperatura:
•
Pulse el botón Temperatura.
•
Presione el botón + para aumentar la temperatura,
presione el botón - para bajar la temperatura.
4. 3UHVLRQH(1&(1'(5$3$*$5&20(1=$5&RPLHQ]D
HOWHPSRUL]DGRUGHFXHQWDUHJUHVLYD
•
/DOX]DIY lenta permanece encendida durante el
proceso de cocción.
5. Cuando se completa la cocción, la olla arrocera ingresa
automáticamente al modo Mantener caliente.
CONSEJOS PARA OBTENER EXCELENTES
RESULTADOS
•
0LGDHODUUR]\HODJXDFRQSUHFLVLyQ
•
Para darle más sabor, puede sustituir el agua con fondo o
FDOGRGHFDUQH\SXHGHSLFDUKLHUEDVIUHVFDV\PH]FODUODV
FRQHODUUR]DO¿QDOGHODFRFFLyQDQWHVGHGHMDUUHSRVDU
•
$OJXQDVYDULHGDGHVGHDUUR]VHGHEHQHQMXDJDUDQWHV
GHFRFLQDUODV(ODUUR]HQULTXHFLGRTXHVHHQFXHQWUD
comúnmente en los Estados Unidos, no se enjuaga para
SUHVHUYDUORVQXWULHQWHVDJUHJDGRV6LHQMXDJDHODUUR]
DQWHVGHFRFLQDUORPLGDHODUUR]DQWHVGHHQMXDJDUOR\
drene la mayor cantidad de agua posible.
•
'HVSXpVGHDJUHJDUHODUUR]\HODJXDDODFD]XHODGH
cocción, extiéndalo uniformemente sobre el fondo.
•
No abra la tapa durante la cocción.
•
/DPD\RUtDGHORVWLSRVGHDUUR]HVWDUiQSRFRFRFLGRVDO
¿QDOGHOSURJUDPDGHFRFFLyQ3HUPLWDTXHHODUUR]FRFLGR
GHVFDQVHHQODFD]XHODGHFRFFLyQGXUDQWHD
minutos para absorber la última parte de la humedad.
COCCIÓN DE RETARDO
(OWHPSRUL]DGRUGHUHWDUGRUHWUDVDHOLQLFLRGHORVSURJUDPDV
de cocción, excepto pasta, salteado y DIY. El inicio del
proceso de cocción puede retrasarse hasta 24 horas.
IMPORTANTE
•
3DUDPDQWHQHUODFDOLGDGGHODUUR]VHUHFRPLHQGDTXH
QRFRQ¿JXUHHOWHPSRUL]DGRUGHUHWDUGRGXUDQWHPiVGH
12 horas.
1. &RORTXHORVLQJUHGLHQWHVHQODFD]XHODGHFRFFLyQ
FRORTXHODFD]XHODGHFRFFLyQHQODROODDUURFHUD\FLHUUH
la tapa.
2. Seleccione el programa de cocción deseado.
3. 3UHVLRQHHOERWyQ7HPSRUL]DGRUGHUHWDUGR/DSDQOODGHO
WHPSRUL]DGRUGHUHWDUGRVHLOXPLQDUi\ORVSULPHURVGRV
dígitos (horas) parpadearán.
4. 3UHVLRQHORVERWRQHV\SDUDFRQ¿JXUDUODFDQWLGDGGH
horas deseada.
5. Presione Tiempo. Los dos últimos dígitos parpadearán
(minutos).
6. 3UHVLRQHORVERWRQHV\SDUDFRQ¿JXUDUODFDQWLGDGGH
minutos deseados.
7. Pulse el botón ENCENDER/APAGAR/COMENZAR. El
WHPSRUL]DGRUGHFXHQWDUHJUHVLYDFRPHQ]DUi\HOSURFHVR
GHFRFFLyQFRPHQ]DUiFXDQGR¿QDOLFHHOUHWDUGR

20
COMIDA AL VAPOR
Además del programa Vapor, los alimentos se pueden cocinar
DOYDSRUGXUDQWHHOSURFHVRGHFRFFLyQGHODUUR]/DROOD
arrocera se puede usar para cocinar al vapor alimentos como
verduras, carne o pescado.
Se necesitan aproximadamente 70 minutos para cocinar
XQORWHGHDUUR]EODQFR\DSUR[LPDGDPHQWHDPLQXWRV
(según el tipo y la cantidad) para limpiar al vapor, cortar las
verduras.
1. Determine el tiempo necesario para cocinar la comida al
vapor. Vea la guía de Vapor.
2. En el momento apropiado, abra la olla arrocera.
3. Coloque la canasta de vapor con las verduras cortadas
GLVSXHVWDVHQXQDVRODFDSDVREUHHOERUGHGHODFD]XHOD
de cocción.
4. Cierre la tapa y continúe cocinando durante el tiempo
restante.
5. Retire la comida inmediatamente después de cocinar al
vapor para evitar que se cocine en exceso.
NOTAS:
•
Si cocina carne o pescado al vapor, primero coloque
papel de aluminio en el fondo de la canasta de vapor
SDUDHYLWDUTXHORVMXJRVGHFDUQHVH¿OWUHQHQHODUUR]
•
Las verduras deben cortarse a un tamaño similar al
indicado en la siguiente tabla.
•
Los tiempos de cocción son aproximados y producirán
verduras cocidas pero crujientes/tiernas. Agregue o
GLVPLQX\DHOWLHPSRVLSUH¿HUHYHUGXUDVPiVVXDYHVR
más crujientes.

21
GUÍA DE VAPOR
NOTA: Mientras cocina al vapor, controle la temperatura interna de su carne con un termómetro para carne para
asegurarse de que la carne que cocina alcance una temperatura segura.
ALIMENTOS CANTIDAD PREPARACIÓN TIEMPOS DE COCCIÓN
Espárragos RQ]DVaHVSiUUDJRV recortado y cortado a la mitad 8 minutos
Col china enana 2 enteros cortado a la mitad 17 minutos
Brócoli RQ]DV ÀRUHWHV 15 minutos
Hojas de repollo 4 hojas sin semillas 6 minutos
Zanahorias bebé RQ]DV entero 18 minutos
Zanahorias rebanadas RQ]DVòF HQURGDMDVGHòGHHVSHVRU 16 minutos
Ejotes RQ]DV recortado 9 minutos
Hojas de lechuga: variedad
mantequilla
6 hojas sin semillas 6 minutos
Guisantes nieve RQ]DV recortado 8 minutos
Patatas nuevas RQ]DV en cuartos 16 minutos
Patatas amarillas/doradas RQ]DV ôSLH]DV 16 minutos
Patatas dulces 1 lb ¾" cubos 17 minutos
&DODED]DYHUDQRFDODEDFtQ RQ]DVFHQURGDMDV HQURGDMDVGHòGHHVSHVRU 8 minutos
Pollo 1 lb tiras de 2" 25 minutos
Camarones 1 lb pelado y desvenado 15 minutos
3HVFDGRVDOPyQSH]HVSDGD RQ]DV corte para encajar en la
bandeja
18 minutos
Huevos Hasta 12 perfore un agujero en el fondo
de cada huevo
15 minutos - semiduro
24 minutos - duro

22
Arroz dulce
INGREDIENTES
T
WD]DGHDUUR]MD]PtQHQMXDJDGR\HVFXUULGR
T
WD]DGHOHFKHGHFRFR
T
WD]DGHDJXD
T
ПШЖ cucharadita de sal
T
1 hoja de Salaam u hoja de curry fresca
T
ПШЖ cucharadita de cilantro molido
INDICACIONES
1. /DYH\HVFXUUDHODUUR]
2. &RORTXHHODUUR]HODJXDODOHFKHGHFRFRODVDOODKRMDGH6DODDP\HOFLODQWURPROLGRHQOD
ROOD\FRORTXHODFD]XHODHQODROOD
3. &LHUUHODWDSDGHODROODDUURFHUDSUHVLRQHHOERWyQGHDUUR]EODQFR\SUHVLRQH(1&(1'(5
APAGAR/COMENZAR.
4. Abra la tapa y revuelva periódicamente, cierre la tapa y continúe cocinando hasta que se
complete el ciclo.
RECETAS

23
Goulash húngaro
INGREDIENTES
T
2 cebollas en cuartos
T
RQ]DVGHMDPyQFRUWDGRHQFXELWRV
T
3 cucharadas de aceite
T
2 libras de estofado de res cortado en cubitos
T
2 dientes de ajo machacados
T
6ПШЖWD]DVGHDJXDGLYLGLGDV
T
3 cucharaditas de caldo de res en polvo
T
3 cucharaditas de caldo de verduras en polvo
T
2 cucharadas de pimentón molido
T
2 hojas grandes de laurel
T
2 cucharadas de pasta de tomate
T
4 cucharadas de harina
INDICACIONES
1. &RORTXHHODFHLWHHQODFD]XHODGHFRFFLyQ\FRORTXHODFD]XHODGHQWURGHODROODDUURFHUD
2. 3UHVLRQHHOERWyQ6DOWHDGR\SUHVLRQH(1&(1'(5$3$*$5&20(1=$5&DOLHQWHODFD]XHODGH
cocción hasta que el aceite brille.
3. &RORTXHODFHEROOD\HOMDPyQHQODFD]XHODGHFRFFLyQ\VDOWHHKDVWDTXHODFHEROODHVWp
transparente, revolviendo ocasionalmente.
4. 5HWLUHODFHEROOD\HOMDPyQGHODFD]XHODGHFRFFLyQ
5. (QSHTXHxDVSRUFLRQHVDJUHJXHODFDUQHDODFD]XHODGHFRFFLyQ\GRUH
6. &XDQGRWRGDODFDUQHHVWpGRUDGDUHJUHVHODFDUQHODFHEROOD\HOMDPyQDODFD]XHODGHFRFFLyQ
7. Agregue 5ПШЖWD]DVGHDJXDFDOGRHQSROYRSLPHQWyQPROLGRKRMDVGHODXUHO\SDVWDGHWRPDWH
Revuelva para combinar.
8. Cierre la tapa y presione el botón de Chile. Presione ENCENDER/APAGAR/COMENZAR.
9. 'LVXHOYDODKDULQDHQWD]DGHDJXD&XDQGRTXHGDQFLQFRPLQXWRVHQHOWLHPSRGHFRFFLyQDEUDOD
WDSD\UHYXHOYDODPH]FODOHQWDPHQWHHQHOJXODVKSDUDHVSHVDU
10. Cierre la tapa y deje cocinar por cinco minutos más. Sirva sobre patatas hervidas o en puré.

24
Sopa de puerro y patata
INGREDIENTES
T
2 cucharadas de mantequilla sin sal
T
4 puerros medianos limpios y picados
T
1 tallo pequeño de apio, picado
T
2 libras de patatas peladas y cortadas en
cubitos
T
1 hoja de laurel
T
1 ramita de tomillo fresco
T
WD]DVGHDJXD
T
2 cucharaditas de sal
T
òWD]DGHQDWDSDUDPRQWDU
T
pimienta fresca molida
T
cebollino picado, para decorar
INDICACIONES
1. &RORTXHODFD]XHODGHFRFFLyQHQODROODDUURFHUD\SUHVLRQH6DOWHDGRSDUDSUHFDOHQWDU
2. Agregue la mantequilla y caliente hasta que se forme espuma.
3. Agregue los puerros y el apio y saltee hasta que estén suaves pero no dorados, de 5 a
7 minutos.
4. Agregue los ingredientes restantes, excepto la crema y revuelva para combinar.
5. Cierre la tapa y presione el botón Sopa. Presione ENCENDER/APAGAR/COMENZAR.
6. Cuando la cocción se haya completado, retire la hoja de laurel y el tomillo.
7. Licúe la sopa con una licuadora o una licuadora de mano hasta que quede suave.
8. $JUHJXHODFUHPD\VD]RQHDOJXVWR6LUYD\GHFRUHFRQFHEROOLQRSLFDGR

25
Fondo de vegetales
INGREDIENTES
T
2 cebollas grandes sin pelar, partidas por la mitad
T
4 tallos de apio picado
T
]DQDKRULDVJUDQGHVSHODGDV\SLFDGDV
T
RQ]DVGHFKDPSLxRQHVFRUWDGRVSRUODPLWDG
T
FDEH]DGHDMRVFRUWDGRVSRUODPLWDG
T
1 cucharadita de granos de pimienta negra enteros
T
1 hoja de laurel
T
2 ramitas tomillo fresco
T
6 ramitas de perejil de hoja plana
T
WD]DVGHDJXDIUtD
INDICACIONES
1. $JUHJXHWRGRVORVLQJUHGLHQWHVDODFD]XHODGHFRFFLyQ
2. Cierre la tapa y presione el botón Cocción lenta. Presione ENCENDER/APAGAR/
COMENZAR.
3. Cuando se haya completado la cocción, deje que el caldo se enfríe hasta que sea seguro de
PDQHMDU\FXHOHDWUDYpVGHXQWDPL]GHPDOOD¿QD
4. Use inmediatamente o refrigere durante la noche. El fondo se puede congelar en pequeños
contenedores herméticos para uso futuro.

26
Avena con granola casera
INGREDIENTES
T
ПШЖƚĂnjĂĚĞƉĂĐĂŶĂƐŽŶƵĞĐĞƐ͕ƉŝĐĂĚĂƐĞŶƚƌŽnjŽƐ
ƉĞƋƵĞŹŽƐ
T
ПШИƚĂnjĂĚĞĂůŵĞŶĚƌĂƐ͕ƉŝĐĂĚĂƐĞŶƚƌŽnjŽƐŐƌĂŶĚĞƐ
T
ПШМƚĂnjĂĚĞĐŽĐŽƌĂůůĂĚŽƐŝŶĂnjƷĐĂƌ
T
ПШМƚĂnjĂĚĞƉĞƉŝƚĂƐ;ƐĞŵŝůůĂƐĚĞĐĂůĂďĂnjĂͿ
T
ПШМƚĂnjĂĚĞƐĞŵŝůůĂƐĚĞŐŝƌĂƐŽů
T
1 ĐƵĐŚĂƌĂĚĂĚĞƐĞŵŝůůĂƐĚĞĐŚŝĂ
T
ПШИǀĂƐŽĚĞƐŝƌŽƉĞĚĞĂƌĐĞ
T
2 cucharadas de aceite de coco
T
1 vaina de vainilla partida, semillas
raspadas
T
RQ]DVGHDYHQDLQWHJUDOLQWHJUDO
enrollada
T
3ПШЗWD]DVGHDJXD
T
6 dátiles Medjool, sin hueso, picados
T
PDQ]DQDVLQFRUD]yQSLFDGD
INDICACIONES
1. Precaliente el horno a 275° F (135° C)
2. Combine las nueces, el coco, las pepitas, las semillas de girasol y las semillas de chias en un
WD]yQSHTXHxR\PH]FOHELHQ
3. Caliente el jarabe de arce, el aceite de coco y la vainilla en una cacerola pequeña a fuego lento.
Vierta sobre los ingredientes combinados de granola y revuelva para cubrir uniformemente.
4. Extienda de manera uniforme sobre una bandeja forrada con papel pergamino.
5. Hornee por 20-30 minutos revolviendo ocasionalmente. La granola debe estar principalmente seca
y tostada.
6. &RORTXHODDYHQDHODJXDODVIHFKDV\ODPDQ]DQDHQODFD]XHODGHFRFFLyQ5HYXHOYDSDUD
combinar.
7. &RORTXHODFD]XHODGHFRFFLyQHQODROOD\FLHUUHODWDSD3UHVLRQHHOERWyQ$YHQD\SUHVLRQH
ENCENDER/APAGAR/COMENZAR.
8. Cuando la cocción se haya completado, sirva y cubra con granola.

27
Pho de pollo
INGREDIENTES
T
2 cucharadas de aceite vegetal
T
2 cebollas partidas por la mitad
T
WUR]RGHMHQJLEUHGHSXOJDGDVHQURGDMDV
T
1 manojo pequeño de cilantro
T
3 vainas de anís estrellado
T
1 rama de canela
T
4 clavos
T
1 cucharadita de semillas de hinojo
T
1 cucharadita de semillas de cilantro
T
ПШИ WD]DGHVDOVDGHSHVFDGR
T
FXFKDUDGDGHD]~FDUWHUFLDGR
T
2 libras de muslos de pollo
T
WD]DVGHFDOGRGHSROOR
T
SRUFLRQHVGH¿GHRVSKRSUHSDUDGRV
T
FHEROODVYHUGHVHQURGDMDV¿QDV
INDICACIONES
1. &RORTXHODFD]XHODGHFRFFLyQHQODROODDUURFHUD\SUHVLRQH6DOWHDGRSDUDSUHFDOHQWDUODFD]XHOD
2. Coloque el aceite en la olla y caliente hasta que brille.
3. Agregue las cebollas y el jengibre y cocine hasta que se doren, aproximadamente 5 minutos.
4. Agregue el cilantro, el anís estrellado, la canela, el clavo, las semillas de hinojo, las semillas de
FLODQWURODVDOVDGHSHVFDGRHOD]~FDU\HOFDOGRGHSROOR5HYXHOYDSDUDFRPELQDU
5. Cierre la tapa, presione el botón Sopa y presione ENCENDER/APAGAR/COMENZAR.
6. &XDQGRODFRFFLyQVHKD\DFRPSOHWDGRWUDQV¿HUDORVPXVORVGHSROORDXQSODWR\GHVPHQ~FHORV
7. &XHOHHOFDOGRDWUDYpVGHXQWDPL]GHPDOOD¿QD\GHVHFKHORVLQJUHGLHQWHV
8. 'HVHFKHORVVyOLGRVGHODSDUWHVXSHULRU\VD]RQHDOJXVWRFRQVDOVDGHSHVFDGR\D]~FDU
9. &RORTXHORV¿GHRVSUHSDUDGRVHQWD]RQHVLQGLYLGXDOHV\FXEUDFRQSROORGHVPHQX]DGR\FHEROODV
verdes.
10. 9LHUWDHOFDOGRFDOLHQWHVREUHORV¿GHRV\HOSROOR\VLUYD

28
Risotto de camarones
INGREDIENTES
T
2 cucharadas de aceite de oliva
T
WD]DGHDSLRSLFDGR
T
1 cebolla blanca troceada
T
3 dientes de ajo picados
T
1ПШЖWD]DVGHDUUR]FUXGR
T
ПШЖ copa de vino blanco seco
T
WD]DVGHFDOGRGHSROOR
T
1 cucharada de salsa Worchestershire
T
1 libra de camarones cocidos
INDICACIONES
1. $JUHJXHDFHLWHDODFD]XHODGHFRFFLyQ&RORTXHODFD]XHODGHFRFFLyQHQODROODDUURFHUD\
SUHVLRQHHOERWyQGH$UUR]EODQFR3UHVLRQH(1&(1'(5$3$*$5&20(1=$5
2. Agregue el apio, la cebolla y el ajo y saltee durante 2 a 3 minutos.
3. $JUHJXHHODUUR]\FRQWLQ~HFRFLQDQGRGXUDQWHDPLQXWRV
4. Agregue el caldo de pollo y la salsa Worchestershire y revuelva para combinar.
5. Cierre la tapa y continúe cocinando.
6. &XDQGRHODUUR]HVWpOLVWRDJUHJXHORVFDPDURQHV\VLUYD

29
Salsa de frijoles
INGREDIENTES
T
ПШИ WD]DGHFHEROODURMDSLFDGD
T
2 dientes de ajo, picados
T
RQ]DVGHIULMROHVUHIULWRV
T
ODWDGHRQ]DVGHIULMROHVQHJURVHQMXDJDGRV\HVFXUULGRV
T
WD]DGHPDt]HQODWDGRHVFXUULGR
T
ПШИ cucharadita de salsa suave preparada
T
ПШИ cucharadita de comino molido
T
1 aguacate pelado y cortado en cubitos
T
ПШЖWD]DGHWRPDWHVFKHUU\FRUWDGRVSRUODPLWDG
INDICACIONES
1. $JUHJXHHODFHLWHODFHEROOD\HODMRDODFD]XHODGHFRFFLyQ
2. &RORTXHODFD]XHODGHFRFFLyQHQODROODDUURFHUD\SUHVLRQHHOERWyQ6DOWHDUSUHVLRQH
ENCENDER/APAGAR/COMENZAR y cocine por 3 minutos.
3. $JUHJXHORVIULMROHVUHIULWRVORVIULMROHVQHJURVHOPDt]ODVDOVD\HOFRPLQR
4. 0H]FOHELHQ\FLHUUHODWDSD
5. Cocine hasta que la salsa de frijoles esté burbujeante, aproximadamente de 8 a 10 minutos.
6. &RORTXHODVDOVDHQXQWD]yQSDUDVHUYLU
7. Agregue el aguacate y los tomates y revuelva suavemente.

30
CUIDADO Y LIMPIEZA
ADVERTENCIA - PELIGRO DE QUEMADURAS
•
Espere hasta que la olla arrocera se haya enfriado antes
de limpiarla.
De lo contrario, pueden producirse quemaduras.
Desenchufe la olla arrocera de la toma de corriente, deje que
se enfríe y luego limpie y seque la olla y todas sus partes
después de cada uso para evitar olores y bajo rendimiento.
CUIDADOS GENERALES
IMPORTANTE: Use solo paños suaves con una solución
suave de jabón para platos para limpiar la olla arrocera. No
lave la olla arrocera en el lavavajillas.
NOTA: /DFD]XHODGHFRFFLyQHVDSWDSDUDODYDYDMLOODV
LIMPIEZA DEL EXTERIOR DE LA OLLA ARROCERA
IMPORTANTE: NO sumerja la olla arrocera en agua.
&RQXQSDxRVXDYH\K~PHGROLPSLHODVVXSHU¿FLHVH[WHUQDV
de la olla arrocera.
Con un paño suave y seco, seque completamente las
VXSHU¿FLHVH[WHUQDV

31
Válvula de vapor
IMPORTANTE:
•
/LPSLHODYiOYXODGHYDSRUFRQIUHFXHQFLDSDUDJDUDQWL]DU
una ventilación adecuada.
•
La olla arrocera debe estar fría al tacto antes de limpiar la
válvula de vapor.
1. Con la tapa de la olla arrocera abierta, tome la válvula de
vapor y extráigala.
a
a Válvula de
vapor
2. Lave la válvula de vapor con agua y jabón después de
cada uso.
Colector de condensación
1. Tome el colector de condensación y extráigalo.
a
a
Colector de condensación
2. Vacíe y enjuague el colector de condensación después de
cada uso de la olla arrocera.
3. Con un paño suave, séquelo bien.

32
LIMPIEZA DE LAS PIEZAS INTERIORES DE LA
OLLA ARROCERA
Presione el botón de liberación de la tapa para abrir la tapa
de la olla arrocera.
Condensación
La condensación del vapor se acumulará debajo de la válvula
de ventilación de vapor.
1. Con un paño suave, seque completamente las áreas
donde se acumula la condensación.
Placa de calentamiento
1. Con un estropajo de acero, elimine cualquier residuo
quemado en la placa de calentamiento de metal.
2. Con un paño suave y húmedo, limpie la placa de
calentamiento y luego séquela bien.
Cazuela de cocción
IMPORTANTE:
•
(OLQWHULRUGHODFD]XHODGHFRFFLyQWLHQHXQUHYHVWLPLHQWR
antiadherente que puede perder sus propiedades
antiadherentes si se raya o daña.
•
No utilice limpiadores abrasivos, vinagre, agentes
blanqueadores, estropajos de acero u otros cepillos de
OLPSLH]DIXHUWHVSDUDOLPSLDUODFD]XHODGHFRFFLyQ
•
No use utensilios de cocina de metal.
•
/DYHODFD]XHODGHFRFFLyQLQPHGLDWDPHQWHGHVSXpV
GHTXLWDUHODUUR]VD]RQDGR/RVFRQGLPHQWRVSXHGHQ
GDxDUHOUHYHVWLPLHQWRDQWLDGKHUHQWHGHODFD]XHODGH
cocción si se dejan en contacto por un período de tiempo
prolongado.
1. /DYHODFD]XHODGHFRFFLyQFRQXQSDxRVXDYH\XQ
limpiador no abrasivo o una solución suave de jabón para
platos y agua tibia.
NOTA: /DFD]XHODGHFRFFLyQHVDSWDSDUDODYDYDMLOODV
2. Con un paño suave, seque el interior y el exterior de la
FD]XHODGHFRFFLyQ
3. 9XHOYDDPRQWDUODVSLH]DV
a
b
c
d
a
Cesta de vapor
b Cazuela de cocción
c Válvula de vapor
d Colector de condensación

33
SOLUCIÓN DE PROBLEMAS
Antes de llamar al servicio técnico, repase los siguientes consejos. Puede ahorrarle tiempo y dinero.
Esta lista incluye sucesos comunes que no son el resultado de una mala mano de obra o de materiales defectuosos.
ADVERTENCIA - PELIGRO DE CHOQUE ELÉCTRICO
•
Enchufe en un tomacorriente de 3 clavijas con conexión a tierra.
•
No quite la clavija de conexión a tierra del enchufe del cable de
alimentación.
•
No use un adaptador.
•
No utilice un cable de extensión.
El incumplimiento de estas instrucciones puede provocar la muerte,
incendio o descarga eléctrica.
PROBLEMA POSIBLES CAUSAS SOLUCIÓN
La olla arrocera no
funciona
El cable de alimentación no está completamente
enchufado a una toma de corriente de 3 clavijas
que funcione.
Conecte el cable de alimentación a la toma de
corriente.
Ha habido una falla de energía. Reinicie el disyuntor o reemplace el fusible una
YH]TXHVHUHVWDEOH]FDODHQHUJtD
Se conectó otro electrodoméstico a la misma
toma de corriente, que disparó el disyuntor o
fundió un fusible doméstico.
Reinicie el disyuntor o reemplace el fusible.
Enchufe el cable de alimentación en un circuito
VHSDUDGR\HVSHFt¿FR

34
PROBLEMA POSIBLES CAUSAS SOLUCIÓN
El arroz está blando,
pegajoso o aglutinado
(ODUUR]IXHFRFLQDGRFRQGHPDVLDGDDJXD 5HYXHOYDHODUUR]&LHUUHODWDSD\GHMHPDQWHQHU
caliente durante 10 a 30 minutos. Revuelva con
frecuencia.
(ODUUR]IXHHQMXDJDGRRUHPRMDGRDQWHVGH
cocinar.
(OHQMXDJXHSUHYLRSXHGHKDFHUTXHHODUUR]VH
agriete y se vuelva blando y pegajoso durante la
cocción.
5HPRMDUDQWHVGHFRFLQDUVXDYL]DODWH[WXUDGHO
DUUR]
6LVHUHTXLHUHHQMXDJDUHQMXDJXHHODUUR]
rápidamente y drene la mayor cantidad de agua
SRVLEOH1RSHUPLWDTXHHODUUR]VHUHPRMHHQ
líquido antes de cocinarlo.
El arroz está duro o
seco
(ODUUR]QRVHFRFLQyFRQVX¿FLHQWHDJXDRVH
cocinó con agua mineral.
8VHPiVDJXDFXDQGRFRFLQHDUUR]
5HPRMHHODUUR]SRUXQFRUWRWLHPSRDQWHVGH
cocinarlo.
Agregue de
ПШЖDWD]DGHDJXD\UHYXpOYDOD
&LHUUHODWDSD\SUHVLRQHHOERWyQ$UUR]UiSLGR
5HYXHOYD\YHUL¿TXHODFRQVLVWHQFLD
El arroz está quemado
NOTA: (ODUUR]TXHVH
vuelva de color marrón
claro no es el resultado
de una falla en la olla
arrocera.
Se agregaron otros ingredientes y/o condimentos
DODUUR]DQWHVGHFRFLQDUOR
&RFLQHDUUR]FRQVRORODSURSRUFLyQDGHFXDGDGH
agua.
(ODUUR]HVWXYRHPSDSDGRSRUGHPDVLDGRWLHPSR 5HPRMHHODUUR]SRUXQSHUtRGRGHWLHPSRPiV
corto.
El modo Mantener caliente se usó por demasiado
tiempo.
5HYXHOYDHODUUR]FRQIUHFXHQFLDHQHOPRGR
Mantener caliente.
El arroz no sabe bien Se puso una proporción incorrecta de
ingredientes al agua o se usó un programa de
cocción incorrecto para la receta.
Mida con precisión la proporción correcta de
ingredientes al agua.
La válvula de vapor no estaba conectada a la olla
arrocera.
'HVSXpVGHODOLPSLH]DYXHOYDDFRORFDUOD
válvula de vapor en la olla arrocera. Consulte
³&XLGDGR\OLPSLH]D´

35
PROBLEMA POSIBLES CAUSAS SOLUCIÓN
Olor desagradable
NOTA: Un olor a plástico
es normal las primeras
veces que se usa la olla
arrocera.
El modo Mantener caliente se usó por demasiado
tiempo.
1RSHUPLWDTXHHODUUR]SHUPDQH]FDHQPRGR
0DQWHQHUFDOLHQWHLQGH¿QLGDPHQWH6LUYDHO
DUUR]SRFRGHVSXpVGHOSHUtRGRGHGHVFDQVRGH
10 minutos.
(ODUUR]TXHGyHQODFD]XHODGHFRFFLyQGHVSXpV
de que el modo Mantener caliente se apagara.
5HWLUHHODUUR]FRFLGRGHODROOD
(ODUUR]QRVHHQMXDJyDIRQGR (QMXDJXHHODUUR]KDVWDTXHHODJXDVDOJDOLPSLD
/DFD]XHODGHFRFFLyQ\RODYiOYXODGHYDSRU
están sucias.
/LPSLH\VHTXHELHQODVSLH]DV9HU³/LPSLH]D´
Se dejó la cuchara de plástico en la olla. Retire la cuchara de plástico y todos los
accesorios de la olla arrocera antes de usarla.
El arroz está seco y ha
cambiado de color
(ODUUR]KDVLGRUHFDOHQWDGRUHSHWLGDPHQWH (ODUUR]GHEHUHFDOHQWDUVHVRORXQDYH]SDUD
PDQWHQHUODFDOLGDG5RFtHHODUUR]FRQDJXDSDUD
evitar que se seque durante el recalentamiento.
La válvula de vapor no está conectada
correctamente.
Después del lavado, conecte la válvula de vapor
FRUUHFWDPHQWHDODROODDUURFHUD9HU³/LPSLH]D´
La olla arrocera está
hirviendo y salpicando
NOTA: Es normal que
DSDUH]FDKXPHGDGHQ
la tapa interior o en la
FD]XHODGHFRFFLyQ\
gotee cuando se abre la
tapa.
La válvula de vapor no está conectada
correctamente.
Después del lavado, conecte la válvula de vapor
FRUUHFWDPHQWHDODROODDUURFHUD9HU³/LPSLH]D´
La válvula de vapor y/o el sensor de temperatura
están sucios.
Limpie la válvula de vapor y el sensor de
temperatura.
Se usó un programa equivocado
LQYROXQWDULDPHQWHSDUDFRFLQDUDUUR]
Seleccione el programa de cocción para los
ingredientes que está cocinando.
La tapa de la olla
arrocera es difícil de
cerrar
Sustancias extrañas en el cierre de la tapa evitan
que la tapa exterior se enganche.
Retire bien los residuos del pestillo de la tapa.
Capa en el interior de
la cazuela de cocción
(ODOPLGyQHQHODUUR]VHGHUUHWLUiGXUDQWHOD
FRFFLyQ\VHVHFDUiHQHOLQWHULRUGHODFD]XHODGH
cocción.
Durante el lavado, use una esponja o utensilio
de fregar de plástico no abrasivo para quitar
suavemente la capa.

36
1 AÑO DE GARANTÍA
(VWDHVOD~QLFDJDUDQWtDH[SUHVDSDUDHVWHSURGXFWR\UHHPSOD]DFXDOTXLHURWUDJDUDQWtDRFRQGLFLyQ
6HJDUDQWL]DTXHHVWHSURGXFWRHVWiOLEUHGHGHIHFWRVGHPDWHULDO\PDQRGHREUDSRUXQSHUtRGRGHXQDxRDSDUWLUGHODIHFKD
de compra original. Durante este período, su solución exclusiva es la reparación o sustitución de este producto o de cualquier
componente que se encuentre defectuoso, a nuestra discreción; sin embargo, usted es responsable de todos los costes asociados
con la devolución del producto a nosotros y la devolución del producto o componente en virtud de esta garantía. Si el producto o
FRPSRQHQWH\DQRHVWiGLVSRQLEOHORUHHPSOD]DUHPRVSRUXQRVLPLODUGHLJXDORPD\RUYDORU
Esta garantía no cubre el desgaste por uso normal y el funcionamiento que no se ajuste a los manuales de instrucciones ni a los
GDxRVTXHVHSURGX]FDQHQHOSURGXFWRFRPRFRQVHFXHQFLDGHXQDFFLGHQWHDOWHUDFLyQDEXVRRXVRLQFRUUHFWR(VWDJDUDQWtD
se extiende solo al comprador consumidor original o al destinatario del regalo. Guarde el recibo de compra original, ya que se
requiere un comprobante de compra para reclamar la garantía. Esta garantía es nula si el producto se usa para otro uso que no
VHDXQKRJDUXQLIDPLOLDURVLHVWiVXMHWRDFXDOTXLHUYROWDMH\IRUPDGHRQGDTXHQRVHDHOHVSHFL¿FDGRHQODHWLTXHWD
Excluimos todas las reclamaciones por daños especiales, incidentales y consecuentes por incumplimiento de la garantía expresa
o implícita. Toda responsabilidad se limita al importe del precio de compra. Toda garantía implícita, incluida cualquier garantía legal
o condición de comerciabilidad o idoneidad para un propósito particular, salvo en la medida en que lo prohíba la ley, en cuyo caso
dicha garantía o condición se limita a la duración de esta garantía escrita.
(VWDJDUDQWtDOLPLWDGDOHRWRUJDDXVWHGGHUHFKRVOHJDOHVHVSHFt¿FRV(VSRVLEOHTXHWHQJDRWURVGHUHFKRVOHJDOHVTXHYDUtDQ
según el lugar donde viva. Algunos estados o provincias no permiten limitaciones en garantías implícitas o daños consecuentes
especiales e incidentales, por lo que las limitaciones anteriores pueden no aplicarse a usted.
Servicio al cliente:
Midea America Corp
5 Sylvan Way, Suite 100
Parsippany, NJ 07054
Teléfono: 866 646 4332

-
 1
1
-
 2
2
-
 3
3
-
 4
4
-
 5
5
-
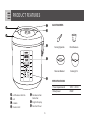 6
6
-
 7
7
-
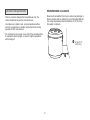 8
8
-
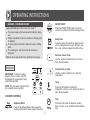 9
9
-
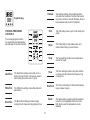 10
10
-
 11
11
-
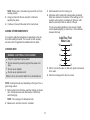 12
12
-
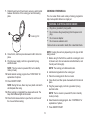 13
13
-
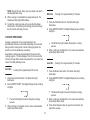 14
14
-
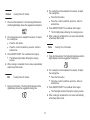 15
15
-
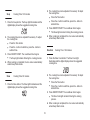 16
16
-
 17
17
-
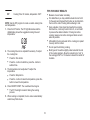 18
18
-
 19
19
-
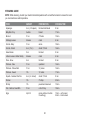 20
20
-
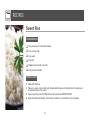 21
21
-
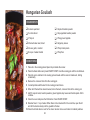 22
22
-
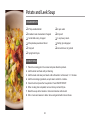 23
23
-
 24
24
-
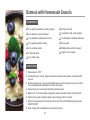 25
25
-
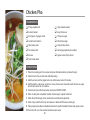 26
26
-
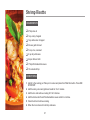 27
27
-
 28
28
-
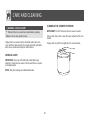 29
29
-
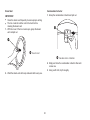 30
30
-
 31
31
-
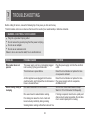 32
32
-
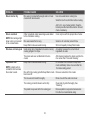 33
33
-
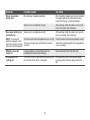 34
34
-
 35
35
-
 36
36
-
 37
37
-
 38
38
-
 39
39
-
 40
40
-
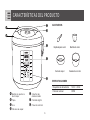 41
41
-
 42
42
-
 43
43
-
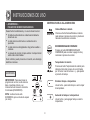 44
44
-
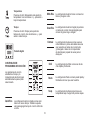 45
45
-
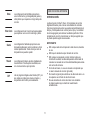 46
46
-
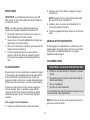 47
47
-
 48
48
-
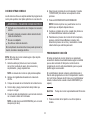 49
49
-
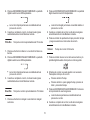 50
50
-
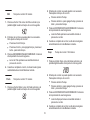 51
51
-
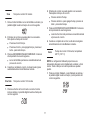 52
52
-
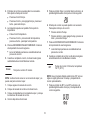 53
53
-
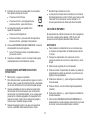 54
54
-
 55
55
-
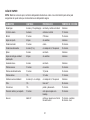 56
56
-
 57
57
-
 58
58
-
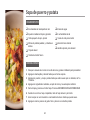 59
59
-
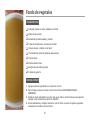 60
60
-
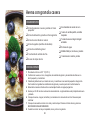 61
61
-
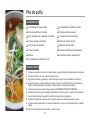 62
62
-
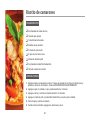 63
63
-
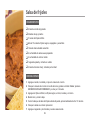 64
64
-
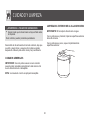 65
65
-
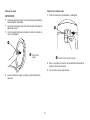 66
66
-
 67
67
-
 68
68
-
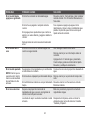 69
69
-
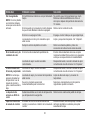 70
70
-
 71
71
-
 72
72


COMFEE' MB-M25 Manual de usuario
- Categoría
- Pequeños electrodomésticos de cocina
- Tipo
- Manual de usuario
en otros idiomas
- English: COMFEE' MB-M25 User manual
Otros documentos
-
Elite EPC-807 Guía del usuario
-
Hamilton Beach 37541 Manual de usuario
-
Magic Chef MCSMC6B Guía del usuario
-
Cuisinart FRC-1000 El manual del propietario
-
Redmond RMC-PM190A El manual del propietario
-
Midea MPC176-SS Manual de usuario
-
-
KALORIK EPCK 44847 BK El manual del propietario
-
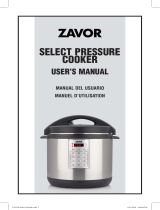 Zavor SELECT Serie Manual de usuario
-
Fagor 670041930 Manual de usuario
