

D
E
D
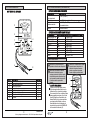
PRELIMINARY ADJUSTMENT
1
IMPORTANT: Always identify the
battery polarity before testing.
IMPORTANT: To avoid excessive
drain on the battery under test, do
not press the pushbutton down
when using the test leads or short
the test leads across one another
when pressing the pushbutton.
IMPORTANT: Do not allow the test
leads to touch the metal positive
and negative contact points on
the tester during any battery test.
Button cell 1.5V
AAA-N-1.5V
1.125V+/-0.09V
AA-C-D-1.5V
150mA
1.125V+/-0.09V
Lithium 3V
1mA
2.25V+/-0.18V
6V
10mA
4.50V+/-0.36V
9V
10mA
6.75V+/-0.54V
12V
10mA
9.00V+/-0.72V
15V
10mA
11.25V+/-0.90V
22.5V
10mA
16.875V+/-1.35V
1.125V+/-0.09V
1mA
50mA
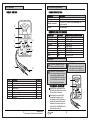
Battery Type
Load Current
Minimum Voltage for Good Indication
Operating temperature
Humidity
Storage environment
Altitude
32-104°F(0-40°C)
Up to 80% relative humidity
14° F to 122° F (-10 to 50°C) with a maximum 70%
relative humidity
Up to 2000 meters
Component Specification
4 3
HOMEDEPOT.COM
Please contact 1-877-527-0313 for further assistance.
Pre-Operation
PACKAGE CONTENTS
Pre-Operation (continued)
PRODUCT SPECIFICATIONS
A
1
1
1
1
B
C
D
E
Part
Description
Quantity
1
1
1
1
F
G
H
Red test lead
Black test lead
Battery selector
Indicator scale
Zero adjustment screw
Positive contact point
Negative contact point
Pushbutton
A
F
G
D
E
C
H
B
D
MINIMUM VOLTAGE SPECIFICATIONS
Operation
Locate the zero adjustment screw
(E) directly below the indicator scale
(D) on the face of the tester.
If necessary, use a small flat tip
screwdriver to slowly turn the
adjustment screw (E) clockwise or
counterclockwise until the needle
indicator lines up directly over the
far left side of the REPLACE portion
of the indicator scale (D).

D
N
I
C
K
E
L
C
A
D
M
I
U
M
B
U
T
T
O
N
C
E
L
L
L
I
T
H
I
U
M
R
E
G
U
L
A
R
D
D
H
D
D
A
B
F
D
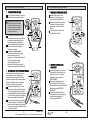
ALTERNATE TESTING METHODS
3
D
C
A
B
G
F
D
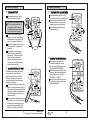
TESTING A BATTERY
2
6 5
HOMEDEPOT.COM
Please contact 1-877-527-0313 for further assistance.
Operation (Continued)
Operation (continued)
Set the battery selector (C) to the
type of battery you are testing.
IMPORTANT: If the battery selector
(C) is incorrectly positioned, an
inaccurate test will result and
may damage the tester and cause
excessive drain on the battery.
Touch the red test lead (A) to the
positive (+) terminal on the battery,
and the black test lead (B) to the ne
gative (–) terminal on the battery.
Observe the battery condition on the
indicator scale (D) as indicated by
the needle.
When testing 9-volt rectangular
batteries, position the positive (+)
and negative (–) battery terminals
directly onto the positive and
negative contact points (F and G).
Then observe the battery condition
on the indicator scale (D).
Depending on the battery type, it may
be easier to use the positive and
negative contact points (F and G) on
the tester instead of touching both
test leads to the positive and negative
terminals on a battery.
Position the positive (+) terminal of the
battery on the positive contact point (F).
Then touch the black test lead (B) to the
negative (–) terminal of the battery and
observe the battery condition on the
indicator scale (D).
The reverse can be done by positioning
the negative (–) terminal of the battery
on the negative contact point (F) and
touching the red test lead (A) to the
positive (+) terminal on the battery.
Insert the battery, negative (-) side
up, in the slot below the pushbutton (H).
Press down on the pushbutton (H) to
make contact with the positive and
negative terminals on the battery.
Read the battery condition on the
indicator scale (D).
When testing nickel-cadmium
rechargeable batteries, read the
bottom portion of the indicator scale
(D) marked NICKEL CADMIUM.
When testing button cells and lithium
batteries, read on the middle portion
of the indicator scale (D) marked
BUTTON CELL - LITHIUM.
When testing all other batteries, read
the top portion of the indicator scale
(D) marked REGULAR.
TESTING BUTTON CELL BATTERIES
4
READING THE INDICATOR SCALE
5

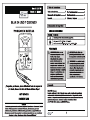
Questions, problems, missing parts? Before returning to the store,
call Home Depot Customer Service
1-877-527-0313
HOMEDEPOT. COM
Retain this manual for future use.
MARGINAL READINGS
The condition of a battery is marginal when the needle indicator rests in the
60%-70% (yellow) area on the REGULAR portion of the indicator scale (D). Consider
replacing the battery if the measurement is in this area.
Periodic maintenance of this instrument
is not required. However, should the
unit require cleaning,wipe it with a soft
cloth dampened in a mild soap and
water solution.
Avoid placing the tester in areas where
vibration, dust, or dirt are present.
Do not store the tester in excessively
hot, humid or damp places.
7
HOMEDEPOT.COM
Please contact 1-877-527-0313 for further assistance.
Operation (continued)
Care and Cleaning


Batería botón 1.5V
AAA-N-1.5V
1.125V+/-0.09V
AA-C-D-1.5V
150mA
1.125V+/-0.09V
Litio 3V
1mA
2.25V+/-0.18V
6V
10mA
4.50V+/-0.36V
9V
10mA
6.75V+/-0.54V
12V
10mA
9.00V+/-0.72V
15V
10mA
11.25V+/-0.90V
22.5V
10mA
16.875V+/-1.35V
1.125V+/-0.09V
1mA
50mA
Tipo de Batería
Carga de Corriente
Voltaje Mínimo para Indicación de Bueno
Pre-Funcionamiento
CONTENIDO DEL EMPAQUE
Pre-Funcionamiento (Continuación)
ESPECIFICACIONES DEL PRODUCTO
ESPECIFICACIONES MÍNIMAS DE VOLTAJE
Funcionamiento
Localice el Tornillo de ajuste a cero
(E) directamente debajo de la escala
indicadora (D) en la cara del probador.
Si es necesario, utilice un destornillador
plano pequeño para girar el tornillo de
ajuste (E) hágalo en el sentido de las
manecillas del reloj y viceversa hasta
que la aguja del indicador se alinea
directamente sobre el lado más a la
izquierda de la porción de REEMPLACE
de la escala del indicador (D).
Componente
Especificación
32-104°F (0-40°C)
Humedad
14 a 122°F (-10 a 50°C) con un máximo de 70 %
de humedad relativa
Altitud
Temperatura de
funcionamiento
Hasta 80 % de humedad relativa
Ambiente de
almacenamiento
Hasta 2000 metros
IMPORTANTE: Siempre identifique la
polaridad de la batería antes de probarla.
IMPORTANTE: No permita que las puntas
de prueba toquen cualquiera de los
metales de los puntos de contacto
positivos y negativos del probador
durante cualquier prueba de batería.
IMPORTANTE: Para evitar un consumo
excesivo de la batería bajo prueba,
mantenga presionado el pulsador cuando
esté usando las puntas de prueba o haga
que las puntas de prueba se toquen entre
sí mientras mantiene presionado el
pulsador.
A
1
1
1
1
B
C
D
E
Parte
Descripción
Cantidad
1
1
1
1
F
G
H
Tornillo de ajuste mecánico del cero
Punta de prueba roja
Punta de prueba negra
Selector de batería
Escala indicadora
Punto de contacto positivo
Punto de contacto negativo
Pulsador
AJUSTE PRELIMINAR
1
4
HOMEDEPOT.COM
Por favor, póngase en contacto con el 1-877-527-0313 para obtener más ayuda.
3
A
F
G
D
E
C
H
B
D
D
E
D

LEYENDO LA ESCALA DEL
INDICADOR
5
PROBANDO BATERIAS DE BOTON
4
ALTERNANDO LOS METODOS DE PRUEBA
3
PROBANDO UNA BATERIA
2
Funcionamiento (Continuación)
Fije el selector de batería (C) en el tipo
de batería que usted está probando.
IMPORTANTE: Si el selector de la
batería (C) está incorrectamente
colocado, el resultado será una
prueba inexacta y puede dañar el
medidor y provocar un consumo
excesivo de la batería.
Coloque la punta de prueba roja (A)
en el terminal positivo (+) de la batería
y la punta de prueba negra (B) en el
terminal negativo (-) de la batería.
Observe la condición de la batería en
la escala del indicador (D) según lo
indicado por la aguja.
Cuando esté probando baterías
rectangulares de 9 voltios, coloque
los terminales positivo (+) y
negativo (-) de la batería directamente
sobre los puntos de contacto
positivo y negativo (F y G). A
continuación, observe el estado de
la batería en la escala del indicador (D).
Coloque el terminal positivo (+) de la
batería en el punto de contacto positivo
(F). A continuación, toque con la punta
de prueba negra (B) el terminal negativo
(-) de la batería y observe el estado de la
batería en la escala del indicador (D).
Lo inverso puede hacerse colocando el
terminal negativo (-) de la batería en el
punto de contacto negativo (F) y tocando
con la punta de prueba roja (A) la terminal
positiva de la batería.
Funcionamiento (Continuación)
Inserte la batería, con el lado
negativo (-) hacia arriba, en la
ranura debajo del pulsador (H).
Presione el pulsador (H) para hacer
contacto con los polos positivo y
negativo de los terminales de la
batería.
Lea el estado de la batería en la
escala del indicador (D).
Cuando esté probando las baterías
recargables de níquel-cadmio, lea
la parte inferior de la escala del
indicador (D) marcada como
NIQUEL CADMIO.
Cuando esté probando pilas de
botón y baterías de litio, lea en la
parte media de la escala del indicador
(D) marcada como BATERÏA DE
BOTON LITIO.
Cuando esté probando todas las
otras baterías, lea la parte superior
de la escala del indicador (D)
marcada como REGULAR.
6
HOMEDEPOT.COM
Por favor, póngase en contacto con el 1-877-527-0313 para obtener más ayuda.
5
D
A
B
F
D
D
C
A
B
G
F
D
D
N
I
C
K
E
L
C
A
D
M
I
U
M
B
U
T
T
O
N
C
E
L
L
L
I
T
H
I
U
M
R
E
G
U
L
A
R
D
D
H
D
Dependiendo del tipo de batería, podrían
ser más fáciles de usar los puntos de
contacto positivos y negativos (F y G) del
probador en lugar hacer que ambas puntas
de prueba contacten con los terminales
positivos y negativos de una batería.

HOMEDEPOT.COM
Por favor, póngase en contacto con el 1-877-527-0313 para obtener más ayuda.
7
¿Preguntas, problemas, piezas faltantes? Antes de regresarlo
a la tienda, llame a Servicio al Cliente de Home Depot
1-877-527-0313
HOMEDEPOT.COM
Conserve este manual para referencia futura.
LECTURAS MARGINALES
La condición de una batería es marginal cuando la aguja descansa en el área de
60 % - 70 % (amarilla) en la porción REGULAR de la escala del indicador (D).
Considere reemplazar la batería si la medida se encuentra en esta área.
No se requiere un mantenimiento
periódico de este instrumento. Sin
embargo, si la unidad requiere de
limpieza, límpiela con un paño suave
humedecido en una solución suave de
jabón y agua.
Evite colocar el probador en áreas donde
existan vibraciones, polvo o suciedad.
No guarde el probador en lugares
excesivamente calientes, húmedos o
mojados.
Funcionamiento (Continuación)
Cuidado y Limpieza
-
 1
1
-
 2
2
-
 3
3
-
 4
4
-
 5
5
-
 6
6
-
 7
7
-
 8
8


Commercial Electric MS602H Instrucciones de operación
- Tipo
- Instrucciones de operación
- Este manual también es adecuado para
en otros idiomas
Artículos relacionados

Otros documentos
-
Gardner Bender GBT-500A Manual de usuario
-
Puls UF20.241 Guía de instalación
-
Bosch Appliances MMD 540H Manual de usuario
-
Klein Tools CL220 Manual de usuario
-
Klein Tools CL320 Manual de usuario
-
Craftsman 82139 El manual del propietario
-
Extech Instruments MiniTec MN24 Manual de usuario
-
Profile PIN-116 Manual de usuario
-
Southwire 10030S Instrucciones de operación
-