Silvercrest KH 2281 Operating Instructions Manual
- Categoría
- Radios
- Tipo
- Operating Instructions Manual

KOMPERNASS GMBH · BURGSTRASSE 21 · D-44867 BOCHUM
www.kompernass.com
ID-Nr.: KH2281-07/08-V1
RADIO DE COCINA
Instrucciones de uso
RADIOSVEGLIA
Istruzioni per l'uso
KITCHEN RADIO
Operating instructions
5
RADIO DE COCINA
RADIOSVEGLIA
KÜCHENRADIO
Bedienungsanleitung
KH 2281
CV_KH2281_AR5027_LB5 15.07.2008 9:00 Uhr Seite 1

KH 2281
i
dyt u f j
q
e
o g hsa
r
w
CV_KH2281_AR5027_LB5 15.07.2008 9:00 Uhr Seite 4

- 1 -
ÍNDICE PÁGINA
Datos técnicos 2
Uso conforme al previsto 2
Instrucciones de seguridad 2
Volumen de suministro 4
Leyenda aparato 4
Colocación de la radio de cocina debajo de un armario colgante 4
Emplazar la radio de cocina 5
Puesta en funcionamiento 5
Inserción de las pilas de backup....................................................................................................5
Alimentación de corriente ...............................................................................................................5
Ajustar la hora ..................................................................................................................................6
Ajustar la fecha.................................................................................................................................6
Conexión y desconexión de la eliminación de pantalla .............................................................6
Ajustar el modo de 12 o 24 horas................................................................................................6
Temporizador de cocina .................................................................................................................6
Función de alarma (alarma 1 y alarma 2) ...................................................................................7
Funcionamiento de la radio 8
Ajustar manualmente la emisora.....................................................................................................8
Búsqueda automática de emisora..................................................................................................8
Memorizar la emisora .....................................................................................................................8
Ajustar el volumen............................................................................................................................8
Conexión del refuerzo de graves...................................................................................................8
Bloquear............................................................................................................................................8
Ajustar hora de desconexión automática......................................................................................8
Limpieza 9
Evacuación 9
Importador 9
Garantía y servicio posventa 10
Lea atentamente este manual de instrucciones antes del primer uso y consérvelo para posteriores utilizaciones.
Entréguelo en caso de traspasar el aparato a terceros.
IB_KH2281_Ar5027_LB5 15.07.2008 9:05 Uhr Seite 1

- 2 -
RADIO DE COCINA
KH2281
Datos técnicos
Este aparato satisface los requisitos fundamentales
y otras normativas relevantes de la directiva EMC
2004/108/CE, así como la directiva para aparatos
de baja tensión 2006/95/CE.
Conexión a la red eléctrica: AC 220 - 240 V
~
50 Hz
Consumo de potencia: 5 vatios
Consumo de potencia en
standby: 0,7 W
Temperatura de servicio: +5
~
+35°C
Humedad: 5
~
90 %
(sin condensación)
Medidas (L x A x Al): 305 x 157 x 45 mm
Peso : 800 g aprox.
Clase de protección: II /
Pilas de reserva
2x 1,5 V, tipo AAA/LR03/Micro
(No incluidas en el volumen de suministro)
Gama de frecuencias de radio:
FM (UKW) : 87,5 – 108,5 MHz
Las particularidades técnicas del aparato posibilitan una
gama de frecuencias ajustable de 87,5 - 108,5 MHz.
En diferentes países pueden existir regulaciones
nacionales divergentes a las gamas de frecuencia
de radio existentes. Preste atención de que queda
prohibida transmitir a terceros o para fines distintos
las informaciones recibidas que queden fuera de la
gama de frecuencia radioeléctricas asignada.
Uso conforme al previsto
La radio de cocina ha sido diseñada para su
emplazamiento y montaje debajo de un armario.
La radio de cocina está prevista para la recepción
de emisoras de radio FM y para su uso como
despertador por medio de una señal de alarma
o la radio.
La radio de cocina no está concebida para ser
utilizada en ámbitos industriales o comerciales.
No se asume ninguna garantía por daños resultantes
de un uso no conforme al previsto del aparato.
Instrucciones de seguridad
• Este aparato no ha sido concebido para su uso
por personas (incluidos los niños) cuyas
facultades físicas, sensoriales o mentales estén
limitadas o carezcan de los conocimientos o la
experiencia necesarias, si no están bajo
vigilancia de una persona que garantice su
seguridad o han sido instruidas correctamente
acerca del uso del aparato.
• Mantenga vigilados a los niños, a fin de
asegurar de que no jueguen con el aparato.
• Para evitar un encendido involuntario, extraiga
la clavija de red después de cada uso y antes
de cada limpieza.
• Compruebe el aparato y todas las piezas si
presentan daños visibles. El concepto de
seguridad del aparato solo funcionará en
estado correcto.
• La clavija de red deberá quedar fácilmente
accesible de modo que en caso de emergen-
cia se pueda separar el aparato de manera
rápida de la red.
¡Peligro de descarga eléctrica!
• Conecte el aparato únicamente a una base
de enchufe instalada y conectada a tierra de
acuerdo con la normativa. La tensión de red
debe corresponderse a los datos de la placa
de características del aparato.
IB_KH2281_Ar5027_LB5 15.07.2008 9:05 Uhr Seite 2

- 3 -
• En caso de una clavija de red dañada o cable
de red dañado, encomiende su sustitución a
personal técnico autorizado o al servicio de
posventa con el fin de evitar riesgos.
• Deje que el servicio de asistencia técnica repare
o en su caso sustituya la línea de conexión o
bien los aparatos que no funcionen
correctamente.
No sumerja nunca el aparato en agua.
Límpielo sólo con un trapo ligeramente
humedecido.
• No exponga el aparato a lluvia ni lo utilice
jamás en entornos mojados o húmedos.
• Cuide de que el cable de alimentación no se
moje o humedezca nunca durante el
funcionamiento.
• No está permitido abrir o reparar la carcasa
del aparato. En este caso no existe seguridad
y perderá el derecho a la garantía.
• Proteja el aparato contra gotas y salpicaduras
de agua. Para ello, no coloque ningún recipiente
que contenga líquido (p. ej. jarrón con flores)
encima o junto al aparato.
¡Riesgo de incendio!
• No utilice el aparato en la proximidad de
superficies calientes.
• No coloque el aparato en lugares donde
quede expuesto directamente a la radiación
solar. De otro modo podría sobrecalentarse y
dañarse de forma irreparable.
• No cuelgue la radio de cocina por encima de
una encimera. La radio de cocina puede dañarse.
¡Existe riesgo de incendio!
• No deje nunca el aparato desatendido durante
su funcionamiento.
• Nunca cubra la rejilla de ventilación del
aparato mientras que este encendido.
• No coloque fuentes de fuego abiertas, como
velas encima del o junto al aparato.
¡Peligro de lesiones!
• Mantenga los niños alejados de la línea de
conexión y del aparato. Los niños a veces
menosprecian los riesgos que pueden tener
los aparatos eléctricos.
• Procure un asiento estable del aparato.
• En caso de que se caiga el aparato o esté
dañado, no deberá ponerlo de nuevo en
funcionamiento. Deje que compruebe el
aparato personal especialista cualificado y
en su caso que lo repare.
• Las pilas/baterías pueden causar peligro de
muerte si se ingieren. Mantenga las pilas fuera
del alcance de los niños pequeños. En caso de
ingestión de una pila consulte inmediatamente
con un médico.
• Igualmente, mantenga los plásticos de embalaje
fuera del alcance de los niños pequeños.
Podrían asfixiarse.
Advertencia:
Ciertas pinturas de muebles agresivas pueden
dañar los pies de goma del aparato. Coloque
el aparato sobre una superficie antideslizante.
¡Tormentas!
En caso de tormentas se pueden dañar los
aparatos conectados a la red eléctrica. Extraiga
por ello en caso de tormenta la clavija de red
de la base de enchufe.
Indicación sobre la tensión de
choque (EFT/proceso de paso
eléctrico rápido) y descargas
electroestáticas:
En caso de un fallo de función debido a procesos
de paso eléctrico rápido (tensión de choque)
o descargas electroestáticas, se debe reposi-
cionar el producto, con el fin de restablecer el
modo de funcionamiento normal. Es posible
que sea necesario interrumpir la alimentación
de corriente y volver a conectarlo. Deberá
retirar las pilas (si están disponibles) y volver
a colocarlas.
IB_KH2281_Ar5027_LB5 15.07.2008 9:05 Uhr Seite 3

- 4 -
Nota acerca de la desconexión
de red
El interruptor de ENCENDIDO del aparato
no lo desconecta completamente de la red
eléctrica. Además, en el modo inactivo el
aparato también consume corriente. Para
desconectar el aparato completamente de la
red es necesario extraer la clavija de red de la
base de enchufe.
Nota acerca de la manipulación
de las pilas
El aparato utiliza pilas para el salvado de la memoria.
Tenga en cuenta lo siguiente a la hora de manipular
pilas:
¡Riesgo de explosión!
No arroje las pilas al fuego. No vuelva a
cargar las pilas.
• No abra las pilas, no estañe ni suelde las pilas
nunca.
¡Existe riesgo de explosión y de lesiones!
• Compruebe periódicamente las pilas. Las pilas
gastadas pueden ocasionar daños al aparato.
• Cuando no vaya a utilizar el aparato durante
un periodo prolongado, extraiga las pilas.
• Si las pilas han perdido líquido, utilice guantes
de protección.
• Limpie el compartimiento de pilas y los
contactos de las pilas con un paño seco.
¡
Atención!
¡Por los daños en la radio de cocina derivados
de influencias de la humedad, penetración de
agua en el aparato o bien sobrecalentamiento
no nos hacemos responsables / se pierden los
derechos a la garantía!
Volumen de suministro
- Radio de cocina KH 2281
- Placa de montaje
- 4 tornillos
- Instrucciones de uso
Leyenda aparato
q
Placa de montaje
w
Palanca de anclaje
e
Cable de red
r
Antena flexible
t
Tecla TIMER/ALARM MODE
y
Tecla ALARM 1/VOL+
u
Tecla POWER ON/OFF
i
Tecla ALARM 2/VOL-
o
Teclas 1/3 PRESET, 2/4 PRESET
a
Compartimento de pilas
s
Pantalla
d
Tecla A.O.T.
f
Tecla STORE
g
Teclas TUNING UP/DOWN
h
Altavoces
j
Tecla MODE SET/BASS
Colocación de la radio de
cocina debajo de un armario
colgante
Puede colgar la radio de cocina con la placa de
montaje suministrada
q
p. ej. debajo de un
armario de cocina colgante:
1. Busque un lugar de montaje apropiado para
la radio de cocina.
2. P
resione las dos palancas de anclaje
w
del
dorso del aparato hacia abajo. Deslice la placa
de montaje
q
hacia atrás y retirela.
3. Sujete la placa de montaje
q
en el lugar de
montaje. Deje un espacio de unos 3,5 cm
respecto al borde anterior. De este modo la
radio de cocina cerrará al ras.
IB_KH2281_Ar5027_LB5 15.07.2008 9:05 Uhr Seite 4

- 5 -
4- Marque con lápiz los cuatro puntos para los
taladros de los orificios.
5- Marque los taladros con un granete.
6. Atornille con firmeza la placa de montaje
q
usando los tornillos adjuntos en el accesorio.
7. Coloque la radio de cocina inclinada con los
dos huecos dentro de las pestañas de sujeción
sobre la placa de montaje
q
. Empuje la radio
de cocina hacia arriba, hasta que se encaje
de forma audible.
Fije la antena flexible de hilo con un trozo de
cinta adhesiva de modo que no cuelgue.
Emplazar la radio de cocina
No instale la radio de cocina sin la placa de
montaje
q
. De lo contrario el altavoz queda oculto
y apenas se puede escuchar la música.
Para emplazar la radio de cocina con la placa de
montaje suministrada
q
:
1. Presione simultáneamente hacia abajo las dos
palancas de anclaje
w situadas en el dorso
del aparato. Tire de la placa de montaje
q
hacia atrás y retirela.
2. Deslice ambos salientes de sujeción en la
placa de montaje
q
en las cavidades del
lado dorsal posterior de la radio de cocina.
3. Presione la parte anterior de la placa de mon-
taje
q
firmemente hacia abajo hasta escuchar
como encastra. A continuación puede colocar
la radio de cocina.
Para desmontar la placa de montaje
q
coloque el
pulgar debajo de la placa de montaje
q
y presione
hacia delante y hacia arriba hasta que se afloje.
Retire la placa de montaje
q
.
Puesta en funcionamiento
Inserción de las pilas de backup
Por medio de las pilas de backup no se pierden en
caso de fallo de corriente la información sobre la
hora, fecha, alarmas de despertador y SDA (Special
Day Alert) ajustado. Para ello precisa dos pilas de
1,5V del tipo AAA. Estas no están contenidas en
el volumen de suministro.
1. Abra la tapa del compartimento de pilas
a
situado en el lado inferior de la radio de cocina.
2. Inserte las pilas. Preste atención a la polaridad
correcta.
3.
Cierre la tapa del compartimento de pilas
a
.
Debe escuchar como encastra la tapa.
Advertencia:
Las pilas de reserva se deberán comprobar
como mínimo una vez al año y en su caso
cambiarlas.
Alimentación de corriente
• Conecte la clavija de red en una base de
enchufe. En la pantalla, la hora se inicia a
las "00:00.
00".
Para poder utilizar las funciones de alarma de la
radio, debe ajustar en primer lugar la fecha y la
hora, tal y como se describe en los apartados
siguientes.
IB_KH2281_Ar5027_LB5 15.07.2008 9:05 Uhr Seite 5

- 6 -
Ajustar la hora
Para que sea posible ajustar la hora, la fecha, la
iluminación de pantalla y el formato de hora, la
radio debe estar desconectada.
1. Pulse una vez la tecla MODE SET/BASS
j
.
La hora parpadea.
2. Pulse las teclas TUNING UP/DOWN
g
para ajustar
la hora minuto a minuto. Pulsar y mantener
accionadas las teclas varia la hora en
intervalos de 10 minutos.
Si no se pulsa ninguna tecla durante 10 segundos,
se guarda el ajuste y la radio de cocina vuelve a
mostrar la hora.
Ajustar la fecha
1. Pulse dos veces la tecla MODE SET/BASS
j
. En la
pantalla, parpadea la indicación de fecha
"01
.01.08".
2. Pulse las teclas TUNING UP/DOWN
g
para ajustar
la fecha día a día. Pulsar y mantener
accionadas las teclas, cambia la fecha en
intervalos de 10 días.
Si no se pulsa ninguna tecla durante 10 segundos,
se guarda el ajuste y la radio de cocina vuelve a
mostrar la hora.
Conexión y desconexión de la
eliminación de pantalla
1. Pulse tres veces la tecla MODE SET/BASS
j
.
En la pantalla aparece "L".
2. Pulse la tecla TUNING UP
g
para conectar la
iluminación de pantalla. En la pantalla aparece
"H".
3. Pulse las teclas TUNING DOWN
g
para descon
ectar la iluminación de pantalla. En la pantalla
aparece "L".
Si no se pulsa ninguna tecla durante 10 segundos,
se guarda el ajuste y la radio de cocina vuelve a
mostrar la hora.
Ajustar el modo de 12 o 24 horas
1. Pulse cuatro veces la TECLA MODE SET/BASS
g
.
En la pantalla aparece "24" para el modo de 24
horas.
2. Pulse las teclas TUNING UP
g
para ajustar el
modo de 24 horas.
3. Pulse las teclas TUNING DOWN
g
para ajustar el
modo de 12 horas.
En la pantalla aparece "12". Para las horas de la
tarde aparece adicionalmente PM en la pantalla.
Temporizador de cocina
1. Pulse la tecla TIMER/ALARM MODE
t
. En la
pantalla aparece el símbolo del
temporizador (timer).
2. Con las teclas TUNING UP/DOWN
g
, ajuste la
hora que desee (puede ajustarse un intervalo
comprendido entre 1 minuto y 23:59 h).
3. Pulse de nuevo la tecla TIMER/ALARM MODE
t
para iniciar el temporizador de cocina. En la
pantalla aparece el símbolo del temporizador
y, además, un símbolo de reloj que marcha
hacia atrás.
30 segundos antes de terminarse el tiempo ajustado
suena una señal acústica, que suena a intervalos
más cortos a medida que transcurre el tiempo.
Cuando se acaba el tiempo, la señal suena de
forma continua durante una hora.
• Pulse la tecla
TIMER/ALARM MODE
t
para desactivar
la señal.
Interrumpir el temporizador de cocina
• Puede interrumpir el temporizador de cocina
pulsando brevemente la tecla
TIMER/ALARM MODE
t
.
El tiempo del temporizador parpadea. Aparece el
símbolo de reloj.
• Vuelva a pulsar la tecla
TIMER/ALARM MODE
t
.
El tiempo continua funcionando.
Cancelar el temporizador de cocina
• Para cancelar el temporizador de cocina, man-
tenga pulsada la tecla
TIMER/ALARM MODE
t
.
En la pantalla aparece la hora.
IB_KH2281_Ar5027_LB5 15.07.2008 9:05 Uhr Seite 6

- 7 -
Programar el temporizador de cocina
Puede guardar tiempos en el temporizador de cocina.
1. Pulse la tecla TIMER/ALARM MODE
t
.
2. Con las teclas TUNING UP/DOWN
g
, ajuste la
hora elegida
3. Pulse la tecla STORE
f
. En la pantalla parpadea
ahora „T“.
4. Pulse las teclas 1/3 PRESET, 2/4 PRESET
o
para la
posición de memoria elegida. Dispone de cuatro
posiciones de memoria. En el display aparece
el número del puesto de memoria elegido.
5. Vuelva a pulsar la tecla STORE
f
. La hora de
alarma ha quedado ahora memorizada.
Si no se pulsa ninguna tecla durante 10 segundos,
la radio de cocina conmuta de nuevo a la indicación
de la hora.
6. Para llamar las temporizaciones de cocina
memorizadas, pulse la tecla
TIMER/ALARM MODE
t
y la tecla de la posición memoria
correspondiente (
1/3 PRESET, 2/4 PRESET
o
).
7. Pulse de nuevo la tecla TIMER/ALARM MODE
t
para iniciar el temporizador de cocina. En la
pantalla aparece un símbolo de reloj que marcha
hacia atrás.
8. Para cancelar el temporizador de cocina, man-
tenga pulsada la tecla
TIMER/ALARM MODE
t
.
Función de alarma (alarma 1 y alarma 2)
Con su radio de cocina puede programar dos
temporizaciones de alarma.
1. Pulse la tecla ALARM 1/VOL+
y
(o ALARM 2/VOL-
i
).
En la pantalla aparece la última hora de alarma
elegida A1 o A2 y, eventualmente, el símbolo
para el tipo de alarma (véase la tabla anterior).
Función de
despertador
Símbolo en la
pantalla
Señales acústicas
Radio
Desconectado Sin símbolo
2. Pulse las teclas TUNING UP/DOWN
g
para ajustar
la hora de alarma elegida.
3. Pulse la tecla ALARM 1/VOL+
y
(o ALARM 2/VOL-
i
)
tantas veces como sea necesario hasta que la
pantalla muestre la función de alarma deseada
(véase la tabla anterior).
4. Pulse la tecla A.O.T.
d
para ajustar los días de
la semana en los que desea que se le despierte:
Puede elegir entre días laborables (Mo, Tu,
We, Th, Fr), fin de semana (Su, Sa), toda la
semana (Su, Mo, Tu, We, Th, Fr, Sa) o bien el
día de semana actual. El ajuste seleccionado
es mostrado en la pantalla.
5. Pulse de la tecla A.O.T.
d
tantas veces como
sea necesario hasta que se hayan ajustado los
días de alarma elegidos. Mantenga pulsada
la tecla
A.O.T.
d
hasta que la pantalla sólo
muestre un único día de la semana.
6. Pulse la tecla A.O.T.
d
para ajustar el día de la
semana elegido.
Para regresar de nuevo a la selección de los días
laborables, fines de semana o bien semana
completa, mantenga pulsada de nuevo brevemente
la tecla
A.O.T.
d
.
7. Pulse la tecla Mode SET/BASS
g
para guardar
el ajuste y regresar a la indicación de la hora.
Cuando suena la alarma...
• y se ha seleccionado la función de alarma
"Radio", la radio funciona durante una hora
con un volumen de despertador previamente
definido. Ese volumen no se puede modificar.
Para finalizar, pulse la tecla
ALARM 1/VOL+
y
o
ALARM 2/VOL-
i
.
• si se encuentra seleccionada la función de
despertador „señales acústicas“, suenan las
señales acústicas 10 minutos. Para finalizar,
pulse la tecla
ALARM 1/VOL+
y
o ALARM 2/
VOL-
i
.
IB_KH2281_Ar5027_LB5 15.07.2008 9:05 Uhr Seite 7

- 8 -
Funcionamiento de la radio
Ajustar manualmente la emisora
1. Pulse la tecla POWER ON/OFF
u
. En la pantalla
se muestra la frecuencia actual.
2. Pulse la tecla TUNING UP
g
para aumentar la
frecuencia.
3. Pulse la tecla TUNING DOWN
g
para disminuir la
frecuencia.
Búsqueda automática de emisora
Puede optar a que se busque la emisora. La radio
de cocina recorre las frecuencias hasta localizar
una emisora.
1. Pulse la tecla POWER ON/OFF
u
.
2. Mantenga pulsada la tecla TUNING UP
g
durante
dos segundos: La radio de cocina busca la
emisora con la frecuencia más alta siguiente-.
3. Mantenga pulsada la tecla TUNING DOWN
g
durante dos segundos: La radio de cocina
busca la emisora con la frecuencia más baja
siguiente-.
Repita estos pasos hasta encontrar una emisora de
su agrado.
Memorizar la emisora
Con las teclas de memoria 1/3 PRESET, 2/4 PRESET
o
,
puede guardar cuatro emisoras.
1. Pulse la tecla POWER ON/OFF
u
.
2. Busque una emisora conforme a lo descrito en
el capítulo „Funcionamiento de la radio“.
3. Pulse la tecla STORE
f
. La indicación "M"
aparece en la pantalla y parpadea "MEM".
4. Pulse una de las teclas 1/3 PRESET, 2/4 PRESET
o
en la que desea guardar una emisora.
• Pulse la tecla de memoria correspondiente
varias veces para seleccionar la posición de
memoria deseada (p
.EJ. una vez la tecla 1/3
PRESET para la posición de memoria 1, dos
veces la tecla
1/3 PRESET para la posición de
memoria 3).
5. Pulse de nuevo la tecla STORE
f
. La emisora
queda memorizada.
• Para ajustar las emisoras memorizadas, mien-
tras está en el modo Radio pulse varias veces
la tecla de memoria correspondiente (
1/3 PRE-
SET, 2/4 PRESET
o
) hasta que aparezca el
número de la posición de memoria en la
pantalla.
Ajustar el volumen
• Mientras la radio esté funcionando, pulse la tecla
ALARM 1/VOL+
y
para aumentar el volumen.
• Pulse la tecla
ALARM 2/VOL-
i
para reducir el
volumen.
Conexión del refuerzo de graves
• Durante el funcionamiento de la radio, pulse la
tecla
MODE SET/BASS
j
para activar el refuerzo
de graves. En la pantalla aparece la indicación
BASS.
• Pulse la tecla
MODE SET/BASS
j
para desactivar
de nuevo el refuerzo de graves. En la pantalla
desaparece la indicación BASS.
Bloquear
Puede bloquear la radio de la cocina para que las
personas no autorizadas o los niños no puedan
variar los ajustes.
• Mantenga pulsada la tecla
STORE
f
.
En la pantalla aparece el símbolo de una llave.
• Para eliminar el bloqueo, mantenga pulsada
de nuevo la tecla
STORE
f
, hasta que
desaparezca el símbolo de la llave.
Ajustar hora de desconexión automática
Puede ajustar una hora de desconexión a la que se
desactive automáticamente la radio.
• Pulse la tecla
A.O.T.
d
. En caso necesario, la
radio se enciende. En la pantalla aparece la
indicación "120 AOT".
• Pulse varias veces la tecla
A.O.T.
d
para ajustar
la hora de desconexión en pasos de 5 minutos
desde un máximo de 120 hasta un mínimo de
5 minutos.
IB_KH2281_Ar5027_LB5 15.07.2008 9:05 Uhr Seite 8

- 9 -
Si no se pulsa ninguna tecla durante 10 segundos,
se guarda el ajuste y la radio de cocina vuelve a
mostrar la hora.
• Para desactivar esta función, pulse la tecla
A.O.T.
d
hasta que aparezca en la pantalla
la indicación "OFF AOT".
Limpieza
¡Advertencia!
¡Si penetra humedad en el aparato, existe riesgo
de una descarga eléctrica! Además la Radio
de cocina podría sufrir daños irreparables.
Limpie la carcasa de la Radio de cocina DVD úni-
camente con un paño ligeramente húmedo con
detergente suave. ¡Al realizar la limpieza tenga
cuidad de que no penetre humedad en la carcasa
del aparato!
Evacuación
Evacuación del aparato
En ningún caso deberá tirar el aparato a la
basura doméstica.
Este producto está sujeto a la directiva
europea 2002/96/CE.
Evacue el aparato en un centro de evacuación
autorizado a través de las instalaciones de
evacuación comunitarias.
Preste atención a las normas en vigor. En caso de
duda póngase en contacto con las instalaciones
municipales de evacuación de residuos.
Evacuación de acumuladores / pilas
recargables!
Las pilas/baterías no pueden ser evacuadas con la
basura doméstica. Cada consumidor está obligado
legalmente a entregar las pilas/acumuladores en
un punto de recogida municipal de residuos especiales.
Con esta obligación se consigue que las pilas /
baterías se desechen de forma respetuosa con el
medio ambiente.
Devuelva las pilas/acumuladores en estado
descargado.
Eliminación del embalaje
Evacue todos los materiales de embalaje
de forma respetuosa con el medio ambiente.
Importador
KOMPERNASS GMBH
BURGSTRASSE 21
44867 BOCHUM, (ALEMANIA)
www.kompernass.com
IB_KH2281_Ar5027_LB5 15.07.2008 9:05 Uhr Seite 9

- 10 -
Garantía y servicio posventa
Este aparato tiene 3 años de garantía desde la
fecha de compra. Si a pesar de nuestros altos
estándares de calidad encuentra algún motivo
de queja respecto a este aparato, le rogamos que
se ponga en contacto con nuestra línea directa de
asistencia.
Si no puede solucionarse telefónicamente su
problema, en este número de teléfono se le dará
• un número de referencia (número RMA) y
• una dirección a la cual puede enviar su
producto para seguir el proceso de garantía.
En caso de enviarnos el producto le rogamos que
adjunte una copia del tique de compra o factura.
El aparato debe estar bien empaquetado para ser
transportado y el número RMA debe estar visible.
Los envíos que no vayan acompañados del número
RMA no podrán ser procesados.
Indicación:
La prestación de garantía se limita a los fallos
de material o de fabricación.
La prestación de garantía no rige para
• las piezas de desgaste
• los daños ocurridos en las piezas frágiles,
como los interruptores o acumuladores.
Este producto ha sido diseñado exclusivamente
para el uso particular y no para el uso industrial.
En caso de manipulación indebida e incorrecta, uso
de la fuerza y en caso de abrir el aparato personas
extrañas a nuestros centros de asistencia técnica
autorizados, la garantía pierde su validez.
Esta garantía no reduce sus derechos de garantía
legales prescritos.
$
IB_KH2281_Ar5027_LB5 15.07.2008 9:05 Uhr Seite 10

¡Cumplimente este apartado en su totalidad y adjúntelo al aparato!
Escriba el remite de forma legible:
Apellidos
Nombre
Calle
CP/LUGAR
País
Teléfono
Fecha / Firma
Descripción del fallo:
$
Garantía
Kompernass Service España
C/Invención 7
Polígono Industrial Los Olivos
28906 Getafe – Madrid
Tel.: 902/430758
Fax: 91/6652551
e-mail: support.es@kompernass.com
www.mysilvercrest.de
Para garantizar que el proceso de
reparación será gratuito, póngase
en contacto con la línea directa de
asistencia. Para ello tenga preparado
el ticket de compra.
Radio de cocina KH2281
IB_KH2281_Ar5027_LB5 15.07.2008 9:05 Uhr Seite 11

- 12 -
IB_KH2281_Ar5027_LB5 15.07.2008 9:05 Uhr Seite 12

- 13 -
INDICE PAGINA
Dati tecnici 14
Uso conforme 14
Avvertenze di sicurezza 14
Fornitura 16
Legenda dell'apparecchio 16
Installazione della radio da cucina sotto un pensile 16
Montaggio della radio da cucina 17
Messa in funzione 17
Inserimento delle pile di back-up .................................................................................................17
Connessione all'alimentazione di corrente .................................................................................17
Impostazione dell'ora....................................................................................................................18
Impostazione della data ...............................................................................................................18
Accensione e spegnimento dell'illuminazione del display ........................................................18
Impostazione della modalità 12 o 24 ore .................................................................................18
Timer da cucina..............................................................................................................................18
Funzione di sveglia (allarme 1 e allarme 2)...............................................................................19
Funzionamento della radio 20
Impostazione manuale delle emittenti .........................................................................................20
Ricerca automatica delle emittenti ...............................................................................................20
Memorizzazione dell'emittente ....................................................................................................20
Impostazione del volume..............................................................................................................20
Attivazione dell'amplificazione dei bassi ....................................................................................20
Blocco .............................................................................................................................................20
Impostazione del tempo di spegnimento automatico ................................................................20
Pulizia 21
Smaltimento 21
Importatore 21
Garanzia & assistenza 22
Leggere attentamente le istruzioni per l'uso prima del primo utilizzo e conservarle per l'uso futuro.
In caso di cessione dell'apparecchio a terzi, consegnare anche le istruzioni.
IB_KH2281_Ar5027_LB5 15.07.2008 9:05 Uhr Seite 13

- 14 -
RADIOSVEGLIA KH2281
Dati tecnici
Questo apparecchio adempie i requisiti di base e le
altre norme rilevanti della direttiva EMV
2004/108/CE, nonché della direttiva per gli
apparecchi a bassa tensione 2006/95/CE.
Connessione di rete: AC 220 - 240 V
~
50 Hz
Potenza assorbita: 5 Watt
Potenza assorbita:
Standby: 0,7 W
Temperatura di
esercizio: +5
~
+35°C
Umidità: 5
~
90 %
(senza condensa)
Dimensioni
(L x P x A): 305 x 157 x 45 mm
Peso: ca. 800 g
Classe di protezione: II /
Pile di back-up
2 x 1,5 V tipo AAA / LR03 / Micro
(non incluse nella fornitura)
Gamma di frequenze radio:
VHF (FM): 87,5 – 108,5 MHz
Le caratteristiche tecniche dell'apparecchio permettono
un campo di frequenze regolabile di
87,5 - 108,5MHz.
A seconda delle nazioni potrebbero esistere regola-
menti differenti in relazione ai campi di frequenza
radiofonici attribuiti. Si ricorda che è vietato utilizzare,
inoltrare a terzi o abusare delle informazioni ricevute al
di fuori del campo di frequenza attribuito.
Uso conforme
La radio da cucina è destinata al montaggio o
all'installazione sotto un pensile.
La radio da cucina è destinata alla ricezione di emittenti
radio in FM, nonché come sveglia tramite segnale
acustico o radio.
La radio da cucina non è prevista per l'impiego in
ambienti commerciali o industriali.
Non si assume alcuna responsabilità per i danni
derivanti da un uso non conforme dell'apparecchio!
Avvertenze di sicurezza
• Questo apparecchio non è indicato per l'uso
da parte di persone (inclusi bambini) con
limitate capacità fisiche, sensoriali o mentali o pri-
ve dell'esperienza e/o della conoscenza
necessaria, a meno che tali persone non
vengano sorvegliate da un responsabile per
la sicurezza o abbiano ricevuto indicazioni
sull'impiego dell'apparecchio.
• Sorvegliare i bambini per accertarsi che non
giochino con l'apparecchio.
• Per evitare un'accensione indesiderata, dopo
ogni uso e prima di ogni pulizia, staccare sempre
la presa dalla spina.
• Controllare che l'apparecchio e tutte le sue
parti non abbiano danni visibili. La sicurezza
dell'apparecchio è garantita solo se lo stesso si
trova in perfetto stato.
• La spina deve essere sempre facilmente
raggiungibile, in modo da poter scollegare
rapidamente l'apparecchio dalla rete elettrica
in caso di emergenza.
Pericolo di scossa elettrica!
• Collegare l'apparecchio esclusivamente a una
presa installata a norma e provvista di messa a
terra. La tensione di rete deve corrispondere ai
dati riportati sulla targhetta dell'apparecchio.
IB_KH2281_Ar5027_LB5 15.07.2008 9:05 Uhr Seite 14

- 15 -
• Fare sostituire immediatamente la spina o il
cavo di rete danneggiato da personale
specializzato autorizzato o dal centro di
assistenza ai clienti, per evitare possibili danni.
• Fare immediatamente riparare o sostituire dal
servizio assistenza i cavi o gli apparecchi non
perfettamente funzionanti o danneggiati.
Non immergere mai l'apparecchio in
acqua. Pulirlo solo con un panno
leggermente inumidito.
• Non esporre l'apparecchio alla pioggia e non
utilizzarlo mai in ambienti umidi o bagnati.
• Impedire che il cavo di connessione alla rete
elettrica si bagni o inumidisca durante l'uso.
• Non aprire l'alloggiamento dell'apparecchio e
non tentare di ripararlo. In caso contrario, non
si garantisce la sicurezza e la garanzia decade.
• Proteggere l'apparecchio da spruzzi e gocce
d'acqua. Non collocare pertanto alcun oggetto
pieno di liquidi (ad es. vasi di fiori) su o accanto
all'apparecchio.
Pericolo d'incendio!
• Non utilizzare l'apparecchio nelle vicinanze
di superfici surriscaldate.
• Non posizionare l'apparecchio in luoghi diret-
tamente irradiati dal sole. In caso contrario,
esso potrebbe surriscaldarsi e danneggiarsi
irreparabilmente.
• Non sospendere la radio da cucina sui fornelli.
Ciò potrebbe provocarne il danneggiamento.
Sussiste il pericolo d'incendio!
• Non lasciare mai l'apparecchio incustodito
durante l'uso.
• Non coprire mai le aperture di aerazione
dell'apparecchio acceso.
• Non collocare fiamme libere, come ad es.
candele, su o accanto all'apparecchio.
Pericolo di ferimento
• Tenere i bambini lontani dal cavo di collega-
mento e dall'apparecchio. I bambini spesso
sottovalutano i rischi collegati all'uso di
apparecchi elettrici.
• Provvedere a un posizionamento sicuro
dell'apparecchio.
• Se l'apparecchio ha subìto cadute o danni,
non deve più essere messo in funzione. L'appa-
recchio dev'essere sottoposto a controllo da
parte di personale specializzato e all'occorrenza
riparato.
• Le pile/accumulatori possono costituire un peri-
colo mortale se ingeriti. Conservare le pile in un
luogo inaccessibile ai bambini. In caso di ingestio-
ne di pile, ricorrere immediatamente al soccorso
medico.
• Tenere lontano dai bambini anche le pellicole
di imballaggio. Sussiste il pericolo di
soffocamento.
Avvertenza:
Alcune vernici aggressive per mobili possono
corrodere i piedini in gomma dell'apparecchio.
Collocare l'apparecchio, se necessario, su
una base antisdrucciolevole.
Temporale!
In caso di temporale, gli apparecchi collegati
alla rete elettrica potrebbero subire dei danni.
Pertanto, in caso di temporale, disinserire sempre
la spina dalla presa.
Indicazioni sulle tensioni a impulsi
(EFT / transitori elettrici veloci) e
scariche elettrostatiche:
In caso di malfunzionamento a seguito di tran-
sitori elettrici veloci (tensione a impulsi) o scariche
elettrostatiche, il prodotto deve essere reim-
postato per ripristinarne il normale funzionamento.
Si consiglia di scollegare l'alimentazione elettrica
e collegarla di nuovo. Le pile (se presenti)
devono essere estratte e reinserite.
IB_KH2281_Ar5027_LB5 15.07.2008 9:05 Uhr Seite 15

- 16 -
Avvertenza sulla sospensione della
tensione
L'interruttore POWER non scollega completa-
mente l'apparecchio dalla rete elettrica.
L'apparecchio, inoltre, assorbe corrente in
modalità di standby. Per scollegare completa-
mente l'apparecchio dalla rete elettrica, è
necessario staccare la spina dalla presa.
Avvertenze relative all'uso delle pile
L'apparecchio utilizza le pile per il salvataggio dei
dati in memoria. Per il corretto uso delle pile osservare
quanto segue:
Pericolo di esplosione!
Non gettare le pile nel fuoco. Non ricaricare
le pile.
• Non aprire, saldare o sciogliere le pile.
Pericolo di esplosione e lesioni!
• Controllare periodicamente le pile. Le pile che
presentano fuoriuscita di acidi possono causare
danni all'apparecchio.
• Se non si utilizza l'apparecchio per lungo tempo,
rimuovere le pile.
• Se le pile sono deteriorate, indossare guanti
di protezione.
• Pulire il vano pile e i contatti delle pile con un
panno asciutto.
Attenzione!
L'azienda declina ogni responsabilità per i danni
alla radio da cucina provocati dall'umidità, dalla
penetrazione di acqua nell'apparecchio o dal
surriscaldamento!
Fornitura
- Radio da cucina KH 2281
- Piastra di montaggio
- 4 viti
- Istruzioni per l'uso
Legenda dell'apparecchio
q
Piastra di montaggio
w
Leva di arresto
e
Cavo di rete
r
Antenna lineare
t
Tasto TIMER/ALARM MODE
y
Tasto ALARM 1/VOL+
u
Tasto POWER ON/OFF
i
Tasto ALARM 2/VOL-
o
Tasti 1/3 PRESET, 2/4 PRESET
a
Vano pile
s
Display
d
Tasto A.O.T.
f
Tasto STORE
g
Tasti TUNING UP/DOWN
h
Altoparlante
j
Tasto MODE SET/BASS
Installazione della radio da
cucina sotto un pensile
La radio da cucina può essere sospesa, ad es. a un
pensile, con l'ausilio dell'acclusa piastra di
montaggio
q
:
1. Cercare un luogo di installazione adatto per la
radio da cucina.
2. Premere verso il basso le due leve di arresto
w
sul
retro dell'apparecchio. Spingere la piastra di
montaggio
q
all'indietro e prelevarla.
3. Mantenere la piastra di montaggio
q
sul punto
di installazione. Lasciare circa 3,5 cm. di spazio
agli angoli anteriori. In tal modo, successivamente
sarà possibile allineare la radio da cucina.
IB_KH2281_Ar5027_LB5 15.07.2008 9:05 Uhr Seite 16

- 17 -
4. Contrassegnare i quattro punti per i fori con
una matita.
5. Marcare i fori con un mandrino.
6. Avvitare la piastra di montaggio
q
con la vite
acclusa negli accessori.
7. Inserire la radio da cucina obliquamente con
i due intagli negli agganci della piastra di
montaggio
q
. Premere la radio da cucina verso
l'alto, fino a udirne l'inserimento.
Fissare l'antenna lineare con un pezzo di nastro
adesivo in modo che non penda verso il basso.
Montaggio della radio da cucina
Non montare la radio da cucina priva della piastra
di montaggio
q
. L'altoparlante resterà altrimenti
coperto e la musica sarà difficilmente udibile.
Per installare la radio da cucina con l'acclusa piastra
di montaggio
q
:
1. Premere contemporaneamente verso il basso
le due leve di arresto
w
sul retro dell'appa-
recchio. Spingere la piastra di montaggio
q
all'indietro e rimuoverla.
2. Spingere entrambi i perni di sostegni sulla piastra
di montaggio
q
negli intagli sul lato inferiore
posteriore della radio da cucina.
3. Premere la parte anteriore della piastra di
montaggio
q
saldamente verso il basso fino
all'inserimento udibile. Ora è possibile montare
la radio da cucina.
Per smontare la piastra di montaggio
q
, afferrare
la piastra di montaggio
q
da sotto con i pollici, e
premere in avanti e verso l'alto fino a svincolarla.
Rimuovere la piastra di montaggio
q
.
Messa in funzione
Inserimento delle pile di back-up
In caso di caduta di tensione, grazie alle pile di
back-up, i dati relativi all'ora, alla data, all'ora di
sveglia e agli allarmi speciali impostati (SDA: Special
Day Alert) non andranno perduti. Utilizzare a tal
fine due pile da 1,5V tipo AAA, non incluse nella
fornitura.
1. Aprire lo sportello del vano pile
a
sul retro
della radio da cucina.
2. Inserire le pile, rispettando la corretta polarità.
3. Chiudere lo sportello del vano pile
a
.
Lo sportello deve inserirsi in modo udibile.
Avvertenza:
le pile di back-up devono essere controllate
almeno una volta all'anno ed eventualmente
sostituite.
Connessione all'alimentazione di
corrente
• Inserire la spina in una presa di rete.
Nel display appare l'ora „00:00.
00“.
Per poter utilizzare le funzioni di allarme della
radio, impostare prima l'ora e la data, come descritto
nei paragrafi seguenti.
IB_KH2281_Ar5027_LB5 15.07.2008 9:05 Uhr Seite 17

- 18 -
Impostazione dell'ora
Per poter impostare l'ora, la data, l'illuminazione
del display e il formato dell'ora, la radio dev'essere
spenta.
1. Premere una volta il tasto MODE SET/BASS
j
.
L'ora lampeggia.
2. Premere i tasti TUNING UP/DOWN
g
, per impostare
l'ora a intervalli di minuti. Premendo e
mantenendo premuti i tasti, l'orario si
modifica in intervalli di 10 minuti.
Se non si preme alcun tasto entro 10 secondi,
l'impostazione viene salvata e la radio da cucina
ritorna alla visualizzazione dell'ora.
Impostazione della data
1. Premere due volte il tasto MODE SET/BASS
j
.
Nel display lampeggia la data „01
.01.08“.
2. Premere i tasti TUNING UP/DOWN
g
, per impostare
la data in intervalli di giorni. Premendo e
mantenendo premuti i tasti, la data si modifica
in intervalli di 10 giorni.
Se non si preme alcun tasto entro 10 secondi,
l'impostazione viene salvata e la radio da cucina
ritorna alla visualizzazione dell'ora.
Accensione e spegnimento
dell'illuminazione del display
1. Premere tre volte il tasto MODE SET/BASS
j
.
Nel display appare „L“.
2. Premere il tasto TUNING UP
g
, per attivare l'illu-
minazione del display. Nel display appare „H“.
3. Premere il tasto TUNING DOWN
g
, per attivare
l'illuminazione del display. Nel display appare „L“.
Se non si preme alcun tasto entro 10 secondi,
l'impostazione viene salvata e la radio da cucina
ritorna alla visualizzazione dell'ora.
Impostazione della modalità 12 o 24 ore
1. Premere quattro volte il tasto MODE SET/BASS
j
.
Nel display compare „24“ per la modalità 24 ore.
2. Premere il tasto TUNING UP
g
, per impostare la
modalità 24.
3. Premere il tasto TUNING DOWN
g
, per impostare
la modalità 12.
Nel display appare „12“. Sul display compare inoltre
PM per le ore del pomeriggio.
Timer da cucina
1. Premere il tasto TIMER/ALARM MODE
t
.
Nel display compare il simbolo del Timer .
2. Con i tasti TUNING UP/DOWN
g
impostare il tempo
desiderato (è possibile impostare un lasso di
tempo da 1 minuto a 23:59 h).
3. Premere nuovamente il tasto TIMER/ALARM MODE
t
,
per avviare il timer da cucina. Nel display
compare il simbolo del timer e il simbolo
di un orologio che scorre a ritroso.
30 secondi prima della scadenza del tempo impostato,
risuona un segnale acustico, a intervalli sempre più
brevi man mano che il tempo passa. Una volta
scaduto il tempo, il segnale acustico risuona in
continuo per un'ora.
• Premere il tasto
TIMER/ALARM MODE
t
, per arrestare
il segnale acustico.
Interruzione del timer da cucina
• È possibile interrompere il timer da cucina, pre-
mendo brevemente il tasto
TIMER/ALARM MODE
t
.
Il tempo del timer lampeggia. Il simbolo dell'ora
scompare.
• Premere nuovamente il tasto
TIMER/ALARM MODE
t
.
Il tempo continua a scorrere.
Arresto del timer da cucina
• Tenere premuto il tasto TIMER/ALARM MODE
t
per
arrestare il timer da cucina.
Nel display viene visualizzata l'ora.
IB_KH2281_Ar5027_LB5 15.07.2008 9:05 Uhr Seite 18

- 19 -
Programmazione del timer da cucina
È possibile salvare i tempi del timer da cucina.
1. Premere il tasto TIMER/ALARM MODE
t
.
2. Con i tasti TUNING UP/DOWN
g
impostare
il tempo desiderato.
3. Premere il tasto STORE
f
. Nel display lam-
peggerà „T“.
4. Premere il tasto 1/3 PRESET, 2/4 PRESET
o
per la
posizione di memoria desiderata. Sono a
di-sposizione quattro posizioni di memoria.
Nel display compare il numero della posizione
di memoria selezionata.
5. Premere nuovamente il tasto STORE
f
.
In tal modo è stato salvato il tempo.
Se non si preme alcun tasto per 10 secondi, la radio
da cucina ritorna alla visualizzazione dell'ora.
6. Per richiamare i tempi memorizzati del timer da
cucina, premere il tasto della modalità
TIMER/
ALARM MODE
t
e il tasto della relativa posizione
di memoria (
1/3 PRESET, 2/4 PRESET
o
).
7. Premere nuovamente il tasto TIMER/ALARM MODE
t
, per avviare il timer da cucina. Nel display
lampeggia il simbolo di un orologio con il tempo
che scorre a ritroso.
8. Tenere premuto il tasto
TIMER/ALARM MODE
t
per
arrestare il timer da cucina.
Funzione di sveglia
(allarme 1 e allarme 2)
Con la radio da cucina è possibile programmare
due orari di sveglia.
1. Premere il tasto ALARM 1/VOL+
y
(o ALARM 2/VOL-
i
).
Nel display compare il tempo di sveglia impostato
per ultimo A1 o A2 ed eventualmente il simbolo
per il tipo di allarme (v. tabella sopra).
Funzione di sveglia Simbolo nel display
Segnali acustici
Radio
Spenta Nessun simbolo
2. Premere i tasti TUNING UP/DOWN
g
, per impostare
l'orario di sveglia desiderato.
3. Premere il tasto ALARM 1/VOL+
y
(o ALARM 2/VOL-
i
)
fino a ottenere la visualizzazione nel display
della funzione di sveglia desiderata (v. tabella
in alto).
4. Premere il tasto A.O.T.
d
, per impostare i giorni
della settimana in cui si desidera essere svegliati:
È possibile scegliere fra giorni feriali (Mo, Tu,
We, Th, Fr), fine settimana (Su, Sa), intera
settimana (Su, Mo, Tu, We, Th, Fr, Sa) o
singolo giorno. L'impostazione selezionata
viene visualizzata nel display.
5. Premere il tasto A.O.T.
d
fino a ottenere l'impo-
stazione dei giorni della settimana desiderati.
Tenere premuto il tasto
A.O.T.
d
, fino a ottenere
la visualizzazione nel display di un singolo
giorno della settimana.
6. Premere il tasto A.O.T.
d
, per impostare il giorno
della settimana desiderato.
Per ritornare alla selezione dei giorni feriali, fine
settimana o di tutta la settimana, tenere nuovamente
premuto il tasto
A.O.T.
d
per breve tempo.
7. Premere il tasto MODE SET/BASS
j
, per salvare
l'impostazione e ritornare all'indicazione dell'ora.
Quando suona l'allarme...
• ed è stata selezionata la funzione di sveglia
„Radio“, la radio resterà accesa per un'ora
a volume predefinito. Il livello del volume non
può essere modificato. Per terminare, premere
il tasto
ALARM 1/VOL+
y
o ALARM 2/VOL-
i
.
• ed è stata selezionata la funzione di sveglia
„Segnali acustici“, i segnali acustici verranno
emessi per 10 minuti. Per terminare, premere
il tasto
ALARM 1/VOL+
y
o ALARM 2/VOL-
i
.
IB_KH2281_Ar5027_LB5 15.07.2008 9:05 Uhr Seite 19

- 20 -
Funzionamento della radio
Impostazione manuale delle emittenti
1. Premere il tasto POWER ON/OFF
u
. Nel display
viene visualizzata la frequenza corrente.
2. Premere il tasto TUNING UP
g
, per aumentare
la frequenza.
3. Premere il tasto TUNING DOWN
g
, per diminuire
la frequenza.
Ricerca automatica delle emittenti
È possibile eseguire la ricerca per emittente. La radio
da cucina esegue la scansione delle frequenze fino
a trovare un'emittente.
1. Premere il tasto POWER ON/OFF
u
.
2. Tenere premuto due secondi il tasto TUNING UP
g
:
la radio da cucina cerca l'emittente con
la frequenza immediatamente superiore.
3. Tenere premuto due secondi il tasto TUNING
DOWN
g
: la radio da cucina cerca l'emittente
con la frequenza immediatamente inferiore.
Ripetere questi passi fino a trovare l'emittente
desiderata.
Memorizzazione dell'emittente
Con i tasti di memoria 1/3 PRESET, 2/4 PRESET
o
è possibile memorizzare 4 emittenti.
1. Premere il tasto POWER ON/OFF
u
.
2. Cercare un'emittente, come descritto al capitolo
„Funzionamento della radio“.
3. Premere il tasto STORE
f
.
Nel display compare il messaggio „M“ e
lampeggia „MEM“.
4. Premere uno dei tasti 1/3 PRESET, 2/4 PRESET
o
su cui si vuole collocare l'emittente.
• Premere il rispettivo tasto di memoria più volte
per la posizione di memoria desiderata (ad es.
una volta il tasto
1/3 PRESET per la posizione di
memoria 1, due volte il tasto
1/3 PRESET per la
posizione di memoria 3).
5. Premere nuovamente il tasto STORE
f
. In tal
modo è stata memorizzata l'emittente.
• Per impostare l'emittente memorizzata, nella
modalità Radio premere più volte il relativo
tasto di memoria (
1/3 PRESET, 2/4 PRESET
o
) fino
alla comparsa del numero della posizione di
memoria nel display.
Impostazione del volume
• Durante il funzionamento della radio, premere
il tasto
ALARM 1/VOL+
y
, per aumentare il volume.
• Premere il tasto
ALARM 2/VOL-
i
, per ridurre il
volume.
Attivazione dell'amplificazione
dei bassi
• Durante il funzionamento della radio, premere
il tasto
MODE SET/BASS
j
, per attivare l'amplifica-
zione dei bassi. Nel display compare il messaggio
BASS.
• Premere il tasto
MODE SET/BASS
j
, per disattivare
l'amplificazione dei bassi. Nel display scompare il
messaggio BASS.
Blocco
La radio da cucina può essere bloccata per impedire
la modifica delle impostazioni a persone non
autorizzate o a terzi.
• Tenere premuto il tasto
STORE
f
.
Nel display compare il simbolo di una chiave.
• Per eliminare il blocco, mantenere premuto
nuovamente il tasto
STORE
f
fino alla scomparsa
del simbolo della chiave.
Impostazione del tempo di
spegnimento automatico
È possibile impostare un tempo di spegnimento
automatico della radio.
• Premere il tasto
A.O.T.
d
.
La radio si accende. Nel display compare il
messaggio „120 AOT“.
• Premere più volte il tasto
A.O.T.
d
, per impostare
il tempo di spegnimento in passi di 5 minuti,
da 120 a 5 minuti.
IB_KH2281_Ar5027_LB5 15.07.2008 9:05 Uhr Seite 20

- 21 -
Se non si preme alcun tasto entro 10 secondi,
l'impostazione viene salvata e la radio da cucina
ritorna alla visualizzazione dell'ora.
• Per disattivare la funzione, premere il tasto
A.O.T.
d
, fino a ottenere nel display il messaggio
„OFF AOT“.
Pulizia
Attenzione!
L'infiltrazione di umidità nell'apparecchio
comporta il pericolo di scarica elettrica! La
radio da cucina può subire danni irreparabili!
Pulire l'alloggiamento della radio da cucina solo
con un panno leggermente umido e un detergente
delicato. Impedire la penetrazione di umidità
nell'apparecchio durante la pulizia!
Smaltimento
Smaltimento dell'apparecchio
Non gettare per alcun motivo l'apparecchio
insieme ai normali rifiuti domestici.
Questo prodotto è conforme ai requisiti della
Direttiva europea 2002/96/CE.
Smaltire l'apparecchio presso un'azienda autorizzata
o presso l'ente comunale di smaltimento.
Rispettare le prescrizioni attualmente in vigore.
In caso di dubbio, mettersi in contatto con l'ente
di smaltimento competente.
Smaltire le pile/gli accumulatori!
Pile e/o accumulatori non devono essere smaltiti
insieme ai rifiuti domestici. Ogni utente è obbligato
per legge a consegnare le pile/gli accumulatori usati
presso gli appositi centri di raccolta della propria città
o del proprio quartiere, o presso i punti vendita.
Questo obbligo è finalizzato allo smaltimento
ecologico delle pile e/o degli accumulatori.
Restituire pile/accumulatori solo se completamente
scarichi.
Smaltimento dell'imballaggio
Smaltire tutto il materiale di imballaggio
in modo ecocompatibile.
Importatore
KOMPERNASS GMBH
BURGSTRASSE 21
44867 BOCHUM, GERMANY
www.kompernass.com
IB_KH2281_Ar5027_LB5 15.07.2008 9:05 Uhr Seite 21

- 22 -
Garanzia & assistenza
Questo apparecchio è garantito per tre anni a partire
dalla data di acquisto. Qualora, nonostante i nostri
elevati standard di sicurezza, si rilevasse un motivo di
reclamo relativo al presente apparecchio, contattare
la nostra hotline di assistenza.
Qualora fosse impossibile elaborare la pratica di
reclamo telefonicamente, si riceverà
• un numero di pratica (numero RMA) nonché
• un indirizzo a cui inviare il prodotto per l'ela-
borazione della garanzia.
In caso di invio del prodotto, è necessario allegare
una copia della prova di acquisto (scontrino). L'appa-
recchio dev'essere imballato in modo idoneo al
trasporto, con il numero di RMA direttamente visibile.
Gli invii privi di numero RMA non potranno essere
elaborati.
Avvertenza:
La garanzia copre solo difetti del materiale
o di fabbricazione.
La garanzia non è valida
• per le parti saldate
• per i danni a parti fragili come interruttori
o accumulatori.
Il prodotto è destinato esclusivamente all'uso domestico
e non a quello commerciale. La garanzia decade
in caso di impiego improprio o manomissione, uso
della forza e interventi non eseguiti dalla nostra
filiale di assistenza autorizzata.
La garanzia non limita i diritti di garanzia del
consumatore fissati per legge.
$
IB_KH2281_Ar5027_LB5 15.07.2008 9:05 Uhr Seite 22

Compilare completamente questo tagliando e allegarlo all'apparecchio!
Indicare chiaramente il mittente:
Cognome
Nome
Indirizzo
CAP/località
Nazione
Telefono
Data/firma
Descrizione del guasto:
$
Garanzia
Kompernass Service Italia
Corso Lino Zanussi 11
33080 Porcia (PN)
Tel.: 0434/1851001
Fax: 0434/1851001
e-mail: support.it@kompernass.com
www.mysilvercrest.de
Per ottenere la certezza di una ripa-
razione gratuita, mettersi in contatto
con la nostra hotline di assistenza,
Tenere a portata di mano lo scontrino.
Radio da cucina KH2281
IB_KH2281_Ar5027_LB5 15.07.2008 9:05 Uhr Seite 23

- 24 -
IB_KH2281_Ar5027_LB5 15.07.2008 9:05 Uhr Seite 24

- 25 -
INDEX PAGE
Technical data 26
Intended Use 26
Safety instructions 26
Items supplied 28
Part identification 28
Fixing the kitchen radio beneath a wall cabinet 28
Setting up the kitchen radio 29
Commissioning 29
Inserting the back-up batteries......................................................................................................29
Providing mains power..................................................................................................................29
Setting the time...............................................................................................................................30
Setting the date ..............................................................................................................................30
Switching the display lighting on and off....................................................................................30
Selecting 12 or 24 hour time display..........................................................................................30
Kitchen timer...................................................................................................................................30
Setting alarm times (Alarms 1 and 2)..........................................................................................31
Radio operation 32
Manual station selection ...............................................................................................................32
Automatic station search ...............................................................................................................32
Programming stations.....................................................................................................................32
Adjusting the volume......................................................................................................................32
Switching the bass booster on......................................................................................................32
Lock function...................................................................................................................................32
Setting the automatic switch-off time............................................................................................32
Cleaning 33
Disposal 33
Importer 33
Warranty & Service 34
Read these operating instructions carefully before using the appliance for the first time and preserve this
booklet for later reference. Pass this booklet on to whoever might acquire the appliance at a future date.
IB_KH2281_Ar5027_LB5 15.07.2008 9:05 Uhr Seite 25

- 26 -
KITCHEN RADIO KH2281
Technical data
This appliance complies with the fundamental require-
ments and other relevant prescripts of both the EMC
Guidelines 2004/108/EG and the Guidelines for
Low Voltage Appliances 2006/95/EG.
Power supply: AC 220 - 240 V
~
50 Hz
Power consumption : 5 Watt
Power consumption:
Standby: 0,7 W
Operating temperature: +5
~
+35°C
Humidity: 5
~
90 %
(No condensation)
Dimensions
(L x D x H): 305 x 157 x 45 mm
Weight : approx. 800 g
Protection class: II /
Backup batteries
2x 1.5 V, Type AAA/LR03/Micro
(Batteries not supplied)
Frequency range radio:
VHF (FM): 87.5 – 108.5 MHz
The technical features of the appliance enable an
adjustable frequency range of FM 87.5 - 108.5 MHz.
In some countries, different national regulations may
apply to the assigned radio frequency ranges. Please
note that information received outside of the assigned
radio frequency ranges may not be used, passed on
to third parties or otherwise misused.
Intended Use
This Kitchen Radio is intended for use either free-
standing or for assembly beneath a wall cabinet.
The intended uses for this Kitchen Radio are the
reception of FM radio transmissions and as an
alarm/timer, using either signal tones or the radio
itself. This Kitchen Radio is not intended for utilisation
in commercial or industrial applications.
No warranty claims will be granted for damage
resulting from improper use!
Safety instructions
• This appliance is not intended for use by indivi-
duals (including children) with restricted physical,
physiological or intellectual abilities or deficiences
in experience and/or knowledge unless they are
supervised by a person responsible for their
safety or receive from this person instruction in
how the appliance is to be used.
• Children should be supervised to ensure that
they do not play with the appliance.
• To avoid unintentional switching on, disconnect
the power cable after use and before cleaning.
• Check the appliance and all parts for visible
damage. The safety concept can work only if the
appliance is in a faultless condition.
• The power plug must always be easily accessible,
so that the appliance can be quickly separated
from the mains in the event of an emergency.
Risk of electrical shocks.
• Connect the appliance only to correctly installed
and earthed mains sockets. Ensure that the rating
of the local power supply tallies completely with
the details given on the rating plate of the
appliance.
IB_KH2281_Ar5027_LB5 15.07.2008 9:05 Uhr Seite 26

- 27 -
• To avoid risks, arrange for defective power plugs
and/or cables to be replaced at once by qualified
technicians or our Customer Service Depart-
ment.
• Arrange for customer service to repair or replace
connecting cables and/or appliances that are
not functioning properly or have been damaged.
NEVER submerse the appliance in water.
Wipe it only with a slightly damp cloth.
• Do not expose the appliance to rain and never
use it in a humid or wet environment.
• Make sure that the power cable does not
become wet during operation.
• Do not attempt to open the housing or to repair
the radio. Should you do so, appliance safety is
no longer assured and the warranty becomes
void.
• Protect the appliance against drip and spray
water. Do not place any water-filled vessels (e.g.
flower vases) on or adjacent to the appliance.
Risk of fire!
• Do not use the appliance near hot surfaces.
• Do not locate the appliance in places exposed
to direct sunlight, Otherwise, it may overheat
and become irreparably damaged.
• Do not locate the kitchen radio directly above
hotplates. The kitchen radio may be damaged.
There is a danger of fire!
• Do not leave the appliance unattended when
in use.
• Never cover the ventilation slots of the appliance
while it is being used.
• Do not place unprotected fire sources, such as
candles, on or adjacent to the appliance.
Injury hazard
• Keep children away from the connecting cable
and the appliance. Children frequently under-
estimate the dangers of electrical appliances.
• Provide for a safe location for the appliance.
• Do not operate the appliance if it has fallen or
is damaged. Arrange for the appliance to be
checked and/or repaired by qualified technicians.
• Batteries/Cells are potentially fatal if swallowed.
Store batteries out of the reach of children. If
a battery should be swallowed, seek medical
assistance IMMEDIATELY.
• Keep the plastic packaging well away from
small children. There is a risk of suffocation.
Note:
Some aggressive furniture finishes can have
a destructive influence on the device's rubber
feet. If necessary, place the device on a nonslip
pad.
Thunderstorms!
Equipment connected to a power supply can
be damaged during a thunderstorm. You should
therefore always remove the plug from the power
socket when there is a storm.
Notice regarding electrical power
surges (EFT / electrical fast tran-
sient) and electrostatic discharges:
In a case of malfunction due to an electrical fast
transient (power surge) and/or electrostatic
discharge, the appliance must be returned to
default settings in order to re-establish normal
operation. Possibly the power supply must be
separated and then reconnected. The batteries
(if present) must be removed and then reinserted.
IB_KH2281_Ar5027_LB5 15.07.2008 9:05 Uhr Seite 27

- 28 -
Notice regarding separation from
mains-power
The POWER switch does not completely
disconnect the appliance from the power
network. Additionally, the appliance consumes
power when in standby-mode. To completely
separate the appliance from mains-power, the
power plug MUST be removed from the wall
socket.
Information regarding the handling
of batteries
The appliance uses batteries for memory conservation.
For the handling of batteries please observe the
following:
Risk of explosion!
Do not throw batteries into a fire. Do not recharge
the batteries.
• Never open batteries, never solder or weld
batteries.
The risk of explosions and injuries exists!
• Regularly check the condition of the batteries.
Leaking batteries can cause damage to the
appliance.
• If you do not intend to use the appliance for an
extended period, remove the batteries.
• In the event of the batteries leaking acids, wear
protective gloves.
• Clean the battery compartment and the battery
contacts with a dry cloth.
Important
!
No liability/warranty will be considered for
damage to the Kitchen Radio caused by the
effects of moisture, water penetration or
overheating!
Items supplied
- Kitchen Radio KH 2281
- Mounting plate
- 4 Screws
- Operating Instructions
Part identification
q
Mounting plate
w
Retaining lever
e
Power cable
r
Wire antenna
t
Button TIMER/ALARM MODE
y
Button ALARM 1/VOL+
u
Button POWER ON/OFF
i
Button ALARM 2/VOL-
o
Button 1/3 PRESET, 2/4 PRESET
a
Battery compartment
s
Display
d
Button A.O.T.
f
Button STORE
g
Button TUNING UP/DOWN
h
Loudspeaker
j
Button MODE SET
Fixing the kitchen radio beneath
a wall cabinet
With the supplied mounting plate
q
you can fix
the kitchen radio below, for example, a kitchen wall
cabinet:
1. Determine a suitable location for the kitchen
radio.
2. Press the two retaining levers
w
on the back of
the appliance down. Push the mounting plate
q
back and remove it.
3. Place the mounting plate
q
against the instal-
lation location. Allow 3,5 cm room to the front
edges. This way the kitchen radio will later fit
flush.
IB_KH2281_Ar5027_LB5 15.07.2008 9:05 Uhr Seite 28

- 29 -
4. Mark the four points for the drillholes with
a pencil.
5. Mark the drillhole with a mandril.
6. Firmly secure the mounting plate
q
with the
supplied screws.
7. Hold the kitchen radio slanted, with the two
recesses in the retaining lugs on the mounting
plate
q
. Press the kitchen radio upwards until
it audibly engages.
Secure the wire antenna with a piece of adhesive
tape such that it does not hang down.
Setting up the kitchen radio
Do not set the kitchen radio up without the mounting
plate
q
. Otherwise the speakers are covered and
the sound is scarcely audible.
To set up the kitchen radio with the enclosed mounting
plate
q
:
1. Simultaneously press the two retaining levers
w
on the back of the appliance down. Push the
mounting plate
q
back and remove it.
2. Push the two retainer lugs on the mounting plate
q
into the recesses on the lower rear side of the
kitchen radio.
3. Firmly press the front part of the mounting plate
q
down until you hear it engage. You can now
set up the radio.
To disassemble the mounting plate
q
, grip the
mounting plate
q
from below with the thumbs and
press it forwards and up until it disengages. You can
now remove the mounting plate
q
.
Commissioning
Inserting the back-up batteries
The back-up batteries ensure that the programmed
time, date, alarm time and set SDAs (Special Day
Alert) are not erased in the event of a power failure.
For this, you require two 1.5V batteries of type
AAA. They are not supplied with the appliance.
1. Open the lid of the battery compartment
a
on the underside of the kitchen radio.
2. Insert the batteries. Make sure the polarities
are correct.
3. Close the lid of the battery compartment
a
.
The lid must audibly engage.
Note:
The back-up batteries must be checked at least
once per year and, if necessary, exchanged
for new ones.
Providing mains power
• Insert the plug into a power socket. In the
display, the time is indicated by "00:00.
00".
To be able to use the alarm functions of the radio,
first of all programme in the date and time, as
described in the following section.
IB_KH2281_Ar5027_LB5 15.07.2008 9:05 Uhr Seite 29

- 30 -
Setting the time
To be able to programme in the time, date, display
illumination and hour-format, the radio must be switched
off.
1. Press the button MODE SET/BASS
j
once. The
time blinks.
2. Press the button TUNING UP/DOWN
g
to set the
time in minute intervals. Pressing and holding
the button changes the time at ten-minute intervals
If a subsequent button is not pressed within ten
seconds, the kitchen radio saves the setting and
switches back to time display.
Setting the date
1. Press the button MODE SET/BASS
j
twice. In the
display the date indicator "01
.01.08" blinks.
2. Press the button TUNING UP/DOWN
g
to set the
date in day intervals. Pressing and holding
the buttons changes the date at intervals of
10 days.
If a subsequent button is not pressed within ten
seconds, the kitchen radio saves the setting and
switches back to time display.
Switching the display lighting on and
off
1. Press the button MODE SET/BASS
j
three times.
In the display appears "L".
2. Press the button TUNING UP
g
to switch the display
illumination on. In the display appears "H".
3. Press the button TUNING DOWN
g
to switch the
display illumination off. In the display appears "L".
If a subsequent button is not pressed within ten
seconds, the kitchen radio saves the setting and
switches back to time display.
Selecting 12 or 24 hour time display
1. Press the button MODE SET/BASS
j
four times.
In the display appears "24" for the 24 hour modus.
2. Press the button TUNING UP
g
to select the 24
hour modus.
3. Press the button TUNING DOWN
g
to select the
12 hour modus.
In the display appears "12". For the hours of the af-
ternoon there now appears additionally an PM
on the display.
Kitchen timer
1. Press the button TIMER/ALARM MODE
t
. In the
display appears the timer symbol .
2. Press the button TUNING UP/DOWN
g
to set the
desired period of time (a time span between
1 minute and 23:59 h is possible).
3. Press the button TIMER/ALARM MODE
t
once more
to start the kitchen timer. In the display appears
the timer symbol and, additionally, a back-
wards running time symbol.
From 30 seconds before expiry of the time span an
acoustic signal sounds, repeating at shorter intervals
the closer the set time approaches. When the time
span has elapsed, the signal sounds continuously
for one hour.
• Press the button
TIMER/ALARM MODE
t
to switch
the signal tone off.
Interrupting the kitchen timer.
• You can interrupt the kitchen timer by briefly
pressing the button
TIMER/ALARM MODE
t
.
The timer period blinks. The clock symbol no longer
appears.
• Press the button
TIMER/ALARM MODE
t
once more.
The time continues to run.
Switching the kitchen timer off
• To switch the kitchen timer off, hold the button
TIMER/ALARM MODE
t
pressed down.
The time will be shown in the display.
IB_KH2281_Ar5027_LB5 15.07.2008 9:05 Uhr Seite 30

- 31 -
Programming the kitchen timer
You can save kitchen timer periods.
1. Press the button TIMER/ALARM MODE
t
.
2. Using the button TUNING UP/DOWN
g
programme
in the desired time.
3. Press the button STORE
f
. In the display "T"
blinks.
4. Press the button 1/3 PRESET, 2/4 PRESET
o
for the
required save position. There are four save
locations at your disposal. In the display the
number of the selected save location appears.
5. Press the button STORE
f
once again. The time
period is now saved.
If a button is not pressed within ten seconds, the
kitchen radio switches back to time display.
6. To recall the saved kitchen timer settings, press
the button
TIMER/ALARM MODE
t
and the button
of the corresponding memory save location (
1/3
PRESET, 2/4 PRESET
o
).
7. Press the button TIMER/ALARM MODE
t
once
more to start the kitchen timer. A clock symbol
running in an anti-clockwise direction appears
on the display.
8. To switch the kitchen timer off, hold the button
TIMER/ALARM MODE
t
pressed down.
Setting alarm times (Alarms 1 and 2)
You can programme two alarm times into your
kitchen radio.
1. Press the button ALARM 1/VOL+
y
(or ALARM 2/
VOL-
i
). The last set alarm time for A1 resp. A2
and, possibly, the symbol for the type of alarm
(see table above) are shown on the display.
Alarm function Symbol in the display
Acoustic signal
Radio
Switched off no symbol
2. Press the button TUNING UP/DOWN
g
to set the
desired alarm time.
3. Press the button ALARM 1/VOL+
y
(or ALARM 2/
VOL-
i
) repeatedly until the desired alarm type
(see table above) is shown in the display.
4. Press the button A.O.T.
d
to set the weekdays
on which you require the alarm function:
You can select between workdays (Mo, Tu,
We, Th, Fr), weekends (Su, Sa), whole weeks
(Su, Mo, Tu, We, Th, Fr, Sa) or the present
weekday. The selected setting is shown on the
display.
5. Press the button A.O.T.
d
repeatedly until the
desired alarm days are programmed in. Keep
the button
A.O.T.
d
pressed down until a single
day appears on the display.
6. Press the button A.O.T.
d
to set the required
weekday.
To return to the selection of workdays, weekends or
whole weeks, once again hold the button
A.O.T.
d
briefly pressed down.
7. Press the button MODE SET/BASS
j
to save the
programming and to return to time display.
When the alarm signal sounds...
• and the alarm function "Radio" has been selected,
the radio plays for one hour at a pre-defined
alarm volume. This volume level cannot be
changed. To finish it, press the button
ALARM
1/VOL+
y
or ALARM 2/VOL-
i
.
• and the alarm function "Signaltones" has been
selected, the signal tone sounds for 10 minutes.
To finish it, press the button
ALARM 1/VOL+
y
or
ALARM 2/VOL-
i
.
IB_KH2281_Ar5027_LB5 15.07.2008 9:05 Uhr Seite 31

- 32 -
Radio operation
Manual station selection
1. Press the button POWER ON/OFF
u
. The currently
selected frequency is shown in the display.
2. Press the button TUNING UP
g
to raise the
frequency.
3. Press the button TUNING DOWN
g
to lower the
frequency.
Automatic station search
You can have the kitchen radio search for stations.
The kitchen radio searches the frequency range until
it finds a station.
1. Press the button POWER ON/OFF
u
.
2. Keep the button TUNING UP
g
pressed down for
two seconds: the kitchen radio searches for the
station with the next highest frequency.
3. Keep the button TUNING DOWN
g
pressed down
for two seconds: the kitchen radio searches for
the station with the next lowest frequency.
Repeat these steps until you have found a radio
station to your liking.
Programming stations
With the memory save buttons 1/3 PRESET, 2/4
PRESET
o
you can save four radio stations.
1. Press the button POWER ON/OFF
u
.
2. Find a station as described in the section
"
Radio operation
".
3. Press the button STORE
f
. The indicator "M“
appears in the display and "MEM" blinks.
4. Press one of the buttons 1/3 PRESET, 2/4 PRESET
o
,
at which you wish to save the radio station.
• Press the respective save button several times for
the desired save location (e.g. once on button
1/3 PRESET for save location 1, twice on button
1/3 PRESET for save location 3).
5. Press the button STORE
f
once again.
The station is programmed.
• To recall saved radio stations, in radio modus
press the respective button (
1/3 PRESET, 2/4
PRESET
o
) repeatedly until the number of the
memory position appears on the display.
Adjusting the volume.
• Press the button ALARM 1/VOL+
y
during radio
operation to increase the volume.
• Press the button
ALARM 2/VOL-
i
to reduce the
volume.
Switching the bass booster on
• During radio operation, press the button MODE
SET/BASS
j
to switch the bass booster on. In the
display the indicator BASS appears.
• Press the button
MODE SET/BASS
j
to switch the
bass booster off. The indicator BASS in the
display extinguishes.
Lock function
You can lock the kitchen radio so that settings cannot
be altered by unauthorised people or children.
• Keep the button
STORE
f
pressed down.
A key symbol appears on the display.
• To disable the lock function, press and hold the
button
STORE
f
until the key symbol extinguishes.
Setting the automatic switch-off time
You can programme in a switch-off time, at which
the radio automatically switches itself off.
• Press the button
A.O.T.
d
. If need be, the radio
switches itself on. In the display appears the
indicator "120 AOT".
• Repeatedly press the button
A.O.T.
d
to
programme in a switch-off time from 5 to
120 mins in 5 minute steps.
IB_KH2281_Ar5027_LB5 15.07.2008 9:05 Uhr Seite 32

- 33 -
If a subsequent button is not pressed within ten
seconds, the kitchen radio saves the setting and
switches back to time display.
• To switch the function off, press the button
A.O.T.
d
until the indicator "OFF AOT" appears in
the display.
Cleaning
Warning!
Moisture penetrating into the appliance creates
the risk of electric shock! Additionally, the kitchen
radio could become irreparably damaged!
Clean the housing of the kitchen radio only with a
slightly moist cloth and a mild detergent. Ensure that
moisture cannot permeate into the appliance during
cleaning!
Disposal
Disposing of the appliance
Do not, under any circumstances, dispose
of the appliance in household refuse.
This product is subject to the provisions of
European Directive 2002/96/EG.
Dispose of the appliance through an approved
disposal centre or at your community waste facility.
Observe the currently applicable regulations. In
case of doubt, please contact your waste disposal
centre.
Disposal of batteries!
Used batteries/rechargeable batteries may not be
disposed of in household waste. Every consumer is
statutorily obliged to dispose of batteries at a collec-
tion site of his community/city district or at a retail
store. The purpose of this obligation is to ensure that
batteries are disposed of in a non-polluting manner.
Only dispose of batteries when they are fully
dis-charged.
Disposal of packaging
Dispose of the packaging materials in an
environmentally responsible manner.
Importer
KOMPERNASS GMBH
BURGSTRASSE 21
44867 BOCHUM, GERMANY
www.kompernass.com
IB_KH2281_Ar5027_LB5 15.07.2008 9:05 Uhr Seite 33

- 34 -
Warranty & Service
You receive a 3-year warranty for this device as of
the purchase date. Should you, in spite of our high
quality standards, have grounds for complaint please
contact our Service Hotline.
In the event that processing of your complaint is not
possible by telephone here you will receive
• a processing number (RMA number) as well
as
• an address, to which you can send your product
for warranty processing.
In the case of mailing shipment please enclose a
copy of the purchase receipt (sales slip). The app-
liance must be securely packed and the RMA number
clearly visible. Products sent in without the RMA
number cannot be processed.
Note:
The warranty provisions cover only material
or factory defects.
The warranty is not valid;
• for worn out parts
•for damages to breakable parts such as
switches and batteries.
This product is for private use only and is not intended
for commercial use. The warranty is void in the case
of abusive and improper handling, use of force and
internal tampering not carried out by our authorized
service branch.
Your statutory warranty claims are not restricted by
this warranty.
$
IB_KH2281_Ar5027_LB5 15.07.2008 9:05 Uhr Seite 34

Fill in this section and submit it with the appliance!
Sender, please write clearly:
Last name
First name
Street
Postcode/Place
Country
Telephone
Date/Signature
Description of fault:
$
Warranty
DES Ltd
Units 14-15
Bilston Industrial Estate
Oxford Street
Bilston
WV14 7EG
Tel.: 0870/787-6177
Fax: 0870/787-6168
e-mail: support.uk@kompernass.com
Irish Connection
Harbour view
Howth
Co. Dublin
Tel: 00353 (0) 87 99 62 077
Fax: 00353 18398056
e-mail: support.ie@kompernass.com
www.mysilvercrest.de
In order to be assured of a cost free
repair procedure, contact us over
the service hotline. Ensure you have
your sales receipt available.
Kitchen Radio KH2281
IB_KH2281_Ar5027_LB5 15.07.2008 9:05 Uhr Seite 35

- 36 -
IB_KH2281_Ar5027_LB5 15.07.2008 9:05 Uhr Seite 36

- 37 -
INHALTSVERZEICHNIS SEITE
Technische Daten 38
Bestimmungsgemäßer Gebrauch 38
Sicherheitshinweise 38
Lieferumfang 40
Legende Gerät 40
Anbringen des Küchenradios unter einen Hängeschrank 40
Aufstellen des Küchenradios 41
Inbetriebnahme 41
Einlegen der Backup-Batterien......................................................................................................41
Stromversorgung herstellen...........................................................................................................41
Uhrzeit einstellen............................................................................................................................42
Datum einstellen.............................................................................................................................42
Displaybeleuchtung ein- und ausschalten....................................................................................42
12- oder 24-Stundenmodus einstellen.........................................................................................42
Küchentimer ....................................................................................................................................42
Weckfunktion (Alarm 1 und Alarm 2) .........................................................................................43
Radiobetrieb 44
Sender manuell einstellen .............................................................................................................44
Sender automatisch suchen ..........................................................................................................44
Sender speichern ...........................................................................................................................44
Lautstärke einstellen .......................................................................................................................44
Bassverstärkung einschalten..........................................................................................................44
Sperren............................................................................................................................................44
Automatische Ausschaltzeit einstellen..........................................................................................44
Reinigung 45
Entsorgen 45
Importeur 45
Garantie & Service 46
Lesen Sie die Bedienungsanleitung vor der ersten Verwendung aufmerksam durch und heben Sie diese für
den späteren Gebrauch auf. Händigen Sie bei Weitergabe des Gerätes an Dritte auch die Anleitung aus.
IB_KH2281_Ar5027_LB5 15.07.2008 9:05 Uhr Seite 37

- 38 -
KÜCHENRADIO
KH2281
Technische Daten
Dieses Gerät erfüllt die grundlegenden Anforderun-
gen und andere relevante Vorschriften der EMV-
Richtlinie 2004/108/EG, sowie der Richtlinie für
Niederspannungsgeräte 2006/95/EG.
Netzanschluss: AC 220 - 240 V
~
50 Hz
Leistungsaufnahme: 5 Watt
Leistungsaufnahme
Standby: 0,7 W
Betriebstemperatur: +5
~
+35°C
Feuchtigkeit: 5
~
90 %
(keine Kondensation)
Abmessungen
(L x B x H): 305 x 157 x 45 mm
Gewicht: ca 800 g
Schutzklasse: II /
Backup-Batterien
2x 1,5 V, Typ AAA/LR03/Micro
(Nicht im Lieferumfang enthalten)
Frequenzbereich Radio:
UKW (FM): 87,5 – 108,5 MHz
Die technischen Gegebenheiten des Gerätes
ermöglichen einen einstellbaren Frequenzbereich
von 87,5 - 108,5MHz.
In verschiedenen Ländern können abweichende
nationale Regelungen zu den zugewiesenen Rund-
funkfrequenzbereichen bestehen. Beachten Sie, dass
Sie die außerhalb des zugewiesenen Rundfunk-
frequenzbereiches empfangenen Informationen nicht
verwerten, an Dritte weiterleiten oder zweckent-
fremdet missbräuchlich verwenden dürfen.
Bestimmungsgemäßer
Gebrauch
Das Küchenradio ist zum Aufstellen oder für die
Montage unter einem Schrank bestimmt.
Das Küchenradio ist zum Empfang von FM-Radio-
sendern, sowie zum Wecken durch Signalton oder
Radio vorgesehen.
Das Küchenradio ist nicht zur Verwendung in gewerb-
lichen oder industriellen Bereichen vorgesehen.
Für Schäden, die aus nicht bestimmungsgemäßem
Gebrauch des Geräts resultieren, wird keine Gewähr-
leistung übernommen!
Sicherheitshinweise
• Dieses Gerät ist nicht dafür bestimmt, durch
Personen (einschließlich Kinder) mit einge-
schränkten physischen, sensorischen oder
geistigen Fähigkeiten oder mangels Erfahrung
und/oder mangels Wissen benutzt zu werden,
es sei denn, sie werden durch eine für ihre
Sicherheit zuständige Person beaufsichtigt oder
erhielten von ihr Anweisungen, wie das Gerät
zu benutzen ist.
• Kinder sollten beaufsichtigt werden, um sicher-
zustellen, dass sie nicht mit dem Gerät spielen.
• Um ein unbeabsichtigtes Einschalten zu vermei-
den, ziehen Sie nach jedem Gebrauch und vor
jeder Reinigung den Netzstecker.
• Prüfen Sie das Gerät und alle Teile auf sichtbare
Schäden. Nur in einwandfreiem Zustand kann
das Sicherheitskonzept des Gerätes funktionieren.
• Der Netzstecker muss immer leicht zugänglich
sein, so dass im Notfall das Gerät schnell vom
Stromnetz getrennt werden kann.
Gefahr durch elektrischen Schlag!
• Schließen Sie das Gerät nur an eine
vorschriftsmäßig installierte und geerdete Netz-
steckdose an. Die Netzspannung muss mit den
Angaben auf dem Typenschild des Gerätes
übereinstimmen.
IB_KH2281_Ar5027_LB5 15.07.2008 9:05 Uhr Seite 38

- 39 -
• Lassen Sie beschädigte Netzstecker oder Netz-
kabel sofort von autorisiertem Fachpersonal
oder dem Kundenservice austauschen, um
Gefährdungen zu vermeiden.
• Lassen Sie Anschlussleitungen bzw. Geräte,
die nicht einwandfrei funktionieren oder
beschädigt wurden, sofort vom Kundendienst
reparieren oder austauschen.
Tauchen Sie das Gerät niemals in
Wasser ein. Wischen Sie es nur mit
einem leicht feuchten Tuch ab.
• Setzen Sie das Gerät nicht dem Regen aus und
benutzen Sie es auch niemals in feuchter oder
nasser Umgebung.
• Achten Sie darauf, dass die Anschlussleitung
während des Betriebs niemals nass oder feucht
wird.
• Sie dürfen das Gerätegehäuse nicht öffnen oder
reparieren. In diesem Falle ist die Sicherheit
nicht gegeben und die Gewährleistung erlischt.
• Schützen Sie das Gerät vor Tropf- und Spritz-
wasser. Stellen Sie deshalb keine mit Flüssigkeit
gefüllten Gegenstände (z. B. Blumenvasen) auf
oder neben das Gerät.
Brandgefahr!
• Benutzen Sie das Gerät nicht in der Nähe von
heißen Oberflächen.
• Stellen Sie das Gerät nicht an Orten auf, die
direkter Sonnenstrahlung ausgesetzt sind.
Andernfalls kann es überhitzen und irreparabel
beschädigt werden.
• Hängen Sie das Küchenradio nicht über einem
Herd auf. Das Küchenradio kann beschädigt
werden. Es besteht die Gefahr eines Brandes!
• Lassen Sie das Gerät während des Betriebs
niemals unbeaufsichtigt.
• Decken Sie niemals die Lüftungsschlitze des
Gerätes ab, wenn es eingeschaltet ist.
• Stellen Sie keine offenen Brandquellen, wie
z. B. Kerzen auf oder neben das Gerät.
Verletzungsgefahr
• Halten Sie Kinder von Anschlussleitung und
Gerät fern. Kinder unterschätzen häufig die
Gefahren von Elektrogeräten.
• Sorgen Sie für einen sicheren Stand des Gerätes.
• Falls das Gerät heruntergefallen oder beschä-
digt ist, dürfen Sie es nicht mehr in Betrieb
nehmen. Lassen Sie das Gerät von qualifizier-
tem Fachpersonal überprüfen und gegebenen-
falls reparieren.
• Batterien/Akkus können bei Verschlucken
lebensgefährlich sein. Bewahren Sie die
Batterien für Kleinkinder unerreichbar auf.
Wurde eine Batterie verschluckt, muss sofort
medizinische Hilfe in Anspruch genommen
werden.
• Halten Sie auch die Verpackungsfolien von
Kindern fern. Es besteht Erstickungsgefahr.
Hinweis:
Einige aggressive Möbellacke können die
Gummifüße des Geräts angreifen. Stellen Sie
das Gerät ggf. auf eine rutschfeste Unterlage.
Gewitter!
Bei einem Gewitter können am Stromnetz
angeschlossene Geräte Schaden nehmen.
Ziehen Sie bei Gewitter deshalb immer den
Netzstecker aus der Steckdose.
Hinweis zu Stoßspannungen
(EFT/elektrischer schneller
Übergangsvorgang) und
elektrostatischen Entladungen:
Im Falle einer Fehlfunktion aufgrund
elektrischer schneller Übergangsvorgänge
(Stoßspannung) bzw. elektrostatischer
Entladungen muss das Produkt zurückgesetzt
werden, um den normalen Betrieb wieder
herzustellen. Möglicherweise muss die Strom-
versorgung getrennt und wieder neu ange-
schlossen werden. Die Batterien (falls
vorhanden) müssen entnommen und wieder
eingesetzt werden.
IB_KH2281_Ar5027_LB5 15.07.2008 9:05 Uhr Seite 39

- 40 -
Hinweis zur Netztrennung
Der POWER-Schalter dieses Gerätes trennt das
Gerät nicht vollständig vom Stromnetz. Außer-
dem nimmt das Gerät im Standby-Betrieb
Strom auf. Um das Gerät vollständig vom Netz
zu trennen, muss der Netzstecker aus der Netz-
steckdose gezogen werden.
Hinweise zum Umgang mit Batterien
Das Gerät verwendet zur Speichersicherung
Batterien. Für den Umgang mit Batterien beachten
Sie bitte Folgendes:
Explosionsgefahr!
Werfen Sie keine Batterien ins Feuer. Laden Sie
Batterien nicht wieder auf.
• Öffnen Sie die Batterien niemals, löten oder
schweißen Sie nie an Batterien.
Es besteht Explosions- und Verletzungsgefahr!
• Überprüfen Sie regelmäßig die Batterien.
Auslaufende Batterien können Beschädigungen
am Gerät verursachen.
• Wenn Sie das Gerät längere Zeit nicht
benutzen, entnehmen Sie die Batterien.
• Bei ausgelaufenen Batterien, ziehen Sie
Schutzhandschuhe an.
• Reinigen Sie das Batteriefach und die Batterie-
kontakte mit einem trockenen Tuch.
Achtung!
Für Schäden am Küchenradio, die durch
Feuchtigkeitseinwirkung, in das Gerät
eingedrungenes Wasser oder Überhitzung
entstanden sind wird keine Haftung/Gewähr-
leistung übernommen!
Lieferumfang
- Küchenradio KH 2281
- Montageplatte
- 4 Schrauben
- Bedienungsanleitung
Legende Gerät
q
Montageplatte
w
Arretierungshebel
e
Netzleitung
r
Wurfantenne
t
Taste TIMER/ALARM MODE
y
Taste ALARM 1/VOL+
u
Taste POWER ON/OFF
i
Taste ALARM 2/VOL-
o
Tasten 1/3 PRESET, 2/4 PRESET
a
Batteriefach
s
Display
d
Taste A.O.T.
f
Taste STORE
g
Tasten TUNING UP/DOWN
h
Lautsprecher
j
Taste MODE SET
Anbringen des Küchenradios
unter einen Hängeschrank
Sie können das Küchenradio mit der mitgelieferten
Montageplatte
q
z. B. an einem Küchenschrank
aufhängen:
1. Suchen Sie eine geeignete Anbaustelle für das
Küchenradio aus.
2. Drücken Sie die zwei Arretierungshebel
w
auf
der Geräterückseite nach unten. Schieben Sie
die Montageplatte
q
nach hinten und nehmen
Sie sie ab.
3. Halten Sie die Montageplatte
q
an die
Anbaustelle. Lassen Sie zu den vorderen
Kanten ca. 3,5 cm Platz. So schließt das
Küchenradio später bündig ab.
IB_KH2281_Ar5027_LB5 15.07.2008 9:05 Uhr Seite 40

- 41 -
4. Markieren Sie die vier Punkte für die
Bohrungen mit einem Stift.
5. Markieren Sie die Bohrung mit einem Dorn.
6. Schrauben Sie die Montageplatte
q
mit den
im Zubehör beiliegenden Schrauben fest.
7. Setzen Sie das Küchenradio schräg mit den
zwei Aussparungen in die Haltenasen an der
Montageplatte
q
. Drücken Sie das Küchen-
radio nach oben, bis es hörbar einrastet.
Fixieren Sie die Wurfantenne mit einem Stück
Klebeband, so dass sie nicht herunterhängt.
Aufstellen des Küchenradios
Stellen Sie das Küchenradio nicht ohne die
Montageplatte
q
auf. Der Lautsprecher ist sonst
verdeckt und die Musik kaum hörbar.
Um das Küchenradio mit der mitgelieferten
Montageplatte
q
aufzustellen:
1. Drücken Sie gleichzeitig die zwei Arretierungs-
hebel
w
auf der Geräterückseite nach unten.
Ziehen Sie die Montageplatte
q
nach hinten
und nehmen Sie sie ab.
2. Schieben Sie die beiden Haltenasen an der
Montageplatte
q
in die Vertiefungen an der
hinteren Unterseite des Küchenradios.
3. Drücken Sie den vorderen Teil der
Montageplatte
q
fest nach unten, bis sie hörbar
einrastet. Sie können das Küchenradio nun
aufstellen.
Um die Montageplatte
q
zu demontieren, greifen
Sie mit den Daumen unter die Montageplatte
q
und drücken Sie sie nach vorne und oben, bis sie
sich löst. Nehmen Sie die Montageplatte
q
ab.
Inbetriebnahme
Einlegen der Backup-Batterien
Durch die Backup-Batterien gehen bei einem Strom-
ausfall die Uhrzeit, Datum, Weckzeiten und ein
eingestellter SDA (Special Day Alert) nicht verloren.
Sie benötigen hierfür zwei 1,5 V Batterien des Typs
AAA. Diese sind nicht im Lieferumfang enthalten.
1. Öffnen Sie die Klappe des Batteriefachs
a
an
der Unterseite des Küchenradios.
2. Legen Sie die Batterien ein. Achten Sie dabei
auf die richtige Polarität.
3. Schließen Sie die Klappe des Batteriefachs
a
.
Die Klappe muss hörbar einrasten.
Hinweis:
Die Backup-Batterien sollten mindestens
einmal jährlich überprüft und gegebenenfalls
ausgewechselt werden.
Stromversorgung herstellen
• Stecken Sie den Netzstecker in eine
Netzsteckdose. Im Display startet die Uhrzeit
bei „00:00.
00“.
Um die Alarmfunktionen des Radios nutzen zu
können, stellen Sie zunächst Uhrzeit und Datum ein,
wie in den folgenden Abschnitten beschrieben.
IB_KH2281_Ar5027_LB5 15.07.2008 9:05 Uhr Seite 41

- 42 -
Uhrzeit einstellen
Um Uhrzeit, Datum, Displaybeleuchtung und
Stundenformat einstellen zu können, muss das
Radio ausgeschaltet sein.
1. Drücken Sie die Taste MODE SET
j
einmal. Die
Uhrzeit blinkt.
2. Drücken Sie die Tasten TUNING UP/DOWN
g
, um
die Uhrzeit in Minutenintervallen einzustellen.
Drücken und Halten der Tasten ändert die
Uhrzeit in Intervallen von 10 Minuten.
Wenn innerhalb von 10 Sekunden keine Taste
gedrückt wird, wird die Einstellung gespeichert und
das Küchenradio schaltet zurück zur Uhrzeitanzeige.
Datum einstellen
1. Drücken Sie die Taste MODE SET
j
zweimal. Im Display blinkt die Datumsanzeige
„01
.01.08“.
2. Drücken Sie die Tasten TUNING UP/DOWN
g
, um
das Datum in Tagesintervallen einzustellen.
Drücken und Halten der Tasten ändert das
Datum in Intervallen von 10 Tagen.
Wenn innerhalb von 10 Sekunden keine Taste
gedrückt wird, wird die Einstellung gespeichert und
das Küchenradio schaltet zurück zur Uhrzeitanzeige.
Displaybeleuchtung
ein- und ausschalten
1. Drücken Sie dreimal die Taste MODE SET
j
. Im
Display erscheint „L“.
2. Drücken Sie die Taste TUNING UP
g
, um die
Displaybeleuchtung einzuschalten. Im Display
erscheint „H“.
3. Drücken Sie die Taste TUNING DOWN
g
, um die
Displaybeleuchtung auszuschalten. Im Display
erscheint „L“.
Wenn innerhalb von 10 Sekunden keine Taste
gedrückt wird, wird die Einstellung gespeichert und
das Küchenradio schaltet zurück zur Uhrzeitanzeige.
12- oder 24-Stundenmodus einstellen
1. Drücken Sie viermal die Taste MODE SET
j
.
Im Display erscheint „24“ für den 24-Stunden-
modus.
2. Drücken Sie die Taste TUNING UP
g
, um den
24-Stundenmodus einzustellen.
3. Drücken Sie die Taste TUNING DOWN
g
, um den
12-Stundenmodus einzustellen.
Im Display erscheint „12“. Für die Stunden des
Nachmittags erscheint nun zusätzlich PM im Display.
Küchentimer
1. Drücken Sie die Taste TIMER/ALARM MODE
t
. Im
Display ercheint das Timersymbol .
2. Stellen Sie mit den Tasten TUNING UP/DOWN
g
die gewünschte Zeit ein (ein Zeitraum von
1 Minute bis 23:59 h ist möglich).
3. Drücken Sie die Taste TIMER/ALARM MODE
t
erneut, um den Küchentimer zu starten. Im
Display erscheint das Timersymbol und
zusätzlich ein rückwärtslaufendes Uhren-
symbol.
30 Sekunden vor Ablaufen der Zeit, ertönt ein
akustisches Signal, das bei fortlaufender Zeit in
immer kürzeren Abständen ertönt. Ist die Zeit ab-
gelaufen, ertönt das Signal fortlaufend für eine
Stunde.
• Drücken Sie die Taste
TIMER/ALARM MODE
t
, um
den Signalton zu beenden.
Küchentimer unterbrechen
• Sie können den Küchentimer unterbrechen,
indem Sie die Taste
TIMER/ALARM MODE
t
kurz
drücken.
Die Timer-Zeit blinkt. Das Uhren-Symbol erlischt.
• Drücken Sie die Taste
TIMER/ALARM MODE
t
erneut.
Die Zeit läuft weiter.
Küchentimer abbrechen
• Um den Küchentimer abzubrechen, halten Sie
die Taste
TIMER/ALARM MODE
t
gedrückt.
Im Display wird die Uhrzeit angezeigt.
IB_KH2281_Ar5027_LB5 15.07.2008 9:05 Uhr Seite 42

- 43 -
Küchentimer programmieren
Sie können Küchentimer-Zeiten abspeichern.
1. Drücken Sie die Taste TIMER/ALARM MODE
t
.
2. Stellen Sie mit den Tasten TUNING UP/DOWN
g
die gewünschte Zeit ein
3. Drücken Sie die Taste STORE
f
. Im Display
blinkt „T“ auf.
4. Drücken Sie die Tasten 1/3 PRESET, 2/4 PRESET
o
für den gewünschten Speicherplatz. Ihnen
stehen vier Speicherplätze zur Verfügung. Im
Display erscheint die Nummer des von Ihnen
gewählten Speicherplatzes.
5. Drücken Sie erneut die Taste STORE
f
. Die Zeit
ist nun gespeichert.
Wenn innerhalb von 10 Sekunden keine Taste
gedrückt wird, schaltet das Küchenradio zurück zur
Uhrzeitanzeige.
6. Um die gespeicherten Küchentimer -Zeiten abzu-
rufen, drücken Sie die Taste
TIMER/ALARM MODE
t
und die Taste des entsprechenden Speicher-
platzes (
1/3 PRESET, 2/4 PRESET
o
).
7. Drücken Sie die Taste TIMER/ALARM MODE
t
erneut, um den Küchentimer zu starten. Im
Display erscheint ein rückwärts laufendes
Uhrensymbol.
8. Um den Küchentimer abzubrechen, halten Sie
die Taste
TIMER/ALARM MODE
t
gedrückt.
Weckfunktion (Alarm 1 und Alarm 2)
Sie können mit Ihrem Küchenradio zwei Weckzeiten
programmieren.
1. Drücken Sie die Taste ALARM 1/VOL+
y
(oder
ALARM 2/VOL-
i
). Im Display erscheint die zuletzt
eingestellte Weckzeit A1 bzw. A2 und eventuell
das Symbol für den Typ des Alarms (siehe
Tabelle oben).
Weckfunktion Symbol im Display
Signaltöne
Radio
Abgeschaltet kein Symbol
2. Drücken Sie die Tasten TUNING UP/DOWN
g
, um
die gewünschte Weckzeit einzustellen.
3. Drücken Sie die Taste ALARM 1/VOL+
y
(oder
ALARM 2/VOL-
i
) so oft, bis die gewünschte
Weckfunktion (siehe Tabelle oben) im Display
angezeigt wird.
4. Drücken Sie die Taste A.O.T.
d
, um die
Wochentage, an denen Sie geweckt werden
wollen, einzustellen:
Sie können wählen zwischen werktags (Mo,
Tu, We, Th, Fr), Wochenende (Su, Sa), ganze
Woche (Su, Mo, Tu, We, Th, Fr, Sa) oder den
aktuellen Wochentag. Die gewählte Einstellung
wird im Display angezeigt.
5. Drücken Sie die Taste A.O.T.
d
so oft, bis die
gewünschten Wecktage eingestellt sind. Halten
Sie die Taste
A.O.T.
d
gedrückt, bis im Display
ein einzelner Wochentag angezeigt wird.
6. Drücken Sie die Taste A.O.T.
d
, um den
gewünschten Wochentag einzustellen.
Um wieder zurück zur Auswahl von Werktagen,
Wochenende oder ganzer Woche zu gelangen,
halten Sie die Taste
A.O.T.
d
erneut kurz gedrückt.
7. Drücken Sie die Taste MODE SET
j
, um die Ein-
stellung zu speichern und zur Uhrzeitan-
zeige zurückzukehren.
Wenn der Alarm ertönt...
• und die Weckfunktion „Radio“ gewählt ist, läuft
das Radio eine Stunde mit einer vordefinierten
Wecklautstärke. Diese Lautstärke kann nicht
verändert werden. Zum Beenden drücken Sie
die Taste
ALARM 1/VOL+
y
oder ALARM 2/VOL-
i
.
• und die Weckfunktion „Signaltöne“ gewählt
ist, ertönen die Signaltöne 10 Minuten. Zum
Beenden drücken Sie die Taste
ALARM 1/VOL+
y
oder ALARM 2/VOL-
i
.
IB_KH2281_Ar5027_LB5 15.07.2008 9:05 Uhr Seite 43

- 44 -
Radiobetrieb
Sender suchen
Sender manuell einstellen
1. Drücken Sie die Taste Taste POWER ON/OFF
u
.
Im Display wird die aktuelle Frequenz
angezeigt.
2. Drücken Sie die Taste TUNING UP
g
um die
Frequenz zu erhöhen.
3. Drücken Sie die Taste TUNING DOWN
g
, um die
Frequenz zu verringern.
Sender automatisch suchen
Sie können nach Sendern suchen lassen. Das
Küchenradio durchsucht dann die Frequenzen, bis
es einen Sender gefunden hat.
1. Drücken Sie die Taste POWER ON/OFF
u
.
2. Halten Sie die Taste TUNING UP
g
zwei Sekun-
den gedrückt: das Küchenradio sucht nach
dem Sender mit der nächsthöheren Frequenz.
3. Halten Sie die Taste TUNING DOWN
g
zwei Sekun-
den gedrückt: Das Küchenradio sucht nach dem
Sender mit der nächstniedrigeren Frequenz.
Wiederholen Sie diese Schritte, bis Sie den
entsprechenden Sender gefunden haben.
Sender speichern
Sie können mit den Speichertasten Tasten 1/3 PRESET,
2/4 PRESET
o
4 Sender abspeichern.
1. Drücken Sie die Taste POWER ON/OFF
u
.
2. Suchen Sie einen Sender, wie im Kapitel
„
Radiobetrieb
“ beschrieben.
3. Drücken Sie die Taste STORE
f
. Die Anzeige
„M“erscheint im Display und es blinkt „MEM“.
4. Drücken Sie eine der Tasten 1/3 PRESET, 2/4 PRESET
o
, auf der Sie den Sender ablegen wollen.
• Drücken Sie die jeweilige Speichertaste mehr-
mals für den gewünschten Speicherplatz (z. B.
einmal Taste
1/3 PRESET für Speicherplatz 1,
zweimal Taste
1/3 PRESET für Speicherplatz 3).
5. Drücken Sie die Taste STORE
f
erneut. Der
Sender ist gespeichert.
• Um gespeicherte Sender einzustellen, drücken
Sie im Radio-Modus mehrmals die entsprechen-
de Speichertaste (
1/3 PRESET, 2/4 PRESET
o
) bis
die Nummer des Speicherplatzes im Display
erscheint.
Lautstärke einstellen
• Drücken Sie während des Radiobetriebs die
Taste
ALARM 1/VOL+
y
, um die Lautstärke zu
erhöhen.
• Drücken Sie die Taste
ALARM 2/VOL-
i
, um die
Lautstärke zu verringern.
Bassverstärkung einschalten
• Drücken Sie während des Radiobetriebs die
Taste
MODE SET
j
, um die Bassverstärkung ein-
zuschalten. Im Display erscheint die Anzeige
BASS.
• Drücken Sie die Taste
MODE SET
j
, um die Bass-
verstärkung wieder auszuschalten. Die
Anzeige BASS im Display erlischt.
Sperren
Sie können das Küchenradio sperren, damit Unbe-
fugte oder Kinder keine Einstellungen ändern können.
• Halten Sie die Taste
STORE
f
gedrückt.
Im Display erscheint ein Schlüsselsymbol.
• Um die Sperre zu entfernen, halten Sie erneut
die Taste
STORE
f
gedrückt, bis das
Schlüsselsymbol erlischt.
Automatische Ausschaltzeit einstellen
Sie können eine Ausschaltzeit einstellen, nach der
sich das Radio automatisch ausschaltet.
• Drücken Sie die Taste
A.O.T.
d
. Das Radio
schaltet sich gegebenenfalls ein. Im Display
erscheint die Anzeige „120 AOT“.
• Drücken Sie mehrmals die Taste
A.O.T.
d
, um
die Abschaltzeit in Schritten von 5 Minuten von
120 bis 5 Minuten einzustellen.
IB_KH2281_Ar5027_LB5 15.07.2008 9:05 Uhr Seite 44

- 45 -
Wenn innerhalb von 10 Sekunden keine Taste
gedrückt wird, wird die Einstellung gespeichert und
das Küchenradio schaltet zurück zur Uhrzeitanzeige.
• Um die Funktion auszuschalten, drücken Sie
die Taste
A.O.T.
d
, bis die Anzeige „OFF AOT“
im Display erscheint.
Reinigung
Warnung!
Dringt Feuchtigkeit in das Gerät ein, besteht
die Gefahr eines elektrischen Schlages!
Außerdem kann das Küchenradio dabei
irreparabel beschädigt werden!
Reinigen Sie das Gehäuse des Küchenradios
ausschließlich mit einem leicht feuchten Tuch und
einem milden Spülmittel. Achten Sie darauf, dass
bei der Reinigung keine Feuchtigkeit in das Gerät
gelangt!
Entsorgen
Gerät entsorgen
Werfen Sie das Gerät keinesfalls in den
normalen Hausmüll.
Dieses Produkt unterliegt der europäischen
Richtlinie 2002/96/EG.
Entsorgen Sie das Gerät über einen zugelassenen
Entsorgungsbetrieb oder über Ihre kommunale
Entsorgungseinrichtung.
Beachten Sie die aktuell geltenden Vorschriften.
Setzen Sie sich im Zweifelsfall mit Ihrer Entsorgungs-
einrichtung in Verbindung.
Batterien/Akkus entsorgen!
Batterien/Akkus dürfen nicht im Hausmüll entsorgt
werden. Jeder Verbraucher ist gesetzlich verpflichtet,
Batterien/Akkus bei einer Sammelstelle seiner
Gemeinde/ seines Stadtteils oder im Handel
abzugeben.Diese Verpflichtung dient dazu, dass
Batterien/Akkus einer umweltschonenden
Entsorgung zugeführt werden können.
Geben Sie Batterien/Akkus nur im entladenen
Zustand zurück.
Verpackung entsorgen
Führen Sie alle Verpackungsmaterialien
einer umweltgerechten Entsorgung zu.
Importeur
KOMPERNASS GMBH
BURGSTRASSE 21
44867 BOCHUM, GERMANY
www.kompernass.com
IB_KH2281_Ar5027_LB5 15.07.2008 9:05 Uhr Seite 45

- 46 -
Garantie & Service
Sie erhalten auf dieses Gerät 3 Jahre Garantie ab
Kaufdatum. Sollten Sie trotz unserer hohen Quali-
tätsstandards einen Grund zur Beanstandung dieses
Gerätes haben, so kontaktieren Sie bitte unsere
Service-Hotline.
Falls eine telefonische Bearbeitung Ihrer Beanstan-
dung nicht möglich ist, erhalten Sie dort
• eine Bearbeitungsnummer (RMA-Nummer)
sowie
• eine Adresse, an die Sie Ihr Produkt zur
Garantieabwicklung einsenden können.
Bitte legen Sie im Falle einer Einsendung eine Kopie
des Kaufbeleges (Kassenzettel) bei. Das Gerät muss
transportsicher verpackt und die RMA-Nummer
direkt ersichtlich sein. Einsendungen ohne RMA-
Nummer können nicht bearbeitet werden.
Hinweis:
Die Garantieleistung gilt nur für Material- oder
Fabrikationsfehler.
Die Garantieleistung gilt nicht
• für Verschleißteile
• für Beschädigungen an zerbrechlichen Teilen
wie Schaltern oder Akkus.
Das Produkt ist lediglich für den privaten und nicht
für den gewerblichen Gebrauch bestimmt. Bei
missbräuchlicher und unsachgemäßer Behandlung,
Gewaltanwendung und bei Eingriffen, die nicht von
unserer autorisierten Service-Niederlassung vorge-
nommen wurden, erlischt die Garantie.
Ihre gesetzlich festgelegten Gewährleistungsan-
sprüche werden durch diese Garantie nicht
eingeschränkt.
$
IB_KH2281_Ar5027_LB5 15.07.2008 9:05 Uhr Seite 46

Diesen Abschnitt vollständig ausfüllen und dem Gerät beilegen!
Absender bitte deutlich schreiben:
Name
Vorname
Straße
PLZ/Ort
Land
Telefon
Datum/Unterschrift
Fehlerbeschreibung :
$
Garantie
Kompernaß Service Deutschland
Tel.: +49 (0) 180 5 008107
(14 Ct/Min. aus dem dt. Festnetz,
ggf. abweichende Preise aus dem
Mobilfunknetz)
Fax: +49 (0) 2832 3532
e-mail: support.de@kompernass.com
www.mysilvercrest.de
Kompernaß Service Österreich
Tel.: (+43) 07612/6260516
email: support.at@kompernass.com
www.mysilvercrest.de
Um einen kostenlosen Reparaturab-
lauf zu gewährleisten, setzen Sie
sich bitte mit der Service-Hotline in
Verbindung. Halten Sie hierfür Ihren
Kassenbeleg bereit.
Küchenradio KH2281
IB_KH2281_Ar5027_LB5 15.07.2008 9:05 Uhr Seite 47

- 48 -
IB_KH2281_Ar5027_LB5 15.07.2008 9:05 Uhr Seite 48
Transcripción de documentos
CV_KH2281_AR5027_LB5 15.07.2008 9:00 Uhr Seite 1 5 RADIO DE COCINA RADIOSVEGLIA KH 2281 RADIO DE COCINA Instrucciones de uso RADIOSVEGLIA Istruzioni per l'uso KITCHEN RADIO Operating instructions KOMPERNASS GMBH · BURGSTRASSE 21 · D-44867 BOCHUM www.kompernass.com ID-Nr.: KH2281-07/08-V1 KÜCHENRADIO Bedienungsanleitung CV_KH2281_AR5027_LB5 15.07.2008 9:00 Uhr Seite 4 KH 2281 q w r e t yu i o a s d f g h j IB_KH2281_Ar5027_LB5 15.07.2008 9:05 Uhr Seite 1 ÍNDICE PÁGINA Datos técnicos 2 Uso conforme al previsto 2 Instrucciones de seguridad 2 Volumen de suministro 4 Leyenda aparato 4 Colocación de la radio de cocina debajo de un armario colgante 4 Emplazar la radio de cocina 5 Puesta en funcionamiento 5 Inserción de las pilas de backup ....................................................................................................5 Alimentación de corriente ...............................................................................................................5 Ajustar la hora ..................................................................................................................................6 Ajustar la fecha.................................................................................................................................6 Conexión y desconexión de la eliminación de pantalla .............................................................6 Ajustar el modo de 12 o 24 horas ................................................................................................6 Temporizador de cocina .................................................................................................................6 Función de alarma (alarma 1 y alarma 2) ...................................................................................7 Funcionamiento de la radio 8 Ajustar manualmente la emisora.....................................................................................................8 Búsqueda automática de emisora ..................................................................................................8 Memorizar la emisora .....................................................................................................................8 Ajustar el volumen ............................................................................................................................8 Conexión del refuerzo de graves...................................................................................................8 Bloquear ............................................................................................................................................8 Ajustar hora de desconexión automática ......................................................................................8 Limpieza 9 Evacuación 9 Importador 9 Garantía y servicio posventa 10 Lea atentamente este manual de instrucciones antes del primer uso y consérvelo para posteriores utilizaciones. Entréguelo en caso de traspasar el aparato a terceros. -1- IB_KH2281_Ar5027_LB5 15.07.2008 9:05 Uhr Seite 2 RADIO DE COCINA KH2281 Uso conforme al previsto La radio de cocina ha sido diseñada para su emplazamiento y montaje debajo de un armario. La radio de cocina está prevista para la recepción de emisoras de radio FM y para su uso como despertador por medio de una señal de alarma o la radio. La radio de cocina no está concebida para ser utilizada en ámbitos industriales o comerciales. No se asume ninguna garantía por daños resultantes de un uso no conforme al previsto del aparato. Datos técnicos Este aparato satisface los requisitos fundamentales y otras normativas relevantes de la directiva EMC 2004/108/CE, así como la directiva para aparatos de baja tensión 2006/95/CE. Conexión a la red eléctrica: AC 220 - 240 V ~50 Hz Consumo de potencia: 5 vatios Consumo de potencia en standby: 0,7 W Temperatura de servicio: +5 ~ +35°C Humedad: 5 ~ 90 % (sin condensación) Medidas (L x A x Al): 305 x 157 x 45 mm Peso : 800 g aprox. Clase de protección: II / Instrucciones de seguridad • Pilas de reserva 2x 1,5 V, tipo AAA/LR03/Micro (No incluidas en el volumen de suministro) • Gama de frecuencias de radio: FM (UKW) : • 87,5 – 108,5 MHz Las particularidades técnicas del aparato posibilitan una gama de frecuencias ajustable de 87,5 - 108,5 MHz. En diferentes países pueden existir regulaciones nacionales divergentes a las gamas de frecuencia de radio existentes. Preste atención de que queda prohibida transmitir a terceros o para fines distintos las informaciones recibidas que queden fuera de la gama de frecuencia radioeléctricas asignada. • • Este aparato no ha sido concebido para su uso por personas (incluidos los niños) cuyas facultades físicas, sensoriales o mentales estén limitadas o carezcan de los conocimientos o la experiencia necesarias, si no están bajo vigilancia de una persona que garantice su seguridad o han sido instruidas correctamente acerca del uso del aparato. Mantenga vigilados a los niños, a fin de asegurar de que no jueguen con el aparato. Para evitar un encendido involuntario, extraiga la clavija de red después de cada uso y antes de cada limpieza. Compruebe el aparato y todas las piezas si presentan daños visibles. El concepto de seguridad del aparato solo funcionará en estado correcto. La clavija de red deberá quedar fácilmente accesible de modo que en caso de emergencia se pueda separar el aparato de manera rápida de la red. ¡Peligro de descarga eléctrica! • -2- Conecte el aparato únicamente a una base de enchufe instalada y conectada a tierra de acuerdo con la normativa. La tensión de red debe corresponderse a los datos de la placa de características del aparato. IB_KH2281_Ar5027_LB5 • • 15.07.2008 9:05 Uhr Seite 3 ¡Peligro de lesiones! En caso de una clavija de red dañada o cable de red dañado, encomiende su sustitución a personal técnico autorizado o al servicio de posventa con el fin de evitar riesgos. Deje que el servicio de asistencia técnica repare o en su caso sustituya la línea de conexión o bien los aparatos que no funcionen correctamente. • • • No sumerja nunca el aparato en agua. Límpielo sólo con un trapo ligeramente humedecido. • • • • • No exponga el aparato a lluvia ni lo utilice jamás en entornos mojados o húmedos. Cuide de que el cable de alimentación no se moje o humedezca nunca durante el funcionamiento. No está permitido abrir o reparar la carcasa del aparato. En este caso no existe seguridad y perderá el derecho a la garantía. Proteja el aparato contra gotas y salpicaduras de agua. Para ello, no coloque ningún recipiente que contenga líquido (p. ej. jarrón con flores) encima o junto al aparato. • Mantenga los niños alejados de la línea de conexión y del aparato. Los niños a veces menosprecian los riesgos que pueden tener los aparatos eléctricos. Procure un asiento estable del aparato. En caso de que se caiga el aparato o esté dañado, no deberá ponerlo de nuevo en funcionamiento. Deje que compruebe el aparato personal especialista cualificado y en su caso que lo repare. Las pilas/baterías pueden causar peligro de muerte si se ingieren. Mantenga las pilas fuera del alcance de los niños pequeños. En caso de ingestión de una pila consulte inmediatamente con un médico. Igualmente, mantenga los plásticos de embalaje fuera del alcance de los niños pequeños. Podrían asfixiarse. Advertencia: Ciertas pinturas de muebles agresivas pueden dañar los pies de goma del aparato. Coloque el aparato sobre una superficie antideslizante. ¡Tormentas! ¡Riesgo de incendio! • • • • • • En caso de tormentas se pueden dañar los aparatos conectados a la red eléctrica. Extraiga por ello en caso de tormenta la clavija de red de la base de enchufe. No utilice el aparato en la proximidad de superficies calientes. No coloque el aparato en lugares donde quede expuesto directamente a la radiación solar. De otro modo podría sobrecalentarse y dañarse de forma irreparable. No cuelgue la radio de cocina por encima de una encimera. La radio de cocina puede dañarse. ¡Existe riesgo de incendio! No deje nunca el aparato desatendido durante su funcionamiento. Nunca cubra la rejilla de ventilación del aparato mientras que este encendido. No coloque fuentes de fuego abiertas, como velas encima del o junto al aparato. Indicación sobre la tensión de choque (EFT/proceso de paso eléctrico rápido) y descargas electroestáticas: En caso de un fallo de función debido a procesos de paso eléctrico rápido (tensión de choque) o descargas electroestáticas, se debe reposicionar el producto, con el fin de restablecer el modo de funcionamiento normal. Es posible que sea necesario interrumpir la alimentación de corriente y volver a conectarlo. Deberá retirar las pilas (si están disponibles) y volver a colocarlas. -3- IB_KH2281_Ar5027_LB5 15.07.2008 9:05 Uhr Seite 4 Nota acerca de la desconexión de red Volumen de suministro El interruptor de ENCENDIDO del aparato no lo desconecta completamente de la red eléctrica. Además, en el modo inactivo el aparato también consume corriente. Para desconectar el aparato completamente de la red es necesario extraer la clavija de red de la base de enchufe. - Nota acerca de la manipulación de las pilas q Placa de montaje w Palanca de anclaje e Cable de red r Antena flexible t Tecla TIMER/ALARM MODE y Tecla ALARM 1/VOL+ u Tecla POWER ON/OFF i Tecla ALARM 2/VOLo Teclas 1/3 PRESET, 2/4 PRESET a Compartimento de pilas s Pantalla d Tecla A.O.T. f Tecla STORE g Teclas TUNING UP/DOWN h Altavoces j Tecla MODE SET/BASS Leyenda aparato El aparato utiliza pilas para el salvado de la memoria. Tenga en cuenta lo siguiente a la hora de manipular pilas: ¡Riesgo de explosión! No arroje las pilas al fuego. No vuelva a cargar las pilas. • • • • • Radio de cocina KH 2281 Placa de montaje 4 tornillos Instrucciones de uso No abra las pilas, no estañe ni suelde las pilas nunca. ¡Existe riesgo de explosión y de lesiones! Compruebe periódicamente las pilas. Las pilas gastadas pueden ocasionar daños al aparato. Cuando no vaya a utilizar el aparato durante un periodo prolongado, extraiga las pilas. Si las pilas han perdido líquido, utilice guantes de protección. Limpie el compartimiento de pilas y los contactos de las pilas con un paño seco. Colocación de la radio de cocina debajo de un armario colgante ¡Atención! Puede colgar la radio de cocina con la placa de montaje suministrada q p. ej. debajo de un armario de cocina colgante: 1. Busque un lugar de montaje apropiado para la radio de cocina. 2. Presione las dos palancas de anclaje w del dorso del aparato hacia abajo. Deslice la placa de montaje q hacia atrás y retirela. 3. Sujete la placa de montaje q en el lugar de montaje. Deje un espacio de unos 3,5 cm respecto al borde anterior. De este modo la radio de cocina cerrará al ras. ¡Por los daños en la radio de cocina derivados de influencias de la humedad, penetración de agua en el aparato o bien sobrecalentamiento no nos hacemos responsables / se pierden los derechos a la garantía! -4- IB_KH2281_Ar5027_LB5 15.07.2008 9:05 Uhr Seite 5 Puesta en funcionamiento 4- Marque con lápiz los cuatro puntos para los taladros de los orificios. 5- Marque los taladros con un granete. 6. Atornille con firmeza la placa de montaje q usando los tornillos adjuntos en el accesorio. 7. Coloque la radio de cocina inclinada con los dos huecos dentro de las pestañas de sujeción sobre la placa de montaje q. Empuje la radio de cocina hacia arriba, hasta que se encaje de forma audible. Inserción de las pilas de backup Por medio de las pilas de backup no se pierden en caso de fallo de corriente la información sobre la hora, fecha, alarmas de despertador y SDA (Special Day Alert) ajustado. Para ello precisa dos pilas de 1,5V del tipo AAA. Estas no están contenidas en el volumen de suministro. 1. Abra la tapa del compartimento de pilas a situado en el lado inferior de la radio de cocina. 2. Inserte las pilas. Preste atención a la polaridad correcta. 3. Cierre la tapa del compartimento de pilas a. Debe escuchar como encastra la tapa. Fije la antena flexible de hilo con un trozo de cinta adhesiva de modo que no cuelgue. Emplazar la radio de cocina No instale la radio de cocina sin la placa de montaje q. De lo contrario el altavoz queda oculto y apenas se puede escuchar la música. Para emplazar la radio de cocina con la placa de montaje suministrada q: 1. Presione simultáneamente hacia abajo las dos palancas de anclaje w situadas en el dorso del aparato. Tire de la placa de montaje q hacia atrás y retirela. 2. Deslice ambos salientes de sujeción en la placa de montaje q en las cavidades del lado dorsal posterior de la radio de cocina. 3. Presione la parte anterior de la placa de montaje q firmemente hacia abajo hasta escuchar como encastra. A continuación puede colocar la radio de cocina. Para desmontar la placa de montaje q coloque el pulgar debajo de la placa de montaje q y presione hacia delante y hacia arriba hasta que se afloje. Retire la placa de montaje q. Advertencia: Las pilas de reserva se deberán comprobar como mínimo una vez al año y en su caso cambiarlas. Alimentación de corriente • Conecte la clavija de red en una base de enchufe. En la pantalla, la hora se inicia a las "00:00.00". Para poder utilizar las funciones de alarma de la radio, debe ajustar en primer lugar la fecha y la hora, tal y como se describe en los apartados siguientes. -5- IB_KH2281_Ar5027_LB5 15.07.2008 9:05 Uhr Seite 6 Ajustar la hora Ajustar el modo de 12 o 24 horas 1. Pulse cuatro veces la TECLA MODE SET/BASS g. Para que sea posible ajustar la hora, la fecha, la iluminación de pantalla y el formato de hora, la radio debe estar desconectada. 1. Pulse una vez la tecla MODE SET/BASS j. La hora parpadea. 2. Pulse las teclas TUNING UP/DOWN g para ajustar la hora minuto a minuto. Pulsar y mantener accionadas las teclas varia la hora en intervalos de 10 minutos. Si no se pulsa ninguna tecla durante 10 segundos, se guarda el ajuste y la radio de cocina vuelve a mostrar la hora. En la pantalla aparece "24" para el modo de 24 horas. 2. Pulse las teclas TUNING UP g para ajustar el modo de 24 horas. 3. Pulse las teclas TUNING DOWN g para ajustar el modo de 12 horas. En la pantalla aparece "12". Para las horas de la tarde aparece adicionalmente PM en la pantalla. Temporizador de cocina 1. Pulse la tecla TIMER/ALARM MODE t. En la pantalla aparece el símbolo del temporizador (timer). 2. Con las teclas TUNING UP/DOWN g, ajuste la hora que desee (puede ajustarse un intervalo comprendido entre 1 minuto y 23:59 h). 3. Pulse de nuevo la tecla TIMER/ALARM MODE t para iniciar el temporizador de cocina. En la pantalla aparece el símbolo del temporizador y, además, un símbolo de reloj que marcha hacia atrás. 30 segundos antes de terminarse el tiempo ajustado suena una señal acústica, que suena a intervalos más cortos a medida que transcurre el tiempo. Cuando se acaba el tiempo, la señal suena de forma continua durante una hora. • Pulse la tecla TIMER/ALARM MODE t para desactivar la señal. Ajustar la fecha 1. Pulse dos veces la tecla MODE SET/BASS j. En la pantalla, parpadea la indicación de fecha "01.01.08". 2. Pulse las teclas TUNING UP/DOWN g para ajustar la fecha día a día. Pulsar y mantener accionadas las teclas, cambia la fecha en intervalos de 10 días. Si no se pulsa ninguna tecla durante 10 segundos, se guarda el ajuste y la radio de cocina vuelve a mostrar la hora. Conexión y desconexión de la eliminación de pantalla 1. Pulse tres veces la tecla MODE SET/BASS j. En la pantalla aparece "L". 2. Pulse la tecla TUNING UP g para conectar la Interrumpir el temporizador de cocina iluminación de pantalla. En la pantalla aparece "H". 3. Pulse las teclas TUNING DOWN g para descon ectar la iluminación de pantalla. En la pantalla aparece "L". Si no se pulsa ninguna tecla durante 10 segundos, se guarda el ajuste y la radio de cocina vuelve a mostrar la hora. • Puede interrumpir el temporizador de cocina pulsando brevemente la tecla TIMER/ALARM MODE t. El tiempo del temporizador parpadea. Aparece el símbolo de reloj. • Vuelva a pulsar la tecla TIMER/ALARM MODE t. El tiempo continua funcionando. Cancelar el temporizador de cocina • Para cancelar el temporizador de cocina, mantenga pulsada la tecla TIMER/ALARM MODE t. En la pantalla aparece la hora. -6- IB_KH2281_Ar5027_LB5 15.07.2008 9:05 Uhr Seite 7 Programar el temporizador de cocina 2. Pulse las teclas TUNING UP/DOWN g para ajustar Puede guardar tiempos en el temporizador de cocina. 1. Pulse la tecla TIMER/ALARM MODE t. 2. Con las teclas TUNING UP/DOWN g, ajuste la hora elegida 3. Pulse la tecla STORE f. En la pantalla parpadea ahora „T“. 4. Pulse las teclas 1/3 PRESET, 2/4 PRESET o para la posición de memoria elegida. Dispone de cuatro posiciones de memoria. En el display aparece el número del puesto de memoria elegido. 5. Vuelva a pulsar la tecla STORE f. La hora de alarma ha quedado ahora memorizada. Si no se pulsa ninguna tecla durante 10 segundos, la radio de cocina conmuta de nuevo a la indicación de la hora. 6. Para llamar las temporizaciones de cocina memorizadas, pulse la tecla TIMER/ALARM MODE t y la tecla de la posición memoria correspondiente (1/3 PRESET, 2/4 PRESET o). 7. Pulse de nuevo la tecla TIMER/ALARM MODE t para iniciar el temporizador de cocina. En la pantalla aparece un símbolo de reloj que marcha hacia atrás. 8. Para cancelar el temporizador de cocina, mantenga pulsada la tecla TIMER/ALARM MODE t. la hora de alarma elegida. 3. Pulse la tecla ALARM 1/VOL+ y (o ALARM 2/VOL- i) tantas veces como sea necesario hasta que la pantalla muestre la función de alarma deseada (véase la tabla anterior). 4. Pulse la tecla A.O.T. d para ajustar los días de la semana en los que desea que se le despierte: Puede elegir entre días laborables (Mo, Tu, We, Th, Fr), fin de semana (Su, Sa), toda la semana (Su, Mo, Tu, We, Th, Fr, Sa) o bien el día de semana actual. El ajuste seleccionado es mostrado en la pantalla. 5. Pulse de la tecla A.O.T. d tantas veces como sea necesario hasta que se hayan ajustado los días de alarma elegidos. Mantenga pulsada la tecla A.O.T. d hasta que la pantalla sólo muestre un único día de la semana. 6. Pulse la tecla A.O.T. d para ajustar el día de la semana elegido. Para regresar de nuevo a la selección de los días laborables, fines de semana o bien semana completa, mantenga pulsada de nuevo brevemente la tecla A.O.T. d. 7. Pulse la tecla Mode SET/BASS g para guardar el ajuste y regresar a la indicación de la hora. Función de alarma (alarma 1 y alarma 2) Cuando suena la alarma... Con su radio de cocina puede programar dos temporizaciones de alarma. Función de despertador • Símbolo en la pantalla Señales acústicas • Radio Desconectado Sin símbolo 1. Pulse la tecla ALARM 1/VOL+ y (o ALARM 2/VOL- i). En la pantalla aparece la última hora de alarma elegida A1 o A2 y, eventualmente, el símbolo para el tipo de alarma (véase la tabla anterior). -7- y se ha seleccionado la función de alarma "Radio", la radio funciona durante una hora con un volumen de despertador previamente definido. Ese volumen no se puede modificar. Para finalizar, pulse la tecla ALARM 1/VOL+ y o ALARM 2/VOL- i. si se encuentra seleccionada la función de despertador „señales acústicas“, suenan las señales acústicas 10 minutos. Para finalizar, pulse la tecla ALARM 1/VOL+ y o ALARM 2/ VOL- i. IB_KH2281_Ar5027_LB5 15.07.2008 9:05 Uhr Seite 8 Funcionamiento de la radio • Ajustar manualmente la emisora 1. Pulse la tecla POWER ON/OFF u. En la pantalla se muestra la frecuencia actual. Para ajustar las emisoras memorizadas, mientras está en el modo Radio pulse varias veces la tecla de memoria correspondiente (1/3 PRESET, 2/4 PRESET o) hasta que aparezca el número de la posición de memoria en la pantalla. 2. Pulse la tecla TUNING UP g para aumentar la Ajustar el volumen frecuencia. 3. Pulse la tecla TUNING DOWN g para disminuir la • frecuencia. • Búsqueda automática de emisora Puede optar a que se busque la emisora. La radio de cocina recorre las frecuencias hasta localizar una emisora. 1. Pulse la tecla POWER ON/OFF u. 2. Mantenga pulsada la tecla TUNING UP g durante dos segundos: La radio de cocina busca la emisora con la frecuencia más alta siguiente-. 3. Mantenga pulsada la tecla TUNING DOWN g durante dos segundos: La radio de cocina busca la emisora con la frecuencia más baja siguiente-. Repita estos pasos hasta encontrar una emisora de su agrado. Mientras la radio esté funcionando, pulse la tecla ALARM 1/VOL+ y para aumentar el volumen. Pulse la tecla ALARM 2/VOL- i para reducir el volumen. Conexión del refuerzo de graves • Durante el funcionamiento de la radio, pulse la tecla MODE SET/BASS j para activar el refuerzo de graves. En la pantalla aparece la indicación BASS. • Pulse la tecla MODE SET/BASS j para desactivar de nuevo el refuerzo de graves. En la pantalla desaparece la indicación BASS. Bloquear Puede bloquear la radio de la cocina para que las personas no autorizadas o los niños no puedan variar los ajustes. • Mantenga pulsada la tecla STORE f. En la pantalla aparece el símbolo de una llave. • Para eliminar el bloqueo, mantenga pulsada de nuevo la tecla STORE f, hasta que desaparezca el símbolo de la llave. Memorizar la emisora Con las teclas de memoria 1/3 PRESET, 2/4 PRESET o, puede guardar cuatro emisoras. 1. Pulse la tecla POWER ON/OFF u. 2. Busque una emisora conforme a lo descrito en el capítulo „Funcionamiento de la radio“. 3. Pulse la tecla STORE f. La indicación "M" aparece en la pantalla y parpadea "MEM". 4. Pulse una de las teclas 1/3 PRESET, 2/4 PRESET o en la que desea guardar una emisora. • Pulse la tecla de memoria correspondiente varias veces para seleccionar la posición de memoria deseada (p.EJ. una vez la tecla 1/3 PRESET para la posición de memoria 1, dos veces la tecla 1/3 PRESET para la posición de memoria 3). 5. Pulse de nuevo la tecla STORE f. La emisora queda memorizada. Ajustar hora de desconexión automática Puede ajustar una hora de desconexión a la que se desactive automáticamente la radio. • Pulse la tecla A.O.T. d. En caso necesario, la radio se enciende. En la pantalla aparece la indicación "120 AOT". • Pulse varias veces la tecla A.O.T. d para ajustar la hora de desconexión en pasos de 5 minutos desde un máximo de 120 hasta un mínimo de 5 minutos. -8- IB_KH2281_Ar5027_LB5 15.07.2008 9:05 Uhr Seite 9 Evacuación Si no se pulsa ninguna tecla durante 10 segundos, se guarda el ajuste y la radio de cocina vuelve a mostrar la hora. • Para desactivar esta función, pulse la tecla A.O.T. d hasta que aparezca en la pantalla la indicación "OFF AOT". Evacuación del aparato En ningún caso deberá tirar el aparato a la basura doméstica. Este producto está sujeto a la directiva europea 2002/96/CE. Evacue el aparato en un centro de evacuación autorizado a través de las instalaciones de evacuación comunitarias. Preste atención a las normas en vigor. En caso de duda póngase en contacto con las instalaciones municipales de evacuación de residuos. Limpieza ¡Advertencia! ¡Si penetra humedad en el aparato, existe riesgo de una descarga eléctrica! Además la Radio de cocina podría sufrir daños irreparables. Evacuación de acumuladores / pilas recargables! Limpie la carcasa de la Radio de cocina DVD únicamente con un paño ligeramente húmedo con detergente suave. ¡Al realizar la limpieza tenga cuidad de que no penetre humedad en la carcasa del aparato! Las pilas/baterías no pueden ser evacuadas con la basura doméstica. Cada consumidor está obligado legalmente a entregar las pilas/acumuladores en un punto de recogida municipal de residuos especiales. Con esta obligación se consigue que las pilas / baterías se desechen de forma respetuosa con el medio ambiente. Devuelva las pilas/acumuladores en estado descargado. Eliminación del embalaje Evacue todos los materiales de embalaje de forma respetuosa con el medio ambiente. Importador KOMPERNASS GMBH BURGSTRASSE 21 44867 BOCHUM, (ALEMANIA) www.kompernass.com -9- IB_KH2281_Ar5027_LB5 15.07.2008 9:05 Uhr Seite 10 Garantía y servicio posventa Este aparato tiene 3 años de garantía desde la fecha de compra. Si a pesar de nuestros altos estándares de calidad encuentra algún motivo de queja respecto a este aparato, le rogamos que se ponga en contacto con nuestra línea directa de asistencia. Si no puede solucionarse telefónicamente su problema, en este número de teléfono se le dará • un número de referencia (número RMA) y • una dirección a la cual puede enviar su producto para seguir el proceso de garantía. En caso de enviarnos el producto le rogamos que adjunte una copia del tique de compra o factura. El aparato debe estar bien empaquetado para ser transportado y el número RMA debe estar visible. Los envíos que no vayan acompañados del número RMA no podrán ser procesados. Indicación: La prestación de garantía se limita a los fallos de material o de fabricación. La prestación de garantía no rige para • las piezas de desgaste • los daños ocurridos en las piezas frágiles, como los interruptores o acumuladores. - 10 - $ Este producto ha sido diseñado exclusivamente para el uso particular y no para el uso industrial. En caso de manipulación indebida e incorrecta, uso de la fuerza y en caso de abrir el aparato personas extrañas a nuestros centros de asistencia técnica autorizados, la garantía pierde su validez. Esta garantía no reduce sus derechos de garantía legales prescritos. ¡Cumplimente este apartado en su totalidad y adjúntelo al aparato! IB_KH2281_Ar5027_LB5 15.07.2008 Seite 11 Garantía Radio de cocina KH2281 Para garantizar que el proceso de reparación será gratuito, póngase en contacto con la línea directa de asistencia. Para ello tenga preparado el ticket de compra. Kompernass Service España C/Invención 7 Polígono Industrial Los Olivos 28906 Getafe – Madrid Tel.: 902/430758 Fax: 91/6652551 e-mail: [email protected] Escriba el remite de forma legible: www.mysilvercrest.de Apellidos Nombre Calle CP/LUGAR País Teléfono Fecha / Firma Descripción del fallo: $ 9:05 Uhr IB_KH2281_Ar5027_LB5 15.07.2008 9:05 Uhr Seite 12 - 12 - IB_KH2281_Ar5027_LB5 15.07.2008 9:05 Uhr Seite 13 INDICE PAGINA Dati tecnici 14 Uso conforme 14 Avvertenze di sicurezza 14 Fornitura 16 Legenda dell'apparecchio 16 Installazione della radio da cucina sotto un pensile 16 Montaggio della radio da cucina 17 Messa in funzione 17 Inserimento delle pile di back-up .................................................................................................17 Connessione all'alimentazione di corrente .................................................................................17 Impostazione dell'ora ....................................................................................................................18 Impostazione della data ...............................................................................................................18 Accensione e spegnimento dell'illuminazione del display ........................................................18 Impostazione della modalità 12 o 24 ore .................................................................................18 Timer da cucina..............................................................................................................................18 Funzione di sveglia (allarme 1 e allarme 2)...............................................................................19 Funzionamento della radio 20 Impostazione manuale delle emittenti .........................................................................................20 Ricerca automatica delle emittenti ...............................................................................................20 Memorizzazione dell'emittente ....................................................................................................20 Impostazione del volume ..............................................................................................................20 Attivazione dell'amplificazione dei bassi ....................................................................................20 Blocco .............................................................................................................................................20 Impostazione del tempo di spegnimento automatico ................................................................20 Pulizia 21 Smaltimento 21 Importatore 21 Garanzia & assistenza 22 Leggere attentamente le istruzioni per l'uso prima del primo utilizzo e conservarle per l'uso futuro. In caso di cessione dell'apparecchio a terzi, consegnare anche le istruzioni. - 13 - IB_KH2281_Ar5027_LB5 15.07.2008 9:05 Uhr Seite 14 RADIOSVEGLIA KH2281 Uso conforme La radio da cucina è destinata al montaggio o all'installazione sotto un pensile. La radio da cucina è destinata alla ricezione di emittenti radio in FM, nonché come sveglia tramite segnale acustico o radio. La radio da cucina non è prevista per l'impiego in ambienti commerciali o industriali. Non si assume alcuna responsabilità per i danni derivanti da un uso non conforme dell'apparecchio! Dati tecnici Questo apparecchio adempie i requisiti di base e le altre norme rilevanti della direttiva EMV 2004/108/CE, nonché della direttiva per gli apparecchi a bassa tensione 2006/95/CE. Connessione di rete: AC 220 - 240 V ~ 50 Hz Potenza assorbita: 5 Watt Potenza assorbita: Standby: 0,7 W Temperatura di esercizio: +5 ~ +35°C Umidità: 5 ~ 90 % (senza condensa) Dimensioni (L x P x A): 305 x 157 x 45 mm Peso: ca. 800 g Classe di protezione: II / Avvertenze di sicurezza • Pile di back-up • 2 x 1,5 V tipo AAA / LR03 / Micro (non incluse nella fornitura) • Gamma di frequenze radio: VHF (FM): 87,5 – 108,5 MHz Le caratteristiche tecniche dell'apparecchio permettono un campo di frequenze regolabile di 87,5 - 108,5MHz. A seconda delle nazioni potrebbero esistere regolamenti differenti in relazione ai campi di frequenza radiofonici attribuiti. Si ricorda che è vietato utilizzare, inoltrare a terzi o abusare delle informazioni ricevute al di fuori del campo di frequenza attribuito. • • Questo apparecchio non è indicato per l'uso da parte di persone (inclusi bambini) con limitate capacità fisiche, sensoriali o mentali o prive dell'esperienza e/o della conoscenza necessaria, a meno che tali persone non vengano sorvegliate da un responsabile per la sicurezza o abbiano ricevuto indicazioni sull'impiego dell'apparecchio. Sorvegliare i bambini per accertarsi che non giochino con l'apparecchio. Per evitare un'accensione indesiderata, dopo ogni uso e prima di ogni pulizia, staccare sempre la presa dalla spina. Controllare che l'apparecchio e tutte le sue parti non abbiano danni visibili. La sicurezza dell'apparecchio è garantita solo se lo stesso si trova in perfetto stato. La spina deve essere sempre facilmente raggiungibile, in modo da poter scollegare rapidamente l'apparecchio dalla rete elettrica in caso di emergenza. Pericolo di scossa elettrica! • - 14 - Collegare l'apparecchio esclusivamente a una presa installata a norma e provvista di messa a terra. La tensione di rete deve corrispondere ai dati riportati sulla targhetta dell'apparecchio. IB_KH2281_Ar5027_LB5 • • 15.07.2008 9:05 Uhr Pericolo di ferimento Fare sostituire immediatamente la spina o il cavo di rete danneggiato da personale specializzato autorizzato o dal centro di assistenza ai clienti, per evitare possibili danni. Fare immediatamente riparare o sostituire dal servizio assistenza i cavi o gli apparecchi non perfettamente funzionanti o danneggiati. • • • Non immergere mai l'apparecchio in acqua. Pulirlo solo con un panno leggermente inumidito. • • • • Seite 15 Non esporre l'apparecchio alla pioggia e non utilizzarlo mai in ambienti umidi o bagnati. Impedire che il cavo di connessione alla rete elettrica si bagni o inumidisca durante l'uso. Non aprire l'alloggiamento dell'apparecchio e non tentare di ripararlo. In caso contrario, non si garantisce la sicurezza e la garanzia decade. Proteggere l'apparecchio da spruzzi e gocce d'acqua. Non collocare pertanto alcun oggetto pieno di liquidi (ad es. vasi di fiori) su o accanto all'apparecchio. • • Avvertenza: Pericolo d'incendio! • • • • • • Tenere i bambini lontani dal cavo di collegamento e dall'apparecchio. I bambini spesso sottovalutano i rischi collegati all'uso di apparecchi elettrici. Provvedere a un posizionamento sicuro dell'apparecchio. Se l'apparecchio ha subìto cadute o danni, non deve più essere messo in funzione. L'apparecchio dev'essere sottoposto a controllo da parte di personale specializzato e all'occorrenza riparato. Le pile/accumulatori possono costituire un pericolo mortale se ingeriti. Conservare le pile in un luogo inaccessibile ai bambini. In caso di ingestione di pile, ricorrere immediatamente al soccorso medico. Tenere lontano dai bambini anche le pellicole di imballaggio. Sussiste il pericolo di soffocamento. Non utilizzare l'apparecchio nelle vicinanze di superfici surriscaldate. Non posizionare l'apparecchio in luoghi direttamente irradiati dal sole. In caso contrario, esso potrebbe surriscaldarsi e danneggiarsi irreparabilmente. Non sospendere la radio da cucina sui fornelli. Ciò potrebbe provocarne il danneggiamento. Sussiste il pericolo d'incendio! Non lasciare mai l'apparecchio incustodito durante l'uso. Non coprire mai le aperture di aerazione dell'apparecchio acceso. Non collocare fiamme libere, come ad es. candele, su o accanto all'apparecchio. - 15 - Alcune vernici aggressive per mobili possono corrodere i piedini in gomma dell'apparecchio. Collocare l'apparecchio, se necessario, su una base antisdrucciolevole. Temporale! In caso di temporale, gli apparecchi collegati alla rete elettrica potrebbero subire dei danni. Pertanto, in caso di temporale, disinserire sempre la spina dalla presa. Indicazioni sulle tensioni a impulsi (EFT / transitori elettrici veloci) e scariche elettrostatiche: In caso di malfunzionamento a seguito di transitori elettrici veloci (tensione a impulsi) o scariche elettrostatiche, il prodotto deve essere reimpostato per ripristinarne il normale funzionamento. Si consiglia di scollegare l'alimentazione elettrica e collegarla di nuovo. Le pile (se presenti) devono essere estratte e reinserite. IB_KH2281_Ar5027_LB5 15.07.2008 9:05 Uhr Seite 16 Avvertenza sulla sospensione della tensione Fornitura L'interruttore POWER non scollega completamente l'apparecchio dalla rete elettrica. L'apparecchio, inoltre, assorbe corrente in modalità di standby. Per scollegare completamente l'apparecchio dalla rete elettrica, è necessario staccare la spina dalla presa. - Radio da cucina KH 2281 Piastra di montaggio 4 viti Istruzioni per l'uso Legenda dell'apparecchio Avvertenze relative all'uso delle pile L'apparecchio utilizza le pile per il salvataggio dei dati in memoria. Per il corretto uso delle pile osservare quanto segue: Pericolo di esplosione! Non gettare le pile nel fuoco. Non ricaricare le pile. • • • • • Non aprire, saldare o sciogliere le pile. Pericolo di esplosione e lesioni! Controllare periodicamente le pile. Le pile che presentano fuoriuscita di acidi possono causare danni all'apparecchio. Se non si utilizza l'apparecchio per lungo tempo, rimuovere le pile. Se le pile sono deteriorate, indossare guanti di protezione. Pulire il vano pile e i contatti delle pile con un panno asciutto. q Piastra di montaggio w Leva di arresto e Cavo di rete r Antenna lineare t Tasto TIMER/ALARM MODE y Tasto ALARM 1/VOL+ u Tasto POWER ON/OFF i Tasto ALARM 2/VOLo Tasti 1/3 PRESET, 2/4 PRESET a Vano pile s Display d Tasto A.O.T. f Tasto STORE g Tasti TUNING UP/DOWN h Altoparlante j Tasto MODE SET/BASS Installazione della radio da cucina sotto un pensile Attenzione! L'azienda declina ogni responsabilità per i danni alla radio da cucina provocati dall'umidità, dalla penetrazione di acqua nell'apparecchio o dal surriscaldamento! La radio da cucina può essere sospesa, ad es. a un pensile, con l'ausilio dell'acclusa piastra di montaggio q: 1. Cercare un luogo di installazione adatto per la radio da cucina. 2. Premere verso il basso le due leve di arresto w sul retro dell'apparecchio. Spingere la piastra di montaggio q all'indietro e prelevarla. 3. Mantenere la piastra di montaggio q sul punto di installazione. Lasciare circa 3,5 cm. di spazio agli angoli anteriori. In tal modo, successivamente sarà possibile allineare la radio da cucina. - 16 - IB_KH2281_Ar5027_LB5 15.07.2008 9:05 Uhr 4. Contrassegnare i quattro punti per i fori con una matita. 5. Marcare i fori con un mandrino. 6. Avvitare la piastra di montaggio q con la vite acclusa negli accessori. 7. Inserire la radio da cucina obliquamente con i due intagli negli agganci della piastra di montaggio q. Premere la radio da cucina verso l'alto, fino a udirne l'inserimento. Fissare l'antenna lineare con un pezzo di nastro adesivo in modo che non penda verso il basso. Montaggio della radio da cucina Non montare la radio da cucina priva della piastra di montaggio q. L'altoparlante resterà altrimenti coperto e la musica sarà difficilmente udibile. Per installare la radio da cucina con l'acclusa piastra di montaggio q: 1. Premere contemporaneamente verso il basso le due leve di arresto w sul retro dell'apparecchio. Spingere la piastra di montaggio q all'indietro e rimuoverla. 2. Spingere entrambi i perni di sostegni sulla piastra di montaggio q negli intagli sul lato inferiore posteriore della radio da cucina. 3. Premere la parte anteriore della piastra di montaggio q saldamente verso il basso fino all'inserimento udibile. Ora è possibile montare la radio da cucina. Per smontare la piastra di montaggio q, afferrare la piastra di montaggio q da sotto con i pollici, e premere in avanti e verso l'alto fino a svincolarla. Rimuovere la piastra di montaggio q. Seite 17 Messa in funzione Inserimento delle pile di back-up In caso di caduta di tensione, grazie alle pile di back-up, i dati relativi all'ora, alla data, all'ora di sveglia e agli allarmi speciali impostati (SDA: Special Day Alert) non andranno perduti. Utilizzare a tal fine due pile da 1,5V tipo AAA, non incluse nella fornitura. 1. Aprire lo sportello del vano pile a sul retro della radio da cucina. 2. Inserire le pile, rispettando la corretta polarità. 3. Chiudere lo sportello del vano pile a. Lo sportello deve inserirsi in modo udibile. Avvertenza: le pile di back-up devono essere controllate almeno una volta all'anno ed eventualmente sostituite. Connessione all'alimentazione di corrente • Inserire la spina in una presa di rete. Nel display appare l'ora „00:00.00“. Per poter utilizzare le funzioni di allarme della radio, impostare prima l'ora e la data, come descritto nei paragrafi seguenti. - 17 - IB_KH2281_Ar5027_LB5 15.07.2008 9:05 Uhr Impostazione dell'ora Per poter impostare l'ora, la data, l'illuminazione del display e il formato dell'ora, la radio dev'essere spenta. 1. Premere una volta il tasto MODE SET/BASS j. L'ora lampeggia. 2. Premere i tasti TUNING UP/DOWN g, per impostare l'ora a intervalli di minuti. Premendo e mantenendo premuti i tasti, l'orario si modifica in intervalli di 10 minuti. Se non si preme alcun tasto entro 10 secondi, l'impostazione viene salvata e la radio da cucina ritorna alla visualizzazione dell'ora. Seite 18 Impostazione della modalità 12 o 24 ore 1. Premere quattro volte il tasto MODE SET/BASS j . Nel display compare „24“ per la modalità 24 ore. 2. Premere il tasto TUNING UP g, per impostare la modalità 24. 3. Premere il tasto TUNING DOWN g, per impostare la modalità 12. Nel display appare „12“. Sul display compare inoltre PM per le ore del pomeriggio. Timer da cucina 1. Premere il tasto TIMER/ALARM MODE t. Nel display compare il simbolo del Timer . 2. Con i tasti TUNING UP/DOWN g impostare il tempo Impostazione della data 1. Premere due volte il tasto MODE SET/BASS j. Nel display lampeggia la data „01.01.08“. 2. Premere i tasti TUNING UP/DOWN g, per impostare la data in intervalli di giorni. Premendo e mantenendo premuti i tasti, la data si modifica in intervalli di 10 giorni. Se non si preme alcun tasto entro 10 secondi, l'impostazione viene salvata e la radio da cucina ritorna alla visualizzazione dell'ora. Accensione e spegnimento dell'illuminazione del display desiderato (è possibile impostare un lasso di tempo da 1 minuto a 23:59 h). 3. Premere nuovamente il tasto TIMER/ALARM MODE t, per avviare il timer da cucina. Nel display compare il simbolo del timer e il simbolo di un orologio che scorre a ritroso. 30 secondi prima della scadenza del tempo impostato, risuona un segnale acustico, a intervalli sempre più brevi man mano che il tempo passa. Una volta scaduto il tempo, il segnale acustico risuona in continuo per un'ora. • Premere il tasto TIMER/ALARM MODE t, per arrestare il segnale acustico. 1. Premere tre volte il tasto MODE SET/BASS j. Nel display appare „L“. 2. Premere il tasto TUNING UP g, per attivare l'illuminazione del display. Nel display appare „H“. 3. Premere il tasto TUNING DOWN g, per attivare l'illuminazione del display. Nel display appare „L“. Se non si preme alcun tasto entro 10 secondi, l'impostazione viene salvata e la radio da cucina ritorna alla visualizzazione dell'ora. Interruzione del timer da cucina • È possibile interrompere il timer da cucina, premendo brevemente il tasto TIMER/ALARM MODE t. Il tempo del timer lampeggia. Il simbolo dell'ora scompare. • Premere nuovamente il tasto TIMER/ALARM MODE t. Il tempo continua a scorrere. Arresto del timer da cucina • Tenere premuto il tasto TIMER/ALARM MODE t per arrestare il timer da cucina. Nel display viene visualizzata l'ora. - 18 - IB_KH2281_Ar5027_LB5 15.07.2008 9:05 Uhr Seite 19 2. Premere i tasti TUNING UP/DOWN g, per impostare Programmazione del timer da cucina È possibile salvare i tempi del timer da cucina. 1. Premere il tasto TIMER/ALARM MODE t. 2. Con i tasti TUNING UP/DOWN g impostare il tempo desiderato. 3. Premere il tasto STORE f. Nel display lampeggerà „T“. 4. Premere il tasto 1/3 PRESET, 2/4 PRESET o per la posizione di memoria desiderata. Sono a di-sposizione quattro posizioni di memoria. Nel display compare il numero della posizione di memoria selezionata. 5. Premere nuovamente il tasto STORE f. In tal modo è stato salvato il tempo. Se non si preme alcun tasto per 10 secondi, la radio da cucina ritorna alla visualizzazione dell'ora. 6. Per richiamare i tempi memorizzati del timer da cucina, premere il tasto della modalità TIMER/ ALARM MODE t e il tasto della relativa posizione di memoria (1/3 PRESET, 2/4 PRESET o). 7. Premere nuovamente il tasto TIMER/ALARM MODE t, per avviare il timer da cucina. Nel display lampeggia il simbolo di un orologio con il tempo che scorre a ritroso. 8. Tenere premuto il tasto TIMER/ALARM MODE t per arrestare il timer da cucina. l'orario di sveglia desiderato. 3. Premere il tasto ALARM 1/VOL+ y (o ALARM 2/VOL- i) fino a ottenere la visualizzazione nel display della funzione di sveglia desiderata (v. tabella in alto). 4. Premere il tasto A.O.T. d, per impostare i giorni della settimana in cui si desidera essere svegliati: È possibile scegliere fra giorni feriali (Mo, Tu, We, Th, Fr), fine settimana (Su, Sa), intera settimana (Su, Mo, Tu, We, Th, Fr, Sa) o singolo giorno. L'impostazione selezionata viene visualizzata nel display. 5. Premere il tasto A.O.T. d fino a ottenere l'impostazione dei giorni della settimana desiderati. Tenere premuto il tasto A.O.T. d, fino a ottenere la visualizzazione nel display di un singolo giorno della settimana. 6. Premere il tasto A.O.T. d, per impostare il giorno della settimana desiderato. Per ritornare alla selezione dei giorni feriali, fine settimana o di tutta la settimana, tenere nuovamente premuto il tasto A.O.T. d per breve tempo. 7. Premere il tasto MODE SET/BASS j, per salvare l'impostazione e ritornare all'indicazione dell'ora. Quando suona l'allarme... Funzione di sveglia (allarme 1 e allarme 2) • Con la radio da cucina è possibile programmare due orari di sveglia. Funzione di sveglia Simbolo nel display • Segnali acustici Radio Spenta Nessun simbolo 1. Premere il tasto ALARM 1/VOL+ y (o ALARM 2/VOL- i). Nel display compare il tempo di sveglia impostato per ultimo A1 o A2 ed eventualmente il simbolo per il tipo di allarme (v. tabella sopra). - 19 - ed è stata selezionata la funzione di sveglia „Radio“, la radio resterà accesa per un'ora a volume predefinito. Il livello del volume non può essere modificato. Per terminare, premere il tasto ALARM 1/VOL+ y o ALARM 2/VOL- i. ed è stata selezionata la funzione di sveglia „Segnali acustici“, i segnali acustici verranno emessi per 10 minuti. Per terminare, premere il tasto ALARM 1/VOL+ y o ALARM 2/VOL- i. IB_KH2281_Ar5027_LB5 15.07.2008 9:05 Uhr Funzionamento della radio Seite 20 • Impostazione manuale delle emittenti 1. Premere il tasto POWER ON/OFF u. Nel display Per impostare l'emittente memorizzata, nella modalità Radio premere più volte il relativo tasto di memoria (1/3 PRESET, 2/4 PRESET o) fino alla comparsa del numero della posizione di memoria nel display. viene visualizzata la frequenza corrente. 2. Premere il tasto TUNING UP g, per aumentare Impostazione del volume la frequenza. 3. Premere il tasto TUNING DOWN g, per diminuire la frequenza. • • Durante il funzionamento della radio, premere il tasto ALARM 1/VOL+ y, per aumentare il volume. Premere il tasto ALARM 2/VOL- i, per ridurre il volume. Ricerca automatica delle emittenti È possibile eseguire la ricerca per emittente. La radio da cucina esegue la scansione delle frequenze fino a trovare un'emittente. 1. Premere il tasto POWER ON/OFF u. 2. Tenere premuto due secondi il tasto TUNING UP g: la radio da cucina cerca l'emittente con la frequenza immediatamente superiore. 3. Tenere premuto due secondi il tasto TUNING DOWN g: la radio da cucina cerca l'emittente con la frequenza immediatamente inferiore. Ripetere questi passi fino a trovare l'emittente desiderata. Memorizzazione dell'emittente Con i tasti di memoria 1/3 PRESET, 2/4 PRESET o è possibile memorizzare 4 emittenti. 1. Premere il tasto POWER ON/OFF u. 2. Cercare un'emittente, come descritto al capitolo „Funzionamento della radio“. 3. Premere il tasto STORE f. Nel display compare il messaggio „M“ e lampeggia „MEM“. 4. Premere uno dei tasti 1/3 PRESET, 2/4 PRESET o su cui si vuole collocare l'emittente. • Premere il rispettivo tasto di memoria più volte per la posizione di memoria desiderata (ad es. una volta il tasto 1/3 PRESET per la posizione di memoria 1, due volte il tasto 1/3 PRESET per la posizione di memoria 3). 5. Premere nuovamente il tasto STORE f. In tal modo è stata memorizzata l'emittente. Attivazione dell'amplificazione dei bassi • • Durante il funzionamento della radio, premere il tasto MODE SET/BASS j, per attivare l'amplificazione dei bassi. Nel display compare il messaggio BASS. Premere il tasto MODE SET/BASS j, per disattivare l'amplificazione dei bassi. Nel display scompare il messaggio BASS. Blocco La radio da cucina può essere bloccata per impedire la modifica delle impostazioni a persone non autorizzate o a terzi. • Tenere premuto il tasto STORE f. Nel display compare il simbolo di una chiave. • Per eliminare il blocco, mantenere premuto nuovamente il tasto STORE f fino alla scomparsa del simbolo della chiave. Impostazione del tempo di spegnimento automatico È possibile impostare un tempo di spegnimento automatico della radio. • Premere il tasto A.O.T. d. La radio si accende. Nel display compare il messaggio „120 AOT“. • Premere più volte il tasto A.O.T. d, per impostare il tempo di spegnimento in passi di 5 minuti, da 120 a 5 minuti. - 20 - IB_KH2281_Ar5027_LB5 15.07.2008 9:05 Uhr Se non si preme alcun tasto entro 10 secondi, l'impostazione viene salvata e la radio da cucina ritorna alla visualizzazione dell'ora. • Per disattivare la funzione, premere il tasto A.O.T. d, fino a ottenere nel display il messaggio „OFF AOT“. Pulizia Attenzione! L'infiltrazione di umidità nell'apparecchio comporta il pericolo di scarica elettrica! La radio da cucina può subire danni irreparabili! Pulire l'alloggiamento della radio da cucina solo con un panno leggermente umido e un detergente delicato. Impedire la penetrazione di umidità nell'apparecchio durante la pulizia! Seite 21 Smaltimento Smaltimento dell'apparecchio Non gettare per alcun motivo l'apparecchio insieme ai normali rifiuti domestici. Questo prodotto è conforme ai requisiti della Direttiva europea 2002/96/CE. Smaltire l'apparecchio presso un'azienda autorizzata o presso l'ente comunale di smaltimento. Rispettare le prescrizioni attualmente in vigore. In caso di dubbio, mettersi in contatto con l'ente di smaltimento competente. Smaltire le pile/gli accumulatori! Pile e/o accumulatori non devono essere smaltiti insieme ai rifiuti domestici. Ogni utente è obbligato per legge a consegnare le pile/gli accumulatori usati presso gli appositi centri di raccolta della propria città o del proprio quartiere, o presso i punti vendita. Questo obbligo è finalizzato allo smaltimento ecologico delle pile e/o degli accumulatori. Restituire pile/accumulatori solo se completamente scarichi. Smaltimento dell'imballaggio Smaltire tutto il materiale di imballaggio in modo ecocompatibile. Importatore KOMPERNASS GMBH BURGSTRASSE 21 44867 BOCHUM, GERMANY www.kompernass.com - 21 - IB_KH2281_Ar5027_LB5 15.07.2008 9:05 Uhr Seite 22 Garanzia & assistenza Questo apparecchio è garantito per tre anni a partire dalla data di acquisto. Qualora, nonostante i nostri elevati standard di sicurezza, si rilevasse un motivo di reclamo relativo al presente apparecchio, contattare la nostra hotline di assistenza. Qualora fosse impossibile elaborare la pratica di reclamo telefonicamente, si riceverà • un numero di pratica (numero RMA) nonché • un indirizzo a cui inviare il prodotto per l'elaborazione della garanzia. In caso di invio del prodotto, è necessario allegare una copia della prova di acquisto (scontrino). L'apparecchio dev'essere imballato in modo idoneo al trasporto, con il numero di RMA direttamente visibile. Gli invii privi di numero RMA non potranno essere elaborati. Avvertenza: La garanzia copre solo difetti del materiale o di fabbricazione. La garanzia non è valida • per le parti saldate • per i danni a parti fragili come interruttori o accumulatori. - 22 - $ Il prodotto è destinato esclusivamente all'uso domestico e non a quello commerciale. La garanzia decade in caso di impiego improprio o manomissione, uso della forza e interventi non eseguiti dalla nostra filiale di assistenza autorizzata. La garanzia non limita i diritti di garanzia del consumatore fissati per legge. $ Compilare completamente questo tagliando e allegarlo all'apparecchio! IB_KH2281_Ar5027_LB5 15.07.2008 9:05 Uhr Seite 23 Garanzia Radio da cucina KH2281 Per ottenere la certezza di una riparazione gratuita, mettersi in contatto con la nostra hotline di assistenza, Tenere a portata di mano lo scontrino. Indicare chiaramente il mittente: Cognome Nome Indirizzo CAP/località Nazione Telefono Data/firma Descrizione del guasto: Kompernass Service Italia Corso Lino Zanussi 11 33080 Porcia (PN) Tel.: 0434/1851001 Fax: 0434/1851001 e-mail: [email protected] www.mysilvercrest.de IB_KH2281_Ar5027_LB5 15.07.2008 9:05 Uhr Seite 24 - 24 - IB_KH2281_Ar5027_LB5 15.07.2008 9:05 Uhr Seite 25 INDEX PAGE Technical data 26 Intended Use 26 Safety instructions 26 Items supplied 28 Part identification 28 Fixing the kitchen radio beneath a wall cabinet 28 Setting up the kitchen radio 29 Commissioning 29 Inserting the back-up batteries......................................................................................................29 Providing mains power ..................................................................................................................29 Setting the time...............................................................................................................................30 Setting the date ..............................................................................................................................30 Switching the display lighting on and off....................................................................................30 Selecting 12 or 24 hour time display..........................................................................................30 Kitchen timer ...................................................................................................................................30 Setting alarm times (Alarms 1 and 2)..........................................................................................31 Radio operation 32 Manual station selection ...............................................................................................................32 Automatic station search ...............................................................................................................32 Programming stations.....................................................................................................................32 Adjusting the volume......................................................................................................................32 Switching the bass booster on......................................................................................................32 Lock function...................................................................................................................................32 Setting the automatic switch-off time ............................................................................................32 Cleaning 33 Disposal 33 Importer 33 Warranty & Service 34 Read these operating instructions carefully before using the appliance for the first time and preserve this booklet for later reference. Pass this booklet on to whoever might acquire the appliance at a future date. - 25 - IB_KH2281_Ar5027_LB5 15.07.2008 9:05 Uhr Seite 26 KITCHEN RADIO KH2281 Intended Use Technical data This appliance complies with the fundamental requirements and other relevant prescripts of both the EMC Guidelines 2004/108/EG and the Guidelines for Low Voltage Appliances 2006/95/EG. Power supply: AC 220 - 240 V ~50 Hz Power consumption : 5 Watt Power consumption: Standby: 0,7 W Operating temperature: +5 ~ +35°C Humidity: 5 ~ 90 % (No condensation) Dimensions (L x D x H): 305 x 157 x 45 mm Weight : approx. 800 g Protection class: II / This Kitchen Radio is intended for use either freestanding or for assembly beneath a wall cabinet. The intended uses for this Kitchen Radio are the reception of FM radio transmissions and as an alarm/timer, using either signal tones or the radio itself. This Kitchen Radio is not intended for utilisation in commercial or industrial applications. No warranty claims will be granted for damage resulting from improper use! Safety instructions • Backup batteries • 2x 1.5 V, Type AAA/LR03/Micro (Batteries not supplied) • Frequency range radio: VHF (FM): • 87.5 – 108.5 MHz The technical features of the appliance enable an adjustable frequency range of FM 87.5 - 108.5 MHz. In some countries, different national regulations may apply to the assigned radio frequency ranges. Please note that information received outside of the assigned radio frequency ranges may not be used, passed on to third parties or otherwise misused. • This appliance is not intended for use by individuals (including children) with restricted physical, physiological or intellectual abilities or deficiences in experience and/or knowledge unless they are supervised by a person responsible for their safety or receive from this person instruction in how the appliance is to be used. Children should be supervised to ensure that they do not play with the appliance. To avoid unintentional switching on, disconnect the power cable after use and before cleaning. Check the appliance and all parts for visible damage. The safety concept can work only if the appliance is in a faultless condition. The power plug must always be easily accessible, so that the appliance can be quickly separated from the mains in the event of an emergency. Risk of electrical shocks. • - 26 - Connect the appliance only to correctly installed and earthed mains sockets. Ensure that the rating of the local power supply tallies completely with the details given on the rating plate of the appliance. IB_KH2281_Ar5027_LB5 • • 15.07.2008 9:05 Uhr To avoid risks, arrange for defective power plugs and/or cables to be replaced at once by qualified technicians or our Customer Service Department. Arrange for customer service to repair or replace connecting cables and/or appliances that are not functioning properly or have been damaged. NEVER submerse the appliance in water. Wipe it only with a slightly damp cloth. • • • • Do not expose the appliance to rain and never use it in a humid or wet environment. Make sure that the power cable does not become wet during operation. Do not attempt to open the housing or to repair the radio. Should you do so, appliance safety is no longer assured and the warranty becomes void. Protect the appliance against drip and spray water. Do not place any water-filled vessels (e.g. flower vases) on or adjacent to the appliance. Seite 27 Injury hazard • • • • • Note: Some aggressive furniture finishes can have a destructive influence on the device's rubber feet. If necessary, place the device on a nonslip pad. Thunderstorms! Equipment connected to a power supply can be damaged during a thunderstorm. You should therefore always remove the plug from the power socket when there is a storm. Risk of fire! • • • • • • Keep children away from the connecting cable and the appliance. Children frequently underestimate the dangers of electrical appliances. Provide for a safe location for the appliance. Do not operate the appliance if it has fallen or is damaged. Arrange for the appliance to be checked and/or repaired by qualified technicians. Batteries/Cells are potentially fatal if swallowed. Store batteries out of the reach of children. If a battery should be swallowed, seek medical assistance IMMEDIATELY. Keep the plastic packaging well away from small children. There is a risk of suffocation. Do not use the appliance near hot surfaces. Do not locate the appliance in places exposed to direct sunlight, Otherwise, it may overheat and become irreparably damaged. Do not locate the kitchen radio directly above hotplates. The kitchen radio may be damaged. There is a danger of fire! Do not leave the appliance unattended when in use. Never cover the ventilation slots of the appliance while it is being used. Do not place unprotected fire sources, such as candles, on or adjacent to the appliance. Notice regarding electrical power surges (EFT / electrical fast transient) and electrostatic discharges: In a case of malfunction due to an electrical fast transient (power surge) and/or electrostatic discharge, the appliance must be returned to default settings in order to re-establish normal operation. Possibly the power supply must be separated and then reconnected. The batteries (if present) must be removed and then reinserted. - 27 - IB_KH2281_Ar5027_LB5 15.07.2008 9:05 Uhr Notice regarding separation from mains-power Items supplied The POWER switch does not completely disconnect the appliance from the power network. Additionally, the appliance consumes power when in standby-mode. To completely separate the appliance from mains-power, the power plug MUST be removed from the wall socket. - Information regarding the handling of batteries q Mounting plate w Retaining lever e Power cable r Wire antenna t Button TIMER/ALARM MODE y Button ALARM 1/VOL+ u Button POWER ON/OFF i Button ALARM 2/VOLo Button 1/3 PRESET, 2/4 PRESET a Battery compartment s Display d Button A.O.T. f Button STORE g Button TUNING UP/DOWN h Loudspeaker j Button MODE SET Risk of explosion! Do not throw batteries into a fire. Do not recharge the batteries. • • • • Never open batteries, never solder or weld batteries. The risk of explosions and injuries exists! Regularly check the condition of the batteries. Leaking batteries can cause damage to the appliance. If you do not intend to use the appliance for an extended period, remove the batteries. In the event of the batteries leaking acids, wear protective gloves. Clean the battery compartment and the battery contacts with a dry cloth. Important! No liability/warranty will be considered for damage to the Kitchen Radio caused by the effects of moisture, water penetration or overheating! Kitchen Radio KH 2281 Mounting plate 4 Screws Operating Instructions Part identification The appliance uses batteries for memory conservation. For the handling of batteries please observe the following: • Seite 28 Fixing the kitchen radio beneath a wall cabinet With the supplied mounting plate q you can fix the kitchen radio below, for example, a kitchen wall cabinet: 1. Determine a suitable location for the kitchen radio. 2. Press the two retaining levers w on the back of the appliance down. Push the mounting plate q back and remove it. 3. Place the mounting plate q against the installation location. Allow 3,5 cm room to the front edges. This way the kitchen radio will later fit flush. - 28 - IB_KH2281_Ar5027_LB5 15.07.2008 9:05 Uhr Seite 29 Commissioning 4. Mark the four points for the drillholes with a pencil. 5. Mark the drillhole with a mandril. 6. Firmly secure the mounting plate q with the supplied screws. 7. Hold the kitchen radio slanted, with the two recesses in the retaining lugs on the mounting plate q. Press the kitchen radio upwards until it audibly engages. Inserting the back-up batteries The back-up batteries ensure that the programmed time, date, alarm time and set SDAs (Special Day Alert) are not erased in the event of a power failure. For this, you require two 1.5V batteries of type AAA. They are not supplied with the appliance. 1. Open the lid of the battery compartment a on the underside of the kitchen radio. 2. Insert the batteries. Make sure the polarities are correct. 3. Close the lid of the battery compartment a. The lid must audibly engage. Secure the wire antenna with a piece of adhesive tape such that it does not hang down. Setting up the kitchen radio Do not set the kitchen radio up without the mounting plate q. Otherwise the speakers are covered and the sound is scarcely audible. To set up the kitchen radio with the enclosed mounting plate q: 1. Simultaneously press the two retaining levers w on the back of the appliance down. Push the mounting plate q back and remove it. 2. Push the two retainer lugs on the mounting plate q into the recesses on the lower rear side of the kitchen radio. 3. Firmly press the front part of the mounting plate q down until you hear it engage. You can now set up the radio. To disassemble the mounting plate q, grip the mounting plate q from below with the thumbs and press it forwards and up until it disengages. You can now remove the mounting plate q. Note: The back-up batteries must be checked at least once per year and, if necessary, exchanged for new ones. Providing mains power • Insert the plug into a power socket. In the display, the time is indicated by "00:00.00". To be able to use the alarm functions of the radio, first of all programme in the date and time, as described in the following section. - 29 - IB_KH2281_Ar5027_LB5 15.07.2008 9:05 Uhr Setting the time To be able to programme in the time, date, display illumination and hour-format, the radio must be switched off. 1. Press the button MODE SET/BASS j once. The time blinks. 2. Press the button TUNING UP/DOWN g to set the time in minute intervals. Pressing and holding the button changes the time at ten-minute intervals If a subsequent button is not pressed within ten seconds, the kitchen radio saves the setting and switches back to time display. Seite 30 Selecting 12 or 24 hour time display 1. Press the button MODE SET/BASS j four times. In the display appears "24" for the 24 hour modus. 2. Press the button TUNING UP g to select the 24 hour modus. 3. Press the button TUNING DOWN g to select the 12 hour modus. In the display appears "12". For the hours of the afternoon there now appears additionally an PM on the display. Kitchen timer 1. Press the button TIMER/ALARM MODE t. In the Setting the date display appears the timer symbol 1. Press the button MODE SET/BASS j twice. In the . 2. Press the button TUNING UP/DOWN g to set the display the date indicator "01.01.08" blinks. desired period of time (a time span between 1 minute and 23:59 h is possible). 3. Press the button TIMER/ALARM MODE t once more to start the kitchen timer. In the display appears the timer symbol and, additionally, a backwards running time symbol. From 30 seconds before expiry of the time span an acoustic signal sounds, repeating at shorter intervals the closer the set time approaches. When the time span has elapsed, the signal sounds continuously for one hour. • Press the button TIMER/ALARM MODE t to switch the signal tone off. 2. Press the button TUNING UP/DOWN g to set the date in day intervals. Pressing and holding the buttons changes the date at intervals of 10 days. If a subsequent button is not pressed within ten seconds, the kitchen radio saves the setting and switches back to time display. Switching the display lighting on and off 1. Press the button MODE SET/BASS j three times. In the display appears "L". 2. Press the button TUNING UP g to switch the display Interrupting the kitchen timer. illumination on. In the display appears "H". 3. Press the button TUNING DOWN g to switch the • display illumination off. In the display appears "L". If a subsequent button is not pressed within ten seconds, the kitchen radio saves the setting and switches back to time display. You can interrupt the kitchen timer by briefly pressing the button TIMER/ALARM MODE t. The timer period blinks. The clock symbol no longer appears. • Press the button TIMER/ALARM MODE t once more. The time continues to run. Switching the kitchen timer off • To switch the kitchen timer off, hold the button TIMER/ALARM MODE t pressed down. The time will be shown in the display. - 30 - IB_KH2281_Ar5027_LB5 15.07.2008 9:05 Uhr Seite 31 Programming the kitchen timer You can save kitchen timer periods. 1. Press the button TIMER/ALARM MODE t. 2. Using the button TUNING UP/DOWN g programme in the desired time. 3. Press the button STORE f. In the display "T" blinks. 4. Press the button 1/3 PRESET, 2/4 PRESET o for the required save position. There are four save locations at your disposal. In the display the number of the selected save location appears. 5. Press the button STORE f once again. The time period is now saved. If a button is not pressed within ten seconds, the kitchen radio switches back to time display. 6. To recall the saved kitchen timer settings, press the button TIMER/ALARM MODE t and the button of the corresponding memory save location (1/3 PRESET, 2/4 PRESET o). 7. Press the button TIMER/ALARM MODE t once more to start the kitchen timer. A clock symbol running in an anti-clockwise direction appears on the display. 8. To switch the kitchen timer off, hold the button TIMER/ALARM MODE t pressed down. 2. Press the button TUNING UP/DOWN g to set the desired alarm time. 3. Press the button ALARM 1/VOL+ y (or ALARM 2/ VOL- i) repeatedly until the desired alarm type (see table above) is shown in the display. 4. Press the button A.O.T. d to set the weekdays on which you require the alarm function: You can select between workdays (Mo, Tu, We, Th, Fr), weekends (Su, Sa), whole weeks (Su, Mo, Tu, We, Th, Fr, Sa) or the present weekday. The selected setting is shown on the display. 5. Press the button A.O.T. d repeatedly until the desired alarm days are programmed in. Keep the button A.O.T. d pressed down until a single day appears on the display. 6. Press the button A.O.T. d to set the required weekday. To return to the selection of workdays, weekends or whole weeks, once again hold the button A.O.T. d briefly pressed down. 7. Press the button MODE SET/BASS j to save the programming and to return to time display. When the alarm signal sounds... Setting alarm times (Alarms 1 and 2) • You can programme two alarm times into your kitchen radio. Alarm function Symbol in the display • Acoustic signal Radio Switched off no symbol 1. Press the button ALARM 1/VOL+ y (or ALARM 2/ VOL- i). The last set alarm time for A1 resp. A2 and, possibly, the symbol for the type of alarm (see table above) are shown on the display. - 31 - and the alarm function "Radio" has been selected, the radio plays for one hour at a pre-defined alarm volume. This volume level cannot be changed. To finish it, press the button ALARM 1/VOL+ y or ALARM 2/VOL- i. and the alarm function "Signaltones" has been selected, the signal tone sounds for 10 minutes. To finish it, press the button ALARM 1/VOL+ y or ALARM 2/VOL- i. IB_KH2281_Ar5027_LB5 15.07.2008 9:05 Uhr Radio operation Seite 32 • Manual station selection To recall saved radio stations, in radio modus press the respective button (1/3 PRESET, 2/4 PRESET o) repeatedly until the number of the memory position appears on the display. 1. Press the button POWER ON/OFF u. The currently Adjusting the volume. selected frequency is shown in the display. 2. Press the button TUNING UP g to raise the • frequency. 3. Press the button TUNING DOWN g to lower the frequency. • Automatic station search Switching the bass booster on You can have the kitchen radio search for stations. The kitchen radio searches the frequency range until it finds a station. 1. Press the button POWER ON/OFF u. 2. Keep the button TUNING UP g pressed down for two seconds: the kitchen radio searches for the station with the next highest frequency. 3. Keep the button TUNING DOWN g pressed down for two seconds: the kitchen radio searches for the station with the next lowest frequency. Repeat these steps until you have found a radio station to your liking. • Programming stations With the memory save buttons 1/3 PRESET, 2/4 PRESET o you can save four radio stations. 1. Press the button POWER ON/OFF u. 2. Find a station as described in the section "Radio operation". 3. Press the button STORE f. The indicator "M“ appears in the display and "MEM" blinks. 4. Press one of the buttons 1/3 PRESET, 2/4 PRESET o, at which you wish to save the radio station. • Press the respective save button several times for the desired save location (e.g. once on button 1/3 PRESET for save location 1, twice on button 1/3 PRESET for save location 3). 5. Press the button STORE f once again. The station is programmed. • Press the button ALARM 1/VOL+ y during radio operation to increase the volume. Press the button ALARM 2/VOL- i to reduce the volume. During radio operation, press the button MODE SET/BASS j to switch the bass booster on. In the display the indicator BASS appears. Press the button MODE SET/BASS j to switch the bass booster off. The indicator BASS in the display extinguishes. Lock function You can lock the kitchen radio so that settings cannot be altered by unauthorised people or children. • Keep the button STORE f pressed down. A key symbol appears on the display. • To disable the lock function, press and hold the button STORE f until the key symbol extinguishes. Setting the automatic switch-off time You can programme in a switch-off time, at which the radio automatically switches itself off. • Press the button A.O.T. d. If need be, the radio switches itself on. In the display appears the indicator "120 AOT". • Repeatedly press the button A.O.T. d to programme in a switch-off time from 5 to 120 mins in 5 minute steps. - 32 - IB_KH2281_Ar5027_LB5 15.07.2008 9:05 Uhr If a subsequent button is not pressed within ten seconds, the kitchen radio saves the setting and switches back to time display. • To switch the function off, press the button A.O.T. d until the indicator "OFF AOT" appears in the display. Cleaning Warning! Moisture penetrating into the appliance creates the risk of electric shock! Additionally, the kitchen radio could become irreparably damaged! Clean the housing of the kitchen radio only with a slightly moist cloth and a mild detergent. Ensure that moisture cannot permeate into the appliance during cleaning! Seite 33 Disposal Disposing of the appliance Do not, under any circumstances, dispose of the appliance in household refuse. This product is subject to the provisions of European Directive 2002/96/EG. Dispose of the appliance through an approved disposal centre or at your community waste facility. Observe the currently applicable regulations. In case of doubt, please contact your waste disposal centre. Disposal of batteries! Used batteries/rechargeable batteries may not be disposed of in household waste. Every consumer is statutorily obliged to dispose of batteries at a collection site of his community/city district or at a retail store. The purpose of this obligation is to ensure that batteries are disposed of in a non-polluting manner. Only dispose of batteries when they are fully dis-charged. Disposal of packaging Dispose of the packaging materials in an environmentally responsible manner. Importer KOMPERNASS GMBH BURGSTRASSE 21 44867 BOCHUM, GERMANY www.kompernass.com - 33 - IB_KH2281_Ar5027_LB5 15.07.2008 9:05 Uhr Seite 34 Warranty & Service You receive a 3-year warranty for this device as of the purchase date. Should you, in spite of our high quality standards, have grounds for complaint please contact our Service Hotline. In the event that processing of your complaint is not possible by telephone here you will receive • a processing number (RMA number) as well as • an address, to which you can send your product for warranty processing. In the case of mailing shipment please enclose a copy of the purchase receipt (sales slip). The appliance must be securely packed and the RMA number clearly visible. Products sent in without the RMA number cannot be processed. Note: The warranty provisions cover only material or factory defects. The warranty is not valid; • for worn out parts •for damages to breakable parts such as switches and batteries. - 34 - $ This product is for private use only and is not intended for commercial use. The warranty is void in the case of abusive and improper handling, use of force and internal tampering not carried out by our authorized service branch. Your statutory warranty claims are not restricted by this warranty. IB_KH2281_Ar5027_LB5 15.07.2008 9:05 Uhr Seite 35 Fill in this section and submit it with the appliance! Warranty Kitchen Radio KH2281 In order to be assured of a cost free repair procedure, contact us over the service hotline. Ensure you have your sales receipt available. Sender, please write clearly: Last name First name Street Postcode/Place Irish Connection Harbour view Howth Co. Dublin Tel: 00353 (0) 87 99 62 077 Fax: 00353 18398056 e-mail: [email protected] Country www.mysilvercrest.de Telephone Date/Signature Description of fault: $ DES Ltd Units 14-15 Bilston Industrial Estate Oxford Street Bilston WV14 7EG Tel.: 0870/787-6177 Fax: 0870/787-6168 e-mail: [email protected] IB_KH2281_Ar5027_LB5 15.07.2008 9:05 Uhr Seite 36 - 36 - IB_KH2281_Ar5027_LB5 15.07.2008 9:05 Uhr Seite 37 INHALTSVERZEICHNIS SEITE Technische Daten 38 Bestimmungsgemäßer Gebrauch 38 Sicherheitshinweise 38 Lieferumfang 40 Legende Gerät 40 Anbringen des Küchenradios unter einen Hängeschrank 40 Aufstellen des Küchenradios 41 Inbetriebnahme 41 Einlegen der Backup-Batterien......................................................................................................41 Stromversorgung herstellen ...........................................................................................................41 Uhrzeit einstellen............................................................................................................................42 Datum einstellen .............................................................................................................................42 Displaybeleuchtung ein- und ausschalten....................................................................................42 12- oder 24-Stundenmodus einstellen .........................................................................................42 Küchentimer ....................................................................................................................................42 Weckfunktion (Alarm 1 und Alarm 2) .........................................................................................43 Radiobetrieb 44 Sender manuell einstellen .............................................................................................................44 Sender automatisch suchen ..........................................................................................................44 Sender speichern ...........................................................................................................................44 Lautstärke einstellen .......................................................................................................................44 Bassverstärkung einschalten..........................................................................................................44 Sperren............................................................................................................................................44 Automatische Ausschaltzeit einstellen ..........................................................................................44 Reinigung 45 Entsorgen 45 Importeur 45 Garantie & Service 46 Lesen Sie die Bedienungsanleitung vor der ersten Verwendung aufmerksam durch und heben Sie diese für den späteren Gebrauch auf. Händigen Sie bei Weitergabe des Gerätes an Dritte auch die Anleitung aus. - 37 - IB_KH2281_Ar5027_LB5 15.07.2008 9:05 Uhr KÜCHENRADIO KH2281 Seite 38 Bestimmungsgemäßer Gebrauch Das Küchenradio ist zum Aufstellen oder für die Montage unter einem Schrank bestimmt. Das Küchenradio ist zum Empfang von FM-Radiosendern, sowie zum Wecken durch Signalton oder Radio vorgesehen. Das Küchenradio ist nicht zur Verwendung in gewerblichen oder industriellen Bereichen vorgesehen. Für Schäden, die aus nicht bestimmungsgemäßem Gebrauch des Geräts resultieren, wird keine Gewährleistung übernommen! Technische Daten Dieses Gerät erfüllt die grundlegenden Anforderungen und andere relevante Vorschriften der EMVRichtlinie 2004/108/EG, sowie der Richtlinie für Niederspannungsgeräte 2006/95/EG. Netzanschluss: AC 220 - 240 V ~50 Hz Leistungsaufnahme: 5 Watt Leistungsaufnahme Standby: 0,7 W Betriebstemperatur: +5 ~ +35°C Feuchtigkeit: 5 ~ 90 % (keine Kondensation) Abmessungen (L x B x H): 305 x 157 x 45 mm Gewicht: ca 800 g Schutzklasse: II / Sicherheitshinweise • Backup-Batterien 2x 1,5 V, Typ AAA/LR03/Micro (Nicht im Lieferumfang enthalten) Frequenzbereich Radio: UKW (FM): • 87,5 – 108,5 MHz Die technischen Gegebenheiten des Gerätes ermöglichen einen einstellbaren Frequenzbereich von 87,5 - 108,5MHz. In verschiedenen Ländern können abweichende nationale Regelungen zu den zugewiesenen Rundfunkfrequenzbereichen bestehen. Beachten Sie, dass Sie die außerhalb des zugewiesenen Rundfunkfrequenzbereiches empfangenen Informationen nicht verwerten, an Dritte weiterleiten oder zweckentfremdet missbräuchlich verwenden dürfen. • • • Dieses Gerät ist nicht dafür bestimmt, durch Personen (einschließlich Kinder) mit eingeschränkten physischen, sensorischen oder geistigen Fähigkeiten oder mangels Erfahrung und/oder mangels Wissen benutzt zu werden, es sei denn, sie werden durch eine für ihre Sicherheit zuständige Person beaufsichtigt oder erhielten von ihr Anweisungen, wie das Gerät zu benutzen ist. Kinder sollten beaufsichtigt werden, um sicherzustellen, dass sie nicht mit dem Gerät spielen. Um ein unbeabsichtigtes Einschalten zu vermeiden, ziehen Sie nach jedem Gebrauch und vor jeder Reinigung den Netzstecker. Prüfen Sie das Gerät und alle Teile auf sichtbare Schäden. Nur in einwandfreiem Zustand kann das Sicherheitskonzept des Gerätes funktionieren. Der Netzstecker muss immer leicht zugänglich sein, so dass im Notfall das Gerät schnell vom Stromnetz getrennt werden kann. Gefahr durch elektrischen Schlag! • - 38 - Schließen Sie das Gerät nur an eine vorschriftsmäßig installierte und geerdete Netzsteckdose an. Die Netzspannung muss mit den Angaben auf dem Typenschild des Gerätes übereinstimmen. IB_KH2281_Ar5027_LB5 • • 15.07.2008 9:05 Uhr Lassen Sie beschädigte Netzstecker oder Netzkabel sofort von autorisiertem Fachpersonal oder dem Kundenservice austauschen, um Gefährdungen zu vermeiden. Lassen Sie Anschlussleitungen bzw. Geräte, die nicht einwandfrei funktionieren oder beschädigt wurden, sofort vom Kundendienst reparieren oder austauschen. Tauchen Sie das Gerät niemals in Wasser ein. Wischen Sie es nur mit einem leicht feuchten Tuch ab. • • • • Seite 39 Verletzungsgefahr • • • • Setzen Sie das Gerät nicht dem Regen aus und benutzen Sie es auch niemals in feuchter oder nasser Umgebung. Achten Sie darauf, dass die Anschlussleitung während des Betriebs niemals nass oder feucht wird. Sie dürfen das Gerätegehäuse nicht öffnen oder reparieren. In diesem Falle ist die Sicherheit nicht gegeben und die Gewährleistung erlischt. Schützen Sie das Gerät vor Tropf- und Spritzwasser. Stellen Sie deshalb keine mit Flüssigkeit gefüllten Gegenstände (z. B. Blumenvasen) auf oder neben das Gerät. • Brandgefahr! • • • • • • Benutzen Sie das Gerät nicht in der Nähe von heißen Oberflächen. Stellen Sie das Gerät nicht an Orten auf, die direkter Sonnenstrahlung ausgesetzt sind. Andernfalls kann es überhitzen und irreparabel beschädigt werden. Hängen Sie das Küchenradio nicht über einem Herd auf. Das Küchenradio kann beschädigt werden. Es besteht die Gefahr eines Brandes! Lassen Sie das Gerät während des Betriebs niemals unbeaufsichtigt. Decken Sie niemals die Lüftungsschlitze des Gerätes ab, wenn es eingeschaltet ist. Stellen Sie keine offenen Brandquellen, wie z. B. Kerzen auf oder neben das Gerät. - 39 - Halten Sie Kinder von Anschlussleitung und Gerät fern. Kinder unterschätzen häufig die Gefahren von Elektrogeräten. Sorgen Sie für einen sicheren Stand des Gerätes. Falls das Gerät heruntergefallen oder beschädigt ist, dürfen Sie es nicht mehr in Betrieb nehmen. Lassen Sie das Gerät von qualifiziertem Fachpersonal überprüfen und gegebenenfalls reparieren. Batterien/Akkus können bei Verschlucken lebensgefährlich sein. Bewahren Sie die Batterien für Kleinkinder unerreichbar auf. Wurde eine Batterie verschluckt, muss sofort medizinische Hilfe in Anspruch genommen werden. Halten Sie auch die Verpackungsfolien von Kindern fern. Es besteht Erstickungsgefahr. Hinweis: Einige aggressive Möbellacke können die Gummifüße des Geräts angreifen. Stellen Sie das Gerät ggf. auf eine rutschfeste Unterlage. Gewitter! Bei einem Gewitter können am Stromnetz angeschlossene Geräte Schaden nehmen. Ziehen Sie bei Gewitter deshalb immer den Netzstecker aus der Steckdose. Hinweis zu Stoßspannungen (EFT/elektrischer schneller Übergangsvorgang) und elektrostatischen Entladungen: Im Falle einer Fehlfunktion aufgrund elektrischer schneller Übergangsvorgänge (Stoßspannung) bzw. elektrostatischer Entladungen muss das Produkt zurückgesetzt werden, um den normalen Betrieb wieder herzustellen. Möglicherweise muss die Stromversorgung getrennt und wieder neu angeschlossen werden. Die Batterien (falls vorhanden) müssen entnommen und wieder eingesetzt werden. IB_KH2281_Ar5027_LB5 15.07.2008 9:05 Uhr Hinweis zur Netztrennung Lieferumfang Der POWER-Schalter dieses Gerätes trennt das Gerät nicht vollständig vom Stromnetz. Außerdem nimmt das Gerät im Standby-Betrieb Strom auf. Um das Gerät vollständig vom Netz zu trennen, muss der Netzstecker aus der Netzsteckdose gezogen werden. - Hinweise zum Umgang mit Batterien Legende Gerät Das Gerät verwendet zur Speichersicherung Batterien. Für den Umgang mit Batterien beachten Sie bitte Folgendes: Explosionsgefahr! Werfen Sie keine Batterien ins Feuer. Laden Sie Batterien nicht wieder auf. • • • • • Seite 40 Öffnen Sie die Batterien niemals, löten oder schweißen Sie nie an Batterien. Es besteht Explosions- und Verletzungsgefahr! Überprüfen Sie regelmäßig die Batterien. Auslaufende Batterien können Beschädigungen am Gerät verursachen. Wenn Sie das Gerät längere Zeit nicht benutzen, entnehmen Sie die Batterien. Bei ausgelaufenen Batterien, ziehen Sie Schutzhandschuhe an. Reinigen Sie das Batteriefach und die Batteriekontakte mit einem trockenen Tuch. Küchenradio KH 2281 Montageplatte 4 Schrauben Bedienungsanleitung q Montageplatte w Arretierungshebel e Netzleitung r Wurfantenne t Taste TIMER/ALARM MODE y Taste ALARM 1/VOL+ u Taste POWER ON/OFF i Taste ALARM 2/VOLo Tasten 1/3 PRESET, 2/4 PRESET a Batteriefach s Display d Taste A.O.T. f Taste STORE g Tasten TUNING UP/DOWN h Lautsprecher j Taste MODE SET Anbringen des Küchenradios unter einen Hängeschrank Achtung! Für Schäden am Küchenradio, die durch Feuchtigkeitseinwirkung, in das Gerät eingedrungenes Wasser oder Überhitzung entstanden sind wird keine Haftung/Gewährleistung übernommen! Sie können das Küchenradio mit der mitgelieferten Montageplatte q z. B. an einem Küchenschrank aufhängen: 1. Suchen Sie eine geeignete Anbaustelle für das Küchenradio aus. 2. Drücken Sie die zwei Arretierungshebel w auf der Geräterückseite nach unten. Schieben Sie die Montageplatte q nach hinten und nehmen Sie sie ab. 3. Halten Sie die Montageplatte q an die Anbaustelle. Lassen Sie zu den vorderen Kanten ca. 3,5 cm Platz. So schließt das Küchenradio später bündig ab. - 40 - IB_KH2281_Ar5027_LB5 15.07.2008 9:05 Uhr Seite 41 Inbetriebnahme 4. Markieren Sie die vier Punkte für die Bohrungen mit einem Stift. 5. Markieren Sie die Bohrung mit einem Dorn. 6. Schrauben Sie die Montageplatte q mit den im Zubehör beiliegenden Schrauben fest. 7. Setzen Sie das Küchenradio schräg mit den zwei Aussparungen in die Haltenasen an der Montageplatte q. Drücken Sie das Küchenradio nach oben, bis es hörbar einrastet. Einlegen der Backup-Batterien Durch die Backup-Batterien gehen bei einem Stromausfall die Uhrzeit, Datum, Weckzeiten und ein eingestellter SDA (Special Day Alert) nicht verloren. Sie benötigen hierfür zwei 1,5 V Batterien des Typs AAA. Diese sind nicht im Lieferumfang enthalten. 1. Öffnen Sie die Klappe des Batteriefachs a an der Unterseite des Küchenradios. 2. Legen Sie die Batterien ein. Achten Sie dabei auf die richtige Polarität. 3. Schließen Sie die Klappe des Batteriefachs a. Die Klappe muss hörbar einrasten. Fixieren Sie die Wurfantenne mit einem Stück Klebeband, so dass sie nicht herunterhängt. Aufstellen des Küchenradios Stellen Sie das Küchenradio nicht ohne die Montageplatte q auf. Der Lautsprecher ist sonst verdeckt und die Musik kaum hörbar. Um das Küchenradio mit der mitgelieferten Montageplatte q aufzustellen: 1. Drücken Sie gleichzeitig die zwei Arretierungshebel w auf der Geräterückseite nach unten. Ziehen Sie die Montageplatte q nach hinten und nehmen Sie sie ab. 2. Schieben Sie die beiden Haltenasen an der Montageplatte q in die Vertiefungen an der hinteren Unterseite des Küchenradios. 3. Drücken Sie den vorderen Teil der Montageplatte q fest nach unten, bis sie hörbar einrastet. Sie können das Küchenradio nun aufstellen. Um die Montageplatte q zu demontieren, greifen Sie mit den Daumen unter die Montageplatte q und drücken Sie sie nach vorne und oben, bis sie sich löst. Nehmen Sie die Montageplatte q ab. Hinweis: Die Backup-Batterien sollten mindestens einmal jährlich überprüft und gegebenenfalls ausgewechselt werden. Stromversorgung herstellen • Stecken Sie den Netzstecker in eine Netzsteckdose. Im Display startet die Uhrzeit bei „00:00.00“. Um die Alarmfunktionen des Radios nutzen zu können, stellen Sie zunächst Uhrzeit und Datum ein, wie in den folgenden Abschnitten beschrieben. - 41 - IB_KH2281_Ar5027_LB5 15.07.2008 9:05 Uhr Uhrzeit einstellen Um Uhrzeit, Datum, Displaybeleuchtung und Stundenformat einstellen zu können, muss das Radio ausgeschaltet sein. 1. Drücken Sie die Taste MODE SET j einmal. Die Uhrzeit blinkt. 2. Drücken Sie die Tasten TUNING UP/DOWN g, um die Uhrzeit in Minutenintervallen einzustellen. Drücken und Halten der Tasten ändert die Uhrzeit in Intervallen von 10 Minuten. Wenn innerhalb von 10 Sekunden keine Taste gedrückt wird, wird die Einstellung gespeichert und das Küchenradio schaltet zurück zur Uhrzeitanzeige. Seite 42 12- oder 24-Stundenmodus einstellen 1. Drücken Sie viermal die Taste MODE SET j. Im Display erscheint „24“ für den 24-Stundenmodus. 2. Drücken Sie die Taste TUNING UP g, um den 24-Stundenmodus einzustellen. 3. Drücken Sie die Taste TUNING DOWN g, um den 12-Stundenmodus einzustellen. Im Display erscheint „12“. Für die Stunden des Nachmittags erscheint nun zusätzlich PM im Display. Küchentimer 1. Drücken Sie die Taste TIMER/ALARM MODE t. Im Display ercheint das Timersymbol . Datum einstellen 2. Stellen Sie mit den Tasten TUNING UP/DOWN g 1. Drücken Sie die Taste MODE SET j die gewünschte Zeit ein (ein Zeitraum von 1 Minute bis 23:59 h ist möglich). 3. Drücken Sie die Taste TIMER/ALARM MODE t erneut, um den Küchentimer zu starten. Im Display erscheint das Timersymbol und zusätzlich ein rückwärtslaufendes Uhrensymbol. 30 Sekunden vor Ablaufen der Zeit, ertönt ein akustisches Signal, das bei fortlaufender Zeit in immer kürzeren Abständen ertönt. Ist die Zeit abgelaufen, ertönt das Signal fortlaufend für eine Stunde. • Drücken Sie die Taste TIMER/ALARM MODE t, um den Signalton zu beenden. zweimal. Im Display blinkt die Datumsanzeige „01.01.08“. 2. Drücken Sie die Tasten TUNING UP/DOWN g, um das Datum in Tagesintervallen einzustellen. Drücken und Halten der Tasten ändert das Datum in Intervallen von 10 Tagen. Wenn innerhalb von 10 Sekunden keine Taste gedrückt wird, wird die Einstellung gespeichert und das Küchenradio schaltet zurück zur Uhrzeitanzeige. Displaybeleuchtung ein- und ausschalten 1. Drücken Sie dreimal die Taste MODE SET j. Im Display erscheint „L“. 2. Drücken Sie die Taste TUNING UP g, um die Küchentimer unterbrechen Displaybeleuchtung einzuschalten. Im Display erscheint „H“. 3. Drücken Sie die Taste TUNING DOWN g, um die Displaybeleuchtung auszuschalten. Im Display erscheint „L“. Wenn innerhalb von 10 Sekunden keine Taste gedrückt wird, wird die Einstellung gespeichert und das Küchenradio schaltet zurück zur Uhrzeitanzeige. • Sie können den Küchentimer unterbrechen, indem Sie die Taste TIMER/ALARM MODE t kurz drücken. Die Timer-Zeit blinkt. Das Uhren-Symbol erlischt. • Drücken Sie die Taste TIMER/ALARM MODE t erneut. Die Zeit läuft weiter. Küchentimer abbrechen • Um den Küchentimer abzubrechen, halten Sie die Taste TIMER/ALARM MODE t gedrückt. Im Display wird die Uhrzeit angezeigt. - 42 - IB_KH2281_Ar5027_LB5 15.07.2008 9:05 Uhr Seite 43 Küchentimer programmieren 2. Drücken Sie die Tasten TUNING UP/DOWN g, um Sie können Küchentimer-Zeiten abspeichern. 1. Drücken Sie die Taste TIMER/ALARM MODE t. 2. Stellen Sie mit den Tasten TUNING UP/DOWN g die gewünschte Zeit ein 3. Drücken Sie die Taste STORE f. Im Display blinkt „T“ auf. 4. Drücken Sie die Tasten 1/3 PRESET, 2/4 PRESET o für den gewünschten Speicherplatz. Ihnen stehen vier Speicherplätze zur Verfügung. Im Display erscheint die Nummer des von Ihnen gewählten Speicherplatzes. 5. Drücken Sie erneut die Taste STORE f. Die Zeit ist nun gespeichert. Wenn innerhalb von 10 Sekunden keine Taste gedrückt wird, schaltet das Küchenradio zurück zur Uhrzeitanzeige. 6. Um die gespeicherten Küchentimer -Zeiten abzurufen, drücken Sie die Taste TIMER/ALARM MODE t und die Taste des entsprechenden Speicherplatzes (1/3 PRESET, 2/4 PRESET o). 7. Drücken Sie die Taste TIMER/ALARM MODE t erneut, um den Küchentimer zu starten. Im Display erscheint ein rückwärts laufendes Uhrensymbol. 8. Um den Küchentimer abzubrechen, halten Sie die Taste TIMER/ALARM MODE t gedrückt. Weckfunktion (siehe Tabelle oben) im Display angezeigt wird. 4. Drücken Sie die Taste A.O.T. d, um die Wochentage, an denen Sie geweckt werden wollen, einzustellen: Sie können wählen zwischen werktags (Mo, Tu, We, Th, Fr), Wochenende (Su, Sa), ganze Woche (Su, Mo, Tu, We, Th, Fr, Sa) oder den aktuellen Wochentag. Die gewählte Einstellung wird im Display angezeigt. 5. Drücken Sie die Taste A.O.T. d so oft, bis die gewünschten Wecktage eingestellt sind. Halten Sie die Taste A.O.T. d gedrückt, bis im Display ein einzelner Wochentag angezeigt wird. 6. Drücken Sie die Taste A.O.T. d, um den gewünschten Wochentag einzustellen. Um wieder zurück zur Auswahl von Werktagen, Wochenende oder ganzer Woche zu gelangen, halten Sie die Taste A.O.T. d erneut kurz gedrückt. 7. Drücken Sie die Taste MODE SET j, um die Einstellung zu speichern und zur Uhrzeitanzeige zurückzukehren. Weckfunktion (Alarm 1 und Alarm 2) Wenn der Alarm ertönt... Sie können mit Ihrem Küchenradio zwei Weckzeiten programmieren. • Weckfunktion die gewünschte Weckzeit einzustellen. 3. Drücken Sie die Taste ALARM 1/VOL+ y (oder ALARM 2/VOL- i) so oft, bis die gewünschte Symbol im Display Signaltöne • Radio Abgeschaltet kein Symbol 1. Drücken Sie die Taste ALARM 1/VOL+ y (oder ALARM 2/VOL- i). Im Display erscheint die zuletzt eingestellte Weckzeit A1 bzw. A2 und eventuell das Symbol für den Typ des Alarms (siehe Tabelle oben). - 43 - und die Weckfunktion „Radio“ gewählt ist, läuft das Radio eine Stunde mit einer vordefinierten Wecklautstärke. Diese Lautstärke kann nicht verändert werden. Zum Beenden drücken Sie die Taste ALARM 1/VOL+ y oder ALARM 2/VOL- i. und die Weckfunktion „Signaltöne“ gewählt ist, ertönen die Signaltöne 10 Minuten. Zum Beenden drücken Sie die Taste ALARM 1/VOL+ y oder ALARM 2/VOL- i. IB_KH2281_Ar5027_LB5 15.07.2008 9:05 Uhr Radiobetrieb Seite 44 • Sender suchen Sender manuell einstellen 1. Drücken Sie die Taste Taste POWER ON/OFF u. Um gespeicherte Sender einzustellen, drücken Sie im Radio-Modus mehrmals die entsprechende Speichertaste (1/3 PRESET, 2/4 PRESET o) bis die Nummer des Speicherplatzes im Display erscheint. Lautstärke einstellen Im Display wird die aktuelle Frequenz angezeigt. 2. Drücken Sie die Taste TUNING UP g um die Frequenz zu erhöhen. 3. Drücken Sie die Taste TUNING DOWN g, um die Frequenz zu verringern. • • Drücken Sie während des Radiobetriebs die Taste ALARM 1/VOL+ y, um die Lautstärke zu erhöhen. Drücken Sie die Taste ALARM 2/VOL- i, um die Lautstärke zu verringern. Bassverstärkung einschalten Sender automatisch suchen • Sie können nach Sendern suchen lassen. Das Küchenradio durchsucht dann die Frequenzen, bis es einen Sender gefunden hat. 1. Drücken Sie die Taste POWER ON/OFF u. 2. Halten Sie die Taste TUNING UP g zwei Sekunden gedrückt: das Küchenradio sucht nach dem Sender mit der nächsthöheren Frequenz. 3. Halten Sie die Taste TUNING DOWN g zwei Sekunden gedrückt: Das Küchenradio sucht nach dem Sender mit der nächstniedrigeren Frequenz. Wiederholen Sie diese Schritte, bis Sie den entsprechenden Sender gefunden haben. • Sperren Sender speichern Sie können mit den Speichertasten Tasten 1/3 PRESET, 2/4 PRESET o 4 Sender abspeichern. 1. Drücken Sie die Taste POWER ON/OFF u. 2. Suchen Sie einen Sender, wie im Kapitel „Radiobetrieb“ beschrieben. 3. Drücken Sie die Taste STORE f. Die Anzeige „M“erscheint im Display und es blinkt „MEM“. 4. Drücken Sie eine der Tasten 1/3 PRESET, 2/4 PRESET o, auf der Sie den Sender ablegen wollen. • Drücken Sie die jeweilige Speichertaste mehrmals für den gewünschten Speicherplatz (z. B. einmal Taste 1/3 PRESET für Speicherplatz 1, zweimal Taste 1/3 PRESET für Speicherplatz 3). 5. Drücken Sie die Taste STORE f erneut. Der Sender ist gespeichert. Drücken Sie während des Radiobetriebs die Taste MODE SET j, um die Bassverstärkung einzuschalten. Im Display erscheint die Anzeige BASS. Drücken Sie die Taste MODE SET j, um die Bassverstärkung wieder auszuschalten. Die Anzeige BASS im Display erlischt. Sie können das Küchenradio sperren, damit Unbefugte oder Kinder keine Einstellungen ändern können. • Halten Sie die Taste STORE f gedrückt. Im Display erscheint ein Schlüsselsymbol. • Um die Sperre zu entfernen, halten Sie erneut die Taste STORE f gedrückt, bis das Schlüsselsymbol erlischt. Automatische Ausschaltzeit einstellen Sie können eine Ausschaltzeit einstellen, nach der sich das Radio automatisch ausschaltet. • Drücken Sie die Taste A.O.T. d. Das Radio schaltet sich gegebenenfalls ein. Im Display erscheint die Anzeige „120 AOT“. • Drücken Sie mehrmals die Taste A.O.T. d, um die Abschaltzeit in Schritten von 5 Minuten von 120 bis 5 Minuten einzustellen. - 44 - IB_KH2281_Ar5027_LB5 15.07.2008 9:05 Uhr Wenn innerhalb von 10 Sekunden keine Taste gedrückt wird, wird die Einstellung gespeichert und das Küchenradio schaltet zurück zur Uhrzeitanzeige. • Um die Funktion auszuschalten, drücken Sie die Taste A.O.T. d, bis die Anzeige „OFF AOT“ im Display erscheint. Reinigung Warnung! Dringt Feuchtigkeit in das Gerät ein, besteht die Gefahr eines elektrischen Schlages! Außerdem kann das Küchenradio dabei irreparabel beschädigt werden! Reinigen Sie das Gehäuse des Küchenradios ausschließlich mit einem leicht feuchten Tuch und einem milden Spülmittel. Achten Sie darauf, dass bei der Reinigung keine Feuchtigkeit in das Gerät gelangt! Seite 45 Entsorgen Gerät entsorgen Werfen Sie das Gerät keinesfalls in den normalen Hausmüll. Dieses Produkt unterliegt der europäischen Richtlinie 2002/96/EG. Entsorgen Sie das Gerät über einen zugelassenen Entsorgungsbetrieb oder über Ihre kommunale Entsorgungseinrichtung. Beachten Sie die aktuell geltenden Vorschriften. Setzen Sie sich im Zweifelsfall mit Ihrer Entsorgungseinrichtung in Verbindung. Batterien/Akkus entsorgen! Batterien/Akkus dürfen nicht im Hausmüll entsorgt werden. Jeder Verbraucher ist gesetzlich verpflichtet, Batterien/Akkus bei einer Sammelstelle seiner Gemeinde/ seines Stadtteils oder im Handel abzugeben.Diese Verpflichtung dient dazu, dass Batterien/Akkus einer umweltschonenden Entsorgung zugeführt werden können. Geben Sie Batterien/Akkus nur im entladenen Zustand zurück. Verpackung entsorgen Führen Sie alle Verpackungsmaterialien einer umweltgerechten Entsorgung zu. Importeur KOMPERNASS GMBH BURGSTRASSE 21 44867 BOCHUM, GERMANY www.kompernass.com - 45 - IB_KH2281_Ar5027_LB5 15.07.2008 9:05 Uhr Seite 46 Garantie & Service Sie erhalten auf dieses Gerät 3 Jahre Garantie ab Kaufdatum. Sollten Sie trotz unserer hohen Qualitätsstandards einen Grund zur Beanstandung dieses Gerätes haben, so kontaktieren Sie bitte unsere Service-Hotline. Falls eine telefonische Bearbeitung Ihrer Beanstandung nicht möglich ist, erhalten Sie dort • eine Bearbeitungsnummer (RMA-Nummer) sowie • eine Adresse, an die Sie Ihr Produkt zur Garantieabwicklung einsenden können. Bitte legen Sie im Falle einer Einsendung eine Kopie des Kaufbeleges (Kassenzettel) bei. Das Gerät muss transportsicher verpackt und die RMA-Nummer direkt ersichtlich sein. Einsendungen ohne RMANummer können nicht bearbeitet werden. Hinweis: Die Garantieleistung gilt nur für Material- oder Fabrikationsfehler. Die Garantieleistung gilt nicht • für Verschleißteile • für Beschädigungen an zerbrechlichen Teilen wie Schaltern oder Akkus. - 46 - $ Das Produkt ist lediglich für den privaten und nicht für den gewerblichen Gebrauch bestimmt. Bei missbräuchlicher und unsachgemäßer Behandlung, Gewaltanwendung und bei Eingriffen, die nicht von unserer autorisierten Service-Niederlassung vorgenommen wurden, erlischt die Garantie. Ihre gesetzlich festgelegten Gewährleistungsansprüche werden durch diese Garantie nicht eingeschränkt. Diesen Abschnitt vollständig ausfüllen und dem Gerät beilegen! IB_KH2281_Ar5027_LB5 15.07.2008 Seite 47 Garantie Küchenradio KH2281 Um einen kostenlosen Reparaturablauf zu gewährleisten, setzen Sie sich bitte mit der Service-Hotline in Verbindung. Halten Sie hierfür Ihren Kassenbeleg bereit. Absender bitte deutlich schreiben: Name Vorname Straße PLZ/Ort Land Telefon Datum/Unterschrift Fehlerbeschreibung : $ 9:05 Uhr Kompernaß Service Deutschland Tel.: +49 (0) 180 5 008107 (14 Ct/Min. aus dem dt. Festnetz, ggf. abweichende Preise aus dem Mobilfunknetz) Fax: +49 (0) 2832 3532 e-mail: [email protected] www.mysilvercrest.de Kompernaß Service Österreich Tel.: (+43) 07612/6260516 email: [email protected] www.mysilvercrest.de IB_KH2281_Ar5027_LB5 15.07.2008 9:05 Uhr Seite 48 - 48 --
 1
1
-
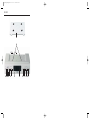 2
2
-
 3
3
-
 4
4
-
 5
5
-
 6
6
-
 7
7
-
 8
8
-
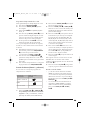 9
9
-
 10
10
-
 11
11
-
 12
12
-
 13
13
-
 14
14
-
 15
15
-
 16
16
-
 17
17
-
 18
18
-
 19
19
-
 20
20
-
 21
21
-
 22
22
-
 23
23
-
 24
24
-
 25
25
-
 26
26
-
 27
27
-
 28
28
-
 29
29
-
 30
30
-
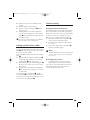 31
31
-
 32
32
-
 33
33
-
 34
34
-
 35
35
-
 36
36
-
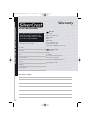 37
37
-
 38
38
-
 39
39
-
 40
40
-
 41
41
-
 42
42
-
 43
43
-
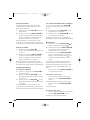 44
44
-
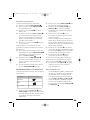 45
45
-
 46
46
-
 47
47
-
 48
48
-
 49
49
-
 50
50


Silvercrest KH 2281 Operating Instructions Manual
- Categoría
- Radios
- Tipo
- Operating Instructions Manual
en otros idiomas
- italiano: Silvercrest KH 2281
- English: Silvercrest KH 2281
- Deutsch: Silvercrest KH 2281
Artículos relacionados
-
Silvercrest KH 2299 Instrucciones de operación
-
Silvercrest 330422 El manual del propietario
-
Silvercrest KH 2029 Operating Instructions Manual
-
-
-
-
Silvercrest SRD 250 A2 Operating Instructions Manual
-
Silvercrest SWED 100 A1 Operating Instructions Manual