Silvercrest 330978 El manual del propietario
- Categoría
- Radios
- Tipo
- El manual del propietario


SilverCrest SWDR 500 C2 / IAN: 330978_1907
US-EN Error in the first paragraph of Chapter 8.4.2:
Please press the keys "TUNE-"(13) and "TUNE+"(11)
instead of "VOL-" (12) and "VOL+" (4).
US-ES Error en el primer párrafo del capítulo 8.4.2:
Por favor, pulse las teclas "TUNE-"(13) y "TUNE+"(11) en
lugar de "VOL-" (12) y "VOL+" (4).

V 1.1
US-EN ..................................................................................... 2
US-ES .................................................................................... 42

SilverCrest SWDR 500 C2
2 - US-EN
Table of Contents
1. General Information ............................................................. 4
1.1. Read and retain the operating manual ..................................................... 4
1.2. Explanation of symbols used ..................................................................... 4
2. Safety ................................................................................... 5
2.1. Intended use ................................................................................................ 5
2.2. Safety Instructions ....................................................................................... 5
3. Package Contents ............................................................... 12
4. Technical Data .................................................................... 13
5. Copyright ........................................................................... 14
6. Overview of Controls and Button Functions ........................ 15
6.1 ScreenDisplay ............................................................................................ 17
6.2 Stand ........................................................................................................... 18
7. Before Initial Use ................................................................ 18
7.1 Using Mains Power and Battery Power ................................................... 19
7.2 Inserting the Batteries ................................................................................. 19
7.3 Connecting the Power Adapter ................................................................ 20
8. Initial Use ........................................................................... 20
8.1 Display Lighting .......................................................................................... 20
8.2 Switching the Device On and Off ............................................................ 20
8.3 Setting the Time Zone ................................................................................ 21
8.4 Setting the Date/ Time ................................................................................ 23
8.4.1 Setting Automatically Via RBDS ........................................................ 23
8.4.2 Manual Setting ................................................................................... 23
8.5 Displaying World Time .............................................................................. 26
8.6 Functions of the ‘MODE’ Button ............................................................... 26
8.7 SDA Special Date Alarm ........................................................................... 26
8.8 NAP Timer .................................................................................................. 27
8.9 Stopwatch ................................................................................................... 28
8.10 Setting the AM Reception Range ........................................................... 29
8.11 Setting the Volume ................................................................................... 29

SilverCrest SWDR 500 C2
US-EN - 3
8.12 Setting the Reception Sensitivity ............................................................. 29
8.13 Activating Bass Boost .............................................................................. 29
8.14 Choosing a Station .................................................................................. 30
8.15 Automatic Station Scanning With Auto-Store Function ........................ 30
8.16 Manually Scanning for Stations ............................................................. 30
8.17 Setting Stations Manually ....................................................................... 31
8.18 Fine-Tuning a Station ............................................................................... 31
8.19 Manually Saving Stations ....................................................................... 32
8.20 Finding Stored Stations ........................................................................... 32
8.21 Playback in Stereo ................................................................................... 33
8.22 SLEEP Timer .............................................................................................. 33
8.23 Setting the Alarm Time ............................................................................ 34
8.24 Activating the Alarm ................................................................................ 35
8.25 Activating/Deactivating the Button Lock ............................................... 37
8.26 Connecting Earphones ............................................................................ 37
8.27 Storing the Device When Not in Use .................................................... 37
9. Troubleshooting ................................................................. 38
10. Environmental information and disposal .......................... 39
11. FCC hints ........................................................................... 39
12. Warranty .......................................................................... 40

SilverCrest SWDR 500 C2
4 - US-EN
1. General Information
1.1. Read and retain the operating manual
This operating manual contains important information regarding
the safe use of the multi-band radio as well as details on day-to-
day use and disposal. Carefully familiarize yourself with the
operating manual, paying special attention to the safety
instructions before using the multi-band radio, and use it only for the
application areas and purposes described. If you give the multi-band radio
away or sell it, please ensure that you also pass on the operating manual. It is
part of the product.
1.2. Explanation of symbols used
The following symbols and signal words are used in this operating manual, on
the multi-band radio, or on the packaging.
This symbol / signal word indicates a hazard with a high level of risk that if not
prevented could result in death or serious injury.
This symbol / signal word indicates a hazard with a medium level of risk that if
not prevented could result in death or serious injury.
This symbol / signal word indicates a hazard with a low level of risk that if not
prevented could result in minor or moderate injury.
This signal word warns of possible damage to property.

SilverCrest SWDR 500 C2
US-EN - 5
This symbol indicates further information on handling and
use.
Take care when using earphones. Listening at a high
volume for prolonged periods can damage the user’s
hearing.
2. Safety
2.1. Intended use
This device is an electric entertainment appliance, designed to receive and play
radio stations. The device can also be used as a clock and an alarm clock. It
may only be used for private purposes and is not for industrial or commercial
use. The device should also not be used in tropical climates. The manufacturer
shall not be liable for any damages or faults arising as a result of unauthorized
modification of the device. Only use the accessories specified by the
manufacturer. Please observe the national regulations and/or laws of the
country in which the device is used.
Please be aware that national laws in different countries vary regarding which
frequency ranges you may legally receive. Information received outside of the
allowed frequency ranges may not be utilized and its content or any facts
received may not be passed on to third parties.
2.2. Safety Instructions
IMPORTANT SAFEGUARDS
When using electrical appliances, basic safety precautions should always be
followed, including the following:
1. Read all instructions.

SilverCrest SWDR 500 C2
6 - US-EN
2. To protect against risk of electrical shock do not put in water or other liquid.
3. Close supervision is necessary when any appliance is used by or near
children.
4. Unplug from outlet when not in use, before putting on or taking off parts,
and before cleaning.
5. Avoid contacting moving parts.
6. Do not operate any appliance with a damaged cord or plug or after the
appliance malfunctions, or is dropped or damaged in any manner. Return
appliance to the nearest authorized service facility for examination, repair or
electrical or mechanical adjustment.
7. The use of attachments not recommended or sold by the manufacturer may
cause fire, electric shock or injury.
8. Do not let cord hang over edge of table or counter.
9. Do not let cord contact hot surface, including the stove.
SAVE THESE INSTRUCTIONS
For household use only.
Power adapter
Only plug the power adapter into a suitable plug socket that is always easily
accessible. Never touch the power adapter with wet hands. There is a risk of
electric shock. In the following cases, remove the power adapter from the
mains:
• If there is a dangerous situation.
• If unusual sounds or smoke are coming from the power adapter.
• Before a storm or thunderstorm where there is a danger of lightning.
• The power adapter has been damaged.
• The power adapter has been exposed to rain, liquid or extreme humidity.

SilverCrest SWDR 500 C2
US-EN - 7
• If you wish to clean it.
• The power adapter uses electricity even when in standby. To completely
remove it from the mains, the power adapter must be unplugged from the
socket.
Please observe this advice to avoid the risk of death and of fire! The power
adapter should also never be covered as this is a fire hazard. Never try to
open the housing of the power adapter. There is a risk of death by electric
shock.
Cables
Always take hold of all cables by the plug and do not pull on the cable itself.
Do not place any items of furniture or other heavy objects on cables. Make
sure that the cables are not bent, particularly at the plug and at the connector
sockets. To avoid damaging the cable, do not lay it over hot or sharp locations
or corners. Never make a knot in a cable and do not connect it with other
cables. All cables should be laid in such a way that no one steps on them or is
obstructed by them.
Display
Do not apply pressure to the screen and keep it away from sharp objects. A
broken screen can cause injuries. Wear gloves when collecting broken pieces
and, where relevant, contact the manufacturer. Where the screen is scratched
or otherwise damaged, make completely sure that no liquid is leaking from it.
If any liquid leaks, please observe the following advice:
• If the liquid comes into contact with skin, wipe it off with a clean cloth
and then rinse with plenty of water. It may be necessary to seek medical
attention.

SilverCrest SWDR 500 C2
8 - US-EN
•
If the liquid comes into contact with the eyes, rinse with running water
for at least 15 minutes. Seek immediate medical attention.
•
If the liquid is swallowed, first rinse the mouth with water and then drink
plenty of water. Seek medical attention immediately!
Listening at high volume can be dangerous
Take care when using earphones. Listening at a high volume
for prolonged periods can damage the user’s hearing.
Do not use the earphones at a high volume. This would risk damaging your
hearing and may disturb those around you. Although the device is set up so
that you can still be aware of ambient noises, set the volume at least low
enough so that you can continue to be aware of sounds in your surroundings.
In dangerous situations, e.g., road use, working with machines or other
situations requiring your full attention, the noise may negatively affect your
concentration or decrease your awareness of what is happening around you.
In scenarios such as these, do not use the device.
Operating environment
The device is not designed for operation in rooms with a high temperature,
humidity (for example, the bathroom), or excessive dust. Operating
temperature and operating humidity: 41 °F – 95 °F (5°C to 35°C), 85
percent maximum relative humidity.

SilverCrest SWDR 500 C2
US-EN - 9
Please make sure that:
there is always adequate ventilation (do not place the device on a shelf, a
carpet, a bed or anywhere where the ventilation slots will be covered; leave
a distance of at least 4 in/10 cm free on each side)
contact with splashing and dripping water and aggressive liquids is avoided,
and that the device is not operated in the vicinity of water. It is especially
important that the device never be immersed, nor should any objects filled
with liquid (for example, vases or drinks) be placed on or near the device.
there are no naked flames (for example, burning candles) placed on or near
the device
no foreign bodies penetrate into the device
the device is not exposed to excessive temperature fluctuations, as otherwise
condensation can occur and lead to electrical short circuits. If, however, the
device is exposed to large temperature fluctuations, wait for approximately
two hours until the device has reached ambient temperature before starting it
up.
the device and the power adapter are not used during lightning storms.
During lightning storms, remove the power adapter from the plug socket.
when the power adapter is being used, the socket it is connected to is
always easily accessible. Always lay the cable in such a way that nobody
can trip on it.
Please make sure that:
the device is not exposed to direct sources of heat (for example, heaters)
the device is not exposed to direct sunlight or strong artificial light
the device is not placed close to magnetic fields (for example, loudspeakers)
the device is not exposed to excessive shocks and vibrations

SilverCrest SWDR 500 C2
10 - US-EN
Danger to children and persons with reduced physical, sensory
or mental capabilities (for example, partially disabled, elderly
people with limited physical and mental abilities), or lack of
experience and knowledge (for example, older children).
Do not allow children under fourteen years of age to operate this multi-band
radio.
The multi-band radio can be used by people with reduced physical sensory
or mental abilities or who lack experience and/or knowledge, providing
they are supervised or have been instructed in the safe use of the device and
understand the resulting dangers.
Greatest attention is required if the multi-band radio is used by or near
children or persons with reduced physical, sensory or mental abilities or
disabilities.
Keep the packaging film away from children. There is a risk of suffocation.
Under no circumstances may the multi-band radio be immersed in water or
held under running water.
In case of battery leakage, remove the batteries to avoid damaging the multi-
band radio. You can remove leaked battery fluid with a dry, absorbent cloth.
Wear suitable gloves to do so! Contact with the skin must be avoided. In the
case of contact with eyes, rinse eyes immediately with plenty of water and
seek medical attention.
Always take care to install your batteries correctly observing the “+” and “-”
marks on the battery and the device.
Always replace the whole set of batteries at one time, taking care not to mix
old and new ones, or batteries of different types.
Remove discharged batteries from equipment promptly to avoid possible
damage from leakage.
Never dispose of batteries in fire, except under conditions of controlled
incineration. (Failure to observe this precaution may result in an explosion.)

SilverCrest SWDR 500 C2
US-EN - 11
Never attempt to recharge primary batteries as this may cause leakage, fire,
or explosion.
Never short circuit batteries as this may lead to high temperatures, leakage,
or explosion.
Never heat batteries in order to revive them.
Never attempt to disassemble or open batteries as this can lead to
electrolyte burns.
Keep batteries out of the reach of children, especially those batteries fitting
within the limits of the truncated cylinder as defined in Figure 1.
Figure 1:
inner dimensions in
millimeters (mm)
Immediately seek medical attention if a cell or battery has been swallowed.
Also, contact your local poison control center.
Repairs/maintenance/cleaning
Repair work is required if the device has been damaged, for example, if the
power adapter or the device housing are damaged, liquids or objects have got
inside the device or if the device has been exposed to rain or moisture. Repair
work is also required if the device does not work properly or has been
dropped. If you notice any smoke or unusual noises or smells, switch off the
device immediately, remove the batteries and unplug the power adapter from
the power socket. In these cases, you must not continue to use the device until it

SilverCrest SWDR 500 C2
12 - US-EN
has been checked by a specialist. All repair work should only be carried out by
qualified technicians. Never open the housing of the device. Clean the device
using a clean, dry cloth and never use abrasive liquids. Do not try to open the
housing of the device, as this will void your guarantee.
In the case of battery leakage, the device must be cleaned by a specialist.
3. Package Contents
Unpack the device and all accessories. Remove all packaging materials and
check all parts for completeness and for signs of damage. If any parts are
missing or damaged, please contact the manufacturer.
A SWDR 500 C2 multi-band radio
B Power adapter
C These instructions (symbol icon)

SilverCrest SWDR 500 C2
US-EN - 13
4. Technical Data
These details only describe the technical capabilities of this
device. Laws about the frequency ranges that you may legally
receive can vary in different countries. Please note that
receiving stations outside the scope of these laws is illegal and
could result in penalties.
Multi-Band Radio
Power supply • Power adapter provided:
• Optional batteries 4x AA 1.5V
(Mignon, LR6)
Power consumption During use as a radio: approximately
0.7 W
In standby: < 0.2 W
Audio power output 500 mW
Frequency bands
Please note, due to production
tolerances, the upper and lower
ends of the reception range can
vary slightly from the values given
here.
FM 87.9 – 107.9 MHz
MW 530 – 1720 KHz
SW1 4.75 – 5.94 MHz
SW2 5.95 – 7.09 MHz
SW3 7.10 – 9.49 MHz
SW4 9.50 – 11.64 MHz
SW5 11.65 – 13.59 MHz
SW6 13.60 – 15.09 MHz
SW7 15.10 – 17.49 MHz
SW8 17.50 – 21.44 MHz
SW9 21.45 – 21.85 MHz
LW 153 - 279 KHz
Number of memory locations 400 (100 per frequency band)

SilverCrest SWDR 500 C2
14 - US-EN
Dimensions (W x D x H) approx. 7.0 x 1.6 x 4.3 inch/
17,7 x 4,1 x 11 cm
Weight approx. 10 oz./285 g (w/o batteries)
Maximum output voltage at
earphone connector socket Approximately 120 mV
Battery life Approximately 28 hours
Operating temperature 41 °F – 95 °F/5°C to 35°C
Storage conditions 14 °F – 122 °F/-10°C to 50°C
Please note: The device must not be
stored in hot areas (for example, in
vehicles in the summer).
Operating humidity Maximum 85% relative humidity
Power Adapter
Manufacturer DONGGUANG OBELIEVE
ELECTRONIC CO.,LTD
Type OBL-0590600U
Input voltage, frequency/input
current
100-240 V , 50/60 Hz / 0.3 A MAX
Output voltage/output current 5.9 V / 600 mA ,
The specifications and design are subject to change without notice.
5. Copyright
All contents of this operating manual are subject to copyright law, and are
provided to the user solely as a source of information.
Any form of copying or reproduction of data and information is prohibited
without the express written permission of the author. This also concerns
commercial use of the contents and data.
The text and illustrations correspond to the technical standards at the time of
printing.

SilverCrest SWDR 500 C2
US-EN - 15
6. Overview of Controls and Button Functions
These operating instructions also include a cover that can be unfolded. Unfold
this cover page so that you can always see the controls.

SilverCrest SWDR 500 C2
16 - US-EN
1 Telescopic aerial
2 SNOOZE/BASS button (postpone the alarm for 5 to 120
minutes/low tones are amplified)
3 LOCK button (lock the buttons)
4 VOL + button (increase volume)
5 DISPLAY button (displays the time zone)
6 Display
7 BAND button (choose frequency band)
8 POWER/SLEEP button (switch on/off; set sleep timer)
9 SET/STORE button (set time, save station)
10 M+/AL2 button (go to next memory location, alarm 2)
11 TUNE+ button (station scan up, set minutes +)
12 VOL - button (reduce volume)
13 TUNE- button (station scan down, set minutes -)
14 M-/AL1 button (go to previous memory location, alarm 1)
15 MODE button
16 Loudspeaker
17 Carry strap
18 Stand (on the back)
19 Battery compartment (on the back)
20 (connector socket for optional power adapter)
21 (connector socket for earphones)
22 DX/LOCAL button (setting the reception sensitivity)

SilverCrest SWDR 500 C2
US-EN - 17
6.1 ScreenDisplay
23 Stopwatch
24 CITY
25 SDA (special date alarm)
26 VOLUME
27 MEM (memory position)
28 RBDS (radio data system)
29 Other displays: Station name, date, memory position
30 ST (STEREO – only when using earphones)
31 BASS (activate bass boost)
32 SLEEP (snooze function)
33 Alarm 1/2 active (buzzer)
34 Alarm 1/2 active (radio)
35 LOCK (lock the buttons)
36 PM time display
37 Frequency unit
38 Low battery indicator
39 Time/frequency display

SilverCrest SWDR 500 C2
18 - US-EN
40 Weekday display
41 Frequency band
42 NAP timer (short-term timer)
6.2 Stand
On the back of the device there is a stand (18), which can be used to stand
the multi-band radio in a tilted position. To do this, pull out the stand (18).
7. Before Initial Use
You can choose whether to run the device using the supplied power adapter
(B) or with four AA batteries (Mignon, LR6). Batteries are not included in the
delivery.

SilverCrest SWDR 500 C2
US-EN - 19
7.1 Using Mains Power and Battery Power
When the multi-band radio (A) is disconnected from the mains, various settings
(time and alarm time) are lost. To avoid this, insert batteries before
disconnecting from the mains. This will mean that these settings are maintained.
Saved radio stations are not lost even if no batteries are installed and the
mains power is disconnected.
7.2 Inserting the Batteries
Open the battery compartment (19) on the back of the device by sliding the
battery compartment lid down in the direction of the arrow and removing it.
Insert the batteries with the correct polarity (see the + and - markings), as
shown in the following diagram. The polarity is marked on the batteries and on
the battery compartment. Now place the lid back on the battery compartment
(19) and slide it up until it engages.
If your screen (6) signals that the battery level is low (38), the batteries have
almost run out of charge. Swap them for new batteries of the same type.
Remove the batteries when not using the device for a
prolonged period of time. The batteries could leak and cause
damage to the device.

SilverCrest SWDR 500 C2
20 - US-EN
7.3 Connecting the Power Adapter
Insert the connector from the power adapter (B) into the connector socket (20)
of the multi-band radio (A). Plug the power adapter (B) into an easily
accessible mains plug socket.
When the device is plugged into the power adapter (B), it is powered
exclusively by the adapter and not by any batteries that may be inserted.
When using the power adapter (B) to power the radio for prolonged periods
of time, you should remove the batteries to prevent them from draining.
8. Initial Use
8.1 Display Lighting
Every time a button is pressed, the screen lights up for approximately 10
seconds and then the light switches off.
8.2 Switching the Device On and Off
To switch on the device, briefly press the ‘POWER/SLEEP’ button (8) once.
When switched on, the screen (6) displays the frequency and the frequency
band as well as the day of the week:
FM Frequency modulation
MW Medium wave
SW Shortwave
LW Longwave
In the ‘FM’ frequency band, the name of the currently selected station is also
displayed provided the station transmits its name. If a station does not transmit
a station name or reception is too poor, the current date is displayed instead.
In the ‘MW,’ ‘SW,’ and ‘LW’ frequency bands, the current date is also
displayed here.

SilverCrest SWDR 500 C2
US-EN - 21
To switch off the device, press the ‘POWER/SLEEP’ button (8) again. When
switched off, the screen (6) displays the date, current time, and weekday.
When setting up the multi-band radio, the best way to begin is by
setting the time zone. To do this, read the following section entitled
'Set the time zone'.
8.3 Setting the Time Zone
The following tables provides an overview of the city abbreviations for the
various time zones. You can also use the table to see the time differences and
any summer time arrangements.
Abbreviation Difference
to UTC*
Summer
time
City / Country
HNL -10:00 h no Honolulu / USA
ANC -9:00 h yes Anchorage / USA
YVR -8:00 h yes Vancouver / Canada
LAX -8:00 h yes Los Angeles / USA
DEN -7:00 h yes Denver / USA
CHI -6:00 h yes Chicago / USA
MEX -6:00 h yes Mexico City / Mexico
NYC -5:00 h yes NewYork / USA
YYZ -5:00 h yes Toronto / Canada
YUL -5:00 h yes Montreal / Canada
CCS -4:30 h no Caracas / Venezuela
RIO -3:00 h yes Rio de Janeiro / Brazil
BUE -3:00 h no Buenos Aires / Argentina
UTC* 0:00 h no Universal Time Coordinated
LON 0:00 h yes London / Great Britain
BER +1:00 h yes Berlin / Germany
PAR +1:00 h yes Paris / France
ROM +1:00 h yes Rome / Italy
CAI +2:00 h yes Cairo / Egypt

SilverCrest SWDR 500 C2
22 - US-EN
IST +2:00 h yes Istanbul / Turkey
MOW +3:00 h yes Moscow / Russia
KWI +3:00 h no Kuwait City / Kuwait
DXB +4:00 h no Dubai / Saudi Arabia
KHI +5:00 h no Karachi / Pakistan
DAC +6:00 h yes Dhaka / Bangladesh
BKK +7:00h no Bangkok / Thailand
SIN +8:00 h no Singapore
HKG +8:00 h no Hong Kong
PEK +8:00 h no Beijing/China
SHA +8:00 h no Shanghai / China
TYO +9:00 h no Tokyo / Japan
SYD +10:00 h yes Sydney / Australia
NOU +11:00h no Noumea / New Caledonia
AKL +12:00h yes Auckland / New Zealand
*UTC: Universal Time Coordinated
UTC stands for ‘Universal Time Coordinated’ and also used to be called GMT
(Greenwich Mean Time). The different time zones are calculated based on
UTC, the coordinated universal time. The differences are shown in the second
table column.
To set the time zone, do the following:
In off mode, press the ‘SET/STORE’ button (9) until the screen (6) displays
‘US’ or ‘EU.’ Now briefly press the ‘SET/STORE’ button (9) again to get to
the time zone setting. The currently selected city code and below that the
corresponding local time are now displayed at the top of the screen (6). The
default setting is 'UTC'.

SilverCrest SWDR 500 C2
US-EN - 23
By pressing the ‘VOL-’ (12) or ‘VOL+’ (4) buttons, you can now set the city
code that is appropriate for your time zone, for example BER for Berlin. You
can find the appropriate city abbreviation in the table above. Changing the
city code also changes the displayed time.
After this, set the correct time, as described below.
8.4 Setting the Date/Time
8.4.1 Setting Automatically Via RBDS
Automatic time synchronization via RBDS is enabled on delivery. As soon as
the device receives an RBDS signal after it is switched on, the date and time
are synchronized and displayed correctly after a delay.
The multi-band radio is only set automatically if the selected station
transmits an RBDS signal and the reception quality is strong enough
to receive the RBDS signal. If an RBDS signal is received, the RBDS
indicator (28) appears on the display.
Time synchronization and correct time setting also depend directly on the
selected time zone. Setting the correct time zone first is therefore mandatory.
Please note the preceding section ‘Setting the Time Zone.’
8.4.2 Manual Setting
First deactivate automatic time synchronization via RBDS. With the radio
switched off, press the ‘MODE’ button (15) four times until ‘TS ON’ (automatic
time synchronization activated) is displayed at the top of the screen (6). Press
the ‘VOL-’ (12) or ‘VOL+’ (4) button to change the setting to ‘TS OFF’
(automatic time synchronization deactivated).
Now set the correct time zone.
The time can only be altered when the radio is switched off. If the device is on,
press the ‘POWER/SLEEP’ button (8) to switch it off.

SilverCrest SWDR 500 C2
24 - US-EN
If no buttons are pressed for about seven seconds during setup, the settings will
be accepted and the setup mode will be ended. You can hold down the ‘VOL-’
(12) or ‘VOL+’ (4) button to move more quickly through the numbers.
In off mode, press the ‘SET/STORE’ button (9) until the screen (6) displays
‘US’ or ‘EU.’ Now select your preferred date format with the ‘VOL-’ (12) or
‘VOL+’ button (4).
Example:
EU DD.MM.YYYY
US MM.DD.YYYY
Confirm your settings by pressing the ‘SET/STORE’ button (9).
Please note that this setting also changes the tuning resolution of the AM
frequency band.
Now set the correct time zone as described in the previous section and
confirm your setting by pressing the ‘SET/STORE’ button (9). The selected
time format flashes.
Now you can use the ‘VOL-’ (12) or ‘VOL+’ (4) buttons to set the time
format. The default setting is the 24-hour format. You can choose between
the 12-hour or 24-hour format. Confirm your setting by pressing the
‘SET/STORE’ button (9). The number for the hour flashes.
Now you can press the ‘VOL-’ (12) or ‘VOL+’ (4) button to set the hour.
Confirm your setting by pressing the ‘SET/STORE’ button (9). The number for
the minute flashes.
Now you can press the ‘VOL-’ (12) or ‘VOL+’ (4) button to set the minute.
Confirm your setting by pressing the ‘SET/STORE’ button (9). The number for
the year flashes.

SilverCrest SWDR 500 C2
US-EN - 25
Now set the correct year with the ‘VOL-’ (12) or ‘VOL+’ (4) button. Confirm
your setting by pressing the ‘SET/STORE’ button (9). The number for the
month flashes.
Now you can press the ‘VOL-’ (12) or ‘VOL+’ (4) button to set the month.
Confirm your setting by pressing the ‘SET/STORE’ button (9). The number for
the day flashes.
Now you can press the ‘VOL-’ (12) or ‘VOL+’ (4) button to set the day.
Confirm your setting by pressing the ‘SET/STORE’ button (9).
On the screen (6) you will also see the weekday (40) that coordinates with the
date that you set.
Indicator Weekday
MON Monday
TUE Tuesday
WED Wednesday
THU Thursday
FRI Friday
SAT Saturday
SUN Sunday
Set-up is now complete.
If you have chosen the 12-hour time format, the screen (6) will display the
‘PM’ icon (36) during the hours after midday.
The time must be adapted if you travel to another time zone.

SilverCrest SWDR 500 C2
26 - US-EN
8.5 Displaying World Time
Press the ‘DISPLAY’ button (5). The current time is displayed large on the screen
(6). You can have the current time for any time zone displayed in addition in
the upper section of the screen. Press the ‘TUNE-’ (13) or ‘TUNE+’ (11) button
to select the time zone for which you want the time to be displayed. Then the
selected time zone with the corresponding time is displayed above the current
time each time the ‘DISPLAY’ (5) button is pressed.
Please note that the time zone is only displayed here. To set the time zone,
follow the procedure described in the section ‘Setting the Time Zone.’
8.6 Functions of the ‘MODE’ Button
When switched off, you can use the ‘MODE’ button (15) to access the setup
mode for various functions:
Press once SDA special date alarm
Press twice NAP timer (timer for short periods)
Press three times Stopwatch
Press four times Time synchronization via RBDS ON/OFF
When the radio is on, the ‘MODE’ button (15) has the following functions
Press once Display and change the tuning resolution
Press twice • UKW (FM): Display and change the
setting ‘MONO’ and ‘AUTO-ST’
• KW (SW): Fast selection of the sub-bands
8.7 SDA Special Date Alarm
This functions gives you the option of setting up to ten annual special date
alarms. Proceed as follows:
When the radio is switched off, press the ‘MODE’ button (15) once. ‘SDA’ is
illuminated on the screen (6). The number 01 (for the first SDA) and the date
associated with it flash in the month.day format. If the alarm is not

SilverCrest SWDR 500 C2
US-EN - 27
activated, the ‘SDA’ icon (25) will also flash. An activated SDA will be
indicated by the ‘SDA’ icon (25) being displayed. In this scenario, the ‘SDA’
icon (25) will also be displayed when the device is being used as a clock.
Use the ‘VOL-’ (12) and ‘VOL+’ (4) buttons to set the date. You can hold
down the buttons to quickly scroll through the numbers.
Briefly press the ‘SET/STORE’ button (9) to activate or deactivate the SDA
that has been set up. Each SDA can be activated and deactivated
separately. The setting will be saved automatically.
Press the ‘TUNE-’ (13) or ‘TUNE+’ (11) buttons to program further SDAs.
The activated SDAs will now go off every year. If the current date corresponds
with the SDA alarm, a buzzer tone will go off every hour between 08:00 and
23:00 for about ten minutes. Current radio operation is not interrupted by an
SDA. The alarm goes off only after the user has stopped playback and the
minute display of the clock was incremented by ‘1.’
To end this alarm, press any button.
8.8 NAP Timer
You have the option of setting a timer for a short period (alarm sound only) for
a one-off occurrence. There are six preset times and you can choose between
them using the ‘TUNE-’ (13) and ‘TUNE+’ (11) buttons. The durations of the six
preset timers are all different: 10, 15, 20, 25, 30, and 35 minutes.
When the radio is switched off, press the ‘MODE’ button (15) twice. The
NAP timer icon (42) is displayed on the screen (6), along with the number of
the timer and the preset activation time in minutes.
Press the ‘TUNE-’ (13) or ‘TUNE+’ (11) button repeatedly to go through the
preset times.
You can use the ‘VOL-’ (12) or ‘VOL+’ (4) buttons to adapt these times to
your requirements, from 1 minute to 39 minutes.
To start the timer, briefly press the ‘SET/STORE’ button (9).

SilverCrest SWDR 500 C2
28 - US-EN
The screen (6) will now display the time counting down. When the timer
ends, an alarm will sound until it is switched off.
The NAP timer alarm can be switched off by pressing any button.
To deactivate the activated NAP timer before the time runs out, briefly press
the ‘SET/STORE’ button (9). Now the screen displays the remaining time of
the previously set timer. To restart the timer with the remaining time, briefly
press the ‘SET/STORE’ button (9) again.
Even while the timer is running, you can still change the run time with the
‘VOL-’ (12) or ‘VOL+’ (4) button.
Please note: Do not press any buttons other than ‘SET/STORE’ (9),
‘VOL-’ (12), or ‘VOL+’ (4) while the NAP timer is active. Otherwise
the NAP timer is ended.
8.9 Stopwatch
The stopwatch function can be used as follows:
When the device is switched off, press the ‘MODE’ button (15) three times.
The screen (6) will display the stopwatch icon (23) and ‘STOP,’ 00:00
(minutes:seconds), and also hundredths of a second at the top right.
Briefly press the ‘VOL+’ button (4) to start the stopwatch.
Briefly press the ‘VOL+’ button (4) again to stop the stopwatch.
Pressing the ‘VOL+’ button (4) again restarts the stopwatch, beginning with
the currently displayed time.
Briefly press the ‘VOL-’ button (12) to reset the stopwatch to 00:00.
While the stopwatch is running, the stopwatch time will be
displayed on the screen (6). When the stopwatch is reset to
00:00, the screen display switches back to the normal time after
about eight seconds.

SilverCrest SWDR 500 C2
US-EN - 29
8.10 Setting the AM Reception Range
Due to the various radio transmission systems in different countries, it is best to
adapt the tuning resolution and/or the reception range:
Region Frequency band range Tuning resolution
Europe 522 kHz – 1620 kHz 9 kHz
America 530 kHz – 1720 kHz 10 kHz
Proceed as follows:
In off mode, press the ‘SET/STORE’ button (9) until the screen (6) displays
‘US’ or ‘EU.’ Now select your reception region with the ‘VOL-’ (12) and
‘VOL+’ buttons. Please note that this setting also changes the date format.
8.11 Setting the Volume
By pressing the ‘VOL-’ (12) and ‘VOL+’ (4) buttons, you can change the
volume in accordance with your preferences. The settings range from a
minimum volume level of 00 to a maximum volume level of 16. The device
starts at the volume that it was at when last switched off.
8.12 Setting the Reception Sensitivity
This function only applies for FM and SW. If you wish to use the device in
normal mode, slide the ‘DX/LOCAL’ selection switch (22) to the ‘DX’ position.
If you only wish to receive stations with a high field strength, slide the
‘DX/LOCAL’ selection switch (22) to the ‘LOCAL’ position. This is
recommended if, for example, you wish to receive a weak local station that
stronger national stations are blocking out.
8.13 Activating Bass Boost
You have the option of boosting the playback of bass notes.
With the device switched on, press the ‘SNOOZE/BASS’ button (2). ‘BASS’
(31) will be displayed on the screen (6).
Press the ‘SNOOZE/BASS’ button (2) again to switch off the bass boost.
The ‘BASS’ display (31) turns off.

SilverCrest SWDR 500 C2
30 - US-EN
8.14 Choosing a Station
In order to achieve the best possible signal, pull out the telescopic aerial (1) to
its maximum length. The telescopic aerial (1) can be rotated. In this way, the
reception can be optimized.
8.15 Automatic Station Scanning With Auto-Store
Function
The most convenient way of searching for and saving stations is the automatic
station scanning function with automatic channel saving (auto-store function).
Switch the device on.
First choose the desired frequency band by pressing the ‘BAND’ button (7).
Press the ‘SET/STORE’ button (9) for about one second to start automatically
scanning for stations. Automatic station scanning always begins with the
lowest frequency.
The multi-band radio (A) will now scan the entire frequency range for
stations with a strong signal.
The first 100 stations found will be stored and saved directly in memory
positions P001 to P100.
When all 100 memory locations are full, the scanning will continue until
completion but no further stations will be saved. After station scanning is
complete, the station in memory position P001 will be played.
Please note that memory positions already in use will be
overwritten.
8.16 Manually Scanning for Stations
Switch the device on.
First choose the desired frequency band by pressing the ‘BAND’ button (7).
The shortwave band SW is divided into nine sub-bands, SW1 to
SW9 (see section titled 'Specifications'). To select individual sub-

SilverCrest SWDR 500 C2
US-EN - 31
bands, press the ‘MODE’ button (15) twice. ‘SW << >>’ is
displayed at the top of the screen. Use the ‘TUNE-’ (13) and
‘TUNE+’ (11) buttons to choose the desired sub-band. Then press
the ‘MODE’ button (15) again to continue scanning for stations.
To begin the search in the direction of your choice, press the ‘TUNE-’ (13) or
‘TUNE+’ (11) button for about one second. The search will stop at the next
station that is found and the frequency will be displayed on the screen (6).
8.17 Setting Stations Manually
Instead of using the station search, you also have the option of configuring
stations manually. This makes it possible to find weaker stations as well. To do
this, proceed as follows:
To increase or decrease the frequency by one increment, briefly press the
‘TUNE-’ (13) or ‘TUNE+’ (11) button. These increments vary depending on the
selected frequency band and tuning resolution. Also please note the following
section regarding the tuning resolution.
8.18 Fine-Tuning a Station
You have the option of refining the tuning resolution of the tuning controls
according to the following table, in the event that a station cannot be exactly
located.
To configure this, do the following:
When the radio is switched on, press the ‘MODE’ button (15) once.
The current frequency is displayed on the screen (6), with ‘STEP’ and the
current tuning resolution shown above that.
You can now use the ‘TUNE-’ (13) or ‘TUNE+’ (11) buttons to select set
tuning to normal or fine. The setting will be saved automatically.

SilverCrest SWDR 500 C2
32 - US-EN
Frequency range: Fine / normal tuning resolution
UKW (FM) 100 kHz / 50 kHz
MW (AM) EU* 9 kHz / 1 kHz
MW (AM) US* 10 kHz / 1 kHz
SW 5 kHz / 1 kHz
LW 9 kHz / 1 kHz
*With MW (AM), the tuning resolution depends on the date format (EU or US)
that was selected according to the section ‘Setting the Date/Time’.
8.19 Manually Saving Stations
It is possible to save 100 stations or frequencies per frequency band. To do
this, proceed as follows:
Find a station that you would like to save.
Briefly press the ‘SET/STORE’ button (9).
The previously chosen memory location flashes at the top of the screen (6).
Use the ‘M-/AL1’ (14) or ‘M+/AL2’ (10) buttons to choose the memory
location where you wish to store your station.
Press the ‘SET/STORE’ button (9) to finish saving.
Please note that memory positions already in use will be
overwritten.
8.20 Finding Stored Stations
To go to a station that you have previously saved, use the ‘M-/AL1’ (14) or
‘M+/AL2’ (10) buttons to choose the memory location in which your chosen
station is stored.
Please note:
The memory locations are not in use in the default setting. When a
memory location not in use is selected, the lowest frequency of the
chosen frequency band is played.

SilverCrest SWDR 500 C2
US-EN - 33
If a memory location is in use, the stored frequency is maintained
until it is overwritten by saving once again.
If the multi-band radio is not supplied with electricity, the time
settings are lost but any saved stations will be retained.
8.21 Playback in Stereo
Playback can only be in stereo quality when earphones are attached. When
this is the case, the ‘ST’ icon (30) appears on the screen (6).
Sometimes however the stereo signal is weak and there is noise. In ‘AUTO-ST’
mode, the multi-band radio automatically switches between ‘MONO’ and
‘STEREO’ depending on the reception quality.
One can also permanently set reception to ‘MONO’ manually. To do so, set
the radio to FM mode and press the ‘MODE’ button (15) twice, then use the
‘TUNE-’ (13) and ‘TUNE+’ (11) buttons to choose between the ‘MONO’ and
‘AUTO-ST’ settings. The chosen setting is retained until you change it again.
8.22 SLEEP Timer
With the SLEEP timer, you can set a time between ten and 90 minutes, after
which your multi-band radio (A) will automatically switch off. This can be set in
intervals of ten minutes. Proceed as follows:
Switch the device off with the ‘POWER/SLEEP’ button (8).
Hold down the ‘POWER/SLEEP’ button (8) for about one second. The multi-
band radio (A) now switches on and the number 90 (for 90 minutes) and
the ‘SLEEP’ symbol (32) flash on the screen (6).
Now press the ‘POWER/SLEEP’ button (8) until the desired number of
minutes (40 for example) has been reached. Each time the ‘POWER/SLEEP’
button (8) is pressed, the duration until the radio switches off is reduced by
ten minutes.

SilverCrest SWDR 500 C2
34 - US-EN
The multi-band radio (A) automatically switches off after the selected number
of minutes (40 for example) has elapsed.
The SLEEP icon (32) is visible on the screen (6) when the SLEEP timer is
activated.
While the SLEEP timer is activated you can still change the frequency band,
begin scanning for stations, access saved stations and set the volume.
You can cancel the activated SLEEP timer by switching off the device.
8.23 Setting the Alarm Time
It is possible to set two alarm times (AL1 and AL2). Ensure that the clock has
been set to the correct time. The alarm time can only be altered when the radio
is switched off. If the device is on, press the ‘POWER/SLEEP’ button (8) to
switch it off.
Below is a description of how to set up AL1. AL2 can be set in the same way. If
no buttons are pressed for about eight seconds during setup, the settings will
be accepted and the setup mode will be ended.
Press the ‘M-/AL1’ button (14) for about one second. The time in hours will
flash on the screen (6).
Now use the ‘VOL-’ (12) and ‘VOL+’ (4) buttons to set the desired hour for
the alarm. You can also hold down the buttons to move more quickly through
the numbers. To accept the setting, briefly press on the ‘M-/AL1’ button (14).
The minute indicator will flash on the display (6).
Now use the ‘VOL-’ (12) and ‘VOL+’ (4) buttons to set the desired minute for
the alarm. You can also hold down the buttons to move more quickly through
the numbers. To accept the setting, briefly press on the ‘M-/AL1’ button (14).
Now you can use the ‘VOL-’ (12) and ‘VOL+’ (4) buttons to choose if you
want to be woken with ‘bUZZ’ (buzzer) or ‘rdA’ (radio). Confirm your
selection by pressing the ‘M-/AL1’ button (14).
Now you can use the ‘VOL-’ (12) and ‘VOL+’ (4) buttons to set the alarm
volume. To accept the setting, briefly press on the ‘M-/AL1’ button (14).

SilverCrest SWDR 500 C2
US-EN - 35
Finally you can choose which weekdays the alarm time should apply to. You
can use the ‘VOL-’ (12) and ‘VOL+’ (4) buttons to choose from the following
alternatives in sequence:
Individual weekdays
Weekdays from Monday to Friday
Weekends Saturday and Sunday
All weekdays
To accept the setting, briefly press on the ‘M-/AL1’ button (14).
The alarm time has now been set.
8.24 Activating the Alarm
Below is a description of how to set up AL1. The same procedure applies to
AL2.
When you have set the alarm time, you can activate the alarm function as
follows:
When the radio is switched off, briefly press the ‘M-/AL1’ button (14) once
to display the alarm setting on the screen (6).
Briefly press the ‘M-/AL1’ button (14) a second time to activate the buzzer
alarm. The screen (6) shows the associated icon (33).
Briefly press the ‘M-/AL1’ button (14) for a third time to activate the radio
alarm. The screen (6) shows the associated icon (34).
Please note that earphones must not be connected when using the
radio alarm. When earphones are connected, the alarm tone
(radio or buzzer) is output only through them.
At the time the alarm was set for, the device will switch on automatically, at
the same frequency that it was last tuned to and in the same frequency band.
However, if you chose the buzzer alarm setting, you will be woken up by this
instead.

SilverCrest SWDR 500 C2
36 - US-EN
The alarm tone starts quietly and gradually becomes louder until it
reaches the selected alarm volume.
Press any button to switch off the alarm sound, or press the
‘SNOOZE/BASS’ button (2) to delay the alarm for about five more minutes.
The alarm icon (33, 34) flashes. Once the five minute snooze period if over,
the alarm sound will switch on again. If you briefly press any button during
the five minute snooze period, the SNOOZE function will be deactivated but
the alarm function will remain activated.
The default setting for the snooze time is five minutes. You can
increase the snooze time up to 120 minutes, according to your
preference. To do this, hold down the ‘SNOOZE/BASS’ button (2)
for about one second when the radio is switched off. The current
snooze time setting will be displayed on the screen (6). You can
use the ‘VOL-’ (12) and ‘VOL+’ (4) buttons to change the snooze
time. You can also hold down the buttons to move more quickly
through the numbers. To accept the setting, briefly press on the
‘SNOOZE/BASS’ button (2).
To deactivate the alarm, keep pressing the ‘M-/AL1’ button (14) until the
alarm icon (33, 34) is no longer displayed on the screen (6).
You can still use the device as normal when the alarm function is
activated. Please note:
• Radio alarm:
The automatic alarm will turn the radio on at the same
frequency that it was last tuned to and in the same frequency
band.

SilverCrest SWDR 500 C2
US-EN - 37
• Buzzer alarm:
The alarm tone begins very quietly and keeps getting louder
until the configured volume is reached.
8.25 Activating/Deactivating the Button Lock
Press the ‘LOCK’ button (3) for about one second to activate the button lock on
the multi-band radio. The ‘LOCK’ icon (35) will now flash on the screen (6).
Any further actions require the button lock to be deactivated again by pressing
and holding the ‘LOCK’ button (3) again for about one second. The ‘LOCK’
icon (35) will no longer be flashing on the screen (6).
Please note that when the button lock is activated, an alarm cannot be turned
off or snoozed either.
8.26 Connecting Earphones
Take care when using earphones. Listening at full
volume for prolonged periods can damage the user’s
hearing.
You may connect earphones with a 3.5 mm phone jack via the earphone jack
(21). When the earphones are connected, the loudspeaker (16) is
automatically switched off.
8.27 Storing the Device When Not in Use
If you will not be using the device for a prolonged period of time,
remove any batteries that you may have inserted.
Keep the device in a cool, dry place.

SilverCrest SWDR 500 C2
38 - US-EN
9. Troubleshooting
The device will not switch on
• Check that the power adapter is connected.
• If you have inserted batteries, these may be empty; replace with new
batteries.
• Check that the batteries are inserted with the correct polarity. Observe the
marking on the battery housing and on the batteries. See also the section
titled ‘Inserting the batteries.’
• Check whether the button lock is activated. If so, press the ‘LOCK’ button
(3) for about one second in order to deactivate the button lock.
No radio reception, poor radio reception
• Pull out the telescopic aerial (1) as far as it will go and ensure it is
correctly oriented.
• Configure the station correctly. It may be necessary to start a new search.
• Check that the ‘DX/LOCAL’ selection switch (22) is in the correct position.
See also the section titled ‘Setting the reception sensitivity.’
The station name is not displayed
• This feature is only supported in FM mode.
• The chosen station is not transmitting an RBDS signal, or reception is too
poor to receive the RBDS signal. Try changing the antenna position to
improve the reception.
No sound despite the device being switched on
• Check the volume settings.
• If earphones are connected, the in-built loudspeaker (16) is switched off.
No alarm tone, or not loud enough
• Check the alarm tone volume in the alarm settings and turn it up if needed.
I cannot use the controls on the device
• Check whether the button lock is activated.

SilverCrest SWDR 500 C2
US-EN - 39
10. Environmental information and disposal
Disposal of Packaging
Sort the packaging prior to disposal. Dispose of the packaging with
the local utility company.
Disposal of Used Devices
Do not dispose of used devices together with household waste! If at
any time in the future you should not use this device anymore, please
dispose of it in compliance with the applicable regulations in your
state or country. This ensures professional recycling of used devices
and excludes negative consequences for the environment.
Make sure that the disposal is in compliance with local regulations
and EPA recommendations (www.epa.gov).
Questions?
• Call customer service at 1 (844) 543-5872
• Visit the Website Customer Service Platform at www.lidl.com/contact-us
11. FCC hints
This device complies with the FCC Rules. Operation is subject to the following
two conditions:
(1) this device may not cause harmful interference, and
(2) this device must accept any interference received, including interference
that may cause undesired operation.
Please note that changes or modifications not expressly approved by the party
responsible for compliance could void the user´s authority to operate the
equipment.

SilverCrest SWDR 500 C2
40 - US-EN
12. Warranty
3 years limited warranty
What does this warranty cover?
The warranty covers:
• Damage, breakage or inoperability due to defect.
• Damage not caused by normal wear and tear or failure to follow the
safety and maintenance instructions provided in the user manual.
What is not covered by the warranty?
The warranty does not cover damage caused by:
• Normal wear and tear of the product, including fragile parts (such as
switches, glass, etc.);
• Improper use or transport;
• Disregarding safety and maintenance instructions;
• Accidents or acts of nature (e.g. lightning, fire, water, etc.);
• Tampering with the product (such as removing cover, unscrewing screws
etc.)
Consequential and incidental damages are also not covered under this
warranty. However, some states do not allow the exclusion or limitation of
incidental or consequential damages, so this limitation or exclusion may not
apply to you.
What is the period of coverage and warranty resolution?
The warranty is for 3 years from the date of purchase. At our discretion,
product will either be refunded or replaced.
What will we not do?
We will not:
• Start a new warranty period upon product exchange;
• Repair product.

SilverCrest SWDR 500 C2
US-EN - 41
How to process the warranty?
To initiate, please:
• Call customer service at 1 (844) 543-5872
• Visit the Website Customer Service Platform at www.lidl.com/contact-us
or
• Visit a LIDL store for further assistance
To ensure the quickest warranty return process, please have the following
available:
• The original sales receipt that includes the date purchased;
• The product and manual in the original package;
• A statement of the problem.
What must you do to keep the warranty in effect?
• Retain the original receipt;
• Follow all product instructions;
• Do not repair or modify the product.
How does state law relate to this warranty?
This warranty gives you specific legal rights, and you may also have other
rights which vary from state to state. All implied warranties are limited by the
duration and terms of this warranty. Some states do not allow limitations on
how long an implied warranty lasts, so the above limitation may not apply to
you.
Country of origin: China

SilverCrest SWDR 500 C2
42 - US-ES
Índice
1. Información general ........................................................... 44
1.1. Lea y conserve las instrucciones de uso .................................................. 44
1.2. Explicación de los símbolos usados ........................................................ 44
2. Seguridad ........................................................................... 45
2.1. Uso previsto ............................................................................................... 45
2.2. Instrucciones de seguridad ...................................................................... 45
3. Material incluido ................................................................. 53
4. Información técnica ............................................................ 54
5. Copyright ........................................................................... 55
6. Resumen de los elementos de control y las funciones de los
botones .................................................................................. 56
6.1 Indicadores de la pantalla ........................................................................ 58
6.2 Pie de soporte ............................................................................................ 59
7. Antes de poner en funcionamiento el aparato .................... 59
7.1 Funcionamiento con alimentador y con baterías .................................... 60
7.2 Colocar las baterías .................................................................................. 60
7.3 Conectar el alimentador ........................................................................... 61
8. Puesta en funcionamiento................................................... 61
8.1 Iluminación de la pantalla ........................................................................ 61
8.2 Encender y apagar el aparato ................................................................. 61
8.3 Definir la zona horaria .............................................................................. 62
8.4 Configurar la fecha y hora ....................................................................... 64
8.4.1 Configuración automática por RBDS ............................................... 64
8.4.2 Configuración manual ....................................................................... 65
8.5 Indicadores de hora mundial .................................................................... 67
8.6 Funciones del botón «MODE».................................................................. 68
8.7 SDA (alarma especial de fecha) .............................................................. 68
8.8 Temporizador corto ................................................................................... 69
8.9 Cronómetro ................................................................................................ 70
8.10 Configurar el rango de frecuencias de AM .......................................... 71

SilverCrest SWDR 500 C2
US-ES - 43
8.11 Ajustar el volumen ................................................................................... 71
8.12 Definir la sensibilidad de recepción ...................................................... 71
8.13 Activar la amplificación de graves ........................................................ 72
8.14 Seleccionar una emisora ........................................................................ 72
8.15 Búsqueda automática de emisoras con la función Auto-Store ............ 72
8.16 Búsqueda manual de emisoras .............................................................. 73
8.17 Sintonización manual de emisoras ........................................................ 73
8.18 Sintonización precisa de emisoras ........................................................ 74
8.19 Guardar emisoras manualmente............................................................ 74
8.20 Acceder a emisoras guardadas ............................................................. 75
8.21 Reproducción en estéreo ........................................................................ 75
8.22 Temporizador de apagado automático (SLEEP) .................................. 76
8.23 Configurar la hora del despertador (alarma) ....................................... 77
8.24 Activar la función de despertador ......................................................... 78
8.25 Activar y desactivar el bloqueo de los botones .................................... 80
8.26 Conectar los auriculares ......................................................................... 80
8.27 Almacenamiento cuando no se utiliza................................................... 81
9. Solución de problemas ....................................................... 81
10. Información medioambiental y eliminación ...................... 83
11. Indicaciones de la FCC ....................................................... 83
12. Garantía ........................................................................... 84

SilverCrest SWDR 500 C2
44 - US-ES
1. Información general
1.1. Lea y conserve las instrucciones de uso
Este instructivo de uso contiene información importante
relacionada con el uso seguro del radio multibanda, así como
detalles sobre su uso cotidiano y su eliminación. Familiarícese
con el instructivo de uso, ponga atención especial a las
instrucciones de seguridad antes de usar el radio multibanda, y úselo solo
para las áreas de aplicación y los fines descritos. Si cede el radio multibanda
o lo vende, asegúrese de ceder también el instructivo de uso. Es parte del
producto.
1.2. Explicación de los símbolos usados
Los siguientes símbolos y palabras claves se usan en este instructivo de uso, en
el radio multibanda o en el empaque.
Este símbolo / palabra clave indica peligro con un alto nivel de riesgo que, de
no evitarse, podría resultar en una lesión grave o incluso la muerte.
Este símbolo/palabra clave indica peligro con un nivel medio de riesgo que,
de no evitarse, podría ocasionar una lesión grave o incluso la muerte.
Este símbolo/palabra clave indica peligro con un nivel bajo de riesgo que, de
no evitarse, podría ocasionar una lesión menor o moderada.
Esta palabra clave advierte sobre un posible daño material.

SilverCrest SWDR 500 C2
US-ES - 45
Este símbolo indica mayor información sobre el manejo y
el uso.
Tenga cuidado al usar auriculares. Escuchar a un volumen
alto durante periodos prolongados puede dañar la
audición del usuario.
2. Seguridad
2.1. Uso previsto
Este es un aparato eléctrico para entretenimiento, diseñado para recibir y
reproducir emisoras de radio. El aparato también puede ser usado como reloj
y reloj con alarma. Solo puede ser usado con fines privados y no está
diseñado para uso industrial o comercial. El aparato tampoco puede ser
usado en climas tropicales. El fabricante no se hace responsable por daños o
fallas derivados de una modificación no autorizada al aparato. Use solo los
accesorios especificados por el fabricante. Siga los reglamentos nacionales o
las leyes del país en el que se usa el aparato.
Tenga en cuanta que las leyes nacionales en distintos países varían en cuanto
a los rangos de frecuencias que puede recibir de forma legal. La información
recibida fuera de estos rangos permitidos de frecuencias no puede ser
utilizada y su contenido o la información no pueden ser divulgados a terceros.
2.2. Instrucciones de seguridad
MEDIDAS DE SEGURIDAD
IMPORTANTES
Al usar aparatos eléctricos, siempre se deberán seguir las precauciones
básicas de seguridad, incluyendo las siguientes:

SilverCrest SWDR 500 C2
46 - US-ES
1. Lea todas las instrucciones.
2. A fin de evitar el riesgo de descarga eléctrica, no sumerja el aparato en
agua u otros líquidos.
3. Se necesita supervisión cercana cuando los niños utilicen el aparato o se
utilice cerca de ellos.
4. Desconéctelo cuando no lo use, antes de colocar o remover partes, así
como antes de limpiarlo.
5. Evite tocar las partes en movimiento.
6. No utilice el aparato si el cable o el enchufe están dañados, o después de
que el aparato funcione incorrectamente, o si se cae o se daña de alguna
forma. Regrese el aparato al servicio de mantenimiento autorizado más
cercano para su inspección, reparación o ajuste eléctrico o mecánico.
7. El uso de accesorios no recomendados o vendidos por el fabricante puede
provocar incendios, descargas eléctricas o lesiones.
8. No deje que el cable cuelgue sobre el borde de la mesa o la barra.
9. No deje que el cable entre en contacto con una superficie caliente, como
una estufa.
CONSERVE ESTAS INSTRUCCIONES
Para uso doméstico únicamente.
Alimentador
Enchufe el alimentador solamente en un enchufe adecuado y de fácil acceso
en todo momento. No toque nunca el alimentador con las manos mojadas.
Existe riesgo de descarga eléctrica. Desenchufe el alimentador de la corriente
eléctrica en los siguientes casos:
• Si existe una situación de peligro.
• Si el alimentador emite ruidos inusuales o sale humo de él.

SilverCrest SWDR 500 C2
US-ES - 47
• En caso de tormenta eléctrica.
• Si el alimentador está dañado.
• Si el alimentador ha estado en contacto con lluvia, líquidos o humedad
elevada.
• Cuando lo vaya a limpiar.
• En el modo de espera, el alimentador también consume electricidad, de
modo que para que no esté sometido a corriente eléctrica es necesario
desenchufar el alimentador.
Observe estas instrucciones para evitar peligro de muerte y de incendio. El
alimentador nunca se debe cubrir (peligro de incendio). No intente nunca
abrir la carcasa del alimentador. Existe peligro de muerte por descarga
eléctrica.
Cable
Tome todos los cables por el enchufe y no jale del cable. No ponga muebles
ni objetos pesados encima de los cables y asegúrese de que no se doblen,
especialmente por el punto en el que se unen al enchufe y a los conectores.
No tienda cables sobre puntos y bordes calientes o afilados para evitar
posibles daños. No haga nunca nudos en los cables y no los ate a otros
cables. Todos los cables deberán tenderse de manera que nadie los pise y
que no estorben.
Pantalla
No ejerza presión sobre la pantalla y mantenga cualquier objeto puntiagudo
lejos de la misma. Si la pantalla está rota, existe peligro de lesiones. Póngase
guantes cuando recoja las piezas rotas y, en caso necesario, póngase en
contacto con el fabricante. En caso de arañazos o daños en la pantalla, vigile
con atención que el líquido de la pantalla no fluya hacia el exterior.

SilverCrest SWDR 500 C2
48 - US-ES
En caso de salir líquido, siga las siguientes indicaciones:
•
Si el líquido toca la piel, lávela con un trapo limpio y enjuáguela con
agua abundante. En caso necesario, póngase en contacto con un
médico.
•
Si el líquido entra en contacto con los ojos, enjuáguelos bajo agua
corriente como mínimo durante 15 minutos. Vaya inmediatamente al
médico.
•
En caso de ingerir el líquido, enjuáguese primero la boca con agua y, a
continuación, beba agua abundante. Póngase en contacto con un
médico inmediatamente.
Escuchar a un volumen elevado puede ser peligroso
Tenga cuidado al usar auriculares. Escuchar a un volumen
alto durante periodos prolongados puede dañar la audición
del usuario.
No use los auriculares a un volumen elevado. Esto puede poner en riesgo su
audición y puede molestar a las personas a su alrededor. Si bien el aparato
está configurado de forma que usted pueda seguir atento a los ruidos
ambientales, ponga el volumen de manera que pueda seguir escuchando los
sonidos a su alrededor.
En situaciones peligrosas, p. ej., su uso en la vía pública, al trabajar con
maquinas u otras situaciones que requieran su atención plena, el ruido puede

SilverCrest SWDR 500 C2
US-ES - 49
afectar negativamente su concentración o disminuir su atención a lo que está
sucediendo a su alrededor. En situaciones como estas no use el aparato.
Entorno de uso
El aparato no está diseñado para usarse en habitaciones con temperatura o
humedad altas (por ejemplo, un baño), o polvo excesivo. Temperatura y
humedad de uso: 41 °F – 95 °F (5 °C a 35 °C), 85 por ciento máximo de
humedad relativa.
Asegúrese de lo siguiente:
que haya siempre una ventilación adecuada (no coloque el aparato sobre
una repisa, una alfombra, una cama o en algún lugar donde queden
cubiertas las ranuras de ventilación; deje una distancia libre de al menos 4
in/10 cm a cada lado).
evite el contacto con salpicaduras o gotas de agua y líquidos agresivos, y
que el aparato no se use cerca del agua. Es de particular importancia que
el aparato nunca se sumerja y que no se coloquen sobre el aparato o cerca
de él objetos con líquidos, por ejemplo, floreros o bebidas.
que no haya llamas abiertas (por ejemplo, velas encendidas) sobre el
aparato o cerca de él.
no permita que entren objetos extraños en el aparato.
el aparato no debe exponerse fluctuaciones excesivas de temperatura, ya
que se puede generar condensación y provocar cortocircuitos. Sin embargo,
si el aparato se ha expuesto a fluctuaciones grandes de temperatura, espere
aproximadamente dos horas hasta que el aparato haya alcanzado
temperatura ambiente antes de encenderlo.
el aparato y el alimentador no se deben utilizar cuando haya tormenta
eléctrica. En caso de tormenta eléctrica, desenchufe el alimentador.

SilverCrest SWDR 500 C2
50 - US-ES
Si se utiliza el alimentador, el enchufe utilizado debe ser accesible en todo
momento. Coloque el cable de alimentación de manera que nadie pueda
tropezar con él.
Asegúrese de lo siguiente:
el aparato no debe exponerse a fuentes directas de calor (por ejemplo,
calefactores).
el aparato no debe exponerse a luz solar directa o luz artificial intensa.
no coloque el aparato cerca de campos magnéticos (por ejemplo, bocinas).
no exponga el aparato a golpes ni vibraciones excesivas.
Peligro para niños y personas con capacidades físicas,
sensoriales o mentales reducidas (por ejemplo, discapacitados,
personas mayores con capacidades físicas y mentales
limitadas), o sin la experiencia y el conocimiento necesarios
(por ejemplo, niños mayores).
No permita que los niños menores de catorce años usen este radio
multibanda.
El radio multibanda puede ser usado por personas con capacidades físicas,
sensoriales o mentales reducidas, o sin experiencia o conocimiento, siempre
y cuando hayan sido instruidas acerca del uso seguro del aparato y
comprendan los peligros implícitos.
Se requiere una gran atención cuando los niños utilicen el radio multibanda
o se utilice cerca de ellos, o de personas con capacidades físicas,
sensoriales o mentales limitadas o discapacidades.
Mantenga el plástico del empaque alejado de los niños. Existe riesgo de
asfixia.

SilverCrest SWDR 500 C2
US-ES - 51
Por ningún motivo sumerja el radio multibanda en agua ni lo coloque
debajo del chorro de agua.
En caso de que la batería chorree, retire las baterías para evitar dañar el
radio multibanda. Puede eliminar el líquido chorreado de la batería con un
trapo seco y absorbente. ¡Use guantes de protección! Evite el contacto con
la piel. En caso de contacto con los ojos, enjuáguelos inmediatamente con
agua abundante y busque ayuda médica.
Asegúrese siempre de instalar las baterías correctamente, tomando en
cuenta las marcas «+» y «-» en la batería y en el aparato.
Siempre reemplace el juego completo de baterías a la vez, asegurándose
de no mezclar baterías viejas y nuevas, o de distintos tipos.
Retire las baterías agotadas del equipo para evitar posibles daños por
fugas.
Nunca elimine las baterías en el fuego, excepto en condiciones de
incineración controlada. (De lo contrario, se puede provocar una explosión.)
Nunca intente recargas las baterías primarias, ya que esto puede provocar
que se chorreen, un incendio o una explosión.
Nunca haga cortocircuito en las baterías, ya que esto puede provocar
sobrecalentamiento, fugas o explosión.
Nunca caliente las baterías para revivirlas.
Nunca intente desensamblar o abrir las baterías, ya que esto puede
provocar quemaduras con el electrolito.
Mantenga las baterías fuera del alcance de los niños, en especial las
conexiones dentro de los límites del cilindro trunco, como se define en la
figura 1.

SilverCrest SWDR 500 C2
52 - US-ES
Figura 1:
dimensiones internas
en milímetros (mm)
Busque atención médica inmediata si traga una celda o una batería. De igual
forma, póngase en contacto con el centro local para intoxicaciones.
Reparaciones/mantenimiento/limpieza
Es necesario reparar el aparato si se ha dañado, por ejemplo, si el
alimentador o la carcasa están dañados, si entraron líquidos u objetos en el
aparato o si ha sido expuesto a la lluvia o la humedad. También es necesario
reparar el aparato si no funciona correctamente o se ha dejado caer. Si
detecta humo, ruidos u olores inusuales, apague aparato inmediatamente,
retire las baterías y desconecte el alimentador de la toma de corriente. En
estos casos, debe dejar de usar el aparato hasta que lo revise un especialista.
Todos los trabajos de reparación los debe llevar a cabo un técnico
debidamente cualificado. Nunca abra la carcasa del aparato. Limpie el
aparato solo con un trapo limpio y seco, y nunca use líquidos abrasivos. No
intente abrir la carcasa del aparato, ya que esto anulará la garantía.
En caso de fugas en la batería, un especialista debe limpiar el aparato.

SilverCrest SWDR 500 C2
US-ES - 53
3. Material incluido
Saque el aparato y todos los accesorios del embalaje. Retire todos los
materiales de empaque y compruebe que todas las piezas se hallen íntegras y
no presenten daños. Si su material presenta daños o no está completo,
póngase en contacto con el fabricante.
A Radio multibanda SWDR 500 C2
B Alimentador
C Estas instrucciones (símbolo)

SilverCrest SWDR 500 C2
54 - US-ES
4. Información técnica
Esta información solo describe las capacidades técnicas de este
aparato. Las leyes acerca de los rangos de frecuencias que
puede recibir de forma legal pueden variar en distintos países.
Tenga en cuenta que es ilegal recibir emisoras fuera del alcance
de estas leyes y puede generar penas.
Radio multibanda
Alimentación eléctrica • Alimentador suministrado:
• opcionalmente con 4 baterías AA de
1.5 V (Mignon, LR6)
Consumo Al funcionar como radio: 0.7 W aprox.
En modo de espera: < 0.2 W
Potencia de salida de audio 500 mW
Bandas de frecuencias
Tenga en cuenta que los valores
inferior y superior de la banda
indicados pueden variar
mínimamente debido a las
tolerancias de fabricación.
FM 87.9 - 107.9 MHz
MW 530 - 1720 KHz
SW1 4.75 – 5.94 MHz
SW2 5.95 – 7.09 MHz
SW3 7.10 – 9.49 MHz
SW4 9.50 – 11.64 MHz
SW5 11.65 – 13.59 MHz
SW6 13.60 – 15.09 MHz
SW7 15.10 – 17.49 MHz
SW8 17.50 – 21.44 MHz
SW9 21.45 – 21.85 MHz
LW 153 - 279 KHz
Memorias para emisoras 400 (100 por banda de frecuencias)
Dimensiones (An x Pr x Al) aprox. 7.0 x 1.6 x 4.3 pulgadas/
17.7 x 4.1 x 11 cm

SilverCrest SWDR 500 C2
US-ES - 55
Peso aprox. 10 oz./285 g (sin baterías)
Tensión máxima de salida en
la toma de auriculares aprox. 120 mV
Duración de las baterías aprox. 28 horas
Temperatura de uso 41 °F – 95 °F/5 °C a 35 °C
Condiciones de
almacenamiento
14 °F – 122 °F/-10 °C a 50 °C
Tenga en cuenta lo siguiente: El aparato
no se debe almacenar en lugares
calientes (por ejemplo, dentro de
vehículos en verano).
Humedad de uso: máximo 85 % de humedad relativa
Alimentador
Fabricante DONGGUANG OBELIEVE
ELECTRONIC CO.,LTD
Tipo OBL-0590600U
Tensión/corriente/frecuencia
de entrada
100-240 V , 50/60 Hz / 0.3 A MAX
Tensión/corriente de salida 5.9 V / 600 mA ,
Los datos técnicos y el diseño pueden ser modificados sin previo aviso.
5. Copyright
Todo el contenido de este manual de operaciones está sujeto a las leyes de
derechos de autor, y se proporcionan al usuario solo como fuente de
información.
Se prohíbe cualquier forma de copia o reproducción de los datos y la
información sin la autorización por escrito del autor. Esto también es válido
para el uso comercial del contenido y los datos.
El texto y las ilustraciones corresponden con los estándares técnicos al
momento de impresión.

SilverCrest SWDR 500 C2
56 - US-ES
6. Resumen de los elementos de control y las
funciones de los botones
Estas instrucciones de uso cuentan, además, con una cubierta desplegable.
Despliegue la contraportada de manera que pueda tener los elementos de
control siempre a la vista.

SilverCrest SWDR 500 C2
US-ES - 57
1 Antena telescópica
2 Botón SNOOZE/BASS (posponer el despertador de 5 a 120
minutos / amplificar los graves)
3 Botón LOCK (bloqueo de botones)
4 Botón VOL + (subir el volumen)
5 Botón DISPLAY (ver la zona horaria)
6 Pantalla
7 Botón BAND (seleccionar la banda de frecuencias)
8 Botón POWER/SLEEP (encender/apagar; configurar el
temporizador de apagado automático)
9 Botón SET/STORE (configurar la hora, guardar emisoras)
10 Botón M+/AL2 (ir a la siguiente memoria, alarma 2)
11 Botón TUNE+ (buscar emisoras hacia delante, configuración de
minutos +)
12 Botón VOL - (bajar el volumen)
13 Botón TUNE- (buscar emisoras hacia atrás, configuración de
minutos -)
14 Botón M- / AL1 (ir a la memoria anterior, alarma 1)
15 Botón MODE
16 Altavoz
17 Correa
18 Pie de soporte (en la parte posterior)
19 Compartimento de las baterías (en la parte posterior)
20 (toma de alimentador opcional)
21 (conexión de auriculares)
22 Selector DX/LOCAL (definir la sensibilidad de recepción)

SilverCrest SWDR 500 C2
58 - US-ES
6.1 Indicadores de la pantalla
23 Cronómetro
24 CIUDAD
25 SDA (alarma especial de fecha)
26 VOLUME (volumen)
27 MEM (memoria)
28 RBDS (Sistema de datos de radio)
29 Indicadores varios: nombre de la emisora, fecha, número de
memoria
30 ST (estéreo, solamente con auriculares)
31 BASS (amplificación de graves activada)
32 SLEEP (función de apagado automático)
33 Alarma 1/2 activada (señal sonora)
34 Alarma 1/2 activada (radio)
35 LOCK (bloqueo de botones)
36 Indicador para horas de tarde
37 Unidad de frecuencia
38 Indicador de batería baja

SilverCrest SWDR 500 C2
US-ES - 59
39 Indicador de hora/frecuencia
40 Indicador de día de la semana
41 Banda de frecuencias
42 Temporizador corto
6.2 Pie de soporte
En la parte posterior del aparato hay un pie de soporte (18) con el que se
puede colocar el radio multibanda de manera oblicua. Despliegue el pie de
soporte (18).
7. Antes de poner en funcionamiento el aparato
Puede utilizar el aparato con el alimentador suministrado (B) o con 4 baterías
de tipo AA (Mignon, LR6). Baterías no incluidas.

SilverCrest SWDR 500 C2
60 - US-ES
7.1 Funcionamiento con alimentador y con baterías
Cuando el radio multibanda no está conectado a la corriente, se pierden
algunas configuraciones (hora y hora del despertador). Para evitarlo, póngale
baterías antes de desenchufarlo de la corriente. De este modo, no perderá las
configuraciones mencionadas.
Las emisoras de radio guardadas no se pierden en caso de desenchufar el
radio sin haber colocado las baterías.
7.2 Colocar las baterías
Abra el compartimento para las baterías (19) en la parte posterior del aparato
deslizando hacia abajo la tapa del compartimento en dirección de la flecha y
retirándola. Coloque las baterías con los polos correctamente orientados
(tenga en cuenta los símbolos + y -), tal como se muestra en la imagen inferior.
El polo de las baterías viene indicado como símbolo en las propias pilas y en
el compartimento para las mismas. Vuelva a colocar la tapa del
compartimento de las baterías (19) y deslícela hacia arriba hasta que encaje.
Si en la pantalla (6) ve el indicador de batería baja (38), significa que las
baterías están casi agotadas. Cámbielas por otras baterías nuevas del mismo
tipo.

SilverCrest SWDR 500 C2
US-ES - 61
Extraiga las baterías cuando no vaya a utilizar el aparato
durante un periodo de tiempo prolongado. Las baterías
podrían perder líquido y dañar el aparato.
7.3 Conectar el alimentador
Conecte el conector del alimentador (B) en la toma (20) del radio multibanda
(A). A continuación, conecte el alimentador (B) a un enchufe de fácil acceso.
Cuando el alimentador (B) está enchufado, el aparato funcionará
exclusivamente con la corriente proporcionada por el mismo, nunca con las
baterías que pueda haber colocado. En caso de utilizar el aparato con
alimentador (B) durante un período prolongado, debería extraer las baterías
colocadas para evitar pérdidas de líquido.
8. Puesta en funcionamiento
8.1 Iluminación de la pantalla
Cada vez que presione un botón, la pantalla se iluminará durante unos 10
segundos y luego volverá a apagarse.
8.2 Encender y apagar el aparato
Para encender el aparato, presione brevemente el botón «POWER/SLEEP» (8)
una vez. Cuando el radio está encendido, la pantalla (6) muestra la
frecuencia sintonizada, la banda de frecuencias y el día de la semana:
FM Frecuencia modulada
MW Onda media
SW Onda corta
LW Onda larga
Además, en la banda de frecuencias FM, la pantalla muestra el nombre de la
emisora actualmente sintonizada (siempre que la emisora transmita el

SilverCrest SWDR 500 C2
62 - US-ES
nombre). Si una emisora no transmite el nombre o si la recepción no es buena,
en lugar del nombre se mostrará la fecha actual.
En las bandas de frecuencias MW, SW y LW, siempre se mostrará la fecha
actual en este lugar.
Para apagar el aparato, presione de nuevo brevemente el botón
«POWER/SLEEP» (8). Cuando el radio está apagado, la pantalla (6) muestra
la fecha, la hora y el día de la semana.
Recomendamos empezar a programar el radio multibanda
definiendo la zona horaria. Para ello, consulte la sección siguiente,
«Definir la zona horaria».
8.3 Definir la zona horaria
La siguiente tabla le ofrece un resumen de las abreviaturas de ciudades de
cada zona horaria. Además, en la tabla también podrá ver las diferencias
horarias y la aplicación o no del horario de verano.
Abreviatura Diferencia
respecto
a UTC*
Horario
de
verano
Ciudad/país
HNL -10:00 h no Honolulu/EE. UU.
ANC -9:00 h sí Anchorage/EE. UU.
YVR -8:00 h sí Vancouver/Canadá
LAX -8:00 h sí Los Ángeles/EE. UU.
DEN -7:00 h sí Denver/EE. UU.
CHI -6:00 h sí Chicago/EE. UU.
MEX -6:00 h sí Ciudad de México/México
NYC -5:00 h sí Nueva York/EE. UU.
YYZ -5:00 h sí Toronto/Canadá
YUL -5:00 h sí Montreal/Canadá
CCS -4:30 h no Caracas/Venezuela
RIO -3:00 h sí Rio de Janeiro/Brasil

SilverCrest SWDR 500 C2
US-ES - 63
BUE -3:00 h no Buenos Aires/Argentina
UTC* 0:00 h no Universal Time Coordinated
(tiempo universal
coordinado)
LON 0:00 h sí Londres/Reino Unido
BER +1:00 h sí Berlín/Alemania
PAR +1:00 h sí París/Francia
ROM +1:00 h sí Roma/Italia
CAI +2:00 h sí El Cairo/Egipto
IST +2:00 h sí Estambul/Turquía
MOW +3:00 h sí Moscú/Rusia
KWI +3:00 h no Ciudad de Kuwait/Kuwait
DXB +4:00 h no Dubái/Arabia Saudí
KHI +5:00 h no Karachi/Pakistán
DAC +6:00 h sí Dacca/Bangladés
BKK +7:00 h no Bangkok/Tailandia
SIN +8:00 h no Singapur
HKG +8:00 h no Hong Kong
PEK +8:00 h no Pekín/China
SHA +8:00 h no Shanghái/China
TYO +9:00 h no Tokio/Japón
SYD +10:00 h sí Sídney/Australia
NOU +11:00 h no Noumea/Nueva Caledonia
AKL +12:00 h sí Auckland/Nueva Zelanda
*UTC: Universal Time Coordinated (tiempo universal coordinado)
UTC son las siglas de «Universal Time Coordinated» (tiempo universal
coordinado), antes también conocido como GMT (Greenwich Mean Time,
tiempo medio en Greenwich). Las distintas zonas horarias se determinan a

SilverCrest SWDR 500 C2
64 - US-ES
partir del tiempo universal coordinado (UTC). Las diferencias horarias se
muestran en la segunda columna de la tabla.
Para definir la zona horaria, proceda de la siguiente manera:
Mantenga presionado el botón «SET/STORE» (9) mientras el aparato esté
apagado y hasta que en la pantalla (6) aparezca «US» o «EU». Presione
de nuevo una sola vez el botón «SET/STORE» (9) para acceder a la
configuración de zona horaria. Ahora, en la parte superior de la pantalla
(6) se mostrará la abreviatura de la ciudad que está configurada y debajo
la hora local correspondiente. El aparato se suministra con la zona «UTC»
preconfigurada.
Presionando el botón «VOL-» (12) y «VOL+» (4) podrá definir la zona
horaria que desee, por ejemplo, BER para Berlín. Puede consultar las
abreviaturas de las ciudades en la tabla de más arriba. Cada vez que se
cambia la abreviatura de ciudad también cambia la hora mostrada.
A continuación, configure la hora correcta tal como se describe en la siguiente
sección.
8.4 Configurar la fecha y hora
8.4.1 Configuración automática por RBDS
El aparato se suministra con la sincronización horaria automática por RBDS
activada. Tras encender el radio, en cuanto este reciba señal RBDS, la fecha y
la hora se sincronizarán y al cabo de un rato ya se mostrarán correctamente.
La configuración automática depende de que la emisora
sintonizada envíe una señal RBDS y de que la calidad de la señal
RBDS sea suficiente. Cuando se recibe una señal RBDS, en la
pantalla aparece el indicador de RBDS (28).
Además, la sincronización horaria y la configuración correcta de la hora
dependen directamente de la zona horaria definida. Por eso es imprescindible

SilverCrest SWDR 500 C2
US-ES - 65
que haya definido la zona horaria correcta. En este sentido, consulte el
capítulo anterior («Definir la zona horaria»).
8.4.2 Configuración manual
En primer lugar, debe desactivar la sincronización horaria automática por
RBDS. Para hacerlo, presione 4 veces el botón «MODE» (15) con el aparato
apagado hasta que en la pantalla (6) aparezca «TS ON» (sincronización
horaria automática activada). Presionando los botones «VOL-» (12) y «VOL+»
(4), seleccione la opción «TS OFF» (sincronización horaria automática
desactivada).
A continuación, defina la zona horaria correcta.
La hora solamente se puede configurar cuando el aparato está apagado. En
caso de que el aparato esté encendido, apáguelo con el botón
POWER/SLEEP (8).
Si no se presiona ningún botón durante 7 segundos mientras se está
configurando, se aplicará la configuración y se finalizará el modo de
configuración. Para que las cifras avancen más rápido, puede mantener
presionados los botones «VOL-» (12) y «VOL+» (4).
Mantenga presionado el botón «SET/STORE» (9) mientras el aparato esté
apagado y hasta que en la pantalla (6) aparezca «US» o «EU». A
continuación, seleccione el formato de fecha preferido con los botones
«VOL-» (12) y «VOL+».
Ejemplo:
EU DD.MM.AAAA
US MM.DD.AAAA
Confirme la selección presionando el botón «SET/STORE» (9).
Tenga en cuenta que esta opción también afecta la separación entre
canales de la banda de frecuencias AM.

SilverCrest SWDR 500 C2
66 - US-ES
Configure a continuación la zona horaria correcta tal como se describe en
el capítulo anterior y confirme la configuración presionando el botón
«SET/STORE» (9). El formato de hora configurado parpadeará.
Ahora podrá configurar el formato de hora con los botones «VOL-» (12) y
«VOL+» (4). El aparato se suministra con el formato de 24 horas
preconfigurado. Puede elegir entre 12H y 24H. Confirme la configuración
presionando el botón «SET/STORE» (9). La cifra de la hora parpadeará.
Ahora puede configurar la hora con los botones «VOL-» (12) y «VOL+»
(4). Confirme la configuración presionando el botón «SET/STORE» (9). La
cifra de los minutos parpadeará.
Ahora puede configurar los minutos con los botones «VOL-» (12) y
«VOL+» (4). Confirme la configuración presionando el botón «SET/STORE»
(9). La cifra del año parpadeará.
A continuación, configure correctamente el año con los botones «VOL-»
(12) y «VOL+» (4). Confirme la configuración presionando el botón
«SET/STORE» (9). La cifra del mes parpadeará.
Ahora puede configurar el mes con los botones «VOL-» (12) y «VOL+» (4).
Confirme la configuración presionando el botón «SET/STORE» (9). La cifra
del día del mes parpadeará.
Ahora puede configurar el día con los botones «VOL-» (12) y «VOL+» (4).
Confirme la configuración presionando el botón «SET/STORE» (9).
En la pantalla (6) también aparecerá el día de la semana (40) conforme a los
datos definidos.

SilverCrest SWDR 500 C2
US-ES - 67
Indicadores Día de la semana
MON lunes
TUE martes
WED miércoles
THU jueves
FRI viernes
SAT sábado
SUN domingo
Ya ha terminado de configurar la fecha y hora.
Si ha elegido el formato de 12 horas, en la pantalla (6) aparecerá el
símbolo «PM» (36) para las horas de la tarde.
Deberá cambiar la hora si viaja a otra zona horaria.
8.5 Indicadores de hora mundial
Presione el botón «DISPLAY» (5). En la pantalla (6) verá la hora actual en
tamaño grande. Además, también puede definir que en la parte superior de la
pantalla se muestre la hora actual de otra zona horaria de su elección. Puede
seleccionar la zona horaria de la que desea ver la hora con los botones
«TUNE-» (13) y «TUNE+» (11). La zona horaria seleccionada y la hora
correspondiente se mostrarán encima de la hora actual cada vez que presione
el botón «DISPLAY» (5).
Tenga en cuenta que aquí la zona horaria solamente se puede consultar. Para
configurar la zona horaria proceda como se describe en el capítulo «Definir la
zona horaria».

SilverCrest SWDR 500 C2
68 - US-ES
8.6 Funciones del botón «MODE»
Al presionar el botón «MODE» (15) con el aparato apagado, puede acceder
al modo de configuración de distintas funciones:
1 presión SDA (alarma especial de fecha)
2 presiones Temporizador corto
3 presiones Cronómetro
4 presiones Sincronización horaria por RBDS
activada/desactivada
Al presionar el botón «MODE» (15) con el aparato encendido, se accede a
las siguientes funciones:
1 presión Ver y cambiar la separación entre canales
2 presiones • Frecuencia modulada (FM): Ver y
cambiar la opción «MONO» y «AUTO-ST»
• Onda corta (SW): Selección rápida de
subbandas
8.7 SDA (alarma especial de fecha)
Esta función le permite programar hasta 10 alarmas anuales de fecha
especiales. Para hacerlo, proceda de la siguiente manera:
Presione una vez el botón «MODE» (15) con el aparato apagado. En la
pantalla (6), se iluminará «SDA». 01 (para la primera alarma SDA) y la
fecha configurada en el formato mes.día parpadeará. Si la alarma no está
activada, también parpadeará el símbolo «SDA» (25). Si una alarma SDA
está activada, se puede ver porque el símbolo «SDA» (25) se ilumina. En
este caso, el símbolo «SDA» (25) también se muestra durante el
funcionamiento como reloj.
Configure la fecha que desee con los botones «VOL-» (12) y «VOL+» (4).
Para que las cifras avancen más deprisa, puede mantener presionados los
botones.

SilverCrest SWDR 500 C2
US-ES - 69
Presione brevemente el botón «SET/STORE» (9) para activar o desactivar la
«SDA» configurada. Cada una de las «SDA» se puede activar y desactivar
de forma individual (independientemente de las demás alarmas SDA). La
configuración se guardará automáticamente.
Presione el botón «TUNE-» (13) y «TUNE+» (11) para programar otra SDA
de la misma manera.
Así, las SDA configuradas sonarán cada año. Cuando la fecha actual
coincida con la de la alarma SDA, durante el día sonará una señal sonora
durante unos 10 minutos en las horas en punto entre las 08:00 y las 23:00.
Las SDA no interrumpen el funcionamiento en modo radio. La alarma se
dispara cuando el usuario termina de escuchar y el indicador de minutos
supera el valor «1».
Para detener la alarma puede presionar cualquier botón.
8.8 Temporizador corto
Tiene la posibilidad de programar un temporizador corto (solo con sonido de
alarma) para que suene una sola vez. Puede elegir entre los 6 períodos de
tiempo preconfigurados utilizando los botones «TUNE-» (13) y «TUNE+» (11).
Los 6 temporizadores tienen valores distintos, en concreto: 10, 15, 20, 25, 30
y 35 minutos.
Presione dos veces el botón «MODE» (15) con el aparato apagado. En la
pantalla (6) aparecerá el símbolo del temporizador corto (42), el número
del temporizador y los minutos tras los cuales debe sonar.
Presione los botones «TUNE-» (13) y «TUNE+» (11) para desplazarse por
los tiempos preconfigurados.
Con los botones «VOL-» (12) y «VOL+» (4) puede ajustar los tiempos a sus
necesidades concretas (entre 1 y 39 minutos).
Presione brevemente el botón «SET/STORE» (9) para iniciar el
temporizador.

SilverCrest SWDR 500 C2
70 - US-ES
Ahora en la pantalla (6) podrá ver una cuenta atrás del tiempo. Cuando
haya transcurrido el tiempo del temporizador, sonará una alarma que no se
detendrá hasta que la apague.
Para desactivar la alarma sonora puede presionar cualquier botón.
Presione brevemente el botón «SET/STORE» (9) para desactivar el
temporizador corto antes de que transcurra el tiempo definido. En ese caso,
la pantalla mostrará el tiempo restante del temporizador que se había
activado. Vuelva a presionar el botón «SET/STORE» (9) para iniciar el
temporizador con el tiempo restante.
Mientras el temporizador está funcionando, también puede modificar el
tiempo del mismo con los botones «VOL-» (12) y «VOL+» (4).
Tenga en cuenta lo siguiente: mientras haya un temporizador corto
activado, no debe presionar ningún botón que no sea
«SET/STORE» (9), «VOL-» (12) y «VOL+» (4). De lo contrario, el
temporizador corto se detendrá.
8.9 Cronómetro
El cronómetro se utiliza así:
Presione dos veces el botón «MODE» (15) con el aparato apagado. En la
pantalla (6) aparecerá el símbolo del cronómetro (23) y «STOP», 00:00
(minutos:segundos); en la parte superior derecha también se mostrarán
las centésimas de segundo.
Presione brevemente el botón «VOL+» (4) para iniciar el cronómetro.
Vuelva a presionar brevemente el botón «VOL+» (4) para detener el
cronómetro o ponerlo en pausa.
Al volver a presionar el botón «VOL+» (4) el cronómetro continúa
funcionando con el tiempo que se muestra en ese momento.
Presione brevemente el botón «VOL-» (12) para restablecer el cronómetro
en 00:00.

SilverCrest SWDR 500 C2
US-ES - 71
Cuando hay un cronómetro en marcha, en la pantalla (6) se
muestra el tiempo del mismo. Si se restablece el cronómetro a
00:00, el indicador de pantalla volverá a mostrar
automáticamente la hora normal al cabo de unos 8 segundos.
8.10 Configurar el rango de frecuencias de AM
Debido a los distintos sistemas de radio utilizados en cada país, se
recomienda ajustar el rango de frecuencias y la separación entre canales:
Región Rango de frecuencias Separación entre
canales
Europa 522 kHz – 1620 kHz 9 kHz
América 530 kHz – 1720 kHz 10 kHz
Para hacerlo, proceda de la siguiente manera:
Mantenga presionado el botón «SET/STORE» (9) mientras el aparato esté
apagado y hasta que en la pantalla (6) aparezca «US» o «EU». A
continuación, seleccione la región de recepción con los botones «VOL-»
(12) y «VOL+». Tenga en cuenta que esta opción también afecta la
configuración del formato de fecha.
8.11 Ajustar el volumen
Presionando los botones «VOL-» (12) y «VOL+» (4) puede ajustar el volumen
a su gusto. Se puede ajustar desde el nivel «00» (volumen mínimo) hasta el
nivel «16» (volumen máximo). Al encender el aparato, se utilizará el nivel de
volumen que se ajustó la última vez.
8.12 Definir la sensibilidad de recepción
Esta función solo es relevante para FM y SW. Desplace el selector
«DX/LOCAL» (22) a la posición «DX» si desea utilizar el aparato con el modo
normal.
Desplace el selector «DX/LOCAL» (22) a la posición «LOCAL» si solamente
desea sintonizar emisoras con intensidades de campo elevadas. Es

SilverCrest SWDR 500 C2
72 - US-ES
recomendable utilizarlo, por ejemplo, cuando la potente señal de una emisora
suprarregional se superpone a la señal débil de la emisora local que desea
escuchar.
8.13 Activar la amplificación de graves
Es posible amplificar la señal de los sonidos graves.
Presione el botón «SNOOZE/BASS» (2) con el aparato encendido. En la
pantalla (6) aparecerá BASS (31).
Vuelva a presionar el botón «SNOOZE/BASS» (2) para desactivar la
amplificación de graves. El indicador «BASS» (31) desparecerá.
8.14 Seleccionar una emisora
Para garantizar la mejor recepción posible, despliegue completamente la
antena telescópica (1) antes de sintonizar una emisora. La antena telescópica
(1) se puede girar. Así podrá conseguir una recepción óptima.
8.15 Búsqueda automática de emisoras con la función
Auto-Store
La manera más cómoda de buscar emisoras y guardarlas es la búsqueda
automática de emisoras con guardado automático (función Auto-Store).
Encienda el aparato.
En primer lugar, seleccione la banda de frecuencias deseada con el botón
«BAND» (7).
Presione el botón «SET/STORE» (9) durante un 1 segundo para iniciar la
búsqueda automática de emisoras. La búsqueda automática de emisora
siempre empieza por las frecuencias más bajas.
El receptor de radio multibanda (A) examinará toda la banda de
frecuencias en busca de emisoras con buena señal.
Las primeras 100 emisoras que encuentre se guardarán directamente en las
memorias P001 a P100.

SilverCrest SWDR 500 C2
US-ES - 73
Cuando las 100 memorias estén ocupadas, la búsqueda proseguirá hasta el
final, pero no se guardará ninguna emisora más. Al terminar la búsqueda, se
escuchará la emisora guardada en la memoria P001.
Tenga en cuenta que es posible sobrescribir las memorias ya
guardadas.
8.16 Búsqueda manual de emisoras
Encienda el aparato.
En primer lugar, seleccione la banda de frecuencias deseada con el botón
«BAND» (7).
La banda de la onda corta («SW») se subdivide en 9 subbandas,
de la «SW1» a la «SW9»; véase el capítulo «Datos técnicos» a
este respecto). Para seleccionar cada una de las subbandas,
presione primero el botón «MODE» (15) 2 veces. En la parte
superior de la pantalla se mostrará «SW << >>». Seleccione la
subbanda que desee con los botones «TUNE-» (13) y «TUNE+»
(11). Vuelva a presionar el botón «MODE» (15) para continuar y
buscar emisoras.
Presione el botón «TUNE-» (13) y «TUNE+» (11) durante un segundo para
empezar la búsqueda en la dirección escogida. La búsqueda se detendrá al
encontrar una emisora y la frecuencia de la misma se mostrará en la
pantalla (6).
8.17 Sintonización manual de emisoras
Además de la búsqueda de emisoras, también tiene la posibilidad de
sintonizar emisoras manualmente. De este modo es posible encontrar emisoras
con señal débil. Para hacerlo, proceda de la siguiente manera:
Presione brevemente los botones «TUNE-» (13) y «TUNE+» (11) para reducir
o aumentar la frecuencia un intervalo. Los intervalos son distintos en función de
la banda de frecuencias y la separación entre canales seleccionadas. En
relación a la separación entre canales, consulte el capítulo siguiente.

SilverCrest SWDR 500 C2
74 - US-ES
8.18 Sintonización precisa de emisoras
Tiene la posibilidad de configurar la separación entre canales de la
sintonización de emisoras conforme a la siguiente tabla para afinar la
sintonización en caso de que no sea posible encontrar una emisora con
exactitud.
Para hacerlo, proceda de la siguiente manera:
Funcionando en modo de radio, presione 1 vez el botón «MODE» (15).
En la pantalla (6) aparecerá la frecuencia sintonizada en ese momento y,
encima, el indicador «STEP» y la separación entre canales actual.
A continuación, podrá configurar la separación entre canales con los
botones «TUNE-» (13) y «TUNE+» (11) para que la sintonización sea
normal o precisa. La configuración se guardará automáticamente.
Rango de frecuencias Separación entre canales
normal/precisa
FRECUENCIA MODULADA (FM) 100 kHz / 50 kHz
MW (AM) EU* 9 kHz / 1 kHz
MW (AM) US* 10 kHz / 1 kHz
ONDA CORTA (SW) 5 kHz / 1 kHz
LW 9 kHz / 1 kHz
*En el caso de MW (AM), la separación entre canales depende de la
configuración del formato de fecha (EU o US) que se haya elegido (véase
capítulo «Configurar la fecha y hora»).
8.19 Guardar emisoras manualmente
Puede guardar 100 emisoras o frecuencias en cada banda de frecuencias.
Para hacerlo, proceda de la siguiente manera:
Busque la emisora que desea guardar.
Presione brevemente el botón «SET/STORE» (9).

SilverCrest SWDR 500 C2
US-ES - 75
En la parte superior de la pantalla (6), parpadeará la última memoria
seleccionada.
Con los botones «M-/AL1» (14) y «M+/AL2» (10), seleccione la memoria
en la que desea guardar la emisora.
Presione el botón «SET/STORE» (9) para que se guarde.
Tenga en cuenta que es posible sobrescribir las memorias ya
guardadas.
8.20 Acceder a emisoras guardadas
Para acceder a una emisora guardada anteriormente, seleccione la
memoria de la emisora guardada que desee con los botones «M-/AL1»
(14) y «M+/AL2» (10).
Tenga en cuenta lo siguiente:
El aparato se suministra con las memorias vacías. Si selecciona una
memoria vacía, se escuchará la frecuencia inferior de la banda de
frecuencias seleccionada.
En cambio, si una memoria ya está ocupada, la frecuencia
guardada quedará guardada hasta que se sobrescriba por otra
nueva.
Cuando el radio multibanda no recibe alimentación eléctrica, la
hora configurada se pierde, pero no las emisoras guardadas.
8.21 Reproducción en estéreo
La reproducción de una emisora con calidad estéreo solamente es posible si
se utilizan auriculares. En ese caso, en la pantalla (6) aparecerá el símbolo
«ST» (30).
Sin embargo, puede ocurrir que la señal estéreo sea débil y emita ruido. Con
el modo «AUTO-ST», la radio multibanda pasa automáticamente de
«MONO» a «STEREO», y viceversa, en función de la calidad de la señal.

SilverCrest SWDR 500 C2
76 - US-ES
También existe la posibilidad de configurar manualmente el modo «MONO»
para siempre. Para hacerlo, presione 2 veces el botón «MODE» (15) mientras
esté funcionando en modo de radio FM y seleccione la opción «MONO» o
«AUTO-ST» con los botones «TUNE-» (13) y «TUNE+» (11). La opción elegida
se utilizará siempre hasta que la vuelva a modificar.
8.22 Temporizador de apagado automático (SLEEP)
Con el temporizador de apagado automático (SLEEP) puede definir un tiempo
(entre 10 y 90 minutos) para que una vez haya transcurrido el receptor de
radio multibanda (A) se apague automáticamente. Se pueden elegir valores
con intervalos de 10 minutos. Para hacerlo, proceda de la siguiente manera:
Apague el aparato con el botón «POWER/SLEEP» (8).
Presione el botón «POWER/SLEEP» (8) durante un segundo. El radio
multibanda (A) se encenderá y en la pantalla (6) parpadeará la cifra 90
(90 minutos) y el símbolo «SLEEP» (32).
Presione el botón «POWER/SLEEP» (8) las veces necesarias hasta ver los
minutos deseados (por ejemplo, 40). Cada vez que presione el botón
«POWER/SLEEP» (8), el tiempo para el apagado automático se reducirá 10
minutos.
El radio multibanda (A) se apagará automáticamente una vez transcurridos
los minutos que haya definido (por ejemplo, 40).
En la pantalla (6) se puede ver que el temporizador de apagado
automático está activado por el símbolo «SLEEP» (32).
Aunque haya un temporizador de apagado automático activado, podrá
cambiar de banda de frecuencias, iniciar la búsqueda de emisoras, acceder
a emisoras guardadas y ajustar el volumen.
Puede cancelar el temporizador de apagado automático apagando el
aparato usted mismo.

SilverCrest SWDR 500 C2
US-ES - 77
8.23 Configurar la hora del despertador (alarma)
Puede configurar dos horas para el despertador (AL1 y AL2). Asegúrese de
que la hora esté correctamente configurada. La hora del despertador
solamente se puede configurar cuando el aparato está apagado. En caso de
que esté encendido, apáguelo con el botón «POWER/SLEEP» (8).
A continuación, se describe como configurar la AL1. Puede programar la AL2
de la misma manera. Si no se presiona ningún botón durante 8 segundos
mientras se está configurando, se aplicará la configuración y se finalizará el
modo de configuración.
Presione el botón «M-/AL1» (14) durante un 1 segundo. En la pantalla (6),
parpadeará el indicador de hora.
A continuación, seleccione la hora para el despertador con los botones
«VOL-» (12) y «VOL+» (4). Para que las cifras avancen más deprisa, puede
mantener presionados los botones. Para confirmar la configuración,
presione brevemente el botón «M-/AL1» (14). En la pantalla (6),
parpadeará el indicador de minutos.
A continuación, seleccione los minutos para el despertador con los botones
«VOL-» (12) y «VOL+» (4). Para que las cifras avancen más deprisa, puede
mantener presionados los botones. Para confirmar la configuración,
presione brevemente el botón «M-/AL1» (14).
A continuación, puede elegir mediante los botones «VOL-» (12) y «VOL+»
(4) si quiere despertarse con «BUZZ» (alarma sonora) o con «rdA» (sonido
del radio). Confirme la selección presionando el botón «M-/AL1» (14).
A continuación, seleccione el volumen para el despertador con los botones
«VOL-» (12) y «VOL+» (4). Para confirmar la configuración, presione
brevemente el botón «M-/AL1» (14).
Finalmente, también puede seleccionar qué días de la semana se debe
utilizar la alarma configurada. Utilizando los botones «VOL-» (12) y «VOL+»
(4) puede elegir entre las siguientes opciones:

SilverCrest SWDR 500 C2
78 - US-ES
Un solo día de la semana
Días laborales (de lunes a viernes)
Fin de semana (sábado y domingo)
Todos los días de la semana
Para confirmar la configuración, presione brevemente el botón «M-/AL1» (14).
Ya ha terminado de configurar el despertador.
8.24 Activar la función de despertador
A continuación, se describe como configurar la AL1. Puede programar la AL2
de la misma manera.
Una vez configurada la hora del despertador, puede activar la función de
despertador así:
Presione brevemente el botón «M-/AL1» (14) con el aparato apagado,
para ver la hora configurada para el despertador en la pantalla (6).
Vuelva a presionar brevemente el botón «M-/AL1» (14) para activar el
despertador con alarma sonora. A continuación, aparecerá en la pantalla
(6)
el símbolo correspondiente (33).
Vuelva a presionar brevemente el botón «M-/AL1» (14) para activar el
despertador con el sonido de la radio. A continuación, aparecerá en la
pantalla (6) el símbolo correspondiente (34).
Tenga en cuenta que al utilizar el modo de despertador con radio
no pueden estar conectados los auriculares. En caso de estar
conectados, el sonido del despertador (alarma sonora o radio)
solamente se oirá por los auriculares.
A la hora definida para la alarma, el aparato se enciende automáticamente
con la última frecuencia sintonizada de la última banda de frecuencias

SilverCrest SWDR 500 C2
US-ES - 79
seleccionada. Sin embargo, si al configurar el despertador ha elegido la
alarma sonora, se despertará con este sonido.
La alarma sonora empieza a volumen reducido y va aumentando
gradualmente hasta el volumen que se ha configurado para el
despertador.
Presione cualquier botón para detener el sonido del despertador o presione
el botón «SNOOZE/BASS» (2) para posponer unos 5 minutos la función de
despertador. El símbolo de alarma (33 o 34) parpadeará. Tras 5 minutos
de pausa, el despertador volverá a sonar. Si durante la pausa de 5 minutos
presiona algún botón, la función «SNOOZE» se desactivará, pero la función
de despertador continuará activada.
El aparato se suministra con la pausa de despertador configurada
como 5 minutos. Puede alargar este tiempo según le parezca
oportuno hasta 120 minutos. Para hacerlo, mantenga presionado
el botón «SNOOZE/BASS» (2) durante dos segundos con el
aparato apagado. En la pantalla (6) verá el tiempo de pausa
configurado para el despertador. Utilizando los botones «VOL-»
(12) y «VOL+» (4) puede modificar la duración de la pausa del
despertador. Para que las cifras avancen más deprisa, puede
mantener presionados los botones. Para confirmar la
configuración, presione brevemente el botón «SNOOZE/BASS»
(2).
Para desactivar el despertador, presione el botón «M-/AL1» (14) hasta que
no aparezca ningún símbolo de alarma (33 o 34) en la pantalla (6).

SilverCrest SWDR 500 C2
80 - US-ES
Aunque la función de despertador esté activada, el aparato se
puede utilizar normalmente. Tenga en cuenta lo siguiente:
• Despertarse con la radio:
El despertador se enciende automáticamente con la última
frecuencia sintonizada de la última banda de frecuencias
seleccionada.
• Despertarse con el zumbido:
El sonido del despertador empieza a bajo volumen y va
aumentado progresivamente hasta alcanzar el volumen
configurado.
8.25 Activar y desactivar el bloqueo de los botones
Presione el botón «LOCK» (3) durante un segundo para activar el bloqueo de
los botones del radio multibanda. En la pantalla (6), parpadeará el símbolo
«LOCK» (35).
Solo podrá volver a utilizar los botones si desactiva el bloqueo de los mismos
volviendo a presionar el botón «LOCK» (3) durante un segundo. En la pantalla
(6), ya no parpadeará el símbolo «LOCK» (35).
Tenga en cuenta que cuando el bloqueo de botones está activado, no se
puede detener ni poner en pausa el despertador.
8.26 Conectar los auriculares
Tenga cuidado a la hora de utilizar auriculares.
Escuchar sonido durante mucho tiempo a un volumen
elevado puede dañar el aparato auditivo del usuario.
En la salida para auriculares (21) puede conectar auriculares con una clavija
de 3.5 mm. Una vez los auriculares están conectados, el altavoz (16) se
desactiva automáticamente.

SilverCrest SWDR 500 C2
US-ES - 81
8.27 Almacenamiento cuando no se utiliza
Si no va a utilizar el aparato durante un largo periodo de tiempo,
extraiga las baterías (si las había colocado).
Guarde el aparato en un lugar fresco y seco.
9. Solución de problemas
El aparato no se enciende
• Compruebe que el alimentador esté enchufado a una toma de corriente.
• Puede que las baterías estén gastadas; ponga baterías nuevas.
• Compruebe que las baterías estén correctamente colocadas (orientación
de los polos). Consulte los símbolos en el compartimento de las baterías y
en las mismas baterías a este respecto. Véase también el capítulo
«Colocar las baterías».
• Compruebe que el bloqueo de botones no esté activado. En caso de
estarlo, presione el botón «LOCK» (3) durante un segundo para
desactivar el bloqueo.
No recibe señales de radio, mala calidad de recepción
• Despliegue la antena telescópica (1) por completo y oriéntela
correctamente.
• Sintonice la emisora correctamente. En caso necesario, inicie de nuevo la
búsqueda de emisoras.
• Compruebe que el selector «DX/LOCAL» (22) esté en la posición
correcta. Véase también el capítulo «Definir la sensibilidad de recepción»
a este respecto.
No aparece el nombre de la emisora
• Esta función solo está disponible en FM.
• La emisora sintonizada no emite señal RBDS o la señal es demasiado
mala para recibir la señal RBDS. Intente cambiar la orientación de la
antena para mejorar la recepción de la señal.

SilverCrest SWDR 500 C2
82 - US-ES
No hay sonido pero el aparato está encendido
• Compruebe el volumen.
• Si hay unos auriculares conectados, el altavoz integrado (16) deja de
funcionar.
Despertador demasiado bajo o que no suena
• Compruebe que el volumen del despertador en la configuración de
alarmas y súbalo en caso necesario.
Los botones no funcionan
• Compruebe que el bloqueo de botones no esté activado.

SilverCrest SWDR 500 C2
US-ES - 83
10. Información medioambiental y eliminación
Eliminación del empaque
Separe el empaque antes de eliminarlo. Elimine el empaque de
acuerdo con el servicio de recolección municipal.
Eliminación de aparatos usados
¡No tire el aparato usado con la basura común! Si en el futuro ya
no usara este aparato, elimínelo de acuerdo con las normas
correspondientes de su estado o país. Esto garantiza que se realice
un reciclaje profesional de los aparatos usados y evita
consecuencias negativas para el medioambiente.
Asegúrese de que lo elimina de acuerdo con las normas locales y
las recomendaciones de EPA (www.epa.gov).
¿Tiene preguntas?
• Llame al servicio de atención al cliente al 1 (844) 543-5872
• Visite el sitio web de la plataforma del servicio de atención al cliente en
www.lidl.com/contact-us.
11. Indicaciones de la FCC
Este dispositivo cumple con el reglamento de la FCC. Su funcionamiento está
sujeto a las siguientes dos condiciones:
(1) este dispositivo no deberá ocasionar interferencias dañinas y
(2) este dispositivo deberá aceptar cualquier interferencia recibida, incluso
aquella que produzca un funcionamiento no deseado.
Por favor, tenga en cuenta que cualquier cambio o modificación no
aprobados expresamente por la parte responsable del cumplimiento puede
anular el derecho del usuario a utilizar el equipo.

SilverCrest SWDR 500 C2
84 - US-ES
12. Garantía
Garantía limitada de 3 años
Lo que cubre la presente garantía
La garantía incluye:
• Daños, quebraduras o incapacidad para funcionar debido a defectos.
• Daños que no hayan sido causados por el desgaste propio del uso o por
no seguir las instrucciones de seguridad y mantención incluidas en el
manual para el usuario.
Lo que no cubre esta garantía
La garantía no cubre daños causados por:
• El desgaste propio del uso del producto, incluidas las partes frágiles
(como interruptores, piezas de vidrio, etc.).
• Uso o transporte no indicado del producto.
• Desatención a las instrucciones de seguridad y mantención.
• Accidentes o causas de fuerza mayor (e.g. relámpagos, incendio,
inundación, etc.).
• Manipulación mal intencionada del producto (retirar la cubierta, tornillos,
etc.).
La presente garantía tampoco cubre daños indirectos o emergentes. Sin
embargo algunos estados no permiten la exclusión o limitación de daños
indirectos o emergentes, por lo que dicha exclusión o limitación pudiera no
aplicarse en su caso.
Período de cobertura y resolución de la garantía
La garantía es válida por 3 años a partir de la fecha de compra. La empresa,
según lo estime conveniente, devolverá el dinero o repondrá el producto.

SilverCrest SWDR 500 C2
US-ES - 85
La empresa no:
• Dará inicio a un nuevo período de garantía al hacerse el cambio del
producto.
• Reparará el producto.
¿Cómo se tramita la garantía?
Recomendamos que primero usted:
• Llame al Servicio de atención al cliente al 1 (844) 543-5872.
• Visite el Portal de atención al cliente en www.lidl.com/contact-us
• Visite una de nuestras tiendas LIDL en caso de cualquier inquietud.
A fin de acelerar el trámite de la garantía, tenga a bien contar con lo
siguiente:
• Recibo de venta original que incluya la fecha de compra.
• Producto y manual en su empaque original.
• Descripción del problema.
¿Qué debe hacer usted para mantener la garantía vigente?
• Guardar el recibo original.
• Seguir todas las instrucciones para el uso del producto.
• No realizar ninguna reparación ni alteración al producto.
¿De qué manera influyen las leyes estatales con esta garantía?
La presente garantía le otorga derechos legales específicos, y pudiera usted
contar con otros derechos los cuales varían de un estado a otro. Todas las
garantías implícitas se encuentran limitadas a la duración y términos de la
presente garantía. Algunos estados no permiten limitaciones al período de
tiempo y términos de la garantía implícita, por lo que dichas limitaciones
pudieran no aplicarse en su caso.
País de origen: China

-
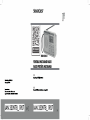 1
1
-
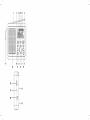 2
2
-
 3
3
-
 4
4
-
 5
5
-
 6
6
-
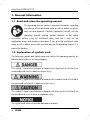 7
7
-
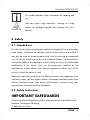 8
8
-
 9
9
-
 10
10
-
 11
11
-
 12
12
-
 13
13
-
 14
14
-
 15
15
-
 16
16
-
 17
17
-
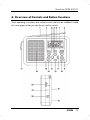 18
18
-
 19
19
-
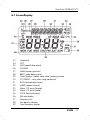 20
20
-
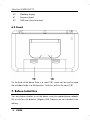 21
21
-
 22
22
-
 23
23
-
 24
24
-
 25
25
-
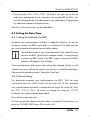 26
26
-
 27
27
-
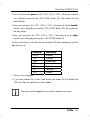 28
28
-
 29
29
-
 30
30
-
 31
31
-
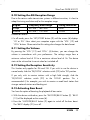 32
32
-
 33
33
-
 34
34
-
 35
35
-
 36
36
-
 37
37
-
 38
38
-
 39
39
-
 40
40
-
 41
41
-
 42
42
-
 43
43
-
 44
44
-
 45
45
-
 46
46
-
 47
47
-
 48
48
-
 49
49
-
 50
50
-
 51
51
-
 52
52
-
 53
53
-
 54
54
-
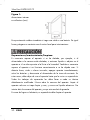 55
55
-
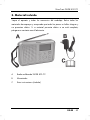 56
56
-
 57
57
-
 58
58
-
 59
59
-
 60
60
-
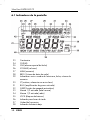 61
61
-
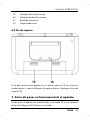 62
62
-
 63
63
-
 64
64
-
 65
65
-
 66
66
-
 67
67
-
 68
68
-
 69
69
-
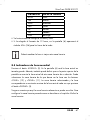 70
70
-
 71
71
-
 72
72
-
 73
73
-
 74
74
-
 75
75
-
 76
76
-
 77
77
-
 78
78
-
 79
79
-
 80
80
-
 81
81
-
 82
82
-
 83
83
-
 84
84
-
 85
85
-
 86
86
-
 87
87
-
 88
88
-
 89
89


Silvercrest 330978 El manual del propietario
- Categoría
- Radios
- Tipo
- El manual del propietario
en otros idiomas
- English: Silvercrest 330978 Owner's manual
Artículos relacionados
-
Silvercrest 330422 El manual del propietario
-
-
-
-
Silvercrest SWE 100 B1 Manual de usuario
-
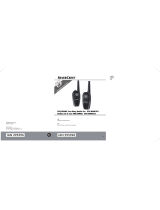 Lidl US 2AJ9OSFG8000B2 Manual de usuario
-
-
Silvercrest SPMR 8000 A1 User Manual And Service Information
-
Silvercrest SMRA 5.0 A1 User Manual And Service Information

