Silvercrest 359924 El manual del propietario
- Tipo
- El manual del propietario

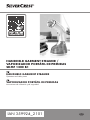
HANDHELD GARMENT STEAMER
Operation and safety notes
VAPORIZADOR PORTÁTIL DE PRENDAS
Instrucciones de utilización y de seguridad
IAN 359924_2101
HANDHELD GARMENT STEAMER/
VAPORIZADOR PORTÁTIL DE PRENDAS
SDMF 1200 B1

US-EN Operation and safety notes Page 3
US-ES Instrucciones de utilización y de seguridad Página 18

3US-EN
Description of signal words ....................................... Page 4
Customer service ................................................... Page 4
Warnings and symbols used ...................................... Page 4
Introduction ......................................................... Page 5
Intended use........................................................... Page 5
Scope of delivery....................................................... Page 5
Technical data ......................................................... Page 5
Description of parts ..................................................... Page 6
Important safety instructions ..................................... Page 8
Before first use ...................................................... Page 12
Operation............................................................ Page 12
Filling/draining the water tank............................................. Page 12
Removing/attaching the brush............................................. Page 13
Steam smoothing clothes . . . . . . . . . . . . . . . . . . . . . . . . . . . . . . . . . . . . . . . . . . . . . . . . . Page 13
Steam smoothing curtains and upholstery .................................... Page 15
Stop steam smoothing ................................................... Page 15
Cleaning and care .................................................. Page 15
Descaling ............................................................. Page 15
Storage .............................................................. Page 16
Disposal.............................................................. Page 16
Three year limited warranty ...................................... Page 17

4 US-EN
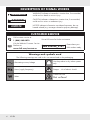
DESCRIPTION OF SIGNAL WORDS
WARNING WARNING indicates a hazardous situation that, if not avoided,
could result in death or serious injury.
CAUTION CAUTION indicates a hazardous situation that, if not avoided,
could result in minor or moderate injury.
NOTICE
NOTICE indicates information considered important, but not
hazard related (e.g. messages related to property damage).
CUSTOMER SERVICE
Call customer service at
1 (844) 543-5872 Visit a LIDL store for further assistance.
Visit the Website Customer Service
Platform at
www.lidl.com/contact-us IAN 359924_2101 Please have your
IAN number ready
Warnings and symbols used
The following warnings are used in this user manual and on the packaging:
Alternating current/voltage Use the product in dry indoor spaces
only.
Hertz (supply frequency) Danger – risk of electric shock!
Watts CAUTION
Hot surface!

5US-EN
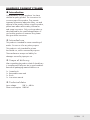
HANDHELD GARMENT STEAMER
Introduction
Congratulations on your purchase. You have
selected a quality product. The instructions for
use are a part of the product. They contain
important information about the safety, use and
disposal of the product. Before using the product,
please learn about all the safety information
and usage instructions. Only use the product as
described and for the specified applications. If
you lend the product to someone else, please
also give all the instructions.
Intended use
This product is intended for steam smoothing of
textiles. Do not use it for any other purpose.
This product is only intended for private
household use, not for commercial purposes.
The manufacturer accepts no liability for
damages caused by improper use.
Scope of delivery
After unpacking the product, check if the delivery
is complete and if all parts are in good condition.
Remove all packaging materials before use.
1 x Steam brush
1 x Removable water tank
1 x Brush
1 x Instruction manual
Technical data
Input voltage: 120V∼, 60 Hz
Power consumption: 1200W

6 US-EN
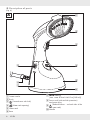
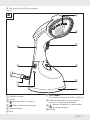
Description of parts
(Fig. A)
A
[1]
[2]
[3]
[4]
[5]
[6]
[7]
[8]
[9]
[]
[1] Steam nozzles
[2] Brush
[3] (Steam button with lock)
[4] (Water tank opening)
[5] Water tank
[6] Base
[7] MAX marking
(max. water fill level: 8.45 fl oz [250 ml])
[8] Power cord (with anti-kink protection)
and power plug
[9] (Release buttons – on both sides of the
water tank)
[] Handle

7US-EN
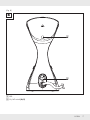
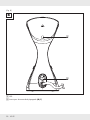
(Fig. B)
B
[]
[]
[] LED
[] On/off switch (O/I)

8 US-EN
IMPORTANT
SAFETY
INSTRUCTIONS
READ ALL INSTRUCTIONS.
KEEP FOR FUTURE
REFERENCE. INCLUDE ALL
DOCUMENTATION WHEN
PASSING THIS PRODUCT ON
TO OTHERS.
When using your appliance,
basic precautions should always
be followed, including the
following:
1. Read all instructions.
2. To reduce the risk of contact
with hot water emitting from
the steam vents, check the
appliance before each use
by holding it away from your
body and operating the
steam button.
3. Use the appliance only for its
intended use.
4. To reduce the risk of electric
shock, do not immerse the
appliance in water or other
liquids.
5. Never yank the cord to
disconnect it from outlet;
instead, grasp the plug and
pull to disconnect.
6. Do not allow the cord to
touch hot surfaces. Let the
appliance cool completely
before putting it away. Loop
the cord loosely around
appliance when storing.
7. Always disconnect the
appliance from the electrical
outlet when filling with water
or emptying, and when not in
use.
8. Do not operate the appliance
with a damaged cord or if the
appliance has been dropped
or damaged. To reduce the
risk of electric shock, do not
disassemble or attempt to
repair the appliance; take it
to a qualified service person
for examination and repair.
Incorrect reassembly or repair
could cause a risk of fire,
electric shock, or injury to
persons when the appliance
is used.

9US-EN
9. Close supervision is necessary
for any appliance being
used by or near children.
Do not leave the appliance
unattended while connected.
10. Burns could occur from
touching hot metal parts,
hot water, or steam. Use
care when you turn a steam
appliance upside down—there
may be hot water in the
reservoir.
11. To reduce the likelihood
of circuit overload, do not
operate another high wattage
appliance on the same circuit.
12. If an extension cord is
absolutely necessary,
a (ampere rating of the
appliance) ampere rated
cord should be used. Cords
rated for less amperage may
overheat. Care should be
taken to arrange the cord so
that the cord cannot be pulled
or tripped over.
13. To reduce the risk of electric
shock, this appliance has a
polarized plug (one blade
is wider than the other). This
plug will fit in a polarized
outlet only one way. If the
plug does not fit fully into
the outlet, reverse the plug. If
it still does not fit, contact a
qualified electrician to install
the proper outlet. Do not
change the plug in any way.
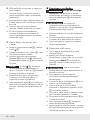
CAUTION
Do not fill above the max. fill-level
mark.
WARNING
Failure to observe the following
warnings may result in death or
serious injuries.
CAUTION
Failure to observe the following
warnings may result in injuries or
property damage.
WARNING
DANGER TO LIFE AND
RISK OF ACCIDENTS FOR
INFANTS AND CHILDREN!

10 US-EN
Never leave children
unsupervised with the packaging
materials. There is always a risk
of suffocation if children play with
the packaging materials. Children
frequently underestimate the
dangers. Always keep children
away from the packaging
materials. This product is not a
toy.
This product is not intended
for use by persons (including
children) with reduced physical,
sensory, or mental capabilities
or lack of experience and
knowledge, unless they have
been given supervision or
instruction concerning use of the
product by a person responsible
for their safety. Children should
be supervised to ensure that they
do not play with the product.
WARNING
Changes or modifications
to this product not expressly
approved by the party
responsible for compliance
could void the user’s authority
to operate the product.
NOTICE
This product
has been tested and found
to comply with the limits for a
ClassB digital device, pursuant
to Part15 of the FCCRules.
These limits are designed to
provide reasonable protection
against harmful interference in
a residential installation. This
product generates, uses, and
can radiate radio frequency
energy and, if not installed
and used in accordance with
the instructions, may cause
harmful interference to radio
communications.
However, there is no guarantee
that interference will not occur
in a particular installation.
If this product does cause
harmful interference to radio
or television reception, which
can be determined by turning
the product off and on, the
user is encouraged to try to
correct the interference by
one or more of the following
measures:

11US-EN
• Reorient or relocate the
receiving antenna.
• Increase the separation
between the product and
receiver.
• Connect the product into an
outlet on a circuit different
from that to which the
receiver is connected.
• Consult the dealer or an
experienced radio/TV
technician for help.
This product complies with
Part15 of the FCCRules.
Operation is subject to the
following twoconditions:
(1) This product may not cause
harmful interference, and
(2) This product must accept
any interference received,
including interference
that may cause undesired
operation.
FOR
HOUSEHOLD
USE ONLY
SAVE THESE
INSTRUCTIONS

12 US-EN
Before first use
Remove the packaging. Check if all parts are
complete.
Clean the product (see “Cleaning and
care”).
NOTICE
The product may give off
some vapors or odors during first use. These
are production or transport residue that will
quickly subside. There may also be quiet
noises such as clicking or crackling. These
will also quickly subside once the plastic
parts have finally adjusted to the operating
conditions.
Operation
Filling/draining the water
tank
CAUTION Risk of electric shock!
Before filling the water tank [5]: Disconnect
the power plug [8] from the power outlet.
NOTICE
Fill the water tank [5] with tap water or
distilled water without any additives. Use the
following mixtures according to your regional
water hardness:
Water hardness Water
Soft Tap water
Medium hard Distilled and tap water
(ratio: 1:1)
Hard Distilled water
Your local water utility can inform you
about your region's local water hardness.
The water tank [5] has a filling capacity of
approximately 8.45fl oz (250ml).
The MAX marking [7] for the maximum
filling capacity applies when the water
tank [5] is positioned vertically.
C
[9]
[5]
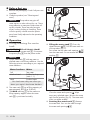
Filling the water tank [5]: Press the
release buttons [9]. Pull the water tank out
of the product (Fig. C).
Pour water via the water tank opening [4]
into the water tank. Do not exceed the MAX
marking [7].
D
[7]
[4]
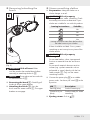
Close the water tank opening . Wipe
away any splashed water. Reinsert the water
tank into the product (Fig. D). The water tank
clicks into place audibly.
Draining the water tank [5]: Remove
the water tank. Pour out the water through
the water tank opening [4].

13US-EN
Removing/attaching the
brush
E
[2][1]
(Fig. E)
WARNING Risk of burns! Wait
until the product has cooled down before
removing or attaching the brush [2].
NOTICE
The product can be used with
or without the brush [2].
Removing the brush [2]: Carefully pull
the brush off the upper bracket.
Attaching the brush [2]: Press the
brush onto the steam nozzles [1]. The upper
bracket must engage.
Steam smoothing clothes
Preparation: Hang the clothes on a
clothes hanger or a rail.
CAUTION Risk of property
damage! Before steam smoothing: Check
the ironing instructions to determine if your
clothes are suitable for use with this product:
Ironing instructions Suitable
Yes
Yes
Yes
No
Ironing instructions can often be found on
the label sewn to your clothes.
If there should be no label: First try steam
smoothing on an inconspicuous piece of the
clothes article.
CAUTION Risk of property
damage!
Do not treat leather, velvet, impregnated
furniture or materials that are sensitive to
steam.
Do not touch materials that are sensitive
to heat (e.g. synthetic materials such as
polyamide or rayon) directly with the hot
steam nozzles [1]. Only use the steam
smoothing function.
Connect the power plug [8] to a suitable
power outlet. Set the on/off switch [] to the
I position.
LED [] Description
Flashing (blue) Product warming up
Continuously on
(blue)
Product ready for steam
smoothing
Ejecting steam: Push in [3].

14 US-EN
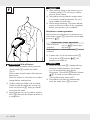
F
WARNING Risk of burns!
When steam smoothing, always point the
steam nozzles [1] towards the clothes
(Fig. F).
Never steam smooth clothes while they are
being worn.
Allow the clothes to cool down on a clothes
hanger before wearing them.
Slightly stretch the clothes with one hand.
Steam smooth the clothes by moving over
them with the brush [2]. Keep your hands
away from the steam.
Apply light pressure on the clothes with the
brush [2]. Move the brush back and forth in
a straight line.
NOTICE
After washing: Hang up the clothes (e.g. on
a clothes hanger). This will let your clothes
dry with fewer creases.
The product cannot produce strong creases
or a smooth, ironed appearance. An iron is
more suitable for those tasks.
While steam smoothing: The clothes absorb
moisture. Allow the clothes to dry completely
before storing them in your wardrobe.
Continuous steam operation
During continuous operation, hot steam exits out
of the steam nozzles [1] without the need to keep
pressing in [3].
Continuous steam operation
Start continuous
operation Press in [3]. Move down
the lock [3].
Stop continuous
operation
Move up the lock [3].
If water drips out of the steam nozzles [1]:
Pull up the lock [3]. Release [3]. The
products now heats up.
NOTICE
When the water tank [5] is emptied during
continuous steam operation, the product
turns off automatically after approx.
40 seconds. The red LED [] flashes. Release
[3]. Fill water into the water tank (see
“Filling/draining the water tank”).
The product turns back on automatically
when the steam button [3] is pressed.

15US-EN
Steam smoothing curtains
and upholstery
Remove creases and wrinkles from curtains
and upholstery by hanging them over a
railing and then tightening them.
Before steam smoothing: Always carry out a
test on an inconspicuous piece of the fabric.
Steam the curtains/upholstery (see “Steam
smoothing clothes”).
When using the product horizontally: Hold
the product vertically from time to time to
maintain maximum steam power.
Stop steam smoothing
Move up the lock [3], if applicable. Release
[3].
Place the product, with its base [6], on a flat
and stable surface.
Set the on/off switch [] to the O position.
Disconnect the power plug [8] from the
power outlet.
NOTICE
When [3] is released, the
product stops heating automatically after
approx. 15 minutes. The red LED [] flashes
until the product switches off.
Let the product cool down (for approx.
15 minutes). Do not leave the product
unattended while it is still hot.
Empty the water tank [5] after each use to
prevent limescale (see “Filling/draining the
water tank”).
Cleaning and care
CAUTION Risk of electric shock!
Before cleaning or maintaining the product:
Disconnect the power plug [8] from the
power outlet.
WARNING Do not immerse the product’s
electrical components in water or other
liquids. Never hold the product under
running water.
Wipe down the product with a slightly damp
cloth.
Do not use any abrasive, aggressive
cleaners, or hard brushes to clean the
product.
Let all parts dry completely after cleaning.
Descaling
Use a commercially available descaling
agent.
Mix a solution of descaling agent and water.
Fill the solution up to the MAX marking [7]
in the water tank [5]. Insert the water tank
into the product.
WARNING Follow the instructions of the
descaling agent’s manufacturer when mixing
the solution.
Let the solution work according to the
instructions of the descaling agent’s
manufacturer.
Connect the power plug [8] to a suitable
power outlet.
Wait until the product has reached its
operating temperature (the LED [] lights up
permanently).
Let the steam escape over a sink until no
debris or dirt is left.
Disconnect the power plug [8] from the
power outlet.
Empty the water tank [5]. Rinse the water
tank with clear water.
To rinse the internal pipes, use clear tap
water to generate steam (see “Steam
smoothing clothes”).

16 US-EN
Storage
Store the product in the original packaging
when it is not in use.
Store the product at a dry location out of the
reach of children.
Store the product with the water tank [5]
emptied only.
Disposal
Dispose of the packaging through your local
recycling facilities and in compliance with all
federal, state and local regulations.
Please note the package markings
regarding waste separation, indicated
by abbreviations (a) and numbers (b),
meaning: 1–7: plastics / 20–22: paper
and cardboard / 80–98: composite
materials.
Contact your local waste management
authority for additional information on
how to dispose of the used product.
To help protect the environment, please dispose
of the product properly when it has reached the
end of its useful life, do not throw in the garbage.
Information on collection sites and their opening
hours is available from your local authority.

17US-EN
Three year limited warranty
What does this warranty cover?
The warranty covers:
• Damage, breakage or inoperability due to
defect.
• Damage not caused by normal wear and
tear or failure to follow the safety and
maintenance instructions provided in the user
manual.
What is not covered by the warranty?
The warranty does not cover damage caused by:
• Normal wear and tear of the product,
including fragile parts (such as switches,
glass, etc.);
• Improper use or transport;
• Disregarding safety and maintenance
instructions;
• Accidents or acts of nature (e.g. lightning,
fire, water, etc.).
• Tampering with the product (such as
removing cover, unscrewing screws etc.)
Consequential and incidental damages are also
not covered under this warranty. However, some
states do not allow the exclusion or limitation
of incidental or consequential damages, so this
limitation or exclusion may not apply to you.
What is the period of coverage and
warranty resolution?
The warranty is for 3 years from the date of
purchase. At our discretion, product will either be
refunded or replaced.
What will we not do?
We will not:
• Start a new warranty period upon product
exchange;
• Repair product.
How to process the warranty?
To initiate, please:
• Call customer service at 1 (844) 543-5872
• Visit the Website Customer Service Platform
at www.lidl.com/contact-us
or
• Visit a LIDL store for further assistance
To ensure the quickest warranty return process,
please have the following available:
• The original sales receipt that includes the
date purchased;
• The product and manual in the original
package;
• A statement of the problem.
What must you do to keep the
warranty in effect?
• Retain the original receipt;
• Follow all product instructions;
• Do not repair or modify the product.
How does state law relate to this
warranty?
This warranty gives you specific legal rights, and
you may also have other rights which vary from
state to state. All implied warranties are limited
by the duration and terms of this warranty. Some
states do not allow limitations on how long an
implied warranty lasts, so the above limitation
may not apply to you.

18 US-ES
Descripción de las palabras de advertencia ................... Página 19
Servicio al cliente .................................................. Página 19
Advertencias y símbolos empleados............................ Página 19
Introducción ........................................................ Página 20
Uso previsto .......................................................... Página 20
Incluido con el producto ................................................ Página 20
Datos técnicos ........................................................ Página 20
Descripción de las piezas ............................................... Página 21
Instrucciones de seguridad importantes........................ Página 23
Antes del primer uso .............................................. Página 27
Funcionamiento .................................................... Página 27
Llenado/vaciado del tanque de agua...................................... Página 27
Extracción/instalación del cepillo ......................................... Página 28
Alisado de prendas con vapor............................................ Página 28
Alisado de cortinas y tapices con vapor .................................... Página 30
Para dejar de alisar con vapor ........................................... Página 30
Limpieza y cuidados............................................... Página 30
Limpieza del sarro ..................................................... Página 30
Almacenamiento................................................... Página 31
Eliminación ......................................................... Página 31
Garantía limitada de 3 años ..................................... Página 32

19US-ES
DESCRIPCIÓN DE LAS PALABRAS DE ADVERTENCIA
ADVERTENCIA ADVERTENCIA indica una situación peligrosa, que puede
provocar la muerte o lesiones graves si no se evita.
PRECAUCIÓN PRECAUCIÓN indica una situación peligrosa, que puede
provocar lesiones leves o moderadas si no se evita.
AVISO
AVISO indica información que se considera importante, pero
que no implica un peligro (p. ej. mensajes relacionados con
daños materiales).
SERVICIO AL CLIENTE
Llame al Servicio de atención al
cliente al 1 (844) 543-5872
Visite una de nuestras tiendas LIDL en caso de
cualquier inquietud.
Visite el Portal de atención al
cliente en
www.lidl.com/contact-us IAN 359924_2101 Por favor tenga su
número IAN a la
mano.
Advertencias y símbolos empleados
En este manual de instrucciones y en el embalaje se emplean las indicaciones de advertencia
siguientes:
Voltaje/ corriente alterna Use el producto solo en espacios
interiores secos.
Hertz (frecuencia de suministro) Peligro– ¡Riesgo de descarga
eléctrica!
Vatio CUIDADO
¡Superficie caliente!

20 US-ES
VAPORIZADOR PORTÁTIL DE
PRENDAS
Introducción
Felicidades por la compra de su nuevo producto.
Usted ha seleccionado un producto de calidad.
Las instrucciones de uso son parte del producto.
Contienen información importante respecto
a la seguridad, el uso y la eliminación. Antes
de usar el producto, familiarícese con toda la
información de seguridad y las instrucciones
de uso. Utilice la unidad únicamente como se
describe y para las aplicaciones indicadas. Si
traspasa el producto a alquien más, por favor
asegúrese de incluir toda la documentación con
él.
Uso previsto
Este producto está hecho para alisar telas
usando vapor. No lo utilice para ningún otro
propósito.
Este producto ha sido diseñado únicamente
para el uso doméstico privado, no para fines
comerciales.
El fabricante no se responsabiliza por daños
provocados por un uso inadecuado.
Incluido con el producto
Tras desempacar el producto, revise que esté
completo y que todas las piezas estén en
buen estado. Extraiga todos los materiales del
empaque antes de usar.
1x Cepillo de vapor
1x Tanque de agua extraíble
1x Cepillo
1x Manual de instrucciones
Datos técnicos
Tensión de entrada: 120 V∼, 60 Hz
Consumo de
energía: 1200 W

21US-ES
Descripción de las piezas
(Fig. A)
A
[1]
[2]
[3]
[4]
[5]
[6]
[7]
[8]
[9]
[]
[1] Boquillas de vapor
[2] Cepillo
[3] (Botón de vapor con seguro)
[4] (Abertura del tanque de agua)
[5] Tanque de agua
[6] Base
[7] Marca MAX
(nivel máximo de agua: 8.45floz [250ml])
[8] Cable de alimentación (con protección
antirrizos) y clavija de alimentación
[9] (Botones de liberación, a ambos lados
del tanque de agua)
[] Manilla

22 US-ES
(Fig. B)
B
[]
[]
[] LED
[] Interruptor de encendido/apagado (O/I)

23US-ES
INSTRUCCIONES
DE SEGURIDAD
IMPORTANTES
LEA TODAS LAS
INSTRUCCIONES. GUARDE
COMO REFERENCIA
FUTURA. INCLUYA TODA
LA DOCUMENTACIÓN AL
ENTREGAR ESTE PRODUCTO A
OTRA PERSONA.
Al utilizar su electrodoméstico,
siempre siga las precauciones
básicas de seguridad, incluidas
las siguientes:
1. Lea todas las instrucciones.
2. Para reducir el riesgo
de contacto con el agua
caliente que sale de los
orificios de vapor, revise el
electrodoméstico antes de
cada uso sosteniéndolo lejos
del cuerpo y usando el botón
de vapor.
3. Use el electrodoméstico solo
para su uso previsto.
4. Para reducir el riesgo de
descarga eléctrica, no
sumerja el electrodoméstico
en agua u otros líquidos.
5. Jamás tire del cable para
desconectarlo de la corriente;
en lugar de ello, tome la
clavija y tire de ella para
desconectar el cable.
6. No permita que el cable
toque superficies calientes.
Deje que el electrodoméstico
se enfríe por completo antes
de guardarlo. Enrolle el
cable de forma holgada
en el electrodoméstico al
guardarlo.
7. Desconecte siempre el
electrodoméstico de la toma
de corriente al llenarlo de
agua o vaciarlo, y cuando no
esté en uso.
8. No use el electrodoméstico
si tiene el cable dañado o
si se ha caído o dañado.
Para reducir el riesgo de
descarga eléctrica, no
desarme ni intente reparar
el electrodoméstico; llévelo
a un técnico de reparación
calificado para que lo
examine y repare. Un
ensamblaje o reparación
incorrectos podrían provocar
un riesgo de incendio,
descarga eléctrica o lesiones
a personas al usar el
electrodoméstico.

24 US-ES
9. Se requiere una supervisión
cercana al usar un
electrodoméstico cerca
de niños. No deje el
electrodoméstico sin
supervisión al tenerlo
conectado.
10. Podría haber quemaduras
al tocar piezas metálicas
calientes, agua caliente o
vapor. Tenga cuidado al
voltear un electrodoméstico
a vapor boca abajo, ya que
podría haber agua caliente
en el depósito.
11. Para reducir la probabilidad
de sobrecargas del circuito,
no use otro electrodoméstico
de alto consumo energético
en el mismo circuito.
12. Si el uso de un cable de
extensión es absolutamente
necesario, se debe utilizar
un cable con clasificación
de amperios (considerando
la clasificación de amperios
del electrodoméstico). Los
cables con una clasificación
de amperios menor podrían
sobrecalentarse. Se debe
tener cuidado al colocar el
cable, para no tirar de él ni
tropezarse con él.
13. Para reducir el riesgo de
descarga eléctrica, este
electrodoméstico posee
una clavija polarizada (una
punta es más ancha que la
otra). Esta clavija calza en
la toma de corriente solo de
una manera. Si el enchufe
no entra completamente en
el tomacorriente, póngalo al
revés. Si todavía no calza,
contacte a un electricista
calificado para instalar la
toma de corriente adecuada.
No modifique la clavija de
ningún modo.
PRECAUCIÓN
No llenar por sobre la marca del
nivel máximo de llenado.
ADVERTENCIA
No seguir estas advertencias
puede provocar la muerte o
lesiones graves.
PRECAUCIÓN
No seguir las advertencias puede
provocar lesiones o daños a la
propiedad.
ADVERTENCIA
¡PELIGRO CONTRA LA VIDA
Y RIESGO DE ACCIDENTES
PARA INFANTES Y NIÑOS!

25US-ES
Jamás deje a los niños sin
supervisión con el material de
empaque. Siempre existe un
riesgo de asfixia si los niños
juegan con el material de
empaque. Los niños suelen,
con frecuencia, subestimar los
peligros. Mantenga siempre a los
niños lejos de los materiales de
empaque. Este producto no es un
juguete.
Este producto no está diseñado
para que los usen personas
(incluyendo niños) con
capacidades físicas, sensoriales
o mentales reducidas, o que
no tengan la experiencia y
conocimiento necesarios, a menos
que hayan recibido supervisión
e instrucción en relación con el
uso del producto por parte de
una persona responsable de su
seguridad. Debiera supervisarse
a los niños para asegurarse
de que no jueguen con este
producto.
ADVERTENCIA
Los cambios o modificaciones
a este producto que no estén
expresamente aprobados por
la entidad responsable del
cumplimiento podrían anular
la autoridad del usuario para
usar el producto.
AVISO
Este producto ha
sido probado por cuanto a su
cumplimiento con los límites de
un dispositivo digital ClaseB,
según el apartado 15de
las Regulaciones FCC. Estos
límites están diseñados para
proporcionar una protección
razonable contra interferencias
dañinas en instalaciones
residenciales. Este producto
genera, usar y puede irradiar
energía de radiofrecuencias
y, de no instalarse y usarse
según las instrucciones, puede
provocar interferencia dañina
sobre las comunicaciones por
radio.
Sin embargo, no hay garantía
alguna de que no pueda
ocurrir interferencia en una
instalación en particular.
Si este producto provoca
interferencia dañina a la
recepción de radio o televisión,
lo cual se puede determinar
al apagar y encender el
producto, se recomienda
corregir dicha interferencia
mediante una o más de las
siguientes medidas correctivas:

26 US-ES
• Reoriente o reinstale la
antena receptora.
• Aumente la separación
entre el producto y el
receptor.
• Conecte el producto a una
toma de corriente de un
circuito distinto al que está
conectado el receptor.
• Consulte al representante
de ventas o a un técnico de
radio/ TV experimentado
para obtener ayuda.
Este producto cumple
con el Inciso15 de las
RegulacionesFCC. El uso está
sujeto a las dos siguientes
condiciones:
(1) Este producto no puede
provocar interferencia
dañina y
(2) Este producto debe
aceptar cualquier
interferencia recibida,
incluida interferencia
que pueda provocar
un funcionamiento no
deseado.
EXCLUSIVAMENTE
PARA USO
DOMÉSTICO
GUARDE ESTAS
INSTRUCCIONES

27US-ES
Antes del primer uso
Quite el empaque. Revise que todas las
piezas estén enteras.
Limpie el producto (consulte “Limpieza y
cuidados”).
AVISO
El producto podría soltar
vapores u olores durante el primer uso. Estos
son residuos de producción o transporte que
se eliminarán rápidamente. Podría haber
ruidos leves como clics o crujidos. Estos
también desaparecerán pronto, a medida
que las piezas plásticas se vayan ajustando
finalmente a las condiciones operativas.
Funcionamiento
Llenado/vaciado del tanque
de agua
PRECAUCIÓN ¡Riesgo de descarga
eléctrica! Antes de llenar el tanque
de agua [5]: Desconecte la clavija de
alimentación [8] de la toma de corriente.
AVISO
Llene el tanque de agua [5] con agua del
grifo o agua destilada sin aditivos. Use las
siguientes mezclas según la dureza del agua
de su zona:
Dureza del agua Agua
Blanda Agua del grifo
Medianamente dura Agua destilada y del
grifo (proporción: 1:1)
Dura Agua destilada
Su servicio de agua potable local puede
informarle acerca de la dureza del agua
en su área.
El tanque de agua [5] tiene una capacidad
de aproximadamente 8.45floz (250ml).
La marca MAX [7] para la capacidad de
llenado máximo se aplica cuando el tanque
de agua [5] se coloca verticalmente.
C
[9]
[5]
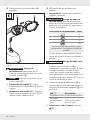
Llenado del tanque de agua [5]:
Presione los botones de liberación [9].
Tire el tanque de agua para sacarlo del
producto (fig.C).
Vierta agua a través de la abertura del
tanque de agua [4] para que entre en él.
No supere la marca MAX [7].
D
[7]
[4]
Cierre la abertura del tanque de agua .
Limpie las salpicaduras de agua. Reinserte
el tanque de agua en el producto (fig.D).
El tanque de agua hace un sonido de clic al
calzar en posición.
Drenaje del tanque de agua [5]:
Saque el tanque de agua. Vierta el agua
desde la abertura del tanque de agua [4]
para sacarla.

28 US-ES
Extracción/instalación del
cepillo
E
[2][1]
(Fig. E)
ADVERTENCIA ¡Riesgo de
quemaduras! Espere hasta que el
producto se haya enfriado antes de extraer
o instalar el cepillo[2].
AVISO
El producto se puede usar con
o sin el cepillo [2].
Extracción del cepillo [2]: Saque
cuidadosamente el cepillo desde el soporte
superior.
Instalación del cepillo [2]: Presione el
cepillo hacia las boquillas de vapor [1]. El
soporte superior debe activarse.
Alisado de prendas con
vapor
Preparación: Cuelgue las prendas en un
colgador o baranda.
PRECAUCIÓN ¡Riesgo de daños a
la propiedad! Antes de alisar al vapor:
Revise las instrucciones de planchado para
determinar si las prendas son aptas para su
uso con este producto:
Instrucciones de planchado Apto
Sí
Sí
Sí
No
Las instrucciones de planchado suelen
encontrarse en una etiqueta cosida a las
prendas.
En caso de que no haya etiqueta: Primero,
intente alisar sobre un trozo no visible de las
prendas.
PRECAUCIÓN ¡Riesgo de daños a la
propiedad!
No trate cuero, terciopelo, muebles
impregnados o materiales sensibles al vapor.
No toque materiales sensibles al vapor
(como, por ejemplo, materiales sintéticos
como poliamidas o rayón) directamente con
las boquillas de vapor calientes [1]. Use solo
la función de alisado al vapor.
Conecte la clavija de alimentación [8] a
una toma de corriente adecuada. Mueva el
interruptor de encendido/apagado [] a la
posición I.
LED [] Descripción
Parpadeante (azul) Producto calentándose
Encendido
constantemente
(azul)
Producto listo para
alisar al vapor
Cómo hacer salir el vapor: Presione
[3].

29US-ES
F
ADVERTENCIA ¡Riesgo de
quemaduras!
Cuando alise al vapor, apunte siempre las
boquillas de vapor [1] hacia las prendas
(fig.F).
Jamás alise al vapor prendas que tenga
puestas.
Deje enfriar las prendas en un colgador
antes de usarlas.
Estire levemente las prendas con una mano.
Siga alisando las prendas moviéndolas
sobre el cepillo [2]. Mantenga sus manos
alejadas del vapor.
Aplique una presión ligera sobre las prendas
con el cepillo [2]. Mueva el cepillo hacia
atrás y adelante en línea recta.
AVISO
Después de lavar: Cuelgue las prendas (por
ejemplo, en un colgador). Así, las prendas
se secarán dejando menos arrugas.
El producto no puede alisar arrugas
persistentes ni entregar resultados como los
de una plancha. Para tales casos, lo más
adecuado es usar una plancha.
Al alisar al vapor: Las prendas absorben
la humedad. Deje secar las prendas por
completo antes de almacenarlas en su
guardarropa.
Funcionamiento continuo con vapor
Durante el funcionamiento continuo, sale vapor
caliente de las boquillas de vapor [1] sin
necesidad de mantener presionado [3].
Funcionamiento continuo con vapor
Para comenzar el
funcionamiento
continuo
Presione [3]. Mueva el
seguro hacia abajo [3].
Para detener el
funcionamiento
continuo
Mueva el seguro hacia
arriba [3].
Si cae agua desde las boquillas de vapor
[1]: Mueva el seguro hacia arriba [3]. Suelte
[3]. El producto comenzará a calentarse.
AVISO
Cuando el tanque de agua [5] se vacíe
durante el funcionamiento continuo
con vapor, el producto se apagará
automáticamente tras aprox. 40segundos.
El LED rojo [] parpadea. Suelte [3].
Llene el tanque de agua (consulte “Llenado/
vaciado del tanque de agua”).
El producto vuelve a encenderse
automáticamente cuando se presiona el
botón de vapor [3].

30 US-ES
Alisado de cortinas y tapices
con vapor
Quite las arrugas y marcas de cortinas y
tapices colgándolos sobre una baranda y
tensándolos.
Antes de alisar al vapor: Realice siempre una
prueba sobre un trozo de tela que no quede
a la vista.
Trate con vapor las cortinas/tapices
(consulte “Alisado de prendas con vapor”).
Al usar el producto horizontalmente:
Sostenga el producto verticalmente de
vez en cuando para mantener la potencia
máxima del vapor.
Para dejar de alisar con
vapor
Mueva el seguro hacia arriba [3], si aplica.
Suelte [3].
Coloque el producto, con su base [6], sobre
una superficie plana y estable.
Mueva el interruptor de encendido/
apagado [] a la posición O. Desconecte
la clavija de alimentación [8] de la toma de
corriente.
AVISO
Al soltar [3], el producto
deja de calentar automáticamente tras
aprox. 15minutos. El LED rojo [] parpadea
hasta que el producto se apaga.
Deje enfriar el producto (durante aprox.
15minutos). No deje el producto sin
supervisión mientras siga caliente.
Vacíe el tanque de agua [5] tras caada uso
para evitar la formación de depósitos de cal
(consulte “Llenado/vaciado del tanque de
agua”).
Limpieza y cuidados
PRECAUCIÓN ¡Riesgo de descarga
eléctrica! Antes de limpiar o realizar
mantenimiento al producto: Desconecte la
clavija de alimentación [8] de la toma de
corriente.
ADVERTENCIA No sumerja los
componentes eléctricos del producto en
agua ni en otros líquidos. Nunca mantenga
el producto bajo agua corriente.
Limpie el producto con un paño ligeramente
húmedo.
No utilice limpiadores agresivos o abrasivos
ni cepillos duros para limpiar el producto.
Deje secar todas las piezas por completo
después de limpiarlas.
Limpieza del sarro
Use un agente descalcificante de venta
directa al público.
Mezcle una solución de agente
descalcificante y agua. Llene con la solución
hasta la marca MAX [7] del tanque de
agua [5]. Inserte el tanque de agua en el
producto.
ADVERTENCIA Siga las instrucciones
del fabricante del agente descalcificante al
mezclar la solución.
Deje trabajar la solución según las
instrucciones del fabricante del agente
descalcificante.
Conecte la clavija de alimentación [8] a una
toma de corriente adecuada.
Espere hasta que el producto haya
alcanzado su temperatura operativa (el LED
[] se enciende estático).
Deje salir el vapor sobre un fregadero hasta
que no quede sedimento ni suciedad.
Desconecte la clavija de alimentación [8] de
la toma de corriente.
Vacíe el tanque de agua [5]. Enjuague el
tanque de agua con agua limpia.
Para enjuagar las tuberías internas, use agua
del grifo limpia para generar vapor (consulte
“Alisado de prendas con vapor”).

31US-ES
Almacenamiento
Guarde el producto en su embalaje original
cuando no esté en uso.
Guarde el producto en un lugar seco fuera
del alcance de los niños.
Almacene el producto solo con el tanque de
agua [5] vacío.
Eliminación
Deshágase del empaque mediante sus
instalaciones de reciclaje locales y de acuerdo
con las regulaciones federales, estatales y
locales.
Observe las señales del material
de empaque para la separación de
residuos, los cuales están señalados
con abreviaturas (a) y números (b) que
significan lo siguiente: 1–7: plásticos /
20–22: papel y tablero de fibra /
80–98: materiales mixtos.
Contacte a las autoridades locales
correspondientes para la eliminación de
desechos para mayor información sobre
cómo desechar su producto desgastado.

32 US-ES
Garantía limitada de 3 años
Lo que cubre la presente garantía
La garantía incluye:
• Daños, quebraduras o incapacidad para
funcionar debido a defectos.
• Daños que no hayan sido causados por el
desgaste propio del uso o por no seguir las
instrucciones de seguridad y mantención
incluidas en el manual para el usuario.
Lo que no cubre esta garantía
La garantía no cubre daños causados por:
• El desgaste propio del uso del producto,
incluidas las partes frágiles (como
interruptores, piezas de vidrio, etc.).
• Uso o transporte no indicado del producto.
• Desatención a las instrucciones de seguridad
y mantención.
• Accidentes o causas de fuerza mayor
(e.g. relámpagos, incendio, inundación,
etc.).
• Manipulación mal intencionada del
producto (retirar la cubierta, tornillos, etc.).
La presente garantía tampoco cubre daños
indirectos o emergentes. Sin embargo algunos
estados no permiten la exclusión o limitación de
daños indirectos o emergentes, por lo que dicha
exclusión o limitación pudiera no aplicarse en
su caso.
Período de cobertura y resolución de la
garantía
La garantía es válida por 3 años a partir de la
fecha de compra. La empresa, según lo estime
conveniente, devolverá el dinero o repondrá el
producto.
La empresa no:
• Dará inicio a un nuevo período de garantía
al hacerse el cambio del producto.
• Reparará el producto.
¿Cómo se tramita la garantía?
Recomendamos que primero usted:
• Llame al Servicio de atención al cliente al
1 (844) 543-5872.
• Visite el Portal de atención al cliente en
www.lidl.com/contact-us
• Visite una de nuestras tiendas LIDL en caso
de cualquier inquietud.
A fin de acelerar el trámite de la garantía, tenga
a bien contar con lo siguiente:
• Recibo de venta original que incluya la
fecha de compra.
• Producto y manual en su empaque original.
• Descripción del problema.
¿Qué debe hacer usted para mantener
la garantía vigente?
• Guardar el recibo original.
• Seguir todas las instrucciones para el uso del
producto.
• No realizar ninguna reparación ni alteración
al producto.
¿De qué manera influyen las leyes
estatales con esta garantía?
La presente garantía le otorga derechos legales
específicos, y pudiera usted contar con otros
derechos los cuales varían de un estado a otro.
Todas las garantías implícitas se encuentran
limitadas a la duración y términos de la
presente garantía. Algunos estados no permiten
limitaciones al período de tiempo y términos
de la garantía implícita, por lo que dichas
limitaciones pudieran no aplicarse en su caso.

IAN 359924_2101
Distributed by / Distribuido por:
LIDL US, LLC, Arlington, VA 22202
Model No. / Modelo Núm.: HG07732C-US/ HG07732D-US
Version / Versión: 08 / 2021
Made in / Hecho en: China
-
 1
1
-
 2
2
-
 3
3
-
 4
4
-
 5
5
-
 6
6
-
 7
7
-
 8
8
-
 9
9
-
 10
10
-
 11
11
-
 12
12
-
 13
13
-
 14
14
-
 15
15
-
 16
16
-
 17
17
-
 18
18
-
 19
19
-
 20
20
-
 21
21
-
 22
22
-
 23
23
-
 24
24
-
 25
25
-
 26
26
-
 27
27
-
 28
28
-
 29
29
-
 30
30
-
 31
31
-
 32
32
-
 33
33


Silvercrest 359924 El manual del propietario
- Tipo
- El manual del propietario
En otros idiomas
- English: Silvercrest 359924 Owner's manual
Documentos relacionados
-
Silvercrest 353450 El manual del propietario
-
-
-
-
-
-
-
Silvercrest SDRB 1000 B1 El manual del propietario
-
-