Silvercrest 291127 El manual del propietario
- Categoría
- Ollas arroceras
- Tipo
- El manual del propietario

STEAMER /
VAPORERA
SDD 1500 A1
IAN 291127
STEAMER
Operation and safety notes
VAPORERA
Instrucciones de utilización y de seguridad

US-EN Operation and safety notes Page 3
US-ES Instrucciones de utilización y de seguridad Pagina 28

3 US-EN
Description of signal words ......................................................................................... Page 4
Customer service ..................................................................................................................Page 4
List of pictograms used....................................................................................................Page 4
Introduction...............................................................................................................................Page 4
Intended use ....................................................................................................................................Page 4
Part description ................................................................................................................................ Page 5
Technical data .................................................................................................................................Page 7
Scope of delivery ............................................................................................................................Page 7
Important safeguards ......................................................................................................Page 7
Before use...................................................................................................................................Page 13
Dividing plate 5 / 7 ........................................................................................................................ Page 13
Initial setup.......................................................................................................................................Page 14
Use ....................................................................................................................................................Page 15
Setting the steaming time ................................................................................................................ Page 15
Prepare whole meals ......................................................................................................................Page 16
Pre-set steaming times .....................................................................................................................Page 16
Pause during steaming ....................................................................................................................Page 17
Removing food from the product .................................................................................................... Page 17
Boil dry alarm .................................................................................................................................. Page 17
Refilling the water tank during use .................................................................................................Page 17
Cooking rice and liquids.................................................................................................................Page 17
Cooking eggs ..................................................................................................................................Page 18
Care and cleaning ................................................................................................................ Page 18
Descaling .........................................................................................................................................Page 18
Recipes ...........................................................................................................................................Page 20
Steaming guide ......................................................................................................................Page 22
Vegetable ........................................................................................................................................Page 22
Fish and seafood ............................................................................................................................. Page 24
Poultry ..............................................................................................................................................Page 24
Meat and sausages ........................................................................................................................Page 24
Rice ..................................................................................................................................................Page 25
Eggs .................................................................................................................................................Page 26
Disposal ........................................................................................................................................Page 26
Three year limited warranty ......................................................................................Page 26

4 US-EN
DESCRIPTION OF SIGNAL WORDS
WARNING indicates a hazardous situation that, if not avoided,
could result in death or serious injury.
CAUTION indicates a hazardous situation that, if not avoided,
could result in minor or moderate injury.
NOTICE indicates information considered important, but not
hazard related (e.g. messages related to property damage).
CUSTOMER SERVICE
Call customer service at
1 (844) 543-5872
Visit a LIDL store for further assistance.
Visit the Website Customer Service
Platform at www.lidl.com/contact-us IAN 291127 Please have your
IAN number ready.
List of pictograms used
Observe caution and safety notes! Indoor use only.
Caution - Hot surface! Danger - Risk of electric shock!
Risk of fire Food-safe!
V~Voltage (alternating current) Hertz (mains frequency)
Watts (effective power)
FOOD STEAMER
Introduction
Congratulations on your purchase. You have
selected a quality product. The instructions for use
are a part of the product. They contain important
information about the safety, use and disposal of
the product. Before using the product, please
learn about all the safety information and usage
instructions.
Only use the product as described and for the
specified applications. If you lend the product to
someone else, please also give all the instructions.
Intended use
This product is only suitable for
indoor use.
The product is only designed for food steaming. It
may only be used in dry and confirmed space.
The product is only intended for use indoors.

5 US-EN
It is not intended for commercial use or for any
other use. The manufacturer is not liable for
damage caused by improper use.
This product is intended to be used in household
only.
Part description
1 Lid handle
2 Steam vent
3 Lid
4 Rice tray
5 Dividing plate (round top shape,
for top container)
6 Top container (number 2, can be found on
the handle of container)
7 Dividing plate (square shape, for bottom
container)
8 Bottom container (number 1, can be found on
the handle of container)
9 Drip tray
10 Water tank
11 Water inlet filler
12 Main unit
13 Control panel
14 MIN mark
15 MAX mark
R.MENU
L.MENU
MAX
MIN
1
3
2
4
5
6
7
8
9
10
11
14
15
12
13

6 US-EN
16 Filter 17 Steam diffuser
16
17 17
16
18 On/Off button
19 Food icons (Left Compartment)
20 Timer (Left compartment)
21 Refill icon
22 Timer (Right compartment)
23 Food icons (Right compartment)
24 Descale icon
25 Right menu button
26 Steaming icon (Right compartment)
27 Start/Pause button
28 Steaming icon (Left compartment)
29 Left menu button
30 Decrease button (–)
31 Increase button (+)
R.MENU
L.MENU
18 19 21 23
2529 27 2628
20 22
24
30
31
Food types 19 /23
32 Vegetable
33 Meat
34 Fish
35 Poultry
36 Eggs
37 Rice
32 33 34 35 36 37

7 US-EN
Status of steaming icons 26 /28
38 Steam icon
39 Keep warm icon
40 Water gauge
41 Locking tabs
42 Holes
38 39
40 15
Important safeguards
READ ALL INSTRUCTIONS. KEEP
FOR FUTURE REFERENCE. INCLUDE
ALL DOCUMENTATION WHEN
PASSING THIS PRODUCT ON TO
OTHERS.
Failure to observe the
following warnings may
result in fatal or serious
injuries.
Technical data
Nominal voltage: 120 V∼ (alternating
current), 60 Hz
Nominal power: 1500 W
Steam container
capacity: max. 5.6 QT / 5.3 l
(number 1)
max. 6 QT / 5.7 l
(number 2)
Rice bowl capacity: max 1.1 QT / 1 l
Water tank capacity: max 1.7 QT / 1.6 l /
min 0.26 QT / 250 ml
Scope of delivery
Immediately after unpacking, please check the
package contents for completeness and if the
product and all parts are in good condition.
Remove all packaging materials before use.
1 Main unit
1 Top container (number 2)
1 Bottom container (number 1)
1 Drip tray
1 Dividing plate A
1 Dividing plate B
1 Rice tray
1 Lid

8 US-EN
DANGER TO LIFE
AND RISK OF ACCI-
DENTS FOR INFANTS AND
CHILDREN! Never leave
children unsupervised with the
packaging materials. The
packaging material poses a
suffocation hazard. Children
frequently underestimate the
dangers. Always keep children
away from the packaging
material.
This product is not intended for
use by persons (including
children) with reduced physical,
sensory or mental capabilities,
or lack of experience and
knowledge, unless they have
been given supervision or
instruc tion concerning use of
the product by a per son
responsible for their safety.
Children should be supervised
to ensure that they do not play
with the product.
FOR HOUSEHOLD USE ONLY.
Changes or modifications to
this product not expressly
approved by the party
responsible for compliance
could void the user‘s authority
to operate the product.
Note: This product has been
tested and complies with the
limits for a Class B digital
device, pursuant to Part 15 of
the FCC Rules. These limits are
designed to provide reasonable
protection against harmful
interference in a residential
installation. This product
generates, uses and can
radiate radio frequency energy
and, if not installed and used in
accordance with the instructions,
may cause harmful interference
to radio communications.
However, there is no guarantee
that interference will not occur
in a particular installation.

9 US-EN
If this product causes harmful
interference to radio or television
reception, which can be determined
by turning the product off and on,
the user is encouraged to try and
correct the interference by one or
more of the following measures:
• Reorient or relocate the
receiving antenna.
• Increase the separation
between the product and
receiver.
• Connect the product into an
outlet on a circuit different
from that to which the
receiver is connected.
• Consult the dealer or an
experienced radio / TV
technician for help.
Do not touch hot surfaces. Use
handles or knobs.
To protect against electrical
shock do not immerse supply
cord, plug, or main unit 12 in
water or other liquid.
Close supervision is necessary
when the product is used by or
near children.
Unplug from mains power
socket when not in use and
before cleaning. Allow to cool
before putting on or taking off
parts.
Do not operate the product
with a damaged supply cord or
plug or after it malfunctions or
has been damaged in any
manner. Return it to the nearest
authorized service facility for
examination, repair, or
adjustment.
The use of accessory attachments
not recommended by the
product manufacturer may
cause injuries.
Do not use outdoors
Do not let supply cord hang
over edge of table or counter,
or touch hot surfaces.
Do not place on or near a hot
gas or electric burner, or in a
heated oven.
Extreme caution must be used
when moving the product
containing hot oil or other hot
liquids.

10 US-EN
Always attach plug to the
product first, then plug supply
cord into the wall outlet. To
disconnect, turn any control to
„off“, then remove plug from
wall outlet.
Do not use the product for
other than intended use.
This product has a polarized
plug (one blade is wider than
the other). To reduce the risk of
electric shock, this plug is
intended to fit into a polarized
outlet only one way. If the plug
does not fit fully into the outlet,
reverse the plug. If it still does
not fit, contact a qualified
electrician. Do not attempt to
modify the plug in any way.
Children shall not play with the
product.
Do not operate the
product in explosive
environments, where
inflammable liquids or gases
are located.
ATTENTION! Never leave the
product unattended during
operation.
HAZARD OF FIRE!
Do not operate the
product in the proximity of or
below curtains, wall cupboards
or other inflammable materials.
A short supply cord is provided
to reduce the risk resulting from
becoming entangled in or
tripping over a longer cord.
An extension cords may be
used if care is exercised in their
use.
- If an extension cord is used:
1) The marked electrical rating
of the extension cord should
be at least as great as the
electrical rating of the product;
2) The extension cord should
be arranged so that it will
not drape over the
countertop or tabletop
where it can be pulled on by
children or tripped over
unintentionally; and

11 US-EN
3) If the product is of the
grounded type, the
extension cord should be a
grounding-type 3-wire cord.
Avoid the hazard of
life by electric shock
Never touch the product, the
supply cord or the mains plug
with wet hand.
Make sure that the details on
the rating label are in
conformity with your mains
voltage. Only connect the
product to alternating current
with an earthing contact as this
provide protection against
electric shock.
Do not operate this product
with an external timer or a
separate remote control system,
such as a wireless remote
control socket.
Check the supply cord regularly
for damage or deterioration.
Never let the supply cord become
wet or damp during operation.
Do not pull the supply cord for
unplugging the product. Unplug
the product by pulling out the
plug.
Never place containers filled with
liquid, such as drinking glasses,
vases etc. on the product.
Never use in very humid
environments.
Never use in the immediate
vicinity of a kitchen sink, bath,
shower or a swimming pool, as
water may splash into the
product. If liquid should enter
the product, unplug the mains
plug immediately and have the
product repaired by a qualified
technician.
Failure to observe the
following warnings can
result in injuries or property
damage.
Never let the supply cord
becomes a trip hazard, that no-
one can get tangled in it or tread
on it.
Misuse can cause injury!

12 US-EN
HOT SURFACE! The
product will become
very hot during use. Beware of
getting in contact with the
ascending steam or the hot
food.
Be aware that hot steam
escapes from steam vents 2.
Never cover these openings,
otherwise steam might build up
in the product and escape
violently when it is opened.
Do not open the lid 3 during
the steaming process. Before
removing the lid, press the start /
pause button 27 to pause the
steaming process. Always lift the
lid 3 with the lid handle 1 .
Move the lid 3 underside
away from you and let the
steam exhaust backwards.
Do not bend over the product
during steam generation. Use
mittens when touching the lid 3
and the containers 6 / 8 or
trays 4 / 9. Use a long fork or
tongs when checking if the food
is done.
The heating element is subject
to residual heat after use.
Never let the supply cord hang
down over the edge of the work
surface so that the product
cannot be pulled down
accidentally.
Let the product completely cool
down, before moving it to a
different location or remove the
remaining water from the main
unit 12 or drip tray 9.
Ensure the water level is
between minimum and
maximum marking. Do not
overfill the product otherwise
hot water may be ejected.
SAVE THESE INSTRUCTIONS
Only use clean drinking water
to generate steam.

13 US-EN
Place the product on a heat
resistant surface (no varnished
tables, no table cloths). Do not
operate it in the vicinity of other
sources of heat (oven, gas
flame). Otherwise, the product
and / or pieces of furniture may
be damaged.
Place the product on an even,
stable surface at a safe
distance to walls and
cupboards in order to avoid
any damage caused by steam
rising.
Always fill the water tank 10
with sufficient water for the
period of steaming. Do not
cover the main unit 12 / drip
tray 9 with aluminium foil or
any other material. If not
observed, this can lead to an
overheating of the product.
Damage of the product is the
consequence.
Never operate the product
without water in the water
tank 10 .
Before use
Remove all packaging material before use.
It is important to clean the
product before first use or if it has not been
used for a long period of time. See the “Care
and cleaning” section for more information.
It is essential that the product is
descaled at regular intervals to maintain
optimum steam and extend the life of the unit.
See the “Descaling” section for more
information.
During the first use, you may notice some
smoke / vapour emitting from the rear of the
main unit 12 . It is normal as grease is usually
applied on some parts of the product during
the manufacturing process. After serval use of
the product, it will no longer occur. This is not
dangerous and will not contaminate or
flavour food during use.
Dividing plate 5 / 7
The top / bottom containers 6 / 8 can be
separated into two compartments each with
the dividing plates 5 / 7. To do so, place
the dividing plate 5 / 7 into the
designated rails.
To setup a larger single steaming
compartment, remove the dividing
plates 5 / 7 from the top / bottom
containers 6 / 8.

14 US-EN
41 42
Note: The dividing plate (square shape, for
bottom container 8) 7 can only be inserted in
one direction. Ensure both locking tabs 41
engage both holes 42 on the bottom container
8.
Initial setup
Check and ensure that the mains voltage of
the mains power socket is according to the
Technical Data section.
Place the main unit 12 on a stable, even
surface.
Fill the water tank 10 with cold water to the
maximum level.
Note: The water tank 10 has to be filled
with water at least up to the MIN mark 14 .
R.MENU
L.MENU
HOT
SURFACE! Make sure that the
water does not exceed the MAX
mark 15 . Otherwise, hot water may spurt out
of the product during operation.
Do not add anything like
seasonings etc. to the water. This may affect
the steam flow and / or damage the surface
of the water tank 10 and the heating element.
First place the drip tray 9 onto the main
unit 12 , ensure that the ribs underneath the
drip tray 9 faces towards the rear side of
the main unit 12 and are placed securely in
the designated ribs.
Then place the bottom container 8 with
inserted dividing plate 7 onto the drip
tray 9.
Now place food in the compartment of
bottom container 8. Use the dividing
plate 7 to ensure food do not mix.
If necessary, put the top container 6 on the
bottom container 8, place food in the
compartment of top container 6, use the
dividing plate 5 to ensure food do not mix.
Never use bowls or other
parts, not especially produced for this
product. Otherwise, there may be the risk of
injuries and / or damage of the product.
Place the lid 3 centrically so that the top
container 6 is completely closed and no
steam can exhaust.
Ensure that all parts are positioned correctly
before switching on the product.
Connect the mains plug to a suitable mains
power socket.
The product will beep and the control panel 13
will shows “00I00”.

15 US-EN
R.MENUL.MENU
Now the product is ready to use.
Note: The product will switch off
automatically if idled for a minute.
Use
Setting the steaming time
To set the steaming time, press the left
compartment button 29 or right compartment
button 25 repeatedly and select desired food
type 32 – 37 from relevant food icon (left
compartment) / (right compartment) 19 / 23 .
The steam icon 38 will appear.
While the relevant timer 20 / 22 is flashing
(within 3 seconds), press the increase
button 31 or decrease button 30 to adjust
the steaming time (if necessary).
Repeat above steps for the other
compartment (if required).
Note: The steaming time of each food type can
be adjust between 1 minute and 99 minutes.
Note: In case the steaming time of both left
and right compartments are set to be
different, the compartment with longer
steaming time will start first.
Note: To steam without the dividing
plate A/B 5 / 7, food is recommended to
be placed and steamed evenly under the
same amount of time. To achieve follow below
steps.
Press and hold the left compartment button 29
until both timers 20 / 22 flash together.
If required, adjust the steaming time for the
product using the increase button 31 or
decrease button 20.
Press the start / pause button 27 . The product
will beep, the steam icon 39 will flash and
the timer 20 / 22 will start counting down.
When the timer reaches zero the alarm will
beep twice. The product will automatically
switch to keep warm for 20 minutes. The keep
warm icon 39 appears.
When 20 minutes keep warm finished, the
product will beep 5 times before switch off
automatically.
Note: Water refilling is necessary if the
steaming time is longer, refer to “Refilling the
water tank during use” for detail.
Frequently monitor on the water gauge 40 if
necessary.
HOT
SURFACE! Make sure that the
water does not exceed the MAX
mark 15 . Otherwise, hot water may spurt out
of the product during operation.
HOT
SURFACE! The product will
become hot during use. Beware of
getting in contact with the ascending steam or
any components.
When finished steaming, press the On/Off
button 18 , and pull the mains plug from the
mains power socket. Carefully lift the lid 3
with the lid handle 1. Move the lid 3
underside away from you and let the steam
exhaust backwards.

16 US-EN
HOT
SURFACE! Do not bend over the
product during steam generation.
Use mittens when touching the lid 3 and the
containers 6 / 8 or trays 4 / 9. To check
whether the food is done, use a long fork or
tongs.
Carefully remove the cooked food from the
top/bottom container 6 / 8.
Prepare whole meals
To prepare a whole meal, both top/bottom
container 6 / 8 can be used.
Hint:
- the heaviest food or food taking longest
steam time should be placed in the bottom
container 8,
- the steam works most effectively in the
bottom container 8 and less so when it
travels upwards, steaming time in the upper
container 6 is extended by a few minutes.
- evenly stir or rearrange the steaming food
occasionally with a long cooking fork or tongs.
Exception: raw meat, poultry, fish and
seafood are recommended to be steamed in
the bottom container 8 to prevent juices
dripping onto other food.
Note: Never steam frozen meat, poultry or
seafood direct from freezer. Always thaw
thoroughly first.
Put bottom container 8 on the product and
start steaming (see ”Initial setup” and “Setting
the steaming time”).
Fill top container 6 with food which will take
a moderate time to steam.
Before removing
the lid, press the start / pause
button 27 to pause the steaming
process. A cloud of hot steam may escape if
you remove the lid 3 without sufficient
caution during the steaming process.
Carefully lift the lid 3 with the lid handle 1.
Move the lid 3 underside away from you
and let the steam exhaust backwards.
Take the lid 3 right off.
Put top container 6 on bottom container 8
and close the lid 3 again to continuous
steaming.
Pre-set steaming times
The product has 7 pre-set steaming times.
These can be adjusted using the increase
button 31 and decrease button 30.
To select the pre-set steaming time, press the
left menu button 29 or right menu button 25
repeatedly and select desired food type 32 –
37 .
Pre-set steaming times as follows:
Egg 36 12 minutes
Fish 34 15 minutes
Vegetables 32 20 minutes
Meat 32 30 minutes
Poultry 35 35 minutes
Rice 37 40 minutes
Keep Warm 39 10 minutes (Do not use this
setting to steam food).
Press the start/pause button 27 to start
steaming.

17 US-EN
Pause during steaming
To pause the steaming process press the
start/pause button 27 , the steam icon 39
stops flashing and the timer 20 / 22 stops. To
resume press the start/pause button 27
again.
Whilst the product is paused, it is possible to
adjust the steaming time. Press the left menu
button 29 or right menu button 25 once.
Depending on the timer of which
compartment to be changed, use increase
button 31 or decrease button 30 to set the
new steaming time while relevant timer 20 /
22 is flashing.
Removing food from the
product
Use mittens to remove the
lid 3 and container 6 / 8, ensure to lift
the lid 3 with the lid handle 1. Move the
lid 3 underside away from you and let the
steam exhaust backwards.
Do not remove the drip tray 9 until it has
completely cooled.
Boil dry alarm
This product has a boil dry alarm. The alarm
warns you if there is too little water in the product.
Too high temperatures and damages to the
product may occur.
When the water level is lower than the “MIN”
level the product will beeps continuously and
the refill icon 21 will flash continuously. Refill
the water tank 10 with water as soon as
possible.
Use the water inlet filler 11 to refill the water
tank 10 as described in “Refilling the water
tank during use”.
If the product is filled with too little water
during use, it will beep continuously. Refill the
water tank 10 with water as soon as possible
or switch it off by pressing the On/Off
button 18 .
Refilling the water tank
during use
Use the water inlet filler 11 to refill the water
tank 10 during steaming.
Gently pull the water inlet filler 11 out from
the side of the product. Refill water through
the water inlet filler 11 carefully using a jug
(not supplied).
40 15
The buzzer will stop automatically and the
refill icon 21 will disappear.
Frequently monitor on the water gauge 40 if
necessary.
Cooking rice and liquids
Set up the product as described in ”Initial
setup” and “Setting the steaming time”.
Pour 1 cup of uncooked rice and 1½ cups of
water into the rice tray 4 and stir gently.

18 US-EN
Place the rice tray 4 into the compartment of
a container 6 / 8 and place the lid 3 on
the product.
Note: If you are using both top and bottom
containers 6 / 8, the rice tray 4 should
be placed in the top container 6 so that
nothing drips into the rice.
Set the steaming time for the compartment to
the Rice preset (40 minutes) and press the
start/pause button 27 to start steaming.
Before removing the lid, press
the start / pause button 27 to pause the
steaming process. Carefully lift the lid 3 with
the lid handle 1. Move the lid 3 underside
away from you and let the steam exhaust
backwards.
Stir the rice occasionally.
Sauces, other liquids and fruit can also be
heated and steamed using rice tray 4.
Follow the process described above.
Cooking eggs
The product can be used to cook hard boiled
eggs.
Follow description in ”Initial setup” to setup
the drip tray 9 and bottom container 8
and/or top container 6.
Place the eggs individually into the dimples
within the bottom container 8 and / or top
container 6.
Replace the lid 3.
Set the steaming time and steam as described
in “Setting the steaming time”.
The product has a preset ‘Eggs’ setting of
12 minutes. This can be manually adjusted
using the increase button 31 or decrease
button 30 for personal preference.
Care and cleaning
Never immerse the main
unit 12 , supply cord or mains plug into water.
Unplug from the mains power
socket and leave the product to cool
completely before cleaning.
Rinse thoroughly the water tank 10 then wipe
the main unit 12 with a damp cloth.
Wash the lid 3, rice tray 4, containers
6 / 8 and dividing plates 5 / 7 in
warm water and washing-up liquid.
Pull the filter 16 and steam diffuser 17 out
and clean in warm water and washing-up
liquid. Replace them after cleaning.
To clean the main unit 12 use a dry, lint-free
cloth.
Clean your product after each use.
Note: Please note that none of the included
parts is suitable for dishwashers.
Descaling
The product is required to be descaled
regularly to maintain optimum steam and
extend the life of the product. After every
15 hours of steaming usage, the descale
icon 24 will appears to remind you to
descale the product.
Fill the water tank 10 with at least 20.29 oz
(650 ml) of white vinegar but should not more
than the MAX level. (Not brown vinegar)
IMPORTANT: Do not use any other
chemical or commercial descale agent.
Correctly position the drip tray 9, top and
bottom container 6 / 8 and lid 3, onto
the water tank 10 before connecting to the
mains power socket.

19 US-EN
Set the timer for 25 minutes for both
compartments and press start/pause
button 27 .
If the white vinegar solution
begins to boil over the edge of the
main unit 12 , switch off the timer and pull the
mains plug. Reduce the quantity of white
vinegar slightly. Do not try to move the
product whilst the vinegar is still hot.
When the steaming completed, unplug the
product from the mains power socket and
wait for being cooled completely before
pouring out vinegar.
Rinse the water tank 10 several times with
clean water.
Fill the water tank 10 to the MAX mark with
clean water. Place the drip tray 9, bottom
container 8, top container 6 and lid 3
onto the water tank 10 and then connect the
product to the mains power socket.
Switch on the product and start steaming on
any setting for 10 minutes. Switch off and
wait for being cooled completely before
pouring out the remaining water.

20 US-EN
Recipes
Ratatouille
4 Servings
Ingredients:
2 Peppers (red, yellow or green)
1 Eggplant (0.55 lb / 250 g)
1 Zucchini (0.55 lb / 250 g)
0.55 lb / 250 g Tomatoes
1 Onion
2 Garlic cloves
Salt & pepper
Tabasco
Herbs de Provence
0.22 lb / 100 g Tomato ketchup
2 tbsps. Tomato puree
Directions:
Rinse and chop peppers, eggplant, zucchini,
tomatoes, onion and garlic into cubes. Mix all
ingredients together and season with salt, pepper,
tabasco, ketchup and tomato puree and herbs de
Provence. Cover the bottom of bottom container 8
with a cling wrap and place the mixed ingredients
on top of the cling wrap. Choose the vegetable
program 32 and steam for 12 minutes.
Side dish: Rice
Also great as a side for meat dishes or (cold) to
accompany a buffet.
Mini chocolate cakes
6 Servings
Ingredients:
3.38 oz / 100 ml Milk
0.28 lb / 125 g Flour
1 tsp. Baking powder
2 tbsp Heaped cocoa
1 Egg
0.11 lb / 50 g Butter
0.11 lb / 50 g Sugar
1 Splash of rum
Directions:
Place all ingredients into a bowl and mix it for
3 minutes with a hand mixer. Place the dough into
six silicon muffin baking dishes and place into the
product for 14 minutes using the Eggs program 36.
Remove the mini chocolate cakes immediately from
the baking dishes after steaming and let them
cool on a rack.
Pears in chocolate sauce
2 Servings
Ingredients:
1 Pear
1/2 Cup of cream
0.11 lb / 50 g Chocolate (plain)
Chopped pistachios
Directions:
Peel and cut the pears into halves and remove the
core.
Break the chocolate into pieces and place into the
rice tray 4 together with the cream.
Place pears and chocolate into the product and use
the vegetable program 32 for 10 minutes.
Remove the pears and place onto a plate. Stir the
sauce until it gets dark and the chocolate is
distributed evenly. Then pour over the pears and
decorate with some chopped pistachios.
Leek-Ham-Pinwheels
8 Servings
Ingredients:
4 Leeks
8 Slices of boiled ham
0.09 lb / 40 g Butter
0.09 lb / 40 g Flour
2 Wedges of soft cheese
33.81 oz / 1 l Vegetable stock

21 US-EN
Directions:
Cut the leek in half (crosswise) and steam it in the
product for 5-7 minutes using vegetable
program 32 . Wrap the leek into the boiled ham
slices and place them in a greased casserole dish.
Prepare a light sauce made of butter and flour
(roux) as well as the vegetable stock and add the
soft cheese.
Season to taste. Pour the sauce over the leek-
ham-pinwheels and overbake at 400°F (200 °C)
for 20 minutes in the oven.
Vanilla chicken fillet with honey-
glazed carrots
2 Servings
Ingredients:
2 Chicken fillets, without skin
(around 0.66 lbs / 300 g)
1/2 Vanilla bean, cut in half (crossway)
2 tbsps. Grape seed oil
16 Baby carrots, peeled
2 tbsp. Butter
3 tbsp. Honey
Pinch of salt
Pinch of black pepper, ground
Directions:
Place the chicken fillet with the oil, the vanilla
bean and the pepper into a bag and marinate it
for at least 2 hours. Also marinate each 8 carrots
with 1 tsp. butter and 1.5 tbsps. honey.
Steam the chicken in poultry program 35 for
10 minutes. Remove it from the bag and
sear in a
pre-heated pan. Season with salt afterwards.
Steam the carrots in vegetable program 32 for
20 minutes. Then place into a pre-heated pan
and fry until the honey is caramelized. Salt and
pepper to taste.
Side dish: Couscous or polenta
Salmon trout with vegetables
2 Servings
Ingredients:
1 Salmon trout
2 Peppers (red and yellow)
3 Carrots
1 Cloves of garlic
1 Onion
3 tbsps. Natural yoghurt
3 tbsps. Crème Fraîche
1 tbsp. Dill, dried
3 tbsps. Lemon juice
Salt & Pepper
Directions:
Clean the salmon trout well, season the in- and
outside with salt and pepper. Clean the
vegetables and cut into small cubes. Cover the
bottom of the bottom container 8 with a cling
warp. Fill the fish with the vegetables and place
into the product. Place the additional vegetables
thereunto. Sprinkle some dill onto the vegetables.
Steam in fish program 34 25-30 minutes.
Mix the crème fraîche, yoghurt, lemon juice and
dill into a dip and season with salt and pepper.
Add into the product for the last 10 - 15 minutes.

22 US-EN
Steaming guide
Steaming times and portion sizes mentioned in the
table are an approximate guide only when using
the bottom container 8 only. Adjust cooking time
may requires due to the size of the food, the
spacing of the food in the container, position of
container, the freshness of food and personal
preference.
Vegetable
Cut thick stems from broccoli, cauliflower and
cabbage in small pieces.
Shorten time should be used if steam leafy,
green vegetables as they loose color easily.
Salt and season vegetables after steaming if
required.
Frozen vegetables should not be thawed
before steaming.
Vegetable Type 1 Serving 2 Servings 3 Servings 4 Servings
Artichokes fresh 25 Min.
(1 medium
size)
30 Min.
(2 medium
size)
30 Min.
(3 medium
size)
32 Min.
(4 medium
size)
Asparagus fresh 9 Min.
(0.44 lb /
200 g)
10 Min.
(0.88 lb /
400 g)
12 Min.
(1.32 lb /
600 g)
12 Min.
(1.76 lb /
800 g)
frozen 9 Min.
(0.44 lb /
200 g)
10 Min.
(0.88 lb /
400 g)
12 Min.
(1.32 lb /
600 g)
12 Min.
(1.76 lb /
800 g)
Beans, green fresh 14 Min.
(0.44 lb /
200 g)
15 Min.
(0.88 lb /
400 g)
17 Min.
(1.32 lb /
600 g)
17 Min.
(1.76 lb /
800 g)
frozen 14 Min.
(0.44 lb /
200 g)
15 Min.
(0.88 lb /
400 g)
20 Min.
(1.32 lb /
600 g)
20 Min.
(1.76 lb /
800 g)
Broccoli fresh 8 Min.
(0.44 lb /
200 g)
8 Min.
(0.88 lb /
400 g)
10 Min.
(1.32 lb /
600 g)
10 Min.
(1.76 lb /
800 g)
frozen 10 Min.
(0.44 lb /
200 g)
10 Min.
(0.88 lb /
400 g)
14 Min.
(1.32 lb /
600 g)
14 Min.
(1.76 lb /
800 g)
Brussels sprouts fresh 16 Min.
(0.44 lb /
200 g)
18 Min.
(0.88 lb /
400 g)
20 Min.
(1.32 lb /
600 g)
20 Min.
(1.76 lb /
800 g)
Carrots fresh, sliced 14 Min.
(0.44 lb /
200 g)
20 Min.
(0.88 lb /
400 g)
20 Min.
(1.32 lb /
600 g)
20 Min.
(1.76 lb /
800 g)
Corn on the
cob fresh, whole 10 Min.
(1 piece) 10 Min.
(2 pieces) 12 Min.
(3 pieces) 15 Min.
(4 pieces)

23 US-EN
Vegetable Type 1 Serving 2 Servings 3 Servings 4 Servings
Cauliflower fresh, florets 8 Min.
(0.44 lb /
200 g)
8 Min.
(0.88 lb /
400 g)
12 Min.
(1.32 lb /
600 g)
12 Min.
(1.76 lb /
800 g)
frozen 9 Min.
(0.44 lb /
200 g)
12 Min.
(0.88 lb /
400 g)
14 Min.
(1.32 lb /
600 g)
14 Min.
(1.76 lb /
800 g)
Green,
squashes fresh, in
slices 13 Min.
(0.44 lb /
200 g)
14 Min.
(0.88 lb /
400 g)
16 Min.
(1.32 lb /
600 g)
18 Min.
(1.76 lb /
800 g)
Mushrooms fresh 10 Min.
(0.22 lb /
100 g)
10 Min.
(0.44 lb /
200 g)
12 Min.
(0.83 lb /
300 g)
12 Min.
(0.88 lb /
400 g)
Peas frozen 8 Min.
(0.44 lb /
200 g)
8 Min.
(0.88 lb /
400 g)
12 Min.
(1.32 lb /
600 g)
14 Min.
(1.76 lb /
800 g)
Potatoes peeled and
chopped 20 Min.
(0.99 lb /
450 g)
20 Min.
(1.98 lb /
900 g)
24 Min.
(2.98 lb /
1350 g)
26 Min.
(4.07 lb /
1850 g)
New potatoes fresh, whole 28 Min.
(0.44 lb /
200 g)
30 Min.
(0.88 lb /
400 g)
30 Min.
(1.32 lb /
600 g)
36 Min.
(1.76 lb /
800 g)
Spinach fresh 5 Min.
(0.28 lb /
125 g)
5 Min.
(0.55 lb /
250 g)
6 Min.
(0.83 lb /
375 g)
8 Min.
(1.1 lb /
500 g)
frozen 7 Min.
(0.44 lb /
200 g)
9 Min.
(0.88 lb /
400 g)
12 Min.
(1.32 lb /
600 g)
16 Min.
(1.76 lb /
800 g)

24 US-EN
Fish and seafood
The fish is done when its color turns opaque. Defrosting may not requires if frozen fish is
separated before steaming and steaming time
extended.
Fish and
seafood Type 1 Serving 2 Servings 3 Servings 4 Servings
Lobster,
tails fresh 9 Min.
(1 piece) 9 Min.
(2 pieces) 9 Min.
(3 pieces) 9 Min.
(4 pieces)
Fish, fillets fresh 10 Min.
(0.28 lb / 125 g) 13 Min.
(0.55 lb / 250 g) 13 Min.
(0.83 lb / 375 g) 14 Min.
(1.1 lb / 500 g)
frozen 15 Min.
(0.28 lb / 125 g) 15 Min.
(0.55 lb / 250 g) 17 Min.
(0.83 lb / 375 g) 17 Min.
(1.1 lb / 500 g)
Fish, thick
steaks Salmon,
cod 18 Min.
(0.28 lb / 125 g) 18 Min.
(0.55 lb / 250 g) 20 Min.
(0.83 lb / 375 g) 22 Min.
(1.1 lb / 500 g)
Tuna 16 Min.
(0.29 lb / 135 g) 20 Min.
(0.59 lb / 270 g) 22 Min.
(0.88 lb / 400 g) 22 Min.
(1.18 lb / 535 g)
Mussels fresh 6 Min.
(0.44 lb / 200 g) 6 Min.
(0.88 lb / 400 g) 10 Min.
(1.32 lb / 600 g) 12 Min.
(1.76 lb / 800 g)
Oysters fresh 11 Min.
(3 pieces) 15 Min.
(6 pieces) 15 Min.
(9 pieces) 15 Min.
(12 pieces)
Prawns fresh 5 Min.
(0.44 lb / 200 g) 8 Min.
(0.88 lb / 400 g) 10 Min.
(1.32 lb / 600 g) 12 Min.
(1.76 lb / 800 g)
Poultry
Poultry Type 1 Serving 2 Servings 3 Servings 4 Servings
Chicken Boneless
breast 13 Min.
(0.44 lb / 200 g) 17 Min.
(0.88 lb / 400 g) 19 Min.
(1.32 lb / 600 g) 20 Min.
(1.76 lb / 800 g)
Drumsticks 25 Min.
(0.44 lb / 200 g) 25 Min.
(0.88 lb / 400 g) 28 Min.
(1.32 lb / 600 g) 28 Min.
(1.76 lb / 800 g)
Meat and sausages
Meat and
sausages Type 1 Serving 2 Servings 3 Servings 4 Servings
Beef In slices, fillet
steak or roast
beef
17 Min.
(0.28 lb /
125 g)
17 Min.
(0.55 lb /
250 g)
20 Min.
(0.83 lb /
375 g)
20 Min.
(0.1.1 lb /
500 g)

25 US-EN
Meat and
sausages Type 1 Serving 2 Servings 3 Servings 4 Servings
Lamb Chops with or
without bones 12 Min.
(2 chops) 12 Min.
(4 chops) 14 Min.
(6 chops) 14 Min.
(8 chops)
Pork Fillet, loin
steak or loin
chops
10 Min.
(0.22 lb /
100 g /
1 chop)
10 Min.
(0.44 lb /
200 g /
2 chops)
12 Min.
(0.83 lb /
300 g /
3 chops)
12 Min.
(0.88 lb /
400 g /
4 chops)
Sausages Beef or pork
sausages
(e.g. frank-
furter)
7 Min.
(0.44 lb /
200 g)
8 Min.
(0.88 lb /
400 g)
9 Min.
(1.32 lb /
600 g)
10 Min.
(1.76 lb /
800 g)
Rice
Use provided rice tray 4 and add required
rice and water.
Place the rice tray in top container 6 in the
top most container as the flavours of other
food not dripping on it.
Rice Type 1 Serving 2 Servings 3 Servings 4 Servings
Rice white 35 Min.
(0.22 lb / 100 g
+ 0.16 Qt /
150 ml water)
35 Min.
(0.44 lb / 200 g
+ 0.32 Qt /
300 ml water)
40 Min.
(0.50 lb / 225 g
+ 0.36 Qt /
340 ml water)
40 Min.
(0.83 lb / 300 g
+ 0.63 Qt /
600 ml water)
brown 55 Min.
(0.17 lb / 75 g +
0.12 Qt /115 ml
water)
55 Min.
(0.33 lb /150 g +
0.24 Qt /225 ml
water)
60 Min.
(0.50 lb /225 g +
0.36 Qt /340 ml
water)
60 Min.
(0.83 lb / 300 g +
0.48 Qt /450 ml
water)
Rice
pudding Rice
pudding 99 Min.
1.76 oz / 50 g
rice + 0.53 oz /
15 g caster sugar
+ 0.2 Qt /
190 ml warm
milk)
99 Min.
3.53 oz / 100 g
rice + 1.06 oz /
30 g caster sugar
+ 0.4 Qt /
378 ml warm
milk)
109 Min.
5.3 oz / 150 g
rice + 1.59 oz /
45 g caster sugar
+ 0.6 Qt /
567 ml warm
milk)
109 Min.
7.05 oz / 200 g
rice + 2.11 oz /
60 g caster sugar
+ 0.8 Qt / 757 ml
warm milk)

26 US-EN
Eggs
If steaming soft-boiled eggs, set steaming time
to 8 minutes and take out steamed eggs timely.
Eggs Type 1 Serving 2 Servings 3 Servings 4 Servings max.
quantity
Eggs soft-
boiled 12 Min.
(1 piece) 12 Min.
(2 pieces) 12 Min.
(3 pieces) 12 Min.
(4 pieces) 12 Min.
(10 pieces)
hard-
boiled 18 Min.
(1 piece) 18 Min.
(2 pieces) 18 Min.
(3 pieces) 18 Min.
(4 pieces) 18 Min.
(10 pieces)
Disposal
Dispose of the packaging through your
local recycling facilities and in
compliance with all federal, state and
local regulations.
b
a
Please note the package markings
regarding waste separation, indicated
by abbreviations (a) and numbers (b),
meaning: 1–7: plastics / 20–22: paper
and cardboard / 80–98: composite
materials.
Contact your local waste management
authority for additional information on
how to dispose of the used product.
To help protect the environment, please dispose of
the product properly when it has reached the end
of its useful life, do not throw in the garbage.
Information on collection sites and their opening
hours is available from your local authority.
Three year limited warranty
What does this warranty cover?
The warranty covers:
Damage, breakage or inoperability due to
defect.
Damage not caused by normal wear and tear
or failure to follow the safety and maintenance
instructions provided in the user manual.
What is not covered by the warranty?
The warranty does not cover damage caused by:
Normal wear and tear of the product, including
fragile parts (such as switches, glass, etc.);
Improper use or transport;
Disregarding safety and maintenance
instructions;
Accidents or acts of nature (e.g. lightning, fire,
water, etc.);
Tampering with the product (such as removing
cover, unscrewing screws etc.)
Consequential and incidental damages are also
not covered under this warranty. However, some
states do not allow the exclusion or limitation of
incidental or consequential damages, so this
limitation or exclusion may not apply to you.
What is the period of coverage and
warranty resolution?
The warranty is for 3 years from the date of
purchase. At our discretion, product will either be
refunded or replaced.

27 US-EN
What will we not do?
We will not:
Start a new warranty period upon product
exchange;
Repair product.
How to process the warranty?
To initiate, please:
Call customer service at 1 (844) 543-5872
Visit the Website Customer Service Platform at
www.lidl.com/contact-us
or
Visit a LIDL store for further assistance
To ensure the quickest warranty return process,
please have the following available:
The original sales receipt that includes the date
purchased;
The product and manual in the original
package;
A statement of the problem.
What must you do to keep the warranty
in effect?
Retain the original receipt;
Follow all product instructions;
Do not repair or modify the product.
How does state law relate to this
warranty?
This warranty gives you specific legal rights, and
you may also have other rights which vary from
state to state. All implied warranties are limited by
the duration and terms of this warranty. Some
states do not allow limitations on how long an
implied warranty lasts, so the above limitation
may not apply to you.

28 US-ES
Descripción de las palabras de advertencia ..............................................Página 29
Servicio al cliente .............................................................................................................. Página 29
Lista de pictogramas utilizados ............................................................................ Página 29
Introducción ........................................................................................................................... Página 29
Uso previsto .................................................................................................................................. Página 29
Descripción de la pieza ............................................................................................................... Página 30
Datos técnicos .............................................................................................................................. Página 32
Incluido con el producto ..............................................................................................................Página 32
Importantes consideraciones de seguridad ............................................... Página 32
Antes de usar ........................................................................................................................ Página 38
Placa divisora 5 / 7 .....................................................................................................................Página 38
Configuración inicial ....................................................................................................................Página 39
Uso ................................................................................................................................................. Página 40
Ajuste del tiempo de cocción ......................................................................................................Página 40
Preparar alimentos enteros ..........................................................................................................Página 41
Tiempos de cocción prestablecidos ............................................................................................Página 41
Pausa durante la cocción ............................................................................................................Página 42
Extraer los alimentos del producto.............................................................................................. Página 42
Alarma de hervido en seco .........................................................................................................Página 42
Relleno del tanque de agua durante el uso ............................................................................... Página 42
Cocinar arroz y otros líquidos ..................................................................................................... Página 42
Cocinar huevos ............................................................................................................................ Página 43
Cuidado y limpieza .......................................................................................................... Página 43
Descalcificación ........................................................................................................................... Página 43
Recetas ....................................................................................................................................... Página 45
Guía de cocción al vapor ............................................................................................Página 47
Vegetales ...................................................................................................................................... Página 47
Pescado y mariscos ...................................................................................................................... Página 49
Aves de corral .............................................................................................................................. Página 49
Carne y salchichas ....................................................................................................................... Página 49
Arroz ............................................................................................................................................. Página 50
Huevos .......................................................................................................................................... Página 51
Eliminación ..............................................................................................................................Página 51
Garantía limitada de 3 años ...................................................................................Página 51

29 US-ES
DESCRIPCIÓN DE LAS PALABRAS DE ADVERTENCIA
ADVERTENCIA ADVERTENCIA indica una situación peligrosa, que puede provocar
la muerte o lesiones graves si no se evita.
PRECAUCIÓN indica una situación peligrosa, que puede provocar
lesiones leves o moderadas si no se evita.
AVISO indica información que se considera importante, pero que
no implica un peligro (p. ej. mensajes relacionados con daños
materiales).
SERVICIO AL CLIENTE
Llame al Servicio de atención al cliente al
1 (844) 543-5872
Visite una de nuestras tiendas LIDL en caso
de cualquier inquietud.
Visite el Portal de atención al cliente en
www.lidl.com/contact-us IAN 291127 Por favor tenga su
número IAN a la
mano.
Lista de pictogramas utilizados
¡Preste atención a las notas de segu-
ridad y precaución! Sólo para uso en interiores.
¡Precaución: superficie caliente! ¡Peligro: riesgo de descarga eléc-
trica!
¡Riesgo de incendio! ¡Seguro para los alimentos!
V~Voltaje (corriente alterna) Hertz (frecuencia principal)
Watts (potencia efectiva)
VAPORERA
Introducción
Felicidades por la compra de su nuevo producto.
Usted ha seleccionado un producto de calidad.
Las instrucciones de uso son parte del producto.
Contienen información importante respecto a la
seguridad, el uso y la eliminación. Antes de usar
el producto, familiarícese con toda la información
de seguridad y las instrucciones de uso. Utilice la
unidad únicamente como se describe y para las
aplicaciones indicadas.
Si traspasa el producto a alquien más, por favor
asegúrese de incluir toda la documentación con
él.
Use este producto sólo de la manera descrita y
para las aplicaciones especificadas. Si le presta
el producto a alguien más, entréguele también
todas las instrucciones.
Uso previsto
Este producto es apto sólo para uso en
interiores.

30 US-ES
Este producto está diseñado únicamente para
cocinar al vapor. Se puede usar sólo en un lugar
seco y cerrado. El producto está hecho para
usarse sólo en interiores. No está hecho para uso
comercial o para algún otro uso. El fabricante no
se responsabiliza por daños provocados por un
uso inadecuado.
Este producto está hecho para usarse sólo en
entornos domésticos.
Descripción de la pieza
1 Asa de la tapa
2 Ventilación del vapor
3 Tapa
4 Bandeja para arroz
5 Placa divisora (forma superior redondeada,
para el contenedor superior)
6 Contenedor superior (número 2, se encuentra
en el asa del contenedor)
7 Placa divisora (forma cuadrada, para el
contenedor inferior)
8 Contenedor inferior (número 1, se encuentra
en el asa del contenedor)
9 Bandeja para escurrimientos
10 Tanque de agua
11 Boquilla de llenado de agua
12 Unidad principal
13 Panel de control
14 Marca MIN
15 Marca MAX
R.MENU
L.MENU
MAX
MIN
1
3
2
4
5
6
7
8
9
10
11
14
15
12
13

31 US-ES
16 Filtro 17 Difusor de vapor
16
17 17
16
18 Botón de encendido/apagado
19 Iconos de alimentos (compartimiento
izquierdo)
20 Temporizador (compartimiento izquierdo)
21 Icono de rellenado
22 Temporizador (compartimiento derecho)
23 Iconos de alimentos (compartimiento
derecho)
24 Icono de descalcificar
25 Botón del menú derecho
26 Iconos de cocción al vapor
(compartimiento derecho)
27 Botón de inicio/pausa
28 Icono de cocción al vapor
(compartimiento izquierdo)
29 Botón del menú izquierdo
30 Botón reducir (–)
31 Botón aumentar (+)
R.MENU
L.MENU
18 19 21 23
2529 27 2628
20 22
24
30
31
Tipos de alimentos 19 /23
32 Vegetal
33 Carne
34 Pescado
35 Ave de corral
36 Huevos
37 Arroz
32 33 34 35 36 37

32 US-ES
Estado de los iconos de cocción al vapor
26 /28
38 Icono de vapor
39 Icono mantener caliente
40 Indicador del nivel de agua
41 Pestañas de bloqueo
42 Orificios
38 39
40 15
Importantes consideraciones de seguridad
LEA TODAS LAS
INSTRUCCIONES. GUARDE
COMO REFERENCIA FUTURA.
INCLUYA
TODA LA
DOCUMENTACIÓN AL
ENTREGAR ESTE PRODUCTO A
OTRA PERSONA.
No seguir estas
advertencias puede
provocar lesiones graves
o fatales.
Datos técnicos
Voltaje nominal: 120 V∼ (corriente alterna),
60 Hz
Potencia nominal: 1500 W
Capacidad del
contenedor de vapor: máx. 5,6 QT / 5,3 l
(número 1)
máx. 6 QT / 5,7 l
(número 2)
Capacidad del
tazón para arroz: máx 1,1 QT / 1 l
Capacidad del
tanque de agua: máx 1,7 QT / 1,6 l /
mín 0,26 QT / 250 ml
Incluido con el producto
Inmediatamente después de desempacarlo, revise
que el contenido esté completo y que tanto el
producto como todas sus piezas estén en buen
estado.
Extraiga todos los materiales del empaque antes
de usar.
1 Unidad principal
1 Contenedor superior (número 2)
1 Contenedor inferior (número 1)
1 Bandeja para escurrimientos
1 Placa divisora A
1 Placa divisora B
1 Bandeja para arroz
1 Tapa

33 US-ES
¡PELIGRO CONTRA
LA VIDA Y RIESGO
DE ACCIDENTES PARA
INFANTES Y NIÑOS! Jamás
deje a los niños sin supervisión
con los materiales de empaque.
El material de empaque es
peligroso y puede provocar
asfixia. Los niños suelen, con
frecuencia, subestimar los
peligros. Mantenga siempre a
los niños lejos de los materiales
de empaque.
Este producto no está diseñado
para que los usen personas
(incluyendo niños) con
capacidades físicas, sensoriales
o mentales reducidas, o que no
tengan la experiencia y
conocimiento necesarios, a
menos que hayan recibido
supervisión e instrucción en
relación con el uso del
producto por parte de una
persona responsable de su
seguridad. Debiera
supervisarse a los niños para
asegurarse de que no jueguen
con este producto.
EXCLUSIVAMENTE PARA USO
DOMÉSTICO.
Los cambios o modificaciones a
este producto que no estén
expresamente aprobados por
la entidad responsable del
cumplimiento podrían anular la
autoridad del usuario para usar
el producto.
Nota: Este producto ha sido
probado y cumple con los
límites de un dispositivo digital
Clase B, según el Inciso 15 de
las Regulaciones FCC. Estos
límites están diseñados para
proporcionar una protección
razonable contra interferencias
dañinas en instalaciones
residenciales. Este producto
genera, usar y puede irradiar
energía de radiofrecuencias y,
de no instalarse y usarse según
las instrucciones, puede
provocar interferencia dañina
sobre las comunicaciones por
radio.
Sin embargo, no hay garantía
alguna de que no pueda
ocurrir interferencia en una
instalación en particular.

34 US-ES
Si este producto genera
interferencia dañina a la
recepción de radio o TV, lo cual
puede determinarse al encender
y apagar el producto, se anima
al usuario a intentar corregir la
interferencia siguiendo uno o
más de estos consejos:
• Reoriente o reinstale la
antena receptora.
• Aumente la separación
entre
el producto y el receptor.
• Conecte el producto a una
toma de corriente de un
circuito distinto al que está
conectado el receptor.
• Consulte al representante de
ventas o a un técnico de
radio/TV experimentado
para obtener ayuda.
No toque las superficies
calientes. Use las asas o
perillas.
Para protegerse contra
descargas eléctricas, no
sumerja el cable de
alimentación, el enchufe o la
unidad principal 12 en agua u
otros líquidos.
Se debe tener una estricta
supervisión cuando el producto
lo usen niños o cuando se use
cerca de ellos.
Desenchufe de la toma de
corriente cuando no esté en
uso y antes de limpiarlo. Deje
enfriar antes de instalar o
quitar piezas.
No use el producto si tiene el
cable o enchufe dañados, ni
después de que haya
funcionado de forma
incorrecta, o de que hayan
recibido daños de cualquier
manera. Devuélvalo al local de
servicio autorizado más
cercano para que lo examinen,
reparen o ajusten.
El uso de accesorios no
recomendados por el
fabricante puede provocar
lesiones.
No usar en exteriores.
No deje el cable de
alimentación colgando sobre el
borde de la mesa o mueble, ni
tampoco deje que toque
superficies calientes.
No dejar sobre o cerca de un
quemador a gas o eléctrico, o
en un horno caliente.
Se debe tener extremo cuidado
al mover productos que
contengan aceite u otros
líquidos calientes.

35 US-ES
Conecte siempre primero el
cable de alimentación al
producto, luego a la toma de
corriente. Para desconectarlo,
mueva todos los controles
hacia la posición “off”
(apagado), y luego saque el
enchufe de la toma de
corriente.
No use el producto para un
uso distinto a aquel para el
cual se fabricó.
Este producto posee un
enchufe polarizado (una punta
es más ancha que la otra).
Para reducir el riesgo de
descarga eléctrica, este
enchufe está hecho para
insertarse en una toma de
corriente polarizada en una
sola posición. Si el enchufe no
entra completamente en la
toma de corriente, invierta su
posición. Si aún no calza,
contacte a un electricista
calificado. No intente modificar
el cable de ningún modo.
Los niños no deben jugar con
el producto.
No utilice el producto
en entornos explosivos,
donde se encuentren líquidos o
gases inflamables.
¡ATENCIÓN! Jamás deje el
producto sin supervisión
mientras esté encendido.
¡RIESGO DE
INCENDIO! No opere
el producto cerca o debajo de
cortinas, aparadores u otros
materiales inflamables.
Se incluye un cable de
alimentación corto a fin de
reducir riesgos que podrían
provocar enredos o tropezones
con un cable más largo.
Se puede usar un cable
alargador si es que se hace
prestando los cuidados
pertinentes.
- En caso de usar un cable
alargador:
1) La clasificación eléctrica
marcada en el cable
alargador debe ser al
menos igual a la
clasificación eléctrica del
producto.
2) El cable alargador debe
instalarse de manera tal que
no quede sobre ningún
objeto en la mesa o
encimera, donde los niños
pudieran tirar de él o
tropezarse.

36 US-ES
3) Si el producto tiene
conexión a tierra, el cable
alargador debe ser del tipo
con conexión a tierra de
3 cables.
Evite riesgos de
muerte por descargas
eléctricas
Jamás toque el producto, el
cable de alimentación o el
enchufe con las manos
mojadas.
Asegúrese de que los detalles
en la etiqueta de clasificación
concuerden con los del voltaje
del que dispone. Conecte el
producto sólo a corriente
alterna con contacto a tierra,
ya que éste protege contra
descargas eléctricas.
No opere este producto con un
temporizador externo o sistema
de control remoto distinto,
como un control remoto
inalámbrico.
Revise regularmente que el
cable de alimentación no tenga
daños ni deterioros.
Jamás deje que el cable de
alimentación se moje durante el
funcionamiento.
No tire del cable de
alimentación para desconectar
el producto. Desconecte el
producto tirando del enchufe.
Jamás deje contenedores llenos
de líquidos, tales como vasos
para bebidas, jarros, etc. sobre
el producto.
Jamás usar en entornos
húmedos.
Jamás usar en la cercanía
inmediata de un fregadero,
ducha o piscina, ya que podría
salpicar agua hacia el
producto. Si llega a ingresar
líquido al producto, desconecte
el enchufe inmediatamente y
lleve el producto a que lo
repare un técnico calificado.
No hacer caso a las
siguientes advertencias
puede provocar lesiones o
daños a la propiedad.
Jamás deje que el cable de
alimentación se convierta en un
riesgo de tropezamiento o en
el cual alguien pueda
enredarse.
¡Un uso inadecuado puede
provocar lesiones!

37 US-ES
¡SUPERFICIE
CALIENTE! El
producto se calentará mucho
durante el uso. Tenga cuidado
de entrar en contacto con el
vapor ascendente o con los
alimentos calientes.
Tenga presente que desde las
ventilaciones de vapor escapa
vapor caliente 2. Jamás cubra
estas aberturas; de lo contrario,
se podría acumular vapor
caliente en el producto y
escapar con violencia al
abrirlo.
No abra la tapa 3 durante el
proceso de cocción al vapor.
Antes de quitar la tapa,
presione el botón de inicio/
pausa 27 para pausar el
proceso de cocción al vapor.
Levante siempre la tapa 3
usando la manilla de la
tapa 1 .
Deje la tapa 3 a un lado y
deje que el vapor escape.
No se incline sobre el producto
mientras esté generando vapor.
Use mitones para tocar la
tapa 3 y los contenedores 6 /
8 o bandejas 4 / 9.
Use un tenedor largo o tenazas
para comprobar que los
alimentos estén cocidos.
El elemento calefactor está
sujeto a calor residual después
de usarse.
Jamás debe que el cable de
alimentación cuelgue sobre el
borde de una superficie de
trabajo, para que el producto
no pueda caerse
accidentalmente al tirar de él.
Deje enfriar completamente el
producto antes de cambiarlo a
otro lugar o de retirar el agua
restante de la unidad principal
12 o bandeja para
escurrimientos 9.
Asegúrese de que el nivel del
agua esté entre la marca
mínima y máxima. No llene el
producto más de la cuenta; de
lo contrario, podría escaparse
el agua caliente.
GUARDE ESTAS
INSTRUCCIONES
Utilice únicamente agua
potable limpia para generar
vapor.

38 US-ES
Deje el producto sobre una
superficie resistente al calor (no
sirven mesas barnizadas ni
manteles). No opere el
producto en la cercanía
inmediata de otras fuentes de
calor (horno, flamas de gas,
etc.). De lo contrario, el
producto y/o muebles podrían
dañarse.
Deje el producto sobre una
superficie pareja y estable, a
una distancia segura de las
paredes y aparadores para así
evitar daños provocados por el
ascenso de vapor.
Llene siempre el tanque de
agua 10 con suficiente agua
para el periodo de cocción al
vapor. No cubra la unidad
principal 12 / bandeja para
escurrimientos 9 con láminas
de aluminio o algún otro
material. Si no sigue esta
recomendación, podría
sobrecalentar al producto. Las
consecuencia son daños al
producto.
Jamás use el producto sin agua
en el tanque de agua 10.
Antes de usar
Extraiga todos los materiales de empaque
antes de usar. Es importante limpiar el
producto antes de usarlo por primera vez, o
si no se ha usado durante un largo periodo
de tiempo. Consulte la sección “Cuidado y
limpieza” para obtener más información.
Es esencial que el producto se
descalcifique en intervalos regulares para así
mantener una calidad óptima del vapor y
extender su vida útil. Consulte la sección
“Descalcificación” para obtener más
información.
Durante el primer uso, podría apreciar algo
de humo/vapor saliendo desde la parte
posterior de la unidad principal 12. Esto es
algo normal, ya que suele aplicarse grasa a
algunas partes del producto durante el
proceso de fabricación. Tras usar varias
veces el producto, esto ya no ocurrirá. Esto
no es peligroso y no contaminará ni
cambiará el sabor de los alimentos durante el
uso.
Placa divisora 5 / 7
Los contenedores superior e inferior 6 / 8
pueden separarse en dos compartimientos,
usando las placas divisoras 5 / 7. Para
hacerlo, inserte la placa divisora 5 / 7 en
los rieles designados.
Para crear un compartimiento de cocción más
grande, extraiga las placas divisoras 5 /
7 de los contenedores superior e
inferior 6 / 8.

39 US-ES
41 42
Nota: La placa divisora (forma cuadrada, para
el contenedor inferior 8) 7 sólo puede
insertarse en una dirección. Asegúrese de que
ambas pestañas de bloqueo 41 se aseguren en
ambos orificios 42 del contenedor inferior 8.
Configuración inicial
Verifique y asegúrese de que el voltaje de
alimentación de la toma de corriente
concuerde con el indicado en la sección
Datos Técnicos.
Instale la unidad principal 12 en una
superficie estable y nivelada.
Llene el tanque de agua 10 con agua fría
hasta el nivel máximo.
Nota: El tanque de agua 10 debe llenarse
con agua hasta alcanzar, al menos, la marca
MIN 14.
R.MENU
L.MENU
¡SUPERFICIE
CALIENTE! Asegúrese de que el
agua no sobrepase la marca
MAX 15. De lo contrario, podría salir agua
caliente desde el producto durante el uso.
No añada nada como aliños,
etc. al agua. Esto podría afectar al flujo de
vapor y/o dañar la superficie del tanque de
agua 10 y el elemento calefactor.
Instale primero la bandeja para
escurrimientos 9 en la unidad principal 12 ,
asegúrese de que las costillas bajo la
bandeja para escurrimientos 9 queden de
cara hacia la parte posterior de la unidad
principal 12 y que estén fijadas de forma
segura en las costillas designadas.
Luego, inserte el contenedor inferior 8 con
la placa divisora insertada 7 hacia la
bandeja para escurrimientos 9.
Ahora inserte los alimentos en el
compartimiento del contenedor inferior 8.
Use la placa divisora 7 para asegurarse de
que los alimentos no se mezclen.
De ser necesario, ponga el contenedor
superior 6 sobre el contenedor inferior 8,
introduzca los alimentos en el compartimiento
del contenedor superior 6 y use la placa
divisora 5 para asegurarse de que los
alimentos no se mezclen.
Jamás use tazones u otros
objetos similares que no se hayan producido
especialmente para este producto. De lo
contrario, podría haber riesgo de lesiones
y/o daños al producto.
Posicione la tapa 3 centrada, para que el
contenedor superior 6 quede
completamente cerrado y no se pueda
escapar el vapor.
Asegúrese de que todas las piezas estén
instaladas correctamente antes de encender
el producto.
Conecte el enchufe a una toma de energía
apta.
El producto emitirá un bip y el panel de
control 13 indicará “00I00”.

40 US-ES
R.MENUL.MENU
El producto ya está listo para usarse.
Nota: El producto se apagará
automáticamente si está inactivo durante un
minuto.
Uso
Ajuste del tiempo de cocción
Para establecer el tiempo de cocción,
presione el botón del compartimiento
izquierdo 29 o derecho 25 reiteradamente y
seleccione el tipo de alimento 32 – 37 en
base al icono (compartimiento
izquierdo) / (compartimiento derecho) 19 /
23. Aparecerá el icono 38 de vapor.
Mientras el temporizador
correspondiente 20 / 22 esté parpadeando
(dentro de 3 segundos), presione el botón
aumentar 31 o reducir 30 para ajustar el
tiempo de cocción (de ser necesario).
Repita los pasos anteriores para el otro
compartimiento (de ser necesario).
Nota: El tiempo de cocción al vapor de
cada tipo de alimento se puede ajustar entre
1 y 99 minutos.
Nota: En caso de que el tiempo de cocción
del compartimiento izquierdo y derecho sea
distintos, el compartimiento con el mayor
tiempo de cocción comenzará primero.
Nota: Para cocinar al vapor sin la placa
divisora A/B 5 / 7, se recomienda colocar
los alimentos y cocinar de manera pareja
durante la misma cantidad de tiempo. Para
esto, siga estos pasos.
Mantenga presionado el botón del
compartimiento izquierdo 29 hasta que
ambos temporizadores 20 / 22 parpadeen
juntos.
De ser necesario, ajuste el tiempo de cocción
usando el botón aumentar 31 o reducir 20.
Presione el botón de inicio/pausa 27. El
producto emitirá un sonido de bip, el icono
de vapor 39 parpadeará y el
temporizador 20 / 22 comenzará su cuenta
regresiva.
Cuando el temporizador llegue a cero, la
alarma emitirá un sonido de bip dos veces. El
producto cambia al modo mantener caliente
automáticamente durante 20 minutos.
Aparece el icono mantener caliente 39 .
Tras haber pasado 20 minutos del modo
mantener caliente, el producto emitirá
5 sonidos de bip antes de apagarse
automáticamente.
Nota: Rellene el agua de ser necesario
cuando el tiempo de cocción sea muy
extenso, consulte “Relleno del tanque de
agua durante el uso” para obtener más
detalles.
Monitorice frecuentemente el indicador del
nivel de agua 40 , de ser necesario.
¡SUPERFICIE
CALIENTE! Asegúrese de que el
agua no sobrepase la marca
MAX 15. De lo contrario, podría salir agua
caliente desde el producto durante el uso.
¡SUPERFICIE
CALIENTE! El producto se
calentará durante el uso. Tenga
cuidado de entrar en contacto con el vapor
ascendente o con los componentes.
Cuando haya terminado de cocinar, presione
el botón de encendido/apagado 18 y
desconecte el cable de la toma de corriente.
Levante cuidadosamente la tapa 3 usando
el asa 1. Deje la tapa 3 a un lado y deje
que el vapor escape.

41 US-ES
¡SUPERFICIE
CALIENTE! No se incline sobre el
producto mientras esté generando
vapor. Use mitones para tocar la tapa 3 y
los contenedores 6 / 8 o bandejas 4 /
9. Para comprobar si los alimentos están
cocidos, use un tenedor largo o tenazas.
Extraiga cuidadosamente los alimentos
cocinados del contenedor superior/inferior
6 / 8.
Preparar alimentos enteros
Para preparar alimentos enteros, se puede
usar el contenedor superior/inferior 6 / 8.
Consejo:
- Los alimentos más pesados o que requieren
mayor tiempo de cocción se debieran
insertar en el contenedor inferior 8,
- El vapor funciona con mayor eficiencia en el
contenedor inferior 8 y su efectividad se
reduce a medida que sube; por lo tanto, el
tiempo de cocción en el contenedor superior
6 es mayor que en el inferior por algunos
minutos.
- Mezcle o reorganice los alimentos
ocasionalmente con un tenedor largo o
tenazas.
Excepción: se recomienda cocinar la
carne cruda, las aves de corral, el pescado
y los mariscos en el contenedor inferior 8,
para así evitar que los jugos escurran hacia
los demás alimentos.
Nota: Jamás cocine al vapor carne, aves de
corral o mariscos congelados directamente
sacados del congelador. Descongélelos
exhaustivamente primero.
Ponga el contenedor inferior 8 en el
producto y comience a cocinar al vapor
(consulte “Configuración inicial” y “Ajuste del
tiempo de cocción”).
Llene el contenedor superior 6 con
alimentos que tomen un tiempo moderado de
cocción al vapor.
Antes de quitar
la tapa, presione el botón de
inicio/pausa 27 para pausar el
proceso de cocción al vapor. Una nube de
vapor caliente podría escapar si retira la
tapa 3 sin tener suficiente cuidado durante
el proceso de cocción.
Levante cuidadosamente la tapa 3 desde el
asa 1. Deje la tapa 3 a un lado y deje
que el vapor escape.
Quite la tapa 3 de la derecha.
Ponga el contenedor superior 6 sobre el
contenedor inferior 8 y cierre la tapa 3
nuevamente para seguir cocinando.
Tiempos de cocción
prestablecidos
El producto posee 7 tiempos de cocción
prestablecidos. Estos pueden ajustarse
usando el botón aumentar 31 y el botón
reducir 30 .
Para seleccionar el tiempo de cocción
prestablecido, presione el botón del menú
izquierdo 29 o derecho 25 reiteradamente y
seleccione el tipo de alimento deseado 32 –
37.
Los tiempos de cocción prestablecidos son los
siguientes:
Huevo 36 12 minutos
Pescado 34 15 minutos
Vegetales 32 20 minutos
Carne 32 30 minutos
Aves de corral 35 35 minutos
Arroz 37 40 minutos
Mantener caliente 39 10 minutos (no use
este ajuste para
cocinar alimentos).
Presione el botón de inicio/pausa 27 para
comenzar a cocinar al vapor.

42 US-ES
Pausa durante la cocción
Para pausar el proceso de cocción, presione
el botón de inicio/pausa 27 , luego el icono
de vapor 39 dejará de parpadear y también
lo hará el temporizador 20 / 22. Para
continuar con la cocción, presione el botón
de inicio/pausa 27 nuevamente.
El tiempo de cocción se puede ajustar
mientras el producto está en pausa. Presione
el botón del menú izquierdo 29 o
derecho 25 una vez. Dependiendo del
temporizador del compartimiento que desee
cambiar, use el botón aumentar 31 o
reducir 30 para establecer el nuevo tiempo
de cocción mientras el temporizador
pertinente 20 / 22 esté parpadeando.
Extraer los alimentos del
producto
Use mitones para retirar la
tapa 3 y contenedor 6 / 8,
asegurándose de levantar la tapa 3 desde
el asa 1. Deje la tapa 3 a un lado y deje
que el vapor escape.
No extraiga la bandeja para escurrimientos
9 sino hasta que se haya enfriado
completo.
Alarma de hervido en seco
El producto posee una alarma de hervido en
seco. La alarma le avisa en caso de que haya
demasiado poca agua en el producto. Podrían
producirse temperaturas excesivamente altas y
daños al producto.
Cuando el nivel de agua sea menor al nivel
“MIN”, el producto emitirá sonidos de bip
continuamente y el icono de rellenado 21
parpadeará continuamente. Rellene el tanque
de agua 10 lo antes posible.
Use la boquilla de llenado de agua 11 para
rellenar el tanque 10 como se indica en
“Relleno del tanque de agua durante el uso”.
Si el producto se llena con demasiado poca
agua durante el uso, emitirá sonidos de bip
continuos. Rellene el tanque de agua 10 lo
antes posible o apague el producto usando
el botón de encendido/apagado 18.
Relleno del tanque de agua
durante el uso
Use la boquilla de llenado de agua 11 para
rellenar el tanque de agua 10 durante el
proceso de cocción.
Tire suavemente de la boquilla de llenado de
agua 11 para sacarla desde el costado del
producto. Rellene con agua a través de la
boquilla de llenado de agua 11
cuidadosamente usando una jarra (no
incluida).
40 15
La chicharra se detendrá automáticamente y
el icono de rellenado 21 desaparecerá.
Monitorice frecuentemente el indicador del
nivel de agua 40 , de ser necesario.
Cocinar arroz y otros líquidos
Configure el producto como se indica en
“Configuración inicial” y “Ajuste del tiempo
de cocción”.
Vierta 1 taza de arroz crudo junto con 1½
tazas de agua en la bandeja para arroz 4
y mezcle suavemente.

43 US-ES
Instale la bandeja para arroz 4 en el
compartimiento de un contenedor 6 / 8 y
coloque la tapa 3 sobre el producto.
Nota: Si está usando los contenedores
superior e inferior 6 / 8, la bandeja para
arroz 4 se debe instalar en el
compartimiento superior 6 para que nada
escurra hacia el arroz.
Configure el tiempo de cocción al vapor para
el compartimiento en el ajuste prestablecido
Arroz (40 minutos) y presione el botón de
inicio/pausa 27 para comenzar a cocinar al
vapor.
Antes de quitar la tapa,
presione el botón de inicio/pausa 27 para
pausar el proceso de cocción al vapor.
Levante cuidadosamente la tapa 3 usando
el asa 1. Deje la tapa 3 a un lado y deje
que el vapor escape.
Mueva el arroz ocasionalmente.
Las salsas y otros líquidos o frutas también
pueden calentarse y cocinarse al vapor
usando la bandeja para arroz 4. Siga el
proceso indicado anteriormente.
Cocinar huevos
El producto se puede usar para cocinar
huevos duros.
Siga la descripción de “Configuración inicial”
para instalar la bandeja para
escurrimientos 9 y el contenedor inferior 8
y/o superior 6.
Inserte los huevos individualmente en los
hoyuelos dentro del contenedor inferior
8 y / o superior 6.
Coloque la tapa 3.
Configure el tiempo de cocción y nivel de
vapor, según se indica en “Ajuste del tiempo
de cocción”.
El producto posee un ajuste prestablecido
“Huevos” que dura 12 minutos. Esto se
puede ajustar manualmente usando el botón
aumentar 31 o reducir 30 según sus
preferencias personales.
Cuidado y limpieza
Jamás sumerja la unidad
principal 12 , cable de alimentación o
enchufe en agua.
Desenchufe desde la toma de
corriente y deje enfriar el producto
completamente antes de limpiarlo.
Enjuague exhaustivamente el tanque de
agua 10 y luego limpie la unidad
principal 12 con un paño humedecido.
Lave la tapa 3, bandeja para arroz 4,
contenedores 6 / 8 y placas
divisoras 5 / 7 en agua tibia y líquido
para lavar platos.
Saque el filtro 16 y el difusor de vapor 17
para luego limpiarlos en agua tibia y líquido
para lavar platos. Reinstálelos después de
limpiarlos.
Para limpiar la unidad principal 12 use un
paño seco que no libere pelusas.
Limpie su producto después de cada uso.
Nota: Tenga en cuenta que ninguna de las
piezas incluidas es apta para lavavajillas.
Descalcificación
El producto se debe descalcificar
regularmente para mantener una calidad
óptima del vapor y extender la vida útil del
producto. Tras cada 15 horas de uso, el
icono de descalcificar 24 aparecerá para
recordarle que debe descalcificar el
producto.
Llene el tanque de agua 10 con al menos
20,29 oz (650 ml) de vinagre blanco, pero
sin sobrepasar la marca MAX. (No vinagre
de vino tinto).
IMPORTANTE: No use ningún otro agente
descalcificador comercial o químico.
Instale correctamente la bandeja para
escurrimientos 9, contenedor superior e
inferior 6 / 8 y tapa 3 en el tanque de
agua 10 antes de conectarse a la toma de
corriente.

44 US-ES
Configure el temporizador para 25 minutos
en ambos compartimientos y presione el
botón de inicio/pausa 27 .
Si la solución de vinagre
blanco comienza a hervir por sobre el borde
de la unidad principal 12 , apague el
temporizador y desenchufe el producto.
Reduzca levemente la cantidad de vinagre
blanco. No intente mover el producto
mientras el vinagre sigue estando caliente.
Cuando la cocción se haya completado,
desenchufe el producto de la toma de
corriente y espere hasta que se enfríe por
completo antes de sacar el vinagre.
Enjuague el tanque de agua 10 varias veces
con agua limpia.
Llene el tanque de agua 10 hasta la marca
MAX usando agua limpia. Instale la bandeja
para escurrimientos 9, contenedor inferior
8, contenedor superior 6 y tapa 3 en el
tanque de agua 10 y luego conecte el
producto a la toma de corriente.
Encienda el producto y comienza a cocinar
al vapor en cualquier ajuste durante
10 minutos. Apague y espere hasta que se
enfríe por completo antes de verter el agua
restante.

45 US-ES
Recetas
Ratatouille
4 porciones
Ingredientes:
2 Pimientos (rojos, amarillos o
verdes)
1 Berenjenas (0,55 lb / 250 g)
1 Zucchini (0,55 lb / 250 g)
0,55 lb / 250 g Tomates
1 Cebolla
2 Dientes de ajo
Sal y pimienta
Tabasco
Hierbas provenzales
0,22 lb / 100 g Kétchup de tomate
2 Cucharadas Puré de tomates
Indicaciones:
Lave y pique en cubos los pimientos, las
berenjenas, el zucchini, los tomates, la cebolla y el
ajo. Mezcle todos los ingredientes y sazone con
sal, pimienta, tabasco, kétchup, puré de tomates y
hierbas provenzales. Cubra la parte inferior del
contenedor inferior 8 con film plástico y coloque
los ingredientes mezclados sobre el film.
Seleccione el programa vegetales 32 y cocine al
vapor durante 12 minutos.
Acompañamiento: Arroz
También es bueno como acompañamiento para
carnes o se puede usar frío como
acompañamiento en un buffet.
Mini pasteles de chocolate
6 porciones
Ingredientes:
3,38 oz / 100 ml de leche
0,28 lb / 125 g de harina
1 cdta Polvos de hornear
2 cdtas Soperas de cacao
1 Huevo
0,11 lb / 50 g mantequilla
0,11 lb / 50 g Azúcar
1 Chorrito de ron
Indicaciones:
Ponga todos los ingredientes en un bol y mezcle
durante 3 minutos con una mezcladora manual.
Coloque la masa en seis platos de silicona para
hornear muffins y deje en el producto durante
14 minutos usando el programa Huevos 36.
Extraiga los mini pasteles de chocolate
inmediatamente de los platos para hornear
después de haberse cocinado y déjelos enfriar en
un estante.
Peras en salsa de chocolate
2 porciones
Ingredientes:
1 Pera
1/2 Taza de crema
0,11 lb / 50 g Chocolate (normal)
Pistachos picados
Indicaciones:
Pele y corte las peras en mitades y extráigales el
centro.
Rompa el chocolate en trozos y colóquelo en la
bandeja para arroz 4 junto con la crema.
Coloque las peras y el chocolate en el producto y
se el programa vegetales 32 durante 10 minutos.
Extraiga las peras y déjelas en un plato. Mezcle
la salsa hasta que se vuelva oscura y el chocolate
se haya distribuido equitativamente. Luego, vierta
las peras y decore con un poco de pistachos
picados.
Rollos de jamón y puerro
8 porciones
Ingredientes:
4 Puerros
8 Rodajas de jamón cocido
0,09 lb / 40 g de mantequilla
0,09 lb / 40 g de harina
2 panes de queso suave
33,81 oz / 1 l de caldo de vegetales

46 US-ES
Indicaciones:
Corte el puerro en mitades (cruzado) y cocine al
vapor en el producto durante 5-7 minutos usando
el programa vegetales 32 . Envuelva el puerro
con las rebanadas de jamón cocido y deje sobre
un plato de cacerola enmantequillado.
Prepare una salsa ligera hecha de mantequilla y
harina (roux), así como también caldo de
vegetales y queso suave.
Sazone a gusto. Vierta la salsa sobre los rollos de
jamón y puerro
y hornee por encima a 400 °F (200 °C) durante
20 minutos en el horno.
Filete de pollo a la vainilla con
zanahorias cubiertas en miel
2 porciones
Ingredientes:
2 Filetes de pollo, sin piel
(unos 0.66 lbs / 300 g)
1/2 Vaina de vainilla, cortada por
la mitad (cruzada)
2 Cucharadas Aceite de pepitas de uva
16 Zanahorias de cóctel, peladas
2 Cucharadas Mantequilla
3 Cucharadas Miel
Pizca de sal
Pizca de pimienta negra,
molida
Indicaciones:
Coloque el filete de pollo con el aceite, la vainilla
y la pimienta en una bolsa y marine durante al
menos 2 horas. Marine también 8 zanahorias
con 1 cdta. de mantequilla y 1,5 cdas de miel
Cocine al vapor en programa Aves de corral 35
durante 10 minutos. Saque los alimentos de la
bolsa y
colóquelos en un sartén precalentado.
Sazone con sal.
Cocine al vapor las zanahorias en programa
Vegetales 32 durante 20 minutos. Luego, coloque
en un sartén precalentado y fría hasta que la miel
se caramelice. Sazone con sal y pimienta a gusto.
Acompañamiento: Cuscús o polenta
Trucha salmón con vegetales
2 porciones
Ingredientes:
1 Trucha salmón
2 Pimientos (rojo y amarillo)
3 Zanahorias
1 Diente de ajo
1 Cebolla
3 Cucharadas Yogur natural
3 Cucharadas Crème Fraîche
1 Cucharadas Eneldo, seco
3 Cucharadas Jugo de limón
Sal y pimienta
Indicaciones:
Limpie bien la trucha salmón, sazone por dentro y
fuera con sal y pimienta. Limpie los vegetales y
córtelos en cubos pequeños. Cubra la parte
inferior del contenedor inferior 8 con un film
plástico. Rellene el pescado con los vegetales y
colóquelo en el producto. Coloque los vegetales
adicionales. Rocíe con un poco de eneldo sobre
los vegetales. Cocine en programa Pescado
durante 34 25-30 minutos.
Mezcle la crème fraîche, el yogur, el jugo de
limón y el eneldo para formar una salsa y sazone
con sal y pimienta. Añádalo al producto en los
últimos 10 - 15 minutos del proceso.

47 US-ES
Guía de cocción al vapor
Los tiempos de cocción al vapor y los tamaños de
porciones indicados en la tabla son una guía
aproximada al usar sólo el contenedor inferior
8. Tal vez sea necesario ajustar el tiempo de
cocción debido al tamaño de los alimentos, al
espacio entre los alimentos dentro del
contenedor, a la posición del contenedor y a la
frescura de los alimentos o a sus preferencias
personales.
Vegetales
Corte las varas gruesas de brócoli, coliflor y
repollo en trozos pequeños.
Se debe reducir el tiempo de cocción si está
cocinando vegetales verdes y con muchas
hojas, ya que pierden su color fácilmente.
De ser necesario, sazone los vegetales tras
cocinarlos.
Los vegetales congelados no se deben
descongelar antes de cocinarlos al vapor.
Vegetal Tipo 1 porción 2 porciones 3 porciones 4 porciones
Alcachofas frescas 25 Min.
(1 tamaño
mediano)
30 Min.
(2 tamaño
mediano)
30 Min.
(3 tamaño
mediano)
32 Min.
(4 tamaño
mediano)
Espárrago fresco 9 Min.
(0,44 lb /
200 g)
10 Min.
(0,88 lb /
400 g)
12 Min.
(1,32 lb /
600 g)
12 Min.
(1,76 lb /
800 g)
congelado 9 Min.
(0,44 lb /
200 g)
10 Min.
(0,88 lb /
400 g)
12 Min.
(1,32 lb /
600 g)
12 Min.
(1,76 lb /
800 g)
Frijoles, verdes frescos 14 Min.
(0,44 lb /
200 g)
15 Min.
(0,88 lb /
400 g)
17 Min.
(1,32 lb /
600 g)
17 Min.
(1,76 lb /
800 g)
congelados 14 Min.
(0,44 lb /
200 g)
15 Min.
(0,88 lb /
400 g)
20 Min.
(1,32 lb /
600 g)
20 Min.
(1,76 lb /
800 g)
Brócoli fresco 8 Min.
(0,44 lb /
200 g)
8 Min.
(0,88 lb /
400 g)
10 Min.
(1,32 lb /
600 g)
10 Min.
(1,76 lb /
800 g)
congelado 10 Min.
(0,44 lb /
200 g)
10 Min.
(0,88 lb /
400 g)
14 Min.
(1,32 lb /
600 g)
14 Min.
(1,76 lb /
800 g)
Coles de
bruselas frescas 16 Min.
(0,44 lb /
200 g)
18 Min.
(0,88 lb /
400 g)
20 Min.
(1,32 lb /
600 g)
20 Min.
(1,76 lb /
800 g)
Zanahorias frescas,
rebanadas 14 Min.
(0,44 lb /
200 g)
20 Min.
(0,88 lb /
400 g)
20 Min.
(1,32 lb /
600 g)
20 Min.
(1,76 lb /
800 g)
Mazorca de
maíz fresca,
entera 10 Min.
(1 unidad) 10 Min.
(2 unidades) 12 Min.
(3 unidades) 15 Min.
(4 unidades)

48 US-ES
Vegetal Tipo 1 porción 2 porciones 3 porciones 4 porciones
Coliflor fresca,
flóculos 8 Min.
(0,44 lb /
200 g)
8 Min.
(0,88 lb /
400 g)
12 Min.
(1,32 lb /
600 g)
12 Min.
(1,76 lb /
800 g)
congelada 9 Min.
(0,44 lb /
200 g)
12 Min.
(0,88 lb /
400 g)
14 Min.
(1,32 lb /
600 g)
14 Min.
(1,76 lb /
800 g)
Verde,
calabacín fresco,
rebanado 13 Min.
(0,44 lb /
200 g)
14 Min.
(0,88 lb /
400 g)
16 Min.
(1,32 lb /
600 g)
18 Min.
(1,76 lb /
800 g)
Callampas frescas 10 Min.
(0,22 lb /
100 g)
10 Min.
(0,44 lb /
200 g)
12 Min.
(0,83 lb /
300 g)
12 Min.
(0,88 lb /
400 g)
Guisantes congelados 8 Min.
(0,44 lb /
200 g)
8 Min.
(0,88 lb /
400 g)
12 Min.
(1,32 lb /
600 g)
14 Min.
(1,76 lb /
800 g)
Patatas peladas y
picadas 20 Min.
(0,99 lb /
450 g)
20 Min.
(1,98 lb /
900 g)
24 Min.
(2,98 lb /
1350 g)
26 Min.
(4,07 lb /
1850 g)
Patatas nuevas frescas,
enteras 28 Min.
(0,44 lb /
200 g)
30 Min.
(0,88 lb /
400 g)
30 Min.
(1,32 lb /
600 g)
36 Min.
(1,76 lb /
800 g)
Espinacas frescas 5 Min.
(0,28 lb /
125 g)
5 Min.
(0,55 lb /
250 g)
6 Min.
(0,83 lb /
375 g)
8 Min.
(1,1 lb /
500 g)
congeladas 7 Min.
(0,44 lb /
200 g)
9 Min.
(0,88 lb /
400 g)
12 Min.
(1,32 lb /
600 g)
16 Min.
(1,76 lb /
800 g)

49 US-ES
Pescado y mariscos
El pescado está cocinado cuando su color se
vuelve opaco.
Puede que no sea necesario descongelar el
pescado si el pescado congelado se separa
antes de cocinarlo al vapor y si se extiende el
tiempo de cocción.
Pescado
y
mariscos
Tipo 1 porción 2 porciones 3 porciones 4 porciones
Langosta,
colas fresca 9 Min.
(1 unidad) 9 Min.
(2 unidades) 9 Min.
(3 unidades) 9 Min.
(4 unidades)
Pescado,
filetes fresco 10 Min.
(0,28 lb / 125 g) 13 Min.
(0,55 lb / 250 g) 13 Min.
(0,83 lb / 375 g) 14 Min.
(1,1 lb / 500 g)
congelado 15 Min.
(0,28 lb / 125 g) 15 Min.
(0,55 lb / 250 g) 17 Min.
(0,83 lb / 375 g) 17 Min.
(1,1 lb / 500 g)
Pescado,
trozos
gruesos
Salmón,
bacalao 18 Min.
(0,28 lb / 125 g) 18 Min.
(0,55 lb / 250 g) 20 Min.
(0,83 lb / 375 g) 22 Min.
(1,1 lb / 500 g)
Atún 16 Min.
(0,29 lb / 135 g) 20 Min.
(0,59 lb / 270 g) 22 Min.
(0,88 lb / 400 g) 22 Min.
(1,18 lb / 535 g)
Mejillones frescos 6 Min.
(0,44 lb / 200 g) 6 Min.
(0,88 lb / 400 g) 10 Min.
(1,32 lb / 600 g) 12 Min.
(1,76 lb / 800 g)
Ostras frescas 11 Min.
(3 unidades) 15 Min.
(6 unidades) 15 Min.
(9 unidades) 15 Min.
(12 unidades)
Langostinos frescos 5 Min.
(0,44 lb / 200 g) 8 Min.
(0,88 lb / 400 g) 10 Min.
(1,32 lb / 600 g) 12 Min.
(1,76 lb / 800 g)
Aves de corral
Aves de
corral Tipo 1 porción 2 porciones 3 porciones 4 porciones
Pollo Pechugas
deshuesa-
das
13 Min.
(0,44 lb / 200 g) 17 Min.
(0,88 lb / 400 g) 19 Min.
(1,32 lb / 600 g) 20 Min.
(1,76 lb / 800 g)
Muslos 25 Min.
(0,44 lb / 200 g) 25 Min.
(0,88 lb / 400 g) 28 Min.
(1,32 lb / 600 g) 28 Min.
(1,76 lb / 800 g)
Carne y salchichas
Carne y
salchichas Tipo 1 porción 2 porciones 3 porciones 4 porciones
Carne En rebanadas,
roast beef o
filetes de
carne
17 Min.
(0,28 lb /
125 g)
17 Min.
(0,55 lb /
250 g)
20 Min.
(0,83 lb /
375 g)
20 Min.
(1,1 lb /
500 g)

50 US-ES
Carne y
salchichas Tipo 1 porción 2 porciones 3 porciones 4 porciones
Cordero Chuletas con o
sin hueso 12 Min.
(2 chuletas) 12 Min.
(4 chuletas) 14 Min.
(6 chuletas) 14 Min.
(8 chuletas)
Cerdo Filete, lomo o
chuletas 10 Min.
(0,22 lb /
100 g /
1 chuleta)
10 Min.
(0,44 lb /
200 g /
2 chuletas)
12 Min.
(0,83 lb /
300 g /
3 chuletas)
12 Min.
(0,88 lb /
400 g /
4 chuletas)
Salchichas Salchichas de
carne o cerdo
(por ejemplo,
frankfurter)
7 Min.
(0,44 lb /
200 g)
8 Min.
(0,88 lb /
400 g)
9 Min.
(1,32 lb /
600 g)
10 Min.
(1,76 lb /
800 g)
Arroz
Use la bandeja para arroz incluida 4 y
añada la cantidad de arroz y agua
necesarias.
Coloque la bandeja para arroz en el
contenedor superior 6 en la parte más alta
del contenedor superior para que los sabores
de los otros alimentos no escurran hacia el
arroz.
Arroz Tipo 1 porción 2 porciones 3 porciones 4 porciones
Arroz blanco 35 Min.
(0,22 lb / 100 g +
0,16 Qt / 150 ml
de agua)
35 Min.
(0,44 lb / 200 g +
0,32 Qt / 300 ml
de agua)
40 Min.
(0,50 lb / 225 g +
0,36 Qt / 340 ml
de agua)
40 Min.
(0,83 lb / 300 g +
0,63 Qt / 600 ml
de agua)
integral 55 Min.
(0,17 lb / 75 g +
0,12 Qt / 115 ml
de agua)
55 Min.
(0,33 lb / 150 g +
0,24 Qt / 225 ml
de agua)
60 Min.
(0,50 lb / 225 g +
0,36 Qt / 340 ml
de agua)
60 Min.
(0,83 lb / 300 g +
0,48 Qt / 450 ml
de agua)
Pudín
de
arroz
Pudín
de
arroz
99 Min.
1,76 oz / 50 g
arroz + 0,53 oz /
15 g de azúcar
granulada
+ 0,2 Qt /
190 ml de leche
tibia)
99 Min.
3,53 oz / 100 g
arroz + 1,06 oz /
30 g de azúcar
granulada
+ 0,4 Qt /
378 ml de leche
tibia)
109 Min.
5,3 oz / 150 g
arroz + 1,59 oz /
45 g de azúcar
granulada
+ 0,6 Qt /
567 ml de leche
tibia)
109 Min.
7,05 oz / 200 g
arroz + 2,11 oz /
60 g de azúcar
granulada
+ 0,8 Qt / 757 ml
de leche tibia)

51 US-ES
Huevos
Si está cocinando huevos semiduros,
configure el tiempo de cocción en 8 minutos
y saque los huevos oportunamente.
Huevos Tipo 1 porción 2 porciones 3 porciones 4 porciones Cantidad
máxima
Huevos semi
duros 12 Min.
(1 unidad) 12 Min.
(2 unidades) 12 Min.
(3 unidades) 12 Min.
(4 unidades) 12 Min.
(10 unidades)
huevos
duros 18 Min.
(1 unidad) 18 Min.
(2 unidades) 18 Min.
(3 unidades) 18 Min.
(4 unidades) 18 Min.
(10 unidades)
Eliminación
Deshágase del empaque mediante sus
instalaciones de reciclaje locales y de
acuerdo con las regulaciones
federales, estatales y locales.
b
a
Observe las señales del material de
empaque para la separación de
residuos, los cuales están señalados
con abreviaturas (a) y números (b)
que significan lo siguiente:
1–7: plásticos / 20–22: papel y
tablero de fibra / 80–98: materiales
mixtos.
Contacte a las autoridades locales
correspondientes para la eliminación
de desechos para mayor información
sobre cómo desechar su producto
desgastado.
Para ayudar a proteger el medio ambiente,
elimine el producto adecuadamente al final de su
vida útil, no lo tire en la basura normal. Puede
obtener información de sus autoridades locales
sobre los puntos de recolección y horarios de
atención.
Garantía limitada de 3 años
Lo que cubre la presente garantía
La garantía incluye:
Daños, quebraduras o incapacidad para
funcionar debido a defectos.
Daños que no hayan sido causados por el
desgaste propio del uso o por no seguir las
instrucciones de seguridad y mantención
incluidas en el manual para el usuario.
Lo que no cubre esta garantía
La garantía no cubre daños causados por:
El desgaste propio del uso del producto,
incluidas las partes frágiles (como
interruptores, piezas de vidrio, etc.).
Uso o transporte no indicado del producto.
Desatención a las instrucciones de seguridad
y mantención.
Accidentes o causas de fuerza mayor (e.g.
relámpagos, incendio, inundación, etc.).
Manipulación mal intencionada del producto
(retirar la cubierta, tornillos, etc.).
La presente garantía tampoco cubre daños
indirectos o emergentes. Sin embargo algunos
estados no permiten la exclusión o limitación de
daños indirectos o emergentes, por lo que dicha
exclusión o limitación pudiera no aplicarse en su
caso.
Período de cobertura y resolución de la
garantía
La garantía es válida por 3 años a partir de la
fecha de compra. La empresa, según lo estime
conveniente, devolverá el dinero o repondrá el
producto.

52 US-ES
La empresa no:
Dará inicio a un nuevo período de garantía
al hacerse el cambio del producto
Reparará el producto.
¿Cómo se tramita la garantía?
Recomendamos que primero usted:
Llame al Servicio de atención al cliente al
1 (844) 543-5872.
Visite el Portal de atención al cliente en
www.lidl.com/contact-us
Visite una de nuestras tiendas LIDL en caso de
cualquier inquietud.
A fin de acelerar el trámite de la
garantía, tenga a bien contar con lo
siguiente:
Recibo de venta original que incluya la fecha
de compra.
Producto y manual en su empaque original.
Descripción del problema.
¿Qué debe hacer usted para mantener
la garantía vigente?
Guardar el recibo original.
Seguir todas las instrucciones para el uso del
producto.
No realizar ninguna reparación ni alteración
al producto.
¿De qué manera influyen las leyes
estatales con esta garantía?
La presente garantía le otorga derechos legales
específicos, y pudiera usted contar con otros
derechos los cuales varían de un estado a otro.
Todas las garantías implícitas se encuentran
limitadas a la duración y términos de la
presente garantía. Algunos estados no permiten
limitaciones al período de tiempo y términos de la
garantía implícita, por lo que dichas limitaciones
pudieran no aplicarse en su caso.

IAN 291127
Distributed by / Distribuido por:
Lidl US LLC., Arlington, VA 22202
Model No. / Modelo Núm.: HG02514-US
Version / Versión: 06 / 2017
Made in / Hecho en: China
-
 1
1
-
 2
2
-
 3
3
-
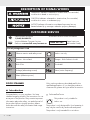 4
4
-
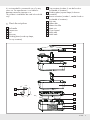 5
5
-
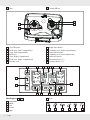 6
6
-
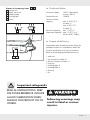 7
7
-
 8
8
-
 9
9
-
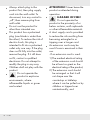 10
10
-
 11
11
-
 12
12
-
 13
13
-
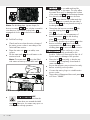 14
14
-
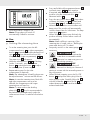 15
15
-
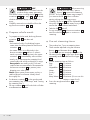 16
16
-
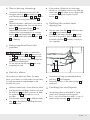 17
17
-
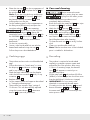 18
18
-
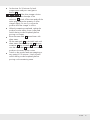 19
19
-
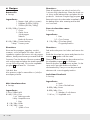 20
20
-
 21
21
-
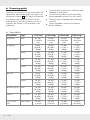 22
22
-
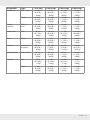 23
23
-
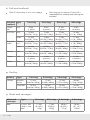 24
24
-
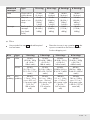 25
25
-
 26
26
-
 27
27
-
 28
28
-
 29
29
-
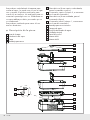 30
30
-
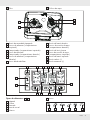 31
31
-
 32
32
-
 33
33
-
 34
34
-
 35
35
-
 36
36
-
 37
37
-
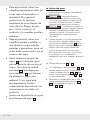 38
38
-
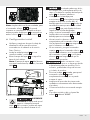 39
39
-
 40
40
-
 41
41
-
 42
42
-
 43
43
-
 44
44
-
 45
45
-
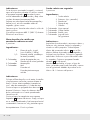 46
46
-
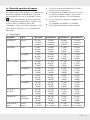 47
47
-
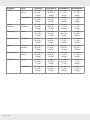 48
48
-
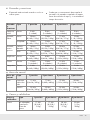 49
49
-
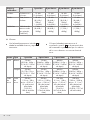 50
50
-
 51
51
-
 52
52
-
 53
53


Silvercrest 291127 El manual del propietario
- Categoría
- Ollas arroceras
- Tipo
- El manual del propietario
en otros idiomas
- English: Silvercrest 291127 Owner's manual
Artículos relacionados
Otros documentos
-
Cuisinart STM-1000 CookFresh Digital Glass Steamer Manual de usuario
-
Groupe Brandt CV-906D El manual del propietario
-
KALORIK 9 Quart 3-Tier Food Steamer Manual de usuario
-
-
Aroma ARC-930SB Manual de usuario
-
Oster 5712 Manual de usuario
-
-
-
 Merand ATOUPAIN MILLENIUM Manual de usuario
