

Owner's Record
The model and serial nmnbers are located
on the bottoru. Record the serial number ill
the space provided below, Refer to these
numbers whenever you call upon your Sony
dealer regarding this product,
Model No. DSC-T77
Serial No.
To reduce fire or shock hazard, do
not expose the unit to rain or
moisture.
CAUTIO : TO REDUCE THE RISK OF ELECTRIC SHOCK,
DO NOT REMOVE COVER {OR BACK).
NO USER-SERViCEABLE _AmS INSIDE.
REFER SERVICING TO OUALIFIED SERVICE PErtSONNEL.
This symbol is intended to
alert the user to the presence
of uninsulated "dangerous
voltage" within the
product's enclosure that
may be of sufficient
magnitude to constitute a
risk of electric shock to
persnus.
This symbol is intended to
alert the user tn the presence
of important operating and
maintenance (servicing)
instructions in the literature
accompanying the
appliance.
IMPORTANT
SAFEGUARDS
For your protection, please read these safety
instructions completely before operating
the appliance, and keep this manual for
future reference.
Carefully observe all warnings, precautions
and instructions on the appliance, or the one
described in the operating instructions and
adhere to them.
Power Sources
This set should be operated only frnm the type of
power source indicated on the marking label. If
you are not sure of the type of electrical power
supplied to your home, consult your dealer or
local power company. For those sets designed to
operate fl'om battery power, or other sources, relier
to the operating instructions.
Polarization
This set Inalr be equipped with a polarized ac
power cord plug (a plug having one blade wider
than the other).
This plug will fit into the power outlet only one
way. This is a sali_ty feature. If you are unable to
insert the plug flflly into the outlet, try reversing
the plug. If the plug should still fail tn fit, contact
your electrician to have a suitable outlet installed.
Do not defi_at the safi_ty purpose of the polarized
plug by lorcing it in.
Overloading
Do not nverlnad wall outlets, extension cords or
convenience receptacles beyond their capacib/
since this can result in fire or electric shock.
Object and Liquid Entry
Never push objects of an> kind into the set
through openings as they may touch dangerous
voltage points or short out parts that could result
in a fire or electric shock. Never spill liquid of any
kind on the set.

Attachments
Do not use attachments not recommended by the
manufacturer, as they may cause hazards.
Cleaning
Unplug tile set fronl the wall outlet belore
cleaning or polishing it. Do not use liquid cleaners
or aerosol cleaners. Use a cloth lightly dampened
with water for cleaning the exterior of the set.
Water and Moisture
Do not use puwer-line operated sets Ileal"water --
for example, near a bathtub, washbowl, kitchen
sink, or laundry tub, ill a wet basement, or near a
swin/miug pool, etc.
Power-Cord Protection
Route the power coM so that it is not likely to be
walked nn or pincbed by items placed upon or
against them, paying particular atteutinn to the
plugs, receptacles, and the point where the cord
exits from the appliance.
Accessories
Do uot place tlle set nu an unstable cart, stand,
tripod, bracket, or table. The set may lall, causing
serious injury to a cbild or an adult, and serious
damage to the set. Use only a cart, stand, tripod,
bracket, or table recomn/euded by tile
manufacturer.
Ventilation
The slots and openings ill the cabinet are provided
for necessary vemilation. To ensure reliable
operatiun of the set, and to protect it from
overheating, these slots and openings must never
be blocked or covered.
Never cover the slnts and openings with a clnth
or other materials.
Never blnck tile slots and openings by placing
the set on a bed, sofa, rug, (11"other similar
surface.
Never place the set ill a confined space, such as
a bookcase, (11"built=in cabinet, unless proper
ventilation is pruvided.
Do not place the set near or over a radiator or
heat register, or where it is exposed to direct
sunlight.
Lightning
For added protection lot tbis set during a lightning
storm, or when it is lel: unattended and unused [k_r
long periods of time, unplug it from the wall
outlet and disconnect the antenna or cable system.
This will prevent damage to tile set due to
lightning and powerqine surges.
Damage Requiring Service
Unplug the set from tile wall outlet aM refer
servicing to qualified service personnel under the
lollowing conditions:
When the power cord or plug is damaged or
flayed.
If liquid has been spilled or nbjects have fallen
intn tile set.
If tile set has been exposed to rain or water.
lftbe set has been subject to excessive shock by
being dropped, or tile cabinet has been
damaged.
If tile set does not operate nnrmally wben
following tile operating instructions. Adjust
only tbose controls tbat are specified in tile
operating instructions, hnproper adjustment of
otber controls may result in damage and will
ol:en require extensive work by a qualified
technician to restnre tile set to nurnlal operation.
When the set exhibits a distinct change in
performance this indicates a need lot service.
Servicing
Dn nnt attempt tn service the set yourself as
npeniug nr l'emoving covers may expose yn[i to
dangerous voltage or other bazards.
Reler all servicing to qualified service personnel.
Replacement parts
When replacement parts are required, be sure tile
service technician has used replacement parts
specified by the manufacturer that have the same
cbaracteristics as the original parts.
Unautborized substitutions may result in fire,
electric shock, or other hazards.
Safety Check
Upun cumpletion of any service or repairs to the
set, ask tile service technician to perfbrm routine
salbty checks (as specified by the manulhcmrer)
to determine that the set is in salb operating
condition.

Read this first
Replace the battery with the specified type only.
Otherwise, fire or injury may result.
Do not expose the batteries to excessive heat such
as sunshine, fire or the like.
RECYCLING LITHIUM-ION
BATTERIES
Lithium-Inn batteries are
recyclable.
You can help preserve our
environment by returning your
used rechargeable batteries to
the collection and recycling
location nearest you.
For more information regarding recycling of
rechargeable batteries, call toll free
1-800-822-8837, or visit http://wwwa'brc.org/
Caution: Do not handle damaged or leaking
Lithium-Inn batteries.
This power unit is intended to be correctly
orientated in a vertical or l]nor mount position.
| | - • t
If you bave any questions about this product, you
may call:
Sony Customer Information Center
1-80(1-222-SONY (7669)
The number below is for the FCC related matters
only.
Regulatory Information
Declaration of Conformity
Trade Name: SONY
Model No.: [)SC-T77
Responsible Party: Sony Electronics Inc.
Address: 16530 Via Esprillo,
San Diego, CA 92127U.S.A.
Telephone No.: 858-942-2230
This device complies with Part 15 of the FCC
Rules. Operation is subject to the following
two conditions: (1) This device may not cause
harmftd interference, and (2) this device must
accept any iuterlerence received, including
interlbreuce that may cause undesired
operation.
CAUTION
Ynu are cautioned that any changes or
modifications not expressly approved in this
manual could void your authority to operate this
equipment.
4

Note:
This equipment has been tested and found to
comply with the limits for a Class B digital
device, pursuant to Part 15 of the FCC Rules.
These limits are designed to provide reasonable
protection against harmful interference in a
residential installation. This equipment generates,
uses, and can radiate radio fl'equency energy and,
it"not installed and used in accordance with the
instructions, may cause harmflfl interlereuce to
radio communications. However, there is no
guarantee that interference will not occur in a
particular installation. If this equipment does
cause harmful interference to radio or television
reception, which can be determined by turning the
equipment off and on, tile user is encouraged to
try to correct the interfizreuce by one or more of
the following measures:
Reorient or relocate tile receiving antenna.
Increase the separation between tile equipment
and receiver.
Connect tile equipment into an outlet on a
circuit different from that to which tile receiver
is connected.
Consult the dealer or an experienced radiofrV
technician fi_r help.
The supplied iuterlace cable must be used with the
equipment in order to comply with the limits lot a
digital device pursuant to Subpart B of Part 15 of
FCC Rules.
This product has been tested and found compliant
with tile limits set out in the EMC Directive for
using connection cables shorter than 3 meters
(9.8 llzet).
Attention
The electromagnetic fields at tile specific
fi'equencies may influence the picture and sound
of this unit.
Notice
It"static electricity or electromagnetism causes
data trausllzr to discontinue midway (fail), restart
tile application or disconnect and connect the
comnmnicatiou cable (USB, etc.) again.
[el.']

Disposal of Old Electrical &
Electronic Equipment (Applicable
in the European Union and other
European countries with separate
collection systems)
This symbol on the product or on its packaging
indicates that this product shall not be treated as
household waste, lnstead it shall be banded over
to the applicable collection point for the recycling
of electrical and electronic equipment. By
ensuring this product is disposed of correctly, you
will help prevent potential negative consequences
for the environment and human health, which
could otherwise be caused by inappropriate waste
handling of this product. The recycling of
materials will help to conserve natural resources.
For more detailed information about recycling of
this product, please contact your local Civic
Office. your household waste disposal service or
the shop where you purchased the product.
Disposal of waste batteries
(applicable in the European Union
and other European countries with
separate collection systems)
This symbol on the battery or on the packaging
indicates that the battery provided with this
product shall not be treated as household waste.
By ensuring these batteries are disposed of
correctly, you will help prevent potentially
negative consequences lilt the environment and
hmnan health which could otherwise he caused by
inappropriate waste handling of the battery. The
recycling of the materials will help to conserve
natural resol./rces.
In case of products that for sallzty, performance or
data integrity reasons require a permanent
connection with an incorporated battery, this
battery should be replaced by qualified service
staff only.
To ensure that the battery will be treated properly,
hand over the product at end-ofqife to the
applicable collection point for the recycling of
electrical and electronic equipment.
For all other batteries, please view the section on
how to remove the battery from the product
safely. Hand the battery over to the applicable
collection point for the recycling of waste
batteries.
For more detailed infk_rmation about recycling of
this product or battery, please contact your local
Civic Office. your household waste disposal
service or the shop where you purchased the
product.
6

Notice for the customers in the
countries applying EU Directives
The manulhcmrer of this product is Snn_
Corpnmtion, 1=7= 1 Konan Minatn=ku Tokyo, 108=
0075 Japan. The Authorized Representative for
EMC and product safety is Sony Deutschland
GmbH, Hedelfinger Strasse 61,7(t327 Stuttgart,
Germany. For any service or guarantee matters
please relk2r to the addresses given in separate
service or guarantee documents.
A moulded plug complying with BS 1363 is fitted
to this equipment fnr your sali_ty and
convenience.
Should the fuse in tile plug supplied need to be
replaced, a fnse of the same rating as the supplied
one and approved by ASTA or BSI to BS 1362,
(i.e., marked with an @ or _'_ mark) must be
used.
lfthe plug supplied with this equipment has a
detachable Rise cover, be sure to attach tile fuse
cnver afier you change the fuse. Never use the
plug without the fuse cover. If you should lose tile
fl/se cover, please cnntact your nearest Snny
service station.

Table of contents
IMPORTANT SAFEGUARDS ..................................................................... 2
Read this first ............................................................................................ 4
Notes on using the camera ..................................................................... 10
"" "":-_eLL,n9 started ..................................................................._1
Checkinc the accessories supplied .................................................... 11
Identifying paris ..................................................................................... 12
Charging the battery pacK .................................................................... 13
Inserting the battery packta "Memory Stick Duo" _no[ supplied) ............ 15
Setting the clock ...................................................................................... 17
Shooting/viewing images ......................................18
Shooting images ...................................................................................... 18
Viewing images ........................................................................................ 19
Using
Using
shooting functions ........................................................20
Detecting smiles and shooting automatically (Smile Shutter) ................. 20
Detecting the shooting conditions automatically (Scene Recognition)... 21
Shooting close-ups (Macro/Close focus) ................................................ 22
Using the self-timer .................................................................................. 22
Selecting a flash mode ............................................................................ 23
Focusing on a specific point of the frame ............................................... 24
Focusing on the face of the subject (Face Detection) ............................. 24
Selecting the image size to match the usage .......................................... 25
Using the Shooting mode that matches the scene (Scene Selection) .... 27
Shooting movies ...................................................................................... 28
Displaying minimum indicators (Easy Shooting) ..................................... 29
viewing functions ..........................................................30
Viewing an enlarged image (Playback zoom) ......................................... 30
Displaying images full-screen (Wide Zoom) ............................................ 30
Rotating a vertical orientation image (Temporarily rotated display) ........ 31
Viewing still images with music (Slideshow) ............................................ 31
Searching for an image (Image Index) .................................................... 32
Selecting the display format (View Mode) ............................................... 32
8

Deleting images .............................................................................34
Deleting the currently displayed image .................................................. 34
Deleting multiple images ......................................................................... 34
Deleting all images (Format) ................................................................... 35
Connecting to other devices .................................................36
Viewing images on a TV .......................................................................... 36
Printing still images ................................................................................. 37
Using the camera with a computer ......................................................... 38
Changing camera settings ......................................................42
Changing the screen display .................................................................. 42
Changing the operation sounds .............................................................. 42
Using the HOME screen .......................................................................... 43
Using the MENU items ............................................................................ 45
Using functions in Program Auto mode .................................................. 47
Others ..................................................................................................48
Viewing "Cyber-shot Handbook". ............................................................ 48
List of icons displayed on the screen ...................................................... 49
Troubleshooting ....................................................................................... 51
Precautions .............................................................................................. 53
Specifications .......................................................................................... 54

_Notes on using the camera
Internal memory and "Memory
Stick Duo" back up
Do not turn off the camera, remo_,c tile battery
pack, or remove the "Memory Stick Duo"
while the access lamp is lit. Otherwise, the
internal memo U data or "Memory Stick Duo"
may be damaged. Be sure to make a backup
copy to protect your data.
On management files
When you insert a "Memory Stick Duo"
without a management file into the camera and
turn on the power, parl of the "Memo U Stick
Duo" capacity is used to automatically create a
management file. It may take some time until
you can perform the next operation.
Notes on recording/playback
• Before you start rccordiug, make a trial
recording to make sure that the camera is
working correctly.
• The camera is neither dust-proof, nor splash-
proof, nor water-proof. Read "Precautions"
(page 53) before operating the camera.
• Avoid exposing the camera to water. If water
enters inside the camera, a malfunction may
OCCllr. Ill SOllle cases, the camera cannot be
repaired.
• Do not aim the camera at the sun or other
bright light. It may cause the malfunction of
the camera.
• Do not use the camera near a location that
generates strong radio waves or emits
radiation. Otherwise, the camera may not
properly record or play back images.
• Using the camera in sandy or dusty locations
may cause malfunctions.
• If moisture condensation occurs, remove it
belk)rc using the camera (page 53).
• Do not shake or strike the camera. It may
cause a malfunction and you may not be able
to record images. Furthermore, the recording
media may become unusable or image data
may be damaged.
• Clean the flash surface before use. The heat
of flash emission may cause dirt on the flash
surface to become discolored or to stick to
the flash surface, resulting in insufficient
light emission.
Notes on the LCD screen
• The LCD scrcen is manufactured using
extremely high-precision technology so over
99.99c_ of the pixels are operational for
effective use. However, some tiny black and/
or bright dots (white, red, blue or green) may
appear on the LCD screen. These dots arc a
normal result of the manufacturing process,
and do not affect the recording.
• If water droplets or other liquids splash on
the LCD screen and make it wet,
immediately wipe off the scrcen with a soft
cloth. Leaving liquids on the LCD screen
surface can harm the quality and cause a
malfunction.
On image data compatibility
• The camera conforms with DCF (Design rule
for Camera File system) universal standard
established by JEITA (Japan Electronics and
Information Technology Industries
Association).
• Sony does not guarantee that the camera will
play back images rccorded or edited with
other equipment, or that other equipment will
play back images recorded with the camera.
Warning on copyright
Telex, ision programs, fihns, vidcotapcs, and
other materials may be copyrighted.
Unauthorized recording of such materials may
be contra W to the provisions of the copyright
laws.
No compensation for damaged
content or recording failure
Sony cannot compensate for failure to record
or loss or damage of recorded content due to a
malfunction of the camera or recording media,
etc.
10

Checking the accessories supplied
• Battery charger BC-CSD (1) • CD-ROM (1)
Cyber-shot application software
"Cyber-shot Handbook"
"Cyber-shot Step-up Guide"
• Instruction Manual (this manual) (1)
• Power cord (mains lead) ( 1)
(not supplied in the USA and Canada)
• Rechargeable baltery pack NP-BDI (1)/
Battery case (1)
• Paint pen (1)
_Using the wrist strap
Attach the strap and place your hand through
lhe loop Io prevent the camera from damage
by being dropped.
Hook
_Using the paint pen
The paint pen is used when operating the
touch panel. I1 atlaches lo lhe wrist slrap.
©
_NN
• USB, A/V cable for multi-use terminal (l)
• Do not carry the camera by holding the
paint pen. The camera may fall off.
• Wrist slrap (1)
• Station plate F (1)
The station plate is used when mounting the
camera on Cyber-shot station (not
supplied).
11

ii!ii_i!ii!i:_ii!ii_ii_i:!!:;i!i!_!ii!ii!ii!ii!i_;!i!,i_ii!!i!?!_!_!_i!iil
iiiiiiiiiiiiiiiii
iiiiiiiiiiiiiii
©
Identifying parts
[]
[] Zoom (W/T) lever
[] Shutter button
[] Microphone
[] POWER button/POWER lamp
[] Flash
[] Self-timer lamp/Smile Shutter lamp/
AF illuminator
[] Lens
]Lens cover
[] LCD screen/Touch panel
[] (Playback) button
[] Hook for wrist strop/Grip
[] Speaker
[] Battery/"Memory Stick Duo" cover
[] Tripod receptacle
• Use a tripod with a screw less than 5.5 mm
(7/32 inch) long. Otherwise_ you cannot
firmly secure the camera, and damage to the
canlera may occur.
[] Battery eject lever
[] Access lamp
[] "Memory Stick Duo" slot
[] Battery insertion slot
[] Multi connector
12

Charging the battery pack
1
Insert the battery pack into
the battery charger.
• You can charge the battery even when
it is partially charged.
Battery pack
Connect the battery
charger to the wall
outlet (wall socket).
If you continue charging the
battery pack for about one more
hour after the CHARGE lamp
turns off. the charge will last
slightly longer (full charge).
For customers in the USA and Canada
Plug
CHARGE lamp
Lit: Charging
Off: Charging finished (normal
charge)
CHARGE lamp
For customers in countries/regions other
than the USA and Canada
©
When charging is finished, disconnect the battery
charger.
13

iii
i
iiiiiiiiiiiii
iii
/ Charging time
iiiiiiiiiiiiiiiii:i!i_;;;!ii!;i;i:iii!ii_i
©
• The table above shows the time required to charge a fully depleted battery pack at a temperature of
25°C (77°F). Charging may take longer depending on conditions of use and circumstances.
• Connect the battery charger to the nearest wall outlet (wall socket).
• Even if the CHARGE lamp is not lit, the battery charger is not disconnected from the AC power
source (mains) as long as it is connected to the wall outlet (wall socket). If some trouble occurs
while using the battery charger, immediately shut off the power by disconnecting the plug from the
wall outlet (wall socket).
• When charging is finished, disconnect the power cord (mains lead) from the wall outlet (wall
socket), and remove the battery pack from the battery charger.
• Designed for use with compatible Sony batteries.
/ Battery life and number of images you can record/view
Shooting still images Approx. 110 Approx. 220
Viewing still images Approx. 230 Approx. 4600
• The measurement method is based on the CIPA standard. (CIPA: Camera & hnaging Products
Association)
• The battery lit'e and the number ol' still images may vary depending on the camera seltings.
14

Inserting the battery pack/a "Memory
Stick Duo" (not supplied)
Open the cover.
Insert the "Memory Stick
Duo" (not supplied).
With the terminal side facing the lens, insert
the "Memory Stick Duo" until it clicks into
place.
©
Insert the battery pack.
Align the • mark on the battery with the
battery eject lever, then insert the battery
while pressing the lever in the direction of
the arrow.
Close the cover.
®
15

[i[i[i[i[i[i[
[i[i[i[i[i[i[i[i[
iiiiiiiiiiiiiii
©
g
"Memory Stick" that you
can use
"Memory Stick Duo"
You can also use a "Memory Stick PRO Duo"
or "Memory Stick PRO-HG Duo" with the
camera.
For details on the number of images/time that
can be recorded, see pages 26, 29. Other types
of "Memory Stick" or memory card are not
compatible with the camera.
"Memory Stick"
You cannot use :t "Memory Stick" vdth the
camera.
_To remove the "Memory
Stick Duo"
Access lamp
Make sure that the access
lamp is not lit, then push the
"Memory Stick Duo" in once,
_When there is no "Memory
Stick Duo" inserted
hnages are stored in the camera's internal
memory (approximately 15 MB).
To copy images from the internal
memory to a "Memory Stick Duo," insert
the "Memory Stick Duo" in the camera,
touch [_ and select [Copyl in
[Memory Tooll of_ (Manage
Memory) (page 44).
_To remove the battery pack
Battery eject
lever
=_'X'_ Slide the battery eject lever,
"_, Be sure not to drop the
_ battery pack.
_Checking the remaining
battery charge
A remaining charge indicator appears on
the upper left of the LCD screen.
It
High Low
• Never remove the "Memory Stick Duo"/
battery pack when the access lmnp is lit. This
may cause damage to data in the "Memory
Stick Duo"/internal memory.
• It takes about one minute until the correct
remaining charge indicator appears.
• The remaining charge indicator may not be
correct under certain circuli1stances.
• If the NP-FD1 battery pack (not supplied) is
used, the minute display is also shown after
the remaining charge indicator.
• Battery capacity decreases over time and
through repeated use. When the operating
time per charge decreases markedly, the
battery pack needs to be replaced. Purchase a
new battery pack.
16

Setting the clock
1
Lower the lens cover.
The camera is turned on.
• You can also turn on the camera by
pressing the POWER button.
• It may take time for the power to turn
on and allow operation.
POWER button
Lens cover
Touch the desired date
display format, then
touch _>.
i Y=M=D
r D-M=Y
©
Touch each item, then
touch A/V to set its
numeric value.
• Midnight is indicated as 12:00 AM
and noon as 12:00 PM.
Touch [OK].
• The camera does not have a feature for superimposing dates on images. By using "PMB" in the
CD-ROM (supplied), you can print or save images with the date.
• If the camera is running on and you do not operate the camera for about three minutes, the camera
turns off automatically (Auto power-off function).
_Setting the date and time again
Touch _ --_ _ (Settings) --_ [Clock Settings] (page 44).
17

iiiii_
iiiii
iiiii
iiiiiii
Shooting images
I Lower the lens cover.
The camera is turned on.
g
o
B
18
Lens cover
Hold the camera
steady as
illustrated.
• Slide the zoom (W/T) lever
to the T side to zoom.
Slide to the W side to
return.
Zoom (W[]-)lever
-T
3
4
Press the shutter
button halfway down
to focus.
€(_o_'is displayed to indicate that
SteadyShot is working. When
the image is in focus, a beep
sounds and the • indicator
lights. The shortest shooting
distance is approximately 8 cm
(3 1/4 inches) (W)/50 cm (19 4/3
inches) (T) (fiom the lens).
Shutter button
Press the shutter
button fully down.
The image is shot.
SteadyShot
mark
AE/AF
lock

Viewing images
1
Press the _ (Playback)
button.
The last image shot is displayed.
• When images on the "Memory Stick Duo"
recorded with other cameras cannot be
played back on this camera, view the
images in [Folder Viewl (page 32).
(Playback) button
_Selecting next/previous
image
Touch _1 (Next)/14 (Previous) on the
screen.
_Deleting an image
Touch _ (Delete), then touch [OK].
O
©
B
_Returning to shooting images
Press the shutter button halfway down.
_Turning off the camera
Close the lens cover.
• You can also turn off the camera by pressing the POWER button.
19

Detecting smiles and shooting automatically
(Smile Shutter)
1
Touch _ (REC Mode) --,
(Auto Adjustment) --,
t
or _ --, @ (Smile
icon).
2 Wait detecting a smile.
When the smile level exceeds the "_
point on the indicator, the camera
shoots images automatically. When
you touch 0 (Smile icon) again,
Smile Shutter ends.
• If you press the shutter button
during Smile Shutter, the camera
shoots the image in Auto
Adjustment, and then returns to
Smile Shutter mode.
Face Detection frame
Smile Detection Sensitivity indicator
2O

Detecting the shooting conditions
automatically (Scene Recognition)
The camera automatically detects the shooting conditions, and then takes the shot.
1
Touch _ (REC Mode) --.
(Auto Adjustment) --.
[_ or_.
--_ Touch _ --* _ (Scene Recognition) --. desired mode --.
(Off): Does not use Scene Recognition. c
o')
(Auto): When the camera recognizes the scene, it switches to the optimal 5
settings and shoots the image. ¢z
(Advanced): When the camera recognizes the scene, it switches to the o
optimal settings and shoots the image, o
5
In addition, when the camera recognizes J (Twilight), &J (Twilight Portrait), _J_ ¢z
(Twilight using a tripod), [] (Backlight) or &_ (Backlight Portrait), it shoots _E"
another image. When the camera recognizes oo (Portrait). Anti Blink operates.
m_ U
o')
• Scene Recognition does not operate in _ (Macro On), _(_ (Close focus enabled) or Bursl mode.
21

Shooting close-ups (Macro/Close focus)
You can shoot beautiful close-up images of small subjects such as insects or flowers.
1
Touch ¢AuT0(Macro) --*
desired mode ---. NN.
_AUT0 (Auto): The camera adjusts the
focus automatically from distant
subjects to close-up.
Normally, put the camera in this
mode.
(Macro On): The camera adjusts
the focus with priority on close-up subjects.
Set Macro On when shooting close subjects.
_Q, (Close focus enabled): Use this mode to shoot at even closer distances than
Macro recording.
Locked to the W side: Approximately 1 to 20 cm (13/32 to 7 7/8 inches)
Using the self-timer
1
Touch ®OFF(Self-Timer) --.
desired mode ---. NN.
_0_ (Off): Not using the self-timer.
<_0(Self-Timer l Osec): Shooting
starts after a 10-second delay. Use this
setting if you want to include yourself
in the image. To cancel, touch G0 •
_2 (Self-Timer 2sec): Shooting
starts after a two-second delay. This is to prevent bhming due to unsteadiness when
the shutter button is pressed.
_ Press the shutter button.
The self-timer lamp flashes and a beep sounds until the shutter operates.
22

Selecting a flash mode
1
Touch _Atrr0(Flash) --.
desired mode ---* NN.
_T0 (Flash Auto): Flashes when
there is insufficient light or backlight
(Flash On): Flash always operates.
SsL (Slow Synchro): Flash always
operates. The shutter speed is slow in
a dark place to clearly shoot the
background that is out of flash light.
@ (Flash Off): Flash does not operate.
• You cannot use ,{ (Flash On) or ,_SL (Slow Synchro) when Scene Recognition is set to [Auto] or
[Advanced].
• Even with flash on, the ['lash may not operate during burst.
C
03
5
(C)
©
5
(C)
o3
23

Focusing on a specific point of the frame
Simply touch the point of the fiame you wish to focus on to change the focus position.
1
Point the camera at the
subject, then touch the point
of the frame you want to
focus on.
• You can change the focus point as
many times as you wish before
pressing the shutter button halfway
down.
• If you want the camera to choose a
locus point automatically, touch
_0Fr.
[&] : Face detected,
_z: No face detected,
Focusing on the face of the subject
(Face Detection)
The camera detects the face of the subject and focuses on it. You can select which
subject takes priority when focusing.
1
Touch _ -- E°3 (Face
-.Detection) --. desired mode
--,_.
c_2(When touched): Detects the
face when an area with a face is
touched on the screen.
E_a_o(Auto): Selects the face the
camera is to automatically focus on.
&_&_(Child Priority): Detects and shoots with priority on a child's face.
r&l.(Adult Priority): Detects and shoots with priority on an adult's face.
24

Selecting the image size to match the usage
The image size determines the size of the image file that is recorded when you take a
image.
The larger the image size, the more detail will be reproduced when the image is printed
on large-format paper. The smaller the image size, the more images can be recorded.
Select the image size that matches the way you will view your images.
1 (Image Size)
--, desired size --, NN.
L_ 10M For prints up to A3+ size
(3648x2736)
5M
(2592x 1944)
3M
(2048x 1536)
[_1A VGA
(640x480)
_..a 3:2 (8M)
(3648x2432)
_9+ 16:9 (7M)
(3648x2056)
L_..9 16:9 (2M)
(1920x 1080)
For prints up to A4 size
For prints up to L/L2 size
For e-mail attachments
3:2 aspect ratio as in photo prints and
postcards
For viewing on a high-delinition TV.
4:3 or 3:2
Images will fill the entire screen.
C
09
5
tO)
O
5
tO)
E"
09
• When you print images shot with 16:9 aspect ratio, both edges may be cut off.
25

_Number of still images that can be recorded
The figures in the table below indicate the number of images when [REC Model is set to
[Not'mall.
(Units: Images)
i!i!i!i!i!i!i!i!]i;!i!_!i!ii_i_i:%;!i_!;!i_;!_''i!i!i!i!i!i!i!i!i!i!i!i!i!i!i!i!i!i!i!i!i!i!i!i!i!i!i!i!i!i!i!i!i!i!i!i!i!i!i!i!i_!_i!i!i!i!i!i!i!i!i!i!i!i!i!i!i!i!i!i!i!i!i!i!i!i!i!i!i!i!i!i!i!i!i!i!i!i!i!i!i!i!i_!_i!i!i!i!i!i!i!i!i!i!i!i!i!i!i!i!i!i!i!i!i!i!i!i!i!i!i!i!i!i!i!i!i!i!i!i!i!i!i!i!i_!_i!i!i!i!i!i!i!i!i!i!i!i!i!i!i!i!i!i!i!i!i!i!i!i!i!i!i!i!i!i!i!i!i!i!i!i!i!i!i!i
I I)M 3 56 118 242 493 972 1963 3991
5M 6 89 188 384 781 1541 3111 6324
3M ll) 144 301 617 1253 2472 4991 10140
VGA 96 1385 2898 5925 12030 23730 47910 97390
3:2(8M) 3 57 119 244 497 980 1980 4024
16:9(7M) 4 60 126 257 523 1031 2083 4234
16:9(2M) 16 230 483 987 2005 3955 7986 16230
• The number of still images may vary depending on the shooting conditions and the recording
media.
• When the number of remaining shootable images is greater than 9,999, the ">9999" indicator
appears.
• When an image shot with other cameras is played back on this camera, the image may not appear
in the actual image size.
26

Using the Shooting mode that matches the
scene (Scene Selection)
1
Select the shooting mode.
n
Oo o_
To select _SO_/mQ/M /_:
Touch _ (REC Mode) --,
desired mode --, _.
To select _!/?'=_/_/".;_?/_/¢:
Touch _ (REC Mode) --,
(Scene Selection) --,
desired mode --, _.
I_O (High Sensitivity):
Shoots images without a
flash even in low lighting,
_ (Gourmet): Shoots food
arrangements in delicious
color.
[] (Landscape): Shoots
with the focus on a distant
subject.
(Beach): Shoots
seaside or lakeside scenes
with the blueness of the
water captured more vividly.
(Snow): Shoots snow
scenes in white more clearly.
! /ii_ii_
c
09
LQ
0
o
LQ
09
oo (Soft Snap): Shootsmn
images with a softer
atmosphere for portraits of
people, flowers, etc
_J (Twilight Portrait):
Shoots sharp images of
people in a dark place
without losing the nighttime
atmosphere,
J (Twilight): Shoots night
scenes without losing the
nighttime atmosphere,
;i:fi"(Fireworks): Shoots
fireworks in aJJtheir
splendor
(Underwater): Shoots
underwater in natural colors
when the water-proof case is
attached.
_ (Hi-Speed Shutter):
Shoots moving subjects in
bright places.
• The flash does not operate in some modes.
27

Shooting movies
1 Touch t_ (REC Mode) --.
H (Movie Mode) --. NN.
m
2 Press the shutter button fully down to start recording.
Press the shutter button fully down again to stop recording.
_Viewing movies
Press the (Playback) button and touch the l_l (Next) / 14 (Previous) buttons to select
a movie to view.
_image size
The larger the image size, the higher the image quality. The higher the number of fiames
per second, the smoother the playback image.
_E 640(Fine) (640x480) Approx. 30
_U 640(Standard)(640x480) Approx. 17
3_0 32([) (320x240) Approx. 8
For viewing on a TV dfigh picture quality)
For viewing on a TV (slandard piclure quality)
For e-mail allachments
28

_Maximum recording time
The table below shows the approximate maximnm recording times. These are the total
times for all movie files. Continuous shooting is possible for approximately 10 minutes.
(Units: hour : minute : second)
640(Fine) 0:02:50 0:06:00 0:12:20 0:25:00 0:49:20 1:39:40 3:22:51)
640(Standard) 0:00:40 0:10:20 0:21:40 0:44:21) 1:30:10 2:58:1)0 5:59:21) 12:10:20
321) t):I)2:51) 0:41:30 1:25:20 2:57:40 6:1)1:1)0 11:52:1)0 23:57:30 48:41:51)
• The recording time may vary depending on the shooting condilions and the recording media.
• Movies with the size set to [640(Fine)] can only be recorded on a "Memory Stick PRO Duo".
• This camera does not support HD recordings or playbacks l'or movies.
Displaying minimum indicators
(Easy Shooting)
This mode reduces the minimum number of settings and makes the indicators easier to
see.
1 Touch _ (REC Mode) --.
EASY(Easy Shooting) --. NN.
c
03
(23
0
(23
03
Self-Timer Select O0N (Self-Timer lOsec) or OOFF(Off) wilh OOFFbreton.
Image Size []_[]] _ Selecl [Large] or [Small] in [hnage Size]
Flash _---* Selecl [Auto] or [Of'f'] in [Flash]
_1Returning to normal display
Touch #_ (REC Mode) _ _ (Auto Adjustment) _ _.
29

Viewing an enlarged image (Playback zoom)
1
2
Press the _1 (Playback)
button to display an image,
then touch the area you want
to enlarge.
The image is enlarged at twice the size,
with the area you touched at the center.
When _ is set to [hnage Only],
touch the center of the screen, then
touch the area you want to enlarge.
Adjust the zoom scale and
position.
The zoom scale increases each time you
touch the screen.
_/_/_/_: Adjusts the position.
_ : Changes the zoom scale.
%%:Turns _l_f;ill_ on/off.
[_: Cancels playback zoom.
Shows the displayed area of the whole
image
Displaying images full-screen (Wide Zoom)
1Press the _ (Playback)
button to display the still
image, then touch _::Z_.
• Touch _ again to end the wide
ZOOln.
3O

Rotating a vertical orientation image
(Temporarily rotated display)
1
Press the !_:_(Playback)
button to display the still
image, then select the
vertical orientation images,
then touch t_.
• Touch ,(w_u again to end the display.
Viewing still images with music (Slideshow)
1
Press the _/ (Playback)
button to display a still
image, then touch
(Slideshow).
Touch [Start].
The slideshow starts.
• To end the slideshow, touch the screen, and then touch [Exitl.
ii ii
C
o')
5
<
5
o')
31

Searching for an image (Image Index)
1
Press the (Playback)
button to display an image,
then touch _ (Image
Index).
• If you touch F]_"_, you can set the
number of images displayed in the
index screen to 12 or 20 images.
Touch the i/_ buttons to
turn the pages.
• To return to the single-image screen,
touch the thumbnail image.
Selecting the display format (View Mode)
Allows you to select the display format for viewing multiple images when using
"Memory Stick Duo".
1
Press the _ (Playback)
button to display an image,
then touch N_(Image Index)
---* t._ (View Mode) ---.
desired mode.
(Date View): Displays images by
the date.
(Event View): Analyzes the dates shots and frequency, automatically organizes
the images into groups and displays them.
(_ (Favorites): Displays images registered as Favorites.
[_ (Folder View): Displays and organizes images by folders.
32

_Easily locating the images to be displayed
When set to Date View/Event View/Folder View:
When using a "Memory Stick Duo", touch _ (Date List), [] (Event List) or _ (Select
Folder) to easily locate the desired images.
Date List: Displays a list
ofthe images taken on the
selected date,
Event List: Displays a list
of the images registered
to the selected event,
Select Folder: Touch
[OK] to display a list of the
images contained in the
selected folder.
When set to Favorites: You can display images registered to Favorites divided into
six groups.
Favorites: Displays a list ofthe images registered to the
selected Favorites number,
c
09
5"
LQ
<
5"
LQ
09
• When you cannot play back images recorded with other cameras, view the images in [Folder
View].
33

Deleting the currently displayed image
1Touch # (Delete) --. [OK] (page 19).
Deleting multiple images
1Touch _ (Image Index) --.
(Delete).
2 Select images for deletion.
(_) Touch _/T to turn the pages, then
touch the images you want to
delete.
The _/mark is attached to the
selected images.
(_) Repeat step (!).
@ Touch i-_) _ [OK].
You can switch between single-image
and index screen using _, when selecting images.
_Deleting in date, event or folder units
PTF_ql]--. _ (Delete) --* _i_ (All in Date Range), WiN(All in Event) or _= (All in This
Folder) _ _ _ [OK1.
• The images is displayed in [Folder View'] when using the internal memory.
34

Deleting all images (Format)
You can delete all data stored on "Memory Stick Duo" or the internal memory. If a
"Memory Stick Duo" is inserted, all data stored on the "Memory Stick Duo" are deleted.
If no "Memory Stick Duo" is inserted, all data stored in the internal memory are deleted.
Formatting permanently deletes all data, including protected images.
1Touch _ --* _ (Manage
Memory) --, [Memory Tool]
--, _ --, [Format] --, _.
Touch [OK].
q_
db
m
5
LQ
3
LQ
_b
09
35

Viewing images on a TV
Connect the camera to the TV with the cable for multi-use
terminal (supplied).
he multi connector
1
Cable for multi-use terminal
TO audio/video input
S
36

Printing still images
If you have a PictBridge compliant printer, you can print images by the following
procedure.
First, set the camera to enable USB connection between the camera and the printer.
1
Touch _ --* _ (Settings) _]
--. [Main Settings] --. NN
[USB Connect] --. Ntt --.
[PictBridge] --. Nti.
The USB mode is set.
3
4
Connect the camera to the printer with the cable for multi-
use terminal (supplied).
Turn on the printer.
After the connection is made, the f_( indicator appears.
Touch _ --. ,b, (Print) --. desired item --. N_.
_ (This Image): Print the currently displayed image.
_ (Multiple Images): Touch _q/I-ql to display the image, then touch the image
you want to print.
Touch the desired setting item, then [OK].
The image is printed.
©
©
cb
5
(£3
U
o
g
CL
Cb
<
37

Using the camera with a computer
_Using "PMB (Picture Motion Browser)"
Yon can enjoy the recorded images more than ever by taking adwmtage of the software,
and "PMB" is included on a CD-ROM (supplied).
There are more functions, in addition to those listed below, for enjoying your images.
For details, see the "PMB Guide".
%
Viewing images in a
calendar.
Print DVD
Printing images with Creating a dala disc using
date stamps, a CD burner drive or DVD
burner drive,
When using the "Memory Stick
Duo", exporting images and
viewing them,
• "PMB" is not compatible with Macintosh computers.
38

_Stage 1: installing the "PMB" (supplied)
You can install the software (supplied) using the following procedure. When you install
"PMB," "Music Transfer" is also installed.
• Log on as Administrator.
1
Check your computer environment.
Recommended environment for using "PMB" and "Music Transfer"
OS (pre-installed): Microsoft Windows 2000 Professional SP4, Windows XP*
SP3/Windows Vista SPI *
CPU: Intel Pentium Ill 500 MHz or faster (Recommended: Intel Pentium I[I
800 MHz or faster)
Memory: 256 MB or more (Recommended: 512 MB or more)
Hard Disk: Disk space required for installation--approximately 400 MB
Display: Screen resolution: 1,024 x 768 dots or more
':' 64-bit editions and Starter (Edition) are not supported.
Turn on your computer, and insert the CD-ROM (supplied)
into the CD-ROM drive.
The installation menu screen appears.
3 Click [Install].
The "Choose Setup Language" screen
appears.
Follow the instructions on the screen to complete the
installation.
Remove the CD-ROM after the installation is complete.
(3
O
(t)
5
(23
U
o
g
CL
(I)
<
5
39

_Stage 2: importing images to your computer using "PMB"
1 Insert a fully charged battery pack to the camera, then press
the [_ (Playback) button.
Connect the camera to your computer.
"Connecting..." appears on the screen of the camera.
CabJe for multi-use
terminal
__ @_multi
connector
• (_,¢ is displayed on the screen during the comnmnicafion session. Do not operate the
contpuler while the indicalor is displayed. When the indicator changes to you can
start using the computer again.
Click the [Import] button.
For details, see the "PMB Guide".
_Stage 3: Viewing "PMB Guide"
1Double-click the _ (PMB Guide) icon on the desktop.
• To access the "PMB Guide" fl'om the start luenu: Click [Start 1 _ [All Programsl
--* [Sony Picture Utilityl --* [Helpl --* [PMB GuN@
• Do not disconnect the cable Ibr multi-use terminal fl'om the camera while the camera is operating
or while "Accessing..." appears on the screen of the camera. Doing st) may corrupt the data.
• When using a battery with little remaining charge, you may not be able to transfer the data or the
data may be corrupted. Using the AC Adaptor (not supplied) and the USB / A/V / DC IN cable for
multi-use terminal (not supplied) is recommended.
4O

_Using the camera with your Macintosh computer
You can copy images to your Macintosh computer. "PMB" is not compatible, but you
can install "Music Transfer" on your Macintosh computer. When images is exported to
the camera, view them in [Folder View].
Recommended computer environment
The following environment is recommended for a computer connected to the camera.
Recommended environment for importing images
OS (pre-installed): Mac OS 9.1/9.2/Mac OS X (vl0.1 to v10.5)
USB jack: Provided as standard
Recommended environment for using "Music Transfer"
OS (pre-installed): Mac OS X (v10.3 to v10.5)
Memory: 64 MB or more (128 MB or more is recommended)
Hard Disk: Disk space required for installation--approximately 250 MB
©
©
5
(.C)
U
g
Q_
<
41

Changing the screen display
1
Touch _ --* desired
mode --. _.
(Normal): Displays buttons and ..................
icons
(Simple): Displays only buttons
(Image Only): Hides buttons
and icons
• _ disappears from the screen if [hnage Only] playback is selected. To display the buttons,
touch the center o1'the screen. The [Normal] display returns temporarily.
42
Changing the operation sounds
You can set the sound produced when you operate the camera.
1
Touch _ --* _ (Settings) _
--, [Main Settings] --*
--*mode[Beep]--,_.--*_ --, desired
Shutter: Turns on the shutter sound
when you press the shutter butt on.
On: Turns on the beep/shutter sound
when you operate the touch panel/
press the shutter button.
Off: Turns off the beep/shutter sound.

Using the HOME screen
On the HOME screen, camera operations are organized for convenience into broad
categories t_r selection, such as shooting, viewing and printing images.
Only the awfilable items are displayed on the screen.
_otj x
I Shooting _
__ i
Shooting
_ _ Shooting
Q View images
Date View" Displays images by the date.
Event View" Analyzes the dates shots and frequency, automatically organizes the
images into groups and displays them.
Favorites" Displays images registered as Favorites.
Folder View Displays and organizes images by folders.
':' These items are displayed only when "Memory Stick Duo" is inserted into the camera.
_ _ Slideshow
Slideshow Plays back images in succession along with elfects and music.
Music Tool Download Music: Changes the slideshow music.
Format Music: Deletes all slideshow music.
_ Print
g
2
©
43

Manage Memory
Memory Tool - Memory
Stick Toni
Memory Tool - 1mernal
Memory Tool
Format:
Create REC.Folder:
Change REC.Fnlder:
Copy:
Format:
Formats a "Memory Stick Dun."
Creates a new folder nn a "Memory Stick
Duo."
Changes the li)ldel" used lilt recording images.
Copies all images recorded in the internal
memory to a "Memory Stick Dun."
Formats the internal memory.
_ Settings
Main Settings - Main
Settings 1
Main Settings - Main
Settings 2
Shooting Settings =
Shooting Settings 1
Beep:
Function Guide:
Initialize:
Calibration:
Housing:
Demo Mode:
USB Connect:
COMPONENT:
Vklen Out:
TV TYPE:
Selects tile beeps produced when you operate
tile camera.
Displays the function guide.
Restores the camera to its delault settings.
Corrects misaligmnent of the response
positions of the buttons on the touch panel.
Changes the button operations when tile
camera is in tile housing (water-proof case).
[)emonstrates the Smile Slmtter and Scene
Recognition flmction.
Sets the mode used when connecting tile
camera to a cnmputer or a printer.
Sets the video signal according tn a connected
TV terminal.
Sets the mode according tn the video output
system to be connected.
Set tn the aspect ratio of a TV to be
connected.
AF llhnninatnr:
Grid Line:
AF Mode:
Digital Zoom:
Auto Orientation:
Auto Review:
Shooting Settings -
Shooting Settings 2
Clock Settings Sets the date and time.
Language Setting Selects the language to be used in tile melm items, warnings and
messages.
Strobes the till light when focusing in low
light.
Displays lines to easily set a subject in a
horizontal or vertical position.
Selects the auto locus operation mode.
Selects the zoom method for zoom in excess
of optical zoom.
Recognizes the orientation change and saves
tile image in tile proper orientation.
Displays tile image on the screen fk>r
approximately two seconds after shooting a
still image.
44

Using the MENU items
Displays awtilable functions tBr easy setting when the camera is in shooting or playback
mode. Only the awtilable items are displayed on the screen.
MENU in shooting mode
hnage Size Sets the image size.
(L_ 10M/_ 5M/L_ 3M/[-_IA VGA/_,,,z 3:2(8M)/L_,,,+
16:9(7M)/_,, 9 16:9(2M)/F_ E 640(Fine)/_D 640(Standard)/3_ 0
32O)
Scene Recognition Automatically detects the shooting conditions and then takes the shot.
(_a_ OflT_ auto/_ I=ad ...... d)
Face Detection Selects the priority subject for adjusting the fncus when using face
detection.
([_ When touched/[_u],0 Auto/_C_,3 Child Priority/[_et=_ Adult Priority)
Smile Detection Sensitivity Sets the level of sensitivity to detect smile.
(_ Low/_ Medium/_ High)
REC Mode Selects the continuous shooting method.
([] Nnrmal/_l Burst/BRK_+0.3EV, BRK_+0.7EV. BRK_+I.0EV)
EV Adjusts exposure manually.
( 2.()EV to +2.()EV)
Metering Mode Sets which part nf the subject to measure to determine the exposure.
([_ Multi/[_ Center)
Focus Changes the locus method.
(1_ Multi AF/oo unlimited distance)
White Balance Adjusts color tones according tn the surrounding light conditions.
WB Auto/';;_-'- [)aylighff_ Cloudy/_1 Fhmrescent Light 1.(AUTO
_2 Fluorescent Light 2, _,a Fhmrescent Light 3/:,,6,_ Incandescent/
,_ws Flash)
Underwater White Balance Adjusts the colors when shooting underwater.
(_ ALito/t_ 1 Underwater 1. 012 Underwater 2/_wB Flash)
45

46
Flash Level
Anti Blink
Red Eye Reduction
DRO
Color Mode
SteadyShot
Shooting Settings
Adjusls lhe amount nl flash lighl.
(_-/,_STD Standard/,_+)
Sets Ami Blink functinn.
(t_u,0 At,to/_F Ofl)
Sets to reduce the red-eye phenomenon.
(_& Amo/(ia'N On/(g% Off)
Opfimizes the brighlness and cnmrasl.
([_OFF Olf/{_] DRO sta,,dard/[_ s DRO ph,s)
Changes lhe vividness nllhe image nr adds special effects.
(__a + Normal/V_ Vivid_ Sepia/_ + B & W)
Selects the anli-blur mnde.
(1(_1_ Shonling/l(_o_ Cnntinuous/((_o;_ Olf)
Selects the shooting sellings.
MENU in viewing mode
(Date List) Selects the playback date list.
(Event List) Selects the event group tn be played back.
P"I (Select Folder) Selects the folder for viewing images.
_+113*a(View Mode) Switches the View Modes.
(1_ Date View/E_'lQ Event View/Q_ Favorites/_ Vnlder View)
O_ (Filter by Faces) Plays back images filtered to meet certain conditions.
( O_OFFOf'lT_C_ All people/,'_O_ Children/_Ck lnlants/
_0, Smiles)
(Slideshnw) Plays back images in succession along with effi_cts and music.
Q) (Add / Remove Acids images to Favorites or removes images from Favnrites.
F........ites) (Q3 This lmage/_ Multiple lmages/Q_0N Add All in Date Range"'/
Remove All in Date Range')
"' The displayed text differs according to each View Mode.
(Retouch) Retouches still images.
(_-Jp Trimming/_p Red Eye Cnrrection/_ Unsharp ...... king/
_,s Sofl F....... _ Partial Color_ Fisheye Lenses C...... Filter/
Radial Blur/_ Retro/_-'l_ Happy F...... )
_D (Paint) Paints nn a still image and saves as a new image.
(Multi-Purpnse Changes the image size according tn usage.
Resize) (_ HDTV/_ Bl()g/E-mail)
(Delete) Deletes images.
(_'IlraThis hnage/_N Multiple hnages/_ All in Date Range")
':' The displayed text differs according to each View Mode.

(Protect) Preventsaccidemalerasure.
(_ Thislmage/CC_NMultiplelmages/_SelAllinDaleRange":/
C_0_ Remove All in Date Range*)
":The displayed text differs according lo each View Mode.
[IPOF Adds a Print order mark 1olhe image you want to prim in a "Memory
Stick Duo".
(DP0_This lmage/_°_ Multiple lmages_[_ Sel All in [)ate Range:V
DPOFRemove All in Date Range')
_o_F
":The displayed text differs according 1l>each View Mode.
(Prim) Prims images using a PiclBridge compliam primer.
(_ This lmage/_-I Multiple lmages/_ All in Dale Range ) )
":The displayed text differs according 1oeach View Mode.
4'D)"(Rotate) Rotates a still image.
[I_](Volume Settings) Adjusls the volume.
Using functions in Program Auto mode
You can change the Focus, Metering Mode, IS(), and EV settings when [REC Model is
set to _ (Program Auto).
(Focus) Changes the locus method.
(_ Multi AF/_ Center AF/rJI Spot AF/1.0m/3.0m/7.0m/Oo
unlimited distance)
[] (Metering Mode) Measures the metering area.
([] Multi/[_ Center/[_ Spot)
Iso (ISO) Sets the ISO sensitivity.
AUTO
(IS() AUTO/1SO80 to 1SO3200)
OEV (EV) Adjusts the exposure
( 2.0EV to +2.0EV)
g
O9
47

Viewing "Cyber-shot Handbook"
"Cyber-shot Handbook," which explains how to use the camera in detail, is included on
the CD-ROM (supplied). Refer to it for in-depth instructions on the many functions of
the camera.
_For Windows users
1 Turn on your computer, and insert the CD-ROM (supplied)
into the CD-ROM drive.
Click "Cyber-shot Handbook".
"Cyber-shot Step-up Guide", which contains
information on accessories for the camera, is
installed at the same time.
Start "Cyber-shot Handbook" from the shortcut on the
desktop.
_For Macintosh users
1 Turn on your computer, and insert the CD-ROM (supplied)
into the CD-ROM drive.
Select the [Handbook] folder and copy "Handbook.pdf"
stored in the [GB] folder to your computer.
After copying is complete, double-click "Handbook.pdf".
48

List of icons displayed on the screen
Icons are displayed on the screen to indicate the camera status.
You can select the display settings by touching the _ indication on the bottom right
of the screen (page 42).
When shooting still images
@ _ 125 F3.5 IS041IO +2.0EV
• The icons are limited in EASY (Easy
Shooting) mode.
When shooting movies
When playing back
[]
Ballery remaining
Low battery warning
L_ _ _IM Image size
_ _+
_E _o _o
_t( PictBridge connecling
[O] Smile Detection Sensitivily
indicator
1'
l
_ _Zoom scaling
xl.3sCt Pet
[] Ig_ _'1 _2 View Mode
_P3 _4 cP5 _P0
'_q _t_q Filler by V.....
e<a
ILTM PMB export
Q_) Favorites
Prolecl
DPOF Print order (DPOF) mark
I_X2. 0 Playback zoom
[]
((_o__({_o}} SteadyShot
_r/_ Recording folder
_1_7t> Playback folder
g6 Number of recordable
images
8/8 hnage mHnber/Number of
images recorded in selected
folder
00:25:05 Recordable time (h:m:s)
©
49

5O
(_ [_[] Recording/Playback Media
("Memory Slick Duo",
internal memory)
PiclBridge connecling
_ _ Changing folder
_ -._ Scene Recognition
<_ Red-eye reduction
._+ ,__ Flash level
Flash charging
±o.3_±O.7_R_±1.o_ Recording mode
_'3 _ [_1_ Face Detecli(m
[] Metering Mode
oo Focus
_)ON AF illuminator
1(_1_ Vibralion warning
_1 [_1 Touch AF indicalor
_ Housing
";_"_1,_ _ Whi_ehal......
[]
AF range linder h'ame
_0 _...)_ Self-timer
_s DRO
_ULL Management file hdl
VOL. |||||,,, Volume
C232200 Self-diagnosis display
................... Hislogram
• [] appears when
histogram display is
disabled.
RN
125
F3.5
IS0400
+2.0EV
AWB -:_;'-_L _
,to,
REC
Standby
0:12
0:00:12
101-0012
2008 1 1
9:30 AM
AE/AF lock
NR slow shutter
Shutter speed
Aperture value
1SO number
Exposure Value
Metering mode
Flash
White balance
Macro/Close ff_cus
• Displayed when
[Display Setup] is set to
[hnage Only].
Flash mode
• Displayed when
[Display Setup] is set to
[hnage Only].
Recording a movie/Standby
a movie
Recording time (m:s)
Playback
Playback bar
Counter
Folder-file nmnber
Recorded date/time of the
playback image

Troubleshooting
If you experience trouble with the camera, try the following solutions.
O Check the items below, and refer to "Cyber-shot Handbook" (PDF).
It a code such as "C/E:[-II-I:[-II-I" appears on the screen, refer to "Cyber-shot
Handbook."
v
O Removethebatterypack,waitfor aboutoneminute,re-insertthe battery
pack,thenturnon thepower.
v
O Initializethesettings(page44).
O ConsultyourSonydealeror localauthorizedSonyservicefacility.
On repairing cameras with internal memory or Music files function included, data in the
camera may be checked on minimum necessity to verify and improve the malfunction
symptoms. Sony will not copy or save any of those data.
Cannot insert the battery pack.
•Insert the battery pack correctly to push the battery eject lever (page 15).
Cannot turn on the camera.
•After inserting the battery pack into the camera, it may take a few moments for the camera to
power up.
• Insert the battery pack correctly (page 15).
• The battery pack is discharged. Insert a charged battery pack (page 13).
• The battery pack is dead. Replace it with a new one.
• Use a recommended battery pack.
The power turns off suddenly.
•If you do not operate the camera for about three minutes while the power is on, the camera __C)
turns
(
The remaining charge indicator is incorrect.
• The battery chargc is quickly used up in tile Ik_llowing cases:
When you use the camera in an extremely hot or cold location.
When you use the flash and zoom frequently.
When you repeatedly turn the power on and off.
When [Brighmess] of the _ (screen display) is set Io [Bright].
• A discrepancy arose between the remaining charge indicator and the actual rcmaining battery
charge. Fully discharge the battery pack once, then charge it to correct the indication.
• The battery pack is discharged. Insert the charged battery pack (page 13).
• The battery pack is dead. Replace it with a new one.
Cannot charge the battery pack while inside the camera.
• You cannot charge the battery pack using the AC Adaptor (not supplied). Use the battery
charger (supplied) to charge the battery.
Cannot record images.
• Check the free capacity of tile internal memory or "Memory Stick Duo" (pages 26, 29). If it is
full, do one of the following:
Delete unnecessary images (page 34).
Change the "Memory Stick Duty".
• You cannot record images while charging the flash.
• When shooting a still image, set the shooting mode other than _ (Movie).
• Set the shooting mode to _ (Movie) when shooting movies.
• The image size is set to [640(Fine)] when recording movies. Do one of the lbllowing:
Set the image size to other than [640(Fine)].
Insert a "Memory Stick PRO Duty."
Vertical streaks appear when you are shooting a very bright subject.
• The smear phenomenon is occurring and white, black, red, purple or other streaks appear on
the image. This phenomenon is not a mall'unction.
Cannot play back images.
• Press (Playback) button (page 19).
• The folder/file name has been changed on your computer.
• No guarantees are made for playing back, on this camera, files containing images which were
processed on a computer or images which were shot using other cameras.
• The camera is in USB mode. Delete the USB connection.
• You may not be able to play back some images stored on the "Memory Stick Duo" shot using
other cameras. Play such images in Folder View (page 32).
• This is caused by copying images on your computer Io Ihe "Memory Stick Duo" without
using the "PMB". Play such images in Folder View' (page 32).
52

Precautions
Do not use/store the camera in the
following places
• In an extremely hot, cohl or humid place
In places such as in a car parked in the sun,
the camera body may become delk)rmed and
this may cause a malfunction.
• Under direct sunlight or near a heater
The camera body may become discolored or
deformed, and this may cause a malfunction.
• In a location subject to rocking vibration
• Near strong magnetic place
• In sandy or dusty places
Be careful not to let sand or dust get into the
camera. This may cause the camera to
malfunction, and in some cases this
malfunction cannot be repaired.
On carrying
Do not sit do',_u in a chair or other phtce with
the camera in the back pocket of your trousers
or skirt, as this may cause malfunction or
damage the camera.
On cleaning
Cleaning the LCD screen
Wipe the screen surface with an LCD cle:miug
kit (not supplied) to remove fingerprints, dust,
etc.
Cleaning the lens
Wipc the lens with a sofl cloth to rcmo'_,c
fingerprints, dust, etc.
Cleaning the camera surface
Clean the camera surl'ace with a soft cloth
slightly moistened with water, then wipe the
surface with a dW cloth. To prevent damage to
the finish or casing:
Do not expose the camera to chemical
products such as thinner, benzine, alcohol,
disposable cloths, insect repellent, sunscreen
or insecticide.
Do not touch the camera with any of the
above on your hand.
Do not leave the camera in contact with
rubber or vinyl for a long time.
On operating temperatures
Your camera is designcd for use under the
temperatures between 0°C and 40°C f32°F and
I04°F). Shooting in extremely cold or hot
places that exceed this range is not
rccoliU]fleuded.
On moisture condensation
If the camera is brought directly from a cold to
a warm location, moisture may condense
inside or outside the camera. This moisture
condensation may cause a malfunction of the
camera.
If moisture condensation occurs
Turn off the camera and v_ait about an hour for
the moisture to evaporate. Note that if you
attempt to shoot with moisture remaining
inside the lens, you will be unable to record
clear images.
On the internal rechargeable
backup battery
This camera has an internal rcchargeable
battery for maintaining the date and time and
other settings regardless of whether the power
is on or ofT.
This rechargeable battery is continually
charged as long as you are using the camera.
However, if you use the camera for only short
periods, it discharges gradually, and if' you do
not use the camera at all for about one mouth it
becomes completely discharged. In this case,
be sure to charge this rechargeable battery
before using the camera.
However, even if' this rechargeable battery is
not charged, you can still use the camera, but
the date and time will not be indicated.
Charging method of the internal
rechargeable backup battery
Insert charged battery pack in the camera, and
then leave the camera for 24 hours or more
with the power off.
g-
53

Specifications
Camera
[System]
Image device: 7.7 mm (1/2.3 thee) color CCD,
Primary color filter
Total pixel number of camera: Approx. 11t.3
Megapixels
Efli_ctive pixel number of camera: Approx. 11).1
Megapixels
Lens: Carl Zeiss Vario-Tessar 4x zoom lens
f=6.18-24.7mm(35 140mm(35mm
film equivalent))
F3.5 (W) F4.6 iT)
Exposure control: Automatic exposure, Scene
Selection (1 I modes)
White balance: Automatic, Daylight, Cloudy,
Fluorescent 1,2,3, Incandescent, Flash
Underwater White Balance: Auto, Underwater
1,2, Flash
File format (DCF compliant):
Still images: Exif Ver. 2.21 JPEG compliant,
DPOF compatible
Movies: MPEG 1compliant (Monaural)
Recording media: lnternal Memory
(approx. 15 MB), "Memory Stick Duo"
Flash: Flash range (lSO sensitivity
(Recommended exposure lndex) set to Auto):
Approx. 0.08 to 3.0 m (3 1/4 inches to
9 li_et 11) 1/8 incites) (W)/
approx. 0.5 to 2.4 m (I feet 7 3/4 incites to
7 li_et 11) 1/2 incites) (T)
[InputandOutputconnectors]
Multi connector:Video output
Audio ot/tput (Monaural)
USB communication
USB communication: Hi=Speed USB (USB 2.1)
compliant)
[LCDscreen]
LCD panel: Wide (16:9), 7.5 cm (3.0 thee) TFT
drive
Total immber of dots: 230 400 (960 x 240) dots
[Power,general]
Power: Rechargeable battery pack NP-B[) 1,3.6 V
NP=FDI (not supplied), 3.6 V
AC=LS5K AC Adaptor (not supplied), 4.2 V
Power consumption (during shooting): 1.1 W
Operating temperature: 0 to 4(/°C (32 to 104°F)
Storage temperature: 20 to +60°C ( 4 to +I4(t°F)
Dimensions: 93.6 x 57.2 x 15.1)mm (3 314x 2 318
x 19132 inches) (W/H/D, excluding
protrusions)
Mass (including NP-BDI battery pack, paint pen
and strap etc.): Approx. 151 g (5.3 oz)
Microphone: Monaural
Speaker: Monaural
Exif Print: Compatible
PRINT hnage Matching 111:Compatible
PictBridge: Compatible
BC-CSD battery charger
Power requirements: AC 100 V to 240 V,
51)/60 Hz, 2.2 W
Outpnt voltage: DC 4.2 V, I).33 A
Operating temperature: 0 to 40°C (32 to 104°F)
Storage temperature: 20 to +60°C ( 4 to +14(t°F)
Dimensions: Approx. 62 x 24 x 91 mm (2 1/2 x
31/32 x 3 5/8 incites) (W/H/D)
Mass: Approx. 75 g (2.7 oz)
Rechargeable battery pack
NP-BD1
Used hatter3< Lithiun>ion hattery
Maximum voltage: DC 4.2 V
Nominal voltage: DC 3.6 V
Capacity: 2.4 Wit (68(t malt)
Design and specifications are subject to
change without notice.
54

Trademarks
• The follo'Mng marks are trademarks of Sony
Corporation.
Cyb_r,-sho'l:, "Cyber-shot," "Memory
Slick," ,_,., "Memory Stick PRO,"
MEMDRY5TIER PRO, "Memory Stick Duo,"
MEMDRYSTIEK DUD, "Memory Stick PRO
Duo," MEMORYSTIER PRO DUO, "Memory
Stick PRO-HG Duo,"
MeMorvStlcl_PRO-HGDUO,"Memory Stick
Micro," "MagicGate," M_GICGZ_"r'E,
"PhotoTV HD," "Info LITHIUM"
• Microsoft, Windows, DirectX and Windows
Vista are either registered trademarks or
trademarks of Microsoft Corporation in the
United States and/or other countries.
• Macintosh and Mac OS are trademarks or
registered trademarks of Apple Inc.
• Intel, MMX, and Pentium are trademarks or
registered trademarks of Intel Corporation.
• Adobe and Reader are either trademarks or
registered trademarks of Adobe Systems
Incorporated in the United States andk)r
other countries.
• In addition, system and product names used
in this manual arc, in general, trademarks or
registered trademarks of their respective
developers or manufacturers. However, the
_:'{or ® marks are not used in all cases in this
llrlantlal.
g-
55

Nombre del producto: Cfimara Digital
Modelo: DSC-T77
POR FAVOR LEA DETALLADAMENTE
ESTE MANUAL DE INSTRUCCIONES
ANTES DE CONECTAR Y OPERAR
ESTE EQUIPO.
RECUERDE QUE UN MAL USO DE SU
APARATO PODRIA ANULAR LA
GARANTIA.
Para reducir el riesgo de incendio o
descarga el6ctrica, no exponga la
unidad a la Iluvia ni a la humedad.
Sustituya la baterfa/micamente por otra del tipo
especificado. De lo contrario, es posible que se
produzcan incendios o lesiones.
No exponga las pilas a Nentes de calor excesivo,
como la luz solar directa, el luego o similares.
Este producto se ha probado y cumple con la
normativa que establece la Directiva EMC si se
utiliza un cable de conexi6n de menos de 3 metros
tie longimd.
Atencidn
Los campos electromagndticos a fl'ecuencias
especfficas podr;in influir en laimagen _el sonido
de esta unidad.
Aviso
Si la electrici&ld estfiticn o el electromagnetismo
interrumpen la transrnisfon tie datos (lallo),
reinicie la aplicaci6n o desconecte el cable de
comunicaci6n (USB, etc.) y vuelva a conectarlo.
Tratamiento de los equipos
el6ctricos y electrdnicos al final
de su vida util (aplicable en la
Unidn Europea y en paises
europeos con sistemas de
recogida selectiva de residuos)
Este sflnbolo en el equipo o el embalm@ indica
que el presente producto no puede ser tratado
como residuos domdsticos normales, sino que
debe entregarse en el correspondiente punto tie
recogida de equipos eldctricos y electr6nicos. A1
asegurarse de que este producto se desecha
correctamente, Ud. ayuda a prevenir las
consecuencias negativas para el medio ambiente y
la salud lmmana que podrfan derivarse de la
incorrecta manipulacidn en el momento de
deshacerse de este producto. E1reciclaje de
materiales ayuda a conservar los recursos
naturales. Para recibir infk>rmacidn detallada sobre
el reciclaje de este producto, pdngase en contacto
con el ayuntamiento, el punto de recogida mils
cercano o el establecimiento donde ha adquirido
el product().

Tratamiento de las baterias al final
de su vida util (aplicable en la
Unibn Europea y en paises
europeos con sistemas de
recogida selectiva de residuos)
Este shnbolo en la baterfa o en el embalaje indica
que la baterfa proporcionada con este producto no
puede ser tratada como un residuo domdstico
normal.
A1 asegurarse de que estas baterfas se desechan
correctamente, Ud. ayuda a prevenir las
consecuencias negativas para el medio ambiente y
la salud lmmana que podrfan derivarse de la
incorrecta manipulacidn en el momento de
deshacerse de la baterfa. E1 reciclaje de materiales
ayuda a conservar los l'ecursos naturales.
En el caso de productos que por razones de
seguridad, rendimiento o mantenimiento de datos,
sea necesaria una conexidn permanente COil la
baterfa incorporada, esta baterfa solo deber_i ser
reemplazada por personal tdcnico cualificado para
ello.
Para asegurarse de que la baterfa serfi tratada
correctamente, entregue el producto al final de su
vida Otil en un punto de recogida para el reciclado
de aparatos eldctricos y electr6nicos.
Para las demzls bateHas, yea la secci6n donde se
indica c6mo quitar la baterfa del producto de
forma segura. Deposite la baterfa en el
correspondiente punto de recogida para el
reciclado.
Para recibir infk>rmaci6n detallada sobre el
reciclaje de este producto o de la bateHa, p6ngase
en contacto con el ayuntamiento, el punto de
recogida m_is cercano o el establecimiento donde
ha adquirido el producto.
Aviso para los clientes de paises
en los que se aplican las
directivas de la UE
E1 l_ff_ricante tie este producto es Sot O
Corporation, 1=7=1 Konan Minato=ku Tokyo, 108=
0075. Japdn. E1 representante autorizado en lo
refi_rente al cumplimiento de la directiva EMC y a
la seguridad de los productos es Sony
Deutschland GmbH. Hedelfinger Strasse 61.
70327 Stuttgart. Alemania. Para resolver
cualquier asunto relacionado con el soporte
tdcnico o la garantfa, consulte las direcciones que
se indican en los documentos de soporte tdcnico y
garantfa suministrados pot separado.
I_']

|ndice
Notas sobre la utilizaci0n de la cb_mara ................................................... 6
Comprobacion de los accesorios sumlnlstrados ................................ 7
Identificacl0n de las parses ....................................................................... 8
Carga de la batena ................................................................................... 9
Inserci0n de la bateria/un "Memory Stick Duo" (no suministrado) ......... 11
Ajuste del reloj .................................................................................... q3
Toma/visionado de imbgenes .........................._4
Toma de imagenes ................................................................................ 14
Visualizacion de imagenes ...................................................................... 15
4
Utilizacion de las funciones de toma de imagen ......16
Detecci0n de sonrisas y toma autom_.tica (Captador de sonrisas) ........ 16
DetecciOn de las condiciones de la toma de imagen autom_.ticamente
(Reconocimiento de escena) ................................................................... 17
Toma de primeros pianos (Macro/Enfoque de cerca) ............................ 18
UtilizaciOn del autodisparador ................................................................. 18
SelecciOn de un modo de flash ............................................................... 19
Enfoque de un punto especifico del cuadro ........................................... 20
Enfoque de la cara del motivo (DetecciOn de cara) ................................ 20
SelecciOn del tamaho de imagen para coincidir con la utilizaciOn ......... 21
UtilizaciOn del modo de toma que coincide con la escena
(SelecciOn escena) .................................................................................. 23
Toma de peliculas ................................................................................... 24
VisualizaciOn de los indicadores minimos (Toma f_.cil) ........................... 25
Utilizacion de las funciones de visionado ....................26
Visionado de una imagen ampliada (Zoom de reproducci0n) ................ 26
VisualizaciOn de imP.genes en pantalla completa (Zoom ancho) ............ 26
Giro de una imagen de orientaciOn vertical (VisualizaciOn girada
temporalmente) ........................................................................................ 27
Visionado de imP.genes fijas con m0sica (Diapositivas) ......................... 27
B0squeda de una imagen (indice de imP.genes) .................................... 28
SelecciOn del formato de visualizaciOn (Modo visualizaciOn) ................. 28

Borrado de im_igenes .................................................................30
Eliminaci0n de la imagen visualizada actualmente ................................ 30
EliminaciOn de m01tiples imP.genes ......................................................... 30
EliminaciOn de todas las imP.genes (Formatear) ..................................... 31
Conexion a otros dispositivos .............................................32
Visionado de imP.genes en un televisor .................................................. 32
ImpresiOn de imP.genes fijas ................................................................... 33
UtilizaciOn de la c_.mara con un ordenador ............................................ 34
Cambio de los ajustes de la c_imara .................................38
Cambio de la visualizaci0n en pantalla ................................................... 38
Cambio de los sonidos de operaciOn ..................................................... 38
UtilizaciOn de la pantalla HOME .............................................................. 39
UtilizaciOn de los elementos de MENU ................................................... 41
UtilizaciOn de funciones en modo Programa autom_.tico ....................... 44
Otros ..................................................................................................... 45
Visionado de la "Guia pr_.ctica de Cyber-shot". ..................................... 45
Lista de iconos visualizados en la pantalla ............................................. 46
SoluciOn de problemas ........................................................................... 48
Precauciones ........................................................................................... 50
Especificaciones ..................................................................................... 51

_Notas sobre la utilizaci6n de la c_mara
6
Copia de seguridad de la memoria
interna y del "Memory Stick Duo"
No apague la cfimara, extraiga la baterfa, ni
retire el "Memory Stick Duo" mientras estfi
encendida la hhnpara de acceso. De 1o
contrario, podnhl dafiarse los datos de la
memoria imerna o el "Memory Stick Duo".
Aseg6rese de hater uua copia de seguridad
para proteger sus datos.
Acerca de los archivos de gestibn
Cuando inserta un "Memory Stick Duo" sin
archivo de gestidn en la c_hnara y conecta la
alimentacidn, parte de la capacidad del
"Memory Stick Duo" se utiliza para crear
autom_ticamente un archiw) de gesti6u. Es
posible que lleve alg6n tiempo hasta que
pueda realizar la siguieute operacidn.
Notas sobre la grabacibn/
reproduccibn
• Antes de comenz:_tr a grabar, haga un:t
grabaci6u a modo de prueba para asegurarse
de que la c:hnara est:i funciouando
correctameute.
• La c_hnara no est_i hecha a prueba de polvo,
ni a prueba de salpicaduras, ni a prueba de
agua. Lea "Precauciones" (p_igiua 50) antes
de utilizar la cfimara.
• Evite exponer la c_hnara al agua. Si eutra
agua dentro de la c:hnara, podr_i ocurrir un
real funciouamiento. Eu algunos casos, la
c_mara no podr_i ser reparada.
• No dirija la c_mara hacia el sol ni hacia otras
luces intensas. Podr_i ocasiouar un real
fuuciouamieuto de la c_hnara.
• No utilice la c_imara cerca de un lugar que
genere ondas de radio fuertes o emita
radiaci6u. De 1o coutrario, es posible que la
c_hnara no pueda grabar o reproducir
inl_genes correct ameute.
• La utilizacidn de la cfimara eu lugares
areuosos o polvorientos podrfi ocasionar uu
real funciouamiento.
• Si se condensa humedad, elimfllela antes de
utilizar la cfimara (pfigina 50).
• No agite ni golpee la cfimara. Podrfa
ocasiouar un real funciouamieuto y no poder
grabar im_igenes. Adem_is, el soporte de
grabaci6n podrfa quedar inutilizable o
dafiarse los datos de imagen.
• Limpie la superficie del flash antes de
utilizarlo. El calor de la emisidn del flash
podr:i hacer que la suciedad en la superficie
del flash se descolorc o se adhiera en ella,
ocasiouando uua insuficieute emisi6n de luz.
Notas sobre la pantalla LCD
• La pantalla LCD est:_ fabricada utilizando
tecuologf:t de muy alta precisidn pot 1o que
re:is de199,99% de los pfxeles son operativos
para uso el_ctivo. Sin embargo, es posible
que aparezcan alguuos puntos diminutos
negros y/o brillantes (blancos, mjos, azules o
verdes) en la pantalla LCD. Estos puntos sou
un resultado normal del proceso de
fabricacidu, y no afcctan a la grabacidn.
• Si salpica agua u otros lfquidos a la pantalla
LCD y se moja, seque iumediatamente la
pantalla con un patio suave. Los lfquidos
dcjados en la superficie de la pantalla LCD
pueden perjudicar la calidad y ocasiouar un
real funcionamiento.
Acerca de la compatibilidad de los
datos de imagen
• La cfimara cumple con la norma universal
DCF (Design rule for Camera File system)
establecida pot la JEITA (Japan Electronics
and Information Technology Industries
Association).
• Sony no garantiza que la c_hnara pueda
reproducir imfigenes grabadas o editadas con
otro equipo, ni que otros equipos puedan
reproducir imfigeues grabadas con la c_hnara.
Aviso sobre los derechos de autor
Los programas de telex, isi6m pclfculas, cintas
de vfdeo y dem:is materiales pueden estar
protegidos por copyright. La grabacidn no
autorizada de tales materiales puede ir en
contra de los artfculos de las leyes de
copyright.
No hay compensaci6n por dafio
del contenido o fallo de grabaci6n
Sony no compcnsar_ por no poder grabar o pot
la pdrdida o dafio del contenido grabado
debido a un real fuucionamiento de la cfimara
o el soporte de grabaci6n, etc.

Comprobaci6n de los accesorios
suministrados
• Cargador de baterfa BC-CSD ( 1) • CD-ROM (1)
Soflware de aplicacidn del Cyber-shot
"Gufa prfictica de Cyber-shot"
"Gufa avanzada de Cyber-shot"
• Manual de instrucciones (este manual) (1)
• Cable de alimentacidn (1) (no suministrado
en EE.UU.y Canadfi)
• Baterfa recargable NP-BD 1 (1)/c_tia de la
baterfa (1)
i
i
i
i
i
i
i
_Utilizaci6n de la correa de
mu_eca
Coloque la correa y pase la mano a travds del
lazo para evitar que pueda cadrsele la c_hnara
y dafiarse.
<
O
• Lfipiz de pinlar (1)
_Utilizaci6n del I_piz de
pintar
El N_.pizde pintar se utiliz:_ cuando se emplca
el p_mel t;k'lil. Se coloca en la correa de
mufieca.
• Cable USB, A/V para terminal de usos
mt_ltiples (1)
• Correa para mufieca (1)
• No transporle la c:hnara agarrando del l_ipiz
de pintar. La cfimara podrfi caerse.
• Placa de estacidn F (1)
La placa de estacidn se utiliza cuando se
monta la cfimara en el Cyber-shot station
(no suministrado).

ii!ii_[!_i!_:_!i_ii_i:!!:;_!_!_!ii!_i!i_!ii!ii!_;!_!_i_i_!!_!?!_!_!_!_!_!_i_
iiiiiiiiiiiiiiiii
iiiiiiiiiiiiiii
<
Identificacion de las partes
[]
_te inferior
[] Palanca del zoom (W/T)
[] Bot6n del disparador
[3] Micrdfono
[] Bot6n POWER/L_impam POWER
[] Flash
[] L_impara del autodisparador/L_impara
del captador de sonrisas/Iluminador
AF
[] Objetivo
[] Tapa del objetivo
[] Pantalla LCD/Panel t_ictil
[] Bot6n _ (Reproducci6n)
[] Enganche pare la correa de mufieca/
Empufiadura
[] Altavoz
[] Tapa de la baterfit/"Memory Stick
Duo"
[] Rosca pare trfpode
• Utilice un trfpode con un tornillo de menos
de 5,5 mm de largo. De 1ocontrario, no
podr:i sujetar firmemente la cfimara, yes
posible que la c_hnarase dafie.
[] Palanca de expulsi6n de llt baterfa
[] L_impara de acceso
[] Ranura de "Memory Stick Duo"
[] Ranum de inserci6n de llt baterfa
[] Conector mfiltiple
8

Carga de la bateria
1
Inserte la bateria en el
cargador de bateria.
• Puede cargar la bateria incluso cuando
est_ parcialmente cargada.
Bateria
Conecte el cargador
de bateria a la toma
de corriente de la
pared.
Si continfia cargando la baterfa
durante aproximadamente una
hora m_s despuds de haberse
apagado la l_mpara CHARGE,
la carga duram un poco rods
(carga completa).
Para clientes en EE.UU. y Canada
Clavija
Lmnpara CHARGE
Iluminada: Cargando
Apagada: Ha finalizado la carga
(carga normal)
Lampara CHARGE
Para clientes en paises/regiones distintos de
EE.UU. y Canada
<
0
Cuando se haya completado la carga, desconecte el
cargador de bateria.

iii
i
iiiiiiiiiiiii
iii
/Tiempo de carga
iiiiiiiiiiiiiiiii!!i_i_;!ii!:ii:iii!ii{i
<
0
• La tabla de arriba muestra el tiempo requerido para cargar una baterfa completamente descargada a
una temperatura de 25°C
La carga podrA llevar mAs tiempo segfin las condiciones de utilizacidn y las circunstancias.
• Conecte el cargador de baterfa a la toma de corriente de la pared mils prdxima.
• Aunque la lfimpara CHARGE no estd encendida, el cargador de baterfa no estarfi desconectado de
la fuente de alimentaci6n de ca en tanto que el mismo estd conectado a la toma de corriente de la
pared. Si ocurre algln problema mientras utiliza el cargador de baterfa, interrumpa inmediatamente
la alimentacidn desconectando la clavija de la toma de corriente de la pared.
• Cuando finalice la carga, desenchufe el cable de alimentacidn de la toma de corriente de la pared, y
extraiga la baterfa del cargador de baterfa.
• Disefiado para utilizarse con baterfas Sony compatibles.
/ Duracidn de la bateria y namero de ira&genes que se pueden
grabar/ver
Toma de imdtgenes fijas Aprox. 110 Aprox. 220
Visionado de imdtgenes fijas Aprox. 230 Aprox. 4 600
• El mdtodo de medici6n cstA basado cn el est_indar CIPA. (CIPA: Camera & Imaging Products
Association)
• La duracidn de la balerfa y el ndmero de imageries fijas podrln variar dependiendo de los ajustes
de la cfimara.
10

Insercion de la bateria/un "Memory
Stick Duo" (no suministrado)
Abra la tapa.
Inserte el "Memory Stick
Duo" (no suministrado).
Con el lado del terminal orientado hacia el
objetivo, inserte el "Memory Stick Duo"
hasta que produzca un chasquido al encajar
en su sitio.
Inserte la bateria.
Alinee la marca • de la baterfa con la
palanca de expulsi6n de la baterfa, despu&s
inserte la baterfa mientras presiona la
palanca en la direcci6n indicada por la
flecha.
<
O
Cierre la tapa.
®
11

iiiiiiiiiiiii
iiiiiiiiiiiiiiiii
iiiiiiiiiiiiiii
<
©
"Memory Stick" que puede
utilizar
"Memory Stick Duo"
Tambidn pucde utilizar un "Memory Stick
PRO Duo" o "Memory Stick PRO-HG Duo"
con la c_hilara.
Para mils detalles sobre el nfimero de
im_igenes/liempo que se pueden grabar,
consulte las p_iginas 2Z 25. Otros tipos de
"Memory Stick" o tarjeta de memoria no son
compatibles con la c_hnara.
"Memory Stick"
No puedc utilizar un "Memory Stick" con la
c_hnara.
_Para extraer el "Memory
Stick Duo"
L_impara de
acceso
_Cuando no hay insertado un
"Memory Stick Duo"
Las im,figenes se ahnacenan en la
memoria interna de la c_J.mara
(aproximadamente 15 MB)
Pare copiar imfigenes de la memoria
interna a un "Memory Stick Duo",
inserte el "Memory Stick Duo" en la
cfimara, toque _ y seleccione
[Copiarl en [Herrta. Memorial de
(Gesti6n de memoria) (pfigina 40).
_Para extraer la bateria
Palanca de
expulsion de la
bateria
Deslice la palanca de
expulsion de la bateria,
Asegurese de no dejar caer
la bateria,
_Comprobacidn de la carga
de bateria restante
En la parte superior izquierda de la
pantalla LCD aparece un indicador de
carga restante.
Aseg0rese de que la kimpara
de acceso no esta _ _ _ _
encendida, despues pulse el I_
"Memory Stick Duo" hacia
Alta Baja
dentro una vez,
12
• No extraiga nunca el "Memory Stick Duo"/
baterfa cuando estd iluminada la 15mpara de
acceso. Esto podrfa ocasionar dafio a los
datos del "Memory Stick Duo"/memoria
interna.
• La apariciOn del indicador de carga restante
correcto lleva aproximadamente un rain
(minuto).
• Es posible que el indicador de carga rcstante
no sea corrccto ell ciertas circunstancias.
• Si utiliza la baterfa NP-FDI (no
suministrada), tambidn podrfi ver los minutos
despuds del indicador de carga restante.
• La capacidad de la baterfa disminuye a
medida que pasa el tiempo y con el uso
repetido. Cuando el tiempo de operacidn por
carga disminuya notablemente, la baterfa
necesitarfi ser reemplazada. Adquiera una
baterfa nueva.

Ajuste del reloj
1
Baje la tapa del objetivo.
La c_imara se enciende.
• Tambidn puede encender la c_imara
pulsando el bot6n POWER.
• Es posible que lleve algOn tiempo en
conectarse la alimentaci6n y pennitir
realizar opemciones.
Botdn POWER
Tapa del
objetivo
Toque el formato de
visualizaci6n de fecha
deseado, y despues
toque =_,.
¢......................
A-M-D
r D-M-A
<
©
Toque cada elemento,
despues toque A/V para
ajustar su valor
numerico.
• Medianoche se indica como
12:00 AM, y mediodfa como
12:00 PM.
Toque [OK].
• La c_imara no tiene una funcidn para superponer fcchas en iron,genes. Utilizando "PMB" del CD-
ROM (suministrado), puede imprimir o guardar imfigenes con la fccha.
• Si la cfimara est_i encendida y no la utiliza durante unos tres rain (minuto), la cfimara se apagarfi
automfiticamente (Funcidn de apagado autom_itico).
_Ajuste de la fecha y la hora otra vez
Toque [[_ --* _ (Ajustes) --* [Ajustes del reloj] (p;igina 40).
13

iiiii
iiiiiii
B
©
©
B
g
14
Toma de imagenes
Baje la tapa del objetivo.
La C_ilnara se enciende.
Sujete la c_tmara
sin moverla como
se muestra en la
ilustraci6n.
• Deslice la palanca del zoom
(W/T) hacia el lado T para
__tCeI'C_.IF COIl ZOOln.
Deslice hacia el lado W para
volver.
Palanca del zoom (W/T)
3
4
Pulse el bot6n del
disparador hasta la
mitad para enfocar.
{(_o_'se visualiza para indicar que
SteadyShot est_i funcionando.
Cuando la ilnagen est_i enfocada,
suena un pitido y se ilulnina el
indicador O. La distancia de
tolna in,is corta es de
aproxilnadalnente 8 cln (W),
50 cln (T) (desde el objetivo).
Boton del
disparador
Pulse el bot6n del
disparador a fondo.
Se tolna la ilnagen.
Tapa del
objetivo
Marca de
SteadyShot
Bloqueo
AE/AF

Visualizacion de imagenes
1
Pulse el bot6n ,_i
(Reproducci6n).
Se visualiza la filtima imagen tomada.
• Cuando im_genes del "Memory Stick
Duo" grabadas con otras cmnaras no
puedan reproducirse en esta cmnara, vea
las im_genes en [Vet carpetasl
(pfigina 28).
Boton (Reproduccion)
_Seiecci6n de la imagen
siguiente/anterior
Toque I_| (Siguiente)/I-_ (Anterior) en la
pantalla.
_Eiiminaci6n de una imagen
Toque _ (Borrar), despu_s toque [OK1.
ii_i!_!_!_!!i_!_!_i!_!_!_i_:_i_:_i_:_i_:_i_!!_!_!_i!_i_!_!
iii,i_)i!i!i!i_!iii_!ii_iii_i_}!ii!!i!i!!_i!ii!i!!_!i!i!!ii,ii:iiii!i_iiii
ii!i_i_)i_i,!,!!i,!,!!i,!,!!i,!,ii_i!iii,lii!_i_i!i,lii!_i_i!i,lii!_i
iii,i_ii!i!iiiiii,!iiii!ii_i'i!i_)iii!il}il}i!ii!i!ii!,!_!iii_iii!i_i:i!
iii_i!!!_!;!!i;iiiil;iiii!;i_i;ii_i_ii_iiii'ii!i!_ii!ii'i'iii_i_iil}iii_i!
iii_!;il}i_ii_i_i:ii_i!ii!i!iiii_!_!ii_!_i!,!i!i!)ii_);iiiii!il
iii_i_ii_!_i!i!_!_i_i_i!_!_!_!_!_!_!_!_!_!_!_!_!_!_!_!_!_!_!_!i
ii_i!_!_!_!!i_!_!_i!_!_!_!;_!;_!;_i!!_!_!_i!i_!i_:!_!i_
ii_!_i!_i!_i!_i!_i_!_)_)i_ii!i!i_i!_i!_i!_i_:_!_!_
©
B
©
©
B
@
@
_Para volver a la toma de im_igenes
Pulse el bot6n del disparador hasta la mitad.
_Para apagar la c_imara
Cierre la tapa del objetivo.
• Tambidn puede apagar la cmnam pulsando el bot6n POWER.
15

Deteccion de sonrisas y toma automatica
(Captador de sonrisas)
1
Toque _ (Modo
Grabaci6n) --. _ (Ajuste
t
automfitico) --. C_ o
--* ® (Icono de sonrisa).
2 Espere mientras se
detecta una sonrisa.
Cuando el nivel de sonrisa excede el
punto _ del indicador, la cmnara
toma imSgenes automSticamente.
Cuando toque 0 (Icono de sonrisa)
otto vez, finalizar5 el Captador de
sonrisas.
• Si pulsa el bot6n del disparador
durante el Captador de sonrisas, la
cmnam tomarfi la imagen en ajuste
automfitico, y despu& volvem al
modo Captador de sonrisas.
Cuadro de Deteccion de cara
Indicador de sensibilidad de deteccidn de
sonrisas
16

Deteccion de las condiciones de la toma de imagen
automaticamente (Reconocimiento de escena)
La cmnara detecta automfiticamente las condiciones de la toma de imagen, y despu6s
toma la imagen.
1
Toque _ (Modo
Grabaci6n) --. _ (Ajuste
n
automfitico) --. C_ o NN.
m
2 Toque _ --. _1 (Reconocimiento de escena) --* modo
deseado ---. NN-
(Desactivar): No utiliza Reconocimiento de escena.
_1 (Auto): Cuando la cmnara reconozca la escena, cambiam a los ajustes 6ptimos
y tomar_ la imagen.
(Avanzado): Cuando la cfimam reconozca la escena, cambiarfi a los ajustes
6ptimos y tomarfi la imagen.
Adem_s, cuando la cmnara reconoce J (CrepOsculo), _ (Retmto crepOsculo), _J
(CrepOsculo utilizando trfpode), [] (Contmluz) o _" (Retmto a contmluz), toma
otto imagen. Cuando la cfimam reconoce _ (Retmto), se acciona la reduccidn de
ojos cermdos.
I_rgllgl
• El Reconocimiento de escena no responder_i en el modo _'_ (Macro activado), _O. (Permitido
enl'ocar de cerca) ni R_ifaga.
C
p0
o
S"
D_
(I)
F
(t)
o9
D_
(t)
D_
(t)
(C)
(t)
17

Toma de primeros pianos (Macro/Enfoque de
cerca)
Puede tomar bellas im;igenes en primer plano de objetos pequefios tales como insectos o
flores.
1
Toque _u+0(Macro) --,
modo deseado --. N3.
_AUT0(Auto): La c_mam ajusta el
enfoque autom_ticamente desde
motivos distantes a primer plano.
Nonnahnente, ponga la cmnam en
este modo.
(Macro activado): La c_mara
ajusta el entbque con prioridad sobre motivos en primer plano.
Ajuste a Macro actiwMo cuando tome motivos cercanos.
&O, (Permitido enfocar de cerca): Utilice este modo para tomar a distancias
incluso re;is cortas que con la grabaci6n Macro.
Bloqueado en el lado W: Aproximadamente 1 a 20 cm
Utilizacion del autodisparador
1
2
Toque ®OFF
(Autodisparador) --. modo
deseado --. N_.
OoF_(Desactivar): Sin utilizar el
autodisparador.
G0 (Autodisparador 10 s): La
toma se inicia tins un retardo de
10 s (segundo). Utilice este ajuste si
quiere incluirse en la imagen. Pare
cancelar, toque 630.
6.32(Autodisparador 2 s): La toma se inicia tins un retardo de dos s (segundo).
Esto es para evitar el desenfoque debido a la inestabilidad cuando se pulsa el bot6n
del dispamdor.
Pulse el botdn del disparador.
La lfimpam del autodispamdor parpadea y suena un pitido hasta que se acciona el
obtumdor.
18

Selecci6n de un modo de flash
1
Toque _A_ (Flash) --. modo
deseado --, _.
_AUTO(Flash automdtico): Destella
cuando hay insuficiente luz o
contraluz.
(Flash activado): El flash
funciona siempre.
_sL (Sinc lenta): El flash funciona
siempre. En un lugar oscuro la velocidad de obtumci6n es lenta pare tomar
clammente el t_ndo que queda fuem del alcance de la luz del flash.
@ (Flash desactivado): El flash no funciona.
• Cuando Reconocimienlo de escena estfi ajustado a [Auto] o [Avanzado] no se puede utilizar
(Flash activado) ni I_SL (Sinc lenta).
• Incluso con el flash activado, es posible ClUeel flash no funcione durante la r_faga.
C
©
o,
D_
(D
i ii
(D
09
D_
(D
D_
(D
LC)
(D
19

Enfoque de un punto especifico del cuadro
Simplemeute toque el puuto del cuadro que quiere eufocar para cambiar la posici6u de
eufoque.
1
Oriente la cfimara hacia el
motivo, despues toque el
punto del cuadro que quiere
enfocar.
• Puede cambiar el punto de enfoque
cuantas veces lo desee antes de
pulsar el bot6n del dispamdor hasta
la mitad.
• Si quiere que la c;hnam elija un
punto de enfoque autom;iticamente,
toque I=0FF.
_] : Se ha detectado cara.
='_z:No se ha detectado cara,
Enfoque de la cara del motivo (Deteccion de
cara)
Lit c;hnam detecta llt cam del motivo y llt eutk_ca. Puede selecciouar qu6 motivo teudr;i
prioridad al eutk)car.
1
Toque _ --. E_.,o
(Detecci6n de cara) --.
modo deseado --. _.
_-_(Cuando se toca): Detecta la
cara cuaudo se toca uu ;irea de la
pautalla doude hay uua cara.
_o (Auto): Seleccioua la cara que la _
c;hnara va a eufocar autom;iticameute.
o_:_ (Prioridad nifios): Detecta y toma imageu con prioridad sobre cara de uifio.
Eo_: (Prioridad adultos): Detecta y toma imageu con prioridad sobre cam de
adulto.
2O

Seleccion del tamafio de imagen para
coincidir con la utilizacion
El tamafio de imagen detennina el tamafio del archivo de imagen que se gmba cuando
toma una ilnagen.
Cuanto m_s grande sea el tamafio de imagen, m_s detalles se reproducir_n cuando la
imagen sea impresa en papel de fonnato grande. Cuanto mils pequefio sea el tamafio de
imagen, mils ilnfigenes podrfin gmbarse. Seleccione el tamafio de imagen que
corresponda con la fonna en que verfi sus imfigenes.
1 --* L_ (Tamafio
imag) --. modo deseado
L'_ 10M
/3 648x2 736)
Para copias hasla tamafio A3+
_5M 5M Para copias hasta tamafio A4
(2 592x I 944)
3M Para copias hasta tamafio L/L2
(2 I)48xl 536)
[-_1AVGA Para adjuntar a correo electrdnico
(640x480)
_'.'2 3:2 (8M) Relacidn de aspecto 3:2 como las
(3 648x2 432) copias de fotos y tmjetas postales
_.'9+ 16:9 (7M)
/3 648x2 056)
_..9 16:9/2M)
/ 1920x I 080)
Para vet en un televisor de alta
delinici6n.
C
©
S"
D_
g
U
(t)
09
D_
U
93
D_
93
(£1
21

1_6IRI
• Cuando imprima imfigenes tomadas con relacidn de aspecto 16:9, es posible clue ambos bordes
sean recorlados.
_Namero de im_igenes fijas que se pueden grabar
Las cifras de la tabla de abajo indican el n6mero de im;igenes cuando [Modo Grabacidn]
est_ajustadoa[Normal1.
(Unidadcs: Im_igcncs)
VIM 3 56 118 242 493 972 l 963 3 991
5M 6 89 188 384 781 1 541 3 Ill 6324
3M 10 144 3(11 617 1253 2472 4991 lit 140
VGA 96 1 385 2 898 5 925 12 030 23 73(1 47 910 97 390
3:2(8M) 3 57 119 244 497 98(1 1 980 4 024
16:9(7M) 4 6(1 126 257 523 1 031 2 083 4 234
16:9(2M) 16 23(1 483 987 2 005 3 955 7 986 16 23(1
• El nfimero de im_igenes fijas podrfi variar dependiendo de las condiciones de la toma y el soporle
de grabacidn.
• Cuando el nfimero de imfigenes rcstantes que pueden tomarse es superior a 9 999, aparece el
indicador ">9999".
• Cuando se reproduzca en esta cfimara una imagen tomada con otras cfimaras, es posible que la
imagen no aparezca en el tamafio de imagen real.
22

Utilizacion del modo de toma que coincide
con la escena (Seleccion escena)
1
Seleccione el modo de
toma de imagen.
Para seleccionar _+'o_/&-_/
&_/J: Toque _ (Modo
Grabaci6n) --+ modo
deseado --+ m.
Para seleccionar WP&/8l':i:ii:'/
_ml¢: Toque _ (Modo Grabaci6n) --+ _ (Selecci6n escena)
--+ modo deseado --+ _.
i_+O(Alta sensibilidad):
Toma imP+genes sin flash
incluso con poca
iluminaci6n.
[] (Paisaje): Toma con el
enfoque en un mofivo
distante.
_p_(Gourmet): Toma
arreglos de comidas en
deliciosos colores,
_"_ (Playa): Toma escenas
de costas y riberas de lagos
con el azul del agua
capturado mas vividamente,
(Nieve): Toma escenas
de nieve en bJanco m_+s
claramente.
®° (Instantanea suave):R3
Toma imP+genes con un
ambiente m_ts suave para
retratos de personas, fiores,
etc,
_++ (Retrato crepOsculo):
Toma im_tgenes nitidas de
gente en un Jugar oscuro sin
perder el ambiente
nocturno.
J (CrepOsculo): Toma
escenas noc[urnas sin
perder el ambiente
nocturno.
;i{:i.+(Fuegos artificiales):
Toma fuegos artificiales en
todo su esplendor,
(Submarino): Toma
imP+genes submarinas en
colores naturaJes cuando se
usa con Ja caja resistente aJ
agua.
_ (Obturador rapido):
Toma objetos en movimiento
en lugares brillantes.
c
p_
©
o,
Q_
g
(D
O9
Q_
U
Q_
LQ
• E1 flash no resporJderfi en algunos modos. 23

Toma de peliculas
1
Toque _ (Modo
Grabaci6n) ----.H (Modo
m
pelicula) ----._.
m
2 Pulse el bot6n del disparador a fondo para iniciar la
grabaci6n.
Pulse el bot6n del disparador a fondo otra vez para detener
3 la grabaci6n.
_Visionado de pel{culas
Pulse el bot6n El (Reproducci6n) y toque los botones _| (Siguiente) / t4 (Anterior)
para seleccionar una pelfcula que quiere ver.
Bo
_VOL Control del volumen
I_ Reproduccidn
• Delener
I_1_1_1_1 Avance r@ido/rebobinado rglpido
_Tamafio de imagen
Cuanto mils grande sea el tamafio de imagen, mils alta ser_ llt calidad de imagen. Cuanto
mayor sea el nfimero de fotogramas pot segundo, rods unifonne ser_ llt imagen de
repmduccidn.
Ta aft i : : s! :: :::::: ::::::::::::::::::::
_E 640(Fina) (640x480) Aprox. 30 Para ver en un televisor (calidad de imagen alia)
_D 640(Est_indar) (640x480) Aprox. 17 Para ver en un televisor (calidad de imagen estfindar)
3_0 321) (320x240) Aprox. 8 Para adjuntar a correo electrdnico
24

_Tiempo de grabaci6n m_i×imo
La tabla de abajo muestra los tiempos de grabaci6n mfiximos aproximados. Estos son los
tiempos totales para todos los archivos de pelfcula. Se puede fihnar continuamente
durante 10 rain 0ninuto) aproximadamente.
(Unidades: h (hora) : min (minuto) : s (segundo))
64(t(Est_indar) 0:(t0:4(t 0:10:2(t ():21:4(t 0:44:2(t 1:30:1(t 2:58:00 5:59:20 12:10:20
320 0:(12:50 0:41:30 I 1:25:20 I 2:57:40 ] 6:O1:00 I 11:52:O0 1 23:57:30148:41:50
• El tiempo de grabacidn podrfi variar dependiendo de las condiciones de la toma y del soporte de
grabacidn.
• Las pelfculas con el tamafio ajustado a [640(Fina)] sdlo pueden grabarse en un "Memory Stick
PRO Duo".
• Esta cfimara no admite grabaciones ni reproducciones HD para pelfculas.
Visualizacion de los indicadores minimos
(Toma facil)
Este modo reduce al mfnimo el nOmero de ajustes y hace que los indicadores resulten
m_s f_ciles de vet.
1
Toque _ (Modo
Grabaci6n) --. EASY(Toma
fficil) --. _.
i ii
C
p3
©
o,
Cz.
db
_b
03
CZ.
db
CZ.
db
LQ
db
Autodisparador Seleccione 4_)0_ (Autodisparador 10 s) o 4_.)0Ft, (Desaclivar) con el boldn _-)OFF •
Tama_o imag [_---_ Seleccione [Grande] o [Pequefio] en [Tamafio imag]
Flash _ _ Seleccione [Auto] o [Desactivar] en IFlash]
_Para volver a la visualizaeibn normal
Toque _!_ (Modo Grabacidn) --* _[_ (Ajuste autom_tico) --* _.
25

Visionado de una imagen ampliada (Zoom de
reproduccion)
1
2
Pulse el bot6n iX
(Reproducci6n) para
visualizar una imagen,
despues toque el Area que
quiere ampliar.
La imagen se amplfa al doble del
tamafio, con el _rea que toe6 en el
ceutro. Cuaudo | est_ ajustado a
[$61o imagJ, toque el centro de la
pantalla, despu& toque el _rea que quiere ampliar.
Ajuste la escala del zoom y
la posici6n.
La escala del zoom aumenta cada vez
que toca la pantalla.
_/_/_/_: Ajusta la posicidn.
(_ : Cambia la relacidn del zoom.
_: Actiwddesactiwt _/_/_/_.
[_ : Cancela el zoom de reproducci6n.
Muestra el area visualizada de la
imagen entera
Visualizacion de imagenes en pantalla
completa (Zoom ancho)
1
Pulse el botdn _i
(Reproduccidn) para
visualizar la imagen fija,
despues toque _.
• Toque _ otra vez para terminar el
ZOOIil ancho.
26

Giro de una imagen de orientacion vertical
(Visualizacion girada temporalmente)
1
Pulse el bot6n _i
(Reproducci6n) para
visualizar la imagen riD,
despues seleccione las
imfigenes de orientaci6n
vertical, despues toque _'_.
• Toque 4'_ otra vez para tinalizar la
visualizaci6n.
Visionado de imfigenes fijas con mt_sica
(Diapositivas)
1
Pulse el bot6n _
(Reproducci6n para
visualizar una imagen fija,
despues toque
(Diapositivas).
2 Toque [Inicio].
Comienza el pase de diapositiwts.
• Para tinalizar el pase de diapositiwts, toque la pantalla, y despu_s toque [Salir].
i ii
C
©
D_
co
©
(t)
o3
D_
co
<
D_
O
27

Bt_squeda de una imagen (indice de imagenes)
1
Pulse el bot6n .-]
(Reproducci6n) para
visualizar una imagen,
despues toque N_([ndice de
imfigenes).
• Si toca _]_, podm ajustar el
nOmero de im_genes visualizadas en
la pantalla de indice a 12 6 20 imfigenes.
Toque los botones i/_
para pasar las pfiginas.
• Para volver a la pantalla de una sola
imagen, toque la imagen en
miniatura.
28
Seleccion del formato de visualizacion
(Modo visualizacion)
Le pennite seleccionar el t_nnato de visualizaci6n pare vet mfiltiples imfigenes cuando
se utiliza "Memory Stick Duo".
1
Pulse el botdn _l
(Reproduccidn) para
visualizar una imagen,
despues toque N1(indice de
imfigenes) --. _.Q_ (Modo
visualizacidn) --. modo
deseado.
[_ (Vet fecha): Visualiza imfigenes pot la fecha.
(Vet evento): Analiza las fechas tomadas y la fiecuencia, organiza
automfiticamente las imfigenes en grupos y las visualiza.
Q? (Favoritos): Visualiza imfigenes registmdas como Favoritos.
[_ (Vet carpetas): Visualiza y organiza imfigenes pot carpetas.

_Localizaci6n f_icil de imageries que va a visualizar
Cuando estd ajustado a Ver fecha/Ver evento/Ver carpetas:
Cuando utilice un "Memory Stick Duo", toque _ (Lista Fecha), [] (Lista de evento) o
_EI (Seleccionar carpeta) para localizar fficihnente las imfigenes que desea.
kista Fecha: Visualiza
una lista de las imagenes
tomadas en la fecha
seleccionada,
., Lista de evento:
[E_2°°8-_-_ ] _] _ Visualiza una lista de las
[ t '_ el evento seleooionado,
[
Seleccionar carpeta:
Toque [OK] para
visualizar una lista de
imagenes contenidas en
la carpeta seleccionada,
Cuando est_i ajustado a Favoritos: Puede visualizar im;igenes registradas en
Favoritos divididas en seis gmpos.
Favoritos: Visualiza una lista de las imagenes
registradas en el numero de Favoritos seleccionado,
• Cuando no pueda reproducir imfigenes grabadas con otras c_hnaras, vdalas en [Ver carpetas].
C
c)
S"
D_
(I)
C)
(I)
09
D_
(I)
<
D_
O
29

Eliminacion de la imagen visualizada
actualmente
1Toque # (Borrar) --, [OK] (pfigina 15).
Eliminacion de multiples imagenes
1Toque _ (fndice de
imfigenes) --, # (Borrar).
2 Seleccione imfigenes para
borrar.
(!) Toque _/_ para pasar las pfiginas,
despuds toque las imfigenes que
quiere eliminar.
Se pone la marca V' alas
imclgenes seleccionadas.
(_ Repita el paso (!).
@ Toque _ _ [OK1.
Puede cambiar entre una sola imagen y pantalla de fndice utilizando _, cuando
selecciona imclgenes.
_Eliminaci6n en unidades de fecha, evento o carpeta
_ _ (Borrar) _ _1_ (Todas im_gs de tango fecha), _@ (Todo de evento) o
_. (Todo En Esta Carpeta) _ ['_ _ [OK1.
• Cuando se utiliza la memoria interna, las im_igenesse visualizan en [Ver carpetas].
3O

Eliminacion de todas las imagenes
(Formatear)
Puede eliminar todos los datos ahnacenados en el "Memory Stick Duo" o la memoria
interna. Si hay insertado un "Memory Stick Duo", se eliminarfin todos los datos
ahnacenados en el "Memory Stick Duo". Si no hay insertado un "Memory Stick Duo",
se eliminar_n todos los datos ahnacenados en la memoria interna. El formateo elimina
permanentemente todos los datos, incluidas las imfigenes protegidas.
1
Toque _ --, _ (Gestidn
de memoria) --, [Herrta.
Memoria] --, _ --,
[Formatear] --, _.
Toque [OK].
(33
O
q
O_
O
O_
_D
Y
Co,
(£1
(t)
31

Visionado de imagenes en un televisor
1 Conecte la c_.mara al televisor con el cable para terminal de
usos mQItiples (suministrado).
_ AI conector mOltiple _ Alas tomas de
entrada de
audio/video
Cable para terminal de usos mQItiples
32

Impresion de imagenes fijas
Si tiene una impresora compatible con PictBridge, puede imprimir im_genes mediante el
procedimiento siguiente.
En primer lugar, ajuste la cmnara para permitir la conexi6n USB entre la cmnara y la
impresora.
1
Toque _ --. _ (Ajustes)
--. [Ajustes principales] --.
[Conexi6n USB] --. _ --.
[PictBridge] --. _.
Se establecer_ el modo USB.
3
4
Conecte la cfimara a la impresora, con el cable para
terminal de usos mQItiples (suministrado).
Encienda la impresora.
Despu&dehacerlacouexi6u,apareceel iudicador_(.
Toque _ --. _ (Imprimir) --. elemento deseado --. m.
_ (Esta imagen): hnpfima la imagen visualizada actuahnente.
_ (MUltiples im_genes): Toque _l/I-_ para visualizar la imagen, despu_s
toque llt imagen que quiere imprimir.
Toque el elemento de ajuste deseado, despues [OK].
Se imprimim llt imageu.
_!ii_
ii_i i
c)
©
D_
73
o
7<
o
33

Utilizacion de la camara con un ordenador
_Utilizaci6n de "PMB (Picture Motion Browser)"
Puede disfrutar de las im_genes grabadas m_s que nunca aprovechando las ventajas del
software, y "PMB" incluidos en el CD-ROM (suministmdo).
Hay mils funciones, ademfis de las de la lista de abajo, para disfiutar de las imfigenes.
Pare mils detalles, consulte la "Guia de PMB".
multimedia
Para colgar imageries en
el _;ervicio multimedia.
Visionado de
, imb.genes en un
calendario
Imprimir DVD
moresion me Creacior me ur alsco me
imagenes con SellOS clatos UilllZaRClo LIRa
de fecha, unidad grabadora de CD o
de DVD.
Exportacion y visionado de
im6.genes cuando se utiliza el
"Memory Stick Duo",
• "PMB" no es compatible con ordenadores Macintosh.
34

_Etapa 1: Instalaci6n de "PMB" (suministrado)
Puede iustalar el software (sumiuistrado) utilizaudo el procedimieuto siguieute. Cuaudo
iustale "PMB", tambi6u se iustalarfi "Music Transfer".
• Inicie la sesi6n como Administrador.
1
3
Compruebe el entorno de su ordenador.
Entorno recomendado para utilizar "PMB" y "Music Transfer"
SO (preinstalado): Microsoft Windows 2000 Professional SP4, Windows XP*
SP3/Windows Vista SPI *
CPU: Intel Pentium II[ 500 MHz o mils rfipido (Recomendado: Intel Pentium I[[
800 MHz o mils rfipido)
Memoria: 256 MB o mils (Recomendado: 512 MB o mils)
Disco duro: Espacio requerido en disco para la instalaci6n -- aproximadamente
400 MB
Pantalla: Resoluci6n de pantalla; 1 024 x 768 puntos o mils
':'Las ediciones de 64 bits y Starter (Edition) no son compatibles.
Encienda su ordenador e inserte el CD-ROM (suministrado)
en la unidad de CD-ROM.
Aparecer5 la pautalla del meu6 de iustalaci6u.
Haga clic en [Install] (Instalar).
Aparecer_ la pautalla "Choose Setup
Language" (Elegir idioma de iustalaci6u).
4 Siga las instrucciones de la pantalla para completar la
instalaci6n.
Extraiga el CD-ROM despues de completarse la instalaci6n.
o
O
o
CL
_5
o
o
35

_Etapa 2: Importaci6n de imageries a su ordenador utilizando
"PMB"
Inserte una bateria completamente cargada en la cfimara,
despues pulse el bot6n I_ (Reproducci0n).
Conecte la cfimara a su ordenador.
Aparece "Conectando_ ." en la pantalla de la c_hnara.
ctor
mOItiple
• Duranle la sesi6n de comunicacidn se muestra 5_, en la panlalla. No utilice el ordenador
mientras estd visualizado el indicador. Cuando el indicador cambia a , puede
comenzar a utilizar el ordenador de nuevo.
3 Haga clic en el botdn [Import] (Importar).
Para m_is detalles, consulte la "Gufa de PMB".
_Etapa 3: Visionado de la "Guia de PMB"
1
Haga doble clic en el icono _', (Guia de PMB) del escritorio.
• Para acceder a la "Guia de PMB" desde el menfi de inicio: Haga clic en [Start 1
(Inicio) -_ [All Programs] (Todos los programas) -_ [Sony Picture Utility] -_
[Help] (Ayuda) -_ [Gufa de PMB].
36
• No desconecte el cable para terminal de usos mfiltiples de la c_hnara mientras la cfimara estfi
funcionando ni mientras aparece "Acceso..." en la pantalla de la cfimara. Si 1o hace podrfi
estropear los datos.
• Cuando utilice una baterfa con poca carga rcstante, es posible que no pueda transfcrir los datos o
que los datos se estropeen. Se recomienda utilizar el adaptador de ca (no suministrado) y el cable
USB / A/V / DC IN para terminal de usos mt]ltiples (no suministrado).

_Utflizaci6n de la c_mara con su ordenador Macintosh
Puede copiar im;igenes a su ordenador Macintosh. "PMB" no es compatible, pero puede
instalar "Music Transfer" en su ordenador Macintosh. Cuando las im;igenes sean
exportadas a la c;hnara, vdalas en [Ver carpetasl.
Entorno de ordenador recomendado
Para uu ordeuador couectado a la c;hnara se recomieuda el eutoruo siguieute.
Entorno recomendado para importar imfigenes
SO (preinstalado): Mac OS 9,1/9,2/Mac OS X (vl0,1 a v10,5)
Toma USB: Sumiuistrada como est;iudar
Entorno recomendado para utilizar "Music Transfer"
SO (preinstalado): Mac OS X (vl0,3 a vl0,5)
Memoria: 64 MB o re;is (se recomiendan 128 MB o re;is)
Disco duro: Espacio requerido en disco para la instalaci6n -- aproximadamente
250 MB
©
O
CL
37

Cambio de la visualizacion en pantalla
1
Toque _ --. modo
deseado --. _.
(Normal): Visualiza botones e ..................
iconos
(Simple): Visualiza botones
solamente
(Sblo imag.): Oculta botones e
iconos
• Si se sclecciona la reproduccidn [$61o imag.], _ desaparecer_i de la panlalla. Para visualizar
los boloncs, toque el cenlro de la pantalla. Volvcrzl la visualizacidn [Nomml] lemporahnente.
ho un a
38
Cambio de los sonidos de operacion
Puede ajustar el sonido producido cuando utiliza la cmnam.
1
Toque _ --. _ (Ajustes) [_
--. [Ajustes principales] --.
I_ --* [Pitido] --. _ --.
modo deseado --. _.
Obturador: Actiwt el sonido del
obtumdor pare cuando se pulsa el
bot6n del dispamdor.
Activar: Actiwt el sonido de pitido/
obtumdor pare cuando se utiliza el panel t;ictil o se pulsa el bot6n del dispamdor.
Desactivar: Desactiwt el sonido de pitido/obtumdor.

Utilizacion de la pantalla HOME
En la pantalla HOME, las operaciones de la cMnara est_n organizadas de forma
conveniente en amplias categor/as de selecci6n, tales como toma, visionado e impresi6n
de im_genes.
En la pantalla solamente se visualizan los elementos disponibles.
• x
Tema de imagen
_ _ Toma de imagen
r_ Visionado de im_gs.
Ver fecha':' Visualiza im_igenes por la fecha.
Ver evento # Analiza las fechas tomadas y la fi'ecuencia, organiza automfiticamente las
im_igenes en grupos y las visualiza.
Favoritos::' Visualiza im_igenes registradas como Favoritos.
Ver carpetas Visualiza y organiza imfigenes por carpetas.
"' Eslos elementos se visualizan solamente cuando hay "Memory Stick Duo" insertado en la c_hnara.
_ _ DiaposRivas
Diapositivas Reproduce imfigenes sucesb, amente junto con efectos y mtlsica.
Herramienta mOsica Desc mOsica: Cambia la mOsica del pase de diapositivas.
Format mOsi: Elimina loda la mOsica del pase de
diapositivas.
_ Imprimir
09
©
39

Gesti6n de memoria
Herrta. Memoria - Her
Memory Stick
Herrta. Memoria =
Herr.memoria imerna
Formatear:
Crea CarpGrabaci6n:
Camb. Carp. Grab.:
Copiar:
Formatear:
Formatea un "Memory Stick Duo".
Crea una carpeta nueva en un "Memory Stick
Dl/o".
Cambia la carpeta utilizada para grabar
im_igenes.
Copia todas las imfigenes grabadas en la
memoria interna a un "Memory Stick Duo".
Formatea la memoria interna.
_ Ajustes
4O
Ajustes principales -
Ajustes principales 1
Ajustes principales -
Ajustes principales 2
Ajustes de toma - Ajustes
toma de imagen 1
Ajustes de toma - Ajustes
toma de imagen 2
Ajustes del reloj
Language Setting
Pitido: Selecciona los pitidos producidos cuando
utiliza la cfimara.
Gufa f__mciones: Visualiza la gufa de funciones.
lnicializar: Restaura la cglmara a sus ajustes
predeterminados.
Calibracidn: Corrige la desalineaci6n de las posiciones de
respuesta de los botones del panel t_ictil.
Envoltura: Cambia las operaciones de los botones
cuando la ctlmara estfi ell la envoltura (c_tia a
prueba tie agua).
Demuestra las funciones Captador de sonrisas
y Reconocimiento de escena.
Establece el modo utilizado cuando se conecta
la cglmara a un ordenador o a una impresora.
Establece la serial de video de acuerdo con un
terminal de televisi6n conectado.
Establece el modo de acuerdo con el sistema
de salida de vfdeo que se va a conectar.
Establece la relacidn de aspecto de un
televisor qtle se va a conectar.
Destella la luz tie relleno cuando se enfoca ell
poca luz.
Visualiza lhleas para ajustar fdcihnente un
motivo en posicidn horizontal o vertical.
Selecciona el modo de operacidn de enfbque
autom_tico.
Selecciona el mdtodo de zoom para zoom ell
exceso del zoom 6ptico.
Reconoce el cambio de orientaci6n y guarda
la imagen en la orientaci6n apropiada.
Visualiza la imagen el1 la pantalla durante
aproximadamente dos s (segundo) despuds de
tomar una imagen fija.
Establece la lbcha y hora.
Selecciona el idioma a utilizar en los elementos de menfi, avisos y mensajes.
Modo demostracidn:
Conexi6n USB:
COMPONENT:
Salida vl'deo:
T1PO TV:
lluminador AF:
Cuadrfcula:
Modo AF:
Zoom digital:
Orient. autom.:
Revisi6n autom:

Utilizacion de los elementos de MENU
Visualiza funciones disponibles para ajustarlas fiicihnente cuando la c_mara est_ en
modo de toma de imagen o reproducci6n. En la pantalla solamente se visualizan los
elementos disponibles.
MENU en modo de toma de imagen
Tamaflo imag Establece el tamafio de imagen.
16:9(7M)/_.. 9 16:9(2M)/_E 6401Fina)/_'_l ) 640/Est_indar)/3_-ff_ 0
321))
Reconocimienlo de escena Detecta autom_iticamente las condiciones de toma y despuds toma la
imagen.
(_ D ..... livar/_ auto/_ I_av ....... do)
Detecci6n de cara Selecciona el motivo que tiene prioridad para ajustar el enfoque cuando se
uliliza delecci6n tie cara.
([_2 Cuando se loca![_u]v0 Aulo/_r_? Prioridad nifios/[_]g= Prioridad
adullos)
Sensib deleccidn s(mrisas Ajusta el nivel de sensibilidad para detectar s(mrisa.
_ Baio/_ Medio/OAI*(,)
Modo Grabacidn Selecciona el mdtodo de toma cominua.
(_] Normal/_l R_Ifaga/BRK_+0.3EV, BRK_+0.7EV. BRK_+I.0EV)
EV Ajusta la exposici6n manuahnente.
( 2.0EV a +2.0EV)
Modo medicidn Establece qud parle del motivo se mide para delerminar la exposici6n.
(_ Multi/[('=;_ Cenlro)
Enfoque Cambia el mdtodo tie enfoque.
/_ Mulli AF/oo distancia ilimitada)
Balance Blanc() Ajusta los Ionos tie color en hmci6n tie las condiciones de la luz
ambienlal.
wB Auto/-;_,_ Luz diurna/_ Nublado/_l Luz fluorescente 1.(AUTO
_2 Luz fluorescenle 2, _ Luz flu( rescenle 3/=,,6,_lncandescenle/
,_w_ Flash)
41

Balance Blanco submarino
Nivel flash
Reducci6n de ojos cerrados
Reducci6n ojos rojos
DRO
Modo color
SleadyShol
Ajusles de loma
Ajusta los colores cuando se hacen [olnas subnlarinas.
(I_ aul°/_lll Submarino 1, OI2 Submarino 2/_wB Flash)
Ajusta la cantidad de luz del flash.
(,$-/,_m Est_indar/,_+)
Establece la funci6n Reducci6n de ojos cerrados.
(_r0 AUt°/I_FF D ..... tivar)
Se ajusla para reducir el efeclo ojos rojos.
(r_A,_ Aulo/('_N Aclivar/(;_F Desactivar)
Oplimiza el brilk> y el comrasle.
(_FF Desactivar/[il]_ DRO standard/_s DRO plus)
Cambia la vivacidad de la imagen o agrega efi_clos especiales.
(Ea+ Normal/V_ Vfvido/_ Sepia/_ ,W+ B y N)
Selecciona el modo de toma estable.
(((,_ll_ Tomando/l(,_o_ C(mlinuo/((_[ Desactivar)
Selecciona los ajusles de toma de imagen.
MENU en modo de visionado
42
[] (Lista Fecha) Selecciona la lista de li2cha de reproduccidn.
(Lista de evento) Selecciona el grupo de event() que se va a reproducir.
P"I (Seleccionar carpeta) Selecciona una carpeta para ver imfigenes.
¢,Q_ (Modo visualizacidn) Cambia los modos de visualizacidn.
(_ Ver fecha/_ V....... to/Q) F....... itos/[_ Ver carpetas)
(Filtro por caras) Reproduce imfigenes filtradas para reunir ciertas condiciones.
( QOFF D..... tiw_r/t_O_ Toda la gente/,_Q Nifios/_Q Beb&/
_Q Sonrisas)
(Diapositivas) Reproduce imfigenes sucesivamente junto con eli_ctos y mfisica.
Qp (Agregar/quitar Afiade im_igenes a Favoritos o quita imfigenes de Favoritos.
F........itos) (Q'_ Esta imagen/Q_ Mtiltiples im_ig..... /Q_0N afiade todo d...... go
fecha":/Q_0FF Quita todo de rango fecha*)
* E1 texto visualizado varfa de acuerdo con cada modo de visualizacidn.
(Retocar) Retoca im_igenes fijas.
(_ Recortar/_,s C .......... i6n ojos rojos/_ E.................. ient ....
nflido_.s EnfkN ........ 'e_ Color parcial_ Objelivo ojo de pez/
Vill,'o de cruce/_ D..... [k>cI........ lial/_ Retro_ Sonrisas)
@D (Pintar) Pinta sobre una imagen fija y la guarda como imagen nueva.
(Mfiltiples tamafios) Cambia el tamafio de imagen de acuerdo con la utilizacidn.
(_ HDTV/_ Blog/E-mail)

(Borrar) Borra imfigenes.
(_ Esta imagen/_ M61tiples imfig ..... 1_ Todas imfigs d ....... go
fecha :')
:: E1 text() visualizado varl'u de ucueMo con cuda modo de visualizaci6n.
Oa" (Proteger) Previene el borrado accidental.
(O_r_ Esta imugen/O'_O Mfiltiples imfig ..... /O_ Ajusta todo de rango
fecha::/_0Fl_ Quita todo de rang(} fecD.ff )
':' E1 text() visualizado varfa de acuerdo con cada modo de visualizaci6n.
[IP[}F Afiade una marca de orden de impresi6n a la imagen que quiere imprimir
de un "Memory Slick Duo".
(Dp0_ Esta imugen/l)P°_ Mt'iltiples im_g .... /D_0F Ajusla todo d....... go
fecha::/_0_ quita todo de rur'_go fecha :')
:: E1 text() visualizado varfa de ucuerdo con cuda modo de visualizaci6n.
/hnprimir) lmprime imfigenes utilizando una impresora compatible con PictBridge.
/_,,_ Esta iraagen/L_ MMtiples imfigenes/_[] To&as ir'at_gs de rango
fecha :')
:":E1 text() visualizado varfu de ucuerdo con cuda modo de visualizaci6n.
(IZl_' /Girar) Gira una imagen Ilia.
[1_ (Ajusles de el volumen.
volunlen)
Ajusta
C)
us-
U
£2.
(D
o'2
£2.
(D
C)
43

Utilizacion de funciones en modo Programa
automatico
Puede cambiar los ajustes de enfoque, modo de medici6n, ISO, y EV cuando [Modo
Grabaci6n] est_ ajustado a [_ (Programa autom_tico).
N (Enfoque) Cambia el mdtodo de enfoque.
(N Multi AF/lln AF ceutro/l"_ AF punmal/l,0m/3,0m/7,0m/Oo
distaucia ilimitada)
[] (Modo medicidn) Mide el th'ea de medicidn.
([] Multi/[_ Centro/r_ Punto)
Iso (1SO) Ajusta la seusibilidad ISO.
AUTO
(1SO AUTO/1SO80 a 1SO3200)
_[V (EV) Ajusta la exposici6n
( 2,0EV a +2,0EV)
44

Visionado de la "Guia practica de Cyber-
shot"
La "Gufa prdctica de Cyber-shot", que explica c6mo utilizar la cdmara en detalle, estd
incluida en el CD-ROM (suministrado). Consdltela para ver instrucciones exhaustiwts
sobre las muchas ftmciones de la c_mara.
_Para usuarios de Windows
1 Encienda su ordenador e inserte el CD-ROM (suministrado)
en la unidad de CD-ROM.
Haga clic en "Cyber-shot
Handbook".
La "Gufa awmzada de Cyber-shot", que
contiene informaci6n sobre accesorios para
la c_mara, se instala al mismo tiempo.
Inicie la "Guia prfictica de Cyber-shot" desde el acceso
directo del escritorio.
_Para usuarios de Macintosh
1 Encienda su ordenador e inserte el CD-ROM (suministrado)
en la unidad de CD-ROM.
Seleccione la carpeta [Handbook] y copie el "Handbook.pdf"
almacenado en la carpeta [ES] a su ordenador.
Despues de haberse completado el copiado, haga doble clic
en "Handbook.pdf".
o
45

Lista de iconos visualizados en la pantalla
46
Los iconos se visualizan en la pantalla para indicar el estado de la c;hnara.
Puede seleccionar los ajustes de visualizaci6n tocando la indicaci6n 1_ de la parte
inferior derecha de la pantalla (p_gina 38).
Cuando se toman imdgenes fijas
• Los iconos estfin limitados en modo EASY
(Tom:t fficil).
Cuando se toman pel[culas
t(Og,__ U0:21i:05
Espera 0:12 +2.0EV
Cuando se reproduce
[]
I_ Balerfa reslante
Aviso de poca baterfa
[_ _ _ Tamafio de imagen
_" Conexi6n PictBridge
[t_] hMicador de sensibilidad de
deleccidn de sonrisas
J
, , , , Relaci6n del zoom
×1,3 SQ, PO_
[] _1 _P2 Modo de vism,lizacidn
_P3 <P4_5 _
_O_ _t_O, Filtro pc,,"caras
_,'o,
Exportaci6n del PMB
Q_ Favoritos
O-,1 Proteger
DPOF Marca de orden de
impresi6n (DPOF)
t_X2_ 0 Zoom de reproduccidn
[]
v! !_ ,,,a!o_!
((,_o_1(_1_o;_ SleadyShol
_1_ Carpeta de grabaci6n
liaR, Carpela de reproducci6n
_6 Nfimero de im_igenes que se
pueden grabar
8[8 Ndmero de imagen/Ndmero
de imfigenes grabadas en la
carpeta seleccionada

N
00:25:05 Tiempo que se puede grabar
(b:min:s)
1_ [_ Soporte de grabaci6n/
Reproducci6n ("Memory
Stick Duo". memoria
interna)
rC_ C(mexi6n PictBridge
I[_ [!_ _ Cambio de carpela
_ "t- Reconocimiemo de escena
,_ Reduccidn del eflzcl(t ojos
rojos
}+ ,__ Nivel de flash
_[_ Carga del flash
_1 ±o,3_±O,'/_K±'ho_R_Modo de grabaci6n
_.m=, [_lg, Detecci6n de cara
[] Modo de medici6n
cx_ Enfoque
}_'ON lluminador AF
1(_11_ Aviso de vibraci6n
_I _:1 lndicador del Toque AF
Envollura
V_ S_ []___.jW+ Mod ..... lot
[]
_urt
VOL. |||||,,,
C:32:00
Cuadro del visor de rango
AF
Autodisparador
DRO
Archivo de gesti6n lleno
Volumen
Visualizacidn de
autodiagndstico
{:
Hislograma
• [] aparece cuando la
visualizaci6n del
histograma est_i
desactivada.
[]
vi i! i
RN
125
F3,5
IS0400
+2,0EV
GRABAR
Espera
0:12
m q
0:00:12
101-0012
2008 1 1
9:30 AM
Bloqueo AE/AF
Obturacidn lenta con
reducci6n de ruido (NR)
Velocidad de obmracidn
Valor de abertura
NOmero 1SO
Valor de exposicidn
Modo de medicidn
Flash
Balance del blanc()
Macro/Enloque de cerca
• Se visualiza cuando
[Configuraci6n de
visualizaci6n] est_i
ajustado a [$61o imag.].
Modo de flash
• Se visualiza cuando
[Configuraci6n de
visualizaci6n] est_i
ajustado a [$61o imag.].
Grabacidn de una pelfcula/
Puesta en espera de una
pelfcula
Tiempo de grabaci6n
(min:s)
Reproduccidn
Barra de reproduccidn
Contador
NOmero de carpeta-archivo
Fecha/hora grabadas de la
imagen de reproduccidn
47

Solucion de problemas
Si encuentra problemas con la cMnara, pruebe las siguientes soluciones.
O
Compruebe el elemento de abajo, y consulte la "Guia prbctica de Cyber-shot"
(PDF).
Si aparece un c6digo tal como "C/E: f-If-I: f-lf-I" en la pantalla, consulte la "Gufa
prfictica de Cyber-shot".
v
O Extraigalabateria, espereunmin(minuto)aproximadamente,vuelvaa
insertarlay, a continuaci6n,conectela alimentaci6n.
v
O Inicialicelosajustes(p_gina40).
O ConsulteconeldistribuidorSonyocon laoficinadeserviciolocalautorizada
de Sony.
AI reparar cMnaras que incluyan memoria interna o funci6n de archivos de mfisica, los
datos ahnacenados en la cMnara podmn set comprobados en 1omfnimo necesario para
verificar y mejorar los slntomas del real funcionamiento. Sony no copiar_ ni guardar_
ninguno de esos datos.
Resulta imposible insertar la bateria.
• Inserle la baterfa correctamente para empujar la palanca de cxpulsi6n dc la baterla
(pfigina 11).
Resulta imposible encender la camara.
• Dcspu,.Ss tie insertar la batcrfa en la cfimara, es posiblc que la cfilnara tarde unos momentos ell
rcsponder.
• Inserle la baterfa correctamente (p_igina 11).
• La baterla est_i descargada. Inserte una baterfa cargada (pfigina 9).
• La baterla est_i inutilizable. Reemplficela con una nueva.
• Utilice una baterla recomendada.
La alimentacibn se desconecta st_bitamente.
• Si no utiliza la c_hnara durante unos m:s rain (minuto) mientras est,5 conectada la
alimentaci6n, la c_mara se apagarzi autom_iticamente para evitar que la baterla se agote.
Encienda la c_hnara otra vez (p_igina 13).
• La baterla estd inutilizable. Reempl_cela con una nueva.
48

El indicador de carga restante es incorrecto.
• La carga de la baterfa st." agotar5 rSpidamente en los casos siguientes:
Cuando utilice la cSmara en un lugar muy c_ilido o fifo.
Cuando utilice el flash y el zoom con frecuencia.
Cuando conecte y desconecte la alimentaci6n rcpetidamente.
Cuando [Brillo] de _ (visualizacidn en pantalla) est5 ajustado a {Brillo].
• Surgid una discrcpancia entre el indicador de carga restante y la carga de baterfa rcstante real.
Descargue completamente la baterfa una vez, y despuds c_irguela para corregir la indicacidn.
• La baterfa est5 descargada. Inserle la baterfa cargada (p_igina 9).
• La baterfa estfi inutilizable. Reemphlcela con una nueva.
Resulta imposible cargar la bateria mientras esta dentro de la camara.
• No es posible cargar la balerfa utilizando el adaptador de ca (no suministrado). Utilice el
cargador de baterfa (suministrado) para cargar la baterfa.
Resulta imposible grabar imagenes.
• Compruebe la capacidad libre de la memoria intema o el "Memory Stick Duo" (p_iginas 22,
25). Si est_i llena, realice uno de lo siguiente:
Borre imSgenes no necesarias (pfigina 30).
Cambie el "Memory Stick Duo".
• No es posible grabar imSgenes mientras se carga el flash.
• Cuando vaya a tomar una imagen fija, ajuste el modo de toma de imagen a uno distinto de
(Pelicula).
• Ajuste el modo de toma de hnagen a _ (Pelfcula) cuando tome pelfculas.
• El tamafio de imagen estfi ajustado a [640(Fina)] cuando est:i grabando pelfculas. Realice uno
de lo siguiente:
Ajuste el tamafio de imagen a uno distinto de {640(Fina)].
Inserte un "Memory Stick PRO Duo".
Aparecen rayas verticales al tomar un motivo muy brillante.
• Sc est_i produciendo el fen6meno de borrosidad y aparecen rayas bhmcas, negras, rojas,
pfirpuras, y otras en la imagen. Este l'en6meno no es un real l'uncionamiento.
Resulta imposible reproducir im_lgenes.
• Pulse el botdn r_,,. (Reproduccidn) (p_igina 15).
• El hombre de carpeta/archivo ha sido cambiado en su ordenador.
• No se ofrecen garanlfas para reproducir, en esla cfimara, archivos clue contengan im:igenes
que hayan sido procesadas en un ordenador o im_igenes clue hayan sido tomadas con otras
clhllaras.
• La c_hnara estfi en el modo USB. Elimine la conexi6n USB.
• Es posible que no pueda reproducir algunas imfigenes ahnacenadas en el "Memory Slick
Duo" lomadas con otras cfimaras. Reproduzca lales im@enes en Ver carpelas (p@ina 28).
• Esto ocurre cuando se copian im@enes del ordenador al "Memory Stick Duo" sin utilizar el
"PMB". Reproduzca tales imfigenes en Ver carpetas (p_igina 28).
49

Precauciones
No utilice o almacene la c_mara en
los siguientes lugares
• En un lugar muy caluroso, frfo o hfimedo
En lugares tales como ell un automdvil
aparcado al sol, es posible que el cuerpo de
la c_imara se deforme y esto podrfi ocasionar
un real funcionamiento.
• B@:) la luz solar directa o cerca de una estufa
El cuerpo de la cfimara podrl7 decolorarse o
defklrmarse, y esto podrfi ocasionar un real
funcionamiento.
• En un lugar expuesto a vibracidn basculante
• Cerca de un lugar magndtico fuerte
• En lugares arenosos o polvorientos
Tenga cuidado de no dejar entrar dentro de la
cfimara arena o polvo, gsto podr_i ocasionar
un real funcionamiento en la c_hnara, y en
algunos casos este real funcionanfiento no
podr_i repararse.
Acerca del transporte
No st..siente en una silla u otro lugar con la
c_hnara en el bolsillo trasero de sus pantalones
o falda, porque podrfi ocasionar un real
funcionamiento de la cfimara o datiarla.
Acerca de la limpieza
Limpieza de la pantalla LCD
Limpie la superficie de la pantalla con un kit
de limpieza de LCD (no sunfinistrado) para
quitar las huellas dactilares, el polvo, etc.
kimpieza del objetivo
Limpie el objeti_,o con un patio sua_,c para
quitar huellas dactilares, polvo, etc.
Limpieza de la superficie de la camara
Limpie la superficie dc la c_imara con un patio
suave ligeramente humedecido con agua,
despuds limpie la superficie con un patio seco.
Para evitar dafiar el acabado o la envoltura:
No exponga la cfimara a productos quflnicos
tales como diluyente, bencina, alcohol,
patios desechables, repelente de insectos,
bronceador o insecticida.
No toque la c_hnara con nada de lo de arriba
ell Stl tllano.
No dcje la cfimara ell contacto con goma o
vinilo durante largo tiempo.
Acerca de la temperatura de
funcionamiento
Su c_hnara estfi disetiada para set utilizada a
temperaturas de entre 0°C y 40°C
No se recomienda tomar im@enes en lugarcs
extremadamente frills o calurosos que excedan
esta gama.
Acerca de la condensacibn de
humedad
Si se traslada la c&nara directamente de un
lugar fifo a uno c_ilido, es posible que la
humedad se condense en el interior o el
exterior de la c_hnara. Esta condensaci6n de
humedad podr_i ocasionar un real
funcionamiento de la c_hnara.
Si se produce condensacion de humedad
Apague la c_hnara y espere una h (hora)
aproximadamente hasta que la humedad se
evapore. Tenga en cuenta clue si intenta tomar
im_igenes quedando a6n humedad en el
interior del objetivo, no podr_i grabar imfigenes
claras.
Acerca de la bateHa interna de
respaldo recargable
Esta cfimara tiene una batcrfa recargable
interna para mantener la lEcha y hora y otros
ajustes independientemente de si la
alimentacidn est_i conectada o desconectada.
Esta baterfa recargable se carga continuamente
siempre que est_i utilizando la c_hnara. Sin
embargo, si utiliza la c_imara solamente
durante cortos perfodos se descargar_i
graduahnente, y si no la utiliza en absoluto
durante un rues se descargar_i completamente.
En este caso, asegOrese de cargar esta baterfa
recargable antes de utilizar la cfimara.
Sin embargo, aunque esta baterfa rccargable
no estd cargada, afin podrfi utilizar la c_hnara,
per() la fccha y la hora no se indicarfin.
M4todo de carga de la bateria interna de
respaldo recargable
lnserte la baterfa cargada en la c_hnara, y
despuds dcje la c_hnara durante 24 h (hora) o
m_is con la alimentaci6n desconectada.
5O

Especificaciones
C;imara
[Sistema]
Dispositivo de imagen: CCD de color de 7,7 mm
(tipn 1/2,3), Filtro de color primarin
Ndmero total de pfxeles de la cfimara:
Aprnx. 10,3 Megapfxeles
Ndmero elizctivn de pfxeles de la cfimara: Aprnx.
10,1 Megapfxeles
Ohjetivo: Ohjetivo zoom Carl Zeiss Vario-Tessar
4x
f= 6,18 - 24,7 mrn (35 14(1mm
(equivalente a pelfcula de 35 ram))
F3,5 (W) F4,6 (Y)
Control de exposicidn: Exposicidn automfitica,
Seleccidn de escena (11 modos)
Balance del blanch: Automa_tico, Luz diurna,
Nublado, Fluorescente 1,2,3, lncandescente,
Flash
Balance Blanch submarino: Auto, Submarino 1,2,
Flash
Fnrmato de archivo (Cumple con DCF):
lma_genes fijas: Exif Ver. 2,21, Cumple con
JPEG, compatible con DPOF
Pelfculas: Cumple con MPEGI (Monofdnicn)
Snporte de grabaci6n: Memoria interna
(aprox. 15 MB)"Memory Stick Duo"
Flash: Alcance del flash (sensibilidad 1SO (fildice
de exposicidn recomendado) ajustado a
Auto):
aprox. 0,08 a 3,0 m (W)/aprox. 0,5 a 2,4 m
(%
[Conectoresdeentraday salida]
Conector mtiltiple: Salida de _fdeo
Salida de audio (Mnnofdnica)
Conmunicacidn USB
Conmunicacidn USB: Hi=Speed USB (Cumple
con USB 2.0)
[PantallaLCD]
Panel LCD: Par;orfimicn (16:9), unidad TFT
7,5 cm (tipo 3,0)
NOmero total de puntos: 23(1400 (96(t x 240)
ptnltos
[Alimentacibn,general]
Alimentacidn: B_terfa recarg_ble NP=BDI, 3,6 V
NP-FDI (no suministrada), 3,6 V
Adaptador de ca AC-LS5K (no suministrado),
4,2 V
Consumo (din'ante la toma de imagen): 1,1 W
Temperamra de fnncionamiento: 0 a 40°C
Temperamra de almacenamiemo: 20 a +60°C
Dimensinnes: 93,6 x 57,2 x 15,0 mm (An/A1/Pr,
excluyendo los salientes)
Pesn (incluyendo la baterfa NP-BDI, el lfipiz de
pintar y la correa para mufieca, etc.): Aprnx.
151 g
Micrdlono: Monofdnico
Altavnz: Monnfdnico
Exif Print: Compatible
PRINT hnage Matching 111:Compatible
PictBridge: Compatible
Cargador de bateria BC-CSD
Requisitos de ;dimentacidn: cat100 V a 240 V
50/60 Hz 2,2 W
Tensidn de salida: cc 4,2 V 0,33 A
Temperamra de fimcionamiento: (t a 40°C
Temperamra de ahnacenamiento: 211a +60°C
Dimensiones: Aprnx. 62 x 24 x 91 mm (An/A1/
Pr)
Peso: Aprnx. 75 g
Bateria recargable NP-BD1
Baterfa utilizada: Baterfa de litin4dn
Tensidn malxima: cc 4,2 V
Tensidn nominal: cc 3,6 V
Capacidad: 2,4 Wh (68(t mAh)
El disefio y las especificaciones est_h_ sujetos a
cambios sin previo aviso.
51

Marcas comerciales
• Las ITlarcas siguientes son nlarcas
comerciales de Sony Corporation.
CybEp-sho'l:, "Cyber-shot", "Memory
Stick"+ +_+, "Memory Stick PRO",
MEmoRYSTIEK PRO, "Memory Stick Duo",
MEMORYSTIEK0U9, "Memory Stick PRo
Duo", MEMORY STIEKPRO 0uo, "Memory
Stick PRO-HG Duo",
MEmorYSTI[gPRO -HGOUO,"Memory Stick
Micro", "MagicGate", MZ_GICCI--_T_ =,
"PhotoTV HD", "Inlk> LITHIUM"
• Microsoft, Windows, DirectX y Windows
Vista son o bien marcas comerciales
registradas o marcas comerciales de
Microsofl Corporation en los Estados Unidos
de Amdrica y/u otros parses.
• Macintosh y Mac OS son marcas
conlerciales o nlarcas comerciales
registradas de Apple Inc.
• lntel, MMX, y Pentium son marcas
comerciales o marcas comerciales
registradas de Intel Corporation.
• Adobe y Reader son marcas comerciales o
bien marcas comerciales registradas de
Adobe Systems Incorporated en los Estados
Unidos y/u otros parses.
• Adem_is, los nombres de sistemas y
productos utilizados en este manual son, en
general, nlarcas comerciales o marcas
comerciales registradas de sus respectivos
desarrolladores o fabricantes. Sin embargo,
las marcas _x+o ® no se utilizan en todos los
casos ell este manual.
52

53

-
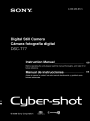 1
1
-
 2
2
-
 3
3
-
 4
4
-
 5
5
-
 6
6
-
 7
7
-
 8
8
-
 9
9
-
 10
10
-
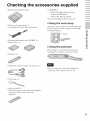 11
11
-
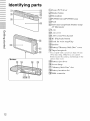 12
12
-
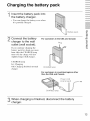 13
13
-
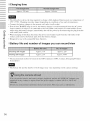 14
14
-
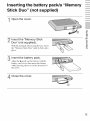 15
15
-
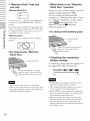 16
16
-
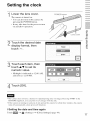 17
17
-
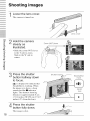 18
18
-
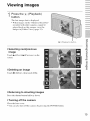 19
19
-
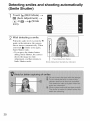 20
20
-
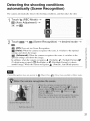 21
21
-
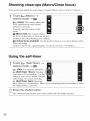 22
22
-
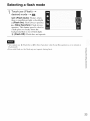 23
23
-
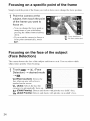 24
24
-
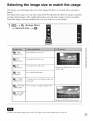 25
25
-
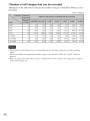 26
26
-
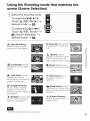 27
27
-
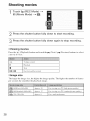 28
28
-
 29
29
-
 30
30
-
 31
31
-
 32
32
-
 33
33
-
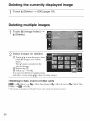 34
34
-
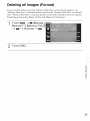 35
35
-
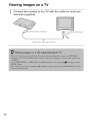 36
36
-
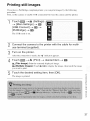 37
37
-
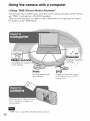 38
38
-
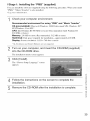 39
39
-
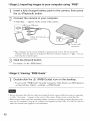 40
40
-
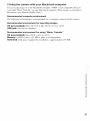 41
41
-
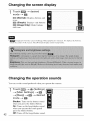 42
42
-
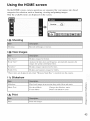 43
43
-
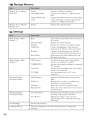 44
44
-
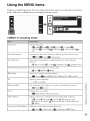 45
45
-
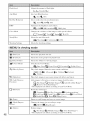 46
46
-
 47
47
-
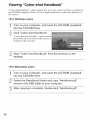 48
48
-
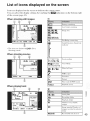 49
49
-
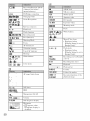 50
50
-
 51
51
-
 52
52
-
 53
53
-
 54
54
-
 55
55
-
 56
56
-
 57
57
-
 58
58
-
 59
59
-
 60
60
-
 61
61
-
 62
62
-
 63
63
-
 64
64
-
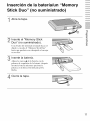 65
65
-
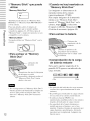 66
66
-
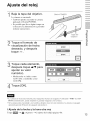 67
67
-
 68
68
-
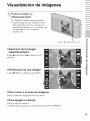 69
69
-
 70
70
-
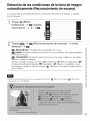 71
71
-
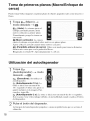 72
72
-
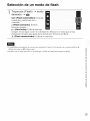 73
73
-
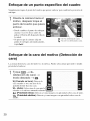 74
74
-
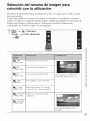 75
75
-
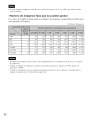 76
76
-
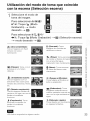 77
77
-
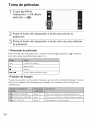 78
78
-
 79
79
-
 80
80
-
 81
81
-
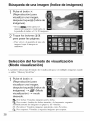 82
82
-
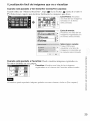 83
83
-
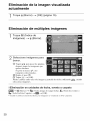 84
84
-
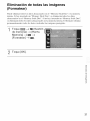 85
85
-
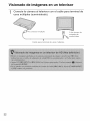 86
86
-
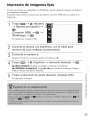 87
87
-
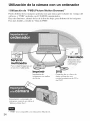 88
88
-
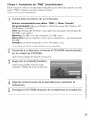 89
89
-
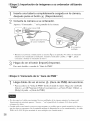 90
90
-
 91
91
-
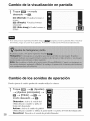 92
92
-
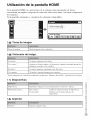 93
93
-
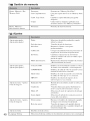 94
94
-
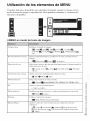 95
95
-
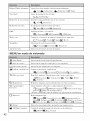 96
96
-
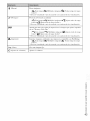 97
97
-
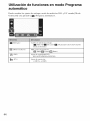 98
98
-
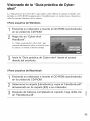 99
99
-
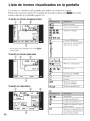 100
100
-
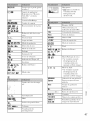 101
101
-
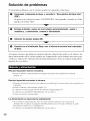 102
102
-
 103
103
-
 104
104
-
 105
105
-
 106
106
-
 107
107
-
 108
108


Sony DSC-T77 El manual del propietario
- Categoría
- Videocámaras
- Tipo
- El manual del propietario
en otros idiomas
- English: Sony DSC-T77 Owner's manual
Artículos relacionados
-
Sony CYBER-SHOT DSC-WXI0 Manual de usuario
-
-
Sony DSC-W215 Manual de usuario
-
-
-
-
-
-
-
Sony DSC-S950 El manual del propietario