Kenmore 91140494200 El manual del propietario
- Categoría
- Hornos
- Tipo
- El manual del propietario
Este manual también es adecuado para

t_i_i_i_ii_ _i_i_i_i_i_i_:
Single 24" Self-Cleaning Built-In
Wall Oven
Use & Ca_e Guide
Homo de Pared
de 24" de Una Unidad
con Autolimpieza
G_da para e_ Uso y C_._idado
Models, Modelos 911.40494, 40495, 40499
÷
÷
! •
229c4o2oP322
(SR-10503)
Sears, Roebuck and Co.,
Hoffman Estates, IL 60179 U.S.A. www, sears,com
I I 20P322 ENvO3 1 ÷ 8120t02, 2:58 PM [

÷ _ii!_iii!iiiim iiiiiiiiiiiiiMiiiiiiiii_i_.........I L
÷
24" SELF-CLEANINGOVEN
Tableof Contents
Oven Safety .......................... 3-4
Features of Your Oven .............. 5
Removal of Packaging Tape ... 5
Traditional Oven Functions ...... 6
Timed Oven Functions ............. 6
Touch Pads .............................. 6
Control Display ......................... 7
Clock ........................................ 8
Kitchen Timer ........................... 8
Tones ........................................ 9
F Codes .................................... 9
Oven Cooking Tips ........... 10-12
Setting Bake ........................... 13
Setting a Timed Bake ............. 13
Setting a Delayed
Start Time ............................... 13
Broiling ................................... 14
Special Features ............... 15-16
Self-Cleaning Cycle .......... 17-18
Control Panel .......................... 19
Broiler Pan and Grid ............... 19
Walls of the Oven ................... 19
Oven Door Glass .................... 19
Door Vent Trim ........................ 19
Oven Light Bulb ...................... 20
Oven Racks ............................ 21
Oven Door .............................. 21
Before Calling
for Service ........................ 22-24
Temperature Adjustment ....... 25
Warranty ................................. 26
Consumer
Service Numbers .................... 52
÷
For your convenience and future reference, please write down your model
and serial numbers in the space provided. They are located on the front
frame behind the oven door.
MODEL NUMBER:
SERIAL NUMBER:
© Sears, Roebuck and Co,
20P322 ENv03 2 ÷ 8/20tO2, 2:58 PM I I

[I
iiii:ii:iiMiiii!i
t
÷
IMPORTANT
SAFETYINSTRUCTIONS
SAVE THESE INSTRUCTIONS
Read all instructions before using this appliance. When using gas or
electrical appliances, basic safety precautions should be followed,
including the following:
To ensure safety for yourself, family
and home, please read your Use and
Care Guide carefully Keep it handy
for reference, Pay close attention to
Safety Sections. BE SURE your
appliance is installed and grounded
by a qualified technician.
• DO NOT leave children alone or
unattended near an appliance
in use.
• TEACH CHILDREN not to play
with controls or any part of the
appliance, and not to sit, climb or
stand on the door, or any part of
the appliance.
• CAUTION: NEVER STORE items
of interest to children in cabinets
above the appliance. Children
climbing on an appliance could
be seriously injured.
• KEEP THIS book for later use.
• NEVER TRY to repair or replace
any part of the appliance unless
instructions are given in this guide.
All other work should be done by a
qualified technician.
• NEVER USE your appliance for
warming or heating the room.
• ALWAYS KEEP combustible wal!
coverings, curtains, dishcloths,
towels, pot holders and other linens
a safe distance from the appliance
• NEVER USE a towel or other bulky
cloth as a pot holder. Make sure the
pot holder is dry. Moist pot holders
could cause steam burns. DO NOT
let pot holders touch hot surfaces.
• ALWAYS KEEP the oven area free
from things that will burn. Food,
wooden utensils, grease buildup,
gasoline and other flammable
vapors or liquids could catch fire
Plastic utensils could melt, and
canned foods could explode. Your
appliance should never be used as
a storage area
• ALWAYS KEEP your appliance
clear of things that will burn
(gasoline and other flammable
vapors or liquids).
• NEVER HEAT unopened food
containers. Pressure buildup can
cause the container to burst and
cause injury.
• NEVER LEAVE containers of fat or
drippings in your oven.
• NEVER TRY to clean a hot surface,
Some cleaners produce noxious
fumes, and wet cloths or sponges
could cause steam burns.
• NEVER WEAR loose-fitting clothing
when using your appliance,
• RE SURE the oven is securely
installed in a cabinet that is firmly
attached to the house structure.
• LARGE SCRATCHES OR
IMPACTS to glass doors can lead
to broken or shattered glass.
3
÷
i I 20P322 ENvO3 3 ÷ 8/20/02, 2:58 PM

[L
÷
IMPORTANTSAFETY
INSTRUCTIONS
DO NOTtouch heatingelements,
surfaces nearthemor interioroven
surfaces.These maybe hotenoughto
causeburns eventhoughtheyaredark
in color. Duringandafteruse, do not
touch or letclothTngor flammable
materialcontact theelementsor hot
surfacesuntTItheyhavehad timeto
cool. Othersurfacesnearthe ovenvent
openings,oven doorandwindow may
alsobe hot enoughtocauseburns.
• PLACE OVENRACKSin the desired
positionwhTletheoveniscool. Ifracks
mustbe movedwhile ovenishot, do not
letpot holder contactthe hotoven
element.
• AFTERBROILING,alwaystakethe
broiler pan and grid outofthe oven
and clean them.Leftovergrease]nthe
broilerpan could catch firethenext time
you use youroven.
• ALWAYSUSEcarewhenopening the
OVeRdooELet hotair and steamescape
beforemovTngfoods.
• NEVERUSEaluminumfoil to ITnethe
ovenbottom.Improperuseof foil could
startafire,or electricalshockcould
result.
• NEVERBLOCKthe ovenventopening.
• CLEANONLYthe parts listedinthis
manual,Followallcleaninginstructions.
Be sureto removebreilerpan andgrid
before theself-cleancycle.
• NEVERRUB, move,clean,or damage
the door gasketon self-cleaningovens.
Itisessentialfor a goodseal.
• NEVERTRYto clean utensils,
ccokware,removableparts, or broiler
panand grid in the self-cleancycle.
• DO NOTUSEovencleaners No
commercialoven cleaneror protective
coatTngofany kindshouldbe used in
or around anypart ofthe oven.
• IFTHE SELF-CLEANINGmode
malfunctions,turnthe ovenoff and
disconnectthe powersupply. Haveit
servicedby aqualifiedtechnician.
IMPORTANT SAFETY NOTICE!
The CaliforniaSafe DdnkingWater
andToxicEnforcementActrequires
the governorofCalifomiato publish
alistof substancesknowntothe
stateto causebirthdefectsor other
mproducUve harmand requires
businessesto warntheir customers
ofpotentialexposuretosuch
substances.Thefiberglassinsulation
in aserf-cleaningovenwillgiveoff a
verysmallamountof carbonmonoxide
duringthecleaningcycle, Exposure
can beminimizedby ventingwithan
open dooror window or usinga
ventilationfan or hood.
IMPORTANT: The health of
some birds is extremely sensitive
to the fumes given off during the
self-cleaning cycle of any oven. Move
birds to another well-ventilated room.
READ AND UNDERSTAND
THIS INFORMATION NOWI
Besure everyoneIn your home
knowswhat todo in caseof fire.
Neverusewateron a greasefire;
itwill only spreadthe flames.
OVENFIRE:
Donot try tomovethe pan!
1. Closetheoven doorand turn
controlsoff.
2. Iffire contTnues,carefullyopenthe
door,throwbakingsoda onthe fire
or usea dry chemical,foamor halon
type extinguisher.
SAVE THESE INSTRUCTIONS
4
÷
I I 2(]P322 ENv03 4 . 8/20/02, 2:58 PM T

[i i ÷- t -- I I
OPERATION
FEATURESOF YOUR24" GASBUlLT-INWALLOVEN
Self-Clean
Automatic
Door Latch
Oven Control
:lock Pad
Oven Light
÷
Broil
Broiler Pan
Model and
Serial Number
Self-Cleaning
Door Gasket
Automatic Oven
-Light Switch
Oven Light
Oven Rack Guides
Self-Cleaning
Removable Oven
_Racks
Removable
Oven Door
÷
To remove the adhesive left from packaging tape, use household diehwashing
liquid, mineral oil or cooking oil With a soft cloth rub into the area and allow to
soak. Rinse and dry well Repeat procedure using an appliance polish to ensure
no damage is done. This should be done before the oven is turned on for
the first time. The tape cannot be removed once the oven has heated.
Packaging tape may be found in the following areas: door handle, control panel
area, door trim and oven area
5

OPERATION
OvenControl,ClockandTimer
$oo
Your new touch pad oven control will allow you to set various functions with
ease. Below are the different types of functions and a description of each.
÷
BAKE- Cooksfoodsin the traditional
ovenwith atemperaturerangeof 170°F
to 550°F.
BROIL- Cooksfoodsat5500FHI broil
or 450° LO broil fromthe direct heatof the
upperelement.Broilingshouldbe done
withthe door openedto the broilstop
position.
CLEAN- Cleansthe insideareaof the
ovenfor you. Whenthe cycle isfinished,
theovenwill turnoff automatically.
NOTE;Theoven door will automatically
latchand willonly unlatchoncethe oven
hascooled down.
Setthe amountof timeyou
wantfoodsto cook.Theoven
turnsoff automaticallyat the
endof this time.
®
Set the time of day you want
the oven to turn on. The oven
will turn on automatically at the
time you have set. When
DELAY START TIME is used
with OVEN COOKING TtME,
the oven will also turn off
automatically at the end of the
cooking time.
_ TheHOUR/MINUPand DOWN
arrow pads set the time of
HOUR Mm day, length of cooking time,
_ f_. / _length of cleaning time. the
_,,Vj; ,V_VJ delayed start time. and the
time set on the KitchenTimer.
The TEMP pads set the
temperatureused for
TEMP cooking.
The STARTpad mustbe
pressedtoactivateanyoven
function.
The CLEAR/OFFpad is used
to cancel any ovenfunction
andthe endofcycle tone. It
will notcanceltheClockor
KitchenTimer.
KITCHEN The KITCHEN TIMER ON/OFF
TIMER
pad is used to turn the Kitchen
(ON/OFI=_ Timer on or off. It will not
control any of the other oven
functions.
_The CLOCKpad isusedto set
the timeof day.
_The OVENLIGHTpadturns
the ovenlightonor off.
8
÷
1II 20P322 ENv03 6 ÷ 8120/02, 2:58 PM I [

÷ iii!i!iiT L iiiiiiiii iiim!i!l, LL
÷
OPERATION
ControlDisplay
OvenTemperature
Indicator "On" Indicator
\ /
flBBB ('BBBB'+
Set Indicator/ _ • Timed Indicator
DF.LAYBAKE CLEAN STARTCLO_ CLEAN
OvenFunction OvenFunction
Indicator Indicator
The Control Display is an easy
reference for using your oven control.
Below are descriptions of how the
Control Display works.
OVEN TEMPERATURE INDICATOR -
This indicator has a multiple purpose.
• Displays the temperature
• Displays error code "ERR" -
If the oven temperature indicator
flashes "ERR," then you have set
an invalid time or temperature.
• Displays oven problems - ff your
control flashes "F" and e number or
letter, you have experienced an
oven problem Please read the
section on F-CODES in your
manual.
"ON" INDICATOR - Wilt light when
the oven turns on
SET INDICATOR - The set indicator
will flash in combination with an oven
function or timed function to let you
know you need to set a time or
temperature. Example: "SET" and
"BAKE" will flash to let you know you
need to setthe bake temperature
TIMED INDICATOR - Displays the
time of day, cooking time, delay start
time, cleaning time or the time sot on
the kitchen timer.
• Displays reminder code "PUSH
START" Ifthe time indicator
flashes the words "PUSH START,"
then you need to press the START
pad to activate your setting,
OVEN FUNCTION INDICATORS -
Display which oven function has
been set, when the oven door locks,
and if the function is delayed.
÷
7
11 20P322 ENv03 ? ÷ 8t20/02, 2:58 pM I I

OPERATION
ClockandTimer
The clock must be set for the correct
time of day before a delayed oven
function can work properly. The Lime
of day cannot be changed during a
timed oven function, but can be
changed during a bake or broil
function
HOW TO SET THE CLOCK
HOUR MIN
1. Press the CLOCK pad.
2. Press the HOUR/MIN UP and/or
DOWN arrow pads to set the time.
3. Press the START pad.
RECALL THE CLOCK
While using your oven for cooking,
press the CLOCK pad if you wish to
check the time of day. The current
time of day will show in the display
POWER FAILURE
If you have experienced a power
failure, the time will flash in the display
and will be incorrect. Reset your
clock.
Any oven cooking function that was in
process will need to be reset.
r _ f
The Kitchen Timer is used to
time cooking processes or other
household activities. _tdoes not
control the oven. It can be set for up
to 9 hours and 59 minutes ttwill
count down in minutes until the LAST
60 SECONDS is reached; then the
control will beep once When the
countdown reaches ZERO, the
control will beep 3 times followed by
one beep every 6 seconds until the
KITCHEN TIMER OFFION pad is
pressed. The 6-second beep can be
removed for future cycles if desired.
For directions on removing this
continuous beep, see "Tones" on the
following page.
HOW TO SET THE TIMER
KITCHEN
T.,. @@
QV)\YJ --
1, Press the KITCHEN TIMER ON/
OFF pad.
2. Press the HOUR/MIN UP and/or
DOWN arrow pads to set the time.
3. Press the START pad.
4 When the countdown has reached
zero, press the KITCHEN TIMER
ON/OFF pad to turn off the beep.
To cancel the timer during the
countdown, press the KITCHEN
TIMER ON/OFF pad TWICE.
÷
I I 20P32.2 ENv03 8 ÷ 81_, 2:58 PM [

IL
iiiii!!i!i!iim ii i
÷
OPERATION
OvenControl,ClockandTimer
Your new control has a series of
tones that will sound at different times.
These tones may sound while you set
the control for an oven function, or at
the end of the oven function. It will
also alert you that there may be a
problem with the functions. Below
are the types of tones and a brief
description of each
TONES WHILE SE'n'ING THE
CONTROL - When you press a touch
pad you will hear a beep. This beep
will let you know you have placed
enough pressure on the pad to
activate it (The arrow pads do
not beep.)
END OF TIMED CYCLE TONE At
the end of atimed cooking function,
you will hear 3short beeps followed
by 1 beep every 6 seconds. This
6-second beep will continue to sound
until the CLEAR/OFF pad is pressed
or you may select the special feature
to cancel this 6-second beep from
sounding at the end of future cycles,
TO CANCEL THE 6-SECOND BEEP
1. Press and held the BAKE and
BROIL pads, at the same time
for 3 seconds, until the display
shows "SF"
2. Press the KITCHEN TIMER ON/
OFF pad. The display will show
"CON BEEP" (continuous beep).
3. Press the KITCHEN TIMER ON/
OFF pad again. The display will
show "BEEP" (beep canceled).
4. Press the START pad to cancel
the 6-second beep and leave the
special feature mode.
Ifyou would like to return the
6-second heap, repeat steps above
until the display shows your choice
and press the START pad
A'rrENTION TONE - This tone will
sound if you make an error or an
oversight is made while setting an
oven function,
Examples would be:
a. Setting a clean cycle and the
oven door is not properly closed
b. Setting function and not pressing
the START pad.
c. Pressing an additional function pad
without first setting a temperature
or time
d. "ERR" will flash if you set an
invalid temperature. Press the
CLEAR/OFF pad to clear the
control and reset your oven
function
Any of these can be quickly identified
by watching the display.
PREHEAT TONE - When you
select a cooking mode, set an oven
temperature and press the START
pad, the oven starts to heat. When the
temperature inside the oven reaches
the temperature you have set, atone
will sound to let you know the oven is
ready for baking.
ffyou set an oven function and the
control beeps while the display is
flashing "F" and a number or letter
such as "F-4" or "Fr' there may be
a problem with the control or oven.
Simply press the CLEAR/OFF pad
and wait about an hour Try setting
the function again Ifthe code
repeats, write down the flashing
code and call for service Tell the
technician what code was flashing,
÷
I 20P322 ENv03 9 . 8/20/02, 2:58 PM

÷
OPERATION
OvenCookingTips
It is normal to have some odor when
using your oven for the first time. TO
help eliminate this odor, ventilate the
room by opening a window or
using a vent hood.
IMPORTANT: Never cover the oven
bottom or oven rack with aluminum
foil, Improper use can cause poor
heat flow, poor baking results, and
may damage the oven finish. To
prevent staining from spillovers, you
may place a piece of aluminum foil
or a cookie sheet on the rack below
the food which may spill over.
The oven vent is located under the
control panel This area could
become hot during oven use. It is
normal for steam to come out of
the vent and/or collect moisture
underneath when the oven is in use.
The vent is important for proper air
circulation. Never block this vent.
_Oven Vent
m _ Location
Opening the door often to check
foods will cause heat loss and poor
baking results
Preheating is bringing the oven
temperature up to the temperature
you will be using during baking. Let
the oven preheat thoroughly when
recipes calt for preheating
To prolong the life of your oven
light bulb, follow this helpful tip:
Always turn the light oft when the
oven is not in use or during a clean
cycle if your oven light is left on for
an extended period of time, the oven
will be warm when the door is opened
due to the heat generated from the
oven light bulb.
In the back of the oven you will notice
a small tube, This is a heat sensor
that maintains the temperature of the
oven Never move or bend this tube
The low temperature zone of your
oven (between 170° and 200°F) is
available to keep hot cooked foods
warm. However, foods kept at these
temperatures longer than 2 hours
may spoil.
10
÷
i I 20P322 ENV03 10 . 8120/132,2:58 PM

OPERATION
OvenCookingTips
The Oven Temperature Sensor at the
back of the oven continuously senses
and controls the temperature inside
the oven. To keep a constant set
temperature, the elements will cycle
(turn on and off during cooking).
FLAT COOKIE SHEETS, without
sides, allow air to circulate all around
the cookies for even browning
÷
When using your convenient Delay
Start operation, foods such as deity
products, fish, poultry, etc., should
never sit more then 1 hour before
cooking. Room temperature and the
heat from the oven light promote
bacterial growth,
Most recipes for baking have been
developed using high-fat products
such as butter or margarine (80% fat
by weight--the federal requirement
for products labeled "margarine").
You will get poor results if cakes, pies,
pastries, cookies, or candies are
made with low-fat spreads. Low-fat
spreads contain _essfat and more
water. The high moisture content of
these spreads affects the texture and
flavor of favorite baked recipes The
lower the fat content of a spread
product, the more noticeable these
differences become To ensure best
results, use margarine, butter, or stick
spreads containing at least 70%
vegetable oi!
SHINY PANS reflect heat and are
perfect for cakes and quick breads
that need a light brown crust.
GLASS, DARK NON-STICK, OR
DARKENED BY AGE BAKEWARE
absorbs heat and can be used for
yeast breads, pie crust or foods that
need a brown crust. The oven
temperature, when using these pans,
should be reduced by 25°F
÷
11

L
II
T I L
÷
OPERATION
Oven Cooking Tips
Baking results will be better if baking
pans are centered in the oven as
much as possible. Ifbaking with more
than one pan, place the pans so each
has at least 1" to 1V2"of air space
around it If baking four cake layers
at the same time, place two layers
on rack 2 and two layers on rack 4.
Stagger pans on the rack so one is
not directly above the other
You may feel that your new oven
cooks differently than the oven it.
replaced We recommend that you
use your new oven a few weeks to
become more familiar with it, following
the times given in your recipes as a
guide. If you feel your oven is too hot
or too cool for your cooking
preference, see Do-it-Yourself
Adjustment in back of this manual to
make the adjustment.
The oven racks ere designed with
stops, a convenience as well as a
safety precaution, The guides have a
bump to prevent the racks from tilting
when racks are pulled out of the oven.
This design allows the racks to be
inserted in only one way.
Your oven has four (4) rack positions
The top position is only a guide. It
cannot be used as a rack position.
Always place oven racks in the
proper position while oven is cool.
CAUTION: When you are using the
rack in the lowest position (1), you will
need to use caution when pulling the
rack out. We recommend that you pull
the rack out several inches and then,
using two pot holders, pull the rack
out by holding the sides of it. The rack
is low and you could be burned if you
place your hand in the middle of the
rack end pull ell the way out. Be very
careful not to burn your hand on the
door when using a rack in the lowest
position (1).
÷
12
20P322 ENv33 12 ÷ 8/20_]2, 2:59 PM I [

irT iiiii] ! ÷ liiiiiiiiiii
OPERATION
Baking& Boasting
÷
Toset the oven to turn on at a latertime
1. Pressthe BAKEpad. of day, cook for a specific amount of
time and turn off automatically.
2. Pressthe TEMP UP (_ 1. Pressthe BAKE pad.
and/or DOWN arrow
TEMP pads to set the oven _ 2, Pressthe TEMP UP
temperatureyou prefer and/or DOWN arrow
LfJ)
to use. TEMP pads to set the oven
3. Pressthe START pad. _ temperature you
prefer to use.
4. When baking is finished
press the CLEAR/OFF
pad.
To set the oven to cook for a specific
time and turn off automatically.
1. Pressthe BAKE pad.
2. PresstheTEMP UP
and/or DOWN arrow
TEMP pads to setthe oven
temperature you
prefer to use.
3. Press the OVEN
COOKING TIME
pad.
@@4. PresstheHOUR
and/or MINUTE UP
HOUR MIN and/or DOWN arrow
@@ padstosetthe
amount of time you
prefer your foods to
cook.
5. Pressthe START pad.
3, Pressthe OVEN
COOKING TIME pad.
@@4. PresstheNOURand/
or MINUTE UP and/
HOUR MIN or DOWN arrow pads
@@ to set the amount of
time you prefer your
foods to cook.
5. Press the DELAY
START TIME pad.
HOUR MIN
@@
Pressthe HOUR and/
or MINUTE UP and/
or DOWN arrow pads
to set thetime of day
you prefer theoven to
turnon.
(_ 7. Press the START
pad.
The oven will turn off at the end of the
cooking time unless the cook and
hold feature has been activated.
÷
13
_ 20P322 FJ_v03 13 _p 8/20/O2, 2:59 PM I

÷
OPERATION
Broiling
Broiling is cooking by direct heat
from the upper element, The oven
door should remain open to the broil
stop position during broiling.
NOTE: Food can be broiled with
the door closed, but it may not be as
brown because the element will cycle
on and off.
It is not necessary to preheat the oven
when broiling. Use the broiler pan and
grid that came with your oven. Both
are designed for proper drainage of
fat and liquids.
If foil is used it must be
molded tightly to the
gdd and slits cut into
the foil to match those
of the grid. This allows fats and
liquids to drain into the broiler
pan, preventing fire and
excessive smoke.
Always remove the pan and grid
from the oven. Storing _
or forgetting a soiled
broiler pan in the oven
is a potential smoke or fire
hazard.
k I
The U.S Department of Agriculture
recommends to cook meat and
poultry thoroughly--meat to at least
an INTERNAL temperature of !60°F
and poultry to at least an INTERNAL
temperature of 180°F. Cooking to
these temperatures usually protects
against foodborne illness
The closer you place foods to the
broil burner, the faster foods brown
on the outside yet remain red to pink
in the center.
Moving meats away from the burner
will allow the meat to cook to the
center while browning on the outside
Cook side 1 at least 2minutes longer
than side 2 Be sure the sump of the
broiler pan is always facing to the
front of the oven
The size, weight, thickness, starting
temperature and your preference of
the aloneness of the meat will affect
broiling. This chart is based on meats
at refrigerator temperature
FOOD RACK TOTAL
POSFFION TIME (MIN.)
Steak 1" thick 3 9-11
Ground beef
psttiss
1" thick 3 18-18
Pork Chops-I/2"
thick 3 27-29
FiSh (fillets) 3 1I-13
Chicken (pieces) 2 45-55
la. Press the BROIL pad. (This will
automatically set HI Broil).
lb. While the set indicator is flashing
in the display, press the BROIL
pad again if you prefer to use
Lo Broil Uso Lo Broil to cook
foods such as poultry or thick
cuts of meat thoroughly without
over-browning them.
2. Press the START pad
3. When broiling is finished, press
the CLEAR/OFF pad.
14
÷

II , I: iiiiilliiii!i!li Iii: i i iiiiiiiiiiiN:i!
OPERATION
SettingSpecialFeatures
Your new touch pad control has
additional features that you may
choose to use. After making your
selection, if you want to change the
setting, follow the steps until the
display shows your choice.
2. (a) Press the BROIL pad. The
control display will show the
degree sign and "F"
(b) Press the BROIL pad again
This will change "F°" (Fahrenheit)
to "C°" (Celsius).
:3. Pressthe START pad.
÷
The centre! is automatically set to turn
off the oven after 12 hours baking or
3 hours broiling should you forget and
leave the oven on. If you want to
remove this feature:
1. Press and hold, atthe same
time, the BAKE and BROIL pads
for 3 seconds, until the display
shows "SF"
2. Press the DELAY START TIME
pad The display shows "12Shdn"
(12-hour shut-off).
Press the DELAY START TIME
pad again. The display will show
"No 8hdn" (no shut-off).
3. Press the START pad
Your oven control is set for the
Fahrenheit temperature selections.
Most recipes are given using the
Fahrenheit scale, You can change this
to use the Celsius selection.
1. Press and hold, atthe same
time, the BAKE and BROIL pads
for 3 seconds, until the display
shows "SF."
Your control is set to use the 12-hour
clock. If you prefer to use the 24-hour
Military Time clock or black out the
display:
1. Press and hold, atthe same
time, the BAKE and BROIL pads
for 3 seconds, until the display
shows "SF "
2. (a) Press the CLOCK pad Thc
display shows "12hr." If this is
your choice press the START
pad.
or
(b) Press the CLOCK pad
again. The display will show
"24hr" Example: 5:00 on the
!2-hour clock will show 17:00
hours on the military clock, If this
is your choice press the START
pad
or
(c) Press the CLOCK pad again
The display will show "OFF" If
this is your choice press START.
The display will not show time.
(The Delay Start Time feature will
not operate)
÷
15
i 20P322 ENV03 15 ÷ 8120!02, 2:59 PM l

÷
OPERATION
SettingSpecialFeatures
Your control will allow you to lock the
touch pads so they cannot be
activated when pressed. If you're
worried about leaving the oven
unsupervised, activate this feature.
1. Press and hold, atthe same
time, the BAKE and BROIL pads
for 3 seconds, until the display
shows "SF "
2. (a) Press the CLEAN pad.
The display shows "LOC OFF"
(lockout off),
(b) Press the CLEAN pad again.
The display will show "LOC ON"
(lockout on),
3. Press the START pad,
This feature can only be set when
the oven is not In use.
When this feature is on, the display
will show "LOC," if a touch pad is
pressed. (This feature will not affect
the clock, timer, or oven light pads.)
Your new contro! has a cook and hold
feature for timed cooking only that will
keep hot cooked foods warm up to
3 hours after the timed cooking is
finished To activate this feature:
1. Press and hold, atthe same
time, the BAKE and BROIL pads
for 3seconds, until the display
shows "SF"
2. (a) Press the OVEN COOKING
TIME pad. The display will show
"HLd OFF,"
(b) Pressthe OVEN COOKING
TiME pad again to activate the
feature. The display will show
"HLd ON."
3. Press the START pad
This special feature will allow you to
change the speed; #1 means speed
of change is slow up to #5 which
means speed of change is fast. To
set the speed you prefer, follow these
steps:
1. Press and hold, atthe same
time, the BAKE and BROIL pads
for 3seconds, until the display
shows "SF "
2. Press the UP arrow pad. The
display will show the current set
speed
3. Press the UP arrow to increase the
speed up to the number 5
or
Press the DOWN arrow pad to
decrease the speed down to the
number 1.
4. Press the START pad.
÷
16
I 20P322 ENvO3 16 _ 812(}/02, 2:59 pM I [

J
÷
CAREANDCLEANING
Self-CleaniegCycle
1.
2.
Remove the broiler pan and grid,
utensils and any foil that may be
in the oven,
If your oven =sequipped
with nickel oven racks, they.
should be removed If your
oven is equipped with gray
porcelain-coated oven racks,
they may stay in the oven during
the self-clean cycle.
Front Frame
Clean these areas with hot water,
soap-filled pads or cleansers such as
Soft Scrub®to remove any soil, Rinse
well with clean water and dry.
3. Wipe up any heavy spillovers on
the oven bottom
4. Do not clean the door gasket
The fiberglass material of the oven
door gasket cannot withstand
abrasion, It is essential for the
gasket to remain intact If you
notice it becoming worn or
frayed, it should be replaced
The door gasket is designed to have
a 5" 6" gap at the bottom of the door.
This allows for proper air circulation.
DoorPanel Gasket
Door Liner _' _ s"_
It is normal for your oven door to give
the appearance of not having a good
seal against the oven. This is due to
the gasket The location of the gasket
on the door maintains a good seal and
prevents any heat loss
Utensils should never be
I _1./I left in the oven during a
clean cycle.
Nickel oven racks may
be cleaned during the self-clean
cycle, but will lose their luster
and become hard to slide. If you
choose to leave them in during
the cycle, wiping the edges down
with vegetable oil after the cycle
will help them slide easier.
Gray porcelain-costed oven
racks may safely be cleaned in
the oven during a self-clean
cycle. It will be necessary to
grease the edges of the oven
rack with a light coating of
vegetable oil after a clean cycle.
This will help maintain the ease
of sliding the racks in and out of
the oven.
For the first clean cycle, vent the
room with an opened window or
hood vent. This will reduce the
odor when heating new parts.
÷
17
20P322 ENv03 17 _ 8/'20_2, 2:59 PM

IL
, ii iiil #
÷
CAREANDCLEANING
Self-CleaningCycle
The Clean Cycle, including cooldown
time, is automatically set for 4 hours,
but you may change this from 3 hours
if oven is lightly soiled up to 5 hours if
oven is heavily soiled
1. Press the CLEAN
pad. 4 hours will
show in the display.
_2. Ifyouwantto
change the length of
HOUR MIN clean time, pressthe
_ HOUR/MIN UP and/or DOWN arrow
pads.
3. Press the STARTpad.
Simply press the CLEAR/OFF pad.
You will need to wait for the oven
temperature to drop below the lock
temperature (approx. 1 hour) before
attempting to open the door,
After the cycle, you may notice some
white ash in the oven Just wipe it up
with a damp cloth or sponge,
If white spots remain, scrub them
with a soap-filled pad Be sure ta
rinse thoroughly, These are usually
deposits of salt that cannot be
removed during the cycle.
If for any reason you are not
satisfied with the cleaning results,
just repeat the cycle.
1. Press the CLEAN
pad.
@@ 2. Ifyouwanttochange
the length of clean
HOUR MIN time, press the
_(_ HOUR/MIN UP and/
or DOWN arrow
pads
3. Press the DELAY
START TIME pad.
(_(_4. PresstheHOUR/MIN UP and/or
HOUR MIN DOWN arrow padsto
(_ _ set the time you
prefer the clean
cycle to start.
Press the START
pad.
÷
18

÷
CAREANDCLEANING
Cleaning
CLEANING MATERIALS
• Dishwashing detergent
• Warm water
• Soft cloth
Do not use abrasive cleaners,
industrial cleaners, or bleach.
_lif_i'.,7_,T;UzYUl_]rei_ e
CLEANING MATERIALS
• Dishwashing detergent
• Warm water
• Soap-filled pad
• Commercial oven cleaner
TO CLEAN
Allow the pan to soak. Sprinkle the
grid with dishwashing detergent and
cover with adamp cloth or paper
towel and let stand. Scour as needed.
Wash, rinse, and dry well. You may
also place both the pen and grid in
the dishwasher.
Clean only as touch-up between
clean cycles. Use dishwashing liquid,
warm water, or soap-filled pad Rinse
well after cteaning and dry. Never
use oven cleaners in or around any
part of the oven. When cleaning, be
sure not to bend or displace the
temperature sensor located on the
back wall of the oven.
TO CLEAN
For everyday cleaning, use glass
cleaner and a paper towel, For
stubborn soil use paste of baking
soda and water. Rinse thoroughly,
CLEANING MATERIALS
• Soft abrasive cleaner
• Sponge scrubber
Do not use hard, abrasive cleaners,
Industrial cleaners, or bleach.
÷
19
il 20P322 v03 1, ÷ o o,2 Po II

L M_s_'"'III
l
CAREANDCLEANING
CleaningAndRemovableParts
÷
BulbCover BailWire
TO REMOVE THE COVER
1. Disconnect electrical power to the
oven at the main circuit breaker or
fuse box.
2, Hold your hand under cover and
firmly push back the bail wire, until
it clears and releases the bulb
cover.
REPLACE THE LIGHT BULB
Unscrew the light bulb and replace it
with a 40-watt appliance bulb.
TO REPLACE COVER
1. Place the bulb cover into the
groove of the bulb socket,
2. Pull the bail wire forward until it
snaps into the indentation on top
of the bulb cover
3. Reconnect the electrical power to
the oven.
2O
÷
2o ÷ o, oo ,oPM

÷
CARE AND CLEARING
CleaningAndRemovableParts
CLEANING MATERIALS
• Dishwashing detergent
• Warm water
• Scouring pad or soap-filled pad
Bumpin I
RaisedBack 1_
of The_
TO REMOVE
1. Pull the racks out to the stop lock
position
2. Pull up the front of the rack and
slide under the bump of the rack
guide.
TO CLEAN
Clean with warm water and
detergent. For hard-to-remove
stains, gently scrub with a scouring
pad or a soap-filled pad. Rinse well
Gray porcelain=coated oven racks
may also be cleaned in the oven
during the self-clean cycle Itis
necessary to wipe the edges of gray
porcelain-coated oven racks with a
light coating of vegetable oil after
cleaning: This will help maintain the
ease of sliding the racks in and out of
the oven
TO REPLACE
1, Place the raised back of the rack
onto the rack guides
2. Lift the front of the rack until the
raised back slides under the
bump of the rack guides,
3, Slide the rack all the way back
Broil Stop Position
I
TO REMOVE
1. Open the door to the broil stop
position
2. Grasp the door at each side and
lift up and off the hinges. DO NOT
LIFT DOOR BY THE HANDLE.
_ AUTION: When the
door is removed and
the hinge arms are at
the broil stop position,
as a precaution, cover the
hinge arms with toweling or an
empty paper towel roll. Do not
bump or try to move the hinge
arms while working In the oven
area. They could snap back,
causing injury to the hands or
damage the porcelain finish of
the front frame.
TO REPLACE
1. Make sure the hinge arms are in
the broil stop position.
2. Lift the door by the sides
3. Line up the slots at the bottom
edge of the door with the hinge
arms
4. Slide the door down onto the hinge
arms as far as it will go.
5. Close the door.
21
÷

] iiiii,i ii! ÷ liiiiiiiiiiii..... iiii! iiiil iiiiiiiII
÷
BEFORECALLINGFORSERVICE
Tosave you time and money, before making a service call, check the list below
for any problem you may feel you have with the performance of your oven, If the
problem is something you cannot fix, use the Consumer Service Numbers
located at the back of this guide. When making any calls, have the Model No.,
Serial No., Repair Parts List, Use and Care Guide and the Date of Purchase
available.
PROBLEM POSSIBLE CAUSE POSSIBLE SOLUTION
The display of your
control is flashing "F"
followed by a number
or letter.
Oven malfunction. Press the CLEAR/OFF
pad. Let the oven cool
for 1 hour and place the
oven back into an oven
operation, If the problem
repeats, cal] for service.
Oven will not work;
totally inoperative.
a. No power to
oven,
b. Clock in
blackout mode.
a. Check the household
circuit breaker or fuse
box
b, See the "Setting
Special Features"
section of this manual,
Foods do not bake
properly.
a,
b.
Oven was not a,
preheated long enough.
Improper rack or pan b.
placement.
c. Oven vent blocked or c.
covered.
d. improper use of foil. d.
e. Improper temperature e.
setting for utensil used.
f. Oven temperature f,
needs adjustment.
g. Oven and oven rack g.
not level
h. Oven controls h.
improperly set.
Be sure to preheat
oven when recipe calls
for it.
Maintain uniform air
space around pans
and utensils; see oven
cooking tips section
Keep vent clear
Racks should not be
covered during baking.
Reduce temperature
25 degrees for glass or
dull/darkened pans
Check oven
temperature
adjustment section.
Check the installation
instructions for
leveling.
See the baking
section.
÷
22
2oP o.vo 22 ÷ °, oo22 oPo I[

> 7t i ] ÷ I L
÷
BEFORECALLINGFORSERVICE
PROBLEM POSSIBLE CAUSE POSSIBLE SOLUTION
Oven temperature Oven control calibration, See the temperature
seems inaccurate, adjustment instructions
following this section
Oven will not unlock, Clean cycle is not Oven temperature must
finished, drop below the lock
temperature before the
door will unlock.
Oven light does not s. Light switch is in off a. Check switch setting.
work. position.
b. Oven light bulb loose b. Check or replace light
or burned out. bulb.
Foods do not broil a. Improper rack a. Check broil pan
properly, position, placement; see broiling
section.
b. Oven preheated, b. Do not preheat when
broiling,
c. Improper use of foil. c. Check broiling section
d. improper broiling d. Check broiling chart in ,_
time. broiling section.
e. Low vottage (208), e. Use higher rack
position.
f. Oven controls f, See the broiling
improperly set section,
Oven reck does not
slide easily.
Racks were left in
the oven during a
self-clean cycle
Wipe the rack edges
with a small amount of
vegetable oil,
Oven smokes. a. Dirty oven. a. Check for heavy
spillover.
b. Improper use of b. Use of foil not
aluminum foil. recommended.
c. Broiler pan containing c. Clean pan and grid
grease left in the oven. after each use.
Oven emits odor. a. Oven insulation may a. Put oven through self-
emit odor during the clean cycle to speed
first few usages up process of odor
"wearing out."
b. Failure to wipe out b. Wipe excess soil off
excess soil before using oven
23

BEFORECALLINGFORSERVICE
PROBLEM POSSIBLE CAUSE
Cleaning results a. Oven was heavily
were poor, soiled
b. Clean cycle
interrupted
POSSIBLE SOLUTION
e. Heavy spillovers
should be cleaned
before the cycle is set.
b. Allow the oven to clean
its full cycle
÷ ÷
24
i 20P322 FJNv03 24 ÷ 8/20/02, 2:59 PM I i

/ I . : iiiii:ili/1 ÷ liiiiiiiiii:i iiiii i i; Miiiii L
÷
"DO-IT-YOURSELF"
TEMPERATURE
ADJUSTMENT
You may feel that your new oven
cooks differently than the oven it ÷
replaced We recommend that you
use your new oven a few weeks to
become more familiar with it,
following the times given in your
recipes as a guide. ( _.,._ _
Ifyou think your new oven is too hot
(burning foods) or not hot enough
(foods are undercooked) you can
adjust the temperature yourself. The
appearance and texture of foods is a
better indicator of oven accuracy than
an oven thermometer. These
thermometers can vary by 20-40
degrees from the true temperature of
the oven. In addition, the oven door TEMP
must be opened to read these
thermometers. Opening the door will
change the temperature of the oven
To decide how much to change
the temperature, set the oven
temperature 25 degrees higher
(if foods are undercooked) or 25
degrees lower (if foods are burning)
than the temperature in your recipe, / STAre" I
then bake. The resu(ts of this "test"
should give you an idea of how much
the temperature should be changed.
1. Press and hold down
both the BAKE and
BROIL pads for 3
seconds, until the
display shows "SF."
2. Press the BAKE pad
A factory set 2-digit
number will show in
the display, usually
"00"
If you think the oven
is not hot enough,
3a. Press the TEMP UP
arrow pad to increase
(÷) the temperature up
to +35°F
If you think the oven
istoo hot,
3b, Press the TEMP
DOWN arrow pad to
decrease (-) the
temperature down to
-35°F
4. Pressthe START
pad.
This increased or decreased
temperature setting will remain in
memory until the above steps are
repeated. A power failure will not
affect this setting.
The broil and self-clean temperatures
will not be affected.
÷
25
JI 20P322 ENvO3 25 ÷ 8/20/02, 2:59 PM

÷
BUILT-IN
WALLOVENWARRANTY
fFULL ONE-YEAR WARRANTY ON ALL PARTS
If, within one year from the date of installation, any part fails to function
properly due to a defect in material or workmanship, Sears will repair or
replace it, at our option, free of charge.
Ifthis product is subjected to other than private family use, the above
warranty is effective for only 90 days
WARRANTY SERVICE IS AVAILABLE BY CONTACTING THE NEAREST
SEARS SERVICE CENTER IN THE UNITED STATES.
This warranty gives you specific Jegal rights, and you may also have other
rights which vary from state to state.
%, Sears Roebuck and Co. Dept 817 WA Hoffman Estates, IL 60179
To further add to the value of your Oven,
Buy e Sears Maintenance Agreement.
Yearsof Ownership Coverage 1st Year 2nd Year 3rd Year
1. Replacement of Defective Parts W M_ MA
2.Annual Preventive Maintenance MA _ MA
• Check at your request
W- Warranty MA- MaintenanceAgreement
Kenmore Appliances ere designed, manufactured and tested for years of
dependable operation Yet, any appliance may require service from time to
time The Sears Maintenance Agreement offers you an outstanding servtee
program for your product.
The table above shows the additional benefits a Sears Maintenance
Agreement offers compared to a Sears Warranty.
Contact your Sears Sales Associate or local Sears Service Center to
purchase a Sears Maintenance Agreement
J
÷
26
11 322 .v03 ÷ 0ooo22 ooPo I[

÷
HORPlODE24"CONAUTOLIMPIEZA
Indice
Seguridad en el uso del
homo ....................................... 28-29
Caracteristicas de su homo .......... 30
Como sacar la cinta
de empaque ................................. 30
Funciones tradicionales
del homo ....................................... 31
Funciones autom_ticas
del homo ..................................... 31
Otros botones ............................... 31
Panel de control ............................ 32
Reloj .............................................. 33
Cronometro de la cocina .............. 33
Tonos ............................................ 34
C6digos F ..................................... 34
Consejos para coc]nar en el
homo ....................................... 35-37
Como hornear .............................. 38
C0mo hornear en forma
automatica .................................... 38
C6mo prograrnar una hora
de comienzo demorado ................ 38
COmo asar .................................... 39
Ciclo de autolimpieza ............. 4_43
Panel de control ............................ 44
Caeerola y parrilla para asar a la
parrilla ...................................... 44
Interior del horno con
autolimpieza .................................. 44
Vidr]o de la puerta del homo ........ 44
Moldura de la ventilaci0n
de la puerta ................................... 44
Luz del homo ................................ 45
Parrillas del horno ......................... 46
Puerta del homo ........................... 46
Antes de Ilamar para
un servicio ............................... 47-49
Ajustes a la temperatura ............... 50
Garantia ........................................ 51
Numeros para servic)o del
consumidor ................................... 52
Funciones especiales ............. 40-41
÷
Pare su conveniancia y refemncla future, pot favor ascribe el n_mero de modelo y
serle en el espaclo que se provee. Estan ubicsdos en el marco frontal detr_s de la
puerfa,
Nt)mero de moclelo: Nt_merode serie:
© Sears, Roebuck and Co.
27
20P322 SPy03 27 ___ 8/20/02, 3:01 PM [

L,
÷
INSTRUCCIO#ESDESEGURIDADIMPORTA#TES
GUARDE ESTAS INSTRUCCIONES
Lea todas las Instrucclones antes de usar este aparato. Cuando use
aparatos a gas o eldctricos, se deber|an seguir precauciones de segurldad,
incluyendo Io siguiente:
IMPORTANTE: Para garanlizar su
seguridad, la de su familia y la de slu
hogar, por favor lea su Guia para el Uso y
Cuidado cuidadosamente. Mant6ngalo a
la mano para referencias Ponga mucha
atencion alas secciones de seguridad.
ASEGURESE que su eslufa sea instalada
por un tecnico especializado y que haga
fierr8 adecuadamente.
• NO DEJE a los nifios sinvigilancia cerca
de un estufa que se est6 usando.
• ENSEI_IEA LOS NII_IOSA rio jugar con
los controles o cualquier parte de la
estufa, no seRfarse, subirse o pararse
sobre la puerta del homo
• fPRECAUCION! NUNCA GUARDE
articulos que sean de interes para
los nifios en el panel trasero o en los
gabinetes sobre la estufa. Los nifios que
se suban sobre la esfufa podrian rosultar
gravemente heridos
• GUARDE ESTE libro para un uso {uluro
° NUNCA TRATE de reparar o reernplazar
una parte de la estufa a menos que las
instrucciones se den en este guia. Todo
otro trabajo deberia ser hecho per un
tecnico especializado
• NUNCA USE su estufa para entibiar o
calentar una habitaciSn.
• SIEMPRE MANTENGA los
revestimientos combustibles de INs
paredes, eortinas y otros patios a una
distancia prudenle de la eskJfa
• NUNCA USE una toalla u otro paffo
abudado como agarradera. Asegl]rese
que la agarradera este seca Las
agarraderas hGmedas podrian causar
quemaduras por vapor. NO PERMITA
que Las agarraderas toquen las
superficies para cocinar calientes
• SIEMPRE MANTENGA el area de La
estufa despelada de cosas due se
podfian quemar, Los alimentos, los
utensilios de madera, la acumulacidn de
grasa, la gaso[ina y otros vapores
o liquidos ]nflamables se podrian
]ncendiar Los utensilios de pl_tstico se
poddan derret]r y las com]das en
conservas poddan explo[ar Su homo
nunca de deberia usar para almaeenar
cosas.
• SIEMPRE MANTENGA la estufa
despejada de cosas que se poddan
quemar (gasolina y otros vapores o
liduidos inflamables)
• NUNCA OALIENTE contenedores de
alimentos oerrados. El aumento de la
presi6n puede causar que el contenedor
explore y cause heridas
• NUNCA DEJE conlerledores con grasa
o goteaduras dentro o cerca de la
estufa.
• NUNCA TRATE de ]impiar una cubierta
cal]enfe. Argunos limp]adoresproducen
vapores t0xicos, y los patios o esponjas
mojadas podrian causar quemaduras
pot vapor,
• NUNCA USE ropa suelta cuando use el
estufa.
• ASEGI_RESE due el homo est6
instalado firmemente en un gabinete due
este bien pegado a la pared.
• RASGUI_OS GRANDES O IMPACTOS
sobre las superficies de vidrio de las
puertas podrian romper o agriefar el
vidri.
28
NO TOQUE las superficies para
calentar, las superficies cerca de elias o
las superficies interiores. Estas poddan
estar suficientemente calientes para
auemar aunque se yeaR de color
oscuro aurante y despues del uso, no
÷
]1 20P ,2 o 28 ÷ 30,PM I[

÷
INSTRUCCIO#ES
IMPORTANTESPAPASU
$EGURIDAD
toque o permita que la ropa o matefiales
inflamables hagan conlacto con las superfi-
cies calientes hasta que hayan tenido tiempo
de en[riarrse Las otras suprficies cerca de
tas ventanillas de ventilacidn del homo,
puertas, ventanas y I_s superficies para
eocinar tambien podrian estar
suficientemente caliente_ para causaT
quemaduras
• COLOQUE LAS PARRILLAS DI=L HORNO
eft la position deseada miefltras el homo
este frio Si las parrillas se deben mover
mientras el homo esta caliente, no permita
que la agarradera haga contacto con el
quemadof caliente del homo.
• DESPUES OE ASAR A LA PARRILLA1
siempre saque la cacerola y la parrilla para
aBar del homo y limpielas Los Bobrados de
grasa en la cacerola para a_ar podrian
incendiarse la prdx_ma vez que usted use el
homo
• SIEMPRE TENGA CUIDADO cuando abra la
pueMa del homo Deje que el aJre calien[e y
el vapor escapen antes de mover los
alimentos
• NUNCA USE papel de aluminio para forrar el
fondo del homo El uso inadeouado del
papel de alummio podria resultar en un golpe
de corriente o en un incendio
• NUNCA OBSTRUYA la aberttJra de la
ventilacidn del homo
• LIMPIESOLAMENTE las partes que
se listan en este manual Siga todas las
instrucciones para ia limpieza Asegflrese de
sacar la cacerola y la parrilla para asar antes
del ciclo de autolimpieza
• NUNCA FRIEGDE, mueva, limpie, o dafie el
sello de la puerla en los hornos con
aulolimpieza Esesencialpara unbuen
sellado
• NUNCATRATE de limpiar los utensilios,
ollas, partes removibles, o la cacerola y la
pardlla para asar en et eiclo de autolimpieza
• NO USE limpiadores para hornos - No Be
deberia usar ninguna clase de limpiador para
hornos dentro o airededor de cualquier parte
del homo
• Sl LA FUNCION DE AUTOLIMPIEZA
falla, apague el homo y desconecte la
electricidad, Hfigale un servicio per un
tecnico calificado
IADVERTENCIA DE
SEGURIDAD IMPORTANTE!
CaliforniaSafe DrinkingWaterand
ToxicEnforcementAct requiemque el
gobemsdorde Californiapubliqueuns Iicte
de substencln que elostadosopsque
producendefectosde nscimientou otros
de_os reproductivosy requiemque los
hombresde negociosedvlertanesue
cllentesdel contactopotencialatales
substancias.Elalslante de fibre de vidrioen
elhomo con eutollmplezaemltir_una muy
peque_aconfidedde mon6xido decarbono
duraateelclclo de autollmpleza,I=1coatscto
sepuede minimizer ventllandocon una
puertoo ventena abiertao usandoun
ventilsdoro uns tampons de ventilaci6n.
IMPORTANTE: La satudde algunos
pltjaroses extremadamentesensitiveelos
vaporesproducidosporel ciclode
autolimpiezade cualquier homo. Pongslos
pdjarosen otra habhecldnque esfeblen
ventllada.
ILEA Y COMPRENDA ESTA
INFORMACION AHORA!
Asegt)resequetodos en su hogarsepanque
haceren cesode Incendfo.Ntmc8useague
sobm un incendfode grass;esto solamente
eatenderi insNames.
FUEGOEN EL HORNO:
[Notrotsde moverlacacerole!
1. Cierrela puefla del hornoy apague !os
corltroles,
2. Siel incendiocontinfla, cuidadosamenie
abra la puerta arrojesoda paracocmar
sob[e el fuego, o use unextintor de
quimicoseco, espumao "halon",
GUARDE ESTAS INSTRUCCIONES
29
÷

!I I ÷ LL
OPERAClON
CARACTERISTICASDESURORNODEPAREDA GASDE24"
÷
VentilaciCn del
Cerrojo
automatico
para
Elemento
pflr8 assr a 18
parrilla
Luz del
Cacemla y
pandlla para
asar a la
n_mero de modelo
y serie
Elemento
Con_oldel
horno
Sello de la puerta
pare autolimpleza
botCn
Interruptor de
Interruptor
automdtico de la
Gufas para
homo
Interior del homo
Parrillas de homo
Puerta removibie
÷
Para sacar el residuo del adhesivo de la cinta de empaque, use detergente IfQuido para
platosr aceite mineral o aceite para ooc_nar. Con un pado suave _Ctelos sobre el _rea y
permita que se remoje, Enjague y seque bien. Repita el procedimienlo usando un pulidor
para estufas para asegurarse que el homo no se dare Esto so dobena hacer antes de
encender el homo por pdmera ve_ La cinta no se puede sacar una vez que el homo
se haya c81erltado. La cinta de empaque me puede encontrar en las siguientes _reas:
man]lla de la puerla, area del panel de control, moldura de la puerta y _lrea del homo
3O
20P322 SPy03 30 ÷ 8/20KI2, 3:01 PM I /

II , ÷ ..........m.......
÷
OPERACION
Control Del Homo, Roloj y CrooGmetro
I sooL L
Su nuevo cent[el de homo a botones le permitira programar _as varias {unciones con |acilidad. Mas
abajo est&n los diferentes tipos de funciones y la descripciSn de cada uno,
I II I! III
(_ _"_ LOSbolones con las flechas paraHORNEAR - Cocina los alimentos en el homo SUBIR y BAJAR laHORAS/
tfadicional a una temperatura que Maria de HOUR MIN MIN!$ros programan la hera del
170°F a 550°F. _x F_. dia, la cantidad de tiempo para
ASAB A LA PARRILLA- Asa los alimentos en _ LV) cocinar, la cantidad de tiempo
ALTO a 550°F o en DAJO a 450°F a calor para lirnpiar, la hera para un
difecto del elemento superior El asado a la comienzo demorado, y la hera del
pa_dlia se debe hacer con la puerta abierta en c_onOmetro de la cocina.
la posicion de tope para asar a la parrilla. _ LOSbetenes TEMP selecciona la
UMPIEZA- Limpia el &rea interior del homo _ [emperatura para cocinar
per usted. Cuando el ciclo termina, el homo se TEMP
apagara automaticamente.
NOTA: La puerta del homo se cerrar_, con
cerrolo automaticamente y el cerrojo se abfira _ El boron START debe empujarse
s6to cuando el homo se haya enffiado, _ para activar cualquier funciOn del
homo.
_ rograma la cantidad de _empo
en que usted desea cocinar los
alimentos. El homo se apaga
au{om,_{icamente al final de esta
cantidad de tiempo
Programa la ho(a del dia en la
cual usted desea que el homo _e
encienda. El homo se encender&
autom&tioamente a la hera que
ElboronCLEAR/OFFseu_a para
cancelar cualquie_funcion del
homo y el tore de fin de ciclo.
NOcancelar4 elReloj oel
Cronometmde la Coclna.
KITCHEN Elbot_n KITCHENTIMERON/
TIMER OFF (CRON6METRODE LA
COCINAENCENDIDO/APAGADO)se usa para
encender oapagar el Cron(_metro
de {aCocina No comrolar_
ningunaotra funal_ del homo
umed ha programado. Cuando se _ Et boron del RELOJ se usa para
use el HeRA DE COMIENZO _ poner la hera del dia,
DEMORADO (DELAY START
TIME) con TIEMPO PARA _ El boron OVEN LIGHT se usa
para encender o apagar la luz
COCINAR, el homo se apagara _ del homo.
a_Jtomalicamente al termino del
ciclo paracocinar. 31
÷
I 20P322 SPvD3 31 ÷ 8/20_2, 3:01 PM

I! ;; ii!i!iiiiiii]i ÷
÷
OPERAClON
PanelDeControl
Indlcador de Indicador de
temperature del homo encendido
-fB BB BBBB :
S _ _o S •
Indle_dor de . Indi_dor de la hora
progrema L_ DOOR CO,_ITOP I/11,_J
Indlcador de funci6n Indlcador de funcidn
del homo del homo
El Dial de Control es una referencia f_lcil
para utilizar el control del homo M&s
abajo est_ln las descripciones para indicar
cdmo funciona el Dial de Control
INDICADOR DE LA TEMPERATURA
DEL HORNO - Este indicador tiene un
prop6sito mOItiple.
• Muestre la temperature
• Muestre un c6digo de error "ERR" -
Si el indicador de temperatura del homo
pestaSea "ERR", entonces usted ha
programado un tiempo ouna
temperatura incorrecta
• Muestm pmblemas el homo - $i el
control pestar3ea "F" y un nt_mero o
tetra, usted est_l experimentando un
problema del homo. Pot favor lea la
secci6n CODIGOS-F en su manual.
INDICADOR DE ENCENDIDO - Se
encendera cuando se programe una
funci6n del homo
INnlCABOR DE PROGRAMA - El
indicador de programa pests_e_r_ en
combination con una funci6n del homo o
una funciOn automatica para avisarie que
necesita programar un tiempo ouna
temperatura. Ejempla: "SET" y "BAKE"
pesta_ear_n para avisarle que necesita
programar la temperatura del homo.
INDICADOR DE LA HORA - Muestra la
hora del dia, la cantidad de tiempo para
cocinar, [a hora para comenzar una
funci6n demorada para cocinar, limpiar,
o la hora programada en el cron6metro
de la cocina.
• Muestm un codigo pare recordar
"PUSH START" - $i el indicador de la
hora del horno pesta_ea las palabras
"PUSH START", entonces usted tiene
aue empujar el bot6n START para
activar su program&
INDICADORS DE LAS FUNCIONES DEL
HORNO- Muestran que funci6nha sida
programada, cuando la puerta del homo
esta enganchada, y si la funcf6n es
demorada,
÷
32
j 20P322 SPy03 32 F_. 8/2Og}2, 3:01 PM

IL i .
÷
OPERAClON
RelojyCronGmetro
El reloj debe ponerse a la correcta hora
del dia antes que una funck3n demorada
deL homo [uncione correctamente La hora
del dia no Be puede cambiar durante una
funci0n autom_tica del homo, pero se
puede cambiar durante una funcion para
hornear o para asar a la parrilla.
COMO PONER EL RELOJ
1. Empuje el bot6n CLOCK
2. Empuje losbot6nes con lasflechas
para SUBIR y/o BAJAR las HORAS/
MINUTOS para poner la hora correcta
del dia
3. Empuje el boron START,
PARA VOLVER AL RELOJ
Mientras este usando el homo para
coclnar, empuje el bot6n CLOCK, sl
desea ver la hora del dia. La hora
presente del dia se vera en el dial
CORTE DE CORRIENTE
S]ha oourrldo un corte de corriente,
la hora pestafiear& en el dial y estara
]ncorrecta. Ponga nuevamente el reloj
a lahora.
Cualquier funcion para cocinar del homo
que estaba en proceso tendra que ser
reprogramada.
El cron6metro de la cocina se usa para
medir el tiempo de los procesos para
cocinar u otras activ]dades del hogar
No controla el horno. Se puede programar
hasla 9 horas y 59 minutos. Contar_ hacia
atras en minutos hasta que Ilegue a los
ULTIMOS 60 SEGUNDOS, entonces el
control sonata una vez. Cuando lacuenta
Ilegue a CERO, el control sonara 3 veces
seguido de un sonido cada 6 segundos
hasta que el bot6n KITCHEN TIMER ON/
OFF se empuje El sonido de cada 6
segundos se puede eliminar para ciclos
futuros si se desea. Para las instrucc=ones
de c6mo eliminar estos sonidos continuos,
vea TONOS en lapag]na siguiente.
COMO PROGRAMAR EL CRONOMETRO
1. Empuje e! boton KITCHEN TIMER
ON/OFF.
2. Empuje los botones con las flechas
para SUBIR y/o BAJAR las HORAS/
MINIJTOS para poner lahora correcta
del dia,
3. Empuje e! boron START,
4. Cuando la cuenta Ilegue a cero,
empuje el botdn KITCHEN TIMER
ON/OFF
Para cancelar el crondmetro durante la
cuenta, empuje el bot6n KITCHEN TIMER
ON/OFF DOS VECES.
÷
33
]i zoPs22sP,,03 33 ., _o,_,3:01PM i]

II
........I i I.'---o
ii! !!ii!iiiiI@liiiii.
I
÷
OPERACION
CoahwlDelHomo,
Relojy CronGmetro
El nuevo control tiene una serie de
_onosqua sonaran a tiempos diferentes
Estos tones pueden sonar mientras usled
ptogtama una _u_c_n Oe_homo, o al _inal
de una funciOn deFhomo, Tambien le
avisar& si existe una problema con una
de las funciones M_S abajo estan los
tipos de tones y una breve descripci0n
de cada uno.
SONIDOS MIENTRAS SELECCIONA EL
CONTROL - Cuando usted toque un
botOn oyerA un sonldo. Este tone le harA
saber qua el boron ha side activado. (Los
botones con las flechas no hacen un
sonido,)
TONe AL FINAL DE UN CICLO
AUTOMATICO - Dospu_s de una funcion
para cocin_- autom&tica, usted escuchara
Ires tones cortes seguidos per un tone
cada 6 segundos. El tone de csda 6
segundos segu]r& sonando hasta que
empuje el bot0n CLFAR/OFF o usled
decida seleooionar el programa especial
para canoelar y ev]tar qua el tone de 6
seg_ndos suer_e a_finalde un Cited future.
C(_MO CANCELAR EL TONe DE 6
SFGUNDOS
1. Empuje y sujele los botones
BAKE y BROIL, al mismo tiempo
per 3 segundos, hasta que el dial
muestre "8 F"
2. Empuje el bot0n KITCHEN TIMER
OR/OFF. El dial moslrar_ "CON
BEEP_' (tone continue).
3. Empuje el botOn KITCHEN TIMER
ON/OFF nuevarnente, El dial mostrara
"BEEP" (lone cancelado)
4. Empuje el boton START, para
cancelar el tone y salir de esle modulo
especial.
Si desea regresar a los tones de 6
segundos, repita los pasos de arriba hasta
qua el dia_muestr_ su seleoc_3n y ampule
el botdn START (comienzo).
TONe BE ATFNOION - Este tone sonar&
si haee un error u omite algo mienlras
prog_ama una tuncidndelhorna.
Unos ajemplos sorian:
a. Programar un ciclo de limpieza y la
puerta del horno no esta bien cerrada
b. Programar una tunciOn y noempujar
el botOn START,
c. Empujar un botOn para una funciOrl
adieional stn programar primero la
temperatura o el tiempo
d. "ERR" pestafiearA si usted programa
una temperatura invalida. Empuje el
boron CLEAR/OFF para porter el dial
en blanco y reprogramar la funci0n del
horrid.
Cualquiera de estos se puede identificar
rap]damente con mirar el dial,
TONe DE PRECALFRTAMIERTO -
Cuando usted seleccione un mode de
coeinado, aJuste la [emperatura del homo,
y presione el botOn para el comienzo
(START) para qua el homo comience a
ealentar, Cuando la temperatura dentro
del homo Ilega a la temperatura Qua usted
program0, sonara un tone para avisar[e
qua et borne est#. listo para hornear,
S usted programa una funciOn del homo
y el control suena mientras el dial hace
pesta_ear una "F" y un nQmero o letra tal
come "F-4" o "FI", es posible qua exista
u_a p_obLemacoaelcor_trol o con el
homo. Simplemente empuje el bolOn
CLEAR/OFF y espere una hera. Trate de
programar esa funci0n nuevamenle. 8i el
cddigo se repite, escriba el cOdigo qua
pestahea y llama para un servicio, Digale
al tecnico qu# cOdigo estaba
pestafieando
÷
34
1 I 20P322SPvg3 34 _ 8/20KI2, 3.01 PM !

_ iii_ili_iiI
÷
OPERAGION
Consejo$Para Cocinar
en el Homo
Es normaE sentir un poco 0e olor cuando
use su homo por primera vez. Esto es
causado por el calentamiento de las
partes nuevas y del aislante. Para ayudar
a eliminar este olor, venUle la habltacl6n
abdendo un8 ventana o usando una
csmpana de ventllaci6n.
IMPORTANTE: Nunca cubra el fondo 0el
homo o la pamela del homo cen papel de
aluminko. Et uso inadecuado puede causar
una mala circuLaci0n del calor, pobres
resultados aJ hornear, y podria dafiar el
acabado del homo Para prevenir
manchas a causa de derrames, usted
podria porter un pedazo de papel de
aluminio o una bandeja para galletas
debajo de ]a comida que se podda subir.
Si abre la puerta frecuentemente para
mirar los alimentos causar_ una p_rdida
de calor causar_ malos resultados cuando
horn_,
El precalentamiento es subir ia homo
temperatura a la temperalura que va a
usar euando hornes. Permita que el homo
se precaliente cuando 1as recetas
requ]eren precalentamiento
Para prolongar la vida del foco de la luz
del homo, s[ga estos consejos: Siempre
apague la luz cuando el homo no este en
uso 0 durante un ciclo de limpieza, Si la
luz del homo se deja encend]da por un
largo periodo de tiempo, el homo estar&
t]bio cuando abra la puerta debido al calor
generado por el foco de la luz de] horno.
÷
La ventiiaciOn del homo est& ubicada
debalo del panel de control. Es/a _rea se
podfia calenlar mueho durante el uso del
horno. Es normal que salga vapor de la
ventilaeiQn y/o que se produzca humedad
debajo cuando el homo no est6 en uso. La
ventilaci6n es importante para la correcta
circulaci[3n del aire Nunc8 obstruy8 la
ventilaci6n
Ventilaci6n
_ I del homo
En ia parte trasera deJ homo usted notarA
un pequefio tubo Esto es un sensor de
calor que mantiene la temperatura del
homo. Nunca mueva o doble este tubo.
Sensor de
atura del homo
La zona de temperatura bala de su
homo (entre 170 ° y 200°F) est_ disponsible
para mantener los alimentos tibios. Sin
embargo, los alimentos que se mantengan
a esta temperatura por m_s de 2 horas se
podban echar a perder
35
I I 20P322 SPy03 35 8/21_]2, 3:01 PM I [

"_S iiiiiiiiiiiii
÷
OPERACION
ConsejosPara Cocinar
en el Homo
El Sensor de Temperatura del Homo en la
parte trasera del homo mide ycontrola
continuamente la temperatura dentro del
homo Para mantener una temperatura
programada constante, los elementos
har_n un ciclo de encendido y apagado
m]enlra$ el homo coc]na.
Cuando use su conveniente operack')n
de Comienzo Demorado, los 81imentos
tales cOred productos Idcteos, pescado,
aves, etc., nunca se debeHan dejar
expuestos por m_s de una hora antes
de ser coclnados La temperatura
ambiente y el calor de !a luz del homo
promueven e] crecimiento de bacterias.
I.A8 BANDEJAS BAJAS, sin lados,
para galletas perm]ten que el aire circule
alrededor de las galletas para que se
doren en forma parela.
LOS UTENSILIOS BRILLAN'I3ES son
perfectos para que los queques y panes
rapidos tengan una corteza caf_ dorada.
U'FENSILIOS DE VIDRIO, OSCUROS
CONTRA PEGADURAS, U OPACOS
POR LA EDAD, absorben el calor, son
perfectos para panes con levadura,
cortezas para pasteles o alimentos que
tengan uaa corteza care. Cuando use
estos utensilios, la temperatura del homo
se deberia reducir en 25°E
÷
La mayor(a de las recetas para hornear
han sido desarrolladas utilizando
produc{os con un alto contenido de
manteca tales cOred mantequi[Ja y
margarina (80% de rnanteea por peso--_.l
requerlmlento federal para los productos
marcados "margarina"). Usted obtendr_]
maids resultados si los queques, pasteles,
tortas, galletas, o dulces son hechos con
mantequilla con bajo conlenido de
manteca. Las mantequi!las y margarinas
con bajo contenido de aceite contienen
mends manteca y m&s agua El alto
contenido de agua de la man{equma o
margar]na afecta la textura y el sabot de
sus recetas para hornear favoritas
Mientras mas bajo sea e[ contenido de
manteca de la mantequilla o marganna,
masse notaran estas diferenc]as Para
asegurar los mejores resultados, use
margarina, mantequilla u otras barras de
estos productos que contengan por Io
mends 70% de aceite vegetal.
36
I 20P322 SPy03 36 _ 8120/02, 3_]1 PM

[I i ÷ lii i i i; iii Mii
÷
OPERAClON
ConsejosPara Cocinar
EnEl Homo
S] esla horneando con m&s de un utensilio,
Col0quelos de manera que cada uno tenga
por Io menos de 1" a 1V2"de espacio de
aJre a su alrededor. Siesta horneando
cuatro queques al mismo tiempo, coloque
dos queques en la parrilla 2 y dos queques
en la parrilla 4. Coloque los moldes en
zigzag para que no queden directamente
uno encima de1 otro
Usted podria pensar que su homo
nuevo cocin8 diferentemente al homo que
reemplaz.0. Le recomendamos que use su
homo nuevo por varias semanas para que
se familiarice mAs con 0L,siguienda los
tiempos que se dan en la receta como
una guia. $i cree que su homo esla.
funcionando demasiado cafienle o ffio
para su preferencia para coG]nat, yea
Ajustes a la Temperatura-H&galos usted
mismo en la parte de arras de esle manual
para hacer el ajuste.
Las parrillas del homo est_n diserladas
con topes, una convenienc]a y tambien
una precauc]On de seguridad. Las guias
tienen un tope para preven_r que las
parrillas se den vuelta cuando se sacan
del homo, Este dise5o permite que ]as
parrillas puedan ser insertadas de solo
una manera.
Su homo tiene cuatro (4) posiciones para
las parrillas La pos]cion Oe rnas arriba es
solamente una guia, No puede ser usada
como pes]ciOn para una parrifla.
Guias
Siempre coloque las parrlllas del homo
en la poslci6n correcta cuando el homo
est6 frio.
÷
37

OPERAClON
CGmoHornearYAsK
÷
1. Empuje eL bolon BAKE
_ 2. Empuje los botonescon las flechas TEMP
TEMP UP y/o DOWN para
programar la
_V._ temperatura del homo
que desea usar.
3. Empule el bot6n
START
_CC_)EARj_ 4. Cuando termine de
hornea, empuje el botOn
CLEAR/OFF.
Para programar que elhomo cocine por
un tiempo determinado yse apague
automAticamente:
(_ 1. Empuje el boton
BAKE
2. Empuje el bot6n
con las flechas "I3EMP
"_EMP UP y/o DOWN para
se[eocionar la
temperatura _delhomo
que usled desea usar,
3.
@®,
HOUR MIN
@@
Empuje el bot0n OVEN
COOKING TIME.
Empuje el boton
con las fiechas
para SUBIR y/o
BAJAR las HORAS/
MINUTOS para
seleccionar la cantidad
de tiempo en que
0esea que los
anmento8 se CooiReR
Para programar que el homo se enoienda
a una hora posterior del dia, cocine por
una canlidad de l]empo especiflca y se
apague automaticamente.
TEMP
@
3.
@@4
HOUR MIN
@@
1. Empuje el botch BAKE.
2. Empuje el bot(3n con
las flechas TEMP UP
y/o DOWN para
seleccionar la
temperatura del homo
que prefiere usar.
Empuje el botOn OVEN
COOKING TIME.
Empuje el bok)n
con las flechas
para SUBIR y/o
BAJAR lasHORAS/
MINUTOS para
seleccionar la cantidac_
de tiempo en que
desea cocinar los
alimentos
5, Empuje el botch
DELAY START TIME.
@@ 6. Empujeelbot6ncon las flechas
HOUR MIN para SUBIR y/o
@ @ BAJAR las HOFIAS/
MINUTOS para
seleccionar la hora del
dia en que prefiere que
el homo se encien0a.
7. Empule el botchSTART
El homo se apagara a] termino del tiempo
para cocinar amenos que el programa
par8 mantencion de temperatura se haya
activado,
_S'rART_ 5. STARTEmpujeel bot0n
38
÷
20p322 SPy03 38 . 8120tg2, 3:01 PM ] [

÷
OPERACION
CGmoAsarALaParrilla
Asar es cocinar al calor dire;to del elemento
superior. La puerta de! homo deberia
permanecer abierta en la posici6n de tope
para asar cuando ase a la parrilla.
NOTA: Los a]imentos puedert ser asados
con la puerta cerrada, pete es posible que
no queden tan dorados porque el
elemento hara title entre encendido y
apagado.
No es necesario precalentar el homo
cuando ase a la parrilla, Use la cacerola
y la parr]lla para asar que viene con su
homo, Ambas est_n dise_adas para
drenar adecuadamente la grasa y los
liquidos.
Cuando use papel de
_ alumlnlo, el pspel de /
aluminio debe estar
moldeado flrmernonte a la
parrllla y los cortes en el papel deben
colncldlr con los cortes de Is parr,Is.
Esto permite que la grasa y los
liquidos caigan a la cacerola,
evltando que so produzca un incendl©
y humo excesivo.
Siempro saquo la cacerola y la parrilla
del homo. Guarder y
olvldar una ¢acerola
mm asar sucls en el
horno es un pellgro
para producir un
Incendio o humo.
ElDepartamento de Agriculturade losEstados
Unidosrecomienda cocinar la came y lasayes
completamente--la came a uncalor INTERNe
de po_Iomenos 160°Fylasayesa un calor
INTERNe deper Iomenos 180°F.Elcocinar a
estastemperaturasgeneralmenteprotege
contra enfermedadescausadas per los
alimentos,
Mientras mas cerca coloque los alimentos
del elemento para asar, mas r&pido se
dorartm per afuera, pero quedando rojo
o rosado en el centre.
Colocando las carnes lejos del eiemento
permitira que las carries se eocinen en el
centre mienlras se doran per afuera.
Usando eslas postcLones, cocine el lade 1
per Io meRes 2 minutes mAs due el lade 2.
AsegQrese due la parte honda de la
cacerola para asar s_empre este hacia
el frente del homo.
£1 tamaflo, peso, grosor, temperatura
inicial y su preferenoia personal afectara el
asado a laparrilla Esta tabla esta basada
en carnes a la temperatura del
refrigerador
ALIMENTO i POSICION TIEMPO
! DE TOTAl.
iPARRILLA _mlnutosl
Blmc 1" de gruuo 3 9-11
Tortas do earns
mollda_l_ de _Rmso 3 16-18
ChulOtU de cerdc-
1/2 _ de _r LqSO 3 27--28
P_cado (fll_) 3 11_13
Polto(pmsas_ 2 45-55
18,
lb.
Empuie el bot6n BROIL• (Esto
autom_iUcamente programs ASADO
en HI-ALTO).
Mientras el indicador de programa
peslafiea en el dial, empuje
nuevamente el botC)nBROIL si
prefiere asar en BAJO (LO). Ase en
LO (BAJO) para cocinar bien
alimentos tales come ayes o cortes
de came gruesos sin due se doren
Oemasiado.
2. Empuje elbot6n START.
3, Cuando termine de asar, empuje el
boton CLEAR/OFF
39
÷
[ 20P322 SPvO3 39 , 8/20/02, 3:01 PM [

fill
÷
OPERACION
CGmoSelecMonar
Programa$E_peciales
Su nuevo control a bolones tiene
caracteristicas adlclonales que usted
podria usar, Despu{_sde hacer su
selecci6n, si usied desea cambiar el
programa, siga los pasos hasta que el
dial muestre su selecci6n.
El control se programa aulomaticamente
para apagarse despu_s de hornear por
12 horas o despu6s de asar a la parrllla
por 3 horas en caso que se le olvide y
deje el homo encendldo. SI desea eliminar
este programa:
1, Empuje y sulete, al mlsmo tlempo,
los botones BAKE y BROIL por
3 segundos, hasta due el dial
muestre "SF."
2. Empuje el botch DELAY START"riME.
EJdial muestra "12SHDN" (apagado
en 12 horas). Empuje el botch DELAY
START TIME nuevamente. El dial
mostrar_ "NO SHDN" (no apagado).
3. Empuje el bot6n STAR3",
(b) Empuje el botOn BROIL
nuevamente. Esto cambiara "F°''
(Fahrenheit) a "C °'' (Centigrado).
3. Empuje el bot6n START,
Su control esta programado para usar el
reloi en 12 horas. S] usted prefiere usar
Hora Mililar de 24 horas o porter el dial en
blanco, se hace asi:
1. Empuje y sujete, al mlsmo tiempo,
los botones BAKE y BROIL por
3 segundos, hasta que el dial
muestre "SF,"
2. (a) Empujeelbol6nCLOCK Eldlal
mostrara "12hr," Si 6sta es su
selecciah, empule el bot6n START
(b) Empuje el bot6n CLOCK
nuevamente E] dial mostrara"24hr"
Ejemplo: 5:00 en el reloj de 12horas
leera 17:00 en el relol de 24 horas.
Empuje el botch START.
(¢) Empuje el bot6n CLOCK
nuevamente. El dial ahora mostrara
"OFF." Siesta es su selecci6n,
empuje el bot(SnSTART. La hora no
se mostrara en el dial. (La funci6rl
demorada no funcionara.)
÷
El control del homo estA programatic
para la selecci6n de temperaturas en
Fahrenheit. La mayoria de las recetas se
dan usando la escala Fahrenheit, Usted
puede cambiar esto y usar una selecci6n
en Centigrados,
1. Empuje y sulete, al mismo tlempo,
los botones BAKE y BROIL por
3 segundos, hasta que el dial
muestre "SF,"
2. (a) Empuje el bot6n BROIL. El dial
del control mostrara el signo para
grado y "F°."
40
20P322 Spy03 40 _ 8#20/132,3:01 PM I ]

÷
OPERAClO#
CGmo$eleccionar
ProgramasEspeciales
El control le permitira cerrar los botches
de manera que no se puedan activar
cuando los empuje. Si se preocupa de
deJarel homo sin supervision, active este
programa.
1. Empuje y sujete, al mlsmo fiempo
per 3 segundos, los hotones BAKE
y BROIL. hasla que el dial muestre
"SF."
2, (a) Empuje el botdn CLEAN. El dial
muestra "LO¢ OFF" (cierre inactive)
(b) Empuje el bol0n CLEAN
nuevamente. El dial mostrara "LOC
ON" (cierre activado).
3. Empuje el bot0n START.
Este programa se puede seleccionar
solamente cuando el homo no estd
en UBO.
Cuando este programa este activado, el
control sonora y el dial mostrar_ "LOC," si
se empuja un botSn. Los botones Clock,
rimer o Oven Light no son afectados.
Su nuevo control tiene una funci6n para
cecinar y mantener la temperatura para
cocinar autom_ticamente solamente que
man|endrPJlos al]mentos tibios hasta
3 horas despues que el cocinado
automatico haya terminado Pare
aclivar esta funci6n:
1. Empule y sujete, al mlsmo tlempo,
los bolones BAKE y BROIL per
3 segundos, haste que el dial
muestre "SF."
2. (a) Empuje el bot0n OVEN COOKING
TIME Ei dial mostrar_ "HLd OFF."
(b) Empujo el boron OVEN COOKING
TIME nuevamente para activar este
programa. El dial mostrara "HLd ON,"
3. Empuie el boton START.
Este Programa Especial le permit]r&
cambiar la velocidad; #1 significa que el
cambio de velocidad es lento haste #5
que significa que el camb]o de velocidad
es rapido. Pare se[eccionar la ve[ocidad
que prefiere, s]ga estos pasos:
1. Empuje y sujete, el mlsmo tlempo,
los bolones BAKE y BROIL por
3 segundos, hasta que el dial
muestre "SF"
2. Empuje el botd,n con la flecha SUBIR,
El dial le mostrar& una posici6n de
velocidad entre 1y 5.
3. Empuje la f[echa SUBIR para
aumentar la velocidad haste el
numero 5.
Empuje el bol6n con la flecha BAJAR
para disminuir la velocidad hasta el
nOmero 1.
4. Empuje el boton START.
÷
41
20P322 SPy03 41 . 8/20/1_, 3:01 PM I [

÷
CUIDADOYLIMPIEZA
E1CicloDeAutolimpieza
1,
2.
Saque 4acaceroLa y la parrilla para
asar. ulensilios, y cuaiquier papel
de aiuminio que podria quedar en
el homo.
Si su homo est,[ equipado con
parrillas de niquel. 1as mismas
deben ser removidas. S] su homo est_l
equipado con pamllas cub]ertas de
porcelana gr]s. las m]smas deben ser
removidas durante el c]clo de limpieza
autom_tica.
Marco frontal
"_- Reveetimiento
de la puerta
Limpie estas areas con 8gua cal[ente,
lanillas con jabSn o limpiadores oomo
Soft Scrub para sacar cualquier suciedad.
Enjuague bien con agua limpia y seque.
3, Limpie cualquier derrame pesado del
rondo del homo.
4. No iimpie el sello de 18puerla del
homo.. El material de libra de vidrio
de la puerta del homo no soporta la
abrasion. Es esencial que el sello
permanezca intaoto Si usted nota que
se est_ gastando o trizando, deberia
ser reemplazado
42
El sello de la puerta esta dise_ado para
que tenga un espacio de 5L6 ' en el rondo
del homo, Esto permite la circulacl6n
adecuada del a_re.
Reveetimiento de la puerte
Es normal que su homo d6 la apariencia
de no tenet un buen sello sobre el homo.
Esto se debe a[ sello. La ubicacion del
se]lo sobre la puerta mantiene la puerta
sellada y previene cualquier p_rdida
de calor.
Los utensd_os nunca se
debenan dejar dentro
del homo durante un
ciclo de autollmpleza.
I-as parrillas de niquel del homo se
podrian llmpiar dursnte el ciclo de
autollmpieze, pero perderAn su hrillo
y se pondr_n dlflciles de deslizar. Si
decide dejerles dentro durante el
cielo de Ilmpieza, pase eceite vegetal
e los extremos de la parrllla pars que
se desllcen m_s f_cllmente.
I_as parrlllas cubiertee de porcelana
gris pueden ser limpiedas con
segurided en el interior del homo
durante el ciclo de Ilmpleza
autom_tlce. Ser_ neceserto pare
engrasar los extmmos de le parrllla
del homo con una cape Ilgem de
aceite vegetal despuds de un clclo de
Iimpleza. Esto eyudara a que se hega
f_cll deslizat los estantes o re}illas en
el homo.
Durante el primer ciclo de Ilmpieza,
ventile la hebitecidn con une ventena
abierte o une cempana de ventila©idn.
Eeto eviter_ el olor fuerb_ producldo
pot el calentamiento de las partes
fluevas.
÷
i 20P322 SPy03 42 _ 8/2(}_32, 3:01 PM [

÷
CUIDADO Y LIMPIEZA
Ciclo De Autolimpieza
El Ciclo de Limpieza, ]nciuyendo ei
tiempo de enfriamiento, est& programado
autom&ticamenle pot 4 horas, pero usted
puede camb]ar esto de 3 horas si el homo
esla levemente sucio a 5 horas si el homo
esta muy sucio,
1. Empuje el bot6n
CLEAN Mostrara 4
heras en el dial.
@ 2. Empule el bol6ncon las flechas
HOUR MIN paraSUBIR y/o
°,.A.,osHORAS,
MIN UTO8 para
-- seleccionar la cantidad
de t]empo que usted
desee que dure eJ
ciclo.
3. Empujeel boton
START.
_JKtlreI[eIKeN_].'.'SHIFJI=II.,_J_._
Simplemenle empuje el bot6n
CLEAR/OFF Usted necesitar&esperar a
que la temperatura de[ homo baje m&s
que la temperatura de enganche (aprox.
1 hora) antes de tratar de abrir ia puerta.
Despues del c]clo usted podria notar un
poco de cenizas blancas en el homo
S]mplemente limpielas con un patio o
esponja homed&
Si algunas manchas blancas persisten,
frieguelas con una lan]lla con jabon
Asegtlrese de enjuagar b]en. Estas son
generalmente dep0sitos de sal que no se
pueden sacar durante el ciclo.
Si pot alguna raz6n usted no queda
saUsfecho con los resultados de la
limpleza, simplemente replta el clclo.
(_ 1. £mpujeel bot0n
CLEAN.
@@2. Siusteddeseacambiar la cantidad
HOUR MIN de t]empo para
@ @ ,impiar, empuje los
botones con las
flechas para SUBIR y/
o BAJAR las HORAS/
MINUTOS.
3,
@@4.
HOUR MIN
@@
Empuje el boton
DELAY START TIME.
Empuje los botones
con las flechas
SUBIR y/o BAJAR las
HORAS/MINUTOS
para seleccionar la
hora del dia en que
prefiere que el ciclo de
limpieza empiece
Empuie el bot6n
START.
÷
43
1120P322sPv0 ÷ o=2.3 ,PM IV

I
I[
CUIDADOYLIMPIEZA
Limpieza
MATERIALES DE LIMPIEZA
• Detergente liquido para platos
• Agua tibia
• Patio suave
No use limpladores abraslvos,
limpladores industrlales, o
blnnquedores (cloro).
Limpie solamente como un toque enlre
ciclos de limpieza, Use detergente liquida,
agua libia, o lanikla con jab6n. Enjuague
bien despu_s de limpiar y seque. Nunca
use limpiadores de hornos dentro o
alrededor de cualquler parle del homo.
Cuando I]mp]e, asegt)rese de no doblar o
desplazar el sensor de temperatura
ubicado en la pared trasera del horno.
÷
MATERIALES OE LIMPIEZA
• Detergente liquido para platos
• Agua tibia
• Lanillas con jabon
• Umpiador comercial para hornos
C(_MO LIMPIAR
Permita que la cacerola se remoje. Ponga
detergente para platos sobre Laparrilla y
cubra con un par3oo una toalla h0meda
por un raid. Friegue a med]da que sea
necesario. Lave, enjuague, y seque bien.
Usted tambien podria porter la cacerola y
la parrilla en la lavadora de platos.
COMO LIMPIAR
Para Limpieza diaria, use un limpiador
para vic_rios y una toalla de pape!. Para
suciedad pesada, use una pasta de soda
para hornear y agua. Enjuague b]en
I_'Z.,,-lt._ll,f.,lr_,JEeJ_i_J,,l,lP__,W_d,!l_:jf:l
MATERIALES DE LIMPIEZA
• Limpiador abrasivo suave
• Esponja-fregador
NO use liapisdores abrasivos fuertes,
Ilmpiadores Industrlnles, o cloro.
÷
44
20P322 SPy03 44 _, 812(]/02, 3_1 PM I [_ -

i
CUIDADO Y LIMPIEZA
PartesRemovibles
÷
PRECAUCION: Us_ed
debe desconectar el poder
eh_ctrico hacia el homo en
el interruptor principal del
circuito o en ia caJa de los fusibles antes
do trater de reemplazar los focos de la
luz del homo. No toque el foco de la luz
con laa manos moJadas o con un pai_o
mojado. Espere haste que ol foco se haya
enfriado y use un pai_o seco.
Collar con Soqueto
Cubierta Alambre
del foco suJetedor
C(_MO SACAR LA CUBIERTA
1. Oesconete la electricidad hacia el
homo en el circuito principal o en la
caja de Losfumbles
2. Coloque la mano ba]o la cubierta
y empuje el alambre sujetador
firmemente hacia a_s, hasla que
pase por encima y suelte la cubierta
del foao.
REEMPLACE EL FOCO DE LA LUZ
Desatornille el foco de la ]uz y
reempl_ce/o con un foco para hornos
residenciales de 40 watts.
C(_MO REEMPLAZAR LA CUBIERTA
1. Coloque ]a cubierta del foco en la
ranura del soquete del foco
2. Tire el alambre sujetador hacia
adelante hasta que caiga en la
indenci0n sobre la cubierta del foco.
3. Reconecte la erectricidad hacia el
horno.
45
÷
i 20P322 SPy03 45 _ 8/20/02, 3:01 PM

iiiiiiiiii il i ÷ !iiiiiiiiiiii
i i iiiiiiiMiii!
÷
CUIDADO Y LIMPIEZA
Limpiezay Partes Removibles
MATERIALES DE LtMPIEZA
• Detergente pare plates
•Agua tibia
•Lanas pare fregar o lanillacon jab0n
Tope en
Pel_e tre_ler8
levantada de
CbMO SACAR
1. Tire las parrillas haste la posiei_n
de tope.
2. Levante e! frente de la parrilla y
deslicela bajo el tope de la guia para
1asparrillas,
C{_MO LIMPIAR
Limpie con agua tibia y deter genie. Para
sacar manchas duras, friegue levemente
con lane para fregar o con una lanilla con
jab0n. Enjuague bien
Las parridas cubiertas de porcelana gris
pueden ser ILmpiadas con seguridad en
e! interior del homo durante el ciclo de
Iimpieza aulom&tica. SerA neeesario pare
engrasar los extremos de la parrilla del
homo con una capa Iigera de aceile
vegetal despues de un ciclo de limpieza
Esto ayudara a que se haga f;&ci]deslizar
los estantes o rejillas en el horno.
C(_MO COLOCAR NUEVAMENTE
1, Coloque la parte levantada de atras
de la parrilla sobre las guias
2. Levante el frente de la parrilla hasta
que la parle levanlada de atras se
deslice pot debalO del tope de las
gules.
3. Deslice la parfilla haste atras.
Poslci6n de tope pare sear a la pardlla
I;" BIsa0ra_
IE II_,Y .
C(_MO SACAR
1. Abra la puerta hasta [a posicion para
asar ala parrilla.
2, Tome la puerta de cada lado, levantela
y s&quela de las bisagras. NO
LEVANTE LA PUERTA DE LA
MANILLA.
PRECAUCION: Cuando
la puerta se saca y los
brazos de las blsagras
esMn an Is posici6n de
tope para asar a la pard.a,
como precauci6n cubra los bmzos
de las bisag ras con toallas o con un
rollo de toallas vac(o. No pase a
Ilevar o trate de mover los brazos de
las blsagms mientras estd
trabajando en el drea del homo. Se
podrian devolver violentamente y
causade herldas en las manos o
dafter el acabado de porcelana en el
frente del marco.
k
COMO COLOCARLA NUEVAMENTE
1. Asegt_rese que los brazos de las
bisagras est_n en la posici0n de tope
pare asar ala parrilla.
2. Levanle la puerta de ambos lados.
3. Coloque en linea las ranuras en la orilla
del rondo del homo con los brazos de
las b]sagras.
4. Oesnce la puerta hacia abajo sobre los
brazos de las b]sagras Io mas posible
5, Cierre la puerta.
46
÷
I 20P322SP_33 46 _ 8/20/02,331 PM

rI t ÷ I"
÷
ANTESDELLAMARPARAIIN SERVICIO
Para ahorrar liempo y dinero, antes de Ilamar para un servicio, revise la I]sta de m_ts
abajo para cualqu]er problema que usted crea _ue t]ene con el luncionamiento de su
homo, Si el problema es algo que usted no puede reparar, use los Nt3meros de ServiGio
para el Consumidor qua se encuentran al final de este manual ¢uando haga un Ilnmado,
tenga disponible el n,',mero de modelo, n_mero de aerie, llsta de partes para
mpamciones, manual de use y cuidado y la fecha de compm.
PROBLEMA
POSIBLE CAUSA POSIBLE SOLUCION
El dial del conb-ol
pestadea una "F" seguida
per un n,_mero o letm.
Mal funcionamiento del
homo,
Empuje el bot6n
CLEAR/OFF Permita que e!
homo se enfrie per una herb y
ponga nuevamente el homo
en funcionamienlo. Si el
problema se repite, Ilame
para LJnservicio
El homo no funciona;
totalmente inoperante.
a. No pasa electricidad
al homo.
b. Reloj en m6dulo
apagado,
a. Revise la caja del circuito
de la casa o los fusible&
b. Vea la secciOn
"Programas especiaies °
de este manual
LOS alimentos
no so horneen
adocuadam0nte.
a. El homo no se
precalentd le
suficiente.
b. Posici6n incorrecta
de la parr]lla o la
cacerola.
c. La vent]laci0n del
homo esta obstruida
o cubierla.
d. Use ]r_correcto del
papal de aluminio.
e. Temperatura
incorrecta para el
utensilio usado
f. La temperatura del
homo necesita ajus/e.
g. El hornoo laparrilla
del homo no est_n
niveladas
h. Controls de] homo
real puestos.
a. Asegt3rese de precalentar
cuando la receta Io
requiera.
b. Mantenga un espacio de
aire uniforme alrededor de
1aselias y utensilios. Vea
la secci0n para Cocinar en
el Homo
c. Mantenga laventilacidn
despejada.
d. No cubra las parrilias
cuando hornee.
e, Reduzca la temperatura
en 25 grades para
utensilios de v]drio,
' OsGuros u opacos
f. Revise la secci6n de
ajustes a la temperatura.
g. Vea las inslrucciones
de ]nstalaci6n para la
n]velackSn.
h. Yea la seccldn para
hornear.
÷
47
I 20P322 8Pu03 47 ÷ 8/20KI2. 3:0! PM

÷
ANTESDELLAMARPARAUNSERVIClO
PROBLEMA PO$1BLE CAUSA POStBLE SOLUCION
La tempemtuna del homo Calibraci6n del control del Vea las instrucciones para
no parece estar exacta, homo a]usta_la temperatur_ due
siguen esta seccion
La puerta del homo no se El ciclo de limpieza no ha La temperatura de! homo
desengencha, terminado, debe bajar a menos de la
temperatura de enganche
antes que la puerta pueda
abrirse,
La luz del homo no a. El interruptor de la luz a. Revise laposici6n del
funciona esta apagado, interruptor.
b, E[ {oco de la luz del b. Revise o reemplace el
homo esta suelto o foco de la luz.
quemado
LOSallmentos no se a. Posici6n incorrecta de a. Revise la posici6n de las
asan adecuadamente a [a parrilla, cacerolas; vea la secci6n
to _r_lla. para asar a la parrilla.
b. El homo se precalent6 b, No precal]ente cuando
ase a la parrilla.
i
Ma_uso de pap_ de c. Lea la secci6n _ara asa[
C.
aluminio, a {a parr}lla,
-r
d. Cantidad de tiempo d. Vea la tabla para asar en
inoorrecta para asaf, lasection de cOmo asat
a la parrilla,
e, VoltaJe bajo (208 e. Use position de parriHa
Voltios). rods a)ta y/o ase pot m_s
tiempo,
f. Controts del homo real f. Vea la secci6n para asar
puestos, a la parri[la.
La parril18 del homo no
se desliza con facllldad.
Las parrillas fuerondejadas Paso un Irapo mojado con un
en el interior de1homo poco de aceite veget_ a los
durante el ptoceso de extremos de I_aparril[a,
limpieza autorn_tica.
El homo humea.
8. Homo sucio,
b. Mal uso de papel de
aluminio.
©. Cacerola para asar con
grasa se dej6 en el
homo.
e. Ve_] que no hayan
derrames grandes.
b. No se recomienda el uso
del papel de aluminio.
c. Limpie la Gacerola y la
parrilla despu_s de cada
uso
48
.P 22 .03 . ÷ 20o2 O,PM i[¸¸

J
ANTESDELLAMARPARAUNSERVlClO
PROBLEMA
El homo emlte
un oloi'.
POSIBLE CAUSA
a. El aislante del homo
podria emitir un olor
guran|e los primeros
usos,
b. Falla de limpiar el
exceso de suciedad.
POSIBLE SOLUCION
a. Ponga el homo en un ciclo
de 8utolirrlpiez8 par8
acelerar el proceso de
eliminar el oLor.
b, Limpie eLexceso de
suciedad antes de usar
el homo
El homo no se limpi6 o
los resultados fueton
ma_os.
a. El homo estaba
demasiado sucio
b. El eiclo de limpieza
fue interrumpido.
a. Los derrames grandes se
deberian limpiar antes de
programar un c]clo. Usted
tambi_n podria repetir el
c]cLo.
b. Perm]te que e]homo
Iimpiar por un ciclo
comp{eto.
÷ ÷
49
20p322 SFV03 49 ._ 8120K12,3:01 PM

÷
AJUSTES DE TEMPERATURA -
"HABALDS USTEDMISMO"
Usted podriadferentementePensaraue_homoSUnueVOquehOrnOco{_na / BAKE] 1.
reemplaz0. Recomendamos que use su j,.
homo nuevo seUnaSdanP°CaSenlasSemanaSrecelasparatemposqUese faro liance con _, slgulendOcomolOSque_
una guia.
func_onandoCreeque SUdemasiadonUevohOmOcaliente(quemaS estalacomida) o no c_ienta Iosurcienle
2.
([a comida no queda ben coc_da), usted
msmo puede ajustar la temperatura. La
apar encia y latextura de os al mentos
son mejores indicadores de la exaclitud
de un homo que un termdmetro. Estos
termdmetros pueden vat ar en 20-40
abrir paradeeerlaverdareresloslerm6metros.temperaluraAbrir]ah°rn°grad°s d_AdemAs'la puerta se tfene que _(_
puerta cambara a temperatura del homo. TEMp
temperatura,decdirensubaCuanto_temperaluraCambiarla delhornoen 25 grados (si los a mentos noPara _V_
quedan bien cocidos) o baje
temperatura en 25 grados (s__ comida se
quema) de _ temperatura de a receta,
luego hornee. Los resuitados de esta
deberia camloar a lemperatura"prueba" _ deberian dar una idea de __ 4.
ciJ_nto
Empuje y sujele los botones
BAKE y BROIL por 3
segundos, hasta que el dial
muestre "SF"
Empuje e[ boron BAKE,
Un nQmero puesto en
f_bfica de dos digtos
aparecera en el dial,
generatmenle "(X_."
SI plensa que el homo
no est_ suficientemente
caliente,
3a. Empuje el bot6n con [a
flecha UP TEMP para
aumentar (+) a
temperatura hasta +35°F
Si plensa que el homo
esti demasiado caliente,
31).Empuje e bot0n con la
flecha DOWN TEMP para
bajar (-) la temperatura
hasta -35_F
Empuje el boron START.
Este aumento o d_smnucidn en _ posic0n
de la temperatura permanecera en
memona hasta que los pasos de arfiba
sean repetidos. Un corte de cornente no
afectar& esta posic 6n.
Las temperaturas para asar a la parr la o
para la au[olimpeza no ser_n afectadas.
÷
50

÷
GARANTIADELIlORNO
DEPAREDEMPOTRADO
UN AI;IO COMPLETO DE GARANTIA PARA TODAS LAS PARTES
Si, dentro de un argo de la fecha de instalaci6n, cualquier parte deja de
funcionar adecuadamente debido a un defecto en el material o la obra de
mano, Sears la reparar_ o reemplazar&, a nuestra opci6n, sin costo
Si este producto es eometido a un uso que no sea el familiar privado, la
garantia de arriba es efectiva pot solamente 90 alias.
EL SERVICiO DE GARANTIA ESTA DISPONIBLE PONIENDOSE EN
CONTACTO CON EL CENTRO DE SERVICIO SEARS MAS CERCANO EN
LOS ESTADOS UNIDOS.
Esta garantia le brinda derechos legales especificos, y ueted tambi6n podria
toner otros derechos que varian de estado a estado.
Sears Roebuck and Co. Dept. 817 WA Hoffman Estates, IL 60179
• J
Pare ampliar el valor de su homo,
compre un contrato de mantenimlento Sears.
Ahos de cobertura de propledad ler afio 2do a_o 3or afio
1. Roemplazo de las partes G GM CM
defectuosas
2. Revisi6n de mantenimiento CM CM CM
preventive anual a solicitud de
usted •
G -Garantie CM - ContnatodeMantenlmlento
Los aparatoe electrodom6eticos Kenmore est_.ndisefiados, fabricados y
probadoe pot argosde operaci6n confiable. Sin embargo, cualquier aparato
electrodom6stico podria requerir un servicio cada eierto tiempo. El Contrato de
Mantenimiento Sears _eofrece un excelente programa de servicio para su
producto,
La tabla do arriba muestra los beneficios adicionales que un Contrato de
Mantenimiento Sears ofrece comparado a una Garantia Sears.
P6ngase en contacto con eu Servicio de Ventae de Sears ocon un Centro de
Servicio Sears para eomprar un Contrato do Mantenimiento Sears.
÷
51

÷
Forrepeurof majorbra_dappliancesin your own home...
nomatterwhomadeit,nomatterwhosold_t!
1-800-4-MY-HOME _ Any_me,dayornight
(1_00469A663) (U.SAandCanada)
W_MN.S_ThCOITI WWW Jm_,LC, a
Forrepairofcarry-inproductslikevacuums,lawnequipmentand
eleclronics,callforthenearestSearsPartsaridRepairCenter.
1-800-488-1222 Anyum__y orrigri([_SAo_y)
Forthereplacementparts,a_ccessoriesandowne('smanuals
thatyouneedtodo4t-yourself,callSearsPartsDirect_!
1-800-366-PART 6 &m. - 11 p.m..7 days aweek
(1_0(X366-7278) {U.S./_ only)
,,w,'w..Nemcom_art_ ract
To purchaseorinqdreabout aSearsServiceAgreement
orSearsMaintenanceAgreement;
1-800-827-6655 (U.S.A-) 1-800-361-6665 (Canada)
7 &m. = 5I_m.,CST, Iv_q. - S_L 9 &m. -8 I_m.EST, M - F, 4 p.m.SaL
Parapedrserviclode re_ a AuCanada pourserviceeniranctais:
domiclb,ypea_den_plezas: 1-800.LE-FOYERuc
I"a_'SU'HOe_ (1_0_3439_
(1_88-_ w_w._
÷
HomeCaW
©Sea_ Roet_ckandC_
® Registered Trademark / TM Trademark / s._Service Mark of Sears, Roebuc_ and CO.
® Ma_ca Registrada / Tu Marca de F_brica / SMMa_ca de Serw:io de Seam, Roebuck and Co.
Mc Marque de commerce / _o Marque d_posee de Sears, Rcebuc_ and Co.
52
20P322 Spy03
52 _ 8/20/_2,3:01PM ! I
-
 1
1
-
 2
2
-
 3
3
-
 4
4
-
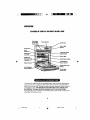 5
5
-
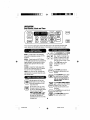 6
6
-
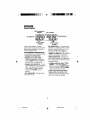 7
7
-
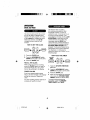 8
8
-
 9
9
-
 10
10
-
 11
11
-
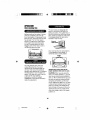 12
12
-
 13
13
-
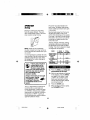 14
14
-
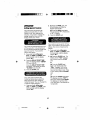 15
15
-
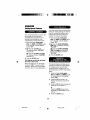 16
16
-
 17
17
-
 18
18
-
 19
19
-
 20
20
-
 21
21
-
 22
22
-
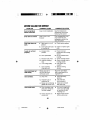 23
23
-
 24
24
-
 25
25
-
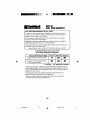 26
26
-
 27
27
-
 28
28
-
 29
29
-
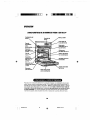 30
30
-
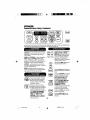 31
31
-
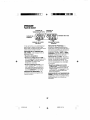 32
32
-
 33
33
-
 34
34
-
 35
35
-
 36
36
-
 37
37
-
 38
38
-
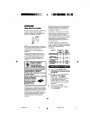 39
39
-
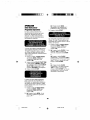 40
40
-
 41
41
-
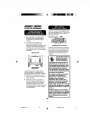 42
42
-
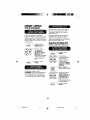 43
43
-
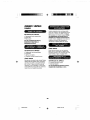 44
44
-
 45
45
-
 46
46
-
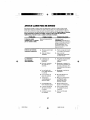 47
47
-
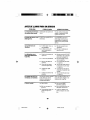 48
48
-
 49
49
-
 50
50
-
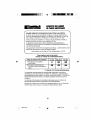 51
51
-
 52
52


Kenmore 91140494200 El manual del propietario
- Categoría
- Hornos
- Tipo
- El manual del propietario
- Este manual también es adecuado para
en otros idiomas
- English: Kenmore 91140494200 Owner's manual
Artículos relacionados
-
Kenmore 91130169894 El manual del propietario
-
-
-
-
Kenmore 911.47466 Manual de usuario
-
-
Kenmore 911.41885 Series El manual del propietario
-
-
-
