Maxell HUM2200 Manual de usuario
- Categoría
- Humidificadores
- Tipo
- Manual de usuario
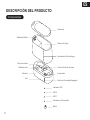
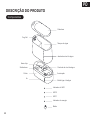
Maxell HUM2200 es un humidificador inteligente con un diseño elegante y compacto que encaja perfectamente en cualquier habitación. Este humidificador cuenta con un tanque de agua de 2,2 litros, lo que le permite funcionar hasta 20 horas continuas sin necesidad de rellenarlo. Además, su funcionamiento silencioso no interfiere con el sueño ni con las actividades diarias.
Maxell HUM2200 es un humidificador inteligente con un diseño elegante y compacto que encaja perfectamente en cualquier habitación. Este humidificador cuenta con un tanque de agua de 2,2 litros, lo que le permite funcionar hasta 20 horas continuas sin necesidad de rellenarlo. Además, su funcionamiento silencioso no interfiere con el sueño ni con las actividades diarias.


-
 1
1
-
 2
2
-
 3
3
-
 4
4
-
 5
5
-
 6
6
-
 7
7
-
 8
8
-
 9
9
-
 10
10
-
 11
11
-
 12
12
-
 13
13
-
 14
14
-
 15
15
-
 16
16
-
 17
17
-
 18
18
-
 19
19
-
 20
20
-
 21
21
-
 22
22
-
 23
23
-
 24
24
-
 25
25
-
 26
26
-
 27
27
-
 28
28
-
 29
29
-
 30
30
-
 31
31
-
 32
32
-
 33
33
-
 34
34
-
 35
35
-
 36
36
-
 37
37
-
 38
38
-
 39
39
-
 40
40
-
 41
41
-
 42
42


Maxell HUM2200 Manual de usuario
- Categoría
- Humidificadores
- Tipo
- Manual de usuario
Maxell HUM2200 es un humidificador inteligente con un diseño elegante y compacto que encaja perfectamente en cualquier habitación. Este humidificador cuenta con un tanque de agua de 2,2 litros, lo que le permite funcionar hasta 20 horas continuas sin necesidad de rellenarlo. Además, su funcionamiento silencioso no interfiere con el sueño ni con las actividades diarias.
en otros idiomas
- English: Maxell HUM2200 User manual
- português: Maxell HUM2200 Manual do usuário
Artículos relacionados
Otros documentos
-
Orbit B-hyve Guía de inicio rápido
-
 SCS Sentinel MCO0093 Automation Kit Manual de usuario
-
 Bakeey C20 Manual de usuario
-
Duux Beam Mini 2 El manual del propietario
-
 V-TAC VT-5555 Manual de usuario
-
One For All URC 7980 Manual de usuario
-
-
LG SC9S Manual de usuario


