Zycoo SH30 Network Horn Speaker Quick Guía de instalación
- Tipo
- Guía de instalación

Quick Installation Guide
SH30
Network Horn Speaker


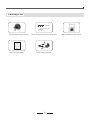
Packing List
M5*45
ø8*40
Network Horn Speaker (1PCS)
M5*45 screws with anchors (3 PCS each)
Quick Installation Guide (1PCS)
Power Adaptor (optional)Warranty Card (1PCS)
01

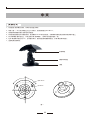
安装方式
图一
120
φ64.0mm
φ5.0mm
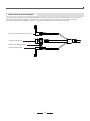
1、将设备的“安装螺栓”拆除,将喇叭与底座分离开;
、根据(图一)尺寸在安装面上钻三个安装孔 ;2 ,膨胀管规格为ø8*40mm
、3 使用塑料锤将膨胀管打进所钻的孔里面;
4、将设备底座的固定孔对准膨胀管,使用镙钉KA5*45将进行固定。必须确保设备是安全地安装到安装平面上;
5、将“安装螺栓”重新连接上,并安全地拧紧“安装螺栓”,使喇叭与底座紧固在一起;
6、松开“角度调节旋钮”约75%,但不要折卸开,旋转设备到需要的角度后,拧紧“角度调节旋钮”;
7、连接电源线及网线。
安装螺栓
角度调节旋钮
底座
中 文
02

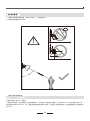
安装角度
系统登录导向
1.连接好电源(或PoE)及网线。
2.设备启动完成后,按下恢复出厂设置按键5秒后,松开按键,设备进行IP播报。出厂默认DHCP,若未获取到IP地址,则
默认登录IP地址为192.168.1.101。直接在浏览器地址栏输入IP地址,即可进入设备登录界面,设备的缺省用户名及密码均
为admin。
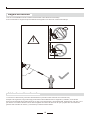
!
90°
1、调节喇叭角度时需要注意,喇叭口不可向上,不可垂直向下;
2、建议调节角度斜向下约 °。60
~60°
03

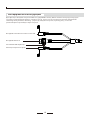
恢复出厂设置导向
长按恢复出厂设置按键10秒以上,听到语音提示后松开,设备进入恢复设置状态,系统指示灯熄灭。恢复成功后,系统运
行指示灯进入闪烁状态。
直流电源24V输入
恢复出厂设置按键
以太网接口
系统运行指示灯
04

English
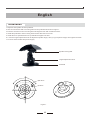
Installation
Figure 1
120
φ64.0mm
φ5.0mm
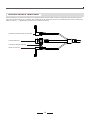
1.Separate the speaker and the pedestal.
2.Use an 8 mm drill to drill 3 mounting holes for the pedestal as shown in Figure 1.
3.Push the anchors into the mounting holes and tighten then with a rubber hammer.
4.Install the pedestal to the mounting holes and fix with KA5*45 screws.
5.Install the horn speaker back to the pedestal and tighten the bolt.
6. Loose the angle adjustment knob to adjust the speaker angle, after you get a perfect angle, then tighten the knob.
7.Connect network cable and power supply.
Speaker Fixing Bolt
Angle Adjustment Knob
Pedestal
05

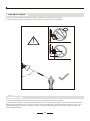
Speaker Angle
Web Login
1.Connect network cable and power supply (if PoE is not enabled on the network cable).
2.Wait for 30 seconds then press and hold the RST button for 5 seconds and release, it will announce the IP address
obtained from the DHCP server. If there’s no DHCP server or DHCP fails, it will use default IP 192.168.1.101. In the
browser address bar input the IP address you hear to open its web management interface. Default username and
password admin/admin.
!
90°
1.It’s not recommended to angle the speaker upwards or straightly downwards.
2. Approximately 60 degrees angle with vertical direction downwards is recommended.
~60°
06

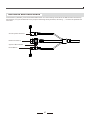
Interfaces and Instructions
To reset factory defaults, press and hold the RST button for 10 seconds (5 seconds for IP address announcements)
and release, now you should hear voice prompts “Resetting factory defaults, rebooting…”, it means the speaker will
now reset.
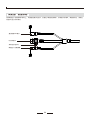
24V DC power Interface
Reset Button
Ethernet Interface
System LED Indicator
07

Installation
Figure 1
120
φ64.0mm
φ5.0mm
1. Séparez le haut-parleur et le piédestal.
2.Utilisez un foret de 8 mm pour percer 3 trous de montage pour le piédestal, comme illustré à la figure 1.
3.Enfoncez les chevilles dans les trous de montage et serrez-les ensuite avec un marteau en caoutchouc.
4.Installez le socle dans les trous de montage et fixez-le avec des vis KA5 * 45.
5.Installez le haut-parleur sirène sur le socle et serrez le boulon.
6. Desserrez le bouton de réglage de l'angle pour régler l'angle du haut-parleur, après avoir obtenu un angle parfait,
puis serrez le bouton.
7.Connectez le câble réseau et l'alimentation.
Boulon de fixation d'enceinte
Bouton de réglage d'angle
Piédestal
Français
08

Angle du haut-parleur
Connexion Web
1.Connectez le câble réseau et l'alimentation (si PoE n'est pas activé sur le câble réseau).
2.Attendez 30 secondes, puis appuyez et maintenez le bouton RST pendant 5 secondes et relâchez, il annoncera
l'adresse IP obtenue du serveur DHCP. S'il n'y a pas de serveur DHCP ou si la configuration par DHCP échoue, il
utilisera l'IP par défaut 192.168.1.101. Dans la barre d'adresse du navigateur, saisissez l'adresse IP que vous
entendez pour ouvrir son interface de gestion Web. Nom d'utilisateur et mot de passe par défaut admin / admin.
!
90°
1.Il n'est pas recommandé d'incliner l'enceinte vers le haut ou vers le bas.
2. Un angle d'environ 60 degrés avec une direction verticale vers le bas est recommandé.
~60°
09

Interfaces et instructions
Pour réinitialiser les paramètres d'usine, appuyez sur le bouton RST et maintenez-le enfoncé pendant 10 secondes (5
secondes pour les annonces d'adresse IP) et relâchez, vous devriez maintenant entendre les invites vocales
"Réinitialisation des paramètres d'usine, redémarrage ...", cela signifie que le haut-parleur va maintenant se
réinitialiser.
Interface d'alimentation 24 V CC
Bouton de réinitialisation
Interface Ethernet
Indicateur LED système
10

Lingua italiana
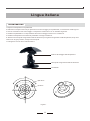
Installazione
Figura 1
120
φ64.0mm
φ5.0mm
1.Separare l'altoparlante e il piedistallo.
2.Utilizzare un trapano da 8 mm per praticare 3 fori di montaggio per il piedistallo, come illustrato nella Figura 1.
3.Inserire i tasselli nei fori di montaggio e completare l’inserimento con un martello di gomma.
4.Installare il piedistallo in corrispondenza dei fori di montaggio e fissare con viti KA5-45.
5.Installare l'altoparlante a tromba sul piedistallo e stringere il bullone.
6. Allentare la manopola di regolazione dell'inclinazione per regolare l'angolazione dell'altoparlante, dopo aver
ottenuto un angolo perfetto, stringere la manopola.
7.Collegare il cavo di rete e l'alimentazione.
Bullone di fissaggio dell'altoparlante
Manopola di regolazione dell'inclinazione
Piedistallo
11

Inclinazione altoparlante
Web Login
1.Collegare il Cavo di rete e alimentatore (se PoE non è abilitato sul cavo di rete).
2.Attendere 30 secondi poi premere e tenere premuto il pulsante RST per 5 secondi e rilasciare, verrà annunciato
l'indirizzo IP ottenuto dal server DHCP. Se il server DHCP è assente o se il server DHCP fallisce, verrà utilizzato l'IP
predefinito 192.168.1.101. Nella barra degli indirizzi del browser immettere l'indirizzo IP che si sente, per aprire la
relativa interfaccia di gestione web. Nome utente e password predefiniti admin/admin.
!
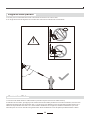
90°
1.Non è consigliabile inclinare l'altoparlante completamente verso l'alto o verso il basso.
2.Si consiglia di inclinarlo di circa 60 gradi con direzione verticale verso il basso.
~60°
12

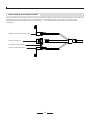
Interfacce e istruzioni
Per ripristinare le impostazioni predefinite di fabbrica, premere e tenere premuto il pulsante RST per 10 secondi (5
secondi per gli annunci di indirizzi IP) e rilasciare, ora si dovrebbe sentire le istruzioni vocali "Reimpostare le
impostazioni predefinite di fabbrica, riavvio...", significa che l'altoparlante verrà ora reimpostato.
Interfaccia di alimentazione 24V DC
Pulsante Reimposta
Interfaccia Ethernet
Indicatore LED di sistema
13

Установка
Рис. 1
120
φ64.0mm
φ5.0mm
1.Разделите громкоговоритель и подставку.
2.Используйте сверло диаметром 8 мм, чтобы просверлить 3 монтажных отверстия для подставки, как показано
на Рис. 1.
3.Вставьте анкеры в монтажные отверстия и затяните их резиновым молотком.
4.Установите подставку в монтажные отверстия и закрепите винтами КА5*45.
5.Установите рупорный громкоговоритель обратно на подставку и затяните болт.
6. Loose the angle adjustment knob to adjust the speaker angle, after you get a perfect angle, then tighten the knob.
6. Ослабьте ручку регулировки угла, чтобы отрегулировать угол наклона громкоговорителя. После того, как вы
подберете идеальный угол, затяните ручку.
7.Подключите сетевой кабель и блок питания.
Крепёжный Болт Для Громкоговорителя
Ручка Регулировка Угла Наклона
Подставка
14
Русский

Угол наклона громкоговорителя
Вход в веб-интерфейс
1.Подключите сетевой кабель и источник питания (Если не используется PoE).
2. Ожидайте 30с, затем нажмите и удерживайте кнопку RST в течение 5 секунд, после чего отпустите. Вы
услышите IP адрес устройства, полученный от DHCP сервера. Если DHCP сервер не используется, или
работает неисправно, IP адрес по умолчанию - 192.168.1.101. Для открытия веб-интерфейса введите IP адрес
устройства в адресную строку браузера. Для входа используйте логин/пароль по умолчанию - admin/admin.
1. Не рекомендуется сильно наклонять громкоговоритель вверх или вниз.
2. Рекомендуется использовать угол ~60 градусов с вертикальным направлением вниз Вход в веб-интерфейс.
15
!
90°
~60°

16
Интерфейс питания постоянного тока 24 В
Кнопка для сброса настроек
Интерфейс Ethernet
Системный LED индикатор
Для сброса до заводских настроек нажмите и удерживайте кнопку RST в течение 10 секунд (5 секунд для
голосового оповещения IP адреса), затем отпустите, после чего вы услышите голосовое уведомление
“Resetting factory defaults, rebooting…(Сброс до заводских настроек, перезагрузка)”, после чего
громкоговоритель произведет сброс настроек.
Интерфейсы и Инструкции

Español
Instalación
Figura 1
120
φ64.0mm
φ5.0mm
1.Separa el altavoz y el Soporte.
2.Utilice una broca de 8 mm para perforar 3 orificios de montaje para el soporte, como se muestra en la figura 1.
3.Empuje los anclajes en los orificios de montaje y apriételos con un martillo de goma.
4.Instale el Soporte en los orificios de montaje y fíjelo con tornillos KA5*45.
5.Instale el altavoz de la bocina de nuevo en el Soporte y apriete el tornillo.
6.Afloje el mando de ajuste del ángulo para ajustar el ángulo del altavoz, después de obtener un ángulo perfecto, y
luego apriete el mando.
7.Conecte el cable de red y la fuente de alimentación.
Perno de fijación del altavoz
Perilla de ajuste del ángulo
Soporte
17

Ángulo del altavoz
Inicio de sesión en la web
1.Conecte el cable de red y la fuente de alimentación (si PoE no está activado en el cable de red).
2.Espere 30 segundos, luego mantenga presionado el botón RST durante 5 segundos y suéltelo, anunciará la
dirección IP obtenida del servidor DHCP. Si no hay un servidor DHCP o si el DHCP falla, utilizará la IP 192.168.1.101
por defecto. En la barra de direcciones del navegador introduzca la dirección IP que oye para abrir su interfaz de
gestión web. Nombre de usuario y contraseña por defecto admin/admin.
!
90°
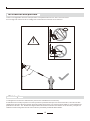
1.No es recomendable inclinar el altavoz hacia arriba o directamente hacia abajo.
2.Se recomienda un ángulo de aproximadamente 60 grados con dirección vertical hacia abajo.
~60°
18

Instrucciones e interfaces
Para restablecer los valores de fábrica, mantenga pulsado el botón RST durante 10 segundos (5 segundos para los
anuncios de direcciones IP) y suéltelo, ahora debería oír las indicaciones de voz "Restablecimiento de los valores de
fábrica, reinicio...", significa que el altavoz se restablecerá ahora.
Interfaz de alimentación de 24V DC
Botón de reinicio
Interfaz Ethernet
Indicador LED del sistema
19


Company: Zycoo Co., Ltd.
Address:16F, D5, Tianfu Software Park, Chengdu, China
Telephone:+86 (28)85337096 ext 813 / 815
Website:www.zycoo.com
制造厂商:成都智科通信技术股份有限公司
总部地址:四川省成都市高新区天府软件园 D5 栋 16 层
咨询电话:028-85337096
公司网址:www.zycoo.com.cn
-
 1
1
-
 2
2
-
 3
3
-
 4
4
-
 5
5
-
 6
6
-
 7
7
-
 8
8
-
 9
9
-
 10
10
-
 11
11
-
 12
12
-
 13
13
-
 14
14
-
 15
15
-
 16
16
-
 17
17
-
 18
18
-
 19
19
-
 20
20
-
 21
21
-
 22
22
-
 23
23
-
 24
24


Zycoo SH30 Network Horn Speaker Quick Guía de instalación
- Tipo
- Guía de instalación
en otros idiomas
Artículos relacionados
-
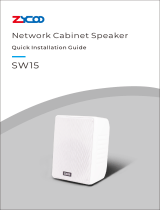 Zycoo SW15 Network Cabinet Speaker Quick Guía de instalación
-
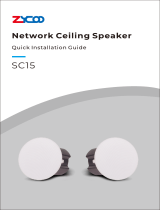 Zycoo SC15 Network Ceiling Speaker Quick Guía de instalación
-
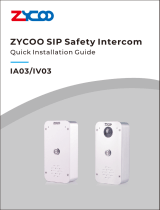 Zycoo IV03 SIP Safety Video Intercom Quick Guía de instalación
-
 Zycoo M100 Dispatch Microphone Console Quick Guía de instalación
-
 Zycoo SC10 Network Ceiling Speaker Quick Guía de instalación
-
 Zycoo SL30 Network Column Speaker Quick Guía de instalación


