Zycoo SC10 Network Ceiling Speaker Quick Guía de instalación
- Tipo
- Guía de instalación

Network Ceiling Speaker
SC10 Quick Installation Guide

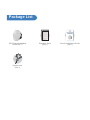
SC10 Quick Installation
Guide(Qty 1)
Warranty Card
(Qty 1)
Quick Installation Guide
(Qty 1)
Package List
Hook screw
(Qty 1)

English
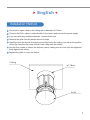
Installation Method
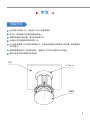
1
Use a tool to open a hole in the ceiling with a diameter of 170mm.
Connect the PoE+ cable or network cable to the device and connect the power supply.
If you are using any peripheral devices, connect them now.
Remove the grille from the device and set it aside.
Carefully insert the device through the mounting hole in the ceiling, and adjust the position
of the clip using the clip screw so that it can clamp onto the ceiling.
Use the four screws to secure the device in place, making sure the four clips are tightened
firmly against the ceiling.
Replace the grille to cover the device.
φ170mm
Ceiling
Grille
1
2
3
4
5
6
7

2
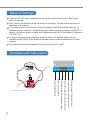
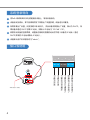
Network Settings
Connect the PoE+ cable ornetwork cable and power supply to the device. Wait for the
device to start up.
Then, remove the grille and press the button on the device. This will cause the device to
broadcast its IP address.
If you want to restore the device to its factory settings, press and hold the button for 10
seconds and then release it. The device will then restore its factory settings, and DHCP in
default. If the device does not obtain an IP address through DHCP, the default IP address is
192.168.1.101.
To access the device's login interface, enter the device's IP address (either the one
obtained through DHCP or the default IP address) directly into the address bar of a web
browser.
The default username and password for the device are both "admin".
1
2
Inteaces and Instructions
Input: 12V 2A PoE: IEEE 802.3 at(42.5-57V 30W)
IP: DHCP
Username: admin
Password: admin
Network Ceiling Speaker
Model :SC10
12V+ 12V- COM NO SW+ SW-
DC power supply 12V positive input
DC power supply 12V negative input
Dry contact signal common terminal input
Dry contact signal normally open output
Switch signal positive
switch signal negative
*Wire har ness passes u nder cove r
3
4
5

中文
3
安装方式
用工具在天花板上开一个直径为170mm的安装圆孔。
将 PoE+ 线或网线以及电源连接到设备上。
如果您有使用外接设备,请在此时连接它们。
从设备上取下前面网并将其放在一边。
小心地将设备推入已开好的安装圆孔中,并旋转夹扣螺丝以调整夹片的位置,使其能够勾
在天花板上。
使用四颗螺丝将四个夹扣固定到位,确保四个夹子牢牢地固定在天花板上。
装回之前取下的前面网以完成安装。
φ170mm
天花
前面网
1
2
3
4
5
6
7

4
1
2
系统登录导向
将PoE+线或网线以及电源连接到设备上,等待设备启动。
设备启动完成后,取下前面网并按下恢复出厂设置按键,设备进行IP播报。
如需恢复出厂设置,长按按键10秒后松开。 然后设备将恢复出厂设置,默认为 DHCP。 如
果设备未通过 DHCP 获取 IP 地址,则默认 IP 地址为 192.168.1.101。
若要访问设备的登录界面,请直接在网络浏览器的地址栏中输入设备的 IP 地址(通过
DHCP 获取的 IP 地址或默认 IP 地址)。
设备默认用户名和密码均为“admin”。
接口和说明
Input: 12V 2A PoE: IEEE 802.3 at(42.5-57V 30W)
IP: DHCP
Username: admin
Password: admin
Network Ceiling Speaker
Model :SC10
12V+ 12V- C OM NO SW+ SW-
直流电源12V正极输入
直流电源12V负极输入
干接点信号公共端输入
干接点信号常开输出
开关信号正极
开关信号负极
*线束从盖子下方穿过
3
4
5

Français
5
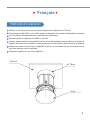
Méthode d'installation
Utilisez un outil pour ouvrir un trou dans le plafond d'un diamètre de 170 mm.
Connectez le câble PoE+ ou le câble réseau au dispositif et branchez l'alimentation électrique.
Si vous utilisez des périphériques, connectez-les maintenant.
Retirez la grille du dispositif et mettez-la de côté.
Insérez soigneusement le dispositif à travers le trou de montage dans le plafond, et ajustez la
position de la pince en utilisant la vis de la pince pour qu'elle puisse être serrée sur le plafond.
Utilisez les quatre vis pour fixer le dispositif en place, en vous assurant que les quatre pinces
sont bien serrées contre le plafond.
Replacez la grille pour couvrir le dispositif.
φ170mm
Plafond
Grille
1
2
3
4
5
6
7

6
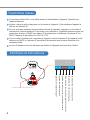
Paramètres réseau
Connectez le câble PoE+ ou le câble réseau et l'alimentation à l'appareil. Attendez que
l'appareil démarre.
Ensuite, retirez la grille et appuyez sur le bouton de l'appareil. Cela entraînera l'appareil à
diffuser son adresse IP.
Si vous souhaitez restaurer les paramètres d'usine de l'appareil, appuyez sur le bouton et
maintenez-le enfoncé pendant 10 secondes, puis relâchez-le. L'appareil restaurera alors ses
paramètres d'usine, et DHCP par défaut. Si le périphérique n'obtient pas d'adresse IP via
DHCP, l'adresse IP par défaut est 192.168.1.101.
Pour accéder à l'interface de connexion de l'appareil, entrez l'adresse IP de l'appareil (celle
obtenue via DHCP ou l'adresse IP par défaut) directement dans la barre d'adresse d'un
navigateur Web.
Le nom d'utilisateur et le mot de passe par défaut de l'appareil sont tous deux "admin".
1
2
Inteaces et instructions
Input: 12V 2A PoE: IEEE 802.3 at(42.5-57V 30W)
IP: DHCP
Username: admin
Password: admin
Network Ceiling Speaker
Model :SC10
12V+ 12V- COM NO S W+ SW-
Alimentation DC 12V entrée positive
Alimentation DC 12V entrée négative
Entrée de borne commune de signal de contact sec
Signal de contact sec sortie normalement ouverte
Signal de commutation positif
signal de commutation négatif
* Le faisce au de câb les pas se sous l e couverc le
3
4
5

7
Lingua italiana
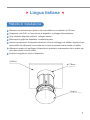
Metodo di installazione
Utilizzare uno strumento per aprire un foro nel soffitto con un diametro di 170 mm.
Collegare il cavo PoE+ o il cavo di rete al dispositivo e collegare l'alimentazione.
Se si utilizzano dispositivi periferici, collegarli adesso.
Rimuovere la griglia del dispositivo e metterla da parte.
Inserire con attenzione il dispositivo attraverso il foro di montaggio nel soffitto e regolare la po-
sizione della clip utilizzando la vite della clip in modo che possa essere serrata sul soffitto.
Utilizzare le quattro viti per fissare il dispositivo in posizione, assicurandosi che le quattro clip
siano ben serrate contro il soffitto.
Sostituire la griglia per coprire il dispositivo.
φ170mm
Soffitto
Griglia
1
2
3
4
6
5
7

8
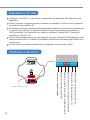
Impostazioni di rete
Collegare il cavo PoE+ o il cavo di rete e l'alimentatore al dispositivo. Attendere l'avvio del
dispositivo.
Quindi, rimuovere la griglia e premere il pulsante sul dispositivo. Ciò farà sì che il dispositivo
trasmetta il proprio indirizzo IP.
Se desideri ripristinare il dispositivo alle impostazioni di fabbrica, tieni premuto il pulsante per
10 secondi e poi rilascialo. Il dispositivo ripristinerà quindi le impostazioni di fabbrica e il
DHCP predefinito. Se il dispositivo non ottiene un indirizzo IP tramite DHCP, l'indirizzo IP
predefinito è 192.168.1.101.
Per accedere all'interfaccia di login del dispositivo, inserire l'indirizzo IP del dispositivo (quello
ottenuto tramite DHCP o l'indirizzo IP predefinito) direttamente nella barra degli indirizzi di un
browser web.
Il nome utente e la password predefiniti per il dispositivo sono entrambi "admin".
1
2
Inteacce e istruzioni
Input: 12V 2A PoE: IEEE 802.3 at(42.5-57V 30W)
IP: DHCP
Username: admin
Password: admin
Network Ceiling Speaker
Model :SC10
12V+ 12V- C OM NO SW+ SW-
Alimentazione DC Ingresso positivo 12V
Alimentazione DC Ingresso negativo 12V
Ingresso terminale comune segnale contatto pulito
Segnale di contatto pulito uscita normalmente aperta
Segnale di commutazione positivo
commutare il segnale negativo
*Il cablaggio p assa sotto cope rtura
3
4
5

Русский
9
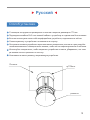
Способ установки
С помощью инструмента просверлите в потолке отверстие диаметром 170 мм.
Подсоедините кабель PoE+ или сетевой кабель к устройству и подключите блок питания.
Если вы используете какие-либо периферийные устройства, подключите их сейчас.
Снимите решетку с устройства и отложите ее в сторону.
Осторожно вставьте устройство через монтажное отверстие в потолке и отрегулируйте
положение зажима с помощью винта зажима, чтобы он мог зафиксироваться на потолке.
Используйте четыре винта, чтобы закрепить устройство на месте, убедившись, что четы
ре зажима плотно прилегают к потолку.
Установите на место решетку, закрывающую устройство.
φ170mm
Потолок
решетка
1
2
3
4
5
6
7

10
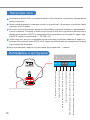
Настройки сети
Подключите кабель PoE+ или сетевой кабель и блок питания к устройству. Дождитесь за
пуска устройства.
Затем снимите решетку и нажмите кнопку на устройстве. Это заставит устройство транс
лировать свой IP-адрес.
Если вы хотите восстановить заводские настройки устройства, нажмите и удерживайте
кнопку в течение 10 секунд, а затем отпустите ее. После этого устройство восстановит з
аводские настройки и DHCP по умолчанию. Если устройство не получает IP-адрес чере
з DHCP, IP-адрес по умолчанию — 192.168.1.101.
Чтобы получить доступ к интерфейсу входа в систему устройства, введите IP-адрес уст
ройства (полученный через DHCP или IP-адрес по умолчанию) непосредственно в адре
сную строку веб-браузера.
Имя пользователя и пароль по умолчанию для устройства — «admin».
1
2
Интерфейсы и инструкции
Input: 12V 2A PoE: IEEE 802.3 at(42.5-57V 30W)
IP: DHCP
Username: admin
Password: admin
Network Ceiling Speaker
Model :SC10
12V+ 12V- C OM NO SW+ SW-
Источник питания постоянного тока 12 В положительный вход
Источник питания постоянного тока 12 В отрицательный вход
Вход общей клеммы сигнала сухого контакта
Сигнал сухого контакта, нормально открытый выход
Положительный сигнал переключения
сигнал переключения отрицательный
* Жгут проводов проходит под крышкой
3
4
5

Español
11
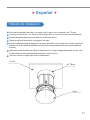
Metodo de instalacion
Use una herramienta para abrir un agujero en el techo con un diámetro de 170 mm.
Conecte el cable PoE+ o el cable de red al dispositivo y conecte la fuente de alimentación.
Si está utilizando dispositivos periféricos, conéctelos ahora.
Retire la rejilla del dispositivo y póngala a un lado.
Inserte cuidadosamente el dispositivo a través del orificio de montaje en el techo y ajuste la
posición de la abrazadera utilizando el tornillo de la abrazadera para que pueda sujetarse
al techo.
Utilice los cuatro tornillos para fijar el dispositivo en su lugar, asegurándose de que las cua-
tro abrazaderas estén apretadas firmemente contra el techo.
Vuelva a colocar la rejilla para cubrir el dispositivo.
φ170mm
Techo
Reja
1
2
3
4
5
6
7

12
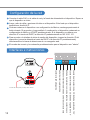
Conguración de la red
Conecte el cable PoE+ o el cable de red y la fuente de alimentación al dispositivo. Espere a
que el dispositivo se inicie.
Luego, retire la rejilla y presione el botón en el dispositivo. Esto hará que el dispositivo
transmita su dirección IP.
Si desea restaurar el dispositivo a su configuración de fábrica, mantenga presionado el
botón durante 10 segundos y luego suéltelo. A continuación, el dispositivo restaurará su
configuración de fábrica y el DHCP predeterminado. Si el dispositivo no obtiene una
dirección IP a través de DHCP, la dirección IP predeterminada es 192.168.1.101.
Para acceder a la interfaz de inicio de sesión del dispositivo, ingrese la dirección IP del
dispositivo (ya sea la obtenida a través de DHCP o la dirección IP predeterminada)
directamente en la barra de direcciones de un navegador web.
El nombre de usuario y la contraseña predeterminados para el dispositivo son "admin".
1
2
Inteaces e instrucciones
Input: 12V 2A PoE: IEEE 802.3 at(42.5-57V 30W)
IP: DHCP
Username: admin
Password: admin
Network Ceiling Speaker
Model :SC10
12V+ 12V- C OM NO SW+ SW-
Fuente de alimentación de CC Entrada positiva de 12 V
Fuente de alimentación de CC Entrada negativa de 12 V
Entrada de terminal común de señal de contacto seco
Salida normalmente abierta de señal de contacto seco
Señal de interruptor positiva
cambiar la señal negativa
*El mazo de cable s pasa por debajo d e la cubierta
3
4
5


电话:+86(0)28 85337096
网址:www.zycoo.com.cn
地址:成都市高新区天府软件园D5栋16楼
成都智科通信技术股份有限公司
Address:No. 1602, 16th Floor, Building No. 599, Century City South Road,
High-tech Zone, Chengdu, Sichuan Province, China
Telephone:+86 (28)85337096 ext 813 / 815
Website:www.zycoo.com
Zycoo Co., Ltd.
-
 1
1
-
 2
2
-
 3
3
-
 4
4
-
 5
5
-
 6
6
-
 7
7
-
 8
8
-
 9
9
-
 10
10
-
 11
11
-
 12
12
-
 13
13
-
 14
14
-
 15
15
-
 16
16


Zycoo SC10 Network Ceiling Speaker Quick Guía de instalación
- Tipo
- Guía de instalación
en otros idiomas
Artículos relacionados
-
 Zycoo SC15 Network Ceiling Speaker Quick Guía de instalación
-
 Zycoo IV03 SIP Safety Video Intercom Quick Guía de instalación
-
 Zycoo SH30 Network Horn Speaker Quick Guía de instalación
-
 Zycoo SW15 Network Cabinet Speaker Quick Guía de instalación
-
 Zycoo SL30 Network Column Speaker Quick Guía de instalación
-
 Zycoo M100 Dispatch Microphone Console Quick Guía de instalación


