Boss Audio Systems BV7348B-V2 El manual del propietario
- Categoría
- Receptores de medios de coche
- Tipo
- El manual del propietario


To ensure safety while driving
and to comply with laws,
drivers should not watch video or
operate the video device while driving.

Content
-1-
Safety Information.........................
Disc Note.......................................
Installation ....................................
Detaching control panel....................
Attaching control panel.....................
Electric Connection ......................
Remote Control .............................
Basic Operation.............................
Control Panel ................................
Setup Operation............................
Setting animation...........................
Setting disc....................................
Setting radio...................................
Setting BT......................................
Setting wallpaper............ ................
Version about..................................
Setting time.......... .........................
Setting audio mode.........................
Setting video mode.........................
Setting OSD language....................
Setting illumination color.................
Reset Factory Settings ...................
Rear View Camera ........................
Radio Operation............................
Listening to radio.............................
Storing stations in memory ..............
Automatic Memory Storing &
Program Scanning......................
RDS function..................................
19
19
19
20
20
20
20
20
21
23
24
25
26
27
28
29
2
3
4
5
6
7
8
11
11
13
13
13
14
14
14
14
14
14
15
15
15
15
15
16
16
16
17
17
Media Operation............................
Selecting Play Mode........................
On-Screen Display Function............
Digital Video Special Function......
Multi-subtitle language function.......
Multi-audio language function..........
Multi-angle function.........................
Title menu function ..........................
BT Operation..................................
AUX Operation...............................
USB Operation...............................
Card Operation..............................
MP3/WMA/JPEG/MPEG4 Play .........
SWC Operation..............................
Specification..................................
Troubleshooting.............................

SAFETY INFORMATION
-2-
CAUTION:
THIS DIGITAL VIDEO PLAYER IS A CLASS I LASER PRODUCT. HOWEVER
THIS DIGITAL VIDEO PLAYER USES A VISIBLE/INVISIBLE LASER BEAM
WHICH COULD CAUSE .
HAZARDOUS RADIATION EXPOSURE IF DIRECTED. BE SURE TO OPERATE
THE DIGITAL VIDEO PLAYER CORRECTLY AS INSTRUCTED.
USE OF CONTROLS OR ADJUSTMENTS OR PERFORMANCE OF
PROCEDURES OTHER THAN THOSE SPECIFIED HEREIN MAY RESULT IN
HAZARDOUS RADIATION EXPOSURE.DO NOT OPEN COVERS AND DO NOT
REPAIR YOURSELF. REFER SERVICING TO QUALIFIED PERSONNEL.
WARNING:
TO REDUCE THE RISK OF FIRE OR ELECTRIC SHOCK, DO NOT EXPOSE THIS
EQUIPMENT TO RAIN OR MOISTURE.
TO REDUCE THE RISK OF FIRE OR ELECTRIC SHOCK, AND ANNOYING
INTERFERENCE, USE ONLY THE RECOMMENDED ACCESSORIES.
THIS DEVICE IS INTENDED FOR CONTINUOUS OPERATION.
This product incorporates copyright protection technology that is protected
by method claims of certain U.S. Patents and other intellectual property rights
owned by Macrovision Corporation and other rights owners.Use of this
copyright protection technology must be authorized by Macro vision Corporation,
and is intended for home and other limited viewing uses only unless
otherwise authorized by Macrovision Corporation. Reverse engineering or
disassembly is prohibited.
REGION MANAGEMENT INFORMATION:
This Digital Video Player is designed and manufactured to respond to the Region
Management Information that is recorded on a Digital Video disc. If the Region
number described on the Digital Video disc does not correspond to the Region
number of this Digital Video Player, this Digital Video Player cannot play this disc.

DISC NOTE
Preparing New Discs with Rough
Spots
A new disc may have rough edges on
its inside and outside edges.If a disc
with rough edges is used, the proper
setting will not be performed and the
player will not play the disc.Therefore,
remove the rough edges in advance
by using a ball point pen or pencil as
shown on the right.To remove the
rough edges, press the side of the pen
or pencil against the inside and outside
edges of the disc.
Rough spots
on
outside edge
Ball point pen
or pencil
Rough spots
on inside
edge
Label side
up
Do not touch
the
underside
of the disc
Do not
bend
Wipe the disc from
center
toward the outside
edge
Disc Cleaning
Use a dry soft cloth to wipe the surface.
If the disc is quite dirty, use a soft cloth
slightly moistured with isopropyl
(rubbing) alcohol. Never use solvents
such as benzine, thinner or conventional
record cleaners as they may mar the
surface of the disc.
Handling and Cleaning
Dirt, dust, scratches and warping disc
will cause misoperation.
Do not place stickers or make
scratches on discs.
Do not warp discs.
A disc should always be kept in its
case when not in use to prevent from
damaging.
Do not place discs in the following
places:
1.Direct sunlight
2.Dirty, dusty and damp areas
3.Near car heaters
4.On the seats or dashboard
Discs which cannot be played
with this player
Digital Video-RAM
CDV
CD-G
Note:
A disc may become somewhat scratched
(although not enough to make it unus-
able) depending on your handling it and
conditions in the usage environment.
Note these scratches are not an indica-
tion of any problem with the player.
-3-
Disc formats supported by this
player
Digital
Video
VCD
CD
MP3
Audio and Video
Disc size 12 cm
Audio and Video
Disc size 12 cm
Audio
Disc size 12 cm
Audio
Disc size 12 cm

NOTES:
Choose the mounting location where the
unit will not interfere with the normal
driving function of the driver.
Before finally installing the unit, connect
the wiring temporarily and make sure it
is all connected up properly and the unit
and the system work properly.
Use only the parts included with the unit
to ensure proper installation. The use of
unauthorized parts can cause
malfunctions.
Consult with your nearest dealer if insta-
llation requires the drilling of holes or
other modifications of the vehicle.
Install the unit where it does not get in
the driver s way and cannot injure the
passenger if there is a sudden stop,
like an emergency stop.
'
30
INSTALLATION
-4-
If installation angle exceeds 30 from
horizontal, the unit might not give its
optimum performance.
Avoid installing the unit where it would
be subject to high temperature, such
as from direct sunlight, or from hot air,
from the heater, or where it would be
subject to dust, dirt or excessive
vibration.
DIN FRONT/REAR-MOUNT
This unit can be properly installed either
from "Front"(conventional DIN Front-
mount) or "Rear"(DIN Rear-mount
installation, utilizing threaded screw
holes at the sides of the unit chassis).
For details, refer to the following
illustrated installation methods.
DASH BOARD
METAL MOUNTING
STRAP
HEX NUT
SPRING WASHER
PLAIN WASHER
TAPPING SCREW
CONSOLE
SLIDE BRACKET
HOUSING
HEX BOLT

INSTALLATION
-5-
DETACHING CONTROL PANEL
1. Press the OPEN button to flip down the
front panel .
2. First slide the front panel a little to
the right, and pull it off towards you .
OPEN button
3. put it in the protective case for safe
keeping.
PROTECTIVE CASE
FRONT PANEL
KEY PLATE
PLASTIC FRAME
KEY PLATE
If you want to take CHASSIS out of the SLIDE BRACKET HOUSING , first remove
the PLASTIC FRAME of the both sides away, then insert the two KEY PLATES into
left and right sides of chassis as above illustration.

INSTALLATION
-6-
How to clean the connectors
Frequent detachment will deteriorate
the connectors.
To minimize this possibility, periodically
wipe the connectors with a clean, soft,
dry cloth only, being careful not to
damage the connectors.
Connector
ATTACHING CONTROL PANEL
1. First, insert the right side of the front
panel into the main unit.
Bulge
Hollow
Bulge
Hollow
3. Push it back to the position for playing
2. Push the right side of the front panel
until it locks firmly into the main unit, at
one time, insert the left side of the
front panel into the main unit .

-7-
ELECTRIC CONNECTION
WIRE CONNECTION
Note:
To enable the viewing of videos or photos, the Parking Brake wire must be
connected to the switched side of the parking brake when fully engaged.
Disabling the parking brake feature is strictly prohibited by law and voids
all warranties. Please review your local and state laws before attempting
to view videos or photos on the display.
RADIO ANTENNA
VIOLET/WHITE
(B+)12V
REAR CAMERA SWITCH
PARKING BRAKE(B-)
GREY
GREY/BLACK
FRONT
RCH SPK.
VIOLET
VIOLET/BLACK
WHITE
WHITE/BLACK
GREEN
GREEN/BLACK
REAR
LCH SPK.
IGNITION SWITCH(B+)
RED
REAR
RCH SPK.
FRONT
LCH SPK.
LIGHT GREEN
FUSE
FUSE
KEY GROUND(BLACK)
KEY 1(BROWN)
KEY 2(WHITE)
SUBWOOFER GREY
REAR CAMERA INPUT YELLOW
FRONT RCA AUDIO OUT
FRONT RCA AUDIO OUT
VIDEO OUTPUT
VIDEO OUTPUT
AUTO ANTENNA(+)
BLUE/WHITE
GROUND(B-)
CONSTANT(B+)
YELLOW
BLACK
Whi te Yell ow
Yell ow
Red

REMOTE CONTROL
-8-
1. CLK Press it briefly to show the clock
time .
2. PAIR/ Press it to use the BT
function,refer to the BT operation
3. STOP Press once to pause playback,
press PLAY/PAUSE to resume playback .
4. SETUP Press it to open the SETUP
menu.
5.MO/ST(AUDIO) In radio mode, press it
to select STEREO or MONO mode (when
a station is weak, sometimes switching
to Mono will improve sound quality ) .
In Disc playback mode, pressing it button
opens the AUDIO setup menu for making
changes to the way te soundtrack is
reproduced .
in video play mode
6. LO/DX(SUBTITLE) Changing of the
SUBTITLE language on multi-subtitle
language Digital Video disc. In radio mode,
Press this button for distance reception
when you are located at weak signal
location, depress it for stronger signal.
7. REDIAL/ Press this button to use
the BT function, refer to BT operation.
8.GOTO/ Press this button to begin
playback at a moment in the program you
designate. Use the number buttons to
enter the data that is needed, then press
ENTER to confirm the input.
In BT phone menu, it serves as the
button on your mobile handset.
15
17
19
13
14
7
2
6
22
11
18
3
16
5
1
24
9
21
20
12
10
4
8
26
23
25

REMOTE CONTROL
-9-
9. / Press to skip to the next
track & press to skip back one track.
Press and hold to switch
between BASS,TREBLE,BALANCE,
FADE,SWF VOL and SWF FRE.
After switching on the desired mode
above, rotate VOL knob to set it.
11. VOL+/VOL- Press it to adjust
volume level .
12. / / / Use these buttons to
navigate the various menus present in
the product.
13. MENU/SUB WOOFER Press to
display the root menu of the Digital Video
disc. switch
SWF FREQ between 80HZ, 120HZ and 160HZ
14. BAND(OSD) In Radio mode, press
this button repeatedly to switch between
the five radio bands .
In Disc Playback modes, Press this
button to see information about the disc
currently in play.
15. /MOD Press this button to turn the
unit ON , press and hold to turn the unit
OFF. Press it briefly to select
16. PLAY/PAUSE ( ) In DISC mode,
starting playback, stopping picture/track.
17. MUTE Press this button to turn off the
audio. Press again to restore the sound
to its prior volume level.
18. TITLE/PBC (A/PS) Display the
TITLE menu which is recorded on the
. changing between PBC
ON and PBC OFF on the VCD disc.
In radio mode, press shortly to scan the
preset station, press longer to enter into
automatic memory storing function .
10.
Press and hold this button to
.
a desired
work source.
Digital Video
SEL
19. ZOOM Press this button to active
the ZOOM function . Each press of the
zoom button changes the screen in the
sequence : 2x 3x 4x ½ 1/3 1/4 .
Use the / / / buttons to move
through the zoomed picture .
Note : during the JPEG playback, press
the ZOOM button, the “ZOOM 100%” will
appear on screen, then press the /
button to increase/decrease in size,
use the / / / buttons to move
through the zoomed picture .
20. ANGLE Changing of the view angle
on multi-angle Digital Video disc.
21. EQ/LOUD Press it briefly to turn to
equalization function. Press it longer to
switch the LOUDNESS function between
LOW, MIDDLE, HIGH and OFF.
22. /
In DISC mode, Press to start forward
rapidly. Press to reverse rapidly.
23. ENTER Confirm the Track/Chapter
selected with the number key or selected
with the cursor buttons on TV screen.
24. 0 - 9(0/TA & 9/AF)
Use to input numerical values during
programming, with the GOTO button,
or to directly select a track to play .
In Radio mode, (when the RDS
engaged,), 0 serves as TA function,
9 serves as the AF function .
25. +10/ Add ten tracks select button
in media play mode.
In BT menu, it serves as the button
on your mobile handset.
26. RADIO PRESET Six preset memory
buttons.

REMOTE CONTROL
-10-
Using the Remote Control
Face the remote control towards the player front face IR mark (remote control signal
receiver).
Operation angle: About 30 degree in each the direction of the front of the IR mark.
Preparing the Remote Control
1.First push to inside as the direction indicated by the arrow (See )And then
Remove the battery holder as the direction indicated by the arrow (See ).
2.Replace the battery Set a new battery property with (+)side up as illustrated
(See ).
3.Insert the battery holder. Push in the holder to the original position(See ).
1
2
3
4
Inserting the Battery
Note :
The lithium cell in the battery compartment of remote control has been secured for
transport with a plastic . Before initial use please remove this plastic so that the
remote control is ready for operation .

BASIC OPERATION
-11-
1. REL Button
Press it to flip down the front panel ,
then you can insert a disc into the disc
compartment. You can also press the
Eject button to eject the disc.
2119 20
2. (POWER On/Off)/SRC Button
Press it to switch the device ON, press
and hold (approximately 2 seconds) to
switch the device OFF . During the
playback mode, you can press it to select
an input mode by pressing repeatedly
until proper one is found:
>RADIO >DISC >USB > CARD >AUX IN
>BT
Control Panel
Control Panel
Base of Control Panel
3. VOL Multifunction Button
In normal mode, this button is used to
increase or decrease the volume.
4. utton
In home interface, rotate the VOL knob
or press the </> button on remote to
do selection, then press SEL to enter.
SEL B
Press and hold to switch
between BASS,TREBLE,BALANCE,
FADE,SWF VOL and SWF FRE.
After switching on the desired mode
above, rotate VOL knob to set it.
1
17
18
15
13
16
3
6
9
11
10
8 12
4 14
7
5
2
MENU
+10
-10

BASIC OPERATION
-12-
5. BAND/MENU Button
In Radio mode, press the button repeat
edly (or the BAND button on the remote
control) to cycle through and select the
desired radio band, the designation of
the corresponding level- FM1, FM2,
FM3, AM1(MW1), AM2(MW2)- is shown
in the TFT.
Press to display the root menu for the
playing media.
6.MUTE/PTY Button
Press this button to turn off the audio.
Press again to restore the volume to the
prior level. You can also disable the
MUTE function by turning the VOL +/-
knob.
In Radio Mode, press this button and
hold for a bout 2 seconds to select the
PTY of the grogram type (examples of
such types of program are :
NEWS, POP.....)
7/8.>>|/ and |<</ Buttons
In radio mode, Long pressing |<< or >>|
button can automatically search down
or up for an available station beginning
from the current frequency; Briefly
pressing |<< or >>| button can manually
search down or up for a your desired
station beginning from the current
frequency.
In media mode, pressing |<< or >>|
button can play previous or next track;
continuously and long pressing |<< or
>>| button can fast backwards or
forwards at the following multiple of
normal speed: x2, x4, x8, x20.
In SETUP or SWC mode, press and hold
the SEL button to back to previous mode;
The other mode, press the SEL button
to back to home interface
* In BT MUSIC mode, the function of the
fast forwards or backwards is disabled.
In BT PHONE mode, for the function of
the and buttons, please refer to
the part of the BT Operation.
9-14. PRESET STATION MEMORY
A)In RADIO mode
Go to any preset station by pressing one
of the 6preset station(1-6) ,if one of these
buttons is pressed for more than 2
seconds, the stations currently being
listened to will be memorized into the
selected preset button.
B) In DISC/USB/SD mode
During playing, press 1/>II button to
pause the current playback, press again
to continue play;
Press 2/RPT button to select repeat
function;
Press 3/RDM button to select random
function;
Press 4/STOP button to turn to previous
mode, press again to turn to home mode;
Press 5/+10 to turn to next ten tracks;
Press 6/-10 to turn to previous ten tracks.
15. AUX INPUT JACK
For information about using an AUX IN
audio source, refer to AUX operation.
16. TFT Display
17. USB PORT
For information about connecting a
USB device.
18. MIC (Microphone position )
19. CARD SLOT
For information about connecting a
memory card device.
20. (EJECT) Button
In DISC playing ,Press the Open button
to flip down the front panel, then you
can press the this button to eject the disc .
21. RESET Button
Press this button to return to factory
settings.

BASIC OPERATION
-13-
SETUP OPERATION
ADJUSTABLE ITEMS:
In home mode, rotate the VOL knob to
select “ ” and press SEL button or
press ENTER on remote to turn to
setting menu.
During setting ,use the VOL knob as turn
up and down and use the >>I and I<< as
turn left and right. You can also use the
directions button to do selection then
press SEL to confirm the input.
Setup interface 1
Setup interface 2
ANIMATION
In RADIO mode, you can change the
playing time of animation among of
“OFF, 10S, 30S, 1M,90S, 2M, 3M and
4M ”.
Note:
Please set the playing time of the
animation to “ 10S ” for the first, when
you turn the unit on .
General setup interface1
GENERAL
ANIMATION 2 MINUTE
KEY BEEP ON
DISC ...DISC ...
RADIO ...
Disc setup as follow:
FORMAT
TV TYPE
This is to select the appropriate TV
aspect (4:3 or 16:9) according to the
connected TV set.
Normal/PS (For 4:3 TV)
Played back in the PAN & SCAN style.
(If connected to wide-screen TV, the
left and right edges are cut off.)
Normal/LB (For 4:3 TV)
Played back in LETTER BOX style.
(If connected to wide-screen TV, black
bands appear at top and bottom of the
screen.)
Wide (For 16:9 TV)
Select when a wide-screen TV set is
connected.
This player is capable of playing discs
recorded in either PAL or NTSC formats.
Make the selection based on whether
you are connecting the unit to a PAL TV
or an NTSC TV. You can also set the unit
to AUTO (auto select). The disadvantage
to autoselect is that each time you turn
the unit on it checks to see what kind of
monitor is connected, which causes a
small delay and some flickering of the
display image which you may find
unpleasant.
16:9
4:3 Letter Box
4:3 Pan Scan
DISC
FORMAT NT SC
TV TYPE 4:3PS
RATING ADULT
KEY BEEP : ON or OFF.
10:00 AM10:00 AM

BASIC OPERATION
-14-
RATING
Select to turn Parental Control on or off.
changes to the Parental Control
menu below .)
Key in “0000” and then turn to rating
then you can setting as follow:
KID SAFE -> G -> PG -> PG-13
-> PG R -> R ->NC-17 -> ADULT
RADIO
ST/MONO: To select stereo or mono.
LOCAL: To select local or distant.
REGION: To select radio frequency.
BLUETOOTH
To select BT function on or off.
WALLPAPER
To select wallpaper .
ABOUT
To show the version information.
CLOCK SETUP
To adjust the time and time format.
The factory default password is 0000.
(The password must be used to make
General setup interface2
GENERAL
WALLPAPER ...
BLUETOOTH ON
ABOUT ...
clock setup interface
AUDIO SETUP
To turn to audio quality adjustment.
TREBLE: -7 to +7
To adjust treble level .
BASS: -7 to +7
To adjust bass level .
SUBWOOFER: To adjust subwoofer
volume and frequency.
EQ: To select audio mode as follow:
USER -> JAZZ -> CLASSIC -> POP -> ROCK
LOUDNESS: To to select loudness
effect as :OFF -> LOW -> MID -> HIGH
FADER/BALANCE:
BALANCE: R 0-10 to L 0-10
Adjust sound balance between left
and right speakers .
FADE: F 0-10 to R 0-10
Adjust sound balance between front
and rear speakers .
audio setup interface2
audio setup interface1

BASIC OPERATION
-15-
The RESET button is to be activated for
the following reasons:
A. Initial installation of the unit when
all wiring is completed.
B. All the function buttons do not operate.
C. Error symbol on the display.
Rear View Camera
When connecting the rear view camera
the mirror image of the rear view is auto-
matically displayed on the monitor
when you change the gear to the back
position.
Reset Factory Settings
RESET button is placed on the housing
and must be activated with either a
ballpoint pen or thin metal object.
RESET
VIDEO SETUP
COLOR: 0 to 40
Adjust the color for the picture-lighter
or darker.
BRIGHTNESS: 0 to 40
Adjust if the picture is too bright or
too dark.
CONTRAST: 0 to 40
Adjust the contrast of the bright and
dark portion.
TINT: 0 to 40
Adjust the tint if the human skin color
is unnatural.
-Adjustable when “NTSC “ is selected
for “NTSC/PAL “ .
LANGUAGE
To select OSD language.
ILLUMINATION COLOR
Rotate the VOL knob to select the
backlight for all buttons.
When the word AUTO and the word
ILLUMINATION COLOR show that the
backlight change automatically.
Video setup interface
20
20
20
20

BASIC OPERATION
-16-
RADIO OPERATION
Listening to Radio
Press the SRC repeatedly to select the
RADIO mode, the message will like
following below :
Selecting The Frequency Band
Repeatedly press the BAND button on
the front panel to select the band, the
message will show in turn :
FM1 FM2 FM3
AM2(MW2)
AM1(MW1)
Start Searching For a Station
During Radio mode, briefly press the
button on the front panel to increase
frequency by one step of channel
spacing . (Or you can press button
on the remote control)
Manual Search
During Radio mode, briefly press the
button on the front panel to decrease
frequency by one step of channel
spacing . (Or you can press button
on the remote control)
Automatic Search
During Radio mode, press and hold
(for more than 2’s ) the “ / ” button
to start search for a radio station
automatically .
When an FM stereo broadcast is
hard to receive
Press ST/MO button on the remote
control to select the MONO or STEREO
mode . (When Stereo mode is activated,
the ST symbol will appear . )
You can use the “ / ” buttons on the
remote control to start search for a radio
station automatically .
To tune in strong-signal FM
Station only (LO/DX function)
Press the LOC/DX button on the remote
control to choose between the LOC and
DX mode of Local and Long-distance
traffic news . The word “LOC” or “DX”
will display in the screen .
Storing Stations In Memory
Setting Memory
With this system, a total of 30 stations
can be stored in the memory of six
buttons. Each band stores up to six
preset stations. The stations might be
FM1, FM2, FM3, AM1(MW1), and
AM2(MW2) band.
The operation is as below :
- Store in Memory
>Select the frequency band
>Select the station
>Keep the desired memory key pressed
in until the station is heard again after
a brief interruption .

BASIC OPERATION
-17-
In Radio Mode, press and keep (for more
than 2 ’ S) the remote of “ APS ” button
to active automatic station storage.
The radio searches within the current
frequency band, e.g. FM1, for the stron-
ger signal level until the search cycle
has finished . The six strongest stations
are then allocated to the corresponding
storage locations .
Then the station of the first storage
location is set .
Automatic Memory Storing &
Program Scanning
Automatic Preset Setup
Scan Function
In Radio mode, briefly press the “APS”
button on the remote control , the radio
briefly plays all the preset stations of the
frequency band .
REG FUNCTION
at certain times some stations divide up
their programs into regional programs
with varying content .
REG ON : the message “REG ON” will
appears in the display for a few seconds .
Note :
- the display capacity is limited . It is
possible that in the double display
mode some segments of the display
are deleted .
RDS FUNCTION
ADJUSTABLE ITEMS:
REGION SET
To switch the REGION function
ON and OFF.
- Retrieve a preset station
press the 1-6 buttons briefly on the
remote control to retrieve a station
which had been stored in the memory
in advance the chose number is shown
on display .
- the function REG ON prevents the
radio from switching to alternative
frequency which have a different regional
program content .
REG OFF : the program identification(PI)
of the regional program is ignored during
the search for an alternative frequency
(AF) or a program identification (PI) .
Select RDS REGIONAL to turn RDS
function on or off.
PI MUTE / PI SOUND
(only for radio operation)
f you are in an area where two program
identifications (PI) overlap, you can
select the option PI SOUND and
PI MUTE for playback of the sound.
Alternate switching of the program
identification should be avoided .
PI SOUND :
f switching nevertheless occurs the
sound of another station is heard for
less than one second .
PI MUTE :
the sound of another station is
suppressed .
In Radio mode, long press the 0/TA
button to switch the TA function ON
and OFF .
PI SET
To change between PI MUTE and
PI SOUND .
I
I
TA Traffic Announcement
(Priority For Traffic Information)
When the TA function is activated, the
TA symbol appears in the display .
During radio operation in one FM
frequency band the search for a traffic
announcement station is started
automatically (TA SEEK) .

If an FM station is being received which
transmits the latest traffic announce-
ments from time to time, the TP display
lights up.
When the TA function is switched on ,
the FM traffic automatically interrupt
CD operation (the word TRAFFIC
appears in the display).
The volume level is increased to the
minimum value for the transmission of
traffic announcements.
After the traffic announcements has
finished, the program that was
previously running is resumed.
AF FUNCTION
(Alternative Frequencies)
AF is a function that works with the help
of RDS (Radio Data System) and can
only be used with FM stations. The radio
searches in the background for the best
frequency reception of the station that
has been tuned into .
When the AF function has been switched
on, the radio continuously tests the
signal strength of the AF frequency .
The test interval for each AF frequency
depends on the signal strength of the
current station and varies from a few
minutes in the case of weak signals.
Whenever the new AF frequency is
stronger than the station that is currently
tuned in , the radio switched to this
frequency for a short time for a short
time and the message
In Radio mode, long press the 9/AF
button to switch AF function ON and OFF .
“NEW FREQUENCY “ is displayed for
one or two seconds.
PTY FUNCTION
In Radio mode, press and hold “PTY”
to select the Program type .
PTY Selection of the program type
besides the stations name, some FM
stations also transmit information on the
type of program. This information can
be displayed by your car radio .
Examples of such types of program are :
SPORT NEWS POP WEATHER ......
With PTY function you can specifically
select stations transmitting a particular
type of program. Press the PTY button
repeatedly to call up the PTY selection
menu. The message “PTY SEEK” then
appears briefly in the display .
When PTY has been selected the radio
start searching for corresponding PTY
information and stops when the PTY
information has been found, “NO PTY”
appears in the display. If the PTY
information being searched for no longer
exists, the PTY function automatically
switches to normal mode .
BASIC OPERATION
-18-

SELECTING PLAY MODE
During the Disc playback, press the
“2, RDM, INT ” button on the remote
control to select the different playing
mode .
2). REPEAT FUNCTION
REPEAT OFF
REPEAT ONE REPEAT ALL
FOR VCD/CD :
Longer press 2 button on the remote
control to select REPEAT mode as
follows :
FOR Digital Video :
Longer press 2 button on the remote
control to select REPEAT mode as
follows :
REPEAT ALL
CHAPTER REPEAT ON TITL E REP EAT ON
REPEAT OFF
-19-
MEDIA OPERATION
11
22
33
44
55 66
77
88
99
SELSEL
VOLVOL
TOP
INT
RDM
AF
1). TOP FUNCTION
ForDigital Video/ VCD/CD/MP3:
In the state of Digital Video/VCD/CD/
MP3 disc playing, press the button to
select the first track/chapter to play.
(depend on the disc used for VCD)
3). INTRO FUNCTION
FOR CD :
longer press the 3/INT button on the
remote control to play the previous 10
seconds part of each track/chapter on
disc.
(Longer press again to cancel this mode)
FOR VCD :
longer press the 3/INT button on
the remote control, It display will
following menu as below :
SEQ PLAY INTRO 1
Note: when select INTRO 1 Mode, this
player to start to play the previous 10
seconds part of each track/chapter on
disc. (Longer press it again to cancel
this mode .)
FOR Digital Video/MP3 :
For Digital Video/MP3 , longer press the
INT button is not available .
4). RDM (RANDOM) FUNCTION
During DISC playback, longer press the
4/RDM button on the remote control to
play in random. Each playing, the order
is different .
(Depend on the disc used for VCD).
Longer press it again to cancel
this function .
REPEAT ALL
REPEAT ONE REP EAT FOLD ER
REPEAT OFF
FOR MP3 :
Longer press 2 button on the remote
control to select REPEAT mode as
follows :
ON-SCREEN DISPLAY FUNCTION
During playback, press the OSD button
on the remote control . It will display the
message for the playing media such as
Title Number, Chapter Number and so on.

-20-
Digital Video Special Function
Notes:
- The angle number is different
according to the disc.
- The function only work for disc having
scenes recorded at different angles.
- When no different angle are recorded,
will be displayed at
screen left top corner.
“ INVALID KEY ”
During Digital Video playback,
press the ANGLE button on the
remote control
3. Multi-Angle Function
(for Digital Video Only)
Each time the button is pressed , the
number of the angle changes in sequen-
tial order.
4. Title Menu Function
For Digital Video:
If the Digital Video has multiple titles
recorded on the disc. It can select
preferred title from the title menu to start
playback.
- During Digital Video playback, press
TITLE button on the remote .The title
menu is display.
- Select preferred title by the cursor
button and confirmed by press the
ENTER button .
For VCD:
Press TITLE/PBC button on the remote
control while the disc is playing, you can
switch between "PBC ON"and "PBC off"
mode.
MONO LEFT MONO RIGHT
STEREO
MIX-MONO
For VCD/CD:
during playback, Press AUDIO on the
remote control . It is possible to switch
the sound between monaural and
stereo sound.
Notes:
- The language number is different
according to the disc.
- Some disc only contain one language
soundtrack
- When no different language soundtra-
ck are recorded will be
display at screen left top corner.
“ INVALID KEY ”
2. Multi-Audio Language Function
For Digital Video:
During Digital Video playback,
press the AUDIO on the remote
Each time the button is pressed number
changes on sequential order.
Notes:
- The language number is different
according to the disc.
- Some discs only contain one subtitle
language.
- When no different subtitle language
are recorded, “ INVALID KEY ” will be
displayed at screen left top corner.
During Digital Video playback.
press the SUBTITLE on the
remote control .
1. Multi-subtitle Language
Function (for Digital Video Only)
Each time the button is pressed number
of the subtitle language changes
in sequential order.
DIGITAL VIDEO SPECIAL FUNCTION

BT OPERATION
-21-
Bluetooth Operation
1. Pairing and Connecting
Prior to using the BT device named
Boss Audio as a hands-free system
for a BT-enabled mobile phone for the
first time, you must pair and connect
them as follows:
* During operation of the device named
Boss Audio as a hands-free system for
a BT- enabled mobile phone, place the
BT-enabled mobile phone no more
than 3 meters from the head unit;
Select the BT hands-free icon or press
PAIR button to turn to BT PHONE mode.
First,switch on the BT function of your
mobile phone; then search and find a
BT device named Boss Audio, then
select and enter it and it will pair and
connect with the BT device Boss Audio
of the car A/V system automatically.
Then the frame of the BT logo will
light all the time.
* When finishing pairing and connecting,
the audio of the mobile phone transfers
to the car audio system whenever a
call is made or received or the mobile
phone plays music.
2. BT PHONE
Once connecting is complete, you may
access the following function. Some of
the below mentioned functions only
accessible for handset supported with
hands-free profile.
In power off mode, a incoming call or
call out to wake up this unit and turn to
BT hands-free mode, when the phone
call ended the unit back to power off
mode.
Answer a call
After you hear the ring tone (the incoming
telephone number will display on the
TFT LCD), press the “ ”button briefly on
the front panel to listen .
Make a call
Dial the number on the remote control
and then press briefly the “ ” button .
When you dials the wrong number,
press “ ” button to delete it.
Redial last number
When displaying BT phone interface,
press and hold the “ ” button(appro-
ximately 2 seconds) on the remote
control to dial out the last dialed phone
number.
Adjust the Volume
During conversation in progress, tune
the Volume switch until you reach the
desired volume level.
End/Reject a call
In BT phone menu, press the “ ” button
briefly on the remote control .
CALL IN PROGRESS
00:01:32

BT OPERATION
-22-
Note:
a). Before using the function of the BT
about the unit , please check your
phone’s instruction guide or contact
phone manufacture if you are not sure if
your phone supports the hands-free
BT function.
b). When operating the function of BT
about the unit , you need make your
call-phone and the unit successfully for
one time. Afterwards, you only need to
take on the power and the function of
BT will work in three minutes automati-
cally if you want to operate the function
of BT .
Play MP3 music
In BT MUSIC menu, you can play the
MP3 from your mobile handset.
(Please Note: please make sure it
support BT A2DP & AVRCP profile.)

-23-
AUX OPERATION
On the front panel of this unit, there is an
AUX IN jack, follow the diagram below to
connect analogue replay devices(only
for the Audio connect, if you want to
connect the Video, please plug the
<Video input > on the back of the unit .) .
Use this jack to replay sound of other
replay equipment such as disc players,
computers, etc. Via the loudspeakers.
3). You now hear the sound from the
external device played back through
the loudspeakers .
4). use the VOL+/- on the front panel to
adjust the volume level.
AUX OPERATION
1). Please connect the external device
with stereo jack plug the Aux in socket .
2). Press the SRC repeatedly to select
the AUX mode, the message will like
following as below :
AUX IN JACK FRONT PANEL
Ground
Right
Left

Important Note:
1. During the DISC playback, if you want to play the USB, please first remove
USB and then connect it again to start (when the Disc and USB in this player).
2. When the DISC and USB in this player,they can not to transfer .
USB OPERATION
In USB Playback mode
You can use the UP, DOWN, RIGHT or LEFT buttons to navigate and to select
files to play, and press ENTER to begin playback (or viewing, in the case of
JPEG files).
To skip to the next or last track, press the or . Press the or
buttons for Fast Forward or Fast Reverse playback.
REPEAT play modes are also available by repeatedly pushing REPEAT until
the desired mode is found.
First remove the dust protection cap , then following the diagram below,
connect your device to the USB port of the unit . If it is properly connected, the
device will be mounted and start playing automatically. (All operations are as
same as disc mode .)
USB OPERATION
-24-

Mode change to card mode
After a memory card was inserted into the main unit card slot . the unit will starts
playing the files contained on the memory card . Once the unit read the memory card
successfully, the first file on the memory card will automatically start playback.
Press and hold the SEL button repeatedly is allowing changing to other modes .
Card OPERATION
The unit can support playback MP3/WMA/JPEG/MP4 format which are stored
into a memory card .
Please read below before you start the operation of memory card .
File Playback Operation
All the memory car playback operation function is same as the operation
on CD/MP3/WMA .
Please to “ MP3/WMA” operation for more details .
Change DISC to Card
The operations are same as USB mode, refer to see USB operation .
Change Card to DISC
The operations are same as USB mode, refer to see USB operation .
-25-
CARD OPERATION
INSERTING THE CARD .
First to slide the panel a
little to the right, then pull it
off towards you.
Insert the memory card.
Press in till heard a “CLICK”.
Attached the panel to play.
Label side
facing upward
REMOVING THE CARD .
Press in till heard a “CLICK”.
Remove the SD card and
attached the panel to play.
Press the open button
to flip down panel .
OPEN
Press the open button
to flip down panel .
OPEN
First to slide the panel a
little to the right, then pull it
off towards you.

MP3/WMA/JPEG/MPEG4 PLAY
-26-
MP3/MP4 OPERATION
The unit is support MP3/WMA/JPEG/MPEG4 . During playing press the MENU,
the following picture will appear on the monitor . The unit will play the first track
automatically . You can to choose others mode (MP3/JPEG /MPEG4) to play .
EX. : when the MP3 mode is selected .
As the interface show, Use / / / on the remote control to select the
play mode or item, then press ENTER button on the remote control to confirm.
NOTE:
in JPEG/MPEG4 mode, the details operations as same as MP3/WMA operation .
1 Current type (highlighted bar) .
2 Audio play mode select.
3 Picture play mode select.
4 Movie play mode select,
5 Current play track .
SKIP AHEAD / BACK
In playback mode, press the or button on front panel to skip ahead or
back one item in the list . (Or press the or button on the remote control .)
Fast Forward/ Fast Reverse Playback
In playback mode, press and hold (for a more than two seconds ) the or on
front panel to move to FAST FORWARD or FAST REVERSE play .
You can also briefly press the or button on remote control to accomplish
this .
REPEAT FUNCTION
Pressing REPEAT button repeatedly can select repeat play mode.
REP-ONE:
Play the same song over and over again.
REP ALL:
Play all songs on the disc, then repeats the entire disc over and over again .
SONGS 001
002
003
004
2 3 4
5
1

-27-
STEERING WHEEL CONTROL
Press the SRC repeatedly to select the
SWC mode, the message will like
following as below :
There are 2 KEY for no more than 12
buttons to select.
Before operation, select the icon
to cancel the original input that to
set your favour.
For first time use this function, input a
key (such as 0.38,0.38 is a magnitude
of voltage, according to your car )
through the steering remote and
show in button 1 position.
Then select a function icon such as
will show in button 1 position and select
to confirm and back to home menu
that means select finish.
The function of the icons as follow:
To begin function save.
After selection to confirm
operation.
To cancel the input and
resume load.
When electric resistance is too
low, select this icon to increase.
When electric resistance is too
high, select this icon to reduce.
0.38
Use the VOL knob or the </> button to
do selection.
First select Assign begin setting;
then select the input(0.38) and press
SEL or ENTER to confirm;

SPECIFICATION
-28-
Specification
General
Power Supply Requirement..................................................DC 12V
Current consumption........................................................10A MAX.
Maximum Power Output........................................................ 4 x 80W
Audio
Signal Output................................Front, Rear, and Subwoofer Output
Frequency Response...................................................20 Hz - 20 KHz
S/N Ratio...........................................................................90 dB (JIS)
Wow and Flutter............................................Below measurable limits
TFT Monitor
Monitor Screen Size.......................................................3.2 Inch Wide
Color System.....................................................................NTSC/PAL
Disc/USB/Card
Compatible Format....Digital Video/MPEG4/VCD/IMAGE/MP3/WMA/CD
Radio
FM
Frequency range.....................................EUR (87.5 MHz - 108 MHz)
USA (87.5 MHz - 107.9MHz)
American 1 (87.5 MHz - 108MHz)
American 2 (87.5 MHz - 108MHz)
OIRT(88.1 MHz - 107.9MHz)
Usable sensitivity.................................................................15dBu
I.F Frequency...................................................................10.7 MHz
AM(MW)
Frequency...............................................EUR (522 KHz - 1620 KHz)
USA (530 KHz - 1710 KHz)
American 1(530 KHz - 1710 KHz)
American 2(520 KHz - 1600 KHz)
OITR (531 KHz - 1602 KHz)
Usable sensitivity.................................................................40dBu
I.F Frequency....................................................................450 Khz
BT:
BT specification..............................................................V1.2 Class 2
BT Supported Profiles............. HSP, HFP and A2DP & AVRCP profiles
Range of frequency.................................................2.4GHz Spectrum
NOTE:
Specification and design are subject to modification, without notice,
due to improvements in technology.

Before going through the check list, check wiring connection. If any of the problems
persist after check list has been made, consult your nearest service dealer.
TROUBLESHOOTING
-29-
Inserting the disc in reverse
direction
Press the RESET button.
Front panel is not properly fixed
into its place
The car ignition switch is
not on
If the power supply is properly
connected to the car accessory
terminal,switch the ignition key
to "ACC"
The fuse is blown
Replace the fuse
Presence of disc inside the
player.
Remove the disc in the player,
then put a new one
Insert the compact disc with
the label facing upward
The disc is extremely dirty
or defective
Clean the disc or try to play a
new one
Temperature inside the car
is too high
Cool off or until the ambient
temperature return to normal
Unit has frozen up
The antenna cable is not
connected
Insert the antenna cable firmly
The signals are too weak
Select a station manually
SYMPTOM CAUSE SOLUTION
Video/image
appears
black-white
The color system is
set incorrectly
Please switch to correct color
system from menu
No video/image
appears
The unit is not connected
to the parking brake
detection switch
Make proper connection
according to wire connection “ ”
The parking brake is not
engaged
For safety reasons no video/
images are displayed
while the vehicle is moving.
Engaging the parking brake will
cause images to be displayed.
Unit has become
unresponsive
The radio does not
work
Disc can not be
loaded or ejected
No power
No color in picture
The disc format is not
according to the TV-set
used (PAL/NTSC)
Please the color system of
the choice accommodation
JPEG disc can
not be played
back
No JPEG files are recorded
on the disc.
JPEG files are not recorded
in a compliant format
Change the disc
Record JPEG files using a
compliant application
Change the disc
BV7348B
MADE IN CHINA


Para garantizar la seguridad durante la conducción
y respetar las normas de tráfico,
los conductores no deben visualizar vídeo
ni operar el dispositivo de vídeo durante la conducción.

Contenido
-1-
...............
.......................
....................................
............................
.........
......................
..........................
..........................
...........................
..........
.............
....................
...................
Configuración de BT........................
...
...........................
......................
..............
...................
...........
..............
.........
...............
.......................
.......................
Almacenamiento Automático en Memoria
y Exploración de Programa...............
Función RDS...................................18
Información de Seguridad
Notas sobre el disco
Instalación
El panel de mando
Colocación del panel de control
Conexión Eléctrica...
Mando a Distancia
Operación Básica
Panel de Control
Operación de configuración
Configuración de animación
Configuración de disco
Configuración de radio.
Configuración de fondo de pantalla
Acerca de Versión
Configuración de reloj
Configuración de audio......
Configuración de vídeo.
Configuración de idioma OSD
Configuración de color de iluminación
........................................
Restablecer ajustes de fábrica
Cámara de Vista Trasera...
Operación de Radio
Escuchando la radio.
Almacenando y Escuchando una
presintonía.....................................
2
3
4
5
6
7
8
11
11
13
13
13
14
14
14
14
14
14
15
15
15
15
15
16
16
16
17
Operación de Media.......................
Selección de Modo de Reproducción..
Función Visualización En Pantalla.....
Función Especial de Vídeo Digital...
Función de idioma Multi-subtítulos.....
Función de idioma Multi-audio...........
Función Multi-ángulo.......................
Función menú de título.....................
Operación BT.................................
Operación AUX...............................
Operación USB...............................
Operación de tarjeta.......................
MP3/WMA/JPEG/MPEG4 Juego ......
Operación SWC..............................
Especificaciones............................
Diagnóstico y Resolución de
Problemas..................................... 29
19
19
19
20
20
20
20
20
21
23
24
25
26
27
28

Información de Seguridad
-2-
PRECAUCIÓN:
ESTE REPRODUCTOR DE VÍDEO DIGITAL ES UN PRODUCTO LÁSER DE
CLASE I, UTILIZA UN RAYO LÁSER VISIBLE/INVISIBLE QUE PODRÍA
CAUSAR RADIACIÓN PELIGROSA EN CASO DE EXPOSICIÓN DIRECTA.
ASEGÚRESE DE OPERAR EL REPRODUCTOR DE VÍDEO DIGITAL DE
FORMA CORRECTA SIGUIENDO LAS INSTRUCCIONES.
EL USO DE CONTROLES, LA REALIZACIÓN DE AJUSTES O LA
MANIPULACIÓN DE MODO DIFERENTE A LO ESPECIFICADO AQUÍ PODRÍA
PROVOCAR LA EXPOSICIÓN A RADIACIÓN PELIGROSA. NO ABRA LAS
CUBIERTAS NI REALICE REPARACIONES POR SU CUENTA. PARA
TRABAJOS DE SERVICIO CONSULTE A PERSONAL CUALIFICADO.
ADVERTENCIA:
PARA REDUCIR EL RIESGO DE INCENDIOS O DESCARGAS ELÉCTRICAS,
NO EXPONGA ESTE EQUIPO A LLUVIA O HUMEDAD.
PARA REDUCIR EL RIESGO DE INCENDIOS O DESCARGAS ELÉCTRICAS Y
MOLESTAS INTERFERENCIAS, USE SOLO ACCESORIOS RECOMENDADOS.
ESTE DISPOSITIVO ESTÁ CONCEBIDO PARA UNA OPERACIÓN CONTINUA.
Este producto incorpora tecnología de protección de derechos de autor protegida por
reivindicaciones de procedimiento de determinadas patentes de los Estados Unidos y
otros derechos de propiedad intelectual propiedad de Macrovision Corporation y otros
propietarios de derechos. El uso de esta tecnología de protección de derechos de autor
debe ser autorizado por Macrovision Corporation, y está ideado solo para la visualización
doméstica u otras visualizaciones de alcance limitado, a no ser que Macrovision
Corporation lo disponga de otra manera. Está prohibido llevar a cabo procedimientos de
ingeniería inversa o desmontaje.
INFORMACIÓN DE GESTIÓN DEL CÓDIGO DE REGIÓN:
Este Reproductor de Vídeo Digital está diseñado y fabricado para responder a la
Información de Gestión del Código de Región registrada en el disco de Vídeo
Digital. Si el código de región descrito en el disco de Vídeo Digital no se
corresponde al código de región de este reproductor, el dispositivo no podrá
reproducir el disco.

Notas sobre el disco
Tratamiento de Discos Nuevos
con Puntos Ásperos
Un disco nuevo puede tener rugosidades
en los bordes internos y externos. Si se
usa un disco con bordes rugosos, el
funcionamiento no será correcto y el
reproductor no reproducirá el disco.
Por lo tanto, debe retirar los filos rugosos
con antelación usando un bolígrafo o lápiz
como se muestra abajo. Para eliminar los
filos rugosos, presione la cara del bolígrafo
o lápiz contra los bordes internos y
externos del disco.
Puntos ásperos en
borde externo
Bolígrafo o lápiz
Puntos ásperos en
borde interno
No tocar la cara
inferior dle disco
No doblar
Limpie el disco desde el
centro hacia el borde
exterior
Etiqueta hacia arriba
Limpieza del disco
Use un paño seco suave para limpiar la
superficie. Si el disco está muy sucio, use
un paño suave ligeramente humedecido
con alcohol isopropílico (por frotamiento).
Nunca use disolventes como la benzina,
diluyentes o limpiadores registrados
convencionales que podrían estropear
la superficie del disco.
Manipulación y limpieza
Los discos con suciedad, polvo,
arañazos y deformaciones provocarán
un mal funcionamiento.
No coloque pegatinas ni haga arañazos
en los discos.
No deforme los discos.
Los discos deben guardarse siempre
en su caja cuando no estén siendo
usados para evitar daños.
No coloque los discos en los
siguientes lugares:
1.Luz directa del Sol
2.Zonas con polvo, suciedad o humedad
3.Cerca de la calefacción del vehículo
4.Sobre los asientos o el salpicadero
Discos que no pueden ser
reproducidos con este reproductor
Vídeo Digital- RAM
CDV
CD-G
Nota:
Un disco puede sufrir arañazos (aunque
no sean suficientes para dejarlo inutilizable)
según la forma en que lo maneje y las
condiciones del entorno de uso.
Tenga en cuenta que estos arañazos no
son indicadores de problemas del
reproductor.
-3-
Formatos de disco que admite
Vídeo
Digital
VCD
CD
MP3
Disco de Audio y
Vídeo de 12 cm
Disco de Audio y
Vídeo de 12 cm
Disco de Audio de
12 cm
Disco de Audio de
12 cm
este reproductor

NOTAS:
Seleccione una ubicación para el montaje
donde la unidad no interfiera en la
conducción correcta del conductor.
Antes de completar la instalación de la
unidad, conecte temporalmente el
cableado y asegúrese de que todo esté
conectado correctamente y que la unidad
y el sistema funcionen sin problemas.
Use solo las piezas incluidas en la unidad
para asegurarse de la correcta instalación.
El uso de piezas no autorizadas puede
provocar fallos en el funcionamiento.
Consulte con su proveedor más cercano
si la instalación requiere la perforación
de orificios u otras modificaciones en el
vehículo.
Instale la unidad donde no entre dentro del
campo de movimiento del conductor y no
pueda herir a los pasajeros en caso de
frenada brusca, como puede ser una
parada de emergencia.
30
Instalación
-4-
Si el ángulo de instalación supera los 30
grados sobre el plano horizontal, la unidad
no ofrecerá un rendimiento óptimo.
Evite instalar la unidad donde puede sufrir
altas temperaturas, como a causa de la
exposición a la luz solar directa, o el aire
caliente de la calefacción, o donde pueda
recibir polvo, suciedad o una vibración
excesiva.
MONTAJE FRONTAL/POSTERIOR
DE DIN
Esta unidad puede ser instalada ya
sea ¨Frontal¨ (montaje frontal de DIN
convencional) o ¨Posterior¨ (montaje
posterior de DIN, utilizando orificios
para tornillos de rosca a los lados del
chasis de la unidad). Para más detalles,
consulte los siguientes métodos de
instalación ilustrados.
SALPICADERO
CINTA DE MONTAJE
METÁLICA
TUERCA HEXAGONAL
ARANDELA DE RESORTE
ARANDELA PLANA
TORNILLO
AUTORROSCANTE
CONSOLA
CAJA DE SOPORTE
DESLIZANTE
TORNILLO
HEXAGONAL

-5-
DESMONTAJE DEL PANEL DE
CONTROL
1.Presione el botón OPEN para replegar el
panel frontal.
2.En primer lugar deslice el panel frontal
ligeramente a la derecha, y tire de él hacia
usted.
BOTÓN OPEN
3. Empújelo hasta colocarlo para
reproducir.
ESTUCHE PROTECTOR
PANEL FRONTAL
CHAPA LLAVE
FRONTAL EXTERIOR
DE PLÁSTICO
CHAPA LLAVE
Si desea extraer el CHASIS de la CAJA DE SOPORTE DESLIZANTE, retire en primer
lugar la CUBIERTA DE PLÁSTICO a ambos lados, y a continuación inserte las dos
CHAPAS DE LLAVE en los lados izquierdo y derecho del chasis como se muestra arriba.
Instalación

-6-
Cómo limpiar los conectores
Desenchufar los conectores
frecuentemente los deteriorará.
Para reducir esta posibilidad, limpie los
conectores periódicamente solo con un
paño limpio, suave y seco, teniendo
cuidado de no dañarlos.
COLOCACIÓN DEL PANEL DE CONTROL
1. Primero, insertar el lado derecho de
la frente panel en la unidad principal.
Salient
Hueco
Salient
Hueco
Conector
3. Presione de nuevo la posicón de playing.
2. Presione la parte derecha del panel
frontal hasta que se bloquee firmemente
en la unidad principal, a la vez, inserte
el lado izquierdo del panel frontal en la
unidad principal.
Instalación

-7-
Conexión Eléctrica
TOMA DE ANTENA
DE RADIO
CABLEADO
ANTENA AUTOMÁTICA(+)
AZUL/BLANCO
GROUND- tierra (B-)
COPIA DE SEGURIDAD DE
MEMORIA (B+)
AMARILLO
NEGRO
Nota:
Para habilitar la visualización de vídeos o fotos, el cable del freno de mano
debe estar conectada a la parte de conmutación del freno de estacionamiento
cuando está totalmente comprometido. Desactivación de la función de freno
de estacionamiento está estrictamente prohibido por la ley y anula todas las
garantías. Por favor, revise sus leyes locales y estatales antes de intentar ver
vídeos o fotos en la pantalla.
TOMA RCA AUDIO OUT FRONTAL
TOMA RCA AUDIO OUT FRONTAL
TOMA VIDEO OUTPUT
TOMA VIDEO OUTPUT
Whi te Yello w
Yell ow
Red
ALTAVOZ FRONTAL IZQ
ALTAVOZ POSTERIOR IZQ
BLANCO
BLANCO/NEGRO
VERDE
VERDE/NEGRO
INTERRUPTOR DE ARRANQUE
(B+)
ROJO
FUSIBLE
SUBWOOFER GRIS
ENTRADA CÁMARA POSTERIOR
AMARILLO
LLAVE GROUND- tierra (NEGRO)
LLAVE 1 (MARRÓN)
LLAVE 2 (BLANCO)
VERDE CLARO
FRENO DE ESTACIONAMIENTO
(B-)
FUSIBLE
VIOLETA/BLANCO
(B+) 12V
INTERRUPTOR CÁMARA
TRASERA
ALTAVOZ FRONTAL DER
ALTAVOZ POSTERIOR DER
GRIS
GRIS/NEGRO
VIOLETA
VIOLETA/NEGRO

Mando a Distancia
-8-
1. CLK Púlselo brevemente para mostrar
el reloj en modo de reproducción de vídeo.
2. PAIR/ Presiónelo para usar el BT
(Bluetooth), consulte ¨Operación del BT¨.
3. STOP Presiónelo una vez para
pausar la reproducción. Presione PLAY/
PAUSE para reanudar la reproducción.
4. SETUP Presione este botón para
abrir el menú de configuración.
5.MO/ST En modo Radio, presione este
botón para cambiar entre los modos de
recepción Mono y Estéreo (cuando la
recepción de una estación es débil, es
posible que cambiando a Mono mejore
la calidad del sonido).
En modo Reproducción de Vídeo Digital,
al presionar este botón se abre el menú
de configuración de AUDIO para realizar
6. LO/DX(SUBTITLE)
Consulte ¨Operación de subtítulos¨.
En modo Radio, presione este botón para
cambiar la sensibilidad de recepción de
radio a estaciones cercanas o lejanas.
7. REDIAL/ Presiónelo para usar el BT
(Bluetooth), consulte ¨Operación del BT¨.
8.GOTO/ Pulse este botón para iniciar
la reproducción en un momento del
programa que haya designado. Use los
botones numéricos para introducir los
datos necesarios, a continuación pulse
ENTER para confirmar la información
introducida.
En modo de teléfono BT (Bluetooth), sirve
como el botón en su teléfono móvil.
15
17
19
13
14
7
2
6
22
11
18
3
16
5
1
24
9
21
20
12
10
4
8
26
23
25
cambios en la forma en que es
reproducida la pista sonora.

-9-
9. / Presione estos botones para
saltar hacia delante o hacia atrás una pista.
SWF VOL, SWF FRE.
Tras seleccionar el modo deseado de los
mencionados, gire la rueda VOL o presione
los botones VOL+/VOL- para establecerlo.
11. VOL+/VOL- Use estos controles para
ajustar el nivel del volumen.
12. / / / Presiónelos para navegar
entre los diferentes menús del producto.
13. MENU/SUB WOOFER Presione este
botón brevemente para mostrar el directorio
raíz de un archivo multimedia de Vídeo
Digital.Presione y mantenga presionado este
botón para cambiar SWF FREQ entre 80HZ,
120HZ y 160HZ
14. BAND(OSD) En modo Radio, presione
este botón repetidamente para cambiar
entre las cinco bandas de radio: FM1 > FM2
> FM3 >AM1(MW1) > AM2(MW2)
En modo de Reproducción de Disco, presione
este botón para ver información acerca del
disco que está siendo reproducido.
15. /MOD Presione este botón para
encender la unidad, presiónelo y manténgalo
presionado para apagar la unidad.
16. PLAY/PAUSE ( ) En modo de
Reproducción Multimedia, presione este
botón para pausar la reproducción. Vuelva
a presionarlo para continuar la reproducción
desde el punto donde se había pausado.
17. MUTE Presione este botón para
desactivar el audio. Presiónelo de nuevo
para volver a activarlo a su nivel de
volumen previo.
18. TITLE/PBC (A/PS) En modo de
reproducción de Vídeo Digital, para menú
de títulos (TITLE); en modo de reproducción
VCD, presione este botón para crear un menú
PBC (Control de reproducción); consulte ¨
Función de Menú de Títulos¨.
10. Presione y manténgalo
presionado para cambiar entre BASS
(graves), TREBLE (agudos), BALANCE,
FADE,
.
SEL
En modo Radio, presione este botón y
manténgalo presionado para iniciar el modo
Auto-Program, el sintonizador buscará todas
las estaciones de señal fuerte y las asignará
a los botones de presintonías.
19. ZOOM Presiónelo para aumentar el
tamaño de la imagen.
Use las teclas de dirección ( / / / )
en el mando a distancia para mover la
imagen aumentada.
Nota: durante la reproducción de JPEG,
presione el botón ZOOM, en la pantalla
aparecerá ¨ZOOM 100%¨, a continuación
presione los botones / para aumentar/
disminuir el tamaño, use los botones
/ / / para moverse a través de la
imagen ampliada.
20. ANGLE Presione este botón para
cambiar el ángulo de visualización de la
unidad operativa.
21. EQ/LOUD Presiónelo de forma
mantenida para cambiar la función
LOUDNESS (sonoridad) entre LOW(baja),
MIDDLE(media), HIGH(alta) y
OFF(desactivada).
22. /
En modo Reproducción de Disco, presione
para reproducir en avance rápido.
En modo DISCO, presiónelo para retroceso
rápido.
23. ENTER Confirma la Pista/Capítulo
seleccionados con las teclas numéricas o
seleccionados con los botones cursores en
la pantalla de TV.
24. 0 - 9 (0/TA y 9/AF)
Úselos para introducir valores numéricos
durante la programación, con el botón GO TO,
o para seleccionar directamente una pista
para ser reproducida.
En modo Radio (cuando está activado el RDS),
0 sirve para función TA, 9 sirve para función AF.
25. +10/ Botón de selección para añadir
diez pistas en modo reproducción multimedia.
Presiónelo para usar el BT, consulte ¨
Operación del BT¨.
26. PRESINTONÍAS Seis botones de
memoria preestablecida.
Mando a Distancia

-10-
Uso del Mando a Distancia
Dirija el mando a distancia hacia la marca del IR (receptor de señal del mando
a distancia) en la cara frontal del reproductor.
Ángulo de operación: Alrededor de ±30 grados en todas las direcciones frente a
la marca IR.
Nota:
La pila de litio en el compartimento de la pila del mando a distancia ha sido
protegida con un plástico para el transporte. Por favor, antes del primer uso,
retire este plástico para dejar así listo el mando a distancia para su operación.
Preparación del Mando a Distancia
1
2
3
4
Insertando la Pila
1.En primer lugar presione hacia dentro como indica la dirección de la flecha
(ver ) y a continuación retire el soporte de la pila en la dirección indicada por
la flecha (ver ).
2.Reemplace la pila, coloque correctamente una pila nueva con el lado (+) hacia
arriba como muestra la imagen (ver ).
3.Introduzca el soporte de la pila. Presione el soporte hasta dejarlo en la posición
original (ver ).
Mando a Distancia

Operación Básica
-11-
1. BOTÓN REL
Pulse para detachable el panel frontal.
2119 20
2. (Encendido/Apagado) /
Botón SRC
Presiónelo para encender la unidad.
Presiónelo y manténgalo presionado
durante dos segundos para apagar el
dispositivo. En modo reproducción,
presiónelo de forma repetida para
seleccionar entre los modos RADIO,
DISC, USB, CARD, AUX y BT.
CONTROLES DE LA UNIDAD
3. BOTÓN VOL+/ VOL-
En modo normal, estos dos botones se
usan para incrementar o disminuir el
volumen.
4.
Presione y manténgalo presionado para
cambiar entre BASS (graves), TREBLE
(agudos), BALANCE, FADE,
BOTÓN SEL
SWF VOL,
SWF FRE.
Tras seleccionar el modo deseado de los
mencionados, gire la rueda VOL o presione
los botones VOL+/VOL- para establecerlo.
En la interfaz de inicio, gire la rueda de VOL
o presione los botones </> en el mando a
distancia para realizar la selección.
En modo SETUP o SWC, presione y
mantenga presionado el botón SEL
para volver al modo anterior;
En otros modos, presione el botón SEL
para volver a la interfaz de inicio.
1
17
18
15
13
16
3
6
9
11
10
8 12
4 14
7
5
2
Panel de control
Base de Panel de control

-12-
5. Botón BND/MENU
En modo Radio, presione este botón
repetidamente para cambiar entre las
cinco bandas de radio: FM1 > FM2
> FM3 >AM1(MW1) > AM2(MW2)
Pulse para visualizar el menú raíz de los
medios de reproducción.
6. Botón MUTE/PTY
Presione este botón para desactivar los
altavoces durante un espacio de tiempo.
En la pantalla parpadeará la palabra
MUTE. Vuelva a presionarlo para cancelar
la función de silencio.
Esta función también se puede cancelar
haciendo girar el botón multifunción VOL.
En modo Radio, presione este botón y
manténtalo presionado durante 2
segundos aproximadamente para
seleccionar el PTY del tipo de programa
(algunos ejemplos de estos tipos de
programa son: NOTICIAS, POP...)
7/8.Botones >>I/ y I<</
En modo radio, presione de forma
prolongada los botones o para buscar
automáticamente hacia arriba o hacia
abajo una estación disponible
empezando desde la frecuencia en la
que se encuentre; presione brevemente
los botones o para buscar manualmente
hacia arriba o hacia abajo la estación
que desee empezando desde la
frecuencia en la que se encuentre.
En modo Media, presione los botones
o para reproducir la pista anterior o
siguiente; presionando o de forma
mantenida y continuadamente puede
hacer avanzar o retroceder en los
siguientes múltiplos de la velocidad
normal: x2, x4, x8, x20.
Colóquese en cualquier sintonía
presionando alguna de las 6 presintonías
(1-6), si uno de estos botones es
presionado durante más de 2 segundos,
la estación que esté siendo escuchada
en ese momento será memorizada en
dicho botón de presintonía.
B) En modo DISC/USB/SD
Durante la reproducción, presione el
botón 1/ para pausar la reproducción de
ese momento, vuelva a presionarlo para
continuar con la reproducción;
Presione el botón 2/RPT para seleccionar
la función repetición;
Presione el botón 3/RDM para seleccionar
la función aleatorio;
Presione el botón 4/STOP para encender
a la anterior modo, pulse de nuevo para
desactivar el modo de casa;
Presione 5/+10 para ir a las diez pistas
siguientes;
Presione 6/-10 para ir a las diez pistas
anteriores.
15. JACK DE ENTRADA AUXILIAR
Inserte un dispositivo externo en esta
toma AUX para obtener salida de audio
del dispositivo a través de la unidad.
16. Pantalla TFT
(pantalla de cristal líquido)
Para la operación del TFT, consulte
Ajustes de Monitor TFT.
17. PUERTO USB
Para más información sobre la conexión
de un dispositivo USB, por favor vea
¨Operación de USB¨.
18. MICRÓFONO
19. RANURA DE TARJETA SD
20. BOTÓN (EXPULSAR)
Introduzca el disco, la cara impresa
hacia arriba, hasta que el mecanismo
lo detecte y arrastre el disco hacia
dentro. Presione este botón para
expulsar el disco.
21. BOTÓN RESET
Presione este botón para volver a la
configuración de fábrica.
* En modo BT MUSIC, la función de
avance o retroceso rápido no está
disponible.
En modo BT PHONE, para la función
de los botones y , consulte el
apartado Operación de BT.
-1 . MEMORIA DE PRESINTONÍAS
Y BOTONES , INT, RPT, RDM
A) en modo RADIO
9 4
Operación Básica

-13-
OPERACIÓN DE CONFIGURACIÓN
ÍTEMS AJUSTABLES:
En modo inicio, gire la rueda de VOL para
seleccionar ¨ ¨ y presione el botón SEL
o presione ENTER en el mando a distancia
para volver al menú de ajustes.
Durante la configuración, use la rueda VOL
para girar a subir y bajar, y >>I y
I<< para izquierda y derecha.
También puede usar los botones de
dirección para realizar la selección,
seguidamente presione SEL para
confirmar los datos introducidos.
Interfaz de Configuración 1
Interfaz de Configuración 2
En modo RADIO, puede cambiar el tiempo
de reproducción de animación entre
¨OFF, 10S, 30S, 1M, 90S, 2M, 3M y 4M¨.
Nota:
Por favor, establezca el tiempo de
reproducción de la animación en ¨10S¨
al principio, cuando encienda la unidad.
Interfaz de Configuración general 1
GENERAL
ANIMATION 2 MINUTE
KEY BEEP ON
DISC ...DISC ...
RADIO ...
Configuración de disco como se
ve a continuación:
FORMATO
Este reproductor es capaz de reproducir
discos grabados en formatos PAL o NTSC.
Haga la selección según si está conectando
la unidad a un televisor PAL o NTSC.
También puede establecer la unidad como
AUTO (selección automática). La desventaja
de la selección automática es que cada vez
que encienda la unidad, esta buscará a qué
tipo de monitor está conectada, lo que
provoca un pequeño retraso y algunos
parpadeos desagradables de la imagen
en pantalla.
TIPO DE TV
Aquí se selecciona el aspecto de TV
apropiado (4:3 o 16:9) de acuerdo con el
set de TV conectado.
Normal/PS (Para TV 4:3)
Reproducido en estilo PAN & SCAN (si está
conectada a TV de pantalla ancha, los bordes
izquierdo y derecho quedan cortados).
Normal/LB (Para TV 4:3)
Reproducido en estilo LETTER BOX (buzón).
(Si está conectada a TV de pantalla ancha,
en la parte superior en inferior de la pantalla
aparecerán bandas negras).
Ancho (Para TV 16:9)
Selecciónelo cuando esté conectado un set
de TV de pantalla ancha.
16:9
4:3 Letter Box
4:3 Pan Scan
DISC
FORMAT NT SC
TV TYPE 4:3PS
RATING ADULT
TONO DE LAS TECLAS: ON o OFF.
Operación Básica
ANIMACIÓN
10:00 AM10:00 AM

-14-
Interfaz de Configuración general 1
GENERAL
WALLPAPER ...
BLUETOOTH ON
ABOUT ...
Interfaz de configuración de reloj
Interfaz 2 de configuración de audio
Interfaz 1 de configuración de audio
Operación Básica
CLASIFICACIÓN
Seleccione para activar o desactivar el
Control Parental. La contraseña de
fábrica por defecto es 0000.
(La contraseña se debe usar para realizar
cambios en el menú de Control Parental
como se ve a continuación).
Teclee ¨0000¨ y vaya a la clasificación
para que pueda configurarlo de la
siguiente manera:
KID SAFE -> G -> PG -> PG-13 ->
PG R -> R -> NC-17 -> ADULT
RADIO
ST/MONO:Para seleccionar estéreo
o mono
LOCAL:Para seleccionar local o a distancia.
REGION: Para seleccionar frecuencia de
radio .
BLUETOOTH
Para activar o desactivar la función BT.
FONDO DE PANTALLA
Para seleccionar un fondo de pantalla.
ACERCA DE
Para mostrar la información de versión.
CONFIGURACIÓN DE RELOJ
Toque sobre el RELOJ para ajustar el
tiempo y el formato de tiempo.
CONFIGURACIÓN DE AUDIO
Para ir al ajuste de la calidad del audio.
AGUDOS: -7 a +7
Ajuste el nivel de los agudos.
GRAVES: -7 a +7
Ajuste el nivel de los graves.
SUBWOOFER: Para ajustar el volumen y
la frecuencia del subwoofer.
EQ: Para seleccionar el modo de audio:
USER -> JAZZ -> CLASSIC -> POP -> ROCK
LOUDNESS: Para seleccionar el efecto de
sonoridad entre: OFF -> LOW -> MID -> HIGH
FADER/BALANCE:
BALANCE: R 0-10 a L 0-10
Ajuste el balance de sonido entre los
altavoces izquierdo y derecho.
FADE: F 0-10 a R 0-10
Ajuste el balance de sonido entre los
altavoces frontal y trasero.

CONFIGURACIÓN DE VÍDEO
COLOR: 0 a 40
Ajuste el color de para que la imagen
sea más clara o más oscura.
BRILLO: 0 a 40
Ajuste la imagen si tiene demasiado
brillo o es demasiado oscura.
CONTRASTE: 0 a 40
Ajuste el contraste de la porción de
brillo y oscuridad.
MATIZ: 0 a 40
Ajuste el matiz si el color de la piel
humana no resulta natural.
- Ajustable cuando ¨NTSC¨ está
seleccionado para ¨NTSC/PAL¨.
IDIOMA
Para seleccionar el idioma de OSD.
COLOR DE ILUMINACIÓN
Gire la rueda VOL para seleccionar la
luz de fondo de todos los botones.
Cuando la palabra AUTO y el color
muestran palabra ILUMINACIÓN que el
cambia automáticamente la luz de fondo.
-15-
Interfaz de configuración de vídeo
El botón RESET puede ser activado por
las siguientes razones:
A.Instalación inicial de la unidad cuando
todo el cableado queda completado.
B.Ningún botón de función está operativo.
Símbolo de error en la pantalla.
Cámara de Vista Trasera
Cuando se conecta la cámara de vista
trasera, se muestra automáticamente la
imagen espejo de la vista trasera en
el monitor en el momento de accionar
la marcha atrás.
RESTAURACIÓN DE
CONFIGURACIÓN DE FÁBRICA
El botón RESET se encuentra en la
cubierta y para activarlo es necesario
usar un bolígrafo o un objeto fino de metal.
RESET
Operación Básica
20
20
20
20

-16-
OPERACIÓN DE RADIO
Escuchando la Radio
Presione SRC repetidamente para
seleccionar el modo RADIO, aparecerá
un mensaje como el siguiente:
Seleccionando la Banda de Frecuencia
Presione repetidamente el botón BAND
en el panel frontal para seleccionar la
banda, el mensaje pasará a:
FM1 FM2 FM3
AM2(MW2)
AM1(MW1)
Cuando es difícil recibir una emisora
estéreo FM
Presione el botón ST/MO en el
mando a distancia para seleccionar
modo MONO o ESTÉREO.
Para sintonizar solo Estaciones
FM de señal fuerte (función LO/DX)
En modo Radio, presione el botón
LOC en el mando a distancia para
seleccionar modo LOC/DX de
información de tráfico Local y Larga
distancia.
Almacenando y escuchando
una Presintonía
Estableciendo la memoria
Con este sistema, se pueden almacenar
un total de 30 estaciones en la memoria
de seis botones. Cada banda puede
almacenar hasta seis presintonías. Las
estaciones estarán en las bandas FM1,
FM2, FM3, AM1(MW1) y AM2(MW2).
La operación se realizará de la siguiente
manera:
- Almacenar en la Memoria
> Seleccione la banda de frecuencia
> Seleccione la estación
>Mantenga la tecla de memoria
deseada se pulsa en hasta que la
estación se escucha de nuevo
después una breve interrupción.
Operación Básica
Iniciar la búsqueda de una estación
Búsqueda Manual
En modo Radio, presione brevemente
el botón en el panel frontal para
aumentar un nivel la frecuencia en la
separación entre canales (o puede
presionar el botón en el mando a
distancia).
En modo Radio, presione brevemente
el botón en el panel frontal para
disminuir un nivel la frecuencia en la
separación entre canales (o puede
presionar el botón en el mando a
distancia).
Búsqueda Automática
En modo Radio, presione y mantenga
presionado (durante más de 2 segundos)
los botones ¨ / ¨ para iniciar la
búsqueda de una estación de radio
automáticamente.
Puede usar los botones ¨ / ¨ en
el mando a distancia para iniciar la
búsqueda automática de una estación
de radio.

-17-
En modo Radio, presione y mantenga
presionado (durante más de 2 segundos)
el botón ¨APS¨ del mando a distancia
para activar el almacenamiento
automático de estaciones.
La radio busca en la banda de frecuencia
en la que se encuentre, p. ej.: FM1, el
nivel de señal más fuerte hasta que
termina el ciclo de búsqueda. Las seis
estaciones más fuertes quedan
colocadas en sus correspondientes
ubicaciones de almacenamiento.
A continuación se coloca en la primera
ubicación de almacenamiento.
Almacenamiento Automático en
Memoria y Exploración de Programa
Configuración de Presintonía
Automática
Función de exploración
En modo Radio, presione brevemente el
botón ¨APS¨ del mando a distancia, la
radio reproducirá brevemente todas las
presintonías de la banda de frecuencia.
FUNCTIÓN RDS
ÍTEMS AJUSTABLES:
ESTABLECER REGIÓN
Para activar y desactivar la función
REGION.
FUNCIÓN REG
En ocasiones algunas estaciones dividen
sus programas en programas regionales
con diferente contenido.
REG ON: el mensaje ¨REG ON¨
aparecerá en la pantalla durante unos
segundos.
Operación Básica
- Recuperar una presintonía
Prensa los rangos 1-6 brevemente para
recuperar una estación que haya sido
almacenada en la memoria previamente,
el número elegido se muestra en la
pantalla.
Nota:
- la capacidad de la pantalla es limitada.
Es posible que en modo doble pantalla
algunos segmentos de la pantalla
queden borrados.
- la función REG ON evita que la radio
cambie a otras frecuencias con contenido
de programa regional diferente.
REG OFF: la identificación de la red de
emisoras (PI) del programa regional es
ignorada durante la búsqueda de una
frecuencia alternativa (AF) o una
identificación de la red de emisoras (PI).
Seleccione RDS REGIONAL para activar
o desactivar la función RDS.
CONFIGURACIÓN DE PI
Para cambiar entre PI MUTE y PI SOUND.
PI MUTE / PI SOUND
(solo para operación de radio)
Si está en un área donde se superpongan
dos identificaciones de la red de emisoras
(PI), puede seleccionar la opción
PI SOUND y PI MUTE para la
reproducción del sonido.
Debe evitarse el cambio alternado de la
identificación de la red de emisoras.
PI SOUND:
Si el cambio sin embargo tiene lugar, el
sonido de otra estación se escuchará
durante menos de un segundo.
PI MUTE:
El sonido de otra estación queda anulado.
TA Identificación de Información
Sobre el Tráfico
(Prioridad de la Información del Tráfico)
En modo Radio, presione de forma
mantenida el botón 0/TA para activar y
desactivar la función TA.Cuando la
función TA está activada, en la pantalla
aparece el símbolo TA. Cuando se opera
la radio en una banda de frecuencia FM,
la búsqueda de avisos de tráfico se inicia
automáticamente (TA SEEK).

FUNCIÓN PTY
En modo Radio, presione y mantenga
¨PTY¨ para seleccionar el tipo de
programa.
PTY Selección del tipo de programa
Junto al nombre de las estaciones,
algunas estaciones FM también
transmiten información sobre el tipo
de programa. Esta información puede
ser visualizada en la radio de su coche.
Algunos ejemplos de estos tipos de
programa son:
DEPORTES NOTICIAS POP TIEMPO...
Con la función TPY puede seleccionar
específicamente estaciones que
transmitan un tipo de programa particular.
Presione el botón PTY repetidamente
para hacer salir el menú de selección
PTY.En la pantalla se mostrará
brevemente el mensaje ¨PTY SEEK¨.
Cuando se haya seleccionado PTY,
la radio comenzará a buscar la
correspondiente información PTY y
se detendrá cuando se haya encontrado
dicha información PTY. ¨NO PTY¨ en
pantalla. Si la información PTY que está
siendo buscada no existe, la función PTY
cambia automáticamente a modo normal.
-18-
Operación Básica
Si se está recibiendo una estación FM
que transmite avisos de tráfico
actualizados de un tiempo a otro, en la
pantalla se ilumina TP (identificación de
red con programas de tráfico).
Cuando la función TA está activada, el
tráfico FM interrumpirá automáticamente
la operación del CD (en la pantalla
aparecerá la palabra TRAFFIC).
El nivel de volumen aumenta hasta el
mínimo valor para la transmisión de
avisos de tráfico.
Una vez finalizados los avisos de tráfico,
se vuelve al programa que estaba
operando previamente.
FUNCIÓN AF
(Frecuencias Alternativas)
En modo Radio, presione de forma
mantenida el botón 9/AF para activar y
desactivar la función AF.
AF es una función que actúa con la
ayuda del RDS (Sistema de
Radiodifusión de Datos) y solo puede
ser usada con estaciones FM. La radio
busca en segundo plano la mejor
recepción de frecuencia de la estación
que ha sido sintonizada.
Cuando la función AF es activada, la
radio examina continuadamente la
fuerza de la frecuencia AF. El intervalo
de prueba de cada frecuencia AF
depende de la fuerza de señal de la
estación escuchada y varía durante
algunos minutos en caso de señales
débiles. En el momento en que la nueva
frecuencia AF sea más fuerte que la
estación sintonizada, la radio pasa a
esta frecuencia durante un breve espacio
de tiempo y se muestra el mensaje
¨NEW FREQUENCY¨ durante uno o dos
segundos.

SELECCIÓN DE MODOS DE
REPRODUCCIÓN
Durante la reproducción de disco,
presione el botón ¨2, RDM, INT¨ en el
mando a distancia para seleccionar los
diferentes modos de reproducción.
2). FUNCIÓN REPETIR
REPEAT OFF
REPEAT ONE REPEAT ALL
PARA VCD/CD:
Presione de forma mantenida el botón
2 en el mando a distancia para
seleccionar el modo REPEAT como se
ve a continuación:
PARA Vídeo Digital:
Presione de forma mantenida el botón
2 en el mando a distancia para
seleccionar el modo REPEAT como se
ve a continuación:
REPEAT ALL
CHAPTER REPEAT ON TITL E REP EAT ON
REPEAT OFF
-19-
Operación de Media
11
22
33
44
55 66
77
88
99
SELSEL
VOLVOL
TOP
INT
RDM
AF
1). FUNCIÓN TOP
Para Vídeo Digital/VCD/CD/MP3:
En estado de de reproducción de Disco
Vídeo Digital/VCD/CD/MP3, presione
el botón para seleccionar la primera
pista/capítulo para reproducir
(depende del disco usado para VCD).
3). FUNCIÓN INTRO
PARA CD:
Presione de forma mantenida el botón
3/INT en el mando a distancia para
reproducir los 10 primeros segundos
de cada pista/capítulo del disco.
(Vuelva a presionar de forma mantenida
para cancelar este modo)
PARA VCD:
Presione de forma mantenida el botón
3/INT en el mando a distancia, se
mostrará el siguiente menú:
SEQ PLAY INTRO 1
Nota: al seleccionar Modo INTRO 1, el
reproductor empieza a reproducir los
primeros 10 segundos de cada pista/
capítulo del disco (Vuelva a presionar
de forma mantenida para cancelar este
modo).
PARA Vídeo Digital/MP3:
Para Vídeo Digital/MP3, el botón INT
no está disponible.
4). FUNCIÓN RDM (ALEATORIO)
Durante la reproducción de DISCO,
presione de forma mantenida el botón
4/RDM en el mando a distancia para
reproducir de forma aleatoria. El orden
es diferente en cada reproducción.
(Depende del disco usado para VCD).
Vuelva a presionar de forma mantenida
para cancelar esta función.
REPEAT ALL
REPEAT ONE REP EAT FOLD ER
REPEAT OFF
PARA MP3:
Presione de forma mantenida el botón
2 en el mando a distancia para
seleccionar el modo REPEAT como se
ve a continuación:
FUNCIÓN VISUALIZACIÓN EN
PANTALLA
Durante la reproducción, presione el
botón OSD en el mando a distancia.
Se mostrará el mensaje sobre los
medios reproducidos como Número de
Título, Número de Capítulo, etc.

-20-
Función Especial de Vídeo Digital
Notas:
- El número de ángulo es diferente
según el disco.
- La función solo es ejecutable en discos
con escenas grabadas desde
diferentes ángulos.
- Cuando no existen grabados diferentes
ángulos, en la esquina superior
izquierda de la pantalla se mostrará el
mensaje ¨INVALID KEY¨.
Durante la reproducción de Vídeo
Digital, presione el botón ANGLE en
el mando a distancia.
3. Función Multi-ángulo
(solo para Vídeo Digital)
Cada vez que presione el botón, el
número del ángulo cambia en orden
secuencial.
4. Función Menú de Título
Para Vídeo Digital:
Si el Vídeo Digital tiene múltiples títulos
grabados en el disco, se puede
seleccionar el título preferido en el menú
título para iniciar la reproducción.
- Durante la reproducción de Vídeo
Digital, presione el botón TITLE en el
mando a distancia. Se muestra el menú
de título.
- Seleccione su título preferido con el
cursor y confirme presionando el botón
ENTER.
Para VCD:
Presione el botón TITLE/PBC en el mando
a distancia mientras el disco esté siendo
reproducido, puede cambiar entre
¨PBC ON¨ y ¨PBC OFF¨.
MONO LEFT MONO RIGHT
STEREO
MIX-MONO
Para VCD/CD:
Durante la reproducción, presione
AUDIO en el mando a distancia.
Es posible cambiar el sonido entre mono
y estéreo..
Notas:
-El número del idioma es diferente
según el disco.
-Algunos discos solo contienen una
pista de idioma.
-Cuando no existen grabadas diferentes
pistas de idioma, en la esquina superior
izquierda de la pantalla se mostrará el
mensaje ¨INVALID KEY¨.
2. Función de Idioma Multi-audio
Para Vídeo Digital:
Durante la reproducción de Vídeo
Digital, presione AUDIO en el mando
a distancia.
Cada vez que se presione el botón,
el número de la pista de audio del
idioma cambia en orden secuencial.
Durante la reproducción de Vídeo
Digital, presione el botón SUBTITLE
en el mando a distancia.
1. Función de Idioma Multi-subtítulos
( solo para Vídeo Digital)
Cada vez que se presione el botón, el
número del idioma de subtítulos
cambia en orden secuencial.
Notas:
-El número del idioma es diferente
según el disco.
-Algunos discos solo contienen un
idioma de subtítulos.
Cuando no existen grabados diferentes
idiomas de subtítulos, en la esquina
superior izquierda de la pantalla se
mostrará el mensaje ¨INVALID KEY¨.
Función Especial de Vídeo Digital

Operación del BT
-21-
Operación del BT
1. Sincronización y conexión
Antes de utilizar por primera vez el
dispositivo BT llamado Boss Audio
como sistema manos libres para un
teléfono móvil con tecnología BT,
deberá sincronizarlos y conectarlos
de la siguiente manera:
* Durante la operación del dispositivo
llamado Boss Audio como sistema
manos libres para un teléfono móvil
con tecnología BT, coloque dicho
teléfono a una distancia no superior a
3 metros de la unidad;
Seleccione el icono manos libres BT o
presione el botón PAIR para activar el
modo BT PHONE.
En primer lugar active la función BT de
su teléfono móvil; a continuación
busque un dispositivo BT llamado
Boss Audio, selecciónelo y acceda a él,
se vinculará y conectará al dispositivo
BT Boss Audio del sistema A/V del
vehículo. Seguidamente el marco del
logo BT se iluminará permanentemente.
* Una vez finalizada la sincronización y
conexión, el audio del teléfono móvil
se transfiere al sistema de audio del
vehículo al realizar o recibir una
llamada o al reproducir música desde
el teléfono móvil.
2. TELÉFONO BT
Una vez completada la conexión,
podrá acceder a las siguientes funciones.
Algunas de las funciones mencionadas
a continuación solo son accesibles para
teléfonos con perfil manos libres.
En modo apagado, al recibir o realizar
una llamada, la unidad se activa y
cambia a modo manos libres vía BT.
Al finalizar la llamada, la unidad vuelve
a modo apagado.
Responder a una llamada
Tras oír el tono de llamada (el número
de teléfono entrante se mostrará en el
TFT LCD), presione el botón ¨ ¨
brevemente en el panel frontal para
escuchar.
Realizar una llamada
Marque el número en el mando a
distancia y a continuación presione
brevemente el botón ¨ ¨. Si introduce
un número incorrecto, presione el botón
¨ ¨ para borrarlo.
Volver a marcar el último número
Mientras se muestra la interfaz BT
phone, presione y mantenga presionado
el botón ¨ ¨ (aproximadamente 2
segundos) en el mando a distancia para
llamar al último número de teléfono
marcado.
Ajustar el Volumen
Durante una conversación, ajuste el
interruptor de volumen hasta alcanzar
el nivel deseado.
Finalizar/Rechazar una llamada
En el menú BT phone, presione el botón
¨ ¨ brevemente en el mando a distancia.
CALL IN PROGRESS
00:01:32

-22-
Nota:
a). Antes de usar la función BT con la
unidad, compruebe la guía de
instrucciones de su teléfono o contacte
con el fabricante de su teléfono si no
está seguro si soporta la función
Bluetooth manos libres.
b). Al operar la función Bluetooth con a
unidad, necesita realizar con éxito una
llamada con su teléfono y su unidad.
En adelante, solo necesitará
encenderla y la función de BT funcionará
en tres minutos automáticamente si
desea operarla.
Reproducir música MP3
En el menú BT MUSIC puede reproducir
el MP3 de su teléfono móvil.
(Nota: asegúrese de que soporta perfil
Bluetooth A2DP y AVRCP.)
Operación del BT

-23-
Operación de AUX
En el panel frontal de esta unidad se
encuentra una toma de jack AUX IN,
siga el diagrama mostrado abajo para
conectar dispositivos de reproducción
análogos (solo para conectar Audio, si
desea conectar Vídeo, conecte el
<entrada de vídeo> en la parte posterior
de la unidad). Use este jack para
reproducir sonido de otros equipos de
eproducción como reproductores de
Vídeo Digital, ordenadores, etc., a
través de los altavoces.
1) Por favor, conecte el dispositivo
externo con jack estéreo (3.5mm) a la
toma AUX IN.
TOMA AUX IN EN PANEL FRONTAL
Operación de AUX
2). Presione SRC repetidamente para
seleccionar el modo AUX, el mensaje
será como el siguiente:
Tierra
Derecho
Izquierd
3). Ahora escuchará el sonido del
dispositivo externo reproducido a través
de los altavoces.
4). utilizar el botón VOL + / - para ajustar
el nivel de volumen.

Nota Importante:
1. Durante la reproducción de DISCO, si desea reproducir USB, retire en primer
lugar el USB y vuelva a conectarlo para empezar (cuando Disco y USB estén en
el reproductor).
2. Cuando el DISCO y el USB estén en el reproductor, no se pueden transferir.
OPERACIÓN DE USB
En modo de Reproducción USB
Puede usar los botones ARRIBA, ABAJO, DERECHA e IZQUIERDA para navegar y
para seleccionar archivos para reproducir, presione ENTER para iniciar la
reproducción (o visualización en el caso de archivos JPEG).
Para saltar a la pista siguiente o anterior, presione o . Presione los
botones o para Avance Rápido o Retroceso Rápido.
Los modos de reproducción REPEAT (repetición) son también accesibles pulsando
repetidamente REPEAT hasta encontrar el modo deseado.
En primer lugar retire la tapa antipolvo, seguidamente, según el diagrama que se ve
abajo, conecte su dispositivo al puerto USB de la unidad. Si está propiamente
conectado, el dispositivo quedará montado y empezará la reproducción
automáticamente. (Todas las operaciones son las mismas que en el modo disco.)
OPERACIÓN DE USB
-24-

RETIRAR LA TARJETA
Después de haber insertado una tarjeta de memoria en la ranura de tarjeta de la
unidad principal, la unidad empezará a reproducir los archivos que contenga la
tarjeta. Una vez que la unidad haya leído la tarjeta de memoria, se empezará a
reproducir automáticamente el primer archivo de la tarjeta. Presione y mantenga
presionado el botón SEL repetidamente para cambiar a otros modos.
OPERACIÓN DE Tarjeta
La unidad soporta reproducción de formatos MP3/WMA/JPEG/MP4 almacenados
en una tarjeta de memoria.
Lea la información aquí abajo antes de usar su tarjeta de memoria.
Reproducción de Archivo
Todas las operaciones de reproducción de tarjeta de memoria son las mismas que
la operación de CD/MP3/WMA.
Consulte ¨Operación de MP3/WMA¨ para más detalles.
Cambio de DISCO a Tarjeta
Las operaciones son las mismas que en el modo USB, consulte el apartado
Operación de USB.
Cambio de Tarjeta a DISCO
Las operaciones son las mismas que en el modo USB, consulte el apartado
Operación de USB.
-25-
OPERACIÓN DE Tarjeta
INSERTAR LA TARJETA
En primer lugar deslice el
panel ligeramente a la
derecha, después tire de
él hacia usted.
Inserte la tarjeta de memoria.
Presione hasta oír un ¨CLIC¨.
Coloque el panel para reproducir.
La cara de la etiqueta
hacia arriba
RETIRAR LA TARJETA
Presione hasta oír un ¨CLIC¨.
Retire la tarjeta SD y coloque
el panel para reproducir.
Pulse el botón de apertura
para voltear hacia abajo
del panel.
OPEN
En primer lugar deslice el
panel ligeramente a la
derecha, después tire de
él hacia usted.
Pulse el botón de apertura
para voltear hacia abajo
del panel.
OPEN

REPRODUCCIÓN DE MP3/WMA/JPEG/MPEG4
-26-
REPRODUCCIÓN DE MP3/WMA/JPEG/MPEG4
La unidad soporta MP3/WMA/JPEG/MPEG4. Durante la reproducción presione
MENU, en el monitor aparecerá la siguiente imagen. La unidad reproducirá la
primera pista automáticamente. Puede seleccionar otros modos
(MP3/JPEG/MPEG4) para reproducir.
Ej.: cuando el modo MP3 es seleccionado.
Como muestra la interfaz, use / / / en el mando a distancia para seleccionar
el modo de reproducción o elemento, a continuación presione el botón ENTER en el
mando a distancia para confirmar.
NOTA:
En modo JPEG/MPEG4, las operaciones son las mismas que las operaciones
MP3/WMA.
1 Tipo actual (barra destacada).
2 Selección de modo de reproducción
de audio.
3 Selección de modo de reproducción
de imagen.
4 Selección de modo de reproducción
de película.
5 Pista actual.
FUNCIÓN DE REPETICIÓN
Presionando el botón REPEAT repetidamente puede seleccionar el modo de
reproducción repetida.
REP-ONE:
Reproduce la misma canción una y otra vez.
REP ALL:
Reproduce todas las canciones del disco, a continuación vuelve a repetir el disco
entero de forma continuada.
Reproducción en Avance Rápido/ Retroceso Rápido
En modo de reproducción, presione y mantenga presionado (durante más de dos
segundos) o en el panel frontal para ir a reproducción en AVANCE RÁPIDO o
RETROCESO RÁPIDO.
También puede presionar brevemente los botones o en el mando a distancia
para ejecutarlo.
1
SONGS 001
002
003
004
2 3 4
5
SALTAR HACIA DELANTE / ATRÁS
En modo de reproducción, presione los botones o en el panel frontal para
saltar hacia delante o atrás un elemento de la lista (o presione los botones o
en el mando a distancia).

-27-
CONTROL DEL VOLANTE (Operación SWC)
Hay 2 TECLAS para no más de 12
botones para guardar.
Antes de la operación, seleccionar el
icono para cancelar la entrada
original que configurar su favor.
La primera vez que use esta función,
introduzca una clave (como 0.38, 0.38
es una magnitud de voltaje, según su
vehículo) mediante el mando a distancia
y se muestra en la posición botón 1.
Use la rueda VOL o el botón </> para
hacer la selección.
En primer lugar seleccione Asignar
para iniciar la configuración;
A continuación seleccione los datos
para introducir (0.38) y presione SEL o
ENTER para confirmar;
Seguidamente seleccione un icono de
función como que se mostrará en la
posición de botón 1 y seleccione
para confirmar y volver al menú de
inicio que significa que la selección ha
finalizado.
Las funciones de los iconos son
las siguientes:
Para iniciar la función guardar.
Después de la selección,
para confirmar la operación.
Para cancelar la entrada y
volver a cargar.
Cuando la resistencia eléctrica
sea demasiado baja, seleccionar
este icono para aumentar.
Cuando la resistencia eléctrica
sea demasiado alta, seleccionar
este icono para reducir.
0.38
Presione SRC repetidamente para
seleccionar el modo SWC, el mensaje
será como el siguiente:

Especificaciones
-28-
General:
Voltaje de Alimentación: 12V DC (11V-15V)
Consumo Eléctrico: Menos de 10 A
Potencia máxima de salida: 4 x 80 W
Salida de señal: Salidas Frontal, Posterior y Subwoofer
Características: (1) Respuesta en Frecuencia 20 Hz-20 KHz
(2) S/N Ratio(relación señal/ruido)90 dB (JIS)
(3) Wow y Flutter Por debajo de los límites medibles
Sección RADIO:
Sección de FM
Cobertura de Frecuencia: EUR (87.5 MHz - 108 MHz)
USA (87.5 MHz - 107.9MHz)
American 1 (87.5 MHz - 108MHz)
American 2 (87.5 MHz - 108MHz)
OIRT(88.1 MHz - 107.9MHz)
IF: 10.7 MHz
Sensibilidad (S/N = 30 dB): 15 dBu
Sección de AM(MW)
Cobertura de Frecuencia: EUR (522 KHz - 1620 KHz)
USA (530 KHz - 1710 KHz)
American 1(530 KHz - 1710 KHz)
American 2(520 KHz - 1600 KHz)
OITR (531 KHz - 1602 KHz)
IF: 450 KHz
Sensibilidad (S/N = 20 dB): 40 dBu
Monitor TFT:
Tamaño de Pantalla de Monitor: Ancho 3.2 pulgadas
Sistema de Color: NTSC/PAL
BT:
Especificación de BT: V1.2 Clase 2
Perfiles Soportados de BT: HSP, HFP y A2DP & AVRCP
Rango de frecuencia: 2.4GHz Spectrum
NOTA:
Las especificaciones y el diseño están sujetos a modificaciones sin
previo aviso debido a mejoras en la tecnología.

Antes de consultar la lista de comprobación, examine la conexión del cableado.
Si alguno de los problemas continua después de haber comprobado la lista,
consulte con su proveedor de servicio más cercano.
Diagnóstico y Resolución de Problemas
-29-
BV7348B
Fabricado en China
Introducción del disco en la
orientación opuesta
Presione el botón RESET
El panel frontal no está
correctamente fijado en su lugar
El interruptor de arranque
del vehículo no está conectado
Si el suministro de energía está
correctamente conectado a la
terminal de accesorio del vehículo,
coloque la llave de arranque en
posición ¨ACC¨
El fusible está fundido
Reemplace el fusible
Presencia de disco dentro
del reproductor
Retire el disco del reproductor e
introduzca uno nuevo
Introduzca el disco con la cara
impresa hacia arriba
El disco está extremadamente
sucio o defectuoso
Limpie el disco o intente
reproducir otro disco
La temperatura dentro del
vehículo es demasiado alta
Enfríe el vehículo o espere hasta
que la temperatura ambiente
vuelva a ser normal
La unidad se ha quedado
congelada
El cable de antena no está
conectado
Inserte firmemente el cable
de antena
Las señales son demasiado
débiles
Seleccione una estación
manualmente
PROBLEMA CAUSA SOLUCIÓN
Vídeo/imagen
aparecen en
blanco y negro
El sistema de color está
mal configurado
Cambie a sistema de color
apropiado en el menú
No aparece
vídeo/imagen
La unidad no está conectada
al interruptor de detección
del freno de estacionamiento
El freno de estacionamiento
no está enganchado
Por razones de seguridad no se
muestra vídeo/imagen cuando
el vehículo se está desplazando
Colocar el freno de
estacionamiento hará que
se muestren las imágenes.
La unidad no
responde
No funciona la
radio
El disco no puede
ser cargado o
expulsado
Ausencia de
energía
Imagen sin color
El formato de disco no es
apto para el set de TV
utilizado (PAL/NTSC)
Seleccione un sistema de color
apropiado.
No se puede
reproducir disco
JPEG
No hay archivos JPEG en
el disco
Los archivos JPEG no están
grabados en un formato
compatible.
Cambie los archivos grabados
en el disco usando una
aplicación compatible
Cambie el disco
Realice la conexión correcta de
acuerdo con la
¨conexión de cables¨
-
 1
1
-
 2
2
-
 3
3
-
 4
4
-
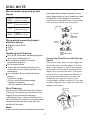 5
5
-
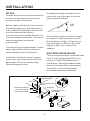 6
6
-
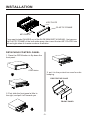 7
7
-
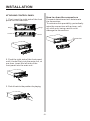 8
8
-
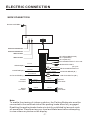 9
9
-
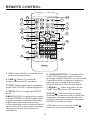 10
10
-
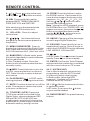 11
11
-
 12
12
-
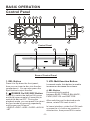 13
13
-
 14
14
-
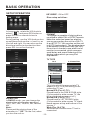 15
15
-
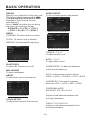 16
16
-
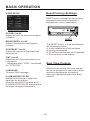 17
17
-
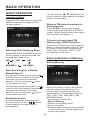 18
18
-
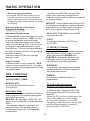 19
19
-
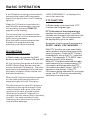 20
20
-
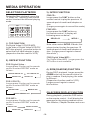 21
21
-
 22
22
-
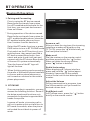 23
23
-
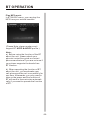 24
24
-
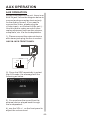 25
25
-
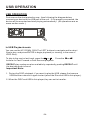 26
26
-
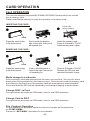 27
27
-
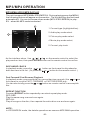 28
28
-
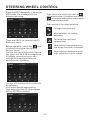 29
29
-
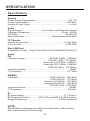 30
30
-
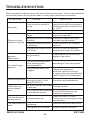 31
31
-
 32
32
-
 33
33
-
 34
34
-
 35
35
-
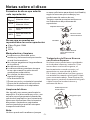 36
36
-
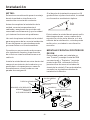 37
37
-
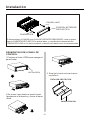 38
38
-
 39
39
-
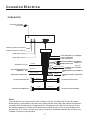 40
40
-
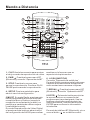 41
41
-
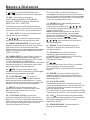 42
42
-
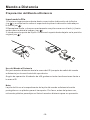 43
43
-
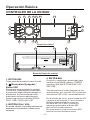 44
44
-
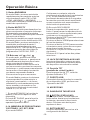 45
45
-
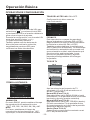 46
46
-
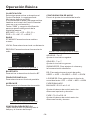 47
47
-
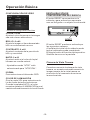 48
48
-
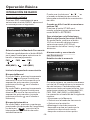 49
49
-
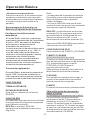 50
50
-
 51
51
-
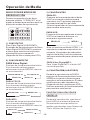 52
52
-
 53
53
-
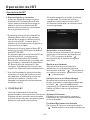 54
54
-
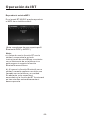 55
55
-
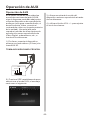 56
56
-
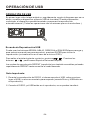 57
57
-
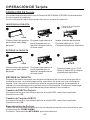 58
58
-
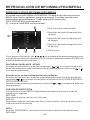 59
59
-
 60
60
-
 61
61
-
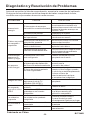 62
62


Boss Audio Systems BV7348B-V2 El manual del propietario
- Categoría
- Receptores de medios de coche
- Tipo
- El manual del propietario
en otros idiomas
Artículos relacionados
-
 Boss Audio Systems BV7348B-V3 El manual del propietario
-
 Boss Audio Systems BV7345 El manual del propietario
-
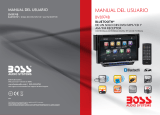 Boss Audio Systems BV8974B El manual del propietario
-
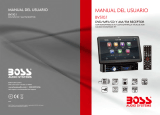 Boss Audio Systems BVS10.1 El manual del propietario
-
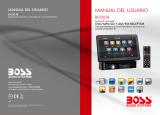 Boss Audio Systems BVS10.1B El manual del propietario
-
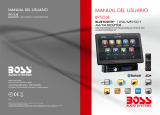 Boss Audio Systems BVS13.3B El manual del propietario
-
 Boss Audio Systems BV8972 El manual del propietario
-
 Boss Audio Systems BV7254 El manual del propietario
-
 Boss Audio Systems BV7260B El manual del propietario
-
 Boss Audio Systems 611UAB Manual de usuario


Otros documentos
-
Premier SCR-2067TFT Instructional Manual
-
Yamaha RX-V740RDS Manual de usuario
-
Jensen VM9511TS Manual de usuario
-
-
-
-
-
-
AMS CT412 BT El manual del propietario
-
 DS18 MRX2 El manual del propietario
