
MODULO DI COMANDO 1
Guida all’utilizzo
User manual
Guide d’utilisation
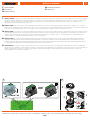
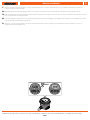
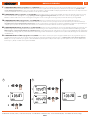
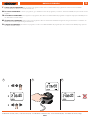
INSTALLAZIONE. Il modulo di comando è a perfetta tenuta stagna e funziona anche immerso permanentemente in acqua no a un metro di profondità
(grado di protezione IP68). Può essere installato all’interno e all’esterno di pozzetti. Anché sia garantita la sua ermeticità, è necessario assicurarsi che il
modulo di comando sia allineato ed inserito nell’apposita guida e che il coperchio trasparente sia perfettamente avvitato no in battuta con la
guarnizione di tenuta ben posizionata nella sede.
INSTALLATION. The control module is fully watertight and will function even when installed permanently under water at a depth of up to one metre
(ingress protection IP68). It can be installed in the open, or in a cup underground. To ensure it is watertight, make sure that the control unit is aligned and
inserted in the guides, and that the clear cover is fully screwed on right up to the seal, which must be correctly positioned.
INSTALLATION. Le module de commande est parfaitement étanche et fonctionne même immergé de façon permanente dans de l'eau jusqu'à un mètre
de profondeur (degré de protection ip68). Il peut être installé à l'intérieur et dans un regard enterré. An de garantir son herméticité, il est nécessaire de
veiller à ce que le module de commande soit aligné et inséré dans le guide prévu à cet eet et que le couvercle transparent soit parfaitement vissé
jusqu'au fond avec le joint d'étanchéité bien positionné dans son logement.
INSTALLATION. Das Steuermodul ist perfekt abgedichtet und auch dauerhaft unter Wasser in einer Tiefe von bis zu einem Meter funktionstüchtig
(Schutzklasse IP68). Es kann sowohl innerhalb als auch außerhalb von Schächten installiert werden. Zum Gewährleisten seiner Dichtheit muss das
Steuermodul in die entsprechende Führung eingesetzt und an dieser ausgerichtet sein; außerdem muss die transparente Abdeckung perfekt, bis zum
Anschlag aufgeschraubt werden und ihre Dichtung korrekt in ihrem Sitz positioniert sein.
INSTALACIÓN. El módulo de mando es perfectamente estanco y funciona aunque siempre esté sumergido en agua hasta un metro de profundidad
(grado de protección IP68). Se puede instalar al aire libre o en una arqueta. Para garantizar su hermeticidad, es necesario asegurarse de que el módulo de
mando esté alineado e insertado en la guía correspondiente y que la tapa transparente esté perfectamente enroscada a fondo con la junta de
estanqueidad bien asentada en su alojamiento.
Per Modulo di comando (codice): - For Control unit (code): - Pour Module de commande (code): - Für 9V Steuermodul (Art.): - Para Módulo de mando (código):
IT
UK
FR
DE
ES
IT
UK
FR
Benuttzzerrhandbucch
Guía de uso
DE
ES
90821
RUNNING
TIME
DAY
123456
ONLY
ALKALINE
BATTERY
LINE B
LINE A
LINE B
LINE A
LINE B
LINE A
RUNNING
TIME
DAY
123456
ONLY
ALKALINE
BATTERY
LINE B
LINE A
LINE B
LINE A
LINE B
LINE A
ONLY
ALKALINE
BATTERY
RUNNING
TIME
DAY
123456
LINE B
LINE A
LINE B
LINE A
LINE B
LINE A
ONLY
ALKALINE
BATTERY
RUNNING
TIME
DAY
123456
LINE B
LINE A
LINE B
LINE A
LINE B
LINE A
ONLY
ALKALINE
BATTERY
RUNNING
TIME
DAY
123456
LINE B
LINE A
LINE B
LINE A
LINE B
LINE A
1
3
2
4
OK!
max 1 m
1 2

MODULO DI COMANDO 2
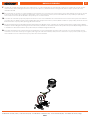
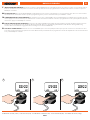
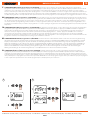
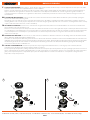
Il modulo di comando può pilotare no a due elettrovalvole con solenoide bistabile a 9V. Collegare il lo verde al polo negativo (lo nero) di ciascuna
elettrovalvola (comune). Collegare il lo bianco al polo positivo (lo rosso) dell’elettrovalvola A. Collegare il lo marrone al polo positivo (lo rosso)
dell’elettrovalvola B.
The control unit can operate one or two 9V bistable solenoid valves. The connection to the solenoid valves can be made underground or above-ground.
Connect the green wire to the negative pole (black wire) of each solenoid valve (common). Connect the white wire to the positive pole (red wire) of
solenoid valve A. Connect the brown wire to the positive pole of solenoid valve B.
Le module de commande peut piloter jusqu'à 2 électrovannes avec solénoïde bistable 9 V. Le branchement avec les électrovannes peut aussi s'eectuer
en surface (hors sol). Reliez le l vert au pôle négatif (-)(l noir) de chaque électrovanne (commun). Reliez le l blanc au pôle positif (+) de l’électrovanne A.
Reliez le l marron au pôle positif (+)(l rouge) de l’électrovanne B.
Das Steuermodul kann bis zu zwei Magnetventile mit bistabilem 9-V-Magnet steuern. Schließen Sie den grünen Draht an den negativen Pol (schwarzer
Draht) der einzelnen Magnetventile an (gemeinsamer Anschluss). Schließen Sie den weißen Draht an den positiven Pol (roter Draht) des Magnetventils an
A. Schließen Sie den braunen Draht an den positiven Pol (roter Draht) des Magnetventils an B.
El módulo de mando puede controlar hasta dos electroválvulas con solenoide biestable de 9 V. Es posible conectarlo con las electroválvulas sin estar
enterrado. Conecte el hilo verde al polo negativo (cable negro) de cada electroválvula (común). Conecte el hilo blanco al polo positivo (cable rojo) de la
electroválvula A. Conecte el hilo marrón al polo positivo de la electroválvula B.
Per Modulo di comando (codice): - For Control unit (code): - Pour Module de commande (code): - Für 9V Steuermodul (Art.): - Para Módulo de mando (código):
IT
UK
FR
DE
ES
90821
RUNNING
TIME
DAY
123456
ONLY
ALKALINE
BATTERY
LINE B
LINE A
LINE B
LINE A
LINE B
LINE A
B
A

MODULO DI COMANDO 3
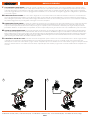
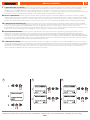
COLLEGAMENTO A RAIN SENSOR. Il modulo di comando è predisposto per il collegamento ad un sensore di pioggia Rain Sensor: quando l’acqua
piovana all’interno di quest’ultimo supera i 5 mm di pluviometria, il sensore sospende automaticamente le irrigazioni per riprenderle quando l’acqua è
evaporata. Interrompere il collegamento tra i li giallo e grigio, tagliando il giunto alla loro estremità. Collegare i li giallo e grigio ai li provenienti dal
sensore di pioggia. Attenzione: se il sensore di pioggia non viene utilizzato, occorre assicurarsi che i li giallo e grigio siano collegati tra loro, ripristinando
se necessario il giunto.
CONNECTION TO RAIN SENSOR. The control unit is designed to be connected to a Rain Sensor. When the rainwater in the sensor exceeds 5 mm, the
sensor automatically stops the irrigation cycles, which only restart once the water has evaporated. Break the connection between the yellow and grey
wires, cutting their joined ends; connect the yellow and grey wires with those of the rain sensor. Warning: if the rain sensor is not used, make certain that
the yellow and grey wires are joined together, restoring the connection, if required.
BRANCHEMENT À RAIN SENSOR. Le module de commande est prévu pour le raccordement à un capteur de pluie Rain Sensor: lorsque l'eau de pluie à
l'intérieur de ce dernier dépasse 5 mm de pluviométrie, le capteur interrompt automatiquement les arrosages pour les reprendre lorsque l'eau s'est
évaporée. Interrompez le branchement entre les ls jaune et gris, en coupant le joint à leur extrémité ; reliez les ls jaune et gris aux ls provenant du
pluviomètre. Attention : si le pluviomètre n'est pas utilisé, assurez-vous que les ls jaune et gris sont reliés entre eux, en rétablissant le joint si nécessaire.
ANSCHLUSS AN DEN RAIN SENSOR. Das Steuermodul ist für den Anschluss an einen Regensensor (Rain Sensor) vorgerüstet: Wenn das Regenwasser
darin eine Niederschlagshöhe von 5mm überschreitet, setzt der Sensor automatisch die Bewässerungen aus und nimmt sie erst wieder auf, wenn das
Wasser verdunstet ist. Trennen Sie den gelben vom grauen Draht, indem Sie die Verbindung an ihren Enden durchschneiden. Schließen Sie den gelben
und den grauen Draht an die Drähte des Regensensors an. Achtung. Wenn der Regensensor nicht verwendet wird, müssen Sie sicherstellen, dass der
gelbe und der graue Draht wieder miteinander verbunden werden.
CONEXIÓN DEL SENSOR DE LLUVIA. El módulo de mando está preparado para la conexión a un sensor de lluvia Rain Sensor: cuando el agua de lluvia
contenida en este supera los 5 mm de pluviometría, el sensor suspende temporalmente los riegos y los reanuda cuando se ha evaporado el agua.
Interrumpa la conexión entre el hilo amarillo y el gris cortando el empalme que une sus extremos. Conecte el hilo amarillo y el gris a los hilos procedentes
del sensor de lluvia. Atención: si no utiliza el sensor de lluvia, compruebe que el hilo amarillo y el gris estén conectados restableciendo el empalme si es
necesario.
Per Modulo di comando (codice): - For Control unit (code): - Pour Module de commande (code): - Für 9V Steuermodul (Art.): - Para Módulo de mando (código):
IT
UK
FR
DE
ES
90821
RUNNING
TIME
DAY
123456
ONLY
ALKALINE
BATTERY
LINE B
LINE A
LINE B
LINE A
LINE B
LINE A
RUNNING
TIME
DAY
123456
ONLY
ALKALINE
BATTERY
LINE B
LINE A
LINE B
LINE A
LINE B
LINE A
1 2

MODULO DI COMANDO 4
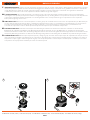
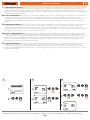
INSERIMENTO BATTERIA. Svitare il coperchio trasparente ed estrarre il modulo di comando. Svitare il tappo dell’alloggiamento della batteria. Connettere
la batteria rispettando la polarità ed inserire la batteria nell’alloggiamento. Riavvitare il tappo controllando che la guarnizione di tenuta sia correttamente
in sede. Riposizionare il modulo di comando seguendo la guida e richiudere il coperchio trasparente controllando che la guarnizione di tenuta sia
correttamente posizionata in sede. È molto importante sostituire la batteria ad ogni inizio stagione.
FITTING THE BATTERY. Unscrew the transparent cover and remove the control unit. Unscrew the cap of the battery housing. Connect the battery,
observing the correct polarity, and replace it inside the housing. Retighten the cap, checking that the seal is positioned correctly in its seat. Reposition the
control unit as indicated and ret the transparent cover, checking that the seal is correctly seated in its groove. Important: be sure to replace the
battery at the beginning of each season.
REMPLACER LA PILE. Dévissez le couvercle transparent et sortez le groupe de commande. Dévisser le bouchon du compartiment à pile. Branchez la pile
en respectant la polarité et placez la pile dans le compartiment à pile. Revissez le bouchon en contrôlant que le joint d'étanchéité soit correctement en
place dans sa rainure. Replacez la commande dans son guide et refermez le couvercle transparent en contrôlant que le joint d'étanchéité soit
correctement en place dans sa rainure. Notez qu'il est très important de remplacer la pile au début de chaque saison.
EINLEGEN DIE BATTERIE. Schrauben Sie die transparente Abdeckung ab und ziehen Sie das Steuermodul heraus. Schrauben Sie den Deckel des
Batteriefachs ab. Schließen Sie die Batterie unter Beachtung der Polarität an und setzen Sie sie in das Batteriefach ein. Schrauben Sie den Verschluss
wieder fest; kontrollieren Sie dabei, dass die Dichtung richtig sitzt. Setzen Sie das Steuermodul gemäß den Anweisungen wieder ein und schließen Sie die
transparente Abdeckung; kontrollieren Sie dabei, dass die Dichtung richtig sitzt. Es ist sehr wichtig, dass Sie die Batterie zu jedem Saisonbeginn ersetzen.
COLOCACIÓN DE LA PILA. Desenrosque la tapa transparente y extraiga el grupo de mando. Desenrosque la tapa del compartimiento de la pila. Conecte
la pila respetando la polaridad e introduzca la pila en su alojamiento. Enrosque la tapa controlando que la arandela quede correctamente colocada en su
alojamiento. Coloque el grupo de mando siguiendo la guía y cierre la tapa transparente controlando que la arandela quede correctamente colocada en
su alojamiento. Es muy importante sustituir la pila al inicio de cada temporada.
Per Modulo di comando (codice): - For Control unit (code): - Pour Module de commande (code): - Für 9V Steuermodul (Art.): - Para Módulo de mando (código):
IT
UK
FR
DE
ES
90821
RUNNING
TIME
DAY
123456
ONLY
ALKALINE
BATTERY
LINE B
LINE A
LINE B
LINE A
LINE B
LINE A
ONLY
ALKALINE
BATTERY
RUNNING
TIME
DAY
123456
LINE B
LINE A
LINE B
LINE A
LINE B
LINE A
9V
Alcaline
9 V
Alkaline
3
3
2
1
1
2
1 2

MODULO DI COMANDO 5
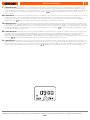
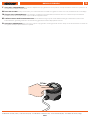
Appena collegata la batteria, il display si accende completamente per 4 secondi, le elettrovalvole ricevono un impulso di chiusura e il modulo di
comando si imposta sull’orario 00:00.
When tting the battery, the display lights up for 4 seconds, the solenoid valves closes, and the timer clock will be set automatically to 00:00.
Après le branchement de la pile, l'acheur s'allume totalement pendant 4 secondes, les électrovannes reçoivent une impulsion de fermeture et l'heure
sur le programmateur est préréglée à 00:00.
Sobald Sie die Batterie angeschlossen haben, geht das Display für 4Sekunden vollständig an, die Magnetventile erhalten einen Schließimpuls und das
Steuermodul stellt sich auf die Uhrzeit 00:00 ein.
Apenas se conecta la pila, el display se enciende completamente durante cuatro segundos, las electroválvulas reciben un impulso de cierre y el
programador muestra las 00:00 horas.
Per Modulo di comando (codice): - For Control unit (code): - Pour Module de commande (code): - Für 9V Steuermodul (Art.): - Para Módulo de mando (código):
IT
UK
FR
DE
ES
90821
RUNNING
TIME
DAY
123456
ONLY
ALKALINE
BATTERY
LINE B
LINE A
LINE B
LINE A
LINE B
LINE A
GNINNUR
EMIT
YAD
123456
LINE A
LINE B
LINE A
LINE B
LINE A
LINE B
GNINNUR
EMIT
YAD
123456
LINE A
LINE B
LINE A
LINE B
LINE A
LINE B
4 sec.

MODULO DI COMANDO 6
IMPOSTAZIONE ORA CORRENTE. Premendo il pulsante centrale ENTER apparirà la scritta OK ad indicare che si può procedere con l’inserimento dell’ora.
Premere una delle frecce per impostare l’ora corrente. Tenendo premuta la freccia la programmazione avanza piu’ velocemente. Inserita l’ora, premere
ENTER per confermare.
SETTING THE TIME. Press the middle ENTER button; “OK” will show on the screen to indicate that you can now enter the time. Press one of the arrows to
set the time. Press and hold the arrow to speed up programming. Once you have entered the time, press ENTER to conrm.
PROGRAMMATION DE L'HEURE COURANTE. En appuyant sur le bouton central ENTER, le message OK apparaît pour indiquer qu'il est possible de saisir
l'heure. Appuyez sur une des èches pour dénir l'heure courante. En maintenant la èche enfoncée, la programmation avance plus rapidement. Une fois
l'heure saisie, appuyez sur ENTER pour conrmer.
EINSTELLUNG DER AKTUELLEN UHRZEIT. Bei Drücken der mittigen ENTER-Taste bestätigt die Anzeige OK, dass Sie jetzt die Uhrzeit eingeben können.
Drücken Sie eine der Pfeiltasten, um die aktuelle Uhrzeit einzustellen. Wenn Sie die Pfeiltaste gedrückt halten, läuft der Wert der Programmierung
schneller. Wenn Sie die Uhrzeit eingegeben haben, bestätigen Sie sie mit der ENTER-Taste.
AJUSTE DE LA HORA ACTUAL. Pulsando el botón central ENTER, aparece el mensaje OK para indicar que se puede continuar con la introducción de la
hora. Pulse una de las echas para ajustar la hora actual. Manteniendo pulsada la echa, la programación avanza más rápidamente. Una vez introducida la
hora, pulse ENTER para conrmar.
Per Modulo di comando (codice): - For Control unit (code): - Pour Module de commande (code): - Für 9V Steuermodul (Art.): - Para Módulo de mando (código):
IT
UK
FR
DE
ES
90821
RUNNING
TIME
DAY
123456
ONLY
ALKALINE
BATTERY
LINE B
LINE A
LINE B
LINE A
LINE B
LINE A
RUNNING
TIME
DAY
123456
ONLY
ALKALINE
BATTERY
LINE B
LINE A
LINE B
LINE A
LINE B
LINE A
RUNNING
TIME
DAY
123456
ONLY
ALKALINE
BATTERY
LINE B
LINE A
LINE B
LINE A
LINE B
LINE A
1 2 3

MODULO DI COMANDO 7
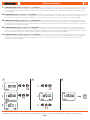
PROGRAMMAZIONE. Il programmatore consente l’irrigazione su due linee A e B. Su ciascuna linea si possono impostare no a 3 programmi: linea A,
programmi 1-3-5; linea B, programmi 2-4-6, per un totale di 6 programmi d’irrigazione giornalieri. Attenzione: tutti i programmi si impostano allo stesso
modo. I programmi vanno inseriti in successione temporale, entro le 24 ore solari. In automatico il programmatore avanza, sia in OPEN che in CLOSED, di 1
minuto rispetto all’ultimo orario impostato. Attenzione: se appare il simbolo lampeggiante, il programmatore sta attendendo un comando:
premere un tasto.
PROGRAMMING. The timer allows you to water along two lines, A and B. Up to 3 programmes can be set on each line: line A, programmes 1-3-5; line B,
programmes 2-4-6, for a total of 6 daily irrigation programmes. Note: all programmes are set in the same way. Programmes must be entered in
chronological order, within a 24-hour timeframe. The timer automatically advances by 1 minute with respect to the set time, both when OPEN and
CLOSED. Note: if the symbol is ashing, this means the timer is waiting for a command. Press any button.
PROGRAMMATION. Le programmateur permet l'arrosage sur deux lignes A et B. Sur chaque ligne, il est possible de dénir jusqu'à 3 programmes : ligne
A, programmes 1-3-5; ligne B, programmes 2-4-6, pour un total de 6 programmes d'arrosage quotidiens. Attention: tous les programmes se règlent de la
même manière. Les programmes sont insérés en succession temporelle, dans les 24 heures solaires. En automatique le programmateur avance, aussi bien
en OPEN qu'en CLOSED, de 1 minute par rapport au dernier horaire déni Attention: si le symbole clignotant apparaît, le programmateur attend
une commande: appuyez sur une touche.
PROGRAMMIERUNG. Der Bewässerungscomputer gestattet die Bewässerung auf zwei Kreisen, A und B. Für jeden Kreis können bis zu drei Programme
eingestellt werden: KreisA, Programm 1-3-5; Kreis B, Programm2-4-6. Das ergibt insgesamt sechs Bewässerungsprogramme pro Tag. Achtung: Alle
Programme werden auf dieselbe Weise eingestellt. Die Programme müssen nacheinander eingestellt werden, innerhalb von 24 Stunden. Im
Automatikmodus rückt der Bewässerungscomputer, sowohl in OPEN als auch in CLOSED, um 1Minute nach der eingestellten Uhrzeit vor. Achtung: Wenn
das Symbol blinkend erscheint, wartet der Bewässerungscomputer auf einen Befehl: Drücken Sie eine Taste.
PROGRAMACIÓN. El programador permite regar en dos líneas, A y B. Para cada línea se pueden congurar hasta 3 programas: línea A, programas 1-3-5;
línea B, programas 2-4-6, para un total de 6 programas de riego diarios. Atención: todos los programas se conguran del mismo modo. Los programas se
deben añadir en orden temporal, a lo largo de las 24 horas solares. El programador avanza automáticamente, tanto en OPEN como en CLOSED, 1 minuto
respecto a la última hora denida. Atención: si aparece el símbolo parpadeando, el programador está esperando una orden: pulse un botón.
Per Modulo di comando (codice): - For Control unit (code): - Pour Module de commande (code): - Für 9V Steuermodul (Art.): - Para Módulo de mando (código):
IT
UK
FR
DE
ES
90821

MODULO DI COMANDO 8
PROGRAMMAZIONE LINEA A (programma 1-3-5) APERTURA. Dopo aver impostato l’ora e il giorno corrente premere la freccia destra per entrare nella
pagina del programma 1 della linea A. Appare l’orario 00:00 preceduto da 1 (programma 1). Premere il tasto centrale ENTER. Sul display compare OK ad
indicare che si può impostare l’orario di apertura utilizzando le frecce (es h 05:00); sul display, in alto, si visualizza 1 (programma 1). Confermare l’orario
premendo ENTER.
PROGRAMMING LINE A (programmes 1-3-5) OPENING. After setting the day and time press the right arrow to open the page for programme 1 on line
A. The time 00:00 will show, preceded by a 1 (for programme 1). Press the middle ENTER button. You will see “OK” on the screen, meaning the opening
time can be set using the arrows (e.g. 05:00). You will see a 1 (for programme 1) at the top of the screen. Conrm the time by pressing ENTER.
PROGRAMMATION LIGNE A (programme 1-3-5) OUVERTURE. Après avoir déni l'heure et le jour courant, appuyez sur la èche droite pour entrer
dans la page du programme 1 de la ligne A. L'horaire 00:00 précédé de 1 (programme 1) apparaît. Appuyez sur la touche centrale ENTER. Sur l'acheur
apparaît OK pour indiquer qu'il est possible de dénir l'horaire d'ouverture avec les èches (ex h 05:00); sur l'acheur, en haut, apparaît 1 (programme 1).
Conrmez l'horaire en appuyant sur ENTER.
PROGRAMMIERUNG KREISA (Programm 1-3-5) ÖFFNUNG. Nachdem Sie die aktuelle Uhrzeit und den aktuellen Wochentag eingestellt haben,
drücken Sie die rechte Pfeiltaste, um die Seite des Programms1 des Kreises A zu önen. Es erscheint die 1 (Programm1) gefolgt von der Uhrzeit 00:00.
Drücken Sie die mittige ENTER-Taste. Auf dem Display bestätigt die Anzeige OK, dass Sie jetzt die Uhrzeit der Önung mit Hilfe der Pfeiltasten eingeben
können (z.B. h 05:00); oben auf dem Display erscheint 1 (Programm1). Bestätigen Sie die Uhrzeit mit der ENTER-Taste.
PROGRAMACIÓN DE LA LÍNEA A (programa 1-3-5) APERTURA. Después de ajustar la hora y el día actuales, pulse la echa derecha para entrar en la
página del programa 1 de la línea A. Aparece la hora 00:00 precedida de 1 (programa 1). Pulse el botón central ENTER. En la pantalla aparece OK para
indicar que se puede ajustar la hora de apertura utilizando las echas (por ej., 05:00 h); en la parte superior de la pantalla aparece 1 (programa 1).
Conrme la hora pulsando ENTER.
Per Modulo di comando (codice): - For Control unit (code): - Pour Module de commande (code): - Für 9V Steuermodul (Art.): - Para Módulo de mando (código):
IT
UK
FR
DE
ES
90821
Mem.
1
3
2
1
3
2
1 2 3

MODULO DI COMANDO 9
PROGRAMMAZIONE LINEA A (programma 1-3-5) CHIUSURA. Premere la freccia destra per passare alla pagina CLOSED (chiusura). Il programmatore
automaticamente propone l’orario di chiusura ad 1 minuto successivo rispetto all’orario di apertura precedentemente impostato (es apertura 05:00 -
orario chiusura proposto 05:01), l’orario è preceduto da 1 (programma 1). Premere ENTER. Sul display appare OK ad indicare che si può impostare l’orario
di chiusura utilizzando le frecce (es 05:20). Confermare l’orario premendo ENTER.
PROGRAMMING LINE A (programmes 1-3-5) CLOSING. Press the right arrow to go to the page “CLOSED”. The timer automatically suggests a closing
time 1 minute after the opening time set (e.g. opening at 05:00, suggested closing time 05:01). The time has a 1 before it (for programme 1). Press
ENTER. You will see “OK” on the screen, meaning the closing time can be set using the arrows (e.g. 05:20). Conrm the time by pressing ENTER.
PROGRAMMATION LIGNE A (programme 1-3-5) FERMETURE. Appuyez sur la èche droite pour passer à la page CLOSED (fermeture). Le
programmateur propose automatiquement l'horaire de fermeture à 1 minute successive par rapport à l'horaire d'ouverture précédemment déni (ex
ouverture 05:00 - horaire de fermeture proposé 05:01), l’horaire est précédé par 1 (programme 1). Appuyez sur ENTER. Sur l'acheur apparaît OK pour
indiquer qu'il est possible de dénir l'horaire de fermeture avec les èches (ex 05:20). Conrmez l'horaire en appuyant sur ENTER.
PROGRAMMIERUNG KREISA (Programm 1-3-5) SCHLIESSUNG. Drücken Sie die rechte Pfeiltaste, um zur Seite CLOSED (Schließung) zu wechseln. Der
Bewässerungscomputer schlägt automatisch die Uhrzeit der Schließung vor, die 1Minute nach der zuvor eingestellten Uhrzeit der Önung liegt (z.B.
Önung 05:00 - vorgeschlagene Uhrzeit der Schließung 05:01); vor der Uhrzeit steht die 1 (Programm1). Drücken Sie die ENTER-Taste. Auf dem Display
erscheint OK, was anzeigt, dass Sie jetzt die Uhrzeit der Schließung mit Hilfe der Pfeiltasten eingeben können (z.B. h 05:20). Bestätigen Sie die Uhrzeit mit
der ENTER-Taste.
PROGRAMACIÓN DE LA LÍNEA A (programa 1-3-5) CIERRE. Pulse la echa derecha para pasar a la página CLOSED (cierre). El programador propone
automáticamente la hora de cierre 1 minuto después de la hora de apertura ajustada previamente (por ej., apertura 05:00 - hora de cierre propuesta
05:01); la hora va precedida de 1 (programa 1). Pulse ENTER. EN la pantalla aparece OK para indicar que se puede ajustar la hora de cierre utilizando las
echas (por ej., 05:20). Conrme la hora pulsando ENTER.
Per Modulo di comando (codice): - For Control unit (code): - Pour Module de commande (code): - Für 9V Steuermodul (Art.): - Para Módulo de mando (código):
IT
UK
FR
DE
ES
90821
Mem.
1
3
2
1
2
1 2 3

MODULO DI COMANDO 10
PROGRAMMAZIONE LINEA B (programma 2-4-6)APERTURA. Premendo la freccia destra si entra nella pagina della prima programmazione
(programma 2) della linea B. Il display visualizza l’orario 00:00 OPEN preceduto da 2 (programma 2). Premere ENTER. Il display visualizza il simbolo OK ad
indicare che si può impostare l’orario di apertura. Il programmatore automaticamente propone l’orario di apertura ad 1 minuto successivo rispetto
all’orario di chiusura precedentemente impostato (del programma 1 - h 05:21). Premere ENTER e con le frecce scegliere l’orario di apertura desiderato (es
05:50). Sul display, in alto, si visualizza 2 (programma 2). Confermare l’orario premendo ENTER. Procedere per la chiusura del programma 2 con la stessa
modalità del programma 1. Per l’impostazione delle aperture/chiusure dei restanti programmi (3-5 A; 4-6 B) ripetere i passaggi precedentemente elencati.
PROGRAMMING LINE B (programmes 2-4-6) OPENING. Press the right arrow to open the rst programming page (programme 2) for line B. The time
00:00 OPEN will show on the screen, preceded by a 2 (for programme 2). Press ENTER. You will see “OK” on the screen, meaning the opening time can be
set. The timer automatically suggests an opening time 1 minute after the closing time set (for programme 1, 05:21). Press ENTER and use the arrows to
choose the desired opening time (e.g. 05:50). You will see a 2 (for programme 2) at the top of the screen. Conrm the time by pressing ENTER. To close
programme 2, follow the same procedure as for programme 1. To set the opening/closing times for the remaining programmes (3-5 A; 4-6 B), repeat the
steps above.
PROGRAMMATION LIGNE B (programme 2-4-6) OUVERTURE. En appuyant sur la èche droite, on entre dans la page de la première programmation
(programme 2) de la ligne B. Sur l'acheur apparaît l'horaire 00:00 OPEN précédé de 2 (programme 2). Appuyez sur ENTER. Sur l'acheur apparaît le
symbole OK pour indiquer qu'il est possible de dénir l'horaire d'ouverture. Le programmateur propose automatiquement l’horaire d'ouverture à 1
minute successive par rapport à l'horaire de fermeture précédemment déni (du programme 1 - h 05:21). Appuyez sur ENTER et avec les èches,
choisissez l'horaire d'ouverture souhaité (ex 05:50). Sur l'acheur, en haut, apparaît 2 (programme 2). Conrmez l’horaire en appuyant sur ENTER.
Procédez pour la fermeture du programme 2 avec la même modalité que celle du programme 1. Pour la programmation des ouvertures/fermetures des
programmes restants (3-5 A; 4-6 B), répétez les passages précédemment énumérés.
PROGRAMMIERUNG KREISB (Programm 2-4-6) ÖFFNUNG. Durch Drücken der rechten Pfeiltaste önet sich die Seite der ersten Programmierung
(Programm2) des Kreises B. Auf dem Display erscheint die 2 (Programm2) gefolgt von der Uhrzeit 00:00 OPEN. Drücken Sie die ENTER-Taste. Auf dem
Display erscheint OK, was anzeigt, dass Sie jetzt die Uhrzeit der Schließung einstellen können. Der Bewässerungscomputer schlägt automatisch die
Uhrzeit der Schließung vor, die 1Minute nach der zuvor eingestellten Uhrzeit der Önung (des Programms 1 - h 05:21) liegt. Drücken Sie ENTER und
wählen Sie mit den Pfeiltasten die gewünschte Uhrzeit der Önung (z.B. 05:50). Oben auf dem Display erscheint 2 (Programm2). Bestätigen Sie die
Uhrzeit mit der ENTER-Taste. Für die Schließung des Programms2 gehen Sie vor, wie für das Programm1 beschrieben. Für die Einstellung der
Önungen/Schließungen der restlichen Programme (3-5 A; 4-6 B) wiederholen Sie die zuvor beschriebenen Schritte.
PROGRAMACIÓN DE LA LÍNEA B (programa 2-4-6) APERTURA. Pulsando la echa derecha, se entra en la página de la primera programación
(programa 2) de la línea B. La pantalla muestra la hora 00:00 OPEN precedida de 2 (programa 2). Pulse ENTER. La pantalla muestra el símbolo OK para
indicar que se puede ajustar la hora de apertura. El programador propone automáticamente la hora de apertura 1 minuto después de la hora de cierre
ajustada previamente (del programa 1 - 05:21 h). Pulse ENTER y seleccione con las echas la hora de apertura deseada (por ej., 05:50). En la parte superior
de la pantalla aparece 2 (programa 2). Conrme la hora pulsando ENTER. Para el cierre del programa 2 siga el mismo procedimiento que para el programa
1. Para el ajuste de la apertura/cierre de los demás programas (3-5 A; 4-6 B) repita los pasos anteriores.
Per Modulo di comando (codice): - For Control unit (code): - Pour Module de commande (code): - Für 9V Steuermodul (Art.): - Para Módulo de mando (código):
IT
UK
FR
DE
ES
90821
Mem.
1
3
2
1
2
1 2 3

MODULO DI COMANDO 11
PROGRAMMAZIONE SETTIMANALE. Premere la freccia destra no a visualizzare la pagina di programmazione settimanale. Premere ENTER per scegliere
i giorni in cui si vuole irrigare, di default sono inseriti tutti i giorni della settimana. Con le frecce posizionare il cursore sotto il giorno da abilitare o
disabilitare e premere ENTER. Attenzione: i giorni impostati valgono per entrambe le linee. Il giorno 1 coincide con il giorno in cui si imposta il
programmatore per la prima volta e serve come riferimento. Esempio: se giovedì = 1 e si desidera saltare l’irrigazione del venerdì, il giorno da eliminare è il
2. Posizionare il cursore sotto EXIT. Premere ENTER per uscire dalla pagina della programmazione settimanale.
WEEKLY PROGRAMMING. Press the right arrow until the weekly programming page is shown. Press ENTER to select the days on which you want to
irrigate. All days of the week are selected by default. Use the arrows to position the cursor under the day you want to enable or disable and press ENTER.
Note: the day settings apply to both lines. Day 1 is the day the timer is set for the rst time and is used as a reference. Example: If Thursday = day 1 and the
intention is to skip watering on Friday, the day to deselect is day 2. Position the cursor under EXIT. Press ENTER to exit the weekly programming page.
PROGRAMMATION HEBDOMADAIRE. Appuyez sur la èche droite jusqu'à visualiser la page de programmation hebdomadaire. Appuyez sur ENTER
pour choisir les jours où vous souhaitez arroser, par défaut tous les jours de la semaine sont insérés. Avec les èches, positionnez le curseur sous le jour à
activer ou désactiver et appuyez sur ENTER. Attention: les jours programmés valent pour les deux lignes. Le jour 1 coïncide avec le jour où le
programmateur est réglé pour la première fois et sert de référence. Exemple : si jeudi = jour 1, pour sauter l'arrosage du vendredi le jour à éliminer est le 2.
Positionnez le curseur sous EXIT. Appuyez sur ENTER pour sortir de la page de la programmation hebdomadaire.
WOCHENPROGRAMMIERUNG. Drücken Sie auf die rechte Pfeiltaste, bis die Seite der Wochenprogrammierung angezeigt wird. Drücken Sie die
ENTER-Taste, um die Tage auszuwählen, an denen Sie bewässern möchten; standardmäßig sind alle Wochentage ausgewählt. Mit den Pfeiltasten
positionieren Sie den Cursor unter dem Tag, der aktiviert oder deaktiviert werden soll, und drücken Sie ENTER. Achtung: Die eingestellten Tage gelten für
beide Kreise. Der Tag1 entspricht dem Tag, an dem der Bewässerungscomputer zum ersten Mal programmiert wird, und er dient als Bezugswert. Beispiel:
wenn Donnerstag = 1 und die Bewässerung am Freitag ausgesetzt werden soll, ist der zu löschende Wochentag die 2. Positionieren Sie den Cursor unter
EXIT. Drücken Sie ENTER, um die Seite der Wochenprogrammierung zu verlassen.
PROGRAMACIÓN SEMANAL. Pulse la echa derecha hasta que aparezca la página de programación semanal. Pulse ENTER para seleccionar los días en
los que se desea regar. Por defecto, están activados todos los días de la semana. Utilice las echas para situar el cursor debajo del día que desea habilitar o
deshabilitar y pulse ENTER. Atención: los días congurados valen para ambas líneas. El día 1 coincide con el día en el que se congura el programador por
primera vez y sirve de referencia. Ejemplo: si el jueves = día 1 y se desea saltar el riego del viernes, el día que se debe eliminar es el 2. Sitúe el cursor
debajo de EXIT. Pulse ENTER para salir de la página de la programación semanal.
Per Modulo di comando (codice): - For Control unit (code): - Pour Module de commande (code): - Für 9V Steuermodul (Art.): - Para Módulo de mando (código):
IT
UK
FR
DE
ES
90821
1
3
2
1
2
1
2
1 2 3

MODULO DI COMANDO 12
PROGRAMMAZIONE MANUALE. Posizionare il cursore sotto EXIT. Premere ENTER per uscire dalla pagina della programmazione settimanale e la freccia
destra per entrare in quella manuale: funzione utile per eettuare un’ulteriore irrigazione senza cancellare i programmi impostati. Il programmatore
automaticamente imposta un tempo d’irrigazione di 5 minuti. Premere ENTER. Con la freccia sinistra si avvia l’irrigazione. Per interrompere l’irrigazione
premere la freccia destra e poi ENTER. Premendo la freccia destra si accede alla pagina della programmazione manuale della linea B. Con la freccia destra
si ritorna alla pagina iniziale (ora/giorno).
MANUAL PROGRAMMING. Position the cursor under EXIT. Press ENTER to exit the weekly programming page and the right arrow to open the manual
programming page. Manual programming is useful for running an additional irrigation cycle, without deleting the programmes set. The timer
automatically sets an irrigation run time of 5 minutes. Press ENTER. Use the left arrow to start irrigating. To interrupt the cycle before the end, press the
right arrow and then ENTER. Press the right arrow to open the manual programming page for line B. Use the right arrow to return to the initial page
(day/time).
PROGRAMMATION MANUELLE. Positionnez le curseur sous EXIT. Appuyez sur ENTER pour sortir de la page de la programmation hebdomadaire et sur
la èche droite pour entrer dans celle manuelle: fonction utile pour eectuer un ultérieur arrosage sans supprimer les programmes dénis. Le
programmateur règle automatiquement un temps d'arrosage de 5 minutes. Appuyez sur ENTER. Avec la èche gauche, on active l'arrosage. Pour
interrompre l'arrosage, appuyez sur la èche droite, puis sur ENTER. En appuyant sur la èche droite, on accède à la page de la programmation manuelle
de la ligne B. Avec la èche droite, on retourne à la page initiale (heure/jour).
MANUELLE PROGRAMMIERUNG. Positionieren Sie den Cursor unter EXIT. Drücken Sie ENTER, um die Seite der Wochenprogrammierung zu verlassen,
und die rechte Pfeiltaste, um die Seite der manuellen Programmierung zu önen: Diese Funktion ist hilfreich, wenn Sie eine weitere Bewässerung
vornehmen möchten, ohne die eingestellten Programme zu löschen. Der Bewässerungscomputer stellt automatisch eine Bewässerungsdauer von 5
Minuten ein. Drücken Sie ENTER. Mit der linken Pfeiltaste starten Sie die Bewässerung.. Zum Unterbrechen der Bewässerung drücken Sie die rechte
Pfeiltaste und dann ENTER. Durch Drücken der rechten Pfeiltaste önet sich die Seite der manuellen Programmierung des Kreises B. Mit der rechten
Pfeiltaste kehren Sie zur Startseite zurück (Uhrzeit/Wochentag).
PROGRAMACIÓN MANUAL. Sitúe el cursor debajo de EXIT. Pulse ENTER para salir de la página de la programación semanal y la echa derecha para
entrar en la manual: esta función resulta útil para realizar un riego adicional sin eliminar los programas congurados. El programador ajusta
automáticamente un tiempo de riego de 5 minutos. Pulse ENTER. Con la echa izquierda se inicia el riego. Para interrumpir el riego, pulse la echa
derecha seguida de ENTER. Pulsando la echa derecha, se accede a la página de la programación manual de la línea B. Con la echa derecha se vuelve a
la página inicial (hora/día).
Per Modulo di comando (codice): - For Control unit (code): - Pour Module de commande (code): - Für 9V Steuermodul (Art.): - Para Módulo de mando (código):
IT
UK
FR
DE
ES
90821
1
3
2
2
11
2
1 2 3

MODULO DI COMANDO 13
CANCELLARE UN PROGRAMMA. Per cancellare un programma andare nella modalità CLOSED del programma da eliminare. Premere ENTER e
successivamente le due frecce contemporaneamente.
DELETING A PROGRAMME. To delete a programme, go to CLOSED mode for the programme you want to delete. Press ENTER, then press the two arrows
together.
SUPPRIMER UN PROGRAMME. Pour supprimer un programme, allez dans la modalité CLOSED du programme à supprimer. Appuyez sur ENTER, puis sur
les deux èches en même temps.
LÖSCHEN EINES PROGRAMMS. Zum Löschen eines Programms önen Sie den Modus CLOSED des Programms, das gelöscht werden soll. Drücken Sie
ENTER und anschließend gleichzeitig beide Pfeiltasten.
ELIMINAR UN PROGRAMA. Para eliminar un programa, acceda a la modalidad CLOSED del programa que desea eliminar. Pulse ENTER y luego pulse las
dos echas al mismo tiempo.
Per Modulo di comando (codice): - For Control unit (code): - Pour Module de commande (code): - Für 9V Steuermodul (Art.): - Para Módulo de mando (código):
IT
UK
FR
DE
ES
90821
Mem.
RUNNING
TIME
DAY
123456
ONLY
ALKALINE
BATTERY
LINE B
LINE A
LINE B
LINE A
LINE B
LINE A
1
3
2
1 2 3

MODULO DI COMANDO 14
RESETTARE IL PROGRAMMATORE. Per resettare completamente il programmatore tenere premute contemporaneamente le due frecce per almeno 10
secondi, nché sul display compare 00:00.
RESETTING THE TIMER. To fully reset the timer, press and hold the two arrow buttons together for at least 10 seconds, until 00:00 shows on the display.
RÉINITIALISER LE PROGRAMMATEUR. Pour réinitialiser complètement le programmateur, maintenez enfoncées en même temps les deux èches
pendant au moins 10 secondes, jusqu'à ce que sur l'acheur apparaisse 00:00.
ZURÜCKSETZEN DES BEWÄSSERUNGSCOMPUTERS. Um den Bewässerungscomputer auf die Fabrikeinstellungen zurückzusetzen, halten Sie die
beiden Pfeiltasten gleichzeitig mindestens 10Sekunden lang gedrückt, bis auf dem Display 00:00 erscheint.
RESETEAR EL PROGRAMADOR. Para resetear por completo el programador, mantenga pulsadas al mismo tiempo las dos echas durante un mínimo de
10 segundos, hasta que aparezca 00:00 en la pantalla.
Per Modulo di comando (codice): - For Control unit (code): - Pour Module de commande (code): - Für 9V Steuermodul (Art.): - Para Módulo de mando (código):
IT
UK
FR
DE
ES
90821
RUNNING
TIME
DAY
123456
ONLY
ALKALINE
BATTERY
LINE B
LINE A
LINE B
LINE A
LINE B
LINE A
10 sec.

MODULO DI COMANDO 15
PULIZIA E MANUTENZIONE. A ne stagione, prima dell’arrivo delle gelate invernali, chiudere l’acqua e scaricare l’impianto facendo aprire in modalità
manuale le valvole in modo che l’acqua rimasta al loro interno deuisca.
Svitare il coperchio trasparente ed estrarre il modulo di comando. Svitare il tappo dell’alloggiamento della batteria ed estrarre la batteria. Riavvitare il
tappo controllando che la guarnizione di tenuta sia correttamente in sede. Riposizionare il modulo di comando seguendo la guida e richiudere il
coperchio trasparente controllando che la guarnizione di tenuta sia correttamente posizionata in sede. Con l’arrivo della nuova stagione inserire una
nuova batteria.
CLEANING AND MAINTENANCE. At the end of the season, before the winter frosts, turn o the water and drain the system, manually opening the
valves to run o the water remaining inside.
Unscrew the clear cover and remove the control unit. Unscrew the cap on the battery compartment and take out the battery. Screw the cap back on,
checking that the seal is correctly in place. Reposition the control unit using the guide and put the clear cover back on, checking that the seal is correctly
in place. At the start of the new season, insert a new battery.
NETTOYAGE ET ENTRETIEN. En n de saison, avant l'arrivée des gelées hivernales, fermez l'eau et videz l'installation en ouvrant en mode manuel les
vannes an que l'eau restée à l'intérieur sorte.
Dévissez le couvercle transparent et extrayez le module de commande. Dévissez le bouchon du logement de la pile et retirez la pile. Revissez le bouchon
en contrôlant que le joint d'étanchéité soit correctement dans son logement. Repositionnez le module de commande en suivant le guide et refermez le
couvercle transparent en contrôlant que le joint d'étanchéité soit correctement positionné dans son logement. Avec l'arrivée de la nouvelle saison,
insérez une nouvelle pile.
REINIGUNG UND WARTUNG. Am Saisonende, vor dem ersten Frost, schließen Sie das Wasser und leeren Sie die Anlage, indem Sie die Ventile manuell
önen, damit das enthaltene Restwasser abießen kann.
Schrauben Sie die transparente Abdeckung ab und ziehen Sie das Steuermodul heraus. Schrauben Sie den Deckel des Batteriefachs ab und nehmen Sie
die Batterie heraus. Schrauben Sie den Verschluss wieder fest; kontrollieren Sie dabei, dass die Dichtung richtig sitzt. Setzen Sie das Steuermodul gemäß
den Anweisungen wieder ein und schließen Sie die transparente Abdeckung; kontrollieren Sie dabei, dass die Dichtung richtig sitzt. Am Anfang der
neuen Saison setzen Sie eine neue Batterie ein.
LIMPIEZA Y MANTENIMIENTO. A nal de temporada, antes de que lleguen las heladas del invierno, corte el agua y vacíe el sistema, abriendo
manualmente las válvulas para que salga el agua que quede en su interior.
Desenrosque la tapa transparente y extraiga el módulo de mando. Desenrosque el tapón del alojamiento de la pila y extraiga la pila. Vuelva a enroscar el
tapón, comprobando que la junta de estanqueidad esté colocada correctamente en su alojamiento. Vuelva a colocar el módulo de mando siguiendo la
guía y cierre la tapa transparente, comprobando que la junta de estanqueidad esté colocada correctamente en su alojamiento. Al llegar la nueva
temporada, coloque una pila nueva.
Per Modulo di comando (codice): - For Control unit (code): - Pour Module de commande (code): - Für 9V Steuermodul (Art.): - Para Módulo de mando (código):
IT
UK
FR
DE
ES
90821
ONLY
ALKALINE
BATTERY
RUNNING
TIME
DAY
123456
LINE B
LINE A
LINE B
LINE A
LINE B
LINE A
9 V
Alkaline
ONLY
ALKALINE
BATTERY
RUNNING
TIME
DAY
123456
LINE B
LINE A
LINE B
LINE A
LINE B
LINE A
1
24
3
4
31
2
1 2
-
 1
1
-
 2
2
-
 3
3
-
 4
4
-
 5
5
-
 6
6
-
 7
7
-
 8
8
-
 9
9
-
 10
10
-
 11
11
-
 12
12
-
 13
13
-
 14
14
-
 15
15


en otros idiomas
- français: claber Control Unit Mode d'emploi
- italiano: claber Control Unit Guida utente
- English: claber Control Unit User guide
- Deutsch: claber Control Unit Benutzerhandbuch
Artículos relacionados
-
claber 1” F. programmable solenoid valve Guía del usuario
-
claber 90826 Manual de usuario
-
-
-
-
-
-
claber Hydro-4 Guía del usuario
-
-
Otros documentos
-
Toro TEMPUS Series Controller Manual de usuario
-
Rain Bird TBOS-BT Battery-Operated Bluetooth Controllers Manual de usuario
-
Genius AM 433 RC A245 ZLV292 03 Multi Instrucciones de operación
-
Vision TC2-CTL1 El manual del propietario
-
 Lutron Electronics PowPak RMKS-DAL32-SZ Installation Instructions Manual
-
Haier LET32T1000HFM Manual de usuario
-
-
-
Sony MDS-JA30ES El manual del propietario
