ELETTRA - ELETTROVALVOLA PROGRAMMABILE 12
PULIZIA E MANUTENZIONE. A ne stagione, prima dell’arrivo delle gelate invernali, chiudere l’acqua e scaricare l’impianto facendo aprire in modalità
manuale la valvola in modo che l’acqua rimasta al suo interno deuisca.
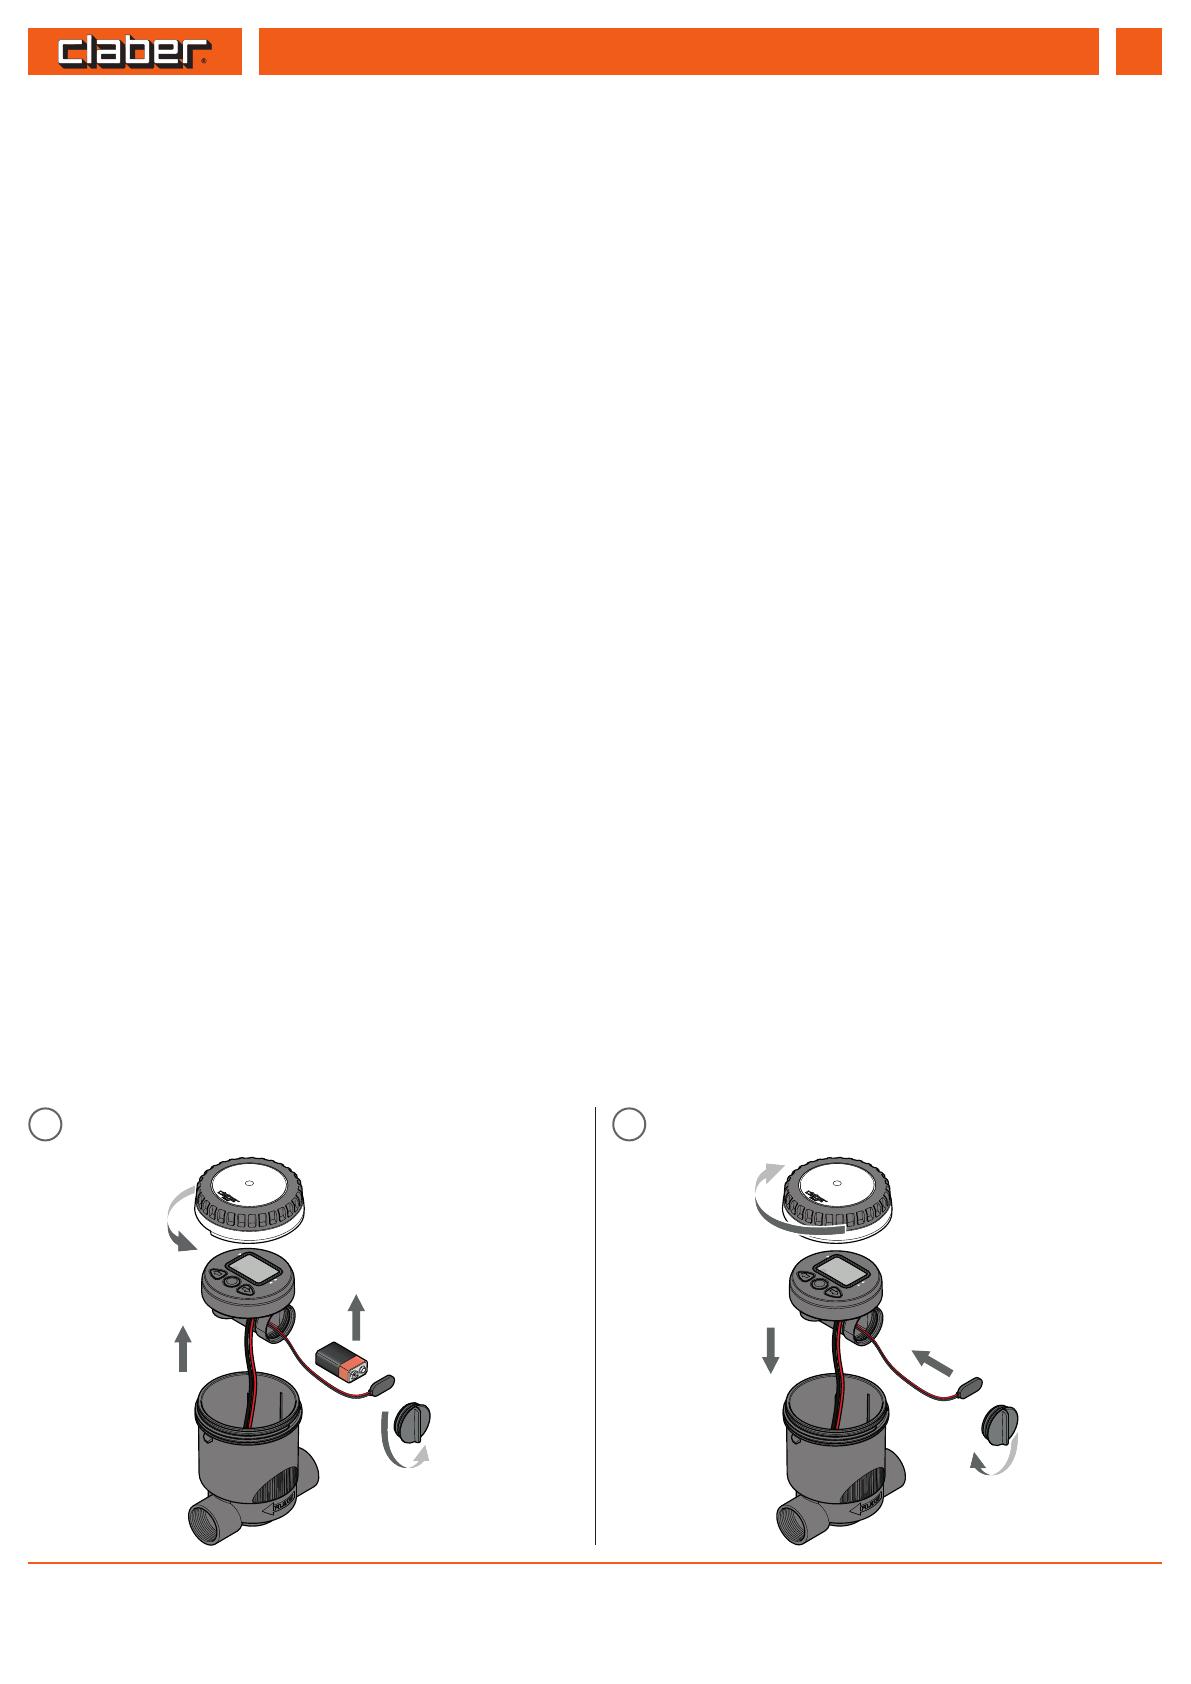
Svitare il coperchio trasparente. Estrarre il gruppo di comando. Svitare il tappo dell’alloggiamento della batteria e rimuovere la batteria. Riavvitare il tappo
controllando che la guarnizione di tenuta sia correttamente posizionata in sede. Allineare il gruppo di comando alla apposita guida e reinserirlo nella
sede. Richiudere il coperchio trasparente controllando che la guarnizione di tenuta sia correttamente posizionata in sede. Con l’arrivo della nuova
stagione inserire una nuova batteria.
CLEANING AND MAINTENANCE. At the end of the season, before the winter frosts, turn o the water and drain the system, manually opening the valve
to run o the water remaining inside.
Unscrew the clear cover. Remove the control unit. Unscrew the cap on the battery compartment and remove the battery. Screw the cap back on,
checking that the seal is correctly in place. Line up the control unit with the guides and put back in place. Put the clear cover back on, checking that the
seal is correctly in place. At the start of the new season, insert a new battery.
NETTOYAGE ET ENTRETIEN. En n de saison, avant l'arrivée des gelées hivernales, fermez l'eau et videz l'installation en ouvrant en mode manuel la
vanne an que l'eau restée à l'intérieur sorte.
Dévissez le couvercle transparent. Retirez le groupe de commande. Dévissez le bouchon du logement de la pile et retirez la pile. Revissez le bouchon en
contrôlant que le joint d'étanchéité soit correctement positionné dans son logement. Alignez le groupe de commande au guide prévu à cet eet et
réinsérez-le dans le logement. Referme le couvercle transparent en contrôlant que le joint d'étanchéité soit correctement positionné dans son logement.
Avec l'arrivée de la nouvelle saison, insérez une nouvelle pile.
REINIGUNG UND WARTUNG. Am Saisonende, vor dem ersten Frost, schließen Sie das Wasser und leeren Sie die Anlage, indem Sie das Ventil manuell
önen, damit das enthaltene Restwasser abießen kann.
Schrauben Sie die transparente Abdeckung ab. Ziehen Sie die Steuergruppe heraus. Schrauben Sie den Deckel des Batteriefachs ab und entfernen Sie die
Batterie. Schrauben Sie den Verschluss wieder fest; kontrollieren Sie dabei, dass die Dichtung richtig sitzt. Richten Sie die Steuergruppe an der
entsprechenden Führung aus und setzen Sie sie wieder in ihren Sitz ein. Schließen Sie die transparente Abdeckung wieder; kontrollieren Sie dabei, dass
die Dichtung richtig sitzt. Am Anfang der neuen Saison setzen Sie eine neue Batterie ein.
LIMPIEZA Y MANTENIMIENTO. A nal de temporada, antes de que lleguen las heladas del invierno, corte el agua y vacíe el sistema, abriendo
manualmente la válvula para que salga el agua que quede en su interior.
Desenrosque la tapa transparente. Extraiga el grupo de mando. Desenrosque el tapón del alojamiento de la pila y quite la pila. Vuelva a enroscar el tapón,
comprobando que la junta de estanqueidad esté colocada correctamente en su alojamiento. Alinee el grupo de mando con la guía correspondiente y
vuelva a montarlo en su alojamiento. Vuelva a cerrar la tapa transparente, comprobando que la junta de estanqueidad esté colocada correctamente en su
alojamiento. Al llegar la nueva temporada, coloque una pila nueva.
Per Elettra (codice): - For Programmable solenoid valve (code): - Pour Électrovanne programmable (code): - Für Programmierbares Magnetventil (Art.): - Para
Electroválvula progr. (código):
IT
UK
FR
DE
ES
90826
ONLY
ALKALINE
BATTERY
RUNNING
TIME
DAY
123456
9 V
Alkaline
ONLY
ALKALINE
BATTERY
RUNNING
TIME
DAY
123456
SELECT
SELECT
1
24
3
4
31
2
1 2


