
ELETTROVALVOLA PROGRAMMABILE RF 1
Guida all’utilizzo
User manual
Guide d’utilisation
INSTALLAZIONE. L’elettrovalvola programmabile è a perfetta tenuta stagna e funziona anche immersa permanentemente in acqua no a un metro di
profondità (grado di protezione IP68). Può essere installata all’interno di pozzetti, sia in posizione orizzontale che verticale. Anché sia garantita la sua
ermeticità, è necessario assicurarsi che il gruppo di comando sia allineato ed inserito nell’apposita guida e che il coperchio trasparente sia perfettamente
avvitato no in battuta con la guarnizione di tenuta ben posizionata nella sede. Attenzione: assicurarsi di installare l’elettrovalvola programmabile
rispettando la direzione del usso d’acqua indicata dalla freccia “FLOW”.
INSTALLATION. The programmable solenoid valve is fully watertight and will function even if installed permanently under water at a depth of up to one
metre (IP68 ingress protection). It can be installed in the open or in a valve box, positioned either horizontally or vertically. To ensure it is watertight, make
sure that the control unit is aligned and inserted in the guides, and that the clear cover is fully screwed on right up to the seal, which must be correctly
positioned. Warning: be certain to install the programmable solenoid valve observing the water ow direction indicated by the arrow: "FLOW".
INSTALLATION. L'électrovanne programmable est parfaitement étanche et fonctionne même plongée de façon permanente dans de l'eau jusqu'à un
mètre de profondeur (degré de protection IP68). Elle peut être montée dans un regard en position horizontale ou verticale. An de garantir son
herméticité, il est nécessaire de veiller à ce que le groupe de commande soit aligné et inséré dans le guide prévu à cet eet et que le couvercle
transparent soit parfaitement vissé jusqu'au fond avec le joint d'étanchéité bien positionné dans son logement. Attention : assurez-vous d'installer
l'électrovanne programmable en respectant le sens du débit d'eau indiqué par le èche “FLOW”.
INSTALLATION. Das programmierbare Magnetventil ist perfekt abgedichtet und auch dauerhaft unter Wasser in einer Tiefe von bis zu einem Meter
funktionstüchtig (Schutzklasse IP68). Es kann im Inneren von Ventilschächten sowohl in waagerechter als auch senkrechter Position installiert werden.
Zum Gewährleisten seiner Dichtheit muss die Steuergruppe in die entsprechende Führung eingesetzt und an dieser ausgerichtet sein; außerdem muss
die transparente Abdeckung perfekt, bis zum Anschlag aufgeschraubt werden und ihre Dichtung korrekt in ihrem Sitz positioniert sein. Achtung: Stellen
Sie sicher, dass Sie das programmierbare Magnetventil entsprechend der Richtung des Wasserusses installieren, die durch den Pfeil „FLOW“ angezeigt
wird.
INSTALACIÓN. La electroválvula programable es perfectamente estanca y funciona aunque siempre esté sumergida en agua hasta un metro de
profundidad (grado de protección IP68). Se puede instalar en arquetas, tanto en horizontal como en vertical. Para garantizar su hermeticidad, es necesario
asegurarse de que el grupo de mando esté alineado e insertado en la guía correspondiente y de que la tapa transparente esté perfectamente enroscada
a fondo con la junta de estanqueidad bien asentada en su alojamiento. Atención: cuando instale la electroválvula programable, compruebe que se
respete la dirección del ujo de agua, indicada por la echa "FLOW".
Per Elettrovalvola programmabile 1” M RF (codice): - For 1” M. RF programmable solenoid valve (code): - Pour 1” M électrovanne programmable RF (code): - Für RF
programmierbares 1” AG Magnetventil (Art.): - Para 1” M electroválvula programable RF (código):
IT
UK
FR
DE
ES
IT
UK
FR
Benuttzzerrhandbucch
Guía de uso
DE
ES
8323
ONLY
ALKALINE
BATTERY
max 1m
ONLY
ALKALINE
BATTERY
ONLY
ALKALINE
BATTERY
ONLY
ALKALINE
BATTERY
1
3
2
4
ONLY
ALKALINE
BATTERY
1 32

ELETTROVALVOLA PROGRAMMABILE RF 2
INSERIMENTO BATTERIE - Elettrovalvola. Svitare il coperchio trasparente. Estrarre il gruppo di comando. Svitare il tappo del vano batterie, estrarre il
porta-batterie, se presenti rimuovere le batterie esaurite. Inserire le batterie nuove rispettando la polarità. Riavvitare il tappo controllando che la
guarnizione di tenuta sia correttamente posizionata in sede. Allineare il gruppo di comando alla apposita guida e reinserirlo nella sede. Richiudere il
coperchio trasparente controllando che la guarnizione di tenuta sia correttamente posizionata in sede. Attenzione: utilizzare esclusivamente batterie di
marca, Alkaline AAA da1,5 V non ricaricabili.
All’inserimento delle batterie si avvia un ciclo di inizializzazione (sequenza di accensione dei led e di chiusura delle valvole).
Importante: ricordarsi di aprire il rubinetto dell’acqua.
FITTING THE BATTERIES - Solenoid valve. Unscrew the transparent cover. Remove the control unit. Unscrew the battery compartment plug, take out
the battery-holder, and if present, remove the drained batteries. Fit the new batteries in the holder, observing the correct polarity. Retighten the cap,
checking that the seal is positioned correctly in its seat. Align the control unit with the guide on the casing and t it back into place. Retighten the
transparent cover, checking that the seal is in its seat. Warning: use branded AAA Alkaline 1.5 V batteries (not rechargeable) only.
Once the batteries are tted, an initialization routine will start (display Leds light up in sequence, valves close in sequence).
Important: remember to turn on the water tap.
MISE EN PLACE DE LES PILES - Électrovanne. Dévissez le couvercle transparent. Sortez le groupe de commande. Dévissez le couvercle du
compartiment des piles, enlevez le support des piles, et si présentes retirez les piles usées. Placez les piles neuves en respectant la polarité. Revissez le
bouchon en contrôlant que le joint d'étanchéité soit correctement en place dans sa rainure. Alignez le groupe de commande sur son guide et replacez-le
dans son logement. Refermez le couvercle transparent en contrôlant que le joint d'étanchéité soit correctement en place dans sa rainure. Attention:
utilisez exclusivement des piles de marque, 1,5V Alcaline type AAA non rechargeables.
Un cycle d'initialisation démarre après la mise en place des piles (séquence d'allumage des LED et de fermeture des vannes).
Attention: ne pas oublier d'ouvrir le robinet d'eau.
EINLEGEN DER BATTERIEN - Magnetventil. Schrauben Sie die transparente Abdeckung ab. Ziehen Sie die Steuergruppe heraus. Lösen Sie die
Abdeckung des Batteriefachs, ziehen Sie die Batteriehalterung heraus und, wenn vorhanden, entfernen Sie die alten Batterien. Achten Sie beim Einlegen
der neuen Batterien auf die richtige Polarität. Schrauben Sie den Verschluss wieder fest; kontrollieren Sie dabei, dass die Dichtung richtig sitzt. Richten Sie
die Steuergruppe an der entsprechenden Führung aus und setzen Sie sie wieder in ihren Sitz ein. Schließen Sie die transparente Abdeckung wieder;
kontrollieren Sie dabei, dass die Dichtung richtig sitzt. Achtung: Verwenden Sie ausschließlich nicht auadbare 1,5V Alkali-Markenbatterien vom Typ AAA.
Beim Einlegen der Batterien startet die Initialisierung (Einschaltsequenz der LEDs und Schlie sequenz der Ventile).
Wichtig: Denken Sie daran, den Wasserhahn zu önen.
COLOCACIÓN DE LAS PILAS - Electroválvula. Desenrosque la tapa transparente. Extraiga el grupo de mando. Desenrosque la tapa del compartimento
de las pilas, extraiga el portapilas y retire las pilas agotadas, si las hay. Ponga las pilas nuevas respetando la polaridad. Enrosque la tapa controlando que la
arandela quede correctamente colocada en su alojamiento. Alinee el grupo de mando en su guía e introdúzcalo en su alojamiento. Cierre la tapa
transparente controlando que la arandela quede correctamente colocada en su alojamiento. Atención: utilice únicamente pilas alcalinas de marca de 1,5
V tipo AAA no recargables.
Cuando se ponen las pilas, se activa un ciclo de inicialización (secuencia de encendido de los leds y cierre de las válvulas).
Atención: acuérdese de abrir el grifo del agua.
Per Elettrovalvola programmabile 1” M RF (codice): - For 1” M. RF programmable solenoid valve (code): - Pour 1” M électrovanne programmable RF (code): - Für RF
programmierbares 1” AG Magnetventil (Art.): - Para 1” M electroválvula programable RF (código):
IT
UK
FR
DE
ES
8323
ONLY
ALKALINE
BATTERY
ONLY
ALKALINE
BATTERY
AAA
+
AAA
+
AAA
+
AAA
+
3
1
2
3
2
1
1 2

ELETTROVALVOLA PROGRAMMABILE RF 3
Per Elettrovalvola programmabile 1” M RF (codice): - For 1” M. RF programmable solenoid valve (code): - Pour 1” M électrovanne programmable RF (code): - Für RF
programmierbares 1” AG Magnetventil (Art.): - Para 1” M electroválvula programable RF (código):
8323
INSERIMENTO BATTERIE - Radiocomando. Slare il coperchio dal retro del radiocomando e inserire 2 batterie di marca, Alkaline AAA da 1,5 V non
ricaricabili. N.B. Rispettare la polarità indicata sul fondo (++ - -).
FITTING THE BATTERIES - Remote Control. Remove the cover on the back of the remote control and insert 2 branded alkaline AAA 1.5V batteries (not
rechargeable). N.B. Match up the poles as marked inside the compartment (++ - -).
MISE EN PLACE DE LES PILES - Radio commande. Extrayez le couvercle de l’arrière de la radiocommande et insérez 2 piles de marque, Alkaline AAA de
1,5 V non rechargeables. N.B. Respectez la polarité indiquée sur le fond (++ - -).
EINLEGEN DER BATTERIEN - Fernbedienung. Entfernen Sie die Abdeckung von der Rückseite der Fernbedienung und legen Sie 2 nicht auadbare
Markenbatterien (Alkaline AAA zu je 1,5V) ein. Hinweis: Bitte beachten Sie dabei die auf dem Boden angegebene Polung (++ --).
COLOCACIÓN DE LAS PILAS - Mando a distancia. Quite la tapa por la parte trasera del mando a distancia e introduzca 2 pilas de marca, alcalinas AAA
de 1,5 V no recargables. Nota: respete la polaridad indicada en el fondo (++ - -).
IT
UK
FR
DE
ES
AAA
+
AAA
+
AAA
+
AAA
+
2x AAA
Alkaline
1,5 V
1 2 3

CARATTERISTICHE GENERALI - Descrizione degli indicatori Led del pannello. Dopo 30 secondi dall’inserimento delle batterie o dall’ultima pressione
di un tasto i Led del pannello si spengono: per riattivare la visualizzazione premere un tasto qualsiasi.
L’elettrovalvola programmabile RF si programma attraverso radiocomando RF (cod. 8347, gestisce no a 2 dispositivi RF - cod. 8348, gestisce no a 6
dispositivi RF) venduto separatamente. In assenza di Radiocomando RF sarà possibile solo l’irrigazione manuale.
GENERAL SPECIFICATIONS - Description of Led indicators on display panel. 30 seconds after having tted the batteries, or pressed any of the
buttons, the Leds on the panel will go out: to refresh the display, press any button.
The RF programmable solenoid valve can be programmed using the RF remote control (code 8347 manages up to 2 RF devices/ code 8348 manages up
to 6 RF devices), sold separately. Without the RF remote control, you can only irrigate manually.
CARACTÉRISTIQUES GÉNÉRALES - Description des voyants d'indication (LED) sur le clavier : 30 secondes après la mise en place des piles ou le
dernier appui sur une touche, les voyants du clavier s'éteignent : pour réactiver l'achage, appuyer sur une touche quelconque.
La électrovanne programmable RF se programme moyennant radiocommande RF (code 8347, il gère jusqu'à 2 dispositifs RF - code 8348, il gère jusqu'à 6
dispositifs RF) vendue séparément. En l'absence de Radiocommande RF seul l'arrosage manuel sera possible.
ALLGEMEINE EIGENSCHAFTEN - Beschreibung der LED-Anzeige des Bedienfelds. 30Sekunden nach Einlegen der Batterien oder nach dem letzten
Tastendruck gehen die LED am Bedienfeld aus: Zum Reaktivieren der Anzeige drücken Sie eine beliebige Taste.
Die RF programmierbares Magnetventil wird über eine separat erhältliche Funk-Fernbedienung programmiert (Art. 8347, steuert bis zu 2 Funkgeräte, oder
Art. 8348, steuert bis zu 6 Funkgeräte). Ohne Funk-Fernbedienung ist nur die manuelle Bewässerung möglich.
CARACTERÍSTICAS GENERALES - Descripción de los indicadores de led del panel. Al cabo de 30 segundos de poner las baterías o de presionar una
tecla, los indicadores de led del panel se apagan: para encenderlos de nuevo, pulse cualquier tecla.
La electroválvula programable RF se programa mediante el mando a distancia RF (cód. 8347, controla hasta 2 dispositivos RF - cód. 8348, controla hasta 6
dispositivos RF) vendido por separado. Si no se dispone del mando a distancia RF, solo se podrá realizar el riego manual.
IT
UK
FR
DE
ES
ELETTROVALVOLA PROGRAMMABILE RF 4
Per Elettrovalvola programmabile 1” M RF (codice): - For 1” M. RF programmable solenoid valve (code): - Pour 1” M électrovanne programmable RF (code): - Für RF
programmierbares 1” AG Magnetventil (Art.): - Para 1” M electroválvula programable RF (código):
8323
OK
LOW
A
F
E
B
C
D
STATO - STATUS - ÉTAT - STATUS - ESTADO SIGNIFICATO - SITUATION - DESCRIPTION - BEDEUTUNG - SIGNIFICADO
Luce verde accesa ssa
Green light on
Lumière verte allumée de manière xe
Grüne Lampe leuchtet x
Luz verde encendida ja
Indica che la linea è aperta.
Indicates the line is open.
Indique que la ligne est ouverte.
Gibt an, dass der Kreis geönet ist.
Indica que la línea está abierta.
Luce verde lampeggiante
Flashing green light
Lumière verte clignotante
Grüne Lampe blinkt
Luz verde parpadeando
Indica che la linea è stata selezionata.
Indicates the selected line.
Indique que la ligne a été sélectionnée.
Gibt an, dass der Kreis gewählt wurde.
Indica que se ha seleccionado la línea.
B. Simbolo B. Symbol B. Symbole B. Symbol B. Símbolo
STATO - STATUS - ÉTAT - STATUS - ESTADO SIGNIFICATO - SITUATION - DESCRIPTION - BEDEUTUNG - SIGNIFICADO
Luce verde lampeggiante
Flashing green light
Lumière verte clignotante
Grüne Lampe blinkt
Luz verde parpadeando
Indica che la linea è aperta in modalità manuale. La pressione del tasto OK chiude la linea.
Indicates that the line is open in manual mode. Press the OK button to close the line.
Indique que la ligne est ouverte en mode manuel. L'appui sur la touche OK ferme la ligne.
Gibt an, dass der gewählte Kreis im manuellen Modus geönet ist. Durch Drücken der Taste OK wird
der Kreis geschlossen.
Indica que la línea se ha abierto en modalidad manual. Si se pulsa la tecla se cierra la línea.
A. Simbolo A. Symbol A. Symbole A. Symbol A. Símbolo

ELETTROVALVOLA PROGRAMMABILE RF 4
Per Elettrovalvola programmabile 1” M RF (codice): - For 1” M. RF programmable solenoid valve (code): - Pour 1” M électrovanne programmable RF (code): - Für RF
programmierbares 1” AG Magnetventil (Art.): - Para 1” M electroválvula programable RF (código):
8323
C. Simbolo - Indica lo stato del Rain Sensor RF (solo se nel Radiocomando RF la funzione RAIN SENSOR è stata attivata: vedi capitolo dedicato).
C. Symbol - Indicates the status of the RF Rain Sensor (only if the RF Remote Control is set up with the RAIN SENSOR function activated for the RF unit: see the
relevant section).
C. Symbole - Indique l'état du pluviomètre Rain Sensor RF (seulement si la fonction RAIN SENSOR de la Radiocommande RF a été activée pour le module RF:
voir chapitre dédié).
C. Symbol - Zeigt den Status des Rain Sensor RF an (nur wenn an der Funk-Fernbedienung die Funktion RAIN SENSOR aktiviert wurde: siehe das entsprechende
Kapitel)
C. Símbolo - Indica el estado del sensor de lluvia RF (solo si, en el mando a distancia RF, la función RAIN SENSOR se ha activado: véase el capítulo
correspondiente).
STATO - STATUS - ÉTAT - STATUS - ESTADO SIGNIFICATO - SITUATION - DESCRIPTION - BEDEUTUNG - SIGNIFICADO
Acceso sso
Permanently alight
Allumé (lumière xe)
Durchgängig leuchtend
Encendido jo
Irrigazione sospesa dall’intervento del Rain Sensor RF.
Watering programme suspended by activation of the RF Rain Sensor.
Interruption de l'arrosage après l'intervention du pluviomètre Rain Sensor RF.
Bewässerung vom Rain Sensor RF ausgesetzt.
Riego interrumpido debido a la intervención del sensor de lluvia RF.
Lampeggiante
Blinking
Clignotant
Blinkend
Parpadeante
L’elettrovalvola non riceve il segnale dal Rain Sensor RF da oltre 24 ore per uno dei seguenti motivi:
1) Le batterie del Rain Sensor RF sono esaurite (sostituire le batterie);
2) La portata del segnale a radiofrequenza è insuciente (avvicinare il sensore all’elettrovalvola).
The RF solenoid valve has received no signal from the RF Rain Sensor for more than 24 hours for one of
the following reasons:
1) the batteries of the RF Rain Sensor are at (replace the batteries);
2) the radio frequency signal is too weak (position the sensor nearer to the RF unit).
Le module RF ne reçoit pas le signal du pluviomètre Rain Sensor RF depuis plus de 24 heures
pour une des causes suivantes :
1) les piles du pluviomètre Rain Sensor RF sont à plat (remplacer les piles) ;
2) la portée du signal RF est insusante (rapprocher le pluviomètre au module RF).
Der RF Magnetventil empfängt seit mehr als 24Stunden kein Signal vom Rain Sensor RF aus einem der
folgenden Gründe:
1) Die Batterien des Rain Sensor RF sind leer (Batterien ersetzen);
2) Die Reichweite des Funksignals ist unzureichend (Sensor an RF Magnetventil annähern).
La electroválvula no recibe ninguna señal del sensor de lluvia RF desde hace más de 24 horas por
uno de los siguientes motivos:
1) Las baterías del sensor de lluvia RF están agotadas; sustitúyalas;
2) El alcance de la señal de radiofrecuencia es insuciente; acerque el sensor a la electroválvula.
D. Simbolo RF - Indica una comunicazione in corso con il Radiocomando RF.
D. Simbolo RF - Indicates that the unit is dialoguing with the RF Remote Control.
D. Symbole RF - Indique une communication en cours avec la Radiocommande RF.
D. Funk-Symbol - Zeigt eine bestehende Kommunikation mit der Funk-Fernbedienung an.
D. Símbolo RF - Indica que hay una comunicación en curso con el mando a distancia RF.
E. Simbolo - Indica lo stato di carica delle batterie.
E. Symbol - Indicates the charge status of the batteries.
E. Symbole - Indique l'état de la charge des piles.
E. Symbol - Zeigt den Ladestand der Batterien an.
E. Símbolo - Indica el estado de carga de las baterías.
STATO - STATUS - ÉTAT - STATUS - ESTADO SIGNIFICATO - SITUATION - DESCRIPTION - BEDEUTUNG - SIGNIFICADO
Rosso lampeggiante
Red, blinking
Rouge clignotant
Rot blinkend
Rojo parpadeante
In attesa di associazione con il Radiocomando RF.
Awaiting connection with the RF Remote Control.
En attente de combinaison du fonctionnement avec la Radiocommande RF.
Wartet auf die Zuweisung der Funk-Fernbedienung.
En espera de que se asocie al mando a distancia RF.
Rosso sso
Red, permanently alight
Rouge allumé (lumière xe)
Rot x
Rojo jo
È in corso la fase di associazione con il Radiocomando RF.
RF Remote Control-unit connection procedure in progress.
L'opération de combinaison du fonctionnement avec la Radiocommande RF est en cours.
Die Zuweisung der Funk-Fernbedienung ist im Gang.
Se está efectuando la asociación con el mando a distancia RF.
Verde lampeggiante
Green, blinking
Vert clignotant
Grün blinkend
Verde parpadeante
In fase di trasferimento dati.
Data transmission in progress.
Transfert de données en cours.
Die Datenübertragung ist im Gang.
Se están transmitiendo datos.
LOW BATT
LOW BATT
LOW BATT
LOW BATT
LOW BATT

ELETTROVALVOLA PROGRAMMABILE RF 4
Per Elettrovalvola programmabile 1” M RF (codice): - For 1” M. RF programmable solenoid valve (code): - Pour 1” M électrovanne programmable RF (code): - Für RF
programmierbares 1” AG Magnetventil (Art.): - Para 1” M electroválvula programable RF (código):
8323
F. Simbolo OROLOGIO - Indica la condizione operativa del Radiocomando.
F. CLOCK symbol - Indicates the operational status of the remote control.
F. Symbole HORLOGE - Indique la condition de service de la radiocommande.
F. UHR-Symbol - Zeigt den Betriebsstatus der Funk-Fernsteuerung.
F. Símbolo del RELOJ - Indica la condición operativa del mando a distancia.
Il colore rosso del simbolo orologio , sia sso che lampeggiante, è un avvertimento che l’elettrovalvola non è attualmente programmata per irrigare in modo
automatico.
The red colour of the clock symbol , whether permanently alight or blinking, warns that the RF unit is not currently programmed for automatic watering.
La couleur rouge du symbole horloge , allumé (lumière xe) ou clignotant, est un avertissement signalant que le module RF n'est pas actuellement programmé
pour arroser de manière automatique.
Die Farbe Rot des Uhr-Symbols weist sowohl x als auch blinkend darauf hin, dass der RF Magnetventil aktuell nicht für die automatische Bewässerung
programmiert ist.
El color rojo del símbolo del reloj , tanto si está jo como si parpadea, indica que la electroválvula no está programada para el riego automático.
STATO - STATUS - ÉTAT
STATUS - ESTADO CONDIZIONE OPERATIVA - SITUATION - CONDITION DE SERVICE
BETRIEBSSTATUS - CONDICIÓN OPERATIVA SOLUZIONI - SOLUTIONS - SOLUTIONS
LÖSUNGEN - SOLUCIONES
Rosso sso
Red, permanently alight
Rouge allumé (lumière xe)
Rot x
Rojo jo
Non associato al radiocomando. Nessuna irrigazione automatica inserita o trasferita.
Not paired with remote control. No automatic watering entered or transferred.
Non associé à la radiocommande. Aucun arrosage automatique inséré ou transféré.
Der Fernbedienung nicht zugewiesen. Keine automatische Bewässerung
eingegeben oder übertragen.
No asociado al mando a distancia. No hay riegos automáticos introducidos o
transferidos.
Rosso/Verde alternato
Alternating Red/Green
Rouge/Vert alterné
Rot/Grün abwechselnd
Rojo/verde alternado
Associato, orario sincronizzato. Programmi di irrigazione NON ancora
trasferiti. Irrigazione automatica sospesa.
Connected, time synchronized. Irrigation programmes NOT yet transferred.
Automatic watering suspended.
Combiné, heure synchronisée. Programmes d'arrosage NON encore
transférés. Arrosage automatique suspendu.
Zugewiesen, Uhrzeit synchronisiert. Bewässerungsprogramme noch NICHT
übertragen. Automatische Bewässerung ausgesetzt.
Asociado. Hora sincronizada. Programas de riego aún NO transferidos.
Riego automático suspendido.
Associare.
Connection required.
Combiner.
Zuweisen.
Efectúe la asociación.
Trasferire i programmi di irrigazione dal
radiocomando all’elettrovalvola.
Transfer the watering programmes from
the remote control to the solenoid valve.
Transférez les programmes d'arrosage de
la radiocommande à l’électrovanne.
Übertragen Sie die
Bewässerungsprogramme von der
Fernbedienung an das Magnetventil.
Transera los programas de riego desde el
mando a distancia a la electroválvula.
Verde lampeggiante
Green blinking
Vert Clignotant
Grün blinkend
Verde Parpadeante
Associato, orario NON sincronizzato tra i due dispositivi (ad esempio per
una perdita di orario causata da assenza prolungata delle batterie): i
programmi di irrigazione verranno eseguiti in orari diversi da quelli
impostati sul Radiocomando RF.
Paired, time NOT synchronised between the two devices (for example,
because the time has been lost due to a prolonged period without
batteries). the irrigation programmes will be run at dierent times to those
set on the RF remote control.
Associé, horaire NON synchronisé entre les deux dispositifs (par exemple
pour une perte d'horaire causée par l'absence prolongée des piles): les
programmes d'arrosage seront eectués à des horaires diérents de ceux
congurés sur la Radiocommande RF.
Zugewiesen, Uhrzeit NICHT synchronisiert zwischen beiden Geräten (zum
Beispiel wegen eines Verlusts der Uhrzeit nach längerem Batterieausfall):
Die Bewässerungsprogramme werden zu anderen als den an der
Funk-Fernbedienung eingestellten Uhrzeiten vorgenommen.
Asociado, horario NO sincronizado entre los dos dispositivos (por ejemplo,
si se pierde el horario debido a una ausencia prolongada de las pilas): los
programas de riego se activarán a horas distintas de las ajustadas en el
mando a distancia RF.
Riprogrammare l’elettrovalvola.
Reprogramme the solenoid valve.
Reprogrammer l'électrovanne.
Das Magnetventil neu programmieren.
Vuelva a programar la electroválvula.
Verde sso
Green, permanently alight
Vert (lumière xe)
Grün x
Verde jo
Associato, orario sincronizzato. Programmi di irrigazione impostati per
irrigare automaticamente. Irrigazione automatica abilitata.
Connected, time synchronized. Watering programmes set to run
automatically. Automatic watering enabled.
Combiné, heure synchronisée. Programmes d'arrosage présélectionnés
pour arroser automatiquement. Arrosage automatique validé.
Zugewiesen, Uhrzeit synchronisiert. Die Bewässerungsprogramme sind
für die automatische Bewässerung eingestellt. Automatische Bewässerung
aktiviert.
Asociado. Hora sincronizada. Programas de riego congurados para regar
automáticamente. Riego automático habilitado.

UTILIZZO. L’elettrovalvola permette di gestire 1 linea nelle seguenti modalità: irrigazione manuale o irrigazione programmata.
Irrigazione manuale. È possibile eettuare un’operazione di apertura o chiusura manuale della linea sia localmente, agendo sul pannello di controllo, sia
in remoto da Radiocomando RF (vedi paragrafo dedicato).
Nel caso il pannello dell’elettrovalvola programmabile sia spento, riattivarla premendo un tasto qualsiasi del pannello.
Tramite le frecce abilitare la linea (1).
Premere il tasto OK per aprire la linea (quando la linea è aperta lampeggia il simbolo OK e si accende sso il numero “1”) (2).
Premere il tasto OK per chiudere l’elettrovalvola aperta in manuale o attendere 5 minuti per la chiusura automatica (3).
L’apertura in manuale di una elettrovalvola interrompe qualsiasi irrigazione automatica in corso.
USE. The solenoid valve allows control of 1 line in the following modes: Manual waterin, Programmed irrigation.
Manual watering. The line can be opened or shut manually both locally, or remotely by remote control (
see the relevant section
).
If the panel of the programmable solenoid valve is o, press any button on the panel to reactivate it.
Use the arrows to engage the line (1).
Press the OK button to open the line (the OK symbol ashes when the line is open and the number “1” lights up) (2).
Press OK to shut o the open solenoid valve manually or wait 5 minutes for it to close automatically (3).
Manually opening the solenoid valve interrupts any automatic irrigation in progress.
UTILISATION. L'électrovanne permet de gérer 1 ligne dans les modes d'utilisation suivants : arrosage manuel, arrosage programmé
Arrosage manuel. Il est possible d'eectuer une ouverture ou une fermeture manuelle de la ligne aussi bien sur place (sur le terrain), en agissant sur le
clavier de commande, qu'à distance, en utilisant la radiocommande (
voir chapitre dédié
).
Si le clavier de l’électrovanne programmable est éteint, le réactiver en appuyant sur une touche quelconque de celui-ci.
Moyennant les èches valider la ligne (1).
Appuyer sur la touche OK pour ouvrir la ligne (l'ouverture de la ligne est signalée par le clignotement du symbole OK et l'allumage (lumiére xe) du
numéro “1”). (2).
Appuyez sur la touche OK pour fermer l’électrovanne ouverte en manuel ou attendez 5 minutes pour la fermeture automatique (3).
L’ouverture en manuel de l’électrovanne interrompt tout arrosage automatique en cours.
GEBRAUCH. Mit dem Magnetventil können Sie 1 Kreis in den folgenden Modi steuern: manuelle Bewässerung oder programmierte Bewässerung.
Manuelle Bewässerung. Sie können einen Kreis sowohl lokal über die Bedienungsblende des programmierbaren Magnetventils als auch mit der
Funk-Fernsteuerung aus der Entfernung manuell önen oder schließen (siehe entsprechender Abschnitt).
Sollte die Bedienungsblende des programmierbaren Magnetventils ausgeschaltet sein, können Sie durch Drücken einer beliebigen Taste die Anzeige
wieder einschalten.
Aktivieren Sie mit den Pfeiltasten den Kreis (1).
Önen Sie mit der OK-Taste den Kreis (bei geönetem Kreis blinkt das Symbol OK und es leuchtet die Zier “1”) (2).
Um das geönete Magnetventil im manuellen Modus zu schließen, betätigen Sie die OK-Taste oder warten Sie 5 Minuten auf die automatische
Schließung (3).
Das manuelle Önen des Magnetventils unterbricht jegliche laufende automatische Bewässerung.
USO. La electroválvula permite gestionar 1 línea en los siguientes modos: riego manual o riego programado.
Riego manual. Es posible abrir o cerrar manualmente una línea tanto localmente, mediante el panel de control, como a distancia, mediante el mando a
distancia (
véase el capítulo correspondiente
).
Si el panel de mando de la electroválvula programable está apagado, enciéndalo pulsando cualquier tecla.
Pulse las echas para habilitar la línea (1).
Pulse la tecla OK para abrir la línea (cuando la línea está abierta, el símbolo parpadea y el número “1” se enciende jo) (2).
Pulse el botón OK para cerrar la electroválvula abierta manualmente o espere 5 minutos para que se produzca el cierre automático (3).
La apertura manual de la electroválvula interrumpe cualquier riego automático en curso.
IT
UK
FR
DE
ES
ELETTROVALVOLA PROGRAMMABILE RF 5
Per Elettrovalvola programmabile 1” M RF (codice): - For 1” M. RF programmable solenoid valve (code): - Pour 1” M électrovanne programmable RF (code): - Für RF
programmierbares 1” AG Magnetventil (Art.): - Para 1” M electroválvula programable RF (código):
8323
12 12
3
4
5
6
7
8
9
10
11
ONLY
ALKALINE
BATTERY
ONLY
ALKALINE
BATTERY
ONLY
ALKALINE
BATTERY
OK
LOW
OK
LOW
1 2 3

ELETTROVALVOLA PROGRAMMABILE RF 6
Per Elettrovalvola programmabile 1” M RF (codice): - For 1” M. RF programmable solenoid valve (code): - Pour 1” M électrovanne programmable RF (code): - Für RF
programmierbares 1” AG Magnetventil (Art.): - Para 1” M electroválvula programable RF (código):
8323
CARATTERISTICHE GENERALI - Indicazioni display Radiocomando. 1) Indicano le partenze programmate (START TIME) dell‘irrigazione automatica, 2)
Indica il livello della batteria, 3) Indica la linea che stiamo programmando, 4) Indicano quali programmi (solo A, solo B, sia A che B, né A né B) sono abilitati,
5) Indica la pagina per test e per l‘irrigazione manuale, 6) Indica che siamo in modalità modica parametro, 7) Indica le pagine di start time (partenze), 8)
Indica l‘ora o, nelle pagine di programmazione, la durata e l‘orario di inizio irrigazione, 9) Indica che si sta irrigando, 10) Indica il giorno della settimana in
cui si desidera irrigare e con quale dei due programmi.
GENERAL SPECIFICATIONS - Remote control display information. 1) Indicate the programmed start times (start time) for automatic watering, 2)
Indicates battery level, 3) Indicates the line which is being programmed, 4) Indicate which programmes (only A, only B, both A and B neither A nor B) are
enabled, 5) Indicates the page for testing and manual watering, 6) Indicates that we are in change parameter mode, 7) Shows start time pages, 8) Indicate
the time or, in the programming pages, the run time and start time of watering, 9) Indicates that watering is in progress, 10) Indicates the day of the week
in which watering is required and with which of the two programmes.
CARACTÉRISTIQUES GÉNÉRALES - Indications sur l’acheur de la Radiocommande. 1) Indiquent les départs programmés (start time) de l'arrosage
automatique, 2) Indique l'état de charge de la pile, 3) Indique la ligne qui est cours de programmation, 4) Indique les programmes activés (seulement A,
seulement B, à la fois A et B, ni A ni B), 5) Indique la page pour les tests et 'arrosage manuel, 6) Indique que nous sommes en modalité de modication du
paramètre, 7) Indique les pages de start time (départs), 8) Indique l'heure, dans les pages de programmation, la durée et l'heure du début de l'arrosage, 9)
Indique que l'arrosage est en cours, 10) Indique le jour de la semaine durant lequel vous souhaitez arroser et avec lequel des deux programmes.
ALLGEMEINE EIGENSCHAFTEN - Angaben Display Fernbedienung. 1) Geben die programmierten Startzeiten (START TIME) der automatischen
Bewässerung an, 2) Zeigt den Batterieladestand an, 3) Zeigt an, welcher Kreis gerade programmiert wird, 4) Zeigt an, welche Programme (nur A, nur B,
sowohl A als auch B, weder A noch B) aktiv sind, 5) Zeigt die Seite für Tests und für die manuelle Bewässerung an, 6) Zeigt an, dass wir uns im Modus zum
Ändern der Parameter benden, 7) zeigt die Seiten der Start Time (Startzeiten) an, 8) Zeigt die Uhrzeit oder, auf den Programmierungsseiten, die Dauer
und die Startzeit der Bewässerung an, 9) Zeigt an, dass gerade eine Bewässerung durchgeführt wird, 10) In der Programmierung zeigt es an, an welchem
Wochentag und mit welchem der beiden Programme bewässert werden soll.
CARACTERÍSTICAS GENERALES - Indicaciones de la pantalla del mando a distancia. 1) Indican los inicios programados (start time) del riego
automático, 2) Indica el nivel de la pila, 3) Indica la línea que estamos programando, 4) Indican qué programas (solo A, solo B, tanto A como B, ni A ni B)
están habilitados, 5) Indica la página de test y de riego manual, 6) Indica que se está en modalidad de modicación de parámetro, 7) Indica las páginas de
start time (inicios), 8) Indica la hora o, en las páginas de programación, la duración y la hora de inicio del riego, 9) Indica que se está regando, 10) Indica el
día de la semana en el que se desea regar y con cuál de los dos programas.
IT
UK
FR
DE
ES
PROG
EXIT
LINE
B
A
B
A
B
A
B
A
B
A
B
A
B
A
B
A
S M T W T F S
LOW BATT
OK
ERR
1 2 3 4
14
15
7
8
9
10
1
2
3
6
4
5

ELETTROVALVOLA PROGRAMMABILE RF 7
Per Elettrovalvola programmabile 1” M RF (codice): - For 1” M. RF programmable solenoid valve (code): - Pour 1” M électrovanne programmable RF (code): - Für RF
programmierbares 1” AG Magnetventil (Art.): - Para 1” M electroválvula programable RF (código):
8323
COME USARE LA TASTIERA DEL RADIOCOMANDO. Tre soli tasti permettono di impostare tutti i parametri. Le frecce permettono di scorrere tra le varie
pagine per selezionare quella desiderata. Il tasto OK permette di accedere alla MODIFICA del parametro visualizzato. Premuto il tasto OK, nel display in
basso a sinistra appare la scritta OK. Quando la scritta OK è accesa le frecce permettono di modicare il valore del parametro visualizzato.
Raggiunto il valore desiderato, premere il tasto OK per confermare la modica, nel display in basso a destra scompare la scritta OK. Ora è possibile
spostarsi nuovamente di pagina tramite le frecce.
Se nessun tasto viene premuto per 5 minuti circa, il programmatore automaticamente ritorna sulla pagina dell’ora e giorno, senza confermare la
modica che era in corso.
HOW TO USE THE REMOTE CONTROL KEYPAD. Only three keys let you set all the parameters. The arrows let you scroll through the various pages in
order to select the one desired. The OK key lets you access the EDITING of the parameter displayed. When is pressed, OK appears in the bottom left
display. With OK, the
arrows turn on and let you edit the value of the parameter displayed.
Once you have reached the desired value, press OK to conrm the change. At the bottom right of the display, “OK” will show. It is now possible to go back
to the page with the arrows.
If a key is not pressed for approximately 5 minutes, the water timer automatically returns to the date and hour page, without conrming the
changes in progress.
COMMENT UTILISER LE CLAVIER DE LA RADIOCOMMANDE. Trois touches seulement permettent de programmer tous les paramètres. Les èches
permettent de faire déler les diérentes pages pour sélectionner celle souhaitée. La touche OK permet d'accéder à la MODIFICATION du paramètre
aché. En appuyant sur la touche OK, sur l'acheur en bas à gauche apparaît l'inscription OK. Avec l'inscription OK allumée, les èches permettent de
modier la valeur du paramètre aché.
Une fois la valeur souhaitée atteinte, appuyez sur la touche OK pour conrmer la modication, sur l’acheur en bas à droite apparaîtra le message OK. Il
est alors possible de changer à nouveau de page en utilisant les èches.
Si aucune touche n'est pressée pendant 5 minutes environ, le programmateur revient automatiquement à la page de l'heure et du jour, sans avoir
conrmé la modication qui était en cours.
BENUTZUNG DER TASTATUR DER FERNBEDIENUNG. Drei Tasten ermöglichen die Einstellung sämtlicher Parameter. Mit den Pfeilen können Sie durch
die verschiedenen Seiten blättern, um die gewünschte Seite auszuwählen. Mit der OK-Taste kann der jeweils angezeigte Parameter GEÄNDERT werden.
Indem Sie die OK-Taste gedrückt halten, erscheint unten links auf dem Display die Anzeige OK. Wenn OK leuchtet, können Sie mit den Pfeilen den Wert
des angezeigten Parameters ändern.
Nach Erreichen des gewünschten Werts betätigen Sie die OK-Taste, um die Änderung zu bestätigen. Auf dem Display unten rechts erlischt die Anzeige
OK. Es ist nun wieder möglich, die Seiten mit Hilfe der Pfeile zu verschieben.
Wenn für etwa 5 Minuten keine Taste gedrückt wird, kehrt der Bewässerungscomputer automatisch auf die Seite der Uhrzeit und des Datums
zurück, ohne dass die vorgenommenen Änderungen abgespeichert werden.
CÓMO USAR EL TECLADO DEL MANDO A DISTANCIA. Con solo tres teclas se pueden denir todos los parámetros. Las echas permiten desplazarse
por las distintas páginas para seleccionar la deseada. La tecla OK permite acceder a la MODIFICACIÓN del parámetro mostrado. Al pulsar la tecla OK, la
pantalla muestra abajo a la izquierda el mensaje OK. Cuando el mensaje OK está encendido, las echas permiten modicar el valor del parámetro
mostrado.
Al llegar al valor deseado, pulse el botón OK para conrmar la modicación; en la pantalla, abajo a la derecha, desaparece el mensaje OK. Ahora podrá
volver a cambiar de página mediante las echas.
Si no se pulsa ninguna tecla en unos 5 minutos, el programador vuelve automáticamente a la página de la hora y el día, sin conrmar la
modicación que se estaba realizando.
IT
UK
FR
DE
ES
S M T W T F S
PROG
B
A
S M T W T F S
PROGLINE
OK
A
PROGLINE
A
PROGLINE
OK
A
PROGLINE
OK
A
PROGLINE
A
PROGLINE
OK
A
1 32 4

ELETTROVALVOLA PROGRAMMABILE RF 8
Per Elettrovalvola programmabile 1” M RF (codice): - For 1” M. RF programmable solenoid valve (code): - Pour 1” M électrovanne programmable RF (code): - Für RF
programmierbares 1” AG Magnetventil (Art.): - Para 1” M electroválvula programable RF (código):
8323
ASSOCIAZIONI - Procedura di associazione elettrovalvola RF - Radiocomando RF. Per associare i dispositivi tenerli a non meno di 50 cm e non più di
10 metri di distanza senza ostacoli (1). Attivare l’elettrovalvola premendo un tasto qualsiasi.
Premere contemporaneamente i tre tasti dell’elettrovalvola RF per almeno 5 secondi, no a quando i simboli OROLOGIO e RF iniziano a lampeggiare rosso
(2).
Premere il tasto UNIT del Radiocomando RF per selezionare il numero dell’Unità RF al quale associare l’elettrovalvola RF (3). Entro un minuto dal
completamento del punto 2 inserire per qualche secondo un oggetto appuntito nel foro S1 del Radiocomando RF: comparirà l’icona di radiofrequenza. Il
display del Radiocomando RF lampeggia: i due componenti stanno cercando di stabilire una connessione in radiofrequenza.
CONNECTIONS - Procedure for the connection of the RF solenoid valve - RF Remote Control. To pair the devices, keep them no less than 50 cm and
no more than 10 metres apart and ensure there are no obstacles (1). Press any button to activate the solenoid valve.
Press the three RF solenoid valve buttons at the same time and hold for at least 5 seconds, until the red LEDs with the CLOCK and RF symbols start to ash
(2).
Hold down the Remote control RF UNIT button to select the RF Unit number to which the RF solenoid valve is to be associated (3). Within one minute
from completing point 2, insert a pointy object into hole S1 in the RF remote control for a few seconds: a radio frequency icon will appear. The Remote
control RF display ashes indicating that the two components are trying to establish a radio frequency connection.
COMBINAISONS DE FONCTIONNEMENT - Procédure de combinaison du fonctionnement électrovanne programmable RF - Radiocommande
RF. Pour associer les dispositifs, gardez-les à pas moins de 50 cm et pas plus de 10 mètres de distance sans obstacles (1). Activez l’électrovanne en
appuyant sur n'importe quelle touche.
Appuyez simultanément sur les trois touches de l’électrovanne programmable RF pendant au moins 5 secondes, jusqu'à ce que les symboles HORLOGE
et RF commencent à clignoter en rouge (2).
Appuyez sur la touche UNIT de la Radiocommande RF pour sélectionner le numéro de l’Unité RF auquel doit être associé la électrovanne programmable
RF (3). Une minute avant l'achèvement du point 2, insérez pendant quelques secondes un objet pointu dans le trou S1 de la Radiocommande RF: l'icône
de radiofréquence apparaîtra. L'acheur de la Radiocommande RF clignote pour signaler que les deux composants tentent d'établir une connexion par
radiofréquence.
ZUWEISUNGEN - Vorgehensweise zum Zuweisen des RF Magnetventil zur Funk-Fernbedienung. Zum Zuweisen der Geräte müssen diese eine
Entfernung von mindestens 50 cm und höchstens 10Meter zueinander haben, ohne Hindernisse (1). Aktivieren Sie das Magnetventil, indem Sie eine
beliebige Taste betätigen.
Drücken Sie gleichzeitig die drei Tasten des RF Magnetventil und halten Sie sie 5Sekunden lang gedrückt, bis das UHR- und das FUNK-Symbol rot zu
blinken beginnen (2).
Drücken Sie die UNIT-Taste auf der Funkfernbedienung, um die Nummer der Funk-Einheit auszuwählen, der der RF Magnetventil (3) zugewiesen werden
soll. Drücken Sie innerhalb von einer Minute nach Abschluss des Punktes 2 Stecken sie für einige Sekunden einen spitzen Gegenstand in das kleine Loch
S1 an der Funk-Fernbedienung: Es erscheint das Funk-Symbol. Das Display der Funkfernbedienung blinkt, was anzeigt, dass die beiden Komponenten
versuchen, eine Funkverbindung herzustellen.
ASOCIACIONES - Procedimiento para asociar la electroválvula programable RF y el mando a distancia RF. Para asociar los dispositivos,
manténgalos a una distancia de entre 50 cm como mínimo y 10 metros como máximo entre sí, sin obstáculos (1). Active la electroválvula pulsando
cualquier botón.
Pulse simultáneamente las tres teclas de la electroválvula programable durante al menos 5 segundos, hasta que los símbolos RELOJ y RF empiecen a
parpadear en rojo (2).
Pulse la tecla UNIT del Mando a distancia RF para seleccionar el número de la Unidad RF al que asociar la electroválvula (3). Antes de que pase un minuto
desde la acción del punto 2 introduzca durante unos segundos un objeto puntiagudo en el agujero S1 del mando a distancia RF: aparecerá el icono de
radiofrecuencia. La pantalla del Mando a distancia RF parpadea, indicando que los dos componentes están intentando establecer una conexión por
radiofrecuencia.
IT
UK
FR
DE
ES
50 cm (min)
10 m (max)
S1
2
1
3
ONLY
ALKALINE
BATTERY
ONLY
ALKALINE
BATTERY
1 2 3

ELETTROVALVOLA PROGRAMMABILE RF 9
Per Elettrovalvola programmabile 1” M RF (codice): - For 1” M. RF programmable solenoid valve (code): - Pour 1” M électrovanne programmable RF (code): - Für RF
programmierbares 1” AG Magnetventil (Art.): - Para 1” M electroválvula programable RF (código):
8323
ASSOCIAZIONI. L’esito del processo di associazione è visibile sul display del Radiocomando RF quando il simbolo RF termina di lampeggiare:
- associazione non avvenuta: simbolo RF acceso sso e simbolo di errore lampeggiante (1). Ripetere la procedura di associazione.
- associazione avvenuta correttamente: simbolo RF spento. Compare l’unità associata (es. 1 AB Unit) (2).
Indipendentemente dall’esito dell’associazione sul display dell’elettrovalvola RF compariranno tutti i simboli in sequenza illuminati. Se l’associazione è
avvenuta correttamente l’elettrovalvola RF mostrerà il simbolo dell’orologio rosso/verde alternato (3).
CONNECTIONS. The outcome of the connection procedure is indicated on the RF Remote Control display when the RF symbol stops blinking:
- connection failed: RF symbol permanently alight and error symbol blinking. (1). Repeat the connection procedure.
- connection successful: RF symbol o. The paired unit will show (e.g. 1 AB Unit)(2).
Regardless of the outcome of the pairing, all the symbols will light up in sequence on the RF programmable solenoid valve display. If pairing is successful,
RF programmable solenoid valve will display the clock symbol alternating red/green (3).
COMBINAISONS DE FONCTIONNEMENT. Le résultat de l'opération de combinaison du fonctionnement apparaît sur l'acheur de la Radiocommande
RF lorsque le symbole RF cesse de clignoter :
- combinaison de fonctionnement échouée : symbole RF allumé (lumière xe) et symbole d'erreur clignotant (1). Répétez la procédure
d’association.
- combinaison de fonctionnement réussie : symbole RF éteint. L’unité associée apparaît (ex. 1 AB Unit) (2).
Indépendamment du résultat de l'association, sur l'acheur du électrovanne programmable RF apparaitront tous les symboles éclairés en séquence. Si
l'association a lieu correctement, le électrovanne programmable RF montrera le symbole de l'horloge rouge/vert alterné (3).
ZUWEISUNGEN. Das Ergebnis der Zuweisung ist auf dem Display der Funk-Fernbedienung sichtbar, wenn das Funk-Symbol zu blinken aufhört:
- Zuweisung nicht erfolgt: das Funk-Symbol leuchtet x und das Fehler-Symbol blinkt (1). Wiederholen Sie den Zuweisungsvorgang.
- Zuweisung korrekt erfolgt: Funk-Symbol aus. Das zugewiesene Gerät erscheint (z.B. 1 AB Gerät) (2).
Unabhängig vom Ergebnis der Zuweisung auf dem Display des RF programmierbares Magnetventil leuchten nacheinander alle Symbole auf. Wenn die
Zuweisung erfolgreich war, leuchtet am RF programmierbares Magnetventil nur das Uhren-Symbol rot/grün abwechselnd (3).
ASOCIACIONES. El resultado del proceso de asociación se visualiza en la pantalla del mando a distancia RF cuando el símbolo de radiofrecuencia
deja de parpadear:
- Asociación fallida: símbolo de radiofrecuencia encendido de forma ja y símbolo de error parpadeante (1). Repita el procedimiento de
asociación.
- Asociación ejecutada correctamente: símbolo de radiofrecuencia apagado. Aparece la unidad asociada (p. ej., 1 AB Unit) (2).
Independientemente del resultado de la asociación, en la pantalla de la electroválvula programable RF aparecerán encendidos en secuencia todos los
símbolos. Si se ha efectuado correctamente la asociación, la electroválvula programable mostrará el símbolo del reloj rojo/verde alternado (3).
IT
UK
FR
DE
ES
ONLY
ALKALINE
BATTERY
ERR
OK
LOW
S M T W T F S
PROG
B
A
ERR
ERR
ERR
ERR
ERR
1 2 3

ELETTROVALVOLA PROGRAMMABILE RF 10
Per Elettrovalvola programmabile 1” M RF (codice): - For 1” M. RF programmable solenoid valve (code): - Pour 1” M électrovanne programmable RF (code): - Für RF
programmierbares 1” AG Magnetventil (Art.): - Para 1” M electroválvula programable RF (código):
8323
UTILIZZO. L’elettrovalvola programmabile RF comanda una linea di irrigazione. Nel radiocomando ogni linea ha due programmi, A e B, indipendenti tra
loro. In entrambi i programmi si possono impostare no a 4 orari di partenza giornalieri nell’arco delle 24 h solari.
USE. The RF programmable solenoid valve controls a watering line. On the remote control, each line has two independent programmes, A and B. In both
programmes up to 4 daily start times can be set in a 24-hour span.
UTILISATION. L’électrovanne programmable RF commande une ligne d’arrosage. Sur la radiocommande, chaque ligne a deux programmes A et B
indépendants. Sur les deux programmes, il est possible de régler jusqu'à 4 horaires de départ quotidiens dans les 24 h solaires.
GEBRAUCH. Das programmierbare RF-Magnetventil steuert einen Bewässerungskreis. In der Fernbedienung hat jeder Kreis zwei unabhängige
Programme, A und B. In beiden Programmen können bis zu 4tägliche Starzeiten im Lauf von 24h eingestellt werden.
USO. La electroválvula programable RF controla una línea de riego. En el mando a distancia cada línea tiene dos programas, A y B, independientes entre
sí. En los dos programas se pueden congurar hasta 4 horas de inicio diarias a lo largo de las 24 h solares.
IT
UK
FR
DE
ES
ONLY
ALKALINE
BATTERY

ELETTROVALVOLA PROGRAMMABILE RF 11
Per Elettrovalvola programmabile 1” M RF (codice): - For 1” M. RF programmable solenoid valve (code): - Pour 1” M électrovanne programmable RF (code): - Für RF
programmierbares 1” AG Magnetventil (Art.): - Para 1” M electroválvula programable RF (código):
8323
NOZIONI SULLA PROGRAMMAZIONE. Vengono qui riportate tutte le pagine di programmazione in ordine di comparsa: i tasti frecce permettono di
scorrere le varie pagine. Il tasto OK permette accedere alla MODIFICA del parametro visualizzato.
GUIDELINES ON PROGRAMMING. The display provides information about all the programming pages in the order they appear: the arrows allow the
user to scroll through the dierent pages. The OK key lets you access the EDITING of the parameter displayed.
NOTIONS SUR LA PROGRAMMATION. Sont déclarés ici toutes les pages de programmation dans l'ordre d'apparition : les èches permettent de faire
déler les diérentes pages. La touche OK permet d'accéder à la MODIFICATION du paramètre aché.
HINWEISE ZUR PROGRAMMIERUNG. Hier werden sämtliche Programmierungsseiten in der Reihenfolge angegeben, in der sie erscheinen: Sie die Pfeile
gestatten das Durchblättern der einzelnen Seiten. Mit der OKTaste kann der jeweils angezeigte Parameter GEÄNDERT werden.
NOCIONES DE PROGRAMACIÓN. Se da cuenta aquí todas las páginas de programación en orden de aparición: las echas permiten desplazar las
diversas páginas. La tecla OK permite acceder a la MODIFICACIÓN del parámetro mostrado.
IT
UK
FR
DE
ES
RUN TIME PROGRAM A
PROGRAM A
START TIME PROGRAM A
RUN TIME PROGRAM B
PROGRAM B
START TIME PROGRAM B
WEEKLY
SCHEDULE RAIN SENSOR
MANUAL
TEST
S M T W T F S
PROGLINE
A
PROG
A
1 2 3 4
PROG
A
1 2 3 4
PROG
A
1 2 3 4
PROG
A
1 2 3 4
PROGLINE
B
PROG
1 2 3 4
B
PROG
1 2 3 4
B
PROG
1 2 3 4
B
A A A
B
A
BB
A
B
A
B B
A
B
S M T W T F S
14
15
PROG
1 2 3 41 2 3 4
B
PROG
B
A

ELETTROVALVOLA PROGRAMMABILE RF 12
Per Elettrovalvola programmabile 1” M RF (codice): - For 1” M. RF programmable solenoid valve (code): - Pour 1” M électrovanne programmable RF (code): - Für RF
programmierbares 1” AG Magnetventil (Art.): - Para 1” M electroválvula programable RF (código):
8323
ESEMPIO DI PROGRAMMAZIONE
PROGRAMMING EXAMPLE
EXEMPLE DE PROGRAMMATION
PROGRAMMIERUNGSBEISPIEL
EJEMPLO DE PROGRAMACIÓN
IT
UK
FR
DE
ES
START
TIME
RUN
TIME
START
TIME
RUN
TIME
LINE
START
TIME
RUN
TIME
LINE
h 5:00
h 5:00
h 21:00
h 5:00
h 21:00
h 6:00
OFF OFF OFF
h 21:00 OFF OFF
h 6:00 OFF OFF OFF
OFF OFF
PROGRAM A
PROGRAM B
WEEKLY SCHEDULE
h 5:00
h 21:00
5
min 5
min
20
min
1 2 3 4
LINE
A
LINE
B
LINE
A
S
A A
M T W T
A
F
B
S
PROGLINE
A
PROG
A
1 2 3 4
PROG
A
1 2 3 4
PROG
A
1 2 3 4
PROG
A
1 2 3 4
1 2 3 4

ELETTROVALVOLA PROGRAMMABILE RF 13
Per Elettrovalvola programmabile 1” M RF (codice): - For 1” M. RF programmable solenoid valve (code): - Pour 1” M électrovanne programmable RF (code): - Für RF
programmierbares 1” AG Magnetventil (Art.): - Para 1” M electroválvula programable RF (código):
8323
RADIOCOMANDO - UTILIZZO - Irrigazione programmata. Impostazione ora e giorno. Premere OK (1) e con le due frecce impostare l’ora desiderata
(2). Premere OK per confermare (3). Con le frecce impostare il giorno della settimana (4-5) e premere OK (6).
I giorni indicati sono: S domenica, M lunedì, T martedì, W mercoledì, T giovedì, F venerdì, S sabato.
REMOTE CONTROL - USE - Programmed watering. Setting the day and time. Press OK (1) and use the two arrows to set the desired time (2). Press OK
to conrm (3). Use the arrows to set the day of the week (4-5) and press OK (6).
The days are shown as: S Sunday, M Monday, T Tuesday, W Wednesday, T Thursday, F Friday, S Saturday.
RADIO COMMANDE - UTILISATION - Arrosage programmé. Conguration de l'heure et du jour. Appuyez sur OK (1) et avec les deux èches
congurez l'heure souhaitée (2). Appuyez sur OK pour conrmer (3). Avec les èches congurez le jour de la semaine (4-5) et appuyez sur OK (6).
Les jours indiqués sont: S dimanche, M lundi, T mardi, W mercredi, T jeudi, F vendredi, S samedi.
FERNBEDIENUNG - GEBRAUCH - Programmierte Bewässerung. Einstellung von Uhrzeit und Wochentag. Drücken Sie OK (1) und stellen Sie mit
den beiden Pfeiltasten die gewünschte Uhrzeit ein (2). Drücken Sie OK, um die Einstellung zu bestätigen (3). Stellen Sie mit den Pfeiltasten den
Wochentag ein (4-5) und drücken Sie OK (6).
Die angezeigten Tage sind: S Sonntag, M Montag, T Dienstag, W Mittwoch, T Donnerstag, F Freitag, S Samstag.
MANDO A DISTANCIA - USO - Riego programado. Ajuste de hora y día. Pulse OK (1) y use las dos echas para ajustar la hora deseada (2). Pulse OK
para conrmar (3). Use las echas para seleccionar el día de la semana (4-5) y pulse OK (6).
Los días indicados son: S domingo, M lunes, T martes, W miércoles, T jueves, F viernes, S sábado.
IT
UK
FR
DE
ES
OK
OK
S
OK
W
OK
S M T W T F S
OK
OK
1 3 5
2 4 6

ELETTROVALVOLA PROGRAMMABILE RF 14
Per Elettrovalvola programmabile 1” M RF (codice): - For 1” M. RF programmable solenoid valve (code): - Pour 1” M électrovanne programmable RF (code): - Für RF
programmierbares 1” AG Magnetventil (Art.): - Para 1” M electroválvula programable RF (código):
8323
RADIOCOMANDO - PROGRAMMAZIONE DELL‘IRRIGAZIONE. Impostare/modicare il RUN TIME. La pagina RUN TIME permette di impostare per la
LINEA la sua durata di irrigazione sia per il programma A che per il programma B. La durata dell’irrigazione per ogni linea è impostabile da 1 a 60
minuti.
Dalla pagina ora corrente premere UNIT no ad arrivare all’unità da programmare. Premere la freccia destra.
Dalla pagina RUN TIME, premere il tasto OK per abilitare la modica, il simbolo OK lampeggia ad indicare che i parametri visualizzati possono essere
modicati e richiedono una conferma dell’impostazione. Con le frecce cambiare il valore visualizzato (tenendo continuamente premuti i tasti si avanza
più velocemente). Premere il tasto OK per confermare il valore impostato. Premendo la freccia destra si passa all’impostazione degli START TIME.
REMOTE CONTROL - PROGRAMMING WATERING. Set/modify the RUN TIME. The RUN TIME page allows the user to set a watering run time for
programme A and programme B for the LINE. The watering cycle run time for each line can be set from 1 to 60 minutes.
From the page showing the time, press UNIT until you arrive at the unit to be programmed. Press the right arrow.
From the RUN TIME page, press OK to enable modication, the symbol OK ashes indicating that the parameters displayed can be modied and require a
setting conrmation. Using the arrows changes the value displayed (by pressing and holding the keys, the value will change more quickly). Press OK to
conrm the set value. Press the right arrow to go to the START TIME settings.
RADIO COMMANDE - PROGRAMMATION DE L'ARROSAGE. Régler/modier le RUN TIME. La page RUN TIME permet de régler pour la LIGNE sa durée
d'arrosage aussi bien pour le programme A que pour le programme B. La durée de l'arrosage pour chaque ligne est réglable de 1 à 60 minutes.
Depuis la page de l’heure courante, appuyez sur UNIT jusqu’à arriver à l’unité à programmer. Appuyez sur la èche droite.
Depuis la page RUN TIME, appuyez sur la touche OK pour activer la modication, le symbole OK clignote pour indiquer que les paramètres achés
peuvent être modiés et exigent une conrmation du réglage. À l'aide des èches changez la valeur achée (en maintenant les touches appuyées, vous
avancez plus rapidement ). Appuyez sur la touche OK pour conrmer la valeur réglée. En appuyant sur la èche droite, on passe à la conguration des
START TIME.
FERNBEDIENUNG - PROGRAMMIERUNG DER BEWÄSSERUNG. Einstellen/Ändern der RUN TIME. Die Seite RUN TIME (Bewässerungsdauer)
ermöglicht die Einstellung der Bewässerungsdauer des KREISES, sowohl für das Programm A als auch für das Programm B. Die Bewässerungsdauer kann
für jeden Kreis von 1 bis 60min eingestellt werden.
Von der Seite aktuelle Uhrzeit betätigen Sie die UNIT-Taste, bis Sie zu dem Gerät kommen, das es zu programmieren gilt. Betätigen Sie die rechte
Pfeiltaste.
Drücken Sie auf der Seite RUN TIME die OK-Taste, um die Änderung zu bestätigen, das Symbol OK blinkt und zeigt so an, dass die angezeigten Parameter
geändert werden können und eine Bestätigung der Einstellung erfordern. Verwenden Sie die Pfeile, um den angezeigten Wert zu ändern (indem Sie die
Tasten durchgängig gedrückt halten, ändert sich der Wert schneller). Drücken Sie die OK-Taste, um den eingestellten Wert zu bestätigen. Durch Drücken
der rechten Pfeiltaste gelangen Sie zur Einstellung der START TIMEs (Startzeiten).
MANDO A DISTANCIA - PROGRAMACIÓN DEL RIEGO. Denir/modicar el RUN TIME. La página RUN TIME permite congurar la duración de riego
por la LÍNEA, tanto para el programa A como para el programa B. La duración del riego para cada línea se puede ajustar de 1 a 60 minutos.
Desde la página de la hora actual, pulse UNIT hasta llegar a la unidad que desea programar. Pulse la echa derecha.
En la página RUN TIME, pulse la tecla OK para habilitar la modicación, el símbolo OK parpadeará para indicar que los parámetros mostrados pueden
modicarse y requieren la conrmación del ajuste realizado. Utilice las echas para cambiar el valor mostrado (manteniendo pulsadas las teclas, se avanza
más rápidamente). Pulse la tecla OK para conrmar el valor denido. Pulsando la echa derecha se pasa al ajuste de los START TIME.
IT
UK
FR
DE
ES
1
2
PROGLINE
A
PROGLINE
OK
A
PROGLINE
OK
A
PROGLINE
A
1
3
2
1
S M T W T F S
PROG
B
A
1 2 3

ELETTROVALVOLA PROGRAMMABILE RF 15
Per Elettrovalvola programmabile 1” M RF (codice): - For 1” M. RF programmable solenoid valve (code): - Pour 1” M électrovanne programmable RF (code): - Für RF
programmierbares 1” AG Magnetventil (Art.): - Para 1” M electroválvula programable RF (código):
8323
RADIOCOMANDO - UTILIZZO - Irrigazione programmata. Impostare da 1 a 4 orari di partenza. Per impostare la partenza 1 premere OK (1), il
simbolo 1 rimane acceso sso (2). Con le frecce inserire l’orario di partenza dell’irrigazione 1 (ad es. 8.00) (tenendo premuti i tasti, l’avanzamento è più
rapido) (3). Premere OK per confermare l’orario inserito (4).
Premere freccia destra per visualizzare la successiva pagina di programmazione (5). Impostare le altre partenze con la stesssa modalità. OFF: nessuna
partenza. Gli orari vanno inseriti in sequenza, entro le 24 ore solari.
Premere la freccia destra per visualizzare la successiva pagina di programmazione: giorni in cui irrigare.
REMOTE CONTROL - USE - Programmed watering. Set from 1 to 4 watering cycles start times. To set start 1 press OK (1), the 1 symbol is xed (2).
Use the arrows to enter the start time for irrigation 1 (i.e. 8:00) with the use of the arrrow buttons (scrolling is faster when holding down the buttons) (3).
Press OK to conrm the time entered (4).
Press the right arrow to display the next programming page (5). Set the other start times in the same way. OFF: no programmed starts. Enter times in
sequence, within a 24-hour timeframe.
Press the right arrow to display the next programming page: irrigation days.
RADIO COMMANDE - UTILISATION - Arrosage programmé. Programmez de 1 à 4 horaires de départ. Pour programmer le départ 1 (1), appuyez sur
OK et le symbole 1 reste allumé xe (2). Avec les èches, saisissez l'horaire de départ de l'arrosage 1 (par ex. 8h00) (en maintenant appuyées les touches,
l'avancement est plus rapide) (3). Appuyez sur OK pour conrmer l'horaire (4).
Appuyez sur la èche droite pour visualiser la page suivante de programmation (5). Congurez les autres départs avec la même modalité. OFF: aucun
départ. Les horaires doivent être saisis en séquence, dans les 24 heures solaires.
Appuyez sur la èche droite pour visualiser la page suivante de programmation: jours pendant lesquels arroser.
FERNBEDIENUNG - GEBRAUCH - Programmierte Bewässerung. Stellen Sie 1 bis 4 Startzeiten ein. Zum Einstellen der Startzeit 1 drücken Sie OK (1),
das Symbol 1 leuchtet daraufhin x (2). Geben Sie mit den Pfeiltasten die Startzeit der Bewässerung 1 ein (z.B. 8.00) (wenn Sie die Tasten gedrückt halten,
läuft der Wert schneller) (3). Drücken Sie OK, um die eingegebene Uhrzeit zu bestätigen (4).
Drücken Sie die rechte Pfeiltaste, um zur nächsten Programmierungsseite zu wechseln (5). Stellen Sie die anderen Startzeiten auf die gleiche Weise ein.
OFF: kein Start. Die Uhrzeiten müssen nacheinander eingestellt werden, innerhalb von 24 Stunden.
Drücken Sie die rechte Pfeiltaste, um zur nächsten Programmierungsseite zu wechseln: Wochentage, an denen bewässert wird.
MANDO A DISTANCIA - USO - Riego programado. Dena entre 1 y 4 horas de inicio. Para denir el inicio 1 pulse OK (1); el símbolo 1 permanece
encendido jo (2). Use las echas para ajustar la hora de inicio del riego 1 (por ej. 8.00) (manteniendo pulsadas las teclas, se avanza más rápido) (3). Pulse
OK para conrmar la hora introducida (4).
Pulse la echa derecha para ver la siguiente página de programación (5). Ajuste los demás inicios siguiendo el mismo procedimiento. OFF: ningún inicio.
Las horas se deben ajustar en secuencia, de acuerdo con las 24 horas solares.
Pulse la echa derecha para ver la siguiente página de programación: días en los que regar.
IT
UK
FR
DE
ES
PROG
OK
A
1
PROG
A
1 2 3 4
PROG
A
2
PROG
OK
A
1
PROG
A
1
1 3 5
2 4

ELETTROVALVOLA PROGRAMMABILE RF 16
Per Elettrovalvola programmabile 1” M RF (codice): - For 1” M. RF programmable solenoid valve (code): - Pour 1” M électrovanne programmable RF (code): - Für RF
programmierbares 1” AG Magnetventil (Art.): - Para 1” M electroválvula programable RF (código):
8323
RADIOCOMANDO - UTILIZZO - Irrigazione programmata. Scegliere in che giorni attivare i cicli di irrigazione impostati (WEEKLY SCHEDULE).
Premere il tasto OK (1), si accede alla modica della programmazione settimanale (lampeggia S = Domenica). Premere le frecce per spostarsi sui giorni
successivi (2). Premere più volte il tasto OK per eliminare o ripristinare l’irrigazione nel giorno selezionato (in questo esempio si elimina il mercoledì, W =
WEDNESDAY) (3). Per uscire premere le frecce per posizionarsi su EXIT (4); quando EXIT lampeggia, premere OK (5). Premere la freccia destra per
visualizzare la successiva pagina di programmazione: Rain Sensor RF.
I giorni indicati sono: S domenica, M lunedì, T martedì, W mercoledì, T giovedì, F venerdì, S sabato.
REMOTE CONTROL - USE - Programmed watering. Choose in which days to activate the watering cycles set (WEEKLY SCHEDULE). Press OK (1) to
access the screen where you can modify weekly programming (ashing S = Sunday). Press the arrows to move to future days (2). Press OK multiple times
to delete or reinstate irrigation on the selected day (in this example, W = WEDNESDAY is deleted) (3). To exit, press the arrows until you reach EXIT (4);
press OK when EXIT ashes (5). Press the right arrow to display the next programming page: Rain Sensor RF.
The days are shown as: S Sunday, M Monday, T Tuesday, W Wednesday, T Thursday, F Friday, S Saturday.
RADIO COMMANDE - UTILISATION - Arrosage programmé. Choisissez les jours durant lesquels vous souhaitez activer les cycles d'arrosage
réglés (WEEKLY SCHEDULE). Appuyez sur la touche OK (1) pour accéder à la modication de la programmation hebdomadaire (clignote S = Dimanche).
Appuyez sur les èches pour vous déplacer sur les jours suivants (2). Appuyez plusieurs fois sur la touche OK pour supprimer ou rétablir l'arrosage le jour
sélectionné (dans cet exemple, le mercredi est éliminé, W=WEDNESDAY) (3). Pour sortir, appuyez sur les èches pour vous positionner sur EXIT (4) ;
lorsqu'EXIT clignotera, appuyez sur OK (5). Appuyez sur la èche droite pour visualiser la page suivante de programmation: Rain Sensor RF.
Les jours indiqués sont: S dimanche, M lundi, T mardi, W mercredi, T jeudi, F vendredi, S samedi.
FERNBEDIENUNG - GEBRAUCH - Programmierte Bewässerung. Wählen Sie, an welchen Wochentagen die eingestellten Bewässerungszyklen
aktiviert werden sollen (WEEKLY SCHEDULE). Drücken Sie die OK-Taste (1), und es önet sich die Seite zum Bearbeiten der Wochenprogrammierung
(S blinkt = Sonntag). Drücken Sie die Pfeiltasten, um zu den nächsten Wochentagen zu wechseln (2). Drücken Sie mehrmals die OK-Taste, um die
Bewässerung am gewählten Wochentag zu deaktivieren bzw. wieder zu aktivieren (in diesem Beispiel wird sie am Mittwoch deaktiviert, W =
WEDNESDAY) (3). Zum Verlassen der Seite drücken Sie die Pfeiltasten, bis Sie EXIT (4) erreichen; wenn EXIT blinkt, drücken Sie OK (5). Drücken Sie die
rechte Pfeiltaste, um zur nächsten Programmierungsseite zu wechseln: Rain Sensor RF.
Die angezeigten Tage sind: S Sonntag, M Montag, T Dienstag, W Mittwoch, T Donnerstag, F Freitag, S Samstag.
MANDO A DISTANCIA - USO - Riego programado. Seleccione los días en los que desea activar los ciclos de riego congurados (WEEKLY
SCHEDULE). Pulse la tecla OK (1) para acceder a la modicación de la programación semanal (parpadea S = Domingo). Pulse las teclas para pasar a los
días siguientes (2). Pulse varias veces la tecla OK para eliminar o restablecer el riego en el día seleccionado (en este ejemplo, se elimina el miércoles, W =
WEDNESDAY) (3). Para salir, sitúese en EXIT utilizando las echas (4); cuando parpadee EXIT, pulse OK (5). Pulse la echa derecha para ver la siguiente
página de programación: Rain Sensor RF.
Los días indicados son: S domingo, M lunes, T martes, W miércoles, T jueves, F viernes, S sábado.
IT
UK
FR
DE
ES
S M T W T F S
OK
EXIT
B
A
B
A
B
A
B
A
B
A
B
A
B
A
14
15
S M T W T F S
OK
EXIT
B
A
B
A
B
A
B
A
B
A
B
A
B
A
14
15
S M T W T F S
OK
EXIT
B
A
B
A
B
A
B
A
B
A
B
A
14
15
S M T W T F S
OK
B
A
B
A
B
A
B
A
B
A
B
A
14
15
S M T W T F S
OK
EXIT
B
A
B
A
B
A
B
A
B
A
B
A
14
15
1 3 5
2 4

ELETTROVALVOLA PROGRAMMABILE RF 17
Per Elettrovalvola programmabile 1” M RF (codice): - For 1” M. RF programmable solenoid valve (code): - Pour 1” M électrovanne programmable RF (code): - Für RF
programmierbares 1” AG Magnetventil (Art.): - Para 1” M electroválvula programable RF (código):
8323
ASSOCIAZIONI - Procedura di associazione elettrovalvola RF - Rain Sensor RF. L’elettrovalvola RF riconosce il segnale di un Rain Sensor RF installato,
purché i dispositivi siano posti a una distanza non superiore a 30 m senza ostacoli e in assenza di altri segnali in radiofrequenza.
CONNECTIONS - Procedure for the connection of RF programmable solenoid valve - RF Rain Sensor. The RF solenoid valve recognises the signal of
an installed RF Rain Sensor, provided the devices are no more than 30m away (obstacle free) and there are no other radio frequency signals.
COMBINAISONS DE FONCTIONNEMENT - Procédure de combinaison du fonctionnement électrovanne programmable RF - Pluviomètre Rain
Sensor RF. L’électrovanne RF reconnaît le signal d'un Rain Sensor RF installé, si les dispositifs sont installés à une distance non supérieure à 30 mètres sans
obstacles et en l'absence d'autres signaux en radiofréquence.
ZUWEISUNGEN - Vorgehensweise zum Zuweisen des RF programmierbares Magnetventil zum Rain Sensor RF. Das RF-Magnetventil erkennt das
Signal eines installierten RF-Rain Sensors, sofern sich die Geräte in einer Entfernung von höchstens 30 m, ohne Hindernisse und ohne andere Funksignale
benden.
ASOCIACIONES - Procedimiento para asociar el electroválvula programable RF y el sensor de lluvia por radiofrecuencia. La electroválvula RF
reconoce la señal de un Rain Sensor RF instalado, siempre que los dispositivos estén situados a una distancia máxima de 30 m sin obstáculos y no haya
otras señales de radiofrecuencia.
IT
UK
FR
DE
ES
ONLY
ALKALINE
BATTERY
30 m (max)
1 2

ELETTROVALVOLA PROGRAMMABILE RF 18
Per Elettrovalvola programmabile 1” M RF (codice): - For 1” M. RF programmable solenoid valve (code): - Pour 1” M électrovanne programmable RF (code): - Für RF
programmierbares 1” AG Magnetventil (Art.): - Para 1” M electroválvula programable RF (código):
8323
RADIOCOMANDO - PROGRAMMAZIONE DELL‘IRRIGAZIONE - Rain sensor RF. Dalla pagina RAIN SENSOR premere il tasto OK, si accede alla
attivazione/disattivazione del Rain Sensor RF (Sensore di Pioggia in radio frequenza).
Con la pressione della freccia destra si cambia lo stato da “NO” (sensore disattivato) a “YES” (sensore attivato) e viceversa. Confermare premendo OK. Il
riconoscimento tra i dispositivi avviene nell’arco di circa 5-10 minuti.
Stato del Rain Sensor RF:
Spento: Sensore VUOTO oppure non attivo per il programmatore.
Acceso sso: Sensore PIENO e attivo per il programmatore. Con sensore PIENO vengono interrotti eventuali programmi d’irrigazione e si previene
che altri programmi partano in automatico nché il simbolo rimane acceso.
Acceso lampeggiante: il programmatore non riceve più informazioni da oltre 24 ore dal Rain Sensor RF ed opera indipendentemente dal sensore
stesso. Controllare le batterie del Rain Sensor RF e la sua corretta installazione.
Attenzione: all’elettrovalvola RF può essere abbinato solo il Rain Sensor RF (cod. 90831) e non il Rain Sensor a lo (cod. 90915).
REMOTE CONTROL - WATERING PROGRAMMING - Rain Sensor RF. From the RAIN SENSOR page press OK, activates when the Rain Sensor RF
activates/deactivates. Press
the right arrow to move the status from “NO” (sensor deactivated) to “YES” (sensor activated) and vice versa. Conrm by pressing OK. Recognition
between the devices takes about 5-10 minutes.
Status of Rain Sensor RF:
ON: Sensor EMPTY or not active for the water timer.
Permanently on: Sensor FULL or active for the water timer. With the sensor FULL any watering programmes are interrupted and other programmes
start automatically while the symbol remains active.
Active and ashing: the water timer has not received any information from the Rain Sensor RF for more than 24 hours and is working independently
from the sensor. Check the Rain Sensor RF installation and batteries.
Warning: the RF solenoid valve can only be combined with the RF Rain Sensor (code 90831), not the wired Rain Sensor (code 90915).
RADIO COMMANDE - PROGRAMMATION DE L'ARROSAGE - Rain Sensor RF. Depuis la page RAIN SENSOR appuyez sur la touche OKon accède à
l'activation/désactivation du Rain Sensor RF (Capteur de Pluie). En pressant la èche droite vous passez de l'état de “NO” (capteur désactivé) a “YES”
(capteur activé) et vice-versa.
Conrmez en appuyant sur la touche OK. La reconnaissance entre les dispositifs s'eectue dans les 5-10 minutes.
État du Rain Sensor RF :
Éteint : Capteur VIDE ou bien non activé pour le programmateur.
Allumé xe : Capteur PLEIN et activé pour le programmateur Avec le capteur PLEIN, les éventuels programmes d'arrosage sont interrompus et il est
signalé que d'autres programmes se déclenchent automatiquement jusqu'à ce que le symbole reste allumé.
Allumé et clignotant : le programmateur ne reçoit plus d'informations depuis plus de 24 heures de la part de Rain Sensor RF et opère
indépendamment du capteur. Contrôlez les piles du Rain Sensor RF et qu'elles soient correctement positionnées.
Attention: l’électrovanne programmable ne peut être associé qu’au Rain Sensor RF (code 90831) et non pas au Rain Sensor avec l (code 90915).
IT
UK
FR
1
2
S M T W T F S
B
AA
B
A
B
A
B
A
B
A
B
A
14
15
OK
1
2
1
3
2
OK
1 2 3

ELETTROVALVOLA PROGRAMMABILE RF 18
Per Elettrovalvola programmabile 1” M RF (codice): - For 1” M. RF programmable solenoid valve (code): - Pour 1” M électrovanne programmable RF (code): - Für RF
programmierbares 1” AG Magnetventil (Art.): - Para 1” M electroválvula programable RF (código):
8323
FERNBEDIENUNG - PROGRAMMIERUNG DER BEWÄSSERUNG - Rain Sensor RF. Drücken Sie auf der Seite RAIN SENSOR die OK-Taste, Sie gelangen zur
Seite für die Aktivierung/Deaktivierung des Rain Sensor RF (Funk-Regensensor). Durch Drücken des rechten Pfeils ändern Sie den Status von „NO“ (Sensor
deaktiviert) auf „YES“ (Sensor aktiviert) und umgekehrt. Bestätigen Sie die Änderung durch Drücken der OK-Taste. Die Erkennung zwischen den beiden
Geräten erfolgt im Laufe von circa 5-10Minuten.
Status des Rain Sensor RF:
Aus: Sensor LEER oder nicht aktiv für den Bewässerungscomputer.
Leuchtet durchgängig: Sensor VOLL und aktiv für den Bewässerungscomputer. Bei VOLLEM Sensor werden eventuelle Bewässerungsprogramme
unterbrochen und es wird verhindert, dass andere Programme automatisch gestartet werden, bis das Symbol wieder verschwindet.
Blinkend: Der Bewässerungscomputer empfängt seit mehr als 24 Stunden keine Informationen mehr vom Rain Sensor RF und funktioniert
unabhängig von diesem. Kontrollieren Sie die Batterien des Rain Sensor RF und dass er korrekt installiert ist.
Achtung: An RF Magnetventil kann nur mit dem Rain Sensor RF (Art. 90831) und nicht dem kabelgebundenen Rain Sensor (Art. (Art. 90915) kombiniert
werden.
MANDO A DISTANCIA - PROGRAMACIÓN DEL RIEGO - Rain Sensor RF. En la página RAIN SENSOR pulse la tecla OK, se accederá a la
activación/desactivación del Rain Sensor RF (Sensor de Lluvia). Pulsando la echa derecha se cambia el estado de “NO” (sensor desactivado) a “YES”
(sensor activado) y viceversa. Conrme pulsando la tecla OK. El reconocimiento entre los dispositivos se produce en un plazo de 5-10 minutos.
Estado del Rain Sensor RF:
Apagado: Sensor VACÍO o no activo para el programador.
Encendido jo: Sensor LLENO y activo para el programador. Cuando el sensor está LLENO se interrumpen los programas de riego que se estén
realizando y se impide que comiencen automáticamente otros programas mientras el símbolo permanezca encendido.
Encendido parpadeando: el programador lleva más de 24 horas sin recibir información del Rain Sensor RF y funciona con independencia del sensor.
Compruebe las pilas del Rain Sensor RF y su correcta instalación.
Atención: a electroválvula programable RF solo se puede asociar el Rain Sensor RF (cód. 90831), no el Rain Sensor por cable (cód. 90915).
DE
ES
1
2
S M T W T F S
B
AA
B
A
B
A
B
A
B
A
B
A
14
15
OK
1
2
1
3
2
OK
1 2 3

ELETTROVALVOLA PROGRAMMABILE RF 19
Per Elettrovalvola programmabile 1” M RF (codice): - For 1” M. RF programmable solenoid valve (code): - Pour 1” M électrovanne programmable RF (code): - Für RF
programmierbares 1” AG Magnetventil (Art.): - Para 1” M electroválvula programable RF (código):
8323
RADIOCOMANDO - UTILIZZO - Irrigazione programmata. Test / irrigazione manuale. Premere la freccia destra per visualizzare la successiva pagina di
programmazione: test manuale. Premere il tasto RF per attivare la comunicazione tra Radiocomando e l’elettrovalvola RF (1): la scritta TEST lampeggerà
per qualche istante. Sul display verranno visualizzate la linea 1 e la scritta OFF (2); premere OK per attivare l’irrigazione per un tempo prestabilito di 5
minuti (3). Premere nuovamente OK per interrompere anzitempo l’irrigazione. Per uscire dalla funzione, premere la freccia destra nchè compare la scritta
TEST (4) e premere OK (5). Premere la freccia destra per ritornare alla pagina UNIT (6). Per tornare alla pagina ORA/GIORNO, premere più volte il tasto UNIT.
Per accedere direttamente alla programmazione manuale dalla pagina ORA/GIORNO, premere il tasto UNIT e visualizzare l’unità desiderata. Premere la
freccia destra e portarsi alla pagina test. Proseguire come precedentemente indicato.
REMOTE CONTROL - USE - Programmed watering. Test/manual watering. Press the right arrow to display the next programming page: manual testing.
Press the RF button to activate communication between remote control and the RF solenoid valve (1); the TEST message will blink briey. The display
shows line 1 and the message OFF (2); press OK to activate watering for a preset time of 5 minutes (3). Press OK a second time to stop watering before the
end of the preset time. To quit the function, press the right arrow until TEST is displayed (4), then press OK (5). Press the right arrow to return to the UNIT
page (6). To go back to the TIME/DAY page, press the UNIT button several times.
To access manual programming directly from the TIME/DAY page, press the UNIT button to display the desired unit. Press the right arrow and go to the
test page. Proceed as indicated above.
RADIO COMMANDE - UTILISATION - Arrosage programmé. Test / arrosage manuel. Appuyez sur la èche droite pour visualiser la page suivante de
programmation: test manuel. Appuyez sur la touche RF pour établir la communication entre la radiocommande et l’électrovanne RF (1). Sur l'acheur
apparaîtront le circuit 1 et la mention OFF (2). Appuyez sur la touche OK pour activer l'arrosage pour la durée préétablie de 5 minutes (3). Appuyez à
nouveau sur la touche OK pour interrompre l'arrosage avant. Pour sortir de la fonction, appuyez sur la èche droite jusqu'à ce le message TEST apparaisse
(4), puis appuyez sur la touche OK (5). Appuyez sur la èche droite pour retourner à la page UNIT (6). Pour revenir à l'écran HEURE/JOUR, appuyez
plusieurs fois sur la touche UNIT.
Pour accéder directement à la programmation manuelle de la page HEURE/JOUR, appuyez sur la touche UNIT et visualisez l'unité souhaitée. Appuyez sur
la èche droite et allez à la page test. Continuez comme précédemment indiqué..
FERNBEDIENUNG - GEBRAUCH - Programmierte Bewässerung. Test / manuelle Bewässerung. Drücken Sie die rechte Pfeiltaste, um zur nächsten
Programmierungsseite zu wechseln: manueller Test. Drücken Sie die RF-Taste, um die Kommunikation zwischen der Fernbedienung und dem RF
Magnetventil zu aktivieren: Die Meldung TEST blinkt kurz (1). Auf dem Display erscheinen der Kreis 1 und die Meldung OFF (2); drücken Sie OK, um die
Bewässerung für eine voreingestellte Dauer von 5 Minuten zu aktivieren (3). Drücken Sie erneut OK, um die Bewässerung vorzeitig zu beenden. Zum
Verlassen der Funktion, drücken Sie die rechte Pfeiltaste, bis die Meldung TEST erscheint (4), und drücken Sie dann OK (5). Drücken Sie die rechte
Pfeiltaste, um zur Seite UNIT zurückzukehren (6). Um zur Seite UHRZEIT/WOCHENTAG zurückzukehren, drücken Sie mehrmals die UNIT-Taste.
Um direkt die manuelle Programmierung von der Seite UHRZEIT/WOCHENTAG aufzugreifen, drücken Sie mehrmals die UNIT-Taste und zeigen Sie die
gewünschte Einheit an. Drücken Sie die rechte Pfeiltaste, um zur Test-Seite zurückzukehren. Fahren Sie fort, wie oben beschrieben.
MANDO A DISTANCIA - USO - Riego programado. Test/riego manual. Pulse la echa derecha para ver la siguiente página de programación: test
manual. Pulse la tecla RF para activar la comunicación entre el mando a distancia y la electroválvula RF (1): la palabra TEST parpadeará durante unos
segundos. En el display se visualizan la línea 1 y la palabra OFF (2); pulse la tecla OK para activar el riego por el tiempo predenido de 5 minutos (3). Pulse
de nuevo la tecla OK para interrumpir el riego antes de que transcurra el tiempo predenido. Para salir de la función, pulse la echa derecha hasta que
aparezca el mensaje TEST (4) y, luego, pulse la tecla OK (5). Pulse la echa derecha para volver a la página UNIT (6). Para volver a la página HORA/DÍA, pulse
varias veces la tecla UNIT.
Para acceder directamente a la programación manual desde la página HORA/DÍA, pulse la tecla UNIT y consulte la unidad deseada. Pulse la echa
derecha para ir a la página test. Siga el procedimiento explicado.
IT
UK
FR
DE
ES
LINE
OK
EXIT
A
PROG
B
A
LINE
A
OK
EXIT
1 3 5
2 4 6

ELETTROVALVOLA PROGRAMMABILE RF 20
Per Elettrovalvola programmabile 1” M RF (codice): - For 1” M. RF programmable solenoid valve (code): - Pour 1” M électrovanne programmable RF (code): - Für RF
programmierbares 1” AG Magnetventil (Art.): - Para 1” M electroválvula programable RF (código):
8323
PROGRAMMAZIONE DELL‘IRRIGAZIONE - Abilitazione dei programmi A e B e la messa in o. Sul display viene visualizzata normalmente la
schermata ORA/GIORNO corrente; premere il tasto UNIT, selezionare l’unità con le frecce e premere OK. Premere le frecce per abilitare il programma
desiderato solo A, solo B, entrambi i programmi o metterli in OFF.
N.B. La sovrapposizione temporale del ciclo di irrigazione del programma A e di quello del programma B è invece permessa (se l’impianto non ha
portata suciente, questa condizione potrebbe pregiudicare la qualità delle irrigazioni).
Eettuata la scelta, premere il tasto OK per confermare l’abilitazione dei programmi visualizzati.
PROGRAMMING WATERING - Enabling programmes A and B and setting to o. The DAY/TIME screen is normally shown on the display; press the
UNIT button, use the arrows to select the unit and press OK. Press the arrows to enable programme A, programme B or both programmes, or to set them
to OFF.
N.B. Programme A irrigation cycles can overlap with programme B irrigation cycles (if there is an insucient ow rate in the system, this may aect
the irrigation quality).
Once the selection has been made, press OK to conrm enabling of the programmes displayed.
PROGRAMMATION DE L'ARROSAGE - Activation des programmes A et B et l'arrêt sur OFF. Sur l’acheur apparaît normalement la page-écran
HEURE/JOUR courant, appuyez sur la touche UNIT, sélectionnez l’unité avec les èches et appuyez sur OK. Appuyez sur les èches pour activer le
programme souhaité: uniquement A, uniquement B, les deux programmes ou mettez-les sur OFF.
N.B. La superposition temporaire du cycle d'arrosage du programme A et de celui du programme B est par contre admise (si l'installation n'a pas
une portée susante, cette condition pourrait compromettre la qualité des arrosages).
Une fois le choix eectué, appuyez sur la touche OK pour conrmer l'activation des programmes achés.
PROGRAMMIERUNG DER BEWÄSSERUNG - Aktivierung der Programme A und B und Stellen auf OFF. Auf dem Display wird ganz normal der
aktuelle UHRZEIT/WOCHENTAG-Bildschirm angezeigt. Betätigen Sie die UNIT-Taste, wählen Sie das Gerät mit den Pfeiltasten aus und drücken Sie auf OK.
Betätigen Sie die Pfeiltasten, um das gewünschte Programm freizuschalten: nur A, nur B, beide Programme oder OFF.
Hinweis: der Bewässerungszyklus von Programm A und der von Programm B dürfen sich dagegen zeitlich überschneiden (wenn die
Anlagenleistung unzureichend ist, könnte durch diese Betriebsbedingung die Qualität der Bewässerung beeinträchtigt werden).
Nachdem Sie Ihre Auswahl getroen haben, drücken Sie die OK-Taste, um die Aktivierung des angezeigten Programms zu bestätigen.
PROGRAMACIÓN DEL RIEGO - Habilitación de los programas A y B y puesta en o. En la pantalla aparece con normalidad la pantalla HORA/DÍA
actual; pulse el botón UNIT, seleccione la unidad con las echas y pulse OK. Pulse las echas para habilitar el programa deseado: solo A, solo B, los dos
programas o ponerlos en OFF.
Nota: en cambio, se permite el solapamiento temporal del ciclo de riego del programa A y el del programa B (si la instalación no tiene suciente
caudal, esto podría afectar negativamente a la calidad de los riegos).
Una vez realizada la selección, pulse la tecla OK para conrmar la habilitación de los programas mostrados.
IT
UK
FR
DE
ES
PROG
B
A
S M T W T F S
1
2
PROG
B
A
3
1
3
2
1
3
2
PROG
OK
B
A
PROG
OK
B
A
PROG
B
A
PROG
OK
B
A
PROG
OK
A
PROG
OK
B
1 2 3

UTILIZZO - Irrigazione programmata. Trasferimento dati inseriti da Radiocomando RF all’elettrovalvola RF. Tenere i dispositivi a non meno di 50
cm e non più di 10 metri di distanza, senza ostacoli (1). Premere il tasto UNIT per scegliere l’unità (2) e premere il tasto RF (3). Per qualche secondo, sul
display del radiocomando apparirà l’icona RF lampeggiante (4). La successiva scomparsa del simbolo RF indica che l’aggiornamento è avvenuto
correttamente. Se appare la scritta ERR lampeggiante sul radiocomando, avvicinare i due dispositivi e ripetere l’operazione (5). Per tornare alla pagina
ORA/GIORNO, premere più volte il tasto UNIT (6).
Ogni modica eseguita da radiocomando RF deve essere trasferita all’elettrovalvola RF. Dopo la sostituzione delle batterie sull’elettrovalvola, eettuare la
sincronizzazione dell’orario da Radiocomando RF con la stessa modalità.
USE - Programmed watering. Transferring the data entered from RF remote control to RF solenoid valve. Keep the devices no less than 50 cm and
no more than 10 metres apart and ensure there are no obstacles (1). Press the UNIT button to choose the unit (2) and press the RF button (3). The
ashing RF icon will be displayed on the remote control screen for a few seconds (4). The subsequent disappearance of the RF symbol indicates that the
update was successful. If ERR blinking appears on the remote control, bring the two devices closer together and repeat this operation (5). press the UNIT
button several times to return to the DATE/TIME page (6).
Each change made from the RF remote control must be transferred to the RF solenoid valve. After replacing the RF solenoid valve batteries, synchronise
the time from the RF remote control in the same way.
UTILISATION - Arrosage programmé. Transfert des données saisies de Radiocommande RF à l’électrovanne RF. Gardez les dispositifs à pas moins
de 50 cm et pas plus de 10 mètres de distance sans obstacles (1). Appuyez sur la touche UNIT pour choisir l’unité (2) et appuyez sur la touche RF (3).
Pendant quelques secondes, sur l'acheur de la radiocommande apparaîtra l'icône RF en clignotant (4). La disparition successive du symbole RF indique
que la mise à jour a été correctement eectuée. Si l'inscription ERR clignotant apparaît sur la radiocommande, rapprochez les deux dispositifs et répétez
l'opération (5). Pour revenir à la page HEURE/JOUR, appuyez plusieurs fois sur la touche UNIT (6).
Toute modication eectuée depuis Radiocommande RF doit être transférée à l’électrovanne RF. Après le remplacement des piles sur l’électrovanne RF,
eectuez la synchronisation de l'horaire depuis Radiocommande RF avec la même modalité.
GEBRAUCH - Programmierte Bewässerung. Übertragung der eingegebenen Daten von der Funk-Fernbedienung an den RF Magnetventil. Die
Geräte müssen eine Entfernung von mindestens 50 cm und höchstens 10Meter zueinander haben, ohne Hindernisse (1). Betätigen Sie die UNIT-Taste,
um ein Gerät auszuwählen (2) und betätigen Sie die RF-Taste (3). Für einige Sekunden blinkt auf dem Display der Fernbedienung das RF-Symbol (4). Das
anschließende Verschwinden des RF-Symbols zeigt an, dass die Aktualisierung erfolgreich war. Wenn die Meldung ERR auf der Fernbedienung blinkt,
nähern Sie die beiden Geräte einander an und wiederholen Sie den Vorgang (5). Um zur Seite UHRZEIT/WOCHENTAG zurückzukehren, drücken Sie
mehrmals die UNIT-Taste (6).
Jede an der Funk-Fernbedienung vorgenommene Änderung muss an den RF Magnetventil übertragen werden. Nach Austausch der Batterien nehmen
Sie die Synchronisierung der Uhrzeit an der Funk-Fernbedienung mit derselben Modalität vor.
USO - Riego programado. Transferencia de datos introducidos desde el mando a distancia RF a la electroválvula RF. Mantenga los dispositivos a
una distancia de entre 50 cm como mínimo y 10 metros como máximo entre sí, sin obstáculos (1). Pulse el botón UNIT para elegir la unidad (2) y pulse el
botón RF (3). Durante unos segundos, la pantalla del mando a distancia mostrará el icono RF parpadeando (4). Cuando desaparezca el símbolo RF,
signcará que la actualización ha concluido correctamente. Si aparece el mensaje ERR intermitente en el mando a distancia, acerque los dos dispositivos y
repita la operación (5). Para volver a la pantalla HORA/DÍA, pulse varias veces la tecla UNIT (6).
Toda modicación realizada desde el mando a distancia RF se debe transferir a la electroválvula RF. Después de cambiar las pilas de la electroválvula RF,
sincronice el horario desde el mando a distancia RF siguiendo el mismo procedimiento.
IT
UK
FR
DE
ES
ELETTROVALVOLA PROGRAMMABILE RF 21
Per Elettrovalvola programmabile 1” M RF (codice): - For 1” M. RF programmable solenoid valve (code): - Pour 1” M électrovanne programmable RF (code): - Für RF
programmierbares 1” AG Magnetventil (Art.): - Para 1” M electroválvula programable RF (código):
8323
PROG
B
A
PROG
ERR
B
A
S M T W T F S
OK
50 cm (min)
10 m (max)
PROG
B
A
PROG
B
A
ONLY
ALKALINE
BATTERY
1 3 5
2 4 6

RESET. Il RESET, ovvero il ripristino delle impostazioni di fabbrica, cancella tutti i programmi d’irrigazione, l’associazione con il Rain Sensor RF e con il
Radiocomando RF. Per eettuare il RESET dell’elettrovalvola premere contemporaneamente le frecce per 10 secondi, no alla comparsa di tutti i simboli in
sequenza illuminati (1).
Per resettare il Radiocomando RF inserire un oggetto appuntito nel foro S1 e contemporaneamente premere le frecce per 10 secondi (2).
RESET. RESET restores factory settings, deleting all watering programmes and pairings with the RF Rain Sensor and the RF remote control. To RESET the
valve, press both arrows at the same time and hold for 10 seconds, until all the symbols light up in sequence (1).
To reset the RF remote control, insert a pointy object in hole S1 and press both arrows at the same time and hold for 10 seconds (2).
RÉDÉMARRAGE. Le RESET, à savoir le rétablissement des congurations faites en usine, eace tous les programmes d'arrosage, l'association avec le Rain
Sensor RF et avec la Radiocommande RF. Pour eectuer le RESET de la électrovanne, appuyez simultanément sur les èches pendant 10 secondes,
jusqu'à l'apparition de tous les symboles éclairés en séquence (1).
Pour réinitialiser la Radiocommande RF, insérez un objet pointu dans le trou S1 et simultanément appuyez sur les èches pendant 10 secondes (2).
RESET. Der RESET-Vorgang, d.h. das Zurücksetzen auf die Fabrikeinstellungen, löscht alle Bewässerungsprogramme, die Zuweisung zum RF-Rain Sensor
und zur RF-Fernbedienung. Zum Vornehmen des RESET drücken Sie die Pfeiltasten gleichzeitig für 10Sekunden, bis nacheinander alle Symbole
aueuchten (1).
Zum Zurücksetzen der Funk-Fernbedienung stecken Sie einen spitzen Gegenstand in das kleine Loch S1 und drücken Sie gleichzeitig die Pfeiltasten 10
Sekunden lang (2).
RESET. El RESET, es decir, el restablecimiento de los ajustes predeterminados, elimina todos los programas de riego, así como la asociación con el Rain
Sensor RF y con el mando a distancia RF. Para efectuar el RESET de la electroválvula, pulse simultáneamente las echas durante 10 segundos, hasta que
aparezcan todos los símbolos encendidos en secuencia (1).
Para resetear el mando a distancia RF, introduzca un objeto puntiagudo en el agujero S1 y pulse al mismo tiempo las dos echas durante 10 segundos (2).
IT
UK
FR
DE
ES
ELETTROVALVOLA PROGRAMMABILE RF 22
Per Elettrovalvola programmabile 1” M RF (codice): - For 1” M. RF programmable solenoid valve (code): - Pour 1” M électrovanne programmable RF (code): - Für RF
programmierbares 1” AG Magnetventil (Art.): - Para 1” M electroválvula programable RF (código):
8323
ONLY
ALKALINE
BATTERY
OK
LOW
x10 sec.
1 2

PULIZIA E MANUTENZIONE. A ne stagione, prima dell’arrivo delle gelate invernali, chiudere l’acqua e scaricare l’impianto facendo aprire in modalità
manuale la valvola in modo che l’acqua rimasta al suo interno deuisca.
Estrarre il gruppo di comando e riporlo in un ambiente asciutto dove la temperatura non scende al di sotto dei 3 °C. Ricordarsi di togliere le batterie.
All’avvio della nuova stagione inserire delle batterie nuove e chiudere il tappo facendo attenzione che la guarnizione di tenuta sia correttamente inserita.
Collegare i cavetti al solenoide turchese rispettando la polarità (rosso + nero -) e reinserire il gruppo comando allineandolo correttamente nell’apposita
guida facendo attenzione a non schiacciare i cavi. Chiudere sempre il coperchio trasparente no in fondo controllando che la guarnizione di tenuta
venga correttamente posizionata.
CLEANING AND MAINTENANCE. At the end of the season, before the winter frosts, turn o the water and drain the system, manually opening the valve
to run o the water remaining inside.
Remove the control unit and store it in a dry place, where the temperature does not fall below 3°C. Remember to remove the batteries.
At the start of the season, insert new batteries and close the lid, taking care to insert the seal correctly.
Connect the wires to the blue solenoid valve matching up the poles (red + black -) and reinsert the control unit, lining it up in the guides and taking care
not to crush the wires. Always put the clear cover back on and fully close, checking that the seal is correctly in place.
NETTOYAGE ET ENTRETIEN. En n de saison, avant l'arrivée des gelées hivernales, fermez l'eau et videz l'installation en ouvrant en mode manuel la
vanne an que l'eau restée à l'intérieur sorte.
Extrayez le groupe de commande et rangez-le dans un lieu sec, où la température ne descend pas en dessous de 3 °C. N’oubliez pas de retirer les piles.
Avec l’arrivée de la nouvelle saison, insérez de nouvelles piles et fermez le bouchon en veillant à ce que le joint d’étanchéité soit bien inséré.
Branchez les câbles sur le solénoïde turquoise en respectant la polarité (rouge + noir -) et réinsérez le groupe de commande en l’alignant correctement
dans le logement prévu à cet eet et en veillant à ne pas écraser les câbles. Fermez toujours le couvercle transparent jusqu’au fond en contrôlant que le
joint d’étanchéité soit correctement positionné.
REINIGUNG UND WARTUNG. Am Saisonende, vor dem ersten Frost, schließen Sie das Wasser und leeren Sie die Anlage, indem Sie das Ventil manuell
önen, damit das enthaltene Restwasser abießen kann.
Ziehen Sie das Steuermodul ab und lagern Sie es an einem trockenen Ort, an dem die Temperatur nicht unter 3°C fällt. Denken Sie daran, die Batterien zu
entfernen.
Zu Beginn der neuen Saison legen Sie neue Batterien ein und schließen Sie die Abdeckung. Achten Sie dabei darauf, dass die Dichtung korrekt sitzt.
Verbinden Sie die Kabel unter Beachtung der korrekten Polung (rot + schwarz -) mit der türkisen Magnetspule, und setzen Sie das Steuermodul wieder
ein, indem Sie es korrekt an den entsprechenden Führungsschienen ausrichten. Achten Sie dabei darauf, die Kabel nicht zu quetschen. Schließen Sie die
transparente Abdeckung wieder vollständig und überprüfen Sie dabei, dass die Dichtung richtig sitzt.
LIMPIEZA Y MANTENIMIENTO. A nal de temporada, antes de que lleguen las heladas del invierno, corte el agua y vacíe el sistema, abriendo
manualmente la válvula para que salga el agua que quede en su interior.
Extraiga el grupo de mando y guárdelo en un lugar seco en el que la temperatura no baje de los 3 °C. Recuerde extraer las pilas.
Al principio de la nueva temporada, introduzca pilas nuevas y cierre la tapa asegurándose de que la junta de estanqueidad esté correctamente montada.
Conecte los cables al solenoide azul turquesa respetando la polaridad (rojo + negro -) y vuelva a introducir el grupo de mando alineándolo
correctamente en la guía prevista, con cuidado para no aplastar los cables. Cierre siempre a fondo la tapa transparente, asegurándose de colocar
correctamente la junta de estanqueidad.
IT
UK
FR
DE
ES
ELETTROVALVOLA PROGRAMMABILE RF 23
Per Elettrovalvola programmabile 1” M RF (codice): - For 1” M. RF programmable solenoid valve (code): - Pour 1” M électrovanne programmable RF (code): - Für RF
programmierbares 1” AG Magnetventil (Art.): - Para 1” M electroválvula programable RF (código):
8323
ONLY
ALKALINE
BATTERY
ONLY
ALKALINE
BATTERY
AAA
+
AAA
+
1
24
3
4
3
1
2
1 2
-
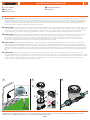 1
1
-
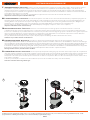 2
2
-
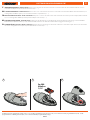 3
3
-
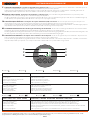 4
4
-
 5
5
-
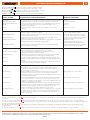 6
6
-
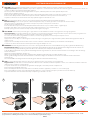 7
7
-
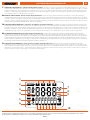 8
8
-
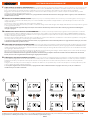 9
9
-
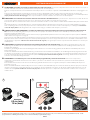 10
10
-
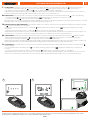 11
11
-
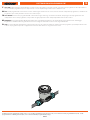 12
12
-
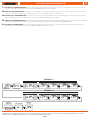 13
13
-
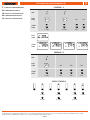 14
14
-
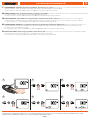 15
15
-
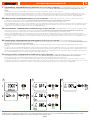 16
16
-
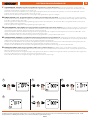 17
17
-
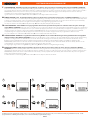 18
18
-
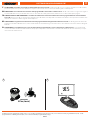 19
19
-
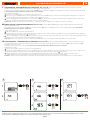 20
20
-
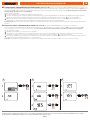 21
21
-
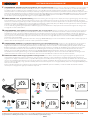 22
22
-
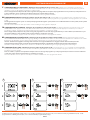 23
23
-
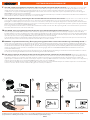 24
24
-
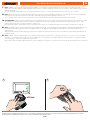 25
25
-
 26
26


claber 1" M. RF programmable solenoid valve Manual de usuario
- Tipo
- Manual de usuario
- Este manual también es adecuado para
En otros idiomas
Documentos relacionados
-
claber 90826 Manual de usuario
-
claber 1" M. RF programmable solenoid valve Manual de usuario
-
-
-
-
-
-
claber Hydro-4 Guía del usuario
-
claber 8055 Manual de usuario
-
