Craftsman 90016496 El manual del propietario
- Categoría
- Herramientas eléctricas
- Tipo
- El manual del propietario

TM
20v Max* Power Unit &
Drill Attachment
ModeU" 16496
z_CAUTION: Read, understand and follow
all Safety Rules and Operating Instructions
in this manual before using this product.
Sears Brands Management Corporation,
Hoffman Estates, _L 60179 U,S,A°
See the full line of Craftsman ® products
at craftsman,corn
. SAFETY
. OPERATION
. MAmNTENANCE
. TROUBLESHOOTING
. ESPAt_OL PG, 13
*Maximum initial battery pack voltage
(measured without a workload) is 20
volts. The nominal voltage is 18.
Part No. 90587570 REV 01 AUG 12

CRAFTSMAN ONE YEAR LIMITED WARRANTY
FOR ONE YEAR from the date of purchase, this power tool and any supplied battery
pack and charger are warranted against defects in material or workmanship. With
proof of purchase, a defective product will be replaced free of charge.
For warranty coverage details to obtain free replacement, visit the web site:
www.craftsman.com
This warranty does not cover bits, which are expendable parts that can wear out
from normal use within the warranty period.
This warranty is void if this product is ever used whime providing commerciam
services or if rented to another person.
This warranty gives you specific megamrights, and you may arose have other rights
which vary from state to state.
Sears Brands Management Corporation, Hoffman Estates, IL 60179
SYMBOL SIGNAL MEANING
z_ SAFETY ALERT SYMBOL: Indicates DANGER, WARNING, OR CAUTIONo
May be used in conjunction with ether symbols or pictographs.
Z_DANGER: indicates hazardous situation which, if not avoided, will result in death or serious injury.
Z_ WARNING: Indicates hazardous situation which, if not avoided, could result in death or
serious injury.
z_ CAUTION: Indicates a hazardous situation which, if not avoided, could result in minor or
moderate injury or property damage.
GeneraH Safety RuHes
AWARNING: Read aH safety warrJings and aH irJStructions, Failure to
follow the warnings and instructions may result in electric shock, fire and/br
senous injury.
SAVE ALL WARNUNGS AND UNSTRUCTUONS FOR FUTURE REFERENCE
The term "power tool" in the warnings refers to your mains-operated (corded)
power too/or battery-operated (cordless) power tool
SAVE THESE mNSTRUCTmONS
1) WORK AREA SAFETY
a} Keep work area clean and well lit. Cluttered or dark areas invite accidents.
b) Do not operate power tools in explosive atmospheres, such as in the presence of flammaMe
liquids, gases or dust. Power tools create sparks w,_ichmay ignite the dust or fumes.
c) Keep children and bystanders away while operating a power tool. Distractions can cause
you to lose control
2) ELECTRICAL SAFETY
a) Power tool plugs must match the outlet. Never modify the plug in any way. Do not use
any adapter plugs with earthed (grounded) power tools. Unmodified plugs and matching
outlets will reduce risk of electric shock.
b) Avoid body contact with earthed or grounded surfaces such as pipes, radiators, ranges and
refrigerators. There is an increased risk of electric shock ff your body is earthed or grounded.
c) Do not expose power tools to rain or wet conditions. Water entenng a power tool will
increase the risk of electric shock.
2

d)Do not abuse the cord. Never use the cord for carrying, pulling or unplugging the power
tool. Keep cord away from heat, oil, sharp edges or moving parts. Damaged or entangled
cords increase the risk of electric shock.
e) When operating a power tool outdoors, use an extension cord suitable for outdoor use.
Use of a cord suitable for outdoor use reduces the risk of electric shock.
f) if operating a power tool in a damp location is unavoidable, use a ground fault circuit
interrupter (GFCl) protected supply. Use of a GFCl reduces the risk of electric shock.
3) PERSONAL SAFETY
a) Stay alert, watch what you are doing and use common sense when operating a power tool. Do
not use a power tooJ while you are tired or under the influence of drugs, aJcohol or medication.
A moment of inattention while operating power tools may result in serious personal injury.
b) Use personal protective equipment. Always wear eye protection. Protective equipment
such as dust mask, nonskid safety shoes, hard hat, or hearing protection used for appropriate
conditions will reduce personal injuries.
c) Prevent unintentional starting. Ensure the switch is in the off position before connecting to
power source and/or battery pack, picking up or carrying the tool. Carrying power tools with
your finger on the switch or energizing power tools that have the switch on invites accidents.
d) Remove any adjusting key or wrench before turning the power tool on= A wrench or a key
left attached to a rotating part of the power tool may result in personal injury.
e) Do not overreach. Keep proper footing and balance at all times. This enables better control
of the power tool in unexpected situations.
f} Dress property. Do not wear toose cJothing or jeweJry. Keep your hair, cJothing and g!ovee away
from moving parts. Loose clothes, jewelry or long hair can be caught in moving parts.
g) If devices are provided for the connection of dust extraction and collection facilities, ensure these
are connected and properly used. Use of dust collection can reduce dust-related hazards.
4) POWER TOOL USE AND CARE
a) Do not force the power tool. Use the correct power tool for your application. The correct
power tool wifl do the job better and safer at the rate for which it was designed.
b) Do not use the power tool if the switch does not turn it on and off. Anypower tool that
cannot be controlled with the switch is dangerous and must be repaired.
c) Disconnect the plug from the power source and/or the battery pack from the power tool
before making any adjustments, changing accessories, or storing power tools. Such
preventive safety measures reduce the risk of starting the power tool accidentally.
d) Store idle power tools out of the reach of children and do not allow persons unfamiliar
with the power tool or these instructions to operate the power tool. Power tools are
dangerous in the hands of untrained users.
e) blaintain power tools. Check for misalignment or binding of moving parts, breakage of parts and
any other condition that may affect the power tool's operation. If damaged, have the power tool
repaired before use. Many accidents are caused by poorly maintained power tools.
f) Keep cutting tools sharp and clean. Properly maintained cutting tools with sharp cutting
edges are less likely to bind and are easier to control
g} Use the power tool, accessories and tool bits, etc. in accordance with these instructions,
taking into account the working conditions and the work to be performed. Use of the power tool
for operations different from those intended could result in a hazardous situation.
5) BATTERY TOOL USE AND CARE
a) Recharge only with the charger specified by the manufacturer. A charger that is suitable for
one type of battery pack may create a risk of fire when used with another battery pack.
b) Use power tools only with specifically designated battery packs. Use of any other battery
packs may create a risk of injury and fire.
c) When battery pack is not in use, keep it away from other metal objects like paper clips,
coins, keys, nails, screws, or other small metal objects that can make a connection from
one terminal to another. Shorting the battery terminals together may cause burns or a fire.

d) Under abusive conditions, liquid may be ejected from the battery, avoid contact, if
contact accidentally occurs, flush with water, if liquid contacts eyes, additionally seek
medical help. Liquid ejected from the battery may cause irritation or burns.
6) SERVICE
a) Have your power tool serviced by a qualified repair person using only identical
replacement parts. This will ensure that the safety of the power tool is maintained.
Specific Safety RuHes
. Hold power tool by insulated gripping surfaces, when performing an operation where the
cutting accessory may contact hidden wiring. Cutting accessory contacting a "live" wire may
make exposed metal parts of the power tool "live" and could give the operator an electric shock.
. Use auxiliary handle(s} if supplied with the tool. Loss of control can cause personal injury.
° Use clamps or another practical way to secure and support the work piece to a stable platform.
Holding the work by hand or against your body leaves it unstable and may lead to loss of control
o When not in use, place tool on its side on a stable surface where it will not cause a tripping or
failing hazard. Some tools wit,# large battery packs will stand upright but may be easily knocked over.
° Keep your hair, clothing, and gloves away from air vents. Air vents often cover moving parts in
which these items can be caughL
. Hold tool firmly with two hands, one hand on the handle, and the othergripping the bottom
around the battery area. Use auxiliary handle ff provided. Loss of control can cause personal injury.
zLWARNING: Some dust created by power sanding, sawing, grinding, drilling, and other
construction activities contains chemicals known to the State of California to cause cancer,
birth defects or other reproductive harm. Some examples of these chemicals are:
, lead from lead-based paints,
, crystalline silica from bricks and cement and other masonry products, and
, arsenic and chromium from chemica@-treated lumber.
Your risk from these exposures varies, depending on how often you do this type of work. To reduce
your exposure to these chemicals: work in a well ventilated area, and work with approved safety
equipment, such as those dust masks that are specially designed to filter out microscopic particles.
, Avoid prolonged contact with dust from power sanding, sawing, grinding, drilling, and other
construction activities. Wear protective clothing and wash exposed areas with soap and
water. Allowing dust to get into your mouth, eyes, or layon the skin may promote absorption of
harmfu! chemicals.
2_WARNING: use of this tool can generate and/or disperse dust, which may cause serious
and permanent respiratory or other injury. Always use NIOSH/OSHA approved respiratory
protection appropriate for the dust exposure. Direct particles away from face and body.
° Wear appropriate hearing protection during use. Under some conditions and duration of use,
noise from this product may contribute to hearing loss.
z_WARNING: ALWAYS use safety glasses. Everyday eye glasses are NOT safety
glasses. Also use face or dust mask if cutting operation is dusty.
ALWAYS WEAR CERTIFIED SAFETY EQUIPMENT:
° ANSI Z87,1 eye protection (CAN/CPA Z94,3),
° ANSI S12,6 (S3,19) hearing protection,
° NOSH/OSHA respiratory protection,

SYMBOLS
The label on your tool may include the following symbols. The symbols andtheir definitions are as follows:
V,.................. volts
Hz ................ hertz
min ............... minutes
= = =, ............ direct current
(_)................. Class l Construction
(grounded)
[] ................. Class II Construction
(double insulated)
............ Read instruction manual before use
G ................. Use proper eye protection
A ................... amperes
W .................. watts
................ alternating current
no.................. no load speed
O .................. earthing terminal
Z_ ................ safetv alert symbol
,_/min or rpm_,revolutions or
reciprocation per minute
.................. Use proper respiratory protection
O .................. Use proper hearing protection
UMPORTANT SAFETY UNSTRUCTUONS FOR BATTERY CHARGERS
SAVE THESE iNSTRUCTiONS: This manual contains important safety instructions for
battery chargers=
° Before using charger, read all instructions and cautionary markings on charger, battery pack, and
product using battery pack.
Z_WARNING: Shock hazard. Donot allow any liquid to get inside charger.
z_CAUTION: Burn hazard. To reduce the risk of injury, charge only designated Craftsman _'R_
batteries. Other types of batteries may burst causing personal injury and damage.
z_CAUTION: Under certain conditions, with the charger plugged in to the power supply, the
charger can be shorted by foreign material. Foreign materials of aconductive nature such as, but not
limited to, steel woo!, aluminum foi!, or any buildup of metallic particles should be kept away from
charger cavities. Always unplug the charger from the power supply when there is no battery pack in the
cavity. Unplug charger before attempting to clean.
, DO NOT attempt to charge the battery pack with any chargers other than the ones in this
manual. The charger and battery pack are specifically designed to work together,
, These chargers are not intended for any uses other than charging designated Craftsman ®
rechargeabte batteries. Any other uses may result in risk of fire, electric shock or electrocution.
, Do not expose charger to rain or snow.
, Pull by plug rather than cord when disconnecting charger. This will reduce risk of damage to
electric plug and cord,
° Make sure that cord is located so that it will not be stepped on, tripped over, or otherwise
subjected to damage or stress.
, Do not use an extension cord unless it is absolutely necessary. Use of improper extension cord
could result in risk of fire, electric shock, or electrocution,
, An extension cord must have adequate wire size (AWG or American Wire Gauge) for safety.
The snarler the gauge number of the wire, the greater the capacity of the cable, that is 16 gauge
has more capacity than 18 gauge, When using more than one extension to make up the total length,
be sure each individual extension contains at least the minimum wire size,

Minimum Gauge for Cord Sets
Volts TotaJ Length of Cord in Feet
120V 0=25 26-50 51-100 !01-150
(0=7,6m) (7,6-15,2m) (15,2o30,4m)(30,4=45,7m)
240V 0=50 51-100 101-200 201-300
(0=15,2m) (15,2-30,4m)(30,4=60,9m) (60,9-91,4m)
Ampere Rating
More Not more American Wire Gauge
Than Than
0 - 6 18 16 16 14
6 - 10 18 16 14 12
10 - 12 16 16 14 !2
12 = 16 14 12 Not Recommended
° Do not place any object on top of charger or place the charger on a soft surface that might
block the ventilation slots and result in excessive internal heat. Place the charger in a
position away from any heat source. The charger is ventilated through slots in the top and the
bottom of the housing.
° Do not mount charger on wail or permanently affix charger to any surface. The chargeris
intended to use on a flat, stable surface (Le., table top, bench top).
° Do not operate charger with damaged cord or plug -- have them replaced immediately.
° Do not operate charger if it has received a sharp blow, been dropped, or otherwise damaged
in any way. Take it to an authorized service center.
° Do not disassemble charger; take it to an authorized service center when service or repair is
required. Incorrect reassembly may result in a risk of electric shock, electrocution or fire.
° Disconnect the charger from the outlet before attempting any cleaning. This will reduce the risk
of electric shock. Removing the battery pack will not reduce this risk.
° NEVER attempt to connect 2 chargers together.
° The charger is designed to operate on standard household electrical power
(120 Volts). Do not attempt to use it on any other voltage.
SAVE THESE UNSTRUCTUONS
UMPORTANT SAFETY UNSTRUCTUON FOR BATTERY PACKS
z_ WARNING: For safe operation, read this manual and manuals originally supplied with tool
before using the charger,
The battery pack is not fully charged out of the carton= Before using the battery pack and charger,
read the safety instructions below. Then follow charging procedures outlined.
READ ALL iNSTRUCTiONS
, Do not incinerate the battery pack even if it is severely damaged or is completely worn out. The
battery pack can explode in a fire, Toxic fumes and materials are created when battery packs are burned,
• Do not charge or use battery in explosive atmospheres, such as in the presence of flammabJe
tiquids, gases or dust. inserting or removing the battery from the charger may ignite the dust or fumes.
, if battery contents come into contact with the skin, immediately wash area with mild soap
and water. If battery liquid gets into the eye, rinse water over the open eye for 15 minutes or until
irritation ceases. If medical attention is needed, the battery electrolyte for Lithium=Ion batteries is
composed of a mixture of liquid organic carbonates and lithium salts.
° Contents of opened battery ceils may cause respiratory irritation. Provide fresh air. If
symptoms persist, seek medical attention.
Z_ WARNING: Burn hazard. Battery liquid may be flammable if exposed to spark or flame.
° Charge the battery packs only in Craftsman chargers.
, DO NOT splash or immerse in water or other liquids. This may cause premature cell failure.
° Do not store or use the tool and battery pack in locations where the temperature may reach
or exceed 105°F (40°0) (such as outside sheds or metal buildings in summer).

Z_WARNING:Never attempt to open the battery pack for any reason./f battery pack case is
cracked or damaged, do not insert into charger. Do not crush, drop or damage battery pack. Do not
use a battery pack or charger that has received a sharp blow, been dropped, run over or damaged in
any way (Le. pierced with a nail, hit with a hammer, stepped on). Damaged battery packs should be
returned to service center for recycfing.
z_WARNING: Fire hazard. Do not store or carry battery so that metal objects can contact
exposed battery terminals. For example, do not place battery in aprons, pockets, tool boxes,
product kit boxes, drawers, etc., with loose nails, screws, keys, etc. Transporting batteries can
possibly cause fires if the battery terminals inadvertently come in contact with conductive
materials such as keys, coins, hand tools and the like. The US Department of Transportation
Hazardous Material Regulations (HMR) actually prohibit transporting batteries in commerce or on
airplanes (i.e., packed in suitcases and carry-on luggage) UNLESS they are properly protected from
short circuits. So when transporting individual batteries, make sure that the battery terminals are
protected and weft insulated from materials that could contact them and cause a short circuiL NOTE:
Lithiumqon batteries should not be put in checked baggage.
STORAGE RECOMMENBATmONS
1, The best battery pack storage place is one that is cool and dry away from direct sunlight and excess
heat or cold.
2. Long storage will not harm the battery pack or charger.
BATTERY PACK CHARGmNG, INSTALMNG, AND REMOVING
CHARGING PROCEDURE
1=Plug the charger (8) into an appropriate outlet before inserting
the battery pack (6).
2. Insert the battery pack into the charger as shown in Figure A.
_3. The green LED will flash indicating that the battery is
being charged.
_4. The completion of charge is indicated by the green LED
remaining on continuously. The pack is fully charged and
may be used at this time or left on the charger.
IMPORTANT: Recharge discharged batteries as soon as
possible after use or battery life may be greatly diminished.
For longest battery life, do not discharge batteries fully. It is recommended that the batteries be
recharged after each use.
QUmOK BOOST CHARGE
When the Quick Boost button is pushed the charger "boosts" the charge current for 10 minutes and
starts blinking the blue LED while the green LED blinks=After 10 minutes the blue LED wi!l stay on and
the green LED will continue blinking until the battery pack is fully charged=Once the charge cycle is
complete, the green LED and blue LED wilt remain on continuously=
CHARGER DIAGNOSTICS
This charger is designed to detect certain problems that can arise with the battery packs or the
power source, Problems are indicated by one LED flashing in different patterns,
BAD BATTERY
_The charger can detect a weak or damaged battery. The red LED flashes in the pattern
indicated on the label. If you see this bad battery blink pattern, do not continue to charge the
battery= Return it to an appliance service center or a collection site for recycling=
HOT/COLD PACK DELAY
_When the charger detects a battery that is excessively hot or excessively cold, it automatically
starts a Hot/Cold Pack Delay, suspending charging until the battery has normalized. After this
happens, the charger automatically switches to the Pack Charging mode. This feature ensures maximum
battery life. The red LEDflashes in the pattern indicated on the charger label.
7

IMPORTANTCHARGmNGNOTES
1.Longestlifeandbestperformancecanbeobtainedifthebatterypackischargedwhentheair
temperatureisbetween65°Fand75°F(18°°24°C).DONOTchargethebatterypackinanair
temperaturebelow40°F(4.5°C),orabove105°F(40.5°C).Thisisimportantandwiltprevent
seriousdamagetothebatterypack.
2.Thechargerandbatterypackmaybecomewarmtotouchwhilecharging.Thisisanormal
condition,anddoesnotindicateaproblem.Tofacilitatethecoolingofthebatterypackafteruse,
avoidplacingthechargerorbatterypackinawarmenvironmentsuchasinametalshed,oran
uninsulatedtrailer.
3,Ifthebatterypackdoesnotchargeproperly:
a.Checkcurrentatreceptaclebyplugginginalamporotherappliance
b.Checktoseeifreceptacleisconnectedtoalightswitchwhichturnspoweroff
whenyouturnoutthelights.
c.Movechargerandbatterypacktoalocationwherethesurroundingair
temperatureisapproximately65°F-75°F(18°°24°C).
d.Ifchargingproblemspersist,takethetool,batterypackandchargertoalocal
servicecenter.
4.Thebatterypackshouldberechargedwhenitfailstoproducesufficientpoweronjobswhichwere
easilydonepreviously.DONOTCONTINUEtouseundertheseconditions.Followthecharging
procedure.Youmayalsochargeapartiallyusedpackwheneveryoudesirewithnoadverseaffect
onthebatterypack.
5.Foreignmaterialsofaconductivenaturesuchas,butnotlimitedto,steelwool,aluminumfoil,orany
buildupofmetallicparticlesshouldbekeptawayfromchargercavities.Alwaysunplugthechargerfrom
thepowersupplywhenthereisnobatterypackinthecavity.Unplugchargerbeforeattemptingtoclean.
6.Donotfreezeorimmersechargerinwateroranyotherliquid.
z_WARNING: Shock hazard. Do not allow any liquid to get inside charger. Never attempt to open
the battery pack for any reason, If the plastic housing of the battery pack breaks or cracks, return to a
service center or coflection site for recycfing,
INSTALLING AND REMOVING THE BATTERY PACK FROM THE POWER UNiT
WARNING: Make certain the lock=offbutton is engaged toprevent switch actuation before
removing or installing battery.
TO INSTALL BATTERY PACK: Insert battery pack into the Power Unit until an audible click is heard
(Figure B), Make sure battery pack is fully seated and fully latched into position.
TO REMOVE BATTERY PACK: Depress the battery release button (7) as shown in Figure C and pull
battery pack out of the Power Unit.

PARTS AND FEATURES
1. Power Unit
2. Forward/reverse slider
3. Variable speed trigger
4. Attachment release button
5. Bit holder
6_20v Max battery
7. Battery release button
8. Battery charger
j J@
9. Drill attachment
10. Keyless chuck
11. Torque adjustment collar
@
OPERATMNG: POWER UNMT
TRmGGER SWITCH & FORWARD/REVERSE SLIDER
The Power Unit's (1) forward/reverse slider (2) is used to control the direction the chuck (10) spin:
Forward to drive screws; Reverse to remove screws. It is located above the variable speed trigger (3).
To reverse the motor, release the trigger FIRST, then push the slider to the right-hand side of the
tool (as viewed from rear of tool). After any reversing operations, return lever to the forward position.
Never change the direction of rotation while the motor is running.
° The Power Unit is turned ON and OFF by pulling and releasing the trigger. The more the trigger is
pulled, the higher the speed of the Power Unit.
° A forward/reverse control slider determines the direction of the too!.
° To select forward rotation, release the trigger switch and depress the forward/reverse control button
to the left.
, To select reverse, depress the forward/reverse contro! button to the right (as viewed from rear of too!).
NOTE: When changing the position of the control button, be sure the trigger is released.
INSTALMNG AND REMOVING ATTACHMENTS - FIGURE D
z_WARNING: Shock hazard. Under no circumstances should this product be used near water.
ZLWARNING: Burn hazard. Moving parts within the Power Unit become hot during use. Avoid
contact with moving parts within Power Unit when removing and installing accessories.
z_WARNING: Before assembly, Before assembly, lock the Power Unit by setting the forward/
reverse slider (2) to the center position and remove the battery from the Power UniL Remove
any accessory from the attachment before removing or installing the attachmenL
zLWARNING: To reduce the risk of injury, do not place fingers or other objects inside the Power
Unit, other than the attachments designed to work with the Power Unit.

° LockthePowerUnitbysettingtheforward/reverseslider(2)tothe
centerposition.
° Toremoveanattachment,depressthereleasebutton(4)andtake
theattachmentoffthetool.
• Tofitanattachment,lineitupwiththetoolasshownandpushitonto
thePowerUnituntilitsnapsintoplaceandanaudibleclickisheard.
° Ensurethatattachmentissecurelyattachedbygentlypu!fingonit
intheoppositedirectionfromthePowerUnit.
NOTE:Onlyuseattachmentsthatarespecificallydesignedforand
compatiblewiththePowerUnit.
NOTE:Refertoindividualattachmentinstructionmanualsforspecific
safetywarningsandoperatinginstructionsbeforeoperatingattach-
mentswiththePowerUnit.
OPERATUNG: DRULL/SCREWDRUVER ATTACHMENT
z_SAFETY WARNINGS AND INSTRUCTIONS: DRILLS
t, Hold drill firmly with one hand on the grip and the other hand on the bottom of the battery pack
unless an auxiliary handle has been supplied with the tool Use auxiliary handle if supplied with
the tool.
2. When attaching accessories in the drill chuck, hand tighten the keyless chuck firmly.
z_WARNING: Drill may stall (ifoverloaded or improperly used) causing a twist. Always expect the
stall. Grip the drill firmly with both hands to control the twisting action and prevent loss of control which
could cause personal injury. If a stall does occur, release the trigger immediately and determine the
reason for the staff before re-starting.
z_WARNING: Let the tool work at its own pace. Do not overload.
z_WARNING: Before drilling into wails, floors or ceilings, check for the location of wiring and pipes.
FITTING AND REMOVING A DRmLL BIT OR SCREWDRIVER BIT
The drill/screwdriver attachment (9) is fitted with a keyless chuck (10) to allow for an easy exchange
of bits.
° Lock the tool by setting the forward/reverse slider (2) to the center position.
° Open the chuck by turning the front part clockwise with one hand while holding the rear part with
the other.
° Insert the bit shaft into the chuck.
° Firmly tighten the chuck by turning the front part counterclockwise.
° To remove the screwdriver bit from the holder (5) on the Power Unit, lift the bit from the recess.
° To store the screwdriver bit, firmly push it into the holder.
SCREW DRmVING
° Always use the correct type and size of screwdriver bit.
° Ifscrews are difficult to tighten, try applying a small amount of washing liquid or soap as a lubricant.
° Always hold the tool and screwdriver bit in a straight line with the screw.
° For driving fasteners, the reversing button should be pushed to the left (as viewed from rear of
tool). Use reverse (button pushed to the right) for removing fasteners. When moving from forward
to reverse, or vice versa, always release the trigger switch first.
KEYLESS CHUCK - FIGURE E
z_WARNING: To reduce the risk of injury, turn off and remove battery from the tool before
making any adjustments or removing or installing attachments or accessories.
z_WARNING: Do not attempt to tighten or !oosen drili bits (or any other accessory) by gripping the
front part of the chuck and turning the tool on. Damage to the chuck and personal injury may occur.
10

To insert a drill bit or other accessory:
1. Grasp the rear half of the chuck (10) with one hand and use
your other hand to rotate the front half to the left, as viewed from
the chuck end.
2. Insert the bit or other accessory fully into the chuck, and tighten
securely by holding the rear half of the chuck and rotating the
front portion to the right, as viewed from the chuck end.
TORQUE CONTROL - FIGURE F
This toot is fitted with a torque adjustment collar (11) to select the
operating mode and to set the torque for tightening screws, Large
screws and hard workpiece materials require a higher torque setting
than small screws and soft workpiece materials. _,
° For drilling in wood, metal and plastics, set the collar to the drilling
position symbol
° For screwddving, set the collar to the desired setting. Ifyou do not
yet know the appropriate setting, proceed as follows:
Set the collar to the lowest torque setting.
Tighten the first screw.
If the clutch ratchets before the desired result is achieved,
increase the collar setting and continue tightening the
screw. Repeat until you reach the correct setting. Use this setting for the remaining screws.
ON-BOARD BIT STORAGE
A bit storage slot (5) is built-in to the area just above the battery pack for easy bit storage and acces&
DRmLLING
, Use sharp drill bits only.
, Support and secure work properly, as instructed inthe Safety Instructions.
, Use appropriate and required safety equipment, as instructed in the Safety Instructions.
, Secure and maintain work area, as instructed in the Safety Instructions.
, Run the drill very slowly, using light pressure, until the hole is started enough to keep the drill bit from
slipping out of it.
, Apply pressure ina straight line with the bit. Use enough pressure to keep the bit biting but not so
much as to stall the motor or deflect the bit.
, Hold the drill firmly with two hands to control its twisting action.
° DO NOT CLICK THE TRIGGER OF A STALLED DRILL OFF AND ON IN AN ATTEMPT TO START
IT. DAMAGE TO THE DRILL CAN RESULT.
° Minimize stalling on breakthrough by reducing pressure and slowly drilling through the last part of
the hole.
° Keep the motor running while pulling the bit out of a drilled hole. This will help reduce jamming.
° Make sure switch turns drill on and off.
DRmLMNG IN WOOD
Holes in wood can be made with the same twist dri!1bits used for metat or with spade bits, These bits
should be sharp and should be pulled out frequently when drilling to clear chips from the flutes,
DRILLING mNMETAL
Use a cutting lubricant when drilling metals. The exceptions are cast iron and brass which should be
drilled dry. The cutting lubricants that work best are sulfudzed cutting oil or lard oil.
11

MAINTENANCE
Use only mild soap and damp cloth to clean the tool Never let any liquid get inside the tool; never
immerse any part of the tool into a liquid,
IMPORTANT: To assure product SAFETY and RELIABILITY, repairs, maintenance, and adjustment
(other than those listed in this manual) should be performed bya qualified service dealer or other
qualified service personnel
ACCESSORIES
z_WARNING: The use ofany accessory not recommended for use with this tool could be hazardous.
Additional attachments and accessories for use with this tool are available at extra cost from your local
Sears store or Sears service center.
If you need assistance regarding accessories, please call: 1-877-795-2353.
This Class B digital apparatus complies with Canadian ICES-00&
This device complies with part 15 of the FCC rules. Operation is subject to the following two
conditions: (1) This device may not cause harmful interference, and (2) this device must accept any
interference received, including interference that may cause undesired operation.
NOTE: This equipment has been tested and found to comply with the limits for aClass B
digital device, pursuant to Part 15 of the FCC Rules. These limits are designed to provide reasonable
protection against harmful interference in a residential installation. This equipment generates,
uses and can radiate radio frequency energy and, if not installed and used in accordance with the
instructions, may cause harmful interference to radio communications. However, there is no guarantee
that interference will not occur in a particular installation.
Ifthis equipment does cause harmful interference to radio or television reception, which can
be determined by turning the equipment off and on, the user is encouraged to try to correct the
interference by one or more of the following measures:
° Reorient or relocate the receiving antenna.
° Increase the separation between the equipment and receiver.
, Connectthe equipmentinto an outleton acircuitdifferent fromthat to whichthe receiverisconnected.
° Consult the dealer or an experienced radio/TV technician for help.
Changes or modifications to this unit not expressly approved bythe party responsible for compliance
could void the user's authority to operate the equipment. This Class Bdigital apparatus complies with
Canadian ICES-003.
TROUBLESHOOTING
ProMem
. Unitwill not start.
•Battery pack will not
charge.
•Unit shuts off
abruptly.
PossiMe Cause
•Battery pack notinstalledproperly.
•Battery pack notcharged=
•Attachment isnot secured=
•Battery pack notinserted intocharger.
°Charger notplugged in.
•Surrounding airtemperature too hot
or too cold.
•Battery pack hasreached its
maximum thermal limit.
. Out ofcharge. (To maximize battery
mile,the battery pack is designed to
shutoff abruptly when the charge
is depmeted.)
PossiMe Solution
• Check batterypack installation.
° Check batterypack charging
requirements.
• Make certainthe attachment isfully
pushed intothe Power Unit.
• Insertbattery,pack intocharger until
LED illuminate&
° Plug charger intoa workingoutlet.
Referto "important Charging Notes"
formore details.
• Move charger and battery packto
asurrounding airtemperature of
above 40 degrees F (4,5°0) or below
105degrees F (40,5°C).
° Allow batter},,pack tocool down.
• Place on charger andallow to charge.
12

UNANODEGARANTiALIMITADAPARALOSPRODUCTOSCRAFTSMAN
Esteproductoest4 garantizado contra defectos de material o rnano de obra
DURANTE UN At_O a partir de la fecha de cornpra. Se reernpiazar_ un producto
defectuoso sin cargo ai presentar el comprobante de compra.
Para conocer detalles sobre la cobertura de la garant_a para obtener un reempiazo
gratuito, visite el sitio web: www.craftsrnan.com
Esta garant_a no cubre las brocas, que son piezas consurnibies que pueden
desgastarse con el uso normal dentro dei per_odo de garant_a.
Esta garant_a queda nula si el producto se utiiiza aiguna vez para proporcionar
servicios cornerciaies o si se aiquiia a otra persona.
Esta garant_a le concede derechos legales especfficos yes posibie que adem4s
usted tenga otros derechos que var_en de un estado a otto.
Sears Brands Management Corporation, Hoffrnan Estates, IL 60179
SIGNIFICADO DE SIMBOLO SENAL
/_ SiMBOLQ DE ALERTA DE SEGURJDAD: Indica PELmGRO, ADVERTENCJA
O ATENCJON. Se puede utilizan en conjunto con otros simbolos o pictografias.
z_ PELIGRO: Jndica una situaci6n de peligro, que de no evitarse, podria provocar la
muerte o lesiones graves.
Z_ADVERTENCIA: Indica una situaci6n de peligro, que de no evitarse, podria provocar
la muerte o lesiones graves.
z_ ATENOI6N: Indica una situaci6n de peligro, que de no evitarse, podria provocar
lesiones menores o moderadas o dados a la propiedad.
zLADVERTENCIA: Lea todas Jas advertencias de seguridad e instrucciones El
incumplimiento de las advertencias e instrucciones puede provocar descargas el6ctdcas,
incendios o lesiones graves.
Conserve todas _as advertencias e instrucciones para futuras consu_tas°
El termino "herramienta electrica" incluidoen las advertencias hace referencia a
las herramientas electricas operadas con corriente (con cable electrico) o alas
herramientas electricas operadas con baterias (inal&mbricas).
CONSERVE ESTAS INSTRUCCIONES
1) Seguridad en el _rea de trabajo
a) Mantenga el _rea de trabajo limpia y bien iluminada. Las areas abarrotadas y oscuras
propician accidentes,
b) No opere herramientas el_ctricas en atm6sferas explosivas, como ambientes donde
se encuentran l_quidos, gases o polvo inflamables. Las herramientas electricas originan
chispas que pueden encender el polvo o los vapores,
c) Mantenga a los ni_os y espectadores alejados de la herramienta el_ctrica en
funcionamiento. Las distracciones pueden provocar la perdida de control,
2) Seguridad el_ctrica
a) Los enchufes de la herramienta el_ctrica deben adaptarse al tomacorriente. Nunca
modifique el enchufe de ninguna manera. No utilice ningun enchufe adaptador con
herramientas el_ctricas con cone×i6n a tierra. Los enchufes no modificados y que se
adaptan a los tomacorrientes reduc/ran el riesgo de descarga el4ctrica,
b) Evite el contacto corporal con superficies puestas a tierra, como pot ejemplo tuber_as,
radiadores, tangos y refrigeradores. Existe mayor desgo de descarga electrica si su cuerpo
13

est_ puesto a tierra,
c) No exponga las herramientas el@ctricas a la lluvia o a condiciones de humedad. Si
ingresa agua a una herramienta el@ctrica, aumentar_ el riesgo de descarga el@ctrica,
d) No maltrate al cable. Nunca utilice el cable para transportar, tirar o desenchufar la
herramienta el_ctrica. Mantenga el cable lejos del calor, aceite, bordes afilados o piezas
m6viles. Los cables dafiados o enredados aumentan el riesgo de descarga electrica,
e) AI operar una herramienta el_ctrica en el exterior, utilice un cable prolongador adecuado
para tal uso. Utilice un cable adecuado para use en exteriores a fir} de reducir el riesgo de
descarga el@ctrica,
f) Si el uso de una herramienta el_ctrica en un lugar humedo es imposible de evitar, utiliee
un suministro protegido con un interruptor de cireuito pot falla a tierra (GFCl). El use de
un GFCl reduce el riesgo de descargas el@ctricas,
3) Seguridad personal
a) Permanezca alerta, controle 1o que est_ haciendo y utilice el sentido comun cuando
emplee una herramienta el_ctrica. No utilice una herramienta el@ctrica siesta cansado o
bajo el efecto de drogas, alcohol o medicamentos, Un memento de descuido mientras se
opera una herramienta el_rrica puede provocar lesiones personales graves,
b) Utilice equipos de protecci6n personal. Siempre utilice protecci6n para los ojos. En las
condiciones adecuadas, el use de equipos de proteccidn, come mbscaras para polvo, calzado
de seguridad antideslizante, cascos o proteccidn auditiva, reducira las lesiones personales,
c) Evite el encendido pot accidente. Asegurese de que el interruptor est_ en la posici6n
de apagado antes de conectarlo a la fuente de energ_a o paquete de bater_as, o antes
de levantar o transportar la herramienta. Transportar herramientas electricas con el dedo
apoyado en el interrupter o enchufar herramientas electricas con el interrupter en la posicidn
de encendido puede propiciar accidentes,
d) Retire las clavijas de aiuste o llaves de tuercas antes de encender la herramienta
el_ctrica, Una flave de tuercas o una clavija de ajuste que se deje conectada a una pieza
giratoria de la herramienta el_:trica pueden provocar lesiones personales,
e) No se estire. Conserve el equilibrio adecuado y mant_ngase parado correctamente en todo
momento. Esto permite un mejor control de la herramienta e/ectrica en situaciones inesperadas,
f) Use la vestimenta adecuada. No use ropas holgadas ni joyas. Mantenga el cabello, la
ropa y los guantes alejados de las piezas en movimiento. Las ropas holgadas, las joyas o
el cabeflo largo pueden quedar atrapados en las piezas en movimiento,
g) Si se suministran dispositivos para ia conexi6n de accesorios con fines de recolecci6n
y extracci6n de polvo, asegurese de que est_n conectados y que se utilicen
correctamente. El use de dispositivos de recoleccidn de polvo puede reducir los peligros
relacionados con el polvo,
4) Uso y mantenimiento de la herramienta el_ctrica
a) No fuerce la berramienta el_ctrica. Utilice la herramienta el_ctrica correcta para el
trabajo que realizar_. La herramienta el6crrica correcta har_ el trabajo mejor y mas seguro a
la velocidad para la que fue dise_ada,
b) No utilice la herramienta el_ctrica si no puede encenderla o apagarla con el
interruptor. Toda herramienta el_trica que no puede set controlada mediante el
interrupter es peligrosa y debe set reparada,
c) Desconecte el enchufe de la fuente de energ_a y/o el paquete de bater_as de la
berramienta el_ctrica antes de realizar ajustes, cambiar accesorios o almacenar
herramientas el_ctricas. Estas medidas de seguridad preventivas reducen el riesgo de
encender la herramienta el@ctrica en forma accidental,
d) Guarde las herramientas el_ctricas que no est_n en uso fuera del alcance de los ni_os
y no permite que otras personas no familiarizadas con ella o con estas instrucciones
operen la herramienta. Las herramientas elecrricas son peligrosas en las manes de usuarios
no entrenados,
e) Mantenimiento de las herramientas el_ctricas. Controle que no haya piezas m6viles
real alineadas o trabadas, piezas rotas y toda otra situaci6n que pueda afectar el
14

funcienamientedelas berramientas el_ctricas. Si eneuentra daSes, baga reparar la
berramienta el_ctrica antes de utilizarla. Se producen touches accidentes a causa de las
herramientas el@ctricas que carecen de un mantenirniento adecuado.
f) Mantenga las berramientas de certe afiladas y limpias. Las herramientas de corte con
mantenirniento adecuado, con los bordes de corte afilados son menos propensas a trabarse
y son mas fbciles de controlar.
g) Utilice la berramienta el_ctrica, los aceeseries y las brecas de la berramienta, etc. de
acuerde cen estas instruccienes y teniende en cuenta las condicienes de trabaje y el
trabaie que debe realizarse. El use de la herramienta el@c_rica para operaciones diferentes
de aquellas para las que fue disefiada podr[a originar una s/tuaci6n peligrosa.
5) Use y mantenimiente de la berramienta cen bater_as
a) Recargue selamente con el cargader especificade per el fabricante. Un cargador
adecuado para un t_po de paquete de bater[as puede or/ginar riesgo de incendio si se utfliza
con otto paquete de bater/as.
b) Utiiice berramientas el_ctricas s61e con paquetes de bater_as especfficamente
diseSades. El use de cualquier otto paquete de bater[as puede produc/r riesgo de incendio y
lesiones.
c) Cuande ne utiiice el paquete de bater_as, mant_ngaie lejes de etres ebjetes met_lices
come sujetapapeles, menedas, llaves, claves, ternilles u etres ebjetes met_lices
pequeSos que puedan realizar una conexi6n desde un terminal al otto. Los cortocircuitos
en los terminales de la bater[a pueden provocar quemaduras o incendio,
d) En eondiciones abusivas, el l_quido puede set expulsado de la bater_a. Evite su
eontaeto. Si entra en contacto aeeidentalmente, eniuague con agua. Si el l_quido entra
en eontacto con sus ojos, busque atenci6n m_dica. El I[quido expulsado de la bater[a
puede provocar irr/tacidn o quemaduras,
6) Mantenimiento
a) Haga que una persona de reparaciones calificada realice el mantenimiento de su
berramienta el_etrica y utiliee piezas de repuesto id_ntieas solamente. Esto garantizar_ la
seguridad de la herramienta el@ctr/ca,
NORMAS DE SEGURmDAD ESPECiFmCAS
° AI realizar una operaei6n en la que el accesorio de corte pueda toear cables el_ctricos
ocultos o su propio cable, sostenga la herramienta el_ctrica per las superficies de agarre
aisladas. El contacto de/accesorio de corte con un cable con corriente electrica puede provocar
que las partes metalicas expuestas de la herramienta el@ctrica tambien conduzcan la corriente y
que el operador sufra una descarga el@ctrica,
° Use los manges au×iliares que se suministran con la berramienta. La p@rdida del control podda
ocasionar lesiones personales=
° Cuando trabaje en una escalera ouna plataforma asegurese de dejar la herramienta de lade
cuando no la use. Algunas herramientas con batedas grandes se paran sobre su base, pero se
pueden volcar facitmente=
. Utilice abrazaderas u otra forma pr_etica para asegurar y sostener la pieza de trabajo sobre
una plataforma estable. Sostener el trabajo con la mane o contra el cuerpo no brinda la estabilidad
requerida y puede !levar a la p@rdida del control=
° Mantenga el cabello, la ropa y los guantes alejados de los orificios de ventilaci6n. Los orificios
de ventilaciSn suelen cubrir piezas moviles donde estos elementos se pueden enganchar=
° Sostenga la herramienta firmemente con ambas manes. Utilice e! mango auxlliar, en case
de tenerlo= Si no tiene mango auxiliar, agarre la herramienta per la parte inferior de la bateda= La
p@rdida del control podda ocasionar lesiones personales=
15

2_ADVERTENCIA: parts dei polvo producido pot las herramientas el_ctricas ai lijar,
assrrar, esmerilar, taladrar y realizar otras actividades de la construcci6n, contiene productos
qu_micos reconocidos pot el Estado de California como causantes de c_ncer, defsctos de
nacimiento u otros problemas reproductivos. Algunos de estos productos qu_micos son:
° el p!omo de las pJnturas de base plomo,
° la silice cristalina de ladrillos, el cemento y otros productos de mamposteda, y
° el ars¢nico y el cromo de la madera con tratamiento quimico=
EJriesgo dedvado de estas exposiciones vada segOn la frecuencia con la que se realice este tipo
de trabajo= Para reducir ta exposiciOn a estos productos quimicos: trabaje en _,reasbien ventiladas
y trabaje con equipos de seguridad aprobados, como las mascaras para polvo especialmente
dise_adas para filtrar las particulas microsc6picas=
, Evite el contacto prolongado con el polvo proveniente del lijado, aserrado, amolado y
taladrado sl@ctrico y otras actividadee de conetrucci6n. Use vestimenta protectora y lays
todae las _reae expueetae con agua y jab6n. De entrar polvo en sus ojos, boca, o que este
permanezca sobre su piel puede promover la absorci6n de quimicos da_inos=
z_ADVERTENC_A: El uso de esta herramienta puede generar y/o dispersar el poivo, el
cual puede ocasionar lesi6n reepiratoria u otto tipo de leei6n grave y permanente. Utilice
siempre protecciSn respiratoria NIOSH/OSHA apropiada para la exposici6n al polvo=Didja las
particulas lejos de su cara o su cuerpo=
z_ADVERTENCIA: USE SIEMPRE LENTES DE SEGURIDAD. Los anteojos de uso
diario NO son lentes de eeguridad. Utilice tambi_n m_ecaras faciales o para polvo si el corte
produce polvillo. UTILICE SlEMPRE EQUIPOS DE SEGURIDAD CERTIFICADOS:
° Proteccidn para los ojos segOn la norma ANSI Z87.1 (CAN/CSA Z94,3)
° Proteccidn auditiva segOn la norma ANSI S12.6 (S3.19)
° Proteccidn respiratoria segOn las normas NIOSH/OSHA/MSHA
S/MBOLOS
, La etiqueta de su herramienta puede incluir los siguientes simbolos= Los simbolos y
sus definiciones son los siguientes:
V.................. voltios
Hz ................ hertz
min .............. minutos
= = =, ........... corriente directa
(_) ................ Construccidn Clase I
(mis 9 la torte)
[] ............... Construccidn de clase II
,,,/min .......... revoluciones o minuto seguridad
....... Lea el manual de instrucciones antes de/uso
........... Use proteccidn adecuada para las vfas respiratodas
(3 ........... Use proteccidn adecuada para los ojos
0 ........... Use proteccidn adecuada para los ofdos
A ................ amperios
W ............... vatios
"x, .............. corriente alterna
no ............... no velocidad sin carga
............... terminal a tierra
z_ ............. simbolo de alerta
INSTRUCCIONES DE SEGURIDAD IMPORTANTES PARA LOS
CARGADORES DE BATERIAS
CONSERVE ESTAS INSTRUCCIONES: Este manual contiene instrucciones de seguddad
importantes para los cargadores de baterias.
° Antes de utilizar e! cargador, lea todas las instrucciones y las prevenciones en e! cargador, en el
paquete de batedas y en el producto que utiliza e! paquete de batedas.
2_ADVERTENCIA: Riesgo de descarga el@ctrica. No permita que ningOn liquido entre en e!
cargador=
16

z_PRECAUCm0N: Riesgo de quemaduras. Para reducirel riesgode lesiones,cargue solamente
baterias Craftsman ®.Otros tipos de baterias pueden estallar y provocar daSospersonales y materiales.
z_PREOAUOION: En determinadas circunstancias, con el cargador enchufado en el
tomacorriente, algunos materiales extra_os pueden provocar un cortocircuito en el cargador. Se
deben mantener lejos de las cavidades del cargador los materiales extra_os de naturaleza
conductora, entre los que se incluyen ta lana de acero, el papel de aluminio o cualquier acumulaciSn
de particulas metAlicas. Estos son sSto algunos ejemp!os y no constituyen una lista taxativa.
Siempre desenchufe el cargador de! tomacorriente cuando no haya un paquete de batedas en la
cavidad. Desenchufe el cargador antes de intentar limpiarlo.
° NO intente cargar el paquete de bater_as con otros cargadores que no scan de la marca. Los
cargadores y los paquetes de bater_as estbn disehados especfficamente para trabajarjuntos.
° Estos cargadores est_n diseSados para utilizarse exclusivamente con las bater_as
recargables Craftsman ®designadas. Otros usos pueden provocar riesgo de incendio, descarga
el@ctrica o electrocucidn.
° No exponga el cargador a la lluvia ni a la nieve.
° Para desconectar el cargador o los cables para cadena de margarita, tire del enchufe en lugar
del cable. Esto reducira el riesgo de dahar el enchufe o el cable.
. Asegurese de que el cable est6 ubicado de modo que no 1o pise o se tropiece con 61y que no
est6 sujeto a da_os o tensiones de alguna otra forma.
. No utilioe un cable prolongador a menos que sea absolutamente necesario. El uso de un cable
prolongador incorrecto puede provocar riesgo de incendio, descarga el@ctrica o electrocucidn.
° Para garantizar la seguridad, un cable prolongador debe tenet un tama_o de cable adecuado
(AWG o Calibre de conductor de Estados Unidos). Cuanto mbs pequeho sea el nOrnero de
calibre del conductor, mayor serb la capacidad del cable; es decir, un cafibre 16 tiene mbs
capacidad que un cafibre 18. Cuando se utiliza mbs de una prolongacidn para Iograr la Iongitud
total, asegOrese de que cada prolongacidn tenga la medida mlbirna del conductor.
Catibre minimal des cordons de raHonge
Tension
120V
240V
lntensit6 (A)
Au Au
moins plus
0 6
6 !0
10 - 12
12 - 16
Longueur totaie du cordon en pieds
0-25 26-50 51-!00 101-150
(0-7,6m) (7,6-15,2m) (15,2-30,4m)(30,4-45,7m)
0-50 51-100 101-200 201-300
(0-15,2m) (15,2-30,4m)(30,4-60,em)(60,9-91,4m)
Oatibre moyen des ills (AWG)
!8 !6 !6 !4
!8 !6 !4 !2
16 16 14 12
14 12 Nonrecommande
° No coloque objetos en la parte superior del cargador ni coloque el cargador en una superficie
blanda que pueda bloquear las ranuras de ventilaci6n y provocar un calor intemo excesivo.
Coloque el cargador en una posici6n alejada de cualquier fuente de calor. El cargador se
ventila a trav@s de ranuras en la parte superior e inferior de la cubierta.
. No monte el cargador en la pared ni 1o instale en forma permanente sobre ninguna superficie.
El cargador esta dise_ado para ser utilizado sobre una superficie plana y estable (p. ej., un banco o
una mesa).
° No opere el cargador con cables o enchufes daSados: reemplbcelos de inmediato.
. No opere el cargador si 6ste ha recibido un golpe fuerte, se ha ca_do, o se ha da_ado de
cualquier otra manera. Llevelo a un centro de mantenimiento autorizado.
° No desarme el cargador; ll6velo a un centro de mantenimiento autorizado cuando se requiera
mantenimiento ouna reparaci6n. El armado incorrecto puede implicar un riesgo de descarga
el@ctrica, electrocucidn o incendio.
17

°Antesdelimpiarlo, deseonecte el cargador del tomacorriente, Esto reducira e! desgo de
descarga e!¢ctrica= Quitar e! paquete de batedas no reducira este riesgo=
° NUNOA intente conectar 2 cargadores juntos,
° El eargador est_ diseSado para operar con corriente el_etriea dom_stiea est_ndar (120
voltios), No intente utilizarlo con otto voltaje,
CONSERVE ESTASINSTRUCCIONES
INSTRUCCIONES DE SEGURIDAD IMPORTANTES PARA LOS
PAQUETES DE BATERIAS
z_ADVERTENCIA: Para un funcionamiento seguro, lea #ste y todos los manuales de
instrucciones incluidos con la herramienta antes de usar el cargador.
EJ paquete de batedas incluido en }a caja no est& completamente cargado= Antes de utHizar e!
paquete de baterias y el cargador, lea las instrucciones de seguridad a contJnuaci6n= Luego siga los
procedimientos de carga descdtos=
LEA TODAS LAS INSTRUCCIONES
° No incinere el paquete de bater_as, aun si tiene da_os importantes o est_ completamente
desgastado. El paquete de bater[as puede explotar en el fuego, Cuando se queman paquetes de
bater[as, se generan vapores y materiales tdxicos,
° No cargue ni use la bater_a en atm6sferas explosivas, come ambientes en los que hay
l_quidos, gases o polvo irfflamables, lnsertar o retirar la bater[a del cargador puede encender el
polvo o los vapores,
, Si el contenido de las bater_as entra en contacto con la piel, lave el area de inmediato con
agua y iab6n suave. Si el I[quido de la baterfa entra en contacto con los ojos, enjuague con agua
manteniendo los ojos abiertos durante 15 minutos o hasta que la irritacidn cese, Si se necesita
atencidn medica, el electrolito de las bater[as de
Lithium=Ion contiene una mezcla de carbonatos orgbnicos I[quidos y sales de Iitio,
° El contenido de las c_lulas de la bater_a abierta puede generar irritaci6n respiratoria. Respire
aire fresco, Si los s[ntomas persisten, busque atencidn medica,
Z_ADVERTENOIA: Peligro de quemaduras. El I[quido de la bater[a puede eneenderse si se
expone a chispas o llamas,
, Cargue los paquetes de baterfas sdlo con cargadores de Craftsman,
, NO satpique o sumerja en agua u otros J_quidos. Esto puede causar una fafla prematura de !as celulas.
° No almacene ni utilice la herramienta y el paquete de bater_as en lugares en los que la
temperatura pueda alcanzar o superar los 40 °C (105 °F)(come en toldos al aire libre o
construcciones de metal en verano}.
Z_ ADVERTF:NOIA: Nunca intente abrir el paquete de hater[as por ningSn motivo, Si la eaja
del paquete de hater[as esta agrietada o dafiada, no la introduzca en el cargador, No comprima,
deje caer ni daF}e el paquete de hater[as, No utflice un paquete de bater[as o un cargador que
haya recibido un golpe fuerte, se haya ca,do, este agotado o dahado de alguna forma (por
ejemplo, perforado con un clavo, golpeado con un martillo, pisado), Los paquetes de bater[as
da#ados deben devolverse al centro de mantenimiento para su reciclado,
ZLADVERTENCIA: Riesgo de incendio. No guarde o transporcte la bater_a de rlirlguna
manera que permita que los terminales expuestos de la bater_a entren en contacto con
objetos met_lieos. Por ejemplo, no coloque la bater[a en delantales, bolsillos, cajas de
herramientas, cajas de juegos de productos, cajones, etc, con clavos, flaves, tornillos sueltos, etc,
Transportar bater_as puede provocar incendios si los terminales de la bater_a entran en
contacto accidentalmente con materiales conductores como llaves, monedas, herramientas
de mano u objetos similares. Las Normas para Materiales Peligrosos del Departamento de
Transporte de los EE, UU, (HMR) concretamente proh[ben transportar hater[as comercialmente o en
aviones (es decir, empacadas en maletas y equipaje de mano) A MENOS que esten debidamente
protegidas de cortocircuitos, Por Io tanto, cuando transporte bater[as individuales, asegSrese de
18

que los termina/es de la bateria esten protegidos y bien aislados de materia/es que puedan hacer
contacto y causar un cortocircuito, NOTA: Las baterias de iones de Lithiumqen no deben
colocarse dentro del equipaje registrado.
RECOMENDACIONES CON RESPECTO AL ALMACENAMRENTO
t, El mejor lugar de almacenamiento es uno que sea fresco y seco fuera de la luz solar directa y de
un exceso de calor o frio,
2, El almacenamiento pro!ongado no da_ar& el paquete de baterias o el cargador, En las
condiciones adecuada.
CARGA, INSTALACION Y EXTRACCION DEL PAQUETE DE BATER_AS
PROCEDIMIENTO DE CARGA
t, Enchufe e! cargador (8) en un tomacorriente adecuado antes
de insertar el paquete de baterias (6).
2. Introduzca el paquete de batedas en el cargador. (Figura A)
_3. La luz LED verde titilara para indicar que ta bateria se
esta cargando.
|4. La finalizaci0n de la carga se indica mediante la luz
LED verde que permanece encendida de manera
continua. El paquete esta completamente cargado
y puede utilizarse en este momento o dejarse en el
cargador.
Despu_s del uso, recargue las bater_as descargadas a la brevedad posible o de 1o contrario la
vida util de las bater_as podr_a aeortarse en gran medida, Para obtener la m;_×ima vida util de
las bater_as, no permita que _stas se desearguen completamente, Se recomienda recargar las
batedas despucs de cada uso,
ClCLO DE CARGA RELAMPAGO
Cuando el botSn Quick Boost se empuja el cargador "refuerza" la corriente de carga durante
10 minutos y empieza a parpadear el LED azul, mientras que el LED verde parpadee. DespuOs
de 10 minutos, el LED azul permanecer& encendido y el LED verde continuar& parpadeando
hasta que la bateria est& totalmente cargada. Una vez que el ciclo de carga completa, el LED
verde y el LED azul se mantendr& en forma continua.
DIAGNOSTmCO DEL CARGADOR
Este cargador esta dise_ado para detectar ciertos problemas que pueden surgir con los paquetes de
baterias o la fuente de alimentaci0n. Los problemas se indican mediante una luz LED que titila en
diferentes patrones.
BATERtA EN MAL ESTADO
_EI cargador puede detectar una bateria dcbil o da_ada, La luz LED rojo titila en el patrCn
indicado en la etiquet& Si observa este patron intermitente de bateda en mal estado,
interrumpa la carga de la bated& Devu¢lvala a un centro de mantenimiento o a un lugar de
recolecciOn para reciciado.
RETRASO POR PAQUETE CAMENTE/FR/O
_Cuando el cargador detecta una bateria excesivamente caliente o excesivamente fria,
enciende autom&ticamente un Retraso por paquete catiente/fdo que suspende la carga hasta
que la bateria se normaliz& Despues de esto, e! cargador cambia automa.ticamente al modo de
Paquete cargando. Esta funciOn garantiza la duraci0n m&xima de la bated& La luz rojo titila en e!
patron indicado en la etiquet&
DEJAR LA BATER/A EN EL CARGADOR
E! cargador y el paquete de baterias se pueden dejar conectados indefinidamente con la luz LED verde
encendida, El cargador mantendr& el paquete de baterias como nuevo y completamente cargado,
19

NOTAS IMPORTANTES SOBRE LA CARGA
1. Obtendr& una duraci6n mas pro!ongada y un mejor rendimJento sJel paquete de baterias se carga
cuando la temperatura ambiente esta entre 18 °C y 24 °C (65 °F y 75 °F). NO cargue el paquete
de bateria con una temperatura ambJenta! per debajo de 4,5 °C (40 °F) o por encJma de 40,5 °C
(105 °F). Esto es importante y evJtar&daSos graves en el paquete de baterias.
2. EJcargador y el paquete de baterias pueden estar cafientes al tacto durante la carga. Esto es
una condJcbn normal y no Jndica un problem& Para facJfitar el enfrJado deJpaquete de baterias
despues de su use, evJteco!ocar e! cargador o e! paquete de baterias en un ambJente c&iJdo,
como debajo de un toldo de metal o en un remolque sin aislamJento.
3. SJel paquete de baterias no se carga adecuadamente:
a. Revise e! tomacorrJente enchufando una lampara u otto aparato
b. VerJfique si el tomacorriente esta conectado a un Jnterruptor que corta Ia energia cuando
usted apaga las luces.
c. Mueva e! cargador y el paquete de baterias a un lugar donde la temperatura ambJentaI
sea de aproxJmadamente 18 °C a 24 °C (65 °F a 75 °F).
d. SJlos problemas de carga persJsten, !leve JaherramJenta, el paquete de baterias y e!
cargador al centre de mantenimiento local
4. Se debe recargar el paquete de batedas cuando no produce energia suficJente para tareas
que previamente realJzaba con facJlidad. NO CONTINUE utJ!izandola herramJenta en estas
condicJones. Siga el procedimiento de carg& Tambicn se puede cargar un paquete de baterias
parcialmente usado cuando se desee, sin ningOn efecto negativo sobre ¢stas.
5. Se deben mantener lejos de las cavidades del cargador los materiales extra_os de naturaieza
conductora, entre los que se incluyen la lana de acero, el papel de alumJnio o cualquJer
acumulaci6n de partJculas metalicas, Estos son s01oalgunos ejemp!os y no constJtuyen una
IJstataxatJva, Siempre desenchufe el cargador de! tomacorrJente cuando no haya un paquete de
baterias en la cavidad, Desenchufe el cargador antes de Jntentar IJmpiarto,
6. No congele ni sumerja el cargador en agua ni en ningOn otto IJquJdo.
Z_ADVERTENCIA: Riesgo de descarga el_ctrica. No permJtaque nJngOnIJquJdoentre en el
cargador. Nunca intente abrir el paquete de bater/as por ningOn motivo. Si la caja protectora de
pl4stico de/paquete de bater/as se rompe oagrieta, devuelvala a un centro de mantenimiento para
su reciclado.
INSTALACKSN Y EXTRACCKSN DEL PAQUETE DE BATERJAS DE LA HERRAMJENTA
Siempre asegQrese de que e! Jnterruptor desfizante de avance/reversa (7) este en la posJcJoncentral
al instalar y quJtar baterJas_
/_ PREOAUCION: Aseg_Jrese de que el botdn de bloqueo este trabado para evitar el
accionamiento de/interruptor antes de extraer o instalar la bater/a.
PARA JNSTALAR EL PAQUETE DE BATER_AS: Inserte el paquete de batedas en la
herramJenta hasta que se escuche un ciic (Figura B). AsegOrese de que e! paquete de batedas est¢
bJenco!ocado y completamente asegurado en su lugar.
2O

DESCRUPCU6N DE LAS FUNCUONES
1. Unidad motriz
2. Interruptor deslizante de avanceireversa
3. GatiNo de velocidad variable
4. Bot6n de liberaci6n del aditamento
5. Sujetador de puntas
6. Bateria
7. Bot6n de Nberaci6n de ta baterJa
8. Cargador de baterias
9. Aditamento de taladroidestorniNador
10. Mandril sin Have
11. AniNo de ajuste de torsi6n
/-@
PARA EXTRAER EL PAQUETE DE BATER/AS: Presione el bot0n de Iiberaci6n de la bateda,
como se muestra en la Figura C, y tire del paquete de batedas hasta extraerlo de la herramienta.
INSTRUCCIONES DE OPERACION: UNIDAD MOTRIZ
INTERRUPTOR DE GATILLO INTERRUPTOR DESLIZANTE DE AVANCE/REVERSA
El interruptor deslizante de avance/reversa (2) de la unidad motriz (1) se uti!iza para controlar la
direcci0n de giro del mandril (10): avance para instalar tornillos y reversa para quitar torniltos. Este
se encuentra encima del gatillo de velocidad variable (3). Para revertir el motor, PRIMERO suelte e!
gati!lo, luego empuje el interrupter des!izante hacia el lade derecho de la herramienta (visto desde
atras). Despucs de cualquier operaci6n en reversa, devuelva la palanca a la posJcJ0nde avance.
Nunca cambie la direccJ6n de rotacJon con el motor en funcionamiento.
° E! taladro se ENCIENDE y APAGA tirando y Nberando el interruptor disparador. Cuanto mas se
oprima al dJsparador, mayor sera la ve!ocidad del taladro.
° El bot0n de control de avance/reversa determina la direccJ6n de la herramienta y tambicn sJrve
como bot0n de bloqueo.
° Para seleccionar la rotaci6n de avance, IJbereel interruptor disparador y oprima e! bot0n de control
de avance/reversa a la izquierda.
° Para seleccJonar reversa, optima el bot6n de control avance/reversa en la direccion opuesta.
NOTA: la posJcJoncentral del bot6n de control bloquea la herramienta en JaposJcionde apagado.
A! cambiar la posJcJ0ndel boton de control, aseg0rese de que el disparador est¢ Nberado.
INSTALACION Y EXTRACCI6N DE ADITAMENTOS - FIGURA D
2_PRECAUCION: Riesgo de descarga el_ctrica. Bajo ninguna circunstancia uti!ice este
producto cerca de agua.
Z_ADVERTENOIA: Peligro de quemaduras. Las piezas movHesdentro de la unJdad motriz se
calJentan durante et uso. Evite e! contacto con las piezas m0viles dentro de la unJdadmotdz al quitar
e instalar accesorios.
21

z_ADVERTENCIA: Antes de asamblea, trabe la unidad de energia fijando el resbalador
delantero/reverso (2) a la posici6n central y quite la bateda de la unidad de energia. Quite cualquier
accesorio de! accesorio antes de quitar o de instalar el accesorio.
AADVERTENCIA: Para reducir el riesgo de lesiones, no introduzca los dedos niotros objetos
en la unidad motriz, que no sean los aditamentos disefiados para funcionar con esta.
o Bloquee la unidad motriz fijando el interruptor deslizante de avarice/
reversa (2) en la posici6n central.
• Para quitar un aditamento, oprima e! bot6n de liberaci6n (4) y
extraiga el aditamento de la herramienta.
° Para instalar un aditamento, alineelo con la herramienta como se
muestra y empOje!o sobre la unidad motdz hasta que encaje en su
lugar y se escuche un clic.
° AsegOrese de que e! aditamento este firmemente instalado tirando
de este con suavidad para intentar separarlo de la unidad motriz.
NOTA: Utilice Onicamente aditamentos que esten especificamente
disefiados para la unidad motriz y que sean compatibles con esta.
NOTA: Consulte los manuales de instrucciones de cada accesodo
para conocer las advertencias de seguridad y las instrucciones de funcionamiento antes de utilizar los
aditamentos con la unidad motriz.
UNSTRUCCUONES DE OPERACK)N: ADUTAMENTO DE TALADRO/
DESTORNULLADOR
zLADVERTENCIA: INSTRUCClONES Y ADVERTENClAS DE SEGURtDAD: TALADROS
1. Sostenga firmemente el taladro con una mano sobre e! agarre y la otra sobre la parte
inferior del paquete de batedas.
2. Cuando acople accesorios en el portabrocas, ajuste manualmente y con firmeza e!
portabrocas sin !lave.
zLADVERTENCIA: El taladro se puede atascar (si se sobrecarga o se usa inadecuadamente) y
provocar una torsi6n. Siempre espere el atascamiento. Sujete e! taladro firmemente con ambas
manos para controlar latorsi6n y evitar la perdida de control que podria ocasionar lesiones
personales. En caso de que la herramienta se atasque, suelte el disparador inmediatamente y
determine la causa del atascamiento antes de encenderla nuevamente.
ZLADVERTENOIA: Deje la herramienta trabajar en su propio paso. No sobrecargue
ZLADVERTENOIA: Antes de perforar en las paredes, los pisos o los techos, comprueban para
saber si hay la !ocalizaci6n dei cableado y de las pipas.
COLOCACION Y EXTRACCION DE UNA BROCA O UNA PUNTA
El aditamento de taladro/destornillador (9) cuenta con un mandril sin llave (10) que permite cambiar
las brocas/puntas facilmente.
° Bloquee la herramienta fijando el interruptor deslizante de avance/reversa (2) en la posici6n
central.
° Abra el mandril girando la parte delantera en sentido de las agujas del re!oj con una mano,
mientras sostiene la parte trasera con la otra.
° Inserte e! eje de la broca/punta en el mandril.
° Ajuste firmemente el mandril girando la parte delantera en sentido contrario alas agujas del re!oj.
° Para sacar la punta del sujetador, levantela de la cavidad.
° Para guardar la punta, empOjela firmemente en e! SUJETADOR (5).
DESTORNILLADO
° Utilice siempre el tipo y tamafio correcto de punta de destomillador.
° Si los tornillos son dificiles de ajustar, pruebe aplicar una pequefia cantidad de detergente o jab6n
como lubricante.
° Siempre sostenga la herramienta y ta punta de destornillador en linea recta con e! tornillo.
22

° Para colocar sujetadores, se debe empujar el bot6n de inversion hacia la izquierda. Use la inversa
(bot6n hacia laderecha) para retirar sujetadores. A! cambiar de avance a reversa, o viceversa,
siempre libere e! interruptor disparador primero.
PORTABROCAS SIN LLAVE - FIGURA E
z_ADVERTENCIA: Para reducir el riesgo de lesiones, apague la
herramienta y quitele la bater{a odesconecte el enchufe de la fuente de
alimentaci6n antes de realizar cualquier ajuste o de quitar o instalar
aditamentos oaccesodos. Quite todo accesodo del aditamento antes
de quitar o instalar el aditamento.
z_ADVERTENOIA: No tome la parte delantera de! portabrocas
y encienda la herramienta para ajustar las brocas (o cualquier otro
accesorio). Cuando se cambian los accesorios, se pueden provocar
dafios al portabrocas y dafios personales.
Para insertar una broca u otro accesorio:
1. Tome la mitad posterior del portabrocas (10) con una mano y use la otra mano para girar la mitad
de frente en direcci6n contraria alas agujas del reloj, vista desde el extremo del portabrocas.
2. Inserte por completo la broca u otro accesorio en el portabrocas y ajuste para asegurar,
sosteniendo la mitad posterior del portabrocas y girando la porci6n de frente en la direcci6n de
las agujas de! re!oj, vista desde e! extremo del portabrocas.
AJUSTE DEL CONTROL DE TORSI6N - FIGURA F
Esta herramienta viene equipada con un anillo de ajuste de torsi6n
(11), para seleccionar el modo de operaci6n y para configurar la
torsi6n al ajustar los tornillos. Los tornillos grandes y las piezas de
trabajo de material duro requieren un ajuste mayor de torsion que los
tornillos pequefios y las piezas de trabajo de material blando.
° Para taladrar en madera, metal y plastico, ajuste e! anillo en la
posici6n del simbolo de taladrado B.
• Para atornillar, ajuste el anillo en la configuraci6n deseada. Si aOn no
conoce la configuraci6n de ajuste adecuada, proceda como sigue:
° Ajuste e! anillo en la configuraci6n de torsi6n mas baja.
° Ajuste el primer tornillo.
° Si el portabrocas avanza antes de !ograr el resultado deseado, aumente la configuraci6n
del ani!lo y siga ajustando el tornillo. Repita e! proceso hasta que !ogre ta configuraci6n
deseada. Utilice esta configuraci6n para los tornillos restantes.
ESPACmO EN LA HERRAMIENTA PARA GUARDAR BROCAS
Hay una ranura para guardar brocas (5) en e! Area que esta justo por encima del paquete de batedas.
TALADRADO
° Solamente utilice brocas afiladas.
° Apoye y asegure apropiadamente ta pieza de trabajo, como se recomienda en las Instrucciones de
seguridad.
• Utilice el equipo de seguridad apropiado y requerido, come se se_ala en las instrucciones de seguridad.
° Cuide el Area de trabajo, como se menciona en las instrucciones de seguddad.
° Haga funcionar el taladro muy lentamente, utilizando poca presi6n, hasta haber perforado !o
suficiente para evitar que la broca se deslice hacia afuera de! barreno.
° Aplique presi6n en linea recto con la broca. Haga presi6n suficiente para conservar a la broca
cortando, pero no tanta como para que e! motor se atasque o la broca se desvie.
, Suiete firmemente el taladro para controlar su acciOn de torsion.
° NO OPRIMA EL GATILLO DE UN TALADRO ATASCADO PARA INTENTAR ENCENDERLO Y
APAGARLO. PUEDE DA=ARLO.
23

° Minimice el atascamiento al iniciar et barreno reduciendo la presi6n y perforando lentamente a
travcs de la Qltima parte del barreno.
° Conserv'e el motor en funcionamiento mientras saca la broca de un barreno. Esto ayudara a evitar
atascaduras.
° Asegurese que el interruptor enciende y apaga el taladro.
TALADRADO EN MADERA
Los orificios en madera se pueden realizar con las mismas brocas de taladro helicoidales que se
usan para los metales o con brocas de pal& Estas brocas deben estar afiladas y se deben retirar
con frecuencia mientras se taladra para limpiar las virutas de las ranuras.
TALADRADO EN METAL
Utilice un lubdcante de corte cuando taladre metales, Las excepciones son el bronce y el hierro
fundido que deben taladrarse en seco, Los Jubricantes de corte que funcionan mejor son el aceite de
corte sulfurizado o e! aceite de grasa de cerdo,
MANTENIMIENTO
Utilice Qnicamentejab6n suave y un trapo hQmedopara limpiar la herramient& Nunca permita que se
introduzcan liquidos en la herramienta; nunca sumerja ninguna parte de la herramienta en ningQnliquido_
IMPORTANTE: Para garantizar la SEGURIDAD y CONFIABILIDAD del producto, las reparaciones, e!
mantenimiento y el ajuste (a excepci6n de los que no estcn enumerados en este manual) deben ser
realizados pot un centro de mantenimiento calificado u otto personal de mantenimiento calificado.
ACCESORIOS
zLADVERTENCIA: El uso de accesorios no recomendados para utilizar con esta herramienta
puede resultar peligroso.
Los aditamentos y accesodos adicionales para uso con esta herramienta estb,n disponibles a un costo
adicional en la tienda local de Sears o el centro de mantenimiento local de Sears.
Si necesita ayuda con respecto a los accesorios, !lame al: 1-877-795-2353.
Este mecanismo cumple con la parte 15 de las normas de la Comisi6n Federal de
Comunicaciones de Estados Unidos (FCC). La operaci6n estA sujeta alas dos condiciones
siguientes: (1) Este mecanismo posiblemente no cause interferencia perjudicial; y (2) este
mecanismo puede aceptar cualquier interferencia recibida, incluso interferencia que podria
provocar una operaci6n no deseada.
NOTA: Este equipo ha sido probado y se encontr6 que cumple con los limites para dispositivo
digital Clase B, segOn la parte 15 de las normas de la FCC. Estos limites estAn diseSados
para brindar protecci6n razonable contra interferencia per]udicial en una instalaci6n residencial.
Este equipo genera, usa y puede irradiar energia en frecuencia de radio y, si no se instala
y se usa de acuerdo con las instrucciones, puede provocar interferencia perjudicial en las
comunicaciones de radio. Sin embargo, no hay garantia de que la interferencia no ocurra en
una instalaci6n en particular. Si este equipo provoca interferencia per]udicial en la recepci6n de
radio o televisi6n, Io que se puede determinar al apagar y encender el equipo, el usuario debe
tratar de corregir la interferencia mediante una o mAs de las siguientes medidas:
• Cambiar la orientaci6n o la ubicaci6n de la antena de recepci6n.
• Aumentar la separaci6n entre el equipo y el receptor.
• Conectar el equipo a un tomacorriente sobre un circuito diferente de aquel al que estA
conectado el receptor.
• Consultar al vendedor o pedir la ayuda de un tecnico en radio y televisi6n con experiencia.
Los cambios o las modificaciones que se le realicen a esta unidad sin aprobaci6n expresa del
tercero responsable del cumplimiento pueden anular la autorizaci6n del usuario para operar el
equipo. Este aparato digital de la clase B se conforma con
ICES-003 canadiense.
24

DETECCK_N DE PROBLEMAS
ProMema
• La unidad no
enciende.
• El paquete de
baterias no carga.
• La unidad seapaga
repentinamente.
Causa posibie
• El paquete de baterias no
est& bien instalado=
• El paquete de baterias no
est& cargado=
° EJaccesorio no esta
asegurado=
®
®
El paquete de baterias no
est& insertado en eEcargador.
El cargador no est&
enchufado.
Temperatura ambiental.
El paquete de batedasalcanz6
el lim_tet6rmico m&ximo.
No tienem&s carga.(Para
maximizar lavida _timdel
paquete de batefias, este
est_ diseSado para apagarse
repentinamente cuando no
tiene m_s carga).
Solucion posibie
Check battery pack installation.
Check battery packcharging
requirements.
AsegOrese de empujar pot completo e!
accesorio dentro de la unidad motdz=
Inserte el paquete de baterias en el
cargador hasta (LED) se encienda la
luz verde
Enchufe el cargador en un
tomacomente que funcione=
Consulte "Notas importantes sobre
la carga" para conocer m&s detalles.
Traslade el cargador y la bateria a
una temperatura ambiental que est6
por encima de 40 °F (4.5 °C) o pot
debajo de 105 °F (40=5°C).
• Espere queel paquete de baterias se
enfde.
• Col6quelo en elcargador para que se
cargue.
25

26

27

CRAFTSMA
-
 1
1
-
 2
2
-
 3
3
-
 4
4
-
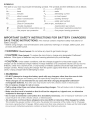 5
5
-
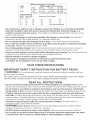 6
6
-
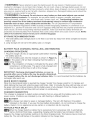 7
7
-
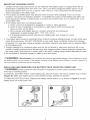 8
8
-
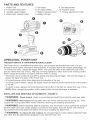 9
9
-
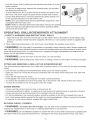 10
10
-
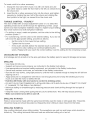 11
11
-
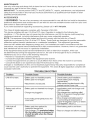 12
12
-
 13
13
-
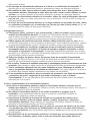 14
14
-
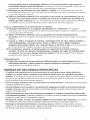 15
15
-
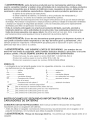 16
16
-
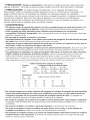 17
17
-
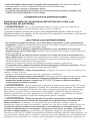 18
18
-
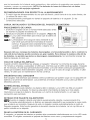 19
19
-
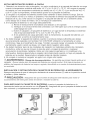 20
20
-
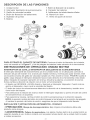 21
21
-
 22
22
-
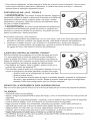 23
23
-
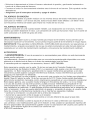 24
24
-
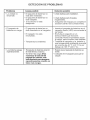 25
25
-
 26
26
-
 27
27
-
 28
28


Craftsman 90016496 El manual del propietario
- Categoría
- Herramientas eléctricas
- Tipo
- El manual del propietario
en otros idiomas
- English: Craftsman 90016496 Owner's manual
Artículos relacionados
Otros documentos
-
Black & Decker LDX112C TYPE1 El manual del propietario
-
Bostitch Cordless Drill BTC400LB Manual de usuario
-
-
-
-
-
-
-
-