
READ AND SAVE THESE INSTRUCTIONS,
WIRING AND INSTALLATION DIAGRAMS
To be installed by a certified electrician or other qualified person.
This Fan Speed Control is to be used only with ceiling paddle fans.
CAUTION: Due to varying standards by fan manufacturers, the speeds on this
control may vary on all settings. Some fans may turn too fast on high; others
may turn too slowly at the lowest setting of the speed control.
To avoid overheating and possible damage to other equipment do not install
this device to control a receptacle, a fluorescent lighting fixture or bulb, or a
transformer supplied appliance.
Do not use to control a fan and light that can be operated by same switch.
EASY TO INSTALL
Directions:
1. PRIOR TO INSTALLATION, set fan pull chain to its highest speed (be sure
fan is operating at full speed before disconnecting power).
2. Disconnect power to circuit by removing fuse or turning circuit breakers to
OFF before installing.
3. Remove existing wall plate and switch.
4. Connect fan control, as shown in the wiring and installation diagrams, using
the lead wires provided. Install fan control in wall box, with the word “TOP”
on the metal strap right side up, using the mounting screws provided.
5. Fasten fan control to wall box with mounting screws provided.
6. Attach wall plate.
7. Set fan control to OFF position. See Operating Instructions.
(See below)
8. Restore power and test. Be sure to check that fan does not stall in any of
the ON positions. Do not allow fan to remain in “stalled position.” DO NOT
USE PULL CHAIN AFTER INSTALLATION OF FAN CONTROL.
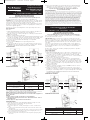
WIRING DIAGRAM
INSTALLATION DIAGRAM
OPERATING INSTRUCTIONS:
1. Use paddle (conventional switch) to turn unit ON or OFF.
2. To change fan speed slide knob up or down until desired level is reached.
NOTE: Control may feel warm to the touch in normal operation.
This control is intended for installation in a U.L. Listed metal or (polymeric)
plastic outlet box.
NOTICE:
1. Connect only to a single fan. (Do not use on fan/light kit.)
2. Fan must have thermal protection feature. (Do not allow fan to “stall” in
any ON position.)
Use only copper or copper clad wire with this device.
IMPORTANT NOTES:
1. All Fan Speed Controls can be damaged by improper wiring. Check for
short circuits prior to installing the fan speed control.
Procedure for short circuit check:
a. Disconnect power to circuit by removing fuse or turn circuit breakers
OFF.
b. Install a switch instead of the fan speed control. Turn the switch to the
"ON" position.
c. Turn power ON. If the circuit breaker trips, a short is present. If the light
fails to turn ON and OFF with the switch, the wiring may be incorrect.
d. Correct wiring, if necessary and retest.
e. Install the fan speed control only after the fan operates properly with
the switch.
2. Protect from dirt and dust. The Fan Speed Control can be damaged from
contaminates encountered during the construction process. The control
should not be installed until the construction process is complete.
Any Fan Speed Control damage due to improper installation is
not covered under warranty.
LIFETIME WARRANTY
The device you have purchased is warranted under normal use against defects in workman-
ship and materials for as long as you own the device. If the device fails due to manufacturing
defect during normal use, return the device for replacement to the store where purchased or
send to: Pass & Seymour Legrand Consumer Division, 50 Boyd Avenue, Syracuse, NY 13209.
All requests for replacement must include a dated sales receipt (legible copies acceptable).
ALL OTHER WARRANTIES, INCLUDING BUT NOT LIMITED TO ANY WARRANTIES OF MER-
CHANTABILITY OR FITNESS FOR A PARTICULAR PURPOSE, ARE LIMITED TO A PERIOD OF
TWO YEARS FROM THE DATE OF PURCHASE. YOUR SOLE AND EXCLUSIVE REMEDY
AGAINST PASS & SEYMOUR LEGRAND UNDER ANY WARRANTY SHALL BE THE EQUIVA-
LENT REPLACEMENT OF THE DEVICE. IN NO EVENT SHALL ANY WARRANTY APPLY TO
ANY DEFECT ARISING OUT OF ANY ALTERATION OF THE DEVICE, IMPROPER WIRING,
IMPROPER INSTALLATION, MISUSE, ABNORMAL USE OR NEGLIGENCE. IN NO EVENT
SHALL PASS & SEYMOUR LEGRAND BE LIABLE FOR LOST PROFITS, INDIRECT, SPECIAL,
EXEMPLARY, INCIDENTAL OR CONSEQUENTIAL DAMAGES. Some states do not allow limi-
tations on how long implied warranties last and do not allow exclusion or limitation of inci-
dental or consequential damages. Some of the above limitations or exclusions may not apply
to every purchaser.
LEA Y GUARDE ESTAS INSTRUCCIONES,
DIAGRAMAS DE CABLEADO E INSTALACIÓN
Para ser instalado por un electricista certificado o persona competente.
Este control de velocidad de ventilador sólo debe utilizarse con ventiladores
de aspas para instalación en techo.
PRECAUCIÓN: Debido a las diferentes normas de los fabricantes de venti-
ladores, las velocidades en este control podrían variar en todos los valores de
graduación. Algunos ventiladores podrían girar demasiado rápido en el valor
alto; otros podrían girar demasiado lento en el valor más bajo del control de
velocidad.
Para evitar el calentamiento excesivo y posibles daños a otros equipos, no
instale este dispositivo para controlar un tomacorriente, una bombilla o arte-
facto de iluminación fluorescente, o un electrodoméstico alimentado por
transformador.
No utilice para controlar un ventilador y lámpara que puedan ser operados
por el mismo interruptor.
FÁCIL DE INSTALAR
Instrucciones de uso:
1. ANTES DE LA INSTALACIÓN, ajuste la cadena de accionamiento del venti-
lador en su velocidad máxima (antes de desconectar el suministro eléctri-
co, asegúrese que el ventilador esté funcionando a máxima velocidad).
2. Antes de instalar, desconecte el suministro eléctrico al circuito retirando el
fusible o apagando los cortacircuitos.
3. Quite la placa e interruptor de pared existentes.
4. Conecte el control de ventilador, según se muestra en los diagramas de
cableado e instalación, utilizando los conductores suministrados. Instale el
control de ventilador en la caja de pared, con los tornillos de montaje sum-
inistrados y con la palabra "TOP" impresa en la banda metálica hacia arriba.
5. Sujete el control de ventilador a la caja de pared mediante los tornillos de
montaje suministrados.
6. Fije la placa de pared.
7. Coloque el control de ventilador en la posición OFF. Consulte las instruc-
ciones de operación. (Ver abajo)
8. Restaure el suministro eléctrico y pruebe. Asegúrese de verificar que el
ventilador no se bloquea en ninguna de las posiciones de ENCENDIDO. NO
permita que el ventilador permanezca en "posición bloqueada". NO UTILICE
LA CADENA DE ACCIONAMIENTO DESPUÉS DE LA INSTALACIÓN DEL
CONTROL DE VENTILADOR.
DIAGRAMA DE CABLEADO
DIAGRAMA DE INSTALACIÓN
WIRE CONNECTOR USAGE CHART
WIRE COMBINATIONS STRIP LENGTHS COLOR
1#14 & 1#16; 1#14 & 2#18; 2, 3#16;
#14–1/2", #16 & #18–9/16" ORANGE
1#16 & 1–3#18: 3–5#18; 2#18
1#14 & 1, 2#16; 1#14 & 1, 2#18; #14 & #16–7/16",
IVORY
2, 3#16; 2–5#18 #18–1/2"
Do not USE
this wire for
single pole
installation
(Red)
Wire to
Motor/Source
(Black)
Wire to
Motor/Source
(Red)
Ground Wire
(Green or
Bare)
Traveler
Wire to
3-Way
Switch
Wire to
Source
(Black)
Traveler
Wire to
3-Way
Switch
Ground Wire
(Green or
Bare)
Single Pole 3-Way
Harmony™ De-Hummer
Installation Instructions
Fan Speed Control
Single Pole/3-Way
1.6A, 3-Speed De-Hummer 120VAC, 60Hz
Instrucciones de instalación Harmony De-Hummer
Control de Velocidad de Ventilador
Unipolar/3-Vías
De-Hummer 1.6A, 3 Velocidades, 120VCA, 60Hz
No UTILICE
este alambre
para instalación
unipolar
(Rojo)
Alambre hacia el
motor / la fuente
(Negro)
Alambre hacia el
motor / la fuente
(Rojo)
Alambre
de tierra
(Verde o Desnudo)
Alambre
común hacia
interruptor
de 3 vías
Alambre hacia
fuente
(Negro)
Alambre
común hacia
interruptor
de 3 vías
Alambre
de tierra
(Verde o Desnudo)
Unipolar 3 Vías
TABLA PARA EL USO DE CAPUCHONES
COMBINACIONES DE CABLES LARGO A PELAR COLOR
1#14 & 1#16; 1#14 & 2#18; 2, 3#16;
#14–1/2", #16 & #18–9/16" ANARANJADO
1#16 & 1–3#18: 3–5#18; 2#18
1#14 & 1, 2#16; 1#14 & 1, 2#18; #14 & #16–7/16",
MARFIL
2, 3#16; 2–5#18 #18–1/2"
Turn
Girar
340808RevB:Layout 1 10/23/08 11:05 AM Page 1

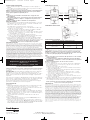
DIAGRAMME DE CÂBLAGE
DIAGRAMME D’INSTALLATION
INSTRUCTIONS D’UTILISATION
1. Utiliser la palette (interrupteur traditionnel) pour allumer ou éteindre
l’unité.
2. Pour modifier la vitesse, faire glisser le curseur jusqu’à la vitesse désirée.
REMARQUE : Le régulateur peut être tiède au toucher en fonctionnement
normal. Ce régulateur est conçu pour être installé dans une boîte électrique
en métal ou en plastique (polymère) homologuée par UL.
AVIS :
1. Ne raccorder qu’à un seul ventilateur. (Ne pas utiliser avec un ensemble
ventilateur/lumière.)
2. Le ventilateur doit être équipé d’un dispositif de protection thermique.
(S’assurer que le ventilateur ne s’arrête (cale) dans aucune des positions
ON (MARCHE).)
N’utiliser ce dispositif qu’avec des fils en cuivre ou cuivrés.
Remarques importantes :
1. Tous les régulateurs de vitesse de ventilateur peuvent être endommagés
par un câblage incorrect. Vérifier qu’il n’y a pas de court-circuit avant
d’installer le régulateur.
Comment vérifier l’absence de court-circuit :
a. Couper l’alimentation du circuit en retirant le fusible ou en ouvrant les
disjoncteurs (ARRÊT / OFF).
b. Installer un interrupteur à la place du régulateur. Mettre l’interrupteur
en position fermée (MARCHE / ON).
c. Rétablir l’alimentation électrique. Si le disjoncteur saute, c’est qu’il
existe un court-circuit. Si le ventilateur ne démarre ou ne s’arrête pas
correctement, le câblage peut être incorrect.
d. Rectifier le câblage si besoin est, et retester le circuit.
e. Installer le régulateur uniquement si le ventilateur fonctionne correcte-
ment avec l’interrupteur.
2. Protéger le dispositif de la saleté et de la poussière. Le régulateur peut être
endommagé par des débris laissés au cours de la construction. Le régula-
teur ne doit pas être installé avant la fin de la construction.
Aucun régulateur de vitesse de ventilateur endommagé par une installation
incorrecte n’est couvert par la garantie.
GARANTIE À VIE
Tant que vous en serez propriétaire et moyennant un usage normal, l’appareil que vous
avez acheté est garanti contre tout défaut de fabrication et de matériaux. Si l’appareil ne
fonctionne plus en raison d’un défaut de fabrication alors qu’il en a été fait un usage nor-
mal, adressez-vous au magasin où vous l’avez acheté pour le faire remplacer, ou
expédiez-le à : Pass & Seymour Legrand Consumer Division, 50 Boyd Avenue, Syracuse,
NY 13209. Toutes les demandes de remplacement doivent s’accompagner du reçu de
caisse daté (les copies lisibles sont acceptées). TOUTES LES AUTRES GARANTIES, Y
COMPRIS, SANS S’Y LIMITER TOUTEFOIS, LES GARANTIES DE QUALITÉ MARCHANDE
OU D’ADAPTATION À UN USAGE PARTICULIER, SONT LIMITÉES À UNE PÉRIODE DE
DEUX ANS À COMPTER DE LA DATE D’ACHAT. VOTRE SEUL ET UNIQUE RECOURS CON-
TRE PASS & SEYMOUR/LEGRAND EN VERTU DE L’UNE OU L’AUTRE DES GARANTIES EST
D’OBTENIR LE REMPLACEMENT ÉQUIVALENT DE L’APPAREIL. AUCUNE GARANTIE NE
PEUT S’APPLIQUER EN AUCUN CAS CONTRE UN DÉFAUT DÛ À UNE MODIFICATION DE
L’APPAREIL, À UN CÂBLAGE INCORRECT, À UNE MAUVAISE INSTALLATION, À UN MAU-
VAIS USAGE, À UN USAGE ANORMAL OU À DE LA NÉGLIGENCE. PASS & SEY-
MOUR/LEGRAND NE PEUT EN AUCUN CAS ÊTRE TENU RESPONSABLE DE PERTE DE
PROFITS, DE DOMMAGES INDIRECTS, DE DOMMAGES-INTÉRÊTS EXEMPLAIRES OU
PARTICULIERS, DE DOMMAGES ACCESSOIRES OU DE DOMMAGES CONSÉCUTIFS.
Certains états et provinces n'autorisent pas la limitation de la durée des garanties
implicites et n’autorisent pas l'exclusion ou la limitation des dommages accessoires ou
indirects. Certaines limitations ou exclusions énumérées peuvent ne pas s’appliquer à
tous les acheteurs.
INSTRUCCIONES DE OPERACIÓN:
1. Utilice el botón (interruptor convencional) para encender o apagar la
unidad.
2. Para cambiar la velocidad del ventilador, deslice la perilla hacia arriba o
hacia abajo hasta alcanzar el nivel deseado.
NOTA: El control podría sentirse tibio al tacto durante el funcionamiento nor-
mal. Este control está diseñado para instalación en una caja de salida de
metal o plástico (polimérico) aprobada por U.L.
AVISO:
1. Sólo conecte a un ventilador sencillo. (No utilice en juego de venti-
lador/lámpara).
2. El ventilador debe tener la característica de protección térmica. (No per-
mita que el ventilador se “bloquee” en ninguna de las posiciones de
ENCENDIDO).
Sólo utilice alambre de cobre o cobrizado con este dispositivo.
NOTAS IMPORTANTES:
1. Todos los controles de velocidad de ventilador pueden dañarse a causa de
un cableado incorrecto. Antes de instalar el control de velocidad de venti-
lador, revise en busca de cortocircuitos.
Procedimiento de revisión para localizar cortocircuitos:
a. Desconecte el suministro eléctrico al circuito quitando el fusible o apa-
gando los cortacircuitos (OFF).
b. Instale un interruptor en lugar del control de velocidad de ventilador.
Coloque el interruptor en la posición encendido (ON).
c. Encienda el suministro eléctrico. Si el cortacircuitos se dispara, existe un
cortocircuito. Si el ventilador no se enciende y apaga con el interruptor,
el cableado podría estar incorrecto.
d. Si es necesario, corrija el cableado, y pruebe nuevamente.
e. Instale el control de velocidad de ventiladorúnicamente después de que
el ventilador funcione apropiadamente con el interruptor.
2. Proteja contra la suciedad y el polvo. El control de velocidad de ventilador
puede dañarse por contaminantes que se generan durante el proceso de
construcción. El control no debe instalarse antes de terminar la construcción.
Cualquier daño del control de velocidad de ventilador causado por
una instalación incorrecta no está amparado por la garantía.
GARANTÍA DE POR VIDA
El dispositivo que compró está garantizado bajo uso normal contra defectos de mano de
obra y de materiales mientras usted posea el dispositivo. Si el dispositivo falla debido a
un defecto de fabricación durante el uso normal, devuélvalo para su reemplazo a la tien-
da donde lo compró o envíelo a: Pass & Seymour Legrand Consumer Division, 50 Boyd
Avenue, Syracuse, NY 13209. Todas las solicitudes de reemplazo deben incluir un recibo
de compra con fecha (se aceptan copias legibles). CUALQUIER OTRA GARANTÍA,
INCLUYENDO PERO SIN LIMITARSE A CUALQUIER GARANTÍA DE APTITUD E IDONEIDAD
PARA UN FIN CONCRETO, ESTÁ LIMITADA A UN PERÍODO DE DOS AÑOS A PARTIR DE
LA FECHA DE COMPRA. SU RECURSO ÚNICO Y EXCLUSIVO EN CONTRA DE PASS & SEY-
MOUR/LEGRAND BAJO CUALQUIER GARANTÍA SERÁ EL REEMPLAZO DEL DISPOSITIVO
POR UNO EQUIVALENTE. EN NINGÚN CASO SE APLICARÁ GARANTÍA ALGUNA A UN
DEFECTO DERIVADO DE UNA ALTERACIÓN DEL DISPOSITIVO, CABLEADO INCORRECTO,
INSTALACIÓN INCORRECTA, USO INADECUADO, USO ANORMAL O NEGLIGENCIA. PASS
& SEYMOUR/LEGRAND NO SERÁ LEGALMENTE RESPONSABLE EN NINGÚN CASO POR
LA PÉRDIDA DE INGRESOS, DAÑOS Y PERJUICIOS INDIRECTOS, ESPECIALES, EJEM-
PLARES, INCIDENTALES O CONSECUENTES. Algunos estados no permiten limitaciones
en cuanto a la duración de las garantías implícitas y no permiten la exclusión o limitación
de los daños incidentales o consecuentes. Algunas de las limitaciones o exclusiones
anteriores podrían no corresponder a todos los compradores.
LIRE ET CONSERVER CES INSTRUCTIONS ET DIAGRAMMES
DE CÂBLAGE ET D’INSTALLATION
Doit être installé par un électricien certifié ou une autre personne qualifiée.
Ce régulateur de vitesse ne doit être utilisé qu’avec des ventilateurs de pla-
fond à pales.
MISE EN GARDE : Du fait des différents standards utilisés par les fabricants
de ventilateur, les vitesses de ce régulateur peuvent varier sur tous les
réglages. Certains ventilateurs peuvent tourner trop rapidement sur « High »
(maxi), d’autres peuvent tourner trop lentement au réglage le plus bas du
régulateur.
Pour éviter toute surchauffe et endommagement éventuel des autres appareils,
ne pas installer ce dispositif pour contrôler une prise, une ampoule ou un tube
fluorescent, ou un appareil ménager alimenté par un transformateur.
Ne pas utiliser pour contrôler un ventilateur et un appareil d’éclairage qui
peuvent être commandés par le même interrupteur.
FACILE À INSTALLER
Instructions
1. AVANT L’INSTALLATION et avant de déconnecter l’alimentation électrique,
s’assurer que le ventilateur fonctionne à sa vitesse la plus élevée.
2. Couper l’alimentation du circuit en retirant le fusible ou en ouvrant les dis-
joncteurs avant de commencer l’installation.
3. Retirer la plaque murale et l’interrupteur existants.
4. Raccorder le régulateur comme indiqué sur les diagrammes de câblage et
d’installation, en utilisant les fils fournis. Installer le régulateur de ventila-
teur dans une boîte murale, avec le mot « TOP » sur la bande métallique à
l’endroit, en utilisant les vis fournies.
5. Fixer le régulateur de ventilateur sur la boîte murale à l’aide des vis
fournies.
6. Fixer la plaque murale.
7. Régler le régulateur de ventilateur sur la position OFF (ARRÊT). Voir les
Instructions d'utilisation (cidessous).
8. Remettre le circuit sous tension et tester. S’assurer que le ventilateur ne
s’arrête dans aucune des positions ON (MARCHE). Ne pas laisser le ventila-
teur en position « calée ». NE PAS UTILISER LA CHAÎNE DU VENTILATEUR
APRÈS L’INSTALLATION DU RÉGULATEUR DE VITESSE.
Instructions d’installation du De-Hummer Harmony
Régulataleur de Vitesse de Ventilateur
Unipolaire/3-Voies
De-Hummer 1,6 A, 3 Vitesses, 120VCA, 60Hz
P/N 340808 Rev. B
P.O. Box 4822
Syracuse, NY 13221-4822
Call 800.223.4185 for Technical Support
Visit our website: www.passandseymour.com
Ne pas UTILISER
ce fil pour une
installation
unipolaire
(Rouge)
Connecter au
moteur / la source
(Noir)
Connecter au
moteur / la source
(Rouge)
Fil de terre
(Vert ou nu)
Commun vers
interrupteur
3 voies
Connecter
à la source
(Noir)
Commun vers
interrupteur
3 voies
Fil de terre
(Vert ou nu)
Unipolaire 3 Voies
TABLEAU D'UTILISATION DES CONNECTEURS DE FILS
COMBINAISONS DE FILS LONGUEUR DE DÉNUDAGE COULEUR
1#14 & 1#16; 1#14 & 2#18; 2, 3#16;
#14–1/2", #16 & #18–9/16" ORANGE
1#16 & 1–3#18: 3–5#18; 2#18
1#14 & 1, 2#16; 1#14 & 1, 2#18; #14 & #16–7/16",
IVOIRE
2, 3#16; 2–5#18 #18–1/2"
Tourner
340808RevB:Layout 1 10/23/08 11:05 AM Page 2
-
 1
1
-
 2
2


Legrand Harmony™ De-Hummer Fan Speed Control Guía de instalación
- Tipo
- Guía de instalación
- Este manual también es adecuado para
en otros idiomas
Artículos relacionados
-
Legrand TDDH163P Guía de instalación
-
-
-
-
-
-
-
-
-