Rollei Dashcam M1 El manual del propietario
- Tipo
- El manual del propietario

www.rollei.de
M1 Motorrad-
Dashcam
Louis Edition
ANLEITUNG | MANUAL
FOR GERMAN | ENGLISH| FRENCH | SPANISH
ITALIAN | DUTCH | RUSSIAN | POLISH
Erhältlich im

CONTENT
M1 Motorrad-Dashcam
Louis Edition
French
Avant la première utilisation ....................12
Explication des symboles .......................12
Vue d‘ensemble ..............................12
Carte mémoire ...............................13
Connexions ..................................13
Raccordement de l‘alimentation électrique ........14
Affichage de l‘écran pendant l‘enregistrement .....14
Paramètres du menu ..........................15
Connexion WiFi/app ...........................14
Caractéristiques techniques .....................15
Instructions de sécurité ........................15
Élimination ..................................15
Conformité ..................................15
Spanish
Antes del primer uso ..........................16
Explicación de los símbolos .....................16
Visión general ................................16
Tarjeta de memoria ...........................17
Conexiones ..................................17
Conectando la fuente de alimentación ............18
Pantalla durante la grabación ...................18
Ajustes del menú .............................19
Conexión WiFi/app ............................19
Datos técnicos ................................19
Instrucciones de seguridad .....................19
Eliminación ..................................19
Conformidad ................................19
Deutsch
Vor dem ersten Gebrauch........................4
Zeichenerklärung ..............................4
Übersicht .....................................4
Speicherkarte..................................5
Verbindungen .................................5
Stromversorgung anschließen ....................6
Bildschirmanzeige bei der Aufnahme ..............6
Menü-Einstellungen ............................7
WiFi-Verbindung/App ..........................7
Technische Daten ..............................7
Sicherheitshinweise.............................7
Entsorgung ...................................7
Konformität...................................7
English
Before first use ................................8
Explanation of symbols..........................8
Overview .....................................8
Memory card .................................9
Connections ..................................9
Connecting the power supply ...................10
Screen display during recording .................10
Menu settings ................................11
WiFi connection/app ..........................11
Technical data ................................11
Safety Instructions ............................11
Disposal .....................................11
Conformity ..................................11

Italian
Prima del primo utilizzo .......................20
Spiegazione dei simboli ........................20
Panoramica ..................................20
Scheda di memoria ............................21
Collegamenti ................................21
Collegamento dell‘alimentazione elettrica.........22
Visualizzazione dello schermo durante la
registrazione .................................22
Impostazioni del menu ........................23
Connessione WiFi/app .........................23
Dati tecnici ..................................23
Istruzioni di sicurezza ..........................23
Smaltimento .................................23
Conformità ..................................23
Dutch
Voor het eerste gebruik ........................24
Verklaring van de symbolen ....................24
Overzicht ....................................24
Geheugenkaart ..............................25
Aansluitingen ................................25
Aansluiting van de voeding .....................26
Schermweergave tijdens de opname .............26
Menu-instellingen ............................27
WiFi-connectie/app ...........................27
Technische gegevens ..........................27
Veiligheidsinstructies ..........................27
Verwijdering .................................27
Conformiteit .................................27
Russian
Перед первым использованием .................28
Пояснения к символам 28
Обзор 28
Карта памяти 29
Подключения 29
Подключение источника питания 30
Экранный дисплей во время записи 30
Настройки меню ..............................31
WiFi-соединение/app ..........................31
Технические характеристики ....................31
Правила техники безопасности 31
Утилизация ..................................31
Соответствие 31
Polish
Przed pierwszym użyciem .......................32
Objaśnienie symboli 32
Przegląd 32
Karta pamięci .................................33
Połączenia ...................................33
Podłączenie zasilania...........................34
Wyświetlanie ekranu podczas nagrywania 34
Ustawienia menu ..............................35
Połączenie WiFi/aplikacja 35
Specykacje techniczne 35
Instrukcje bezpieczeństwa .......................35
Utylizacja ....................................35
Zgodność z przepisami 35

4
DEUTSCH
Vor dem ersten Gebrauch
Bitte lesen Sie vor dem ersten Gebrauch die Bedienungsanleitung
und die Sicherheitshinweise aufmerksam durch.
Bewahren Sie die Bedienungsanleitung zusammen mit dem Gerät
für den späteren Gebrauch auf. Sollten andere Personen dieses
Gerät nutzen, so stellen Sie ihnen diese Anleitung zur Verfügung.
Wenn Sie das Gerät verkaufen, gehört diese Anleitung zum Gerät
und muss mitgeliefert werden.
Zeichenerklärung
Die folgenden Symbole werden in dieser Bedienungsanleitung,
auf der Kamera, dem Zubehör oder auf der Verpackung verwen-
det.
Mit diesem Symbol gekennzeichnete Produkte erfüllen
alle maßgeblichen Gemeinschaftsvorschriften des Europäi-
schen Wirtschaftsraums.
Mit diesem Zeichen gekennzeichnete Produkte werden
mit Gleichstrom betrieben.
1
2
3
4
5
OK-Taste
• Ein-/Ausschalter / Aufnahmestart/-stopp
Menü-Taste:
• Videomodus: Kurz drücken, um das Einstellungsmenü auf-
zurufen
• Wiedergabemodus: Halten Sie die Taste etwa 3 Sekunden
lang gedrückt, um das Menü für die Wiedergabeeinstellun-
gen aufzurufen.
Aufwärtstaste
• Im Videomodus drücken Sie die Aufwärtstaste, um das ge-
wählte Kamerabild auf dem Bildschirm zu ändern.
• Im Einstellungsmenü drücken Sie die Aufwärtstaste, um
obige Optionen zu wählen.
Abwärtstaste
• Im Videomodus drücken Sie die Abwärtstaste, um ein Foto
zu machen.
• Im Einstellungsmenü drücken Sie die Abwärtstaste, um
untere Optionen zu wählen.
MicroSD-Karten-Steckplatz
• MicroSD-Karte (kompatibel mit 8GB bis 32GB, wir empfeh-
len eine SD-Karte der Klasse 10 oder höher)
Display
Power / GPS / Anschluss für Rückkamera
Fernbedienung / Anschluss für Frontkamera
Steuereinheit: Gewinde-Anschluss für Lenkerhalterung
Lautsprecher
Übersicht
6
7
8
9
10
11
12
13
Foto-Taste
Mikrofon
• Kurz drücken, um das Mikrofon ein-/auszuschalten
Datei sperren
• Kurz drücken, um die Datei zu sperren, kurz drücken, um
normales Video aufzunehmen
Fernbedienung
65
2
1
3
4
9 10
7
8
11 12
13
Ohne Abbildung:
• Niederspannungskabel für das Motorrad
• USB Netzkabel

5
1
2
3
4
5
Speicherkarte
• Die Speicherkarte ist nicht im Lieferumfang enthalten, Sie
müssen eine zusätzliche Speicherkarte kaufen. Bitte verwenden
Sie nur MicroSD-Karten der Geschwindigkeitsklasse 10 oder
Video-Geschwindigkeitsklasse V10 oder höher.
• Bitte verwenden Sie eine Speicherkarte in der Größe zwischen
8 GB bis 32 GB.
• Bitte formatieren Sie die MicroSD-Karte vor der Verwendung
mit FAT32.
Hinweis: Beim Formatieren wird der gesamte Inhalt der SD-
Karte gelöscht, bitte sichern Sie Ihre Dateien.
SD-Karte einsetzen
Vergewissern Sie sich, dass die
Kamera ausgeschaltet ist und die
Karte korrekt eingesetzt ist, indem
Sie die Karte in den Steckplatz
schieben, bis Sie ein Klicken hören.
SD-Karte entfernen
Stellen Sie sicher, dass die Kamera
ausgeschaltet ist, schieben Sie die
Karte in den Kartenschlitz, bis Sie
ein Klicken fühlen, dann können
Sie die MicroSD-Karte sicher ent-
nehmen.
Hinweise:
1. Lassen Sie die Speicherkarte nicht los, bevor Sie sie komplett
herausgenommen haben.
2. Formatieren Sie Ihre Speicherkarte regelmäßig. Wir empfehlen
einmal im Monat.
3. Wenn Sie beim Einschalten eine MicroSD-Karte entfernen oder
einsetzen, können Ihre Daten oder Ihre Kamera beschädigt
werden.
Verbindungen
1. USB Anschluss für Stromkabel
Bevor Sie die Kamera an einem Motorrad installieren, können
Sie die Kamera für den Betrieb über das USB-Netzkabel an eine
Stromquelle anschließen.
Hinweis
• Netzteil oder Powerbank benötigen einen 5V / 2,0 A Ausgang.
• Beachten Sie, dass bei niedrigem Ladezustand der Powerbank
die Kamera nicht normal startet.
• Wenn die Kamera an das USB-Stromkabel angeschlossen ist,
funktioniert der GPS-Empfänger nur wenn genügend Strom
vorhanden ist.
1
2
3
4
5
Rot (Leistung)
Schwarz (GPS-Schnittstelle)
Blau (Rückkamera)
Gelb (Fernbedienung)
Grün (Frontkamera)

6
Vorne
Halterung
M1 Motorrad-Dashcam
Louis Edition
Hinten
Mit der Batterie
verbinden
(Buck-Linie)
Abbildung mit freundlicher Genehmigung von: KTM Sportmotorcycle Deutschland GmbH
DEUTSCH
Anschlussverfahren für Strom- und GPS-Verbindungskabel
Stromkabel
GPS-Kabel
Stromversorgung anschließen
Die Installation kann unterschiedlich an verschiedenen Motor-
rädern sein. Zu Ihrer eigenen Sicherheit wenden Sie sich bitte an
Ihren örtlichen Fachhändler.
Hinweis
• Dies ist nur ein Beispiel. Bitte passen Sie die Installationsmetho-
de entsprechend Ihrem eigenen Motorradmodell an.
• Wenn Sie zusätzliches Zubehör (Verlängerungskabel, zusätz-
liche Teile) erwerben möchten, wenden Sie sich bitte an Ihren
örtlichen Fachhändler.
• Nachdem Sie sich vergewissert haben, dass die Anzahl der An-
schlüsse und Zuordnung korrekt sind, vergewissern Sie sich, dass
das Kabel und der Anschluss vollständig angeschlossen sind.
Bildschirmanzeige bei der Aufnahme
Videomodus
Aufnahmezeit
Video-Auflösung
Aufladen/Kapazität
App-Verbindung
WiFi-Anzeige
MicroSD-Karten-Anzeige
GPS-Anzeige
Uhrzeit
Datum
Mikrofon
1
2
3
4
5
6
7
8
9
10
11
5
11
6
7
1 2 3 4
8910
Verbinden von Motorrad-Netzkabeln
Plus-Pol (ACC)
Minus-Pol (GND)

7
Menü-Einstellungen
• Filmcliplänge: 1/2 Minute
• Piepton: Ein/Aus
• Tonaufnahme: Ein/Aus
• Einstellungen der Uhr: Einstellen des Datums
• Sprache: Deutsch/Englisch/Französisch/Spanisch/ Italienisch/Nie-
derländisch/Russisch/Polnisch
• Flimmern: 50 Hz/60 Hz
• LCD-Energiesparmodus: Aus/1 min/3 min
• Schutzlevel: Aus/hoch/mittel/niedrig
• GPS-Status
• Zeitzone
• Einstellung zurücksetzen
• SD-Karte formatieren
• FW-Version
WiFi-Verbindung/App
1. Laden Sie bitte die App „Rollei Dashcam“ aus dem Google
Play Store für die Android-Version und dem App Store für die
iOS-Version herunter.
2. Verbinden Sie ihr Smartphone mit dem WLAN „Rollei-M1-xxxx“
3. Geben Sie das Passwort ein, das Standardpasswort lautet
„1234567890“.
4. Nach erfolgreicher Verbindung öffnen Sie die App und fügen
das Gerät hinzu.
Sicherheitshinweise
1. Dieses Produkt muss ordnungsgemäß installiert werden, ohne
die Sicht des Fahrers oder die Funktion des Fahrzeugs zu beein-
trächtigen. Achten Sie ebenfalls auf eine stabile Montage. An-
dernfalls kann es leicht zu Unfällen und Verletzungen führen.
2. Halten Sie die Kamera von starken Magnetfeldern fern, da dies
zu Schäden an dem Produkt führen kann.
3. Trennen Sie während der Formatierung und Verwendung
die Stromversorgung nicht und setzen oder entfernen Sie die
Speicherkarte nicht, da andernfalls diese beschädigt oder ein
Programmfehler verursacht werden kann.
4. Die Speicherkarte in dieser Kamera ist nicht dazu gedacht,
andere Dateien zu speichern. Bevor Sie diese verwenden,
formatieren Sie bitte die Speicherkarte und sichern Sie vorher
wichtige Videos, Bilder und sonstige Dateien.
5. Um Stromschläge zu vermeiden, stecken oder entfernen Sie den
Netzstecker nicht mit nassen Händen.
6. Verwenden Sie dieses Produkt nicht an Orten mit hoher Luft-
feuchtigkeit oder Temperaturen über 60 ° C oder unter -20 ° C.
7. Verwenden Sie nur das mitgelieferte Stromversorgungskabel
und das mit diesem Produkt kompatible Zubehör.
8. Verwenden Sie eine Speicherkarte der Klasse 10 mit 8 GB oder
größer.
Entsorgung
Entsorgen Sie die Verpackung sortenrein. Nutzen Sie da-
für die örtlichen Möglichkeiten zum Sammeln von Papier,
Pappe und leichten Verpackungen. (Anwendbar in der
Europäischen Union und anderen europäischen Staaten
mit Systemen zur getrennten Sammlung von Wertstoffen)
Geräte, die mit diesem Symbol gekennzeichnet sind,
dürfen nicht mit dem Hausmüll entsorgt werden! Sie
sind gesetzlich dazu verpflichtet, Altgeräte getrennt vom
Hausmüll zu entsorgen. Informationen zu Sammelstellen,
die Altgeräte kostenlos entgegennehmen, erhalten Sie bei
Ihrer Gemeinde- oder Stadtverwaltung.
Konformität
Hiermit erklärt die Rollei GmbH & Co. KG, dass der Funkanlagen-
typ „Rollei M1 Motorrad-Dashcam Louis Edition“ der Richtlinie
2014/53/EU entspricht:
2011/65/EU RoHS-Richtlinie
2014/53/EU RED-Richtlinie
Der vollständige Text der EU-Konformitätserklärung ist unter den
folgenden Internetadressen verfügbar:
www.rollei.de/egk/m1motorraddashcam-louisedition
Technische Daten
M1 Motorrad-Dashcam Louis Edition
Bildsensor CMOS 1/2.9“, Auflösung 2,12 MP
Auflösung 1080P
Aufnahmemodi Schleifenaufnahme 1 oder 2 Minuten
Objektiv Weitwinkel-Objektiv
Display 3“ IPS-Display
Speicher Steckplatz für microSD-Karten bis zu
SDHC 32 GB (Klasse 10 oder höher)
Datenformat Foto: JPG / Video: TS
Anschlüsse Steuereinheit: Gewinde-Anschluss
für Lenkerhalterung
Fernbedienung Inklusive
Schutzklasse Kamera wetterfest nach IP67,
Steuereinheit wetterfest nach IP65
Umgebungstemperatur –20 bis +60 °C
Stromversorgung DC 12 / 24 V
Maße / Gewicht Vorder- und Rückkamera:
4,5 x 2,5 cm / 33 g
Steuereinheit: 10,8 x 5,9 x 2,1 cm / 131 g

8
ENGLISH
Before first use
Please read the operating instructions and the safety instructions
carefully before using the device for the first time.
Keep the operating instructions together with the appliance for
future reference. If other people use this device, make this manu-
al available to them. If you sell the device, this manual is part of
the device and must be supplied with it.
Explanation of symbols
The following symbols are used in this manual, on the LED light,
the power supply unit or on the packaging.
Products marked with this symbol comply with all relevant
community regulations of the European Economic Area.
Products marked with this symbol are operated with direct
current.
1
2
3
4
5
OK button
• On/off switch / recording start/stop
Menu button:
• Video mode: Press briefly to enter the settings menu
• Playback mode: Press and hold the button for about
3 seconds to display the playback settings menu.
Up Button
• In the video mode, press the up key to change the selected
camera image on the screen.
• In the settings menu, press the up key to choose options
above.
Down Button:
• In the video mode, press the down key to take a picture.
• In the settings menu, press the down key to choose options
below.
MicroSD card slot
• MicroSD card (compatible with 8GB to 32GB, we
recommend a class 10 SD card or higher)
Display
Power / GPS / Connection for rear camera
Remote control / connection for front camera
Control unit: threaded connection for handlebar bracket
Speaker
Overview
6
7
8
9
10
11
12
13
Photo button
Microphone
• Press briefly to switch the microphone on/off
Lock file
• Press briefly to lock the file, press briefly to record normal
video
Remote Control
65
2
1
3
4
9 10
7
8
11 12
13
Without illustration:
• Low voltage cable for the motorcycle
• USB power cable

9
1
2
3
4
5
Memory card
• The memory card is not included in the scope of delivery; you
must purchase an additional memory card. Please use only Mi-
croSD cards of speed class 10 or video speed class V10 or higher.
• Please use a memory card with a size between 8 GB to 32 GB.
• Please format the MicroSD card with FAT32 before use.
Note: When formatting, the entire contents of the SD Card
deleted, please back up your files.
Insert SD card
Make sure the camera is powered
off and the card is inserted correctly
by pushing the card into the slot
until you hear a click.
Removing SD card
Make sure the camera is turned
off, slide the card into the card slot
until you feel a click, then you can
safely remove the MicroSD card.
Notes:
1. Do not release your finger before
removing the memory card.
2. Format your memory card regularly.
We recommend once a month.
3. If you remove or insert a MicroSD card when turning on the
power, your data or camera may be damaged.
Connections
1. USB connector for power cable
Before installing the camera on a motorcycle, you can connect
the camera to a power source for operation using the USB
power cord.
Note
• Power supply unit or power bank require a 5V / 2.0 A output.
• Please note that if the power bank is low, the camera will not
start normally.
• If the camera is connected to the USB power cable, the GPS
receiver will only work if there is enough power.
1
2
3
4
5
Red (power)
Black (GPS interface)
Blue (rear camera)
Yellow (remote control)
Green (front camera)

10
Front
Bracket
M1 Motorcycle Dashcam
Louis Edition
Rear
Connect to the
battery
(buck line)
Picture courtesy of: KTM Sportmotorcycle Germany GmbH
Connection method for power and GPS connection cables
Power cable
GPS cable
Connecting Motorcycle Power Cables
Positive pole (ACC)
Negative pole (GND)
ENGLISH
Connecting the power supply
The installation can be different on different motorcycles. For
your own safety, please contact your local dealer.
Note
• This is only an example. Please adapt the installation method to
your own motorcycle model.
• If you wish to purchase additional accessories (extension cable,
additional parts), please contact your local dealer.
• After making sure that the number of connections and assi-
gnment are correct, make sure that the cable and connector are
fully connected.
Screen display during recording
Video mode
Recording time
Video resolution
Charging/Capacity
App Connection
WiFi display
MicroSD card display
GPS display
Clock
Date
Microphone
1
2
3
4
5
6
7
8
9
10
11
5
11
6
7
1 2 3 4
8910

11
Menu settings
• Movie clip time: 1/2 minute
• Beep: On/Off
• Sound recording: On/Off
• Clock Settings: Setting the date
• Language: German / English / French / Spanish / Italian / Dutch /
Russian / Polish
• Flicker: 50 Hz / 60 Hz
• LCD power saving mode: Off / 1 min / 3 min
• Protect level: off / high / middle / low
• GPS status
• Time zone
• Reset Setup
• Format SD card
• FW version
WiFi connection/app
1. Please download the Rollei Dashcam app from the Google Play
Store for the Android version and the App Store for the iOS
version
2. Connect your smartphone to the WLAN „Rollei-M1-xxxx”
3. Enter the password, the default password is „1234567890“.
After successful connection, open the app and add the device.
Safety Instructions
1. This product must be properly installed without obstructing the
driver‘s view or the function of the vehicle also ensure a stable
installation. Failure to do so may result in accidents and injuries.
2. Keep the camera away from strong magnetic fields as this may
cause damage to the product.
3. Do not disconnect the power supply or insert or remove the me-
mory card during formatting and use, as this may damage the
card or cause a program error.
4. The memory card in this camera is not designed to store other
files. Before using it, please format the memory card and back
up important movies, pictures and other files.
5. To avoid electric shock, do not insert or remove the power plug
with wet hands.
6. Do not use this product in places with high humidity or tempe-
ratures above 60°C or below -20°C.
7. Use only the supplied power supply cable and accessories com-
patible with this product.
8. Use a class 10 memory card of 8 GB or larger.
Disposal
Dispose of the packaging according to its type. Use the
local possibilities for collecting paper, cardboard and other
materials. (Applicable in the European Union and other
European countries with systems for the separate collec-
tion of recyclable materials)
Devices that are marked with this symbol must not be
disposed of with household waste! You are legally obli-
ged to dispose of old devices separately from to dispose
of household waste. Information on collection points that
accept old appliances free of charge can be obtained from
your local authority or town council.
Conformity
Herewith Rollei GmbH & Co. KG declares that the radio system
type ”Rollei M1 Motorrad-Dashcam Louis Edition“ complies with
Directive 2014/53/EU:
2011/65/EU RoHS Directive
2014/53/EU RED Directive
The complete text of the EU Declaration of
Conformity can be downloaded at the following Internet address:
www.rollei.com/egk/m1motorraddashcam-louisedition
Technical specifications
M1 Motorcycle Dashcam Louis Edition
Image sensor CMOS 1/2.9“, resolution 2.12 MP
Resolution 1080P
Recording modes Loop recording 1 or 2 minutes
Lens Wide angle lens
Display 3“ IPS Display
Memory Slot for microSD cards up to SDHC 32 GB
(class 10 or higher)
Data format Photo: JPG / Video: TS
Connections Control unit: threaded connection
for handlebar bracket
Remote Control Included
Protection class Camera weatherproof according to IP67,
control unit weatherproof according to IP65
Ambient temperature –20 to +60 °C
Power supply DC 12 / 24 V
Dimensions / Weight Front and rear camera: 4.5 x 2.5 cm / 33 g
Control unit: 10.8 x 5.9 x 2.1 cm / 131 g

12
FRENCH
Avant la première utilisation
Veuillez lire attentivement le mode d‘emploi et les consignes de
sécurité avant d‘utiliser l‘appareil pour la première fois.
Conservez les instructions d‘utilisation avec l‘appareil pour pou-
voir vous y référer ultérieurement. Si d‘autres personnes utilisent
cet appareil, mettez ce manuel à leur disposition. Si vous vendez
l‘appareil, ce manuel fait partie intégrante de l‘appareil et doit
être fourni avec celui-ci.
Explication des symboles
Les symboles suivants sont utilisés dans ce manuel, sur le voyant
LED, le bloc d‘alimentation ou sur l‘emballage.
Les produits marqués de ce symbole sont conformes à
toutes les réglementations communautaires pertinentes
de l‘Espace économique européen.
Les produits marqués de ce symbole fonctionnent en
courant continu.
1
2
3
4
5
Bouton OK
• Interrupteur marche/arrêt / démarrage/arrêt de l‘enregis-
trement
Bouton de menu:
• Mode vidéo: Appuyez brièvement pour entrer dans le
menu des paramètres
• Mode de lecture: Appuyez sur la touche pendant environ
3 secondes pour afficher le menu des paramètres de lecture.
Bouton haut
• En mode vidéo, appuyez sur la touche haut pour modifier
l‘image de la caméra sélectionnée à l‘écran.
• Dans le menu des paramètres, appuyez sur la touche haut
pour choisir les options ci-dessus.
Bouton bas
• En mode vidéo, appuyez sur la touche bas pour prendre
une photo.
• Dans le menu des paramètres, appuyez sur la touche bas
pour choisir les options ci-dessous.
Fente pour carte microSD
• Carte MicroSD (compatible avec 8 à 32 Go, nous
recommandons une carte SD de classe 10 ou supérieure)
Écran
Alimentation / GPS / Connexion pour caméra arrière
Télécommande / connexion pour la caméra frontale
Unité de commande: connexion filetée pour support de
guidon
Orateur
Vue d‘ensemble
6
7
8
9
10
11
12
13
Bouton photo
Microphone
• Appuyez brièvement pour allumer/éteindre le microphone
Verrouiller le fichier
• Appuyez brièvement pour verrouiller le fichier, appuyez
brièvement pour enregistrer une vidéo normale
Télécommande
65
2
1
3
4
9 10
7
8
11 12
13
Sans illustration:
• Câble basse tension pour la moto
• Câble d‘alimentation USB

13
1
2
3
4
5
Carte mémoire
• La carte mémoire n‘est pas comprise dans le volume de livrai-
son; vous devez acheter une carte mémoire supplémentaire.
Veuillez utiliser uniquement des cartes MicroSD de classe de
vitesse 10 ou de classe de vitesse vidéo V10 ou supérieure.
• Veuillez utiliser une carte mémoire d‘une taille comprise entre
8 GB à 32 GB.
• Veuillez formater la carte MicroSD avec FAT32 avant de l‘utiliser.
Note: Lors du formatage, tout le contenu de la carte SD est
supprimé, veuillez sauvegarder vos fichiers.
Insérer la carte SD
Assurez-vous que l‘appareil photo
est éteint et que la carte est correc-
tement insérée en poussant la carte
dans la fente jusqu‘à ce que vous
entendiez un clic.
Retirer la carte SD
Assurez-vous que l‘appareil photo
est éteint, faites glisser la carte dans
la fente jusqu‘à ce que vous sentiez
un clic, puis vous pouvez retirer la
carte MicroSD en toute sécurité.
Notes:
1. Ne relâchez pas la carte mémoire tant
que vous ne l‘avez pas complètement retirée.
2. Formatez votre carte mémoire régulièrement.
Nous vous recommandons de le faire une fois par mois.
3. Si vous retirez ou insérez une carte MicroSD lors de la mise sous
tension, vos données ou votre appareil photo risquent d‘être
endommagés.
Connexions
1. Connecteur USB pour le câble d‘alimentation
Avant d‘installer l‘appareil photo sur une moto, vous pouvez le
brancher à une source d‘alimentation pour le faire fonctionner
à l‘aide du cordon d‘alimentation USB.
Note
• Le bloc d‘alimentation ou la banque d‘énergie nécessitent une
sortie de 5V / 2,0 A.
• Veuillez noter que si la Powerbank est basse, la caméra ne
démarrera pas normalement.
• Si l‘appareil photo est connecté au câble d‘alimentation USB,
le récepteur GPS ne fonctionnera que s‘il y a suffisamment de
courant.
1
2
3
4
5
Rouge (alimentation)
Noir (interface GPS)
Bleu (caméra arrière)
Jaune (télécommande)
Vert (caméra frontale)

14
Front
Parenthèse
M1 Moto Dashcam
Louis Edition
Arrière
Connexion à la
batterie
(ligne buck)
Photo reproduite avec l‘aimable autorisation de: KTM Sportmotorcycle Germany GmbH
FRENCH
Méthode de connexion pour les câbles d‘alimentation et de
connexion GPS
Câble d‘alimentation
Câble GPS
Raccordement de l‘alimentation électrique
L‘installation peut être différente sur les différentes motos. Pour
votre propre sécurité, veuillez contacter votre concessionnaire
local.
Note
• Ce n‘est qu‘un exemple. Veuillez adapter la méthode d‘installa-
tion à votre propre modèle de moto.
• Si vous souhaitez acheter des accessoires supplémentaires (câble
de rallonge, pièces supplémentaires), veuillez contacter votre
concessionnaire local.
• Après vous être assuré que le nombre de connexions et l‘affec-
tation sont corrects, assurez-vous que le câble et le connecteur
sont entièrement connectés.
Affichage de l‘écran pendant l‘enregistrement
Mode vidéo
Durée d‘enregistrement
Résolution vidéo
Charge/Capacité
Connexion à l‘application
Affichage du WiFi
Affichage de la carte MicroSD
Affichage GPS
Horloge
Date
Microphone
1
2
3
4
5
6
7
8
9
10
11
5
11
6
7
1 2 3 4
8910
Connecter les câbles d‘alimentation des motocyclettes
Pôle positif (ACC)
Pôle négatif (GND)

15
Les consignes de sécurité
1. Ce produit doit être correctement installé sans obstruer la vue
du conducteur ou le fonctionnement du véhicule. Veillez égale-
ment à une installation stable. Le non-respect de cette consigne
peut entraîner des accidents et des blessures.
2. Tenez l‘appareil à l‘écart des champs magnétiques forts, car cela
pourrait endommager le produit.
3. Ne pas déconnecter l‘alimentation électrique ni insérer ou reti-
rer la carte mémoire pendant le formatage et l‘utilisation, car
cela pourrait endommager la carte ou provoquer une erreur de
programme.
4. La carte mémoire de cet appareil n‘est pas conçue pour stocker
d‘autres fichiers. Avant de l‘utiliser, veuillez formater la carte
mémoire et sauvegarder les films, photos et autres fichiers
importants.
5. Pour éviter tout risque de choc électrique, n‘insérez pas ou ne
retirez pas la fiche d‘alimentation avec les mains mouillées.
6. N‘utilisez pas ce produit dans des endroits très humides ou à
des températures supérieures à 60°C ou inférieures à -20°C.
7. Utilisez uniquement le câble d‘alimentation électrique fourni et
les accessoires compatibles avec ce produit.
8. Utilisez une carte mémoire de classe 10 de 8 Go ou plus.
Élimination
Éliminez l‘emballage en fonction de son type. Utilisez
les possibilités locales de collecte du papier, du carton et
d‘autres matériaux. (Applicable dans l‘Union européenne
et dans les autres pays européens disposant de systèmes
de collecte séparée des matériaux recyclables)
Les appareils marqués de ce symbole ne doivent pas être
jetés avec les ordures ménagères! La loi vous oblige à
éliminer les anciens appareils séparément des ordures
ménagères. Des informations sur les points de collecte
qui acceptent gratuitement les anciens appareils peuvent
être obtenues auprès de votre autorité locale ou de votre
conseil municipal.
Conformité
Par la présente, la société Rollei GmbH & Co. KG déclare que
le système radio de type „Rollei M1 Motorrad-Dashcam Louis
Edition“ est conforme à la directive 2014/53/UE:
2011/65/UE Directive RoHS
2014/53/UE Directive RED
Le texte complet de la déclaration de conformité de l‘UE peut
être téléchargé à l‘adresse Internet suivante:
www.rollei.com/egk/m1motorraddashcam-louisedition
Paramètres du menu
• Durée du clip vidéo: 1/2 minute
• Bip: Marche/Arrêt
• Enregistrement sonore: On/Off
• Régler l‘horloge: Régler la date
• La langue: Allemand / Anglais / Français / Espagnol / Italien /
Néerlandais / Russe / Polonais
• Scintillement: 50 Hz / 60 Hz
• Mode d‘économie d‘énergie de l‘écran LCD: Arrêt / 1 min / 3 min
• Niveau de protection: désactivé / élevé / moyen / faible
• État du GPS
• Fuseau horaire
• Réinitialisation des paramètres
• Format de la carte SD
• Version FW
Connexion WiFi/app
1. Veuillez télécharger l‘application Rollei Dashcam sur le Google
Play Store pour la version Android et sur l‘App Store pour la
version iOS
2. Connectez votre smartphone au WLAN „Rollei-M1-xxxx
3. Entrez le mot de passe, le mot de passe par défaut est
„1234567890“. Après une connexion réussie, ouvrez l‘applica-
tion et ajoutez l‘appareil.
Caractéristiques techniques
M1 Motorcycle Dashcam Louis Edition
Capteur d‘image CMOS 1/2,9“, résolution 2,12 MP
Résolution 1080P
Modes d‘enregistrement Enregistrement en boucle de 1 ou 2 min.
Objectif Objectif grand angle
Écran 3“ IPS-Display
Mémoire Emplacement pour cartes microSD
jusqu‘à SDHC 32 Go (classe 10 ou supérieure)
Format données Photo: JPG / Vidéo: TS
Connexions Unité de commande: connexion filetée
pour support de guidon
Télécommande Incluse
Classe de protection Caméra étanche selon IP67, unité de
contrôle étanche selon IP65
Température ambiante –20 à +60 °C
Alimentation électrique DC 12 / 24 V
Dimensions / Poids Caméra avant et arrière: 4,5 x 2,5 cm / 33 g
Unité de contrôle: 10,8 x 5,9 x 2,1 cm / 131 g

16
SPANISH
Antes del primer uso
Por favor, lea atentamente las instrucciones de uso y las
instrucciones de seguridad antes de utilizar el dispositivo por
primera vez.
Guarde el manual de instrucciones junto con el aparato para
futuras consultas. Si otras personas utilizan este dispositivo, ponga
este manual a su disposición. Si usted vende el aparato, este ma-
nual es parte del mismo y debe ser suministrado con él.
Explicación de los símbolos
Los siguientes símbolos se utilizan en este manual, en la luz LED,
en la fuente de alimentación o en el embalaje.
Los productos marcados con este símbolo cumplen con
todas las regulaciones comunitarias relevantes del Área
Económica Europea.
Los productos marcados con este símbolo funcionan con
corriente continua.
1
2
3
4
5
Botón de OK:
• Interruptor de encendido/apagado / inicio/parada de la
grabación
Botón de menú:
• Modo de video: Pulsar brevemente para entrar en el menú
de ajustes
• Modo de reproducción: Presione y mantenga presionado el
botón durante aproximadamente 3 segundos para mostrar
el menú de ajustes de reproducción.
Botón Arriba
• En el modo de video, presione el botón de arriba para cam-
biar la imagen de la cámara seleccionada en la pantalla.
• En el menú de ajustes, presione la tecla hacia arriba para
elegir las opciones anteriores.
Botón de abajo
• En el modo de vídeo, presione la tecla abajo para tomar
una foto.
• En el menú de ajustes, presione la tecla abajo para elegir
las opciones de abajo.
Ranura de tarjeta microSD
• Tarjeta MicroSD (compatible con 8GB a 32GB, nosotros
recomiendan una tarjeta SD de clase 10 o superior)
Pantalla
Alimentación / GPS / Conexión para la cámara trasera
Mando a distancia / conexión para la cámara frontal
Unidad de control: conexión roscada para soporte de manillar
Orador
Visión general
6
7
8
9
10
11
12
13
El botón de la foto
Micrófono
• Presione brevemente para encender o apagar el micrófono
Archivo de bloqueo
• Presione brevemente para bloquear el archivo, presione
brevemente para grabar un video normal
Mando a distancia
65
2
1
3
4
9 10
7
8
11 12
13
Sin ilustración:
• Cable de baja tensión para la moto
• Cable de alimentación USB

17
1
2
3
4
5
Tarjeta de memoria
• La tarjeta de memoria no está incluida en el volumen de su-
ministro; debe adquirir una tarjeta de memoria adicional. Por
favor, utilice sólo tarjetas MicroSD de clase de velocidad 10 o de
clase de velocidad de vídeo V10 o superior.
• Por favor, utilice una tarjeta de memoria con un tamaño entre
8 GB a 32 GB.
• Por favor, formatee la tarjeta MicroSD con FAT32 antes de
usarla.
Nota: Al formatear, se elimina todo el contenido de la tarjeta
SD, por lo que es necesario hacer una copia de seguridad de los
archivos.
Inserte la tarjeta SD
Asegúrese de que la cámara esté
apagada y la tarjeta esté insertada
correctamente empujando la tarje-
ta en la ranura hasta que escuche
un clic.
Quitar la tarjeta SD
Asegúrate de que la cámara esté
apagada, desliza la tarjeta en la
ranura de la tarjeta hasta que
sientas un chasquido, entonces
podrás retirar la tarjeta MicroSD
con seguridad.
Notas:
1. No suelte la tarjeta de memoria hasta que
la haya retirado completamente.
2. Formatee su tarjeta de memoria regularmente.
Recomendamos una vez al mes.
3. Si retira o inserta una tarjeta MicroSD al encender la cámara, los
datos o la cámara pueden resultar dañados.
Conexiones
1. Conector USB para el cable de alimentación
Antes de instalar la cámara en una motocicleta, puede conectar
la cámara a una fuente de alimentación para su funcionamiento
mediante el cable de alimentación USB.
Nota
• La fuente de alimentación o el banco de energía requieren una
salida de 5V / 2.0 A.
• Tenga en cuenta que si el Powerbank está bajo, la cámara no
arrancará normalmente.
• Si la cámara está conectada al cable de alimentación USB, el
receptor GPS sólo funcionará si hay suficiente energía.
1
2
3
4
5
Rojo (alimentación)
Negro (interfaz GPS)
Azul (cámara trasera)
Amarillo (control remoto)
Verde (cámara frontal)

18
Frente
Soporte
M1 Motocicleta Dashcam
Edición Louis
En la parte
posterior
Conéctese a la
batería
(buck line)
Foto cortesía de: KTM Sportmotorcycle Germany GmbH
SPANISH
Método de conexión de los cables de alimentación y de conexión
del GPS
Cable de alimentación
Cable GPS
Conectando la fuente de alimentación
La instalación puede ser diferente en diferentes motocicletas.
Por su propia seguridad, por favor, póngase en contacto con su
distribuidor local.
Nota
• Esto es sólo un ejemplo. Por favor, adapte el método de instala-
ción a su propio modelo de motocicleta.
• Si desea adquirir accesorios adicionales (cable de extensión,
piezas adicionales), póngase en contacto con su concesionario
local.
• Después de asegurarse de que el número de conexiones y la
asignación son correctos, asegúrese de que el cable y el conec-
tor estén completamente conectados.
Pantalla durante la grabación
Modo de video
Tiempo de grabación
Resolución de video
Carga/capacidad
Conexión de la aplicación
Pantalla WiFi
Pantalla de tarjeta MicroSD
Pantalla GPS
Reloj
Fecha
Micrófono
1
2
3
4
5
6
7
8
9
10
11
5
11
6
7
1 2 3 4
8910
Conexión de los cables de alimentación de las motocicletas
Polo positivo (ACC)
Polo negativo (GND)

19
Instrucciones de seguridad
1. Este producto debe instalarse correctamente sin obstruir la vista
del conductor ni el funcionamiento del vehículo. Si no lo hace,
puede provocar accidentes y lesiones.
2. Mantenga la cámara alejada de campos magnéticos fuertes, ya
que esto puede causar daños al producto.
3. No desconecte la fuente de alimentación ni inserte o extraiga
la tarjeta de memoria durante el formateo y el uso, ya que esto
podría dañar la tarjeta o causar un error de programa.
4. La tarjeta de memoria de esta cámara no está diseñada para
almacenar otros archivos. Antes de usarla, formatee la tarjeta
de memoria y haga una copia de seguridad de las películas,
imágenes y otros archivos importantes.
5. Para evitar descargas eléctricas, no inserte ni retire el enchufe
de alimentación con las manos húmedas.
6. No utilice este producto en lugares con alta humedad o con
temperaturas superiores a 60°C o inferiores a -20°C.
7. Utilice sólo el cable de alimentación y los accesorios compatibles
con este producto.
8. Utilice una tarjeta de memoria de clase 10 de 8 GB o más
grande.
Eliminación
Deshágase del embalaje según su tipo. Utilice las posi-
bilidades locales para recoger papel, cartón y otros
materiales. (Aplicable en la Unión Europea y otros países
europeos con sistemas de recogida selectiva de materiales
reciclables)
¡Los aparatos marcados con este símbolo no deben ser
eliminados con la basura doméstica! Usted está legal-
mente obligado a eliminar los aparatos viejos por sepa-
rado de la basura doméstica. La información sobre los
puntos de recogida que aceptan aparatos viejos de forma
gratuita puede obtenerse en su ayuntamiento o en la
municipalidad.
Conformidad
Por la presente, Rollei GmbH & Co. KG declara que el sistema
de radio tipo „Rollei M1 Motorrad-Dashcam Louis Edition“
cumple con la Directiva 2014/53/UE:
2011/65/UE Directiva RoHS
2014/53/UE Directiva RED
El texto completo de la Declaración de Conformidad de la UE
puede descargarse en la siguiente dirección de Internet:
www.rollei.com/egk/m1motorraddashcam-louisedition
Datos técnicos
M1 Motorcycle Dashcam Louis Edition
Sensor de imagen CMOS 1/2,9“, resolución 2,12 MP
Resolución 1080P
Modos de grabación Grabación en bucle 1 o 2 minutos
Lente Lente gran angular
Pantalla Pantalla IPS de 3“
Memoria Ranura para tarjetas microSD hasta SDHC
32 GB (clase 10 o superior)
Formato de datos Foto: JPG / Video: TS
Conexiones Unidad de control: conexión roscada
para soporte de manillar
Control remoto Incluido
Clase de protección Cámara resistente a la intemperie según
IP67, unidad de control resistente a la
intemperie según IP65
Temperatura ambiente –20 a +60 °C
Fuente de alimentación DC 12 / 24 V
Dimensiones / Peso Cámara delantera y trasera: 4,5 x 2,5 cm / 33 g
Unidad de control: 10,8 x 5,9 x 2,1 cm / 131 g
Ajustes del menú
• Tiempo de grabación de la película: 1/2 minuto
• Bip: Encendido/Apagado
• Grabación de sonido: Encendido/apagado
• Ajustando el reloj: Ajustar la fecha
• Lenguaje: Alemán / Inglés / Francés / Español / Italiano / Holan-
dés / Ruso / Polaco
• Parpadeo: 50 Hz / 60 Hz
• Modo de ahorro de energía del LCD: Apagado / 1 min / 3 min
• Nivel de protección: apagado / alto / medio / bajo
• Estado del GPS
• Zona horaria
• Reajustar la configuración
• Formatea la tarjeta SD
• Versión FW
Conexión WiFi/app
1. Por favor, descargue la aplicación Rollei Dashcam de la Google
Play Store para la versión Android y la App Store para la versión
iOS
2. Conecta tu smartphone a la WLAN „Rollei-M1-xxxx“.
3. Introduzca la contraseña, la contraseña por defecto es
„1234567890“. Después de la conexión exitosa, abra la aplicaci-
ón y agregue el dispositivo.

20
ITALIAN
Prima del primo utilizzo
Leggere attentamente le istruzioni per l‘uso e le avvertenze di
sicurezza prima di utilizzare l‘apparecchio per la prima volta.
Conservare le istruzioni per l‘uso insieme all‘apparecchio per rife-
rimento futuro. Se altre persone utilizzano l‘apparecchio, mettere
a loro disposizione questo manuale. Se vendete l‘apparecchio,
questo manuale è parte integrante dell‘apparecchio e deve essere
fornito con esso.
Spiegazione dei simboli
In questo manuale vengono utilizzati i seguenti simboli, sulla luce
LED, sull‘alimentatore o sulla confezione.
I prodotti contrassegnati con questo simbolo sono con-
formi a tutte le normative comunitarie pertinenti dello
Spazio economico europeo.
I prodotti contrassegnati con questo simbolo funzionano
in corrente continua.
1
2
3
4
5
Pulsante OK
• Interruttore on/off/avvio/arresto registrazione
Tasto Menu
• Modalità video: Premere brevemente per accedere al menu
delle impostazioni
• Modalità di riproduzione: Premere e tenere premuto il
tasto per circa 3 secondi per visualizzare il menu delle
impostazioni di riproduzione
Pulsante Su
• In modalità video, premere il tasto su per cambiare l‘imma-
gine della telecamera selezionata sullo schermo.
• Nel menu delle impostazioni, premere il tasto su per sceg-
liere le opzioni di cui sopra
Pulsante giù
• Nella modalità video, premere il tasto verso il basso per
scattare una foto.
• Nel menu impostazioni, premere il tasto verso il basso per
scegliere le opzioni sottostanti.
Slot per schede MicroSD
• Scheda MicroSD (compatibile con 8GB a 32GB, noi
raccomandare una scheda SD di classe 10 o superiore)
Display
Alimentazione / GPS / Connessione per la telecamera posteriore
Telecomando / collegamento per telecamera frontale
Centralina: attacco filettato per staffa manubrio
Altoparlante
Panoramica
6
7
8
9
10
11
12
13
Pulsante foto
Microfono
• Premere brevemente per accendere e spegnere il microfono
Blocca file
• Premere brevemente per bloccare il file, premere breve-
mente per registrare il video normale
Controllo remoto
65
2
1
3
4
9 10
7
8
11 12
13
Senza illustrazione:
• Cavo a bassa tensione per la moto
• Cavo di alimentazione USB

21
1
2
3
4
5
Scheda di memoria
• La scheda di memoria non è compresa nella fornitura; è neces-
sario acquistare una scheda di memoria aggiuntiva. Si prega di
utilizzare solo schede MicroSD della classe di velocità 10 o della
classe di velocità video V10 o superiore.
• Si prega di utilizzare una scheda di memoria con una dimensio-
ne compresa tra da 8 GB a 32 GB.
• Si prega di formattare la scheda MicroSD con FAT32 prima
dell‘uso.
Nota: durante la formattazione, l‘intero contenuto della scheda
SD cancellato, si prega di eseguire il backup dei file.
Inserire la scheda SD
Assicurarsi che la fotocamera sia
spenta e che la scheda sia inserita
correttamente spingendo la scheda
nello slot fino a quando non si
sente un clic.
Rimozione della scheda SD
Assicurarsi che la fotocamera sia
spenta, far scorrere la scheda nello
slot per schede fino a sentire un
clic, poi si può tranquillamente
rimuovere la scheda MicroSD
Nota:
1. Non rilasciare la scheda di memoria
fino a quando non l‘avete completamente rimossa.
2. Formattare la scheda di memoria regolarmente.
Si consiglia una volta al mese.
3. Se si rimuove o si inserisce una scheda MicroSD all‘accensione,
i dati o la fotocamera potrebbero essere danneggiati.
Collegamenti
1. Connettore USB per cavo di alimentazione
Prima di installare la fotocamera su una motocicletta, è possi-
bile collegare la fotocamera a una fonte di alimentazione per il
funzionamento utilizzando il cavo di alimentazione USB.
Nota
• L‘alimentatore o il banco di alimentazione richiedono un‘uscita
a 5V / 2,0 A.
• Si prega di notare che se la Powerbank è bassa, la fotocamera
non si avvia normalmente.
• Se la fotocamera è collegata al cavo di alimentazione USB, il
ricevitore GPS funziona solo se c‘è abbastanza corrente.
1
2
3
4
5
Rosso (alimentazione)
Nero (interfaccia GPS)
Blu (telecamera posteriore)
Giallo (telecomando)
Verde (telecamera anteriore)

22
Parte anteriore
Staffa
M1 Motorcycle Dashcam
Edizione Louis
Posteriore
Collegare alla
batteria
(linea buck)
Immagine per gentile concessione di: KTM Sportmotorcycle Germany GmbH
ITALIAN
Metodo di connessione per i cavi di alimentazione e di
connessione GPS
Cavo di alimentazione
Cavo GPScable
Collegamento dell‘alimentazione elettrica
L‘installazione può essere diversa su diverse motociclette. Per la
vostra sicurezza, contattate il vostro rivenditore locale.
Nota
• Questo è solo un esempio. Si prega di adattare il metodo di
installazione al proprio modello di moto.
• Se desiderate acquistare ulteriori accessori (cavo di prolunga,
parti aggiuntive), contattate il vostro concessionario di zona.
• Dopo essersi assicurati che il numero di collegamenti e l‘asseg-
nazione siano corretti, assicurarsi che il cavo e il connettore
siano completamente collegati.
Visualizzazione dello schermo durante la registrazione
Modalità video
Tempo di registrazione
Risoluzione video
Caricamento/capacità
Connessione App
Display WiFi
Display per schede MicroSD
Display GPS
Orologio
Data
Microfono
1
2
3
4
5
6
7
8
9
10
11
5
11
6
7
1 2 3 4
8910
Collegamento dei cavi di alimentazione del motociclo
Polo positivo (ACC)
Polo negativo (GND)

23
Istruzioni di sicurezza
1. Questo prodotto deve essere installato correttamente senza
ostacolare la visuale del conducente o il funzionamento del
veicolo. In caso contrario si possono verificare incidenti e lesioni.
2. Tenere la telecamera lontano da forti campi magnetici, poiché
ciò potrebbe causare danni al prodotto.
3. Non scollegare l‘alimentazione elettrica né inserire o rimuovere
la scheda di memoria durante la formattazione e l‘uso, poiché
ciò potrebbe danneggiare la scheda o causare un errore di
programma.
4. La scheda di memoria di questa fotocamera non è progettata
per memorizzare altri file. Prima di utilizzarla, formattare la
scheda di memoria ed eseguire il backup di filmati, immagini e
altri file importanti.
5. Per evitare scosse elettriche, non inserire o rimuovere la spina di
alimentazione con le mani bagnate.
6. Non utilizzare questo prodotto in luoghi con elevata umidità o
temperature superiori a 60°C o inferiori a -20°C.
7. Utilizzare solo il cavo di alimentazione in dotazione e gli
accessori compatibili con questo prodotto.
8. Utilizzare una scheda di memoria di classe 10 da 8 GB o
superiore.
Smaltimento
Smaltire l‘imballaggio secondo il suo tipo. Utilizzare le
possibilità locali per la raccolta di carta, cartone e altri
materiali. (Applicabile nell‘Unione Europea e in altri paesi
europei con sistemi di raccolta differenziata dei materiali
riciclabili)
Gli apparecchi contrassegnati con questo simbolo non de-
vono essere smaltiti con i rifiuti domestici! Siete obbligati
per legge a smaltire i vecchi apparecchi separatamente dai
rifiuti domestici. Informazioni sui punti di raccolta che ac-
cettano gratuitamente i vecchi apparecchi possono essere
richieste al vostro comune o al consiglio comunale.
Conformità
Con la presente Rollei GmbH & Co. KG dichiara che il sistema ra-
dio tipo „Rollei M1 Motorrad-Dashcam Louis Edition“ è conforme
alla direttiva 2014/53/UE:
2011/65/UE Direttiva RoHS
2014/53/UE Direttiva RED
Il testo completo della dichiarazione di conformità UE può essere
scaricato al seguente indirizzo Internet:
www.rollei.com/egk/m1motorraddashcam-louisedition
Impostazioni del menu
• Tempo del filmato: 1/2 minuto
• Bip: On/Off
• Registrazione del suono: On/Off
• Impostazione dell‘orologio: Impostazione della data
• Lingua: tedesco / inglese / francese / francese / spagnolo / italia-
no / olandese / russo / polacco
• Flicker: 50 Hz / 60 Hz
• Modalità di risparmio energetico LCD: Off / 1 min / 3 min
• Livello di protezione: spento / alto / medio / basso
• Stato GPS
• Fuso orario
• Reimpostare l‘impostazione
• Formato scheda SD
• Versione FW
Connessione WiFi/app
1. Scaricare l‘applicazione Rollei Dashcam dal Google Play Store
per la versione Android e dall‘App Store per la versione iOS
2. Collegare lo smartphone alla WLAN „Rollei-M1-xxxx
3. Inserire la password, la password predefinita è „1234567890“.
Dopo aver effettuato con successo la connessione, aprire l‘app e
aggiungere il dispositivo.
Dati tecnici
M1 Motorcycle Dashcam Louis Edition
Sensore di immagine CMOS 1/2,9“, risoluzione 2,12 MP
Risoluzione 1080P
Modalità di registrazione Registrazione in loop 1 o 2 minuti
Lente Lente grandangolare
Display 3“ IPS-Display
Memoria Slot per schede microSD fino a SDHC
32 GB (classe 10 o superiore)
Formato dati Foto: JPG / Video: TS
Collegamenti Centralina: attacco filettato per staffa
manubrio
Telecomando Incluso
Classe di protezione Telecamera resistente alle intemperie
secondo IP67, unità di controllo resistente
alle intemperie secondo IP65
Temperatura ambiente –20 a +60 °C
Alimentazione DC 12 / 24 V
Dimensioni / Peso Telecamera anteriore e posteriore:
4,5 x 2,5 cm / 33 g | Unità di controllo:
10,8 x 5,9 x 2,1 cm / 131 g

24
DUTCH
Voor het eerste gebruik
Lees de gebruiksaanwijzing en de veiligheidsinstructies zorgvul-
dig door voordat u het apparaat voor de eerste keer gebruikt.
Bewaar de gebruiksaanwijzing samen met het apparaat voor toe-
komstig gebruik. Indien andere personen dit apparaat gebruiken,
stel deze handleiding dan ter beschikking. Als u het apparaat
verkoopt, maakt deze handleiding deel uit van het apparaat en
moet deze meegeleverd worden.
Verklaring van de symbolen
De volgende symbolen worden gebruikt in deze handleiding, op
het LED-lampje, de voedingseenheid of op de verpakking.
Producten die met dit symbool zijn gemarkeerd, voldoen
aan alle relevante communautaire voorschriften van de
Europese Economische Ruimte.
Producten die met dit symbool zijn gemarkeerd, worden
met gelijkstroom bediend.
1
2
3
4
5
OK-toets
• Aan/uit-schakelaar / opname start/stop
Menuknop
• Videomodus: Druk kort op om het instellingenmenu te
openen
• Afspeelmodus: Houd de knop ingedrukt voor ongeveer
3 seconden om het menu voor de weergave-instellingen
weer te geven.
Omhoog knop
• Druk in de videomodus op de omhoog-toets om het gese-
lecteerde camerabeeld op het scherm te wijzigen.
• Druk in het instellingenmenu op de omhoog-toets om de
bovenstaande opties te kiezen.
Omlaag knop
• Druk in de videomodus op de omlaag-toets om een foto te
maken.
• Druk in het instellingenmenu op de omlaag-toets om on-
derstaande opties te kiezen.
MicroSD-kaartsleuf
• MicroSD-kaart (compatibel met 8GB tot 32GB, we een
klasse 10 SD-kaart of hoger aan te bevelen)
Scherm
Vermogen / GPS / Aansluiting voor achteruitrijcamera
Afstandsbediening / aansluiting voor de frontcamera
Besturingseenheid: schroefdraadaansluiting voor stuurhouder
Spreker
Overzicht
6
7
8
9
10
11
12
13
Fotoknop
Microfoon
• Druk kort op om de microfoon aan/uit te zetten
Vergrendelbestand
• Druk kort om het bestand te vergrendelen, druk kort om
normale video op te nemen
Afstandsbediening
65
2
1
3
4
9 10
7
8
11 12
13
Zonder illustratie:
• LaaGPSanningskabel voor de motorfiets
• USB-stroomkabel

25
1
2
3
4
5
Geheugenkaart
• De geheugenkaart is niet bij de levering inbegrepen; u moet
een extra geheugenkaart aanschaffen. Gebruik alleen Mi-
croSD-kaarten van de snelheidsklasse 10 of de videosnelheids-
klasse V10 of hoger.
• Gebruik een geheugenkaart met een formaat tussen 8 GB tot
32 GB.
• Formatteer de MicroSD-kaart voor gebruik met FAT32.
Opmerking: Als u formatteert, wordt de volledige inhoud
van de SD-kaart verwijderd, maak dan een back-up van uw
bestanden.
Plaats de SD-kaart
Zorg ervoor dat de camera is uitge-
schakeld en dat de kaart correct is
geplaatst door de kaart in de sleuf
te duwen totdat u een klik hoort.
Verwijderen van SD-kaart
Zorg ervoor dat de camera is
uitgeschakeld, schuif de kaart in de
kaartsleuf totdat u een klik voelt,
dan kunt u de MicroSD-kaart veilig
verwijderen.
Opmerkingen:
1. Laat de geheugenkaart pas los als
u deze volledig hebt verwijderd.
2. Formatteer uw geheugenkaart regelmatig geformatteerd.
Wij raden u aan één keer per maand.
3. Als u een MicroSD-kaart verwijdert of plaatst wanneer u de
stroom inschakelt, kunnen uw gegevens of het toestel
beschadigd raken.
Aansluitingen
1. USB-aansluiting voor voedingskabel
Voordat u de camera op een motorfiets installeert, kunt u de
camera met behulp van het USB-voedingskabel op een stroom-
bron aansluiten voor gebruik.
Opmerking
• Voedingseenheid of vermogensbank vereisen een 5V / 2,0 A-
uitgang.
• Houd er rekening mee dat als de Powerbank laag is, de camera
niet normaal zal starten.
• Als de camera is aangesloten op de USB-stroomkabel, werkt de
GPS-ontvanger alleen als er voldoende stroom is.
1
2
3
4
5
Rood (stroom)
Zwart (GPS-interface)
Blauw (achterste camera)
Geel (afstandsbediening)
Groen (frontcamera)

26
Voorkant
Beugel
M1 Motorfiets Dashcam
Louis Editie
Achteraan
Aansluiten
op de batterij
(bokkenlijn)
Благодаря фотографиям: KTM Sportmotorcycle Germany GmbH
DUTCH
Aansluitmethode voor stroom- en GPS-aansluitkabels
Stroomkabel
GPS-kabel
Aansluiting van de voeding
De installatie kan op verschillende motoren verschillend zijn.
Neem voor uw eigen veiligheid contact op met uw lokale dealer.
Let op
• Dit is slechts een voorbeeld. Gelieve de installatiemethode aan
te passen aan uw eigen motormodel.
• Als u extra accessoires (verlengkabel, extra onderdelen) wilt
aanschaffen, neem dan contact op met uw lokale dealer.
• Nadat u zich ervan heeft vergewist dat het aantal aansluitingen
en de toewijzing correct zijn, dient u ervoor te zorgen dat de
kabel en de connector volledig zijn aangesloten.
Schermweergave tijdens de opname
Videomodus
Opnametijd
Videoresolutie
Opladen/Capaciteit
App Aansluiting
wifidisplay
MicroSD-kaartdisplay
GPS-scherm
Klok
Datum
Microfoon
1
2
3
4
5
6
7
8
9
10
11
5
11
6
7
1 2 3 4
8910
Aansluiten van motorvoedingskabels
Positieve pool (ACC)
Negatieve pool (GND)

27
Veiligheidsinstructies
1. Dit product moet op de juiste manier worden geïnstalleerd zon-
der het zicht van de bestuurder of de functie van het voertuig
te belemmeren. Doet u dit niet, dan kan dit leiden tot ongeluk-
ken en verwondingen.
2. Houd de camera uit de buurt van sterke magnetische velden,
omdat dit het product kan beschadigen.
3. Ontkoppel de stroomtoevoer niet en plaats of verwijder de
geheugenkaart niet tijdens het formatteren en gebruiken, om-
dat dit de kaart kan beschadigen of een programmafout kan
veroorzaken.
4. De geheugenkaart in deze camera is niet ontworpen om
andere bestanden op te slaan. Formatteer de geheugenkaart
voordat u deze gebruikt en maak een back-up van belangrijke
films, foto‘s en andere bestanden.
5. Om een elektrische schok te voorkomen, mag u de stekker niet
met natte handen in de camera steken of eruit halen.
6. Gebruik dit product niet op plaatsen met een hoge vochtig-
heidsgraad of temperaturen boven 60°C of onder -20°C.
7. Gebruik alleen de meegeleverde voedingskabel en accessoires
die compatibel zijn met dit product.
8. Gebruik een klasse 10 geheugenkaart van 8 GB of groter.
Verwijdering
Gooi de verpakking weg volgens het type. Gebruik de lo-
kale mogelijkheden om papier, karton en andere materia-
len in te zamelen. (Van toepassing in de Europese Unie en
andere Europese landen met systemen voor de gescheiden
inzameling van recycleerbare materialen)
Apparaten die met dit symbool zijn gemarkeerd, mogen
niet bij het huisvuil worden weggegooid! U bent wettelijk
verplicht om oude apparaten gescheiden van het huisvuil
af te voeren. Informatie over inzamelpunten waar oude
apparaten gratis worden geaccepteerd, kunt u opvragen
bij uw gemeente of gemeente.
Conformiteit
Bij dezen wordt Rollei GmbH & Co. KG verklaart dat het radio-
systeem type „Rollei M1 Motorrad-Dashcam Louis Edition“
voldoet aan de richtlijn 2014/53/EU:
2011/65/EU RoHS-richtlijn
2014/53/EU RED-richtlijn
De volledige tekst van de EU-conformiteitsverklaring kan worden
gedownload op het volgende internetadres:
www.rollei.com/egk/m1motorraddashcam-louisedition
Menu-instellingen
• Filmcliptijd: 1/2 minuut
• Piep: Aan/uit
• Geluidsopname: Aan/uit
• De klok instellen: Instellen van de datum
• Taal: Duits / Engels / Frans / Spaans / Italiaans / Nederlands /
Russisch / Pools
• Flikkering: 50 Hz / 60 Hz
• LCD-energiebesparingsmodus: Uit / 1 min / 3 min
• Beschermingsniveau: uit / hoog / gemiddeld / laag
• gps-status
• Tijdzone
• Reset-instelling
• Formaat SD-kaart
• FW-versie
WiFi-connectie/app
1. Download de Rollei Dashcam app van de Google Play Store
voor de Android versie en de App Store voor de iOS versie.
2. Sluit uw smartphone aan op het WLAN „Rollei-M1-xxxxxx“.
3. Voer het wachtwoord in, het standaard wachtwoord is
„1234567890“. Open na een succesvolle verbinding de app en
voeg het apparaat toe.
Technische gegevens
M1 Motorcycle Dashcam Louis Edition
Beeldsensor CMOS 1/2,9“, resolutie 2,12 MP
Resolutie 1080P
Opnamemodi Loop opname 1 of 2 minuten
Lens Groothoeklens
Weergave 3“ IPS-Display
Geheugen Slot voor microSD-kaarten tot SDHC
32 GB (klasse 10 of hoger)
Gegevensformaat Foto: JPG / Video: TS
Aansluitingen Besturingseenheid: schroefdraadaan-
sluiting voor stuurhouder
Afstandsbediening Inbegrepen
Beschermklasse Camera weerbestendig volgens IP67,
besturingseenheid weerbestendig
volgens IP65
Omgevingstemperatuur –20 tot +60 °C
Voeding DC 12 / 24 V
Afmetingen / Gewicht Voor- en achtercamera: 4,5 x 2,5 cm / 33 g
Controle-eenheid: 10,8 x 5,9 x 2,1 cm / 131 g

28
RUSSIAN
Перед первым использованием
Перед первым использованием прибора внимательно
прочитайте инструкцию по эксплуатации и указания по
технике безопасности.
Сохраните инструкцию по эксплуатации вместе с прибором для
дальнейшего использования Если устройство используется
другими людьми, предоставьте им это руководство Если Вы
продаете устройство, то данное руководство является составной
частью устройства и должно поставляться вместе с ним
Пояснения к символам
Следующие символы используются в данном руководстве, на
светодиодной подсветке, блоке питания или на упаковке
Изделия, обозначенные этим символом, соответствуют
всем соответствующим правилам Европейского
экономического пространства
Изделия, маркированные этим символом, работают на
постоянном токе
1
2
3
4
5
кнопка ОК
• Вкл/выкл / начало/остановка записи
Кнопка меню:
• Режим видео: Кратко нажмите для входа в меню настроек
• Режим воспроизведения: Нажмите и удерживайте кнопку
примерно 3 секунды для отображения меню настроек
воспроизведения
Кнопка вверх
• В режиме видео нажмите кнопку вверх, чтобы изменить
изображение с выбранной камеры на экране
• В меню настроек нажмите клавишу вверх для выбора
опций выше
Кнопка вниз
• В режиме видеосъемки нажмите клавишу вниз, чтобы
сделать снимок
• В меню настроек нажмите клавишу вниз для выбора опций
ниже
Слот для MicroSD карты
• Карта MicroSD (совместима с 8 Гб до 32 Гб, мы
рекомендуем карту SD класса 10 или выше)
Показать
Питание / GPS / Подключение для задней камеры
Пульт дистанционного управления /
подключение для передней камеры
Блок управления: резьбовое соединение для кронштейна руля
Спикер
Обзор
6
7
8
9
10
11
12
13
Кнопка фото
Микрофон
• Нажмите коротко, чтобы включить/выключить микрофон
Блокировочный файл
• Нажмите кнопку кратко, чтобы заблокировать файл,
нажмите кнопку кратко, чтобы записать обычное видео
Дистанционное управление
65
2
1
3
4
9 10
7
8
11 12
13
Без иллюстраций:
• Низковольтный кабель для мотоцикла
• кабель питания USB

29
1
2
3
4
5
Карта памяти
• Карта памяти не входит в комплект поставки; необходимо
приобрести дополнительную карту памяти Пожалуйста,
используйте только карты MicroSD класса скорости 10 или
видео класса скорости V10 или выше
• Пожалуйста, используйте карту памяти размером от
8 ГБ до 32 ГБ
• Пожалуйста, отформатируйте карту MicroSD с помощью FAT32
перед использованием
Примечание: При форматировании удалите все содержимое
SD-карты и создайте резервную копию файлов
Вставьте карту памяти SD
Убедитесь, что камера выключена
и карта вставлена правильно,
вставив карту в слот до щелчка
Извлечение SD-карты
Убедитесь, что камера выключена,
вставьте карту в слот для карт, пока
вы не почувствуете щелчок, то вы
можете безопасно извлечь MicroSD
карты
Примечания:
1 Не отпускайте карту памяти, пока не
извлечете ее полностью
2 Регулярно форматируйте карту памяти Рекомендуется делать
это один раз в месяц
3 Если вы извлечете или вставите карту памяти MicroSD при
включении питания, это может привести к повреждению данных
или камеры
Подключения
1. USB-разъём для кабеля питания
Перед установкой камеры на мотоцикл можно подключить
камеру к источнику питания для работы с помощью кабеля
питания USB
Примечание
• Блок питания или блок питания требуют выхода 5 В / 2,0 А
• Пожалуйста, обратите внимание, что если Powerbank
находится на низком уровне, камера не запускается
нормально
• Если камера подключена к USB-кабелю питания, GPS-
приемник будет работать только при наличии достаточной
мощности
1
2
3
4
5
Красный (питание)
Черный (GPS-интерфейс)
Синий (задняя камера)
Жёлтый (пульт дистанционного управления)
Зеленый (передняя камера)

30
Фронт
Кронштейн
Приборная панель мотоцикла M1
луисское издание
Задний
Подключите к
аккумулятору
(линия расп-
рямления)
Met dank aan de foto‘s: KTM Sportmotorcycle Duitsland GmbH
RUSSIAN
Способ подключения кабелей питания и GPS
Кабель питания
кабель GPS
Подключение источника питания
Установка может быть разной на разных мотоциклах Для Вашей
собственной безопасности, пожалуйста, свяжитесь с Вашим
местным дилером
Примечание
• Это только пример Пожалуйста, адаптируйте способ установки
к вашей собственной модели мотоцикла
• Если Вы хотите приобрести дополнительные принадлежности
(удлинительный кабель, дополнительные детали), пожалуйста,
свяжитесь с Вашим местным дилером
• Убедившись в правильности количества подключений и
назначения, убедитесь в том, что кабель и разъем подключены
полностью
Экранный дисплей во время записи
Режим видео
Время записи
Разрешение видео
Зарядка/емкость
Подключение приложений
WiFi-дисплей
Дисплей карты MicroSD
дисплей GPS
Часы
Дата
Микрофон
1
2
3
4
5
6
7
8
9
10
11
5
11
6
7
1 2 3 4
8910
Подключение силовых кабелей мотоциклов
Положительный полюс (ACC)
Отрицательный полюс
(Отрицательный полюс)

31
Настройки меню
• Время видеоклипа: 1/2 минуты
• Бип: Вкл/Выкл
• Звукозапись: Вкл/Выкл
• Настройка часов: Установка даты
• Язык: Немецкий / Английский / Французский / Испанский /
Итальянский / Голландский / Русский / Польский
• Мерцание: 50 Гц / 60 Гц
• Режим энергосбережения ЖК-дисплея: Off / 1 мин / 3 мин
• Уровень защиты: выкл / высокая / средняя / низкая
• GPS-статус
• Часовой пояс
• Сброс настроек
• Формат SD карты
• FW версия
WiFi-соединение/app
1 Пожалуйста, загрузите приложение Rollei Dashcam из Google
Play Store для версии Android и App Store для версии iOS
2 Подключите ваш смартфон к WLAN „Rollei-M1-xxxx“
3 Введите пароль, пароль по умолчанию „1234567890“
После успешного подключения откройте приложение и
добавьте устройство
Правила техники безопасности
1 Данное изделие должно быть установлено надлежащим
образом, не мешая обзору водителя или работе транспортного
средства Также обеспечьте стабильную установку
Несоблюдение этого требования может привести к несчастным
случаям и травмам
2 Держите камеру подальше от сильных магнитных полей, так
как это может привести к повреждению устройства
3 Не отсоединяйте питание, не вставляйте и не извлекайте карту
памяти во время форматирования и использования, так как
это может привести к повреждению карты или программной
ошибке
4 Карта памяти в данной фотокамере не предназначена
для хранения других файлов Перед использованием
отформатируйте карту памяти и создайте резервные копии
важных видеороликов, изображений и других файлов
5 Во избежание поражения электрическим током не вставляйте и
не вынимайте штекер питания мокрыми руками
6 Не используйте данное устройство в местах с высокой
влажностью или температурой выше 60°C или ниже -20°C
7 Используйте только входящий в комплект поставки кабель
питания и аксессуары, совместимые с данным изделием
8 Используйте карту памяти класса 10 емкостью 8 ГБ и выше
Утилизация
Утилизируйте упаковку в соответствии с ее
типом. Используйте местные возможности для сбора
бумаги, картона и других материалов (Применяется
в Европейском Союзе и других европейских странах с
системами раздельного сбора вторсырья)
Устройства, обозначенные этим символом, нельзя
выбрасывать вместе с бытовыми отходами! YoВы
обязаны по закону утилизировать старые приборы
отдельно от бытовых отходов Информацию о пунктах
приема, которые бесплатно принимают старые приборы,
можно получить в местном или городском управлении
Соответствие
Компания Rollei GmbH & Co KG заявляет, что радиосистема
типа „Rollei M1 Motorrad-Dashcam Louis Edition“ соответствует
директиве 2014/53/EU:
2011/65/EU Директива RoHS
2014/53/ЕС Директива RED
Полный текст Декларации ЕС о Соответствие
можно скачать по следующему адресу в Интернете:
wwwrolleicom/egk/m1motorraddashcam-louisedition
Технические характеристики
M1 Motorcycle Dashcam Louis Edition
Датчик изображения CMOS 1/29“, разрешение 212 MP
Резолюция 1080P
Режимы записи Цикл записи 1 или 2 минуты
Объектив Широкоугольный объектив
Дисплей 3“ IPS-дисплей
Память Слот для карт памяти microSD до SDHC
32 Гб (класса 10 и выше)
Формат данных Фото: JPG / видео: TS
Соединения Блок управления: резьбовое соединение
для кронштейна руля
Дистанционное
управление Включено
Степень защиты Камера погодостойкая в соответствии с
IP67, блок управления погодостойкий в
соответствии с IP65
Температура
oкружающей среды –20 до +60 °C
Источник питания DC 12 / 24 В
Размеры / Вес Передняя и задняя камеры: 4,5 x 2,5 см /
33 гр | Блок управления: 10,8 x 5,9 x
2,1 см / 131 г

32
POLISH
Przed pierwszym użyciem
Przed pierwszym użyciem urządzenia należy dokładnie zapoznać
się z instrukcją obsługi i instrukcją bezpieczeństwa.
Instrukcję obsługi należy zachować razem z urządzeniem do
wykorzystania w przyszłości Jeżeli inne osoby będą używać tego
urządzenia, należy udostępnić im tę instrukcję W przypadku
sprzedaży urządzenia, niniejsza instrukcja jest częścią składową
urządzenia i musi być do niego dołączona
Objaśnienie symboli
W niniejszej instrukcji, na diodach LED, na zasilaczu lub na opakowa-
niu używane są następujące symbole
Produkty oznaczone tym symbolem są zgodne ze wszystki-
mi odpowiednimi przepisami wspólnotowymi Europejskiego
Obszaru Gospodarczego
Produkty oznaczone tym symbolem są zasilane prądem
stałym
1
2
3
4
5
Przycisk OK
• Włącznik/wyłącznik /nagrywanie start/stop
Przycisk menu:
• Tryb wideo: Naciśnij krótko, aby wejść do menu ustawień
• Tryb odtwarzania: Nacisnąć i przytrzymać przycisk przez około
3 sekundy, aby wyświetlić menu ustawień odtwarzania
Guzik w górę
• W trybie wideo, naciśnij przycisk w górę, aby zmienić wybrany
obraz z kamery na ekranie
• W menu ustawień, naciśnij przycisk w górę, aby wybrać
powyższe opcje
Przycisk w dół
• W trybie wideo, naciśnij przycisk w dół, aby zrobić zdjęcie
• W menu ustawień, naciśnij przycisk w dół, aby wybrać opcje
poniżej
Gniazdo kart microSD
• Karta MicroSD (kompatybilna z 8 GB do 32 GB, my polecam
kartę SD klasy 10 lub wyższej)
Wyświetlacz
Zasilanie / GPS / Przyłącze dla tylnej kamery
Pilot zdalnego sterowania / podłączenie do przedniej kamery
Jednostka sterująca: połączenie gwintowane do wspornika
kierownicy
Mówca
Przegląd
6
7
8
9
10
11
12
13
Przycisk fotografowania
Mikrofon
• Krótko naciśnij, aby włączyć/wyłączyć mikrofon
Akta blokady
• Naciśnij krótko, aby zablokować plik, naciśnij krótko, aby
nagrać normalne wideo
Pilot zdalnego sterowania
65
2
1
3
4
9 10
7
8
11 12
13
Bez ilustracji:
• Przewód niskiego napięcia do motocykla
• Kabel zasilający USB

33
1
2
3
4
5
Karta pamięci
• Karta pamięci nie wchodzi w zakres dostawy; należy zakupić
dodatkową kartę pamięci Proszę używać tylko kart MicroSD o
klasie prędkości 10 lub wideo klasy prędkości V10 lub wyższej
• Proszę używać karty pamięci o rozmiarze pomiędzy 8 GB
do 32 GB
• Proszę sformatować kartę MicroSD z FAT32 przed użyciem
Uwaga: Podczas formatowania, cała zawartość karty SD została
usunięta, proszę wykonać kopię zapasową plików
Włóż kartę SD
Upewnij się, że kamera jest
wyłączona, a karta jest włożona
prawidłowo, wsuwając ją do gniazda
aż do usłyszenia kliknięcia
Wyjmowanie karty SD
Upewnij się, że aparat jest wyłączony,
wsuń kartę do gniazda karty, aż poc-
zujesz kliknięcie, następnie możesz
bezpiecznie wyjąć kartę MicroSD
Notatki:
1 Nie zwalniaj karty pamięci, dopóki
nie zostanie ona całkowicie wyjęta
2 Regularnie formatuj swoją kartę pamięci
Zalecamy raz w miesiącu
3 Wyjęcie lub włożenie karty pamięci MicroSD podczas włączania
zasilania może spowodować uszkodzenie danych lub aparatu
Połączenia
1. Złącze USB dla kabla zasilającego
Przed zainstalowaniem kamery na motocyklu można podłączyć
ją do źródła zasilania w celu pracy za pomocą kabla zasilającego
USB
Uwaga
• Zasilacz lub bank zasilający wymaga wyjścia 5V / 2,0 A
• Należy pamiętać, że jeśli Powerbank jest niski, aparat nie uruchomi
się normalnie
• Jeśli aparat jest podłączony do kabla zasilającego USB, odbiornik
GPS będzie działał tylko wtedy, gdy będzie miał wystarczającą ilość
prądu
1
2
3
4
5
Czerwony (zasilanie)
Czarny (interfejs GPS)
Niebieski (tylna kamera)
Żółty (pilot zdalnego sterowania)
Zielony (przednia kamera)

34
Przód
Uchwyt
M1 Motorcycle Dashcam
wydanie Louis
Z tyłu
Podłączenie do
akumulatora (linia
kubełkowa)
Dzięki za zdjęcia: KTM Sportmotorcycle Germany GmbH
POLISH
Sposób podłączenia kabli zasilających i połączeń GPS
Przewód zasilający
Kabel GPS
Podłączenie zasilania
Instalacja może być różna na różnych motocyklach Dla własnego
bezpieczeństwa, prosimy o kontakt z lokalnym sprzedawcą
Uwaga
• To tylko przykład Proszę dostosować metodę instalacji do
własnego modelu motocykla
• Jeśli chcą Państwo zakupić dodatkowe akcesoria (przedłużacz,
dodatkowe części), prosimy o kontakt z lokalnym sprzedawcą
• Po upewnieniu się, że liczba połączeń i przyporządkowanie są
prawidłowe, należy upewnić się, że kabel i złącze są w pełni
podłączone
Wyświetlanie ekranu podczas nagrywania
Tryb wideo
Czas nagrywania
Rozdzielczość wideo
Ładunek/Pojemność
Podłączenie aplikacji
Wyświetlacz WiFi
Wyświetlacz karty MicroSD
Wystawa GPS
Zegar
Data
Mikrofon
1
2
3
4
5
6
7
8
9
10
11
5
11
6
7
1 2 3 4
8910
Podłączanie kabli zasilających do motocykli
Biegun dodatni (ACC)
Biegun ujemny (GND)

35
Ustawienia menu
• Czas klipu lmowego: 1/2 minuty
• Bip: On/Off
• Nagranie dźwiękowe: Włączanie/wyłączanie
• Ustawianie zegara: Ustawianie daty
• Język: Niemiecki / Angielski / Francuski / Hiszpański / Włoski /
Holenderski / Rosyjski / Polski
• Miganie: 50 Hz / 60 Hz
• Tryb oszczędzania energii LCD: Wyłączony / 1 min / 3 min
• Poziom ochrony: wyłączony / wysoki / średni / niski
• Status GPS
• Strefa czasowa
• Ustawienia resetowania
• Format karty SD
• Wersja FW
Połączenie WiFi/aplikacja
1 Proszę pobrać aplikację Rollei Dashcam z Google Play Store dla
wersji Android i App Store dla wersji iOS
2 Podłączyć smartfon do sieci WLAN „Rollei-M1-xxxx
3 Wprowadzić hasło, domyślne hasło to „1234567890“
Po udanym połączeniu, otwórz aplikację i dodaj urządzenie
Instrukcje bezpieczeństwa
1 Produkt ten musi być prawidłowo zamontowany, nie zasłaniając
kierowcy widoku ani funkcji pojazdu Należy również zapewnić
stabilną instalację Niezastosowanie się do tego wymogu może
prowadzić do wypadków i obrażeń ciała
2 Trzymaj kamerę z dala od silnych pól magnetycznych, ponieważ
może to spowodować uszkodzenie produktu
3 Nie odłączać zasilania, nie wkładać ani nie wyjmować karty
pamięci podczas formatowania i użytkowania, ponieważ może to
spowodować uszkodzenie karty lub błąd programu
4 Karta pamięci w tym aparacie nie jest przeznaczona do przecho-
wywania innych plików Przed użyciem należy sformatować kartę
pamięci i wykonać kopię zapasową ważnych lmów, zdjęć i innych
plików
5 Aby uniknąć porażenia prądem, nie należy wkładać ani wyjmować
wtyczki zasilania mokrymi rękoma
6 Nie należy używać tego produktu w miejscach o wysokiej
wilgotności lub temperaturze powyżej 60°C lub poniżej -20°C
7 Używać wyłącznie dostarczonego kabla zasilającego i akcesoriów
kompatybilnych z tym produktem 6 Nie używać tego produktu w
miejscach o wysokiej wilgotności lub temperaturze powyżej 60°C
lub poniżej -20°C
8 Używać karty pamięci klasy 10 o pojemności 8 GB lub większej
Utylizacja
Opakowanie należy utylizować zgodnie z jego rodzajem.
Wykorzystaj lokalne możliwości zbierania papieru, kartonu i
innych materiałów (Stosowane w Unii Europejskiej i innych
krajach europejskich posiadających systemy selektywnej
zbiórki materiałów nadających się do recyklingu)
Urządzenia oznaczone tym symbolem nie mogą być wyr-
zucane razem z odpadami domowymi! Stare urządzenia
są prawnie zobowiązane do oddzielnej utylizacji od odpadów
domowych Informacje o punktach zbiórki, które nieodpłatnie
przyjmują stare urządzenia, można uzyskać w urzędzie
miasta lub gminy
Zgodność z przepisami
Herewith Rollei GmbH & Co KG oświadcza, że system radiowy typu
„Rollei M1 Motorrad-Dashcam Louis Edition“ jest zgodny z dyrektywą
2014/53/UE:
Dyrektywą 2011/65/UE RoHS
Dyrektywa 2014/53/UE RED
Pełny tekst deklaracji UE z dnia
Zgodność można pobrać pod następującym adresem internetowym:
wwwrolleicom/egk/m1motorraddashcam-louisedition
Specykacje techniczne
M1 Motorcycle Dashcam Louis Edition
Czujnik obrazu CMOS 1/2,9“, rozdzielczość 2,12 MP
Uchwała 1080P
Tryby nagrywania Nagrywanie w pętli 1 lub 2 minuty
Lens Soczewka szerokokątna
Wyświetlacz Wyświetlacz 3“ IPS
Pamięć Gniazdo dla kart microSD do SDHC
32 GB (klasa 10 lub wyższa)
Format danych Zdjęcie: JPG / video: TS
Połączenia Jednostka sterująca: połączenie
gwintowane do wspornika kierownicy
Pilot zdalnego sterowania Włącznie z
Klasa ochrony Odporność kamery na warunki
atmosferyczne zgodnie z IP67,
jednostki sterującej na warunki
atmosferyczne zgodnie z IP65
Temperatura otoczenia –20 do +60 °C
Zasilanie DC 12 / 24 V
Wymiary / Waga Przednia i tylna kamera: 4,5 x 2,5 cm | 33 g
Jednostka sterująca: 10,8 x 5,9 x 2,1 cm / 131 g

www.rollei.com
Rollei GmbH & Co. KG
In de Tarpen 42
22848 Norderstedt
Service Hotline:
+49 40 270750277
@rollei_de
/rollei.foto.de
-
 1
1
-
 2
2
-
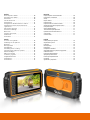 3
3
-
 4
4
-
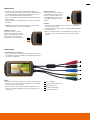 5
5
-
 6
6
-
 7
7
-
 8
8
-
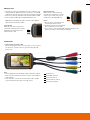 9
9
-
 10
10
-
 11
11
-
 12
12
-
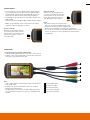 13
13
-
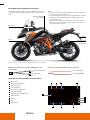 14
14
-
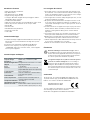 15
15
-
 16
16
-
 17
17
-
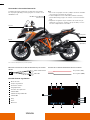 18
18
-
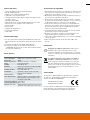 19
19
-
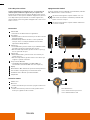 20
20
-
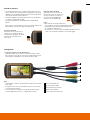 21
21
-
 22
22
-
 23
23
-
 24
24
-
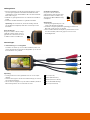 25
25
-
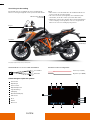 26
26
-
 27
27
-
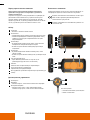 28
28
-
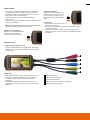 29
29
-
 30
30
-
 31
31
-
 32
32
-
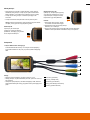 33
33
-
 34
34
-
 35
35
-
 36
36


Rollei Dashcam M1 El manual del propietario
- Tipo
- El manual del propietario
en otros idiomas
- français: Rollei Dashcam M1 Le manuel du propriétaire
- italiano: Rollei Dashcam M1 Manuale del proprietario
- Deutsch: Rollei Dashcam M1 Bedienungsanleitung
- polski: Rollei Dashcam M1 Instrukcja obsługi
Artículos relacionados
Otros documentos
-
 Mr Handsfree Dashcam 1080P HD DC-100 El manual del propietario
-
iON DashCam Guía de inicio rápido
-
 ROAV C1- R2110 El manual del propietario
-
Quintezz HD 720P Manual de usuario
-
LED s light 1000503 Manual de usuario
-
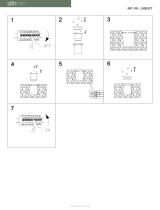 LED s light 1000527 Ground Light Manual de usuario
-
-
AKASO Trace 1 Pro Dual Lens Car Dash Camera, 2K Dash Cam WiFi Manual de usuario
-
VAVA VA-VD002 Manual de usuario
-
iON DashCam Wi-Fi Manual de usuario


