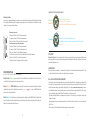
Bell & Ross BR V2-92 AERONAVALE Instrucciones de operación
- Categoría
- Relojes
- Tipo
- Instrucciones de operación

www.bellross.com
BR-CAL.302 - AUTOMATIC
BR-CAL.301
- CHRONOGRAPH
BR-CAL.303 - GMT 24H

Notice Technique
Technical Notes
Technische Anweisung
Noticia Técnica
Istruzioni Tecniche
Technische informatie
Instruções Técnicas
2
6
10
14
18
22
26
30
34
38
42

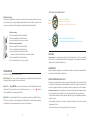
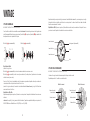
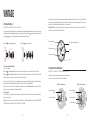
UTILISATION DU CRHONOGRAPHE
MOUVEMENTS AUTOMATIQUES BRCAL.301
La fonction Chronographe permet la mesure d’un temps en minutes et secondes.
Selon les modèles le cadran af che 2 ou 3 compteurs
UTILISATION GÉNÉRALE
MOUVEMENTS AUTOMATIQUES BRCAL.301/302/303
Nos modèles sont équipés de couronne vissée ou non-vissée. ATTENTION : une fois un réglage terminé et pour garantir une par-
faite étanchéité, repousser la couronne jusqu’à la position 1 (modèle type ) ou jusqu’à la position 0 a n de la revisser (modèle
type ). La couronne et les poussoirs ne doivent jamais être manipulés sous l’eau.
Modèle type (couronne vissée)
Modèle type (couronne NON vissée)
Mise en service
Lorsque la montre est arrêtée
.
Modèle type (couronne NON vissée) : remonter le mécanisme en tournant la couronne dans le sens des aiguilles d’une
montre.
Modèle type (couronne vissée) : dévisser la couronne (sens inverse des aiguilles d’une montre) jusqu’à la position 1, puis
remonter le mécanisme en tournant la couronne (sens des aiguilles d’une montre). Après environ 40 rotations, la montre est
complètement remontée (le mécanisme ne possède pas de butoir a n d’éviter une surtension du remontoir). L’autonomie de
fonctionnement est alors de 40h environ.
Lorsque la montre est portée
, c’est l’automatisme qui remonte le mouvement. Réserve de marche : les montres Bell & Ross
ont une réserve de marche d’environ 40h.
Réglage de la date
Réglage rapide
(couronne en position 2) : tirer la couronne jusqu’à la position 2 et régler la date en tournant la couronne dans
le sens inverse des aiguilles d’une montre.
ATTENTION : comme pour toutes les montres mécaniques dotées d’un calendrier, le réglage rapide de la date (couronne en posi-
tion 2) NE DOIT EN AUCUN CAS être effectué entre 21.00h (9 P.M.) et 3.00 h (3 A.M.).
Réglage lent
(couronne en position 3) : a n d’assurer un changement de date à minuit et non à midi, il est conseillé d’effectuer
le réglage de la date à l’aide des aiguilles horaires. Tirer la couronne jusqu’à la position3 et tourner les aiguilles jusqu’au
changement de date. Régler ensuite l’heure précisément.
Réglage de l’heure (couronne en position 3) : l’aiguille des secondes est alors arrêtée, ce qui permet un réglage à la
seconde près. Régler l’heure en tournant la couronne dans le sens souhaité.
2 3
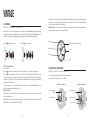
VINTAGE
P1
A
B
F
E
D
C
D
H
GP2
I
123
0 1 32
0 1 32
P1
P2
P1
A
B
F
E
D
C
D
H
GP2
I
123
0 1 32
0 1 32
P1
P2
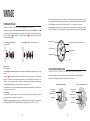
Modèle 3 compteurs
P1
A
B
F
E
D
C
D
H
GP2
I
123
0 1 32
0 1 32
P1
P2
P1
A
B
F
E
D
C
D
H
GP2
I
123
0 1 32
0 1 32
P1
P2
Modèles 2 compteurs
Compteur des
secondes
(trotteuse)
Compteur des
secondes
(trotteuse)
Compteur des minutes Compteur des minutes
Compteur des heures
Aiguille des minutes
Aiguille des heures
Aiguille des secondes
Date
Couronne
Lunette tournante (sur certains modèles)

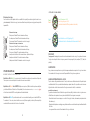
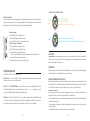
UTILISATION DU GMT-24H
MOUVEMENTS AUTOMATIQUES BRCAL.303
Réglage de l’heure : Fuseau 1 (couronne en position 3). L’aiguille des secondes est alors arrêtée ce qui permet un réglage
à la seconde près. Régler l’heure en tournant la couronne dans le sens souhaité.
Réglage du Fuseau 2 - Aiguille GMT-24H (couronne en position 2) : Placer la lunette en position neutre (triangle de la
lunette en face de l’index 12h du cadran). Tourner la couronne dans le sens des aiguilles d’une montre (voir schéma modèle type
p.2) a n de caler l’aiguille GMT-24H sur la graduation souhaitée de la lunette.
Réglage du Fuseau 3.Un 3e fuseau horaire peut être af ché à l’aide de la lunette tournante et de l’aiguille GMT-24H. Pour
af cher le 3e fuseau horaire, tournez la lunette dans le sens horaire (décalage négatif) ou antihoraire (décalage positif) selon
le décalage existant entre l’heure locale et le fuseau désiré.
-12
-12
Fuseau 1 : il est 10H10 à Genève
Fuseau 2 : il est 16H10 à Hong Kong
(heure indiquée par l’aiguille GMT sur la graduation de la lunette)
Fuseau 3 : il est 04H10 à New York (Hong Kong -12)
(L’indication du Fuseau 3 s’obtient en fonction du décalage horaire avec le Fuseau 2)
Fuseau 1
Fuseau 2
Fuseau 3
LECTURE DE 3 FUSEAUX HORAIRES : EXEMPLE
IMPORTANT
Champs magnétiques. Les champs magnétiques peuvent altérer la bonne marche de votre montre. Aussi, nous vous conseil-
lons d’éviter de placer votre montre à proximité des appareils électroniques qui peuvent générer des champs magnétiques
importants (radio, smartphone, téléviseur, ordinateur, tablette, enceintes acoustiques…).
ENTRETIEN
Après chaque immersion dans l’eau de mer, il est conseillé de rincer soigneusement la montre et son bracelet avec de l’eau
douce. Il est également recommandé de réviser l’étanchéité de votre montre tous les deux ans.
GARANTIE INTERNATIONALE BELL & ROSS
Pour béné cier de votre garantie internationale de 2 ans, votre carte doit être activée au moment de l’achat par votre point de
vente agréé Bell & Ross et systématiquement présentée pour toute intervention. Vous pouvez désormais accéder à la version
digitale de cette carte ainsi qu’à toutes les informations concernant votre montre en scannant le QR code ou en vous connectant
sur : www.bellross.com/warranty. A n de garantir un service conforme aux exigences de la marque, toute intervention sur
votre montre doit être effectuée par le centre de réparation ou un horloger agréés Bell&Ross. La garantie exclut toutefois :
. Les dommages qui résultent d’accidents ou d’un usage impropre ou abusif de la montre (choc violent, écrasement, manipu-
lations brutales du fermoir...).
. Les dommages qui résultent de réparations ou démontages non effectués par un revendeur ou un centre de service après-
vente agréés Bell & Ross.
. Les conséquences de l’usage normal et du vieillissement de la montre et du bracelet.
4 5
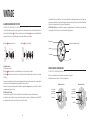
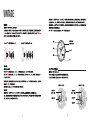
Mesure d’un temps
Nos modèles sont dotés de poussoirs vissés ou non-vissés. Dévisser les poussoirs (sens inverse des aiguilles d’une montre)
avant de déclencher le chronographe. ATTENTION : après toute utilisation du chronographe, revisser les poussoirs sur certains
modèles (sens des aiguilles d’une montre), a n de garantir une parfaite étanchéité.
Mesure d’un temps
1re pression Poussoir P1 : déclenche la mesure du temps.
2e pression Poussoir P1 : stoppe la mesure du temps.
3e pression Poussoir P2 : remise à zéro et arrêt du chronographe.
Mesure d’un temps avec interruption
1re pression Poussoir P1 : déclenche la mesure du temps.
2e pression Poussoir P1 : stoppe la mesure du temps.
3e pression Poussoir P1 : relance la mesure du temps.
Ceci permet de soustraire au temps total chronométré un ou plusieurs intervalles de temps.
4e pression Poussoir P1: stoppe la mesure du temps.
5e pression PoussoirP2: remise à zéro et arrêt du chronographe.
P1
A
B
F
E
D
C
D
H
GP2
I
123
0 1 32
0 1 32
P1
P2

USING THE CHRONOGRAPH
BRCAL.301 SELFWINDING CHRONOGRAPH MOVEMENTS
The chronograph function can measure time in minutes and seconds.
The dial features 2 or 3 counters, depending on the model
GENERAL USE
BRCAL.301/302/303 SELFWINDING MOVEMENTS
Our models are equipped with a crown (either screw-down or non screw-down). NOTE: Once the watch is set, to ensure perfect
water resistance, push the crown back to position 1 (type model) or to position 0 to screw it back in place (type model).
The crown and pushers must never be operated underwater.
Type model (screw-down crown)
Type model (NON screw-down crown)
Starting the watch
Once the watch has been stopped
.
Type model (NON screw-down crown): wind the movement by rotating the crown clockwise.
Type model (screw-down crown): unscrew the crown (rotate anticlockwise) to position 1. Wind the mechanism by rotating
the crown (clockwise). After approximately 40 rotations, the watch is fully wound (the winding mechanism does not have a stop
to prevent overwinding). The power reserve is approximately 40 hours when fully wound.
When the watch is worn
, the automatic mechanism will wind the movement. Power reserve: Bell & Ross watches have a power
reserve of approximately 40hours.
Setting the date
Quick setting
(crown in position 2): pull the crown out to position 2 and set the date by turning the crown anticlockwise.
NOTE: as with all mechanical watches with a date function, quickset date setting (crown in position 2) MUST NOT UNDER ANY
CIRCUMSTANCES be carried out between the times of 9 PM (21.00) and 3 AM (03.00).
Slow setting
(crown in position 3): to ensure the date changes at midnight rather than noon, it is recommended to set the date
by adjusting the hands of the watch. Pull the crown out to position 3 and turn the hands until the date changes. Then set the
precise time.
Setting the time (crown in position 3): the seconds hand will stop, enabling the time to be set to the nearest second. Set the
time by rotating the crown in the required direction.
6 7
VINTAGE
P1
A
B
F
E
D
C
D
H
GP2
I
123
0 1 32
0 1 32
P1
P2
P1
A
B
F
E
D
C
D
H
GP2
I
123
0 1 32
0 1 32
P1
P2
Model with 3 counters
P1
A
B
F
E
D
C
D
H
GP2
I
123
0 1 32
0 1 32
P1
P2
P1
A
B
F
E
D
C
D
H
GP2
I
123
0 1 32
0 1 32
P1
P2
Model with 2 counters
Central sweep seconds Central sweep seconds
Minute counter
Minute counter
Hour counter
Minute hand
Hour hand
Seconds hand
Date
Crown
Rotating bezel (certain models)

USING THE GMT-24H
BRCAL.303 GMT24H SELFWINDING MOVEMENTS
Setting the time: Time zone 1 (crown in position 3). The seconds hand will stop, enabling the time to be set to the nearest
second. Set the time by turning the crown in the required direction.
Setting Time zone 2 - GMT-24H hand (crown in position 2): Place the bezel in the neutral position (triangle on the bezel
opposite the 12 index on the dial). Rotate the crown clockwise (see diagram of type model p.2) to move the GMT-24H hand to the
desired section on the graduated bezel.
Setting Time zone 3
.
A third time zone can be displayed using the rotating bezel and the GMT-24H hand. To display the third
time zone, turn the bezel clockwise (negative difference) or anticlockwise (positive difference) depending on the time difference
between the local time and the desired time zone.
-12
-12
Time zone 1: it is 10:10 in Geneva
Time zone 2: it is 16:10 in Hong Kong
(time indicated by the GMT hand on the bezel graduation)
Time zone 3: it is 04:10 in New York (Hong Kong - 12)
(The indication on Time zone 3 is obtained depending on the time difference with
Time zone 2)
Time zone 1
Time zone 2
Time zone 3
READING THE THREE TIME ZONES: EXAMPLE
IMPORTANT
Magnetic elds. Magnetic elds can adversely affect the accuracy of your watch. Also, we would recommend that you avoid
placing your watch near electronic devices that may generate signi cant magnetic elds (radio, smartphone, television, com-
puter, tablet, loudspeakers, etc.).
MAINTENANCE
After being immersed in seawater, it is recommended to carefully rinse off the watch and strap with fresh water. It is also
recommended to have the water resistance of your watch checked every two years.
BELL & ROSS INTERNATIONAL WARRANTY
To bene t from your 2-year international warranty, your card must be activated at the time of purchase by your approved Bell
& Ross point of sale, and presented every time an operation is performed. You can now access the digital version of this card
and all the information relating to your watch by scanning the QR code or visiting: www.bellross.com/warranty. To ensure a
service that meets the brand’s exacting standards, any servicing of your watch must be carried out by the Bell & Ross service
centre or a watchmaker approved by Bell & Ross. The warranty does not, however, include:
. Any damage caused by accidents or by inappropriate or improper use of the watch (e.g. violent impacts, crushing, rough
handling of the clasp).
. Any damage caused by repair or disassembly operations carried out by a retailer or after-sales service centre not approved
by Bell & Ross.
. The consequences of the watch and bracelet/strap ageing and normal wear and tear.
8 9
Measuring the time
Our models are equipped with pushers (screw-down or non screw-down). Unscrew the pushers (anticlockwise) before starting
the chronograph. NOTE: After using the chronograph, ensure the pushers on the relevant models are screwed back in (rotate
clockwise), to ensure perfect water resistance.
Measuring a time period
First press of Pusher P1: sets off the time measurement.
Second press of Pusher P1: stops the time measurement.
Third press of Pusher P2: stops and resets the chronograph.
Measuring a time period with an interruption
First press of Pusher P1: sets off the time measurement.
Second press of Pusher P1: stops the time measurement.
Third press of Pusher P1: restarts the time measurement.
This allows one or more time intervals to be subtracted from the total time measured.
Fourth press of Pusher P1: stops the time measurement.
Fifth press of Pusher P2: stops and resets the chronograph.
P1
A
B
F
E
D
C
D
H
GP2
I
123
0 1 32
0 1 32
P1
P2

VERWENDUNG DES CHRONOGRAPHEN
AUTOMATIKCHRONOGRAPHENWERKE BRCAL.301
Die Chronographenfunktion ermöglicht eine Zeitmessung in Minuten und Sekunden.
Je nach Modell zeigt das Zifferblatt zwei oder drei Zähler.
ALLGEMEINE VERWENDUNG
AUTOMATIKWERKE BRCAL.301/302/303
Unsere Modelle sind mit einer Schraubkrone oder einer nicht verschraubten Krone ausgestattet. ACHTUNG: Nach dem Einstellen
und um eine perfekte Dichtigkeit zu garantieren, die Krone wieder in Position 1 zurückdrücken (Modellart ) bzw. bis in Position
0, um sie wieder festzudrehen (Modellart ). Die Krone und die Drücker dürfen nie unter Wasser betätigt werden.
Modellart (Schraubkrone)
Modellart (NICHT verschraubte Krone)
Inbetriebnahme.
Wenn die Uhr stehen geblieben ist
.
Modellart (NICHT verschraubte Krone): Den Mechanismus aufziehen, dazu die Krone im Uhrzeigersinn drehen.
Modellart (Schraubkrone): Die Krone bis in Position 1 herausdrehen (gegen den Uhrzeigersinn) und dann den Mechanismus
durch Drehen der Krone (im Uhrzeigersinn) aufziehen. Nach etwa 40Drehungen ist die Uhr vollständig aufgezogen (der Mecha-
nismus hat keinen Anschlag, um ein Überspannen des Aufzugs zu vermeiden). Die Gangreserve beträgt dann etwa 40Stunden.
Wenn die Uhr getragen wird
, wird das Uhrwerk automatisch aufgezogen. Gangreserve: Uhren von Bell & Ross verfügen über
eine Gangreserve von etwa 40 Stunden.
Einstellen des Datums
Schnelles Einstellen
(Krone in Position2): Die Krone bis in Position2 herausziehen und das Datum durch Drehen der Krone
gegen den Uhrzeigersinn einstellen.
ACHTUNG: Wie bei allen mechanischen Uhren mit Kalender, darf die Schnelleinstellung des Datums (Krone in Position 2) AUF
KEINEN FALL zwischen 21 Uhr (9 P.M.) und 3 Uhr (3 A.M.) vorgenommen werden.
Langsames Einstellen
(Krone in Position3): Um einen Datumswechsel um Mitternacht (und nicht mittags) sicherzustellen, sollte
das Datum mit dem Stundenzeiger eingestellt werden. Dazu die Krone bis in Position3 herausziehen und die Zeiger bis zum
Datumswechsel drehen. Anschließend die Uhrzeit genau einstellen.
Einstellen der Uhrzeit (Krone in Position 3): Der Sekundenzeiger wird gestoppt, so dass auf die Sekunde genau eingestellt
werden kann. Die Uhrzeit durch Drehen der Krone in die gewünschte Richtung einstellen.
10 11
VINTAGE
P1
A
B
F
E
D
C
D
H
GP2
I
123
0 1 32
0 1 32
P1
P2
P1
A
B
F
E
D
C
D
H
GP2
I
123
0 1 32
0 1 32
P1
P2
Modell mit drei Zählern
P1
A
B
F
E
D
C
D
H
GP2
I
123
0 1 32
0 1 32
P1
P2
P1
A
B
F
E
D
C
D
H
GP2
I
123
0 1 32
0 1 32
P1
P2
Modell mit zwei Zählern
Sekundenzähler:
Zentraler Sekundenzeiger
Sekundenzähler:
Zentraler Sekundenzeiger
Minutenzähler Minutenzähler
Stundenzähler
Minutenzeiger
Stundenzeiger
Sekundenzeiger
Datum
Krone
Drehlünette (einige Modelle)

VERWENDUNG DER 24-STUNDEN-GMT-FUNKTION
GMT24HAUTOMATIKWERKE BRCAL.303
Einstellen der Uhrzeit: Zeitzone1 (Krone in Position3). Der Sekundenzeiger wird gestoppt, so dass auf die Sekunde
genau eingestellt werden kann. Die Uhrzeit durch Drehen der Krone in die gewünschte Richtung einstellen.
Einstellen von Zeitzone2 – 24-Stunden-GMT-Zeiger (Krone in Position2); Die Lünette in die Neutralstellung drehen
(Dreieck der Lünette auf 12-Uhr-Index auf dem Zifferblatt). Die Krone im Uhrzeigersinn drehen (siehe Darstellung Modellart S. 2)
bis der 24-Stunden-GMT-Zeiger auf die gewünschte Uhrzeit auf der Skala der Lünette weist.
Einstellen von Zeitzone3
.
Mit Hilfe der Drehlünette und des 24-Stunden-GMT-Zeigers kann eine 3.Zeitzone angezeigt
werden. Dazu die Lünette je nach zeitlicher Verschiebung zwischen lokaler Uhrzeit und gewünschter Zeitzone im Uhrzeigersinn
(negative Zeitverschiebung) oder gegen den Uhrzeigersinn (positive Zeitverschiebung) drehen.
-12
-12
Zeitzone 1: Es ist 10.10Uhr in Genf
Zeitzone 2: Es ist 16.10Uhr in Hongkong
(Uhrzeit, die der GMT-Zeiger auf der Lünette anzeigt)
Zeitzone 3: Es ist 4.10Uhr in New York (Hongkong -12)
(Anzeige von Zeitzone3 erfolgt entsprechend der Zeitverschiebung zu Zeitzone2)
Zeitzone 1
Zeitzone 2
Zeitzone 3
ABLESEN VON 3ZEITZONEN: BEISPIEL
WICHTIG
Magnetfelder. Magnetfelder können die Ganggenauigkeit Ihrer Uhr beeinträchtigen. Wir empfehlen Ihnen, Ihre Uhr von elek-
tronischen Geräten fern zu halten, die starke Magnetfelder erzeugen können (Radio, Smartphone, Fernseher, Computer, Tablet,
Lautsprecher ...).
PFLEGE
Nach jedem Eintauchen in Salzwasser sollten die Uhr und ihr Armband gründlich mit Süßwasser abgespült werden. Außerdem
empfehlen wir, die Wasserdichtigkeit Ihrer Uhr alle zwei Jahre prüfen zu lassen.
INTERNATIONALE GARANTIE VON BELL & ROSS
Um von Ihrer internationalen Garantie von 2 Jahren Gebrauch zu machen, muss Ihre Karte beim Kauf Ihrer Uhr von Ihrem Bell
& Ross Vertragshändler aktiviert und grundsätzlich bei allen Eingriffen vorgelegt werden. Sie können dann durch Scannen des
QR-Codes oder auf www.bellross.com/warranty die digitale Version der Karte sowie alle Informationen zu Ihrer Uhr einsehen.
Um ein Funktionieren zu garantieren, das den Ansprüchen der Marke genügt, müssen alle Eingriffe an Ihrer Uhr von einem von
Bell & Ross zugelassenen Reparaturcenter oder Uhrmacher vorgenommen werden. Die Garantie schließt jedoch aus:
. Schäden durch Unfälle oder unsachgemäßen oder missbräuchlichen Gebrauch der Uhr (heftiger Schlag, Quetschen, grobe
Handhabung der Schließe usw.).
. Schäden infolge von Reparaturen oder Zerlegungen, die nicht von einem von Bell & Ross zugelassenen Händler oder Kunden-
dienstcenter durchgeführt wurden.
. Die Folgen des normalen Gebrauchs und der Alterung der Uhr und des Armbandes.
12 13
Zeitmessung
Unsere Modelle sind mit verschraubten oder nicht verschraubten Drückern ausgestattet. Vor dem Starten des Chronographen
die Drücker herausdrehen (gegen den Uhrzeigersinn). ACHTUNG: Nach jeder Verwendung des Chronographen bei einigen Model-
len die Drücker wieder festdrehen (Uhrzeigersinn), um eine perfekte Wasserdichtigkeit zu garantieren.
Zeitmessung
1. Druck auf Drücker P1: Startet die Zeitmessung.
2. Druck auf Drücker P1: Stoppt die Zeitmessung.
3. Druck auf Drücker P2: Nullrückstellung und Stoppen des Chronographen.
Zeitmessung mit Unterbrechung
1. Druck auf Drücker P1: Startet die Zeitmessung.
2. Druck auf Drücker P1: Stoppt die Zeitmessung.
3. Druck auf Drücker P1: Startet die Zeitmessung wieder.
Damit können von der gemessenen Gesamtzeit ein oder mehrere Zeitintervalle abgezogen werden.
4. Druck auf Drücker P1: Stoppt die Zeitmessung.
5. Druck auf Drücker P2: Nullrückstellung und Stoppen des Chronographen.
P1
A
B
F
E
D
C
D
H
GP2
I
123
0 1 32
0 1 32
P1
P2

UTILIZACIÓN DEL CRONÓGRAFO
MOVIMIENTOS AUTOMÁTICOS CRONÓGRAFOS BRCAL.301
La función de cronógrafo permite medir un tiempo en minutos y segundos.
Según los modelos, la esfera muestra dos o tres contadores
USO GENERAL
MOVIMIENTOS AUTOMÁTICOS BRCAL.301/302/303
Nuestros modelos incorporan una corona que puede ser enroscada o no enroscada. ATENCIÓN: una vez realizado un ajuste, y
para garantizar una perfecta hermeticidad, volver a presionar la corona hasta la posición 1 (modelo tipo ) o hasta la posición
0 para volver a enroscarla (modelo tipo ). La corona y los pulsadores no se deben manipular nunca bajo el agua.
Modelo tipo (corona enroscada)
Modelo tipo (corona NO enroscada)
Puesta en funcionamiento.
Con el reloj parado
.
Modelo tipo (corona NO enroscada): dar cuerda al mecanismo girando al corona en el sentido de las agujas del reloj.
Modelo tipo (corona enroscada): desenroscar la corona (sentido contrario a las agujas del reloj) hasta la posición 1 y dar
cuerda al mecanismo girando la corona (sentido de las agujas del reloj). Después de unas 40 rotaciones, se le habrá dado toda
la cuerda al reloj (el mecanismo no tiene un tope para evitar una sobretensión al dar cuerda). En este punto, la autonomía de
funcionamiento es de unas 40 horas.
Cuando se lleva puesto el reloj
, el automatismo se encarga de recargar el movimiento. Reserva de marcha: los relojes
Bell&Ross tienen una reserva de marcha de unas 40h.
Ajuste de la fecha
Ajuste rápido
(corona en posición 2): tirar de la corona hasta la posición 2 y ajustar la fecha girando la corona en el sentido
contrario a las agujas del reloj.
ATENCIÓN: como para todos los relojes mecánicos con calendario, el ajuste rápido de la fecha (corona en posición 2) NUNCA
DEBE HACERSE entre las 21:00 h (9PM) y las 3:00h (3 AM).
Ajuste lento
(corona en posición 3): para garantizar un cambio de fecha a medianoche y no a mediodía, se recomienda efectuar
el ajuste de la fecha con ayuda de las agujas de las horas. Tirar de la corona hasta la posición 3 y girar las agujas hasta cambiar
la fecha. A continuación, ajustar la hora de forma precisa.
Ajuste de la hora (corona en posición 3): el segundero se para, lo que permite efectuar un ajuste con una precisión de un
segundo. Ajustar la hora girando la corona en el sentido deseado.
14 15
VINTAGE
P1
A
B
F
E
D
C
D
H
GP2
I
123
0 1 32
0 1 32
P1
P2
P1
A
B
F
E
D
C
D
H
GP2
I
123
0 1 32
0 1 32
P1
P2
Modelo de tres contadores
P1
A
B
F
E
D
C
D
H
GP2
I
123
0 1 32
0 1 32
P1
P2
P1
A
B
F
E
D
C
D
H
GP2
I
123
0 1 32
0 1 32
P1
P2
Modelo de dos contadores
Contador de segundos:
trotadora
Contador de segundos:
trotadora
Contador de minutos Contador de minutos
Contador de horas
Minutero
Aguja de las horas
Segundero
Fecha
Corona
Bisel giratorio (en determinados modelos)

USO DEL GMT-24H
MOVIMIENTOS AUTOMÁTICOS GMT 24H BRCAL.303
Ajuste de la hora: Huso 1 (corona en posición 3). El segundero se para, lo que permite efectuar un ajuste con una precisión
de un segundo. Ajustar la hora girando la corona en el sentido deseado.
Ajuste del Huso 2 - Aguja GMT-24H (corona en posición 2): Situar el bisel en la posición neutra (triángulo del bisel frente
al índice de las 12h de la esfera). Girar la corona en el sentido de las agujas del reloj (ver esquema modelo tipo p. 2) para hacer
coincidir la aguja GMT-24H con la graduación deseada del bisel.
Ajuste del Huso 3
.
Se puede visualizar un 3er huso horario con ayuda del bisel giratorio y de la aguja GMT-24H. Para ver el
3.er huso horario, girar el bisel en el sentido de las agujas del reloj (desfase negativo) o en el sentido contrario a las agujas del
reloj (desfase positivo) en función del desfase existente entre la hora local y el huso deseado.
-12
-12
Huso 1: son las 10:10 h en Ginebra
Huso 2: son las 16:10 h en Hong Kong
(hora indicada por la aguja GMT en la graduación del bisel)
Huso 3: son las 4:10 h en Nueva York (Hong Kong -12)
(La indicación del Huso 3 se obtiene en función del desfase horario con el Huso 2)
Huso 1
Huso 2
Huso 3
LECTURA DE LOS 3 HUSOS HORARIOS: EJEMPLO
IMPORTANTE
Campos magnéticos. Los campos magnéticos pueden alterar el buen funcionamiento del reloj. Por ello, le recomendamos
evitar colocar el reloj a proximidad de aparatos electrónicos que puedan generar campos magnéticos importantes (radio,
smartphone, televisor, ordenador, tableta, altavoces, etc.).
MANTENIMIENTO
Después de cada inmersión en agua de mar, se recomienda aclarar con cuidado el reloj y la pulsera con agua dulce. También se
recomienda revisar la hermeticidad del reloj cada dos años.
GARANTÍA INTERNACIONAL BELL & ROSS
Para bene ciarse de la garantía internacional de 2 años, su punto de venta homologado Bell & Ross debe activar su tarjeta
en el momento de la compra y deberá presentarla sistemáticamente en cada intervención. A partir de ese momento, podrá
acceder a la versión digital de esta tarjeta y a toda la información relativa al reloj escaneando el código QR o conectándose a:
www.bellross.com/warranty. Con el n de garantizar un servicio acorde con las exigencias de la marca, cualquier intervención
en su reloj debe encargarse al centro de reparación o a un relojero homologado por Bell&Ross. La garantía no incluye:
. Los daños resultantes de accidentes o de un uso inadecuado o abusivo del reloj (golpe fuerte, aplastamiento, manipulaciones
bruscas del cierre, etc.).
. Los daños resultantes de reparaciones o desmontajes no realizados por un distribuidor o un centro de servicio posventa
homologados por Bell & Ross.
. Las consecuencias de un uso normal y del envejecimiento del reloj y de la correa o pulsera.
16 17
Medición de un tiempo
Nuestros modelos incluyen pulsadores enroscados o no enroscados. Desenroscar los pulsadores (sentido contrario a las agu-
jas del reloj) antes de activar el cronógrafo. ATENCIÓN: en determinados modelos, después de utilizar el cronógrafo se deben
volver a enroscar los pulsadores (sentido de las agujas del reloj) para garantizar una perfecta hermeticidad.
Medición de un tiempo
1.a presión en el pulsador P1: activa la medición del tiempo.
2.a presión en el pulsador P1: para la medición del tiempo.
3a presión en el pulsador P2: pone a cero y para el cronógrafo.
Medición de un tiempo con interrupción
1.a presión en el pulsador P1: activa la medición del tiempo.
2.a presión en el pulsador P1: para la medición del tiempo.
3.a presión en el pulsador P1: reactiva la medición del tiempo.
Permite restar al tiempo total cronometrado uno o varios intervalos de tiempo.
4.a presión en el pulsador P1: para la medición del tiempo.
5.a presión en el pulsador P2: pone a cero y para el cronógrafo.
P1
A
B
F
E
D
C
D
H
GP2
I
123
0 1 32
0 1 32
P1
P2

UTILIZZO DEL CRONOGRAFO
MOVIMENTI CRONOGRAFO AUTOMATICI BRCAL.301
La funzione Cronografo consente di misurare un periodo di tempo in minuti e secondi.
Il quadrante presenta 2 o 3 contatori a seconda del modello
UTILIZZO GENERALE
MOVIMENTI AUTOMATICI BRCAL.301/302/303
I nostri modelli sono dotati di corona avvitata o non avvitata. ATTENZIONE: Al termine della regolazione e al ne di garantire una
perfetta impermeabilità, riportare la corona in posizione 1 (modello tipo ) o in posizione 0 (modello tipo ) per riavvitarla. Non
manipolare mai la corona e i pulsanti sotto l’acqua.
Modello tipo (corona avvitata)
Modello tipo (corona NON avvitata)
Regolazione iniziale.
Quando l’orologio è fermo
.
Modello tipo (corona NON avvitata) : caricare il meccanismo ruotando la corona in senso orario.
Modello tipo (corona avvitata) : svitare la corona (senso antiorario) no alla posizione 1, quindi caricare il meccanismo
ruotando la corona (senso orario).
Dopo circa 40 giri, l’orologio è completamente carico (il meccanismo non possiede un dispositivo di arresto per evitare un’ec-
cessiva tensione della corona). La riserva di carica è di circa 40 ore.
Quando l’orologio viene indossato
, il movimento si carica automaticamente. Riserva di carica: gli orologi Bell & Ross hanno
una riserva di carica di circa 40 ore.
Impostazione della data.
Impostazione rapida
(corona in posizione 2): estrarre la corona in posizione 2 e impostare la data ruotando la corona in senso
antiorario.
ATTENZIONE: Come per tutti gli orologi meccanici dotati di calendario, l’impostazione rapida della data (corona in posizione 2)
NON DEVE MAI essere effettuata tra le ore 21.00 (9 P.M.) e le ore 3.00 (3 A.M.).
Impostazione lenta
(corona in posizione 3): per assicurare il cambio della data a mezzanotte, e non a mezzogiorno, si consiglia
di impostare la data con le lancette orarie. Estrarre la corona in posizione 3 e ruotare le lancette no al cambio della data.
Impostare successivamente l’ora esatta.
Impostazione dell’ora (corona in posizione 3): la lancetta dei secondi si arresta, consentendo così di impostare l’ora con
precisione al secondo. Impostare l’ora ruotando la corona nel senso desiderato.
18 19
VINTAGE
P1
A
B
F
E
D
C
D
H
GP2
I
123
0 1 32
0 1 32
P1
P2
P1
A
B
F
E
D
C
D
H
GP2
I
123
0 1 32
0 1 32
P1
P2
Modello 3 contatori
P1
A
B
F
E
D
C
D
H
GP2
I
123
0 1 32
0 1 32
P1
P2
P1
A
B
F
E
D
C
D
H
GP2
I
123
0 1 32
0 1 32
P1
P2
Modello 2 contatori
Contatore dei secondi:
lancetta al centro
Contatore dei secondi:
lancetta al centro
Contatore dei minuti Contatore dei minuti
Contatore delle ore
Lancetta dei minuti
Lancetta delle ore
Lancetta dei secondi
Data
Corona
Lunetta girevole (alcuni modelli)

UTILIZZO DEL GMT-24H
MOVIMENTI AUTOMATICI GMT 24H BRCAL.303
Impostazione dell’ora. Fuso 1 (corona in posizione 3). La lancetta dei secondi si arresta, consentendo così di impostare
l’ora con precisione al secondo. Impostare l’ora ruotando la corona nel senso desiderato.
Impostazione del Fuso 2 - Lancetta GMT-24 ore (corona in posizione 2): Mettere la lunetta in posizione neutra (trian-
golo della lunetta di fronte all’indice delle ore 12 del quadrante). Girare la corona in senso orario (vedere schema modello tipo p.2)
al ne di ssare la lancetta GMT-24 ore sulla graduazione della lunetta desiderata .
Impostazione del Fuso 3
.
È possibile visualizzare un 3° fuso orario mediante la lunetta girevole e la lancetta GMT-24 ore.
Per visualizzare il 3° fuso orario, ruotare la lunetta in senso orario (differenza negativa) o antiorario (differenza positiva) a
seconda della differenza esistente tra l’ora locale e il fuso desiderato.
-12
-12
Fuso 1: a Ginevra sono le 10:10
Fuso 2: a Hong Kong sono le 16:10
(ora indicata dalla lancetta GMT sulla graduazione della lunetta)
Fuso 3: a New York sono le 04:10 (Hong Kong -12)
(L’indicazione del Fuso 3 si ottiene in base alla differenza oraria dal Fuso 2)
Fuso 1
Fuso 2
Fuso 3
LETTURA DEI 3 FUSI ORARI: ESEMPIO
IMPORTANTE
Campi magnetici. I campi magnetici possono alterare il buon funzionamento del vostro orologio. Vi consigliamo di non lasciare
l’orologio vicino a dispositivi elettronici che possono generare forti campi magnetici (radio, smartphone, TV, PC, tablet, alto-
parlanti...).
MANUTENZIONE
Dopo ogni immersione in acqua di mare si consiglia di risciacquare accuratamente con acqua dolce l’orologio e il suo cinturino.
Si raccomanda inoltre di far eseguire la revisione dell’impermeabilità dell’orologio almeno ogni due anni.
GARANZIA INTERNAZIONALE BELL & ROSS
Per poter usufruire della garanzia internazionale di 2 anni, la carta deve essere attivata al momento dell’acquisto dal punto
vendita autorizzato Bell & Ross e presentata sistematicamente per qualsiasi intervento. È ora possibile accedere alla versione
digitale della carta e a tutte le informazioni relative all’orologio scansionando il codice QR o connettendosi a:
www.bellross.com/warranty.
Per garantire un’assistenza tecnica all’altezza delle esigenze della marca, tutti gli interventi sui nostri orologi devono essere
effettuati da un centro riparazioni o da un orologiaio autorizzati da Bell & Ross. La garanzia no comprende:
. I danni dovuti a incidenti o a un uso improprio o scorretto dell’orologio (urto violento, schiacciamento, manipolazioni violente
della chiusura, ecc.).
. I danni derivanti da riparazione o smontaggio non eseguiti da un rivenditore o un centro di assistenza post-vendita autorizzati da
Bell & Ross.
. Le conseguenze dell’uso normale e dell’invecchiamento dell’orologio e del bracciale.
20 21
Misurazione di un tempo
I nostri modelli sono dotati di pulsanti avvitati o non avvitati. Svitare i pulsanti (senso antiorario) prima di avviare il crono-
grafo. ATTENZIONE: dopo l’utilizzo del cronografo, su alcuni modelli riavvitare i pulsanti (senso orario) per garantire una perfetta
impermeabilità.
Misurazione di un tempo
Prima pressione Pulsante P1: avvia la misurazione del tempo.
Seconda pressione Pulsante P1: arresta la misurazione del tempo.
Terza pressione Pulsante P2: azzeramento e arresto del cronografo.
Misurazione di un tempo con interruzione.
Prima pressione Pulsante P1: avvia la misurazione del tempo.
Seconda pressione Pulsante P1: arresta la misurazione del tempo.
Terza pressione Pulsante P1: riavvia la misurazione del tempo.
Questo permette di sottrarre al totale cronometrato uno o più intervalli di tempo.
Quarta pressione Pulsante P1: arresta la misurazione del tempo.
Quinta pressione Pulsante P2: azzeramento e arresto del cronografo.
P1
A
B
F
E
D
C
D
H
GP2
I
123
0 1 32
0 1 32
P1
P2

GEBRUIK VAN DE CHRONOGRAAF
AUTOMATISCHE CHRONOGRAFEN BRCAL.301
Met de chronograaffunctie kan een tijd in minuten en seconden worden gemeten.
Afhankelijk van het model, staan er 2 of 3 tellers op de wijzerplaat
ALGEMENE GEBRUIKSINSTRUCTIES
AUTOMATISCHE HORLOGES BRCAL.301/302/303
Onze modellen hebben een geschroefde of geen geschroefde kroon. LET OP: wanneer het horloge is ingesteld, duwt u de kroon
terug tot stand 1 (model type ) of tot stand 0 en draait u ze weer vast (model type ) om een perfecte waterdichtheid te
garanderen. U mag de kroon en de drukknoppen nooit onder water uittrekken en/of losdraaien.
Model type (geschroefde kroon)
Model type (GEEN geschroefde kroon)
In gebruik nemen.
Als het horloge is gestopt
.
Model type (GEEN geschroefde kroon): wind het uurwerk op door de kroon rechtsom te draaien.
Model type (geschroefde kroon): draai de kroon los (linksom) tot stand 1 en wind het uurwerk op door de kroon rechtsom
te draaien.
Na ongeveer 40 omwentelingen is het horloge volledig opgewonden (het uurwerk heeft geen aanslag om te voorkomen dat het
mechanisme te strak wordt opgewonden). De werkingsduur is dan ongeveer 40 uur.
Wanneer het horloge wordt gedragen
, wordt het automatisch opgewonden. Gangreserve: horloges van Bell & Ross hebben
een gangreserve van ongeveer 40 uur.
Instellen van de datum
Snel instellen
(kroon in stand 2): trek de kroon uit tot stand 2 en stel de datum in door de kroon linksom te draaien.
LET OP: Zoals voor alle mechanische horloges met een kalender, mag het snel instellen van de datum (kroon in stand 2) NOOIT
worden uitgevoerd tussen 21.00 u (9 uur ‘s avonds) en 3:00 u (3 uur ‘s nachts).
Langzaam instellen
(kroon in stand 3): om ervoor te zorgen dat de datum om middernacht verandert en niet om 12 uur ‘s mid-
dags, adviseren wij de datum in te stellen met behulp van de wijzers van het horloge. Trek de kroon uit tot stand 3 en verdraai
de wijzers tot de datum verandert. Stel vervolgens de tijd nauwkeurig in.
Instellen van de tijd (kroon in stand 3): de secondewijzer is dan gestopt, waardoor een instelling tot op de seconde nauw-
keurig mogelijk is. Stel de tijd in door de kroon in de gewenste richting te draaien.
22 23
VINTAGE
P1
A
B
F
E
D
C
D
H
GP2
I
123
0 1 32
0 1 32
P1
P2
P1
A
B
F
E
D
C
D
H
GP2
I
123
0 1 32
0 1 32
P1
P2
Model met 3 tellers
P1
A
B
F
E
D
C
D
H
GP2
I
123
0 1 32
0 1 32
P1
P2
P1
A
B
F
E
D
C
D
H
GP2
I
123
0 1 32
0 1 32
P1
P2
Model met 2 tellers
Secondeteller:
secondewijzer
van het midden
Secondeteller:
secondewijzer
van het midden
Minutenteller Minutenteller
Urenteller
Minutenwijzer
Urenwijzer
Secondewijzer
Datum
Kroon
Draaibare ring (bepaalde modellen)

GEBRUIK VAN GMT-24U
AUTOMATISCHE HORLOGES GMT 24U BRCAL.303
De tijd instellen: Tijdzone 1 (kroon in stand 3). De secondewijzer is dan gestopt, waardoor een instelling tot op de seconde
nauwkeurig mogelijk is. De uren instellen door de kroon in de gewenste richting te draaien.
Tijdzone 2 instellen - Wijzer GMT-24u (kroon in stand 2): De ring in de neutrale stand plaatsen (driehoek van de ring
vóór de 12u index van de wijzerplaat). Draai de kroon rechtsom (zie schema model type p.2) om het horloge GMT-24u op de
gewenste graad van de ring te plaatsen.
Tijdzone 3
instellen.
Een 3e tijdzone kan worden weergegeven met behulp van de draaibare ring en de GMT-24u wijzer (E).
Als u de 3e tijdzone wilt weergeven, draait u de ring rechtsom (negatieve verschuiving) of linksom (positieve verschuiving),
afhankelijk van het tijdverschil tussen de plaatselijke tijd en de gewenste tijdzone.
Tijdzone 1: het is 10:10 uur in Genève
Tijdzone 2: Het is 16:10 uur in Hong Kong
(de tijd die wordt aangegeven door de GMT-wijzer op de gradenschaal van de ring)
Tijdzone 3: het is 4:10 uur in New York (Hong Kong -12)
(De aanduiding van tijdzone 3 is afhankelijk van het tijdsverschil met tijdzone 2)
Tijdzone 1
Tijdzone 2
Tijdzone 3
WEERGAVE VAN DE 3 TIJDZONES: VOORBEELD
BELANGRIJK
Magnetische velden. Magnetische velden kunnen de goede werking van het horloge nadelig beïnvloeden. Wij adviseren u
daarom uw horloge niet vlakbij elektronische apparaten te leggen die sterke magnetische velden kunnen opwekken (radio,
smartphone, televisie, pc, tablet, luidsprekerbox, enz.).
ONDERHOUD
Als het horloge in aanraking is geweest met zeewater, adviseren wij het horloge en de horlogeband zo snel mogelijk zorgvuldig
schoon te spoelen met zoet water. Ook adviseren wij de waterdichtheid van het horloge elke twee jaar te laten controleren.
INTERNATIONALE GARANTIE BELL & ROSS
Om te genieten van uw internationale garantie van 2 jaar moet uw kaart geactiveerd zijn op het moment van aankoop door uw
Bell & Ross geautoriseerd verkooppunt en systematisch worden voorgelegd voor elke interventie. U kunt nu toegang krijgen
tot de digitale versie van deze kaart en alle informatie over uw horloge door de QR-code te scannen of door te surfen naar:
www.bellross.com/warranty.
Om een service te kunnen garanderen die past bij de eisen van ons merk, mogen werkzaamheden aan het horloge uitsluitend
worden uitgevoerd door het Bell & Ross-reparatiecentrum of een erkende Bell & Ross-dealer. De garantie geldt niet voor:
. Schade als gevolg van ongelukken of onjuist of oneigenlijk gebruik van het horloge (hevige schokken, verbrijzelen, ruwe
behandeling van de sluiting, enz.).
. Schade als gevolg van reparaties of demontage die niet door een erkende Bell & Ross-dealer of servicecentrum zijn uitgevoerd.
. De gevolgen van normaal gebruik en veroudering van het horloge en de horlogeband.
-12
-12
24 25
Meten van een tijd
Onze modellen hebben geschroefde of geen geschroefde drukknoppen. Draai de schroefknoppen los (linksom) alvorens de chro-
nograaf te starten. LET OP: na elk gebruik van de chronograaf moet u de drukknoppen op bepaalde modellen weer vastschroeven
(rechtsom) om een perfecte waterdichtheid te garanderen.
Meten van een tijd
1e druk op drukknop P1: start het meten van de tijd.
2e druk op drukknop P1: stopt het meten van de tijd.
3e druk op drukknop P2: op nul terugzetten en stoppen van de chronograaf.
Meten van een tijd met onderbreking
1e druk op drukknop P1: start het meten van de tijd.
2e druk op drukknop P1: stopt het meten van de tijd.
3e druk op drukknop P1: start opnieuw het meten van de tijd.
Hierdoor kunnen een of meer tijdsintervallen worden afgetrokken van de gemeten totaaltijd.
4e druk op drukknop P1: stopt het meten van de tijd.
5e druk op drukknop P2: op nul terugzetten en stoppen van de chronograaf.
P1
A
B
F
E
D
C
D
H
GP2
I
123
0 1 32
0 1 32
P1
P2

UTILIZAÇÃO DO CRONÓGRAFO
MOVIMENTOS AUTOMÁTICOS CRONÓGRAFOS BRCAL.301
A função Cronógrafo permite medir um tempo em minutos e segundos.
Consoante os modelos, o mostrador exibe 2 ou 3 contadores.
UTILIZAÇÃO GERAL
MOVIMENTOS AUTOMÁTICOS BRCAL.301/302/303
Os nossos modelos estão equipados com coroa aparafusada ou não aparafusada. ATENÇÃO: depois de terminar o acerto e para
garantir uma perfeita estanqueidade, empurrar a coroa para a posição1 (modelo tipo ) ou para a posição 0 para apertá-la
(modelo tipo ). A coroa e os botões nunca devem ser manuseados dentro de água.
Modelo tipo (coroa aparafusada)
Modelo tipo (coroa NÃO aparafusada)
Colocação em funcionamento.
Com o relógio parado
.
Modelo tipo (coroa NÃO aparafusada): dar corda ao mecanismo, rodando a coroa no sentido dos ponteiros do relógio.
Modelo tipo (coroa aparafusada): desapertar a coroa (no sentido contrário ao dos ponteiros do relógio) até à posição 1 e dar
corda ao mecanismo, rodando a coroa (no sentido dos ponteiros do relógio).
Após cerca de 40 voltas, o relógio tem a corda completa (o mecanismo não dispõe de batente para evitar uma sobretensão do
mecanismo de dar corda). A autonomia de funcionamento é, então, de 40 horas, aproximadamente.
Quando o relógio está a ser usado
, é o automatismo que dá corda ao movimento. Reserva de marcha: os relógios Bell & Ross
têm uma reserva de marcha de, aproximadamente, 40 horas.
Acerto da data
Acerto rápido
(coroa na posição 2): puxar a coroa para a posição 2 e acertar a data, rodando a coroa no sentido contrário ao
dos ponteiros do relógio.
ATENÇÃO: como em todos os relógios mecânicos com calendário, o acerto rápido da data (coroa na posição 2) NÃO DEVE, EM
CASO ALGUM, ser efetuado entre as 21.00h (9 P.M.) e as 3.00 h (3 A.M.).
Acerto lento
(coroa na posição 3): para assegurar uma mudança da data à meia-noite e não ao meio-dia, aconselha-se a
proceder ao acerto da data com auxílio dos ponteiros das horas e dos minutos. Puxar a coroa para a posição 3 e fazer girar os
ponteiros até que a data mude. Em seguida, acertar a hora com precisão.
Acerto da data (coroa na posição 3): o ponteiro dos segundos para, o que permite um acerto preciso ao segundo. Para
acertar a hora, rodar a coroa no sentido pretendido.
26 27
VINTAGE
P1
A
B
F
E
D
C
D
H
GP2
I
123
0 1 32
0 1 32
P1
P2
P1
A
B
F
E
D
C
D
H
GP2
I
123
0 1 32
0 1 32
P1
P2
Modelo com 3 contadores
P1
A
B
F
E
D
C
D
H
GP2
I
123
0 1 32
0 1 32
P1
P2
P1
A
B
F
E
D
C
D
H
GP2
I
123
0 1 32
0 1 32
P1
P2
Modelo com 2 contadores
Contador dos segundos:
trotador
Contador dos segundos:
trotador
Contador dos minutos Contador dos minutos
Contador das horas
Ponteiro dos minutos
Ponteiro das horas
Ponteiro dos segundos
Data
Courona
Aro rotativo (em alguns modelos)

UTILIZAÇÃO DO GMT-24H
MOVIMENTOS AUTOMÁTICOS GMT 24H BRCAL.303
Acerto da hora: Fuso 1 (coroa na posição 3). O ponteiro dos segundos para, o que permite um acerto preciso ao segundo.
Para acertar a hora, rodar a coroa no sentido pretendido.
Acerto do Fuso 2 - Ponteiro GMT-24H (coroa na posição 2): Colocar o aro em posição neutra (triângulo do ar em frente
do index 12h do mostrador). Rodar a coroa no sentido dos ponteiros do relógio (ver esquema do modelo tipo p.2), de modo a des-
locar o ponteiro GMT-24H para a posição pretendida na escala existente no aro.
Acerto do Fuso 3
.
Pode ser indicado um 3.o fuso horário com o auxílio do aro rotativo e do ponteiro GMT-24H. Para indicar
o 3.o fuso horário, rode o aro no sentido dos ponteiros do relógio (diferença negativa) ou no sentido contrário ao dos ponteiros
do relógio (diferença positiva), consoante a diferença existente entre a hora local e o fuso horário pretendido.
-12
-12
Fuso 1: são 10h10 em Genebra
Fuso 2: são 16h10 em Hong Kong
(hora indicada pelo ponteiro GMT na escala do aro)
Fuso 3: são 04h10 em Nova Iorque (Hong Kong -12)
(A indicação do Fuso 3 obtém-se em função da diferença horária relativamente ao Fuso 2)
Fuso 1
Fuso 2
Fuso 3
LEITURA DE 3 FUSOS HORÁRIOS: EXEMPLO
IMPORTANTE
Campos magnéticos. Os campos magnéticos podem alterar o correto funcionamento do seu relógio. Assim, aconselhamo-lo a
evitar colocar o seu relógio perto de aparelhos eletrónicos que possam gerar fortes campos magnéticos (rádio, smartphone,
televisor, computador, tablet, colunas de som…).
MANUTENÇÃO
Após cada imersão na água do mar, é aconselhável lavar cuidadosamente o relógio e o bracelete com água doce. É igualmente
aconselhável mandar veri car a estanqueidade do seu relógio a cada dois anos.
GARANTIA INTERNACIONAL BELL & ROSS
Para bene ciar da garantia internacional de 2 anos, aquando da compra o seu cartão deve ser ativado pelo ponto de venda
autorizado Bell & Ross e ser sistematicamente apresentado para qualquer intervenção. Agora, pode aceder à versão digital
deste cartão, bem como a todas as informações relativas ao seu relógio, lendo o código QR ou acedendo a:
www.bellross.com/warranty.
Para garantir um serviço conforme às exigências da marca, qualquer intervenção no seu relógio deve ser efetuada no centro
de reparação Bell & Ross ou por um relojoeiro autorizado Bell & Ross. A garantia exclui:
. Os danos resultantes de acidentes ou de uma utilização inadequada ou abusiva do relógio (impacto violento, esmagamento,
manipulações bruscas do fecho...).
. Os danos resultantes de reparações ou desmontagens não efetuadas por um revendedor ou centro de serviço pós-venda
autorizado Bell & Ross.
. As consequências da utilização normal e do envelhecimento do relógio e da bracelete.
28 29
Medição de um tempo
Os nossos modelos são dotados de botões aparafusados ou não aparafusados. Desapertar os botões (no sentido contrário ao
dos ponteiros do relógio), antes de iniciar o cronógrafo. ATENÇÃO: depois de utilizar o cronógrafo, volte a apertar os botões em
alguns modelos (no sentido dos ponteiros do relógio), para garantir uma perfeita estanqueidade.
Medição de um tempo
1.ª pressão Botão B1: início da medição do tempo.
2.ª pressão Botão B1: paragem da medição do tempo.
3.ª pressão Botão B2: reposição a zero e paragem do cronógrafo.
Medição de um tempo com interrupção
1.ª pressão Botão B1: início da medição do tempo.
2.ª pressão Botão B1: paragem da medição do tempo.
3.ª pressão Botão B1: reinício da medição do tempo.
Desta forma é possível subtrair ao tempo total cronometrado um ou vários intervalos de tempo.
4.ª pressão Botão B1: paragem da medição do tempo.
5.ª pressão Botão B2: reposição a zero e paragem do cronógrafo.
P1
A
B
F
E
D
C
D
H
GP2
I
123
0 1 32
0 1 32
P1
P2

ЧАСОВЫЕ МЕХАНИЗМЫ С АВТОМАТИЧЕСКИМ ПОДЗАВОДОМ И ХРОНОГРАФОМ BRCAL.301
Функция хронографа позволяет выполнять измерение отрезков времени в минутах и секундах.
В зависимости от модели на циферблате расположены 2 или 3 счетчика
ЧАСОВЫЕ МЕХАНИЗМЫ С АВТОМАТИЧЕСКИМ ПОДЗАВОДОМ BRCAL.301/302/303
Наши модели оснащены завинчивающейся и незавинчивающейся заводной головкой. ! По окончании
установки даты и времени верните заводную головку обратно в положение 1 для обеспечения водонепроницае-
мости часов (тип модели ) или завинтите ее в положение 0 (тип модели ). Запрещено использовать под водой
заводную головку или кнопки.
Тип модели (завинчивающаяся заводная головка)
Тип модели (завинчивающаяся
заводная головка)
.
Часы остановились
.
Тип модели (завинчивающаяся заводная головка): заведите механизм, вращая заводную головку по часовой
стрелке.
Тип модели (завинчивающаяся заводная головка): отвинтите заводную головку против часовой стрелки в
положение 1, заведите механизм, вращая заводную головку по часовой стрелке. Для полного завода достаточно
сделать 40 оборотов (механизм не имеет специального ограничителя, предотвращающего перенапряжение
заводной пружины). Время работы часов без подзавода составляет около 40 часов.
Во время ношения часов
часовой механизм подзаводится автоматически. : часы марки Bell & Ross
обладают запасом хода до 40 часов.
Быстрая установка
(заводная головка в положении 2): вытяните заводную головку в положение 2 и установите
дату, вращая заводную головку против часовой стрелки.
! Как и у любых других механических часов с календарем, быстрая установка даты (заводная головка в
положении 2) НИ В КОЕМ СЛУЧАЕ не должна выполняться в период между 21:00 ч (9 P.M.) и 3:00 ч (3 A.M.).
Медленная установка
(заводная головка в положении 3): чтобы гарантировать смену даты в полночь, а не в пол-
день, рекомендуется выполнять установку даты с помощью часовых стрелок. Вытяните заводную головку в поло-
жение3 и вращайте стрелки, пока не произойдет смена даты. После этого установите точное время.
(заводная головка в положении 3): при этом секундная стрелка останавливается, что позво-
ляет установить время с точностью до секунды. Установите время, вращая заводную головку в любом направлении.
30 31
VINTAGE
P1
A
B
F
E
D
C
D
H
GP2
I
123
0 1 32
0 1 32
P1
P2
P1
A
B
F
E
D
C
D
H
GP2
I
123
0 1 32
0 1 32
P1
P2
P1
A
B
F
E
D
C
D
H
GP2
I
123
0 1 32
0 1 32
P1
P2
P1
A
B
F
E
D
C
D
H
GP2
I
123
0 1 32
0 1 32
P1
P2
Счетчик секунд:
центральная
секундная стрелка
Счетчик секунд:
центральная
секундная стрелка
Счетчик минут Счетчик минут
Счетчик часов
Минутная стрелка
Часовая стрелка
Секундная стрелка
Дата
Заводная головка
Вращающийся безель (у некоторых моделей)

GMT24H
ЧАСОВЫЕ МЕХАНИЗМЫ С АВТОМАТИЧЕСКИМ ПОДЗАВОДОМ GMT 24H BRCAL.303
: (заводная головка в положении 3). При этом секундная
стрелка останавливается, что позволяет установить время с точностью до секунды. Установите время, вращая
заводную головку в любом направлении.
– GMT-24H (заводная головка в положении 2): Установите
безель в нейтральное положение (треугольник на безеле напротив отметки «12 часов» на циферблате). Вращайте
заводную головку по часовой стрелке (. .2) для установки стрелки GMT-24H на
необходимой отметке часовой шкалы на безеле.
.
Время третьего часового пояса отображается при помощи вра-
щающегося безеля и стрелки GMT-24H. Для отображения времени третьего часового пояса вращайте безель по
часовой стрелке (отрицательная разница во времени) или против часовой стрелки (положительная разница во
времени) в соответствии с существующей разницей во времени между местным временем и временем нужного
часового пояса.
-12
-12
Часовой пояс 1: в Женеве 10:10
Часовой пояс 2: в Гонконге 16:10
(время указывается стрелкой GMT на шкале безеля)
Часовой пояс 3: в Нью-Йорке 04:10 (Гонконг -12)
(Время третьего часового пояса отображается в соответствии с разни-
цей во времени со вторым часовым поясом)
1
2
3
:
. Воздействие магнитных полей может отрицательно влиять на точность хода часов. В связи с
этим мы рекомендуем не держать часы в непосредственной близости от электронных приборов, которые могут
создавать сильные магнитные поля (радиоприемники, смартфоны, телевизоры, компьютеры, планшеты, акусти-
ческие системы и т. п.).
После каждого погружения в морскую воду рекомендуется тщательно ополоснуть часы и ремешок пресной
водой. Кроме того, рекомендуется проверять водонепроницаемость часов каждые два года.
BELL & ROSS
Для получения двухлетней международной гарантии ваш гарантийный талон должен быть активирован в момент
покупки в магазине, сертифицированном компанией Bell & Ross, и обязательно должен предъявляться при
любом обращении. В дальнейшем вы сможете получить доступ к цифровой версии талона и всей информации
о своих часах при сканировании QR-кода или посещении сайта: www.bellross.com/warranty. Для организации
сервисного обслуживания в соответствии с требованиями компании любой вид работ должен осуществляться
в центрах сервисного обслуживания Bell & Ross или часовых мастерских, сертифицированных компанией Bell &
Ross. Однако гарантия не распространяется на:
. Повреждения, возникшие в результате несчастного случая или неправильного или ненадлежащего использова-
ния часов (сильные удары, сдавливание, грубые манипуляции с застежкой и т.д.).
. Повреждения, возникшие в результате работ по ремонту или разборки, выполненных дилером или сервисным
центром, не сертифицированным компанией Bell & Ross.
. Последствия нормального использования и старения часов и браслета.
32 33
Наши модели оснащены завинчивающимися и не завинчивающимися кнопками. Отвинтите кнопки (против часо-
вой стрелки) до запуска хронометра. ! После любого использования хронографа завинтите кнопки на
соответствующих моделях (по часовой стрелке) для обеспечения водонепроницаемости.
1-е нажатие кнопки P1: запуск измерения.
2-е нажатие кнопки P1: остановка измерения.
3-е нажатие кнопки P2: обнуление показаний и остановка хронографа.
1-е нажатие кнопки P1: запуск измерения.
2-е нажатие кнопки P1: остановка измерения.
3-е нажатие кнопки P1: повторный запуск измерения.
Эта функция позволяет вычитать от общего измеренного времени один или
несколько временных интервалов.
4-е нажатие кнопки P1: остановка измерения.
5-е нажатие кнопки P2: обнуление показаний и остановка хронографа.
P1
A
B
F
E
D
C
D
H
GP2
I
123
0 1 32
0 1 32
P1
P2

34 35
P1
A
B
F
E
D
C
D
H
GP2
I
123
0 1 32
0 1 32
P1
P2
P1
A
B
F
E
D
C
D
H
GP2
I
123
0 1 32
0 1 32
P1
P2
VINTAGE
P1
A
B
F
E
D
C
D
H
GP2
I
123
0 1 32
0 1 32
P1
P2
P1
A
B
F
E
D
C
D
H
GP2
I
123
0 1 32
0 1 32
P1
P2

-12
-12
36 37
P1
A
B
F
E
D
C
D
H
GP2
I
123
0 1 32
0 1 32
P1
P2

38 39
P1
A
B
F
E
D
C
D
H
GP2
I
123
0 1 32
0 1 32
P1
P2
P1
A
B
F
E
D
C
D
H
GP2
I
123
0 1 32
0 1 32
P1
P2
VINTAGE
P1
A
B
F
E
D
C
D
H
GP2
I
123
0 1 32
0 1 32
P1
P2
P1
A
B
F
E
D
C
D
H
GP2
I
123
0 1 32
0 1 32
P1
P2

-12
-12
40 41

42 43
P1
A
B
F
E
D
C
D
H
GP2
I
123
0 1 32
0 1 32
P1
P2
P1
A
B
F
E
D
C
D
H
GP2
I
123
0 1 32
0 1 32
P1
P2
VINTAGE
P1
A
B
F
E
D
C
D
H
GP2
I
123
0 1 32
0 1 32
P1
P2
P1
A
B
F
E
D
C
D
H
GP2
I
123
0 1 32
0 1 32
P1
P2

-12
-12
44 45
P1
A
B
F
E
D
C
D
H
GP2
I
123
0 1 32
0 1 32
P1
P2

46 47

© Bell&Ross 05/19 - 1re Edition - A-M-195
48
-
 1
1
-
 2
2
-
 3
3
-
 4
4
-
 5
5
-
 6
6
-
 7
7
-
 8
8
-
 9
9
-
 10
10
-
 11
11
-
 12
12
-
 13
13
-
 14
14
-
 15
15
-
 16
16
-
 17
17
-
 18
18
-
 19
19
-
 20
20
-
 21
21
-
 22
22
-
 23
23
-
 24
24
-
 25
25
-
 26
26


Bell & Ross BR V2-92 AERONAVALE Instrucciones de operación
- Categoría
- Relojes
- Tipo
- Instrucciones de operación
en otros idiomas
Artículos relacionados
-
Bell & Ross BR0393-BL-ST/SCA Instrucciones de operación
-
-
-
-
-
-
Bell & Ross BR-X1 ROSE GOLD & CERAMIC Instrucciones de operación
-
Otros documentos
-
Breitling Chronomat 44 GMT Guía del usuario
-
-
-
 Patek Philippe 5990 Guía del usuario
-
-
-
-
-
Hublot Classic Fusion Manual de usuario
-
Junghans Meister fein Chronoscope MEGA Solar Manual de usuario
