La página se está cargando...

Cambridge Pre-Packaged / Pre-Cut
Olde English Wall Pizza Oven Kit
Instruction Manual
Cambridge Pre-Embaló Manual de
Instrucción de Olde Ingles Pared
Horno de Pizza

2011
1
Cambridge Pre-Packaged / Pre-Cut
Olde English Wall Pizza Oven Kit
Layer Reference Guide: Guía de Referencia:
Layer 24
Layer 23
Layer 22
Layer 21
Layer 19
Layer 18
Layer 17
Layer 16
Layer 15
Layer 14
Layer 13
Layer 12
Layer 11
Layer 10
Layer 9
Layer 8
Layer 7
Layer 6
Layer 5
Layer 4
Layer 3
Layer 2
Finished
Grade
4” Above Foundation
Layer 1
Layer 20
4” Compacted 3/4” stone 8” Concrete slab (4000 PSI)

2011
2
Cambridge Pre-Packaged / Pre-Cut
Olde English Wall Pizza Oven Kit
PlaceBlue,orRedshimhere.
PlaceBlue,orRedshimhere.
PlaceBlue,orRed
shimhere.
PlaceBlue,orRedshimhere.
PlaceBlue,orRedshimhere.
PlaceBlue,orRedshimhere.
PlaceBlue,orRedshimhere.
PlaceBlue,orRedshimhere.
PlaceBlue,orRedshimhere.
PlaceBlue,orRedshimhere.
ShimPlacementDetail:
PlaceBlue,orRedshimhere.
PlaceBlue,orRedshimhere.
PlaceBlue,orRedshimhere.
PlaceBlue,orRed
shimhere.
PlaceBlue,orRedshimhere.
PlaceBlue,orRedshimhere.
PlaceBlue,orRedshimhere.
PlaceBlue,orRedshimhere.
PlaceBlue,orRedshimhere.
PlaceBlue,orRedshimhere.

2011
3
Cambridge Pre-Packaged / Pre-Cut
Olde English Wall Pizza Oven Kit
Items included in the Pizza Oven Kit:
1 - Pizza Oven
6 - 48” Reinforced concrete lintels
1 - Plastic shim pack sheet for leveling lintels or
block as needed
3 - Cubes of Cambridge Olde English Wall
1 - Pallet of Pre-Cut Wall Pieces
1 - Pallets of Cast Stone Pieces
1 - Installation manual for concrete pad and Olde
English Wall
1 - Care & Cooking Package which includes:
13” Rectangular Pizza Peel
8” Round Pizza Peel for rotating and removing
pizza
Adjustable Brush with copper bristles
Oven rake
Oven Ash shovel
Wall mounted Peel rack
Material Required:
¾” clean stone (approx. 3/4 ton)
Concrete (approx. 42-80 lb bags)
Cambridge concrete adhesive (approx. 6-29 oz. or
17-10.3 oz. tubes)
(4 pcs) 2” x 4” x 8’ lumber
2 ½” wood screws
5/8” rebar (approx. 66’)
Silicone for flashing
Tools Required For Pizza Oven Kit Installation:
Skid steer loader or other type of machinery
with forks capable of lifting 1000lbs
Heavy duty nylon lifting straps (minimum 15’ in
length)
Safety Goggles
Ear Protection
Dust Mask
Gloves
Shovels (digging & flat)
Metal Cutters for banding on cubes
Mason Hammer (chipping, hammer)
Road Stone Rake
Tamper (Hand or Mechanical)
Wheelbarrow
Level (2’ and 6’ recommended)
Speed Square
Caulk Gun 10 oz or 28 oz (depends on what size
adhesive is purchased)
Rubber Mallet
14” Demo saw with diamond blade
Tape Measure
Marking Device (pencil, soap stone, etc)
Chalk Line
Hand Broom
Concrete Tools (Trowel/Floats)
6 Foot ladder or scaffold according to your com-
pany’s state, and OSHA safety policy
Drill & 1/16” bit
5/16” nut driver
7 ¼” Circular saw with wood blade
4” Electric grinder with
4” Diamond cup grinder

2011
4
Cambridge Pre-Packaged / Pre-Cut
Olde English Wall Pizza Oven Kit
Herramientas necesarias para el Horno de Pizza Kit de
Instalacion:
Minicargador de direcci n deslizante u otro tipo de ma-
quinaria con horquillas capaz de levantar 1000 libras
Las correas de nylon de alta resistencia de elevacion
(mínimo 15’ de longitud)
Gafas de seguridad
Protecci n auditiva
Máscara de polvo
Guantes
Palas (excavacion y plano)
Cortadores de Metal de bandas en los cubos
Mason Hammer (astillado, martillo)
Camino del rastrillo de Piedra
Sabotaje (manual o mecánica)
Carretilla
Nivel (2’ y 6’ recomendado)
Velocidad de la Plaza
Pistola para calafatear 10 oz o 28 oz (depende de qué
tamaño es comprar pegamento)
Martillo de goma
14” Demo sierra con disco de diamante
Cinta métrica
Dispositivo de marcado (lápiz, piedra jab n, etc)
Línea de tiza
Escoba de mano
Herramientas concretas (paleta / flotadores)
6 pies escalera o andamio de acuerdo al estado de su em-
presa, y la política de seguridad de OSHA
Taladro y 1/16” bits
5/16” tuerca conductor
7 ¼” Sierra circular con hoja de madera
4” amoladora eléctrica
4” amoladora de la taza del diamante
Los artículos incluidos en el kit de Pizza Hor-
no:
1 - Horno de Pizza
6 - 48” dinteles de hormigon armado
1 - paquete de hoja de cuña de plástico para
nivelar dinteles o bloquear cuando sea nece-
sario
3 - Cubos de Olde Ingles Pared
1 - Paleta de piezas de pared Precortadas
1 - Paleta de piezas de piedra artificial
1 - Manual de instalacion para la plataforma
de concreto y Olde Inglés pared
Material Necesario:
¾” piedra limpia (aprox. 3/4 tonelada)
Concreto (aprox. 42 bolsas de 80 libras)
Cambridge concretas adhesivo (aprox. 6-29 oz
o 17- 10.3 oz. Tubos)
(4 piezas) de 2” x 4” x 8’ Madera
2 ½” tornillos para madera
5/8” barra de refuerzo (aprox. 66’)
Silicona para el flasheo

2011
5
Cambridge Pre-Packaged / Pre-Cut
Olde English Wall Pizza Oven Kit
5/8”Rebar
4”Compacted3/4”CleanStone8”ConcreteSlab(4000PSI)
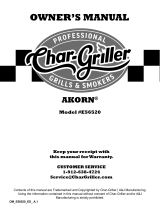
Cojin de concreto para el Horno de Pizza:
Llame 811 para obtener informaci n sobre la utilidad de metro marcado. Seleccione la ubicacion de-
seada y excavar 80” de largo x 64” W x 16” D área de plataforma de concreto. Llene la zona excavada
con aproximadamente 4” de ¾” limpia grava, compactando cada 3”. Marco los restantes 8” con 2” x 4”
de madera para crear una plataforma de nivel. (Asegúrese de 2”x 4” marco de madera está perfec-
tamente horizontal, de adelante hacia atrás y de lado a lado) Véanse los detalles del dibujo para la colo-
caci n de varillas de acero de refuerzo. Relleno los resantes 8”de 2” x 4” marco de madera con una mez-
cla de concreto 4000 psi fuerte.
* Deje que la almohadilla curar por un mínimo de 48 horas.
64”
80”
4”
12”
12”
12”
12”
12”
12”
4”
2”
2”15” 15” 15”
RebarSpacing
Pizza Oven Concrete Pad Construction:
Call 811 for information on underground utility marking. Select desired location and excavate 80” L x
64” W x 16” D area for concrete pad. Fill excavated area with approximately 4” of ¾” clean gravel,
compacting every 3”. Frame remaining 8” with 2” x 4” lumber to create a level pad. (Be sure 2”x 4”
wood frame is perfectly level, front to back and side to side) See attached drawing for details of steel re-
inforcement rod placement. Fill remaining 8” with a 4,000 psi strong concrete mix.
*Allow pad to cure for minimum of 48 hours.
12”

2011
6
Cambridge Pre-Packaged / Pre-Cut
Olde English Wall Pizza Oven Kit
Stones Included In The Kit:
Large Cast Headstone (1 Piece)
Small Cast Headstone (1 Piece) Cast Stone Extensions (2 Pieces) 48” Lintel (6 Pieces)
45° Angle Cut (8 Pieces) Small Cast Stone Legs (10 Pieces) Large Cast Stone Legs (6 Pieces)
Left Corner Stone (1 Piece) Center Stone (1 Piece) Right Corner Stone (1 Piece)

2011
7
Cambridge Pre-Packaged / Pre-Cut
Olde English Wall Pizza Oven Kit
Stones Included In The Kit:
3”x8” Cut Stone (12 Pieces) 4”x8” Cut Stone (23 Pieces) 8”x8” Cut Stone (15 Pieces)
4”x4” Cut Stone (16 Pieces) Wall Stones (290 Pieces) 4”x12” Cut Stone (32 Pieces)
16 1/4”x16 1/4” Cast Stone Mantle Corners (2 Pieces) 31 1/2”x16 1/4” Cast Stone Center (1 Piece)
22”x10 3/4” Corner Cast Stone (2 Pieces) 18 1/4”x10 3/4” Center Cast Stone (1 Piece)
311/2”

2011
8
Cambridge Pre-Packaged / Pre-Cut
Olde English Wall Pizza Oven Kit
Layer 1:
Piece Count = (42) Olde English Wall Stones
Mark a line 4” in on all sides from the outside of
the concrete pad to create a footprint. Apply
concrete adhesive and install the wall stones ac-
cording to the photo. Please ensure that this and
each additional layer is as level as possible.
*Work slowly and methodically and check that
each layer is installed correctly before proceed-
ing to the next layer.
Capa 1:
Numero de Piezas = (42) Piezas de Olde Ingles
pared
Marque una línea 4” adentro en todos los lados
del exterior del cojín concreto para crear una
huella. Aplique el pegamento concreto e instale
las piedras de la pared según cuadro abajo. Aseg-
úrese por favor de que esto y cada capa adicional
esté tan llano como sea posible. el
*Trabaja lentamente y metódicamente y com-
prueba que cada capa está instalada correc-
tamente antes de proceder a la capa siguiente.
60”
80”

2011
9
Cambridge Pre-Packaged / Pre-Cut
Olde English Wall Pizza Oven Kit
Layer 2:
Piece Count = (12) Olde English Wall Stones, (1)
8”x8” Cut Stone, (2) Large Cast Stone Legs
Apply concrete adhesive and install wall stones,
cut stones and cast stone legs according to the
photo.
Make sure to maintain 36” between the two cast
stone legs.
Note: Use the shims provided in the kit when
installing the cast stone pieces to achieve
proper level.
Capa 2:
Numero de piezas = (12) Piezas de Olde Ingles
pared, (1) 8”x8” piedra cortada, (2) Grandes
piernas de la piedra del molde
Aplique el pegamento concreto e instale las pie-
dras de la pared, corte las piedras y eche las pier-
nas de piedra según el cuadro abajo.
Cerciórese de mantener 36” que se abren entre
las dos piernas de piedra echadas.
Nota: Utilice las calzas proporcionadas en el
kit cuando la instalación de la piedra del
molde junta las piezas para alcanzar el nivel
apropiado.
36”
8”
8”
PlaceBlue,orRedshimhere.
PlaceBlue,orRedshimhere.
Large Cast Stone Legs

2011
10
Cambridge Pre-Packaged / Pre-Cut
Olde English Wall Pizza Oven Kit
Layer 3:
Piece Count = (11) Olde English Wall Stones, (2)
4”x12” Cut Stones, (2) 4”x4” Cut Stones, (1)
8”x8” Cut Stone, (1) 4”x8” Cut Stone, (2) Small
Cast Stone Legs
Apply concrete adhesive and install wall stones,
cut stones and cast stone legs according to the
photo.
Make sure to maintain a 36” opening between
the two cast stone legs.
Capa 3:
Numero de piezas = (11) Piezas de Olde Ingles
pared, (2) corte 4” x12” piedras, (2) 4” x 4” corta-
ron piedras, (1) 8”x 8” cortaron piedra, (1) 4” x
8” cortaron piedra, (2) pequeñas piernas de la
piedra del molde
Aplique el pegamento concreto e instale las pie-
dras de la pared, corte las piedras y eche las pier-
nas de piedra según el cuadro abajo.
Cerciórese de mantener 36” que se abren entre
las dos piernas de piedra echadas.
PlaceBlue,orRedshimhere.
PlaceBlue,orRedshimhere.
Small Cast Stone Legs

2011
11
Cambridge Pre-Packaged / Pre-Cut
Olde English Wall Pizza Oven Kit
Layer 4:
Piece Count = (12) Olde English Wall Stones, (1)
8”x8” Cut Stone, (2) Large Cast Stone Legs
Apply concrete adhesive and install wall stones,
cut stones and cast stone legs according to the
photo.
Make sure to maintain a 36” opening between
the two cast stone legs.
Capa 4:
Numero de Piezas = (12) Piezas de Olde Ingles
pared, (1) 8”x8” piedra cortada, (2)Grandes pier-
nas de la piedra del molde
Aplique el pegamento concreto e instale las pie-
dras de la pared, corte las piedras y eche las pier-
nas de piedra según el cuadro abajo.
Cerciórese de mantener 36” que se abren entre
las dos piernas de piedra echadas.
PlaceBlue,orRedshimhere. PlaceBlue,orRedshimhere.
Large Cast Stone Legs

2011
12
Cambridge Pre-Packaged / Pre-Cut
Olde English Wall Pizza Oven Kit
Layer 5:
Piece Count = (11) Olde English Wall Stones, (2)
4”x12” Cut Stones, (2) 4”x4” Cut Stones, (1)
8”x8” Cut Stone, (1) 4”x8” Cut Stone, (2) Small
Cast Stone Legs
Apply concrete adhesive and install wall stones,
cut stones and cast stone legs according to the
photo.
Make sure to maintain a 36” opening between
the two cast stone legs.
Capa 5:
Numero de Piezas = (11) Piezas de Olde Ingles
pared, (2) 4”x12” piedras cortadas, (2) 4”x 4”
piedras cortadas, (1) 8”x8” piedra cortada, (1)
4"x 8" piedra corte (2) Pequenas piernas de la
piedra del molde
Aplique el pegamento concreto e instale las pie-
dras de la pared, corte las piedras y eche las pier-
nas de piedra según el cuadro abajo.
Cerciórese de mantener 36” que se abren entre
las dos piernas de piedra echadas.
PlaceBlue,orRedshimhere. PlaceBlue,orRedshimhere.
Small Cast Stone Legs

2011
13
Cambridge Pre-Packaged / Pre-Cut
Olde English Wall Pizza Oven Kit
Layer 6:
Piece Count = (12) Olde English Wall Stones, (1)
8”x8” Cut Stone, (2) Large Cast Stone Legs
Apply concrete adhesive and install wall stones,
cut stones and cast stone legs according to the
photo.
Make sure to maintain a 36” opening between
the two cast stone legs.
Capa 6:
Numero de Piezas = (12) Piezas de Olde Ingles
pared, (1) 8”x8” piedra cortada, (2) Grande pier-
nas de la piedra del molde
Aplique el pegamento concreto e instale las pie-
dras de la pared, corte las piedras y eche las pier-
nas de piedra según el cuadro abajo.
Cerciórese de mantener 36” que se abren entre
las dos piernas de piedra echadas.
36”
PlaceBlue,orRedshimhere. PlaceBlue,orRedshimhere.
Large Cast Stone Legs

2011
14
Cambridge Pre-Packaged / Pre-Cut
Olde English Wall Pizza Oven Kit
Layer 7:
Piece Count = (11) Olde English Wall, (2) 4”x12”
Cut Stones, (2) 4”x4” Cut Stones, (1) 8”x8” Cut
Stone, (1) 4”x8” Cut Stone, (2) Small Cast Stone
Legs
Apply concrete adhesive and install wall stones,
cut stones and cast stone legs according to the
photo.
Make sure to maintain a 36” opening between
the two cast stone legs.
Capa 7:
Numero de Piezas = (11) Piezas de Olde Ingles
pared, (2) 4”x12” piedra cortada, (2) 4”x4” pie-
dra cortada, (1) 8”x8” piedra cortada, (1) 4”x8”
piedra cortada, (2)pequenas piernas de la piedra
del molde
Aplique el pegamento concreto e instale las pie-
dras de la pared, corte las piedras y eche las pier-
nas de piedra según el cuadro abajo.
Cerciórese de mantener 36” que se abren entre
las dos piernas de piedra echadas.
PlaceBlue,orRedshimhere. PlaceBlue,orRedshimhere.
Small Cast Stone Legs

2011
15
Cambridge Pre-Packaged / Pre-Cut
Olde English Wall Pizza Oven Kit
Layer 7-A: Wood Box Head Stone Placement
Piece Count = (1) Large Cast Headstone
Prior to installing the headstone, measure the
space between the cast leg stones to ensure the
36” opening.
Apply concrete adhesive and install the large
cast head stone onto the cast stone legs. Line up
the cast details between the headstone and legs.
Note: Use the shims provided in the kit when
installing the cast stone pieces to achieve
proper level.
Capa 7-A: Colocación de la piedrade la cabeza
Numero de Piezas = (1) lápida mortuoria grande
del molde.
Antes de instalar la lápida mortuoria, mida el es-
pacio entre las piedras de la pierna del molde pa-
ra asegurar los 36” que se abren. Aplique el pega-
mento concreto e instale la piedra grande de la
cabeza del molde sobre las piernas de la piedra
del molde. Alinéese los detalles del molde entre la
lápida mortuoria y las piernas.
Nota: Utilice las
calzas proporcionadas en el kit cuando la in-
stalación de la piedra del molde junta las
piezas para alcanzar el nivel apropiado.
LARGE CAST HEADSTONE
PlaceBlue,orRedshimhere. PlaceBlue,orRedshimhere.

2011
16
Cambridge Pre-Packaged / Pre-Cut
Olde English Wall Pizza Oven Kit
Layer 8:
Piece Count = (12) Olde English Wall Stones, (1)
8”x8” Cut Stone
Apply concrete adhesive and install wall stones
and cut stone according to the photo.
Capa 8:
Numero de Piezas = (12) Piezas de Olde Ingles
pared, (1) corte 8” x 8”
Piedra Aplique el pegamento concreto e instale
las piedras de la pared y corte la piedra según el
cuadro abajo.

2011
17
Cambridge Pre-Packaged / Pre-Cut
Olde English Wall Pizza Oven Kit
Note:
4”x8” stone
standing on end
Layer 9:
Piece Count = (5) Olde English Wall Stones, (6)
4”x8” Cut Stones, (8) 4”x12” Cut Stones, (2)
4”x4” Cut Stones, (3) 48” Lintels
Apply concrete adhesive and install wall stones,
cut stones and lintels according to the photo.
Lintels will need to be shimmed to match
4” height of the wall stones. Use the wedge
shims on this layer.
Capa 9:
Numero de Piezas = (5) Piezas de Olde Ingles
pared, (6) 4”x 8” piedras del corte, (8) 4”x 12”
piedras del corte, (2) 4”x 4” piedras del corte, (3)
48” dinteles
Aplique el pegamento concreto e instale las pie-
dras de la pared, las piedras del corte y los din-
teles según el cuadro abajo. Los dinteles pueden
necesitar ser calzado para emparejar 4” alturas
con las piedras de la pared. Utilice las calzas
NEGRAS de la cuña en esta capa.
UseWedgeShimshere. UseWedgeShims
here.
UseWedgeShims
here.
UseWedgeShimshere.

2011
18
Cambridge Pre-Packaged / Pre-Cut
Olde English Wall Pizza Oven Kit
Layer 9-A: Pizza Oven Placement
Set up lifting straps approximately 8” in from
the front and approximately 12” in from the
back of the pizza oven. Using a skid steer or oth-
er type of machinery, carefully lift the pizza ov-
en onto the (3) 48” lintels. Place the front lower
edge of the pizza oven 5 3/4” from the cast stone
headstone. (Be careful not to bang into the
headstone, this can cause breakage as well as the
headstone to fall.) Center the oven making sure
to have equal distance on both the left and the
right sides. The lifting straps should be in be-
tween the gaps of the lintels for easy removal.
Capa 9-A: Colocación del horno de la pizza
Fije las correas de elevación aproximadamente 8”
adentro del frente y aproximadamente 12” aden-
tro de la parte posterior del horno de la pizza.
Usando el buey de la resbalón o el otro tipo de
maquinaria, levante cuidadosamente el horno de
la pizza sobre (3) 48” dinteles. Ponga el borde
más bajo delantero del horno 5 3/4” de la pizza
de la lápida mortuoria de la piedra del molde.
(Tenga cuidado de no golpear en la lápida mor-
tuoria, ésta puede hacer fractura así como la lápi-
da mortuoria caer.) Centre el horno cercio-
rándose de tener distancia igual en los derechos
izquierdos y. Las correas de elevación deben es-
tar entre los boquetes de los dinteles para el re-
Lifting straps
Front of box 5 3/4”
from back of headstone
53/4”

2011
19
Cambridge Pre-Packaged / Pre-Cut
Olde English Wall Pizza Oven Kit
Layer 10:
Piece count = (7) Olde English Wall Stones, (7)
4”x12” Cut Stones, (4) 4”x4” Cut Stones, (1)
4”x8” Cut Stone
Apply concrete adhesive and install wall stones
and cut stones according to the photo.
Capa 10:
Numero de Piezas = (7) Piezas de Olde Ingles
pared, (7) corte 4” x12” piedras, (4) 4”x4” pie-
dras cortadas, (1) 4”x8” piedras cortadas
Aplique el pegamento concreto e instale las pie-
dras de la pared y corte las piedras según el cuad-
ro abajo.
4”x4”x8”stone
standingonend
fromlayer8
Note:

2011
20
Cambridge Pre-Packaged / Pre-Cut
Olde English Wall Pizza Oven Kit
Layer 10-A: Smoke Stack/Flue Installation
Install flue pipe on top of the Pizza Oven collar
(no fastening necessary).
Capa 10-A: Instalación del apilado de humo/tubo
Instale la pipa de tubo encima del collar del hor-
no de la pizza (no sujeción necesaria).

2011
21
Cambridge Pre-Packaged / Pre-Cut
Olde English Wall Pizza Oven Kit
Layer 11:
Piece count = (14) Olde English Wall Stones, (2)
8”x8” Cut Stones
Wood Box Cast Stone Mantle Placement:
(1) 31 ½”x16 ¼”x4” Center (2) 16 ¼”x16 ¼”x4”
Cast Stone Mantle Corners
Apply concrete adhesive and install mantle pieces.
Overhang mantle pieces by 4” on the front, left
and right sides. The back of the mantle is flush
with the pizza oven. Apply concrete adhesive and
install the wall stones and cut stones according to
the photo.
Note: Use the shims provided in the kit when
installing the cast stone pieces to achieve prop-
er level.
Capa 11:
Numero de Piezas = (14) Piezas de Olde Ingles
pared, (2) piedras cortadas 8”x8”
Colocación de madera de la capa de la piedra del
molde de la caja:
(1) 31½” x16¼” x4” centro (2) 16¼”x16¼”x4”
echó las esquinas de piedra de la capa
Aplique el pegamento concreto e instale los
pedazos de la capa. Sobresalga por los pedazos de
la capa por 4” en el frente, lados izquierdos y
derechos. La parte posterior de la capa es rasante
con el horno de la pizza. Aplique el pegamento
concreto e instale las piedras de la pared y corte
las piedras según el cuadro abajo.
Nota: Utilice
las calzas proporcionadas en el kit cuando la
instalación de la piedra del molde junta las
piezas para alcanzar el nivel apropiado.
4”overhang
4”overhang
caststonecaststone
4”overhang
4”overhang
PlaceBlue,orRedshimhere.
PlaceBlue,orRedshimhere.
16 1/4
X
16 1/4
16 1/4
X
16 1/4
31 1/2
X
16 1/4

2011
22
Cambridge Pre-Packaged / Pre-Cut
Olde English Wall Pizza Oven Kit
Layer 12:
Piece Count = (12) Olde English Wall Stones, (1)
8”x8” Cut Stone, (2) Small Cast Stone Legs
Apply concrete adhesive and install wall stones,
cut stones and cast stone legs according to the pho-
to.
Make sure to maintain a 24” between the two cast
stone legs.
Note: Use the shims provided in the kit when
installing the cast stone pieces to achieve prop-
er level.
Capa 12:
Numero de Piezas = (12) Piezas de Olde Ingles
pared, (1) 8” x8” Piedra Cortada, (2) pequeñas
piernas de la piedra del molde
Aplique el pegamento concreto e instale las pie-
dras de la pared, corte las piedras y eche las pier-
nas de piedra según el cuadro abajo.
Cerciórese de mantener un 24” entre las dos pier-
nas de piedra echadas.
Nota: Utilice las calzas proporcionadas en el
kit cuando la instalación de la piedra del
molde junta las piezas para alcanzar el nivel
24”
PlaceBlue,orRedshimhere.
PlaceBlue,orRedshimhere.
Small Cast Stone Legs
Setlegin111/2”
fromedgeofmantle.
Setlegin111/2”
fromedgeofmantle.
111/2”
111/2”
Setleg13/4”infrom
backofmantle.
31/2”Inset
31/2”Inset
4”Inset

2011
23
Cambridge Pre-Packaged / Pre-Cut
Olde English Wall Pizza Oven Kit
Layer 13:
Piece Count = (12) Olde English Wall Stones, (1)
8”x8” Cut Stone, (2) Small Cast Stone Legs
Apply concrete adhesive and install wall stones,
cut stones and cast stone legs according to the pho-
to.
Make sure to maintain a 24 ¼” between the two
cast stone legs.
Capa 13:
Numero de Piezas = (12) Piezas de Olde Ingles
pared, (1) 8” x8” Piedra cortada, (2) pequeñas
piernas de la piedra del molde
Aplique el pegamento concreto e instale las pie-
dras de la pared, corte las piedras y eche las pier-
nas de piedra según el cuadro abajo.
Cerciórese de mantener un 24 1/4” entre las dos
piernas de piedra echadas.
PlaceBlue,orRedshimhere. PlaceBlue,orRedshimhere.
Small Cast Stone Legs

2011
24
Cambridge Pre-Packaged / Pre-Cut
Olde English Wall Pizza Oven Kit
Layer 14:
Piece Count = (12) Olde English Wall Stones, (1)
8”x8” Cut Stone
Apply concrete adhesive and install wall stones,
cut stone according to the photo.
Capa 14:
Numero de Piezas = (12) Piezas de Olde English
pared, (1) 8” x8” Piedra cortada
Aplique el pegamento concreto e instale las pie-
dras de la pared, corte la piedra según el cuadro
abajo.

2011
25
Cambridge Pre-Packaged / Pre-Cut
Olde English Wall Pizza Oven Kit
Layer 14-A: Pizza Oven Headstone Placement
Piece Count = (1) Small Cast Headstone (2) Cast
Stone Extensions
Prior to installing the headstone, measure the
space between the cast leg stones to ensure the 24
¼” opening. Apply concrete adhesive and install
the small headstone onto the cast surround leg
stones. Line up the cast details between the head-
stone and legs then install the (2) cast stone exten-
sions.
Capa 14-A: Colocación de la lápida mortuoria del
horno de la pizza La
Numero de Piezas = (1) Pequeña lápida mor-
tuoria del molde (2) echó las extensiones de pie-
dra
Antes de instalar la lápida mortuoria, mida el es-
pacio entre las piedras de la pierna del molde pa-
ra asegurar a los 24 abertura del ¼”. Aplique el
pegamento concreto e instale la pequeña lápida
mortuoria sobre las piedras de la pierna del anil-
lo del molde. Alinéese los detalles del molde entre
la lápida mortuoria y las piernas después instalan
(2) las extensiones de piedra echadas.
setsurroundextensions
SMALLCASTHEADSTONE
PlaceBlue,orRedshimhere.

2011
26
Cambridge Pre-Packaged / Pre-Cut
Olde English Wall Pizza Oven Kit
Layer 15:
Piece Count = (12) Olde English Wall Stones, (1)
8”x8” Cut Stone
Apply concrete adhesive and install the wall stones
and cut stone according to the photo.
Capa 15:
Numero de Piezas = (12) Piezas de Olde Ingles
pared, (1) 8” x8” Piedra cortada
Aplique el pegamento concreto e instale las pie-
dras de la pared y corte la piedra según el cuadro
abajo.

2011
27
Cambridge Pre-Packaged / Pre-Cut
Olde English Wall Pizza Oven Kit
Layer 16:
Piece Count = (12) Olde English Wall Stones, (1)
8”x8” Cut Stone
Apply concrete adhesive and install the wall stones
and cut stone according to the photo.
Capa 16:
Numero de Piezas = (12) Piezas de Olde Ingles
pared, (1) 8”x8” Piedra cortada
Aplique el pegamento concreto e instale las pie-
dras de la pared y corte la piedra según el cuadro
abajo.

2011
28
Cambridge Pre-Packaged / Pre-Cut
Olde English Wall Pizza Oven Kit
Layer 17:
Piece Count = (12) Olde English Wall Stones, (3)
4”x12” Cut Stones, (1) 4”x8” Cut Stone, (1) 8”x8”
Cut Stone
Apply concrete adhesive and install the wall stones
and cut stones according to the photo.
Capa 17:
Numero de Piezas = (12) Piezas de Olde Ingles
pared, (3) 4” x12” piedra cortada, (1) 4” x8” pie-
dra cortada, (1) 8” x8” Piedra cortada
Aplique el pegamento concreto e instale las pie-
dras de la pared y corte las piedras según el cuad-
ro abajo.

2011
29
Cambridge Pre-Packaged / Pre-Cut
Olde English Wall Pizza Oven Kit
Layer 17-A: Pizza Oven Cast Stone Mantle
Piece Count = (1) Center, (1) Left Corner, (1)
Right Corner
Apply concrete adhesive and install the cast stone
mantle pieces flush against the wall stones
according to the photo. There should be a 1 1/8”
overhand on the sides.
Capa 17-A: Capa del horno de la pizza
Numero de Piezas = (1) Centro (1) Palo Izquier-
do, (1) Rincón de Derecho
Aplique el pegamento concreto e instale los
pedazos de la capa de la piedra del molde a ras
contra las piedras de la pared según el cuadro
abajo
caststonepieces
Overhang11/8”
Overhang11/8”

2011
30
Cambridge Pre-Packaged / Pre-Cut
Olde English Wall Pizza Oven Kit
Layer 18:
Piece Count = (16) Olde English Wall stones
Apply concrete adhesive and install the wall stones
and cut stones according to the photo.
Capa 18:
Numero de Piezas = (16) Piezas de Olde Ingles
pared
Aplique el pegamento concreto e instale las pie-
dras de la pared según el cuadro abajo

2011
31
Cambridge Pre-Packaged / Pre-Cut
Olde English Wall Pizza Oven Kit
Layer 19:
Piece Count = (10) Olde English Wall Stones, (6)
4”x12” Cut Stones, (4) 4”x4” Cut Stones, (1) 4”x8”
Cut Stones, (3) 48” lintels.
Apply concrete adhesive and install wall stones,
cut stones and lintels according to the photo. Lin-
tels will need to be shimmed to match 4”
height of the wall stones. Use the wedge shims
on this layer.
Capa 19:
Numero de Piezas = (10) Piezas de Olde Ingles
pared, (6) 4” x12” piedras cortadas, (4) 4” x4”
piedras cortadas, (1) 4” x8” piedras cortadas, (3)
48” dinteles.
Aplique el pegamento concreto e instale las pie-
dras de la pared, las piedras del corte y los din-
teles según el cuadro abajo.
Los dinteles pueden
necesitar ser calzado para emparejar 4” altu-
ras con las piedras de la pared. Utilice las cal-
zas NEGRAS de la cuña en esta capa.
UseWedge
Shimshere.
UseWedge
Shimshere.

2011
32
Cambridge Pre-Packaged / Pre-Cut
Olde English Wall Pizza Oven Kit
Layer 20:
Piece Count = (31) Olde English Wall stones, (6)
4”x 8” Cut Stones, (2) 4”x 12” Cut Stones.
Cast Stone Caps: (1) 31 1/2”x12”x4” Center Cast
Stone & (2) 16 1/4”x12”x4” Corner Cast Stones
Cast Stone Cap Placement: Overhang mantle
pieces by 4”on the front, left and right sides. The
back of the cap will be flush with the wall stones.
Apply concrete adhesive and install wall stones
according to the photo, making sure to have an
overhang of 4” on the left and right and 4” at the
back.
Capa 20:
Numero de Piezas = (31) Piezas de Olde Ingles
pared, (6) 4” x 8” piedras cortadas, (2) 4” x12”
piedras cortadas.
Casquillos de piedra del molde: (1) 31
1/2”x12”x4” Centro echó de piedra; (2)
16”x12”x4” la esquina echó de piedras
Colocación de piedra del casquillo del molde: So-
bresalga por los pedazos de la capa por 4” en el
frente, lados izquierdos y derechos. La parte pos-
terior del casquillo será rasante con las piedras
de la pared. Aplique el pegamento concreto e in-
stale las piedras de la pared según la foto, cercio-
rándose de tener una proyección de 4” en los left
and right y 4” en la parte posterior.
4”overhang
caststone
4”overhang
4”overhang4”overhang
caststone
31 1/2 x 12
16 1/4 x 12 16 1/4 x 12

2011
33
Cambridge Pre-Packaged / Pre-Cut
Olde English Wall Pizza Oven Kit
Layer 21:
Piece Count = (4) Olde English Wall stones, (4)
3”x8” Cut Stones.
Apply concrete adhesive and install wall stones,
and cut stones around the chimney flue according
to the photo.
Capa 21:
Numero de Piezas = (4) Piezas de Olde Ingles
pared, (4) 3” x8”piedras cortadas.
Aplique el pegamento concreto e instale las pie-
dras de la pared y corte las piedras alrededor del
tubo de la chimenea según el cuadro abajo.
201/2” 201/2”
73/4”

2011
34
Cambridge Pre-Packaged / Pre-Cut
Olde English Wall Pizza Oven Kit
Layer 22:
Piece Count = (4) Olde English Wall stones, (4)
3”x8” Cut Stones.
Apply concrete adhesive and install wall stones,
and cut stones around the chimney flue according
to the photo.
Capa 22:
Numero de piezas = (4) Piezas de Olde Ingles
pared, (4) 3”x8” piedras cortadas.
Aplique el pegamento concreto e instale las pie-
dras de la pared y corte las piedras alrededor del
tubo de la chimenea según el cuadro abajo

2011
35
Cambridge Pre-Packaged / Pre-Cut
Olde English Wall Pizza Oven Kit
Layer 23:
Piece Count = (4) Olde English Wall stones, (4)
3”x8” Cut Stones.
Apply concrete adhesive and install wall stones,
and cut stones around the chimney flue according
to the photo.
Capa 23:
Numero de Piezas = (4) Piezas de Olde Ingles
pared, (4) 3”x8” piedras cortadas.
Aplique el pegamento concreto e instale las pie-
dras de la pared y corte las piedras alrededor del
tubo de la chimenea según el cuadro abajo.

2011
36
Cambridge Pre-Packaged / Pre-Cut
Olde English Wall Pizza Oven Kit
Layer 24:
Piece Count = (8) 45
o
Corner Angle Cuts, (4) 4”x8”
Cut Stones
Apply concrete adhesive and install wall stones,
and cut stones around the chimney flue according
to the photo. There will be a 2 ½” overhang on the
front, back, left and right side.
Capa 24:
Numero de Piezas = (8) 45
o
esquinas angulo (4)
4”x8” piedras cortadas.
Aplique el pegamento concreto e instale las pie-
dras de la pared y corte las piedras alrededor del
tubo de la chimenea según el cuadro abajo. Ha-
brá proyección en el frente, parte posterior, lado
izquierdo y derecho de un 2 ½”.
21/2”overhang

2011
37
Cambridge Pre-Packaged / Pre-Cut
Olde English Wall Pizza Oven Kit
Casquillo de terminación de la chimenea
Numero de Piezas = (1) persecución destella, (1)
casquillo de la terminación.
Instale la persecución de acero que destella sobre la
pipa de la chimenea y encima de 4 pedazos el
casquillo concreto que se cerciora de el reborde está
haciendo frente hacia arriba como se muestra.
Aplique el pegamento y céntrese. Instale el casquillo
de la terminación encima de la pipa de la chimenea
que lo resbala abajo sobre la tapa del reborde en la
persecución que destella, ésta evitará que cualquier
ruina entre en la chimenea. Usted puede ajustar la
pipa de la chimenea en caso de necesidad.
Flashing & Chimney Termination Cap
Piece Count = (1) Chase Flashing, (1) Termina-
tion Cap.
Install the steel chase flashing over the chimney
pipe and on top of the 4 piece concrete cap mak-
ing sure the flange is facing upward as shown.
Apply adhesive and center. Install termination
cap on top of the chimney pipe sliding it down
over the top of the flange on the chase flashing,
this will prevent any debris from entering the
chimney. You may trim the chimney pipe if neces-
sary.

2011
38
Cambridge Pre-Packaged / Pre-Cut
Olde English Wall Pizza Oven Kit
VIEWS
Front Right
Left Rear

2011
39
Cambridge Pre-Packaged / Pre-Cut
Olde English Wall Pizza Oven Kit
INITIAL CURING OF YOUR NEW CAMBRIDGE OVEN:
It is of the utmost importance that your new Cambridge Pizza Oven undergoes a curing or “breaking
in” period before firing to full heat. Your oven, although steel fiber reinforced, will still have some pock-
ets of moisture present in its walls that have to be dried out gradually. If not heated slowly, the moisture
will turn to steam and potentially cause cracks in the oven. Therefore, the use of rolled up paper, card-
board or small pieces of wood that when ignited would cause flames to lick the top of the oven should
not be used until after the oven has been fully cured.
Recommended procedure: You may build your fire with wood in a separate location such as a grill and
when the wood is reduced to coals, transfer them to the center of the oven. You may also use natural
charcoal briquettes (with no lighter fluid added) and transfer them from your grill to the oven. (Do not
use lighter fluid when igniting the briquettes or in the future when firing up your oven at any time).
This procedure should be repeated for three days in a row. At the end of each day place the door over
the entrance to keep heat in overnight. At the end of this time your oven should be sufficiently cured and
all moisture should be dried out. Failure to follow these steps may void your oven warranty.
Note: You will notice small hairline cracks in your oven even after you have followed the recommended
procedure. This is normal and is caused by the settling and expansion and contraction of the refractory
dome. Start your first fire after curing slowly, gradually building up to a full flame. Your oven will heat
up to pizza cooking temperature in less than one hour.
Types of wood to use: Most any hardwood is acceptable such as oak, apple, cherry, hickory, etc. You
must not use pine or any wood that has a high sap content.

2011
40
Cambridge Pre-Packaged / Pre-Cut
Olde English Wall Pizza Oven Kit
CURADO INICIAL DE SU NUEVO HORNO DE CAMBRIDGE:
Es primordial que su nuevo horno de la pizza de Cambridge experimenta un curado o la “adaptación”
período antes de encender a calentar por completo. Su horno, aunque la fibra de acero reforzada,
todavía tendrá algunos bolsillos de humedad presentes en sus paredes que tengan que ser desecadas
gradualmente. Si no calentado lentamente, la humedad dará vuelta al vapor y potencialmente causará
las grietas en el horno. Por lo tanto, el uso de rodado encima del papel, de la cartulina o de los pequeños
pedazos de madera que cuando estaban encendidos harían las llamas lamer la tapa del horno no deben
ser utilizados hasta después de que el horno se haya curado completamente.
Procedimiento recomendado: Usted puede construir su fuego con madera en una localización separada
tal como una parrilla hasta que la madera se reduzca a los carbones, los transfiere al centro del horno.
Usted puede también utilizar briquetas naturales del carbón de leña (sin un líquido más ligero
agregado) y transferirlas de su parrilla al horno. (No utilice un líquido más ligero al encender las bri-
quetas o en el futuro al encender para arriba su horno en cualquier momento). Este procedimiento se
debe repetir por tres días en una fila. En el extremo de cada lugar del día la puerta sobre la entrada pa-
ra mantener calor adentro de noche. En el final de este tiempo su horno debe ser curado suficientemente
y toda la humedad debe ser desecada. La falta de seguir estos pasos puede anular su garantía del horno.
Nota: Usted puede todavía notar las pequeñas grietas de rayita en su horno incluso después usted ha se-
guido el procedimiento recomendado. Esto es normal y es causada por el establecimiento y la extensión
y la contracción de la bóveda refractaria. Comience su primer fuego después de curar lentamente, grad-
ualmente aumentando hasta una llama llena. Su horno calentará hasta temperatura de cocción de la piz-
za sobre menos de una hora.
Tipos de madera a utilizar: La mayoría de la cualquier madera dura es aceptable por ejemplo roble,
manzana, cereza, nuez dura, el etc. Usted no debe utilizar el pino o ninguna madera que tenga un alto
contenido de la savia.

2011
41
Cambridge Pre-Packaged / Pre-Cut
Olde English Wall Pizza Oven Kit
Wood Fired Pizza Dough Recipe (for approx 12-15 ten inch pizzas):
Ingredients:
6 ¾ loosely filled cups all purpose flour (imported “flour type 00” is best but all purpose will work well.)
½ oz. active dry yeast (or one tablespoon)
Two teaspoons salt
Two full cups hot tap water
Optional-two tablespoons sugar for crispy crust
(Cut ingredients in half if you wish for smaller groups)
1. Mix together all of the dry ingredients first, then slowly add the water. Keep kneading the dough
thoroughly until it is smooth. Cover with a towel and place in a warm area.
2. Let the dough rise once (about one hour). Punch it down and knead again.
3. Let the dough rise a second time for one hour.
4. After it has risen, punch it down and use it to make your pizzas.
(Tip: Flour the outside of your dough by rolling it top and bottom on a plate covered in loose flour. This
will make your dough easier to work with)
Making Your Pizza:
On a lightly floured surface, such as a piece of smooth marble, granite or other suitable preparation ar-
ea, take a section of dough and either use a rolling pin to flatten it out or work it with your hands and
fingers into an approximately 10 inch round, thin layer. Do not be concerned if you do not get a perfect
circular pizza. It will not affect the taste. Do make sure that it is uniformly flat so it bakes evenly.
Take your pizza sauce, spiced with your favorite herbs and spread evenly around the surface of the piz-
za. Use fresh mozzarella cheese cut thin and spread on top of the sauce. Any other topping of your
choice can be applied at this time such as pepperoni, sausage or vegetables. Quickly slide the metal pizza
peel under your pizza for placement into the oven.
The oven should be between 750-800 degrees Fahrenheit. A good way to test your temperature and to
get acquainted with your oven is to cook your dough without any sauce or toppings and see how long it
takes to bake. It should be ready in less than 2 minutes. With the tools provided in the kit, move the fire
and coals to either the right or left side of the oven, brush area clean and cook pizza on the side opposite
the fire. After about one minute, with the tool provided, turn your pizza 180 degrees so it is evenly ex-
posed to the heat and allow it to finish cooking. Pizzas will typically cook in 90 to 120 seconds. If the
temperature begins to lower, simply place another log on top of the glowing coals and in a short time the
oven will heat up to peak performance.

2011
42
Cambridge Pre-Packaged / Pre-Cut
Olde English Wall Pizza Oven Kit
Receta encendida madera de la pasta de la pizza
(para aproximadamente 12-15 diez pizzas de la pulgada):
Ingredientes:
6 3/4 basos de harina de uso múltiple libremente llenada (el “tipo de harina importado 00” es el mejor
pero de uso múltiple trabajará bien.)
½ onza. levadura seca activa (o una cuchara de sopa)
Sal 2 cucharillas
2tazas de agua caliente
Opcional 2 cucharas de sopa de Azúcar para la corteza curruscante
(Ingredientes corte por la mitad si usted desea para grupos más pequeños)
1. Mezcle juntos todos los ingredientes secos primero, después agregue lentamente el agua. Guarde el
amasar de la pasta a fondo hasta que sea lisa. Cubierta con una toalla y lugar en un área caliente.
2. Deje la pasta levantarse una vez (cerca de una hora). Perfórela abajo y amásela otra vez.
3. Deje la pasta levantarse una segunda vez para una hora.
4. Después de que se haya levantado, perfórela abajo y utilícela para hacer sus pizzas.
(Extremidad: Flour el exterior de su pasta rodándolo superior e inferior en una placa cubierta en harina
floja. Esto hará su pasta más fácil trabajar con)
Fabricación de su pizza:
En una superficie ligeramente floured, tal como un pedazo de mármol liso, el granito o la otra área con-
veniente de la preparación, toma una sección de la pasta y utilice un perno de balanceo para aplanarlo
hacia fuera o para trabajarlo con sus manos y dedos en aproximadamente 10 pulgadas redondas, de ca-
pa delgada. No se trate si usted no consigue una pizza circular perfecta. No afectará al gusto. Cerciórese
de que sea uniformemente plana así que cuece al horno uniformemente.
Tome su salsa de la pizza, condimentada con sus hierbas preferidas y sepárese uniformemente alrededor
de la superficie de la pizza. Utilice el queso fresco de la mozarela cortado delgadamente y sepárese enci-
ma de la salsa. Cualquier otro desmoche de su opción puede ser aplicado en este tiempo tal como sal-
chichones, salchicha o vehículos. Resbale rápidamente la cáscara de la pizza del metal debajo de su piz-
za para la colocación dentro del horno.
El horno debe estar entre 750-800 grados Fahrenheit. Una buena manera de probar su temperatura y
de conseguir conocida con su horno es cocinar su pasta sin ninguna salsa o desmoches y considerar
cuánto tiempo toma para cocer al horno. Debe estar lista en menos de 2 minutos. Con las herramientas
proporcionadas en kit, mueva el fuego y los carbones al lado izquierdo correcto o del horno, cepille el
área limpia y cocine la pizza en el lateral enfrente del fuego. Después de que cerca de un minuto, con la
herramienta proporcionada, dé vuelta a su pizza 180 grados así que se expone uniformemente al calor y
permite que acabe de cocinar. Las pizzas cocinarán típicamente en 90 a 120 segundos. Si la temperatura
comienza a bajar, ponga simplemente otra tapa de la conexión de los carbones que brillan intensamente
y en un breve periodo de tiempo el horno calentará hasta funcionamiento máximo.
1/43