
INSTRUCTIONS FOR INSTALLING CORNER / FINISHED END STONES
(please read carefully BEFORE you unwrap your trays!)
IMPORTANT
Carefully review the AirStone installation instructions
(included in this carton, on a separate sheet). This
will give you a general overview on how to install
AirStone.
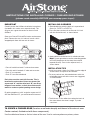
Open your Corner/Finished End carton and remove a
pack. Observe the way it is laid out. In each shrink
wrapped pack there are two sets of stones:
- Piece #1 and #2 are both 2” wide and are mates
- Piece # 3 and #4 are both 4” wide and are mates
- Ends “A” are squared
- Ends “B” have one rolled end
Each piece must be used with its mate. This is
because the outer ends of these two stones (the
square end “A” and the rolled end “B”) are mirror
images of one another, so their face contours will
match to create our patent pending corner design.
By pairing together at a 90º angle the square end “A”
with the rolled end “B”, you create beautiful corners!
TO CREATE A FINISHED EDGE (for when a wall ends abruptly and the end of the stone is seen.
Create a natural, finished end with these components).
Use the rolled-end stone as the last stone of the row. Use its mate anywhere as primary stone.
INSTALLING CORNERS
1. Spread adhesive onto the back of a squared-end
piece (i.e., PIECE 1 or PIECE 3).
2. Press the piece to the wall so that end A is flush
with the end of the wall, as shown below.
3. Apply adhesive to the back of its rolled-end mate.
Note: Do not get adhesive on the extending portion
of End B (the portion of the stone that extends
beyond the wall). Press to the adjacent wall, as
shown above.
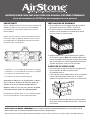
INSTALLATION TIPS
• Install your corner stones first. Make sure the edge of
all the stones are square to one another.
• For every vertical row, alternate between walls the
rolled edge stone so that the seams are staggered,
as shown below:
• The thickness of the adhesive used on the back of
the stone effects the stone’s length. Try to be
consistent.

INSTRUCCIONES PARA INSTALAR PIEZAS DE ESQUINA/ EXTREMO TERMINADO
(¡Lea detenidamente ANTES de desempaquetar sus piezas!)
IMPORTANTE
Revise cuidadosamente las instrucciones de instalación de
AirStone (incluidas en esta caja, en una hoja separada).
Esto le dará una visión general sobre cómo instalar las
piezas AirStone.
Abra la caja que contiene sus piezas de esquina/ extremo
terminado y saque un paquete. Observe la forma en que
está organizado. En cada paquete envuelto en film trans-
parente hay dos sets de piezas:
- Las piezas # 1 y # 2 son ambas de 2" de ancho y son pareja.
- Las piezas # 3 y # 4 son ambas de 4" de ancho y son pareja.
- Los extremos "A" tienen bordes rectos.
- Los extremos "B" tienen un borde irregular.
Cada pieza se debe usar con su pareja. Esto se debe a
que los extremos exteriores de estas dos piezas (el
extremo recto "A" y el extremo irregular "B") son
imágenes entre sí, por lo que sus contornos encajarán
para formar nuestro diseño de esquina patentado.
¡Al emparejar el extremo recto "A" con el extremo irregular
"B" en un ángulo de 90º, creará esquinas preciosas!
PARA CREAR UN BORDE TERMINADO (Para cuando una pared termina abruptamente y se ve el extremo de la
pieza. Puede crear un extremo terminado natural con estos componentes).
Utilice la pieza de extremo irregular como última pieza de la fila. Utilice su pareja en cualquier lugar como pieza primaria.
INSTALACIÓN DE ESQUINAS
1. Unte el adhesivo en la parte posterior de una pieza
de extremo recto (o sea, PIEZA 1 o PIEZA 3).
2. Presione la pieza en la pared de modo que el
extremo A esté alineado con el borde de la pared,
como se muestra a continuación.
3. Aplique adhesivo en la parte posterior de la pareja
de extremo irregular. Nota: No coloque adhesivo en
la parte extendida del Extremo B (la parte de la piedra
que se extiende más allá de la pared).Presione hacia
la pared adyacente, como se muestra arriba.
CONSEJOS DE INSTALACIÓN
• Instale primero las piezas de esquina. Asegúrese de
que los bordes de todas las piezas estén
encuadrados entre sí.
• Para cada fila vertical, debe alternar entre las paredes
la pieza de borde irregular para que las costuras
queden escalonadas, como se muestra a continuación
• El grosor del adhesivo aplicado en la parte posterior
de la pieza afecta la longitud de la pieza. Trate de ser
consistente.
PIEZA 1
PIEZA 3
PIEZA 2
PIEZA 4
-
 1
1
-
 2
2


