
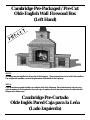
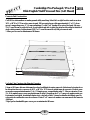
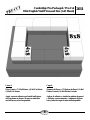
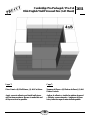
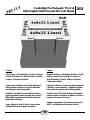
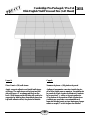
Cambridge Pre-Packaged / Pre-Cut
Olde English Wall Firewood Box
(Left Hand)
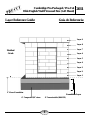
Cambridge Pre-Cortado
Olde Inglés Pared Caja para la Leña
(Lado Izquierda)
NOTE:
Woodbox may be installed on either side of the fireplace. These instructions are for a left side woodbox.
For a right side woodbox, reverse the placement of the block on the top layer.
NOTA:
Caja de madera se puede instalar en cualquier lado de la chimenea. Estas instrucciones son para una
caja de madera de lado izquierdo. Para una caja de madera de lado derecho, invierta la colocación del
bloque en la última capa.

2011
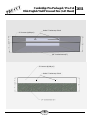
Cambridge Pre-Packaged / Pre-Cut
Olde English Wall Firewood Box (Left Hand)
1
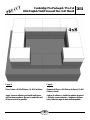
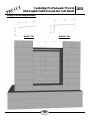
Layer Reference Guide: Guía de Referencia:
Finished
Grade
Layer 7
Layer 6
Layer 5
Layer 4
Layer 3
Layer 2
Layer 1
Foundation Layer
2” Above Foundation
Layer 8
Layer 9
6” Compacted 3/4” stone 4” Concrete slab (4000 PSI)

2011
Cambridge Pre-Packaged / Pre-Cut
Olde English Wall Firewood Box (Left Hand)
2
Tools Required for Woodbox Installation:
Safety Goggles
Ear Protection
Dust Mask
Gloves
Shovels (digging & flat)
Metal Cutters for banding on cubes
Mason Hammer (chipping, hammer)
Road Stone Rake
Tamper (Hand or Mechanical)
Wheelbarrow
Level (2’ and 6’ recommended)
Speed Square
Caulk Gun 10 oz or 28 oz (depends on what size
adhesive is purchased)
Rubber Mallet
14” Demo saw with diamond blade
Tape Measure
Marking Device (pencil, soap stone, etc)
Chalk Line
Hand Broom
Concrete Tools (Trowel/Floats)
2 Carpenter Clamps
Drill & 1/16” bit
5/16” nut driver
7 ¼” Circular saw with wood blade
4” Electric grinder
4” Diamond cup grinder
Items Included in the Woodbox Kit:
2 - Reinforced concrete lintels 32” x 4” x 8”
3 - Plastic shim pack sheet for leveling lintels or
block as needed
Imported polished granite tile for facing front of
fireplace (4”x12” and 4”x8” tiles)
1 - Cube of Cambridge Olde English Wall
1 - Installation manual for concrete pad and Olde
English Wall
Material Required:
¾” clean stone (approx. 1/4 ton)
Concrete (approx. 9-80 lb bags)
Cambridge concrete adhesive (approx. 2-29 oz.
or 6-10.3 oz. tubes)
(4 pcs) 2” x 4” x 8’ lumber
2 ½” wood screws
½” rebar (approx. 8’)

2011
Cambridge Pre-Packaged / Pre-Cut
Olde English Wall Firewood Box (Left Hand)
3
Herramientas Necesarias para Instalación:
Gafas de seguridad
Protección auditiva
Máscara de polvo
Guantes
Palas (excavación y plano)
Cortadores de Metal de bandas en los cubos
Mason Hammer (astillado, martillo)
Camino del rastrillo de Piedra
Sabotaje (manual o mecánica)
Carretilla
(Nivel (2’y 6’ recomendado)
Velocidad de la Plaza
Pistola para calafatear 10 oz o 28 oz (depende de
qué tamaño es comprar pegamento)
Martillo de goma
14” Demo sierra con disco de diamante
Cinta métrica
Dispositivo de marcado (lápiz, piedra jabón, etc)
Línea de tiza
Escoba de mano
Herramientas concretas (paleta / flotadores)
2 abrazaderas Carpintero
Taladro y 1/16” bits
5/16”tuerca conductor
7 ¼” Sierra circular con hoja de madera
4” molinillo eléctrico
4” Diamante trituradora taza
Los Artículos Incluidos en el Kit de la Chimenea:
2 - Dinteles de hormigón armado de 32”x 4” x 8”
3 - Cuña de plástico hoja de paquete para nivelar
dinteles o bloquear cuando sea necesario
Importados baldosas de granito pulido para hacer
frente a frente de la chimenea (4”x 12” y 4”x 8” azu-
lejos)
1 - Cubo de Olde Cambridge Inglés Pared
1 - Manual de instalación para la plataforma de
concreto y Olde Inglés pared
Material Necesario:
¾”piedra limpia (aprox. 1/4 de tonelada)
Hormigón (aproximadamente 9-bolsas de 80
libras)
Cambridge concretas adhesivo (aprox. 2-29oz
o de 6-10.3 oz. tubos)
(4 piezas) de 2”x 4” x 8’de madera
2 ½”tornillos para madera
½”barra de refuerzo (aprox. 8’)

2011
Cambridge Pre-Packaged / Pre-Cut
Olde English Wall Firewood Box (Left Hand)
4
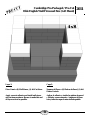
Concrete Pad Construction:
Call 811 for information on underground utility marking. Select left or right location and excavate a
36”L x 48”W x 12”D area for concrete pad. Fill excavated area with approximately 6” of ¾” clean
gravel, compacting every 3”. Frame remaining 4” with 2”x4” lumber to create a level pad. (Be sure
2”x4” wood frame is perfectly level, front to back and side to side) See attached drawing for details of
steel reinforcement rod placement. Fill 2”x 4” wood frame with a 4,000 psi concrete mix.
*Allow pad to cure for minimum of 48 hours.
La Leña Caja Construcción Base de Concreto:
Llame al 811 para obtener información sobre la utilidad de metro marcado. Seleccione la izquierda oa
la ubicación correcta y excavar de 36”L x 48”W x 12”D área de plataforma de concreto. Llene la zona
excavada con aproximadamente 6” de ¾” limpia grava, compactando cada 3”. Marco restantes 4”con
2”x 4”de madera para crear una plataforma de nivel. (Asegúrese de 2”x 4” marco de madera está per-
fectamente horizontal, de adelante hacia atrás y de lado a lado) Véanse los detalles del dibujo para la
colocación de varillas de acero de refuerzo. Llene 2”x 4” marco de madera con una mezcla de concreto
4,000 psi.
*Deje que la almohadilla para curar por un mínimo de 48 horas.
48”
36”
14”
14”
4”
6” 10”

2011
Cambridge Pre-Packaged / Pre-Cut
Olde English Wall Firewood Box (Left Hand)
5
4” Concrete (4,000 psi.)
Rebar 2” below top of slab
3/4” Crushed stone (6”)
4” Concrete (4,000 psi.)
Rebar 2” below top of slab

2011
Cambridge Pre-Packaged / Pre-Cut
Olde English Wall Firewood Box (Left Hand)
6
Stones Included In The Kit:
4”x8”x32” Lintel (2 Pieces) 6”x12” Stone Cut (4 Pieces)
8”x8” Stone Cut (5 Pieces) Wall Stones (75 Pieces) 4”x8” Stone Cut (10 Pieces)
4”x8”x3/8” Tile (1Piece) 4”x12”x3/8” Tile (1 Piece) 4”x6”x1” Veneer Cut (2 Pieces)

2011
Cambridge Pre-Packaged / Pre-Cut
Olde English Wall Firewood Box (Left Hand)
7
Layer 1:
Piece Count = (9) Wall Stones, (1) 8x8 Cut Stone,
(1) 4x8 Cut Stone
Apply adhesive and install wall stones and cut
stones as shown. The woodbox will be set against
the side of the fireplace. The back of the first
layer will be even with the back of the fireplace.
See photo for details. Be sure to make this and
all layers as level as possible.
Capa 1:
Numero de Piezas = (9) Piedras de Pared, (1) 8x8
Piedra Cortada, (1) 4x8 Piedra Cortada
Aplicar el adhesivo y instale las piedras de la pa-
red y piedras talladas, como se muestra. La leñe-
ra se establecerá en el lado de la chimenea. La
parte posterior de la primera capa será aún más
con la parte posterior de la chimenea. Vea la foto
para obtener más información, aplicar el adhesi-
vo. Asegúrese de hacer esto y todas las capas lo
más nivelado posible.

2011
Cambridge Pre-Packaged / Pre-Cut
Olde English Wall Firewood Box (Left Hand)
8
Layer 2:
Piece Count = (7) Wall Stones, (1) 8x8 Cut Stone,
(2) 4x8 Cut Stones
Apply concrete adhesive and install wall stones
and cut stones as shown. Be sure to make this
and all layers as level as possible.
Capa 2:
Numero de Piezas = (7) Piedras de Pared, (1) 8x8
Piedra Cortada, (2) 4x8 Piedra Cortada
Aplicar el adhesivo y instale las piedras de pared
y talladas, como se muestra. Asegúrese de hacer
esto y todas las capas lo más nivelado posible.

2011
Cambridge Pre-Packaged / Pre-Cut
Olde English Wall Firewood Box (Left Hand)
9
Layer 3:
Piece Count = (8) Wall Stones, (1) 4x8 Cut Stone
Apply concrete adhesive and install wall stones
and cut stone as shown. Be sure to make this and
all layers as level as possible.
Capa 3:
Numero de Piezas = (8) Piedras de Pared, (1) 4x8
Piedra Cortada
Aplicar el adhesivo y instale las piedras de pared
y talladas, como se muestra. Asegúrese de hacer
esto y todas las capas lo más nivelado posible.

2011
Cambridge Pre-Packaged / Pre-Cut
Olde English Wall Firewood Box (Left Hand)
10
Layer 4:
Piece Count = (7) Wall Stones, (1) 8x8 Cut Stone,
(2) 4x8 Cut Stones
Apply concrete adhesive and install wall stones
and cut stones as shown. Be sure to make this
and all layers as level as possible.
Capa 4:
Numero de Piezas = (7) Piedras de Pared, (1) 8x8
Piedra Cortada, (2) 4x8 Piedra Cortada
Aplicar el adhesivo y instale las piedras de pared
y talladas, como se muestra. Asegúrese de hacer
esto y todas las capas lo más nivelado posible.

2011
Cambridge Pre-Packaged / Pre-Cut
Olde English Wall Firewood Box (Left Hand)
11
Layer 5:
Piece Count = (8) Wall Stones, (1) 4x8 Cut Stone
Apply concrete adhesive and install wall stones
and cut stone as shown. Be sure to make this and
all layers as level as possible.
Capa 5:
Numero de Piezas = (8) Piedras de Pared, (1) 4x8
Piedra Cortada
Aplicar el adhesivo y instale las piedras de pared
y talladas, como se muestra. Asegúrese de hacer
esto y todas las capas lo más nivelado posible.

2011
Cambridge Pre-Packaged / Pre-Cut
Olde English Wall Firewood Box (Left Hand)
12
Layer 6:
Piece Count = (7) Wall Stones, (1) 8x8 Cut Stone,
(2) 4x8 Cut Stones
Apply concrete adhesive and install wall stones
and cut stones as shown. Be sure to make this
and all layers as level as possible.
Capa 6:
Numero de Piezas = (7) Piedras de Pared, (1) 8x8
Piedra Cortada, (2) 4x8 Piedra Cortada
Aplicar el adhesivo y instale las piedras de pared
y talladas, como se muestra. Asegúrese de hacer
esto y todas las capas lo más nivelado posible.

2011
Cambridge Pre-Packaged / Pre-Cut
Olde English Wall Firewood Box (Left Hand)
13
Layer 7:
Piece Count = (8) Wall Stones, (1) 4x8 Cut Stone
Apply concrete adhesive and install wall stones
and cut stone as shown. Be sure to make this and
all layers as level as possible.
Capa 7:
Numero de Piezas = (8) Piedras de Pared, (1) 4x8
Piedra Cortada
Aplicar el adhesivo y instale las piedras de pared
y talladas, como se muestra. Asegúrese de hacer
esto y todas las capas lo más nivelado posible.

2011
Cambridge Pre-Packaged / Pre-Cut
Olde English Wall Firewood Box (Left Hand)
14
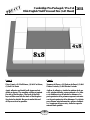
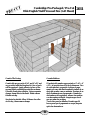
Layer 8:
Piece Count = (3) Wall Stones, (1) 8x8 Cut Stone,
(4) 6x12 Cut Stones, (2) 4x8x32 Lintels, (2) 4x6x1
Veneer Cut Stones (for lintel)
Apply concrete adhesive and install wall stones
and cut stones as shown. Be sure to make this
and all layers as level as possible.
Install the (2) 4x8x32 concrete lintels as shown,
applying adhesive where the ends rest on layer 7.
Shim will be required under lintels so they are
flush with wall stones.
Apply adhesive to the (2) 4x6x1 veneer stones
and install them according to the photo.
Capa 8:
Numero de Piezas = (3) Piedras de Pared, (1) 8x8
Piedra Cortada, (4) 6x12 Piedra Cortada, (2)
4x8x32 Dinteles, (2) 4x6x1 Piedra Cortada de
Chapa (para dintel)
Aplicar el adhesivo y instale las piedras de pared
y talladas, como se muestra. Asegúrese de hacer
esto y todas las capas lo más nivelado posible.
Instale los dos (2) 4x 8x32 dinteles de hormigón
como se muestra, de aplicar el adhesivo en los ex-
tremos de descanso en la capa 7.
Aplique el pegamento a las piedras de chapa (2)
4x6x1 y su instalación de acuerdo a la foto.

2011
Cambridge Pre-Packaged / Pre-Cut
Olde English Wall Firewood Box (Left Hand)
15
4x8x3/8” Tile 4x12x3/8” Tile
See page 16 for tile facing instructions.

2011
Cambridge Pre-Packaged / Pre-Cut
Olde English Wall Firewood Box (Left Hand)
16
Granite Tile Facing:
Granite tile are precut to 4”x8” and 4”x12” and
are provided with the fireplace kit. One of each
will be required. Apply adhesive to face of the
exposed lintel and install granite tile as shown.
Press tile firmly into adhesive. Using carpenter
clamps, clamp tiles to the lintel. Please ensure
tiles do not sag.
See photo for details. Allow 24 hours for adhe-
sive to dry, then remove clamps.
Granito Baldosa:
El azulejo del granito es precortado a 4” x8” y 4”
x12” y se proporciona el kit de la chimenea. Uno
de cada uno será requerido. Aplique el pega-
mento a la cara del dintel expuesto e instale el az-
ulejo del granito como se muestra. Presione el az-
ulejo firmemente en el pegamento. Usando las
abrazaderas del carpintero, afiance los azulejos
con abrazadera al dintel. Asegúrese por favor
que no cedan los azulejos.
Vea la foto para los detalles. Permita que 24
horas para que el pegamento se seque, después
quite las abrazaderas.

2011
Cambridge Pre-Packaged / Pre-Cut
Olde English Wall Firewood Box (Left Hand)
17
Layer 9:
Piece Count = (18) wall stones
Apply concrete adhesive and install wall stones
as shown. The wall stones on the front and left
side will have a 4” overhang and flush on the
back. (Wall stones on the left side will need to be
supported or held in place from block placed on
top until adhesive dries.) See photo for details.
Capa 9:
Numero de piezas = (18) piedras de pared
Aplique el pegamento concreto e instale las pie-
dras de la pared como se muestra. Las piedras de
la pared en el lado izquierdo delantero y tendrán
la proyección 4” y rubor en la parte posterior.
(Las piedras de la pared en el lado izquierdo ne-
cesitarán ser apoyadas o ser sostenidas en el
lugar del bloque puesto en tapa hasta que el pega-
mento se seque.) Vea la foto para los detalles.

2011
Cambridge Pre-Packaged / Pre-Cut
Olde English Wall Firewood Box (Left Hand)
18
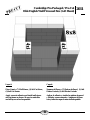
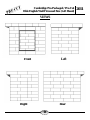
VIEWS
Front Left
Right Rear
Transcripción de documentos
Cambridge Pre-Packaged / Pre-Cut Olde English Wall Firewood Box (Left Hand) NOTE: Woodbox may be installed on either side of the fireplace. These instructions are for a left side woodbox. For a right side woodbox, reverse the placement of the block on the top layer. NOTA: Caja de madera se puede instalar en cualquier lado de la chimenea. Estas instrucciones son para una caja de madera de lado izquierdo. Para una caja de madera de lado derecho, invierta la colocación del bloque en la última capa. Cambridge Pre-Cortado Olde Inglés Pared Caja para la Leña (Lado Izquierda) Cambridge Pre-Packaged / Pre-Cut Olde English Wall Firewood Box (Left Hand) Layer Reference Guide: 2011 Guía de Referencia: Layer 9 Layer 8 Layer 7 Finished Grade Layer 6 Layer 5 Layer 4 Layer 3 Layer 2 Layer 1 2” Above Foundation Foundation Layer 6” Compacted 3/4” stone 4” Concrete slab (4000 PSI) 1 Cambridge Pre-Packaged / Pre-Cut Olde English Wall Firewood Box (Left Hand) 2011 Tools Required for Woodbox Installation: Material Required: Safety Goggles Ear Protection Dust Mask Gloves Shovels (digging & flat) Metal Cutters for banding on cubes Mason Hammer (chipping, hammer) Road Stone Rake Tamper (Hand or Mechanical) Wheelbarrow Level (2’ and 6’ recommended) Speed Square Caulk Gun 10 oz or 28 oz (depends on what size adhesive is purchased) Rubber Mallet 14” Demo saw with diamond blade Tape Measure Marking Device (pencil, soap stone, etc) Chalk Line Hand Broom Concrete Tools (Trowel/Floats) 2 Carpenter Clamps Drill & 1/16” bit 5/16” nut driver 7 ¼” Circular saw with wood blade 4” Electric grinder 4” Diamond cup grinder ¾” clean stone (approx. 1/4 ton) Concrete (approx. 9-80 lb bags) Cambridge concrete adhesive (approx. 2-29 oz. or 6-10.3 oz. tubes) (4 pcs) 2” x 4” x 8’ lumber 2 ½” wood screws ½” rebar (approx. 8’) Items Included in the Woodbox Kit: 2 - Reinforced concrete lintels 32” x 4” x 8” 3 - Plastic shim pack sheet for leveling lintels or block as needed Imported polished granite tile for facing front of fireplace (4”x12” and 4”x8” tiles) 1 - Cube of Cambridge Olde English Wall 1 - Installation manual for concrete pad and Olde English Wall 2 Cambridge Pre-Packaged / Pre-Cut Olde English Wall Firewood Box (Left Hand) 2011 Herramientas Necesarias para Instalación: Material Necesario: Gafas de seguridad Protección auditiva Máscara de polvo Guantes Palas (excavación y plano) Cortadores de Metal de bandas en los cubos Mason Hammer (astillado, martillo) Camino del rastrillo de Piedra Sabotaje (manual o mecánica) Carretilla (Nivel (2’y 6’ recomendado) Velocidad de la Plaza Pistola para calafatear 10 oz o 28 oz (depende de qué tamaño es comprar pegamento) Martillo de goma 14” Demo sierra con disco de diamante Cinta métrica Dispositivo de marcado (lápiz, piedra jabón, etc) Línea de tiza Escoba de mano Herramientas concretas (paleta / flotadores) 2 abrazaderas Carpintero Taladro y 1/16” bits 5/16”tuerca conductor 7 ¼” Sierra circular con hoja de madera 4” molinillo eléctrico 4” Diamante trituradora taza ¾”piedra limpia (aprox. 1/4 de tonelada) Hormigón (aproximadamente 9-bolsas de 80 libras) Cambridge concretas adhesivo (aprox. 2-29oz o de 6-10.3 oz. tubos) (4 piezas) de 2”x 4” x 8’de madera 2 ½”tornillos para madera ½”barra de refuerzo (aprox. 8’) Los Artículos Incluidos en el Kit de la Chimenea: 2 - Dinteles de hormigón armado de 32”x 4” x 8” 3 - Cuña de plástico hoja de paquete para nivelar dinteles o bloquear cuando sea necesario Importados baldosas de granito pulido para hacer frente a frente de la chimenea (4”x 12” y 4”x 8” azulejos) 1 - Cubo de Olde Cambridge Inglés Pared 1 - Manual de instalación para la plataforma de concreto y Olde Inglés pared 3 Cambridge Pre-Packaged / Pre-Cut Olde English Wall Firewood Box (Left Hand) 2011 Concrete Pad Construction: Call 811 for information on underground utility marking. Select left or right location and excavate a 36”L x 48”W x 12”D area for concrete pad. Fill excavated area with approximately 6” of ¾” clean gravel, compacting every 3”. Frame remaining 4” with 2”x4” lumber to create a level pad. (Be sure 2”x4” wood frame is perfectly level, front to back and side to side) See attached drawing for details of steel reinforcement rod placement. Fill 2”x 4” wood frame with a 4,000 psi concrete mix. *Allow pad to cure for minimum of 48 hours. 48” 14” 36” 14” 4” 6” 10” La Leña Caja Construcción Base de Concreto: Llame al 811 para obtener información sobre la utilidad de metro marcado. Seleccione la izquierda oa la ubicación correcta y excavar de 36”L x 48”W x 12”D área de plataforma de concreto. Llene la zona excavada con aproximadamente 6” de ¾” limpia grava, compactando cada 3”. Marco restantes 4”con 2”x 4”de madera para crear una plataforma de nivel. (Asegúrese de 2”x 4” marco de madera está perfectamente horizontal, de adelante hacia atrás y de lado a lado) Véanse los detalles del dibujo para la colocación de varillas de acero de refuerzo. Llene 2”x 4” marco de madera con una mezcla de concreto 4,000 psi. *Deje que la almohadilla para curar por un mínimo de 48 horas. 4 Cambridge Pre-Packaged / Pre-Cut Olde English Wall Firewood Box (Left Hand) Rebar 2” below top of slab 4” Concrete (4,000 psi.) 3/4” Crushed stone (6”) 4” Concrete (4,000 psi.) Rebar 2” below top of slab 5 2011 Cambridge Pre-Packaged / Pre-Cut Olde English Wall Firewood Box (Left Hand) 2011 Stones Included In The Kit: 4”x8”x32” Lintel (2 Pieces) 8”x8” Stone Cut (5 Pieces) 4”x8”x3/8” Tile (1Piece) 6”x12” Stone Cut (4 Pieces) Wall Stones (75 Pieces) 4”x12”x3/8” Tile (1 Piece) 6 4”x8” Stone Cut (10 Pieces) 4”x6”x1” Veneer Cut (2 Pieces) Cambridge Pre-Packaged / Pre-Cut Olde English Wall Firewood Box (Left Hand) 2011 Layer 1: Capa 1: Piece Count = (9) Wall Stones, (1) 8x8 Cut Stone, (1) 4x8 Cut Stone Numero de Piezas = (9) Piedras de Pared, (1) 8x8 Piedra Cortada, (1) 4x8 Piedra Cortada Apply adhesive and install wall stones and cut stones as shown. The woodbox will be set against the side of the fireplace. The back of the first layer will be even with the back of the fireplace. See photo for details. Be sure to make this and all layers as level as possible. Aplicar el adhesivo y instale las piedras de la pared y piedras talladas, como se muestra. La leñera se establecerá en el lado de la chimenea. La parte posterior de la primera capa será aún más con la parte posterior de la chimenea. Vea la foto para obtener más información, aplicar el adhesivo. Asegúrese de hacer esto y todas las capas lo más nivelado posible. 7 Cambridge Pre-Packaged / Pre-Cut Olde English Wall Firewood Box (Left Hand) 2011 Layer 2: Capa 2: Piece Count = (7) Wall Stones, (1) 8x8 Cut Stone, (2) 4x8 Cut Stones Numero de Piezas = (7) Piedras de Pared, (1) 8x8 Piedra Cortada, (2) 4x8 Piedra Cortada Apply concrete adhesive and install wall stones and cut stones as shown. Be sure to make this and all layers as level as possible. Aplicar el adhesivo y instale las piedras de pared y talladas, como se muestra. Asegúrese de hacer esto y todas las capas lo más nivelado posible. 8 Cambridge Pre-Packaged / Pre-Cut Olde English Wall Firewood Box (Left Hand) 2011 Layer 3: Capa 3: Piece Count = (8) Wall Stones, (1) 4x8 Cut Stone Numero de Piezas = (8) Piedras de Pared, (1) 4x8 Piedra Cortada Apply concrete adhesive and install wall stones and cut stone as shown. Be sure to make this and all layers as level as possible. Aplicar el adhesivo y instale las piedras de pared y talladas, como se muestra. Asegúrese de hacer esto y todas las capas lo más nivelado posible. 9 Cambridge Pre-Packaged / Pre-Cut Olde English Wall Firewood Box (Left Hand) 2011 Layer 4: Capa 4: Piece Count = (7) Wall Stones, (1) 8x8 Cut Stone, (2) 4x8 Cut Stones Numero de Piezas = (7) Piedras de Pared, (1) 8x8 Piedra Cortada, (2) 4x8 Piedra Cortada Apply concrete adhesive and install wall stones and cut stones as shown. Be sure to make this and all layers as level as possible. Aplicar el adhesivo y instale las piedras de pared y talladas, como se muestra. Asegúrese de hacer esto y todas las capas lo más nivelado posible. 10 Cambridge Pre-Packaged / Pre-Cut Olde English Wall Firewood Box (Left Hand) 2011 Layer 5: Capa 5: Piece Count = (8) Wall Stones, (1) 4x8 Cut Stone Numero de Piezas = (8) Piedras de Pared, (1) 4x8 Piedra Cortada Apply concrete adhesive and install wall stones and cut stone as shown. Be sure to make this and all layers as level as possible. Aplicar el adhesivo y instale las piedras de pared y talladas, como se muestra. Asegúrese de hacer esto y todas las capas lo más nivelado posible. 11 Cambridge Pre-Packaged / Pre-Cut Olde English Wall Firewood Box (Left Hand) 2011 Layer 6: Capa 6: Piece Count = (7) Wall Stones, (1) 8x8 Cut Stone, (2) 4x8 Cut Stones Numero de Piezas = (7) Piedras de Pared, (1) 8x8 Piedra Cortada, (2) 4x8 Piedra Cortada Apply concrete adhesive and install wall stones and cut stones as shown. Be sure to make this and all layers as level as possible. Aplicar el adhesivo y instale las piedras de pared y talladas, como se muestra. Asegúrese de hacer esto y todas las capas lo más nivelado posible. 12 Cambridge Pre-Packaged / Pre-Cut Olde English Wall Firewood Box (Left Hand) 2011 Layer 7: Capa 7: Piece Count = (8) Wall Stones, (1) 4x8 Cut Stone Numero de Piezas = (8) Piedras de Pared, (1) 4x8 Piedra Cortada Apply concrete adhesive and install wall stones and cut stone as shown. Be sure to make this and all layers as level as possible. Aplicar el adhesivo y instale las piedras de pared y talladas, como se muestra. Asegúrese de hacer esto y todas las capas lo más nivelado posible. 13 Cambridge Pre-Packaged / Pre-Cut Olde English Wall Firewood Box (Left Hand) 2011 Layer 8: Capa 8: Piece Count = (3) Wall Stones, (1) 8x8 Cut Stone, (4) 6x12 Cut Stones, (2) 4x8x32 Lintels, (2) 4x6x1 Veneer Cut Stones (for lintel) Numero de Piezas = (3) Piedras de Pared, (1) 8x8 Piedra Cortada, (4) 6x12 Piedra Cortada, (2) 4x8x32 Dinteles, (2) 4x6x1 Piedra Cortada de Chapa (para dintel) Apply concrete adhesive and install wall stones and cut stones as shown. Be sure to make this and all layers as level as possible. Aplicar el adhesivo y instale las piedras de pared y talladas, como se muestra. Asegúrese de hacer esto y todas las capas lo más nivelado posible. Install the (2) 4x8x32 concrete lintels as shown, applying adhesive where the ends rest on layer 7. Shim will be required under lintels so they are flush with wall stones. Instale los dos (2) 4x 8x32 dinteles de hormigón como se muestra, de aplicar el adhesivo en los extremos de descanso en la capa 7. Aplique el pegamento a las piedras de chapa (2) 4x6x1 y su instalación de acuerdo a la foto. Apply adhesive to the (2) 4x6x1 veneer stones and install them according to the photo. 14 Cambridge Pre-Packaged / Pre-Cut Olde English Wall Firewood Box (Left Hand) See page 16 for tile facing instructions. 4x8x3/8” Tile 4x12x3/8” Tile 15 2011 Cambridge Pre-Packaged / Pre-Cut Olde English Wall Firewood Box (Left Hand) 2011 Granite Tile Facing: Granito Baldosa: Granite tile are precut to 4”x8” and 4”x12” and are provided with the fireplace kit. One of each will be required. Apply adhesive to face of the exposed lintel and install granite tile as shown. Press tile firmly into adhesive. Using carpenter clamps, clamp tiles to the lintel. Please ensure tiles do not sag. El azulejo del granito es precortado a 4” x8” y 4” x12” y se proporciona el kit de la chimenea. Uno de cada uno será requerido. Aplique el pegamento a la cara del dintel expuesto e instale el azulejo del granito como se muestra. Presione el azulejo firmemente en el pegamento. Usando las abrazaderas del carpintero, afiance los azulejos con abrazadera al dintel. Asegúrese por favor que no cedan los azulejos. Vea la foto para los detalles. Permita que 24 horas para que el pegamento se seque, después quite las abrazaderas. See photo for details. Allow 24 hours for adhesive to dry, then remove clamps. 16 Cambridge Pre-Packaged / Pre-Cut Olde English Wall Firewood Box (Left Hand) 2011 Layer 9: Capa 9: Piece Count = (18) wall stones Numero de piezas = (18) piedras de pared Apply concrete adhesive and install wall stones as shown. The wall stones on the front and left side will have a 4” overhang and flush on the back. (Wall stones on the left side will need to be supported or held in place from block placed on top until adhesive dries.) See photo for details. Aplique el pegamento concreto e instale las piedras de la pared como se muestra. Las piedras de la pared en el lado izquierdo delantero y tendrán la proyección 4” y rubor en la parte posterior. (Las piedras de la pared en el lado izquierdo necesitarán ser apoyadas o ser sostenidas en el lugar del bloque puesto en tapa hasta que el pegamento se seque.) Vea la foto para los detalles. 17 Cambridge Pre-Packaged / Pre-Cut Olde English Wall Firewood Box (Left Hand) VIEWS Front Left Right Rear 18 2011-
 1
1
-
 2
2
-
 3
3
-
 4
4
-
 5
5
-
 6
6
-
 7
7
-
 8
8
-
 9
9
-
 10
10
-
 11
11
-
 12
12
-
 13
13
-
 14
14
-
 15
15
-
 16
16
-
 17
17
-
 18
18
-
 19
19


Documentos relacionados
-
CAMBRIDGE Pre-Cut Manual de usuario
-
-
-
-
-
-
-
-
-
