
16
AIR CONDITIONER OPERATION
OPERACIÓN DEL ACONDICIONADOR DE AIRE
AIR CONDITIONER OPERATION
OPERACIÓN DEL ACONDICIONADOR DE AIRE
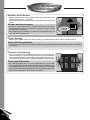
Operating the unit
Hacer funcionar la unidad
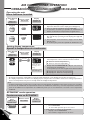
1. Start operation by pressing OFF/ON.
Operation will start and the display panel will light up.
1. Poner en marcha empujando el botón OFF/ON.
La operación enciende y la pantella de visualización se
ilumina mostrando las temperaturas arregladas antes.
2. To stop operation, press OFF/ON again.
The unit will stop operating and the display panel light will
turn off.
2. Para suspender el funcionamiento, empuja el botón OFF/
ON de nuevo.
La unidad se para y la luz de la pantella de visualización cesa.
Display
Pantalla de
visualización
Touch Control
Panel
Tablero de
instrumentos
Remote control
Telecontrol
OFF/ON
OPERATION
OFF/ON
OPERATION
OPERATION
OPERATION
hr
°F
hr
°F
Setting display temperature
Ajustar la temperatura de visualización
1. Press TEMP/TIMER 5 or ∞ to set the display temperature.
The temperature can be set between 60°F and 86°F.
5 Press to increase temperature
∞ Press to decrease temperature
1. Empuja el botón TEMP/TIMER 5 o ∞ para seleccionar la
temperatura de visualización.
La temperatura puede estar arreglada desde 60ºF hasta 86ºF.
5 Empuja para aumentar la temperatura
∞ Empuja para disminuir la temperatura
Display will change
according to the
setting.
La indicación cambia
según el arreglo.
Note:
• The latest temperature setting will be memorized and will appear on the display the next time it’s turned on.
• The display temperature selection is for display purpose only and does not indicate actual room setting temperatures.
Your room temperature may not necessarily match the displayed temperature.
Nota:
• La ultima temperatura escogida esta recuerda y aparecerá el la pantella de visualización la proxima vez que será encendida.
• La selección de visualización de temperatura tiene fines de visualización solamente y no indica temperaturas actuales del
ajuste de la habitación. La temperatura de la habitación puede que no necesariamente concuerde con la temperatura
visualizada.
Display
Pantalla de
visualización
Touch Control
Panel
Tablero de
instrumentos
Remote control
Telecontrol
hr
°F
TEMP/TIMER
TEMP/TIMER
ECONOMY mode operation
Funcionamento en ECONOMY
1. To reduce power consumption:
• Press ECONOMY.
• To cancel this operation, press once more.
1. Para reducir el consumo de electricidad:
• Empuja el botón ECONOMY.
• Para anularlo, empuja el botón de nuevo.
Display
Pantalla de
visualización
Touch Control
Panel
Tablero de
instrumentos
Remote control
Telecontrol
ECONOMY
ECONOMY
16

17
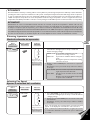
1. Press FAN SPEED to choose the speed level of the fan.
The indicator will light up and a “beep” sound will indicate
changing settings.
1. Empuja el botón FAN SPEED para seleccionar la velocidad
del ventilador
El indicador se luce y un sonido “beep” indica los cambios
de arreglo.
Note: The latest fan speed setting will be memorized and will
appear on the display the next time the unit is turned on.
Nota: La ultima velocidad del ventilador escogida esta recuerda
y el indicador iluminará la proxima vez que la unidad esta
encendida.
The indicator will
change in order as set.
El indicador cambia
según el arreglo.
HIGH
MED
LOW
Selecting Fan Speed
Ajustar la velocidad del ventilador
Touch Control
Panel
Tablero de
instrumentos
Remote control
Telecontrol
Indicator
Indicador
Selecting Operation mode
Modo de selección de operación
The indicator will
change in order as set.
El indicador cambia
según el arreglo.
Touch Control
Panel
Tablero de
instrumentos
Remote control
Telecontrol
Indicator
Indicador
1. Press MODE to select the desired operation .
The indicator will light up and a “beep” sound will
indicate changing settings.
COOL mode To set display temperature to your
preference of cooling comfort.
FAN mode To provide air circulation without cooling the
room.
During Fan operation, temperature setting
cannot be selected.
1. Empuja el botón MODE para seleccionar la operación
escogida.
El indicador se luce y un sonido “beep” indica los cambios
de arreglo.
Modo COOL Para seleccionar la temperatura de visualización
según su preferencia de bienestar.
Modo FAN Para proveer un excambio de aire sin enfriar
el cuarto.
Durante el uso del modo FAN, la temperatura
no puede estar modificada
17
HIGH
MED
LOW
FAN SPEED
FAN SPEED
COOL
FAN
COOL
FAN
MODE
MODE
ECONOMY
Recommended for electricity cost saving. When economy button is pressed, target temperature is shifted up 1°F, this will reduce
operating time of the compressor and therefore reduce power consumption. It may, however, take a little longer for the compressor
to cycle on and thereby increase the room temperature slightly. Economy mode will override your current fan speed, setting it to
“LOW”. Compressor stops when the room temperature reaches the target temperature. It turns on again when the room
temperature rises. When power failure occurs, the economy setting is cancelled. Once power is resumed, reset the economy setting.
ECONOMY
Ahorramiento de costos recomendados. Cuando el botón de economía se aprieta, la temperatura a alcanzar sube 1ºF, esto
reducirá el tiempo de operación del compresor y reducirá el consumo de energía. Puede, que sin embargo, le lleve un poco más
de tiempo al compresor para la reinyección y por lo tanto incrementar la temperatura de la habitación levemente. El modo
económico reemplazará la velocidad actual del ventilador, fijándola al modo “LOW”. El compresor se apagan cuando la temperatura
de la habitación llega al nivel del termostato preajustado. Se encenderán nuevamente cuando suba la temperatura en la habitación.
Si occure un corte eléctrico, se cancelará el ajuste del economía. Ajústelo de nuevo cuando se restablezca la corriente.

18
AIR CONDITIONER OPERATION
OPERACIÓN DEL ACONDICIONADOR DE AIRE
AIR CONDITIONER OPERATION
OPERACIÓN DEL ACONDICIONADOR DE AIRE
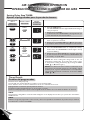
1. Press the TIMER button.
The SET/CANCEL indicator light will blink, indicating an
entry is required.
1. Empuja el botón TIMER.
La luz del indicador SET/CANCEL oscila, significando que
unos datos deben estar seleccionados.
2. Press the TEMP/TIMER ∂ or ƒ button until the preferred
hour of operation is reached.
2. Empuja el botón TEMP/TIMER ∂ o ƒ hasta que la hora
de empiezo de funcionamento escogida sea seleccionada.
3. Press the SET/CANCEL button to complete the setting.
At this time, the SET/CANCEL indicator light is steady
instead of blinking.
3. Empuja el botón SET/CANCEL para terminar el arreglo.
A este momento, la luz del indicador SET/CANCEL deja
de oscilar y se queda “ON”.
NOTE: The hour reading will change back to the set
temperature reading after 10 seconds. (You can also revert
to temperature setting immediately by pressing the TEMP/
TIMER ∂ or ƒ buttons again.)
NOTA: La indicación de hora volverá a la indicación de la
temperatura seleccionada después de 10 segundas. (Usted
también puede regresar immediatamente a la temperatura
seleccionada presionando nuevamente los botones TEMP/
TIMER ∂ o ƒ.)
Setting Delay Stop TIMER
Ajustar el programador para la parada de demora
hr
°F
hr
°F
hr
°F
hr
°F
Display
Pantalla de
visualización
Touch Control
Panel
Tablero de
instrumentos
Remote control
Telecontrol
NOTE:
The last timer setting will be memorized and will appear on the display the next time you operate the unit with the
TIMER function.
NOTA:
El último arreglo del programador esta recuerdo y lucirá en la pantella de visualización la próxima vez que utiliza el
acondicionador con la función TIMER.
Timer Details
Detalles del programador
The timer is for delay stop only.
The unit will turn off automatically according to your specified setting.
Timer duration can be set from a minimum of 1 hour to a maximum of 12 hours.
El programador es solamente para la parada de demora.
La unidad se apaga automáticamente con los arreglos recuerdos.
La duración del programador puede estar arreglada desde un mínimo de 1 hora hasta un máximo de 12 horas.
TIMER
TIMER
TEMP/TIMER
SET
SET/
CANCEL
TEMP/TIMER
SET/
CANCEL
TEMP/TIMER
TEMP/TIMER

19
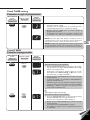
Check TIMER setting
Controlar arreglo el programador
1. Press the TIMER button to check the remaining
programmed timer setting.
The figure will be displayed for 10 seconds then will
automatically switch back to temperature setting.
1. Empuja el botón TIMER para controlar arreglo el
programador que queda.
La indicación luce durante 10 segundos y después esta
reemplazada con la indicación del arreglo de temperatura.
NOTE: The timer figure will change according to the time
remaining (if you set it to turn off 3 hours from now, the timer
will show “2” when you check the timer an hour later).
NOTA: La indicación del programador cambia según la hora
real (si arregla la parada 3 horas después que ahora, el
programador lucerá “2” cuando le controla una hora mas tarde.
(Cancellation within 10 seconds)
(
Cancelación dentro de 10 segundos)
1. Press the SET/CANCEL button to cancel the timer setting.
The temperature reading and SET/CANCEL indicator light
will turn off simultaneously.
Temperature setting will be displayed again 10 seconds
later. (Or, press the TEMP/TIMER ∂ or ƒ button to show
the temperature reading immediately.)
1. Empuja el botón SET/CANCEL para cancelar el arreglo
del programador.
La luz de la pantalla y la del indicador SET?CANCEL se
apagarán simultáneamente.
La indicación aparecerá el la pantalla 10 segundos después
para mostrar la temperatura. (O, presione el botón TEMP/
TIMER ∂ o ƒ para obtener la indicación de la
temperatura inmediatamente).
or
o
(Cancellation after 10 seconds)
(
Cancelación después de 10 segundos)
1. Press the SET/CANCEL button to cancel the timer setting.
The SET/CANCEL indicator light will turn off.
However the temperature remains displayed.
1. Empuja el botón SET/CANCEL para cancelar el arreglo
del programador.
La luz del indicador SET/CANCEL se apagará.
Sin embargo, la indicación de la temperatura permanece
en la pantalla.
Cancel TIMER
Cancelar el programador
Display
Pantalla de
visualización
Touch Control
Panel
Tablero de
instrumentos
Remote control
Telecontrol
Display
Pantalla de
visualización
Touch Control
Panel
Tablero de
instrumentos
Remote control
Telecontrol
TIMER
TIMER
SET
SET/
CANCEL
SET
SET/
CANCEL
SET/
CANCEL
SET/
CANCEL
hr
°F
hr
°F
hr
°F
hr
°F
hr
°F

20
HELPFUL INFORMATION
INFORMACIÓN ÚTIL
HELPFUL INFORMATION
INFORMACIÓN ÚTIL
CORTE DE
CORRIENTE
Thunder and lightning
• This air conditioner is equipped with a built-in surge protective
device. However, in order to further protect your air conditioner
from being damaged by abnormally strong lightning activity, you
may switch off the main power supply & unplug from power socket.
Tormentas Electricas
• El acondicionador de aire está equipado con un aparato
empotrado de protección de sobretensión. Sin embargo, para que
su acondicionador de aire tenga más protección y no sea dañado
por una actividad anormal de fuertes rayos, puede desconectar la
alimentación principal y desenchufar el enchufe.
Random Auto Restart
• When power resumes after a power failure, operation will restart
automatically after 3 - 4 minutes.
• Operation will automatically resume under the previous operation
mode.
Al azar de Autoarranque
• Si hay un corte eléctrico, la unidad comenzará a funcionar
automáticamente de 3 a 4 minutos después de que se haya
restablecido la corriente.
• Al restablecerse la corriente se reiniciará automáticamente con
el modo de funcionamiento.
Timer Setting
• When power failure occurs, the timer setting is cancelled. Once power returns, reset the timer.
Ajuste del Temporizador
• Si ocurre un corte eléctrico, se cancelará el ajuste del temporizador. Ajústelo de nuevo cuando se restablezca
la corriente.
-
 1
1
-
 2
2
-
 3
3
-
 4
4
-
 5
5


Panasonic CWXC80YU Instrucciones de operación
- Tipo
- Instrucciones de operación
- Este manual también es adecuado para
en otros idiomas
Artículos relacionados
-
Panasonic CW-XC83YU Manual de usuario
-
-
-
-
-
-
-
-
-