Viking Range VMDD Guía del usuario
- Categoría
- Microondas
- Tipo
- Guía del usuario

1
E
Use & Care Manual
Convection/Speed
Microwave Oven
VMDD5306SS

2
E
If service is required:
1. Call your authorized service agency.
2. Have the following information readily available:
a. Model number
b. Serial number
c. Date purchased
d. Name of dealer from whom purchased
3. Clearly describe the problem that you are having.
If you are unable to obtain the name of an authorized service agency, or if you continue to have service problem, contact
Viking Range, LLC at (888) 845-4641 or write to:
VIKING RANGE, LLC
PREFERRED SERVICE
111 Front Street
Greenwood, Mississippi (MS) 38930 USA
Record the information indicated below. You will need it if service is ever required. The model and serial number for your
oven are located on the left side of the oven cavity on an identification label.
Model Number _______________________________ Serial Number _________________________________________
Date of Purchase _____________________________ Date Installed _________________________________________
Dealer's Name ______________________________________________________________________________________
Address
_____________________________________________________________________________________________________________
_______________________________________________________________________________________________________________________
If service requires installation of parts, use only authorized parts to ensure protection under the warranty.
PLEASE RETAIN THIS MANUAL FOR FUTURE REFERENCE
PRECAUTIONS TO AVOID POSSIBLE
EXPOSURE TO EXCESSIVE MICROWAVE ENERGY
(a) Do not attempt to operate this microwave oven with the door open since open-door operation can result in
harmful exposure to microwave energy. It is important not to defeat or tamper with the safety interlocks.
(b) Do not place any object between the microwave oven front face and the door or allow soil or cleaner residue
to accumulate on sealing surfaces.
(c) Do not operate the microwave oven if it is damaged. It is particularly important that the microwave oven door
close properly and that there is no damage to the: (1) door (bent), (2) hinges and latches (broken or loosened),
(3) door seals and sealing surfaces.
(d) The microwave oven should not be adjusted or repaired by anyone except properly qualified service personnel.
Service Information

3
E
2 SERVICE INFORMATION
2 PRECAUTIONS TO AVOID POSSIBLE
EXPOSURE TO EXCESSIVE MICROWAVE
ENERGY
3 TABLE OF CONTENTS
4 IMPORTANT SAFETY INSTRUCTIONS
5 INSTALLATION INSTRUCTIONS
6 GROUNDING INSTRUCTIONS
7-10 INFORMATION YOU NEED TO KNOW
7 ABOUT YOUR OVEN
7 ABOUT MICROWAVE COOKING
7 ABOUT CHILDREN AND THE MICROWAVE
8 ABOUT SAFETY
8-9 ABOUT UTENSILS AND COVERINGS
10 ABOUT FOOD
11-12 PART NAMES
11 OVEN PARTS
11 ACCESSORIES
12 CONTROL PANEL
12 MENU LABEL
13 BEFORE OPERATING
13 TO SET THE CLOCK
13 STOP/CLEAR
14 MANUAL OPERATION
14 TIME COOKING
14 TO SET POWER LEVEL
14 MANUAL DEFROST
15-19 MICROWAVE FEATURES
15 DEFROST
16 SENSOR COOKING
16-17 REHEAT
16-17 POPCORN
17-18 COOK
19 MORE MENUS
20-23 CONVECTION FEATURES
20 BAKE
20 ROAST
20 GRILL
20-21 MORE MENUS
22 SPEED BAKE
22 SPEED ROAST
22-23 HELPFUL HINTS FOR CONVECTION AND SPEED
FUNCTIONS COOKING
24-25 OTHER CONVENIENT FEATURES
24 MULTIPLE SEQUENCE COOKING
24 SETTING/TIMER
24 +30 SEC
25 CONTROL LOCK
25 HELP (DISPLAY INDICATOR)
26 CLEANING AND CARE
27 SPECIFICATIONS
28 SERVICE CALL CHECK
29 WARRANTY
Table of Contents

4
E
When using electrical appliances basic safety precautions
should be followed, including the following:
WARNING-To reduce the risk of burns, electric shock,
fire, injury to persons or exposure to excessive microwave
energy:
1. Read all instructions before using the appliance.
2. Read and follow the specific “PRECAUTIONS TO
AVOID POSSIBLE EXPOSURE TO EXCESSIVE
MICROWAVE ENERGY” on page 2.
3. This appliance must be grounded. Connect only
to properly grounded outlet. See “GROUNDING
INSTRUCTIONS” on page 6.
4. Install or locate this appliance only in accordance
with the provided installation instructions.
5. Some products such as whole eggs and sealed
containers—for example, closed glass jars—are able
to explode and should not be heated in this oven.
6. Use this appliance only for its intended use as
described in this manual. Do not use corrosive
chemicals or vapors in this appliance. This type of
oven is specifically designed to heat, cook or dry
food. It is not designed for industrial or laboratory
use.
7. As with any appliance, close supervision is necessary
when used by children.
8. Do not operate this appliance if it has a damaged
cord or plug, if it is not working properly or if it has
been damaged or dropped.
9. This appliance should be serviced only by qualified
service personnel. Contact nearest Authorized
Servicer for examination, repair or adjustment.
10. Do not cover or block any openings on the appliance.
11. Do not store or use this appliance outdoors. Do not
use this product near water—for example, near a
kitchen sink, in a wet basement, near a swimming
pool, or similar locations.
12. Do not immerse cord or plug in water.
13. Keep cord away from heated surfaces.
14. Do not let cord hang over edge of table or counter.
15. See door surface cleaning instructions on page 26.
16. To reduce the risk of fire in the oven cavity:
a. Do not overcook food. Carefully attend to
appliance when paper, plastic or other combustible
materials are placed inside the oven to facilitate
cooking.
b. Remove wire twist-ties from paper or plastic bags
before placing bag in oven.
c. If materials inside the oven should ignite, keep
oven door closed, turn oven off and disconnect
the power cord or shut off power at the fuse or
circuit breaker panel.
d. Do not use the cavity for storage purposes. Do not
leave paper products, cooking utensils or food in
the cavity when not in use.
17. Liquids, such as water, coffee or tea are able to
be overheated beyond the boiling point without
appearing to be boiling. Visible bubbling or boiling
when the container is removed from the oven is
not always present. THIS COULD RESULT IN VERY
HOT LIQUIDS SUDDENLY BOILING OVER WHEN
A SPOON OR OTHER UTENSIL IS INSERTED INTO
THE LIQUID.
To reduce the risk of injury to persons:
a. Do not overheat the liquid.
b. Stir the liquid both before and halfway through
heating it.
c. Do not use straight-sided containers with narrow
necks. Use a wide-mouthed container.
d. After heating, allow the container to stand in the
oven at least for 20 seconds before removing the
container.
e. Use extreme care when inserting a spoon or other
utensil into the container.
18. If the oven is installed as a built-in, observe the
following instructions:
a. Do not mount over a sink.
b. Do not store anything directly on top of the
appliance surface when the appliance is in
operation.
19. If the oven light fails, consult an AUTHORIZED SER-
VICER.
IMPORTANT SAFETY INSTRUCTIONS
SAVE THESE INSTRUCTIONS

5
E
Installation Instructions
UNPACKING AND EXAMINING YOUR
OVEN
Remove all packing materials from inside the oven cavity;
however, DO NOT REMOVE THE WAVEGUIDE COVER,
which is located located on the inside top of the cavity.
Read enclosures and SAVE the Installation/Use and Care
Manual.
Check the oven for any damage, such as misaligned or
bent door, damaged door seals and sealing surfaces,
broken or loose door hinges and latches and dents inside
the cavity or on the door. If there is any damage, do
not operate the oven and contact your local authorized
service agent.
Waveguide cover
Safety door latchesDoor seals and
sealing surfaces
CHOOSING A LOCATION
Your oven can be built into a cabinet or wall by itself,
above any electric built-in oven, warming drawer or
below a cooktop or counter.
If installing above an oven
or warming drawer, please allow 2” of space between
the products.

6
E
This appliance must be grounded. This oven is equipped
with a cord having a grounding wire with a grounding plug.
It must be plugged into a wall receptacle that is properly
installed and grounded in accordance with the National
Electrical Code and local codes and ordinances. In the
event of an electrical short circuit, grounding reduces
risk of electric shock by providing an escape wire for the
electric current.
WARNING – Improper use of the grounding plug can
result in a risk of electric shock.
ELECTRICAL REQUIREMENTS
• The electrical outlet must be readily accessible so that
the unit can be unplugged easily in an emergency.
The AC power supply must be 220-240V, 50Hz, with a
minimum 1.6kW distri bution circuit breaker. It should
be possible to isolate the appli ance from the supply by
incorporating a switch in the fixed wiring in accordance
with electrical codes. It is recommended that a separate
circuit serving only this appliance be provided. Do not
store or use the oven outdoors.
• Do not operate the oven with the door open or alter
the door safety latches in any way. Do not operate the
oven if there is an object between the door seals and
sealing surfaces.
Grounding Instructions
IMPORTANT: If you are unsure how to connect your oven,
please consult an authorized, qualified electrician.
Note:
1. If you have any questions about the grounding or
electrical instructions, consult a qualified electrician or
service person.
2. Neither Viking Range, LLC nor the dealer can accept
any liability for damage to the oven or personal injury
resulting from failure to observe the correct electrical
connection procedures.
RADIO OR TV INTERFERENCE
Should there be any interference caused by the oven
to your radio or TV, check that the oven is on a different
electrical circuit, relocate the radio or TV as far away
from the oven as feasible or check position and signal of
receiving antenna.
TO AVOID THE POSSIBILITY OF ELECTRIC
SHOCK:
• If the power supply cord of this appliance is damaged,
it must be replaced with a special cord. The exchange
must be made by an authorized service agent.
TO AVOID THE POSSIBILITY OF BURNS:
• Do not lean or swing on the oven door. Do not play with
the oven or use it as a toy. Children should be taught all
important safety instructions: use of potholders, careful
removal of food coverings; paying special attention
to packaging (e.g. self -heating materials) designed to
make food crisp, as they may be extra hot.

7
E
ABOUT YOUR OVEN
This Installation/Use and Care Manual is valuable: read it
carefully and always save it for reference.
A good microwave cookbook is a valuable asset. Check
it for microwave cooking principles, techniques, hints
and recipes.
NEVER use the oven without the turntable and support
nor turn the turntable over so that a large dish could be
placed in the oven. The turntable will turn both clockwise
and counterclockwise.
ALWAYS have food in the oven when it is on to absorb
the microwave energy.
When using the oven at power levels below 100%, you
may hear the magnetron cycling on and off. It is normal
for the exterior of the oven to be warm to the touch when
cooking or reheating.
Condensation is a normal part of microwave cooking.
Room humidity and the moisture in food will influence the
amount of moisture that condenses in the oven. Generally,
covered foods will not cause as much condensation as
uncovered ones. Vents on the oven back must not be
blocked.
After using CONVECTION, SPEED FUNCTIONS or
CONVECTION MORE MENUS, you will hear the sound
of the cooling fan. The fan may continue to operate as
long as 5 minutes, depending on the oven temperature.
Be aware that, unlike microwave-only ovens, convection
microwave ovens have a tendency to become hot during
CONVECTION, SPEED FUNCTIONS and CONVECTION
MORE MENUS cooking.
The oven is for food preparation only. It should not be
used to dry clothes or newspapers.
Your oven is rated 950 watts by using the IEC Test
Procedure. In using recipes or package directions, check
food a minute or two before the minimum time and add
time accordingly.
ABOUT MICROWAVE COOKING
• Arrange food carefully. Place thickest areas towards
outside of dish.
• Watch cooking time. Cook for the shortest amount of
time indicated and add more as needed. Food severely
overcooked can smoke or ignite.
• Cover foods while cooking. Check recipe or cookbook
for suggestions: paper towels, wax paper, microwave
plastic wrap or a lid. Covers prevent spattering and
help foods to cook evenly.
• Stir foods from outside to center of dish once or twice
during cooking, if possible.
Information You Need To Know
• Turn foods over once during microwaving to speed
cooking of such foods as chicken and hamburgers.
Large items like roasts must be turned over at least
once.
• Rearrange foods such as meatballs halfway through
cooking both from top to bottom and from the center
of the dish to the outside.
• Add standing time. Remove food from oven and stir,
if possible. Cover for standing time which allows the
food to finish cooking without overcooking.
• Check for doneness. Look for signs indicating that
cooking temperatures have been reached.
Doneness signs include:
- Food steams throughout, not just at edge.
- Center bottom of dish is very hot to the touch.
- Poultry thigh joints move easily.
- Meat and poultry show no pinkness.
- Fish is opaque and flakes easily with a fork.
ABOUT CHILDREN AND THE
MICROWAVE
Children below the age of 7 should use the oven with a
supervising person very near to them. Between the ages
of 7 and 12, the supervising person should be in the
same room.
The child must be able to reach the oven comfortably; if
not, he/she should stand on a sturdy stool.
At no time should anyone be allowed to lean or swing
on the oven door.
Children should be taught all safety precautions: use
potholders, remove coverings carefully, pay special
attention to packages that crisp food because they may
be extra hot.
Don’t assume that because a child has mastered one
cooking skill he/she can cook everything.
Children need to learn that the oven is not a toy. See page
25 for Control Lock feature.

8
E
Information You Need To Know
ABOUT SAFETY
• Check foods to see that they are cooked to the United
States Department of Agriculture's recommended
temperatures.
To test for doneness, insert a meat thermometer in a
thick or dense area away from fat or bone. Never leave
the thermometer in the food during cooking, unless it is
approved for oven use.
TEMP FOOD
160˚F (71˚C) For fresh pork, ground meat,
boneless white poultry, fish, seafood,
egg dishes and frozen prepared food.
165˚F (74˚C) For leftover, ready-to-reheat
refrigerated, and deli and carry-out
“fresh” food.
170˚F (77˚C) White meat of poultry.
180˚F (82˚C) Dark meat of poultry.
• ALWAYS use potholders to prevent burns when
handling utensils that are in contact with hot food.
Enough heat from the food can transfer through utensils
to cause skin burns.
• Avoid steam burns by directing steam away from the
face and hands. Slowly lift the farthest edge of a dish's
covering and carefully open popcorn and oven cooking
bags away from the face.
• Stay near the oven while it's in use and check cooking
progress frequently so that there is no chance of
overcooking food.
• NEVER use the cavity for storing cookbooks or other
items.
• Select, store and handle food carefully to preserve its
high quality and minimize the spread of foodborne
bacteria.
• Keep waveguide cover clean. Food residue can cause
arcing and/or fires.
• Use care when removing items from the oven so that
the utensil, your clothes or accessories do not touch
the safety door latches.
ABOUT UTENSILS AND COVERINGS
It is not necessary to buy all new cookware. Many pieces already in your kitchen can be used successfully in your new
convection oven. The chart below will help you decide what utensils and coverings should be used in each mode.
UTENSILS AND
COVERINGS
MICROWAVE ONLY
CONVECTION
BAKE, ROAST, GRILL
SPEED ROAST
SPEED BAKE
Aluminum foil NO YES. For shielding NO
Aluminum containers NO YES. Grill-No cover NO
Browning dish NO NO NO
Glass ceramic (Pyroceram
®
) YES. Excellent YES. Excellent YES. Excellent
Glass, heat-resistant YES. Excellent YES. Excellent YES. Excellent
Glass, non-heat-resistant NO NO NO
Lids, glass YES YES. Grill-No cover YES
Lids, metal NO YES. Grill-No cover NO
Metal cookware NO YES NO. Silicone cookware is
suggested
Metal, misc: dishes with
metallic trim, screws, bands,
handles. Metal twist ties
NO NO NO
Oven cooking bags YES. Good for large meats or
foods that need tenderizing.
DO NOT use metal twist ties.
YES. Grill-No cover YES. DO NOT use metal
twist ties.

9
E
Information You Need To Know
UTENSILS AND
COVERINGS
MICROWAVE ONLY
CONVECTION
BAKE, ROAST, GRILL
SPEED ROAST
SPEED BAKE
Paper plates YES. For reheating. NO NO
Paper towels YES. To cover for reheating and
cooking. Do not use recycled
paper towels which may contain
metal fillings.
NO NO
Paper, ovenable YES YES. For temperatures
up to 400°F. Do not
use for grilling.
YES. For temperatures up
to 400°F.
Microwave-safe plastic
containers
YES. Use for reheating and
defrosting. Some microwave-
safe plastics are not suitable
for cooking foods with high
fat and sugar content. Follow
manufacturer's directions.
NO NO
Plastic, Thermoset
®
YES YES. Are heat resistant
up to 425°F. Do not
use for grilling.
YES
Plastic wrap YES. Use brands specially
marked for microwave use.
DO NOT allow plastic wrap to
touch food. Vent so steam can
escape.
NO NO
Pottery, porcelain
stoneware
YES. Check manufacturer's
recommendation for being
microwave safe.
YES YES. Must be microwave
safe AND ovenable.
Styrofoam YES. For reheating. NO NO
Wax paper YES. Good covering for cooking
and reheating.
NO NO
Wicker, wood, straw YES. May be used for short
periods of time. Do not use
with high fat or high sugar
content foods. Could char.
NO NO
ACCESSORIES
There are many microwave accessories available for purchase. Evaluate carefully before you purchase so that they meet
your needs. When selecting microwave accessories, ensure that they are marked or are verified as microwave-safe. A
microwave-safe thermometer will assist you in determining correct doneness and assure you that foods have been cooked
to safe temperatures when using microwave-only cooking. Viking Range, LLC is not responsible for any damage to the
oven when accessories are used.

10
E
Information You Need To Know
ABOUT FOOD
FOOD DO DON'T
Eggs, sausages,
nuts, seeds, fruits
& vegetables
• Puncture egg yolks before cooking to prevent
“explosion”.
• Pierce skins of potatoes, apples, squash, hot
dogs and sausages so that steam escapes.
• Cook eggs in shells.
• Reheat whole eggs.
• Dry nuts or seeds in shells.
Popcorn • Use specially bagged popcorn for the oven.
• Listen while popping corn for the popping to
slow to 1 or 2 seconds or use special POPCORN
pad.
• Pop popcorn in regular brown bags or
glass bowls.
• Exceed maximum time on popcorn
package.
Baby food • Transfer baby food to small dish and heat
carefully, stirring often. Check temperature
before serving.
• Put nipples on bottles after heating and shake
thoroughly. “Wrist” test before feeding.
• Heat disposable bottles.
• Heat bottles with nipples on.
• Heat baby food in original jars.
General • Cut baked goods with filling after heating to
release steam and avoid burns.
• Stir liquids briskly before, during and after
heating to avoid “eruption”.
• Use deep bowl, when cooking liquids or cereals,
to prevent boilovers.
• Heat or cook in closed glass jars or air
tight containers.
• Heat can in the microwave as harmful
bacteria may not be destroyed.
• Deep fat fry.
• Dry wood, gourds, herbs or wet papers.

11
E
OVEN PARTS
Part Names
1 Ventilation openings (Rear side)
2 Oven door with see-through window
3 Oven light
It will light when the door is opened or
when oven is in operation.
4 Turntable support
5 Removable turntable
The turntable will rotate clockwise or
counterclockwise.
6 Safety door latches
The oven will not operate unless the door
is securely closed.
7 Waveguide cover: DO NOT REMOVE.
8 Handle
9 Glass control panel
10 Lighted digital display
11 Convection air openings
12 Removable low rack (Grilling rack)
13 Removable high rack (Baking rack)
14 Turntable motor shaft
15 Menu Label
16 Serial plate
4
5
12
13
1 7 910
11
3
2
14 86
15
16
ACCESSORIES
The following accessories are designed especially for use in this oven only for convection
(bake, roast, or grill) or speed (bake or roast) cooking. DO NOT USE FOR MICROWAVE
ONLY COOKING. Do not substitute similar types of racks for these specially designed ones.
High Turntable Rack - See chart on page 21 for instructions of when to use this rack.
Low Turntable Rack - See chart on page 20-21 for instructions of when to use this rack.
Oven Racks (2) - These racks are used for baking or roasting, and two level cooking.
Examples: cookies or pizza.

12
E
Number next to the control panel illustration indicates pages on which there are
feature descriptions and usage information.
CONTROL PANEL
MENU LABEL
Part Names
Interactive Display
Words will light in the display to indicate features
and cooking instructions.
20-21
20 20 20 16-17 16-17 17-18
13Indicators 14
22-23 22-23 19 15
24 24
COOK DEFROST MICROWAVE MORE MENUS CONVECTION MORE MENUS
1 Baked Potatoes
2 Sweet Potatoes
3 Fish / Seafood
4 Brown Rice
5 White Rice
6 Quick Fresh Vegetables
7 Long Fresh Vegetables
8 Frozen Vegetables
9 Ground Meat
10 Frozen Entrée
1 Ground Meat
2 Steaks / Chops
3 Boneless Poultry
4 Bone-in Poultry
5 Roast
6 Casserole and Soup
Melt
1 Butter
2 Chocolate
7 Beverage Reheat
8 Hot Water
9 Hot Cereal
BAKE
1 Biscuit
2 Cookies Packaged
3 Bundt Cake
4 Pizza - Thin / Classic / Rising
5 Breaded Shrimp
6 Breaded Chicken Tenders
ROAST
7 Whole Chicken
8 Pork Tenderloin
9 Turkey Breast
GRILL
10 Beef Hamburgers
11 Turkey Burgers
12 Drummies
13 Chicken Breast Boneless
14 Fish Fillet
15 Veggie Burger
Soften
3 Ice Cream
4 Cream Cheese
Warm
5 Syrup
6 Dessert Topping

13
E
• Before operating your new oven make sure you read
and understand this Use and Care Manual completely.
• Before the oven can be used, follow these procedures:
1. Plug in the oven. Close the door. The oven display will
show
WELCOME TOUCH CLEAR
.
2. Touch the STOP/CLEAR pad.
:
will appear.
3. Set clock.
TO SET THE CLOCK
1. Touch TIMER/SETTINGS pad twice.
2. Enter the correct time of day by touching the numbers
in sequence. Touch START/+30 SEC pad.
This is a 12 hour clock. If you attempt to enter an incorrect
clock time,
ERROR
will appear in the display. Touch the
STOP/CLEAR pad and re-enter the time.
• If the electrical power supply to your oven should be
interrupted, the display will intermittently show
WELCOME
TOUCH CLEAR
after the power is reinstated. If this occurs
during cooking, the program will be erased. The time
of day will also be erased. Simply touch STOP/CLEAR
pad and reset the clock for the correct time of day.
STOP/CLEAR
Touch the STOP/CLEAR pad to:
1. Erase if you make a mistake during programming.
2. Cancel timer.
3. Stop the oven temporarily during cooking.
4. Return the time of day to the display.
5. Cancel a program during cooking, touch twice.
Before Operating

14
E
Manual Operation
MANUAL DEFROST
If the food that you wish to defrost is not listed on the
DEFROST CHART or is above or below the limits in the
AMOUNT column on the DEFROST CHART, you need to
defrost manually.
You can defrost any frozen food, either raw or previously
cooked, by using POWER LEVEL 3. Follow the exact
3-step procedure found under TO SET POWER LEVEL.
Estimate defrosting time and touch
3 for 30% when you
select the power level.
For either raw or previously cooked frozen food, the
rule of thumb is approximately 5 minutes per pound.
For example, defrost 5 minutes for 1 pound of frozen
spaghetti sauce.
Always stop the oven periodically to remove or separate
the portions that are defrosted. If food is not defrosted
at the end of the estimated defrosting time, program the
oven in 1 minute increments on POWER LEVEL 3 until
totally defrosted.
When using plastic containers from the freezer, defrost
only long enough to remove from the plastic in order to
place in a microwave-safe dish.
TIME COOKING
Your oven can be programmed for 99 minutes and 99
seconds (99.99). Always enter the seconds after the
minutes, even if they are both zeros.
• Suppose you want to cook for 5 minutes at 100%.
1. Enter cooking time by touching the number pads
500.
2. Touch START/+30 SEC pad.
TO SET POWER LEVEL
There are eleven preset power levels.
Using lower power levels increases the cooking time which
is recommended for foods such as cheese, milk and long
slow cooking of meats. Consult cookbook or recipes for
specific recommendations.
TOUCH POWER
LEVEL PAD ONCE
THEN TOUCH
APPROXIMATE
PERCENTAGE
OF POWER
COMMON WORDS
FOR
POWER LEVELS
POWER LEVEL 100% High
9 90%
8 80%
7 70% Medium High
6 60%
5 50% Medium
4 40%
3 30% Med Low/Defrost
2 20%
1 10% Low
0 0%
• Suppose you want to defrost for 5 minutes at 30%.
1. Enter defrosting time by touching the number pads
500.
2. Touch POWER LEVEL pad and number
3.
3. Touch START/+30 SEC pad.
You can program up to 4 automatic cooking sequences.
Follow directions on page 24. Note that power level must
be entered first when programming multiple sequences.

15
E
DEFROST CHART
FOOD AMOUNT PROCEDURE
1. Ground Meat 0.5-2.0 lb
(0.22-0.9 kg)
Remove any thawed pieces after each stage. Let stand, covered, 5–10 minutes.
2. Steaks/Chops 0.5-3.0 lb
(0.22-1.36 kg)
After each stage of defrost cycle, rearrange, and remove any meat or fish that is
nearly defrosted. Let stand, covered, 10–20 minutes.
3. Boneless
Poultry
0.5-2.0 lb
(0.22-0.9 kg)
Use boneless breast of chicken or turkey. After each stage, if there are warm or
thawed portions, rearrange or remove. Let stand, covered, for 10 to 20 minutes.
4. Bone-in
Poultry
0.5-3.0 lb
(0.22-1.36 kg)
Arrange pieces with meatiest portions toward outside of glass dish or microwave
safe rack. After each stage, if there are warm or thawed portions, rearrange or
remove. Let stand, covered, for 10 to 20 minutes.
5. Roast 2.0-4.0 lb
(0.9-1.8 kg)
Start defrosting with fat side down. After each stage, turn roast over. Let stand,
covered, for 30 to 60 minutes.
6. Casserole
and Soup
1-6 cups After the audible signal, stir if possible. At the end, stir well and let stand, covered,
for 5 to 10 minutes.
Note:
Check foods when oven signals. After final stage, small sections may still be icy. Let stand to continue thawing. Do not
defrost until all ice crystals are thawed.
DEFROST
DEFROST automatically defrosts foods shown in the
DEFROST CHART.
• Suppose you want to defrost a 2.0 pound steak:
1. Touch DEFROST pad once.
2. Select desired food by touching the associated number
on the number pad from the menu label selection.
Ex. Touch
1 for Ground Meat.
3. Enter weight by touching the number pads
20.
4. Touch START/+30 SEC pad.
The oven will stop and directions will be displayed. Follow
the indicated message.
5. After the 1st stage, open the door. Turn steak over.
Close the door. Touch START/+30 SEC pad.
Microwave Features
6. After the 2nd stage, open the door. Turn steak over.
Close the door. Touch START/+30 SEC pad.
7. After defrost cycle ends, cover and let stand as
indicated in chart below.
Note:
• If you attempt to enter more or less than the allowed
amount as indicated in chart, an error message will
appear in the display.
• To defrost other foods or foods above or below the
weights allowed on DEFROST CHART see MANUAL
DEFROST on page 14.

16
E
Microwave Features
SENSOR COOKING
The Sensor is a semi-conductor device that detects the
vapor (moisture and humidity) emitted from the food as
it heats. The sensor adjusts the cooking times and power
level for various foods and quantities.
USING SENSOR SETTINGS:
1. After oven is plugged in, wait 2 minutes before using
sensor settings.
2. Be sure the exterior of the cooking container and the
interior of the oven are dry. Wipe off any moisture with
a dry cloth or paper towel.
3. REHEAT and POPCORN can only be entered within 1
minute after cooking, opening and closing the door or
touching the STOP/CLEAR pad.
4. During the first part of sensor cooking, the food name
will appear on the display. Do not open the oven door
or touch STOP/CLEAR during this part of the cooking
cycle. The measurement of vapor will be interrupted. If
this occurs, an error message will appear. To continue
cooking, touch the STOP/CLEAR pad and select
cooking time and variable power.
When the sensor detects the vapor emitted from the
food, remainder of cooking time will appear. Door may
be opened when remaining cooking time appears on
the display. At this time, you may stir or season food,
as desired.
5. Check food for temperature after cooking. If additional
time is needed, continue to cook with variable power
and time.
6. If the sensor does not detect vapor properly when
popping popcorn, the oven will turn off, and the correct
time of day will be displayed. If the sensor does not
detect vapor properly when using sensor reheat,
ERROR
will be displayed, and the oven will turn off.
7. Each food has a cooking hint. Touch TIMER/SETTINGS
when the HELP indicator is lighted in the display.
SELECTING FOODS:
1. The sensor works with foods at normal storage
temperature. For example, food for dinner plate reheat
would be at refrigerator temperature and popcorn at
room temperature.
2. Foods weighing less than 3 ounces should be reheated
by time and variable power.
COVERING FOODS:
Some foods work best when covered. Use the cover
recommended in the chart for these foods.
1. Casserole lid.
2. Plastic wrap: Use plastic wrap recommended for
microwave cooking. Cover dish loosely; allow
approximately ½ inch to remain uncovered to allow
steam to escape. Plastic wrap should not touch food.
3. Wax paper: Cover dish completely; fold excess wrap
under dish to secure. If dish is wider than paper, overlap
two pieces at least one inch to cover.
Be careful when removing any covering to allow steam to
escape away from you.
REHEAT
You can reheat many foods by touching just one pad. You
don't need to calculate reheating time or power level.
• Suppose you want to heat prepared chili:
Touch REHEAT pad.
When sensor detects the vapor emitted from the food,
remainder of reheating time will appear.
POPCORN
• Suppose you want to pop a 3.5 oz. bag of popcorn:
Touch POPCORN pad once, then touch START/+30 SEC.
This sensor setting works well with most brands of
microwave popcorn. Pop only one bag at a time. Unfold
the bag and place in oven according to directions.

17
E
Microwave Features
SENSOR CHART
FOOD AMOUNT PROCEDURE
Popcorn Only 1 package
at a time
Use only popcorn packaged for microwave oven use. Try several brands
to decide which you like best. Do not try to pop unpopped kernels.
2.85-3.5 oz bag
(80-99 g) (Regular size)
Touch POPCORN pad once, then touch START/+30 SEC. This setting
works well with most 3.0-3.5 oz bags of microwave popcorn.
1.2-1.75 oz bag
(34-50 g) (Snack size)
Touch POPCORN pad twice, then touch START/+30 SEC.
Reheat
Leftovers such as
rice, potatoes,
vegetables,
casserole.
0.25-2.25 lb
(0.11-1.0 kg)
Place in dish or casserole slightly larger than amount to be reheated.
Flatten, if possible. Cover with lid, plastic wrap or wax paper. Use covers
such as plastic wrap or lids with larger quantities of more dense foods
such as stews. After reheating, stir well, if possible. Foods should be
very hot. If not, continue to heat with variable power and time. After
stirring, re-cover and allow to stand 2 to 3 minutes.
Soups 1-4 cups After reheating, stir well, if possible. Foods should be very hot. If not,
continue to heat with variable power and time. After stirring, re-cover
and allow to stand 2 to 3 minutes.
Canned entrees
and vegetables
4-36 oz After reheating, stir well, if possible. Foods should be very hot. If not,
continue to heat with variable power and time. After stirring, re-cover
and allow to stand 2 to 3 minutes.
COOK
• Suppose you want to cook a baked potato:
1. Touch COOK pad.
2. Select desired sensor setting. Ex: touch number pad
1 to cook baked potatoes.
3. Touch START/+30 SEC pad. When sensor detects the
vapor emitted from the food, the remainder of cooking
time will appear.
COOK CHART
FOOD AMOUNT PROCEDURE
1. Baked Potatoes
2. Sweet Potatoes
1-6 med.
1-6 med.
Pierce. Place on paper-towel-lined turntable. After cooking,
remove from oven, wrap in aluminum foil and let stand 5 to
10 minutes.
3. Fish/Seafood 0.25-2.0 lb
(0.11-0.90 kg)
Arrange in ring around shallow glass dish (roll fillet with edges
underneath). Cover with vented plastic wrap. After cooking,
let stand, covered for 3 minutes.
4. Brown rice
5. White rice
0.5-4.0 cups
0.5-4.0 cups
Place rice into a deep casserole and add double quantity
of water. Cover with lid or plastic wrap. After cooking, stir,
cover and let stand 3 to 5 minutes or until all liquid has been
absorbed.
Rice Water Size of casserole
0.5 cup 1 cup 1.5 quart
1 cup 2 cups 2 quart
1.5 cups 3 cups 2.5 or 3 quart
2 cups 4 cups 3 quart or larger
3 cups 6 cups 3 quart or larger
4 cups 8 cups 3 quart or larger

18
E
Microwave Features
COOK CHART
FOOD AMOUNT PROCEDURE
6. Quick Fresh Vegetables
Broccoli
Brussels sprouts
Cabbage
Cauliflower (flowerets)
Cauliflower (whole)
Spinach
Zucchini
Baked apples
0.25-3.0 lb (0.11-1.36 kg)
0.25-3.0 lb (0.11-1.36 kg)
0.25-3.0 lb (0.11-1.36 kg)
0.25-3.0 lb (0.11-1.36 kg)
1 med.
0.25-1.0 lb (0.11-0.45 kg)
0.25-3.0 lb (0.11-1.36 kg)
2-4 med.
Wash and place in casserole. Add no water if vegetables have
just been washed. Cover with lid for tender vegetables. Use
plastic wrap for tender-crisp vegetables. Stir before standing if
possible. After cooking, let stand, covered, 2-5 minutes.
7. Long Fresh vegetables
Carrots, sliced
Corn on the cob
Green beans
Winter squash:
diced
halves
0.25-2.0 lb (0.11-0.9 kg)
2-4 pcs.
0.25-2.0 lb (0.11-0.9 kg)
0.25-2.0 lb (0.11-0.9 kg)
1-2
Place in casserole. Add 1-4 tbsp. water. Cover with lid for
tender vegetables. Use plastic wrap cover for tender-crisp
vegetables. Stir before standing, if possible. After cooking, let
stand, covered, 2-5 minutes.
8. Frozen Vegetables 0.25-2.0 lb (0.11-0.9 kg) Cover with lid or plastic wrap. After cooking, stir and let stand
3 minutes, covered.
9. Ground Meat 0.25-2.0 lb (0.11-0.9 kg) Use this setting to cook ground beef or turkey as patties
or in a casserole to be added to other ingredients. Place
patties on a microwave-safe rack and cover with wax paper.
Place ground meat in a casserole and cover with wax paper
or plastic wrap. When microwave stops, turn patties over or
stir meat in casserole to break up large pieces. Re-cover and
touch START/+30 SEC. After cooking, let stand, covered, for
2 to 3 minutes.
10. Frozen Entrées 0.5-3.0 lb (0.22-1.36 kg) Use for frozen convenience foods. It will give satisfactory results
for most brands. Remove package from outer wrapping and
follow package directions for covering. After cooking, let stand,
covered, for 1 to 3 minutes.

19
E
Microwave Features
MELT/SOFTEN/ WARM CHART
FOOD AMOUNT PROCEDURE
Melt Use a Pyrex measuring cup. Cover with plastic wrap.
1. Butter 2 tbsp
0.5 cup
After touching MORE MENUS, touch
1 two times for 2 tbsp.
After touching MORE MENUS, touch 1 three times for 0.5 cup.
2. Chocolate 1 cup chips
1 square
After touching MORE MENUS, touch
2 two times for 1 cup chips.
After touching MORE MENUS, touch
2 three times for 1 square.
Soften DO NOT COVER.
3. Ice Cream 1 pint
1.5 qt.
After touching MORE MENUS, touch
3 two times for 1 pint.
After touching MORE MENUS, touch 3 three times for 1.5 quart.
4. Cream Cheese 3 oz.
8 oz.
After touching MORE MENUS, touch
4 two times for 3 oz.
After touching MORE MENUS, touch 4 three times for 8 oz.
Warm Use a Pyrex measuring cup. DO NOT COVER.
5. Syrup 0.25 cup
0.5 cup
After touching MORE MENUS, touch
5 two times for 0.25 cup.
After touching MORE MENUS, touch
5 three times for 0.5 cup.
6. Dessert Toppings 0.25 cup
0.5 cup
After touching MORE MENUS, touch
6 two times for 0.25 cup.
After touching MORE MENUS, touch 6 three times for 0.5 cup.
7. Beverage Reheat 0.5-2 cups This setting is good for restoring a cooled beverage to a better drinking
temperature. Touch
7 pad for a 0.5 cup increase per touch. Stir after heating.
8. Hot Water 1-6 cups Use this setting for heating COLD TAP WATER to a temperature somewhat below
the boiling point to make instant coffee or tea. Touch 8 for 1 cup increase per
touch. Stir liquid briskly before and after heating to avoid sudden boilover.
9. Hot Cereal 1-6 servings Use individual packets or bulk cereal in your favorite variety: oatmeal, oat bran,
farina, etc. Follow the package directions for the correct amount of water or milk.
To prevent boilovers, it is very important to choose a large container because
microwave cooking of cereal causes high boiling. Touch 9 for 1 serving increase
per touch. If the oven stops, stir and touch START/+30 SEC. After cooking, stir
and let stand, covered, for 2 minutes.
MORE MENUS
MELT/ SOFTEN / WARM
These features automatically compute the correct heating
time and microwave power level for melting, softening
and warming foods shown in the chart below.
1. Touch MORE MENUS pad once.
2. See Menu Label. Select desired food by touching
number pad. Ex: Touch
2 for chocolate.
3. Repeat touching same number pad to select quantity.
Ex: Touch
2 two more times for 1 square.
4. Touch START/+30 SEC pad.
Note:
• To melt, soften or warm other food or foods above or
below the quantity allowed on the MELT/SOFTEN/
WARM CHART, use manual operation.

20
E
Convection Features
MORE MENUS CHART
FOOD AMOUNT RACK PROCEDURE
1. Biscuit 6-12 each 1 or 2 oven
racks
Place oven racks inside the oven and preheat. Evenly space biscuits
on an oven tray and set on the oven rack in the lower position when
preheat is complete. If using more than one oven tray, set the second
pan on the oven rack in the upper position. The biscuits are done
when the tops turn golden brown.
2. Cookies
Packaged
10-12 1 or 2 oven
racks
Ideal for refrigerated cookie dough. Prepare according to package
or recipe directions and place on a greased and floured low
turntable rack. Cookies should be approximately
1
⁄ 3 inch thick and
2 inches in diameter for best results. After the preheat is over, place
pan in oven. Cool before serving.
3. Bundt Cake 1 cake Low
turntable
rack
Ideal for packaged cake mix or your own recipe. Place low turntable
rack in the oven during preheat. Prepare according to package or
recipe directions and place in a greased and floured bundt pan.
Place pan in oven on the low turntable rack. Cool before frosting
and serving.
4. Pizza
Thin/Classic/
Rising
1 frozen pizza Low
turntable
rack
Place low turntable rack in the oven during preheat. When preheat
is complete, place 1 frozen 10" pizza directly onto the low turntable
rack toward the center. The pizza is done when the crust is golden
brown and the cheese is melted. Let stand 5 minutes before serving.
BAKE
During convection heating, hot air is circulated throughout
the oven cavity to brown and crisp foods quickly and
evenly. This oven can be programmed for ten different
convection cooking temperatures for up to 99 minutes,
99 seconds.
• Suppose you want to bake at 350˚F for 20 minutes:
1. Touch BAKE pad.
2. Select temperature by touching number pad
6
350˚F
.
3. Enter cooking time by touching number pads
2000.
4. Touch START/+30 SEC pad.
ROAST
CONVECTION ROAST roasts chicken, turkey, turkey
breast or pork.
• Suppose you want to roast a 2.5 pound chicken:
1. Touch ROAST pad.
2. Select desired setting. Ex: for chicken, touch number
pad
7.
3. Touch number pad to enter weight. Ex:
25 lb.
4. Touch START/+30 SEC pad.
After CONVECTION ROAST cycle ends, a long tone will
sound. Follow the indicated message.
GRILL
CONVECTION GRILL grills hamburgers, chicken pieces,
steaks and fish steaks.
• Suppose you want to grill 2 hamburgers:
1. Touch GRILL pad.
2. Select desired setting. Ex: for hamburgers, touch
number pad 1.
3. Touch START/+30 SEC pad.
After grill preheat cycle ends, the oven will stop and
directions will be displayed. Follow the indicated
message. Open the door and place hamburgers into
oven. Close the door.
4. Touch START/+30 SEC pad.
MORE MENUS
This section of the operation manual offers instructions for
preparing 15 popular foods using CONVECTION BAKE,
ROAST and GRILL.
After selecting the desired feature, follow the directions
indicated in the display.
For helpful hints, simply touch TIMER/SETTINGS anytime
HELP is lighted in the display.
Caution: The oven cabinet, cavity, door, turntable,
turntable support, racks and dishes will become hot. To
PREVENT BURNS, use thick oven gloves when removing
the food or turntable from the oven.

21
E
Convection Features
MORE MENUS CHART
FOOD AMOUNT RACK PROCEDURE
5. Breaded
Shrimp
1-16 pieces Oven rack,
lower
position
Evenly space frozen breaded shrimp on a baking sheet. Place on
the oven rack in the lower position after preheating. The shrimp are
done when golden brown. Let stand 2-3 minutes before serving.
6. Breaded
Chicken
Tenders
2-6 pieces Oven rack,
lower
position
Evenly space frozen breaded chicken tenders on a baking sheet.
Place on the oven rack in the lower position after preheating. The
chicken tenders are done when golden brown. Let stand 3-5 minutes
before serving.
7. Whole Chicken 2.5-7.5 lb Oven rack,
lower
position
Place the low turntable rack in the oven during preheat. Season
chicken as desired and place the tray on top of the low turntable
rack after preheating. After cooking, remove from oven, cover with
foil and allow to stand for 5-10 minutes.
8. Pork
Tenderloin
1.0-3.0 lb Oven rack,
lower
position
Boneless pork loin is recommended because it cooks evenly. Place
on a low rack. After cooking, remove from oven, cover with foil and
allow to stand 5-10 minutes. Internal temperature should be 160˚F.
9. Turkey Breast 1.5-6.0 lb Oven rack,
lower
position
Season, as desired. Place on low rack. After the cycle ends, cover
with foil and let stand 10 minutes. Internal temperature of white
meat should be 170˚F.
10. Beef
Hamburgers
2-4 patties
6 oz each
High
turntable
rack
Season as desired, and evenly space burgers toward the center
of the high turntable rack; no preheating is necessary. Follow the
oven prompt to flip burgers; to do so, carefully remove turntable
and rack at the same time, flip burgers and slide the turntable and
rack back inside of the oven. Press START/+30SEC to continue.
11. Turkey
Burgers
2-4 patties
6 oz each
High
turntable
rack
Season as desired, and evenly space burgers toward the center
of the high turntable rack; no preheating is necessary. Follow the
oven prompt to flip burgers; to do so, carefully remove turntable
and rack at the same time, flip burgers and slide the turntable and
rack back inside of the oven. Press START/+30SEC to continue.
12. Drummies 1.0-2.5 lb High
turntable
rack
Season drummies as desired and place directly onto high turntable
rack with the thick portions toward the center of the rack.
13. Chicken
Breast
Boneless
2.0-4.0 lb High
turntable
rack
Season chicken pieces as desired and place directly onto High
Turntable Rack, evenly spaced. Flip at 27 minutes (follow instructions
on oven display).
14. Fish Fillet 2-4 pieces
6 oz each
High
turntable
rack
Season fillets as desired and place directly onto High Turntable Rack,
evenly spaced. Flip at 7 minutes (follow instructions on oven display).
15. Veggie
Burger
2-4 patties
3 oz each
High
turntable
rack
Place patties directly onto High Turntable Rack, evenly spaced. Flip
at 7 minutes (follow instructions on oven display).

22
E
Convection Features
WARNING: DO NOT USE ALUMINUM FOIL TO COVER
OR SHIELD FOOD WHEN USING SPEED BAKE OR SPEED
ROAST. THE MICROWAVE IS ACTIVE DURING THESE
COOKING CYCLES. THE USE OF ANY METAL OTHER
THAN THE PROVIDED OVEN RACKS AND HIGH AND
LOW TURNTABLE RACKS INCREASES THE RISK OF
ARCING AND POSSIBLY FIRE INSIDE OF THE OVEN
CAVITY.
SPEED BAKE
This cook function provides superior results for baked
goods that require more than 20 minutes baking time. The
SPEED BAKE cooking function cycles the oven’s power
between 90% convection oven and 10% microwave power
to create golden brown exteriors and perfectly moist
interiors for foods such as Bundt cakes, quick breads and
muffins.
SPEED ROAST
This is ideal for larger, dense cuts of meat and whole
poultry. The SPEED ROAST cooking function cycles the
oven’s power between 70% convection oven and 30%
microwave power. This allows for reduced cooking time
as the microwaves directly and rapidly heat the food
internally while convection function circulates dry, heated
air throughout the oven cavity to provide even cooking
with browning for crispy exteriors while the inside retains
its juicy texture.
DEFAULT OVEN
TEMPERATURE
MICROWAVE
POWER
SPEED BAKE 325˚F 10%
SPEED ROAST 300˚F 30%
With the exception of those foods that cook best by
convection heating alone, most foods are well suited to
mix cooking using either SPEED BAKE or SPEED ROAST.
The marriage of these two cooking methods produces
juicy meats, moist and tender cakes and fine textured
breads, all with just the right amount of browning and
crispness.
The temperatures can be changed; however, the
microwave power cannot.
The oven temperature can be changed from 100˚F to
450˚F. To change the temperature, first touch SPEED
ROAST or SPEED BAKE then touch the same pad again.
When the display says SELECT TEMP, touch desired
temperature pad. Ex: SPEED ROAST, SPEED ROAST pad,
7. The temperature will change to 375˚F automatically.
TO COOK WITH SPEED FUNCTIONS
• Suppose you want to bake a cake for 25 minutes on
SPEED BAKE:
1. Touch SPEED BAKE pad.
2. Enter cooking time by touching number pads 2500.
3. Touch START/+30 SEC pad.
TO PREHEAT AND COOK WITH SPEED
FUNCTIONS
Your oven can be programmed to combine preheating
and speed functions cooking operations. You can preheat
at the same temperature as the preset combination
temperature or change it to a different temperature.
• Suppose you want to preheat to 350˚F and then cook
25 minutes on 325˚F SPEED BAKE:
1. Touch Preheat pad.
2. Touch temperature pad
6
350˚F
.
3. Touch SPEED BAKE pad.
4. Touch SPEED BAKE pad once more to change the
cooking temperature.
5. Touch temperature pad
5
325˚F
.
6. Enter cooking time by touching number pads
2500.
7. Touch START/+30 SEC pad.
When the oven reaches the programmed temperature,
signal will sound 4 times*. The oven will stop and
directions will be displayed. Follow the indicated message.
8. Open the door. Place food in the oven. Close the door.
Touch START/+30 SEC pad.
* If the oven door is not opened, the oven will
automatically hold at the preheat temperature for 30
minutes. After this time has elapsed, an audible signal
will sound and the oven will turn off.
Note: To program only preheat, touch the START/+30
SEC pad after step 2. Preheating will start. When the
oven reaches the programmed temperature, follow the
indicated message.
HELPFUL HINTS FOR CONVECTION
AND SPEED FUNCTIONS
COOKING
Your Convection Oven can cook any food perfectly
because of the number of ways it can cook: microwave
only, speed functions, convection only or grill. This
Operation Manual tells you how to program the oven.
The oven cannot be used without the turntable in place.
Never restrict the movement of the turntable.

23
E
Convection Features
CONVECTION COOKING:
1. When preheating, the turntable can be left in or
removed. When using the high rack for 2 shelf baking
in a preheated oven, it is easier to remove the turntable
for preheat.
Place high rack on turntable along with foods. When
preheat is over, open oven door and quickly place
turntable, high rack and foods to be baked inside.
2. Do not cover turntable, low rack or high rack with
aluminum foil. It interferes with air flow that cooks food.
3. Round pizza pans are excellent cooking utensils for
many convection-only items. Choose pans that do not
have extended handles.
4. Using a preheated low rack can give a grilled
appearance to steaks, hot dogs etc.
SPEED FUNCTIONS COOKING:
1. Meats are best when roasted directly on the low rack.
A dish can be placed below the meat if gravy is to be
made from the drippings.
2. Less tender cuts of meat can be roasted and tenderized
using oven cooking bags.
3. When baking, check for doneness after time has
elapsed. If not completely done, let stand in oven a
few minutes to complete cooking.

24
E
MULTIPLE SEQUENCE COOKING
The oven can be programmed for up to 4 automatic
cooking sequences for the microwave mode and 2
automatic cooking sequences with preheat for SPEED
BAKE/SPEED ROAST mode, switching from one power
level setting to another automatically.
Sometimes cooking directions tell you to start on one
power level and then change to a different power level.
Your oven can do this automatically.
• Suppose you want to cook roast beef for 5 minutes at
100% and then continue to cook for 30 minutes at 50%.
1. First touch POWER LEVEL pad twice for 100% power.
Then enter cooking time.
2. Touch POWER LEVEL pad. Touch number pad
5 for
50% power. Then enter second cooking time.
3. Touch START/+30 SEC pad.
Note:
1. If POWER LEVEL pad is touched twice, HIGH will be
displayed.
2. If you wish to know power level, simply touch the
POWER LEVEL pad. As long as your finger is touching
the POWER LEVEL pad, the power level will be
displayed.
SETTINGS/TIMER
Settings provides 7 features which make using your oven
easy because specific instructions are provided in the
interactive display.
1. CLOCK
To set clock:
1. Touch TIMER/SETTINGS pad twice.
2. Enter the correct time of day by touching the numbers
in sequence. Touch START/+30 SEC pad.
2. TIMER
• Suppose you want to set a timer for 3 minutes.
1. Touch TIMER/SETTINGS pad 3 times.
2. Enter time by touching the number pads
300.
3. Touch START/+30 SEC pad.
3. AUDIBLE SIGNAL ELIMINATION
If you wish to have the oven operate with no audible
signals, touch TIMER/SETTINGS 4 times and START/+30
SEC pads.
To cancel and restore the audible signal, touch TIMER/
SETTINGS 4 times and START/+30 SEC pads.
4. REMIND SIGNAL
If you wish to have the oven operate with no remind
signal, touch TIMER/SETTINGS 5 times and START/+30
SEC pads.
To cancel and restore the remind signal, touch TIMER/
SETTINGS 5 times and START/+30 SEC pads.
5. WEIGHT UNIT LBS/KGS
The oven's default temperature is set to U.S. Customary
Unit-pounds. To change to KGS, touch TIMER/SETTINGS
6 times and the number 6. Then, touch START/+30 SEC
pad.
To change to LBS, touch TIMER/SETTINGS 6 times and
the number
1. Then, touch START/+30 SEC pad.
6. TEMPERATURE SELECTIONS
The oven's default temperature setting is ˚F. To change to
˚C, touch TIMER/SETTINGS 7 times and the number 1.
Then, touch START/+30 SEC pad.
To change to ˚F, touch TIMER/SETTINGS 7 times and the
number
6. Then, touch START/+30 SEC pad.
7. DEMONSTRATION MODE
To demonstrate, touch TIMER/SETTINGS 8 times and then
touch START/+30 SEC pad and hold for 3 seconds.
DEMO ON
will appear in the display. Cooking operations and specific
special features can now be demonstrated with no power
in the oven. For example, touch START/+30 SEC pad and
the display will show
1.00
and count down quickly to
END
.
To cancel, touch TIMER/SETTINGS 8 times and then touch
START/+30 SEC pads. If easier, unplug the oven from the
electrical outlet and replug.
+30 SEC
+30 SEC allows you to cook for 30 seconds at 100%
by simply touching the START/+30 SEC pad. You can
also extend cooking time in multiples of 30 seconds by
repeatedly touching the START/+30 SEC pad during
manual cooking up to 99 minutes.
Note:
• To use +30 SEC, touch pad within 3 minutes after
cooking, closing the oven door or touching the STOP/
CLEAR pad.
• +30 SEC cannot be used with Sensor settings, REHEAT
or DEFROST.
Other Convenient Features

25
E
CONTROL LOCK
The Safety Lock prevents unwanted oven operation
such as by small children. The oven can be set so that
the control panel is deactivated or locked. To set, touch
STOP/CLEAR pad and hold for 3 seconds. Should a pad
be touched,
LOCK ON
will appear in the display.
To cancel, touch STOP/CLEAR pad and hold for 3 seconds.
HELP (DISPLAY INDICATOR)
Many of the settings have cooking hints. If you wish to
check, touch TIMER/SETTINGS pad whenever HELP is
lighted in the Interactive Display for these hints.
Other Convenient Features

26
E
26
EEE
26
E
26
E
26
E
26
WAVEGUIDE COVER
The waveguide cover is made from mica so it requires
special care. Keep the waveguide cover clean to assure
good oven performance. Carefully wipe with a damp
cloth any food spatters from the surface of the cover
immediately after they occur. Built-up splashes may
overheat and cause smoke or possibly catch fire. Do not
remove the waveguide cover.
ODOR REMOVAL
Occasionally, a cooking odor may remain in the oven. To
remove, combine 1 cup water, grated peel and juice of 1
lemon and several whole cloves in a 2-cup glass measuring
cup. Boil for several minutes using 100% power. Allow
to set in oven until cool. Wipe interior with a soft cloth.
TURNTABLE/TURNTABLE SUPPORT
The turntable, turntable support and racks can be
removed for easy cleaning. Wash them in mild, sudsy
water; for stubborn stains use a mild cleanser and a non-
abrasive scouring sponge. They are also dishwasher-proof.
Use top rack of dishwasher for turntable support.
Foods with high acidity, such as tomatoes or lemons, will
cause the porcelain enamel turntable to discolor. Do not
cook highly acidic foods directly on the turntable; if spills
occur, wipe up immediately.
The turntable motor shaft is not sealed, so excess water
or spills should not be allowed to stand in this area.
Disconnect the power cord before cleaning or leave the
door open to inactivate the oven during cleaning.
EXTERIOR
The outside surface is precoated metal and plastic. Clean
the outside with mild soap and water; rinse and dry with a
soft cloth. Do not use any type of household or abrasive
cleaner.
DOOR
Wipe the window on both sides with a damp cloth to
remove any spills or spatters. Metal parts will be easier to
maintain if wiped frequently with a damp cloth. Avoid the
use of spray and other harsh cleaners as they may stain,
streak or dull the door surface.
TOUCH CONTROL PANEL
Care should be taken in cleaning the touch control panel.
If the control panel becomes soiled, open the oven door
before cleaning. Wipe the panel with a cloth dampened
slightly with water only. Dry with a soft cloth. Do not scrub
or use any sort of chemical cleaners. Close door and touch
STOP/CLEAR pad.
INTERIOR - AFTER MICROWAVE
COOKING
Cleaning is easy because little heat is generated to the
interior surfaces; therefore, there is no baking and setting
of spills or spattering. To clean the interior surfaces, wipe
with a soft cloth and warm water. DO NOT USE ABRASIVE
OR HARSH CLEANERS OR SCOURING PADS. For heavier
soil, use baking soda or a mild soap; rinse thoroughly with
hot water. NEVER SPRAY OVEN CLEANERS DIRECTLY
ONTO ANY PART OF THE Oven.
INTERIOR - AFTER CONVECTION,
SPEED BAKE OR SPEED ROAST
Spatters may occur because of moisture and grease.
Wash immediately after use with hot, soapy water. Rinse
and polish dry. Harder to remove spatters may occur if
oven is not thoroughly cleaned or if there is long time/
high temperature cooking. If so, you may wish to purchase
an oven cleaner pad with liquid cleaner within it—not a
soap filled steel pad—for use on stainless or porcelain
surfaces. Follow manufacturer's directions carefully and be
especially cautious not to get any of the liquid cleaner in
the perforations on the wall or ceiling or any door surfaces.
Rinse thoroughly and polish dry.
After cleaning the interior thoroughly, residual grease may
be removed from the interior ducts and heater by simply
operating the oven on 450˚F for 20 minutes without food.
Ventilate the room if necessary.
Cleaning and Care

27
E
Specifications
AC Line Voltage: UL Rating-Single phase 240V, 50Hz, AC only
CSA Rating-Single phase 220V, 50Hz, AC only
AC Power Required: UL /CSA Rating 11.5 A, 2550W
Output Power:
Microwave*
Convection Heater
950 watts
1600 watts
Frequency: 2450 MHz
Outside Dimensions (WxHxD):
29
1
⁄ 2" x 17
7
⁄ 8"x 25
13
⁄ 16" (749.3 x 454.02 x 655.6 mm)
Cavity Dimensions (WxHxD):
17
1
⁄ 16"x 9
7
⁄ 16"x 16
15
⁄ 16" (433.4 x 239.7 x 430.2 mm)
Oven Capacity:** 1.6 Cu. Ft.
Cooking Uniformity: Turntable system, diameter 16" (3406.4 mm)
*
The International Electrotechnical Commission’s standardized method for measuring output wattage. This test method
is widely recognized.
**
Internal capacity is calculated by measuring maximum width, depth and height. Actual capacity for holding food is
less.
In compliance with standards set by:
FCC – Federal Communications Commission Authorized.
DHHS – Complies with Department of Health and Human Services (DHHS) rule, CFR, Title 21, Chapter I, Subchapter J.
– This symbol on the nameplate means the product is listed by Underwriters Laboratories, Inc. for use in USA
or Canada.
NHW – Department of National Health and Welfare of Canada.
This oven is listed by the Canadian Standard Association as certified.

28
E
Please check the following before calling for service:
1. Place one cup of water in a glass measuring cup in the
oven and close the door securely.
Operate the oven for one minute at HIGH 100%.
A
Does the oven light come on?
YES _____ NO _____
B
Does the cooling fan work?
(Put your hand over the rear ventilating
openings.)
YES _____ NO _____
C
Does the turntable rotate?
(It is normal for the turntable to turn in either
direction.)
YES _____ NO _____
D
Is the water in the oven warm?
YES _____ NO _____
Service Call Check
2. Remove water from the oven and operate the oven for
5 minutes at Convection 450˚F.
Operate the oven for one minute at HIGH 100%.
A
Do CONV and COOK indicators light?
YES _____ NO _____
B
After the oven shuts off, is inside of the oven
hot?
YES _____ NO _____
If “NO” is the answer to any of the above questions, please
check electrical outlet, fuse and/or circuit breaker. If they
are functioning properly, CONTACT YOUR NEAREST
AUTHORIZED SERVICER.
A oven should never be serviced by a “do-it-yourself”
repair person.
Note:
If time appearing in the display is counting down very
rapidly, check Demonstration Mode on page 24 and
cancel.

29
E
Oven Warranty
TWO YEAR FULL WARRANTY
Convection/Speed Microwave Ovens and all of their component parts, except as detailed below*, are warranted to be free from defective
materials or workmanship in residential housed hold use for a period of two (2) years from the date of original retail purchase. Viking Range,
warrantor, agrees to repair or replace at its option, any part which fails or is found to be defective during the warranty period. Warranty
service must be performed by a Viking Range LLC authorized service agency or representative.
* 90 Day Cosmetic Warranty: Products are warranted to be free from cosmetic defects in material or workmanship for a period of 90 days
from the date of original retail purchase. This warranty covers manufacturing based defects only and does not cover issues resulting from
handling or installation. Inspection of the product should be made at time of delivery. Any defects must be reported to the selling dealer
within the 90 day period. Viking Range LLC uses the most up to date processes and the best materials available to produce all color
finishes. However, slight color variation may be noticed because of the inherent differences in painted parts and porcelain parts as well
as differences in product location and natural or artificial lighting. Warranty service must be performed by a Viking Range LLC authorized
service agency or representative.
* 90 Day Residential Plus: Viking products are designed and certified for residential use only. They are not intended for use in commercial
applications. Viking products should only be used in accordance to national and local codes.
Viking is not responsible for property damage or injury resulting from use in a commercial application. To support the manufacturing
quality of its appliance’s Viking will provide a full 90 day warranty for products used in “Residential Plus “applications. This “Residential
Plus” warranty applies to applications where use of the product extends beyond residential use but is in compliance with national and local
code. In some jurisdictions these applications are zoned as residential. Examples of, but not limited to, such applications covered by this
warranty are bed and breakfasts, fire stations, private clubs, churches, condominium/apartment common areas etc. Under this "Residential
Plus" warranty, the product, its components and accessories are warranted to be free from defective material or workmanship for a period
of ninety (90) days from the date of original retail purchase. Viking Range, LLC, warrantor, agrees to repair or replace, at its option, any
part which fails or is found to be defective during the warranty period. This warranty covers parts and labor. This warranty excludes use of
the product in all commercial locations such as restaurants, food service locations and institutional food service locations.
FIVE YEAR LIMITED WARRANTY
If the magnetron tube fails due to defective materials or workmanship in normal household use during the third through fifth year from the date
of original retail purchase it will be repaired or replaced, free of charge for the part itself, with the owner paying all other costs, including labor.
WARRANTY TERMS
This warranty extends to the original retail purchaser of the product warranted hereunder and to each transferee owner of the product during
the term of the original purchaser’s warranty. The warranty is transferable by the original retail purchaser via home sale only. If a transferee
owner is unable to provide proof of purchase from the original purchaser and the product has not been previously registered, the production
date of the product, located in the serial number on the product, will serve as the effective warranty start date.
The activation date of the warranty begins from the date of original retail purchase. In the case of new product purchase via building
development sales, activation begins from the earlier date of either certificate of occupancy or 24 months from date of manufacture. Note
date of manufacture is identified by serial tag on product.
This warranty does not cover units purchased as b-stock, liquidation, salvage, seconds, refurbished, as-is, used products.
This warranty shall apply to products purchased in the United States and Canada. Products must be purchased in the country where service
is requested. Warranty service must be performed by a Viking Range LLC authorized service agency or representative. Warranty shall not
apply to damage resulting from abuse, accident, natural disaster, loss of electrical power to the product for any reason, alteration, improper
installation, improper operation, or repair service of the product by anyone other than a Viking Range LLC authorized service agency or
representative. This warranty does not apply to commercial usage. Warrantor is not responsible for consequential or incidental damage
whether arising out of breach of warranty, breach of contract or otherwise. Some jurisdictions do not allow the exclusion or limitation of
incidental or consequential damages, so the above limitations do not apply to you.
Owner shall be responsible for proper installation, providing normal care and maintenance, providing proof of purchase upon request, and
making the product reasonably accessible for service. If the product or one of its component parts contains a defect or malfunction during
the warranty period, after a reasonable number of attempts by the warrantor to remedy the defects or malfunctions, the owner is entitled
to either a refund or replacement, at the warrantor’s discretion of the product or its component part or parts. Warrantor’s liability on any
claim of any kind, with respect to the goods or services covered hereunder, shall in no case exceed the price of the goods or service or part
thereof which gives rise to the claim.
WARRANTY SERVICE
Under the terms of this warranty, service must be performed by a Viking Range LLC authorized service agent or representative. Service will
be provided during normal business hours Labor performed at overtime or premium rates shall not be covered by the warranty. To obtain
warranty service contact Viking Range LLC Customer Care at 1-888-845-4641. Please have model number, serial number, and date of
original purchase available when calling. IMPORTANT: retain proof of original purchase to establish warranty period. The return of the owner
registration card is not a condition of warranty coverage. You should, however, return the owner registration card so Viking Range LLC can
contact you should any question of safety arise which could affect you. Any implied warranties of merchantability and fitness applicable to
the above described burner assemblies, infrared rotisserie burners, grill grates, and stainless steel parts are limited in duration to the period
of coverage of the applicable express written limited warranties set forth above. Some jurisdictions do not allow limitations on how long an
implied warranty lasts, so the above limitations may not apply to you. This warranty gives you specific legal rights, and you may also have
other rights which may vary from jurisdiction to jurisdiction.
Specifications subject to change without notice.

30
E
VIKING RANGE, LLC
111 FRONT STREET
GREENWOOD, MISSISSIPPI 38930 USA
(662) 455-1200
FOR PRODUCT INFORMATION
CALL 1-888-845-4641
OR VISIT OUR WEB SITE AT VIKINGRANGE.COM
E

1
S
SPANISH
Manual de uso y cuidado
Horno microondas con
convección/velocidad
VMDD5306SS

2
S
SPANISH
Si se necesita servicio:
1. Llame a su agencia de servicio autorizada.
2. Debe tener disponible la siguiente información:
a. Número de modelo
b. Número de serie
c. Fecha de compra
d. Nombre del distribuidor al que le realizó la compra
3. Describa claramente el problema que tiene.
Si no puede obtener el nombre de una agencia de servicio autorizada o si continúa teniendo un problema de servicio,
comuníquese con Viking Range, LLC al teléfono (888) 845-4641 o escriba a:
VIKING RANGE, LLC
PREFERRED SERVICE
111 Front Street
Greenwood, Mississippi (MS) 38930 USA
Registre la información que se indica a continuación. Será necesaria si alguna vez requiere del servicio. El número de
modelo y de serie de su horno microondas se encuentra en la etiqueta de identificación al lado izquierdo de la cavidad
del horno.
Número de modelo ___________________________ Número de serie _______________________________________
Fecha de compra _____________________________ Fecha de instalación ____________________________________
Nombre del distribuidor _____________________________________________________________________________
Dirección
___________________________________________________________________________________________________________
_______________________________________________________________________________________________________________________
Si el servicio requiere de instalación de partes, use sólo las partes autorizadas para garantizar la protección bajo la
garantía.
CONSERVE ESTE MANUAL PARA REFERENCIA FUTURA
PRECAUCIONES PARA EVITAR POSIBLES
EXPOSICIONES AL EXCESO DE ENERGÍA DEL
MICROONDAS
(a) No trate de operar este horno con la puerta abierta ya que la operación puede provocar una exposición
perjudicial a la energía del microondas. No altere o manipule indebidamente los interbloqueos de seguridad.
(b) No coloque ningún objeto entre la parte frontal del horno y la puerta ni deje que se acumulen restos de
limpiadores o suciedad en las superficies de sellado.
(c) No opere el microondas si tiene daños. Es muy importante que la puerta del horno microondas cierre
adecuadamente y que no haya daños a: (1) la puerta (doblada), (2) las bisagras y los cerrojos (rotos o flojos), (3)
los sellos de la puerta y las superficies de sellado.
(d) El horno sólo debe ser ajustado o reparado por el personal de servicio calificado apropiado.
Información de servicio

3
S
SPANISH
2 INFORMACIÓN DE SERVICIO
2 PRECAUCIONES PARA EVITAR POSIBLES
EXPOSICIONES A EXCESO DE ENERGÍA
DE MICROONDAS
3 TABLA DE CONTENIDO
4 INSTRUCCIONES DE SEGURIDAD
IMPORTANTES
5 INSTRUCCIONES DE INSTALACIÓN
6 INSTRUCCIONES PARA CONEXIÓN A TIERRA
7-10 INFORMACIÓN QUE DEBE CONOCER
7 SOBRE SU HORNO
7 SOBRE LA COCCIÓN POR MICROONDAS
7 SOBRE LOS NIÑOS Y EL MICROONDAS
8 SOBRE SEGURIDAD
8-9 SOBRE LOS UTENSILIOS Y ENVOLTURAS
10 SOBRE LOS ALIMENTOS
11-12 NOMBRE DE LAS PARTES
11 PARTES DEL HORNO
11 ACCESORIOS
12 PANEL DE CONTROL
12 ETIQUETA DE MENÚ
13 ANTES DE OPERAR
13 PARA CONFIGURAR EL RELOJ
13 STOP/CLEAR (PARAR/BORRAR)
14 OPERACIÓN MANUAL
14 COCCIÓN POR TIEMPO
14 PARA FIJAR EL NIVEL DE POTENCIA
14 DESCONGELAMIENTO MANUAL
15-19 CARACTERÍSTICAS DEL MICROONDAS
15 DEFROST (DESCONGELAR)
16 COCCIÓN POR SENSOR
16-17 REHEAT (RECALENTAR)
16-17 POPCORN (PALOMITAS DE MAÍZ)
17-18 COOK (COCCIÓN)
19 MORE MENUS (MÁS MENÚS)
20-23 CARACTERÍSTICAS DE LA CONVECCIÓN
20 BAKE (HORNEAR)
20 ROAST (ASAR)
20 GRILL (A LA PARRILLA)
20-22 MORE MENUS (MÁS MENÚS)
22 SPEED BAKE (HORNEAR CON VELOCIDAD)
22 SPEED ROAST (ASAR CON VELOCIDAD)
23 CONSEJOS ÚTILES PARA COCCIÓN MEDIANTE LAS
FUNCIONES DE CONVECCIÓN Y VELOCIDAD
24-25 OTRAS FUNCIONES CONVENIENTES
24 COCCIÓN EN SECUENCIAS MÚLTIPLES
24 SETTING/TIMER (AJUSTE/TEMPORIZADOR)
24 +30 SEC (+30 SEGUNDOS)
25 BLOQUEO DE CONTROL
25 HELP (AYUDA - INDICADOR DE PANTALLA)
26 LIMPIEZA Y CUIDADO
27 ESPECIFICACIONES
28 REVISIÓN PARA SOLICITUD DE SERVICIO
29 GARANTÍA
Tabla de Contenido

4
S
SPANISH
Al usar artefactos eléctricos deben tomarse precauciones
de seguridad básicas, incluyendo las siguientes:
ADVERTENCIA - Para reducir el riesgo de quemaduras,
descarga eléctrica, incendios, lesiones a personas o
exposición al exceso de energía del microondas:
1. Lea todas las instrucciones antes de usar el artefacto.
2. Lea y siga la sección específica “PRECAUCIONES
PARA EVITAR LA POSIBLE EXPOSICIÓN AL EXCESO
DE ENERGÍA DEL MICROONDAS” en la página 2.
3. Este artefacto debe ser conectado a tierra.
Conéctela únicamente a un tomacorriente puesto a
tierra adecuadamente. Vea “INSTRUCCIONES DE
CONEXIÓN ELÉCTRICA A TIERRA” en la página 6.
4. Instale o coloque este artefacto sólo de acuerdo a
las instrucciones de instalación proporcionadas.
5. Algunos productos como huevos enteros y
recipientes sellados—por ejemplo, frascos de
vidrio cerrados—pueden explotar y no deben ser
calentados en este horno.
6. Use este artefacto sólo para el uso destinado como
se describe en este manual. No use productos
químicos ni vapores corrosivos en este artefacto.
Este tipo de horno está diseñado específicamente
para calentar, cocinar o deshidratar los alimentos. No
está diseñado para uso industrial o de laboratorio.
7. Como cualquier artefacto, una supervisión adecuada
es necesaria cuando lo usen los niños.
8. No haga funcionar este artefacto si el cable de
energía o enchufe están dañados, si no funciona
apropiadamente o si tiene daños o se ha caído.
9. Este artefacto debe recibir servicio sólo del personal
de servicio calificado. Comuníquese con el Personal
de servicio autorizado más cercano para una
evaluación, reparación o ajuste.
10. No cubra ni bloquee ninguna abertura del artefacto.
11. No guarde ni use este artefacto en exteriores. No use
este producto cerca del agua—por ejemplo, cerca
del fregadero de la cocina, de una base mojada, de
piscinas o lugares similares.
12. No sumerja el cable de energía o enchufe en el agua.
13. Mantenga el cable alejado de superficies calientes.
14. No deje que el cable cuelgue sobre el borde de la
mesa o cubierta de cocina.
15. Vea las instrucciones para limpiar la superficie de la
puerta en la página 26.
16. Para reducir el riesgo de incendio en la cavidad del
horno:
a. No cocine demasiado los alimentos. Preste
cuidadosa atención al electrodoméstico cuando
coloque papel, plástico u otros materiales
combustibles dentro del horno para facilitar la
cocción.
b. Retire los sujetadores de alambre de las bolsas
de papel o de plástico antes de colocar las bolsas
en el horno.
c. Si los materiales en el horno empiezan a
arder, mantenga cerrada la puerta del horno,
apáguelo y desconecte el cable de energía o
desconecte la energía en la caja de fusibles o
en el panel de interruptores automáticos.
d. No use la cavidad para almacenar objetos. No
deje productos de papel, utensilios de cocina o
alimentos en la cavidad cuando no lo use.
17. 17. Los líquidos, como agua, café o té pueden
sobrecalentarse más allá del punto de ebullición sin
que pueda notarse que están hirviendo. No siempre
habrá burbujas o vapor de ebullición visibles al retirar
el recipiente del horno. ESTO PUEDE CAUSAR UN
DERRAME IMPREVISTO DE LÍQUIDOS DEMASIADO
CALIENTES AL INTRODUCIR UNA CUCHARA U
OTRO UTENSILIO EN EL LÍQUIDO.
Para reducir el riesgo de lesiones a personas:
a. No sobrecaliente el líquido.
b. Revuelva el líquido antes y a la mitad del
calentamiento.
c. No use un recipiente de paredes rectas y boca
angosta. Use un recipiente de boca ancha.
d. Después de calentar, deje que el recipiente en
el horno por lo menos 20 segundos antes de
retirarlo.
e. Tenga extremo cuidado al insertar una cuchara u
otro utensilio en el recipiente.
18. Si el horno microondas va a ser empotrado, siga las
siguientes instruccione:
a. No debe montarse sobre un fregadero.
b. No almacene nada directamente encima de la
superficie del artefacto cuando el artefacto se
encuentre en operación.
19. Si la luz del horno no funciona, consulte al PERSONAL
DE SERVICIO AUTORIZADO.
INSTRUCCIONES DE SEGURIDAD IMPORTANTES
GUARDE ESTAS INSTRUCCIONES

5
S
SPANISH
Instrucciones de instalación
DESEMBALAJE Y VERIFICACIÓN DE SU
HORNO
Retire todos los materiales de empaque que están dentro
de la cavidad del horno; sin embargo, NO RETIRE LA
CUBIERTA DE LA GUÍA DE ONDAS que se encuentra en
la pared superior de la cavidad. Lea los anexos y GUARDE
el Manual de instalación/uso y cuidado.
Revise que el horno no tenga daños, como mal
alineamiento o inclinación, sellos de la puerta y superficies
de sellado dañados, o bisagras y cerrojos de la puerta
rotas o flojas y abolladuras en la cavidad o en la puerta.
Si encuentra algún daño, no haga funcionar el horno y
comuníquese con su agente de servicio local autorizado.
Waveguide cover
Safety door latchesDoor seals and
sealing surfaces
Cubierta de la guía de
ondas
Sellos de la puerta y
superficies de sellado
Sellos de la puerta y
superficies de sellado
Pestillos de seguridad
de la puerta
SELECCIONE UNA UBICACIÓN
Su horno puede integrarse en un gabinete o pared
por sí mismo, encima de cualquier horno eléctrico
incorporado, cajón calefactor o debajo de una estufa
o mostrador. Si se instala encima de un horno o cajón
calentador, deje 2 pulgadas de espacio entre los
productos.

6
S
SPANISH
Este artefacto debe ser conectado a tierra. Este horno
está equipado con un cable que tiene un alambre a tierra
y un enchufe con conexión a tierra. Debe conectarlo
en un tomacorriente de pared instalado y conectado
a tierra apropiadamente de acuerdo con el Código
eléctrico nacional y los códigos y reglamentos locales.
En caso de que se produzca un cortocircuito eléctrico, la
conexión a tierra reduce el riesgo de descarga eléctrica
proporcionando una vía de escape para la corriente
eléctrica.
ADVERTENCIA – El uso inapropiado del enchufe con
conexión a tierra puede causar una descarga eléctrica.
REQUISITOS ELÉCTRICOS
• El tomacorriente debe estar fácilmente accesible
para que la unidad se pueda desconectar fácilmente
en caso de emergencia. La alimentación eléctrica
debe ser 220-240 VCA, 50 Hz, con un interruptor
termomagnético de distribución con capacidad mínima
de 1.6 kW. Deberá ser posible aislar el artefacto de la
alimentación eléctrica incorporando un interruptor en
el cableado fijo con apego a los códigos eléctricos. Se
recomienda un circuito por separado que sea sólo para
este electrodoméstico. No guarde ni use este horno
en exteriores.
• No opere el horno con la puerta abierta o altere los
cerrojos de seguridad de la puerta en cualquier forma.
No opere el horno si hay cualquier objeto entre los
sellos de la puerta y las superficies de sellado.
Instalación permanente
y correcta
Enchufe de 3 clavijas
Clavija de tierra
Tomacorriente
para 3 clavijas
Caja del tomacorriente
conectada a tierra
Instrucciones para conexión a tierra
IMPORTANTE: Si usted no está seguro de cómo conectar
su horno, consulte a un electricista autorizado y calificado.
Nota:
1. Si tiene alguna pregunta sobre las instrucciones
eléctricas o de conexión a tierra, consulte a un
electricista calificado o al encargado de brindar el
servicio.
2. Ni Viking Range, LLC ni el distribuidor pueden aceptar
ninguna responsabilidad por daños al horno o lesiones
personales causadas por no seguir los procedimientos
de conexión eléctrica correctos.
INTERFERENCIA DE RADIO O
TELEVISIÓNE
Si hubiera cualquier interferencia causada por el horno
microondas en su radio o TV, revise que el horno esté
conectado a un circuito eléctrico distinto, aleje la radio
o TV del horno lo más que pueda o revise la posición y
señal de la antena de recepción.
PARA EVITAR LA POSIBILIDAD DE
DESCARGA ELÉCTRICA:
• Si el cable de alimentación eléctrica de este artefacto
está dañado, debe ser remplazado por un cable
especial. El cambio lo debe hacer un agente de servicio
autorizado.
PARA EVITAR LA POSIBILIDAD DE
QUEMADURAS
• Evite apoyarse o columpiarse de la puerta del horno.
No juegue con el horno o lo use como un juguete.
Se debe enseñar a los niños todas las instrucciones
de seguridad eléctricas: uso de los agarra ollas, retiro
cuidadoso de las cubiertas de los alimentos; prestar
atención especial al embalaje (por ejemplo, materiales
que se autocalientan) diseñados para hacer crujientes
los alimentos, ya que pueden estar excesivamente
calientes.t.

7
S
SPANISH
SOBRE SU HORNO
Este Manual de instalación/uso y cuidado es valioso: léalo
detalladamente y guárdelo para futura referencia.
Un buen libro de cocina para microondas es muy útil.
Consúltelo sobre principios, técnicas, sugerencias y
recetas de cocina en microondas.
NUNCA use el horno sin el plato giratorio ni el soporte ni
dé vuelta al plato giratorio para colocar un plato grande
en el horno. El plato giratorio girará en sentido horario
y antihorario.
SIEMPRE coloque alimentos dentro del horno durante su
operación para que absorban la energía del microondas.
Al usar el horno con niveles de potencia por debajo
del 100%, usted podría escuchar que el magnetrón se
enciende y apaga. Es normal que la parte exterior del
horno esté caliente al tacto cuando cocina o recalienta.
La condensación es una parte normal de la cocción
con microondas. La humedad ambiental y la humedad
en la comida influirán en la cantidad de humedad que
se condense en el horno. Generalmente, los alimentos
cubiertos no producirán tanta condensación como los
no cubiertos. No bloquee las ranuras de ventilación en
la parte posterior.
Después de usar CONVECCIÓN, FUNCIONES DE
VELOCIDAD o MÁS MENÚS POR CONVECCIÓN,
escuchará el sonido del ventilador de enfriamiento. El
ventilador puede continuar funcionando hasta por 5
minutos dependiendo de la temperatura del horno.
Tenga en cuenta que a diferencia de los hornos
microondas convencionales, los hornos por convección
tienden a calentarse durante la cocción por CONVECTION
(Convección), SPEED FUNCTION (Funciones de
velocidad) y CONVECTION MORE MENUS (Más menús
por convección).
El uso del horno es sólo para la preparación de los
alimentos. No debe usarse para secar ropa o periódicos.
Su horno microondas tiene una capacidad nominal de
950 vatios determinados con el Procedimiento de prueba
IEC. Al seguir instrucciones de recetas o de productos
envasados, verifique los alimentos uno o dos minutos
antes del tiempo mínimo y aumente tiempo según
corresponda.
SOBRE LA COCCIÓN POR
MICROONDAS
• Distribuya los alimentos con cuidado. Coloque las áreas
más gruesas hacia la parte exterior del plato.
• Verifique el tiempo de cocción. Cocine durante el
período de tiempo más corto indicado y aumente como
sea necesario. Los alimentos que se cocinan en exceso
pueden quemarse o encenderse.
Información que debe conocer
• Cubra los alimentos durante su cocción. Consulte la
receta o el libro de cocina para obtener sugerencias:
Toallas de papel, papel encerado, película plástica para
microondas o una tapa. Las cubiertas evitan derrames
y permiten que los alimentos se cocinen de manera
uniforme.
• Revuelva los alimentos desde afuera hacia el centro del
plato una o dos veces durante la cocción, si es posible.
• Voltee los alimentos una vez durante la cocción en
microondas para acelerar la cocción de alimentos como
pollo y hamburguesas. Los alimentos grandes como
asados deben voltearse al menos una vez.
• Reacomode los alimentos como albóndigas a la mitad
de la cocción desde la parte superior a la inferior y
desde el centro del plato hacia el exterior.
• Deje un tiempo de espera. Retire los alimentos del
horno y revuélvalos, si es posible. Cubra durante el
tiempo de espera, lo cual permite que los alimentos
se terminen de cocinar sin recocerlos.
• Verifique la cocción. Verifique si hay señales que
indiquen que se ha alcanzado la temperatura de
cocción.
Las señales de cocción completa incluyen:
- Todo el alimento emana vapor, no sólo en los bordes.
- Temperatura de la base central del plato muy caliente
al tacto.
- Fácil movimiento de las articulaciones de los muslos
del ave.
- La carne y la carne de ave no presentan un color
rosáceo.
- El pescado está opaco y se desmenuza fácilmente
con un tenedor.
SOBRE LOS NIÑOS Y EL
MICROONDAS
Los niños menores de 7 años deben usar el horno
microondas bajo la supervisión cercana de un adulto. En
el caso de los niños entre 7 y 12 años, la persona que los
supervisa debe estar en la misma habitación.
El niño debe alcanzar el horno de manera cómoda; en
caso contrario, debe usar un banco firme.
No debe permitir que nadie se apoye o se cuelgue de la
puerta del horno.
Los niños deben conocer todas las precauciones de
seguridad: usar agarra ollas, retirar las cubiertas con
cuidado, prestar mucha atención a los paquetes de
alimentos crujientes, ya que podrían estar muy calientes.
No asuma que un niño/niña puede cocinar de todo sólo
porque aprendió una técnica de cocción.
Los niños deben aprender que el horno no es un juguete.
Vea la página 25 para consultar la función de Bloqueo
del control.

8
S
SPANISH
Información que debe conocer
SOBRE SEGURIDAD
• Verifique que la cocción de los alimentos se realice
de acuerdo a las temperaturas recomendadas por el
Departamento de Agricultura de los EE.UU.
Para verificar la cocción, introduzca un termómetro para
carne en un área gruesa o densa lejos de la grasa y el
hueso. NUNCA deje el termómetro en los alimentos
durante la cocción, a menos que sea aprobado para uso
en horno microondas.
TEMP ALIMENTO
160˚F (71˚C) Para platos con cerdo fresco,
carne molida, carne blanca de ave
deshuesada, pescado, mariscos,
huevos y alimentos preparados
congelados.
165˚F (74˚C) Para sobrantes, comida refrigerada
lista para recalentar, carnes frías y
comida "lista" para llevar.
170˚F (77˚C) Carne blanca de ave.
180˚F (82˚C) Carne oscura de ave.
• SIEMPRE use un agarra ollas para prevenir quemaduras
al manipular utensilios que están en contacto con
los alimentos calientes. El calor de los alimentos
puede transferirse a través de los utensilios causando
quemaduras en la piel.
• Evite las quemaduras causadas por el vapor dirigiéndolo
lejos de su rostro y manos. Levante lentamente el borde
más alejado de la cubierta de un plato y abra con
cuidado las bolsas de palomitas de maíz y las bolsas
especiales para cocinar en horno apartándolas de su
rostro.
• Permanezca cerca del horno mientras esté en uso y
verifique con frecuencia el progreso de la cocción para
que los alimentos no se cocinen demasiado.
• NUNCA use la cavidad para guardar libros de cocina
u otros artículos.
• Seleccione, almacene y manipule los alimentos con
cuidado para conservar su alta calidad y minimizar la
propagación de bacterias.
• Conserve limpia la cubierta de la guía de ondas. Los
residuos de alimentos pueden producir arcos eléctricos
o incendios.
• Tenga cuidado al retirar los alimentos del horno para
que los utensilios, su ropa o accesorios no toquen los
pestillos de seguridad de la puerta.
SOBRE LOS UTENSILIOS Y ENVOLTURAS
No es necesario comprar utensilios de cocina nuevos. Usted puede usar la mayoría de los utensilios de su cocina
en su nuevo horno microondas. El cuadro siguiente le ayudará a decidir qué utensilios y envolturas debe usar en
cada modo.
UTENSILIOS Y
ENVOLTURAS
SOLO MICROONDAS
CONVECTION BAKE
(HORNEAR POR CONVEC-
CIÓN), ROAST (ASAR),
GRILL (A LA PARRILLA)
SPEED ROAST (ASAR
CON VELOCIDAD)
SPEED BAKE (HORNEAR
CON VELOCIDAD)
Papel aluminio NO SÍ. Para cubrir NO
Recipientes de aluminio NO SÍ. Parrilla - Sin cubierta NO
Plato para dorar NO NO NO
Vidrio cerámico
(Pyroceram
®
)
SÍ. Excelente SÍ. Excelente SÍ. Excelente
Vidrio resistente al calor SÍ. Excelente SÍ. Excelente SÍ. Excelente
Vidrio no resistente al calor NO NO NO
Tapas de vidrio SÍ SÍ. Parrilla - Sin cubierta SÍ
Tapas de metal NO SÍ. Parrilla - Sin cubierta NO
Utensilios de metal NO SÍ NO. Se sugieren
utensilios de cocina
hechos de silicona.

9
S
SPANISH
Información que debe conocer
UTENSILIOS Y
ENVOLTURAS
SOLO MICROONDAS
CONVECTION BAKE
(HORNEAR POR CONVEC-
CIÓN), ROAST (ASAR),
GRILL (A LA PARRILLA)
SPEED ROAST (ASAR
CON VELOCIDAD)
SPEED BAKE (HORNEAR
CON VELOCIDAD)
Metales varios: platos con
bordes, filetes, bandas y
asas metálicas. Sujetadores/
amarres de metal
NO NO NO
Bolsas para cocción en
hornos
SÍ. Apropiadas para piezas
grandes de carne que
necesitan ablandarse. NO
use sujetadores/amarres de
alambre.
SÍ. Parrilla - Sin cubierta SÍ. NO use sujetadores/
amarres de alambre.
Platos de papel SÍ. Para recalentar. NO NO
Toallas de papel SÍ. Para cubrir para recalentar y
cocinar. No use toallas de papel
reciclado que pueden contener
partículas metálicas.
NO NO
Papel resistente al calor SÍ SÍ. Para temperaturas
hasta 400 °F (204 °C).
No lo use para asar a la
parrilla.
SÍ. Para temperaturas
hasta los 400 °F (204 °C).
Recipientes plásticos aptos
para microondas
SÍ. Use para recalentar y
descongelar. Algunos plásticos
aptos para microondas no son
adecuados para la cocción de
alimentos con alto contenido
de grasa y azúcar. Siga las
instrucciones del fabricante.
NO NO
Plástico, Thermoset®
SÍ SÍ. Resisten hasta 425°F
(218 °C). No lo use para
asar a la parrilla.
SÍ
Película plástica SÍ. Use marcas especialmente
indicadas para uso en
microondas. NO deje que
la película plástica toque los
alimentos. Haga agujeros para
que el vapor pueda salir.
NO NO
Cerámica, cerámica de gres
y porcelana
SÍ. Consulte las
recomendaciones del fabricante
sobre su seguridad para uso en
microondas.
SÍ SÍ. Debe ser seguro para
microondas Y resistente
al calor.
Styrofoam (espuma de
poliestireno)
SÍ. Para recalentar. NO NO
Papel encerado SÍ. Envoltura apropiada para
cocinar y recalentar.
NO NO
Mimbre, madera, paja SÍ. Puede ser usado por cortos
períodos de tiempo. No
use con alimentos con alto
contenido de grasa o azúcar.
Se puede carbonizar.
NO NO

10
S
SPANISH
Información que debe conocer
ACCESORIOS
Existen muchos accesorios disponibles para microondas. Revise cuidadosamente antes de comprarlos para que satisfagan
sus necesidades. Al elegir accesorios para microondas, asegúrese de que estén marcados como aptos ara microondas.
Un termómetro resistente a las microondas le ayudará a determinar la cocción correcta y asegurará que sus alimentos
se han cocido a temperaturas seguras al usar la cocción sólo con microondas. Viking Range, LLC no es responsable de
ningún daño al horno al usar accesorios.
SOBRE LOS ALIMENTOS
ALIMENTO LO QUE DEBE HACER ¡NO!
Huevos,
salchichas, frutos
secos, semillas,
frutas y vegetales
• Perfore las yemas del huevo antes de cocinarlo
para evitar una "explosión".
• Haga pequeños agujeros en la piel de las papas,
manzanas, calabacitas, hot dogs y salchichas
para liberar el vapor.
• Cocine los huevos con cascarón.
• Recaliente los huevos enteros.
• Deshidratar frutos secos o semillas con
cáscara.
Palomitas de maíz • Use palomitas de maíz empacadas en una bolsa
especial para horno microondas.
• Escuche mientras las palomitas revientan hasta
que la frecuencia de palomitas reventadas se
reduzca a 1 o 2 segundos o use el interruptor
táctil especial para palomitas de maíz.
• Cocine palomitas de maíz en bolsas de
papel común o en tazones de vidrio.
• Exceda el tiempo máximo que indica el
paquete de las palomitas de maíz.
Alimentos para
bebés
• Transfiera los alimentos del bebé a un plato
pequeño y caliéntelos con cuidado, revolviendo
con frecuencia. Verifique la temperatura antes
de servir.
• Coloque los chupones en los biberones después
de calentarlos y sacúdalos bien. Verifique la
temperatura en su muñeca antes de alimentar al
bebé.
• Caliente botellas desechables.
• Caliente los biberones con los chupones
puestos.
• Caliente los alimentos para bebé en sus
frascos originales.
General • Corte los alimentos horneados con relleno
después de calentarlos para liberar el vapor y
prevenir las quemaduras.
• Revuelva bien los líquidos antes, durante y
después de calentar para evitar “erupciones”.
• Use un tazón profundo al cocinar líquidos o
cereales para evitar que rebosen.
• Caliente o cocine en frascos de vidrio
cerrados o en recipientes herméticos.
• El calor puede en el microondas ya que
las bacterias dañinas no pueden ser
destruidas.
• Fría en aceite.
• Seque madera, calabazas, hierbas o
papeles húmedos.

11
S
SPANISH
PARTES DEL HORNO
Nombre de las partes
1 Ranuras de ventilación (parte posterior)
2 Puerta del microondas con ventana
transparente
3 Luz del horno
Se enciende cuando se abre la puerta y
cuando el horno está funcionando.
4 Soporte del plato giratorio
5 Plato giratorio desmontable
El plato giratorio puede girar en sentido
horario o antihorario.
6 Pestillos de seguridad de la puerta
El horno no funcionará si la puerta no está
bien cerrada.
7 Cubierta de la guía de ondas NO LA RETIRE.
8 Manija
9 Panel de control táctil
10 Pantalla digital iluminada
11 Aberturas para aire de convección
12 Rejilla baja removible (Rejilla para asar a la
parrilla)
13 Rejilla alta removible (Rejilla para hornear)
14 Eje del motor del plato giratorio
15 Etiqueta de menús
16 Placa con el número de serie
4
5
12
13
1 7 910
11
3
2
14 86
15
16
ACCESORIOS
Los siguientes accesorios están diseñados especialmente para uso en este horno solo
para cocción por convección (hornear, asar o asar a la parrilla), para cocción con velocidad
(hornear o asar). NO LOS USE PARA COCCIÓN EXCLUSIVA CON MICROONDAS. No
sustituya con rejillas de tipo similar a estas rejillas diseñadas especialmente.
Rejilla alta para el plato giratorio - Vea la tabla en la página 21 para conocer instrucciones
de cuándo usar esta rejilla.
Rejilla baja para el plato giratorio - Vea la tabla en las páginas 20-21 para conocer
instrucciones de cuándo usar esta rejilla.
Rejillas del horno (2) - Estas rejillas se usan para hornear o asar, y para cocinar en dos
niveles. Ejemplos: galletas o pizza.

12
S
SPANISH
El número cerca de la ilustración del panel de control indica las páginas donde puede encontrar
descripciones de las características e información de uso.
PANEL DE CONTROL
ETIQUETA DE MENÚ
Nombre de las partes
Pantalla INTERACTIVA
Las palabras en la pantalla interactiva se iluminarán para indicar las
características e instrucciones de cocción.
20-21
20 20 20 16-17 16-17 17-18
13Indicadores 14
22-23 22-23 19 15
24 24
COOK DEFROST MICROWAVE MORE MENUS CONVECTION MORE MENUS
1 Baked Potatoes
2 Sweet Potatoes
3 Fish / Seafood
4 Brown Rice
5 White Rice
6 Quick Fresh Vegetables
7 Long Fresh Vegetables
8 Frozen Vegetables
9 Ground Meat
10 Frozen Entrée
1 Ground Meat
2 Steaks / Chops
3 Boneless Poultry
4 Bone-in Poultry
5 Roast
6 Casserole and Soup
Melt
1 Butter
2 Chocolate
7 Beverage Reheat
8 Hot Water
9 Hot Cereal
BAKE
1 Biscuit
2 Cookies Packaged
3 Bundt Cake
4 Pizza - Thin / Classic / Rising
5 Breaded Shrimp
6 Breaded Chicken Tenders
ROAST
7 Whole Chicken
8 Pork Tenderloin
9 Turkey Breast
GRILL
10 Beef Hamburgers
11 Turkey Burgers
12 Drummies
13 Chicken Breast Boneless
14 Fish Fillet
15 Veggie Burger
Soften
3 Ice Cream
4 Cream Cheese
Warm
5 Syrup
6 Dessert Topping

13
S
SPANISH
• Antes de operar su nuevo horno, asegúrese de haber
leído y entendido completamente esta Guía de uso y
cuidado.
• Antes de usar el horno, siga estos procedimientos:
1. Conecte el horno. Cierre la puerta. La pantalla del horno
mostrará
WELCOME TOUCH CLEAR
(Bienvenido, toque CLEAR )
2. Presione el interruptor táctil STOP/CLEAR. Aparecerá
:
3. Configure el reloj.
PARA CONFIGURAR EL RELOJ
1. Toque dos veces el interruptor táctil TIMER/SETTINGS.
2. Ingrese la hora correcta del día tocando los números en
secuencia. Toque el interruptor táctil START/+30 SEC.
Este es un reloj de 12 horas. Si intenta ingresar una hora
incorrecta en el reloj, la pantalla mostrará el mensaje
ERROR. Toque el interruptor táctil STOP/CLEAR e ingrese
nuevamente la hora.
• Si se interrumpe el suministro de energía eléctrica a
su horno, la pantalla mostrará en forma intermitente
WELCOME TOUCH CLEAR
(Bienvenido, toque CLEAR) después
de que se restablezca la energía. Si esto ocurre durante
la cocción, se borrará el programa. También se borrará
la hora del día. Sólo toque el interruptor táctil STOP/
CLEAR y restablezca el reloj a la hora correcta del día.
STOP/CLEAR (PARAR/BORRAR)
Toque el interruptor táctil STOP/CLEAR para:
1. Borrar si comete un error durante la programación.
2. Cancelar el temporizador.
3. Detener el horno temporalmente durante la cocción.
4. Reingresar la hora del día en la pantalla.
5. Cancelar un programa durante la cocción, presionando
dos veces.
Antes de operar

14
S
SPANISH
Operación manual
DESCONGELAMIENTO MANUAL
Si el alimento que quiere descongelar no aparece en la
TABLA DE DEFROST o si está por encima o debajo de los
límites en la columna de CANTIDAD, deberá descongelar
manualmente.
Usted puede descongelar cualquier alimento congelado, ya
sea crudo o cocido previamente, usando el POWER LEVEL
3. Siga exactamente el procedimiento de 3 pasos que se
encuentra en la sección PARA ESTABLECER EL NIVEL DE
POTENCIA. Calcule el tiempo de descongelamiento y
toque 3 para 30% cuando seleccione el nivel de potencia.
Para alimentos congelados ya sea crudos o previamente
cocidos, la regla general indica aproximadamente 5
minutos por libra (453 g). Por ejemplo, descongele
durante 5 minutos 1 libra de salsa para espaguetis
congelada.
Siempre detenga el horno periódicamente para retirar
o separar las porciones que estén descongeladas. Si
al final del tiempo estimado de descongelamiento los
alimentos no están descongelados, programe el horno
en incrementos de 1 minuto, en POWER LEVEL 3 hasta
que se descongelen totalmente.
Cuando use recipientes de plástico del congelador,
descongele sólo lo suficiente para retirar el alimento
del plástico y colocar el alimento en un plato apto para
microondas.
COCCIÓN POR TIEMPO
Su horno se puede programar para 99 minutos 99
segundos (99.99). Siempre ingrese los segundos después
de los minutos, aun si ambos son ceros.
• Suponga que desea cocinar por 5 minutos al 100%.
1. Ingrese el tiempo de cocción tocando los números
táctiles
500.
2. Toque el interruptor táctil START/+30 SEC.
PARA FIJAR EL NIVEL DE
POTENCIA
Existen once niveles de potencia predeterminados.
Usar los niveles de potencia más bajos aumenta el tiempo
de cocción, lo que es recomendable para alimentos
como queso, leche y la cocción lenta y prolongada de
carnes. Consulte el libro de recetas o las recetas para
recomendaciones específicas.
TOQUE EL
INTERRUPTOR
TÁCTIL DE NIVEL DE
POTENCIA UNA VEZ,
LUEGO TOQUE
PORCENTAJE
APROXIMADO
DE POTENCIA
PALABRAS
COMUNES PARA
LOS NIVELES DE
POTENCIA
POWER LEVEL 100% Alto
9 90%
8 80%
7 70% Medio-alto
6 60%
5 50% Medio
4 40%
3 30%
Medio bajo/
descongelar
2 20%
1 10% Bajo
0 0%
• Suponga que desea descongelar durante 5 minutos al
30%.
1. Ingrese el tiempo de descongelamiento presionando
los interruptores táctiles
500.
2. Toque el interruptor táctil POWER LEVEL y el número
3.
3. Toque el interruptor táctil START/+30 SEC.
Usted puede programar hasta 4 secuencias de cocción
automática. Siga las instrucciones de la página 24. No
olvide que debe ingresar primero el Nivel de potencia al
programar secuencias múltiples.

15
S
SPANISH
TABLA DE DEFROST
ALIMENTO CANTIDAD PROCEDIMIENTO
1. Ground Meat
(Carne molida)
0.5-2.0 lb
(0.22-0.9 kg)
Retire las piezas descongeladas después de cada etapa. Deje reposar cubierto
de 5 a 10 minutos.
2. Steaks/Chops
(Bistec/chuletas)
0.5-3.0 lb
(0.22-1.36 kg)
Después de cada etapa del ciclo de descongelamiento, vuelva a acomodar,
y retire cualquier carne o pescado que esté casi descongelado. Deje reposar
cubierto de 10 a 20 minutos.
3. Boneless Poultry
(Carne de ave
deshuesada)
0.5-2.0 lb
(0.22-0.9 kg)
Use pechuga de pollo o de pavo deshuesada. Después de cada etapa, si hay
porciones tibias o descongeladas, reacomode o retire. Cubra y deje reposar
de 10 a 20 minutos.
4. Bone-in Poultry
(Carne de ave
con hueso)
0.5-3.0 lb
(0.22-1.36 kg)
Acomode las piezas con las partes más gruesas hacia la parte externa del
plato de vidrio o de la rejilla apta para microondas. Después de cada etapa,
si hay porciones tibias o descongeladas, reacomode o retire. Cubra y deje
reposar de 10 a 20 minutos.
5. Roast
(Asado)
2.0-4.0 lb
(0.9-1.8 kg)
Inicie el descongelamiento colocando el lado con grasa hacia abajo. Después
de cada etapa, dele vuelta al asado. Cubra y deje reposar de 30 a 60 minutos
6. Casserole and Soup
(Guisados o sopa)
1-6 tazas Después de escuchar la señal audible, revuelva si es posible Al final, revuelva
bien y deje reposar cubierto de 5 a 10 minutos.
Nota:
Revise los alimentos a la señal del horno. Después de la etapa final, todavía pueden quedar partes pequeñas con hielo.
Deje reposar para continuar el descongelamiento. No descongele hasta que se derritan todos los cristales de hielo.
DEFROST (DESCONGELAR)
DEFROST descongela automáticamente los alimentos
mostrados en la TABLA DE DEFROST.
• Suponga que quiere descongelar un bistec de 2.0
libras.
1. Toque el interruptor táctil DEFROST una vez.
2. Seleccione el alimento deseado tocando en el panel
táctil, el número correspondiente que aparece en la
etiqueta de menús. Ej. Toque
1 para Ground Meat
(Carne molida)
3. Ingrese el peso tocando los interruptores táctiles
20.
4. Toque el interruptor táctil START/+30 SEC.
El horno se detendrá y las instrucciones aparecerán en la
pantalla. Siga el mensaje indicado.
Características del microondas
5. Después de la 1a etapa, abra la puerta. Dele la vuelta
al bistec. Cierre la puerta. Toque el interruptor táctil
START/+30 SEC.
6. Después de la 2a etapa, abra la puerta. Dele la vuelta
al bistec. Cierre la puerta. Toque el interruptor táctil
START/+30 SEC.
7. Al terminar el ciclo de descongelamiento, cubra y deje
reposar como se indica en la tabla a continuación.
Nota:
• Si intenta ingresar una cantidad mayor o menor que la
permitida según lo indicado en la tabla, un mensaje
de error aparecerá en la pantalla.
• Para descongelar otros alimentos o una cantidad de
alimentos por encima o debajo de los pesos permitidos
en la TABLA DE DEFROST, vea DESCONGELAMIENTO
MANUAL en la página 14.

16
S
SPANISH
Características del microondas
COCCIÓN POR SENSOR
El sensor es un dispositivo de semiconductor que
detecta el vapor (humedad) emitido por los alimentos al
calentarse. El sensor ajusta los tiempos de cocción y los
niveles de potencia para diversos alimentos y cantidades.
USO DE LOS AJUSTES DEL SENSOR:
1. Después de conectar el horno, espere 2 minutos antes
de usar los ajustes del sensor.
2. Asegúrese de que el exterior del recipiente de cocción
y el interior del horno estén secos. Remueva cualquier
rastro de humedad con un paño seco o toalla de papel.
3. REHEAT y POPCORN solo se pueden ingresar dentro
de 1 minuto posterior a la cocción, abriendo y cerrando
la puerta o presionando el interruptor táctil STOP/
CLEAR.
4. Durante la primera parte de la cocción por sensor, en la
pantalla aparecerá el nombre de los alimentos. No abra
la puerta del horno microondas ni toque STOP/CLEAR
durante esta parte del ciclo. La medición del vapor será
interrumpida. Si esto sucede, en la pantalla aparecerá
un mensaje de error. Para continuar cocinando, toque
el interruptor táctil STOP/CLEAR y elija el tiempo de
cocción y potencia variable.
Cuando el sensor detecte el vapor emitido por los
alimentos, aparecerá en pantalla el tiempo de cocción
restante. Puede abrir la puerta cuando aparezca en
la pantalla el tiempo restante de cocción. En este
momento, puede revolver o sazonar los alimentos,
como desee.
5. Revise la temperatura de los alimentos después de la
cocción. Si es necesario un tiempo adicional, continúe
la cocción con un tiempo y potencia variables.
6. Si el sensor no detecta el vapor apropiadamente al
cocinar palomitas de maíz, el horno se apagará y
aparecerá en la pantalla la hora correcta del día. Si el
sensor no detecta el vapor apropiadamente al utilizar
recalentar por sensor, el mensaje
ERROR
aparecerá en
la pantalla y el horno se apagará.
7. Cada alimento tiene una sugerencia de cocción. Toque
TIMER/SETTINGS cuando se encienda el indicador
HELP en la pantalla.
SELECCIÓN DE LOS ALIMENTOS:
1. El sensor funciona con alimentos a una temperatura de
almacenamiento normal. Por ejemplo, los alimentos
de una cena para recalentar estarán a la temperatura
del refrigerador y las palomitas de maíz a temperatura
ambiente.
2. Los alimentos que pesen menos de 3 onzas (85 g)
deberán recalentarse con tiempo y potencia variables.
CUBIERTA DE LOS ALIMENTOS:
La cocción de ciertos alimentos es mejor cuando están
cubiertos. Use la cubierta recomendada en la tabla para
estos alimentos.
1. Tapa de la cacerola.
2. Película plástica: Use película plástica recomendada
para cocción en microondas. Envuelva los platos de
forma suelta; deje un espacio de casi 1/2 pulgada
sin cubrir para permitir la salida de vapor. La película
plástica no debe tocar los alimentos.
3. Papel encerado: Cubra el plato completamente;
doble el exceso de la envoltura debajo del plato para
sujetarlo. Si el plato es más ancho que el papel, traslape
dos pedazos de papel por lo menos una pulgada para
cubrir.
Tenga cuidado al retirar cualquier envoltura para permitir
la salida de vapor lejos de usted.
REHEAT (RECALENTAR)
Puede recalentar muchos alimentos con sólo tocar un
interruptor táctil. No es necesario calcular el tiempo de
cocción o nivel de potencia.
• Suponga que quiere calentar un platillo preparado de
'chili' (chile con carne).
Presione el botón REHEAT.
Cuando el sensor detecta el vapor emitido por los
alimentos, aparecerá en la pantalla el tiempo de
recalentamiento restante.
POPCORN (PALOMITAS DE MAÍZ)
• Suponga que quiere preparar una bolsa de palomitas
de maíz de 3.5 oz (99 g):
Toque una vez el interruptor táctil POPCORN, luego toque
START/+30 SEC.
Esta función del sensor funciona bien con la mayoría de
las marcas de palomitas de maíz para microondas. Sólo
prepare un paquete a la vez. Desdoble el paquete y
colóquelo en el horno de acuerdo con las instrucciones.

17
S
SPANISH
Características del microondas
TABLA DEL SENSOR
ALIMENTO CANTIDAD PROCEDIMIENTO
Popcorn
(Palomitas de maíz)
Sólo 1 paquete a la vez Use únicamente palomitas de maíz para cocción en horno
microondas. Pruebe con varias marcas para elegir la que prefiera.
No intente cocinar los granos que no reventaron completamente.
Bolsa de 2.85-3.5 oz
(80-99 g) (Tamaño normal)
Toque una vez el interruptor táctil POPCORN, luego toque
START/+30 SEC. Esta función es útil con la mayoría de las bolsas
de palomitas de maíz para microondas de 3.0-3.5 oz (85-99 g).
Bolsa de 1.2-1.75 oz (34-50 g)
(Tamaño de bocadillo)
Toque dos veces el interruptor táctil POPCORN, luego toque
START/+30 SEC.
Reheat (Recalentar)
Sobrantes como
arroz, papas,
vegetales,
guisados.
0.25-2.25 lb
(0.11-1.0 kg)
Coloque en un plato o cacerola ligeramente más grande que
la cantidad que va a recalentar. Aplane, si es posible. Recubra
con una tapa, película plástica o papel encerado. Use envolturas
como películas plásticas o tapas para grandes cantidades de
alimentos con mayor densidad como estofados. Después de
recalentar, revuelva bien, si es posible. Los alimentos deben estar
muy calientes. Si no es así, continúe el recalentamiento con una
potencia y tiempo variables. Después de revolver, recubra y deje
que permanezca de 2 a 3 minutos.
Sopas 1-4 tazas Después de recalentar, revuelva bien, si es posible. Los
alimentos deben estar muy calientes. Si no es así, continúe el
recalentamiento con una potencia y tiempo variables. Después
de revolver, recubra y deje que permanezca de 2 a 3 minutos.
Entradas
y verduras
enlatadas
4-36 oz (118-946 mL) Después de recalentar, revuelva bien, si es posible. Los
alimentos deben estar muy calientes. Si no es así, continúe el
recalentamiento con una potencia y tiempo variables. Después
de revolver, recubra y deje que permanezca de 2 a 3 minutos.
COOK
• Suponga que desea cocinar una papa al horno:
1. Toque el interruptor táctil COOK.
2. Seleccione el ajuste deseado del sensor. Ej.: Toque el
interruptor táctil 1 para cocinar papas al horno.
3. Toque el interruptor táctil START/+30 SEC. Cuando
el sensor detecte el vapor emitido por los alimentos,
aparecerá en pantalla el tiempo de cocción restante.
TABLA DE COOK
ALIMENTO CANTIDAD PROCEDIMIENTO
1. Baked Potatoe
(Papas al horno)
2. Sweet Potatoe
(Camotes)
1-6 medianas
1-6 medianas
Haga pequeños agujeros. Colóquelo sobre el plato
giratorio forrado con toalla de papel. Después de la
cocción, retire del microondas, envuelva en papel aluminio
y deje reposar de 5 a 10 minutos.
3. Fish/Seafood
(Pescado/mariscos)
0.25-2.0 lb
(0.11-0.90 kg)
Colóquelo en forma de anillo en un plato de cristal poco
profundo (enrolle el filete con los bordes hacia abajo).
Cubra con una película plástica con agujeros de ventilación.
Después de la cocción, déjelo reposar cubierto durante 3
minutos.

18
S
SPANISH
Características del microondas
TABLA DE COOK
ALIMENTO CANTIDAD PROCEDIMIENTO
4. Brown rice
(Arroz integral)
5. White rice
(Arroz blanco)
0.5-4.0 tazas
0.5-4.0 tazas
Coloque el arroz en una cacerola honda y agregue el
doble de cantidad de agua. Cubra con una tapa o película
plástica. Después de la cocción, revuelva, cubra y deje
reposar de 3 a 5 minutos o hasta que absorba todo el
líquido.
Arroz Agua
Tamaño de la
cacerola
0.5 taza (118 mL) 1 taza (236 mL)
1.5 cuartos de
galón (1.41 L)
1 taza (236 mL) 2 tazas (473 mL)
2 cuartos (1.89
L)
1.5 tazas (354
mL)
3 tazas (709 mL) 2.5 o 3 cuartos
2 tazas (473 mL) 4 tazas (709 mL) 3 cuartos o más
3 tazas (709 mL) 6 tazas (1.41 L) 3 cuartos o más
4 tazas (709 mL) 8 tazas (1.89 L) 3 cuartos o más
6. Quick Fresh Vegetables
(Verduras frescas rápidas)
Brócoli
Coles de Bruselas
Repollo
Coliflor (flores pequeñas)
Coliflor (entera)
Espinaca
Calabacita
Manzanas al horno
0.25-3.0 lb (0.11-1.36 kg)
0.25-3.0 lb (0.11-1.36 kg)
0.25-3.0 lb (0.11-1.36 kg)
0.25-3.0 lb (0.11-1.36 kg)
1 mediana
0.25-1.0 lb (0.11-0.45 kg)
0.25-3.0 lb (0.11-1.36 kg)
2-4 medianas
Lave y coloque en una cacerola. No agregue agua si acaba
de lavar las verduras. Cubra con la tapa para verduras
tiernas. Use película plástica para verduras tiernas y
crujientes. Si es posible, revuelva antes de dejar reposar.
Después de la cocción, déjelo reposar cubierto de 2 a 5
minutos.
7. Long Fresh vegetables
(Verduras largas frescas)
Zanahorias en tajadas
Elote en mazorca
Ejotes
Calabaza:
en cubitos
en mitades
0.25-2.0 lb (0.11-0.9 kg)
2-4 piezas
0.25-2.0 lb (0.11-0.9 kg)
0.25-2.0 lb (0.11-0.9 kg)
1-2
Coloque en una cacerola. Agregue 1-4 cucharadas de
agua. Cubra con la tapa para verduras tiernas. Use película
plástica para verduras tiernas crujientes. Si es posible,
revuelva antes de dejar reposar. Después de la cocción,
déjelo reposar cubierto de 2 a 5 minutos.
8. Verduras congeladas 0.25-2.0 lb (0.11-0.9 kg) Cubra con una tapa o película plástica. Después de la
cocción, mezcle y deje reposar 3 minutos, cubierto.
9. Carne molida 0.25-2.0 lb (0.11-0.9 kg) Use este ajuste para cocinar carne de res o de pavo picada
como hamburguesas o en un guisado para ser agregado a
otros ingredientes. Coloque las hamburguesas en una rejilla
para microondas y recubra con papel encerado. Coloque la
carne molida en una cacerola y cúbrala con papel encerado
o una película plástica. Cuando el microondas se detenga,
voltee las hamburguesas o revuelva la carne en la cacerola
para dividir las piezas grandes. Cubra nuevamente y toque
START/+30 SEC. Luego de la cocción, deje reposar cubierto
de 2 a 3 minutos.
10. Frozen Entrées 0.5-3.0 lb (0.22-1.36 kg) Use para alimentos precocinados congelados. Obtendrá
resultados satisfactorios para la mayoría de las marcas.
Retire la envoltura externa del paquete y siga las
instrucciones del mismo para cubrirlo. Después de la
cocción, déjelos cubiertos de 1 a 3 minutos.

19
S
SPANISH
Características del microondas
TABLA MELT/SOFTEN/ WARM
ALIMENTO CANTIDAD PROCEDIMIENTO
Melt (Fundir) Use una taza medidora de Pyrex. Cubra con una película plástica.
1. Butter
(Mantequilla)
2 cucharadas
0.5 taza (118 mL)
Después de tocar MORE MENUS toque
1 dos veces para 2 cucharadas.
Después de tocar MORE MENUS toque 1 tres veces para 0.5 taza.
2. Chocolate 1 taza (236 mL)
de hojuelas
1 cuadro
Después de tocar MORE MENUS toque
2 dos veces para 1 taza de hojuelas.
Después de tocar MORE MENUS toque 2 tres veces para 1 cuadro.
Soften (Ablandar) NO CUBRIR.
3. Ice Cream
(Helado)
1 pinta (473 mL)
1.5 qt (1.4 L)
Después de tocar MORE MENUS toque
3 dos veces para 1 pinta (473 mL).
Después de tocar MORE MENUS toque 3 tres veces para 1.5 qt (1.4 L).
4. Cream Cheese
(Queso crema)
3 oz (88 mL)
8 onzas (236 mL)
Después de tocar MORE MENUS toque
4 dos veces para 3 oz (88 mL).
Después de tocar MORE MENUS toque 4 tres veces para 8 oz (236 mL).
Warm (Entibiar) Use una taza medidora de Pyrex. NO CUBRIR.
5. Jarabe 0.25 taza (59 mL)
0.5 taza (118 mL)
Después de tocar MORE MENUS toque
5 dos veces para 0.25 taza (59 mL).
Después de tocar MORE MENUS toque 5 tres veces para 0.5 taza (118 mL).
6. Aderezos para
postres
0.25 taza (59 mL)
0.5 taza (118 mL)
Después de tocar MORE MENUS toque
6 dos veces para 0.25 taza (59 mL).
Después de tocar MORE MENUS toque 6 tres veces para 0.5 taza (118 mL).
7. Recalentar
bebidas
0.5-2 tazas
(118-473 mL)
Este ajuste es bueno para calentar una bebida fría a una mejor temperatura
para beber. Toque el interruptor táctil
7 para un aumento de 0.5 taza por cada
toque. Revuelva después de calentar.
8. Agua caliente 1-6 tazas
(0.2-1.4 L)
Use este ajuste para calentar AGUA DE GRIFO FRÍA a una temperatura un tanto
debajo del punto de ebullición para hacer café o té instantáneo. Toque 8 para
aumentar 1 taza por cada toque. Revuelva bien los líquidos antes y después de
calentar para evitar que hiervan repentinamente.
9. Cereal caliente 1-6 porciones Utilice paquetes individuales o cereal a granel de su variedad favorita: avena,
salvado de avena, farina, etc. Siga las indicaciones del paquete para la cantidad
correcta de agua o leche. Para evitar derrames, es muy importante elegir un
recipiente grande porque la cocción de cereal con microoondas causa una
fuerte ebullición. Toque 9 para aumentar 1 porción por cada toque. Si el horno
se para, revuelva y presione START/+30 SEC. Después de la cocción, revuelva
y deje reposar, cubierto, por 2 minutos.
MORE MENUS (MÁS MENÚS)
MELT/SOFTEN/WARM
(FUNDIR/ABLANDAR/ENTIBIAR)
Estas características calculan automáticamente el tiempo
de calentamiento y el nivel de potencia de microondas
correcto para fundir, ablandar y entibiar los alimentos
mostrados en la tabla a continuación.
1. Toque el interruptor táctil MORE MENUS una vez.
2. Vea la Etiqueta de menús. Seleccione el alimento
deseado presionando el botón de número. Ej. Toque
2 para chocolate.
3. Toque nuevamente el mismo número de interruptor
táctil para seleccionar la cantidad. Ej. Toque el número
2 dos veces más para 1 cuadro.
4. Toque el interruptor táctil START/+30 SEC.
Nota:
• Para fundir, suavizar o entibiar otros alimentos mayores
o menores de la cantidad permitida en la TABLA
MELT/SOFTEN/WARM CHART, utilice el manual de
operación.

20
S
SPANISH
Características de la convección
TABLA MORE MENUS
ALIMENTO CANTIDAD REJILLA PROCEDIMIENTO
1. Biscuit (Bísquet) 6-12 1 o 2 rejillas
del horno
Coloque las rejillas para horno dentro del horno y precaliente.
Acomode los bísquets uniformemente en una bandeja para horno
y coloque en la rejilla del horno en posición inferior cuando el
precalentamiento esté terminado. Si usa más de una bandeja para
horno, coloque la segunda bandeja en la parrilla sobre la rejilla del
horno en la posición superior. Los bísquets están cocidos cuando
las partes superiores adquieren un color café dorado.
2. Cookies
Packaged
(Galletas
empacadas)
10-12 1 o 2 rejillas
del horno
Ideal para masa para galletas refrigerada. Prepare de acuerdo con
las instrucciones del paquete o receta y coloque en una rejilla para
plato giratorio engrasada y enharinada. Las galletas deben tener
aproximadamente 1/3 pulg (8 mm) de espesor y 2 pulg (50 mm)
de diámetro para los mejores resultados. Después del tiempo de
precalentamiento, coloque la bandeja en el horno Enfríe antes
de servir.
BAKE (HORNEAR)
Durante la cocción por convección, circula aire caliente
en el interior de la cavidad del horno para dorar y dejar
crujientes los alimentos de manera rápida y pareja.
Este horno microondas se puede programar para diez
diferentes temperaturas de cocción por convección por
hasta 99 minutos y 99 segundos.
• Suponga que quiere cocinar a 350 ˚F (176 ˚C) por 20
minutos.
1. Toque el interruptor táctil BAKE.
2. Seleccione la temperatura tocando el interruptor táctil
6
350˚F
.
3. Ingrese el tiempo de cocción tocando los interruptores
táctiles
2000.
4. Toque el interruptor táctil START/+30 SEC.
ROAST (ASAR)
CONVECTION ROAST (Asar por convección) rostiza pollo,
pavo, pechuga de pavo o cerdo.
• Suponga que quiere asar un pollo de 2.5 libras
(1.13 Kg).
1. Toque el interruptor táctil ROAST.
2. Seleccione el ajuste deseado. Ej: para pollo, toque el
interruptor táctil
7.
3. Toque el panel táctil para ingresar el peso. Ej:
25 lb
(11.3 Kg)
4. Toque el interruptor táctil START/+30 SEC.
Al terminar el ciclo CONVECTION ROAST escuchará una
señal larga. Siga el mensaje indicado.
GRILL (A LA PARRILLA)
CONVECTION GRILL (Asar a la parrilla por convección)
asa hamburguesas, piezas de pollo, bistecs y filetes de
pescado.
• Suponga que quiere asar a la parrilla 2 hamburguesas:
1. Toque el interruptor táctil GRILL.
2. Seleccione el ajuste deseado. Ej: Para hamburguesas,
toque el interruptor táctil del número
1.
3. Toque el interruptor táctil START/+30 SEC.
Al terminar el ciclo de precalentar la parrilla, el horno
parará y se mostrarán instrucciones. Siga el mensaje
indicado. Abra la puerta y coloque las hamburguesas
dentro del horno. Cierre la puerta.
4. Toque el interruptor táctil START/+30 SEC.
MORE MENUS (MÁS MENÚS)
Esta sección del manual operación ofrece instrucciones
para la preparación de 15 alimentos populares usando las
funciones CONVECTION BAKE, ROAST y GRILL.
Después de seleccionar la función deseada, siga las
instrucciones indicadas en la pantalla.
Obtenga valiosos consejos tocando TIMER/SETTINGS
en cualquier momento que se ilumine el mensaje HELP
en la pantalla.
Precaución: El gabinete del horno, la cavidad, la puerta,
el plato giratorio, el soporte del plato giratorio, las
rejillas y platos pueden estar muy calientes. Para EVITAR
QUEMADURAS, use guantes gruesos para horno al retirar
los alimentos o el plato giratorio del horno microondas.

21
S
SPANISH
Características de la convección
TABLA MORE MENUS
ALIMENTO CANTIDAD REJILLA PROCEDIMIENTO
3. Bundt Cake
(Pastel bundt)
1 pastel Rejilla baja
del plato
giratorio
Ideal para harina preparada para pasteles empacada o su propia
receta. Coloque la rejilla baja del plato giratorio en el horno
durante el calentamiento. Prepare de acuerdo con las instrucciones
del paquete o receta y coloque en una bandeja engrasada y
enharinada. Coloque la bandeja en el horno sobre la rejilla inferior
del plato giratorio. Enfríe antes de aplicar el glaseado y sirva.
4. Pizza Thin/
Classic/Rising
(Delgada/
Clásica/De harina
leudante)
1 pizza
congelada
Rejilla baja
del plato
giratorio
Coloque la rejilla baja del plato giratorio en el horno durante el
calentamiento. Al terminar el precalentamiento, coloque 1 pizza
de 10" (25 cm) congelada directamente en el centro de la rejilla
baja del plato giratorio. La pizza está cocida cuando la corteza
tiene color café dorado y el queso está fundido. Deje reposar 5
minutos antes de servir.
5. Breaded Shrimp
(Camarones
empanizados)
1-16 piezas Rejilla del
horno,
posición
inferior
Acomode uniformemente camarones congelados en una lámina
para hornear Coloque en la rejilla del horno en posición inferior
después de precalentar. Los camarones están cocidos cuando
adquieren un color café dorado. Deje reposar 2-3 minutos antes
de servir.
6. Breaded
Chicken Tenders
(Tiras de pollo
empanizadas)
2-6 piezas Rejilla del
horno,
posición
inferior
Acomode uniformemente tiras de pollo empanizadas en una
lámina para hornear Coloque en la rejilla del horno en posición
inferior después de precalentar. Las tiras de pollo están cocidas
cuando adquieren un color café dorado. Deje reposar 3-5 minutos
antes de servir.
7. Whole Chicken
(Pollo entero)
2.5-7.5 lb
(1.2-3.4 kg)
Rejilla del
horno,
posición
inferior
Coloque la rejilla baja del plato giratorio en el horno durante
el calentamiento. Condimente el pollo a su gusto y coloque
la bandeja sobre la rejilla baja del plato giratorio después de
precalentar. Después de la cocción, retire del horno, cubra con
papel aluminio y deje reposar de 5 a 10 minutos.
8. Pork Tenderloin
(Lomo de cerdo)
1.0-3.0 lb
(0.5-1.4 kg)
Rejilla del
horno,
posición
inferior
Se recomienda lomo de cerdo sin hueso porque se cuece en forma
pareja. Coloque en una rejilla inferior. Después de la cocción,
retire del horno, cubra con papel aluminio y deje reposar de 5 a
10 minutos. La temperatura interna debe ser de 160 ˚F (71 °C).
9. Turkey Breast
(Pechuga de
pavo)
1.5-6.0 lb
(0.7-2.7 kg)
Rejilla del
horno,
posición
inferior
Condimente a su gusto. Coloque en la rejilla inferior. Al terminar
el ciclo, cubra con papel aluminio y deje reposar 10 minutos. La
temperatura interna de la carne blanca debe ser de 170 ˚F (76 °C).
10. Beef
Hamburgers
(Hamburguesas
de res)
2-4
hamburguesas
6 oz (170 g)
cada una
Rejilla alta
del plato
giratorio
Condimente a su gusto, y separe ordenadamente las hamburguesas
hacia el centro de la rejilla alta del plato giratorio; no es necesario
precalentar. Siga las indicaciones del horno para voltear las
hamburguesas; para hacer esto, retire cuidadosamente el plato
giratorio y la rejilla al mismo tiempo, voltee las hamburguesas y
deslice nuevamente el plato giratorio y la rejilla en el interior del
horno. Toque START/+30SEC para continuar.
11. Turkey
Burgers
(Hamburguesas
de pavo)
2-4
hamburguesas
6 oz (170 g)
cada una
Rejilla alta
del plato
giratorio
Condimente a su gusto, y separe ordenadamente las hamburguesas
hacia el centro de la rejilla alta del plato giratorio; no es necesario
precalentar. Siga las indicaciones del horno para voltear las
hamburguesas; para hacer esto, retire cuidadosamente el plato
giratorio y la rejilla al mismo tiempo, voltee las hamburguesas y
deslice nuevamente el plato giratorio y la rejilla en el interior del
horno. Toque START/+30SEC para continuar.

22
S
SPANISH
Características de la convección
ADVERTENCIA: NO UTILICE PAPEL DE ALUMINIO PARA
CUBRIR O PROTEGER LOS ALIMENTOS AL USAR 'SPEED
BAKE' (HORNEAR CON VELOCIDAD) O 'SPEED ROAST'
(ASAR CON VELOCIDAD). EL MICROONDAS ESTÁ
ACTIVO DURANTE ESTOS CICLOS DE COCCIÓN. EL
USO DE CUALQUIER METAL QUE NO SEA LAS REJILLAS
PARA HORNO SUMINISTRADOS Y LAS REJILLAS ALTA
Y BAJA DEL PLATO GIRATORIO, AUMENTA EL RIESGO
DE ARCO ELÉCTRICO Y POSIBLEMENTE INCENDIO
DENTRO DE LA CAVIDAD DEL HORNO.
SPEED BAKE
(HORNEAR CON VELOCIDAD)
Esta función brinda resultados superiores para alimentos
horneados que requieren más de 20 minutos de tiempo
de horneado. La función de cocción SPEED BAKE alterna
la potencia del horno entre 90% para horno de convección
y 10% para microondas para crear superficies de color
café dorado e interiores perfectamente húmedos para
alimentos tales como pasteles Bundt, panes rápidos y
muffins.
SPEED ROAST
(ASAR CON VELOCIDAD)
Este es ideal para cortes grandes y densos de carne
y aves enteras. La función de cocción SPEED ROAST
alterna la potencia del horno entre 70% para horno de
convección y 30% horno microondas. Esto reduce el
tiempo de cocción porque las microondas calientan rápida
y directamente el interior del alimento mientras que la
función de convección circula aire seco y caliente a través
de la cavidad del horno para proporcionar una cocción
uniforme con dorado para exteriores crujientes mientras
el interior conserva su textura jugosa.
TEMPERATURA
DEL HORNO POR
OMISIÓN
POTENCIA DEL
MICROONDAS
SPEED BAKE 325 ˚F (162 ˚C) 10%
SPEED ROAST 300 ˚F (162 ˚C) 30%
Con excepción de los alimentos que se cuecen mejor
calentando únicamente por convección, la mayoría de
los alimentos se adaptan bien a la cocción mixta usando
SPEED BAKE (Hornear con velocidad) o SPEED ROAST
(Asar con velocidad).
La combinación de estos dos métodos de cocción
produce carnes jugosas, bizcochos húmedos y suaves y
panes de fina textura, dorados y crujientes en el punto
exacto.
Puede cambiar las temperaturas, sin embargo, no puede
cambiar la potencia del microondas.
La temperatura del horno se puede cambiar de 100 ˚F a
450 ˚F (37-232 °C). Para cambiar la temperatura, toque
primero SPEED ROAST o SPEED BAKE, luego toque el
mismo interruptor táctil nuevamente. Cuando la pantalla
indique SELECT TEMP (Seleccione temperatura), toque
el interruptor táctil correspondiente a la temperatura
deseada. Ej: Interruptor táctil SPEED ROAST, SPEED
ROAST,
7. La temperatura cambiará automáticamente
a 375 ˚F (190 ˚C).
CÓMO COCINAR CON FUNCIONES DE
VELOCIDAD
• Suponga que quiere hornear un pastel durante 25
minutos en SPEED BAKE :
1. Toque el interruptor táctil SPEED BAKE.
TABLA MORE MENUS
ALIMENTO CANTIDAD REJILLA PROCEDIMIENTO
12. Drummies
(Muslos de
pollo)
1.0-2.5 lb
(0.5-1.2 kg)
Rejilla alta
del plato
giratorio
Condimente los muslos de pollo a su gusto y colóquelos
directamente en la rejilla alta del plato giratorio con las porciones
gruesas hacia el centro de la rejilla.
13. Chicken Breast
Boneless
(Pechugas
de pollo
deshuesadas)
1.0-2.5 lb
(0.5-1.2 kg)
Rejilla alta
del plato
giratorio
Condimente las piezas de pollo a su gusto y colóquelas
directamente en la rejilla alta del plato giratorio, separadas
uniformemente. Voltee a los 27 minutos (siga las instrucciones en
la pantalla del horno).
14. Fish Fillet
(Filetes de
pescado)
2-4 piezas
6 oz (170 g)
cada una
Rejilla alta
del plato
giratorio
Condimente los bistecs a su gusto y colóquelos directamente en
la rejilla alta del plato giratorio, separados uniformemente. Voltee
a los 7 minutos (siga las instrucciones en la pantalla del horno).
15. Veggie Burger
(Hamburguesa
vegetariana)
2-4
hamburguesas
3 oz (85 g)
cada una
Rejilla alta
del plato
giratorio
Coloque las hamburguesas directamente en la rejilla alta del plato
giratorio, separadas uniformemente. Voltee a los 7 minutos (siga
las instrucciones en la pantalla del horno).

23
S
SPANISH
Características de la convección
2. Ingrese el tiempo de cocción tocando los interruptores
táctiles 2500.
3. Toque el interruptor táctil START/+30 SEC.
PARA PRECALENTAR Y COCINAR CON
FUNCIONES DE VELOCIDAD
Su microondas se puede programar para combinar las
funciones de precalentamiento y de velocidad. Usted
puede precalentar a la misma temperatura que la
combinación de temperaturas prefijada o cambiar a una
temperatura diferente.
• Suponga que quiere precalentar a 350 ˚F (176 °C) y
después cocinar durante 25 minutos a 325 ˚F (162 °F)
en SPEED BAKE:
1. Toque el interruptor táctil PREHEAT.
2. Toque el interruptor táctil de temperatura
6
350˚F
.
3. Toque el interruptor táctil SPEED BAKE.
4. Toque el interruptor táctil SPEED BAKE una vez más
para cambiar la temperatura de cocción.
5. Toque el interruptor táctil de temperatura
5
325˚F
.
6. Ingrese el tiempo de cocción tocando los interruptores
táctiles
2500.
7. Toque el interruptor táctil START/+30 SEC.
Cuando el horno alcance la temperatura programada,
escuchará la señal 4 veces*. El horno se detendrá y las
instrucciones aparecerán en la pantalla. Siga el mensaje
indicado.
8. Abra la puerta. Coloque los alimentos en el horno.
Cierre la puerta. Toque el interruptor táctil START/+30
SEC.
* Si la puerta del horno no se abre, el horno mantendrá
automáticamente la temperatura de precalentamiento
durante 30 minutos. Al cumplirse este período, el horno
emitirá una señal audible y se apagará.
Nota: Su horno de convección puede cocinar cualquier
alimento perfectamente debido a las numerosas maneras
en que puede cocinar: solo microondas, funciones de
velocidad, solo convección o a la parrilla. Este manual de
operación le indica cómo programar el horno.
El horno no se puede usar si no está el plato giratorio en
su lugar. Nunca restrinja el movimiento del plato giratorio.
CONSEJOS ÚTILES PARA COCCIÓN
MEDIANTE LAS FUNCIONES DE
CONVECCIÓN Y VELOCIDAD
Su horno de convección puede cocinar cualquier alimento
perfectamente debido a las numerosas maneras en que
puede cocinar: solo microondas, funciones de velocidad,
solo convección o a la parrilla. Este manual de operación
le indica cómo programar el horno.
El horno no se puede usar si no está el plato giratorio en
su lugar. Nunca restrinja el movimiento del plato giratorio.
COCCIÓN POR CONVECCIÓN:
1. Durante el precalentamiento, el plato giratorio puede
estar presente o estar retirado. Cuando se usa la
parrilla superior para hornear en 2 niveles en un horno
precalentado, es más fácil retirar el plato giratorio para
precalentar.
Coloque la rejilla alta sobre el plato giratorio junto con
los alimentos. Al terminar el precalentamiento, abra la
puerta del horno e introduzca rápidamente el plato
giratorio junto con la rejilla alta y los alimentos a cocinar.
2. No cubre el plato giratorio, la rejilla inferior o la rejilla
superior con papel aluminio. Interferiría con el flujo de
aire que cocina los alimentos.
3. Las charolas redondas para pizza son excelentes
utensilios para muchos alimentos que se cocinan
mediante solo convección. Escoja charolas que no
tengan manijas extendidas.
4. El uso de una rejilla baja precalentada puede dar un
aspecto de cocinado a la parrilla a los bistecs, hot
dogs, etc.
COCCIÓN CON LAS FUNCIONES DE
VELOCIDAD:
1. Las carnes quedan mejor cuando se rostizan
directamente sobre la rejilla inferior. Su puede
colocar un plato bajo la carne si se van a utilizar los
escurrimientos para preparar una salsa (gravy).
2. Los cortes de carne menos tiernos se pueden asar y
suavizar usando bolsas para cocinar en horno.
3. Al hornear, revise si ya está listo cuando termine el
tiempo. Si no está completamente cocido, deje reposar
en el horno algunos minutos para completar la cocción.

24
S
SPANISH
COCCIÓN EN SECUENCIAS
MÚLTIPLES
El horno puede ser programado hasta para 4 secuencias
automáticas de cocción para el modo de microondas y 2
secuencias de cocción con precalentamiento para el modo
SPEED BAKE/SPEED ROAST (Hornear con velocidad/Asar
con velocidad), intercambiando de un nivel de potencia
a otro automáticamente.
A veces, las instrucciones de cocción le indican
empezar en un nivel de potencia y luego cambiar a un
nivel de potencia diferente. Su horno puede hacerlo
automáticamente.
• Suponga que desea cocinar un rosbif por 5 minutos al
100 % y luego continuar la cocción por 30 minutos al
50%.
1. Primero toque el interruptor táctil POWER LEVEL dos
veces para una potencia al 100%. Luego ingrese el
tiempo de cocción.
2. Toque el interruptor táctil POWER LEVEL. Presione el
número
5 para una potencia al 50%. Luego ingrese
el segundo tiempo de cocción.
3. Toque el interruptor táctil START/+30 SEC.
Nota:
1. Si presiona dos veces el botón POWER LEVEL,
aparecerá el mensaje HIGH (ALTO) en la pantalla.
2. Si desea saber el nivel de potencia, simplemente toque
el interruptor táctil POWER LEVEL. Mientras su dedo
toque el interruptor táctil POWER LEVEL, el nivel de
potencia aparecerá en pantalla.
SETTINGS/TIMER
(AJUSTES/TEMPORIZADOR)
SETTINGS le ofrece 7 funciones que facilitan el uso de su
horno ya que la pantalla interactiva le brinda instrucciones
específicas.
1. RELOJ
Para configurar el reloj:
1. Toque dos veces el interruptor táctil TIMER/SETTINGS.
2. Ingrese la hora correcta del día tocando los números en
secuencia. Toque el interruptor táctil START/+30 SEC.
2. TEMPORIZADOR
• Suponga que quiere configurar el temporizador a 3
minutos.
1. Toque 3 veces el interruptor táctil TIMER/SETTINGS.
2. Ingrese el tiempo tocando
300 con los interruptores
táctiles.
3. Toque el interruptor táctil START/+30 SEC.
3. SUPRESIÓN DE LA SEÑAL AUDIBLE
Si usted desea operar su horno microondas sin señales
audibles, toque el interruptor táctil TIMER/SETTINGS 4
veces y el START/+30 SEC.
Para cancelar y restaurar la señal audible, toque el
interruptor táctil TIMER/SETTINGS 4 veces y el START/
+30 SEC.
4. SEÑAL DE RECORDATORIO
Si usted desea operar su horno sin señales de recordatorio,
toque el interruptor táctil TIMER/SETTINGS 5 veces y el
START/+30 SEC.
Para cancelar y restaurar la señal audible, toque el
interruptor táctil TIMER/SETTINGS 5 veces y el START/
+30 SEC.
5. UNIDADES DE PESO LBS/KGS
La temperatura por omisión del horno está configurada
al sistema U.S. de unidades habitual - libras Para cambiar
a KGS, toque TIMER/SETTINGS 6 veces y el número 6.
Luego, toque el interruptor táctil START/+30 SEC.
Para cambiar a KGS, toque TIMER/SETTINGS 6 veces y
el número
1. Luego, toque el interruptor táctil START/
+30 SEC.
6. SELECCIONES DE TEMPERATURA
El ajuste de temperatura por omisión en el horno es °F.
Para cambiar a °C, toque TIMER/SETTINGS 7 veces y
el número 1. Luego, toque el interruptor táctil START/
+30 SEC.
Para cambiar a °F, toque TIMER/SETTINGS 7 veces y
el número
6. Luego, toque el interruptor táctil START/
+30 SEC.
7. MODO DE DEMOSTRACIÓN
Para hacer una demostración, toque TIMER/SETTINGS 8
veces y luego toque START/+30 SEC y mantenga el toque
durante 3 segundos.
DEMO ON
aparecerá en la pantalla.
Ahora se pueden demostrar las operaciones de cocción
y las características especiales específicas de cocción
sin alimentar energía al horno. Por ejemplo, toque el
interruptor táctil START/+30 SEC y la pantalla mostrará
1.00 y contará en forma regresiva rápidamente hasta
END
.
Para cancelar, toque el interruptor táctil TIMER/SETTINGS
8 veces y luego toque el interruptor táctil START/+30
SEC. Si le resulta más fácil, desconecte el horno del
tomacorriente eléctrico y vuelva a conectarlo.
+30 SEC (+30 SEGUNDOS)
+30 SEC le permite cocinar durante 30 segundos al
100% mediante el toque del interruptor táctil START/+30
SEC. También puede extender el tiempo de cocción
en múltiplos de 30 segundos tocando repetidamente
Otras funciones convenientes

25
S
SPANISH
el interruptor táctil START/+30 SEC durante la cocción
manual hasta 99 minutos.
Nota:
• Para usar +30 SEC, toque el interruptor táctil dentro
de los 3 minutos posteriores a la cocción, de cerrar la
puerta o de tocar el interruptor táctil STOP/CLEAR.
• +30 SEC no se puede usar con los ajustes de Sensor,
REHEAT o DEFROST.
BLOQUEO DE CONTROL
La función Safety Lock evita la operación no deseada
del horno por parte de niños pequeños. El horno puede
ajustarse para que el panel de control se desactive o
bloquee. Para configurar, toque el interruptor táctil STOP/
CLEAR y continúe tocando durante 3 segundos. Si se
toca un interruptor táctil, aparecerá
LOCK ON
en la pantalla.
Para cancelar, toque el interruptor táctil STOP/CLEAR y
continúe tocando durante 3 segundos.
HELP (DISPLAY INDICATOR) -
AYUDA (INDICADOR DE
PANTALLA)
Muchas de las funciones tienen sugerencias para cocinar.
Si desea verificarlo, toque el interruptor táctil TIMER/
SETTINGS cuando se ilumine HELP en la pantalla
interactiva para acceder a estas sugerencias.
Otras funciones convenientes

26
S
26
EEE
26
E
26
E
26
E
SPANISH
26
cuidadosamente las instrucciones del fabricante y tenga
especial cuidado de no derramar el líquido limpiador
en los agujeros de la pared o techo ni en ninguna de
las superficies de la puerta. Enjuague cuidadosamente
y seque.
Después de limpiar bien la parte interna, puede eliminar
la grasa residual de los ductos y calentadores internos con
sólo hacer funcionar el horno a 450˚F por 20 minutos sin
alimentos. Ventile la habitación si es necesario.
CUBIERTA DE LA GUÍA DE ONDAS
La cubierta de la guía de onda está hecha de mica por lo
que requiere cuidado especial. Conserve limpia la cubierta
de la guía de onda para asegurar un buen rendimiento del
horno. Limpie cuidadosamente con un paño humedecido
cualquier salpicadura de alimento de la superficie
de la cubierta inmediatamente después de que haya
ocurrido. Las salpicaduras acumuladas pueden provocar
sobrecalentamiento y ocasionar humo o posiblemente
incendiarse. No retire la cubierta de la guía de onda.
ELIMINACIÓN DE OLORES
Ocasionalmente, el olor de la cocción puede permanecer
en el horno. Para retirarlo, mezcle 1 taza de agua, el jugo
de 1 limón y su cáscara rallada y varios clavos enteros
en una taza de medida de vidrio con capacidad para 2
tazas. Hierva por varios minutos utilizando la potencia al
100%. Deje reposar en el horno hasta que enfríe. Limpie
el interior con un paño suave.
PLATO GIRATORIO/
SOPORTE DEL PLATO GIRATORIO
El plato giratorio, el soporte del plato giratorio, y las rejillas
se pueden retirar para facilitar su limpieza. Lávelos en
agua jabonosa suave; para manchas persistentes utilice
un limpiador suave y una esponja de fregar no abrasiva.
También son aptos para el lavavajillas. Use la rejilla
superior del lavavajillas para el soporte del plato giratorio.
Los alimentos con alto grado de acidez, como tomates o
limones, causarán que el esmalte de porcelana del plato
giratorio pierda su color. No cocine alimentos con alto
grado de acidez directamente sobre el plato giratorio; de
ocurrir un derrame, seque inmediatamente.
El eje del motor del plato giratorio no está sellado, de
modo que no debe quedar agua en exceso o derrames
en esta área.
Desconecte el cable de alimentación antes de la limpieza
o deje abierta la puerta para desactivar el horno durante
la limpieza.
PARTE EXTERNA
La superficie exterior es de metal y plástico con
recubrimiento previo. Limpie el exterior con jabón suave
y agua; enjuague y seque con un paño suave. No utilice
ningún tipo de limpiador doméstico o abrasivo.
PUERTA
Limpie cualquier salpicadura o derrame de la ventana por
ambos lados con un paño húmedo. Las partes de metal
son más fáciles de mantener si se limpian frecuentemente
con un paño húmedo. Evite el uso de limpiadores con
atomizadores o limpiadores ásperos, ya que pueden
manchar, vetear u opacar la superficie de la puerta.
PANEL DE CONTROL TÁCTIL
El panel de control táctil debe limpiarse con cuidado. Si
el panel de control se ensucia, abra la puerta del horno
microondas antes de limpiarlo. Limpie el panel con un
paño humedecido ligeramente sólo con agua. Seque
con un paño suave. No restriegue ni use ningún tipo de
limpiador químico. Cierre la puerta y toque el interruptor
táctil STOP/CLEAR.
PARTE INTERNA - DESPUÉS DE LA
COCCIÓN POR MICROONDAS
La limpieza es fácil porque se genera poco calor en
las superficies internas; por lo tanto, las salpicaduras o
derrames no se hornean ni endurecen. Para limpiar las
superficies internas, limpie con un paño suave y húmedo
con agua tibia. NO USE LIMPIADORES ABRASIVOS
O ÁSPEROS O ESPONJILLAS DE FREGAR. Para una
suciedad más intensa, utilice bicarbonato de sodio o un
jabón suave; enjuague cuidadosamente con agua caliente.
NUNCA ROCÍE DIRECTAMENTE LIMPIADORES PARA
HORNO SOBRE NINGUNA PARTE DEL HORNO.
INTERIOR - DESPUÉS DE
CONVECTION, SPEED BAKE O
SPEED ROAST
Pueden ocurrir derrames debido a la humedad o la grasa.
Lave inmediatamente después de usarlo con agua caliente
jabonosa. Enjuague y seque. Los derrames difíciles de
limpiar pueden ocurrir si no limpia bien el horno o si
el tiempo de cocción es prolongado o la temperatura
es muy alta. En ese caso, puede comprar una esponja
limpiadora para horno que viene impregnada con líquido
limpiador -no es la esponja de acero impregnada con
jabón- para uso en superficies de acero o porcelana. Siga
Limpieza y cuidado

27
S
SPANISH
Especificaciones
Voltaje en línea de CA: Clasificación UL solo 240V, 50Hz, AC monofásico
Clasificación CSA solo 220V, 50Hz, CA monofásico
Se requiere energía de CA: Clasificación UL/CSA 11.5 A, 2550 W
Potencia de salida:
Microondas*
Calentador por convección
950 vatios
1600 vatios
Frecuencia 2450 MHz
Dimensiones exteriores
(ancho x altura x profundidad):
29
1
⁄ 2" x 17
7
⁄ 8"x 25
13
⁄ 16" (749.3 x 454.02 x 655.6 mm)
Dimensiones de la cavidad
(ancho x altura x profundidad):
17
1
⁄ 16"x 9
7
⁄ 16"x 16
15
⁄ 16" (433.4 x 239.7 x 430.2 mm)
Capacidad del horno:** 1.6 pies cúbicos
Uniformidad de la cocción: Sistema plato giratorio, diámetro 16" (3406.4 mm)
*
Método estandarizado de la Comisión Electrotécnica Internacional para la medición de la potencia en vatios de salida.
Este método de prueba es ampliamente reconocido.
**
La capacidad interna se calcula midiendo el ancho, la profundidad y la altura máxima. La capacidad real para los
alimentos es menor.
Cumple con las normas establecidas por:
FCC – Autorizado por la Comisión Federal de Comunicaciones.
DHHS – Cumple con la norma del Departamento de Salud y Servicios Humanos (DHHS), CFR, Título 21, capítulo I,
subcapítulo J.
– Este símbolo en la placa de identificación significa que el producto tiene la certificación de Underwriters
Laboratories, Inc. para uso en EE.UU. o Canadá.
NHW – Departamento de salud y bienestar nacional del Canadá.
El horno está aprobado por Canadian Standard Association según está certificado.

28
S
SPANISH
Revise lo siguiente antes de llamar para solicitar servicio:
1. Coloque en el horno una taza de agua en una taza
medidora de vidrio y cierre la puerta firmemente.
Opere el horno por un minuto en HIGH 100%.
A
¿Se enciende la luz del horno?
SÍ _____ NO _____
B
¿Funciona el ventilador de enfriamiento?
(Coloque su mano en la ranura de ventilación
posterior.)
SÍ _____ NO _____
C
¿El plato giratorio gira?
(Es normal que el plato giratorio gire en cual-
quier dirección.)
SÍ _____ NO _____
D
¿El agua que está en el horno está caliente?
SÍ _____ NO _____
Revisión para solicitud de servicio
2. Retire el agua del horno y hágalo funcionar por 5
minutos en CONVECCIÓN a 450 ˚F (232 °C).
Opere el horno por un minuto en HIGH 100%.
A
¿Se encienden las luces indicadoras CONV y
COOK?
SÍ _____ NO _____
B
Después de apagarse el horno, ¿todavía está
caliente su parte interna?
SÍ _____ NO _____
Si respondió “NO” a cualquiera de las preguntas
anteriores, por favor revise el tomacorriente eléctrico,
la caja de fusibles y/o el interruptor del circuito. Si están
funcionando correctamente, COMUNÍQUESE CON EL
PERSONAL DE SERVICIO AUTORIZADO MÁS CERCANO.
Un horno microondas nunca debe ser reparado por una
persona "no calificada"
Nota:
Si el tiempo que aparece en la pantalla está haciendo
cuenta regresiva rápidamente, verifique el Modo de
demostración en la página 24 y cancele.

29
S
SPANISH
Garantía del Horno
DOS AÑOS DE GARANTÍA TOTAL
Hornos de microondas de convección / velocidad y todos sus componentes, excepto como se detalla a continuación*, están garantizados
de estar libres de defectos en materiales o mano de obra en uso doméstico normal por un periodo de dos (2) años a partir de la fecha de
compra original al por menor. Viking Range, el garante, se compromete a reparar o reemplazar, a su elección, cualquier parte que falle o se
encuentre defectuosa durante el periodo de garantía. El servicio de garantía debe ser realizado por una agencia de servicio o representante
autorizado de Viking Range LLC.
* 90 días de garantía cosmética: Se garantiza que los productos están libres de defectos cosméticos en materiales o mano de obra durante
un período de 90 días a partir de la fecha original de compra al por menor. Esta garantía cubre únicamente los defectos en manufactura y
no cubre problemas resultantes de manejo o instalación. Se debe inspeccionar el producto en el momento de la entrega. Cualquier defecto
debe ser informado al distribuidor dentro del período de noventa (90) días. Viking Range LLC usa procesos más actualizados y materiales
de alta calidad para producir todos los acabados de color. Sin embargo, puede ser posible que se observe una ligera variación de color
debido a diferencias inherentes en los componentes pintados y en componentes de porcelana así como por diferencias en la ubicación
del producto y la iluminación natural o artificial. El servicio de garantía debe ser realizado por una agencia de servicio o representante
autorizado de Viking Range LLC.
* 90 Días Residencial Plus: Los productos Viking están diseñados y certificados solo para uso residencial. No están destinados para utilizarse
en aplicaciones comerciales. Los productos Viking deberán usarse solo con apego a los códigos nacional y local.
Viking no es responsable por daños a la propiedad o lesiones resultantes del uso en una aplicación comercial. Como apoyo a la calidad
de manufactura de sus artefactos, Viking proporcionará una garantía completa de 90 días para los productos usados en aplicaciones de
tipo “Residencial Plus“. La garantía “Residencial Plus“ se aplica a las aplicaciones en las que el uso del producto se extiende más allá del
uso residencial pero cumple con el código nacional y el local. En algunas jurisdicciones estas aplicaciones se clasifican como residenciales.
Ejemplos de tales aplicaciones cubiertas por esta garantía, pero sin limitarse a ellas, son hospedajes tipo 'cama y desayuno', estaciones de
bomberos, clubes privados, iglesias, áreas comunes de condominios/apartamentos, etc. Bajo esta garantía "Residencial Plus", el producto,
sus componentes y accesorios están garantizados de estar libres de materiales o mano de obra defectuosos por un período de noventa
(90) días a partir de la fecha de la compra original al por menor. Viking Range, LLC, el garante, se compromete a reparar o reemplazar, a su
elección, cualquier parte que falle o se encuentre defectuosa durante el periodo de garantía. Esta garantía cubre las partes y la mano de
obra. Esta garantía excluye el uso del producto en ubicaciones comerciales tales como restaurantes, ubicaciones de servicios alimenticios
y ubicaciones de servicios alimenticios institucionales.
CINCO AÑOS DE GARANTÍA LIMITADA
Si el tubo del magnetrón falla debido a materiales o mano de obra defectuosa en uso doméstico normal durante el tercero al quinto año a
partir de la fecha de compra original al por menor, será reparado o reemplazado, sin cargo para dicha parte, pagando el propietario todos
los demás gastos, incluyendo mano de obra.
TÉRMINOS DE LA GARANTÍA
Esta garantía se extiende al comprador original al por menor del producto que aquí se garantiza y a cada propietario cesionario del producto
durante el plazo de la garantía al comprador original. Esta garantía es transferible por parte del comprador original al por menor solo a
través de la venta de una casa. Si un propietario cesionario no puede presentar prueba de la compra del comprador original y el producto
no se ha registrado previamente, la fecha de producción del producto, ubicada en el número de serie del producto, servirá como la fecha
efectiva de inicio de la garantía.
La fecha de activación de la garantía empieza en la fecha de la compra original al por menor. En el caso de la compra de nuevos productos
a través de la venta de desarrollos de edificios, la fecha de activación empieza en la fecha más antigua ya sea del certificado de ocupación o
bien 24 meses a partir de la fecha de fabricación. Nótese que la fecha de fabricación se identifica mediante la etiqueta de serie en el producto.
Esta garantía no cubre las unidades compradas como material de 'calidad b', de liquidación, salvamento, segundas, restaurados, tal como
están, o usados.
Esta garantía se aplicará a los productos comprados en los Estados Unidos y Canadá. Los productos deben ser comprados en el país donde
se solicite el servicio. El servicio de garantía debe ser realizado por una agencia de servicio o representante autorizado de Viking Range LLC.
La garantía no se aplicará a daños que resulten de abuso, accidente, desastres naturales, pérdida de energía eléctrica para el producto por
cualquier razón, alteración, instalación inadecuada, operación inadecuada, reparación o servicio de reparación del producto por alguien
ajeno a una agencia de servicio o representante autorizado de Viking Range LLC. Esta garantía no se aplica para uso comercial. El garante
no se responsabiliza por daños indirectos o incidentales si surgen como resultado del incumplimiento de la garantía, incumplimiento del
contrato, u otro. Algunas jurisdicciones no permiten la exclusión o limitación de daños incidentales o indirectos, de modo que la limitación
o exclusiones anteriores pueden no aplicarse a usted.
El propietario será responsable de una adecuada instalación, proporcionar un cuidado y mantenimiento normal, presentando el comprobante
de compra cuando se le solicite, y hacer que el electrodoméstico esté razonablemente accesible para reparación. Si el producto o una de
las partes componentes contienen un defecto o falla durante el periodo de garantía, después de un número razonable de intentos por
parte del garante para remediar los defectos o fallas, el propietario tiene derecho ya sea a un reembolso o reemplazo, a juicio del garante,
del producto o de la parte o partes componentes. La responsabilidad el garante en cualquier reclamo de cualquier tipo, con respecto a los
productos o servicios que aquí se cubren, no deberá en ningún caso exceder el precio de los productos o servicio o de una parte de los
mismos que origine el reclamo.
SERVICIO DE GARANTÍA
Según los términos de esta garantía, el servicio debe ser realizado por un agente o representante de servicio autorizado de Viking Range
LLC. El servicio será proporcionado durante horas normales de trabajo y la mano de obra realizada a tasas de sobretiempo o con bonificación
no será cubierta por esta garantía. Para obtener el servicio de garantía, póngase en contacto con el servicio de atención al cliente de Viking
Range LLC al tel. 1-888-845-4641. Tenga a la mano el número de modelo, número de serie y la fecha de la compra original al hacer la
llamada. IMPORTANTE: Conserve el comprobante de compra original para establecer el periodo de garantía. La devolución de la Tarjeta
de registro del propietario no es una condición para la cobertura de la garantía. Sin embargo, usted debe devolver la Tarjeta de registro del
propietario de modo que Viking Range Corporation pueda ponerse en contacto con usted si surgiera algún aspecto de seguridad que pudiera
afectarle. Cualquier garantía implícita de comerciabilidad e idoneidad aplicable a los conjuntos de quemadores descritos anteriormente,
quemadores de asador infrarrojos, rejillas de parrilla y partes de acero inoxidable está limitada en duración al periodo de cobertura de las
garantías limitadas escritas expresas aplicables establecidas anteriormente. Algunas jurisdicciones no permiten limitaciones sobre cuánto
tiempo dura una garantía implícita, de modo que la limitación antes mencionada puede no aplicarse a usted. Esta garantía le da derechos
legales específicos, aunque usted también puede tener otros derechos que pueden variar dependiendo de la jurisdicción.
Especificaciones sujetas a cambio sin previo aviso.

30
S
VIKING RANGE, LLC
111 FRONT STREET
GREENWOOD, MISSISSIPPI 38930 USA
(662) 455-1200
PARA MÁS INFORMACIÓN SOBRE PRODUCTOS
LLAME AL 1-888-845-4641, O VISITE NUESTRO SITIO
WEB EN VIKINGRANGE.COM
SPANISH
TINS-B361URR0
-
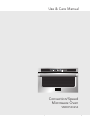 1
1
-
 2
2
-
 3
3
-
 4
4
-
 5
5
-
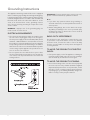 6
6
-
 7
7
-
 8
8
-
 9
9
-
 10
10
-
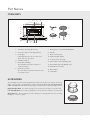 11
11
-
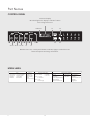 12
12
-
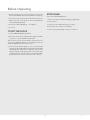 13
13
-
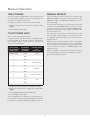 14
14
-
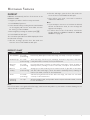 15
15
-
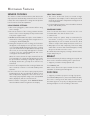 16
16
-
 17
17
-
 18
18
-
 19
19
-
 20
20
-
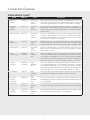 21
21
-
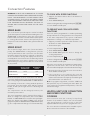 22
22
-
 23
23
-
 24
24
-
 25
25
-
 26
26
-
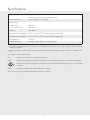 27
27
-
 28
28
-
 29
29
-
 30
30
-
 31
31
-
 32
32
-
 33
33
-
 34
34
-
 35
35
-
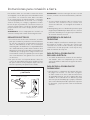 36
36
-
 37
37
-
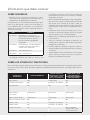 38
38
-
 39
39
-
 40
40
-
 41
41
-
 42
42
-
 43
43
-
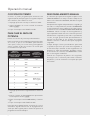 44
44
-
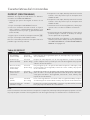 45
45
-
 46
46
-
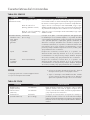 47
47
-
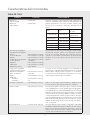 48
48
-
 49
49
-
 50
50
-
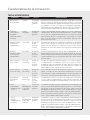 51
51
-
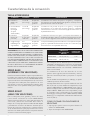 52
52
-
 53
53
-
 54
54
-
 55
55
-
 56
56
-
 57
57
-
 58
58
-
 59
59
-
 60
60


Viking Range VMDD Guía del usuario
- Categoría
- Microondas
- Tipo
- Guía del usuario
En otros idiomas
- English: Viking Range VMDD User guide
Documentos relacionados
-
Viking F20303 Manual de usuario
-
-
Viking VMOR205 Manual de usuario
-
-
Viking Range VMOR205 El manual del propietario
-
Viking DMOR206 El manual del propietario
-
-
-
Otros documentos
-
Electrolux TINSEB425MRRO Guía del usuario
-
Sharp YC-GG02E-B El manual del propietario
-
-
Viking VMOR506SS Manual de usuario
-
-
Hkoenig VIO9 Manual de usuario
-
Sharp YC-PC322A Manual de usuario
-
Sharp R-402JK El manual del propietario
-
Denver OG-2030 Manual de usuario
-
Haier HMC1085SESS Manual de usuario