Sharp YC-PC322A Manual de usuario
- Categoría
- Microondas
- Tipo
- Manual de usuario

*Product images are for illustration purpose only. Actual product may vary.
YC-PC322A
Microwave oven
User manual
EN PTDE FR NLES PL IT


EN
EN – 1
EN – 1
Attention:
Your product
is marked with
this symbol.
It means that
used electrical
and electronic
products should
not be mixed
with general
household
waste. There is a
separate collec-
tion system for
these products.
A. Information on Disposal for Users
(private households)
1. In the European Union
Attention: If you want to dispose of this equipment, please do not use the
ordinary dustbin!
Used electrical and electronic equipment must be treated separately and
in accordance with legislation that requires proper treatment, recovery and
recycling of used electrical and electronic equipment.
Following the implementation by member states, private households within
the EU states may return their used electrical and electronic equipment to
designated collection facilities free of charge*.
In some countries* your local retailer may also take back your old product
free of charge if you purchase a similar new one.
*) Please contact your local authority for further details.
If your used electrical or electronic equipment has batteries or
accumulators, please dispose of these separately beforehand according
to local requirements. By disposing of this product correctly you will help
ensure that the waste undergoes the necessary treatment, recovery and
recycling and thus prevent potential negative e ects on the environment
and human health which could otherwise arise due to inappropriate waste
handling.
2. In other Countries outside the EU
If you wish to discard this product, please contact your local authorities and
ask for the correct method of disposal.
For Switzerland: Used electrical or electronic equipment can be returned
free of charge to the dealer, even if you don't purchase a new product.
Further collection facilities are listed on the homepage of www.swico.ch or
www.sens.ch.
B. Information on Disposal for Business Users
1. In the European Union
If the product is used for business purposes and you want to discard it:
Please contact your SHARP dealer who will inform you about the take-back
of the product. You might be charged for the costs arising from take-back
and recycling. Small products (and small amounts) might be taken back by
your local collection facilities.
For Spain: Please contact the established collection system or your local
authority for take-back of your used products.
2. In other Countries outside the EU
If you wish to discard of this product, please contact your local authorities
and ask for the correct method of disposal.
For service, please refer to www.sharpconsumer.com/contact/, for your warranty rights go to
www.sharpconsumer.com/support/ or contact the retailer where you purchased your product.
Declarations of conformity are available from www.sharpconsumer.com/documents-of-conformity/
www.sharpconsumer.com/
support/
www.sharpconsumer.com/
documents-of-conformity/
www.sharpconsumer.com/
contact/

EN – 2
EN – 2
PRECAUTIONS TO AVOID POSSIBLE EXPOSURE TO MICROWAVE ENERGY
1. Do not attempt to operate this oven with the door open as this can result in harmful exposure to microwave
energy. It is important not to defeat or tamper with the safety interlocks.
2. Do not insert anything between the oven front face and the door or allow debris or cleaner residue to accumulate
on sealing surfaces.
3. Do not operate the oven if it is damaged. It is very important that the oven door closes properly and that there is
no damage to the door, hinges, latches or door seals and sealing surfaces.
4. Do not attempt to repair or adjust the oven.
CONTENTS
IMPORTANT SAFETY INSTRUCTIONS .............................................................................................................................................................. 3
INSTALLATION .......................................................................................................................................................................................................10
RADIO INTERFERENCE .......................................................................................................................................................................................11
GROUNDING (EARTHING) INSTRUCTIONS..................................................................................................................................................11
SPECIFICATIONS ................................................................................................................................................................................................... 11
OVEN AND ACCESSORIES .................................................................................................................................................................................12
CONTROL PANEL .................................................................................................................................................................................................. 13
BEFORE USING THE OVEN .................................................................................................................................................................................13
SETTING THE CLOCK ........................................................................................................................................................................................... 13
MICROWAVE COOKING ...................................................................................................................................................................................... 14
QUICK START .........................................................................................................................................................................................................14
GRILL COOKING .................................................................................................................................................................................................... 15
MICROWAVE + GRILL .......................................................................................................................................................................................... 15
CONVECTION ........................................................................................................................................................................................................16
MICROWAVE + CONVECTION .......................................................................................................................................................................... 16
AUTO MENU ..........................................................................................................................................................................................................17
AUTO DEFROST ....................................................................................................................................................................................................18
AUTO REHEAT........................................................................................................................................................................................................18
KITCHEN TIMER ..................................................................................................................................................................................................... 18
POWER SAVING FUNCTION ..............................................................................................................................................................................18
MUTE FUNCTION ................................................................................................................................................................................................. 19
SAFETY LOCK ........................................................................................................................................................................................................19
CHILD LOCK ........................................................................................................................................................................................................... 19
AUTOMATIC PROTECTION MECHANISM .....................................................................................................................................................19
CLEANING AND CARE ........................................................................................................................................................................................20
SUITABLE OVENWARE ........................................................................................................................................................................................21
MICROWAVE COOKING ADVICE......................................................................................................................................................................22
DEFROSTING ADVICE .........................................................................................................................................................................................24
REHEATING ADVICE ............................................................................................................................................................................................25
TROUBLESHOOTING ........................................................................................................................................................................................... 26
STICKING BUTTON PROTECTION ...................................................................................................................................................................27
BEFORE CALLING FOR ASSISTANCE .............................................................................................................................................................. 27

EN
EN – 2EN – 2
PRECAUTIONS TO AVOID POSSIBLE EXPOSURE TO MICROWAVE ENERGY
1. Do not attempt to operate this oven with the door open as this can result in harmful exposure to microwave
energy. It is important not to defeat or tamper with the safety interlocks.
2. Do not insert anything between the oven front face and the door or allow debris or cleaner residue to accumulate
on sealing surfaces.
3. Do not operate the oven if it is damaged. It is very important that the oven door closes properly and that there is
no damage to the door, hinges, latches or door seals and sealing surfaces.
4. Do not attempt to repair or adjust the oven.
CONTENTS
IMPORTANT SAFETY INSTRUCTIONS .............................................................................................................................................................. 3
INSTALLATION .......................................................................................................................................................................................................10
RADIO INTERFERENCE .......................................................................................................................................................................................11
GROUNDING (EARTHING) INSTRUCTIONS..................................................................................................................................................11
SPECIFICATIONS ................................................................................................................................................................................................... 11
OVEN AND ACCESSORIES .................................................................................................................................................................................12
CONTROL PANEL .................................................................................................................................................................................................. 13
BEFORE USING THE OVEN .................................................................................................................................................................................13
SETTING THE CLOCK ........................................................................................................................................................................................... 13
MICROWAVE COOKING ...................................................................................................................................................................................... 14
QUICK START .........................................................................................................................................................................................................14
GRILL COOKING .................................................................................................................................................................................................... 15
MICROWAVE + GRILL .......................................................................................................................................................................................... 15
CONVECTION ........................................................................................................................................................................................................16
MICROWAVE + CONVECTION .......................................................................................................................................................................... 16
AUTO MENU ..........................................................................................................................................................................................................17
AUTO DEFROST ....................................................................................................................................................................................................18
AUTO REHEAT........................................................................................................................................................................................................18
KITCHEN TIMER ..................................................................................................................................................................................................... 18
POWER SAVING FUNCTION ..............................................................................................................................................................................18
MUTE FUNCTION ................................................................................................................................................................................................. 19
SAFETY LOCK ........................................................................................................................................................................................................19
CHILD LOCK ........................................................................................................................................................................................................... 19
AUTOMATIC PROTECTION MECHANISM .....................................................................................................................................................19
CLEANING AND CARE ........................................................................................................................................................................................20
SUITABLE OVENWARE ........................................................................................................................................................................................21
MICROWAVE COOKING ADVICE......................................................................................................................................................................22
DEFROSTING ADVICE .........................................................................................................................................................................................24
REHEATING ADVICE ............................................................................................................................................................................................25
TROUBLESHOOTING ........................................................................................................................................................................................... 26
STICKING BUTTON PROTECTION ...................................................................................................................................................................27
BEFORE CALLING FOR ASSISTANCE .............................................................................................................................................................. 27
EN – 3
EN – 3
IMPORTANT SAFETY INSTRUCTIONS
READ CAREFULLY AND KEEP FOR FUTURE REFERENCE
To avoid the danger of re. The microwave oven should
not be left unattended during operation. Power levels
that are too high, or cooking times that are too long, may
overheat foods resulting in a re.
This oven is designed to be used on a countertop only. It is not
designed to be built into a kitchen unit. Do not place the oven
in a cabinet. The electrical outlet must be readily accessible so
that the unit can be unplugged easily in an emergency.
The AC power supply must be 230-240 V, 50 Hz, with a
minimum 10 A distribution line fuse, or a minimum 10A
distribution circuit breaker. A separate circuit serving only this
appliance should be provided.
Do not place the oven in areas where heat is generated. For
example, close to a conventional oven. Do not install the oven
in an area of high humidity or where moisture may collect. Do
not store or use the oven outdoors.
If smoke is observed, switch off or unplug the oven and
keep the door closed in order to sti e any ames.
Use only microwave-safe containers and utensils. Utensils
should be checked to ensure that they are suitable for use
in microwave ovens.
When heating food in plastic or paper containers, keep an
eye on the oven due to the possibility of ignition.
Clean the waveguide cover and the oven cavity. These
must be dry and free from grease. Built up grease may
overheat and begin to smoke or catch re.
Do not place ammable materials near the oven or ventilation
openings. Do not block the ventilation openings.

EN – 4
EN – 4
Remove all metallic seals, wire twists, etc., from food and food
packages. Arcing on metallic surfaces may cause a re.
Do not use the microwave oven to heat oil for deep frying. The
temperature cannot be controlled and the oil may catch re.
To make popcorn, use only special microwave popcorn makers.
Do not store food or any other items inside the oven.
Check the settings after you start the oven to ensure the oven
is operating as desired.
Do not leave the oven unattended while it is operating.
To avoid overheating and re, special care must be taken when
cooking or reheating foods with a high sugar or fat content,
for example, Sausage rolls, Pies or Christmas pudding. See the
corresponding hints in the user manual.
To avoid the possibility of injury. WARNING:
Do not operate the oven if it is damaged or malfunctioning.
Check the following before use:
a) Make sure the door closes properly and ensure it is not
misaligned or warped.
b) Check to make sure the hinges and safety door latches are
not broken or loose.
c) Ensure that the door seals and sealing surfaces have not
been damaged.
d) Make sure inside the oven cavity or on the door are no
dents.
e) Ensure that the power supply cord and plug are not
damaged.
If the door or door seals are damaged, the oven must not be
operated until it has been repaired by a competent person.
Never adjust, repair or modify the oven yourself. It is
hazardous for anyone other than a competent person to
carry out any service or repair operation which involves

EN
EN – 4EN – 4
Remove all metallic seals, wire twists, etc., from food and food
packages. Arcing on metallic surfaces may cause a re.
Do not use the microwave oven to heat oil for deep frying. The
temperature cannot be controlled and the oil may catch re.
To make popcorn, use only special microwave popcorn makers.
Do not store food or any other items inside the oven.
Check the settings after you start the oven to ensure the oven
is operating as desired.
Do not leave the oven unattended while it is operating.
To avoid overheating and re, special care must be taken when
cooking or reheating foods with a high sugar or fat content,
for example, Sausage rolls, Pies or Christmas pudding. See the
corresponding hints in the user manual.
To avoid the possibility of injury. WARNING:
Do not operate the oven if it is damaged or malfunctioning.
Check the following before use:
a) Make sure the door closes properly and ensure it is not
misaligned or warped.
b) Check to make sure the hinges and safety door latches are
not broken or loose.
c) Ensure that the door seals and sealing surfaces have not
been damaged.
d) Make sure inside the oven cavity or on the door are no
dents.
e) Ensure that the power supply cord and plug are not
damaged.
If the door or door seals are damaged, the oven must not be
operated until it has been repaired by a competent person.
Never adjust, repair or modify the oven yourself. It is
hazardous for anyone other than a competent person to
carry out any service or repair operation which involves
EN – 5
EN – 5
the removal of a cover which gives protection against
exposure to microwave energy.
Do not operate the oven with the door open or alter the door
safety latches in any way. Do not operate the oven if there is an
object between the door seals and sealing surfaces.
Do not allow grease or dirt to build up on the door seals
and adjacent parts. Clean the oven at regular intervals and
remove any food deposits.
Follow the instructions for “Care and Cleaning”. Failure
to maintain the oven in a clean condition could lead to a
deterioration of the surface that could adversely aff ect
the life of the appliance and possibly result in a hazardous
situation.
Individuals with PACEMAKERS should check with their doctor or
the manufacturer of the pacemaker for precautions regarding
microwave ovens.
To avoid the possibility of electric shock.
• Under no circumstances should you remove the outer
cabinet.
• Never spill or insert any objects into the door lock openings
or ventilation openings. In the event of a spill, turn o and
unplug the oven immediately, and call an authorised SHARP
service agent.
• Do not immerse the power supply cord or plug in water or
any other liquid.
• Do not let the power supply cord hang over the edge of a
table or work surface.
• Keep the power supply cord away from heated surfaces,
including the rear of the oven.
• Keep the appliance and its cord out of reach of children less
than 8 years.
• Do not attempt to replace the oven lamp yourself or allow

EN – 6
EN – 6
anyone who is not an electrician authorised by SHARP to do
so. If the oven lamp fails, please consult your dealer or an
authorised SHARP service agent.
• If the power supply cord is damaged, it must be replaced by
an authorised SHARP service agent.
WARNING: Liquids and other foods must not be heated
in sealed containers since they are liable to explode.
Microwave heating of beverages can result in delayed
eruptive boiling; therefore, care must be taken when
handling the container. To avoid the possibility of
explosion and sudden boiling:
Never use sealed containers. Remove seals and lids before use.
Sealed containers can explode due to a build-up of pressure
even after the oven has been turned o . Take care when
microwaving liquids. Use a wide mouthed container to allow
bubbles to escape.
Never heat liquids in narrow necked containers such as
baby bottles, as this may result in the contents erupting
from the container when heated and cause burns.
To prevent sudden eruption of boiling liquid and possible
scalding:
1. Do not use excessive amount of time.
2. Stir liquid prior to heating/reheating.
3. It is advisable to insert a glass rod or similar (not metal) into
the liquid whilst reheating.
4. Let liquid stand for at least 20 seconds in the oven at the
end of cooking time to prevent delayed eruptive boiling.
Do not cook eggs in their shells, and whole hard-boiled
eggs should not be heated in microwave ovens since they
may explode even after microwave cooking has ended.
To cook or reheat eggs which have not been scrambled or

EN
EN – 6EN – 6
anyone who is not an electrician authorised by SHARP to do
so. If the oven lamp fails, please consult your dealer or an
authorised SHARP service agent.
• If the power supply cord is damaged, it must be replaced by
an authorised SHARP service agent.
WARNING: Liquids and other foods must not be heated
in sealed containers since they are liable to explode.
Microwave heating of beverages can result in delayed
eruptive boiling; therefore, care must be taken when
handling the container. To avoid the possibility of
explosion and sudden boiling:
Never use sealed containers. Remove seals and lids before use.
Sealed containers can explode due to a build-up of pressure
even after the oven has been turned o . Take care when
microwaving liquids. Use a wide mouthed container to allow
bubbles to escape.
Never heat liquids in narrow necked containers such as
baby bottles, as this may result in the contents erupting
from the container when heated and cause burns.
To prevent sudden eruption of boiling liquid and possible
scalding:
1. Do not use excessive amount of time.
2. Stir liquid prior to heating/reheating.
3. It is advisable to insert a glass rod or similar (not metal) into
the liquid whilst reheating.
4. Let liquid stand for at least 20 seconds in the oven at the
end of cooking time to prevent delayed eruptive boiling.
Do not cook eggs in their shells, and whole hard-boiled
eggs should not be heated in microwave ovens since they
may explode even after microwave cooking has ended.
To cook or reheat eggs which have not been scrambled or
EN – 7
EN – 7
mixed, pierce the yolks and the whites. Shell and slice hard
boiled eggs before reheating them in the microwave oven.
Pierce the skin of such foods as potatoes, sausages and fruit
before cooking, or they may explode.
WARNING: The contents of feeding bottles and baby
food jars must be stirred or shaken and the temperature
checked before consumption, in order to avoid burns. Use
pot holders or oven gloves when removing food from the
oven to prevent burns. To avoid the possibility of burns:
• Always open containers, popcorn makers, oven cooking
bags, etc., away from the face and hands to avoid steam
burns and eruption of boiling. To avoid burns, always test
food temperature and stir before serving and pay special
attention to the temperature of food and drink given to
babies, children or the elderly. Accessible parts may become
hot during use. Young children should be kept away.
• Temperature of the container is not a true indication of the
temperature of the food or drink; always check the food
temperature.
• Always stand back from the oven door when opening it to
avoid burns from escaping steam and heat.
• Slice stu ed baked foods after heating to release steam and
avoid burns.
• Keep children away from the door to prevent them burning
themselves.
WARNING: Only allow children aged from 8 years and
above to use the oven without supervision when adequate
instructions have been given so that the child is able to
use the oven in a safe way and understands the hazards of
improper use.
When the appliance is operated in the GRILL, MIX GRILL,
CONVECTION, MIX CONVECTION and AUTO MENU mode

EN – 8
EN – 8
(mode applicable to model), children should only use the
oven under adult supervision due to the temperature
generated.
This appliance is not intended for use by persons
(including children) with reduced physical, sensory or
mental capabilities, or lack of experience and knowledge,
unless they have been given supervision or instruction
concerning use of the appliance by a person responsible
for their safety.
Children should be supervised to ensure that they do not
play with the appliance. Cleaning by children should be
monitored.
Models with Electronic touch panel are enabled with a
child lock mode.
Do not lean or swing on the oven door. Do not play with the
oven or use it as a toy.
Children should be taught all important safety instructions:
use of pot holders, careful removal of food coverings - paying
special attention to packaging (e.g., self-heating materials)
designed to make food crisp, as they may be extra hot.
Other warnings
Never modify the oven in any way.
Do not move the oven while it is in operation.
This appliance is intended to be used in household. This oven
is for home food preparation and may only be used for cooking
food and beverages. Drying of food or clothing and heating
of warming pads, slippers, sponges, damp cloth and similar
may lead to risk of injury, ignition or re. It is not suitable for
commercial or laboratory use.

EN
EN – 8EN – 8
(mode applicable to model), children should only use the
oven under adult supervision due to the temperature
generated.
This appliance is not intended for use by persons
(including children) with reduced physical, sensory or
mental capabilities, or lack of experience and knowledge,
unless they have been given supervision or instruction
concerning use of the appliance by a person responsible
for their safety.
Children should be supervised to ensure that they do not
play with the appliance. Cleaning by children should be
monitored.
Models with Electronic touch panel are enabled with a
child lock mode.
Do not lean or swing on the oven door. Do not play with the
oven or use it as a toy.
Children should be taught all important safety instructions:
use of pot holders, careful removal of food coverings - paying
special attention to packaging (e.g., self-heating materials)
designed to make food crisp, as they may be extra hot.
Other warnings
Never modify the oven in any way.
Do not move the oven while it is in operation.
This appliance is intended to be used in household. This oven
is for home food preparation and may only be used for cooking
food and beverages. Drying of food or clothing and heating
of warming pads, slippers, sponges, damp cloth and similar
may lead to risk of injury, ignition or re. It is not suitable for
commercial or laboratory use.
EN – 9
EN – 9
To promote trouble-free use of your oven and avoid
damage.
Never operate the oven when it is empty. When using a
browning dish or self-heating material, always place a heat-
resistant insulator such as a porcelain plate under it to prevent
damage to the oven base due to heat stress. The preheating
time speci ed in the dish’s instructions must not be exceeded.
Do not use metal utensils, which re ect microwaves and may
cause electrical arcing. Do not put cans in the oven.
To prevent the turntable or base of the oven breaking:
a) Before cleaning with water, leave to cool.
b) Do not put hot or cold foods or hot utensils on a cold
turntable/oven base.
c) Do not place anything on the outer cabinet during
operation.
NOTE:
Do not use plastic containers for microwaving if the oven is still
hot from using a combination mode (oven model dependant)
because they may melt.
Plastic containers must not be used during above modes unless
the container manufacturer says they are suitable.
If you are unsure how to connect your oven, please consult an
authorised, quali ed electrician.
Neither the manufacturer nor the dealer can accept any liability
for damage to the oven or personal injury resulting from failure
to observe the correct electrical connection procedure.
Water vapour or drops may occasionally form on the oven walls
or around the door seals and sealing surfaces. This is a normal
occurrence and is not an indication of microwave leakage or a
malfunction.
This appliance is intended for use in household and similar

EN – 10
EN – 10
applications such as; Kitchen areas reserved for sta in
stores, o ces and other professional environments / Farms
/ Use by clients of hotels, motels and other residential type
environments / Bed and breakfast type environments.
This symbol means that the surfaces are liable to get
hot during use.
INSTALLATION
1. Remove all packing materials from the inside of the oven cavity and remove any protective lm found on the
microwave oven cabinet surface.
2. Check the oven carefully for any signs of damage.
3. Place the oven on a secure, level surface, strong enough to take the oven weight, plus the heaviest item likely to
be cooked in the oven. Do not place the oven in a cabinet.
4. Select a level surface that provide enough open space for the intake and/or outlet vents. See picture on the rst
page. The rear surface of appliance can be placed against a wall.
• The minimum installation height is 85 cm.
• A minimum space of 20 cm is required between the sides of the microwave oven and any adjacent walls or objects.
• Leave a minimum space of 30 cm above the oven.
• Do not remove the feet from the bottom of the oven.
• Blocking the intake and/or outlet openings can damage the oven.
• Place the oven as far away from radios and TV as possible. Operation of microwave oven may cause interference to
your radio or TV reception.
20 cm
30 cm
85 cm
10 cm
20 cm
5. Securely connect the plug of the oven to a standard earthed (grounded) household electrical outlet.
WARNING:
Do not place the oven where heat, moisture or high humidity are generated, (for example, near or above a
conventional oven) or near combustible materials (for example, curtains).
Do not block or obstruct air vent openings.
Do not place objects on top of the oven.
Do not touch the exterior of the microwave oven during or shortly after operation as it will be hot.

EN
EN – 10EN – 10
applications such as; Kitchen areas reserved for sta in
stores, o ces and other professional environments / Farms
/ Use by clients of hotels, motels and other residential type
environments / Bed and breakfast type environments.
This symbol means that the surfaces are liable to get
hot during use.
INSTALLATION
1. Remove all packing materials from the inside of the oven cavity and remove any protective lm found on the
microwave oven cabinet surface.
2. Check the oven carefully for any signs of damage.
3. Place the oven on a secure, level surface, strong enough to take the oven weight, plus the heaviest item likely to
be cooked in the oven. Do not place the oven in a cabinet.
4. Select a level surface that provide enough open space for the intake and/or outlet vents. See picture on the rst
page. The rear surface of appliance can be placed against a wall.
• The minimum installation height is 85 cm.
• A minimum space of 20 cm is required between the sides of the microwave oven and any adjacent walls or objects.
• Leave a minimum space of 30 cm above the oven.
• Do not remove the feet from the bottom of the oven.
• Blocking the intake and/or outlet openings can damage the oven.
• Place the oven as far away from radios and TV as possible. Operation of microwave oven may cause interference to
your radio or TV reception.
20 cm
30 cm
85 cm
10 cm
20 cm
5. Securely connect the plug of the oven to a standard earthed (grounded) household electrical outlet.
WARNING:
Do not place the oven where heat, moisture or high humidity are generated, (for example, near or above a
conventional oven) or near combustible materials (for example, curtains).
Do not block or obstruct air vent openings.
Do not place objects on top of the oven.
Do not touch the exterior of the microwave oven during or shortly after operation as it will be hot.
EN – 11
EN – 11
RADIO INTERFERENCE
Operation of the microwave oven may cause interference to your radio, TV, or similar equipment. If there is
interference, it may be reduced or eliminated by taking the following measures:
1. Clean the door and cavity where they meet.
2. Change the direction of the receiving antenna of the radio or television.
3. Relocate the microwave oven with respect to the receiver.
4. Plug the microwave oven into a di erent outlet so that microwave oven and receiver are not on the same mains
feed.
GROUNDING (EARTHING) INSTRUCTIONS
This appliance must be grounded. This oven is equipped with a cord having a grounding wire with a grounding plug.
It must be plugged into a wall socket that has been properly installed and grounded. In the event of an electrical short
circuit, grounding reduces risk of electric shock by providing an escape wire for the electric current. It is recommended
that a separate circuit serving only the oven be provided.
WARNING: Improper use of the grounding plug can result in a risk of electric shock.
NOTE:
1. If you have any questions about the grounding or electrical instructions, consult a quali ed electrician or service
person.
2. Neither the manufacturer nor the dealer can accept any liability for damage to the oven or personal injury
resulting from failure to observe the electrical connection procedures.
The mains lead used in your microwave oven uses the following colour coded wires:
Green and Yellow = EARTH | Blue = NEUTRAL | Brown = LIVE
SPECIFICATIONS
Model name: YC-PC322A
AC Line Voltage 230~240 V, 50 Hz single phase
Distribution line fuse/circuit breaker 10 A
Power
Power Consumption 2300 W
Microwave Output Power 1000 W
Grill Output Power 1250 W
Convection Power 2300 W
O Mode Power <0.5 W
Microwave Frequency 2450 MHz*
Outside Dimensions (W) x (H) x (D) mm 539 x 280 x 415
Cavity Dimensions (W) x (H) x (D)** mm 362 x 223 x 378
Glass Turntable Size (ø mm) 315
Oven Capacity 32 litres**
Baking Tray Size (Diameter x H in mm) 317 x 48
Grill Rack Size (Diameter x Height in mm) 255 x 80
Weight 21 kg
Oven Lamp (LED type) 1,5 W
* - This Product ful ls the requirement of the European standard EN55011. In conformity with this standard, this product is classi ed as
group 2 class B equipment.
Group 2 means that the equipment intentionally generates radio-frequency energy in the form of electromagnetic radiation for the heat
treatment of food.
Class B equipment means that the equipment is suitable to be used in domestic establishments.
** - Internal capacity is calculated by measuring maximum width, depth and height. Actual capacity for holding food is less.
AS PART OF A POLICY OF CONTINUOUS IMPROVEMENT, WE RESERVE THE RIGHT TO ALTER DESIGN AND SPECIFICATIONS
WITHOUT NOTICE.

EN – 12
EN – 12
OVEN AND ACCESSORIES
1. Door safety lock system
2. Oven window
3. Control Panel
4. Display
5. Oven cavity
6. Waveguide Cover (Do Not remove)
7. Glass Tray
8. Roller Ring
9. Turntable Coupling
10. Grill Rack
11. Baking Tray
12. Ventilation openings
13. Outer cabinet
14. Power supply cord
• The Grill Rack and Baking Tray are designed for
use with grill and convection ovens only. DO
NOT use any metal accessories when using the
microwave function.
• For use of the Grill Rack refer to the GRILL
sections of this User Manual.
Never touch the grill when it is hot.
NOTE: When you order accessories, please
mention two items: part name and model name.
NOTES:
• After cooking fatty foods without a cover,
always clean the cavity and any cooking
utensils thoroughly, these must be dry and
free from grease. Built-up grease may overheat
and begin to smoke or catch re.
• When microwaving, always place cookware on the turntable.
• DO NOT use the Grill Rack or Baking Tray while using the microwave function.
WARNING: This symbol means that the surfaces are liable to get hot during use. The door, outer
cabinet, oven cavity, accessories and dishes will become very hot during operation. To prevent burns,
always use thick oven gloves.
2
7
5
9
6
8
1
3
4
14
12
13
1110

EN
EN – 12EN – 12
OVEN AND ACCESSORIES
1. Door safety lock system
2. Oven window
3. Control Panel
4. Display
5. Oven cavity
6. Waveguide Cover (Do Not remove)
7. Glass Tray
8. Roller Ring
9. Turntable Coupling
10. Grill Rack
11. Baking Tray
12. Ventilation openings
13. Outer cabinet
14. Power supply cord
• The Grill Rack and Baking Tray are designed for
use with grill and convection ovens only. DO
NOT use any metal accessories when using the
microwave function.
• For use of the Grill Rack refer to the GRILL
sections of this User Manual.
Never touch the grill when it is hot.
NOTE: When you order accessories, please
mention two items: part name and model name.
NOTES:
• After cooking fatty foods without a cover,
always clean the cavity and any cooking
utensils thoroughly, these must be dry and
free from grease. Built-up grease may overheat
and begin to smoke or catch re.
• When microwaving, always place cookware on the turntable.
• DO NOT use the Grill Rack or Baking Tray while using the microwave function.
WARNING: This symbol means that the surfaces are liable to get hot during use. The door, outer
cabinet, oven cavity, accessories and dishes will become very hot during operation. To prevent burns,
always use thick oven gloves.
2
75
9
6
8
1
3
4
14
12
13
1110
EN – 13
EN – 13
CONTROL PANEL
1. DIGITAL DISPLAY – Cooking time, power, indicators and clock time are
displayed.
2. 10 SECONDS, 1 MINUTE, 10 MINUTES – Use to set time of cooking or the
clock.
3. AUTO MENU keys – Press to select auto cooking menu. (Refer to page 17
for advice on use).
4. START/QUICK START – (Page 14).
5. MICROWAVE POWER – Press to select microwave power level. (Page 14).
6. GRILL – Press to set grill cooking program. (Page 15).
7. MICROWAVE+GRILL – Press to set microwave and grill combination cooking
program. (Page 15).
8. CONVECTION TEMPERATURE – Press to select convection temperature.
9. MICROWAVE+CONVECTION – Press to select convection ombination
cooking.
10. UP – Press to set food weight or servings.
11. DOWN – Press to set food weight or servings.
12. STOP/ECO – Press once to temporarily stop cooking, or twice to cancel
cooking altogether. Use to set power saving mode. (Page 18).
13. CHILD LOCK – (Page 19).
14. TIME/SET CLOCK –
Use to set clock time. Use to set timer function. (Page 13).
BEFORE USING THE OVEN
When the oven rst plugged in, beep will sound and the display will show "1:00". Note that the clock does not have to
be set for the oven to operate correctly. To set the clock, follow the instructions in the “Setting the Clock” section of
this User Manual.
When new, the very rst time the grill and/or convection is used, smoke and odors will be given o . To avoid this
happening when food is being cooked, use the grill and convection function without food for approx. 20 minutes.
• After opening and closing the door, the oven will enter the standby mode. If no buttons are press within 1 minute,
the display will remain on and the buttons will not operate. To enter standby mode again, open and close the door.
• During cooking, if the STOP/ECO button is pressed once, the cooking cycle will be paused. To restart cooking press
the START/QUICK START button. If the STOP/ECO button is pressed twice, cooking will be canceled.
• When programming the oven for a particular function and there is a pause between button presses of more than 30
seconds the oven will return to the standby mode.
• When a cooking cycle is completed, the display will show “End” and a tone will be heard every two minutes until a
button is pressed or the door is opened.
SETTING THE CLOCK
This oven has a clock which can be used in either 12- or 24-hour mode. To set the clock, follow the instructions as
below:
1. In standby mode, press and hold TIME/SET CLOCK button for at least 3 seconds to enter the clock setting mode.
2. Press the TIME/SET CLOCK button to select the 12- or 24-hour clock mode.
3. Use the 10 SECONDS, 1 MINUTE and 10 MINUTES buttons to set the desired hours and minutes.
4. Press the TIME/SET CLOCK button to store and exit the clock setting mode.
• It is not necessary to set the clock for the oven to work normally.
• While in the cook mode, press the TIME/SET CLOCK button to see the time of day (if set). The time of day will
change back to the cooking count down after 5 seconds. Note that the time of day can not be viewed if the kitchen
timer has been set.
10 SECONDS 1 MINUTE 10 MINUTES
YC-PC322A
1000W
STOP/ECO TIME/
SET CLOCK
CHILD
LOCK
AUTO PROGRAMS
REHEAT
BEVERAGES JACKE T
POTATO PIZZA POPCORN
FROZEN
MEAL FRESH
VEGETABLES PORRID GE AUTO
DEFROST
GRILLED
STEAK GRILLED
CHICKEN AUTO
REHEAT
ROAST
BEEF
ROAST
CHICKEN
OVEN
CHIPS
MICROWAVE
POWER
MICROWAVE
+ CONVECTION
CONVECTION
TEMPERATURE
GRILL
START/
QUICK START
MICROWAVE
+ GRILL
13
5
3
2
14
11
6
8
9
7
10
12
4
1

EN – 14
EN – 14
MICROWAVE COOKING
To use the microwave function, follow the insturcitons given below:
1. In standby mode, press the MICROWAVE POWER button to select power level. Each time this button is pressed,
the display will show the microwave power level.
2. Once the desired microwave power level has been selected, use the 10 SECONDS, 1 MINUTE and 10 MINUTES
buttons to select the time to cook.
3. Press the START/QUICK START button to start cooking.
4. When the cooking cycle is completed, the display will show “End” and a tone will be heard every two minutes until
a button is pressed or the door is opened.
Note that the table below is for guidance. Your oven has 10 microwave power levels. These are 10%, 20%, 30%, 40%,
50%, 60%, 70%, 80%, 90% and 100%. The actual wattage output can be calculated by multiplying the microwave
power by the percentage.
Microwave Cooking Guide:
Display Microwave
Power Suggested Use
P100 100% Use this setting for fast cooking or reheating e.g., for casseroles, hot beverages,
vegetables etc.
P-80 80%
For dense foods which require a long cooking time when cooked conventionally,
e.g., beef dishes. It is advisable to use this power setting to ensure the meat will be
tender.
P-60 60% Used for longer cooking of dense foods such as roast joints, meat loaf and plated
meals, also for sensitive dishes such as cheese sauce and sponge cakes.
P-40 40%
Defrost setting; select this power setting, to ensure that the dish defrosts evenly.
This setting is also ideal for simmering rice, pasta, dumplings and cooking egg
custard.
P-20 20% For gentle defrosting, e.g., cream gateaux or pastry.
• During cooking you can check the cooking power level by pressing and holing the MICROWAVE POWER button.
• The longest cooking time is 95 minutes.
QUICK START
If you need to cook at 100% power level, just press the START/QUICK START button while in the standby mode. Each
time the START/QUICK START button is pressed, it will add 30 seconds to the cooking time.

EN
EN – 14EN – 14
MICROWAVE COOKING
To use the microwave function, follow the insturcitons given below:
1. In standby mode, press the MICROWAVE POWER button to select power level. Each time this button is pressed,
the display will show the microwave power level.
2. Once the desired microwave power level has been selected, use the 10 SECONDS, 1 MINUTE and 10 MINUTES
buttons to select the time to cook.
3. Press the START/QUICK START button to start cooking.
4. When the cooking cycle is completed, the display will show “End” and a tone will be heard every two minutes until
a button is pressed or the door is opened.
Note that the table below is for guidance. Your oven has 10 microwave power levels. These are 10%, 20%, 30%, 40%,
50%, 60%, 70%, 80%, 90% and 100%. The actual wattage output can be calculated by multiplying the microwave
power by the percentage.
Microwave Cooking Guide:
Display Microwave
Power Suggested Use
P100 100% Use this setting for fast cooking or reheating e.g., for casseroles, hot beverages,
vegetables etc.
P-80 80%
For dense foods which require a long cooking time when cooked conventionally,
e.g., beef dishes. It is advisable to use this power setting to ensure the meat will be
tender.
P-60 60% Used for longer cooking of dense foods such as roast joints, meat loaf and plated
meals, also for sensitive dishes such as cheese sauce and sponge cakes.
P-40 40%
Defrost setting; select this power setting, to ensure that the dish defrosts evenly.
This setting is also ideal for simmering rice, pasta, dumplings and cooking egg
custard.
P-20 20% For gentle defrosting, e.g., cream gateaux or pastry.
• During cooking you can check the cooking power level by pressing and holing the MICROWAVE POWER button.
• The longest cooking time is 95 minutes.
QUICK START
If you need to cook at 100% power level, just press the START/QUICK START button while in the standby mode. Each
time the START/QUICK START button is pressed, it will add 30 seconds to the cooking time.
EN – 15
EN – 15
GRILL COOKING
The Grill heating element at the top of the oven cavity has one power setting only, it is e cient and economical. The
grill is ideal for cooking bacon, gammon steak, sh ngers and tea cakes.
Use the Gill Rack for grilling small items of food such as bacon and sausages, turn over halfway through grilling. Food
can be placed directly on the rack or placed in a an dish or on a heat-resistant plate. To make sure that any fat or oil
which can drip from the food being cooked, ensure that a suitable tray is placed below the Grill Rack.
When browning and crisping the surface of foods in a casserole dish, the Grill Rack can be used if the container is
shallow enough. However, it is advisable to place such containers directly on the turntable allow a little extra time to
brown and crisp as desired. It is not possible to use the Grill Rack for grilling.
To use the grill function, follow the instructions below:
1. In standby mode, press the GRILL button to select the grill function. The display will show ”Grl”
2. use the 10 SECONDS, 1 MINUTE and 10 MINUTES buttons to select the time to cook.
3. Press the START/QUICK START button to start cooking.
4. When the cooking cycle is completed, the display will show “End” and a tone will be heard every 2 minutes until a
button is pressed or the door is opened.
MICROWAVE + GRILL
Using both the microwave and grill function it is possible to brown and cook the food quickly. To use the microwave
and grill function, follow the instruction as below:
1. In standby mode, press MICROWAVE + GRILL pad once or twice to select "Co-1" or "Co-2".
2. Use the 10 SECONDS, 1 MINUTE and 10 MINUTES buttons to set cooking time.
3. Press START/QUICK START button to start.
4. When the cooking cycle is completed, the display will show “End” and a tone will be heard every two minutes until
a button is pressed or the door is opened.
Microwave + Grill Function
Display Cooking Process Suggested Use
Co-1
The oven will cook in the following cycle:
Microwave 22 seconds, grill 11 seconds. this will
repeat until the end of the total time set.
Chicken Pieces, Chicken Breast, Pork
Chops
Co-2
The oven will cook in the following cycle:
Microwave on full power for 18 seconds then grill for
15 seconds. this will repeat until the end of the total
time set.
Whole Chicken
• Maximum cooking time with the grill is 95 minutes.
• During grilling allow smoke or smells to disperse by opening a window or switching on kitchen ventilation. This is
normal and not a fault with the oven.
• During cooking you can check the current combination cooking power by touching MICROWAVE + GRILL button.
• When using the grill function, the grill will turn on and o at regular intervals to prevent overheating.
• When using the MICROWAVE+GRILL function, food can be placed in a suitable container directly on the turntable.
WARNING: The door, outer cabinet, oven cavity, accessories and dishes will become very hot during operation. To
prevent burns, always use thick oven gloves.

EN – 16
EN – 16
CONVECTION
During convection cooking, hot air is circulated throughout the oven cavity to brown and make crisp foods quickly
and evenly. This oven can be programmed for thirteen di erent cooking temperatures (200°C, 190°C, 180°C, 170°C,
160°C, 150°C, 140°C, 130°C, 120°C, 110°C).
It is recommended to preheat the oven before cooking in the convection mode. To preheat and cook using the
convection function, follow the instructions given below:
Your oven can be programmed to combine preheating and convection cooking operations.
1. In standby mode, press CONVECTION button repeatedly to select convection temperature.
2. Press START/QUICK START button to start the preheat function.
3. When the designated temperature is reached, the oven will bleep.
Once the oven has preheated and the bleep sounds:
1. Open the door and place container of food at the center of the atbed.
2. Use the 10 SECONDS, 1 MINUTE and 10 MINUTES buttons to set cooking time. The longest time is 95 minutes.
3. Press START/QUICK START button to start.
NOTE: When the convection preheat temperature is reached, the oven will bleep every two seconds. The preheat
temperature will be maintained for 30 minutes after which the oven will turn o ."
MICROWAVE + CONVECTION
The Microwave+Convection mode makes cooking easier and faster as it uses fast microwave cooking and convection
to crisp the food.
It is possible to cook at 4 di erent convection temperatures. To start the dual cook mode, follow the instrucitons as
below:
1. In standby mode, press MICROWAVE+CONVECTION repeatedly to select temperature (200°C, 170°C, 140°C,
110°C).
2. Press the 10 SECONDS, 1 MINUTE and 10 MINUTES buttons to set cooking time. The time ranges from 10
seconds to 95 minutes.
3. Press START/QUICK START button to start.
When using the Microwave + Convection function the timing of the microwave and convection cooking is as shown
below. Choose the most suitable option for cooking your food and making it crispy.
Display Cooking Process
200 °C 10 second of microwave power, then 23 seconds of convection cooking. Cycle will repeat until
end of set cooking time.
170 °C 15 second of microwave power, then 18 seconds of convection cooking. Cycle will repeat until
end of set cooking time.
140 °C 19 second of microwave power, then 14 seconds of convection cooking. Cycle will repeat until
end of set cooking time.
110 °C 24 second of microwave power, then 9 seconds of convection cooking. Cycle will repeat until
end of set cooking time.

EN
EN – 16EN – 16
CONVECTION
During convection cooking, hot air is circulated throughout the oven cavity to brown and make crisp foods quickly
and evenly. This oven can be programmed for thirteen di erent cooking temperatures (200°C, 190°C, 180°C, 170°C,
160°C, 150°C, 140°C, 130°C, 120°C, 110°C).
It is recommended to preheat the oven before cooking in the convection mode. To preheat and cook using the
convection function, follow the instructions given below:
Your oven can be programmed to combine preheating and convection cooking operations.
1. In standby mode, press CONVECTION button repeatedly to select convection temperature.
2. Press START/QUICK START button to start the preheat function.
3. When the designated temperature is reached, the oven will bleep.
Once the oven has preheated and the bleep sounds:
1. Open the door and place container of food at the center of the atbed.
2. Use the 10 SECONDS, 1 MINUTE and 10 MINUTES buttons to set cooking time. The longest time is 95 minutes.
3. Press START/QUICK START button to start.
NOTE: When the convection preheat temperature is reached, the oven will bleep every two seconds. The preheat
temperature will be maintained for 30 minutes after which the oven will turn o ."
MICROWAVE + CONVECTION
The Microwave+Convection mode makes cooking easier and faster as it uses fast microwave cooking and convection
to crisp the food.
It is possible to cook at 4 di erent convection temperatures. To start the dual cook mode, follow the instrucitons as
below:
1. In standby mode, press MICROWAVE+CONVECTION repeatedly to select temperature (200°C, 170°C, 140°C,
110°C).
2. Press the 10 SECONDS, 1 MINUTE and 10 MINUTES buttons to set cooking time. The time ranges from 10
seconds to 95 minutes.
3. Press START/QUICK START button to start.
When using the Microwave + Convection function the timing of the microwave and convection cooking is as shown
below. Choose the most suitable option for cooking your food and making it crispy.
Display Cooking Process
200 °C 10 second of microwave power, then 23 seconds of convection cooking. Cycle will repeat until
end of set cooking time.
170 °C 15 second of microwave power, then 18 seconds of convection cooking. Cycle will repeat until
end of set cooking time.
140 °C 19 second of microwave power, then 14 seconds of convection cooking. Cycle will repeat until
end of set cooking time.
110 °C 24 second of microwave power, then 9 seconds of convection cooking. Cycle will repeat until
end of set cooking time.
EN – 17
EN – 17
AUTO MENU
For convience the Auto Programs allow food to be cooked quickly and e ecenlty with only a few button presses. It is
not necessary to program the duration and the cooking power, all that is required is to press the required auto cook
button, enter the weight/pieces by using the UP and DOWN buttons and then press START/QUICK START button.
For example, to cook two jacket potatoes.
1. Open the door and place the food inside the oven using suitable ovenware for the cook cycle being used.
2. Close the door.
3. Press the JACKET POTATO button once.
4. Use the UP and DOWN buttons to enter numbers of potatoes.
5. Press START/QUICK START button.
6. When the cooking cycle is completed, the display will show “End” and a tone will be heard every two minutes until
a button is pressed or the door is opened.
Auto cook menus:
Auto Menu Method to Select Weight or Pieces Size/Weight
Frozen Meal Select the weight by using the UP and DOWN buttons control, then
press the START/QUICK START button to begin cooking.
200 to 800g
Auto Defrost 100 to 1800g
Reheat Beverages Select the number of cups by using the UP and DOWN buttons, then
press the START/QUICK START button to begin cooking.
1 to 3 cups (200ml
each)
Jacket Potato
Select the number of potatoes by using the UP and DOWN buttons,
then press the START/QUICK START button to begin cooking.
Depending on the number of potatoes selected you may be asked to
rearrange the potatoes part way through the cooking cycle.
1 to 3 potatoes
(230g each)
Popcorn
Select the weight by using the UP and DOWN buttons, then press the
START/QUICK START button to begin cooking.
100g
Fresh Vegetables 200 to 600g
Pizza 150g / 300g / 450g
Porridge 50 to 150g
Grilled Steak* 200 to 600g
Grilled Chicken* 200 to 600g
Auto Reheat* 200 to 800g
Oven Chips 200g
Roast Beef / Lamb 200 to 600g
Roast Chicken 800g to 1400g
• The result of auto cook depends on factors such as the shape and size of food, your personal preference as to the
doneness of certain foods and how the food is placed in the oven. If the resold of the cooking is not satifactory,
please adjust the cooking time to suit.
• For some of the auto cook programs, you may be requested to turn the food over. Open the door, turn the food,
close the door and then press the START/QUICK START button to resume cooking.
• Wear oven gloves (or similar) when turning food over.

EN – 18
EN – 18
AUTO DEFROST
Auto Defrost allows you to defrost food by weight. The defrosting time and power level are automatically set once the
food category and the weight are programmed. The frozen food weight ranges from 200 to 1800g.
1. In the standby mode, press the AUTO DEFROST button.
2. Use the UP and DOWN buttons to select weight of food to be defrosted.
3. Press the START/QUICK START button to start the defrost cycle.
4. If oven stops during the defrosting cycle, turn the food over to ensure uniform defrosting and then press START/
QUICK START to defrost for the remaining time.
5. When a defrost cycle is completed, the display will show “End” and a tone will be heard every two minutes until a
button is pressed or the door is opened.
AUTO REHEAT
The oven allows you to reheat food based on the weight entered by user. The defrosting time and power level are
automatically set once the food category and the weight are programmed. The reheat weight ranges from 200 to
800g.
1. In standby mode, press the AUTO REHEAT button.
2. Using the UP and DOWN buttons to select weight of food to be reheated
3. Press START/QUICK START.
4. When the cooking cycle is completed, the display will show “End” and a tone will be heard every two minutes until
a button is pressed or the door is opened.
KITCHEN TIMER
The oven is equipped with a kitchen timer which will count down from the time set.
1. While in the standby mode, press TIME/SET CLOCK button once.
2. Using the 10 SECONDS, 1 MINUTE and 10 MINUTES to set desired time. The longest time is 95 minutes.
3. Press START/QUICK START button to con rm.
4. Display will count down from the set time.
5. When the display reaches zero, a tone will sound.
It is also possible to use the kitchen timer while in the cook mode. To do this follow the steps as outline above while
your food is cooking. Once the kitchen timer is activated, it will appear on the display for ve seconds, then the display
will revert to to the countdown timer for the cooking cycle. To view the timer again press the TIME/SET CLOCK button
once and the kitchen timer will appear for ve seconds, then revert to the cooking countdown.
• To cancel the TIMER program press STOP/ECO button and the display shows the time.
• If a cooking cycle has been started, it is possible to start the kitchen timer by following the steps as above.
POWER SAVING FUNCTION
This feature allows power to be saved while the oven is not being used. To activate this feature while in the standby
mode, press and hold STOP/ECO button for 3 seconds, the display will turn o ; the oven will enter power saving
mode.
To cancel the power saving mode, press any button or open and close the oven door.

EN
EN – 18EN – 18
AUTO DEFROST
Auto Defrost allows you to defrost food by weight. The defrosting time and power level are automatically set once the
food category and the weight are programmed. The frozen food weight ranges from 200 to 1800g.
1. In the standby mode, press the AUTO DEFROST button.
2. Use the UP and DOWN buttons to select weight of food to be defrosted.
3. Press the START/QUICK START button to start the defrost cycle.
4. If oven stops during the defrosting cycle, turn the food over to ensure uniform defrosting and then press START/
QUICK START to defrost for the remaining time.
5. When a defrost cycle is completed, the display will show “End” and a tone will be heard every two minutes until a
button is pressed or the door is opened.
AUTO REHEAT
The oven allows you to reheat food based on the weight entered by user. The defrosting time and power level are
automatically set once the food category and the weight are programmed. The reheat weight ranges from 200 to
800g.
1. In standby mode, press the AUTO REHEAT button.
2. Using the UP and DOWN buttons to select weight of food to be reheated
3. Press START/QUICK START.
4. When the cooking cycle is completed, the display will show “End” and a tone will be heard every two minutes until
a button is pressed or the door is opened.
KITCHEN TIMER
The oven is equipped with a kitchen timer which will count down from the time set.
1. While in the standby mode, press TIME/SET CLOCK button once.
2. Using the 10 SECONDS, 1 MINUTE and 10 MINUTES to set desired time. The longest time is 95 minutes.
3. Press START/QUICK START button to con rm.
4. Display will count down from the set time.
5. When the display reaches zero, a tone will sound.
It is also possible to use the kitchen timer while in the cook mode. To do this follow the steps as outline above while
your food is cooking. Once the kitchen timer is activated, it will appear on the display for ve seconds, then the display
will revert to to the countdown timer for the cooking cycle. To view the timer again press the TIME/SET CLOCK button
once and the kitchen timer will appear for ve seconds, then revert to the cooking countdown.
• To cancel the TIMER program press STOP/ECO button and the display shows the time.
• If a cooking cycle has been started, it is possible to start the kitchen timer by following the steps as above.
POWER SAVING FUNCTION
This feature allows power to be saved while the oven is not being used. To activate this feature while in the standby
mode, press and hold STOP/ECO button for 3 seconds, the display will turn o ; the oven will enter power saving
mode.
To cancel the power saving mode, press any button or open and close the oven door.
EN – 19
EN – 19
MUTE FUNCTION
It is possible to mute any tones from the microwave using the mute function. To set mute function press CHILD LOCK
button once the display will show "oFF" for 5 seconds. While in the mute mode, there will be no sound when buttons
are pressed.
To turn o the mute function, press the CHILD LOCK button once; the display will shows "on" for 5 seconds to
indicate the sound has been turned back on.
If the mute function is set and the oven is disconnected from the mains supply, it will be canceled when the mains is
reconnected.
SAFETY LOCK
This is an automatic function to prevent unsupervised operation of the oven by children. While in the standby mode,
if there is no operation within one minute, the oven will automatically enter Safety lock mode and "Loc" will appear
in the display. In the lock state, all buttons are disabled. Press any button, lock indication appears on the display for 5
seconds to remind user to cancel the Safety lock.
To turn the safety lock o simply open and close the door to the microwave and the keypad will become active again
and the lock indicator light will turn o .
CHILD LOCK
To set the CHILD LOCK, press and hold the CHILD LOCK button for 3 seconds, a long beep will be heard and the
display will indicate “Loc”. The oven is now in the CHILD LOCK mode. While in this mode, the display will show the
clock, if any key is pressed or the door is opened, “Loc” will be seen for 5 seconds.
To cancel the CHILD LOCK, press and hold the CHILD LOCK button for 3 seconds until a long beep sound is heard.
AUTOMATIC PROTECTION MECHANISM
OVERHEATING PROTECTION – When the oven senses a high temperature the display will indicate "E01" and stop
operating. This can be canceled by pressing the STOP/ECO button.
LOW TEMPERATURE PROTECTION – When the oven enters the low temperature protection mode, the display will
indicate "E02" and stop operating. This can be canceled by pressing the STOP/ECO button.
SENSOR MALFUNCTION PROTECTION – When the oven senses an issue with one of the sensors "E03" will be
displayed and the oven will stop operating. In addition, the oven will emit a warning tone. This can be canceled by
pressing the STOP/ECO button.

EN – 20
EN – 20
CLEANING AND CARE
• Turn o the oven and unplug the power cord from the mains supply when cleaning.
• Keep the inside of the oven clean. When food splatters or spilled liquids adhere to oven sides, top base or turntable,
wipe with a damp cloth. Mild detergents may be used if the oven gets very dirty. Avoid using spray or other harsh
cleaners. They may stain, streak or dull the door surface.
• The outside of the oven should be cleaned with a damp cloth. To prevent damage to the operating parts inside the
oven, water should not be allowed to seep into the ventilation openings.
• Wipe the door and window on both sides, the door seals and adjacent parts frequently with a damp cloth to remove
any spills or spatters.
• Do not use abrasive cleaners.
• Do not steam cleaners.
• Do not allow the control panel to become wet. Clean with a soft, damp cloth. When cleaning the control panel, leave
oven door open to prevent oven from accidentally turning on.
• If steam accumulates inside or around the outside of the oven door, wipe with a soft cloth. This may occur when the
microwave oven is operated under high humidity condition. This is not a fault.
• The turntable should be cleaned regularly to avoid contamination and potential arcing/damage. Simply wipe the
bottom surface of the oven with mild detergent.
• Remove odors from your oven by combining a cup of water with the juice and skin of one lemon in a microwaveable
bowl. Microwave for 5 minutes. Wipe thoroughly and dry with a soft cloth.
• If the light bulb fails, please contact customer service for advice.
• The oven should be cleaned regularly and any food deposits should be removed. Failure to maintain the oven in
a clean condition could lead to deterioration of surface that could adversely a ect the life of the unit and could
possibly result in a hazardous situation.
• Please do not dispose of this appliance into the domestic rubbish bin; refer to your countries advice on disposal of
this type of product.

EN
EN – 20EN – 20
CLEANING AND CARE
• Turn o the oven and unplug the power cord from the mains supply when cleaning.
• Keep the inside of the oven clean. When food splatters or spilled liquids adhere to oven sides, top base or turntable,
wipe with a damp cloth. Mild detergents may be used if the oven gets very dirty. Avoid using spray or other harsh
cleaners. They may stain, streak or dull the door surface.
• The outside of the oven should be cleaned with a damp cloth. To prevent damage to the operating parts inside the
oven, water should not be allowed to seep into the ventilation openings.
• Wipe the door and window on both sides, the door seals and adjacent parts frequently with a damp cloth to remove
any spills or spatters.
• Do not use abrasive cleaners.
• Do not steam cleaners.
• Do not allow the control panel to become wet. Clean with a soft, damp cloth. When cleaning the control panel, leave
oven door open to prevent oven from accidentally turning on.
• If steam accumulates inside or around the outside of the oven door, wipe with a soft cloth. This may occur when the
microwave oven is operated under high humidity condition. This is not a fault.
• The turntable should be cleaned regularly to avoid contamination and potential arcing/damage. Simply wipe the
bottom surface of the oven with mild detergent.
• Remove odors from your oven by combining a cup of water with the juice and skin of one lemon in a microwaveable
bowl. Microwave for 5 minutes. Wipe thoroughly and dry with a soft cloth.
• If the light bulb fails, please contact customer service for advice.
• The oven should be cleaned regularly and any food deposits should be removed. Failure to maintain the oven in
a clean condition could lead to deterioration of surface that could adversely a ect the life of the unit and could
possibly result in a hazardous situation.
• Please do not dispose of this appliance into the domestic rubbish bin; refer to your countries advice on disposal of
this type of product.
EN – 21
EN – 21
SUITABLE OVENWARE
1. The ideal material for a microwave utensil is transparent to microwave, it allows energy to pass through the
container and heat the food.
2. Microwave cannot penetrate metal, so metal utensils or dishes with metallic trim should not be used.
3. Do not use recycled paper products when microwave cooking, as they may contain small metal fragments which
may cause sparks and/or res.
4. Round /oval dishes rather than square/oblong ones are recommend, as food in corners tends to overcook.
5. Narrow strips of aluminum foil may be used to prevent overcooking of exposed areas. But be careful don’t use too
much and keep a distance of 2.54 cm between foil and cavity
The list below is a general guide to help you select the correct utensils.
Cookware Microwave
Safe
Grill/
Convection Comment
Browning dishes /
Always follow the manufacturers instructions.
Do not exceed heating times given. Be very careful as these
dishes become very hot.
China and ceramics / Porcelain, pottery, glazed earthenware and bone china are
usually suitable, except for those with metallic decoration.
Heat–Resistant Glass Care should be taken to ensure that any glass cook ware is
suitable for use in a microwave oven.
Non Heat–Resistant Glass
Heat–Resistant Ceramics Ensure that any ceramic material is not too thick or in high in
mineral content.
Microwave–Safe Plastic Dish Always check that the plastic cook ware is suitable to be used in
a microwave oven.
Kitchen Paper / Only use kitchen paper which is recommended for use in
microwave ovens.
Glassware e.g. Pyrex® / Care should be taken if using ne glassware as it can break or
crack if heated suddenly.
Metal Tray It is not recommended to use metal cookware as it will arc,
which can lead to re.
Metal Rack It is not recommended to use metal cookware as it will arc,
which can lead to re.
Aluminium foil
Foil Containers /
Small pieces of aluminium foil can be used to shield food from
overheating. Keep foil at least 2.54 cm from the oven walls, as
arcing may occur.
Foil containers are not recommended unless speci ed by the
manufacturer, e.g. Microfoil®, follow instructions carefully.
Cling lm It should not touch the food and must be pierced to let the
steam escape.
Plastic/Polystyrene e.g fast food
containers
Care must be taken as some containers warp, melt or discolour
at high temperatures.
Freezer/Roasting bags Must be pierced to let steam escape. Ensure bags are suitable
for microwave use.
Paper - Plates, cups and kitchen
paper
Do not use plastic or metal ties, as they may melt or catch re
due to the metal ‘arcing’.
Straw and wooden Containers Only use for warming or to absorb moisture.
Care must be taken as overheating may cause re.
Recycled paper and newspaper
Always attend the oven when using these materials as
overheating may cause re.
May contain extracts of metal which will cause ‘arcing’ and may
lead to re.
WARNING: When heating food in plastic or paper containers, monitor the oven due to the possibility of
ignition.
NOTE: Do not leave your oven unattended while in use.

EN – 22
EN – 22
MICROWAVE COOKING ADVICE
Microwaves cook food faster than conventional cooking. It is therefore essential that certain techniques are followed
to ensure good results. Many of the following techniques are similar to those used in conventional cooking.
WARNING: Liquids and foods must not be heated in sealed containers or jars/containers with lids on, as
pressure will build up inside and may cause the jar/container to explode.
COOKING ADVICE NOTES:
• Always attend the oven when in use.
• Ensure that the utensils are suitable for use in a microwave oven.
• Only use microwave popcorn within the recommended packaging (follow the manufacturers instructions). Never
use oil unless speci ed by the manufacturer and never cook for longer than instructed.
WARNING: If you exceed recommended cooking times and use power levels that are too high, food
may overheat, burn and, in extreme circumstances, catch re and damage the oven.
Arrange
Place the thickest parts of food towards the outside of the dish. e.g. Chicken drumsticks.
Foods that are placed towards the outside of the dish will receive more energy, so cook quicker, than those in the
centre.
Cover
Certain foods bene t from being covered during microwave cooking.
Use vented microwave cling lm or a suitable lid.
Pierce
Foods with a shell, skin or membrane must be pierced in several places before cooking or reheating as steam will build
up and may cause food to explode. e.g. Potatoes, Fish, Chicken, Sausages.
NOTE: Eggs should not be heated using microwave power as they may explode, even after cooking has ended. e.g.
poached, fried, hard boiled.
Stir, turn and rearrange
For even cooking it is essential to stir, turn and rearrange food during cooking. Always stir and rearrange from the
outside towards the centre.
Stand
Standing time is necessary after cooking so it enables the heat to disperse equally throughout the food.

EN
EN – 22EN – 22
MICROWAVE COOKING ADVICE
Microwaves cook food faster than conventional cooking. It is therefore essential that certain techniques are followed
to ensure good results. Many of the following techniques are similar to those used in conventional cooking.
WARNING: Liquids and foods must not be heated in sealed containers or jars/containers with lids on, as
pressure will build up inside and may cause the jar/container to explode.
COOKING ADVICE NOTES:
• Always attend the oven when in use.
• Ensure that the utensils are suitable for use in a microwave oven.
• Only use microwave popcorn within the recommended packaging (follow the manufacturers instructions). Never
use oil unless speci ed by the manufacturer and never cook for longer than instructed.
WARNING: If you exceed recommended cooking times and use power levels that are too high, food
may overheat, burn and, in extreme circumstances, catch re and damage the oven.
Arrange
Place the thickest parts of food towards the outside of the dish. e.g. Chicken drumsticks.
Foods that are placed towards the outside of the dish will receive more energy, so cook quicker, than those in the
centre.
Cover
Certain foods bene t from being covered during microwave cooking.
Use vented microwave cling lm or a suitable lid.
Pierce
Foods with a shell, skin or membrane must be pierced in several places before cooking or reheating as steam will build
up and may cause food to explode. e.g. Potatoes, Fish, Chicken, Sausages.
NOTE: Eggs should not be heated using microwave power as they may explode, even after cooking has ended. e.g.
poached, fried, hard boiled.
Stir, turn and rearrange
For even cooking it is essential to stir, turn and rearrange food during cooking. Always stir and rearrange from the
outside towards the centre.
Stand
Standing time is necessary after cooking so it enables the heat to disperse equally throughout the food.
EN – 23
EN – 23
Food Characteristics
Composition Foods high in fat or sugar (e.g. Christmas pudding, mince pies) require less heating time.
Care should be taken as overheating can lead to re.
Bones in food conduct heat, making the food cook more quickly. Care must be taken so
that the food is cooked evenly.
Density Food density will a ect the amount of cooking time needed.
Light porous foods, such as cakes or bread, cook more quickly than heavy, dense foods,
such as roasts and casseroles.
Quantity The number of microwaves in your oven remains the same regardless of how much food
is being cooked. The cooking time must be increased as the amount of food placed in
the oven increases.
e.g. Four potatoes will take longer to cook than two.
Size Small foods and small pieces cook faster than large ones, as microwaves can penetrate
from all sides to the centre. For even cooking make all the pieces the same size.
Shape Foods which are irregular in shape, such as chicken breasts or drumsticks, take longer to
cook in the thicker parts. For even cooking, place the thickest parts to the outside of the
dish where they will receive more energy.
Round shapes cook more evenly than square shapes when microwave cooking.
Temperature of food The initial temperature of food a ects the amount of cooking time needed.
Chilled foods will take longer to cook than food at room temperature.
The temperature of the container is not a true indication of the temperature of the food
or drink. Cut into foods with llings, for example jam doughnuts, to release heat or
steam.
WARNING: Face and Hands: Always use oven gloves to remove food or cookware from the oven. Stand
back when opening the oven door to allow heat or steam to disperse. When removing
covers (such as cling lm), opening roasting bags or popcorn packaging, direct steam away
from face and hands.
WARNING: Check the temperature of food and drink, stir before serving. Take special care when
serving to babies, children or the elderly. The contents of feeding bottles and baby food
jars are to be stirred or shaken and the temperature is to be checked before consumption
to avoid burns.

EN – 24
EN – 24
DEFROSTING ADVICE
Using your microwave oven is the quickest defrosting method. It is a simple process but the following instructions are
essential to ensure the food is thoroughly defrosted.
• Remove all packaging and wrapping before defrosting.
• To defrost food, use microwave power levels P-20 to P-40.
• Please refer to the further information below.
Rearrange
Foods that are placed towards the outside of the dish will defrost quicker than foods in the centre. It is therefore
essential that the food is rearranged up to 4 times during defrosting.
Move closely packed pieces from the outside to the centre and rearrange over-lapping areas.
This will ensure that all parts of the food defrosts evenly.
Separate
Foods may be stuck together when removed from the freezer. It is important to separate foods as soon as it is possible
during defrosting.
e.g. bacon rashers, chicken llets.
Shield
Some areas of food being defrosted may become warm. To prevent them becoming warmer and starting to cook,
these areas can be shielded with small pieces of foil, which re ect microwaves, e.g. legs and wings on a chicken.
Stand
Standing time is necessary to ensure food is thoroughly defrosted.
Defrosting is not complete once the food is removed from the microwave oven. Food must stand, covered, for a
length of time to ensure the centre has completely defrosted.
Turn over
It is essential that all foods are turned over up to 4 times during defrosting.
This is important to ensure thorough defrosting.

EN
EN – 24EN – 24
DEFROSTING ADVICE
Using your microwave oven is the quickest defrosting method. It is a simple process but the following instructions are
essential to ensure the food is thoroughly defrosted.
• Remove all packaging and wrapping before defrosting.
• To defrost food, use microwave power levels P-20 to P-40.
• Please refer to the further information below.
Rearrange
Foods that are placed towards the outside of the dish will defrost quicker than foods in the centre. It is therefore
essential that the food is rearranged up to 4 times during defrosting.
Move closely packed pieces from the outside to the centre and rearrange over-lapping areas.
This will ensure that all parts of the food defrosts evenly.
Separate
Foods may be stuck together when removed from the freezer. It is important to separate foods as soon as it is possible
during defrosting.
e.g. bacon rashers, chicken llets.
Shield
Some areas of food being defrosted may become warm. To prevent them becoming warmer and starting to cook,
these areas can be shielded with small pieces of foil, which re ect microwaves, e.g. legs and wings on a chicken.
Stand
Standing time is necessary to ensure food is thoroughly defrosted.
Defrosting is not complete once the food is removed from the microwave oven. Food must stand, covered, for a
length of time to ensure the centre has completely defrosted.
Turn over
It is essential that all foods are turned over up to 4 times during defrosting.
This is important to ensure thorough defrosting.
EN – 25
EN – 25
REHEATING ADVICE
For the reheating of foods, follow the advice and guidelines below to ensure food is thoroughly reheated before
serving.
Plated meals
Remove any poultry or meat portions, reheat these separately, see below.
Place smaller items of food to the centre of the plate, larger and thicker foods to the edge. Cover with vented
microwave cling lm and reheat on power level P-50, stir/rearrange halfway through reheating.
NOTE: Ensure the food is thoroughly reheated before serving.
Sliced meat
Cover with vented microwave cling lm and reheat on power level P-60. Rearrange at least once to ensure even
reheating.
NOTE: Ensure the meat is thoroughly reheated before serving.
Poultry portions
Place thickest parts of the portions to the outside of the dish, cover with vented microwave cling lm and reheat on
power level P-70.
Turn over halfway through reheating.
NOTE: Ensure the poultry is thoroughly reheated before serving.
Casseroles
Cover with vented microwave cling lm or a suitable lid and reheat on power level P-50.
Stir frequently to ensure even reheating.
NOTE: Ensure the food is thoroughly reheated before serving.
To achieve the best results when reheating, select a suitable microwave power level appropriate to the type of food.
e.g. A bowl of vegetables can be reheated using power level P-100, while a lasagne which contains ingredients that
cannot be stirred, should be reheated using power level P-40.
NOTES:
• Remove food from foil or metal containers before reheating.
• Reheating times will be a ected by the shape, depth, quantity and temperature of food together with the size,
shape and material of the container.
WARNING: Never heat liquids in narrow-necked containers, as this could result in the contents erupting
from the container and may cause burns.
• To avoid overheating and re, special care must be taken when reheating foods with a high sugar or fat content, e.g.
mince pies or Christmas pudding.
• Never heat oil or fat for deep frying as this may lead to overheating and re.
• Canned potatoes should not be heated in the microwave oven, follow the manufacturer’s instructions on the can.
WARNING: The contents of feeding bottles and baby food jars are to be stirred or shaken and the
temperature is to be checked before consumption to avoid burns.

EN – 26
EN – 26
TROUBLESHOOTING
If you think the oven is not working properly there are some simple checks you can carry out yourself before calling an
engineer. This will help prevent unnecessary service calls if the fault is something simple.
Follow this simple check below:
Place half a cup of water on the turntable and close the door. Set the timer know to cook for 1 minute using
microwave power level of P-100.
1. Does the oven lamp come on when it is cooking?
2. Does the cooling fan work? (Check by placing your hand above the air vent openings).
3. After 1 minute does the audible signal sound?
4. Is the water in the cup hot?
If you answer “NO” to any question rst check that the oven is plugged in properly and the fuse has not blown. If
there is no fault with either, check against the troubleshooting chart below.
WARNING: Never adjust, repair or modify the oven yourself. It is hazardous for anyone other than a
SHARP trained engineer to carry out servicing or repairs. This is important as it may involve
the removal of covers that provide protection against microwave energy.
• The door seal stops microwave leakage during oven operation, but does not form an airtight seal. It is normal to see
drops of water, light or feel warm air around the oven door. Food with a high moisture content will release steam
and cause condensation inside the door which may drip from the oven.
• Repairs and Modi cations: Do not attempt to repair, modify or operate the oven if it is not working properly.
• Outer Cabinet and Lamp Access: Never remove the outer cabinet. This is very dangerous due to high voltage parts
inside which must never be touched, as this could be fatal.
Your oven is not tted with a lamp access cover. If the lamp fails, do not attempt to replace the lamp yourself, call a
SHARP approved service facility.
TROUBLESHOOTING CHART
QUERY ANSWER
Draught circulates around
the door.
When the oven is working, air circulates within the cavity.
The door does not form an airtight seal so air may escape from the door.
Condensation forms in the
oven, and may drip from the
door.
The oven cavity will normally be colder than the food being cooked, and so steam
produced when cooking will condense on the colder surface.
The amount of steam produced depends on the water content of the food being
cooked. Some foods, such as potatoes have a high moisture content.
Condensation trapped in the door glass should clear after a few hours.
Flashing or arcing from within
the cavity when cooking.
Arcing will occur when a metallic object comes into close proximity to the oven
cavity during cooking. This may possibly roughen the surface of the cavity, but
would not otherwise damage the oven.
Arcing potatoes. Ensure all “eyes” are removed from the potatoes and that they have been pierced,
place directly onto the turntable in a heat resistant an dish or similar.
Oven does not work when
the START/QUICK START
button is pressed.
Check the door is closed properly.
Oven cooks too slowly. Ensure correct power level has been selected.
Oven makes a noise. The microwave energy pulses ON and OFF during cooking/defrosting.
Bleep is heard from the oven every minute and the display indicates "Fail"
If the control panel buttons are pressed continuously for more than 1 minute this
error will occur.
Outer cabinet is hot. The cabinet may become warm to the touch - keep children away.

EN
EN – 26EN – 26
TROUBLESHOOTING
If you think the oven is not working properly there are some simple checks you can carry out yourself before calling an
engineer. This will help prevent unnecessary service calls if the fault is something simple.
Follow this simple check below:
Place half a cup of water on the turntable and close the door. Set the timer know to cook for 1 minute using
microwave power level of P-100.
1. Does the oven lamp come on when it is cooking?
2. Does the cooling fan work? (Check by placing your hand above the air vent openings).
3. After 1 minute does the audible signal sound?
4. Is the water in the cup hot?
If you answer “NO” to any question rst check that the oven is plugged in properly and the fuse has not blown. If
there is no fault with either, check against the troubleshooting chart below.
WARNING: Never adjust, repair or modify the oven yourself. It is hazardous for anyone other than a
SHARP trained engineer to carry out servicing or repairs. This is important as it may involve
the removal of covers that provide protection against microwave energy.
• The door seal stops microwave leakage during oven operation, but does not form an airtight seal. It is normal to see
drops of water, light or feel warm air around the oven door. Food with a high moisture content will release steam
and cause condensation inside the door which may drip from the oven.
• Repairs and Modi cations: Do not attempt to repair, modify or operate the oven if it is not working properly.
• Outer Cabinet and Lamp Access: Never remove the outer cabinet. This is very dangerous due to high voltage parts
inside which must never be touched, as this could be fatal.
Your oven is not tted with a lamp access cover. If the lamp fails, do not attempt to replace the lamp yourself, call a
SHARP approved service facility.
TROUBLESHOOTING CHART
QUERY ANSWER
Draught circulates around
the door.
When the oven is working, air circulates within the cavity.
The door does not form an airtight seal so air may escape from the door.
Condensation forms in the
oven, and may drip from the
door.
The oven cavity will normally be colder than the food being cooked, and so steam
produced when cooking will condense on the colder surface.
The amount of steam produced depends on the water content of the food being
cooked. Some foods, such as potatoes have a high moisture content.
Condensation trapped in the door glass should clear after a few hours.
Flashing or arcing from within
the cavity when cooking.
Arcing will occur when a metallic object comes into close proximity to the oven
cavity during cooking. This may possibly roughen the surface of the cavity, but
would not otherwise damage the oven.
Arcing potatoes. Ensure all “eyes” are removed from the potatoes and that they have been pierced,
place directly onto the turntable in a heat resistant an dish or similar.
Oven does not work when
the START/QUICK START
button is pressed.
Check the door is closed properly.
Oven cooks too slowly. Ensure correct power level has been selected.
Oven makes a noise. The microwave energy pulses ON and OFF during cooking/defrosting.
Bleep is heard from the oven every minute and the display indicates "Fail"
If the control panel buttons are pressed continuously for more than 1 minute this
error will occur.
Outer cabinet is hot. The cabinet may become warm to the touch - keep children away.
EN – 27
EN – 27
STICKING BUTTON PROTECTION
In any state, if any button on the control panel is stuck for more than1 minute, the program stops working
immediately and the display shows "FAIL". The microwave will emit a bleep. If the button keeps sticking, bleep will
sound every one minute. After troubleshooting, press STOP/ECO button to return to standby mode.
BEFORE CALLING FOR ASSISTANCE
Before asking for service, please check each item below:
• Check to ensure that the oven is plugged in securely. If it is not, remove the plug from the outlet, wait 10 seconds,
and plug it in again securely.
• Check for a blown circuit fuse or a tripped main circuit breaker. If these seem to be operating properly, test the
outlet with another appliance.
• Check to ensure that the power and timer knobs are set correctly.
• Check to ensure that the door is securely closed engaging the door safety lock system. Otherwise, the microwave
energy will not ow into the oven
IF NONE OF THE ABOVE RECTIFIES THE SITUATION, THEN CONTACT A QUALIFIED TECHNICIAN. DO NOT TRY TO ADJUST
OR REPAIR THE OVEN YOURSELF.

DE – 1
DE – 1
Achtung:
Ihr Produkt ist
mit diesem
Symbol gekenn-
zeichnet. Dies
bedeutet, dass
Elektro-Altge-
räte nicht mit
dem allgemei-
nen Hausmüll
vermischt
werden dürfen.
Es gibt ein sepa-
rates Sammel-
system für diese
Produkte.
Serviceleistungen nden Sie unter www.sharpconsumer.com/contact/, Ihre Garantierechte unter
www.sharpconsumer.com/support/ oder bei dem Händler, bei dem Sie das Produkt erworben haben.
Konformitätserklärungen nden Sie unter www.sharpconsumer.com/documents-of-conformity/
www.sharpconsumer.com/
support/
www.sharpconsumer.com/
documents-of-conformity/
www.sharpconsumer.com/
contact/
A. Entsorgungsinformationen
(für private Haushalte)
1. In der EU
Achtung: Bitte entsorgen Sie das Gerät nicht über den Hausmüll!
Elektro-Altgeräte müssen getrennt vom übrigen Abfall und gemäß den gültigen
gesetzlichen Vorschriften zur Entsorgung und zum Recycling elektrischer und
elektronischer Altgeräte behandelt werden.
Gemäß der Umsetzung der Altgeräterichtlinie seitens der Mitgliedsstaaten können
Privathaushalte in der Europäischen Union ihre elektrischen und elektronischen
Altgeräte an dafür vorgesehenen Entsorgungsstellen kostenlos abgeben.
In einigen Ländern* kann auch Ihr örtlicher Händler Ihr Altgerät kostenlos
entgegennehmen, wenn Sie ein vergleichbares Neugerät kaufen.
*) Kontaktieren Sie hierfür bitte Ihre örtlichen Behörden.
Wenn Ihr Elektroaltgerät Batterien oder Akkus enthält, sollten Sie diese vorher
getrennt entsorgen, gemäß den örtlichen Anforderungen. Wenn Sie dieses
Produkt korrekt entsorgen, tragen Sie zu einer korrekten Schadsto behandlung
und zu einem e zienten Recycling und im Ende ekt zum Umweltschutz und zur
Verhinderung von eventuellen Gesundheitsrisiken bei.
Informationen gültig für Deutschland
Altgeräte sind getrennt zu sammeln und zu entsorgen. Besitzer von Altgeräten
tragen damit zur sicheren Entsorgung bei und helfen, mögliche umwelt- oder
gesundheitsschädliche Folgen zu vermeiden.
Entnehmbare Lampen, die zerstörungsfrei zu entnehmen sind, sind vor der
Entsorgung zu entfernen und getrennt zu behandeln.
Informationen über gescha ene Sammel- bzw. Rückgabemöglichkeiten sowie
die Verp ichtungen des Handels/der Vertreiber gegenüber Endnutzern zur
kostenfreien Rücknahme von Altgeräten nden Sie auf der lokalen Website des
Herstellers des Produktes (www.sharpconsumer.eu), oder wenden Sie sich an den
Händler, von dem das Produkt bezogen wurde.
Die Verantwortung für das Löschen von personenbezogenen Daten, die sich auf
dem zu entsorgenden Gerät be nden, liegt beim Endnutzer.
Das Symbol mit der durchgestrichenen Mülltonne weist darauf hin, dass Produkte
und/oder Verpackungen getrennt vom Hausmüll gesammelt und entsorgt werden
müssen. Der schwarze Balken zeigt an, dass das Produkt nach dem 13. August 2005
auf den Markt gebracht wurde.
2. In Nicht-EU-Ländern
Bitte kontaktieren Sie Ihre örtlichen Behörden für mehr Informationen über die
korrekte Entsorgung Ihres Produkts.
Für die Schweiz: Gebrauchte elektrische und elektronische Geräte können beim
Händler kostenlos abgegeben werden, auch wenn kein neues Produkt gekauft
wird. Weitere Einrichtungen zur Entsorgung nden Sie auf der Homepage von
www.swico.ch oder www.sens.ch.
B. Entsorgungsinformationen für gewerbliche Nutzer
1. In der EU
Wenn das Produkt für gewerbliche Zwecke benutzt wurde und Sie es entsorgen
möchten:
Kontaktieren Sie bitte Ihren SHARP-Händler, der Sie über die Zurücknahme
des Produkts informieren wird. Es könnten Ihnen dabei Rücknahme- und
Recyclingkosten in Rechnung gestellt werden. Kleine Produkte (und kleine
Mengen) werden möglicherweise auch von ihrem örtlichen Recyclinghof
entgegengenommen.
In Spanien: Kontaktieren Sie bitte ihr örtliches Entsorgungsunternehmen oder die
örtlichen Behörden, um mehr über die Entsorgung Ihrer Altgeräte zu erfahren.
2. In Nicht-EU-Ländern
Bitte kontaktieren sie Ihre örtlichen Behörden für mehr Informationen über die
korrekte Entsorgung Ihres Produkts.

DE
DE – 2
DE – 2
VORSICHTSMASSNAHMEN ZUR VERMEIDUNG EINER MÖGLICHEN
EXPOSITION GEGENÜBER MIKROWELLENENERGIE
1. Betreiben Sie diesen Ofen nicht mit geö neter Tür. Dies kann zu einer schädlichen Exposition gegenüber
Mikrowellenenergie führen. Es ist wichtig, dass Sie die Sicherheitsverriegelungen nicht umgehen oder
manipulieren.
2. Stecken Sie keine Gegenstände zwischen die Vorderseite des Ofens und die Tür und achten Sie darauf, dass sich
kein Schmutz und keine Reinigungsmittelreste auf den Dicht ächen ansammeln.
3. Bedienen Sie den Ofen nicht, wenn dieser beschädigt ist. Es ist besonders wichtig, dass die Gerätetür richtig
schließt und dass die Tür, Scharniere, Schlösser oder Türdichtungen und Dicht ächen unbeschädigt sind.
4. Sie sollten nicht versuchen, den Ofen zu reparieren oder zu verstellen.
INHALTSVERZEICHNIS
WICHTIGE SICHERHEITSHINWEISE................................................................................................................................................................... 3
EINBAU ....................................................................................................................................................................................................................12
FUNKSTÖRUNG ....................................................................................................................................................................................................13
ANWEISUNGEN ZUR ERDUNG ........................................................................................................................................................................13
TECHNISCHE DATEN ........................................................................................................................................................................................... 13
GERÄT UND ZUBEHÖR ....................................................................................................................................................................................... 14
BEDIENFELD ..........................................................................................................................................................................................................15
VORBEREITUNG .................................................................................................................................................................................................... 15
EINSTELLEN DER UHR ........................................................................................................................................................................................15
GAREN MIT DER MIKROWELLE ........................................................................................................................................................................16
SCHNELLSTART ..................................................................................................................................................................................................... 16
GRILLEN ...................................................................................................................................................................................................................17
MIKROWELLE + GRILL ........................................................................................................................................................................................17
HEISSLUFT .............................................................................................................................................................................................................. 18
MIKROWELLE + HEISSLUFT ..............................................................................................................................................................................18
AUTO-MENÜ .......................................................................................................................................................................................................... 19
AUTO DEFROST (AUTOMATISCHES AUFTAUEN) .......................................................................................................................................20
AUTOMATISCHES AUFWÄRMEN .....................................................................................................................................................................20
KÜCHENTIMER ...................................................................................................................................................................................................... 20
ENERGIESPARFUNKTION ................................................................................................................................................................................... 20
STUMM-FUNKTION ............................................................................................................................................................................................. 21
SICHERHEITSVERRIEGELUNG ........................................................................................................................................................................... 21
KINDERSICHERUNG:............................................................................................................................................................................................21
AUTOMATISCHER SCHUTZMECHANISMUS ................................................................................................................................................ 21
REINIGUNG UND WARTUNG ............................................................................................................................................................................ 22
PASSENDES OFENGESCHIRR ............................................................................................................................................................................23
MIKROWELLENGARTIPPS ..................................................................................................................................................................................24
AUFTAU-TIPPS ....................................................................................................................................................................................................... 26
AUFWÄRM-TIPPS .................................................................................................................................................................................................. 27
FEHLERBEHEBUNG .............................................................................................................................................................................................. 28
SCHUTZ VOR KLEMMENDEN TASTEN ........................................................................................................................................................... 29
EHE SIE UNTERSTÜTZUNG ANFORDERN ..................................................................................................................................................... 29

DE – 3
DE – 3
WICHTIGE SICHERHEITSHINWEISE
BITTE SORGFÄLTIG DURCHLESEN UND ZUM SPÄTEREN
NACHSCHLAGEN AUFBEWAHREN
Um die Gefahr eines Brandes auszuschließen. Mikrowel-
lengeräte sollten während des Betriebs nicht unbeaufsich-
tigt gelassen werden. Zu hohe Leistungsstufen oder zu
lange Garzeiten können das Gargut überhitzen und Feuer
verursachen.
Dieses Gerät ist nur für den Einsatz auf einer Arbeits äche vor-
gesehen. Es ist nicht für den Einbau in einem Küchenschrank
konzipiert. Das Gerät nicht in einen Schrank stellen. Die Steck-
dose muss ständig zugänglich sein, sodass der Netzstecker im
Notfall einfach abgezogen werden kann.
Die Netzspannung muss 230-240 V Wechselstrom, 50 Hz betra-
gen und sollte mit einer Sicherung von mindestens 10 A oder
einem Sicherungsautomaten von mindestens 10 A ausgestattet
sein. Ein getrennter, nur dem Betrieb dieses Geräts dienender
Stromkreis sollte vorgesehen werden.
Stellen Sie das Gerät nicht an einem Ort auf, an dem Hitze ge-
neriert wird, z. B. neben einem konventionellen Herd.
Das Gerät nicht an Orten aufstellen, an denen hohe Luftfeuch-
tigkeit vorhanden ist oder sich Kondenswasser bilden kann.
Das Gerät nicht im Freien aufbewahren oder aufstellen. Das
Gerät nicht im Freien aufbewahren oder aufstellen.
Wird Rauch festgestellt, ist das Gerät sofort auszuschalten
oder der Netzstecker abzuziehen und die Tür geschlossen
zu halten, damit eventuelle Flammen erstickt werden.
Nur mikrowellengeeignetes Geschirr verwenden. Geschirr
sollte überprüft werden, ob es für Mikrowellengeräte ge-
eignet ist.
Beim Erhitzen von Lebensmitteln in Plastik- oder Papier-

DE
DE – 4
DE – 4
behältern müssen Sie das Gerät überwachen, da sich diese
entzünden könnten.
Reinigen Sie die Abdeckung des Hohlleiters und den Gar-
raum. Sie müssen trocken und frei von Fett sein. Angesam-
meltes Fett könnte sich überhitzen, zu rauchen anfangen
oder Feuer fangen.
Keine brennbaren Materialien in der Nähe desGerätes oder
den Lüftungsö nungen aufbewahren. Niemals die Lüftungsö -
nungen blockieren.
Alle Metallverschlüsse, Drähte usw. von Lebensmitteln und Ver-
packungen entfernen. Funkenbildung auf Metallober ächen
kann zu Feuer führen.
Das Mikrowellengerät nicht zum Frittierenvon Lebensmitteln
in Öl oder Fett verwenden.Die Temperatur kann nicht kontrol-
liert werden und das Fett kann sich entzünden.
Zum Herstellen von Popcorn sollte nur fürMikrowellengeräte
vorgesehenes Popcorn-Geschirr verwendet werden.
Keine Lebensmittel oder andere Gegenstände im Gerät lagern.
Die Einstellungen nach dem Starten des Gerätes überprüfen,
um sicherzustellen, dass das Gerät wie gewünscht arbeitet.
Lassen Sie den Ofen beim Betrieb nicht unbeaufsichtigt.
Zur Vermeidung von Überhitzung und Feuer sollte besonders
vorsichtig vorgegangen werden, wenn Lebensmittel mit einem
besonders hohen Zucker- oder Fettgehalt gegart oder aufge-
wärmt werden, wie z.B. Würstchen, Kuchen oder weihnachtli-
che Süßspeisen. Beachten Sie die entsprechenden Hinweise in
dieser Bedienungsanleitung.
Zur Vermeidung von Verletzungen. WARNUNG:
Das Gerät nicht betreiben, wenn es beschädigt ist oder Fehl-
funktionen aufweist. Überprüfen Sie vor dem Betrieb die
folgenden Punkte:

DE – 5
DE – 5
a) Vergewissern Sie sich, dass die Tür einwandfrei schließt
und dass sie nicht falsch ausgerichtet oder verzogen ist.
b) Vergewissern Sie sich, dass die Scharniere und Verriegelun-
gen der Sicherheitstüren nicht beschädigt oder lose sind.
c) Vergewissern Sie sich, dass die Türdichtungen und Dich-
tungsober ächen nicht beschädigt sind.
d) Vergewissern Sie sich, dass sich im Garraum und an der
Tür keine Dellen oder andere Beschädigungen vorhanden
sind.
e) Vergewissern Sie sich, dass das Netzkabel und der Stecker
nicht beschädigt sind.
Falls die Tür bzw. die Türdichtungen beschädigt sind, darf das
Gerät nicht weiter betrieben werden, bevor es durch eine
kompetente Person repariert wurde.
Nehmen Sie unter keinen Umständen Reparaturen oder
Änderungen an Ihrem Mikrowellengerät selbst vor. Repa-
raturen, insbesondere solche, bei denen die Abdeckung
des Geräts entfernt werden muss, dürfen ausschließlich
von entsprechend quali zierten Technikern vorgenom-
men werden.
Das Gerät nicht mit geö neter Türe betreiben oder verändern
Sie die Türsicherheitsverriegelung in keiner Weise. Gerät nicht
betreiben, wenn sich ein Objekt zwischen den Türdichtungen
und den Dichtungsober ächen be ndet.
Vermeiden Sie die Bildung von Schmutz oder Fett an
Türdichtungen und angrenzenden Teilen. Reinigen Sie
das Gerät in regelmäßigen Abständen und entfernen Sie
Lebensmittelrückstände.
Befolgen Sie die Hinweise im Kapitel „Reinigung und
P ege“. Wird das Gerät nicht in einem sauberen Zustand
gehalten, kann dies zu einer Beschädigung der Ober äche
führen, was die Gebrauchsdauer des Gerätes nachteilig

DE
DE – 6
DE – 6
beein ussen und möglicherweise zu einer Gefahrensitua-
tion führen kann.
Personen mit HERZSCHRITTMACHERN sollten ihren Arzt oder
den Hersteller des Herzschrittmachers nach Vorsichtsmaßnah-
men beim Umgang mit Mikrowellengeräten befragen.
Zur Vermeidung von Elektroschocks.
• Unter keinen Umständen sollte das äußere Gehäuse ent-
fernt werden.
• Niemals Flüssigkeiten in die Ö nungen der Türsicherheits-
verriegelung oder Lüftungsö nungen eintreten lassen, fer-
ner keine Gegenstände in diese Ö nungen stecken. Wenn
größere Mengen Flüssigkeiten verschüttet werden, das
Gerät sofort ausschalten, den Netzstecker ziehen und den
SHARP-Kundendienst kontaktieren.
• Niemals das Netzkabel bzw. den Netzstecker in Wasser oder
andere Flüssigkeiten tauchen.
• Das Netzkabel nicht über scharfe Kanten eines Tisches oder
eine Arbeitsplatte führen.
• Das Netzkabel von erwärmten Ober ächen, einschließlich
der Geräterückseite, fernhalten.
• Das Gerät und Kabel von Kindern unter 8 Jahren fernhalten.
• Auf keinen Fall versuchen, die Garraumlampe selbst auszu-
wechseln, sondern nur von einem von SHARP autorisierten
Elektriker auswechseln lassen! Wenn die Garraumlampe aus-
fallen sollte, wenden Sie sich bitte an Ihren Elektrohändler
oder eine von SHARP autorisierte Kundendienststelle.
• Wenn das Netzkabel beschädigt wird, muss es von einem
autorisierten Servicetechniker von SHARP ersetzt werden.
WARNUNG: Speisen in üssiger und anderer Form dürfen
nicht in verschlossenen Gefäßen erhitzt werden, da diese
explodieren könnten. Die Erhitzung von Getränken durch
Mikrowellen kann verspätetes Aufwallen verursachen. Bei
der Handhabung der Gefäße ist daher Vorsicht geboten.

DE – 7
DE – 7
Zur Vermeidung von Explosionen und plötzlichem Sieden:
Benutzen Sie niemals verschlossene Behälter. Verschlüsse und
Abdeckungen müssen entfernt werden. Verschlossene Behälter
können durch den Druckanstieg selbst nach dem Ausschalten
des Gerätes noch explodieren. Seien Sie beim Erhitzen von
Flüssigkeiten vorsichtig. Verwenden Sie Behälter mit einer gro-
ßen Ö nung, damit entstehende Blasen entweichen können.
Niemals Flüssigkeiten in schmalen, hohen Gefäßen (z. B.
Saug aschen) erhitzen, da der Inhalt herausspritzen kann
und es zu Verbrennungen kommen könnte.
Vermeiden von plötzlichem Überkochen und möglichen Ver-
brühungen:
1. Stellen Sie keine extrem langen Garzeiten ein.
2. Die Flüssigkeiten vor dem Garen/Erhitzen umrühren.
3. Es wird empfohlen, während des erneuten Erhitzens einen
Glasstab oder einen ähnlichen Gegenstand (kein Metall) in
den Behälter zu stellen.
4. Nach dem Erhitzen die Flüssigkeiten noch mindestens 20
Sekunden im Gerät stehen lassen, um verspätetes Aufwallen
durch Siedeverzug zu verhindern.
Eier nicht mit der Schale kochen. Hartgekochte Eier dür-
fen nicht in Mikrowellengeräten erwärmt werden, da sie
selbst nach der Erwärmung explodieren können. Zum
Garen oder Aufwärmen von Eiern, die nicht verquirlt oder
verrührt wurden, das Eigelb und Eiweiß anstechen. Vor
dem Aufwärmen im Mikrowellengerät die Schale von ge-
kochten Eiern entfernen und die Eier in Scheiben schnei-
den.
Die Schale von Lebensmitteln, wie z.B. Karto eln, Würstchen
oder Obst, vor dem Garen anstechen, damit der Dampf entwei-
chen kann.

DE
DE – 8
DE – 8
Der Inhalt von Saug aschen und Baby-Nahrungsbehält-
nissen muss vor dem Gebrauch geschüttelt bzw. gerührt
und die Temperatur muss vor dem Verzehr geprüft wer-
den, um Verbrennungen zu vermeiden. Bei der Entnahme
von Gargut aus dem Garraum sollten Top appen oder
Ofenhandschuhe verwendet werden. Zur Vermeidung von
Verbrennungen:
• Behälter, Popcorngeschirr, Kochbeutel, usw. immer vom Ge-
sicht und den Händen abgewandt ö nen, um Verbrennun-
gen durch Dampf und plötzliches Sieden zu vermeiden. Um
Verbrennungen zu vermeiden, immer die Lebensmitteltem-
peratur prüfen und umrühren, bevor Sie die Speisen servie-
ren. Besondere Vorsicht ist geboten, wenn die Lebensmittel
oder Getränke für Babys, Kinder oder alte Menschen ge-
dacht sind. Zugängliche Teile können während des Betriebs
heiß werden. Halten Sie Kinder deshalb von ihnen fern.
• Die Temperatur des Behälters ist kein Hinweis auf die tat-
sächliche Temperatur des Lebensmittels oder Getränks;
immer die Temperatur prüfen.
• Halten Sie beim Ö nen der Gerätetür ausreichenden Ab-
stand, um Verbrennungen durch austretende Hitze oder
Dampf zu vermeiden.
• Schneiden Sie gefüllte und gebackene Speisen nach dem
Garen in Scheiben, um den Dampf entweichen zu lassen
und Verbrennungen zu vermeiden.
• Kinder von der Tür fernhalten, um Verbrennungen zu ver-
meiden.
WARNUNG: Erlauben Sie Kindern über 8Jahren die Nut-
zung des Gerätes ohne Aufsicht nur, wenn ausreichende
Anweisungen gegeben wurden, sodass das Kind in der
Lage ist, das Gerät auf eine sichere Weise zu bedienen und
die Gefahren eines unsachgemäßen Gebrauchs versteht.
Wenn das Gerät in den Modi GRILL, MIX GRILL, KONVEK-

DE – 9
DE – 9
TION, MIX-KONVEKTION und AUTO-MENÜ betrieben wird
(Modus gilt je nach Modell), sollten Kinder das Gerät we-
gen der hohen Temperaturen nur unter Aufsicht von Er-
wachsenen betreiben.
Dieses Gerät ist nicht für die Verwendung durch Personen
(einschließlich Kinder) mit eingeschränkten physischen,
sensorischen oder geistigen Fähigkeiten, oder Mangel an
Erfahrung und Wissen bestimmt, sofern sie keine ange-
messene Aufsicht oder ausführliche Anleitung zur Benut-
zung des Geräts durch eine verantwortliche Person für
ihre Sicherheit erhalten haben.
Kinder sollten beaufsichtigt werden, um sicherzustellen,
dass sie nicht mit dem Gerät spielen. Die Reinigung durch
Kinder sollte überwacht werden.
Modelle mit elektronischem Touchscreen haben einen
Kindersicherungsmodus.
Nicht an die Gerätetür lehnen oder hängen. Nicht mit dem Ge-
rät spielen, oder es als Spielzeug verwenden.
Kinder sollten mit allen wichtigen Sicherheitshinweisen ver-
traut gemacht werden, wie z. B. Verwendung von Top appen
und vorsichtiges Abnehmen von Deckeln. Beachten Sie be-
sonders Verpackungen, die Lebensmittel knusprig halten (z. B.
selbstbräunende Materialien), da diese besonders heiß werden.
Sonstige Warnungen
Niemals das Gerät in irgendeiner Weise modi zieren.
Das Gerät während des Betriebs nicht bewegen.
Dieses Gerät ist für den Einsatz im Haushalt bestimmt. Dieses
Gerät ist nur für den Hausgebrauch und darf nur zum Garen
von Lebensmitteln und das Erwärmen von Getränken verwen-
det werden. Das Trocknen von Lebensmitteln oder Kleidung
und das Erwärmen von Heizkissen, Panto eln, Schwämmen,

DE
DE – 10
DE – 10
feuchten Tüchern und dergleichen kann zu Verletzungs-, Ent-
zündungs- oder Brandgefahr führen. Es eignet sich nicht für
gewerbliche Zwecke oder den Gebrauch in einem Labor.
Zur Vermeidung von Fehlfunktionen und Beschädigungen
dieses Gerätes.
Das Gerät darf niemals im leeren Zustand betrieben werden.
Bei der Verwendung von Bräunungsgeschirr oder selbsterwär-
menden Materialien muss eine hitzebeständige Isolierung (z.B.
ein Porzellanteller) zwischen Geschirr und Drehteller gestellt
werden. Dadurch werden Beschädigungen des Ofenbodens
durch Wärme vermieden. Die angegebene Aufheizzeit für das
Geschirr darf nicht überschritten werden.
Keine Metall-Utensilien verwenden, die Mikrowellen re ektie-
ren, da dies Funkenbildung zur Folge haben kann. Stellen Sie
keine Konservendosen in das Gerät.
So verhindern Sie, dass der Drehteller oder Ofenboden bricht:
a) Vor der Reinigung mit Wasser: abkühlen lassen.
b) Stellen Sie keine heißen oder kalten Lebensmittel oder
Utensilien auf einen kalten Drehteller/Ofenboden.
c) Stellen Sie während des Betriebs keine anderen Gegenstän-
de auf das Gehäuse.
HINWEIS:
Benutzen Sie keine Kunststo behälter für die Mikrowelle, wenn
der Ofen nach einer Verwendung eines Kombinationsmo-
dus (abhängig vom Ofenmodell) noch heiß ist– sie könnten
schmelzen.
Während der oben genannten Modi dürfen keine Plastikbe-
hälter benutzt werden, außer der Hersteller dieser Behälter hat
ihre Eignung bestätigt.
Sollten Sie sich beim Anschluss des Gerätes nicht sicher sein, so
kontaktieren Sie bitte einen Fachmann.

DE – 11
DE – 11
Weder der Hersteller noch der Händler übernimmt Haftung für
Schäden an Ofen oder Verletzungen, die infolge von Nichtbe-
achtung des elektrischen Anschlusses entstehen.
An den Innenwänden oder den Dichtungen und Dichtungs-
ober ächen können Wasserdampf oder Tropfen entstehen.
Dies ist ein normaler Vorgang und kein Zeichen für eine Fehl-
funktion der Mikrowelle.
Dieses Gerät ist für den Einsatz in Haushalten und ähnlichen
Anwendungsgebieten vorgesehen, wie z.B.; Küchenbereiche,
reserviert für das Personal in Geschäften, Büros und anderen
professionellen Umgebungen / Bauernhöfen / Nutzung von
Hotels, Motels und anderen Wohnumgebungen durch Kunden
/ Umgebungen wie ein Gästehaus.
Dieses Symbol besagt, dass die Ober ächen während
der Benutzung heiß werden können.

DE
DE – 12
DE – 12
EINBAU
1. Entfernen Sie jegliches Verpackungsmaterial von der Innenseite des Ofens und entfernen Sie die den Schutz lm
am Gehäuse der Mikrowelle.
2. Überprüfen Sie das Gerät auf eventuelle Beschädigungen.
3. Platzieren Sie das Gerät auf einer sicheren, ebenen Ober äche, die stabil genug ist, um das Gewicht des Gerätes
und der darin zubereiteten Lebensmittel zu tragen. Das Gerät nicht in einem Schrank aufstellen.
4. Wählen Sie eine ebene Fläche, die über genügend Freiraum für die Ein- und/oder Auslässe verfügt. Siehe Bild auf
der ersten Seite. Die Rückseite des Gerätes sollte an einer Wand platziert werden.
• Die minimale Installationshöhe sollte 85 cm betragen.
• Es muss ein Mindestabstand von 20 cm zwischen den Seiten des Mikrowellengeräts und allen angrenzenden Wän-
den eingehalten werden.
• Es ist ein Mindestabstand von 30 cm über dem Gerät einzuhalten.
• Nicht die Standfüße des Gerätes entfernen.
• Ein Blockieren der Ein- und/ oder Auslassö nungen kann das Gerät beschädigen.
• Platzieren Sie das Gerät so weit als möglich von Radios und TV-Geräten entfernt. Der Mikrowellenbetrieb kann den
Radio- oder TV-Empfang stören.
20 cm
30 cm
85 cm
10 cm
20 cm
5. Den Netzstecker des Mikrowellengerätes mit einer normalen, geerdeten Steckdose verbinden.
WARNUNG:
Das Gerät nicht an Orten an denen Hitze, Feuchtigkeit oder hohe Luftfeuchtigkeit (z. B. in der Nähe oder über einem
konventionellen Backofen) auftreten können, oder in der Nähe brennbarer Materialien (z. B. Vorhänge) aufstellen.
Lüftungsö nungen nicht blockieren oder versperren.
Nichts auf das Gerät stellen.
Berühren Sie die Außenseite des Mikrowellengeräts nicht beim Betrieb oder kurz danach, da sie heiß werden kann.

DE – 13
DE – 13
FUNKSTÖRUNG
Der Betrieb des Mikrowellengeräts kann Störungen bei Ihrem Radio, Fernseher oder bei ähnlichen Geräten
verursachen. Sollten Störungen auftreten, können sie durch folgende Maßnahmen eingedämmt oder beseitigt
werden:
1. Reinigen Sie die Tür und den Hohlraum, wo sie aufeinandertre en.
2. Ändern Sie die Ausrichtung der Empfangsantenne vom Radio oder Fernseher.
3. Stellen Sie das Mikrowellengerät im Verhältnis zum Empfänger neu auf.
4. Stecken Sie das Mikrowellengerät in eine andere Steckdose, damit das Mikrowellengerät und der Empfänger nicht
an der gleichen Netzleitung angeschlossen sind.
ANWEISUNGEN ZUR ERDUNG
Dieses Gerät muss geerdet sein. Dieser Ofen ist mit einem Kabel mit Erdungsdraht und Erdungsstecker ausgestattet.
Dieser muss an eine ordnungsgemäß installierte und geerdete Wandsteckdose angeschlossen werden. Im Falle
eines elektrischen Kurzschlusses verringert die Erdung das Risiko eines Stromschlags, indem ein Fluchtdraht für den
elektrischen Strom bereitgestellt wird. Es wird empfohlen, einen separaten Stromkreis bereitzustellen, der nur den
Ofen versorgt.
WARNUNG: Bei unsachgemäßer Verwendung des Erdungssteckers kann die Gefahr eines Stromschlags bestehen.
HINWEIS:
1. Wenn Sie Fragen zur Erdung oder zu den elektrischen Anweisungen haben, wenden Sie sich an einen
quali zierten Elektriker oder Servicetechniker.
2. Weder der Hersteller noch der Händler übernimmt Haftung für Schäden an Ofen oder Verletzungen, die infolge
von Nichtbeachtung des elektrischen Anschlusses entstehen.
Das in Ihrem Mikrowellenherd verwendete Netzkabel verwendet die folgenden farblich gekennzeichneten Drähte:
Grün und Gelb = ERDUNG | Blau = NEUTRAL | Braun = STROMFÜHREND
TECHNISCHE DATEN
Modellname: YC-PC322A
Wechselstromversorgung 230~240 V, 50 Hz einphasig
Sicherung/Sicherungsautomat 10 A
Stromstärke
Stromverbrauch 2300 W
Mikrowellenausgangsleistung 1000 W
Grillausgangsleistung 1250 W
Heißluft-Stromstärke 2300 W
Aus-Modus-Stromstärke < 0,5W
Mikrowellenfrequenz 2450 MHz*
Außenabmessungen (B) x (H) x (T) mm 539 x 280 x 415
Garraumabmessungen (B) x (H) x (T)** mm 362 x 223 x 378
Drehteller aus Glas (ø mm) 315
Garraumkapazität 32 Liter**
Garblechgröße (Durchmesser x H in mm) 317 x 48
Grillgestell-Maße (Durchmesser x Höhe in mm) 255 x 80
Gewicht 21 kg
Garraumlampe (LED) 1,5 W
* - Dieses Produkt erfüllt die Anforderungen der europäischen Norm EN55011.
Gemäß dieser Norm ist dieses Gerät als Gerät der Gruppe 2 Klasse B eingestuft.
Gruppe 2 bedeutet, dass das Gerät zweckbestimmt hochfrequente Radioenergie in Form elektromagnetischer Strahlen zur Wärmebehand-
lung von Lebensmitteln erzeugt.
Klasse B bedeutet, das Gerät für den Einsatz im Haushalt geeignet ist.
** - Die interne Kapazität wird durch die Messung der maximalen Breite, Tiefe und Höhe berechnet. Die tatsächliche Kapazität zur Aufnah-
me von Lebensmitteln ist geringer.
IM RAHMEN EINES BESTREBENS NACH STÄNDIGER VERBESSERUNG BEHALTEN WIR UNS DAS RECHT VOR, JEDERZEIT
UND OHNE ANGABE VON GRÜNDEN, TECHNISCHE DATEN ODER DAS DESIGN ZU VERÄNDERN.

DE
DE – 14
DE – 14
GERÄT UND ZUBEHÖR
1. Türverriegelungssystem
2. Gerätefenster
3. Bedienfeld
4. Display
5. Garraum
6. Abdeckung des Hohlleiters (Nicht entfernen)
7. Glasteller
8. Drehtellerring
9. Drehtellerkupplung
10. Grillgestell
11. Garblech
12. Lüftungsö nungen
13. Außenseite
14. Netzkabel
• Das Grillgestell und das Backblech sind
nur für die Verwendung mit Grill- und
Umluftöfen vorgesehen. Verwenden
Sie KEIN Metallzubehör, wenn Sie die
Mikrowellenfunktion nutzen.
• Informationen zur Verwendung des
Grillgestells nden Sie in den Abschnitten
GRILL in diesem Benutzerhandbuch.
Niemals den Grill berühren, wenn dieser
heiß ist.
HINWEIS: Bei der Bestellung von Zubehör teilen
Sie bitte folgende Angaben mit: Name des
Zubehörteils und Bezeichnung des Modells.
HINWEISE:
• Reinigen Sie den Garraum und alle Utensilien nach dem Garen von Lebensmitteln mit hohem Fettanteil und ohne
Abdeckhaube immer sehr gründlich. Dieses muss trocken und frei von Fettrückständen sein. Akkumuliertes Fett
kann sehr heiß werden und zu Rauch- oder Feuerentwicklung führen.
• Stellen Sie das Kochgeschirr bei der Verwendung der Mikrowelle immer auf den Drehteller.
• Verwenden Sie das Grillgestell oder das Backblech NICHT, während Sie die Mikrowellenfunktion nutzen.
ACHTUNG: Dieses Symbol besagt, dass die Ober ächen während der Benutzung heiß werden
können. Die Tür, das Gehäuse, der Garraum, Zubehör und Geschirr werden beim Betrieb sehr heiß.
Verwenden Sie immer dicke Ofenhandschuhe, um Verbrennungen zu vermeiden.
2
7
5
9
6
8
1
3
4
14
12
13
1110

DE – 15
DE – 15
BEDIENFELD
1. DIGITALES DISPLAY (ANZEIGE)– Es werden Kochzeit, Leistung, Anzeigen
und Uhrzeit angezeigt.
2. 10 SECONDS, 1 MINUTE, 10 MINUTES – Zum Einstellen der Garzeit oder
Uhrzeit.
3. AUTO MENU-Tasten – Drücken, um Autogaren-Menü auszuwählen (siehe
Seite 19 für Nutzungshinweise).
4. START/SCHNELLSTART – (Seite 16).
5. MICROWAVE POWER (MIKROWELLE)– Drücken, um die Leistungsstufe der
Mikrowelle auszuwählen (Seite 16).
6. GRILL (GRILL)– Drücken, um das Grill-Garprogramm einzustellen (Seite
17).
7. MICROWAVE+GRILL (MIKROWELLE+GRILL)– Drücken, um das kombinierte
Mikrowellen- und Grill-Garprogramm einzustellen (Seite 17).
8. CONVECTION TEMPERATURE (HEISSLUFTTEMPERATUR)– Drücken, um
Heißlufttemperatur auszuwählen.
9. MICROWAVE+CONVECTION (MIKROWELLE+HEISSLUFT)– Drücken, um
kombiniertes Garen mit Heißluft auszuwählen.
10. UP (WENIGER) – Drücken, um Gewicht oder Portionszahl auszuwählen.
11. DOWN (WENIGER) – Drücken, um Gewicht oder Portionszahl
auszuwählen.
12. STOP/ECO (STOPP/ÖKO)– Einmal drücken, um das Garen vorübergehend zu
unterbrechen, oder zweimal drücken, um das Garen ganz abzubrechen.
Mit dieser Taste können Sie den Energiesparmodus einstellen. (Seite 20).
13. CHILD LOCK (KINDERSICHERUNG) – (Seite 21).
14. TIME/SET CLOCK (UHRZEIT/UHRZEIT EINSTELLEN)–
Damit stellen Sie die Uhrzeit ein.
Damit stellen Sie die Timer-Funktion ein. (Seite 15).
VORBEREITUNG
Wenn der Backofen zum ersten Mal angeschlossen wird, ertönt ein Signalton und auf dem Display wird
„1:00"angezeigt. Beachten Sie, dass die Uhr nicht eingestellt sein muss, damit der Backofen richtig funktioniert. Um
die Uhr einzustellen, befolgen Sie die Anweisungen im Abschnitt „Uhrzeit einstellen” in diesem Benutzerhandbuch.
Wenn der Grill neu ist und zum ersten Mal benutzt wird, werden Rauch und Gerüche freigesetzt. Um dies beim Garen
von Speisen zu vermeiden, verwenden Sie die Grill- und Heißluftfunktion ca. 20 Minuten lang ohne Speisen.
• Nach dem Ö nen und Schließen der Tür schaltet der Backofen in den Standby-Modus. Wenn innerhalb von 1 Minute
keine Taste gedrückt wird, bleibt das Display eingeschaltet und die Tasten funktionieren nicht. Um wieder in den
Standby-Modus zu gelangen, ö nen und schließen Sie die Tür.
• Wenn während des Garvorgangs die Taste STOP/ECO einmal gedrückt wird, wird der Garvorgang unterbrochen.
Um den Garvorgang wieder aufzunehmen, drücken Sie die Taste START/QUICK START. Wenn die Taste STOP/ECO
zweimal gedrückt wird, wird der Garvorgang abgebrochen.
• Wenn der Backofen für eine bestimmte Funktion programmiert ist und zwischen den Tastendrücken eine Pause von
mehr als 30 Sekunden liegt, kehrt der Backofen in den Standby-Modus zurück.
• Nach Beendigung eines Garvorgangs wird auf dem Display „End” angezeigt und alle zwei Minuten ertönt ein Ton,
bis eine Taste gedrückt oder die Tür geö net wird.
EINSTELLEN DER UHR
Dieses Gerät verfügt über eine Uhr, die entweder im 12- oder 24-Stunden-Modus verwendet werden kann. Um die
Uhr einzustellen, befolgen Sie die nachstehenden Anweisungen:
1. Halten Sie im Standby-Modus die Taste TIME/SET CLOCK mindestens 3 Sekunden lang gedrückt, um in den
Modus zum Einstellen der Uhr zu gelangen.
2. Drücken Sie die Taste TIME/SET CLOCK, um den 12- oder 24-Stunden-Modus auszuwählen.
10 SECONDS 1 MINUTE 10 MINUTES
YC-PC322A
1000W
STOP/ECO TIME/
SET CLOCK
CHILD
LOCK
AUTO PROGRAMS
REHEAT
BEVERAGES JACKE T
POTATO PIZZA POPCORN
FROZEN
MEAL FRESH
VEGETABLES PORRID GE AUTO
DEFROST
GRILLED
STEAK GRILLED
CHICKEN AUTO
REHEAT
ROAST
BEEF
ROAST
CHICKEN
OVEN
CHIPS
MICROWAVE
POWER
MICROWAVE
+ CONVECTION
CONVECTION
TEMPERATURE
GRILL
START/
QUICK START
MICROWAVE
+ GRILL
13
5
3
2
14
11
6
8
9
7
10
12
4
1

DE
DE – 16
DE – 16
3. Verwenden Sie die Tasten 10 SECONDS, 1 MINUTE und 10 MINUTES, um die gewünschte Stunden- und
Minutenzahl einzustellen.
4. Drücken Sie die Taste TIME/SET CLOCK, um die Einstellung zu speichern und den Einstellungsmodus zu verlassen.
• Es ist nicht notwendig, die Uhr einzustellen, damit das Gerät normal funktioniert.
• Drücken Sie im Garmodus die Taste TIME/SET CLOCK, um die Tageszeit (falls eingestellt) anzuzeigen. Die Uhrzeit
wechselt nach fünf Sekunden zurück zum Countdown des Garvorgangs. Beachten Sie, dass die Tageszeit nicht
angezeigt werden kann, wenn der Küchentimer eingestellt ist.
GAREN MIT DER MIKROWELLE
Um die Mikrowellenfunktion zu nutzen, befolgen Sie die nachstehenden Anweisungen:
1. Drücken Sie im Standby-Modus die Taste MICROWAVE POWER, um die Leistungsstufe zu wählen. Jedes Mal,
wenn diese Taste gedrückt wird, zeigt das Display die Leistungsstufe der Mikrowelle an.
2. Wenn Sie die gewünschte Leistungsstufe gewählt haben, verwenden Sie die Tasten 10 SECONDS, 1 MINUTE und
10 MINUTES, um die Garzeit einzustellen.
3. Drücken Sie die Taste START/QUICK START, um den Garvorgang zu starten.
4. Nach Beendigung des Garvorgangs wird auf dem Display „End” angezeigt und alle zwei Minuten ertönt ein Ton,
bis eine Taste gedrückt oder die Tür geö net wird.
Beachten Sie, dass die nachstehende Tabelle nur zur Orientierung dient. Ihr Gerät verfügt über
10Mikrowellenleistungsstufen. Diese sind 10%, 20%, 30%, 40%, 50%, 60%, 70%, 80%, 90% und 100%. Die tatsächliche
Wattzahl kann berechnet werden, indem die Mikrowellenleistung mit dem Prozentsatz multipliziert wird.
Mikrowellengaranleitung:
Display Mikrowellen-
leistung Vorgeschlagene Nutzung
P100 100 % Nutzen Sie diese Einstellung für schnelles Garen oder Aufwärmen für z. B. Au äufe,
heiße Getränke, Gemüse usw. verwendet.
P-80 80 %
Für feste Lebensmittel, die eine lange Garzeit erfordern, wenn sie konventionell
gegart werden, wie z. B. Rind eisch, sollte diese Leistungseinstellung verwendet
werden, damit das Fleisch zart wird.
P-60 60 %
Zum längeren Garen von dichten Speisen wie Braten, Hackbraten und
Plattengerichten, aber auch für emp ndliche Gerichte wie Käsesauce und
Biskuitkuchen.
P-40 40 %
Auftaueinstellung; wird zum Auftauen verwendet, damit Speisen gleichmäßig
auftauen. Diese Stufe ist auch bestens geeignet, um Reis, Pasta und Klöße zu
sieden und Eiercreme zuzubereiten.
P-20 20 % Wird zum schonenden Auftauen für z. B. Sahnetorten oder Blätterteig verwendet.
• Während des Garvorgangs können Sie die Leistungsstufe durch Drücken und Halten der Taste MICROWAVE POWER
überprüfen.
• Die längste Garzeit beträgt 95 Minuten.
SCHNELLSTART
Wenn Sie mit 100 % Leistung kochen möchten, drücken Sie einfach die Taste START/QUICK START während Sie sich
im Standby-Modus be nden. Jedes Mal, wenn die Taste START/QUICK START gedrückt wird, verlängert sich die
Garzeit um 30 Sekunden.

DE – 17
DE – 17
GRILLEN
Das Heizelement des Grills im oberen Teil des Garraums hat nur eine Leistungseinstellung und ist e zient und
sparsam. Der Grill ist ideal zum Garen von Speck, Gammonsteak, Fischstäbchen und Teegebäck.
Verwenden Sie das Grillgestell zum Grillen von kleinen Speisen wie Speck und Würstchen, die Sie nach der Hälfte
des Grillvorgangs umdrehen. Die Speisen können direkt auf das Rost gelegt werden oder in einer Tortenform oder
auf einer hitzebeständigen Platte platziert werden. Um sicherzustellen, dass kein Fett oder Öl vom Grillgut abtropfen
kann, stellen Sie eine geeignete Schale unter das Grillgestell.
Zum Anbraten und Knusprigmachen der Ober äche von Speisen in einer Au au orm kann das Grillgestell verwendet
werden, wenn der Behälter ach genug ist. Es ist jedoch ratsam, solche Behälter direkt auf den Drehteller zu stellen,
damit sie etwas länger bräunen und knusprig werden. Das Grillgestell kann nicht zum Grillen verwendet werden.
Um die Grillfunktion zu verwenden, befolgen Sie die nachstehenden Anweisungen:
1. Drücken Sie im Standby-Modus die Taste GRILL, m die Grillfunktion zu wählen. Auf dem Display wird „Grl”
angezeigt.
2. Verwenden Sie die Tasten 10 SECONDS, 1 MINUTE und 10 MINUTES, um die Garzeit auszuwählen.
3. Drücken Sie die Taste START/QUICK START, um den Garvorgang zu starten.
4. Nach Beendigung des Garvorgangs wird auf dem Display „End” angezeigt und alle zwei Minuten ertönt ein Ton,
bis eine Taste gedrückt oder die Tür geö net wird.
MIKROWELLE + GRILL
Mit der Mikrowellen- und der Grillfunktion können Sie die Speisen schnell bräunen und garen. Um die Mikrowellen-
und Grillfunktion zu verwenden, befolgen Sie die nachstehenden Anweisungen:
1. Drücken Sie im Stand-by-Modus einmal oder zweimal die Taste MICROWAVE + GRILL, um „Co-1“ (Kombination1)
oder „Co-2“ (Kombination2) auszuwählen.
2. Verwenden Sie die Tasten 10 SECONDS, 1 MINUTE und 10 MINUTES, um die Garzeit auszuwählen.
3. Drücken Sie zum Starten die Taste START/QUICK START.
4. Nach Beendigung des Garvorgangs wird auf dem Display „End” angezeigt und alle zwei Minuten ertönt ein Ton,
bis eine Taste gedrückt oder die Tür geö net wird.
Mikrowellen- und Grillfunktion
Display Garprozess Vorgeschlagene Nutzung
Co-1
Das Gerät gart in folgendem Zyklus:
Mikrowelle, 22 Sekunden, Grill für 11 Sekunden.
Dies wird bis zum Ende der eingestellten Gesamtzeit
wiederholt.
Hähnchenstücke, Hähnchenbrust,
Schweinskoteletts
Co-2
Das Gerät gart in folgendem Zyklus:
Mikrowelle auf voller Leistung für 18 Sekunden, dann
Grill für 15 Sekunden. Dies wird bis zum Ende der
eingestellten Gesamtzeit wiederholt.
Ganzes Huhn
• Die maximale Garzeit beim Grillen beträgt 95 Minuten.
• Lassen Sie während des Grillens Rauch oder Gerüche abziehen, indem Sie ein Fenster ö nen oder die
Küchenlüftung einschalten. Dies ist normal und kein Gerätefehler.
• Während des Garens können Sie die aktuelle Kombinationsleistung überprüfen, indem Sie die Taste MICROWAVE +
GRILL berühren.
• Wenn Sie die Grillfunktion verwenden, schaltet sich der Grill in regelmäßigen Abständen ein und aus, um eine
Überhitzung zu vermeiden.
• Bei Verwendung der Funktion MICROWAVE+GRILL können die Speisen in einem geeigneten Gefäß direkt auf den
Drehteller gelegt werden.
WARNUNG: Die Tür, das Gehäuse, der Garraum, Zubehör und Geschirr werden beim Betrieb sehr heiß. Verwenden Sie
immer dicke Ofenhandschuhe, um Verbrennungen zu vermeiden.

DE
DE – 18
DE – 18
HEISSLUFT
Beim Heißluftgaren zirkuliert heiße Luft im ganzen Garraum, um Gerichte schnell und gleichmäßig zu braunen und
ein knackiges Ergebnis zu liefern. Dieses Gerät kann für dreizehn verschiedene Gartemperaturen programmiert
werden (200°C, 190°C, 180°C, 170°C, 160°C, 150°C, 140°C, 130°C, 120°C, 110°C).
Wir empfehlen, das Gerät vor dem Garen im Heißluft-Modus vorzuheizen. Zum Vorheizen und Garen mit der
Heißluftfunktion befolgen Sie die nachstehenden Anweisungen:
Ihr Ofen kann programmiert werden, damit er Vorheiz- und Heißluftgarvorgänge kombiniert.
1. Drücken Sie im Stand-by-Modus wiederholt die Taste CONVECTION (HEISSLUFT), um die Heißluft-Temperatur
einzustellen.
2. Drücken Sie die START/SCHNELLSTART-Taste, um die Vorheizfunktion zu starten.
3. Wenn die gewünschte Temperatur erreicht ist, ertönt ein Piepton.
Sobald das Gerät vorgeheizt ist und der Signalton ertönt:
1. Ö nen Sie die Tür und stellen Sie in die Mitte des Flachbetts einen Behälter mit Lebensmitteln.
2. Verwenden Sie die Tasten 10 SECONDS, 1 MINUTE und 10 MINUTES, um die Garzeit auszuwählen. Die längste
mögliche Zeit ist 95 Minuten.
3. Drücken Sie zum Starten die Taste START/QUICK START.
HINWEIS: Wenn die Heißluft-Vorheiztemperatur erreicht ist, piept der Ofen alle zwei Sekunden. Die
Vorheiztemperatur wird 30 Minuten lang beibehalten.
MIKROWELLE + HEISSLUFT
Der Modus „Microwave+Convection“ (Mikrowelle+HEISSLUFT) erleichtert und beschleunigt das Garen, da sie das
schnelle Garen in der Mikrowelle und die Heißluft zum Bräunen der Speisen nutzt.
Es ist möglich, bei 4 verschiedenen Heißlufttemperaturen zu garen. Befolgen Sie zum Starten des dualen Garmodus
die nachstehenden Anweisungen:
1. Drücken Sie im Stand-by-Modus wiederholt die Taste MICROWAVE+CONVECTION, um die Temperatur
auszuwählen (200°C, 170°C, 140°C, 110°C).
2. Drücken Sie die Tasten 10 SECONDS, 1 MINUTE und 10 MINUTES, um die Garzeit auszuwählen. Die mögliche Zeit
liegt zwischen 10 Sekunden und 95 Minuten.
3. Drücken Sie zum Starten die Taste START/QUICK START.
Wenn Sie die Funktion Mikrowelle + Heißluft verwenden, ist der Zeitplan für das Garen in der Mikrowelle und mit
Heißluft wie unten dargestellt. Wählen Sie die Option, die am besten geeignet ist, um Ihre Speisen zu garen und
knusprig zu machen.
Display Garprozess
200 °C 10 Sekunden Mikrowellenleistung, dann 23 Sekunden Heißluftgaren. Der Zyklus wird bis zum
Ende der eingestellten Garzeit wiederholt.
170 °C 15 Sekunden Mikrowellenleistung, dann 18 Sekunden Heißluftgaren. Der Zyklus wird bis zum
Ende der eingestellten Garzeit wiederholt.
140 °C 19 Sekunden Mikrowellenleistung, dann 14 Sekunden Heißluftgaren. Der Zyklus wird bis zum
Ende der eingestellten Garzeit wiederholt.
110 °C 24 Sekunden Mikrowellenleistung, dann 9 Sekunden Heißluftgaren. Der Zyklus wird bis zum
Ende der eingestellten Garzeit wiederholt.

DE – 19
DE – 19
AUTO-MENÜ
Die Autoprogramme ermöglichen ein schnelles und e zientes Garen von Speisen mit nur wenigen Tastendrücken. Es
ist nicht notwendig, die Dauer und die Kochleistung zu programmieren. Es genügt, die gewünschte Autogaren-Taste
zu drücken, das Gewicht/die Stücke mit den Tasten UP und DOWN einzugeben und anschließend die Taste START/
QUICK START zu drücken.
Wenn Sie beispielsweise zwei Pellkartoff eln garen wollen.
1. Ö nen Sie die Tür und geben Sie das Gargut in den Ofen, wobei Sie ein für den jeweiligen Garzyklus geeignetes
Geschirr verwenden müssen.
2. Schließen Sie die Tür.
3. Drücken Sie einmal die Taste JACKET POTATO (PELLKARTOFFEL).
4. Verwenden Sie die Tasten UP und DOWN, um die Anzahl der Karto eln einzugeben.
5. Drücken Sie die Taste START/QUICK START.
6. Nach Beendigung des Garvorgangs wird auf dem Display „End” angezeigt und alle zwei Minuten ertönt ein Ton,
bis eine Taste gedrückt oder die Tür geö net wird.
Autogar-Menüs:
Auto-Menü Methode zur Auswahl von Gewicht oder Anzahl der Stücke Größe/Gewicht
Tiefkühlgericht Wählen Sie das Gewicht über die Tasten UP und DOWN und drücken
Sie anschließend START/QUICK START, um den Garvorgang zu
starten.
200 bis 800 g
Automatisches
Entfrosten 100 bis 1800 g
Aufwärmen von
Getränken
Wählen Sie die Anzahl der Tassen über die Tasten UP und DOWN und
drücken Sie anschließend START/QUICK START, um den Garvorgang
zu starten.
1 bis 3 Tassen
(jeweils 200 ml)
Große Pellkarto el
Wählen Sie die Anzahl der Karto eln über die TastenUP und DOWN
und Drücken Sie anschließend die Taste START/QUICK START, um
den Garvorgang zu starten. Je nach Anzahl der gewählten Karto eln
werden Sie eventuell aufgefordert, die Karto eln während des
Garvorgangs umzuschichten.
1 bis 3 Karto eln
(jeweils 230 g)
Popcorn
Wählen Sie das Gewicht über die Tasten UP und DOWN und drücken
Sie anschließend START/QUICK START, um den Garvorgang zu
starten.
100g
Frisches Gemüse 200 bis 600 g
Pizza 150 g / 300g / 450 g
Haferbrei 50 bis 150 g
Gegrilltes Steak* 200 bis 600 g
Gegrilltes
Hähnchen* 200 bis 600 g
Automatisches
Aufwärmen* 200 bis 800g
Backofen-Pommes 200 g
Roastbeef / Lamm 200 bis 600g
Brathähnchen 800g,1400g
• Das Ergebnis des automatischen Garvorgangs hängt von Faktoren wie Form und Größe des Garguts, Ihrer
persönlichen Vorliebe für den Gargrad bestimmter Speisen und der Art und Weise, wie das Gargut in den Ofen
geschoben wird, ab. Wenn das Ergebnis des Garvorgangs nicht zufriedenstellend ist, passen Sie bitte die Garzeit
entsprechend an.
• Für einige der Auto-Garprogramme werden Sie möglicherweise aufgefordert, das Essen umzudrehen. Ö nen Sie
die Tür, drehen Sie das Essen um, schließen Sie die Tür und drücken Sie anschließend auf die Taste START/QUICK
START, um den Garvorgang fortzusetzen.
• Tragen Sie beim Umdrehen von Lebensmitteln Ofenhandschuhe (oder ähnliches).

DE
DE – 20
DE – 20
AUTO DEFROST (AUTOMATISCHES AUFTAUEN)
Mit dem automatischen Auftauen können Sie Lebensmittel nach Gewicht auftauen. Die Auftaudauer und die
Leistungsstufe werden automatisch eingestellt, sobald die Lebensmittelkategorie und das Gewicht programmiert
sind. Der Gewichtsbereich für Gefriergut reicht von 200 g bis 1800 g.
1. Drücken Sie im Standby-Modus die Taste AUTO DEFROST.
2. Nutzen Sie die Tasten UP und DOWN, um das Gewicht des aufzutauenden Produkts einzustellen.
3. Drücken Sie die START/SCHNELLSTART-Taste, um das Auftauen zu beginnen.
4. Wenn das Gerät während des Auftauens stoppt, drehen Sie die Produkte um, um ein gleichmäßiges Auftauen
zu gewährleisten, und drücken Sie dann die Taste START/QUICK START, um das Auftauen für die restliche Zeit
fortzusetzen.
5. Nach Beendigung des Auftauvorgangs wird auf dem Display „End” angezeigt und alle zwei Minuten ertönt ein
Ton, bis eine Taste gedrückt oder die Tür geö net wird.
AUTOMATISCHES AUFWÄRMEN
Das Gerät ermöglicht das Aufwärmen von Speisen auf der Grundlage des vom Benutzer eingegebenen Gewichts.
Die Auftaudauer und die Leistungsstufe werden automatisch eingestellt, sobald die Lebensmittelkategorie und das
Gewicht programmiert sind. Das Aufwärmgewicht reicht von 200 g bis 800 g.
1. Drücken Sie im Standby-Modus die Taste AUTO REHEAT.
2. Nutzen Sie die Tasten UP und DOWN, um das Gewicht des aufzuwärmenden Produkts einzustellen.
3. Drücken Sie START/QUICK START.
4. Nach Beendigung des Garvorgangs wird auf dem Display „End” angezeigt und alle zwei Minuten ertönt ein Ton,
bis eine Taste gedrückt oder die Tür geö net wird.
KÜCHENTIMER
Das Gerät ist mit einem Küchentimer ausgestattet, der ab der eingestellten Zeit herunterzählt.
1. Drücken Sie im Standby-Modus einmal die Taste TIME/SET CLOCK.
2. Verwenden Sie die Tasten10 SECONDS, 1 MINUTE und 10 MINUTES, um die gewünschte Zeit auszuwählen. Die
längste mögliche Zeit ist 95 Minuten.
3. Drücken Sie zum Bestätigen die Taste START/QUICK START.
4. Die Anzeige zählt die eingegebene Zeit herunter.
5. Wenn die Anzeige Null erreicht, ertönt ein Ton.
Es ist auch möglich, den Küchentimer im Garmodus zu verwenden. Führen Sie dazu die oben beschriebenen
Schritte aus, während Ihr Essen gart. Sobald der Küchentimer aktiviert ist, wird er fünf Sekunden lang auf dem
Display angezeigt, dann kehrt die Anzeige zum Countdown-Timer für den Kochzyklus zurück. Um den Timer wieder
anzuzeigen, drücken Sie einmal die Taste TIME/SET CLOCK und der Küchentimer erscheint fünf Sekunden lang, dann
wird wieder der Countdown für den Garvorgang angezeigt.
• Um das TIMER-Programm abzubrechen, drücken Sie die Taste STOP/ECO und die Anzeige zeigt die Zeit an.
• Wenn ein Kochzyklus gestartet wurde, kann der Küchentimer wie oben beschrieben gestartet werden.
ENERGIESPARFUNKTION
Mit dieser Funktion kann Strom gespart werden, wenn das Gerät nicht benutzt wird. Um diese Funktion im Standby-
Modus zu aktivieren, halten Sie die Taste STOP/ECO 3 Sekunden lang gedrückt; das Display schaltet sich aus; das Gerät
geht in den Energiesparmodus über.
Um den Energiesparmodus zu beenden, drücken Sie eine beliebige Taste oder ö nen und schließen Sie die Gerätetür.

DE – 21
DE – 21
STUMM-FUNKTION
Mit der Stummschaltungsfunktion können Sie alle Töne des Mikrowellengeräts stummschalten. Um die
Stummschaltung zu aktivieren, drücken Sie einmal die Taste CHILD LOCK und auf dem Display wird 5 Sekunden lang
„OFF" angezeigt. Im Stummschaltungsmodus ertönt kein Ton, wenn Tasten gedrückt werden.
Um die Stummschaltung zu deaktivieren, drücken Sie einmal die Taste CHILD LOCK; auf dem Display wird 5 Sekunden
lang „ON" angezeigt, um anzuzeigen, dass der Ton wieder eingeschaltet wurde.
Wenn die Stummschaltfunktion eingestellt ist und das Gerät vom Stromnetz getrennt wird, wird sie aufgehoben,
sobald das Netz wieder angeschlossen wird.
SICHERHEITSVERRIEGELUNG
Dies ist eine automatische Funktion, die verhindert, dass Kinder das Gerät unbeaufsichtigt bedienen. Wenn sich
das Gerät im Standby-Modus be ndet und innerhalb einer Minute nicht bedient wird, schaltet es automatisch
in den Sicherheitsverriegelungsmodus und auf dem Display erscheint „Loc". Im Verriegelungszustand sind
alle Tasten deaktiviert. Wenn Sie eine beliebige Taste drücken, erscheint auf der Anzeige 5Sekunden lang die
Verriegelungsanzeige. Dies erinnert den Benutzer daran, die Verriegelungssperre aufzuheben.
Um die Sicherheitsverriegelung zu deaktivieren, ö nen und schließen Sie einfach die Tür der Mikrowelle. Dann wird
die Tastatur wieder aktiviert und die Anzeigeleuchte der Verriegelung schaltet sich ab.
KINDERSICHERUNG:
Um die KINDERSICHERUNG einzustellen, halten Sie die Taste CHILD LOCK 3Sekunden lang gedrückt– es ertönt
ein langer Piepton und auf der Anzeige erscheint „Loc”. Das Gerät be ndet sich jetzt im „CHILD LOCK“-Modus
(Kindersicherung). Das Display zeigt in diesem Modus die Uhr an– wenn eine Taste gedrückt oder die Tür geö net
wird, wird fünf Sekunden lang „Loc” angezeigt.
Um die KINDERSICHERUNG abzuschalten, halten Sie die Taste CHILD LOCK 3Sekunden lang gedrückt, bis ein langer
Signalton erklingt.
AUTOMATISCHER SCHUTZMECHANISMUS
ÜBERHITZUNGSSCHUTZ – Wenn das Gerät eine hohe Temperatur feststellt, wird auf der Anzeige „E01" angezeigt
und das Gerät stellt den Betrieb ein. Dieser Vorgang kann abgebrochen werden, indem Sie die Taste STOP/ECO
drücken.
SCHUTZ BEI NIEDRIGER TEMPERATUR – Wenn das Gerät in den Schutzmodus bei niedriger Temperatur übergeht,
wird auf der Anzeige „E02" angezeigt und das Gerät stellt den Betrieb ein. Dieser Vorgang kann abgebrochen werden,
indem Sie die Taste STOP/ECO drücken.
SCHUTZ VOR SENSOR-FEHLFUNKTION – Wenn das Gerät bei einem der Sensoren ein Problem feststellt, wird „E03“
angezeigt und das Gerät stellt den Betrieb ein. Außerdem gibt das Gerät einen Warnton ab. Dieser Vorgang kann
abgebrochen werden, indem Sie die Taste STOP/ECO drücken.

DE
DE – 22
DE – 22
REINIGUNG UND WARTUNG
• Schalten Sie das Gerät aus und ziehen Sie den Netzstecker aus der Wandsteckdose, wenn Sie das Gerät reinigen.
• Halten Sie das Innere des Ofens sauber. Sollten an den Seiten, an der Decke der Basisplatte oder auf dem Drehteller
Lebensmittelspritzer oder verschüttete Flüssigkeiten anhaften, wischen Sie diese mit einem feuchten Tuch ab. Wenn
das Gerät stark verschmutzt ist, können Sie milde Reinigungsmittel verwenden. Benutzen Sie keine Sprays und keine
anderen scharfen Reinigungsmittel. Durch sie können Flecken, Streifen oder Mattierungen auf der Türober äche
auftreten.
• Die Außenseite des Geräts sollte mit einem feuchten Tuch gereinigt werden. Damit keine Schäden an den
Betriebsteilen im Inneren des Ofens auftreten, darf kein Wasser in die Lüftungsö nungen eindringen.
• Wischen Sie die Tür und das Fenster auf beiden Seiten, die Türdichtungen und die anliegenden Teile regelmäßig mit
einem feuchten Tuch ab, um Spritzer oder Verunreinigungen zu entfernen.
• Verwenden Sie keine scheuernden Reinigungsmittel.
• Nicht dampfstrahlen.
• Achten Sie darauf, dass das Bedienfeld nicht nass wird. Reinigen Sie das Bedienfeld mit einem weichen, feuchten
Tuch. Lassen Sie die Gerätetür beim Reinigen des Bedienfelds o en, damit es nicht versehentlich eingeschaltet wird.
• Sollte sich Dampf innerhalb oder um die Außenseite der Ofentür herum ansammeln, wischen Sie mit einem
weichen Tuch nach. Dies kann passieren, wenn das Mikrowellengerät bei hoher Luftfeuchtigkeit betrieben wird.
Dies ist kein Defekt.
• Sie sollten den Drehteller regelmäßig reinigen, damit keine Verunreinigungen oder potenzielle Lichtbögen/Schäden
auftreten. Wischen Sie die Unterseite des Ofens einfach mit einem milden Reinigungsmittel ab.
• Sie können Gerüche aus Ihrem Gerät entfernen– vermischen Sie dazu eine Tasse Wasser mit dem Saft und der Schale
einer Zitrone in einer mikrowellengeeigneten Schale. Erhitzen Sie das Ganze 5 Minuten lang in der Mikrowelle.
Wischen Sie das Gerät anschließend gründlich ab und trocknen Sie es mit einem weichen Tuch.
• Wenn die Glühbirne defekt ist, wenden Sie sich bitte an den Kundendienst.
• Das Gerät sollte regelmäßig gereinigt werden. Außerdem sollten Lebensmittelrückstände regelmäßig entfernt
werden. Wird das Gerät nicht in einem sauberen Zustand gehalten, kann dies zu einer Beschädigung der
Ober äche führen, was die Gebrauchsdauer des Gerätes nachteilig beein ussen und möglicherweise zu einer
Gefahrensituation führen kann.
• Bitte entsorgen Sie dieses Gerät nicht über den Hausmüll, sondern beachten Sie die Hinweise Ihres Landes zur
Entsorgung dieser Art von Produkten.

DE – 23
DE – 23
PASSENDES OFENGESCHIRR
1. Das ideale Material für ein Mikrowellengerät ist für Mikrowellen transparent. Es lässt Energie durch den Behälter
ießen und erhitzt die Lebensmittel.
2. Die Mikrowelle kann kein Metall durchdringen, daher sollten keine Metallutensilien oder Geschirr mit Metallrand
verwendet werden.
3. Verwenden Sie beim Garen in der Mikrowelle keine Recyclingpapierprodukte, da diese kleine Metallteile enthalten
können, die Funken und/oder Brände verursachen können.
4. Es wird eher rundes/ovales als quadratisches/längliches Geschirr empfohlen, da das Essen an den Ecken zum
Überkochen neigt.
5. Schmale Aluminiumfolienstreifen können verwendet werden, um ein Überkochen an freiliegenden Bereichen
zu verhindern. Verwenden Sie jedoch nicht zu viel und halten Sie einen Abstand von 2,54 cm zwischen Folie und
Hohlraum ein.
Die folgende Liste ist eine allgemeine Anleitung zur Auswahl der richtigen Utensilien.
Geschirr Mikrowelle
Fest
Grill/
Heißluft Kommentar
Bräunungsgeschirr /
Befolgen Sie immer die Anleitung des Herstellers.
Überschreiten Sie nicht die angegebenen Erwärmzeiten. Seien Sie sehr
vorsichtig, da dieses Geschirr sehr heiß wird.
Porzellan und Keramik / Porzellan, Tongeschirr, glasiertes Steingut und feines Porzellan sind
grundsätzlich geeignet, sofern sie kein metallisches Dekor aufweisen.
Hitzebeständiges Glas Es sollte darauf geachtet werden, dass Glasgeschirr für die Verwendung in
einem Mikrowellenherd geeignet ist.
Nicht-Hitzebeständiges Glas
Hitzebeständige Keramik Achten Sie darauf, dass das keramische Material nicht zu dick ist oder einen
hohen Mineralgehalt hat.
Mikrowellengeeignetes
Kunststo geschirr
Vergewissern Sie sich stets, dass das Kunststo geschirr für die Verwendung
in einem Mikrowellenherd geeignet ist.
Küchenpapier / Verwenden Sie nur Küchenpapier, das für die Verwendung in
Mikrowellenherden empfohlen wird.
Glas z.B. Pyrex® / Seien Sie vorsichtig bei der Verwendung von feinen Gläsern, diese können
beim plötzlichen Erwärmen zerspringen.
Metalltablett Verwenden Sie kein Metallgeschirr, da ein Lichtbogen entstehen und somit
ein Feuer verursacht werden kann.
Metallrost Verwenden Sie kein Metallgeschirr, da ein Lichtbogen entstehen und somit
ein Feuer verursacht werden kann.
Alufolie
Folienbehälter /
Kleine Stücke aus Aluminiumfolie können verwendet werden, um die
Lebensmittel vor Überhitzung zu schützen. Halten Sie die Folie mindestens
2,54 cm von den Wänden des Innenraums entfernt, da Lichtbögen auftreten
können.
Folienbehälter werden generell nicht empfohlen, außer vom Hersteller
anders angegeben, wie z.B. Microfoil®. Folgen Sie den Anweisungen
sorgfältig.
Klarsichtfolie Sie sollten die Lebensmittel nicht berühren und stechen Sie in diese ein,
damit der Dampf entweichen kann.
Plastik/Polystyrol, z. B.
Fastfood-Behälter
Bitte beachten Sie, dass sich einige Behälter bei hohen Temperaturen
verformen, schmelzen oder ihre Farbe verändern.
Gefrier-/Bratbeutel Muss zum Auslass von Dampf angestochen werden. Stellen Sie sicher, dass
die verwendeten Beutel mikrowellengeeignet sind.
Pappteller/-becher und
Küchenpapier
Verwenden Sie keine Kunststo - oder Metall-Bindungen, da diese schmelzen
können oder wegen "Lichtbögen" Feuer fangen können.
Behälter aus Stroh und Holz Nur zum Aufwärmen verwenden, oder um Feuchtigkeit zu absorbieren
Überhitzung kann zu Feuer führen.
Recyclingpapier und
Zeitungen
Überwachen Sie das Gerät immer, wenn Sie diese Materialien verwenden, da
eine Überhitzung zu Bränden führen kann.
Kann metallische Bestandteile enthalten, die zu Lichtbögen und Bränden
führen können.
WARNUNG: Beim Erhitzen von Lebensmitteln in Plastik- oder Papierbehältern müssen Sie das Gerät
überwachen, da sich diese entzünden könnten.
HINWEIS: Lassen Sie das Gerät bei der Verwendung nicht unbeaufsichtigt.

DE
DE – 24
DE – 24
MIKROWELLENGARTIPPS
Mikrowellen garen Speisen schneller als konventionelle Garweisen. Daher ist es wichtig, dass Sie bestimmte Techniken
anwenden, um gute Ergebnisse zu erzielen. Viele dieser Techniken ähneln jedoch jenen, die beim konventionellen
Garen verwendet werden.
WARNUNG: Flüssigkeiten oder Speisen dürfen nicht in geschlossenen Behältern oder Behältern/
Gläsern mit einem Deckel erhitzt werden, da sich darin Druck aufbauen kann. Dies kann
dazu führen, dass das Gefäß/der Behälter explodiert.
GARHINWEISE:
• Lassen Sie das Gerät im Betrieb niemals unbeaufsichtigt.
• Stellen Sie sicher, dass das Verwendete Geschirr mikrowellengeeignet ist.
• Verwenden Sie nur Mikrowellen-Popcorn in seiner empfohlenen Verpackung (befolgen Sie die
Herstelleranweisungen). Verwenden Sie niemals Öl, außer der Hersteller emp ehlt dies ausdrücklich, und garen Sie
es nie länger als empfohlen.
WARNUNG: Wenn Sie die empfohlenen Garzeiten und zu hohe Leistungsstufen verwenden, können
sich Lebensmittel überhitzen, brennen und unter Umständen Feuer fangen und das Gerät
beschädigen.
Anordnen
Platzieren Sie die dicksten Lebensmittel auf die Außenseite des Geschirrs, z.B. Hühnerbeine.
Lebensmittel, die auf der Außenseite des Geschirrs platziert sind, werden mehr Energie erhalten, somit schneller garen
als jene in der Mitte.
Abdecken
Bei manchen Speisen ist es vorteilhaft, sie während des Garens in der Mikrowelle abzudecken.
Verwenden Sie nur mikrowellengeeignete Frischhaltefolie oder einen geeigneten Deckel
Einstechen
Lebensmittel mit einer Schale, einer Haut oder einer Membran müssen an verschiedenen Stellen eingestochen
werden, bevor sie gegart oder aufgewärmt werden, denn dabei entsteht Dampf, der zum Platzen führen kann– z.B.
Karto eln, Fisch, Hühnchen, Würstchen.
HINWEIS: Eier sollten nicht mit Mikrowellenleistung erhitzt werden. Sie könnten auch nach dem Garen noch
explodieren– z.B. pochiert, gebraten, hartgekocht.
Umrühren, Wenden und Neuanordnen.
Für ein gleichmäßiges Garen ist Umrühren, Wenden und Neuanordnen von Speisen während des Garvorgangs
essenziell. Führen Sie dies immer vom Rand in die Mitte durch.
Ruhen
Nach dem Garen ist eine Ruhezeit nötig, damit sich die Hitze gleichmäßig in den Lebensmitteln verteilen kann.

DE – 25
DE – 25
Lebensmittelmerkmale
Zusammensetzung Speisen mit einem hohen Zuckergehalt (z.B. Früchtepuddings oder gefülltes Gebäck)
benötigen weniger Garzeit. Passen Sie also auf, denn Überhitzen kann zu Bränden
führen.
Knochen in Lebensmitteln sind Hitzeleiter, sodass das Lebensmittel schneller garen wird.
Passen Sie also auf, dass die Speisen gleichmäßig garen.
Dichte Die Lebensmitteldichte beein usst die benötigte Garzeit.
Leicht poröse Lebensmittel, wie Kuchen oder Brot, garen schneller als schwere und
dichte, wie z.B. Braten und Schmorgerichte.
Menge Die Anzahl der Mikrowellen in Ihrem Gerät bleibt dieselbe, egal wie viel Speisen gegart
werden. Die Garzeit muss daher erhöht werden, wenn die Lebensmittelmenge im Gerät
zunimmt.
Beispielsweise dauert das Garen von vier Karto eln länger als das von zwei Stück.
Größe Kleine Lebensmittel und kleine Portionen garen schneller als größere, da die
Mikrowellen von allen Seiten in ihr Inneres eindringen können. Für ein gleichmäßiges
Garen, teilen Sie alles in gleich große Portionen.
Form Lebensmittel in unregelmäßiger Form, wie Hähnchenbrust oder Hühnerbeine,
benötigen für ihre dickeren Teile eine längere Garzeit. Für ein gleichmäßiges Garen,
platzieren Sie die dickeren Teile auf den Rand des Geschirrs, sodass sie mehr Energie
abbekommen.
Runde Formen garen gleichmäßiger als viereckige Formen.
Speisentemperatur Die Ausgangstemperatur der Lebensmittel beein usst die benötigte Garzeit
Gekühlte Lebensmittel brauchen länger zum Garen als solche mit Zimmertemperatur.
Die Temperatur des Behältnisses ist kein wirkliches Anzeichen für die Temperatur der
enthaltenen Speisen oder Getränken. Schneiden sie Speisen mit Füllungen auf, wie. z.B.
mit Marmelade gefüllte Donuts, um Hitze oder Dampf entweichen zu lassen.
WARNUNG: Gesicht und Hände: Benutzen Sie immer Ofenhandschuhe, um Speisen oder Geschirr aus
dem Gerät zu entnehmen. Treten Sie einen Schritt zurück, um Hitze und Dampf entweichen
zu lassen. Wenn Sie Abdeckungen entfernen (wie z.B. Klarsichtfolie), Bratbeutel oder
Popcorn-Packungen öff nen, sollten Sie den Dampf immer von Ihren Händen oder ihrem
Gesicht fernhalten.
WARNUNG: Vor dem Servieren sollten Sie immer die Temperatur der Speisen und Getränke überprüfen
und diese umrühren. Gehen Sie mit besonderer Vorsicht vor, wenn Sie sie Babys, Kindern
oder alten Menschen servieren. Der Inhalt von Baby äschchen und Babynahrungsgläsern
müssen besonders auf ihre Temperatur vor dem Verzehr überprüft sowie umgerührt oder
geschüttelt werden, um Verbrennungen zu verhindern.

DE
DE – 26
DE – 26
AUFTAU-TIPPS
Die Verwendung Ihres Mikrowellengeräts ist die schnellste Methode zum Auftauen von Lebensmitteln. Es ist eine
einfache Methode, aber die folgenden Anweisungen sind essenziell, um zu gewährleisten, dass Speisen vollständig
aufgetaut werden.
• Entfernen Sie vor dem Auftauen die gesamte Verpackung.
• Um Lebensmittel aufzutauen, benutzen Sie die Mikrowellenleistungsstufen P-20 bis P-40.
• Beziehen Sie sich hierbei bitte unten auf die weiteren Informationen.
Neuanordnen
Lebensmittel, die am Rand des Geschirrs liegen, tauen schneller auf als jene in der Mitte. Deshalb sollte man sie bis zu
viermal neuanordnen.
Bewegen Sie eng nebeneinander liegende Stücke am Rand in die Mitte und ordnen Sie übereinander liegende Teile
neu an.
Dies wird dafür sorgen, dass alle Teile der Speisen gleichmäßig auftauen
Trennen
Lebensmittel können beim Einfrieren zusammengeklebt sein. Es ist wichtig, sie sobald wie möglich voneinander zu
trennen.
z.B. Baconscheiben oder Hühner lets.
Abschirmen
Manche Teile des aufzutauenden Lebensmittels können warm werden. Um zu verhindern, dass sie noch wärmer
werden und anfangen zu kochen, können sie mit kleinen Folienstücken abgeschirmt werden, die Mikrowellen
re ektieren. Beispiele hierfür wären z.B. Hühnerbeine und Chicken Wings.
Ruhen
Ruhezeit ist nötig, um zu gewährleisten, dass die Speisen vollständig aufgetaut sind.
Das Auftauen ist nicht abgeschlossen, wenn die Speisen aus dem Gerät entnommen sind. Die Speisen müssen
abgedeckt ruhen, um sicherzustellen, dass sie auch in der Mitte komplett aufgetaut sind.
Wenden
Es ist wichtig, dass alle Lebensmittel während des Auftauens bis zu 4Mal gewendet werden.
Dies ist wichtig, damit ein sorgfältiges Auftauen gewährleistet wird.

DE – 27
DE – 27
AUFWÄRM-TIPPS
Für das Wiederaufwärmen von Speisen sollten Sie den unten angegebenen Ratschlägen und Hinweisen folgen, um
sicherzustellen, dass die Speisen vor dem Servieren vollständig erwärmt sind.
Tellergerichte
Entfernen Sie Ge ügel- oder Fleischstücke und erwärmen Sie diese separat, wie unten beschrieben.
Platzieren Sie kleinere Stücke in die Mitte des Tellers sowie größere und dickere an den Rand. Decken Sie sie mit
mikrowellengeeigneter Folie ab und erwärmen Sie die Speise auf Stufe P-50. Nach der Hälfte der Erwärmungszeit
sollten Sie es umrühren bzw. neuanordnen.
HINWEIS: Stellen Sie sicher, dass die Speisen vor dem Servieren vollständig erwärmt sind.
Geschnittenes Fleisch
Decken Sie sie mit mikrowellengeeigneter Frischhaltefolie ab und erwärmen Sie die Speise auf Stufe P-60. Mischen Sie
es mindestens einmal neu durch, um ein gleichmäßiges Erwärmen zu garantieren.
HINWEIS: Stellen Sie sicher, dass das Fleisch vor dem Servieren vollständig erwärmt ist.
Ge ügelportionen
Platzieren Sie die dicksten Teile der Portion an den Rand des Geschirrs, decken Sie sie mit mikrowellengeeigneter Folie
und erwärmen Sie sie bei Stufe P-70.
Wenden Sie die Ge ügelportionen nach der Hälfte der Aufwärmphase.
HINWEIS: Stellen Sie sicher, dass das Ge ügel vor dem Servieren vollständig erwärmt ist.
Schmorgerichte
Decken Sie die Schmorgerichte mit mikrowellengeeigneter Folie oder einem passenden Deckel ab sowie erwärmen
Sie diese Gerichte bei Stufe P-50.
Regelmäßig umrühren, um gleichmäßiges Erwärmen zu gewährleisten.
HINWEIS: Stellen Sie sicher, dass die Speisen vor dem Servieren vollständig erwärmt sind.
Um das beste Erwärmungsresultat zu erzielen, wählen Sie eine zum Speisentyp passende Mikrowellenleistungsstufe
aus. Beispielsweise sollte eine Schale Gemüse bei Stufe P-100 erwärmt werden, während eine Lasagne (die ja nicht
umgerührt werden kann) bei Stufe P-40 erwärmt werden sollte.
HINWEISE:
• Nehmen Sie die Speisen aus der Folie oder Metallbehältnissen heraus, bevor Sie sie erwärmen.
• Die Erwärmungszeiten werden von der Form, Tiefe, Menge und Temperatur der Speisen und der Größe, Form und
dem Material des Behälters ab.
WARNUNG: Erhitzen Sie niemals Flüssigkeiten in schmalen, hohen Gefäßen, da der Inhalt
herausspritzen und zu Verbrennungen führen könnte.
• Zur Vermeidung von Überhitzung und Feuer sollte besonders vorsichtig vorgegangen werden, wenn Lebensmittel
mit einem besonders hohen Zucker- oder Fettgehalt, wie z. B. gefüllte Süßspeisen oder Früchtepuddings, gegart
oder aufgewärmt werden.
• Erhitzen sie niemals Fett oder Öl zum Frittieren, da dies zu Überhitzung oder Bränden führen kann.
• Dosenkarto eln sollte nicht in einem Mikrowellengerät erhitzt werden, befolgen Sie die Herstellerangaben auf der
Dose.
WARNUNG: Der Inhalt von Saug aschen und Babynahrungsgläser muss vor dem Gebrauch
geschüttelt bzw. gerührt und die Temperatur muss vor dem Verzehr geprüft werden, um
Verbrennungen zu vermeiden.

DE
DE – 28
DE – 28
FEHLERBEHEBUNG
Wenn Sie denken, dass das Gerät nicht ordentlich funktioniert, gibt es einige einfache Überprüfungen, die Sie selbst
durchführen können bevor Sie den Kundendienst rufen. Dies kann Ihnen viel Aufwand ersparen, wenn es sich um
einen einfachen Fehler handelt.
Führen Sie die folgende Überprüfung durch:
Geben Sie eine halbe Tasse Wasser auf den Drehteller und schließen Sie die Tür. Stellen Sie den Timer auf 1 Minute
Garzeit bei Stufe P-100.
1. Schaltet Sich die Gerätelampe beim Garen ein?
2. Funktioniert der Lüfter? (Überprüfen Sie dies, indem Sie Ihre Hand über die Lüftungsö nungen platzieren.)
3. Ertönt der Signalton nach einer Minute?
4. Ist das Wasser in der Tasse heiß?
Wenn die Antwort auf eine der Fragen „NEIN“ ist, überprüfen Sie, ob das Gerät richtig eingesteckt ist oder die
Sicherung durchgebrannt ist. Wenn dies nicht der Fall ist, konsultieren Sie die folgende Tabelle.
WARNUNG: Reparieren, modi zieren oder passen Sie das Gerät niemals selbst an. Die Durchführung
von Reparaturarbeiten ist für alle Personen außer den ausgebildeten SHARP-Technikern
gefährlich. Dies ist insofern wichtig, da die Entfernung von Schutzabdeckungen zur
Freisetzung von Mikrowellen führen kann.
• Die Türabdichtung verhindert das Austreten von Mikrowellen während des Betriebs, aber stellt keine luftdichte
Dichtung dar. Daher ist es normal, Wassertropfen oder einen leichten lauwarmen Luftstrom im Türbereich zu
bemerken. Aus Lebensmitteln mit einem hohen Feuchtigkeitsgehalt tritt Dampf aus, der zu Kondenswasser im Gerät
führt, das aus dem Gerät heraustropfen kann.
• Reparaturen und Umbauten: Versuchen Sie nicht, das Gerät zu reparieren, zu verändern oder in Betrieb zu nehmen,
wenn es nicht richtig funktioniert.
• Zugri auf das Gehäuse und die Lampe: Entfernen Sie niemals das Gehäuse. Das ist extrem gefährlich, aufgrund der
Präsenz von elektrisch geladenen Teilen im Innern, deren Berührung tödlich sein kann.
Ihr Gerät ist nicht mit einer Lampenabdeckung versehen. Wenn die Lampe kaputtgeht, versuchen Sie nicht, sie
selbsttätig zu entfernen, rufen Sie den SHARP-Kundendienst.

DE – 29
DE – 29
FEHLERBEHEBUNG-DIAGRAMM
FRAGE ANTWORT
Ein Luftzug tritt an der Tür
auf.
Wenn das Gerät in Betrieb ist, zirkuliert Luft im Garraum.
Die Tür ist nicht luftdicht abgeschlossen, daher kann Luft durch die Tür austreten.
Kondenswasser sammelt sich
im Gerät an und kann aus der
Tür heraustropfen.
Der Garraum wird normalerweise kälter als das Gargut sein und daher wird der
beim Garen entstehende Dampf auf der kälteren Ober äche kondensieren.
Die entstandene Dampfmenge hängt vom Wassergehalt des Garguts ab. Manche
Lebensmittel, z.B. Karto eln sind höchst wasserhaltig.
Das Kondenswasser in der Glastür sollte nach ein paar Stunden verschwunden
sein.
Blitz- oder Lichtbogenbildung
im Garraum beim Garen.
Ein Lichtbogen bildet sich, wenn ein Metallobjekt während des Garens dem
Garraum nahekommt. Dies kann möglicherweise die Garraumober äche aufrauen,
aber wird sonst das Gerät nicht beschädigen.
Lichtbogenbildung bei
Karto eln.
Stellen Sie sicher, dass Sie alle „Augen“ aus den Karto eln entfernt haben und die
Karto eln eingestochen haben, dann können Sie sie direkt auf den Drehteller in
eine hitzebeständige Au au orm o.ä. geben.
Das Gerät funktioniert nicht,
wenn die Taste START/QUICK
START gedrückt wird.
Überprüfen Sie, ob die Tür richtig geschlossen ist.
Gerät gart zu langsam. Überprüfen Sie die eingestellte Leistungsstufe.
Das Gerät produziert
Geräusche.
Die Mikrowellenenergie pulsiert währen des Garens/Auftauens.
Das Gerät gibt jede Minute einen Piepton ab und das Display zeigt „Fail" an.
Wenn die Tasten des Bedienfelds länger als 1 Minute ununterbrochen gedrückt
werden, tritt dieser Fehler auf.
Das Gehäuse ist heiß. Das Gehäuse kann warm werden, halten Sie Kinder von ihm fern.
SCHUTZ VOR KLEMMENDEN TASTEN
Wenn eine Taste auf dem Bedienfeld länger als 1 Minute gedrückt wird, stoppt das Programm sofort und das Display
zeigt „FAIL“ an. Das Mikrowellengerät gibt einen Signalton ab. Wenn die Taste weiterhin gedrückt bleibt, ertönt
der Signalton jede Minute. Drücken Sie nach der Fehlersuche die STOP/ECO-Taste, um in den Standby-Modus
zurückzukehren.
EHE SIE UNTERSTÜTZUNG ANFORDERN
Ehe Sie einen Service anfordern, überprüfen Sie bitte jeden der folgenden Punkte:
• Vergewissern Sie sich, dass das Gerät sicher eingesteckt ist. Wenn das nicht der Fall ist, ziehen Sie den Stecker aus
der Steckdose, warten Sie 10Sekunden lang und schließen das Gerät anschließend erneut ordnungsgemäß an.
• Vergewissern Sie sich, ob eine Sicherung des Stromkreises durchgebrannt ist oder ein Hauptstromkreisunterbrecher
ausgelöst wurde. Wenn diese einwandfrei zu funktionieren scheinen, überprüfen Sie die Steckdose mit einem
anderen Gerät.
• Vergewissern Sie sich, dass die Drehknöpfe für Leistung und Timer richtig eingestellt sind.
• Stellen Sie sicher, dass die Tür sicher geschlossen ist und in das Türsicherungssystem einrastet. Andernfalls ießt die
Mikrowellenenergie nicht in das Gerät.
WENN KEINER DER OBEN AUFGEFÜHRTEN PUNKTE DAS PROBLEM LÖSEN KANN, WENDEN SIE SICH AN EINEN
GESCHULTEN TECHNIKER. VERSUCHEN SIE NICHT, DAS GERÄT SELBST ZU MODIFIZIEREN ODER ZU REPARIEREN.

ES
ES – 1
ES – 1
Atención:
Su producto
está marca-
do con este
símbolo. Esto
signi ca que los
productos eléc-
tricos y electró-
nicos usados
no deberían
mezclarse con
los residuos
domésticos ge-
nerales. Existe
un sistema de
recogida espe-
cial para estos
productos.
A. Información sobre eliminación
para particulares
1. En la Unión Europea
Atención: Si desea eliminar este equipo, no utilice el cubo de la basura
habitual.
Los equipos eléctricos y electrónicos usados deben tratarse por separado de
acuerdo con la legislación que requiere un tratamiento, una recuperación y
un reciclaje adecuados de los equipos eléctricos y electrónicos usados.
Tras la aplicación por parte de los estados miembros, los hogares de los
estados de la UE podrán devolver, sin coste alguno, sus equipos eléctricos o
electrónicos usados a las instalaciones para ello designadas.*
En algunos países* el establecimiento local puede recoger el producto sin
coste alguno por la compra uno nuevo similar.
*) Si desea más información, póngase en contacto con las autoridades
locales.
Si sus equipos eléctricos o electrónicos usados incorporan pilas o
acumuladores, elimínelos por separado con antelación siguiendo los
requisitos locales. La correcta eliminación de estos productos ayuda a
garantizar que los residuos sean sometidos a los procesos de tratamiento,
recuperación y reciclaje adecuados, así como a prevenir los efectos
negativos potenciales sobre el medio ambiente y la salud de los seres
humanos resultante de una manipulación inadecuada de los residuos.
2. Países no pertenecientes a la Unión Europea
Si desea eliminar este producto, póngase en contacto con las autoridades
locales para consultar el método correcto.
Para Suiza: los equipos eléctricos o electrónicos pueden devolverse al
vendedor sin coste alguno, incluso si no compra ningún producto nuevo.
Encontrará más información sobre los centros de recogida en la página de
inicio www.swico.ch o www.sens.ch.
B. Información sobre eliminación para empresas
1. En la Unión Europea
Si el producto es utilizado para nes empresariales y desea eliminarlo:
póngase en contacto con su distribuidor de SHARP, que le informará sobre
la retirada del producto. Es posible que deba sufragar los costes derivados
de la retirada y el reciclaje. También es posible que los centros de recogida
locales acepten los productos pequeños (y en cantidades pequeñas).
Para España: póngase en contacto con el sistema de recogida establecido
ocon la autoridad local para la retirada del producto usado.
2. Países no pertenecientes a la Unión Europea
Si desea eliminar este producto, póngase en contacto con las autoridades
locales para consultar el método correcto de eliminación.
Para cuestiones de servicio, diríjase a www.sharpconsumer.com/contact/ y para conocer sus derechos de garantía,
diríjase www.sharpconsumer.com/support/ o póngase en contacto con el establecimiento en el que compró el
producto.
Las declaraciones de conformidad está disponibles en www.sharpconsumer.com/documents-of-conformity/
www.sharpconsumer.com/
support/
www.sharpconsumer.com/
documents-of-conformity/
www.sharpconsumer.com/
contact/

ES – 2
ES – 2
PRECAUCIONES PARA EVITAR LA POSIBLE EXPOSICIÓN A LA ENERGÍA DE
MICROONDAS
1. No intente utilizar este horno con la puerta abierta, ya que, de hacerlo, podría resultar expuesto a la energía de
microondas. Es importante no eliminar ni manipular los cierres de seguridad,
2. No inserte ningún objeto entre la cara frontal y la puerta, ni permita que se acumulen residuos o desechos en la
super cies selladas.
3. No use el horno si está dañado. Es muy importante que la puerta del horno cierre correctamente, y que ni la
puerta, las bisagras, los cierres ni las juntas de la puerta y las super cies de sellado presenten daños.
4. No intente reparar ni ajustar el horno.
ÍNDICE
INSTRUCCIONES IMPORTANTES DE SEGURIDAD ....................................................................................................................................... 3
INSTALACIÓN ........................................................................................................................................................................................................11
INTERFERENCIAS DE RADIO ............................................................................................................................................................................. 12
INSTRUCCIONES DE TOMA DE TIERRA (MASA)..........................................................................................................................................12
ESPECIFICACIONES .............................................................................................................................................................................................12
HORNO Y ACCESORIOS ......................................................................................................................................................................................13
PANEL DE CONTROL ...........................................................................................................................................................................................14
ANTES DE UTILIZAR EL HORNO ...................................................................................................................................................................... 14
AJUSTE DEL RELOJ ..............................................................................................................................................................................................14
PREPARACIÓN DE ALIMENTOS CON LA FUNCIÓN DE MICROONDAS ..............................................................................................15
INICIO RÁPIDO ...................................................................................................................................................................................................... 15
PREPARACIÓN DE ALIMENTOS AL GRILL ..................................................................................................................................................... 16
MICRONDAS + GRILL .......................................................................................................................................................................................... 16
CONVECCIÓN ........................................................................................................................................................................................................ 17
MICROONDAS + CONVECCIÓN ......................................................................................................................................................................17
MENÚ AUTOMÁTICO ..........................................................................................................................................................................................18
DESCONGELAR AUTOMÁTICAMENTE...........................................................................................................................................................19
RECALENTAR AUTOMÁTICAMENTE ............................................................................................................................................................... 19
TEMPORIZADOR DE COCINA ........................................................................................................................................................................... 19
FUNCIÓN DE AHORRO DE ENERGÍA .............................................................................................................................................................19
FUNCIÓN DE SILENCIO ......................................................................................................................................................................................20
BLOQUEO DE SEGURIDAD ................................................................................................................................................................................20
BLOQUEO PARA NIÑOS .....................................................................................................................................................................................20
MECANISMO DE PROTECCIÓN AUTOMÁTICO ...........................................................................................................................................20
LIMPIEZA Y MANTENIMIENTO ......................................................................................................................................................................... 21
UTENSILIOS ADECUADOS PARA EL HORNO...............................................................................................................................................22
CONSEJOS PARA PREPARAR ALIMENTOS CON EL MICROONDAS ...................................................................................................... 23
CONSEJOS PARA DESCONGELAR ................................................................................................................................................................... 25
CONSEJOS PARA RECALENTAR ....................................................................................................................................................................... 26
RESOLUCIÓN DE PROBLEMAS .........................................................................................................................................................................27
PROTECCIÓN CONTRA LOS BOTONES ATASCADO ..................................................................................................................................28
ANTES DE LLAMAR AL SERVICIO TÉCNICO .................................................................................................................................................28

ES
ES – 3
ES – 3
INSTRUCCIONES IMPORTANTES DE SEGURIDAD
LEA DETENIDAMENTE Y GUARDE PARA FUTURAS REFEREN-
CIAS
Para prevenir incendios, no debe dejarse sin vigilancia el
horno microondas durante el proceso de preparación de
alimentos. Si se aplican niveles de potencia demasiado
altos o periodos de preparación demasiado largos, los ali-
mentos pueden sobrecalentarse y provocar un incendio.
Este horno se ha diseñado para usarse únicamente sobre una
encimera. No se ha pensado para integrarse en una unidad de
cocina. No coloque el horno dentro de un armario. La toma de
corriente debe ser de fácil acceso para que la unidad pueda
desconectarse fácilmente en caso de emergencia.
La toma de alimentación de CA debe ser de 230-240V, 50Hz,
con un fusible de línea de distribución de 10A o un disyuntor
de corriente de 10A como mínimo. Se deberá utilizar un circui-
to eléctrico independiente solo para este aparato.
No coloque el horno en zonas donde se genere calor, como
cerca de un horno convencional. No instale el horno en áreas
de alta humedad o donde se pueda acumular humedad. No
guarde o use el horno en exteriores.
Si se observa humo, apague o desconecte el horno y man-
tenga la puerta cerrada con el n de sofocar las llamas.
Utilice solamente recipientes y utensilios aptos para mi-
croondas. Se deberán comprobar los utensilios para veri-
car que son aptos para su uso en hornos de microondas.
Al calentar alimentos en recipientes de papel o plástico,
vigile el horno debido a la posibilidad de ignición.
Limpie la cubierta del guiaondas y la cavidad del horno.
Estos elementos deben estar secos y no contener grasa.
La grasa acumulada puede recalentarse y provocar humo

ES – 4
ES – 4
oincendios.
No coloque materiales in amables cerca del horno o los ori -
cios de ventilación. No bloquee los ori cios de ventilación.
Extraiga todos los sellos metálicos, cierres con alambre, etc., de
los alimentos y de los alimentos envasados. Los arcos eléctricos
en super cies metálicas pueden provocar incendios.
No use el horno microondas para calentar aceite para freír. La
temperatura no se puede controlar y el aceite puede incendiar-
se.
Cuando haga palomitas de maíz, utilice solamente fabricantes
especializados en palomitas para microondas.
No almacene alimentos u otros artículos dentro del horno.
Compruebe la con guración después de encender el horno
para asegurarse de que el aparato funciona como se desea.
No deje el horno sin atender mientras se usa.
Para evitar el calentamiento excesivo y un posible incendio, se
debe prestar atención especial al preparar o recalentar alimen-
tos con un contenido alto de azúcar o grasa, por ejemplo, sal-
chichas, pasteles o pudin de Navidad. Consulte las sugerencias
correspondientes en el manual de funcionamiento.
Para evitar la posibilidad de lesiones. ADVERTENCIA:
No use el horno si está dañado o no funciona correctamente.
Compruebe lo siguiente antes de usar:
a) Asegúrese de que la puerta está correctamente cerrada y
de que no esté desalineada o deformada.
b) Asegúrese de que las bisagras y las cerraduras de seguri-
dad de la puerta no están rotas ni sueltas.
c) Asegúrese de que las juntas de las puertas y super cies de
sellado no están dañadas.
d) Asegúrese de que interior de la cavidad del horno o la
puerta no presentan abolladuras.

ES
ES – 5
ES – 5
e) Asegúrese de que el cable de alimentación y el enchufe no
estén dañados.
Si las juntas de la puerta o la puerta están dañadas, no debe
utilizarse el horno hasta que haya sido reparado por una per-
sona competente.
No ajuste, repare ni modi que el horno. Es peligroso para
cualquier persona que no esté capacitada para llevar a
cabo operaciones de mantenimiento o reparación que
consistan en retirar una cubierta que sirva de protección
contra la exposición a la energía de microondas.
No utilice el horno con la puerta abierta ni modi que las cerra-
duras de seguridad de ninguna manera. No utilice el horno si
hay algún objeto entre las juntas de la puerta y las super cies
de sellado.
No permita que la grasa ni la suciedad se acumulen en las
juntas de las puertas y las partes adyacentes. Limpie el
horno con regularidad y elimine los depósitos de alimen-
tos.
Siga las instrucciones de ''cuidado y limpieza''. No mante-
ner el horno limpio podría dar lugar a que la super cie se
deteriore, y podría afectar negativamente a la vida útil del
aparato y originar situaciones de peligro.
Las personas con MARCAPASOS deben consultar a su médico o
al fabricante del marcapasos para tomar las precauciones debi-
das respecto a los hornos microondas.
Para evitar la posibilidad de una descarga eléctrica.
• Bajo ninguna circunstancia se deberá desmontar la carcasa
exterior.
• No derrame ni inserte objetos en las aberturas de cerradu-
ra de la puerta u ori cios de ventilación. En caso de que se
produzca un derrame, apague, desenchufe inmediatamente
el aparato y llame a un agente autorizado de servicio SHARP.

ES – 6
ES – 6
• No sumerja el cable de alimentación ni el enchufe en agua u
otros líquidos.
• No deje que el cable de alimentación cuelgue sobre el bor-
de de una mesa o super cie de trabajo.
• Mantenga el cable de alimentación alejado de super cies
calientes, incluida la parte posterior del horno.
• Mantenga el aparato y el cable fuera del alcance de los ni-
ños menores de ocho años.
• No trate de cambiar la lámpara del horno personalmente ni
permita que ninguna persona no autorizada por SHARP lo
haga. Si la lámpara se estropea, consulte a su distribuidor o
un agente autorizado del servicio SHARP.
• Si el cable de alimentación presenta algún daño, deberá ser
sustituido por personal de servicio autorizado de SHARP.
ADVERTENCIA: Los líquidos y otros alimentos no deben
calentarse en recipientes cerrados, ya que podrían explo-
tar. Calentar bebidas en el microondas puede retardar la
ebullición, por lo que se deberá tener cuidado al manejar
el recipiente. Para evitar la posibilidad de explosión y de
una ebullición repentina:
No utilice recipientes herméticos. Retire los cierres y las tapas
antes de utilizarlos. Los recipientes sellados pueden explotar
debido al aumento de la presión incluso una vez que el hor-
no se haya apagado. Tenga mucho cuidado cuando caliente
líquidos. Use recipientes de boca ancha para dejar escapar las
burbujas.
No caliente nunca líquidos en recipientes de boca estre-
cha tales como biberones, ya que el contenido del envase
podría salir a chorros cuando se caliente y causar quema-
duras.
Para prevenir la salida repentina del líquido hirviendo y posi-
bles quemaduras:

ES
ES – 7
ES – 7
1. No caliente durante una cantidad excesiva de tiempo.
2. Remueva el líquido antes de calentar o recalentar.
3. Es aconsejable introducir una varilla de cristal o un utensilio
similar (no metálico) en el líquido mientras se calienta.
4. Deje el líquido en reposo durante al menos 20segundos en
el horno al nal del tiempo de preparación para evitar ebu-
lliciones posteriores.
No prepare huevos con cáscara ni caliente huevos duros
en el microondas, ya que pueden explotar incluso des-
pués de que el aparato haya terminado la preparación.
Para preparar o recalentar los huevos que no hayan sido
revueltos o mezclados, perfore las yemas y las claras. Pele
y corte los huevos duros antes de calentarlos en el horno
microondas.
Perfore la piel de alimentos como patatas, salchichas y frutas
antes de prepararlos, ya que pueden explotar.
ADVERTENCIA: Se debe revolver y agitar el contenido de
biberones y envases de alimentación para bebés, y revisar
la temperatura antes de su consumo con el n de evitar
quemaduras. Utilice agarradores o guantes de cocina
cuando saque los alimentos del horno para evitar quema-
duras. Para evitar la posibilidad de quemaduras:
• Cuando abra recipientes, envases para preparar palomitas
de maíz, bolsas de cocinar al horno, etc., mantenga la cara y
las manos a una distancia prudencial para evitar quemadu-
ras por vapor y erupción hirviente. Para evitar quemaduras,
compruebe siempre la temperatura de los alimentos, re-
mueva antes de servir y preste especial atención a la tem-
peratura de los alimentos y las bebidas destinados a bebés,
niños o ancianos. Las piezas accesibles pueden calentarse
durante el uso. Los niños pequeños deben permanecer a
una distancia prudencial.

ES – 8
ES – 8
• La temperatura de los recipientes no es un indicador real
de la temperatura de los alimentos ni las bebidas; veri que
siempre la temperatura de los alimentos.
• Mantenga siempre la distancia de la puerta del horno cuan-
do se abra para evitar quemaduras por el vapor y el calor
que se escapa.
• Corte los alimentos rellenos horneados después de calentar
para liberar el vapor y evitar quemaduras.
• Mantenga a los niños lejos de la puerta para evitar que pue-
dan quemarse.
ADVERTENCIA: Solo permita que los niños a partir de ocho
años utilicen el horno sin supervisión cuando hayan re-
cibido las instrucciones adecuadas para utilizarlo de una
forma segura y comprendan los peligros de un uso inade-
cuado.
Cuando se utilice el aparato en los modos GRILL, MIX GRI-
LL, CONVECTION, MIX CONVECTION y AUTO MENU (modo
aplicable en función del modelo), los niños solo deben
utilizar el horno bajo la supervisión de un adulto debido a
la temperatura que se genera.
Este aparato no está diseñado para ser utilizado por per-
sonas (incluidos niños) con discapacidades físicas, senso-
riales o mentales, con falta de experiencia y conocimiento,
a menos que una persona responsable de su seguridad les
supervise o instruya en su uso.
Se debe vigilar a los niños para asegurarse de que no jue-
guen con el electrodoméstico. La limpieza por parte de los
niños debe supervisarse.
Los modelos con panel táctil electrónico cuentan con un
modo de bloqueo.
No se apoye sobre la puerta del horno ni la balancee. No jue-
gue con el horno ni lo utilice como un juguete.

ES
ES – 9
ES – 9
Los niños deben aprender todas las instrucciones importantes
de seguridad: el uso de agarraderas de cocina, la extracción cui-
dadosa de las tapas de los alimentos y prestar especial atención
a los envases (por ejemplo, materiales de calentamiento auto-
mático) diseñados para hacer los alimentos crujientes, ya que
pueden estar muy calientes.
Otras advertencias
No modi que el horno de ninguna manera.
No mueva el horno mientras esté en funcionamiento.
Este electrodoméstico se ha diseñado para un uso doméstico.
Este horno se ha diseñado para preparar alimentos en el hogar
únicamente. No es apto para uso comercial ni en laboratorios.
Secar alimentos o ropa, y calentar almohadillas térmicas, zapa-
tillas, esponjas, ropa húmeda u otros objetos similares puede
provocar lesiones, explosión o fuego. Este horno no es apto
para uso comercial ni de laboratorio.
Para fomentar el uso de su horno sin problemas y evitar
daños.
Nunca utilice el horno si está vacío. Cuando utilice un plato
para dorar o material de autocalentamiento, coloque siempre
un aislante resistente al calor, como un plato de porcelana
debajo para evitar daños en la base del horno debido al estrés
por calor. No se debe exceder el tiempo de precalentamiento
especi cado en las instrucciones de los platos.
No utilice utensilios de metal, pues re ejan las microondas y
pueden provocar arco eléctrico. No introduzca latas en el hor-
no.
Para evitar que el plato giratorio o la base del horno se rompa:
a) Antes de limpiar con agua, deje se enfríe.
b) No coloque alimentos calientes o fríos, o utensilios calientes
en una base de horno o el plato giratorio frío.

ES – 10
ES – 10
c) No coloque nada en el compartimiento exterior durante la
operación.
NOTA:
No utilice contenedores de plástico para calentar en el mi-
croondas si el horno está todavía caliente después de utilizarlo
en un modo de combinación (según el modelo del horno),
porque podrían derretirse.
No se deben utilizar contenedores de plástico con el horno en
estos modos, a menos que el fabricante del contenedor indi-
que que resulta adecuado.
Si no está seguro de cómo conectar el horno, consulte a un
electricista autorizado y certi cado.
Ni el fabricante ni el distribuidor aceptan ninguna responsabili-
dad por averías en el horno o lesiones personales que resulten
del incumplimiento del procedimiento de conexión eléctrica
correcto.
Se puede formar vapor de agua o gotas de vez en cuando en
las paredes del horno o alrededor de los sellos de las puertas y
las super cies de sellado. Esto es normal y no un indicador de
fugas o mal funcionamiento del microondas.
Este aparato está destinado para su uso doméstico y aplica-
ciones similares, tales como: áreas de cocina reservadas para
personal en tiendas, o cinas y otros entornos profesionales,
granjas, uso por parte de clientes de hoteles, moteles y otros
entornos de tipo residencial, o de tipo pensión.
Este símbolo signi ca que las super cies pueden
calentarse durante el uso.

ES
ES – 11
ES – 11
INSTALACIÓN
1. Retire todos los materiales de embalaje del interior del horno y cualquier película protectora que se encuentre en
la super cie de la carcasa del horno microondas.
2. Revise detenidamente el horno para detectar cualquier signo de avería.
3. Coloque el horno en una super cie nivelada segura, lo su cientemente rme como para que pueda soportar el
peso del horno, sumándole el artículo más pesado posible para cocinar en el horno. No coloque el horno sobre un
armario.
4. Seleccione una super cie plana que proporcione su ciente espacio abierto para las rejillas de ventilación de
entrada o salida. Consulte la imagen de la primera página. La super cie posterior del aparato se debe colocar
contra una pared.
• La altura mínima de la instalación es de 85 cm.
• Se requiere un espacio mínimo de 20cm entre las paredes del horno y las paredes u objetos adyacentes.
• Deje un espacio de 30 cm como mínimo por encima del horno.
• No quite las patas de la parte inferior del horno.
• Bloquear los ori cios de entrada o de salida puede provocar daños en el horno.
• Sitúe el horno lo más alejado de la radio y la televisión como sea posible. El funcionamiento del horno de microon-
das puede provocar interferencias en la recepción de radio o televisión.
20 cm
30 cm
85 cm
10 cm
20 cm
5. Conecte de forma segura el enchufe del horno a una toma de corriente eléctrica estándar conectada a tierra.
ADVERTENCIA:
No coloque el horno en un lugar donde se genere calor, vaho o mucha humedad (por ejemplo, cerca o encima de un
horno convencional), o cerca de materiales combustibles (por ejemplo, cortinas).
No bloquee ni obstruya los ori cios de ventilación de aire.
No coloque objetos encima del horno.
No toque el exterior del microondas cuando esté en funcionamiento o poco después de utilizarlo porque estará
caliente.

ES – 12
ES – 12
INTERFERENCIAS DE RADIO
El uso del microondas puede causar interferencias en aparatos de radio, televisores u otros equipos similares. Las
interferencias se pueden reducir adoptando las siguientes medidas:
1. Limpie la puerta y la cavidad en sus zonas de contacto.
2. Reoriente la dirección de la antena receptora de radio o televisión.
3. Reubique el horno con respecto al receptor.
4. Enchufe el microondas a una toma diferente de modo que el horno y el receptor no se encuentren en la misma
toma de electricidad.
INSTRUCCIONES DE TOMA DE TIERRA (MASA)
Este electrodoméstico debe contar con una toma a tierra. Este horno está equipado con un cable que incluye un
hilo de puesta a tierra con una patilla en el enchufe. El enchufe debe conectarse a una toma de pared correctamente
instalada y con puesta a tierra. En el caso de que se produzca un cortocircuito eléctrico, la puesta a tierra reduce el
riesgo de una descarga eléctrica a través de un cable de escape para la corriente eléctrica. Se recomienda utilizar un
circuito separado solo para el horno.
ADVERTENCIA: El uso inadecuado del enchufe de puesta a tierra puede dar como resultado una
descarga eléctrica.
NOTA:
1. Si tiene alguna duda sobre las instrucciones eléctricas o de puesta a tierra, consulte a un técnico o a un electricista
certi cado.
2. Ni el fabricante ni el distribuidor aceptan ninguna responsabilidad por averías en el horno o lesiones personales
resultantes del incumplimiento del procedimiento de conexión eléctrica.
El cable de alimentación utilizado en su horno microondas utiliza los siguientes cables de colores:
Verde y amarillo = TOMA DE TIERRA | Azul = NEUTRO | Marrón = FASE
ESPECIFICACIONES
Nombre del modelo: YC-PC322A
Tensión de línea de CA 230~240 V, 50 Hz monofásico
Fusible/interruptor del circuito de la línea de distribución
10A
Potencia
Consumo 2300W
Potencia de salida de microondas 1000W
Potencia de salida de grill 1250 W
Potencia de convección 2300 W
Potencia en modo apagado <0,5W
Frecuencia de microondas 2450 MHz*
Dimensiones exteriores (An) x (Al) x (P)mm 539 x 280 x 415
Dimensiones de la cavidad (An) x (Al) x (P)**mm 362 x 223 x 378
Dimensiones del plato giratorio de cristal (ø mm) 315
Capacidad del horno 32 litros**
Dimensiones la bandeja para hornear (diámetro x H in mm)
317 x 48
Tamaño de la parrilla para grill (diámetro x altura en mm)
255 x 80
Peso 21 kg
Lámpara del horno (tipo LED) 1,5W
* - Este producto cumple los requisitos de la norma europea EN55011. De conformidad con esta norma, este producto se clasi ca como
equipo de grupo2 claseB.
Grupo2 signi ca que el equipo genera energía de radiofrecuencia intencionadamente en forma de radiación electromagnética para el
tratamiento térmico de los alimentos. ClaseB signi ca que el equipo se puede usar en entornos domésticos.
** - La capacidad interna se calcula midiendo la anchura, la profundidad y la altura máxima. La capacidad real de almacenaje de alimen-
tos es inferior.
COMO PARTE DE UNA POLÍTICA DE MEJORA CONTINUA, NOS RESERVAMOS EL DERECHO DE CAMBIAR EL DISEÑO SIN
PREVIO AVISO.

ES
ES – 13
ES – 13
HORNO Y ACCESORIOS
1. Sistema de bloqueo de seguridad de la
puerta
2. Ventana del horno
3. Panel de control
4. Pantalla
5. Cavidad del horno
6. Tapa del emisor de ondas (no extraer)
7. Bandeja de cristal
8. Anillo de rodamiento
9. Acoplamiento del plato giratorio
10. Parrilla
11. Bandeja para hornear
12. Ori cios de ventilación
13. Mueble exterior
14. Cable de alimentación
• La parrilla y la bandeja para hornear se ha
diseñado solo para hornos con grill y sistema
de convección. NO utilice accesorios de metal
con la función de microondas.
• Para utilizar la parrilla consulte las secciones
dedicadas a la preparación de alimentos con la
función grill de este manual de usuario.
Nunca toque el grill cuando esté caliente.
NOTA: Cuando realice pedidos de accesorios,
mencione dos elementos: el nombre de la pieza
y el nombre del modelo.
NOTAS:
• Después de preparar alimentos grasos sin una
tapa, limpie bien siempre la cavidad y cualquier utensilio de cocina; estos elementos deben estar secos y libre de
grasas. La grasa acumulada puede recalentarse y causar humo o incendiarse.
• Cuando utilice el microondas, coloque siempre los utensilios en la placa giratoria.
• NO utilice la parrilla ni la bandeja para hornear mientras utiliza la función de microondas.
ADVERTENCIA: Este símbolo signi ca que las super cies pueden calentarse durante el uso.
La puerta, el armario exterior, el interior del horno, los accesorios y los platos pueden alcanzar altas
temperaturas durante el funcionamiento. Para prevenir quemaduras, utilice siempre guantes gruesos para
horno.
2
7
5
9
6
8
1
3
4
14
12
13
1110

ES – 14
ES – 14
PANEL DE CONTROL
1. PANTALLA DIGITAL: muestra el tiempo de cocción, la potencia, el reloj e
otros indicadores.
2. 10 SECONDS, 1 MINUTE, 10 MINUTES (10 SEGUNDOS, 1 MINUTO,
10MINUTOS): permite establecer el tiempo de preparación de los alimentos
o el reloj.
3. Teclas de MENÚS AUTOMÁTICOS: pulse para seleccionar un menú de
preparación automática de los alimentos (consulte la página 18 para
obtener consejos sobre su uso).
4. START/QUICK START (INICIO/INICIO RÁPIDO): (página 15).
5. MICROWAVE POWER (POTENCIA DE MICROONDAS): pulse para seleccionar el
nivel de potencia del microondas. (Página 15).
6. GRILL pulse para establecer el programa de preparación de alimentos al grill.
(Página 16).
7. MICROWAVE+GRILL (MICROONDAS+GRILL): pulse para establecer el
programa de preparación combinada de alimentos con microondas y grill.
(Página 16).
8. CONVECTION TEMPERATURE (TEMPERATURA DE CONVECCIÓN): pulse para
seleccionar al temperatura de convección.
9. MICROWAVE+CONVECTION (MICROWAVE+CONVECCIÓN): pulse para
seleccionar la preparación de alimentos combina con convección.
10. UP : (ABAJO): pulse para establecer el peso de los alimentos o las raciones.
11. DOWN : (ABAJO): pulse para establecer el peso de los alimentos o las raciones.
12. STOP/ECO (PARAR/MODO ECO): pulse una vez para detener temporalmente la preparación de alimentos o dos
veces para cancelarla completamente.
Permite establecer el modo de ahorro de energía. (Página 19).
13. CHILD LOCK (BLOQUEO PARA NIÑO): (Página 20).
14. TIME/SET CLOCK
(HORA/AJUSTE DEL RELOJ): permite establecer la hora y la función de temporizador. (Página 14).
ANTES DE UTILIZAR EL HORNO
Cuando el horno se enchufa por primera vez, se oirá un pitido y la pantalla mostrará "1:00". No es necesario ajustar el
reloj para que el horno funcione correctamente. Siga las instrucciones de la sección "Ajuste del reloj" de este manual
de instrucciones.
La primera vez que se utilice la función de grill y/o convección, el aparato puede despedir humo y olores. Para
evitar que esto ocurra cuando se están preparando alimentos, utilice la función de grill sin alimentos durante
aproximadamente 20minutos.
• Tras abrir y cerrar la puerta, el horno entrará en modo en espera. Si no se pulsa ningún botón durante un minuto,
la pantalla permanecerá encendida y los botones no funcionarán. Para volver al modo en espera, abra y cierre la
puerta.
• Durante la preparación de alimentos, si se presiona el botón STOP/ECO una vez, el ciclo de preparación de
alimentos se detendrá. Para reiniciar la preparación de alimentos, pulse el botón START/QUICK START. Si se pulsa el
botón STOP/ECO dos veces, la preparación de alimentos se detendrá.
• Cuando se programe el horno para una función particular y se produzca una pausa entre las pulsaciones de los
botones superior a 30segundos, el horno volver al modo en espera.
• Cuando se complete el ciclo de preparación de alimentos, la pantalla mostrará "End" (Final) y se oirá un todo cada
dos minutos hasta que se pulse un botón o se abra la puerta.
AJUSTE DEL RELOJ
Este horno incorpora un reloj que se puede usar en modo de 12 o de 24horas. Para ajustar el reloj, siga las
instrucciones que se indican a continuación:
1. En modo en espera, mantenga pulsado el botón TIME/SET CLOCK durante al menos 3segundos para acceder al
10 SECONDS 1 MINUTE 10 MINUTES
YC-PC322A
1000W
STOP/ECO TIME/
SET CLOCK
CHILD
LOCK
AUTO PROGRAMS
REHEAT
BEVERAGES JACKE T
POTATO PIZZA POPCORN
FROZEN
MEAL FRESH
VEGETABLES PORRID GE AUTO
DEFROST
GRILLED
STEAK GRILLED
CHICKEN AUTO
REHEAT
ROAST
BEEF
ROAST
CHICKEN
OVEN
CHIPS
MICROWAVE
POWER
MICROWAVE
+ CONVECTION
CONVECTION
TEMPERATURE
GRILL
START/
QUICK START
MICROWAVE
+ GRILL
13
5
3
2
14
11
6
8
9
7
10
12
4
1

ES
ES – 15
ES – 15
modo de ajuste del reloj.
2. Pulse el botón TIME/SET CLOCK para elegir entre el modo de reloj de 12 o de 24horas.
3. Utilice los botones 10 SECONDS, 1 MINUTE y 10 MINUTES para establecer las horas y minutos deseados.
4. Pulse el botón TIME/SET CLOCK para almacenar y salir del modo de ajuste del reloj.
• No es necesario ajustar el reloj del horno para que funcione con normalidad.
• En el modo de preparación de alimentos, pulse el botón TIME/SET CLOCK para ver la hora del día (si se ha ajustado).
La hora del día volverá a la cuenta atrás de preparación de alimentos trascurridos cinco segundos. Tenga en cuenta
que la hora del día no se puede ver si se ha establecido el temporizador de la cocina.
PREPARACIÓN DE ALIMENTOS CON LA FUNCIÓN DE MICROONDAS
Para usar la función de microondas, siga las instrucciones que se indican a continuación:
1. En el modo en espera, pulse el botón MICROWAVE POWER para seleccionar el nivel de potencia. Cada vez se
pulse este botón, la pantalla mostrará el nivel de potencia del microondas.
2. Una vez seleccionado el nivel de potencia de microondas deseado, use los botones 10 SECONDS, 1 MINUTE y
10MINUTES para seleccionar el tiempo para preparar los alimentos.
3. Pulse el botón START/QUICK START para iniciar la preparación de alimentos.
4. Cuando se complete el ciclo de preparación de alimentos, la pantalla mostrará "End" (Final) y se oirá un tono cada
dos minutos hasta que se pulse un botón o la puerta se abra.
Tenga en cuenta las indicaciones de la tabla siguiente como guía. El horno tiene 10niveles de potencia de
microondas: 10%, 20%, 30%, 40%, 50%, 60%, 70%, 80%, 90% y 100%. La salida de tensión actual puede calcularse
multiplicando la potencia de microondas por el porcentaje.
Guía para preparar alimentos con el microondas:
Pantalla Potencia de
microondas Uso sugerido
P100 100 % Se utiliza para preparar o recalentar alimentos rápidamente, por ejemplo, guisos,
bebidas calientes, verduras, etc.
P-80 80 %
Para alimentos densos que requieren un periodo de preparación largo cuando se
preparan de manera convencional, por ejemplo, asados de carne, es recomendable
utilizar esta con guración de potencia para garantizar que la carne quede tierna.
P-60 60 %
Para la preparación durante más tiempo de alimentos densos como asados,
pasteles de carne y alimentos emplatados; también para platos sensibles como
salsa de queso y bizcochos.
P-40 40 %
Para asegurarse de que el plato se descongela de manera uniforme, seleccione
esta con guración de potencia. Este ajuste es ideal para preparar arroz, pasta,
albóndigas y an de huevo a fuego lento.
P-20 20 % Para descongelar alimentos lentamente, por ejemplo, de pasteles de crema u
hojaldre.
• Durante la preparación de alimentos, puede comprobar el nivel de potencia de cocción si mantiene pulsado el
botón MICROWAVE POWER.
• El tiempo máximo de cocción es de 95minutos.
INICIO RÁPIDO
Si necesita preparar alimentos a nivel de potencia 100%, pulse simplemente el botón START/QUICK START mientras
está en el modo en espera. Cada vez que pulse el botón START/QUICK START, se añadirán 30segundos al tiempo de
preparación de alimentos.

ES – 16
ES – 16
PREPARACIÓN DE ALIMENTOS AL GRILL
El elemento de calor del grill situado en la parte superior de la cavidad del horno solo tiene un ajuste de potencia, y es
e ciente y económico. El grill es ideal para preparar beicon, letes de jamón de cerdo, palitos de pescado y pasteles
de té.
Utilice la parrilla para asar pequeñas piezas de alimentos como beicon y salchichas, dándoles la vuelta a mitad de
preparación. Los alimentos se puede colocar directamente sobre la parrilla o sobre un plato de an o en un plato
resistente al calor. Para asegurarse de que no gotea grasa o aceite de los alimentos que se están preparando, coloque
una bandeja adecuada debajo de la parrilla.
Al dorar o tostar la super cie de alimentos en una cazuela, se puede utilizar la parrilla si el contenedor es lo
su cientemente plano. Sin embargo, se aconseja colocar este tipo de contenedores directamente sobre el plato
giratorio. Permita cierto tiempo adicional para dorar o tostar al gusto. No se debe usar la parrilla para asar.
Para usar la función de grill, siga las instrucciones que se indican a continuación:
1. En el modo en espera, pulse el botón GRILL para seleccionar la función de grill. La pantalla mostrará "Grl".
2. Utilice los botones 10 SECONDS, 1 MINUTE y 10 MINUTES para seleccionar el tiempo deseado.
3. Pulse el botón START/QUICK START para iniciar la preparación de alimentos.
4. Cuando se complete el ciclo de preparación de alimentos, la pantalla mostrará "End" (Final) y el tono se oirá cada
dos minutos hasta que se pulse un botón o la puerta se abra.
MICRONDAS + GRILL
El uso de la función de microondas y grill permite preparar alimentos y dorarlos rápidamente. Para usar la función de
microondas y grill, siga las instrucciones que se indican a continuación:
1. En modo en espera, pulse el botón MICROWAVE+GRILL una o dos veces para seleccionar "Co-1" o "Co-2".
2. Utilice los botones 10 SECONDS, 1 MINUTE y 10 MINUTES para establecer el tiempo de preparación de los
alimentos.
3. Pulse el botón START/QUICK START para comenzar.
4. Cuando se complete el ciclo de preparación de alimentos, la pantalla mostrará "End" (Final) y se oirá un tono cada
dos minutos hasta que se pulse un botón o la puerta se abra.
Función Microwave + Grill
Pantalla Proceso de preparación de alimentos Uso sugerido
Co-1
El horno preparará los alimentos en el siguiente ciclo:
Microondas durante 22segundos y luego al grill
durante 11segundos. Este proceso se repetirá hasta
nal del tiempo total establecido.
Despieces de pollo, pechugas de pollo y
chuletas de cerdo
Co-2
El horno preparará los alimentos en el siguiente ciclo:
Microondas a potencia máxima durante 18segundos
y luego al grill durante 15segundos. Este proceso se
repetirá hasta nal del tiempo total establecido.
Pollo entero
• El tiempo máximo de preparación con la función de asado es 95minutos.
• Durante la operación de asado permita que el humo y los olores se dispersen abriendo una ventana o encendiendo
la ventilación de la cocina. Esto es normal y no es indicativo de avería del horno.
• Durante la preparación de alimentos, puede comprobar la combinación actual de potencia de cocción tocando el
botón MICROWAVE + GRILL.
• Al utilizar la función de grill, el grill se activará y se desactivará a intervalos regulares para evitar el
sobrecalentamiento.
• Al utilizar la función MICROWAVE+GRILL, los alimentos se deben situar en un contenedor adecuado directamente
sobre el plato base del horno.
ADVERTENCIA: La puerta, el armario exterior, el interior del horno, los accesorios y los platos pueden calentarse
mucho durante el uso del aparato. Para prevenir quemaduras utilice siempre guantes gruesos para horno.

ES
ES – 17
ES – 17
CONVECCIÓN
Durante la preparación de alimentos por convección, el aire caliente circula a través de la cavidad del horno para
dorar y preparar alimentos crujientes de forma rápida y uniforme. Este horno puede programarse a 13temperaturas
diferentes de preparación de alimentos (200°C, 190°C, 180°C, 170°C, 160°C, 150°C, 140°C, 130°C, 120°C, 110°C).
Se recomienda precalentar el horno antes de preparar los alimentos en el modo de convección. Para precalentar y
preparar los alimentos con ayuda de la función por convección, siga las instrucciones siguientes:
Este horno se puede programar para combinar las funciones de precalentamiento y cocción por convección.
1. En el modo en espera, pulse repetidamente el botón CONVECTION para seleccionar repetidamente la
temperatura por convección.
2. Pulse el botón START/QUICK START para iniciar el ciclo de precalentamiento.
3. Cuando se alcance la temperatura designada, el horno emitirá un pitido.
Cuando el horno se haya precalentado y haya sonado un pitido:
1. Abra el horno y coloque el recipiente de alimentos en el centro de la parte inferior de la cavidad.
2. Utilice los botones 10 SECONDS, 1 MINUTE y 10 MINUTES para establecer el tiempo de preparación de los
alimentos. El tiempo máximo es de 95minutos.
3. Pulse el botón START/QUICK START para comenzar.
NOTA: El horno pitará cada dos segundos cuando se alcance la temperatura de precalentamiento. La temperatura de
precalentamiento se mantendrá durante 30minutos después de que el horno se haya apagado.
MICROONDAS + CONVECCIÓN
El modo Microondas + Convección facilita y agiliza la preparación de alimentos porque utiliza la preparación rápida de
alimentos por microondas y convección para obtener resultados crujientes.
Es posible preparar los alimentos a cuatro temperaturas diferentes de convección. Para iniciar el modo de preparación
dual, siga las instrucciones siguientes:
1. En el modo en espera, pulse repetidamente el botón MICROWAVE+CONVECTION para seleccionar la
temperatura (200°C, 170°C, 140°C, 110°C).
2. Pulse los botones 10 SECONDS, 1 MINUTE y 10 MINUTES para establecer el tiempo de preparación de los
alimentos. El tiempo posible va de 10segundos a 95minutos.
3. Pulse el botón START/QUICK START para comenzar.
Cuando utilice la función Microwave + Convection, el tiempo entre la preparación de los alimentos por microondas y
por convección se distribuye como se muestra debajo. Seleccione la opción adecuada para preparar los alimentos y
que queden crujientes.
Pantalla Proceso de preparación de alimentos
200 °C 10segundos en modo microondas y luego 23segundos en modo convección. El ciclo se
repetirá hasta el nal del tiempo de cocción.
170 °C 15segundos en modo microondas y luego 18segundos en modo convección. El ciclo se
repetirá hasta el nal del tiempo de cocción.
140 °C 19segundos en modo microondas y luego 14segundos en modo convección. El ciclo se
repetirá hasta el nal del tiempo de cocción.
110 °C 24segundos en modo microondas y luego 9segundos en modo convección. El ciclo se repetirá
hasta el nal del tiempo de cocción.

ES – 18
ES – 18
MENÚ AUTOMÁTICO
Para su comodidad, los programas automáticos permiten preparar alimentos de forma rápida y e ciente con la
pulsación de unos pocos botones. No es necesario programar la duración ni la potencia de cocción. Todo lo que
necesita hacer es pulsar el botón de preparación automática de alimentos, introducir el peso o las piezas con ayuda de
los botones el ARRIBA y ABAJO, y pulsar el botón START/QUICK START.
Por ejemplo, para preparar dos unidades de patatas asadas.
1. Abra la puerta y coloque los alimentos dentro del horno utilizando los contenedores adecuados para el ciclo de
cocción que se va a usar.
2. Cierre la puerta.
3. Pulse el botón JACKET POTATO (Patatas asadas).
4. Utilice los botones UP y DOWN para especi car el número de patatas.
5. Pulse el botón START/QUICK START.
6. Cuando se complete el ciclo de preparación de alimentos, la pantalla mostrará "End" (Final) y se oirá un tono cada
dos minutos hasta que se pulse un botón o la puerta se abra.
Menús de preparación automática de alimentos:
Menú automático Método para seleccionar el peso y las piezas Tamaño/peso
Alimentos
congelados (g) Seleccione el peso utilizando los botones UP y DOWN. A
continuación, pulse el botón START/QUICK START para empezar a
preparar los alimentos.
De 200 al 800g
Descongelar
automáticamente De 100 al 1800g
Recalentar bebidas
Seleccione el número de tazas mediante los botones UP y DOWN. A
continuación, pulse el botón START/QUICK START para empezar a
preparar los alimentos.
De 1 a 3 tazas
(200ml cada una)
Patatas asadas
Seleccione el número de patatas mediante los botones UP y DOWN
y pulse el botón START/QUICK START para empezar a preparar los
alimentos. Dependiendo del número de patatas seleccionado puede
que se le pida que las recoloque a lo largo del ciclo de preparación.
De 1 a 3 patatas
(230g cada una)
Palomitas
Seleccione el peso mediante los botones UP y DOWN. A
continuación, pulse el botón START/QUICK START para empezar a
preparar los alimentos.
100g
Verduras frescas De 200 al 600g
Pizza 150g/300g/450g
Gachas De 50 al 150g
Bistec a la parrilla De 200 al 600g
Pollo a la parrilla* De 200 al 600g
Recalentar
automáticamente* De 200 al 800g
Patatas fritas al
horno 200 g
Asado de ternera/
cordero De 200 al 600g
Pollo asado De 800g a 1400g
• El resultado de la preparación automática depende de factores como la forma y el tamaño de los alimentos, su
preferencia personal y la forma en la que se dispongan los alimentos en el horno. Si descubre que el resultado no es
del todo satisfactorio, ajuste el tiempo de preparación en consecuencia.
• En algunos programas de cocción, puede que se solicite dar la vuelta a los alimentos. Abra la puerta, de la vuelta a
los alimentos, cierre la puerta y pulse el botón START/QUICK START para reanudar la cocción.
• Utilice guantes de horno (o utensilios similares) para dar la vuelta a los alimentos.

ES
ES – 19
ES – 19
DESCONGELAR AUTOMÁTICAMENTE
La función de descongelación automática le permite descongelar los alimentos en función del peso. El tiempo de
descongelación y el nivel de potencia se establecen automáticamente una vez que se programan la categoría de los
alimentos. El peso de los alimentos congelados varía de 200 a 1800g.
1. En el modo en espera, pulse el botón AUTO DEFROST.
2. Use los botones UP y DOWN para seleccionar el peso de los alimentos que desea descongelar.
3. Pulse el botón START/QUICK START para iniciar el ciclo de descongelación.
4. Si el horno se detienen durante el ciclo de descongelación, dé la vuelta a los alimentos para asegurarse de
descongelarlos de forma uniforme y pulse START/QUICK START para descongelar el tiempo restante.
5. Cuando se complete el ciclo de descongelado, la pantalla mostrará "End" (Final) y se oirá un todo cada dos
minutos hasta que se pulse un botón o se abra la puerta.
RECALENTAR AUTOMÁTICAMENTE
El horno le permite recalentar los alimentos en función del peso introducido por el usuario. El tiempo de
descongelación y el nivel de potencia se establecen automáticamente una vez que se programan la categoría de los
alimentos. El peso para recalentar varía de 200 a 800g.
1. En el modo espera, pulse el botón RECALENTAR AUTOMÁTICAMENTE.
2. Use los botones UP y DOWN para seleccionar el peso de los alimentos que desea recalentar
3. Pulse el botón START/QUICK START.
4. Cuando se complete el ciclo de preparación de alimentos, la pantalla mostrará "End" (Final) y se oirá un tono cada
dos minutos hasta que se pulse un botón o la puerta se abra.
TEMPORIZADOR DE COCINA
El horno incorpora un temporizador de cocina que cuenta hacia atrás a partir del tiempo establecido.
1. En el modo en espera, pulse una vez el botón TIME/SET CLOCK.
2. Utilice los botones 10 SECONDS, 1 MINUTE y 10 MINUTES para establecer el tiempo deseado de preparación de
los alimentos. El tiempo máximo es de 95minutos.
3. Pulse el botón START/QUICK START para con rmar.
4. Aparecerá la cuenta atrás en la pantalla durante el tiempo de cocción establecido.
5. Cuando la pantalla llegue a cero, se oirá un tono.
También se puede utilizar el temporizador de cocina durante el modo de preparación de alimentos. Para ello, siga
los pasos indicados anteriormente mientras se preparan los alimentos. Una vez activado el temporizador de cocina,
este aparecerá en la pantalla durante cinco segundos y luego revertirá al contador de cuenta atrás durante el ciclo
de preparación de alimentos. Para ver el temporizador, pulse el botón TIME/SET CLOCK una vez y el temporizador
de cocina aparecerá durante cinco segundos, después de lo cual revertirá a la cuenta atrás de preparación de los
alimentos.
• Para cancelar el programa del temporizador, pulse el botón STOP/ECO y la pantalla mostrar el tiempo.
• Si el ciclo de preparación de alimentos se ha iniciado, es posible iniciar el temporizador de cocina siguiendo los
pasos indicados arriba.
FUNCIÓN DE AHORRO DE ENERGÍA
Esta función permite ahorrar energía mientras el horno no se está utilizando. Para activar esta función en estado en
espera, mantenga pulsado el botón STOP/ECO durante tres segundos; la pantalla se apagará y el horno entrará en
modo de ahorro de energía.
Para cancelar el modo de ahorro de energía, pulse cualquier botón o abra y cierre la puerta del horno.

ES – 20
ES – 20
FUNCIÓN DE SILENCIO
Es posible silenciar los tonos del microondas mediante la función de silencio. Para establecer la función de silencio,
pulse el botón CHILD LOCK una vez que la pantalla muestre "OFF" durante cinco segundos. En el modo de silencio,
no se escuchará ningún sonido cuando se pulsen los botones.
Para desactivar la función de silencio, pulse el botón CHILD LOCK una vez; la pantalla mostrará "ON" durante cinco
segundos para indicar que se activado de nuevo el sonido.
Si se establece la función y el horno se desconecta de la corriente, se cancelará cuando se vuelva a reconectar la
alimentación.
BLOQUEO DE SEGURIDAD
Esta es una función automática para evitar el uso del horno sin supervisión por niños. En el modo en espera, si no se
realiza ninguna operación en el transcurso de un minuto, el horno entrará en modo de bloqueo de seguridad y en
la pantalla aparecerá "Loc". En estado de bloqueo, se desactivan todos los botones. Si se pulsa un botón cualquiera,
aparecerá la indicación de bloqueo en la pantalla durante cinco segundos para recordar al usuario que cancele el
bloqueo de seguridad.
Para desactivar el bloqueo de seguridad, simplemente abra y cierre la puerta del microondas; el teclado numérico se
volverá a activar y el indicador luminoso del bloqueo se apagará.
BLOQUEO PARA NIÑOS
Para establecer la función de bloqueo para niños, mantenga pulsado el botón CHILD LOCK durante tres segundos.
Se oirá un pitido largo, la pantalla mostrará "Loc" y el horno pasará a modo de bloqueo para niños. En este modo, la
pantalla mostrará el reloj. Si se pulsa algún botón o se abre la puerta se mostrará "Loc" en la pantalla durante cinco
segundos.
Para cancelar la función de bloqueo para niños, mantenga pulsado el botón CHILD LOCK durante tres segundos hasta
que suene un pitido largo.
MECANISMO DE PROTECCIÓN AUTOMÁTICO
PROTECCIÓN CONTRA SOBRECALENTAMIENTO: si el horno siente una alta temperatura, la pantalla mostrará "E01"
y dejará de funcionar. Este estado se puede cancelar pulsando el botón STOP/ECO.
PROTECCIÓN CONTRA BAJA TEMPERATURA: si el horno entra en modo de protección de baja temperatura, la
pantalla mostrará "E02" y dejará de funcionar. Este estado se puede cancelar pulsando el botón STOP/ECO.
PROTECCIÓN POR AVERÍA DE UN SENSOR: si el horno detecta un problema con uno de los sensores, la pantalla
mostrará "E03" y el horno dejará de funcionar. Asimismo, el horno emitirá un tono de advertencia. Este estado se
puede cancelar pulsando el botón STOP/ECO.

ES
ES – 21
ES – 21
LIMPIEZA Y MANTENIMIENTO
• Apague el horno y desconecte el cable de la toma de corriente cuando vaya a limpiarlo.
• Mantenga limpia la parte interior del horno. Limpie con un paño húmedo las paredes del horno si se producen
salpicaduras o se derraman líquidos de alimentos en los lados, la parte superior o el plato giratorio. Utilice
detergentes suaves si el horno se ensucia mucho. Evite utilizar limpiadores abrasivos o aerosoles, pues podrían dejar
manchas, rayar o deslustrar la super cie de la puerta.
• La parte exterior del horno debe limpiarse con un paño húmedo. Para evitar dañar los componentes internos del
horno, no debe ltrarse agua a través de las aperturas de ventilación.
• Limpie frecuentemente la puerta y la ventana en ambos lados, las juntas de la puerta y las partes adyacentes con un
paño húmedo para eliminar derramamientos y salpicaduras.
• No utilice un limpiador abrasivo.
• No utilice limpiadores a vapor
• No permita que el panel de control se humedezca. Limpie con un paño suave y húmedo. Cuando limpie el panel de
control, deje abierta la puerta para evitar que el horno se encienda accidentalmente.
• Si se acumula calor dentro o alrededor de la puerta del horno, límpielo con un paño suave. Esto puede ocurrir si el
horno es utilizado en entornos de alta humedad. No se trata de un fallo.
• El plato giratorio del horno debe limpiarse regularmente para evitar contaminación y posibles arcos voltaicos o
daños. Limpie simplemente la super cie inferior del horno con un detergente suave.
• Elimine los olores del horno mezclando una taza de agua con el zumo y la piel de un limón en un cuenco adecuado
para microondas. Caliente durante cinco minutos. A continuación, limpie y seque bien con un paño suave.
• Si la bombilla deja de brillar, póngase en contacto con el servicio técnico para recabar consejo.
• El horno debe limpiarse de manera regular y se deben eliminar todos los depósitos de alimentos. No mantener
el horno limpio podría dar lugar a un deterioro de la super cie, y podría afectar negativamente a la vida útil del
aparato y originar situaciones de peligro.
• No elimine este aparato con la basura doméstica; consulte las normas de eliminación para este tipo de productos
aplicables en su país.

ES – 22
ES – 22
UTENSILIOS ADECUADOS PARA EL HORNO
1. El material ideal para los utensilios del microondas es transparente a las microondas, pues permite que la energía
traspase el contenedor y caliente el alimento.
2. Las microondas no pueden atravesar el metal, por lo que no deben utilizarse utensilios de metal ni platos con
acabado de metal.
3. No utilice productos de papel reciclado al cocinar con microondas, ya que pueden contener pequeños fragmentos
de metal que podrían causar chispas o un incendio.
4. Se recomienda el uso de platos redondos u ovalados en lugar de cuadrados o alargados, ya que los alimentos de
las esquinas tienden a cocerse en exceso.
5. Se pueden utilizar láminas de aluminio en tiras para evitar la cocción excesiva de áreas expuestas. Pero tenga
cuidado de utilizar demasiadas y de mantener una distancia de 2,54cm entre el aluminio y la cavidad.
La siguiente lista es una guía general para ayudarle a seleccionar los utensilios correctos.
Utensilios de cocina Microondas
Seguro
Grill/
Convección Comentario
Platos para dorar / Siga siempre las instrucciones del fabricante.
No exceda los tiempos de calentamiento que se indican. Tenga mucho cuidado
ya que estos platos se calientan mucho.
Porcelana y cerámica / Los utensilios de porcelana, cerámica, loza de barro esmaltada y porcelana
na son generalmente adecuados, a excepción de aquellas con decoración
metálica.
Cristal resistente al calor
Asegúrese de utilizar cristalería adecuada para hornos microondas.
Cristal no resistente al calor
Cerámicas no resistentes al calor Asegúrese de que el material cerámico no es demasiado grueso o que
incorpore un alto contenido mineral.
Plato de plástico seguro para su uso en
microondas
Asegúrese siempre de que los utensilios de cocina de plástico son adecuados
para horno microondas.
Papel de cocina / Utilice solo papel de cocina recomendado para microondas.
Cristalería, por ejemplo, Pyrex® / Se debe tener cuidado si se utiliza cristalería na, ya que puede romperse o
agrietarse si se calienta bruscamente.
Bandeja de metal No se recomienda usar utensilios de metal, ya que crearían un arco eléctrico y
provocar un incendio.
Parrilla metálica No se recomienda usar utensilios de metal, ya que crearían un arco eléctrico y
provocar un incendio.
Papel de aluminio
Los recipientes de aluminio /
Se pueden utilizar trozos pequeños de papel de aluminio para proteger los
alimentos contra el sobrecalentamiento. Mantenga el papel al menos a 2,54 cm
de distancia de las paredes del horno, ya que puede producirse arco eléctrico.
Los recipientes de aluminio no son recomendables a menos que los
especi que el fabricante, por ejemplo, Microfoil®, siga las instrucciones
cuidadosamente.
Film transparente No se deben tocar los alimentos y deben perforarse para permitir dejar salir
el vapor.
Plástico/poliestireno, por ejemplo
recipientes de comida rápida
Se debe tener cuidado con algunos recipientes, ya que pueden deformarse,
derretirse o descolorarse con las altas temperaturas.
Bolsas para congelar/asar Se deben perforar para dejar salir el vapor. Asegúrese de que las bolsas son
adecuadas para su uso en microondas.
Platos de papel, tazas y papel de cocina No utilice ataduras de plástico o metal, ya que pueden derretirse o incendiarse
debido al ‘arco eléctrico’.
Recipientes de madera y paja
Utilizar únicamente para calentar o para absorber la humedad.
Se debe tener cuidado, ya que el sobrecalentamiento puede provocar un
incendio.
Papel reciclado y periódicos
Vigile siempre el horno cuando se utilizan estos materiales, ya que el
sobrecalentamiento puede ocasionar un incendio.
Puede contener extractos de metal que pueden causar "arco eléctrico" y puede
provocar un incendio.
ADVERTENCIA: Al calentar alimentos en recipientes de papel o plástico, vigile el horno debido a la
posibilidad de ignición.
NOTA: No deje el horno sin atender mientras lo usa.

ES
ES – 23
ES – 23
CONSEJOS PARA PREPARAR ALIMENTOS CON EL MICROONDAS
Los microondas preparan los alimentos de manera más rápida que los métodos convencionales de cocina. Por lo
tanto, es muy importante seguir determinadas técnicas para garantizar buenos resultados. Muchas de las técnicas
siguientes se parecen a las que se usan en los métodos convencionales de cocina.
ADVERTENCIA: Los líquidos y alimentos no deben calentarse en recipientes sellados ni en tarros
orecipientes con la tapa puesta, ya que se acumulará presión en el interior, lo que
podría provocar la explosión del recipiente o tarro.
NOTAS SOBRE LOS CONSEJOS PARA COCINAR:
• Vigile siempre el horno mientras lo utiliza.
• Asegúrese de que los utensilios sean adecuados para hornos microondas.
• Utilice exclusivamente palomitas para microondas en el envase recomendado (siga las instrucciones del fabricante).
Nunca debe utilizar aceite, a menos que el fabricante así lo indique, y nunca debe preparar las palomitas durante
más tiempo del recomendado.
ADVERTENCIA: Si supera los tiempos de cocción recomendados y utiliza niveles de potencia
demasiado altos, los alimentos se podrían calentar en exceso o quemar, y en
situaciones extremas podrían incendiarse y dañar el horno.
Colocar
Coloque las partes más gruesas de los alimentos hacia el exterior del plato, p.ej., los muslos de pollo.
Los alimentos que se colocan hacia el exterior del plato reciben más energía y, por lo tanto, se preparan más
rápidamente que los alimentos colocados en el centro.
Tapar
Algunos alimentos se preparan mejor en el microondas si se tapan.
Utilice lm transparente ventilado de adherencia o una tapa adecuada.
Perforar
Los alimentos con cáscara, piel o membrana se deben perforar en varios puntos antes de cocinarlos o recalentarlos,
ya que, de lo contrario, se acumularía vapor y podrían explotar. Por ejemplo, de las patatas, el pescado, el pollo y las
salchichas.
NOTA: Los huevos no deben calentarse en el microondas porque podrían explotar, incluso después de prepararse,
p.ej., huevos escalfados, fritos o duros.
Remover, girar y volver a colocar
Para conseguir una cocción uniforme es muy importante remover, girar y volver a colocar los alimentos durante la
cocción. Siempre debe remover y volver a colocar desde el exterior hacia el centro.
Reposo
Deje un periodo de reposo tras la preparación para permitir que el calor se disperse de manera uniforme a través de
todos los alimentos.

ES – 24
ES – 24
Características de los alimentos
Composición Los alimentos con un contenido alto en grasa o azúcares (p.ej., púdines o pasteles
rellenos) requieren menos tiempo para calentarse. Se debe tener cuidado con ellos, ya
que el sobrecalentamiento puede provocar un incendio.
Los huesos de los alimentos son conductores de calor y hacen que los alimentos se
cocinen más rápidamente. Se debe tener cuidado para que los alimentos se cocinen de
manera uniforme.
Densidad La densidad de los alimentos in uye en el tiempo de cocción necesario.
Los alimentos ligeros o porosos, como los bizcochos o el pan, se cuecen más
rápidamente que los alimentos pesados y densos, como los asados de carne y los guisos.
Cantidad El número de microondas del horno es el mismo, sea cual sea la cantidad de alimentos
que se esté preparando. Se debe aumentar el tiempo de cocción a medida que aumente
la cantidad de alimentos;
por ejemplo, cuatro patatas tardan más tiempo en cocinarse que dos.
Tamaño Los alimentos y los trozos pequeños se preparan más rápidamente que los grandes,
ya que las microondas pueden penetrar desde todos los lados hacia el centro. Para
conseguir una cocción uniforme, prepare todos los alimentos con el mismo tamaño.
Forma Los alimentos de forma irregular, como las pechugas o los muslos de pollo, tardan más
tiempo en prepararse en las partes más gruesas. Para conseguir una cocción uniforme,
coloque las partes más gruesas en el exterior del plato, donde recibirán más energía.
Las formas redondas se preparan en el microondas de manera más uniforme que las
cuadradas.
Temperatura de los
alimentos
La temperatura inicial de los alimentos in uye en el tiempo de cocción necesario.
Los alimentos fríos tardan más tiempo en cocinarse que los alimentos a temperatura
ambiente;
La temperatura del recipiente no es un parámetro able de la temperatura del alimento
o la bebida. Haga cortes en los alimentos rellenos, por ejemplo, un donut relleno de
mermelada, para liberar el calor o el vapor.
ADVERTENCIA: Rostro y manos: utilice siempre guantes de horno para retirar los alimentos o
recipientes del horno. Apártese al abrir la puerta del horno para que se disperse el
calor o vapor. Al quitar un recubrimiento (por ejemplo, lm transparente) o al abrir
bolsas de asado o envases de palomitas, aparte el rostro y las manos de la dirección del
vapor.
ADVERTENCIA: Compruebe la temperatura de los alimentos y las bebidas, y remueva antes de servir.
Tenga mucho cuidado con los alimentos para bebés, niños o personas mayores. Debe
remover o agitar el contenido de los biberones y los tarros de comida para bebés, y
debe comprobar la temperatura de los alimentos antes de consumirlos, para evitar
quemaduras.

ES
ES – 25
ES – 25
CONSEJOS PARA DESCONGELAR
Usar el microondas es el método para descongelar más rápido. Es un proceso sencillo, pero es muy importante que
siga las instrucciones que se indican a continuación para garantizar que los alimentos se descongelen bien.
• Retire todos los envases y envoltorios antes de descongelar.
• Para descongelar alimentos, utilice los niveles de potencia del microondas P-20 o P-40.
• Consulte a continuación para obtener más información.
Recolocar
Los alimentos colocados hacia el exterior del plato se descongelan más rápidamente que los alimentos dispuestos en
el centro. Por lo tanto, es muy importante recolocar los alimentos hasta cuatro veces durante el descongelado.
Mueva los trozos que estén muy encajados desde el exterior hacia el centro, y recoloque las partes que se solapen.
De esta manera, todas las partes de los alimentos se descongelarán de manera uniforme.
Separar
Los alimentos pueden quedarse pegados al sacarlos del congelador. Es importante separar los alimentos lo antes
posible durante el descongelado,
p.ej., tiras de beicon o letes de pollo.
Cubrir
Algunas partes de los alimentos que se estén descongelando pueden calentarse. Para evitar que se calienten
demasiado y empiecen a cocerse, se pueden cubrir con papel de aluminio, que re ejan las microondas; p.ej., las patas
y las alas de pollo.
Reposo
Es necesario un tiempo de reposo para garantizar que los alimentos se descongelen bien.
La descongelación no naliza una vez que se retiran los alimentos del horno microondas. Los alimentos deben
permanecer, tapados, durante un tiempo para garantizar que el centro se descongele completamente.
Girar
Es muy importante girar todos los alimentos al menos cuatro veces durante el proceso de descongelación.
Esto es importante para garantizar una descongelación adecuada.

ES – 26
ES – 26
CONSEJOS PARA RECALENTAR
Para recalentar alimentos, siga las instrucciones y recomendaciones que se indican a continuación, a n de garantizar
que los alimentos se calientan bien antes de servirlos.
Platos de comida
Retire cualquier pieza de ave o carne roja, y caliente esas piezas por separado (véase más abajo).
Coloque los trozos más pequeños en el centro del plato y los trozos más grandes y gruesos en el borde. Cubra los
alimentos con lm transparente ventilado para microondas y recaliéntelos a nivel P-50. Remueva o recoloque los
alimentos cuando haya transcurrido la mitad del tiempo.
NOTA: Asegúrese de que los alimentos se hayan calentado bien antes de servirlos.
Carne en lonchas
Tape la carne con lm transparente ventilado para microondas y caliente a nivel P-60. Recoloque la carne al menos
una vez para garantizar que se caliente de manera uniforme.
NOTA: Asegúrese de que la carne se haya calentado bien antes de servirla.
Porciones de ave
Coloque las partes más gruesas de las porciones en el exterior del plato, cúbralas con lm transparente ventilado para
microondas y caliente a nivel P-70.
Dé la vuelta hacia la mitad del proceso de calentamiento.
NOTA: Asegúrese de que la carne de ave se haya calentado bien antes de servirla.
Guisos
Cubra con lm transparente ventilado para microondas o con una tapa adecuada y caliente a nivel P-50.
Remueva con frecuencia para garantizar que los alimentos se calienten de manera uniforme.
NOTA: Asegúrese de que los alimentos se hayan calentado bien antes de servirlos.
Para conseguir los mejores resultados al recalentar, seleccione un nivel de potencia de microondas adecuado para
el tipo de alimento. Por ejemplo, un plato de verduras se puede calentar a nivel P-100, mientras que una lasaña, que
contiene ingredientes que no se pueden remover, se debe calentar a nivel P-40.
NOTAS:
• Antes de recalentar los alimentos, sáquelos de los recipientes metálicos o del papel de aluminio.
• En el tiempo de recalentamiento in uyen la forma, la profundidad, la cantidad y la temperatura de los alimentos, así
como el tamaño, la forma y el material del recipiente.
ADVERTENCIA: No caliente nunca líquidos en recipientes de boca estrecha, ya que el contenido podría
salir a chorros del recipiente y causar quemaduras.
• Para evitar que los alimentos se calienten demasiado y que se produzcan incendios, se debe prestar especial
atención al preparar o recalentar alimentos con un contenido alto de azúcar o grasa, por pasteles rellenos o púdines.
• Nunca debe calentar aceite o grasa para freír, ya que se podrían producir un calentamiento excesivo y fuego.
• Las patatas en conserva no se deben calentar en un horno microondas; siga las instrucciones del envase.
ADVERTENCIA: El contenido de biberones y tarros de comida para bebés se debe remover o agitar, y se
debe comprobar la temperatura de los alimentos antes de consumirlos a n de evitar
quemaduras.

ES
ES – 27
ES – 27
RESOLUCIÓN DE PROBLEMAS
Si cree que el horno no funciona correctamente, puede llevar a cabo una sencillas comprobaciones antes de llamar
a un técnico. De esta forma, puede evitar llamadas innecesarias al servicio, en caso de que el fallo se deba a algo
sencillo.
Siga estas sencillas comprobaciones:
Coloque una taza de agua en el plato giratorio y cierre la puerta. Establezca el temporizador para funcionar durante
1minuto a potencia P-100 del microondas.
1. ¿Se enciende la lámpara del horno cuando el agua cuece?
2. ¿Funciona el ventilador de refrigeración? (Compruébelo colocando la mano sobre las salidas de ventilación).
3. Transcurrido un minuto, ¿suena la señal acústica?
4. ¿Está caliente el agua de la taza?
Si la respuesta a alguna de estas preguntas es negativa, compruebe primero que el horno está enchufado
correctamente y que el fusible no se ha fundido. Si el cable está bien enchufado y el fusible no se ha fundido,
consulte la tabla de resolución de problemas siguiente.
ADVERTENCIA: Nunca ajuste, repare o modi que el horno por su cuenta. Para cualquier persona que
no tenga los conocimientos adecuados, es peligroso llevar a cabo operaciones de
mantenimiento o reparación. Esto es importante, ya que puede requerir la retirada de
cubiertas que proporcionan protección contra la energía de microondas.
• La junta de la puerta evita que se ltren líquidos del microondas durante el funcionamiento del horno, pero no
ofrece un sellado hermético. Es normal observar gotas de agua, luz o sentir aire caliente alrededor de la puerta del
horno. Los alimentos con un alto contenido de humedad despedirán vapor o generarán condensación dentro de la
puerta, lo que puede formar gotas fuera del horno.
• Reparaciones y modi caciones: no intente reparar, modi car ni utilizar el microondas si no funciona correctamente.
• Carcasa exterior y acceso a la lámpara: no retire nunca la carcasa exterior. Esto es muy peligroso debido a las piezas
de alta tensión internas que no deben tocarse nunca, porque su contacto podría causar la muerte
El horno no integra una cubierta de acceso a la lámpara. Si la lámpara falla, no intente sustituirla. Llame al servicio
técnico homologado de SHARP.

ES – 28
ES – 28
TABLA DE RESOLUCIÓN DE PROBLEMAS
CONSULTA RESPUESTA
Corrientes de aire alrededor
de la puerta.
Cuando el horno está en funcionamiento, el aire circula alrededor de la cavidad
La puerta no está sellada herméticamente, por lo que el aire puede escaparse.
En el horno se forma
condensación y puede dar
lugar a la formación de gotas
en la puerta.
Por lo general, la cavidad del horno estará más fría que los alimentos cocinados;
por lo tanto, el vapor generado al preparar alimentos se condensará en la
super cie más fría.
La cantidad de vapor generado depende del contenido en agua del alimento
preparado. Algunos alimentos, como las patatas, tienen un gran contenido en
humedad.
La condensación atrapada en el cristal de la puerta se disipará en unas horas.
Se observan destellos y arcos
voltaicos en la cavidad al
preparar los alimentos.
Se producen arcos voltaicos cuando un objeto metálico se sitúa cerca de la
cavidad del horno durante la cocción. Esto puede causar abrasión de la super cie
de la cavidad, pero no producirá ningún daño al horno.
Asar patatas. Retire todas las raíces de las patatas, píchelas y colóquelas directamente sobre la
bandeja o en un recipiente plano resistente al calor o similar.
El horno no funciona cuando
se pulsa el botón START/
QUICK START.
Asegúrese de que la puerta está correctamente cerrada.
El horno preara los alimentos
demasiado despacio.
Asegúrese de que corregir el nivel de potencia seleccionado.
El horno hace ruido. Los impulsos de la energía de microondas se activan y desactivan durante los
procesos de cocción y descongelación.
El horno emitirá un pitido cada minuto y mostrará "Fail" (Error) en la pantalla
Si se pulsan los botones del panel de control continuamente durante más de un
minuto, se producirá este error.
La carcasa exterior está
caliente.
La carcasa exterior puede calentarse al tacto. Mantenga a los niños a los niños
lejos.
PROTECCIÓN CONTRA LOS BOTONES ATASCADO
En cualquier estado, si un botón del panel de control se atasca durante más de un minuto, el programa dejará de
funcionar inmediatamente y mostrará el mensaje "FAIL" (ERROR). El microondas emitirá un pitido. Si el botón se sigue
atascando, el horno pitará cada minuto. Tras solucionarse el problema, pulse el botón STOP/ECO para volver al modo
en modo en espera.
ANTES DE LLAMAR AL SERVICIO TÉCNICO
Antes de solicitar asistencia, consulte los siguientes elementos:
• Asegúrese de que el horno está correctamente enchufado a la corriente. Si no es así, retire el enchufe, espere
10segundos, y vuelva a enchufarlo bien.
• Compruebe si hay algún fusible fundido o si saltó un disyuntor de corriente. Si estos elementos parecen no
presentar problemas, pruebe la toma con otro aparato.
• Asegúrese de que los mandos de potencia y del temporizador están correctamente establecidos.
• Asegúrese de que la puerta está bien cerrada con el sistema de bloqueo activado. De lo contrario, la energía del
microondas no uirá en el horno.
SI NO SE SOLUCIONA LA SITUACIÓN CON NINGUNA DE LAS ACCIONES ANTERIORES, PÓNGASE EN CONTACTO CON UN
TÉCNICO CERFICADO. NO INTENTE AJUSTAR NI REPARAR EL HORNO PERSONALMENTE.

PT
PT – 1
PT – 1
Atenção:
O seu produto
está marcado
com este sím-
bolo. Signi ca
que os produtos
elétricos e ele-
trónicos usados
não devem ser
misturados com
o lixo domésti-
co geral. Existe
um sistema de
recolha especí-
co para estes
produtos.
A. Informações sobre a Eliminação para os
Utilizadores (particulares)
1. Na União Europeia
Atenção: Se quiser eliminar este equipamento, não use um caixote do lixo
comum!
O equipamento elétrico e eletrónico usado tem de ser tratado em separado
e de acordo com a legislação que requer um tratamento, recuperação e
reciclagem adequados de equipamento elétrico e eletrónico usado.
No seguimento da implementação pelos estados membros, os agregados
domésticos privados nos estados da UE devem entregar o seu equipamento
elétrico e eletrónico usado num local designado para a sua recolha, sem
qualquer custo*.
Em alguns países* o seu vendedor local pode também receber o seu
produto antigo, sem qualquer custo, se adquirir um outro semelhante.
*) Contacte as entidades locais para mais informações.
Se o seu equipamento elétrico ou eletrónico usado tiver pilhas ou pilhas
recarregáveis, elimine-as previamente em separado de acordo com as
exigências locais. Ao eliminar corretamente este produto estará a ajudar a
garantir que os resíduos recebem o tratamento, recuperação e reciclagem
necessários e, assim, evita potenciais efeitos negativos sobre o meio
ambiente e a saúde humana que, de outro modo, poderiam surgir devido
ao manuseamento incorreto dos resíduos.
2. Em outros países fora da UE
Se pretende desfazer-se deste produto, contacte, por favor, as suas
autoridades locais e informe-se sobre o método de eliminação correto.
Para a Suíça: O equipamento elétrico e eletrónico usado pode ser devolvido
ao comerciante, sem qualquer custo, mesmo que não adquira um novo
produto. Os locais de recolha adicionais encontram-se listados na página
principal de www.swico.ch ou www.sens.ch.
B. Informações sobre a Eliminação de Produtos para
Utilizadores-Empresas
1. Na União Europeia
Se o produto é utilizado para ns comerciais e se pretende desfazer-se dele:
Agradecemos que contacte o seu revendedor SHARP que o informará sobre
como devolver o produto. Podem ser-lhe cobrados custos resultantes da
devolução e reciclagem. Produtos pequenos (e pequenas quantidades)
podem ser devolvidos nos locais de recolha da sua zona.
Para a Espanha: Agradecemos que contacte o sistema de recolha instituído
ou a sua autoridade local para a devolução dos seus produtos usados.
2. Em outros países fora da UE
Se pretende desfazer-se deste produto, contacte, por favor, as suas
autoridades locais e informe-se sobre o método de eliminação correto.
Para assistência técnica, veja www.sharpconsumer.com/contact/, para os seus direitos da garantia, vá a
www.sharpconsumer.com/support/ ou contacte o revendedor onde comprou o produto.
As declarações de conformidade encontram-se disponíveis a partir de
www.sharpconsumer.com/documents-of-conformity/
www.sharpconsumer.com/
support/
www.sharpconsumer.com/
documents-of-conformity/
www.sharpconsumer.com/
contact/

PT – 2
PT – 2
PRECAUÇÕES PARA EVITAR POSSÍVEIS EXPOSIÇÕES À ENERGIA DAS MICRO-
ONDAS
1. Não tente usar este forno com a porta aberta, pois isso pode provocar uma exposição danosa à energia das micro-
ondas. É importante não derrotar ou adulterar os bloqueios de segurança..
2. Não insira nada entre a parte da frente do forno e a porta, nem permita a acumulação de sujidade ou resíduos do
produto de limpeza nas superfícies de vedação.
3. Não use o forno se estiver dani cado. É muito importante que a porta do forno se feche devidamente e que não
haja nenhum dano nas portas, dobradiças, fechos ou nas vedações da porta e superfícies de vedação.
4. Não tente reparar ou ajustar o forno.
CONTEÚDOS
INSTRUÇÕES DE SEGURANÇA IMPORTANTES ............................................................................................................................................. 3
INSTALAÇÃO ..........................................................................................................................................................................................................11
INTERFERÊNCIA DE RÁDIO ...............................................................................................................................................................................12
INSTRUÇÕES DE LIGAÇÃO À TERRA ..............................................................................................................................................................12
ESPECIFICAÇÕES ..................................................................................................................................................................................................12
FORNO E ACESSÓRIOS ....................................................................................................................................................................................... 13
PAINEL DE CONTROLO ....................................................................................................................................................................................... 14
ANTES DE USAR O FORNO ...............................................................................................................................................................................14
ACERTAR O RELÓGIO .......................................................................................................................................................................................... 14
COZINHAR COM MICRO-ONDAS ...................................................................................................................................................................15
INÍCIO RÁPIDO ...................................................................................................................................................................................................... 15
COZINHAR COM O GRILL .................................................................................................................................................................................. 16
MICRO-ONDAS+GRILL ....................................................................................................................................................................................... 16
CONVECÇÃO..........................................................................................................................................................................................................17
MICRO-ONDAS+CONVECÇÃO ........................................................................................................................................................................17
MENU AUTOMÁTICO ..........................................................................................................................................................................................18
DESCONGELAR AUTOMÁTICO ........................................................................................................................................................................19
REAQUECER AUTOMÁTICO...............................................................................................................................................................................19
TEMPORIZADOR DE COZINHA ........................................................................................................................................................................ 19
FUNÇÃO DE POUPANÇA DE ENERGIA ..........................................................................................................................................................19
FUNÇÃO DE SILENCIAR .....................................................................................................................................................................................20
BLOQUEIO DE SEGURANÇA ............................................................................................................................................................................. 20
BLOQUEIO DE CRIANÇAS ..................................................................................................................................................................................20
MECANISMO DE PROTEÇÃO AUTOMÁTICA ...............................................................................................................................................20
LIMPEZA E MANUTENÇÃO ...............................................................................................................................................................................21
LOIÇA PRÓPRIA PARA O FORNO.....................................................................................................................................................................22
CONSELHOS DE CULINÁRIA DO MICRO-ONDAS ......................................................................................................................................23
CONSELHOS SOBRE DESCONGELAR .............................................................................................................................................................25
CONSELHOS SOBRE REAQUECER ...................................................................................................................................................................26
RESOLUÇÃO DE PROBLEMAS .......................................................................................................................................................................... 27
PROTEÇÃO CONTRA BOTÕES PRESOS .........................................................................................................................................................28
ANTES DE LIGAR À ASSISTÊNCIA TÉCNICA ................................................................................................................................................. 28

PT
PT – 3
PT – 3
INSTRUÇÕES DE SEGURANÇA IMPORTANTES
LEIA COM ATENÇÃO E GUARDE PARA REFERÊNCIA FUTURA
Para evitar o perigo de incêndio. O forno micro-ondas não
deve ser deixado sem vigilância enquanto estiver a funcio-
nar. Níveis de potência demasiado elevados ou tempo de
cozedura demasiado longo podem sobreaquecer os ali-
mentos, provocando um incêndio.
Este forno foi projetado para ser usado apenas numa bancada.
Não foi projetado para ser encastrado numa unidade de co-
zinha. A tomada elétrica tem de estar acessível rapidamente,
para que a unidade possa ser facilmente desligada da corrente
em caso de emergência.
O cabo de alimentação CA deve ser de 230-240 V, 50 Hz, com
um mínimo de 10 A do fusível de distribuição ou um mínimo
de 10 A do disjuntor de distribuição. Deve ser fornecido um
circuito separado que sirva apenas este eletrodoméstico.
Não coloque o forno em zonas onde se produza muito calor,
por exemplo, junto a um forno tradicional. Não instale o forno
numa zona de grande humidade ou onde se possam acumular
gotas de água. Não guarde nem use o forno no exterior.
Caso se observe fumo, desligue ou desconecte da parede
o forno e mantenha a porta fechada, de forma a abafar
quaisquer chamas.
Use apenas recipientes e utensílios seguros para o micro-
-ondas. Os utensílios devem ser veri cados para garantir
que são adequados para o uso em fornos micro-ondas.
Quando aquecer alimentos em recipientes de plástico ou
papel, esteja atento ao forno devido à possibilidade de
ignição.
Limpe capa do guia de ondas e a cavidade do forno. Estas
devem estar secas e sem gordura. A gordura acumulada

PT – 4
PT – 4
pode provocar sobreaquecimento e deitar fumo ou pegar
fogo.
Não coloque materiais in amáveis perto do forno ou das aber-
turas de ventilação. Não bloqueie as aberturas de ventilação.
Retire todos os selos metálicos, arames, etc., da comida e de
embalagens de comida. O arco elétrico nas superfícies metáli-
cas pode provocar um incêndio.
Não use o forno micro-ondas para aquecer óleo para fritar.
A temperatura não pode ser controlada e o óleo pode pegar
fogo.
Para fazer pipocas, use apenas embalagens próprias para fazer
pipocas no micro-ondas.
Não guarde comida ou quaisquer outros objetos dentro do
forno.
Veri que as de nições quando iniciar o forno para ter a certeza
que o forno está a funcionar como desejado.
Não deixe o forno sem vigilância durante o funcionamento.
Para evitar sobreaquecimento e fogo é necessário ter cuidado
especial ao cozinhar ou reaquecer alimentos com muito açúcar
ou teor de gordura, por exemplo, salsichas, tartes ou pudins.
Veja as dicas correspondentes no manual de utilização.
Para evitar o risco de lesões. ATENÇÃO:
Não use o forno caso este esteja dani cado ou a funcionar
mal. Veri que o seguinte antes de o usar:
a) Certi que-se de que a porta se fecha devidamente e que
não está desalinhada ou deformada.
b) Veri que que as dobradiças e os fechos de segurança da
porta não estão partidos ou soltos.
c) Veja-se de que as vedações da porta e da superfície não
foram dani cadas.

PT
PT – 5
PT – 5
d) Certi que-se de que no interior da cavidade do forno ou a
porta não há brechas.
e) Certi que-se de que o cabo de alimentação e a tomada
não estão dani cados.
Caso a porta ou as vedações da porta estejam dani cadas, o
forno não deve ser posto em funcionamento até ter sido repa-
rado por uma pessoa competente.
Nunca ajuste, repare ou modi que o forno sozinho. É
arriscado para qualquer pessoa que não seja uma pessoa
competente para tal levar a cabo qualquer tipo de opera-
ção que envolva a remoção de uma capa que protege da
exposição a energia das micro-ondas.
Não opere o forno com a porta aberta nem altere os fechos de
segurança da porta de nenhum modo. Não opere o forno se
houver algum objeto entre as vedações da porta e as vedações
da superfície.
Não permita que se acumule gordura ou sujidade nas
vedações da porta e nas peças adjacentes. Limpe o forno
regularmente e remova todos os depósitos de comida.
Siga as instruções em "Cuidados e Manutenção". A falta
de limpeza do forno leva à deterioração da superfície que
afetará adversamente a vida da máquina e poderá criar
situações perigosas
Pessoas com PACEMAKERS devem aconselhar-se com o seu mé-
dico ou com o fabricante do pacemaker sobre regras de segu-
rança com fornos micro-ondas.
Para evitar a possibilidade de choques elétricos
• Nunca em nenhum momento remova a cobertura exterior.
• Não derrame ou insira nenhum objeto nas ranhuras dos
ganchos da porta ou nas aberturas de ventilação. Em caso
de derrame, desligue e desconecte imediatamente o forno

PT – 6
PT – 6
da corrente elétrica e chame um agente da assistência técni-
ca autorizado SHARP.
• Não submerja o cabo de alimentação ou a tomada em água
ou qualquer outro líquido.
• Não deixe o cabo de alimentação pendurado à beira de uma
mesa ou superfície de trabalho.
• Mantenha o cabo de alimentação longe de superfícies
quentes, incluindo o motor do forno.
• Mantenha o aparelho e o cabo fora do alcance de crianças
com menos de 8 anos.
• Não tente substituir a lâmpada do forno sozinho e não per-
mita que alguém que não seja um eletricista autorizado pela
SHARP o faça. Se a lâmpada do forno se fundir, por favor
contacte o seu revendedor ou a assistência técnica autoriza-
da SHARP.
• Se o cabo de alimentação estiver dani cado, terá de ser
substituído por um agente autorizado da SHARP.
ATENÇÃO: Os líquidos e outros alimentos não devem ser
aquecidos em recipientes fechados, pois podem explodir.
O aquecimento de bebidas no micro-ondas pode provocar
uma erupção de ebulição tardia; por este motivo, deve ter-
-se cuidado ao manusear o recipiente. Para evitar a possi-
bilidade de explosão e ebulição repentina:
Nunca use recipientes selados. Remova os selos e tampas antes
de usar. Os recipientes selados podem explodir devido à pres-
são criada, mesmo depois do forno ter sido desligado. Tenha
cuidado quando aquecer líquidos no micro-ondas. Use um reci-
piente com abertura larga para permitir que as bolhas saiam.
Nunca aqueça líquidos num recipiente com gargalo estrei-
to, como biberons, pois isto pode provocar uma erupção
do conteúdo do recipiente quando estiver quente e provo-
car queimaduras.

PT
PT – 7
PT – 7
Para evitar uma erupção espontânea de um líquido a ferver e
eventuais queimaduras:
1. Não use tempo excessivo.
2. Mexa o líquido antes de o aquecer/reaquecer.
3. Aconselha-se a inserir uma vareta de vidro ou semelhante
(não metálica) dentro do líquido quando o reaquecer.
4. Deixe o líquido descansar por, pelo menos, 20 segundos
no forno após o m do tempo de cozedura para evitar uma
erupção de bolhas tardia.
Não cozinhe ovos com casca e igualmente ovos cozidos
não devem ser aquecidos no forno micro-ondas, pois po-
dem explodir mesmo depois do forno ter parado de tra-
balhar. Para cozinhar ou reaquecer ovos que não tenham
sido mexidos, perfure a gema e a clara. Descasque e corte
os ovos cozidos antes de os reaquecer no forno micro-on-
das.
Perfure a pele de alimentos, tais como batatas, salsichas e fruta
antes de cozinhar, pois estes podem explodir.
ATENÇÃO: O conteúdo de biberons e boiões com comida
de bebé têm de ser mexidos ou agitados e a temperatura
tem de ser veri cada antes de ser consumida, para evitar
queimaduras. Use pegas ou luvas para o forno quando
remover os alimentos do forno para evitar queimaduras.
• Abra sempre os recipientes, sacos de pipocas, sacos para
cozinhar no forno, etc., longe do rosto e mãos para evitar
queimaduras por vapor e a erupção de ebulição. Para evitar
queimaduras, veri que sempre a temperatura dos alimentos
e mexa antes de servir. Preste especial atenção à temperatu-
ra dos alimentos e bebidas dados a bebés, crianças e idosos.
As peças acessíveis podem car quentes durante a utiliza-
ção. As crianças pequenas devem ser mantidas à distância.
• A temperatura do recipiente não é a verdadeira temperatura

PT – 8
PT – 8
da comida ou bebida; veri que sempre a temperatura da
comida.
• Afaste-se sempre quando abrir a porta do forno para evitar
queimaduras de vapor ou calor que saia do interior.
• Corte em fatias alimentos assados antes de os aquecer para
soltar o vapor e evitar queimaduras.
• Mantenha as crianças afastadas da porta para evitar que se
queimem.
ATENÇÃO: Permita às crianças com 8 ou mais anos usar o
forno sem supervisão apenas quando tenham sido dadas
instruções adequadas para que a criança consiga usar o
forno de forma segura e compreenda os perigos de uma
utilização imprópria.
Quando o eletrodoméstico for usado nos modos GRILL,
MIX GRILL, CONVECÇÃO, MIX CONVECÇÃO e MENU AUTO-
MÁTICO, as crianças só deverão usar o forno com supervi-
são de um adulto devido às temperaturas geradas.
Este aparelho não foi feito para ser usado por pessoas
(incluindo crianças) com capacidades físicas, sensoriais e
mentais reduzidas, ou com falta de experiência e conheci-
mentos, a não ser que esteja uma pessoa responsável pela
sua segurança a supervisionar ou a dar instruções relati-
vas ao uso do aparelho.
As crianças devem ser supervisionadas de modo a garan-
tir que não brincam com o aparelho. A limpeza feita por
crianças deve ser supervisionada.
Os modelos com painel tátil eletrónico vêm com um modo
de bloqueio de crianças.
Não se apoie ou balance na porta do forno. Não brinque com o
forno nem o utilize como um brinquedo.
Deve-se ensinar às crianças todas as instruções de segurança
importantes: o uso de pegas, o retirar com cuidado as cobertu-

PT
PT – 9
PT – 9
ras dos alimentos, prestando especial atenção às embalagens
(por exemplo, materiais que se aquecem sozinhos) feitas para
tornar a comida estaladiça, pois podem estar particularmente
quentes.
Outros avisos
Nunca modi que o forno de nenhuma maneira.
Não mova o forno quando este estiver a funcionar.
Este forno destina-se apenas para ser usado num ambiente
doméstico. Destina-se à preparação de alimentos em casa e
apenas pode ser usado para cozinhar alimentos e bebidas. A
secagem de alimentos ou vestuário e o aquecimento de bolsas
térmicas, pantufas, esponjas, panos húmidos e semelhantes
pode levar ao risco de lesões, ignição ou fogo. Não é adequado
para uso comercial ou num laboratório.
Para promover o uso sem problemas do seu forno e evitar
problemas.
Nunca use o forno quando este estiver vazio. Quando usar um
prato de barro ou material que aqueça sozinho, coloque sem-
pre por baixo um isolante resistente ao calor, como um prato
de porcelana, para prevenir danos na base do forno devido à
tensão do calor. O tempo de pré-aquecimento especi cado nas
instruções da loiça não deve ser excedido.
Não use utensílios metálicos, pois estes re ectem as micro-on-
das e podem causar arcos elétricos. Não coloque latas dentro
do forno.
Para evitar que o prato giratório ou a base do forno se que-
brem.
a) Antes de limpar com água, deixe arrefecer.
b) Não coloque alimentos quentes ou os, ou utensílios quen-
tes num prato giratório/base do forno frios.
c) Não coloque nada na parte exterior durante o funcionamen-
to.

PT – 10
PT – 10
NOTA:
Não utilize recipientes de plástico para o micro-ondas se o for-
no ainda estiver quente depois da utilização de um modo com-
binado (depende do modelo do forno), pois podem derreter.
Os recipientes de plástico não devem ser utilizados nos modos
acima mencionados, a não ser que o produtor do recipiente
diga que são adequados.
Caso tenha dúvidas sobre a forma como ligar o seu forno, con-
sulte um eletricista autorizado e quali cado.
Nem o fabricante, nem o revendedor podem aceitar qualquer
responsabilidade por estragos no forno ou danos pessoais
resultantes da inobservância dos procedimentos corretos de
ligação elétrica.
É possível que se forme ocasionalmente vapor ou gotas de
água nas paredes do forno ou à volta das vedações da porta e
da superfície. Isto é normal e não signi ca nenhuma falha ou
mal funcionamento do micro-ondas.
Este eletrodoméstico destina-se a ser usado num ambiente do-
méstico e aplicações semelhantes, tais como: áreas de cozinha
reservadas para o pessoal em lojas, escritórios e outros ambien-
tes pro ssionais / quintas / uso de clientes em hotéis, motéis e
outros ambientes de tipo residencial / ambientes do estilo de
pousadas.
Este símbolo signi ca que as superfícies podem car
quentes durante o uso.

PT
PT – 11
PT – 11
INSTALAÇÃO
1. Retire todo o tipo de embalagens de dentro da cavidade do forno e retire todas as películas de proteção que
encontrar na superfície da cabine do micro-ondas.
2. Veri que cuidadosamente se o forno tem sinais de estragos.
3. Coloque o forno numa superfície segura, nivelada e su cientemente forte para suportar o peso do forno junta-
mente com o da peça mais pesada que pensa cozinhar no forno. Não coloque o forno num recipiente fechado.
4. Escolha uma superfície nivelada com espaço su ciente para as entradas e/ou saídas de ar. Veja a imagem na
primeira página. A superfície traseira do aparelho deve ser colocada em frente a uma parede.
• A altura mínima de instalação é de 85 cm.
• É necessário haver um espaço mínimo de 20 cm entre os lados do forno micro-ondas e quaisquer paredes ou
objetos adjacentes.
• Deixe um espaço mínimo de 30 cm por cima do forno.
• Não remova os pés da base do forno.
• Bloquear a abertura de entrada e/ou saída pode dani car o forno.
• Coloque o forno tão longe de rádios e televisores quanto possível. O funcionamento do forno micro-ondas pode
provocar interferências na receção de rádio ou televisão.
20 cm
30 cm
85 cm
10 cm
20 cm
5. Conecte de forma segura a cha do forno a uma tomada elétrica (com ligação à terra) normal de uso doméstico.
ATENÇÃO:
Não coloque o forno em locais onde se gere calor, orvalho ou muita humidade (por exemplo, perto ou por baixo de
um forno convencional) ou perto de materiais combustíveis (por exemplo, cortinas).
Não bloqueie nem obstrua as aberturas da saída de ar.
Não coloque objetos em cima do forno.
Não toque no exterior do forno micro-ondas durante ou logo após o funcionamento, pois pode estar quente.

PT – 12
PT – 12
INTERFERÊNCIA DE RÁDIO
A utilização do micro-ondas pode interferir com o seu rádio, televisor ou equipamento semelhante. Quando houver
interferência, esta pode ser reduzida ou eliminada seguinto as seguintes medidas:
1. Limpe a porta e a cavidade no sítio onde se juntam.
2. Mude a direção da antena de receção do rádio ou televisor.
3. Mude a localização do forno micro-ondas em relação ao recetor.
4. Ligue o forno micro-ondas a uma tomada diferente, para que este e o recetor não estejam no mesmo circuito de
corrente.
INSTRUÇÕES DE LIGAÇÃO À TERRA
Este eletrodoméstico tem de ter ligação à terra. Este forno vem equipado com um cabo com um o de ligação à terra,
com uma cha de ligação à terra. Tem de ser ligada a uma tomada que tenha sido devidamente instalada e ligada à
terra. No caso de haver um curto-circuito elétrico, a ligação à terra reduz o risco de choque elétrico, fornecendo um o
de escape para a corrente elétrica. Recomenda-se a instalação de um circuito separado apenas para o forno.
ATENÇÃO: A utilização inadequada da cha de ligação à terra pode provocar um risco de choque
elétrico.
NOTA:
1. Se tiver algumas questões sobre a ligação à terra ou as instruções elétricas, consulte um eletricista quali cado ou
uma pessoa da assistência técnica.
2. Nem o fabricante, nem o revendedor podem aceitar qualquer responsabilidade por estragos no forno ou lesões
pessoais resultantes da inobservância dos procedimentos corretos de ligação elétrica.
A ligação à rede usada no seu forno micro-ondas usa os com os seguintes códigos de cores:
Verde e amarelo = TERRA | Azul = NEUTRO | Castanho = ENERGIZADO
ESPECIFICAÇÕES
Nome do modelo: YC-PC322A
Tensão da Linha AC 230~240 V, 50 Hz monofásico
Fusível de linha de distribuição/disjuntor 10 A
Potência
Consumo energético 2300 W
Potência de saída do micro-ondas 1000 W
Potência de saída do grill 1250 W
Potência da convecção 2300 W
Potência no modo desligado <0,5 W
Frequência das Micro-ondas 2450 MHz*
Dimensões Exteriores (L) x (A) x (P) mm 539 x 280 x 415
Dimensões da cavidade (L) x (A) x (P) mm 362 x 223 x 378
Tamanho do prato giratório de vidro (ø mm) 315
Capacidade do Forno 32 litros**
Tamanho do tabuleiro de assar (diâmetro x A em mm)
317 x 48
Tamanho da grelha do grill (diâmetro x altura em mm)
255 x 80
Peso 21 kg
Lâmpada do forno (de tipo LED) 1,5 W
* - Este produto cumpre os requisitos da norma europeia EN55011. Em conformidade com este requisito, o produto é classi cado como
equipamento do grupo 2 classe B. O grupo 2 signi ca que o equipamento gera intencionalmente energia com frequência de rádio, em
forma de radiação eletromagnética para o tratamento de alimentos por calor. Equipamento de classe B signi ca que o equipamento é
adequado para ser usado em ambientes domésticos.
** - A capacidade interna calcula-se medindo a largura, profundidade e altura máximas. A capacidade real para os alimentos é menor.
COMO PARTE DA POLÍTICA DE CONTÍNUAS MELHORIAS, RESERVAMO-NOS O DIREITO DE ALTERAR O DESENHO E AS
ESPECIFICAÇÕES SEM AVISO PRÉVIO.

PT
PT – 13
PT – 13
FORNO E ACESSÓRIOS
1. Sistema de bloqueio de segurança da porta
2. Janela do forno
3. Painel de controlo
4. Mostrador
5. Cavidade do forno
6. Capa da guia de ondas (não retirar)
7. Tabuleiro de vidro
8. Anel rolante
9. Acoplamento do prato giratório
10. Grelha do grill
11. Tabuleiro de assar
12. Aberturas de ventilação
13. Estrutura exterior
14. Cabo de alimentação
• A grelha do grill e o tabuleiro de assar foram
projetados para serem usados apenas em
fornos com grill e convecção. NÃO use
nenhuns acessórios metálicos quando usar a
função de micro-ondas.
• Sobre o uso da grelha do grill, veja a secção
GRILL no manual do utilizador.
Nunca toque no grill quando este estiver
quente
NOTA: Quando encomendar acessórios, re ra
estes dois itens: o nome da peça e o nome do
modelo.
NOTAS:
• Depois de cozinhar comida gordurosa sem
cobertura, limpe sempre devidamente a cavidade e quaisquer utensílios de cozinha. Estes deve estar secos e sem
gordura. A gordura acumulada pode causar sobreaquecimento e começar a deitar fumo ou a arder.
• Quando usar as micro-ondas, coloque sempre loiça no prato giratório.
• NÃO use a grelha do grill nem o tabuleiro de assar quando usar a função de micro-ondas.
ATENÇÃO: Este símbolo signi ca que as superfícies podem car quentes durante a utilização. A
porta, o compartimento exterior, a cavidade do forno, os acessórios e pratos carão muito quentes durante
a operação. Para evitar queimaduras, use sempre luvas almofadadas de cozinha.
2
7
5
9
6
8
1
3
4
14
12
13
1110

PT – 14
PT – 14
PAINEL DE CONTROLO
1. MOSTRADOR DIGITAL - São apresentados o tempo de cozedura, a potência,
os indicadores e a hora.
2. 10 SEGUNDOS, 1 MINUTO, 10 MINUTOS – Use para de nir a duração da
cozedura ou a hora do relógio.
3. Botões do MENU AUTOMÁTICO – Carregue para selecionar o menu de
cozedura automática. (Veja a página 18 para obter conselhos sobre como
usar).
4. INÍCIO/INÍCIO RÁPIDO – (Página 15).
5. POTÊNCIA DO MICRO-ONDAS - Carregue para selecionar o nível de potência
do micro-ondas. (Página 15).
6. GRILL - Carregue para de nir o programa de cozedura do grill. (Página 16).
7. MICRO-ONDAS+GRILL - Carregue para de nir o programa de cozedura
combinado de micro-ondas e grill. (Página 16).
8. TEMPERATURA DE CONVECÇÃO – Carregue para selecionar a temperatura
da convecção.
9. MICRO-ONDAS+CONVECÇÃO – Carregue para selecionar a combinação de
cozedura de convecção.
10. CIMA – Carregue para de nir o peso ou as doses dos alimentos.
11. BAIXO – Carregue para de nir o peso ou as doses dos alimentos.
12. STOP/ECO - Carregue uma vez para parar temporariamente de cozinhar, ou
duas vezes para cancelar a cozedura de todo. Use para de nir o modo de
poupança de energia. (Página 19).
13. BLOQUEIO DE CRIANÇAS – (Página 20).
14. HORA/DEFINIR-
Use para acertar a hora. Use para de nir a função do temporizador. (Página 14)
ANTES DE USAR O FORNO
Quando o forno for ligado pela primeira vez, irá soar um sinal sonoro e o mostrador apresentará a indicação "1:00".
Tenha em conta que o relógio não precisa de estar acertado para o forno funcionar devidamente. Para acertar
orelógio, siga as instruções na secção “Acertar a hora” deste manual do utilizador.
Quando for novo, da primeira vez que for usado o grill e/ou a convecção serão produzidos fumo e cheiros. Para evitar
que isto aconteça quando estiverem a ser cozinhados alimentos, use a função do grill e da convecção sem alimentos
durante cerca de 20 minutos.
• Depois de abrir e fechar a porta, o forno entrará no modo de standby (espera). Se não se carregarem em nenhuns
botões durante 1 minuto, o mostrador continuará ligado e os botões não irão funcionar. Para voltar a entrar no
modo de standby, abra e feche a porta.
• Durante a cozedura, se o botão STOP/ECO for carregado uma vez, o ciclo de cozedura será parado. Para continuar
a cozinhar, carregue no botão INÍCIO/INÍCIO RÁPIDO. Se carregar duas vezes no botão STOP/ECO, a cozedura será
cancelada.
• Quando programar o forno para uma função concreta e houver uma pausa entre o carregar nos botões de mais de
30 segundos, o forno regressará ao modo de standby (espera).
• Quando um ciclo de cozedura terminar, o mostrador apresentará a indicação “End” e ouvir-se-á um sinal sonoro
acada 2 minutos, até se carregar em algum botão ou a porta ser aberta.
ACERTAR O RELÓGIO
Este forno tem um relógio que pode ser usado no modo de 12 ou 24 horas. Para acertar o relógio, siga as instruções
em baixo:
1. No modo standby (espera), carregue e mantenha o botão HORA/DEFINIR RELÓGIO durante pelo menos
3segundos para entrar no modo para acertar o relógio.
2. Carregue no botão HORA/DEFINIR RELÓGIO para selecionar o modo do relógio de 12 ou 24.
3. Use os botões 10 SEGUNDOS, 1 MINUTO e 10 MINUTOS para de nir as horas e minutos desejados.
10 SECONDS 1 MINUTE 10 MINUTES
YC-PC322A
1000W
STOP/ECO TIME/
SET CLOCK
CHILD
LOCK
AUTO PROGRAMS
REHEAT
BEVERAGES JACKE T
POTATO PIZZA POPCORN
FROZEN
MEAL FRESH
VEGETABLES PORRID GE AUTO
DEFROST
GRILLED
STEAK GRILLED
CHICKEN AUTO
REHEAT
ROAST
BEEF
ROAST
CHICKEN
OVEN
CHIPS
MICROWAVE
POWER
MICROWAVE
+ CONVECTION
CONVECTION
TEMPERATURE
GRILL
START/
QUICK START
MICROWAVE
+ GRILL
13
5
3
2
14
11
6
8
9
7
10
12
4
1

PT
PT – 15
PT – 15
4. Carregue no botão HORA/ACERTAR RELÓGIO para guardar e sair do modo de de nição do relógio.
• Não é preciso ter o relógio com a hora certa para o forno funcionar normalmente.
• Enquanto no modo de cozedura, carregue no botão HORA/DEFINIR RELÓGIO para ver a hora (se estiver
de nida). A hora mudará para a contagem decrescente da cozedura ao m de 5 segundos. Tenha em conta que se
otemporizador de cozinha tiver sido de nido, não será possível ver a hora.
COZINHAR COM MICRO-ONDAS
Para usar a função de micro-ondas, siga as instruções em baixo:
1. No modo de standby (espera), carregue no botão de POTÊNCIA DO MICRO-ONDAS para selecionar o nível de
potência. De cada vez que carregar no botão, o mostrador apresentará o nível de potência do micro-ondas.
2. Assim que tiver sido selecionado o nível de potência do micro-ondas desejado, use os botões 10 SEGUNDOS,
1MINUTO e 10 MINUTOS para selecionar o tempo da cozedura.
3. Carregue no botão INÍCIO/INÍCIO RÁPIDO para começar a cozinhar.
4. Quando um ciclo de cozedura terminar, o mostrador apresentará a indicação “End” e ouvir-se-á um sinal sonoro a
cada 2 minutos, até se carregar em algum botão ou a porta ser aberta.
Veja a tabela em baixo para obter orientações. O seu forno tem 10 níveis de potência de micro-ondas. Estes são 10%,
20%, 30%, 40%, 50%, 60%, 70%, 80%, 90% e 100%. A voltagem atual de saída pode ser calculada multiplicando a
potência do micro-ondas pela percentagem.
Guia de cozedura com micro-ondas:
Mostra-
dor
Potência do
Micro-ondas Sugestão de utilização
P100 100 % Use esta de nição para cozinhar depressa ou para reaquecer, por exemplo, para
estufados, bebidas quentes, legumes, etc.
P-80 80 %
Para alimentos denso que exigem um tempo de cozedura longo quando
cozinhados de forma convencional, por exemplo, para pratos de carne.
Éaconselhável usar este nível de potência para que a carne que tenra.
P-60 60 %
Usado para cozedura longa de alimentos densos, por exemplo assados, rolo de
carne e refeições prontas, bem como para pratos delicados, como molho de queijo
ou bolos esponja.
P-40 40 %
De nições de descongelar; seleccione este nível de potência para que os alimentos
se descongelem uniformemente. Este nível é também ideal para fazer arroz, massa,
pastéis e leite creme.
P-20 20 % Para um descongelar suave, por ex., de bolos ou massas.
• Durante a cozedura pode veri car o nível da potência de cozedura carregando e mantendo o botão da POTÊNCIA
DO MICRO-ONDAS.
• A duração máxima da cozedura é de 95 minutos.
INÍCIO RÁPIDO
Se precisar de cozinhar com um nível de potência de 100%, carregue no botão INÍCIO/INÍCIO RÁPIDO enquanto
estiver no modo de standby (espera). De cada vez que se carregar no botão INÍCIO/INÍCIO RÁPIDO, este acrescentará
30 segundos ao tempo de cozedura.

PT – 16
PT – 16
COZINHAR COM O GRILL
O elemento aquecedor do grill no cimo da cavidade do forno tem apenas uma de nição de potência, que é e caz e
económica. O grill é perfeito para cozinhar bacon, bife de ambre, douradinhos e biscoitos.
Use a grelha do grill para grelhar pequenos alimentos, como bacon e salsichas. Vire ao contrário a meio da cozedura.
Os alimentos podem ser colocados diretamente na grelha ou numa travessa ou loiça própria para ir ao forno. Para
garantir que não cai gordura ou óleo dos alimentos durante a cozedura, garanta que há um tabuleiro adequado por
baixo da grelha do grill.
Quando tostar a superfície de alimentos numa travessa, pode usar a grelha do grill, caso o recipiente seja
su cientemente baixo. No entanto, recomenda-se que coloque estes recipientes diretamente no prato giratório e
permitir um pouco mais de tempo para tostar como gostar. Não será possível usar a grelha do grill para grelhar.
Para usar a função do grill, siga as instruções em baixo:
1. No modo de standby (espera), carregue no botão GRILL para selecionar a função do grill. O mostrador
apresentará a indicação ”Grl”
2. use os botões 10 SEGUNDOS, 1 MINUTO e 10 MINUTOS para selecionar a duração da cozedura.
3. Carregue no botão INÍCIO/INÍCIO RÁPIDO para começar a cozinhar.
4. Quando um ciclo de cozedura terminar, o mostrador apresentará a indicação “End” e ouvir-se-á um sinal sonoro a
cada 2 minutos, até se carregar em algum botão ou a porta ser aberta.
MICRO-ONDAS+GRILL
Ao usar ambas as funções de micro-ondas e grill, é possível tostar os alimentos mais depressa. Para usar a função do
micro-ondas e do grill, siga as instruções em baixo:
1. No modo de standby (espera), carregue uma ou duas vezes no botão MICROWAVE + GRILL para selecionar "Co-1"
ou "Co-2".
2. Use os botões 10 SEGUNDOS, 1 MINUTO e 10 MINUTOS para de nir a duração da cozedura.
3. Carregue no botão INÍCIO/INÍCIO AUTOMÁTICO para iniciar.
4. Quando um ciclo de cozedura terminar, o mostrador apresentará a indicação “End” e ouvir-se-á um sinal sonoro a
cada 2 minutos, até se carregar em algum botão ou a porta ser aberta.
Função do Micro-ondas + Grill
Mostrador Processo de cozedura Sugestão de utilização
Co-1
O forno irá cozinhar no seguinte ciclo:
Micro-ondas 22 segundos, grill 11 segundos. Isto
repete-se até ao m do tempo total de nido.
Peças de frango, peito de frango,
costeletas de porco
Co-2
O forno irá cozinhar no seguinte ciclo:
Micro-ondas em potência máxima durante 18
segundos, depois grill durante 15 segundos. Isto
repete-se até ao m do tempo total de nido.
Frango inteiro
• A duração máxima da cozedura com o grill é de 95 minutos.
• Enquanto grelhar, permita que o fumo ou cheiros se dispersem abrindo uma janela ou ligando o exaustor da
cozinha. Isto é normal e não é um defeito do forno.
• Durante a cozedura pode veri car a combinação da potência de cozedura tocando no botão MICRO-ONDAS +
GRILL.
• Quando usar a função do grill, o grill liga-se e desliga-se em intervalos regulares para evitar o sobreaquecimento.
• Quando usar a função MICRO-ONDAS+GRILL, os alimentos podem ser colocados num recipiente adequado
diretamente no prato giratório.
ATENÇÃO: a porta, a armação exterior, a cavidade do forno, os acessórios e os pratos carão muito quentes durante
aoperação. Para evitar queimaduras, use sempre luvas grossas.

PT
PT – 17
PT – 17
CONVECÇÃO
Durante a cozedura por convecção circula ar quente dentro da cavidade do forno para tostar e tornar os alimentos
crocantes de forma rápida e uniforme. Este forno pode ser programado com treze temperaturas de cozedura
diferentes (200°C, 190°C, 180°C, 170°C, 160°C, 150°C, 140°C, 130°C, 120°C, 110°C).
Recomenda-se que pré-aqueça o forno antes de cozinhar no modo de convecção. Para pré-aquecer e cozinhar com
afunção de convecção, siga as instruções em baixo.
O seu forno pode ser programado para combinar o preaquecimento com as funções de cozedura por
convecção.
1. No modo de espera (standby), carregue várias vezes no botão CONVECÇÃO para selecionar a temperatura de
convecção.
2. Carregue no botão INÍCIO/INÍCIO RÁPIDO para iniciar a função de pré-aquecimento.
3. Quando for alcançada a temperatura desejada, o forno irá emitir um apito.
Assim que o forno estiver pré-aquecido e soar o apito:
1. Abra a porta e coloque o recipiente com os alimentos no meio do piso liso.
2. Use os botões 10 SEGUNDOS, 1 MINUTO e 10 MINUTOS para de nir a duração da cozedura. O tempo máximpo
possível é 95 minutos.
3. Carregue no botão INÍCIO/INÍCIO AUTOMÁTICO para iniciar.
NOTA: Quando a temperatura de preaquecimento por convecção for alcançada, o forno emitirá um apito de dois em
dois segundos. A temperatura de preaquecimento será mantida durante 30 minutos e depois disso o forno desliga-se.
MICRO-ONDAS+CONVECÇÃO
O modo de micro-ondas+convecção torna a cozedura mais fácil e mais rápida, pois usa a cozedura rápida das micro-
ondas e a convecção para tostar os alimentos.
Pode cozinhar-se em 4 temperaturas de convecção diferentes. Para iniciar o modo de cozedura dual, siga as instruções
em baixo:
1. No modo de espera (standby), carregue várias vezes no botão MICRO-ONDAS+CONVECÇÃO para selecionar a
temperatura (200°C, 170°C, 140°C, 110°C).
2. Carregue nos botões 10 SEGUNDOS, 1 MINUTO e 10 MINUTOS para de nir a duração da cozedura. O alcance do
tempo vai de 10 segundos a 95 minutos.
3. Carregue no botão INÍCIO/INÍCIO AUTOMÁTICO para iniciar.
Quando usar a função de Micro-ondas+Convecção, a duração da cozedura com micro-ondas e convecção é como
apresentado em baixo. Escolha a opção mais adequada para cozinhar os seus alimentos e torná-los estaladiços.
Mostrador Processo de cozedura
200 °C 10 segundos de potência de micro-ondas, depois 23 segundos de cozedura por convecção.
Ociclo repete-se até ao m da duração da cozedura de nida.
170 °C 15 segundos de potência de micro-ondas, depois 18 segundos de cozedura por convecção.
Ociclo repete-se até ao m da duração da cozedura de nida.
140 °C 19 segundos de potência de micro-ondas, depois 14 segundos de cozedura por convecção.
Ociclo repete-se até ao m da duração da cozedura de nida.
110 °C 24 segundos de potência de micro-ondas, depois 9 segundos de cozedura por convecção.
Ociclo repete-se até ao m da duração da cozedura de nida.

PT – 18
PT – 18
MENU AUTOMÁTICO
Para sua comodidade, os programas automáticos permitem que os alimentos sejam cozinhados de forma rápida
e e caz, apenas carregando em alguns botões. Não é necessário programar a duração e a potência de cozedura; é
necessário apenas carregar no botão de cozedura automática exigido, introduzir o peso/peças girando os botões
CIMA e BAIXO e carregar no botão INÍCIO/INÍCIO RÁPIDO.
Por exemplo, para cozinhar duas batatas recheadas.
1. Abra a porta e coloque os alimentos no interior do forno usando loiça adequada para o ciclo de cozedura a ser
usado.
2. Feche a porta.
3. Carregue uma vez no botão BATATAS RECHEADAS.
4. Use os botões CIMA e BAIXO para introduzir o número de batatas.
5. Carregue no botão INÍCIO/INÍCIO RÁPIDO.
6. Quando um ciclo de cozedura terminar, o mostrador apresentará a indicação “End” e ouvir-se-á um sinal sonoro
acada 2 minutos, até se carregar em algum botão ou a porta ser aberta.
Menus de cozedura automática:
Menu Automático Método de seleção do peso ou das peças Tamanho/peso
Refeições
congeladas Selecione o peso usando o controlo dos botões de CIMA e BAIXO,
depois carregue no botão INÍCIO/INÍCIO RÁPIDO para começar a
cozinhar.
200 a 800 g
Descongelar
automático 100 a 1800 g
Reaquecer bebidas
Selecione o número de copos usando o controlo dos botões de CIMA
e BAIXO, depois carregue no botão INÍCIO/INÍCIO RÁPIDO para
começar a cozinhar.
1 a 3 copos (200ml
cada)
Batatas Recheadas
Selecione o número de batatas usando os botões de CIMA e BAIXO,
depois carregue no botão INÍCIO/INÍCIO RÁPIDO para começar a
cozinhar. Dependendo do número de batatas selecionado poderá ter
de mudar a posição destas a meio do ciclo de cozedura.
1 a 3 batatas (230g
cada)
Pipocas
Selecione o peso usando o controlo dos botões de CIMA e BAIXO,
depois carregue no botão INÍCIO/INÍCIO RÁPIDO para começar a
cozinhar.
100g
Legumes Frescos 200 a 600 g
Pizza 150 g / 300 g /
450 g
Papas 50 a 150 g
Bifes grelhados* 200 a 600 g
Frango grelhado* 200 a 600 g
Reaquecer
automático* 200 a 800 g
Batatas fritas no
forno 200 g
Carne assada/
borrego 200 a 600 g
Frango Assado 800 a 1400 g
• Os resultados da cozedura automática dependem de fatores, como o formato e o tamanho dos alimentos, as suas
preferências pessoais e se determinados alimentos estão muito ou pouco cozinhados, bem como o modo como os
alimentos estão colocados no forno. Caso os resultados da cozedura não sejam satisfatórios, ajuste a duração da
cozedura para se adaptar.
• Em alguns dos programas da cozedura automática pode ser pedido para virar os alimentos. Abra a porta, vire os
alimentos, feche a porta e carregue no botão INÍCIO/INÍCIO RÁPIDO para continuar a cozinhar.
• Use luvas de forno (ou semelhantes) ao virar os alimentos.

PT
PT – 19
PT – 19
DESCONGELAR AUTOMÁTICO
O descongelar automático permite-lhe descongelar alimentos pelo peso. A duração de descongelar e o nível de
potência são de nidos automaticamente assim que forem programados a categoria dos alimentos e o peso. O peso
dos alimentos congelados vai de 200g a 1800g.
1. No modo de standby (espera), carregue no botão DESCONGELAR AUTOMÁTICO.
2. Gire os botões de CIMA e BAIXO para selecionar o peso dos alimentos a serem descongelados.
3. Carregue no botão INÍCIO/INÍCIO RÁPIDO para iniciar o ciclo de descongelar.
4. Caso o forno pare durante o ciclo de descongelar, vire os alimentos ao contrário para garantir que descongelam
uniformemente e volte a carregar em INÍCIO/INÍCIO RÁPIDO para descongelar durante o tempo restante.
5. Quando um ciclo de descongelar terminar, o mostrador apresentará a indicação “End” e ouvir-se-á um sinal
sonoro a cada 2 minutos, até se carregar em algum botão ou a porta ser aberta.
REAQUECER AUTOMÁTICO
O forno permite-lhe reaquecer alimentos com base no peso introduzido pelo utilizador. A duração e o nível de
potência do descongelar automático são automaticamente de nidos assim que forem programados a categoria e o
peso dos alimentos.O peso dos alimentos a serem reaquecidos vai de 200g a 1800g
1. No modo de standby (espera), carregue no botão REAQUECER AUTOMÁTICO.
2. Com os botões de CIMA e BAIXO selecione o peso dos alimentos a serem descongelados.
3. Carregue no botão INÍCIO/INÍCIO RÁPIDO.
4. Quando um ciclo de cozedura terminar, o mostrador apresentará a indicação “End” e ouvir-se-á um sinal sonoro a
cada 2 minutos, até se carregar em algum botão ou a porta ser aberta.
TEMPORIZADOR DE COZINHA
O forno vem equipado com um temporizador de cozinha que irá fazer a contagem decrescente da duração de nida.
1. No modo de espera (standby), carregue uma vez no botão HORA/DEFINIR RELÓGIO.
2. Use os botões 10 SEGUNDOS, 1 MINUTO e 10 MINUTOS para de nir a duração desejada. O tempo máximpo
possível é 95 minutos.
3. Carregue no botão INÍCIO/INÍCIO RÁPIDO para con rmar.
4. O mostrador entrará em contagem decrescente durante o tempo de nido.
5. Quando o mostrador chegar a zero, ouvir-se-á um sinal sonoro.
É também possível usar o temporizador de cozinha no modo de cozedura. Para o fazer, siga os passos de nidos em
cima enquanto os alimentos estiverem a ser cozinhados. Assim que o temporizador de cozinha tiver sido ativado, este
aparecerá no mostrador durante cinco segundos; depois, o mostrador voltará à contagem decrescente desse ciclo de
cozedura. Para voltar a ver o temporizador, carregue uma vez no botão HORA/DEFINIR RELÓGIO e o temporizador de
cozinha aparecerá durante cinco segundos, passando depois à contagem decrescente.
• Para cancelarTIMER, carregue no botão STOP/ECO e o mostrador apresentará a hora.
• Caso tenha sido iniciado um ciclo de cozedura, é possível iniciar o temporizador de cozinha seguindo os passos em
cima.
FUNÇÃO DE POUPANÇA DE ENERGIA
Esta função permite poupar energia quando o forno não estiver a ser usado. Para ativar esta função no modo de
standby (espera), carregue e mantenha o botão STOP/ECO durante 3 segundos. O mostrador desligar-se-á e o forno
entrará no modo de poupança de energia.
Para cancelar o modo de poupança de energia, carregue em qualquer botão ou abra e fecha a porta do forno.

PT – 20
PT – 20
FUNÇÃO DE SILENCIAR
É possível silenciar quaisquer sons do micro-ondas usando a função de silenciar. Para de nir a função de silenciar,
carregue uma vez no botão do BLOQUEIO DE CRIANÇAS e o mostrador apresentará a indicação "oFF" durante
5segundos. Enquanto estiver no modo silenciado, não se ouvirá nenhum som ao carregar nos botões.
Para desligar a função de silenciar, carregue uma vez no botão do BLOQUEIO DE CRIANÇAS. O mostrador
apresentará a indicação "on" durante 5 segundos para indicar que o som voltou a ser ligado.
Se a função de silenciar tiver sido de nida e o forno for desligado da corrente, esta será cancelada quando a corrente
for retomada.
BLOQUEIO DE SEGURANÇA
Esta é uma função automática para evitar a utilização não vigiada do forno por parte de crianças. No modo standby
(espera), se não for usado durante um minuto, o forno entrará automaticamente no modo de bloqueio de segurança
e a indicação "Loc" aparecerá no mostrador. No modo de bloqueio, todos os botões são desativados. Se carregar
em qualquer botão, a indicação de bloqueio aparecerá no mostrador durante 5 minutos a relembrar o utilizador de
cancelar o bloqueio de segurança.
Para desligar o bloqueio de segurança basta abrir a porta do micro-ondas e o teclado voltará a car ativo e o indicador
de bloqueio apagar-se-á.
BLOQUEIO DE CRIANÇAS
Para de nir o BLOQUEIO DE CRIANÇAS, carregue e mantenha o botão BLOQUEIO DE CRIANÇAS durante 3 segundos.
Ouvir-se-á um apito longo e o mostrador apresentará a indicação “Loc”. O forno está agora no modo de BLOQUEIO DE
CRIANÇAS. Enquanto estiver neste modo, o mostrador apresentará a hora e, se alguém carregar em algum botão, ou a
porta for aberta, aparecerá a indicação “Loc” durante 5 segundos.
Para cancelar o BLOQUEIO DE CRIANÇAS, carregue e mantenha o botão BLOQUEIO DE CRIANÇAS durante
3segundos até ouvir um apito prolongado.
MECANISMO DE PROTEÇÃO AUTOMÁTICA
PROTEÇÃO DE SOBREAQUECIMENTO- Quando o forno detetar uma temperatura alta, o mostrador apresentará
aindicação "E01" e deixará de funcionar. Isto pode ser cancelado carregando no botão STOP/ECO.
PROTEÇÃO DE TEMPERATURA BAIXA- Quando o forno entrar no modo de proteção de temperatura baixa,
omostrador apresentará a indicação "E02" e deixará de funcionar. Isto pode ser cancelado carregando no botão
STOP/ECO.
PROTEÇÃO DE ANOMALIA DO SENSOR- Quando o forno detetar um problema com um dos sensores, aparecerá a
indicação "E03" e o forno deixará de funcionar. Além disso, o forno irá emitir um sinal de aviso. Isto pode ser cancelado
carregando no botão STOP/ECO.

PT
PT – 21
PT – 21
LIMPEZA E MANUTENÇÃO
• Quando limpar, desligue o forno e retire a cha da tomada de alimentação.
• Mantenha o interior do forno limpo. Quando salpicos de comida ou líquidos derramados se colarem às paredes,
teto, base ou prato giratório, limpe com um pano húmido. Podem usar-se detergentes suaves, caso o forno que
muito sujo. Evite usar sprays ou outros agentes de limpeza agressivos. Estes podem manchar, riscar ou matizar a
superfície da porta.
• A parte exterior do forno deve ser limpa com um pano húmido. Para evitar danos nas peças de funcionamento do
interior do forno, não se deve deixar entrar água nas aberturas de ventilação.
• Limpe a porta e a janela de ambos os lados, as vedações da porta e as peças adjacentes com um pano húmido para
remover eventuais salpicos ou derrames.
• Não use agentes de limpeza abrasivos.
• Não use agentes de limpeza a vapor.
• Não permita que o painel de controlo que molhado. Limpe com um pano macio húmido. Quando limpar o painel
de controlo, deixe a porta do forno aberta para evitar que o forno se ligue acidentalmente.
• Se se acumular vapor no interior ou à volta da parte exterior da porta do forno, limpe com um pano macio. Isto
pode acontecer quando o micro-ondas funciona em condições de grande humidade. Não é uma anomalia.
• O prato giratório deve ser limpo com regularidade para evitar sujidade e eventuais danos/faíscas. Basta limpar a
superfície da base do forno com um detergente suave.
• Remova cheiros do forno misturando um copo de água com sumo e casca de um limão numa tigela própria para o
micro-ondas. Aqueça no micro-ondas durante 5 minutos. Limpe exaustivamente e seque com um pano macio.
• Se a lâmpada se fundir, contacte o apoio ao cliente para saber o que fazer.
• O forno deve ser limpo com regularidade e devem ser removidos quaisquer depósitos de comida. Não manter o
forno limpo pode provocar a deterioração da superfície, o que poderá afetar adversamente a vida útil da unidade e
poderá eventualmente provocar uma situação perigosa.
• Não elimine este eletrodoméstico no caixote do lixo doméstico. Veja os conselhos do seu país sobre a eliminação
deste tipo de produtos.

PT – 22
PT – 22
LOIÇA PRÓPRIA PARA O FORNO
1. O material ideal para utensílios para o micro-ondas é transparente para micro-ondas, pois permite que a energia
passe através do recipiente e aqueça os alimentos
2. As micro-ondas não conseguem penetrar no metal, pelo que não devem ser usados utensílios metálicos ou pratos
com uma risca metálica.
3. Não use produtos de papel reciclado quando cozinhar com micro-ondas, pois podem conter pequenos
fragmentos metálicos que podem provocar faíscas e /ou fogo.
4. São mais recomendados pratos redondos/ovais do que quadrados/alongados, pois os alimentos nos cantos têm
tendência a car cozinhados demais.
5. Podem usar-se tiras nas de película de alumínio para evitar que as zonas expostas se cozinhem excessivamente.
Tenha cuidado para não usar muitas e mantenha uma distância de 2,54 cm entre a película e a cavidade.
A lista seguinte é um guia geral para ajudar a selecionar os utensílios de cozinha corretos.
Loiça de cozinha Micro-ondas
Segura
Grill/
Convecção Comentários
Loiça de barro /
Siga sempre as instruções do produtor.
Não ultrapasse os tempos de cozedura indicados. Tenha muito
cuidado, pois estes recipientes podem car muito quentes.
Porcelana e cerâmica /
Porcelana, cerâmica, panelas de barro e porcelana de ossos
em geral podem ser usadas, à exceção daquelas que tiverem
decorações metálicas.
Vidro resistente ao calor Deve ter-se cuidado para garantir que a loiça de vidro é
adequada para usar num forno micro-ondas.
Vidro não resistente ao calor
Cerâmica resistente ao calor Certi que-se de que os materiais de cerâmica não são espessos
de mais ou com alto teor de minerais.
Prato de plástico próprio para o
micro-ondas
Veri que sempre se a loiça de plástico é adequada para usar no
micro-ondas.
Papel de cozinha / Use apenas papel de cozinha recomendado para usar em fornos
micro-ondas.
Loiça de vidro, por ex., Pyrex® / Tenha cuidado se usar loiça de vidro sensível, pois este pode
partir-se ou estalar se for aquecido repentinamente.
Tabuleiro metálico Não é recomendável o uso de loiça metálica, pois irá provocar
faíscas e pode provocar um incêndio.
Grelha metálica Não é recomendável o uso de loiça metálica, pois irá provocar
faíscas e pode provocar um incêndio.
Película de alumínio
Recipientes de alumínio /
Podem usar-se pequenos pedaços de película de alumínio para
evitar que os alimentos se sobreaqueçam. Mantenha a película
a pelo menos 2,54cm das paredes do forno, pois pode provocar
arco elétrico.
Não se recomendam recipientes de alumínio, a não ser que seja
especi cado pelo produtor, por ex., Microfoil ®, siga as instruções
com cuidado.
Película aderente Não deve tocar nos alimentos e deve estar furada para deixar
sair o vapor.
Plástico/Esferovite, por ex.,
recipientes de fast food
Tenha em atenção que alguns recipientes podem deformar-
se, derreter ou perder a cor quando expostos a temperaturas
elevadas.
Sacos de congelar/assar Deve estar perfurado para deixar sair o vapor. Certi que-se de
que os sacos são apropriados para usar no micro-ondas.
Pratos/copos de papel e papel de
cozinha
Não utilize atilhos de plástico ou metal, pois podem derreter ou
pegar fogo devido a arcos elétricos metálicos.
Recipientes de verga e madeira
Utilize apenas para aquecer ou para absorver humidade.
Deve-se ter cuidado, pois o sobreaquecimento pode provocar
um incêndio.
Papel reciclado e jornais
Esteja sempre com atenção ao forno quando usar estes materiais,
pois podem sobreaquecer e provocar um incêndio.
Podem conter extratos de metal, o que provocará fagulhas e
pode provocar um incêndio.
ATENÇÃO: Quando aquecer alimentos em recipientes de plástico ou papel, controle o forno devido
àpossibilidade de ignição.
NOTA: Não deixe o forno sem supervisão enquanto estiver a funcionar.

PT
PT – 23
PT – 23
CONSELHOS DE CULINÁRIA DO MICRO-ONDAS
Os micro-ondas cozinham mais rapidamente do que a cozedura tradicional. Por isso, é essencial que se sigam
certas técnicas para garantir bons resultados. Muitas das seguintes técnicas são semelhantes às usadas na cozedura
tradicional.
ATENÇÃO: Os líquidos e alimentos não devem ser aquecidos em recipientes fechados ou boiões/
recipientes com tampas, pois dentro deles formar-se-á pressão e poderá provocar uma
explosão.
NOTAS SOBRE OS CONSELHOS DE CULINÁRIA:
• Preste atenção ao forno quando este estiver em uso.
• Certi que-se de que os utensílios são adequados para o uso em fornos de micro-ondas.
• Use apenas pipocas de micro-ondas que tenham uma embalagem adequada (siga as instruções do produtor). Não
use nunca óleo, a não ser que o produtor o re ra e nunca cozinhe mais tempo do que o indicado.
ATENÇÃO: Se exceder o tempo de cozedura recomendado e usar níveis de potência demasiado altos,
os alimentos podem sobreaquecer, queimar-se e em circunstâncias extremas pegar fogo e
dani car o forno.
Acomodar
Coloque as partes mais espessas dos alimentos na borda do prato, por exemplo, coxas de frango.
Os alimentos colocados virados para fora do prato receberão mais energia, cozinhar-se-ão mais depressa do que os do
centro.
Cubrir
Certos alimentos bene ciam se forem tapados durante a cozedura no micro-ondas.
Use uma película aderente ventilada ou uma tampa adequada.
Perfure
Alimentos com casca, pele ou membranas devem ser perfurados em vários locais antes de cozinhar ou reaquecer, pois
formar-se-á vapor que poderá provocar a explosão do alimento.
por ex., Batatas, Peixe, Frango, Salsichas.
NOTA: Os ovos não devem ser aquecidos usando a potência de micro-ondas, pois podem explodir, mesmo depois da
cozedura terminar, por ex., escalfados, estrelados, cozidos.
Mexa, vire e volte a acomodar
Para uma cozedura uniforme é essencial mexer, virar e voltar a acomodar os alimentos durante a cozedura. Mexa e
acomode sempre do exterior para o interior.
Deixe repousar
O tempo de repouso é necessário após a cozedura, pois permite que o calor seja distribuido uniformemente pela
comida.

PT – 24
PT – 24
Características dos alimentos
Composição Alimentos ricos em gorduras ou açúcar (por ex., bolo de Natal, tartes de carne) exigem
menos tempo de aquecimento. Deve ter-se cuidado, pois o sobreaquecimento pode
provocar um incêndio.
Os ossos nos alimentos conduzem o calor, cozinhando os alimentos mais rapidamente.
Deve ter-se o cuidado de garantir que os alimentos são cozinhados uniformemente.
Densidade A densidade dos alimentos afeta a quantidade de tempo de cozedura necessária.
Alimentos leves e porosos, como bolos ou pão, são cozinhados mais depressa do que
alimentos pesados, densos, como assados ou guisados.
Quantidade O número de micro-ondas no seu forno é sempre o mesmo, independentemente
da forma como os alimentos estão a ser cozinhados. O tempo de cozedura deve ser
aumentado conforme aumenta a quantidade de alimentos colocados no forno.
Por ex., quatro batatas demoram mais a cozinhar do que duas.
Medida Alimentos e pedaços pequenos cozinham-se mais depressa do que alimentos grandes,
pois as micro-ondas podem penetrar de todos os lados até ao centro. Para cozinhar
uniformemente, prepare os pedaços todos do mesmo tamanho.
Forma Alimentos com formas irregulares, como peito ou coxas de frango, demoram mais tempo
a cozinhar nas partes mais espessas. Para cozinhar uniformemente, coloque as partes
mais espessas viradas para fora do prato, onde poderão receber mais energia.
Formas arredondadas cozinham mais uniformemente do que formas quadradas em
fornos micro-ondas.
Temperatura dos
alimentos
A temperatura inicial dos alimentos afeta a quantidade de tempo de cozedura
necessário.
Alimentos frios demoram mais tempo a cozinhar do que alimentos à temperatura
ambiente.
A temperatura do recipiente não é um indicador verdadeiro da temperatura dos
alimentos ou das bebidas. Corte os alimentos com recheio, por exemplo, dónutes com
recheio, para soltar o calor ou o vapor
ATENÇÃO: Cara e Mãos: Use sempre luvas para retirar os alimentos ou a loiça do forno. Afaste-se
quando abrir a porta, para permitir que o calor ou vapor dispersem. Quando retirar
coberturas (como película aderente), abrir sacos de assar ou embalagens de pipocas,
direccione o vapor para longe da sua cara e mãos.
ATENÇÃO: Veri que a temperatura dos alimentos e bebidas e misture antes de servir. Tenha particular
atenção quando servir bebés, crianças ou idosos. O conteúdo de biberons e boiões de
comida devem ser mexidos ou agitados e a temperatura veri cada antes de se consumir, de
modo a evitar queimaduras.

PT
PT – 25
PT – 25
CONSELHOS SOBRE DESCONGELAR
Usar o micro-ondas é o método mais rápido para descongelar. É um processo simples, porém as seguintes instruções
são essenciais para garantir que os alimentos são devidamente descongelados.
• Retire todo o tipo de embalagens e invólucros antes de descongelar.
• Para descongelar alimentos, use os níveis de potência do micro-ondas de P-20 a P-40.
• Consulte a informação seguinte em baixo.
Volte a acomodar
Os alimentos que estão virados para fora no prato descongelar-se-ão mais rapidamente do que os alimentos no
centro. Por isso, é essencial voltar a acomodá-los até 4 vezes durante o processo.
Mude as peças de viradas para fora para o meio e volte a acomodar as zonas de sorbreposição.
Isto irá garantir que todas as peças carão uniformemente descongeladas.
Separe
Os alimentos podem estar presos uns aos outros quando retirados do congelador. É importante separar os alimentos
assim que for possível durante a descongelação.
Por ex., fatias de bacon, bifes de peru.
Proteja
Algumas zonas dos alimentos que estão a ser descongelados podem car quentes. Para evitar que estas se aqueçam
demasiado e comecem a cozinhar, elas podem ser cobertas com pequenos pedaços de película que re ita as micro-
ondas, por ex., coxas e asas de um frango.
Deixe repousar
O tempo de repouso é necessário para garantir que os alimentos são totalmente descongelados
O processo de descongelar não termina quando se retiram os alimentos do micro-ondas. Os alimentos devem
repousar, tapados, durante um certo período de tempo para garantir que cam completamente descongelados.
Vire ao contrário
É essencial que todos os alimentos sejam virados ao contrário pelo menos 4 vezes durante o descongelar.
Isto é importante para garantir um descongelar completo.

PT – 26
PT – 26
CONSELHOS SOBRE REAQUECER
Para o reaquecimento de alimentos, siga os conselhos e instruções em baixo para garantir que os alimentos são
devidamente aquecidos antes de os servir.
Refeições no prato
Retire todo o tipo de doses de carne ou aves; aqueça-as separadamente, veja em baixo.
Coloque os pedaços mais pequenos de comida no meio do prato e os maiores nas bordas. Cubra com película
aderente ventilada para o micro-ondas e reaqueça em P-50. Misture/volte a acomodar a meio do processo de
reaquecimento.
NOTA: Certi que-se de que os alimentos foram totalmente reaquecidos antes de os servir.
Carne fatiada
Cubra com película aderente ventilada para o micro-ondas e reaqueça em P-60. Volte a acomodar os alimentos pelo
menos uma vez para garantir um reaquecimento uniforme.
NOTA: Certi que-se de que a carne foi totalmente reaquecida antes de servir.
Doses de frango
Coloque os pedaços mais espessos da dose virados para a borda do prato, cubra com película aderente ventilada para
o micro-ondas e reaqueça em P-70.
Vire ao contrário a meio do processo de reaquecimento.
NOTA: Veri que que as aves foram totalmente reaquecidas antes de servir.
Guisados
Cubra com película aderente ventilada para o micro-ondas ou com uma tampa apropriada e reaqueça em P-50.
Mexa com frequência para garantir um reaquecimento uniforme.
NOTA: Certi que-se de que os alimentos foram totalmente reaquecidos antes de os servir.
Para alcançar os melhores resultados quando quiser reaquecer, escolha um nível de potência do micro-ondas
apropriado para esse tipo de alimento, por ex., uma taça com legumes pode ser reaquecida usando o nível de
potência P-100, enquanto que uma lasanha, que tem ingredientes que não podem ser misturados, deve ser
reaquecida a P-40.
NOTAS:
• Retire os alimentos de recipientes de plástico ou metal antes de os reaquecer.
• O tempo de reaquecimento é afetado pela forma, densidade, quantidade e temperatura dos alimentos, bem como
pelo tamanho, forma e material do recipiente.
ATENÇÃO: Nunca aqueça líquidos em recipientes com um gargalo estreito, pois isto pode provocar
uma erupção do conteúdo e pode causar queimaduras.
• Para evitar sobreaquecimento e incêndios, devem ser tidos cuidados especiais quando reaquecer alimentos com
grande quantidade de açúcar ou gordura, como por exemplo, tortas ou doces de Natal.
• Nunca aqueça óleo ou gordura para fritar, pois isto pode levar a um sobreaquecimento e incêndio.
• Batatas enlatadas não devem ser aquecidas no forno de micro-ondas. Siga as instruções do produtor na
embalagem.
ATENÇÃO: O conteúdo de biberons e boiões de comida de bebé deve ser mexido ou agitado e a
temperatura veri cada antes de consumir, para evitar queimaduras.

PT
PT – 27
PT – 27
RESOLUÇÃO DE PROBLEMAS
Caso considere que o forno não está a funcionar devidamente, há alguns pontos que pode veri car sozinho, antes de
contactar um engenheiro. Isto ajudará a evitar chamadas desnecessárias para a assistência técnica, caso o problema
seja algo simples.
Siga este exame simples:
Coloque meio copo de água no prato giratório e feche a porta. De na o temporizador para cozinhar durante 1 minuto
usando o nível de potência do micro-ondas P-100.
1. A lâmpada do forno acende-se enquanto se cozinha?
2. A ventoinha de arrefecimento funciona? (Veri que colocando a mão por cima da abertura de ventilação.)
3. Ao m de 1 minuto ouve-se o sinal sonoro?
4. A água no copo está quente? Se a sua resposta a alguma destas questões for “NÃO”, veri que em primeiro lugar
se o forno está devidamente ligado à corrente e se o fusível não disparou. Se não houver nenhum problema com
nenhuma destas coisas, veri que novamente a tabela de resolução de problemas em baixo.
ATENÇÃO: Nunca ajuste, repare ou altere o forno sozinho. É perigoso para alguém que não um
engenheiro formado da SHARP efetuar trabalhos de manutenção ou reparação. Isto é
importante, pois pode envolver a remoção de capas que fornecem proteção contra a
energia de micro-ondas.
• As vedações da porta impedem a fuga de micro-ondas durante o funcionamento do forno, mas não são herméticas.
É normal ver gotas de água, luz, ou sentir ar quente perto da porta do forno. Alimentos com muita humidade irão
libertar vapor e provocar condensação dentro da porta, que poderá gotejar do forno.
• Reparações e alterações: Se o forno não estiver a funcionar corretamente, não tente repará-lo, alterá-lo ou colocá-lo
em funcionamento.
• Estrutura exterior e acesso à lâmpada: Nunca retire a estrutura exterior. Isto é muito perigoso devido à alta voltagem
de peças no interior que não devem ser tocadas nunca, pois isso pode ser fatal. O seu forno não vem com uma capa
de acesso à lâmpada. Se a lâmpada se fundir, não tente substituí-la sozinho, ligue a uma unidade de assistência
técnica da SHARP.

PT – 28
PT – 28
TABELA DE RESOLUÇÃO DE PROBLEMAS
PERGUNTA RESPOSTA
Há uma corrente de ar a
circular à volta da porta.
Enquanto o forno trabalha, circula ar dentro da cavidade.
A porta não veda de forma hermética, pelo que pode sair ar através dela.
Forma-se condensação
dentro do forno, que pode
pingar da porta.
A cavidade do forno normalmente está mais fria do que os alimentos que estão a
ser cozinhados, por isso o vapor produzido durante a cozedura irá condensar na
superfície mais fria.
A quantidade de vapor produzido depende do teor de água no alimento a ser
cozinhado. Alguns alimentos, como batatas, têm um alto teor de água.
A condensação presa no vidro da porta deve desaparecer ao m de algumas
horas.
Clarões e faíscas dentro
da cavidade enquanto se
cozinha.
Quando um objeto metálico se aproxima muito da cavidade do forno durante a
cozedura podem ocorrer faíscas. Isto poderá tornar a superfície da cavidade mais
áspera, mas não irá dani car de outro modo o forno.
Batatas com faíscas Certi que-se de que todos os "olhos" das batatas foram retirados e de que foram
furadas. Coloque-as diretamente sobre o prato giratório, ou numa travessa
resistente ao calor, ou semelhante.
O forno não funciona quando
se carrega no botão INÍCIO/
INÍCIO RÁPIDO.
Veri que se a porta está devidamente fechada.
O forno cozinha muito
devagar.
Veri que que selecionou o nível de potência correto.
O forno faz barulho. A energia das micro-ondas vai pulsando durante a cozedura/descongelação.
Ouve-se um apito do forno a cada minuto e o mostrador indica "Fail"
Se os botões do painel de controlo forem constantemente pressionados durante
mais de 1 minuto, ocorrerá este erro.
A estrutura exterior está
quente.
A estrutura pode car quente - mantenha as crianças afastadas.
PROTEÇÃO CONTRA BOTÕES PRESOS
Se em algum momento um dos botões do painel de controlo car preso durante mais de 1 minuto, o programa
para imediatamente de funcionar e o mostrador apresentará a indicação "FAIL". O micro-ondas emitirá um apito. Se
obotão continuar preso, o apito irá soar a cada minuto. Depois de resolver o problema, carregue no botão STOP/ECO
para regressar ao modo de standby (espera).
ANTES DE LIGAR À ASSISTÊNCIA TÉCNICA
Antes de ligar à assistência técnica veri que cada um dos pontos em baixo:
• Veri que se o forno está ligado à tomada com rmeza Se não, retire a cha da tomada, aguarde 10 segundos e volte
a ligá-la com rmeza.
• Veri que se algum fusível saltou ou se um disjuntor disparou. Caso pareçam funcionar corretamente, teste a tomada
com outro eletrodoméstico.
• Certi que-se de que os manípulos de potência e do temporizador estão devidamente de nidos.
• Certi que-se de que a porta está a encaixar devidamente no sistema de bloqueio de segurança. Caso contrário,
aenergia das micro-ondas não irá uir dentro do forno.
SE NENHUM DOS PONTOS ACIMA CORRIGIR A SITUAÇÃO, CONTACTE UM TÉCNICO QUALIFICADO. NÃO TENTE
AJUSTAR OU REPARAR O FORNO SOZINHO.

FR
FR – 1
FR – 1
Attention:
Votre produit
comporte ce
symbole. Il
signi e que
les produits
électriques et
électroniques
usagés ne
doivent pas
être mélangés
avec les déchets
ménagers
généraux. Un
système de
collecte séparé
est prévu pour
ces produits.
A. Informations sur la mise au rebut à l’intention des
utilisateurs privés (ménages)
1. Au sein de l'Union européenne
Attention: si vous souhaitez mettre cet appareil au rebut, ne le jetez pas
dans une poubelle ordinaire !
Les appareils électriques et électroniques usagés doivent être traités sépa-
rément et conformément aux lois en vigueur en matière de traitement, de
récupération et de recyclage adéquats de ces appareils.
Suite à la mise en œuvre de ces dispositions dans les États membres, les mé-
nages résidant au sein de l’Union européenne peuvent désormais rapporter
gratuitement* leurs appareils électriques et électroniques usagés sur des
sites de collecte désignés.
Dans certains pays*, votre détaillant reprendra également gratuitement
votre ancien produit si vous achetez un produit neuf similaire.
*) Veuillez contacter votre administration locale pour plus de renseigne-
ments.
Si vos appareils électriques ou électroniques usagés sont équipés de piles
ou d’accumulateurs, veuillez les éliminer séparément, conformément aux
prescriptions locales. En éliminant correctement ce produit, vous contri-
buerez à garantir que les déchets subissent le traitement, la valorisation
et le recyclage nécessaires et à prévenir ainsi les e ets négatifs potentiels
sur l’environnement et la santé humaine qui pourraient autrement résulter
d’une manipulation inappropriée des déchets.
2. Pays hors de l'Union européenne
Si vous souhaitez mettre ce produit au rebut, veuillez contacter votre admi-
nistration locale qui vous renseignera sur la méthode d’élimination correcte
de cet appareil.
Suisse : les équipements électriques ou électroniques usagés peuvent être
ramenés gratuitement au détaillant, même si vous n'achetez pas un nouvel
appareil. Pour obtenir la liste des autres sites de collecte, veuillez vous
reporter à la page d'accueil du site www.swico.ch ou www.sens.ch.
B. Informations sur la mise au rebut à l’intention des
entreprises
1. Au sein de l'Union européenne
Si ce produit est utilisé dans le cadre des activités de votre entreprise et que
vous souhaitez le mettre au rebut :
Veuillez contacter votre revendeur SHARP qui vous informera des conditions
de reprise du produit. Des frais de reprise et de recyclage pourront vous être
facturés. Les produits de petite taille (et en petites quantités) pourront être
repris par vos organisations de collecte locales.
Espagne : veuillez contacter l'organisation de collecte existante ou votre
administration locale concernant les modalités de reprise de vos produits
usagés.
2. Pays hors de l'Union européenne
Si vous souhaitez mettre ce produit au rebut, veuillez contacter votre admi-
nistration locale qui vous renseignera sur la méthode d’élimination correcte
de cet appareil.
Pour le support, visitez www.sharpconsumer.com/contact/, pour vos droits de garantie, adressez-vous à
www.sharpconsumer.com/support/ ou contactez le détaillant auprès duquel vous avez acheté votre produit.
Les déclarations de conformité sont disponibles sur www.sharpconsumer.com/documents-of-conformity/
www.sharpconsumer.com/
support/
www.sharpconsumer.com/
documents-of-conformity/
www.sharpconsumer.com/
contact/

FR – 2
FR – 2
PRÉCAUTIONS POUR ÉVITER UNE EXPOSITION POSSIBLE À UNE ÉNERGIE
EXCESSIVE DE MICRO-ONDES
1. Ne tentez pas d'utiliser ce four avec la porte ouverte car cela peut entraîner une exposition nocive à l'énergie des
micro-ondes. Il est important de ne pas rompre ou manipuler les dispositifs de verrouillages de sécurité.
2. N'insérez aucun objet entre la face avant du four et la porte ou ne laissez pas accumuler de la saleté ou des résidus
de nettoyage sur les surfaces d'étanchéité.
3. N'utilisez pas le four s'il est endommagé. Il est très important que la porte du four ferme correctement et qu'il n'y
ait aucun dommage à la porte, aux charnières, aux serrures ou aux joints de porte et aux surfaces d'étanchéité.
4. N'essayez pas de réparer ou d’ajuster le four.
TABLE DES MATIÈRES
INSTRUCTIONS IMPORTANTES DE SÉCURITÉ............................................................................................................................................... 3
INSTALLATION .......................................................................................................................................................................................................12
PERTURBATIONS RADIO .................................................................................................................................................................................... 13
INSTRUCTIONS DE MISE À LA TERRE ............................................................................................................................................................13
SPÉCIFICATIONS ................................................................................................................................................................................................... 13
FOUR ET ACCESSOIRES ...................................................................................................................................................................................... 14
PANNEAU DE COMMANDE ...............................................................................................................................................................................15
AVANT D'UTILISER LE FOUR .............................................................................................................................................................................15
RÉGLAGE DE L’HORLOGE ..................................................................................................................................................................................15
CUISSON AU MICRO-ONDES ...........................................................................................................................................................................16
DÉMARRAGE RAPIDE .......................................................................................................................................................................................... 16
CUISSON AU GRIL ................................................................................................................................................................................................17
MICRO-ONDES + GRIL ........................................................................................................................................................................................17
CONVECTION ........................................................................................................................................................................................................18
MICRO-ONDES+CONVECTION........................................................................................................................................................................18
MENU AUTO ..........................................................................................................................................................................................................19
DÉCONGÉLATION AUTOMATIQUE ................................................................................................................................................................. 20
RÉCHAUFFAGE AUTOMATIQUE .......................................................................................................................................................................20
MINUTERIE .............................................................................................................................................................................................................20
FONCTION D'ÉCONOMIE D’ÉNERGIE ............................................................................................................................................................20
FONCTION MUET ................................................................................................................................................................................................. 21
SERRURE DE SÉCURITÉ .......................................................................................................................................................................................21
VERROUILLAGE ENFANT ....................................................................................................................................................................................21
MÉCANISME DE PROTECTION AUTOMATIQUE .........................................................................................................................................21
NETTOYAGE ET ENTRETIEN ..............................................................................................................................................................................22
BIEN CHOISIR LA VAISSELLE ............................................................................................................................................................................. 23
CONSEILS POUR LA CUISSON AU MICRO-ONDES ....................................................................................................................................24
CONSEILS POUR LA DÉCONGÉLATION .........................................................................................................................................................26
CONSEILS POUR LE RÉCHAUFFAGE ............................................................................................................................................................... 27
DÉPANNAGE ..........................................................................................................................................................................................................28
PROTECTION COLLANTE DES BOUTONS .....................................................................................................................................................29
AVANT D'APPELER L'ASSISTANCE ...................................................................................................................................................................29

FR
FR – 3
FR – 3
INSTRUCTIONS IMPORTANTES DE SÉCURITÉ
VEUILLEZ LES LIRE ATTENTIVEMENT ET LES CONSERVER
POUR TOUTE RÉFÉRENCE ULTÉRIEURE
Attention aux risques d’incendie. Vous devez surveiller le
four durant son fonctionnement. Un niveau de puissance
trop élevé, ou un temps de cuisson trop long, peuvent en-
traîner une augmentation de la température des aliments
et créer un risque d'incendie.
Ce four est conçu pour être uniquement utilisé sur un plan de
travail de cuisine. Il n'est pas conçu pour être installé dans un
élément de cuisine. Veuillez ne pas placer le four dans un pla-
card. La prise secteur doit être facilement accessible, a n que
la che du cordon d’alimentation puisse être aisément débran-
chée en cas d’urgence.
La tension d’alimentation doit être égale à 230-240 V, 50
Hz avec un fusible de distribution de 10 A minimum, ou un
disjoncteur de 10 A minimum. La prise secteur doit être faci-
lement accessible, a n que la che du cordon d’alimentation
puisse être aisément débranchée en cas d’urgence.
Veuillez ne pas placer votre four à proximité d’une zone généra-
trice de chaleur. Par exemple, près d’un four à cuisson conven-
tionnelle. Ne placez pas ce four dans une atmosphère à humidi-
té élevée ou bien où l’humidité peut s'accumuler. Ne stockez et
n'utilisez pas le four à l’extérieur.
Si vous observez la présence de fumée, éteignez ou dé-
branchez le four et laissez la porte fermée a n d’étouff er
les ammes.
Utilisez uniquement des récipients et ustensiles compa-
tibles avec la cuisson au micro-ondes. Il est important de
véri er que les ustensiles utilisés sont bien compatibles
avec la cuisson au micro-ondes.

FR – 4
FR – 4
Lorsque vous réchauff ez un plat dans un récipient en plas-
tique ou en papier, surveillez le four pour prévenir tout
risque d’incendie.
Nettoyez le couvercle du guide d'ondes et la cavité du four.
Nettoyez le couvercle du guide d'ondes, la cavité du four
et le plateau après utilisation. Ceux-ci doivent être secs et
exempts de graisse. Les accumulations de graisse peuvent
s’échauff er au point générer de la fumée ou de prendre
feu.
Ne placez pas de produits susceptibles de s’en ammer au voi-
sinage du four ou de ses ouvertures de ventilation. N'obstruez
pas les ouvertures de ventilation.
Retirez toutes les étiquettes, ls, etc., métalliques qui peuvent
se trouver sur l’emballage des aliments. Ces éléments métal-
liques peuvent entraîner la formation d’un arc électrique et
causer un incendie.
N’utilisez pas ce four micro-ondes pour faire de la friture. La
température de l’huile ne peut pas être contrôlée et l’huile ris-
querait de s’en ammer.
Pour faire des popcorns, n’utilisez que des ustensiles conçus
pour les fours à micro-ondes.
Ne conservez aucun aliment ou produit à l’intérieur du four.
Véri ez les réglages après la mise en service du four et assu-
rez-vous que le four fonctionne correctement.
Ne laissez pas le four sans surveillance pendant qu'il fonc-
tionne.
Pour éviter toute surchau e ou tout incendie, faites attention
lorsque vous cuisinez ou réchau ez des plats ayant une forte
proportion de sucre ou de graisse, par exemple des saucisses,
des tartes ou des gâteaux. Reportez-vous aux conseils corres-
pondants dans le manuel d'utilisation.

FR
FR – 5
FR – 5
Pour éviter toute blessure. AVERTISSEMENT:
N’utilisez pas le four s’il est endommagé ou ne fonctionne pas
normalement. Véri ez les points suivants avant toute utilisa-
tion du four.
a) Assurez-vous que la porte ferme correctement, qu’elle ne
présente pas de défaut d’alignement et qu’elle n’est pas
voilée.
b) Assurez-vous que les charnières et les loquets de la porte
de sécurité ne sont pas brisés ou lâches.
c) Assurez-vous que les joints de porte et surfaces de contact
ne sont pas endommagés.
d) Assurez-vous que l'intérieur de la cavité et de la porte n'est
pas cabossé.
e) Assurez-vous que le cordon d’alimentation et sa prise ne
sont pas endommagés.
Si la porte ou les joints de porte sont endommagés, n’utilisez
pas le four jusqu’à ce qu’il soit réparé par du personnel quali-
é .
Vous ne devez rien réparer ou remplacer par vous-même
dans le four. Faites appel à du personnel quali é. N’es-
sayez pas de démonter l’appareil ni d’enlever le dispositif
de protection contre l’énergie micro-ondes, vous risque-
riez d’endommager le four et de vous blesser.
Ne faites pas fonctionner le four avec la porte ouverte et ne
modi ez pas les loquets de sécurité de la porte d'une quel-
conque manière. N’utilisez pas le four si un objet est interposé
entre le joint de porte et la surface de contact du joint.
Évitez que la graisse ou la saleté ne s’accumulent sur le
joint de porte ou sur la surface des pièces proches. Net-
toyez le four à intervalles réguliers et retirez tous les dé-
pôts de nourriture.

FR – 6
FR – 6
Suivez les instructions d'«Entretien et nettoyage». Le
non-respect des consignes de nettoyage du four entraî-
nera une détérioration des surfaces susceptible d'aff ecter
le bon fonctionnement de l'appareil et de présenter des
risques.
Si vous avez un STIMULATEUR CARDIAQUE, consultez votre mé-
decin ou le fabricant du stimulateur a n de vous renseigner sur
les précautions à prendre lors de l’utilisation du four.
Pour éviter toute décharge électrique.
• Ne retirez en aucun cas le boîtier externe.
• N’introduisez aucun objet ou liquide dans les ouvertures
des verrous de la porte ou dans les ouvertures d’aération. Si
un liquide pénètre dans le four, mettez immédiatement le
four hors tension, débranchez la che du cordon d’alimenta-
tion et adressez-vous à un technicien d’entretien agréé par
SHARP.
• Ne plongez jamais la che du cordon d’alimentation dans
l’eau ou tout autre liquide.
• Veillez à ce que le cordon d’alimentation ne pende pas à
l’extérieur de la table ou du meuble sur lequel est posé le
four.
• Veillez à ce que le cordon d’alimentation soit éloigné des
surfaces chau ées, y compris de l’arrière du four.
• Gardez l'appareil et son cordon d'alimentation hors de por-
tée des enfants de moins de 8 ans.
• Ne tentez pas de remplacer vous-même la lampe du four
et ne laissez personne d’autre qu’un électricien agréé par
SHARP faire ce travail. Si la lampe du four grille, adres-
sez-vous au revendeur ou à un agent d’entretien agréé par
SHARP.
• Si le cordon d'alimentation est endommagé, il doit être rem-
placé par un agent de service SHARP agréé.

FR
FR – 7
FR – 7
AVERTISSEMENT : Les liquides ou autres aliments ne
doivent pas être réchauff és dans des récipients fermés,
ceux-ci étant susceptibles d'exploser. Le réchauff age des
boissons au micro-ondes peut entraîner une ébullition
explosive diff érée; faites donc bien attention lors de la
manipulation du récipient. Pour éviter toute explosion ou
ébullition soudaine:
N'utilisez jamais de récipients fermés. Retirez les joints et les
couvercles avant de les utiliser. Les récipients scellés peuvent
exploser en raison d'une accumulation de pression, même
après l'arrêt du four. Faites attention lorsque vous mettez des
liquides au micro-ondes. Utilisez un récipient à large ouverture
pour permettre aux bulles de s'échapper.
Ne chauff ez pas de liquide dans un récipient à col étroit tel
qu’un biberon car le contenu du récipient peut déborder
rapidement et provoquer des brûlures.
Pour éviter tout débordement de liquide bouillant et brûlure
éventuelle:
1. N’utilisez pas de temps de cuisson trop longs.
2. Remuez le liquide avant le chau age/réchau age.
3. Il est recommandé de placer une tige de verre ou similaire
(non métallique) dans le liquide durant le réchau age.
4. Conservez le liquide pendant au moins 20 secondes dans le
four une fois le chau age terminé, de manière à éviter toute
ébullition soudaine di érée.
Veuillez ne pas cuire d'œuf dans leur coquille et ne pas ré-
chauff er d'œuf dur entier dans le four micro-ondes, ceux-ci
risquant d’exploser même après la cuisson. Pour cuire ou
réchauff er des œufs qui n’ont pas été brouillés ou mélan-
gés, percez le jaune et le blanc. Retirez la coquille des œufs
durs et coupez les œufs en tranches avant de les réchauf-
fer dans un four à micro-ondes.

FR – 8
FR – 8
Percez la peau des aliments tels que pommes de terre et saucis-
ses avant de les cuire, ceux-ci pouvant exploser.
AVERTISSEMENT: Le contenu des biberons et pots pour
bébé doit être agité ou secoué et la température véri ée
avant leur consommation pour éviter toute brûlure. Utili-
sez un porte-récipient ou des gants de cuisine anti-chaleur
lorsque vous retirez les aliments du four de façon à éviter
toute brûlure. Pour éviter tout risque de brûlure:
• Ouvrez toujours les récipients, les appareils à popcorn, les
sacs de cuisson au four, etc. loin du visage et des mains pour
éviter les brûlures de vapeur et les éruptions d'ébullition.
Pour éviter les brûlures, testez toujours la température des
aliments, remuez avant de servir et prêtez une attention
particulière à la température des aliments et des boissons
o ertes aux bébés, aux enfants ou aux personnes âgées. Les
parties accessibles peuvent chau er en cours d'utilisation.
Les jeunes enfants devraient être tenus à l'écart.
• La température du récipient n'est pas un bon indicateur de
la température des aliments, véri ez toujours la température
des aliments.
• Tenez-vous éloigné du four lors de l'ouverture de la porte,
de manière à éviter toute brûlure due à la vapeur ou à la
chaleur.
• Coupez en tranches les plats cuisinés farcis après chau age
a n de laisser s’échapper la vapeur et d’éviter les brûlures.
• Ne laissez pas les enfants s'approcher de la porte pour éviter
qu'ils ne se brûlent.
AVERTISSEMENT: Ne laissez un enfant âgé de 8ans ou
moins utiliser le four sans supervision que si vous lui avez
donné des instructions adéquates, a n que l’enfant soit
capable d’utiliser le four de manière sûre et comprenne les
dangers d’une utilisation abusive.
Lorsque l'appareil est en mode GRIL, MIX GRIL, CONVEC-

FR
FR – 9
FR – 9
TION, MIX CONVECTION ou MENU AUTO (modes appli-
cables en fonction du modèle), les enfants ne doivent uti-
liser le four que sous la supervision d'un adulte, en raison
des hautes températures générées.
Cet appareil n'est pas conçu pour être utilisé par des per-
sonnes (ycompris des enfants) ayant des capacités phy-
siques, sensorielles ou mentales réduites ou manquant
d'expérience et de connaissances, sauf s’ils sont supervisés
ou si des instructions concernant l'utilisation de l'appareil
leur ont été données par une personne responsable de
leur sécurité.
Les enfants doivent être supervisés pour s'assurer qu'ils ne
jouent pas avec
l'appareil. Le nettoyage par les enfants doit être surveillé.
Les modèles avec écran tactile électronique sont activés
par un mode de verrouillage enfant.
Ne vous appuyez pas ou ne vous accrochez pas sur la porte du
four. N'utilisez pas le four comme un jouet.
Vous devez enseigner aux enfants les consignes de sécurité
comme l’usage d’un porte-récipient et le retrait avec précau-
tion de l'emballage des produits alimentaires. Vous devez
leur dire de porter une attention particulière aux emballages
conçus pour rendre la nourriture croustillante (par exemple,
ceux destinés à griller un aliment) dont la température peut
être très élevée.
Autres avertissements
Veuillez ne pas modi er le four en aucune manière.
Veuillez ne pas déplacer le four pendant son fonctionnement.
Cet appareil est destiné à un usage domestique. Ce four sert à
la préparation d'aliments à domicile seulement et ne peut pas
être utilisé pour la cuisson d'aliments et de boissons. Le sé-

FR – 10
FR – 10
chage de la nourriture ou de tissus et le chau age de coussins
chau ants, de pantou es, d'éponges, de linge humide et autres
peuvent entraîner des risques de blessures ou d'incendie. Cet
appareil ne convient pas pour un usage commercial ou de
laboratoire.
Pour éviter une anomalie de fonctionnement et pour éviter
d’endommager le four.
N'utilisez jamais ce four à vide. Si vous utilisez un plat brunis-
seur ou un plat en matière auto-chau ante, interposez une pro-
tection contre la chaleur (par exemple, un plat en porcelaine)
de manière à ne pas endommager la base du four. Le temps de
préchau age précisé dans le livre de recettes ne doit pas être
dépassé.
N'utilisez pas de récipients métalliques, qui re ètent les mi-
cro-ondes et peuvent causer des arcs électriques. Ne placez pas
de cannettes dans le four.
Pour éviter que le plateau rotatif ou la base du four ne cède:
a) Avant de nettoyer avec de l'eau, laissez refroidir.
b) Ne placez pas d'aliments ou d'ustensiles chauds ou froids
sur le plateau rotatif/la base du four froide.
c) Ne posez aucun objet sur le boîtier du four pendant son
fonctionnement.
REMARQUE:
N'utilisez pas des récipients en plastique pour la fonction mi-
cro-ondes si le four est encore chaud après l'utilisation d'un
mode combiné (en fonction du modèle de four), car ces objets
pourraient fondre.
Les récipients en plastique ne doivent pas être utilisés dans
les modes ci-dessus, sauf si le fabricant de conteneurs indique
qu'ils sont appropriés pour cet usage.
Si vous avez des doutes quant à la manière de brancher le four,
consultez un technicien quali é.

FR
FR – 11
FR – 11
Ni le fabricant ni le distributeur ne sauraient être tenus respon-
sables des dommages occasionnés au four ou des blessures
personnelles qui résulteraient d'une mauvaise observation des
consignes de branchement électrique.
Des gouttes d’eau peuvent se former sur les parois de la cavité
du four, autour des joints et des surfaces d’étanchéité. Ceci est
normal et n'est pas une indication d'un mauvais fonctionne-
ment ou de fuites de micro-ondes.
Cet appareil est destiné à être utilisé dans des applications do-
mestiques et similaires telles que : les espaces cuisine réservés
au personnel des magasins, bureaux et autres environnements
professionnels / les fermes / l'utilisation par les clients dans des
hôtels, motels et autres environnements de type résidentiel /
les environnements de type Bed and Breakfast.
Ce symbole signi e que les surfaces sont susceptibles
de chau er pendant l'utilisation.

FR – 12
FR – 12
INSTALLATION
1. Retirez tous les éléments d'emballage de l'intérieur de la cavité du four et enlevez le lm protecteur protégeant la
surface du boîtier du four micro-ondes.
2. Véri ez soigneusement que le four ne présente
aucun signe de dommages.
3. Placez le four sur une surface sûre, plane et su samment solide pour supporter le poids du four, plus le poids de
l'aliment le plus lourd à cuire dans le four. Ne placez pas le four dans un placard.
4. Sélectionnez une surface plane fournissant assez d'espace libre pour les grilles d'aération d'entrée et de sortie. Voir
l'image sur la première page. La surface arrière de l'appareil doit être placée contre un mur.
• La hauteur minimale d'installation est de 85 cm.
• Un espace minimum de 20 cm est requis entre les bords du four micro-ondes et les murs ou objets adjacents.
• Gardez un espace d'au moins 30 cm au-dessus du four.
• Ne retirez pas les pieds du bas du four.
• Bloquer l'entrée et/ou la sortie d'aération peut endommager le four
• Placez le four aussi loin que possible des radios et TV. Le fonctionnement du four à micro-ondes peut causer des
interférences sur votre signal radio ou TV.
20 cm
30 cm
85 cm
10 cm
20 cm
5. Branchez la che du cordon d’alimentation dans une prise murale standard (avec prise de terre).
AVERTISSEMENT:
Ne placez pas le four dans un endroit générant de la chaleur ou des niveaux élevés d'humidité (par exemple, près ou
au-dessus d'un four conventionnel) ou près de matériaux combustibles (par ex. rideaux).
Ne bloquez ou n’obstruez pas les ouvertures de ventilation.
Ne placez pas d’objet sur le four.
Ne touchez pas l'extérieur du four micro-ondes pendant ou peu après fonctionnement, car il sera chaud.

FR
FR – 13
FR – 13
PERTURBATIONS RADIO
Le fonctionnement du four micro-ondes peut provoquer des interférences pour les radios, télévisions et équipements
similaires. En cas d'interférences, vous pouvez les réduire ou les éliminer en prenant les mesures suivantes:
1. Nettoyez la porte et la cavité où elles se rencontrent.
2. Changez la direction de l'antenne de réception de la radio ou de la télévision.
3. Déplacez le four à micro-ondes par rapport au récepteur.
4. Branchez le four à micro-ondes dans une autre prise de courant de façon à ce que le four à micro-ondes et le
récepteur soient sur des circuits di érents.
INSTRUCTIONS DE MISE À LA TERRE
Cet appareil doit être mis à la terre. Cet appareil est équipé d'un cordon doté d'un l de mise à la terre avec une che
de mise à la terre. La che doit être branchée sur une prise correctement installée et mise à la terre. En cas de court-
circuit électrique, la mise à la terre réduit le risque de choc électrique en fournissant une voie d'échappement pour le
courant électrique. Il est recommandé de prévoir un circuit séparé desservant uniquement le four.
AVERTISSEMENT: Une mauvaise utilisation de la prise de mise à la terre peut entraîner un risque
d’électrocution.
REMARQUE:
1. Si vous avez des questions concernant la mise à la terre ou l'installation électrique, veuillez consulter un électricien
quali é ou un agent de service.
2. Ni le fabricant ni le distributeur ne sauraient être tenus responsables des dommages occasionnés au four ou des
blessures personnelles qui résulteraient d'une mauvaise observation des consignes de branchement électrique.
La che secteur utilisée dans votre four à micro-ondes utilise des ls respectant le code couleur suivant:
Vert et jaune = TERRE | Bleu = NEUTRE | Marron = SOUS TENSION
SPÉCIFICATIONS
Nom du modèle: YC-PC322A
Tension d’alimentation 230-240 V, 50 Hz, monophasé
Fusible/disjoncteur de protection 10 A
Puissance
Consommation électrique 2300W
Puissance de sortie du micro-ondes 1000W
Puissance de sortie du gril 1250 W
Puissance de convection 2300 W
Puissance en mode Arrêt < 0,5W
Fréquence des micro-ondes 2450 MHz*
Dimensions extérieures (L) x (H) x (P) mm 539 x 280 x 415
Dimensions de la cavité (L) x (H) x (P)** mm 362 x 223 x 378
Taille du plateau tournant en verre (ø mm) 315
Capacité du four 32 litres**
Taille de la plaque de cuisson (diamètre x H en mm) 317 x 48
Taille du porte-grille (diamètre x hauteur en mm) 255 x 80
Poids 21 kg
Lampe du four (type DEL) 1,5W
* - Ce produit répond aux exigences de la norme européenne EN55011. Conformément à cette norme, ce produit est un équipement de
groupe 2, classe B. Groupe 2 signi e que cet équipement génère volontairement de l'énergie RF sous forme de rayonnement électromagné-
tique pour le traitement thermique d'aliments. Classe B signi e que l'équipement est adapté à une utilisation domestique.
** - La capacité intérieure est calculée en multipliant la largeur, la profondeur et la hauteur maximales. La contenance réelle pour les
aliments est inférieure à cette valeur
LES SPÉCIFICATIONS PEUVENT ÊTRE CHANGÉES SANS PRÉAVIS LORS D’AMÉLIORATIONS APPORTÉES À L’APPAREIL.

FR – 14
FR – 14
FOUR ET ACCESSOIRES
1. Système de verrouillage de sécurité de la
porte
2. Vitre du four
3. Panneau de commande
4. A chage
5. Cavité du four
6. Boîtier du guide d'ondes (ne pas enlever)
7. Plateau de verre
8. Anneau roulant
9. Couplage de plateau rotatif
10. Porte-grille
11. Plaque de cuisson
12. Ouvertures de ventilation
13. Boîtier extérieur
14. Cordon d'alimentation
• Le porte-grille et la plaque de cuisson sont
conçus pour être utilisés uniquement avec
les fours à gril et à convection. N'utilisez PAS
d'accessoires métalliques lorsque vous utilisez
la fonction micro-ondes.
• Pour l'utilisation du porte-grille, reportez-vous
aux sections GRIL de ce manuel d'utilisation.
Ne touchez jamais la grille lorsqu’elle est
chaude.
REMARQUE: Lorsque vous commandez des
accessoires, mentionnez deux éléments : le nom
de la pièce et le nom du modèle.
REMARQUES:
• Après la cuisson d'aliments gras sans couvercle, nettoyez toujours la cavité et les ustensiles de cuisine de manière
approfondie, pour qu'ils soient secs et exempts de graisse. La graisse accumulée peut chau er et commencer à
fumer, voire s'en ammer.
• Lors de la cuisson au micro-ondes, placez toujours les ustensiles de cuisine sur le plateau tournant.
• N'utilisez PAS le porte-grille ou la plaque de cuisson lorsque vous utilisez la fonction micro-ondes.
AVERTISSEMENT: Ce symbole signi e que les surfaces sont susceptibles de chauff er pendant
l'utilisation. La porte, le boîtier extérieur, la cavité du four et les accessoires peuvent devenir très chauds
durant le fonctionnement. Pour éviter de vous brûler, utilisez toujours d'épais gants de cuisine anti-chaleur
pour four.
2
7
5
9
6
8
1
3
4
14
12
13
1110

FR
FR – 15
FR – 15
PANNEAU DE COMMANDE
1. AFFICHAGE NUMÉRIQUE – Temps de cuisson, puissance, indicateurs et
horloge sont a chés.
2. 10 SECONDES, 1 MINUTE, 10 MINUTES – Permet de régler l'heure de la
cuisson ou l'horloge.
3. Touches MENU AUTO – Appuyez pour sélectionner le menu de cuisson
automatique. (Consultez la page 19 pour des conseils d'utilisation).
4. DÉMARRER/DÉMARRAGE RAPIDE – (Page16 ).
5. PUISSANCE DU MICRO-ONDES – Appuyez pour sélectionner le niveau de
puissance du micro-ondes. (Page 16).
6. GRIL – Appuyez pour lancer le programme de cuisson par gril. (Page 17).
7. MICRO-ONDES+GRIL – Appuyez sur régler le programme de cuisson
combinée micro-ondes et grill. (Page 17).
8. TEMPÉRATURE DE CONVECTION – Appuyez pour sélectionner la
température de convection.
9. MICRO-ONDES+CONVECTION – Appuyez sur pour sélectionner la cuisson
combinée à convection.
10. HAUT – Appuyez pour régler le poids des aliments ou les portions.
11. BAS – Appuyez pour régler le poids des aliments ou les portions.
12. ARRÊTER/ECO – Appuyez une fois pour arrêter temporairement la cuisson, ou
deux fois pour annuler la cuisson complètement.
Utilisez pour dé nir le mode d'économie d'énergie.
(Page 20).
13. VERROUILLAGE ENFANT – (Page21 ).
14. HEURE/RÉGLER HORLOGE –
Utilisez pour régler l'horloge.
Utilisez la fonction de réglage du minuteur. (Page 15).
AVANT D'UTILISER LE FOUR
Lorsque le four est branché pour la première fois, un bip retentit et l'écran a che 1:00. Notez qu'il n'est pas nécessaire
de régler l'horloge pour que le four fonctionne correctement. Pour régler l'horloge, suivez les instructions dans la
section Réglage de l'horloge de ce manuel d'utilisation.
Lorsque vous utilisez la convection ou le gril pour la première fois, de la fumée et des odeurs se dégagent. Pour éviter
que cela ne se produise pendant la cuisson d'aliments, utilisez la fonction gril ou convection sans aliments pendant
environ 20 minutes.
• Après avoir ouvert et fermé la porte, le four passe en mode veille. Si vous n'appuyez sur aucune touche dans un
délai d'une minute, l'a chage reste allumé et les boutons ne fonctionnent pas. Pour repasser en mode veille, ouvrez
et fermez la porte.
• Pendant la cuisson, si vous appuyez sur ARRÊTER/ECO une fois, le cycle de cuisson est interrompu. Pour reprendre
la cuisson, appuyez sur DÉMARRER/DÉMARRAGE RAPIDE. Si vous appuyez sur ARRÊTER/ECO deux fois, la cuisson
est annulée.
• Lorsque vous programmez le four pour une fonction particulière et qu'il y a une pause de plus de 30 secondes entre
deux pressions sur une touche, le four revient en mode veille.
• Une fois un cycle de cuisson terminé, l'écran a che End et une tonalité se fera entendre toutes les deux minutes
jusqu'à ce qu'un bouton soit enfoncé ou que la porte soit ouverte.
RÉGLAGE DE L’HORLOGE
Ce four est équipé d'une horloge qui peut être utilisée en mode 12 ou 24 heures. Pour régler l'horloge, suivez les
instructions ci-dessous :
1. En mode veille, appuyez sur HEURE/RÉGLER HORLOGE pendant au moins 3 secondes pour entrer dans le mode
de réglage de l'horloge.
2. Appuyez sur HEURE/RÉGLER HORLOGE pour sélectionner le mode horloge à 12 ou 24 heures.
10 SECONDS 1 MINUTE 10 MINUTES
YC-PC322A
1000W
STOP/ECO TIME/
SET CLOCK
CHILD
LOCK
AUTO PROGRAMS
REHEAT
BEVERAGES JACKE T
POTATO PIZZA POPCORN
FROZEN
MEAL FRESH
VEGETABLES PORRID GE AUTO
DEFROST
GRILLED
STEAK GRILLED
CHICKEN AUTO
REHEAT
ROAST
BEEF
ROAST
CHICKEN
OVEN
CHIPS
MICROWAVE
POWER
MICROWAVE
+ CONVECTION
CONVECTION
TEMPERATURE
GRILL
START/
QUICK START
MICROWAVE
+ GRILL
13
5
3
2
14
11
6
8
9
7
10
12
4
1

FR – 16
FR – 16
3. Utilisez les touches 10 SECONDES , 1 MINUTE et 10 MINUTES pour régler les heures et minutes souhaitées.
4. Appuyez sur la touche HEURE/RÉGLER HORLOGE pour mémoriser et quitter le mode de réglage de l'horloge.
• Il n'est pas nécessaire de régler l'horloge pour que le four fonctionne normalement.
• En mode cuisson, appuyez sur HEURE/RÉGLER HORLOGE pour voir l'heure du jour (si elle est dé nie). L'heure
repasse au compte à rebours de cuisson après 5 secondes. Notez que l'heure ne peut pas être visualisée si la
minuterie de cuisine a été réglée.
CUISSON AU MICRO-ONDES
Pour utiliser la fonction micro-ondes, suivez les instructions données ci-dessous :
1. En mode veille, appuyez sur PUISSANCE MICRO-ONDES pour sélectionner le niveau de puissance. À chaque
pression, l'écran a che le niveau de puissance du micro-ondes.
2. Une fois le niveau de puissance micro-ondes souhaité sélectionné, utilisez les touches 10 SECONDES , 1 MINUTE
et10 MINUTES pour sélectionner le temps de cuisson.
3. Appuyez sur la touche DÉMARRER/DÉMARRAGE RAPIDE pour démarrer la cuisson.
4. Une fois le cycle de cuisson terminé, l'écran a che End et une tonalité se fera entendre toutes les deux minutes
jusqu'à ce qu'un bouton soit enfoncé ou que la porte soit ouverte.
Notez que le tableau ci-dessous est donné à titre indicatif. Votre four dispose de 10 niveaux de puissance micro-ondes
: 10%, 20 %, 30%, 40 %, 50%, 60 %, 70%, 80 %, 90% et 100 %. La puissance de sortie réelle peut être calculée en
multipliant la puissance du micro-ondes par le pourcentage.
Guide de cuisson au micro-ondes:
Affi chage Puissance
micro-ondes Utilisation recommandée
P100 100% Utilisez ce réglage pour la cuisson rapide ou le réchau age, par ex., de plats
cuisinés, boissons chaudes, légumes, etc.
P-80 80%
Convient aux aliments denses nécessitant une cuisson traditionnelle prolongée (les
plats de bœuf par exemple). Ce niveau de puissance est recommandé pour obtenir
une viande tendre.
P-60 60%
Utilisé pour la cuisson prolongée d'aliments denses comme les rôtis, les pains de
viande et les plats cuisinés, ainsi que pour les plats délicats comme les sauces au
fromage et les génoises.
P-40 40%
Réglage de décongélation: sélectionnez ce niveau de puissance, a n de s'assurer
que les aliments décongèlent de manière uniforme. Ce réglage est aussi parfait
pour la cuisson du riz, des pâtes, des raviolis chinois et de la crème anglaise.
P-20 20% Pour une décongélation légère, par ex. pour les gâteaux à la crème ou pâtisseries.
• Pendant la cuisson, vous pouvez véri er le niveau de puissance de cuisson en appuyant longuement sur la touche
PUISSANCE MICRO-ONDES.
• Le temps de cuisson le plus long est de 95 minutes.
DÉMARRAGE RAPIDE
Si vous avez besoin de cuisiner à un niveau de puissance de 100%, appuyez simplement sur DÉMARRER/
DÉMARRAGE RAPIDE en mode veille. Chaque fois que vous appuyez sur DÉMARRER/DÉMARRAGE RAPIDE, cela
ajoutera 30 secondes au temps de cuisson.

FR
FR – 17
FR – 17
CUISSON AU GRIL
L'élément chau ant du gril situé en haut de la cavité du four n'a qu'un seul réglage de puissance. Il est e cace et
économique. Le gril est idéal pour la cuisson du bacon, du bifteck de porc, des bâtonnets de poisson et des gâteaux
au thé.
Utilisez le porte-grille pour griller de petits aliments tels que le bacon et les saucisses, en les retournant à mi-cuisson.
Les aliments peuvent être placés directement sur la grille, dans un plat à tarte ou sur une assiette résistant à la chaleur.
Pour éviter que la graisse ou l'huile ne s'égoutte des aliments pendant la cuisson, veillez à placer un plateau approprié
sous le porte-grille.
Pour faire dorer et croustiller la surface des aliments dans un plat à gratin, la grille peut être utilisée si le récipient est
su samment peu profond. Cependant, il est conseillé de placer ces récipients directement sur le plateau tournant,
a n de leur laisser un peu plus de temps pour dorer et croustiller comme souhaité. Il n'est pas possible d'utiliser le
porte-grille pour les grillades.
Pour utiliser la fonction gril, suivez les instructions ci-dessous :
1. En mode veille, appuyez sur GRIL pour sélectionner la fonction gril. L'écran a chera Grl
2. Utilisez les touches 10 SECONDES , 1 MINUTE et 10 MINUTES pour sélectionner le temps de cuisson.
3. Appuyez sur la touche DÉMARRER/DÉMARRAGE RAPIDE pour démarrer la cuisson.
4. Une fois le cycle de cuisson terminé, l'écran a che End et une tonalité se fera entendre toutes les 2 minutes
jusqu'à ce qu'un bouton soit enfoncé ou que la porte soit ouverte.
MICRO-ONDES + GRIL
En utilisant à la fois les fonctions micro-ondes et gril, il est possible de faire dorer et cuire les aliments rapidement.
Pour utiliser les fonctions micro-ondes et gril, suivez les instructions ci-dessous :
1. En mode veille, appuyez sur MICROWAVE + GRILL une ou deux fois pour sélectionner « Co-1 » ou « Co-2 ».
2. Utilisez les touches 10 SECONDES , 1 MINUTE et 10 MINUTES pour régler le temps de cuisson.
3. Appuyez sur la touche DÉMARRER/DÉMARRAGE RAPIDE pour démarrer.
4. Une fois le cycle de cuisson terminé, l'écran a che End et une tonalité se fera entendre toutes les deux minutes
jusqu'à ce qu'un bouton soit enfoncé ou que la porte soit ouverte.
Fonction micro-ondes + gril
Affi chage Processus de cuisson Utilisation recommandée
Co-1
La cuisson du four s'e ectue selon le cycle suivant :
Micro-ondes pendant 22 secondes, puis gril pendant
11 secondes. Cette opération se répète jusqu'à la n
du temps total prévu.
Morceaux de poulet, poitrines de poulet,
côtelettes de porc
Co-2
La cuisson du four s'e ectue selon le cycle suivant :
Micro-ondes à pleine puissance pendant 18 secondes,
puis gril pendant 15 secondes. Cette opération se
répète jusqu'à la n du temps total prévu.
Poulet entier
• Le temps maximal de cuisson avec le gril est de 95 minutes.
• Pendant la cuisson, laissez la fumée ou les odeurs se disperser en ouvrant une fenêtre ou en mettant en marche la
ventilation de la cuisine. Ce phénomène est normal et ne constitue pas un défaut du four.
• Pendant la cuisson, vous pouvez véri er la puissance de cuisson combinée actuelle en appuyant sur MICRO-ONDES
+ GRIL.
• Lorsque vous utilisez la fonction gril, le gril s’allume et s’éteint à intervalles réguliers a n d’éviter toute surchau e.
• Lors de l'utilisation de la fonction MICRO-ONDES+GRIL, les aliments peuvent être placés dans un récipient
approprié directement sur le plateau rotatif.
ATTENTION: La porte, le boîtier extérieur, la cavité du four et les accessoires peuvent devenir très chauds durant le
fonctionnement. Pour éviter de vous brûler, utilisez toujours d'épais gants de cuisine anti-chaleur pour four.

FR – 18
FR – 18
CONVECTION
Pendant la cuisson par convection, l'air chaud circule dans toute la cavité du four et grille rapidement et
uniformément les aliments croustillants. Ce four peut être programmé pour treize di érentes températures de cuisson
(200°C, 190°C, 180°C, 170°C, 160°C, 150°C, 140°C, 130°C, 120°C, 110°C).
Il est recommandé de préchau er le four avant de cuisiner en mode convection. Pour préchau er et cuire en utilisant
la fonction de convection, suivez les instructions données ci-dessous :
Votre four peut être programmé pour combiner le préchauff age et la cuisson par convection.
1. En mode veille, appuyez sur la touche CONVECTION pour sélectionner la température de convection.
2. Appuyez sur DÉMARRER/DÉMARRAGE RAPIDE pour démarrer la fonction de préchau age.
3. Lorsque la température désignée est atteinte, le four émet un bip.
Une fois que le four a préchauff é et que le bip sonore retentit :
1. Ouvrez la porte et placez le contenant de la nourriture au centre du plateau.
2. Utilisez les touches 10 SECONDES , 1 MINUTE et 10 MINUTES pour régler le temps de cuisson. Le temps le plus
long est de 95minutes.
3. Appuyez sur la touche DÉMARRER/DÉMARRAGE RAPIDE pour démarrer.
REMARQUE: Lorsque la température de préchau age de convection est atteinte, le four émet un signal sonore toutes
les deux secondes, et la température de préchau age sera maintenue pendant 30 minutes, après quoi le four s'éteint.
MICRO-ONDES+CONVECTION
Le mode Micro-ondes+Convection rend la cuisson plus facile et rapide, car il utilise la cuisson rapide par micro-ondes
et la convection pour rendre les aliments croustillants.
Il est possible de cuire à 4 températures de convection di érentes. Pour lancer le mode de cuisson double, suivez les
instructions ci-dessous :
1. En mode veille, appuyez sur la touche MICRO-ONDES+CONVECTION à plusieurs reprises pour sélectionner la
température de (200°C, 170°C, 140°C, 110°C).
2. Appuyez sur les touches 10 SECONDES , 1 MINUTE et 10 MINUTES pour régler le temps de cuisson. Le temps est
réglable de 10 secondes à 95minutes.
3. Appuyez sur la touche DÉMARRER/DÉMARRAGE RAPIDE pour démarrer.
Lorsque vous utilisez la fonction Micro-ondes+Convection, les temps de cuisson par micro-ondes et par convection
sont indiqués ci-dessous. Choisissez l'option la plus appropriée pour cuire vos aliments et les rendre croustillants.
Affi chage Processus de cuisson
200 °C 10 secondes de puissance micro-ondes, puis 23 secondes de cuisson par convection. Le cycle se
répète jusqu'à la n du temps de cuisson programmé.
170 °C 15 secondes de puissance micro-ondes, puis 18 secondes de cuisson par convection. Le cycle se
répète jusqu'à la n du temps de cuisson programmé.
140 °C 19 secondes de puissance micro-ondes, puis 14 secondes de cuisson par convection. Le cycle se
répète jusqu'à la n du temps de cuisson programmé.
110 °C 24 secondes de puissance micro-ondes, puis 9 secondes de cuisson par convection. Le cycle se
répète jusqu'à la n du temps de cuisson programmé.

FR
FR – 19
FR – 19
MENU AUTO
Pour plus de commodité, les programmes automatiques permettent de cuire les aliments rapidement et e cacement
en appuyant sur quelques touches seulement. Il n'est pas nécessaire de programmer la durée et la puissance de
cuisson, il su t d'appuyer sur la touche de cuisson automatique souhaitée, d'entrer le poids et la quantité/le poids des
aliments à cuire en utilisant les boutons HAUT et BAS, puis en appuyant sur DÉMARRER/DÉMARRAGE RAPIDE.
Par exemple, pour faire cuire deux pommes de terre au four.
1. Ouvrez la porte et placez les aliments dans le four à l'aide d'ustensiles adaptés au cycle de cuisson utilisé.
2. Fermez la porte.
3. Appuyez une fois sur la touche JACKET POTATO.
4. Utilisez les touches HAUT et BAS pour entrer le nombre de pommes de terre.
5. Appuyez sur la touche DÉMARRER/DÉMARRAGE RAPIDE pour con rmer.
6. Une fois le cycle de cuisson terminé, l'écran a che End et une tonalité se fera entendre toutes les deux minutes
jusqu'à ce qu'un bouton soit enfoncé ou que la porte soit ouverte.
Menus à cuisson automatique:
Menu Auto Méthode pour sélectionner le poids ou le nombre Taille/Poids
Plat surgelé Sélectionnez le poids avec les touches HAUT et BAS, puis appuyez
sur DÉMARRER/DÉMARRAGE RAPIDE pour commencer la cuisson.
200 à 800 g
Décongélation
automatique 100 à 1800 g
Réchau er des
boissons
Sélectionnez le nombre de tasses avec les touches HAUT et BAS, puis
appuyez sur DÉMARRER/DÉMARRAGE RAPIDE pour commencer la
cuisson.
1 à 3 tasses (200 mL
chacune)
Pommes de
terre en robe des
champs
Sélectionnez le nombre de pommes de terre en utilisant les touches
HAUT et BAS, puis appuyez sur DÉMARRER/DÉMARRAGE RAPIDE
pour commencer la cuisson. Selon le nombre de pommes de terre
sélectionné, il peut vous être demandé de réorganiser les pommes de
terre au cours du cycle de cuisson.
1 à 3 pommes
de terre (230g
chacune)
Popcorn
Sélectionnez le poids avec les touches HAUT et BAS, puis appuyez
sur DÉMARRER/DÉMARRAGE RAPIDE pour commencer la cuisson.
100g
Légumes frais 200 à 600 g
Pizza 150g/300g/450g
Porridge 50 à 150 g
Steak grillé* 200 à 600 g
Poulet grillé* 200 à 600 g
Réchau age
automatique* 200 à 800 g
Frites au four 200 g
Rôti de bœuf/
agneau 200 à 600 g
Poulet rôti 800g to 1400g
• Le résultat de la cuisson automatique dépend de facteurs tels que la forme et la taille des aliments, votre préférence
personnelle quant à la cuisson de certains aliments et la façon dont les aliments sont placés dans le four. Si le
résultat de la cuisson n'est pas satisfaisant, ajustez le temps de cuisson en conséquence.
• Pour certains programmes de cuisson automatique, il peut vous être demandé de retourner les aliments. Ouvrez la
porte, retournez les aliments, fermez la porte, puis appuyez sur la touche DÉMARRER/DÉMARRAGE RAPIDE pour
reprendre la cuisson.
• Portez des gants de cuisine (ou similaires) lorsque vous retournez les aliments.

FR – 20
FR – 20
DÉCONGÉLATION AUTOMATIQUE
La décongélation automatique permet de décongeler les aliments en fonction de leur poids. Le temps de
décongélation et le niveau de puissance sont automatiquement réglés une fois la catégorie d'aliments et le poids
programmés. Le poids des aliments congelés va de 200 à 1800 g.
1. En mode veille, appuyez sur DÉCONGÉLATION AUTOMATIQUE.
2. Utilisez les touches HAUT et BAS pour sélectionner le poids de la nourriture à décongeler.
3. Appuyez sur la touche START/QUICK START pour démarrer la décongélation.
4. Si le four s'arrête pendant le cycle de décongélation, retournez les aliments pour assurer une décongélation
uniforme, puis appuyez sur DÉMARRER/DÉMARRAGE RAPIDE pour décongeler pendant le temps restant.
5. Une fois un cycle de décongélation terminé, l'écran a che End et une tonalité se fera entendre toutes les deux
minutes jusqu'à ce qu'un bouton soit enfoncé ou que la porte soit ouverte.
RÉCHAUFFAGE AUTOMATIQUE
Le four permet de réchau er des aliments en fonction du poids saisi par l'utilisateur. Le temps de décongélation et le
niveau de puissance sont automatiquement réglés une fois la catégorie d'aliments et le poids programmés. Le poids
de décongélation va de 200 à 800 g.
1. En mode veille, appuyez sur RÉCHAUFFAGE AUTOMATIQUE.
2. Utilisez les touches HAUT et BAS pour sélectionner le poids de la nourriture à réchau er
3. Appuyez sur DÉMARRER/DÉMARRAGE RAPIDE.
4. Une fois le cycle de cuisson terminé, l'écran a che End et une tonalité se fera entendre toutes les deux minutes
jusqu'à ce qu'un bouton soit enfoncé ou que la porte soit ouverte.
MINUTERIE
Le four est équipé d'une minuterie de cuisine qui e ectue un compte à rebours à partir du temps programmé.
1. En mode veille, appuyez sur HEURE/RÉGLER HORLOGE une fois.
2. Utilisez les touches 10 SECONDES , 1 MINUTE et 10 MINUTES pour régler le temps souhaité. Le temps le plus
long est de 95minutes.
3. Appuyez sur la touche START/QUICK START pour con rmer.
4. L'écran a che un compte à rebours à partir du temps programmé.
5. Lorsque l'a chage atteint zéro, une tonalité retentit.
Il est également possible d'utiliser le minuteur de cuisine en mode cuisson. Pour ce faire, suivez les étapes décrites ci-
dessus pendant la cuisson de vos aliments. Une fois la minuterie de cuisine activée, elle s'a che à l'écran pendant cinq
secondes, puis l'écran revient au compte à rebours du cycle de cuisson. Pour a cher à nouveau la minuterie, appuyez
sur HEURE/RÉGLER HORLOGE une fois, et le minuteur de cuisine s'a chera pendant cinq secondes, puis reviendra au
compte à rebours de cuisson.
• Pour annuler le programme du MINUTEUR, appuyez la touche STOP/ECO et l'écran a chera l'heure.
• Si un cycle de cuisson a été lancé, il est possible de mettre en marche le minuteur de cuisine en suivant les mêmes
étapes que ci-dessus.
FONCTION D'ÉCONOMIE D’ÉNERGIE
Cette fonction permet d'économiser de l'énergie lorsque le four n'est pas utilisé. Pour activer cette fonction en
mode veille, maintenez ARRÊTER/ECO pendant 3 secondes. L'a chage s'éteint et le four entre en mode d'économie
d'énergie.
Pour annuler le mode d'économie d'énergie, appuyez sur n'importe quelle touche ou ouvrez et fermez la porte du
four.

FR
FR – 21
FR – 21
FONCTION MUET
Il est possible de couper tous les sons du micro-ondes à l'aide de la fonction de sourdine. Pour régler la fonction de
sourdine, appuyez sur VERROUILLAGE ENFANT une fois, et l'écran a chera oFF pendant 5 secondes. En mode muet,
aucun son n'est émis lorsque vous appuyez sur les touches.
Pour désactiver la fonction de sourdine, appuyez sur VERROUILLAGE ENFANT une fois. L'écran a chera ON pendant
5 secondes pour indiquer que le son a été réactivé.
Si la fonction de mise en sourdine est réglée et que le four est débranché du secteur, elle sera annulée lors de la
reconnexion au secteur.
SERRURE DE SÉCURITÉ
Une fonction automatique permet d'empêcher les enfants d'utiliser le four sans surveillance. En mode veille, si aucune
opération n'est e ectuée dans un délai d'une minute, le four passe automatiquement en mode de verrouillage enfant
et le message Loc s'a che sur l'écran. En état de verrouillage, tous les boutons sont désactivés. Si vous appuyez sur un
bouton, l'indication de verrouillage apparaît sur l'a chage pendant 5 secondes pour rappeler à l'utilisateur d'annuler
le verrouillage de sécurité.
Pour désactiver le verrou de sécurité, il su t d'ouvrir et fermer la porte du micro-ondes, et le clavier redeviendra actif
et le voyant de verrouillage s'éteindra.
VERROUILLAGE ENFANT
Pour régler le VERROUILLAGE ENFANT, maintenez la touche VERROUILLAGE ENFANT pendant 3 secondes, un long
signal sonore retentit et l'écran indique Loc. Le four est maintenant en mode VERROUILLAGE ENFANT. Dans ce mode,
l'écran a che l'horloge. Si une touche est enfoncée ou que la porte est ouverte, Loc s'a che pendant dix secondes.
Pour annuler le VERROUILLAGE ENFANT, appuyez sur la touche VERROUILLAGE ENFANT pendant 3 secondes jusqu'à
ce qu'un long signal sonore s'active.
MÉCANISME DE PROTECTION AUTOMATIQUE
PROTECTION CONTRE LA SURCHAUFFE - Lorsque le four détecte une haute température, l'écran indique E01 et le
fonctionnement cesse. Cela peut être annulé en appuyant sur la touche ARRÊTER/ECO.
PROTECTION CONTRE LA BASSE TEMPÉRATURE - Lorsque le four entre en mode de protection contre la basse
température, Protection, l'écran indique «E02» et le fonctionnement cesse. Cela peut être annulé en appuyant sur la
touche ARRÊTER/ECO.
PROTECTION CONTRE LE DYSFONCTIONNEMENT DES CAPTEURS - Lorsque le four détecte un problème avec un
des capteurs, E03 s'a che et le four cesse de fonctionner. En outre, le four émet un signal sonore d'avertissement.
Cela peut être annulé en appuyant sur la touche ARRÊTER/ECO.

FR – 22
FR – 22
NETTOYAGE ET ENTRETIEN
• Éteignez le four et débranchez le cordon d'alimentation lorsque vous le nettoyez.
• Gardez l'intérieur du four propre. Lorsque des éclaboussures d'aliments ou de liquides déversés adhèrent aux côtés,
au haut ou au plateau rotatif du four, essuyez-les avec un chi on humide. Des détergents doux peuvent être utilisés
si le four est très sale. Évitez d'utiliser des produits de nettoyage forts. Ils peuvent tâcher, rayer la surface ou ternir la
porte.
• L'extérieur du four doit être nettoyé avec un chi on humide. A n d'éviter tout dommage aux pièces opérationnelles
à l'intérieur du four, il ne faut pas laisser l'eau couler dans les ouvertures de ventilation.
• Essuyez la porte et la fenêtre des deux côtés, les joints de la porte et les pièces adjacentes avec un chi on humide
a n d'éliminer les éclaboussures.
• N'utilisez pas de produits nettoyants abrasifs.
• Ne nettoyez pas à la vapeur.
• Ne laissez pas le panneau de commande se mouiller. Nettoyez avec un chi on doux et humide. Lors du nettoyage
du panneau de commande, laissez la porte du four ouverte pour empêcher le four de s'allumer accidentellement.
• Si de la vapeur accumule à l'intérieur ou à l'extérieur de la porte du four, essuyez avec un chi on doux. Cela
peut se produire lorsque le four à micro-ondes est utilisé dans des conditions d'humidité élevée. Ce n'est pas un
dysfonctionnement.
• Nettoyez le plateau rotatif régulièrement pour éviter la contamination et les risques d'arc électrique/de dommages
potentiels. Il su t d'essuyer la surface du fond du four avec un détergent doux.
• Éliminez les odeurs du four en mélangeant une tasse d'eau avec le jus et la peau d'un citron dans un bol allant aux
micro-ondes. Essuyez complètement et séchez avec un chi on doux.
• Si l'ampoule cesse de fonctionner, contactez le service client pour obtenir des conseils.
• Le four doit être nettoyé régulièrement et les dépôts de nourriture doivent être enlevés. Si le four n'est pas maintenu
dans un état propre, la surface pourrait se détériorer, ce qui pourrait nuire à la durée de vie de l'appareil et entraîner
une situation dangereuse.
• Veuillez ne pas jeter cet appareil avec les ordures domestiques. Consultez les réglementations de votre pays sur
l'élimination de ce type de produit.

FR
FR – 23
FR – 23
BIEN CHOISIR LA VAISSELLE
1. Le matériau idéal pour un ustensile de micro-ondes laisse passer les micro-ondes. Il permet à l'énergie de traverser
le conteneur et de chau er la nourriture.
2. Le micro-ondes ne peut pas pénétrer le métal, aussi les ustensiles métalliques ou plats avec une nition
métallique ne doivent pas être utilisés.
3. N'utilisez pas de produits en papier recyclé pour la cuisson au micro-ondes, car ils peuvent contenir de petits
fragments métalliques pouvant provoquer des étincelles et/ou des incendies.
4. Des plats ronds/ovales plutôt que carrés/oblongs sont recommandés, car la nourriture dans les coins a tendance à
cuire excessivement.
5. Des bandes étroites de papier d'aluminium peuvent être utilisées pour empêcher la surcuisson des zones
exposées. Mais attention à ne trop en utiliser, et conservez une distance de 2,54 cm entre la feuille et la cavité.
La liste ci-dessous est un guide général pour vous aider à sélectionner les bons ustensiles.
Ustensiles de cuisine Micro-ondes
micro-ondes
Gril/
Convection Commentaire
Plats brunisseurs /
Suivez toujours les instructions des fabricants.
Ne dépassez pas les temps de cuisson donnés. Faites très
attention, ces plats peuvent devenir très chauds.
Porcelaine et céramiques /
La porcelaine, la poterie, la faïence émaillée et la porcelaine ne
sont habituellement adaptées, à part dans le cas de décorations
métalliques.
Verre résistant à la chaleur Il convient de s'assurer que les ustensiles de cuisson en verre
peuvent être utilisés dans un four à micro-ondes.
Verre non résistant à la chaleur
Céramique résistante à la chaleur Veillez à ce que le matériau céramique ne soit pas trop épais ou à
forte teneur en minéraux.
Plat en plastique compatible
micro-ondes
Véri ez toujours que les ustensiles de cuisine en plastique
peuvent être utilisés dans un four à micro-ondes.
Essuie-tout / N'utilisez que du papier essuie-tout recommandé pour les fours
à micro-ondes.
Plats en verre, par ex. Pyrex® / Restez vigilant lors de l’utilisation de verrerie ne, la chaleur
brutale pouvant les craqueler ou les casser.
Plateaux en métal Il n’est pas recommandé d’utiliser de récipients en métal, ceux-ci
pouvant être source d’arcs électriques et causer des incendies.
Supports en métal Il n’est pas recommandé d’utiliser de récipients en métal, ceux-ci
pouvant être source d’arcs électriques et causer des incendies.
Papier aluminium
Récipient en Aluminium /
De petits morceaux d'aluminium peuvent être utilisés pour
empêcher les aliments de surchau er. Gardez le papier
aluminium à une distance d'au moins 2,54 cm des parois du four,
des arcs électriques pouvant se former.
Les récipients en papier aluminium ne sont pas recommandés,
sauf si spéci é par le fabricant, par ex. Microfoil®. Suivez dans ce
cas les instructions avec attention.
Film plastique Ne doit pas toucher la nourriture et doit être percé pour laisser la
vapeur s’échapper.
Plastique/Polystyrène par ex.
récipients de restauration rapide
Il est important de bien faire attention à la cuisson, certains
récipients pouvant se déformer, fondre ou se décolérer à haute
température.
Sachets de congélation / à griller
Doit être percé pour permettre à la vapeur de s'échapper.
Assurez-vous que les sacs sont compatibles avec la cuisson
micro-ondes.
Assiettes / Gobelets en papier et
papier essuie-tout
N'utilisez pas d'attaches en plastique ou métal, celles-ci pouvant
fondre ou s'en ammer à cause d'arcs électriques.
Paille et récipients en bois
Utilisez uniquement pour réchau er ou absorber l'humidité.
Surveillez soigneusement la cuisson, une surchau e peut être
source d'incendie.
Papier recyclé et journaux
Restez toujours à proximité du micro-ondes lors de l’utilisation
de ces matériaux, leur surchau e pouvant être cause de départ
de feu.
Peut contenir des résidus de métaux pouvant causer des arcs
électriques et un départ de feu.
AVERTISSEMENT: Lorsque vous réchauff ez un plat dans un récipient en plastique ou en papier,
surveillez le four pour prévenir tout risque d’ignition.
REMARQUE: Ne laissez pas votre four sans surveillance pendant l'utilisation.

FR – 24
FR – 24
CONSEILS POUR LA CUISSON AU MICRO-ONDES
Les micro-ondes cuisent les aliments plus rapidement que la cuisson traditionnelle. Il est ainsi essentiel de suivre
certaines techniques pour assurer de bons résultats. Un grand nombre des techniques suivantes sont similaires à
celles utilisées dans la cuisine classique.
AVERTISSEMENT: Les liquides et aliments ne doivent pas être chauff és dans des contenants/pots
scellés ou avec un couvercle, car la pression s'accumulerait à l'intérieur et pourrait
causer l'explosion du contenant.
REMARQUES SUR LES CONSEILS DE CUISSON:
• Restez toujours à proximité du four lors de son utilisation.
• Véri ez que les ustensiles sont appropriés à l’usage dans un four à micro-ondes.
• Utilisez uniquement la fonction Popcorn du micro-ondes dans les limites recommandées sur l'emballage (suivez les
instructions du fabricant). N'utilisez jamais d'huile sauf mention contraire par le fabricant, et ne dépassez jamais le
temps de cuisson indiqué.
ATTENTION: Si vous dépassez les temps de cuisson recommandés et utilisez des niveaux de puissance
trop élevés, la nourriture peut surchauff er, brûler et même prendre feu et endommager le
four dans les cas extrêmes.
Arranger
Placez les parties les plus épaisses de la nourriture vers l'extérieur du plat, par exemple des pilons de poulet.
Les aliments placés vers l'extérieur du plat recevront plus d’énergie, et cuiront donc plus rapidement que ceux au
centre.
Couvrir
Certains aliments devraient être couverts pendant la cuisson au micro-ondes.
Utilisez du lm plastique pour micro-ondes ou un couvercle adapté.
Percer
Les aliments à coquille, peau ou membrane doivent être percés à plusieurs endroits avant cuisson ou réchau age, car
la vapeur s'accumule et peut causer l'explosion des aliments, par ex. pour les pommes de terre, le poisson, le poulet,
les saucisses.
REMARQUE: Les œufs ne doivent pas être chau és en utilisant la fonction micro-ondes car ils peuvent exploser, même
une fois leur cuisson terminée, par exemple si vous réchau ez des œufs pochés, frits ou à la coque.
Mélanger, tourner et réarranger
Pour une cuisson uniforme, il est essentiel de mélanger, tourner et réarranger les aliments pendant la cuisson.
Mélangez et réarrangez toujours de l'extérieur vers le centre.
Laisser reposer
Un temps de repos est nécessaire après cuisson, car cela permet à la chaleur de se disperser uniformément dans la
nourriture.

FR
FR – 25
FR – 25
Caractéristiques de la nourriture
Composition Les aliments riches en gras ou en sucre (par ex. ans, pâtés) nécessitent moins de temps
de chau age. Attention pour éviter les surchau es qui peuvent conduire à des incendies.
Les os des aliments conduisent la chaleur, ce qui cuit la nourriture plus rapidement.
Attention à cuire de tels aliments uniformément.
Densité La densité de nourriture a ectera le temps de cuisson nécessaire.
Les aliments légers et poreux, comme les gâteaux ou le pain, cuisent plus rapidement
que les aliments lourds et denses, comme les rôtis et les ragoûts.
Quantité La quantité de micro-ondes dans votre four reste la même, quelle que soit la quantité
d'aliments cuisinés. Le temps de cuisson doit être augmenté en fonction de la quantité
d'aliments placés dans le four.
par ex. il faut plus de temps pour cuire quatre pommes de terre que deux.
Taille Les petits aliments cuisent plus rapidement que les grands, car les micro-ondes peuvent
pénétrer de tous les côtés jusqu'au centre. Pour une cuisson uniforme, utilisez des
morceaux de taille similaire.
Forme Les aliments qui sont de forme irrégulière, comme les poitrines ou les pilons de poulet
nécessiteront plus de temps de cuisson pour les parties les plus épaisses. Pour une
cuisson uniforme, placez les morceaux les plus épais vers l'extérieur du plat, où ils
recevront plus d’énergie.
Les formes rondes cuiront plus uniformément que les formes carrées au micro-ondes.
Température de la
nourriture
La température initiale de la nourriture a ecte le temps de cuisson requis.
Les aliments frais nécessiteront plus de temps de cuisson que ceux à température
ambiante.
La température du conteneur n'est pas une véritable indication de la température de
la nourriture ou boisson. Coupez les aliments avec garniture, comme les beignets à la
con ture, pour libérer la chaleur ou la vapeur.
AVERTISSEMENT: Visage et mains: portez toujours des gants de cuisine pour retirer des aliments
ou ustensiles du four. Restez en arrière lorsque vous ouvrez la porte du four pour
permettre la dissipation de la chaleur ou de la vapeur. Lors du retrait des couvercles
( lm plastique par exemple), de l'ouverture de sacs de cuisson ou d'emballages de
popcorn, attention à ne pas laisser la vapeur atteindre vos mains et votre visage.
AVERTISSEMENT: Véri ez la température des aliments et boissons, et mélangez-les avant de les servir.
Faites particulièrement attention lorsque vous servez des nourrissons, enfants
ou personnes âgées. Le contenu des biberons et petits pots doit être mélangé ou
secoué, et la température doit être véri ée avant consommation pour éviter les
brûlures.

FR – 26
FR – 26
CONSEILS POUR LA DÉCONGÉLATION
Le micro-ondes est la méthode de décongélation la plus rapide du four. C'est un processus simple, mais les
instructions suivantes sont essentielles pour vous assurer que la nourriture est bien décongelée.
• Retirez l'emballage complet avant décongélation.
• Pour décongeler des aliments, utilisez les niveaux de puissance de micro-ondes de P-20 à P-40.
• Consultez la suite pour plus d'informations.
Réarranger
Les aliments placés vers l’extérieur du plat seront décongelés plus rapidement que ceux au centre. Il est donc essentiel
d'arranger la nourriture jusqu'à 4 fois lors de la décongélation.
Déplacez les morceaux étroitement emballés de l'extérieur vers le centre et réorganisez les zones de chevauchement.
Cela assurera la décongélation uniforme des aliments.
Séparer
Les aliments peuvent être collés lors de leur retrait du congélateur. Il est important de séparer les aliments dès que
possible lors de la décongélation.
par ex. tranches de jambon, lets de poulet.
Protéger
Certaines zones de la nourriture peuvent devenir chaudes. Pour éviter qu'elles deviennent trop chaudes et
commencent à cuire, ces zones doivent être protégées par de petits morceaux de papier aluminium, qui ré échit les
micro-ondes, par ex. sur les cuisses et ailes de poulet.
Laisser reposer
Un temps de repos est nécessaire pour assurer la décongélation complète de la nourriture.
La décongélation n'est pas terminée lorsque la nourriture est sortie du micro-ondes. La nourriture doit rester couverte
pendant un certain temps pour s’assurer que le centre est complètement décongelé.
Retourner
Il est essentiel que tous les aliments soient retournés jusqu'à 4 fois pendant la décongélation.
Il est important de garantir la décongélation complète.

FR
FR – 27
FR – 27
CONSEILS POUR LE RÉCHAUFFAGE
Pour réchau er des aliments, suivez les conseils et les instructions ci-dessous pour vous assurer que la nourriture est
complètement réchau ée avant de la servir.
Plateaux-repas
Enlevez les morceaux de viande ou de volaille, réchau ez-les séparément, voir ci-dessous.
Placez les petits morceaux au centre de l’assiette, et les morceaux plus gros au bord. Couvrez avec un lm plastique et
réchau ez sur le niveau de puissance P-50. Mélangez/Réarrangez à la moitié du temps de réchau age.
REMARQUE: Assurez-vous que la nourriture est complètement réchau ée avant de la servir.
Viande émincée
Couvrez avec du lm plastique pour micro-ondes et réchau ez sur le niveau de puissance P-60. Réarrangez au moins
une fois pour assurer un réchau age uniforme.
REMARQUE: Assurez-vous que la viande est complètement réchau ée avant de la servir.
Morceaux de volaille
Placez les morceaux les plus gros au bord de l'assiette, couvrez avec du lm plastique pour micro-ondes et réchau ez
sur le niveau de puissance P-70.
Retournez les aliments à mi-temps.
REMARQUE: Assurez-vous que la volaille est complètement réchau ée avant de la servir.
Ragoûts
Couvrez avec du lm plastique pour micro-ondes et réchau ez sur le niveau de puissance P-50.
Mélangez fréquemment pour assurer un réchau age uniforme.
REMARQUE: Assurez-vous que la nourriture est complètement réchau ée avant de la servir.
Pour obtenir les meilleurs résultats lors du réchau age, sélectionnez un niveau de puissance de micro-ondes adapté
pour le type de nourriture. Par exemple, un bol de légumes peut être réchau é avec le niveau de puissance P-100,
alors que des lasagnes contenant des ingrédients ne pouvant pas être mélangés doivent être réchau ées avec le
niveau de puissance P-40.
REMARQUES:
• Retirez la nourriture des contenants en aluminium ou en métal avant de la réchau er.
• Les temps de réchau age varient en fonction de la forme, de l'épaisseur, de la quantité et de la température de la
nourriture, ainsi que de la taille, de la forme et du matériau du contenant.
AVERTISSEMENT: Ne chauff ez pas de liquide dans un récipient à col étroit, car le contenu du récipient
peut déborder rapidement et provoquer des brûlures.
• Pour éviter les surchau es et incendies, faites attention lorsque vous réchau ez des plats ayant une forte proportion
de sucre ou de graisse, comme des tartes ou des gâteaux.
• Ne chau ez jamais l'huile ou la graisse à frire, car cela peut provoquer une surchau e et un incendie.
• Les pommes de terre en conserve ne doivent pas être chau ées dans le four à micro-ondes, suivez les instructions
du fabricant sur la boîte.
AVERTISSEMENT: Veillez à remuer ou à agiter le contenu des biberons et pots pour bébé et à véri er
leur température avant qu'ils ne soient consommés pour éviter toute brûlure.

FR – 28
FR – 28
DÉPANNAGE
Si vous pensez que le four ne fonctionne pas correctement, voici quelques véri cations simples que vous pouvez
e ectuer vous-même avant d’appeler un technicien. Cela vous évitera des appels inutiles au centre de service si la
cause du problème est simple.
Suivez les véri cations simples décrites ci-dessous:
Placez une demi-tasse d'eau sur le plateau rotatif et fermez la porte. Programmez le four pour cuire 1 minute en
utilisant le niveau de puissance de micro-ondes P-100.
1. Est-ce que la lampe s'allume pendant la cuisson?
2. Est-ce que le ventilateur de refroidissement fonctionne? (Véri ez en plaçant votre main au-dessus des ouvertures
de ventilation.)
3. Entendez-vous le signal sonore après 1minute?
4. L'eau dans la tasse est-elle chaude?
Si la réponse à une de ces questions est NON, véri ez d’abord que le four est bien branché et que le fusible n’a pas
sauté. S’il n’y a pas de problème de ce côté-là, consultez le tableau de dépannage ci-dessous.
ATTENTION: Ne jamais bricoler, réparer ou modi er vous-même le four. Il est dangereux pour
quiconque d'autre qu'un ingénieur SHARP formé d'eff ectuer l'entretien ou des réparations.
Ce point est important car il peut impliquer le retrait de couvercles qui off rent une
protection contre l'énergie des micro-ondes.
• Le joint de la porte empêche les fuites de micro-ondes pendant le fonctionnement, mais ne forme pas un joint
étanche. Il est normal de voir des gouttes d’eau ou de la lumière, ou de sentir de la chaleur autour de la porte du
four. La nourriture avec une haute teneur en humidité dégagera de la vapeur et causera de la condensation à
l’intérieur de la porte qui peut s’écouler hors du four.
• Réparations et modi cations: n’essayez pas d’utiliser, de réparer ou de modi er le four s’il ne fonctionne pas
correctement.
• Cabinet extérieur et lampe d'accès: Ne retirez jamais le boîtier externe. Cela est très dangereux en raison de la
présence de pièces haute tension qui ne doivent jamais être touchées, car cela peut provoquer une électrocution
fatale.
Votre four n’est pas équipé d’un couvercle d’accès à la lampe. Si la lampe est en panne, ne tentez pas de remplacer la
lampe vous-même, et appelez un centre de service agréé SHARP.

FR
FR – 29
FR – 29
TABLEAU DE DÉPANNAGE
PROBLÈME RÉPONSE
De l’eau circule autour de la
porte.
Lorsque le four fonctionne, l’air circule dans la cavité.
La porte ne forme pas un joint étanche, et de l’air peut donc s’échapper de la
porte.
De la condensation se forme
dans le four et peut s’écouler
de la porte.
La cavité du four est normalement plus froide que les aliments cuisinés, et la
chaleur produite lors de cuisson se condense donc sur la surface plus froide.
La quantité de vapeur produite dépend de la teneur en eau de l’aliment cuisiné.
Certains aliments, comme les pommes de terre ont une haute teneur en humidité.
La condensation prise dans la vitre de la porte devrait s’évaporer après quelques
heures.
Des clignotements ou arcs
électriques sont visibles dans
la cavité lors de la cuisson.
Les arcs électriques se produisent lorsqu'un objet métallique est à proximité
immédiate de la cavité du four pendant la cuisson. Cela peut éventuellement
dépolir la surface de la cavité, sans endommager le four pour autant.
Arcs électriques lors de la
cuisson de pommes de terre.
Veillez à éliminer les œilletons et à percer les pommes de terre. Placez-les
directement sur le plateau tournant ou dans un plat résistant à la chaleur ou
contenant semblable.
Le four ne fonctionne pas
lorsque vous appuyez sur
DÉMARRER/DÉMARRAGE
RAPIDE.
Véri ez que la porte est bien fermée.
Le four chau e trop
lentement;
Assurez-vous d’avoir sélectionné le bon niveau de puissance.
Le four émet un son. L’énergie des micro-ondes s’active et se désactive en séquence lors de la cuisson/
décongélation.
Le four émet un bip toutes les minutes et l'a chage indique «Fail».
Si vous appuyez sur les touches du panneau de commande sans interruption
pendant plus d'une minute, cette erreur se produira.
Le boîtier extérieur est chaud. Le boîtier peut devenir chaud au toucher, maintenez les enfants à l’écart.
PROTECTION COLLANTE DES BOUTONS
Dans tous les cas, si l'une des touches du panneau de commande reste bloquée pendant plus d'une minute, le
programme s'arrête immédiatement et l'écran a che FAIL. Le micro-ondes émettra un bip. Si le bouton reste bloqué,
un bip sera émis toutes les minutes. Après le dépannage, appuyez sur ARRÊTER/ECO pour revenir en mode veille.
AVANT D'APPELER L'ASSISTANCE
Avant de demander un service, véri ez chacun des éléments ci-dessous:
• Véri ez que le four est bien branché. Si ce n'est pas le cas, retirez la che de la prise, attendez 10secondes et
rebranchez de façon sûre.
• Véri ez si un fusible du circuit a sauté ou si un coupe-circuit a été déclenché. S'ils semblent fonctionner
correctement, testez la prise avec un autre appareil.
• Véri ez que les boutons d'alimentation et de minuterie sont correctement réglés.
• Véri ez que la porte est bien fermée et qu'elle engage le système de verrouillage de sécurité. Sinon, l'énergie des
micro-ondes ne circulera pas dans le four.
SI AUCUNE DE CES MESURES NE RÉSOUT LE PROBLÈME, CONTACTEZ UN TECHNICIEN QUALIFIÉ. NE TENTEZ PAS DE
RÉGLER OU RÉPARER LE FOUR VOUS-MÊME.

PL – 1
PL – 1
Uwaga:
Państwa
produkt jest
oznaczony tym
symbolem.
Oznacza on,
że zużytych
urządzeń
elektrycznych i
elektronicznych
nie można
łączyć ze zwy-
kłymi odpadami
z gospodarstw
domowych. Dla
tych produktów
istnieje oddziel-
ny system zbiór-
ki odpadów.
A. Informacje dla użytkowników (prywatnych gospo-
darstw domowych) dotyczące usuwania odpadów
1. W krajach Unii Europejskiej
Uwaga: Jeśli chcą Państwo usunąć to urządzenie, prosimy nie używać zwykłych
pojemników na śmieci!
Zużyty sprzęt elektryczny i elektroniczny należy usuwać oddzielnie, zgodnie
z wymogami prawa dotyczącymi odpowiedniego przetwarzania, odzysku i
recyklingu zużytego sprzętu elektrycznego i elektronicznego.
Po wdrożeniu przepisów unijnych w Państwach Członkowskich prywatne
gospodarstwa domowe na terenie krajów UE mogą bezpłatnie* zwracać zużyty
sprzęt elektryczny i elektroniczny do wyznaczonych punktów zbiórki odpadów.
W niektórych krajach* można bezpłatnie zwrócić stary produkt do lokalnych
punktów sprzedaży detalicznej pod warunkiem, że zakupią Państwo podobny
nowy produkt.
*) W celu uzyskania dalszych informacji na ten temat należy skontaktować się z
lokalnymi władzami.
Jeśli twój zużyty sprzęt elektryczny lub elektroniczny posiada baterie albo
akumulatory, usuń je wcześniej zgodnie z lokalnymi wymogami. Prawidło-
wo usuwając ten produkt, przyczyniasz się do właściwej utylizacji odpadów,
odzyskiwania zasobów i recyklingu. Jednocześnie zapobiegasz potencjalnemu
negatywnemu wpływowi na środowisko i zdrowie ludzkie, który miałoby
nieprawidłowe usunięcie urządzenia.
2. Kraje pozaunijne
W celu uzyskania szczegółowych informacji na temat prawidłowej metody
pozbycia się zużytych baterii, prosimy o kontakt z władzami lokalnymi.
W Szwajcarii: Zużyte urządzenia elektryczne lub elektroniczne można bezpłat-
nie zwracać do sprzedawcy, nawet jeśli nie zostanie zakupiony nowy produkt.
Szczegóły na temat punktów zbiórki odpadów są wymienione na stronie: www.
swico.ch lub www.sens.ch.
B. Informacje dla użytkowników biznesowych dotyczące
usuwania odpadów
1. W krajach Unii Europejskiej
W przypadku, gdy produkt używany jest do celów biznesowych i zamierzają go
Państwo usunąć:
Należy skontaktować się z autoryzowanym sprzedawcą rmy SHARP, który
poinformuje o możliwości zwrotu wyrobu. Być może będą Państwo musieli
ponieść koszty zwrotu i recyklingu produktu. Produkty niewielkich rozmiarów (i
w małych ilościach) można zwrócić do lokalnych punktów zbiórki odpadów.
W Hiszpanii: W celu usunięcia zużytego produktu prosimy o skontaktowanie się
wyznaczonym punktem systemu zbiórki odpadów lub władzami lokalnymi.
2. Kraje pozaunijne
W celu uzyskania szczegółowych informacji na temat prawidłowej metody
pozbycia się zużytych baterii, prosimy o kontakt z władzami lokalnymi.
Aby uzyskać informacje o serwisie przejdź do strony www.sharpconsumer.com/contact/; aby uzyskać informacje
o warunkach gwarancji przejdź do strony www.sharpconsumer.com/support/ lub skontaktuj się ze sprzedawcą
urządzenia.
Deklaracje zgodności są dostępne na stronie: www.sharpconsumer.com/documents-of-conformity/
www.sharpconsumer.com/
support/
www.sharpconsumer.com/
documents-of-conformity/
www.sharpconsumer.com/
contact/

PL
PL – 2
PL – 2
ŚRODKI OSTROŻNOŚCI, KTÓRYCH NALEŻY PRZESTRZEGAĆ, ABY UNIKNĄĆ
MOŻLIWOŚCI NARAŻENIA SIĘ NA DZIAŁANIE MIKROFAL
1. Nie wolno używać kuchenki przy otwartych drzwiczkach, ponieważ może to spowodować narażenie się na
szkodliwe działanie promieniowania mikrofal. Ważne jest, aby nie blokować działania układów zabezpieczających
ani nie manipulować przy nich.
2. Nie wolno wsuwać jakichkolwiek przedmiotów między przednią powierzchnię kuchenki a drzwiczki i nie
dopuszczać do gromadzenia się zanieczyszczeń lub pozostałości środków czyszczących na powierzchniach
uszczelniających.
3. Nie wolno używać kuchenki, jeśli nie działa prawidłowo. Bardzo ważne jest, aby drzwiczki kuchenki zamykały się
prawidłowo, a także by drzwiczki oraz zawiasy, zatrzaski, uszczelki drzwiczek i powierzchnie uszczelniające nie były
uszkodzone.
4. Nie wolno samodzielnie naprawiać ani regulować urządzenia.
SPIS TREŚCI
WAŻNE INFORMACJE DOTYCZĄCE BEZPIECZEŃSTWA ............................................................................................................................ 3
INSTALACJA ........................................................................................................................................................................................................... 12
ZAKŁÓCENIA FAL RADIOWYCH ......................................................................................................................................................................13
WSKAZÓWKI DOTYCZĄCE UZIEMIENIA .......................................................................................................................................................13
DANE TECHNICZNE .............................................................................................................................................................................................13
KUCHENKA I JEJ WYPOSAŻENIE .................................................................................................................................................................... 14
PANEL STEROWANIA ..........................................................................................................................................................................................15
PRZED PIERWSZYM UŻYCIEM KUCENKI ......................................................................................................................................................15
USTAWIENIE ZEGARA .........................................................................................................................................................................................15
TRYB PRACY Z MIKROFALAMI .........................................................................................................................................................................16
SZYBKI START ........................................................................................................................................................................................................ 16
TRYB PRACY Z GRILLEM ....................................................................................................................................................................................17
GOTOWANIE PRZY UŻYCIU MIKROFAL I GRILLA ....................................................................................................................................... 17
TERMOOBIEG ........................................................................................................................................................................................................18
GOTOWANIE PRZY UŻYCIU MIKROFAL I TERMOOBIEGU .......................................................................................................................18
PROGRAMY AUTOMATYCZNEGO GOTOWANIA .......................................................................................................................................19
AUTOMATYCZNE ROZMRAŻANIE .................................................................................................................................................................. 20
AUTOMATYCZNE PODGRZEWANIE ...............................................................................................................................................................20
TIMER KUCHENNY ...............................................................................................................................................................................................20
TRYB OSZCZĘDZANIA ENERGII ....................................................................................................................................................................... 20
FUNKCJA WYCISZENIA ....................................................................................................................................................................................... 21
BLOKADA PRZYCISKÓW ....................................................................................................................................................................................21
BLOKADA RODZICIELSKA ................................................................................................................................................................................. 21
MECHANIZM AUTOMATYCZNEJ OCHRONY ...............................................................................................................................................21
CZYSZCZENIE I KONSERWACJA ...................................................................................................................................................................... 22
PRZYDATNE NACZYNIA .....................................................................................................................................................................................23
PORADY DOTYCZĄCE GOTOWANIA PRZY WYKORZYSTANIU MIKROFAL ........................................................................................24
PORADY DOTYCZĄCE ROZMRAŻANIA ........................................................................................................................................................26
PORADY DOTYCZĄCE PODGRZEWANIA .....................................................................................................................................................27
ROZWIĄZYWANIE PROBLEMÓW .................................................................................................................................................................... 28
ZABEZPIECZENIE PRZED ZABLOKOWANIEM PRZYCISKÓW ..................................................................................................................29
ZANIM WEZWIESZ POMOC ..............................................................................................................................................................................29

PL – 3
PL – 3
WAŻNE INFORMACJE DOTYCZĄCE BEZPIECZEŃSTWA
PRZECZYTAJ UWAŻNIE I ZACHOWAJ NA PRZYSZŁOŚĆ
Aby uniknąć niebezpieczeństwa pożaru. Nie powinno się
pozostawiać pracującej kuchenki bez nadzoru. Ustawienie
zbyt wysokiego poziomu mocy lub zbyt długiego czasu
gotowania może doprowadzić do przegrzania potrawy i
spowodować pożar.
Opisywana kuchenka została zaprojektowana do instalacji na
blacie szafki. Nie jest przeznaczona do instalacji w zabudowie.
Nie wolno umieszczać kuchenki wewnątrz szafki. Gniazdko
elektryczne, do którego podłączana jest kuchenka, musi być
stale dostępne, żeby w razie konieczności można było po pro-
stu wyciągnąć wtyczkę.
Napięcie sieci musi wynosić 230–240 V~, 50 Hz, instalacja
elektryczna powinna być wyposażona w bezpiecznik/wyłącznik
automatyczny o dopuszczalnym prądzie 10 A lub większym.
Zaleca się podłączenie urządzenia do niezależnego obwodu
prądu.
Nie należy stawiać urządzenia w pobliżu źródeł ciepła, np. w
pobliżu zwykłego piecyka. Nie należy instalować kuchenki w
miejscach o dużej wilgotności lub tam, gdzie może się skraplać
para. Nie należy przechowywać ani użytkować urządzenia na
wolnym powietrzu.
Jeśli podgrzewane produkty zaczną dymić, wyłącz ku-
chenkę lub odłącz wtyczkę i odczekaj, aż podgrzewane
produkty przestaną dymić.
Stosuj wyłącznie pojemniki i naczynia przeznaczone do
kuchenek mikrofalowych. Należy stosować wyłącznie na-
czynia nadające się do kuchenek mikrofalowych. Korzysta-
jąc z plastykowych, papierowych lub innych łatwopalnych
pojemników na żywność nigdy nie pozostawiaj urządze-

PL
PL – 4
PL – 4
nia bez nadzoru.
Osłonę źródła mikrofal i komorę operacyjną należy oczy-
ścić po użyciu. Części te powinny być suche i bez tłuszczu.
Nagromadzony tłuszcz może się przegrzać, zacząć dymić
lub zapalić się.
W pobliżu urządzenia lub jego otworów wentylacyjnych nie
wolno przechowywać materiałów łatwopalnych. Nigdy nie blo-
kuj otworów wentylacyjnych.
Usuwaj z produktów i opakowań wszystkie metalowe zamknię-
cia, druty itp. Powstawanie łuku elektrycznego na powierzch-
niach metalu może doprowadzić do pożaru.
Nie używaj kuchni mikrofalowej do smażenia potraw w głębo-
kim oleju. Temperatury oleju nie można kontrolować i tłuszcz
może się zapalić.
Do prażenia kukurydzy powinny być używane wyłącznie do
tego przeznaczone naczynia.
Nie przechowuj w urządzeniu żadnej żywności ani innych
przedmiotów.
Po uruchomieniu kuchenki sprawdź ustawienia, żeby upewnić
się, że pracuje ona zgodnie z życzeniem.
Nie wolno pozostawiać pracującej kuchenki bez nadzoru.
Żeby uniknąć przegrzania lub pożaru, należy zachować szcze-
gólną ostrożność podczas gotowania i podgrzewania potraw
zawierających duże ilości cukru lub tłuszczu, np. krokietów z
mięsem lub budyniu. Niniejszej instrukcji obsługi należy uży-
wać razem z podanymi dalej wskazówkami dotyczącymi goto-
wania.
Żeby uniknąć obrażeń ciała.
Nie używaj kuchenki, jeżeli jest uszkodzona lub wykazuje
wadliwe funkcjonowanie. Przed użyciem sprawdź następujące
punkty:

PL – 5
PL – 5
a) Drzwiczki muszą się zamykać prawidłowo i nie mogą być
skrzywione lub scentrowane.
b) Należy się upewnić, że zawiasy oraz zatrzaski bezpieczeń-
stwa nie są złamane ani luźne.
c) Należy się upewnić, że uszczelki drzwiczek i powierzchnie
uszczelniające nie są uszkodzone.
d) Należy się upewnić, że wewnątrz urządzenia i na drzwicz-
kach nie ma żadnych wgnieceń ani innych uszkodzeń.
e) Należy się upewnić, że przewód zasilający oraz wtyczka nie
są uszkodzone.
Nie używaj kuchenki, jeśli drzwiczki lub uszczelki drzwiczek są
uszkodzone. Naprawę należy powierzyć wykwali kowanym
pracownikom serwisu.
Nigdy nie próbuj samodzielnie regulować, naprawiać ani
mody kować urządzenia. Wszelkie naprawy, zwłaszcza
wiążące się z otwarciem obudowy, mogą być przeprowa-
dzone wyłącznie przez wykwali kowanych pracowników
serwisu rmy SHARP.
Nie używaj kuchenki przy otwartych drzwiczkach lub zamknię-
ciu przerobionym w jakikolwiek sposób. Nie używaj kuchen-
ki, jeśli pomiędzy uszczelkami drzwiczek a powierzchniami
uszczelniającymi znajdują się jakieś przedmioty.
Nie dopuszczaj do gromadzenia się tłuszczu i zabrudzeń
na uszczelkach drzwiczek i sąsiednich elementach.
Stosuj się do wskazówek z rozdziału „Czyszczenie i kon-
serwacja”. Dopuszczenie do nadmiernego zanieczyszcze-
nia kuchenki może spowodować zniszczenie jej ścianek,
doprowadzić do jej przedwczesnego zużycia oraz może
wywołać sytuacje niebezpieczne.
Osoby mające ROZRUSZNIK SERCA powinny zapytać swojego
lekarza lub producenta rozrusznika o środki ostrożności pod-

PL
PL – 6
PL – 6
czas posługiwania się kuchenkami mikrofalowymi.
Żeby uniknąć porażenia prądem elektrycznym.
• W żadnym wypadku nie wolno zdejmować zewnętrznej
obudowy kuchenki.
• Nie należy wprowadzać żadnych przedmiotów ani płynów w
otwory zatrzasków bezpieczeństwa drzwiczek ani w otwory
wentylacyjne. Jeśli jakiś płyn rozleje się wewnątrz kuchen-
ki, urządzenie należy natychmiast wyłączyć, wyjąć wtyczkę
przewodu zasilającego z gniazda i zwrócić się do serwisu
rmy SHARP.
• Przewodu zasilającego ani wtyczki nie wolno zanurzać w
wodzie ani jakiejkolwiek innej cieczy.
• Przewód nie powinien być zawieszony na krawędzi stołu lub
blatu kuchennego.
• Przewód zasilający należy prowadzić z dala od powierzchni
nagrzewających się, włącznie z tylną ścianką kuchenki.
• Dzieciom poniżej 8 roku życia należy uniemożliwić zbliżanie
się do kuchenki i przewodu zasilającego.
• Nie wolno samodzielnie wymieniać lampki oświetleniowej
w kuchence ani też pozwalać, by wymieniał ją ktokolwiek,
niebędący elektrykiem upoważnionym przez rmę SHARP.
• Jeśli ulegnie uszkodzeniu przewód zasilający, musi on zo-
stać wymieniony przez upoważnionego pracownika serwisu
rmy SHARP.
OSTRZEŻENIE: Płynów i innych pokarmów nie wolno pod-
grzewać w zamkniętych pojemnikach, ponieważ mogą
one eksplodować. Podczas przenoszenia pojemnika z
płynem podgrzanym w kuchence należy zachować szcze-
gólną ostrożność, ponieważ może nastąpić opóźnione
wykipienie cieczy.
Nigdy nie wolno używać szczelnie zamkniętych pojemników.
Przed użyciem należy zdjąć pokrywki i wieczka. Szczelnie za-
mknięte pojemniki mogą wybuchnąć wskutek wzrostu ciśnie-

PL – 7
PL – 7
nia, nawet po wyłączeniu kuchenki. Przy podgrzewaniu płynów
w kuchence należy zachować szczególną ostrożność. Stosuj
naczynia o szerokim wylocie, aby pęcherzyki pary mogły swo-
bodnie uchodzić.
Nigdy nie należy ogrzewać płynów w pojemnikach o wą-
skich szyjkach, takich jak butelki dla niemowląt, ponieważ
gorący płyn może z nich gwałtownie wytrysnąć, powodu-
jąc oparzenia.
Żeby uniknąć gwałtownego wytryśnięcia wrzącej cieczy i opa-
rzeń:
1. Nie należy przekraczać zalecanych czasów podgrzewania.
2. Płyn należy przed podgrzaniem zamieszać.
3. Wskazane jest włożenie do naczynia szklanej pałeczki lub
podobnego przedmiotu na czas ogrzewania.
4. Po zakończeniu ogrzewania płyn należy pozostawić co naj-
mniej 20 sekund w kuchence, aby zapobiec opóźnionemu
wykipieniu.
Nie należy używać kuchenki do gotowania jajek w skorup-
kach ani do podgrzewania jajek gotowanych na twardo.
Mogą one eksplodować nawet po zakończeniu procesu
gotowania. Przed gotowaniem lub podgrzewaniem jajek
nie roztrzepanych czy rozmieszanych należy przekłuć
żółtko i białko. Jajka ugotowane na twardo należy przed
podgrzewaniem w kuchence mikrofalowej obrać i pokra-
jać w plasterki.
Przed gotowaniem należy przekłuć skórkę takich produktów
jak ziemniaki, parówki i owoce – w przeciwnym razie mogą
eksplodować.
OSTRZEŻENIE: W celu uniknięcia poparzeń należy zawsze
sprawdzać temperaturę pokarmów dla niemowląt i mie-
szać zawartość butelek i naczyń przed podaniem. Podczas

PL
PL – 8
PL – 8
wyjmowania potraw z kuchenki należy używać chwytek
do garnków lub rękawic kuchennych. Żeby uniknąć popa-
rzeń:
• Pojemniki, naczynia do prażenia kukurydzy, woreczki do
pieczenia itp. należy otwierać w taki sposób, by para nie
wydobywała się z nich na twarz i ręce. W celu uniknięcia
poparzeń należy zawsze sprawdzać temperaturę pokarmów
i mieszać je przed podaniem; szczególną ostrożność należy
zachować w przypadku temperatury pokarmów i napojów
przeznaczonych dla niemowląt, małych dzieci oraz osób
starszych. Nie wolno dopuścić, żeby do kuchenki zbliżały
się małe dzieci, ponieważ niektóre jej elementy bardzo się
nagrzewają. Temperatura naczynia nie jest miarodajnym
wskaźnikiem temperatury pokarmu czy napoju; zawsze na-
leży sprawdzać temperaturę samego pokarmu.
• Temperatura naczynia nie jest miarodajnym wskaźnikiem
temperatury pokarmu czy napoju; zawsze należy sprawdzać
temperaturę samego pokarmu.
• Przy otwieraniu drzwiczek kuchenki należy zachować
ostrożność, by nie ulec poparzeniu wydobywającą się z
wnętrza parą i falą gorąca.
• Pieczone potrawy z nadzieniem należy po przyrządzeniu
pokrajać w plastry, by para mogła ujść.
• Nie wolno pozwalać dzieciom, żeby zbliżały się do drzwiczek
podczas pracy kuchenki, ponieważ mogłyby się poparzyć.
OSTRZEŻENIE: Dzieci w wieku od ośmiu lat mogą korzy-
stać z kuchenki bez nadzoru tylko, jeśli zostały szczegó-
łowo poinstruowane o sposobie bezpiecznego używania
urządzenia i rozumieją ryzyko związane z niewłaściwym
użyciem.
Dzieci mogą korzystać z kuchenki wyłącznie pod nadzo-
rem opiekunów, jeśli urządzenie pracuje w trybie GRILL,
PRACY KOMBINOWANEJ Z GRILLEM, PRACY Z TERMOOBIE-

PL – 9
PL – 9
GIEM lub PROGRAMIE AUTOMATYCZNEGO GOTOWANIA
(dostępne tryby pracy zależą od modelu kuchenki), ponie-
waż kuchenka w tym czasie jest bardzo gorąca.
Urządzenie to nie może być obsługiwane przez osoby
(włącznie z dziećmi) z obniżonymi zdolnościami zyczny-
mi, zmysłowymi bądź umysłowymi, a także przez osoby
bez doświadczenia i wiedzy na temat obsługi, chyba że
dostały pozwolenie, bądź udzielono im instrukcji obsługi
urządzenia przez osobę odpowiedzialną za ich bezpie-
czeństwo.
Dzieci powinny pozostawać pod opieką, aby nie bawiły
się urządzeniem. Czyszczenie kuchenki przeprowadzane
przez dzieci powinno być monitorowane.
Modele z elektronicznym panelem dotykowym obsługują
tryb blokady rodzicielskiej.
Nie wolno opierać się ani huśtać na drzwiczkach kuchenki. Nie
wolno traktować kuchenki jako przedmiotu do zabawy.
Dzieciom należy wpoić zasady bezpieczeństwa: używanie ręka-
wic kuchennych, ostrożne zdejmowanie pokrywek, zachowanie
szczególnej ostrożności co do opakowań (np. materiałów sa-
monagrzewających się), gdyż opakowania te mogą być bardzo
gorące.
Inne ostrzeżenia:
Nie wolno w żaden sposób samodzielnie dokonywać mody ka-
cji kuchenki.
Nie wolno poruszać kuchenką podczas jej pracy.
Opisywane urządzenie przeznaczone jest tylko do użytku w
gospodarstwach domowych. Kuchenka służy wyłącznie do
przygotowywania potraw i napojów w warunkach domowych
i można jej używać tylko do takich celów. Suszenie żywności
lub odzieży oraz ogrzewanie poduszek rozgrzewających, kapci,

PL
PL – 10
PL – 10
gąbek, wilgotnych ściereczek itp. może doprowadzić do obra-
żeń, zapalenia się lub pożaru. Kuchenka nie jest przeznaczona
do użytku przemysłowego ani laboratoryjnego.
Żeby zapewnić niezawodną pracę kuchenki i uniknąć
uszkodzeń:
Nigdy nie należy włączać pustej kuchenki. Używając naczynia
powodującego rumienienie potraw lub materiałów samona-
grzewających się, zawsze należy pod nimi umieścić izolację
termiczną, na przykład porcelanowy talerz, aby zapobiec uszko-
dzeniu podstawy urządzenia na skutek nadmiernego wzrostu
temperatury. Niedopuszczalne jest przekraczanie czasu pod-
grzewania, podanego w przepisach.
Nie wolno używać naczyń metalowych odbijających mikrofale i
mogących spowodować powstawanie łuków elektrycznych. Nie
wkładaj do kuchenki puszek.
Aby zapobiec pęknięciu talerza obrotowego lub podstawy
kuchenki:
a) Przed rozpoczęciem mycia wodą należy odczekać dopóki
kuchenka nie ostygnie.
b) Nie wolno ustawiać gorących ani zimnych produktów lub
naczyń na zimnej podstawie kuchenki.
c) Podczas pracy urządzenia nie należy na jego obudowie sta-
wiać jakichkolwiek przedmiotów.
UWAGA:
Nie wolno używać plastikowych naczyń, jeśli komora operacyj-
na nie ostygła jeszcze po użyciu w trybie pracy kombinowanej
(w zależności od modelu kuchenki), ponieważ mogłyby się
roztopić.
W wymienionych trybach nie wolno używać plastikowych na-
czyń, o ile ich producent nie zaznaczył, że są one do tego celu
przeznaczone.

PL – 11
PL – 11
W przypadku wątpliwości co do sposobu przyłączenia kuchen-
ki należy skontaktować się z upoważnionym, wykwali kowa-
nym elektrykiem.
Producent ani sprzedawca nie ponoszą żadnej odpowiedzial-
ności za uszkodzenie kuchenki lub obrażenia ciała, powstałe
wskutek zaniedbania poprawnych połączeń elektrycznych.
Na ściankach kuchenki lub wokół uszczelki drzwiczek może
czasami pojawiać się para wodna lub krople wody. Jest to zja-
wisko normalne i nie świadczy o wydobywaniu się mikrofal na
zewnątrz ani o wadliwym działaniu kuchenki.
Opisywane urządzenie przeznaczone jest do użytku w go-
spodarstwach domowych i w podobnych zastosowaniach: w
pomieszczeniach kuchennych przeznaczonych dla personelu w
sklepach, biurach i innych miejscach pracy / w gospodarstwach
rolnych / przez klientów w hotelach, motelach i innych miej-
scach zakwaterowania / w pensjonatach.
Ten symbol oznacza, że ścianki kuchenki bardzo się
nagrzewają.

PL
PL – 12
PL – 12
INSTALACJA
1. Wyjmij ze środka kuchenki wszystkie elementy opakowania i zdejmij warstwę ochronną znajdującą się na obudo-
wie urządzenia.
2. Upewnij się, że kuchenka nie nosi żadnych śladów uszkodzenia.
3. Ustaw kuchenkę na równym i płaskim podłożu, dostatecznie wytrzymałym, by mogło unieść ciężar kuchenki wraz
z przyrządzaną w niej żywnością. Nie wolno umieszczać kuchenki wewnątrz szafki.
4. Wybierz miejsce, które zapewni dostateczną ilość wolnej przestrzeni dla prawidłowego działania otworów wloto-
wych i/lub wylotowych powietrza. Zapoznaj się z rysunkiem na pierwszej stronie. Tylną ściankę kuchenki można
ustawić przy ścianie.
• Minimalna wysokość instalacji wynosi 85 cm.
• Pomiędzy kuchenką a sąsiadującymi ścianami lub przedmiotami należy pozostawić przynajmniej 20 cm wolnej
przestrzeni.
• Nad kuchenką należy pozostawić co najmniej 30 cm wolnej przestrzeni.
• Nie należy demontować nóżek znajdujących się na spodzie kuchenki.
• Zablokowanie otworów wlotowych i/lub wylotowych powietrza może spowodować uszkodzenie kuchenki.
• Kuchenkę należy ustawić w możliwie największej odległości od odbiorników radiowych i telewizyjnych. Korzystanie
z kuchenki mikrofalowej może powodować zakłócenia odbiorników radiowych i telewizyjnych.
20 cm
30 cm
85 cm
10 cm
20 cm
5. Podłącz wtyczkę kuchenki do standardowego uziemionego gniazdka elektrycznego.
OSTRZEŻENIE:
Nie należy stawiać urządzenia w pobliżu źródeł ciepła, w miejscach o dużej wilgotności (np. w pobliżu zwykłego
piekarnika) lub w pobliżu palnych materiałów (np. zasłon).
Nie należy blokować ani zasłaniać otworów wentylacyjnych.
Nie należy ustawiać żadnych przedmiotów na obudowie urządzenia.
Nie wolno dotykać zewnętrznych powierzchni kuchenki podczas pracy lub krótko po jej zakończeniu, ponieważ są
gorące.

PL – 13
PL – 13
ZAKŁÓCENIA FAL RADIOWYCH
Pracująca kuchenka mikrofalowa może powodować zakłócenia odbiorników radiowych i telewizyjnych lub
podobnego sprzętu. W przypadku wystąpienia zakłóceń można je zmniejszyć lub wyeliminować podejmując poniższe
środki:
1. Oczyścić drzwiczki i komorę operacyjną w miejscu, w którym się stykają.
2. Zmienić kierunek ustawienia anteny odbiornika radiowego lub telewizyjnego.
3. Zmienić położenie kuchenki względem odbiornika.
4. Podłączyć kuchenkę mikrofalową do innego gniazdka elektrycznego, aby kuchenka i odbiornik były podłączone
do innych obwodów.
WSKAZÓWKI DOTYCZĄCE UZIEMIENIA
Opisywane urządzenie należy uziemić. Kuchenka jest wyposażona w przewód zasilający z wtyczką z uziemieniem.
Wtyczkę należy podłączyć do prawidłowo zainstalowanego gniazdka elektrycznego z uziemieniem. W przypadku
wystąpienia zwarcia elektrycznego uziemienie zmniejsza zagrożenie porażenia prądem poprzez przepływ prądu
przewodem uziemiającym. Zaleca się podłączenie kuchenki do niezależnego obwodu prądu.
OSTRZEŻENIE: Nieprawidłowe użycie wtyczki z uziemieniem może doprowadzić do porażenia prądem.
UWAGA:
1. W przypadku jakichkolwiek wątpliwości dotyczących prawidłowego uziemienia kuchenki lub zaleceń dotyczących
instalacji elektrycznej należy skontaktować się z wykwali kowanym elektrykiem lub personelem autoryzowanego
serwisu.
2. Producent ani sprzedawca nie ponoszą żadnej odpowiedzialności za uszkodzenie kuchenki lub obrażenia ciała,
powstałe wskutek zaniedbania poprawnych połączeń elektrycznych.
Przewód zasilający kuchenki mikrofalowej wykorzystuje następujące kolory przewodów:
Zielono-żółty = UZIEMIENIE | Niebieski = NEUTRALNY | Brązowy = NAPIĘCIOWY
DANE TECHNICZNE
Typ kuchenki: YC-PC322A
Napięcie zasilające 230–240 V~/ 50 Hz, prąd zmienny jednofazowy
Bezpiecznik/wyłącznik automatyczny 10 A
Poziom
mocy
Pobór mocy 2300 W
Moc mikrofal 1000 W
Moc wyjściowa w trybie grilla 1250 W
Moc wyjściowa podczas pracy z termoobiegiem
2300 W
Pobór mocy w trybie wyłączenia < 0,5 W
Częstotliwość mikrofal 2450 MHz*
Wymiary zewnętrzne (szer.) x (wys.) x (gł.) mm 539 x 280 x 415
Wymiary komory operacyjnej (szer.) x (wys.) x (gł.)** mm
362 x 223 x 378
Wymiary szklanego talerza obrotowego (ø mm) 315
Pojemność kuchenki 32 litrów**
Wymiary blachy do pieczenia (średnica x wys. w mm) 317 x 48
Wymiary rusztu grilla (średnica x wys. w mm) 255 x 80
Masa 21 kg
Lampka oświetleniowa (typ LED) 1,5 W
* - Opisywane urządzenie spełnia wymagania europejskiego standardu EN55011. Zgodnie z tym standardem urządzenie zostało skla-
sy kowane jako sprzęt należący do grupy 2 i klasy B. Przynależność do grupy 2 oznacza, że urządzenie w sposób zamierzony generuje
fale radiowe służące do podgrzewania jedzenia. Przynależność do klasy B oznacza, że urządzenie może pracować w gospodarstwach
domowych.
** - Pojemność kuchenki jest obliczana poprzez pomnożenie maksymalnej szerokości, głębokości i wysokości komory operacyjnej. Rzeczy-
wista pojemność przeznaczona na potrawy jest mniejsza.

PL
PL – 14
PL – 14
STAWIAJĄC SOBIE ZA CEL CIĄGŁE DOSKONALENIE SWOICH PRODUKTÓW FIRMA SHARP ZASTRZEGA SOBIE PRAWO DO
ZMIANY WYGLĄDU I DANYCH TECHNICZNYCH URZĄDZENIA BEZ UPRZEDZENIA.
KUCHENKA I JEJ WYPOSAŻENIE
1. System blokady drzwiczek
2. Szyba w drzwiczkach
3. Panel sterowania
4. Wskazanie na wyświetlaczu
5. Komora operacyjna
6. Osłona źródła mikrofal (nie wolno usuwać)
7. Szklana taca
8. Pierścień obrotowy
9. Gniazdo napędowe talerza obrotowego
10. Ruszt grilla
11. Blacha do pieczenia
12. Otwory wentylacyjne
13. Obudowa
14. Przewód zasilający
• Ruszt grilla i blacha do pieczenia są
przeznaczone wyłącznie do użytku z
kuchenkami z funkcją grilla i termoobiegu. NIE
WOLNO stosować jakichkolwiek metalowych
akcesoriów podczas gotowania mikrofalami.
• Informacje na temat korzystania z rusztu
grilla można znaleźć w sekcjach dotyczących
trybów pracy z GRILLEM w niniejszej instrukcji
obsługi.
Nigdy nie dotykaj nagrzanego rusztu.
UWAGA: W celu zamówienia wyposażenia
dodatkowego należy podać typ kuchenki oraz
nazwę części.
UWAGI:
• Po przygotowaniu tłustych potraw bez użycia osłony zawsze dokładnie wyczyść komorę operacyjną i wykorzystane
naczynia kuchenne – muszą być one suche i wolne od tłuszczu. Nagromadzony tłuszcz może spowodować
przegrzanie, dymienie, a nawet pożar.
• Podczas gotowania w kuchence mikrofalowej naczynia kuchenne należy zawsze umieszczać na talerzu obrotowym.
• NIE WOLNO stosować rusztu grilla ani blachy do pieczenia podczas procesu wykorzystującego funkcję gotowania
mikrofalami.
OSTRZEŻENIE: Ten symbol oznacza, że ścianki kuchenki bardzo się nagrzewają. Drzwiczki,
obudowa, komora operacyjna, elementy wyposażenia i naczynia bardzo silnie się nagrzewają podczas
pracy kuchenki. Wyjmując naczynia z kuchenki należy chwytać je przez grube rękawice, żeby zapobiec
poparzeniom.
2
7
5
9
6
8
1
3
4
14
12
13
1110

PL – 15
PL – 15
PANEL STEROWANIA
1. WYŚWIETLACZ – Wyświetlany jest czas trwania procesu, poziom mocy,
wskaźniki i aktualna godzina.
2. Przyciski 10 SECONDS, 1 MINUTE, 10 MINUTES – Służą do ustawienia czasu
przygotowania potrawy lub zegara.
3. Przyciski AUTOMATYCZNEGO GOTOWANIA – Naciśnij, aby wybrać program
automatycznego gotowania (patrz strona 19, aby uzyskać porady
dotyczące użytkowania).
4. Przycisk START/QUICK START – (strona 16).
5. Przycisk MICROWAVE POWER – Naciśnij, aby wybrać poziom mocy mikrofal
(strona 16).
6. Przycisk GRILL – Naciśnij, aby ustawić program pracy z grillem (strona17).
7. Przycisk MICROWAVE+GRILL – Naciśnij, aby ustawić program pracy
kombinowanej z grillem (strona 17).
8. Przycisk CONVECTION TEMPERATURE – Naciśnij, aby wybrać temperaturę
termoobiegu.
9. Przycisk MICROWAVE+CONVECTION – Naciśnij, aby wybrać program pracy
kombinowanej z termoobiegiem.
10. Przycisk GÓRA – Naciśnij, aby ustawić masę potrawy lub ilość porcji.
11. Przycisk DÓŁ – Naciśnij, aby ustawić masę potrawy lub ilość porcji.
12. Przycisk STOP/ECO – Naciśnij jeden raz, aby tymczasowo przerwać pracę
kuchenki, albo naciśnij dwa razy, aby całkowicie anulować proces.
Wykorzystaj do ustawienia trybu oszczędzania energii (strona20 ).
13. Przycisk CHILD LOCK – (strona 21).
14. Przycisk TIME/SET CLOCK
– Wykorzystaj do ustawienia godziny.
Użyj do ustawienia funkcji timera (strona 15).
PRZED PIERWSZYM UŻYCIEM KUCENKI
Po pierwszym podłączeniu kuchenki do zasilania zostanie wyemitowany sygnał dźwiękowy, a na wyświetlaczu pojawi
się wskazanie „1: 00”. Należy pamiętać, że zegar nie musi zostać ustawiony, aby kuchenka działała prawidłowo. Aby
ustawić zegar, należy postępować zgodnie ze wskazówkami podanymi w sekcji „Ustawienie zegara” w niniejszej
instrukcji obsługi.
Jeśli kuchenka jest nowa, przy pierwszym użyciu grilla i/lub termoobiegu zostaną wydzielone dym i zapachy. Aby
uniknąć takiej sytuacji podczas przygotowania potraw, należy uruchomić kuchenkę bez żywności na 20 minut w
trybie z grillem i termoobiegiem.
• Po otwarciu i zamknięciu drzwiczek kuchenka przełączy się do trybu czuwania. Jeśli nie zostanie naciśnięty
żaden przycisk przez jedną minutę, wyświetlacz pozostanie włączony, a przyciski nie będą działać. Aby ponownie
przełączyć kuchenkę do trybu czuwania, należy otworzyć i zamknąć drzwiczki.
• Jeśli podczas procesu naciśniesz jeden raz przycisk STOP/ECO, cykl gotowania zostanie wstrzymany. Aby wznowić
proces, naciśnij przycisk START/QUICK START. Jeśli dwa razy naciśniesz przycisk STOP/ECO, proces zostanie
anulowany.
• Po zaprogramowaniu danej funkcji i przerwie między naciśnięciem przycisków trwającej ponad 30 sekund
kuchenka powróci do trybu czuwania.
• Po zakończeniu cyklu gotowania na wyświetlaczu pojawi się napis „End” i co dwie minuty będzie emitowany sygnał
dźwiękowy do chwili naciśnięcia przycisku lub otwarcia drzwiczek.
USTAWIENIE ZEGARA
Opisywana kuchenka została wyposażona w zegar, który można ustawić w formacie 12- lub 24-godzinnym. Aby
ustawić zegar, należy postępować zgodnie ze wskazówkami podanymi poniżej:
1. W trybie czuwania naciśnij i przytrzymaj przycisk TIME/SET CLOCK przez co najmniej trzy sekundy, aby przejść do
trybu ustawienia zegara.
10 SECONDS 1 MINUTE 10 MINUTES
YC-PC322A
1000W
STOP/ECO TIME/
SET CLOCK
CHILD
LOCK
AUTO PROGRAMS
REHEAT
BEVERAGES JACKE T
POTATO PIZZA POPCORN
FROZEN
MEAL FRESH
VEGETABLES PORRID GE AUTO
DEFROST
GRILLED
STEAK GRILLED
CHICKEN AUTO
REHEAT
ROAST
BEEF
ROAST
CHICKEN
OVEN
CHIPS
MICROWAVE
POWER
MICROWAVE
+ CONVECTION
CONVECTION
TEMPERATURE
GRILL
START/
QUICK START
MICROWAVE
+ GRILL
13
5
3
2
14
11
6
8
9
7
10
12
4
1

PL
PL – 16
PL – 16
2. Naciśnij przycisk TIME/SET CLOCK, aby ustawić format 12- lub 24-godzinny.
3. Przyciskami 10 SECONDS, 1 MINUTE i 10 MINUTES ustaw żądaną godzinę i minuty.
4. Naciśnij przycisk TIME/SET CLOCK, aby zapisać i zakończyć ustawienie zegara.
• Nie jest konieczne ustawienie zegara, aby kuchenka działała normalnie.
• W trybie gotowania naciśnij przycisk TIME/SET CLOCK, aby sprawdzić aktualną godzinę (jeśli została ustawiona). Po
pięciu sekundach wskazanie zmieni się z powrotem na odliczanie czasu gotowania. Należy pamiętać, że nie można
wyświetlić aktualnej godziny, jeśli zostanie ustawiony timer kuchenny.
TRYB PRACY Z MIKROFALAMI
Aby skorzystać z funkcji gotowania mikrofalami, należy postępować zgodnie ze wskazówkami podanymi
poniżej:
1. W trybie czuwania naciśnij przycisk MICROWAVE POWER, aby wybrać poziom mocy mikrofal. Po każdym
naciśnięciu przycisku wyświetlacz pokazuje poziom mocy mikrofal.
2. Po wyborze żądanego poziomu mocy mikrofal przyciskami 10 SECONDS, 1 MINUTE i 10 MINUTES ustaw czas
przygotowania potrawy.
3. Naciśnij przycisk START/QUICK START, aby rozpocząć proces.
4. Po zakończeniu cyklu gotowania na wyświetlaczu pojawi się napis „End” i co dwie minuty będzie emitowany
sygnał dźwiękowy do chwili naciśnięcia przycisku lub otwarcia drzwiczek.
Należy pamiętać, że tabela ma charakter orientacyjny. Opisywana kuchenka posiada dziesięć poziomów mocy
mikrofal: 10%, 20%, 30%, 40%, 50%, 60%, 70%, 80%, 90% i 100%. Rzeczywistą moc wyjściową można obliczyć mnożąc
moc mikrofal przez procenty.
Wskazówki dotyczące gotowania przy użyciu mikrofal:
Wskaza-
nie na
wyświe-
tlaczu
Poziom mocy
mikrofal Sugerowany sposób użycia
P-100 100% Należy stosować podczas szybkiego gotowania lub podgrzewania potraw, np.
duszonego mięsa, gorących płynów, warzyw itp.
P-80 80%
Należy stosować do gęstych potraw, które wymagają długiego czasu gotowania
w przypadku gotowania tradycyjnego, na przykład dań z wołowiny. Użycie tego
poziomu mocy mikrofal jest wskazane, żeby mięso było miękkie.
P-60 60%
Należy stosować podczas dłuższego gotowania gęstych potraw (np. pieczeni,
klopsów i potraw w panierce) oraz delikatnych dań, na przykład sosu serowego czy
pulchnego ciasta.
P-40 40%
Służy do rozmrażania. Wybierz to ustawienie, żeby zapewnić równomierne
rozmrożenie dania. Jest ono również idealne w przypadku gotowanego ryżu,
makaronu, knedli i słodkiego sosu z gotowanych jajek z dodatkiem mąki.
P-20 20% Służy do łagodnego rozmrażania, na przykład tortu lub ciasta z kremem.
• Podczas trwania procesu można sprawdzić poziom mocy naciskając i przytrzymując przycisk MICROWAVE POWER.
• Najdłuższy czas możliwy do ustawienia wynosi 95 minut.
SZYBKI START
Jeśli chcesz przygotowywać potrawę przy poziomie mocy mikrofal 100%, po prostu w trybie czuwania naciśnij
przycisk START/QUICK START. Każde naciśnięcie przycisku START/QUICK START powoduje zwiększenie czasu
trwania procesu o 30 sekund.

PL – 17
PL – 17
TRYB PRACY Z GRILLEM
Element grzejny grilla zamontowany nad komorą operacyjną kuchenki ma tylko jedno ustawienie mocy, jest wydajny
i ekonomiczny. Tryb grilla jest doskonały do przygotowywania bekonu, steków wieprzowych, paluszków rybnych i
bułeczek z rodzynkami.
Skorzystaj z rusztu grilla podczas grillowania jedzenia o małych rozmiarach, takich jak bekon i kiełbaski, upływie
połowy czasu grillowania przewróć na drugą stronę. Jedzenie można umieszczać bezpośrednio na ruszcie lub na
ustawionym na nim naczyniu żaroodpornym. Pod rusztem należy umieścić odpowiednią tacę, ponieważ tłuszcz lub
olej może kapać z przygotowywanej potrawy.
Do przyrumienienia i nadania kruchości powierzchni potrawy w naczyniu żaroodpornym można użyć rusztu grilla,
jeśli naczynie jest dostatecznie płytkie. Jednak zaleca się umieszczanie tego rodzaju naczyń bezpośrednio na talerzu
obrotowym, aby zapewnić trochę więcej czasu na przyrumienienie i nadanie kruchości zgodnie z życzeniem. Nie jest
możliwe użycie rusztu grilla do grillowania.
Aby skorzystać z trybu grilla, należy postępować zgodnie ze wskazówkami podanymi poniżej:
1. W trybie czuwania naciśnij przycisk GRILL, aby wybrać tryb pracy z grillem. Na wyświetlaczu pojawi się napis „Grl”.
2. Przyciskami 10 SECONDS, 1 MINUTE i 10 MINUTES ustaw czas przygotowania potrawy.
3. Naciśnij przycisk START/QUICK START, aby rozpocząć proces.
4. Po zakończeniu cyklu gotowania na wyświetlaczu pojawi się napis „End” i co dwie minuty będzie emitowany
sygnał dźwiękowy do chwili naciśnięcia przycisku lub otwarcia drzwiczek.
GOTOWANIE PRZY UŻYCIU MIKROFAL I GRILLA
Wykorzystanie trybu mikrofal i grilla umożliwia szybkie przyrumieniania i gotowanie potraw. Aby korzystać z trybu
mikrofal i grilla, należy postępować zgodnie ze wskazówkami podanymi poniżej:
1. W trybie czuwania naciśnij jeden lub dwa razy przycisk MICROWAVE+GRILL, aby wybrać opcję „Co-1” lub „Co-2”.
2. Przyciskami 10 SECONDS, 1 MINUTE i 10 MINUTES ustaw czas trwania procesu.
3. Naciśnij przycisk START/QUICK START, aby rozpocząć gotowanie.
4. Po zakończeniu cyklu gotowania na wyświetlaczu pojawi się napis „End” i co dwie minuty będzie emitowany
sygnał dźwiękowy do chwili naciśnięcia przycisku lub otwarcia drzwiczek.
Tryb pracy z mikrofalami i grillem
Wskazanie
na wyświe-
tlaczu
Proces gotowania Sugerowany sposób użycia
Co-1
Kuchenka przygotuje potrawę w następującym cyklu:
Gotowanie przy użyciu mikrofal przez 22 sekund,
grillowanie przez 11 sekund. Cykl będzie powtarzany
do zakończenia ustawionego czasu.
Części kurczaka, piersi kurczaka, kotlety
wieprzowe
Co-2
Kuchenka przygotuje potrawę w następującym cyklu:
Gotowanie przy użyciu pełnej mocy mikrofal przez
18 sekund, grillowanie przez 15 sekund. Cykl będzie
powtarzany do zakończenia ustawionego czasu.
Cały kurczak
• Maksymalny czas gotowania z wykorzystaniem grilla wynosi 95 minut.
• Podczas grillowania należy otworzyć okno lub włączyć wyciąg kuchenny, żeby zapewnić prawidłowe
odprowadzanie dymu i zapachów. Jest to zjawisko normalne i nie świadczy o uszkodzeniu kuchenki.
• Podczas trwania procesu można sprawdzić aktualny poziom mocy w trybie pracy kombinowanej naciskając przycisk
MICROWAVE+GRILL.
• Podczas korzystania z trybu grilla – element grzejny grilla będzie się włączał i wyłączał w regularnych odstępach
czasu, aby zapobiec przegraniu.
• Podczas GOTOWANIA PRZY UŻYCIU MIKROFAL I GRILLA potrawę w odpowiednim naczyniu można umieścić
bezpośrednio na talerzu obrotowym.
OSTRZEŻENIE: Drzwiczki, obudowa, komora operacyjna, elementy wyposażenia i naczynia bardzo silnie się
nagrzewają podczas pracy kuchenki. Wyjmując naczynia z kuchenki należy chwytać je przez grube rękawice, żeby
zapobiec poparzeniom.

PL
PL – 18
PL – 18
TERMOOBIEG
W trybie pracy z termoobiegiem gorące powietrze krąży w komorze operacyjnej, powodując równomierne
przyrumienienie i szybkie uzyskanie chrupkiej potrawy. Opisywaną kuchenkę można zaprogramować na jedenaście
różnych temperatur gotowania (200°C, 190°C, 180°C, 170°C, 160°C, 150°C, 140°C, 130°C, 120°C, 110°C).
Zaleca się wstępne rozgrzewanie kuchenki przed wykorzystaniem z trybu pracy z termoobiegiem. Aby wstępnie
rozgrzać kuchenkę i skorzystać z trybu pracy z termoobiegiem, należy postępować zgodnie ze wskazówkami
podanymi poniżej:
Kuchenkę można zaprogramować w ten sposób, aby połączyć funkcję podgrzewania z funkcją termoobiegu.
1. W trybie czuwania naciśnij kilkakrotnie przycisk CONVECTION, aby wybrać temperaturę termoobiegu.
2. Naciśnij przycisk START/QUICK START, aby rozpocząć podgrzewanie.
3. Po osiągnięciu żądanej temperatury kuchenka wyemituje sygnał dźwiękowy.
Po rozgrzaniu kuchenki i wyemitowaniu sygnału dźwiękowego:
1. Otwórz drzwiczki i umieść naczynie z potrawą na środku tacy.
2. Przyciskami 10 SECONDS, 1 MINUTE i 10 MINUTES ustaw czas trwania procesu. Najdłuższy czas możliwy do
ustawienia wynosi 95 minut.
3. Naciśnij przycisk START/QUICK START, aby rozpocząć gotowanie.
UWAGA: Po osiągnięciu temperatury podgrzewania przy wykorzystaniu funkcji termoobiegu kuchenka rozpocznie
emitowanie sygnału dźwiękowego co dwie sekundy. Temperatura podgrzewania będzie utrzymywana przez 30 minut,
po czym kuchenka wyłączy się.
GOTOWANIE PRZY UŻYCIU MIKROFAL I TERMOOBIEGU
Tryb mikrofale + termoobieg sprawia, że gotowanie jest łatwiejsze i szybsze. Wykorzystuje szybkie gotowanie przy
użyciu mikrofal z termoobiegiem, aby uzyskać chrupiące potrawy.
Istnieje możliwość gotowania z wykorzystaniem termoobiegu przy czterech różnych temperaturach. Aby uruchomić
tryb pracy łączonej, należy postępować zgodnie ze wskazówkami podanymi poniżej:
1. W trybie czuwania naciśnij kilkakrotnie przycisk MICROWAVE+CONVECTION, aby wybrać temperaturę
termoobiegu (200°C, 170°C, 140°C, 110°C).
2. Przyciskami 10 SECONDS, 1 MINUTE i 10 MINUTES ustaw czas trwania procesu. Zakres czasowy wynosi od
10sekund do 95 minut.
3. Naciśnij przycisk START/QUICK START, aby rozpocząć gotowanie.
W przypadku korzystania z trybu mikrofale + termoobieg czasy gotowania przy użyciu mikrofal i termoobiegu zostały
przedstawione poniżej. Wybierz najbardziej odpowiednią opcję gotowania, aby uzyskać chrupiące potrawy.
Wskazanie na
wyświetlaczu Proces gotowania
200°C Gotowanie przy użyciu mikrofal przez 10 sekund, następnie 23 sekund w trybie pracy
ztermoobiegiem. Cykl będzie powtarzany do zakończenia ustawionego czasu trwania procesu.
170°C Gotowanie przy użyciu mikrofal przez 15 sekund, następnie 18 sekund w trybie pracy
ztermoobiegiem. Cykl będzie powtarzany do zakończenia ustawionego czasu trwania procesu.
140°C Gotowanie przy użyciu mikrofal przez 19 sekund, następnie 14 sekund w trybie pracy
ztermoobiegiem. Cykl będzie powtarzany do zakończenia ustawionego czasu trwania procesu.
110°C Gotowanie przy użyciu mikrofal przez 24 sekund, następnie 9 sekund w trybie pracy
ztermoobiegiem. Cykl będzie powtarzany do zakończenia ustawionego czasu trwania procesu.

PL – 19
PL – 19
PROGRAMY AUTOMATYCZNEGO GOTOWANIA
Dla wygody programy automatycznego gotowania umożliwiają szybkie i skuteczne przygotowanie potraw za
pomocą zaledwie kilku naciśnięć przycisków. Nie jest konieczne programowanie czasu trwania procesu ani poziomu
mocy. Wystarczy nacisnąć odpowiedni przycisk programu automatycznego gotowania, wprowadzić masę/ilość sztuk
korzystając z przycisków GÓRA i DÓŁ, a następnie przyciskając przycisk START/QUICK START.
Przykład: Gotowanie dwóch ziemniaków w mundurkach.
1. Otwórz drzwiczki i umieść potrawę wewnątrz kuchenki, w naczyniu odpowiednim do ustawionego cyklu
gotowania.
2. Zamknij drzwiczki.
3. Naciśnij jeden raz przycisk JACKET POTATO.
4. Przyciskami GÓRA i DÓŁ wprowadź liczbę ziemniaków.
5. Naciśnij przycisk START/QUICK START.
6. Po zakończeniu cyklu gotowania na wyświetlaczu pojawi się napis „End” i co dwie minuty będzie emitowany
sygnał dźwiękowy do chwili naciśnięcia przycisku lub otwarcia drzwiczek.
Programy automatycznego gotowania:
Program automatycznego
gotowania Sposób wyboru masy lub sztuk Rozmiar/masa
Frozen Meal (zamrożone
potrawy) Przyciskami GÓRA i DÓŁ wybierz masę, a następnie naciśnij
przycisk START/QUICK START, aby rozpocząć gotowanie.
Od 200 do 800 g
Auto Defrost (automatyczne
rozmrażanie) Od 100 do 1800 g
Reheat Beverages
(podgrzewanie napojów)
Przyciskami GÓRA i DÓŁ wybierz liczbę liżanek, a następnie
naciśnij przycisk START/QUICK START, aby rozpocząć
gotowanie.
Od 1 do 3 liżanek
(200 ml każda)
Jacket Potato (ziemniaki w
mundurkach)
Przyciskami GÓRA i DÓŁ wybierz liczbę ziemniaków, a
następnie naciśnij przycisk START/QUICK START, aby
rozpocząć gotowanie. W zależności od wybranej liczby
ziemniaków możesz zostać poproszony o zmianę ich
ułożenia podczas cyklu gotowania.
Od 1 do 3
ziemniaków (230 g
każdy)
Popcorn (prażona kukurydza)
Przyciskami GÓRA i DÓŁ wybierz masę, a następnie naciśnij
przycisk START/QUICK START, aby rozpocząć gotowanie.
100g
Fresh Vegetables (świeże
warzywa) Od 200 do 600 g
Pizza 150 g, 300 g, 450 g
Porridge (płatki owsiane) Od 50 do 150 g
Grilled Steak (grillowane
zrazy)* Od 200 do 600 g
Grilled Chicken (grillowany
kurczak)* Od 200 do 600 g
Auto Reheat (automatyczne
podgrzewanie)* Od 200 do 800 g
Frytki z piekarnika 200 g
Pieczeń wołowa/barania Od 200 do 600 g
Pieczony kurczak 800g do 1400g
• Rezultaty zastosowania funkcji automatycznego gotowania zależą od różnych czynników, takich jak kształt i
rozmiary potrawy, osobiste preferencje odnośnie stopnia wysmażenia niektórych potraw oraz sposób umieszczania
potraw w kuchence. Jeśli wynik gotowanie nie jest zadawalający, dostosuj czas gotowania do swoich potrzeb.
• W przypadku niektórych programów automatycznego gotowania może się pojawić prośba o odwrócenie potrawy.
Otwórz drzwiczki, odwróć potrawę, zamknij drzwiczki, a następnie naciśnij przycisk START/QUICK START, żeby
dokończyć gotowanie.
• Przystępując do obracania potrawy, nałóż rękawice do piekarnika (lub podobne).

PL
PL – 20
PL – 20
AUTOMATYCZNE ROZMRAŻANIE
Program automatycznego rozmrażania umożliwia rozmrażanie żywności według masy. Czas rozmrażania i poziom
mocy są ustawiane automatycznie po zaprogramowaniu kategorii i masy potrawy. Zakres wagowy zamrożonych
potraw: od 200 do 1800 g.
1. W trybie czuwania naciśnij przycisk AUTO DEFROST.
2. Przyciskami GÓRA i DÓŁ wybierz masę produktu, który chcesz rozmrozić.
3. Naciśnij przycisk START/QUICK START, aby rozpocząć rozmrażanie.
4. Jeśli kuchenka wstrzyma pracę podczas cyklu rozmrażania, obróć produkt na drugą stronę, aby zapewnić
równomierne rozmrożenie. Następnie naciśnij przycisk START/QUICK START, aby kontynuować rozmrażanie
przez pozostały czas.
5. Po zakończeniu cyklu gotowania na wyświetlaczu pojawi się napis „End” i co dwie minuty będzie emitowany
sygnał dźwiękowy do chwili naciśnięcia przycisku lub otwarcia drzwiczek.
AUTOMATYCZNE PODGRZEWANIE
Program automatycznego podgrzewania umożliwia podgrzewanie żywności według masy. Czas podgrzewania
i poziom mocy są ustawiane automatycznie po zaprogramowaniu kategorii i masy potrawy. Zakres wagowy
podgrzewanych potraw: od 200 do 800 g.
1. W trybie czuwania naciśnij przycisk AUTO REHEAT.
2. Przyciskami GÓRA i DÓŁ wybierz masę produktu, który chcesz rozmrozić.
3. Naciśnij przycisk START/QUICK START.
4. Po zakończeniu cyklu gotowania na wyświetlaczu pojawi się napis „End” i co dwie minuty będzie emitowany
sygnał dźwiękowy do chwili naciśnięcia przycisku lub otwarcia drzwiczek.
TIMER KUCHENNY
Kuchenka jest wyposażona w timer kuchenny, który odlicza czas trwania procesu.
1. W trybie czuwania naciśnij jeden raz przycisk TIME/SET CLOCK.
2. Przyciskami 10 SECONDS, 1 MINUTE i 10 MINUTES ustaw czas trwania procesu. Najdłuższy czas możliwy do
ustawienia wynosi 95 minut.
3. Naciśnij przycisk START/QUICK START, aby zaakceptować.
4. Na wyświetlaczu rozpocznie się odliczanie czasu trwania procesu.
5. Po upływie ustawionego czasu zostanie wyemitowany sygnał dźwiękowy.
Istnieje możliwość wykorzystania timera kuchennego w trybie gotowania. Aby skorzystać z timera, podczas
gotowania należy wykonać poniższe czynności. Po uruchomieniu timera kuchennego pojawi się on na wyświetlaczu
na pięć sekund, a następnie wyświetlacz powróci do odliczania pozostałego czasu trwania procesu. Aby ponownie
wyświetlić wskazanie timera, naciśnij jeden raz przycisk TIME/SET CLOCK. Timer kuchenny wyświetli się na pięć
sekund, a następnie wyświetlacz powróci do odliczania pozostałego czasu trwania procesu.
• Aby anulować funkcję timera, naciśnij przycisk STOP/ECO, a na wyświetlaczu pojawi się aktualna godzina.
• Jeśli cykl gotowania zostanie rozpoczęty, można uruchomić timer kuchenny wykonując poniższe czynności.
TRYB OSZCZĘDZANIA ENERGII
Funkcja umożliwia oszczędzanie energii, gdy kuchenka nie jest używana. Aby włączyć funkcję, w trybie czuwania
naciśnij i przytrzymaj przycisk STOP/ECO przez trzy sekundy – wyświetlacz wyłączy się, a kuchenka przełączy się do
trybu oszczędzania energii.
Aby anulować tryb oszczędzania energii, należy nacisnąć dowolny przycisk lub otworzyć drzwiczki kuchenki.

PL – 21
PL – 21
FUNKCJA WYCISZENIA
Istnieje możliwość wyciszenia wszystkich sygnałów dźwiękowych emitowanych przez kuchenkę mikrofalową za
pomocą funkcji wyciszenia. Aby ustawić funkcję wyciszenia, naciśnij jeden raz przycisk CHILD LOCK. Na wyświetlaczu
pojawi się napis „oFF” na pięć sekund. W trybie wyciszenia po naciśnięciu przycisków nie będą emitowane sygnały
dźwiękowe.
Aby wyłączyć funkcję wyciszenia, naciśnij jeden raz przycisk CHILD LOCK; na wyświetlaczu pojawi się napis „on” na
pięć sekund informujący, że sygnały dźwiękowe zostały ponownie włączone.
Jeśli funkcja wyciszenia jest ustawiona, a kuchenka zostanie odłączona od sieci elektrycznej, funkcja wyciszenia
zostanie anulowana po ponownym podłączeniu do sieci elektrycznej.
BLOKADA PRZYCISKÓW
Jest to automatyczna funkcja zapobiegająca obsłudze kuchenki przez dzieci pozostawione bez nadzoru. Jeśli
wciągu minuty nie zostanie naciśnięty żaden przycisk w trybie czuwania, kuchenka automatycznie przełączy się do
trybu blokady przycisków, a na wyświetlaczu pojawi się napis „Loc”. Przy włączonej blokadzie wszystkie przyciski
są nieaktywne. Naciśnięcie dowolnego przycisku spowoduje pojawienie się wskaźnika blokady na pięć sekund,
przypominając użytkownikowi o konieczności anulowania blokady.
Aby wyłączyć blokadę przycisków wystarczy otworzyć i zamknąć drzwiczki kuchenki. Przyciski zostaną ponownie
uaktywnione, a wskaźnik blokady wyłączy się.
BLOKADA RODZICIELSKA
Aby ustawić BLOKADĘ RODZICIELSKĄ, naciśnij i przytrzymaj przycisk CHILD LOCK przez trzy sekundy. Kuchenka
wyemituje długi sygnał dźwiękowy, a na wyświetlaczu pojawi się napis „Loc”. Urządzenie znajduje się w trybie
BLOKADY RODZICIELSKIEJ. W tym trybie po naciśnięciu dowolnego przycisku lub otwarciu drzwiczek na wyświetlaczu
pojawi się zegar i przez pięć sekund będzie widoczny napis „Loc”.
Aby wyłączyć BLOKADĘ RODZICIELSKA, naciśnij i przytrzymaj przycisk CHILD LOCK przez trzy sekundy, dopóki nie
zostanie wyemitowany długi sygnał dźwiękowy.
MECHANIZM AUTOMATYCZNEJ OCHRONY
ZABEZPIECZENIE PRZED PRZEGRZANIEM – Jeśli kuchenka wykryje wysoka temperaturę, na wyświetlaczu pojawi się
kod „E01” i praca kuchenki zostanie zatrzymana. Zabezpieczenie można anulować naciskając przycisk STOP/ECO.
ZABEZPIECZENIE PRZED NISKĄ TEMPERATURĄ – Jeśli kuchenka przełączy się do trybu niskiej temperatury, na
wyświetlaczu pojawi się kod „E02” i praca kuchenki zostanie zatrzymana. Zabezpieczenie można anulować naciskając
przycisk STOP/ECO.
ZABEZPIECZENIE PRZED USTERKĄ CZUJNIKÓW – Jeśli kuchenka wykryje problem z jednym z czujników, wyświetli
się kod „E03” i praca kuchenki zostanie zatrzymana. Ponadto urządzenie wyemituje ostrzegawczy sygnał dźwiękowy.
Zabezpieczenie można anulować naciskając przycisk STOP/ECO.

PL
PL – 22
PL – 22
CZYSZCZENIE I KONSERWACJA
• Przystępując do czyszczenia wyłącz kuchenkę i odłącz wtyczkę przewodu zasilającego od gniazdka elektrycznego w
ścianie.
• Wnętrze kuchenki należy utrzymać w czystości. Jeśli resztki potrawy i rozlane płyny przylegają do ścianek, części
górnej, podstawy lub talerza obrotowego, należy zetrzeć je wilgotną ściereczką. W przypadku silnych zabrudzeń
do czyszczenia można użyć łagodnych detergentów. Należy unikać stosowania środków czyszczących w sprayu
i środków do szorowania. Mogłoby to doprowadzić do powstania plam, smug lub zmatowienia powierzchni
drzwiczek.
• Zewnętrzne powierzchnie kuchenki należy czyścić wilgotną ściereczką. Aby zapobiec uszkodzeniu elementów
roboczych wewnątrz urządzenia, nie wolno dopuścić do przedostania się wody do otworów wentylacyjnych.
• Należy regularnie przecierać drzwiczki i szybę po obu stronach, uszczelki drzwiczek i sąsiednie elementy wilgotną
ściereczką, aby usunąć wszelkie zachlapania i plamy.
• Nie należy stosować żadnych środków do szorowania.
• Do czyszczenia urządzenia nie należy stosować odkurzaczy parowych.
• Nie wolno dopuścić do zamoczenia panelu sterowania. Należy go czyścić miękką, wilgotną ściereczką. Podczas
czyszczenia panelu sterowania należy pozostawić otwarte drzwiczki kuchenki, aby zapobiec przypadkowemu
włączeniu kuchenki.
• Jeśli para gromadzi się wewnątrz lub na zewnątrz drzwiczek kuchenki, należy przetrzeć zaparowane powierzchnie
miękką ściereczką. Może się to zdarzyć, jeśli kuchenka pracuje w warunkach wysokiej wilgotności. Nie oznacza to
usterki urządzenia.
• Talerz obrotowy należy regularnie czyścić, aby uniknąć zanieczyszczenia i potencjalnego iskrzenia/uszkodzenia
kuchenki. Wystarczy przetrzeć dolną powierzchnię kuchenki łagodnym detergentem.
• Usuń zapachy z kuchenki szklanką za pomocą roztworu wody z dodatkiem soku z całej cytryny umieszczonego
w szklanym naczyniu przeznaczonym do kuchenek mikrofalowych. Gotuj z użyciem mikrofal przez pięć minut.
Przetrzyj dokładnie i osusz miękką ściereczką.
• W przypadku uszkodzenia żarówki należy skontaktować się z centrum obsługa klienta w celu uzyskania porady.
• Kuchenkę należy regularnie czyścić i usuwać z niej wszystkie pozostałości jedzenia. Dopuszczenie do nadmiernego
zanieczyszczenia kuchenki może spowodować zniszczenie jej ścianek, doprowadzić do jej przedwczesnego zużycia
oraz może wywołać sytuacje niebezpieczne.
• Nie wolno usuwać opisywanego urządzenia razem ze zwykłymi odpadkami z gospodarstw domowych; należy
zapoznać się z zasadami usuwania tego rodzaju urządzeń obowiązującymi w danym kraju.

PL – 23
PL – 23
PRZYDATNE NACZYNIA
1. Doskonały materiał na naczynia do kuchenki mikrofalowej jest przezroczysty dla mikrofal, umożliwiający
przenikanie energii przez naczynie i podgrzewanie potraw.
2. Mikrofale nie przenikają przez metale, dlatego nie należy stosować naczyń metalowych ani naczyń z metalowymi
wykończeniami.
3. W kuchence mikrofalowej nie należy stosować produktów z papieru z recyklingu, ponieważ mogą zawierać małe
metalowe fragmenty, które mogą spowodować iskrzenie i/lub pożar.
4. Zalecane są naczynia owalne/okrągłe zamiast kwadratowych/prostokątnych, ponieważ żywność w rogach może
się nadmiernie zagotowywać.
5. Można stosować wąskie paski z folii aluminiowej, aby zapobiec przegrzaniu odsłoniętych części potrawy. Ale
należy zachować ostrożność, aby nie użyć ich zbyt wiele i zachować odległość 2,54 cm między paskami folii a
komorą operacyjną.
Poniższa lista podaje ogólne wskazówki, które pozwalają wybrać prawidłowe naczynia.
Naczynia kuchenne
Naczynie
przeznaczone
do kuchenek
mikrofalowych
Grill/ter-
moobieg Komentarze
Naczynia powodujące
rumienienie potraw / Zawsze przestrzegaj zaleceń producenta.
Nie należy przekraczać podanych czasów nagrzewania. Zachowaj
szczególną ostrożność, ponieważ te naczynia mogą się znacznie nagrzewać.
Porcelana i naczynia ceramiczne / Porcelana, ceramika, ceramika glazurowana i porcelana kostna są zazwyczaj
odpowiednie, z wyjątkiem naczyń posiadających metaliczne ozdoby.
Szklane naczynia żaroodporne Należy zachować ostrożność, aby wszelkie naczynia szklane mogły być
stosowane w kuchence mikrofalowej.
Naczynia szklane nieodporne
na ciepło
Naczynia ceramiczne
żaroodporne
Należy upewnić się, że materiał ceramiczny nie jest zbyt gruby ani nie
zawiera zbyt wielu minerałów.
Plastikowe naczynia odpowiednie
do kuchenek mikrofalowych
Zawsze należy sprawdzać, czy plastikowe naczynia mogą być stosowane w
kuchence mikrofalowej.
Papier kuchenny / Należy stosować wyłącznie papier kuchenny przeznaczony do kuchenek
mikrofalowych.
Naczynia szklane, np. Pyrex® / Należy zachować szczególną ostrożność przy używaniu delikatnych
naczyń szklanych, ponieważ mogą się stłuc lub pęknąć w wyniku nagłego
podgrzania.
Metalowe tace Nie jest zalecane stosowanie metalowych naczyń, ponieważ powodują one
wyładowania elektryczne, a co za tym idzie mogą doprowadzić do pożaru.
Metalowe ruszty Nie jest zalecane stosowanie metalowych naczyń, ponieważ powodują one
wyładowania elektryczne, a co za tym idzie mogą doprowadzić do pożaru.
Folia aluminiowa
Naczynia z folii /
Można użyć małych kawałków folii aluminiowej do ochrony potraw przed
przegrzaniem. Folia powinna znajdować się przynajmniej 2,54 cm od
ścianek kuchenki, ponieważ może dojść do wyładowań.
Naczynia foliowe nie są zalecane, o ile wyraźnie nie określił tego producent
(np. Microfoil®). Należy przestrzegać dołączonych instrukcji.
Folia plastikowa Nie należy dotykać potraw i folię należy przekłuć, żeby pozwolić na
wydostanie się pary.
Plastik/polistyren, np. naczynia z
barów szybkiej obsługi
Należy zachować ostrożność, ponieważ niektóre naczynia mogą się
odkształcić, stopić lub stracić kolor przy wysokich temperaturach.
Torby do zamrażania/pieczenia Torby należy przekłuć, żeby pozwolić na wydostanie się pary. Upewnij się, że
torby nadają się do użycia w kuchence mikrofalowej.
Papierowe talerze, kubki i papier
kuchenny
Nie należy ich wiązać materiałami plastikowymi lub metalowymi, ponieważ
mogą się stopić lub zapalić w wyniku wyładowań.
Naczynia słomiane i drewniane
Można używać tylko przy podgrzewaniu lub do wchłaniania wilgoci.
Należy zachować ostrożność, ponieważ nadmierne podgrzanie może
spowodować pożar.
Papier z recyklingu i gazety
Zawsze należy nadzorować kuchenkę podczas korzystania z takich
materiałów, ponieważ nadmierne podgrzanie może spowodować pożar.
Mogą zawierać skrawki metalu, które mogą powodować wyładowania i
wywołać pożar.
OSTRZEŻENIE: Korzystając z plastykowych, papierowych lub innych łatwopalnych pojemników na
żywność nigdy nie pozostawiaj urządzenia bez nadzoru.
UWAGA: Nie wolno pozostawiać pracującej kuchenki bez nadzoru.

PL
PL – 24
PL – 24
PORADY DOTYCZĄCE GOTOWANIA PRZY WYKORZYSTANIU MIKROFAL
Gotowanie z wykorzystaniem mikrofal jest szybsze niż tradycyjne metody gotowania. Dlatego konieczne jest
przestrzeganie pewnych technik, aby zapewnić dobre rezultaty gotowania. Wiele z poniższych technik jest podobnych
do stosowanych w tradycyjnym gotowaniu.
OSTRZEŻENIE: Płynów i potraw nie wolno podgrzewać w zamkniętych słoikach/pojemnikach,
ponieważ powstałe wewnątrz ciśnienie może spowodować ich eksplozję.
PORADY DOTYCZĄCE GOTOWANIA:
• Nie odchodź od kuchenki w trakcie jej wykorzystywania.
• Upewnij się, że stosowane naczynia nadają się do użycia w kuchence mikrofalowej.
• Popcorn należy przygotowywać wyłącznie w zalecanych do tego opakowaniach (postępuj według instrukcji
producenta). Nie wolno używać oleju, o ile nie zostało to wyraźnie zalecone przez producenta, i gotować dłużej niż
podano w instrukcji.
OSTRZEŻENIE: Jeśli zostanie przekroczony maksymalny zalecany czas gotowania lub zostaną użyte
zbyt wysokie ustawienia mocy, potrawy mogą ulec przegrzaniu, spaleniu, co skrajnych
przypadkach może spowodować pożar i uszkodzenie kuchenki.
Ustaw
Umieść najgrubsze części potrawy na zewnątrz – np. udka kurczaka.
Żywność umieszczona na brzegu naczynia otrzymuje więcej energii, a co za tym idzie gotuje się szybciej.
Przykryj
Niektóre potrawy lepiej gotują się w mikrofalówce pod przykryciem.
Przykryj naczynie oddychającą folią do mikrofalówek lub odpowiednią pokrywką.
Nakłuj
Żywność posiadająca skorupkę, skórkę lub błonę musi zostać przekłuta w kilku miejscach przed gotowaniem lub
podgrzaniem, ponieważ powstała w przeciwnym wypadku para może spowodować jej eksplozję.
Np. ziemniaki, ryby, kurczaki, kiełbaski.
UWAGA: Nie należy używać kuchenki do gotowania jajek, ponieważ mogą eksplodować nawet po zakończeniu
procesu gotowania. Np. gotowane w skorupkach, smażone, gotowane na twardo.
Zamieszaj, obróć i przestaw
Żeby zapewnić równomierne gotowanie, należy mieszać, obracać i przestawiać żywność w trakcie procesu gotowania.
Zawsze należy mieszać i przekładać żywność od zewnątrz do środka.
Odstaw
Po zakończeniu gotowania konieczne jest odstawienie potrawy, co pozwoli na równomierne rozprowadzenie ciepła
wewnątrz.

PL – 25
PL – 25
Charakterystyka potrawy
Skład Potrawy o dużej zawartości tłuszczu lub cukru (tj. budyń, kruche babeczki) wymagają
krótszego czasu podgrzewania. Należy zachować ostrożność, ponieważ przegrzanie
może spowodować pożar
Kości w mięsie przewodzą ciepło, powodując szybsze gotowanie się potraw. Należy
zadbać o równomierne gotowanie potraw.
Gęstość Gęstość potraw wpływa na wymagany czas gotowania.
Lekkie, porowate potrawy, takie jak ciastka i chleb, gotują się szybciej niż ciężkie, gęste
potrawy, takie jak pieczenie i mięsa duszone.
Waga Gęstość promieniowania mikrofalowego pozostaje taka sama, niezależnie od ilości
gotowanej żywności. Czas procesu należy zwiększyć odpowiednio do zwiększonej ilości
potrawy umieszczonej w kuchence.
Np. cztery ziemniaki będą gotowały się dłużej niż dwa.
Rozmiar Małe ilości jedzenia gotują się szybciej niż większe, ponieważ mikrofale mogą
wtedy wnikać ze wszystkich stron do samego środka. Żeby gotowanie zachodziło
równomiernie, wszystkie kawałki powinny być tej samej wielkości.
Kształt Żywność o nieregularnych kształtach, taka jak piersi lub udka z kurczaka, gotują się
dłużej w grubszych częściach. Żeby zapewnić równomierne gotowanie, umieść grubsze
części od zewnętrznej strony naczynia, gdzie dostarczona zostanie im większa energia.
Potrawy o okrągłych kształtach są równomierniej gotowane niż potrawy o kanciastych
formach.
Temperatura potrawy Początkowa temperatura żywności wpływa na wymagany czas gotowania.
Schłodzone potrawy będą gotowały się dłużej od jedzenia o temperaturze pokojowej.
Temperatura pojemnika nie jest właściwym wskaźnikiem temperatury żywności lub
napojów. Przetnij potrawy z nadzieniem, np. pączki z dżemem, żeby uwolnić ciepło lub
parę.
OSTRZEŻENIE: Twarz i ręce: Zawsze korzystaj z rękawic kuchennych podczas wyjmowania potraw i
naczyń z kuchenki. Podczas otwierania drzwiczek odsuń się pozwalając na rozproszenie
się ciepła i pary. Podczas zdejmowania przykrycia (takiego jak folia plastikowa),
otwierania toreb do pieczenia lub opakowań od popcornu, należy skierować parę z
daleka od twarzy i rąk.
OSTRZEŻENIE: Sprawdź temperaturę potraw i napojów mieszając je przed podaniem. Zachowaj
szczególną ostrożność podczas podawania dzieciom lub osobom starszym. W celu
uniknięcia poparzeń należy zawsze sprawdzać temperaturę pokarmów dla niemowląt i
mieszać zawartość butelek i naczyń przed podaniem.

PL
PL – 26
PL – 26
PORADY DOTYCZĄCE ROZMRAŻANIA
Wykorzystanie kuchenki mikrofalowej to najszybsza metoda rozmrażania. Jest to prosty proces, ale należy
przestrzegać poniższych wskazówek w celu całkowitego rozmrożenia.
• Usuń wszelkie opakowania przed rozmrażaniem.
• Przy rozmrażaniu żywności należy korzystać z poziomu mocy mikrofal P-20 lub P-40.
• Należy zapoznać się z poniższymi informacjami.
Przestaw
Żywność ustawiona na brzegach naczynia rozmraża się szybciej od żywności umieszczonej w środku. Z tego względu
istotne jest przestawianie produktów do 4 razy podczas rozmrażania.
Przenieś gęsto ustawione produkty z zewnętrznej części do środka i przestaw żywność w stykających się obszarach.
Zapewni to równomierne rozmrożenie żywności.
Rozdziel
Produkty mogą być sklejone po wyjęciu z zamrażarki. Ważne jest, żeby rozdzielić je tak szybko jak to możliwe podczas
procesu rozmrażania.
Np. plasterki bekonu, lety z kurczaka.
Osłoń
Niektóre fragmenty rozmrażanych potraw mogą się nagrzewać. Żeby temu zapobiec i uchronić je przed
zagotowaniem, można je okryć małymi kawałkami folii, która odbija promieniowanie mikrofalowe. Np. nóżki i
skrzydełka kurczaka.
Odstaw
Wymagane jest odstawienie jedzenia w celu całkowitego rozmrożenia.
Proces rozmrażania nie jest zakończony od razu po wyjęciu potrawy z kuchenki. Potrawę należy przykryć, odstawić i
odczekać pewien czas do całkowitego rozmrożenia.
Obróć
Kluczową czynnością jest czterokrotne obracanie potrawy podczas rozmrażania.
Pozwoli to zapewnić całkowite rozmrożenie.

PL – 27
PL – 27
PORADY DOTYCZĄCE PODGRZEWANIA
Przy podgrzewaniu potraw przestrzegaj poniższych zaleceń, żeby zapewnić gruntowne podgrzanie przed podaniem.
Dania na talerzu
Zdejmij drób i mięso - podgrzej je osobno. Patrz poniżej.
Umieść mniejsze kawałki potrawy na środku naczynia, a większe i grubsze na brzegu. Przykryj oddychającą folią
plastikową do mikrofalówek i podgrzej przy poziomie mocy P-50. W połowie czasu podgrzewania zamieszaj/przestaw
produkty.
UWAGA: Upewnij się, że potrawa jest dokładnie podgrzana przed podaniem.
Mięso w plastrach
Przykryj oddychającą folią plastikową do mikrofalówek i podgrzej przy poziomie mocy P-60. Przynajmniej raz
przestaw produkty, aby zapewnić równomierne podgrzanie.
UWAGA: Upewnij się, że mięso jest dokładnie podgrzane przed podaniem.
Kawałki drobiu
Umieść najgrubsze kawałki na brzegu naczynia, przykryj oddychającą folią do mikrofalówek i podgrzej przy poziomie
mocy P-70.
Po upływie połowy czasu rozmrażania przewróć na drugą stronę.
UWAGA: Upewnij się, że drób jest dokładnie podgrzany przed podaniem.
Mięso duszone
Przykryj oddychającą folią do mikrofalówek lub odpowiednią pokrywką i podgrzej przy poziomie mocy P-50.
Mieszaj często, żeby zapewnić równe podgrzanie.
UWAGA: Upewnij się, że potrawa jest dokładnie podgrzana przed podaniem.
Aby osiągnąć najlepsze rezultaty podczas podgrzewania, należy wybrać poziom mocy odpowiedni dla danego
rodzaju potrawy. Np. miskę warzyw można podgrzać przy poziomie mocy P-100, natomiast lasagne zawierającą
składniki, których nie można zamieszać, należy podgrzewać przy poziomie mocy P-40.
UWAGI:
• Wyjmij jedzenie z folii lub metalowych opakowań przed podgrzewaniem.
• Na czas podgrzewania ma wpływ kształt, rozmiar, masa i temperatura żywności, a także wymiary, kształt i materiał
naczynia.
OSTRZEŻENIE: Nigdy nie należy ogrzewać płynów w pojemnikach o wąskich szyjkach, ponieważ
gorący płyn może z nich gwałtownie wytrysnąć, powodując oparzenia.
• Żeby uniknąć przegrzania lub pożaru, należy zachować szczególną ostrożność podczas gotowania i podgrzewania
potraw zawierających duże ilości cukru lub tłuszczu, np. kruchych ciast lub budyniu.
• Nigdy nie podgrzewaj oleju lub tłuszczu do głębokiego smażenia, ponieważ może to doprowadzić do przegrzania i
pożaru.
• Nie wolno podgrzewać puszkowanych ziemniaków w kuchence mikrofalowej. Postępuj według zaleceń producenta
umieszczonych na puszce.
OSTRZEŻENIE: W celu uniknięcia poparzeń należy zawsze sprawdzać temperaturę pokarmów dla
niemowląt i mieszać zawartość butelek i naczyń przed podaniem.

PL
PL – 28
PL – 28
ROZWIĄZYWANIE PROBLEMÓW
Jeśli kuchenka pracuje nieprawidłowo, możesz w prosty sposób sprawdzić jej działanie zanim wezwiesz serwis.
Pozwoli to uniknąć zbędnego kontaktowania się z personelem serwisu w przypadku niewielkiego problemu.
Przeprowadź następujące proste czynności kontrolne:
Umieść w kuchence liżankę z wodą na talerzu obrotowym i dokładnie zamknij drzwiczki. Ustaw timer na gotowanie
przez minutę wykorzystując poziom mocy mikrofal P-100.
1. Czy lampka oświetleniowa świeci podczas gotowania?
2. Czy wentylator pracuje? (Sprawdź przykładając dłoń do otworów wentylacyjnych.)
3. Czy po upływie minuty rozlega się sygnał dźwiękowy?
4. Czy woda w liżance jest gorąca?Jeśli odpowiedź na którekolwiek z powyższych pytań brzmi „NIE”, sprawdź,
czy zasilanie kuchenki jest prawidłowo podłączone lub bezpiecznik nie przerwał zasilania na skutek zwarcia
elektrycznego. Jeśli nie występuje żadna z powyższych przyczyn, zapoznaj się z tabelą rozwiązywania problemów.
OSTRZEŻENIE: Nigdy nie próbuj samodzielnie regulować, naprawiać ani mody kować urządzenia.
Wszelkie naprawy i czynności serwisowe są niebezpieczne i powinny być
przeprowadzone wyłącznie przez wykwali kowanych pracowników serwisu rmy
SHARP. Jest to bardzo ważne, ponieważ naprawa lub serwisowanie może wymagać
demontażu osłon, które chronią przed promieniowaniem mikrofal.
• Uszczelki drzwiczek chronią przed przenikaniem promieniowania mikrofal na zewnątrz pracującej kuchenki, ale nie
tworzą hermetycznego uszczelnienia. Pojawienie się kropel wody, światła lub ciepłego powietrza wokół drzwiczek
kuchenki jest zjawiskiem zupełnie normalnym. Podgrzewanie potraw o wysokiej zawartości wilgoci uwalnia parę
wodną i powoduje jej skraplanie na wewnętrznej powierzchni drzwiczek. Krople wody mogą kapać z urządzenia.
• Naprawy i mody kacje urządzenia: Użytkownikowi nie wolno naprawiać, mody kować ani używać kuchenki, jeśli
nie działa prawidłowo.
• Dostęp do obudowy i lampki oświetleniowej: Nie wolno zdejmować obudowy urządzenia. Jest to bardzo
niebezpieczne, ponieważ wewnętrzne elementy kuchenki znajdują się pod wysokim napięciem. Dotknięcie ich grozi
śmiercią.
Opisywana kuchenka nie została wyposażona w osłonę umożliwiającą dostęp do lampki oświetleniowej.
Wprzypadku przepalenia lampki użytkownik nie powinien próbować wymienić jej samodzielnie, lecz skontaktować
się z autoryzowanym serwisem rmy SHARP.

PL – 29
PL – 29
TABELA ROZWIĄZYWANIA PROBLEMÓW
PYTANIE ODPOWIEDŹ
Wokół drzwiczek odczuwalne jest
wypływanie powietrza na zewnątrz.
Podczas pracy kuchenki powietrze przepływa w komorze operacyjnej.
Drzwiczki nie zapewniają hermetycznego uszczelnienia. Dlatego powietrze
może wydostawać się na zewnątrz poprzez drzwiczki.
Para wodna skrapla się w kuchence,
więc krople wody mogą kapać na
zewnątrz poprzez drzwiczki.
Zazwyczaj komora operacyjna jest chłodniejsza od potrawy przeznaczonej
do gotowania. Dlatego wytworzona para wodna skrapla się na chłodniejszej
powierzchni.
Ilość wytworzonej pary wodnej zależy od zawartości wody w potrawie
przeznaczonej do gotowania. Niektóre produkty spożywcze, np. ziemniaki,
odznaczają się wysoką zawartością wilgoci.
Skroplona para wodna, pozostająca wewnątrz szklanej części drzwiczek,
powinna zniknąć po kilku godzinach.
Migotanie lub iskrzenie wewnątrz
komory operacyjnej podczas
gotowania.
Iskrzenie pojawia się podczas gotowania, jeśli metalowy przedmiot
znajdzie się w pobliżu ścianki komory operacyjnej. Może to doprowadzić do
zadrapania powierzchni komory operacyjnej, ale nie powinno powodować
innych uszkodzeń kuchenki.
Iskrzące ziemniaki. Dokładnie usuń wszystkie „oczka” z ziemniaków, a następnie nakłuj
ziemniaki. Ułóż bezpośrednio na talerzu obrotowym, albo w naczyniu
żaroodpornym lub podobnym.
Kuchenka nie działa po naciśnięciu
przycisku START/QUICK START.
Sprawdź, czy drzwiczki zostały prawidłowo zamknięte.
Kuchenka gotuje zbyt wolno. Upewnij się, że został wybrany prawidłowy poziom mocy mikrofal.
Kuchenka głośno pracuje. Podczas gotowania/rozmrażania promieniowanie mikrofal jest włączane i
wyłączane naprzemian.
Kuchenka co minutę emituje sygnał dźwiękowy, a na wyświetlaczu pojawi
się komunikat „Fail”.
Błąd występuje, jeśli przyciski na panelu sterowania są naciskane w sposób
ciągły przez ponad jedną minutę.
Zewnętrzna obudowa jest bardzo
gorąca.
Obudowa może być gorąca i nie wolno jej dotykać – dzieci nie powinny
zbliżać się do kuchenki.
ZABEZPIECZENIE PRZED ZABLOKOWANIEM PRZYCISKÓW
W dowolnym stanie urządzenia zablokowanie któregokolwiek z przycisków na panelu sterowania przez ponad
jedną minutę spowoduje natychmiastowe zatrzymanie programu, a na wyświetlaczu pojawi się komunikat „FAIL”.
Kuchenka wyemituje sygnał dźwiękowy. Jeśli przycisk będzie nadal zablokowany, co minutę będzie emitowany sygnał
dźwiękowy. Po rozwiązaniu problemu naciśnij przycisk STOP/ECO, aby przełączyć urządzenie do trybu czuwania.
ZANIM WEZWIESZ POMOC
Przed wezwaniem pracownika serwisu należy sprawdzić następujące punkty:
• Sprawdź, czy kuchenka jest prawidłowo podłączona. Jeśli nie, odłącz wtyczkę od gniazdka elektrycznego, odczekaj
dziesięć sekund i starannie podłącz ją ponownie.
• Sprawdź, czy bezpiecznik/wyłącznik automatyczny nie przerwał zasilania na skutek zwarcia elektrycznego. Jeśli
wydaje się, że działa prawidłowo, sprawdź gniazdko elektryczne podłączając inne sprawnie działające urządzenie.
• Sprawdź, czy pokrętła POZIOM MOCY MIKROFAL i TIMER są ustawione prawidłowo.
• Sprawdź, czy drzwiczki zostały prawidłowo zamknięte, włączając system blokady drzwiczek. W przeciwnym razie
promieniowanie mikrofal nie zostanie włączone.
JEŚLI ŻADNE Z POWYŻSZYCH ROZWIĄZAŃ NIE ELIMINUJE PROBLEMU, NALEŻY SKONTAKTOWAĆ SIĘ Z PERSONELEM
AUTORYZOWANEGO SERWISU. NIE PRÓBUJ SAMODZIELNIE REGULOWAĆ ANI NAPRAWIAĆ KUCHENKI.

NL
NL – 1
NL – 1
Let op:
uw product
is gemar-
keerd met dit
symbool. Dit
betekent dat
afgedankte
elektrische en
elektronische
apparatuur niet
samen met het
normale huis-
afval mogen
worden wegge-
gooid.Er bestaat
een afzonderlijk
inzamelingssys-
teem voor deze
producten.
A. Informatie over afvalverwijdering voor gebruikers
(particuliere huishoudens)
1. In de Europese Unie
Let op: Deze apparatuur niet samen met het normale huisafval weggooien!
Afgedankte elektrische en elektronische apparatuur moet gescheiden
worden ingezameld conform de wetgeving inzake de verantwoorde verwer-
king, terugwinning en recycling van afgedankte elektrische en elektronische
apparatuur.
Na de invoering van de wet door de lidstaten mogen particuliere huishou-
dens in de lidstaten van de Europese Unie hun afgedankte elektrische en
elektronische apparatuur kosteloos* naar hiertoe aangewezen inzamelings-
inrichtingen brengen*.
In sommige landen* kunt u bij de aanschaf van een nieuw apparaat het
oude product kosteloos bij uw lokale distributeur inleveren.
*) Neem contact op met de plaatselijke autoriteiten voor verdere informatie.
Indien uw gebruikte elektrische of elektronische apparatuur batterijen
of accu's bevat, dan dienen deze hieraan vooraf afzonderlijk, conform de
plaatselijke voorschriften, te worden weggegooid. Door dit product op een
verantwoorde manier weg te gooien, zorgt u ervoor dat het afval de juiste
verwerking, terugwinning en recycling ondergaat en potentiële negatieve
e ecten op het milieu en de menselijke gezondheid worden voorkomen,
die anders door het verkeerd verwerken van het afval zouden kunnen
ontstaan.
2. In andere landen buiten de Europese Unie
Als u dit product wilt weggooien, neem dan contact op met de plaatselijke
autoriteiten voor informatie omtrent de juiste verwijderingsprocedure.
Voor Zwitserland: U kunt afgedankte elektrische en elektronische appara-
tuur kosteloos bij de distributeur inleveren, zelfs als u geen nieuw product
koopt.
Aanvullende inzamelingsinrichtingen zijn vermeld op de startpagina van
www.swico.ch of www.sens.ch.
B. Informatie over afvalverwijdering voor bedrijven
1. In de Europese Unie
Als u het product voor zakelijke doeleinden heeft gebruikt en als u dit wilt
weggooien:
Neem contact op met uw SHARP distributeur die u inlichtingen verschaft
over de terugname van het product. Het kan zijn dat u een afvalverwij-
deringsbijdrage voor de terugname en recycling moet betalen. Kleine
producten (en kleine hoeveelheden) kunnen door de lokale inzamelingsin-
richtingen worden verwerkt.
Voor Spanje: Neem contact op met de inzamelingsinrichting of de lokale
autoriteiten voor de terugname van uw afgedankte producten.
2. In andere landen buiten de Europese Unie
Als u dit product wilt weggooien, neem dan contact op met de plaatselijke
autoriteiten voor informatie omtrent de juiste verwijderingsprocedure.
Voor service, zie www.sharpconsumer.com/contact/, voor uw garantierechten gaat u naar
www.sharpconsumer.com/support/ of neemt u contact op met de winkel waar u uw product hebt gekocht.
De conformiteitsverklaringen zijn te vinden op www.sharpconsumer.com/documents-of-conformity/
www.sharpconsumer.com/
support/
www.sharpconsumer.com/
documents-of-conformity/
www.sharpconsumer.com/
contact/

NL – 2
NL – 2
VOORZORGSMAATREGELEN OM MOGELIJKE BLOOTSTELLING AAN
MICROGOLFENERGIE TE VERMIJDEN
1. Probeer niet om deze oven te gebruiken met de deur open: dit kan leiden tot een schadelijke blootstelling aan
microgolfenergie. Het is belangrijk om de veiligheidssluitingen intact te houden en hier niet mee te knoeien.
2. Plaats niets tussen de voorkant van de oven en de deur en voorkom dat vuil of resten van schoonmaakmiddelen
zich ophopen op de afdichtingen.
3. Gebruik de oven niet indien deze is beschadigd. Het is bijzonder belangrijk dat de ovendeur goed sluit en dat de
deur zelf en de scharnieren, veiligheidsvergrendelingen of afdichtingen van de deur en afdichtingsvlakken niet
beschadigd zijn.
4. Tracht de oven niet te repareren of af te stellen.
INHOUDSOPGAVE
BELANGRIJKE VEILIGHEIDSMAATREGELEN .................................................................................................................................................. 3
INSTALLATIE ........................................................................................................................................................................................................... 12
RADIOSTORING ....................................................................................................................................................................................................13
AARDINGSINSTRUCTIES .................................................................................................................................................................................... 13
SPECIFICATIES ....................................................................................................................................................................................................... 13
OVEN EN TOEBEHOREN ..................................................................................................................................................................................... 14
BEDIENINGSPANEEL ...........................................................................................................................................................................................15
VOOR HET GEBRUIK VAN DE OVEN ...............................................................................................................................................................15
DE KLOK INSTELLEN ............................................................................................................................................................................................15
VOEDSEL BEREIDEN MET DE MAGNETRON ................................................................................................................................................16
SNELSTART ............................................................................................................................................................................................................. 16
GRILLEN ...................................................................................................................................................................................................................17
MICROWAVE + GRILL .......................................................................................................................................................................................... 17
CONVECTION ........................................................................................................................................................................................................18
MICROWAVE + CONVECTION .......................................................................................................................................................................... 18
AUTO-MENU .......................................................................................................................................................................................................... 19
AUTOMATISCH ONTDOOIEN ...........................................................................................................................................................................20
AUTO REHEAT........................................................................................................................................................................................................20
KOOKWEKKER ....................................................................................................................................................................................................... 20
ENERGIESPAARSTAND........................................................................................................................................................................................20
MUTE-FUNCTIE .....................................................................................................................................................................................................21
VEILIGHEIDSVERGRENDELINGSSYSTEEM ...................................................................................................................................................21
KINDERSLOT ..........................................................................................................................................................................................................21
AUTOMATISCH BESCHERMINGSMECHANISME.........................................................................................................................................21
REINIGING EN ZORG ...........................................................................................................................................................................................22
GESCHIKTE SCHALEN ......................................................................................................................................................................................... 23
TIPS VOOR KOKEN MET DE MAGNETRON ................................................................................................................................................... 24
TIPS VOOR ONTDOOIING .................................................................................................................................................................................. 26
TIPS VOOR OPWARMEN.....................................................................................................................................................................................27
PROBLEEMOPLOSSING ...................................................................................................................................................................................... 28
BEVEILIGING TEGEN KNOPPEN DIE BLIJVEN HANGEN ...........................................................................................................................29
VOORDAT U HULP INROEPT.............................................................................................................................................................................29

NL
NL – 3
NL – 3
BELANGRIJKE VEILIGHEIDSMAATREGELEN
ZORGVULDIG LEZEN EN BEWAREN VOOR GEBRUIK IN DE
TOEKOMST.
Om brand te voorkomen, laat u de combi-magnetron
tijdens gebruik niet onbeheerd achter. Te hoge vermo-
gensniveaus of te lange bereidingstijden kunnen het
voedsel mogelijk oververhitten met brand als gevolg.
Deze oven werd uitsluitend ontworpen om op een aanrecht
te gebruiken. Hij is niet geschikt om in een muur of een kast te
worden ingebouwd. Plaats de oven niet in een kast.
Steek de stekker van het netsnoer in een gemakkelijk toegan-
kelijk stopcontact zodat u de stekker bij nood snel uit het stop-
contact kunt trekken.
Sluit de oven alleen aan op een stopcontact met 230-240V,
50Hz wisselstroom met een minimale 10A-zekering of een
minimale 10A-circuitonderbreker. Voor dit apparaat moet een
afzonderlijk stroomcircuit worden gebruikt dat alleen voor dit
apparaat bestemd is.
Plaats de oven niet op plaatsen waar hitte wordt opgewekt.
Bijvoorbeeld naast een conventionele oven. Plaats de oven niet
in een zeer vochtige of natte ruimte. Plaats of gebruik de oven
niet buitenshuis.
Als u rook opmerkt, dient u de oven uit te schakelen of de
stekker uit het stopcontact te trekken en de deur gesloten
te houden zodat eventuele vlammen doven.
Gebruik alleen bakjes, schalen en dergelijke die geschikt
zijn voor combi-magnetrons. Zorg dat de gebruikte bak-
jes, schalen etc. geschikt zijn voor gebruik in combi-mag-
netrons.
Bij het verwarmen van eten in plastic of papieren bakjes
dient u op de combi-magnetron te letten of de bakjes

NL – 4
NL – 4
geen vlam vatten.
Reinig het afdekplaatje voor de golfgeleider en de oven-
ruimte. Deze onderdelen dienen droog en vetvrij te zijn.
Opgehoopt vet kan mogelijk oververhitten, gaan roken en
vlam vatten.
Plaats geen ontvlambare materialen in de buurt van de oven of
de ventilatie-openingen.
Blokkeer de ventilatie-openingen niet.
Verwijder alle metalen draadjes, verzegelingen, enz. van het
voedsel en de verpakking. Vonken van metalen voorwerpen
kunnen mogelijk brand veroorzaken.
Gebruik de combi-magnetron niet voor bakken met olie of het
verwarmen van frituurvet. De temperatuur kan namelijk niet
worden geregeld en de olie kan mogelijk vlam vatten.
Gebruik alleen popcorn die in een voor magnetrons geschikt
materiaal is verpakt.
Bewaar geen voedsel of andere voorwerpen in de oven.
Controleer de instellingen van de oven na het starten ervan om
ervoor de zorgen dat de oven naar wens werkt.
Laat de oven niet onbewaakt achter terwijl deze in werking is.
Om oververhitting en brand te voorkomen dient u goed op te
letten wanneer u voedsel met een hoog suiker- of vetgehalte,
zoals bijvoorbeeld worstenbroodjes, gebak of kerstpudding
verhit of opwarmt. Volg de bijbehorende aanwijzingen in de
gebruikershandleiding.
Voorkomen van letsel. WAARSCHUWING
Gebruik de oven niet indien deze is beschadigd of niet nor-
maal functioneert. Controleer voor gebruik het volgende:
a) Controleer of de deur goed sluit en niet krom of anders
beschadigd is.

NL
NL – 5
NL – 5
b) Controleer of de scharnieren en deurvergrendelingen niet
gebroken zijn of loszitten.
c) Controleer of de deurafdichtingen en afdichtingsvlakken
niet zijn beschadigd.
d) Controleer of er geen deuken in de ovenruimte of in de
deur zitten.
e) Controleer of het netsnoer en de stekker niet beschadigd
zijn.
Als de deur of de afdichtingen beschadigd zijn, mag de oven
niet gebruikt worden totdat hij door een vakman is gerepa-
reerd.
Nooit zelf aanpassingen, veranderingen of reparaties aan
de oven uitvoeren. Niemand, behalve een gekwali ceerde
technicus, dient onderhouds- of reparatiewerkzaamheden
uit te voeren waarbij een afdekking die bescherming biedt
tegen blootstelling aan microgolven, wordt verwijderd.
Dit kan gevaarlijk zijn.
Gebruik de oven niet wanneer de deur openstaat en bewerk de
vergrendingen van de deur niet. Gebruik de oven niet wanneer
er zich een voorwerp tussen de deurafdichtingen en pasvlak-
ken bevindt.
Laat vet of vuil zich niet opbouwen op de deurafdichtin-
gen of aangrenzende delen. Reinig de oven regelmatig en
verwijder voedselresten.
Volg de instructies voor “Onderhoud en reiniging”. Indien
de oven niet naar behoren schoon wordt gehouden, kan
dit leiden tot aantasting van het oppervlak. Dit kan dan
weer leiden tot een verkorte levensduur van het apparaat
en mogelijk tot gevaarlijke situaties.
Personen met een PACEMAKER dienen een dokter of de fa-
brikant van de pacemaker te raadplegen aangaande speciale
voorzorgsmaatregelen bij gebruik van combi-magnetrons.

NL – 6
NL – 6
Het voorkomen van de mogelijkheid van een elektrische
schok.
• De behuizing mag nooit worden geopend of verwijderd.
• Zorg dat er geen vloeisto en of andere voorwerpen in de
openingen van de deurvergrendelingen of ventilatie-ope-
ningen komen. Indien er iets in deze openingen terecht
is gekomen schakel de oven dan onmiddellijk uit, trek de
stekker uit het stopcontact en raadpleeg erkend SHARP
onderhoudspersoneel.
• Dompel het netsnoer en de stekker niet in water of andere
vloeisto en.
• Laat het netsnoer niet over de rand van een tafel of werk-
blad hangen.
• Houd het netsnoer uit de buurt van warme oppervlakken,
inclusief de achterkant van de oven.
• Houd het apparaat en het netsnoer buiten bereik van kinde-
ren jonger dan 8 jaar.
• Vervang de ovenlamp niet zelf en laat dit niet door ondes-
kundige, niet door SHARP erkende elektriciens uitvoeren.
Raadpleeg uw dealer of erkend SHARP onderhoudsperso-
neel indien de ovenlamp niet meer functioneert.
• Als het netsnoer beschadigd is, dan dient dit door een er-
kend SHARP onderhoudspersoneel vervangen te worden.
WAARSCHUWING: vloeistoff en en andere etenswaren
mogen niet in gesloten bakjes en verpakkingen worden
opgewarmd, aangezien ze kunnen ontploff en. Bij het
verhitten van dranken in de magnetron kunnen deze soms
later nog overkoken. Houd hiermee rekening wanneer
u de verpakking vastpakt. Om de mogelijkheid van een
explosie en overkoken te voorkomen:
Gebruik nooit gesloten bakjes. Verwijder de sluiting en deksels
voor gebruik. Gesloten bakjes en dergelijke kunnen zelfs nadat
de oven is uitgeschakeld nog ontplo en door de opgebouwde

NL
NL – 7
NL – 7
druk. Let op bij het bereiden van vloeisto en met de magne-
tron. Gebruik altijd essen of verpakkingen met een wijde hals
zodat bellen kunnen ontsnappen.
Verhit nooit vloeistoff en in essen met een dunne hals,
zoals baby-zuig essen, daar de vloeistof plotseling uit de
es zou kunnen spuiten en brandwonden kan veroorza-
ken.
Om te voorkomen dat kokende vloeistof uit de es spat:
1. Gebruik niet te veel bereidingstijd.
2. Roer de vloeistof voor het verwarmen/ opwarmen.
3. Het wordt aanbevolen om tijdens het opwarmen een glazen
staaf of soortgelijk voorwerp (geen metaal) in de vloeistof te
steken.
4. Laat de vloeistof na het koken ten minste 20 seconden in
de oven staan om te voorkomen dat de vloeistof later uit de
es spuit.
Verhit nooit hele eieren in hun schaal in de combi-magne-
tron. Ook hardgekookte eieren moeten niet in combi-mag-
netrons worden opgewarmd, aangezien ze kunnen ont-
ploff en, zelfs nadat de combi-magnetron is uitgezet. Voor
het opwarmen van eieren die niet zijn geklopt, dient u het
eigeel en eiwit door te prikken. Pel en snijd hard gekookte
eieren in plakjes alvorens deze in de combi-magnetron te
verwarmen.
Prik ter voorkomen van het ontplo en van voedsel de schil of
het vel van aardappelen, worstjes, fruit en dergelijke door voor
het verwarmen.
WAARSCHUWING: De inhoud van baby esjes en potjes
babyvoedsel moet geroerd of geschud worden en de
temperatuur moet gecontroleerd worden voor gebruik
om brandwonden te voorkomen. Voorkom brandwonden

NL – 8
NL – 8
en gebruik ovenwanten of pannenlappen wanneer u het
voedsel uit de oven haalt. Om de mogelijkheid van brand-
wonden te voorkomen:
• Voorkom brandwonden door hete stoom en overkoken en
houd open bakjes, popcornschalen, kookzakken en dergelijk
uit de buurt van uw gezicht en handen. Om brandwonden
te voorkomen dient u altijd de temperatuur van het voedsel
te testen en door te roeren voordat u het serveert. Besteed
hierbij speciale aandacht aan de temperatuur van voedsel
en dranken voor baby's, kinderen of ouderen. Bereikbare
delen kunnen tijdens het gebruik heet worden. Houd jonge
kinderen op afstand.
• De temperatuur van de verpakking komt niet overeen met
de temperatuur van het voedsel of de vloeistof. Controleer
altijd de temperatuur van het voedsel of de vloeistof.
• Blijf altijd op veilige afstand van de ovendeur staan wanneer
u deze opent, om brandwonden door ontsnappende stoom
of hitte te voorkomen.
• Snijd gevulde gebakken etenswaren na het koken om de
stoom te laten ontsnappen en brandwonden te voorkomen.
• Houd kinderen uit de buurt van de oven zodat zij zich niet
aan een hete oven kunnen branden.
WAARSCHUWING:Laat kinderen vanaf de leeftijd van
8jaar de oven alleen zonder toezicht gebruiken wanneer
zij adequate instructies hebben ontvangen zodat het kind
de oven op een veilige manier kan gebruiken en de geva-
ren van incorrect gebruik begrijpt.
Wanneer het apparaat bediend wordt op de functies
GRILL, MIX GRILL, CONVECTIE, MIX CONVECTIE en AUTO
MENU, mogen kinderen de combi-magnetron alleen onder
toezicht van volwassenen gebruiken vanwege de opge-
wekte temperaturen.

NL
NL – 9
NL – 9
Dit apparaat is niet bedoeld voor gebruik door personen
(inclusief kinderen) met verminderde fysieke, zintuiglijke
of verstandelijke vermogens, of gebrek aan ervaring of
kennis, tenzij zij onder toezicht of instructies hebben ont-
vangen over het gebruik van het apparaat door de verant-
woordelijke van hun veiligheid.
Houd toezicht op kinderen zodat zij niet met het apparaat
kunnen spelen. Kinderen mogen het apparaat onder toe-
zicht reinigen.
Modellen met het elektronische aanraakpaneel beschik-
ken over een kinderslotmodus.
Let op dat kinderen niet aan de deur of oven gaan hangen. De
oven is geen speelgoed.
Zorg dat kinderen ook van de veiligheidsmaatregelen op de
hoogte zijn: het gebruik van pannelappen, het voorzichtig ver-
wijderen van de afdekking van voedsel; benadruk dat verpak-
king van bepaalde gerechten (bijvoorbeeld voor het knapperig
maken van voedsel) zeer heet kan worden.
Overige waarschuwingen
Breng op geen enkele manier veranderingen aan de oven aan.
Verplaats de oven niet terwijl deze in werking is.
Dit apparaat is bedoeld voor huishoudelijk gebruik. Deze oven
dient alleen voor het bereiden van voedsel thuis en dient
derhalve alleen voor het bereiden van voedsel en dranken te
worden gebruikt. Het drogen van voedsel of kleding en het
opwarmen van warme kompressen, panto els, sponzen, voch-
tige doeken en dergelijke kan een risico op letsel, ontbranding
of brand opleveren. Gebruik de oven niet voor commerciële
doeleinden of in een laboratorium.
Voorkomen van problemen of beschadiging.
Gebruik de oven nooit wanneer deze leeg is. Ter voorkoming

NL – 10
NL – 10
van beschadiging van de bodem van de oven door oververhit-
ting dient u bij gebruik van bruineringsschalen of zelfverwar-
mende materialen altijd een hittebestendig isolatiemateriaal
zoals een porseleinen bord onder de schaal of het materiaal te
plaatsen. Overschrijd nooit de in de handleiding van het vaat-
werk voorgeschreven opwarmtijd.
Gebruik geen metalen voorwerpen. Microgolven re ecteren
hier namelijk op waardoor vonken kunnen ontstaan. Plaats
geen blikjes in de oven.
Voorkom als volgt dat het draaiplateau of de ovenbodem
breekt:
a) Laat het draaiplateau of de ovenbodem afkoelen alvorens
het draaiplateau of de ovenbodem met water te reinigen.
b) Plaats heet of koud voedsel of hete schalen en dergelijke
niet op een koud draaiplateau/koude ovenbodem.
c) Plaats tijdens gebruik geen voorwerpen op de behuizing
van de oven.
OPMERKING:
Gebruik geen plastic verpakkingen bij het opwarmen met de
magnetronfunctie indien de oven nog steeds heet is van het
gebruik van de combinatiemodus (afhankelijk van het ovenmo-
del) omdat deze dan kunnen smelten.
Plastic bakjes en verpakkingen kunnen niet met de hierboven
genoemde functie worden gebruikt tenzij het bakje of verpak-
king door de fabrikant als geschikt zijn gemerkt.
Raadpleeg een erkend elektricien indien u twijfels heeft over
het aansluiten van uw oven.
Noch de fabrikant noch de dealer zijn aansprakelijk voor scha-
de aan de oven of letsel indien de oven niet op de voorgeschre-
ven, juiste manier is aangesloten.
Condens of vocht kunnen zich mogelijk op de ovenwanden of

NL
NL – 11
NL – 11
rond de deurafdichtingen en pasvlakken vormen. Dit is nor-
maal en duidt niet op een defect of het lekken van microgol-
ven.
Dit apparaat is bedoeld voor huishoudelijk gebruik en soort-
gelijke toepassingen. Bijvoorbeeld: kantines gereserveerd voor
personeel in winkels, kantoren en andere professionele omge-
vingen/boerderijen/gebruik door klanten van hotels, motels en
andere residentiële omgevingen/bed and breakfasts.
Dit symbool betekend dat oppervlakten door gebruik
heet kunnen worden.

NL – 12
NL – 12
INSTALLATIE
1. Verwijder al het verpakkingsmateriaal uit de binnenkant van de oven en verwijder de beschermingslaag van de
behuizing van de magnetron.
2. Controleer de oven zorgvuldig op tekenen van beschadiging.
3. Plaats de oven op een veilig, vlak oppervlak, dat sterk genoeg is om het gewicht van de combi-magnetron plus de
zwaarst mogelijk te koken artikelen te dragen. Plaats de oven niet in een kast.
4. Kies een vlak oppe rvlak met genoeg ruimte voor de ventilatieopeningen. Zie de afbeelding op de eerste pagina.
De achterkant van het apparaat kan tegen een muur worden geplaatst.
• De minimale installatiehoogte bedraagt 85 cm.
• Er dient minimaal 20 cm ruimte over te worden gelaten tussen de zijkanten van de oven en eventuele wanden of
voorwerpen.
• Laat een minimale ruimte van 30 cm boven de oven open.
• Verwijder de voetjes van de onderkant van de oven niet.
• Blokkering van de ventilatieopeningen kan de oven beschadigen.
• Plaats de oven zo ver mogelijk verwijderd van radio's en tv's. Gebruik van de magnetron kan de ontvangst van uw
radio of tv verstoren.
20 cm
30 cm
85 cm
10 cm
20 cm
5. Steek de stekker van de oven in een standaard geaard stopcontact.
WAARSCHUWING:
Plaats de oven niet op een plek waar hitte of vochtigheid onstaat (bijvoorbeeld naast of boven een gewone oven) of
naast brandbare materialen (bijvoorbeeld gordijnen).
Blokkeer of belemmer de ventilatieopeningen niet.
Plaats geen objecten op de oven.
Raak de buitenkant van de magnetron niet aan terwijl hij in werking is of kort daarna, aangezien die dan warm is.

NL
NL – 13
NL – 13
RADIOSTORING
Het gebruik van de magnetron kan storing op uw radio, televisie of soortgelijke apparatuur veroorzaken. Eventuele
storing kan worden verminderd of vermeden door de volgende maatregelen te tre en:
1. Maak de deur en de ovenruimte schoon waar deze elkaar raken.
2. Pas de richting van de ontvangstantenne van uw radio of televisie aan.
3. Zet de magnetron op een andere plaats ten opzichte van de ontvanger.
4. Steek de stekker van de magnetron in een ander stopcontact zodat deze op een ander stroomcircuit aangesloten
is dan de ontvanger.
AARDINGSINSTRUCTIES
Dit apparaat moet geaard zijn. Deze oven is voorzien van een snoer met een aardingsdraad en een geaarde
stekker. Dit snoer moet aangesloten worden op een stopcontact dat correct is geïnstalleerd en geaard. In geval
van kortsluiting vermindert de aarding het risico op een elektrische schok doordat de elektrische stroom via een
ontsnappingsdraad wordt afgevoerd. We raden aan om een apart circuit te voorzien dat alleen de oven van stroom
voorziet.
WAARSCHUWING: onjuist gebruik van de aardingsstekker kan leiden tot het risico op een elektrische schok.
OPMERKING:
1. Als u vragen hebt over de aarding of de elektrische instructies, raadpleeg dan een gekwali ceerde elektricien of
onderhoudsmonteur.
2. Noch de fabrikant noch de dealer zijn aansprakelijk voor schade aan de oven of letsel indien de oven niet op de
voorgeschreven manier is aangesloten.
Het netsnoer van uw combi-magnetron heeft de volgende kleurgecodeerde draden:
Groen en Geel = AARDE | Blauw = NEUTRAAL | Bruin = SPANNINGVOEREND
SPECIFICATIES
Modelnaam: YC-PC322A
AC-netspanning 230~240 V, 50 Hz, enkele fase
Zekering/circuitonderbreker 10 A
Vermogen
Stroomverbruik 2300 W
Uitgangsvermogen magnetron 1000 W
Uitgangsvermogen grill 1250 W
Convectievermogen 2300 W
Stroomverbruik wanneer uitgeschakeld
< 0,5 W
Frequentie van de magnetron 2450 MHz*
Buitenste afmetingen (B) x (H) x (D) mm 539 × 280 × 415
Afmetingen binnenkant (B) × (H) × (D)** mm 362 × 223 × 378
Afmetingen glazen draaiplateau (ø mm) 315
Ovencapaciteit 32 liter**
Afmetingen bakplaat (diameter × H in mm) 317 x 48
Afmetingen grillrooster (diameter × hoogte in mm) 255 x 80
Gewicht 21 kg
Ovenlamp (LED) 1,5 W
* - Dit product voldoet aan de vereisten van de Europese norm EN55011.
In overeenstemming met deze norm is dit product geclassi ceerd als apparatuur in groep 2 klasse B.
Groep 2 betekent dat er opzettelijk radiofrequentie-energie wordt gegenereerd onder de vorm van elektromagnetische straling om
voedingswaren op te warmen en te bereiden.
Klasse B betekent dat dit product geschikt is voor normaal huishoudelijk gebruik.
** - De inhoud wordt berekend door het meten van de maximale breedte, hoogte en diepte van het apparaat. De eigenlijke inhoud voor
voedsel is minder.
ALS ONDERDEEL VAN ONS BELEID VAN CONTINUE VERBETERINGEN, BEHOUDEN WIJ HET RECHT OM HET ONTWERP EN

NL – 14
NL – 14
DE SPECIFICATIES ZONDER VOORAFGAANDE KENNISGEVING TE WIJZIGEN.
OVEN EN TOEBEHOREN
1. Veiligheidsvergrendelingssysteem voor de
deur
2. Ovenvenster
3. Bedieningspaneel
4. Display
5. Ovenruimte
6. Afdekplaatje voor golfgeleider (niet
verwijderen)
7. Glasplaat
8. Draairing
9. Draaiplateaukoppeling
10. Grilrooster
11. Bakplaat
12. Ventilatie-openingen
13. Behuizing
14. Netsnoer
• Het grillrooster en de bakplaat zijn ontwikkeld
voor gebruik met grill- en covectie-ovens.
Gebruik de metalen accessoires NIET als u de
magnetronfunctie gebruikt.
• Voor gebruik van het grillrooster raadpleegt u
de secties over GRILLEN van deze handleiding.
Raak de grill nooit aan wanneer deze heet is.
OPMERKING: vermeld bij het nabestellen van
accessoires twee items: de onderdeelnaam en
de modelnaam.
OPMERKINGEN:
• Maak na het bereiden van vet voedsel
zonder deksel altijd de ovenruimte en eventueel keukengerei grondig schoon, deze moeten droog en vetvrij zijn,
Opgebouwd vet kan gaan roken of vlam vatten.
• Plaats het keukengerei altijd op het draaiplateau als u de magnetron gebruikt.
• Gebruik het grillrooster of de bakplaat NIET tijdens het gebruik van de magnetronfunctie.
WAARSCHUWING: Dit symbool betekend dat de oppervlakten mogelijk heet worden tijdens het
gebruik. De deur, behuizing, ovenruimte, accessoires en vaatwerk zullen erg heet worden tijdens het
gebruik. Gebruik altijd dikke ovenwanten om brandwonden te voorkomen.
2
7
5
9
6
8
1
3
4
14
12
13
1110

NL
NL – 15
NL – 15
BEDIENINGSPANEEL
1. DIGITALE DISPLAY: Weergave van bereidingstijd, vermogen, indicaties en
kloktijd.
2. 10 SECONDS, 1 MINUTE, 10 MINUTES - Voor het instellen van de
bereidingstijd of de klok.
3. AUTO MENU-knoppen - Druk hierop om het Auto Cooking-menu te
selecteren. (Zie pagina 19 voor advies over het gebruik).
4. START/QUICK START – (pagina 16).
5. MICROWAVE POWER – Druk hierop om het magnetronvermogen te
selecteren. (pagina 16).
6. GRILL – Druk hierop om het bereidingsprogramma voor grillen in te stellen.
(Pagina 17).
7. MICROWAVE+GRILL – Druk hierop om het bereidingsprogramma voor de
combinatie van magnetron en grill in te stellen. (pagina 17).
8. CONVECTION TEMPERATURE - Druk hierop om de convectietemperatuur te
kiezen.
9. MICROWAVE+CONVECTION - Druk hierop om convectiecombinatie te
kiezen.
10. OMHOOG - Druk hierop om het gewicht van de etenswaren of de porties
in te stellen.
11. OMLAAG - Druk hierop om het gewicht van de etenswaren of de porties
in te stellen.
12. STOP/ECO – Druk eenmaal hierop om de bereiding tijdelijk te onderbreken of tweemaal om de bereiding volledig
te annuleren. Stel hiermee de energiespaarstand in. (Pagina 20).
13. CHILD LOCK – (pagina 21).
14. TIME/SET CLOCK –
Stel hiermee de kloktijd in.
Stel hiermee de kookwekkerfunctie in. (pagina 15).
VOOR HET GEBRUIK VAN DE OVEN
Als u de stekker van de oven voor het eerst in het stopcontact steekt, dan klinkt er een pieptoon. Op het display
verschijnt "1:00". Let op: u hoeft de klok niet in te stellen om de oven correct te laten werken. Om de klok in te stellen,
volgt u de instructies in de sectie "De klok instellen" van deze handleiding.
Als de grill nieuw is, dan zullen er bij het eerste gebruik van de grill- en/of convectiefunctie rook en geuren vrijkomen.
Om te voorkomen dat dit gebeurt wanneer u etenswaren gebruikt, gebruikt u de grill- en convectiefunctie de eerste
keer gedurende ca. 20 minuten zonder etenswaren.
• Na het openen en sluiten van de deur, schakelt de oven in de stand-bymodus. Als u binnen 1 minuut geen knoppen
indrukt, dan blijft het display aan en werken de knoppen niet. Om weer in de stand-bymodus te komen, opent en
sluit u de deur.
• Als u tijdens de bereiding een keer op de knop STOP/ECO drukt, dan wordt de bereidingscyclus gepauzeerd. Om de
bereiding te hervatten drukt u op de knop START/QUICK START. Als u de knop STOP/ECO tweemaal indrukt, dan
wordt de bereiding geannuleerd.
• Als u de oven voor een bepaalde functie programmeert en er tussen het indrukken van de knoppen een pauze van
meer dan 30 seconden zit, dan schakelt de oven terug naar de stand-bymodus.
• Als een bereidingscyclus is voltooid, dan verschijnt op het display "End" en is er om de twee minuten een pieptoon
te horen, totdat u op een knop drukt of de deur opent.
DE KLOK INSTELLEN
Deze oven heeft een klok die zowel in 12- als 24-uurs modus kan worden gebruikt. Volg de onderstaande instructies
om de klok in te stellen:
1. Houd in de stand-bymodus de knop TIME/SET CLOCK minimaal 3 seconden ingedrukt om de klokinstelmodus te
openen.
10 SECONDS 1 MINUTE 10 MINUTES
YC-PC322A
1000W
STOP/ECO TIME/
SET CLOCK
CHILD
LOCK
AUTO PROGRAMS
REHEAT
BEVERAGES JACKE T
POTATO PIZZA POPCORN
FROZEN
MEAL FRESH
VEGETABLES PORRID GE AUTO
DEFROST
GRILLED
STEAK GRILLED
CHICKEN AUTO
REHEAT
ROAST
BEEF
ROAST
CHICKEN
OVEN
CHIPS
MICROWAVE
POWER
MICROWAVE
+ CONVECTION
CONVECTION
TEMPERATURE
GRILL
START/
QUICK START
MICROWAVE
+ GRILL
13
5
3
2
14
11
6
8
9
7
10
12
4
1

NL – 16
NL – 16
2. Druk op de knop TIME/SET CLOCK om de 12- of 24-uurs modus te selecteren.
3. Gebruik de knoppen 10 SECONDS, 1 MINUTE and 10 MINUTES om de gewenste uren en minuten in te stellen.
4. Druk op de knop TIME/SET CLOCK om de klokinstelling op te slaan en de instelmodus te verlaten.
• U hoeft de klok niet in te stellen voor een normale werking van de oven.
• Druk in de kookmodus op de knop TIME/SET CLOCK om de tijd te zien (indien ingesteld). Na 5 seconden verdwijnt
de tijd en kom het aftellen van de bereidingstijd weer op het scherm te staan. Let op: u kunt de tijd niet bekijken als
de kookwekker is ingesteld.
VOEDSEL BEREIDEN MET DE MAGNETRON
Om de magnetronfunctie te gebruiken, volgt u de onderstaande instructies:
1. Druk in de stand-bymodus op de knop MICRWAVE POWER om het vermogensniveau te kiezen. Telkens als u deze
knop indrukt, geeft het display het vermogensniveau van de magnetron aan.
2. Zodra u het gewenste magnetronvermogen hebt gekozen, gebruikt u de knoppen 10 SECONDS, 1 MINUTE en
10MINUTES om de bereidingstijd te kiezen.
3. Druk op de knop START/QUICK START om de bereiding te starten.
4. Als de bereidingscyclus is voltooid, dan verschijnt op het display "End" en is er om de twee minuten een pieptoon
te horen, totdat u op een knop drukt of de deur opent.
Let op: de onderstaande tabel is slechts een leidraad. Uw oven heeft 10 magnetronvermogensniveaus. Dit zijn
10%, 20%, 30%, 40%, 50% 60%, 70%, 80% en 100%. U kunt het daadwerkelijke wattage berekenen door het
magnetronvermogen te vermenigvuldigen met het percentage.
TIPS VOOR BEREIDING MET DE MAGNETRON:
Display Magnetron-
vermogen Voorgesteld gebruik
P100 100 % Gebruik deze instelling voor het snel bereiden of opwarmen van stoofschotels,
warme dranken, groenten etc.
P-80 80 %
Voor compact voedsel dat een lange bereidingstijd nodig heeft wanneer het
conventioneel bereid wordt, bijv. rundvleesschotels; deze vermogensinstelling
wordt gekozen om er zeker van te zijn dat het vlees mals blijft.
P-60 60 %
Gebruik deze instelling voor het langer garen van voedsel met een hoge dichtheid,
zoals braadstukken, gehaktbrood en kant-en-klaarmaaltijden, maar ook voor
gevoelige gerechten zoals kaassaus en biscuitgebak.
P-40 40 %
Instelling voor ontdooien; kies dit vermogensniveau om ervoor te zorgen dat het
gerecht gelijkmatig ontdooit. Deze instelling is ook ideaal voor het sudderen van
rijst, pasta, dumplings en vla.
P-20 20 % Voor voorzichtige ontdooiing voor bijv. taart of gebak.
• Tijdens de bereiding kunt u het vermogen controleren door op de knop MICROWAVE POWER te drukken.
• De langste bereidingstijd is 95 minuten.
SNELSTART
Als u iets op 100% vermogen wilt bereiden, dan drukt u in de stand-bymodus op de knop START/QUICK START.
Telkens als u de knop START/QUICK START indrukt, wordt de bereidingstijd met 30 seconden verlengd.

NL
NL – 17
NL – 17
GRILLEN
Het verwarmingselement van de grill bovenin de ovenruimte heeft slechts één vermogensstand. Deze is e ciënt en
zuinig. De grill is ideaal voor het bereiden van bacon, hamlappen, vissticks en theecakes.
Gebruik het grillrooster voor het grillen van kleine gerechten zoals spek en worstjes. Draai de etenswaren halverwege
omdraaien. U kunt de etenswaren direct op het rooster plaatsen of de etenswaren in een schaal of op een
hittebestendige plaat leggen. Zorg dat er geen vet of olie van het te grillen voedsel druipt door een geschikte schaal
onder het grillrooster te plaatsen.
Voor het bruinen en krokant maken van de buitenkant van etenswaren, zoals u in een braadpan doet, kunt u het
grillrooster gebruiken als de bak waarin de etenswaren zitten ondiep genoeg is. Het is echter raadzaam om dergelijke
bakjes direct op het draaiplateau te plaatsen, zodat deze wat extra tijd krijgen om bruin en krokant te worden. U kunt
het grillrooster niet gebruiken om te grillen.
Om de grillfunctie te gebruiken, volgt u de onderstaande instructies:
1. Druk in de stand-bymodus op de knop GRILL om de grillfunctie te selecteren. Op het display verschijnt "Grill"
2. Gebruik de knoppen 10 SECONDS, 1 MINUTE en 10 MINUTES om de bereidingstijd te kiezen.
3. Druk op de knop START/QUICK START om de bereiding te starten.
4. Als de bereidingscyclus is voltooid, dan verschijnt op het display "End" en is er om de 2 minuten een pieptoon te
horen, totdat u op een knop drukt of de deur opent.
MICROWAVE + GRILL
Door zowel de magnetron- als de grillfunctie te gebruiken, is het mogelijk de etenswaren snel bruin en gaar te krijgen.
Om de magnetron- en grillfunctie te gebruiken, volgt u de onderstaande instructies:
1. In de stand-bymodus drukt u één of twee keer op MICROWAVE + GRILL om "Co-1" of "Co-2” te selecteren.
2. Gebruik de knoppen 10 SECONDS, 1 MINUTE en 10 MINUTES om de bereidingstijd in te stellen.
3. Druk op de knop START/QUICK START om de bereiding te starten.
4. Als de bereidingscyclus is voltooid, dan verschijnt op het display "End" en is er om de twee minuten een pieptoon
te horen, totdat u op een knop drukt of de deur opent.
Magnetron- + grillfunctie
Display Bereidingsproces Voorgesteld gebruik
Co-1
De oven zal in de volgende cyclus etenswaren
bereiden:
Magnetron 22 seconden, 11 seconden grillen. Dit
wordt herhaald tot het einde van de totaal ingestelde
tijd.
Stukjes kip, kip let, varkenskoteletten
Co-2
De oven zal in de volgende cyclus etenswaren
bereiden:
Magnetron op vol vermogen gedurende 18 seconden,
daarna 15 seconden grillen. Dit wordt herhaald tot het
einde van de totaal ingestelde tijd.
Hele kip
• De maximale bereidingstijd met de grill is 95 minuten.
• Laat tijdens het grillen rook of geuren ontsnappen door in de keuken een raam open te zetten of de
keukenventilatie aan te zetten. Dit is normaal en duidt niet op een defect aan de oven.
• Tijdens de bereiding kunt u het huidige gecombineerde vermogen controleren door op de knop MICROWAVE +
GRILL te drukken.
• Als u de grillfunctie gebruikt, dan schakelt de grill met regelmatige tussenpozen in en uit om oververhitting te
voorkomen.
• Als u de functie MICROWAVE+GRILL gebruikt, dan kunt u de etenswaren in een geschikte bak of schaal
rechtstreeks op het draaiplateau plaatsen.
WAARSCHUWING: De deur, behuizing, ovenruimte en accessoires worden erg heet tijdens gebruik. Gebruik altijd
dikke ovenwanten om brandwonden te voorkomen.

NL – 18
NL – 18
CONVECTION
Tijdens het convectiekoken wordt warme lucht door de ovenruimte gecirculeerd om snel en gelijkmatig een bruin
en krokant resultaat te krijgen. Op deze oven kunnen dertien verschillende bereidingstemperaturen worden
geprogrammeerd (200°C, 190°C, 180°C, 170°C, 160°C, 150°C, 140°C, 130°C, 120°C, 110°C).
We raden aan om de oven voor te verwarmen alvorens met de convectiefunctie eten te bereiden. Om voor te
verwarmen en etenswaren te bereiden met de convectiefunctie, volgt u de onderstaande instructies:
Uw oven kan worden geprogrammeerd zodat de functies voorverwarming en convectie worden
gecombineerd.
1. In de stand-bymodus drukt u herhaaldelijk op de knop CONVECTION om de convectietemperatuur te selecteren.
2. Druk op de knop START/QUICK START- om de voorverwarmingsfunctie te starten.
3. Wanneer de ingestelde temperatuur is bereikt, geeft de oven een geluidssignaal.
Zodra de oven is voorverwarmd en het geluidsignaal klinkt:
1. Open de deur en plaats de etenswaren in het midden van het bodemvlak.
2. Gebruik de knoppen 10 SECONDS, 1 MINUTE en 10 MINUTES om de bereidingstijd in te stellen. De langste
bereidingstijd is 95 minuten.
3. Druk op de knop START/QUICK START om de bereiding te starten.
OPMERKING: Wanneer de temperatuur voor voorverwarming met convectie bereikt is, piept de oven om de twee
seconden. De voorverwarmtemperatuur wordt 30minuten aangehouden, daarna schakelt de oven uit.
MICROWAVE + CONVECTION
De Microwave+Convection-modus maakt de bereiding gemakkelijker en sneller, omdat deze modus de
magnetronfunctie voor een snelle bereiding en de convectiefunctie om de etenswaren krokant te maken.
Het is mogelijk om etenswaren op 4 verschillende convectietemperaturen te bereiden. Om de dubbele
bereidingsmodus te starten, volgt u de onderstaande instructies:
1. In de stand-bymodus drukt u herhaaldelijk op de knop MICROWAVE+CONVECTION om de
convectietemperatuur te selecteren (200°C, 170°C, 140°C, 110°C).
2. Gebruik de knoppen 10 SECONDS, 1 MINUTE 10 95 10 MINUTES om de bereidingstijd in te stellen. De
bereidingstijd varieert van 10 seconden tot 95 minuten.
3. Druk op de knop START/QUICK START om de bereiding te starten.
Als u de functie Microwave+Convection gebruikt, dan is de timing van de bereiding met de magnetron en de
convectie zoals hieronder aangegeven. Kies de meest geschikte optie om uw etenswaren te bereiden en knapperig te
maken.
Display Bereidingsproces
200 °C 10 seconden magnetronvermogen, dan 23 seconden convectiebereiding. De cyclus wordt
herhaald tot het einde van de ingestelde kooktijd.
170 °C 15 seconden magnetronvermogen, dan 18 seconden convectiebereiding. De cyclus wordt
herhaald tot het einde van de ingestelde kooktijd.
140 °C 19 seconden magnetronvermogen, dan 14 seconden convectiebereiding. De cyclus wordt
herhaald tot het einde van de ingestelde kooktijd.
110 °C 24 seconden magnetronvermogen, dan 9 seconden convectiebereiding. De cyclus wordt
herhaald tot het einde van de ingestelde kooktijd.

NL
NL – 19
NL – 19
AUTO-MENU
Met de automatische programma's kunt u etenswaren snel en e ciënt bereiden met slechts enkele drukken op de
knop. U hoeft niet de de tijdsduur en het vermogen te programmeren. U hoeft alleen maar op de gewenste knop
voor automatische bereiding te drukken, het gewicht/aantal stukken in te voeren door de knoppen OMHOOG en
OMLAAG te gebruiken. Druk dan op de knop START/QUICK START.
Bijvoorbeeld: de bereiding van twee gepofte aardappels.
1. Open de deur en plaats de etenswaren in de oven met ovengerei dat geschikt is voor de gebruikte
bereidingscyclus.
2. Sluit de deur.
3. Druk één keer op de knop JACKET POTATO.
4. Gebruik de knoppen OMHOOG en OMLAAG om het aantal aardappels in te voeren.
5. Druk op de knop START/QUICK START.
6. Als de bereidingscyclus is voltooid, dan verschijnt op het display "End" en is er om de twee minuten een pieptoon
te horen, totdat u op een knop drukt of de deur opent.
Automatische-bereidingsmenu's:
Auto Menu Methode om het gewicht of aantal te selecteren Maat/gewicht
Diepvriesmaaltijd Selecteer het gewicht met de knoppen OMHOOG en OMLAAG. Druk
dan op de knop START/QUICK START om de bereiding te starten.
200 tot 800 g
Automatisch
Ontdooien 100 tot 1800 g
Reheat Beverages
Selecteer het aantal kopjes met de knoppen OMHOOG en OMLAAG.
Druk dan op de knop START/QUICK START om de bereiding te
beginnen.
1 tot 3 kopjes
(200ml elk)
Gepofte aardappel
Selecteer het aantal aardappelen met de knoppen OMHOOG
en OMLAAG. Druk dan op de knop START/QUICK START om
de bereiding te beginnen. Afhankelijk van het aantal gekozen
aardappelen krijgt u mogelijk de vraag om de aardappelen
halverwege de bereidingscyclus opnieuw te verdelen.
1 tot 3 aardappelen
(230 g per stuk)
Popcorn
Selecteer het gewicht met de knoppen OMHOOG en OMLAAG. Druk
dan op de knop START/QUICK START om de bereiding te beginnen.
100g
Verse groente 200 tot 600 g
Pizza 150 g/300 g/450 g
Pap 50 tot 150 g
Gegrilde steak* 200 tot 600 g
Gegrilde kip* 200 tot 600 g
Automatisch
opwarmen* 200 tot 800 g
Ovenfriet 200 g
Gebraden rund/
lamsvlees 200 tot 600 g
Geroosterde kip 800g tot 1400g
• Het resultaat van de automatisch bereiding hangt af van factoren zoals de vorm en grootte van het voedsel, uw
persoonlijke voorkeur voor de gaarheid van bepaalde etenswaren en zelfs hoe u het voedsel in de oven plaatst. Als
het resultaat niet helemaal naar wens is, pas dan de bereidingstijd aan.
• Voor sommige automatische bereidingsprogramma's krijg u mogelijk de vraag om de etenswaren om te draaien.
Open de deur, draai de etenswaren om, sluit de deur en druk vervolgens op de knop START/QUICK START om de
bereiding te hervatten.
• Draag ovenwanten (of iets dergelijks) wanneer u etenswaren omdraait.

NL – 20
NL – 20
AUTOMATISCH ONTDOOIEN
Met Auto Defrost kunt u etenswaren aan de hand van het gewicht ontdooien. De ontdooitijd en het vermogen
worden automatisch ingesteld zodra u de levensmiddelencategorie en het gewicht hebt geprogrammeerd. Het
gewicht van de ingevroren etenswaren varieert van 200 g tot 1800 g.
1. Druk in de stand-bymodus op de knop AUTO DEFROST.
2. Gebruik de knoppen OMHOOG en OMLAAG om het gewicht van de te ontdooien etenswaren te selecteren.
3. Druk op de START/QUICK START- toets om de ontdooicyclus te beginnen.
4. Als de oven tijdens de ontdooicyclus stopt, draai de etenswaren dan om voor een gelijkmatige ontdooiing. Druk
vervolgens op de knop START/QUICK START om gedurende de resterende tijd te ontdooien.
5. Als de ontdooicyclus is voltooid, dan verschijnt op het display "End" en is er om de twee minuten een pieptoon te
horen, totdat u op een knop drukt of de deur opent.
AUTO REHEAT
Met Auto Reheat kunt u etenswaren aan de hand van het ingestelde gewicht ontdooien. De ontdooitijd en het
vermogen worden automatisch ingesteld zodra u de levensmiddelencategorie en het gewicht hebt geprogrammeerd.
Het opwarmgewicht varieert van 200 g tot 800 g.
1. Druk in de stand-bymodus op de knop AUTO REHEAT.
2. Gebruik de knoppen OMHOOG en OMLAAG om het gewicht van de op te warmen etenswaren te selecteren.
3. Druk op de knop START/QUICK START.
4. Als de bereidingscyclus is voltooid, dan verschijnt op het display "End" en is er om de twee minuten een pieptoon
te horen, totdat u op een knop drukt of de deur opent.
KOOKWEKKER
De oven is uitgerust met een kookwekker die vanaf de ingestelde tijd aftelt.
1. Druk in de stand-bymodus één keer op de knop TIME/SET CLOCK.
2. Gebrui de knoppen 10 SECONDS, 1 MINUTE en 10 MINUTES om de gewenste tijd in te stellen. De langste tijd is
95 minuten.
3. Druk ter bevestiging op de knop START/QUICK START.
4. De display telt de ingestelde tijd af.
5. Als de tijd op het display nul bereikt, dan klinkt er een pieptoon.
Het is ook mogelijk om de kookwekker te gebruiken terwijl het apparaat in de bereidingsmodus staat. Volg hiervoor
de bovenstaande stappen terwijl uw etenswaren bereid worden. Zodra de kookwekker geactiveerd is, verschijnt deze
gedurende vijf seconden op het display. Daarna keert het display terug naar de afteltimer voor de bereidingscyclus.
Om de timer nog eens te bekijken, drukt u op de knop TIME/SET CLOCK. De kookwekker verschijnt dan gedurende
vijf seconden op het display. Vervolgens verschijnt de afteltimer voor de bereidingscyclus weer.
• Om het TIMER-programma te annuleren, drukt u op de knop STOP/ECO. Op het display verschijnt de tijd.
• Als u een bereidingscyclus hebt gestart, dan is het mogelijk om de kookwekker te starten aan de hand van de
bovenstaande de stappen.
ENERGIESPAARSTAND
Met deze functie kunt u stroom besparen als de oven niet in gebruik is. Om deze functie te activeren in de stand-
bymodus, houdt u de knop STOP/ECO gedurende 3 seconden ingedrukt. Het display gaat uit en de oven schakelt
over naar de energiespaarstand.
Om de energiespaarstand te annuleren, drukt u op een willekeurige knop of opent en sluit u de ovendeur.

NL
NL – 21
NL – 21
MUTE-FUNCTIE
Het is mogelijk de tonen van de magnetron uit te schakelen met de mute-functie. Om de mute-functie in te
stellen, drukt u op knop CHILD LOCK. Op het display verschijnt dan gedurende 5 seconden de melding "oFF". In de
gedempte modus klinken er geen geluid als u op de knoppen drukt.
Om de mute-functie uit te schakelen, drukt u één keer op de knop CHILD LOCK. Op het display verschijnt gedurende
5 seconden de melding "on" om aan te geven dat het geluid weer is ingeschakeld.
Als u de mute-functie hebt ingesteld en de oven loskoppelt van de netvoeding, dan wordt de mute-functie
geannuleerd als u de oven weer aansluit op de netvoeding.
VEILIGHEIDSVERGRENDELINGSSYSTEEM
Dit is een automatische functie die u kunt gebruiken om onbegeleid gebruik door kleine kinderen te voorkomen. Als
er in de stand-bymodus gedurende één minuut niets bediend wordt, dan schakelt de oven automatisch over naar de
veiligheidsvergrendelingsmodus. Op het display verschijnt dan de melding "Loc". In de vergrendelde modus zijn alle
knoppen uitgeschakeld. Als u op een willekeurige knop drukt, dan verschijnt de vergrendelingsindicatie gedurende
5seconden op het display om u eraan te herinneren om de veiligheidsvergrendeling te annuleren.
Om de veiligheidsvergrendeling uit te schakelen, opent en sluit u gewoon de deur van de magnetron. Het
toetsenblok wordt opnieuw geactiveerd en het indicatielampje voor de vergrendeling dooft.
KINDERSLOT
Om het KINDERSLOT in te stellen, houdt u de knop CHILD LOCK gedurende 3 seconden ingedrukt. U hoort dan een
lange pieptoon en op het display verschijnt de melding "Loc". De oven staat nu in de KINDERSLOT-modus. In deze
modus toont het display de klok. Als u een knop indrukt of de deur opent, dan verschijnt de melding "Loc" gedurende
5 seconden op het display.
Om het KINDERSLOT te annuleren, houdt u de knop CHILD LOCK gedurende 3 seconden ingedrukt totdat u een lange
pieptoon hoort.
AUTOMATISCH BESCHERMINGSMECHANISME
OVERVERHITTINGSBEVEILIGING – Wanneer de oven een hoge temperatuur detecteert, wordt op het display "E01"
weergegeven en stopt de oven met werken. Dit kunt u annuleren door op de knop STOP/ECO te drukken.
BEVEILIGING TEGEN LAGE TEMPERATUREN – Wanneer de oven de modus voor beveiliging tegen lage
temperaturen inschakelt, wordt op het display "E02" weergegeven en stopt de oven met werken. Dit kunt u annuleren
door op de knop STOP/ECO te drukken.
BEVEILIGING TEGEN SENSORSTORING – anneer de oven een probleem met een van de sensoren detecteert, wordt
"E03" weergegeven op het display en stopt de oven met werken. Er klinkt ook een waarschuwingssignaal. Dit kunt u
annuleren door op de knop STOP/ECO te drukken.

NL – 22
NL – 22
REINIGING EN ZORG
• Schakel de oven uit en trek de stekker uit het stopcontact wanneer u hem gaat reinigen.
• Houd de binnenkant van de oven schoon. Wanneer opgespat voedsel of gemorste vloeisto en aan de zijwanden,
de bovenkant of het bodemvlak van de ovenruimte blijven plakken, veegt u die af met een vochtige doek. Als de
oven erg vuil wordt, kunnen milde schoonmaakmiddelen worden gebruikt. Gebruik geen spray of andere agressieve
reinigingsmiddelen. Die kunnen vlekken, strepen of een do e aanslag achterlaten op het oppervlak van de deur.
• De buitenkant van de oven dient te worden gereinigd met een vochtige doek. Om schade aan de werkende delen
binnen in de oven te voorkomen mag er geen water in de ventilatieopeningen binnensijpelen.
• Veeg de deur en het venster, de deurafdichtingen of aangrenzende delen regelmatig schoon met een vochtige doek
om alle spatten of gemorst voedsel te verwijderen.
• Gebruik geen schuurmiddelen.
• Niet met stoom reinigen.
• Laat het bedieningspaneel niet nat worden. Veeg het schoon met een zachte, vochtige doek. Laat de deur open
wanneer u het bedieningspaneel schoonmaakt om te vermijden dat u de oven per ongeluk inschakelt.
• Als er zich stoom verzamelt aan de binnenkant of rond de buitenkant van de ovendeur, veeg die dan schoon met
een vochtige doek. Dit is mogelijk wanneer de magnetron wordt gebruikt onder vochtige omstandigheden. Dit is
geen defect.
• Het draaiplateau van de oven moet regelmatig worden gereinigd om te vermijden dat hij vuil wordt of dat vonken/
schade ontstaan. Veeg het bodemoppervlak van de oven gewoon schoon met een mild reinigingsmiddel.
• Om geurtjes uit uw oven te verwijderen, doet u een kopje water en het sap en de schil van één citroen in een
magnetronbestendige kom. Verhit die 5minuten met de magnetronfunctie. Veeg de magnetron grondig schoon en
droog hem af met een zachte doek.
• Neem contact op met de klantendienst voor advies als de lamp defect raakt.
• De oven dient regelmatig te worden gereinigd en eventuele voedselresten dienen te worden verwijderd. Indien de
oven niet schoon wordt gehouden, kan dit leiden tot aantasting van het oppervlak. Dit kan dan weer leiden tot een
verkorte levensduur van het apparaat en mogelijk tot gevaarlijke situaties.
• Gooi dit apparaat niet met het gewone huisvuil. Raadpleeg het advies van uw land over de verwijdering van dit
soort producten.

NL
NL – 23
NL – 23
GESCHIKTE SCHALEN
1. Het ideale materiaal voor magnetrongerei laat microgolven door, laat de energie door het bakje gaan en
verwarmt het voedsel.
2. Microgolven dringen niet door metaal, dus gebruik geen metalen keukengerei of borden met metalen randen.
3. Gebruik geen gerecyclede papierproducten voor het bereiden van etenswaren in de magnetron. Deze producten
kunnen kleine metalen fragmenten bevatten die vonken en/of brand kunnen veroorzaken.
4. We raden ronde/ovale borden aan boven vierkante/langwerpige borden, omdat de etenswaren in de hoeken vaak
overgaar worden.
5. U kunt smalle reepjes aluminiumfolie gebruiken om te voorkomen dat de blootgestelde delen te gaar worden. Let
op: gebruik niet te veel folie en houd een afstand van 2,54 cm tussen de folie en de ovenruimte aan
De onderstaande lijst is een algemene leidraad om u te helpen het juiste keukengerei te kiezen.
Kookgerei Magnetron
Veilig
Grill/
Convectie Opmerking
Bruiningsschalen /
Volg altijd de instructies van de fabrikant op.
Overschrijd de opgegeven verwarmingstijden niet. Wees zeer
voorzichtig omdat deze schalen heel heet worden.
Porselein en keramiek / Porselein, aardewerk en beenderporselein zijn normaal
gesproken geschikt, behalve als deze metalen decoratie hebben.
Hittebestendig glas Zorg dat u over glazen keukengerei beschikt dat geschikt is voor
gebruik in een combi-magnetron.
Niet-hittebestendig Glas
Hittebestendig keramiek Zorg ervoor dat het keramisch materiaal niet te dik is of een hoog
gehalte aan mineralen bevat.
Magnetronveilig plastic bord Controleer altijd of het plastic keukengerei geschikt is voor
gebruik in een combi-magnetron.
Keukenpapier / Gebruik alleen keukenpapier dat wordt aanbevolen voor gebruik
in combi-magnetrons.
Glasservies bijv. Pyrex® / Ga zorgvuldig om met jn glaswerk omdat dit kan breken of
barsten bij plotselinge temperatuurverschillen.
Metalen ovenschaal Metalen kookgerei wordt niet aanbevolen omdat dit gaat
vonken, wat tot brand kan leiden.
Metalen rek Metalen kookgerei wordt niet aanbevolen omdat dit gaat
vonken, wat tot brand kan leiden.
Aluminiumfolie
Aluminium verpakkingen /
Kleine stukken aluminiumfolie kunnen worden gebruikt om
voedsel tegen oververhitting te beschermen. Houd de folie
tenminste 2,54 cm van de ovenwanden, omdat het anders kan
gaan vonken.
Verpakkingen, bakjes en schalen van aluminium worden niet
aanbevolen tenzij anders aangegeven door de fabrikant, bijv.
Microfoil®; volg de instructies zorgvuldig op.
Vershoudfolie Het mag het voedsel niet raken en moet doorgeprikt zijn om de
stoom te laten ontsnappen.
Plastic/polystyreen bijv. fastfood-
bakjes
Ga hier zorgvuldig mee om omdat sommige bakjes vervormen,
smelten of verkleuren bij hoge temperaturen.
Diepvries/braadzakken
Moeten zijn doorgeprikt om de stoom te laten ontsnappen.
Controleer of de zakken geschikt zijn voor gebruik in de
magnetron.
Papieren borden, bekers en
keukenrolpapier
Gebruik geen plastic of metalen bevestigingen, omdat deze
kunnen smelten of vlam kunnen vatten door de vonken van het
metaal.
Bakjes van riet of hout
Gebruik deze alleen voor opwarmen of om vocht te absorberen.
Voorzichtigheid is geboden omdat door oververhitting brand
kan ontstaan.
Gerecycled papier en krantenpapier
Blijf altijd bij de oven wanneer deze materialen worden gebruikt
omdat oververhitting brand kan veroorzaken.
Kan stukjes metaal bevatten die vonken veroorzaken en kunnen
leiden tot brand.
WAARSCHUWING: Bij het verwarmen van eten in plastic of papieren bakjes dient u in de gaten te
houden dat de bakjes geen vlam vatten.
OPMERKING: Laat uw oven niet onbewaakt achter terwijl deze in werking is.

NL – 24
NL – 24
TIPS VOOR KOKEN MET DE MAGNETRON
Met een magnetron bereidt u etenswaren sneller dan door deze op de conventionele manier te koken. Het is daarom
van essentieel belang dat bepaalde technieken worden gevolgd om goede resultaten te garanderen. Veel van de
volgende technieken zijn vergelijkbaar met de technieken die in de conventionele keuken worden gebruikt.
WAARSCHUWING: Vloeistoff en en etenswaren mogen niet worden opgewarmd in gesloten bakjes of
potjes/bakjes met een deksel. Binnen in het bakje/potje stijgt de druk, waardoor het
bakje/potje kan exploderen.
KOOKADVIEZEN:
• Blijf altijd bij de oven als deze in gebruik is.
• Zorg ervoor dat het keukengerei geschikt is voor gebruik in een magnetronoven.
• Gebruik alleen magnetronpopcorn in de aanbevolen verpakking (volg de instructies van de fabrikant op). Gebruik
nooit olie, tenzij dit is aangegeven door de fabrikant, en bereid de popcorn nooit langer dan in de instructies
vermeld staat.
WAARSCHUWING: Als u de aanbevolen kooktijden overschrijdt en te hoge vermogensniveaus
gebruikt, kan voedsel te warm worden of aanbranden. In extreme gevallen kan het
voedsel in brand vliegen en de oven beschadigen.
Verdeling
Plaats de dikste etenswaren aan de buitenkant van de schaal, bijv. kippenboutjes.
Etenswaren die aan de buitenkant van de schaal geplaatst worden, krijgen meer energie en zijn dus sneller gaar dan
de etenswaren in het midden.
Afdekken
Bepaalde etenswaren kunnen beter afgedekt worden tijdens de bereiding in de magnetron.
Gebruik vershoud- of magnetronfolie of een geschikt deksel met (een) ventilatieopening(en).
Gaatjes prikken
In etenswaren met een schaal, huid of membraan moeten voor het koken of opwarmen op meerdere plaatsen gaatjes
worden geprikt, omdat de stoom zich anders ophoopt. Dit kan ertoe leiden dat de etenswaren exploderen, bijv.
aardappelen, vis, kip, worstjes.
OPMERKING: Eieren mogen niet worden opgewarmd in de magnetron. Ze kunnen ontplo en, zelfs nadat de bereiding
voltooid is, dus ook al zijn ze bijvoorbeeld gepocheerd, gebakken of hardgekookt.
Roeren, omdraaien en opnieuw verdelen
Voor een gelijkmatige bereiding is het essentieel om tijdens het koken de etenswaren om te roeren, deze om te
draaien en om deze opnieuw te verdelen. Werk altijd vanuit de buitenkant naar het midden toe bij het roeren en
opnieuw verdelen.
Wachten
Wachttijd na bereiding is belangrijk, omdat het ervoor zorgt dat de warmte gelijkmatig door het voedsel wordt
verspreidt.

NL
NL – 25
NL – 25
Kenmerken van etenswaren
Compositie Voedingsmiddelen met een hoog vet- of suikergehalte (bijv. kerstpudding,
gehaktbroodjes) hebben minder opwarmtijd nodig. Wees voorzichtig, want
oververhitting kan tot brand leiden.
Botten in etenswaren geleiden warmte, waardoor het voedsel sneller gaar wordt. Let
erop dat het voedsel gelijkmatig wordt gekookt.
Dichtheid De dichtheid van etenswaren is van invloed op de benodigde kooktijd.
Lichte, poreuze etenswaren, zoals gebak of brood, kookt sneller dan zware, dichte
etenswaren, zoals gebraad en ovenschotels.
Hoeveelheid Het aantal microgolven in uw oven blijft gelijk, ongeacht de hoeveelheid etenswaren
die gekookt wordt. De kooktijd moet worden verlengd naarmate de hoeveelheid
etenswaren in de oven toeneemt.
Het duurt bijvoorbeeld langer om vier aardappelen te koken dan twee.
Grootte Kleine etenswaren en kleine stukjes koken sneller dan grote, omdat de microgolven
van alle kanten tot in het midden kunnen doordringen. Zorg er voor een gelijkmatige
bereiding voor dat alle stukken van dezelfde grootte zijn.
Vorm Bij etenswaren met een onregelmatige vorm, zoals kip let of kippenboutjes, duurt het
langer voordat de dikkere delen gaar zijn. Leg de dikste delen aan de buitenkant van de
schaal, waar deze meer energie krijgen.
Ronde vormen koken gelijkmatiger dan vierkante vormen bij bereiding in de magnetron.
Temperatuur van
etenswaren
De begintemperatuur van etenswaren beïnvloedt de benodigde kooktijd.
Het koken van gekoelde etenswaren duurt langer dan etenswaren op
kamertemperatuur.
De temperatuur van de verpakking is geen echte indicatie van de temperatuur van de
etenswaren of de drank. Snij in etenswaren met vullingen, bijvoorbeeld donuts met jam,
om warmte of stoom te laten ontsnappen.
WAARSCHUWING: Gezicht en handen: draag altijd ovenhandschoenen om etenswaren of keukengerei
uit de oven te pakken. Doe een stap achteruit als u de oven opent om warmte
of stoom te laten ontsnappen. Bij het verwijderen van afdekkingen (zoals
vershoudfolie), het openen van braadzakken of popcornverpakkingen, dient u
ervoor te zorgen dat de stoom niet in de richting van het gezicht of de handen
ontsnapt.
WAARSCHUWING: Controleer de temperatuur van etenswaren en drankjes en roer voor het serveren.
Wees bijzonder voorzichtig bij etenswaren of drankjes voor baby's, kinderen of
ouderen. De inhoud van zuig essen en potjes met babyvoeding moet geroerd of
geschud worden. Controleer de temperatuur voor consumptie om te voorkomen dat
er brandwonden ontstaan.

NL – 26
NL – 26
TIPS VOOR ONTDOOIING
Het ontdooien van etenswaren met behulp van uw magnetron is de snelste methode. Het is een eenvoudig
bereidingsproces, maar de volgende instructies zijn essentieel om ervoor te zorgen dat de etenswaren grondig
ontdooid worden.
• Verwijder alle verpakkingen voor het ontdooien.
• Gebruik de magnetronvermogensniveaus P-20 of P-40 om etenswaren te ontdooien.
• Meer informatie vindt u hieronder.
Verdelen
Etenswaren die aan de buitenkant van de schaal geplaatst worden, zullen sneller ontdooien dan de etenswaren in het
midden. Het is daarom van essentieel belang dat de etenswaren tijdens het ontdooien tot 4 keer opnieuw verdeeld
worden.
Verplaats dicht opeengepakte stukken van buiten naar het midden en verdeel de stukken die elkaar overlappen
opnieuw.
Dit zorgt ervoor dat alle stukken gelijkmatig ontdooien.
Scheiden
Etenswaren kunnen aan elkaar kleven als u deze uit de vriezer haalt. Het is belangrijk om de etenswaren tijdens het
ontdooien zo snel mogelijk te scheiden.
bijv. spekreepjes, kip lets.
Afschermen
Sommige stukken van ontdooide etenswaren kunnen warm worden. Om te voorkomen dat deze warmer worden en
beginnen te koken, kunt u deze stukjes afschermen met kleine stukjes folie, die de microgolven re ecteren. Bijv. de
poten en vleugels van kip.
Wachten
De wachttijd is nodig om ervoor te zorgen dat de etenswaren grondig ontdooien.
Het ontdooiproces is niet voltooid als de etenswaren eenmaal uit de magnetron zijn gehaald. De etenswaren moeten
gedurende een bepaalde tijd afgedekt blijven staan om ervoor te zorgen dat ook de kern volledig ontdooid is.
Omdraaien
Het is cruciaal dat alle etenswaren tijdens het ontdooien minstens 3 tot 4 keer omgedraaid worden.
Dit is belangrijk voor een grondige ontdooiing.

NL
NL – 27
NL – 27
TIPS VOOR OPWARMEN
Voor het opwarmen van etenswaren volgt u de onderstaande adviezen en richtlijnen. Zo zorgt u ervoor dat de
etenswaren grondig opgewarmd worden alvorens u deze opdient.
Maaltijden op een bord
Haal eventuele porties gevogelte of vlees van het bord af. Warm deze afzonderlijk op, zie hieronder.
Plaats kleinere stukken etenswaren in het midden van het bord, grotere en dikkere etenswaren aan de rand. Bedek het
bord met magnetronfolie en warm het gerecht op het vermogen P-50 op. Roer halverwege de opwarmfase en verdeel
de etenswaren opnieuw.
OPMERKING: zorg ervoor dat de etenswaren grondig opgewarmd worden alvorens u deze opdient.
Gesneden vlees
Bedek dit met vershoud- of magnetronfolie en warm het vlees op het vermogen P-60 op. Verdeel de stukken vlees
minstens één keer opnieuw om te zorgen voor een gelijkmatige opwarming.
OPMERKING: zorg ervoor dat het vlees grondig opgewarmd wordt alvorens u dit opdient.
Porties gevogelte
Leg de dikste stukken van de porties aan de buitenkant van het bord. Bedek het bord met vershoud- of
magnetronfolie en warm het gevogelte op het vermogen P-70 op.
Draai de stukken halverwege het opwarmen om.
OPMERKING: zorg ervoor dat het gevogelte grondig opgewarmd wordt alvorens u dit opdient.
Ovenschotels
Bedek deze met vershoud- of magnetronfolie of een geschikt deksel en warm het gerecht op het vermogen P-50 op.
Roer regelmatig om te zorgen voor een gelijkmatige opwarming.
OPMERKING: zorg ervoor dat de etenswaren grondig opgewarmd worden alvorens u deze opdient.
Om de beste resultaten te verkrijgen bij het opwarmen, selecteert u een magnetronvermogen dat geschikt is voor de
betre ende etenswaren. Een schaal met groenten kan bijvoorbeeld worden opgewarmd op P-100, terwijl een lasagne
met ingrediënten die niet kunnen worden geroerd, opgewarmd dient te worden op P-40.
OPMERKINGEN:
• Verwijder de etenswaren uit de folie of metalen bakjes alvorens u deze opwarmt.
• Opwarmtijden zijn afhankelijk van de vorm, diepte, hoeveelheid en temperatuur van de etenswaren, evenals van de
grootte, vorm en het materiaal van het bakje.
WAARSCHUWING: Verhit nooit vloeistoff en in essen met een dunne hals, omdat de vloeistof
plotseling uit de es zou kunnen spuiten en brandwonden kan veroorzaken.
• Om oververhitting en brand te voorkomen dient u goed op te letten wanneer u voedsel met een hoog suiker- of
vetgehalte, zoals gehaktbroodjes of kerstpudding opwarmt.
• Verwarm nooit olie of vet dat bedoeld is om te frituren. Dit kan leiden tot oververhitting en brand.
• Aardappelen in blik mogen niet opgewarmd worden in de magnetron. Volg de instructies van de fabrikant op het
blikje.
WAARSCHUWING: De inhoud van baby esjes roeren of schudden en de temperatuur voor consumptie
controleren om verbranding te voorkomen.

NL – 28
NL – 28
PROBLEEMOPLOSSING
Indien u het idee heeft dat de oven niet goed werkt zijn er een aantal eenvoudige controles die u kunt uitvoeren
voordat u de hulp van een technicus inroept. Hiermee wordt voorkomen dat u onnodig een technicus laat komen
voor een defect dat eenvoudig is op te lossen.
Deze eenvoudige controle wordt hieronder uiteengezet:
Zet een half kopje water op het draaiplateau en sluit de deur. Stel de timer in voor bereiding gedurende 1minuut op
het magnetronvermogensniveau 100P.
1. Gaat de ovenlamp aan tijdens het koken?
2. Werkt de ventilator? (U kunt hiervoor uw hand boven de luchtventilatoropeningen plaatsen.)
3. Hoort u na 1 minuut het belsignaal?
4. Is het water in de kop heet geworden?
Als uw antwoord "NEE" is op iedere vraag controleer dan eerst of de oven op de juiste manier is aangesloten en
of er geen zekering is gesprongen. Als dit niet het geval is kunt u de onderstaande probleemoplossingstabel
raadplegen.
WAARSCHUWING: Repareer, wijzig of pas de oven nooit zelf aan. Dit is gevaarlijk en het onderhoud
en reparaties dienen te worden uitgevoerd door een hiervoor opgeleide
onderhoudsmonteur van SHARP. Dit is belangrijk omdat hierbij wellicht een
afdekking van de magnetron dient te worden geopend die bescherming biedt tegen
microgolven.
• De deurafdichting houdt lekkage van microgolven tijdens de ovenfunctie tegen, maar zorgt niet voor een
luchtdichte afsluiting. Het is normaal dat er rond de ovendeur druppels water of licht te zien is of dat u hier warme
lucht voelt. Voedsel dat veel vocht bevat, veroorzaakt stoom en condensatie aan de binnenkant, die aan de
buitenkant te zien kan zijn.
• Reparaties en aanpassingen: voer geen reparaties of aanpassingen aan de oven uit als deze niet naar behoren
functioneert. Gebruik de oven dan ook niet.
• Behuizing en lamp: maak de behuizing nooit open. Dit is erg gevaarlijk omdat de onderdelen binnenin onder hoge
spanning staan en dus nooit mogen worden aangeraakt. Dit is immers levensgevaarlijk.
De oven is niet voorzien van een toegankelijk deksel op de lamp. Als de lamp kapot is, dient u deze niet zelf te
vervangen maar neem hiervoor contact op met een door SHARP erkende servicedienst.

NL
NL – 29
NL – 29
PROBLEEMOPLOSSINGSTABEL
VRAAG ANTWOORD
Ik voel een luchtstroom bij
de deur.
Wanneer de oven werkt, circuleert er lucht in de ovenruimte.
De deur vormt geen luchtdichte afsluiting dus er kan lucht via de deurkieren
ontsnappen.
Er wordt condensatie in de
oven gevormd, die op de
deur te zien kan zijn.
De ovenruimte is normaal gesproken kouder dan de etenswaren die worden
bereid. De stoom die tijdens het koken wordt geproduceerd condenseert op het
koudere oppervlak.
De hoeveelheid stoom hangt af van de hoeveelheid water dat de etenswaren
bevatten. Sommige etenswaren, zoals aardappelen, bevatten ontzettend veel
vocht.
Condensatie in de glazen deur zou na een paar uur verdwenen moeten zijn.
Flitsen of vonken in de
ovenruimte tijdens het koken.
Vonken ontstaan als er een metalen voorwerp in de buurt komt van de
ovenruimte tijdens de bereiding. Dit kan mogelijk het oppervlak van de
ovenruimte aantasten, maar zal de oven niet beschadigen.
Vonken bij het bereiden van
aardappels.
Controleer of alle "ogen" van de aardappelen zijn verwijderd en dat u ze heeft
ingeprikt. Plaats ze direct op het draaiplateau of in een hittebestendige schaal of
iets soortgelijks.
De oven werkt niet als ik op
de knop START/QUICK START
druk.
Controleer of de deur goed is gesloten.
Oven werkt te langzaam. Zorg ervoor dat het juiste vermogen is geselecteerd.
Oven maakt geluid. De magnetronenergie gaat aan en uit tijdens het koken/ontdooien.
Om de minuut klinkt er een pieptoon uit de oven en op het display verschijnt de
melding "Fail"
Als u de knoppen op het bedieningspaneel langer dan 1 minuut ononderbroken
ingedrukt houdt, dan treedt deze fout op.
Buitenkast is heet. De kast kan handwarm worden - houd kinderen uit de buurt.
BEVEILIGING TEGEN KNOPPEN DIE BLIJVEN HANGEN
Als een knop op het bedieningspaneel in eender welke toestand langer dan 1 minuut blijft hangen, dan stopt het
programma onmiddellijk met werken en verschijnt op het display "FAIL". De magnetron geeft een pieptoon. Als de
knop blijft hangen, dan hoort u om de minuut een pieptoon. Druk na het oplossen van het probleem op STOP/ECO
om terug te keren naar de stand-bymodus.
VOORDAT U HULP INROEPT
Controleer voordat u de hulp van de klantendienst inroept elk van de volgende zaken:
• Controleer of de stekker van de oven correct in het stopcontact zit. Zo niet, dan trekt u de stekker uit het
stopcontact, wacht u 10seconden en steekt u hem er opnieuw en correct in.
• Controleer of er geen zekering gesprongen is of stroomonderbreker geactiveerd is. Als deze zaken correct lijken te
werken, test u het stopcontact met een ander apparaat.
• Controleer of het vermogen en de timer goed zijn ingesteld.
• Controleer of de deur goed gesloten is door het deurvergrendelingssysteem in te schakelen. Anders stroomt de
microgolfenergie niet de oven in.
ALS GEEN VAN DE BOVENSTAANDE CONTROLES HET PROBLEEM VERHELPT, NEEM DAN CONTACT OP MET EEN
GEKWALIFICEERDE MONTEUR. PROBEER DE OVEN NIET ZELF TE REPAREREN.

IT – 1
IT – 1
Attenzione:
Il prodotto è
contrassegnato
con questo sim-
bolo. Signi ca
che prodotti
elettrici ed elet-
tronici usati non
devono essere
messi insieme ai
ri uti normali.
C’è un sistema
di raccolta sepa-
rato per questi
prodotti.
A. Informazioni sullo smaltimento per gli utilizzatori
(uso privato)
1. Nell'Unione europea
Attenzione: se si vuole disfarsi di questo apparecchio, non utilizzare la
normale raccolta di ri uti!
Apparecchi elettrici ed elettronici usati devono essere smaltiti
separatamente e secondo la regolamentazione che richiede un trattamento
speci co, il recupero e il riciclaggio di apparecchiature elettriche ed
elettroniche.
Secondo le disposizioni degli stati membri, i privati possono restituire
all’interno dell’UE i propri apparecchi elettrici ed elettronici usati per
raccolte speci che e senza costi*.
In alcuni paesi* il rivenditore locale può anche ritirare il vostro vecchio
prodotto gratuitamente se ne comprate uno simile nuovo.
*) Contattare le autorità locali per ulteriori dettagli.
Se l'attrezzatura elettrica o elettronica è dotata di batterie o accumulatori,
smaltirla separatamente in anticipo rispettando le normative locali.
Smaltendo correttamente questo prodotto, fate in modo che i ri uti
subiscano il trattamento, il recupero e il riciclo adeguati; questo previene
potenziali e etti negativi sull'ambiente e sulla salute, che potrebbero essere
causati da uno smaltimento inappropriato.
2. In altri paesi al d fuori dell'UE
Se si vuole eliminare questo prodotto, contattare le autorità locali e chiedere
quali siano le modalità per un corretto smaltimento.
Per la Svizzera: apparecchiature elettriche o elettroniche usate possono
essere restituite senza costi al fornitore, anche se non si acquista un
nuovo prodotto. Ulteriori agevolazioni per la raccolta sono elencate nella
homepage di www.swico.ch o www.sens.ch.
B. Informazioni sul prodotto per utilizzatore business.
1. Nell'Unione europea
Se questo prodotto è utilizzato per scopi professionali e si desidera
eliminarlo:
Contattare il fornitore SHARP, che vi informerà riguardo alle modalità di
ritiro del prodotto. Potrebbero esservi addebitati dei costi derivati dal ritiro
e dallo smaltimento. Piccoli prodotti (e piccole quantità) potrebbero essere
ritirati dagli enti locali di raccolta.
Per la Spagna: contattare il sistema di raccolta u ciale o le autorità locali per
il ritiro dei prodotti usati.
2. In altri paesi al d fuori dell'UE
Se si vuole eliminare questo prodotto, contattare le autorità locali e chiedere
quali siano le modalità per un corretto smaltimento.
Per l'assistenza e i diritti di garanzia visita www.sharpconsumer.com/support/ o contatta il rivenditore da cui hai
acquistato il prodotto.
Le Dichiarazioni di conformità sono disponibili alla pagina www.sharpconsumer.com/documents-of-conformity/
www.sharpconsumer.com/
support/
www.sharpconsumer.com/
documents-of-conformity/
www.sharpconsumer.com/
contact/

IT
IT – 2
IT – 2
PRECAUZIONI PER EVITARE UNA POSSIBILE ESPOSIZIONE A ENERGIA
AMICROONDE
1. Non tentare di utilizzare questo forno con lo sportello aperto in quanto ciò potrebbe provocare un'esposizione
dannosa a energia a microonde. È importante non forzare o manomettere le chiusure di sicurezza.
2. Non inserire nulla tra la super cie anteriore del forno e lo sportello né permettere a detriti o residui di accumularsi
sulle super ci di sigillatura.
3. Non utilizzare il forno se è stato danneggiato. È molto importante che lo sportello del forno si chiuda
adeguatamente e che non ci siano danni allo sportello, ai cardini, ai blocchi o ai sigilli dello sportello e alle
super ci di sigillatura.
4. Non tentare di riparare il forno da sé.
CONTENUTI
ISTRUZIONI IMPORTANTI SULLA SICUREZZA .............................................................................................................................................. 3
INSTALLAZIONE ....................................................................................................................................................................................................11
INTERFERENZE RADIO ........................................................................................................................................................................................12
ISTRUZIONI SULLA MESSA A TERRA ..............................................................................................................................................................12
SPECIFICHE ............................................................................................................................................................................................................12
FORNO E ACCESSORI ..........................................................................................................................................................................................13
PANNELLO DI CONTROLLO ..............................................................................................................................................................................14
PRIMA DI USARE IL FORNO ..............................................................................................................................................................................14
IMPOSTARE L'OROLOGIO ..................................................................................................................................................................................14
COTTURA A MICROONDE ................................................................................................................................................................................. 15
AVVIO RAPIDO ...................................................................................................................................................................................................... 15
COTTURA GRILL....................................................................................................................................................................................................16
MICROONDE + GRILL .........................................................................................................................................................................................16
CONVEZIONE .........................................................................................................................................................................................................17
MICROONDE + CONVEZIONE .......................................................................................................................................................................... 17
MENU AUTOMATICI ............................................................................................................................................................................................18
SCONGELAMENTO AUTOMATICO ..................................................................................................................................................................19
RISCALDAMENTO AUTOMATICO ....................................................................................................................................................................19
TIMER DA CUCINA ............................................................................................................................................................................................... 19
FUNZIONE RISPARMIO ENERGETICO ............................................................................................................................................................19
FUNZIONE MUTO.................................................................................................................................................................................................20
BLOCCO DI SICUREZZA ...................................................................................................................................................................................... 20
BLOCCO BAMBINI ................................................................................................................................................................................................20
MECCANISMO DI PROTEZIONE AUTOMATICA ..........................................................................................................................................20
PULIZIA E MANUTENZIONE .............................................................................................................................................................................21
UTENSILI ADATTI ..................................................................................................................................................................................................22
RACCOMANDAZIONI PER CUCINA A MICROONDE .................................................................................................................................23
CONSIGLI PER SCONGELAMENTO .................................................................................................................................................................25
CONSIGLI PER RISCALDAMENTO ...................................................................................................................................................................26
RISOLUZIONE DEI PROBLEMI...........................................................................................................................................................................27
PROTEZIONE CONTRO I PULSANTI INCASTRATI .......................................................................................................................................28
PRIMA DI CHIAMARE L'ASSISTENZA .............................................................................................................................................................. 28

IT – 3
IT – 3
ISTRUZIONI IMPORTANTI SULLA SICUREZZA
LEGGETE ATTENTAMENTE E CONSERVATELO PER FUTURE
CONSULTAZIONI
Per evitare rischi di incendi, il forno a microonde non deve
rimanere incustodito durante il funzionamento. Livelli di
potenza troppo alti o tempi di cottura troppo lunghi pos-
sono surriscaldare il cibo e causare un incendio.
Questo forno è progettato per essere utilizzato solamente su
un piano da lavoro. Non è progettato per essere incassato. Non
inserire il forno in un armadio.
La presa della corrente deve essere facilmente accessibile in
modo da poter facilmente staccare l'unità in caso di emergenza.
La tensione di alimentazione del forno deve essere di 230-240
V, 50 Hz, con un fusibile del quadro di distribuzione di un mi-
nimo di 10 A, o un salvavita di un minimo di 10 A. Dovrebbe
essere fornito un circuito separato solo per questo apparecchio.
Non collocare il forno in aree dove viene generato calore. Ad
esempio, vicino a un forno convenzionale. Non installare il for-
no in un'area ad alta umidità o dove si possa accumulare acqua.
Non conservare o usare il forno all'aperto.
Qualora il forno dovesse produrre fumo, spegnerlo o scol-
legare la spina dalla presa di corrente, mantenendo inoltre
lo sportello chiuso in modo da soff ocare le eventuali am-
me.
Usa soltanto contenitori e utensili adatti alle microonde.
Bisogna controllare che gli utensili siano appropriati all'u-
so in forni a microonde.
Quando si riscalda il cibo in contenitori di plastica o carta,
tieni d'occhio il forno poiché c'è la possibilità di ignizione.
Dopo l’uso, pulisci sempre il coperchio guida onde, la
cavità del forno, il piatto rotante: devono essere asciutti

IT
IT – 4
IT – 4
e senza tracce di grasso. Gli accumuli di grasso possono
surriscaldarsi, fumare o in ammarsi.
Non mettere materiali in ammabili vicino al forno o alle aper-
ture di ventilazione. Non ostruire le aperture di ventilazione.
Togliere dal cibo e dal suo involucro i sigilli e li di chiusura me-
tallici. La formazione di archi elettrici sulle super ci metalliche
può causare un incendio.
Non usare il forno a microonde per friggere o riscaldare l’olio di
frittura. La temperatura in tal caso non può essere controllata e
può prendere fuoco.
Per fare i pop corn, usate esclusivamente quelli prodotti per i
microonde.
Non conservare cibo od oggetti all’interno del forno.
Controllare le impostazioni dopo aver avviato il forno, per ac-
certarsi che esso funzioni nel modo desiderato.
Non lasciare il forno senza supervisione mentre è in funzione.
Per evitare surriscaldamento o incendio, prestare molta atten-
zione alla cottura o al riscaldamento di cibi che contengono
molto zucchero o sostanze grasse, quali ad esempio salsicce,
pasticci di carne o dolci. Leggi i suggerimenti corrispondenti
nel manuale d'uso.
Per evitare il rischio di lesioni. ATTENZIONE:
Non usare il forno se è danneggiato o non funziona normal-
mente. Controllare quanto segue prima di continuare ad
usarlo:
a) Assicurarsi che lo sportello si chiuda correttamente e che
non sia fuori sesto o deformato.
b) Controllare per assicurarsi che i cardini e i blocchi di sicu-
rezza dello sportello non siano rotti o allentati.
c) Assicurarsi che le guarnizioni e le super ci di tenuta dello
sportello non siano danneggiate.

IT – 5
IT – 5
d) Assicurarsi che l'interno del forno o lo sportello non siano
ammaccati.
e) Assicurarsi che il cavo di alimentazione e la sua spina non
siano danneggiati.
Lo sportello o le relative guarnizioni si danneggiano, non usa-
te il forno sino all’avvenuta riparazione da parte di personale
competente.
Non cercare mai di adattare, riparare o modi care il forno
da soli. Qualsiasi intervento di assistenza o riparazione
dell’apparecchio che richieda la rimozione della copertura
di protezione dall’esposizione diretta alle microonde deve
essere eff ettuato esclusivamente da personale specializza-
to.
Non mettere in funzione il forno con lo sportello aperto né
alterare la serratura di sicurezza del forno in alcun modo. Non
azionare il forno in caso sia presente un oggetto tra le guarni-
zioni dello sportello e le super ci isolanti.
Non fare in modo che grasso o sporco si formino sulle
guarnizioni e le parti adiacenti. Pulire regolarmente il for-
no e togliete i residui di cibo.
Seguire le istruzioni per "Cura e pulizia". La mancata puli-
zia del forno potrebbe danneggiare la super cie e quindi
in uire sulla durata dell'elettrodomestico e creare situa-
zioni pericolose.
Chi porta uno PACEMAKER deve rivolgersi al medico o al fabbri-
cante del pacemaker riguardo alle precauzioni da prendere per
l’uso del forno a microonde.
Per evitare il rischio di scosse elettriche.
• La copertura esterna del forno non deve assolutamente
essere smontata.
• Non inserire alcun oggetto nelle aperture di ventilazione

IT
IT – 6
IT – 6
del forno. In caso di ingresso di liquidi, spegnere immediata-
mente il forno, staccare il cavo di alimentazione e chiamare
un tecnico di assistenza SHARP autorizzato.
• Non immergere il cavo di alimentazione o la sua spina
nell’acqua o in altro liquido.
• Non lasciare pendere il cavo di alimentazione dal bordo di
un tavolo o piano di lavoro.
• Tenere il cavo di alimentazione lontano da super ci riscalda-
te, compresa la parte posteriore del forno.
• Tenere l'elettrodomestico e il suo cavo fuori dalla portata di
bambini minore di 8 anni.
• Non cercare di sostituire da soli la lampadina del forno, e
non farla sostituire da chi non sia un tecnico SHARP autoriz-
zato. Se la lampadina si fulmina, rivolgersi al rivenditore o a
un concessionario SHARP autorizzato.
• Se il cavo di alimentazione è danneggiato, deve essere sosti-
tuito da un agente di servizio SHARP autorizzato.
AVVERTENZA: liquidi e altri cibi non devono essere ri-
scaldati in contenitori sigillati poiché questi potrebbero
esplodere. Riscaldare bevande a microonde può sfociare
in un bollore eruttivo ritardato; pertanto, bisogna fare
attenzione quando si maneggia il contenitore. Per evitare
esplosioni o bolliture improvvise:
Non usare mai recipienti sigillati. Togliere i sigilli e coperchi
prima dell’uso. I recipienti sigillati possono esplodere a causa
dell’aumento della pressione, anche dopo lo spegnimento del
forno. Fare attenzione a usare il forno a microonde con i liquidi.
Usare recipienti con grandi aperture che permettano la fuoriu-
scita delle bolle d’aria.
Non riscaldare mai liquidi in recipienti con collo stretto,
come i biberon, perché potrebbe veri carsi una fuoriuscita
del contenuto dal contenitore quando vengono riscaldati,
con pericolo di bruciature.

IT – 7
IT – 7
Per evitare improvvise eruzioni di liquido bollente con possibili
bruciature:
1. Predisporre un periodo di tempo non eccessivamente lun-
go.
2. Mescolare bene il liquido prima di cuocere o riscaldare.
3. Durante il riscaldamento si consiglia di porre nel liquido
un’asticciola di vetro o uno strumento simile (purché non di
metallo).
4. Lasciar riposare il liquido nel forno per almeno 20 secondi al
termine del tempo di cottura per evitare l’eruzione ritardata
della bollitura.
Non usare il forno a microonde per cuocere le uova con il
guscio né per riscaldare le uova sode intere, perché po-
trebbero esplodere anche dopo la fase di riscaldamento.
Per cucinare o riscaldare le uova che non sono state stra-
pazzate, foratene il tuorlo e l’albume. Sgusciate e aff ettate
le uova assodate prima di riscaldarle nel forno a microon-
de.
Forare la buccia di cibi come patate, salsicce e frutta prima di
cuocere, altrimenti possono esplodere.
ATTENZIONE: al ne di evitare scottature, prima del con-
sumo si raccomanda di agitare bene il contenuto di bibe-
ron o di vasetti per l’alimentazione dei bambini, nonché
di controllarne la temperatura. Usare presine o guanti da
forno quando si rimuove il cibo dal forno per prevenire
ustioni. Per evitare il rischio di scottature:
• Aprire sempre contenitori, preparazioni per popcorn, borse
per cottura al forno, ecc., lontano da viso e mani per evitare
ustioni da vapore e zampilli di liquidi bollenti. Per evitare
le ustioni, testare sempre la temperatura degli alimenti e
agitare prima di servire e prestare particolare attenzione alla
temperatura degli alimenti e delle bevande dati a bambini o

IT
IT – 8
IT – 8
anziani. Le parti accessibili possono scaldarsi durante l'uso. I
bambini piccoli devono essere tenuti lontano.
• La temperatura del contenitore non è una veritiera indica-
zione della temperatura del cibo o della bevanda; controlla-
re sempre la temperatura del cibo.
• Per evitare le scottature causate dalla fuoriuscita del vapore
e del calore, allontanarsi dallo sportello del forno durante
l’apertura.
• Per far uscire il vapore ed evitare ustioni, praticare alcune
incisioni sui cibi ripieni riscaldati.
• Tenere i bambini lontano dallo sportello per impedire che si
ustionino.
ATTENZIONE: permettete l'utilizzo del forno ai bambini
dagli 8 anni in su senza supervisione solamente dopo aver
dato le necessarie istruzioni, in modo che il bambino sia in
grado di utilizzare il forno in tutta sicurezza e abbia capito
i pericoli di un uso improprio.
Quando l'elettrodomestico è in funzione nelle modali-
tà GRILL, MIX GRILL, CONVEZIONE, MIX CONVEZIONE e
MENU AUTO (modalità applicabile a seconda del modello),
i bambini dovrebbero utilizzarlo solo con la supervisione
di un adulto a causa della temperatura generata.
Questo apparecchio non è inteso per l'utilizzo da parte di
persone (compresi bambini) che abbiano ridotte capaci-
tà siche, sensoriali o mentali, mancanza di esperienza e
conoscenze, a meno che non siano state date loro super-
visione o istruzioni riguardo l'utilizzo dell'apparecchio da
parte di una persona responsabile della loro sicurezza.
I bambini dovrebbero essere supervisionati per assicurarsi
che non giochino con l'apparecchio. La pulizia da parte dei
bambini deve essere monitorata.
I modelli con pannello touch elettronico sono dotati di una
modalità blocco per bambini.

IT – 9
IT – 9
Non appoggiarsi o far dondolare lo sportello. Non giocare col
forno né usarlo come se fosse un giocattolo.
Illustrare ai bambini le norme di sicurezza: insegnare loro ad
usare le presine per togliere i piatti dal forno, a rimuovere con
precauzione i coperchi e, in particolare, gli involucri (ad esem-
pio i materiali autoriscaldanti) usati per rendere il cibo croccan-
te, in quanto possono diventare estremamente caldi.
Altri avvertimenti
Non modi care il alcun modo il forno.
Non spostare il forno mentre sta funzionando.
Questo apparecchio è pensato per l'uso casalingo. Questo for-
no è progettato per la preparazione di cibo in casa e può essere
usato soltanto per cucinare cibo e bevande. Asciugare cibo o
tessuti o scaldare cuscinetti, pantofole, spugne, panni umidi o
oggetti simili può provocare il rischio di lesioni, scintille o am-
me. Non è adatto all'uso commerciale o in laboratorio.
Per evitare difetti di funzionamento o danni al forno:
Non azionare il forno quando è vuoto. Usando un piatto per
rosolare i cibi, o del materiale autoriscaldante, mettere sempre
sotto di esso del materiale isolante resistente al calore, come
un piatto di porcellana, per evitare danni alla base del forno a
causa del calore. Non dovete inoltre superare il tempo di preri-
scaldamento speci cato nelle istruzioni del piatto.
Non utilizzare utensili in metallo, che ri ettono le microonde e
possono causare archi elettrici. Non mettere lattine nel forno.
Per prevenire la rottura del piatto rotante o della base del forno:
a) Prima di pulire con acqua, attendere che si sia ra reddato.
b) Non mettere cibo o utensili caldi o freddi sul piatto rotante
freddo o sulla base del forno fredda.
c) Non mettere alcun oggetto sul mobile esterno durante il
funzionamento del forno.

IT
IT – 10
IT – 10
NOTA:
Non utilizzare contenitori di plastica per la cottura a microonde
se il forno è ancora caldo dopo l'utilizzo di una modalità com-
binata (a seconda del modello del forno) perché potrebbero
sciogliersi.
I contenitori di plastica non devono essere usati nelle funzioni
sopra citate, a meno che il produttore degli stessi contenitori
non a ermi che essi siano adatti a questo tipo di utilizzo.
Se non siete sicuri su come collegare il vostro forno, consultare
un elettricista autorizzato e quali cato.
Né il produttore né il rivenditore si fanno carico di alcuna re-
sponsabilità per danni al forno o per lesioni personali derivanti
dal mancato rispetto della procedura di collegamento elettrico.
Si possono talvolta formare del vapore acqueo o delle gocce
sulle pareti del forno o attorno alle guarnizioni e alle super ci
di tenuta. Ciò è del tutto normale e non è indice di malfunzio-
namento o di perdita.
Questi apparecchio è progettato per l'uso domestico e in appli-
cazioni simili, come: aree cucina riservate allo sta in negozi, uf-
ci e altri ambienti professionali; fattorie; uso da parte di clienti
in hotel, motel e altri ambienti di tipo residenziale; ambienti
tipo bed and breakfast.
Questo simbolo sta a signi care che le super ci
potrebbero diventare calde durante l'utilizzo.

IT – 11
IT – 11
INSTALLAZIONE
1. Togliere tutto il materiali all'interno del forno e togliete tutte le pellicole protettive dal microonde e sulla sua
super cie.
2. Controllare con attenzione che il forno non sia danneggiato.
3. Posizionare il forno su di una super cie sicura e piana, resistente a su cienza per sostenere il peso del forno e il
più pesante elemento possibile che possa esservi cucinato. Non mettere il forno in un armadio.
4. Scegliere una super cie che dia su ciente spazio alle ventole di ingresso e uscita. Vedere l'immagine nella prima
pagina. La parte posteriore dell'elettrodomestico deve essere posizionata contro il muro.
• L'altezza minima per l'installazione è 85 cm.
• È richiesto uno spazio minimo di 20 cm tra i lati del forno a microonde e qualunque parete adiacente.
• Lasciare almeno 30 cm di spazio sopra il forno.
• Non togliere i piedini da sotto il forno.
• Bloccare la presa e/o i bocchettoni di s ato potrebbe danneggiare il forno.
• Posizionare il forno il più lontano possibile da radio e televisori. Il funzionamento del microonde potrebbe causare
interferenze con la radio o il televisore.
20 cm
30 cm
85 cm
10 cm
20 cm
5. Inserire la spina del cavo di alimentazione del forno in una presa a muro standard a massa.
AVVERTENZE:
Non posizionare il forno in un posto in cui si producono calore, condensa o grande umidità (per esempio vicino o
sopra un normale forno) o vicino a materiali combustibili (per esempio tende).
Non bloccare od ostruire le bocche di areazione.
Non appoggiare oggetti sopra il forno.
Non toccare l'esterno del forno a microonde durante o poco dopo l'utilizzo, poiché sarà caldo.

IT
IT – 12
IT – 12
INTERFERENZE RADIO
L'utilizzo del forno a microonde può provocare interferenze a radio, televisori o apparecchi simili. Quando si veri cano
tali interferenze, possono essere ridotte o eliminate prendendo le seguenti misure:
1. Pulire lo sportello e l'interno nel punto in cui si incrociano.
2. Cambiare la direzione dell'antenna di ricezione della radio o del televisore.
3. Cambiare la posizione del forno a microonde rispetto al ricevitore.
4. Collegare la spina del forno a microonde in una presa diversa in modo che il forno a microonde e il ricevitore non
siano connessi alla stessa presa.
ISTRUZIONI SULLA MESSA A TERRA
Questo apparecchio deve essere connesso alla messa a terra. Questo forno è dotato di un cavo con un lo per la
messa a terra con una spina appropriata. Deve essere connessa a una presa a muro che sia stata installata e collegata
alla terra correttamente. Nel caso di un corto circuito elettrico, la messa a terra riduce il rischio di scosse elettriche
fornendo una fuga per la corrente. Si raccomanda di usare una presa dedicata soltanto a questo forno.
ATTENZIONE: l'uso improprio della spina con messa a terra può provocare rischi di scosse elettriche.
NOTA:
1. In caso di domande sulla messa a terra o istruzioni elettriche, consultare un elettricista quali cato o un addetto
all'assistenza.
2. Né il produttore né il rivenditore si fanno carico di alcuna responsabilità per danni al forno o per lesioni personali
derivanti dal mancato rispetto della corretta procedura di collegamento elettrico.
Il circuito usato nel forno a microonde usa i seguenti colori per i li:
Verde e giallo = TERRA | Blu = NEUTRALE | Marrone = CORRENTE
SPECIFICHE
Nome del modello: YC-PC322A
Tensione linea AC 230~240 V, 50 Hz singola fase
Fusibile linea distribuzione/interruttore di circuito 10 A
Corrente
Consumo energetico 2300 W
Potenza uscita microonde 1000 W
Potenza uscita grill 1250 W
Potenza convezione 2300 W
Consumo energetico da spento <0,5 W
Frequenza microonde 2450 MHz*
Dimensioni esterne (L) x (A) x (P) mm 539 x 280 x 415
Dimensioni cavità (L) x (A) x (P)** mm 362 x 223 x 378
Dimensioni piatto rotante in vetro (ø mm) 315
Capacità forno 32 litri**
Dimensioni vassoio da forno (diametro x altezza in mm)
317 x 48
Dimensioni griglia per grill (diametro x altezza in mm)
255 x 80
Peso 21 kg
Lampada del forno (tipo LED) 1,5 W
* - Questo prodotto soddisfa i requisiti dello standard europeo EN55011. In conformità con questo standard, questo prodotto è classi cato
come apparecchiatura di gruppo 2 classe B.
Gruppo 2 signi ca che l’apparecchiatura genera intenzionalmente energia a radiofrequenza nella forma di radiazione elettromagnetica
per il trattamento al calore degli alimenti.
Apparecchiatura di classe B signi ca che l'apparecchiatura è idonea per l'uso domestico.
** - La capacità interna è calcolata misurando larghezza, profondità e altezza massime. Lo spazio a disposizione per gli alimenti è inferio-
re.
NEL QUADRO DELLA NOSTRA POLITICA DI MIGLIORAMENTO CONTINUO, LE SPECIFICHE TECNICHE POSSONO ESSERE
MODIFICATE SENZA COMUNICAZIONE PREVENTIVA.

IT – 13
IT – 13
FORNO E ACCESSORI
1. Sistema di blocco di sicurezza dello sportello
2. Sportello del forno
3. Pannello di controllo
4. Display
5. Cavità del forno
6. Coperchio guida onde (NON TOGLIERE)
7. Vassoio di vetro
8. Anello a rotelle
9. Giunto del piatto rotante
10. Griglia per grill
11. Vassoio da forno
12. Aperture di ventilazione
13. Rivestimento esterno
14. Cavo per l'alimentazione
• La griglia per grill e la teglia sono progettate
per l'uso solo con forni a grill e convezione.
NON usare accessori di metallo quando si
utilizza la funzione microonde.
• Per l'uso della griglia per grill, consultare le
sezioni relative al grill di questo manuale.
Non toccate mai il grill quando è caldo.
NOTA: Ordinando gli accessori, indicare due
elementi: nome della parte e il nome del
modello.
NOTE:
• Dopo aver cucinato cibi grassi senza un
coperchio, pulite sempre l'interno e qualsiasi
utensile di cottura, che deve essere asciutto e
senza tracce di grasso. L'accumulo di grasso potrebbe surriscaldarsi, fumare o prendere fuoco.
• Durante la cottura a microonde, collocare sempre le stoviglie sul piatto rotante.
• NON usare la griglia per grill e la teglia con la funzione microonde.
ATTENZIONE: questo simbolo indica che le super ci possono diventare bollenti durante l’uso.
Lo sportello, il cabinato esterno, la cavità del forno, accessori e piatti divengono molto caldi durante il
funzionamento. Per prevenire le ustioni, usare sempre spessi guanti da forno.
2
7
5
9
6
8
1
3
4
14
12
13
1110

IT
IT – 14
IT – 14
PANNELLO DI CONTROLLO
1. DISPLAY DIGITALE: mostra tempo di cottura, potenza, indicatori e orario.
2. 10 SECONDI, 1 MINUTO, 10 MINUTI: usare per impostare il tempo di cottura
o l’orologio.
3. Tasti MENU AUTO: premere per selezionare il menu di cottura automatica.
(Consultare pagina 18 per suggerimenti sull'uso).
4. AVVIO/AVVIO RAPIDO: (pagina 15).
5. POTENZA MICROONDE: premere per selezionare il livello di potenza delle
microonde. (Pagina 15).
6. GRILL: premere per impostare il programma di cottura grill. (Pagina 16).
7. MICROONDE+GRILL: premere per impostare il programma di cottura con
combinazione di microonde e grill. (Pagina 16).
8. TEMPERATURA CONVEZIONE: premere per selezionare la temperatura di
convezione.
9. MICROONDE+CONVEZIONE: premere per selezionare la cottura combinata
con convezione.
10. SU : premere per impostare il peso del cibo o le portate.
11. GIÙ : premere per impostare il peso del cibo o le portate.
12. STOP/ECO – premere una volta per fermare temporaneamente la cottura, o
due volte per annullare del tutto la cottura. Usare per impostare la modalità di
risparmio energetico. (Pagina 19).
13. BLOCCO PER BAMBINI: (pagina 20).
14. ORA/IMPOSTA OROLOGIO
: usare per impostare l'orario.
Usare per impostare la funzione timer. (Pagina 14).
PRIMA DI USARE IL FORNO
Quando il forno viene connesso all'alimentazione per la prima volta, si udirà un segnale acustico e il display mostrerà
"1:00". Bisogna tenere presente che l'orologio non deve necessariamente essere impostato il forno funzioni
correttamente. Per impostare l'orario, seguire le istruzioni nella sezione “Impostare l'ora” di questo manuale utente.
Quando è nuovo, la prima volta che viene usato il grill e/o la convezione, verranno emessi fumo e odori. Per evitare
che questo accada mentre si cuoce il cibo, usare la funzione grill e la convezione per circa 20 minuti.
• Dopo l'apertura e la chiusura dello sportello, il forno entrerà in modalità stand-by. Se non viene premuto alcun
pulsante entro 1 minuto, il display resterà acceso e i pulsanti non funzioneranno. Per entrare nuovamente in
modalità stand-by, aprire e chiudere lo sportello.
• Durante la cottura, se il pulsante STOP/ECO viene premuto una volta, il ciclo di cottura verrà messo in pausa. Per
riavviare al cottura premere il pulsante AVVIO/AVVIO RAPIDO. Se il pulsante STOP/ECO viene premuto due volte,
verrà cancellata la cottura..
• Quando si programma il forno per una funzione in particolare e c'è una pausa tra le pressioni dei pulsanti di oltre
30secondi, il forno tornerà alla modalità stand-by.
• Quando si completa un ciclo di cottura, il display mostrerà “End” (Fine) e verrà emesso un segnale acustico ogni due
minuti nché non viene premuto un pulsante o non viene aperto lo sportello.
IMPOSTARE L'OROLOGIO
Questo forno ha un orologio che può essere usato in modalità da 12 o 24 ore. Per impostare l'orologio, seguire le
seguenti istruzioni.
1. In modalità stand-by, premere e tenere premuto ORA/IMPOSTA OROLOGIO per almeno 3 secondi per entrare
nella modalità di impostazione dell'orologio.
2. Premere il pulsante ORA/IMPOSTA OROLOGIO per selezionare la modalità oraria da 12 o 24 ore.
3. Usare i pulsanti 10 SECONDI, 1 MINUTO e 10 MINUTI per impostare le ore e i minuti desiderati.
4. Premere il pulsante ORA/IMPOSTA OROLOGIO per salvare e uscire dalla modalità di impostazione dell’orologio.
10 SECONDS 1 MINUTE 10 MINUTES
YC-PC322A
1000W
STOP/ECO TIME/
SET CLOCK
CHILD
LOCK
AUTO PROGRAMS
REHEAT
BEVERAGES JACKE T
POTATO PIZZA POPCORN
FROZEN
MEAL FRESH
VEGETABLES PORRID GE AUTO
DEFROST
GRILLED
STEAK GRILLED
CHICKEN AUTO
REHEAT
ROAST
BEEF
ROAST
CHICKEN
OVEN
CHIPS
MICROWAVE
POWER
MICROWAVE
+ CONVECTION
CONVECTION
TEMPERATURE
GRILL
START/
QUICK START
MICROWAVE
+ GRILL
13
5
3
2
14
11
6
8
9
7
10
12
4
1

IT – 15
IT – 15
• Non è necessario impostare l'orologio perché il forno funzioni normalmente.
• In modalità cottura, premere il pulsante ORA/IMPOSTA OROLOGIO per vedere l'ora del giorno (se impostata).
L'ora passerà di nuovo al conteggio della cottura dopo 5 secondi. Bisogna tenere presente che l'ora non può essere
visualizzata se è stato impostato il timer.
COTTURA A MICROONDE
Per usare la funzione microonde, seguire le istruzioni di seguito:
1. In modalità stand-by, premere il pulsante POTENZA MICROONDE per selezionare il livello di potenza. Ogni volta
che viene premuto il pulsante, il display mostrerà il livello di potenza delle microonde.
2. Una volta selezionati il livello di potenza del microonde desiderato, usare i pulsanti 10 SECONDI, 1 MINUTO e
10MINUTI per selezionare il tempo di cottura.
3. Premere il tasto AVVIO/AVVIO RAPIDO per iniziare a cuocere.
4. Quando si completa un ciclo di cottura, il display mostrerà “End” (Fine) e verrà emesso un segnale acustico ogni
due minuti nché non viene premuto un pulsante o non viene aperto lo sportello.
Si tenga presente che la tabella di seguito è a scopo di guida. Il forno ha 10 livelli di potenza delle microonde: 10%,
20%, 30%, 40%, 50%, 60%, 70%, 80%, 90% e 100%. Il wattaggio e ettivo emesso può essere calcolato moltiplicando la
potenza delle microonde per la percentuale.
Guida alla cottura a microonde:
Display Potenza
microonde Uso consigliato
P100 100 % Impostazione usata per la cottura rapida o per riscaldare, ad es. per pasticci,
bevande calde, verdure, ecc.
P-80 80 %
Per cibi densi che richiedono una cottura prolungata quando cucinati in modo
convenzionale (ad esempio la carne di manzo). Si raccomanda di utilizzare questa
impostazione per ottenere una carne tenera.
P-60 60 % Per cotture più lunghe di cibi densi come arrosto, polpettone e pasti impiattati,
nonché per piatti delicati come salsa al formaggio e torte spugnose.
P-40 40 %
Per scongelare; selezionare questa potenza per assicurarvi che il cibo si scongeli
uniformemente. Questa impostazione è ideale anche per far cuocere a fuoco lento
riso, pasta, tortellini e per creme all'uovo.
P-20 20 % Per scongelamento delicato, per esempio per dolci al cucchiaio o pasticcini.
• Durante la cottura è possibile controllare il livello di potenza della cottura premendo e tenendo premuto il pulsante
POTENZA MICROONDE.
• Il tempo massimo di cottura è 95 minuti.
AVVIO RAPIDO
Se c'è bisogno di cuocere al 100% di potenza, basta premere il pulsante AVVIO/AVVIO RAPIDOmentre si è in
modalità stand-by. A ogni pressione del pulsante AVVIO/AVVIO RAPIDO, verranno aggiunti 30 secondi al tempo di
cottura.

IT
IT – 16
IT – 16
COTTURA GRILL
L'elemento riscaldante Grill nella parte alta dell'interno del forno ha soltanto un'impostazione di potenza, che è
e ciente ed economica. Il grill è ideale per la cottura di pancetta, bistecche di prosciutto, bocconcini di pesce e
biscotti da tè.
Usare la griglia del grill per grigliare cibi piccoli, come pancetta e salsicce, capovolgere a metà cottura. Il cibo può
essere collocato direttamente sulla griglia o in un piatto an oppure su un piatto termoresistente. Per evitare che
goccioli olio o grasso dal cibo in cottura, assicurarsi che sotto la griglia del grill sia collocato un piatto adeguato.
Quando si vuole imbrunire e rendere croccante la super cie di cibi in una casseruola, la griglia del grill può essere
usata se il contenitore è abbastanza poco profondo. Tuttavia, si consiglia di collocare tali contenitori direttamente
sul piatto ruotante e aggiungere un po' di tempo in più per imbrunire e rendere croccante come desiderato. Non è
possibile usare la griglia del grill per grigliare.
Per usare la funzione grill, seguire le istruzioni di seguito:
1. In modalità stand-by, premere il pulsate GRILL per selezionare la funzione grill. Il display mostrerà ”Grl”.
2. Usare i pulsanti 10 SECONDI, 1 MINUTO e 10 MINUTI per impostare il tempo di cottura..
3. Premere il tasto AVVIO/AVVIO RAPIDO per iniziare a cuocere.
4. Quando si completa un ciclo di cottura, il display mostrerà End (Fine) e verrà emesso un segnale acustico ogni due
minuti nché non viene premuto un pulsante o non viene aperto lo sportello.
MICROONDE + GRILL
Usare sia la funzione microonde che grill è possibile per dorare e cuocere rapidamente il cibo. Per usare la funzione
microonde e grill, seguire le istruzioni di seguito:
1. In modalità stand-by, premere il pulsante MICROONDE + GRILL una volta o due per selezionare "Co-1" o "Co-2".
2. Usare i pulsanti 10 SECONDI, 1 MINUTO e 10 MINUTI per impostare il tempo di cottura.
3. Premere AVVIO/MINUTO QUICK per avviare.
4. Quando si completa un ciclo di cottura, il display mostrerà “End” (Fine) e verrà emesso un segnale acustico ogni
due minuti nché non viene premuto un pulsante o non viene aperto lo sportello.
Funzione microonde + grill
Display Processo di cottura Uso consigliato
Co-1
Il forno cuocerà nel seguente ciclo:
Microonde per 22 secondi, grill per 11 secondi. Ciò si
ripeterà no alla ne del tempo impostato.
Pezzi di pollo, petti di pollo, bocconi di
maiale
Co-2
Il forno cuocerà nel seguente ciclo:
Microonde a piena potenza per 18 secondi poi grill
per 15 secondi. Ciò si ripeterà no alla ne del tempo
impostato.
Pollo intero
• Il tempo di cottura massimo con il grill è 95 minuti.
• Durante la grigliatura permettere al fumo e agli odori di disperdersi aprendo una nestra o attivando la cappa della
cucina. Questo è un comportamento normale e non un difetto del forno.
• Durante la cottura puoi controllare la combinazione attuale di potenza di cottura toccando il pulsante MICROONDE
+ GRILL.
• Quando si usa la funzione grill, il grill si accenderà e spegnerà a intervalli regolari per prevenire il surriscaldamento.
• Quando si usa la funzione MICROONDE+GRILL, il cibo può essere collocato in un contenitore adatto direttamente
sul piatto rotante.
ATTENZIONE: lo sportello, la copertura esterna, l'interno e gli accessori diventano molto caldi durante il
funzionamento. Per evitare bruciature, usate sempre guanti da forno.

IT – 17
IT – 17
CONVEZIONE
Durante la cottura a convezione, l'aria calda circola attraverso l'interno del forno per imbrunire e rendere croccante il
cibo in maniera rapida e omogenea. Questo forno può essere programmato su tredici diverse temperature di cottura
(200°C, 190°C, 180°C, 170°C, 160°C, 150°C, 140°C, 130°C, 120°C, 110°C).
Si raccomanda di per pre-riscaldare il forno prima della cottura in modalità convezione. Per pre-riscaldare e cuocere
usando la funzione convezione, seguire le istruzioni di seguito:
Il forno può essere programmato per combinare le operazioni di cottura di preriscaldamento e convezione.
1. In modalità stand-by, premere il pulsante CONVEZIONE ripetutamente per selezionare la temperatura di
convezione.
2. Premere il tasto AVVIO/AVVIO RAPIDO per iniziare la funzione di preriscaldamento.
3. Quando viene raggiunta la temperatura designata, il forno emetterà un segnale acustico.
Una volta che il forno si è pre-riscaldato e si è udito il segnale acustico:
1. Aprire lo sportello e collocare il contenitore del cibo al centro del ripiano interno.
2. Usare i pulsanti 10 SECONDI, 1 MINUTO e 10 MINUTI per impostare il tempo di cottura. Il tempo più lungo è 95
minuti.
3. Premere AVVIO/MINUTO QUICK per avviare.
NOTA: quando la temperatura di pre-riscaldamento della convezione viene raggiunta, il forno emetterà un segnale
acustico ogni due secondi. La temperatura di pre-riscaldamento sarà mantenuta per 30 minuti dopodiché il forno si
spegnerà.
MICROONDE + CONVEZIONE
La modalità Microonde+Convezione rende più facile e veloce la cottura in quanto utilizza la cottura a microonde e a
convezione per rendere più croccante il cibo.
Si può cuocere il cibo a 4 di erenti temperature a convezione. Per avviare la modalità duale di cottura, seguire le
istruzioni di seguito:
1. In modalità stand-by, premere il pulsante MICROONDE+CONVEZIONE ripetutamente per selezionare la
temperatura di convezione (200°C, 170°C, 140°C, 110°C).
2. Usare i pulsanti 10 SECONDI, 1 MINUTO e 10 MINUTI per impostare il tempo di cottura. Il tempo va da 10 secondi
a 95 minuti.
3. Premere AVVIO/MINUTO QUICK per avviare.
Quando si usa la funzione Microonde + Convezione, il tempo della cottura a microonde e convezione corrisponde a
quanto riportato di seguito. Scegliere l’opzione più adatta per la cottura del cibo e per renderlo croccante.
Display Processo di cottura
200 °C 10 secondi di potenza microonde, quindi 23 secondi di cottura a convezione. Il ciclo si ripeterà
no alla ne del tempo di cottura impostato.
170 °C 15 secondi di potenza microonde, quindi 18 secondi di cottura a convezione. Il ciclo si ripeterà
no alla ne del tempo di cottura impostato.
140 °C 19 secondi di potenza microonde, quindi 14 secondi di cottura a convezione. Il ciclo si ripeterà
no alla ne del tempo di cottura impostato.
110 °C 24 secondi di potenza microonde, quindi 9 secondi di cottura a convezione. Il ciclo si ripeterà
no alla ne del tempo di cottura impostato.

IT
IT – 18
IT – 18
MENU AUTOMATICI
Per una questione di comodità, i programmi automatici permettono al cibo di essere cotto rapidamente e in maniera
e cace con sole poche pressioni di pulsanti. Non è necessario programmare la durata o la potenza della cottura: tutto
ciò che serve è premere il pulsante di cottura automatica, indicare il peso/i pezzi usando i pulsanti SU e GIÙ e poi
premere il pulsante AVVIO/AVVIO RAPIDO.
Per esempio, per cuocere due patate al cartoccio.
1. Aprire lo sportello e collocare il cibo all'interno del forno usando delle stoviglie adeguate al ciclo di cottura usato.
2. Chiudere lo sportello.
3. Premete una volta il tasto PATATA AL CARTOCCIO.
4. Usare i pulsanti SU e GIÙ per indicare il numero di patate.
5. Premere AVVIO/AVVIO RAPIDO.
6. Quando si completa un ciclo di cottura, il display mostrerà “End” (Fine) e verrà emesso un segnale acustico ogni
due minuti nché non viene premuto un pulsante o non viene aperto lo sportello.
Menu cottura automatica:
Menu automatico Metodo per selezionare peso o pezzi Dimensioni/peso
Pasto congelato Selezionare il peso usando i pulsanti SU e GIÙ, quindi premere il
pulsante AVVIO/AVVIO RAPIDO per cominciare la cottura.
Da 200 a 800 g
Scongelamento
automatico Da 100 a 1800 g
Riscaldare bevande Selezionare il numero di tazze usando i pulsanti SU e GIÙ, quindi
premere il pulsante AVVIO/AVVIO RAPIDO per cominciare la cottura.
Da 1 a 3 tazze (da
200 ml ciascuna)
Patate al forno
Selezionare il numero di patate usando i pulsanti SU e GIÙ, quindi
premere il pulsante AVVIO/AVVIO RAPIDO per cominciare la cottura.
A seconda del numero di patate selezionate potrebbe essere richiesto
di cambiare posizione alle patate durante il ciclo di cottura.
Da 1 a 3 patate (da
230 g ciascuna)
Popcorn
Selezionare il peso usando i pulsanti SU e GIÙ, quindi premere il
pulsante AVVIO/AVVIO RAPIDO per cominciare la cottura.
100g
Verdure fresche Da 200 a 600 g
Pizza 150 g / 300 g /
450 g
Porridge Da 50 a 150 g
Bistecca alla griglia* Da 200 a 600 g
Pollo grigliato* Da 200 a 600 g
Riscaldamento
automatico* Da 200 a 800 g
Patatine al forno 200 g
Manzo/agnello
arrosto Da 200 a 600 g
Pollo arrosto Da 800 g a 1400 g
• Il risultato della cottura automatica dipende da fattori quali la forma e la dimensione del cibo, le preferenze
personali in termini di cottura di certi cibi e come il cibo viene collocato nel forno. Se il risultato della cottura non è
soddisfacente, regolare il tempo di cottura di conseguenza.
• Per alcuni programmi di cottura automatica, è possibile che venga richiesto di capovolgere il cibo. Aprire lo
sportello, capovolgere il cibo, chiudere lo sportello e poi premere il pulsante AVVIO/AVVIO RAPIDO per riprendere
la cottura.
• Indossare guanti da forno (o simili) quando si capovolge il cibo.

IT – 19
IT – 19
SCONGELAMENTO AUTOMATICO
Lo scongelamento automatico permette di scongelare il cibo in base al peso. Il tempo di scongelamento e il livello
di potenza sono con gurati automaticamente una volta programmati la categoria di cibo e il peso. Il peso del cibo
congelato va da 200g a 1800g.
1. In modalità stand-by, premere il pulsante SCONGELAMENTO AUTOMATICO.
2. Usare i pulsanti SU e GIÙ per selezionare il peso del cibo da scongelare.
3. Premere il tasto AVVIO/AVVIO RAPIDO per iniziare il ciclo di scongelamento.
4. Se il forno si arresta durante il ciclo di scongelamento, capovolgere il cibo per assicurare uno scongelamento
uniforme e quindi premere AVVIO/AVVIO RAPIDO per scongelare il tempo rimanente.
5. Quando si completa un ciclo di scongelamento, il display mostrerà “End” (Fine) e verrà emesso un segnale acustico
ogni 2 minuti nché non viene premuto un pulsante o non viene aperto lo sportello.
RISCALDAMENTO AUTOMATICO
Il forno permette di riscaldare il cibo in base al peso indicato dall'utente. Il tempo di scongelamento e il livello di
potenza sono con gurati automaticamente una volta programmati la categoria di cibo e il peso. Il peso per lo
scongelamento va da 200g a 800g.
1. In modalità stand-by, premere il pulsante RISCALDAMENTO AUTOMATICO.
2. Usare i pulsanti SU e GIÙ per selezionare il peso del cibo da riscaldare.
3. Premere AVVIO/AVVIO RAPIDO.
4. Quando si completa un ciclo di cottura, il display mostrerà “End” (Fine) e verrà emesso un segnale acustico ogni
due minuti nché non viene premuto un pulsante o non viene aperto lo sportello.
TIMER DA CUCINA
Il forno è dotato di timer che conterà alla rovescia dal tempo impostato.
1. In modalità stand-by, premere una volta il pulsante ORA/IMPOSTA OROLOGIO.
2. Usare i pulsanti 10 SECONDI, 1 MINUTO e 10 MINUTI per impostare il tempo desiderato. Il tempo più lungo è
95minuti.
3. Premere AVVIO/AVVIO RAPIDO per confermare.
4. Il display farà il conto alla rovescia dal tempo di cottura impostato.
5. Quando il display raggiunge lo zero, verrà emesso un segnale acustico.
Inoltre è possibile usare il timer nella modalità di cottura. Per farlo, seguire i passaggi come de niti in precedenza
mentre il cibo è in cottura. Una volta attivato il timer, questo apparirà sul display per cinque secondi, quindi il display
tornerà a mostrare il time col conto alla rovescia per il ciclo di cottura. Per visualizzare di nuovo il timer, premere il
pulsante ORA/IMPOSTA OROLOGIO una volta e il time apparirà per cinque secondi, per poi tornare a mostrare il
conto alla rovescia della cottura.
• Per annullare il programma TIMER premere il pulsante STOP/ECO e l'orologio mostra l'ora.
• Se è stato avviato un ciclo di cottura, è possibile avviare il timer seguendo i passaggi come descritto in precedenza.
FUNZIONE RISPARMIO ENERGETICO
Questa funzione permette di risparmiare corrente mentre il forno non è in uso. Per attivare questa funzione in
modalità stand-by, premere e tieni premuto STOP/ECO per 3 secondi, il display si spegnerà; il forno entrerà in
modalità risparmio energetico.
Per cancellare la funzione, premere qualsiasi pulsante oppure aprire e chiudere una volta lo sportello.

IT
IT – 20
IT – 20
FUNZIONE MUTO
È possibile silenziare i suoni del microonde usando la funzione muto. Per impostare la funzione muto premere una
volta il pulsante BLOCCO BAMBINI e il display mostrerà "oFF" per 5 secondi. Mentre si è in modalità muto, non
saranno emessi suoni alla pressione dei pulsanti.
Per spegnere la funzione muto, premere il pulsante BLOCCO BAMBINI una volta e il display mostrerà "ON" per
5secondi per indicare che i suoni sono stati riattivati.
Se la funzione muto è impostata e il forno viene disconnesso dall'alimentazione, la funzione sarà cancellata quando
l'alimentazione viene ripristinata.
BLOCCO DI SICUREZZA
Questa è una funzione automatica per prevenire l'uso del forno da parte di bambini senza supervisione. In modalità
stand-by, se non viene eseguita alcuna operazione per 1 minuto, il forno entrerà automaticamente in modalità blocco
di sicurezza e Loc apparirà sul display. In questo stato, tutti i pulsanti sono disattivati. Premere un pulsante qualsiasi, la
spia del blocco appare sul display per 5 secondi per ricordare all'utente di disattivare il blocco di sicurezza.
Per rimuovere il blocco, aprire lo sportello del microonde e il tastierino tornerà attivo e la spia del blocco si spegnerà.
BLOCCO BAMBINI
Per impostare il BLOCCO BAMBINI, premere e tenere premuto il pulsante BLOCCO BAMBINI per 3 secondi; si udirà
un lungo segnale acustico e il display indicherà "Loc". Il forno ora è in modalità BLOCCO BAMBINI. In questa modalità,
il display mostrerà l'orologio; se viene premuto un pulsante qualsiasi o lo sportello viene aperto, apparirà “Loc” per
5secondi.
Per annullare il BLOCCO BAMBINI, tenere premuto il tasto BLOCCO BAMBINI per 3 secondi nché non si udirà un
lungo bip.
MECCANISMO DI PROTEZIONE AUTOMATICA
PROTEZIONE DAL SURRISCALDAMENTO: quando il forno rileva una temperatura alta, il display indica "E01" e smette
di funzionare. Ciò può essere annullato premendo il pulsante STOP/ECO.
PROTEZIONE DA BASSE TEMPERATURE: quando il forno entra in modalità protezione da basse temperature, il
display mostra "E02" e smette di funzionare. Ciò può essere annullato premendo il pulsante STOP/ECO.
PROTEZIONE MALFUNZIONAMENTO SENSORE: quando il forno rileva che c'è un problema con uno dei sensori,
apparirà "E03" e il forno smetterà di funzionare. In aggiunta il forno emetterà un segnale acustico di avvertimento. Ciò
può essere annullato premendo il pulsante STOP/ECO.

IT – 21
IT – 21
PULIZIA E MANUTENZIONE
• Spegnere il forno e staccare la spina dalla presa quando si pulisce.
• Tenere l'interno del forno pulito. Quando il cibo schizza o si riversano dei liquidi aderendo alle pareti del forno, sul
lato superiore, sulla base o sul piatto rotante, ripulirle con un panno umido. Detergenti leggeri possono essere usati
se il forno si sporca molto. Evitare di usare spray o altri detergenti più aggressivi. Potrebbero macchiare, gra are o
rovinare la super cie dello sportello.
• L'esterno del forno deve essere pulita con un panno umido. Per prevenire danni alle parti funzionali all'interno del
forno, non bisogna permettere che penetri acqua nelle aperture di ventilazione.
• Stro nare lo sportello e la nestra su entrambi i lati, le giunture dello sportello e le parti adiacenti frequentemente
con un panno umido per rimuovere eventuali riversamenti e macchi.
• Non usare detergenti abrasivi.
• Non pulire usando detergenti a vapore.
• Non permettere che il pannello di controllo si bagni. Pulire con un panno so ce e umido. Quando si pulisce il
pannello di controllo, lasciare lo sportello del forno aperto per evitare che il forno si accenda accidentalmente.
• Se si accumula vapore all'interno o attorno l'esterno dello sportello del forno, ripulire con un panno umido. Ciò può
veri carsi quando il forno microonde viene usato in condizioni di alta umidità. Non è un difetto.
• Il piatto rotante dovrebbe essere pulito regolarmente per evitare contaminazioni e possibili danni e archi elettrici.
Basta stro nare la super cie del forno con un lieve detergente.
• Rimuovere odori dal forno combinando una tazza d'acqua con il succo e la buccia di un limone in una ciotola che
può essere usata con le microonde. Usare le microonde per 5 minuti. Stro nare con cura e asciugare con un panno
morbido.
• Se la lampadina si guasta, contattare l'assistenza tecnica per un consiglio.
• Il forno deve essere pulito regolarmente ed eventuali depositi di cibo devono essere rimossi. Il mancato
mantenimento del forno in condizioni di pulizia può portare al deterioramento della super cie che può avere e etti
negativi sull'unità e potrebbe provocare situazioni pericolose.
• Non smaltire questo apparecchio nei ri uti domestici; consultare le indicazioni del tuo paese su come smaltire
questo tipo di prodotto.

IT
IT – 22
IT – 22
UTENSILI ADATTI
1. Il materiale ideale per un utensile per microonde è trasparente alle microonde, e quindi permette all'energia di
passare attraverso il contenitore e riscaldare il cibo.
2. Le microonde non possono penetrare il metallo, quindi non bisogna usare utensili di metallo o stoviglie con
niture metalliche.
3. Non usare prodotti i carta riciclata nella cottura a microonde, in quanto potrebbero contenere piccoli frammenti
metallici che potrebbero provocare scintille e/o amme.
4. Sono consigliate stoviglie rotone/ovali piuttosto che quadrate/rettangolari, in quanto il cibo negli angoli tende a
cuocersi troppo.
5. Si possono usare strisce sottili di fogli di alluminio per evitare che le aree esposte si cuociano troppo. Tuttavia,
bisogna fare attenzione non non usarne troppo e di mantenere una distanza di 2,54 cm tra il foglio e le pareti
interne.
La seguente lista è una guida generale per aiutare l'utente a selezionare gli utenti corretti.
Utensile Microonde
Sicura
Grill/
Conve-
zione
Commento
Piatto crisp /
Seguite sempre le istruzioni del produttore.
Non superate i tempi di cottura indicati. Prestate molta attenzione,
poiché i piatti possono diventare molto caldi.
Porcellana e ceramica / Porcellana, terracotta, vasellame smaltato e porcellana ne sono di solito
adatti, a meno che non abbiano decorazioni in metallo.
Vetro termoresistente Bisogna fare attenzione che gli utensili in vetro siano adatti all'uso in un
forno a microonde.
Vetro non termoresistente
Ceramica termoresistente Assicurarsi che i materiali in ceramica non siano troppo spessi oche non
contengano troppi minerali.
Stoviglie di plastica utilizzabili
nel microonde
Controllare sempre che le stoviglie di plastica sono adatte all'uso in un
forno a microonde.
Carta da cucina / Usare solo carta da cucina consigliata per l'uso in forni a microonde.
Articoli di vetro p.es. Pyrex® / Fate attenzione se utilizzate stoviglie in vetro ne, poiché potrebbero
rompersi o creparsi se riscaldate improvvisamente.
Vassoio di metallo
Non è consigliato l’utilizzo di utensili da cucina in metallo perché
possono creare archi elettrici che, a loro volta, possono causare fuoco
o incendi.
Griglia di metallo
Non è consigliato l’utilizzo di utensili da cucina in metallo perché
possono creare archi elettrici che, a loro volta, possono causare fuoco
o incendi.
Fogli di alluminio
vaschette di alluminio /
Piccoli pezzi di fogli di alluminio possono essere utilizzati per proteggere
il cibo dal surriscaldamento. Mantenete i fogli ad almeno 2,54 cm dalle
pareti del forno, poiché potrebbero veri carsi archi elettrici.
Le vaschette di alluminio non sono consigliate, a meno che il produttore
non lo speci chi, per esempio Microfoil®. Seguite attentamente le
istruzioni.
Pellicola protettiva Non dovrebbe toccare il cibo e deve essere forata per permettere al
vapore di fuoriuscire.
Plastica/polistirene, per
esempio contenitori di fast food
Fate attenzione poiché alcuni contenitori si deformano, si sciolgono o
scoloriscono ad alte temperature.
Sacchetti per il freezer/l'arrosto Deve essere forato per far fuoriuscire il vapore. Assicuratevi che i
sacchetti utilizzati siano adatti all'utilizzo nel forno a microonde.
Carta - piatti, bicchieri e carta
da cucina
Non utilizzate fermagli in plastica o metallo poiché possono sciogliersi o
prendere fuoco a causa degli archi metallici.
Paglia e contenitori di legno Usate solamente per scaldare o per assorbire l'umidità.
Fate attenzione, poiché il surriscaldamento può causare incendi.
Carta riciclata e giornali
Fate sempre attenzione al forno quando utilizzate questi materiali
perché il surriscaldamento può provocare ammate.
Può contenere estratti di metallo che causano archi metallici e possono
sfociare in ammate.
ATTENZIONE: in caso di riscaldamento di alimenti inseriti in contenitori di plastica o di carta, a causa
della possibilità della loro combustione mantenete il forno sotto osservazione.
NOTA: non lasciare il forno senza supervisione mentre è in funzione.

IT – 23
IT – 23
RACCOMANDAZIONI PER CUCINA A MICROONDE
Le microonde cuocono il cibo più rapidamente della cottura convenzionale. Quindi è essenziale che certe tecniche
vengano seguite per assicurare buoni risultati. Molte delle seguenti tecniche sono simili a quelle utilizzate nella
cottura convenzionale.
ATTENZIONE: i liquidi e gli alimenti non devono essere riscaldati in contenitori sigillati o vasetti/
contenitori con coperchi, perché la pressione aumenta all'interno e potrebbe causarne
l'esplosione.
CONSIGLI PER LA COTTURA:
• Essere sempre presenti durante l'uso del forno.
• Assicurarsi che gli utensili siano adatti per l'uso in un forno a microonde.
• Usare solo popcorn a microonde all'interno della confezione consigliata (seguire le istruzioni del produttore). Non
usare olio a meno che non sia speci cato dal produttore e non cuocere più di quanto indicato.
ATTENZIONE: se si superano i tempi di cottura consigliati e si usano livelli di potenza troppo elevati, gli
alimenti potrebbero surriscaldarsi, bruciare e in circostanze estreme, prendere fuoco e
danneggiare il forno.
Disposizione
Collocare le parti più spesse degli alimenti verso l'esterno del piatto, ad es. le cosce di pollo.
Gli alimenti collocati verso l'esterno del piatto ricevono meno energia, quindi cuociono più rapidamente rispetto a
quelli al centro.
Coperchio
Alcuni alimenti bene ciano dall'essere coperti durante la cottura al microonde.
Usare una pellicola per microonde o un coperchio adatto.
Bucare
Gli alimenti con guscio, pelle, o membrana devono essere bucati molte volte di essere cotti o riscaldati perché si forma
vapore e potrebbe causarne l'esplosione, ad es. patate, pesce, pollo, salsicce.
NOTA: le uova non vanno riscaldate usando la potenza delle microonde in quanto potrebbero esplodere, anche dopo
che la cottura è terminata. Ad es. uova in camicia, fritte, sode.
Agitare, girare e ricollocare
Per una cottura uniforme è essenziale agitare, girare e ricollocare gli alimenti durante la cottura. Agitare e ricollocare
sempre dall'esterno verso il centro.
Riposo
Dopo la cottura è necessario lasciare riposare per qualche istante: ciò consente la dispersione uniforme del calore
negli alimenti.

IT
IT – 24
IT – 24
Caratteristiche degli alimenti
Composizione Gli alimenti ricchi di grasso o zucchero (p.es. budini, torte) richiedono meno tempo per la
cottura. Fare attenzione perché un surriscaldamento può causare incendi.
Le ossa negli alimenti conducono calore, e gli alimenti si cuociono più velocemente. Fare
attenzione a una cottura uniforme degli alimenti.
Densità La densità degli alimenti ha e etto sul tempo di cottura necessario.
Gli alimenti leggeri e porosi, come torte o pane, si cuociono più rapidamente rispetto
agli alimenti pesanti e densi come arrosti e pasticci.
Quantità Il numero di microonde nel forno resta lo stesso indipendentemente da quanto cibo
viene cucinato. Il tempo di cottura deve essere aumentato se la quantità di alimenti nel
forno aumenta.
P.es. quattro patate richiedono più tempo di cottura di due.
Dimensioni Gli alimenti e i pezzi piccoli si cuociono più rapidamente di quelli più grandi, poiché i
microonde penetrano da tutti i lati verso il centro. Per una cottura uniforme fare pezzi
delle stesse dimensioni.
Forma Gli alimenti di forma irregolare, come pezzi o cosce di pollo, devono essere cotti più
a lungo nelle parti più spesse. Per una cottura uniforme, collocare le parti più spesse
all'esterno del piatto dove ricevono più energia.
Le forme rotonde si cuociono in modo più uniforme delle forme squadrate con la cottura
a microonde.
Temperatura degli
alimenti
La temperatura iniziale degli alimenti ha e etto sul tempo di cottura necessario.
Gli alimenti freddi richiedono più tempo per la cottura degli alimenti a temperatura
ambiente.
La temperatura del contenitore non è un'indicazione veritiera della temperatura degli
alimenti o della bevanda. Tagliare gli alimenti con farciture, per esempio ciambelle alla
marmellata, per rilasciare il calore o il vapore.
ATTENZIONE: volto e mani: usare sempre guanti da forno per rimuovere gli alimenti o le stoviglie dal
forno. Restare indietro quando si apre lo sportello del forno per consentire al calore o al
vapore di disperdersi. Quando si rimuovono le coperture (come la pellicola), si aprono le
borse degli arrosti o la confezione del popcorn, tenere il vapore lontano da mani e volto.
ATTENZIONE: controllare la temperatura di alimenti e bevande e agitare prima di servire. Fare
attenzione quando si servono i neonati, i bambini o gli anziani. I contenuti dei biberon
e dei vasetti di omogeneizzati devono essere agitati o mescolati e controllare la
temperatura prima di consumare per evitare bruciature.

IT – 25
IT – 25
CONSIGLI PER SCONGELAMENTO
Usare il forno a microonde è il metodo di scongelamento più rapido. Si tratta do un processo semplice ma le seguenti
istruzioni sono essenziali per assicurare che gli alimenti siano adeguatamente scongelati.
• Rimuovere tutta la confezione e la copertura prima di scongelare.
• Per scongelare gli alimenti, usare i livelli da P-20 a P-40 di potenza delle microonde.
• Consultare le informazioni di seguito per ulteriori dettagli.
Spostare
Gli alimenti collocati verso l'esterno del piatto ricevono si scongelano più rapidamente degli alimenti al centro.
Pertanto è essenziale che gli alimenti siano spostati no a quattro volte durante lo scongelamento.
Spostare i pezzi vicini dall'esterno al centro e spostare le parti sovrapposte.
Ciò garantisce che tutte le parti siano scongelate uniformemente.
Separare
Gli alimenti possono essere attaccati insieme quando sono rimossi dal congelatore. É importante separare gli alimenti
non appena possibile durante lo scongelamento.
ad es. fette di pancetta, letti di pollo.
Coperchio
Alcune aree degli alimenti scongelati possono divenire bollenti. Per impedire che diventino può calde e iniziare la
cottura, queste aree devono essere protette con pezzettini di foglio di alluminio, che ri ettono le microonde, ad es.
per cosce e ali di pollo.
Riposo
Il tempo di riposo è necessario per assicurare che gli alimenti siano ben scongelati.
Lo scongelamento non è completo una volta che gli alimenti sono rimossi dal forno a microonde. Gli alimenti
devono riposare, essere coperti, per un certo intervallo di tempo al ne di assicurare che il centro sia completamente
scongelato.
Girare
È essenziale che tutti gli alimenti siano capovolti no a 4 volte durante lo scongelamento.
È importante per assicurare uno scongelamento profondo.

IT
IT – 26
IT – 26
CONSIGLI PER RISCALDAMENTO
Per il riscaldamento degli alimenti, seguire i consigli e le linee guida di seguito per garantire che gli alimenti siano ben
riscaldati prima di servire.
Pasti impiattati
Rimuovere porzioni di carne o pollame, riscaldarle separatamente, vedere di seguito.
Collocare le parti più piccole degli alimenti al centro del piatto, gli alimenti più grandi e spessi sul bordo. Coprire con
una pellicola da microonde e riscaldare alla potenza P-50, agitare/spostare a metà riscaldamento.
NOTA: assicurarsi che gli alimenti siano ben riscaldati prima di servire.
Carne aff ettata
Coprire con una pellicola da microonde e riscaldare alla potenza P-60. Spostare almeno una volta per garantire un
riscaldamento uniforme.
NOTA: assicurarsi che la carne sia ben riscaldata prima di servire.
Porzioni di pollo
Collocare le parti più spesse degli alimenti all'esterno del piatto, coprire con una pellicola da microonde e riscaldare
alla potenza 70p.
Capovolgere a metà riscaldamento.
NOTA: assicurarsi che il pollo sia ben riscaldato prima di servire.
Pasticci
Coprire con una pellicola per microonde o un coperchio adatto e riscaldare alla potenza P-50.
Agitare frequentemente per assicurare un riscaldamento uniforme.
NOTA: assicurarsi che gli alimenti siano ben riscaldati prima di servire.
Per ottenere i migliori risultati durante il riscaldamento, selezionare un livello di potenza del microonde adeguato
al tipo di alimento. Ad es. una ciotola di verdure può essere riscaldata usando la potenza P-100, mentre una lasagna
contenente ingredienti che non possono essere mescolati deve essere riscaldata usando la potenza P-40.
NOTE:
• Rimuovere gli alimenti dal foglio di alluminio o dai contenitori in metallo prima di riscaldare.
• I tempi per il riscaldamento sono in uenzati da forma, profondità, quantità e temperatura degli alimenti insieme a
dimensioni, forma e materiali del contenitore.
ATTENZIONE: non riscaldare mai liquidi in recipienti con collo stretto, perché potrebbe veri carsi una
fuoriuscita del contenuto, con pericolo di bruciature.
• Per evitare surriscaldamento o incendio, prestare molta attenzione alla cottura o al riscaldamento di cibi che
contengono molto zucchero o sostanze grasse, quali ad esempio torte o budini.
• Non riscaldare olio o grasso per la frittura profonda perché potrebbe causare surriscaldamento e incendio.
• Le patate in scatola non devono essere riscaldate nel forno a microonde; seguire le istruzioni del produttore sulla
scatola.
ATTENZIONE: prima del consumo si raccomanda di agitare bene il contenuto dei biberon o dei vasetti
di omogeneizzati, nonché di controllarne la temperatura, per evitare scottature.

IT – 27
IT – 27
RISOLUZIONE DEI PROBLEMI
Se si ritiene che il forno non stia funzionando correttamente, ecco alcune semplici veri che che è possibile eseguire
autonomamente prima di contattare l'assistenza. Ciò consente di evitare interventi non necessari se il guasto è facile
da riparare.
Seguire la seguente procedura:
Collocare mezza tazza d'acqua sul piano rotante e chiudere lo sportello. Impostare il forno per cuocere per 1 minuto
usando la potenza microonde P-100.
1. La spia del forno si illumina durante la cottura?
2. La ventola di ra reddamento funziona? (Controllare collocando la mano sopra le aperture della ventola.)
3. Dopo un minuto viene emesso un segnale acustico?
4. L'acqua nella tazza è calda?
Se la risposta è "NO" a una di queste domande, controllare che il forno sia correttamente collegato e che il fusibile
non sia saltato. Se tutto è in ordine, controllare la tabella seguente.
ATTENZIONE: non adattare, riparare o modi care il forno da soli. Eseguire manutenzione o riparazioni
è pericoloso per tutti tranne che per gli tecnici addestrati SHARP. Questo è importante
perché potrebbe includere la rimozione dei coperchi che off rono protezione dall'energia
a microonde.
• La guarnizione dello sportello arresta la perdita di microonde durante l'uso del forno, ma non forma una chiusura
ermetica. È normale vedere gocce di acqua, luce o aria calda intorno allo sportello del forno. Gli alimenti con elevato
contenuto di umidità rilasciano vapore e generano condensa all'interno dello sportello che potrebbe fuoriuscire dal
forno.
• Riparazioni e modi che: non tentare di riparare, modi care o usare il forno se non opera normalmente.
• Involucro esterno e accesso alla lampadina: non rimuovere l'involucro esterno. Questa operazione è molto
pericolosa a causa dei componenti ad alto voltaggio all'interno che non devono mai essere toccati, in quanto ciò
potrebbe risultare fatale.
Il forno non è dotato di un coperchio per l'accesso alla lampadina. Se quest'ultima si guasta, non tentare di
sostituirla da sé, ma chiamare una struttura di assistenza approvata da SHARP.

IT
IT – 28
IT – 28
TABELLA RISOLUZIONE PROBLEMI
DOMANDA RISPOSTA
Presenza di ipotermia intorno
allo sportello.
Quando il forno è in funzione, l'aria circola nella cavità.
Lo sportello non forma una chiusura ermetica quindi l'aria potrebbe fuoriuscire
dallo sportello.
Nel forno si forma condensa
che potrebbe fuoriuscire
dallo sportello.
La cavità del forno normalmente sarà più fredda degli alimenti cucinati, e quindi il
vapore prodotto durante la cottura si condensa sulla super cie fredda.
La quantità di vapore prodotto dipende dal contenuto d'acqua degli alimenti
cucinati. Alcuni alimenti, come le patate, hanno un elevato contenuto di umidità.
La condensa intrappolata nel vetro dello sportello dovrebbe sparire dopo alcune
ore.
Lampeggiamento o arco
elettrico dall'interno della
cavità durante la cottura.
L'arco elettrico si veri ca quando un oggetto metallico entra in contatto
ravvicinato alla cavità del forno durante la cottura. Ciò può irruvidire la super cie
della cavità, ma senza danneggiare il forno.
Archi elettrici con le patate Assicurarsi che tutti gli "occhi" siano stati rimossi e che le patate siano state forate,
posizionarle direttamente sul piatto rotante o un piatto resistente al calore.
Il forno non funziona quando
viene premuto il tasto AVVIO/
AVVIO RAPIDO.
Controllare che lo sportello sia chiuso correttamente.
Il forno cuoce troppo
lentamente.
Assicurarsi di avere selezionato il livello di potenza corretto.
Il forno emette un rumore. L’energia a microonde pulsa durante la cottura/scongelamento.
Si sente un segnale acustico dal forno ogni minuto e il display indica "Fail".
Se i pulsanti del pannello di controllo vengono premuti continuamente per oltre
1minuto, si veri cherà questo errore.
Il rivestimento esterno è
caldo.
Il rivestimento potrebbe essere caldo al tatto, quindi tenere lontani i bambini.
PROTEZIONE CONTRO I PULSANTI INCASTRATI
Se in uno stato qualsiasi un pulsante qualsiasi sul pannello di controllo resta bloccato per più di 1 minuto, il
programma smetterà di funzionare immediatamente e il display mostrerà "FAIL” (“GUASTO”). Il microonde emetterà
un segnale acustico. Se il pulsante continua a essere incastrato, il suono verrà ripetuto ogni minuto. Dopo aver risolto
il problema, premi il pulsante STOP/ECO per tornare in modalità stand-by.
PRIMA DI CHIAMARE L'ASSISTENZA
Prima di richiedere l'intervento dell'assistenza, controllare ciascuna voce seguente:
• Controllare per assicurarsi che il forno sia collegato correttamente alla presa della corrente. In caso contrario,
rimuovere la spina dalla presa, attendere 10 secondi e reinserirla nuovamente in maniera salda.
• Controllare se è saltato un fusibile o se è scattato il contatore. Se questi sembrano funzionare correttamente, testare
la presa con un altro apparecchio.
• Controllare che la potenza e il timer siano impostati correttamente.
• Controllare che lo sportello sia chiuso correttamente, bloccato dal sistema di blocco di sicurezza. Altrimenti,
l'energia a microonde non scorrerà all'interno del forno.
SE NESSUNA DI QUESTE OPERAZIONI RISOLVE IL PROBLEMA, ALLORA CONTATTARE UN TECNICO QUALIFICATO. NON
PROVARE A MODIFICARE O RIPARARE IL FORNO DA SOLI.

IT – 29
IT – 29


www.sharpconsumer.eu
Sharp Consumer Electronics Poland sp. z o.o.
Ostaszewo 57B, 87-148 Łysomice, Poland
SHARP CORPORATION
1 Takumi-cho, Sakai-ku
Sakai City, Osaka
590-8522, Japan
SDA/MAN/0176
-
 1
1
-
 2
2
-
 3
3
-
 4
4
-
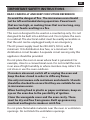 5
5
-
 6
6
-
 7
7
-
 8
8
-
 9
9
-
 10
10
-
 11
11
-
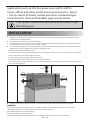 12
12
-
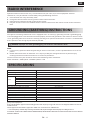 13
13
-
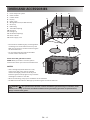 14
14
-
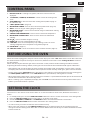 15
15
-
 16
16
-
 17
17
-
 18
18
-
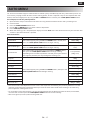 19
19
-
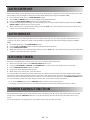 20
20
-
 21
21
-
 22
22
-
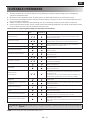 23
23
-
 24
24
-
 25
25
-
 26
26
-
 27
27
-
 28
28
-
 29
29
-
 30
30
-
 31
31
-
 32
32
-
 33
33
-
 34
34
-
 35
35
-
 36
36
-
 37
37
-
 38
38
-
 39
39
-
 40
40
-
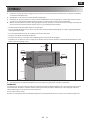 41
41
-
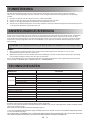 42
42
-
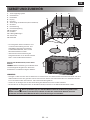 43
43
-
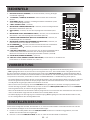 44
44
-
 45
45
-
 46
46
-
 47
47
-
 48
48
-
 49
49
-
 50
50
-
 51
51
-
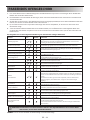 52
52
-
 53
53
-
 54
54
-
 55
55
-
 56
56
-
 57
57
-
 58
58
-
 59
59
-
 60
60
-
 61
61
-
 62
62
-
 63
63
-
 64
64
-
 65
65
-
 66
66
-
 67
67
-
 68
68
-
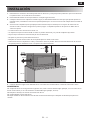 69
69
-
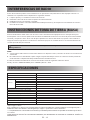 70
70
-
 71
71
-
 72
72
-
 73
73
-
 74
74
-
 75
75
-
 76
76
-
 77
77
-
 78
78
-
 79
79
-
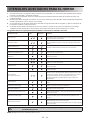 80
80
-
 81
81
-
 82
82
-
 83
83
-
 84
84
-
 85
85
-
 86
86
-
 87
87
-
 88
88
-
 89
89
-
 90
90
-
 91
91
-
 92
92
-
 93
93
-
 94
94
-
 95
95
-
 96
96
-
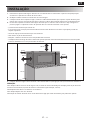 97
97
-
 98
98
-
 99
99
-
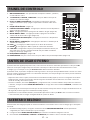 100
100
-
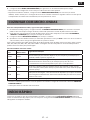 101
101
-
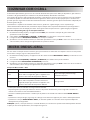 102
102
-
 103
103
-
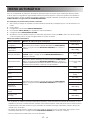 104
104
-
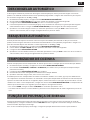 105
105
-
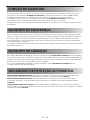 106
106
-
 107
107
-
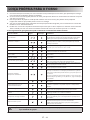 108
108
-
 109
109
-
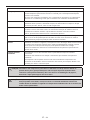 110
110
-
 111
111
-
 112
112
-
 113
113
-
 114
114
-
 115
115
-
 116
116
-
 117
117
-
 118
118
-
 119
119
-
 120
120
-
 121
121
-
 122
122
-
 123
123
-
 124
124
-
 125
125
-
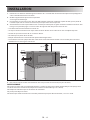 126
126
-
 127
127
-
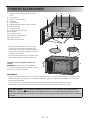 128
128
-
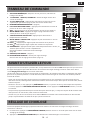 129
129
-
 130
130
-
 131
131
-
 132
132
-
 133
133
-
 134
134
-
 135
135
-
 136
136
-
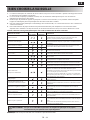 137
137
-
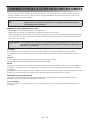 138
138
-
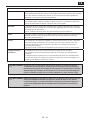 139
139
-
 140
140
-
 141
141
-
 142
142
-
 143
143
-
 144
144
-
 145
145
-
 146
146
-
 147
147
-
 148
148
-
 149
149
-
 150
150
-
 151
151
-
 152
152
-
 153
153
-
 154
154
-
 155
155
-
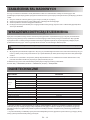 156
156
-
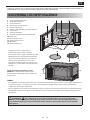 157
157
-
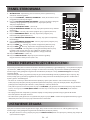 158
158
-
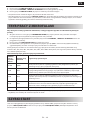 159
159
-
 160
160
-
 161
161
-
 162
162
-
 163
163
-
 164
164
-
 165
165
-
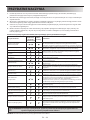 166
166
-
 167
167
-
 168
168
-
 169
169
-
 170
170
-
 171
171
-
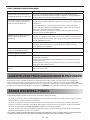 172
172
-
 173
173
-
 174
174
-
 175
175
-
 176
176
-
 177
177
-
 178
178
-
 179
179
-
 180
180
-
 181
181
-
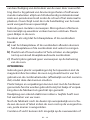 182
182
-
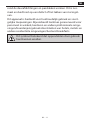 183
183
-
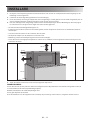 184
184
-
 185
185
-
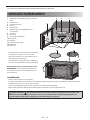 186
186
-
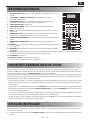 187
187
-
 188
188
-
 189
189
-
 190
190
-
 191
191
-
 192
192
-
 193
193
-
 194
194
-
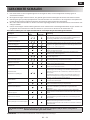 195
195
-
 196
196
-
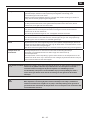 197
197
-
 198
198
-
 199
199
-
 200
200
-
 201
201
-
 202
202
-
 203
203
-
 204
204
-
 205
205
-
 206
206
-
 207
207
-
 208
208
-
 209
209
-
 210
210
-
 211
211
-
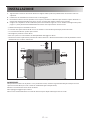 212
212
-
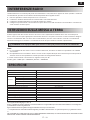 213
213
-
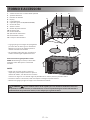 214
214
-
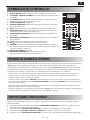 215
215
-
 216
216
-
 217
217
-
 218
218
-
 219
219
-
 220
220
-
 221
221
-
 222
222
-
 223
223
-
 224
224
-
 225
225
-
 226
226
-
 227
227
-
 228
228
-
 229
229
-
 230
230
-
 231
231
-
 232
232


Sharp YC-PC322A Manual de usuario
- Categoría
- Microondas
- Tipo
- Manual de usuario
en otros idiomas
- français: Sharp YC-PC322A Manuel utilisateur
- italiano: Sharp YC-PC322A Manuale utente
- Deutsch: Sharp YC-PC322A Benutzerhandbuch
- Nederlands: Sharp YC-PC322A Handleiding
- português: Sharp YC-PC322A Manual do usuário
- polski: Sharp YC-PC322A Instrukcja obsługi
Artículos relacionados
Otros documentos
-
Viking Range VMDD Guía del usuario
-
Haier HMC1285SESS Manual de usuario
-
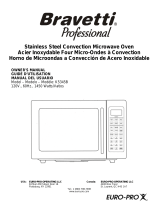 Euro-Pro Professional K5345B El manual del propietario
-
 Euro-Pro Professional K5345B Manual de usuario
-
GE Profile PSA9240DFBB El manual del propietario
-
Haier MWM12001SCGSS Manual de usuario
-
GE PSA9240SFSS El manual del propietario
-
Samsung MC11K7035CG/AA El manual del propietario
-

