
Twin Alpine
Guia para usuario
IMPORTANTE:
RETENGA PARA REFERENCIA FUTURA
Twin Alpine
User Guide
IMPORTANT:
KEEP FOR FUTURE REFERENCE
Your child’s safety
is your responsibility
If you have a problem with this product or
require any replacement parts, please contact
your nearest Mothercare Store or telephone
the Mothercare Customer Care Line
on 01923 210 210
Alternatively write to:
Customer Care
Mothercare
Cherry Tree Road
Watford
Herts
WD24 6SH
La seguridad de su niño
es su responsabilidad
Si surgiera algún problema con este producto o si
necesitara piezas de recambio, sírvase ponerse en
contacto con la tienda Mothercare más próxima, o
llame a la línea de Atención al Cliente de Mothercare,
número (+44) 1923 210 210
Tambien puede escribir a:
Customer Care
Mothercare
Cherry Tree Road
Watford
Herts
WD24 6SH
England
Made in China

2
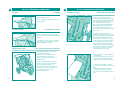
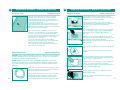
The Twin Alpine Three-wheeler is designed to withstand use on uneven paths,
pavements and even in the countryside. The Twin Alpine is only suitable for children from
birth when used in the fully reclined position and on smooth surfaces. The Twin Alpine
has an adjustable reclining backrest, a lockable front swivel wheel, a detachable bumper
bar, a hood with window, a rain cover and a shopping basket.
La sillita Twin Alpine ha sido diseñada para soportar un uso en superficies desiguales
incluso en el campo. La sillita Twin Alpine es solamente adecuada para niños de más
cuando se utiliza en la posición completamente reclinada y en superficies lisas. La sillita
Twin Alpine dispone de un respaldo reclinable ajustable, una rueda giratoria delantera
bloqueable, una barra parachoques separable, una capota con ventana, una cubierta
para lluvia y una cesta de la compra.
Introduction • Introducción
1
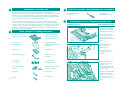
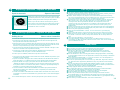
Chasis de la sillita Twin
alpine con la capota y el
cesto de la compra.
Protector de plástico
transparente Weathershield™
para la lluvia
Llave de tuercas
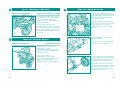
Parts check list • Catálogo de piezas
2
Bomba de aire
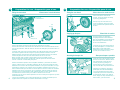
Find the folding latch,
there is only one.
Unclip the latch.
Busque el pestillo de
plegadizo. Sólo hay uno.
Suéltelo.
Lay the chassis down flat
with the two locks facing
up. Remove all packaging
materials from the chassis.
Coloque el chasis plano
con los dos cierres hacia
arriba. Quite todos los
materiales de embalaje del
chasis.
Preparation for use • Preparación para el uso
4
2
1
Unfolding the chassis Cómo desplegar el chasis
Unfold the Three-wheeler
by lifting the two locks
upwards. As the
Three-wheeler opens, lift
up on the handlebar, until
you hear a click.
Despliegue la sillita tirando
de los dos cierres hacia
arriba. Cuando la sillita se
abra, levante la barra de
agarre hasta que oiga
un clic.
3
HANDLEBAR
BARRA DE
AGARRE
LOCKS
CIERRES
3
Barra parachoques
separable
Porta-bebés (2x)
2 ruedas traseras,
1 rueda delantera
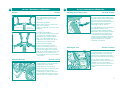
Tools for assembly • Herramientas para el montaje
3
Necesitará un
destornillador de estrella
Guardabarros de la rueda
delantera, 4 tornillos
Twin Alpine chassis with
hood and shopping basket.
Clear plastic
Weathershield™
Spanner
Tyre Pump
Detachable bumper bar
Cosy toe (2x)
2 rear wheels,
1 front wheel
Front wheel footplate,
4 screws
You will need a Phillips
screwdriver.

Remove the plastic packing from the front forks and dispose of safely.
Remove the outer nuts and washers from the wheel’s axle. Fit the front wheel into the
slots on the front forks. Slide the washers onto the axle, fitting the pins into the holes on
the forks.
Screw the nuts onto each end of the wheel’s axle with the flat side of the nut against
the washers. Tighten both nuts using the spanner provided. Before the nuts are
tightened please ensure that the front wheel is fitted parallel to the two rear wheels.
Incorrect alignment could cause the Three-wheeler to veer to one side.
Make sure both nuts are tight. Pull the wheel to ensure it is fitted securely.
Fit the mudguard into place by pushing the 4 plastic spikes into the holes in the
chassis. Screw the 4 screws firmly into place.
Retire la envoltura de plástico de las horquillas delanteras y deséchela de manera
segura. Quite las tuercas y arandelas exteriores del eje de la rueda. Monte la rueda
delantera en las ranuras de las horquillas delanteras. Coloque las arandelas en el eje,
montando las espigas en los agujeros de las horquillas. Atornille las dos tuercas en
ambos extremos del eje de la rueda con el lado plano de la tuerca contra las arandelas.
Apriete las dos tuercas con la llave que se suministra. Antes de apretar las tuercas,
asegúrese que la rueda delantera está montada paralela a las dos ruedas traseras.
Una alineación incorrecta haría que la sillita se desviara hacia un lado.
Asegúrese que las tuercas están apretadas. Tire de la rueda para asegurarse que está
montada firmemente.
Coloque el guardabarros en su lugar introduciendo las 4 puntas de plástico por los
agujeros del chasis. Apriete los 4 tornillos firmemente en su lugar.
Preparation for use • Preparación para el uso
4
4
Fitting the front wheel Cómo montar la rueda delantera
4
PIN
ESPIGA
FORKS
HORQUILLAS
FOOTPLATE
GUARDABARROS
Preparation for use • Preparación para el uso
4
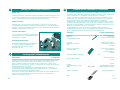
Pumping up the tyres Cómo inflar las ruedas
Attaching the bumper bar Barra parachoques separable
The tyre pump is secured in the
shopping basket. The Three-wheeler’s
tyres are semi-inflated. You should pump
them until they are inflated to 35psi.
Do not over inflate them.
La bomba de aire está enganchada en
la cesta portaobjetos. Las ruedas de la
sillita están a medio inflar. Debe
bombear aire hasta que estén a 35 psi
(2,4 bar). No las infle en exceso.
6
Fitting the rear wheels Cómo colocar las ruedas traseras
Push each wheel’s axle into the
chassis. Check the wheels are firmly
in place by pulling them.
Encaje el eje de cada rueda en el
chasis. Asegúrese de que las ruedas
están correctamente ajustadas tirando
de ellas.
5
Insert the ends of the bumper bar into
the slots on the frame, with the release
clips underneath. Check the bar is
securely in place by pulling it. To
remove the bar push in the release
clips on both sides and pull the bar out.
Introduzca los extremos de la barra
parachoques en las ranuras del bastidor,
con el clip de liberación hacia abajo.
Compruebe que la barra está firme en
su sitio tirando de ella. Para quitar la
barra, empuje los clips de liberación, a
ambos lados, y tire de la barra.
7
PUMP
BOMBA DE
AIRE
5
RELEASE CLIP
CLIP DE
LIBERACIÓN

6
In use • Durante su utilización
5
TO ATTACH THE HARNESS
Insert both fasteners securely into the
clasp. Adjust each strap length with
buckles A.
ABROCHAR EL ARNÉS
Insertar ambos cierres en el broche de
modo que queden fijos.
Ajustar la longitud de cada correa con las
hebillas A.
TO UNDO THE HARNESS
Press the fastener prongs and pull apart.
‘D’ rings (B) are provided for fitting a
separate harness complying with BS
6684. Your child should always be
harnessed in and should never be left
unattended even for short periods.
DESABROCHAR EL ARNÉS
Presionar las púas de los cierres y
separar. Se suministran unos aros en
forma de 'D' (B) para ajustar un arnés
adicional que cumpla con la norma BS
6684. El niño siempre debe llevar el arnés
abrochado y no hay que dejar nunca
desatendido al bebé, ni tan sólo durante
unos instantes.
Harness El arnés
1
2
A
A
A
A
CROTCH STRAP
TIRA DE LA
ENTREPIERNA
BB
Push down firmly on the brake bar to
engage the brake. Check the brake is on
by pushing the Three-wheeler.
Pull the brake bar up to release it.
Empuje hacia abajo con firmeza la barra
del freno para enclavar el freno.
Compruebe que la barra de freno está
activada empujando la sillita. Tire de la
barra de freno hacia arriba para soltarlo.
Operating the brake Accionar el freno
In use • Durante su utilización
5
Both seat backs can be lowered by
pressing the buttons on the clasps and
releasing the straps. To raise the seats,
hold the clasps and pull the straps until
the desired seat height has been reached.
Pueden bajarse ambos respaldos
presionando los botones en los broches y
soltando las correas. Para subir los
asientos, sujete los broches hasta que se
haya alcanzado la altura deseada del
asiento.
Reclining the seats Reclinar el asientos
STRAP
CORREA
CLASP
BROCHE
7
The front wheel can be unlocked to allow
it to rotate, giving greater mobility. Push
the lever at the top of the front wheel fork
across to the left. This releases the
wheel. To lock the wheel push the lever in
the opposite direction and rotate the
wheel until it locks into position.
La rueda delantera se puede desbloquear
para permitir que pivote, lo que
proporciona mayor movilidad. Empuje
lateralmente, hacia la izquierda, la palanca
en la parte superior de la horquilla de la
rueda delantera. Esto liberará la rueda.
Para bloquear el pivotamiento de la rueda,
empuje la palanca en sentido opuesto y
mueva la horquilla hasta que quede
bloqueada en su posición.
Adjusting the front wheel swivel La rueda delantera

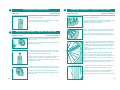
Fitting the rain cover Cómo colocar el protector para la lluvia
8
In use • Durante su utilización
5
Fit the Weathershield™ on top of the
hood. The foot end of the
Weathershield™ is elasticated to fit
around the footplate of the three
wheeler. There is a window to provide
extra ventilation.
Coloque el Weathershield™ sobre la
capota. El extremo correspondiente a
los pies del Weathershield™ es
elástico, lo que le permite ajustarlo al
reposapiés del cochecito. Dispone de
una ventana para proporcionar
ventilación adicional.
9
Fitting the cosy toes Colocación del porta-bebés
In use • Durante su utilización
5
Unclip the shoulder straps and undo
the clasp, so that the five harness
straps are free. Unzip and remove the
front cover. Place the fleecy liner onto
the seat with the fastening flap at the
top. Thread the harness straps
through the corresponding holes in the
liner. Fold the flap over the top of the
seat and press it down onto the
fastener. Re-attach the harness straps
to the clasp.
Desenganche las correas de los
hombros y suelte el broche, de manera
que las cinco correas del arnés queden
libres. Abra la cremallera y separe la
funda delantera. Coloque el forro de rizo
sobre el asiento con la aleta de fijación
en la parte superior. Pase las correas
del arnés por los agujeros correspon-
dientes del forro. Doble la aleta sobre la
parte superior del asiento y apriétela en
los enganches. Vuelva a colocar las
correas del arnés en el broche.
1
The hood window La ventana de la capota
This allows you to see your child. The
pocket should not carry more than 1kg of
items as this may make the Three-wheeler
unstable.
Le permite ver al niño. El bolso no debe
llevar más de 1 Kg. de peso ya que esto
daría inestabilidad a la sillita.
The cosy toe cover can be zipped on
when required.
The cover is optional and you should
be careful not use it indoors as this
might lead to your baby overheating.
La tapa del porta-bebés se puede
colocar con la cremallera cuando haga
falta.
La tapa es opcional y debe tener
cuidado de no usarla en el interior
porque puede dar demasiado calor al
niño.
2
The hood La capota
Pull the hood forward when the
Three-wheeler is in use.
Tire la capota hacia adelante cuando esté
usando la sillita.

Folding the Three-wheeler Cómo plegar la sillita
After use • Después del uso
6
After use • Después del uso
6
To fold the Three-wheeler press the
locking button firmly and at the same time
press both buttons on the front of the two
side locks. Lift on the two handles, the
Three-wheeler will fold.
Para plegar la sillita, pulse con fuerza el
botón de cierre y al mismo tiempo los dos
botones visibles de los dos cierres
laterales. Tire de las dos asas, la sillita
se plegará.
Attach the folding latch before carrying
the Three-wheeler.
Coloque el pestillo de plegadizo antes de
mover la sillita para su transporte.
2
3
The rear wheels have been designed to be
easily removable for more compact storage
of the Three-wheeler. Lift the tabs on each
end of the axle as you pull the wheels.
Las ruedas traseras han sido diseñadas
para que resulte sencillo quitarlas y que la
sillita plegada ocupe menos sitio. Levante
las lengüetas de los dos extremos del eje
mientras tira de las ruedas.
4
Engage the brake and remove the
Weathershield™ if fitted.
Push the hood back. Make sure that the
seat backs are in the reclined position.
Lock the front wheel.
Ponga el freno y retire el
Weathershield™ si está colocado.
Empuje la capota hacia atrás. Asegúrese
que el respaldo está en posición
reclinada. Bloquee la rueda delantera.
1
LOCKING
BUTTON
BOTÓN DE
CIERRE
Fitting the shopping basket Cómo colocar la cesta de la compra
The shopping basket has eight fasteners
on the back (four of which are shown) and
two more on the front. The shopping
basket should not carry more than 4kg of
items evenly distributed.
La cesta de la compra tiene ocho
abrazaderas en la parte trasera (cuatro de
las cuales pueden verse en la imagen). No
deberá meter objetos que pesen más de 4
Kg. distribuidos uniformemente en la cesta
de la compra.
In use • Durante su utilización
5
11
10
FASTENERS

12
Handy Hint • Consejos Prácticos
7
Cuidado de los neumáticos hinchables
8
BRAKE BAR:
Adjusting the tightness of the bolts securing the brake bar brackets will modify the ease
of movement of the brake bar. The bolts should be adjusted evenly on both brackets
using a cross-headed screwdriver and an 8mm open-ended spanner.
BARRA DE FRENO:
Apretando más o menos las tuercas que sujetan los soportes de la barra de freno
podrá modificarse la facilidad de movimiento de la barra de freno. Las tuercas deben
ajustarse a una presión equivalente en ambos suportes, utilizando un destornillador de
estrella y una llave de tuercas de 8 mm.
FOLDING MECHANISM:
The mechanism should be lubricated at intervals
to avoid stiffness in use. Water-dispersing type
spray lubricant is suitable.
MECANISMO DE PLEGADO:
El mecanismo debe lubricarse periódicamente
para evitar se atasque al utilizarlo. Puede
emplearse lubricante en espray de tipo
dispersable en agua.
Los neumáticos hinchables ofrecen un nivel de comodidad y suavidad que los
neumáticos sólidos no pueden igualar pero, al igual que sucede con los neumáticos de
coche o de bicicleta, son susceptibles de tener pinchazos ocasionales.
Hay riesgos obvios que pueden evitarse al usar el cochecito, como espinas, clavos,
cristales rotos, etc. pero los pinchazos también pueden producirse si los neumáticos
están demasiado flojos y quedan pinzados entre la llanta y un objeto duro.
Al igual que los neumáticos de la mayoría de bicicletas, los neumáticos de cochecitos
para bebé incorporan tubos internos con cámara de aire. Si éstos se pinchan, suelen
desinflarse con rapidez debido a su tamaño reducido: cuanto más pequeños son, más
rápido se vacían de aire al producirse un pinchazo.
Pueden adquirirse accesorios postventa en tiendas de ciclismo para reducir la
probabilidad de un pinchazo, pero es recomendable llevar siempre junto al cochecito
algunas herramientas básicas para poder usar en caso de pinchazo.
Llave de tuercas o
llave macho
Para extraer las ruedas
Tubo de solución de
caucho
Spanner or
Allen key
For removing the wheels
Tube of rubber solution
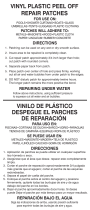
Parches
Preferentemente con borde
de plano estrecho o ahusado
Tiza
Patches
Preferably ‘feather or taper’
edged
Chalk
Rallador o papel de lija
Grater or Sandpaper
Bomba para neumáticos
Adaptada a una válvula
Schrader
Tyre pump
Suitable for a Schrader
valve
Introduction
Introducción
Looking after inflatable tyres
8
Inflatable tyres offer a level of comfort and smoothness that solid tyres cannot match,
but as with car and bicycle tyres, they are susceptible to occasional punctures.
There are obvious hazards to avoid when using your pushchair e.g. thorns, nails,
broken glass etc, but punctures can also occur if the tyres are too soft and are pinched
between the rim and a hard object.
Like most bicycle tyres, pushchair tyres are fitted with inner tubes. If these are
punctured, they tend to deflate quickly because of their small size – the smaller they
are, the quicker they will go down when punctured.
After-sales accessories are available from cycle shops to help reduce the likelihood of
punctures, but it is advisable to carry a few basic tools to use in the event of a
puncture. See Checklist opposite.
puncture repair kit including kit de reparación de pinchazos, que contiene
Check list Lista de comprobación
13
Juego de 2 ó 3 palancas
para neumáticos
Preferentemente de
plástico
Set of 2 or 3 tyre levers
Preferably plastic

Valve type Tipo de válvula
Looking after inflatable tyres
8
This pushchair uses a Schrader valve, this is the most
common type of tyre valve.
Este cochecito usa una válvula Schrader, que es el tipo
de válvula de neumático más habitual.
Repairing a puncture • Reparar un pinchazo
9
Removing the tyre Extraer el neumático
1
Remove the wheel with the punctured tyre using any
necessary tools.
Extraer la rueda con el neumático pinchado utilizando las
herramientas necesarias.
2
To make the tyre easier to get off the wheel, ensure all the
air is out of the inner tube. Remove any valve caps, then
press on the pin in the centre of the valve.
Para que resulte más fácil sacar la rueda, compruebe que
el tubo interior se ha vaciado completamente de aire.
Extraiga todos los tapones de válvula y presione la clavija
del centro de la válvula.
3
Squeeze the sides of the tyre together all the way around
the wheel to unseat the tyre sidewalls from the wheels rim.
Apriete los laterales del neumático alrededor de toda la
rueda para poder extraer lateralmente el neumático de la
llanta de la rueda.
4
Insert the ends of the tyre levers under one side of the tyre
each a few centimetres apart.
Inserte los extremos de las palancas para neumáticos bajo
cada uno de los lados del neumático, dejando varios
centímetros de diferencia entre ellos.
5
One by one pull each lever down toward the spokes of the
wheels. The tyre will be pulled above the rim of the wheel.
Una a una, tire de cada palanca hacia los radios de las
ruedas. El neumático se levantará de la llanta de la rueda.
6
Slide one of the levers all the way around the remainder of
the wheel rim to pull out the rest of the tyre. To remove the
inner tube ensure that the valve has been pushed through
the wheel rim. Pull the inner tube clear and put it safely to
one side.
Completely remove the tyre from the wheel, using the tyre
levers if necessary.
Deslice una de las palancas alrededor de toda la rueda
para sacar el resto del neumático. Para extraer el tubo
interior, compruebe que la válvula está fuera de la llanta de
la rueda. Tire del tubo interior para sacarlo y colóquelo a un
lado.
Extraiga completamente el neumático de la rueda utilizando
las palancas para neumáticos cuando sea necesario.
Repairing a puncture • Reparar un pinchazo
9
Removing the tyre Extraer el neumático
14
15
7
On spoked metal wheels, there may be tape inside the rim
to covers the ends of the spokes.Check this is secure.
En las ruedas metálicas con radios, la parte interior de la
llanta puede estar recubierta con cinta para tapar los
extremos de los radios. Verifique que está en buen estado.

1
Inspect the tyre, inside and out, for the cause of the
puncture. It may help to run your fingers around the
inside of the tyre but this should be done slowly and
carefully as the object that caused the puncture may still
be sticking through the tyre.
If there are any objects in the tyre remove them. If none
are found the puncture may have been caused by the
tyre being too soft and the inner tube becoming pinched
between the rim and a hard object.
Inspeccionar la rueda, por dentro y por fuera, para
detectar la causa del pinchazo. Una opción es deslizar
los dedos a lo largo de la parte interior del neumático,
pero esto debe hacerse lentamente y con cuidado ya que
el objeto que ha causado el pinchazo todavía puede
estar clavado en el neumático.
En caso de hallar algún objeto en el neumático,
extráigalo. Si no encuentra ninguno, el pinchazo puede
haberse producido porque el neumático estaba
demasiado flojo y el tubo interior ha quedado pinzado
entre la llanta y un objeto duro.
Repairing a puncture • Reparar un pinchazo
9
Identify the cause Identificar la causa
3
Smear a thin layer of rubber solution over the roughened
area. Less is better as it gives the best patch adhesion.
Wait around 5 minutes until the rubber solution is
‘touch dry’.
Extienda una capa fina de solución de caucho sobre el
área lijada. Es recomendable utilizar poca cantidad ya que
proporciona una mejor adhesión del parche.
Deje transcurrir 5 minutos hasta que la solución de caucho
esté seca al tacto.
Repairing a puncture • Reparar un pinchazo
9
Repair the inner tube Reparar el tubo interior
Repair the inner tube Reparar el tubo interior
4
Cut one patch from the strip and remove the FOIL backing
only.
Corte un parche de la tira y separe solamente el dorsal
metálico.
5
Press the patch firmly over the hole and onto the ‘touch
dry’ rubber solution. Then rub on the backing paper firmly
until the patch is securely attached.
Aplique el parche sobre el agujero y sobre la solución de
caucho, seca al tacto, presionando con firmeza.
A continuación frote el dorsal, presionándolo hasta que el
parque quede firmemente sujeto.
6
Carefully peel the backing paper of
f the patch, without
lifting the rubber patch.
Retire con cuidado el dorsal del parche sin levantar el
parche de caucho.
1
Partly inflate the inner tube and listen carefully for airleaks.
Immersing the partly inflated tube in a bucket of water will
help locate small holes and valve leaks.
Infle parcialmente el tubo interior y escuche con atención
para detectar cualquier fuga de aire. Sumergir el tubo
parcialmente inflado en un cubo de agua le ayudará a
localizar pequeños agujeros y posibles fugas en la válvula.
2
Once the hole has been located roughen an area of
approximately 2cm all around the hole using the grater or
sandpaper from the puncture repair kit.
Una vez haya localizado el agujero, lime un área de
aproximadamente 2 cm alrededor del agujero utilizando el
rallador o el papel de lija del kit de reparación de
pinchazos.
WARNING: Rubber solution is flammable and gives off a strong vapour. It should only be
used in a well-ventilated area, away from heat sources. It may also cause skin irritation,
so appropriate protective clothing should be worn.
ADVERTENCIA: La solución de caucho es inflamable y desprende un vapor fuerte.
Únicamente debe utilizarse en un área bien ventilada y alejada de cualquier fuente de
calor. También puede provocar irritación cutánea, por lo que deben utilizarse prendas
protectoras.
16
17

Repairing a puncture • Reparar un pinchazo
9
Refitting the tyre Volver a colocar el neumático
1. Fit one side of the tyre back over the wheel rim, using the tyre levers if necessary.
2. Push the tyre away from the valve hole, push the inner tube valve through the hole,
then push the rest of the tube inside the tyre.
3. Hold the valve in place and fit the other side of the tyre back onto the wheel rim, using
the tyre levers if necessary. Care must be taken not to pinch the tube under the end of
the lever or trap it under the tyre as this could cause further punctures.
4. Connect the pump and PARTLY inflate the tyre to seat the sidewalls of the tyre on the
wheel rim. Check the valve is positioned correctly.
5. Once the tyre is fully seated on the wheel rim, inflate the tyre to the pressure
recommended in the user guide or on the sidewall of the tyre.
6. If valve caps are available, re-fit them to keep dirt out of the valve.
1. Coloque un lado del neumático sobre la llanta de la rueda, utilizando las palancas para
neumático si fuera necesario.
2. Separe el neumático del agujero de la válvula, introduzca la válvula del tubo interior a
través del agujero y a continuación empuje el resto del tubo dentro del neumático.
3. Sujete la válvula en su lugar y coloque el otro lado del neumático en la llanta,
utilizando las palancas para neumáticos si fuera necesario. Debe tener la precaución
de no pinzar el tubo con el extremo de la palanca o evitar que quede atrapado bajo el
neumático ya que esto podría provocar otro pinchazo.
4. Conecte la bomba e hinche PARCIALMENTE el neumático para poder asentar los
laterales del neumático en la llanta de la rueda. Compruebe que la válvula está
colocada correctamente.
5. Cuando el neumático esté totalmente asentado dentro de la llanta de la rueda, hinche
el neumático a la presión recomendada en la guía del usuario o en el lateral del propio
neumático.
6. Si la válvula lleva tapón, vuelva a colocarlo para prevenir que la válvula se ensucie.
18
Care of your product
10
● This Three-wheeler requires regular maintenance by you.
● Regularly inspect the locking devices, brakes, harness assembly, catches, joints and
fixings to ensure they are secure and in full working order.
● Brakes, wheels and tyres are subject to wear and should be replaced if necessary.
This can be arranged through your local Mothercare store. The tyres have inner tubes
and can be repaired in the same way as conventional bicycle tyres.
● Should parts of your Three-wheeler become stiff or difficult to operate, ensure that
dirt is not the cause. Then try a light application of a spray lubricant eg. WD 40,
ensuring that the lubricant penetrates between the components, but do not
overspray as this may encourage the accumulation of dirt. Regular lubrication of
moving parts will extend the life of your Three-wheeler and make opening and
folding easier.
● Plastic and metal parts may be sponged clean with warm water and a mild detergent.
● The seat may be cleaned by sponging lightly using warm water and a mild detergent.
● Allow to dry thoroughly before storing.
● Never use the Weathershield™ indoors, or near a heat source, your baby may
overheat.
● Never clean with abrasive, ammonia based, bleach based or spirit type cleaners.
● After exposure to damp conditions, leave fully opened and in a warm environment.
Dry off with a soft cloth. Storing a damp Three-wheeler will encourage mildew to
form.
● Store your Three-wheeler in a dry safe place.
● Your Three-wheeler should be serviced and reconditioned before using it for a
second baby, or within 18 months, whichever is the sooner. This can be arranged by
your local Mothercare store.
Safety notes
11
● Do not allow your child to climb unassisted into the Three-wheeler.
● Apply the brake before putting your child into the Three-wheeler.
● Ensure your child wears a correctly fitted and adjusted harness at all times.
For extra safety, D-rings are provided for the attachment of a separate safety
harness approved to BS 6684.
● Ensure children are clear of moving parts before making adjustments. Overloading,
incorrect folding and the use of non-approved accessories may damage or break this
Three-wheeler.
● Never leave the Weathershield™s or cosy toe on indoors, in a hot atmosphere or
near a heat source your child may overheat.
● Do not use replacement parts or accessories, eg. child seats, bag hooks, raincovers
etc. other than those approved by Mothercare, they may make the Three-wheeler
unsafe.
● Do not overload this Three-wheeler with additional children, goods or accessories.
Bags and other items must not be hung from the handle. A basket is provided for the
carriage of 3kg (6.6 lbs) of items evenly distributed.
● Always apply the brakes when the
Three-wheeler is stationary.
● Be careful when going up or going down kerbs. Remove your child and fold the
Three-wheeler when going up or down stairs or escalators.
● Do not use your Three-wheeler in a manner for which it is not designed.
● Don’t let children play with or hang on the Three-wheeler.
● Hold on to your Three-wheeler when close to moving road vehicles or trains.
Even with the brake on, the draught from the vehicle may move the Three-wheeler.
● If your Three-wheeler is used by someone unfamiliar with it e.g. grandparents always
show them how it works.
● Never leave your child unattended, even for the shortest time.
19
7
Grate some chalk over the patch area and rub the powder
around the patched area. This prevents the patch or rubber
solution sticking to the inside of the tyre when refitted.
Ralle un poco de tiza sobre el área del parche y frote el
polvo sobre la zona parcheada. Esto evitará que el parche
o la solución de caucho se peguen a la parte interior del
neumático al volver a colocarlo.
Repairing a puncture • Reparar un pinchazo
9
Repair the inner tube Reparar el tubo interior

Cuidado del producto
● Este cochecito requiere un mantenimiento regular.
● Inspeccionar regularmente los sistemas de bloqueo, frenos, montaje del arnés,
seguros, ajustes del asiento, juntas y adornos para asegurarse de que están fijos y
funcionan a la perfección.
● Los frenos, las ruedas y los neumáticos se desgastan con el uso y deben
cambiarse si es necesario. Su tienda Mothercare puede ocuparse de ello. Las
ruedas tienen una cámara de aire en su interior y pueden repararse igual que las
ruedas de las bicicletas convencionales.
● En caso de que haya piezas del cochecito que se endurezcan o resulten díficiles de
accionar, hay que asegurarse de que la causa no es la suciedad o el polvo
acumulados. A continuación intentar aplicar un poco de espray lubricante, como por
ejemplo del tipo WD 40, teniendo la precaución de que el lubricante penetre entre
los componentes, pero no aplicar un exceso de producto ya que eso podría
fomentar la acumulación de suciedad o de polvo. La lubricación regular de las
partes móviles prolongará la vida de su cochecito y hará que sea más fácil abrirlo y
plegarlo.
● Las piezas de plástico y de metal pueden limpiarse frotando con una esponja y
utilizando agua tibia y un detergente suave.
● El asiento puede limpiarse frotando suavemente con una esponja utilizando agua
tibia y un detergente suave.
● Hay que dejar secar el cochecito completamente antes de guardarlo.
● No dejar el cochecito expuesto al sol durante largos períodos de tiempo ya que los
tejidos pueden descolorirse.
● No limpiar nunca con agentes limpiadores a base de alcohol, lejía, amoníaco u
otros productos abrasivos.
● En caso de que se moje, dejar totalmente abierto en un ambiente con una temperatura
media. Acabar de secar con un trapo suave. Si se guarda el cochecito estando húmedo
puede producirse moho.
● Guardar el cochecito en lugar seco y seguro.
● El cochecito debe reacondicionarse y prepararse antes de utilizarlo para un segundo
bebé o al cabo de 18 meses de utilización, lo que ocurra primero. Su tienda
Mothercare puede ocuparse de ello.
Medidas de seguridad
● No dejar que el bebé intente subir al cochecito sin ayuda.
● Ponga el freno antes de colocar al bebé en la sillita.
● Asegurarse de que el niño lleva bien puesto el arnés en todo momento. Para mayor
seguridad se suministran aros en forma de 'D' para ajustar un arnés de seguridad
adicional que cumpla con la norma BS 6684.
● Asegurarse de que el niño no toca ninguna de las partes móviles antes de realizar
cualquier ajuste o cambio en el cochecito. Una carga excesiva, el plegado
incorrecto y el uso de accesorios no aprobados por el fabricante pueden dañar o
romper el cochecito.
● No dejar nunca puestas las capotas o los protectores para la lluvia estando el
cochecito en un lugar interior. En un ambiente caluroso o cerca de una fuente de
calor el niño puede experimentar un exceso de calor.
● No utilizar accesorios, como por ejemplo sillitas de bebé, ganchos para bolsas,
protectores contra la lluvia, etc. que no hayan sido aprobados por Mothercare, ya
pondrían en peligro la seguridad del cochecito.
● No cargar en exceso este cochecito con más de un niño, o con productos y
accesorios.
Las bolsas y otros artículos no deben colgarse de los manillares. Se suministra un
canasto con una capacidad de 4kg. (8,8 libras) en el que pueden llevarse
artículos distribuidos de modo uniforme y equilibrado.
● Aplicar los frenos siempre que el cochecito esté inmóvil.
● Hay que tener cuidado al subir o bajar bordillos. Debe sacarse al niño del cochecito
y plegarlo para subir o bajar escaleras o escalas mecánicas.
● No utilizar el cochecito para cualquier propósito que no sea para el que ha sido
expresamente diseñado. No dejar a los niños jugar con el cochecito, apoyarse o
colgar de él.
● Sujetar firmemente el cochecito al aproximarse a automóviles o trenes en
movimiento. Incluso con el freno puesto, la corriente producida por el vehículo
puede hacer mover el cochecito.
● Si el cochecito va a ser usado por alguien que no está habituado a su utilización,
p. ej. los abuelos, mostrar siempre cómo funciona.
● No dejar nunca desatendido al niño, ni tan sólo por un momento.
21
20
10
11

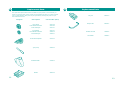
Replacement Parts
12
Diagram
Description
Part number (SKU)
Front wheel footplate
520726-6
520728-0
520729-7
520729-7
520661-0
520662-7
Rear wheel
Rear wheel inner tube
Rear wheel tyre
Front wheel
Front wheel inner tube
Front wheel tyre
Tyre pump
The replacement parts listed below are available for your product. In the event that you
require any of these parts, please contact your local Mothercare store or contact Customer
Care on 01923 210210. Other parts may be repairable by returning the product to your
nearest Mothercare store.
521053-2
520660-3
Basket
564835-9
Double seat unit
Hood fabric
583320-5
583321-2
Cosy toe
583322-9
Weathershield™
564834-2
23
22
Replacement Parts
12
Bumper bar
564839-7
-
 1
1
-
 2
2
-
 3
3
-
 4
4
-
 5
5
-
 6
6
-
 7
7
-
 8
8
-
 9
9
-
 10
10
-
 11
11
-
 12
12


en otros idiomas
- English: mothercare Twin Alpine User manual
Artículos relacionados
Otros documentos
-
 Aqua EZ VR8140 Manual de usuario
-
Quinny buzz Instructions For Use Manual
-
Graco Symbio El manual del propietario
-
Quinny Speedi Instructions For Use & Warranty
-
-
-
-
Ferrari 612 Scaglietti El manual del propietario
