Commercial Electric PWRFX70-PC-4K-BZ Guía del usuario
- Tipo
- Guía del usuario

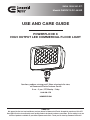
USE AND CARE GUIDE
POWERFLOOD X
HIGH OUTPUT LED COMMERCIAL FLOOD LIGHT
THANK YOU
We appreciate the trust and confidence you have placed in Commercial Electric through the purchase of this LED
flood light. We strive to continually create quality products designed to enhance your home. Visit us online to see our
full line of products available for your home improvement needs. Thank you for choosing Commercial Electric!
Questions, problems, missing parts? Before returning to the store,
call Commercial Electric Customer Service
9 a.m. - 5 p.m., EST, Monday - Friday
1-844-548-3776
HOMEDEPOT.COM
SKU# 1008-341-371
Model# PWRFX70-PC-4K-BZ

NOTICE:
FCC Regulations state that any unauthorized
changes or modifications to this equipment not expressly
approved by the manufacturer could void the user’s
authorization to operate this equipment.
Table of Contents....................................................... 2
Safety Information...................................................... 2
Warranty...................................................................... 2
Pre-Installation........................................................... 3
Planning Installation................................................ 3
3
Tools Required......................................................... 3
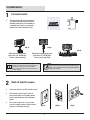
Package Contents................................................... 4
Hardware Included................................................ 4
Installation................................................................ 5
Operation.....................................................................8
Care & Cleaning...........................................................9
Troubleshooting...........................................................9
Table of Contents
Safety Information
PRECAUTIONS
☐Please read and understand this entire manual before
attempting to assemble, install, or operate this light fixture.
☐This light fixture requires a 120-277 Volt AC
power source.
☐Some codes require installation by a qualified electrician.
☐This light fixture must be properly grounded.
☐Make sure connections are secure
using wire nuts, crimp-on lugs or other
approved connecting devices
☐This light fixture should be installed outdoors
to a wall, eave or ground mount applIcation.
WARNING: Turn the power off at the circuit breaker or
fuse. Place tape over the circuit breaker switch and verify
power is off at the light fixture.
WARNING: Risk of fire. Keep the fixture heads at
least 3 in. (76mm) from combustible materials.
CAUTION: Burn hazard. Allow the light fixture to cool
before touching.
NOTICE: If using dimming function, only connect to
0-10V approved dimming switches or control system
2HOMEDEPOT.com
Please contact 1-844-548-3776 for further assistance.
IMPORTANT
THIS PRODUCT MUST BE INSTALLED IN ACCORDANCE
WITH THE APPLICABLE NATIONAL ELECTRICAL CODE AND
LOCAL BUILDING CODES BY A PERSON FAMILIAR WITH
THE CONSTRUCTION AND OPERATION OF THE PRODUCT
AND THE HAZARDS INVOLVED.
INFORMATION: The device is tested and found to
comply with Part 15 of the FCC Rules. Operation is subject
to two conditions: (1) This device may not cause harmful
interference and, (2) this device must accept any
interference received, including any interference that may
cause undesired operation. These limits are designed to
provide reasonable protections against harmful interference
when the equipment is operated in a commercial environment.
Warranty
This is a limited warranty offered by the manufacturer for a period of five years from the date of purchase to its customers.
The manufacturer warrants to customers that the products will be free from defects in material and workmanship. The
obligation of the manufacturer under this warranty is limited to the provision of replacement of products and is extended to
the original purchaser of the product on presenting valid purchase receipt or other proof of date of original purchase
acceptable to the manufacturer. The receipt is required for rendering the warranty performance. Any warranty claims
without original proof of purchase would not be accepted.
It should be noted that the warranty does not apply to the manufacturer products that have been altered or repaired by
unauthorized personnel, have been subjected to neglect, abuse, misuse or accident or damages caused during shipping.
Any other products not manufactured by the manufacturer which have been supplied, installed and/or used in conjunction
with the manufacturer products are not covered under this warranty. Any damages caused by replacements bulbs, LEDs
or corrosion or discoloration of brass components are also not covered by this warranty.
NOTE:
This equipment has been tested and found to comply with the limits for a Class B digital device, pursuant to part 15 of the FCC rules. These limits are designed to provide reasonable protection
against harmful interference in a residential installation. This equipment generates uses and can radiate radio frequency energy and, if not installed and used in accordance with the instructions may cause
harmful interference to radio communications. However, there is no guarantee that interference will not occur in a particular installation. If this equipment does cause harmful interference to radio or
television reception, which can be determined by turning the equipment off and on, the user is encouraged to try to correct the interference by one or more of the following measures
- Reorient or relocate the receiving antenna
- Increase the separation between the equipment and receiver.
- Connect the equipment into an outlet on a circuit different from that to which the receiver is connected
- Consult the dealer or an experienced radio/TV technician for help

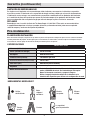
Lumens (Light Output)
Watts (Power Consumption)
Replaces
Lumens/Watts (Efficacy)
Power Requirements (Input Voltage)
Light Color (CCT)
Dimmable
Operating Modes
SPECIFICATIONS
3
Warranty (continued)
LIMITATION OF LIABILITY
In no event shall the manufacturer be liable for indirect, consequential, incidental or special damages, or lost profits.
The manufacturer is not liable for any claims or damage arising out of or connected with the manufacture, sale,
delivery, use, maintenance and repair or modification of the manufacturer products, or supply of any replacement
parts that exceed the purchase price of the manufacturer products giving rise to a claim. Labor charges to remove
or install the fixtures will not be accepted.
TO CLAIM
Please contact The Home Depot customer service at 1-844-548-3776 or email [email protected] and include
your name, address and contact number, along with a copy of the purchase receipt and a brief description of the
problem.
Pre-Installation
PLANNING INSTALLATION
Before installing the light fixture, ensure that all parts are present. Compare parts with the Hardware Included and
Package Contents sections. If any part is missing or damaged, do not attempt to assemble, install, or operate this light
fixture. Contact our customer care team for replacement parts.
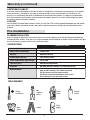
TOOLS REQUIRED
Phillips
screwdriver
Wire
strippers/
cutters
Circuit
tester
Silicone
sealant
Work
gloves
Ladder Safety
goggles
PWRFX70-PC-4K-BZ
120-277VAC
4000 Kelvin (Bright White)
Dimming (When used with a 0-10V dimming switch)
Dusk-to-Dawn: Automatically turns on the lamp during
night and OFF during the day. Switch controlled:
Flip the switch to turn the lamp on and off.
Use the pre-installed black photocell cover on the
device photocell to use this mode setting.
9500 Lumens
70 Watts LED
650W Incandescent
136 Lumens per watt

4
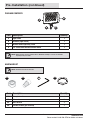
Pre-Installation (continued)
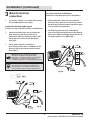
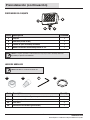
Part Description Quantity
AA Clear photocell cover 1
BB Wire nut 5
CC Allen wrench 1
DD Conduit Locknut (pre-installed) 1
PACKAGE CONTENTS
Part Description Quantity
A Light fixture 1
B Photocell (light sensor) 1
C Knuckle mount tightening screw 1
D 1/2” Swivel NPS threaded knuckle mount 1
NOTE: Optional mounts are not included in the box, Additional mounting accessories are available
separately from your retailer.
HOMEDEPOT.com
Please contact 1-844-548-3776 for further assistance.
AA BB
DD
HARDWARE KIT
NOTE: Hardware not shown to actual size.

NOTE:
While using the light fixture (A) as eave mounted
(fig 1), the photocell sensor (B) may not function properly.
In this case, it is advisable to use the light fixture (A) with
switch-control mode.
5
Installation
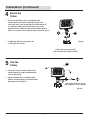
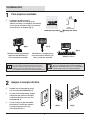
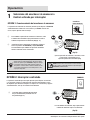
1For best results
☐The light fixture (A) must be mounted
using the threaded knuckle (D) into a
weather proof cover (not included) on
a junction box (fig 2) or a landscape
ground stake (not included) (fig 3). t
INFORMATION
Weather proof cover plates for
junction boxes, landscape ground stake and other
mounting arms and accessories are available.
Please contact your retailer or Commercial Electric
customer support.
2Shut off electric power
☐Verify wall switch is in OFF position (fig 5).
☐At the main electrical panel, turn off
the circuit breaker that supplies power
to the junction box you are working on
(fig 6).
☐For screw-in type fuses, unscrew the
fuse that supplies power to the junction
box you are working on (fig 7). (fig 5). (fig 6). (fig 7).
Mounted to weather proof
cover with 1/2" NPSM Pipe
Thread (sold separately)
Mounted to landscape ground
stake with 1/2" NPSM Pipe
Thread (sold separately) Ground Mount
NOTE:
(fig 4).
(fig 2). (fig 3).

6
Installation (continued)
3Make the electrical
connections
☐If necessary, strip 3/8” of insulation from junction
box and lighting fixture wires (fig 8).
☐Connect light fixture black wire to junction box
black wire (line), light fixture white wire to
junction box white wire (common), and the light
fixture green wire to the junction box ground
wire (fig 9).
☐For the purple and pink unused fixture
wires either leave the wires unstripped or install
wire nuts (BB) on the ends to prevent electrical
hazard (fig 9).
Standard Non-Dimming Wiring diagram
(Follow these steps when NOT wiring to a 0-10V dimmer)
NOTICE:
Leave purple and pink wires terminated
with wire nuts installed and separated when NOT
connecting to a 0-10V dimmer. DO NOT connect the purple
and pink wires to any other wires unless wiring to a
0-10V dimmer designed for use with LED light fixtures (fig 9).
TIP: Hold stripped ends near each other and align any
frayed strands (do not twist wires). Push the wires into
wire nuts (BB) and use your fingers to twist the wire nuts
clockwise until tight. Check for tightness by pulling wires.
For electrical wiring to 0-10V Dimmer
(Follow these steps when wiring to a 0-10V dimmer)
☐
Connect light fixture black wire to junction box
black wire (line), light fixture white wire to junction
box white wire (common) and the light fixture green
wire to junction box ground wire.
☐
For dimming, when wiring to a 0-10V dimmer,
connect the light fixture purple wire to the dimming
device wire (+DIM) and the light fixture pink wire to
the dimming device wire (-DIM) (fig10).
HOMEDEPOT.com
Please contact 1-844-548-3776 for further assistance.
(fig 9).
(fig 8).
(fig 10).
Pink
Pink

7
Installation (continued)
4Secure the
fixture
☐
☐
Secure the light fixture (A) to a junction box with
weather proof cover plate or landscape ground stake
(sold separately). Insert and thread the knuckle mount (D)
in a clockwise motion until the light fixture (A) is at the
desired direction. Tighten the pre-installed conduit locknut
(DD) to ensure fixture (A) is locked to adjusted position (fig 11).
If applicable, plug all unused holes and
seal threads with silicone.
Tighten the knuckle mount (D)
with conduit locknut (DD) (included)
Loosen the screw here to aim
and re-tighten to secure position
(fig 11).
(fig 12).
5Aim the
fixture
☐
☐
Loosen the screw on swivel portion of the
knuckle mount (D) using the provided allen
wrench (CC) (fig 12).
Adjust the fixture (A) to a suitable aiming
position, and then tighten the knuckle mount
tightening screw (C) (fig 12).
A
DD

8
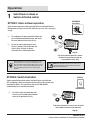
Operation
To disable to photocell, leave the pre-installed
black photocell cover on the photocell
SWITCH
CONTROLLED
1Select Dusk-to-Dawn or
Switch-Activated control
OPTION 1: Dusk-to-Dawn operation
Dusk-to-dawn operation enables the light fixture to automatically turn
ON when dark outside and turn OFF when the sun rises, thus saving you
energy.
AUTOMATIC
NIGHTTIME ON
DAYTIME OFF
☐To enable dusk-to-dawn operation remove the
pre-installed black photocell cover and install
the clear photocell cover (AA) (fig 13).
Ensure the switch powering the light
fixture is turned to the ON position and
leave it ON at all times to enable
automatic dusk-to-dawn operation.
☐
(fig 13).
(fig 14).
NOTE:
During daylight hours if the photocell does not get
enough light from the sun (shady area) it may turn the
light fixture ON prematurely
TIP:
To test if the light fixture and photocell operation
during daylight hours run power to the fixture and cover
the photocell for 10 seconds to turn fixture ON. Uncover
photocell and the fixture should turn OFF after 10 seconds.
If the photocell is not detecting enough light from the sun
shine a flashlight into the photocell to see the fixture
turn OFF.
OPTION 2: Switch Controlled
Switch controlled operation enables the light fixture to turn ON and
OFF by flipping a switch that controls the electricity to the junction box
powering the fixture. The light fixture will not turn ON and OFF
automatically, but is manually controlled.
☐To enable switch activated operation
leave the pre-installed black photocell
cover on the photocell (fig. 14).
HOMEDEPOT.com
Please contact 1-844-548-3776 for further assistance.
(For dusk-to-dawn operation, remove
the black cap and replace with the
clear photocell cover (AA))
Cover
Remove

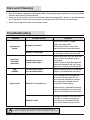
Care and Cleaning
9
☐Shut off main power supply before cleaning the product. To prolong the original appearance, clean the light fixture
with clear water and a soft, damp cloth only.
☐Do not use abrasive cleaners or cleaners that contain alcohol. Do not apply paints, solvents, or any other chemicals
on this light fixture. They could cause a premature deterioration of the finish and may void the warranty.
☐Do not spray the light fixture with a hose or power washer.
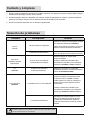
Troubleshooting
Problem Possible Cause Solution
Light does not
turn ON
No power to the fixture
Check if circuit breaker is tripped.
Confirm wall switch is ON.
Verify wiring to fixture is correct (turn
power off to the the fixture beforehand).
Photocell is sensing light Test the Photocell operation by covering it
for 10 seconds until the fixture turns ON.
Light cycles
ON and OFF
continuously
Light
FLICKERS
Photocell light sensor is
sensing reflected light
The light fixture is wired
to an unsuitable dimmer
Relocate light fixture away from other light
sources for Dusk to Dawn operation to
work properly.
OR place the pre-installed black photocell
cover onto the photocell and use the wall
switch to turn the light fixture ON and OFF.
Light stays ON Photocell is in a shaded area
Shine a flashlight into the photocell for
10 seconds. If the light turns OFF, the
fixture should be relocated to a location
with enough light in daylight hours for
the photocell to work properly
OR place the pre-installed black photocell
cover onto the photocell and use the wall
switch to turn the light fixture ON and OFF.
Photocell is faulty
If the light fixture does not turn OFF when
a flashlight is used on the photocell for
10 seconds, then the photocell may be
faulty. Please contact customer service.
NOTE:
Photocell may have a longer delay during trouble shooting. When testing, shine
flashlight or cover the photocell and allow for up to 1 minute for the fixture to work properly
Replace the dimmer with a 0-10V dimming
switch or a standard ON/OFF wall switch.

Commercial ElectricPWRFX70-PC-4K-BZ


Questions, problems, missing parts? Before returning to the store,
call Commercial Electric Customer Service
9 a.m. - 5 p.m., EST, Monday-Friday
1-844-548-3776
HOMEDEPOT.COM
Retain this manual for future use.

GUIA DE USO Y CUIDADO
POWERFLOOD X
LUZ DE INUNDACIÓN COMERCIAL LED DE ALTA SALIDA
GRACIAS
Agradecemos la confianza que ha depositado en Commercial Electric a través de la compra de este reflector LED. Nos
esforzamos por crear continuamente productos de calidad diseñados para mejorar su hogar. Visítenos en línea para ver
nuestros línea completa de productos disponibles para sus necesidades de mejora del hogar. ¡Gracias por elegir
Commercial Electric!
¿Preguntas, problemas, piezas faltantes? Antes de volver a la tienda,
llame al Servicio de atención al cliente de Commercial Electric
9 am - 5 pm, EST, de lunes a viernes
1-844-548-3776
HOMEDEPOT.COM
Número de SKU 1008-341371
Modelo # PWRFX70-PC-4K-BZ

AVISO:
Las regulaciones de la FCC establecen que cualquier
cambio o modificación no autorizados a este equipo que no
haya sido aprobado expresamente por el fabricante podría
anular la autorización del usuario para operar este equipo.
Tabla de contenido..................................................... 2
Información de seguridad.......................................... 2
Garantía...................................................................... 2
Pre-Instalación........................................................... 3
Planificación de la instalación................................ 3
3
Herramientas necesarias........................................ 3
Contenidos del paquete.......................................... 4
Herrajes incluidos................................................... 4
Instalación.................................................................. 5
Operación.................................................................... 8
Cuidado y limpieza..................................................... 9
Solución de problemas............................................... 9
Tabla de contenido
Información de seguridad
PRECAUCIONES
☐Lea y comprenda todo este manual enfríe antes
de tocarla. antes de intentar ensamblar, instalar
u operar esta lámpara.
☐Esta lámpara requiere una fuente de
alimentación de CA de 120-277 voltios.
☐Algunos códigos requieren la instalación por parte
de un electricista calificado.
☐Esta lámpara debe estar correctamente
conectada a tierra.
☐Asegúrese de que las conexiones estén seguras usando
tuercas para cables, orejetas engarzadas u otros
dispositivos de conexión aprobados
☐Esta lámpara debe instalarse en el exterior en una
aplicación de montaje en pared, alero o suelo.
ADVERTENCIA: Desconecte la alimentación en el
disyuntor o fusible. Coloque cinta sobre el interruptor del
disyuntor y verifique que la lámpara esté apagada.
ADVERTENCIA:
Riesgo de fuego. Mantenga las cabezas
de las lámparas a una distancia mínima de 76 mm (3 pulg.)
de materiales combustibles.
PRECAUCIÓN: Peligro de quemaduras. Deje que la
lámpara se enfríe antes de tocarla.
AVISO: Si usa la función de atenuación, solo conéctelo
a interruptores de atenuación aprobados de 0-10 V o
sistema de control
2HOMEDEPOT.com
Comuníquese al 1-844-548-3776 para obtener más ayuda.
IMPORTANTE
ESTE PRODUCTO DEBE SER INSTALADO DE ACUERDO CON EL CÓDIGO
ELÉCTRICO NACIONAL APLICABLE Y LOS CÓDIGOS DE CONSTRUCCIÓN
LOCALES POR UNA PERSONA FAMILIARIZADA CON LA CONSTRUCCIÓN
Y FUNCIONAMIENTO DEL PRODUCTO Y LOS PELIGROS IMPLICADOS.
Garantía
Esta es una garantía limitada ofrecida por el fabricante por un período de cinco años a partir de la fecha de compra
a sus clientes. El fabricante garantiza a los clientes que los productos estarán libres de defectos de material y mano
de obra. La obligación del fabricante bajo esta garantía se limita a la provisión de reemplazo de productos y se
extiende al comprador original del producto al presentar un recibo de compra válido u otra prueba de la fecha de
compra original aceptable para el fabricante. El recibo es necesario para la prestación de la ejecución de la garantía.
No se aceptarán reclamaciones de garantía sin el comprobante de compra original.
Cabe señalar que la garantía no se aplica a los productos del fabricante que hayan sido alterados o reparados por
personal no autorizado, hayan sido objeto de negligencia, abuso, mal uso o accidente o daños causados durante
el envío. Cualquier otro producto no fabricado por el fabricante que haya sido suministrado, instalado y/o utilizado
junto con los productos del fabricante no está cubierto por esta garantía. Cualquier daño causado por el reemplazo
de bombillas, LED o corrosión o decoloración de los componentes de latón tampoco está cubierto por esta garantía.
Especificaciones...................................................
- Reorientar o reubicar la antena receptora
- Aumente la separación entre el equipo y el receptor.
- Conectar el equipo a una toma de un circuito diferente al que está conectado el receptor
- Consulte al distribuidor o a un técnico de radio/TV experimentado para obtener ayuda.
NOTE:
Este equipo ha sido probado y cumple con los límites para un dispositivo digital de Clase B, de conformidad con la parte 15 de las normas de la FCC. Estos límites están diseñados para
proporcionar una protección razonable contra interferencias perjudiciales en una instalación residencial. Este equipo genera usos y puede irradiar energía de radiofrecuencia y, si no se instala y utiliza de
acuerdo con las instrucciones, puede causar interferencias perjudiciales para las comunicaciones por radio. Sin embargo, no hay garantía de que no se produzcan interferencias en una instalación en
particular. Si este equipo causa interferencia dañina a la radio o recepción de televisión, que se puede determinar apagando y encendiendo el equipo, se recomienda al usuario que intente corregir
la interferencia mediante una o más de las siguientes medidas
INFORMACIÓN: El dispositivo se probó y se encontró que
cumple con la Parte 15 de las Reglas de la FCC. El
funcionamiento está sujeto a dos condiciones: (1) Este
dispositivo no puede causar interferencias dañinas y (2) este
dispositivo debe aceptar cualquier interferencia recibida,
incluida cualquier interferencia que pueda causar un
funcionamiento no deseado. Estos límites están diseñados
para brindar protecciones razonables contra interferencias
dañinas cuando el equipo se opera en un entorno comercial.

Lúmenes (salida de luz)
Vatios (consumo de energía)
Reemplaza
Lúmenes/vatios (eficacia)
Requisitos de alimentación (voltaje de entrada)
Color claro (CCT)
Regulable
Modos de funcionamiento
120-277 Vca
4000 Kelvin (blanco brillante)
Atenuación (cuando se usa con un interruptor de atenuación de 0-10 V)
Dusk-to-Dawn: Enciende automáticamente la lámpara durante
noche y APAGADO durante el día. Controlado por interruptor:
Mueva el interruptor a encienda y apague la lámpara.
Utilice el negro preinstalado cubierta de la fotocélula en la
fotocélula del dispositivo para utilizar esta configuración de modo.
ESPECIFICACIONES
3
Garantía (continuación)
LIMITACIÓN DE RESPONSABILIDAD
En ningún caso el fabricante será responsable por daños indirectos, consecuentes, incidentales o especiales,
o por lucro cesante. El fabricante no es responsable de ningún reclamo o daño que surja o esté relacionado con
la fabricación, venta, entrega, uso, mantenimiento y reparación o modificación de los productos del fabricante,
o el suministro de piezas de repuesto que superen el precio de compra de los productos del fabricante. dando
lugar a una demanda. No se aceptarán cargos por mano de obra para quitar o instalar los accesorios.
RECLAMAR
Comuníquese con el servicio al cliente de The Home Depot al 1-844-548-3776 o envíe un correo electrónico
a [email protected] e incluya su nombre, dirección y número de contacto, junto con una copia del
recibo de compra y una breve descripción del problema.
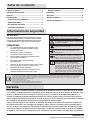
Antes de instalar la lámpara, asegúrese de que todas las piezas estén presentes. Compare las piezas con las secciones Hardware
incluido y Contenido del paquete. Si falta alguna pieza o está dañada, no intente armar, instalar ni operar esta lámpara. Póngase
en contacto con nuestro equipo de atención al cliente para obtener piezas de repuesto.
Pre-Instalación
PLANIFICACIÓN INSTALACIÓN
HERRAMIENTAS NECESARIAST
Phillips
destornillador
Cable
strippers/
cortadores
Circuito
ensayador
Silicona
sellador
Trabajar
guantes
Escalera La seguridad
gafas de protección
PWRFX70-PC-4K-BZ
9500 lúmenes
LED de 70 vatios
650W Incandescente
136 lúmenes por vatio

4
Preinstalación (continuación)
JUEGO DE HERRAJES
Part Description Quantity
AA Automóvil club británico Tapa transparente de la fotocélula 1
BB Cama y desayunoTuerca de alambre 5
CC Llave Allen 1
DD Contratuerca de conducto (preinstalada) 1
CONTENIDOS DEL PAQUETE
Parte Descripción Cantidad
A Lámpara 1
B Fotocélula (sensor de luz) 1
C Tornillo de ajuste de montaje de nudillo 1
D Montura articulada roscada NPS giratoria de 1/2” 1
NOTA: El hardware no se muestra en tamaño real.
NOTA:
Los soportes opcionales no están incluidos en la caja, hay accesorios de montaje adicionales
disponibles por separado de su distribuidor.
Comuníquese al 1-844-548-3776 para obtener más ayuda.
HOMEDEPOT.com
AA BB
DD

Mientras usa la lámpara (A) montada en el alero
(fig. 1T), es posible que el sensor de la fotocélula (B) no
funcione correctamente. En este caso, se aconseja utilizar
la luminaria (A) con modo de control por interruptor.
5
Instalación
1Para mejores resultados
☐La lámpara (A) debe montarse
utilizando el muñón roscado (D) en un
cubierta resistente a la intemperie (no incluida)
en una caja de conexiones (fig. 2) o un paisaje
estaca de tierra (no incluida) (fig. 3).
INFORMACIÓN
Placas de cubierta resistentes a la intemperie para cajas de
conexiones, paisaje estaca de tierra, postes y otros brazos de
montaje y Hay accesorios disponibles. Póngase en contacto
con su distribuidor o Atención al cliente de Electricidad Comercial.
2Apague la energía eléctrica
☐Verifique que el interruptor de pared
esté en la posición APAGADO (fig. 5)
☐En el panel eléctrico principal, apague
el disyuntor que suministra energía a
la caja de conexiones en la que está
trabajando (fig. 6).
☐Para los fusibles de tipo atornillable,
desenrosque el fusible que alimenta
la caja de conexiones en la que
está trabajando (fig. 7).
(fig 5). (fig 6). (fig 7).
(fig 1).
Montado a prueba de intemperie
cubrir con tubo NPSM de 1/2"
Hilo (se vende por separado)
Montado en el suelo del paisaje
estaca con tubería NPSM de 1/2"
Hilo (se vende por separado) Montaje en tierra
NOTE:
montaje en pared Montaje en alero
(fig 4).
(fig 2). (fig 3).

6
Instalación (continuación)
3hacer el electrico
conexiones
☐Si es necesario, pele 3/8” del aislamiento de
la caja de empalmes y los cables del artefacto
de iluminación (fig. 8).
☐Conecte el cable negro del dispositivo de iluminación
al cable negro de la caja de conexiones (línea), el cable
blanco del dispositivo de iluminación al cable blanco
de la caja de conexiones (común) y el cable verde
del dispositivo de iluminación al cable verde (tierra)
de la caja de conexiones (fig. 9).
☐Para los cables de la lámpara púrpura y gris
deje los cables sin pelar o termine individualmente los
cables púrpura y gris del dispositivo con tuercas para
cables (BB) para evitar cortocircuitos (fig. 9).
Diagrama accesorio de iluminación
(Siga estos pasos cuando NO conecte a un atenuador de 0-10 V)
AVISO:
Deje los cables púrpura y rosa terminados con
tuercas para cables instaladas y separadas cuando NO los
conecte a un atenuador de 0-10 V. NO conecte los cables
morado y rosa a ningún otro cable a menos que esté
conectado a un atenuador de 0-10 V diseñado para
usar con lámparas LED (fig. 9).
Para cableado eléctrico a 0-10V Dimmer
(Siga estos pasos cuando realice el cableado a un atenuador
de 0-10 V)
☐
☐
Conecte el cable negro de la lámpara a la caja de
conexiones cable negro (línea), lámpara cable blanco
al empalme cable blanco de la caja (común) y la
lámpara verde cable al cable de tierra de la caja
de conexiones.
Para atenuar, al cablear a un atenuador de 0-10 V,
conecte el cable púrpura de la lámpara a la atenuación
cable del dispositivo (+DIM) y la lámpara
cable rosa al dispositivo de atenuación cable
rosa (-DIM) (fig. 10).
(fig 9).
(fig 8).
(fig 10).
PROPINA
Sostenga los extremos pelados uno cerca del otro
y alinee los hilos deshilachados (no retuerza los cables).
Empuje los cables en las tuercas para cables (BB) y utilice
los dedos para girar las tuercas para cables en el sentido
de las agujas del reloj hasta que queden apretadas
Compruebe la estanqueidad tirando de los cables.
Comuníquese al 1-844-548-3776 para obtener más ayuda.
HOMEDEPOT.com
(común)
Blanco
(común)
Blanco
(atenuar)
Rosa
Rosa
(atenuar)
(atenuar)
Morado
(atenuar)
Morado
(línea)
Negro
(línea)
Negro
0-10V
atenuador
(terrestre)
Verde
(terrestre)
Verde
Caja de
conexiones

7
Instalación (continuación)
4Asegure el
accesorio
☐
☐
Asegure la lámpara (A) a una caja de conexiones con
placa de cubierta resistente a la intemperie o estaca de
suelo de paisaje (se vende por separado). Inserte y
enrosque el soporte de articulación (D) en el sentido de
las agujas del reloj hasta que la lámpara (A) esté en el
dirección deseada. Apriete la contratuerca del conducto
preinstalado(DD) para asegurarse de que el accesorio (A)
esté bloqueado en la posición ajustada (fig 11).
Si corresponde, tape todos los orificios no
utilizados y selle las roscas con silicona.
Apriete el montaje del nudillo (D)
con contratuerca de conducto (DD) (incluida)
5Apunta el
accesorio
☐
☐
Afloje el tornillo en la parte giratoria de la
montura articulada (D) con la llave Allen
provista (CC) (fig. 12).
Ajuste el accesorio (A) a una posición
de orientación adecuada y luego apriete
el tornillo de ajuste del soporte articulado
(C) (fig. 12).
(fig 11).
Afloje el tornillo aquí para apuntar y vuelva a
apretarlo para asegurar la posición
(fig 12).
A
DD

8
Operación
Para deshabilitar la fotocélula, deje la preinstalada
cubierta de fotocélula negra en la fotocélula
CAMBIAR
REVISADO
1Seleccione del anochecer al amanecer o
Control activado por interruptor
OPCIÓN 1: Funcionamiento del anochecer al amanecer AUTOMÁTICO
NOCHE ENCENDIDA
La operación del anochecer al amanecer permite que la lámpara se ENCIENDA
automáticamente cuando está oscuro afuera y se APAGUE cuando sale
el sol, lo que le permite ahorrar energía.
Apagado durante el dia
☐Para habilitar la operación de anochecer a amanecer, retire
la cubierta de la fotocélula negra preinstalada e instale la
cubierta transparente de la fotocélula (AA) (fig. 13)
Asegúrese de que el interruptor que alimenta la lámpara
esté en la posición de ENCENDIDO y déjelo ENCENDIDO
en todo momento para habilitar la operación automática
desde el anochecer hasta el amanecer.
☐
(fig 13).
(fig 14).
NOTA:
Durante el día si la fotocélula no recibe suficiente
luz del sol (área sombreada) puede hacer que la lámpara
ENCENDIDA prematuramente
PROPINA: Para probar si la lámpara y la fotocélula funcionan
durante el día, encienda la lámpara y cubra la fotocélula
durante 10 segundos para ENCENDER la lámpara. Destape
la fotocélula y el dispositivo debe apagarse después de
10 segundos. Si la fotocélula no detecta suficiente luz del
sol, encienda una linterna en la fotocélula para ver cómo
se apaga el dispositivo.
OPCIÓN 2: Interruptor controlado
La operación controlada por interruptor permite que la lámpara se encienda
y se apague al accionar un interruptor que controla la electricidad a la caja
de empalmes que alimenta la lámpara. La lámpara no se encenderá y apagará
automáticamente, sino que se controlará manualmente.
☐To enable switch activated operation leave
the pre-installed black photocell cover on
the photocell (fig 14).
(Para la operación de anochecer a amanecer, retire
la tapa negra y reemplácela con la
tapa transparente de la fotocélula (AA))
Comuníquese al 1-844-548-3776 para obtener más ayuda.
HOMEDEPOT.com
Colocar
Retire la
cubierta

Cuidado y Limpieza
9
☐Apague la fuente de alimentación principal antes de limpiar el producto. Para prolongar la apariencia original, limpie la lámpara
únicamente con agua limpia y un paño suave y húmedo.
☐No utilice limpiadores abrasivos o limpiadores que contengan alcohol. No aplique pinturas, solventes ni ningún otro producto
químico en esta lámpara. Podrían causar un deterioro prematuro del acabado y anular la garantía.
☐No rocíe el artefacto de iluminación con una manguera o hidrolavadora.
Solución de problemas
Problema Causa posible Solución
La luz no
encender
No hay energía para el dispositivo
Compruebe si el disyuntor está disparado. Confirme
que el interruptor de pared esté ENCENDIDO.
Verifique que el cableado a la lámpara sea correcto
(apague la energía de la lámpara de antemano).
La fotocélula está detectando luz Pruebe el funcionamiento de la Fotocélula cubriéndola
durante 10 segundos hasta que el aparato se encienda.
Reubique la lámpara en un lugar donde
no haya luz reflejada.
O coloque la cubierta de la fotocélula negra
preinstalada en la fotocélula y use el interruptor
de pared para ENCENDER y APAGAR la lámpara.
ciclos de luz
Encendido y apagado
continuamente
Luz
PARPADEO
El sensor de luz de la fotocélula
está detectando la luz reflejada
La lámpara está conectada a
un atenuador inadecuado
La luz permanece
ENCENDIDA
La fotocélula está en un área sombreada
Encienda una linterna en la fotocélula durante
10 segundos. Si la luz se APAGA, la lámpara
se debe reubicar en un lugar con suficiente luz
durante el día para que la fotocélula funcione
correctamente.
O coloque la cubierta de la fotocélula negra
preinstalada en la fotocélula y use el interruptor
de pared para ENCENDER y APAGAR la lámpara.
La fotocélula está defectuosa
Si la lámpara no se apaga cuando se usa una
linterna en la fotocélula durante 10 segundos,
es posible que la fotocélula esté defectuosa.
Póngase en contacto con el servicio de atención
al cliente.
NOTA:
La fotocélula puede tener un retraso mayor durante la resolución de problemas.
Al realizar la prueba, encienda la linterna o cubra la fotocélula y espere hasta 1 minuto
para que la lámpara funcione correctamente.
Reemplace el atenuador con un interruptor
de atenuación de 0-10 V o un interruptor de pared
estándar de ENCENDIDO/APAGADO.

Commercial ElectricPWRFX70-PC-4K-BZ


¿Preguntas, problemas, piezas faltantes? Antes
de volver a la tienda, call Commerrvice
9 a.m. - 5 p.m., EST, Monday-Friday
1-844-548-3776
HOMEDEPOT.COM
Conserve este manual para uso futuro.
-
 1
1
-
 2
2
-
 3
3
-
 4
4
-
 5
5
-
 6
6
-
 7
7
-
 8
8
-
 9
9
-
 10
10
-
 11
11
-
 12
12
-
 13
13
-
 14
14
-
 15
15
-
 16
16
-
 17
17
-
 18
18
-
 19
19
-
 20
20
-
 21
21
-
 22
22
-
 23
23
-
 24
24


Commercial Electric PWRFX70-PC-4K-BZ Guía del usuario
- Tipo
- Guía del usuario
en otros idiomas
Otros documentos
-
Halo GFLL70FSUNVDBZK Guía de instalación
-
Defiant DF-5512-WH-D Guía de instalación
-
-
-
-
-
-
Home Decorators Collection FEU1611LM Instrucciones de operación
-