
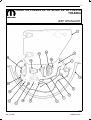
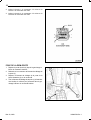
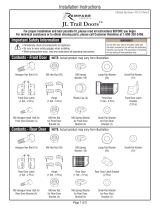
1
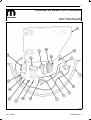
REAR1/2DOORKIT
JEEPWRANGLER
Mar30,2009K6860780Rev.1

2
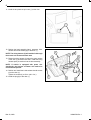
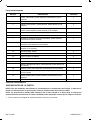
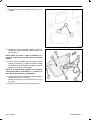
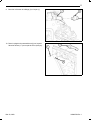
REARDOORS
CALLOUTDESCRIPTIONQUANTITY
1Door,RearHalf,LeftDoor,RightDoor(NotShown)2
2Nut,Hex,ExteriorDoorHandle4
3Handle,ExteriorDoor,LeftDoor,RightDoor(NotShown)2
4Weatherseal,DoortoBody,RearHalfDoor,LeftDoor,RightDoor
(NotShown)
2
5Plug2
6DoorHarness2
7Link,InsideReleasetoLatch,LeftDoor,RightDoor(NotShown)2
8Link,DoorInsideLocktoLatch,LeftDoor,RightDoor(NotShown)2
9Link,OutsideHandletoLatch,LeftDoor,RightDoor(NotShown)2
10Screw(Hinge,Door)8
116wayConnector,2
12Nut,PlasticSnapin4
13Screw,PanHead,M6X1X20(FootmanLoop)(InsideHandle)8
14FootmanLoop,DoorCheckStrapHalfDoor2
15Handle,InsideRelease,LeftDoor,RightDoor(NotShown)2
16Hinge,Door,LeftDoor,RightDoor(NotShown)4
17Presenter,Latch,RearDoor,LeftDoor,RightDoor(NotShown)2
18Latch,RearDoor,LeftDoor,RightDoor(NotShown)2
19Screw(Latch)6
PROCEDURESTEPS:
DOORSUBASSEMBLY
NOTE:Foreaseininstallation,itisrecommendedthatthelatchcomponents,wiringharnessandinteriorhandle
areassembledasanassemblypriortoinstallation.
NOTE:Thelinks(rods)mustbeinstalledwiththecoloredstripe(locatedontherod)towardsthelatchassembly.
Installthelinkstothelatch'scolorcoordinatedretainerunlessotherwisenoted.
1.Paintthedooranddoorhingestomatchbodycolor.
Mar30,2009K6860780Rev.1

3
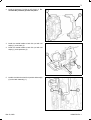
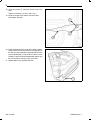
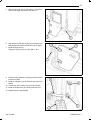
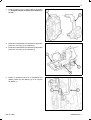
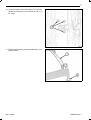
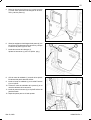
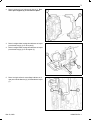
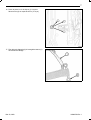
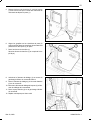
2.Installthepresenter(2)tothetopofthelatch(1).En
surethatthepresenter(2)locksintoplace.
3.Installtheoutsidehandletolatchlink(rodwithred
stripe)(1)tothelatch(2).
4.Installtheoutsidehandletolatchlink(rodwithred
stripe)(1)tothepresenter(3).
5.Installtheinsidelocktolatchlink(rodwithwhitestripe)
(2)tothelatchassembly(1).
Mar30,2009K6860780Rev.1

4
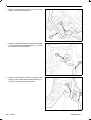
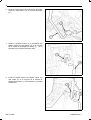
6.Installtheinsidehandletolatchlink(rodwithgreen
stripe)(1)tothelatchassembly(2).
7.Installtheinsidelocktolatchlink(rodwithwhitestripe)
(2)totheinsidereleasehandleassembly(1).Thelink
(2)willattachtotheblackretainer.
8.Installtheinsidehandletolatchlink(rodwithgreen
stripe)(2)totheinsidereleasehandleassembly(1).
Thelink(1)willattachtotheblueretainer.
Mar30,2009K6860780Rev.1

5
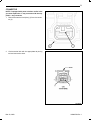
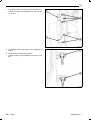
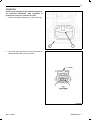
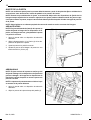
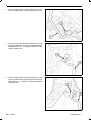
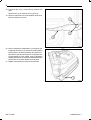
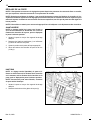
9.Connectthewiringharness(2)tothelatch(1).
10.Installtheexteriordoorhandle(2)tothedoor.
Tightenthenuts(1,3)to5N.m(44in.lbs.).
Mar30,2009K6860780Rev.1

6
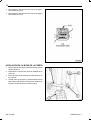
11.Installthetwoplasticsnapinnuts(1)tothedoor.
12.Positionthelatchassembly(latch,presenter,links,
harnessandinsidehandle)(6)tothedoor(1).
NOTE:Thewiringharness(2)willneedbefedthrough
theaccessholenearestthelatcharea.
13.Routethewiringharness(2)alongtheupperportion
ofthedoor(1)anddowntheside.Installthewiring
harnesspushpinretainersintothedoorassembly.
NOTE:Ifvehicleisequippedwithpowerwin
dows/locks,theharnessconnectorwillneedtobe
removedandreplaced.
14.Positionandinstalltheinsidereleasehandlescrews
(4)tothedoor(1).
Tightenthescrews(4)to5N.m(44in.lbs.).
15.Installtheplug(8)tothedoor(1).
Mar30,2009K6860780Rev.1

7
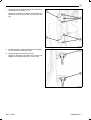
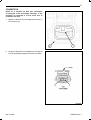
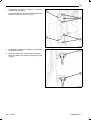
16.Positionandinstallthelatchscrews(1)tothedoor.
Tightenthescrews(6)to8N.m(71in.lbs.).
17.Attachthefootmanloop(2)tothewiringharness(1)
checkstrap.
Mar30,2009K6860780Rev.1

8
18.Usingtwoscrews(1),installthefootmanlooptothe
door.
Tightenthescrews(1)to5N.m(44in.lbs.).
19.Installthehingestotheexteriorsideofthedoor.
Handtightenthebolts.
20.Installtheweatherstrip(1)tothedoor,attachaweath
erstripretainertotheholelocatedonthetopportionof
thedoorandworktowardstheoppositesidebyinsert
ingtheweatherstrip(1)intothedoorchannel.When
installed,installthesecondweatherstripretainerinto
theholelocatedonthetopportionofthedoor.
21.Repeatstepsfortheoppositesidedoor.
Mar30,2009K6860780Rev.1

9
CONNECTOR
NOTE:Ifequippedwithpowerwindowsand/orlocks
youmustreplacethe2wayconnectorwiththesup
plied6wayconnector.
1.Removetheterminallock(blue)(1)fromtheconnec
tor(2).
2.Lifttheterminallockwiththeappropriatedepinning
toolandremovethewires.
Mar30,2009K6860780Rev.1

10
3.InsertPin1fromthe2wayconnectortoPin1onthe
6wayconnector.
4.InsertPin2fromthe2wayconnectortoPin6onthe
6wayconnector.
HALFDOORINSTALLATION
1.Removetheaccessdoor(4)fromtheinteriorBPillar
lowertrim.
2.Disconnectthedoorharnessconnector(2).
3.Removethedoorharnessfromthefootmanloop(3)
ontheBPillar.
4.Pullthedoorharness(1)outtowardstherearofthe
vehiclethroughtheopeningintheinteriorBPillar
lowertrimside.
Mar30,2009K6860780Rev.1

11
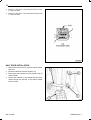
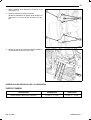
5.Removethehingenuts(2),liftthedoor(1)straightup
offthebodyhingesandremovethedoor(1).
6.Alignthepinsonthedoorhinges(2)totheholesinthe
bodyhingesandpositionthehalfdoor(3)intoplace.
7.Installthehingenuts(1).
Tightenthehingenuts(1)to9N∙m(80in.lbs.).
8.Routethewiringharness(1)throughtheinteriorBPil
larlowertrimside.
9.Installtheharness(1)tothefootmanloop(3)onthe
BPillar.
10.Connectthedoorharness(2)tothebodyharness.
11.Installtheaccessdoor(4)totheBPillarlowertrim.
12.Repeatstepsforoppositeside.
Mar30,2009K6860780Rev.1

12
DOORADJUSTMENT
NOTE:Dooradjustmentmeasurementsshouldbetakenfromstationaryorweldedbodypanelsliketheroof,
rockerorquarterpanels.
NOTE:Duringadjustmentprocedures,itisrecommendedthatallthehingefastenersbeloosenedexceptfor
theuppermostfasteners.Adjustmentscanbemadeusingtheupperboltstoholdthedoorwithfinaltorqueof
thefastenersoccurringaftercorrectdoorpositioningisachieved.
NOTE:Asuitablebodysealantshouldbeusedwhenremovingormovingthehinges.
FORE/AFT
NOTE:Fore/aft(lateral)dooradjustmentisdoneby
looseningthehingetothedoorfastenersonehinge
atatimeandmovingthedoortothecorrectposition.
1.Supportthedoorwithasuitableliftingdevice.
2.Loosentheupper(1)andlower(4)hingetodoorfas
teners.
3.Adjustthedoortothecorrectposition.
4.Tightenthehingetodoorboltsto26N∙m(19ft.lbs.).
UP/DOWN
NOTE:Up/downdooradjustmentisdonebyloosen
inghingetothehingepillarfastenersorthehingeto
doorfastenersandmovingthedoortothecorrectpo
sition.
NOTE:Frontdooropeningshown,reardooropening
similar.
1.Supportthedoorwithasuitableliftingdevice.
2.Loosenthelatchstrikerbolts(3).
Mar30,2009K6860780Rev.1

13
3.Ifnecessary,loosenthehingetobodyfasteners(2,3).
Tightenthehingetobodyfasteners(2,3)to28N∙m
(21ft.lbs.).
4.Ifnecessary,loosenthehingetodoorfasteners(1)
and(4).
5.Adjustthedoortothecorrectposition.
Tightenthedoortohingefastenersto26N∙m(19ft.
lbs.).
Mar30,2009K6860780Rev.1

14
6.Tightenthelatchstrikerbolts(3)26N∙m(19ft.lbs.).
IN/OUT
NOTE:In/outdooradjustmentisdonebyloosening
thehingetobodyfastenersonehingeatatimeand
movingthedoortothecorrectposition.
NOTE:Frontdooropeningshown,reardooropening
similar.
1.Supportthedoorwithasuitableliftingdevice.
2.Loosenthelatchstrikerbolts(3).
Mar30,2009K6860780Rev.1

15
3.Loosenthehingetobodyfasteners(2,3).
4.Adjustthedoortothecorrectposition.
Tightenthehingetobodyfasteners(2,3)to28N∙m
(21ft.lbs.).
5.Tightenthelatchstrikerbolts(3)to26N∙m(19ft.lbs.).
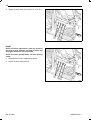
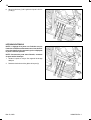
BODYGAPSPECIFICATIONS
REARDOOR
DESCRIPTIONGAPFLUSH
RearDoortoBodySide5.0mm+/1.5mm0.0mm+/1.5mm
Mar30,2009K6860780Rev.1

1
JUEGODEPUEZASDELAMITADDELAPUERTA
TRASERA
JEEPWRANGLER
Mar30,2009K6860780Rev.1

2
Laspuertastraseras
RÓTULODESCRIPCIONCANTIDAD
1.Puerta,mitadtrasera,puertaizquierda,puertaderecha(nose
muestra)
2
2Tuerca,partehexagonal,lamanetaexteriordepuerta4
3Maneta,puertaexterior,puertaizquierda,puertaderecha(nose
muestra)
2
4Sistemahermético,puertasdelacarroceríaypuertadelamitad
trasera,puertaizquierda,puertaderecha(nosemuestra)
2
5Bujía2
6Mazodecablesdelapuerta2
7Articulación,desengancheinteriordelpestillo,puertaizquierda,
puertaderecha(nosemuestra)
2
8Articulación,cerradurainteriordelapuertaparaelpestillo,puerta
izquierda,puertaderecha(nosemuestra)
2
9Articulación,manetaexteriordelpestillo,puertaizquierda,puerta
derecha(nosemuestra)
2
10Tornillo(bisagra,puerta)8
11Conectorde6vías2
12Tuerca,sujecióndeplástico4
13Tornillo,colectorculata,M6X1x20(anillaFootman)(Manetainterior)8
14AnillaFootman,correaparalimitarlaaperturaalamitaddelapuerta2
15Maneta,desengancheinterior,puertaizquierda,puertaderecha(no
semuestra)
2
16Bisagra,puerta,puertaizquierda,puertaderecha(nosemuestra)4
17Soporte,pestillo,puertatrasera,puertaizquierda,puertaderecha
(nosemuestra)
2
18Pestillo,puertatrasera,puertaizquierda,puertaderecha(nose
muestra)
2
19Tornillo(pestillo)6
PASOSDEPROCEDIMIENTO:
SUBCONJUNTOSDELAPUERTA
NOTE:Paraunainstalaciónmáscómoda,serecomiendaqueloscomponentesdelbloqueo,elmazodeca
bleadoylamanetainteriorsemontenjuntoscomounconjunto,antesdeprocederainstalar.
NOTE:Lasarticulaciones(varillas)debeinstalarsevetaacolor(situadaenlabiela)haciaelconjuntodel
pestillo.Instalelasarticulacionesenelreténcoordinadoacolordelpestilloamenosqueseindiquelocontrario.
1.Pintelapuertaylasbisagrasdelapuertadelmismocolorquelacarrocería.
Mar30,2009K6860780Rev.1

3
2.Instaleelsoporte(2)enlapartesuperiordelpestillo
(1).Asegúresedequeelsoporte(2)lobloqueeen
susitio.
3.Instalelamanetaexteriorenlaarticulacióndelpestillo
(varillaconvetaroja)(1)enelpestillo(2).
4.Instalelamanetaexteriordelaarticulacióndelpestillo
(varillaconvetaroja)(1)enelsoporte(3).
5.Instalelacerradurainteriordelaarticulacióndel
pestillo(varillaconvetablanca)(2)enelconjunto
depestillo(1).
Mar30,2009K6860780Rev.1

4
6.Instalelamanetainteriordelaarticulacióndelpestillo
(varillaconvetaverde)(1)enelconjuntodepestillo
(2).
7.Instalelacerradurainteriordelaarticulacióndel
pestillo(varillaconvetablanca)(2)enelconjunto
delamanetadedesengancheinterior(1).LaLa
articulación(2)sefijanalretenedornegro.
8.Instalelamanetainteriordelpestillo(varillacon
vetaverde)(2)enelconjuntodelamanetade
desengancheinterior(1).Laarticulación(1)sefijará
alreténazul.
Mar30,2009K6860780Rev.1

5
9.Conecteelmazodecableado(2)enelpestillo(1).
10.Instalelamanetaexteriordepuerta(2)enlapuerta.
Aprietelastuercas(1,3)a5N∙m(44lbs.pulg.).
Mar30,2009K6860780Rev.1

6
11.Instalelasdostuercasconsujecióndeplástico(1)en
lapuerta.
12.Coloqueelconjuntodelpestillo(pestillo,soporte,ar
ticulaciones,mazodecableadoymanetainterior)(6)
enlapuerta(1).
NOTE:Habráquepasarelmazodecableado(2)a
travésdelorificiodeaccesomáscercanoaláreadel
pestillo.
13.Guíeelmazodecableado(2)alolargodelaparte
superiordelapuerta(1)ybájeloporellateral.Instale
losretenedoresdelaespigadeempujedemazode
cableadoenelconjuntodelapuerta.
NOTE:Sielvehículoestáequipadoconelevalunas
eléctricos/cerradurasautomaticas,elconectorde
mazodeberádesmontarseyreemplazarse.
14.Coloqueeinstalelostornillosdelamanetadedesen
gancheinterior(4)enlapuerta(1).
Aprietelostornillos(4)conunatorsiónde5N∙m(44
lbs.pulg.).
15.Instalelaclavijadeconexión(8)enlapuerta(1).
Mar30,2009K6860780Rev.1

7
16.Coloqueeinstaleeltornillodelpestillo(1)enlapuerta.
Aprietelostornillos(6)conunatorsiónde8N∙m(71
lbs.pulg.).
17.FijelaanillaFootman(2)almazodecableado(1),ver
ifiquelacorrea.
Mar30,2009K6860780Rev.1

8
18.Utilizandodostornillos(1),instalelaanillaFootman
enlapuerta.
Aprietelostornillos(1)conunatorsiónde5N∙m(44
lbs.pulg.).
19.Instalelasbisagrasenelexteriordelapuerta.
Aprieteamanolospernos.
20.Coloqueelburlete(1)enlapuerta,fijeunretenedor
deburleteenorificiosituadoenlapartesuperiorde
lapuertaytrabajehaciaelladoopuestoinsertando
elburlete(1)dentrodelapuerta.Unavezinstalado,
instaleelsegundoretenedordeburletedentrodelori
ficiosituadoenlapartesuperiordelapuerta.
21.Repitalospasosenelladoopuesto.
Mar30,2009K6860780Rev.1

9
CONECTOR
NOTE:Siestáequipadoconlasventanillasdelanteras
y/ocerradurasautomáticas,debereemplazarel
conectorde2víasporelconectorde6vías.
1.Retireelcierredelterminal(azul)(1)delconector(2).
2.Levanteelcierredelterminalconlaherramientade
desbloqueoadecuadayretireloscables.
Mar30,2009K6860780Rev.1

10
3.Inserteespiga1delconectorde2víasenlaespiga1
delconectorde6vías.
4.Inserteespiga2delconectorde2víasenlaespiga6
delconectorde6vías.
INSTALACIÓNDELAMITADDELAPUERTA
1.Retirelapuertadeacceso(4)desdeeladornoinferior
delpilarBinterior.
2.Desconecteelconectordemazodecableadodela
puerta(2).
3.RetiredelmazodelapuertadelaanillaFootman(3)
enelpilarB.
4.Tiredelmazodelapuerta(1)paraextraerlohaciala
partetraseradelvehículoatravésdelaaberturaen
elinteriordelpilarBinferioreladornolateral.
Mar30,2009K6860780Rev.1

11
5.Retirelastuercasdelabisagra(2),levantelapuerta
(1)haciaarribaparasacarlasbisagrasdelacarro
ceríayretirelapuerta(1).
6.Alineelasespigasenlasbisagrasdelapuerta(2)con
losorificiosenlasbisagrasdelacarroceríaycoloque
lamitaddelapuerta(3)ensusitio.
7.Instalelastuercasdelabisagra(1).
Aprieteloslastuercas(1)a9N∙m(80lbs.pulg.).
8.Guíeelmazodecableado(1)atravésdelospilares
Binterioresdelpaneladornadoinferior.
9.Instaleelmazodecableado(1)enlaanillaFootman
(3)enelpilarB.
10.Conecteelmazodecableadodelapuerta(2)enel
mazodecableadodelacarrocería.
11.Instalelapuertadeacceso(4)enelpilarBinferiordel
paneldecorado.
12.Repitalospasosparaenelladoopuesto.
Mar30,2009K6860780Rev.1

12
AJUSTEDELAPUERTA
NOTE:Lasmedicionesparaajustarlaspuertasdeberántomarseapartirdelasplanchasfijasosoldadasdela
carroceríaasícomolasdeltecho,labasedepeldañoolospanelesdelcuarto.
NOTE:Durantelosprocedimientosdeajuste,serecomiendaaflojartodoslosdispositivosdefijacióndelas
bisagrasexceptoaquellosdelosextremossuperiores.Losajustespuedenrealizarseusandolospernossupe
rioresparasostenerlapuerta,aunquelatorsiónfinaldeberáaplicarsedespuésdehabercorregidolaposición
delapuerta.
NOTE:Deberáutilizarseunsellanteapropiadodecarroceríacuandoseretirenomuevanlasbisagras.
ADELANTE/ATRÁS
NOTE:Elajusteadelante/atrás(lateral)delapuertase
realizaaflojandolabisagradelosdispositivosdefi
jación,unabisagracadavez,ydesplazandolapuerta
alaposicióncorrecta.
1.Apoyelapuertasobreundispositivodeelevación
adecuado.
2.Aflojelabisagrasuperior(1)einferior(4)delosdis
positivosdefijacióndelapuerta.
3.Ajustelapuertaenlaposicióncorrecta.
4.Aprietelospernosdelabisagraalapuertaconuna
torsiónde26N∙m(19lbs.pie).
ARRIBA/ABAJO
NOTE:Elajusteverticaldelapuertaserealizayasea
aflojandolabisagradelosdispositivosdefijacióndel
pilardelabisagraolabisagradelosdispositivosde
fijacióndelapuerta;despuéssemuevelapuertaala
posicióncorrecta.
NOTE:Laaperturadepuertatraseraessimilaralaque
semuestradelapuertadelantera.
1.Apoyelapuertasobreundispositivodeelevación
adecuado.
2.Aflojelospernosdelaplacadetopedelpestillo(3).
Mar30,2009K6860780Rev.1

13
3.Sifuesenecesario,aflojelabisagradelosdispositivos
defijacióndelacarrocería(2,3).
Aprietelosdispositivosdefijacióndelabisagraala
carrocería(2,3)conunatorsiónde28N∙m(21lbs.
pie).
4.Sifuesenecesario,aflojelasbisagrasdelosdisposi
tivosdefijacióndelapuerta(1)y(4).
5.Ajustelapuertaenlaposicióncorrecta.
Aprietelosdispositivosdefijacióndelapuertaala
bisagraconunatorsiónde26N∙m(19lbs.pie).
Mar30,2009K6860780Rev.1

14
6.Aprietelospernosdelaplacadetopedelpestillo(3)
conunatorsiónde26N∙m(19lbs.pie).
ADENTRO/AFUERA
NOTE:Elajustehaciadentro/fueraserealiza
aflojandolosdispositivosdefijacióndelabisagra
alacarrocería,unabisagracadavez,ymoviendola
puertaalaposicióncorrecta.
NOTE:Laaperturadepuertatraseraessimilaralaque
semuestradelapuertadelantera.
1.Apoyelapuertasobreundispositivodeelevación
adecuado.
2.Aflojelospernosdelaplacadetopedelpestillo(3).
Mar30,2009K6860780Rev.1

15
3.Aflojelabisagradelosdispositivosdefijacióndela
carrocería(2,3).
4.Ajustelapuertaenlaposicióncorrecta.
Aprietelosdispositivosdefijacióndelabisagraala
carrocería(2,3)conunatorsiónde28N∙m(21lbs.
pie).
5.Aprietelospernosdelaplacadetopedelpestillo(3)
conunatorsiónde26N∙m(19lbs.pie).
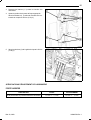
ESPECIFICACIÓNDEESPACIODELACARROCERÍA
PUERTATRASERA
DESCRIPCIONSEPARACIÓNNIVELACIÓN
Puertatraseraalateraldelacarrocería5,0mm+/1,5mm0,0mm+/1,5mm
Mar30,2009K6860780Rev.1

1
TROUSSEDEDEMIPORTEARRIÈRE
JEEPWRANGLER
Mar30,2009K6860780Rev.1

2
PORTESARRIÈRE
LÉGENDEDESCRIPTIONQUANTITÉ
1Porte,demiportearrière,portegauche,portedroite(nonillustrée)2
2Écrou,hexagonal,poignéedeporteextérieure4
3Poignée,porteextérieure,portegauche,portedroite(nonillustrée)2
4Caoutchoucd'étanchéité,porteàcarrosserie,demiportearrière,
portegauche,portedroiteporte(nonillustrée)
2
5Bouchon2
6Faisceaudecâblagedelaporte2
7Tringle,dedéverrouillageintérieurauloquet,portegauche,porte
droite(nonillustrée)
2
8Tringle,deserrureintérieurdeporteauloquet,portegauche,porte
droite(nonillustrée)
2
9Tringle,poignéeextérieureauloquet,portegauche,portedroite
(nonillustrée)
2
10Vis(charnière,porte)8
11Connecteurà6voies,2
12Écrou,detypeencliquetableenplastique4
13Vis,têtecylindriquelarge,M6x1X20(boucled'attache)(poignée
intérieure)
8
14Boucled'attacheduparebrise,brasd'arrêtdedemiporte2
15Poignée,dedéverrouillageintérieur,portegauche,portedroite(non
illustrée)
2
16Charnière,porte,portegauche,portedroite(nonillustrée)4
17Support,deloquet,portearrière,portegauche,portedroite(non
illustrée)
2
18Loquet,portearrière,portegauche,portedroite(nonillustrée)2
19Vis(loquet)6
ÉTAPESDEPROCÉDURE:
SOUSENSEMBLEDEPORTE
NOTE:Pourfaciliterlapose,ilestrecommandéquelescomposantsdeloquet,lefaisceaudecâblageetla
poignéeintérieuresoientmontésentantqu'ensembleavantlapose.
NOTE:Lestringles(tiges)doiventêtreposéesaveclabandecolorée(situéesurlatige)versl'ensemblede
loquet.Àmoinsd'aviscontraire,poserlestringlessurledispositifderetenuedecouleurassortieauloquet.
1.Peindrelaporteetlescharnièresdeportepourqu'elless'agencentàlacouleurdelacarrosserie.
Mar30,2009K6860780Rev.1

3
2.Poserlesupport(2)surledessusduloquet(1).S'as
surerquelesupport(2)severrouilleenplace.
3.Poserlatringlereliantlapoignéeextérieureauloquet
(avecbanderouge)(1)surleloquet(2).
4.Poserlatringlereliantlapoignéeextérieureauloquet
(avecbanderouge)(1)surlesupport(3).
5.Poserlatringlereliantleverrouillageintérieuraulo
quet(avecbandeblanche)(2)àl'ensembledeloquet
(1).
Mar30,2009K6860780Rev.1

4
6.Poserlatringlereliantlapoignéeintérieureauloquet
(tigeavecbandeverte)(1)àl'ensembledeloquet(2).
7.Poserlatringlereliantlaserrureintérieureauloquet
(tigeavecbandeblanche)(2)surlapoignéededéver
rouillageintérieur(1).Latringle(2)sefixeraaudis
positifderetenuenoir.
8.Poserlatringlereliantlapoignéeintérieureauloquet
(tigeavecbandeverte)(2)àlapoignéededéverrouil
lageintérieur(1).Latringle(1)sefixeraaudispositif
deretenuebleu.
Mar30,2009K6860780Rev.1

5
9.Brancherlefaisceaudecâblage(2)auloquet(1).
10.Poserlapoignéedeporteextérieure(2)surlaporte.
Serrerlesécrous(1,3)aucouplede5N.m(44lbpo).
Mar30,2009K6860780Rev.1

6
11.Poserlesdeuxécrousdetypeencliquetableenplas
tique(1)àlaporte.
12.Positionnerl'ensembledeloquet(loquet,support,
tringles,faisceaudecâblageetpoignéeintérieure)
(6)àlaporte(1).
NOTE:Lefaisceaudecâblage(2)devraêtreacheminé
autraversdel'orificed'accèssetrouvantleplusprès
duloquet.
13.Acheminerlefaisceaudecâblage(2)lelongdela
partiesupérieuredelaporte(1)etverslebassur
lecôté.Poserlagoupilleàemboîterdufaisceaude
câblagedansl'ensembledeporte.
NOTE:Silevéhiculeestdotédeglacesetdeserrures
àcommandeélectrique,leconnecteurdefaisceaude
câblagedevraêtredéposéetremplacé.
14.Positionneretposerlesvisdelapoignéededéver
rouillageintérieur(4)àlaporte(1).
Serrerlesvis(4)aucouplede5N.m(44lbpo).
15.Poserlebouchon(8)surlaporte(1).
Mar30,2009K6860780Rev.1

7
16.Placeretposerlesvisdeloquet(1)àlaporte.
Serrerlesvis(6)aucouplede8N.m(71lbpo).
17.Fixerlaboucled'attache(2)àlasanglederetenue(1)
dufaisceaudecâblage.
Mar30,2009K6860780Rev.1

8
18.Àl'aidededeuxvis(1),poserlaboucled'attacheàla
porte.
Serrerlesvis(1)aucouplede5N.m(44lbpo).
19.Poserlescharnièressurlecôtéextérieurdelaporte.
Serrerlesboulonsàlamain.
20.Poserlecaoutchoucd'étanchéité(1)surlaporte,fixer
ledispositifderetenueducaoutchoucd'étanchéitéà
l'orificesituésurlapartiesupérieuredelaporteetl'in
sérerdanslepourtourdelaporteensedirigeantvers
lecôtéopposé.Unefoisinstallé,poserledeuxième
dispositifderetenuedecaoutchoucd'étanchéitédans
l'orificesituésurlapartiesupérieuredelaporte.
21.Répétercesétapespourlaportedel'autrecôté.
Mar30,2009K6860780Rev.1

9
CONNECTEUR
NOTE:Silevéhiculeestdotéd'uninterrupteur
delèveglaceetdeverrouillageélectrique,ilfaut
remplacerleconnecteurà2voiesfourniavecle
connecteurà6voies.
1.Déposerledispositifdeverrouillageborne(bleu)(1)
duconnecteur(2).
2.Souleverledispositifdeverrouillageborneàl'aidede
l'outildedégoupillageappropriéetretirerlescâbles.
Mar30,2009K6860780Rev.1

10
3.Insérerlabroche1duconnecteurà2voiessurla
broche1duconnecteurà6voies.
4.Insérerlabroche2duconnecteurà2voiessurla
broche6duconnecteurà6voies.
POSEDELADEMIPORTE
1.Déposerlaported'accès(4)depuislegarnissagein
férieurdumontantBintérieur.
2.Débrancherleconnecteurdefaisceaudecâblagede
laporte(2).
3.Déposerlefaisceaudecâblagedelaportedela
boucled'attache(3)surlemontantB.
4.Tirerlefaisceaudecâblagedelaporte(1)àl'extérieur
versl'arrièreduvéhiculeparl'ouverturedanslegar
nissageinférieurdumontantBintérieur.
Mar30,2009K6860780Rev.1

11
5.Déposerlesécrousdecharnière(2),souleverlaporte
(1)droitverslehautpourlasortirdescharnièresde
carrosserieetdéposerlaporte(1).
6.Alignerlesgoupillessurlescharnièresdeporte(2)
aveclesorificesdanslescharnièresdecarrosserieet
positionnerlademiporte(3)enplace.
7.Poserlesécrousdecharnière(1).
Serrerlesécrousdecharnière(1)aucouplede9N.m
(80lbpo).
8.Acheminerlefaisceaudecâblage(1)autraversdu
garnissageinférieurdumontantBintérieur.
9.Poserlefaisceaudecâblage(1)àlaboucled'attache
(3)surlemontantB.
10.Brancherlefaisceaudecâblagedelaporte(2)aufais
ceaudecâblagedelacarrosserie.
11.Poserlaported'accès(4)surlegarnissageinférieur
dumontantB.
12.Répétercesétapespourl'autrecôté.
Mar30,2009K6860780Rev.1

12
RÉGLAGEDELAPORTE
NOTE:Ilfautprendrelesmesuresderéglagedesportesdepuislespanneauxdecarrosseriefixesousoudés,
telsquelepavillon,lebasdecarrosserieoulespanneauxdecustode.
NOTE:Durantlesprocéduresderéglage,ilestconseillédedesserrertouteslesfixationsdecharnière,àl’ex
ceptiondesfixationssupérieures.Lesréglagespeuventêtreeffectuésenutilisantlesboulonssupérieurspour
maintenirlaporte;lesfixationsserontensuiteserréesaucouplefinal,unefoisquelaporteauraétérégléeàla
bonneposition.
NOTE:Ilfaututiliserunmasticpourcarrosserieappropriélorsdeladéposeoududéplacementdescharnières.
AVANT/ARRIÈRE
NOTE:Leréglage(latéral)delaporteversl'avantou
versl'arrières’effectueendesserrantuneàuneles
fixationsdecharnièredelaporte,puisendéplaçant
laporteàlabonneposition.
1.Soutenirlaporteaumoyend’unappareildelevage
adéquat.
2.Desserrerlesfixationssupérieures(1)etinférieures
(4)reliantlacharnièreàlaporte.
3.Ajusterlapositiondelaportedefaçonappropriée.
4.Serrerlesboulonsdecharnièredeporteà26N∙m
(19lbpi).
HAUT/BAS
NOTE:Leréglagevertical(haut/bas)deportes’ef
fectueendesserrantsoitlesfixationsdelacharnière
surlemontant,soitlesfixationsdelacharnièresurla
porte,puisendéplaçantlaporteàlabonneposition.
NOTE:Ouverturedeporteavantillustrée,ouverture
deportearrièreidentique.
1.Soutenirlaporteaumoyend’unappareildelevage
adéquat.
2.Desserrerlesboulonsdelagâchedeloquet(3).
Mar30,2009K6860780Rev.1

13
3.Sinécessaire,desserrerlesfixations(2,3)reliantla
charnièreàlacarrosserie.
Serrerlesfixations(2,3)reliantlacharnièreàlacar
rosserieaucouplede28N.m(21lbpi).
4.Sinécessaire,desserrerlesfixations(1)et(4)reliant
lacharnièreàlaporte.
5.Ajusterlapositiondelaportedefaçonappropriée.
Serrerlesfixationsdecharnièredeporteà26N∙m
(19lbpi).
Mar30,2009K6860780Rev.1

14
6.Serrerlesboulons(3)delagâcheduloquetà26N.m
(19lbpi).
INTÉRIEUR/EXTÉRIEUR
NOTE:Leréglagedelaporteversl'intérieurouvers
l'extérieurs’effectueendesserrantuneàunelesfixa
tionsdescharnièresdecarrosserie,puisendéplaçant
laporteàlabonneposition.
NOTE:Ouverturedeporteavantillustrée,ouverture
deportearrièreidentique.
1.Soutenirlaporteaumoyend’unappareildelevage
adéquat.
2.Desserrerlesboulonsdelagâchedeloquet(3).
Mar30,2009K6860780Rev.1

15
3.Desserrerlesfixations(2,3)reliantlacharnièreàla
carrosserie.
4.Ajusterlapositiondelaportedefaçonappropriée.
Serrerlesfixations(2,3)reliantlacharnièreàlacar
rosserieaucouplede28N.m(21lbpi).
5.Serrerlesboulons(3)delagâcheduloquetà26N.m
(19lbpi).
SPÉCIFICATIONSD'ÉCARTEMENTDECARROSSERIE
PORTEARRIÈRE
DESCRIPTIONÉCARTAFFLEUREMENT
Delaportearrièreaupanneaulatéraldecarrosserie5,0mm+/1,5mm0,0mm+/1,5mm
Mar30,2009K6860780Rev.1
-
 1
1
-
 2
2
-
 3
3
-
 4
4
-
 5
5
-
 6
6
-
 7
7
-
 8
8
-
 9
9
-
 10
10
-
 11
11
-
 12
12
-
 13
13
-
 14
14
-
 15
15
-
 16
16
-
 17
17
-
 18
18
-
 19
19
-
 20
20
-
 21
21
-
 22
22
-
 23
23
-
 24
24
-
 25
25
-
 26
26
-
 27
27
-
 28
28
-
 29
29
-
 30
30
-
 31
31
-
 32
32
-
 33
33
-
 34
34
-
 35
35
-
 36
36
-
 37
37
-
 38
38
-
 39
39
-
 40
40
-
 41
41
-
 42
42
-
 43
43
-
 44
44
-
 45
45


en otros idiomas
- français: Mopar 82212123AC Guide d'installation
Artículos relacionados
Otros documentos
-
Signature UPFXC2466S El manual del propietario
-
 RAMPAGE PRODUCTS 7695 Guía de instalación
-
LG Electronics LFXS32766S Manual de usuario
-
-
-
LG Electronics LFXS32726S Manual de usuario
-
Electrolux ELFE4222AW Guía de instalación
