Yamaha TSX-100 El manual del propietario
- Categoría
- Relojes de alarma
- Tipo
- El manual del propietario

©
2007 All rights reserved.
YAMAHA ELECTRONICS CORPORATION, USA
6660 ORANGETHORPE AVE., BUENA PARK, CALIF. 90620, U.S.A.
YAMAHA CANADA MUSIC LTD.
135 MILNER AVE., SCARBOROUGH, ONTARIO M1S 3R1, CANADA
YAMAHA ELECTRONIK EUROPA G.m.b.H.
SIEMENSSTR. 22-34, 25462 RELLINGEN BEI HAMBURG, GERMANY
YAMAHA ELECTRONIQUE FRANCE S.A.
RUE AMBROISE CROIZAT BP70 CROISSY-BEAUBOURG 77312 MARNE-LA-VALLEE CEDEX02, FRANCE
YAMAHA ELECTRONICS (UK) LTD.
YAMAHA HOUSE, 200 RICKMANSWORTH ROAD WATFORD, HERTS WD18 7GQ, ENGLAND
YAMAHA SCANDINAVIA A.B.
J A WETTERGRENS GATA 1, BOX 30053, 400 43 VÄSTRA FRÖLUNDA, SWEDEN
YAMAHA MUSIC AUSTRALIA PTY. LTD.
LEVEL 1, 99 QUEENSBRIDGE STREET, SOUTHBANK, VIC 3006, AUSTRALIA
야마하 뮤직 코리아 ( 주 )
서울특별시 강남구 삼성동 158-9 동성빌딩 8F/9F
Printed in China
CQX1A1290X
TSX-100
TSX-100
DESKTOP AUDIO SYSTEM
OWNER’S MANUAL
MANUAL DE INSTRUCCIONES
사용 설명서
R
TSX-100_R-cv.fm Page 1 Tuesday, January 8, 2008 10:10 AM

i En
1 To assure the finest performance, please read this manual
carefully. Keep it in a safe place for future reference.
2 Install this unit in a well ventilated, cool, dry, clean place
with at least 10 cm on the top, 10 cm on the left and right,
and 10 cm at the back of this unit
— away from direct
sunlight, heat sources, vibration, dust, moisture, and/or cold.
3 Locate this unit away from other electrical appliances,
motors, or transformers to avoid humming sounds.
4 Do not expose this unit to sudden temperature changes from
cold to hot, and do not locate this unit in an environment with
high humidity (i.e. a room with a humidifier) to prevent
condensation inside this unit, which may cause an electrical
shock, fire, damage to this unit, and/or personal injury.
5 Avoid installing this unit where foreign object may fall onto
this unit and/or this unit may be exposed to liquid dripping or
splashing. On the top of this unit, do not place:
– Other components, as they may cause damage and/or
discoloration on the surface of this unit.
– Burning objects (i.e. candles), as they may cause fire,
damage to this unit, and/or personal injury.
– Containers with liquid in them, as they may fall and
liquid may cause electrical shock to the user and/or
damage to this unit.
6 Do not cover this unit with a newspaper, tablecloth, curtain,
etc. in order not to obstruct heat radiation. If the temperature
inside this unit rises, it may cause fire, damage to this unit,
and/or personal injury.
7 Do not plug in this unit to a wall outlet until all connections
are complete.
8 Do not operate this unit upside-down. It may overheat,
possibly causing damage.
9 Do not use force on switches, knobs and/or cords.
10 When disconnecting the power cable from the wall outlet,
grasp the plug; do not pull the cable.
11 Do not clean this unit with chemical solvents; this might
damage the finish.
12 Only voltage specified on this unit must be used. Using this
unit with a higher voltage than specified is dangerous and
may cause fire, damage to this unit, and/or personal injury.
Yamaha will not be held responsible for any damage
resulting from use of this unit with a voltage other than
specified.
13 To prevent damage by lightning, keep the power cord and
outdoor antennas disconnected from a wall outlet or this unit
during a lightning storm.
14 Do not attempt to modify or fix this unit. Contact qualified
Yamaha service personnel when any service is needed. The
cabinet should never be opened for any reasons.
15 When not planning to use this unit for long periods of time
(i.e. vacation), disconnect the AC power plug from the wall
outlet.
16 Be sure to read the “Troubleshooting” section on common
operating errors before concluding that this unit is faulty.
17 Before moving this unit, press POWER OFF to set this unit
to the standby mode, and disconnect the AC power plug from
the wall outlet.
18 Condensation will form when the surrounding temperature
changes suddenly. Disconnect the power cable from the
outlet, then leave this unit alone.
19 When using this unit for a long time, this unit may become
warm. Turn the power off, then leave this unit alone for
cooling.
20 Install this unit near the AC outlet and where the AC power
plug can be reached easily.
21 The batteries shall not be exposed to excessive heat such as
sunshine, fire or the like.
22 Excessive sound pressure from earphones and headphones
can cause hearing loss.
LASER SAFETY
This unit employs a laser. Due to possible eye injury, only a qualified
service person should remove the cover or attempt to service this
device.
DANGER
This unit emits visible laser radiation when open. Avoid direct
eye exposure to beam. When this unit is plugged into the wall
outlet, do not place your eyes close to the opening of the disc tray
and other openings to look into inside.
Caution: Read this before operating your unit.
This unit is not disconnected from the AC power source as
long as it is connected to the wall outlet, even if this unit itself
is turned off by POWER OFF. This state is called the standby
mode. In this state, this unit is designed to consume a very
small quantity of power.
WARNING
TO REDUCE THE RISK OF FIRE OR ELECTRIC SHOCK, DO
NOT EXPOSE THIS UNIT TO RAIN OR MOISTURE.
CAUTION
Use of controls or adjustments or performance of procedures
other than those specified herein may result in hazardous
radiation exposure.
CLASS 1 LASER PRODUCT
LASER KLASSE 1 PRODUKT
LUOKAN 1 LASERLAITE
KLASS 1 LASER APPARAT
PRODUIT LASER DE CLASSE 1

1 En
English
PREPARATIONINTRODUCTION
OPERATION
ADDITIONAL
INFORMATION
Features ................................................................... 2
Controls and functions ........................................... 3
Front/top view............................................................ 3
Remote control........................................................... 4
Preparation before using this unit ........................ 6
Turning on the power................................................. 6
Adjusting the clock.................................................... 7
Basic operation........................................................ 8
Selecting the input source.......................................... 8
Adjusting the volume level........................................ 8
Adjusting sounds ....................................................... 9
Useful operations for the display............................. 10
Listening to CDs, MP3/WMA files,
and external sources ......................................... 11
Listening to CDs...................................................... 11
Listening to MP3/WMA files stored
on your USB device ............................................ 12
Switching the playback information display ........... 14
Repeat and random playback................................... 15
Playing back external sources.................................. 15
Listening to FM and AM radio stations ............. 16
Connecting antennas................................................ 16
Tuning radio stations ............................................... 16
Presetting radio stations automatically
(Auto preset)........................................................ 17
Presetting radio stations manually
(Manual preset).................................................... 17
Selecting preset radio stations (Preset tuning)......... 18
Using the timer functions ..................................... 19
Troubleshooting.....................................................21
General..................................................................... 21
Disc playback .......................................................... 21
MP3/WMA file playback ........................................ 22
Radio reception........................................................ 22
Remote control ........................................................ 23
Notes on discs.........................................................24
Disc information ...................................................... 24
Handling a disc ........................................................ 24
Glossary..................................................................25
Specifications .........................................................25
Contents
INTRODUCTION
PREPARATION
OPERATION
ADDITIONAL INFORMATION

FEATURES
2 En
• Stylish compact all-in-one design
• Audio CDs, MP3 CDs, and WMA CDs playable
• USB supported
• Sophisticated FM/AM tuner
• Simple but functional remote control
• Timer and clock function
“Swing Radiator Bass
™
” is a trademark of YAMAHA
CORPORATION.
■ About this manual
• In this manual, operations that can be performed with either this unit or its remote control are explained using the
remote control.
• The symbol “☞ ” with page number(s) indicates the corresponding reference page(s).
• y indicates a tip for your operation.
• Notes contain important information about safety and operating instructions.
• This manual is printed prior to production. Design and specifications are subject to change in part as a result of
improvements, etc.
In case of differences between the manual and the product, the product has priority.
■ Supplied accessories
This product includes the following accessories. Make sure you have all of the following parts.
y
Select one of the supplied power cables suitable for the type of AC wall outlet in your location before plugging this unit into the AC wall
outlet.
The form of the supplied accessories varies depending on the models.
Features
ALARM
INPUT
VOLUME
STANDBY/ON
ON/OFF
2134
6578
09
TIMER
TIME/INFO
PRESET
DISPLAY
TONE EQ
SLEEPDIMMER
TIME ADJ
TUNE
RANDOM
REPEAT
/ /
ENTER
CDUSB
TUNER
MUTE
PORTABLE
Indoor FM antenna AM loop antenna
Power cable
Remote control
Note

3 En
English
INTRODUCTION
Controls and functions
Front/top view
POWER OFF
SLEEP
ALARM
MUTE
PRESET
VOLVOL
Starts and pauses playback. (☞ P. 11)
Stops playback or ejects a disc when
playback is stopped. (☞ P. 11)
,
Skips to the beginning of the current or next
track.
Press and hold the key to search backward/
forward. (☞ P. 11)
POWER OFF
Sets this unit to the standby mode. (☞ P. 6)
SLEEP
Sets the sleep timer. (☞ P. 20)
6
7/0
4/1¡/¢
USB port (☞ P. 12)
Speaker
Disc slot (☞ P. 11)
Display
VOL u , d
Adjusts volume level. (☞ P. 8)
MUTE
Turns off the volume. (☞ P. 8)
PRESET u, d
Selects the preset stations. (☞ P. 17)
ALARM
Sets the alarm function. (☞ P. 19)
INPUT/SNOOZE
Turns on this unit and selects an input
source (☞ P. 6, 8), or enables the
snooze function when alarm is
activated. (☞ P. 19)

4 En
Controls and functions
Remote control
ALARM
INPUT
VOLUME
STANDBY/ON
ON/OFF
213
657
09
TIMER
TIME/INFO
PRESET
DISPLAY
TONE EQ
SLEEPDIMMER
TIME ADJ
TUNE
RANDOM REPEAT
//
ENTER
CDUSB
TUNER
MUTE
PORTABLE
4
8
STANDBY/ON
DIMMER
TIME/INFO
RANDOM
INPUT
CDUSB
TUNER
PORTABLE
VOLUME
MUTE
Turns on this unit. (☞ P. 6)
Changes the brightness of the display.
(☞ P. 10)
Displays the disc/USB information.
(☞ P. 14)
Sets this unit to the random playback mode.
(☞ P. 15)
Select the source you want to listen to.
Press PORTABLE to listen to the source played back on the
component which is connected to the PORTABLE jack on
the rear panel of this unit. (☞ P. 15)
Press USB to listen to the source stored in the connected
USB memory. (☞ P. 12)
Press TUNER to listen to FM/AM radio broadcast. Each
time you press TUNER, the source switches between FM
and AM. (☞ P. 16)
Press CD to listen to a disc inserted into the disc slot.
(☞ P. 11)
Adjust volume. (☞ P. 8)
Infrared signal
transmitter
Cursor (S/T/W/X) and ENTER
Remove the insulation sheet
before using the remote control.
y
Remove the transparent sheet before using the remote
control.

5 En
Controls and functions
English
INTRODUCTION
ALARM
ON/OFF
TIMERSLEEP
TIME ADJ
1
65
3
7
09
4
8
2
TONE EQ
DISPLAY
REPEAT
/ /
Set various timer and clock function.
ALARM ON/OFF: Activates or cancels the alarm function. (☞ P. 19)
TIME ADJ: Adjusts the clock of this unit. (☞ P. 7)
SLEEP: Sets the sleep timer. (☞ P. 20)
TIMER: Sets the countdown timer. (☞ P. 20)
Select the desired track or preset station directly. (
☞
P. 11, 13, 17, 18)
Adjust the sound.
TONE: Adjusts the bass and treble balance. (☞ P. 9)
EQ: Selects the equalizer mode. (☞ P. 9)
Control playback.
, : Skips to the beginning of the current or next track.
Press and hold the key to search backward/forward. (☞ P. 11, 12)
: Starts and pauses playback. (☞ P. 11, 12)
: Stops playback or ejects a disc when playback is stopped. (☞ P. 11, 12)
4¢
6
7/0
Sets this unit to the repeat playback mode. (☞ P. 15)
Changes the displayed information. (☞ P. 10)
■ Using the remote control
30˚ 30˚
Within 6 m
Use the remote control within 6 m of this unit and point it
toward the remote control sensor.
• Do not put obstacles between the sensor of this unit and the remote control. Doing
so, you cannot operate this unit by the remote control.
• Do not spill liquid on the remote control.
• Do not drop the remote control.
• Do not leave the remote control in the following places:
– hot or humid places such as bathroom or near a heater
– extremely cold places
– dusty places
For replacement of the battery ☞ P. 23.
Notes

PREPARATION BEFORE USING THIS UNIT
6 En
y
Select one of the supplied power cables suitable for the type of AC wall outlet in your location before plugging this unit into the AC wall
outlet.
Preparation before using this unit
Turning on the power
STANDBY/ON
Turn on this unit.
Press again to set this unit to the standby mode.
y
• During the standby mode, the power consumption is reduced.
• In the standby mode, you can select whether to display the date and time (in the ECO OFF
mode) or not to display them (in the ECO ON mode).
1 While in the standby mode, press and hold the MUTE on the top panel.
J The “ECO ON” or “ECO OFF” flashes.
2 While the indicator is flashing, press the MUTE to select “ECO ON” or “ECO OFF”.
3 Wait several seconds.
J The mode is set to ECO ON or ECO OFF.
• The memory back-up circuit prevents the stored data from being lost even if this unit is in
the standby mode. However, the stored data will be lost if the power cable is disconnected
from the AC wall outlet or if the power supply is cut off for more than one week.
On the top panel
You can also perform the above operations on the top panel.
INPUT/SNOOZE
POWER OFF
SLEEP
Turn on this unit.
Set this unit to
the standby mode.
(Not displayed)
ECO ON mode
11:22PM
12 Oct Fri
ECO OFF mode
(Date and time displayed)
Display in
the
standby
mode
Connect the power cable to the AC inlet of this unit
and an AC wall outlet.
1 To AC inlet
2 To an AC wall outlet
STANDBY/ON

Preparation before using this unit
7 En
English
PREPARATION
Adjusting the clock
PRESET
TUNE ENTER
TIME ADJ
TIME ADJ
PRESET
TUNE ENTER
PRESET
TUNE ENTER
Year
2007
Adjust date and time.
W/X
Selects year/day/month/hour/minute.
S/T
Increases or decreases the date or time.
Date
12 Oct Fri
Time
1:23AM
Examples
Confirm.
When the display is off, turn on the power
before making this setting.
Note
y
You can switch the 12-hour notation to 24-hour notation (The default setting is 12-hour
notation).
1 Turn on the power.
2 Press both PRESET u and SLEEP on the top panel.
3 Press W/X on the remote control repeatedly to select TIME display.
4 Press S/T on the remote control to select desired notation.
TIME 12H:12-hour notation
TIME 24H:24-hour notation
5 Press ENTER on the remote control to confirm.

Basic operation
8 En
■ Using the headphones
y
Even when you connect your headphones, the alarm sound is
output through the speaker.
Basic operation
Selecting the input source
On the top panel
INPUT
CDUSB
TUNER
PORTABLE
To listen to music played on a
portable audio device
To listen to MP3/WMA files
stored on your USB device
To listen to radio stations
(FM/AM)
To listen to a CD
PORTABLE
USB
TUNER
CD
INPUT/SNOOZE
Press repeatedly.
Adjusting the volume level
On the top panel
VOLUME
MUTE
To increase or decrease
the volume level
y
If the power is turned off with the
volume set to a level of 41 or more, the
volume level is automatically set to 20
when the power is turned back on.
To turn off the sound
y
Press again to resume the volume level.
VOLUME
Volume 41 20
MUTE
ALARM
MUTE
PRESET
VOLVOL
Decreases the
volume level.
Turns off the sound.
Increases the
volume level.
TUNER
PHONES
PORTABLE
FM ANT
75
UNBAL.
To PHONES

Basic operation
9 En
English
OPERATION
Adjusting sounds
ENTER
TONE EQ
PRESET
TUNE ENTER
EQ
PRESET
TUNE ENTER
TONE
BASS 0
BASS +02
Press repeatedly.
ROCK
POP
JAZZ
CLASSIC
STRAIGHT
For rock music
For popular music
For jazz
For classical music
For various music
Select “BASS” (low frequency range)
or “TREBLE” (high frequency range).
Adjust the level (–10 to +10 dB).
■ Adjusting bass/treble balance
■ Adjusting the total sound balance
Press repeatedly.
Confirm.

Basic operation
10 En
Useful operations for the display
DISPLAY
DISPLAY
Time and playback status
Date
Alarm 2 setting (☞ P. 19)
Sleep timer setting (☞ P. 20)
Alarm 1 setting (☞ P. 19)
Countdown timer (only when activated) (☞ P. 20)
Press repeatedly.
■ Switching the display information
Input
DIMMER
100%
50%
30%
■ Dimming the display
Press repeatedly.
Bright
Mid dim
Dim
DISPLAY
DIMMER

Listening to CDs, MP3/WMA files, and external sources
11 En
English
OPERATION
■ To pause playback
y
To cancel pause, press again.
■ To skip tracks
■ To search backward/
forward
No sound is heard when you search
during pause.
■ To specify a track
y
Enter the track number you want to listen
to.
■ To stop playback
■ To eject a disc
Listening to CDs, MP3/WMA files, and external sources
Listening to CDs
/ /
CD
2134
6578
09
CD
1:23PM
T001 00:01
Elapsed
time
Current
track
Status
indicator
Insert your disc.
y
You can also play back MP3/WMA files recorded on a disc. For operation instruction,
refer to “Listening to MP3/WMA files stored on your USB device” (☞ P. 12).
1:23PM
T014 60:59
Total time of
the disc
Total
tracks
Status
indicator
y
• You can switch the playback information display (☞ P. 14).
• You can also play back MP3/WMA files recorded on a disc. Refer to “Listening to
MP3/WMA files stored on your USB device” (☞ P. 12).
When the playback is
stopped
Playback starts.
On the top panel
POWER OFF
SLEEP
Playback/Pause
Skip forward/
Search forward*
* Press and hold while in playback
or pause.
Stop/Eject*
Skip backward/
Search backward*
Note
/
6
Backward
Forward
Backward
Forward
Press and hold.
2134
6578
0
9
/
While playback
is stopped
While in playback
or pause
Press.
/
/
Press and
hold.

Listening to CDs, MP3/WMA files, and external sources
12 En
■ To stop playback
■ To pause playback
y
To cancel pause, press again.
■ To skip tracks
■ To search backward/
forward
Pause will be canceled when you start
searching.
Listening to MP3/WMA files stored on your USB device
PRESET
TUNE
/
ENTER
USB
2134
6578
09
USB
Connect a USB device.
This unit supports USB mass storage class devices (e.g., flash memories or
portable audio players) using FAT16 or FAT32 format.
• Some devices may not work properly even if they meet the requirements.
• Do not connect devices other than USB mass storage class devices (such as USB
chargers or USB hubs), PCs, card readers, external HDD, etc.
• Yamaha will not be held responsible for any damage to or data loss on the USB device
occurring while the device is connected to this unit.
• Playability of and power supply to all kind of USB devices are not guaranteed.
Notes
1:23PM
Road to Ind
Song title/artist name/album name
Playback starts.
y
You can switch the playback information display (☞ P. 14).
The reading time may exceed 30 seconds depending on the number of files/folders.
Note
On the top panel
POWER OFF
SLEEP
Playback/Pause
Skip forward/
Search forward*
Stop
Skip backward/
Search backward*
* Press and hold
/
/
6
Note
Backward
Forward
Backward
Forward
Press and hold.

Listening to CDs, MP3/WMA files, and external sources
13 En
English
OPERATION
■ To specify a track for playback
y
Enter the track number you want to listen to.
• Depending on the conditions of recording such as software
recording setting, this unit may not be able to play a disc or
USB device in the order of recording.
• For an MP3 or WMA disc/USB device, the number assigned to
each file corresponds to the file sequence in the disc/USB
device, not in the individual folders.
■ To select a folder/file for an MP3 or WMA
format file
• This unit can display up to 255 files and 255 folders. However,
less than 255 files/folders may be displayed if some files/folders
are not playable on this unit.
• If the USB device is partitioned, only the first partition is
displayed.
• Some files may not work properly depending on the USB
device specification.
• Copyright-protected files cannot be played back.
• This unit can play back files of 4 GB in size or less.
Notes
2134
6578
0
9
PRESET
TUNE ENTER
PRESET
TUNE ENTER
PRESET
TUNE ENTER
PRESET
TUNE ENTER
Select a folder.
Only when MP3/WMA disc playback
Select a file.
Start playback.
About MP3 or WMA files
You can play back MP3 or WMA files recorded on your CD-
R, CD-RW, or USB device. This unit regards folders in a disc/
USB device as albums, and files as tracks as shown below.
Folder hierarchy is disregarded.
Notes
Root
Folder (Album)
File (Track)

Listening to CDs, MP3/WMA files, and external sources
14 En
Each time you press the key, the information display
changes.
Some special characters may not be shown properly.
■ Audio CDs
Elapsed time of the current track (Default)
Remaining time of the current track
Total time of the disc
Remaining time of the disc
Back to the default display
■ MP3/WMA files
Scrolling display* (Default)
Elapsed time of the current file
Remaining time of the current file
File name
Song title
Artist name
Album name
Year
Comment
Back to the default display
*
Scrolling display shows the song title, artist name, and album
name of the selected item in sequence.
Switching the playback information display
Note
TIME/INFO
DIMMER
TIME/INFO
Press repeatedly.
1:23PM
T014 02:21
T014-03:41
TTL 54:41
TTL -12:28
1:23PM
to order-Fr
T014 02:21
T014-03:41
Road-to-ind
Road to Ind
Frankie Zip
Made to ord
2007
Live at KCE

Listening to CDs, MP3/WMA files, and external sources
15 En
English
OPERATION
Repeat and random play modes are canceled when the playback
is stopped or the disc/USB device is removed.
Turn down the volume of this unit and your portable audio device
before connection.
y
For operations of the portable audio device, refer to the
instruction manual of the device.
Repeat and random playback
Note
RANDOM REPEAT
■ Random playback
■ Repeat playback
RANDOM
Rd
Press repeatedly.
Normal playback
(Random playback)
REPEAT
Press repeatedly.
R1
Rf
Ra
(Full repeat)
Normal playback
(Single repeat)
(Folder repeat, MP3/WMA disc/USB only)
Playing back external sources
Note
TUNER
PHONES
PORTABLE
FM ANT
GND
AM ANT
75
UNBAL.
PORTABLE
Portable audio
device
PORTABLE
PORTABLE
3.5 mm mini plug
Start playback on the
connected portable
audio device.
Connect your portable audio device.

Listening to FM and AM radio stations
16 En
y
• While listening to the AM radio station, rotate the antenna head
to find the best angle for reception.
• You can also tune radio stations manually by pressing TUNE
W/X repeatedly.
• To increase the quality of the FM sound under the weak radio
wave, press and hold RANDOM on the remote control to
change the FM radio wave reception mode of this unit to the
monaural mode.
■ To switch the frequency step
Because the interstation frequency spacing differs in
different areas, you may need to switch the frequency step
mode. The default step setting is AM 9 kHz/FM 50 kHz.
Switching frequency step
1 Turn on the power.
2 Press both PRESET u and SLEEP on the top panel.
3 Press W/X on the remote control repeatedly to select
TUNER display.
4 Press S/T on the remote control to select desired frequency
step.
TUNER 10/100:AM 10 kHz/FM 100 kHz step
TUNER 9/50:AM 9 kHz/FM 50 kHz step
5 Press ENTER on the remote control to confirm.
y
The frequency step in North, Central and South America is AM
10 kHz/FM 100 kHz.
Listening to FM and AM radio stations
Connecting antennas
TUNER
FM ANT
GND
AM ANT
75
UNBAL.
1
2
3
Indoor FM
antenna
(supplied)
AM loop antenna (supplied)
Ground
(GND terminal)
The wire of the AM loop antenna is shield type. Connect the
white wire to AM ANT terminal and connect the black wire to
GND terminal.
Note
About grounding
For the maximum safety and minimum interference, connect
the antenna GND terminal to a good earth ground. A good
earth ground is a metal stake driven into the moist earth.
12 3
The cable of AM loop
antenna
Tuning radio stations
TUNE
RANDOM
TUNER
TUNER
PRESET
TUNE ENTER
Press and hold.
Select FM or AM.
FM
87.50MHz
FM
89.70MHz

Listening to FM and AM radio stations
17 En
English
OPERATION
After switching to the preset setting display (while part of
the display is flashing), perform this operation while it is
still flashing.
y
• You can delete a preset station by pressing .
• You can delete all the preset stations by pressing and holding
for 3 seconds or longer.
After switching to the preset setting display (while part of
the display is flashing), perform this operation while it is
still flashing.
y
• You can preset up to 30 FM stations and 20 AM stations.
• You can delete a preset station by pressing .
• You can delete all the preset stations by pressing and holding
for 3 seconds or longer.
Presetting radio stations
automatically (Auto preset)
TUNER
/
PRESET
TUNE ENTER
/
ENTER
TUNER
FM
87.50MHz
Press and hold.
Select FM or AM.
Press and hold.
FM
01 87.50MHz
FM
COMPLETE
Enter the
preset mode.
When finished
7/0
7/0
Presetting radio stations
manually (Manual preset)
PRESET
TUNE ENTER
PRESET
ENTER
FM
89.70MHz
PRESET
TUNE ENTER
Tune into a favorite
radio station (☞ P.
Enter the
preset mode.
FM
01 89.70MHz
FM
04 89.70MHz
Select the
desired preset
number.
y
You can also use the
numeric buttons to select
the preset number.
PRESET
TUNE ENTER
Confirm.
Press and hold.
7/0
7/0

Listening to FM and AM radio stations
18 En
Selecting preset radio stations
(Preset tuning)
On the top panel
PRESET
TUNER
PRESET
TUNE ENTER
FM
30 108.00MHz
TUNER
FM
87.50MHz01
Select FM or AM.
Select the
preset radio
station.
y
You can also use the
numeric buttons to
select the station.
ALARM
MUTE
PRESET
VOLVOL

19 En
English
OPERATION
Use this feature to wake up with your favorite CD or radio program, etc. Also use this feature to automatically set this
unit to the standby mode after a certain amount of time.
Using the timer functions
ALARM
PRESET
TUNE ENTER
ON/OFF
2134
6578
09
ALARM
ON/OFF
PRESET
TUNE ENTER
1
2
ALM1 ON
M-F 8:00AM
ALARM
ON/OFF
1
2
SOUND1VOL 12
■ Setting the wake-up timer
PRESET
TUNE ENTER
Adjust the alarm settings.
W/X
Moves through the alarm parameters.
S/T
Changes the alarm parameters.
y
You can also use the numeric buttons to enter time.
y
Once you have set the alarm, you can turn on/off the alarm using ALARM ON/OFF.
INPUT/SNOOZE
■ Using the snooze function
Playback resumes
after 5 minutes.
■ To stop the alarm
On the top panel
or
ALARM
MUTE
PRESET
VOLVOL
On the top panel
ALM1 OFF
M-F 8:00AM
2 Select on/off.
1 Select alarm 1/2.
Shows the active alarm.
4 Set the alarm time.
3 Select the repetition.
M-F: Monday to Friday
Daily: Every day
Once: Only once
5 Select alarm sound from
CD, FM, AM, USB, SOUND1 (beep),
and SOUND2 (beep).
6 Adjust the volume.
When the display is off, turn on the power
before making this setting.
Note

20 En
Using the timer functions
ENTER
TIMERSLEEP
SLEEP
SLEEP OFF
SLEEP 30
SLEEP 60
SLEEP 90
SLEEP 120
TIMER
01 min
Normal display
(sleep off)
■ Setting the sleep timer
Press repeatedly.
PRESET
TUNE ENTER
TIMER
Adjust the countdown timer setting.
■ Setting the countdown timer
An easy to use countdown timer. Let simple timer remind you of timely matters,
such as cooking or hundreds of other uses.
TIMER
■ To stop the alarm
or
INPUT/SNOOZE
On the top panel
SLEEP 60
Set the countdown time
(1 to 60 minutes).
PRESET
TUNE ENTER
01:23PM
02min 59sec
Countdown starts.
y
To cancel the countdown timer, press TIMER twice to select “OFF”.
TIMER
OFF
Confirm.
Short beeps are sounded once the countdown is over.
y
• The beeps gets louder every 10 seconds.
• The volume of the beeps depends on the volume of this unit (☞ P. 8).
When the display is off, turn on the power
before making this setting.
Note

21 En
English
ADDITIONAL
INFORMATION
In case of a problem with this unit, check the following list first. If you cannot solve your problem with the suggested
solutions or if your problem is not listed below, turn off and unplug this unit, and consult the nearest authorized Yamaha
dealer or service center.
Troubleshooting
General
Problem Cause Solution
Power turns on but
immediately shuts off.
The power cable may be connected
improperly.
Make sure the power cable is plugged into
the outlet firmly (☞ P. 6).
This unit may have received a strong
electrical shock such as lightning or
excessive static electricity.
Set this unit to the standby mode, and
disconnect the power cable. Wait about 30
seconds, reconnect the power cable, and
turn on this unit.
The speakers make no sound. The volume may be set to minimum
level.
Adjust the volume level (☞ P. 8).
The mute function may be on. Cancel the mute function (☞ P. 8).
The input source may be incorrect. Select the correct input source (☞ P. 8).
The disc loaded into this unit may not
be compatible.
Use a disc supported by this unit
(☞ P. 24).
Sound suddenly turns off. The sleep timer (☞ P. 20) may be set. Turn on this unit and play the source
again.
This unit does not operate
properly.
This unit may have received a strong
electrical shock such as lightning or
excessive static electricity, or power
supply may have dropped.
Set this unit to the standby mode, and
disconnect the power cable. Wait about 30
seconds, connect the power cable, and
turn on this unit.
A digital or high-frequency
equipment produces noises.
This unit may be placed close to the
digital or high-frequency equipment.
Place this unit away from the equipment.
The clock setting has been
cleared.
The power to this unit may have been
lost for more than a week.
Plug the power cable into the outlet
firmly, and set the clock again (☞ P. 7).
Disc playback
Problem Cause Solution
Some button operations do
not work.
The disc loaded into this unit may not
be compatible.
Use a disc supported by this unit
(☞ P. 24).
Playback does not start
immediately after pressing
.
The disc may be dirty. Wipe the disc clean.
The disc loaded into this unit may not
be compatible.
Use a disc supported by this unit
(☞ P. 24).
When this unit was moved from a cold
to warm place, condensation may have
formed on the disc reading lens.
Wait for an hour or two, and try again.
“No Disc” appears in the
display even though a disc is
in the disc slot, or “Disc
Error” appears in the display.
The disc loaded into this unit may not
be compatible.
Remove the disc and then check whether
this unit supports the disc or not
(☞ P. 24).
The disc may be dirty or foreign
substance is stuck on it.
Remove the disc and then wipe the disc
clean or remove the foreign substance.
Disc is loaded upside-down. Remove the disc and then load the disc
with the labeled side facing up.
6

22 En
Troubleshooting
■ FM/AM
■ FM
■ AM
MP3/WMA file playback
Problem Cause Solution
MP3/WMA file in the USB
device is not played.
The USB device is not recognized.
Set this unit to the standby mode, and turn it
on again
(☞ P. 6).
Disconnect the device while this unit is in
the standby mode. Then connect the device
again and turn on this unit
(☞ P. 6).
Connect an AC adapter if supplied with
the device.
If the solutions above do not resolve the
problem, the USB device is not
playable on this unit.
Try another USB device.
Radio reception
Problem Cause Solution
The preset selecting function
(☞ P. 16) does not work.
The preset (memory) may have been
erased.
Preset radio stations again (☞ P. 17).
The preset station settings
have been cleared.
The power to this unit may have been
lost more than a week.
Plug the power cable into the outlet
firmly, and preset the stations again
(☞ P. 6).
Problem Cause Solution
Too much noise during stereo
broadcast.
The FM antenna may be connected
improperly.
Make sure the FM antenna is connected
properly (☞ P. 16).
The radio station you selected may be
far from your area, or the radio wave
reception is weak in your area.
Try manual tuning to improve the signal
quality (☞ P. 17) or use a multi-channel
outdoor antenna.
Even with an outdoor
antenna, radio wave reception
is weak. (Sound is distorted.)
Multipath reflection or other radio
interferences may have occurred.
Change the height, direction, or
placement of the antenna.
Problem Cause Solution
Too much noise during
broadcast.
The noise may be caused by
atmospheric electricity, lightning,
fluorescent lights, motors, or
thermostat electric devices.
Connect an outdoor antenna and establish
a better grounding to decrease the noise.
However, it is difficult to eliminate these
types of noise.
If this unit is placed near a TV, the
noise may be generated especially in
the evening.
Place this unit away from a TV.
The auto tuning function
(☞ P. 18) does not work.
The AM loop antenna may be
connected improperly.
Make sure the AM loop antenna is
connected properly (☞ P. 16).

23 En
Troubleshooting
English
ADDITIONAL
INFORMATION
■ Replacing the battery in the remote control
Change the battery when the operation range of the remote control decreases.
• Insert the battery according to the polarity markings (+ and –).
• If the batteries run out, immediately remove them from the remote control to prevent an explosion or acid leak.
• If a battery starts leaking, dispose of it immediately. Be careful not to let the leaking battery acid touch your skin or clothing.
• Before inserting new batteries, wipe the compartment clean.
• Dispose of batteries according to your regional regulations.
Remote control
Problem Cause Solution
The remote control does not
work properly.
The remote control may be operated
outside its operation range.
For information on the remote control
operation range, refer to “Using the
remote control” (☞ P. 5).
The remote control sensor on this unit
may be exposed to direct sunlight or
lighting (inverted fluorescent lamps).
Change the lighting or orientation of this
unit.
The battery may be worn out. Replace the battery with new one (see
below).
There are obstacles between the sensor
of this unit and the remote control.
Remove the obstacles.
Use a straight pin to remove
the cover.
Replace the battery with
a new CR2025 battery.
Close the cover.
Notes

NOTES ON DISCS
24 En
This unit is designed for use with audio CD, CD-R, and
CD-RW. Also, this unit can play back 8 cm (3 inch)
compact discs.
y
This unit can play back discs bearing any of the logo marks
above. A disc logo mark is printed on the disc and the disc jacket.
Do not load any other type of disc into this unit. Doing so may
damage this unit.
This unit can play back the following data discs
(For MP3 and WMA files, the parenthetic words
represent the compatible sampling rate and bit
rate):
– MP3 files, recorded on CD-R/RW (fs 44.1, 48 kHz/
32, 64, 96, 128, 192, 256, or 320 kbps and variable
bit encoded MP3 files (CBR and VBR))
– WMA files, recorded on CD-R/RW (fs 44.1 kHz/
192 kbps or less and variable bit encoded WMA
files (CBR and VBR))
– ISO 9660 for CD-R/RW
• CD-R/RW cannot be played back unless finalized.
• Some discs cannot be played back depending on the disc
characteristics or recording conditions.
• Do not use any non-standard shaped discs such as a heart-
shaped disc.
• Do not use discs with many scratches on their surface.
• Copyright-protected WMA files cannot be played back on this
unit.
• The sampling rate 48 kHz is downsampled to 44.1 kHz for
playback.
• Do not touch the surface of the
disc. Hold a disc by its edge (and
the center hole).
• Do not leave a disc in the disc tray
when not playing.
• Do not use a pencil or pointed
marker to write on the disc.
• Do not put a tape, seal, glue, or other attachments on a disc.
• Do not use a protective cover to prevent scratches.
• Do not use a disc that has a printable surface using a
commercially available label printer.
• Do not expose a disc under direct
sunlight, high temperature, high
humidity, or a lot of dust.
• If a disc becomes dirty, wipe it
with a clean, dry cloth from the
center out to the edge. Do not use
record cleaner or paint thinner.
• To avoid malfunction, do not use
a commercially available lens
cleaner.
• Do not insert more than one disc
into the disc slot at one time. This can cause damages to both
this unit and the discs.
• When you listen to 8 cm disc, insert the disc without 8-cm
adapter.
• Do not insert any foreign objects into the disc slot.
• Do not insert a cracked, warped, or glued disc.
Notes on discs
Disc information
Note
Notes
Handling a disc
Caution

25 En
English
ADDITIONAL
INFORMATION
■ MP3 (MPEG-1 Audio Layer-3)
One of the audio compression methods used by MPEG.
It employs the irreversible compression method, which
achieves a high compression rate by thinning out the data
of hardly audible part to human ears. It is said to be
capable of compressing the data quantity by about 1/11
(128 kbps) while maintaining a similar audio quality to
music CD.
■ WMA (Windows Media Audio)
An audio compression method developed by Microsoft
Corporation. It employs the irreversible compression
method, which achieves a high compression rate by
thinning out the data of hardly audible part to human ears.
It is said to be capable of compressing the data quantity by
about 1/22 (64 kbps) while maintaining a similar audio
quality to music CD.
■ Sampling frequency
The number of sampling (process for digitalizing analog
signals) per second. In principle, the higher the sampling
rate, the wider the frequency range that can be played
back, and the higher the quantized bit rate, the finer the
sound that can be reproduced.
■ PCM (Pulse Code Modulation)
A signal that is changed to digital format without
compression. A CD is recorded with 16-bit sound at
44.1 kHz.
■ Track
A CD can be divided into a number of segments (tracks).
Each division is called a track number.
■ PLAYER SECTION
Playback system
•CD, CD-R/RW
Laser
• Type .......................................................................................GaAlAs
• Wave length ............................................................................780 nm
• Emission duration ............................................................. continuous
• Laser output ...............................................................max. 44.6 µW*
*This output is the value measured at a distance of about 200 mm
(7.9 in) from the objective lens surface on the Optical Pick-up Block.
■ AMPLIFIER SECTION
• Minimum RMS output power per channel ...................10 W + 10 W
• Input sensitivity/Impedance
PORTABLE ............................................................ 300 mV/47 kΩ
• Output level/Impedance
PHONES (volume max) ........................................... 470 mV/32 Ω
■ TUNER SECTION
FM
• Tuning Range .................................87.5/87.50 to 108.0/108.00 MHz
AM
• Tuning Range .......................................... 530/522 to 1700/1629 kHz
■ GENERAL
• Power Supply ..........................................AC 100 to 240 V, 50/60 Hz
• Power consumption................................................................... 20 W
• Standby Power consumption......................................... 1.0 W or less
• Dimensions (W x H x D) ............................... 300 x 141.5 x 200 mm
• Weight ...................................................................................... 2.7 kg
Specifications are subject to change without notice.
Glossary
Specifications
Taking care of the unit
When you wipe this unit, use a clean dry cloth. For heavy dirt,
dampen a soft cloth in the water, wring it out, and then clean
this unit up with the cloth.

i Es
1 Para asegurar el mejor rendimiento de este aparato, lea
atentamente este manual. Y luego guárdelo en un lugar seguro
para poder consultarlo en el futuro en caso de ser necesario.
2 Instale este sistema de sonido en un lugar bien ventilado, fresco,
seco y limpio, con un espacio libre mínimo de 10 cm por la parte
superior, los costados derecho e izquierdo y la parte posterior del
este aparato, y alejado de la luz solar directa, fuentes de calor,
vibración, polvo, humedad y/o frío.
3 Coloque este aparato lejos de otros aparatos eléctricos, motores o
transformadores, para evitar así los ruidos de zumbido.
4 No exponga este aparato a cambios bruscos de temperaturas, del
frío al calor, ni lo coloque en lugares muy húmedos (una
habitación con deshumidificador, por ejemplo), para impedir así
que se forme condensación en su interior, lo que podría causar
una descarga eléctrica, un incendio, daños en el aparato y/o
lesiones a las personas.
5 Evite instalar este aparato en un lugar donde puedan caerle
encima objetos extraños o donde quede expuesto al goteo o a la
salpicadura de líquidos. Encima de este aparato no ponga:
–
Otros componentes, porque pueden causar daños y/o
decoloración en la superficie de este aparato.
– Objetos con fuego (velas, por ejemplo), porque pueden causar
un incendio, daños en el aparato y/o lesiones a las personas.
– Recipientes con líquidos, porque pueden caerse y derramar el
líquido, causando descargas eléctricas al usuario y/o dañando
el aparato.
6 No tape este aparato con un periódico, mantel, cortina, etc. para
no impedir el escape del calor. Si aumenta la temperatura en el
interior del aparato, esto puede causar un incendio, daños en el
aparato y/o lesiones a las personas.
7 No enchufe este aparato a una toma de corriente hasta después de
haber terminado todas las conexiones.
8 No ponga el aparato al revés. Podría recalentarse y posiblemente
causar daños.
9 No utilice una fuerza excesiva con los conmutadores, los
controles y/o los cables.
10 Cuando desconecte el cable de la alimentación de la toma de
corriente, sujete la clavija y tire de ella; no tire del propio cable.
11 No limpie este aparato con disolventes químicos porque podría
estropear el acabado.
12 Utilice solamente la tensión especificada en este aparato. Utilizar
el aparato con una tensión superior a la especificada resulta
peligroso y puede producir un incendio, daños en el aparato y/o
lesiones a las personas. Yamaha no se hará responsable de ningún
daño debido al uso de este aparato con una tensión diferente de la
especificada.
13
Para impedir daños debidos a relámpagos, desconecte el cable de
alimentación de la toma de corriente durante una tormenta eléctrica.
14 No intente modificar ni arreglar este aparato. Póngase en
contacto con el personal de servicio Yamaha cualificado cuando
necesite realizar alguna reparación. La caja no deberá abrirse
nunca por ninguna razón.
15 Cuando no piense utilizar este aparato durante mucho tiempo
(es decir, cuando se ausente de casa por vacaciones, etc.)
desconecte el cable de alimentación de la toma de corriente.
16 Asegúrese de leer la sección “Solución de problemas” antes de
dar por concluido que su aparato está averiado.
17 Antes de trasladar este aparato, pulse POWER OFF para ponerlo
en el modo de espera, y luego desconecte el cable de
alimentación de CA de la toma de corriente.
18 La condensación se formará cuando cambie de repente la
temperatura ambiental. Desconecte en este caso el cable de
alimentación de la toma de corriente y no utilice la unidad.
19 La unidad se calentará cuando la utilice durante mucho tiempo.
Desconecte en este caso la alimentación y luego no utilice la
unidad para permitir que ésta se enfríe.
20 Instale esta unidad cerca de la toma de CA y donde se pueda
alcanzar fácilmente la clavija de alimentación.
21
Las baterías y las pilas no deberán exponerse a un calor excesivo como,
por ejemplo, el que producen los rayos del sol, el fuego y similares.
22 La presión acústica excesiva de los auriculares puede causar
pérdida auditiva.
SEGURIDAD CONTRA LA RADIACIÓN LÁSER
Esta unidad utiliza rayos láser. Debido a la posibilidad de que se
produzcan daños en los ojos, la extracción de la cubierta de la
unidad o las reparaciones solamente deberán ser realizadas por un
técnico cualificado.
PELIGRO
Esta unidad emite radiación láser visible cuando se abre. Evite la
exposición directa a los rayos láser. Cuando se conecte esta
unidad a una toma de corriente no acerque sus ojos a la abertura
de la bandeja del disco ni a otras aberturas para mirar al interior.
Precaución: Lea las indicaciones siguientes antes de utilizar este aparato.
Esta unidad no se desconecta de la fuente de alimentación de
CA si está conectada a una toma de corriente, aunque la propia
unidad esté apagada con POWER OFF. A este estado se le llama
modo de espera. En este estado, está unidad ha sido diseñada
para que consuma un cantidad de corriente muy pequeña.
ADVERTENCIA
PARA REDUCIR EL RIESGO DE INCENDIO O
DESCARGA ELÉCTRICA, NO EXPONGA ESTA
UNIDAD A LA LLUVIA NI A LA HUMEDAD.
PRECAUCIÓN
El uso de los controles, los ajustes o los procedimientos que
no se especifican enste manual pueden causar una exposición
peligrosa a la radiación.
CLASS 1 LASER PRODUCT
LASER KLASSE 1 PRODUKT
LUOKAN 1 LASERLAITE
KLASS 1 LASER APPARAT
PRODUIT LASER DE CLASSE 1

1 Es
Español
PREPARACIÓNINTRODUCCIÓN
OPERACIÓN
INFORMACIÓN
ADICIONAL
Características ........................................................ 2
Controles y funciones ............................................. 3
Vista delantera/superior............................................. 3
Mando a distancia...................................................... 4
Preparación antes de usar esta unidad ................. 6
Encendido de esta unidad .......................................... 6
Ajuste del reloj........................................................... 7
Operación básica .................................................... 8
Selección de la fuente de entrada............................... 8
Ajuste del nivel del sonido ........................................ 8
Ajuste de sonidos....................................................... 9
Operaciones útiles para la visualización.................. 10
Para escuchar CD, archivos MP3/WMA
y fuentes externas ............................................. 11
Para escuchar CD..................................................... 11
Para escuchar los archivos MP3/WMA guardados
en su dispositivo USB ......................................... 12
Cambio de la visualización de información de
reproducción ........................................................ 14
Repetición de reproducción aleatoria ...................... 15
Reproducción de fuentes externas ........................... 15
Para escuchar emisoras de radio de
FM y AM ........................................................... 16
Conexión de antenas ................................................ 16
Sintonización de emisoras de radio ......................... 16
Presintonización automática de emisoras de radio
(Presintonización automática) ............................. 17
Presintonización manual de emisoras de radio
(Presintonización manual)................................... 17
Selección de emisoras de radio presintonizadas
(Sintonización de presintonizaciones)................. 18
Uso de las funciones del temporizador ............... 19
Solución de problemas ..........................................21
General..................................................................... 21
Reproducción de discos ........................................... 21
Reproducción de archivo MP3/WMA ..................... 22
Recepción de la radio............................................... 22
Mando a distancia.................................................... 23
Notas acerca de los discos .....................................24
Información de discos.............................................. 24
Manejo de un disco.................................................. 24
Glosario ..................................................................25
Especificaciones .....................................................25
Índice
INTRODUCCIÓN
PREPARACIÓN
OPERACIÓN
INFORMACIÓN ADICIONAL

CARACTERÍSTICAS
2 Es
• Diseño todo en uno compacto y elegante
• Se pueden reproducir Audio CDs, MP3 CDs y
WMA CDs
• Compatible con USB
• Sofisticado sintonizador de FM/AM
• Modo de mando a distancia sencillo pero
funcional
• Función de temporizador y reloj
“Swing Radiator Bass
™
” es una marca de fábrica de YAMAHA
CORPORATION.
■ Acerca de este manual
• En este manual, las operaciones que pueden hacerse con esta unidad o su mando a distancia se explican usando este
último.
• El símbolo “☞ ” con el número de página indica la página de referencia correspondiente.
• y indica un consejo para su utilización.
• Notas con información importante de la seguridad e instrucciones de utilización.
• Este manual se imprime antes de la producción. El diseño y las especificaciones están sujetos a cambios por motivo de
mejoras, etc.
En caso de haber diferencias entre el manual y el producto, el producto tiene prioridad.
■ Accesorios suministrados
Este producto incluye los accesorios siguientes. Verifique que ha recibido todos los accesorios siguientes.
y
Antes de conectar esta unidad a una toma de CA, seleccione uno de los cables de alimentación suministrados que sea apropiado para
conectarlo a dicha toma de CA.
La forma de los accesorios suministrados cambia según los modelos.
Características
Nota
ALARM
INPUT
VOLUME
STANDBY/ON
ON/OFF
2134
6578
09
TIMER
TIME/INFO
PRESET
DISPLAY
TONE EQ
SLEEPDIMMER
TIME ADJ
TUNE
RANDOM
REPEAT
/ /
ENTER
CDUSB
TUNER
MUTE
PORTABLE
Antena de FM interior Antena de cuadro de AM
Cable de alimentación
Mando a distancia

3 Es
Español
INTRODUCCIÓN
Controles y funciones
Vista delantera/superior
POWER OFF
SLEEP
ALARM
MUTE
PRESET
VOLVOL
Inicia la reproducción y hace una pausa en
ella. (☞ P. 11)
Detiene la reproducción o expulsa un disco
cuando se detiene la reproducción estéreo.
(☞ P. 11)
,
Salta al principio de la pista actual o siguiente.
Manténgalo pulsado para buscar hacia atrás/
adelante. (☞ P. 11)
POWER OFF
Pone esta unidad en el modo de espera.
(☞ P. 6)
SLEEP
Ajusta el temporizador para dormir.
(☞ P. 20)
6
7/0
4/1¡/¢
Puerto USB (☞ P. 12)
Altavoz
Ranura del disco
(☞ P. 11)
Visualizador
VOL u , d
Ajusta el nivel del sonido. (☞ P. 8)
MUTE
Silencia el sonido. (☞ P. 8)
PRESET u, d
Selecciona las emisoras presintonizadas.
(☞ P. 17)
ALARM
Establece la función de alarma. (☞ P. 19)
INPUT/SNOOZE
Enciende esta unidad o selecciona una
fuente de entrada (☞ P. 6, 8), o activa
la función de dormitar cuando se
activa la alarma. (☞ P. 19)

4 Es
Controles y funciones
Mando a distancia
ALARM
INPUT
VOLUME
STANDBY/ON
ON/OFF
213
657
09
TIMER
TIME/INFO
PRESET
DISPLAY
TONE EQ
SLEEPDIMMER
TIME ADJ
TUNE
RANDOM REPEAT
//
ENTER
CDUSB
TUNER
MUTE
PORTABLE
4
8
STANDBY/ON
DIMMER
TIME/INFO
RANDOM
INPUT
CDUSB
TUNER
PORTABLE
VOLUME
MUTE
Enciende esta unidad. (☞ P. 6)
Cambia el brillo de la visualización. (☞ P. 10)
Visualiza información de disco/USB. (☞ P. 14)
Pone esta unidad en el modo de reproducción
aleatoria. (☞ P. 15)
Selecciona la fuente que usted quiere escuchar.
Pulse PORTABLE para escuchar la fuente reproducida en el
componente conectado al jack PORTABLE del panel trasero
de esta unidad. (☞ P. 15)
Pulse USB para escuchar la fuente guardada en la memora
USB conectada. (☞ P. 12)
Pulse TUNER para escuchar la emisora de radio de FM/AM.
Cada vez que pulsa TUNER, la fuente cambia entre FM y
AM. (☞ P. 16).
Pulse CD para escuchar el disco insertado en la ranura de
disco. (☞ P. 11)
Ajuste el volumen. (☞ P. 8)
Transmisor de
señal infrarroja
Cursor (S/T/W/X) y ENTER
Quite la hoja de aislamiento antes de usar el
mando a distancia.
y
Quite la hoja transparente antes de usar el mando a
distancia.

5 Es
Controles y funciones
Español
INTRODUCCIÓN
ALARM
ON/OFF
TIMERSLEEP
TIME ADJ
1
65
3
7
09
4
8
2
TONE EQ
DISPLAY
REPEAT
/ /
Establezca varias funciones de temporizador y reloj.
ALARM ON/OFF: Activa o cancela la función de alarma. (☞ P. 19)
TIME ADJ: Ajusta el reloj de esta unidad. (☞ P. 7)
SLEEP: Ajusta el temporizador para dormir. (☞ P. 20)
TIMER: Ajusta el temporizador de cuenta atrás. (☞ P. 20)
Seleccione directamente la pista o la emisora presintonizada
deseada. (☞ P. 11, 13, 17, 18)
Ajuste el sonido.
TONE: Ajusta el equilibrio de los graves y agudos. (☞ P. 9)
EQ: Selecciona el modo del ecualizador. (☞ P. 9)
Controle la reproducción.
, : Salta al principio de la pista actual o siguiente.
Manténgalo pulsado para buscar hacia atrás/adelante. (☞ P. 11, 12)
: Inicia la reproducción y hace una pausa en ella. (☞ P. 11, 12)
: Detiene la reproducción o expulsa un disco cuando se detiene la reproducción
estéreo. (☞ P. 11, 12)
4¢
6
7/0
Pone esta unidad en el modo de repetición de reproducción.
(☞ P. 15)
Cambia la información visualizada. (☞ P. 10)
■ Utilización del mando a
distancia
30˚ 30˚
Dentro de 6 m
Use el mando a distancia dentro de una distancia de 6 m de
esta unidad y apúntelo hacia el sensor de mando a distancia.
• No ponga obstáculos entre el sensor de esta unidad y el control remoto. De lo
contrario no podrá controlar esta unidad con el control remoto.
• No derrame líquidos sobre el mando a distancia.
• No deje caer el mando a distancia.
• No deje el mando a distancia en los lugares siguientes:
– lugares calientes o húmedos como un cuarto de baño o cerca de una calefacción
– lugares muy fríos
– lugares polvorientos
Para sustituir la pila ☞ P. 23.
Notas

PREPARACIÓN ANTES DE USAR ESTA UNIDAD
6 Es
y
Antes de conectar esta unidad a una toma de CA, seleccione uno de los cables de alimentación suministrados que sea apropiado para
conectarlo a dicha toma de CA.
Preparación antes de usar esta unidad
Encendido de esta unidad
STANDBY/ON
Encienda esta unidad.
Pulse de nuevo para poner esta unidad en el modo de espera.
y
• El consumo de energía se reduce durante el modo de espera.
• En el modo de espera, usted puede seleccionar si va a visualizar la fecha y la hora (en el
modo ECO OFF) o no va a visualizarlas (en el modo ECO ON).
1 Estando en el modo de espera, mantenga pulsado MUTE en el panel superior.
J “ECO ON” o “ECO OFF” parpadea.
2
Mientras parpadea el indicador, pulse
MUTE
para seleccionar “ECO ON” o “ECO OFF”.
3 Espere varios segundos.
J El modo se pone en ECO ON o ECO OFF.
• El circuito de protección de la memoria impide que se pierdan los datos almacenados
aunque esta unidad esté en el modo de espera. Sin embargo, los datos almacenados se
perderán si se desconecta el cable de alimentación de la toma de CA o se corta la
alimentación durante más de una semana.
En el panel superior
También puede hacer las operaciones de arriba en el panel superior.
INPUT/SNOOZE
POWER OFF
SLEEP
Encienden esta unidad.
Ponen esta unidad en modo
de espera.
(No se visualiza nada)
Modo ECO ON
11:22PM
12 Oct Fri
Modo ECO OFF
(Se visualiza la fecha y la hora)
Visualización
en el modo
de espera
Conecte el cable de alimentación a la entrada de CA
de esta unidad y a una toma de CA.
1 A la entrada de CA
2 A una toma de CA
STANDBY/ON

Preparación antes de usar esta unidad
7 Es
Español
PREPARACIÓN
Ajuste del reloj
PRESET
TUNE ENTER
TIME ADJ
TIME ADJ
PRESET
TUNE ENTER
PRESET
TUNE ENTER
Year
2007
Ajuste la fecha y la hora.
W/X
Selecciona el año/fecha/hora/minuto.
S/T
Aumenta o disminuye la fecha o la hora.
Date
12 Oct Fri
Time
1:23AM
Ejemplos
Confirme.
La hora aparece en el modo de 12 horas (AM/PM) dependiendo del modelo. Por ejemplo,
“4:00PM”.
Nota
Cuando la visualización esté apagada, conecte
la alimentación antes de hacer este ajuste.
Nota
y
Puede cambiar la anotación de 12 horas por la anotación de 24 horas (el ajuste
predeterminado es la anotación de 12 horas).
1 Conecte la alimentación.
2 Pulse PRESET u y SLEEP en el panel superior.
J El menú “SET MENU” aparece en el visualizador.
3 Pulse repetidamente W/X en el mando a distancia para seleccionar la visualización
TIME.
4 Pulse S/T en el mando a distancia para seleccionar la anotación deseada.
TIME 12H: Anotación de 12 horas
TIME 24H: Anotación de 24 horas
5 Pulse ENTER en el mando a distancia para confirmar.

Operación básica
8 Es
■ Uso de auriculares
y
Aunque conecte sus auriculares, el sonido de alarma saldrá por el
altavoz.
Operación básica
Selección de la fuente de entrada
En el panel superior
INPUT
CDUSB
TUNER
PORTABLE
Para escuchar la música
reproducida en un dispositivo
de audio portátil
Para escuchar archivos MP3/
WMA guardados en su
dispositivo USB
Para escuchar emisoras de
radio (FM/AM)
Para escuchar un CD
PORTABLE
USB
TUNER
CD
INPUT/SNOOZE
Pulse repetidamente.
Ajuste del nivel del sonido
En el panel superior
VOLUME
MUTE
Para aumentar o disminuir el
nivel del sonido
y
Si se desconecta la alimentación con el
volumen ajustado en el nivel 41 o más,
al conectar de nuevo la alimentación, el
nivel del sonido se ajustará
automáticamente en 20.
Para apagar el sonido
y
Pulse de nuevo para recuperar el nivel
del sonido.
VOLUME
Volume 41 20
MUTE
ALARM
MUTE
PRESET
VOLVOL
Disminuye el nivel
del sonido.
Silencia el sonido.
Aumenta el nivel
del sonido.
TUNER
PHONES
PORTABLE
FM ANT
75
UNBAL.
A PHONES

Operación básica
9 Es
Español
OPERACIÓN
Ajuste de sonidos
ENTER
TONE EQ
PRESET
TUNE ENTER
EQ
PRESET
TUNE ENTER
TONE
BASS 0
BASS +02
Pulse repetidamente.
ROCK
POP
JAZZ
CLASSIC
STRAIGHT
Para música rock
Para música popular
Para jazz
Para música clásica
Para varios tipos de música
Seleccione “BASS” (gama de bajas frecuencias) o
“TREBLE” (gama de altas frecuencias).
Ajuste el nivel (–10 a +10 dB).
■ Ajuste del equilibrio de graves/agudos
■ Ajuste del equilibrio total del sonido
Pulse repetidamente.
Confirme.

Operación básica
10 Es
Operaciones útiles para la visualización
DISPLAY
DISPLAY
Hora y estado de la reproducción
Fecha
Ajuste de alarma 2 (☞ P. 19)
Ajuste del temporizador para dormir (☞ P. 20)
Ajuste de alarma 1 (☞ P. 19)
Temporizador de cuenta atrás (sólo cuando se activa) (☞ P. 20)
Pulse repetidamente.
■ Cambio de la información de visualización
Entrada
DIMMER
100%
50%
30%
■ Oscurecimiento de la visualización
Pulse repetidamente.
Brillante
Medio oscuro
Oscuro
DISPLAY
DIMMER

Para escuchar CD, archivos MP3/WMA y fuentes externas
11 Es
Español
OPERACIÓN
■ Para hacer una pausa en
la reproducción
y
Pulse de nuevo para cancelar la pausa.
■ Para saltar pistas
■ Para buscar hacia atrás/
adelante
Cuando busca durante la pausa no se oye
sonido.
■
Para especificar una pista
y
Introduzca el número de pista que quiera
escuchar.
■ Para detener la
reproducción
■ Para expulsar el disco
Para escuchar CD, archivos MP3/WMA y fuentes externas
Para escuchar CD
/ /
CD
2134
6578
09
CD
1:23PM
T001 00:01
Tiempo
transcurrido
Pista actualIndicador
de estado
Inserte su disco.
y
También puede reproducir archivos MP3/WMA grabados en un disco. Para conocer las
instrucciones de funcionamiento, consulte “Para escuchar los archivos MP3/WMA
guardados en su dispositivo USB” (☞ P. 12).
1:23PM
T014 60:59
Tiempo total
del disco
Pistas
totales
Indicador
de estado
y
• Puede cambiar la visualización de información de reproducción (☞ P. 14).
• También puede reproducir archivos MP3/WMA grabados en un disco. Consulte
“Para escuchar los archivos MP3/WMA guardados en su dispositivo USB” (☞ P. 12).
Cuando se detiene la
reproducción
Empieza la reproducción.
En el panel superior
POWER OFF
SLEEP
Reproducción/Pausa
Salto hacia adelante/
Búsqueda hacia adelante*
* Manténgalo pulsado durante la
reproducción o la pausa.
Parada/Expulsión*
Salto hacia atrás/
Búsqueda hacia atrás*
Nota
/
6
Retroceso
Avance
Retroceso
Avance
Mantenga pulsada.
2134
6578
0
9
/
Mientras la reproducción
está parada
En la reproducción
o pausa
Pulse.
/
/
Mantenga
pulsada.

Para escuchar CD, archivos MP3/WMA y fuentes externas
12 Es
■ Para detener la
reproducción
■ Para hacer una pausa en
la reproducción
y
Pulse de nuevo para cancelar la
pausa.
■ Para saltar pistas
■ Para buscar hacia atrás/
adelante
La pausa se puede cancelar cuando
empieza la búsqueda.
Para escuchar los archivos MP3/WMA guardados en su dispositivo USB
PRESET
TUNE
/
ENTER
USB
2134
6578
09
USB
Conecte un dispositivo USB.
Esta unidad es compatible con dispositivos de almacenamiento en masa USB (ej.,
memorias flash o reproductores de audio portátiles) usando el formato FAT16 o FAT32.
• Algunos dispositivos puede que no funcionen bien si no satisfacen los requerimientos.
• No conecte otros dispositivos que no sean los de almacenamiento en masa USB (como
cargadores USB o nodos USB), PC, lectores de tarjetas, HDD externos, etc.
• Yamaha no se hará responsable de ningún daño o pérdida de datos del dispositivo USB
producidos mientras el dispositivo está conectado a esta unidad.
• La reproducción y el suministro de alimentación a todo tipo de dispositivos USB no
están garantizados.
Notas
1:23PM
Road to Ind
Título de canción/nombre de artista/nombre de álbum
Empieza la reproducción.
y
Puede cambiar la visualización de información de reproducción (☞ P. 14).
El tiempo de lectura puede sobrepasar 30 segundos dependiendo del número de
archivo/carpetas.
Nota
En el panel superior
POWER OFF
SLEEP
Reproducción/Pausa
Salto hacia adelante/
Búsqueda hacia adelante*
Parada
Salto hacia atrás/
Búsqueda hacia atrás*
* Mantenga pulsada
/
/
6
Nota
Retroceso
Avance
Retroceso
Avance
Mantenga pulsada.

Para escuchar CD, archivos MP3/WMA y fuentes externas
13 Es
Español
OPERACIÓN
■ Para especificar una pista de
reproducción
y
Introduzca el número de pista que quiera escuchar.
• Dependiendo de las condiciones de grabación, tales como el
ajuste de grabación del software, esta unidad tal vez no pueda
reproducir un disco o dispositivo USB en el orden de la
grabación.
• Para un disco MP3 o WMA/dispositivo USB, el número
asignado a cada archivo corresponde a la secuencia de archivos
del disco/dispositivo USB, no a las carpetas individuales.
■ Para seleccionar una carpeta/archivo
para un archivo del formato MP3 o WMA
• Esta unidad puede visualizar hasta 255 archivos y 255 carpetas.
Pero si algunos archivos/carpetas no se pueden reproducir en
esta unidad se visualizarán menos de 255 archivos/carpetas.
• Si el dispositivo USB está particionado sólo se visualizará la
primera partición.
• Algunos archivos puede que no se reproduzcan bien según la
especificación del dispositivo USB.
• Los archivos con copyright no se pueden reproducir.
• Esta unidad puede reproducir archivos de 4 GB o menos.
Notas
2134
6578
0
9
PRESET
TUNE ENTER
PRESET
TUNE ENTER
PRESET
TUNE ENTER
PRESET
TUNE ENTER
Seleccione una carpeta.
Sólo cuando se reproducen discos MP3/WMA
Seleccione un archivo.
Inicie la reproducción.
Acerca de los archivos MP3 o WMA
Puede reproducir archivos MP3 o WMA grabados en su
CD-R, CD-RW o dispositivo USB. Esta unidad considera las
carpetas de un disco/dispositivo USB como álbumes, y los
archivos como pistas, como se muestra abajo. La jerarquía de
las carpetas se omite.
Notas
Raíz
Carpeta (Álbum)
Archivo (Pista)

Para escuchar CD, archivos MP3/WMA y fuentes externas
14 Es
Cada vez que pulsa la tecla cambia la visualización de
información.
Algunos caracteres especiales no se mostrarán bien.
■ CD de audio
Tiempo transcurrido de la pista actual
(Predeterminado)
Tiempo restante de la pista actual
Tiempo total del disco
Tiempo restante del disco
Vuelta a la visualización predeterminada
■ Archivos MP3/WMA
Visualización en desplazamiento*
(Predeterminado)
Tiempo transcurrido del archivo actual
Tiempo restante del archivo actual
Nombre de archivo
Título de canción
Nombre de artista
Nombre de álbum
Año
Comentario
Vuelta a la visualización predeterminada
*
La visualización en desplazamiento muestra el título de la
canción, el nombre del artista y el nombre del álbum del
elemento seleccionado.
Cambio de la visualización de información de reproducción
Nota
TIME/INFO
DIMMER
TIME/INFO
Pulse repetidamente.
1:23PM
T014 02:21
T014-03:41
TTL 54:41
TTL -12:28
1:23PM
to order-Fr
T014 02:21
T014-03:41
Road-to-ind
Road to Ind
Frankie Zip
Made to ord
2007
Live at KCE

Para escuchar CD, archivos MP3/WMA y fuentes externas
15 Es
Español
OPERACIÓN
Los modos de repetición de reproducción y reproducción
aleatoria se cancelan cuando se detiene la reproducción o se retira
el disco/dispositivo USB.
Baje el volumen de esta unidad y del dispositivo de audio portátil
antes de hacer conexiones.
y
Para conocer las operaciones del dispositivo de audio portátil,
consulte el manual de instrucciones del dispositivo.
Repetición de reproducción
aleatoria
Nota
RANDOM REPEAT
■ Reproducción aleatoria
■ Repetición de la
reproducción
RANDOM
Rd
Pulse repetidamente.
Reproducción normal
(Reproducción aleatoria)
REPEAT
Pulse repetidamente.
R1
Rf
Ra
(Repetición completa)
Reproducción normal
(Repetición sencilla)
(Repetición de carpeta, disco MP3/WMA/USB
solamente)
Reproducción de fuentes externas
Nota
TUNER
PHONES
PORTABLE
FM ANT
GND
AM ANT
75
UNBAL.
PORTABLE
Dispositivo de
audio portátil
PORTABLE
PORTABLE
Miniclavija de 3,5 mm
Inicie la reproducción
del dispositivo de audio
portátil conectado.
Conecte su dispositivo de audio portátil.

Para escuchar emisoras de radio de FM y AM
16 Es
y
• Mientras escucha la emisora de radio de AM, gire la cabeza de
la antena para encontrar el mejor ángulo de recepción.
• También puede sintonizar emisoras de radio manualmente
pulsando repetidamente TUNE W/X.
• Para aumentar la calidad del sonido FM cuando las ondas de
radio son débiles, mantenga pulsado RANDOM en el mando a
distancia para cambiar el modo de recepción de ondas de radio
FM de esta unidad al modo mono.
■ Para cambiar el paso de frecuencias
Como la separación de frecuencias entre emisoras cambia según
las zonas, usted tal vez quiera cambiar el modo de paso de
frecuencias. El ajuste de paso predeterminado es AM 9 kHz/
FM 50 kHz.
Cambio del paso de frecuencia
1 Conecte la alimentación.
2 Pulse PRESET u y SLEEP en el panel superior.
J El menú “SET MENU” aparece en el visualizador.
3 Pulse repetidamente W/X en el mando a distancia para
seleccionar la visualización TUNER.
4 Pulse S/T en el mando a distancia para seleccionar el paso
de frecuencia deseado.
TUNER 10/100: Paso de AM 10 kHz/FM 100 kHz
TUNER 9/50: Paso de AM 9 kHz/FM 50 kHz
5 Pulse ENTER en el mando a distancia para confirmar.
y
El paso de frecuencia en Norteamérica, Centroamérica y
Sudamérica es de AM 10 kHz/FM 100 kHz.
Para escuchar emisoras de radio de FM y AM
Conexión de antenas
TUNER
FM ANT
GND
AM ANT
75
UNBAL.
1
2
3
Antena de FM
interior
(suministrada)
Antena de cuadro de AM
Tierra (terminal
GND)
y
El cable de la antena de cuadro de AM no tiene ninguna
polaridad, pudiendo usted conectarlo por cualquiera de sus
extremos al terminal AM o GND.
Acerca de la conexión a tierra
Para tener la máxima seguridad y mínima interferencia,
conecte el terminal GND de antena a una buena conexión a
tierra. Una buena conexión a tierra es una varilla metálica
clavada en tierra húmeda.
12 3
El cable de la antena
de cuadro de AM
Sintonización de emisoras de radio
TUNE
RANDOM
TUNER
TUNER
PRESET
TUNE ENTER
Mantenga pulsada.
Seleccione
FM o AM.
FM
87.50MHz
FM
89.70MHz

Para escuchar emisoras de radio de FM y AM
17 Es
Español
OPERACIÓN
Después de cambiar a la visualización del ajuste
preestablecido (mientras parpadea parte de la
visualización), haga esta operación durante el parpadeo de
la visualización.
y
• Puede eliminar una emisora presintonizada pulsando .
• Puede eliminar todas las emisoras presintonizadas
manteniendo pulsado durante 3 segundos o más.
Después de cambiar a la visualización del ajuste
preestablecido (mientras parpadea parte de la
visualización), haga esta operación durante el parpadeo de
la visualización.
y
• También puede presintonizar hasta 30 emisoras de FM y 20 de
AM.
• Puede eliminar una emisora presintonizada pulsando .
• Puede eliminar todas las emisoras presintonizadas
manteniendo pulsado durante 3 segundos o más.
Presintonización automática de
emisoras de radio
(Presintonización automática)
TUNER
/
PRESET
TUNE ENTER
/
ENTER
TUNER
FM
87.50MHz
Mantenga pulsada.
Seleccione
FM o AM.
Mantenga pulsada.
FM
01 87.50MHz
FM
COMPLETE
Entre en el modo de
presintonización.
Cuando termine
7/0
7/0
Presintonización manual de
emisoras de radio
(Presintonización manual)
PRESET
TUNE ENTER
PRESET
ENTER
FM
89.70MHz
PRESET
TUNE ENTER
Sintonice una emisora de
radio favorita (
☞
P. 16).
Entre en el modo de
presintonización.
FM
01 89.70MHz
FM
04 89.70MHz
Seleccione el número
de presintonización
deseado.
PRESET
TUNE ENTER
Confirme.
Mantenga pulsada.
y
También puede usar los
botones numéricos para
seleccionar el número de
presintonización.
7/0
7/0

Para escuchar emisoras de radio de FM y AM
18 Es
Selección de emisoras de radio
presintonizadas
(Sintonización de presintonizaciones)
En el panel superior
PRESET
TUNER
PRESET
TUNE ENTER
FM
30 108.00MHz
TUNER
FM
87.50MHz01
Seleccione
FM o AM.
Seleccione la
emisora de radio
presintonizada.
y
También puede usar los
botones numéricos para
seleccionar la emisora.
ALARM
MUTE
PRESET
VOLVOL

19 Es
Español
OPERACIÓN
Use esta función para despertarse escuchando su CD o programa de radio, etc. favorito. Use también esta función para
poner automáticamente esta unidad en el modo de espera después de pasar cierto espacio de tiempo.
Uso de las funciones del temporizador
ALARM
PRESET
TUNE ENTER
ON/OFF
2134
6578
09
ALARM
ON/OFF
PRESET
TUNE ENTER
1
2
ALM1 ON
M-F 8:00AM
ALARM
ON/OFF
1
2
SOUND1VOL 12
■ Ajuste del temporizador para despertarse
PRESET
TUNE ENTER
Haga los ajustes de alarma.
W/X
Se desplaza por los parámetros de alarma.
S/T
Cambia los parámetros de alarma.
y
También puede usar los botones numéricos para poner la hora.
y
Una vez puesta la alarma puede encender/apagar la alarma con ALARM ON/OFF.
INPUT/SNOOZE
■ Uso de la función para dormitar
La reproducción se reanuda
después de 5 minutos.
■ Para detener la alarma
En el panel superior
o
ALARM
MUTE
PRESET
VOLVOL
En el panel superior
ALM1 OFF
M-F 8:00AM
2 Seleccione encendido/apagado.
1 Seleccione alarma 1/2.
Muestra la alarma activa.
4 Ponga la hora de alarma.
3 Seleccione la repetición.
M-F: Lunes a viernes
Daily: Cada día
Once: Sólo una vez
5 Seleccione el sonido de alarma de
CD, FM, AM, USB, SOUND1 (biip) y
SOUND2 (biip).
6 Ajuste el volumen.
Cuando la visualización esté apagada, conecte
la alimentación antes de hacer este ajuste.
Nota

20 Es
Uso de las funciones del temporizador
ENTER
TIMERSLEEP
SLEEP
SLEEP OFF
SLEEP 30
SLEEP 60
SLEEP 90
SLEEP 120
TIMER
01 min
Visualización normal
(apagado del temporizador para dormir)
■ Ajuste del temporizador para dormir
Pulse repetidamente.
PRESET
TUNE ENTER
TIMER
Haga el ajuste del temporizador de cuenta atrás.
■ Ajuste del temporizador de cuenta atrás
Un temporizador de cuenta descendente fácil de usar. Úselo para recordarle cosas oportunas
como, por ejemplo, tiempos empleados para cocinar y cientos de otros usos.
TIMER
■ Para detener la alarma
o
INPUT/SNOOZE
En el panel superior
SLEEP 60
Ajuste el tiempo de cuenta atrás
(1 a 60 minutos).
PRESET
TUNE ENTER
01:23PM
02min 59sec
Empieza la cuenta atrás.
y
Para cancelar el temporizador de cuenta atrás, pulse dos veces TIMER para
seleccionar “OFF”.
TIMER
OFF
Confirme.
Una vez finalizada la cuenta suenan pitidos breves.
y
• Los pitidos suenan más altos cada 10 segundos.
• El volumen de los pitidos depende del volumen de esta unidad (
☞
P. 8).
Cuando la visualización esté apagada, conecte
la alimentación antes de hacer este ajuste.
Nota

21 Es
Español
INFORMACIÓN
ADICIONAL
Si tiene algún problema con esta unidad, compruebe primero los puntos siguientes. Si no puede solucionar su problema
con los remedios sugeridos, o si su problema no está en la lista, apague y desenchufe esta unidad y luego consulte al
concesionario o centro de servicio Yamaha autorizado más cercano.
Solución de problemas
General
Problema Causa Solución
La alimentación se conecta,
pero se desconecta
inmediatamente después.
El cable de alimentación puede estar
mal conectado.
Asegúrese de que el cable de alimentación
esté bien conectado en la toma de
corriente (☞ P. 6).
Esta unidad puede haber recibido una
descarga eléctrica fuerte, un relámpago
por ejemplo, o electricidad estática
excesiva.
Ponga esta unidad en el modo de espera y
desconecte el cable de alimentación. Espere
unos 30 segundos, reconecte el cable de
alimentación y encienda esta unidad.
Los altavoces no producen
sonido.
El volumen puede estar al mínimo. Ajuste el nivel del sonido (☞ P. 8).
La función de silenciamiento puede
estar activada.
Cancele la función de silenciamiento
(☞ P. 8).
La fuente de entrada puede no ser
correcta.
Seleccione la fuente de entrada correcta
(☞ P. 8).
El disco introducido en esta unidad
puede no ser compatible.
Use un disco compatible con esta unidad
(☞ P. 24).
El sonido se apaga de
repente.
El temporizador para dormir
(☞ P. 20) puede estar activado.
Encienda esta unidad y reproduzca de
nuevo la fuente.
La unidad no funciona
correctamente.
Esta unidad puede haber recibido una
descarga eléctrica fuerte, un relámpago
por ejemplo, o electricidad estática
excesiva, o puede que haya caído la
tensión del suministro eléctrico.
Ponga esta unidad en el modo de espera y
desconecte el cable de alimentación.
Espere unos 30 segundos, conecte el cable
de alimentación y encienda esta unidad.
Un equipo digital o de alta
frecuencia produce ruidos.
Esta unidad puede estar cerca del
equipo digital o de alta frecuencia.
Aleje esta unida del equipo.
El ajuste del reloj ha sido
borrado.
La alimentación de esta unidad puede
haber estado cortada durante más de
una semana.
Enchufe bien el cable de alimentación en
la toma de corriente y vuelva a poner en
hora el reloj (☞ P. 7).
Reproducción de discos
Problema Causa Solución
Las operaciones de algunos
botones no funcionan.
El disco introducido en esta unidad
puede no ser compatible.
Use un disco compatible con esta unidad
(☞ P. 24).
La reproducción no empieza
inmediatamente después de
pulsar .
El disco puede estar sucio. Limpie el disco.
El disco introducido en esta unidad
puede no ser compatible.
Use un disco compatible con esta unidad
(☞ P. 24).
Cuando esta unidad se mueve de un
lugar frío a otro caliente se puede
formar condensación en la lente de
lectura del disco.
Espere una hora o dos y pruebe otra vez.
En el visualizador aparece
“No Disc” aunque sí hay un
disco en la ranura, o aparece
“Disc Error”.
El disco introducido en esta unidad
puede no ser compatible.
Retire el disco y luego compruebe si esta
unidad es compatible con el disco o no lo
es (☞ P. 24).
El disco puede estar sucio o tener
sustancias extrañas pegadas.
Retire el disco y luego límpielo pasando
un paño o quite las sustancias extrañas.
El disco está introducido al revés. Retire el disco y luego introdúzcalo con el
lado de la etiqueta hacia arriba.
6

22 Es
Solución de problemas
■ FM/AM
■ FM
■ AM
Reproducción de archivo MP3/WMA
Problema Causa Solución
El archivo MP3/WMA en el
dispositivo USB no se
reproduce.
No se reconoce el dispositivo USB. Ponga esta unidad en el modo de espera y
luego vuelva a encenderla (☞ P. 6).
Desconecte el dispositivo mientras esta
unidad está en el modo de espera. Luego
vuelva a conectar el dispositivo y
encienda esta unidad (☞ P. 6).
Conecte un adaptador de CA si ha sido
suministrado con el dispositivo.
Si las soluciones de arriba no resuelven
el problema, el dispositivo USB no se
puede reproducir en esta unidad.
Pruebe con otro dispositivo USB.
Recepción de la radio
Problema Causa Solución
La función de selección
preajustada (☞ P. 16) no
funciona.
Las presintonizaciones (memoria)
pueden haber sido borradas.
Presintonice de nuevo emisoras de radio
(☞ P. 17).
Los ajustes de emisoras
presintonizadas han sido
borrados.
La alimentación de esta unidad puede
haber estado cortada durante más de
una semana.
Enchufe bien el cable de alimentación en
la toma de corriente y vuelva a
presintonizar las emisoras (☞ P. 6).
Problema Causa Solución
Demasiado ruido durante las
emisiones estéreo.
La antena de FM puede estar mal
conectada.
Asegúrese de que la antena de FM esté
bien conectada (☞ P. 16).
La emisora de radio que usted
seleccionó puede estar muy lejos de su
zona o la recepción de ondas de radio
es débil en su zona.
Pruebe con la sintonización manual para
mejorar la calidad de la señal
(☞ P. 17) o use una antena exterior
multicanal.
La recepción de ondas de
radio es débil hasta con una
antena exterior. (El sonido
sale distorsionado.)
Puede ocurrir el reflejo de múltiples
trayectorias u otras interferencias de
radio.
Cambie la altura, dirección o colocación
de la antena.
Problema Causa Solución
Demasiado ruido durante las
emisiones.
El ruido puede ser causado por la
electricidad atmosférica, tormentas,
luces fluorescentes, motores o aparatos
eléctricos con termostatos.
Conecte una antena exterior y mejore la
conexión a tierra para reducir el ruido. Sin
embargo, resulta difícil eliminar este tipo
de ruido.
Si esta unidad se coloca cerca de un
TV, puede que el ruido se genere más
durante la tarde.
Aleje esta unidad del TV.
La función de sintonización
automática (☞ P. 18) no
funciona.
La antena de cuadro de AM puede estar
mal conectada.
Asegúrese de que la antena de cuadro de
AM esté bien conectada (☞ P. 16).

23 Es
Solución de problemas
Español
INFORMACIÓN
ADICIONAL
■ Cambio de la pila del mando a distancia
Cambie la pila cuando disminuya el alcance de control del mando a distancia.
• Inserte la pila colocando correctamente las polaridades (+ y –).
• Si se agotan las pilas, quítelas inmediatamente del mando a distancia para impedir que revienten o tengan fugas de ácido.
• Si una pila empieza a tener fugas, tírela inmediatamente siguiendo las regulaciones. Tenga cuidado de que el ácido que salga de una
pila no toque su piel o ropas.
• Limpie el compartimiento de las pilas antes de insertarlas.
• Tire las pilas siguiendo las regulaciones de su región.
Mando a distancia
Problema Causa Solución
El mando a distancia no
funciona bien.
El mando a distancia puede estar siendo
utilizado fuera de su margen de control.
Para tener información del margen de
funcionamiento del mando a distancia,
consulte “Utilización del mando a
distancia” (☞ P. 5).
El sensor de mando a distancia de esta
unidad puede estar expuesto a la luz
solar o eléctrica directa (lámparas
fluorescentes con inversor).
Cambie la iluminación u orientación de
esta unidad.
La pila puede estar agotada. Cambie la pila por otra nueva (vea más
abajo).
Hay obstáculos entre el sensor de esta
unidad y el mando a distancia.
Quite los obstáculos.
Use un alfiler recto para
quitar la tapa.
Cambie la pila por una pila
CR2025 nueva.
Cierre la tapa.
Notas

NOTAS ACERCA DE LOS DISCOS
24 Es
Esta unidad ha sido diseñada para ser usada con CD de
audio, CD-R y CD-RW. Además, esta unidad puede
reproducir discos compactos de 8 cm.
y
Esta unidad puede reproducir discos que tienen los logotipos
mostrados arriba. Un logotipo de disco está marcado en el disco y
en su funda.
No introduzca ningún otro tipo de disco en esta unidad. De lo
contrario podría dañarse esta unidad.
Esta unidad puede reproducir los discos de
datos siguientes (Para los archivos MP3 y WMA,
las palabras entre paréntesis representan la
velocidad de muestreo y la velocidad de bits
compatibles):
– Archivos MP3, grabados en CD-R/RW
(en fs 44,1, 48 kHz/32, 64, 96, 128, 192, 256 ó
320 kbps y archivos MP3 codificados con velocidad
de bit variable (CBR y VBR))
– Archivos WMA, grabados en CD-R/RW
(en fs 44,1 kHz/192 kbps o menos y archivos WMA
codificados con velocidad de bit variable (CBR y
VBR))
– ISO 9660 para CD-R/RW
• Los CD-R/RW no se pueden reproducir si no están finalizados.
• Algunos discos no podrán reproducirse, dependiendo de sus
características o condiciones de grabación.
• No utilice discos de formas extrañas como, por ejemplo, discos
en forma de corazón.
• No utilice discos con sus superficies muy rayadas.
• Los archivos WMA protegidos con copyright no se pueden
reproducir en esta unidad.
• La frecuencia de muestreo de 48 kHz se puede muestrear en
sentido descendente a 44,1 kHz.
• No toque la superficie del disco.
Tómelo por su borde y por el
agujero central.
• No deje un disco en su bandeja
cuando no lo reproduzca.
• No escriba en el disco con un
lapicero u otro marcador puntiagudo.
• No ponga cintas, pegatinas, pegamentos u otros materiales en
la superficie de los discos.
• No use cubiertas protectoras para evitar las rayas.
• No use un disco cuya superficie se pueda imprimir con una
impresora de etiquetas de venta en el comercio.
• No exponga los discos a la luz
solar directa, altas temperaturas y
humedad o mucho polvo.
• Si el disco se ensucia, límpielo
pasando un paño limpio y seco
desde el centro hacia el borde. No
use limpiadores de discos de
vinilo ni diluyente de pintura.
• Para evitar fallos en el
funcionamiento, no use un
limpiador de lentes de venta en el
comercio.
• No inserte más de un disco en su ranura al mismo tiempo. Esto
puede causar daños en la unidad y en los discos.
• Cuando quiera escuchar discos de 8 cm, inserte esos discos sin
emplear ningún adaptador de 8 cm.
• No inserte ningún objeto extraño en la ranura del disco.
• No inserte un disco agrietado, deformado o pegado.
Notas acerca de los discos
Información de discos
Nota
Notas
Manejo de un disco
Aviso

25 Es
Español
INFORMACIÓN
ADICIONAL
■ MP3 (MPEG-1 Audio Layer-3)
Uno de los métodos de compresión de audio usados por
MPEG. Este método emplea la compresión irreversible, la
cual logra una relación de compresión alta reduciendo los
datos de las partes que el oído humano apenas puede oír.
Se dice que puede comprimir la cantidad de datos en
aproximadamente 1/11 (128 kbps) manteniendo un
calidad de audio similar a la de los CDs de música.
■ WMA (Windows Media Audio)
Un método de compresión desarrollado por Microsoft
Corporation. Este método emplea la compresión
irreversible, la cual logra una relación de compresión alta
reduciendo los datos de las partes que el oído humano
apenas puede oír. Se dice que puede comprimir la cantidad
de datos en aproximadamente 1/22 (64 kbps) manteniendo
un calidad de audio similar a la de los CDs de música.
■ Frecuencia de muestreo
El número de muestreos (proceso para digitalizar señales
analógicas) por segundo. En principio, cuanto más alta es
la frecuencia de muestreo, más amplia es la gama de
frecuencias que puede reproducirse, y cuanto más alta es
la velocidad de bits cuantificada, más preciso es el sonido
que puede reproducirse.
■ PCM (Modulación por codificación de
impulsos)
Una señal que es cambiada a formato digital sin
compresión. Un CD se graba con un sonido de 16 bits a
44,1 kHz.
■ Pista
Un CD se puede dividir en segmentos (pistas). A cada
división se le llama número de pista.
■ SECCIÓN DEL REPRODUCTOR
Sistema de reproducción
•CD, CD-R/RW
Láser
• Tipo........................................................................................GaAlAs
• Longitud de onda ....................................................................780 nm
• Duración de la emisión .........................................................continua
• Salida de láser..................................................máxima de 44,6 µW*
*Esta salida corresponde al valor medido a una distancia de unos
200 mm de la superficie de la lente del bloque del lector óptico.
■ SECCIÓN DEL AMPLIFICADOR
• Potencia de salida RMS minima por canal...................10 W + 10 W
• Sensibilidad/impedancia de entrada
PORTABLE ............................................................ 300 mV/47 kΩ
• Nivel de salida/impedancia
PHONES (volumen máximo) ................................... 470 mV/32 Ω
■ SECCIÓN DEL SINTONIZADOR
FM
• Gama de sintonización
Modelos de EE.UU. y Canadá ........................... 87,5 a 107,9 MHz
Otros modelos ................................................ 87,50 a 108,00 MHz
AM
• Gama de sintonización
Modelos de EE.UU. y Canadá ...............................530 a 1710 kHz
Otros modelos ........................................................522 a 1629 kHz
■ GENERALIDADES
• Alimentación
Modelos de EE.UU. y Canadá .............................CA 120 V, 60 Hz
Otros modelos .......................................CA 100 a 240 V, 50/60 Hz
• Consumo ................................................................................... 20 W
• Consumo en espera .................................................... 1,0 W o menos
• Dimensiones (An x Al x Prof) .......................300 x 141,5 x 200 mm
• Peso .......................................................................................... 2,7 kg
Las especificaciones están sujetas a cambios sin previo aviso.
Glosario
Especificaciones
Cuidados de la unidad
Cuando limpie esta unidad, utilice un paño limpio y seco. Para
limpiar las partes muy sucias, humedezca un paño blando en
agua, escúrralo y luego páselo por esta unidad para limpiarla.

i
Zh
1 要确保最好的性能,请仔细阅读此手册。 请将它保存在
安全的地方以备将来参考。
2 请将本机放在通风良好,凉爽并且干燥,干净的地方,
至少保持其上方,后方及两侧留出 10 厘米的空间,以
确保通风良好,应远离直射阳光,热源,振动,灰尘,
潮湿和或寒冷的地方。
3 请将本机远离其它电子设备,马达或变压器以避免嗡嗡
声。
4 请勿使本机经受于从冷到热的突然温度改变,勿将本机
放置于高湿度的环境中 (例如有加湿器的房间)以防止
本机内部发生结露,否则可能导致触电,火灾,损害本
机,或人体伤害。
5 请避免在外部物体可能落入本机的地方或本机可能遭遇
液体滴落或飞溅的地方安装本机。 在本机的顶部,请勿
放置:
- 其它组件机,因为它们可能对本机表面造成损坏或者
导致变色。
- 燃烧物体 (例如蜡烛),因为它们可能导致火灾,对
本机造成损害或造成人体伤害。
- 内部装有液体的容器,因为它们可能会摔落并且液体
可能引起用户触电并且会损坏本机。
6 为了不阻断热量散发,请勿使用报纸,桌布,窗帘等遮
盖本机。 如果本机内的温度升高,可能会引起火灾,损
坏本机或导致人体伤害。
7 在所有的连接完成之前请勿将本机插头插入墙上插座。
8 请勿上下倒置操作本机。 它可能过热,并极有可能导致
损坏。
9 请勿在开关,旋钮或导线上用力。
10 当将电源线从墙上插座断开时,请抓住插头;请勿拖拉
导线。
11 请勿使用化学溶剂清洁本机;这可能损坏机壳涂层。
12 只能使用本机规定的电压。 在本机上使用比规定值高的
电压是危险的并可能导致火灾,损坏本机或造成人体伤
害。Yamaha 将不对由于在本机上使用非规定电压而造成
的任何损害负责。
13 为了避免雷击造成损坏,在雷电期间,将电源导线从墙
壁上的电源插座拔下,也将天线从本机上拔下。
14 请勿尝试修改或修理本机。 当需要任何维修时请联系专
业 Yamaha 维修人员。 不能以任何理由打开机壳。
15 当准备长时间 (例如休假)不使用本机时,请将 AC 电
源线从墙上插座断开。
16 对通常的操作错误,在断定本机出故障之前,请务必先
阅读 “故障排除”一节。
17 在搬动本机之前,请按 POWER OFF 以将本机设置为待机
模式,并将 AC 电源插头从墙上插座断开。
18 如果环境温度剧烈变化,就可能形成结露。从插座上拔
下电源插头,将本机搁置一旁。
19 长时间使用本机后,本机可能变热。将电源关闭,将本
机搁置冷却。
20 将本机靠近电源插座安装以便电源的接插。
21 电池不能置于高热环境 , 比如火或直射日光等。
22 来自耳塞式耳机和双耳式耳机的额外声压也许会损害听
力。
激光安全
本机使用激光。因为可能会伤害眼睛,仅可由具有资格的维
修人员拆卸罩盖或试图对本装置进行维修服务。
危险
打开本机时,机器会放出可见激光射线。为了避免光束直接
照射到眼睛上,在插上本机的交流电源时,不要将眼睛对着
打开的托盘或者其他打开着的装置,并且不要往装置内部窥
视。
注意: 在操作本机之前请阅读此部分。
只要本机连接在墙壁的交流电源插座上,即使按下
POWER OFF 按钮后本机自身被关闭,本机也没有从交流
电源断开。这种状态被称为待机模式。在此状态下,本
机消耗很小一部分电力。
注意
使用此处指定外的控制或调节以及进行指定外的操作都
有可能引起有害的辐射暴露。
警告
要减少火灾或触电的危险,请勿将本机暴露于雨中或湿
气中。
CLASS 1 LASER PRODUCT
LASER KLASSE 1 PRODUKT
LUOKAN 1 LASERLAITE
KLASS 1 LASER APPARAT
PRODUIT LASER DE CLASSE 1
03ZH_00_TSX-100_R.book Page i Thursday, November 29, 2007 12:07 PM

1 Zh
前言 准备 操作 补充信息
中文
特性 .................................... 2
控制按钮和功能 .......................... 3
前端 / 机顶视图 .......................... 3
遥控器 .................................. 4
使用本机之前的准备 ...................... 6
打开电源 ................................ 6
调节时钟 ................................ 7
基本操作 ................................ 8
选择输入声源 ............................ 8
调节音量水平 ............................ 8
调节音响 ................................ 9
用于显示的有用操作 ..................... 10
收听 CD,MP3/WMA 文件,和外部声源 ....... 11
收听 CD ................................ 11
收听存储在您的 USB 设备上的
MP3/WMA 文件 ......................... 12
切换播放信息的显示 ..................... 14
重复和随机播放 ......................... 15
播放外部输入源 ......................... 15
收听 FM 和 AM 广播电台 ................... 16
连接天线 ............................... 16
调谐广播电台 ........................... 16
自动预设电台 ( 自动预设 ) ............... 17
预设无线电台手动预设广播电台
(手动预设) .......................... 17
选择预设广播电台 (预设调谐) ........... 18
使用定时器功能 ......................... 19
故障排除 ...............................21
一般 ................................... 21
碟片播放 ............................... 21
MP3/WMA 文件播放 ....................... 22
无线接收机 ............................. 22
遥控器 ................................. 23
关于碟片 ...............................24
碟片信息 ............................... 24
拿取碟片 ............................... 24
术语 ...................................25
规格 ...................................25
目录
前言
准备
操作
补充信息
03ZH_00_TSX-100_R.book Page 1 Thursday, November 29, 2007 12:07 PM

特性
2 Zh
• 时尚紧凑的全合一设计
• 可播放音频 CD,MP3 CD 和 WMA CD
• 支持 USB
• 尖端的 FM/AM 调谐器
• 简单却有效的遥控器
• 定时器和时钟功能
“Swing Radiator Bass
TM
”是 YAMAHA CORPORATION 的商标。
■ 关于本说明书
• 在本说明书中,可以在主机或使用遥控器进行的操作,均使用遥控器进行操作说明。
• 符号 “☞”加上页码指示所对应的参考页码。
• y 指示有关您的操作的提示。
• 注意事项中包含许多关于安全和操作指示的重要信息。
• 本说明书是在产品生产之前印刷的。 由于改进等原因,设计和规格可能会有部分变更。
如果说明书和产品存在不同,以产品为准。
■ 提供的配件
本产品包括以下附件。 请确认您拥有下列所有的部件。
y
在将本机连接到墙壁上的交流电源插座之前,请在附带的电源缆线中选择适合于您所在地区的交流电源插座类型的缆线。
根据信号的不同,附件的形状稍有差异。
特性
注
ALARM
INPUT
VOLUME
STANDBY/ON
ON/OFF
2134
6578
09
TIMER
TIME/INFO
PRESET
DISPLAY
TONE EQ
SLEEPDIMMER
TIME ADJ
TUNE
RANDOM
REPEAT
/ /
ENTER
CDUSB
TUNER
MUTE
PORTABLE
室内 FM 天线 AM 环形天线
电源线
遥控器
本机的保养维护
当您擦拭本机时,请使用干净的干布匹。对于严重的脏
污,可以用软布蘸水,拧干后擦拭本机。
03ZH_00_TSX-100_R.book Page 2 Thursday, November 29, 2007 12:07 PM

3 Zh
中文
前言
控制按钮和功能
前端 / 机顶视图
POWER OFF
SLEEP
ALARM
MUTE
PRESET
VOLVOL
开始和暂停播放。 (☞ 第11页)
停止播放或停止播放时弹出碟片。
(☞ 第11页)
,
跳跃到当前或下一曲目的开头。
按住该按钮可进行反向 / 正向搜索。
(☞ 第11页)
POWER OFF
将本机设置为待机模式。 (☞ 第6页)
SLEEP
设置睡眠定时器。 (☞ 第20页)
6
7/0
4/1¡/¢
USB 接口 (☞ 第12页)
扬声器
碟片插槽
(☞ 第11页)
显示
VOL u, d
调节音量水平。 (☞ 第8页)
MUTE
关闭音量。 (☞ 第8页)
PRESET u, d
选择预设电台。 (☞ 第17页)
ALARM
设置警报功能。 (☞ 第19页)
INPUT/SNOOZE
打开本机并选择一个输入源
(☞ 第 6,8 页),或当警报被激活
时启用暂停功能。 (☞ 第19页)
03ZH_00_TSX-100_R.book Page 3 Thursday, November 29, 2007 12:07 PM

4 Zh
控制按钮和功能
遥控器
ALARM
INPUT
VOLUME
STANDBY/ON
ON/OFF
213
657
09
TIMER
TIME/INFO
PRESET
DISPLAY
TONE EQ
SLEEPDIMMER
TIME ADJ
TUNE
RANDOM REPEAT
//
ENTER
CDUSB
TUNER
MUTE
PORTABLE
4
8
STANDBY/ON
DIMMER
TIME/INFO
RANDOM
INPUT
CDUSB
TUNER
PORTABLE
VOLUME
MUTE
打开本机电源。 (☞ 第6页)
更改显示器的亮度。 (☞ 第10页)
显示碟片 /USB 信息。 (☞ 第14页)
将本机设置为随机播放模式。 (☞ 第15页)
选择您要收听的声源。
按 PORTABLE 收听连接到本机后面板的 PORTABLE 插孔
的组件上播放的声源。 (☞ 第15页)
按
USB 收听存储在连接的 USB 存储器中的声源。
(☞ 第12页)
按
TUNER 收听 FM/AM 无线电广播。 每按 TUNER 一次,
声源在 FM 和 AM 之间切换。(☞ 第16页)
按
CD 收听插入碟片插槽的碟片。 (☞ 第11页)
调节音量。 (☞ 第8页)
红外线传感器
光标 (S/T/W/X)和 ENTER
在使用遥控器之前去掉透明绝缘皮。
y
在使用遥控器之前去掉透明薄膜。
03ZH_00_TSX-100_R.book Page 4 Thursday, November 29, 2007 12:07 PM

5 Zh
控制按钮和功能
中文
前言
ALARM
ON/OFF
TIMERSLEEP
TIME ADJ
1
65
3
7
09
4
8
2
TONE EQ
DISPLAY
REPEAT
/ /
设置各种定时器和时钟功能。
ALARM ON/OFF
:激活或取消警报功能。 (☞ 第19页)
TIME ADJ:调节本机的时钟。 (☞ 第7页)
SLEEP:设置睡眠定时器。 (☞ 第20页)
TIMER:设置倒数定时器。 (☞ 第20页)
直接选择期望的曲目或预设位置。 (☞ 第 11, 13, 17, 18 页 )
调节音响。
TONE
:调节低音和高音平衡。 (☞ 第9页)
EQ:选择均衡器模式。 (☞ 第9页)
控制播放。
,
:跳跃到当前或下一曲目的开头。
按住该按钮可进行反向 / 正向搜索。 (☞ 第 11, 12 页 )
:开始和暂停播放。 (☞ 第 11, 12 页 )
:停止播放或当播放被停止时弹出碟片。 (☞ 第 11, 12 页 )
4¢
6
7/0
设置本机到反复播放模式。 (☞ 第15页)
更改显示的信息。 (☞ 第10页)
■ 使用遥控器
30˚ 30˚
在 6 m 之内
在本机的 6 m 之内使用遥控器,将其对准遥控传感器。
• 不要将障碍物放在遥控器和本机的传感器之间。 否则,您将不能用遥控器
操作本机。
• 不要使液体飞溅到遥控器。
• 不要使遥控器跌落。
• 不要将遥控器放置在以下场所:
- 湿热的地方,比如浴室或加热器
- 特别寒冷的地方
- 肮脏的地方
关于电池的替换 ☞ 第23页。
注
03ZH_00_TSX-100_R.book Page 5 Thursday, November 29, 2007 12:07 PM

使用本机之前的准备
6 Zh
y
在将本机连接到墙壁上的交流电源插座之前,请在附带的电源缆线中选择适合于您所在地区的交流电源插座类型的缆线。
使用本机之前的准备
打开电源
STANDBY/ON
打开本机电源。
再次按下时,将本机设置为待机模式。
y
• 在待机模式,消耗很小电力。
• 在待机模式下,您可以选择显示日期和时间 (在 ECO OFF 模式)或不显示日期和
时间 (在 ECO ON 模式)。
1 在待机模式下,按住上面板上的 MUTE。
J“ECO ON”或 “ECO OFF”闪烁。
2 当指示器闪烁时,按下 MUTE 选择 “ECO ON”或 “ECO OFF”。
3 等待数秒钟。
J ECO ON 或 ECO OFF 模式设定完成。
• 即使在待机模式下,记忆备份电路也可以防止记忆的数据丢失。 但是,如果电源
线从墙壁 AC 插座断开,或电力供应被切断一周以上,记忆的数据将会丢失。
在顶部面板上
您也可以在顶部面板上执行上述操作。
INPUT/SNOOZE
POWER OFF
SLEEP
打开本机电源。
设置本机到待机模式。
( 无显示 )
ECO ON 模式
11:22PM
12 Oct Fri
ECO OFF 模式
( 显示日期和时间 )
待机模式
时的显示
连接电源缆线到本机的交流输入口和墙壁的交流插座上。
1 交流输入口
2 到墙壁上的插座
STANDBY/ON
03ZH_00_TSX-100_R.book Page 6 Thursday, November 29, 2007 12:07 PM

使用本机之前的准备
7 Zh
准备
中文
调节时钟
PRESET
TUNE ENTER
TIME ADJ
TIME ADJ
PRESET
TUNE ENTER
PRESET
TUNE ENTER
Year
2007
调节日期和时间。
W/X
选择年 / 日期 / 小时 / 分钟。
S/T
增加或减少日期或时间。
Date
12 Oct Fri
Time
1:23AM
例
请确认。
根据型号的不同,时间会以 12 小时 (AM/PM) 方式显示。 例如 , “4:00PM”。
注
当显示器关闭时,在进行此设置之前先打开
电源。
注
y
您可以切换 12 小时计时到 24 小时计时 (默认设置为 12 小时计时)。
1 打开电源。
2 同时按下顶部面板上的 PRESET u 和 SLEEP。
J“SET MENU”出现在显示器上。
3 反复按下遥控器上的 W/X,选择 TIME 显示。
4 按下遥控器上的 S/T,选择期望的计时方法。
TIME 12H: 12 小时计时
TIME 24H: 24 小时计时
5 按下遥控器上的 ENTER 来确认。
03ZH_00_TSX-100_R.book Page 7 Thursday, November 29, 2007 12:07 PM

基本操作
8 Zh
■ 使用耳机
y
即使当您连接耳机时, 发出的警报声音通过扬声器输出。
基本操作
选择输入声源
在顶部面板上
INPUT
CDUSB
TUNER
PORTABLE
要收听在便携式音频设备上播放
的音乐
要收听您的 USB 存储器上存储的
MP3/WMA 文件
要收听广播电台 (FM/AM)
要收听 CD
PORTABLE
USB
TUNER
CD
INPUT/SNOOZE
反复按。
调节音量水平
在顶部面板上
VOLUME
MUTE
要增大或减小音量水平
y
如果电源被关闭时音量被设置为 41
或更高的一个水平,当电源打开时
音量被自动设置为 20。
要关闭声音
y
再次按下以恢复音量水平。
VOLUME
Volume 41 20
MUTE
ALARM
MUTE
PRESET
VOLVOL
降低音量水平。
关闭声音。
增加音量水平。
TUNER
PHONES
PORTABLE
FM ANT
75
UNBAL.
到 PHONES
03ZH_00_TSX-100_R.book Page 8 Thursday, November 29, 2007 12:07 PM

基本操作
9 Zh
中文
操作
调节音响
ENTER
TONE EQ
PRESET
TUNE ENTER
EQ
PRESET
TUNE ENTER
TONE
BASS 0
BASS +02
反复按。
ROCK
POP
JAZZ
CLASSIC
STRAIGHT
用于摇滚音乐
用于流行音乐
用于爵士乐
用于古典音乐
用于各种各样的音乐
选择 “BASS”(低频率范围)或 “TREBLE”(高频率范围)。
调节水平 (-10 到 +10 分贝)。
■ 调节低音 / 高音平衡
■ 调节总声音平衡
反复按。
请确认。
03ZH_00_TSX-100_R.book Page 9 Thursday, November 29, 2007 12:07 PM

基本操作
10 Zh
用于显示的有用操作
DISPLAY
DISPLAY
时间和播放状态
日期
警报 2 设置 (☞ 第 19 页)
睡眠定时器设置 (☞ 第 20 页)
警报 1 设置 (☞ 第 19 页)
倒数定时器 (仅当激活时)(☞ 第 20 页)
反复按。
■ 切换显示信息
输入
DIMMER
100%
50%
30%
■ 暗淡显示
反复按。
亮
中暗淡
暗
DISPLAY
DIMMER
03ZH_00_TSX-100_R.book Page 10 Thursday, November 29, 2007 12:07 PM

收听 CD,MP3/WMA 文件,和外部声源
11 Zh
中文
操作
■ 要暂停播放
y
要取消暂停,再按 。
■ 跳转曲目
■ 要反向/正向搜索
在暂停下开始搜索时听不到声音。
■ 要指定一个曲目
y
输入您要收听的曲目编码。
■ 停止播放
■ 要弹出碟片
收听 CD,MP3/WMA 文件,和外部声源
收听 CD
/ /
CD
2134
6578
09
CD
1:23PM
T001 00:01
经过时间当前曲目状态指示器
插入您的碟片。
y
您也可以播放录制在碟片上的 MP3/WMA 文件。有关操作指令,请参阅 “收听存
储在您的 USB 设备上的 MP3/WMA 文件”(☞ 第 12 页)。
1:23PM
T014 60:59
碟片的总时间总曲目状态指示器
y
• 您可以切换播放信息的显示 (☞ 第 14 页)。
• 您也可以播放录制在碟片上的 MP3/WMA 文件。请参阅“收听存储在您的 USB 设
备上的 MP3/WMA 文件”(☞ 第 12 页)。
当播放被停止时开始播放。
在顶部面板上
POWER OFF
SLEEP
向前跳跃 / 向前搜索 *
* 在播放或暂停时,按住该按钮。
停止 / 弹出 *
向后跳跃 / 向后搜索 *
播放 / 暂停
注
/
6
后退 前进
后退 前进
按住。
2134
6578
0
9
/
当播放被停止时 在播放或暂停时
按下。
/
/
按住。
03ZH_00_TSX-100_R.book Page 11 Thursday, November 29, 2007 12:07 PM

收听 CD,MP3/WMA 文件,和外部声源
12 Zh
■ 停止播放
■ 要暂停播放
y
要取消暂停,再按 。
■ 跳转曲目
■ 要反向 / 正向搜索
当您启动搜索时暂停将被取消。
收听存储在您的 USB 设备上的 MP3/WMA 文件
PRESET
TUNE
/
ENTER
USB
2134
6578
09
USB
连接 USB 设备。
本机支持使用 FAT16 或 FAT32 格式的 USB 大容量存储器 (比如,闪存或
携带式音频播放机)。
• 有些装置虽然符合要求,但不一定正常工作。
• 不要在本机上连接USB大容量存储器以外的装置(比如USB充电器或USB集线器),
PC, 读卡器,外部硬盘等。
• 对于连接到本机时所引起的 USB 装置的损坏和数据的丢失,Yamaha 将不承担任何
责任。
• 对于所有类型的 USB 装置的可播放性及电源供应也不能做任何保证。
注
1:23PM
Road to Ind
歌曲标题 / 艺术家名字 / 专辑名称
开始播放。
y
您可以切换播放信息的显示 (☞ 第 14 页)。
根据文件 / 文件夹的数目的不同,读取时间有时候会超过 30 秒。
注
在顶部面板上
POWER OFF
SLEEP
播放 / 暂停
向前跳跃 / 向前搜索 *
停止
向后跳跃 / 向后搜索 *
*按住
/
/
6
注
后退 前进
后退 前进
按住。
03ZH_00_TSX-100_R.book Page 12 Thursday, November 29, 2007 12:07 PM

收听 CD,MP3/WMA 文件,和外部声源
13 Zh
中文
操作
■ 播放指定的曲目
y
输入您要收听的曲目编码。
• 根据录制条件,比如录制软件的设定等的不同,本机也许
不能以碟片或 USB 装置中录制的顺序播放曲目。
• 对于 MP3 或 WMA 碟片 /USB 装置,给各个文件分配号码时,在
碟片 /USB 装置的尺度,而不是在各个文件夹中按顺序进
行。
■ 要为 MP3 或 WMA 格式文件选择文件夹 / 文件
• 本机最多可显示 255 个文件和 255 个文件夹。 但是,如果
某些文件或文件夹不可以播放,显示的文件 / 文件夹就可
能小于 255 个。
• 如果 USB 装置被分区,只有第一个分区能播放。
• 对于某些 USB 装置,有些文件也许不能正常工作。
• 拷贝保护的文件不能播放。
• 本机可以播放不大于 4 GB 的文件。
注
2134
6578
0
9
PRESET
TUNE ENTER
PRESET
TUNE ENTER
PRESET
TUNE ENTER
PRESET
TUNE ENTER
选择一个文件夹。
仅当播放 MP3/WMA 碟片时
选择一个文件。
开始播放。
关于 MP3 或 WMA 文件
您可以播放录制在 CD-R, CD-RW 或 USB 装置的 MP3 或
WMA 文件。 如下所示,本机将碟片 /USB 装置中的文件夹
当作曲集,文件当作曲目。 文件夹的上下结构被忽略。
注
根
文件夹 (影集)
文件 (曲目)
03ZH_00_TSX-100_R.book Page 13 Thursday, November 29, 2007 12:07 PM

收听 CD,MP3/WMA 文件,和外部声源
14 Zh
每按下该按钮一次,显示的信息被更改。
某些特殊字符也许不能妥当显示。
■ 音频 CD
当前曲目的经过时间 ( 默认 )
当前曲目的剩余时间
碟片的总时间
碟片的剩余时间
回到默认显示
■ MP3/WMA 文件
滚动显示 *( 默认 )
当前文件的经过时间
当前文件的剩余时间
文件名称
歌曲标题
艺术家名称
唱片集名称
年
注释
回到默认显示
*
滚动显示依次显示所选择项目的歌曲标题,艺术家名称和
唱片集名称。
切换播放信息的显示
注
TIME/INFO
DIMMER
TIME/INFO
反复按。
1:23PM
T014 02:21
T014-03:41
TTL 54:41
TTL -12:28
1:23PM
to order-Fr
T014 02:21
T014-03:41
Road-to-ind
Road to Ind
Frankie Zip
Made to ord
2007
Live at KCE
03ZH_00_TSX-100_R.book Page 14 Thursday, November 29, 2007 12:07 PM

收听 CD,MP3/WMA 文件,和外部声源
15 Zh
中文
操作
当播放停止或碟片 /USB 设备被删除时,重复和随机播放模
式被取消。
连接前调低本机和您的便携式音频设备的音量。
y
有关便携式音频设备的操作,请参阅设备的使用手册。
重复和随机播放
注
RANDOM REPEAT
■ 随机播放
■ 反复播放
RANDOM
Rd
反复按。
正常播放
(随机播放)
REPEAT
反复按。
R1
Rf
Ra
(全部反复)
正常播放
(单曲反复)
(文件夹重复,MP3/WMA 碟片 / 仅 USB)
播放外部输入源
注
TUNER
PHONES
PORTABLE
FM ANT
GND
AM ANT
75
UNBAL.
PORTABLE
便携音频装置
PORTABLE
PORTABLE
3.5 mm 微型插头
在所连接的便携音频装置
上开始播放。
连接您的便携音频装置。
03ZH_00_TSX-100_R.book Page 15 Thursday, November 29, 2007 12:07 PM

收听 FM 和 AM 广播电台
16 Zh
y
• 收听 AM 无线电台时,请转动天线方向寻找最佳接收方向。
• 您还可以通过反复按 TUNEW/X 手动调谐广播电台。
•
要提高微弱无线电信号下的 FM 声音的质量,按住遥
控器的 RANDOM,改变本机的 FM 无线电接收模式到
单声道。
■ 要切换频率间隔
因为不同地区的频率间隔不同,您也许需要切换频率
间隔模式。 默认的步距设置为 AM 9 kHz/FM 50 kHz。
切换频率间隔
1 打开电源。
2 同时按下顶部面板上的 PRESET u 和 SLEEP。
J“SET MENU”出现在显示器上。
3 反复按下遥控器上的 W/X,选择 TUNER 显示。
4 按下遥控器上的 S/T,选择期望的频率间隔。
TUNER 10/100: AM 10 kHz/FM 100 kHz 间隔
TUNER 9/50: AM 9 kHz/FM 50 kHz 间隔
5 按下遥控器上的 ENTER 来确认。
y
在北,中,南美洲切换频率步距: AM 10 kHz/FM 100 kHz
收听 FM 和 AM 广播电台
连接天线
TUNER
FM ANT
GND
AM ANT
75
UNBAL.
1
2
3
室内 FM 天线
(附带)
AM 环形天线 (附带)
接地 (GND 端子 )
y
AM 环形天线不具有极性,所以可以连接任何一端到 AM 或
GND 端子。
关于接地
为了最大的安全性和最小的干扰,请将天线 GND 端子连
接到良好的接地处。 良好的接地处是插入潮湿泥土的金
属条。
12 3
AM 环形天线的缆线
调谐广播电台
TUNE
RANDOM
TUNER
TUNER
PRESET
TUNE ENTER
按住。
选择 FM 或 AM。
FM
87.50MHz
FM
89.70MHz
03ZH_00_TSX-100_R.book Page 16 Thursday, November 29, 2007 12:07 PM

收听 FM 和 AM 广播电台
17 Zh
中文
操作
切换到预设设置显示之后 (此时部分显示闪烁),
在其闪烁之际进行该操作。
y
• 可以通过按 删除预设电台。
• 您也可以按住 3 秒钟以上来删除所有预设电台。
切换到预设设置显示之后 (此时部分显示闪烁),
在其闪烁之际进行该操作。
y
• 您可以预设最多 30 个 FM 和 20 个 AM 电台。
• 可以通过按 删除预设电台。
• 您也可以按住 3 秒钟以上来删除所有预设电台。
自动预设电台 ( 自动预设 )
TUNER
/
PRESET
TUNE ENTER
/
ENTER
TUNER
FM
87.50MHz
按住。
选择 FM 或 AM。
按住。
FM
01 87.50MHz
FM
COMPLETE
进入预设模式。
当完成时
7/0
7/0
预设无线电台手动预设广播电台
(手动预设)
PRESET
TUNE ENTER
PRESET
ENTER
FM
89.70MHz
PRESET
TUNE ENTER
调到一个喜欢的电台
(☞ 第 16 页)。
进入预设模式。
FM
01 89.70MHz
FM
04 89.70MHz
选择期望的预设
号码。
y
您也可以使用数字按钮
来选择预设号码。
PRESET
TUNE ENTER
请确认。
按住。
7/0
7/0
03ZH_00_TSX-100_R.book Page 17 Thursday, November 29, 2007 12:07 PM

收听 FM 和 AM 广播电台
18 Zh
选择预设广播电台 (预设调谐)
在顶部面板上
PRESET
TUNER
PRESET
TUNE ENTER
FM
30 108.00MHz
TUNER
FM
87.50MHz01
选择 FM 或 AM。
选择预设的无线
电台。
y
您也可以使用数字按钮
来选择电台。
ALARM
MUTE
PRESET
VOLVOL
03ZH_00_TSX-100_R.book Page 18 Thursday, November 29, 2007 12:07 PM

19 Zh
操作
中文
使用此功能可以利用您所喜欢的 CD 或广播节目等唤醒您。使用此功能也可以在使用一定时间之后,设置本机
到待机模式。
使用定时器功能
ALARM
PRESET
TUNE ENTER
ON/OFF
2134
6578
09
ALARM
ON/OFF
PRESET
TUNE ENTER
1
2
ALM1 ON
M-F 8:00AM
ALARM
ON/OFF
1
2
SOUND1VOL 12
■ 设置唤醒定时器
PRESET
TUNE ENTER
调节警报设置。
W/X
浏览警报参数。
S/T
更改警报参数。
y
您可以使用该数字按钮输入时间。
y
一旦设置警报,您可以使用 ALARM ON/OFF 打开 / 关闭警报。
INPUT/SNOOZE
■ 使用暂停功能
5 分钟后继续播放。
■ 要停止警报
在顶部面板上
或
ALARM
MUTE
PRESET
VOLVOL
在顶部面板上
ALM1 OFF
M-F 8:00AM
2 选择开 / 关。
1 选择警报 1/2。
显示现行的警报。
4 设置警报时间。
3 选择重复。
M-F:星期一到星期五
Daily:每天
Once:仅一次
5 在 CD,FM,AM,USB,SOUND1
(提示音),和 SOUND2 (提示音)中
选择警报声音。
6 调节音量。
当显示器关闭时,在进行此设置之前先打开
电源。
注
03ZH_00_TSX-100_R.book Page 19 Thursday, November 29, 2007 12:07 PM

20 Zh
使用定时器功能
ENTER
TIMERSLEEP
SLEEP
SLEEP OFF
SLEEP 30
SLEEP 60
SLEEP 90
SLEEP 120
TIMER
01 min
正常显示
(睡眠关闭)
■ 设置睡眠定时器
反复按。
PRESET
TUNE ENTER
TIMER
调节倒数定时器设置。
■ 设置倒数定时器
简单方便的倒计时定时器。简单定时器可以即时提醒您许多事情,比如烹调的时间等无
数种用途。
TIMER
■ 要停止警报
或
INPUT/SNOOZE
在顶部面板上
SLEEP 60
设置倒数定时器
(1 到 60 分钟)。
PRESET
TUNE ENTER
01:23PM
02min 59sec
倒数开始。
y
要取消倒数定时器,按 TIMER 两次来选择 “OFF”。
TIMER
OFF
请确认。
当倒计时结束时发出短暂的嘟声。
y
• 每个 10 秒钟,嘟声音量增大一些。
• 嘟声音量根据本机音量而定 (☞ 第 8 页)。
当显示器关闭时,在进行此设置之前先
打开电源。
注
03ZH_00_TSX-100_R.book Page 20 Thursday, November 29, 2007 12:07 PM

21 Zh
中文
补充信息
如果本机出现问题,请检查下表中各项目。 如果使用以下所建议的方法还不能解决您的问题,或者您的问题
不在下列之中,请将本机关闭并拔下电源插头,然后就近与 Yamaha 的经销商或服务中心联系。
故障排除
一般
问题 原因 解决方法
电源打开后立即关闭。 电源线连接不当。 请确认电源插头是否牢靠插入插座
(☞ 第 6 页 )。
本机也许受到了强烈的电击,
比如雷电或强烈的静电等。
将本机置于待机模式,然后拔下电
源线。 等待 30 秒钟,再次连接电源
线,打开本机。
扬声器不发声。 音量可能设定为最低。 调节音量水平 (☞ 第 8 页 )。
默音功能可能被开启。 解除默音功能 (☞ 第 8 页)。
输入源可能不正确。 请选择正确的输入源
(☞ 第 8 页)。
加载到本机的碟片可能不兼容。 使用本机支持的碟片
(☞ 第 24 页 )。
声音突然消失。 睡眠定时器 (☞ 第 20 页)可能
被设定。
打开本机,并再次播放信号源。
本机操作不正常。 本机也许受到了强烈的电击,
比如雷电或强烈的静电等;或者
电源掉电。
将本机置于待机模式,然后拔下电
源线。 等待 30 秒钟,连接电源线,
打开本机。
数字或高频装置产生噪音。 本机的位置过于靠近数字或高频
装置。
将本机远离这些装置放置。
时钟设置被取消。 本机的电源断开一个星期以上。 确认电源线是否牢靠插入插座,
然后再设置时钟 (☞ 第 7 页 )。
碟片播放
问题 原因 解决方法
某些按钮操作不工作。 加载到本机的碟片可能不兼容。 使用本机支持的碟片
(☞ 第 24 页 )。
当按下 后,播放不能立即
开始。
碟片可能脏污。 请将碟片擦拭干净。
加载到本机的碟片可能不兼容。 使用本机支持的碟片
(☞ 第 24 页 )。
将本机从寒冷环境突然转移到温
热环境时,碟片读取镜头有可能
结露。
等待 1 到 2 个小时,然后再试。
虽然装有碟片,显示器上却
显示 “No Disc”;或显示器
上出现 “Disc Error”。
加载到本机的碟片可能不兼容。 取出碟片,检查本机是否支持该类
碟片 (☞ 第 24 页 )。
碟片脏污或粘有异物。 取出碟片,擦干净碟片或去除异物。
碟片装反。 取出碟片,然后将标签面向上重新
装入碟片。
6
03ZH_00_TSX-100_R.book Page 21 Thursday, November 29, 2007 12:07 PM

22 Zh
故障排除
■ FM/AM
■ FM 部分
■ AM 部分
MP3/WMA 文件播放
问题 原因 解决方法
MP3/WMA 文件在 USB 设备中不
播放。
USB 设备无法识别。
将本机置于待机模式,然后再次打开
(☞ 第6页)。
在本机处于待机模式时,取下装置。 然
后,再次连接装置到本机
(
☞
第6页)
。
如果装置附带有 AC 电源适配器,
请连接之。
如果上面的解决方案不能解决该
问题,则 USB 设备在本机上不能
播放。
请尝试另一个 USB 设备。
无线接收机
问题 原因 解决方法
预设选择功能 (☞ 第 16 页 )
不起作用。
预设 (记忆)可能被删除。 请再次预设电台 (☞ 第 17 页)。
预设电台已被清除。 本机的电源断开一个星期以上。 确认电源线是否牢靠插入插座,
然后再预设电台 (☞ 第 6 页 )。
问题 原因 解决方法
立体声广播时噪音太大。 FM 天线可能连接不当。 请确认 FM 天线连接是否妥当
(☞ 第 16 页)。
您所选择的电台可能比较远,
或您所在地区的无线信号比较弱。
试用手动调谐以提高信号质量
(☞ 第 17 页),或使用多声道室外
天线。
即使使用室外天线,无线信号
依然微弱。(音频失真。)
存在多路反射或其他射频干扰。 改变天线的高度,方向或位置。
问题 原因 解决方法
无线广播时噪音太大。 空气中的静电,雷电,日光灯,
马达或电热器具等,都有可能引
起噪音。
连接室外天线并良好接地以降低
噪音。 但是,要消除这些噪音比较
困难。
如果本机的位置距离电视机太近,
有可能在晚上噪音特别大。
将本机远离电视机放置。
自动调谐功能 (☞ 第 18 页 )
不起作用。
AM 环形天线可能连接不当。 请确认 AM 环形天线连接是否妥当
(☞ 第 16 页)。
03ZH_00_TSX-100_R.book Page 22 Thursday, November 29, 2007 12:07 PM

23 Zh
故障排除
中文
补充信息
■ 更换遥控器电池
当遥控器的操作范围减小时更换电池。
• 装入电池,使其正负极与极性标记一致 (+ 和 -)。
• 如果电池耗尽,请立即将其从遥控器中取出,以防液体泄漏。
• 如果电池开始泄漏,应该立即丢弃。 请小心,不要使泄漏的电池酸液沾染皮肤或衣物。
• 在装入新电池时,请将电池盒擦拭干净。
• 丢弃电池时应该遵守当地的法规。
遥控器
问题 原因 解决方法
遥控器不能正常工作。 遥控器操作时位于其可操作范围
之外。
关于遥控器的操作范围,请参阅
“使用遥控器”(☞ 第 5 页)。
本机的遥控器传感器可能位于直
射阳光或 (反相日光灯等)光线
之下。
改变光线或本机的位置。
电池可能耗尽。 更换一个新电池 (见下文)。
遥控器和本机的传感器之间有障
碍物。
移除障碍物。
使用别针来移除盒盖。 更换一个新的 CR2025 电池。 关闭盒盖。
注
03ZH_00_TSX-100_R.book Page 23 Thursday, November 29, 2007 12:07 PM

关于碟片
24 Zh
本机设计用于音频 CD, CD-R 和 CD-RW。 当然,本机
也可播放 8 cm CD。
y
本机可以播放具有上述标识符的碟片。 碟片标识符印刷在碟
片及其封套上。
不要加载任何别的碟片到本机。 否则会损坏本机。
本机可以播放下列碟片 ( 对于 MP3 和 WMA 文件,括号
中的数值表示兼容的取样率和比特率 ):
- MP3 文件 , 录制在 CD-R/RW
(fs 44.1, 48 kHz/32, 64, 96, 128, 192,
256 或 320 kbps 以及可变比特录制的 MP3 文件
(CBR 和 VBR))
- WMA 文件 , 录制在 CD-R/RW
(fs 44.1 kHz/192 kbps 或更小,以及可变比特
录制的 WMA 文件 (CBR 和 VBR))
- ISO 9660 用于 CD-R/RW
• 不封尾的 CD-R/RW 不能播放。
• 因为碟片的特性或录制条件等原因,有些碟片可能不能
播放。
• 不可使用任何非标准形状的碟片 (比如心形等)。
• 不要使用表面划痕过多的碟片。
• 拷贝保护的 WMA 文件不能在本机播放。
• 取样率 48 kHz 将被降低到 44.1 kHz 以便播放。
• 不要触摸碟片表面。拿取碟片
时,请挟持其边缘 (和中心
孔 )。
• 当不播放时,不要让碟片滞留
在托盘中。
• 不要使用铅笔或其他尖锐物品
在碟片上书写。
• 不要使用粘贴有胶带,封条或其他张贴物的碟片。
• 不要使用防止划伤的保护套。
• 不要使用商用标签打印机可以在表面打印的碟片。
• 不要将碟片置于直射阳光之
下,高温、高湿或多灰尘的
场所。
• 如果碟片脏污,请使用干净的
干布匹从心部向边缘擦拭。 不
要使用录音机清洗剂或油漆稀
释液。
• 为了避免故障,不要使用市售
的镜头清洗器。
• 不要在碟片插槽中一次插入多
张碟片。 这样会损坏本机以及
碟片。
• 当您使用8厘米碟片时,放入碟片时不要使用8 厘米碟片适
配器。
• 不要在碟片插槽中插入任何其他物品。
• 不要插入破裂,变形或有粘结剂的碟片。
关于碟片
碟片信息
注
注
拿取碟片
注意
03ZH_00_TSX-100_R.book Page 24 Thursday, November 29, 2007 12:07 PM

25 Zh
中文
补充信息
■ MP3 (MPEG-1 Audio Layer-3)
MPEG 使用的音频压缩方法的一种。 这是一种不可逆
压缩方法,通过丢弃人耳不易听到的音频部分达到高
的压缩率。 据说数据的压缩率在 1/11 (128 kbps) 时
还可以得到与音乐 CD 相当的音频质量。
■ WMA (Windows Media Audio)
微软公司开发的一种音频压缩方法。 这是一种不可逆
压缩方法,通过丢弃人耳不易听到的音频部分达到高
的压缩率。 据说数据的压缩率在 1/22 (64 kbps) 时
还可以得到与音乐 CD 相当的音频质量。
■ 取样频率
每秒钟的取样数量 (模拟信号的数码化处理)。 原则
上说,取样频率越高,能被播放的频率范围越宽,而
量化比特数越高,能再现的声音电平的质量越高。
■ PCM (Pulse Code Modulation)
一种未经压缩的数字信号格式。 CD 的录制使用
16-bit 及 44.1 kHz。
■ 曲目
CD 碟片可以被区分成许多片断 (曲目)。 每个分区
被称为一个曲目号码。
■ 播放机部分
播放系统
•
CD, CD-R/RW
激光头
•
类型 ............................................GaAlAs
• 波长 ............................................780 nm
• 辐射类型 ..........................................连续
• 输出功率 ................................. 最大 44.6 µW*
* 该输出是从拾光组件的物镜表面大约 200 mm 的距离测量
的值。
■ 放大器部分
• 最小 RMS 输出功率 ...........................10 W + 10 W
• 输入敏感度 / 阻抗
PORTABLE ............................... 300 mV/47 kΩ
• 输出水平/输出阻抗
PHONES ( 最大音量 ) ...................... 470 mV/32 Ω
■ 调谐器部分
FM 部分
•
调谐范围
美国和加拿大型号.................... 87.5 到 107.9 MHz
其它型号.......................... 87.50 到 108.00 MHz
AM 部分
•
调谐范围
美国和加拿大型号...................... 530 到 1710 kHz
其它型号.............................. 522 到 1629 kHz
■ 一般
• 电源
美国和加拿大型号..................... AC 120 V,60 Hz
其它型号.................... AC 100 到 240 V,50/60 Hz
• 功耗 ............................................. 20 W
• 待机功耗 .................................. 1.0 W 或更小
• 尺寸 (宽×高×深)............... 300 × 141.5 × 200 mm
• 重量.......................................... 2.7 公斤
规格时有变更,恕不另行通知。
○ : 表示该有毒有害物质在该部件所有均质材料中的含量均在 SJ/T 11363-2006 标准规定的限量要求以下。
×
: 表示该有毒有害物质至少在该部件的某一均质材料中的含量超出 SJ/T 11363-2006 标准规定的限量要求。
术语
规格
10
该标记附加在出售到中华人民共和国的电子信息产品上。
环形中的数字表示的是环境保护使用期限的年数。
部件名称
有毒有害物质或元素
铅
(Pb)
汞
(Hg)
镉
(Cd)
六价铬
(Cr(VI))
多溴联苯
(PBB)
多溴二苯醚
(PBDE)
电路板
×
○○○○○
外壳箱体
×
○○○○○
前部面板显示器
×
○○○○○
03ZH_00_TSX-100_R.book Page 25 Thursday, November 29, 2007 12:07 PM

i Ko
1 최고의 성능을 위하여 본 설명서를 주의깊게 읽어 보십시
오 . 본 설명서를 안전한 곳에 보관하고 나중에 참고하십시
오.
2 본 기기를 통풍이 잘 되고 , 서늘하고 , 건조하고 , 깨끗한 곳
에 설치하십시오 . 직사 광선 , 열원 , 진동 , 먼지 , 습기가 있
거나 추운 곳에서 멀리 떨어뜨려 설치하십시오 . 캐비닛 안
에서는 통풍을 위해 본 기기 주위로 10 cm 의 여유 공간을
확보하십시오 .
3 윙윙거리는 소리를 방지하려면 다른 전자 제품 , 모터 또는
변압기에서 본 기기를 멀리 떨어뜨려 설치하십시오 .
4 본 기기 내부의 결로 현상을 방지하려면 낮은 온도에서 높은
온도로 온도가 급격하게 변하는 곳에 본 기기를 노출시키거
나 습도가 높은 환경 ( 예 , 가습기가 있는 룸 ) 에 본 기기를
설치하지 마십시오 . 화재가 발생하거나 , 기기가 손상되거
나 , 사용자가 감전되거나 부상당할 수도 있습니다 .
5 이물질이 본 기기에 떨어질 수 있는 곳 , 또는 액체가 떨어지
거나 흐를 수 있는 곳에 본 기기를 설치하지 마십시오 . 본
기기위에 다음과 같은 물체를 올려놓지 마십시오 :
- 다른 기기 . 본 기기의 표면이 손상되거나 변색될 수도
있습니다 .
- 연소되는 물체 ( 예 : 초 ). 화재가 발생하거나 본 기기가
손상되거나 사용자가 부상당할 수도 있습니다 .
- 액체가 담긴 용기 . 용기가 넘어져 사용자가 감전되거나
본 기기가 손상될 수도 있습니다 .
6 열 복사가 방해되지 않도록 신문 , 책상보 및 커튼 등으로 본
기기를 덮지 마십시오 . 본 기기의 내부 온도가 높아지면 화
재가 발생하거나 본 기기가 손상되거나 사용자가 부상당할
수도 있습니다 .
7 모든 연결이 완료될 때까지 본 기기의 플러그를 연결하지 마
십시오 .
8 본 기기를 뒤집어서 조작하지 마십시오 . 본 기기가 과열되
어 손상될 수도 있습니다 .
9 스위치 , 노브 또는 코드에 강한 압력을 가하지 마십시오 .
10 전원 케이블을 콘센트에서 분리하는 경우 , 항상 플러그를
잡고 케이블을 잡아 당기지 마십시오 .
11 화학 솔벤트로 본 기기를 닦지 마십시오 . 표면의 마무리가
훼손될 수도 있습니다 .
12 반드시 본 기기에 지정된 전압만을 사용하십시오 . 지정된
전압 이외의 전압을 사용하는 것은 매우 위험하며 화재가 발
생하거나 본 기기가 손상되거나 사용자가 부상당할 수도 있
습니다 . 지정된 전압 이외의 전압을 사용하여 발생한 손상
에 대해서 Yamaha 는 어떠한 책임도 지지 않습니다 .
13 번개에 의한 손상을 방지하려면 뇌우시 전원 케이블을 콘센
트에서 분리하십시오 .
14 본 기기를 개조하거나 수리하지 마십시오. 서비스가 필요한
때에는 공인 Yamaha 정비사에게 의뢰하십시오 . 어떤 이유
로든지 절대로 캐비닛을 열지 마십시오 .
15 오랜 기간 동안 본 기기를 사용하지 않는 경우 ( 예 , 휴가 ),
전원을 콘센트에서 분리하십시오 .
16 본 기기의 고장을 결정하기 전에 일반 조작 에러의 “문제
해결”장을 반드시 읽어 보십시오 .
17 본 기기를 옮기기 전에 POWER OFF 을 눌러 본 기기를 대
기 모드로 설정하고 전원 플러그를 콘센트에서 분리하십시
오.
18 주변 온도가 급격히 변하는 경우 , 결로 현상이 발생합니다 .
전원 케이블을 콘센트에서 분리한 후 본 기기를 둡니다 .
19 본 기기를 장시간 사용하는 경우 , 기기가 과열될 수도 있습
니다 . 전원을 끄고 식도록 본 기기를 둡니다 .
20 전원을 기기로 부터 완전히 차단하기 위해서는 기기의 플러
그를 콘센트에서분리해야 합니다. 따라서 기기를 설치할 때
벽면 콘센트에 쉽게 접근할 수 있도록하여 주십시오 .
21 건전지를 직사광선 , 불꽃 등과 같이 과도한 화기에 노출시
키지 마십시오 .
22 너무 높은 음압으로 인해 청력에 이상이 생길 수 있습니다 .
레이저 안전
본 기기는 레이저를 사용하고 있습니다 . 시력이 손상될 수
있으므로 공인 서비스 기술자만 커버를 열고 본 기기를 수리
해야 합니다 .
위험
본 기기를 열면 가시 레이저 방사선이 방출됩니다 . 육안으
로 빔을 직접 보지 마십시오 . 본 기기 플러그가 콘센트에 연
결된 경우 , 디스크 트레이의 입구나 다른 개구부 또는 내부
에 눈을 가깝게 대지 마십시오 .
주의 : 본 기기를 조작하기 전에 읽어 주십시오 .
본 기기가 콘센트에 연결되어 있으면 POWER OFF 으로
본 기기의 자체 전원을 끄더라도 전원이 차단되지 않습니
다 . 이를 대기 모드라 합니다 . 이 상태에서 본 기기는 아
주 적은 양의 전원을 소모하도록 설계되어 있습니다 .
주의
배터리를 올바르게 교체하지 않으면 폭발할 위험이 있습
니다 . 같거나 비슷한 종류의 배터리만 교체하십시오 .
경고
화재 또는 감전의 위험을 줄이기 위해 본 기기를 비 또는
습기에 노출시키지 마십시오 .
CLASS 1 LASER PRODUCT
LASER KLASSE 1 PRODUKT
LUOKAN 1 LASERLAITE
KLASS 1 LASER APPARAT
PRODUIT LASER DE CLASSE 1

1 Ko
소개 준비 조작
한국어
추가 정보
특징 .....................................................................2
각 부 명칭 및 기능 .............................................3
전면 / 상단 패널 ............................................. 3
리모콘 ........................................................... 4
사용 전 주의 사항 ...............................................6
전원 켜기 ....................................................... 6
클록 조정 ....................................................... 7
기본 조작 .............................................................8
입력 소스 선택 ............................................... 8
볼륨 레벨 조정 ............................................... 8
사운드 조정 ................................................... 9
디스플레이 실용 조작 .................................. 10
CD, MP3/WMA 파일 및 외부 소스 청취 ...... 11
CD 청취 ....................................................... 11
USB 장치에 저장된 MP3/WMA
파일 청취 ................................................. 12
재생 정보 표시 전환 ..................................... 14
반복 재생 및 랜덤 재생 ................................ 15
외부 소스 재생 ............................................. 15
FM/AM 라디오 방송국 청취 .......................... 16
안테나 연결 ................................................. 16
라디오 방송국 튜닝 ...................................... 16
자동 라디오 방송국 사전 설정
( 자동 프리세트 ) ..................................... 17
수동 라디오 방송국 사전 설정
( 수동 프리세트 ) ..................................... 17
프리세트 라디오 방송국 선택
( 프리세트 튜닝 ) ..................................... 18
타이머 기능 사용 ............................................. 19
문제 해결 ..........................................................21
일반 .............................................................21
디스크 재생 ..................................................21
MP3/WMA 파일 재생 ..................................22
라디오 수신 ..................................................22
리모콘 ..........................................................23
디스크 참고사항 .............................................. 24
디스크 정보 ..................................................24
디스크 취급 ..................................................24
용어 ................................................................... 25
제품 사양 ..........................................................25
목차
소개
준비
조작
추가 정보

특징
2 Ko
•
스타일이 살아있는 컴팩트한 올인원 디자인
• 재생 가능한 오디오 CD, MP3 CD 및 WMA CD
• USB 지원됨
• 정교한 FM/AM 튜너
• 간편하고 기능적인 리모콘
• 타이머 및 클록 기능
“Swing Radiator Bass
™
”는 YAMAHA
CORPORATION 의 상표입니다 .
■ 본 설명서에 대하여
• 본 설명서에서는 리모콘을 사용하여 이 기기 또는 해당 리모콘으로 수행될 수 있는 작동을 설명합니다 .
• 페이지 번호가 있는 “☞ ”기호는 해당 참조 페이지를 나타냅니다 .
• y 는 조작을 위한 팁을 나타냅니다 .
• 참고는 안전 및 조작 설명에 대한 중요한 정보를 포함하고 있습니다 .
•
본 설명서는 제품이 생산되기 전에 인쇄됩니다. 제품이 향상되어 디자인과 제품 사양이 변경될 수 있습니다.
설명서와 제품 간에 차이가 있는 경우에는 제품을 우선시합니다 .
■ 부속품
본 제품에는 다음과 같은 부속품이 있습니다 . 다음 부품이 모두 있는지 확인하십시오 .
y
본 기기를 AC 벽 콘센트에 꽂기 전에 제공된 전원 케이블 중에서 사용자 지역의 AC 벽 콘센트 종류에 알맞은 것을 선택하
십시오 .
동봉품 구성은 모델에 따라 다릅니다 .
특징
참고
ALARM
INPUT
VOLUME
STANDBY/ON
ON/OFF
2134
6578
09
TIMER
TIME/INFO
PRESET
DISPLAY
TONE EQ
SLEEPDIMMER
TIME ADJ
TUNE
RANDOM
REPEAT
/ /
ENTER
CDUSB
TUNER
MUTE
PORTABLE
실내 FM 안테나 AM 루프 안테나
전원 케이블
리모콘

3 Ko
한국어
소개
각 부 명칭 및 기능
전면 / 상단 패널
POWER OFF
SLEEP
ALARM
MUTE
PRESET
VOLVOL
재생을 시작하고 일시 중지합니다 . (
☞
P. 11)
재생을 정지하거나 재생 정지 상태에서
디스크를 배출합니다 . (☞ P. 11)
,
현재 또는 다음 트랙의 시작으로 건너뜁
니다 .
키를 누른 채 뒤로 / 앞으로 검색합니다 .
(☞ P. 11)
POWER OFF
본 기기를 대기 모드로 설정합니다 . (
☞
P. 6)
SLEEP
슬립 타이머를 설정합니다 . (☞ P. 20)
6
7/0
4/1¡/¢
USB 포트 (☞ P. 12)
스피커
디스크 슬롯
(☞ P. 11)
디스플레이
VOL u, d
볼륨 레벨을 조정하십시오 . (☞ P. 8)
MUTE
볼륨을 완전히 줄입니다 . (☞ P. 8)
PRESET u, d
프리세트 스테이션을 선택합니다 . (
☞
P. 17)
ALARM
알람 기능을 설정합니다 . (☞ P. 19)
INPUT/SNOOZE
본 기기를 켜고 입력 소스 (☞ P. 6, 8)
를 선택하거나 알람 작동 시 스누즈 기
능을 활성화합니다 . (☞ P. 19)

4 Ko
각 부 명칭 및 기능
리모콘
ALARM
INPUT
VOLUME
STANDBY/ON
ON/OFF
213
657
09
TIMER
TIME/INFO
PRESET
DISPLAY
TONE EQ
SLEEPDIMMER
TIME ADJ
TUNE
RANDOM REPEAT
//
ENTER
CDUSB
TUNER
MUTE
PORTABLE
4
8
STANDBY/ON
DIMMER
TIME/INFO
RANDOM
INPUT
CDUSB
TUNER
PORTABLE
VOLUME
MUTE
본 기기의 전원을 켭니다 . (☞ P. 6)
디스플레이의 밝기를 변경합니다 . (☞ P. 10)
디스크 /USB 정보를 표시합니다 . (☞ P. 14)
본 기기를 랜덤 재생 모드로 설정합니다 .
(☞ P. 15)
청취하려는 소스를 선택합니다 .
본 기기 후면 패널의 PORTABLE 단자에 연결된 콤포
넌트에서 재생되는 소스를 청취하는 경우
PORTABLE 을 누릅니다 . (☞ P. 15)
연결된 USB 메모리에 저장된 소스를 청취하는 경우
USB 를 누릅니다 . (☞ P. 12)
FM/AM 라디오 방송국을 청취하는 경우 TUNER 를 누
릅니다 . TUNER 를 누를 때마다 소스가 FM 과 AM 간
에 전환됩니다 (☞ P. 16).
디스크 슬롯에 있는 디스크를 청취하는 경우 CD 를 누
릅니다 . (☞ P. 11)
볼륨을 조절합니다 . (☞ P. 8)
적외선 신호 송신부
커서 (S/T/W/X) 및 ENTER
리모콘을 사용하기 전에 절연지를
제거합니다 .
y
리모콘을 사용하기 전에 투명 용지를 제거합니다 .

5 Ko
각 부 명칭 및 기능
한국어
소개
ALARM
ON/OFF
TIMERSLEEP
TIME ADJ
1
65
3
7
09
4
8
2
TONE EQ
DISPLAY
REPEAT
/ /
다양한 타이머와 클록 기능을 설정합니다 .
ALARM ON/OFF: 알람 기능을 작동하거나 취소합니다 . (☞ P. 19)
TIME ADJ: 본 기기의 클록을 조절합니다 . (☞ P. 7)
SLEEP: 슬립 타이머를 설정합니다 . (☞ P. 20)
TIMER: 카운트 타이머를 설정합니다 . (☞ P. 20)
원하는 트랙이나 프리세트 방송국을 직접 선택합니다 .
(☞ P. 11, 13, 17, 18)
사운드를 조절합니다 .
TONE: 저음과 고음 밸런스를 조절합니다 . (☞ P. 9)
EQ: 이퀄라이저 모드를 선택합니다 . (☞ P. 9)
재생을 제어합니다 .
, : 현재 또는 다음 트랙의 시작으로 건너뜁니다 .
키를 누른 채 뒤로 / 앞으로 검색합니다 . (☞ P. 11, 12)
: 재생을 시작하고 일시 중지합니다 . (☞ P. 11, 12)
:
재생을 정지하거나 재생 정지 상태에서 디스크를 배출합니다 . (
☞
P. 11
, 12)
4¢
6
7/0
본 기기를 반복 재생 모드로 설정합니다 . (☞ P. 15)
표시되는 정보를 변경합니다 . (☞ P. 10)
■ 리모콘 사용
30˚ 30˚
6 미터 이내
본 기기의 6 미터 이내에서 리모콘 센서를 향하게 하여 리모콘을
사용하십시오 .
• 본 기기의 센서와 리모콘 사이에 장애물이 없어야 합니다 . 장애물이 있으
면 리모콘으로 본 기기를 조작할 수 없습니다 .
• 리모콘에 액체를 엎지르지 마십시오 .
• 리모콘을 떨어뜨리지 마십시오 .
• 다음과 같은 장소에 리모콘을 두지 마십시오 :
-발열기 근처나 욕실과 같이 뜨겁거나 습기찬 장소
-매우 추운 장소
-먼지가 많은 장소
배터리 교체에 관해서는 ☞ P. 23.
참고

사용 전 주의 사항
6 Ko
y
본 기기를 AC 벽 콘센트에 꽂기 전에 제공된 전원 케이블 중에서 사용자 지역의 AC 벽 콘센트 종류에 알맞은 것을 선택하
십시오 .
사용 전 주의 사항
전원 켜기
STANDBY/ON
본 기기의 전원을 켭니다 .
본 기기를 대기 모드로 설정하려면 다시 누릅니다 .
y
• 대기 모드 동안에는 전원 소비가 감소합니다 .
• 대기 모드에서 날짜와 시간 표시하거나(ECO OFF 모드에서) 날짜와 시간을 표시
하지 않을 지 (ECO ON 모드에서 ) 를 선택할 수 있습니다 .
1 대기 모드에서 상단 패널의 MUTE 를 누르고 있습니다 .
J“ECO ON” 또는 “ECO OFF”가 깜박입니다 .
2 표시등이 깜박이는 동안에 MUTE 를 눌러 “ECO ON” 또는 “ECO OFF”를
선택합니다 .
3 몇 초간 기다립니다 .
J 모드는 ECO ON 또는 ECO OFF 로 설정됩니다 .
• 본 기기가 대기 모드에 있더라도 메모리 백업 회로로 저장된 데이터의 손실을 방
지할 수 있습니다 . 하지만 , 전원 공급이 일주일 이상 차단되었거나 AC 콘센트에
서 전원 케이블의 연결을 해제한 경우에는 저장된 데이터가 손실될 수 있습니다 .
상단 패널의 경우
상단 패널에서도 위와 같이 조작할 수 있습니다 .
INPUT/SNOOZE
POWER OFF
SLEEP
본 기기의 전원을 켭니다 .
본 기기를 대기 모드로
설정합니다 .
( 표시되지 않음 )
ECO ON 모드
11:22PM
12 Oct Fri
ECO OFF 모드
( 날짜 및 시간이 표시됨 )
대기
모드에서의
디스플레이
본 기기의 플러그 삽입 단자와 콘센트에 전원 케이블을
연결합니다 .
1 플러그 삽입 단자로
2 콘센트로
STANDBY/ON

사용 전 주의 사항
7 Ko
한국어
준비
클록 조정
PRESET
TUNE ENTER
TIME ADJ
TIME ADJ
PRESET
TUNE ENTER
PRESET
TUNE ENTER
Year
2007
날짜와 시간을 조절합니다 .
W/X
년 / 일 / 시 / 분을 선택합니다 .
S/T
날짜 또는 시간을 높이거나 낮춥니다 .
Date
12 Oct Fri
Time
1:23AM
예
확인합니다 .
모델에 따라 12 시간 표기 (AM/PM) 로 시간이 표시됩니다 . 예를 들어 ,
“4:00PM”.
참고
디스플레이가 꺼진 동안 설정하기 전에
전원을 끄십시오 .
참고
y
12 시간 표기에서 24 시간 표기로 전환할 수 있습니다 . ( 기본 설정은 12 시간 표기
입니다 .)
1 전원을 켭니다 .
2 상단 패널의 PRESET u 과 SLEEP 을 동시에 누릅니다 .
J 디스플레이에 “SET MENU”가 나타납니다 .
3 리모콘의 W/X 을 반복해서 눌러 TIME 디스플레이를 선택합니다 .
4 리모콘의 S/T 을 눌러 원하는 표기를 선택합니다 .
TIME 12H: 12 시간 표기
TIME 24H: 24 시간 표기
5 리모콘의 ENTER 를 눌러 확인합니다 .

기본 조작
8 Ko
■ 헤드폰 사용
y
헤드폰을 연결해도 스피커에서 알람 사운드는 출력됩니다 .
기본 조작
입력 소스 선택
상단 패널의 경우
INPUT
CDUSB
TUNER
PORTABLE
휴대용 오디오 기기에서 재생되
는 음악을 청취하는 경우
USB 장치에 저장된 MP3/WMA
파일을 청취하는 경우
라디오 방송국 (FM/AM) 을 청
취하는 경우
CD 를 청취하는 경우
PORTABLE
USB
TUNER
CD
INPUT/SNOOZE
반복해서 누릅니다 .
볼륨 레벨 조정
상단 패널의 경우
VOLUME
MUTE
볼륨 레벨을 올리거나 내리는
경우
y
41 이상의 레벨로 볼륨을 설정한 상
태로 전원을 끈 경우 전원을 다시 켰
을 때 볼륨 레벨이 20 으로 자동 설
정됩니다 .
사운드를 소거하는 경우
y
볼륨 레벨을 다시 켜려면 다시 누릅
니다 .
VOLUME
Volume 41 20
MUTE
ALARM
MUTE
PRESET
VOLVOL
볼륨 레벨을
낮춥니다 .
사운드를 소거합니다 .
볼륨 레벨을
올립니다 .
TUNER
PHONES
PORTABLE
FM ANT
75
UNBAL.
PHONES 으로

기본 조작
9 Ko
한국어
조작
사운드 조정
ENTER
TONE EQ
PRESET
TUNE ENTER
EQ
PRESET
TUNE ENTER
TONE
BASS 0
BASS +02
반복해서 누릅니다 .
ROCK
POP
JAZZ
CLASSIC
STRAIGHT
록 뮤직용
팝 뮤직용
재즈용
클래식 음악용
다양한 음악용
“BASS” ( 저주파수 범위 ) 또는 “TREBLE” ( 고주파수 범위 ) 을
선택합니다 .
레벨을 조절합니다 (-10 ~ +10 dB).
■ 저음 / 고음 밸런스 조절
■ 전체 사운드 밸런스 조절
반복해서 누릅니다 .
확인합니다 .


CD, MP3/WMA 파일 및 외부 소스 청취
11 Ko
한국어
조작
■ 재생을 일시 정지하려면
y
일시 정지를 취소하려면 를 다시
누릅니다 .
■ 트랙을 건너뛰려면
■ 정방향/역방향으로 검색하
려면
일시 정지 동안 검색하면 어떤 사운드
도 들리지 않습니다 .
■ 트랙을 지정하려면
y
청취하려는 트랙 번호를 입력합니다 .
■ 재생을 멈추려면
■ 디스크를 배출하려면
CD, MP3/WMA 파일 및 외부 소스 청취
CD 청취
/ /
CD
2134
6578
09
CD
1:23PM
T001 00:01
경과 시간현재 트랙상태 표시등
디스크를 넣습니다 .
y
디스크에 녹음된 MP3/WMA 파일을 재생할 수도 있습니다 . 조작 지침에 관해서
는 “USB 장치에 저장된 MP3/WMA 파일 청취”를 참고하십시오 (☞ P. 12).
1:23PM
T014 60:59
디스크의
전체 시간
전체 트랙 상태 표시등
y
• 재생 정보 디스플레이를 전환할 수 있습니다 (☞ P. 14).
• 디스크에 녹음된 MP3/WMA 파일을 재생할 수도 있습니다 . “USB 장치에
저장된 MP3/WMA 파일 청취”를 참고하십시오 (☞ P. 12).
재생을 정지한 경우
재생을 시작합니다 .
상단 패널의 경우
POWER OFF
SLEEP
재생 / 일시 정지
정방향 건너뛰기 /
정방향 검색 *
* 재생 또는 일시 정지 동안 누르고
있습니다 .
정지 / 배출 *
역방향 건너뛰기 /
역방향 검색 *
참고
/
6
역방향
정방향
역방향
정방향
길게 누릅니다 .
2134
6578
0
9
/
재생이 정지된
상태
재생 또는 일시
정지 동안
를 누릅니다 .
/
/
길게 누릅니다 .

CD, MP3/WMA 파일 및 외부 소스 청취
12 Ko
■ 재생을 멈추려면
■ 재생을 일시 정지하려면
y
일시 정지를 취소하려면 를 다시
누릅니다 .
■ 트랙을 건너뛰려면
■ 정방향/역방향으로 검색하
려면
검색을 시작하면 일시 정지가 취소됩
니다 .
USB 장치에 저장된 MP3/WMA 파일 청취
PRESET
TUNE
/
ENTER
USB
2134
6578
09
USB
USB 장치를 연결합니다 .
본 기기는 FAT16 또는 FAT32 형식을 사용하여 USB 대용량 스토리지 등
급 장치 ( 예 : 플래시 메모리 또는 휴대용 오디오 플레이어 ) 를 지원합니다 .
• 일부 기기에서 요구 사항을 충족하여도 올바르게 작동하지 않을 수 있습니다 .
• USB 대용량 스토리지 등급 장치 (USB 충전기 또는 USB 허브와 같은 ), PC, 카
드 리더 , 외장 HDD 이외의 장치를 연결하지 마십시오 .
• Yamaha 는 해당 장치를 본 기기에 연결하는 중 발생하는 USB 장치의 데이터
손실 또는 어떤 손상에도 책임을 지지 않습니다 .
• 모든 종류의 USB 장치에 대한 전원 공급 및 재생력이 보장되지 않습니다 .
참고
1:23PM
Road to Ind
곡 제목 / 음악가명 / 앨범명
재생을 시작합니다 .
y
재생 정보 디스플레이를 전환할 수 있습니다 (☞ P. 14).
파일 / 폴더 개수에 따라 판독 시간이 30 초를 초과할 수 있습니다 .
참고
상단 패널의 경우
POWER OFF
SLEEP
재생 / 일시 정지
정방향 건너뛰기 /
정방향 검색 *
정지
역방향 건너뛰기 /
역방향 검색 *
* 길게 누릅니다
/
/
6
참고
역방향
정방향
역방향
정방향
길게 누릅니다 .

CD, MP3/WMA 파일 및 외부 소스 청취
13 Ko
한국어
조작
■ 재생 트랙을 지정하려면
y
청취하려는 트랙 번호를 입력합니다 .
• 소프트웨어 기록 설정과 같은 기록의 조건에 따라 , 본 기
기에서 녹음 순서대로 디스크 또는 USB 장치를 재생할
수 없는 경우도 있습니다 .
• MP3 또는 WMA 디스크 /USB 장치의 경우 , 각 파일에 배
정된 숫자는 개별 폴더에서가 아니라 디스크 /USB 장치
에서의 파일 시퀀스와 일치합니다 .
■ MP3 또는 WMA 형식 파일에서 폴더 / 파일
을 선택하려면
• 본 기기는 최대 파일 255개와 폴더 255개까지 표시할 수
있습니다 하지만 일부 파일 / 폴더가 본 기기에서 재생할
수 없을 경우 255 개 미만의 파일 / 폴더를 표시할 수 있습
니다 .
• USB 장치를 분할한 경우 , 첫 번째 파티션만이 표시됩니
다.
• USB 장치 규격에 따라 일부 파일이 올바르게 작동하지
않을 수 있습니다 .
• 저작권 보호 파일을 재생할 수 없습니다 .
• 본 기기는 4 GB 또는 그 미만의 크기인 파일을 재생할 수
있습니다 .
참고
2134
6578
0
9
PRESET
TUNE ENTER
PRESET
TUNE ENTER
PRESET
TUNE ENTER
PRESET
TUNE ENTER
폴더를 선택합니다 .
MP3/WMA 디스크를 재생하는 경우에만
파일을 선택합니다 .
재생을 시작합니다 .
MP3 또는 WMA 파일 정보
CD-R, CD-RW 또는 USB 장치에 기록된 MP3 또는
WMA 파일을 재생할 수 있습니다 . 본 기기는 아래에 표
시된 대로 파일을 트랙으로 , 디스크 /USB 장치를 앨범으
로 폴더를 간주합니다 . 폴더 계층 구성을 무시합니다 .
참고
루트
폴더(앨범)
파일(트랙)

CD, MP3/WMA 파일 및 외부 소스 청취
14 Ko
버튼을 누를 때마다 , 정보 디스플레이가 변경됩니다 .
일부 특수 문자가 올바르게 표시되지 않을 수 있습니다 .
■ 오디오 CD
현재 트랙의 경과 시간 ( 기본 )
현재 트랙에서 남은 시간
디스크의 전체 시간
디스크에서 남은 시간
기본 디스플레이로 복귀
■ MP3/WMA 파일
스크롤링 표시
*
( 기본 )
현재 파일의 경과 시간
현재 파일에서 남아 있는 시간
파일명
곡 제목
음악가명
앨범명
년
코멘트
기본 디스플레이로 복귀
*
스크롤링 표시에는 선택한 항목의 노래 제목 , 아티스트
이름 및 시퀀스에서 앨범 이름이 차례로 표시됩니다 .
재생 정보 표시 전환
참고
TIME/INFO
DIMMER
TIME/INFO
반복해서 누릅니다 .
1:23PM
T014 02:21
T014-03:41
TTL 54:41
TTL -12:28
1:23PM
to order-Fr
T014 02:21
T014-03:41
Road-to-ind
Road to Ind
Frankie Zip
Made to ord
2007
Live at KCE

CD, MP3/WMA 파일 및 외부 소스 청취
15 Ko
한국어
조작
재생을 정지하거나 디스크 /USB 장치를 분리하면 반복 재
생과 랜덤 재생 모드가 취소됩니다 .
연결하기 전에 본 기기 및 휴대용 오디오 장치의 볼륨을 내
렸는지 확인하십시오 .
y
휴대용 오디오 장치 조작에 관해서는 해당 장치의 사용 설
명서를 참고하십시오 .
반복 재생 및 랜덤 재생
참고
RANDOM REPEAT
■ 랜덤 재생
■ 반복 재생
RANDOM
Rd
반복해서 누릅니다 .
일반 재생
( 랜덤 재생 )
REPEAT
반복해서 누릅니다 .
R1
Rf
Ra
( 전체 반복 )
일반 재생
( 단일 반복 )
( 폴더 반복 , MP3/WMA 디스크 /USB 에만 해당 )
외부 소스 재생
참고
TUNER
PHONES
PORTABLE
FM ANT
GND
AM ANT
75
UNBAL.
PORTABLE
휴대할 수 있는
오디오 장치
PORTABLE
PORTABLE
3.5 mm 미니 플러그
연결된 휴대할 수 있는
오디오 장치에 재생을
시작합니다 .
휴대할 수 있는 오디오 기기를 연결합니다 .

FM/AM 라디오 방송국 청취
16 Ko
y
• AM 라디오 방송국을 청취하는 동안 안테나 헤드를 회전
시켜 최적의 수신 각을 찾습니다 .
• TUNE W/X 을 반복해서 눌러 라디오 방송국을 수동으로
튜닝할 수도 있습니다 .
• 전파가 약한 경우 FM 사운드 품질을 높이려면 , 리모콘의
RANDOM 을 눌러 본 기기의 FM 전파 수신 모드를 모노
모드로 변경합니다 .
■ 주파수 단위를 전환하려면
방송국간 주파수 스페이싱이 영역마다 다르기 때문에 주파
수 단위 모드를 전환해야 할 수도 있습니다 . 기본 단계 설
정은 AM 9 kHz/FM 50 kHz 입니다 .
주파수 단위 전환
1 전원을 켭니다 .
2
상단 패널의 PRESET
u
과 SLEEP 을 동시에 누릅니다 .
J 디스플레이에 “SET MENU”가 나타납니다 .
3 리모콘의 W/X 을 반복해서 눌러 TUNER 디스플레이
를 선택합니다 .
4
리모콘의
S
/
T
을 눌러 원하는 주파수 단위를 선택합니다 .
TUNER 10/100: AM 10 kHz/FM 100 kHz 단위
TUNER 9/50: AM 9 kHz/FM 50 kHz 단위
5 리모콘의 ENTER 를 눌러 확인합니다 .
y
북미 및 중남미의 주파수 단위는 AM 10 kHz/FM 100 kHz
입니다 .
FM/AM 라디오 방송국 청취
안테나 연결
TUNER
FM ANT
GND
AM ANT
75
UNBAL.
1
2
3
실내 FM 안
테나
( 동봉품 )
AM 루프 안테나 ( 동봉품 )
접지 (GND 터미널 )
y
AM 루프 안테나의 도선에는 극성이 없으며 도선의 어느
쪽이나 AM 또는 GND 터미널에 연결할 수 있습니다 .
접지에 대하여
최대한 안전을 보장하고 간섭을 최소화할 수 있도록 안
테나 GND 단자를 적절한 접지부에 연결합니다 . 좋은
접지는 젖은 땅에 박은 쇠막대입니다 .
12 3
AM 루프 안테나 케이블
라디오 방송국 튜닝
TUNE
RANDOM
TUNER
TUNER
PRESET
TUNE ENTER
길게 누릅니다 .
FM 또는 AM 을 선
택합니다 .
FM
87.50MHz
FM
89.70MHz

FM/AM 라디오 방송국 청취
17 Ko
한국어
조작
프리세트 설정 디스플레이로 전환한 후 ( 디스플레이
의 부분이 깜박이는 동안 ) 디스플레이가 계속 깜박
이는 동안에 이 조작을 수행합니다 .
y
•
를 눌러서도 프리세트 방송국을 삭제할 수 있습니다.
• 를 3 초 이상 눌러 프리세트 방송국을 모두 삭제할
수 있습니다 .
프리세트 설정 디스플레이로 전환한 후 ( 디스플레이
의 부분이 깜박이는 동안 ) 디스플레이가 계속 깜박
이는 동안에 이 조작을 수행합니다 .
y
• 최대 30 개 FM 방송국과 20 개 AM 방송국까지 사전 설
정할 수 있습니다 .
•
를 눌러서도 프리세트 방송국을 삭제할 수 있습니다 .
• 를 3 초 이상 눌러 프리세트 방송국을 모두 삭제할
수 있습니다 .
자동 라디오 방송국 사전 설정
( 자동 프리세트 )
TUNER
/
PRESET
TUNE ENTER
/
ENTER
TUNER
FM
87.50MHz
길게 누릅니다 .
FM 또는 AM 을 선
택합니다 .
길게 누릅니다 .
FM
01 87.50MHz
FM
COMPLETE
프리세트 모드
로 들어갑니다 .
완료된 경우
7/0
7/0
수동 라디오 방송국 사전 설정
( 수동 프리세트 )
PRESET
TUNE ENTER
PRESET
ENTER
FM
89.70MHz
PRESET
TUNE ENTER
즐겨찾는 라디오 방송국으
로 튜닝합니다 (
☞
P. 16).
프리세트 모드
로 들어갑니다 .
FM
01 89.70MHz
FM
04 89.70MHz
원하는 프리세
트 번호를 선택
합니다 .
PRESET
TUNE ENTER
확인합니다 .
길게 누릅니다 .
y
또한 숫자 버튼을
사용하여 프리세트 번호
를 선택할 수 있습니다 .
7/0
7/0

FM/AM 라디오 방송국 청취
18 Ko
프리세트 라디오 방송국 선택
( 프리세트 튜닝 )
상단 패널의 경우
PRESET
TUNER
PRESET
TUNE ENTER
FM
30 108.00MHz
TUNER
FM
87.50MHz01
FM 또는 AM 을 선
택합니다 .
프리세트
라디오 방송국을
선택합니다 .
y
또한 숫자 버튼을 사
용하여 방송국을 선택
할 수 있습니다 .
ALARM
MUTE
PRESET
VOLVOL

19 Ko
한국어
조작
이 기능을 사용하여 좋아하는 CD 나 라디오 프로그램을 불러옵니다 . 또한 이 기능을 사용하여 일정 시간이
지난 후 본 기기를 자동으로 대기 모드로 설정합니다 .
타이머 기능 사용
ALARM
PRESET
TUNE ENTER
ON/OFF
2134
6578
09
ALARM
ON/OFF
PRESET
TUNE ENTER
1
2
ALM1 ON
M-F 8:00AM
ALARM
ON/OFF
1
2
SOUND1VOL 12
■ 모닝콜 설정
PRESET
TUNE ENTER
알람 설정을 조절합니다 .
W/X
알람 변수 간을 이동합니다 .
S/T
알람 변수를 변경합니다 .
y
숫자 버튼으로도 시간을 입력할 수 있습니다 .
y
알람 설정이 완료되면 ALARM ON/OFF 를 사용하여 알람을 켜고 끌 수 있습니다 .
INPUT/SNOOZE
■ 스누즈 기능 사용
5 분 후 재생을 다시 시작합니다 .
■ 알람을 정지하려면
상단 패널의 경우
또는
ALARM
MUTE
PRESET
VOLVOL
상단 패널의 경우
ALM1 OFF
M-F 8:00AM
2 ON/OFF 를 선택합니다 .
1 알람 1/2 를 선택합니다 .
작동하는 알람을 표시합니다 .
4 알람 시간을 설정합니다 .
3 반복을 선택합니다 .
M-F: 월요일 ~ 금요일
Daily: 매일
Once: 한 번만
5 CD, FM, AM, USB, SOUND1 ( 진동 )
및 SOUND2 ( 진동 ) 에서 알람 사운
드를 선택합니다 .
6 볼륨을 조절합니다 .
디스플레이가 꺼진 동안 설정하기 전에 전원을
끄십시오 .
참고

20 Ko
타이머 기능 사용
ENTER
TIMERSLEEP
SLEEP
SLEEP OFF
SLEEP 30
SLEEP 60
SLEEP 90
SLEEP 120
TIMER
01 min
표준 디스플레이
( 슬립 꺼짐 )
■ 슬립 타이머 설정
반복해서 누릅니다 .
PRESET
TUNE ENTER
TIMER
카운트 타이머 설정을 조절합니다 .
■ 카운트 타이머 설정
카운트 타이머를 쉽게 사용합니다 . 간단한 타이머로 요리나 수많은 다른 용도로 사용
자에게 시간을 알려줍니다 .
TIMER
■ 알람을 정지하려면
또는
INPUT/SNOOZE
상단 패널의 경우
SLEEP 60
카운트 시간을 설정합니다
(1 ~ 60 분 ).
PRESET
TUNE ENTER
01:23PM
02min 59sec
카운트를 시작합니다 .
y
카운트 타이머를 취소하려면 TIMER 를 두 번 눌러 “OFF”를 선택
합니다 .
TIMER
OFF
확인합니다 .
카운트가 종료되면 삐음이 짧게 울립니다 .
y
• 삐음은 매 10 초마다 커집니다 .
• 삐음의 볼륨은 본 기기의 볼륨에 따릅니다 (
☞
P. 8)
디스플레이가 꺼진 동안 설정하기
전에 전원을 끄십시오 .
참고

21 Ko
한국어
추가 정보
본 기기에 문제가 있는 경우에는 다음 목록을 먼저 확인하십시오 . 제안된 해결책에서 문제를 해결할 수 없거
나 문제가 아래에 나열되어 있지 않 경우 , 본 기기를 끄고 플러그를 분리한 후 가까운 공인 Yamaha 대리점
또는 서비스 센터에 문의하십시오 .
문제 해결
일반
문제 원인 해결책
전원이 켜진 후 곧 꺼집니다 . 전원 케이블이 제대로 연결되어 있
지 않을 수도 있습니다 .
전원 케이블이 콘센트에 완전히 연결
되어 있는지 반드시 확인하십시오
(☞ P. 6).
본 기기는 번개 또는 과도한 정전기
등의 강한 전기 충격을 받을 수 있습
니다 .
본 기기를 대기 모드로 설정하고 전원
케이블의 연결을 해제하십시오 . 약
30 초 경과 후 전원 케이블을 다시 연
결하고 기기를 켜십시오 .
스피커에서 사운드가 출력되지
않습니다 .
볼륨이 최소 레벨로 설정될 수도 있
습니다 .
볼륨 레벨을 조정하십시오 (
☞
P. 8).
음소거 기능이 작동 중일 수 있습니다 .
음소거 기능을 해제하십시오 (
☞
P. 8).
입력 소스가 올바르지 않을 수도 있
습니다 .
올바른 입력 소스를 선택하십시오
(☞ P. 8).
본 기기에 로드된 디스크와 호환되
지 않을 수 있습니다 .
본 기기가 지원하는 디스크를 사용하
십시오 (☞ P. 24).
사운드가 갑자기 꺼집니다 . 슬립 타이머 (☞ P. 20) 가 설정되
어 있을 수 있습니다 .
본 기기를 켜고 소스를 다시 재생하십
시오 .
본 기기가 올바르게 작동하지 않
습니다 .
기기가 번개 또는 과도한 정전기등
의 강한 전기 충격을 받았거나 전력
이 떨어졌을 수 있습니다 .
본 기기를 대기 모드로 설정하고 전원
케이블의 연결을 해제하십시오 . 약
30 초 경과 후 전원 케이블을 연결하
고 기기를 켜십시오 .
디지털 기기 또는 고주파 기기는
노이즈를 유발합니다 .
본 기기가 디지털 기기 또는 고주파 기
기 가까이에 배치되었을 수 있습니다 .
본 기기를 해당 기기와 멀리 배치하십
시오 .
클록 설정이 삭제되었습니다 . 전원 공급이 일주일 이상 중단되었
을 수 있습니다 .
전원 케이블의 플러그를 콘센트에 단
단히 꽂고 클록을 다시 설정하십시오
(☞ P. 7).
디스크 재생
문제 원인 해결책
일부 버튼이 작동하지 않습니다 .
본 기기에 로드된 디스크와 호환되
지 않을 수 있습니다 .
본 기기가 지원하는 디스크를 사용하
십시오 (☞ P. 24).
를 누른 즉시 재생을 시작하
지 않습니다 .
디스크가 더러울 수도 있습니다 . 디스크를 깨끗하게 닦으십시오 .
본 기기에 로드된 디스크와 호환되
지 않을 수 있습니다 .
본 기기가 지원하는 디스크를 사용하
십시오 (☞ P. 24).
본 기기가 추운 장소에서 따뜻한 장소로
이동되었을 때 디스크 판독 렌즈에 물방
울이 형성되었을 수 있습니다 .
한 두 시간 경과 후 다시 시도하십시오 .
디스크를 디스크 슬롯에 넣더라
도 디스플레이에“No Disc”가
표시되거나 “Disc Error”가
표시됩니다 .
본 기기에 로드된 디스크와 호환되
지 않을 수 있습니다 .
디스크를 꺼낸 후 본 기기가 디스크를
지원하는지 여부를 확인하십시오
(☞ P. 24).
디스크가 더럽거나 이물질이 묻어
있습니다 .
디스크를 꺼낸 후 디스크를 깨끗이 닦
거나 이물질을 제거하십시오 .
디스크를 거꾸로 넣습니다 . 디스크를 꺼낸 후 라벨이 붙은 면이 위
로 향하도록 디스크를 넣으십시오 .
6

22 Ko
문제 해결
■ FM/AM
■ FM 부분
■ AM 부분
MP3/WMA 파일 재생
문제 원인 해결책
USB 장치의 MP3/WMA 파일이
재생되지 않습니다 .
USB 장치가 인식되지 않았습니다 .
본 기기를 대기 모드로 설정하고 다시
켭니다 (☞ P. 6).
본 기기가 대기 모드에 있는 동안
USB 장치의 연결을 해제합니다 . 그
런 다음에 장치를 다시 연결하고 본 기
기를 켭니다 (☞ P. 6).
장치에 AC 어댑터가 제공될 경우 어
댑터를 연결합니다 .
상기 해결책으로 문제가 해결되지
않는 경우 본 기기에서 재생할 수 없
는 USB 장치입니다 .
다른 USB 장치를 사용하십시오 .
라디오 수신
문제 원인 해결책
프리세트 선택 기능 (☞ P. 16)
이 작동하지 않습니다 .
프리세트 ( 메모리 ) 가 삭제되었을
수도 있습니다 .
라디오 방송국을 다시 사전 설정하십
시오 (☞ P. 17).
프리세트 방송국 설정이 삭제되
었습니다 .
전원 공급이 일주일 이상 중단되었
을 수 있습니다 .
전원 케이블의 플러그를 콘센트에 단
단히 꽂고 방송국을 다시 사전 설정합
니다 (☞ P. 6).
문제 원인 해결책
스테레오 방송에 노이즈가 너무
많습니다 .
FM 안테나가 제대로 연결되어 있지
않을 수도 있습니다 .
FM 안테나가 제대로 연결되어 있는지
반드시 확인하십시오 (☞ P. 16).
선택한 라디오 방송국이 멀리 있거
나 전파 수신이 약한 지역입니다 .
신호 품질을 향상시키기 위해 수동 조
정을 시도 (☞ P. 17) 하거나 다중 채
널 옥외 안테나를 사용하십시오 .
실외 안테나를 사용하더도 라디
오 주파수 수신이 약합니다 .
( 오디오가 찌그러짐 .)
다중경로 반사 또는 다른 무선 간섭
이 발생하였을 수 있습니다 .
안테나의 높이 , 방향 또는 배치를 변
경하십시오 .
문제 원인 해결책
방송 중 노이즈가 너무 많습니다 .
노이즈는 주변 전기 , 번개 , 형광등 ,
모터 또는 서모스탯 전기 장치로 발
생될 수 있습니다 .
잡음을 줄이기 위해 실외 안테나를 연
결하고 더 좋은 곳에 접지하십시오 .
그러나 , 이들 종류의 잡음은 쉽게 제
거되지 않습니다 .
본 기기가 TV 가까이에 배치될 경
우 , 밤에 특히 노이즈를 생성할 수
있습니다 .
본 기기를 TV 에서 멀리 배치하십시
오.
자동 튜닝 기능 (☞ P. 18) 이 작
동하지 않습니다 .
AM 루프 안테나가 제대로 연결되
어 있지 않을 수도 있습니다 .
AM 루프 안테나가 제대로 연결되어
있는지 반드시 확인하십시오
(☞ P. 16).

23 Ko
문제 해결
한국어
추가 정보
■ 리모콘 배터리 교체
리모콘의 작동 범위가 감소하면 배터리를 교체합니다 .
• 극성 표시 (+ 및 -) 에 따라 배터리를 삽입합니다 .
• 건전지가 소모된 경우 , 폭발 또는 건전지액 누출을 방지하려면 즉시 리모콘에서 건전지를 제거하십시오 .
• 건전지액이 누출되면 즉시 건전지를 폐기하십시오 . 누출 배터리산에 피부 또는 의복이 닿지 않도록 주의하십시오 .
• 새 건전지를 장착하기 전에 건전지 함을 깨끗이 닦으십시오 .
• 지역 규정에 따라 배터리를 폐기하십시오 .
리모콘
문제 원인 해결책
리모콘이 올바르게 작동하지 않
습니다 .
리모콘이 작동 범위 밖에서 리모콘
을 작동했을 수 있습니다 .
리모콘 조작 범위에 대한 내용은 “리
모콘 사용”을 참고하십시오
(☞ P. 5).
본 기기의 리모콘 센서가 직사광선
또는 조명 ( 인버터 형광등 ) 에 노
출되어 있을 수도 있습니다 .
본 기기의 조명 또는 방향을 변경하십
시오 .
건전지 수명이 다했을 수도 있습니
다.
새 건전지로 교체하십시오 ( 아래 참
조).
본 기기의 센서와 리모콘 사이에 장
애물이 있습니다 .
장애물을 치우십시오 .
직선 핀으로 커버를 제거합니다 . CR2025 새 배터리로 교체합니다. 커버를 닫습니다 .
참고

디스크 참고사항
24 Ko
본 기기는 오디오 CD, CD-R 및 CD-RW 와 호환용
으로 설계되었습니다 . 또한 본 기기는 8 cm 콤팩트
디스크를 재생할 수 있습니다 .
y
상기의 로고가 표시된 디스크는 본 기기에서 재생할 수 있
습니다 . 디스크 로고 표시는 디스크 및 디스크 자켓에 인쇄
되어 있습니다 .
본 기기에 다른 형식의 디스크를 넣지 마십시오 . 기기가 손
상될 수 있습니다 .
본 기기는 다음 데이터 디스크를 재생할 수 있습니다
(MP3 및 WMA 파일인 경우 , 인용 어구는 호환가능
한 샘플링 레이트와 비트 레이트를 나타냅니다 ):
- CD-R/RW (fs 44.1, 48 kHz/32, 64, 96,
128, 192, 256 또는 320 kbps 및 가변 비트
부호화된 MP3 파일 (CBR 및 VBR)) 에 녹음
된 MP3 파일
- CD-R/RW (fs 44.1 kHz/192 kbps 미만 및
가변 비트 부호화된 WMA 파일 (CBR 및
VBR)) 에 녹음된 WMA 파일
- CD-R/RW 의 ISO 9660
• 최종화되지 않은 CD-R/RW 는 재생될 수 없습니다 .
• 디스크 특성 또는 기록 조건에 따라 일부 디스크에서는
재생될 수 없습니다 .
• 하트 모양 디스크와 같이 어떤 비표준 모양 디스크도 사
용하지 마십시오 .
• 표면이 많이 손상된 디스크는 사용하지 마십시오 .
•
저작권 보호 WMA 파일은 이 장치에 재생될 수 없습니다.
• 샘플링 레이트 48 kHz 는 재생 시 44.1 kHz 까지 다운샘
플됩니다 .
• 디스크의 표면을 만지지 마십
시오 . 디스크의 가장자리 ( 및
중앙 구멍 ) 를 잡으십시오 .
• 재생하지 않을 때 디스크 트레
이에 디스크를 놓아 두지 마십
시오 .
• 연필이나 뾰쪽한 마커를 사용하여 디스크에 쓰지 마십시
오.
• 테이프, 봉인, 풀 또는 다른 부착물을 디스크에 붙이지 마
십시오 .
• 긁힘을 방지하기 위한 보호 커버를 사용하지 마십시오 .
• 시중에서 판매하는 라벨 프린터를 사용하여 디스크 표면
이 인쇄된 디스크를 사용하지 마십시오 .
• 직사광선 , 고온 , 습도가 높은
곳 또는 먼지가 많은 곳에 디
스크를 두지 마십오 .
• 디스크가 더러운 경우 , 깨끗하
고 마른 천으로 센터에서 가장
자리로 디스크를 닦으십시오 .
레코드 클리너 또는 페인트 신
나를 사용하지 마십시오 .
• 오작동을 방지하려면 시중에
서 판매하는 렌즈 클리너를 사
용하지 마십시오 .
• 디스크 슬롯에 한 번에 하나 이상의 디스크를 삽입하지
마십시오 . 본 기기 및 디스크 모두에 손상을 야기할 수
있습니다 .
• 8 cm 디스크를 들을 경우 8 cm 어댑터 없이 디스크를 넣
으십시오 .
• 디스크 슬롯에 이물질을 삽입하지 마십시오 .
• 갈라졌거나 휘었거나 접착제로 붙인 디스크를 삽입하지
마십시오 .
디스크 참고사항
디스크 정보
참고
참고
디스크 취급
주의

25 Ko
한국어
추가 정보
■ MP3 (MPEG-1 오디오 레이어 -3)
MPEG 에서 사용되는 오디오 압축 방식 중 하나 .
사람이 거의 들을 수 없는 데이터 파트는 제외시켜서
압축률을 높이는 압축을 해제할 수 없는 압축 방식을
사용합니다 . 즉 , 음악 CD 와 음질은 거의 비슷하게
유지하면서도 데이터 용량은 1/11(128 kbps) 정도
로 압축합니다 .
■ WMA (Windows Media Audio)
Microsoft Corporation 에서 개발한 오디오 압축 방
식 . 사람이 거의 들을 수 없는 데이터 파트는 제외시
켜서 압축률을 높이는 압축을 해제할 수 없는 압축
방식을 사용합니다 . 즉 , 음악 CD 와 음질은 거의 비
슷하게 유지하면서도 데이터 용량은 1/22(64 kbps)
정도로 압축합니다 .
■ 샘플링 주파수
초당 샘플링 ( 아날로그 신호를 디지털화하기 위한
과정 ) 의 수입니다 . 원칙적으로 샘플링 레이트가 높
아질수록 재생될 수 있는 주파수 범위는 넓어지며 양
자화된 비트 레이트가 높아질수록 사운드 레벨은 더
미세하게 재생될 수 있습니다 .
■ PCM (Pulse Code Modulation)
압축하지 않고 디지털 포맷으로 변경되는 신호입니
다 . CD 에는 44.1 kHz 에서 16 비트 사운드로 기록
됩니다 .
■ 트랙
CD 는 많은 수의 세그먼트 ( 트랙 ) 로 세분할 수 있
습니다 . 각 구역을 트랙 번호라고 합니다 .
■ 플레이어 부분
재생 시스템
•
CD, CD-R/RW
레이저 픽업
•
형식 .........................................................................GaAlAs
• 파장 .........................................................................780 nm
• 방출 지속 시간 .............................................................. 연속
• 출력 .............................................................. 최대 44.6 µW*
* 이 출력은 광 픽업 블록의 대안 렌즈 표면으로부터 약
200 mm 거리에서 측정한 값입니다 .
■ 앰프 부분
• 채널당 최소 RMS 출력 .................................. 10 W + 10 W
• 입력 감도 / 임피던스
PORTABLE..............................................300 mV/47 kΩ
• 출력 레벨 / 임피던스
PHONES ( 최대 볼륨 ) ...............................470 mV/32 Ω
■ 튜너 부분
FM 부분
•
튜닝 범위
미국 및 캐나다 모델 ............................ 87.5 ~ 107.9 MHz
기타 모델 ........................................ 87.50 ~ 108.00 MHz
AM 부분
•
튜닝 범위
미국 및 캐나다 모델 ..................................530~1710 kHz
기타 모델 .................................................. 522~1629 kHz
■ 일반
• 전원
미국 및 캐나다 모델 ...............................AC 120 V, 60 Hz
기타 모델 ..............................AC 100 ~ 240 V, 50/60 Hz
• 소비 전력..................................................................... 20 W
• 대기 모드 소비 전력............................................ 1.0 W 미만
• 크기 (W x H x D)..........................300 x 141.5 x 200 mm
• 무게............................................................................2.7 kg
제품 사양 및 특징은 사전 예고 없이 변경될 수 있습니다 .
용어
제품 사양
기기 청소
본 기기를 닦을 때 깨끗하고 마른 천을 사용하십시오 . 심
하게 더러운 경우 , 물에 적시고 짠 부드러운 천으로 본
기기를 닦으십시오 .

©
2007 All rights reserved.
YAMAHA ELECTRONICS CORPORATION, USA
6660 ORANGETHORPE AVE., BUENA PARK, CALIF. 90620, U.S.A.
YAMAHA CANADA MUSIC LTD.
135 MILNER AVE., SCARBOROUGH, ONTARIO M1S 3R1, CANADA
YAMAHA ELECTRONIK EUROPA G.m.b.H.
SIEMENSSTR. 22-34, 25462 RELLINGEN BEI HAMBURG, GERMANY
YAMAHA ELECTRONIQUE FRANCE S.A.
RUE AMBROISE CROIZAT BP70 CROISSY-BEAUBOURG 77312 MARNE-LA-VALLEE CEDEX02, FRANCE
YAMAHA ELECTRONICS (UK) LTD.
YAMAHA HOUSE, 200 RICKMANSWORTH ROAD WATFORD, HERTS WD18 7GQ, ENGLAND
YAMAHA SCANDINAVIA A.B.
J A WETTERGRENS GATA 1, BOX 30053, 400 43 VÄSTRA FRÖLUNDA, SWEDEN
YAMAHA MUSIC AUSTRALIA PTY. LTD.
LEVEL 1, 99 QUEENSBRIDGE STREET, SOUTHBANK, VIC 3006, AUSTRALIA
야마하 뮤직 코리아 ( 주 )
서울특별시 강남구 삼성동 158-9 동성빌딩 8F/9F
Printed in China
CQX1A1290X
TSX-100
TSX-100
DESKTOP AUDIO SYSTEM
OWNER’S MANUAL
MANUAL DE INSTRUCCIONES
사용 설명서
R
TSX-100_R-cv.fm Page 1 Tuesday, January 8, 2008 10:10 AM
-
 1
1
-
 2
2
-
 3
3
-
 4
4
-
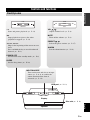 5
5
-
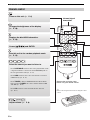 6
6
-
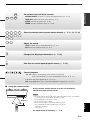 7
7
-
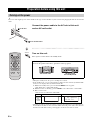 8
8
-
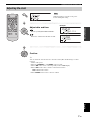 9
9
-
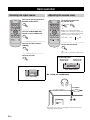 10
10
-
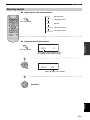 11
11
-
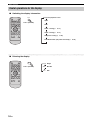 12
12
-
 13
13
-
 14
14
-
 15
15
-
 16
16
-
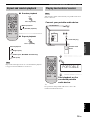 17
17
-
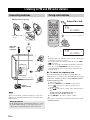 18
18
-
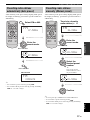 19
19
-
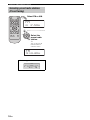 20
20
-
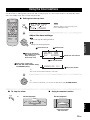 21
21
-
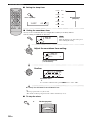 22
22
-
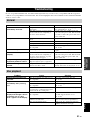 23
23
-
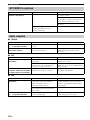 24
24
-
 25
25
-
 26
26
-
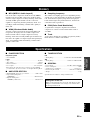 27
27
-
 28
28
-
 29
29
-
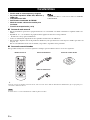 30
30
-
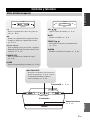 31
31
-
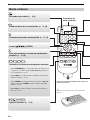 32
32
-
 33
33
-
 34
34
-
 35
35
-
 36
36
-
 37
37
-
 38
38
-
 39
39
-
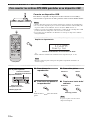 40
40
-
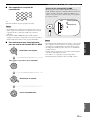 41
41
-
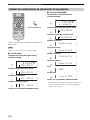 42
42
-
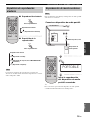 43
43
-
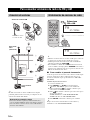 44
44
-
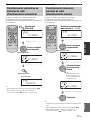 45
45
-
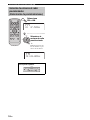 46
46
-
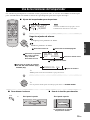 47
47
-
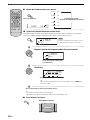 48
48
-
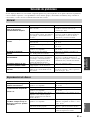 49
49
-
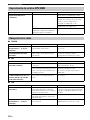 50
50
-
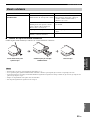 51
51
-
 52
52
-
 53
53
-
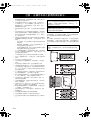 54
54
-
 55
55
-
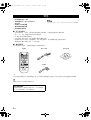 56
56
-
 57
57
-
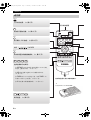 58
58
-
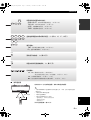 59
59
-
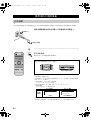 60
60
-
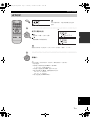 61
61
-
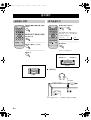 62
62
-
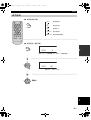 63
63
-
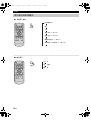 64
64
-
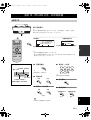 65
65
-
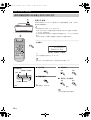 66
66
-
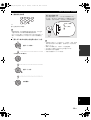 67
67
-
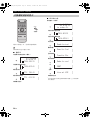 68
68
-
 69
69
-
 70
70
-
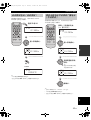 71
71
-
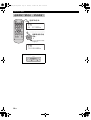 72
72
-
 73
73
-
 74
74
-
 75
75
-
 76
76
-
 77
77
-
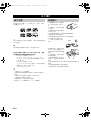 78
78
-
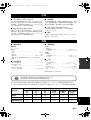 79
79
-
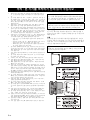 80
80
-
 81
81
-
 82
82
-
 83
83
-
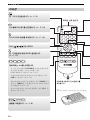 84
84
-
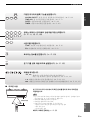 85
85
-
 86
86
-
 87
87
-
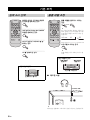 88
88
-
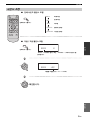 89
89
-
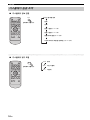 90
90
-
 91
91
-
 92
92
-
 93
93
-
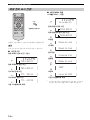 94
94
-
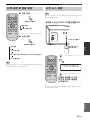 95
95
-
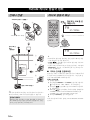 96
96
-
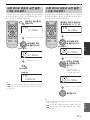 97
97
-
 98
98
-
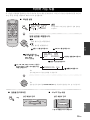 99
99
-
 100
100
-
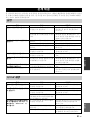 101
101
-
 102
102
-
 103
103
-
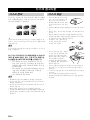 104
104
-
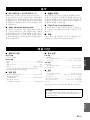 105
105
-
 106
106


Yamaha TSX-100 El manual del propietario
- Categoría
- Relojes de alarma
- Tipo
- El manual del propietario
en otros idiomas
- English: Yamaha TSX-100 Owner's manual