
02673845 1*SX
Owner’s Manual page 5
Bedienungsanleitung page 26
Mode d’emploi page 47
Manual del usuario page 68
Manuale d’uso page 89
201a
Before using this unit, carefully read the sections entitled:
“USING THE UNIT SAFELY” and “IMPORTANT NOTES” (p. 2, p.
4). These sections provide important information concerning the
proper operation of the unit. Additionally, in order to feel assured
that you have gained a good grasp of every feature provided by
your new unit, Getting Started manual should be read in its
entirety. The manual should be saved and kept on hand as a
convenient reference.
Copyright © 2001 ROLAND CORPORATION
All rights reserved. No part of this publication may be reproduced in any form
without the written permission of ROLAND CORPORATION.
Information
When you need repair service, call your nearest Roland/EDIROL Service Center or authorized Roland/EDIROL distributor
in your country as shown below.
U. S. A. / CANADA
EDIROL Corporation North
America
425 Sequoia Drive, Suite 114
Bellingham, WA 98226
U. S. A.
TEL: (360)594-4276
FAX: (360)594-4271
http://www.edirol.com/
AUSTRALIA
EDIROL Australia Pty. Ltd.
72 Central Avenue
Oak Flats NSW 2529
AUSTRALIA
TEL: (02) 4257 9091
http://www.edirol.com.au
EUROPE
EDIROL (Europe) Ltd.
Studio 3.4 114 Power Road
London W4 5PY
U. K.
TEL: +44 (0)20 8747 5949
FAX:+44 (0)20 8747 5948
http://www.edirol.com/europe
Deutschland
TEL: 0700 33 47 65 20
France
TEL: 0810 000 371
Italia
TEL: 02 93778329
As of April 23, 2001 (EDIROL)
EGYPT
Al Fanny Trading Office
P.O. Box 2904,
El Horrieh Heliopolos, Cairo,
EGYPT
TEL: (02) 4185531
REUNION
Maison FO - YAM Marcel
25 Rue Jules Hermann,
Chaudron - BP79 97 491
Ste Clotilde Cedex,
REUNION ISLAND
TEL: 28 29 16
SOUTH AFRICA
That Other Music Shop
(PTY) Ltd.
11 Melle St., Braamfontein,
Johannesbourg
Republic of SOUTH AFRICA
P.O.Box 32918, Braamfontein 2017
Republic of SOUTH AFRICA
TEL: (011) 403 4105
Paul Bothner (PTY) Ltd.
17 Werdmuller Centre Claremont
7700
Republic of SOUTH AFRICA
P.O. Box 23032
Claremont, Cape Town
SOUTH AFRICA, 7735
TEL: (021) 674 4030
AFRICAAFRICA
HONG KONG
Tom Lee Music Co., Ltd.
Service Division
22-32 Pun Shan Street, Tsuen
Wan, New Territories,
HONG KONG
TEL: 2415 0911
CHINA
Beijing Xinghai Musical
Instruments Co., Ltd.
6 Huangmuchang Chao Yang
District, Beijing, CHINA
TEL: (010) 6774 7491
ASIA
INDIA
Rivera Digitec (India) Pvt. Ltd.
409, Nirman Kendra Mahalaxmi
Flats Compound Off. Dr. Edwin
Moses Road, Mumbai-400011,
INDIA
TEL: (022) 498 3079
INDONESIA
PT Citra IntiRama
J1. Cideng Timur No. 15J-150
Jakarta Pusat
INDONESIA
TEL: (021) 6324170
MALAYSIA
Bentley Music SDN BHD
140 & 142, Jalan Bukit Bintang
55100 Kuala Lumpur,MALAYSIA
TEL: (03) 2443333
PHILIPPINES
G.A. Yupangco & Co. Inc.
339 Gil J. Puyat Avenue
Makati, Metro Manila 1200,
PHILIPPINES
TEL: (02) 899 9801
KOREA
Cosmos Corporation
1461-9, Seocho-Dong,
Seocho Ku, Seoul, KOREA
TEL: (02) 3486-8855
SINGAPORE
CRISTOFORI MUSIC PTE
LTD
Blk 3014, Bedok Industrial Park E,
#02-2148, SINGAPORE 489980
TEL: 243 9555
TAIWAN
ROLAND TAIWAN
ENTERPRISE CO., LTD.
Room 5, 9fl. No. 112 Chung Shan
N.Road Sec.2, Taipei, TAIWAN,
R.O.C.
TEL: (02) 2561 3339
THAILAND
Theera Music Co. , Ltd.
330 Verng NakornKasem, Soi 2,
Bangkok 10100, THAILAND
TEL: (02) 2248821
VIETNAM
Saigon Music
138 Tran Quang Khai St.,
District 1
Ho Chi Minh City
VIETNAM
TEL: (08) 844-4068
ARGENTINA
Instrumentos Musicales S.A.
Florida 656 2nd Floor
Office Number 206A
Buenos Aires
ARGENTINA, CP1005
TEL: (54-11) 4- 393-6057
BRAZIL
Roland Brasil Ltda
Rua San Jose, 780 Sala B
Parque Industrial San Jose
Cotia - Sao Paulo - SP, BRAZIL
TEL: (011) 4615 5666
NEW ZEALAND
Roland Corporation (NZ) Ltd.
97 Mt. Eden Road, Mt. Eden,
Auckland 3, NEW ZEALAND
TEL: (09) 3098 715
AUSTRALIA/
NEW ZEALAND
CENTRAL/LATIN
AMERICA
MEXICO
Casa Veerkamp, s.a. de c.v.
Av. Toluca No. 323, Col. Olivar
de los Padres 01780 Mexico D.F.
MEXICO
TEL: (525) 668 04 80
La Casa Wagner de
Guadalajara s.a. de c.v.
Av. Corona No. 202 S.J.
Guadalajara, Jalisco Mexico
C.P.44100 MEXICO
TEL: (3) 613 1414
PANAMA
SUPRO MUNDIAL, S.A.
Boulevard Andrews, Albrook,
Panama City,
REP. DE PANAMA
TEL: (507) 315-0101
VENEZUELA
Musicland Digital C.A.
Av. Francisco de Miranda,
Centro Parque de Cristal, Nivel
C2 Local 20 Caracas
VENEZUELA
TEL: (02) 285 9218
URUGUAY
Todo Musica S.A.
Cuareim 1844, Montevideo,
URUGUAY, CP11200
TEL: 5982-924-2335
DENMARK
Roland Scandinavia A/S
Nordhavnsvej 7, Postbox 880,
DK-2100 Copenhagen
DENMARK
TEL: (039)16 6200
FRANCE
Roland France SA
4, Rue Paul Henri SPAAK,
Parc de l'Esplanade, F 77 462 St.
Thibault, Lagny Cedex FRANCE
TEL: 01 600 73 500
FINLAND
Roland Scandinavia As,
Filial Finland
Lauttasaarentie 54 B
Fin-00201 Helsinki, FINLAND
TEL: (9) 682 4020
GERMANY
Roland Elektronische
Musikinstrumente HmbH.
Oststrasse 96, 22844 Norderstedt,
GERMANY
TEL: (040) 52 60090
HUNGARY
Intermusica Ltd.
Warehouse Area ‘DEPO’ Pf.83
H-2046 Torokbalint, HUNGARY
TEL: (23) 511011
AUSTRIA
Roland Austria GES.M.B.H.
Siemensstrasse 4, P.O. Box 74,
A-6063 RUM, AUSTRIA
TEL: (0512) 26 44 260
BELGIUM/HOLLAND/
LUXEMBOURG
Roland Benelux N. V.
Houtstraat 3, B-2260, Oevel
(Westerlo) BELGIUM
TEL: (014) 575811
EUROPE
GREECE
STOLLAS S.A.
Music Sound Light
155, New National Road
26422 Patras, GREECE
TEL: 061-435400
IRELAND
Roland Ireland
Audio House, Belmont Court,
Donnybrook, Dublin 4.
Republic of IRELAND
TEL: (01) 2603501
ITALY
Roland Italy S. p. A.
Viale delle Industrie 8,
20020 Arese, Milano, ITALY
TEL: (02) 937-78300
NORWAY
Roland Scandinavia Avd.
Kontor Norge
Lilleakerveien 2 Postboks 95
Lilleaker N-0216 Oslo
NORWAY
TEL: 273 0074
PORTUGAL
Tecnologias Musica e Audio,
Roland Portugal, S.A.
Cais Das Pedras, 8/9-1 Dto
4050-465 PORTO
PORTUGAL
TEL: (022) 608 00 60
POLAND
P. P. H. Brzostowicz
UL. Gibraltarska 4.
PL-03664 Warszawa POLAND
TEL: (022) 679 44 19
RUSSIA
Slami Music Company
Sadojava-Triumfalnaja st., 16
103006 Moscow, RUSSIA
TEL: 095 209 2193
SPAIN
Roland Electronics
de España, S. A.
Calle Bolivia 239, 08020
Barcelona, SPAIN
TEL: (93) 308 1000
SWITZERLAND
Roland (Switzerland) AG
Musitronic AG
Gerberstrasse 5, Postfach,
CH-4410 Liestal, SWITZERLAND
TEL: (061) 921 1615
SWEDEN
Roland Scandinavia A/S
SWEDISH SALES OFFICE
Danvik Center 28, 2 tr.
S-131 30 Nacka SWEDEN
TEL: (08) 702 0020
UKRAINE
TIC-TAC
Mira Str. 19/108
P.O. Box 180
295400 Munkachevo, UKRAINE
TEL: (03131) 414-40
UNITED KINGDOM
Roland (U.K.) Ltd.
Atlantic Close, Swansea
Enterprise Park, SWANSEA
SA7 9FJ,
UNITED KINGDOM
TEL: (01792) 700139
ROMANIA
FBS LINES
Piata Libertatii 1,
RO-4200 Gheorgheni
TEL: (066) 164-609
BAHRAIN
Moon Stores
Bab Al Bahrain Road,
P.O. Box 20077
State of BAHRAIN
TEL: 211 005
ISRAEL
Halilit P. Greenspoon &
Sons Ltd.
8 Retzif Ha’aliya Hashnya St.
Tel-Aviv-Yafo ISRAEL
TEL: (03) 6823666
JORDAN
AMMAN Trading Agency
Prince Mohammed St. P.O. Box
825 Amman 11118 JORDAN
TEL: (06) 4641200
KUWAIT
Easa Husain Al-Yousifi
Abdullah Salem Street,
Safat KUWAIT
TEL: 5719499
LEBANON
A. Chahine & Fils
P.O. Box 16-5857 Gergi Zeidan St.
Chahine Building, Achrafieh
Beirut, LEBANON
TEL: (01) 335799
CYPRUS
Radex Sound Equipment Ltd.
17 Diagorou St., P.O. Box 2046,
Nicosia CYPRUS
TEL: (02) 453 426
IRAN
MOCO, INC.
No.41 Nike St.Dr.Shariyati Ave.
Roberoye Cerahe Mirdamad
Tehran, IRAN
TEL: 285 4169
MIDDLE EAST
QATAR
Badie Studio & Stores
P.O. Box 62,
DOHA QATAR
TEL: 423554
SAUDI ARABIA
aDawliah Universal
Electronics APL
Corniche Road, Aldossary Bldg.,
1st Floor
SAUDI ARABIA
P.O.Box 2154, Alkhobar 31952
SAUDI ARABIA
TEL: (03) 898 2081
SYRIA
Technical Light & Sound
Center
Khaled Ibn Al Walid St.
P.O. Box 13520
Damascus - SYRIA
TEL: (011) 2235 384
TURKEY
Barkat Muzik aletleri ithalat
ve ihracat Ltd Sti
Siraselviler cad.Guney is hani 84-
86/6, Taksim. Istanbul. TURKEY
TEL: (0212) 2499324
U.A.E.
Zak Electronics & Musical
Instruments Co. L.L.C.
Zabeel Road, Al Sherooq Bldg.,
No. 14, Grand Floor DUBAI
U.A.E.
TEL: (04) 3360715

2
This product complies with the requirements of European Directive 89/336/EEC.
For EU Countries
For Canada
This Class B digital apparatus meets all requirements of the Canadian Interference-Causing Equipment Regulations.
Cet appareil numérique de la classe B respecte toutes les exigences du Règlement sur le matériel brouilleur du Canada.
NOTICE
AVIS
For the USA
FEDERAL COMMUNICATIONS COMMISSION
RADIO FREQUENCY INTERFERENCE STATEMENT
This equipment has been tested and found to comply with the limits for a Class B digital device, pursuant to Part 15 of the
FCC Rules. These limits are designed to provide reasonable protection against harmful interference in a residential
installation. This equipment generates, uses, and can radiate radio frequency energy and, if not installed and used in
accordance with the instructions, may cause harmful interference to radio communications. However, there is no guarantee
that interference will not occur in a particular installation. If this equipment does cause harmful interference to radio or
television reception, which can be determined by turning the equipment off and on, the user is encouraged to try to correct the
interference by one or more of the following measures:
– Reorient or relocate the receiving antenna.
– Increase the separation between the equipment and receiver.
– Connect the equipment into an outlet on a circuit different from that to which the receiver is connected.
– Consult the dealer or an experienced radio/TV technician for help.
This device complies with Part 15 of the FCC Rules. Operation is subject to the following two conditions:
(1) This device may not cause harmful interference, and
(2) This device must accept any interference received, including interference that may cause undesired operation.
Unauthorized changes or modification to this system can void the users authority to operate this equipment.
This equipment requires shielded interface cables in order to meet FCC class B Limit.
For the USA
DECLARATION OF CONFORMITY
COMPLIANCE INFORMATION STATEMENT
Model name: UA-3
Type of Equipment: USB Audio Interface
Responsible Party: Edirol Corporation North America
Address: 425 Sequoia Drive, Suite 114, Bellingham, WA 98226
Telephone: 360-594-4276
USING THE UNIT SAFELY
001
• Before using this unit, make sure to read the
instructions below, and the Owner’s Manual.
................................................................................................
002a
• Do not open or perform any internal modifi-
cations on the unit.
................................................................................................
003
• Do not attempt to repair the unit, or replace
parts within it (except when this manual
provides specific instructions directing you
to do so). Refer all servicing to your retailer,
the nearest Roland Service Center, or an
authorized Roland distributor, as listed on
the "Information" page.
................................................................................................
004
• Never use or store the unit in places that are:
• Subject to temperature extremes (e.g.,
direct sunlight in an enclosed vehicle, near
a heating duct, on top of heat-generating
equipment); or are
• Damp (e.g., baths, washrooms, on wet
floors); or are
• Humid; or are
• Exposed to rain; or are
• Dusty; or are
• Subject to high levels of vibration.
................................................................................................
007
• Make sure you always have the unit placed
so it is level and sure to remain stable. Never
place it on stands that could wobble, or on
inclined surfaces.
................................................................................................
010
• This unit, either alone or in combination with
an amplifier and headphones or speakers,
may be capable of producing sound levels
that could cause permanent hearing loss. Do
not operate for a long period of time at a high
volume level, or at a level that is uncom-
fortable. If you experience any hearing loss or
ringing in the ears, you should immediately
stop using the unit, and consult an audiol-
ogist.
................................................................................................
011
• Do not allow any objects (e.g., flammable
material, coins, pins); or liquids of any kind
(water, soft drinks, etc.) to penetrate the unit.
................................................................................................
012d
• Immediately turn the power off, and request
servicing by your retailer, the nearest Roland
Service Center, or an authorized Roland
distributor, as listed on the "Information"
page when:
• Objects have fallen into, or liquid has been
spilled onto the unit; or
• The unit has been exposed to rain (or
otherwise has become wet); or
• The unit does not appear to operate
normally or exhibits a marked change in
performance.
................................................................................................
013
• In households with small children, an adult
should provide supervision until the child is
capable of following all the rules essential for
the safe operation of the unit.
................................................................................................
Used for instructions intended to alert
the user to the risk of injury or material
damage should the unit be used
improperly.
* Material damage refers to damage or
other adverse effects caused with
respect to the home and all its
furnishings, as well to domestic
animals or pets.
Used for instructions intended to alert
the user to the risk of death or severe
injury should the unit be used
improperly.
The ● symbol alerts the user to things that must be
carried out. The specific thing that must be done is
indicated by the design contained within the circle. In
the case of the symbol at left, it means that the power-
cord plug must be unplugged from the outlet.
The symbol alerts the user to important instructions
or warnings.The specific meaning of the symbol is
determined by the design contained within the
triangle. In the case of the symbol at left, it is used for
general cautions, warnings, or alerts to danger.
The symbol alerts the user to items that must never
be carried out (are forbidden). The specific thing that
must not be done is indicated by the design contained
within the circle. In the case of the symbol at left, it
means that the unit must never be disassembled.

3
014
• Protect the unit from strong impact.
(Do not drop it!)
................................................................................................
023
• DO NOT play a CD-ROM disc on a conven-
tional audio CD player. The resulting sound
may be of a level that could cause permanent
hearing loss. Damage to speakers or other
system components may result.
................................................................................................
104
• Try to prevent cords and cables from
becoming entangled. Also, all cords and
cables should be placed so they are out of the
reach of children.
................................................................................................
106
• Never climb on top of, nor place heavy
objects on the unit.
................................................................................................
108c
• Disconnect all cords coming from external
devices before moving the unit.
................................................................................................
118
• Should you remove the optical connector
caps, make sure to put them in a safe place
out of children's reach, so there is no chance
of them being swallowed accidentally.
................................................................................................
204
* Microsoft and MS-DOS are registered trademarks of
Microsoft Corporation.
205
* Microsoft, Windows, and Windows NT are regis-
tered trademarks of Microsoft Corporation.
206b
* Windows® 95 is known officially as: “Microsoft®
Windows® 95 operating system.”
206c
* Windows® 98 is known officially as: “Microsoft®
Windows® 98 operating system.”
206d
* Windows NT® is known officially as: “Microsoft®
Windows NT® operating system.”
???
* Windows Me® is known officially as: “Microsoft®
Windows ® Millennium version operating system.”
206e
* Screen shots reprinted with permission from
Microsoft Corporation.
206f
* Windows® 2000 is known officially as: “Microsoft®
Windows® 2000 operating system.”
207
* Apple is a registered trademark of Apple Computer,
Inc.
208
* Macintosh is a registered trademark of Apple
Computer, Inc.
209
* MacOS is a trademark of Apple Computer, Inc.
213
* Pentium is a registered trademark of Intel Corpo-
ration.
214
* MMX is a trademark of Intel Corporation.
220
* All product names mentioned in this document are
trademarks or registered trademarks of their
respective owners.
985
• The explanations in this manual include illustrations
that depict what should typically be shown by the
display. Note, however, that your unit may incor-
porate a newer, enhanced version of the system (e.g.,
includes newer sounds), so what you actually see in
the display may not always match what appears in
the manual.

4
IMPORTANT NOTES
In addition to the items listed under “USING THE UNIT
SAFELY” on page 2, please read and observe the follow-
ing:
Power Supply
• Before connecting this unit to other devices, turn off the
power to all units. This will help prevent malfunctions and/
or damage to speakers or other devices. (It is not necessary
to turn off the power of your computer.)
Placement
• Using the unit near power amplifiers (or other equipment
containing large power transformers) may induce hum. To
alleviate the problem, change the orientation of this unit; or
move it farther away from the source of interference.
• This device may interfere with radio and television recep-
tion. Do not use this device in the vicinity of such receiv-
ers.
• Do not expose the unit to direct sunlight, place it near
devices that radiate heat, leave it inside an enclosed vehi-
cle, or otherwise subject it to temperature extremes. Exces-
sive heat can deform or discolor the unit.
• To avoid possible breakdown, do not use the unit in a wet
area, such as an area exposed to rain or other moisture.
Maintenance
• For everyday cleaning wipe the unit with a soft, dry cloth
or one that has been slightly dampened with water. To
remove stubborn dirt, use a cloth impregnated with a mild,
non-abrasive detergent. Afterwards, be sure to wipe the unit
thoroughly with a soft, dry cloth.
• Never use benzine, thinners, alcohol or solvents of any
kind, to avoid the possibility of discoloration and/or defor-
mation.
Additional Precautions
• Use a reasonable amount of care when using the unit’s but-
tons, sliders, or other controls; and when using its jacks and
connectors. Rough handling can lead to malfunctions.
• When connecting / disconnecting all cables, grasp the con-
nector itself—never pull on the cable. This way you will
avoid causing shorts, or damage to the cable’s internal ele-
ments.
• To avoid disturbing your neighbors, try to keep the unit’s
volume at reasonable levels. You may prefer to use head-
phones, so you do not need to be concerned about those
around you (especially when it is late at night).
• When you need to transport the unit, package it in the box
(including padding) that it came in, if possible. Otherwise,
you will need to use equivalent packaging materials.
• Use a cable from Roland to make the connection. If using
some other make of connection cable, please note the fol-
lowing precautions.
• Some connection cables contain resistors. Do not use
cables that incorporate resistors for connecting to this
unit. The use of such cables can cause the sound level to
be extremely low, or impossible to hear. For information
on cable specifications, contact the manufacturer of the
cable.
• Before you open the included CD-ROM, you must read the
“license agreement." Opening the CD-ROM will be taken
to mean your acceptance of the license agreement.
Handling CD-ROMs
• Avoid touching or scratching the shiny underside (encoded
surface) of the disc. Damaged or dirty CD-ROM discs may
not be read properly. Keep your discs clean using a com-
mercially available CD cleaner.

UA-3 5
DEUTSCHFRANÇAISESPAÑOLITALIANO ENGLISH
You must read this before you use digital recording
Unauthorized recording, distribution, sale, lending, public performance, broadcasting, or the like, in whole or
in part, of a work (musical composition, video, broadcast, public performance, or the like) whose copyright is
held by a third party is prohibited by law.
When exchanging audio signals through a digital connection with an external instrument, this unit can perform
recording without being subjected to some of the restrictions of the Serial Copy Management System (SCMS).
This is because the unit is intended solely for musical production, and is designed not to be subject to restrictions
as long as it is used to record works (such as your own compositions) that do not infringe on the copyrights of
others. (SCMS is a feature that prohibits second-generation and later copying through a digital connection. It
is built into MD recorders and other consumer digital-audio equipment as a copyright-protection feature.)
Do not use this unit for purposes that could infringe on a copyright held by a third party. Roland assumes no
responsibility whatsoever with regard to any infringements of third-party copyrights arising through your use
of this unit.
This device does not support digital audio signals that are formatted for broadcast studio digital audio devices.
On the UA-3
The UA-3 will function with partial SCMS support only for a digital input signal from an external device. When
data containing SCMS flags is input, for example from a MD that was digitally copied from a commercial music
CD, the UA-3 will function as follows.
If input from the UA-3’s digital input connector:
• The UA-3 cannot record this data to your computer
• The audio will be output from the analog outputs (line output jacks, headphone jack) and digital output con-
nector.
If input from the UA-3’s analog inputs (line input jacks):
• Recording can occur normally
Regardless of the presence or absence of the SCMS flag, data that is received at the digital input
connector of the UA-3 will be output directly from the digital output connector.
The UA-3 operates according to SCMS only for digital input signals from an external device.
SCMS flags are not added to the digital audio signals that are output from the UA-3.

Introduction
6
Introduction
Check the contents of the package
The UA-3 includes the following items. When you open the package, first make sure that all items are included. If any
are missing, contact the dealer where you purchased the UA-3.
UA-3
USB cable
Use this to connect the UA-3 to the USB connector of your computer. For details on connections, refer to Connec-
tions and driver installation (Windows p. 8, Macintosh p. 17).
AUDIO Capture CD-ROM
This contains software that you will need in order to use the UA-3.
* Be sure to read the Readme_E.txt file found in the AUDIO Capture CD-ROM. Any updated information will be provided in
the Readme_E.txt file.
Getting Started
This is the document you are reading. Keep it at hand for reference when needed.
License agreement
This contract describes the terms under which Roland Corporation allows you to use the software. You must read this
before opening the CD-ROM package.
You will need to provide these items yourself
External amp, speakers, headphones, and mic are not included
External amp, speakers, or headphones necessary for listening to the sound output via the UA-3 are not included. Nor
is a mic included for inputting sound to the UA-3. You will need to provide these items yourself.
Digital input/output cables for connecting the MD or DAT recorder are not included
Although you can use an MD or DAT digital recorder to perform digital recording, the cables for connecting the re-
corder to the UA-3 are not included. You will need to provide these separately.
Use only the included USB cable.
• Before opening the included CD-ROM, you must read the separate license agreement.
• Do not touch the silver recording surface of the disc, or scratch it. Doing so may make it impossible for data to be
read correctly. If the disc becomes soiled, use a commercially available CD cleaner to clean it.
• Do not play back the CD-ROM on a conventional audio CD player. Doing so will produce a high volume that
may damage your ears or speakers.

Introduction
UA-3 7
DEUTSCHFRANÇAISESPAÑOLITALIANO ENGLISH
Parts of the UA-3 and their function
Mic input jack
Line input jacks
Line output jacks
Digital input connector (optical)
Digital output connector (optical)
USB connector
Mic type select switch
Set this switch according to a type of mic that is connected to the Mic input jack .
When connecting a dynamic mic: “DYNAMIC”
When connecting a condenser mic: “CONDENSER”
Recording input select switch
This selects the input that will be used for recording.
Digital input connectors : “DIGITAL”
Mic input jack / Line input jacks / Guitar input jack :“INPUT + GUITAR/MIC”
USB indicator
This will light when the UA-3 is connected and recognized to the computer.
Output level indicator
The number of LED’s that light changes according to the output level from the Headphone jack and the Line
output jacks . If the red LED lights, use the Line output volume to lower the volume.
Line output volume
This adjusts the volume that is output from the Headphone jack and the Line output jacks .
Guitar/Mic input peak indicator
If the input level from the Guitar input jack and the Mic input jack is excessive, it will light red. If it lights
red, use the Guitar/Mic input adjustment slider to lower the input level.
Guitar/Mic input adjustment slider
This slider adjusts the input level of the Guitar input jack and the Mic input jack .
Guitar input jack
Line input adjustment slider
This slider adjusts the input level of the Line input jacks .
Line input peak indicator
If the input level from the Line input jacks is excessive, it will light red.
If it lights red, use the Line input ad-
justment slider to lower the input level.
Headphone jack
A set of headphones can be connected here. Even if headphones are connected, sound will still be output from the Line
output jacks .
* For details on how each control and connector are actually used, refer to UA-3 Application Guide (p. 110).
• Condenser Mic
The UA-3 supports small multimedia microphones
used for adding narration, and is compatible with plug-
in powered monaural microphones.
• If you are recording only from the line inputs, dis-
connect the cables from the Guitar input jack and
the Mic input jack.
• The UA-3 is not compatible with the phantom-pow-
ered, condenser microphones typically used for music.
It is also incompatible with the stereo microphones
sometimes supplied with MDs.
• You cannot play back computer audio data when
DIGITAL is selected.
1
2
3
45 6
7
12
13 14 1716
15
8
9
10
11
1
2
3
4
5
6
7
1
8
4
1 2
14
9
10
17
3
11
11
17
3
12
14
1
13
13
14
1
14
15
2
16
2
15
17
3

Connections and driver installation (Windows)
8
Connections and driver installation (Windows)
* If you are a Macintosh user, refer to p. 17.
In order to use the UA-3, you must first install the USB Composite Device driver, the USB Human Interface
driver, and the USB Audio Device driver consecutively. These drivers are included with Windows. If you are using
Windows 98, this driver is provided in the Microsoft Windows CD-ROM, so you will need to have the Microsoft
Windows CD-ROM ready. If you are using Windows Me or 2000, the CD-ROM is not necessary.
What is a driver?
A driver is software that allows an application program running on your computer to transfer data to and from the UA-
3 when it is connected to your computer via a USB cable. The driver passes data from the application to the UA-3, and
passes data from the UA-3 to the application.
Making connections and installing the driver
■ Making connections
Always make sure to have the volume level turned down before connecting the UA-3. Even with the volume all the
way down, you may still hear some sound when the power is switched on, but this is normal, and does not indicate a
malfunction.
To prevent malfunction and/or damage to speakers or other devices, always turn down the volume, and turn off the
power of all devices before making any connections. (It is not necessary to turn off the power of your computer.) Use
a USB cable to connect the UA-3 to your computer before turning on the power of your audio equipment.
Before installing the driver
• The UA-3 cannot be used with Windows 95 or Windows NT.
• If other Windows programs are running, exit all of them
before you continue.
• If you will be simultaneously connecting multiple Roland USB
devices (for example; the UA-3 and other USB devices such as the
UA-100G) to your computer, disconnect the UA-100G or other
devices from the USB connector before installing the driver. If you
install the driver when the UA-100G or other devices are con-
nected, installation may not occur correctly.
• Before disconnecting the USB cable or restarting
Windows, please close all applications. You should
also turn down the volume of any audio or amp sys-
tem that is connected.
• This unit is equipped with a protection circuit. A
brief interval (a few seconds) after connecting a
USB connector is required before the unit will
operate normally.
UA-3
Application
USB
Driver
USB port
USB cable
Computer
UA-3
Stereo Set
Powered Speaker etc.
LINE IN, AUX IN
Audio
cable
USB cable
* Connect after starting
up the computer
Computer
USB
port
USB
port
LINE OUT
Stereo
Headphones

Connections and driver installation (Windows)
UA-3 9
DEUTSCHFRANÇAISESPAÑOLITALIANO ENGLISH
■ Installing the driver (Windows Me)
* If you are using a Windows 2000 machine, refer to p. 9, if Windows 98, refer to p. 9.
1. Turn on the power of your computer and start up Windows, and use a USB cable to connect the UA-3 to your
computer.
2. When Windows detects the UA-3 and the Add New Hardware Wiz-
ard dialog box appears, make sure “Automatic search for a better
driver (Recommended)” is selected, then click [Next].
3. The search for the driver starts.
4. When the correct driver is found, driver installation starts.
5. When a dialog box informing you that driver installation has finished
appears, click [Finish], and restart Windows.
After installing the driver, refer to Specifying the audio input/output device (p. 12) and select the device Windows uses.
* Depending on your computing setup, there may be a short wait after the driver is installed until the
device is recognized.
■ Installing the driver (Windows 2000)
* If you are using a Windows Me machine, refer to p. 9, if Windows 98, refer to p. 9.
1. Turn on the power of your computer and start up Windows.
2. Use a USB cable to connect the UA-3 to your computer.
The UA-3 is recognized to the computer and the driver is installed all automatically.
3. After installing the driver, restart Windows.
■ Installing the driver (Windows 98)
* If you are using a Windows Me machine, refer to p. 9, if Windows 2000, refer to p. 9.
Installation must be performed in the order of the USB Composite Device driver, USB Human Interface De-
vice driver, and then the USB Audio Device driver. Use the following procedure to perform the installation.
1. Turn on the power of your computer and start up Windows. Insert the Microsoft Windows CD-ROM into your
CD-ROM drive, and use a USB cable to connect the UA-3 to your computer (p. 8).
Some time may be required until this dialog box appears
Since some computers are sold with the contents of the Microsoft Windows CD-ROM already
in the hard disk, a Microsoft Windows CD-ROM may not have been included. If this is the case,
you will be able to install the driver without the Microsoft Windows CD-ROM

Connections and driver installation (Windows)
10
A USB Composite Device will be detected automatically, and the Add
New Hardware Wizard dialog box will appear. Click [Next].
2. When the display asks “What do you want Windows to do?”,
select “Search for the best driver for your device. (Recom-
mended).” and click [Next].
3. The following dialog box will appear. Check CD-ROM drive, and
click [Next].
4. The following dialog box will appear. Click [Next].
*
Depending on your system, the
Location of driver
may differ from the above
illustration, but this is not a problem.
5. Copying of the file (Driver) will begin.
If this dialog box does not appear, refer to Problems related to the
USB driver (p. 21)
If the Microsoft Windows CD-ROM is not inserted in the CD-ROM drive, the following dialog
box may appear. If this occurs, insert the Microsoft Windows CD-ROM into the CD-ROM
drive, and click [OK].

Connections and driver installation (Windows)
UA-3 11
DEUTSCHFRANÇAISESPAÑOLITALIANO ENGLISH
6. When installation of the USB Composite Device driver is fin-
ished, the following dialog box will appear. Click [Finish].
7. Then, the USB Human Interface Device will automatically be
detected, and the Add New Hardware Wizard dialog box will
appear. Click [Next], and continue the installation using the very
same procedure as steps 2-5 (p. 10-10).
8. When installation of the USB Human Interface Device driver is
finished, the following dialog box will appear. Click [Finish].
9. Next, a USB Audio Device will be detected automatically, and
the Add New Hardware Wizard dialog box will appear. Click
[Next], and continue the installation using the very same proce-
dure as in steps 2-5 (p.10-10).
10.When installation of the USB Audio Device driver is finished,
the following dialog box will appear. Click [Finish].
This completes installation of the USB Composite Device driver, the USB Human Interface Device driver, and
the USB Audio Device driver. Restart Windows.
After installing the driver, refer to Specifying the audio input/output device (p. 12) and select the device Win-
dows uses.
In step 4, the screen will indicate “Windows driver file search for
the device : USB Human Interface Device.”
In step 4, the screen will indicate “Windows driver file search for
the device : USB Audio Device.”

Connections and driver installation (Windows)
12
■ Specifying the audio input/output device
1. Click the Windows [Start] button, and select [Settings] - [Control Panel].
2. Win 98 / Win 98SE
In Control Panel, double-click the [Multimedia] icon to open the Multimedia Properties dialog box.
Win 2000 / Me
In Control Panel, double-click the [Sounds and Multimedia] icon to open the Sounds and Multimedia
Properties dialog box.
* If you don’t find a [Sounds and Multimedia] icon, then in Control Panel, click [view all Control
Panel options].
3. Click the [Audio] tab.
4. For the Playback item Preferred device, click . In the list that appears, click [USB Audio Device] to
select it.
5. For the Recording item Preferred device, click . In the list that appears, click [USB Audio Device]
to select it.
Windows 98 / Windows 98SE
Windows 2000 /Windows Me
6. Click [OK] to complete the settings.
Volume Control settings
The output volume of the UA-3 can be controlled by the Windows Volume Control.
1. Click the Windows [Start] button, and select [Programs] - [Accessories] - [Entertainment] - [Volume
Control] to start it up.
Windows Me Windows 2000/
Windows 98/Windows 98SE
• Depending on your system, “USB
Audio Device” will be shown a
number added, ex. “USB Audio
Device (1).”
• It will not be possible to press
the “Advanced Properties”
button for “Recording.”

Connections and driver installation (Windows)
UA-3 13
DEUTSCHFRANÇAISESPAÑOLITALIANO ENGLISH
2. You can raise or lower the slider to adjust the volume of the UA-3. The following items can be set.
Checking for sound output
After the connections have been made correctly, you can play back the sample data to check your setup.
■ Playing the sample data
Here we will use standard Windows functionality to play the sample data. The sample data is found in the AUDIO
Capture CD-ROM. Insert the CD-ROM into the CD-ROM drive of your computer.
1. Copy “Alright(.wav)” to the desktop by dragging it from the “Sample_Data” folder of the CD-ROM.
USB Audio (Speaker) Adjust the volume of the analog outputs (line output
and headphone output). The digital output will not
change.
1
1. Depending on the version of Windows, this may be displayed as “Analog con-
nector”.
WAVE Adjust the volume that is output from the audio output
device “USB Audio Device.” The digital output and
analog output will change.
SW Synth Adjust the volume of the software synthesizer built into
Windows.
CD Player Adjust the “CD Music” volume for the CD-ROM drive
of your computer.
2
2. If the playback of the CD does not change when you adjust this volume, change
the WAVE volume.
• If Volume Control is not installed on your computer, use Add/ Remove Applications in the Control
Panel to install it. For details on installation, refer to the Windows owner’s manual or Help.
• If Mute is checked, or if the slider is in the lowest position, no sound will be output from the UA-3.
• If you are using Windows 2000 and “CD Player” does not appear, check the [Digital CD playback] item “Enable
digital CD audio for this CD-ROM device,” as described in the following note.
• When using your computer’s CD-ROM drive to play an audio CD, or when playing background music for games
with the UA-3
If using Windows Me:
Select [Start]-[Settings]-[Control Panel]. In the [Control Panel], double-click the [System] icon to
access the System Properties dialog box. Click the [Device Manager] tab, and double-click the
[CDROM] icon. Below it, double-click the CD-ROM drive that you are using and open its Properties.
Click the [Properties] tab, and select the check box located beside the Digital CD playback item
“Enable digital CD audio for this CD-ROM device.”
If using Windows 2000
In the same way as for Windows Me, open the System Properties dialog box. Click the [Hardware tab],
and click the [Device Manager] button to open the Device Manager. From the CD-ROM drives, double-
click the CD-ROM drive that you are using to open its Properties. Click the [Properties] tab, and select
the check box located beside the Digital CD playback item “Enable digital CD audio for this CD-ROM
device.”
If using Windows 98 or Windows 98 SE:
Select [Start] - [Settings] - [Control Panel] - [Multimedia], then click on the [CD Music] tab, then check
“Enable CD digital audio for this CD-ROM device.”
Depending on your computing environment, playback of these CDs may still be impossible. For details,
refer to information provided by your computer’s manufacturer. If you are using a PC-card (PCMCIA)
type CD-ROM drive, playing back WAVE data or an audio CD on the CD-ROM drive may cause the
sound to be interrupted, or no sound may be heard at all.
• The audio quality of the UA-3 will be better if you raise the Volume Control levels.
In order to listen to the sample data, you will need approximately 30MB of free space on the
hard disk where Windows installed.

Connections and driver installation (Windows)
14
2. Right-click the copied file “Alright(.wav)”, and select [Play] or [Properties] from the menu
that appears.
3. Click the [Preview] tab, and then click the button.
The sample data will begin playing.
Did you hear the sample data?
If the sample data played correctly, your computer and the UA-3 are connected correctly, and the drivers have been
installed correctly. If the data did not play correctly, refer to Troubleshooting (p. 21). Troubleshooting contains mate-
rial to help you find and correct such problems.
This completes all connections and driver installation for the UA-3.
Deleting the USB Audio Device driver
■ If re-installing the USB Audio Device driver
■ If installation of the USB Audio Device driver was terminated before completion
Use the following procedure to delete the driver that is already installed.
1. Use a USB cable to connect the UA-3 to your computer.
2. Click the Windows [Start] button, and select [Settings] - [Control Panel].
3. In
[Control Panel]
, double-click [System] to open the System Properties dialog.
4. Click the [Device Manager] tab.
5. Double-click [Sound, video and game controllers] to see a list of the devices.
6. From the list, select USB Audio Device, and click [Remove]. In the Confirm Device Removal dialog box,
click [OK]. If USB Audio Device is not displayed, proceed to step 8.
7. Make sure that USB Audio Device is not in the Sound, video and game controllers list, and click
[Close] to close the System Properties dialog.
8. Follow the steps 1. – 4. again, and double-click [Universal Serial Bus controllers] to display the list of
devices.
If is displayed for the USB-compatible device icon:
Select the [USB Composite Device] icon, and click [Remove]. In the Confirm Device Removal dialog
box, click [OK]. As in the step 7., close System Properties.
If there is no USB-compatible device icon, or if is not displayed:
Simply close System Properties.
If you are using Windows Me and is displayed:
Simply close System Properties.
When the Recording input select switch is set to DIGITAL, it is
not possible to play back audio data from your computer. Set the
switch to INPUT + GUITAR/MIC.
The explanation provided here is for an average Windows system. Depending on your com-
puter, some of the folder names may be different.

Connections and driver installation (Windows)
UA-3 15
DEUTSCHFRANÇAISESPAÑOLITALIANO ENGLISH
9. Disconnect the USB cable from your computer, and restart Windows.
Basic operation of the D-Out Smoother
■ What is the D-Out Smoother?
When audio is played back to a digital device such as MD or DAT connected to the digital output of the UA-3, a certain
amount of time is required for the audio output to be locked immediately after audio playback, so that there may be no
sound for one or two seconds, or the pitch or tempo may become incorrect. The D-Out Smoother is software that allows
the audio to be played smoothly in such situations.
■ Installing the D-Out Smoother
1. Insert the AUDIO Capture CD-ROM into your CD-ROM drive.
2. Click the Windows [Start] button, and select [Run...].
3. In the Open: text box, input “E:\UA_Util\Setup.exe” and click [OK]. Alternatively, click [Browse], select the
file [Setup(.exe)] located in the UA_Util folder of the CD-ROM drive, and click [Open].
4. The installer will start up, and the Choose Setup Language dialog box will appear. Specify whether you are
using the “English (United States)” or “Japanese” version of Windows, and click [OK].
5. Perform the remainder of the installation as directed by the instructions that appear on-screen.
6. When installation is completed, the Setup Complete dialog box will appear. Click [Finish].
This completes installation of the D-Out Smoother.
■ Starting the D-Out Smoother
1. Connect the UA-3 to the USB connector of your computer.
2. Click the Windows [Start] button, and in the [Programs] menu, click [D-Out Smoother].
3. The D-Out Smoother will start up.
In some cases it may display“Cannot find USB Audio Device. Check USB cable or select USB
Audio Device again.” when starting. If this occurs, the computer has not correctly detected the UA 3. It
is possible that the UA-3 is not connected correctly, or that the driver has not been installed correctly.
Refer to Connections and driver installation (Windows) (p. 8) and check these points.
■ Using the D-Out Smoother
The D-Out Smoother has an “ON/OFF” switch and a “TEST” button.
“ON/OFF” switch
Normally, you will leave this “ON” when using the digital output of the UA-3.
Turn this “OFF” when connecting or disconnecting the UA-3.
“TEST” button
Click the [TEST] button. If the test audio is heard, the D-Out Smoother is operating for that device.
When using two or more USB Audio Devices such as the UA-3 or MA-150U, use this button to select the UA-3
for which the D-Out Smoother will operate.
Use the following procedure to make your selection.
If a dialog box suggesting that you restart Windows appears at this point, follow the sugges-
tion and restart your computer.
In this explanation we are assuming that your CD-ROM drive is drive E:, but the drive name
may be different depending on your computer. If the drive name is different on your com-
puter, input the appropriate drive name. You can check the drive name of your CD-ROM
drive by double-clicking the My Computer icon.
The Setting dialog box will appear at the first time when you start up. Make sure that the
Wave-Out Device shows “USB Audio Device,” and click [OK]. If two or more USB audio
devices are displayed, refer to Using the D-Out Smoother (p. 15), and specify the correct device.

Connections and driver installation (Windows)
16
1. From the D-Out Smoother [Control] menu, select [Setting] to access the Setting dialog box. (This dialog box
will appear automatically the first time the software is started up.)
2. From the pull-down menu, select “USB Audio Device” and click [OK].
3. Click the [TEST] button, and check whether or not the test audio is heard.
If the audio is heard, the D-Out Smoother is operating for that device. If the audio is not heard, select a different
USB Audio Device in step 2, and repeat steps 1 through 3.
■ Deleting (uninstalling) the D-Out Smoother
The D-Out Smoother supports the Windows Add/Remove Programs Properties function. You can use the fol-
lowing procedure to remove the program if it becomes unnecessary.
1. Click the Windows [Start] button, and select [Settings] - [Control Panel].
2. In
[Control Panel]
, double-click [Add/Remove Programs] to open the Add/Remove Programs Proper-
ties dialog box.
3. Click the [Install/Uninstall] tab.
4. From the list in the dialog box, click the name of the application that you wish to delete.
5. Click [Add/Remove].
The application you specified in step 4 will be deleted.
Convenient Features
• When [Register to STARTUP] is checked in the Setting dialog, D-Out Smoother will automatically start up
when you start up the computer.
• When [Minimize window when starting up] is checked in the Setting dialog, D-Out Smoother will mini-
mize itself immediately after it starts up, allowing you to use your computer’s screen more effectively.
If you uninstall D-Out Smoother, you should firstly uncheck the [Register to STARTUP] in the
Setting dialog. You can go to the Setting dialog by selecting [Control] - [Setting]. (p. 25)

Connections and driver installation (Macintosh)
UA-3 17
DEUTSCHFRANÇAISESPAÑOLITALIANO ENGLISH
Connections and driver installation (Macintosh)
* If you are a Windows user, refer to p. 8.
In order to use the UA-3, you must first install a driver. UA-3 uses a driver included with Mac OS.
Making connections and installing the driver
■ Making connections
(943)
Always make sure to have the volume level turned down before connecting the UA-3. Even with the volume all the
way down, you may still hear some sound when the power is switched on, but this is normal, and does not indicate a
malfunction.
(921)
To prevent malfunction and/or damage to speakers or other devices, always turn down the volume, and turn off the
power of all devices before making any connections. (It is not necessary to turn off the power of your computer.) Use
a USB cable to connect the UA-3 to your computer before turning on the power of your audio equipment.
■ Getting the unit to be recognized
1. Turn on the power of your computer and start up Mac OS.
2. From the Apple menu, select the [Apple System Profiler].
3. Click the [Devices and Volumes] tab control.
4. Use a USB cable to connect the UA-3 to your computer.
What is a driver?
-> p. 8
• Before disconnecting the USB cable or restarting Mac-
intosh, please close all applications. You should also
turn down the volume of any audio or amp system
that is connected.
• This unit is equipped with a protection circuit. A brief
interval (a few seconds) after connecting a USB connector
is required before the unit will operate normally.
• To prevent damage to your speakers, turn down the volume on this unit, and on
any audio devices you may have connected.
• Make sure to quit all applications that may be running before you make
the connection.
UA-3
Stereo Set
Powered Speaker etc.
LINE IN, AUX IN
Audio
cable
USB cable
* Connect after starting
up the computer
Computer
USB
port
USB
port
LINE OUT
Stereo
Headphones

Connections and driver installation (Macintosh)
18
5. To make sure it is successfully recognized, select [Update all information] from the [Commands] menu. You should
see the following three audio devices in the USB section, as shown below:
If the indication is correct, the installation of the UA-3 driver is successful. Select [Quit] from the [File] menu to
close the Apple System Profiler dialog, then make the sound settings explained below.
If the indication is incorrect, you should try disconnecting the UA-3 from the USB port, and waiting about ten
seconds. Then, do the procedure over again, starting from the step 4.
■ Making the sound settings
6. From the Apple menu, select [Control Panels] - [Sound] to open
the Sound dialog.
7. Click the [Speakers] tab.
8. Turn down the volume on the UA-3, and on your audio equipment, then
click [Start Test].
9. Test sounds are output from left to right, along with what appears on the
screen; adjust the volume using the [Main Volume] bar. When you are
finished, click [Stop Test].
Depend on the your OS version, there is no [Main Volume] bar. In that
case, use the [Volume] bar in the [Output] to adjust the volume.
If the Recording input select switch is set to DIGITAL, it is not pos-
sible to play back audio data from your computer. Set the switch
to INPUT + GUITAR/MIC.

Connections and driver installation (Macintosh)
UA-3 19
DEUTSCHFRANÇAISESPAÑOLITALIANO ENGLISH
10.Select [Input] from the Sound dialog. Then, in Choose a source
for sound input:, choose USB Audio.
11.When you have finished making settings, select [Quit] from the [File] menu to close the Sound dialog.
Known issues: UA-3
• Some applications such as Cakewalk’s Metro Series and TC Work’s Spark Series cannot record/playback at 48
kHz. Please use the UA-3 at 44.1 kHz.
• While the audio application is recording or playing, do not connect/disconnect the USB cable, or move the
Recording input select switch.
Doing so may cause the application to freeze.
• You may hear sound hopping and/or noise when you record and play back at the same time due to high load on the
CPU. However, the noise should not be in the recording itself. Such noise should only be found in the playback
signal.
• If you are going to use the Virtual Sound Canvas 3, you will need to select [Performance] from the [Setting]
menu, and set the Expression Mode to Response Priority.
• The standard driver that comes with Mac OS is not ASIO compatible.
• When you start up your computer with the UA-3 connected, the computer may become unstable. If this occurs,
start up your computer before connecting the UA-3, and connect the UA-3 after start-up.
Checking for sound output
After the connections have been made correctly, you can play back the sample data to check your setup.
■ Playing the sample data
Here we will use standard Macintosh functionality to play the sample data. The sample data is found in the AUDIO
Capture CD-ROM. Insert the CD-ROM into the CD-ROM drive of your computer.
1. Copy “Alright” to the desktop by dragging it from the “Sample_Data” folder of the CD-ROM.
2. Launch QuickTime Player, which is provided with the Mac OS. The
QuickTime Player is normally located in the QuickTime folder within
the Applications folder of your hard disk.
• If you don’t see USB Audio, you should close the Sound dialog. Then, discon-
nect the UA-3, and wait about ten seconds. Then, try doing the procedure over
again, starting at number 2.
• Do not check [Play sound through output device].
In order to listen to the sample data, you will need approximately 30MB of free space on the
hard disk that contains your system.

Connections and driver installation (Macintosh)
20
3. From the [File] menu, select [Open Movie], select the copied file
“Alright,” and click [Convert] to open it.
4. Click the playback button.
The sample data will begin playing.
Did you hear the sample data?
If the sample data played correctly, your computer and the UA-3 are connected correctly, and the drivers have been
installed correctly. If the data did not play correctly, refer to Troubleshooting (p. 21). Troubleshooting contains mate-
rial to help you find and correct such problems.
This completes all connections and driver installation for the UA-3.
If the Recording input select switch is set to DIGITAL, it is not possible to play back audio
data from your computer. Set the switch to INPUT + GUITAR/MIC.

Troubleshooting
UA-3 21
DEUTSCHFRANÇAISESPAÑOLITALIANO ENGLISH
Troubleshooting
If an unexpected problem occurs while using the UA-3, please read this chapter first. It provides numerous hints that will help you solve
problems.
The problems covered in the troubleshooting section are organized according to the operating system on which the problem might be en-
countered. Use the icon shown at the left of the title to find the information you need.
Problems common to both Windows and Macintosh
Problems that occur only on Windows
Problems that occur only on Macintosh
If you are using computer for the first time, or do not understand the explanation of a procedure, refer to the owner’s manuals for your
computer or for OS.
If the UA-3 does not operate as you expect, check the following points.
Problems related to the USB driver
“Add New Hardware Wizard” does not start up automatically
“Add New Hardware Wizard” terminates before completion
• When the USB cable is connected or disconnected, approximately 15 seconds (or more) may be required for the UA-3 to be recog-
nized.
• Is the USB cable connected correctly?
Make sure that the UA-3 and computer are connected correctly by the USB cable.
• Can USB be used on your computer?
Refer to the owner’s manual for your computer, and make sure that it is able to use USB.
• Does your computer or USB hub have sufficient power supply capacity?
The UA-3 cannot be connected if insufficient power is supplied to it. Check whether one of the following cases apply.
If you are using the UA-3 with a notebook computer that is running on its battery, operation may be unreliable with some models of com-
puter. If this is the case, connect the AC adaptor to your notebook computer.
The power conservation mode of your computer may limit the power that is supplied to USB. Check the settings of your computer.
In some cases, the UA-3 cannot be used with a bus-powered hub (a hub that does not contain a power supply). Please use a self-powered
hub (a hub that contains a power supply).
• Does your computer meet the USB specifications?
If you are using a computer that does not meet the USB specifications (such as a homemade computer), operation may be unstable. In
such cases, you may be able to solve the problem by connecting a USB hub that contains a power supply.
• Is “Unknown Device” displayed for “Other devices” or “Universal Serial Bus controllers”?
Use the following procedure to delete “Unknown Device” from “Other devices” (Universal serial bus controller), and re-start your
computer.
1. In the Windows Control Panel, double-click [System] to open the System Properties dialog box.
2. Click the [Device Manager] tab.
3. Double-click [Other devices] (Universal Serial Bus controllers) to see the list of devices.
4. In the list, select Unknown Device and click [Remove].
5. In the Confirm Device Removal dialog box, click [OK].
6. Make sure that the list does not show Other devices or Unknown Device, and click [Close] to close the dialog box.
The “Add New Hardware Wizard” dialog box appears even though you
installed the drivers
If your computer or USB hub has two or more USB connectors, connecting the UA-3 to a USB connector to which the UA-3 has never
before been connected may cause the Add New Hardware Wizard dialog box will appear even though the drivers have already been
installed. Install the drivers once again as described in Connections and driver installation (Windows) (p. 8). This is not a malfunction.
In order to check whether or not the “Unknown Device” is the UA-3, disconnect the USB cable
of the UA-3, and verify that “Unknown Device” has disappeared. Then connect the UA-3 once
again, and delete “Unknown Device.”

Troubleshooting
22
Drivers are not installed correctly
Use the procedure described in Deleting the USB Audio Device driver (p. 14) to delete the USB Audio Device driver installed in your com-
puter, and install the UA-3 drivers once again as described in Connections and driver installation (Windows) (p. 8). Check whether there
is an item named “Unknown Device” in “Other devices” or in “Universal Serial Bus controllers.”
If you find “Unknown Device,” delete it.
A dialog box saying “Unknown Device found” appears, and I can’t install the
driver
Depending on your computer, not all of the Windows 98 files required to support audio over USB may have been installed when the com-
puter was shipped.
Please check with the manufacturer of your computer.
Problems when using the UA-3
OS becomes unstable
• Starting up a computer when the UA-3 is already connected may cause the computer to become unstable.
If this occurs, start up the computer with the UA-3 disconnected, and then connect the UA-3.
■ No sound
• Is the UA-3’s Recording input select switch set to “INPUT + GUITAR/MIC”?
When the Recording input select switch is set to “DIGITAL,” the audio signals input to the digital Input connector are output. The
computer’s audio data is not output.
• Is a digital device such as an MD connected to the digital output of the UA-3?
Depending on your application, playing audio with a digital device such as an MD connected to the digital output of the UA-3 may cause
a certain amount of time to be required for the digital audio output to be locked immediately after playback, so that there will be no sound
for one or two seconds. If this occurs, you can use the D-Out Smoother software from the included CD-ROM to make audio play
smoothly. For details, refer to Basic operation of the D-Out Smoother (p. 15).
• Are you attempting to use the CD player of your computer to play an audio CD?
If you wish to play an audio CD on the CD-ROM drive of your computer, refer to When using your computer’s CD-ROM drive to play an
audio CD, or when playing background music for games with the UA-3 (p. 13).
• Are you running multiple applications?
If multiple applications are running simultaneously, an error message may appear. If this occurs, click [OK], and close the other applica-
tions.
Even if an application window is closed, it is still running if it remains in the taskbar, so be sure to quit any unneeded applications shown
in the taskbar.
• Have you specified the audio data output destination for OS?
The audio data output destination for a computer must be set to UA-3. For details on this setting, refer to Specifying the audio input/
output device (Windows p. 12) or Making the sound settings (Macintosh p. 18).
• Have you specified the audio data output destination for your playback software?
For some software such as Cool Edit Pro LE, you must set the audio data output destination as UA-3. For details on this setting, refer to
the owner’s manual for the software.
• Have the drivers been installed correctly?
In order to playback audio data using the UA-3, the USB Audio Device driver must be installed. For details on installation and settings,
refer to Connections and driver installation (Windows p. 8, Macintosh p. 17).
• Are the various Volume Control faders raised?
Adjust the volume of each fader as described in Volume Control settings (Windows p. 12) or Making the sound settings (Macin-
tosh p. 18).
■ Sound is distorted
• Does the peak indicator light red?
If you are inputting sound from the line input jacks, use the Line input adjustment slider of the UA-3 to reduce the input level. If you
are inputting sound from the Guitar or Mic input jacks, use the Guitar/Mic input adjustment slider to reduce the input level. Also, the
number of LED’s in the output level indicator will change according to the output level of the UA-3. If the red LED lights, use the line
output volume to lower the volume.
The volume level of the instrument connected to LINE IN is too low.
• Could you be using a connection cable that contains a resistor?
Use a connection cable that does not contain a resistor.
• Is the Line Input adjustment slider (p. 7) raised appropriately?
■ Noise is heard when playing back audio
• Is a mic still connected?
If a mic is connected to the UA-3, use the Guitar/Mic input adjustment slider to lower the input level.

Troubleshooting
UA-3 23
DEUTSCHFRANÇAISESPAÑOLITALIANO ENGLISH
•
The graphic accelerator of your computer may cause noise to occur during audio playback.
Use the following procedure to set graphic acceleration to “None.”
1. In the Windows Control Panel, double-click [Display] to open the Display Properties dialog box, and click the [Settings] tab.
2. Click [Advanced] to open properties, and click the [Performance] tab.
3. In Graphics, move the Hardware acceleration: slider to None, and click [OK].
4. In the Display Properties dialog box, click [OK] to close the dialog box.
Then restart your computer.
• Noise is heard in the line input or mic input
If a MIDI sound module and the UA-3 are connected via USB to the same computer, and the output of the MIDI sound module is con-
nected to the line input jacks of the UA-3, noise from the computer may enter via the MIDI sound module and be heard from the UA-3. In
such cases, use a self-powered hub to connect the MIDI sound module and the UA-3 in parallel, or connect the MIDI sound module via
the serial interface or MIDI interface.
• Noise may be heard if you record and play back simultaneously.
If you record and play back simultaneously, the playback may be interrupted depending on the performance of the system, and this may
be heard as noise. However since priority is given to recording, the recorded data will not be lost.
• This problem may be solved by properly grounding the chassis of your computer, or the ground prong of the plug on the AC
power cord that was supplied with your computer. Also, make sure that there are no devices nearby that emit a strong magnetic
field, such as a television or a microwave oven.
• Are a large number of audio devices connected?
If a large number of audio devices are connected, noise may occur. Do not connect audio devices that you are not using.
■ Sound is interrupted during audio playback
• Try increasing the memory
You can increase the processing power of your computer by adding more memory. For details on adding memory, refer to the owner’s
manual for your computer.
• Does your computer fulfill the USB specifications?
The audio may be interrupted if you are using a computer that does not electrically meet the USB specifications. In this case, the problem
may be solved if you connect a USB hub that contains its own power supply.
• Are numerous applications running?
If you use numerous applications during playback, or start up another application, the playback may be interrupted depending on your
computer system. Exit all unneeded applications, and try again. If this does not solve the problem, try restarting a computer.
• Try making the following changes to the disk drive settings.
* The following settings may not exist on your computer.
1. In the Windows Control Panel, double-click [System] to open the System Properties dialog box, and click the [Device Man-
ager] tab.
2. Double-click [Disk drives] to see the list of devices.
3. From the list, select GENERIC IDE DISK TYPExx, and click [Properties] to access the GENERIC IDE DISK TYPExx Prop-
erties dialog box.
* The “xx” in GENERIC IDE DISK TYPExx will be a number that will differ depending on your
system.
4. Click the [Settings] tab, check the [DMA] check box in the Options, and click [OK] to close the dialog box.
* Depending on your system, a dialog box for DMA settings may appear. After checking the contents,
click OK or Cancel.
5. In the System Properties dialog box, click [OK] to close the dialog box.
Restart your computer so that the above settings will take effect.
■ Audio playback stops
• On some computers, the Power Management settings in the Control Panel may cause audio playback to stop.
The Power Management Properties that are displayed when you double-click Power Management will differ depending on your computer
system. One example is given below, but you should consult the owner’s manual for your computer as well. Some computers may not
have the following settings.
1. In the Windows Control Panel, double-click [System] to open the System Properties dialog box, and click the [Device Man-
ager] tab.
2. Double-click [System devices] to see the list of devices.
3. From the list, select [Advanced Power Management support], and click [Properties] to access the Advanced Power Man-
agement support properties dialog box.
4. Click the [Settings] tab, and in Troubleshooting, check the [Disable power status polling] check box. Then click [OK].
5. In the System Properties dialog box, click [OK] to close the dialog box.
6. Restart Windows.

Troubleshooting
24
Digitally recorded sound is distorted, pitch changes or contains noise
• If you are using a long digital cable, noise may occur or the sound may be distorted when it is connected. Use digital cables that
are one meter (about a yard) or shorter.
• Does the sampling frequency setting in the application match the sampling frequency of the digital device connected to the digital
input connector?
• When using digital recording, it is not possible to record in monaural. Set your recording software to the “stereo” setting.
Noise is present in the recorded sound
• It has been found that noise tends to be introduced in sound recorded on the iMac series models, which were released after the
summer of 2000.
• In the SimpleSound application that is included with MacOS, noise will be heard in the sound if it is played back immediately
after being digitally recorded. Save the sound first, then try playing it back.
• Update the USB Audio driver to 1.0.5f4.
If the USB Audio driver, which is provided with the Mac OS, is under 1.0.4, update it to 1.0.5f4.
You can download the driver from the URL below:
http://asu.info.apple.com/swupdates.nsf/artnum/n11703
Checking the USB audio driver’s version
1. Connect the UA-3 to the computer.
2. From the Apple menu, select [Apple System Profiler].
3. Click the [Devices and Volumes] tab.
4. In the USB section, the screen will indicate “Audio (UA-3 USB Audio Device).” Click the arrow at the left of this text.
5. The number displayed to the right of “Driver version” is the version of the USB audio driver.
■ A blank (silent) file is created when you record
• Try setting the bit rate to “16bit.”
If you are using Windows98 Second Edition, and your recording software is set to a bit rate of 8 bits, a blank file may be created, so that
you may not be able to record effectively. If this occurs, you will be able to record correctly by setting the bit rate to “16 bit”.
• Data that contains the SCMS flag cannot be recorded digitally.
The UA-3 supports SCMS (p. 5), so that if SCMS-flagged data (such as data from an MD that was digitally copied from a commercial
music CD) is input to the digital connector, the UA-3 will not be able to record this on the computer. (The sound will be output from the
line output jacks and the headphone jack.)
Cannot record digitally
• Is the Recording input select switch set to “DIGITAL”?
• Is the application set to the same sampling frequency as that of the digital device connected to the digital input connector?
• Recording will no longer be possible if you switch the sampling frequency (for example, between digital broadcast A mode and B
mode) of a device while it remains connected to the digital input connectors.
When switching the sampling frequency, you need to disconnect, then reconnect the digital cable.
• It is not possible to record digital data of a format other than consumer digital audio device format.
Cannot Record Music CD
• The UA-3 cannot record music CDs in the computer’s CD-ROM drive with CoolEdit Pro LE or other programs.
To record music CDs in the computer’s CD-ROM drive, you need to first select your computer’s sound card as the audio device (Wave-
form Record) that is to be used for recording by CoolEdit Pro LE (or the application you are using), then you can proceed with recording.
When recording a music CD with a sound card, uncheck “Enable digital CD audio for this CD-ROM device” you checked in When
using your computer’s CD-ROM drive to play an audio CD, or when playing background music for games with the UA-3 (p. 13).
The volume changed when you resumed from Suspend or Hibernation status
• When Windows 2000 resumes from Suspend or Hibernation, the output volume setting is changed due to a problem of Windows.
Start up the Mixer application as described in Volume Control settings (p. 12), and adjust the USB Audio (Speaker) slider.
Game background music does not sound
• Does the game use an audio CD for background music?
If an audio CD is used to provide background music for the game, refer to When using your computer’s CD-ROM drive to play an audio
CD, or when playing background music for games with the UA-3 (p. 13).
Problems common to software in general
Can’t install
• Is the included CD-ROM inserted into the CD-ROM drive of your computer?
• During installation, were the CD-ROM drive name and the installation file name input correctly?
• Is there sufficient space on your hard disk?

Troubleshooting
UA-3 25
DEUTSCHFRANÇAISESPAÑOLITALIANO ENGLISH
Increase the free space on your hard disk. Delete unneeded files (move them to the Recycle Bin), and then right-click on the Recycle Bin
and select Empty Recycle Bin.
Alternatively, you can add another hard disk to your system.
• Were other applications running when you performed the installation?
Exit all applications, and perform the installation again.
Can’t start up an application
• Are numerous applications running?
It may be that there is not enough memory to start up another application. Close all unneeded applications, and then start up the new appli-
cation. If an error is still displayed, try restarting your computer.
An error is displayed when you start up an application
• If multiple applications are started up simultaneously, an error message may appear.
If this occurs, click [OK], and close all unnecessary applications.
Even if an application window has been closed, the application is still running if it remains in the taskbar. Be sure to close any unneces-
sary application that appears in the taskbar.
• If you are using Cakewalk Pro Audio, you must be sure that the sampling frequency of Cakewalk Pro Audio is set to 44.1kHz.
On Cakewalk ProAudio 7, 8, and 9, the sampling frequency can be set as follows.
[Tools] - [Audio options] - [Settings] - [Default sampling rate]
An Application hangs up
When using digital music software for digital recording with the UA-3’s recording input switch set to DIGITAL, be absolutely sure that a
digital device is connected.
Although in certain applications, Windows limitations may render the operation of the mouse or other such devices inactive until a digital
device is connected, this does not indicate any malfunction.
If no action results from the use of the mouse or other such devices, then reconnect the digital device.
• Confirm occurrence of the above with the following applications
(current as of January, 2001).
•Logic Audio 3.0 or 4.0 During Recording
•Cubase VST 3.7 During Startup/Recording/Playback
•Cubase ASIO Multimedia Setup During Testing
Confirm that the events or conditions above do not occur with the following applications.
•Cakewalk Pro Audio 7, 8, and 9
•CoolEditProLE
•SoundRecorder (Bundled with Windows98)
A shortcut error appears when starting up Windows
If you uninstall the D-Out Smoother with the Register to STARTUP checked (p. 16), the following error message will appear when you
start up Windows. In this case, click [NO] to close the message.
Use the following procedure to delete this message.
1. Click the Windows [Start] button, and select [Settings] - [Taskbar & Start Menu].
2. Click the [Start Menu Programs] tab, then click [Remove].
3. Select [Programs] - [StartUp] - [SmoothDo], and click [Remove].
For details on installing a hard disk, refer to the owner’s manuals for your computer and for
Windows.

26
Sie müssen diesen Abschnitt lesen, bevor Sie
Digitalaufnahmen erstellen
Unberechtigte Aufzeichnung, Vertrieb, Verkauf, Verleih, öffentliche Aufführung, Ausstrahlung oder Sendung
o. ä. (musikalische Komposition, Video-Aufzeichnungen, Ausstrahlung, öffentliche Aufführung oder ähnliches)
ganz oder in Teilen eines Werks, dessen Urheberrechte bei Dritten liegen, ist gesetzlich verboten.
Beim Austausch von Audiosignalen über einen digitalen Anschluss mit einem externen Instrument kann dieses
Gerät Aufnahmen vornehmen, die den Beschränkungen des Serial Copy Management System (SCMS) teilweise
nicht unterliegen. Der Grund hierfür ist, dass das Gerät ausschließlich für die Musikproduktion vorgesehen ist
und so entwickelt wurde, dass es keinen Beschränkungen unterliegt, sofern es für die Aufnahme von Werken
(wie z.B. Ihre eigenen Kompositionen) verwendet wird, die die Urheberrechte Dritter nicht verletzen. (SCMS
ist ein Merkmal, das das Kopieren in der zweiten Generation und später über einen digitalen Anschluss
verhindert). Dieses Merkmal wird in MD-Recorder und andere Digitalaudio-Consumer-Geräte als
Urheberschutzvorrichtung integriert.
Verwenden Sie dieses Gerät nicht für Zwecke, die die Urheberrechte eines Dritten verletzen könnten. Roland
übernimmt keinerlei Verantwortung für etwaige Verletzungen der Urheberrechte Dritter, die infolge der
Benutzung dieses Geräts entstehen könnten.
Dieses Gerät unterstützt keine Digitalaudio-Signale, die für Funkstation-Digitalaudio-Geräte formatiert
wurden.
Über das UA-3
Die teilweise SCMS-Unterstützung des UA-3 funktioniert nur bei digitalen Signalen, die aus externen Geräten
eingespeist werden. Wenn z.B. von einem MD-Gerät Daten mit SCMS-Attributen eingespeist werden, die von
einer kommerziellen Musik-CD kopiert wurden, funktioniert das UA-3 wie folgt:
Wenn die Einspeisung via Digitaleingabe-Anschluss des UA-3 erfolgt:
• Das UA-3 kann diese Daten nicht auf Ihrem Computer aufnehmen.
• Der Sound wird aus den analogen Ausgängen (Line-Ausgangsbuchsen, Kopfhörerbuchse) sowie aus dem
Digitalausgabe-Anschluss ausgegeben.
Wenn die Einspeisung via Analogeingänge des UA-3 (Line-Eingangsbuchsen) erfolgt:
• Normale Aufnahme ist möglich
Unabhängig davon, ob das SCMS-Attribut vorhanden ist, die Daten, die am Digitaleingabe-
Anschluss des UA-3 empfangen werden, werden stets direkt aus dem Digitalausgabe-Anschluss
ausgegeben.
Das UA-3 funktioniert nur entsprechend SCMS, wenn die digitalen Signale von einem externen
Gerät eingespeist werden. Den Digitalaudio-Signalen, die vom UA-3 ausgegeben werden, werden
keine SCMS-Flags hinzugefügt.

Einführung
UA-3 27
DEUTSCHFRANÇAISESPAÑOLITALIANO ENGLISH
Einführung
Überprüfen Sie den Verpackungsinhalt
Das UA-3 enthält folgende Artikel. Wenn Sie die Verpackung öffnen, stellen Sie zuerst sicher, dass alle Artikel
vorhanden sind. Wenn Teile fehlen, nehmen Sie mit dem Händler Kontakt auf, bei dem Sie das UA-3 erworben haben.
UA-3
USB-Kabel
Mit diesem Kabel schließen Sie das UA-3 an den USB-Anschluss Ihres Computers an. Einzelheiten zur Herstellung
der Anschlüsse erhalten Sie unter Anschlüsse und Treiberinstallation (Windows S. 29, Macintosh S. 38).
AUDIO Capture CD-ROM
Diese CD-ROM enthält die für den Einsatz der UA-3 benötigte Software.
* Lesen Sie unbedingt die Datei Readme_E.txt, die sich auf der AUDIO Capture CD-ROM befindet. Alle aktualisierten
Informationen sind in dieser Datei enthalten.
Erste Schritte
Dabei handelt es sich um das Dokument, das Sie gerade lesen. Halten Sie es bereit, um gegebenenfalls nachschlagen
zu können.
Lizenzvereinbarung
Dieser Vertrag beschreibt die Bedingungen, unter denen Roland Corporation Ihnen die Verwendung der Software
erlaubt. Sie müssen die Lizenzvereinbarung lesen, bevor Sie die CD-ROM-Verpackung öffnen.
Folgende Komponenten müssen Sie selbst bereitstellen
Externer Verstärker, Lautsprecher, Kopfhörer und Mikrofon sind nicht im Lieferumfang enthalten
Externer Verstärker, Lautsprecher oder Kopfhörer, die für das Anhören der Soundausgabe via UA-3 benötigt werden,
sind nicht im Lieferumfang enthalten. Ebenso fehlt ein Mikrofon für die Soundeingabe in das UA-3. Sie werden diese
Komponenten selbst bereitstellen müssen.
Kabel für die Digitaleingabe/Ausgabe zum Anschluss der MD- oder DAT-Recorder sind nicht im Lieferumfang
enthalten
Sie können für die Digitalaufnahme auch einen MD- oder DAT-Digitalrecorder verwenden, aber die Kabel für den
Anschluss des Recorders an das UA-3 werden nicht mitgeliefert. Sie müssen diese Kabel selbst separat bereitstellen.
Verwenden Sie ausschließlich das beiliegende USB-Kabel.
• Bevor Sie die Verpackung der beiliegenden CD-ROM öffnen, müssen Sie die separate Lizenzvereinbarung lesen.
• Fassen Sie die silbrige Aufnahmeoberfläche der CD-ROM nicht an und verkratzen Sie sie nicht. Wenn das
geschieht, können die Daten nicht mehr korrekt gelesen werden. Wenn die CD-ROM verschmutzt ist, verwenden
Sie einen im Handel erhältlichen CD-Reiniger für die Reinigung.
• Spielen Sie die CD-ROM nicht auf einem konventionellen Audio-CD-Spieler ab. Dies führt zu einer hohen
Lautstärke, die Ihre Ohren oder die Lautsprecher beschädigen könnten.

Einführung
28
Teile des UA-3 und ihre Funktion
Mic-Eingangsbuchse
Line-Eingangsbuchsen
Line-Ausgangsbuchsen
Anschluss Digitaleingabe (optisch)
Anschluss Digitalausgabe (optisch)
USB-Anschluss
Mic Type-Auswahlschalter
Setzen Sie diesen Schalter entsprechend dem Mikrofontyp, der mit der Mic-Eingangsbuchse verbunden ist .
Beim Anschluss eines dynamischen Mikrofons: “DYNAMIC”
Beim Anschluss eines Kondensator-Mikrophons: “CONDENSER”
Recording Input-Auswahlschalter
Wählt den Input aus, der für die Aufnahme verwendet werden wird.
Digitaleingabe-Anschlüsse : “DIGITAL”
Mic-Eingangsbuchse / Line Input-Buchse / Guitar-Eingangsbuchse :“INPUT + GUITAR/MIC”
USB-Anzeige
Leuchtet auf, wenn das UA-3 angeschlossen ist und vom Computer erkannt wird.
Output-Pegel-Anzeige
Die Anzahl der LEDs, die aufleuchten, ändert sich entsprechend dem Ausgabepegel der Kopfhörerbuchse
sowie der Line-Ausgangsbuchsen . Wenn die rote LED leuchtet, verwenden Sie die Line Output-
Lautstärke , um die Lautstärke zu reduzieren.
Line Output-Lautstärke
Passt die Lautstärke an, die aus der Kopfhörer-Buchse und den Line-Ausgangsbuchsen ausgegeben wird .
Guitar/Mic-Input Peak-Anzeige
Wenn die Eingangslautstärke aus der Guitar-Eingangsbuchse und der Mic-Eingangsbuchse zu hoch ist,
leuchtet die Anzeige rot. Wenn die Anzeige rot leuchtet, verwenden Sie den Guitar/Mic-Input Schieberegler ,
um die Eingangslautstärke zu reduzieren.
Guitar/Mic-Input Schieberegler
Dieser Schieberegeler passt die Eingangslautstärke der Guitar-Eingangsbuchse und der Mic-Eingangs-
buchse an.
Guitar-Eingangsbuchse
Line-Input Schieberegler
Dieser Schieberegler passt die Eingangslautstärke der Line-Eingangsbuchsen an.
Line Input Peak-Anzeige
Wenn die Eingangslautstärke der Line-Eingangsbuchsen zu hoch ist, leuchtet diese Anzeige rot.
Wenn die
Anzeige rot leuchtet, verwenden Sie den
Line Input-Schieberegler
, um die Eingangslautstärke zu reduzieren.
Kopfhörer-Buchse
An dieser Stelle können Kopfhörer angeschlossen werden. Auch bei angeschlossenen Kopfhörern wird Sound aus den
Line-Ausgangsbuchsen ausgegeben .
* Einzelheiten zur Verwendung jedes Steuerelements und Anschlusses finden Sie im UA-3 Application Guide (S. 110).
• Kondensator-Mikrofon
Das UA-3 unterstützt kleine Multimedia-Mikrofone für
das Hinzufügen von gesprochenen Kommentaren und
ist mit monauralen Plug-In-Mikrofonen kompatibel.
• Wenn Sie ausschließlich von den Line-Eingängen
aus aufnehmen, entfernen Sie die Kabel von der
Guitar-Eingangsbuchse und der Mic-Eingangs-
buchse.
• Das UA-3 ist nicht mit den phantom-gespeisten
Kondensator-Mikrofonen kompatibel, die typischer-
weise für Musik verwendet werden. Ebenso ist das
UA-3 inkompatibel mit den Stereo-Mikrofonen, die
manchmal mit MD-Geräten geliefert werden.
• Sie können keine Computer-Audiodaten wieder-
geben, wenn DIGITAL ausgewählt ist.
1
2
3
45 6
7
12
13 14 1716
15
8
9
10
11
1
2
3
4
5
6
7
1
8
4
1
2
14
9
10
17
3
11
11
17
3
12
14
1
13
13
14
1
14
15
2
16
2
15
17
3

Anschlüsse und Treiberinstallation (Windows)
UA-3 29
DEUTSCHFRANÇAISESPAÑOLITALIANO ENGLISH
Anschlüsse und Treiberinstallation (Windows)
* Wenn Sie ein Macintosh-Anwender sind, lesen Sie bitte S. 38.
Bevor Sie das UA-3 benutzen können, müssen Sie nacheinander die Treiber USB Composite Device (USB-
Gerät), USB Human Interface sowie USB Audio Device (USB-Audiogerät) installieren. Diese Treiber sind
in Windows enthalten. Wenn Sie Windows 98 verwenden, befinden sich diese Treiber auf der Microsoft Windows
CD-ROM, Sie sollten daher die Microsoft Windows CD-ROM bereithalten. Wenn Sie Windows Me oder 2000
einsetzen, ist die CD-ROM nicht erforderlich.
Was ist ein Treiber?
Ein Treiber ist Software, die es einem Anwendungsprogramm, das auf Ihrem Computer installiert ist, erlaubt, Daten
zum/vom UA-3 zu übertragen, wenn das Gerät an Ihren Computer via USB-Kabel angeschlossen ist. Der Treiber
überträgt die Daten der Anwendung an das UA-3 sowie die Daten vom UA-3 an die Anwendung.
Anschlüsse und Treiberinstallation
■ Anschluss der Geräte
Achten Sie stets darauf, die Lautstärke zu reduzieren, bevor Sie das UA-3 anschließen. Selbst wenn die Lautstärke
ganz zurückgedreht wurde, hören Sie eventuell Sound beim Einschalten der Geräte, aber dies ist normal und kein
Hinweis auf eine Fehlfunktion.
Um Fehlfunktionen und/oder Schäden an Lautsprechern oder anderen Geräten zu verhindern, reduzieren Sie stets die
Lautstärke und schalten alle Geräte ab, bevor Sie die Verbindungen einrichten. (Es ist nicht erforderlich, den
Computer vom Stromnetz zu trennen.) Verwenden Sie ein USB-Kabel, um das UA-3 an Ihren Computer
anzuschließen, bevor Sie Ihre Audiogeräte einschalten.
Vor der Installation des Treibers
• Das UA-3 kann unter Windows 95 oder Windows NT nicht ver-
wendet werden.
• Wenn noch andere Windows-Programme ausgeführt wer-den,
sollten Sie diese beenden, bevor Sie Ihre Arbeit fortsetzen.
• Wenn Sie mehrere Roland USB-Geräte gleichzeitig an Ihren Computer
anschließen (z.B. das UA-3 und andere USB-Geräte, wie z.B. das UA-
100G), trennen Sie das UA-100G oder andere Geräte vom USB-
Anschluss, bevor Sie den Treiber installieren. Wenn Sie den Treiber
installieren, während das UA-100G oder andere Geräte angeschlossen
sind, wird die Installation eventuell nicht korrekt ausgeführt.
• Bevor Sie das USB-Kabel entfernen oder Windows
neu starten, beenden Sie bitte alle Anwendungen. Sie
sollten auch die Lautstärke aller angeschlossenen
Audio- oder Verstärker-Systeme reduzieren.
• Dieses Gerät ist mit einem Schutzschaltkreis
ausgestattet. Nach dem Anschluss eines USB-
Steckers benötigt das Gerät eine kurze Zeit-
spanne (einige Sekunden), bis es den normalen
Betrieb aufnimmt.
UA-3
Anwendung
USB-
Treiber
USB-Anschluss
USB-Kabel
Computer
UA-3
Stereoanlage
Lautsprecher etc.
LINE IN, AUX IN
Audio-
Kabel
USB-Kabel
* Nach dem Start
des Computers anschließen
Computer
USB-
Anschlus
s
USB-
Anschluss
LINE OUT
Stereo-
Kopfhörer

Anschlüsse und Treiberinstallation (Windows)
30
■ Installation des Treibers (Windows Me)
* Wenn Sie Windows 2000 verwenden, lesen Sie bitte S. 30, wenn Sie Windows 98 verwenden, lesen Sie
bitte S. 30.
1. Schalten Sie Ihren Computer ein und starten Sie Windows. Verwenden Sie ein USB-Kabel, um das UA-3 mit
Ihrem Computer zu verbinden.
2. Wenn Windows das UA-3 erkennt und der Assistent Neue Hardware
hinzufügen erscheint, achten Sie darauf, dass ”Automatisch nach
dem besten Treiber suchen (Empfohlen)” ausgewählt ist und
klicken anschließend auf [Weiter].
3. Die Suche nach dem Treiber beginnt.
4. Sobald der richtige Treiber gefunden wurde, startet der Prozess der Treiberinstallation.
5. Wenn ein Dialogfeld erscheint, das Sie darüber informiert, dass die
Treiberinstallation abgeschlossen ist, klicken Sie auf [Finish]
(Beenden) und starten Windows neu.
Nach der Treiberinstallation lesen Sie bitte Angabe des Audioeingabe/Ausgabegeräts (S. 33) und wählen das Gerät
aus, das von Windows verwendet wird.
* Abhängig von Ihrer Computerinstallation kann es etwas dauern, bis das Gerät erkannt wird, nachdem
der Treiber installiert wurde.
■ Installation des Treibers (Windows 2000)
* Wenn Sie Windows Me verwenden, lesen Sie bitte S. 30, wenn Sie Windows 98 verwenden, lesen Sie
bitte S. 30.
1. Schalten Sie Ihren Computer ein und starten Sie Windows.
2. Schließen Sie das UA-3 an Ihren Computer mit einem USB-Kabel an.
Das UA-3 wird vom Computer erkannt und der Treiber wird automatisch installiert.
3. Starten sie Windows neu, nachdem Sie den Treiber installiert haben.
■ Installation des Treibers (Windows 98)
* Wenn Sie Windows Me verwenden, lesen Sie bitte S. 30, wenn Sie Windows 2000 verwenden, lesen
Sie bitte S. 30.
Die Installation muss in der Reihenfolge USB Composite Device (USB-Verbundgerät), USB Human
Interface Device und USB Audio Device (USB-Audiogerät) erfolgen. Gehen Sie bei der Installation wie
anschließend beschrieben vor.
1. Schalten Sie Ihren Computer ein und starten Sie Windows. Legen Sie die Microsoft Windows CD-ROM in Ihr CD-
ROM-Laufwerk ein und verwenden Sie ein USB-Kabel, um das UA-3 an Ihren Computer anzuschließen (S. 29).
Es kann einige Zeit dauern, bis dieses Dialogfeld erscheint
Da einige Computer beim Kauf bereits den Inhalt der Microsoft Windows CD-ROM auf der
Festplatte speichern, befindet sich die Microsoft Windows CD-ROM eventuell nicht im
Lieferumfang. Wenn das der Fall ist, benötigen Sie für die Installation des Treibers keine
Microsoft Windows CD-ROM.

Anschlüsse und Treiberinstallation (Windows)
UA-3 31
DEUTSCHFRANÇAISESPAÑOLITALIANO ENGLISH
Das Gerät USB Composite Device (USB-Verbundgerät) wird
automatisch erkannt, und das Dialogfeld (Hardware-Assistent) wird
angezeigt. Klicken Sie auf [Weiter].
2. Wenn die Anzeige fragt, “Wie möchten Sie vorgehen?", wählen
Sie ”Nach dem besten Treiber für das Gerät suchen.
(Empfohlen)” Klicken Sie anschließend auf [Weiter].
3. Folgendes Dialogfeld wird angezeigt. Wählen Sie CD-ROM-
Gerät, und klicken Sie anschließend auf [Weiter] .
4. Folgendes Dialogfeld wird angezeigt. Klicken Sie auf [Weiter].
* Abhängig von Ihrem System kann sich die Position des Treibers von der
obigen Abbildung unterscheiden, aber das ist kein Problem.
5. Das Kopieren der Datei (Treiber) beginnt.
Wenn dieses Dialogfeld nicht angezeigt wird, lesen Sie bitte
Probleme in Verbindung mit dem USB-Treiber (S. 42)
Wenn sich die Microsoft Windows CD-ROM nicht im CD-ROM-Laufwerk befindet, wird
eventuell folgendes Dialogfeld angezeigt. In diesem Fall legen Sie die Microsoft Windows CD-
ROM in das CD-ROM-Laufwerk ein und klicken auf [OK].

Anschlüsse und Treiberinstallation (Windows)
32
6. Sobald die Installation des Treibers USB Composite Device
(USB-Verbundgerät) beendet ist, wird folgendes Dialogfeld
angezeigt. Klicken Sie auf [Beenden].
7. Anschließend wird das Gerät USB Human Interface Device
automatisch erkannt, und das Dialogfeld (Hardware-Assistent)
wird angezeigt. Klicken Sie auf [Weiter], und setzen Sie die
Installation wie in den Schritten 2-5 beschrieben fort (S. 31-31).
8. Sobald die Installation des Treibers USB Human Interface
Device beendet ist, wird folgendes Dialogfeld angezeigt. Klicken
Sie auf [Beenden] .
9. Anschließend wird das Gerät USB Audio Device (USB-
Audiogerät) automatisch erkannt, und das Dialogfeld
(Hardware-Assistent) wird angezeigt. Klicken Sie auf [Weiter],
und setzen Sie die Installation wie in den Schritten 2-5
beschrieben fort (S. 31-31).
10.Sobald die Installation des Treibers USB Audio Device beendet
ist, wird folgendes Dialogfeld angezeigt. Klicken Sie auf
[Beenden] .
Damit ist die Installation der Treiber USB Composite Device (USB-Verbundgerät), USB Human Interface
Device und USB Audio Device (USB-Audiogerät) abgeschlossen. Starten Sie Windows neu.
Nach der Treiberinstallation lesen Sie bitte Angabe des Audioeingabe/Ausgabegeräts (S. 33) und wählen das
Gerät aus, das von Windows verwendet wird.
In Schritt 4, zeigt der Bildschirm die Meldung “Die Treiberdatei
für folgendes Gerät wird gesucht: USB Human Interface Device.”
In Schritt 4, zeigt der Bildschirm die Meldung “Die Treiberdatei
für folgendes Gerät wird gesucht: USB Audio Device.”

Anschlüsse und Treiberinstallation (Windows)
UA-3 33
DEUTSCHFRANÇAISESPAÑOLITALIANO ENGLISH
■ Angabe des Audioeingabe/Ausgabegeräts
1. Klicken Sie auf die Windows-Schaltfläche [Start] und wählen Sie[Einstellungen] - [Systemsteuerung].
2. Win 98 / Win 98SE
Doppelklicken Sie in der Systemsteuerung auf das Symbol [Multimedia], um das Dialogfeld
Eigenschaften für Multimedia zu öffnen.
Win 2000 / Me
Doppelklicken Sie in der Systemsteuerung auf das Symbol [Sounds und Multimedia], um das Dialogfeld
Eigenschaften für Sounds und Multimedia zu öffnen.
* Wenn Sie kein Symbol [Sounds und Multimedia] sehen, klicken Sie in der Systemsteuerung auf
[View all Control Panel Options] (Alle Optionen der Systemsteuerung anzeigen).
3. Klicken Sie auf die Registerkarte [Audio].
4. Klicken Sie bei Wiedergabe unter Bevorzugtes Gerät auf . Klicken Sie in der angezeigten Liste auf
[USB-Audiogerät], um dieses Gerät auszuwählen.
5. Klicken Sie bei Wiedergabe unter Bevorzugtes Gerät auf . Klicken Sie in der angezeigten Liste auf
[USB-Audiogerät], um dieses Gerät auszuwählen.
Windows 98 / Windows 98SE
Windows 2000 /Windows Me
6. Klicken Sie auf [OK], um die Konfiguration abzuschließen.
Einstellung der Lautstärkeregelung
Die Ausgabelautstärke des UA-3 kann mit der Lautstärkeregelung von Windows gesteuert werden.
1. Klicken Sie auf die Windows-Schaltfläche [Start] und wählen Sie [Programme] - [Zubehör] -
[Unterhaltungsmedien] - [Lautstärkeregelung], um die Lautstärkeregelung zu starten.
Windows Me Windows 2000/
Windows 98/Windows 98SE
• Abhängig von Ihrem System wird
“USB Audio Device” (USB-
Audiogerät) eine zusätzliche Ziffer
anzeigen, z.B. “USB Audio
Device.”
• Es ist nicht möglich, auf die
Schaltfläche “Erweitert” für
“Aufnahme.” zu klicken.

Anschlüsse und Treiberinstallation (Windows)
34
2. Sie können den Regler nach oben oder nach unten verschieben, um die Lautstärke des UA-3 anzupassen.
Folgende Optionen können eingestellt werden.
Überprüfung der Soundausgabe
Nachdem die Verbindungen korrekt hergestellt wurden, können Sie die Beispieldaten wiedergeben, um Ihre
Installation zu prüfen.
■ Abspielen der Beispieldaten
In diesem Beispiel wird Standard-Windows-Funktionalität für die Wiedergabe der Beispieldaten verwendet. Sie
finden die Beispieldaten auf der AUDIO Capture CD-ROM. Legen Sie die CD-ROM in das CD-ROM-Laufwerk
Ihres Computers ein.
1. Kopieren Sie “Alright(.wav)” auf den Desktop, indem Sie die Datei aus dem Ordner “Sample_Data” der CD-
ROM ziehen.
USB-Audio (Lautsprecher) Passt die Lautstärke der analogen Ausgänge an (Line
Output und Kopfhörer-Ausgang). Die Digitalausgabe
wird hiermit nicht verändert.
1
1. Abhängig von Ihrer Windows-Version kann dies als “Analoganschluss”
angezeigt werden.
WAVE
Passen Sie die Lautstärke an, die vom Audio-
Ausgabegerät “USB Audio Device” ausgegeben wird. Die
Digitalausgabe und die analoge Ausgabe werden hiermit
geändert.
SW Synth Passt die Lautstärke des Software-Synthesizers an, der
in Windows integriert ist.
CD-Wiedergabe Passt die “CD-Musik”-Lautstärke des CD-ROM-Lauf-
werks Ihres Computers an.
2
2. Wenn die Wiedergabe der CD durch die Anpassung der Lautstärke nicht
verändert wird, ändern Sie die WAVE-Lautstärke.
• Wenn die Lautstärkeregelung auf Ihrem Computer nicht installiert ist, verwenden Sie Anwendungen
hinzufügen/entfernen in der Systemsteuerung, um sie zu installieren. Um Details zur Installation zu
erhalten, lesen Sie bitte das Benutzerhandbuch für Windows oder rufen die Windows-Hilfe auf.
• Wenn "Ton aus" aktiviert ist oder wenn der Schieberegler ganz unten ist, wird aus dem UA-3 kein Sound ausgegeben.
• Wenn Sie mit Windows 2000 arbeiten und “CD-Player” nicht angezeigt wird, prüfen Sie die Option in [Digitale CD-
Wiedergabe], ”Digitale CD-Wiedergabe für den CD-Player aktivieren,” wie im folgenden Hinweis beschrieben.
• Wenn Sie das CD-ROM-Gerät Ihres Computers für das Abspielen einer Audio-CD verwenden oder wenn Sie
Hintergrundmusik für Spiele mit dem UA-3 abspielen.
Bei Verwendung von Windows Me:
Wählen Sie [Start]-[Einstellungen]-[Systemsteuerung]. Doppelklicken Sie in der Systemsteuerung
auf das Symbol [System], um das Dialogfeld Systemeigenschaften zu öffnen. Klicken Sie auf das
Register [Geräte-Manager] und doppelklicken Sie auf das Symbol [CD-ROM]. Doppelklicken Sie auf das
CD-ROM-Laufwerk unterhalb des Symbols, das Sie verwenden, und öffnen Sie dessen Eigenschaften.
Klicken Sie auf das Register [Eigenschaften] und aktivieren Sie das Kontrollkästchen, das sich neben der
Digitale CD-Wiedergabe-Option “ Digitale CD-Wiedergabe für den CD-Player aktivieren befindet.”
Bei Verwendung von Windows 2000
Gehen Sie so vor, wie für Windows Me beschrieben. Öffnen Sie das Dialogfeld Systemeigenschaften. Klicken
Sie auf die Registerkarte [Hardware] und klicken Sie anschließend auf [Geräte-Manager], um den Geräte-Man-
ager zu öffnen. Doppelklicken Sie auf das CD-ROM-Laufwerk, das Sie verwenden, und öffnen Sie die Eigen-
schaften. Klicken Sie auf das Register [Eigenschaften] und aktivieren Sie das Kontrollkästchen, das sich neben
der Digitale CD-Wiedergabe-Option “ Digitale CD-Wiedergabe für den CD-Player aktivieren befindet.”
Wenn Sie Windows 98 oder Windows 98 SE verwenden:
Wählen Sie [Start] - [Einstellungen] - [Systemsteuerung] - [Multimedia], anschließend klicken Sie auf das
Register [Musik-CD] und aktivieren Sie “Digitales CD-Audio für dieses Gerät aktivieren.”
Abhängig von Ihrer Computer-Umgebung kann es vorkommen, dass die Wiedergabe dieser CDs trotzdem nicht
möglich ist. Einzelheiten finden Sie in den Informationen, die Ihr Computer-Hersteller anbietet. Wenn Sie ein CD-
ROM-Gerät vom PC-Card-Typ (PCMCIA) verwenden, kann die Wiedergabe von WAVE-Daten oder einer
Audio-CD auf dem CD-ROM-Gerät dazu führen, dass der Sound unterbrochen wird oder kein Sound erklingt.
• Die Audioqualität des UA-3 wird besser, wenn Sie die Lautstärke-Pegel erhöhen.

Anschlüsse und Treiberinstallation (Windows)
UA-3 35
DEUTSCHFRANÇAISESPAÑOLITALIANO ENGLISH
2. Klicken Sie mit der rechten Maustaste auf die kopierte Datei “Alright(.wav)” und wählen
Sie [Wiedergabe] oder [Eigenschaften] aus dem Menü aus, das angezeigt wird.
3. Klicken Sie auf das Register [Vorschau] und klicken Sie anschließend
auf die Schaltfläche .
Die Beispieldaten werden nun abgespielt.
Haben Sie die Beispieldaten gehört?
Wenn die Beispieldaten korrekt wiedergegeben wurden, wurden Ihr Computer und das UA-3 korrekt angeschlossen und
die Treiber korrekt installiert. Wenn die Daten nicht richtig wiedergegeben wurden, lesen Sie bitte Fehlerbehebung (S. 42).
Der Abschnitt zur Fehlerbehebung enthält Hinweise, die Ihnen dabei helfen, Probleme dieser Art zu finden und zu behe-
ben.
Damit ist die Herstellung des Anschlusses und die Treiberinstallation für das UA-3 abgeschlossen.
Löschen des USB Audio Device-Treibers
■ Bei Neuinstallation des USB Audio Device-Treibers
■ Wenn die Installation des USB Audio Device-Treibers vor dem Abschluss der
Installation endete
Gehen Sie wie folgt vor, um den Treiber zu löschen, der bereits installiert ist.
1. Schließen Sie das UA-3 an Ihren Computer mit einem USB-Kabel an.
2. Klicken Sie auf die Windows-Schaltfläche [Start] und wählen Sie [Einstellungen] - [Systemsteuerung].
3. Doppelklicken Sie in der
[Systemsteuerung]
auf das Symbol [System], um das Dialogfeld Systemeigen-
schaften zu öffnen.
4. Klicken Sie auf die Registerkarte [Geräte-Manager].
5. Doppelklicken Sie auf [Audio-, Video und Gamecontroller], um eine Liste der Gerät zu erhalten.
6. Wählen Sie aus der Liste USB Audio Device (USB-Audiogerät) und klicken Sie auf [Entfernen]. Klicken
Sie im Dialogfeld Entfernen des Geräts bestätigen auf [OK]. Wenn USB Audio Device (USB-Audio-
gerät) nicht angezeigt wird, arbeiten sie mit Schritt 8 weiter.
7. Stellen Sie sicher, dass USB Audio Device (USB-Audiogerät) sich nicht in der Liste Audio, Video und
Gamecontroller befindet, und klicken Sie auf [Beenden], um den Dialog Systemeigenschaften zu schließen.
8. Folgen Sie erneut den Schritten 1. – 4. und doppelklicken Sie auf [Universal Serial Bus Controllers] (Uni-
verseller Serieller Buscontroller), um die Geräteliste anzuzeigen.
Wenn als Symbol für das USB-kompatible Gerät angezeigt wird:
Wählen Sie das Symbol [USB Composite Device] (USB-Verbundgerät) und klicken Sie auf [Entfernen].
Klicken Sie im Dialogfeld Entfernen des Geräts bestätigen auf [OK]. Wie in Schritt 7. schließen Sie nun die Sys-
Um die Beispieldaten anhören zu können, sind ca. 30 MB freier Speicherplatz am
Installationsort von Windows auf der Festplatte erforderlich.
Wenn der Recording Input-Auswahlschalter auf DIGITAL gesetzt
wird, ist es nicht möglich, Audiodaten von Ihrem Computer aus
abzuspielen. Setzen Sie den Schalter auf INPUT + GUITAR/MIC.
Die Erklärungen, die Sie an dieser Stelle finden, sind für ein durchschnittliches Windows-System vorgese-
hen. Abhängig von Ihrem Computer kann es vorkommen, dass einige der Ordnernamen anders lauten.

Anschlüsse und Treiberinstallation (Windows)
36
temeigenschaften.
Wenn kein Symbol für ein USB-kompatibles Gerät vorhanden ist oder wenn nicht angezeigt wird:
Schließen Sie einfach die Systemeigenschaften.
Wenn Sie Windows Me verwenden und angezeigt wird:
Schließen Sie einfach die Systemeigenschaften.
9. Trennen Sie das USB-Kabel von Ihrem Computer und starten Sie Windows neu.
Grundlegende Bedienung des D-Out Smoother
■ Was ist der D-Out Smoother?
Wenn Audio auf einem digitalen Gerät, wie z.B. einem MD- oder DAT-Gerät wiedergegeben wird, das an den Digitalaus-
gang des UA-3 angeschlossen ist, wird eine bestimmte Zeitspanne für die Audioausgabe benötigt, da diese sofort nach der
Audiowiedergabe gesperrt wird. Daher wird eventuell für ein bis zwei Sekunden kein Klang ausgegeben oder Pitch und Tem-
po entsprechen nicht den Erwartungen. Bei dem D-Out Smoother handelt es sich um Software, die in derartigen Situationen
die problemlose Audiowiedergabe ermöglicht.
■ Installation des D-Out Smoother
1. Legen Sie die AUDIO Capture CD-ROM in Ihr CD-ROM-Laufwerk ein.
2. Klicken Sie auf die Windows-Schaltfläche [Start] und wählen Sie [Ausführen...].
3. Geben Sie in das Textfeld Öffnen: “E:\UA_Util\Setup.exe” ein und klicken Sie auf [OK]. Alternativ klicken Sie auf
[Durchsuchen], wählen die Datei [Setup(.exe)] im Ordner UA_Util des CD-ROM –Laufwerks und klicken anschließend
auf [Öffnen].
4. Das Installationsprogramm startet, und das Dialogfeld Choose Setup Language (Installationssprache wäh-
len) wird angezeigt. Geben Sie an, ob Sie die englische Version “English (United States)” oder die deutsche
Version ”German” von Windows verwenden und klicken Sie dann auf [OK].
5. Führen Sie den Rest der Installation entsprechend den Instruktionen aus, die auf dem Bildschirm angezeigt werden.
6. Wenn die Installation abgeschlossen ist, wird das Dialogfeld Setup Complete angezeigt. Klicken Sie auf [Fin-
ish] (Beenden).
Damit ist die Installation des D-Out Smoother abgeschlossen.
■ Starten des D-Out Smoother
1. Schließen Sie das UA-3 an den USB-Anschluss Ihres Computers an.
2. Klicken Sie auf die Windows-Schaltfläche [Start] und anschließend im Menü [Programme] auf [D-Out Smoother].
3. Der D-Out Smoother startet.
In einigen Fällen wird die Meldung “Cannot find USB Audio Device. Check USB cable or select
USB Audio Device again.” angezeigt (”USB Audio-Gerät kann nicht gefunden werden. Prüfen Sie
das USB-Kabel oder wählen Sie das USB Audio Device erneut aus.”), wenn das Gerät gestartet
wird. In diesem Fall hat der Computer das UA-3 nicht korrekt erkannt. Es ist möglich, dass das UA-3
nicht korrekt angeschlossen ist oder dass der Treiber nicht korrekt installiert wurde. Lesen Sie hierzu
Anschlüsse und Treiberinstallation (Windows) (S. 29) und prüfen Sie diese Punkte.
■ Verwendung des D-Out Smoother
Der D-Out Smoother verfügt über einen “ON/OFF”-Schalter und eine Schaltfläche ”TEST”.
“ON/OFF”-Schalter
Normalerweise lassen Sie diesen Schalter auf “ON” stehen, wenn Sie die Digitalausgabe des UA-3 verwenden.
Stellen Sie den Schalter auf “OFF”, wenn Sie das UA-3 anschließen oder ausstecken.
Wenn an diesem Punkt ein Dialogfeld angezeigt wird, das vorschlägt, Windows neu zu
starten, folgen Sie dem Vorschlag und starten Ihren Computer neu.
In dieser Erklärung gehen wir davon aus, dass Ihr CD-ROM-Gerät Laufwerk E: ist, aber der
Laufwerkname kann abhängig von Ihrem Computer anders lauten. In diesem Fall geben Sie
bitte den entsprechenden Laufwerknamen ein. Sie können den Laufwerknamen Ihres CD-
ROM-Laufwerks prüfen, indem Sie auf das Symbol Arbeitsplatz doppelklicken.
Das Dialogfeld Setting (Einstellungen) wird angezeigt, wenn Sie das Programm zum ersten Mal
starten. Achten Sie darauf, dass das Wave-Out Device “USB Audio Device,” anzeigt und klicken
Sie auf [OK]. Wenn zwei oder mehr USB-Audiogeräte angezeigt werden, informieren Sie sich bitte
in Verwendung des D-Out Smoother
(S. 36)
, und geben Sie das richtige Gerät an.

Anschlüsse und Treiberinstallation (Windows)
UA-3 37
DEUTSCHFRANÇAISESPAÑOLITALIANO ENGLISH
“TEST”-Schaltfläche
Klicken Sie auf die Schaltfläche [TEST]. Wenn der Testton erklingt, funktioniert der D-Out Smoother bei diesem Gerät.
Wenn Sie zwei oder mehr USB Audio Devices wie z.B. das UA-3 oder MA-150U verwenden, wählen Sie mit
dieser Schaltfläche das UA-3, für den der D-Out Smoother konzipiert ist.
Die Auswahl erfolgt wie anschließend beschrieben.
1. Wählen Sie im D-Out Smoother-Menü [Control] (Steuerung) den Punkt [Setting] (Einstellungen), um auf das
Dialogfeld Setting zuzugreifen. (Dieses Dialogfeld erscheint automatisch, wenn die Software zum ersten Mal
gestartet wird.)
2. Wählen Sie aus der Liste “USB Audio Device” und klicken Sie auf [OK].
3. Klicken Sie auf die Schaltfläche [TEST] und prüfen Sie, ob der Testton zu hören ist.
Wenn der Ton erklingt, funktioniert der D-Out Smoother für dieses Gerät. Wenn kein Ton erklingt, wählen Sie in
Schritt 2 ein anderes USB-Audiogerät und wiederholen die Schritte 1 bis 3.
■ Löschen (Deinstallation) des D-Out Smoother
Der D-Out Smoother unterstützt die Windows-Funktion Eigenschaften von Software. Sie können das Programm
wie folgt deinstallieren, wenn es nicht mehr benötigt wird.
1. Klicken Sie auf die Windows-Schaltfläche [Start] und wählen Sie [Einstellungen] - [Systemsteuerung].
2. Doppelklicken Sie in der
[Systemsteuerung]
auf [Software], um das Dialogfeld Eigenschaften von
Software zu öffnen.
3. Klicken Sie auf die Registerkarte [Installieren/Deinstallieren].
4. Klicken Sie in der Liste im Dialogfeld auf den Namen der Anwendung, die Sie löschen möchten.
5. Klicken Sie auf [Hinzufügen/Entfernen].
Die Anwendung, die Sie in Schritt 4 angegeben haben, wird nun entfernt.
Komfortable Funktionen
• Wenn im Setting-Dialog [Register to STARTUP] (automatischer Start) aktiviert wird, startet der D-Out
Smoother automatisch, wenn Sie den Computer starten.
• Wenn im Setting-Dialog [Minimize window when starting up] (Fenster beim Starten minimieren) aktiviert
ist, wird der D-Out Smoother sofort nach seinem Start minimiert und erlaubt Ihnen den effektiveren Einsatz
Ihres Computerbildschirms.
Wenn Sie den D-Out Smoother deinstallieren, sollten Sie zuerst [Register to STARTUP] im
Setting-Dialog deaktivieren. Sie gelangen in den Dialog Setting, indem Sie [Control] - [Setting]
(Steuerung - Einstellungen) wählen. (S. 46)

Anschlüsse und Treiberinstallation (Macintosh)
38
Anschlüsse und Treiberinstallation (Macintosh)
* Wenn Sie ein Windows-Anwender sind, lesen Sie bitte S. 29.
Bevor Sie das UA-3 verwenden können, müssen Sie einen Treiber installieren. UA-3 benutzt einen Treiber, der im
Mac OS enthalten ist.
Anschlüsse und Treiberinstallation
■ Anschluss der Geräte
(943)
Achten Sie stets darauf, die Lautstärke zu reduzieren, bevor Sie das UA-3 anschließen. Selbst wenn die Lautstärke
ganz zurückgedreht wurde, hören Sie eventuell Sound beim Einschalten der Geräte, aber dies ist normal und kein
Hinweis auf eine Fehlfunktion.
(921)
Um Fehlfunktionen und/oder Schäden an Lautsprechern oder anderen Geräten zu verhindern, reduzieren Sie stets die
Lautstärke und schalten alle Geräte ab, bevor Sie die Verbindungen einrichten. (Es ist nicht erforderlich, den
Computer vom Stromnetz zu trennen.) Verwenden Sie ein USB-Kabel, um das UA-3 an Ihren Computer
anzuschließen, bevor Sie Ihre Audiogeräte einschalten.
■ Erkennung des Geräts veranlassen
1. Schalten Sie Ihren Computer ein und starten Sie Mac OS.
2. Wählen Sie im Menü Apple die Option [Apple System Profiler].
3. Klicken Sie auf die Registerkarte [Devices and Volumes].
4. Schließen Sie das UA-3 an Ihren Computer mit einem USB-Kabel an.
Was ist ein Treiber?
-> S. 29
• Bevor Sie das USB-Kabel entfernen oder den Macintosh
neu starten, schließen Sie bitte alle Anwendungen. Sie
sollten auch die Lautstärke aller angeschlossenen Audio-
oder Verstärker-Systeme reduzieren.
• Dieses Gerät ist mit einem Schutzschaltkreis ausgestattet.
Nach dem Anschluss eines USB-Steckers benötigt das
Gerät eine kurze Zeitspanne (einige Sekunden), bis es den
normalen Betrieb aufnimmt.
• Um Schäden an Ihren Lautsprechern zu vermeiden, drehen Sie die
Lautstärkeregelung dieses Geräts und aller angeschlossenen Audiogeräte zurück.
• Achten Sie darauf, alle Anwendungen zu schließen, die ausgeführt werden, bevor
Sie den Anschluss herstellen.
UA-3
Stereoanlage
Lautsprecher etc.
LINE IN, AUX IN
Audio-
Kabel
USB-Kabel
* Nach dem Start
des Computers anschließen
Computer
USB-
Anschluss
USB-
Anschluss
LINE OUT
Stereo-
Kopfhörer

Anschlüsse und Treiberinstallation (Macintosh)
UA-3 39
DEUTSCHFRANÇAISESPAÑOLITALIANO ENGLISH
5. Um sicherzustellen, dass das UA-3 erfolgreich erkannt wird, wählen Sie [Update all information] im Menü
[Commands]. Sie sollten die folgenden drei Audio-Geräte im USB-Abschnitt sehen, wie unten gezeigt:
Wenn die Anzeige korrekt ist, war die Installation des UA-3-Treibers erfolgreich. Wählen Sie [Quit] im Menü
[File], um den Dialog Apple System Profiler zu schließen. Anschließend nehmen Sie die Soundeinstellungen
vor wie unten beschrieben.
Wenn die Anzeige nicht korrekt ist, sollten Sie versuchen, das UA-3 vom USB-Anschluss zu trennen und ca. zehn
Minuten zu warten. Anschließend wiederholen Sie das Verfahren, beginnend mit Schritt 4.
■ Soundeinstellungen vornehmen
6. Wählen Sie im Menü Apple die Optionen [Control Panels] -
[Sound], um den Dialog Sound zu öffnen.
7. Klicken Sie auf die Registerkarte [Speakers].
8. Reduzieren Sie die Lautstärke des UA-3 und Ihrer Audiogeräte und
klicken Sie anschließend auf [Start Test].
9. Testsounds werden von links nach rechts - wie die Bildschirmanzeige -
ausgegeben. Passen Sie die Lautstärke mit der Leiste [Main Volume]
an. Wenn Sie fertig sind, klicken Sie auf [Stop Test].
Je nach OS-Version ist eventuell keine Leiste [Main Volume]
vorhanden. Verwenden Sie in diesem Fall die Leiste [Volume] in
[Output], um die Lautstärke anzupassen.
Wenn der Recording Input-Auswahlschalter auf DIGITAL gesetzt
wird, ist es nicht möglich, Audiodaten von Ihrem Computer aus
abzuspielen. Setzen Sie den Schalter auf INPUT + GUITAR/MIC.

Anschlüsse und Treiberinstallation (Macintosh)
40
10.Wählen Sie [Input] im Dialog Sound. Anschließend wählen Sie in
Choose a source for sound input:die Option USB Audio.
11. Wenn Sie alle Einstellungen vorgenommen haben, wählen Sie [Quit] im Menü [File], um den Dialog Sound zu schließen.
Bekannte Probleme: UA-3
• Einige Anwendungen, wie z.B. Metro Series von Cakewalk und Spark Series von TC Work können Sound nicht
mit 48 kHz aufnehmen/wiedergeben. Bitte verwenden Sie das UA-3 mit 44.1 kHz.
• Während die Audioanwendung aufnimmt oder Daten abspielt, schließen Sie das USB-Kabel nicht an und trennen
Sie es nicht vom Anschluss oder betätigen den Recording Input-Auswahlschalter.
Dies kann dazu führen, dass die Anwendung abstürzt.
• Sie hören eventuell Sound-Aussetzer und/oder Rauschen, wenn Sie gleichzeitig Sound aufnehmen und
wiedergeben. Dies ist durch die hohe CPU-Auslastung bedingt. Das Rauschen sollte jedoch nicht in der
Aufnahme selbst auftreten. Derartiges Rauschen sollte nur im Wiedergabesignal vorkommen.
• Wenn Sie den Einsatz von Virtual Sound Canvas 3 planen, müssen Sie die Option [Performance] im Menü
[Setting] wählen und den Expression Mode auf Response Priority setzen.
• Der Standardtreiber, der mit Mac OS ausgeliefert wird, ist nicht ASIO-kompatibel.
• Wenn Sie Ihren Computer mit angeschlossenem UA-3 starten, wird der Computer eventuell instabil. Starten Sie
den Computer in diesem Fall, bevor Sie das UA-3 anschließen, und verbinden Sie das UA-3 mit dem Computer
nach dem Hochfahren.
Überprüfung der Soundausgabe
Nachdem die Verbindungen korrekt hergestellt wurden, können Sie die Beispieldaten wiedergeben, um Ihre Installation zu prüfen.
■ Abspielen der Beispieldaten
In dieser Beschreibung wird Standard-Macintosh-Funktionalität für die Wiedergabe der Beispieldaten eingesetzt. Sie finden die
Beispieldaten auf der AUDIO Capture CD-ROM. Legen Sie die CD-ROM in das CD-ROM-Laufwerk Ihres Computers ein.
1. Kopieren Sie “Alright auf den Desktop, indem Sie die Datei aus dem Ordner “Sample_Data” der CD-ROM auf
den Desktop ziehen.
2. Starten Sie den QuickTime Player, der mit Mac OS ausgeliefert wird.
Der QuickTime Player befindet sich normalerweise im Ordner
QuickTime des Ordners Applications auf Ihrer Festplatte.
• Wenn Sie USB Audio nicht sehen, sollten Sie den Dialog Sound schließen.
Anschließend stecken Sie das UA-3 aus und warten ca. zehn Sekunden.
Versuchen Sie danach, die Schritte erneut auszuführen, beginnend mit Schritt 2.
• Aktivieren Sie nicht [Play sound through output device].
Um die Beispieldaten anhören zu können, sind ca. 30 MB freier Speicherplatz am
Installationsort Ihres Systems auf der Festplatte erforderlich.

Anschlüsse und Treiberinstallation (Macintosh)
UA-3 41
DEUTSCHFRANÇAISESPAÑOLITALIANO ENGLISH
3. Wählen Sie im Menü [File] die Option [Open Movie], wählen Sie die
kopierte Datei “Alright,” und klicken Sie auf [Convert], um sie zu
öffnen.
4. Klicken Sie auf den Wiedergabeschalter.
Die Beispieldaten werden nun abgespielt.
Haben Sie die Beispieldaten gehört?
Wenn die Beispieldaten korrekt wiedergegeben wurden, wurden Ihr Computer und das UA-3 korrekt angeschlossen
und die Treiber korrekt installiert. Wenn die Daten nicht richtig wiedergegeben wurden, lesen Sie bitte
Fehlerbehebung (S. 42). Der Abschnitt zur Fehlerbehebung enthält Hinweise, die Ihnen dabei helfen, Probleme dieser
Art zu finden und zu korrigieren.
Damit ist die Herstellung des Anschlusses und die Treiberinstallation für das UA-3 abgeschlossen.
Wenn der Recording Input-Auswahlschalter auf DIGITAL gesetzt wird, ist es nicht möglich,
Audiodaten von Ihrem Computer aus abzuspielen. Setzen Sie den Schalter auf INPUT +
GUITAR/MIC.

Fehlerbehebung
42
Fehlerbehebung
Wenn während der Verwendung des UA-3 unerwartete Fehler auftreten, lesen Sie bitte zunächst dieses Kapitel. Es enthält eine Fülle von
Hinweisen, die Ihnen bei der Lösung der Probleme helfen werden.
Die Probleme, die vom Abschnitt Fehlerbehebung abgedeckt werden, sind nach den Betriebssystemen geordnet, unter denen das Problem
eventuell auftreten kann. Verwenden Sie das Symbol links von der Überschrift, um die benötigten Informationen zu finden.
Probleme, die sowohl unter Windows als auch auf dem Macintosh auftreten können
Probleme, die nur unter Windows auftreten
Probleme, die nur auf dem Macintosh auftreten
Wenn Sie zum ersten Mal mit einem Computer arbeiten oder die Erklärung einer Vorgehensweise nicht verstehen, lesen Sie bitte im
Benutzerhandbuch Ihres Computers oder Ihres Betriebssystems nach.
Wenn das UA-3 nicht wie erwartet funktioniert, sollten Sie zuerst folgende Punkte prüfen.
Probleme in Verbindung mit dem USB-Treiber
“Hardware-Assistent” startet nicht automatisch
“Hardware-Assistent” endet vor Installationsabschluss
• Wenn das USB-Kabel angeschlossen oder abgetrennt ist, dauert es ca. 15 Sekunden (oder mehr), bis das UA-3 erkannt wird.
• Ist das USB-Kabel richtig angeschlossen?
Achten Sie darauf, dass das UA-3 und der Computer vorschriftsmäßig durch das USB-Kabel verbunden sind.
• Kann USB auf Ihrem Computer verwendet werden?
Lesen Sie im Benutzerhandbuch Ihres Computers nach und stellen Sie sicher, dass der Computer USB verwenden kann.
• Verfügt Ihr Computer oder USB-Hub über ausreichende Stromversorgungskapazität?
Das UA-3 kann nicht angeschlossen werden, wenn es nicht mit ausreichend Spannung versorgt wird. Prüfen Sie, ob einer der folgenden
Fälle zutrifft.
Wenn Sie das UA-3 mit einem Notebook verwenden, das sich im Batteriebetrieb befindet, funktionieren einige Computermodelle
möglicherweise unzuverlässig. Wenn das der Fall ist, schließen Sie den AC-Adapter an Ihr Notebook an.
Der Stromsparmodus Ihres Computers reduziert eventuell die Spannung, mit der der USB-Anschluss versorgt wird. Prüfen Sie die
Einstellungen Ihres Computers.
In einigen Fällen kann das UA-3 nicht mit einem bus-betriebenen Hub (ein Hub, der keine eigene Stromversorgung enthält) verwendet
werden. Bitte verwenden Sie einen Hub mit selbstständiger Versorgung (einen Hub, der eine eigene Stromversorgung enthält).
• Entspricht Ihr Computer den USB-Spezifikationen?
Wenn Sie einen Computer verwenden, der nicht den USB-Spezifikationen entspricht (wie z.B. ein selbstgebauter Computer), wird das
Gerät eventuell instabil. In solchen Fällen können Sie das Problem möglicherweise lösen, indem Sie einen USB-Hub anschließen, der
eine eigene Stromversorgung enthält.
• Wird “Unbekanntes Gerät” für ”andere Geräte” oder “Universal Serial Bus Controllers” angezeigt?
Verwenden Sie folgendes Verfahren, um “Unknown Device” (Unbekanntes Gerät” aus “Other devices” (Andere Geräte) (Universal
Serial Bus Controller) zu löschen und starten Sie anschließend den Computer neu.
1. Doppelklicken Sie in der Systemsteuerung von Windows auf das Symbol [System], um das Dialogfeld Eigenschaften von
System zu öffnen.
2. Klicken Sie auf die Registerkarte [Geräte-Manager].
3. Doppelklicken Sie auf [Andere Geräte] (Universal Serial Bus controllers), um eine Liste der Geräte zu erhalten.
4. Wählen Sie aus der Liste Unbekanntes Gerät und klicken Sie auf [Entfernen].
5. Klicken Sie im Dialogfeld Entfernen des Geräts bestätigen auf [OK].
6. Stellen Sie sicher, dass die Liste nicht Andere Geräte oder Unbekanntes Gerät enthält, und klicken Sie auf [Schließen], um
das Dialogfeld zu schließen.
Das Dialogfeld “Add New Hardware Wizard” (Assistent neue Hardware
hinzufügen) wird angezeigt, obwohl Sie die Treiber installiert haben.
Wenn Ihr Computer oder USB-Hub über zwei oder mehrere USB-Anschlüsse verfügt, kann der erste Anschluss des UA-3 an einen USB-
Anschluss dazu führen, dass das Dialogfeld Hardware-Assistent angezeigt wird, obwohl die Treiber bereits installiert wurden.
Installieren Sie die Treiber erneut. Gehen Sie dabei vor wie in Anschlüsse und Treiberinstallation (Windows) (S. 29) beschrieben. Hierbei
handelt es sich nicht um einen Fehler.
Um zu prüfen, ob es sich bei “Unbekanntes Gerät” um das UA-3 handelt, trennen Sie das USB-Kabel
des UA-3 vom Anschluss und prüfen, ob “Unbekanntes Gerät” ausgeblendet wird. Anschließend
verbinden Sie das UA-3 wieder mit dem Anschluss und löschen “Unbekanntes Gerät”.

Fehlerbehebung
UA-3 43
DEUTSCHFRANÇAISESPAÑOLITALIANO ENGLISH
Treiber wurden nicht korrekt installiert
Verwenden Sie das Verfahren, das in Löschen des USB Audio Device-Treibers (S. 35) beschrieben wird, um den USB Audio Device-
Treiber zu löschen, der auf Ihrem Computer installiert ist, und installieren Sie die UA-3-Treiber erneut, wie in Anschlüsse und
Treiberinstallation (Windows) (S. 29) beschrieben. Prüfen Sie, ob ein Gerät mit der Bezeichnung “Unknown Device” (Unbekanntes Gerät)
in “Other devices” (Andere Geräte) oder in ”Universal Serial Bus controllers” vorhanden ist.
Wenn Sie “Unbekanntes Gerät” finden, löschen Sie diesen Eintrag.
Ein Dialogfeld mit den Angaben “Unbekanntes Gerät gefunden” wird
angezeigt, und ich kann den Treiber nicht installieren
Abhängig von Ihrem Computer wurden bei Auslieferung Ihres PCs eventuell nicht alle Windows 98-Dateien installiert, die für die
Unterstützung von Audio über USB erforderlich sind.
Bitte wenden Sie sich diesbezüglich an den Hersteller Ihres Computers.
Probleme bei Verwendung des UA-3
Betriebssystem wird instabil
• Wenn Sie einen Computer bei bereits angeschlossenem UA-3 hochfahren, wird der Computer möglicherweise instabil.
In diesem Fall fahren Sie den Computer bitte hoch, während das UA-3 nicht mit dem Computer verbunden ist, und schließen Sie das UA-
3 erst nach dem Hochfahren an.
■ Kein Sound
• Wurde der Recording Input-Auswahlschalter des UA-3 auf “INPUT + GUITAR/MIC” gesetzt?
Wenn der Recording Input-Auswahlschalter auf “DIGITAL” gestellt wird, werden die am Digitaleingabe-Anschluss eingespeisten
Audiosignale ausgegeben. Die Audiodaten des Computers werden nicht ausgegeben.
• Ist ein Digitalgerät, wie z.B. ein MD, an die Digitalausgabe des UA-3 angeschlossen?
Abhängig von Ihrer Anwendung kann das Abspielen von Sound mit einem digitalen Gerät, wie z.B. MD, das an die Digitalausgabe des UA-3
angeschlossen ist, dazu führen, dass die Digitalaudioausgabe sofort nach der Wiedergabe einige Zeit lang gesperrt ist, so dass eine oder zwei
Sekunden lang kein Sound erklingt. In diesem Fall können Sie die D-Out Smoother-Software auf der beiliegenden CD-ROM verwenden, um
eine problemlose Audiowiedergabe zu erreichen. Einzelheiten hierzu finden Sie unter Grundlegende Bedienung des D-Out Smoother (S. 36).
• Versuchen Sie, das CD-Gerät Ihres Computers für das Abspielen einer Audio-CD zu verwenden?
Wenn Sie im CD-ROM-Laufwerk Ihres Computers eine Audio-CD abspielen möchten, lesen Sie bitte Wenn Sie das CD-ROM-Gerät Ihres
Computers für das Abspielen einer Audio-CD verwenden oder wenn Sie Hintergrundmusik für Spiele mit dem UA-3 abspielen. (S. 34).
• Werden mehrere Anwendungen ausgeführt?
Wenn mehrere Anwendungen gleichzeitig ausgeführt werden, wird eventuell eine Fehlermeldung angezeigt. Klicken Sie in diesem Fall
auf [OK], und schließen Sie die anderen Anwendungen.
Auch bei geschlossenem Anwendungsfenster läuft die Anwendung noch, wenn sie sich in der Taskleiste befindet. Achten Sie daher
darauf, alle nicht benötigten Anwendungen zu beenden, die in der Taskleiste angezeigt werden.
• Haben Sie das Audiodaten-Ausgabeziel für das Betriebssystem angegeben?
Als Audiodaten-Ausgabeziel für den Computer muss UA-3 angegeben werden. Details zu dieser Einstellung finden Sie unter Angabe
des Audioeingabe/Ausgabegeräts (Windows S. 33) oder Soundeinstellungen vornehmen (Macintosh S. 39).
• Haben Sie das Audiodaten-Ausgabeziel für Ihre Wiedergabesoftware angegeben?
Bei einigen Anwendungen, wie z.B. Cool Edit Pro LE, müssen Sie als Audiodaten-Ausgabeziel UA-3 angeben. Einzelheiten zu dieser
Einstellung finden Sie im Benutzerhandbuch der Software.
• Wurden die Treiber richtig installiert?
Bevor Sie mit dem UA-3 Audiodaten wiedergeben können, muss der USB Audio Device (USB-Audio-Gerät)-Treiber installiert
werden. Einzelheiten zur Installation und zu den Einstellungen erhalten Sie unter Anschlüsse und Treiberinstallation (Windows S.
29, Macintosh S. 38).
• Wurden die verschiedenen Lautstärke-Regler nach oben geschoben?
Passen Sie die Lautstärke mit den Reglern an, wie in Einstellung der Lautstärkeregelung (Windows S. 33) oder
Soundeinstellungen vornehmen (Macintosh S. 39) beschrieben.
■ Sound ist verzerrt.
• Leuchtet die Peak-Anzeige rot?
Wenn Sie Sound aus den Line-Eingangsbuchsen einspeisen, verwenden Sie den Line Input-Schieberegler des UA-3, um die
Eingangslautstärke zu reduzieren. Wenn Sie Sound aus den Guitar- oder Mic-Eingangsbuchsen einspeisen, verwenden Sie den Guitar/
Mic-Input Schieberegler, um die Eingangslautstärke zu reduzieren. Ebenso wird sich die Anzahl der LEDs in der Output-Pegel-
Anzeige entsprechend der Ausgabelautstärke des UA-3 ändern. Wenn die rote LED aufleuchtet, verwenden Sie die Line Output-
Lautstärke, um die Lautstärke zu reduzieren.
Der Lautstärke-Pegel des Instruments, das an LINE IN angeschlossen ist, ist zu
niedrig.
• Benutzen Sie eventuell ein Anschlusskabel mit einen Widerstand?
Verwenden Sie ein Anschlusskabel, das keinen Widerstand enthält.
• Wurde der Line Input-Schieberegler (S. 28) entsprechend nach oben geschoben?
■ Das Abspielen von Sound wird von Rauschen gestört
• Ist ein Mikrofon angeschlossen?
Wenn ein Mikrofon an das UA-3 angeschlossen ist, verwenden Sie den Guitar/Mic-Schieberegler, um die Eingangslautstärke zu reduzieren.

Fehlerbehebung
44
•
Der Grafikbeschleuniger Ihres Computers kann Rauschen während der Audiowiedergabe verursachen.
Um die Hardwarebeschleunigung auf “None” (Keine) einzustellen, gehen Sie wie folgt vor:
1. Doppelklicken Sie in Windows in der Systemsteuerung auf [Anzeige], um das Dialogfeld Eigenschaften von Anzeige zu
öffnen, und klicken Sie auf die Registerkarte [Einstellungen].
2. Klicken Sie auf [Erweitert], um die Eigenschaften zu öffnen, und klicken Sie auf die Registerkarte [Leistung].
3. Grafik verschieben Sie den Regler Hardwarebeschleunigung auf Keine, und klicken Sie auf [OK].
4. Klicken Sie im Dialogfeld Eigenschaften von Anzeige auf OK, um das Dialogfeld zu schließen.
Starten Sie Ihren Computer anschließend erneut.
• Im Line-Eingang oder Mic-Eingang ertönt Rauschen
Wenn ein MIDI-Soundmodul und das UA-3 via USB an den gleichen Computer angeschlossen sind und die Ausgabe des MIDI-
Soundmoduls mit den Line-Eingangsbuchsen des UA-3 verbunden ist, kann Rauschen vom Computer via MIDI-Soundmodul übertragen
und vom UA-3 ausgegeben werden. In solchen Fällen verwenden Sie einen Hub mit selbständiger Stromversorgung, um das MIDI-
Soundmodul und das UA-3 parallel anzuschließen, oder schließen Sie das MIDI-Soundmodul via serielle Schnittstelle oder MIDI-
Schnittstelle an.
• Rauschen kann auftreten, wenn Aufnahme und Wiedergabe gleichzeitig erfolgen.
Wenn Sie gleichzeitig Daten aufnehmen und wiedergeben, wird die Wiedergabe möglicherweise abhängig von der Systemleistung
unterbrochen. Dieser Effekt kann als Rauschen wahrgenommen werden. Da jedoch die Aufnahme Priorität erhält, gehen die
aufgenommenen Daten nicht verloren.
• Dieses Problem kann gelöst werden, indem das Gestell Ihres Computers ordnungsgemäß geerdet wird bzw. durch
vorschriftsmäßige Erdung via Erdungsstift des Steckers im AC-Netzkabel, das mit Ihrem Computer mitgeliefert wurde. Stellen Sie
auch sicher, dass sich keine Geräte in der Nähe befinden, die ein starkes magnetisches Feld ausstrahlen, wie z.B. ein Fernsehgerät
oder ein Mikrowellenherd.
• Ist eine große Anzahl von Audiogeräten angeschlossen?
Wenn eine große Anzahl von Audiogeräten angeschlossen ist, kann Rauschen auftreten. Schließen Sie keine Audiogeräte an, die Sie nicht
verwenden.
■ Der Sound wird während der Audiowiedergabe unterbrochen.
• Versuchen Sie, den Speicher zu erhöhen
Sie können die Verarbeitungsleistung Ihres Computers verbessern, indem Sie zusätzlichen Speicher einbauen. Detaillierte Informationen
zum Hinzufügen von Speicher finden Sie im Benutzerhandbuch Ihres Computers.
• Erfüllt Ihr Computer die USB-Anforderungen?
Der Sound kann unterbrochen werden, wenn Sie einen Computer verwenden, der in Bezug auf Elektrik nicht die USB-Anforderungen
erfüllt. In diesem Fall kann das Problem gelöst werden, wenn Sie einen USB-Hub anschließen, der eine eigene Stromversorgung enthält.
• Werden mehrere Anwendungen ausgeführt?
Wenn Sie während der Wiedergabe mit mehreren Anwendungen arbeiten oder eine weitere Anwendung starten, wird die Wiedergabe
eventuell auf bestimmten Computersystemen unterbrochen. Schließen Sie alle nicht benötigten Anwendungen und versuchen Sie es
erneut. Wenn das Problem damit nicht gelöst wird, versuchen Sie, den Computer neu zu starten.
• Versuchen Sie, folgende Änderungen an den Laufwerkeinstellungen vorzunehmen.
* Die nachfolgend genannten Einstellungen sind möglicherweise auf Ihrem Computer nicht vorhanden.
1. Doppelklicken Sie in Windows in der Systemsteuerung auf [System], um das Dialogfeld Eigenschaften von System zu
öffnen, und klicken Sie auf die Registerkarte [Geräte-Manager].
2. Doppelklicken Sie auf Laufwerke, um eine Liste der Laufwerke anzuzeigen.
3. Wählen Sie GENERIC IDE DISK TYPExx aus der Liste, und klicken Sie auf [Eigenschaften], um das Dialogfeld
Eigenschaften von GENERIC IDE DISK TYPExx anzuzeigen.
* Das “xx” in GENERIC IDE DISK TYPExx steht für eine Nummer, die jeweils von Ihrem System
abhängt.
4. Klicken Sie auf die Registerkarte [Einstellungen], markieren Sie das Kontrollkästchen [DMA] unter Optionen, und klicken Sie
auf [OK], um das Dialogfeld zu schließen.
* Abhängig von Ihrem System kann ein Dialogfeld für die DMA-Einstellungen angezeigt werden.
Nachdem Sie den Inhalt des Felds geprüft haben, klicken Sie auf OK oder Abbrechen.
5. Klicken Sie im Dialogfeld Eigenschaften von System auf [OK], um das Dialogfeld zu schließen.
Starten Sie Ihren Computer neu, so dass die obigen Einstellungen übernommen werden.
■ Audiowiedergabe stoppt
• Auf einigen Computern können die Energieverwaltungseinstellungen in der Systemsteuerung dazu führen, dass die Wiedergabe
stoppt.
Die Energieverwaltungseinstellungen, die angezeigt werden, wenn Sie auf Energieverwaltung klicken, sind je nach PC-System
unterschiedlich. Ein Beispiel für die Einstellungen erhalten Sie untenstehend, aber Sie sollten zusätzlich im Handbuch Ihres Computers
nachschlagen. Einige Computer sind eventuell nicht so konfiguriert, wie nachfolgend beschrieben wird.
1. Doppelklicken Sie in Windows in der Systemsteuerung auf [System], um das Dialogfeld Eigenschaften von System zu
öffnen, und klicken Sie auf die Registerkarte [Geräte-Manager].
2. Doppelklicken Sie auf [Systemgeräte] , um eine Liste der Geräte anzuzeigen.
3. Wählen Sie aus dieser Liste [Unterstützung für Advanced Power Management], und klicken Sie auf [Eigenschaften], um
das Dialogfeld Eigenschaften der Unterstützung für Advanced Power Management anzuzeigen.
4. Klicken Sie auf die Registerkarte [Einstellungen] und aktivieren Sie in Fehlerbehebung das Kontrollkästchen
[Stromstatusabfrage deaktivieren] . Klicken Sie anschließend auf [OK].
5. Klicken Sie im Dialogfeld Eigenschaften von System auf [OK], um das Dialogfeld zu schließen.
6. Starten Sie Windows neu.

Fehlerbehebung
UA-3 45
DEUTSCHFRANÇAISESPAÑOLITALIANO ENGLISH
Digital aufgenommener Sound ist verzerrt, die Tonhöhe ändert sich oder
enthält Rauschen
• Wenn Sie ein langes Digitalkabel verwenden, kann Rauschen auftreten oder der Sound wird verzerrt, wenn das Kabel
angeschlossen wird. Verwenden Sie Digitalkabel mit einer Länge von einem Meter oder kürzer.
• Entspricht die Sampling-Frequenz-Einstellung in der Anwendung der Sampling-Frequenz des Digitalgeräts, das mit dem
Digitaleingabe-Anschluss verbunden ist?
• Bei Digitalaufnahmen sind monaurale Aufnahmen nicht möglich. Stellen Sie Ihre Aufnahmesoftware auf “Stereo”.
Im aufgenommenen Sound ist Rauschen zu hören
• Die Erfahrung zeigt, dass Rauschen bei Sound auftreten kann, der auf den Computermodellen der iMac-Serie aufgenommen
wurde, die nach dem Sommer 2000 auf den Markt kamen.
• In der SimpleSound-Anwendung, die im MacOS enthalten ist, erklingt Rauschen im Ton, wenn der Sound sofort nach einer
digitalen Aufnahme wiedergegeben wird. Speichern Sie den Sound zuerst und versuchen Sie anschließend die Wiedergabe erneut.
• Aktualisieren Sie den USB Audio-Treiber auf 1.0.5f4.
Wenn eine USB Audio-Treiberversion vor 1.0.4 mit dem Mac OS mitgeliefert wurde, sollten Sie den Treiber auf 1.0.5f4 aktualisieren.
Sie können den Treiber von dieser URL herunterladen:
http://asu.info.apple.com/swupdates.nsf/artnum/n11703
Prüfung der USB Audio-Treiberversion
1. Schließen Sie das UA-3 an den Computer an.
2. Wählen Sie im Menü Apple die Option [Apple System Profiler].
3. Klicken Sie auf die Registerkarte [Devices and Volumes].
4. Der Bildschirm zeigt im USB-Abschnitt “Audio (UA-3 USB Audio Device) an.” Klicken Sie auf den Pfeil links von diesem Text.
5. Die Nummer, die rechts von“Driver version” angezeigt wird, ist die Version des USB Audio-Treibers.
■ Eine leere (stumme) Datei wird bei der Aufnahme erstellt
• Versuchen Sie, die Bitrate auf “16bit” einzustellen.
Wenn Sie Windows 98 Second Edition verwenden und Ihre Aufnahmesoftware auf eine Bitrate von 8 Bit eingestellt wurde, wird eventuell
eine leere Datei erstellt und Sie können keine Aufnahmen erstellen. In diesem Fall wird eine korrekte Aufnahme möglich, wenn Sie die
Bitrate auf “16 bit” setzen.
• Daten, die das SCMS-Attribut enthalten, können nicht digital aufgenommen werden.
Das UA-3 unterstützt SCMS (S. 26). Das bedeutet, dass das UA-3 bei der Einspeisung von Daten mit SCMS-Attribut (z.B. Daten von
einem MD-Gerät, die von einer kommerziellen Musik-CD digitalkopiert wurden) über den Digitalanschluss nicht in der Lage ist, diese
Daten auf dem Computer aufzuzeichnen. (Der Sound wird von den Line-Ausgangsbuchsen und aus der Kopfhörer-Buchse ausgegeben.)
Digitalaufnahme nicht möglich
• Wurde der Recording Input-Auswahlschalter auf “DIGITAL” gesetzt?
• Wurde die Anwendung auf die gleiche Sampling-Frequenz eingestellt wie das Digitalgerät, das mit dem Digitaleingabe-Anschluss
verbunden ist?
• Aufnahmen sind nicht mehr möglich, wenn Sie die Sampling-Frequenz (z.B. zwischen Digital Broadcast A-Modus und B-Modus)
eines Geräts umschalten, während das Gerät mit den Digitaleingabe-Anschlüssen verbunden ist.
Wenn die Sampling-Frequenz umgeschaltet wird, müssen Sie das Digitalkabel ausstecken und anschließend erneut anschließen.
• Es ist nicht möglich, Digitaldaten in einem anderen Format als Consumer Digital Audio Device aufzunehmen.
Musik-CD-Aufnahme nicht möglich
• Das UA-3 kann mit CoolEdit Pro LE oder anderen Programmen keine Musik-CDs im CD-ROM-Laufwerk des Computers aufnehmen.
Um Musik-CDs im CD-ROM-Laufwerk des Computers aufzunehmen, müssen Sie zuerst die Soundkarte Ihres Computers als audio device
(Audio-Gerät) (Waveform Record) auswählen. Dieses Gerät wird von CoolEdit Pro LE (oder der von Ihnen benutzten Anwendung) für die
Aufnahme verwendet. Anschließend können Sie die Aufnahme beginnen. Wenn Sie eine Musik-CD mit einer Soundkarte aufnehmen, deaktivieren
Sie “Enable digital CD audio for this CD-ROM device (Digitales CD-Audio für dieses Gerät aktivieren)”. Diese Option wurde
aktiviert in Wenn Sie das CD-ROM-Gerät Ihres Computers für das Abspielen einer Audio-CD verwenden oder wenn Sie Hintergrundmusik für
Spiele mit dem UA-3 abspielen. (S. 34).
Das Laufwerk veränderte sich nach der Rückkehr vom Standby-Modus oder
Ruhezustand
• Wenn Windows 2000 vom Standby-Modus oder Ruhezustand zurückkehrt, ändern sich die Einstellungen des Ausgabelaufwerks
aufgrund eines Windowsproblems.
Starten Sie die Mixer-Anwendung wie in Einstellung der Lautstärkeregelung (S. 33) beschrieben, und passen Sie den Regler USB Audio
(Speaker) (USB Audio – Lautsprecher) entsprechend an.
Hintergrundmusik bei Spielen wird nicht ausgegeben
• Verwendet das Spiel eine Audio-CD für die Hintergrundmusik?
Wenn eine Audio-CD verwendet wird, um Hintergrundmusik für das Spiel abzuspielen, lesen Sie bitte Wenn Sie das CD-ROM-Gerät Ihres
Computers für das Abspielen einer Audio-CD verwenden oder wenn Sie Hintergrundmusik für Spiele mit dem UA-3 abspielen. (S. 34).
Typische Softwareprobleme
Installation nicht möglich
• Befindet sich die beigelegte CD-ROM im CD-ROM-Laufwerk Ihres Computers?
• Wurden der CD-ROM-Laufwerknamen und der Installationsdateinamen während der Installation korrekt angegeben?
• Ist genügend Platz auf der Festplatte frei?

Fehlerbehebung
46
Erhöhen Sie den freien Plattenspeicher auf Ihrer Festplatte. Löschen Sie alle nicht benötigten Dateien (verschieben Sie sie in den
Papierkorb). Klicken Sie anschließend mit der rechten Maustaste auf den Papierkorb und wählen Sie die Option Papierkorb leeren.
Als Alternative können Sie auch Ihrem System eine weitere Festplatte hinzufügen.
• Wurden andere Anwendungen ausgeführt, als Sie die Installation ausführten?
Beenden Sie alle Anwendungen und führen Sie die Installation erneut aus.
Anwendung kann nicht gestartet werden
• Werden mehrere Anwendungen ausgeführt?
Es ist möglich, dass nicht genügend Speicher vorhanden ist, um eine weitere Anwendung zu starten. Beenden Sie alle nicht benötigten
Anwendungen, und starten Sie dann die neue Anwendung erneut. Falls immer noch eine Fehlermeldung angezeigt wird, müssen Sie Ihren
Computer neu starten.
Wenn Sie eine Anwendung starten, wird ein Fehler angezeigt.
• Wenn mehrere Anwendungen gleichzeitig gestartet werden, wird eventuell eine Fehlermeldung angezeigt.
Klicken Sie in diesem Fall auf [OK], und schließen Sie alle nicht benötigten Anwendungen.
Auch wenn das Anwendungsfenster geschlossen ist, wird die Anwendung möglicherweise noch ausgeführt, wenn sie sich in der
Taskleiste befindet. Achten Sie darauf, alle nicht benötigten Anwendungen zu beenden, die in der Taskleiste angezeigt werden.
• Wenn Sie Cakewalk Pro Audio verwenden, müssen Sie darauf achten, dass die Sampling-Frequenz von Cakewalk Pro Audio auf
44.1 kHz eingestellt wird.
Bei Cakewalk ProAudio 7, 8, and 9 kann die Sampling-Frequenz wie folgt eingestellt werden.
[Tools] - [Audio options] - [Settings] - [Default sampling rate]
Eine Anwendung stürzt ab
Wenn Sie Digitalmusik-Software für die Digitalaufnahme verwenden, während der Recording Input-Schalter des UA-3 auf DIGITAL
gesetzt wird, stellen Sie in jedem Fall sicher, dass das Digitalgerät angeschlossen wird.
Aufgrund von Windowsbeschränkungen kann in bestimmten Anwendungen die Funktion der Maus oder ähnlicher Geräte deaktiviert sein,
wenn kein Digitalgerät angeschlossen ist. Dies weist nicht auf eine Fehlfunktion hin.
Wenn die Maus oder ähnliche Geräte nicht funktionieren, schließen Sie das Digitalgerät wieder an.
• Die oben genannten Situationen können mit folgenden Anwendungen auftreten
(Stand Januar, 2001)
•Logic Audio 3.0 oder 4.0 Während der Aufnahme
•Cubase VST 3.7 Beim Start/Aufnahme/Wiedergabe
•Cubase ASIO Multimedia Setup Beim Testen
Die oben genannten Ereignisse oder Situationen treten nicht bei folgenden Anwendungen auf.
•Cakewalk Pro Audio 7, 8, und 9
•CoolEditProLE
•SoundRecorder (Gebündelt mit Windows98)
Ein Verknüpfungsfehler wird beim Start von Windows angezeigt
Wenn Sie den D-Out Smoother mit aktiviertem Register to STARTUP (automatischer Start) deinstallieren (S. 37), wird beim Start von
Windows die folgende Fehlermeldung angezeigt. Klicken Sie in diesem Fall auf [NO], um die Meldung zu schließen.
Gehen Sie wie folgt vor, um diese Meldung zu löschen.
1. Klicken Sie auf die Windows-Schaltfläche [Start] und wählen Sie[Einstellungen] - [Taskleiste & Startmenü].
2. Klicken Sie auf das Register [Programme im Menü “Start”] und klicken Sie auf [Entfernen].
3. Wählen Sie [Programme] - [Autostart] - [SmoothDo], und klicken Sie auf [Entfernen].
Detaillierte Informationen zur Installation von Festplatten finden Sie im Benutzerhandbuch
für Ihren Computer und für Windows.

UA-3 47
DEUTSCHFRANÇAISESPAÑOLITALIANO ENGLISH
Vous devez lire ceci avant de procéder à un
enregistrement numérique
Une opération d’enregistrement, de distribution, de vente, de location, de lecture en public, de diffusion ou
équivalente qui n’est pas autorisée, pour tout ou partie d’une œuvre (composition musicale, vidéo, diffusion,
direct ou équivalent) dont les droits d’auteur sont détenus par un tiers est illégale.
Lors de l’échange de signaux audio par une connexion numérique avec un instrument externe, cet appareil peut
procéder à un enregistrement sans être soumis à certaines des restrictions du Système de Gestion des Copies en
Série (SCMS - Serial Copy Management System). C’est dû au fait que cet appareil n’est prévu que pour la
production musicale et n’est pas conçu pour être soumis aux restrictions tant qu’il est utilisé pour enregistrer
des œuvres (comme vos propres compositions) qui n’enfreignent pas des droits d’auteurs de tiers. (SCMS est
une caractéristique qui interdit une seconde génération et une copie ultérieure par une connexion numérique.
Elle est intégrée dans les enregistreurs MD et d’autres équipements audio numériques grand public en tant que
fonction de protection des droits d’auteur.)
N’utilisez pas cet appareil pour enfreindre les droits d’auteurs détenus par une tierce partie. Roland ne
reconnaît aucune responsabilité sur quelque infraction que ce soit, concernant votre utilisation de cet appareil
et qui pourrait enfreindre des droits d’auteurs appartenant à des tiers.
Ce dispositif ne prend pas en charge les signaux audio numériques formatés pour des appareils audio
numérique de studio en qualité diffusion.
A propos de l’UA-3
L’UA-3 fonctionne avec une prise en charge partielle du SCMS, uniquement pour un signal numérique en entrée
provenant d’un appareil externe. Lorsque des données contenant des marqueurs SCMS sont entrées, par exemple à
partir d’un MD copié numériquement à partir d’un CD commercial, l’UA-3 fonctionne comme suit.
Si l’entrée provient du connecteur d’entrée numérique de l’UA-3 :
• L’UA-3 ne peut enregistrer ces données dans votre ordinateur
• L’audio sera dirigé vers les sorties analogiques (prise jack de sortie ligne, prise jack de casque) et vers le
connecteur de sortie numérique.
Si l’entrée provient des entrées analogiques de l’UA-3 (prises jack entrée ligne) :
• l’enregistrement peut s’effectuer normalement
Nonobstant la présence ou l’absence du marqueur SCMS, les données reçues par le connecteur
d’entrée numérique de l’UA-3 seront directement dirigées vers le connecteur de sortie numérique.
L’UA-3 fonctionne selon le SCMS uniquement pour les signaux numériques en entrée à partir
d’un appareil externe. Aucun marqueur SCMS n’est ajouté aux signaux numériques audio issus de
l’UA-3.

Introduction
48
Introduction
Vérifiez le contenu du paquet
L’UA-3 comprend les éléments décrits ci-dessous. A l’ouverture de l’emballage, vérifiez que tous les éléments sont
inclus. Si ce n'est pas le cas, contactez le revendeur qui vous a fourni l’UA-3.
UA-3
Câble USB
Utilisez-le pour connecter l’UA-3 au connecteur de votre ordinateur. Pour plus de détails sur les connexions, voir
Connexions et installation des pilotes (Windows p. 50, Macintosh p. 59).
CD-ROM de capture AUDIO
Il contient le logiciel dont vous aurez besoin pour utiliser l’UA-3.
* Assurez-vous de lire le fichier Readme_F.txt situé dans le CD-ROM de capture AUDIO. Les informations de mise à jour sont
fournies dans le fichier Readme_F.txt.
Mise en route
Il s'agit du présent document. Gardez-le à portée de main pour y trouver des informations en cas de besoin.
Contrat de licence
Ce contrat décrit les termes selon lesquels Roland Corporation vous accorde le droit d’utiliser le logiciel. Vous devez
le lire avant d’ouvrir l’emballage du CD-ROM.
Vous devrez fournir les éléments suivants :
Amplificateur externe, haut-parleurs et micro ne sont pas inclus.
Un amplificateur externe, des haut-parleurs ou un casque sont nécessaires pour écouter le son issu de l’UA-3 et ne sont
pas inclus. Pour les prises de son micro, l'UA-3 n'est pas livré avec un micro. Vous devez vous procurer vous-même
ces éléments.
Les câbles d’entrée/sortie numériques pour la connexion à l’enregistreur MD ou DAT ne sont pas inclus.
Bien que vous puissiez utiliser un enregistreur numérique MD ou DAT pour effectuer un enregistrement numérique,
les câbles de connexion de l’enregistreur à l’UA-3 ne sont pas inclus. Vous devrez les acquérir séparément.
N’utilisez que le câble USB inclus.
• Avant d’ouvrir le CD-ROM inclus, vous devez lire l’accord de licence séparé.
• Ne touchez pas et ne rayez pas la surface d’enregistrement brillante du disque. Dans le cas contraire, il peut être
impossible de lire correctement les données. Si le disque est sale, utilisez un nettoyant pour CD disponible dans
le commerce.
• Ne lisez pas le CD sur un lecteur de CD audio classique. Si vous le faites, vous produirez un volume élevé qui
peut endommager votre ouïe ou vos haut-parleurs.

Introduction
UA-3 49
DEUTSCHFRANÇAISESPAÑOLITALIANO ENGLISH
Eléments de l’UA-3 et fonctions
Prise jack entrée microphone
Prises jack entrée ligne
Prises jack sortie ligne
Connecteur d’entrée numérique (optique)
Connecteur de sortie numérique (optique)
Connecteur USB
Commutateur de type de microphone
Positionnez ce commutateur selon le type de microphone connecté à la prise jack d’entrée microphone .
Pour connecter un microphone dynamique : “ DYNAMIC ”
Pour connecter un microphone à condensateur : “ CONDENSER ”
Commutateur de sélection d’entrée d’enregistrement
Il sélectionne l’entrée qui sera utilisée pour l’enregistrement.
Connecteurs d’entrée numérique : “ DIGITAL ”
Prise jack d’entrée microphone /Prises d’entrée ligne /Prise jack d’entrée guitare
: “ INPUT + GUITAR/MIC ”
Voyant USB
Il s’allume lorsque l’UA-3 est connecté à l’ordinateur et reconnu par lui.
Voyant de niveau de sortie
Le nombre de LED allumées change selon le niveau de sortie de la prise jack casque et des prises jack de sortie
ligne . Si la LED rouge s’allume, agissez sur le bouton de volume de sortie ligne pour baisser le volume.
Volume de sortie ligne
Règle le volume qui sort de la prise jack casque et des prises jack de sortie ligne .
Voyant de crête d’entrée Guitare/Microphone
Si le niveau d’entrée de la prise jack d’entrée guitare ou de la prise jack d’entrée microphone est trop
élevé, il s’allume en rouge. Dans ce cas, utilisez le curseur de réglage de l’entrée guitare/microphone pour
baisser le niveau d’entrée.
Curseur de réglage d’entrée Guitare/Microphone
Ce curseur règle le niveau d’entrée de la prise jack d’entrée guitare et de la prise jack d’entrée
microphone .
Prise jack entrée guitare
Curseur de réglage d’entrée ligne
Ce curseur règle le niveau d’entrée des prises jack d’entrée ligne .
Voyant de crête d’entrée ligne
Si le niveau d’entrée des prises jack d’entrée ligne est trop élevé, il s’allume en rouge.
Dans ce cas, utilisez le
curseur de réglage de l’entrée ligne
pour baisser le niveau d’entrée.
Prise jack du casque
Vous pouvez y connecter un casque. Le son sort toujours des prises jack de sortie ligne , même lorsque le
casque est branché.
* Pour plus de détails sur la façon d’utiliser les différents éléments de l'appareil, consultez le manuel UA-3 Application Guide (p. 110).
• Micro à condensateur
L’UA-3 prend en charge les petits microphones
multimédia utilisés pour ajouter un commentaire ; il est
compatible avec les microphones mono alimentés par
la prise (PIP - plug-in power).
• Si vous n’enregistrez qu’à partir des entrées ligne,
déconnectez les câbles de la prise jack d’entrée
guitare et de la prise jack d’entrée micro.
• L’UA-3 n’est pas compatible avec les microphones à
condensateur et alimentation fantôme, utilisés typiquement
pour la musique. Il est également incompatible avec les
microphones stéréo parfois fournis avec les MD.
• Vous ne pouvez pas lire des données audio
d’ordinateur lorsque DIGITAL est sélectionné.
1
2
3
45 6
7
12
13 14 1716
15
8
9
10
11
1
2
3
4
5
6
7
1
8
4
1
2
14
9
10
17
3
11
11
17
3
12
14
1
13
13
14
1
14
15
2
16
2
15
17
3

Connexions et installation des pilotes (Windows)
50
Connexions et installation des pilotes (Windows)
* Si vous possédez un Macintosh, reportez-vous p. 59.
Pour utiliser l'UA-3 vous devez d'abord installer consécutivement les pilotes Périphérique USB Composite,
Périphérique d'interface utilisateur USB et Périphérique Audio USB. Ces pilotes sont inclus avec Windows.
Si vous utilisez Windows 98, ce pilote est fourni sur le CD-ROM de Microsoft Windows, dont vous aurez besoin
pendant l'installation. Si vous utilisez Windows Me ou 2000, vous n'avez pas besoin du CD-ROM.
Qu'est-ce qu'un pilote ?
Un pilote est un logiciel qui permet à un programme s'exécutant sur votre ordinateur de transférer des données de et
vers un matériel (comme l'UA-3) lorsque celui-ci est connecté à votre ordinateur à l'aide du câble USB. Le pilote
transmet les données de l'application à l'UA-3 et vice-versa.
Etablissement des connexions et installation du pilote
■ Etablissement des connexions
Vérifiez toujours que le niveau du volume est au plus bas avant de connecter l'UA-3. Même avec le volume au
minimum, vous pouvez entendre du bruit lorsque l'alimentation est allumée, mais cette situation est normale et
n'indique pas un mauvais fonctionnement.
Afin d'éviter un mauvais fonctionnement et/ou d'endommager les haut-parleurs et autres périphériques, diminuez
toujours le volume et mettez toujours les périphériques hors tension avant d'effectuer les connexions. (Il n'est pas
nécessaire d'éteindre votre ordinateur.) Utilisez un câble USB pour connecter l'UA-3 à votre ordinateur avant d'allumer
votre équipement audio.
Avant d'installer le pilote
• L'UA-3 ne peut être utilisé avec Windows 95 ou Windows NT.
• Si d'autres programmes s'exécutent dans Windows, fermez-
les tous avant de continuer.
• Si vous prévoyez de connecter en même temps plusieurs périphériques
USB Roland (par exemple l'UA-3 et d'autres périphérique USB
comme l'UA-100G) à votre ordinateur, déconnectez l'UA-100G ou les
autres périphériques du connecteur USB avant d'installer le pilote. Si
vous installez le pilote lorsque l'UA-100G ou d'autres périphériques
sont connectés, l'installation peut ne pas se dérouler correctement.
• Avant de déconnecter le câble USB ou de redémarrer
Windows, veuillez fermer toutes les applications.
Vous devez également baisser le volume de tout
système audio ou de tout amplificateur connecté.
• Cet appareil est équipé d'un circuit de
protection. Lors de la connexion au port USB,
attendez quelques secondes avant d'utiliser
l'appareil.
UA-3
Application
Port
Pilote
Port USB
Câble USB
Ordinateur
UA-3
Ensemble stéréo
Haut-parleurs alimentés, etc.
LINE IN, AUX IN
Câble
audio
Câble USB
* Connecter après le
démarrage de l'ordinateur
Ordinateur
Port
USB
Port
USB
LINE OUT
Casque
stéréo

Connexions et installation des pilotes (Windows)
UA-3 51
DEUTSCHFRANÇAISESPAÑOLITALIANO ENGLISH
■ Installation du pilote (Windows Me)
* Si vous utilisez une machine Windows 2000, voir p. 51, pour Windows 98, voir p. 51.
1. Allumez l'ordinateur, démarrez Windows et utilisez un câble USB pour connecter l'UA-3 à votre ordinateur.
2. Lorsque Windows détecte l'UA-3 et que la boîte de dialogue de
l'Assistant ajout de nouveau matériel apparaît, assurez-vous que
“ Rechercher automatiquement un nouveau pilote
(recommandé) ” est sélectionné, puis cliquez sur [Suivant].
3. La recherche du pilote démarre.
4. Lorsque le bon pilote est trouvé, son installation démarre.
5. Lorsqu'une boîte de dialogue vous informe que l'installation du pilote
est terminée, cliquez sur [Terminer], et redémarrez Windows.
Après l'installation du pilote, voir Spécification du périphérique d'entrée/sortie audio (p. 54) et sélectionnez le
périphérique utilisé par Windows.
* Selon la configuration de votre ordinateur, un court délai peut intervenir après l'installation du pilote
jusqu'à la reconnaissance du périphérique.
■ Installation du pilote (Windows 2000)
* Si vous utilisez une machine Windows Me, voir p. 51, pour Windows 98, voir p. 51.
1. Allumez votre ordinateur et démarrez Windows.
2. Utilisez un câble USB pour connecter l'UA-3 à votre ordinateur.
L'UA-3 est reconnu par l'ordinateur et le pilote est installé de façon totalement automatique.
3. Après installation du pilote, redémarrez Windows.
■ Installation du pilote (Windows 98)
* Si vous utilisez une machine Windows Me, voir p. 51, pour Windows 2000, voir p. 51.
Les pilotes doivent être installés dans cet ordre : Périphérique USB Composite , Périphérique d'interface
utilisateur USB et enfin Périphérique Audio USB. Suivez la procédure ci-après pour effectuer l'installation.
1. Allumez votre ordinateur et démarrez Windows. Insérez le CD-ROM Microsoft Windows dans votre lecteur de
CD-ROM et utilisez un câble USB pour connecter l'UA-3 à votre ordinateur (p. 50).
Cette boîte de dialogue peut demander quelques instants avant
d'apparaître
Certains ordinateurs étant vendus avec le contenu du CD-ROM de Microsoft Windows déjà
installé sur le disque dur, il peuvent ne pas inclure ce CD-ROM. Dans ce cas, vous pourrez
installer le pilote sans celui-ci.

Connexions et installation des pilotes (Windows)
52
Un Périphérique USB Composite est détecté automatiquement et la
boîte de dialogue de l'Assistant ajout de nouveau matériel apparaît.
Cliquez sur [Suivant].
2. Lorsque l'ordinateur vous demande “ Que voulez-vous faire ? ” ,
sélectionnez “ Rechercher le meilleur pilote pour votre
périphérique (Recommandé). ” et cliquez sur [Suivant].
3. La boîte de dialogue suivante s'affiche. Vérifiez le lecteur de
CD-ROM et cliquez sur [Suivant].
4. La boîte de dialogue suivante s'affiche. Cliquez sur [Suivant].
*
Selon votre système, l'
emplacement du pilote
peut différer de celui de la
figure ci-dessus, mais ceci ne constitue pas un problème.
5. La copie du fichier (pilote) démarre.
Si cette boîte de dialogue n'apparaît pas, reportez-vous à
Problèmes liés au pilote USB (p. 63)
Si le CD-ROM de Microsoft Windows n'est pas inséré dans le lecteur de CD-ROM, la boîte de
dialogue suivante apparaît. Dans ce cas, insérez-le dans le lecteur de CD-ROM et cliquez sur
[OK].

Connexions et installation des pilotes (Windows)
UA-3 53
DEUTSCHFRANÇAISESPAÑOLITALIANO ENGLISH
6. Lorsque l'installation du pilote Périphérique USB Composite
est terminée, la boîte de dialogue suivante apparaît. Cliquez sur
[Terminer].
7. Ensuite, le Périphérique d'interface utilisateur USB est
détecté automatiquement et la boîte de dialogue de l'Assistant
ajout de nouveau matériel apparaît. Cliquez sur [Suivant] et
continuez l'installation en suivant exactement les procédures
décrites aux étapes 2-5 (p. 52-52).
8. Lorsque l'installation du pilote Périphérique Audio USB est
terminée, la boîte de dialogue suivante apparaît. Cliquez sur
[Terminer].
9. Ensuite, le Périphérique Audio USB est détecté
automatiquement et la boîte de dialogue de l'Assistant ajout de
nouveau matériel apparaît. Cliquez sur [Suivant] et continuez
l'installation en suivant exactement les procédures décrites aux
étapes 2-5 (p. 52-52).
10.Lorsque l'installation du pilote Périphérique Audio USB est
terminée, la boîte de dialogue suivante apparaît. Cliquez sur
[Terminer].
L'installation des pilotes Périphérique USB Composite, , Périphérique d'interface utilisateur USB et
Périphérique Audio USB est terminée. Redémarrez Windows.
Une fois le pilote installé, reportez-vous à Spécification du périphérique d'entrée/sortie audio (p. 54) et
sélectionnez le périphérique utilisé par Windows.
A l'étape 4, l'écran indique : “ Windows recherche le pilote pour
le périphérique : Périphérique d'interface utilisateur USB. ”
A l'étape 4, l'écran indique : “ Windows recherche le pilote pour
le périphérique : Périphérique audio USB ”.

Connexions et installation des pilotes (Windows)
54
■ Spécification du périphérique d'entrée/sortie audio
1. Cliquez sur le bouton [Démarrer] de Windows, puis dans [Paramètres] choisissez [Panneau de
configuration].
2. Win 98 / Win 98SE
Dans le Panneau de configuration, cliquez deux fois sur l'icône [Multimédia] pour ouvrir la boîte de
dialogue Propriétés multimédia.
Win 2000 / Me
Dans le Panneau de configuration, cliquez deux fois sur l'icône [Sons et Multimédia] pour ouvrir la boîte
de dialogue Propriétés de Sons et multimédia.
* Si vous ne trouvez pas l'icône [Sons et Multimédia], cliquez sur [Afficher toutes les options du
Panneau de configuration] dans le Panneau de configuration.
3. Cliquez sur l'onglet [Audio].
4. Pour déterminer le Périphérique par défaut pour la Lecture des sons, Cliquez sur . Dans la liste qui
apparaît, cliquez sur [Périphérique Audio USB] pour le sélectionner.
5. Pour déterminer le Périphérique par défaut pour l' Enregistrement des sons, cliquez sur . Dans
la liste qui apparaît, cliquez sur [Périphérique Audio USB] pour le sélectionner.
Windows 98 / Windows 98SE
Windows 2000 /Windows Me
6. Cliquez sur [OK] pour terminer les réglages.
Propriétés de Contrôle du volume
Le volume de sortie de l'UA-3 peut être contrôlé par le Contrôle du volume de Windows.
1. Cliquez sur le bouton [Démarrer] de Windows, et sélectionnez [Programmes] - [Accessoires] -
[Divertissement] - [Contrôle du volume] pour le démarrer.
Windows Me Windows 2000/
Windows 98/Windows 98SE
• Selon votre système, “ Périphérique
Audio USB ” sera affiché avec un
numéro, par exemple, “
Périphérique audio USB (1) ”.
• Il n'est alors pas possible de
cliquer sur le bouton “Propriétés
avancées ” pour l'“Enregistre-
ment”.

Connexions et installation des pilotes (Windows)
UA-3 55
DEUTSCHFRANÇAISESPAÑOLITALIANO ENGLISH
2. Vous pouvez monter ou baisser le curseur pour régler le volume de l'UA-3. Les éléments suivants peuvent être
réglés.
Vérification de la sortie son.
Une fois les connexions correctement effectuées, vous pouvez lire l'exemple de données fourni pour vérifier votre
configuration.
■ Lecture de l'exemple de données
Vous allez ici utiliser les fonctionnalités Windows standard pour lire l'exemple de données. L'exemple de données se
situe dans le AUDIO Capture CD-ROM. Introduisez ce CD-ROM dans le lecteur correspondant.
1. Copiez “ Alright(.wav) ” sur le bureau en le glissant à partir du dossier “Sample_Data” du CD-ROM.
USB Audio (Haut-Parleur) Règle le volume des sorties analogiques (sortie ligne et
sortie casque). Ce réglage n'affecte pas les sorties
numériques.
1
1. Selon la version de Windows, cet élément peut être nommé “ Connecteur
analogique ”.
WAVE Règle le volume de sortie du périphérique audio de sortie
“ Périphérique Audio USB ”. Les sorties numériques et
analogiques sont affectées.
Synthé SW
Règle le volume du synthétiseur logiciel intégré à Windows.
Lecteur CD Règle le volume “ CD Audio ” du lecteur de CD-ROM
de votre ordinateur.
2
2. Si la lecture du CD n'est pas modifiée en réglant ce volume, utilisez le volume
WAVE.
• Si le Contrôle du volume n'est pas installé sur votre ordinateur, utilisez Ajout/Suppression de
programmes dans le Panneau de configuration pour l'installer. Pour plus de précisions sur l'installation,
voyez le manuel de l'utilisateur de Windows ou l'Aide.
• Si Muet est coché, ou si le curseur est au plus bas, aucun son ne sortira de l'UA-3.
• Si vous utilisez Windows 2000 et que le “ Lecteur CD ” n'apparaît pas, cochez l'élément “ Activer la lecture
numérique sur ce lecteur de CD-ROM ”, selon la note suivante.
• Lorsque vous utilisez le lecteur de CD-Rom de votre ordinateur pour lire un CD audio ou pour lire la musique de
fond des jeux avec l'UA-3 :
Avec Windows Me :
Sélectionnez [Démarrer]-[Paramètres]-[Panneau de configuration]. Dans le [Panneau de
configuration], cliquez deux fois sur l'icône [Système] pour ouvrir la boîte de dialogue Propriétés
système. Cliquez sur l'onglet [Gestionnaire de périphériques], et cliquez deux fois sur l'icône
[CDROM]. En dessous, cliquez deux fois sur le lecteur de CD-ROM que vous utilisez et ouvrez ses
Propriétés. Cliquez sur l'onglet [Propriétés] et cochez la case située à côté de l'option Lecture CD
numérique “ Activer la lecture numérique sur ce lecteur de CD-ROM. ”
Avec Windows 2000
Comme pour Windows Me, ouvrez la boîte de dialogue Propriétés système. Cliquez sur l'onglet
[Matériel], puis cliquez sur [Gestionnaire de périphériques] dans le cadre “ Gestionnaire de
périphériques”. A partir des lecteurs de CD-ROM, cliquez deux fois sur le lecteur de CD-ROM que vous
utilisez pour ouvrir ses Propriétés. Cliquez sur l'onglet [Propriétés] et cochez la case située à côté de
l'option Lecture CD numérique “ Activer la lecture numérique sur ce lecteur de CD-ROM. ”
Avec Windows 98 ou Windows 98 SE:
Sélectionnez [Démarrer] - [Paramètres] - [Panneau de configuration] - [Multimédia], puis cliquez sur
l'onglet [CD Audio] et cochez “ Lecture numérique pour les CD audio sur ce lecteur de CD-ROM. ”
Selon l'environnement de votre ordinateur, la lecture des CD peut encore poser des problèmes. Pour
plus de détails, reportez-vous aux informations fournies par le constructeur de votre ordinateur. Si vous
utilisez un lecteur de CD-Rom de type PC-card (PCMCIA), la lecture de données WAVE ou d'un CD
audio sur ce lecteur peut interrompre le son ou le supprimer totalement.
• La qualité audio de l'UA-3 sera meilleure si vous montez les niveaux du Contrôle du volume.
Pour pouvoir écouter l'exemple de données, vous aurez besoin d'environ 30 Mo disponibles
sur le disque dur où Windows est installé.

Connexions et installation des pilotes (Windows)
56
2. Cliquez avec le bouton droit de la souris sur le fichier copié “ Alright(.wav) ”, et sélectionnez
[Lire] ou [Propriétés] dans le menu qui apparaît.
3. Cliquez sur l'onglet [Aperçu], et cliquez sur le bouton.
La lecture de l'exemple de données démarre.
Avez-vous entendu l'exemple de données ?
Si l'exemple de données a été lu correctement, votre ordinateur et l'UA-3 sont connectés et les pilotes ont bien été
installés. Si les données n'ont pas été lues correctement, reportez-vous à Dépannage (p. 63). Cette section contient des
informations pour vous aider à localiser et résoudre de tels problèmes.
L'installation des connexions et des pilotes de l'UA-3 est terminée.
Suppression du pilote Périphérique Audio USB
■ Si vous réinstallez le pilote Périphérique Audio USB.
■ Si l'installation du pilote Périphérique Audio USB s'est interrompue avant la fin.
Utilisez la procédure suivante pour supprimer le pilote déjà installé.
1. Utilisez un câble USB pour connecter l'UA-3 à votre ordinateur.
2. Cliquez sur le bouton [Démarrer] de Windows, puis dans [Paramètres], choisissez [Panneau de
configuration].
3. Dans le
[Panneau de configuration]
, cliquez deux fois sur l'icône [Système] pour ouvrir la boîte de dialogue
Propriétés système.
4. Cliquez sur l'onglet [Gestionnaire de périphériques].
5. Cliquez deux fois sur [Contrôleurs son, vidéo et jeu] pour accéder à la liste des périphériques.
6. Dans la liste, sélectionnez Périphérique Audio USB et cliquez [Supprimer]. Dans la boîte de dialogue
Supprimer, cliquez sur [OK]. Si le Périphérique Audio USB n'est pas affiché, passez à l'étape 8.
7. Assurez-vous que le Périphérique Audio USB n'est pas dans la liste Contrôleurs son, vidéo et jeux, et
cliquez sur [Fermer] pour quitter la boîte de dialogue Propriétés système.
8. Suivez à nouveau les étapes 1. – 4., et cliquez deux fois sur [Contrôleur de bus USB] pour afficher la liste des
périphériques.
Si est affiché comme icône de périphérique compatible USB :
Sélectionnez l'icône [Périphérique USB Composite] et cliquez sur [Supprimer]. Dans la boîte de dialogue
Supprimer, cliquez sur [OK]. Comme à l'étape 7., fermez Propriétés système.
S'il n'y a pas d'icône de périphérique compatible USB, ou si n'est pas affiché :
Fermez simplement Propriétés système.
Si vous utilisez Windows Me et que est affiché :
Fermez simplement Propriétés système.
Lorsque le commutateur d'entrées d'enregistrement est réglé
sur DIGITAL, il n'est pas possible de lire les données audio de
votre ordinateur. Réglez l'interrupteur sur INPUT + GUITAR/MIC.
L'explication donnée ici concerne un système Windows standard. Selon votre ordinateur, les
noms de certains dossiers peuvent être différents.

Connexions et installation des pilotes (Windows)
UA-3 57
DEUTSCHFRANÇAISESPAÑOLITALIANO ENGLISH
9. Déconnectez le câble USB de votre ordinateur et redémarrez Windows.
Principes de fonctionnement du D-Out Smoother
■ Qu'est ce que le D-Out Smoother ?
Lorsque qu'un périphérique numérique tel qu'un MD ou un DAT est utilisé en lecture, connecté à la sortie numérique
de l'UA-3, le verrouillage de la sortie audio demande un certain temps après la lecture audio, ce qui peut provoquer un
silence d'une ou deux secondes, ou fausser la tonalité ou le tempo. Le D-Out Smoother est un logiciel qui permet une
lecture audio fluide dans de telles situations.
■ Installation du D-Out Smoother
1. Introduisez le AUDIO Capture CD-ROM dans le lecteur.
2. Cliquez sur le bouton [Démarrer] de Windows, puis dans [Exécuter...].
3. Dans la zone de texte Ouvrir : , tapez “E:\UA_Util\Setup.exe” et cliquez sur [OK]. Sinon, cliquez sur
[Parcourir], sélectionnez le fichier [Setup(.exe)] situé dans le dossier UA_Util du CD-ROM et cliquez sur
[Ouvrir].
4. Le programme d'installation démarre et la boîte de dialogue Choose Setup Language apparaît. Spécifiez si
vous utilisez la version “English (United States)” ou “Français” de Windows et cliquez sur [OK].
5. Effectuez le reste de l'installation en suivant les instructions qui apparaissent à l'écran.
6. Lorsque l'installation est terminée, la boîte de dialogue Installation terminée apparaît. Cliquez sur
[Terminer].
L'installation de D-Out Smoother est terminée.
■ Démarrage de D-Out Smoother
1. Connectez l'UA-3 au connecteur USB de votre ordinateur.
2. Cliquez sur le bouton [Démarrer] de Windows et dans le menu [Programmes], cliquez sur [D-Out
Smoother].
3. The D-Out Smoother démarre.
Dans certains cas, il peut afficher au démarrage “Impossible de trouver un Périphérique Audio USB.
Vérifiez le câble USB ou sélectionnez à nouveau un Périphérique Audio USB. ” . Dans ce cas,
l'ordinateur n'a pas pu détecter correctement l'UA-3. Il est possible que l'UA-3 ne soit pas bien
connecté, ou que le pilote ne soit pas bien installé. Reportez-vous à Connexions et installation des pilotes
(Windows) (p. 50) et vérifiez ces points.
■ Utilisation de D-Out Smoother
D-Out Smoother possède un interrupteur “ ON/OFF ” et un bouton “ TEST ”.
Interrupteur “ ON/OFF ”
Normalement, vous laissez cet interrupteur sur “ ON ” lorsque vous utilisez la sortie numérique de l'UA-3.
Mettez-le sur “ OFF ” lorsque vous connectez ou déconnectez l'UA-3.
Bouton “ TEST ”
Cliquez sur le bouton [TEST]. Si le test audio est entendu, D-Out Smoother fonctionne pour ce périphérique.
Lorsque vous utilisez un ou plusieurs Périphériques Audio USB tels que l'UA-3 et le MA-150U, utilisez ce bouton
pour sélectionner l'UA-3 avec lequel D-Out Smoother doit fonctionner.
Si une boîte de dialogue vous proposant de redémarrer Windows apparaît à ce moment,
suivez la proposition et redémarrez votre ordinateur.
Dans ces explications, nous supposons que votre lecteur de CD-Rom est E:, mais cette lettre
peut être différente sur votre ordinateur. Si c'est le cas, entrez la lettre de lecteur adéquate.
Pour vérifier la lettre attribuée à votre lecteur de CD-ROM, double-cliquez sur l'icône de
Poste de travail.
La boîte de dialogue Setting apparaît au premier démarrage. Assurez-vous que Wave-Out Device
affiche “ Périphérique Audio USB, ” et cliquez sur [OK]. Si deux périphériques audio USB (ou plus)
sont affichés, reportez-vous à Utilisation de D-Out Smoother (p. 57) et spécifiez le bon périphérique.

Connexions et installation des pilotes (Windows)
58
Utilisez la procédure suivante pour effectuer votre sélection.
1. Dans le menu [Control] de D-Out Smoother, sélectionnez [Setting] pour accéder à la boîte de dialogue
Setting. (Cette boîte de dialogue apparaît automatiquement au premier démarrage du logiciel.)
2. Dans le menu déroulant, sélectionnez “Périphérique Audio USB” et cliquez sur [OK].
3. Cliquez sur le bouton [TEST] et vérifiez que le test audio est entendu.
Si le test audio est entendu, D-Out Smoother fonctionne pour ce périphérique. Si l'audio n'est pas entendu,
sélectionnez un Périphérique Audio USB différent à l'étape 2, et répétez les étapes 1 à 3.
■ Suppression (désinstallation) de D-Out Smoother
D-Out Smoother prend en charge la fonction Ajout/Suppression de programmes de Windows. Vous pouvez
utiliser la procédure suivante pour supprimer le programme lorsqu'il n'est plus nécessaire.
1. Cliquez sur le bouton [Démarrer] de Windows, puis dans [Paramètres], choisissez [Panneau de
configuration].
2. Dans le
Panneau de configuration
, cliquez deux fois sur l'icône [Ajout/Suppression de programmes]
pour ouvrir la boîte de dialogue Propriété de Ajout/Suppression de programmes.
3. Cliquez sur l'onglet [Installation/Désinstallation].
4. Dans la liste de la boîte de dialogue, cliquez sur le nom de l'application à désinstaller.
5. Cliquez sur[Ajouter/Supprimer].
L'application spécifiée à l'étape 4 est supprimée.
Fonctions pratiques
• Lorsque [Register to STARTUP] est coché dans la boîte de dialogue Setting, D-Out Smoother démarre
automatiquement en même temps que l'ordinateur.
• Lorsque [Minimize window when starting up] est coché dans la boîte de dialogue Setting, D-Out Smoother
se réduit immédiatement après avoir démarré pour vous permettre de mieux utiliser l'écran de votre ordinateur.
Si vous désinstallez D-Out Smoother, vous devez d'abord désélectionner [Register to
STARTUP] dans la boîte de dialogue Setting. Vous pouvez atteindre la boîte de dialogue Setting
en sélectionnant [Control] - [Setting]. (p. 67)

Connexions et installation des pilotes (Macintosh)
UA-3 59
DEUTSCHFRANÇAISESPAÑOLITALIANO ENGLISH
Connexions et installation des pilotes (Macintosh)
* Si vous possédez un PC sous Windows, reportez-vous p. 50.
Pour pouvoir utiliser l'UA-3, vous devez d'abord installer un pilote. L'UA-3 utilise un pilote compris dans le système
Macintosh.
Etablissement des connexions et installation du pilote
■ Etablissement des connexions
(943)
Vérifiez toujours que le niveau du volume est au plus bas avant de connecter l'UA-3. Même avec le volume au minimum, vous
pouvez entendre du bruit lorsque l'alimentation est allumée, mais cela normal et n'indique pas un mauvais fonctionnement.
(921)
Afin d'éviter un mauvais fonctionnement et d'endommager les haut-parleurs et autres périphériques, diminuez toujours
le volume et mettez toujours les périphériques hors tension avant d'effectuer les connexions. (Il n'est pas nécessaire
d'éteindre votre ordinateur.) Utilisez un câble USB pour connecter l'UA-3 à votre ordinateur avant d'allumer votre
équipement audio.
■ Reconnaissance de l'appareil
1. Allumez votre ordinateur, le système Macintosh (Mac OS) démarre.
2. Dans le menu Apple, sélectionnez [Informations système Apple].
3. Cliquez sur l'onglet [Périphériques/Volumes].
4. Utilisez un câble USB pour connecter l'UA-3 à votre ordinateur.
Qu'est-ce qu'un pilote ?
-> p. 50
• Avant de déconnecter le câble USB ou de redémarrer
le Macintosh, fermez toutes les applications. Vous
devez également baisser le volume du système audio
ou de tout amplificateur connecté.
• Cet appareil est équipé d'un circuit de protection. Lors de la
connexion au port USB, attendez quelques secondes avant
d'utiliser l'appareil.
• Pour éviter d'endommager vos haut-parleurs, baissez le volume sur l'appareil et
sur le système audio connecté.
• Quittez toutes les applications éventuellement actives avant de réaliser la
connexion.
UA-3
Ensemble stéréo
Haut-parleurs alimentés, etc.
LINE IN, AUX IN
Câble
audio
Câble USB
* Connecter après
démarrage de l'ordinateur
Ordinateur
Port
USB
Port
USB
LINE OUT
Casque
stéréo

Connexions et installation des pilotes (Macintosh)
60
5. Pour vérifier que l'appareil est bien reconnu, sélectionnez [Mettre à jour toutes les informations] du menu
[Commandes]. Les trois périphériques audio suivants doivent s'afficher dans la section USB :
Si c'est le cas, l'installation du pilote UA-3 est réussie. Sélectionnez [Quitter] dans le menu [Fichier] pour
fermer la boîte de dialogue Informations système Apple, puis procédez au réglage du son (voir ci-dessous).
Si les trois périphériques ne sont pas affichés, déconnectez l'UA-3 du port USB et attendez environ dix secondes.
Répétez ensuite la procédure à partir de l'étape 4.
■ Réglage du son
6. Dans le menu Apple, sélectionnez [Tableaux de bord] - [Son] pour
ouvrir la boîte de dialogue Son..
7. Cliquez sur l'onglet [Configuration des HP].
8. Baissez le volume sur l'UA-3 et sur votre équipement audio, puis
cliquez sur [Lancer test].
9. Les sons de test passent de gauche à droite, en suivant l'affichage à
l'écran; réglez le volume à l'aide de la barre [Volume général]. Lorsque
vous avez fini, cliquez sur [Arrêter test].
Avec certaines versions du Mac OS, la barre [Volume général]
n'existe pas. Dans ce cas, utilisez la barre [Volume] dans l'onglet
[Sortie] pour régler le volume.
Si le commutateur d'entrées d'enregistrement est réglé sur
DIGITAL, il n'est pas possible de lire les données audio de votre
ordinateur. Réglez l'interrupteur sur INPUT + GUITAR/MIC.

Connexions et installation des pilotes (Macintosh)
UA-3 61
DEUTSCHFRANÇAISESPAÑOLITALIANO ENGLISH
10. Sélectionnez [Entrée] dans la boîte de dialogue Son. Pour Choisissez
un périphérique d'entrée audio :, choisissez USB Audio.
11. Lorsque vous avez terminé les réglages, sélectionnez [Quitter] dans le menu [Fichier] pour fermer la boîte de dialogue Son.
Problèmes connus : UA-3
• Certains logiciels comme Cakewalk Metro Series et TC Work Spark Series ne sont pas capables d'enregistrer et de
lire à 48 kHz. Utilisez l'UA-3 à 44.1 kHz.
• Pendant l'enregistrement ou la lecture, ne pas connecter/déconnecter le câble USB, ni agir sur le commutateur
d'entrées d'enregistrement.
Le logiciel risquerait de se bloquer.
• Il est possible que le son soit hâché ou qu'il soit de mauvaise qualité si vous enregistrez et lisez en même temps, en
raison d'une charge trop importante au niveau du processeur (CPU). Ce défaut ne devrait pas affecter le résultat de
l'enregistrement. Ce genre de problème ne devrait concerner que le signal de lecture.
• Pour utiliser Virtual Sound Canvas 3, sélectionnez [Performance] dans le menu [Setting], puis choisissez
Response Priority pour Expression Mode.
• Le pilote standard livré avec Mac OS n'est pas compatible ASIO.
• Lorsque vous démarrez le Macintosh avec l'UA-3 connecté, l'ordinateur peut devenir instable. Si cela se produit,
démarrez d'abord le Macintosh et connectez ensuite l'UA-3.
Vérification de la sortie son
Une fois les connexions correctement effectuées, vous pouvez lire l'exemple de données fourni pour vérifier votre configuration.
■ Lecture de l'exemple de données
Vous allez ici utiliser les fonctionnalités Macintosh standard pour lire l'exemple de données. L'exemple de données se
trouve sur le CD AUDIO Capture. Introduisez ce CD-ROM dans le lecteur correspondant.
1. Copiez “ Alright ” sur le bureau en le glissant à partir du dossier “ Sample_Data ” du CD-ROM.
2. Lancez QuickTime Player fourni avec Mac OS. QuickTime Player se
trouve en principe dans le dossier QuickTime du dossier Applications
du disque dur.
• Si USB Audio n'est pas disponible, fermez la boîte de dialogue Son.
Déconnectez ensuite l'UA-3 et attendez environ dix secondes. Répétez ensuite la
procédure, en commençant à l'étape 2.
• Ne cochez pas [Lecture du son par le périphérique de sortie].
Pour pouvoir écouter l'exemple de données, vous avez besoin d'environ 30 Mo disponibles sur
le disque dur où Mac OS est installé..

Connexions et installation des pilotes (Macintosh)
62
3. Dans le menu [Fichier], sélectionnez [Ouvrir la séquence],
sélectionnez le fichier copié précédemment “ Alright ”, et cliquez sur
[Convertir] pour l'ouvrir.
4. Cliquez sur le bouton de lecture.
La lecture de l'exemple de données démarre.
Avez-vous entendu l'exemple de données ?
Si l'exemple de données a été lu correctement, votre ordinateur et l'UA-3 sont connectés et les pilotes ont bien été
installés. Si les données n'ont pas été lues correctement, reportez-vous à Dépannage (p. 63). Cette section contient des
informations pour vous aider à localiser et résoudre ce type de problème.
L'installation des connexions et des pilotes de l'UA-3 est terminée.
Si le commutateur d'entrées d'enregistrement est réglé sur DIGITAL, il n'est pas possible de
lire les données audio de votre ordinateur. Réglez l'interrupteur sur INPUT + GUITAR/MIC.

Dépannage
UA-3 63
DEUTSCHFRANÇAISESPAÑOLITALIANO ENGLISH
Dépannage
Si un problème inattendu se produit avec l'UA-3, veuillez lire ce chapitre. Il offre de nombreuses indications pour vous aider à résoudre
les problèmes.
Les problèmes décrits à la section Dépannage sont organisés selon le système d'exploitation sur lequel le problème peut être rencontré.
Utilisez les icônes à gauche du titre pour trouver les informations dont vous avez besoin.
Problèmes communs à Windows et au Macintosh.
Problèmes propres à Windows.
Problèmes propres au Macintosh.
Si vous utilisez un ordinateur pour la première fois, ou si vous ne comprenez pas l'explication d'une procédure, consultez le manuel de votre
ordinateur ou de votre système d'exploitation.
Si le UA-3 ne fonctionne pas comme vous l'attendez, vérifiez les points suivants :
Problèmes liés au pilote USB
L' “ Assistant ajout de nouveau matériel ” ne démarre pas automatiquement
L' “ Assistant ajout de nouveau matériel ” se termine de façon impromptue
• Lorsque le câble USB est connecté ou déconnecté, il faut environ 15 secondes (ou plus) à l'UA-3 pour être reconnu.
• Le câble USB est-il correctement connecté ?
Vérifiez que l'UA-3 et l'ordinateur sont correctement connectés par le câble USB.
• USB peut-il être utilisé sur votre ordinateur ?
Voyez le manuel de l'utilisateur de votre ordinateur et vérifiez qu'il peut utiliser USB.
• Votre ordinateur ou votre répartiteur USB ont-ils assez de puissance électrique ?
L'UA-3 ne peut être connecté s'il est insuffisamment alimenté. Vérifiez si l'un de ces cas s'applique.
Si vous utilisez l'UA-3 avec un ordinateur portable fonctionnant sur ses batteries, le fonctionnement peut ne pas être fiable avec certains
modèles d'ordinateurs. Si c'est le cas, connectez l'adaptateur secteur de votre ordinateur portable.
Le mode d'économie d'énergie de votre ordinateur peut limiter la puissance fournie à USB. Vérifiez les paramètres de votre ordinateur.
Dans certains cas, l'UA-3 ne peut être utilisé avec un répartiteur alimenté par le bus (un répartiteur ne possédant pas d'alimentation
propre). Veuillez utiliser un répartiteur auto-alimenté (un répartiteur possédant sa propre alimentation).
• Votre ordinateur répond-il aux normes USB ?
Si vous utilisez un ordinateur ne répondant pas aux normes USB (comme un ordinateur assemblé par vos soins), le fonctionnement peut
être instable. Dans de tels cas, vous pouvez résoudre le problème en connectant un répartiteur USB possédant sa propre alimentation.
• “ Périphérique inconnu ” s'affiche à la place de “ Autres périphériques ” ou de “ Contrôleurs Universal Serial Bus ”
Utilisez la procédure suivante pour supprimer “ Périphérique inconnu ” de “ Autres périphériques ”
1. Dans le [Panneau de configuration] de Windows, cliquez deux fois sur [Système] pour ouvrir la boîte de dialogue Propriétés
système.
2. Cliquez sur l'onglet [Gestionnaire de périphériques].
3. Cliquez deux fois sur [Autres périphériques] (Contrôleurs Universal Serial Bus) pour obtenir la liste des périphériques.
4. Dans la liste, sélectionnez Périphérique inconnu et cliquez sur [Supprimer].
5. Dans la boîte de dialogue Supprimer, cliquez sur [OK].
6. Vérifiez que la liste n'affiche pas Autres périphériques ou Périphérique inconnu et cliquez sur [Fermer] pour fermer la boîte
de dialogue.
La boîte de dialogue “ Assistant ajout de nouveau matériel ” apparaît même
si vous avez installé les pilotes.
Si votre ordinateur ou répartiteur USB dispose de deux connecteurs USB (ou plus), le fait de connecter l'UA-3 à un connecteur USB sur
lequel vous ne l'avez jamais connecté peut provoquer l'affichage de la boîte de dialogue “ Assistant ajout de nouveau matériel ”,
même si les pilotes ont déjà été installés. Installez à nouveau les pilotes comme décrit dans Connexions et installation des pilotes (Windows)
(p. 50). Il ne s'agit pas d'un dysfonctionnement.
Pour savoir si le “ Périphérique inconnu ” est l'UA-3, déconnectez le câble USB de l'UA-3 et
vérifiez que “ Périphérique inconnu ” a disparu. Puis reconnectez l'UA-3 et supprimez “
Périphérique inconnu ”.

Dépannage
64
Les pilotes ne sont pas correctement installés
Utilisez la procédure décrite dans Suppression du pilote Périphérique Audio USB (p. 56) pour supprimer le pilote Périphérique Audio USB
de votre ordinateur, et installez à nouveau les pilotes de l'UA-3 comme décrit dans Connexions et installation des pilotes (Windows) (p. 50).
Vérifiez si vous avez un élément nommé “ Périphérique inconnu ” ou “ Autres périphériques ” dans “ Contrôleurs Universal Serial Bus ”.
Si vous trouvez un “ Périphérique inconnu ”, supprimez-le.
Une boîte de dialogue “ Périphérique inconnu détecté ” apparaît et il m'est
impossible d'installer le pilote
Selon votre ordinateur, tous les fichiers nécessaires à la prise en charge de l'USB audio par Windows 98 n'ont peut être pas été installés.
Veuillez vous renseigner auprès du constructeur de l'ordinateur.
Problèmes d'utilisation de l'UA-3
Le système d'exploitation devient instable
• Si vous démarrez un ordinateur avec l'UA-3 déjà connecté, il peut devenir instable.
Dans ce cas, démarrez l'ordinateur avec l'UA-3 non connecté, puis connectez-le.
■ Absence de son
• Le commutateur d'entrées d'enregistrement de l'UA-3 est-il réglé sur “ INPUT + GUITAR/MIC ” ?
Lorsque le Commutateur d'entrées d'enregistrement est réglé sur “ DIGITAL ”, les signaux d'entrée audio du connecteur d'entrée
numérique sont envoyés en sortie. Les données audio de l'ordinateur ne sont pas transmises.
• Un périphérique numérique comme un MD est-il connecté à la sortie numérique de l'UA-3 ?
Selon votre application, la lecture audio avec un périphérique numérique comme un MD connecté à la sortie numérique de l'UA-3 peut
demander qu'un certain laps de temps soit alloué pour verrouiller la sortie audio numérique immédiatement après la lecture ; un silence peut
donc intervenir pendant une ou deux secondes. Dans ce cas, vous pouvez utiliser le logiciel D-Out Smoother du CD-ROM inclus pour
obtenir une lecture audio fluide. Pour plus de détails, reportez-vous à la section Principes de fonctionnement du D-Out Smoother (p. 57).
• Essayez-vous d'utiliser le lecteur de CD de votre ordinateur pour lire un CD audio ?
Si vous voulez lire un CD audio à partir du lecteur de CD-ROM de votre ordinateur, voyez Lorsque vous utilisez le lecteur de CD-Rom de
votre ordinateur pour lire un CD audio ou pour lire la musique de fond des jeux avec l'UA-3 : (p. 55).
• D'autres applications sont-elles actives ?
Si plusieurs applications fonctionnent en même temps, un message d'erreur peut apparaître. Dans ce cas, cliquez sur [OK], et fermez les
autres applications.
Même si une fenêtre d'application est fermée, elle fonctionne encore si elle reste dans la barre des tâches ; assurez-vous donc de quitter les
applications inutiles présentes dans la barre des tâches.
• Avez-vous défini la destination des données audio en sortie pour le système d'exploitation ?
La destination en sortie des données audio pour un ordinateur doit être réglée sur UA-3. Pour plus de détails sur ce paramètre, voyez
Spécification du périphérique audio d'entrée/sortie (Windows p. 54) ou Réglage du son (Macintosh p. 60).
• Avez-vous défini la destination des données audio en sortie pour votre logiciel de lecture ?
Pour certains logiciels comme Cool Edit Pro LE, vous devez régler la destination de sortie des données audio sur UA-3. Pour plus de
détails sur ce paramètre, reportez-vous au manuel de l'utilisateur du logiciel.
• Les pilotes sont-ils correctement installés ?
Pour lire les données audio avec l'UA-3, le pilote Périphérique Audio USB doit être installé. Pour plus de détails sur l'installation et
les paramètres, voir Connexions et installation des pilotes (Windows p. 50, Macintosh p. 59).
• Les différents contrôles de volume sont-ils montés ?
Réglez le volume de chaque potentiomètre comme décrit dans Propriétés du contrôle de volume (Windows p. 54) ou Réglage du
son (Macintosh p. 60).
■ Distorsion du son
• Le voyant de crête est-il rouge ?
Si vous entrez du son à partir des prises jack d'entrée ligne, utilisez le Curseur de réglage d'entrée ligne de l'UA-3 pour réduire le
niveau d'entrée. Si vous entrez du son à partir des prises jack d'entrée Guitar ou Mic, utilisez le Curseur de réglage d'entrée Guitar/
Mic pour réduire le niveau d'entrée. Le nombre de LED allumées sur l'indicateur de niveau de sortie dépend du niveau de sortie de l'UA-
3. Si la LED rouge s'allume, baissez le volume de sortie ligne.
Le niveau de volume de l'instrument connecté à LINE IN est trop bas.
• Utilisez-vous un câble de connexion contenant une résistance ?
Utilisez des câbles ne contenant pas de résistance.
• Le curseur de réglage de l'entrée ligne (p. 49) est-il monté comme il faut ?
■ Emission de bruit lors de la lecture audio
• Un micro est-il encore connecté ?
Si un micro est connecté à l'UA-3, utilisez le Curseur de réglage de l'entrée Guitar/Mic pour baisser le niveau d'entrée.

Dépannage
UA-3 65
DEUTSCHFRANÇAISESPAÑOLITALIANO ENGLISH
•
La carte graphique de votre ordinateur peut provoquer du bruit lors de la lecture audio.
Exécutez la procédure suivante pour régler l'accélération graphique sur “ Aucune ”.
1. Dans le Panneau de configuration de Windows, cliquez deux fois sur [Affichage] pour ouvrir la boîte de dialogue
[Propriétés de Affichage], puis cliquez sur l'onglet [Configuration].
2. Cliquez sur [Propriétés avancées] pour ouvrir les propriétés et cliquez sur l'onglet [Performances].
3. Dans Graphiques, déplacez le curseur Accélération matérielle : sur Aucune et cliquez sur [OK].
4. Dans la boîte de dialogue [Propriétés de Affichage], cliquez sur OK pour fermer la boîte de dialogue.
Redémarrez votre ordinateur.
• Les lignes d'entrée ligne ou microphone génèrent du bruit
Si un module MIDI et l'UA-3 sont connectés en USB au même ordinateur et que la sortie du module MIDI est connectée aux prises jack
d'entrée ligne de l'UA-3, du bruit peut entrer par le module MIDI et être entendu par l'UA-3. Dans ce cas, utilisez un répartiteur USB auto-
alimenté pour connecter en parallèle le module MIDI et l'UA-3, ou connectez le module MIDI par l'interface série ou l'interface MIDI.
• L'enregistrement et la lecture simultanés provoquent du bruit
Si vous enregistrez et lisez en même temps, la lecture peut être interrompue en fonction des capacités de votre système, et cela peut être
perçu comme du bruit. Cependant, la priorité étant donnée à l'enregistrement, les données enregistrées ne sont pas perdues.
• Ce problème peut être résolu en reliant le châssis de votre ordinateur à la terre, ou la fiche de terre de la prise du cordon
d'alimentation en courant alternatif fourni avec votre ordinateur. Vérifiez également qu'aucun périphérique proche n'émet de fort
champ magnétique, comme une télévision ou un four à micro-ondes.
• Beaucoup de périphériques audio sont-ils connectés ?
La connexion simultanée de nombreux périphériques audio peut provoquer du bruit. Ne connectez pas les périphériques audio inutilisés.
■ Interruption du son pendant la lecture audio
• Essayez d'augmenter la mémoire
Vous pouvez augmenter la capacité de traitement de votre ordinateur en ajoutant plus de mémoire. Pour plus de détails sur l'ajout de
mémoire, reportez-vous au manuel d'utilisation de votre ordinateur.
• Votre ordinateur répond-il aux normes USB ?
L'audio peut s'interrompre si vous utilisez un ordinateur ne répondant pas aux normes électriques USB. Dans ce cas, le problème peut être
résolu en connectant un répartiteur USB possédant sa propre alimentation.
• Avez-vous beaucoup d'applications qui fonctionnent en même temps ?
Si vous utilisez beaucoup d'applications pendant la lecture, ou si vous démarrez d'autres applications, la lecture peut s'interrompre en
fonction de votre ordinateur. Quittez toutes les applications qui ne sont pas nécessaires et réessayez. Si cela ne résout pas le problème,
essayez de redémarrer l'ordinateur.
• Essayez de modifier les paramètres des lecteurs
* Certains paramètres peuvent ne pas être inclus sur votre ordinateur.
1. Dans le Panneau de configuration de Windows, cliquez deux fois sur [Système] pour ouvrir la boîte de dialogue [Propriétés
Système], puis cliquez sur l'onglet [Gestionnaire de périphériques].
2. Cliquez deux fois sur [Lecteurs de disque] pour accéder à la liste des périphériques.
3. Dans la liste, sélectionnez GENERIC IDE DISC TYPE xx, puis cliquez sur [Propriétés] pour accéder à la boîte de dialogue
Propriétés GENERIC IDE DISK TYPE xx.
* Les “xx” de GENERIC IDE DISK TYPE xx représentent un nombre qui varie selon votre système.
4. Cliquez sur l'onglet [Paramètres], cochez la case [DMA] figurant dans Options, puis cliquez sur [OK] pour fermer la boîte de
dialogue.
* En fonction de votre système, une boîte de dialogue des paramètres DMA peut apparaître. Après
vérification de son contenu, cliquez sur OK ou Annuler.
5. Dans la boîte de dialogue [Propriétés Système], cliquez sur OK pour fermer la boîte de dialogue.
Redémarrez votre ordinateur pour que les paramètres ci-dessus soient pris en compte.
■ Arrêt de la lecture audio
• Sur certains ordinateurs, les paramètres Energie du Panneau de configuration peuvent provoquer l'arrêt de la lecture.
Les Propriétés de Energie affichées lorsque vous cliquez deux fois sur Energie varient selon votre ordinateur. Nous donnons ci-dessous un
exemple, mais vous devez également consulter le manuel de l'utilisateur de votre ordinateur. Il se peut que certains ordinateurs ne
proposent pas les paramètres suivants.
1. Dans le Panneau de configuration de Windows, cliquez deux fois sur [Système] pour ouvrir la boîte de dialogue [Propriétés
Système], puis cliquez sur l'onglet [Gestionnaire de périphériques].
2. Cliquez deux fois sur [Périphériques système] pour accéder à la liste des périphériques.
3. Dans la liste, sélectionnez [Prise en charge de la gestion d'énergie avancée], puis cliquez sur [Propriétés] pour accéder à
la boîte de dialogue [Propriétés Prise en charge de la gestion d'énergie avancée].
4. Cliquez sur l'onglet [Paramètres], et dans Résolution des problèmes, cochez la case [Désactiver l'interrogation de
l'alimentation]. Puis cliquez sur [OK].
5. Dans la boîte de dialogue [Propriétés Système], cliquez sur OK pour fermer la boîte de dialogue.
6. Redémarrez Windows.

Dépannage
66
Le son enregistré numériquement est distordu, la tonalité change ou il contient
du bruit.
• Si vous utilisez un long câble numérique, il peut se produire du bruit ou le son peut être distordu lorsqu'il est connecté. Utilisez
des câbles numériques d'une longueur maximale d'un mètre.
• Le paramètre de fréquence d'échantillonnage de l'application correspond-il à la fréquence d'échantillonnage de l'appareil
numérique connecté à l'entrée numérique ?
• En enregistrement numérique, il n'est pas possible d'enregistrer en mono. Réglez votre logiciel d'enregistrement sur “ stéréo ”.
Le son enregistré présente du bruit
• Nous avons constaté que du bruit tend à se produire dans les sons enregistrés avec les iMac produits après l'été 2000.
• Du bruit se produit dans le son lu immédiatement après un enregistrement numérique dans l'application SimpleSound incluse
avec Mac OS. Enregistrez d'abord le son, puis lisez-le ensuite.
• Mettez à jour le pilote Audio USB à la version 1.0.5f4.
Si le pilote Audio USB fourni avec Mac OS est inférieur à 1.0.4, mettez-le à jour en 1.0.5f4.
Vous pouvez télécharger le pilote de cette URL :
http://asu.info.apple.com/swupdates.nsf/artnum/n11703
Vérification de la version du pilote USB.
1. Connectez l'UA-3 à l'ordinateur.
2. Dans le menu Apple, sélectionnez [Informations système Apple].
3. Cliquez sur l'onglet [Périphériques/Volumes].
4. Dans la section USB, l'écran indique “ Audio (UA-3 USB Audio Device). ”. Cliquez sur la flèche à gauche de ce texte.
5. Le numéro affiché à droite de “ Version du pilote ” est la version du pilote audio USB.
■ Un fichier vide (muet) est créé à l'enregistrement
• Essayez de passer le débit à “ 16 bits ”.
Si vous utilisez Windows 98 Seconde Édition et que votre logiciel d'enregistrement est réglé pour un débit en 8 bits, un fichier vide peut
être créé et vous pouvez ne pas être capable d'enregistrer réellement. Dans ce cas, vous devez pouvoir enregistrer normalement en réglant
le débit sur “ 16 bits ”.
• Les données contenant un indicateur SCMS ne peuvent être enregistrées numériquement.
L'UA-3 prend en charge SCMS (p. 47) ; si des données SCMS sont entrées via le connecteur numérique (comme des données en provenance
d'un MD copié numériquement à partir d'un CD audio commercial), l'UA-3 ne pourra pas les enregistrer dans l'ordinateur. (Le son sortira vers
les prises jack de sortie ligne et la prise jack de casque.)
Impossible d'enregistrer numériquement
• Le commutateur d'entrées d'enregistrement est-il réglé sur “ DIGITAL ” ?
• L'application est-elle réglée à la même fréquence d'échantillonnage que l'appareil numérique branché au connecteur de l'entrée
numérique ?
• L'enregistrement ne sera pas possible si vous changez la fréquence d'échantillonnage (par exemple, entre diffusion numérique
mode A et B) d'un appareil pendant qu'il est branché au connecteur de l'entrée numérique.
Pour changer de fréquence d'échantillonnage, vous devez débrancher et rebrancher le câble numérique.
• Il n'est pas possible d'enregistrer des données numériques d'un format autre que le format des appareils audio numériques grand public.
Impossible d'enregistrer un CD audio
• L'UA-3 ne peut enregistrer de CD audio à partir du lecteur de CD-ROM avec CoolEdit Pro LE ou un autre programme.
Pour enregistrer des CD audio à partir du lecteur de CD-Rom, vous devez avant toute chose sélectionner la carte son de votre ordinateur comme
périphérique audio (Enregistrement wave) d'enregistrement par CoolEdit Pro LE (ou l'application que vous utilisez). Pour enregistrer un CD
audio avec une carte son, désactivez “ Activer la lecture numérique sur ce lecteur de CD-ROM ” que vous avez coché dans Lorsque
vous utilisez le lecteur de CD-Rom de votre ordinateur pour lire un CD audio ou pour lire la musique de fond des jeux avec l'UA-3 : (p. 55).
Le niveau du volume est différent à la reprise suivant un état Suspendu ou en
Hibernation
• Lorsque Windows 2000 reprend après une Suspension ou une Hibernation, le paramètre de volume de sortie est modifié par
Windows.
Démarrez l'application Contrôle du volume décrite dans Propriétés de Contrôle du volume (p. 54), et réglez le curseur USB Audio (Haut-
parleur).
La musique de fond des jeux n'est pas audible
• Le jeu utilise-t-il un CD audio pour sa musique de fond ?
Si un CD audio est utilisé pour la musique de fond du jeu, voyez Lorsque vous utilisez le lecteur de CD-Rom de votre ordinateur pour lire
un CD audio ou pour lire la musique de fond des jeux avec l'UA-3 : (p. 55).
Problèmes généraux communs aux logiciels
Installation impossible
• Le CD-ROM inclus est-il dans le lecteur correspondant de votre ordinateur ?
• Lors de l'installation, avez-vous entré correctement le nom du lecteur de CD-ROM et le nom du fichier d'installation ?
• Disposez-vous d'assez de place sur votre disque dur ?

Dépannage
UA-3 67
DEUTSCHFRANÇAISESPAÑOLITALIANO ENGLISH
Augmentez l'espace disque disponible. Supprimez les fichiers inutiles (déplacez-les vers la Corbeille), puis cliquez avec le bouton droit de
la souris sur Corbeille et choisissez l'option Vider la corbeille.
Si besoin est, installez un disque dur supplémentaire.
• D'autres applications fonctionnent-elles pendant l'installation ?
Quittez toutes les applications et recommencez l'installation.
Impossible de démarrer une application
• Avez-vous beaucoup d'applications qui fonctionnent en même temps ?
Vous n'avez peut-être pas assez de mémoire pour démarrer une autre application. Quittez les applications non indispensables, puis
démarrez l'application. En cas d'affichage d'un message d'erreur, redémarrez votre ordinateur.
Une erreur s'affiche au démarrage d'une application
• Si plusieurs applications fonctionnent en même temps, un message d'erreur peut apparaître.
Dans ce cas, cliquez sur [OK], puis fermez toutes les applications inutiles.
Même si la fenêtre d'une application est fermée, l'application fonctionne toujours si elle reste dans la barre des tâches. Veillez à quitter
toutes les applications inutiles de la barre des tâches.
• Si vous utilisez Cakewalk Pro Audio, vous devez vérifier que la fréquence d'échantillonnage de Cakewalk Pro Audio est bien 44,1
kHz.
Dans Cakewalk ProAudio 7, 8 et 9, la fréquence d'échantillonnage se règle comme suit.
[Tools] - [Audio options] - [Parameters] - [Default Sampling Rate]
Une application se bloque
Lors de l'utilisation d'un logiciel audio numérique pour l'enregistrement numérique avec l'UA-3, le commutateur d'entrées numérique étant
sur DIGITAL, soyez absolument sûr que vous avez branché un périphérique numérique.
Cependant, dans certaines applications, les limitations de Windows peuvent désactiver le fonctionnement de la souris ou de certains
périphériques jusqu'à ce qu'un périphérique numérique soit connecté, ce qui n'est pas un fonctionnement anormal.
Si vous n'obtenez aucune action de la souris ou d'un autre périphérique semblable, reconnectez le périphérique numérique.
• Vérifiez ce qui précède avec les applications suivantes :
(vérifié en janvier 2001).
•Logic Audio 3.0 ou 4.0 A l'enregistrement
•Cubase VST 3.7 Au démarrage/à l'enregistrement/à la lecture
•Cubase ASIO Multimedia Setup En test
Vérifiez que les événements ou conditions ci-dessus n'apparaissent pas avec les applications suivantes :
•Cakewalk Pro Audio 7, 8 et 9
•CoolEditProLE
•Magnétophone (inclus dans Windows 98)
Une erreur de raccourci apparaît au démarrage de Windows
Si vous désinstallez D-Out Smoother avec Register to STARTUP coché (p. 58), le message d'erreur suivant apparaît au démarrage de
Windows. Dans ce cas, cliquez sur [Non] pour fermer le message.
Utilisez la procédure suivante pour supprimer ce message.
1. Cliquez sur le bouton [Démarrer] de Windows, puis dans [Paramètres] - [Barre des tâches...].
2. Cliquez sur l'onglet [Programmes du menu Démarrer], puis sur [Supprimer].
3. Sélectionnez [Programme] - [Démarrage] - [SmoothDo], puis cliquez sur [Supprimer].
Pour plus de détails sur l'installation d'un disque dur supplémentaire, reportez-vous aux
manuels d'utilisation de votre ordinateur et de Microsoft Windows.

68
Debe leer esto antes de utilizar la grabación digital
La grabación, la distribución, la venta, el préstamo, la exhibición pública o la difusión no autorizada de parte
o todo el material (composiciones musicales, vídeos, radiodifusiones, exhibición pública, etc.) cuyo copyright
esté en posesión de un tercero quedan prohibidos por la ley.
Cuando intercambie señales de audio a través de una conexión digital con un instrumento externo, esta unidad
puede efectuar la grabación sin estar sujeta a las restricciones del SCMS (Serial Copy Management o Sistema
de gestión de copias en serie). Esto es debido a que la unidad está destinada únicamente para la producción
musical y está diseñada para no estar sujeta a restricciones mientras se utilice para grabar obras (como, por
ejemplo, sus propias composiciones) que no infrinjan en el copyright de otros. (La opción SCMS prohibe
efectuar copias de segunda generación o posteriores a través de una conexión digital. Se encuentra dentro de
las grabadoras MD y otros equipos de audio digital como una opción de protección del copyright.
No utilice esta unidad para fines que puedan infringir en el copyright de terceros. Roland no asume ninguna
responsabilidad con respecto a la contravención de copyrights a terceros que se produzcan al utilizar esta
unidad.
Este aparato no da soporte a señales de audio digital que hayan sido formateadas para la transmisión de
aparatos de audio digital de estudio
Sobre el UA-3
El UA-3 funcionará sólo con soporte SCSM parcial para una señal de entrada digital de un aparato externo.
Cuando entran datos que contienen indicadores SCMS, por ejemplo de un MD que se ha copiado digitalmente de
un CD de música comercial, el UA-3 funcionará del siguiente modo:
Si entra desde el conector de entrada digital UA-3:
• El UA-3 no puede grabar estos datos en el ordenador
• El audio se transmitirá desde las salidas análogas (jacks de salida de línea, jack de los auriculares) y el
conector de salida digital.
Si entra desde las entradas análogas de UA-3 (jacks de entrada de línea):
• La grabación se efectúa normalmente
Independientemente de la presencia o ausencia del indicador SCMS, los datos que se reciben en el
conector de entrada digital del UA-3 se transmitirán directamente desde el conector de salida
digital.
El UA-3 funciona de acuerdo con SCMS sólo para señales de entrada digitales de un aparato
externo. Los indicativos SCMS no se añaden a las señales de audio digital que se transmiten desde
el UA-3.

Introducción
UA-3 69
DEUTSCHFRANÇAISESPAÑOLITALIANO ENGLISH
Introducción
Comprobación del contenido del paquete
El UA-3 contiene los siguientes elementos. Cuando abra el paquete, en primer lugar asegúrese de que están todos los
elementos. Si falta alguno, póngase en contacto con el distribuidor al que compró el UA-3.
UA-3
Cable USB
Utilícelo para conectar el UA-3 al conector USB de su ordenador. Para obtener más detalles sobre las conexiones,
consulte Instalación del controlador y conexiones (Windows pág. 71, Macintosh pág. 80).
CD-ROM AUDIO Capture
Contiene el software necesario para ser utilizado con el UA-3.
* Asegúrese de leer el archivo Readme_E.txt que se encuentra en el CD-ROM AUDIO Capture En el archivo Readme_E.txt
encontrará la información más reciente.
Guía de iniciación
Es el documento que está leyendo en estos momentos. Téngalo a mano por si necesita consultarlo.
Contrato de licencia
Este contrato describe los términos bajo los que Roland Corporation le permite utilizar el software. Debe leerlo antes
de abrir el paquete del CD-ROM.
Debe contar previamente con los siguientes artículos
No se incluye ni el amplificador externo ni los altavoces ni los auriculares.
El amplificador externo, los altavoces o los auriculares, todos ellos necesarios para escuchar el sonido que emite el
UA-3, no se incluyen. Tampoco se incluye un micrófono para transmitir sonido al UA-3. Debe contar previamente con
estos artículos.
Los cables de entrada/salida digital para conectar la grabadora DAT o MD no se incluyen
Aunque puede utilizar una grabadora digital DAT o MD para efectuar la grabación digital, los cables para conectar la
grabadora al UA-3 no se incluyen. Debe contar previamente con ellos.
Utilice sólo el cable USB que se incluye.
• Antes de abrir el CD-ROM adjunto, debe leer el contrato de licencia que viene por separado.
• No toque la superficie de grabación plateada del disco ni la raye. Si lo hace, es posible que los datos no se puedan
leer correctamente. Si el disco se mancha, utilice un limpiador de CD disponible en el mercado para limpiarlo.
• No escuche el CD-ROM en un reproductor de CD de audio convencional. Si lo hace, se producirá una subida de
volumen que puede dañar los altavoces y causar lesiones auditivas.

Introducción
70
Partes del UA-3 y su función
Jack de entrada del micrófono
Jacks de entrada de línea
Jacks de salida de línea
Conector de entrada digital (óptico)
Conector de salida digital (óptico)
Conector USB
Interruptor de selección de tipo de micrófono
Coloque este interruptor según el tipo de micrófono que está conectado al jack de entrada del micrófono .
Cuando conecte un micrófono dinámico, póngalo en: “DYNAMIC” (DINÁMICO)
Cuando conecte un micrófono electrostático, póngalo en: “CONDENSER” (ELECTROSTÁTICO)
Interruptor de selección de entrada de grabación
Selecciona la entrada que se utilizará para grabar.
Conectores de entrada digital : “DIGITAL”
Jack de entrada del micrófono / Jacks de entrada de línea / Jack de entrada de guitarra
:“INPUT + GUITAR/MIC” (ENTRADA + GUITAR/MIC)
Indicador USB
Se encenderá cuando conecte el UA-3 y sea reconocido por el ordenador.
Indicador OUTPUT LEVEL (NIVEL DE SALIDA)
El número de indicadores LED que se iluminan varía según el nivel de salida del jack de auriculares y los jacks
de salida de línea . Si se ilumina el LED rojo, utilice el Volumen de salida de línea para bajar el volumen.
Volumen de salida de línea
Ajusta el volumen que se transmite del jack de auriculares y los jacks de salida de línea .
Indicador de pico de entrada Guitar/Mic
Si el nivel de entrada del jack de entrada de guitarra y del jack de entrada de micrófono es excesivo,
se encenderá el indicador rojo. Si se enciende el indicador rojo, utilice el deslizador de ajuste de entrada Guitar/
Mic para bajar el nivel de entrada.
Deslizador de ajuste de entrada Guitar/Mic
Este deslizador ajusta el nivel de entrada del jack de entrada de guitarra y los jacks de entrada de
micrófono .
Jack de entrada de guitarra
Deslizador de ajuste de entrada de línea
Este deslizador ajusta el nivel de entrada de los jacks de entrada de línea .
Indicador de pico de entrada de línea
Si el nivel de entrada de los jacks de entrada de línea es excesivo, se iluminará el indicador rojo.
Si se enciende
el indicador rojo, utilice el
deslizador de ajuste de entrada de línea
para bajar el nivel de entrada.
Jack de auriculares
Aquí se pueden conectar auriculares. Aunque estén conectados los auriculares, todavía se transmitirá sonido a través
de los jacks de salida de línea .
* Para obtener más detalles sobre cómo se utiliza cada control y cada conector, consulte la UA-3 Application Guide (pág. 110).
• Micrófono electrostático
El UA-3 da soporte a los micrófonos multimedia de
pequeño tamaño que se utilizan para grabar la voz y es
compatible con los micrófonos monoaurales que
funcionan mediante una clavija.
• Si graba sólo desde las entradas de línea,
desconecte los cables del jack de entrada de
guitarra y del jack de entrada de micrófono.
• El UA-3 no es compatible con los micrófonos
electrostáticos que funcionan virtualmente y que se
utilizan habitualmente en música. Tampoco es
compatible con los micrófonos estéreo que a veces se
suministran con los MD.
• No puede reproducir datos de audio del
ordenador si selecciona DIGITAL.
1
2
3
45 6
7
12
13 14 1716
15
8
9
10
11
1
2
3
4
5
6
7
1
8
4
1
2
14
9
10
17
3
11
11
17
3
12
14
1
13
13
14
1
14
15
2
16
2
15
17
3

Instalación del controlador y conexiones (Windows)
UA-3 71
DEUTSCHFRANÇAISESPAÑOLITALIANO ENGLISH
Instalación del controlador y conexiones (Windows)
* Si es usuario de Macintosh, consulte la pág. 80.
Para utilizar el UA-3, primero debe instalar el controlador USB Composite Device (Dispositivo USB
Composite), el controlador USB Human Interface (Interfaz humana USB) y el controlador USB Audio
Device (Dispositivo de audio USB) consecutivamente. Windows incluye estos controladores. Si utiliza Windows
98, este controlador se incluye en el CD-ROM de Microsoft Windows , de modo que debe tener preparado el CD-
ROM de Microsoft Windows . Si utiliza Windows Me o 2000, el CD-ROM no es necesario.
¿Qué es un controlador?
Un controlador es un software que permite que una programa de aplicaciones que se ejecuta en el ordenador transfiera
datos del UA-3 y viceversa cuando está conectado al ordenador mediante un cable USB. El controlador pasa los datos
de la aplicación al UA-3 y del UA-3 a la aplicación.
Realización de conexiones e instalación del controlador
■ Realización de conexiones
Asegúrese siempre de tener bajado el volumen antes de conectar el UA-3. Aunque el volumen esté completamente
bajado, es posible que todavía oiga algún sonido al encender la unidad pero esto es algo normal y no indica un mal
funcionamiento de la misma.
Para evitar anomalías en el funcionamiento o daños en los altavoces u otros dispositivos, baje siempre el volumen y
apague todos los aparatos antes de realizar cualquier conexión. (no es necesario apagar el ordenador.) Utilice un cable
USB para conectar el UA 3 al ordenador antes de encender el equipo de audio.
Antes de instalar el controlador
• El UA-3 no puede utilizarse con Windows 95 y Windows NT.
• Si se están ejecutando otros programas de Windows, salga
de todos ellos antes de continuar.
• Si va a conectar en el ordenador varios aparatos Roland USB
simultáneamente (por ejemplo, el UA-3 y otros aparatos USB
como el UA-100G), desconecte el UA-100G u otros aparatos del
conector USB antes de instalar el controlador. Si instala el
controlador cuando el UA-100 u otros aparatos están conectados,
puede que la instalación no se realice correctamente.
• Antes de desconectar el cable USB o reiniciar
Windows, cierre todas las aplicaciones. También debe
bajar el volumen de cualquier sistema de
amplificación o de audio que esté conectado.
• Esta unidad viene equipada con un circuito de
protección. Es necesario dejar pasar un pequeño
intervalo (de unos segundos) después de
encender la unidad para que ésta funcione
correctamente.
UA-3
Aplicación
Control-
ador
USB
Puerto USB
Cable USB
Ordenador
UA-3
Equipo estéreo
Altavoces, etc
ENTRADA DE LÍNEA,
LÍNEA AUXILIAR
Cable de
audio
Cable USB
* Conéctelo después de
encender el ordenador
Ordenador
Puerto
USB
Puerto
USB
SALIDA DE
LÍNEA
Auriculares
estéreo

Instalación del controlador y conexiones (Windows)
72
■ Instalación del controlador (Windows Me)
* Si utiliza un equipo con Windows 2000, consulte la pág. 72, si utiliza un equipo con Windows 98,
consulte la pág. 72.
1. Encienda el ordenador e inicie Windows, utilice un cable USB para conectar el UA-3 al ordenador.
2. Cuando Windows detecte el UA-3 y aparezca el cuadro de diálogo Add
New Hardware Wizard (Asistente para agregar nuevo
hardware), asegúrese de que está seleccionada la opción “Automatic
search for a better driver (Recommended)”(Buscar
automáticamente el controlador (recomendado)) y, a
continuación, haga clic en [Next] (Siguiente).
3. Empieza la búsqueda del controlador.
4. Una vez se ha encontrado el controlador adecuado, empieza la instalación del mismo.
5. Cuando aparece un cuadro de diálogo informándole de que la
instalación del controlador ha finalizado, haga clic en [Finish]
(Finalizar), y reinicie Windows.
Después de instalar el controlador, consulte el apartado Especificación del aparato de entrada/salida de audio (pág.
75) y seleccione el dispositivo que utiliza Windows.
* Dependiendo de la configuración de su ordenador, después de que se haya instalado el controlador puede
que se produzca un breve intervalo de espera hasta que el dispositivo sea reconocido.
■ Instalación del controlador (Windows 2000)
* Si utiliza un equipo con Windows Me, consulte la pág. 72, si utiliza un equipo con Windows 98,
consulte la pág. 72.
1. Encienda el ordenador e inicie Windows.
2. Utilice un cable USB para conectar el UA-3 al ordenador.
El ordenador reconoce el UA-3 y el controlador se instala automáticamente.
3. Después de instalar el controlador, reinicie Windows.
■ Instalación del controlador (Windows 98)
* Si utiliza un equipo con Windows Me, consulte la pág. 72, si utiliza un equipo con Windows 2000,
consulte la pág. 72.
La instalación se debe realizar en el orden del controlador USB Composite Device (Dispositivo USB Composite)
, USB Human Interface Device (Dispositivo de interfaz humana USB) y, a continuación, el controlador USB
Audio Device (Dispositivo de audio USB). Utilice el siguiente procedimiento para realizar la instalación.
1. Encienda el ordenador e inicie Windows. Inserte el CD-ROM de Microsoft Windows en la unidad de CD-
ROM y utilice un cable USB para conectar el UA-3 al ordenador (pág. 71).
Puede que este cuadro de diálogo tarde un tiempo en aparecer
Puesto que algunos ordenadores se venden con el contenido del CD-ROM de Microsoft
Windows instalado previamente en el disco duro, puede que el CD-ROM de Microsoft
Windows no venga incluido. Si es este el caso, podrá instalar el controlador sin el CD-ROM de
Microsoft Windows

Instalación del controlador y conexiones (Windows)
UA-3 73
DEUTSCHFRANÇAISESPAÑOLITALIANO ENGLISH
Se detectará automáticamente un USB Composite Device
(Dispositivo USB Composite) y aparecerá el cuadro de diálogo Add
New Hardware Wizard (Asistente para agregar nuevo hardware).
Haga clic en [Next] (Siguiente).
2. Cuando la pantalla le pregunta “What do you want Windows to
do?” (¿Qué desea que haga Windows?), seleccione “Search
for the best driver for your device. (Recommended)” (Buscar
el mejor controlador para su dispositivo (Se recomienda) y
haga clic en [Next] (Siguiente).
3. Aparece el siguiente cuadro de diálogo. Active CD-ROM (unidad
de CD-ROM), y haga clic en [Next] (Siguiente).
4. Aparece el siguiente cuadro de diálogo. Haga clic en [Next]
(Siguiente).
*
Dependiendo del sistema, la
Location of driver (Ubicación del
controlador)
puede ser diferente de la que se muestra en la ilustración, pero esto
no supone ningún problema.
5. El archivo (Controlador) se empezará a copiar.
Si no aparece este cuadro de diálogo, consulte el apartado
Problemas relacionados con el controlador USB (pág. 84)
Si no ha insertado el CD-ROM de Microsoft Windows en la unidad de CD-ROM drive, puede
aparecer el siguiente cuadro de diálogo. Si esto ocurre, inserte el CD-ROM de Microsoft
Windows en la unidad de CD-ROM y haga clic en [OK] (Aceptar).

Instalación del controlador y conexiones (Windows)
74
6. Cuando haya finalizado la instalación del USB Composite
Device (Dispositivo USB Composite) , aparecerá el siguiente
cuadro de diálogo. Haga clic en [Finish] (Finalizar)..
7. A continuación, se detectará automáticamente el USB Human
Interface Device (Dispositivo de interfaz humana USB) y
aparecerá el cuadro de diálogo Add New Hardware Wizard
(Asistente para agregar nuevo hardware) . Haga clic en [Next]
(Siguiente), y continúe la instalación utilizando el mismo
procedimiento que se indica en los pasos 2-5 (p. 73-73).
8. Cuando haya finalizado la instalación del USB Human Interface
Device (Dispositivo de interfaz humana USB) , aparecerá el
siguiente cuadro de diálogo. Haga clic en [Finish] (Finalizar)..
9. A continuación, se detectará automáticamente el USB Audio
Device (Dispositivo de audio USB) y aparecerá el cuadro de
diálogo Add New Hardware Wizard (Asistente para agregar
nuevo hardware) . Haga clic en [Next] (Siguiente), y continúe la
instalación utilizando el mismo procedimiento que se indica en
los pasos 2-5 (p. 73-73).
10.Cuando haya finalizado la instalación del USB Audio Device
(Dispositivo de audio USB) , aparecerá el siguiente cuadro de
diálogo. Haga clic en [Finish] (Finalizar)..
Con esto finaliza la instalación de los controladores USB Composite Device (Dispositivo USB Composite),
USB Human Interface Device (Dispositivo de interfaz humana USB) y USB Audio Device (Dispositivo
de audio USB). Reinicie Windows.
Después de instalar el controlador, consulte el apartado Especificación del aparato de entrada/salida de audio
(pág. 75) y seleccione el dispositivo que utiliza Windows.
En el paso 4, la pantalla indicará “Windows driver file search for
the device : USB Human Interface Device.” (Búsqueda del archivo
de controlador para el dispositivo: Dispositivo de interfaz
humana USB).
En el paso 4, la pantalla indicará “Windows driver file search for
the device : USB Audio Device.” (Búsqueda del archivo de
controlador para el dispositivo : Dispositivo de audio USB).

Instalación del controlador y conexiones (Windows)
UA-3 75
DEUTSCHFRANÇAISESPAÑOLITALIANO ENGLISH
■ Especificación del aparato de entrada/salida de audio
1. Haga clic en el botón [Start] (Inicio) de Windows y seleccione [Settings] (Configuración) - [Control
Panel] (Panel de control).
2. Win 98 / Win 98SE
En Control Panel (Panel de control), haga doble clic en el icono [Multimedia] para abrir el cuadro de
diálogo Multimedia Properties (Propiedades de Multimedia).
Win 2000 / Me
En Control Panel (Panel de control), haga doble clic en el icono [Sounds and Multimedia] (Sonidos y
Multimedia) para abrir el cuadro de diálogo Sounds and Multimedia Properties (Propiedades de
Sonido y Multimedia).
* Si no encuentra el icono [Sounds and Multimedia] (Sonidos y Multimedia), vaya a Control Panel
(Panel de control) y haga clic en [view all Control Panel options] (Ver todas las opciones
de Panel de control).
3. Haga clic en la ficha [Audio].
4. Para el elemento Playback (Reproducción)Preferred device (Dispositivo preferido), haga clic en .
En la lista que aparece, haga clic en [USB Audio Device] (Dispositivo de audio USB) para seleccionarlo.
5. Para el elemento Recording (Grabación)Preferred device (Dispositivo preferido), haga clic en .
En la lista que aparece, haga clic en [USB Audio Device] (Dispositivo de audio USB) para
seleccionarlo.
Windows 98 / Windows 98SE Windows 2000 /Windows Me
6. Haga clic en [OK] (Aceptar) para completar la configuración.
Configuración del control de volumen
El volumen de salida del UA-3 se puede controlar mediante el Volume Control (Control de volumen) de
Windows.
1. Haga clic en el botón [Start] (Inicio) de Windows y seleccione [Programs] (Programas)-
[Accessories] (Accesorios)- [Entertainment] (Entretenimiento) - [Volume Control] (Control de
volumen) para iniciarlo.
Windows Me Windows 2000/
Windows 98/Windows 98SE
• Dependiendo del sistema, “USB
Audio Device” (Dispositivo de
audio USB) aparecerá con un
número añadido, por ejemplo,
“USB Audio Device (1).”
• No será posible pulsar el botón
“Advanced Properties ”
(Propiedades avanzadas) en la
opción “Recording”
(Grabación).

Instalación del controlador y conexiones (Windows)
76
2. Puede subir o bajar el deslizador para ajustar el volumen del UA-3. Se pueden configurar los siguientes
elementos.
Comprobación de la salida de sonido
Una vez se han efectuado las conexiones correctamente, puede reproducir los datos de muestra para comprobar la configuración.
■ Reproducción de los datos de muestra
Aquí utilizaremos la funcionalidad estándar de Windows para reproducir los datos de muestra. Los datos de muestra
se encuentran en el CD-ROM AUDIO Capture . Inserte el CD-ROM en la unidad de CD-ROM del ordenador.
1. Copie “Alright(.wav)” en el escritorio arrastrándolo desde la carpeta “Sample_Data” del CD-ROM.
USB Audio (Speaker) (USB
Audio (Altavoz))
Ajusta el volumen de las salidas análogas (salida de línea
y salida de auriculares). La salida digital no cambiará.
1
1. Dependiendo de la versión de Windows, se puede visualizar como “Analog
connector” (Conector análogo).
WAVE (Onda)
Ajusta el volumen que se envía desde el dispositivo de
salida de audio “USB Audio Device” (Dispositivo de audio
USB). La salida digital y la salida análoga cambiarán.
SW Synth (Sintetizador de
software)
Ajusta el volumen del sintetizador de software
integrado en Windows.
CD Player (Reproductor de
CD)
Ajusta el volumen de la música del CD de la unidad de
CD-ROM del ordenador.
2
2. Si la reproducción del CD no cambia cuando ajusta este volumen, cambie el
volumen WAVE (Onda).
• Si no tiene instalada en su ordenador la opción Volume Control (Control de volumen), utilice la opción Add/
Remove Applications (Agregar o quitar programas) del Control Panel (Panel de control) para
instalarla. Para obtener más información sobre la instalación, consulte el manual del usuario de Windows o la ayuda.
• Si se encuentra seleccionada la opción Mute (Silencio) o si el deslizador está en la posición más baja, el equipo
UA-3 no emitirá ningún sonido.
• Si utiliza Windows 2000 y no aparece “CD Player” (Reproductor de CD), seleccione el elemento “Enable digital
CD audio for this CD-ROM device” (Habilitar el CD de sonido digital para este dispositivo de CD-ROM) de
[Digital CD playback] (Reproducción de CD Digital), tal y como se describe en la nota siguiente.
• Cuando utilice la unidad de CD-ROM del ordenador para escuchar un CD de audio o cuando reproduzca música
de fondo para juegos con el UA-3
Si utiliza Windows Me:
Seleccione [Start] (Inicio)-[Settings] (Configuración)-[Control Panel] (Panel de control). En Control
Panel (Panel de control), haga doble clic en el icono [System] (Sistema) para acceder al cuadro de
diálogo System Properties (Propiedades del sistema). Haga clic en la ficha [Device Manager]
(Administrador de dispositivos) y haga doble clic en el icono [CDROM]. Haga doble clic debajo en la
unidad de CD-ROM que está utilizando y abra las Properties (Propiedades). Haga clic en la ficha
[Properties] (Propiedades) y seleccione la casilla de verificación que se encuentra situada junto al
elemento Enable digital CD audio for this CD-ROM device (Habilitar el CD de sonido digital para
este dispositivo de CD-ROM) de “Digital CD playback” (Reproducción de CD digital).
Si utiliza Windows 2000
Al igual que con Windows Me, abra el cuadro de diálogo System Properties (Propiedades del sistema).
Haga clic en la ficha [Hardware] y, a continuación, haga clic en el botón [Device Manager] (Administrador
de dispositivos) para abrir el Administrador de dispositivos. Desde las unidades de CD-ROM , haga doble
clic en la unidad de CD-ROM que está utilizando par abrir las Properties (Propiedades). Haga clic en la
ficha [Properties] (Propiedades) y seleccione la casilla de verificación que se encuentra situada junto al
elemento Enable digital CD audio for this CD-ROM device (Habilitar el CD de sonido digital para este
dispositivo de CD-ROM) de “Digital CD playback” (Reproducción de CD digital).
Si utiliza Windows 98 o Windows 98 SE:
Seleccione [Start] (Inicio) - [Settings] (Configuración) - [Control Panel] (Panel de control) - [Multimedia] y, a
continuación, haga clic en la ficha [CD Music] (Música de CD) y, a continuación, seleccione “Enable CD digital
audio for this CD-ROM device” (Habilitar el CD de sonido digital para este dispositivo de CD-ROM).
Dependiendo del entorno de su ordenador, la reproducción de estos CD puede ser todavía imposible.
Para obtener más información, consulte la información que le haya proporcionado el fabricante del
ordenador. Si utiliza una unidad de CD-ROM de tipo PC card (PCMCIA), la reproducción de datos
WAVE (onda) o un CD de audio en la unidad de CD-ROM puede hacer que el sonido se interrumpa o
que no se oiga ningún sonido.
• La calidad de audio de la unidad UA-3 será mejor si sube los niveles de control de volumen.

Instalación del controlador y conexiones (Windows)
UA-3 77
DEUTSCHFRANÇAISESPAÑOLITALIANO ENGLISH
2. Haga clic con el botón secundario en el archivo “Alright(.wav)” que ha copiado y seleccione
[Play] (Reproducir)o [Properties] (Propiedades) del menú que aparece a continuación.
3. Haga clic en la ficha [Preview] (Vista previa) y, a continuación,
haga clic en el botón .
Empezará la reproducción de los datos de muestra.
¿Ha podido escuchar los datos de muestra?
Si los datos de muestra se han reproducido correctamente, el ordenador y la unidad UA-3 están conectados correctamente y los
controladores se han instalado correctamente. Si los datos no se han reproducido correctamente, consulte Resolución de
problemas (pág. 84). El apartado Resolución de problemas contiene información para ayudarle a encontrar y corregir problemas.
Con esto finaliza la instalación del controlador y las conexiones para el UA-3.
Eliminación del controlador de dispositivo de audio USB
■ Si vuelve a instalar el controlador de dispositivo de audio USB
■ Si la instalación del dispositivo de audio USB finalizó antes de acabar.
Utilice el siguiente procedimiento para eliminar el controlador que ya está instalado.
1. Utilice un cable USB para conectar el UA-3 al ordenador.
2. Haga clic en el botón [Start] (Inicio) de Windows y seleccione [Settings] (Configuración) - [Control
Panel] (Panel de control).
3. En
Control Panel (Panel de control)
, haga doble clic en [System] (Sistema) para abrir el cuadro de diálogo
System Properties (Propiedades del sistema).
4. Haga clic en la ficha [Device Manager] (Administrador de dispositivos).
5. Haga doble clic en [Sound, video, and game controllers] (Dispositivos de sonido, vídeo y juegos)
para ver la lista de dispositivos.
6. De la lista, seleccione USB Audio Device (Dispositivo de audio USB) y haga clic en [Remove] (Quitar).
En el cuadro de diálogo Confirm Device Removal (Confirmar la eliminación del dispositivo) haga clic
en [OK] (Aceptar). Si no aparece USB Audio Device (Dispositivo de audio USB), vaya al paso 8.
7. Asegúrese de que el USB Audio Device (Dispositivo de audio USB) no está en la lista Sound, video and
game controllers (Dispositivos de sonido, vídeo y juegos) y haga clic en [Close] (Cerrar) para cerrar
el cuadro de diálogo System Properties (Propiedades del sistema) .
8. Siga los pasos 1. – 4. de nuevo y haga doble clic en [Universal Serial Bus controllers] (Dispositivos de
bus serie universal) para mostrar la lista de dispositivos.
Si aparece este símbolo en el icono del dispositivo compatible USB:
Seleccione el icono [USB Composite Device] (Dispositivo USB Composite) y haga clic en [Remove]
(Quitar). En el cuadro de diálogo Confirm Device Removal (Confirmar la eliminación del dispositivo)
Para poder escuchar los datos de muestra, necesitará aproximadamente 30 MB de espacio libre
en el disco duro donde se encuentra instalado Windows.
Cuando se pone el Recording input select switch (Interruptor de
selección de entrada de grabación) en DIGITAL, no es posible
reproducir datos de audio desde el ordenador. Ponga el interruptor
en INPUT + GUITAR/MIC (ENTRADA + GUITAR/MIC).
La explicación que aquí se ofrece es para un sistema Windows de tipo medio. Dependiendo del
ordenador algunos nombres de carpetas pueden ser diferentes.

Instalación del controlador y conexiones (Windows)
78
haga clic en [OK] (Aceptar). Como en el paso 7., cierre System Properties (Propiedades del sistema).
Si no hay ningún icono de dispositivo compatible USB o si no aparece el símbolo :
Sólo tiene que cerrar System Properties (Propiedades del sistema).
Si utiliza Windows Me y aparece el símbolo :
Sólo tiene que cerrar System Properties (Propiedades del sistema).
9. Desconecte el cable USB del ordenador y vuelva a iniciar Windows.
Funcionamiento básico del D-Out Smoother
■ ¿Qué es el D-Out Smoother?
Cuando se reproduce audio a través de un aparato digital como un MD o DAT que estén conectados a la salida digital
del UA-3, se necesita un tiempo para que la salida de audio se bloquee inmediatamente después de la reproducción,
de modo que puede que no haya sonido durante uno o dos segundos o el pitch o el tempo no sean los correctos. D-Out
Smoother es un software mediante el cual el audio se puede reproducir sin problemas en estos casos.
■ Instalación del D-Out Smoother
1. Coloque el CD-ROM AUDIO Capture en la unidad de CD-ROM.
2. Haga clic en el botón [[Start] (Inicio) de Windows y seleccione [Run...] (Ejecutar...)
3. En el cuadro de texto Open (Abrir):, escriba “E:\UA_Util\Setup.exe” y haga clic en [OK] (Aceptar).
También puede hacer clic en [Browse] (Examinar) y seleccionar el archivo [Setup(.exe)] que se encuentra
situado en la carpeta UA_Util de la unidad de CD-ROM y hacer clic en [Open] (Abrir).
4. Se iniciará el instalador y aparecerá el cuadro de diálogo Choose Setup Language (Seleccionar idioma
de instalación). Especifique si utiliza la versión de Windows “English (United States)” (Inglés de los
EE.UU.) o “Spanish” (Español) y haga clic en [OK] (Aceptar).
5. Efectúe el resto de la instalación según se le indica en las instrucciones que aparecen en pantalla.
6. Cuando finaliza la instalación, aparece el cuadro de diálogo Setup Complete (Programa de instalación
completo). Haga clic en [Finish] (Finalizar).
Con esto finaliza la instalación del D-Out Smoother.
■ Inicio del D-Out Smoother
1. Conecte la unidad UA-3 al conector USB de su ordenador.
2. Haga clic en el botón [Start] (Inicio) de Windows y en la opción de menú [Programs] (Programas) haga clic
en [D-Out Smoother].
3. Se iniciará el D-Out Smoother.
En algunos casos puede que aparezca“Cannot find USB Audio Device. Check USB cable or select
USB Audio Device again.” (No se puede encontrar el dispositivo de audio USB. Compruebe el
cable USB o vuelva a seleccionar Dispositivo de audio USB.) al iniciarse. Si esto sucede, el
ordenador no ha detectado correctamente la unidad UA 3. Es posible que la unidad UA-3 no se haya
conectado correctamente o que el controlador no se haya instalado correctamente. Consulte el apartado
Instalación del controlador y conexiones (Windows) (pág. 71) y compruebe estos puntos.
■ Uso del D-Out Smoother
El D-Out Smoother tiene un interruptor “ON/OFF” y un botón “TEST”.
Interruptor “ON/OFF”
Por lo general, debe dejar el interruptor en la posición “ON” (Activado) cuando utilice la salida digital del UA-
3.
Póngalo en la posición “OFF” (Desactivado) cuando conecte o desconecte la unidad UA-3.
Si aparece un cuadro de diálogo donde se le sugiere que reinicie Windows en este punto,
hágalo y reinicie el ordenador.
En las indicaciones que ofrecemos a continuación, damos por supuesto que la unidad de CD-ROM es la
unidad E:, aunque el nombre de la unidad puede ser diferente dependiendo del ordenador. Si el
nombre de la unidad es diferente en el ordenador, ponga el nombre de unidad adecuado. Para
comprobar el nombre de la unidad para el CD-ROM, haga doble clic en el icono My Computer (Mi PC).
El cuadro de diálogo Setting (Configuración) aparece la primera vez que lo inicie. Asegúrese de que
en Wave-Out Device (Dispositivo de salida de onda) aparece “USB Audio Device (Dispositivo
de audio USB),” y haga clic en [OK] (Aceptar). Si aparecen dos o más dispositivos de audio USB,
consulte el apartado Uso del D-Out Smoother
(pág. 78)
y especifique el dispositivo correcto.

Instalación del controlador y conexiones (Windows)
UA-3 79
DEUTSCHFRANÇAISESPAÑOLITALIANO ENGLISH
Botón “TEST”
Haga clic en el botón [TEST] (Prueba). Si se oye el audio de prueba, el D-Out Smoother está funcionando para
ese dispositivo.
Cuando utilice dos o más Dispositivos de audio USB como UA-3 o MA-150U, utilice este botón para seleccionar
la unidad UA-3 en la que va a funcionar el D-Out Smoother.
Utilice el procedimiento siguiente para efectuar su selección.
1. Desde el menú [Control] (Control) de D-Out Smoother, seleccione [Setting] (Configuración) para acceder
al cuadro de diálogo Setting (Configuración). (Este cuadro de diálogo aparecerá automáticamente la primera
vez que se inicie el software.)
2. Desde el menú desplegable, seleccione USB Audio Device (Dispositivo de audio USB) y haga clic en [OK]
(Aceptar).
3. Haga clic en el botón [TEST] (Prueba) y compruebe si se oye el audio de prueba.
Si se oye el audio, el D-Out Smoother está funcionando para ese dispositivo. Si no se oye el audio, seleccione un
Dispositivo de audio USB en el paso 2 y repita los pasos1 a 3.
■ Eliminación (desinstalación) del D-Out Smoother
D-Out Smoother da soporte a la función Add/Remove Programs Properties (Propiedades de Agregar o
quitar programas) de Windows. Puede utilizar el siguiente procedimiento para quitar el programa si ya no lo
necesita.
1. Haga clic en el botón [Start] (Inicio) de Windows y seleccione [Settings] (Configuración) - [Control
Panel] (Panel de control).
2. En
Control Panel (Panel de control)
, haga doble clic en el icono [Add/Remove Programs] (Agregar o
quitar programas) para abrir el cuadro de diálogo [Add/Remove Programs Properties] (Propiedades
de Agregar o quitar programas).
3. Haga clic en la ficha [Install/Uninstall] (Instalar/Desinstalar).
4. Desde la lista que aparece en el cuadro de diálogo, haga clic en el nombre de la aplicación que desea eliminar.
5. Haga clic en [Add/Remove] (Agregar o quitar) .
Se eliminará la aplicación que ha especificado en el paso 4.
Opciones útiles
• Cuando se selecciona [Register to STARTUP] (Registrarse al iniciar)( en el cuadro de diálogo, D-Out
Smoother se iniciará automáticamente cuando inicie el ordenador.
• Cuando se selecciona [Minimize window when starting up] (Minimizar ventana al iniciar) en el cuadro
de diálogo Setting (Configuración), D-Out Smoother se minimizará inmediatamente después de iniciarse,
permitiéndole que utilice la pantalla del ordenador de un modo más eficaz.
Si desinstala D-Out Smoother, debe primero deseleccionar [Register to STARTUP] (Registrarse
al iniciar) en el cuadro de diálogo Setting (Configuración). Puede ir al cuadro de diálogo Setting
(Configuración) seleccionando [Control] (Control) - [Setting] (Configuración). (pág. 88)

Instalación del controlador y conexiones (Macintosh)
80
Instalación del controlador y conexiones (Macintosh)
* Si es usuario de Windows, consulte la pág. 71.
Para poder utilizar la unidad UA-3, primero debe instalar un controlador. UA-3 utiliza un controlador que se incluye
con el sistema operativo Mac.
Realización de conexiones e instalación del controlador
■ Realización de conexiones
(943)
Asegúrese siempre de tener bajado el volumen antes de conectar el UA-3. Aunque el volumen este completamente
bajado, es posible que todavía oiga algún sonido al encender la unidad pero esto es algo normal y no indica un mal
funcionamiento de la misma.
(921)
Para evitar anomalías en el funcionamiento o daños en los altavoces u otros dispositivos, baje siempre el volumen y
apague todos los aparatos antes de realizar cualquier conexión. (No es necesario apagar el ordenador.) Utilice un cable
USB para conectar el UA 3 al ordenador antes de encender el equipo de audio.
■ Preparación de la unidad para su reconocimiento
1. Encienda el ordenador e inicie el sistema operativo Mac.
2. Desde el menú Apple, seleccione [Apple System Profiler]
(Analizador de sistema Apple).
3. Haga clic en la ficha de control [Devices and Volumes] (Dispositivos y volúmenes).
4. Utilice un cable USB para conectar el UA-3 al ordenador.
¿Qué es un controlador?
-> pág. 71
• Antes de desconectar el cable USB o reiniciar
Macintosh, cierre todas las aplicaciones. También
debe bajar el volumen de cualquier sistema de
amplificación o de audio que esté conectado.
• Esta unidad viene equipada con un circuito de protección.
Es necesario dejar pasar un pequeño intervalo (de unos
segundos) después de encender la unidad para que ésta
funcione correctamente.
• Para evitar causar daños a los altavoces, baje el volumen de la unidad y de los
dispositivos de audio que tenga conectados.
• Asegúrese de salir de todas las aplicaciones que se estén ejecutando antes
de realizar la conexión.
UA-3
Equipo estéreo
Altavoces, etc
ENTRADA DE LÍNEA,
LÍNEA AUXILIAR
Cable de
audio
Cable USB
* Conéctelo después de
encender el ordenador
Ordenador
Puerto
USB
Puerto
USB
SALIDA DE
LÍNEA
Auriculares
estéreo

Instalación del controlador y conexiones (Macintosh)
UA-3 81
DEUTSCHFRANÇAISESPAÑOLITALIANO ENGLISH
5. Para asegurarse de que se ha reconocido satisfactoriamente, seleccione [Update all information] (Actualizar toda
la información) del menú [Commands] (Comandos). Se verán los tres dispositivos de audio siguientes en la
sección USB, como se muestra a continuación:
Si la indicación es correcta, la instalación del controlador UA-3 ha sido satisfactoria. Seleccione [Quit] (Salir)
del menú [File] (Archivo) para cerrar el cuadro de diálogo Apple System Profiler (Analizador de sistema
Apple) y efectúe las configuraciones de sonido que se explican a continuación.
Si la indicación no es correcta, debe intentar desconectar la unidad UA-3 del puerto USB y esperar unos diez
segundos. A continuación, vuelva a realizar el procedimiento, empezando a partir del paso 4.
■ Configuración del sonido
6. Desde el menú Apple, seleccione [Control Panels] (Paneles de
control) - [Sound] (Sonido) para abrir el cuadro de diálogo Sound
(Sonido) .
7. Haga clic en la ficha [Speakers] (Altavoces).
8. Apague el volumen de la unidad UA-3 y del equipo de audio, a
continuación haga clic en [Start Test] (Iniciar prueba).
9. Los sonidos de prueba se transmiten de izquierda a derecha junto con lo
que aparece en la pantalla, ajuste el volumen utilizando la barra [Main
Volume] (Volumen principal). Cuando haya finalizado, haga clic en
[Stop Test] (Detener prueba).
Dependiendo de la versión de sistema operativo, la barra [Main
Volume] (Volumen principal) no existe. En ese caso, utilice la barra
[Volume] (Volumen) que se encuentra en [Output] (Salida) para
ajustar el volumen.
Si se coloca el Recording input select switch (Interruptor de
selección de entrada de grabación) en DIGITAL, no es posible
reproducir datos de audio desde el ordenador. Ponga el interruptor
en la posición INPUT + GUITAR/MIC (ENTRADA + GUITAR/MIC).

Instalación del controlador y conexiones (Macintosh)
82
10.Seleccione [Input] (Entrada) desde el cuadro de diálogo Sound
(Sonido). A continuación, en Choose a source for sound input:
(Seleccione una fuente para la entrada de sonido:), seleccione
USB Audio (Audio USB).
11.Cuando haya finalizado de efectuar la configuración, seleccione [Quit] (Salir) desde el menú [File] (Archivo) para
cerrar el cuadro de diálogo Sound (Sonido).
Problemas conocidos: UA-3
• Algunas aplicaciones como la Serie Metro de Cakewalk y la Serie Spark de TC Work no pueden reproducir/grabar
a 48 kHz. Utilice la unidad UA-3 a 44,1 kHz.
• Cuando la aplicación de audio está grabando o reproduciendo, no conecte o desconecte el cable USB ni mueva el
Recording input select switch (Interruptor de selección de entrada de grabación).
Si lo hace, la aplicación puede quedar inmovilizada.
• Puede que oiga que el sonido viene y va y/o ruido si graba o reproduce al mismo tiempo debido a una sobrecarga
de la CPU. Sin embargo, el ruido no debe aparecer en la grabación. El ruido sólo debe aparecer en la señal de
reproducción.
• Si va a utilizar Virtual Sound Canvas 3, debe seleccionar [Performance] (Rendimiento) desde el menú
[Setting] (Configuración) y seleccionar Expression Mode (Modo de expresión) en Response
Priority (Prioridad de respuesta).
• El controlador estándar que viene con el sistema operativo MAC no es compatible con ASIO.
• Cuando inicie el ordenador con la unidad UA-3 conectada, el ordenador se puede volver inestable. Si esto sucede,
inicie el ordenador antes de conectar la unidad UA-3 y conecte la unidad UA-3 después de haberlo iniciado.
Comprobación de la salida de sonido
Una vez se han efectuado las conexiones correctamente, puede reproducir los datos de muestra para comprobar la
configuración.
■ Reproducción de los datos de muestra
Aquí utilizaremos la funcionalidad estándar de Macintosh para reproducir los datos de muestra. Los datos de muestra
se encuentran en el CD-ROM AUDIO Capture . Inserte el CD-ROM en la unidad de CD-ROM del ordenador.
1. Copie “Alright en el escritorio arrastrándolo desde la carpeta “Sample_Data” del CD-ROM.
2. Inicie QuickTime Player (Reproductor QuickTime) que se
proporciona con el sistema operativo MAC. El reproductor QuickTime
normalmente se encuentra situado en la carpeta QuickTime dentro de
la carpeta Applications (Aplicaciones) del disco duro.
• Si no ve la opción USB Audio (Audio USB), debe cerrar el cuadro de diálogo
Sound (Sonido). A continuación, desconecte la unidad UA-3 y espere unos diez
segundos. Intente realizar de nuevo el procedimiento, empezando a partir del paso 2.
• No seleccione [Play sound through output device] (Reproducir sonido
a través del dispositivo de salida).
Para poder escuchar los datos de muestra, necesitará aproximadamente 30 MB de espacio libre
en el disco duro donde se encuentra instalado el sistema.

Instalación del controlador y conexiones (Macintosh)
UA-3 83
DEUTSCHFRANÇAISESPAÑOLITALIANO ENGLISH
3. Desde el menú [File] (Archivo), seleccione [Open Movie] (Abrir
película), seleccione el archivo “Alright,” que ha copiado y haga clic
en [Convert] (Convertir) para abrirlo.
4. Haga clic en el botón de reproducción.
Empezará la reproducción de los datos de muestra.
¿Ha podido escuchar los datos de muestra?
Si los datos de muestra se han reproducido correctamente, el ordenador y la unidad UA-3 están conectados
correctamente y los controladores se han instalado correctamente. Si los datos no se han reproducido correctamente,
consulte Resolución de problemas (pág. 84). El apartado Resolución de problemas contiene información para ayudarle
a encontrar y corregir problemas.
Con esto finaliza la instalación del controlador y las conexiones para el UA-3.
Si se coloca el Recording input select switch (Interruptor de selección de entrada de
grabación) en DIGITAL, no es posible reproducir datos de audio desde el ordenador. Ponga el
interruptor en la posición INPUT + GUITAR/MIC (ENTRADA + GUITAR/MIC).

Resolución de problemas
84
Resolución de problemas
Si sucede un problema inesperado mientras utiliza UA-3, lea este capítulo en primer lugar. Le ofrece numerosos consejos que le ayudarán
a resolver los problemas que se le presenten.
Los problemas que se recogen en el apartado de resolución de problemas se encuentran ordenados según el sistema operativo en el que
puede ocurrir el problema. Utilice el icono que se muestra a la izquierda del título para encontrar la información que busca.
Problemas comunes a Windows y Macintosh
Problemas que sólo ocurren con Windows
Problemas que sólo ocurren con Macintosh
Si utiliza un ordenador por primera vez o no entiende las explicaciones que se dan de un determinado proceso, consulte el manual del
usuario de su ordenador o de su sistema operativo.
Si la unidad UA-3 no funciona como desea, compruebe los siguientes puntos.
Problemas relacionados con el controlador USB
“Add New Hardware Wizard” (Asistente para agregar nuevo hardware) no
se inicia automáticamente
“Add New Hardware Wizard” (Asistente para agregar nuevo hardware)
finaliza antes de acabar
• Cuando se conecta o desconecta el cable USB, es necesario que pasen 15 segundos (o más) para que se reconozca la unidad UA-3.
• ¿El cable USB está conectado correctamente?
Asegúrese de que la unidad UA-3 y el ordenador están conectados correctamente con el cable USB.
• ¿Se puede utilizar el cable USB en el ordenador?
Consulte el manual del usuario del ordenador y asegúrese de que puede utilizar el cable USB.
• ¿El concentrador USB o el ordenador tienen suficiente capacidad de suministro eléctrico?
La unidad UA-3 no se puede conectar si no se suministra suficiente electricidad. Compruebe si se produce alguno de los casos siguientes:
Si utiliza la unidad UA-3 con un ordenador portátil que funciona con baterías, el funcionamiento puede no ser fiable con algunos modelos
de ordenador. Si este es el caso, conecte el adaptador de CA al ordenador portátil.
El modo de conservación de energía de su ordenador puede limitar la potencia que se suministra al USB. Compruebe la configuración del
ordenador.
En algunos casos, la unidad UA-3 no se puede utilizar con un concentrador controlado por bus (un concentrador que no contiene una
fuente de alimentación). Utilice un concentrador con alimentación propia (un concentrador que contenga una fuente de alimentación).
• ¿Cumple su ordenador con las especificaciones USB?
Si utiliza un ordenador que no cumple con las especificaciones USB (como, por ejemplo, un ordenador casero), el funcionamiento puede
ser inestable. En estos casos, puede resolver el problema conectando un concentrador USB que contenga una fuente de alimentación.
• ¿Aparece el aviso “Unknown Device” (Dispositivo desconocido) o “Universal Serial Bus controllers” (Controladoras de bus serie
universal)?
Utilice el siguiente procedimiento para eliminar “Unknown Device” (Dispositivo desconocido) de “Other devices” (Otros
dispositivos) (Universal serial bus controller) (Controlador de bus serie universal) y reinicie el ordenador.
1. En el Control Panel (Panel de control) de Windows, haga doble clic en [System] (Sistema) para abrir el cuadro de diálogo
System Properties (Propiedades del sistema).
2. Haga clic en la ficha [Device Manager] (Administrador de dispositivos).
3. Haga doble clic en [Other devices] (Otros dispositivos) (Universal Serial Bus controllers) (Controladoras de bus serie
universal) para ver la lista de dispositivos.
4. De la lista, seleccione Unknown Device (Dispositivo desconocido) y haga clic en [Remove] (Quitar).
5. En el cuadro de diálogo Confirm Device Removal (Confirmar la eliminación del dispositivo) haga clic en [OK]
(Aceptar).
6. Asegúrese de que la lista no muestra Other devices (Otros dispositivos) o Unknown Device (Dispositivo desconocido)
y haga clic en [Close] (Cerrar) para cerrar el cuadro de diálogo.
Aparece el cuadro de diálogo “Add New Hardware Wizard” (Asistente para
agregar nuevo Hardware) aunque haya instalado los controladores.
Si el ordenador o el concentrador USB tienen dos o más conectores USB, si conecta la unidad UA-3 a un conector USB al que no se le
haya conectado nunca la unidad UA-3 puede que aparezca el cuadro de diálogo Add New Hardware Wizard (Asistente para
agregar nuevo hardware) aunque los controladores ya hayan sido instalados. Instale los controladores de nuevo tal y como se describe
en Instalación del controlador y conexiones (Windows) (pág. 71). Esto no significa que el funcionamiento sea defectuoso.
Para comprobar si el “Unknown Device” (Dispositivo desconocido) es la unidad UA-3,
desconecte el cable USB de la unidad UA-3 y verifique que “Unknown Device” (Dispositivo
desconocido) ha desaparecido. A continuación, conecte la unidad UA-3 y elimine “Unknown
Device” (Dispositivo desconocido).

Resolución de problemas
UA-3 85
DEUTSCHFRANÇAISESPAÑOLITALIANO ENGLISH
Los controladores no se han instalado correctamente
Utilice el procedimiento que se describe en Eliminación del controlador de dispositivo de audio USB (pág. 77) para eliminar el controlador
del dispositivo de audio USB instalado en el ordenador e instale los controladores UA-3 de nuevo tal y como se describe en Instalación
del controlador y conexiones (Windows) (pág. 71). Compruebe si hay un elemento llamado “Unknown Device” (Dispositivo desconocido)
en “Other devices” (Otros dispositivos) o en “Universal Serial Bus controllers.” (Controladores de bus serie universal).
Si encuentra “Unknown Device,” (Dispositivo desconocido), elimínelo.
Aparece un cuadro de diálogo que muestra “Unknown Device found” (Se ha
encontrado un dispositivo desconocido) y no se puede instalar el controlador.
Dependiendo del ordenador, puede que no se hayan instalado todos los archivos de Windows 98 necesarios para dar soporte a audio sobre
USB cuando el ordenador salió de fábrica.
Compruébelo con el fabricante del ordenador.
Problemas al utilizar UA-3
El sistema operativo se vuelve inestable
• Si inicia el ordenador estando la unidad UA-3 ya conectada puede que el ordenador se vuelva inestable.
Si esto sucede, inicie el ordenador con la unidad UA-3 desconectada y, a continuación, conéctela.
■ No hay sonido
• ¿Está colocado el interruptor de selección de entrada de grabación en la posición “INPUT + GUITAR/MIC” (ENTRADA +
GUITAR/MIC)?
Cuando el Recording input select switch (interruptor de selección de entrada de grabación) se ha colocado en “DIGITAL,”
se transmite la entrada de las señales de audio al conector de entrada digital. Los datos de audio del ordenador no se transmiten.
• ¿Está conectado un dispositivo digital como un MD a la salida digital de la unidad UA-3?
Dependiendo de la aplicación, la reproducción de audio con un dispositivo digital como un MD que se ha conectado a la salida digital de
la unidad UA-3 puede ocasionar que se requiera un tiempo para que se bloquee la salida de audio digital inmediatamente después de la
reproducción, de modo que no habrá sonido durante uno o dos segundos. Si esto sucede, puede utilizar el software de D-Out Smoother
que se incluye en el CD-ROM para que la reproducción de audio se realice sin problemas. Para más información, consulte el apartado
Funcionamiento básico del D-Out Smoother (pág. 78).
• ¿Está intentando escuchar un CD de audio en la unidad de CD del ordenador?
Si desea reproducir un CD de audio en la unidad de CD-ROM del ordenador, consulte el apartado Cuando utilice la unidad de CD-ROM
del ordenador para escuchar un CD de audio o cuando reproduzca música de fondo para juegos con el UA-3 (pág. 76).
• ¿Está ejecutando varias aplicaciones simultáneamente?
Si está ejecutando varias aplicaciones simultáneamente, puede que aparezca un mensaje de error. Si esto sucede, haga clic en [OK]
(Aceptar) y cierre las otras aplicaciones.
Aunque se cierre una ventana de aplicación, ésta se encuentra todavía en funcionamiento si sigue en la barra de tareas, de modo que
asegúrese de que únicamente dispone de las aplicaciones necesarias en la barra de tareas.
• ¿Ha especificado el destino de la salida de datos de audio para el sistema operativo?
El destino de la salida de datos de audio de un ordenador se debe establecer en UA-3. Para obtener más información sobre esta
configuración, consulte Especificación del aparato de entrada/salida de audio (Windows pág. 75) o Configuración del
sonido (Macintosh pág. 81).
• ¿Ha especificado el destino de la salida de datos de audio para el software de reproducción?
En determinados tipos de software como Cool Edit Pro LE, debe establecer el destino de la salida de datos de audio en UA-3. Para obtener
detalles sobre esta configuración, consulte el manual del usuario que se adjunta con el software.
• ¿Están los controladores instalados correctamente?
Para reproducir datos de audio utilizando la unidad UA-3, debe tener instalado el controlador USB Audio Device (Dispositivo de
audio USB). Para obtener más detalles sobre la instalación y la configuración, consulte Instalación del controlador y conexiones
(Windows pág. 71, Macintosh pág. 80).
• ¿Se encuentran subidos los diferentes “faders” (atenuadores) del control de volumen?
Ajuste el volumen de cada “fader” (atenuador) tal y como se describe en Configuración del control de volumen (Windows pág. 75)
o Configuración del sonido (Macintosh pág. 81).
■ El sonido está distorsionado
• ¿Se enciende el indicador rojo de pico?
Si transmite sonido desde los jacks de entrada de línea, utilice el Line input adjustment slider (Deslizador de ajuste de entrada
de línea) de la unidad UA-3 para reducir el nivel de entrada. Si transmite sonido desde los jacks de entrada de guitarra o micrófono,
utilice el Guitar/Mic input adjustment slider (Deslizador de ajuste de entrada Guitar/Mic) para reducir el nivel de entrada.
Además, el número de indicadores LED en el indicador de nivel de salida cambiará según el nivel de salida de la unidad UA-3. Si el LED
rojo se ilumina, utilice el volumen de salida de línea para reducir el volumen.
El nivel de volumen del instrumento conectado a la LINE IN (ENTRADA DE
LÍNEA) es demasiado bajo.
• ¿Está utilizando un cable de conexión que contiene un reostato?
Utilice un cable de conexión que no contenga un reostato.
• ¿Está levantado correctamente el deslizador de ajuste de entrada de línea? (pág. 70).

Resolución de problemas
86
■ Se oye ruido al reproducir audio
• ¿Está todavía conectado el micrófono?
Si se encuentra conectado un micrófono a la unidad UA-3, utilice el Guitar/Mic input adjustment slider (Deslizador de ajuste de
entrada Guitar/Mic) para bajar el nivel de entrada.
•
El acelerador gráfico del ordenador puede provocar ruido durante la reproducción de audio.
Utilice el procedimiento siguiente para establecer la aceleración gráfica a “None.” (Ninguna)
1. En el Control Panel (Panel de control) de Windows, haga doble clic en [Display] (Pantalla) para abrir el cuadro de diálogo
Display Properties (Propiedades de pantalla) y haga clic en la ficha [Settings] (Configuración).
2. Haga clic en [Advanced] (Propiedades avanzadas) para abrir las propiedades y haga clic en la ficha [Performance]
(Rendimiento).
3. En Graphics (Gráficos), mueva el deslizador que se encuentra en la opción Hardware acceleration: (Aceleración de
hardware:) a None (Ninguna), y haga clic en [OK] (Aceptar).
4. En el cuadro de diálogo Display Properties (Propiedades de pantalla), haga clic en el botón [OK] (Aceptar) para cerrarlo.
A continuación, reinicie el ordenador.
• Se oye ruido en la entrada de línea o en la entrada del micrófono
Si un módulo de sonido MIDI y la unidad UA-3 están conectados mediante USB al mismo ordenador y la salida del módulo de sonido
MIDI está conectada a los jacks de entrada de línea de la unidad UA-3, puede entrar ruido del ordenador mediante el módulo de sonido
MIDI y se puede oír desde la unidad UA-3. En estos casos, utilice un concentrador con alimentación propia para conectar el módulo de
sonido MIDI y la unidad UA-3 en paralelo o conecte el módulo de sonido MIDI mediante la interfaz serie o interfaz MIDI.
• Se puede oír ruido si graba y reproduce simultáneamente.
Si graba y reproduce simultáneamente, se puede interrumpir la reproducción dependiendo del rendimiento del sistema y esto se puede
escuchar como ruido. Sin embargo, puesto que se da prioridad a la grabación, los datos grabados no se perderán.
• Se puede resolver este problema poniendo una toma de tierra en el chasis del ordenador o en el terminal de contacto de la toma de
tierra de la clavija del cable de CA que se suministró con el ordenador. Asegúrese también de que no hay aparatos en las
proximidades que emitan un campo magnético considerable como un televisor o un microondas.
• ¿Se encuentran conectados muchos aparatos de audio?
Si se encuentran conectados muchos aparatos de audio, se puede producir ruido. No conecte los aparatos de audio que no esté utilizando.
■ Se interrumpe el sonido durante la reproducción de audio.
• Intente aumentar la memoria
Puede aumentar la potencia de procesamiento de su ordenador añadiendo más memoria. Para obtener detalles sobre cómo añadir
memoria, consulte el manual del usuario que se adjunta con su ordenador.
• ¿Cumple su ordenador con las especificaciones USB?
Si utiliza un ordenador que no cumple con las especificaciones USB de tipo eléctrico se puede interrumpir el audio. En este caso, se puede
resolver el problema si conecta un concentrador USB que contiene su propia fuente de alimentación.
• ¿Se están ejecutando varias aplicaciones?
Si utiliza varias aplicaciones durante la reproducción o inicia otra aplicación, se puede interrumpir la reproducción dependiendo del
sistema de su ordenador. Salga de todas las aplicaciones que no utilice y vuelva a intentarlo. Si de este modo no se soluciona el problema,
intente reiniciar el ordenador.
• Intente realizar los siguientes cambios en la configuración de la unidad de disco.
* Puede que no exista la configuración siguiente en su ordenador.
1. En el Control Panel (Panel de control) de Windows, haga doble clic en [System] (Sistema) para abrir el cuadro de diálogo
System Properties (Propiedades del sistema) y haga clic en la ficha [Device Manager] (Administrador de
dispositivos).
2. Haga doble clic en [Disk drives] (Unidades de disco) para ver la lista de dispositivos.
3. De la lista, seleccione GENERIC IDE DISK TYPExx y haga clic en [Properties] (Propiedades) para acceder a la casilla de
verificación GENERIC IDE DISK TYPExx Properties (Propiedades de GENERIC IDE DISK TYPExx).
* El valor “xx” en GENERIC IDE DISK TYPExx será un número que variará dependiendo del
sistema.
4. Haga clic en la ficha [Settings] (Configuración), seleccione el cuadro de verificación [DMA] que se encuentra en Options
(Opciones) y haga clic en [OK] (Aceptar) para cerrar el cuadro de diálogo.
* Dependiendo del sistema, puede aparecer un cuadro de diálogo para la configuración DMA. Después
de comprobar el contenido, haga clic en OK (Aceptar) o Cancel (Cancelar).
5. En el cuadro de diálogo System Properties (Propiedades del sistema), haga clic en el botón [OK] (Aceptar) para cerrarlo.
Reinicie el ordenador de modo que la configuración que ha establecido surta efecto.
■ Se detiene la reproducción de audio
• En algunos ordenadores, la configuración de Administración de energía del Panel de control puede ocasionar que se detenga la
reproducción de audio.
Las Propiedades de Administración de energía que se muestran cuando hace doble clic en Power Management (Administración de
energía) variarán dependiendo del sistema de su ordenador. A continuación se da un ejemplo, pero también debe consultar el manual de
usuario del ordenador. Algunos ordenadores quizá no tengan la configuración siguiente.
1. En el Control Panel (Panel de control) de Windows, haga doble clic en [System] (Sistema) para abrir el cuadro de diálogo
System Properties (Propiedades del sistema) y haga clic en la ficha [Device Manager] (Administrador de
dispositivos).
2. Haga doble clic en [System devices] (Dispositivos de sistema) para ver la lista de dispositivos.
3. De la lista, seleccione [Advanced Power Management support] (Compatibilidad para Administración avanzada de
energía) y haga clic en [Properties] (Propiedades) para acceder al cuadro de diálogo Advanced Power Management
support properties (Propiedades de Compatibilidad para Administración avanzada de energía).
4. Haga clic en la ficha [Settings] (Configuración) y en Troubleshooting (Solución de problemas), seleccione la casilla de
verificación [Disable power status polling] (Desactivar consulta del estado de energía). A continuación, haga clic en
[OK] (Aceptar).
5. En el cuadro de diálogo System Properties (Propiedades del sistema), haga clic en el botón [OK] (Aceptar) para cerrarlo.
6. Reinicie Windows.

Resolución de problemas
UA-3 87
DEUTSCHFRANÇAISESPAÑOLITALIANO ENGLISH
El sonido grabado digitalmente está distorsionado, el pitch cambia o contiene
ruido
• Si utiliza un cable digital largo, se puede producir ruido o el sonido se puede distorsionar cuando se conecta. Utilice cables
digitales que midan un metro o menos.
• ¿Coincide la configuración de frecuencia de sampling de la aplicación con la frecuencia de sampling del aparato digital conectado
al conector de entrada digital?
• Cuando utiliza la grabación digital no es posible grabar en monoaural. Configure el software de grabación en el valor “stereo”
(estéreo).
Hay ruido en el sonido grabado
• Se ha descubierto que se introduce ruido en el sonido grabado con los modelos de la serie iMac que salieron a la venta después del
verano de 2000.
• En la aplicación SimpleSound que se incluye con el sistema operativo Mac, se oirá ruido en el sonido si se reproduce
inmediatamente después de haber sido grabado digitalmente. Guarde primero el sonido y, a continuación, intente reproducirlo.
• Actualice el controlador de audio USB a 1.0.5f4.
Si el controlador de audio USB que se proporciona con el sistema operativo Mac, es inferior a 1.0.4, actualícelo a 1.0.5f4.
Puede bajar el controlador desde la URL que aparece a continuación:
http://asu.info.apple.com/swupdates.nsf/artnum/n11703
Comprobación de la versión del controlador de audio USB
1. Conecte la unidad UA-3 al ordenador.
2. Desde el menú Apple, seleccione [Apple System Profiler] (Analizador de sistema Apple).
3. Haga clic en la ficha [Devices and Volumes] (Dispositivos y volúmenes).
4. En la sección USB, la pantalla indicará “Audio (UA-3 USB Audio Device) (Audio (Dispositivo de audio USB UA-3)).”
Haga clic en la flecha que se encuentra a la izquierda del texto.
5. El número que se muestra a la derecha de “Driver version” (Versión de controlador) es la versión del controlador de audio
USB.
■ Cuando graba se crea un archivo en blanco (sin sonido)
• Intente configurar la velocidad de bits a 16 bits.
Si utiliza Windows98 Segunda edición y el software de grabación está configurado a una velocidad de bits de 8 bits, puede crearse un
archivo en blanco de modo que quizá no pueda grabar de forma efectiva. Si esto sucede, podrá grabar correctamente configurando la
velocidad de bits a 16 bits.
• Los datos que contienen el indicador SCMS no se pueden grabar digitalmente.
La unidad UA-3 da soporte a SCMS (pág. 68), de modo que si los datos marcados con SCMS (como por ejemplo los datos que provengan
de un MD que se ha copiado digitalmente de un CD de música comercial) entran a través del conector digital, el UA-3 no podrá grabarlos
en el ordenador. (El sonido se transmitirá desde los jacks de salida de línea y el jack de auriculares)
No se puede grabar digitalmente
• ¿Está colocado el interruptor de selección de entrada de grabación en la posición “DIGITAL”?
• ¿Está la aplicación configurada en la misma frecuencia de sampling que el aparato digital conectado al conector de entrada
digital?
• La grabación no será posible si cambia la frecuencia de sampling (por ejemplo, entre el modo A y el modo B de transmisión
digital) de un aparato mientras permanece conectado a los conectores de entrada digital.
Cuando cambie la frecuencia de sampling, debe desconectar y volver a conectar el cable digital.
• No es posible grabar datos digitales de un formato distinto al formato del aparato de audio digital del consumidor.
No se pueden grabar CDs de música
• El UA-3 no puede grabar CDs de música en la unidad de CD-ROM con CoolEdit Pro LE u otros programas.
Para grabar CDs de música en la unidad de CD-ROM del ordenador, primero seleccione la tarjeta de sonido del ordenador como el
dispositivo de audio (Waveform Record) (Grabación tipo forma de onda) que se va a utilizar para grabar con CoolEdit Pro LE (o la
aplicación que esté utilizando), a continuación puede continuar con la grabación. Cuando graba un CD de música con una tarjeta de
sonido, desactive “Enable digital CD audio for this CD-ROM device” (Habilitar el CD de sonido digital para este dispositivo de
CD-ROM) que activó en Cuando utilice la unidad de CD-ROM del ordenador para escuchar un CD de audio o cuando reproduzca
música de fondo para juegos con el UA-3 (pág. 76).
El volumen ha cambiado cuando ha reanudado el sistema después de haber
estado en modo de suspensión o hibernación.
• Cuando se reanuda Windows 2000 después de haber estado en modo de suspensión o hibernación, el volumen de salida se cambia
debido a un problema de Windows.
Inicie la aplicación Mixer (Mezclador) como se describe en Configuración del control de volumen (pág. 75) y ajuste el deslizador USB
Audio (Speaker) (Audio USB (Altavoz)).
La música de fondo de un juego no suena
• ¿El juego utiliza un CD de audio como música de fondo?
Si el juego utiliza un CD de audio como música de fondo, consulte el apartado Cuando utilice la unidad de CD-ROM del ordenador para
escuchar un CD de audio o cuando reproduzca música de fondo para juegos con el UA-3 (pág. 76).

Resolución de problemas
88
Problemas habituales con el software en general
No se puede instalar
• ¿Ha insertado el CD-ROM en la unidad de CD-ROM del ordenador?
• ¿Se ha puesto correctamente durante la instalación el nombre de la unidad de CD-ROM y del archivo de instalación?
• ¿Hay suficiente espacio en el disco duro?
Aumente el espacio libre en el disco duro. Elimine los archivos que no necesita (muévalos a la papelera de reciclaje) y, a continuación,
haga clic con el botón secundario en la papelera de reciclaje y seleccione Empty Recycle Bin (Vaciar papelera de reciclaje).
También puede añadir otro disco duro al sistema.
• ¿Se estaban ejecutando otras aplicaciones cuando realizó la instalación?
Salga de todas las aplicaciones y vuelva a realizar la instalación.
No se puede iniciar una aplicación
• ¿Se están ejecutando varias aplicaciones?
Puede que no haya memoria suficiente para iniciar otra aplicación. Cierre todas las aplicaciones que no necesite y, a continuación, inicie
la nueva aplicación. Si se muestra todavía un error, intente reiniciar el ordenador.
Se muestra un error cuando inicia una aplicación
• Si está iniciando varias aplicaciones simultáneamente, puede que aparezca un mensaje de error
Si esto sucede, haga clic en [OK] (Aceptar) y cierre todas las aplicaciones que no sean necesarias.
Aunque se haya cerrado una ventana de aplicación, la aplicación sigue todavía ejecutándose si permanece en la barra de tareas. Asegúrese
de cerrar las aplicaciones que no sean necesarias que se encuentren en la barra de tareas.
• Si utiliza Cakewalk Pro Audio, debe asegurarse de que la frecuencia de sampling de Cakewalk Pro Audio se encuentra en 44,1
kHz.
En Cakewalk ProAudio 7, 8 y 9 la frecuencia de sampling se puede configurar del modo siguiente:
[Tools] (Herramientas) - [Audio options] (Opciones de audio) - [Settings] (Configuración)- [Default sampling rate] (Velocidad de
sampling predeterminada)
Una aplicación se bloquea
Si utiliza software de música digital para la grabación digital y tiene el interruptor de entrada de grabación de la unidad UA-3 en DIGITAL,
asegúrese bien de que se encuentra conectado un aparato digital.
Aunque en algunas aplicaciones las limitaciones de Windows pueden hacer el ratón u otros aparatos no funcionen hasta que no se haya
conectado un aparato digital, esto no significa que la aplicación no funcione correctamente.
Si no ocurre nada cuando utiliza el ratón u otro dispositivo similar, vuelva a conectar el aparato digital.
• Confirme este caso con las siguientes aplicaciones
(Vigentes desde enero de 2001).
•Logic Audio 3.0 o 4.0 Durante la grabación
•Cubase VST 3.7 Durante Startup/Recording/Playback (Inicio/Grabación/Reproducción)
•Cubase ASIO Multimedia Setup Durante la comprobación
Confirme que los eventos o condiciones que se mencionan arriba no se producen con las siguientes aplicaciones.
•Cakewalk Pro Audio 7, 8 y 9
•CoolEditProLE
•Grabadora de sonidos (Incluida con Windows 98)
Aparece un error de método abreviado al iniciar Windows
Si desinstala D-Out Smoother con la opción Register to STARTUP (Registrarse al iniciar) seleccionada (pág. 79), aparecerá el
siguiente mensaje de error cuando inicie Windows. En este caso, haga clic en [NO] para cerrar el mensaje.
Utilice el procedimiento siguiente para borrar este mensaje.
1. Haga clic en el botón [Start] (Inicio) de Windows y seleccione [Settings] (Configuración) - [Taskbar & Start Menu] (Menú
Inicio y Barra de tareas).
2. Haga clic en la ficha [Start Menu Programs] (Programas del menú Inicio) y, a continuación, haga clic en [Remove]
(Quitar).
3. Seleccione [Programs] (Programas) - [StartUp] (Inicio) - [SmoothDo], y haga clic en [Remove] (Quitar).
Para obtener más detalles sobre cómo instalar un disco duro, consulte el manual del usuario
del ordenador y de Windows.

UA-3 89
DEUTSCHFRANÇAISESPAÑOLITALIANO ENGLISH
Leggere attentamente quanto segue prima di avviare la
registrazione digitale
La registrazione, distribuzione, vendita, affitto, esecuzione pubblica, trasmissione o simili, in tutto o in parte,
non autorizzate, di un lavoro (composizione musicale, video, trasmissione, esecuzione pubblica, o simili) di cui
una terza parte detiene i diritti di copyright, sono proibiti dalla legge.
Quando questo apparecchio trasmette segnali audio tramite un collegamento digitale ad un apparecchio
esterno, alcune delle restrizioni del Serial Copy Management System (SCMS) non sono applicabili ed è quindi
possibile effettuare la registrazione. Questo perché l’apparecchio è stato ideato per la sola produzione musicale
e non è soggetto a limitazioni nella misura in cui viene utilizzato per registrare lavori, ad esempio le
composizioni personali, che non infrangono i diritti di copyright di terzi. (SCMS è una funzionalità che
proibisce la copia di seconda generazione e successive eseguite tramite un collegamento digitale. È integrata nei
registratori MD e in altri apparecchi audio digitali sotto forma di funzionalità di protezione del copyright.)
Non utilizzare questo apparecchio per scopi che potrebbero ledere i diritti di copyright di terze parti. Roland
non potrà in alcun caso essere ritenuta responsabile di eventuali violazioni dei diritti di copyright di terze parti
perpetrate con l’uso di questo apparecchio.
Questo apparecchio non supporta i segnali audio digitali che sono formattati per la dispositivi audio digitali di
studi di registrazioni.
Informazioni sull’UA-3
La funzionalità SCMS verrà applicata parzialmente nell’UA-3 solo per i segnali digitali trasmessi da un
dispositivo esterno. Quando i dati contenenti i flag SCMS provengono ad esempio da un MD copiato digitalmente
a partire da un CD musicale commercializzato, l’UA-3 funzionerà come segue:
Se i segnali provengono dal connettore d’ingresso digitale dell’UA-3:
• L’UA-3 non potrà registrare i dati sul computer
• L’audio proverrà dalle uscite analogiche (prese di uscita della linea, presa delle cuffie) e dal connettore di
uscita digitale.
Se i segnali provengono dagli ingressi analogici dell’UA-3 (prese d’ingresso della linea):
• La registrazione potrà essere effettuata normalmente
A prescindere dalla presenza o assenza dei flag SCMS, i dati che arrivano al connettore d’ingresso
digitale dell’UA-3 verranno emessi direttamente dal connettore di uscita digitale.
L’UA-3 applica la funzionalità SCMS solo nel caso di segnali digitali provenienti da un
dispositivo esterno. I flag SCMS non sono aggiunti ai segnali audio digitali che sono emessi
dall’UA-3.

Introduzione
90
Introduzione
Controllo del contenuto della confezione
L’UA-3 comprende i seguenti componenti. Controllare che tutti i componenti siano presenti nella confezione. Se ne
mancano, contattare il rivenditore dove è stato acquistato l’UA-3.
UA-3
Cavo USB
Utilizzare questo cavo per collegare l’UA-3 al connettore USB del computer. Per ulteriori dettagli sui collegamenti,
fare riferimento a Collegamenti e installazione del driver (Windows pag. 92, Macintosh pag. 101).
CD-ROM AUDIO Capture
Contiene il software necessario per poter utilizzare l’UA-3.
* Accertarsi di leggere il file Readme_E.txt sul CD-ROM AUDIO Capture. Vi si troveranno tutte le informazioni più
aggiornate.
Introduzione all’uso:
Conservare questo documento per un utilizzo futuro.
Contratto di licenza
Descrive i termini e le condizioni in base alle quali Roland Corporation permette l’uso del programma. È necessario
leggerlo prima di aprire la confezione del CD-ROM.
I seguenti componenti dovranno essere forniti dall’utente
amplificatore esterno, altoparlanti, cuffie e microfono non sono forniti
l’amplificatore esterno, gli altoparlanti o le cuffie necessari per l’ascolto dell’audio emesso dall’UA-3 non sono forniti
e nemmeno il microfono per trasmettere l’audio all’UA-3. L’utente dovrà fornire lui stesso questi componenti.
I cavi d’ingresso/uscita digitale per il collegamento del registratore MD o DAT non sono forniti
Anche se è possibile usare un registratore digitale DAT o MD per la registrazione digitale, i cavi utilizzati per collegare
il registratore all’UA-3 non sono forniti. I seguenti componenti dovranno essere forniti dall’utente.
Utilizzare solo il cavo USB in dotazione.
• Prima di aprire la confezione del CD-ROM in dotazione, è necessario leggere il contratto di licenza separato.
• Non toccare la superficie argentata di registrazione del disco né graffiarla altrimenti i dati non verranno letti
correttamente. Se il disco è sporco, utilizzare un detergente apposito disponibile nel commercio.
• Non riprodurre il CD-ROM su un normale lettore di CD audio. Potrebbe venire emesso un suono acuto che
danneggia le orecchie o gli altoparlanti.

Introduzione
UA-3 91
DEUTSCHFRANÇAISESPAÑOLITALIANO ENGLISH
Parti dell’UA-3 e loro funzione
Presa d’ingresso del microfono
Prese d’ingresso linea
Prese d’uscita linea
Connettore di ingresso digitale (ottico)
Connettore di uscita digitale (ottico)
Connettore USB
Interruttore di selezione del tipo di microfono
Impostare questo interruttore in base al tipo di microfono che è collegato alla presa d’ingresso del microfono .
Se è collegato un microfono dinamico: “DYNAMIC”
Se è collegato un microfono condenser: “CONDENSER”
Interruttore di selezione dell’ingresso di registrazione
Seleziona l’ingresso che verrà utilizzato per la registrazione.
Connettori di ingresso digitale : “DIGITAL”
Presa ingresso microfono / Prese ingresso linea / Presa ingresso chitarra :“INPUT +
GUITAR/MIC”
Indicatore USB
Si accende quando l’UA-3 è collegato e riconosciuto dal computer.
Indicatore di livello uscita
Il numero di LED che si illuminano cambia a seconda del livello di output dalla presa delle cuffie e dalle prese di
uscita linea . Se si illumina il LED rosso, utilizzare la manopola del volume di uscita linea per ridurre il volume.
Volume d’uscita linea
Regola il volume dell’audio emesso dalla presa delle cuffie e dalle prese di uscita linea .
Indicatore d’ingresso peak chitarra/microfono
Se il livello di ingresso dalla presa d’ingresso chitarra e dalla presa d’ingresso microfono è eccessivo,
diventa rosso. Se diventa rosso, utilizzare lo slider di regolazione dell’ingresso chitarra/microfono per
ridurre il livello d’ingresso.
Slider di regolazione d’ingresso chitarra/microfono
Lo slider regola il livello d’ingresso della presa d’ingresso chitarra e della presa d’ingresso microfono .
Presa d’ingresso chitarra
Cursore di regolazione ingresso linea
Lo slider regola il livello d’ingresso delle prese d’ingresso linea .
Indicatore peak ingresso linea
Se il livello d’ingresso delle prese d’ingresso linea è eccessivo, diventa rosso.
Se diventa rosso, utilizzare lo
cursore di regolazione d’ingresso linea
per ridurre il livello d’ingresso.
Presa cuffie
Si può collegare un set di cuffie. Anche se sono collegate le cuffie, l’audio verrà comunque emesso dalle prese di
uscita linea .
* Per ulteriori informazioni sull’uso dei vari controlli e connettori, fare riferimento a UA-3 Application Guide (pag. 110).
• Microfono condenser
L’UA-3 supporta piccoli microfoni multimediali utiliz-
zati per aggiungere la voce ed è compatibile con micro-
foni monofonici plug-in.
• Se la registrazione avviene solo dagli ingressi
linea, scollegare i cavi dalla presa d’ingresso
chitarra e dalla presa d’ingresso del microfono.
• L’UA-3 non è compatibile con i microfoni condenser che richie-
dono un’alimentazione phantom e che sono generalmente uti-
lizzati nel campo musicale. Inoltre non è compatibile con i
microfoni stereo forniti a volte unitamente agli MD.
• Non è possibile riprodurre dati audio informatici
se DIGITAL è selezionato.
1
2
3
45 6
7
12
13 14 1716
15
8
9
10
11
1
2
3
4
5
6
7
1
8
4
1 2
14
9
10
17
3
11
11
17
3
12
14
1
13
13
14
1
14
15
2
16
2
15
17
3

Collegamenti e installazione del driver (Windows)
92
Collegamenti e installazione del driver (Windows)
* Per gli utenti Macintosh, fare riferimento a pag. 101.
Per poter utilizzare l’UA-3, è necessario installare prima il driver USB Composite Device[Periferica composita
USB] e successivamente nell’ordine il driver USB Human Interface[Interfaccia utente USB] e il driver USB
Audio Device[Periferica audio USB]. Questi driver sono forniti con Windows. Se si utilizza Windows 98, questo
driver si trova nel CD-ROM di Microsoft Windows, che sarà quindi necessario avere pronto. Se si utilizza
Windows Me o 2000, il CD-ROM non è necessario.
Definizione di un driver
Un driver è un programma informatico che permette di eseguire un’applicazione sul computer per trasferire i dati da
e verso l’UA-3 quando l’apparecchio è collegato al computer tramite un cavo USB. Il driver trasmette i dati
dall’applicazione all’UA-3 e viceversa.
Collegamenti e installazione del driver
■ Collegamenti
Prima di collegare l'UA-3, accertarsi che il volume sia al minimo. Si potrebbero sentire comunque dei suoni
all'accensione, anche se il volume è al minimo; è normale e non c'è motivo di preoccuparsi.
Per evitare malfunzionamenti e/o danni ai diffusori o ad altri dispositivi, abbassare sempre il volume e accertarsi che
tutti gli apparecchi non siano alimentati prima di effettuare i collegamenti. (Non è necessario spegnere il computer.)
Utilizzare un cavo USB per collegare l’UA-3 al computer prima di accendere gli apparecchi audio.
Prima di installare il driver
• Non è possibile utilizzare l’UA-3 con Windows 95 o Windows NT.
• Se altri programmi Windows sono in esecuzione, chiuderli
prima di continuare la procedura.
• Se si devono collegare contemporaneamente più apparecchi Roland
USB (ad esempio l’UA-3 ed altri dispositivi USB come l’UA-
100G) al computer, scollegare l’UA-100G o gli altri dispositivi dal
connettore USB prima di installare il driver. Se il driver viene
installato mentre sono collegati gli apparecchi USB, come l’UA-
100G, l’installazione potrebbe non essere corretta.
• Prima di scollegare il cavo USB o di riavviare
Windows, chiudere tutte le applicazioni. Abbassare
anche il volume degli apparecchi audio o degli
amplificatori collegati.
• Questo apparecchio è provvisto di un circuito di
protezione. È necessario aspettare qualche
secondo dopo aver inserito un connettore USB
prima che l’apparecchio funzioni normalmente.
UA-3
Applicazione
Porta
USB
Porta USB
Cavo USB
Computer
UA-3
Impianto stereo
Altoparlanti alimentati, ecc.
LINE IN, AUX IN
Cavo
audio
Cavo USB
* Collegare dopo aver avviato
il computer
Computer
Porta
USB
Porta
USB
LINE OUT
Cuffie
stereo

Collegamenti e installazione del driver (Windows)
UA-3 93
DEUTSCHFRANÇAISESPAÑOLITALIANO ENGLISH
■ Installazione del driver (Windows Me)
* Se si lavora in ambiente Windows 2000, fare riferimento a pag. 93, se Windows 98, fare riferimento a pag.
93.
1. Accendere il computer e avviare Windows e utilizzare un cavo USB per collegare l’UA-3 al computer.
2. Non appena Windows rileva l’UA-3 e compare la finestra di dialogo
Add New Hardware Wizard [Installazione guidata Nuovo
hardware], accertarsi che la casella “Automatic search for a
better driver (Recommended)”[Ricerca automatica di un
driver migliore di quello in uso (scelta consigliata)] sia
selezionata e fare clic su [Next] [Avanti].
3. Viene avviata la ricerca del driver.
4. Una volta che il driver corretto è stato trovato, comincia l’installazione.
5. Nella finestra indicante che l’installazione del driver è giunta al
termine, fare clic su [Finish] [Fine] e riavviare Windows.
Dopo aver installato il driver, fare riferimento a Indicazione del dispositivo audio d’ingresso/uscita (pag. 96) e
selezionare il dispositivo utilizzato da Windows.
* A seconda della configurazione informatica, potrebbe passare un breve intervallo di tempo tra
l’installazione e il riconoscimento del driver.
■ Installazione del driver (Windows 2000)
* Se si lavora in ambiente Windows Me, fare riferimento a pag. 93, se Windows 98, fare riferimento a pag. 93.
1. Accendere il computer e avviare Windows.
2. Utilizzare un cavo USB per collegare l’UA-3 al computer.
L’UA-3 è riconosciuto dal computer e il driver è installato automaticamente.
3. Dopo aver installato il driver, riavviare Windows.
■ Installazione del driver (Windows 98)
* Se si lavora in ambiente Windows Me, fare riferimento a pag. 93, se Windows 2000, fare riferimento a pag. 93.
L’installazione dei driver deve rispettare la seguente successione:USB Composite Device [Periferica composta
USB], USB Human Interface Device [Periferica interfaccia utente USB] e infine USB Audio Device
[Periferica audio USB]. Seguire la procedura sotto indicata per eseguire l’installazione.
1. Accendere il computer e avviare Windows. Inserire il CD-ROM di Microsoft Windows nell’unità
corrispondente e utilizzare un cavo USB per collegare l’UA-3 al computer (pag. 92).
Questa finestra potrebbe richiedere un certo tempo prima di essere
visualizzata
Poiché alcuni computer sono venduti con il contenuto del CD-ROM di Microsoft Windows già
installato sul disco rigido, il CD in questione potrebbe non essere stato fornito. In questo caso
il driver potrà essere installato senza il CD-ROM di Microsoft Windows

Collegamenti e installazione del driver (Windows)
94
Il dispositivo USB Composite Device [Periferica composta USB]
viene rilevato automaticamente e appare la finestra di dialogo Add New
Hardware Wizard [Installazione guidata Nuovo hardware]. Fare
clic su [Next][Avanti].
2. Al messaggio “What do you want Windows to do? ”[Scegliere
l’operazione da effettuare], selezionare “Search for the best
driver for your device [Cerca il miglior driver per la
periferica]. (Recommended) [Scelta consigliata].” e fare clic su
[Next][Avanti].
3. Appare la seguente finestra di dialogo. Selezionare la casella CD-
ROM drive[Unità CD-ROM] e fare clic su [Next][Avanti].
4. Appare la seguente finestra di dialogo. Fare clic su [Next][Avanti].
*
A seconda del sistema utilizzato, la finestra
Location of driver [Percorso
del driver]
potrebbe essere diversa da quella di seguito illustrata, ma non è un
problema.
5. A questo punto comincerà la copia dei file.
Se questa finestra non appare, fare riferimento a Problemi relativi al
driver USB (pag. 105)
Se il CD-ROM di Microsoft Windows non è presente nell’unità CD-ROM, potrebbe apparire la
seguente finestra di dialogo. In questo caso, inserire il CD-ROM di Microsoft Windows
nell’unità CD-ROM e fare clic su [OK].

Collegamenti e installazione del driver (Windows)
UA-3 95
DEUTSCHFRANÇAISESPAÑOLITALIANO ENGLISH
6. Alla fine dell’installazione del driver USB Composite Device
[Periferica composta USB] , appare la seguente finestra di
dialogo. Fare clic su [Finish][Fine].
7. Il dispositivo USB Human Interface Device [Periferica
interfaccia utente USB] viene rilevato automaticamente e
appare la finestra di dialogo Add New Hardware Wizard
[Installazione guidata Nuovo hardware]. Fare clic su
[Next][Avanti] e continuare l’installazione seguendo la stessa
procedura indicata ai passi 2-5 (p. 94-94).
8. Alla fine dell’installazione del driver USB Human Interface
Device [Periferica interfaccia utente USB], appare la seguente
finestra di dialogo. Fare clic su [Finish][Fine].
9. Nella tappa successiva, il dispositivo USB Audio Device [Periferica
audio USB] viene rilevato automaticamente e appare la finestra di
dialogo Add New Hardware Wizard [Installazione guidata Nuovo
hardware]. Fare clic su [Next][Avanti] e continuare l’installazione
seguendo la stessa procedura indicata ai passi 2-5 (p.94-94).
10.Alla fine dell’installazione del driver USB Audio Device
[Periferica audio USB] , appare la seguente finestra di dialogo.
Fare clic su [Finish][Fine].
L’installazione dei driver USB Composite Device [Periferica composita USB], USB Human Interface
Device [Periferica interfaccia utente USB] e infine USB Audio Device [Periferica audio USB] è giunta al
termine. Riavviare Windows.
Dopo aver installato il driver, fare riferimento a Indicazione del dispositivo audio d’ingresso/uscita (pag. 96) e
selezionare il dispositivo utilizzato da Windows.
Al passo 4, la finestra visualizza il messaggio “Windows driver file
search for the device [Ricerca del file del driver per la periferica]:
USB Human Interface Device [Periferica interfaccia utente USB].”
Al passo 4, la finestra visualizza il messaggio “Windows driver
file search for the device [Ricerca del file del driver per la
periferica]: USB Audio Device [Periferica audio USB].”

Collegamenti e installazione del driver (Windows)
96
■ Indicazione del dispositivo audio d’ingresso/uscita
1. In Windows, fare clic sul pulsante [Start] e in [Impostazioni] scegliere [Pannello di controllo].
2. Win 98 / Win 98SE
Nel Pannello di controllo, fare doppio clic sull’icona [Multimedia] per aprire la finestra Proprietà
multimediali .
Win 2000 / Me
Nel Pannello di controllo, fare doppio clic sull’icona [Suoni e multimedia] per aprire la finestra Proprietà
suoni e multimedia .
* Se l’icona [Suoni e multimedia] non risulta visualizzata nel Pannello di controllo, fare clic su
[visualizza tutte le opzioni del Pannello di controllo].
3. Fare clic sulla scheda [Audio].
4. Nella sezione Riproduzione, Periferica preferenziale , fare clic su . Nell’elenco di riepilogo, fare clic su
[USB Audio Device [Periferica audio USB]] per selezionarla.
5. Nella sezione Registrazione, Periferica preferenziale, fare clic su . Nell’elenco di riepilogo, fare
clic su [USB Audio Device [Periferica audio USB]] per selezionarla.
Windows 98 / Windows 98SE
Windows 2000 /Windows Me
6. Fare clic su [OK] per completare le impostazioni.
Impostazioni Controllo volume
Il volume dell’UA-3 può essere regolato tramite il Controllo volume di Windows.
1. Fare clic sul pulsante [Start] in Windows e selezionare [Programmi] - [Accessori] - [Svago] - [Con-
trollo volume] per avviarlo.
Windows Me Windows 2000/
Windows 98/Windows 98SE
• A seconda del sistema utilizzato,
“USB Audio Device [Periferica
audio USB]” è seguito da un
numero, ad esempio “USB Audio
Device [Periferica audio USB] (1).”
• Il pulsante “Proprietà avan-
zate” non sarà accessibile per
“Registrazione.”

Collegamenti e installazione del driver (Windows)
UA-3 97
DEUTSCHFRANÇAISESPAÑOLITALIANO ENGLISH
2. Spostare lo cursore verso l’alto o verso il basso per regolare il volume dell’UA-3. È possibile regolare i seguenti
elementi.
Verifica dell’audio
Dopo aver effettuato correttamente tutti i collegamenti, è possibile riprodurre i dati campione per controllare la
configurazione.
■ Riproduzione dei dati esempio
Nel nostro caso verranno utilizzate le normali funzionalità Windows per riprodurre i dati esempio. I dati esempio si
trovano sul CD-ROM AUDIO Capture. Inserire il CD nell’unità CD-ROM del computer.
1. Copiare il file “Alright(.wav)” sul desktop trascinandolo dalla cartella “Sample_Data” sul CD-ROM.
Audio USB (speaker) Regola il volume delle uscite analogiche (uscita linea e
uscita cuffie). L’uscita digitale non cambia.
1
1. A seconda della versione di Windows, questo elemento potrebbe corrispondere
a “Analog connector” [connettore analogico].
WAVE Regola il volume emesso dal dispositivo di uscita audio
“USB Audio Device [Periferica audio USB].” L’uscita
digitale e quella analogica cambiano.
SW Synth Regola il volume del sintetizzatore software incorpo-
rato in Windows.
Lettore CD Regola il volume “CD musica” dell’unità CD-ROM del
computer.
2
2. Se la riproduzione del CD non cambia dopo aver regolato questo volume,
cambiare il volume WAVE.
• Se il Controllo volume non è installato sul computer, utilizzare Installazione applicazioni nel Pannello
di controllo per installarlo. Per ulteriori informazioni sull’installazione, fare riferimento al manuale utente di
Windows o alla Guida in linea.
• Se è selezionata la casella Disattiva o lo cursore è completamente in basso, l’UA-3 non emetterà alcun suono.
• Se si utilizza Windows 2000 e “Lettore CD” non è elencato, selezionare [Riproduzione CD digitale], “Abilita
riproduzione digitale su questo dispositivo CD-ROM,” come descritto di seguito.
• Se si utilizza l’unità CD-ROM del computer per riprodurre un CD audio o se si riproduce musica di sottofondo
per i giochi con l’UA-3
Se si utilizza Windows Me:
Selezionare [Start]-[Impostazioni]-[Pannello di controllo]. Nel[Pannello di controllo], fare doppio
clic sull’icona [Sistema] per aprire la finestra Proprietà sistema. Fare clic sulla scheda [Gestione
periferiche] e fare doppio clic sull’icona [CDROM]. Nel livello inferiore, fare doppio clic sull’unità CD-
ROM utilizzata e aprirne le Proprietà. Fare clic sulla scheda [Proprietà] e selezionare la casella accanto
alla voce Riproduzione CD digitale “Abilita riproduzione digitale su questo dispositivo CD-ROM.”
Se si utilizza Windows 2000
Come per Windows Me, aprire la finestra di dialogo Proprietà sistema. Fare clic sulla scheda
[Hardware] e quindi sul pulsante [Gestione periferiche] per aprire “Gestione periferiche”. Tra le unità
CD-ROM, fare doppio clic sull’unità CD-ROM utilizzata per aprirne le Proprietà. Fare clic sulla scheda
[Proprietà] e selezionare la casella accanto alla voce Riproduzione CD digitale “Abilita riproduzione
digitale su questo dispositivo CD-ROM.”
Se si utilizza Windows 98 o Windows 98 SE:
Selezionare [Start] - [Impostazioni] - [Pannello di controllo] - [Multimedia], e fare clic sulla scheda
[CD musica] e selezionare “Abilita riproduzione audio su questo dispositivo CD-ROM.”
A seconda della configurazione informatica, si potrebbero avere ancora dei problemi per la riproduzione
di questi CD. Per maggiori informazioni, fare riferimento alle informazioni fornite dal costruttore del
computer. Se si utilizza un’unità CD-ROM di tipo scheda PC (PCMCIA), la riproduzione di dati WAVE
o di un CD audio su questo tipo di unità potrebbe essere interrotta o inesistente.
• La qualità audio dell’UA-3 risulterà migliorata aumentando i livelli di controllo del volume.
Per poter ascoltare i dati esempio, è necessario disporre di circa 30MB di spazio libero sul
disco dove è installato Windows.

Collegamenti e installazione del driver (Windows)
98
2. Fare clic col pulsante destro del mouse sul file copiato “Alright(.wav)” e selezionare [Play]
or [Proprietà] nel menu a comparsa.
3. Fare clic sulla scheda [Anteprima] e poi sul pulsante .
Verrà avviata la riproduzione dei dati esempio.
I dati esempio sono stati riprodotti?
Se i dati esempio sono stati riprodotti correttamente, il computer e l’UA-3 sono collegati correttamente e i driver sono
stati installati altrettanto correttamente. Se i dati non sono stati riprodotti correttamente, fare riferimento a Ricerca e
soluzione dei problemi (pag. 105). La sezione Ricerca e soluzione dei problemi contiene utili informazioni per trovare
e correggere i problemi eventuali.
La procedura relativa ai collegamenti e all’installazione del driver per l’UA-3 è terminata.
Cancellazione del driver USB Audio Device [Periferica audio USB]
■ Reinstallazione del driver USB Audio Device [Periferica audio USB]
■ Se l’installazione del driver USB Audio Device [Periferica audio USB] è stata
interrotta prima della fine
Seguire la procedura di seguito indicata per cancellare il driver che è già stato installato.
1. Utilizzare un cavo USB per collegare l’UA-3 al computer.
2. In Windows, fare clic sul pulsante [Start] e in [Impostazioni] scegliere [Pannello di controllo].
3. Nel
[Pannello di controllo]
, fare doppio clic sull’icona [Sistema] per aprire la finestra Proprietà sistema.
4. Fare clic sulla scheda [Gestione periferiche].
5. Fare doppio clic su [Controller audio, video e giochi] per visualizzare un elenco di periferiche.
6. Nell’elenco selezionare USB Audio Device [Periferica audio USB] e fare clic su [Rimuovi]. Nella finestra
Conferma rimozione periferica, fare clic su [OK]. Se la finestra USB Audio Device [Periferica audio
USB] non è visualizzata, passare al passo 8.
7. Accertarsi che USB Audio Device [Periferica audio USB] non figuri nell’elenco Controller audio, video
e giochi e fare clic su [Chiudi] per chiudere la finestra di dialogo Proprietà sistema.
8. Seguire la procedura indicata al passo 1. – 4. e fare doppio clic su [Controller USB (Universal Serial Bus)]
per visualizzare un elenco delle periferiche.
Se è visualizzato per l’icona di periferica USB compatibile:
Selezionare l’icona [USB Composite Device [Periferica composita USB]] e fare clic su [Rimuovi]. Nella
finestra Conferma rimozione periferica, fare clic su [OK]. Come al passo 7., chiudere Proprietà sistema.
Se l’icona di periferica USB compatibile o non sono visualizzati:
Chiudere Proprietà sistema.
Se si utilizza Windows Me e è visualizzato:
Chiudere Proprietà sistema.
Se l’interruttore di selezione ingresso registrazione è impostato
su DIGITAL, non è possibile riprodurre i dati audio a partire dal
computer. Impostare l’interruttore su INPUT + GUITAR/MIC.
La procedura di seguito illustrata è valida per un sistema Windows generico. A seconda della
configurazione informatica, alcune cartelle potrebbero avere nomi diversi da quelli qui menzionate.

Collegamenti e installazione del driver (Windows)
UA-3 99
DEUTSCHFRANÇAISESPAÑOLITALIANO ENGLISH
9. Scollegare il cavo USB dal computer e riavviare Windows.
Principali funzionalità di D-Out Smoother
■ Descrizione di D-Out Smoother
Quando dei dati audio sono riprodotti su un dispositivo digitale come un MD o DAT collegato all’uscita digitale dell’UA-
3, potrebbe trascorrere un certo intervallo di tempo prima che l’audio venga bloccato subito dopo la riproduzione e quindi
per uno o due secondi l’audio potrebbe essere interrotto o il pitch o il tempo potrebbero essere sbagliati. D-Out Smoother
è un programma che permette di riprodurre l’audio senza soluzione di continuità in situazioni di questo tipo.
■ Installazione di D-Out Smoother
1. Inserire il CD-ROM Audio Capture nell’unità CD-ROM.
2. In Windows, fare clic sul pulsante [Start] e selezionare [Esegui...].
3. Nella casella di testo Apri: immettere “E:\UA_Util\Setup.exe” e fare clic su [OK]. Oppure fare clic su
[Sfoglia], selezionare il file [Setup(.exe)] che si trova nella cartella UA_Util del CD-ROM e fare clic su [Apri].
4. Verrà avviato il programma di installazione e apparirà la finestra di dialogo Choose Setup Language.
Indicare se si utilizza la versione “English (United States)” o “Italiano” di Windows e fare clic su [OK].
5. Eseguire il resto dell’installazione seguendo le istruzioni visualizzate.
6. Alla fine dell’installazione compare la finestra di dialogo Setup Complete. Fare clic su [Finish].
L’installazione di D-Out Smoother è giunta al termine.
■ Avvio di D-Out Smoother
1. Collegare l’UA-3 al connettore USB del computer.
2. Fare clic sul pulsante [Start] di Windows e nel menu [Programmi] fare clic su [D-Out Smoother].
3. D-Out Smoother verrà avviato.
In alcuni casi potrebbe apparire il messaggio“Cannot find USB Audio Device. [Impossibile trovare
la periferica audio USB] Check USB cable or select USB Audio Device again. [Controllare il cavo
USB o selezionare di nuovo la periferica audio USB]” all’avvio. Se ciò dovesse succedere, vuol dire
che il computer non ha rilevato correttamente l’UA 3. Forse l’UA-3 non è collegato correttamente o il
driver non è stato installato correttamente. Fare riferimento a Collegamenti e installazione del driver
(Windows) (pag. 92) e controllare le varie fasi.
■ Uso di D-Out Smoother
D-Out Smoother è provvisto di un interruttore “ON/OFF” e di un pulsante “TEST”.
Interruttore “ON/OFF”
Generalmente viene lasciato in posizione “ON” quando si usa l’uscita digitale dell’UA-3.
Metterlo in posizione “OFF” in fase di collegamento o scollegamento dell’UA-3.
“Pulsante” button
Fare clic sul pulsante [TEST]. Se si sente il segnale acustico di prova, D-Out Smoother funziona con il dispositivo
corrente.
Quando si utilizzano due o più periferiche audio USB come l’UA-3 o l’MA-150U, utilizzare questo pulsante per
selezionare l’UA-3 insieme al quale verrà utilizzato D-Out Smoother.
Seguire la procedura sotto illustrata per la selezione.
Se appare un messaggio richiedente l’avvio di Windows, conformarsi a tale richiesta e
riavviare il computer.
Nella spiegazione che segue si presume che l’unità CD-ROM sia l’unità E:, anche se l’identifi-
cativo dell’unità potrebbe essere diverso in quanto dipende dal computer. Se l’identificativo
dell’unità è diverso sul computer utilizzato, immettere quello opportuno. Per verificare l’iden-
tificativo dell’unità CD-ROM, fare doppio clic sull’icona Risorse del computer.
La prima volta che si avvia il programma compare la finestra di dialogo Setting . Accertarsi
che Wave-Out Device visualizzi “USB Audio Device [Periferica audio USB],” e fare clic su
[OK]. Se sono visualizzati uno o più dispositivi audio USB, fare riferimento a Uso di D-Out
Smoother (pag. 99) e specificare il dispositivo corretto.

Collegamenti e installazione del driver (Windows)
100
1. Nel menu [Control] di D-Out Smoother selezionare [Setting] per accedere alla finestra di dialogo Setting.
(Questa finestra di dialogo appare automaticamente la prima volta che il programma è avviato.)
2. Nel menu a tendina, selezionare “USB Audio Device [Periferica audio USB]” e fare clic su [OK].
3. Fare clic sul pulsante [TEST] e controllare se il segnale acustico di prova viene emesso.
Se si sente il segnale acustico di prova, D-Out Smoother funziona con il dispositivo corrente. Se il segnale
acustico non viene emesso, selezionare una periferica audio USB diversa al passo 2 e ripetere i passi da 1 a 3.
■ Cancellazione (disinstallazione) di D-Out Smoother
D-Out Smoother supporta la funzione Installazione applicazioni di Windows. Se necessario, è possibile seguire la
procedura sotto indicata per rimuovere il programma.
1. In Windows, fare clic sul pulsante [Start] e in [Impostazioni] scegliere [Pannello di controllo].
2. Nel
[Pannello di controllo]
, fare doppio clic sull’icona [Installazione applicazioni] per aprire la finestra
Installazione applicazioni.
3. Fare clic sulla scheda [Installa/Rimuovi].
4. Nell’elenco visualizzato fare clic sul nome dell’applicazione da rimuovere.
5. Fare clic su [Aggiungi/Rimuovi].
L’applicazione specificata al passo 4 verrà cancellata.
Funzionalità interessanti
• Se [Register to STARTUP] è selezionato nella finestra Setting, D-Out Smoother viene avviato
automaticamente all’avvio del computer.
• Se [Minimize window when starting up] è selezionato nella finestra di dialogo Setting, D-Out Smoother si
riduce subito dopo l’avvio permettendo di sfruttare tutto lo schermo del computer.
Prima di disinstallare D-Out Smoother, è opportuno deselezionare l’opzione [Register to
STARTUP] nella finestra di dialogo Setting. Per aprire la finestra di dialogo Setting selezionare
[Control] - [Setting]. (pag. 109)

Collegamenti e installazione del driver (Macintosh)
UA-3 101
DEUTSCHFRANÇAISESPAÑOLITALIANO ENGLISH
Collegamenti e installazione del driver (Macintosh)
* Per gli utenti Windows, fare riferimento a pag. 92.
Per poter utilizzare l’UA-3, è necessario installare prima il driver. UA-3 utilizza un driver fornito con Mac OS.
Collegamenti e installazione del driver
■ Collegamenti
(943)
Prima di collegare l'UA-3, accertarsi che il volume sia al minimo. Si potrebbero sentire comunque dei suoni
all'accensione, anche se il volume è al minimo; è normale e non c'è motivo di preoccuparsi.
(921)
Per evitare malfunzionamenti e/o danni ai diffusori o ad altri dispositivi, abbassare sempre il volume e accertarsi che
tutti gli apparecchi non siano alimentati prima di effettuare i collegamenti. (Non è necessario spegnere il computer.)
Utilizzare un cavo USB per collegare l’UA-3 al computer prima di accendere gli apparecchi audio.
■ Riconoscimento dell’apparecchio
1. Accendere il computer e avviare Mac OS.
2. Nel menu Mela selezionare [Apple System Profiler].
3. Fare clic sulla linguetta [Devices and Volumes].
4. Utilizzare un cavo USB per collegare l’UA-3 al computer.
Definizione di un driver
-> pag. 92
• Prima di scollegare il cavo USB o di riavviare Macin-
tosh, chiudere tutte le applicazioni. Abbassare anche
il volume degli apparecchi audio o degli amplificatori
collegati.
• Questo apparecchio è provvisto di un circuito di prote-
zione. È necessario aspettare qualche secondo dopo aver
inserito un connettore USB prima che l’apparecchio fun-
zioni normalmente.
• Per evitare di danneggiare gli altoparlanti, ridurre al minimo il volume
dell’apparecchio e degli altri dispositivi audio eventualmente collegati.
• Accertarsi di aver chiuso tutte le applicazioni in corso di esecuzione
prima di effettuare i collegamenti.
UA-3
Impianto stereo
Altoparlanti alimentati, ecc.
LINE IN, AUX IN
Cavo
audio
Cavo USB
* Collegare dopo aver
avviato il computer
Computer
Porta
USB
Porta
USB
LINE OUT
Cuffie
stereo

Collegamenti e installazione del driver (Macintosh)
102
5. Per essere sicuri che l’apparecchio venga riconosciuto, selezionare [Update all information] nel menu
[Commands]. Nella sezione USB dovrebbero comparire i seguenti tre dispositivi audio, come sotto illustrato:
Se l’indicazione è corretta, l’installazione dell’UA-3 è andata a termine con successo. Selezionare [Quit] nel
menu [File] per chiudere la finestra di dialogo Apple System Profiler, quindi configurare i parametri audio
come sotto indicato.
Se l’indicazione non è corretta, provare a scollegare l’UA-3 dalla porta USB e aspettare circa dieci secondi.
Riprendere quindi la procedura a partire dal passo 4.
■ Impostazione dei parametri audio
6. Nel menu Mela, selezionare [Control Panels] - [Sound] per aprire
la finestra Sound.
7. Fare clic sulla linguetta [Speakers].
8. Abbassare al minimo il volume dell’UA-3 e degli apparecchi audio e
fare clic su [Start Test].
9. Verranno emessi alcuni segnali acustici di prova da sinistra a destra
secondo quanto visualizzato; regolare il volume con lo cursore [Main
Volume]. Alla fine, fare clic su [Stop Test].
A seconda della versione del sistema operativo, lo cursore [Main
Volume] potrebbe mancare. In questo caso, utilizzare lo cursore
[Volume] nella linguetta [Output] per regolare il volume.
Se l’interruttore di selezione ingresso registrazione è impostato su
DIGITAL, non è possibile riprodurre i dati audio a partire dal
computer. Impostare l’interruttore su INPUT + GUITAR/MIC.

Collegamenti e installazione del driver (Macintosh)
UA-3 103
DEUTSCHFRANÇAISESPAÑOLITALIANO ENGLISH
10.Selezionare la linguetta [Input] nella finestra Sound. In Choose a
source for sound input:, scegliere USB Audio.
11.Alla fine delle impostazioni, selezionare [Quit] nel menu [Mela] per chiudere la finestra Sound.
Problemi noti: UA-3
• Alcune applicazioni come Cakewalk’s Metro Series e TC Work’s Spark Series non possono registrare/riprodurre a
48 kHz. Utilizzare l’UA-3 a 44.1 kHz.
• Se l’applicazione audio sta eseguendo una registrazione o riproduzione, non collegare/scollegare il cavo USB né
spostare l’interruttore di selezione dell’ingresso registrazione.
L’applicazione potrebbe bloccarsi.
• L’audio potrebbe essere irregolare e/o disturbato se la registrazione e la riproduzione avvengono contemporaneamente
con un conseguente sovraccarico per la CPU. Tuttavia il disturbo non dovrebbe apparire nella registrazione ma nel
segnale di riproduzione.
• Se si utilizza Virtual Sound Canvas 3, sarà necessario selezionare [Performance] nel menu [Setting] e
impostare Expression Mode su Response Priority.
• Il driver fornito in standard con Mac OS non è ASIO compatibile.
• Se il computer viene avviato con l’UA-3 collegato, il computer potrebbe diventare instabile. In questo caso
avviare il computer prima di collegare l’UA-3 e collegare l’UA-3 dopo l’avvio.
Verifica dell’audio
Dopo aver effettuato correttamente tutti i collegamenti, è possibile riprodurre i dati esempio per controllare la
configurazione.
■ Riproduzione dei dati esempio
Nel nostro caso verranno utilizzate le normali funzionalità Macintosh per riprodurre i dati esempio. I dati esempio si
trovano sul CD-ROM AUDIO Capture. Inserire il CD nell’unità CD-ROM del computer.
1. Copiare il file “Alright” sulla scrivania trascinandolo dalla cartella “Sample_Data” sul CD-ROM.
2. Avviare QuickTime Player, fornito con Mac OS. QuickTime Player
generalmente si trova nella cartella QuickTime all’interno della
cartella Applications sul disco rigido.
• Se non USB Audio non è visualizzato, chiudere la finestra Sound. Scollegare poi
l’UA-3 e attendere circa dieci secondi. Riprendere quindi la procedura a partire
dal passo 2.
• Non selezionare [Play sound through output device].
Per poter ascoltare i dati esempio, è necessario disporre di circa 30MB di spazio libero sul
disco dove è installato il sistema operativo.

Collegamenti e installazione del driver (Macintosh)
104
3. Nel menu [File], selezionare [Open Movie], selezionare il file copiato
“Alright” e fare clic su [Convert] per aprirlo.
4. Fare clic sul pulsante di riproduzione.
Verrà avviata la riproduzione dei dati esempio.
I dati esempio sono stati riprodotti?
Se i dati esempio sono stati riprodotti correttamente, il computer e l’UA-3 sono collegati correttamente e i driver sono
stati installati altrettanto correttamente. Se i dati non sono stati riprodotti correttamente, fare riferimento a Ricerca e
soluzione dei problemi (pag. 105). La sezione Ricerca e soluzione dei problemi contiene utili informazioni per trovare
e correggere i problemi eventuali.
La procedura relativa ai collegamenti e all’installazione del driver per l’UA-3 è terminata.
Se l’interruttore di selezione ingresso registrazione è impostato su DIGITAL, non è
possibile riprodurre i dati audio a partire dal computer. Impostare l’interruttore su INPUT +
GUITAR/MIC.

Ricerca e soluzione dei problemi
UA-3 105
DEUTSCHFRANÇAISESPAÑOLITALIANO ENGLISH
Ricerca e soluzione dei problemi
Se nell’usare l’UA-3 si dovessero incontrare dei problemi, leggere questo capitolo. Contiene numerosi suggerimenti che possono
contribuire a risolvere il problema.
I problemi esaminati in questa sezione sono organizzati in base al sistema operativo sul quale si possono verificare. L’icona a sinistra del
titolo indica il sistema operativo interessato.
Problemi comuni a Windows e Macintosh
Problemi che si verificano solo in Windows
Problemi che si verificano solo in Macintosh
Se si utilizza il computer per la prima volta o non si capisce una procedura, fare riferimento ai manuali utenti del computer o del sistema
operativo.
Se l’UA-3 non funziona come previsto, controllare i seguenti punti.
Problemi relativi al driver USB
“Add New Hardware Wizard”[Installazione guidata Nuovo hardware] non si
avvia automaticamente
“Add New Hardware Wizard” [Installazione guidata Nuovo hardware] si
interrompe prima di arrivare alla fine
• Quando il cavo USB è collegato o scollegato, ci vogliono circa 15 secondi (o più) perché il computer riconosca l’UA-3.
• Il cavo USB è collegato correttamente?
Accertarsi che l’UA-3 e il computer siano collegati correttamente tramite il cavo USB.
• Il computer utilizzato permette l’uso di un cavo USB?
Fare riferimento al manuale utente del computer per verificare la possibilità d’uso di un cavo USB.
• Il computer o l’hub USB è in grado di fornire la capacità di alimentazione sufficiente?
L’UA-3 non potrà essere collegato se l’alimentazione è insufficiente. Verificare se ci si trova in una delle seguenti situazioni.
Se l’UA-3 viene utilizzato con un computer portatile alimentato dalla batteria, per alcuni modelli di computer il funzionamento potrebbe
essere discontinuo. In questo caso, collegare un adattatore AC al computer portatile.
La modalità di gestione dell’alimentazione potrebbe limitare l’energia fornita all’USB. Controllare la configurazione del computer.
In alcuni casi non è possibile utilizzare l’UA-3 con un hub alimentato dal bus, ovvero un hub sprovvisto di una fonte di alimentazione).
Utilizzare un hub alimentato in modo autonomo, ovvero un hub che contiene una fonte di alimentazione.
• Il computer soddisfa le specifiche tecniche USB?
Se il computer utilizzato non soddisfa le specifiche tecniche USB, come potrebbe essere il caso di un computer assemblato dall’utente, il
funzionamento potrebbe essere instabile. In questi casi il problema potrebbe essere risolto collegando un hub USB provvisto di fonte di
alimentazione.
• È visualizzato “Periferica sconosciuta” per “Altre periferiche” o “Controller USB (Universal Serial Bus)”?
Seguire la procedura sotto indicata per eliminare “Periferica sconosciuta” da “Altre periferiche” (Controller USB) e riavviare il
computer.
1. Nel [Pannello di controllo] di Windows, fare doppio clic sull’icona [Sistema] per aprire la finestra Proprietà sistema.
2. Fare clic sulla scheda [Gestione periferiche].
3. Fare doppio clic su [Altre periferiche] (Controller USB) per visualizzare l’elenco delle periferiche.
4. Nell’elenco selezionare Periferica sconosciuta e fare clic su [Rimuovi].
5. Nella finestra Conferma rimozione periferica, fare clic su [OK].
6. Accertarsi che nell’elenco non figuri Altre periferiche o Periferica sconosciuta e fare clic su [Chiudi] per chiudere la finestra
di dialogo.
La finestra “Add New Hardware Wizard” [Installazione guidata Nuovo
hardware] appare anche se i driver sono già stati installati
Se il computer utilizzato o l’hub USB sono equipaggiati di due o più connettori USB e l’UA-3 viene collegato a un connettore USB al
quale non è mai stato collegato prima, potrebbe apparire la finestra di dialogo Add New Hardware Wizard [Installazione guidata
Nuovo hardware] anche se i driver sono già stati installati. Reinstallare i driver come descritto in Collegamenti e installazione del driver
(Windows) (pag. 92). Non si tratta di un malfunzionamento.
Per verificare se la “Periferica sconosciuta” è l’UA-3, scollegare il cavo USB dall’UA-3 e
controllare che il messaggio “Periferica sconosciuta” non sia più visualizzato. Ricollegare poi
nuovamente l’UA-3 e eliminare “Periferica sconosciuta.”

Ricerca e soluzione dei problemi
106
I driver non sono installati correttamente
Seguire la procedura descritta in Cancellazione del driver USB Audio Device [Periferica audio USB] (pag. 98) per eliminare il driver USB Audio
Device [Periferica audio USB] e reinstallare i driver UA-3 secondo quanto descritto in Collegamenti e installazione del driver (Windows) (pag. 92).
Controllare se è visualizzata una voce denominata “Periferica sconosciuta” in “Altre periferiche” o in “Controller USB (Universal Serial Bus).”
Se “Periferica sconosciuta” è visualizzato, cancellarlo.
Appare una finestra di dialogo con il messaggio “Unknown Device found”
[Trovata periferica sconosciuta] e non posso installare il driver
A seconda della configurazione informatica, forse al momento della consegna sul computer non erano stati installati tutti i file Windows
98 necessari per supportare l’audio via USB.
Accertarsene presso il costruttore del computer.
Problemi nell’uso dell’UA-3
Il sistema operativo diventa instabile
• L’avvio del computer con l’UA-3 già collegato potrebbe rendere instabile il computer.
In questo caso collegare l’UA-3 solo dopo aver avviato il computer.
■ L'audio non viene riprodotto
• L’interruttore di selezione della fonte di registrazione dell’UA-3 è impostato su “INPUT + GUITAR/MIC”?
Se l’interruttore di selezione ingresso registrazione è impostato su “DIGITAL,” vengono riprodotti i segnali audio inviati al
connettore d’ingresso digitale e non i dati audio del computer.
• Una periferica digitale tipo un MD è collegata all’uscita digitale dell’UA-3?
A seconda dell’applicazione, quando dei dati audio sono riprodotti su un dispositivo digitale come un MD collegato all’uscita digitale
dell’UA-3, potrebbe trascorrere un certo intervallo di tempo prima che l’audio venga bloccato subito dopo la riproduzione e quindi per
uno o due secondi l’audio potrebbe essere interrotto. In questo caso, utilizzare il software D-Out Smoother fornito nel CD-ROM per
avere una riproduzione audio fluida. Per maggiori informazioni, fare riferimento a Principali funzionalità di D-Out Smoother (pag. 99).
• Si sta cercando di utilizzare l’unità CD-ROM del computer per riprodurre un CD audio?
Per riprodurre un CD audio sull’unità CD-ROM del computer, fare riferimento a Se si utilizza l’unità CD-ROM del computer per
riprodurre un CD audio o se si riproduce musica di sottofondo per i giochi con l’UA-3 (pag. 97).
• Sono in corso di esecuzione diverse applicazioni?
Se più applicazioni vengono eseguite contemporaneamente, potrebbe apparire un messaggio di errore. In questo caso fare clic su [OK] e
chiudere le altre applicazioni.
Anche se la finestra di un’applicazione viene chiusa, essa rimane in esecuzione nella barra delle applicazioni; accertarsi quindi di chiudere
tutte le applicazioni non necessarie visualizzate nella barra delle applicazioni.
• È stata specificata la destinazione di uscita dei dati audio nel sistema operativo?
La destinazione di uscita dei dati audio per un computer deve essere impostata su UA-3. Per ulteriori informazioni su questa
impostazione, fare riferimento a Indicazione del dispositivo audio di ingresso/uscita (Windows pag. 96) o Impostazione dei
parametri audio (Macintosh pag. 102).
• È stata specificata la destinazione di uscita dei dati audio nel software di riproduzione?
Per alcuni programmi come Cool Edit Pro LE, la destinazione di uscita dei dati audio deve essere impostata su UA-3. Per ulteriori
informazioni su questa impostazione fare riferimento al manuale utente.
• I driver sono stati installati correttamente?
Per poter riprodurre i dati audio con l’UA-3, deve essere installato il driver USB Audio Device [Periferica audio USB]. Per ulteriori
dettagli sull’installazione e la configurazione, fare riferimento a Collegamenti e installazione del driver (Windows pag. 92,
Macintosh pag. 101).
• I vari elementi del controllo volume sono stati regolati?
Regolare il volume di ogni elemento come descritto in Impostazioni Controllo volume (Windows pag. 96) o Impostazione dei
parametri audio (Macintosh pag. 102).
■ L'audio è distorto
• L’indicatore peak diventa rosso?
Se l’audio è trasmesso tramite le prese d’ingresso linea, utilizzare lo cursore di regolazione dell’ingresso linea dell’UA-3 per
ridurre il livello d’ingresso. Se l’audio è trasmesso dalle prese d’ingresso Guitar o Mic, utilizzare lo cursore di regolazione
dell’ingresso chitarra/microfono per ridurre il livello d’ingresso. Inoltre il numero di LED nell’indicatore del livello di output
cambia a seconda del livello di output dell’UA-3. Se il LED diventa rosso, utilizzare lo cursore di uscita linea per abbassare il volume.
Il livello del volume dello strumento collegato a LINE IN è troppo basso.
• Viene forse utilizzato un cavo di connettore dotato di resistore?
Utilizzare un cavo di collegamento senza resistore.
• Lo slider di regolazione d’ingresso linea (pag. 91) è opportunamente regolato?
■ La riproduzione audio è disturbata
• Il microfono è ancora collegato?
Se all’UA-3 è collegato un microfono, utilizzare lo cursore di regolazione d’ingresso chitarra/microfono per ridurre il livello
d’ingresso.

Ricerca e soluzione dei problemi
UA-3 107
DEUTSCHFRANÇAISESPAÑOLITALIANO ENGLISH
•
Il disturbo durante la riproduzione audio potrebbe essere causato dall’acceleratore grafico del computer.
Per impostare l'accelerazione grafica su “None [Nessuna]. ”, attenersi alla seguente procedura:
1. Nel Pannello di controllo di Windows, fare doppio clic su Schermo per aprire la finestra di dialogo Proprietà - Schermo,
quindi fare clic sulla scheda Impostazioni.
2. Fare clic su [Avanzate] per aprire le proprietà e fare clic sulla scheda [Prestazioni].
3. In Grafica, spostare lo cursore Accelerazione hardware: su Min e fare clic su [OK].
4. Nella finestra di dialogo Proprietà - Schermo, fare clic su [OK] per chiudere la finestra di dialogo.
Riavviare quindi il computer.
• L’audio è disturbato nell’ingresso linea o microfono
Se, sullo stesso computer, sono collegati un modulo sonoro MIDI e l'UA-3 tramite un collegamento USB e l'uscita del modulo sonoro
MIDI è collegata alle prese d'ingresso linea dell'UA-3, quest'ultimo potrebbe emettere un audio disturbato a causa delle interferenze
trasmesse dal computer via il modulo sonoro MIDI. In questi casi, utilizzare un hub alimentato autonomamente per collegare
contemporaneamente un modulo sonoro MIDI e l'UA-3 oppure collegare il modulo sonoro MIDI tramite l'interfaccia seriale o
l'interfaccia MIDI.
• L’audio è disturbato quando la registrazione e la riproduzione avvengono contemporaneamente.
Quando registrazione e riproduzione sono effettuate contemporaneamente, la riproduzione potrebbe interrompersi a seconda delle
prestazioni del sistema e dare quindi origine al suono disturbato. Tuttavia, dato che viene data la priorità alla registrazione, i dati registrati
sono integri.
• Questo problema può essere evitato collegando opportunamente alla terra il telaio del computer o il polo con messa a terra della
presa del cordone di alimentazione fornito insieme al computer. Inoltre accertarsi che nelle vicinanze non ci siano dispositivi che
emettono forti campi magnetici come un televisore o un forno a microonde.
• Sono collegati molti dispositivi audio?
Se sono collegati molti dispositivi audio, l’audio potrebbe essere disturbato. Non collegare dispositivi audio che resteranno inutilizzati.
■ L’audio si interrompe durante la riproduzione
• Provare ad aumentare la memoria
Aggiungendo memoria, si aumentano le capacità di elaborazione del computer. Per maggiori informazioni sull’aggiunta della memoria,
consultare il manuale dell'utente del computer.
• Il computer soddisfa le specifiche tecniche USB?
L’audio potrebbe venir interrotto se si utilizza un computer che non soddisfa le specifiche tecniche USB relative all’alimentazione. In
questo caso, per risolvere il problema, provare a collegare un hub USB provvisto di una fonte di alimentazione autonoma.
• Sono in corso di esecuzione molte applicazioni?
Se durante la riproduzione sono attive molte applicazioni o se ne avvia un’altra, la riproduzione potrebbe interrompersi a seconda della
configurazione del computer. Chiudere tutte le applicazioni non necessarie e riprovare. Se il problema persiste, provare a riavviare il
computer.
• Provare a cambiare quanto segue nelle impostazioni dell’unità disco.
* Le seguenti impostazioni potrebbero essere inesistenti sul computer utilizzato.
1. Nel Pannello di controllo di Windows, fare doppio clic su [Sistema] per aprire la finestra di dialogo Proprietà sistema, quindi
fare clic sulla scheda [Gestione periferiche].
2. Per accedere all'elenco delle periferiche, fare doppio clic su [Unità disco] .
3. Nell'elenco, selezionare GENERIC IDE DISK TYPExx e fare clic su [Proprietà] per accedere alla finestra di dialogo Proprietà -
GENERIC IDE DISK TYPExx.
* “xx” in GENERIC IDE DISK TYPExx corrisponde a un numero che cambia in base al sistema
utilizzato.
4. Fare clic sulla scheda [Impostazioni], selezionare la casella di controllo [DMA] in Opzioni e fare clic su [OK] per chiudere la
finestra di dialogo.
* A seconda del sistema utilizzato, potrebbe apparire una finestra di dialogo per le impostazioni DMA.
Dopo averne controllato il contenuto, fare clic su OK o Annulla.
5. Nella finestra di dialogo Proprietà sistema, fare clic su [OK] per chiudere la finestra di dialogo.
Riavviare il computer in modo da rendere effettive le modifiche.
■ La riproduzione audio si interrompe
• Su alcuni computer le impostazioni relative al risparmio energia nel Panello di controllo potrebbero provocare l’interruzione
della riproduzione audio.
Le Proprietà di risparmio energia, visualizzate dopo aver fatto doppio clic su Risparmio energia, cambiano in base al computer utilizzato.
Di seguito se ne troverà un esempio; in ogni caso si consiglia di consultare anche il manuale utente del computer. In alcuni computer, le
seguenti impostazioni potrebbero non essere disponibili.
1. Nel Pannello di controllo di Windows, fare doppio clic su [Sistema] per aprire la finestra di dialogo Proprietà sistema, quindi
fare clic sulla scheda [Gestione periferiche].
2. Per accedere all'elenco delle periferiche, fare doppio clic su [Periferiche di sistema] .
3. Nell'elenco, selezionare [Gestione avanzata del risparmio energetico] e fare clic su [Proprietà] per accedere alla finestra di
dialogo Proprietà - Gestione avanzata del risparmio energetico.
4. Fare clic sulla scheda [Impostazioni] e in Risoluzione dei problemi, selezionare la casella [Disattiva polling dello stato
dell’alimentazione]. Fare clic su [OK].
5. Nella finestra di dialogo Proprietà sistema, fare clic su [OK] per chiudere la finestra di dialogo.
6. Riavviare Windows.

Ricerca e soluzione dei problemi
108
L’audio digitale registrato è distorto, il pitch cambia o è disturbato
• Se il cavo digitale utilizzato per la connessione è troppo lungo l’audio potrebbe risultarne alterato o disturbato. Utilizzare cavi
digitali di non oltre un metro di lunghezza.
• L’impostazione della frequenza di campionamento nell’applicazione corrisponde a quella del dispositivo digitale collegato al
connettore d’ingresso digitale?
• Nella registrazione digitale non è possibile registrare in monofonico. Impostare il software di registrazione sull’impostazione “stereo”.
L’audio registrato è disturbato
• Si è notato che i disturbi tendono ad essere presenti nelle registrazioni audio effettuate sui modelli della serie iMac, che sono usciti
sul mercato dopo l’estate 2000.
• Nell’applicazione SimpleSound inclusa in MacOS, il disturbo sonoro si manifesta quando l’audio è riprodotto subito dopo essere
stato registrato digitalmente. Salvare prima l’audio e poi riprodurlo.
• Aggiornare il driver audio USB a 1.0.5f4.
Se la versione del driver audio USB, fornito con Mac OS, è anteriore alla 1.0.4, aggiornarla alla versione 1.0.5f4.
Il driver può essere scaricato dalla URL sottostante:
http://asu.info.apple.com/swupdates.nsf/artnum/n11703
Controllo della versione del driver audio USB
1. Collegare l’UA-3 al computer.
2. Nel menu Mela selezionare [Apple System Profiler].
3. Fare clic sulla linguetta [Devices and Volumes].
4. Nella sezione USB, la finestra visualizza “Audio (UA-3 USB Audio Device).” Fare clic sulla freccia a sinistra.
5. Il numero visualizzato a destra di “Driver version” corrisponde alla versione del driver audio USB.
■ Durante la registrazione viene creato un file vuoto (senza audio)
• Provare a impostare la velocità di trasferimento su “16bit.”
Se si utilizza Windows98, Seconda Edizione, e il software di registrazione è impostato su una velocità di trasferimento di 8 bit, il file
creato potrebbe essere vuoto impedendo quindi una registrazione efficace. Se ciò dovesse succedere, sarà possibile registrare
correttamente impostando la velocità di trasferimento su “16 bit”.
• Impossibile registrare digitalmente dati che contengono il flag SCMS.
L’UA-3 supporta il sistema SCMS (pag. 89); ciò vuol dire che quando i dati contrassegnati dal flag SCMS, come ad esempio quelli
provenienti da un MD che è stato copiato digitalmente a partire da un CD musicale commerciale, arrivano al connettore d’ingresso
digitale, l’UA-3 non potrà registrarli sul computer. (L’audio verrà emesso dalle prese d’ingresso linea e dalla presa cuffie.)
Impossibile registrare digitalmente
• L’interruttore di selezione d’ingresso registrazione è impostato su “DIGITAL”?
• L’applicazione è impostata sulla stessa frequenza di campionamento del dispositivo digitale collegato al connettore d’ingresso digitale?
• La registrazione non sarà più possibile se la frequenza di campionamento di un dispositivo viene modificata (passando ad esempio
dal modo di trasmissione digitale A a B) mentre questo rimane collegato ai connettori d’ingresso digitale.
Prima di cambiare la frequenza di campionamento è necessario scollegare e poi ricollegare il cavo digitale.
• Non è possibile registrare dati digitali di un formato diverso dal formato per dispositivi audio digitali consumer.
Impossibile registrare CD musicali
• L’UA-3 non è in grado di registrare CD musicali nell’unità CD-ROM del computer con CoolEdit Pro LE o altri programmi.
Per registrare dei CD musicali con l’unità CD-ROM del computer, sarà prima necessario selezionare la scheda audio del computer come
la periferica audio (Waveform Record) da utilizzare per registrare con CoolEdit Pro LE (o l’applicazione utilizzata); a questo punto si
potrà avviare la registrazione. Quando si registra un CD musicale con una scheda audio, deselezionare l’opzione “Abilita riproduzione
digitale su questo dispositivo CD-ROM” che è stata selezionata in Se si utilizza l’unità CD-ROM del computer per riprodurre un
CD audio o se si riproduce musica di sottofondo per i giochi con l’UA-3 (pag. 97).
Dopo aver ripreso l’attività dallo stato di sospensione (Suspend o
Hibernation), il volume è cambiato
• Il cambiamento di volume dopo la ripresa dell’attività dallo stato di sospensione (Suspend o Hibernation) in Windows 2000
dipende da un problema Windows.
Avviare l’applicazione Mixer come descritto in Impostazioni Controllo volume (pag. 96) e regolare lo cursore USB Audio (Speaker).
La musica di sottofondo del gioco non viene riprodotta
• Il gioco utilizza un CD audio per la musica in sottofondo?
Se la musica di sottofondo del gioco proviene da un CD audio, fare riferimento a Se si utilizza l’unità CD-ROM del computer per
riprodurre un CD audio o se si riproduce musica di sottofondo per i giochi con l’UA-3 (pag. 97).
Problemi comuni ai programmi in generale
Non è possibile eseguire installazioni
• Il CD-ROM dell’applicazione è inserito nell’unità CD-ROM del computer.
• Durante l’installazione, l’identificativo dell’unità CD-ROM e il nome del file d’installazione sono stati immessi correttamente?
• C’è spazio sufficiente sul disco rigido?

Ricerca e soluzione dei problemi
UA-3 109
DEUTSCHFRANÇAISESPAÑOLITALIANO ENGLISH
Aumentare la quantità di spazio libero sul disco rigido. Eliminare i file non necessari spostandoli nel Cestino, quindi fare clic con il
pulsante destro del mouse sul Cestino e scegliere Svuota cestino.
In alternativa, è possibile aggiungere un altro disco rigido.
• Erano in corso altre applicazioni quando è stata fatta l’installazione?
Chiudere tutte le applicazioni e riavviare l’installazione.
Impossibile avviare un’applicazione
• Sono in corso di esecuzione molte applicazioni?
La memoria potrebbe essere insufficiente per avviare un’altra applicazione. Chiudere le applicazioni non necessarie, quindi avviare la
nuova applicazione. Se il messaggio di errore viene ancora visualizzato, riavviare il computer.
Appare un messaggio di errore quando viene avviata un’applicazione
• Se più applicazioni vengono eseguite contemporaneamente, potrebbe apparire un messaggio di errore.
In questo caso fare clic su [OK] e chiudere le applicazioni non necessarie.
Anche se la finestra dell’applicazione viene chiusa, essa rimane in esecuzione nella barra delle applicazioni. Accertarsi di chiudere tutte le
applicazioni non necessarie che si trovano nella barra delle applicazioni.
• Se si utilizza Cakewalk Pro Audio, accertarsi che la frequenza di campionamento di Cakewalk Pro Audio sia impostata su
44.1kHz.
Su Cakewalk ProAudio 7, 8 e 9, la frequenza di campionamento può essere impostata come segue.
[Tools] - [Audio options] - [Settings] - [Default sampling rate]
Un’applicazione si blocca?
Quando si utilizza un software per musica digitale per la registrazione digitale e l’interruttore di selezione d’ingresso registrazione dell’UA-
3 è impostato su DIGITAL, accertarsi che un dispositivo digitale sia collegato.
Anche se, in alcuni programmi, i limiti di Windows potrebbero sospendere il funzionamento del mouse o di altri dispositivi fino a quando
non viene collegato un dispositivo digitale, non si tratta di un malfunzionamento.
Se il mouse o gli altri dispositivi continuano ad essere bloccati, ricollegare il dispositivo digitale.
• Si è accertato che il problema si verifica con le seguenti applicazioni
(situazione al gennaio 2001).
•Logic Audio 3.0 or 4.0 In fase di registrazione
•Cubase VST 3.7 In fase di avvio/registrazione/riproduzione
•Cubase ASIO Multimedia Setup In fase di prova
Si è accertato che i problemi di cui sopra non si verificano con le seguenti applicazioni.
•Cakewalk Pro Audio 7, 8 e 9
•CoolEditProLE
•SoundRecorder (fornito con Windows98)
Appare un errore di collegamento all’avvio di Windows
Se D-Out Smoother è stato disinstallato con l’opzione Register to STARTUP selezionata (pag. 100), appaiono i seguenti messaggi di
errore all’avvio di Windows. In questo caso fare clic su [NO] per chiudere i messaggi.
Seguire la procedura sotto indicata per cancellare questo messaggio.
1. In Windows, fare clic sul pulsante [Start] e in [Impostazioni] scegliere [Barra delle applicazioni e menu Avvio].
2. Fare clic sulla scheda [Applicazioni del menu Avvio] e fare clic su [Rimuovi].
3. Selezionare [Programmi] - [StartUp] - [SmoothDo] e fare clic su [Rimuovi].
Per dettagli sull'installazione di dischi rigidi aggiuntivi, consultare il manuale dell'utente del
computer e di Windows.

Appendices
110
Appendices
UA-3 Application Guide
This section explains various ways in which the UA-3 can be connected and used.
To prevent malfunction and/or damage to speakers or other devices, always turn down the volume, and turn off the
power of all devices before making any connections. (It is not necessary to turn off the power of your computer)
■ Digitally recording the output of the UA-3 on MD
Make the connections shown in the following diagram.
* The sampling rate of the UA-3’s digital output is 44.1kHz. Audio data of a sampling rate other than
44.1kHz will be automatically converted within a computer to 44.1kHz, and will be output from the
digital output connectors of the UA-3.
Before you perform digital recording, please read the section entitled You must read this before
you use digital recording (p. 5).
• Depending on the application that you
are using on a Windows machine,
when the digital output of the UA-3 is
connected to a digital device such as
MD and audio is playing, a certain
amount of time may be required
immediately after playback ends for
the digital audio output to be locked,
so that there will be no sound for one
or two second, or the tempo or pitch
may be wrong. If this occurs, you can
use the “D-Out Smoother” software
included in the CD-ROM to make the
audio sound smoothly. For details
refer to Basic operation of the D-Out
Smoother (p. 15).
• If you change the position of the
Recording input select switch,
you should turn down the volume
of any monitor speaker system
that is connected.
Computer
UA-3
Audio cable
USB cable
LINE IN
LINE
OUT
USB
port
USB
port
Stereo
Headphones
MD
Optical digital cable
DIGITAL
OUT
DIGITAL INPUT
Monitor Speakers
Signal flow
Set to "INPUT+GUITAR/MIC"

Appendices
UA-3 111
■ Digital transfer from CD/MD/DAT to your computer (digital recording)
Make connections as shown in the following diagram.
* Set the recording sampling frequency of your recording application to 48 kHz if you are using DAT, or
to 44.1 kHz if you are using MD or CD. For details refer to your application’s manual.
• Since the UA-3 supports SCMS (p.
5), audio data containing copy pro-
tected song that is input to the digital
connector cannot be recorded by the
UA-3 to your computer. (It will be
output from the line output jacks and
the headphone jack.)
• If you change the position of the
Recording input select switch,
you should turn down the volume
of any monitor speaker system
that is connected.
• If the Recording input select
switch is set to DIGITAL, audio
data from your computer will not
be output.
• If you wish to input from the Line
input jacks, Mic input jack or
Guitar input jack, refer to p.112 --
115. On the UA-3, it is not possible
to mix the signal from these inputs
with the signal from the digital
input connector and record them
together.
Computer
UA-3
Audio cable
USB cable
LINE IN
LINE
OUT
USB
port
USB
port
Stereo
Headphones
Optical digital cable
DIGITAL
IN
DIGITAL OUT
Monitor speakers
Signal flow
Set to "DIGITAL"
CD

Appendices
112
■ Recording the line inputs (analog recording)
Make connections as shown in the following diagram.
Use the Line input adjustment slider to adjust the input level. If the LED above the slider lights red, use the slider
to lower the input level. You
will be able to record with higher audio quality if you use the slider to adjust the level so it is as high as you
can get it before causing the LED to light.
If you change the position of
the Recording input select
switch, you should turn down
the volume of any monitor speaker
system that is connected.
Stereo
Headphones
Computer
UA-3
Audio cable
Audio cable
USB cable
LINE IN
LINE OUT
LINE
IN
USB
port
USB
port
Monitor
speakers
MIDI sound module/Audio amplifier
(Cassette, record players)
Signal flow
LINE
OUT
Set to "INPUT + GUITAR/MIC"
In order to record at the best
possible audio quality, do not
connect a guitar or mic to the
"GUITAR" jack or "MIC" jack.
Lower the "GUITAR/MIC" slider
to the lowest position.

Appendices
UA-3 113
■ Recording guitar sounds
When recording guitar sounds with a sequencer or similar device, only the guitar sounds are recorded as you play the
guitar along with the sounds of the computer’s audio data.
Make connections as shown in the following diagram.
Set the recording sample rate of your recording application to the desired setting. (The available sample rates will de-
pend on your application. For details refer to the owner’s manual for your application.) Available sampling frequencies
vary depending on the operating system used.
Use the Guitar/Mic input adjustment slider to adjust the input level. If the LED above the slider lights red, use
the slider to lower the input level. You
will be able to record with higher audio quality if you use the slider to adjust the level so it is as
high as you can get it before causing the LED to light.
• The signal input from the Guitar
input jack is not directly output to
the Digital output connector.
• If you change the position of the
Recording input select switch,
you should turn down the volume of
any monitor speaker system that is
connected.
Stereo
Headphones
Computer
UA-3
Audio cable
USB cable
LINE IN
USB
port
USB
port
Monitor
speakers
LINE
OUT
Only GUITAR will be
recorded to the computer.
audio data
on the computer
The guitar input and
audio data on the computer
will be mixed and output.
The guitar input and
audio data on the computer
will be mixed and output.
Guitar
Signal flow of audio data
on the computer
GUITAR signal flow
Set to "INPUT + GUITAR/MIC"

Appendices
114
■ Recording narration or vocal sounds
Make connections as shown in the following diagram.
Set the recording sample rate of your recording application to the desired setting. (The available sample rates will de-
pend on your application. For details refer to the owner’s manual for your application.) Available sampling frequencies
vary depending on the operating system used.
Use the Guitar/Mic input adjustment slider to adjust the input level. If the LED above the slider lights red, use
the slider to lower the input level.
Use the Guitar/Mic input adjustment slider to adjust the input level. If the LED
above the slider lights red, use the slider to lower the input level. You
will be able to record with higher audio quality if you
use the slider to adjust the level so it is as high as you can get it before causing the LED to light.
• CONDENSER MIC
The UA-3 supports small multimedia
microphones used for adding narration,
and is compatible with plug-in powered
monaural microphones
• Howling could be produced depending on
the location of microphones relative to
speakers. This can be remedied by: 1.
Changing the orientation of the micro-
phones(s). 2. Relocating microphone(s) at
a greater distance from speakers. 3. Lower-
ing volume levels.
• If you change the position of the Record-
ing input select switch, you should
turn down the volume of any monitor
speaker system that is connected.
Stereo
Headphones
Computer
UA-3
Audio cable
USB cable
LINE IN
USB
port
USB
port
Monitor
speakers
LINE
OUT
MIC will be recorded
to the computer.
MIC will be output.
The MIC will be output.
Set to "INPUT + GUITAR/MIC"
Select a MIC type
according to your mic.
Condenser
mic
Dynamic
mic
MIC input signal flow

Appendices
UA-3 115
■ Recording guitar mixed with the line inputs
With these settings, the guitar will be mixed with the line inputs and recorded on your computer.
Make connections as shown in the following diagram.
Set the recording sample rate of your recording application to the desired setting. (The available sample rates will de-
pend on your application. For details, refer to the owner’s manual for your application.)
Use the Line input adjustment slider and Guitar/Mic input adjustment slider to adjust the balance. If the
LED above the slider lights red, use the slider to lower the input level. If
you use the slider to adjust the level so it is as high as
you can get it before causing the LED to light.
• It is not possible to simultaneously
record both a digital source (such as
CD) and an analog source (such as
guitar or mic). Either use the included
software to record them separately, or
record the digital source first and then
record the analog source as described
in Recording guitar sounds (p. 113).
• If you change the position of the
Recording input select switch,
you should turn down the volume
of any monitor speaker system
that is connected.
Stereo
Headphones
Computer
UA-3
Audio cable
USB cable
LINE IN
USB
port
USB
port
Monitor
speakers
LINE
OUT
The GUITAR and LINE IN
will be mixed and recorded
to the computer.
The GUITAR and LINE IN
will be mixed and output.
The GUITAR and LINE IN
will be mixed and output.
Guitar
Set to "INPUT + GUITAR/MIC"
LINE input signal flow
GUITAR input signal flow
Audio cable
LINE OUT
LINE
IN
MIDI sound module / CD / MD / DAT

Appendices
116
■ U-3 Block Diagram
[Recording input select switch is set to INPUT + GUITAR/MIC]
[Recording input select switch is set to DIGITAL]
UA-3 Block Diagram
USB Connector
USB indicator USB CODEC
Output level indicator
Line output jacks
Headphone jack
Digital output connector
(optical)
Guitar/Mic input peak
indicator
Line input peak indicator
Recording input select switch
Line output volume
Guitar input jack
Line input jacks
USB Connector
Mic input jack
Digital input connector
(Optical)
Guitar input jack
Line input jacks
Mic input jack
Digital input connector
(Optical)
USB indicator USB CODEC
Output level indicator
Line output jacks
Headphone jack
Digital output connector
(optical)
Guitar/Mic input peak
indicator
Line input peak indicator
Recording input select switch
Line output volume

UA-3 Specifications
UA-3 117
UA-3 Specifications
UA-3 (USB Audio Interface)
Number of Audio Record/Playback Channels
Record: 1 pair of stereo
Playback: 1 pair of stereo
* When the REC SOURCE switch is at INPUT+GUITAR/MIC, analog recording and audio playback
from your PC can occur simultaneously. When the REC SOURCE switch is at DIGITAL, only digital
recording is possible.
Signal Processing
PC interface: 16 bit
Sampling Frequency
Output: 44.1 kHz
Input: 32 kHz/44.1 kHz/48 kHz *
* When you record audio digitally from a digital device, UA-3 does not support the switching function
of the sampling rate of the digital device. If you want to switch the sampling rate, you have to reconnect
the digital cable.
Interface
USB
Digital input/output:Optical type (conforms to S/P DIF)
* Consumer digital audio device format is supported
Power Supply
Supplied from the computer
Current Draw
360 mA
Dimensions
175 (W) x 125.5 (D) x 34 (H) mm
6-15/16 (W) x 5 (D) x 1-3/8 (H) inches
Weight
260 g/ 10 oz
Accessories
Getting Started Manual
USB cable
CD-ROM
962a
* In the interest of product improvement, the specifications and/or appearance of this unit are subject to
change without prior notice.
About the included song data
Use of the song data supplied with this product for any purpose other than private, personal enjoyment
without the permission of the copyright holder is prohibited by law. Additionally, this data must not be
copied, nor used in a secondary copyrighted work without the permission of the copyright holder.
It’s gonna be alright
Composed & programmed by Mitsuru Sakaue
Vocal: Tahirih Walker, Humiyo Kawazoe
Guitar: Katsuhisa Fujimoto, Idecs Inc.

System Requirements
118
System Requirements
Windows
Operating system:
- Microsoft
® Windows® 98 (includes Second Edition)
- Microsoft® Windows® Me
- Microsoft® Windows® 2000 Professional
Computer:
Windows® compatible computer with an USB connector.
CPU/Clock:
- Microsoft® Windows® 98 (includes Second Edition) /Microsoft® Windows® Me
Pentium II processor 233MHz or higher
- Microsoft® Windows® 2000 Professional
Pentium II processor 400MHz or higher
Or Celeron processor 400MHz or higher
(Pentium III processor 500MHz or higher recommended)
Memory(RAM):
64M bytes or more
Hard Disk:
120M bytes or more
Display/Colors:
800x600 or higher /65,536 colors (16 bit High Color) or more
Macintosh
Operating system:
MacOS 9.0.4 or later
Computer:
Apple Macintosh series with on-board USB.
Test Studied on iMac*, Power Mac G4, Power Mac G4 Cube, and iBook.
* If you are using an iMac that are released after the summer of 2000, noise is heard when recording
audio.
CPU/Clock:
PowerPC G3/300MHz or higher
Memory(RAM):
96M Bytes or more (128M bytes or more recommended; Application memory 32M bytes or more)
Hard Disk:
120M bytes or more
Display/Colors:
800x600 or higher
(986)
* Although Roland has tested numerous configurations, and has determined that on average, a computer
system similar to that described above will permit normal operation of the UA-3, Roland cannot
guarantee that a given computer can be used satisfactorily with the UA-3 based solely on the fact that
it meets the above requirements. This is because there are too many other variables that may influence
the processing environment, including differences in motherboard design and the particular
combination of other devices involved.

2
This product complies with the requirements of European Directive 89/336/EEC.
For EU Countries
For Canada
This Class B digital apparatus meets all requirements of the Canadian Interference-Causing Equipment Regulations.
Cet appareil numérique de la classe B respecte toutes les exigences du Règlement sur le matériel brouilleur du Canada.
NOTICE
AVIS
For the USA
FEDERAL COMMUNICATIONS COMMISSION
RADIO FREQUENCY INTERFERENCE STATEMENT
This equipment has been tested and found to comply with the limits for a Class B digital device, pursuant to Part 15 of the
FCC Rules. These limits are designed to provide reasonable protection against harmful interference in a residential
installation. This equipment generates, uses, and can radiate radio frequency energy and, if not installed and used in
accordance with the instructions, may cause harmful interference to radio communications. However, there is no guarantee
that interference will not occur in a particular installation. If this equipment does cause harmful interference to radio or
television reception, which can be determined by turning the equipment off and on, the user is encouraged to try to correct the
interference by one or more of the following measures:
– Reorient or relocate the receiving antenna.
– Increase the separation between the equipment and receiver.
– Connect the equipment into an outlet on a circuit different from that to which the receiver is connected.
– Consult the dealer or an experienced radio/TV technician for help.
This device complies with Part 15 of the FCC Rules. Operation is subject to the following two conditions:
(1) This device may not cause harmful interference, and
(2) This device must accept any interference received, including interference that may cause undesired operation.
Unauthorized changes or modification to this system can void the users authority to operate this equipment.
This equipment requires shielded interface cables in order to meet FCC class B Limit.
For the USA
DECLARATION OF CONFORMITY
COMPLIANCE INFORMATION STATEMENT
Model name: UA-3
Type of Equipment: USB Audio Interface
Responsible Party: Edirol Corporation North America
Address: 425 Sequoia Drive, Suite 114, Bellingham, WA 98226
Telephone: 360-594-4276
USING THE UNIT SAFELY
001
• Before using this unit, make sure to read the
instructions below, and the Owner’s Manual.
................................................................................................
002a
• Do not open or perform any internal modifi-
cations on the unit.
................................................................................................
003
• Do not attempt to repair the unit, or replace
parts within it (except when this manual
provides specific instructions directing you
to do so). Refer all servicing to your retailer,
the nearest Roland Service Center, or an
authorized Roland distributor, as listed on
the "Information" page.
................................................................................................
004
• Never use or store the unit in places that are:
• Subject to temperature extremes (e.g.,
direct sunlight in an enclosed vehicle, near
a heating duct, on top of heat-generating
equipment); or are
• Damp (e.g., baths, washrooms, on wet
floors); or are
• Humid; or are
• Exposed to rain; or are
• Dusty; or are
• Subject to high levels of vibration.
................................................................................................
007
• Make sure you always have the unit placed
so it is level and sure to remain stable. Never
place it on stands that could wobble, or on
inclined surfaces.
................................................................................................
010
• This unit, either alone or in combination with
an amplifier and headphones or speakers,
may be capable of producing sound levels
that could cause permanent hearing loss. Do
not operate for a long period of time at a high
volume level, or at a level that is uncom-
fortable. If you experience any hearing loss or
ringing in the ears, you should immediately
stop using the unit, and consult an audiol-
ogist.
................................................................................................
011
• Do not allow any objects (e.g., flammable
material, coins, pins); or liquids of any kind
(water, soft drinks, etc.) to penetrate the unit.
................................................................................................
012d
• Immediately turn the power off, and request
servicing by your retailer, the nearest Roland
Service Center, or an authorized Roland
distributor, as listed on the "Information"
page when:
• Objects have fallen into, or liquid has been
spilled onto the unit; or
• The unit has been exposed to rain (or
otherwise has become wet); or
• The unit does not appear to operate
normally or exhibits a marked change in
performance.
................................................................................................
013
• In households with small children, an adult
should provide supervision until the child is
capable of following all the rules essential for
the safe operation of the unit.
................................................................................................
Used for instructions intended to alert
the user to the risk of injury or material
damage should the unit be used
improperly.
* Material damage refers to damage or
other adverse effects caused with
respect to the home and all its
furnishings, as well to domestic
animals or pets.
Used for instructions intended to alert
the user to the risk of death or severe
injury should the unit be used
improperly.
The ● symbol alerts the user to things that must be
carried out. The specific thing that must be done is
indicated by the design contained within the circle. In
the case of the symbol at left, it means that the power-
cord plug must be unplugged from the outlet.
The symbol alerts the user to important instructions
or warnings.The specific meaning of the symbol is
determined by the design contained within the
triangle. In the case of the symbol at left, it is used for
general cautions, warnings, or alerts to danger.
The symbol alerts the user to items that must never
be carried out (are forbidden). The specific thing that
must not be done is indicated by the design contained
within the circle. In the case of the symbol at left, it
means that the unit must never be disassembled.

02673845 1*SX
Owner’s Manual page 5
Bedienungsanleitung page 26
Mode d’emploi page 47
Manual del usuario page 68
Manuale d’uso page 89
201a
Before using this unit, carefully read the sections entitled:
“USING THE UNIT SAFELY” and “IMPORTANT NOTES” (p. 2, p.
4). These sections provide important information concerning the
proper operation of the unit. Additionally, in order to feel assured
that you have gained a good grasp of every feature provided by
your new unit, Getting Started manual should be read in its
entirety. The manual should be saved and kept on hand as a
convenient reference.
Copyright © 2001 ROLAND CORPORATION
All rights reserved. No part of this publication may be reproduced in any form
without the written permission of ROLAND CORPORATION.
Information
When you need repair service, call your nearest Roland/EDIROL Service Center or authorized Roland/EDIROL distributor
in your country as shown below.
U. S. A. / CANADA
EDIROL Corporation North
America
425 Sequoia Drive, Suite 114
Bellingham, WA 98226
U. S. A.
TEL: (360)594-4276
FAX: (360)594-4271
http://www.edirol.com/
AUSTRALIA
EDIROL Australia Pty. Ltd.
72 Central Avenue
Oak Flats NSW 2529
AUSTRALIA
TEL: (02) 4257 9091
http://www.edirol.com.au
EUROPE
EDIROL (Europe) Ltd.
Studio 3.4 114 Power Road
London W4 5PY
U. K.
TEL: +44 (0)20 8747 5949
FAX:+44 (0)20 8747 5948
http://www.edirol.com/europe
Deutschland
TEL: 0700 33 47 65 20
France
TEL: 0810 000 371
Italia
TEL: 02 93778329
As of April 23, 2001 (EDIROL)
EGYPT
Al Fanny Trading Office
P.O. Box 2904,
El Horrieh Heliopolos, Cairo,
EGYPT
TEL: (02) 4185531
REUNION
Maison FO - YAM Marcel
25 Rue Jules Hermann,
Chaudron - BP79 97 491
Ste Clotilde Cedex,
REUNION ISLAND
TEL: 28 29 16
SOUTH AFRICA
That Other Music Shop
(PTY) Ltd.
11 Melle St., Braamfontein,
Johannesbourg
Republic of SOUTH AFRICA
P.O.Box 32918, Braamfontein 2017
Republic of SOUTH AFRICA
TEL: (011) 403 4105
Paul Bothner (PTY) Ltd.
17 Werdmuller Centre Claremont
7700
Republic of SOUTH AFRICA
P.O. Box 23032
Claremont, Cape Town
SOUTH AFRICA, 7735
TEL: (021) 674 4030
AFRICAAFRICA
HONG KONG
Tom Lee Music Co., Ltd.
Service Division
22-32 Pun Shan Street, Tsuen
Wan, New Territories,
HONG KONG
TEL: 2415 0911
CHINA
Beijing Xinghai Musical
Instruments Co., Ltd.
6 Huangmuchang Chao Yang
District, Beijing, CHINA
TEL: (010) 6774 7491
ASIA
INDIA
Rivera Digitec (India) Pvt. Ltd.
409, Nirman Kendra Mahalaxmi
Flats Compound Off. Dr. Edwin
Moses Road, Mumbai-400011,
INDIA
TEL: (022) 498 3079
INDONESIA
PT Citra IntiRama
J1. Cideng Timur No. 15J-150
Jakarta Pusat
INDONESIA
TEL: (021) 6324170
MALAYSIA
Bentley Music SDN BHD
140 & 142, Jalan Bukit Bintang
55100 Kuala Lumpur,MALAYSIA
TEL: (03) 2443333
PHILIPPINES
G.A. Yupangco & Co. Inc.
339 Gil J. Puyat Avenue
Makati, Metro Manila 1200,
PHILIPPINES
TEL: (02) 899 9801
KOREA
Cosmos Corporation
1461-9, Seocho-Dong,
Seocho Ku, Seoul, KOREA
TEL: (02) 3486-8855
SINGAPORE
CRISTOFORI MUSIC PTE
LTD
Blk 3014, Bedok Industrial Park E,
#02-2148, SINGAPORE 489980
TEL: 243 9555
TAIWAN
ROLAND TAIWAN
ENTERPRISE CO., LTD.
Room 5, 9fl. No. 112 Chung Shan
N.Road Sec.2, Taipei, TAIWAN,
R.O.C.
TEL: (02) 2561 3339
THAILAND
Theera Music Co. , Ltd.
330 Verng NakornKasem, Soi 2,
Bangkok 10100, THAILAND
TEL: (02) 2248821
VIETNAM
Saigon Music
138 Tran Quang Khai St.,
District 1
Ho Chi Minh City
VIETNAM
TEL: (08) 844-4068
ARGENTINA
Instrumentos Musicales S.A.
Florida 656 2nd Floor
Office Number 206A
Buenos Aires
ARGENTINA, CP1005
TEL: (54-11) 4- 393-6057
BRAZIL
Roland Brasil Ltda
Rua San Jose, 780 Sala B
Parque Industrial San Jose
Cotia - Sao Paulo - SP, BRAZIL
TEL: (011) 4615 5666
NEW ZEALAND
Roland Corporation (NZ) Ltd.
97 Mt. Eden Road, Mt. Eden,
Auckland 3, NEW ZEALAND
TEL: (09) 3098 715
AUSTRALIA/
NEW ZEALAND
CENTRAL/LATIN
AMERICA
MEXICO
Casa Veerkamp, s.a. de c.v.
Av. Toluca No. 323, Col. Olivar
de los Padres 01780 Mexico D.F.
MEXICO
TEL: (525) 668 04 80
La Casa Wagner de
Guadalajara s.a. de c.v.
Av. Corona No. 202 S.J.
Guadalajara, Jalisco Mexico
C.P.44100 MEXICO
TEL: (3) 613 1414
PANAMA
SUPRO MUNDIAL, S.A.
Boulevard Andrews, Albrook,
Panama City,
REP. DE PANAMA
TEL: (507) 315-0101
VENEZUELA
Musicland Digital C.A.
Av. Francisco de Miranda,
Centro Parque de Cristal, Nivel
C2 Local 20 Caracas
VENEZUELA
TEL: (02) 285 9218
URUGUAY
Todo Musica S.A.
Cuareim 1844, Montevideo,
URUGUAY, CP11200
TEL: 5982-924-2335
DENMARK
Roland Scandinavia A/S
Nordhavnsvej 7, Postbox 880,
DK-2100 Copenhagen
DENMARK
TEL: (039)16 6200
FRANCE
Roland France SA
4, Rue Paul Henri SPAAK,
Parc de l'Esplanade, F 77 462 St.
Thibault, Lagny Cedex FRANCE
TEL: 01 600 73 500
FINLAND
Roland Scandinavia As,
Filial Finland
Lauttasaarentie 54 B
Fin-00201 Helsinki, FINLAND
TEL: (9) 682 4020
GERMANY
Roland Elektronische
Musikinstrumente HmbH.
Oststrasse 96, 22844 Norderstedt,
GERMANY
TEL: (040) 52 60090
HUNGARY
Intermusica Ltd.
Warehouse Area ‘DEPO’ Pf.83
H-2046 Torokbalint, HUNGARY
TEL: (23) 511011
AUSTRIA
Roland Austria GES.M.B.H.
Siemensstrasse 4, P.O. Box 74,
A-6063 RUM, AUSTRIA
TEL: (0512) 26 44 260
BELGIUM/HOLLAND/
LUXEMBOURG
Roland Benelux N. V.
Houtstraat 3, B-2260, Oevel
(Westerlo) BELGIUM
TEL: (014) 575811
EUROPE
GREECE
STOLLAS S.A.
Music Sound Light
155, New National Road
26422 Patras, GREECE
TEL: 061-435400
IRELAND
Roland Ireland
Audio House, Belmont Court,
Donnybrook, Dublin 4.
Republic of IRELAND
TEL: (01) 2603501
ITALY
Roland Italy S. p. A.
Viale delle Industrie 8,
20020 Arese, Milano, ITALY
TEL: (02) 937-78300
NORWAY
Roland Scandinavia Avd.
Kontor Norge
Lilleakerveien 2 Postboks 95
Lilleaker N-0216 Oslo
NORWAY
TEL: 273 0074
PORTUGAL
Tecnologias Musica e Audio,
Roland Portugal, S.A.
Cais Das Pedras, 8/9-1 Dto
4050-465 PORTO
PORTUGAL
TEL: (022) 608 00 60
POLAND
P. P. H. Brzostowicz
UL. Gibraltarska 4.
PL-03664 Warszawa POLAND
TEL: (022) 679 44 19
RUSSIA
Slami Music Company
Sadojava-Triumfalnaja st., 16
103006 Moscow, RUSSIA
TEL: 095 209 2193
SPAIN
Roland Electronics
de España, S. A.
Calle Bolivia 239, 08020
Barcelona, SPAIN
TEL: (93) 308 1000
SWITZERLAND
Roland (Switzerland) AG
Musitronic AG
Gerberstrasse 5, Postfach,
CH-4410 Liestal, SWITZERLAND
TEL: (061) 921 1615
SWEDEN
Roland Scandinavia A/S
SWEDISH SALES OFFICE
Danvik Center 28, 2 tr.
S-131 30 Nacka SWEDEN
TEL: (08) 702 0020
UKRAINE
TIC-TAC
Mira Str. 19/108
P.O. Box 180
295400 Munkachevo, UKRAINE
TEL: (03131) 414-40
UNITED KINGDOM
Roland (U.K.) Ltd.
Atlantic Close, Swansea
Enterprise Park, SWANSEA
SA7 9FJ,
UNITED KINGDOM
TEL: (01792) 700139
ROMANIA
FBS LINES
Piata Libertatii 1,
RO-4200 Gheorgheni
TEL: (066) 164-609
BAHRAIN
Moon Stores
Bab Al Bahrain Road,
P.O. Box 20077
State of BAHRAIN
TEL: 211 005
ISRAEL
Halilit P. Greenspoon &
Sons Ltd.
8 Retzif Ha’aliya Hashnya St.
Tel-Aviv-Yafo ISRAEL
TEL: (03) 6823666
JORDAN
AMMAN Trading Agency
Prince Mohammed St. P.O. Box
825 Amman 11118 JORDAN
TEL: (06) 4641200
KUWAIT
Easa Husain Al-Yousifi
Abdullah Salem Street,
Safat KUWAIT
TEL: 5719499
LEBANON
A. Chahine & Fils
P.O. Box 16-5857 Gergi Zeidan St.
Chahine Building, Achrafieh
Beirut, LEBANON
TEL: (01) 335799
CYPRUS
Radex Sound Equipment Ltd.
17 Diagorou St., P.O. Box 2046,
Nicosia CYPRUS
TEL: (02) 453 426
IRAN
MOCO, INC.
No.41 Nike St.Dr.Shariyati Ave.
Roberoye Cerahe Mirdamad
Tehran, IRAN
TEL: 285 4169
MIDDLE EAST
QATAR
Badie Studio & Stores
P.O. Box 62,
DOHA QATAR
TEL: 423554
SAUDI ARABIA
aDawliah Universal
Electronics APL
Corniche Road, Aldossary Bldg.,
1st Floor
SAUDI ARABIA
P.O.Box 2154, Alkhobar 31952
SAUDI ARABIA
TEL: (03) 898 2081
SYRIA
Technical Light & Sound
Center
Khaled Ibn Al Walid St.
P.O. Box 13520
Damascus - SYRIA
TEL: (011) 2235 384
TURKEY
Barkat Muzik aletleri ithalat
ve ihracat Ltd Sti
Siraselviler cad.Guney is hani 84-
86/6, Taksim. Istanbul. TURKEY
TEL: (0212) 2499324
U.A.E.
Zak Electronics & Musical
Instruments Co. L.L.C.
Zabeel Road, Al Sherooq Bldg.,
No. 14, Grand Floor DUBAI
U.A.E.
TEL: (04) 3360715
Transcripción de documentos
Information When you need repair service, call your nearest Roland/EDIROL Service Center or authorized Roland/EDIROL distributor in your country as shown below. AUSTRALIA EDIROL Australia Pty. Ltd. INDIA MEXICO IRELAND Rivera Digitec (India) Pvt. Ltd. Casa Veerkamp, s.a. de c.v. Roland Ireland 409, Nirman Kendra Mahalaxmi Flats Compound Off. Dr. Edwin Moses Road, Mumbai-400011, INDIA TEL: (022) 498 3079 Av. Toluca No. 323, Col. Olivar de los Padres 01780 Mexico D.F. MEXICO TEL: (525) 668 04 80 Audio House, Belmont Court, Donnybrook, Dublin 4. Republic of IRELAND TEL: (01) 2603501 La Casa Wagner de Guadalajara s.a. de c.v. ITALY Av. Corona No. 202 S.J. Guadalajara, Jalisco Mexico C.P.44100 MEXICO TEL: (3) 613 1414 Viale delle Industrie 8, 20020 Arese, Milano, ITALY TEL: (02) 937-78300 72 Central Avenue Oak Flats NSW 2529 AUSTRALIA TEL: (02) 4257 9091 http://www.edirol.com.au EUROPE INDONESIA EDIROL (Europe) Ltd. Studio 3.4 114 Power Road London W4 5PY U. K. TEL: +44 (0)20 8747 5949 FAX:+44 (0)20 8747 5948 http://www.edirol.com/europe Deutschland TEL: 0700 33 47 65 20 France TEL: 0810 000 371 Italia TEL: 02 93778329 U. S. A. / CANADA EDIROL Corporation North America 425 Sequoia Drive, Suite 114 Bellingham, WA 98226 U. S. A. TEL: (360)594-4276 FAX: (360)594-4271 http://www.edirol.com/ PT Citra IntiRama J1. Cideng Timur No. 15J-150 Jakarta Pusat INDONESIA TEL: (021) 6324170 KOREA EGYPT Al Fanny Trading Office P.O. Box 2904, El Horrieh Heliopolos, Cairo, EGYPT TEL: (02) 4185531 REUNION Maison FO - YAM Marcel 25 Rue Jules Hermann, Chaudron - BP79 97 491 Ste Clotilde Cedex, REUNION ISLAND TEL: 28 29 16 SOUTH AFRICA That Other Music Shop (PTY) Ltd. 11 Melle St., Braamfontein, Johannesbourg Republic of SOUTH AFRICA P.O.Box 32918, Braamfontein 2017 Republic of SOUTH AFRICA TEL: (011) 403 4105 Paul Bothner (PTY) Ltd. 17 Werdmuller Centre Claremont 7700 Republic of SOUTH AFRICA P.O. Box 23032 Claremont, Cape Town SOUTH AFRICA, 7735 TEL: (021) 674 4030 ASIA CHINA Beijing Xinghai Musical Instruments Co., Ltd. MALAYSIA URUGUAY POLAND Cuareim 1844, Montevideo, URUGUAY, CP11200 TEL: 5982-924-2335 PHILIPPINES G.A. Yupangco & Co. Inc. VENEZUELA 339 Gil J. Puyat Avenue Makati, Metro Manila 1200, PHILIPPINES TEL: (02) 899 9801 Musicland Digital C.A. Av. Francisco de Miranda, Centro Parque de Cristal, Nivel C2 Local 20 Caracas VENEZUELA TEL: (02) 285 9218 CYPRUS Radex Sound Equipment Ltd. IRAN MOCO, INC. No.41 Nike St.Dr.Shariyati Ave. Roberoye Cerahe Mirdamad Tehran, IRAN TEL: 285 4169 P. P. H. Brzostowicz ISRAEL UL. Gibraltarska 4. PL-03664 Warszawa POLAND TEL: (022) 679 44 19 Halilit P. Greenspoon & Sons Ltd. PORTUGAL Tecnologias Musica e Audio, Roland Portugal, S.A. Cais Das Pedras, 8/9-1 Dto 4050-465 PORTO PORTUGAL TEL: (022) 608 00 60 8 Retzif Ha’aliya Hashnya St. Tel-Aviv-Yafo ISRAEL TEL: (03) 6823666 JORDAN AMMAN Trading Agency Prince Mohammed St. P.O. Box 825 Amman 11118 JORDAN TEL: (06) 4641200 EUROPE ROMANIA FBS LINES KUWAIT Blk 3014, Bedok Industrial Park E, #02-2148, SINGAPORE 489980 TEL: 243 9555 AUSTRIA Piata Libertatii 1, RO-4200 Gheorgheni TEL: (066) 164-609 Easa Husain Al-Yousifi TAIWAN ROLAND TAIWAN ENTERPRISE CO., LTD. Room 5, 9fl. No. 112 Chung Shan N.Road Sec.2, Taipei, TAIWAN, R.O.C. TEL: (02) 2561 3339 THAILAND Theera Music Co. , Ltd. 330 Verng NakornKasem, Soi 2, Bangkok 10100, THAILAND TEL: (02) 2248821 VIETNAM Saigon Music 138 Tran Quang Khai St., District 1 Ho Chi Minh City VIETNAM TEL: (08) 844-4068 AUSTRALIA/ NEW ZEALAND NEW ZEALAND Roland Corporation (NZ) Ltd. 97 Mt. Eden Road, Mt. Eden, Auckland 3, NEW ZEALAND TEL: (09) 3098 715 CENTRAL/LATIN AMERICA ARGENTINA Instrumentos Musicales S.A. HONG KONG BRAZIL Roland Brasil Ltda Rua San Jose, 780 Sala B Parque Industrial San Jose Cotia - Sao Paulo - SP, BRAZIL TEL: (011) 4615 5666 Roland Austria GES.M.B.H. Siemensstrasse 4, P.O. Box 74, A-6063 RUM, AUSTRIA TEL: (0512) 26 44 260 BELGIUM/HOLLAND/ LUXEMBOURG Roland Benelux N. V. Houtstraat 3, B-2260, Oevel (Westerlo) BELGIUM TEL: (014) 575811 DENMARK Roland Scandinavia A/S Nordhavnsvej 7, Postbox 880, DK-2100 Copenhagen DENMARK TEL: (039)16 6200 FRANCE Roland France SA 4, Rue Paul Henri SPAAK, Parc de l'Esplanade, F 77 462 St. Thibault, Lagny Cedex FRANCE TEL: 01 600 73 500 FINLAND Roland Scandinavia As, Filial Finland Lauttasaarentie 54 B Fin-00201 Helsinki, FINLAND TEL: (9) 682 4020 GERMANY Roland Elektronische Musikinstrumente HmbH. Oststrasse 96, 22844 Norderstedt, GERMANY TEL: (040) 52 60090 GREECE STOLLAS S.A. Music Sound Light 155, New National Road 26422 Patras, GREECE TEL: 061-435400 HUNGARY Intermusica Ltd. Abdullah Salem Street, Safat KUWAIT TEL: 5719499 RUSSIA LEBANON Slami Music Company Sadojava-Triumfalnaja st., 16 103006 Moscow, RUSSIA TEL: 095 209 2193 A. Chahine & Fils SPAIN P.O. Box 16-5857 Gergi Zeidan St. Chahine Building, Achrafieh Beirut, LEBANON TEL: (01) 335799 Roland Electronics de España, S. A. QATAR Badie Studio & Stores Calle Bolivia 239, 08020 Barcelona, SPAIN TEL: (93) 308 1000 P.O. Box 62, DOHA QATAR TEL: 423554 SWEDEN Roland Scandinavia A/S SWEDISH SALES OFFICE Danvik Center 28, 2 tr. S-131 30 Nacka SWEDEN TEL: (08) 702 0020 SAUDI ARABIA aDawliah Universal Electronics APL Corniche Road, Aldossary Bldg., 1st Floor SAUDI ARABIA SWITZERLAND Roland (Switzerland) AG Musitronic AG P.O.Box 2154, Alkhobar 31952 SAUDI ARABIA TEL: (03) 898 2081 Gerberstrasse 5, Postfach, CH-4410 Liestal, SWITZERLAND TEL: (061) 921 1615 SYRIA UKRAINE Technical Light & Sound Center TIC-TAC Mira Str. 19/108 P.O. Box 180 295400 Munkachevo, UKRAINE TEL: (03131) 414-40 UNITED KINGDOM Roland (U.K.) Ltd. Atlantic Close, Swansea Enterprise Park, SWANSEA SA7 9FJ, UNITED KINGDOM TEL: (01792) 700139 Owner’s Manual page 5 Bedienungsanleitung page 26 Mode d’emploi page 47 Manual del usuario page 68 Manuale d’uso page 89 17 Diagorou St., P.O. Box 2046, Nicosia CYPRUS TEL: (02) 453 426 CRISTOFORI MUSIC PTE LTD 6 Huangmuchang Chao Yang District, Beijing, CHINA TEL: (010) 6774 7491 22-32 Pun Shan Street, Tsuen Wan, New Territories, HONG KONG TEL: 2415 0911 Todo Musica S.A. 140 & 142, Jalan Bukit Bintang 55100 Kuala Lumpur,MALAYSIA TEL: (03) 2443333 Bab Al Bahrain Road, P.O. Box 20077 State of BAHRAIN TEL: 211 005 Roland Scandinavia Avd. Kontor Norge 1461-9, Seocho-Dong, Seocho Ku, Seoul, KOREA TEL: (02) 3486-8855 Bentley Music SDN BHD Moon Stores NORWAY Lilleakerveien 2 Postboks 95 Lilleaker N-0216 Oslo NORWAY TEL: 273 0074 Florida 656 2nd Floor Office Number 206A Buenos Aires ARGENTINA, CP1005 TEL: (54-11) 4- 393-6057 Tom Lee Music Co., Ltd. Service Division SUPRO MUNDIAL, S.A. BAHRAIN Roland Italy S. p. A. Boulevard Andrews, Albrook, Panama City, REP. DE PANAMA TEL: (507) 315-0101 Cosmos Corporation SINGAPORE AFRICA PANAMA MIDDLE EAST Khaled Ibn Al Walid St. P.O. Box 13520 Damascus - SYRIA TEL: (011) 2235 384 TURKEY 201a Barkat Muzik aletleri ithalat ve ihracat Ltd Sti Before using this unit, carefully read the sections entitled: “USING THE UNIT SAFELY” and “IMPORTANT NOTES” (p. 2, p. 4). These sections provide important information concerning the proper operation of the unit. Additionally, in order to feel assured that you have gained a good grasp of every feature provided by your new unit, Getting Started manual should be read in its entirety. The manual should be saved and kept on hand as a convenient reference. Siraselviler cad.Guney is hani 8486/6, Taksim. Istanbul. TURKEY TEL: (0212) 2499324 U.A.E. Zak Electronics & Musical Instruments Co. L.L.C. Zabeel Road, Al Sherooq Bldg., No. 14, Grand Floor DUBAI U.A.E. TEL: (04) 3360715 Warehouse Area ‘DEPO’ Pf.83 H-2046 Torokbalint, HUNGARY TEL: (23) 511011 Copyright © 2001 ROLAND CORPORATION All rights reserved. No part of this publication may be reproduced in any form without the written permission of ROLAND CORPORATION. As of April 23, 2001 (EDIROL) 02673845 1*SX USING THE UNIT SAFELY The symbol alerts the user to important instructions or warnings.The specific meaning of the symbol is determined by the design contained within the triangle. In the case of the symbol at left, it is used for general cautions, warnings, or alerts to danger. Used for instructions intended to alert the user to the risk of death or severe injury should the unit be used improperly. Used for instructions intended to alert the user to the risk of injury or material damage should the unit be used improperly. * Material damage refers other adverse effects respect to the home furnishings, as well animals or pets. The symbol alerts the user to items that must never be carried out (are forbidden). The specific thing that must not be done is indicated by the design contained within the circle. In the case of the symbol at left, it means that the unit must never be disassembled. to damage or caused with and all its to domestic The ● symbol alerts the user to things that must be carried out. The specific thing that must be done is indicated by the design contained within the circle. In the case of the symbol at left, it means that the powercord plug must be unplugged from the outlet. For EU Countries This product complies with the requirements of European Directive 89/336/EEC. 010 001 • Before using this unit, make sure to read the instructions below, and the Owner’s Manual. ................................................................................................ 002a • Do not open or perform any internal modifications on the unit. ................................................................................................ 003 • Do not attempt to repair the unit, or replace parts within it (except when this manual provides specific instructions directing you to do so). Refer all servicing to your retailer, the nearest Roland Service Center, or an authorized Roland distributor, as listed on the "Information" page. ................................................................................................ 004 • Never use or store the unit in places that are: • Subject to temperature extremes (e.g., direct sunlight in an enclosed vehicle, near a heating duct, on top of heat-generating equipment); or are • This unit, either alone or in combination with an amplifier and headphones or speakers, may be capable of producing sound levels that could cause permanent hearing loss. Do not operate for a long period of time at a high volume level, or at a level that is uncomfortable. If you experience any hearing loss or ringing in the ears, you should immediately stop using the unit, and consult an audiologist. ................................................................................................ 011 • Do not allow any objects (e.g., flammable material, coins, pins); or liquids of any kind (water, soft drinks, etc.) to penetrate the unit. ................................................................................................ 012d • Immediately turn the power off, and request servicing by your retailer, the nearest Roland Service Center, or an authorized Roland distributor, as listed on the "Information" page when: • Objects have fallen into, or liquid has been spilled onto the unit; or • Damp (e.g., baths, washrooms, on wet floors); or are • The unit has been exposed to rain (or otherwise has become wet); or • Humid; or are • Exposed to rain; or are • Dusty; or are • Subject to high levels of vibration. ................................................................................................ • The unit does not appear to operate normally or exhibits a marked change in performance. ................................................................................................ For the USA FEDERAL COMMUNICATIONS COMMISSION RADIO FREQUENCY INTERFERENCE STATEMENT This equipment has been tested and found to comply with the limits for a Class B digital device, pursuant to Part 15 of the FCC Rules. These limits are designed to provide reasonable protection against harmful interference in a residential installation. This equipment generates, uses, and can radiate radio frequency energy and, if not installed and used in accordance with the instructions, may cause harmful interference to radio communications. However, there is no guarantee that interference will not occur in a particular installation. If this equipment does cause harmful interference to radio or television reception, which can be determined by turning the equipment off and on, the user is encouraged to try to correct the interference by one or more of the following measures: – Reorient or relocate the receiving antenna. – Increase the separation between the equipment and receiver. – Connect the equipment into an outlet on a circuit different from that to which the receiver is connected. – Consult the dealer or an experienced radio/TV technician for help. This device complies with Part 15 of the FCC Rules. Operation is subject to the following two conditions: (1) This device may not cause harmful interference, and (2) This device must accept any interference received, including interference that may cause undesired operation. Unauthorized changes or modification to this system can void the users authority to operate this equipment. This equipment requires shielded interface cables in order to meet FCC class B Limit. For the USA DECLARATION OF CONFORMITY COMPLIANCE INFORMATION STATEMENT Model name: UA-3 Type of Equipment: USB Audio Interface Responsible Party: Edirol Corporation North America Address: 425 Sequoia Drive, Suite 114, Bellingham, WA 98226 Telephone: 360-594-4276 For Canada 013 007 • Make sure you always have the unit placed so it is level and sure to remain stable. Never place it on stands that could wobble, or on inclined surfaces. ................................................................................................ 2 • In households with small children, an adult should provide supervision until the child is capable of following all the rules essential for the safe operation of the unit. ................................................................................................ NOTICE This Class B digital apparatus meets all requirements of the Canadian Interference-Causing Equipment Regulations. AVIS Cet appareil numérique de la classe B respecte toutes les exigences du Règlement sur le matériel brouilleur du Canada. 014 • Protect the unit from strong impact. (Do not drop it!) ................................................................................................ 023 • DO NOT play a CD-ROM disc on a conventional audio CD player. The resulting sound may be of a level that could cause permanent hearing loss. Damage to speakers or other system components may result. ................................................................................................ 204 * Microsoft and MS-DOS are registered trademarks of Microsoft Corporation. 104 • Try to prevent cords and cables from becoming entangled. Also, all cords and cables should be placed so they are out of the reach of children. ................................................................................................ 106 • Never climb on top of, nor place heavy objects on the unit. ................................................................................................ 108c • Disconnect all cords coming from external devices before moving the unit. ................................................................................................ 118 • Should you remove the optical connector caps, make sure to put them in a safe place out of children's reach, so there is no chance of them being swallowed accidentally. ................................................................................................ 205 * Microsoft, Windows, and Windows NT are registered trademarks of Microsoft Corporation. 206b * Windows® 95 is known officially as: “Microsoft® Windows® 95 operating system.” 206c * Windows® 98 is known officially as: “Microsoft® Windows® 98 operating system.” 206d * Windows NT® is known officially as: “Microsoft® Windows NT® operating system.” ??? * Windows Me® is known officially as: “Microsoft® Windows ® Millennium version operating system.” 206e * Screen shots reprinted with permission from Microsoft Corporation. 206f * Windows® 2000 is known officially as: “Microsoft® Windows® 2000 operating system.” 207 * Apple is a registered trademark of Apple Computer, Inc. 208 * Macintosh is a registered trademark of Apple Computer, Inc. 209 * MacOS is a trademark of Apple Computer, Inc. 213 * Pentium is a registered trademark of Intel Corporation. 214 * MMX is a trademark of Intel Corporation. 220 * All product names mentioned in this document are trademarks or registered trademarks of their respective owners. 985 • The explanations in this manual include illustrations that depict what should typically be shown by the display. Note, however, that your unit may incorporate a newer, enhanced version of the system (e.g., includes newer sounds), so what you actually see in the display may not always match what appears in the manual. 3 IMPORTANT NOTES In addition to the items listed under “USING THE UNIT SAFELY” on page 2, please read and observe the following: Power Supply • Before connecting this unit to other devices, turn off the power to all units. This will help prevent malfunctions and/ or damage to speakers or other devices. (It is not necessary to turn off the power of your computer.) Placement • Using the unit near power amplifiers (or other equipment containing large power transformers) may induce hum. To alleviate the problem, change the orientation of this unit; or move it farther away from the source of interference. • This device may interfere with radio and television reception. Do not use this device in the vicinity of such receivers. • Do not expose the unit to direct sunlight, place it near devices that radiate heat, leave it inside an enclosed vehicle, or otherwise subject it to temperature extremes. Excessive heat can deform or discolor the unit. • To avoid possible breakdown, do not use the unit in a wet area, such as an area exposed to rain or other moisture. Maintenance • For everyday cleaning wipe the unit with a soft, dry cloth or one that has been slightly dampened with water. To remove stubborn dirt, use a cloth impregnated with a mild, non-abrasive detergent. Afterwards, be sure to wipe the unit thoroughly with a soft, dry cloth. • Never use benzine, thinners, alcohol or solvents of any kind, to avoid the possibility of discoloration and/or deformation. 4 Additional Precautions • Use a reasonable amount of care when using the unit’s buttons, sliders, or other controls; and when using its jacks and connectors. Rough handling can lead to malfunctions. • When connecting / disconnecting all cables, grasp the connector itself—never pull on the cable. This way you will avoid causing shorts, or damage to the cable’s internal elements. • To avoid disturbing your neighbors, try to keep the unit’s volume at reasonable levels. You may prefer to use headphones, so you do not need to be concerned about those around you (especially when it is late at night). • When you need to transport the unit, package it in the box (including padding) that it came in, if possible. Otherwise, you will need to use equivalent packaging materials. • Use a cable from Roland to make the connection. If using some other make of connection cable, please note the following precautions. • Some connection cables contain resistors. Do not use cables that incorporate resistors for connecting to this unit. The use of such cables can cause the sound level to be extremely low, or impossible to hear. For information on cable specifications, contact the manufacturer of the cable. • Before you open the included CD-ROM, you must read the “license agreement." Opening the CD-ROM will be taken to mean your acceptance of the license agreement. Handling CD-ROMs • Avoid touching or scratching the shiny underside (encoded surface) of the disc. Damaged or dirty CD-ROM discs may not be read properly. Keep your discs clean using a commercially available CD cleaner. You must read this before you use digital recording Unauthorized recording, distribution, sale, lending, public performance, broadcasting, or the like, in whole or in part, of a work (musical composition, video, broadcast, public performance, or the like) whose copyright is held by a third party is prohibited by law. When exchanging audio signals through a digital connection with an external instrument, this unit can perform recording without being subjected to some of the restrictions of the Serial Copy Management System (SCMS). This is because the unit is intended solely for musical production, and is designed not to be subject to restrictions as long as it is used to record works (such as your own compositions) that do not infringe on the copyrights of others. (SCMS is a feature that prohibits second-generation and later copying through a digital connection. It is built into MD recorders and other consumer digital-audio equipment as a copyright-protection feature.) ENGLISH On the UA-3 The UA-3 will function with partial SCMS support only for a digital input signal from an external device. When data containing SCMS flags is input, for example from a MD that was digitally copied from a commercial music CD, the UA-3 will function as follows. If input from the UA-3’s digital input connector: • The UA-3 cannot record this data to your computer • The audio will be output from the analog outputs (line output jacks, headphone jack) and digital output connector. DEUTSCH If input from the UA-3’s analog inputs (line input jacks): • Recording can occur normally Regardless of the presence or absence of the SCMS flag, data that is received at the digital input connector of the UA-3 will be output directly from the digital output connector. Do not use this unit for purposes that could infringe on a copyright held by a third party. Roland assumes no responsibility whatsoever with regard to any infringements of third-party copyrights arising through your use of this unit. FRANÇAIS This device does not support digital audio signals that are formatted for broadcast studio digital audio devices. ITALIANO ESPAÑOL The UA-3 operates according to SCMS only for digital input signals from an external device. SCMS flags are not added to the digital audio signals that are output from the UA-3. UA-3 5 Introduction Introduction Check the contents of the package The UA-3 includes the following items. When you open the package, first make sure that all items are included. If any are missing, contact the dealer where you purchased the UA-3. UA-3 USB cable Use this to connect the UA-3 to the USB connector of your computer. For details on connections, refer to Connections and driver installation (Windows p. 8, Macintosh p. 17). Use only the included USB cable. AUDIO Capture CD-ROM This contains software that you will need in order to use the UA-3. * Be sure to read the Readme_E.txt file found in the AUDIO Capture CD-ROM. Any updated information will be provided in the Readme_E.txt file. • Before opening the included CD-ROM, you must read the separate license agreement. • Do not touch the silver recording surface of the disc, or scratch it. Doing so may make it impossible for data to be read correctly. If the disc becomes soiled, use a commercially available CD cleaner to clean it. • Do not play back the CD-ROM on a conventional audio CD player. Doing so will produce a high volume that may damage your ears or speakers. Getting Started This is the document you are reading. Keep it at hand for reference when needed. License agreement This contract describes the terms under which Roland Corporation allows you to use the software. You must read this before opening the CD-ROM package. You will need to provide these items yourself External amp, speakers, headphones, and mic are not included External amp, speakers, or headphones necessary for listening to the sound output via the UA-3 are not included. Nor is a mic included for inputting sound to the UA-3. You will need to provide these items yourself. Digital input/output cables for connecting the MD or DAT recorder are not included Although you can use an MD or DAT digital recorder to perform digital recording, the cables for connecting the recorder to the UA-3 are not included. You will need to provide these separately. 6 Introduction Parts of the UA-3 and their function 3 2 1 4 5 6 • Condenser Mic The UA-3 supports small multimedia microphones used for adding narration, and is compatible with plugin powered monaural microphones. • If you are recording only from the line inputs, disconnect the cables from the Guitar input jack and the Mic input jack. 9 7 10 8 11 14 15 16 17 1 Mic input jack 2 Line input jacks 3 Line output jacks 4 Digital input connector (optical) 5 Digital output connector (optical) 6 USB connector 7 Mic type select switch Set this switch according to a type of mic that is connected to the Mic input jack When connecting a dynamic mic: “DYNAMIC” When connecting a condenser mic: “CONDENSER” Recording input select switch This selects the input that will be used for recording. Digital input connectors 4 : “DIGITAL” Mic input jack 9 . 1 / Line input jacks / Guitar input jack 2 14 :“INPUT + GUITAR/MIC” FRANÇAIS 8 1 ENGLISH 13 DEUTSCH 12 • The UA-3 is not compatible with the phantom-powered, condenser microphones typically used for music. It is also incompatible with the stereo microphones sometimes supplied with MDs. • You cannot play back computer audio data when DIGITAL is selected. USB indicator This will light when the UA-3 is connected and recognized to the computer. 10 Output level indicator The number of LED’s that light changes according to the output level from the Headphone jack output jacks 3 . If the red LED lights, use the Line output volume 11 to lower the volume. 17 and the Line 11 Line output volume This adjusts the volume that is output from the Headphone jack 17 and the Line output jacks 3 . 12 Guitar/Mic input peak indicator ESPAÑOL If the input level from the Guitar input jack 14 and the Mic input jack 1 is excessive, it will light red. If it lights red, use the Guitar/Mic input adjustment slider 13 to lower the input level. 13 Guitar/Mic input adjustment slider This slider adjusts the input level of the Guitar input jack 14 and the Mic input jack 1 . 14 Guitar input jack 15 Line input adjustment slider This slider adjusts the input level of the Line input jacks 2 . 16 Line input peak indicator 2 is excessive, it will light red. If it lights red, use the Line input ad- ITALIANO If the input level from the Line input jacks justment slider 15 to lower the input level. 17 Headphone jack A set of headphones can be connected here. Even if headphones are connected, sound will still be output from the Line output jacks 3 . * UA-3 For details on how each control and connector are actually used, refer to UA-3 Application Guide (p. 110). 7 Connections and driver installation (Windows) Connections and driver installation (Windows) * If you are a Macintosh user, refer to p. 17. In order to use the UA-3, you must first install the USB Composite Device driver, the USB Human Interface driver, and the USB Audio Device driver consecutively. These drivers are included with Windows. If you are using Windows 98, this driver is provided in the Microsoft Windows CD-ROM, so you will need to have the Microsoft Windows CD-ROM ready. If you are using Windows Me or 2000, the CD-ROM is not necessary. What is a driver? A driver is software that allows an application program running on your computer to transfer data to and from the UA3 when it is connected to your computer via a USB cable. The driver passes data from the application to the UA-3, and passes data from the UA-3 to the application. Before installing the driver Application • The UA-3 cannot be used with Windows 95 or Windows NT. • If other Windows programs are running, exit all of them before you continue. • If you will be simultaneously connecting multiple Roland USB devices (for example; the UA-3 and other USB devices such as the UA-100G) to your computer, disconnect the UA-100G or other devices from the USB connector before installing the driver. If you install the driver when the UA-100G or other devices are connected, installation may not occur correctly. USB port USB Driver USB cable UA-3 Computer Making connections and installing the driver ■ Making connections Always make sure to have the volume level turned down before connecting the UA-3. Even with the volume all the way down, you may still hear some sound when the power is switched on, but this is normal, and does not indicate a malfunction. To prevent malfunction and/or damage to speakers or other devices, always turn down the volume, and turn off the power of all devices before making any connections. (It is not necessary to turn off the power of your computer.) Use a USB cable to connect the UA-3 to your computer before turning on the power of your audio equipment. Computer Stereo Set Powered Speaker etc. USB port LINE IN, AUX IN Audio cable USB cable * Connect after starting up the computer LINE OUT USB port Stereo Headphones UA-3 8 • Before disconnecting the USB cable or restarting Windows, please close all applications. You should also turn down the volume of any audio or amp system that is connected. • This unit is equipped with a protection circuit. A brief interval (a few seconds) after connecting a USB connector is required before the unit will operate normally. Connections and driver installation (Windows) ■ Installing the driver (Windows Me) * If you are using a Windows 2000 machine, refer to p. 9, if Windows 98, refer to p. 9. 1. Turn on the power of your computer and start up Windows, and use a USB cable to connect the UA-3 to your computer. 2. When Windows detects the UA-3 and the Add New Hardware Wizard dialog box appears, make sure “Automatic search for a better driver (Recommended)” is selected, then click [Next]. Some time may be required until this dialog box appears DEUTSCH ENGLISH 3. The search for the driver starts. 4. When the correct driver is found, driver installation starts. 5. When a dialog box informing you that driver installation has finished appears, click [Finish], and restart Windows. After installing the driver, refer to Specifying the audio input/output device (p. 12) and select the device Windows uses. * Depending on your computing setup, there may be a short wait after the driver is installed until the device is recognized. * FRANÇAIS ■ Installing the driver (Windows 2000) If you are using a Windows Me machine, refer to p. 9, if Windows 98, refer to p. 9. 1. Turn on the power of your computer and start up Windows. 2. Use a USB cable to connect the UA-3 to your computer. The UA-3 is recognized to the computer and the driver is installed all automatically. 3. After installing the driver, restart Windows. * ESPAÑOL ■ Installing the driver (Windows 98) If you are using a Windows Me machine, refer to p. 9, if Windows 2000, refer to p. 9. Installation must be performed in the order of the USB Composite Device driver, USB Human Interface Device driver, and then the USB Audio Device driver. Use the following procedure to perform the installation. 1. Turn on the power of your computer and start up Windows. Insert the Microsoft Windows CD-ROM into your CD-ROM drive, and use a USB cable to connect the UA-3 to your computer (p. 8). UA-3 ITALIANO Since some computers are sold with the contents of the Microsoft Windows CD-ROM already in the hard disk, a Microsoft Windows CD-ROM may not have been included. If this is the case, you will be able to install the driver without the Microsoft Windows CD-ROM 9 Connections and driver installation (Windows) A USB Composite Device will be detected automatically, and the Add New Hardware Wizard dialog box will appear. Click [Next]. If this dialog box does not appear, refer to Problems related to the USB driver (p. 21) 2. When the display asks “What do you want Windows to do?”, select “Search for the best driver for your device. (Recommended).” and click [Next]. 3. The following dialog box will appear. Check CD-ROM drive, and click [Next]. 4. The following dialog box will appear. Click [Next]. * Depending on your system, the Location of driver may differ from the above illustration, but this is not a problem. 5. Copying of the file (Driver) will begin. If the Microsoft Windows CD-ROM is not inserted in the CD-ROM drive, the following dialog box may appear. If this occurs, insert the Microsoft Windows CD-ROM into the CD-ROM drive, and click [OK]. 10 Connections and driver installation (Windows) 6. When installation of the USB Composite Device driver is finished, the following dialog box will appear. Click [Finish]. 7. Then, the USB Human Interface Device will automatically be detected, and the Add New Hardware Wizard dialog box will appear. Click [Next], and continue the installation using the very same procedure as steps 2-5 (p. 10-10). ENGLISH In step 4, the screen will indicate “Windows driver file search for the device : USB Human Interface Device.” DEUTSCH 8. When installation of the USB Human Interface Device driver is finished, the following dialog box will appear. Click [Finish]. FRANÇAIS 9. Next, a USB Audio Device will be detected automatically, and the Add New Hardware Wizard dialog box will appear. Click [Next], and continue the installation using the very same procedure as in steps 2-5 (p.10-10). In step 4, the screen will indicate “Windows driver file search for the device : USB Audio Device.” ITALIANO ESPAÑOL 10. When installation of the USB Audio Device driver is finished, the following dialog box will appear. Click [Finish]. This completes installation of the USB Composite Device driver, the USB Human Interface Device driver, and the USB Audio Device driver. Restart Windows. After installing the driver, refer to Specifying the audio input/output device (p. 12) and select the device Windows uses. UA-3 11 Connections and driver installation (Windows) ■ Specifying the audio input/output device 1. Click the Windows [Start] button, and select [Settings] - [Control Panel]. 2. Win 98 / Win 98SE In Control Panel, double-click the [Multimedia] icon to open the Multimedia Properties dialog box. Win 2000 / Me In Control Panel, double-click the [Sounds and Multimedia] icon to open the Sounds and Multimedia Properties dialog box. * If you don’t find a [Sounds and Multimedia] icon, then in Control Panel, click [view all Control Panel options]. 3. Click the [Audio] tab. 4. For the Playback item Preferred device, click select it. . In the list that appears, click [USB Audio Device] to 5. For the Recording item Preferred device, click . In the list that appears, click [USB Audio Device] to select it. Windows 98 / Windows 98SE Windows 2000 /Windows Me • Depending on your system, “USB Audio Device” will be shown a number added, ex. “USB Audio Device (1).” • It will not be possible to press the “Advanced Properties” button for “Recording.” 6. Click [OK] to complete the settings. Volume Control settings The output volume of the UA-3 can be controlled by the Windows Volume Control. 1. Click the Windows [Start] button, and select [Programs] - [Accessories] - [Entertainment] - [Volume Control] to start it up. Windows Me Windows 2000/ Windows 98/Windows 98SE 12 Connections and driver installation (Windows) 2. You can raise or lower the slider to adjust the volume of the UA-3. The following items can be set. USB Audio (Speaker) Adjust the volume of the analog outputs (line output and headphone output). The digital output will not change.1 WAVE Adjust the volume that is output from the audio output device “USB Audio Device.” The digital output and analog output will change. SW Synth Adjust the volume of the software synthesizer built into Windows. CD Player Adjust the “CD Music” volume for the CD-ROM drive of your computer.2 ENGLISH 1. Depending on the version of Windows, this may be displayed as “Analog connector”. 2. If the playback of the CD does not change when you adjust this volume, change the WAVE volume. ESPAÑOL FRANÇAIS DEUTSCH • If Volume Control is not installed on your computer, use Add/ Remove Applications in the Control Panel to install it. For details on installation, refer to the Windows owner’s manual or Help. • If Mute is checked, or if the slider is in the lowest position, no sound will be output from the UA-3. • If you are using Windows 2000 and “CD Player” does not appear, check the [Digital CD playback] item “Enable digital CD audio for this CD-ROM device,” as described in the following note. • When using your computer’s CD-ROM drive to play an audio CD, or when playing background music for games with the UA-3 If using Windows Me: Select [Start]-[Settings]-[Control Panel]. In the [Control Panel], double-click the [System] icon to access the System Properties dialog box. Click the [Device Manager] tab, and double-click the [CDROM] icon. Below it, double-click the CD-ROM drive that you are using and open its Properties. Click the [Properties] tab, and select the check box located beside the Digital CD playback item “Enable digital CD audio for this CD-ROM device.” If using Windows 2000 In the same way as for Windows Me, open the System Properties dialog box. Click the [Hardware tab], and click the [Device Manager] button to open the Device Manager. From the CD-ROM drives, doubleclick the CD-ROM drive that you are using to open its Properties. Click the [Properties] tab, and select the check box located beside the Digital CD playback item “Enable digital CD audio for this CD-ROM device.” If using Windows 98 or Windows 98 SE: Select [Start] - [Settings] - [Control Panel] - [Multimedia], then click on the [CD Music] tab, then check “Enable CD digital audio for this CD-ROM device.” Depending on your computing environment, playback of these CDs may still be impossible. For details, refer to information provided by your computer’s manufacturer. If you are using a PC-card (PCMCIA) type CD-ROM drive, playing back WAVE data or an audio CD on the CD-ROM drive may cause the sound to be interrupted, or no sound may be heard at all. • The audio quality of the UA-3 will be better if you raise the Volume Control levels. Checking for sound output After the connections have been made correctly, you can play back the sample data to check your setup. ■ Playing the sample data ITALIANO Here we will use standard Windows functionality to play the sample data. The sample data is found in the AUDIO Capture CD-ROM. Insert the CD-ROM into the CD-ROM drive of your computer. 1. Copy “Alright(.wav)” to the desktop by dragging it from the “Sample_Data” folder of the CD-ROM. In order to listen to the sample data, you will need approximately 30MB of free space on the hard disk where Windows installed. UA-3 13 Connections and driver installation (Windows) 2. Right-click the copied file “Alright(.wav)”, and select [Play] or [Properties] from the menu that appears. 3. Click the [Preview] tab, and then click the The sample data will begin playing. button. When the Recording input select switch is set to DIGITAL, it is not possible to play back audio data from your computer. Set the switch to INPUT + GUITAR/MIC. Did you hear the sample data? If the sample data played correctly, your computer and the UA-3 are connected correctly, and the drivers have been installed correctly. If the data did not play correctly, refer to Troubleshooting (p. 21). Troubleshooting contains material to help you find and correct such problems. This completes all connections and driver installation for the UA-3. Deleting the USB Audio Device driver The explanation provided here is for an average Windows system. Depending on your computer, some of the folder names may be different. ■ If re-installing the USB Audio Device driver ■ If installation of the USB Audio Device driver was terminated before completion Use the following procedure to delete the driver that is already installed. 1. Use a USB cable to connect the UA-3 to your computer. 2. Click the Windows [Start] button, and select [Settings] - [Control Panel]. 3. In [Control Panel], double-click [System] to open the System Properties dialog. 4. Click the [Device Manager] tab. 5. Double-click [Sound, video and game controllers] to see a list of the devices. 6. From the list, select USB Audio Device, and click [Remove]. In the Confirm Device Removal dialog box, click [OK]. If USB Audio Device is not displayed, proceed to step 8. 7. Make sure that USB Audio Device is not in the Sound, video and game controllers list, and click [Close] to close the System Properties dialog. 8. Follow the steps 1. – 4. again, and double-click [Universal Serial Bus controllers] to display the list of devices. If is displayed for the USB-compatible device icon: Select the [USB Composite Device] icon, and click [Remove]. In the Confirm Device Removal dialog box, click [OK]. As in the step 7., close System Properties. If there is no USB-compatible device icon, or if is not displayed: Simply close System Properties. If you are using Windows Me and Simply close System Properties. 14 is displayed: Connections and driver installation (Windows) 9. Disconnect the USB cable from your computer, and restart Windows. If a dialog box suggesting that you restart Windows appears at this point, follow the suggestion and restart your computer. Basic operation of the D-Out Smoother ■ What is the D-Out Smoother? When audio is played back to a digital device such as MD or DAT connected to the digital output of the UA-3, a certain amount of time is required for the audio output to be locked immediately after audio playback, so that there may be no sound for one or two seconds, or the pitch or tempo may become incorrect. The D-Out Smoother is software that allows the audio to be played smoothly in such situations. ENGLISH ■ Installing the D-Out Smoother In this explanation we are assuming that your CD-ROM drive is drive E:, but the drive name may be different depending on your computer. If the drive name is different on your computer, input the appropriate drive name. You can check the drive name of your CD-ROM drive by double-clicking the My Computer icon. DEUTSCH 1. Insert the AUDIO Capture CD-ROM into your CD-ROM drive. 2. Click the Windows [Start] button, and select [Run...]. 3. In the Open: text box, input “E:\UA_Util\Setup.exe” and click [OK]. Alternatively, click [Browse], select the file [Setup(.exe)] located in the UA_Util folder of the CD-ROM drive, and click [Open]. 4. The installer will start up, and the Choose Setup Language dialog box will appear. Specify whether you are using the “English (United States)” or “Japanese” version of Windows, and click [OK]. 5. Perform the remainder of the installation as directed by the instructions that appear on-screen. 6. When installation is completed, the Setup Complete dialog box will appear. Click [Finish]. This completes installation of the D-Out Smoother. ■ Starting the D-Out Smoother FRANÇAIS The Setting dialog box will appear at the first time when you start up. Make sure that the Wave-Out Device shows “USB Audio Device,” and click [OK]. If two or more USB audio devices are displayed, refer to Using the D-Out Smoother (p. 15), and specify the correct device. ESPAÑOL 1. Connect the UA-3 to the USB connector of your computer. 2. Click the Windows [Start] button, and in the [Programs] menu, click [D-Out Smoother]. 3. The D-Out Smoother will start up. In some cases it may display“Cannot find USB Audio Device. Check USB cable or select USB Audio Device again.” when starting. If this occurs, the computer has not correctly detected the UA 3. It is possible that the UA-3 is not connected correctly, or that the driver has not been installed correctly. Refer to Connections and driver installation (Windows) (p. 8) and check these points. ■ Using the D-Out Smoother The D-Out Smoother has an “ON/OFF” switch and a “TEST” button. “ON/OFF” switch Normally, you will leave this “ON” when using the digital output of the UA-3. Turn this “OFF” when connecting or disconnecting the UA-3. UA-3 ITALIANO “TEST” button Click the [TEST] button. If the test audio is heard, the D-Out Smoother is operating for that device. When using two or more USB Audio Devices such as the UA-3 or MA-150U, use this button to select the UA-3 for which the D-Out Smoother will operate. Use the following procedure to make your selection. 15 Connections and driver installation (Windows) 1. From the D-Out Smoother [Control] menu, select [Setting] to access the Setting dialog box. (This dialog box will appear automatically the first time the software is started up.) 2. From the pull-down menu, select “USB Audio Device” and click [OK]. 3. Click the [TEST] button, and check whether or not the test audio is heard. If the audio is heard, the D-Out Smoother is operating for that device. If the audio is not heard, select a different USB Audio Device in step 2, and repeat steps 1 through 3. Convenient Features • When [Register to STARTUP] is checked in the Setting dialog, D-Out Smoother will automatically start up when you start up the computer. • When [Minimize window when starting up] is checked in the Setting dialog, D-Out Smoother will minimize itself immediately after it starts up, allowing you to use your computer’s screen more effectively. ■ Deleting (uninstalling) the D-Out Smoother The D-Out Smoother supports the Windows Add/Remove Programs Properties function. You can use the following procedure to remove the program if it becomes unnecessary. If you uninstall D-Out Smoother, you should firstly uncheck the [Register to STARTUP] in the Setting dialog. You can go to the Setting dialog by selecting [Control] - [Setting]. (p. 25) 1. Click the Windows [Start] button, and select [Settings] - [Control Panel]. 2. In [Control Panel], double-click [Add/Remove Programs] to open the Add/Remove Programs Properties dialog box. 3. Click the [Install/Uninstall] tab. 4. From the list in the dialog box, click the name of the application that you wish to delete. 5. Click [Add/Remove]. The application you specified in step 4 will be deleted. 16 Connections and driver installation (Macintosh) Connections and driver installation (Macintosh) * If you are a Windows user, refer to p. 8. In order to use the UA-3, you must first install a driver. UA-3 uses a driver included with Mac OS. What is a driver? -> p. 8 Making connections and installing the driver ■ Making connections (943) ENGLISH Always make sure to have the volume level turned down before connecting the UA-3. Even with the volume all the way down, you may still hear some sound when the power is switched on, but this is normal, and does not indicate a malfunction. (921) To prevent malfunction and/or damage to speakers or other devices, always turn down the volume, and turn off the power of all devices before making any connections. (It is not necessary to turn off the power of your computer.) Use a USB cable to connect the UA-3 to your computer before turning on the power of your audio equipment. Computer Stereo Set Powered Speaker etc. USB port USB cable * Connect after starting up the computer LINE OUT USB port • Before disconnecting the USB cable or restarting Macintosh, please close all applications. You should also turn down the volume of any audio or amp system that is connected. • This unit is equipped with a protection circuit. A brief interval (a few seconds) after connecting a USB connector is required before the unit will operate normally. FRANÇAIS Audio cable DEUTSCH LINE IN, AUX IN Stereo Headphones UA-3 ESPAÑOL ■ Getting the unit to be recognized 1. Turn on the power of your computer and start up Mac OS. 2. From the Apple menu, select the [Apple System Profiler]. ITALIANO • To prevent damage to your speakers, turn down the volume on this unit, and on any audio devices you may have connected. • Make sure to quit all applications that may be running before you make the connection. 3. Click the [Devices and Volumes] tab control. 4. Use a USB cable to connect the UA-3 to your computer. UA-3 17 Connections and driver installation (Macintosh) 5. To make sure it is successfully recognized, select [Update all information] from the [Commands] menu. You should see the following three audio devices in the USB section, as shown below: If the indication is correct, the installation of the UA-3 driver is successful. Select [Quit] from the [File] menu to close the Apple System Profiler dialog, then make the sound settings explained below. If the indication is incorrect, you should try disconnecting the UA-3 from the USB port, and waiting about ten seconds. Then, do the procedure over again, starting from the step 4. ■ Making the sound settings 6. From the Apple menu, select [Control Panels] - [Sound] to open the Sound dialog. 7. Click the [Speakers] tab. 8. Turn down the volume on the UA-3, and on your audio equipment, then click [Start Test]. 9. Test sounds are output from left to right, along with what appears on the screen; adjust the volume using the [Main Volume] bar. When you are finished, click [Stop Test]. If the Recording input select switch is set to DIGITAL, it is not possible to play back audio data from your computer. Set the switch to INPUT + GUITAR/MIC. Depend on the your OS version, there is no [Main Volume] bar. In that case, use the [Volume] bar in the [Output] to adjust the volume. 18 Connections and driver installation (Macintosh) 10. Select [Input] from the Sound dialog. Then, in Choose a source for sound input:, choose USB Audio. • If you don’t see USB Audio, you should close the Sound dialog. Then, disconnect the UA-3, and wait about ten seconds. Then, try doing the procedure over again, starting at number 2. • Do not check [Play sound through output device]. 11. When you have finished making settings, select [Quit] from the [File] menu to close the Sound dialog. • • • • • Some applications such as Cakewalk’s Metro Series and TC Work’s Spark Series cannot record/playback at 48 kHz. Please use the UA-3 at 44.1 kHz. While the audio application is recording or playing, do not connect/disconnect the USB cable, or move the Recording input select switch. Doing so may cause the application to freeze. You may hear sound hopping and/or noise when you record and play back at the same time due to high load on the CPU. However, the noise should not be in the recording itself. Such noise should only be found in the playback signal. If you are going to use the Virtual Sound Canvas 3, you will need to select [Performance] from the [Setting] menu, and set the Expression Mode to Response Priority. The standard driver that comes with Mac OS is not ASIO compatible. When you start up your computer with the UA-3 connected, the computer may become unstable. If this occurs, start up your computer before connecting the UA-3, and connect the UA-3 after start-up. DEUTSCH • ENGLISH Known issues: UA-3 Checking for sound output FRANÇAIS After the connections have been made correctly, you can play back the sample data to check your setup. ■ Playing the sample data Here we will use standard Macintosh functionality to play the sample data. The sample data is found in the AUDIO Capture CD-ROM. Insert the CD-ROM into the CD-ROM drive of your computer. ESPAÑOL In order to listen to the sample data, you will need approximately 30MB of free space on the hard disk that contains your system. ITALIANO 1. Copy “Alright” to the desktop by dragging it from the “Sample_Data” folder of the CD-ROM. 2. Launch QuickTime Player, which is provided with the Mac OS. The QuickTime Player is normally located in the QuickTime folder within the Applications folder of your hard disk. UA-3 19 Connections and driver installation (Macintosh) 3. From the [File] menu, select [Open Movie], select the copied file “Alright,” and click [Convert] to open it. 4. Click the playback button. The sample data will begin playing. If the Recording input select switch is set to DIGITAL, it is not possible to play back audio data from your computer. Set the switch to INPUT + GUITAR/MIC. Did you hear the sample data? If the sample data played correctly, your computer and the UA-3 are connected correctly, and the drivers have been installed correctly. If the data did not play correctly, refer to Troubleshooting (p. 21). Troubleshooting contains material to help you find and correct such problems. This completes all connections and driver installation for the UA-3. 20 Troubleshooting Troubleshooting If an unexpected problem occurs while using the UA-3, please read this chapter first. It provides numerous hints that will help you solve problems. The problems covered in the troubleshooting section are organized according to the operating system on which the problem might be encountered. Use the icon shown at the left of the title to find the information you need. Problems common to both Windows and Macintosh Problems that occur only on Windows Problems that occur only on Macintosh ENGLISH If you are using computer for the first time, or do not understand the explanation of a procedure, refer to the owner’s manuals for your computer or for OS. If the UA-3 does not operate as you expect, check the following points. Problems related to the USB driver “Add New Hardware Wizard” does not start up automatically “Add New Hardware Wizard” terminates before completion • • • • DEUTSCH • When the USB cable is connected or disconnected, approximately 15 seconds (or more) may be required for the UA-3 to be recognized. Is the USB cable connected correctly? Make sure that the UA-3 and computer are connected correctly by the USB cable. Can USB be used on your computer? Refer to the owner’s manual for your computer, and make sure that it is able to use USB. Does your computer or USB hub have sufficient power supply capacity? The UA-3 cannot be connected if insufficient power is supplied to it. Check whether one of the following cases apply. If you are using the UA-3 with a notebook computer that is running on its battery, operation may be unreliable with some models of computer. If this is the case, connect the AC adaptor to your notebook computer. The power conservation mode of your computer may limit the power that is supplied to USB. Check the settings of your computer. In some cases, the UA-3 cannot be used with a bus-powered hub (a hub that does not contain a power supply). Please use a self-powered hub (a hub that contains a power supply). Does your computer meet the USB specifications? If you are using a computer that does not meet the USB specifications (such as a homemade computer), operation may be unstable. In such cases, you may be able to solve the problem by connecting a USB hub that contains a power supply. Is “Unknown Device” displayed for “Other devices” or “Universal Serial Bus controllers”? Use the following procedure to delete “Unknown Device” from “Other devices” (Universal serial bus controller), and re-start your computer. FRANÇAIS • In order to check whether or not the “Unknown Device” is the UA-3, disconnect the USB cable of the UA-3, and verify that “Unknown Device” has disappeared. Then connect the UA-3 once again, and delete “Unknown Device.” In the Windows Control Panel, double-click [System] to open the System Properties dialog box. Click the [Device Manager] tab. Double-click [Other devices] (Universal Serial Bus controllers) to see the list of devices. In the list, select Unknown Device and click [Remove]. In the Confirm Device Removal dialog box, click [OK]. Make sure that the list does not show Other devices or Unknown Device, and click [Close] to close the dialog box. ESPAÑOL 1. 2. 3. 4. 5. 6. The “Add New Hardware Wizard” dialog box appears even though you installed the drivers UA-3 ITALIANO If your computer or USB hub has two or more USB connectors, connecting the UA-3 to a USB connector to which the UA-3 has never before been connected may cause the Add New Hardware Wizard dialog box will appear even though the drivers have already been installed. Install the drivers once again as described in Connections and driver installation (Windows) (p. 8). This is not a malfunction. 21 Troubleshooting Drivers are not installed correctly Use the procedure described in Deleting the USB Audio Device driver (p. 14) to delete the USB Audio Device driver installed in your computer, and install the UA-3 drivers once again as described in Connections and driver installation (Windows) (p. 8). Check whether there is an item named “Unknown Device” in “Other devices” or in “Universal Serial Bus controllers.” If you find “Unknown Device,” delete it. A dialog box saying “Unknown Device found” appears, and I can’t install the driver Depending on your computer, not all of the Windows 98 files required to support audio over USB may have been installed when the computer was shipped. Please check with the manufacturer of your computer. Problems when using the UA-3 OS becomes unstable • Starting up a computer when the UA-3 is already connected may cause the computer to become unstable. If this occurs, start up the computer with the UA-3 disconnected, and then connect the UA-3. ■ No sound • Is the UA-3’s Recording input select switch set to “INPUT + GUITAR/MIC”? When the Recording input select switch is set to “DIGITAL,” the audio signals input to the digital Input connector are output. The computer’s audio data is not output. • Is a digital device such as an MD connected to the digital output of the UA-3? Depending on your application, playing audio with a digital device such as an MD connected to the digital output of the UA-3 may cause a certain amount of time to be required for the digital audio output to be locked immediately after playback, so that there will be no sound for one or two seconds. If this occurs, you can use the D-Out Smoother software from the included CD-ROM to make audio play smoothly. For details, refer to Basic operation of the D-Out Smoother (p. 15). • Are you attempting to use the CD player of your computer to play an audio CD? If you wish to play an audio CD on the CD-ROM drive of your computer, refer to When using your computer’s CD-ROM drive to play an audio CD, or when playing background music for games with the UA-3 (p. 13). • Are you running multiple applications? If multiple applications are running simultaneously, an error message may appear. If this occurs, click [OK], and close the other applications. Even if an application window is closed, it is still running if it remains in the taskbar, so be sure to quit any unneeded applications shown in the taskbar. • Have you specified the audio data output destination for OS? The audio data output destination for a computer must be set to UA-3. For details on this setting, refer to Specifying the audio input/ output device (Windows p. 12) or Making the sound settings (Macintosh p. 18). • Have you specified the audio data output destination for your playback software? For some software such as Cool Edit Pro LE, you must set the audio data output destination as UA-3. For details on this setting, refer to the owner’s manual for the software. • Have the drivers been installed correctly? In order to playback audio data using the UA-3, the USB Audio Device driver must be installed. For details on installation and settings, refer to Connections and driver installation (Windows p. 8, Macintosh p. 17). • Are the various Volume Control faders raised? Adjust the volume of each fader as described in Volume Control settings (Windows p. 12) or Making the sound settings (Macintosh p. 18). ■ Sound is distorted • Does the peak indicator light red? If you are inputting sound from the line input jacks, use the Line input adjustment slider of the UA-3 to reduce the input level. If you are inputting sound from the Guitar or Mic input jacks, use the Guitar/Mic input adjustment slider to reduce the input level. Also, the number of LED’s in the output level indicator will change according to the output level of the UA-3. If the red LED lights, use the line output volume to lower the volume. The volume level of the instrument connected to LINE IN is too low. • • Could you be using a connection cable that contains a resistor? Use a connection cable that does not contain a resistor. Is the Line Input adjustment slider (p. 7) raised appropriately? ■ Noise is heard when playing back audio • Is a mic still connected? If a mic is connected to the UA-3, use the Guitar/Mic input adjustment slider to lower the input level. 22 Troubleshooting • The graphic accelerator of your computer may cause noise to occur during audio playback. Use the following procedure to set graphic acceleration to “None.” 1. In the Windows Control Panel, double-click [Display] to open the Display Properties dialog box, and click the [Settings] tab. 2. Click [Advanced] to open properties, and click the [Performance] tab. 3. In Graphics, move the Hardware acceleration: slider to None, and click [OK]. 4. In the Display Properties dialog box, click [OK] to close the dialog box. Then restart your computer. • Noise is heard in the line input or mic input If a MIDI sound module and the UA-3 are connected via USB to the same computer, and the output of the MIDI sound module is connected to the line input jacks of the UA-3, noise from the computer may enter via the MIDI sound module and be heard from the UA-3. In such cases, use a self-powered hub to connect the MIDI sound module and the UA-3 in parallel, or connect the MIDI sound module via the serial interface or MIDI interface. • Noise may be heard if you record and play back simultaneously. If you record and play back simultaneously, the playback may be interrupted depending on the performance of the system, and this may be heard as noise. However since priority is given to recording, the recorded data will not be lost. • This problem may be solved by properly grounding the chassis of your computer, or the ground prong of the plug on the AC power cord that was supplied with your computer. Also, make sure that there are no devices nearby that emit a strong magnetic field, such as a television or a microwave oven. ENGLISH • Are a large number of audio devices connected? If a large number of audio devices are connected, noise may occur. Do not connect audio devices that you are not using. ■ Sound is interrupted during audio playback * 2. 3. In the Windows Control Panel, double-click [System] to open the System Properties dialog box, and click the [Device Manager] tab. Double-click [Disk drives] to see the list of devices. From the list, select GENERIC IDE DISK TYPExx, and click [Properties] to access the GENERIC IDE DISK TYPExx Properties dialog box. * 4. The “xx” in GENERIC IDE DISK TYPExx will be a number that will differ depending on your system. Click the [Settings] tab, check the [DMA] check box in the Options, and click [OK] to close the dialog box. * 5. The following settings may not exist on your computer. FRANÇAIS 1. DEUTSCH • Try increasing the memory You can increase the processing power of your computer by adding more memory. For details on adding memory, refer to the owner’s manual for your computer. • Does your computer fulfill the USB specifications? The audio may be interrupted if you are using a computer that does not electrically meet the USB specifications. In this case, the problem may be solved if you connect a USB hub that contains its own power supply. • Are numerous applications running? If you use numerous applications during playback, or start up another application, the playback may be interrupted depending on your computer system. Exit all unneeded applications, and try again. If this does not solve the problem, try restarting a computer. • Try making the following changes to the disk drive settings. Depending on your system, a dialog box for DMA settings may appear. After checking the contents, click OK or Cancel. In the System Properties dialog box, click [OK] to close the dialog box. Restart your computer so that the above settings will take effect. ■ Audio playback stops ITALIANO ESPAÑOL • On some computers, the Power Management settings in the Control Panel may cause audio playback to stop. The Power Management Properties that are displayed when you double-click Power Management will differ depending on your computer system. One example is given below, but you should consult the owner’s manual for your computer as well. Some computers may not have the following settings. 1. In the Windows Control Panel, double-click [System] to open the System Properties dialog box, and click the [Device Manager] tab. 2. Double-click [System devices] to see the list of devices. 3. From the list, select [Advanced Power Management support], and click [Properties] to access the Advanced Power Management support properties dialog box. 4. Click the [Settings] tab, and in Troubleshooting, check the [Disable power status polling] check box. Then click [OK]. 5. In the System Properties dialog box, click [OK] to close the dialog box. 6. Restart Windows. UA-3 23 Troubleshooting Digitally recorded sound is distorted, pitch changes or contains noise • • • If you are using a long digital cable, noise may occur or the sound may be distorted when it is connected. Use digital cables that are one meter (about a yard) or shorter. Does the sampling frequency setting in the application match the sampling frequency of the digital device connected to the digital input connector? When using digital recording, it is not possible to record in monaural. Set your recording software to the “stereo” setting. Noise is present in the recorded sound • • • It has been found that noise tends to be introduced in sound recorded on the iMac series models, which were released after the summer of 2000. In the SimpleSound application that is included with MacOS, noise will be heard in the sound if it is played back immediately after being digitally recorded. Save the sound first, then try playing it back. Update the USB Audio driver to 1.0.5f4. If the USB Audio driver, which is provided with the Mac OS, is under 1.0.4, update it to 1.0.5f4. You can download the driver from the URL below: http://asu.info.apple.com/swupdates.nsf/artnum/n11703 Checking the USB audio driver’s version 1. 2. 3. 4. 5. Connect the UA-3 to the computer. From the Apple menu, select [Apple System Profiler]. Click the [Devices and Volumes] tab. In the USB section, the screen will indicate “Audio (UA-3 USB Audio Device).” Click the arrow at the left of this text. The number displayed to the right of “Driver version” is the version of the USB audio driver. ■ A blank (silent) file is created when you record • Try setting the bit rate to “16bit.” If you are using Windows98 Second Edition, and your recording software is set to a bit rate of 8 bits, a blank file may be created, so that you may not be able to record effectively. If this occurs, you will be able to record correctly by setting the bit rate to “16 bit”. • Data that contains the SCMS flag cannot be recorded digitally. The UA-3 supports SCMS (p. 5), so that if SCMS-flagged data (such as data from an MD that was digitally copied from a commercial music CD) is input to the digital connector, the UA-3 will not be able to record this on the computer. (The sound will be output from the line output jacks and the headphone jack.) Cannot record digitally • • • • Is the Recording input select switch set to “DIGITAL”? Is the application set to the same sampling frequency as that of the digital device connected to the digital input connector? Recording will no longer be possible if you switch the sampling frequency (for example, between digital broadcast A mode and B mode) of a device while it remains connected to the digital input connectors. When switching the sampling frequency, you need to disconnect, then reconnect the digital cable. It is not possible to record digital data of a format other than consumer digital audio device format. Cannot Record Music CD • The UA-3 cannot record music CDs in the computer’s CD-ROM drive with CoolEdit Pro LE or other programs. To record music CDs in the computer’s CD-ROM drive, you need to first select your computer’s sound card as the audio device (Waveform Record) that is to be used for recording by CoolEdit Pro LE (or the application you are using), then you can proceed with recording. When recording a music CD with a sound card, uncheck “Enable digital CD audio for this CD-ROM device” you checked in When using your computer’s CD-ROM drive to play an audio CD, or when playing background music for games with the UA-3 (p. 13). The volume changed when you resumed from Suspend or Hibernation status • When Windows 2000 resumes from Suspend or Hibernation, the output volume setting is changed due to a problem of Windows. Start up the Mixer application as described in Volume Control settings (p. 12), and adjust the USB Audio (Speaker) slider. Game background music does not sound • Does the game use an audio CD for background music? If an audio CD is used to provide background music for the game, refer to When using your computer’s CD-ROM drive to play an audio CD, or when playing background music for games with the UA-3 (p. 13). Problems common to software in general Can’t install • • • 24 Is the included CD-ROM inserted into the CD-ROM drive of your computer? During installation, were the CD-ROM drive name and the installation file name input correctly? Is there sufficient space on your hard disk? Troubleshooting Increase the free space on your hard disk. Delete unneeded files (move them to the Recycle Bin), and then right-click on the Recycle Bin and select Empty Recycle Bin. Alternatively, you can add another hard disk to your system. For details on installing a hard disk, refer to the owner’s manuals for your computer and for Windows. • Were other applications running when you performed the installation? Exit all applications, and perform the installation again. Can’t start up an application • Are numerous applications running? It may be that there is not enough memory to start up another application. Close all unneeded applications, and then start up the new application. If an error is still displayed, try restarting your computer. An error is displayed when you start up an application • If multiple applications are started up simultaneously, an error message may appear. If this occurs, click [OK], and close all unnecessary applications. Even if an application window has been closed, the application is still running if it remains in the taskbar. Be sure to close any unnecessary application that appears in the taskbar. If you are using Cakewalk Pro Audio, you must be sure that the sampling frequency of Cakewalk Pro Audio is set to 44.1kHz. On Cakewalk ProAudio 7, 8, and 9, the sampling frequency can be set as follows. ENGLISH • [Tools] - [Audio options] - [Settings] - [Default sampling rate] An Application hangs up DEUTSCH FRANÇAIS • When using digital music software for digital recording with the UA-3’s recording input switch set to DIGITAL, be absolutely sure that a digital device is connected. Although in certain applications, Windows limitations may render the operation of the mouse or other such devices inactive until a digital device is connected, this does not indicate any malfunction. If no action results from the use of the mouse or other such devices, then reconnect the digital device. Confirm occurrence of the above with the following applications (current as of January, 2001). •Logic Audio 3.0 or 4.0 During Recording •Cubase VST 3.7 During Startup/Recording/Playback •Cubase ASIO Multimedia Setup During Testing Confirm that the events or conditions above do not occur with the following applications. •Cakewalk Pro Audio 7, 8, and 9 •CoolEditProLE •SoundRecorder (Bundled with Windows98) A shortcut error appears when starting up Windows If you uninstall the D-Out Smoother with the Register to STARTUP checked (p. 16), the following error message will appear when you start up Windows. In this case, click [NO] to close the message. ITALIANO ESPAÑOL Use the following procedure to delete this message. 1. Click the Windows [Start] button, and select [Settings] - [Taskbar & Start Menu]. 2. Click the [Start Menu Programs] tab, then click [Remove]. 3. Select [Programs] - [StartUp] - [SmoothDo], and click [Remove]. UA-3 25 Sie müssen diesen Abschnitt lesen, bevor Sie Digitalaufnahmen erstellen Unberechtigte Aufzeichnung, Vertrieb, Verkauf, Verleih, öffentliche Aufführung, Ausstrahlung oder Sendung o. ä. (musikalische Komposition, Video-Aufzeichnungen, Ausstrahlung, öffentliche Aufführung oder ähnliches) ganz oder in Teilen eines Werks, dessen Urheberrechte bei Dritten liegen, ist gesetzlich verboten. Beim Austausch von Audiosignalen über einen digitalen Anschluss mit einem externen Instrument kann dieses Gerät Aufnahmen vornehmen, die den Beschränkungen des Serial Copy Management System (SCMS) teilweise nicht unterliegen. Der Grund hierfür ist, dass das Gerät ausschließlich für die Musikproduktion vorgesehen ist und so entwickelt wurde, dass es keinen Beschränkungen unterliegt, sofern es für die Aufnahme von Werken (wie z.B. Ihre eigenen Kompositionen) verwendet wird, die die Urheberrechte Dritter nicht verletzen. (SCMS ist ein Merkmal, das das Kopieren in der zweiten Generation und später über einen digitalen Anschluss verhindert). Dieses Merkmal wird in MD-Recorder und andere Digitalaudio-Consumer-Geräte als Urheberschutzvorrichtung integriert. Über das UA-3 Die teilweise SCMS-Unterstützung des UA-3 funktioniert nur bei digitalen Signalen, die aus externen Geräten eingespeist werden. Wenn z.B. von einem MD-Gerät Daten mit SCMS-Attributen eingespeist werden, die von einer kommerziellen Musik-CD kopiert wurden, funktioniert das UA-3 wie folgt: Wenn die Einspeisung via Digitaleingabe-Anschluss des UA-3 erfolgt: • Das UA-3 kann diese Daten nicht auf Ihrem Computer aufnehmen. • Der Sound wird aus den analogen Ausgängen (Line-Ausgangsbuchsen, Kopfhörerbuchse) sowie aus dem Digitalausgabe-Anschluss ausgegeben. Wenn die Einspeisung via Analogeingänge des UA-3 (Line-Eingangsbuchsen) erfolgt: • Normale Aufnahme ist möglich Unabhängig davon, ob das SCMS-Attribut vorhanden ist, die Daten, die am DigitaleingabeAnschluss des UA-3 empfangen werden, werden stets direkt aus dem Digitalausgabe-Anschluss ausgegeben. Verwenden Sie dieses Gerät nicht für Zwecke, die die Urheberrechte eines Dritten verletzen könnten. Roland übernimmt keinerlei Verantwortung für etwaige Verletzungen der Urheberrechte Dritter, die infolge der Benutzung dieses Geräts entstehen könnten. Dieses Gerät unterstützt keine Digitalaudio-Signale, die für Funkstation-Digitalaudio-Geräte formatiert wurden. Das UA-3 funktioniert nur entsprechend SCMS, wenn die digitalen Signale von einem externen Gerät eingespeist werden. Den Digitalaudio-Signalen, die vom UA-3 ausgegeben werden, werden keine SCMS-Flags hinzugefügt. 26 Einführung Einführung Überprüfen Sie den Verpackungsinhalt Das UA-3 enthält folgende Artikel. Wenn Sie die Verpackung öffnen, stellen Sie zuerst sicher, dass alle Artikel vorhanden sind. Wenn Teile fehlen, nehmen Sie mit dem Händler Kontakt auf, bei dem Sie das UA-3 erworben haben. UA-3 USB-Kabel Mit diesem Kabel schließen Sie das UA-3 an den USB-Anschluss Ihres Computers an. Einzelheiten zur Herstellung der Anschlüsse erhalten Sie unter Anschlüsse und Treiberinstallation (Windows S. 29, Macintosh S. 38). ENGLISH Verwenden Sie ausschließlich das beiliegende USB-Kabel. AUDIO Capture CD-ROM Diese CD-ROM enthält die für den Einsatz der UA-3 benötigte Software. Lesen Sie unbedingt die Datei Readme_E.txt, die sich auf der AUDIO Capture CD-ROM befindet. Alle aktualisierten Informationen sind in dieser Datei enthalten. DEUTSCH * • Bevor Sie die Verpackung der beiliegenden CD-ROM öffnen, müssen Sie die separate Lizenzvereinbarung lesen. • Fassen Sie die silbrige Aufnahmeoberfläche der CD-ROM nicht an und verkratzen Sie sie nicht. Wenn das geschieht, können die Daten nicht mehr korrekt gelesen werden. Wenn die CD-ROM verschmutzt ist, verwenden Sie einen im Handel erhältlichen CD-Reiniger für die Reinigung. • Spielen Sie die CD-ROM nicht auf einem konventionellen Audio-CD-Spieler ab. Dies führt zu einer hohen Lautstärke, die Ihre Ohren oder die Lautsprecher beschädigen könnten. Erste Schritte FRANÇAIS Dabei handelt es sich um das Dokument, das Sie gerade lesen. Halten Sie es bereit, um gegebenenfalls nachschlagen zu können. Lizenzvereinbarung Dieser Vertrag beschreibt die Bedingungen, unter denen Roland Corporation Ihnen die Verwendung der Software erlaubt. Sie müssen die Lizenzvereinbarung lesen, bevor Sie die CD-ROM-Verpackung öffnen. Folgende Komponenten müssen Sie selbst bereitstellen ITALIANO ESPAÑOL Externer Verstärker, Lautsprecher, Kopfhörer und Mikrofon sind nicht im Lieferumfang enthalten Externer Verstärker, Lautsprecher oder Kopfhörer, die für das Anhören der Soundausgabe via UA-3 benötigt werden, sind nicht im Lieferumfang enthalten. Ebenso fehlt ein Mikrofon für die Soundeingabe in das UA-3. Sie werden diese Komponenten selbst bereitstellen müssen. Kabel für die Digitaleingabe/Ausgabe zum Anschluss der MD- oder DAT-Recorder sind nicht im Lieferumfang enthalten Sie können für die Digitalaufnahme auch einen MD- oder DAT-Digitalrecorder verwenden, aber die Kabel für den Anschluss des Recorders an das UA-3 werden nicht mitgeliefert. Sie müssen diese Kabel selbst separat bereitstellen. UA-3 27 Einführung Teile des UA-3 und ihre Funktion 3 2 1 4 5 6 9 7 10 8 • Kondensator-Mikrofon Das UA-3 unterstützt kleine Multimedia-Mikrofone für das Hinzufügen von gesprochenen Kommentaren und ist mit monauralen Plug-In-Mikrofonen kompatibel. • Wenn Sie ausschließlich von den Line-Eingängen aus aufnehmen, entfernen Sie die Kabel von der Guitar-Eingangsbuchse und der Mic-Eingangsbuchse. 11 12 13 14 15 16 17 • Das UA-3 ist nicht mit den phantom-gespeisten Kondensator-Mikrofonen kompatibel, die typischerweise für Musik verwendet werden. Ebenso ist das UA-3 inkompatibel mit den Stereo-Mikrofonen, die manchmal mit MD-Geräten geliefert werden. • Sie können keine Computer-Audiodaten wiedergeben, wenn DIGITAL ausgewählt ist. 1 Mic-Eingangsbuchse 2 Line-Eingangsbuchsen 3 Line-Ausgangsbuchsen 4 Anschluss Digitaleingabe (optisch) 5 Anschluss Digitalausgabe (optisch) 6 USB-Anschluss 7 Mic Type-Auswahlschalter Setzen Sie diesen Schalter entsprechend dem Mikrofontyp, der mit der Mic-Eingangsbuchse verbunden ist Beim Anschluss eines dynamischen Mikrofons: “DYNAMIC” Beim Anschluss eines Kondensator-Mikrophons: “CONDENSER” 8 9 Recording Input-Auswahlschalter Wählt den Input aus, der für die Aufnahme verwendet werden wird. Digitaleingabe-Anschlüsse 4 : “DIGITAL” Mic-Eingangsbuchse 1 / Line Input-Buchse 2 / Guitar-Eingangsbuchse 14 1 . :“INPUT + GUITAR/MIC” USB-Anzeige Leuchtet auf, wenn das UA-3 angeschlossen ist und vom Computer erkannt wird. 10 Output-Pegel-Anzeige Die Anzahl der LEDs, die aufleuchten, ändert sich entsprechend dem Ausgabepegel der Kopfhörerbuchse 17 sowie der Line-Ausgangsbuchsen 3 . Wenn die rote LED leuchtet, verwenden Sie die Line OutputLautstärke 11 , um die Lautstärke zu reduzieren. 11 Line Output-Lautstärke Passt die Lautstärke an, die aus der Kopfhörer-Buchse 17 und den Line-Ausgangsbuchsen ausgegeben wird 3 . 12 Guitar/Mic-Input Peak-Anzeige Wenn die Eingangslautstärke aus der Guitar-Eingangsbuchse 14 und der Mic-Eingangsbuchse 1 zu hoch ist, leuchtet die Anzeige rot. Wenn die Anzeige rot leuchtet, verwenden Sie den Guitar/Mic-Input Schieberegler 13 , um die Eingangslautstärke zu reduzieren. 13 Guitar/Mic-Input Schieberegler Dieser Schieberegeler passt die Eingangslautstärke der Guitar-Eingangsbuchse buchse 1 an. 14 und der Mic-Eingangs- 14 Guitar-Eingangsbuchse 15 Line-Input Schieberegler Dieser Schieberegler passt die Eingangslautstärke der Line-Eingangsbuchsen 2 an. 16 Line Input Peak-Anzeige Wenn die Eingangslautstärke der Line-Eingangsbuchsen 2 zu hoch ist, leuchtet diese Anzeige rot. Wenn die Anzeige rot leuchtet, verwenden Sie den Line Input-Schieberegler, 15 um die Eingangslautstärke zu reduzieren. 17 Kopfhörer-Buchse An dieser Stelle können Kopfhörer angeschlossen werden. Auch bei angeschlossenen Kopfhörern wird Sound aus den Line-Ausgangsbuchsen ausgegeben 3 . * 28 Einzelheiten zur Verwendung jedes Steuerelements und Anschlusses finden Sie im UA-3 Application Guide (S. 110). Anschlüsse und Treiberinstallation (Windows) Anschlüsse und Treiberinstallation (Windows) * Wenn Sie ein Macintosh-Anwender sind, lesen Sie bitte S. 38. Bevor Sie das UA-3 benutzen können, müssen Sie nacheinander die Treiber USB Composite Device (USBGerät), USB Human Interface sowie USB Audio Device (USB-Audiogerät) installieren. Diese Treiber sind in Windows enthalten. Wenn Sie Windows 98 verwenden, befinden sich diese Treiber auf der Microsoft Windows CD-ROM, Sie sollten daher die Microsoft Windows CD-ROM bereithalten. Wenn Sie Windows Me oder 2000 einsetzen, ist die CD-ROM nicht erforderlich. Was ist ein Treiber? Anwendung • Das UA-3 kann unter Windows 95 oder Windows NT nicht verwendet werden. • Wenn noch andere Windows-Programme ausgeführt wer-den, sollten Sie diese beenden, bevor Sie Ihre Arbeit fortsetzen. • Wenn Sie mehrere Roland USB-Geräte gleichzeitig an Ihren Computer anschließen (z.B. das UA-3 und andere USB-Geräte, wie z.B. das UA100G), trennen Sie das UA-100G oder andere Geräte vom USBAnschluss, bevor Sie den Treiber installieren. Wenn Sie den Treiber installieren, während das UA-100G oder andere Geräte angeschlossen sind, wird die Installation eventuell nicht korrekt ausgeführt. USB-Anschluss USBTreiber USB-Kabel UA-3 Computer Anschlüsse und Treiberinstallation DEUTSCH Vor der Installation des Treibers ENGLISH Ein Treiber ist Software, die es einem Anwendungsprogramm, das auf Ihrem Computer installiert ist, erlaubt, Daten zum/vom UA-3 zu übertragen, wenn das Gerät an Ihren Computer via USB-Kabel angeschlossen ist. Der Treiber überträgt die Daten der Anwendung an das UA-3 sowie die Daten vom UA-3 an die Anwendung. ■ Anschluss der Geräte FRANÇAIS Achten Sie stets darauf, die Lautstärke zu reduzieren, bevor Sie das UA-3 anschließen. Selbst wenn die Lautstärke ganz zurückgedreht wurde, hören Sie eventuell Sound beim Einschalten der Geräte, aber dies ist normal und kein Hinweis auf eine Fehlfunktion. Um Fehlfunktionen und/oder Schäden an Lautsprechern oder anderen Geräten zu verhindern, reduzieren Sie stets die Lautstärke und schalten alle Geräte ab, bevor Sie die Verbindungen einrichten. (Es ist nicht erforderlich, den Computer vom Stromnetz zu trennen.) Verwenden Sie ein USB-Kabel, um das UA-3 an Ihren Computer anzuschließen, bevor Sie Ihre Audiogeräte einschalten. Computer Stereoanlage Lautsprecher etc. USBAnschluss LINE IN, AUX IN LINE OUT USBAnschluss ESPAÑOL USB-Kabel * Nach dem Start des Computers anschließen • Bevor Sie das USB-Kabel entfernen oder Windows neu starten, beenden Sie bitte alle Anwendungen. Sie sollten auch die Lautstärke aller angeschlossenen Audio- oder Verstärker-Systeme reduzieren. • Dieses Gerät ist mit einem Schutzschaltkreis ausgestattet. Nach dem Anschluss eines USBSteckers benötigt das Gerät eine kurze Zeitspanne (einige Sekunden), bis es den normalen Betrieb aufnimmt. ITALIANO AudioKabel StereoKopfhörer UA-3 UA-3 29 Anschlüsse und Treiberinstallation (Windows) ■ Installation des Treibers (Windows Me) * Wenn Sie Windows 2000 verwenden, lesen Sie bitte S. 30, wenn Sie Windows 98 verwenden, lesen Sie bitte S. 30. 1. Schalten Sie Ihren Computer ein und starten Sie Windows. Verwenden Sie ein USB-Kabel, um das UA-3 mit Ihrem Computer zu verbinden. 2. Wenn Windows das UA-3 erkennt und der Assistent Neue Hardware hinzufügen erscheint, achten Sie darauf, dass ”Automatisch nach dem besten Treiber suchen (Empfohlen)” ausgewählt ist und klicken anschließend auf [Weiter]. Es kann einige Zeit dauern, bis dieses Dialogfeld erscheint 3. Die Suche nach dem Treiber beginnt. 4. Sobald der richtige Treiber gefunden wurde, startet der Prozess der Treiberinstallation. 5. Wenn ein Dialogfeld erscheint, das Sie darüber informiert, dass die Treiberinstallation abgeschlossen ist, klicken Sie auf [Finish] (Beenden) und starten Windows neu. Nach der Treiberinstallation lesen Sie bitte Angabe des Audioeingabe/Ausgabegeräts (S. 33) und wählen das Gerät aus, das von Windows verwendet wird. * Abhängig von Ihrer Computerinstallation kann es etwas dauern, bis das Gerät erkannt wird, nachdem der Treiber installiert wurde. ■ Installation des Treibers (Windows 2000) * Wenn Sie Windows Me verwenden, lesen Sie bitte S. 30, wenn Sie Windows 98 verwenden, lesen Sie bitte S. 30. 1. Schalten Sie Ihren Computer ein und starten Sie Windows. 2. Schließen Sie das UA-3 an Ihren Computer mit einem USB-Kabel an. Das UA-3 wird vom Computer erkannt und der Treiber wird automatisch installiert. 3. Starten sie Windows neu, nachdem Sie den Treiber installiert haben. ■ Installation des Treibers (Windows 98) * Wenn Sie Windows Me verwenden, lesen Sie bitte S. 30, wenn Sie Windows 2000 verwenden, lesen Sie bitte S. 30. Die Installation muss in der Reihenfolge USB Composite Device (USB-Verbundgerät), USB Human Interface Device und USB Audio Device (USB-Audiogerät) erfolgen. Gehen Sie bei der Installation wie anschließend beschrieben vor. 1. Schalten Sie Ihren Computer ein und starten Sie Windows. Legen Sie die Microsoft Windows CD-ROM in Ihr CDROM-Laufwerk ein und verwenden Sie ein USB-Kabel, um das UA-3 an Ihren Computer anzuschließen (S. 29). Da einige Computer beim Kauf bereits den Inhalt der Microsoft Windows CD-ROM auf der Festplatte speichern, befindet sich die Microsoft Windows CD-ROM eventuell nicht im Lieferumfang. Wenn das der Fall ist, benötigen Sie für die Installation des Treibers keine Microsoft Windows CD-ROM. 30 Anschlüsse und Treiberinstallation (Windows) Das Gerät USB Composite Device (USB-Verbundgerät) wird automatisch erkannt, und das Dialogfeld (Hardware-Assistent) wird angezeigt. Klicken Sie auf [Weiter]. Wenn dieses Dialogfeld nicht angezeigt wird, lesen Sie bitte Probleme in Verbindung mit dem USB-Treiber (S. 42) ENGLISH 2. Wenn die Anzeige fragt, “Wie möchten Sie vorgehen?", wählen Sie ”Nach dem besten Treiber für das Gerät suchen. (Empfohlen)” Klicken Sie anschließend auf [Weiter]. DEUTSCH 3. Folgendes Dialogfeld wird angezeigt. Wählen Sie CD-ROMGerät, und klicken Sie anschließend auf [Weiter] . 4. Folgendes Dialogfeld wird angezeigt. Klicken Sie auf [Weiter]. FRANÇAIS Abhängig von Ihrem System kann sich die Position des Treibers von der obigen Abbildung unterscheiden, aber das ist kein Problem. ESPAÑOL * 5. Das Kopieren der Datei (Treiber) beginnt. ITALIANO Wenn sich die Microsoft Windows CD-ROM nicht im CD-ROM-Laufwerk befindet, wird eventuell folgendes Dialogfeld angezeigt. In diesem Fall legen Sie die Microsoft Windows CDROM in das CD-ROM-Laufwerk ein und klicken auf [OK]. UA-3 31 Anschlüsse und Treiberinstallation (Windows) 6. Sobald die Installation des Treibers USB Composite Device (USB-Verbundgerät) beendet ist, wird folgendes Dialogfeld angezeigt. Klicken Sie auf [Beenden]. 7. Anschließend wird das Gerät USB Human Interface Device automatisch erkannt, und das Dialogfeld (Hardware-Assistent) wird angezeigt. Klicken Sie auf [Weiter], und setzen Sie die Installation wie in den Schritten 2-5 beschrieben fort (S. 31-31). In Schritt 4, zeigt der Bildschirm die Meldung “Die Treiberdatei für folgendes Gerät wird gesucht: USB Human Interface Device.” 8. Sobald die Installation des Treibers USB Human Interface Device beendet ist, wird folgendes Dialogfeld angezeigt. Klicken Sie auf [Beenden] . 9. Anschließend wird das Gerät USB Audio Device (USBAudiogerät) automatisch erkannt, und das Dialogfeld (Hardware-Assistent) wird angezeigt. Klicken Sie auf [Weiter], und setzen Sie die Installation wie in den Schritten 2-5 beschrieben fort (S. 31-31). In Schritt 4, zeigt der Bildschirm die Meldung “Die Treiberdatei für folgendes Gerät wird gesucht: USB Audio Device.” 10. Sobald die Installation des Treibers USB Audio Device beendet ist, wird folgendes Dialogfeld angezeigt. Klicken Sie auf [Beenden] . Damit ist die Installation der Treiber USB Composite Device (USB-Verbundgerät), USB Human Interface Device und USB Audio Device (USB-Audiogerät) abgeschlossen. Starten Sie Windows neu. Nach der Treiberinstallation lesen Sie bitte Angabe des Audioeingabe/Ausgabegeräts (S. 33) und wählen das Gerät aus, das von Windows verwendet wird. 32 Anschlüsse und Treiberinstallation (Windows) ■ Angabe des Audioeingabe/Ausgabegeräts 1. Klicken Sie auf die Windows-Schaltfläche [Start] und wählen Sie[Einstellungen] - [Systemsteuerung]. 2. Win 98 / Win 98SE Doppelklicken Sie in der Systemsteuerung auf das Symbol [Multimedia], um das Dialogfeld Eigenschaften für Multimedia zu öffnen. Win 2000 / Me Doppelklicken Sie in der Systemsteuerung auf das Symbol [Sounds und Multimedia], um das Dialogfeld Eigenschaften für Sounds und Multimedia zu öffnen. * Wenn Sie kein Symbol [Sounds und Multimedia] sehen, klicken Sie in der Systemsteuerung auf [View all Control Panel Options] (Alle Optionen der Systemsteuerung anzeigen). 3. Klicken Sie auf die Registerkarte [Audio]. 4. Klicken Sie bei Wiedergabe unter Bevorzugtes Gerät auf [USB-Audiogerät], um dieses Gerät auszuwählen. . Klicken Sie in der angezeigten Liste auf ENGLISH 5. Klicken Sie bei Wiedergabe unter Bevorzugtes Gerät auf . Klicken Sie in der angezeigten Liste auf [USB-Audiogerät], um dieses Gerät auszuwählen. Windows 98 / Windows 98SE Windows 2000 /Windows Me DEUTSCH • Abhängig von Ihrem System wird “USB Audio Device” (USBAudiogerät) eine zusätzliche Ziffer anzeigen, z.B. “USB Audio Device.” • Es ist nicht möglich, auf die Schaltfläche “Erweitert” für “Aufnahme.” zu klicken. FRANÇAIS 6. Klicken Sie auf [OK], um die Konfiguration abzuschließen. Einstellung der Lautstärkeregelung ITALIANO ESPAÑOL Die Ausgabelautstärke des UA-3 kann mit der Lautstärkeregelung von Windows gesteuert werden. 1. Klicken Sie auf die Windows-Schaltfläche [Start] und wählen Sie [Programme] - [Zubehör] [Unterhaltungsmedien] - [Lautstärkeregelung], um die Lautstärkeregelung zu starten. Windows Me Windows 2000/ Windows 98/Windows 98SE UA-3 33 Anschlüsse und Treiberinstallation (Windows) 2. Sie können den Regler nach oben oder nach unten verschieben, um die Lautstärke des UA-3 anzupassen. Folgende Optionen können eingestellt werden. USB-Audio (Lautsprecher) Passt die Lautstärke der analogen Ausgänge an (Line Output und Kopfhörer-Ausgang). Die Digitalausgabe wird hiermit nicht verändert.1 WAVE Passen Sie die Lautstärke an, die vom AudioAusgabegerät “USB Audio Device” ausgegeben wird. Die Digitalausgabe und die analoge Ausgabe werden hiermit geändert. SW Synth Passt die Lautstärke des Software-Synthesizers an, der in Windows integriert ist. CD-Wiedergabe Passt die “CD-Musik”-Lautstärke des CD-ROM-Laufwerks Ihres Computers an.2 1. Abhängig von Ihrer Windows-Version kann dies als “Analoganschluss” angezeigt werden. 2. Wenn die Wiedergabe der CD durch die Anpassung der Lautstärke nicht verändert wird, ändern Sie die WAVE-Lautstärke. • Wenn die Lautstärkeregelung auf Ihrem Computer nicht installiert ist, verwenden Sie Anwendungen hinzufügen/entfernen in der Systemsteuerung, um sie zu installieren. Um Details zur Installation zu erhalten, lesen Sie bitte das Benutzerhandbuch für Windows oder rufen die Windows-Hilfe auf. • Wenn "Ton aus" aktiviert ist oder wenn der Schieberegler ganz unten ist, wird aus dem UA-3 kein Sound ausgegeben. • Wenn Sie mit Windows 2000 arbeiten und “CD-Player” nicht angezeigt wird, prüfen Sie die Option in [Digitale CDWiedergabe], ”Digitale CD-Wiedergabe für den CD-Player aktivieren,” wie im folgenden Hinweis beschrieben. • Wenn Sie das CD-ROM-Gerät Ihres Computers für das Abspielen einer Audio-CD verwenden oder wenn Sie Hintergrundmusik für Spiele mit dem UA-3 abspielen. Bei Verwendung von Windows Me: Wählen Sie [Start]-[Einstellungen]-[Systemsteuerung]. Doppelklicken Sie in der Systemsteuerung auf das Symbol [System], um das Dialogfeld Systemeigenschaften zu öffnen. Klicken Sie auf das Register [Geräte-Manager] und doppelklicken Sie auf das Symbol [CD-ROM]. Doppelklicken Sie auf das CD-ROM-Laufwerk unterhalb des Symbols, das Sie verwenden, und öffnen Sie dessen Eigenschaften. Klicken Sie auf das Register [Eigenschaften] und aktivieren Sie das Kontrollkästchen, das sich neben der Digitale CD-Wiedergabe-Option “ Digitale CD-Wiedergabe für den CD-Player aktivieren befindet.” Bei Verwendung von Windows 2000 Gehen Sie so vor, wie für Windows Me beschrieben. Öffnen Sie das Dialogfeld Systemeigenschaften. Klicken Sie auf die Registerkarte [Hardware] und klicken Sie anschließend auf [Geräte-Manager], um den Geräte-Manager zu öffnen. Doppelklicken Sie auf das CD-ROM-Laufwerk, das Sie verwenden, und öffnen Sie die Eigenschaften. Klicken Sie auf das Register [Eigenschaften] und aktivieren Sie das Kontrollkästchen, das sich neben der Digitale CD-Wiedergabe-Option “ Digitale CD-Wiedergabe für den CD-Player aktivieren befindet.” Wenn Sie Windows 98 oder Windows 98 SE verwenden: Wählen Sie [Start] - [Einstellungen] - [Systemsteuerung] - [Multimedia], anschließend klicken Sie auf das Register [Musik-CD] und aktivieren Sie “Digitales CD-Audio für dieses Gerät aktivieren.” Abhängig von Ihrer Computer-Umgebung kann es vorkommen, dass die Wiedergabe dieser CDs trotzdem nicht möglich ist. Einzelheiten finden Sie in den Informationen, die Ihr Computer-Hersteller anbietet. Wenn Sie ein CDROM-Gerät vom PC-Card-Typ (PCMCIA) verwenden, kann die Wiedergabe von WAVE-Daten oder einer Audio-CD auf dem CD-ROM-Gerät dazu führen, dass der Sound unterbrochen wird oder kein Sound erklingt. • Die Audioqualität des UA-3 wird besser, wenn Sie die Lautstärke-Pegel erhöhen. Überprüfung der Soundausgabe Nachdem die Verbindungen korrekt hergestellt wurden, können Sie die Beispieldaten wiedergeben, um Ihre Installation zu prüfen. ■ Abspielen der Beispieldaten In diesem Beispiel wird Standard-Windows-Funktionalität für die Wiedergabe der Beispieldaten verwendet. Sie finden die Beispieldaten auf der AUDIO Capture CD-ROM. Legen Sie die CD-ROM in das CD-ROM-Laufwerk Ihres Computers ein. 1. Kopieren Sie “Alright(.wav)” auf den Desktop, indem Sie die Datei aus dem Ordner “Sample_Data” der CDROM ziehen. 34 Anschlüsse und Treiberinstallation (Windows) Um die Beispieldaten anhören zu können, sind ca. 30 MB freier Speicherplatz am Installationsort von Windows auf der Festplatte erforderlich. 2. Klicken Sie mit der rechten Maustaste auf die kopierte Datei “Alright(.wav)” und wählen Sie [Wiedergabe] oder [Eigenschaften] aus dem Menü aus, das angezeigt wird. 3. Klicken Sie auf das Register [Vorschau] und klicken Sie anschließend ENGLISH auf die Schaltfläche . Die Beispieldaten werden nun abgespielt. DEUTSCH Wenn der Recording Input-Auswahlschalter auf DIGITAL gesetzt wird, ist es nicht möglich, Audiodaten von Ihrem Computer aus abzuspielen. Setzen Sie den Schalter auf INPUT + GUITAR/MIC. Haben Sie die Beispieldaten gehört? Wenn die Beispieldaten korrekt wiedergegeben wurden, wurden Ihr Computer und das UA-3 korrekt angeschlossen und die Treiber korrekt installiert. Wenn die Daten nicht richtig wiedergegeben wurden, lesen Sie bitte Fehlerbehebung (S. 42). Der Abschnitt zur Fehlerbehebung enthält Hinweise, die Ihnen dabei helfen, Probleme dieser Art zu finden und zu beheben. Damit ist die Herstellung des Anschlusses und die Treiberinstallation für das UA-3 abgeschlossen. FRANÇAIS Löschen des USB Audio Device-Treibers Die Erklärungen, die Sie an dieser Stelle finden, sind für ein durchschnittliches Windows-System vorgesehen. Abhängig von Ihrem Computer kann es vorkommen, dass einige der Ordnernamen anders lauten. ■ Bei Neuinstallation des USB Audio Device-Treibers ■ Wenn die Installation des USB Audio Device-Treibers vor dem Abschluss der Installation endete UA-3 ITALIANO ESPAÑOL Gehen Sie wie folgt vor, um den Treiber zu löschen, der bereits installiert ist. 1. Schließen Sie das UA-3 an Ihren Computer mit einem USB-Kabel an. 2. Klicken Sie auf die Windows-Schaltfläche [Start] und wählen Sie [Einstellungen] - [Systemsteuerung]. 3. Doppelklicken Sie in der [Systemsteuerung] auf das Symbol [System], um das Dialogfeld Systemeigenschaften zu öffnen. 4. Klicken Sie auf die Registerkarte [Geräte-Manager]. 5. Doppelklicken Sie auf [Audio-, Video und Gamecontroller], um eine Liste der Gerät zu erhalten. 6. Wählen Sie aus der Liste USB Audio Device (USB-Audiogerät) und klicken Sie auf [Entfernen]. Klicken Sie im Dialogfeld Entfernen des Geräts bestätigen auf [OK]. Wenn USB Audio Device (USB-Audiogerät) nicht angezeigt wird, arbeiten sie mit Schritt 8 weiter. 7. Stellen Sie sicher, dass USB Audio Device (USB-Audiogerät) sich nicht in der Liste Audio, Video und Gamecontroller befindet, und klicken Sie auf [Beenden], um den Dialog Systemeigenschaften zu schließen. 8. Folgen Sie erneut den Schritten 1. – 4. und doppelklicken Sie auf [Universal Serial Bus Controllers] (Universeller Serieller Buscontroller), um die Geräteliste anzuzeigen. Wenn als Symbol für das USB-kompatible Gerät angezeigt wird: Wählen Sie das Symbol [USB Composite Device] (USB-Verbundgerät) und klicken Sie auf [Entfernen]. Klicken Sie im Dialogfeld Entfernen des Geräts bestätigen auf [OK]. Wie in Schritt 7. schließen Sie nun die Sys35 Anschlüsse und Treiberinstallation (Windows) temeigenschaften. Wenn kein Symbol für ein USB-kompatibles Gerät vorhanden ist oder wenn Schließen Sie einfach die Systemeigenschaften. nicht angezeigt wird: Wenn Sie Windows Me verwenden und angezeigt wird: Schließen Sie einfach die Systemeigenschaften. 9. Trennen Sie das USB-Kabel von Ihrem Computer und starten Sie Windows neu. Wenn an diesem Punkt ein Dialogfeld angezeigt wird, das vorschlägt, Windows neu zu starten, folgen Sie dem Vorschlag und starten Ihren Computer neu. Grundlegende Bedienung des D-Out Smoother ■ Was ist der D-Out Smoother? Wenn Audio auf einem digitalen Gerät, wie z.B. einem MD- oder DAT-Gerät wiedergegeben wird, das an den Digitalausgang des UA-3 angeschlossen ist, wird eine bestimmte Zeitspanne für die Audioausgabe benötigt, da diese sofort nach der Audiowiedergabe gesperrt wird. Daher wird eventuell für ein bis zwei Sekunden kein Klang ausgegeben oder Pitch und Tempo entsprechen nicht den Erwartungen. Bei dem D-Out Smoother handelt es sich um Software, die in derartigen Situationen die problemlose Audiowiedergabe ermöglicht. ■ Installation des D-Out Smoother In dieser Erklärung gehen wir davon aus, dass Ihr CD-ROM-Gerät Laufwerk E: ist, aber der Laufwerkname kann abhängig von Ihrem Computer anders lauten. In diesem Fall geben Sie bitte den entsprechenden Laufwerknamen ein. Sie können den Laufwerknamen Ihres CDROM-Laufwerks prüfen, indem Sie auf das Symbol Arbeitsplatz doppelklicken. 1. Legen Sie die AUDIO Capture CD-ROM in Ihr CD-ROM-Laufwerk ein. 2. Klicken Sie auf die Windows-Schaltfläche [Start] und wählen Sie [Ausführen...]. 3. Geben Sie in das Textfeld Öffnen: “E:\UA_Util\Setup.exe” ein und klicken Sie auf [OK]. Alternativ klicken Sie auf [Durchsuchen], wählen die Datei [Setup(.exe)] im Ordner UA_Util des CD-ROM –Laufwerks und klicken anschließend auf [Öffnen]. 4. Das Installationsprogramm startet, und das Dialogfeld Choose Setup Language (Installationssprache wählen) wird angezeigt. Geben Sie an, ob Sie die englische Version “English (United States)” oder die deutsche Version ”German” von Windows verwenden und klicken Sie dann auf [OK]. 5. Führen Sie den Rest der Installation entsprechend den Instruktionen aus, die auf dem Bildschirm angezeigt werden. 6. Wenn die Installation abgeschlossen ist, wird das Dialogfeld Setup Complete angezeigt. Klicken Sie auf [Finish] (Beenden). Damit ist die Installation des D-Out Smoother abgeschlossen. ■ Starten des D-Out Smoother Das Dialogfeld Setting (Einstellungen) wird angezeigt, wenn Sie das Programm zum ersten Mal starten. Achten Sie darauf, dass das Wave-Out Device “USB Audio Device,” anzeigt und klicken Sie auf [OK]. Wenn zwei oder mehr USB-Audiogeräte angezeigt werden, informieren Sie sich bitte in Verwendung des D-Out Smoother (S. 36), und geben Sie das richtige Gerät an. 1. Schließen Sie das UA-3 an den USB-Anschluss Ihres Computers an. 2. Klicken Sie auf die Windows-Schaltfläche [Start] und anschließend im Menü [Programme] auf [D-Out Smoother]. 3. Der D-Out Smoother startet. In einigen Fällen wird die Meldung “Cannot find USB Audio Device. Check USB cable or select USB Audio Device again.” angezeigt (”USB Audio-Gerät kann nicht gefunden werden. Prüfen Sie das USB-Kabel oder wählen Sie das USB Audio Device erneut aus.”), wenn das Gerät gestartet wird. In diesem Fall hat der Computer das UA-3 nicht korrekt erkannt. Es ist möglich, dass das UA-3 nicht korrekt angeschlossen ist oder dass der Treiber nicht korrekt installiert wurde. Lesen Sie hierzu Anschlüsse und Treiberinstallation (Windows) (S. 29) und prüfen Sie diese Punkte. ■ Verwendung des D-Out Smoother Der D-Out Smoother verfügt über einen “ON/OFF”-Schalter und eine Schaltfläche ”TEST”. “ON/OFF”-Schalter Normalerweise lassen Sie diesen Schalter auf “ON” stehen, wenn Sie die Digitalausgabe des UA-3 verwenden. Stellen Sie den Schalter auf “OFF”, wenn Sie das UA-3 anschließen oder ausstecken. 36 Anschlüsse und Treiberinstallation (Windows) “TEST”-Schaltfläche Klicken Sie auf die Schaltfläche [TEST]. Wenn der Testton erklingt, funktioniert der D-Out Smoother bei diesem Gerät. Wenn Sie zwei oder mehr USB Audio Devices wie z.B. das UA-3 oder MA-150U verwenden, wählen Sie mit dieser Schaltfläche das UA-3, für den der D-Out Smoother konzipiert ist. Die Auswahl erfolgt wie anschließend beschrieben. 1. Wählen Sie im D-Out Smoother-Menü [Control] (Steuerung) den Punkt [Setting] (Einstellungen), um auf das Dialogfeld Setting zuzugreifen. (Dieses Dialogfeld erscheint automatisch, wenn die Software zum ersten Mal gestartet wird.) 2. Wählen Sie aus der Liste “USB Audio Device” und klicken Sie auf [OK]. 3. Klicken Sie auf die Schaltfläche [TEST] und prüfen Sie, ob der Testton zu hören ist. Wenn der Ton erklingt, funktioniert der D-Out Smoother für dieses Gerät. Wenn kein Ton erklingt, wählen Sie in Schritt 2 ein anderes USB-Audiogerät und wiederholen die Schritte 1 bis 3. Komfortable Funktionen ENGLISH • Wenn im Setting-Dialog [Register to STARTUP] (automatischer Start) aktiviert wird, startet der D-Out Smoother automatisch, wenn Sie den Computer starten. • Wenn im Setting-Dialog [Minimize window when starting up] (Fenster beim Starten minimieren) aktiviert ist, wird der D-Out Smoother sofort nach seinem Start minimiert und erlaubt Ihnen den effektiveren Einsatz Ihres Computerbildschirms. ■ Löschen (Deinstallation) des D-Out Smoother Der D-Out Smoother unterstützt die Windows-Funktion Eigenschaften von Software. Sie können das Programm wie folgt deinstallieren, wenn es nicht mehr benötigt wird. DEUTSCH Wenn Sie den D-Out Smoother deinstallieren, sollten Sie zuerst [Register to STARTUP] im Setting-Dialog deaktivieren. Sie gelangen in den Dialog Setting, indem Sie [Control] - [Setting] (Steuerung - Einstellungen) wählen. (S. 46) ITALIANO ESPAÑOL FRANÇAIS 1. Klicken Sie auf die Windows-Schaltfläche [Start] und wählen Sie [Einstellungen] - [Systemsteuerung]. 2. Doppelklicken Sie in der [Systemsteuerung] auf [Software], um das Dialogfeld Eigenschaften von Software zu öffnen. 3. Klicken Sie auf die Registerkarte [Installieren/Deinstallieren]. 4. Klicken Sie in der Liste im Dialogfeld auf den Namen der Anwendung, die Sie löschen möchten. 5. Klicken Sie auf [Hinzufügen/Entfernen]. Die Anwendung, die Sie in Schritt 4 angegeben haben, wird nun entfernt. UA-3 37 Anschlüsse und Treiberinstallation (Macintosh) Anschlüsse und Treiberinstallation (Macintosh) * Wenn Sie ein Windows-Anwender sind, lesen Sie bitte S. 29. Bevor Sie das UA-3 verwenden können, müssen Sie einen Treiber installieren. UA-3 benutzt einen Treiber, der im Mac OS enthalten ist. Was ist ein Treiber? -> S. 29 Anschlüsse und Treiberinstallation ■ Anschluss der Geräte (943) Achten Sie stets darauf, die Lautstärke zu reduzieren, bevor Sie das UA-3 anschließen. Selbst wenn die Lautstärke ganz zurückgedreht wurde, hören Sie eventuell Sound beim Einschalten der Geräte, aber dies ist normal und kein Hinweis auf eine Fehlfunktion. (921) Um Fehlfunktionen und/oder Schäden an Lautsprechern oder anderen Geräten zu verhindern, reduzieren Sie stets die Lautstärke und schalten alle Geräte ab, bevor Sie die Verbindungen einrichten. (Es ist nicht erforderlich, den Computer vom Stromnetz zu trennen.) Verwenden Sie ein USB-Kabel, um das UA-3 an Ihren Computer anzuschließen, bevor Sie Ihre Audiogeräte einschalten. Computer Stereoanlage Lautsprecher etc. USBAnschluss LINE IN, AUX IN AudioKabel USB-Kabel * Nach dem Start des Computers anschließen LINE OUT USBAnschluss • Bevor Sie das USB-Kabel entfernen oder den Macintosh neu starten, schließen Sie bitte alle Anwendungen. Sie sollten auch die Lautstärke aller angeschlossenen Audiooder Verstärker-Systeme reduzieren. • Dieses Gerät ist mit einem Schutzschaltkreis ausgestattet. Nach dem Anschluss eines USB-Steckers benötigt das Gerät eine kurze Zeitspanne (einige Sekunden), bis es den normalen Betrieb aufnimmt. StereoKopfhörer UA-3 ■ Erkennung des Geräts veranlassen 1. Schalten Sie Ihren Computer ein und starten Sie Mac OS. 2. Wählen Sie im Menü Apple die Option [Apple System Profiler]. • Um Schäden an Ihren Lautsprechern zu vermeiden, drehen Sie die Lautstärkeregelung dieses Geräts und aller angeschlossenen Audiogeräte zurück. • Achten Sie darauf, alle Anwendungen zu schließen, die ausgeführt werden, bevor Sie den Anschluss herstellen. 3. Klicken Sie auf die Registerkarte [Devices and Volumes]. 4. Schließen Sie das UA-3 an Ihren Computer mit einem USB-Kabel an. 38 Anschlüsse und Treiberinstallation (Macintosh) 5. Um sicherzustellen, dass das UA-3 erfolgreich erkannt wird, wählen Sie [Update all information] im Menü [Commands]. Sie sollten die folgenden drei Audio-Geräte im USB-Abschnitt sehen, wie unten gezeigt: Wenn die Anzeige korrekt ist, war die Installation des UA-3-Treibers erfolgreich. Wählen Sie [Quit] im Menü [File], um den Dialog Apple System Profiler zu schließen. Anschließend nehmen Sie die Soundeinstellungen vor wie unten beschrieben. Wenn die Anzeige nicht korrekt ist, sollten Sie versuchen, das UA-3 vom USB-Anschluss zu trennen und ca. zehn Minuten zu warten. Anschließend wiederholen Sie das Verfahren, beginnend mit Schritt 4. ■ Soundeinstellungen vornehmen DEUTSCH ENGLISH 6. Wählen Sie im Menü Apple die Optionen [Control Panels] [Sound], um den Dialog Sound zu öffnen. FRANÇAIS 7. Klicken Sie auf die Registerkarte [Speakers]. 8. Reduzieren Sie die Lautstärke des UA-3 und Ihrer Audiogeräte und klicken Sie anschließend auf [Start Test]. ESPAÑOL 9. Testsounds werden von links nach rechts - wie die Bildschirmanzeige ausgegeben. Passen Sie die Lautstärke mit der Leiste [Main Volume] an. Wenn Sie fertig sind, klicken Sie auf [Stop Test]. Wenn der Recording Input-Auswahlschalter auf DIGITAL gesetzt wird, ist es nicht möglich, Audiodaten von Ihrem Computer aus abzuspielen. Setzen Sie den Schalter auf INPUT + GUITAR/MIC. UA-3 ITALIANO Je nach OS-Version ist eventuell keine Leiste [Main Volume] vorhanden. Verwenden Sie in diesem Fall die Leiste [Volume] in [Output], um die Lautstärke anzupassen. 39 Anschlüsse und Treiberinstallation (Macintosh) 10. Wählen Sie [Input] im Dialog Sound. Anschließend wählen Sie in Choose a source for sound input:die Option USB Audio. • Wenn Sie USB Audio nicht sehen, sollten Sie den Dialog Sound schließen. Anschließend stecken Sie das UA-3 aus und warten ca. zehn Sekunden. Versuchen Sie danach, die Schritte erneut auszuführen, beginnend mit Schritt 2. • Aktivieren Sie nicht [Play sound through output device]. 11. Wenn Sie alle Einstellungen vorgenommen haben, wählen Sie [Quit] im Menü [File], um den Dialog Sound zu schließen. Bekannte Probleme: UA-3 • • • • • • Einige Anwendungen, wie z.B. Metro Series von Cakewalk und Spark Series von TC Work können Sound nicht mit 48 kHz aufnehmen/wiedergeben. Bitte verwenden Sie das UA-3 mit 44.1 kHz. Während die Audioanwendung aufnimmt oder Daten abspielt, schließen Sie das USB-Kabel nicht an und trennen Sie es nicht vom Anschluss oder betätigen den Recording Input-Auswahlschalter. Dies kann dazu führen, dass die Anwendung abstürzt. Sie hören eventuell Sound-Aussetzer und/oder Rauschen, wenn Sie gleichzeitig Sound aufnehmen und wiedergeben. Dies ist durch die hohe CPU-Auslastung bedingt. Das Rauschen sollte jedoch nicht in der Aufnahme selbst auftreten. Derartiges Rauschen sollte nur im Wiedergabesignal vorkommen. Wenn Sie den Einsatz von Virtual Sound Canvas 3 planen, müssen Sie die Option [Performance] im Menü [Setting] wählen und den Expression Mode auf Response Priority setzen. Der Standardtreiber, der mit Mac OS ausgeliefert wird, ist nicht ASIO-kompatibel. Wenn Sie Ihren Computer mit angeschlossenem UA-3 starten, wird der Computer eventuell instabil. Starten Sie den Computer in diesem Fall, bevor Sie das UA-3 anschließen, und verbinden Sie das UA-3 mit dem Computer nach dem Hochfahren. Überprüfung der Soundausgabe Nachdem die Verbindungen korrekt hergestellt wurden, können Sie die Beispieldaten wiedergeben, um Ihre Installation zu prüfen. ■ Abspielen der Beispieldaten In dieser Beschreibung wird Standard-Macintosh-Funktionalität für die Wiedergabe der Beispieldaten eingesetzt. Sie finden die Beispieldaten auf der AUDIO Capture CD-ROM. Legen Sie die CD-ROM in das CD-ROM-Laufwerk Ihres Computers ein. Um die Beispieldaten anhören zu können, sind ca. 30 MB freier Speicherplatz am Installationsort Ihres Systems auf der Festplatte erforderlich. 1. Kopieren Sie “Alright auf den Desktop, indem Sie die Datei aus dem Ordner “Sample_Data” der CD-ROM auf den Desktop ziehen. 2. Starten Sie den QuickTime Player, der mit Mac OS ausgeliefert wird. Der QuickTime Player befindet sich normalerweise im Ordner QuickTime des Ordners Applications auf Ihrer Festplatte. 40 Anschlüsse und Treiberinstallation (Macintosh) 3. Wählen Sie im Menü [File] die Option [Open Movie], wählen Sie die kopierte Datei “Alright,” und klicken Sie auf [Convert], um sie zu öffnen. 4. Klicken Sie auf den Wiedergabeschalter. Die Beispieldaten werden nun abgespielt. Wenn der Recording Input-Auswahlschalter auf DIGITAL gesetzt wird, ist es nicht möglich, Audiodaten von Ihrem Computer aus abzuspielen. Setzen Sie den Schalter auf INPUT + GUITAR/MIC. ENGLISH Haben Sie die Beispieldaten gehört? ITALIANO ESPAÑOL FRANÇAIS DEUTSCH Wenn die Beispieldaten korrekt wiedergegeben wurden, wurden Ihr Computer und das UA-3 korrekt angeschlossen und die Treiber korrekt installiert. Wenn die Daten nicht richtig wiedergegeben wurden, lesen Sie bitte Fehlerbehebung (S. 42). Der Abschnitt zur Fehlerbehebung enthält Hinweise, die Ihnen dabei helfen, Probleme dieser Art zu finden und zu korrigieren. Damit ist die Herstellung des Anschlusses und die Treiberinstallation für das UA-3 abgeschlossen. UA-3 41 Fehlerbehebung Fehlerbehebung Wenn während der Verwendung des UA-3 unerwartete Fehler auftreten, lesen Sie bitte zunächst dieses Kapitel. Es enthält eine Fülle von Hinweisen, die Ihnen bei der Lösung der Probleme helfen werden. Die Probleme, die vom Abschnitt Fehlerbehebung abgedeckt werden, sind nach den Betriebssystemen geordnet, unter denen das Problem eventuell auftreten kann. Verwenden Sie das Symbol links von der Überschrift, um die benötigten Informationen zu finden. Probleme, die sowohl unter Windows als auch auf dem Macintosh auftreten können Probleme, die nur unter Windows auftreten Probleme, die nur auf dem Macintosh auftreten Wenn Sie zum ersten Mal mit einem Computer arbeiten oder die Erklärung einer Vorgehensweise nicht verstehen, lesen Sie bitte im Benutzerhandbuch Ihres Computers oder Ihres Betriebssystems nach. Wenn das UA-3 nicht wie erwartet funktioniert, sollten Sie zuerst folgende Punkte prüfen. Probleme in Verbindung mit dem USB-Treiber “Hardware-Assistent” startet nicht automatisch “Hardware-Assistent” endet vor Installationsabschluss • • • • • • Wenn das USB-Kabel angeschlossen oder abgetrennt ist, dauert es ca. 15 Sekunden (oder mehr), bis das UA-3 erkannt wird. Ist das USB-Kabel richtig angeschlossen? Achten Sie darauf, dass das UA-3 und der Computer vorschriftsmäßig durch das USB-Kabel verbunden sind. Kann USB auf Ihrem Computer verwendet werden? Lesen Sie im Benutzerhandbuch Ihres Computers nach und stellen Sie sicher, dass der Computer USB verwenden kann. Verfügt Ihr Computer oder USB-Hub über ausreichende Stromversorgungskapazität? Das UA-3 kann nicht angeschlossen werden, wenn es nicht mit ausreichend Spannung versorgt wird. Prüfen Sie, ob einer der folgenden Fälle zutrifft. Wenn Sie das UA-3 mit einem Notebook verwenden, das sich im Batteriebetrieb befindet, funktionieren einige Computermodelle möglicherweise unzuverlässig. Wenn das der Fall ist, schließen Sie den AC-Adapter an Ihr Notebook an. Der Stromsparmodus Ihres Computers reduziert eventuell die Spannung, mit der der USB-Anschluss versorgt wird. Prüfen Sie die Einstellungen Ihres Computers. In einigen Fällen kann das UA-3 nicht mit einem bus-betriebenen Hub (ein Hub, der keine eigene Stromversorgung enthält) verwendet werden. Bitte verwenden Sie einen Hub mit selbstständiger Versorgung (einen Hub, der eine eigene Stromversorgung enthält). Entspricht Ihr Computer den USB-Spezifikationen? Wenn Sie einen Computer verwenden, der nicht den USB-Spezifikationen entspricht (wie z.B. ein selbstgebauter Computer), wird das Gerät eventuell instabil. In solchen Fällen können Sie das Problem möglicherweise lösen, indem Sie einen USB-Hub anschließen, der eine eigene Stromversorgung enthält. Wird “Unbekanntes Gerät” für ”andere Geräte” oder “Universal Serial Bus Controllers” angezeigt? Verwenden Sie folgendes Verfahren, um “Unknown Device” (Unbekanntes Gerät” aus “Other devices” (Andere Geräte) (Universal Serial Bus Controller) zu löschen und starten Sie anschließend den Computer neu. Um zu prüfen, ob es sich bei “Unbekanntes Gerät” um das UA-3 handelt, trennen Sie das USB-Kabel des UA-3 vom Anschluss und prüfen, ob “Unbekanntes Gerät” ausgeblendet wird. Anschließend verbinden Sie das UA-3 wieder mit dem Anschluss und löschen “Unbekanntes Gerät”. 1. 2. 3. 4. 5. 6. Doppelklicken Sie in der Systemsteuerung von Windows auf das Symbol [System], um das Dialogfeld Eigenschaften von System zu öffnen. Klicken Sie auf die Registerkarte [Geräte-Manager]. Doppelklicken Sie auf [Andere Geräte] (Universal Serial Bus controllers), um eine Liste der Geräte zu erhalten. Wählen Sie aus der Liste Unbekanntes Gerät und klicken Sie auf [Entfernen]. Klicken Sie im Dialogfeld Entfernen des Geräts bestätigen auf [OK]. Stellen Sie sicher, dass die Liste nicht Andere Geräte oder Unbekanntes Gerät enthält, und klicken Sie auf [Schließen], um das Dialogfeld zu schließen. Das Dialogfeld “Add New Hardware Wizard” (Assistent neue Hardware hinzufügen) wird angezeigt, obwohl Sie die Treiber installiert haben. Wenn Ihr Computer oder USB-Hub über zwei oder mehrere USB-Anschlüsse verfügt, kann der erste Anschluss des UA-3 an einen USBAnschluss dazu führen, dass das Dialogfeld Hardware-Assistent angezeigt wird, obwohl die Treiber bereits installiert wurden. Installieren Sie die Treiber erneut. Gehen Sie dabei vor wie in Anschlüsse und Treiberinstallation (Windows) (S. 29) beschrieben. Hierbei handelt es sich nicht um einen Fehler. 42 Fehlerbehebung Treiber wurden nicht korrekt installiert Verwenden Sie das Verfahren, das in Löschen des USB Audio Device-Treibers (S. 35) beschrieben wird, um den USB Audio DeviceTreiber zu löschen, der auf Ihrem Computer installiert ist, und installieren Sie die UA-3-Treiber erneut, wie in Anschlüsse und Treiberinstallation (Windows) (S. 29) beschrieben. Prüfen Sie, ob ein Gerät mit der Bezeichnung “Unknown Device” (Unbekanntes Gerät) in “Other devices” (Andere Geräte) oder in ”Universal Serial Bus controllers” vorhanden ist. Wenn Sie “Unbekanntes Gerät” finden, löschen Sie diesen Eintrag. Ein Dialogfeld mit den Angaben “Unbekanntes Gerät gefunden” wird angezeigt, und ich kann den Treiber nicht installieren Abhängig von Ihrem Computer wurden bei Auslieferung Ihres PCs eventuell nicht alle Windows 98-Dateien installiert, die für die Unterstützung von Audio über USB erforderlich sind. Bitte wenden Sie sich diesbezüglich an den Hersteller Ihres Computers. Probleme bei Verwendung des UA-3 Betriebssystem wird instabil Wenn Sie einen Computer bei bereits angeschlossenem UA-3 hochfahren, wird der Computer möglicherweise instabil. In diesem Fall fahren Sie den Computer bitte hoch, während das UA-3 nicht mit dem Computer verbunden ist, und schließen Sie das UA3 erst nach dem Hochfahren an. ENGLISH • ■ Kein Sound FRANÇAIS DEUTSCH • Wurde der Recording Input-Auswahlschalter des UA-3 auf “INPUT + GUITAR/MIC” gesetzt? Wenn der Recording Input-Auswahlschalter auf “DIGITAL” gestellt wird, werden die am Digitaleingabe-Anschluss eingespeisten Audiosignale ausgegeben. Die Audiodaten des Computers werden nicht ausgegeben. • Ist ein Digitalgerät, wie z.B. ein MD, an die Digitalausgabe des UA-3 angeschlossen? Abhängig von Ihrer Anwendung kann das Abspielen von Sound mit einem digitalen Gerät, wie z.B. MD, das an die Digitalausgabe des UA-3 angeschlossen ist, dazu führen, dass die Digitalaudioausgabe sofort nach der Wiedergabe einige Zeit lang gesperrt ist, so dass eine oder zwei Sekunden lang kein Sound erklingt. In diesem Fall können Sie die D-Out Smoother-Software auf der beiliegenden CD-ROM verwenden, um eine problemlose Audiowiedergabe zu erreichen. Einzelheiten hierzu finden Sie unter Grundlegende Bedienung des D-Out Smoother (S. 36). • Versuchen Sie, das CD-Gerät Ihres Computers für das Abspielen einer Audio-CD zu verwenden? Wenn Sie im CD-ROM-Laufwerk Ihres Computers eine Audio-CD abspielen möchten, lesen Sie bitte Wenn Sie das CD-ROM-Gerät Ihres Computers für das Abspielen einer Audio-CD verwenden oder wenn Sie Hintergrundmusik für Spiele mit dem UA-3 abspielen. (S. 34). • Werden mehrere Anwendungen ausgeführt? Wenn mehrere Anwendungen gleichzeitig ausgeführt werden, wird eventuell eine Fehlermeldung angezeigt. Klicken Sie in diesem Fall auf [OK], und schließen Sie die anderen Anwendungen. Auch bei geschlossenem Anwendungsfenster läuft die Anwendung noch, wenn sie sich in der Taskleiste befindet. Achten Sie daher darauf, alle nicht benötigten Anwendungen zu beenden, die in der Taskleiste angezeigt werden. • Haben Sie das Audiodaten-Ausgabeziel für das Betriebssystem angegeben? Als Audiodaten-Ausgabeziel für den Computer muss UA-3 angegeben werden. Details zu dieser Einstellung finden Sie unter Angabe des Audioeingabe/Ausgabegeräts (Windows S. 33) oder Soundeinstellungen vornehmen (Macintosh S. 39). • Haben Sie das Audiodaten-Ausgabeziel für Ihre Wiedergabesoftware angegeben? Bei einigen Anwendungen, wie z.B. Cool Edit Pro LE, müssen Sie als Audiodaten-Ausgabeziel UA-3 angeben. Einzelheiten zu dieser Einstellung finden Sie im Benutzerhandbuch der Software. • Wurden die Treiber richtig installiert? Bevor Sie mit dem UA-3 Audiodaten wiedergeben können, muss der USB Audio Device (USB-Audio-Gerät)-Treiber installiert werden. Einzelheiten zur Installation und zu den Einstellungen erhalten Sie unter Anschlüsse und Treiberinstallation (Windows S. 29, Macintosh S. 38). • Wurden die verschiedenen Lautstärke-Regler nach oben geschoben? Passen Sie die Lautstärke mit den Reglern an, wie in Einstellung der Lautstärkeregelung (Windows S. 33) oder Soundeinstellungen vornehmen (Macintosh S. 39) beschrieben. ESPAÑOL ■ Sound ist verzerrt. • Leuchtet die Peak-Anzeige rot? Wenn Sie Sound aus den Line-Eingangsbuchsen einspeisen, verwenden Sie den Line Input-Schieberegler des UA-3, um die Eingangslautstärke zu reduzieren. Wenn Sie Sound aus den Guitar- oder Mic-Eingangsbuchsen einspeisen, verwenden Sie den Guitar/ Mic-Input Schieberegler, um die Eingangslautstärke zu reduzieren. Ebenso wird sich die Anzahl der LEDs in der Output-PegelAnzeige entsprechend der Ausgabelautstärke des UA-3 ändern. Wenn die rote LED aufleuchtet, verwenden Sie die Line OutputLautstärke, um die Lautstärke zu reduzieren. Der Lautstärke-Pegel des Instruments, das an LINE IN angeschlossen ist, ist zu niedrig. • Benutzen Sie eventuell ein Anschlusskabel mit einen Widerstand? Verwenden Sie ein Anschlusskabel, das keinen Widerstand enthält. Wurde der Line Input-Schieberegler (S. 28) entsprechend nach oben geschoben? ITALIANO • ■ Das Abspielen von Sound wird von Rauschen gestört • Ist ein Mikrofon angeschlossen? Wenn ein Mikrofon an das UA-3 angeschlossen ist, verwenden Sie den Guitar/Mic-Schieberegler, um die Eingangslautstärke zu reduzieren. UA-3 43 Fehlerbehebung • Der Grafikbeschleuniger Ihres Computers kann Rauschen während der Audiowiedergabe verursachen. Um die Hardwarebeschleunigung auf “None” (Keine) einzustellen, gehen Sie wie folgt vor: 1. Doppelklicken Sie in Windows in der Systemsteuerung auf [Anzeige], um das Dialogfeld Eigenschaften von Anzeige zu öffnen, und klicken Sie auf die Registerkarte [Einstellungen]. 2. Klicken Sie auf [Erweitert], um die Eigenschaften zu öffnen, und klicken Sie auf die Registerkarte [Leistung]. 3. Grafik verschieben Sie den Regler Hardwarebeschleunigung auf Keine, und klicken Sie auf [OK]. 4. Klicken Sie im Dialogfeld Eigenschaften von Anzeige auf OK, um das Dialogfeld zu schließen. Starten Sie Ihren Computer anschließend erneut. • Im Line-Eingang oder Mic-Eingang ertönt Rauschen Wenn ein MIDI-Soundmodul und das UA-3 via USB an den gleichen Computer angeschlossen sind und die Ausgabe des MIDISoundmoduls mit den Line-Eingangsbuchsen des UA-3 verbunden ist, kann Rauschen vom Computer via MIDI-Soundmodul übertragen und vom UA-3 ausgegeben werden. In solchen Fällen verwenden Sie einen Hub mit selbständiger Stromversorgung, um das MIDISoundmodul und das UA-3 parallel anzuschließen, oder schließen Sie das MIDI-Soundmodul via serielle Schnittstelle oder MIDISchnittstelle an. • Rauschen kann auftreten, wenn Aufnahme und Wiedergabe gleichzeitig erfolgen. Wenn Sie gleichzeitig Daten aufnehmen und wiedergeben, wird die Wiedergabe möglicherweise abhängig von der Systemleistung unterbrochen. Dieser Effekt kann als Rauschen wahrgenommen werden. Da jedoch die Aufnahme Priorität erhält, gehen die aufgenommenen Daten nicht verloren. • Dieses Problem kann gelöst werden, indem das Gestell Ihres Computers ordnungsgemäß geerdet wird bzw. durch vorschriftsmäßige Erdung via Erdungsstift des Steckers im AC-Netzkabel, das mit Ihrem Computer mitgeliefert wurde. Stellen Sie auch sicher, dass sich keine Geräte in der Nähe befinden, die ein starkes magnetisches Feld ausstrahlen, wie z.B. ein Fernsehgerät oder ein Mikrowellenherd. • Ist eine große Anzahl von Audiogeräten angeschlossen? Wenn eine große Anzahl von Audiogeräten angeschlossen ist, kann Rauschen auftreten. Schließen Sie keine Audiogeräte an, die Sie nicht verwenden. ■ Der Sound wird während der Audiowiedergabe unterbrochen. • Versuchen Sie, den Speicher zu erhöhen Sie können die Verarbeitungsleistung Ihres Computers verbessern, indem Sie zusätzlichen Speicher einbauen. Detaillierte Informationen zum Hinzufügen von Speicher finden Sie im Benutzerhandbuch Ihres Computers. • Erfüllt Ihr Computer die USB-Anforderungen? Der Sound kann unterbrochen werden, wenn Sie einen Computer verwenden, der in Bezug auf Elektrik nicht die USB-Anforderungen erfüllt. In diesem Fall kann das Problem gelöst werden, wenn Sie einen USB-Hub anschließen, der eine eigene Stromversorgung enthält. • Werden mehrere Anwendungen ausgeführt? Wenn Sie während der Wiedergabe mit mehreren Anwendungen arbeiten oder eine weitere Anwendung starten, wird die Wiedergabe eventuell auf bestimmten Computersystemen unterbrochen. Schließen Sie alle nicht benötigten Anwendungen und versuchen Sie es erneut. Wenn das Problem damit nicht gelöst wird, versuchen Sie, den Computer neu zu starten. • Versuchen Sie, folgende Änderungen an den Laufwerkeinstellungen vorzunehmen. * 1. 2. 3. Doppelklicken Sie in Windows in der Systemsteuerung auf [System], um das Dialogfeld Eigenschaften von System zu öffnen, und klicken Sie auf die Registerkarte [Geräte-Manager]. Doppelklicken Sie auf Laufwerke, um eine Liste der Laufwerke anzuzeigen. Wählen Sie GENERIC IDE DISK TYPExx aus der Liste, und klicken Sie auf [Eigenschaften], um das Dialogfeld Eigenschaften von GENERIC IDE DISK TYPExx anzuzeigen. * 4. Das “xx” in GENERIC IDE DISK TYPExx steht für eine Nummer, die jeweils von Ihrem System abhängt. Klicken Sie auf die Registerkarte [Einstellungen], markieren Sie das Kontrollkästchen [DMA] unter Optionen, und klicken Sie auf [OK], um das Dialogfeld zu schließen. * 5. Die nachfolgend genannten Einstellungen sind möglicherweise auf Ihrem Computer nicht vorhanden. Abhängig von Ihrem System kann ein Dialogfeld für die DMA-Einstellungen angezeigt werden. Nachdem Sie den Inhalt des Felds geprüft haben, klicken Sie auf OK oder Abbrechen. Klicken Sie im Dialogfeld Eigenschaften von System auf [OK], um das Dialogfeld zu schließen. Starten Sie Ihren Computer neu, so dass die obigen Einstellungen übernommen werden. ■ Audiowiedergabe stoppt • Auf einigen Computern können die Energieverwaltungseinstellungen in der Systemsteuerung dazu führen, dass die Wiedergabe stoppt. Die Energieverwaltungseinstellungen, die angezeigt werden, wenn Sie auf Energieverwaltung klicken, sind je nach PC-System unterschiedlich. Ein Beispiel für die Einstellungen erhalten Sie untenstehend, aber Sie sollten zusätzlich im Handbuch Ihres Computers nachschlagen. Einige Computer sind eventuell nicht so konfiguriert, wie nachfolgend beschrieben wird. 1. Doppelklicken Sie in Windows in der Systemsteuerung auf [System], um das Dialogfeld Eigenschaften von System zu öffnen, und klicken Sie auf die Registerkarte [Geräte-Manager]. 2. Doppelklicken Sie auf [Systemgeräte] , um eine Liste der Geräte anzuzeigen. 3. Wählen Sie aus dieser Liste [Unterstützung für Advanced Power Management], und klicken Sie auf [Eigenschaften], um das Dialogfeld Eigenschaften der Unterstützung für Advanced Power Management anzuzeigen. 4. Klicken Sie auf die Registerkarte [Einstellungen] und aktivieren Sie in Fehlerbehebung das Kontrollkästchen [Stromstatusabfrage deaktivieren] . Klicken Sie anschließend auf [OK]. 5. Klicken Sie im Dialogfeld Eigenschaften von System auf [OK], um das Dialogfeld zu schließen. 6. Starten Sie Windows neu. 44 Fehlerbehebung Digital aufgenommener Sound ist verzerrt, die Tonhöhe ändert sich oder enthält Rauschen • • • Wenn Sie ein langes Digitalkabel verwenden, kann Rauschen auftreten oder der Sound wird verzerrt, wenn das Kabel angeschlossen wird. Verwenden Sie Digitalkabel mit einer Länge von einem Meter oder kürzer. Entspricht die Sampling-Frequenz-Einstellung in der Anwendung der Sampling-Frequenz des Digitalgeräts, das mit dem Digitaleingabe-Anschluss verbunden ist? Bei Digitalaufnahmen sind monaurale Aufnahmen nicht möglich. Stellen Sie Ihre Aufnahmesoftware auf “Stereo”. Im aufgenommenen Sound ist Rauschen zu hören • • • Die Erfahrung zeigt, dass Rauschen bei Sound auftreten kann, der auf den Computermodellen der iMac-Serie aufgenommen wurde, die nach dem Sommer 2000 auf den Markt kamen. In der SimpleSound-Anwendung, die im MacOS enthalten ist, erklingt Rauschen im Ton, wenn der Sound sofort nach einer digitalen Aufnahme wiedergegeben wird. Speichern Sie den Sound zuerst und versuchen Sie anschließend die Wiedergabe erneut. Aktualisieren Sie den USB Audio-Treiber auf 1.0.5f4. Wenn eine USB Audio-Treiberversion vor 1.0.4 mit dem Mac OS mitgeliefert wurde, sollten Sie den Treiber auf 1.0.5f4 aktualisieren. Sie können den Treiber von dieser URL herunterladen: http://asu.info.apple.com/swupdates.nsf/artnum/n11703 Prüfung der USB Audio-Treiberversion ENGLISH Schließen Sie das UA-3 an den Computer an. Wählen Sie im Menü Apple die Option [Apple System Profiler]. Klicken Sie auf die Registerkarte [Devices and Volumes]. Der Bildschirm zeigt im USB-Abschnitt “Audio (UA-3 USB Audio Device) an.” Klicken Sie auf den Pfeil links von diesem Text. Die Nummer, die rechts von“Driver version” angezeigt wird, ist die Version des USB Audio-Treibers. ■ Eine leere (stumme) Datei wird bei der Aufnahme erstellt DEUTSCH • Versuchen Sie, die Bitrate auf “16bit” einzustellen. Wenn Sie Windows 98 Second Edition verwenden und Ihre Aufnahmesoftware auf eine Bitrate von 8 Bit eingestellt wurde, wird eventuell eine leere Datei erstellt und Sie können keine Aufnahmen erstellen. In diesem Fall wird eine korrekte Aufnahme möglich, wenn Sie die Bitrate auf “16 bit” setzen. • Daten, die das SCMS-Attribut enthalten, können nicht digital aufgenommen werden. Das UA-3 unterstützt SCMS (S. 26). Das bedeutet, dass das UA-3 bei der Einspeisung von Daten mit SCMS-Attribut (z.B. Daten von einem MD-Gerät, die von einer kommerziellen Musik-CD digitalkopiert wurden) über den Digitalanschluss nicht in der Lage ist, diese Daten auf dem Computer aufzuzeichnen. (Der Sound wird von den Line-Ausgangsbuchsen und aus der Kopfhörer-Buchse ausgegeben.) Digitalaufnahme nicht möglich • • Wurde der Recording Input-Auswahlschalter auf “DIGITAL” gesetzt? Wurde die Anwendung auf die gleiche Sampling-Frequenz eingestellt wie das Digitalgerät, das mit dem Digitaleingabe-Anschluss verbunden ist? Aufnahmen sind nicht mehr möglich, wenn Sie die Sampling-Frequenz (z.B. zwischen Digital Broadcast A-Modus und B-Modus) eines Geräts umschalten, während das Gerät mit den Digitaleingabe-Anschlüssen verbunden ist. Wenn die Sampling-Frequenz umgeschaltet wird, müssen Sie das Digitalkabel ausstecken und anschließend erneut anschließen. Es ist nicht möglich, Digitaldaten in einem anderen Format als Consumer Digital Audio Device aufzunehmen. FRANÇAIS • • Musik-CD-Aufnahme nicht möglich • Das UA-3 kann mit CoolEdit Pro LE oder anderen Programmen keine Musik-CDs im CD-ROM-Laufwerk des Computers aufnehmen. Um Musik-CDs im CD-ROM-Laufwerk des Computers aufzunehmen, müssen Sie zuerst die Soundkarte Ihres Computers als audio device (Audio-Gerät) (Waveform Record) auswählen. Dieses Gerät wird von CoolEdit Pro LE (oder der von Ihnen benutzten Anwendung) für die Aufnahme verwendet. Anschließend können Sie die Aufnahme beginnen. Wenn Sie eine Musik-CD mit einer Soundkarte aufnehmen, deaktivieren Sie “Enable digital CD audio for this CD-ROM device (Digitales CD-Audio für dieses Gerät aktivieren)”. Diese Option wurde aktiviert in Wenn Sie das CD-ROM-Gerät Ihres Computers für das Abspielen einer Audio-CD verwenden oder wenn Sie Hintergrundmusik für Spiele mit dem UA-3 abspielen. (S. 34). Das Laufwerk veränderte sich nach der Rückkehr vom Standby-Modus oder Ruhezustand • Wenn Windows 2000 vom Standby-Modus oder Ruhezustand zurückkehrt, ändern sich die Einstellungen des Ausgabelaufwerks aufgrund eines Windowsproblems. Starten Sie die Mixer-Anwendung wie in Einstellung der Lautstärkeregelung (S. 33) beschrieben, und passen Sie den Regler USB Audio (Speaker) (USB Audio – Lautsprecher) entsprechend an. ESPAÑOL 1. 2. 3. 4. 5. Hintergrundmusik bei Spielen wird nicht ausgegeben Verwendet das Spiel eine Audio-CD für die Hintergrundmusik? Wenn eine Audio-CD verwendet wird, um Hintergrundmusik für das Spiel abzuspielen, lesen Sie bitte Wenn Sie das CD-ROM-Gerät Ihres Computers für das Abspielen einer Audio-CD verwenden oder wenn Sie Hintergrundmusik für Spiele mit dem UA-3 abspielen. (S. 34). ITALIANO • Typische Softwareprobleme Installation nicht möglich • • • UA-3 Befindet sich die beigelegte CD-ROM im CD-ROM-Laufwerk Ihres Computers? Wurden der CD-ROM-Laufwerknamen und der Installationsdateinamen während der Installation korrekt angegeben? Ist genügend Platz auf der Festplatte frei? 45 Fehlerbehebung Erhöhen Sie den freien Plattenspeicher auf Ihrer Festplatte. Löschen Sie alle nicht benötigten Dateien (verschieben Sie sie in den Papierkorb). Klicken Sie anschließend mit der rechten Maustaste auf den Papierkorb und wählen Sie die Option Papierkorb leeren. Als Alternative können Sie auch Ihrem System eine weitere Festplatte hinzufügen. Detaillierte Informationen zur Installation von Festplatten finden Sie im Benutzerhandbuch für Ihren Computer und für Windows. • Wurden andere Anwendungen ausgeführt, als Sie die Installation ausführten? Beenden Sie alle Anwendungen und führen Sie die Installation erneut aus. Anwendung kann nicht gestartet werden • Werden mehrere Anwendungen ausgeführt? Es ist möglich, dass nicht genügend Speicher vorhanden ist, um eine weitere Anwendung zu starten. Beenden Sie alle nicht benötigten Anwendungen, und starten Sie dann die neue Anwendung erneut. Falls immer noch eine Fehlermeldung angezeigt wird, müssen Sie Ihren Computer neu starten. Wenn Sie eine Anwendung starten, wird ein Fehler angezeigt. • • Wenn mehrere Anwendungen gleichzeitig gestartet werden, wird eventuell eine Fehlermeldung angezeigt. Klicken Sie in diesem Fall auf [OK], und schließen Sie alle nicht benötigten Anwendungen. Auch wenn das Anwendungsfenster geschlossen ist, wird die Anwendung möglicherweise noch ausgeführt, wenn sie sich in der Taskleiste befindet. Achten Sie darauf, alle nicht benötigten Anwendungen zu beenden, die in der Taskleiste angezeigt werden. Wenn Sie Cakewalk Pro Audio verwenden, müssen Sie darauf achten, dass die Sampling-Frequenz von Cakewalk Pro Audio auf 44.1 kHz eingestellt wird. Bei Cakewalk ProAudio 7, 8, and 9 kann die Sampling-Frequenz wie folgt eingestellt werden. [Tools] - [Audio options] - [Settings] - [Default sampling rate] Eine Anwendung stürzt ab • Wenn Sie Digitalmusik-Software für die Digitalaufnahme verwenden, während der Recording Input-Schalter des UA-3 auf DIGITAL gesetzt wird, stellen Sie in jedem Fall sicher, dass das Digitalgerät angeschlossen wird. Aufgrund von Windowsbeschränkungen kann in bestimmten Anwendungen die Funktion der Maus oder ähnlicher Geräte deaktiviert sein, wenn kein Digitalgerät angeschlossen ist. Dies weist nicht auf eine Fehlfunktion hin. Wenn die Maus oder ähnliche Geräte nicht funktionieren, schließen Sie das Digitalgerät wieder an. Die oben genannten Situationen können mit folgenden Anwendungen auftreten (Stand Januar, 2001) •Logic Audio 3.0 oder 4.0 Während der Aufnahme •Cubase VST 3.7 Beim Start/Aufnahme/Wiedergabe •Cubase ASIO Multimedia Setup Beim Testen Die oben genannten Ereignisse oder Situationen treten nicht bei folgenden Anwendungen auf. •Cakewalk Pro Audio 7, 8, und 9 •CoolEditProLE •SoundRecorder (Gebündelt mit Windows98) Ein Verknüpfungsfehler wird beim Start von Windows angezeigt Wenn Sie den D-Out Smoother mit aktiviertem Register to STARTUP (automatischer Start) deinstallieren (S. 37), wird beim Start von Windows die folgende Fehlermeldung angezeigt. Klicken Sie in diesem Fall auf [NO], um die Meldung zu schließen. Gehen Sie wie folgt vor, um diese Meldung zu löschen. 1. Klicken Sie auf die Windows-Schaltfläche [Start] und wählen Sie[Einstellungen] - [Taskleiste & Startmenü]. 2. Klicken Sie auf das Register [Programme im Menü “Start”] und klicken Sie auf [Entfernen]. 3. Wählen Sie [Programme] - [Autostart] - [SmoothDo], und klicken Sie auf [Entfernen]. 46 Vous devez lire ceci avant de procéder à un enregistrement numérique Une opération d’enregistrement, de distribution, de vente, de location, de lecture en public, de diffusion ou équivalente qui n’est pas autorisée, pour tout ou partie d’une œuvre (composition musicale, vidéo, diffusion, direct ou équivalent) dont les droits d’auteur sont détenus par un tiers est illégale. ENGLISH Lors de l’échange de signaux audio par une connexion numérique avec un instrument externe, cet appareil peut procéder à un enregistrement sans être soumis à certaines des restrictions du Système de Gestion des Copies en Série (SCMS - Serial Copy Management System). C’est dû au fait que cet appareil n’est prévu que pour la production musicale et n’est pas conçu pour être soumis aux restrictions tant qu’il est utilisé pour enregistrer des œuvres (comme vos propres compositions) qui n’enfreignent pas des droits d’auteurs de tiers. (SCMS est une caractéristique qui interdit une seconde génération et une copie ultérieure par une connexion numérique. Elle est intégrée dans les enregistreurs MD et d’autres équipements audio numériques grand public en tant que fonction de protection des droits d’auteur.) A propos de l’UA-3 L’UA-3 fonctionne avec une prise en charge partielle du SCMS, uniquement pour un signal numérique en entrée provenant d’un appareil externe. Lorsque des données contenant des marqueurs SCMS sont entrées, par exemple à partir d’un MD copié numériquement à partir d’un CD commercial, l’UA-3 fonctionne comme suit. DEUTSCH Si l’entrée provient du connecteur d’entrée numérique de l’UA-3 : • L’UA-3 ne peut enregistrer ces données dans votre ordinateur • L’audio sera dirigé vers les sorties analogiques (prise jack de sortie ligne, prise jack de casque) et vers le connecteur de sortie numérique. Si l’entrée provient des entrées analogiques de l’UA-3 (prises jack entrée ligne) : • l’enregistrement peut s’effectuer normalement Nonobstant la présence ou l’absence du marqueur SCMS, les données reçues par le connecteur d’entrée numérique de l’UA-3 seront directement dirigées vers le connecteur de sortie numérique. FRANÇAIS N’utilisez pas cet appareil pour enfreindre les droits d’auteurs détenus par une tierce partie. Roland ne reconnaît aucune responsabilité sur quelque infraction que ce soit, concernant votre utilisation de cet appareil et qui pourrait enfreindre des droits d’auteurs appartenant à des tiers. Ce dispositif ne prend pas en charge les signaux audio numériques formatés pour des appareils audio numérique de studio en qualité diffusion. ITALIANO ESPAÑOL L’UA-3 fonctionne selon le SCMS uniquement pour les signaux numériques en entrée à partir d’un appareil externe. Aucun marqueur SCMS n’est ajouté aux signaux numériques audio issus de l’UA-3. UA-3 47 Introduction Introduction Vérifiez le contenu du paquet L’UA-3 comprend les éléments décrits ci-dessous. A l’ouverture de l’emballage, vérifiez que tous les éléments sont inclus. Si ce n'est pas le cas, contactez le revendeur qui vous a fourni l’UA-3. UA-3 Câble USB Utilisez-le pour connecter l’UA-3 au connecteur de votre ordinateur. Pour plus de détails sur les connexions, voir Connexions et installation des pilotes (Windows p. 50, Macintosh p. 59). N’utilisez que le câble USB inclus. CD-ROM de capture AUDIO Il contient le logiciel dont vous aurez besoin pour utiliser l’UA-3. * Assurez-vous de lire le fichier Readme_F.txt situé dans le CD-ROM de capture AUDIO. Les informations de mise à jour sont fournies dans le fichier Readme_F.txt. • Avant d’ouvrir le CD-ROM inclus, vous devez lire l’accord de licence séparé. • Ne touchez pas et ne rayez pas la surface d’enregistrement brillante du disque. Dans le cas contraire, il peut être impossible de lire correctement les données. Si le disque est sale, utilisez un nettoyant pour CD disponible dans le commerce. • Ne lisez pas le CD sur un lecteur de CD audio classique. Si vous le faites, vous produirez un volume élevé qui peut endommager votre ouïe ou vos haut-parleurs. Mise en route Il s'agit du présent document. Gardez-le à portée de main pour y trouver des informations en cas de besoin. Contrat de licence Ce contrat décrit les termes selon lesquels Roland Corporation vous accorde le droit d’utiliser le logiciel. Vous devez le lire avant d’ouvrir l’emballage du CD-ROM. Vous devrez fournir les éléments suivants : Amplificateur externe, haut-parleurs et micro ne sont pas inclus. Un amplificateur externe, des haut-parleurs ou un casque sont nécessaires pour écouter le son issu de l’UA-3 et ne sont pas inclus. Pour les prises de son micro, l'UA-3 n'est pas livré avec un micro. Vous devez vous procurer vous-même ces éléments. Les câbles d’entrée/sortie numériques pour la connexion à l’enregistreur MD ou DAT ne sont pas inclus. Bien que vous puissiez utiliser un enregistreur numérique MD ou DAT pour effectuer un enregistrement numérique, les câbles de connexion de l’enregistreur à l’UA-3 ne sont pas inclus. Vous devrez les acquérir séparément. 48 Introduction Eléments de l’UA-3 et fonctions 3 2 1 4 5 6 • Micro à condensateur L’UA-3 prend en charge les petits microphones multimédia utilisés pour ajouter un commentaire ; il est compatible avec les microphones mono alimentés par la prise (PIP - plug-in power). • Si vous n’enregistrez qu’à partir des entrées ligne, déconnectez les câbles de la prise jack d’entrée guitare et de la prise jack d’entrée micro. 9 7 10 8 11 13 14 15 16 17 ENGLISH 12 • L’UA-3 n’est pas compatible avec les microphones à condensateur et alimentation fantôme, utilisés typiquement pour la musique. Il est également incompatible avec les microphones stéréo parfois fournis avec les MD. • Vous ne pouvez pas lire des données audio d’ordinateur lorsque DIGITAL est sélectionné. 1 Prise jack entrée microphone 2 Prises jack entrée ligne 3 Prises jack sortie ligne 4 Connecteur d’entrée numérique (optique) 5 Connecteur de sortie numérique (optique) DEUTSCH 6 Connecteur USB 7 Commutateur de type de microphone Positionnez ce commutateur selon le type de microphone connecté à la prise jack d’entrée microphone Pour connecter un microphone dynamique : “ DYNAMIC ” Pour connecter un microphone à condensateur : “ CONDENSER ” 1 . 8 Commutateur de sélection d’entrée d’enregistrement 2 /Prise jack d’entrée guitare FRANÇAIS Il sélectionne l’entrée qui sera utilisée pour l’enregistrement. Connecteurs d’entrée numérique 4 : “ DIGITAL ” 1 Prise jack d’entrée microphone /Prises d’entrée ligne 14 : “ INPUT + GUITAR/MIC ” 9 Voyant USB Il s’allume lorsque l’UA-3 est connecté à l’ordinateur et reconnu par lui. 10 Voyant de niveau de sortie Le nombre de LED allumées change selon le niveau de sortie de la prise jack casque 17 et des prises jack de sortie ligne 3 . Si la LED rouge s’allume, agissez sur le bouton de volume de sortie ligne 11 pour baisser le volume. 11 Volume de sortie ligne Règle le volume qui sort de la prise jack casque 17 et des prises jack de sortie ligne 3 . 12 Voyant de crête d’entrée Guitare/Microphone ESPAÑOL Si le niveau d’entrée de la prise jack d’entrée guitare 14 ou de la prise jack d’entrée microphone 1 est trop élevé, il s’allume en rouge. Dans ce cas, utilisez le curseur de réglage de l’entrée guitare/microphone 13 pour baisser le niveau d’entrée. 13 Curseur de réglage d’entrée Guitare/Microphone Ce curseur règle le niveau d’entrée de la prise jack d’entrée guitare microphone 1 . 14 et de la prise jack d’entrée 14 Prise jack entrée guitare 15 Curseur de réglage d’entrée ligne Ce curseur règle le niveau d’entrée des prises jack d’entrée ligne 2 . ITALIANO 16 Voyant de crête d’entrée ligne Si le niveau d’entrée des prises jack d’entrée ligne 2 est trop élevé, il s’allume en rouge. Dans ce cas, utilisez le curseur de réglage de l’entrée ligne 15 pour baisser le niveau d’entrée. 17 Prise jack du casque Vous pouvez y connecter un casque. Le son sort toujours des prises jack de sortie ligne casque est branché. * UA-3 3 , même lorsque le Pour plus de détails sur la façon d’utiliser les différents éléments de l'appareil, consultez le manuel UA-3 Application Guide (p. 110). 49 Connexions et installation des pilotes (Windows) Connexions et installation des pilotes (Windows) * Si vous possédez un Macintosh, reportez-vous p. 59. Pour utiliser l'UA-3 vous devez d'abord installer consécutivement les pilotes Périphérique USB Composite, Périphérique d'interface utilisateur USB et Périphérique Audio USB. Ces pilotes sont inclus avec Windows. Si vous utilisez Windows 98, ce pilote est fourni sur le CD-ROM de Microsoft Windows, dont vous aurez besoin pendant l'installation. Si vous utilisez Windows Me ou 2000, vous n'avez pas besoin du CD-ROM. Qu'est-ce qu'un pilote ? Un pilote est un logiciel qui permet à un programme s'exécutant sur votre ordinateur de transférer des données de et vers un matériel (comme l'UA-3) lorsque celui-ci est connecté à votre ordinateur à l'aide du câble USB. Le pilote transmet les données de l'application à l'UA-3 et vice-versa. Avant d'installer le pilote Application • L'UA-3 ne peut être utilisé avec Windows 95 ou Windows NT. • Si d'autres programmes s'exécutent dans Windows, fermezles tous avant de continuer. • Si vous prévoyez de connecter en même temps plusieurs périphériques USB Roland (par exemple l'UA-3 et d'autres périphérique USB comme l'UA-100G) à votre ordinateur, déconnectez l'UA-100G ou les autres périphériques du connecteur USB avant d'installer le pilote. Si vous installez le pilote lorsque l'UA-100G ou d'autres périphériques sont connectés, l'installation peut ne pas se dérouler correctement. Port USB Port Pilote Câble USB UA-3 Ordinateur Etablissement des connexions et installation du pilote ■ Etablissement des connexions Vérifiez toujours que le niveau du volume est au plus bas avant de connecter l'UA-3. Même avec le volume au minimum, vous pouvez entendre du bruit lorsque l'alimentation est allumée, mais cette situation est normale et n'indique pas un mauvais fonctionnement. Afin d'éviter un mauvais fonctionnement et/ou d'endommager les haut-parleurs et autres périphériques, diminuez toujours le volume et mettez toujours les périphériques hors tension avant d'effectuer les connexions. (Il n'est pas nécessaire d'éteindre votre ordinateur.) Utilisez un câble USB pour connecter l'UA-3 à votre ordinateur avant d'allumer votre équipement audio. Ordinateur Ensemble stéréo Haut-parleurs alimentés, etc. Port USB LINE IN, AUX IN Câble audio Câble USB * Connecter après le démarrage de l'ordinateur LINE OUT Port USB Casque stéréo UA-3 50 • Avant de déconnecter le câble USB ou de redémarrer Windows, veuillez fermer toutes les applications. Vous devez également baisser le volume de tout système audio ou de tout amplificateur connecté. • Cet appareil est équipé d'un circuit de protection. Lors de la connexion au port USB, attendez quelques secondes avant d'utiliser l'appareil. Connexions et installation des pilotes (Windows) ■ Installation du pilote (Windows Me) * Si vous utilisez une machine Windows 2000, voir p. 51, pour Windows 98, voir p. 51. 1. Allumez l'ordinateur, démarrez Windows et utilisez un câble USB pour connecter l'UA-3 à votre ordinateur. 2. Lorsque Windows détecte l'UA-3 et que la boîte de dialogue de l'Assistant ajout de nouveau matériel apparaît, assurez-vous que “ Rechercher automatiquement un nouveau pilote (recommandé) ” est sélectionné, puis cliquez sur [Suivant]. Cette boîte de dialogue peut demander quelques instants avant d'apparaître DEUTSCH ENGLISH 3. La recherche du pilote démarre. 4. Lorsque le bon pilote est trouvé, son installation démarre. 5. Lorsqu'une boîte de dialogue vous informe que l'installation du pilote est terminée, cliquez sur [Terminer], et redémarrez Windows. Après l'installation du pilote, voir Spécification du périphérique d'entrée/sortie audio (p. 54) et sélectionnez le périphérique utilisé par Windows. Selon la configuration de votre ordinateur, un court délai peut intervenir après l'installation du pilote jusqu'à la reconnaissance du périphérique. FRANÇAIS * ■ Installation du pilote (Windows 2000) * Si vous utilisez une machine Windows Me, voir p. 51, pour Windows 98, voir p. 51. 1. Allumez votre ordinateur et démarrez Windows. 2. Utilisez un câble USB pour connecter l'UA-3 à votre ordinateur. L'UA-3 est reconnu par l'ordinateur et le pilote est installé de façon totalement automatique. 3. Après installation du pilote, redémarrez Windows. * ESPAÑOL ■ Installation du pilote (Windows 98) Si vous utilisez une machine Windows Me, voir p. 51, pour Windows 2000, voir p. 51. Les pilotes doivent être installés dans cet ordre : Périphérique USB Composite , Périphérique d'interface utilisateur USB et enfin Périphérique Audio USB. Suivez la procédure ci-après pour effectuer l'installation. 1. Allumez votre ordinateur et démarrez Windows. Insérez le CD-ROM Microsoft Windows dans votre lecteur de CD-ROM et utilisez un câble USB pour connecter l'UA-3 à votre ordinateur (p. 50). UA-3 ITALIANO Certains ordinateurs étant vendus avec le contenu du CD-ROM de Microsoft Windows déjà installé sur le disque dur, il peuvent ne pas inclure ce CD-ROM. Dans ce cas, vous pourrez installer le pilote sans celui-ci. 51 Connexions et installation des pilotes (Windows) Un Périphérique USB Composite est détecté automatiquement et la boîte de dialogue de l'Assistant ajout de nouveau matériel apparaît. Cliquez sur [Suivant]. Si cette boîte de dialogue n'apparaît pas, reportez-vous à Problèmes liés au pilote USB (p. 63) 2. Lorsque l'ordinateur vous demande “ Que voulez-vous faire ? ” , sélectionnez “ Rechercher le meilleur pilote pour votre périphérique (Recommandé). ” et cliquez sur [Suivant]. 3. La boîte de dialogue suivante s'affiche. Vérifiez le lecteur de CD-ROM et cliquez sur [Suivant]. 4. La boîte de dialogue suivante s'affiche. Cliquez sur [Suivant]. * Selon votre système, l'emplacement du pilote peut différer de celui de la figure ci-dessus, mais ceci ne constitue pas un problème. 5. La copie du fichier (pilote) démarre. Si le CD-ROM de Microsoft Windows n'est pas inséré dans le lecteur de CD-ROM, la boîte de dialogue suivante apparaît. Dans ce cas, insérez-le dans le lecteur de CD-ROM et cliquez sur [OK]. 52 Connexions et installation des pilotes (Windows) 6. Lorsque l'installation du pilote Périphérique USB Composite est terminée, la boîte de dialogue suivante apparaît. Cliquez sur [Terminer]. 7. Ensuite, le Périphérique d'interface utilisateur USB est détecté automatiquement et la boîte de dialogue de l'Assistant ajout de nouveau matériel apparaît. Cliquez sur [Suivant] et continuez l'installation en suivant exactement les procédures décrites aux étapes 2-5 (p. 52-52). ENGLISH A l'étape 4, l'écran indique : “ Windows recherche le pilote pour le périphérique : Périphérique d'interface utilisateur USB. ” DEUTSCH 8. Lorsque l'installation du pilote Périphérique Audio USB est terminée, la boîte de dialogue suivante apparaît. Cliquez sur [Terminer]. FRANÇAIS 9. Ensuite, le Périphérique Audio USB est détecté automatiquement et la boîte de dialogue de l'Assistant ajout de nouveau matériel apparaît. Cliquez sur [Suivant] et continuez l'installation en suivant exactement les procédures décrites aux étapes 2-5 (p. 52-52). ESPAÑOL A l'étape 4, l'écran indique : “ Windows recherche le pilote pour le périphérique : Périphérique audio USB ”. ITALIANO 10. Lorsque l'installation du pilote Périphérique Audio USB est terminée, la boîte de dialogue suivante apparaît. Cliquez sur [Terminer]. L'installation des pilotes Périphérique USB Composite, , Périphérique d'interface utilisateur USB et Périphérique Audio USB est terminée. Redémarrez Windows. Une fois le pilote installé, reportez-vous à Spécification du périphérique d'entrée/sortie audio (p. 54) et sélectionnez le périphérique utilisé par Windows. UA-3 53 Connexions et installation des pilotes (Windows) ■ Spécification du périphérique d'entrée/sortie audio 1. Cliquez sur le bouton [Démarrer] de Windows, puis dans [Paramètres] choisissez [Panneau de configuration]. 2. Win 98 / Win 98SE Dans le Panneau de configuration, cliquez deux fois sur l'icône [Multimédia] pour ouvrir la boîte de dialogue Propriétés multimédia. Win 2000 / Me Dans le Panneau de configuration, cliquez deux fois sur l'icône [Sons et Multimédia] pour ouvrir la boîte de dialogue Propriétés de Sons et multimédia. * Si vous ne trouvez pas l'icône [Sons et Multimédia], cliquez sur [Afficher toutes les options du Panneau de configuration] dans le Panneau de configuration. 3. Cliquez sur l'onglet [Audio]. 4. Pour déterminer le Périphérique par défaut pour la Lecture des sons, Cliquez sur apparaît, cliquez sur [Périphérique Audio USB] pour le sélectionner. . Dans la liste qui 5. Pour déterminer le Périphérique par défaut pour l' Enregistrement des sons, cliquez sur la liste qui apparaît, cliquez sur [Périphérique Audio USB] pour le sélectionner. Windows 98 / Windows 98SE Windows 2000 /Windows Me . Dans • Selon votre système, “ Périphérique Audio USB ” sera affiché avec un numéro, par exemple, “ Périphérique audio USB (1) ”. • Il n'est alors pas possible de cliquer sur le bouton “Propriétés avancées ” pour l'“Enregistrement”. 6. Cliquez sur [OK] pour terminer les réglages. Propriétés de Contrôle du volume Le volume de sortie de l'UA-3 peut être contrôlé par le Contrôle du volume de Windows. 1. Cliquez sur le bouton [Démarrer] de Windows, et sélectionnez [Programmes] - [Accessoires] [Divertissement] - [Contrôle du volume] pour le démarrer. Windows Me Windows 2000/ Windows 98/Windows 98SE 54 Connexions et installation des pilotes (Windows) 2. Vous pouvez monter ou baisser le curseur pour régler le volume de l'UA-3. Les éléments suivants peuvent être réglés. USB Audio (Haut-Parleur) Règle le volume des sorties analogiques (sortie ligne et sortie casque). Ce réglage n'affecte pas les sorties numériques.1 WAVE Règle le volume de sortie du périphérique audio de sortie “ Périphérique Audio USB ”. Les sorties numériques et analogiques sont affectées. Synthé SW Règle le volume du synthétiseur logiciel intégré à Windows. Lecteur CD Règle le volume “ CD Audio ” du lecteur de CD-ROM de votre ordinateur.2 ENGLISH 1. Selon la version de Windows, cet élément peut être nommé “ Connecteur analogique ”. 2. Si la lecture du CD n'est pas modifiée en réglant ce volume, utilisez le volume WAVE. ESPAÑOL FRANÇAIS DEUTSCH • Si le Contrôle du volume n'est pas installé sur votre ordinateur, utilisez Ajout/Suppression de programmes dans le Panneau de configuration pour l'installer. Pour plus de précisions sur l'installation, voyez le manuel de l'utilisateur de Windows ou l'Aide. • Si Muet est coché, ou si le curseur est au plus bas, aucun son ne sortira de l'UA-3. • Si vous utilisez Windows 2000 et que le “ Lecteur CD ” n'apparaît pas, cochez l'élément “ Activer la lecture numérique sur ce lecteur de CD-ROM ”, selon la note suivante. • Lorsque vous utilisez le lecteur de CD-Rom de votre ordinateur pour lire un CD audio ou pour lire la musique de fond des jeux avec l'UA-3 : Avec Windows Me : Sélectionnez [Démarrer]-[Paramètres]-[Panneau de configuration]. Dans le [Panneau de configuration], cliquez deux fois sur l'icône [Système] pour ouvrir la boîte de dialogue Propriétés système. Cliquez sur l'onglet [Gestionnaire de périphériques], et cliquez deux fois sur l'icône [CDROM]. En dessous, cliquez deux fois sur le lecteur de CD-ROM que vous utilisez et ouvrez ses Propriétés. Cliquez sur l'onglet [Propriétés] et cochez la case située à côté de l'option Lecture CD numérique “ Activer la lecture numérique sur ce lecteur de CD-ROM. ” Avec Windows 2000 Comme pour Windows Me, ouvrez la boîte de dialogue Propriétés système. Cliquez sur l'onglet [Matériel], puis cliquez sur [Gestionnaire de périphériques] dans le cadre “ Gestionnaire de périphériques”. A partir des lecteurs de CD-ROM, cliquez deux fois sur le lecteur de CD-ROM que vous utilisez pour ouvrir ses Propriétés. Cliquez sur l'onglet [Propriétés] et cochez la case située à côté de l'option Lecture CD numérique “ Activer la lecture numérique sur ce lecteur de CD-ROM. ” Avec Windows 98 ou Windows 98 SE: Sélectionnez [Démarrer] - [Paramètres] - [Panneau de configuration] - [Multimédia], puis cliquez sur l'onglet [CD Audio] et cochez “ Lecture numérique pour les CD audio sur ce lecteur de CD-ROM. ” Selon l'environnement de votre ordinateur, la lecture des CD peut encore poser des problèmes. Pour plus de détails, reportez-vous aux informations fournies par le constructeur de votre ordinateur. Si vous utilisez un lecteur de CD-Rom de type PC-card (PCMCIA), la lecture de données WAVE ou d'un CD audio sur ce lecteur peut interrompre le son ou le supprimer totalement. • La qualité audio de l'UA-3 sera meilleure si vous montez les niveaux du Contrôle du volume. Vérification de la sortie son. Une fois les connexions correctement effectuées, vous pouvez lire l'exemple de données fourni pour vérifier votre configuration. ITALIANO ■ Lecture de l'exemple de données Vous allez ici utiliser les fonctionnalités Windows standard pour lire l'exemple de données. L'exemple de données se situe dans le AUDIO Capture CD-ROM. Introduisez ce CD-ROM dans le lecteur correspondant. 1. Copiez “ Alright(.wav) ” sur le bureau en le glissant à partir du dossier “Sample_Data” du CD-ROM. Pour pouvoir écouter l'exemple de données, vous aurez besoin d'environ 30 Mo disponibles sur le disque dur où Windows est installé. UA-3 55 Connexions et installation des pilotes (Windows) 2. Cliquez avec le bouton droit de la souris sur le fichier copié “ Alright(.wav) ”, et sélectionnez [Lire] ou [Propriétés] dans le menu qui apparaît. 3. Cliquez sur l'onglet [Aperçu], et cliquez sur le La lecture de l'exemple de données démarre. bouton. Lorsque le commutateur d'entrées d'enregistrement est réglé sur DIGITAL, il n'est pas possible de lire les données audio de votre ordinateur. Réglez l'interrupteur sur INPUT + GUITAR/MIC. Avez-vous entendu l'exemple de données ? Si l'exemple de données a été lu correctement, votre ordinateur et l'UA-3 sont connectés et les pilotes ont bien été installés. Si les données n'ont pas été lues correctement, reportez-vous à Dépannage (p. 63). Cette section contient des informations pour vous aider à localiser et résoudre de tels problèmes. L'installation des connexions et des pilotes de l'UA-3 est terminée. Suppression du pilote Périphérique Audio USB L'explication donnée ici concerne un système Windows standard. Selon votre ordinateur, les noms de certains dossiers peuvent être différents. ■ Si vous réinstallez le pilote Périphérique Audio USB. ■ Si l'installation du pilote Périphérique Audio USB s'est interrompue avant la fin. Utilisez la procédure suivante pour supprimer le pilote déjà installé. 1. Utilisez un câble USB pour connecter l'UA-3 à votre ordinateur. 2. Cliquez sur le bouton [Démarrer] de Windows, puis dans [Paramètres], choisissez [Panneau de configuration]. 3. Dans le [Panneau de configuration], cliquez deux fois sur l'icône [Système] pour ouvrir la boîte de dialogue Propriétés système. 4. Cliquez sur l'onglet [Gestionnaire de périphériques]. 5. Cliquez deux fois sur [Contrôleurs son, vidéo et jeu] pour accéder à la liste des périphériques. 6. Dans la liste, sélectionnez Périphérique Audio USB et cliquez [Supprimer]. Dans la boîte de dialogue Supprimer, cliquez sur [OK]. Si le Périphérique Audio USB n'est pas affiché, passez à l'étape 8. 7. Assurez-vous que le Périphérique Audio USB n'est pas dans la liste Contrôleurs son, vidéo et jeux, et cliquez sur [Fermer] pour quitter la boîte de dialogue Propriétés système. 8. Suivez à nouveau les étapes 1. – 4., et cliquez deux fois sur [Contrôleur de bus USB] pour afficher la liste des périphériques. Si est affiché comme icône de périphérique compatible USB : Sélectionnez l'icône [Périphérique USB Composite] et cliquez sur [Supprimer]. Dans la boîte de dialogue Supprimer, cliquez sur [OK]. Comme à l'étape 7., fermez Propriétés système. S'il n'y a pas d'icône de périphérique compatible USB, ou si n'est pas affiché : Fermez simplement Propriétés système. Si vous utilisez Windows Me et que Fermez simplement Propriétés système. 56 est affiché : Connexions et installation des pilotes (Windows) 9. Déconnectez le câble USB de votre ordinateur et redémarrez Windows. Si une boîte de dialogue vous proposant de redémarrer Windows apparaît à ce moment, suivez la proposition et redémarrez votre ordinateur. Principes de fonctionnement du D-Out Smoother ■ Qu'est ce que le D-Out Smoother ? Lorsque qu'un périphérique numérique tel qu'un MD ou un DAT est utilisé en lecture, connecté à la sortie numérique de l'UA-3, le verrouillage de la sortie audio demande un certain temps après la lecture audio, ce qui peut provoquer un silence d'une ou deux secondes, ou fausser la tonalité ou le tempo. Le D-Out Smoother est un logiciel qui permet une lecture audio fluide dans de telles situations. ■ Installation du D-Out Smoother ENGLISH Dans ces explications, nous supposons que votre lecteur de CD-Rom est E:, mais cette lettre peut être différente sur votre ordinateur. Si c'est le cas, entrez la lettre de lecteur adéquate. Pour vérifier la lettre attribuée à votre lecteur de CD-ROM, double-cliquez sur l'icône de Poste de travail. DEUTSCH 1. Introduisez le AUDIO Capture CD-ROM dans le lecteur. 2. Cliquez sur le bouton [Démarrer] de Windows, puis dans [Exécuter...]. 3. Dans la zone de texte Ouvrir : , tapez “E:\UA_Util\Setup.exe” et cliquez sur [OK]. Sinon, cliquez sur [Parcourir], sélectionnez le fichier [Setup(.exe)] situé dans le dossier UA_Util du CD-ROM et cliquez sur [Ouvrir]. 4. Le programme d'installation démarre et la boîte de dialogue Choose Setup Language apparaît. Spécifiez si vous utilisez la version “English (United States)” ou “Français” de Windows et cliquez sur [OK]. 5. Effectuez le reste de l'installation en suivant les instructions qui apparaissent à l'écran. 6. Lorsque l'installation est terminée, la boîte de dialogue Installation terminée apparaît. Cliquez sur [Terminer]. L'installation de D-Out Smoother est terminée. FRANÇAIS ■ Démarrage de D-Out Smoother La boîte de dialogue Setting apparaît au premier démarrage. Assurez-vous que Wave-Out Device affiche “ Périphérique Audio USB, ” et cliquez sur [OK]. Si deux périphériques audio USB (ou plus) sont affichés, reportez-vous à Utilisation de D-Out Smoother (p. 57) et spécifiez le bon périphérique. ESPAÑOL 1. Connectez l'UA-3 au connecteur USB de votre ordinateur. 2. Cliquez sur le bouton [Démarrer] de Windows et dans le menu [Programmes], cliquez sur [D-Out Smoother]. 3. The D-Out Smoother démarre. Dans certains cas, il peut afficher au démarrage “Impossible de trouver un Périphérique Audio USB. Vérifiez le câble USB ou sélectionnez à nouveau un Périphérique Audio USB. ” . Dans ce cas, l'ordinateur n'a pas pu détecter correctement l'UA-3. Il est possible que l'UA-3 ne soit pas bien connecté, ou que le pilote ne soit pas bien installé. Reportez-vous à Connexions et installation des pilotes (Windows) (p. 50) et vérifiez ces points. ■ Utilisation de D-Out Smoother ITALIANO D-Out Smoother possède un interrupteur “ ON/OFF ” et un bouton “ TEST ”. Interrupteur “ ON/OFF ” Normalement, vous laissez cet interrupteur sur “ ON ” lorsque vous utilisez la sortie numérique de l'UA-3. Mettez-le sur “ OFF ” lorsque vous connectez ou déconnectez l'UA-3. Bouton “ TEST ” Cliquez sur le bouton [TEST]. Si le test audio est entendu, D-Out Smoother fonctionne pour ce périphérique. Lorsque vous utilisez un ou plusieurs Périphériques Audio USB tels que l'UA-3 et le MA-150U, utilisez ce bouton pour sélectionner l'UA-3 avec lequel D-Out Smoother doit fonctionner. UA-3 57 Connexions et installation des pilotes (Windows) Utilisez la procédure suivante pour effectuer votre sélection. 1. Dans le menu [Control] de D-Out Smoother, sélectionnez [Setting] pour accéder à la boîte de dialogue Setting. (Cette boîte de dialogue apparaît automatiquement au premier démarrage du logiciel.) 2. Dans le menu déroulant, sélectionnez “Périphérique Audio USB” et cliquez sur [OK]. 3. Cliquez sur le bouton [TEST] et vérifiez que le test audio est entendu. Si le test audio est entendu, D-Out Smoother fonctionne pour ce périphérique. Si l'audio n'est pas entendu, sélectionnez un Périphérique Audio USB différent à l'étape 2, et répétez les étapes 1 à 3. Fonctions pratiques • Lorsque [Register to STARTUP] est coché dans la boîte de dialogue Setting, D-Out Smoother démarre automatiquement en même temps que l'ordinateur. • Lorsque [Minimize window when starting up] est coché dans la boîte de dialogue Setting, D-Out Smoother se réduit immédiatement après avoir démarré pour vous permettre de mieux utiliser l'écran de votre ordinateur. ■ Suppression (désinstallation) de D-Out Smoother D-Out Smoother prend en charge la fonction Ajout/Suppression de programmes de Windows. Vous pouvez utiliser la procédure suivante pour supprimer le programme lorsqu'il n'est plus nécessaire. Si vous désinstallez D-Out Smoother, vous devez d'abord désélectionner [Register to STARTUP] dans la boîte de dialogue Setting. Vous pouvez atteindre la boîte de dialogue Setting en sélectionnant [Control] - [Setting]. (p. 67) 1. Cliquez sur le bouton [Démarrer] de Windows, puis dans [Paramètres], choisissez [Panneau de configuration]. 2. Dans le Panneau de configuration, cliquez deux fois sur l'icône [Ajout/Suppression de programmes] pour ouvrir la boîte de dialogue Propriété de Ajout/Suppression de programmes. 3. Cliquez sur l'onglet [Installation/Désinstallation]. 4. Dans la liste de la boîte de dialogue, cliquez sur le nom de l'application à désinstaller. 5. Cliquez sur[Ajouter/Supprimer]. L'application spécifiée à l'étape 4 est supprimée. 58 Connexions et installation des pilotes (Macintosh) Connexions et installation des pilotes (Macintosh) * Si vous possédez un PC sous Windows, reportez-vous p. 50. Pour pouvoir utiliser l'UA-3, vous devez d'abord installer un pilote. L'UA-3 utilise un pilote compris dans le système Macintosh. Qu'est-ce qu'un pilote ? -> p. 50 Etablissement des connexions et installation du pilote ■ Etablissement des connexions ENGLISH (943) Vérifiez toujours que le niveau du volume est au plus bas avant de connecter l'UA-3. Même avec le volume au minimum, vous pouvez entendre du bruit lorsque l'alimentation est allumée, mais cela normal et n'indique pas un mauvais fonctionnement. (921) Afin d'éviter un mauvais fonctionnement et d'endommager les haut-parleurs et autres périphériques, diminuez toujours le volume et mettez toujours les périphériques hors tension avant d'effectuer les connexions. (Il n'est pas nécessaire d'éteindre votre ordinateur.) Utilisez un câble USB pour connecter l'UA-3 à votre ordinateur avant d'allumer votre équipement audio. Ordinateur Ensemble stéréo Haut-parleurs alimentés, etc. DEUTSCH Port USB LINE IN, AUX IN Câble USB * Connecter après démarrage de l'ordinateur LINE OUT Port USB • Avant de déconnecter le câble USB ou de redémarrer le Macintosh, fermez toutes les applications. Vous devez également baisser le volume du système audio ou de tout amplificateur connecté. • Cet appareil est équipé d'un circuit de protection. Lors de la connexion au port USB, attendez quelques secondes avant d'utiliser l'appareil. FRANÇAIS Câble audio Casque stéréo ESPAÑOL UA-3 ■ Reconnaissance de l'appareil 1. Allumez votre ordinateur, le système Macintosh (Mac OS) démarre. 2. Dans le menu Apple, sélectionnez [Informations système Apple]. ITALIANO • Pour éviter d'endommager vos haut-parleurs, baissez le volume sur l'appareil et sur le système audio connecté. • Quittez toutes les applications éventuellement actives avant de réaliser la connexion. 3. Cliquez sur l'onglet [Périphériques/Volumes]. 4. Utilisez un câble USB pour connecter l'UA-3 à votre ordinateur. UA-3 59 Connexions et installation des pilotes (Macintosh) 5. Pour vérifier que l'appareil est bien reconnu, sélectionnez [Mettre à jour toutes les informations] du menu [Commandes]. Les trois périphériques audio suivants doivent s'afficher dans la section USB : Si c'est le cas, l'installation du pilote UA-3 est réussie. Sélectionnez [Quitter] dans le menu [Fichier] pour fermer la boîte de dialogue Informations système Apple, puis procédez au réglage du son (voir ci-dessous). Si les trois périphériques ne sont pas affichés, déconnectez l'UA-3 du port USB et attendez environ dix secondes. Répétez ensuite la procédure à partir de l'étape 4. ■ Réglage du son 6. Dans le menu Apple, sélectionnez [Tableaux de bord] - [Son] pour ouvrir la boîte de dialogue Son.. 7. Cliquez sur l'onglet [Configuration des HP]. 8. Baissez le volume sur l'UA-3 et sur votre équipement audio, puis cliquez sur [Lancer test]. 9. Les sons de test passent de gauche à droite, en suivant l'affichage à l'écran; réglez le volume à l'aide de la barre [Volume général]. Lorsque vous avez fini, cliquez sur [Arrêter test]. Si le commutateur d'entrées d'enregistrement est réglé sur DIGITAL, il n'est pas possible de lire les données audio de votre ordinateur. Réglez l'interrupteur sur INPUT + GUITAR/MIC. Avec certaines versions du Mac OS, la barre [Volume général] n'existe pas. Dans ce cas, utilisez la barre [Volume] dans l'onglet [Sortie] pour régler le volume. 60 Connexions et installation des pilotes (Macintosh) 10. Sélectionnez [Entrée] dans la boîte de dialogue Son. Pour Choisissez un périphérique d'entrée audio :, choisissez USB Audio. • Si USB Audio n'est pas disponible, fermez la boîte de dialogue Son. Déconnectez ensuite l'UA-3 et attendez environ dix secondes. Répétez ensuite la procédure, en commençant à l'étape 2. • Ne cochez pas [Lecture du son par le périphérique de sortie]. 11. Lorsque vous avez terminé les réglages, sélectionnez [Quitter] dans le menu [Fichier] pour fermer la boîte de dialogue Son. • • • • • Certains logiciels comme Cakewalk Metro Series et TC Work Spark Series ne sont pas capables d'enregistrer et de lire à 48 kHz. Utilisez l'UA-3 à 44.1 kHz. Pendant l'enregistrement ou la lecture, ne pas connecter/déconnecter le câble USB, ni agir sur le commutateur d'entrées d'enregistrement. Le logiciel risquerait de se bloquer. Il est possible que le son soit hâché ou qu'il soit de mauvaise qualité si vous enregistrez et lisez en même temps, en raison d'une charge trop importante au niveau du processeur (CPU). Ce défaut ne devrait pas affecter le résultat de l'enregistrement. Ce genre de problème ne devrait concerner que le signal de lecture. Pour utiliser Virtual Sound Canvas 3, sélectionnez [Performance] dans le menu [Setting], puis choisissez Response Priority pour Expression Mode. Le pilote standard livré avec Mac OS n'est pas compatible ASIO. Lorsque vous démarrez le Macintosh avec l'UA-3 connecté, l'ordinateur peut devenir instable. Si cela se produit, démarrez d'abord le Macintosh et connectez ensuite l'UA-3. DEUTSCH • ENGLISH Problèmes connus : UA-3 Vérification de la sortie son FRANÇAIS Une fois les connexions correctement effectuées, vous pouvez lire l'exemple de données fourni pour vérifier votre configuration. ■ Lecture de l'exemple de données Vous allez ici utiliser les fonctionnalités Macintosh standard pour lire l'exemple de données. L'exemple de données se trouve sur le CD AUDIO Capture. Introduisez ce CD-ROM dans le lecteur correspondant. Pour pouvoir écouter l'exemple de données, vous avez besoin d'environ 30 Mo disponibles sur le disque dur où Mac OS est installé.. ITALIANO ESPAÑOL 1. Copiez “ Alright ” sur le bureau en le glissant à partir du dossier “ Sample_Data ” du CD-ROM. 2. Lancez QuickTime Player fourni avec Mac OS. QuickTime Player se trouve en principe dans le dossier QuickTime du dossier Applications du disque dur. UA-3 61 Connexions et installation des pilotes (Macintosh) 3. Dans le menu [Fichier], sélectionnez [Ouvrir la séquence], sélectionnez le fichier copié précédemment “ Alright ”, et cliquez sur [Convertir] pour l'ouvrir. 4. Cliquez sur le bouton de lecture. La lecture de l'exemple de données démarre. Si le commutateur d'entrées d'enregistrement est réglé sur DIGITAL, il n'est pas possible de lire les données audio de votre ordinateur. Réglez l'interrupteur sur INPUT + GUITAR/MIC. Avez-vous entendu l'exemple de données ? Si l'exemple de données a été lu correctement, votre ordinateur et l'UA-3 sont connectés et les pilotes ont bien été installés. Si les données n'ont pas été lues correctement, reportez-vous à Dépannage (p. 63). Cette section contient des informations pour vous aider à localiser et résoudre ce type de problème. L'installation des connexions et des pilotes de l'UA-3 est terminée. 62 Dépannage Dépannage Si un problème inattendu se produit avec l'UA-3, veuillez lire ce chapitre. Il offre de nombreuses indications pour vous aider à résoudre les problèmes. Les problèmes décrits à la section Dépannage sont organisés selon le système d'exploitation sur lequel le problème peut être rencontré. Utilisez les icônes à gauche du titre pour trouver les informations dont vous avez besoin. Problèmes communs à Windows et au Macintosh. Problèmes propres à Windows. Problèmes propres au Macintosh. Problèmes liés au pilote USB L' “ Assistant ajout de nouveau matériel ” ne démarre pas automatiquement ENGLISH Si vous utilisez un ordinateur pour la première fois, ou si vous ne comprenez pas l'explication d'une procédure, consultez le manuel de votre ordinateur ou de votre système d'exploitation. Si le UA-3 ne fonctionne pas comme vous l'attendez, vérifiez les points suivants : L' “ Assistant ajout de nouveau matériel ” se termine de façon impromptue • • • DEUTSCH • Lorsque le câble USB est connecté ou déconnecté, il faut environ 15 secondes (ou plus) à l'UA-3 pour être reconnu. Le câble USB est-il correctement connecté ? Vérifiez que l'UA-3 et l'ordinateur sont correctement connectés par le câble USB. USB peut-il être utilisé sur votre ordinateur ? Voyez le manuel de l'utilisateur de votre ordinateur et vérifiez qu'il peut utiliser USB. Votre ordinateur ou votre répartiteur USB ont-ils assez de puissance électrique ? L'UA-3 ne peut être connecté s'il est insuffisamment alimenté. Vérifiez si l'un de ces cas s'applique. Si vous utilisez l'UA-3 avec un ordinateur portable fonctionnant sur ses batteries, le fonctionnement peut ne pas être fiable avec certains modèles d'ordinateurs. Si c'est le cas, connectez l'adaptateur secteur de votre ordinateur portable. Le mode d'économie d'énergie de votre ordinateur peut limiter la puissance fournie à USB. Vérifiez les paramètres de votre ordinateur. Dans certains cas, l'UA-3 ne peut être utilisé avec un répartiteur alimenté par le bus (un répartiteur ne possédant pas d'alimentation propre). Veuillez utiliser un répartiteur auto-alimenté (un répartiteur possédant sa propre alimentation). Votre ordinateur répond-il aux normes USB ? Si vous utilisez un ordinateur ne répondant pas aux normes USB (comme un ordinateur assemblé par vos soins), le fonctionnement peut être instable. Dans de tels cas, vous pouvez résoudre le problème en connectant un répartiteur USB possédant sa propre alimentation. “ Périphérique inconnu ” s'affiche à la place de “ Autres périphériques ” ou de “ Contrôleurs Universal Serial Bus ” Utilisez la procédure suivante pour supprimer “ Périphérique inconnu ” de “ Autres périphériques ” FRANÇAIS • • Pour savoir si le “ Périphérique inconnu ” est l'UA-3, déconnectez le câble USB de l'UA-3 et vérifiez que “ Périphérique inconnu ” a disparu. Puis reconnectez l'UA-3 et supprimez “ Périphérique inconnu ”. 2. 3. 4. 5. 6. Dans le [Panneau de configuration] de Windows, cliquez deux fois sur [Système] pour ouvrir la boîte de dialogue Propriétés système. Cliquez sur l'onglet [Gestionnaire de périphériques]. Cliquez deux fois sur [Autres périphériques] (Contrôleurs Universal Serial Bus) pour obtenir la liste des périphériques. Dans la liste, sélectionnez Périphérique inconnu et cliquez sur [Supprimer]. Dans la boîte de dialogue Supprimer, cliquez sur [OK]. Vérifiez que la liste n'affiche pas Autres périphériques ou Périphérique inconnu et cliquez sur [Fermer] pour fermer la boîte de dialogue. ESPAÑOL 1. La boîte de dialogue “ Assistant ajout de nouveau matériel ” apparaît même si vous avez installé les pilotes. UA-3 ITALIANO Si votre ordinateur ou répartiteur USB dispose de deux connecteurs USB (ou plus), le fait de connecter l'UA-3 à un connecteur USB sur lequel vous ne l'avez jamais connecté peut provoquer l'affichage de la boîte de dialogue “ Assistant ajout de nouveau matériel ”, même si les pilotes ont déjà été installés. Installez à nouveau les pilotes comme décrit dans Connexions et installation des pilotes (Windows) (p. 50). Il ne s'agit pas d'un dysfonctionnement. 63 Dépannage Les pilotes ne sont pas correctement installés Utilisez la procédure décrite dans Suppression du pilote Périphérique Audio USB (p. 56) pour supprimer le pilote Périphérique Audio USB de votre ordinateur, et installez à nouveau les pilotes de l'UA-3 comme décrit dans Connexions et installation des pilotes (Windows) (p. 50). Vérifiez si vous avez un élément nommé “ Périphérique inconnu ” ou “ Autres périphériques ” dans “ Contrôleurs Universal Serial Bus ”. Si vous trouvez un “ Périphérique inconnu ”, supprimez-le. Une boîte de dialogue “ Périphérique inconnu détecté ” apparaît et il m'est impossible d'installer le pilote Selon votre ordinateur, tous les fichiers nécessaires à la prise en charge de l'USB audio par Windows 98 n'ont peut être pas été installés. Veuillez vous renseigner auprès du constructeur de l'ordinateur. Problèmes d'utilisation de l'UA-3 Le système d'exploitation devient instable • Si vous démarrez un ordinateur avec l'UA-3 déjà connecté, il peut devenir instable. Dans ce cas, démarrez l'ordinateur avec l'UA-3 non connecté, puis connectez-le. ■ Absence de son • Le commutateur d'entrées d'enregistrement de l'UA-3 est-il réglé sur “ INPUT + GUITAR/MIC ” ? Lorsque le Commutateur d'entrées d'enregistrement est réglé sur “ DIGITAL ”, les signaux d'entrée audio du connecteur d'entrée numérique sont envoyés en sortie. Les données audio de l'ordinateur ne sont pas transmises. • Un périphérique numérique comme un MD est-il connecté à la sortie numérique de l'UA-3 ? Selon votre application, la lecture audio avec un périphérique numérique comme un MD connecté à la sortie numérique de l'UA-3 peut demander qu'un certain laps de temps soit alloué pour verrouiller la sortie audio numérique immédiatement après la lecture ; un silence peut donc intervenir pendant une ou deux secondes. Dans ce cas, vous pouvez utiliser le logiciel D-Out Smoother du CD-ROM inclus pour obtenir une lecture audio fluide. Pour plus de détails, reportez-vous à la section Principes de fonctionnement du D-Out Smoother (p. 57). • Essayez-vous d'utiliser le lecteur de CD de votre ordinateur pour lire un CD audio ? Si vous voulez lire un CD audio à partir du lecteur de CD-ROM de votre ordinateur, voyez Lorsque vous utilisez le lecteur de CD-Rom de votre ordinateur pour lire un CD audio ou pour lire la musique de fond des jeux avec l'UA-3 : (p. 55). • D'autres applications sont-elles actives ? Si plusieurs applications fonctionnent en même temps, un message d'erreur peut apparaître. Dans ce cas, cliquez sur [OK], et fermez les autres applications. Même si une fenêtre d'application est fermée, elle fonctionne encore si elle reste dans la barre des tâches ; assurez-vous donc de quitter les applications inutiles présentes dans la barre des tâches. • Avez-vous défini la destination des données audio en sortie pour le système d'exploitation ? La destination en sortie des données audio pour un ordinateur doit être réglée sur UA-3. Pour plus de détails sur ce paramètre, voyez Spécification du périphérique audio d'entrée/sortie (Windows p. 54) ou Réglage du son (Macintosh p. 60). • Avez-vous défini la destination des données audio en sortie pour votre logiciel de lecture ? Pour certains logiciels comme Cool Edit Pro LE, vous devez régler la destination de sortie des données audio sur UA-3. Pour plus de détails sur ce paramètre, reportez-vous au manuel de l'utilisateur du logiciel. • Les pilotes sont-ils correctement installés ? Pour lire les données audio avec l'UA-3, le pilote Périphérique Audio USB doit être installé. Pour plus de détails sur l'installation et les paramètres, voir Connexions et installation des pilotes (Windows p. 50, Macintosh p. 59). • Les différents contrôles de volume sont-ils montés ? Réglez le volume de chaque potentiomètre comme décrit dans Propriétés du contrôle de volume (Windows p. 54) ou Réglage du son (Macintosh p. 60). ■ Distorsion du son • Le voyant de crête est-il rouge ? Si vous entrez du son à partir des prises jack d'entrée ligne, utilisez le Curseur de réglage d'entrée ligne de l'UA-3 pour réduire le niveau d'entrée. Si vous entrez du son à partir des prises jack d'entrée Guitar ou Mic, utilisez le Curseur de réglage d'entrée Guitar/ Mic pour réduire le niveau d'entrée. Le nombre de LED allumées sur l'indicateur de niveau de sortie dépend du niveau de sortie de l'UA3. Si la LED rouge s'allume, baissez le volume de sortie ligne. Le niveau de volume de l'instrument connecté à LINE IN est trop bas. • • Utilisez-vous un câble de connexion contenant une résistance ? Utilisez des câbles ne contenant pas de résistance. Le curseur de réglage de l'entrée ligne (p. 49) est-il monté comme il faut ? ■ Emission de bruit lors de la lecture audio • Un micro est-il encore connecté ? Si un micro est connecté à l'UA-3, utilisez le Curseur de réglage de l'entrée Guitar/Mic pour baisser le niveau d'entrée. 64 Dépannage • La carte graphique de votre ordinateur peut provoquer du bruit lors de la lecture audio. Exécutez la procédure suivante pour régler l'accélération graphique sur “ Aucune ”. 1. Dans le Panneau de configuration de Windows, cliquez deux fois sur [Affichage] pour ouvrir la boîte de dialogue [Propriétés de Affichage], puis cliquez sur l'onglet [Configuration]. 2. Cliquez sur [Propriétés avancées] pour ouvrir les propriétés et cliquez sur l'onglet [Performances]. 3. Dans Graphiques, déplacez le curseur Accélération matérielle : sur Aucune et cliquez sur [OK]. 4. Dans la boîte de dialogue [Propriétés de Affichage], cliquez sur OK pour fermer la boîte de dialogue. Redémarrez votre ordinateur. • Les lignes d'entrée ligne ou microphone génèrent du bruit Si un module MIDI et l'UA-3 sont connectés en USB au même ordinateur et que la sortie du module MIDI est connectée aux prises jack d'entrée ligne de l'UA-3, du bruit peut entrer par le module MIDI et être entendu par l'UA-3. Dans ce cas, utilisez un répartiteur USB autoalimenté pour connecter en parallèle le module MIDI et l'UA-3, ou connectez le module MIDI par l'interface série ou l'interface MIDI. • L'enregistrement et la lecture simultanés provoquent du bruit Si vous enregistrez et lisez en même temps, la lecture peut être interrompue en fonction des capacités de votre système, et cela peut être perçu comme du bruit. Cependant, la priorité étant donnée à l'enregistrement, les données enregistrées ne sont pas perdues. • Ce problème peut être résolu en reliant le châssis de votre ordinateur à la terre, ou la fiche de terre de la prise du cordon d'alimentation en courant alternatif fourni avec votre ordinateur. Vérifiez également qu'aucun périphérique proche n'émet de fort champ magnétique, comme une télévision ou un four à micro-ondes. ENGLISH • Beaucoup de périphériques audio sont-ils connectés ? La connexion simultanée de nombreux périphériques audio peut provoquer du bruit. Ne connectez pas les périphériques audio inutilisés. ■ Interruption du son pendant la lecture audio * 2. 3. * 4. Les “xx” de GENERIC IDE DISK TYPE xx représentent un nombre qui varie selon votre système. Cliquez sur l'onglet [Paramètres], cochez la case [DMA] figurant dans Options, puis cliquez sur [OK] pour fermer la boîte de dialogue. * 5. Certains paramètres peuvent ne pas être inclus sur votre ordinateur. Dans le Panneau de configuration de Windows, cliquez deux fois sur [Système] pour ouvrir la boîte de dialogue [Propriétés Système], puis cliquez sur l'onglet [Gestionnaire de périphériques]. Cliquez deux fois sur [Lecteurs de disque] pour accéder à la liste des périphériques. Dans la liste, sélectionnez GENERIC IDE DISC TYPE xx, puis cliquez sur [Propriétés] pour accéder à la boîte de dialogue Propriétés GENERIC IDE DISK TYPE xx. FRANÇAIS 1. DEUTSCH • Essayez d'augmenter la mémoire Vous pouvez augmenter la capacité de traitement de votre ordinateur en ajoutant plus de mémoire. Pour plus de détails sur l'ajout de mémoire, reportez-vous au manuel d'utilisation de votre ordinateur. • Votre ordinateur répond-il aux normes USB ? L'audio peut s'interrompre si vous utilisez un ordinateur ne répondant pas aux normes électriques USB. Dans ce cas, le problème peut être résolu en connectant un répartiteur USB possédant sa propre alimentation. • Avez-vous beaucoup d'applications qui fonctionnent en même temps ? Si vous utilisez beaucoup d'applications pendant la lecture, ou si vous démarrez d'autres applications, la lecture peut s'interrompre en fonction de votre ordinateur. Quittez toutes les applications qui ne sont pas nécessaires et réessayez. Si cela ne résout pas le problème, essayez de redémarrer l'ordinateur. • Essayez de modifier les paramètres des lecteurs En fonction de votre système, une boîte de dialogue des paramètres DMA peut apparaître. Après vérification de son contenu, cliquez sur OK ou Annuler. Dans la boîte de dialogue [Propriétés Système], cliquez sur OK pour fermer la boîte de dialogue. Redémarrez votre ordinateur pour que les paramètres ci-dessus soient pris en compte. ■ Arrêt de la lecture audio UA-3 ITALIANO ESPAÑOL • Sur certains ordinateurs, les paramètres Energie du Panneau de configuration peuvent provoquer l'arrêt de la lecture. Les Propriétés de Energie affichées lorsque vous cliquez deux fois sur Energie varient selon votre ordinateur. Nous donnons ci-dessous un exemple, mais vous devez également consulter le manuel de l'utilisateur de votre ordinateur. Il se peut que certains ordinateurs ne proposent pas les paramètres suivants. 1. Dans le Panneau de configuration de Windows, cliquez deux fois sur [Système] pour ouvrir la boîte de dialogue [Propriétés Système], puis cliquez sur l'onglet [Gestionnaire de périphériques]. 2. Cliquez deux fois sur [Périphériques système] pour accéder à la liste des périphériques. 3. Dans la liste, sélectionnez [Prise en charge de la gestion d'énergie avancée], puis cliquez sur [Propriétés] pour accéder à la boîte de dialogue [Propriétés Prise en charge de la gestion d'énergie avancée]. 4. Cliquez sur l'onglet [Paramètres], et dans Résolution des problèmes, cochez la case [Désactiver l'interrogation de l'alimentation]. Puis cliquez sur [OK]. 5. Dans la boîte de dialogue [Propriétés Système], cliquez sur OK pour fermer la boîte de dialogue. 6. Redémarrez Windows. 65 Dépannage Le son enregistré numériquement est distordu, la tonalité change ou il contient du bruit. • • • Si vous utilisez un long câble numérique, il peut se produire du bruit ou le son peut être distordu lorsqu'il est connecté. Utilisez des câbles numériques d'une longueur maximale d'un mètre. Le paramètre de fréquence d'échantillonnage de l'application correspond-il à la fréquence d'échantillonnage de l'appareil numérique connecté à l'entrée numérique ? En enregistrement numérique, il n'est pas possible d'enregistrer en mono. Réglez votre logiciel d'enregistrement sur “ stéréo ”. Le son enregistré présente du bruit • • • Nous avons constaté que du bruit tend à se produire dans les sons enregistrés avec les iMac produits après l'été 2000. Du bruit se produit dans le son lu immédiatement après un enregistrement numérique dans l'application SimpleSound incluse avec Mac OS. Enregistrez d'abord le son, puis lisez-le ensuite. Mettez à jour le pilote Audio USB à la version 1.0.5f4. Si le pilote Audio USB fourni avec Mac OS est inférieur à 1.0.4, mettez-le à jour en 1.0.5f4. Vous pouvez télécharger le pilote de cette URL : http://asu.info.apple.com/swupdates.nsf/artnum/n11703 Vérification de la version du pilote USB. 1. 2. 3. 4. 5. Connectez l'UA-3 à l'ordinateur. Dans le menu Apple, sélectionnez [Informations système Apple]. Cliquez sur l'onglet [Périphériques/Volumes]. Dans la section USB, l'écran indique “ Audio (UA-3 USB Audio Device). ”. Cliquez sur la flèche à gauche de ce texte. Le numéro affiché à droite de “ Version du pilote ” est la version du pilote audio USB. ■ Un fichier vide (muet) est créé à l'enregistrement • Essayez de passer le débit à “ 16 bits ”. Si vous utilisez Windows 98 Seconde Édition et que votre logiciel d'enregistrement est réglé pour un débit en 8 bits, un fichier vide peut être créé et vous pouvez ne pas être capable d'enregistrer réellement. Dans ce cas, vous devez pouvoir enregistrer normalement en réglant le débit sur “ 16 bits ”. • Les données contenant un indicateur SCMS ne peuvent être enregistrées numériquement. L'UA-3 prend en charge SCMS (p. 47) ; si des données SCMS sont entrées via le connecteur numérique (comme des données en provenance d'un MD copié numériquement à partir d'un CD audio commercial), l'UA-3 ne pourra pas les enregistrer dans l'ordinateur. (Le son sortira vers les prises jack de sortie ligne et la prise jack de casque.) Impossible d'enregistrer numériquement • • • • Le commutateur d'entrées d'enregistrement est-il réglé sur “ DIGITAL ” ? L'application est-elle réglée à la même fréquence d'échantillonnage que l'appareil numérique branché au connecteur de l'entrée numérique ? L'enregistrement ne sera pas possible si vous changez la fréquence d'échantillonnage (par exemple, entre diffusion numérique mode A et B) d'un appareil pendant qu'il est branché au connecteur de l'entrée numérique. Pour changer de fréquence d'échantillonnage, vous devez débrancher et rebrancher le câble numérique. Il n'est pas possible d'enregistrer des données numériques d'un format autre que le format des appareils audio numériques grand public. Impossible d'enregistrer un CD audio • L'UA-3 ne peut enregistrer de CD audio à partir du lecteur de CD-ROM avec CoolEdit Pro LE ou un autre programme. Pour enregistrer des CD audio à partir du lecteur de CD-Rom, vous devez avant toute chose sélectionner la carte son de votre ordinateur comme périphérique audio (Enregistrement wave) d'enregistrement par CoolEdit Pro LE (ou l'application que vous utilisez). Pour enregistrer un CD audio avec une carte son, désactivez “ Activer la lecture numérique sur ce lecteur de CD-ROM ” que vous avez coché dans Lorsque vous utilisez le lecteur de CD-Rom de votre ordinateur pour lire un CD audio ou pour lire la musique de fond des jeux avec l'UA-3 : (p. 55). Le niveau du volume est différent à la reprise suivant un état Suspendu ou en Hibernation • Lorsque Windows 2000 reprend après une Suspension ou une Hibernation, le paramètre de volume de sortie est modifié par Windows. Démarrez l'application Contrôle du volume décrite dans Propriétés de Contrôle du volume (p. 54), et réglez le curseur USB Audio (Hautparleur). La musique de fond des jeux n'est pas audible • Le jeu utilise-t-il un CD audio pour sa musique de fond ? Si un CD audio est utilisé pour la musique de fond du jeu, voyez Lorsque vous utilisez le lecteur de CD-Rom de votre ordinateur pour lire un CD audio ou pour lire la musique de fond des jeux avec l'UA-3 : (p. 55). Problèmes généraux communs aux logiciels Installation impossible • • • 66 Le CD-ROM inclus est-il dans le lecteur correspondant de votre ordinateur ? Lors de l'installation, avez-vous entré correctement le nom du lecteur de CD-ROM et le nom du fichier d'installation ? Disposez-vous d'assez de place sur votre disque dur ? Dépannage Augmentez l'espace disque disponible. Supprimez les fichiers inutiles (déplacez-les vers la Corbeille), puis cliquez avec le bouton droit de la souris sur Corbeille et choisissez l'option Vider la corbeille. Si besoin est, installez un disque dur supplémentaire. Pour plus de détails sur l'installation d'un disque dur supplémentaire, reportez-vous aux manuels d'utilisation de votre ordinateur et de Microsoft Windows. • D'autres applications fonctionnent-elles pendant l'installation ? Quittez toutes les applications et recommencez l'installation. Impossible de démarrer une application • Avez-vous beaucoup d'applications qui fonctionnent en même temps ? Vous n'avez peut-être pas assez de mémoire pour démarrer une autre application. Quittez les applications non indispensables, puis démarrez l'application. En cas d'affichage d'un message d'erreur, redémarrez votre ordinateur. Une erreur s'affiche au démarrage d'une application • Si plusieurs applications fonctionnent en même temps, un message d'erreur peut apparaître. Dans ce cas, cliquez sur [OK], puis fermez toutes les applications inutiles. Même si la fenêtre d'une application est fermée, l'application fonctionne toujours si elle reste dans la barre des tâches. Veillez à quitter toutes les applications inutiles de la barre des tâches. Si vous utilisez Cakewalk Pro Audio, vous devez vérifier que la fréquence d'échantillonnage de Cakewalk Pro Audio est bien 44,1 kHz. Dans Cakewalk ProAudio 7, 8 et 9, la fréquence d'échantillonnage se règle comme suit. ENGLISH • [Tools] - [Audio options] - [Parameters] - [Default Sampling Rate] Une application se bloque DEUTSCH FRANÇAIS • Lors de l'utilisation d'un logiciel audio numérique pour l'enregistrement numérique avec l'UA-3, le commutateur d'entrées numérique étant sur DIGITAL, soyez absolument sûr que vous avez branché un périphérique numérique. Cependant, dans certaines applications, les limitations de Windows peuvent désactiver le fonctionnement de la souris ou de certains périphériques jusqu'à ce qu'un périphérique numérique soit connecté, ce qui n'est pas un fonctionnement anormal. Si vous n'obtenez aucune action de la souris ou d'un autre périphérique semblable, reconnectez le périphérique numérique. Vérifiez ce qui précède avec les applications suivantes : (vérifié en janvier 2001). •Logic Audio 3.0 ou 4.0 A l'enregistrement •Cubase VST 3.7 Au démarrage/à l'enregistrement/à la lecture •Cubase ASIO Multimedia Setup En test Vérifiez que les événements ou conditions ci-dessus n'apparaissent pas avec les applications suivantes : •Cakewalk Pro Audio 7, 8 et 9 •CoolEditProLE •Magnétophone (inclus dans Windows 98) Une erreur de raccourci apparaît au démarrage de Windows Si vous désinstallez D-Out Smoother avec Register to STARTUP coché (p. 58), le message d'erreur suivant apparaît au démarrage de Windows. Dans ce cas, cliquez sur [Non] pour fermer le message. ITALIANO ESPAÑOL Utilisez la procédure suivante pour supprimer ce message. 1. Cliquez sur le bouton [Démarrer] de Windows, puis dans [Paramètres] - [Barre des tâches...]. 2. Cliquez sur l'onglet [Programmes du menu Démarrer], puis sur [Supprimer]. 3. Sélectionnez [Programme] - [Démarrage] - [SmoothDo], puis cliquez sur [Supprimer]. UA-3 67 Debe leer esto antes de utilizar la grabación digital La grabación, la distribución, la venta, el préstamo, la exhibición pública o la difusión no autorizada de parte o todo el material (composiciones musicales, vídeos, radiodifusiones, exhibición pública, etc.) cuyo copyright esté en posesión de un tercero quedan prohibidos por la ley. Cuando intercambie señales de audio a través de una conexión digital con un instrumento externo, esta unidad puede efectuar la grabación sin estar sujeta a las restricciones del SCMS (Serial Copy Management o Sistema de gestión de copias en serie). Esto es debido a que la unidad está destinada únicamente para la producción musical y está diseñada para no estar sujeta a restricciones mientras se utilice para grabar obras (como, por ejemplo, sus propias composiciones) que no infrinjan en el copyright de otros. (La opción SCMS prohibe efectuar copias de segunda generación o posteriores a través de una conexión digital. Se encuentra dentro de las grabadoras MD y otros equipos de audio digital como una opción de protección del copyright. Sobre el UA-3 El UA-3 funcionará sólo con soporte SCSM parcial para una señal de entrada digital de un aparato externo. Cuando entran datos que contienen indicadores SCMS, por ejemplo de un MD que se ha copiado digitalmente de un CD de música comercial, el UA-3 funcionará del siguiente modo: Si entra desde el conector de entrada digital UA-3: • El UA-3 no puede grabar estos datos en el ordenador • El audio se transmitirá desde las salidas análogas (jacks de salida de línea, jack de los auriculares) y el conector de salida digital. Si entra desde las entradas análogas de UA-3 (jacks de entrada de línea): • La grabación se efectúa normalmente Independientemente de la presencia o ausencia del indicador SCMS, los datos que se reciben en el conector de entrada digital del UA-3 se transmitirán directamente desde el conector de salida digital. No utilice esta unidad para fines que puedan infringir en el copyright de terceros. Roland no asume ninguna responsabilidad con respecto a la contravención de copyrights a terceros que se produzcan al utilizar esta unidad. Este aparato no da soporte a señales de audio digital que hayan sido formateadas para la transmisión de aparatos de audio digital de estudio El UA-3 funciona de acuerdo con SCMS sólo para señales de entrada digitales de un aparato externo. Los indicativos SCMS no se añaden a las señales de audio digital que se transmiten desde el UA-3. 68 Introducción Introducción Comprobación del contenido del paquete El UA-3 contiene los siguientes elementos. Cuando abra el paquete, en primer lugar asegúrese de que están todos los elementos. Si falta alguno, póngase en contacto con el distribuidor al que compró el UA-3. UA-3 Cable USB Utilícelo para conectar el UA-3 al conector USB de su ordenador. Para obtener más detalles sobre las conexiones, consulte Instalación del controlador y conexiones (Windows pág. 71, Macintosh pág. 80). ENGLISH Utilice sólo el cable USB que se incluye. CD-ROM AUDIO Capture Contiene el software necesario para ser utilizado con el UA-3. Asegúrese de leer el archivo Readme_E.txt que se encuentra en el CD-ROM AUDIO Capture En el archivo Readme_E.txt encontrará la información más reciente. DEUTSCH * • Antes de abrir el CD-ROM adjunto, debe leer el contrato de licencia que viene por separado. • No toque la superficie de grabación plateada del disco ni la raye. Si lo hace, es posible que los datos no se puedan leer correctamente. Si el disco se mancha, utilice un limpiador de CD disponible en el mercado para limpiarlo. • No escuche el CD-ROM en un reproductor de CD de audio convencional. Si lo hace, se producirá una subida de volumen que puede dañar los altavoces y causar lesiones auditivas. Guía de iniciación Es el documento que está leyendo en estos momentos. Téngalo a mano por si necesita consultarlo. FRANÇAIS Contrato de licencia Este contrato describe los términos bajo los que Roland Corporation le permite utilizar el software. Debe leerlo antes de abrir el paquete del CD-ROM. Debe contar previamente con los siguientes artículos ITALIANO ESPAÑOL No se incluye ni el amplificador externo ni los altavoces ni los auriculares. El amplificador externo, los altavoces o los auriculares, todos ellos necesarios para escuchar el sonido que emite el UA-3, no se incluyen. Tampoco se incluye un micrófono para transmitir sonido al UA-3. Debe contar previamente con estos artículos. Los cables de entrada/salida digital para conectar la grabadora DAT o MD no se incluyen Aunque puede utilizar una grabadora digital DAT o MD para efectuar la grabación digital, los cables para conectar la grabadora al UA-3 no se incluyen. Debe contar previamente con ellos. UA-3 69 Introducción Partes del UA-3 y su función 3 2 1 4 5 6 • Micrófono electrostático El UA-3 da soporte a los micrófonos multimedia de pequeño tamaño que se utilizan para grabar la voz y es compatible con los micrófonos monoaurales que funcionan mediante una clavija. • Si graba sólo desde las entradas de línea, desconecte los cables del jack de entrada de guitarra y del jack de entrada de micrófono. 9 7 10 8 11 12 13 14 15 16 • El UA-3 no es compatible con los micrófonos electrostáticos que funcionan virtualmente y que se utilizan habitualmente en música. Tampoco es compatible con los micrófonos estéreo que a veces se suministran con los MD. • No puede reproducir datos de audio del ordenador si selecciona DIGITAL. 17 1 Jack de entrada del micrófono 2 Jacks de entrada de línea 3 Jacks de salida de línea 4 Conector de entrada digital (óptico) 5 Conector de salida digital (óptico) 6 Conector USB 7 Interruptor de selección de tipo de micrófono Coloque este interruptor según el tipo de micrófono que está conectado al jack de entrada del micrófono Cuando conecte un micrófono dinámico, póngalo en: “DYNAMIC” (DINÁMICO) Cuando conecte un micrófono electrostático, póngalo en: “CONDENSER” (ELECTROSTÁTICO) 8 9 Interruptor de selección de entrada de grabación Selecciona la entrada que se utilizará para grabar. Conectores de entrada digital 4 : “DIGITAL” Jack de entrada del micrófono 1 / Jacks de entrada de línea :“INPUT + GUITAR/MIC” (ENTRADA + GUITAR/MIC) 2 1 . / Jack de entrada de guitarra 14 Indicador USB Se encenderá cuando conecte el UA-3 y sea reconocido por el ordenador. 10 Indicador OUTPUT LEVEL (NIVEL DE SALIDA) El número de indicadores LED que se iluminan varía según el nivel de salida del jack de auriculares 17 y los jacks de salida de línea 3 . Si se ilumina el LED rojo, utilice el Volumen de salida de línea 11 para bajar el volumen. 11 Volumen de salida de línea Ajusta el volumen que se transmite del jack de auriculares 17 y los jacks de salida de línea 3 . 12 Indicador de pico de entrada Guitar/Mic Si el nivel de entrada del jack de entrada de guitarra 14 y del jack de entrada de micrófono 1 es excesivo, se encenderá el indicador rojo. Si se enciende el indicador rojo, utilice el deslizador de ajuste de entrada Guitar/ Mic 13 para bajar el nivel de entrada. 13 Deslizador de ajuste de entrada Guitar/Mic Este deslizador ajusta el nivel de entrada del jack de entrada de guitarra micrófono 1 . 14 y los jacks de entrada de 14 Jack de entrada de guitarra 15 Deslizador de ajuste de entrada de línea Este deslizador ajusta el nivel de entrada de los jacks de entrada de línea 2 . 16 Indicador de pico de entrada de línea Si el nivel de entrada de los jacks de entrada de línea 2 es excesivo, se iluminará el indicador rojo. Si se enciende el indicador rojo, utilice el deslizador de ajuste de entrada de línea 15 para bajar el nivel de entrada. 17 Jack de auriculares Aquí se pueden conectar auriculares. Aunque estén conectados los auriculares, todavía se transmitirá sonido a través de los jacks de salida de línea 3 . * 70 Para obtener más detalles sobre cómo se utiliza cada control y cada conector, consulte la UA-3 Application Guide (pág. 110). Instalación del controlador y conexiones (Windows) Instalación del controlador y conexiones (Windows) * Si es usuario de Macintosh, consulte la pág. 80. Para utilizar el UA-3, primero debe instalar el controlador USB Composite Device (Dispositivo USB Composite), el controlador USB Human Interface (Interfaz humana USB) y el controlador USB Audio Device (Dispositivo de audio USB) consecutivamente. Windows incluye estos controladores. Si utiliza Windows 98, este controlador se incluye en el CD-ROM de Microsoft Windows , de modo que debe tener preparado el CDROM de Microsoft Windows . Si utiliza Windows Me o 2000, el CD-ROM no es necesario. ¿Qué es un controlador? Aplicación • El UA-3 no puede utilizarse con Windows 95 y Windows NT. • Si se están ejecutando otros programas de Windows, salga de todos ellos antes de continuar. • Si va a conectar en el ordenador varios aparatos Roland USB simultáneamente (por ejemplo, el UA-3 y otros aparatos USB como el UA-100G), desconecte el UA-100G u otros aparatos del conector USB antes de instalar el controlador. Si instala el controlador cuando el UA-100 u otros aparatos están conectados, puede que la instalación no se realice correctamente. Puerto USB Controlador USB Cable USB UA-3 Ordenador Realización de conexiones e instalación del controlador DEUTSCH Antes de instalar el controlador ENGLISH Un controlador es un software que permite que una programa de aplicaciones que se ejecuta en el ordenador transfiera datos del UA-3 y viceversa cuando está conectado al ordenador mediante un cable USB. El controlador pasa los datos de la aplicación al UA-3 y del UA-3 a la aplicación. ■ Realización de conexiones FRANÇAIS Asegúrese siempre de tener bajado el volumen antes de conectar el UA-3. Aunque el volumen esté completamente bajado, es posible que todavía oiga algún sonido al encender la unidad pero esto es algo normal y no indica un mal funcionamiento de la misma. Para evitar anomalías en el funcionamiento o daños en los altavoces u otros dispositivos, baje siempre el volumen y apague todos los aparatos antes de realizar cualquier conexión. (no es necesario apagar el ordenador.) Utilice un cable USB para conectar el UA 3 al ordenador antes de encender el equipo de audio. Ordenador Equipo estéreo Altavoces, etc Puerto USB ENTRADA DE LÍNEA, LÍNEA AUXILIAR SALIDA DE LÍNEA Puerto USB ESPAÑOL Cable USB * Conéctelo después de encender el ordenador • Antes de desconectar el cable USB o reiniciar Windows, cierre todas las aplicaciones. También debe bajar el volumen de cualquier sistema de amplificación o de audio que esté conectado. • Esta unidad viene equipada con un circuito de protección. Es necesario dejar pasar un pequeño intervalo (de unos segundos) después de encender la unidad para que ésta funcione correctamente. ITALIANO Cable de audio Auriculares estéreo UA-3 UA-3 71 Instalación del controlador y conexiones (Windows) ■ Instalación del controlador (Windows Me) * Si utiliza un equipo con Windows 2000, consulte la pág. 72, si utiliza un equipo con Windows 98, consulte la pág. 72. 1. Encienda el ordenador e inicie Windows, utilice un cable USB para conectar el UA-3 al ordenador. 2. Cuando Windows detecte el UA-3 y aparezca el cuadro de diálogo Add New Hardware Wizard (Asistente para agregar nuevo hardware), asegúrese de que está seleccionada la opción “Automatic search for a better driver (Recommended)”(Buscar automáticamente el controlador (recomendado)) y, a continuación, haga clic en [Next] (Siguiente). Puede que este cuadro de diálogo tarde un tiempo en aparecer 3. Empieza la búsqueda del controlador. 4. Una vez se ha encontrado el controlador adecuado, empieza la instalación del mismo. 5. Cuando aparece un cuadro de diálogo informándole de que la instalación del controlador ha finalizado, haga clic en [Finish] (Finalizar), y reinicie Windows. Después de instalar el controlador, consulte el apartado Especificación del aparato de entrada/salida de audio (pág. 75) y seleccione el dispositivo que utiliza Windows. * Dependiendo de la configuración de su ordenador, después de que se haya instalado el controlador puede que se produzca un breve intervalo de espera hasta que el dispositivo sea reconocido. ■ Instalación del controlador (Windows 2000) * Si utiliza un equipo con Windows Me, consulte la pág. 72, si utiliza un equipo con Windows 98, consulte la pág. 72. 1. Encienda el ordenador e inicie Windows. 2. Utilice un cable USB para conectar el UA-3 al ordenador. El ordenador reconoce el UA-3 y el controlador se instala automáticamente. 3. Después de instalar el controlador, reinicie Windows. ■ Instalación del controlador (Windows 98) * Si utiliza un equipo con Windows Me, consulte la pág. 72, si utiliza un equipo con Windows 2000, consulte la pág. 72. La instalación se debe realizar en el orden del controlador USB Composite Device (Dispositivo USB Composite) , USB Human Interface Device (Dispositivo de interfaz humana USB) y, a continuación, el controlador USB Audio Device (Dispositivo de audio USB). Utilice el siguiente procedimiento para realizar la instalación. 1. Encienda el ordenador e inicie Windows. Inserte el CD-ROM de Microsoft Windows en la unidad de CDROM y utilice un cable USB para conectar el UA-3 al ordenador (pág. 71). Puesto que algunos ordenadores se venden con el contenido del CD-ROM de Microsoft Windows instalado previamente en el disco duro, puede que el CD-ROM de Microsoft Windows no venga incluido. Si es este el caso, podrá instalar el controlador sin el CD-ROM de Microsoft Windows 72 Instalación del controlador y conexiones (Windows) Se detectará automáticamente un USB Composite Device (Dispositivo USB Composite) y aparecerá el cuadro de diálogo Add New Hardware Wizard (Asistente para agregar nuevo hardware). Haga clic en [Next] (Siguiente). Si no aparece este cuadro de diálogo, consulte el apartado Problemas relacionados con el controlador USB (pág. 84) ENGLISH 2. Cuando la pantalla le pregunta “What do you want Windows to do?” (¿Qué desea que haga Windows?), seleccione “Search for the best driver for your device. (Recommended)” (Buscar el mejor controlador para su dispositivo (Se recomienda) y haga clic en [Next] (Siguiente). DEUTSCH 3. Aparece el siguiente cuadro de diálogo. Active CD-ROM (unidad de CD-ROM), y haga clic en [Next] (Siguiente). Dependiendo del sistema, la Location of driver (Ubicación del controlador) puede ser diferente de la que se muestra en la ilustración, pero esto no supone ningún problema. ESPAÑOL * FRANÇAIS 4. Aparece el siguiente cuadro de diálogo. Haga clic en [Next] (Siguiente). 5. El archivo (Controlador) se empezará a copiar. ITALIANO Si no ha insertado el CD-ROM de Microsoft Windows en la unidad de CD-ROM drive, puede aparecer el siguiente cuadro de diálogo. Si esto ocurre, inserte el CD-ROM de Microsoft Windows en la unidad de CD-ROM y haga clic en [OK] (Aceptar). UA-3 73 Instalación del controlador y conexiones (Windows) 6. Cuando haya finalizado la instalación del USB Composite Device (Dispositivo USB Composite) , aparecerá el siguiente cuadro de diálogo. Haga clic en [Finish] (Finalizar).. 7. A continuación, se detectará automáticamente el USB Human Interface Device (Dispositivo de interfaz humana USB) y aparecerá el cuadro de diálogo Add New Hardware Wizard (Asistente para agregar nuevo hardware) . Haga clic en [Next] (Siguiente), y continúe la instalación utilizando el mismo procedimiento que se indica en los pasos 2-5 (p. 73-73). En el paso 4, la pantalla indicará “Windows driver file search for the device : USB Human Interface Device.” (Búsqueda del archivo de controlador para el dispositivo: Dispositivo de interfaz humana USB). 8. Cuando haya finalizado la instalación del USB Human Interface Device (Dispositivo de interfaz humana USB) , aparecerá el siguiente cuadro de diálogo. Haga clic en [Finish] (Finalizar).. 9. A continuación, se detectará automáticamente el USB Audio Device (Dispositivo de audio USB) y aparecerá el cuadro de diálogo Add New Hardware Wizard (Asistente para agregar nuevo hardware) . Haga clic en [Next] (Siguiente), y continúe la instalación utilizando el mismo procedimiento que se indica en los pasos 2-5 (p. 73-73). En el paso 4, la pantalla indicará “Windows driver file search for the device : USB Audio Device.” (Búsqueda del archivo de controlador para el dispositivo : Dispositivo de audio USB). 10. Cuando haya finalizado la instalación del USB Audio Device (Dispositivo de audio USB) , aparecerá el siguiente cuadro de diálogo. Haga clic en [Finish] (Finalizar).. Con esto finaliza la instalación de los controladores USB Composite Device (Dispositivo USB Composite), USB Human Interface Device (Dispositivo de interfaz humana USB) y USB Audio Device (Dispositivo de audio USB). Reinicie Windows. Después de instalar el controlador, consulte el apartado Especificación del aparato de entrada/salida de audio (pág. 75) y seleccione el dispositivo que utiliza Windows. 74 Instalación del controlador y conexiones (Windows) ■ Especificación del aparato de entrada/salida de audio 1. Haga clic en el botón [Start] (Inicio) de Windows y seleccione [Settings] (Configuración) - [Control Panel] (Panel de control). 2. Win 98 / Win 98SE En Control Panel (Panel de control), haga doble clic en el icono [Multimedia] para abrir el cuadro de diálogo Multimedia Properties (Propiedades de Multimedia). Win 2000 / Me En Control Panel (Panel de control), haga doble clic en el icono [Sounds and Multimedia] (Sonidos y Multimedia) para abrir el cuadro de diálogo Sounds and Multimedia Properties (Propiedades de Sonido y Multimedia). * Si no encuentra el icono [Sounds and Multimedia] (Sonidos y Multimedia), vaya a Control Panel (Panel de control) y haga clic en [view all Control Panel options] (Ver todas las opciones de Panel de control). 3. Haga clic en la ficha [Audio]. ENGLISH 4. Para el elemento Playback (Reproducción)Preferred device (Dispositivo preferido), haga clic en . En la lista que aparece, haga clic en [USB Audio Device] (Dispositivo de audio USB) para seleccionarlo. DEUTSCH 5. Para el elemento Recording (Grabación)Preferred device (Dispositivo preferido), haga clic en . En la lista que aparece, haga clic en [USB Audio Device] (Dispositivo de audio USB) para seleccionarlo. Windows 98 / Windows 98SE Windows 2000 /Windows Me FRANÇAIS • Dependiendo del sistema, “USB Audio Device” (Dispositivo de audio USB) aparecerá con un número añadido, por ejemplo, “USB Audio Device (1).” • No será posible pulsar el botón “Advanced Properties ” (Propiedades avanzadas) en la opción “Recording” (Grabación). 6. Haga clic en [OK] (Aceptar) para completar la configuración. Configuración del control de volumen ITALIANO ESPAÑOL El volumen de salida del UA-3 se puede controlar mediante el Volume Control (Control de volumen) de Windows. 1. Haga clic en el botón [Start] (Inicio) de Windows y seleccione [Programs] (Programas)[Accessories] (Accesorios)- [Entertainment] (Entretenimiento) - [Volume Control] (Control de volumen) para iniciarlo. Windows Me Windows 2000/ Windows 98/Windows 98SE UA-3 75 Instalación del controlador y conexiones (Windows) 2. Puede subir o bajar el deslizador para ajustar el volumen del UA-3. Se pueden configurar los siguientes elementos. USB Audio (Speaker) (USB Audio (Altavoz)) Ajusta el volumen de las salidas análogas (salida de línea y salida de auriculares). La salida digital no cambiará.1 WAVE (Onda) Ajusta el volumen que se envía desde el dispositivo de salida de audio “USB Audio Device” (Dispositivo de audio USB). La salida digital y la salida análoga cambiarán. SW Synth (Sintetizador de software) Ajusta el volumen del sintetizador de software integrado en Windows. CD Player (Reproductor de CD) Ajusta el volumen de la música del CD de la unidad de CD-ROM del ordenador.2 1. Dependiendo de la versión de Windows, se puede visualizar como “Analog connector” (Conector análogo). 2. Si la reproducción del CD no cambia cuando ajusta este volumen, cambie el volumen WAVE (Onda). • Si no tiene instalada en su ordenador la opción Volume Control (Control de volumen), utilice la opción Add/ Remove Applications (Agregar o quitar programas) del Control Panel (Panel de control) para instalarla. Para obtener más información sobre la instalación, consulte el manual del usuario de Windows o la ayuda. • Si se encuentra seleccionada la opción Mute (Silencio) o si el deslizador está en la posición más baja, el equipo UA-3 no emitirá ningún sonido. • Si utiliza Windows 2000 y no aparece “CD Player” (Reproductor de CD), seleccione el elemento “Enable digital CD audio for this CD-ROM device” (Habilitar el CD de sonido digital para este dispositivo de CD-ROM) de [Digital CD playback] (Reproducción de CD Digital), tal y como se describe en la nota siguiente. • Cuando utilice la unidad de CD-ROM del ordenador para escuchar un CD de audio o cuando reproduzca música de fondo para juegos con el UA-3 Si utiliza Windows Me: Seleccione [Start] (Inicio)-[Settings] (Configuración)-[Control Panel] (Panel de control). En Control Panel (Panel de control), haga doble clic en el icono [System] (Sistema) para acceder al cuadro de diálogo System Properties (Propiedades del sistema). Haga clic en la ficha [Device Manager] (Administrador de dispositivos) y haga doble clic en el icono [CDROM]. Haga doble clic debajo en la unidad de CD-ROM que está utilizando y abra las Properties (Propiedades). Haga clic en la ficha [Properties] (Propiedades) y seleccione la casilla de verificación que se encuentra situada junto al elemento Enable digital CD audio for this CD-ROM device (Habilitar el CD de sonido digital para este dispositivo de CD-ROM) de “Digital CD playback” (Reproducción de CD digital). Si utiliza Windows 2000 Al igual que con Windows Me, abra el cuadro de diálogo System Properties (Propiedades del sistema). Haga clic en la ficha [Hardware] y, a continuación, haga clic en el botón [Device Manager] (Administrador de dispositivos) para abrir el Administrador de dispositivos. Desde las unidades de CD-ROM , haga doble clic en la unidad de CD-ROM que está utilizando par abrir las Properties (Propiedades). Haga clic en la ficha [Properties] (Propiedades) y seleccione la casilla de verificación que se encuentra situada junto al elemento Enable digital CD audio for this CD-ROM device (Habilitar el CD de sonido digital para este dispositivo de CD-ROM) de “Digital CD playback” (Reproducción de CD digital). Si utiliza Windows 98 o Windows 98 SE: Seleccione [Start] (Inicio) - [Settings] (Configuración) - [Control Panel] (Panel de control) - [Multimedia] y, a continuación, haga clic en la ficha [CD Music] (Música de CD) y, a continuación, seleccione “Enable CD digital audio for this CD-ROM device” (Habilitar el CD de sonido digital para este dispositivo de CD-ROM). Dependiendo del entorno de su ordenador, la reproducción de estos CD puede ser todavía imposible. Para obtener más información, consulte la información que le haya proporcionado el fabricante del ordenador. Si utiliza una unidad de CD-ROM de tipo PC card (PCMCIA), la reproducción de datos WAVE (onda) o un CD de audio en la unidad de CD-ROM puede hacer que el sonido se interrumpa o que no se oiga ningún sonido. • La calidad de audio de la unidad UA-3 será mejor si sube los niveles de control de volumen. Comprobación de la salida de sonido Una vez se han efectuado las conexiones correctamente, puede reproducir los datos de muestra para comprobar la configuración. ■ Reproducción de los datos de muestra Aquí utilizaremos la funcionalidad estándar de Windows para reproducir los datos de muestra. Los datos de muestra se encuentran en el CD-ROM AUDIO Capture . Inserte el CD-ROM en la unidad de CD-ROM del ordenador. 1. Copie “Alright(.wav)” en el escritorio arrastrándolo desde la carpeta “Sample_Data” del CD-ROM. 76 Instalación del controlador y conexiones (Windows) Para poder escuchar los datos de muestra, necesitará aproximadamente 30 MB de espacio libre en el disco duro donde se encuentra instalado Windows. 2. Haga clic con el botón secundario en el archivo “Alright(.wav)” que ha copiado y seleccione [Play] (Reproducir)o [Properties] (Propiedades) del menú que aparece a continuación. 3. Haga clic en la ficha [Preview] (Vista previa) y, a continuación, ENGLISH haga clic en el botón . Empezará la reproducción de los datos de muestra. DEUTSCH Cuando se pone el Recording input select switch (Interruptor de selección de entrada de grabación) en DIGITAL, no es posible reproducir datos de audio desde el ordenador. Ponga el interruptor en INPUT + GUITAR/MIC (ENTRADA + GUITAR/MIC). ¿Ha podido escuchar los datos de muestra? Si los datos de muestra se han reproducido correctamente, el ordenador y la unidad UA-3 están conectados correctamente y los controladores se han instalado correctamente. Si los datos no se han reproducido correctamente, consulte Resolución de problemas (pág. 84). El apartado Resolución de problemas contiene información para ayudarle a encontrar y corregir problemas. Con esto finaliza la instalación del controlador y las conexiones para el UA-3. FRANÇAIS Eliminación del controlador de dispositivo de audio USB La explicación que aquí se ofrece es para un sistema Windows de tipo medio. Dependiendo del ordenador algunos nombres de carpetas pueden ser diferentes. ■ Si vuelve a instalar el controlador de dispositivo de audio USB ■ Si la instalación del dispositivo de audio USB finalizó antes de acabar. UA-3 ITALIANO ESPAÑOL Utilice el siguiente procedimiento para eliminar el controlador que ya está instalado. 1. Utilice un cable USB para conectar el UA-3 al ordenador. 2. Haga clic en el botón [Start] (Inicio) de Windows y seleccione [Settings] (Configuración) - [Control Panel] (Panel de control). 3. En Control Panel (Panel de control), haga doble clic en [System] (Sistema) para abrir el cuadro de diálogo System Properties (Propiedades del sistema). 4. Haga clic en la ficha [Device Manager] (Administrador de dispositivos). 5. Haga doble clic en [Sound, video, and game controllers] (Dispositivos de sonido, vídeo y juegos) para ver la lista de dispositivos. 6. De la lista, seleccione USB Audio Device (Dispositivo de audio USB) y haga clic en [Remove] (Quitar). En el cuadro de diálogo Confirm Device Removal (Confirmar la eliminación del dispositivo) haga clic en [OK] (Aceptar). Si no aparece USB Audio Device (Dispositivo de audio USB), vaya al paso 8. 7. Asegúrese de que el USB Audio Device (Dispositivo de audio USB) no está en la lista Sound, video and game controllers (Dispositivos de sonido, vídeo y juegos) y haga clic en [Close] (Cerrar) para cerrar el cuadro de diálogo System Properties (Propiedades del sistema) . 8. Siga los pasos 1. – 4. de nuevo y haga doble clic en [Universal Serial Bus controllers] (Dispositivos de bus serie universal) para mostrar la lista de dispositivos. Si aparece este símbolo en el icono del dispositivo compatible USB: Seleccione el icono [USB Composite Device] (Dispositivo USB Composite) y haga clic en [Remove] (Quitar). En el cuadro de diálogo Confirm Device Removal (Confirmar la eliminación del dispositivo) 77 Instalación del controlador y conexiones (Windows) haga clic en [OK] (Aceptar). Como en el paso 7., cierre System Properties (Propiedades del sistema). Si no hay ningún icono de dispositivo compatible USB o si no aparece el símbolo : Sólo tiene que cerrar System Properties (Propiedades del sistema). Si utiliza Windows Me y aparece el símbolo : Sólo tiene que cerrar System Properties (Propiedades del sistema). 9. Desconecte el cable USB del ordenador y vuelva a iniciar Windows. Si aparece un cuadro de diálogo donde se le sugiere que reinicie Windows en este punto, hágalo y reinicie el ordenador. Funcionamiento básico del D-Out Smoother ■ ¿Qué es el D-Out Smoother? Cuando se reproduce audio a través de un aparato digital como un MD o DAT que estén conectados a la salida digital del UA-3, se necesita un tiempo para que la salida de audio se bloquee inmediatamente después de la reproducción, de modo que puede que no haya sonido durante uno o dos segundos o el pitch o el tempo no sean los correctos. D-Out Smoother es un software mediante el cual el audio se puede reproducir sin problemas en estos casos. ■ Instalación del D-Out Smoother En las indicaciones que ofrecemos a continuación, damos por supuesto que la unidad de CD-ROM es la unidad E:, aunque el nombre de la unidad puede ser diferente dependiendo del ordenador. Si el nombre de la unidad es diferente en el ordenador, ponga el nombre de unidad adecuado. Para comprobar el nombre de la unidad para el CD-ROM, haga doble clic en el icono My Computer (Mi PC). 1. Coloque el CD-ROM AUDIO Capture en la unidad de CD-ROM. 2. Haga clic en el botón [[Start] (Inicio) de Windows y seleccione [Run...] (Ejecutar...) 3. En el cuadro de texto Open (Abrir):, escriba “E:\UA_Util\Setup.exe” y haga clic en [OK] (Aceptar). También puede hacer clic en [Browse] (Examinar) y seleccionar el archivo [Setup(.exe)] que se encuentra situado en la carpeta UA_Util de la unidad de CD-ROM y hacer clic en [Open] (Abrir). 4. Se iniciará el instalador y aparecerá el cuadro de diálogo Choose Setup Language (Seleccionar idioma de instalación). Especifique si utiliza la versión de Windows “English (United States)” (Inglés de los EE.UU.) o “Spanish” (Español) y haga clic en [OK] (Aceptar). 5. Efectúe el resto de la instalación según se le indica en las instrucciones que aparecen en pantalla. 6. Cuando finaliza la instalación, aparece el cuadro de diálogo Setup Complete (Programa de instalación completo). Haga clic en [Finish] (Finalizar). Con esto finaliza la instalación del D-Out Smoother. ■ Inicio del D-Out Smoother El cuadro de diálogo Setting (Configuración) aparece la primera vez que lo inicie. Asegúrese de que en Wave-Out Device (Dispositivo de salida de onda) aparece “USB Audio Device (Dispositivo de audio USB),” y haga clic en [OK] (Aceptar). Si aparecen dos o más dispositivos de audio USB, consulte el apartado Uso del D-Out Smoother (pág. 78) y especifique el dispositivo correcto. 1. Conecte la unidad UA-3 al conector USB de su ordenador. 2. Haga clic en el botón [Start] (Inicio) de Windows y en la opción de menú [Programs] (Programas) haga clic en [D-Out Smoother]. 3. Se iniciará el D-Out Smoother. En algunos casos puede que aparezca“Cannot find USB Audio Device. Check USB cable or select USB Audio Device again.” (No se puede encontrar el dispositivo de audio USB. Compruebe el cable USB o vuelva a seleccionar Dispositivo de audio USB.) al iniciarse. Si esto sucede, el ordenador no ha detectado correctamente la unidad UA 3. Es posible que la unidad UA-3 no se haya conectado correctamente o que el controlador no se haya instalado correctamente. Consulte el apartado Instalación del controlador y conexiones (Windows) (pág. 71) y compruebe estos puntos. ■ Uso del D-Out Smoother El D-Out Smoother tiene un interruptor “ON/OFF” y un botón “TEST”. Interruptor “ON/OFF” Por lo general, debe dejar el interruptor en la posición “ON” (Activado) cuando utilice la salida digital del UA3. Póngalo en la posición “OFF” (Desactivado) cuando conecte o desconecte la unidad UA-3. 78 Instalación del controlador y conexiones (Windows) Botón “TEST” Haga clic en el botón [TEST] (Prueba). Si se oye el audio de prueba, el D-Out Smoother está funcionando para ese dispositivo. Cuando utilice dos o más Dispositivos de audio USB como UA-3 o MA-150U, utilice este botón para seleccionar la unidad UA-3 en la que va a funcionar el D-Out Smoother. Utilice el procedimiento siguiente para efectuar su selección. 1. Desde el menú [Control] (Control) de D-Out Smoother, seleccione [Setting] (Configuración) para acceder al cuadro de diálogo Setting (Configuración). (Este cuadro de diálogo aparecerá automáticamente la primera vez que se inicie el software.) 2. Desde el menú desplegable, seleccione USB Audio Device (Dispositivo de audio USB) y haga clic en [OK] (Aceptar). 3. Haga clic en el botón [TEST] (Prueba) y compruebe si se oye el audio de prueba. Si se oye el audio, el D-Out Smoother está funcionando para ese dispositivo. Si no se oye el audio, seleccione un Dispositivo de audio USB en el paso 2 y repita los pasos1 a 3. Opciones útiles ENGLISH • Cuando se selecciona [Register to STARTUP] (Registrarse al iniciar)( en el cuadro de diálogo, D-Out Smoother se iniciará automáticamente cuando inicie el ordenador. • Cuando se selecciona [Minimize window when starting up] (Minimizar ventana al iniciar) en el cuadro de diálogo Setting (Configuración), D-Out Smoother se minimizará inmediatamente después de iniciarse, permitiéndole que utilice la pantalla del ordenador de un modo más eficaz. ■ Eliminación (desinstalación) del D-Out Smoother DEUTSCH D-Out Smoother da soporte a la función Add/Remove Programs Properties (Propiedades de Agregar o quitar programas) de Windows. Puede utilizar el siguiente procedimiento para quitar el programa si ya no lo necesita. Si desinstala D-Out Smoother, debe primero deseleccionar [Register to STARTUP] (Registrarse al iniciar) en el cuadro de diálogo Setting (Configuración). Puede ir al cuadro de diálogo Setting (Configuración) seleccionando [Control] (Control) - [Setting] (Configuración). (pág. 88) ITALIANO ESPAÑOL FRANÇAIS 1. Haga clic en el botón [Start] (Inicio) de Windows y seleccione [Settings] (Configuración) - [Control Panel] (Panel de control). 2. En Control Panel (Panel de control), haga doble clic en el icono [Add/Remove Programs] (Agregar o quitar programas) para abrir el cuadro de diálogo [Add/Remove Programs Properties] (Propiedades de Agregar o quitar programas). 3. Haga clic en la ficha [Install/Uninstall] (Instalar/Desinstalar). 4. Desde la lista que aparece en el cuadro de diálogo, haga clic en el nombre de la aplicación que desea eliminar. 5. Haga clic en [Add/Remove] (Agregar o quitar) . Se eliminará la aplicación que ha especificado en el paso 4. UA-3 79 Instalación del controlador y conexiones (Macintosh) Instalación del controlador y conexiones (Macintosh) * Si es usuario de Windows, consulte la pág. 71. Para poder utilizar la unidad UA-3, primero debe instalar un controlador. UA-3 utiliza un controlador que se incluye con el sistema operativo Mac. ¿Qué es un controlador? -> pág. 71 Realización de conexiones e instalación del controlador ■ Realización de conexiones (943) Asegúrese siempre de tener bajado el volumen antes de conectar el UA-3. Aunque el volumen este completamente bajado, es posible que todavía oiga algún sonido al encender la unidad pero esto es algo normal y no indica un mal funcionamiento de la misma. (921) Para evitar anomalías en el funcionamiento o daños en los altavoces u otros dispositivos, baje siempre el volumen y apague todos los aparatos antes de realizar cualquier conexión. (No es necesario apagar el ordenador.) Utilice un cable USB para conectar el UA 3 al ordenador antes de encender el equipo de audio. Ordenador Equipo estéreo Altavoces, etc Puerto USB ENTRADA DE LÍNEA, LÍNEA AUXILIAR Cable de audio Cable USB * Conéctelo después de encender el ordenador SALIDA DE LÍNEA Puerto USB • Antes de desconectar el cable USB o reiniciar Macintosh, cierre todas las aplicaciones. También debe bajar el volumen de cualquier sistema de amplificación o de audio que esté conectado. • Esta unidad viene equipada con un circuito de protección. Es necesario dejar pasar un pequeño intervalo (de unos segundos) después de encender la unidad para que ésta funcione correctamente. Auriculares estéreo UA-3 ■ Preparación de la unidad para su reconocimiento 1. Encienda el ordenador e inicie el sistema operativo Mac. 2. Desde el menú Apple, seleccione [Apple System Profiler] (Analizador de sistema Apple). • Para evitar causar daños a los altavoces, baje el volumen de la unidad y de los dispositivos de audio que tenga conectados. • Asegúrese de salir de todas las aplicaciones que se estén ejecutando antes de realizar la conexión. 3. Haga clic en la ficha de control [Devices and Volumes] (Dispositivos y volúmenes). 4. Utilice un cable USB para conectar el UA-3 al ordenador. 80 Instalación del controlador y conexiones (Macintosh) 5. Para asegurarse de que se ha reconocido satisfactoriamente, seleccione [Update all information] (Actualizar toda la información) del menú [Commands] (Comandos). Se verán los tres dispositivos de audio siguientes en la sección USB, como se muestra a continuación: Si la indicación es correcta, la instalación del controlador UA-3 ha sido satisfactoria. Seleccione [Quit] (Salir) del menú [File] (Archivo) para cerrar el cuadro de diálogo Apple System Profiler (Analizador de sistema Apple) y efectúe las configuraciones de sonido que se explican a continuación. Si la indicación no es correcta, debe intentar desconectar la unidad UA-3 del puerto USB y esperar unos diez segundos. A continuación, vuelva a realizar el procedimiento, empezando a partir del paso 4. ■ Configuración del sonido DEUTSCH ENGLISH 6. Desde el menú Apple, seleccione [Control Panels] (Paneles de control) - [Sound] (Sonido) para abrir el cuadro de diálogo Sound (Sonido) . ESPAÑOL FRANÇAIS 7. Haga clic en la ficha [Speakers] (Altavoces). 8. Apague el volumen de la unidad UA-3 y del equipo de audio, a continuación haga clic en [Start Test] (Iniciar prueba). 9. Los sonidos de prueba se transmiten de izquierda a derecha junto con lo que aparece en la pantalla, ajuste el volumen utilizando la barra [Main Volume] (Volumen principal). Cuando haya finalizado, haga clic en [Stop Test] (Detener prueba). ITALIANO Si se coloca el Recording input select switch (Interruptor de selección de entrada de grabación) en DIGITAL, no es posible reproducir datos de audio desde el ordenador. Ponga el interruptor en la posición INPUT + GUITAR/MIC (ENTRADA + GUITAR/MIC). Dependiendo de la versión de sistema operativo, la barra [Main Volume] (Volumen principal) no existe. En ese caso, utilice la barra [Volume] (Volumen) que se encuentra en [Output] (Salida) para ajustar el volumen. UA-3 81 Instalación del controlador y conexiones (Macintosh) 10. Seleccione [Input] (Entrada) desde el cuadro de diálogo Sound (Sonido). A continuación, en Choose a source for sound input: (Seleccione una fuente para la entrada de sonido:), seleccione USB Audio (Audio USB). • Si no ve la opción USB Audio (Audio USB), debe cerrar el cuadro de diálogo Sound (Sonido). A continuación, desconecte la unidad UA-3 y espere unos diez segundos. Intente realizar de nuevo el procedimiento, empezando a partir del paso 2. • No seleccione [Play sound through output device] (Reproducir sonido a través del dispositivo de salida). 11. Cuando haya finalizado de efectuar la configuración, seleccione [Quit] (Salir) desde el menú [File] (Archivo) para cerrar el cuadro de diálogo Sound (Sonido). Problemas conocidos: UA-3 • • • • • • Algunas aplicaciones como la Serie Metro de Cakewalk y la Serie Spark de TC Work no pueden reproducir/grabar a 48 kHz. Utilice la unidad UA-3 a 44,1 kHz. Cuando la aplicación de audio está grabando o reproduciendo, no conecte o desconecte el cable USB ni mueva el Recording input select switch (Interruptor de selección de entrada de grabación). Si lo hace, la aplicación puede quedar inmovilizada. Puede que oiga que el sonido viene y va y/o ruido si graba o reproduce al mismo tiempo debido a una sobrecarga de la CPU. Sin embargo, el ruido no debe aparecer en la grabación. El ruido sólo debe aparecer en la señal de reproducción. Si va a utilizar Virtual Sound Canvas 3, debe seleccionar [Performance] (Rendimiento) desde el menú [Setting] (Configuración) y seleccionar Expression Mode (Modo de expresión) en Response Priority (Prioridad de respuesta). El controlador estándar que viene con el sistema operativo MAC no es compatible con ASIO. Cuando inicie el ordenador con la unidad UA-3 conectada, el ordenador se puede volver inestable. Si esto sucede, inicie el ordenador antes de conectar la unidad UA-3 y conecte la unidad UA-3 después de haberlo iniciado. Comprobación de la salida de sonido Una vez se han efectuado las conexiones correctamente, puede reproducir los datos de muestra para comprobar la configuración. ■ Reproducción de los datos de muestra Aquí utilizaremos la funcionalidad estándar de Macintosh para reproducir los datos de muestra. Los datos de muestra se encuentran en el CD-ROM AUDIO Capture . Inserte el CD-ROM en la unidad de CD-ROM del ordenador. Para poder escuchar los datos de muestra, necesitará aproximadamente 30 MB de espacio libre en el disco duro donde se encuentra instalado el sistema. 1. Copie “Alright en el escritorio arrastrándolo desde la carpeta “Sample_Data” del CD-ROM. 2. Inicie QuickTime Player (Reproductor QuickTime) que se proporciona con el sistema operativo MAC. El reproductor QuickTime normalmente se encuentra situado en la carpeta QuickTime dentro de la carpeta Applications (Aplicaciones) del disco duro. 82 Instalación del controlador y conexiones (Macintosh) 3. Desde el menú [File] (Archivo), seleccione [Open Movie] (Abrir película), seleccione el archivo “Alright,” que ha copiado y haga clic en [Convert] (Convertir) para abrirlo. 4. Haga clic en el botón de reproducción. Empezará la reproducción de los datos de muestra. Si se coloca el Recording input select switch (Interruptor de selección de entrada de grabación) en DIGITAL, no es posible reproducir datos de audio desde el ordenador. Ponga el interruptor en la posición INPUT + GUITAR/MIC (ENTRADA + GUITAR/MIC). ENGLISH ¿Ha podido escuchar los datos de muestra? ITALIANO ESPAÑOL FRANÇAIS DEUTSCH Si los datos de muestra se han reproducido correctamente, el ordenador y la unidad UA-3 están conectados correctamente y los controladores se han instalado correctamente. Si los datos no se han reproducido correctamente, consulte Resolución de problemas (pág. 84). El apartado Resolución de problemas contiene información para ayudarle a encontrar y corregir problemas. Con esto finaliza la instalación del controlador y las conexiones para el UA-3. UA-3 83 Resolución de problemas Resolución de problemas Si sucede un problema inesperado mientras utiliza UA-3, lea este capítulo en primer lugar. Le ofrece numerosos consejos que le ayudarán a resolver los problemas que se le presenten. Los problemas que se recogen en el apartado de resolución de problemas se encuentran ordenados según el sistema operativo en el que puede ocurrir el problema. Utilice el icono que se muestra a la izquierda del título para encontrar la información que busca. Problemas comunes a Windows y Macintosh Problemas que sólo ocurren con Windows Problemas que sólo ocurren con Macintosh Si utiliza un ordenador por primera vez o no entiende las explicaciones que se dan de un determinado proceso, consulte el manual del usuario de su ordenador o de su sistema operativo. Si la unidad UA-3 no funciona como desea, compruebe los siguientes puntos. Problemas relacionados con el controlador USB “Add New Hardware Wizard” (Asistente para agregar nuevo hardware) no se inicia automáticamente “Add New Hardware Wizard” (Asistente para agregar nuevo hardware) finaliza antes de acabar • • • • • • Cuando se conecta o desconecta el cable USB, es necesario que pasen 15 segundos (o más) para que se reconozca la unidad UA-3. ¿El cable USB está conectado correctamente? Asegúrese de que la unidad UA-3 y el ordenador están conectados correctamente con el cable USB. ¿Se puede utilizar el cable USB en el ordenador? Consulte el manual del usuario del ordenador y asegúrese de que puede utilizar el cable USB. ¿El concentrador USB o el ordenador tienen suficiente capacidad de suministro eléctrico? La unidad UA-3 no se puede conectar si no se suministra suficiente electricidad. Compruebe si se produce alguno de los casos siguientes: Si utiliza la unidad UA-3 con un ordenador portátil que funciona con baterías, el funcionamiento puede no ser fiable con algunos modelos de ordenador. Si este es el caso, conecte el adaptador de CA al ordenador portátil. El modo de conservación de energía de su ordenador puede limitar la potencia que se suministra al USB. Compruebe la configuración del ordenador. En algunos casos, la unidad UA-3 no se puede utilizar con un concentrador controlado por bus (un concentrador que no contiene una fuente de alimentación). Utilice un concentrador con alimentación propia (un concentrador que contenga una fuente de alimentación). ¿Cumple su ordenador con las especificaciones USB? Si utiliza un ordenador que no cumple con las especificaciones USB (como, por ejemplo, un ordenador casero), el funcionamiento puede ser inestable. En estos casos, puede resolver el problema conectando un concentrador USB que contenga una fuente de alimentación. ¿Aparece el aviso “Unknown Device” (Dispositivo desconocido) o “Universal Serial Bus controllers” (Controladoras de bus serie universal)? Utilice el siguiente procedimiento para eliminar “Unknown Device” (Dispositivo desconocido) de “Other devices” (Otros dispositivos) (Universal serial bus controller) (Controlador de bus serie universal) y reinicie el ordenador. Para comprobar si el “Unknown Device” (Dispositivo desconocido) es la unidad UA-3, desconecte el cable USB de la unidad UA-3 y verifique que “Unknown Device” (Dispositivo desconocido) ha desaparecido. A continuación, conecte la unidad UA-3 y elimine “Unknown Device” (Dispositivo desconocido). 1. 2. 3. 4. 5. 6. En el Control Panel (Panel de control) de Windows, haga doble clic en [System] (Sistema) para abrir el cuadro de diálogo System Properties (Propiedades del sistema). Haga clic en la ficha [Device Manager] (Administrador de dispositivos). Haga doble clic en [Other devices] (Otros dispositivos) (Universal Serial Bus controllers) (Controladoras de bus serie universal) para ver la lista de dispositivos. De la lista, seleccione Unknown Device (Dispositivo desconocido) y haga clic en [Remove] (Quitar). En el cuadro de diálogo Confirm Device Removal (Confirmar la eliminación del dispositivo) haga clic en [OK] (Aceptar). Asegúrese de que la lista no muestra Other devices (Otros dispositivos) o Unknown Device (Dispositivo desconocido) y haga clic en [Close] (Cerrar) para cerrar el cuadro de diálogo. Aparece el cuadro de diálogo “Add New Hardware Wizard” (Asistente para agregar nuevo Hardware) aunque haya instalado los controladores. Si el ordenador o el concentrador USB tienen dos o más conectores USB, si conecta la unidad UA-3 a un conector USB al que no se le haya conectado nunca la unidad UA-3 puede que aparezca el cuadro de diálogo Add New Hardware Wizard (Asistente para agregar nuevo hardware) aunque los controladores ya hayan sido instalados. Instale los controladores de nuevo tal y como se describe en Instalación del controlador y conexiones (Windows) (pág. 71). Esto no significa que el funcionamiento sea defectuoso. 84 Resolución de problemas Los controladores no se han instalado correctamente Utilice el procedimiento que se describe en Eliminación del controlador de dispositivo de audio USB (pág. 77) para eliminar el controlador del dispositivo de audio USB instalado en el ordenador e instale los controladores UA-3 de nuevo tal y como se describe en Instalación del controlador y conexiones (Windows) (pág. 71). Compruebe si hay un elemento llamado “Unknown Device” (Dispositivo desconocido) en “Other devices” (Otros dispositivos) o en “Universal Serial Bus controllers.” (Controladores de bus serie universal). Si encuentra “Unknown Device,” (Dispositivo desconocido), elimínelo. Aparece un cuadro de diálogo que muestra “Unknown Device found” (Se ha encontrado un dispositivo desconocido) y no se puede instalar el controlador. Dependiendo del ordenador, puede que no se hayan instalado todos los archivos de Windows 98 necesarios para dar soporte a audio sobre USB cuando el ordenador salió de fábrica. Compruébelo con el fabricante del ordenador. Problemas al utilizar UA-3 El sistema operativo se vuelve inestable Si inicia el ordenador estando la unidad UA-3 ya conectada puede que el ordenador se vuelva inestable. Si esto sucede, inicie el ordenador con la unidad UA-3 desconectada y, a continuación, conéctela. ENGLISH • ■ No hay sonido ESPAÑOL FRANÇAIS DEUTSCH • ¿Está colocado el interruptor de selección de entrada de grabación en la posición “INPUT + GUITAR/MIC” (ENTRADA + GUITAR/MIC)? Cuando el Recording input select switch (interruptor de selección de entrada de grabación) se ha colocado en “DIGITAL,” se transmite la entrada de las señales de audio al conector de entrada digital. Los datos de audio del ordenador no se transmiten. • ¿Está conectado un dispositivo digital como un MD a la salida digital de la unidad UA-3? Dependiendo de la aplicación, la reproducción de audio con un dispositivo digital como un MD que se ha conectado a la salida digital de la unidad UA-3 puede ocasionar que se requiera un tiempo para que se bloquee la salida de audio digital inmediatamente después de la reproducción, de modo que no habrá sonido durante uno o dos segundos. Si esto sucede, puede utilizar el software de D-Out Smoother que se incluye en el CD-ROM para que la reproducción de audio se realice sin problemas. Para más información, consulte el apartado Funcionamiento básico del D-Out Smoother (pág. 78). • ¿Está intentando escuchar un CD de audio en la unidad de CD del ordenador? Si desea reproducir un CD de audio en la unidad de CD-ROM del ordenador, consulte el apartado Cuando utilice la unidad de CD-ROM del ordenador para escuchar un CD de audio o cuando reproduzca música de fondo para juegos con el UA-3 (pág. 76). • ¿Está ejecutando varias aplicaciones simultáneamente? Si está ejecutando varias aplicaciones simultáneamente, puede que aparezca un mensaje de error. Si esto sucede, haga clic en [OK] (Aceptar) y cierre las otras aplicaciones. Aunque se cierre una ventana de aplicación, ésta se encuentra todavía en funcionamiento si sigue en la barra de tareas, de modo que asegúrese de que únicamente dispone de las aplicaciones necesarias en la barra de tareas. • ¿Ha especificado el destino de la salida de datos de audio para el sistema operativo? El destino de la salida de datos de audio de un ordenador se debe establecer en UA-3. Para obtener más información sobre esta configuración, consulte Especificación del aparato de entrada/salida de audio (Windows pág. 75) o Configuración del sonido (Macintosh pág. 81). • ¿Ha especificado el destino de la salida de datos de audio para el software de reproducción? En determinados tipos de software como Cool Edit Pro LE, debe establecer el destino de la salida de datos de audio en UA-3. Para obtener detalles sobre esta configuración, consulte el manual del usuario que se adjunta con el software. • ¿Están los controladores instalados correctamente? Para reproducir datos de audio utilizando la unidad UA-3, debe tener instalado el controlador USB Audio Device (Dispositivo de audio USB). Para obtener más detalles sobre la instalación y la configuración, consulte Instalación del controlador y conexiones (Windows pág. 71, Macintosh pág. 80). • ¿Se encuentran subidos los diferentes “faders” (atenuadores) del control de volumen? Ajuste el volumen de cada “fader” (atenuador) tal y como se describe en Configuración del control de volumen (Windows pág. 75) o Configuración del sonido (Macintosh pág. 81). ■ El sonido está distorsionado ITALIANO • ¿Se enciende el indicador rojo de pico? Si transmite sonido desde los jacks de entrada de línea, utilice el Line input adjustment slider (Deslizador de ajuste de entrada de línea) de la unidad UA-3 para reducir el nivel de entrada. Si transmite sonido desde los jacks de entrada de guitarra o micrófono, utilice el Guitar/Mic input adjustment slider (Deslizador de ajuste de entrada Guitar/Mic) para reducir el nivel de entrada. Además, el número de indicadores LED en el indicador de nivel de salida cambiará según el nivel de salida de la unidad UA-3. Si el LED rojo se ilumina, utilice el volumen de salida de línea para reducir el volumen. El nivel de volumen del instrumento conectado a la LINE IN (ENTRADA DE LÍNEA) es demasiado bajo. • • UA-3 ¿Está utilizando un cable de conexión que contiene un reostato? Utilice un cable de conexión que no contenga un reostato. ¿Está levantado correctamente el deslizador de ajuste de entrada de línea? (pág. 70). 85 Resolución de problemas ■ Se oye ruido al reproducir audio • ¿Está todavía conectado el micrófono? Si se encuentra conectado un micrófono a la unidad UA-3, utilice el Guitar/Mic input adjustment slider (Deslizador de ajuste de entrada Guitar/Mic) para bajar el nivel de entrada. • El acelerador gráfico del ordenador puede provocar ruido durante la reproducción de audio. Utilice el procedimiento siguiente para establecer la aceleración gráfica a “None.” (Ninguna) 1. En el Control Panel (Panel de control) de Windows, haga doble clic en [Display] (Pantalla) para abrir el cuadro de diálogo Display Properties (Propiedades de pantalla) y haga clic en la ficha [Settings] (Configuración). 2. Haga clic en [Advanced] (Propiedades avanzadas) para abrir las propiedades y haga clic en la ficha [Performance] (Rendimiento). 3. En Graphics (Gráficos), mueva el deslizador que se encuentra en la opción Hardware acceleration: (Aceleración de hardware:) a None (Ninguna), y haga clic en [OK] (Aceptar). 4. En el cuadro de diálogo Display Properties (Propiedades de pantalla), haga clic en el botón [OK] (Aceptar) para cerrarlo. A continuación, reinicie el ordenador. • Se oye ruido en la entrada de línea o en la entrada del micrófono Si un módulo de sonido MIDI y la unidad UA-3 están conectados mediante USB al mismo ordenador y la salida del módulo de sonido MIDI está conectada a los jacks de entrada de línea de la unidad UA-3, puede entrar ruido del ordenador mediante el módulo de sonido MIDI y se puede oír desde la unidad UA-3. En estos casos, utilice un concentrador con alimentación propia para conectar el módulo de sonido MIDI y la unidad UA-3 en paralelo o conecte el módulo de sonido MIDI mediante la interfaz serie o interfaz MIDI. • Se puede oír ruido si graba y reproduce simultáneamente. Si graba y reproduce simultáneamente, se puede interrumpir la reproducción dependiendo del rendimiento del sistema y esto se puede escuchar como ruido. Sin embargo, puesto que se da prioridad a la grabación, los datos grabados no se perderán. • Se puede resolver este problema poniendo una toma de tierra en el chasis del ordenador o en el terminal de contacto de la toma de tierra de la clavija del cable de CA que se suministró con el ordenador. Asegúrese también de que no hay aparatos en las proximidades que emitan un campo magnético considerable como un televisor o un microondas. • ¿Se encuentran conectados muchos aparatos de audio? Si se encuentran conectados muchos aparatos de audio, se puede producir ruido. No conecte los aparatos de audio que no esté utilizando. ■ Se interrumpe el sonido durante la reproducción de audio. • Intente aumentar la memoria Puede aumentar la potencia de procesamiento de su ordenador añadiendo más memoria. Para obtener detalles sobre cómo añadir memoria, consulte el manual del usuario que se adjunta con su ordenador. • ¿Cumple su ordenador con las especificaciones USB? Si utiliza un ordenador que no cumple con las especificaciones USB de tipo eléctrico se puede interrumpir el audio. En este caso, se puede resolver el problema si conecta un concentrador USB que contiene su propia fuente de alimentación. • ¿Se están ejecutando varias aplicaciones? Si utiliza varias aplicaciones durante la reproducción o inicia otra aplicación, se puede interrumpir la reproducción dependiendo del sistema de su ordenador. Salga de todas las aplicaciones que no utilice y vuelva a intentarlo. Si de este modo no se soluciona el problema, intente reiniciar el ordenador. • Intente realizar los siguientes cambios en la configuración de la unidad de disco. * Puede que no exista la configuración siguiente en su ordenador. 1. 2. 3. 4. En el Control Panel (Panel de control) de Windows, haga doble clic en [System] (Sistema) para abrir el cuadro de diálogo System Properties (Propiedades del sistema) y haga clic en la ficha [Device Manager] (Administrador de dispositivos). Haga doble clic en [Disk drives] (Unidades de disco) para ver la lista de dispositivos. De la lista, seleccione GENERIC IDE DISK TYPExx y haga clic en [Properties] (Propiedades) para acceder a la casilla de verificación GENERIC IDE DISK TYPExx Properties (Propiedades de GENERIC IDE DISK TYPExx). * El valor “xx” en GENERIC IDE DISK TYPExx será un número que variará dependiendo del sistema. Haga clic en la ficha [Settings] (Configuración), seleccione el cuadro de verificación [DMA] que se encuentra en Options (Opciones) y haga clic en [OK] (Aceptar) para cerrar el cuadro de diálogo. * Dependiendo del sistema, puede aparecer un cuadro de diálogo para la configuración DMA. Después de comprobar el contenido, haga clic en OK (Aceptar) o Cancel (Cancelar). 5. En el cuadro de diálogo System Properties (Propiedades del sistema), haga clic en el botón [OK] (Aceptar) para cerrarlo. Reinicie el ordenador de modo que la configuración que ha establecido surta efecto. ■ Se detiene la reproducción de audio • En algunos ordenadores, la configuración de Administración de energía del Panel de control puede ocasionar que se detenga la reproducción de audio. Las Propiedades de Administración de energía que se muestran cuando hace doble clic en Power Management (Administración de energía) variarán dependiendo del sistema de su ordenador. A continuación se da un ejemplo, pero también debe consultar el manual de usuario del ordenador. Algunos ordenadores quizá no tengan la configuración siguiente. 1. En el Control Panel (Panel de control) de Windows, haga doble clic en [System] (Sistema) para abrir el cuadro de diálogo System Properties (Propiedades del sistema) y haga clic en la ficha [Device Manager] (Administrador de dispositivos). 2. Haga doble clic en [System devices] (Dispositivos de sistema) para ver la lista de dispositivos. 3. De la lista, seleccione [Advanced Power Management support] (Compatibilidad para Administración avanzada de energía) y haga clic en [Properties] (Propiedades) para acceder al cuadro de diálogo Advanced Power Management support properties (Propiedades de Compatibilidad para Administración avanzada de energía). 4. Haga clic en la ficha [Settings] (Configuración) y en Troubleshooting (Solución de problemas), seleccione la casilla de verificación [Disable power status polling] (Desactivar consulta del estado de energía). A continuación, haga clic en [OK] (Aceptar). 5. En el cuadro de diálogo System Properties (Propiedades del sistema), haga clic en el botón [OK] (Aceptar) para cerrarlo. 6. Reinicie Windows. 86 Resolución de problemas El sonido grabado digitalmente está distorsionado, el pitch cambia o contiene ruido • • • Si utiliza un cable digital largo, se puede producir ruido o el sonido se puede distorsionar cuando se conecta. Utilice cables digitales que midan un metro o menos. ¿Coincide la configuración de frecuencia de sampling de la aplicación con la frecuencia de sampling del aparato digital conectado al conector de entrada digital? Cuando utiliza la grabación digital no es posible grabar en monoaural. Configure el software de grabación en el valor “stereo” (estéreo). Hay ruido en el sonido grabado • • • Se ha descubierto que se introduce ruido en el sonido grabado con los modelos de la serie iMac que salieron a la venta después del verano de 2000. En la aplicación SimpleSound que se incluye con el sistema operativo Mac, se oirá ruido en el sonido si se reproduce inmediatamente después de haber sido grabado digitalmente. Guarde primero el sonido y, a continuación, intente reproducirlo. Actualice el controlador de audio USB a 1.0.5f4. Si el controlador de audio USB que se proporciona con el sistema operativo Mac, es inferior a 1.0.4, actualícelo a 1.0.5f4. Puede bajar el controlador desde la URL que aparece a continuación: http://asu.info.apple.com/swupdates.nsf/artnum/n11703 1. 2. 3. 4. 5. ENGLISH Comprobación de la versión del controlador de audio USB Conecte la unidad UA-3 al ordenador. Desde el menú Apple, seleccione [Apple System Profiler] (Analizador de sistema Apple). Haga clic en la ficha [Devices and Volumes] (Dispositivos y volúmenes). En la sección USB, la pantalla indicará “Audio (UA-3 USB Audio Device) (Audio (Dispositivo de audio USB UA-3)).” Haga clic en la flecha que se encuentra a la izquierda del texto. El número que se muestra a la derecha de “Driver version” (Versión de controlador) es la versión del controlador de audio USB. ■ Cuando graba se crea un archivo en blanco (sin sonido) DEUTSCH • Intente configurar la velocidad de bits a 16 bits. Si utiliza Windows98 Segunda edición y el software de grabación está configurado a una velocidad de bits de 8 bits, puede crearse un archivo en blanco de modo que quizá no pueda grabar de forma efectiva. Si esto sucede, podrá grabar correctamente configurando la velocidad de bits a 16 bits. • Los datos que contienen el indicador SCMS no se pueden grabar digitalmente. La unidad UA-3 da soporte a SCMS (pág. 68), de modo que si los datos marcados con SCMS (como por ejemplo los datos que provengan de un MD que se ha copiado digitalmente de un CD de música comercial) entran a través del conector digital, el UA-3 no podrá grabarlos en el ordenador. (El sonido se transmitirá desde los jacks de salida de línea y el jack de auriculares) No se puede grabar digitalmente • • ¿Está colocado el interruptor de selección de entrada de grabación en la posición “DIGITAL”? ¿Está la aplicación configurada en la misma frecuencia de sampling que el aparato digital conectado al conector de entrada digital? La grabación no será posible si cambia la frecuencia de sampling (por ejemplo, entre el modo A y el modo B de transmisión digital) de un aparato mientras permanece conectado a los conectores de entrada digital. Cuando cambie la frecuencia de sampling, debe desconectar y volver a conectar el cable digital. No es posible grabar datos digitales de un formato distinto al formato del aparato de audio digital del consumidor. FRANÇAIS • • No se pueden grabar CDs de música El UA-3 no puede grabar CDs de música en la unidad de CD-ROM con CoolEdit Pro LE u otros programas. Para grabar CDs de música en la unidad de CD-ROM del ordenador, primero seleccione la tarjeta de sonido del ordenador como el dispositivo de audio (Waveform Record) (Grabación tipo forma de onda) que se va a utilizar para grabar con CoolEdit Pro LE (o la aplicación que esté utilizando), a continuación puede continuar con la grabación. Cuando graba un CD de música con una tarjeta de sonido, desactive “Enable digital CD audio for this CD-ROM device” (Habilitar el CD de sonido digital para este dispositivo de CD-ROM) que activó en Cuando utilice la unidad de CD-ROM del ordenador para escuchar un CD de audio o cuando reproduzca música de fondo para juegos con el UA-3 (pág. 76). ESPAÑOL • El volumen ha cambiado cuando ha reanudado el sistema después de haber estado en modo de suspensión o hibernación. Cuando se reanuda Windows 2000 después de haber estado en modo de suspensión o hibernación, el volumen de salida se cambia debido a un problema de Windows. Inicie la aplicación Mixer (Mezclador) como se describe en Configuración del control de volumen (pág. 75) y ajuste el deslizador USB Audio (Speaker) (Audio USB (Altavoz)). ITALIANO • La música de fondo de un juego no suena • UA-3 ¿El juego utiliza un CD de audio como música de fondo? Si el juego utiliza un CD de audio como música de fondo, consulte el apartado Cuando utilice la unidad de CD-ROM del ordenador para escuchar un CD de audio o cuando reproduzca música de fondo para juegos con el UA-3 (pág. 76). 87 Resolución de problemas Problemas habituales con el software en general No se puede instalar • • • ¿Ha insertado el CD-ROM en la unidad de CD-ROM del ordenador? ¿Se ha puesto correctamente durante la instalación el nombre de la unidad de CD-ROM y del archivo de instalación? ¿Hay suficiente espacio en el disco duro? Aumente el espacio libre en el disco duro. Elimine los archivos que no necesita (muévalos a la papelera de reciclaje) y, a continuación, haga clic con el botón secundario en la papelera de reciclaje y seleccione Empty Recycle Bin (Vaciar papelera de reciclaje). También puede añadir otro disco duro al sistema. Para obtener más detalles sobre cómo instalar un disco duro, consulte el manual del usuario del ordenador y de Windows. • ¿Se estaban ejecutando otras aplicaciones cuando realizó la instalación? Salga de todas las aplicaciones y vuelva a realizar la instalación. No se puede iniciar una aplicación • ¿Se están ejecutando varias aplicaciones? Puede que no haya memoria suficiente para iniciar otra aplicación. Cierre todas las aplicaciones que no necesite y, a continuación, inicie la nueva aplicación. Si se muestra todavía un error, intente reiniciar el ordenador. Se muestra un error cuando inicia una aplicación • • Si está iniciando varias aplicaciones simultáneamente, puede que aparezca un mensaje de error Si esto sucede, haga clic en [OK] (Aceptar) y cierre todas las aplicaciones que no sean necesarias. Aunque se haya cerrado una ventana de aplicación, la aplicación sigue todavía ejecutándose si permanece en la barra de tareas. Asegúrese de cerrar las aplicaciones que no sean necesarias que se encuentren en la barra de tareas. Si utiliza Cakewalk Pro Audio, debe asegurarse de que la frecuencia de sampling de Cakewalk Pro Audio se encuentra en 44,1 kHz. En Cakewalk ProAudio 7, 8 y 9 la frecuencia de sampling se puede configurar del modo siguiente: [Tools] (Herramientas) - [Audio options] (Opciones de audio) - [Settings] (Configuración)- [Default sampling rate] (Velocidad de sampling predeterminada) Una aplicación se bloquea • Si utiliza software de música digital para la grabación digital y tiene el interruptor de entrada de grabación de la unidad UA-3 en DIGITAL, asegúrese bien de que se encuentra conectado un aparato digital. Aunque en algunas aplicaciones las limitaciones de Windows pueden hacer el ratón u otros aparatos no funcionen hasta que no se haya conectado un aparato digital, esto no significa que la aplicación no funcione correctamente. Si no ocurre nada cuando utiliza el ratón u otro dispositivo similar, vuelva a conectar el aparato digital. Confirme este caso con las siguientes aplicaciones (Vigentes desde enero de 2001). •Logic Audio 3.0 o 4.0 Durante la grabación •Cubase VST 3.7 Durante Startup/Recording/Playback (Inicio/Grabación/Reproducción) •Cubase ASIO Multimedia Setup Durante la comprobación Confirme que los eventos o condiciones que se mencionan arriba no se producen con las siguientes aplicaciones. •Cakewalk Pro Audio 7, 8 y 9 •CoolEditProLE •Grabadora de sonidos (Incluida con Windows 98) Aparece un error de método abreviado al iniciar Windows Si desinstala D-Out Smoother con la opción Register to STARTUP (Registrarse al iniciar) seleccionada (pág. 79), aparecerá el siguiente mensaje de error cuando inicie Windows. En este caso, haga clic en [NO] para cerrar el mensaje. Utilice el procedimiento siguiente para borrar este mensaje. 1. Haga clic en el botón [Start] (Inicio) de Windows y seleccione [Settings] (Configuración) - [Taskbar & Start Menu] (Menú Inicio y Barra de tareas). 2. Haga clic en la ficha [Start Menu Programs] (Programas del menú Inicio) y, a continuación, haga clic en [Remove] (Quitar). 3. Seleccione [Programs] (Programas) - [StartUp] (Inicio) - [SmoothDo], y haga clic en [Remove] (Quitar). 88 Leggere attentamente quanto segue prima di avviare la registrazione digitale La registrazione, distribuzione, vendita, affitto, esecuzione pubblica, trasmissione o simili, in tutto o in parte, non autorizzate, di un lavoro (composizione musicale, video, trasmissione, esecuzione pubblica, o simili) di cui una terza parte detiene i diritti di copyright, sono proibiti dalla legge. ENGLISH Quando questo apparecchio trasmette segnali audio tramite un collegamento digitale ad un apparecchio esterno, alcune delle restrizioni del Serial Copy Management System (SCMS) non sono applicabili ed è quindi possibile effettuare la registrazione. Questo perché l’apparecchio è stato ideato per la sola produzione musicale e non è soggetto a limitazioni nella misura in cui viene utilizzato per registrare lavori, ad esempio le composizioni personali, che non infrangono i diritti di copyright di terzi. (SCMS è una funzionalità che proibisce la copia di seconda generazione e successive eseguite tramite un collegamento digitale. È integrata nei registratori MD e in altri apparecchi audio digitali sotto forma di funzionalità di protezione del copyright.) Informazioni sull’UA-3 La funzionalità SCMS verrà applicata parzialmente nell’UA-3 solo per i segnali digitali trasmessi da un dispositivo esterno. Quando i dati contenenti i flag SCMS provengono ad esempio da un MD copiato digitalmente a partire da un CD musicale commercializzato, l’UA-3 funzionerà come segue: DEUTSCH Se i segnali provengono dal connettore d’ingresso digitale dell’UA-3: • L’UA-3 non potrà registrare i dati sul computer • L’audio proverrà dalle uscite analogiche (prese di uscita della linea, presa delle cuffie) e dal connettore di uscita digitale. Se i segnali provengono dagli ingressi analogici dell’UA-3 (prese d’ingresso della linea): • La registrazione potrà essere effettuata normalmente A prescindere dalla presenza o assenza dei flag SCMS, i dati che arrivano al connettore d’ingresso digitale dell’UA-3 verranno emessi direttamente dal connettore di uscita digitale. FRANÇAIS Non utilizzare questo apparecchio per scopi che potrebbero ledere i diritti di copyright di terze parti. Roland non potrà in alcun caso essere ritenuta responsabile di eventuali violazioni dei diritti di copyright di terze parti perpetrate con l’uso di questo apparecchio. Questo apparecchio non supporta i segnali audio digitali che sono formattati per la dispositivi audio digitali di studi di registrazioni. ITALIANO ESPAÑOL L’UA-3 applica la funzionalità SCMS solo nel caso di segnali digitali provenienti da un dispositivo esterno. I flag SCMS non sono aggiunti ai segnali audio digitali che sono emessi dall’UA-3. UA-3 89 Introduzione Introduzione Controllo del contenuto della confezione L’UA-3 comprende i seguenti componenti. Controllare che tutti i componenti siano presenti nella confezione. Se ne mancano, contattare il rivenditore dove è stato acquistato l’UA-3. UA-3 Cavo USB Utilizzare questo cavo per collegare l’UA-3 al connettore USB del computer. Per ulteriori dettagli sui collegamenti, fare riferimento a Collegamenti e installazione del driver (Windows pag. 92, Macintosh pag. 101). Utilizzare solo il cavo USB in dotazione. CD-ROM AUDIO Capture Contiene il software necessario per poter utilizzare l’UA-3. * Accertarsi di leggere il file Readme_E.txt sul CD-ROM AUDIO Capture. Vi si troveranno tutte le informazioni più aggiornate. • Prima di aprire la confezione del CD-ROM in dotazione, è necessario leggere il contratto di licenza separato. • Non toccare la superficie argentata di registrazione del disco né graffiarla altrimenti i dati non verranno letti correttamente. Se il disco è sporco, utilizzare un detergente apposito disponibile nel commercio. • Non riprodurre il CD-ROM su un normale lettore di CD audio. Potrebbe venire emesso un suono acuto che danneggia le orecchie o gli altoparlanti. Introduzione all’uso: Conservare questo documento per un utilizzo futuro. Contratto di licenza Descrive i termini e le condizioni in base alle quali Roland Corporation permette l’uso del programma. È necessario leggerlo prima di aprire la confezione del CD-ROM. I seguenti componenti dovranno essere forniti dall’utente amplificatore esterno, altoparlanti, cuffie e microfono non sono forniti l’amplificatore esterno, gli altoparlanti o le cuffie necessari per l’ascolto dell’audio emesso dall’UA-3 non sono forniti e nemmeno il microfono per trasmettere l’audio all’UA-3. L’utente dovrà fornire lui stesso questi componenti. I cavi d’ingresso/uscita digitale per il collegamento del registratore MD o DAT non sono forniti Anche se è possibile usare un registratore digitale DAT o MD per la registrazione digitale, i cavi utilizzati per collegare il registratore all’UA-3 non sono forniti. I seguenti componenti dovranno essere forniti dall’utente. 90 Introduzione Parti dell’UA-3 e loro funzione 3 2 1 4 5 6 • Microfono condenser L’UA-3 supporta piccoli microfoni multimediali utilizzati per aggiungere la voce ed è compatibile con microfoni monofonici plug-in. • Se la registrazione avviene solo dagli ingressi linea, scollegare i cavi dalla presa d’ingresso chitarra e dalla presa d’ingresso del microfono. 9 7 10 8 11 13 14 15 1 Presa d’ingresso del microfono 2 Prese d’ingresso linea 3 Prese d’uscita linea 16 17 ENGLISH 12 • L’UA-3 non è compatibile con i microfoni condenser che richiedono un’alimentazione phantom e che sono generalmente utilizzati nel campo musicale. Inoltre non è compatibile con i microfoni stereo forniti a volte unitamente agli MD. • Non è possibile riprodurre dati audio informatici se DIGITAL è selezionato. 4 Connettore di ingresso digitale (ottico) 5 Connettore di uscita digitale (ottico) 8 9 Interruttore di selezione del tipo di microfono Impostare questo interruttore in base al tipo di microfono che è collegato alla presa d’ingresso del microfono Se è collegato un microfono dinamico: “DYNAMIC” Se è collegato un microfono condenser: “CONDENSER” Interruttore di selezione dell’ingresso di registrazione Seleziona l’ingresso che verrà utilizzato per la registrazione. Connettori di ingresso digitale 4 : “DIGITAL” Presa ingresso microfono 1 / Prese ingresso linea GUITAR/MIC” 2 / Presa ingresso chitarra 14 1 . :“INPUT + FRANÇAIS 7 DEUTSCH 6 Connettore USB Indicatore USB Si accende quando l’UA-3 è collegato e riconosciuto dal computer. 10 Indicatore di livello uscita Il numero di LED che si illuminano cambia a seconda del livello di output dalla presa delle cuffie 17 e dalle prese di uscita linea 3 . Se si illumina il LED rosso, utilizzare la manopola del volume di uscita linea 11 per ridurre il volume. 11 Volume d’uscita linea Regola il volume dell’audio emesso dalla presa delle cuffie 17 e dalle prese di uscita linea 3 . 12 Indicatore d’ingresso peak chitarra/microfono ESPAÑOL Se il livello di ingresso dalla presa d’ingresso chitarra 14 e dalla presa d’ingresso microfono 1 è eccessivo, diventa rosso. Se diventa rosso, utilizzare lo slider di regolazione dell’ingresso chitarra/microfono 13 per ridurre il livello d’ingresso. 13 Slider di regolazione d’ingresso chitarra/microfono Lo slider regola il livello d’ingresso della presa d’ingresso chitarra 14 e della presa d’ingresso microfono 1 . 14 Presa d’ingresso chitarra 15 Cursore di regolazione ingresso linea Lo slider regola il livello d’ingresso delle prese d’ingresso linea 2 . ITALIANO 16 Indicatore peak ingresso linea Se il livello d’ingresso delle prese d’ingresso linea 2 è eccessivo, diventa rosso. Se diventa rosso, utilizzare lo cursore di regolazione d’ingresso linea 15 per ridurre il livello d’ingresso. 17 Presa cuffie Si può collegare un set di cuffie. Anche se sono collegate le cuffie, l’audio verrà comunque emesso dalle prese di uscita linea 3 . * UA-3 Per ulteriori informazioni sull’uso dei vari controlli e connettori, fare riferimento a UA-3 Application Guide (pag. 110). 91 Collegamenti e installazione del driver (Windows) Collegamenti e installazione del driver (Windows) * Per gli utenti Macintosh, fare riferimento a pag. 101. Per poter utilizzare l’UA-3, è necessario installare prima il driver USB Composite Device[Periferica composita USB] e successivamente nell’ordine il driver USB Human Interface[Interfaccia utente USB] e il driver USB Audio Device[Periferica audio USB]. Questi driver sono forniti con Windows. Se si utilizza Windows 98, questo driver si trova nel CD-ROM di Microsoft Windows, che sarà quindi necessario avere pronto. Se si utilizza Windows Me o 2000, il CD-ROM non è necessario. Definizione di un driver Un driver è un programma informatico che permette di eseguire un’applicazione sul computer per trasferire i dati da e verso l’UA-3 quando l’apparecchio è collegato al computer tramite un cavo USB. Il driver trasmette i dati dall’applicazione all’UA-3 e viceversa. Prima di installare il driver Applicazione • Non è possibile utilizzare l’UA-3 con Windows 95 o Windows NT. • Se altri programmi Windows sono in esecuzione, chiuderli prima di continuare la procedura. • Se si devono collegare contemporaneamente più apparecchi Roland USB (ad esempio l’UA-3 ed altri dispositivi USB come l’UA100G) al computer, scollegare l’UA-100G o gli altri dispositivi dal connettore USB prima di installare il driver. Se il driver viene installato mentre sono collegati gli apparecchi USB, come l’UA100G, l’installazione potrebbe non essere corretta. Porta USB Porta USB Cavo USB UA-3 Computer Collegamenti e installazione del driver ■ Collegamenti Prima di collegare l'UA-3, accertarsi che il volume sia al minimo. Si potrebbero sentire comunque dei suoni all'accensione, anche se il volume è al minimo; è normale e non c'è motivo di preoccuparsi. Per evitare malfunzionamenti e/o danni ai diffusori o ad altri dispositivi, abbassare sempre il volume e accertarsi che tutti gli apparecchi non siano alimentati prima di effettuare i collegamenti. (Non è necessario spegnere il computer.) Utilizzare un cavo USB per collegare l’UA-3 al computer prima di accendere gli apparecchi audio. Computer Impianto stereo Altoparlanti alimentati, ecc. Porta USB LINE IN, AUX IN Cavo audio Cavo USB * Collegare dopo aver avviato il computer LINE OUT Porta USB Cuffie stereo UA-3 92 • Prima di scollegare il cavo USB o di riavviare Windows, chiudere tutte le applicazioni. Abbassare anche il volume degli apparecchi audio o degli amplificatori collegati. • Questo apparecchio è provvisto di un circuito di protezione. È necessario aspettare qualche secondo dopo aver inserito un connettore USB prima che l’apparecchio funzioni normalmente. Collegamenti e installazione del driver (Windows) ■ Installazione del driver (Windows Me) * Se si lavora in ambiente Windows 2000, fare riferimento a pag. 93, se Windows 98, fare riferimento a pag. 93. 1. Accendere il computer e avviare Windows e utilizzare un cavo USB per collegare l’UA-3 al computer. 2. Non appena Windows rileva l’UA-3 e compare la finestra di dialogo Add New Hardware Wizard [Installazione guidata Nuovo hardware], accertarsi che la casella “Automatic search for a better driver (Recommended)”[Ricerca automatica di un driver migliore di quello in uso (scelta consigliata)] sia selezionata e fare clic su [Next] [Avanti]. ENGLISH Questa finestra potrebbe richiedere un certo tempo prima di essere visualizzata DEUTSCH 3. Viene avviata la ricerca del driver. 4. Una volta che il driver corretto è stato trovato, comincia l’installazione. 5. Nella finestra indicante che l’installazione del driver è giunta al termine, fare clic su [Finish] [Fine] e riavviare Windows. Dopo aver installato il driver, fare riferimento a Indicazione del dispositivo audio d’ingresso/uscita (pag. 96) e selezionare il dispositivo utilizzato da Windows. A seconda della configurazione informatica, potrebbe passare un breve intervallo di tempo tra l’installazione e il riconoscimento del driver. FRANÇAIS * ■ Installazione del driver (Windows 2000) * Se si lavora in ambiente Windows Me, fare riferimento a pag. 93, se Windows 98, fare riferimento a pag. 93. ESPAÑOL 1. Accendere il computer e avviare Windows. 2. Utilizzare un cavo USB per collegare l’UA-3 al computer. L’UA-3 è riconosciuto dal computer e il driver è installato automaticamente. 3. Dopo aver installato il driver, riavviare Windows. ■ Installazione del driver (Windows 98) * Se si lavora in ambiente Windows Me, fare riferimento a pag. 93, se Windows 2000, fare riferimento a pag. 93. ITALIANO L’installazione dei driver deve rispettare la seguente successione:USB Composite Device [Periferica composta USB], USB Human Interface Device [Periferica interfaccia utente USB] e infine USB Audio Device [Periferica audio USB]. Seguire la procedura sotto indicata per eseguire l’installazione. 1. Accendere il computer e avviare Windows. Inserire il CD-ROM di Microsoft Windows nell’unità corrispondente e utilizzare un cavo USB per collegare l’UA-3 al computer (pag. 92). Poiché alcuni computer sono venduti con il contenuto del CD-ROM di Microsoft Windows già installato sul disco rigido, il CD in questione potrebbe non essere stato fornito. In questo caso il driver potrà essere installato senza il CD-ROM di Microsoft Windows UA-3 93 Collegamenti e installazione del driver (Windows) Il dispositivo USB Composite Device [Periferica composta USB] viene rilevato automaticamente e appare la finestra di dialogo Add New Hardware Wizard [Installazione guidata Nuovo hardware]. Fare clic su [Next][Avanti]. Se questa finestra non appare, fare riferimento a Problemi relativi al driver USB (pag. 105) 2. Al messaggio “What do you want Windows to do? ”[Scegliere l’operazione da effettuare], selezionare “Search for the best driver for your device [Cerca il miglior driver per la periferica]. (Recommended) [Scelta consigliata].” e fare clic su [Next][Avanti]. 3. Appare la seguente finestra di dialogo. Selezionare la casella CDROM drive[Unità CD-ROM] e fare clic su [Next][Avanti]. 4. Appare la seguente finestra di dialogo. Fare clic su [Next][Avanti]. * A seconda del sistema utilizzato, la finestra Location of driver [Percorso del driver] potrebbe essere diversa da quella di seguito illustrata, ma non è un problema. 5. A questo punto comincerà la copia dei file. Se il CD-ROM di Microsoft Windows non è presente nell’unità CD-ROM, potrebbe apparire la seguente finestra di dialogo. In questo caso, inserire il CD-ROM di Microsoft Windows nell’unità CD-ROM e fare clic su [OK]. 94 Collegamenti e installazione del driver (Windows) 6. Alla fine dell’installazione del driver USB Composite Device [Periferica composta USB] , appare la seguente finestra di dialogo. Fare clic su [Finish][Fine]. ENGLISH 7. Il dispositivo USB Human Interface Device [Periferica interfaccia utente USB] viene rilevato automaticamente e appare la finestra di dialogo Add New Hardware Wizard [Installazione guidata Nuovo hardware]. Fare clic su [Next][Avanti] e continuare l’installazione seguendo la stessa procedura indicata ai passi 2-5 (p. 94-94). Al passo 4, la finestra visualizza il messaggio “Windows driver file search for the device [Ricerca del file del driver per la periferica]: USB Human Interface Device [Periferica interfaccia utente USB].” DEUTSCH 8. Alla fine dell’installazione del driver USB Human Interface Device [Periferica interfaccia utente USB], appare la seguente finestra di dialogo. Fare clic su [Finish][Fine]. FRANÇAIS 9. Nella tappa successiva, il dispositivo USB Audio Device [Periferica audio USB] viene rilevato automaticamente e appare la finestra di dialogo Add New Hardware Wizard [Installazione guidata Nuovo hardware]. Fare clic su [Next][Avanti] e continuare l’installazione seguendo la stessa procedura indicata ai passi 2-5 (p.94-94). Al passo 4, la finestra visualizza il messaggio “Windows driver file search for the device [Ricerca del file del driver per la periferica]: USB Audio Device [Periferica audio USB].” ITALIANO ESPAÑOL 10. Alla fine dell’installazione del driver USB Audio Device [Periferica audio USB] , appare la seguente finestra di dialogo. Fare clic su [Finish][Fine]. L’installazione dei driver USB Composite Device [Periferica composita USB], USB Human Interface Device [Periferica interfaccia utente USB] e infine USB Audio Device [Periferica audio USB] è giunta al termine. Riavviare Windows. Dopo aver installato il driver, fare riferimento a Indicazione del dispositivo audio d’ingresso/uscita (pag. 96) e selezionare il dispositivo utilizzato da Windows. UA-3 95 Collegamenti e installazione del driver (Windows) ■ Indicazione del dispositivo audio d’ingresso/uscita 1. In Windows, fare clic sul pulsante [Start] e in [Impostazioni] scegliere [Pannello di controllo]. 2. Win 98 / Win 98SE Nel Pannello di controllo, fare doppio clic sull’icona [Multimedia] per aprire la finestra Proprietà multimediali . Win 2000 / Me Nel Pannello di controllo, fare doppio clic sull’icona [Suoni e multimedia] per aprire la finestra Proprietà suoni e multimedia . * Se l’icona [Suoni e multimedia] non risulta visualizzata nel Pannello di controllo, fare clic su [visualizza tutte le opzioni del Pannello di controllo]. 3. Fare clic sulla scheda [Audio]. 4. Nella sezione Riproduzione, Periferica preferenziale , fare clic su [USB Audio Device [Periferica audio USB]] per selezionarla. 5. . Nell’elenco di riepilogo, fare clic su Nella sezione Registrazione, Periferica preferenziale, fare clic su clic su [USB Audio Device [Periferica audio USB]] per selezionarla. Windows 98 / Windows 98SE Windows 2000 /Windows Me . Nell’elenco di riepilogo, fare • A seconda del sistema utilizzato, “USB Audio Device [Periferica audio USB]” è seguito da un numero, ad esempio “USB Audio Device [Periferica audio USB] (1).” • Il pulsante “Proprietà avanzate” non sarà accessibile per “Registrazione.” 6. Fare clic su [OK] per completare le impostazioni. Impostazioni Controllo volume Il volume dell’UA-3 può essere regolato tramite il Controllo volume di Windows. 1. Fare clic sul pulsante [Start] in Windows e selezionare [Programmi] - [Accessori] - [Svago] - [Controllo volume] per avviarlo. Windows Me Windows 2000/ Windows 98/Windows 98SE 96 Collegamenti e installazione del driver (Windows) 2. Spostare lo cursore verso l’alto o verso il basso per regolare il volume dell’UA-3. È possibile regolare i seguenti elementi. Audio USB (speaker) Regola il volume delle uscite analogiche (uscita linea e uscita cuffie). L’uscita digitale non cambia.1 WAVE Regola il volume emesso dal dispositivo di uscita audio “USB Audio Device [Periferica audio USB].” L’uscita digitale e quella analogica cambiano. SW Synth Regola il volume del sintetizzatore software incorporato in Windows. Lettore CD Regola il volume “CD musica” dell’unità CD-ROM del computer.2 ENGLISH 1. A seconda della versione di Windows, questo elemento potrebbe corrispondere a “Analog connector” [connettore analogico]. 2. Se la riproduzione del CD non cambia dopo aver regolato questo volume, cambiare il volume WAVE. ESPAÑOL FRANÇAIS DEUTSCH • Se il Controllo volume non è installato sul computer, utilizzare Installazione applicazioni nel Pannello di controllo per installarlo. Per ulteriori informazioni sull’installazione, fare riferimento al manuale utente di Windows o alla Guida in linea. • Se è selezionata la casella Disattiva o lo cursore è completamente in basso, l’UA-3 non emetterà alcun suono. • Se si utilizza Windows 2000 e “Lettore CD” non è elencato, selezionare [Riproduzione CD digitale], “Abilita riproduzione digitale su questo dispositivo CD-ROM,” come descritto di seguito. • Se si utilizza l’unità CD-ROM del computer per riprodurre un CD audio o se si riproduce musica di sottofondo per i giochi con l’UA-3 Se si utilizza Windows Me: Selezionare [Start]-[Impostazioni]-[Pannello di controllo]. Nel[Pannello di controllo], fare doppio clic sull’icona [Sistema] per aprire la finestra Proprietà sistema. Fare clic sulla scheda [Gestione periferiche] e fare doppio clic sull’icona [CDROM]. Nel livello inferiore, fare doppio clic sull’unità CDROM utilizzata e aprirne le Proprietà. Fare clic sulla scheda [Proprietà] e selezionare la casella accanto alla voce Riproduzione CD digitale “Abilita riproduzione digitale su questo dispositivo CD-ROM.” Se si utilizza Windows 2000 Come per Windows Me, aprire la finestra di dialogo Proprietà sistema. Fare clic sulla scheda [Hardware] e quindi sul pulsante [Gestione periferiche] per aprire “Gestione periferiche”. Tra le unità CD-ROM, fare doppio clic sull’unità CD-ROM utilizzata per aprirne le Proprietà. Fare clic sulla scheda [Proprietà] e selezionare la casella accanto alla voce Riproduzione CD digitale “Abilita riproduzione digitale su questo dispositivo CD-ROM.” Se si utilizza Windows 98 o Windows 98 SE: Selezionare [Start] - [Impostazioni] - [Pannello di controllo] - [Multimedia], e fare clic sulla scheda [CD musica] e selezionare “Abilita riproduzione audio su questo dispositivo CD-ROM.” A seconda della configurazione informatica, si potrebbero avere ancora dei problemi per la riproduzione di questi CD. Per maggiori informazioni, fare riferimento alle informazioni fornite dal costruttore del computer. Se si utilizza un’unità CD-ROM di tipo scheda PC (PCMCIA), la riproduzione di dati WAVE o di un CD audio su questo tipo di unità potrebbe essere interrotta o inesistente. • La qualità audio dell’UA-3 risulterà migliorata aumentando i livelli di controllo del volume. Verifica dell’audio Dopo aver effettuato correttamente tutti i collegamenti, è possibile riprodurre i dati campione per controllare la configurazione. ■ Riproduzione dei dati esempio ITALIANO Nel nostro caso verranno utilizzate le normali funzionalità Windows per riprodurre i dati esempio. I dati esempio si trovano sul CD-ROM AUDIO Capture. Inserire il CD nell’unità CD-ROM del computer. 1. Copiare il file “Alright(.wav)” sul desktop trascinandolo dalla cartella “Sample_Data” sul CD-ROM. Per poter ascoltare i dati esempio, è necessario disporre di circa 30MB di spazio libero sul disco dove è installato Windows. UA-3 97 Collegamenti e installazione del driver (Windows) 2. Fare clic col pulsante destro del mouse sul file copiato “Alright(.wav)” e selezionare [Play] or [Proprietà] nel menu a comparsa. 3. Fare clic sulla scheda [Anteprima] e poi sul pulsante Verrà avviata la riproduzione dei dati esempio. . Se l’interruttore di selezione ingresso registrazione è impostato su DIGITAL, non è possibile riprodurre i dati audio a partire dal computer. Impostare l’interruttore su INPUT + GUITAR/MIC. I dati esempio sono stati riprodotti? Se i dati esempio sono stati riprodotti correttamente, il computer e l’UA-3 sono collegati correttamente e i driver sono stati installati altrettanto correttamente. Se i dati non sono stati riprodotti correttamente, fare riferimento a Ricerca e soluzione dei problemi (pag. 105). La sezione Ricerca e soluzione dei problemi contiene utili informazioni per trovare e correggere i problemi eventuali. La procedura relativa ai collegamenti e all’installazione del driver per l’UA-3 è terminata. Cancellazione del driver USB Audio Device [Periferica audio USB] La procedura di seguito illustrata è valida per un sistema Windows generico. A seconda della configurazione informatica, alcune cartelle potrebbero avere nomi diversi da quelli qui menzionate. ■ Reinstallazione del driver USB Audio Device [Periferica audio USB] ■ Se l’installazione del driver USB Audio Device [Periferica audio USB] è stata interrotta prima della fine Seguire la procedura di seguito indicata per cancellare il driver che è già stato installato. 1. Utilizzare un cavo USB per collegare l’UA-3 al computer. 2. In Windows, fare clic sul pulsante [Start] e in [Impostazioni] scegliere [Pannello di controllo]. 3. Nel [Pannello di controllo], fare doppio clic sull’icona [Sistema] per aprire la finestra Proprietà sistema. 4. Fare clic sulla scheda [Gestione periferiche]. 5. Fare doppio clic su [Controller audio, video e giochi] per visualizzare un elenco di periferiche. 6. Nell’elenco selezionare USB Audio Device [Periferica audio USB] e fare clic su [Rimuovi]. Nella finestra Conferma rimozione periferica, fare clic su [OK]. Se la finestra USB Audio Device [Periferica audio USB] non è visualizzata, passare al passo 8. 7. Accertarsi che USB Audio Device [Periferica audio USB] non figuri nell’elenco Controller audio, video e giochi e fare clic su [Chiudi] per chiudere la finestra di dialogo Proprietà sistema. 8. Seguire la procedura indicata al passo 1. – 4. e fare doppio clic su [Controller USB (Universal Serial Bus)] per visualizzare un elenco delle periferiche. Se è visualizzato per l’icona di periferica USB compatibile: Selezionare l’icona [USB Composite Device [Periferica composita USB]] e fare clic su [Rimuovi]. Nella finestra Conferma rimozione periferica, fare clic su [OK]. Come al passo 7., chiudere Proprietà sistema. Se l’icona di periferica USB compatibile o non sono visualizzati: Chiudere Proprietà sistema. Se si utilizza Windows Me e Chiudere Proprietà sistema. 98 è visualizzato: Collegamenti e installazione del driver (Windows) 9. Scollegare il cavo USB dal computer e riavviare Windows. Se appare un messaggio richiedente l’avvio di Windows, conformarsi a tale richiesta e riavviare il computer. Principali funzionalità di D-Out Smoother ■ Descrizione di D-Out Smoother Quando dei dati audio sono riprodotti su un dispositivo digitale come un MD o DAT collegato all’uscita digitale dell’UA3, potrebbe trascorrere un certo intervallo di tempo prima che l’audio venga bloccato subito dopo la riproduzione e quindi per uno o due secondi l’audio potrebbe essere interrotto o il pitch o il tempo potrebbero essere sbagliati. D-Out Smoother è un programma che permette di riprodurre l’audio senza soluzione di continuità in situazioni di questo tipo. ■ Installazione di D-Out Smoother ENGLISH Nella spiegazione che segue si presume che l’unità CD-ROM sia l’unità E:, anche se l’identificativo dell’unità potrebbe essere diverso in quanto dipende dal computer. Se l’identificativo dell’unità è diverso sul computer utilizzato, immettere quello opportuno. Per verificare l’identificativo dell’unità CD-ROM, fare doppio clic sull’icona Risorse del computer. DEUTSCH 1. Inserire il CD-ROM Audio Capture nell’unità CD-ROM. 2. In Windows, fare clic sul pulsante [Start] e selezionare [Esegui...]. 3. Nella casella di testo Apri: immettere “E:\UA_Util\Setup.exe” e fare clic su [OK]. Oppure fare clic su [Sfoglia], selezionare il file [Setup(.exe)] che si trova nella cartella UA_Util del CD-ROM e fare clic su [Apri]. 4. Verrà avviato il programma di installazione e apparirà la finestra di dialogo Choose Setup Language. Indicare se si utilizza la versione “English (United States)” o “Italiano” di Windows e fare clic su [OK]. 5. Eseguire il resto dell’installazione seguendo le istruzioni visualizzate. 6. Alla fine dell’installazione compare la finestra di dialogo Setup Complete. Fare clic su [Finish]. L’installazione di D-Out Smoother è giunta al termine. ■ Avvio di D-Out Smoother FRANÇAIS La prima volta che si avvia il programma compare la finestra di dialogo Setting . Accertarsi che Wave-Out Device visualizzi “USB Audio Device [Periferica audio USB],” e fare clic su [OK]. Se sono visualizzati uno o più dispositivi audio USB, fare riferimento a Uso di D-Out Smoother (pag. 99) e specificare il dispositivo corretto. ESPAÑOL 1. Collegare l’UA-3 al connettore USB del computer. 2. Fare clic sul pulsante [Start] di Windows e nel menu [Programmi] fare clic su [D-Out Smoother]. 3. D-Out Smoother verrà avviato. In alcuni casi potrebbe apparire il messaggio“Cannot find USB Audio Device. [Impossibile trovare la periferica audio USB] Check USB cable or select USB Audio Device again. [Controllare il cavo USB o selezionare di nuovo la periferica audio USB]” all’avvio. Se ciò dovesse succedere, vuol dire che il computer non ha rilevato correttamente l’UA 3. Forse l’UA-3 non è collegato correttamente o il driver non è stato installato correttamente. Fare riferimento a Collegamenti e installazione del driver (Windows) (pag. 92) e controllare le varie fasi. ■ Uso di D-Out Smoother D-Out Smoother è provvisto di un interruttore “ON/OFF” e di un pulsante “TEST”. Interruttore “ON/OFF” Generalmente viene lasciato in posizione “ON” quando si usa l’uscita digitale dell’UA-3. ITALIANO Metterlo in posizione “OFF” in fase di collegamento o scollegamento dell’UA-3. “Pulsante” button Fare clic sul pulsante [TEST]. Se si sente il segnale acustico di prova, D-Out Smoother funziona con il dispositivo corrente. Quando si utilizzano due o più periferiche audio USB come l’UA-3 o l’MA-150U, utilizzare questo pulsante per selezionare l’UA-3 insieme al quale verrà utilizzato D-Out Smoother. Seguire la procedura sotto illustrata per la selezione. UA-3 99 Collegamenti e installazione del driver (Windows) 1. Nel menu [Control] di D-Out Smoother selezionare [Setting] per accedere alla finestra di dialogo Setting. (Questa finestra di dialogo appare automaticamente la prima volta che il programma è avviato.) 2. Nel menu a tendina, selezionare “USB Audio Device [Periferica audio USB]” e fare clic su [OK]. 3. Fare clic sul pulsante [TEST] e controllare se il segnale acustico di prova viene emesso. Se si sente il segnale acustico di prova, D-Out Smoother funziona con il dispositivo corrente. Se il segnale acustico non viene emesso, selezionare una periferica audio USB diversa al passo 2 e ripetere i passi da 1 a 3. Funzionalità interessanti • Se [Register to STARTUP] è selezionato nella finestra Setting, D-Out Smoother viene avviato automaticamente all’avvio del computer. • Se [Minimize window when starting up] è selezionato nella finestra di dialogo Setting, D-Out Smoother si riduce subito dopo l’avvio permettendo di sfruttare tutto lo schermo del computer. ■ Cancellazione (disinstallazione) di D-Out Smoother D-Out Smoother supporta la funzione Installazione applicazioni di Windows. Se necessario, è possibile seguire la procedura sotto indicata per rimuovere il programma. Prima di disinstallare D-Out Smoother, è opportuno deselezionare l’opzione [Register to STARTUP] nella finestra di dialogo Setting. Per aprire la finestra di dialogo Setting selezionare [Control] - [Setting]. (pag. 109) 1. In Windows, fare clic sul pulsante [Start] e in [Impostazioni] scegliere [Pannello di controllo]. 2. Nel [Pannello di controllo], fare doppio clic sull’icona [Installazione applicazioni] per aprire la finestra Installazione applicazioni. 3. Fare clic sulla scheda [Installa/Rimuovi]. 4. Nell’elenco visualizzato fare clic sul nome dell’applicazione da rimuovere. 5. Fare clic su [Aggiungi/Rimuovi]. L’applicazione specificata al passo 4 verrà cancellata. 100 Collegamenti e installazione del driver (Macintosh) Collegamenti e installazione del driver (Macintosh) * Per gli utenti Windows, fare riferimento a pag. 92. Per poter utilizzare l’UA-3, è necessario installare prima il driver. UA-3 utilizza un driver fornito con Mac OS. Definizione di un driver -> pag. 92 Collegamenti e installazione del driver ■ Collegamenti (943) ENGLISH Prima di collegare l'UA-3, accertarsi che il volume sia al minimo. Si potrebbero sentire comunque dei suoni all'accensione, anche se il volume è al minimo; è normale e non c'è motivo di preoccuparsi. (921) Per evitare malfunzionamenti e/o danni ai diffusori o ad altri dispositivi, abbassare sempre il volume e accertarsi che tutti gli apparecchi non siano alimentati prima di effettuare i collegamenti. (Non è necessario spegnere il computer.) Utilizzare un cavo USB per collegare l’UA-3 al computer prima di accendere gli apparecchi audio. Computer Impianto stereo Altoparlanti alimentati, ecc. Porta USB Cavo USB * Collegare dopo aver avviato il computer LINE OUT Porta USB • Prima di scollegare il cavo USB o di riavviare Macintosh, chiudere tutte le applicazioni. Abbassare anche il volume degli apparecchi audio o degli amplificatori collegati. • Questo apparecchio è provvisto di un circuito di protezione. È necessario aspettare qualche secondo dopo aver inserito un connettore USB prima che l’apparecchio funzioni normalmente. FRANÇAIS Cavo audio DEUTSCH LINE IN, AUX IN Cuffie stereo UA-3 ESPAÑOL ■ Riconoscimento dell’apparecchio 1. Accendere il computer e avviare Mac OS. 2. Nel menu Mela selezionare [Apple System Profiler]. ITALIANO • Per evitare di danneggiare gli altoparlanti, ridurre al minimo il volume dell’apparecchio e degli altri dispositivi audio eventualmente collegati. • Accertarsi di aver chiuso tutte le applicazioni in corso di esecuzione prima di effettuare i collegamenti. 3. Fare clic sulla linguetta [Devices and Volumes]. 4. Utilizzare un cavo USB per collegare l’UA-3 al computer. UA-3 101 Collegamenti e installazione del driver (Macintosh) 5. Per essere sicuri che l’apparecchio venga riconosciuto, selezionare [Update all information] nel menu [Commands]. Nella sezione USB dovrebbero comparire i seguenti tre dispositivi audio, come sotto illustrato: Se l’indicazione è corretta, l’installazione dell’UA-3 è andata a termine con successo. Selezionare [Quit] nel menu [File] per chiudere la finestra di dialogo Apple System Profiler, quindi configurare i parametri audio come sotto indicato. Se l’indicazione non è corretta, provare a scollegare l’UA-3 dalla porta USB e aspettare circa dieci secondi. Riprendere quindi la procedura a partire dal passo 4. ■ Impostazione dei parametri audio 6. Nel menu Mela, selezionare [Control Panels] - [Sound] per aprire la finestra Sound. 7. Fare clic sulla linguetta [Speakers]. 8. Abbassare al minimo il volume dell’UA-3 e degli apparecchi audio e fare clic su [Start Test]. 9. Verranno emessi alcuni segnali acustici di prova da sinistra a destra secondo quanto visualizzato; regolare il volume con lo cursore [Main Volume]. Alla fine, fare clic su [Stop Test]. Se l’interruttore di selezione ingresso registrazione è impostato su DIGITAL, non è possibile riprodurre i dati audio a partire dal computer. Impostare l’interruttore su INPUT + GUITAR/MIC. A seconda della versione del sistema operativo, lo cursore [Main Volume] potrebbe mancare. In questo caso, utilizzare lo cursore [Volume] nella linguetta [Output] per regolare il volume. 102 Collegamenti e installazione del driver (Macintosh) 10. Selezionare la linguetta [Input] nella finestra Sound. In Choose a source for sound input:, scegliere USB Audio. • Se non USB Audio non è visualizzato, chiudere la finestra Sound. Scollegare poi l’UA-3 e attendere circa dieci secondi. Riprendere quindi la procedura a partire dal passo 2. • Non selezionare [Play sound through output device]. 11. Alla fine delle impostazioni, selezionare [Quit] nel menu [Mela] per chiudere la finestra Sound. • • • • • Alcune applicazioni come Cakewalk’s Metro Series e TC Work’s Spark Series non possono registrare/riprodurre a 48 kHz. Utilizzare l’UA-3 a 44.1 kHz. Se l’applicazione audio sta eseguendo una registrazione o riproduzione, non collegare/scollegare il cavo USB né spostare l’interruttore di selezione dell’ingresso registrazione. L’applicazione potrebbe bloccarsi. L’audio potrebbe essere irregolare e/o disturbato se la registrazione e la riproduzione avvengono contemporaneamente con un conseguente sovraccarico per la CPU. Tuttavia il disturbo non dovrebbe apparire nella registrazione ma nel segnale di riproduzione. Se si utilizza Virtual Sound Canvas 3, sarà necessario selezionare [Performance] nel menu [Setting] e impostare Expression Mode su Response Priority. Il driver fornito in standard con Mac OS non è ASIO compatibile. Se il computer viene avviato con l’UA-3 collegato, il computer potrebbe diventare instabile. In questo caso avviare il computer prima di collegare l’UA-3 e collegare l’UA-3 dopo l’avvio. DEUTSCH • ENGLISH Problemi noti: UA-3 Verifica dell’audio FRANÇAIS Dopo aver effettuato correttamente tutti i collegamenti, è possibile riprodurre i dati esempio per controllare la configurazione. ■ Riproduzione dei dati esempio Nel nostro caso verranno utilizzate le normali funzionalità Macintosh per riprodurre i dati esempio. I dati esempio si trovano sul CD-ROM AUDIO Capture. Inserire il CD nell’unità CD-ROM del computer. ESPAÑOL Per poter ascoltare i dati esempio, è necessario disporre di circa 30MB di spazio libero sul disco dove è installato il sistema operativo. ITALIANO 1. Copiare il file “Alright” sulla scrivania trascinandolo dalla cartella “Sample_Data” sul CD-ROM. 2. Avviare QuickTime Player, fornito con Mac OS. QuickTime Player generalmente si trova nella cartella QuickTime all’interno della cartella Applications sul disco rigido. UA-3 103 Collegamenti e installazione del driver (Macintosh) 3. Nel menu [File], selezionare [Open Movie], selezionare il file copiato “Alright” e fare clic su [Convert] per aprirlo. 4. Fare clic sul pulsante di riproduzione. Verrà avviata la riproduzione dei dati esempio. Se l’interruttore di selezione ingresso registrazione è impostato su DIGITAL, non è possibile riprodurre i dati audio a partire dal computer. Impostare l’interruttore su INPUT + GUITAR/MIC. I dati esempio sono stati riprodotti? Se i dati esempio sono stati riprodotti correttamente, il computer e l’UA-3 sono collegati correttamente e i driver sono stati installati altrettanto correttamente. Se i dati non sono stati riprodotti correttamente, fare riferimento a Ricerca e soluzione dei problemi (pag. 105). La sezione Ricerca e soluzione dei problemi contiene utili informazioni per trovare e correggere i problemi eventuali. La procedura relativa ai collegamenti e all’installazione del driver per l’UA-3 è terminata. 104 Ricerca e soluzione dei problemi Ricerca e soluzione dei problemi Se nell’usare l’UA-3 si dovessero incontrare dei problemi, leggere questo capitolo. Contiene numerosi suggerimenti che possono contribuire a risolvere il problema. I problemi esaminati in questa sezione sono organizzati in base al sistema operativo sul quale si possono verificare. L’icona a sinistra del titolo indica il sistema operativo interessato. Problemi comuni a Windows e Macintosh Problemi che si verificano solo in Windows Problemi che si verificano solo in Macintosh Problemi relativi al driver USB “Add New Hardware Wizard”[Installazione guidata Nuovo hardware] non si avvia automaticamente ENGLISH Se si utilizza il computer per la prima volta o non si capisce una procedura, fare riferimento ai manuali utenti del computer o del sistema operativo. Se l’UA-3 non funziona come previsto, controllare i seguenti punti. “Add New Hardware Wizard” [Installazione guidata Nuovo hardware] si interrompe prima di arrivare alla fine • • • DEUTSCH • Quando il cavo USB è collegato o scollegato, ci vogliono circa 15 secondi (o più) perché il computer riconosca l’UA-3. Il cavo USB è collegato correttamente? Accertarsi che l’UA-3 e il computer siano collegati correttamente tramite il cavo USB. Il computer utilizzato permette l’uso di un cavo USB? Fare riferimento al manuale utente del computer per verificare la possibilità d’uso di un cavo USB. Il computer o l’hub USB è in grado di fornire la capacità di alimentazione sufficiente? L’UA-3 non potrà essere collegato se l’alimentazione è insufficiente. Verificare se ci si trova in una delle seguenti situazioni. Se l’UA-3 viene utilizzato con un computer portatile alimentato dalla batteria, per alcuni modelli di computer il funzionamento potrebbe essere discontinuo. In questo caso, collegare un adattatore AC al computer portatile. La modalità di gestione dell’alimentazione potrebbe limitare l’energia fornita all’USB. Controllare la configurazione del computer. In alcuni casi non è possibile utilizzare l’UA-3 con un hub alimentato dal bus, ovvero un hub sprovvisto di una fonte di alimentazione). Utilizzare un hub alimentato in modo autonomo, ovvero un hub che contiene una fonte di alimentazione. Il computer soddisfa le specifiche tecniche USB? Se il computer utilizzato non soddisfa le specifiche tecniche USB, come potrebbe essere il caso di un computer assemblato dall’utente, il funzionamento potrebbe essere instabile. In questi casi il problema potrebbe essere risolto collegando un hub USB provvisto di fonte di alimentazione. È visualizzato “Periferica sconosciuta” per “Altre periferiche” o “Controller USB (Universal Serial Bus)”? Seguire la procedura sotto indicata per eliminare “Periferica sconosciuta” da “Altre periferiche” (Controller USB) e riavviare il computer. FRANÇAIS • • 1. 2. 3. 4. 5. 6. ESPAÑOL Per verificare se la “Periferica sconosciuta” è l’UA-3, scollegare il cavo USB dall’UA-3 e controllare che il messaggio “Periferica sconosciuta” non sia più visualizzato. Ricollegare poi nuovamente l’UA-3 e eliminare “Periferica sconosciuta.” Nel [Pannello di controllo] di Windows, fare doppio clic sull’icona [Sistema] per aprire la finestra Proprietà sistema. Fare clic sulla scheda [Gestione periferiche]. Fare doppio clic su [Altre periferiche] (Controller USB) per visualizzare l’elenco delle periferiche. Nell’elenco selezionare Periferica sconosciuta e fare clic su [Rimuovi]. Nella finestra Conferma rimozione periferica, fare clic su [OK]. Accertarsi che nell’elenco non figuri Altre periferiche o Periferica sconosciuta e fare clic su [Chiudi] per chiudere la finestra di dialogo. ITALIANO La finestra “Add New Hardware Wizard” [Installazione guidata Nuovo hardware] appare anche se i driver sono già stati installati Se il computer utilizzato o l’hub USB sono equipaggiati di due o più connettori USB e l’UA-3 viene collegato a un connettore USB al quale non è mai stato collegato prima, potrebbe apparire la finestra di dialogo Add New Hardware Wizard [Installazione guidata Nuovo hardware] anche se i driver sono già stati installati. Reinstallare i driver come descritto in Collegamenti e installazione del driver (Windows) (pag. 92). Non si tratta di un malfunzionamento. UA-3 105 Ricerca e soluzione dei problemi I driver non sono installati correttamente Seguire la procedura descritta in Cancellazione del driver USB Audio Device [Periferica audio USB] (pag. 98) per eliminare il driver USB Audio Device [Periferica audio USB] e reinstallare i driver UA-3 secondo quanto descritto in Collegamenti e installazione del driver (Windows) (pag. 92). Controllare se è visualizzata una voce denominata “Periferica sconosciuta” in “Altre periferiche” o in “Controller USB (Universal Serial Bus).” Se “Periferica sconosciuta” è visualizzato, cancellarlo. Appare una finestra di dialogo con il messaggio “Unknown Device found” [Trovata periferica sconosciuta] e non posso installare il driver A seconda della configurazione informatica, forse al momento della consegna sul computer non erano stati installati tutti i file Windows 98 necessari per supportare l’audio via USB. Accertarsene presso il costruttore del computer. Problemi nell’uso dell’UA-3 Il sistema operativo diventa instabile • L’avvio del computer con l’UA-3 già collegato potrebbe rendere instabile il computer. In questo caso collegare l’UA-3 solo dopo aver avviato il computer. ■ L'audio non viene riprodotto • L’interruttore di selezione della fonte di registrazione dell’UA-3 è impostato su “INPUT + GUITAR/MIC”? Se l’interruttore di selezione ingresso registrazione è impostato su “DIGITAL,” vengono riprodotti i segnali audio inviati al connettore d’ingresso digitale e non i dati audio del computer. • Una periferica digitale tipo un MD è collegata all’uscita digitale dell’UA-3? A seconda dell’applicazione, quando dei dati audio sono riprodotti su un dispositivo digitale come un MD collegato all’uscita digitale dell’UA-3, potrebbe trascorrere un certo intervallo di tempo prima che l’audio venga bloccato subito dopo la riproduzione e quindi per uno o due secondi l’audio potrebbe essere interrotto. In questo caso, utilizzare il software D-Out Smoother fornito nel CD-ROM per avere una riproduzione audio fluida. Per maggiori informazioni, fare riferimento a Principali funzionalità di D-Out Smoother (pag. 99). • Si sta cercando di utilizzare l’unità CD-ROM del computer per riprodurre un CD audio? Per riprodurre un CD audio sull’unità CD-ROM del computer, fare riferimento a Se si utilizza l’unità CD-ROM del computer per riprodurre un CD audio o se si riproduce musica di sottofondo per i giochi con l’UA-3 (pag. 97). • Sono in corso di esecuzione diverse applicazioni? Se più applicazioni vengono eseguite contemporaneamente, potrebbe apparire un messaggio di errore. In questo caso fare clic su [OK] e chiudere le altre applicazioni. Anche se la finestra di un’applicazione viene chiusa, essa rimane in esecuzione nella barra delle applicazioni; accertarsi quindi di chiudere tutte le applicazioni non necessarie visualizzate nella barra delle applicazioni. • È stata specificata la destinazione di uscita dei dati audio nel sistema operativo? La destinazione di uscita dei dati audio per un computer deve essere impostata su UA-3. Per ulteriori informazioni su questa impostazione, fare riferimento a Indicazione del dispositivo audio di ingresso/uscita (Windows pag. 96) o Impostazione dei parametri audio (Macintosh pag. 102). • È stata specificata la destinazione di uscita dei dati audio nel software di riproduzione? Per alcuni programmi come Cool Edit Pro LE, la destinazione di uscita dei dati audio deve essere impostata su UA-3. Per ulteriori informazioni su questa impostazione fare riferimento al manuale utente. • I driver sono stati installati correttamente? Per poter riprodurre i dati audio con l’UA-3, deve essere installato il driver USB Audio Device [Periferica audio USB]. Per ulteriori dettagli sull’installazione e la configurazione, fare riferimento a Collegamenti e installazione del driver (Windows pag. 92, Macintosh pag. 101). • I vari elementi del controllo volume sono stati regolati? Regolare il volume di ogni elemento come descritto in Impostazioni Controllo volume (Windows pag. 96) o Impostazione dei parametri audio (Macintosh pag. 102). ■ L'audio è distorto • L’indicatore peak diventa rosso? Se l’audio è trasmesso tramite le prese d’ingresso linea, utilizzare lo cursore di regolazione dell’ingresso linea dell’UA-3 per ridurre il livello d’ingresso. Se l’audio è trasmesso dalle prese d’ingresso Guitar o Mic, utilizzare lo cursore di regolazione dell’ingresso chitarra/microfono per ridurre il livello d’ingresso. Inoltre il numero di LED nell’indicatore del livello di output cambia a seconda del livello di output dell’UA-3. Se il LED diventa rosso, utilizzare lo cursore di uscita linea per abbassare il volume. Il livello del volume dello strumento collegato a LINE IN è troppo basso. • • Viene forse utilizzato un cavo di connettore dotato di resistore? Utilizzare un cavo di collegamento senza resistore. Lo slider di regolazione d’ingresso linea (pag. 91) è opportunamente regolato? ■ La riproduzione audio è disturbata • Il microfono è ancora collegato? Se all’UA-3 è collegato un microfono, utilizzare lo cursore di regolazione d’ingresso chitarra/microfono per ridurre il livello d’ingresso. 106 Ricerca e soluzione dei problemi ENGLISH • Il disturbo durante la riproduzione audio potrebbe essere causato dall’acceleratore grafico del computer. Per impostare l'accelerazione grafica su “None [Nessuna]. ”, attenersi alla seguente procedura: 1. Nel Pannello di controllo di Windows, fare doppio clic su Schermo per aprire la finestra di dialogo Proprietà - Schermo, quindi fare clic sulla scheda Impostazioni. 2. Fare clic su [Avanzate] per aprire le proprietà e fare clic sulla scheda [Prestazioni]. 3. In Grafica, spostare lo cursore Accelerazione hardware: su Min e fare clic su [OK]. 4. Nella finestra di dialogo Proprietà - Schermo, fare clic su [OK] per chiudere la finestra di dialogo. Riavviare quindi il computer. • L’audio è disturbato nell’ingresso linea o microfono Se, sullo stesso computer, sono collegati un modulo sonoro MIDI e l'UA-3 tramite un collegamento USB e l'uscita del modulo sonoro MIDI è collegata alle prese d'ingresso linea dell'UA-3, quest'ultimo potrebbe emettere un audio disturbato a causa delle interferenze trasmesse dal computer via il modulo sonoro MIDI. In questi casi, utilizzare un hub alimentato autonomamente per collegare contemporaneamente un modulo sonoro MIDI e l'UA-3 oppure collegare il modulo sonoro MIDI tramite l'interfaccia seriale o l'interfaccia MIDI. • L’audio è disturbato quando la registrazione e la riproduzione avvengono contemporaneamente. Quando registrazione e riproduzione sono effettuate contemporaneamente, la riproduzione potrebbe interrompersi a seconda delle prestazioni del sistema e dare quindi origine al suono disturbato. Tuttavia, dato che viene data la priorità alla registrazione, i dati registrati sono integri. • Questo problema può essere evitato collegando opportunamente alla terra il telaio del computer o il polo con messa a terra della presa del cordone di alimentazione fornito insieme al computer. Inoltre accertarsi che nelle vicinanze non ci siano dispositivi che emettono forti campi magnetici come un televisore o un forno a microonde. • Sono collegati molti dispositivi audio? Se sono collegati molti dispositivi audio, l’audio potrebbe essere disturbato. Non collegare dispositivi audio che resteranno inutilizzati. ■ L’audio si interrompe durante la riproduzione * 2. 3. Nel Pannello di controllo di Windows, fare doppio clic su [Sistema] per aprire la finestra di dialogo Proprietà sistema, quindi fare clic sulla scheda [Gestione periferiche]. Per accedere all'elenco delle periferiche, fare doppio clic su [Unità disco] . Nell'elenco, selezionare GENERIC IDE DISK TYPExx e fare clic su [Proprietà] per accedere alla finestra di dialogo Proprietà GENERIC IDE DISK TYPExx. * 4. “xx” in GENERIC IDE DISK TYPExx corrisponde a un numero che cambia in base al sistema utilizzato. Fare clic sulla scheda [Impostazioni], selezionare la casella di controllo [DMA] in Opzioni e fare clic su [OK] per chiudere la finestra di dialogo. * 5. Le seguenti impostazioni potrebbero essere inesistenti sul computer utilizzato. FRANÇAIS 1. DEUTSCH • Provare ad aumentare la memoria Aggiungendo memoria, si aumentano le capacità di elaborazione del computer. Per maggiori informazioni sull’aggiunta della memoria, consultare il manuale dell'utente del computer. • Il computer soddisfa le specifiche tecniche USB? L’audio potrebbe venir interrotto se si utilizza un computer che non soddisfa le specifiche tecniche USB relative all’alimentazione. In questo caso, per risolvere il problema, provare a collegare un hub USB provvisto di una fonte di alimentazione autonoma. • Sono in corso di esecuzione molte applicazioni? Se durante la riproduzione sono attive molte applicazioni o se ne avvia un’altra, la riproduzione potrebbe interrompersi a seconda della configurazione del computer. Chiudere tutte le applicazioni non necessarie e riprovare. Se il problema persiste, provare a riavviare il computer. • Provare a cambiare quanto segue nelle impostazioni dell’unità disco. A seconda del sistema utilizzato, potrebbe apparire una finestra di dialogo per le impostazioni DMA. Dopo averne controllato il contenuto, fare clic su OK o Annulla. Nella finestra di dialogo Proprietà sistema, fare clic su [OK] per chiudere la finestra di dialogo. ESPAÑOL Riavviare il computer in modo da rendere effettive le modifiche. ■ La riproduzione audio si interrompe UA-3 ITALIANO • Su alcuni computer le impostazioni relative al risparmio energia nel Panello di controllo potrebbero provocare l’interruzione della riproduzione audio. Le Proprietà di risparmio energia, visualizzate dopo aver fatto doppio clic su Risparmio energia, cambiano in base al computer utilizzato. Di seguito se ne troverà un esempio; in ogni caso si consiglia di consultare anche il manuale utente del computer. In alcuni computer, le seguenti impostazioni potrebbero non essere disponibili. 1. Nel Pannello di controllo di Windows, fare doppio clic su [Sistema] per aprire la finestra di dialogo Proprietà sistema, quindi fare clic sulla scheda [Gestione periferiche]. 2. Per accedere all'elenco delle periferiche, fare doppio clic su [Periferiche di sistema] . 3. Nell'elenco, selezionare [Gestione avanzata del risparmio energetico] e fare clic su [Proprietà] per accedere alla finestra di dialogo Proprietà - Gestione avanzata del risparmio energetico. 4. Fare clic sulla scheda [Impostazioni] e in Risoluzione dei problemi, selezionare la casella [Disattiva polling dello stato dell’alimentazione]. Fare clic su [OK]. 5. Nella finestra di dialogo Proprietà sistema, fare clic su [OK] per chiudere la finestra di dialogo. 6. Riavviare Windows. 107 Ricerca e soluzione dei problemi L’audio digitale registrato è distorto, il pitch cambia o è disturbato • • • Se il cavo digitale utilizzato per la connessione è troppo lungo l’audio potrebbe risultarne alterato o disturbato. Utilizzare cavi digitali di non oltre un metro di lunghezza. L’impostazione della frequenza di campionamento nell’applicazione corrisponde a quella del dispositivo digitale collegato al connettore d’ingresso digitale? Nella registrazione digitale non è possibile registrare in monofonico. Impostare il software di registrazione sull’impostazione “stereo”. L’audio registrato è disturbato • • • Si è notato che i disturbi tendono ad essere presenti nelle registrazioni audio effettuate sui modelli della serie iMac, che sono usciti sul mercato dopo l’estate 2000. Nell’applicazione SimpleSound inclusa in MacOS, il disturbo sonoro si manifesta quando l’audio è riprodotto subito dopo essere stato registrato digitalmente. Salvare prima l’audio e poi riprodurlo. Aggiornare il driver audio USB a 1.0.5f4. Se la versione del driver audio USB, fornito con Mac OS, è anteriore alla 1.0.4, aggiornarla alla versione 1.0.5f4. Il driver può essere scaricato dalla URL sottostante: http://asu.info.apple.com/swupdates.nsf/artnum/n11703 Controllo della versione del driver audio USB 1. 2. 3. 4. 5. Collegare l’UA-3 al computer. Nel menu Mela selezionare [Apple System Profiler]. Fare clic sulla linguetta [Devices and Volumes]. Nella sezione USB, la finestra visualizza “Audio (UA-3 USB Audio Device).” Fare clic sulla freccia a sinistra. Il numero visualizzato a destra di “Driver version” corrisponde alla versione del driver audio USB. ■ Durante la registrazione viene creato un file vuoto (senza audio) • Provare a impostare la velocità di trasferimento su “16bit.” Se si utilizza Windows98, Seconda Edizione, e il software di registrazione è impostato su una velocità di trasferimento di 8 bit, il file creato potrebbe essere vuoto impedendo quindi una registrazione efficace. Se ciò dovesse succedere, sarà possibile registrare correttamente impostando la velocità di trasferimento su “16 bit”. • Impossibile registrare digitalmente dati che contengono il flag SCMS. L’UA-3 supporta il sistema SCMS (pag. 89); ciò vuol dire che quando i dati contrassegnati dal flag SCMS, come ad esempio quelli provenienti da un MD che è stato copiato digitalmente a partire da un CD musicale commerciale, arrivano al connettore d’ingresso digitale, l’UA-3 non potrà registrarli sul computer. (L’audio verrà emesso dalle prese d’ingresso linea e dalla presa cuffie.) Impossibile registrare digitalmente • • • • L’interruttore di selezione d’ingresso registrazione è impostato su “DIGITAL”? L’applicazione è impostata sulla stessa frequenza di campionamento del dispositivo digitale collegato al connettore d’ingresso digitale? La registrazione non sarà più possibile se la frequenza di campionamento di un dispositivo viene modificata (passando ad esempio dal modo di trasmissione digitale A a B) mentre questo rimane collegato ai connettori d’ingresso digitale. Prima di cambiare la frequenza di campionamento è necessario scollegare e poi ricollegare il cavo digitale. Non è possibile registrare dati digitali di un formato diverso dal formato per dispositivi audio digitali consumer. Impossibile registrare CD musicali • L’UA-3 non è in grado di registrare CD musicali nell’unità CD-ROM del computer con CoolEdit Pro LE o altri programmi. Per registrare dei CD musicali con l’unità CD-ROM del computer, sarà prima necessario selezionare la scheda audio del computer come la periferica audio (Waveform Record) da utilizzare per registrare con CoolEdit Pro LE (o l’applicazione utilizzata); a questo punto si potrà avviare la registrazione. Quando si registra un CD musicale con una scheda audio, deselezionare l’opzione “Abilita riproduzione digitale su questo dispositivo CD-ROM” che è stata selezionata in Se si utilizza l’unità CD-ROM del computer per riprodurre un CD audio o se si riproduce musica di sottofondo per i giochi con l’UA-3 (pag. 97). Dopo aver ripreso l’attività dallo stato di sospensione (Suspend o Hibernation), il volume è cambiato • Il cambiamento di volume dopo la ripresa dell’attività dallo stato di sospensione (Suspend o Hibernation) in Windows 2000 dipende da un problema Windows. Avviare l’applicazione Mixer come descritto in Impostazioni Controllo volume (pag. 96) e regolare lo cursore USB Audio (Speaker). La musica di sottofondo del gioco non viene riprodotta • Il gioco utilizza un CD audio per la musica in sottofondo? Se la musica di sottofondo del gioco proviene da un CD audio, fare riferimento a Se si utilizza l’unità CD-ROM del computer per riprodurre un CD audio o se si riproduce musica di sottofondo per i giochi con l’UA-3 (pag. 97). Problemi comuni ai programmi in generale Non è possibile eseguire installazioni • • • 108 Il CD-ROM dell’applicazione è inserito nell’unità CD-ROM del computer. Durante l’installazione, l’identificativo dell’unità CD-ROM e il nome del file d’installazione sono stati immessi correttamente? C’è spazio sufficiente sul disco rigido? Ricerca e soluzione dei problemi Aumentare la quantità di spazio libero sul disco rigido. Eliminare i file non necessari spostandoli nel Cestino, quindi fare clic con il pulsante destro del mouse sul Cestino e scegliere Svuota cestino. In alternativa, è possibile aggiungere un altro disco rigido. Per dettagli sull'installazione di dischi rigidi aggiuntivi, consultare il manuale dell'utente del computer e di Windows. • Erano in corso altre applicazioni quando è stata fatta l’installazione? Chiudere tutte le applicazioni e riavviare l’installazione. Impossibile avviare un’applicazione • Sono in corso di esecuzione molte applicazioni? La memoria potrebbe essere insufficiente per avviare un’altra applicazione. Chiudere le applicazioni non necessarie, quindi avviare la nuova applicazione. Se il messaggio di errore viene ancora visualizzato, riavviare il computer. Appare un messaggio di errore quando viene avviata un’applicazione • Se più applicazioni vengono eseguite contemporaneamente, potrebbe apparire un messaggio di errore. In questo caso fare clic su [OK] e chiudere le applicazioni non necessarie. Anche se la finestra dell’applicazione viene chiusa, essa rimane in esecuzione nella barra delle applicazioni. Accertarsi di chiudere tutte le applicazioni non necessarie che si trovano nella barra delle applicazioni. Se si utilizza Cakewalk Pro Audio, accertarsi che la frequenza di campionamento di Cakewalk Pro Audio sia impostata su 44.1kHz. Su Cakewalk ProAudio 7, 8 e 9, la frequenza di campionamento può essere impostata come segue. ENGLISH • [Tools] - [Audio options] - [Settings] - [Default sampling rate] Un’applicazione si blocca? DEUTSCH FRANÇAIS • Quando si utilizza un software per musica digitale per la registrazione digitale e l’interruttore di selezione d’ingresso registrazione dell’UA3 è impostato su DIGITAL, accertarsi che un dispositivo digitale sia collegato. Anche se, in alcuni programmi, i limiti di Windows potrebbero sospendere il funzionamento del mouse o di altri dispositivi fino a quando non viene collegato un dispositivo digitale, non si tratta di un malfunzionamento. Se il mouse o gli altri dispositivi continuano ad essere bloccati, ricollegare il dispositivo digitale. Si è accertato che il problema si verifica con le seguenti applicazioni (situazione al gennaio 2001). •Logic Audio 3.0 or 4.0 In fase di registrazione •Cubase VST 3.7 In fase di avvio/registrazione/riproduzione •Cubase ASIO Multimedia Setup In fase di prova Si è accertato che i problemi di cui sopra non si verificano con le seguenti applicazioni. •Cakewalk Pro Audio 7, 8 e 9 •CoolEditProLE •SoundRecorder (fornito con Windows98) Appare un errore di collegamento all’avvio di Windows Se D-Out Smoother è stato disinstallato con l’opzione Register to STARTUP selezionata (pag. 100), appaiono i seguenti messaggi di errore all’avvio di Windows. In questo caso fare clic su [NO] per chiudere i messaggi. ITALIANO ESPAÑOL Seguire la procedura sotto indicata per cancellare questo messaggio. 1. In Windows, fare clic sul pulsante [Start] e in [Impostazioni] scegliere [Barra delle applicazioni e menu Avvio]. 2. Fare clic sulla scheda [Applicazioni del menu Avvio] e fare clic su [Rimuovi]. 3. Selezionare [Programmi] - [StartUp] - [SmoothDo] e fare clic su [Rimuovi]. UA-3 109 Appendices Appendices UA-3 Application Guide This section explains various ways in which the UA-3 can be connected and used. To prevent malfunction and/or damage to speakers or other devices, always turn down the volume, and turn off the power of all devices before making any connections. (It is not necessary to turn off the power of your computer) Before you perform digital recording, please read the section entitled You must read this before you use digital recording (p. 5). ■ Digitally recording the output of the UA-3 on MD Make the connections shown in the following diagram. Computer MD DIGITAL INPUT USB port Optical digital cable Monitor Speakers USB cable Audio cable LINE IN DIGITAL OUT LINE OUT USB port Stereo Headphones • Depending on the application that you are using on a Windows machine, when the digital output of the UA-3 is connected to a digital device such as MD and audio is playing, a certain amount of time may be required immediately after playback ends for the digital audio output to be locked, so that there will be no sound for one or two second, or the tempo or pitch may be wrong. If this occurs, you can use the “D-Out Smoother” software included in the CD-ROM to make the audio sound smoothly. For details refer to Basic operation of the D-Out Smoother (p. 15). • If you change the position of the Recording input select switch, you should turn down the volume of any monitor speaker system that is connected. UA-3 Set to "INPUT+GUITAR/MIC" * 110 Signal flow The sampling rate of the UA-3’s digital output is 44.1kHz. Audio data of a sampling rate other than 44.1kHz will be automatically converted within a computer to 44.1kHz, and will be output from the digital output connectors of the UA-3. Appendices ■ Digital transfer from CD/MD/DAT to your computer (digital recording) Make connections as shown in the following diagram. Computer CD DIGITAL OUT USB port Optical digital cable Monitor speakers USB cable Audio cable LINE IN DIGITAL IN LINE OUT USB port Stereo Headphones UA-3 Set to "DIGITAL" Signal flow • Since the UA-3 supports SCMS (p. 5), audio data containing copy protected song that is input to the digital connector cannot be recorded by the UA-3 to your computer. (It will be output from the line output jacks and the headphone jack.) • If you change the position of the Recording input select switch, you should turn down the volume of any monitor speaker system that is connected. • If the Recording input select switch is set to DIGITAL, audio data from your computer will not be output. • If you wish to input from the Line input jacks, Mic input jack or Guitar input jack, refer to p.112 -115. On the UA-3, it is not possible to mix the signal from these inputs with the signal from the digital input connector and record them together. * Set the recording sampling frequency of your recording application to 48 kHz if you are using DAT, or to 44.1 kHz if you are using MD or CD. For details refer to your application’s manual. UA-3 111 Appendices ■ Recording the line inputs (analog recording) Make connections as shown in the following diagram. Monitor speakers MIDI sound module/Audio amplifier (Cassette, record players) Computer LINE IN LINE OUT If you change the position of the Recording input select switch, you should turn down the volume of any monitor speaker system that is connected. USB port Audio cable Audio cable USB cable LINE IN LINE OUT USB port Stereo Headphones UA-3 Set to "INPUT + GUITAR/MIC" In order to record at the best possible audio quality, do not connect a guitar or mic to the "GUITAR" jack or "MIC" jack. Lower the "GUITAR/MIC" slider to the lowest position. Signal flow Use the Line input adjustment slider to adjust the input level. If the LED above the slider lights red, use the slider to lower the input level. You will be able to record with higher audio quality if you use the slider to adjust the level so it is as high as you can get it before causing the LED to light. 112 Appendices ■ Recording guitar sounds When recording guitar sounds with a sequencer or similar device, only the guitar sounds are recorded as you play the guitar along with the sounds of the computer’s audio data. Make connections as shown in the following diagram. Monitor speakers Computer LINE IN Audio cable USB port Only GUITAR will be recorded to the computer. The guitar input and audio data on the computer will be mixed and output. USB cable LINE OUT USB port • The signal input from the Guitar input jack is not directly output to the Digital output connector. • If you change the position of the Recording input select switch, you should turn down the volume of any monitor speaker system that is connected. audio data on the computer Stereo Headphones UA-3 Guitar The guitar input and audio data on the computer will be mixed and output. Set to "INPUT + GUITAR/MIC" Signal flow of audio data on the computer GUITAR signal flow Set the recording sample rate of your recording application to the desired setting. (The available sample rates will depend on your application. For details refer to the owner’s manual for your application.) Available sampling frequencies vary depending on the operating system used. Use the Guitar/Mic input adjustment slider to adjust the input level. If the LED above the slider lights red, use the slider to lower the input level. You will be able to record with higher audio quality if you use the slider to adjust the level so it is as high as you can get it before causing the LED to light. UA-3 113 Appendices ■ Recording narration or vocal sounds Make connections as shown in the following diagram. Monitor speakers Condenser mic Computer Dynamic mic LINE IN Audio cable USB port MIC will be output. USB cable MIC will be recorded to the computer. LINE OUT USB port • CONDENSER MIC The UA-3 supports small multimedia microphones used for adding narration, and is compatible with plug-in powered monaural microphones • Howling could be produced depending on the location of microphones relative to speakers. This can be remedied by: 1. Changing the orientation of the microphones(s). 2. Relocating microphone(s) at a greater distance from speakers. 3. Lowering volume levels. • If you change the position of the Recording input select switch, you should turn down the volume of any monitor speaker system that is connected. Stereo Headphones UA-3 The MIC will be output. Select a MIC type according to your mic. Set to "INPUT + GUITAR/MIC" MIC input signal flow Set the recording sample rate of your recording application to the desired setting. (The available sample rates will depend on your application. For details refer to the owner’s manual for your application.) Available sampling frequencies vary depending on the operating system used. Use the Guitar/Mic input adjustment slider to adjust the input level. If the LED above the slider lights red, use the slider to lower the input level. Use the Guitar/Mic input adjustment slider to adjust the input level. If the LED above the slider lights red, use the slider to lower the input level. You will be able to record with higher audio quality if you use the slider to adjust the level so it is as high as you can get it before causing the LED to light. 114 Appendices ■ Recording guitar mixed with the line inputs With these settings, the guitar will be mixed with the line inputs and recorded on your computer. Make connections as shown in the following diagram. MIDI sound module / CD / MD / DAT Monitor speakers Computer LINE IN LINE OUT Audio cable The GUITAR and LINE IN will be mixed and output. Audio cable USB port USB cable LINE OUT LINE IN USB port The GUITAR and LINE IN will be mixed and recorded to the computer. • It is not possible to simultaneously record both a digital source (such as CD) and an analog source (such as guitar or mic). Either use the included software to record them separately, or record the digital source first and then record the analog source as described in Recording guitar sounds (p. 113). • If you change the position of the Recording input select switch, you should turn down the volume of any monitor speaker system that is connected. Stereo Headphones UA-3 Guitar Set to "INPUT + GUITAR/MIC" The GUITAR and LINE IN will be mixed and output. LINE input signal flow GUITAR input signal flow Set the recording sample rate of your recording application to the desired setting. (The available sample rates will depend on your application. For details, refer to the owner’s manual for your application.) Use the Line input adjustment slider and Guitar/Mic input adjustment slider to adjust the balance. If the LED above the slider lights red, use the slider to lower the input level. If you use the slider to adjust the level so it is as high as you can get it before causing the LED to light. UA-3 115 Appendices ■ U-3 Block Diagram UA-3 Block Diagram [Recording input select switch is set to INPUT + GUITAR/MIC] USB Connector USB indicator USB CODEC Digital input connector (Optical) Digital output connector (optical) Line input peak indicator Line input jacks Headphone jack Recording input select switch Guitar input jack Line output volume Mic input jack Line output jacks Output level indicator Guitar/Mic input peak indicator [Recording input select switch is set to DIGITAL] USB Connector USB indicator USB CODEC Digital input connector (Optical) Digital output connector (optical) Line input peak indicator Line input jacks Headphone jack Recording input select switch Guitar input jack Mic input jack 116 Guitar/Mic input peak indicator Line output volume Output level indicator Line output jacks UA-3 Specifications UA-3 Specifications UA-3 (USB Audio Interface) Number of Audio Record/Playback Channels Record: Playback: * 1 pair of stereo 1 pair of stereo When the REC SOURCE switch is at INPUT+GUITAR/MIC, analog recording and audio playback from your PC can occur simultaneously. When the REC SOURCE switch is at DIGITAL, only digital recording is possible. Signal Processing PC interface: 16 bit Sampling Frequency Output: Input: * 44.1 kHz 32 kHz/44.1 kHz/48 kHz * When you record audio digitally from a digital device, UA-3 does not support the switching function of the sampling rate of the digital device. If you want to switch the sampling rate, you have to reconnect the digital cable. Interface USB Digital input/output:Optical type (conforms to S/P DIF) * Consumer digital audio device format is supported Power Supply Supplied from the computer Current Draw 360 mA Dimensions 175 (W) x 125.5 (D) x 34 (H) mm 6-15/16 (W) x 5 (D) x 1-3/8 (H) inches Weight 260 g/ 10 oz Accessories Getting Started Manual USB cable CD-ROM 962a * In the interest of product improvement, the specifications and/or appearance of this unit are subject to change without prior notice. About the included song data Use of the song data supplied with this product for any purpose other than private, personal enjoyment without the permission of the copyright holder is prohibited by law. Additionally, this data must not be copied, nor used in a secondary copyrighted work without the permission of the copyright holder. It’s gonna be alright Composed & programmed by Mitsuru Sakaue Vocal: Tahirih Walker, Humiyo Kawazoe Guitar: Katsuhisa Fujimoto, Idecs Inc. UA-3 117 System Requirements System Requirements Windows Operating system: - Microsoft® Windows® 98 (includes Second Edition) - Microsoft® Windows® Me - Microsoft® Windows® 2000 Professional Computer: Windows® compatible computer with an USB connector. CPU/Clock: - Microsoft® Windows® 98 (includes Second Edition) /Microsoft® Windows® Me Pentium II processor 233MHz or higher - Microsoft® Windows® 2000 Professional Pentium II processor 400MHz or higher Or Celeron processor 400MHz or higher (Pentium III processor 500MHz or higher recommended) Memory(RAM): 64M bytes or more Hard Disk: 120M bytes or more Display/Colors: 800x600 or higher /65,536 colors (16 bit High Color) or more Macintosh Operating system: MacOS 9.0.4 or later Computer: Apple Macintosh series with on-board USB. Test Studied on iMac*, Power Mac G4, Power Mac G4 Cube, and iBook. * If you are using an iMac that are released after the summer of 2000, noise is heard when recording audio. CPU/Clock: PowerPC G3/300MHz or higher Memory(RAM): 96M Bytes or more (128M bytes or more recommended; Application memory 32M bytes or more) Hard Disk: 120M bytes or more Display/Colors: 800x600 or higher (986) * 118 Although Roland has tested numerous configurations, and has determined that on average, a computer system similar to that described above will permit normal operation of the UA-3, Roland cannot guarantee that a given computer can be used satisfactorily with the UA-3 based solely on the fact that it meets the above requirements. This is because there are too many other variables that may influence the processing environment, including differences in motherboard design and the particular combination of other devices involved. USING THE UNIT SAFELY The symbol alerts the user to important instructions or warnings.The specific meaning of the symbol is determined by the design contained within the triangle. In the case of the symbol at left, it is used for general cautions, warnings, or alerts to danger. Used for instructions intended to alert the user to the risk of death or severe injury should the unit be used improperly. Used for instructions intended to alert the user to the risk of injury or material damage should the unit be used improperly. * Material damage refers other adverse effects respect to the home furnishings, as well animals or pets. The symbol alerts the user to items that must never be carried out (are forbidden). The specific thing that must not be done is indicated by the design contained within the circle. In the case of the symbol at left, it means that the unit must never be disassembled. to damage or caused with and all its to domestic The ● symbol alerts the user to things that must be carried out. The specific thing that must be done is indicated by the design contained within the circle. In the case of the symbol at left, it means that the powercord plug must be unplugged from the outlet. For EU Countries This product complies with the requirements of European Directive 89/336/EEC. 010 001 • Before using this unit, make sure to read the instructions below, and the Owner’s Manual. ................................................................................................ 002a • Do not open or perform any internal modifications on the unit. ................................................................................................ 003 • Do not attempt to repair the unit, or replace parts within it (except when this manual provides specific instructions directing you to do so). Refer all servicing to your retailer, the nearest Roland Service Center, or an authorized Roland distributor, as listed on the "Information" page. ................................................................................................ 004 • Never use or store the unit in places that are: • Subject to temperature extremes (e.g., direct sunlight in an enclosed vehicle, near a heating duct, on top of heat-generating equipment); or are • This unit, either alone or in combination with an amplifier and headphones or speakers, may be capable of producing sound levels that could cause permanent hearing loss. Do not operate for a long period of time at a high volume level, or at a level that is uncomfortable. If you experience any hearing loss or ringing in the ears, you should immediately stop using the unit, and consult an audiologist. ................................................................................................ 011 • Do not allow any objects (e.g., flammable material, coins, pins); or liquids of any kind (water, soft drinks, etc.) to penetrate the unit. ................................................................................................ 012d • Immediately turn the power off, and request servicing by your retailer, the nearest Roland Service Center, or an authorized Roland distributor, as listed on the "Information" page when: • Objects have fallen into, or liquid has been spilled onto the unit; or • Damp (e.g., baths, washrooms, on wet floors); or are • The unit has been exposed to rain (or otherwise has become wet); or • Humid; or are • Exposed to rain; or are • Dusty; or are • Subject to high levels of vibration. ................................................................................................ • The unit does not appear to operate normally or exhibits a marked change in performance. ................................................................................................ For the USA FEDERAL COMMUNICATIONS COMMISSION RADIO FREQUENCY INTERFERENCE STATEMENT This equipment has been tested and found to comply with the limits for a Class B digital device, pursuant to Part 15 of the FCC Rules. These limits are designed to provide reasonable protection against harmful interference in a residential installation. This equipment generates, uses, and can radiate radio frequency energy and, if not installed and used in accordance with the instructions, may cause harmful interference to radio communications. However, there is no guarantee that interference will not occur in a particular installation. If this equipment does cause harmful interference to radio or television reception, which can be determined by turning the equipment off and on, the user is encouraged to try to correct the interference by one or more of the following measures: – Reorient or relocate the receiving antenna. – Increase the separation between the equipment and receiver. – Connect the equipment into an outlet on a circuit different from that to which the receiver is connected. – Consult the dealer or an experienced radio/TV technician for help. This device complies with Part 15 of the FCC Rules. Operation is subject to the following two conditions: (1) This device may not cause harmful interference, and (2) This device must accept any interference received, including interference that may cause undesired operation. Unauthorized changes or modification to this system can void the users authority to operate this equipment. This equipment requires shielded interface cables in order to meet FCC class B Limit. For the USA DECLARATION OF CONFORMITY COMPLIANCE INFORMATION STATEMENT Model name: UA-3 Type of Equipment: USB Audio Interface Responsible Party: Edirol Corporation North America Address: 425 Sequoia Drive, Suite 114, Bellingham, WA 98226 Telephone: 360-594-4276 For Canada 013 007 • Make sure you always have the unit placed so it is level and sure to remain stable. Never place it on stands that could wobble, or on inclined surfaces. ................................................................................................ 2 • In households with small children, an adult should provide supervision until the child is capable of following all the rules essential for the safe operation of the unit. ................................................................................................ NOTICE This Class B digital apparatus meets all requirements of the Canadian Interference-Causing Equipment Regulations. AVIS Cet appareil numérique de la classe B respecte toutes les exigences du Règlement sur le matériel brouilleur du Canada. Information When you need repair service, call your nearest Roland/EDIROL Service Center or authorized Roland/EDIROL distributor in your country as shown below. AUSTRALIA EDIROL Australia Pty. Ltd. INDIA MEXICO IRELAND Rivera Digitec (India) Pvt. Ltd. Casa Veerkamp, s.a. de c.v. Roland Ireland 409, Nirman Kendra Mahalaxmi Flats Compound Off. Dr. Edwin Moses Road, Mumbai-400011, INDIA TEL: (022) 498 3079 Av. Toluca No. 323, Col. Olivar de los Padres 01780 Mexico D.F. MEXICO TEL: (525) 668 04 80 Audio House, Belmont Court, Donnybrook, Dublin 4. Republic of IRELAND TEL: (01) 2603501 La Casa Wagner de Guadalajara s.a. de c.v. ITALY Av. Corona No. 202 S.J. Guadalajara, Jalisco Mexico C.P.44100 MEXICO TEL: (3) 613 1414 Viale delle Industrie 8, 20020 Arese, Milano, ITALY TEL: (02) 937-78300 72 Central Avenue Oak Flats NSW 2529 AUSTRALIA TEL: (02) 4257 9091 http://www.edirol.com.au EUROPE INDONESIA EDIROL (Europe) Ltd. Studio 3.4 114 Power Road London W4 5PY U. K. TEL: +44 (0)20 8747 5949 FAX:+44 (0)20 8747 5948 http://www.edirol.com/europe Deutschland TEL: 0700 33 47 65 20 France TEL: 0810 000 371 Italia TEL: 02 93778329 U. S. A. / CANADA EDIROL Corporation North America 425 Sequoia Drive, Suite 114 Bellingham, WA 98226 U. S. A. TEL: (360)594-4276 FAX: (360)594-4271 http://www.edirol.com/ PT Citra IntiRama J1. Cideng Timur No. 15J-150 Jakarta Pusat INDONESIA TEL: (021) 6324170 KOREA EGYPT Al Fanny Trading Office P.O. Box 2904, El Horrieh Heliopolos, Cairo, EGYPT TEL: (02) 4185531 REUNION Maison FO - YAM Marcel 25 Rue Jules Hermann, Chaudron - BP79 97 491 Ste Clotilde Cedex, REUNION ISLAND TEL: 28 29 16 SOUTH AFRICA That Other Music Shop (PTY) Ltd. 11 Melle St., Braamfontein, Johannesbourg Republic of SOUTH AFRICA P.O.Box 32918, Braamfontein 2017 Republic of SOUTH AFRICA TEL: (011) 403 4105 Paul Bothner (PTY) Ltd. 17 Werdmuller Centre Claremont 7700 Republic of SOUTH AFRICA P.O. Box 23032 Claremont, Cape Town SOUTH AFRICA, 7735 TEL: (021) 674 4030 ASIA CHINA Beijing Xinghai Musical Instruments Co., Ltd. MALAYSIA URUGUAY POLAND Cuareim 1844, Montevideo, URUGUAY, CP11200 TEL: 5982-924-2335 PHILIPPINES G.A. Yupangco & Co. Inc. VENEZUELA 339 Gil J. Puyat Avenue Makati, Metro Manila 1200, PHILIPPINES TEL: (02) 899 9801 Musicland Digital C.A. Av. Francisco de Miranda, Centro Parque de Cristal, Nivel C2 Local 20 Caracas VENEZUELA TEL: (02) 285 9218 CYPRUS Radex Sound Equipment Ltd. IRAN MOCO, INC. No.41 Nike St.Dr.Shariyati Ave. Roberoye Cerahe Mirdamad Tehran, IRAN TEL: 285 4169 P. P. H. Brzostowicz ISRAEL UL. Gibraltarska 4. PL-03664 Warszawa POLAND TEL: (022) 679 44 19 Halilit P. Greenspoon & Sons Ltd. PORTUGAL Tecnologias Musica e Audio, Roland Portugal, S.A. Cais Das Pedras, 8/9-1 Dto 4050-465 PORTO PORTUGAL TEL: (022) 608 00 60 8 Retzif Ha’aliya Hashnya St. Tel-Aviv-Yafo ISRAEL TEL: (03) 6823666 JORDAN AMMAN Trading Agency Prince Mohammed St. P.O. Box 825 Amman 11118 JORDAN TEL: (06) 4641200 EUROPE ROMANIA FBS LINES KUWAIT Blk 3014, Bedok Industrial Park E, #02-2148, SINGAPORE 489980 TEL: 243 9555 AUSTRIA Piata Libertatii 1, RO-4200 Gheorgheni TEL: (066) 164-609 Easa Husain Al-Yousifi TAIWAN ROLAND TAIWAN ENTERPRISE CO., LTD. Room 5, 9fl. No. 112 Chung Shan N.Road Sec.2, Taipei, TAIWAN, R.O.C. TEL: (02) 2561 3339 THAILAND Theera Music Co. , Ltd. 330 Verng NakornKasem, Soi 2, Bangkok 10100, THAILAND TEL: (02) 2248821 VIETNAM Saigon Music 138 Tran Quang Khai St., District 1 Ho Chi Minh City VIETNAM TEL: (08) 844-4068 AUSTRALIA/ NEW ZEALAND NEW ZEALAND Roland Corporation (NZ) Ltd. 97 Mt. Eden Road, Mt. Eden, Auckland 3, NEW ZEALAND TEL: (09) 3098 715 CENTRAL/LATIN AMERICA ARGENTINA Instrumentos Musicales S.A. HONG KONG BRAZIL Roland Brasil Ltda Rua San Jose, 780 Sala B Parque Industrial San Jose Cotia - Sao Paulo - SP, BRAZIL TEL: (011) 4615 5666 Roland Austria GES.M.B.H. Siemensstrasse 4, P.O. Box 74, A-6063 RUM, AUSTRIA TEL: (0512) 26 44 260 BELGIUM/HOLLAND/ LUXEMBOURG Roland Benelux N. V. Houtstraat 3, B-2260, Oevel (Westerlo) BELGIUM TEL: (014) 575811 DENMARK Roland Scandinavia A/S Nordhavnsvej 7, Postbox 880, DK-2100 Copenhagen DENMARK TEL: (039)16 6200 FRANCE Roland France SA 4, Rue Paul Henri SPAAK, Parc de l'Esplanade, F 77 462 St. Thibault, Lagny Cedex FRANCE TEL: 01 600 73 500 FINLAND Roland Scandinavia As, Filial Finland Lauttasaarentie 54 B Fin-00201 Helsinki, FINLAND TEL: (9) 682 4020 GERMANY Roland Elektronische Musikinstrumente HmbH. Oststrasse 96, 22844 Norderstedt, GERMANY TEL: (040) 52 60090 GREECE STOLLAS S.A. Music Sound Light 155, New National Road 26422 Patras, GREECE TEL: 061-435400 HUNGARY Intermusica Ltd. Abdullah Salem Street, Safat KUWAIT TEL: 5719499 RUSSIA LEBANON Slami Music Company Sadojava-Triumfalnaja st., 16 103006 Moscow, RUSSIA TEL: 095 209 2193 A. Chahine & Fils SPAIN P.O. Box 16-5857 Gergi Zeidan St. Chahine Building, Achrafieh Beirut, LEBANON TEL: (01) 335799 Roland Electronics de España, S. A. QATAR Badie Studio & Stores Calle Bolivia 239, 08020 Barcelona, SPAIN TEL: (93) 308 1000 P.O. Box 62, DOHA QATAR TEL: 423554 SWEDEN Roland Scandinavia A/S SWEDISH SALES OFFICE Danvik Center 28, 2 tr. S-131 30 Nacka SWEDEN TEL: (08) 702 0020 SAUDI ARABIA aDawliah Universal Electronics APL Corniche Road, Aldossary Bldg., 1st Floor SAUDI ARABIA SWITZERLAND Roland (Switzerland) AG Musitronic AG P.O.Box 2154, Alkhobar 31952 SAUDI ARABIA TEL: (03) 898 2081 Gerberstrasse 5, Postfach, CH-4410 Liestal, SWITZERLAND TEL: (061) 921 1615 SYRIA UKRAINE Technical Light & Sound Center TIC-TAC Mira Str. 19/108 P.O. Box 180 295400 Munkachevo, UKRAINE TEL: (03131) 414-40 UNITED KINGDOM Roland (U.K.) Ltd. Atlantic Close, Swansea Enterprise Park, SWANSEA SA7 9FJ, UNITED KINGDOM TEL: (01792) 700139 Owner’s Manual page 5 Bedienungsanleitung page 26 Mode d’emploi page 47 Manual del usuario page 68 Manuale d’uso page 89 17 Diagorou St., P.O. Box 2046, Nicosia CYPRUS TEL: (02) 453 426 CRISTOFORI MUSIC PTE LTD 6 Huangmuchang Chao Yang District, Beijing, CHINA TEL: (010) 6774 7491 22-32 Pun Shan Street, Tsuen Wan, New Territories, HONG KONG TEL: 2415 0911 Todo Musica S.A. 140 & 142, Jalan Bukit Bintang 55100 Kuala Lumpur,MALAYSIA TEL: (03) 2443333 Bab Al Bahrain Road, P.O. Box 20077 State of BAHRAIN TEL: 211 005 Roland Scandinavia Avd. Kontor Norge 1461-9, Seocho-Dong, Seocho Ku, Seoul, KOREA TEL: (02) 3486-8855 Bentley Music SDN BHD Moon Stores NORWAY Lilleakerveien 2 Postboks 95 Lilleaker N-0216 Oslo NORWAY TEL: 273 0074 Florida 656 2nd Floor Office Number 206A Buenos Aires ARGENTINA, CP1005 TEL: (54-11) 4- 393-6057 Tom Lee Music Co., Ltd. Service Division SUPRO MUNDIAL, S.A. BAHRAIN Roland Italy S. p. A. Boulevard Andrews, Albrook, Panama City, REP. DE PANAMA TEL: (507) 315-0101 Cosmos Corporation SINGAPORE AFRICA PANAMA MIDDLE EAST Khaled Ibn Al Walid St. P.O. Box 13520 Damascus - SYRIA TEL: (011) 2235 384 TURKEY 201a Barkat Muzik aletleri ithalat ve ihracat Ltd Sti Before using this unit, carefully read the sections entitled: “USING THE UNIT SAFELY” and “IMPORTANT NOTES” (p. 2, p. 4). These sections provide important information concerning the proper operation of the unit. Additionally, in order to feel assured that you have gained a good grasp of every feature provided by your new unit, Getting Started manual should be read in its entirety. The manual should be saved and kept on hand as a convenient reference. Siraselviler cad.Guney is hani 8486/6, Taksim. Istanbul. TURKEY TEL: (0212) 2499324 U.A.E. Zak Electronics & Musical Instruments Co. L.L.C. Zabeel Road, Al Sherooq Bldg., No. 14, Grand Floor DUBAI U.A.E. TEL: (04) 3360715 Warehouse Area ‘DEPO’ Pf.83 H-2046 Torokbalint, HUNGARY TEL: (23) 511011 Copyright © 2001 ROLAND CORPORATION All rights reserved. No part of this publication may be reproduced in any form without the written permission of ROLAND CORPORATION. As of April 23, 2001 (EDIROL) 02673845 1*SX-
 1
1
-
 2
2
-
 3
3
-
 4
4
-
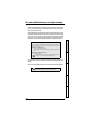 5
5
-
 6
6
-
 7
7
-
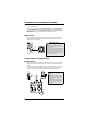 8
8
-
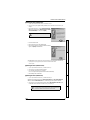 9
9
-
 10
10
-
 11
11
-
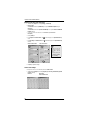 12
12
-
 13
13
-
 14
14
-
 15
15
-
 16
16
-
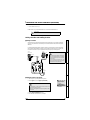 17
17
-
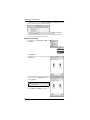 18
18
-
 19
19
-
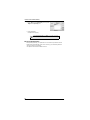 20
20
-
 21
21
-
 22
22
-
 23
23
-
 24
24
-
 25
25
-
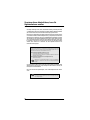 26
26
-
 27
27
-
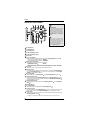 28
28
-
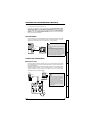 29
29
-
 30
30
-
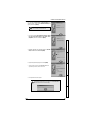 31
31
-
 32
32
-
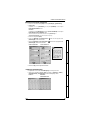 33
33
-
 34
34
-
 35
35
-
 36
36
-
 37
37
-
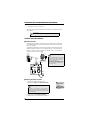 38
38
-
 39
39
-
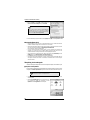 40
40
-
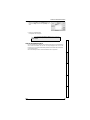 41
41
-
 42
42
-
 43
43
-
 44
44
-
 45
45
-
 46
46
-
 47
47
-
 48
48
-
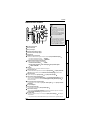 49
49
-
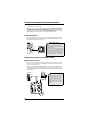 50
50
-
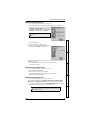 51
51
-
 52
52
-
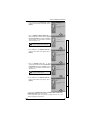 53
53
-
 54
54
-
 55
55
-
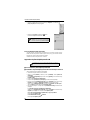 56
56
-
 57
57
-
 58
58
-
 59
59
-
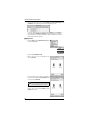 60
60
-
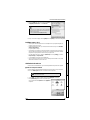 61
61
-
 62
62
-
 63
63
-
 64
64
-
 65
65
-
 66
66
-
 67
67
-
 68
68
-
 69
69
-
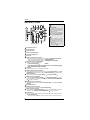 70
70
-
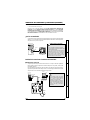 71
71
-
 72
72
-
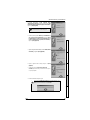 73
73
-
 74
74
-
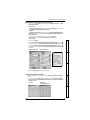 75
75
-
 76
76
-
 77
77
-
 78
78
-
 79
79
-
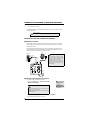 80
80
-
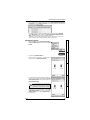 81
81
-
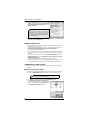 82
82
-
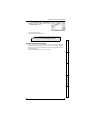 83
83
-
 84
84
-
 85
85
-
 86
86
-
 87
87
-
 88
88
-
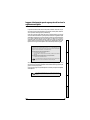 89
89
-
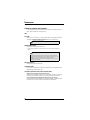 90
90
-
 91
91
-
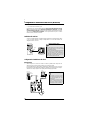 92
92
-
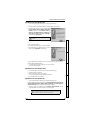 93
93
-
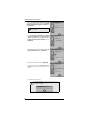 94
94
-
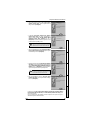 95
95
-
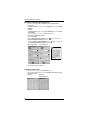 96
96
-
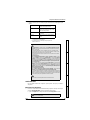 97
97
-
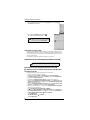 98
98
-
 99
99
-
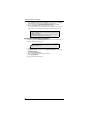 100
100
-
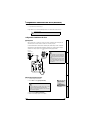 101
101
-
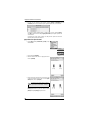 102
102
-
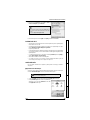 103
103
-
 104
104
-
 105
105
-
 106
106
-
 107
107
-
 108
108
-
 109
109
-
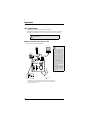 110
110
-
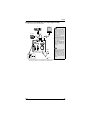 111
111
-
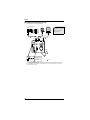 112
112
-
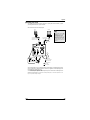 113
113
-
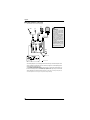 114
114
-
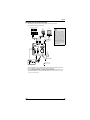 115
115
-
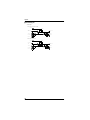 116
116
-
 117
117
-
 118
118
-
 119
119
-
 120
120


en otros idiomas
- français: Edirol UA-3 Le manuel du propriétaire
- italiano: Edirol UA-3 Manuale del proprietario
- English: Edirol UA-3 Owner's manual
- Deutsch: Edirol UA-3 Bedienungsanleitung
Artículos relacionados
-
Edirol Edirol Audio Capture UA-5 Getting Started
-
Edirol M-100FX El manual del propietario
-
-
-
-
-
-
-
-
Edirol PCR-1 El manual del propietario
Otros documentos
-
Roland R-1 Instrucciones de operación
-
Sony SRS-T100PC Instrucciones de operación
-
-
Roland UM-ONE MK2 El manual del propietario
-
Sony DR-260 Manual de usuario
-
-
-
Sony SRS-T10PC Instrucciones de operación
-
-