D-Link DWL-7100AP Quick Install Manual
- Categoría
- Puntos de acceso WLAN
- Tipo
- Quick Install Manual

AirPremier
TM
AG Tri-mode
Dualband Wireless Access Point
Quick Install Guide+
Руководство по быстрой установке+
Guía de instalación rápida+
Guia de instalação rápida+
快速安裝手冊
+
Petunjuk Pemasangan Cepat+
DWL- 7100AP

2
This product can be set up using
any current Web browser, i.e.,
Internet Explorer 6 or Netscape
Navigator 6.2.3 or later.
5V DC, 2.0A
Power Adapter
©2004 D-Link Systems, Inc. All rights reserved. Trademarks or registered trademarks are the property of their respective
holders. Software and specications subject to change without notice.
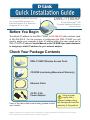
Before You Begin
Check Your Package Contents
DWL-7100AP Wireless Access Point
CD-ROM (containing Manual and Warranty)
Ethernet Cable
If any of the above items are missing, please contact
your reseller.
The default IP address for the DWL-7100AP is 192.168.0.50 with a subnet mask
of 255.255.255.0. For the purpose of configuring the DWL-7100AP you will
need to assign your computer a static IP address within the same range as the
DWL-7100AP’s IP address. See the Manual on the CD-ROM if you need assistance
in assigning a static IP address for your network adapter.
Using a power
supply with a
different voltage rating
will damage and void the
warranty of this product.
DWL-7100AP
D-Link AirPremier
TM
AG
Tri-mode Dualband Wireless
Access Point

3
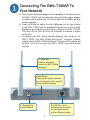
Connecting The DWL-7100AP To
Your Network
A. First, connect the power adapter to the receptor at the back panel of
the DWL-7100AP and then plug the other end of the power adapter
to a wall outlet or power strip. The Power LED will turn ON to indicate
proper operation.
B. Insert an Ethernet cable into the LAN port on the back panel
of the DWL-7100AP and an available Ethernet port on the network
adapter in the computer you will use to congure the DWL-7100AP.
The Link LED for the LAN Port will illuminate to indicate a proper
connection.
C. Computers with 802.11a/b/g wireless adapters can connect to the
DWL-7100AP. The DWL-AG660 AirPremier
TM
Wireless Cardbus
Adapter and the DWL-AG530 AirPremier
TM
Wireless PCI Adapter will
connect, out of the box, with the DWL-7100AP, using their default
settings.
A. Receptor for
Power Adapter.
Reset Button
Pressing this button restores
the access point to its original
factory default settings.
B. LAN Port is for
connecting to a switch
on the local network
with an Ethernet cable
C. Antennas
Used to wirelessly
connect to 802.11a/b/g
adapters.

4
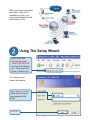
Using The Setup Wizard
When you have completed
the steps in this Quick
Installation Guide, your
connected network should
look similar to this:
The logon pop-up
screen will appear.
Type “admin” for the
username and leave
the password eld
blank.
Open your Web
browser and type
“http://192.168.0.50”
into the URL address
box. Then press the
Enter or Return key.
Click OK

5
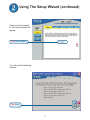
Using The Setup Wizard (continued)
Once you have logged
in, the Home screen will
appear.
You will see the following
screens.
Click Run Wizard
Click Next

6
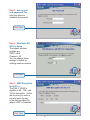
Click Next
Step 1 - Set up your
new password. You
have the option to
establish a password.
Step 2 - Wireless LAN
802.11a Setup
The default wireless
settings are:
SSID = dlink
Channel = 52
You can change these
settings to match an
existing wireless network.
Step 3 - WEP Encryption
for 802.11a
The DWL-7100AP is
capable of 64-, 128-, and
152-bit encryption. Select
the key size you wish to
use and enter the key
in the eld provided. By
default, WEP is Disabled.
Click Next
Click Next
dlink

7
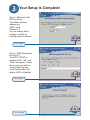
Your Setup is Complete!
Click Next
Click Restart
Step 2 - Wireless LAN
802.11g Setup
The default wireless
settings are:
SSID = dlink
Channel = 6
You can change these
settings to match an
existing wireless network.
Step 3 - WEP Encryption
for 802.11g
The DWL-7100AP is
capable of 64-, 128-, and
152-bit encryption. Select
the key size you wish to
use and enter the key
in the eld provided. By
default, WEP is Disabled.
Click Next
dlink

8
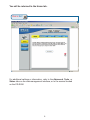
You will be returned to the Home tab.
Click to Exit
For additional settings or information, refer to the Advanced, Tools, or
Status tabs on the web-management interface; or to the manual located
on the CD-ROM.

Technical Support
You can nd software updates and user documentation on the D-Link website.
Tech Support for customers in
Australia:
Tel: 1300-766-868
24/7(24Hrs, 7days a week) technical support
http://www.dlink.com.au
e-mail: [email protected]
India:
Tel: 1800-222-002
9.00 AM to 9.00 PM. All days
http://www.dlink.co.in/support/productsupport.aspx
Indonesia, Malaysia, Singapore and Thailand:
Tel: +62-21-5731610 (Indonesia)
Tel: 1800-882-880 (Malaysia)
Tel: +65 6501 4200 (Singapore)
Tel: +66-2-719-8978/9 (Thailand)
24/7, for English Support Only
http://www.dlink.com.sg/support/
e-mail: [email protected]
Korea:
Tel: +82-2-2028-1815
Monday to Friday 9:00am to 6:00pm
http://www.d-link.co.kr
e-mail: [email protected]
New Zealand:
Tel: 0800-900-900
24/7(24Hrs, 7days a week) technical support
http://www.dlink.co.nz
e-mail: [email protected]

Technical Support
You can nd software updates and user documentation on the D-Link website.
Tech Support for customers in
Egypt:
Tel: +202-2919035 or +202-2919047
Sunday to Thursday 9:00am to 5:00pm
http://support.dlink-me.com
Email: [email protected]
Iran:
Te: +98-21-88880918,19
Saturday to Thursday 9:00am to 5:00pm
http://support.dlink-me.com
Email : [email protected] & [email protected]
Israel:
Magshimim 20 St., Matalon center,
Petach Tikva, Israel 49348
Consumer support line: 03-9212886
Business support line: 03-9212608
Pakistan:
Tel: +92-21-4548158 or +92-21-4548310
Monday to Friday 10:00am to 6:00pm
http://support.dlink-me.com
E-mail: [email protected]
South Africa and Sub Sahara Region:
Tel: +27-12-665-2165
08600 DLINK (for South Africa only)
Monday to Friday 8:30am to 9:00pm South Africa Time
http://www.d-link.co.za
Turkey:
Tel: +90-212-2895659
Monday to Friday 9:00am to 6:00pm
http://www.dlink.com.tr
e-mail: [email protected]
e-mail: [email protected]
U.A.E and North Africa:
Tel: +971-4-4278127 (U.A.E)
Sunday to Thursday 9.00AM to 6.00PM GMT+4
Web: http://www.dlink-me.com
E-mail: [email protected]
Saudi ARABIA (KSA):
Telephone : +966 01 217 0008
Facsimile : +966 01 217 0009
e-mail: [email protected]
Saturday to Wednesday 9.30AM to 6.30PM
Thursdays 9.30AM to 2.00 PM

11
MEMO

12
Это устройство может быть
настроено с помощью любого
Web-браузера, например, Internet
Explorer 6 или Netscape Navigator
6.2.3 или более поздней версии.
Адаптер питания 5В
постоянного тока, 2.0A
©2004 D-Link Systems, Inc. Все права защищены. Торговые марки или зарегистрированные торговые марки являются
собственностью их владельцев. Программное обеспечение и спецификации могут изменяться без уведомления.
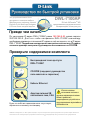
Прежде чем начать
Проверьте содержимое комплекта
Беспроводная точка доступа
DWL-7100AP
CD-ROM (содержит руководство
пользователя и гарантию)
Кабель Ethernet
Если что-либо из перечисленного отсутствует,
обратитесь к вашему поставщику.
По умолчанию IP-адрес DWL-7100AP равен 192.168.0.50, маска подсети
255.255.255.0. Для того чтобы настраивать DWL-7100AP компьютеру
необходимо присвоить статический IP-адрес из той же подсети, что и IP-адрес
DWL-7100AP. Подробные инструкции по настройке статического IP-адреса
сетевого адаптера смотрите в руководстве пользователя на CD-ROM.
Использование
источника питания с
другими характеристиками
может привести к
повреждению устройства и
аннулированию гарантийных
обязательств.
DWL-7100AP
D-Link AirPremier
TM
AG
трехрежимная двухдиапазонная
беспроводная точка доступа

13
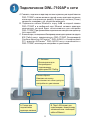
Подключение DWL-7100AP к сети
А. Сначала, подключите адаптер питания к разъему на задней панели
DWL-7100AP и затем вставьте другой конец адаптера питания в
настенную электрическую розетку. Индикатор питания (Power)
загорится, показывая, что устройство включено.
B. Подключите кабель Ethernet к порту LAN на задней панели
DWL-7100AP и в свободный порт Ethernet сетевого адаптера
компьютера, который будет использоваться для настройки
DWL-7100AP. При правильном подключении загорится индикатор
Link порта LAN.
C. Компьютеры, оснащенные беспроводными адаптерами стандарта
802.11a/b/g могут подключаться к DWL-7100AP. Беспроводной
Cardbus-адаптер AirPremier
TM
DWL-AG660 и беспроводной
PCI -адаптер AirPremier
TM
DWL-AG530 могут подключаться к
DWL-7100AP, используя их настройки по умолчанию.
A. Гнездо для
подключения
адаптера питания.
Кнопка сброса
Нажатие на кнопку
восстановит на точке доступа
настройки по умолчанию.
B. Порт LAN служит для
подключения к коммутатору
локальной сети с помощью
кабеля Ethernet.
C. Антенны
Используются для
беспроводного
подключения к
адаптерам 802.11a/b/g.

14
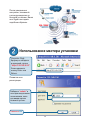
Использование мастера установки
После завершения
настройки, описанной
в этом руководстве по
быстрой установке, Ваша
сеть будет выглядеть
подобным образом:
Появится окно
регистрации.
Наберите “admin” в
поле для ввода имени
пользователя, поле
для ввода пароля
оставьте пустым.
Откройте Web-
браузер и наберите
в адресной строке
“http://192.168.0.50”.
Затем нажмите
кнопку Enter или
Return.
Нажмите OK

15
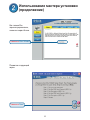
Использование мастера установки
(продолжение)
Как только Вы
зарегистрировались,
появится экран Home.
Появится следующий
экран.
Нажмите Run Wizard
Нажмите Next

16
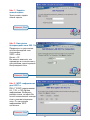
Шаг 1 - Задайте
новый пароль.
Здесь можно задать
новый пароль.
Шаг 2 - Настройка
беспроводной сети 802.11a
Параметры по умолчанию
для беспроводной сети
следующие:
SSID = dlink
Канал = 52
Вы можете изменить эти
параметры в соответствии с
настройками существующей
беспроводной сети.
Шаг 3 - WEP- шифрование
для 802.11a
DWL-7100AP поддерживает
64-, 128-, и 152-битное
шифрование. Выберите
размер ключа, который Вы
хотите использовать и введи
ключ в соответствующем
поле. По умолчанию
шифрование WEP
отключено.
Нажмите Next
Нажмите Next
Нажмите Next
dlink

17
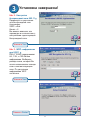
Установка завершена!
Нажмите Restart
Шаг 2 - Настройка
беспроводной сети 802.11 g
Параметры по умолчанию
для беспроводной сети
следующие:
SSID = dlink
Канал = 6
Вы можете изменить эти
параметры в соответствии с
настройками существующей
беспроводной сети.
Шаг 3 - WEP- шифрование
для 802.11 g
DWL-7100AP поддерживает
64-, 128-, и 152-битное
шифрование. Выберите
размер ключа, который Вы
хотите использовать и введи
ключ в соответствующем
поле. По умолчанию
шифрование WEP
отключено.
Нажмите Next
Нажмите Next
dlink

18
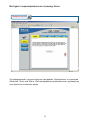
Вы будете перенаправлены на страницу Home.
Нажмите на Exit
За информацией о дополнительных настройках, обращайтесь к страницам
Advanced, Tools, или Status Web-интерфейса управления или к руководству
пользователя на компакт-диске.

19
Техническая поддержка
Обновления программного обеспечения и документация
доступны на Интернет-сайте D-Link.
D-Link предоставляет бесплатную поддержку для клиентов
в течение гарантийного срока.
Клиенты могут обратиться в группу технической поддержки
D-Link по телефону или через Интернет.
Техническая поддержка D-Link:
+7(495) 744-00-99
Техническая поддержка через Интернет
http://www.dlink.ru
e-mail: [email protected]

20
Este producto puede
congurarse usando cualquier
navegador web habitual, p. ej.,
Internet Explorer 6 o Netscape
Navigator 6.2.3 o superior.
Adaptador de alimentación
5 V DC, 2,0 A
©2004 D-Link Corporation. Reservados todos los derechos. Las marcas o marcas registradas son propiedad de los
respectivos titulares. El software y las especicaciones pueden ser modicados sin previo aviso.
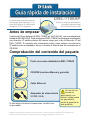
Antes de empezar
Comprobación del contenido del paquete
Punto de acceso inalámbrico DWL-7100AP
CD-ROM (contiene Manual y garantía)
Cable Ethernet
Si falta alguno de estos componentes, contacte con
su proveedor.
La dirección IP por defecto del DWL-7100AP es 192.168.0.50, con una máscara de
subred de 255.255.255.0. Para congurar el DWL-7100AP, ha de asignar al ordenador
una dirección IP estática dentro del mismo rango que la de la dirección IP del
DWL-7100AP. Si necesita más información sobre cómo asignar una dirección
IP estática para el adaptador de red, consulte el Manual que se encuentra en el
CD-ROM.
El uso de una
fuente de
alimentación con
distinto voltaje puede
ser perjudicial y
anular la garantía de
este producto.
DWL-7100AP
Punto de acceso inalámbrico
trimodo de banda dual
D-Link AirPremier
TM
AG

21
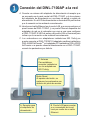
Conexión del DWL-7100AP a la red
A. Conecte un extremo del adaptador de alimentación al receptor que
se encuentra en el panel central del DWL-7100AP, y el otro extremo
del adaptador de alimentación en una base de pared o regleta de
alimentación. En el LED de alimentación se iluminará ON para indicar
que la conexión se ha realizado correctamente.
B. Introduzca el cable Ethernet en el puerto LAN, que se encuentra en el
panel trasero del DWL-7100AP, y un puerto Ethernet disponible del
adaptador de red en el ordenador que vaya a usar para congurar
el DWL-7100AP. El LED de enlace del puerto LAN se iluminará para
indicar que la conexión se ha realizado correctamente.
C. Los ordenadores con adaptadores inalámbricos 802.11a/b/g se
pueden conectar al DWL-7100AP. El adaptador cardbus inalámbrico
DWL-AG660 AirPremier
TM
y el adaptador PCI inalámbrico DWL-AG530
AirPremier
TM
se pueden conectar directamente con el DWL-7100AP,
usando los parámetros por defecto.
A. Receptor para
el adaptador de
alimentación.
Botón Reset
Al apretar este botón, se
restauran los parámetros por
defecto del punto de acceso.
B. Puerto LAN para conectar
a un conmutador de la red
local por medio de un cable
Ethernet.
C. Antenas
Para establecer
conexión inalámbrica
con los adaptadores
802.11a/b/g.

22
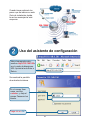
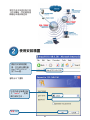
Uso del asistente de conguración
Cuando haya realizado los
pasos que se indican en esta
Guía de instalación rápida,
la red se asemejará a este
esquema:
Se mostrará la pantalla
de entrada al sistema.
En el campo User
name, escriba
«admin», y deje el
campo Password en
blanco.
Abra el navegador web y
escriba «http://192.168.0.50»
en el cuadro de direcciones
URL. Apriete la tecla Enter o
Return.
Haga clic en OK

23
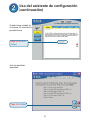
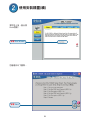
Uso del asistente de conguración
(continuación)
Cuando haya entrado en
el sistema, se mostrará la
pantalla Home.
Verá las pantallas
siguientes.
Haga clic en Run
Wizard
Haga clic en Next

24
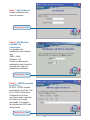
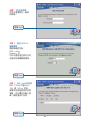
Paso 1: Set Password.
Puede establecer una
clave de acceso.
Paso 2: Set Wireless
LAN 802.11a
Connection
Los parámetros
inalámbricos por defecto
son:
SSID = dlink
Channel = 52
Puede cambiar estos
parámetros para hacerlos
coincidir con una red
inalámbrica existente.
Paso 3: - WEP Encryption
for 802.11a
El DWL-7100AP admite
encriptación de 64-bit, 128-
bit y 152-bit. Seleccione
el tamaño de la clave
que desee usar e escriba
la clave en el campo
apropiado. Por defecto,
la encriptación WEP está
desactivada.
Haga clic en Next
Haga clic en Next
Haga clic en Next
dlink

25
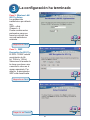
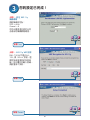
La conguración ha terminado
Haga clic en Restart
Paso 2: Wireless LAN
802.11g Setup
Los parámetros
inalámbricos por defecto
son:
SSID = dlink
Channel = 6
Puede cambiar estos
parámetros para que
hacerlos coincidir con
una red inalámbrica
existente.
Paso 3 - WEP
Encryption for 802.11g
El DWL-7100AP admite
encriptación de 64-
bit, 128-bit y 152-bit.
Seleccione el tamaño de
la clave que desee usar
e escriba la clave en el
campo apropiado. Por
defecto, la encriptación
WEP está desactivada.
Haga clic en Next
Haga clic en Next
dlink

26
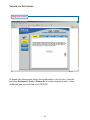
Volverá a la cha Home.
Haga clic en Exit
Si desea más información sobre otros parámetros o de otro tipo, consulte
las chas Advanced, Tools o Status de la interfaz de gestión web, o bien
el Manual, que se encuentra en el CD-ROM.

27
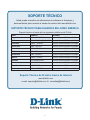
SOPORTE TÉCNICO
Usted puede encontrar actualizaciones de softwares o rmwares y
documentación para usuarios a través de nuestro sitio www.dlinkla.com
SOPORTE TÉCNICO PARA USUARIOS EN LATINO AMERICA
Soporte técnico a través de los siguientes teléfonos de D-Link
PAIS NUMERO HORARIO
Argentina 0800 - 12235465 Lunes a Viernes 08:00am a 21:00pm
Chile 800 - 835465 ó (02) 5941520 Lunes a Viernes 08:00am a 21:00pm
Colombia 01800 - 9525465 Lunes a Viernes 06:00am a 19:00pm
Costa Rica 0800 - 0521478 Lunes a Viernes 05:00am a 18:00pm
Ecuador 1800 - 035465 Lunes a Viernes 06:00am a 19:00pm
El Salvador 800 - 6335 Lunes a Viernes 05:00am a 18:00pm
Guatemala 1800 - 8350255 Lunes a Viernes 05:00am a 18:00pm
México 01800 - 1233201 Lunes a Viernes 06:00am a 19:00pm
Panamá 011 008000525465 Lunes a Viernes 05:00am a 18:00pm
Perú 0800 - 00968 Lunes a Viernes 06:00am a 19:00pm
República Dominicana 18887515478 Lunes a Viernes 05:00am a 18:00pm
Venezuela 0800 - 1005767 Lunes a Viernes 06:30am a 19:30pm
Soporte Técnico de D-Link a través de Internet
www.dlinkla.com
e-mail: [email protected] & [email protected]

28
Este produto pode ser
congurado utilizando qualquer
navegador web atual, como
por ex. o Internet Explorer 6 ou
Netscape Navigator 6.2.3 ou
superior.
Adaptador de
Alimentação de 5V
2.0A CC
©2004 D-Link Corporation. Todos os direitos reservados. As marcas comercias ou marcas comerciais registradas são
propriedade dos seus respectivos detentores. Os softwares e especicações estão sujeitos a mudanças sem prévio aviso.
Antes de Você Começar
Verique o Conteúdo da Sua Embalagem
Access Point Wireless DWL-7100AP
CD-ROM (contendo Manual e Garantia)
Cabo Ethernet
Se qualquer dos itens acima estiver faltando, favor
contatar o seu revendedor.
O endereço IP padrão para o DWL-7100AP é 192.168.0.50 com uma Máscara de
Sub-rede 255.255.255.0. Para congurar o DWL-7100AP, você precisará atribuir
um endereço IP estático ao seu computador no mesmo intervalo do endereço IP
do DWL-7100AP. Consulte o Manual em CD-ROM caso precisar de ajuda para
atribuir um endereço IP Estático ao seu adaptador de rede.
A utilização de uma
fonte de alimentação com
uma classe de voltagem
diferente irá danicar
este produto e anular sua
garantia.
DWL-7100AP
Acess Point Wireless
Banda Dupla Trimodal
D-Link AirPremier
TM
AG

29
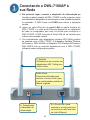
Conectando o DWL-7100AP à
sua Rede
A. Em primeiro lugar, conecte o adaptador de alimentação na
tomada no painel traseiro do DWL-7100AP e então conecte a outra
extremidade do adaptador de alimentação a uma tomada de parede
ou extensão. O LED Power irá LIGAR para indicar a operação
correta.
B. Insira um cabo Ethernet na porta LAN no painel traseiro do
DWL-7100AP e a uma porta Ethernet disponível no adaptador
de rede no computador que você irá utilizar para congurar o
DWL-7100AP. O LED Link para a Porta LAN irá se iluminar para
indicar uma conexão correta.
C. Os computadores com adaptadores wireless 802.11a/b/g podem
se conectar com o DWL-7100AP. O Adaptador Cardbus Wireless
AirPremier
TM
DWL-AG660 e o Adaptador PCI Wireless AirPremier
TM
DWL-AG530 irão se conectar diretamente com o DWL-7100AP,
utilizando suas congurações padrão.
A. Tomada para
o Adaptador de
Alimentação.
Botão Reset
Pressione este botão para
retornar o Access Point para
suas congurações padrão de
fábrica originais.
B. A Porta LAN é para
conectar o access point com
um switch na rede local com
um cabo Ethernet
C. Antenas
Utilizada para se conectar aos
adaptadores 802.11a/b/g sem
utilizar cabos.

30
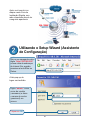
Utilizando o Setup Wizard (Assistente
de Conguração)
Após você concluir as
etapas neste Guia de
Instalação Rápida, sua
rede conectada deverá ter
a seguinte aparência:
A tela pop-up de
logon será exibida.
Digite “admin“ como
nome de usuário
(username) e deixe
o campo de senha
(password) em
branco.
Abra o seu navegador web e
digite “http://192.168.0.50”
na sua caixa de endereços
de Internet. Em seguida,
pressione a tecla Enter ou
Return.
Clique em OK

31
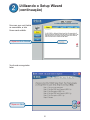
Utilizando o Setup Wizard
(continuação)
Uma vez que você tenha
se conectado, a tela
Home será exibida.
Você verá as seguintes
telas.
Clique em Run Wizard
Clique em Next

32
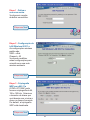
Etapa 1 - Dena a
sua nova senha.
Você possui a opção
de denir uma senha.
Etapa 2 - Conguração da
LAN Wireless 802.11a
As congurações wireless
padrão são:
SSID = dlink
Channel = 52
Você pode modicar
estas congurações para
coincidir com uma rede
wireless existente.
Etapa 3 - Criptograa
WEP para 802.11a
O DWL-G7100AP pode
fornecer criptograa de 64,
128 e 152 bits. Selecione
o tamanho da chave que
você deseja usar e insira a
chave no campo fornecido.
Por default, a criptograa
WEP está desativada.
Clique em Next
Clique em Next
Clique em Next
dlink

33
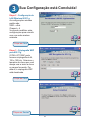
Sua Conguração está Concluída!
Clique em Restart
Etapa 2 - Conguração da
LAN Wireless 802.11g
As congurações wireless
padrão são:
SSID = dlink
Channel = 6
Você pode modicar estas
congurações para coincidir
com uma rede wireless
existente.
Etapa 3 - Criptograa WEP
para 802.11g
O DWL-G7100AP pode
fornecer criptograa de 64,
128 e 152 bits. Selecione o
tamanho da chave que você
deseja usar e insira a chave
no campo fornecido. Por
default, a criptograa WEP
está desativada.
Clique em Next
Clique em Next
dlink

34
Você será redirecionado para a guia Home.
Clique em Exit
Para congurações ou informações adicionais, consulte as guias Advanced,
Tools, ou Status na interface de gerenciamento web; ou o Manual encontrado
no CD-ROM.

35
Suporte Técnico
Você pode encontrar atualizações de software e documentação
de usuário no site da D-Link Brasil.
A D-Link fornece suporte técnico gratuito para clientes no Brasil
durante o período de vigência da garantia deste produto.
Suporte Técnico para clientes no Brasil:
Horários de atendimento:
Segunda à Sexta-feira, das 8:00h às 21:00h,
Sábado, das 8:00h às 20:00h
Website para suporte: www.dlink.com.br/suporte
e-mail: [email protected]
Telefones para contato:
Clientes de São Paulo: 2185-9301
Clientes das demais regiões: 0800 70-24-104

36
本產品可使用當前任何Web瀏覽
器,例如:Internet Explorer 6 或
Netscape Navigator 6.2.3 或以上
5V DC, 2.0 A
電源供應器
©2004 版權所有。D-Link與D-Link商標為友訊科技的商標,其他註冊商標分別隸屬該公司所有。最新規格以原廠通告為準,恕不另行通知。
開始之前
檢查產品包裝
DWL-7100AP無線基地台
光碟片(內附使用手冊)
網路線
若以上物件有任何缺失,請與經銷商聯繫。
DWL-7100AP的預設IP位址是 192.168.0.50,子網路遮罩為255.255.255.0。您必
須為您的電腦指定一個與DWL-7100AP同網段的靜態IP位址,以便於連線管理
DWL-7100AP。
若您在指定靜態IP位址時需要協助,請參閱光碟片上的使用手冊
使用與額定電壓
不同的電源供應器會導
致產品損害,並使保固
失效。
DWL-7100AP
D-Link AirPremier
TM
AG
三模雙頻無線基地台

37
連接DWL-7100AP到您的網路上
A. 首先,將電源供應器連接到DWL-7100AP背面版上的電源孔,並將另
一端連接到電源插座上。電源指示燈(Power LED)亮起,表示已準備
妥當。
B. 將乙太網路線一端連接到DWL-7100AP背面版上的LAN埠,另一端接
到要用來管理DWL-7100AP的電腦上可用的乙太網路埠。連結指示燈
(Link LED)亮起表示連線正確。
C. 安裝有802.11a/b/g 無線網路卡的電腦可以與DWL-7100AP連線。
DWL-AG660 AirPremier
TM
Cardbus無線網路卡與DWL-AG530 AirPremier
TM
PCI無線網路卡預設即可與DWL-7100AP連線。
A. 電源孔
Reset 按鈕
回覆為原廠預設值
B. LAN 埠
使用乙太網路線以連結
到區域網路上的交換器
C.天線
用於與 802.11a/b/g
網路卡連線

38
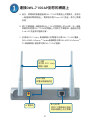
使用安裝精靈
當您完成本快速安裝手冊
上的步驟時,您的網路連
線看起來應該像這樣:
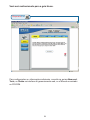
會跳出以下畫面
在使用者名稱欄位輸
入“admin” ,密碼
欄位維持空白。
開啟您的網路瀏覽
器,並在網址欄中輸
http://192.168.0.50”。
按下Enter鍵。
單擊 OK

39
使用安裝精靈(續)
當您登入後,會出現
Home頁面。
您會看到以下畫面。
單擊 Run Wizard
單擊 Next

40
步驟1 - 設定新密碼
您可以選擇設定一組新
的密碼。
步驟 2 - 設定 802.11a
無線網路
預設無線設定為:
SSID = dlink
Channel = 52
您可以變更這些設定以符
合現有的無線網路環境。
步驟 3 - 802.11a WEP加密
DWL-7100AP可進行64-,
128-, 與 152-bit 加密。
選擇您所希望使用的加密
等級,並在欄位中輸入密
碼。預設值為不加密。
單擊 Next
單擊 Next
單擊 Next
dlink

41
您的設定已完成!
單擊 Restart
步驟2 - 設定 802.11g
無線網路
預設無線設定為:
SSID = dlink
Channel = 6
您可以變更這些設定以符
合現有的無線網路環境。
步驟3 - 802.11g WEP加密
DWL-7100AP可進行64-,
128-, 與 152-bit 加密。選
擇您所希望使用的加密等
級,並在欄位中輸入密碼。
預設值為不加密。
單擊 Next
單擊 Next
dlink

42
畫面會導回 Home頁面。
單擊 Exit
要獲得更多設定資訊,請參閱管理介面上的Advanced, Tools, 或 Status 頁面,或光
碟片上的使用手冊。

43
D-Link 友訊科技 台灣分公司
技術支援資訊
如果您還有任何本使用手冊無法協助您解決的產品相關問題,台灣
地區用戶可以透過我們的網站、電子郵件或電話等方式與D-Link台灣
地區技術支援工程師聯絡。
D-Link 免付費技術諮詢專線
0800-002-615
服務時間:週一至週五,早上8:30到晚上9:00
(不含周六、日及國定假日)
網 站:http://www.dlink.com.tw
電子郵件:[email protected]
如果您是台灣地區以外的用戶,請參考D-Link網站,全球各地
分公司的聯絡資訊以取得相關支援服務。
產品保固期限、台灣區維修據點查詢,請參考以下網頁說明:
http://www.dlink.com.tw
產品維修:
使用者可直接送至全省聯強直營維修站或請洽您的原購買經銷商。

44
Produk ini bisa diseting
menggunakan Web Browser
yang ada sekarang
seperti Internet Explorer 6 atau
Netscape Navigator 6.2.3 atau
versi yang lebih baru
5V DC, 2.0A
Power Adapter
©2004 D-Link Systems, Inc. All rights reserved. Trademarks or registered trademarks are the property of their respective
holders. Software and specications subject to change without notice.
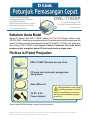
Sebelum Anda Mulai
Periksa Isi Paket Penjualan
DWL-7100AP Wireless Access Point
CD yang berisi petunjuk penggunaan
dan garansi
Kabel Ethernet
Jika isi paket tidak lengkap, harap hubungi penjual.
Alamat IP default dari DWL-7100AP adalah 192.168.0.50 dengan subnet mask
255.255.255.0. Anda harus mengatur alamat IP pada komputer anda dengan sebuah
alamat IP statis yang satu kelas dengan Alamat IP dari DWL-7100AP untuk keperluan
men-setting DWL-7100AP. Lihat bagian Catatan Tambahan Jika anda butuh
panduan untuk mengatur alamat IP statis pada kartu jaringan anda.
Menggunakan power supply
yang tegangannya berbeda
dapat menyebabkan kerusakan
dan akan membatalkan garansi
produk ini.
DWL-7100AP
D-Link AirPremier
TM
AG
Tri-mode Dualband Wireless
Access Point

45
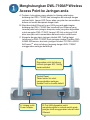
Menghubungkan DWL-7100AP Wireless
Access Point ke Jaringan anda
A. Pertama, hubungkan power adapter ke lubang pada bagian
belakang dari DWL-7100AP dan hubungkan sisi satunya dengan
colokan listrik. Lampu LED Power akan menyala dan menandakan
bahwa unit sudah beroperasi dengan baik
B. Masukkan kabel Ethernet ke port LAN yang ada pada bagian
belakang dari DWL-7100AP dan ke sebuah port Ethernet yang
tersedia pada kartu jaringan komputer anda yang akan digunakan
untuk mengatur DWL-7100AP. Lampu LED Link untuk port LAN
akan menyala untuk menandakan bahwa koneksi sudah benar.
C. Komputer dengan kartu jaringan nirkabel 802.11a/b/g dapat
terhubung ke DWL-7100AP. Kartu jaringan nirkabel CardBus DWL-
AG660 AirPremier
TM
dan kartu jaringan nirkabel PCI DWL-AG530
AirPremier
TM
akan terhubung langsung dengan DWL-7100AP
menggunakan setingan defaultnya.
A. Lubang untuk
Power Adapter.
Tombol Reset
Tekan tombol ini untuk
mengembalikan setingan
Access Point ke kondisi default.
B. Port LAN digunakan untuk
menghubungkan ke sebuah switch pada
jaringan lokal menggunakan sebuah kabel
Ethernet.
C. Antena
Digunakan untuk terhubung
ke kartu jaringan 802.11a/b/g
secara nirkabel

46
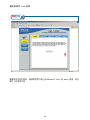
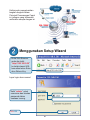
Menggunakan Setup Wizard
Ketika anda menyelesaikan
langkah-langkah dalam
Petunjuk Pemasangan Cepat
ini, jaringan yang terkoneksi
anda akan serupa dengan ini:
Layar login akan muncul.
Ketik “admin” untuk
username dan biarkan
password dalam
keadaan kosong.
Buka Web Browser
anda dan ketik
“http://192.168.0.50”
ke kotak alamat URL
kemudian tekan Enter
atau Return Key.
Klik OK

47
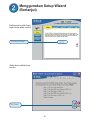
Menggunakan Setup Wizard
(Berlanjut)
Ketika anda sudah login,
layar Home akan muncul.
Anda akan melihat layar
berikut.
Klik Run Wizard
Klik Next

48
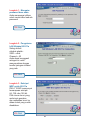
Klik Next
Langkah 1 - Mengatur
password baru anda.
Anda mempunyai pilihan
untuk menentukan sebuah
password
Langkah 2 - Pengaturan
LAN Nirkabel 802.11a
Seting default
nirkabel adalah :
SSID = dlink
Channel = 52
Anda dapat mengganti
setingan ini untuk
menyesuaikan dengan
kondisi jaringan nirkabel
yang ada.
Langkah 3 - Enkripsi
WEP untuk 802.11a
DWL-7100AP mempunyai
kemampuan enkripsi
64-,128- dan 152-bit.
Pilih ukuran kunci yang
anda ingin gunakan
dan masukkan kunci ke
dalam kotak yang sudah
disediakan.
Klik Next
Klik Next
dlink

49
Pengaturan Selesai!
Klik Next
Klik Restart
Langkah 2 - Pengaturan LAN
Nirkabel 802.11g
Seting default nirkabel adalah :
SSID = dlink
Channel = 6
Anda dapat mengganti setingan
ini untuk menyesuaikan dengan
kondisi jaringan nirkabel yang
ada.
Langkah 3 - Enkripsi WEP
untuk 802.11g
DWL-7100AP mempunyai
kemampuan enkripsi 64-,128-
dan 152-bit. Pilih ukuran kunci
yang anda ingin gunakan dan
masukkan kunci ke dalam
kotak yang sudah disediakan.
Klik Next
dlink

50
Anda akan kembali ke halaman Home
Klik untuk keluar
Untuk pengaturan dan informasi lainnya, silahkan buka halaman Advanced,
Tools atau Status pada manajemen antar muka berbasiskan web; atau pada
Petunjuk Penggunaan yang ada dalam CD-ROM.

Dukungan Teknis
Update perangkat lunak dan dokumentasi pengguna dapat
diperoleh pada situs web D-Link.
Dukungan Teknis untuk pelanggan:
Dukungan Teknis D-Link melalui telepon:
Tel: +62-21-5731610
Dukungan Teknis D-Link melalui Internet:
Email : [email protected]
Website : http://support.dlink.co.id

Ver. 2.11(I)
2008/12/09
6WL7100QML04G
-
 1
1
-
 2
2
-
 3
3
-
 4
4
-
 5
5
-
 6
6
-
 7
7
-
 8
8
-
 9
9
-
 10
10
-
 11
11
-
 12
12
-
 13
13
-
 14
14
-
 15
15
-
 16
16
-
 17
17
-
 18
18
-
 19
19
-
 20
20
-
 21
21
-
 22
22
-
 23
23
-
 24
24
-
 25
25
-
 26
26
-
 27
27
-
 28
28
-
 29
29
-
 30
30
-
 31
31
-
 32
32
-
 33
33
-
 34
34
-
 35
35
-
 36
36
-
 37
37
-
 38
38
-
 39
39
-
 40
40
-
 41
41
-
 42
42
-
 43
43
-
 44
44
-
 45
45
-
 46
46
-
 47
47
-
 48
48
-
 49
49
-
 50
50
-
 51
51
-
 52
52


D-Link DWL-7100AP Quick Install Manual
- Categoría
- Puntos de acceso WLAN
- Tipo
- Quick Install Manual
en otros idiomas
- English: D-Link DWL-7100AP
- русский: D-Link DWL-7100AP
- português: D-Link DWL-7100AP
Artículos relacionados
-
D-Link DWL-2200AP - AirPremier - Wireless Access Point El manual del propietario
-
D-Link DWL-3260AP El manual del propietario
-
-
-
-
D-Link DAP-3220 Manual de usuario
-
-
D-Link DCS-6210 Guía de inicio rápido
-
D-Link AirPremier AG DWL-AG530 Manual de usuario
-