La página se está cargando...

OWNER’S MANUAL
9" WINDOW FAN
MODEL:FW23-8HS
ITEM: 667618
READ AND SAVE THESE INSTRUCTIONS

Read Rules for Safe Operation and Instructions Carefully.
1. To reduce the risk of fire or electric shock, do not use this fan with any solid state
speed control device.
2. This appliance has a polarized plug(one blade is wider than the other). To reduce
the risk of electric shock, this plug is intended to fit fully in the outlet only one way.
If plug does not fit fully in the outlet, reverse plug. If it is still does not fit, contact a
qualified electrician. Do not attempt to defect this safety feature.
3. Do not leave fan running unattended.
4. Fan is rated for use as a window fan. Recommend removing from window
(unplugged) when raining.
5. Close supervision is necessary when any appliance is used by or near children.
6. Never insert fingers, pencils, or other foreign objects through the grill.
7. Disconnect fan when removing grills for cleaning. Reinstall before plugging into
power supply.
8. To protect against electrical shock, never immerse fan, cord of plug in water.
Avoid using volatile cleaners.
9. Avoid contact with moving parts.
10. Do not operate in presence of volatile or explosive fumes.
11. Do not place fan or any parts near an open flame, cooking or other heating
device.
12. Do not pull cord to disconnect, grip plug instead.
13. Do not hang or mount fan on a wall or ceiling.
14. Disconnect fan when moving from one location to another.
15. Be sure fan is on a stable surface when operating to avoid turning over.
16. Do not use outdoors.
17. Never operate fan with damaged electrical cord, plug, or when the fan
malfunctions. Avoid use of extension cords.
18. To avoid fire hazard, never place the cord under rugs or any part of an open
flame, cooking, or heating appliance.
19. This product is intended for household use only and not for commercial or
industrial applications.
20. Automatically Operated Device - To Reduce The Risk Of Injury Disconnect
From Power Supply Before Servicing.
CAUTION
WARNING
1

2
When using electrical appliances, basic precautions should always be followed to
reduce the risk of fire, electric shock and injury to persons, including the following:
1. The rules about cord and plug as below:
(1) This product employs overload protection (fuse). A blown fuse indicates an
overload or short-circuit situation. If the fuse blows, unplug the product from
the outlet. Replace the fuse as per the user servicing instructions (follow
product marking for proper fuse rating) and check the products. If the
replacement fuse blows, a short-circuit may be present and the product should
be discarded or returned to an authorized service facility for examination and/
or repair.
(2) Do not operate any fan with a damaged cord or plug. Discard fan or return to
an authorized service facility for examination and/or repair.
(3) Do not run cord under carpeting. Do not cover cord with throw rugs, runners,
or similar coverings. Do not route cord under furniture or appliances. Arrange
cord away from traffic area and where it will not be tripped over.
2. Never insert fingers, pencils, or any other object through the grille when fan is
running.
3. Disconnect fan when moving from one location to another, before putting on or
taking off parts.
4. Disconnect fan when removing grilles for cleaning.
5. Do not operate in the presence of explosive and/or flammable fumes.
6. Do not place fan or any parts near an open flame, cooking or other heating
appliance.
7. Always use on a dry, level surface, do not use outdoors.
8. Do not let the cord hang over the edge of a table, counter, or come in contact
with hot surfaces.
9. To disconnect grip plug and pull from wall outlet. Never yank on cord.
RULES FOR SAFE OPERATION
PREPARATION
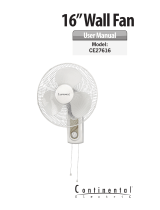
Before beginning assembly of product, make sure all parts are present. Compare
parts with package contents list and diagram above. If any part is missing or
damaged, do not attempt to assemble the product.
Contact customer service for replacement parts.
Estimated Assembly Time: 5minutes
Tools Required for Assembly:Phillips Screwdriver (NOT INCLUDED)

Fig. 3
A
B
C
Fig. 1
A
D
B
C
23.9 in.
11.8 in.
Fig. 2
Pulls out up to 7.3 in.
3
PACKAGE CONTENTS
Part Description Quantity
A
B
C
1
1
2
D
E
F
2
1
2
Fan body
Speed button
Expandable panels
Feet
Screw
Right and Left intake/exhaust control lever
Part Description Quantity
A
B
D
E
C
F
HARDWARE CONTENTS
Quantity
Picture
(Shown to size)
ST2.9x9.5
Screw
2
Part
AA
Description
• Push the feet (B) into the fan body (A) and snap together.
(Fig. 1). Fasten the two screws (D)from the bottom of the
feet.
• This window fan has been designed to fit double-hung,
slider and casement windows with minimum opennings
of 24.4 in. wide and 13 in. high. (Fig. 2)
• This fan is designed and recommended for use with your
window screen in place.
1. With the window fully open, set the fan in the window
with front (A) of fan facing the INSIDE.
2. Hold fan with one hand while adjusting panels (B) with
the other. Before closing window, pull open locks (C)
located at top and bottom on right/left side on fan, and
adjust expandable panel, if necessary.
3. Close the window on top of the fan with the bottom
edge of the window behind the lip of fan housing.
FOR DOUBLE-HUNG TYPE WINDOWS (Fig.3)
INSTALLATION INSTRUCTIONS

A
B
C
D
A
Fig. 4
B
C
A
1. Plug the cord into any standard 120-volt A/C outlet.
2. To turn the fan on, press the SPEED button (A) on the panel. Fan will start at low
speed.
3. Adjust speed to low, medium or high by pressing SPEED button. A light will turn
on for each speed selected (C). Stop the fan by pressing the SPEED button
successively.
4. To start and stop the temperature settings, press the TEMP button (B) to cycle
through the temperature setting. Minimum setting is 60º F; maximum setting is
80º F. The fan will operate only if the temperature you have set is less than room
temperature. A light will turn on indicating the selected temperature (C).
5. Set the individual fan motors on either IN (intake) or OUT (exhaust) using the
control lever (D).
OPERATING INSTRUCTIONS
4
4. If the fan still does not fit properly in the window, re-
adjust the expandable panel on right/left side of fan to
fill in remaining space between panel and window
frame until a secure fit is achieved.
1. Position the fan in the window with the power switch
(A) facing the center of the opening.
2. To adjust height, remove fan from window, extend the
expandable panel (B) until it matches the height of the window.
3. With the window fully open, position the fan in the window with power switch
facing the center of the opening.
4. Fan must fit securely against the inside edge of the window opening.
5. Slide the sliding window to meet the edge of the fan.
The side edge of the window must fit securely behind the lip of fan housing.
6. Adjust the expandable panel to fill in remaining space between fan and window
frame. Expandable panel locks into position by closing the locks once you establish
a fit.
FOR VERTICAL SLIDER-TYPE WINDOWS (Fig.4)

a) Grasp plug and remove from the receptacle or other
outlet device. Do not unplug by pulling on cord.
b) Open fuse cover. Slide open fuse access cover on
top of attachment plug towards blades.
c) Remove fuse carefully. Insert the tip of your tool into
fuse slot (close with the terminal), then prize the fuse
gradually and slowly, but not overexert. If you feel tight, you can try it at several
times and prize the fuse little by little. When one side of the fuse has been prized,
then you can get the fuse out entirely.
d) Risk of fire. Replace fuse only with 2.5 Amp, 125 Volt fuse.
e) Close fuse cover. Slide closed the fuse access cover on top of attachment plug.
f) Risk of fire. Do not replace attachment plug. Contains a safety device (fuse) that
should not be removed. Discard product if the attachment plug is damaged.
Notice:
1. When you replace the fuse, please don’t operate suddenly or overexert, or else
the product will be damage or cause accident.
2. When you feel it hard to be operated, please make sure you have got the right way.
USER SERVICING INSTRUCTIONS
The fan requires little maintenance. Do not try to fix it by yourself. Refer it to
qualified service personnel if service is needed.
1. Before cleaning and assembling, do not plug the pins into the socket.
2. To ensure adequate air circulation to the motor. Keep vents at the rear of the
motor housing from dust, fluff and etc. A vacuum cleaner can not be used to
clean these vents before unplug. Do not disassemble the fan remove fluff.
3. Please wipe the exterior parts with a soft cloth soaking a mild detergent.
Do not use any abrasive detergent or solvents to avoid scratching the sufrace.
Do not use of the following as a cleaner: gasoline, thinner, bending.
4. Do not allow water or any other liquid into the motor housing or interior parts.
MAINTENANCE INSTRUCTION
1. Be sure to unplug the power cord from the outlet before cleaning.
2. Plastic parts should be cleaned with mild soap and damp cloth or sponge.
Thoroughly remove soap film with clean water.
3. Be sure not to get water or other liquid enter the inside of the motor.
4. Dry all parts completely before reassembling and reconnecting to power
source.
CLEANING
5

6
TROUBLE SHOOTING
noitcAevitcerroCesuaCelbissoPmelborP
The fan will not
operate.
The fan isn’t plugged in and/or the
electrical outlet isn’t working properly.
Make sure the fan is plugged in and/or
the electrical outlet is working properly.
The fan will not
operate.
Obstructions are keeping the fan from
working.
Check for obstructions. If you find an
obstruction, turn the fan off.
Unplug the fan and carefully remove the
obstruction. Plug the fan in and turn it
on again by referring to the operating
instructions.

For questions or comments,please write to:
Midea America Corporation
Customer Care Center
11411 NW 107th Street,
Suite 12 Miami, FL 33178
Email us at: customerservice@supportuscenter.com
1-866-646-4332
fan
7

ONE (1) YEAR LIMITED WARRANTY
Please read all instructions before attempting to use this product.
In the event of malfunctions or failure of your Fan, simply deliver or send the Fan,
postage prepaid along with PROOF OF PURCHASE, within the warranty period of one (1)
year, to Midea America Corporation. Midea America Corporation reserves the right to
inspect the claimed defective part or parts to determine if the defect or malfunction
complaint is covered by this warranty. Midea America Corporation shall, within sixty(60)days
after receipt of the product, at its option, repair and/or replace the defective part or parts free
of charge. This warranty shall only cover defect arising from normal usage. Midea America
Corporation assumes no responsibility whatsoever if the Fan should fail during the warranty
period by reason of:
Misuse, negligence, physical damage or accidents.
Lack of maintenance (see instructions for proper maintenance).
Repair by any unauthorized party during the warranty period.
Damage caused by connection to an improper input voltage (see specification
label on your Fan).
Midea America Corporation makes no further warranties or representations, express or
implied except those contained herein. No representative or dealer is authorized to assume
any other liability regarding the Fan. The duration of the implied warranty granted under
State law, including warranties of merchantability and fitness for particular purpose are
limited in duration should the duration of the express warranty grant it hereunder. Midea
America Corporation shall in no event be liable for direct, indirect, special or consequential
damages.
Some states do not allow limitations on how long an implied warranty lasts, and/or the above
limitations or exclusion may not apply to you. This warranty gives you specific legal rights
and you may have other rights which vary from state to state.
Midea America Corporation warrants as limited herein to the original purchaser of retail
thateach new Fan, shall be free of defects in material and workmanship for aperiod of
one (1) year from the date of original purchase. This one (1) year warranty is limited to
the Motor and Electric Element.
8

MANUAL DEL PROPIETARIO
VENTILADOR PARA VENTANA DE
22,86 CM (9 PULG.)
MODELO:FW23-8HS
ARTÍCULO: 667618
LEA Y GUARDE ESTAS INSTRUCCIONES

Lea cuidadosamente las normas para un funcionamiento seguro y las instrucciones:
1. Para reducir el riesgo de incendios o descargas eléctricas, no use este ventilador
con dispositivos de control de velocidad de estado sólido.
2. Este electrodoméstico tiene un enchufe polarizado (una clavija es más ancha que
la otra). Para reducir el riesgo de descarga eléctrica, este enchufe está diseñado
para encajar completamente en el tomacorriente de una sola manera. Si no
encaja por completo en el tomacorriente, invierta el enchufe. Si aún no encaja,
póngase en contacto con un electricista calificado. No pase por alto esta medida
de seguridad.
3. No deje el ventilador funcionando sin supervisión.
4. El ventilador está calificado para usarlo como un ventilador para ventana.
Recomendamos retirarlo de la ventana (desenchufado) cuando esté lloviendo.
5. Es necesaria una supervisión estricta cuando los niños utilicen el electrodoméstico
o cuando estén cerca de él.
6. Nunca inserte los dedos, lápices u otros objetos extraños en la rejilla.
7. Desconecte el ventilador al retirar las rejillas para la limpieza. Vuelva a instalar
antes de conectarlo al suministro de electricidad.
8. Para la protección contra una descarga eléctrica, no sumerja el ventilador ni el
cable del enchufe en agua. Evite usar limpiadores volátiles.
9. Evite tocar las piezas en movimiento.
10. No use el ventilador en presencia de gases volátiles o explosivos.
11. No coloque el ventilador ni ninguna de sus piezas cerca de una llama directa,
cocina u otro dispositivo que genere calor.
12. No jale del cable para desconectarlo; en cambio, sujete el enchufe.
13. No cuelgue ni monte el ventilador en paredes o techos.
14. Desconecte el ventilador cuando lo traslade de una ubicación a otra.
15. Asegúrese de usar el ventilador sobre una superficie estable para evitar que se
vuelque.
16. No lo use en exteriores.
17. Nunca haga funcionar el ventilador con un Nunca haga funcionar el ventilador
con un cable o enchufe eléctrico dañado, ni cuando el ventilador haya
presentado fallas. Evite usar extensiones eléctricas.
18. Para evitar el riesgo de incendio, no coloque el cable debajo de tapetes o las
piezas cerca de una llama, cocina u otro electrodoméstico que genere calor.
19. Este producto está diseñado solo para uso doméstico y no para aplicaciones
comerciales o industriales.
20. Dispositivo de funcionamiento automático: para reducir el riesgo de lesiones,
desconecte del suministro de electricidad antes de realizar el mantenimiento.
1
PRECAUCIÓN
ADVERTENCIA

2
Cuando utilice electrodomésticos, siempre tome medidas de precaución básicas
para reducir el riesgo de incendios, descargas eléctricas y lesiones personales,
incluidas las siguientes:
Presentamos a continuación información sobre el cable y el enchufe:
(1) Este producto posee protección contra sobrecargas (fusible). Un fusible fundido
indica que se ha producido una sobrecarga o un cortocircuito. Si el fusible se
funde, desenchufe el producto del tomacorriente. Reemplace el fusible según
las instrucciones de mantenimiento para el usuario (consulte las etiquetas del
producto para instalar el tipo de fusible adecuado) y verifique si los productos
funcionan. Si el fusible de repuesto se funde, es posible que exista un
cortocircuito y que el producto deba desecharse o devolverse a un local
autorizado para su revisión o reparación.
(2) No opere ningún ventilador con un enchufe o cable dañado. Deseche el
ventilador o llévelo a un establecimiento de servicio autorizado para una revisión
o reparación.
(3) No pase el cable por debajo de una alfombra. No cubra el cable con alfombras,
tapetes o cubiertas similares. No haga pasar el cable por debajo de muebles o
electrodomésticos. Coloque el cable lejos de la zona de circulación, donde nadie
se pueda tropezar y caer.
2. Nunca inserte los dedos, lápices u otro objeto en la rejilla cuando el ventilador
esté en funcionamiento.
3. Desconecte el ventilador cuando lo traslade de una ubicación a otra, antes de
volver a colocarlo o cuando lo desarme.
4. Desconecte el ventilador cuando retire las rejillas para la limpieza.
5. No use el ventilador en presencia de gases explosivos y/o inflamables.
6. No coloque el ventilador ni ninguna de sus piezas cerca de una llama, cocina u
otro electrodoméstico que genere calor.
7. Siempre úselo sobre una superficie seca y nivelada; no lo use en exteriores.
8. No permita que el cable eléctrico cuelgue desde el borde de una mesa o mesón,
ni deje que entre en contacto con superficies calientes.
9. Para desconectar, sujete el enchufe y retírelo del tomacorriente de la pared.
Nunca jale del cable.
INSTRUCCIONES PARA UN FUNCIONAMIENTO SEGURO
PREPARACIÓN
Antes de comenzar a ensamblar el producto, asegúrese de tener todas las piezas.
Compare las piezas con la lista del contenido del paquete
y el diagrama anterior. No intente ensamblar el producto
si falta alguna pieza o si están dañadas. Póngase en
contacto con el Departamento de Servicio al Cliente
para obtener piezas de repuesto.
Tiempo estimado de ensamblaje: 5 minutos.
Herramientas necesarias para el ensamblaje: Destornillador Phillips (NO SE
INCLUYE).

Fig. 3
A
B
C
Fig. 1
A
D
B
C
60,7 cm (23,9 pulg.)
29,97 cm
(11,8 pulg.)
Fig. 2
Se extrae en hasta 18,54 cm (7,3 pulg.)
3
CONTENIDO DEL PAQUETE
Descripción Cantidad daditnaCnóicpircseD azeiP Pieza
A
B
C
1
1
2
D
E
F
2
1
2
Cuerpo del ventilador
Botón de velocidad
Paneles extensibles
Patas
Tornillo
Palanca de control de entrada/salida derecha e izquierda
A
B
D
E
C
F
ADITAMENTOS
Cantidad
Imagen
(tamaño real)
Tornillo
ST 2.9x9.5
2
Pieza
AA
Descripción
• Presione las patas (B) contra el cuerpo del ventilador
(A) y acóplelas. (Fig. 1). Apriete los dos tornillos
(D) en la parte inferior de las patas.
• Este ventilador para ventana se ha diseñado para
ajustarse a ventanas de doble abertura, corredizas
y giratorias con aberturas mínimas de 61,97 cm (24,4
pulg.) de ancho y 33,02 cm (13 pulg.) de alto. (Fig. 2)
• Este ventilador está diseñado y recomendado para
usarse con la malla de la ventana puesta.
1. Con la ventana completamente abierta, coloque el
ventilador en la ventana con el frente (A) del ventilador
hacia el INTERIOR.
2. Sujete el ventilador con una mano y con la otra ajuste
los paneles (B). Antes de cerrar la ventana, jale los
seguros abiertos (C) de la parte superior e inferior a
la derecha/izquierda del ventilador y ajuste el panel
extensible, si es necesario.
3. Cierre la ventana sobre el ventilador con el borde
inferior de la ventana detrás del reborde de la carcasa del ventilador.
PARA VENTANAS DE DOBLE ABERTURA (Fig.3)
INSTRUCCIONES DE INSTALACIÓN

A
B
C
D
A
Fig. 4
B
C
A
1. Enchufe el cable en cualquier tomacorriente estándar de 120 voltios de CA.
2. Para encender el ventilador, presione el botón SPEED (botón de velocidad) (A)
del panel. El ventilador arrancará a una velocidad lenta.
3. Presione el botón SPEED, para ajustar la velocidad a lenta, media o rápida. Se
encenderá una luz cuando seleccione una velocidad (C). Presione el botón
SPEED varias veces para detener el ventilador.
4. Para iniciar o detener los ajustes de temperatura, presione el botón TEMP (botón
de temperatura) (B) para recorrer estos ajustes. El ajuste mínimo es de 15,6 ºC;
el máximo de 26,7 ºC. El ventilador solo funcionará si la temperatura establecida
es menor a la temperatura ambiente. Se encenderá una luz que indica la
temperatura seleccionada (C).
5. Ajuste los motores individuales del motor en IN (entrada) u OUT (salida) con la
palanca de control (D).
INSTRUCCIONES DE FUNCIONAMIENTO
4
4. Si el ventilador no se ajusta correctamente en la ventana,
vuelva a ajustar el panel extensible a la derecha/izquierda
del ventilador para ocupar el espacio que queda entre el
panel y el marco de la ventana hasta que quede firme.
1. Coloque el ventilador en la ventana con el interruptor de
encendido (A) hacia el centro de la abertura.
2. Para ajustar la altura, saque el ventilador de la abertura,
extienda el panel extensible (B) hasta que se ajuste a la altura de la ventana.
3. Con la ventana completamente abierta, coloque el ventilador en la ventana con
el interruptor de encendido hacia el centro de la abertura.
4. El ventilador debe estar bien asegurado contra el borde interno de la abertura de
la ventana.
5. Deslice la ventana corrediza hasta que tope con el borde del ventilador. El borde
lateral de la ventana debe encajar bien detrás del reborde de la carcasa del
ventilador.
6. Ajuste el panel extensible para ocupar el espacio que queda entre el ventilador y
el marco de la ventana. El panel extensible se bloquea en su lugar cuando
cierra los seguros después de ajustarlos.
PARA VENTANAS CORREDIZAS VERTICALES (Fig.4)

a) Tome el enchufe y retírelo del receptáculo o de cualquier otro
tomacorriente. No jale del cable para desenchufarlo.
b) Abra la cubierta del fusible. Abra la cubierta de acceso
al fusible deslizándola sobre la parte superior del
enchufe hacia las clavijas.
c) Retire el fusible cuidadosamente. Inserte la punta de la
herramienta en la ranura para fusibles (cierre con el terminal), luego retire gradual
y lentamente el fusible, sin excederse. Si está apretado, puede intentar varias
veces y retirar el fusible de a poco. Cuando haya soltado un lado del fusible,
ya podrá retirarlo por completo.
d) Riesgo de incendio. Reemplace el fusible solo por uno de 2,5 amperios y 125
voltios.
e) Cierre la cubierta del fusible. Deslice la cubierta de acceso al fusible sobre el
enchufe hasta cerrarla.
f) Riesgo de incendio. No reemplace el enchufe. Contiene un dispositivo de
seguridad (fusible) que no se debe retirar. Deseche el producto si el enchufe está
dañado.que no se debe retirar. Deseche el producto si el enchufe está dañado.
Aviso:
1. Cuando reemplace el fusible, no opere la unidad bruscamente ni se exceda, o
dañará el producto o causará un incidente.
2. Cuando sienta que resulta difícil operarlo, asegúrese de esté instalado de la
manera correcta.
INSTRUCCIONES DE MANTENIMIENTO PARA EL USUARIO
El ventilador requiere poco mantenimiento. No intente repararlo usted mismo. Si es
necesario, consulte al personal de servicio calificado.
1. Antes de la limpieza y el ensamblaje, no conecte las clavijas en el tomacorriente.
2. Para garantizar una circulación de aire suficiente para el motor, evite que se
acumule polvo, pelusas, etc. en las ventilas de la parte posterior de la carcasa del
motor. No utilice una aspiradora para limpiar estas ventilas antes de desconectar
el ventilador. No desensamble la esponja de retiro del ventilador.
3. Limpie las piezas exteriores con un paño suave con detergente suave. Para evitar
rayones en la superficie, no utilice detergentes abrasivos ni solventes. No use
ninguna de las siguientes sustancias como limpiador: gasolina, disolvente o
bencina.
4. No permita que ingrese agua ni otro líquido en la carcasa del motor o en las
piezas interiores.
INSTRUCCIONES DE MANTENIMIENTO
1. Antes de limpiar, asegúrese de desconectar el cable de alimentación del
tomacorriente.
2. Las piezas de plástico se deben limpiar con jabón suave y secar con un paño o
esponja húmedos. Enjuague bien la capa de jabón con agua limpia.
LIMPIEZA
5

3. Asegúrese de que no ingrese agua ni otro líquido en el interior del motor.
4. Seque completamente todas las piezas antes de volver a armar y reconectar la
fuente de alimentación.
6
SOLUCIÓN DE PROBLEMAS
Acción correctivaCausa posibleProblema
El ventilador
no funciona.
El ventilador no está enchufado y/o el
tomacorriente no funciona
correctamente.
Asegúrese de que el ventilador esté
enchufado y/o de que el tomacorriente
funcione correctamente.
El ventilador
no funciona.
Hay obstrucciones que impiden que el
ventilador funcione.
Verifique que no haya obstrucciones.
Si las hay, apague el ventilador.
Desenchufe el ventilador y retire
cuidadosamente la obstrucción. Para
volver a enchufar y encender el
ventilador, consulte las instrucciones
de funcionamiento.

SERVICIO Y SOPORTE
En caso de reclamos de garantía o si se necesita servicio para este ventilador, por favor,
póngase en contacto con nosotros a los siguientes números:
Gratis: 1-866-646-4332
Envíenos un mensaje de correo electrónico a:
customerservice@supportuscenter.com
Para preguntas o comentarios, por favor escriba a:
Midea America Corporation
Customer Care Center
11411 NW 107th Street,
Suite 12 Miami, FL 33178
Para su registro, engrape su recibo de compra a este manual y registre lo siguiente:
FECHA DE COMPRA: ________________________________
_
______________
_
LUGAR DE COMPRA: ________________________________
_
______________
_
(ENGRAPE EL RECIBO DE VENTA AQUÍ)
NOTA: SE REQUIERE UNA PRUEBA DE
COMPRA PARA TODOS LOS RECLAMOS
DE GARANTÍA
IMPRESO EN CHINA
7

GARANTÍA LIMITADA DE UN (1) AÑOS
Por favor lea todas las instrucciones antes de intentar utilizar este producto.
Mal uso, negligencia, daño físico o accidentes.
Falta de mantenimiento (vea las instrucciones de mantenimiento adecuado).
Reparación por alguna parte no autorizada durante el período de garantía.
Daños causados por conexión a un voltaje inapropiado (vea la etiqueta de
especificación en su Ventilador).
Midea America Corporation no ot orga más garantías o representaciones, expresas o implícitas
excepto las que se mencionan aquí. Ningún representante o vendedor está autorizado a asumir
cualquier otra responsabilidad relacionada con el Calefactor con ventilador. La duración de la
garantía implícita otorgada bajo las leyes del Estado, incluyendo garantías de comercialización y
aptitud para un propósito en particular están limitadas en duración si l
a duración de la garantía
expresa lo otorgara a continuación.Midea America Corporation no será en ningún caso responsable
por daños directos, indirectos, especiales o consecuenciales.
Algunos estados no permiten limitaciones sobre la duración de una garantía implícita, y/o las
limitaciones o exclusiones anteriores pueden no aplicarse a usted. Esta garantía le ofrece
derechos legales específicos y usted puede tener otros derechos, que varían de estado a
estado.
●
●
●
●
●
Midea America Corporation ntiza de forma limitada, como se explicita aquí, al comprador original
que cada Ventilador nuevo estará libre de defectos de materiales o mano de obra por el período
de un (1) años desde la fecha de la compra original. Esta garantía de un (1) años está limitada a
los motor,y elementos de calefacción.
En caso de mal funcionamiento o avería de su Ventilador simplemente lleve o envíe el
valentador, con un envío prepago junto con una PRUEBA DE COMPRA, dentro del período de la
garantía de un (1) años, a Midea America Corporation. Midea America Corporation se reserva el
derecho de inspeccionar la parte o partes supuestamente defectuosas para determinar si el
reclamo por defecto o mal funcionamiento está cubierto por esta garantía. Dentro de los sesenta
(60) días de recibido el producto, Midea America Corporation , a su elección, reparará y/o
reemplazará la parte o partes defectuosas sin cargo alguno. Esta garantía sólo cubrirá defectos que
surjan de una utilización normal. Midea America Corporation no asume ninguna responsabilidad si el
Calefacotr con Ventilador se averiara durante el período de la garantía debido a:
8
1/18