Sytech SY1490N El manual del propietario
- Categoría
- Microteléfonos
- Tipo
- El manual del propietario
Este manual también es adecuado para

DESKTOP CALLER ID TELEPHONE WITH HANDSFREE FUNCTION
MODEL: SY-1490
1

2
INTRODUCTION
Thank you for having purchased the new Caller ID telephone SYTECH SY-1490. This manual is designed to
familiarize you with this phone. To get the maximum use from your new phone, we suggest that you read this
Instruction Manual carefully before operating it.
SAFETY INSTRUCTION
When using your telephone equipment, the following basic safety precautions should always be followed to
reduce the risk of fire, electric shock and injury to persons:
1. Read and understand all instructions
2. Follow all warnings and instructions.
3. Do not install the unit near: extreme temperatures, direct sunlight, dusty areas.
4. Do not disassemble the unit. Contact Sytech Hotline Service center for a proper repair or exchange.
5. Never install the unit during a lightning.
6. Do not obstruct the line cable or step on it.
7. Do not install your telephone box in humid areas.
8. Unplug your telephone from the wall outlet before cleaning it. Use only a damp cloth for cleaning.
9. Do not place this product on an unstable cart, stand or table. The product may fall, causing serious damage.
10. Do not overload wall outlets and extension cords as this can result in the risk of fire or electric shock.
11. Do not insert objects through the cabinet slots as these may come in contact with dangerous voltage points
and can cause a risk of electric shock.
12 Never spill liquid of any kind on the product.
Battery Precautions
In order to avoid any risk of electrical shock or injury, read and follow the below instructions.
. Do not throw away the defected batteries to fire. These can explode. Inform yourself to the dealer
where these can be recycled.
. Do not open or damage the batteries. The internal electrolyte is corrosive and can damage the eyes or skin.
It is a toxic element by ingestion.
. Do not attempt to recharge the batteries. These can leak out the corrosive electrolyte and can burst.
. When inserting the batteries into the unit, check the polarity. Inverse polarity can cause the battery to
discharge and the electrolyte to leak.
. Remove the batteries from the unit when it is not in use for a long period of time. (few months or more) as
these can produce an internal leakage.
NOTE: Preserve this manual carefully for future reference.
SAFETY CONDITIONS
• The device cannot be connected to an IT battery supply.
•
The connection of the telephone line and the combined respond to the safety level TRT-3
•
The electric safety corresponds to the verifications of NF EN 60950 and the amendments A1, A2,
A3 and A4.
•
The maximum operating temperature is of 35ºC

3
•
Make sure the phone cable is unplugged before opening the battery cover, under the base.
•
The brand certificate of conformity of the terminal is located under the base.
FEATURES
¾ FSK/DTMF system compatible with auto-detection
¾ Language interface in English /Spanish selectable
¾ 16-digit LCD display with real clock and thermometer
¾ Temperature record checking
¾ Dynamic storage: Maximum 80 incoming calls each with 12-digit number and 8-digit name
¾ 50 outgoing numbers storage
¾ Incoming and outgoing number can be reviewed, called back and deleted
¾ 2 one-touch and 10 two-touch memories
¾ 5 groups reject numbers setting
¾ Maximum 99 phone book memories
¾ 8 normal ringing tones and 10 music ringing tones for selection
¾ 10 kinds of hold music for selection
¾ Do Not Disturb function
¾ 5 sets of alarm clock
¾ 3-step lock function
¾ 5-digit local area code setting and 5-digit long distance code setting
¾ 5 levels of LCD contrast for selection
¾ 32-digit pre-dial and edit function
¾ Mute function
¾ Calculator function
¾ Ringing volume. 3 levels adjustable
¾ Hands-free volume. 4 levels adjustable
¾ Flash, pause and redial function
¾ LCD backlight on/off selectable
¾ Thunder proof and anti-dialling from parallel phones function
¾ Pulse and tone dialling mode selectable
¾ In use LED indicator

4
LOCATION DESCRIPTION

5
1) IN USE LED – Displays a current incoming phone call
2) LCD – Displays telephone functions
3) BRI/DND – Adjusts brightness on LCD screen/Enter into DND setting mode
4) DEL/MUTE – Delete typing error / Disable Microphone
5) BOOK/÷ - Access to phonebook
6) VOLUME –During talk mode, press the key to adjust speakerphone volume
7) Cal/ºC – Access Calculator / Temperature measurement
8) BACK/HOLD – Permits one to go back to the previous screen or place a call on hold.
9) DOWN/- - Permits to scroll down in a menu
10) H.F – Permits to activate or deactivate the hands free function
11) M2 – Direct access to memory M2
12) M1 – Direct access to memory M1
13) UP/+ - Permits to scroll up in a menu
14) SET/ST – Permits to adjust settings on the telephone screen, e.g. Time/Date
15) OUT/X – Exits a menu screen
16) RECALL-Pick up the number from two-touch memories
17) NUMERICAL KEY – Numbers on the keypad
18) REDIAL/P – Redial the last number/Pause
19) FLASH – used for call waiting function
20) EXT – Connection for extension line
21) LINE – Connection for telephone cable
22) LOCK- Restrict telephone use.

6
LCD DISPLAY
Icon Description Function
In
Indicates the sequence number of the incoming call you reviewed
Out
Indicates the sequence number of the outgoing call you reviewed
New CID
This will display when there is a new CID entry
Repeat CID
This will display when the same caller has called more than once
Temperature
Displays the temperature currently.
Time
Displays when setting the date and time.
Displays the time of calling when reviewed calling number.
Clock
Displays the time currently.
Month/Day
Displays the day and month
Voicemail
This will display when you have a new Voice Mail message.(This is a
caller id service and is not usually available from the network
providers.)
Low battery
Whenever this shows nearly “empty”
Speakerphone
Appears when the speakerphone function is turned on.

7
INSTALLATION INSTRUCTIONS
Place the device on a stable and firm surface providing a decent gap on each side for ventilation
Battery Installation
The unit requires 3 x 1.5V AA batteries (Not included). These are necessary for the on screen functions of the
telephone.
NOTE: Before opening the compartment to insert the batteries, ensure the cable is disconnected. Open the
battery compartment and insert the batteries in the correct polarity. Once batteries are inserted, the time
will appear on the screen.
Cable Connection
Connect the handset and the unit with the coil cord.
Insert one end of the line cord to the jack of the base and the other end to your telephone line socket or PABX
socket
FUNCTIONS OF THE TELEPHONE
1) Using the menu
2) Adjusting the LCD contrast

8
3) Language selection
4) Dialling a number
5) Hands free
6) Receiving a call
7) Using the dial pad
8) Memorizing telephone numbers on device
9) Storing name and numbers on phonebook
10) Dialling a number from phonebook
11) Access phonebook
12) Delete data off phonebook
13) Edit data on phonebook
14) Adjust Date/Time
15) Adjust volume of ring tone
16) Placing a call on hold
17) Consulting one of the last 16 dialled numbers
18) Calling one of the last 16 dialled numbers
19) Deleting one of the last 16 dialled numbers
20) Pause function
Using the menu
The majority of the functions can be accessed easily through the menu. The menu includes several
sub-menus in which different functions are found.
Menu Setting:
1.
Whilst either on-hook or off-hook, press SET/ST key to access to the setting mode.
2. Use UP/+ or DOWN/- keys to select the desired option within the menu.
3. Once the option has been selected, press the SET/ST key again to confirm its setting.
4. To change parameters, use UP/+ or DOWN/- keys. If you want to exit the settings at any time, press
the BOOK/÷ key.

9
Adjusting the LCD Contrast
Please refer to “LCD contrast adjusting” under the MENU SETTING option.
Language Selection
There are 2 languages programmed on this device. The default language programmed is SPANISH.
In order to change the language, follow the next steps:-
1. Whilst either on-hook or off-hook, press the SET/ST key.
2. Press the UP/+ key once for the LCD screen to display LANGUAGE.
3. Press the SET/ST key. The language options will flash on the LCD display.
4. Use either the UP/+ or DOWN/-keys to switch from the default language to either English or Spanish.
5. Finally, press the SET/ST key again to confirm your selection.
Dialling a Number
There 3 ways in which you can dial a number.
Basic Dialling
1. Lift the phone off the hook or press the
icon.
2. Wait for the tone to sound and then dial the desired number.
Pre-dialling
1. Dial the number
2. Lift the phone off the hook or press the
icon
3. The number previously typed will dial automatically within a couple of seconds
Redial the last number
1. Lift the phone off the hook and press the REDIAL button
2. The phone will automatically dial the last number called
3. If using the hands free function, press the
icon followed by the REDIAL button.
Hands free
This function allows the user to speak without the necessity of lifting up the handset off the hook:
To call using Hands free
1. Simply press the
button.

10
2. Wait until a dial tone can be heard
3. Dial the number
4. At end of the call, press
to hang up.
5. Use the Volume button to adjust the volume of the speaker phone.
Switch from Hands free to Handheld call
1. Whilst speaking on hands free, simply lift the handset off the hook.
2. Use the volume button to adjust the volume level.
3. To hang up, simply place the handset back on the hook
Receiving a call
1. When receiving a phone call, lift the handset off the hook or press
2. Once the conversation has ended, simply place back the handset on the hook or press
to hang
up
Using the dial pad
Telephone dial pad characters for the phonebook name
Dial pad
buttons
1
ST
Press
2
ND
Press
3
RD
Press
4
TH
Press
5
TH
Press
1 1
2
ABC
A B C 2
3
DEF
D E F 3
4
GHI
G H I 4
5
JKL
J K L 5
6
MNO
M N O 6
7
PORS
P Q R S 7
8
TUV
T U V 8
9
WXYZ
W X Y Z 9
*/. *

11
space 0 0 – ‘
#/= #
GETTING STARTED
1. Set the dialling mode to the correct mode according to the directions from your local telecom.
2. Apply for the caller ID service from your local telecom operator.
3. Connect the handset and the unit with the coil cord supplied.
4. The unit requires 3 × 1.5V AA batteries (not included). Open the battery compartment cover and insert the
batteries in the right polarity. (use alkali batteries). The time will automatically display on the LCD screen.
5. Insert one end of the line cord to the line jack of the base and the other end to the phone box..
FUNCTION AND OPERATION DESCRIPTION
Menu Setting
In on-hook or off-hook state, press the SET/ST key to enter the setting mode. The LCD will display: VIEW
MENU↓↑. Use the UP/+ or DOWN/- keys to select among different options. Once the option has been selected,
press the SET/ST key again to enter into its setting. After finishing adjusting the desired option, press the
SET/ST key again to confirm and move to another option. In order to change the parameters, always use the
UP/+ or DOWN/- keys. If you want to abort the settings at any time, press the BOOK/
÷ key.
The settings for different options are shown in detail below:
Language setting
When the unit is on on-hook or off-hook state, press the SET/ST key and then press the UP/+ key once. The
LCD will display LANGUAGE. Press the SET/ST key and you will see ESPAÑOL flashing on the LCD. Use the
UP/+ or DOWN/- keys to modify the language option to English and then press the SET/ST key again to
confirm.
Area code setting
When the unit is on on-hook or off-hook state, press the SET/ST key and then press the UP/+ key twice. The
LCD will display SET AREA CODE. Press the SET/ST key and “-----“ will appear on the LCD display. The first
dash ‘-’ will be flashing. If you have already set area code, the LCD will display the area code you have set and
the first digit will flash. Use the UP/+ or DOWN/- keys to edit from 0~9 or - and then press the SET/ST key
again to confirm. Proceed as above to set the rest. A maximum of 5 digits can be set.
Long distance code setting
When the unit is on on-hook or off-hook state, press the SET/ST key and then press the UP/+ key three times.
The LCD will display LONG DIST ACCESS. Press the SET/ST key and “0----“ will appear on the LCD display.
The first dash ‘0’ will be flashing. If you have already set a long distance code, the LCD will display the digit
you set and the first digit will flash. Use the UP/+ or DOWN/- keys to edit from 0~9 or - and then press
SET/ST key again to confirm. Proceed as above to set the rest. A maximum of 5 digits can be set.
PABX code setting
When the unit is on on-hook or off-hook state, press the SET/ST key and then press the UP/+ keys four times.
The LCD will display EXT. PREFIX. Press the SET/ST key and you will see “–
“ flashing on the LCD display.
Use the UP/+ or DOWN/-keys to edit from 0~9 or - and then press SET/ST key again to confirm.

12
Note: If the unit is in locked mode, the “EXT, PREFIX” option will not be shown.
Date/Time setting
When the unit is on on-hook or off-hook state, press the SET/ST key and then press the UP/+ key five times.
The LCD will display DATE/TIME. Press the SET/ST key for the year digits to flash. Use the UP/+ or DOWN/
- keys to change the year, then press SET/ST key to enter the setting of the month. Repeat the operation to
set the month, day, hour and minute by turn. The LCD will automatically display the week of the corresponding
day. The current date and time will be updated by the FSK Caller ID signal while the year setting remains
unchanged.
Alarm clock setting
When the unit is on on-hook or off-hook state, press the SET/ST key to enter the menu settings. Press the
UP/+ key six times for the screen to display ALARM. Press the SET/ST key to confirm. The screen then shows
“OFF” on the top line, ”-1- 12-00” and “1” flashing on screen.
”-1-“ indicates ALARM1. The phone can set 5 different alarms
“OFF” indicates the alarm is set to off mode.
“12-00” indicates the alarm clock time
Use the UP/+ or DOWN/-keys to select the alarm clock group from 1 to 5. Press the SET/ST key and
“OFF“ flashes. Use the UP/+ or DOWN/-keys to select “ONE TIME” (Rings only once) or “P. D” (Repeats
every day). When either “ONE TIME” or “P. D ” is selected, press SET/ST key and “12” flashes. Press the UP/+
or DOWN/-keys to adjust the alarm “hour”. Press SET/ST key to confirm and set the alarm “minute” in the
same way.
Set the rest of the alarms using the same method above. If you wish to turn off the alarm, set it to “OFF”.
Once the alarm has been set and the alarm function has been selected to (“ONE TIME or “P.D”), the alarm
will ring during 50 seconds and can be stopped at any time by pressing any key. When there is an incoming
call during the alarm, the unit will stop the alarm tone and give preference to the call.
Flash time setting
When the unit is on on-hook or off-hook state, press the SET/ST key and then press the UP/+ key seven times.
The LCD will display “FLASH”. Press the SET/ST key and you will see “100” flashing on the LCD. Use the
UP/+ or DOWN/- keys to select the flash time at 100, 120, 180, 270, 300, 600 or 1000ms. Press the SET/ST
key to confirm.
Pause time setting
When the unit is on on-hook or off-hook state, press the SET/ST key and then press UP/+ key eight times. The
LCD will display “PAUSE”. Press the SET/ST key “3.0” will be flashing on the LCD. Use the UP/+ or DOWN/
- keys to select the pause time at 1.0s, 2.0s, 3.0s or 4.0s. Press SET/ST key to confirm.
LCD contrast adjusting

13
When the unit is on on-hook or off-hook state, press the SET/ST key and then press the UP/+ key nine times.
The LCD will display “CONTRAST ADJUST”. Press the SET/ST key and “CONTRAST 3” will appear on the
LCD indicating the default contrast is set to level 3. Use the UP/+ or DOWN/- keys to select among the 5
levels.
You can also adjust the contrast while in on-hook state. Press the BRI/DND key for 3 seconds to enter the LCD
contrast adjustment directly.
LCD backlight On/Off setting
When the unit is on on-hook or off-hook state, press the SET/ST key and then press the DOWN/-key nine
times. The LCD will display “LIGHT”. Press the SET/ST key and “LIGHT ON” will be flashing on the LCD
display. Use the UP/+ or DOWN/- keys to select “LIGHT ON” or “LIGHT OFF” to set the LCD backlight to
your choice.
When selecting “LIGHT ON”, the backlight will light up when receiving an incoming call, dialling, pressing any
key, or on music hold state. If there is no activity during 10 seconds, the light will automatically turn off.
When selecting “LIGHT OFF”, the backlight will not light up at any time.
NOTE: The Backlight function will only work when new batteries are inserted.
Ring melody setting
When the unit is on on-hook or off-hook state, press the SET/ST key and then press the DOWN/- key eight
times. The LCD will display “RING MELODY”. Press the SET/ST key and “RING MELODY 1” will appear on
the display. Use the UP/+ or DOWN/- keys to select your desired ring melody and press the SET/ST key to
confirm.
NOTE: 1~8 are normal ringing tones. 9~18 are chord music tones. Ring 1 is set as default
Dialling mode setting
When the unit is on on-hook or off-hook state, press the SET/ST key and then press the DOWN/- key seven
times. The LCD will display “DIAL MODE”. Press the SET/ST key and “TONE“ will be flashing on the LCD
display. Use the UP/+ or DOWN/- keys to select the dialling mode to tone or pulse. Press the SET/ST key to
confirm.
Anti-dialling from parallel phone setting
When the unit is on on-hook or off-hook state, press the SET/ST key and then press the DOWN/- key six
times. The LCD will display “PARALLEL”. Press the SET/ST key and “ALLOW“will be flashing on the LCD.
Use the UP/+ or DOWN/- keys to select “FORBID” or “ALLOW”. Press the SET/ST key to confirm.
When selecting “ALLOW”, you will be able to connect parallel phones via the same telephone line. If
“FORBID” is selected, you will not be able to connect any parallel phone via the same telephone line. In
“FORBID” mode you will here a “Di-Du” tone indicating the setting is set to “FORBID”.
OGM target number setting
This function will show up in the menu but it is not supported by the SY-1490.
Pre-dialling announcement setting

14
This function will show up in the menu but it is not supported by the SY-1490.
Reject number Setting
When the unit is on on-hook or off-hook state, press the SET/ST key and then press the DOWN/- key three
times. The LCD will display “REJECT”. Press the SET/ST key and “-“will appear on the LCD display. Press the
UP/+ or DOWN/-keys to select the sequence from 01~05 and input the reject number using the numerical
keys. Press the SET/ST key to confirm. Set the other reject numbers using the same method. You can use the
UP/+ or DOWN/- keys to review the 5 reject numbers you have selected.
When receiving a call of one of the reject numbers, the unit will not ring but display the number and then hang
up the call.
NOTE: If the PABX code has been set and the first digit of the incoming call number is same as the PABX and
the rest of the digits are same as one of the rejected numbers, the incoming call number will also be regarded
as a reject number.
Phone book setting
When the unit is on on-hook or off-hook state, press the SET/ST key and then press the DOWN/- key twice.
The LCD will display “PHONEBOOK INPUT”. Press the SET/ST key and “INPUT NUMBER” will be displayed.
A dash as follow will flash “-“. Use the digit keys to input the telephone number. Once done, press the SET/ST
key to input the name using the digit keys. The number key “0” is the backspace key. Once finished, press the
SET/ST key to confirm. Use the same method for inputting new telephone numbers and names. If the number
and name already exists in the phonebook, the LCD will display “ALREADY EXIST“. While inputting a number
and name, use the UP/+ or DOWN/- keys to move the cursor and press
DEL/MUTE key to correct.
Press the BOOK/÷ key to exit.
The maximum entry for the Phonebook is up to 99.
Phonebook editing
When the unit is on on-hook or off-hook state, press the SET/ST key then press the DOWN/- key once. The
LCD will display “PHONEBOOK EDIT”. Press the SET/ST key and the LCD will display “INPUT PREFIX“.
Input the name you want to review or input the first character of the name. Press the SET/ST key and the LCD
will display the corresponding name and number. If you don’t input the character of the name, you can press
the SET/ST key directly, then press UP/+ or DOWN/- keys to review the phone book entries one by one. The
edit operation is same as phonebook setting.
NOTE: The alphabet on the key button arrangement are as follow:
1 2ABC 3DEF
4GHI 5JKL 6MNO
7PQRS 8TUV 9WXYZ
*/. 0 #/=
FUNCTION OPERATION
Caller ID Message
The Caller ID feature is only available if you have subscribed Caller Line Identification service with your
network service operator. Your phone can store up to 80 incoming calls including date/time information in the
Call List. The number will be shown on the LCD display when the phone rings. If the number matches with one

15
of the entries in your phonebook, the caller’s name stored in the phonebook will be displayed along with the
name.
When you receive new calls, “NEW” will flash on the display. The screen will display “ALL 000” and “NEW 000”
to indicate all calls received from caller IDs and new caller ID. If the new incoming call is a repeated number,
“REP” will be displayed under “NEW”.
“PRIVATE CALL”, “OUT OF AREA” and “ERROR” maybe shown in the cases:
“PRIVATE CALL” will be displayed when the caller prefers the number to be hidden.
“OUT OF AREA” indicates the call comes from an area where Caller ID service is not supplied.
“ERROR” represents an incorrect incoming signal.
The current date and time will be updated by the FSK Caller ID signal while the year setting remains
unchanged. DTMF Caller ID signal will not change the date and time setting as it only contains the caller’s
number.
Receiving a call
From handset
1. Pick up the handset and talk to the other party.
2. When finished, return the handset to the base.
Switching to speakerphone
1. When using the handset, press
key and return the handset to the base.
2. When finished, press
key again.
From speakerphone
1. When the telephone rings, press
key and talk to the caller. For the other party to hear your voice
clearly, speak into the speaker from a distance of 32cm or less.
2. When finished, press
key again.
NOTE: Generally telecom operators transmit the Caller’s ID between the first and the second ring. Therefore to
view the number, answer the phone after the second ring.
Making a call
From handset
1. Pick up the handset.
2. When you hear the dial tone, dial the desired number.
3. The unit will start to time the conversation after 6 seconds.
4. When finished, return the handset to the base.
From Speakerphone
1. Press
key
2. When you hear the dial tone, dial the desired number.
3. The unit will start to time the conversation after 6 seconds.
4. When finished, press
key again.

16
Redial function
1. Pick up the handset or press key,
2. Press REDIAL/P key for the last dialled number to be dialled again.
Pre-dial function
1. In on-hook state
2. Dial the desired number, if any mistake press DEL/MUTE key to edit.
3. Pick up the handset or press
key to dial out the number.
REVIEWING INCOMING AND OUTGOING CALL NUMBERS
Reviewing incoming call number
While on on-hook or off-hook state, press the UP/+ or DOWN/- key to review incoming call numbers one by
one. After all incoming call numbers are reviewed, the LCD will display: ---END OF LIST---,
Reviewing outgoing call number
1. While on on-hook or off-hook state, press OUT/× key to review the outgoing call numbers and
conversation time from the last to the first calls. While reviewing, press the UP/+ key to check outgoing
calls above.
2. Once all the outgoing call numbers are reviewed, the LCD will display: ---END OF LIST---,
3. If you wish to delete a number, press the DEL/MUTE key once. The LCD will display DEL. Press the
DEL/MUTE key again to confirm and delete the number. To delete all the numbers, press and hold DEL/MUTE
key for 3 seconds. The LCD will display DEL ALL? .Press the DEL/MUTE key to confirm and all numbers will
be deleted.
CALLING BACK INCOMING AND OUTGOING NUMBERS
Calling back incoming call numbers
1. While on on-hook state, review incoming call numbers to find a desired number.
2. Press
key, BACK/HOLD key or pick up the handset, to dial out the number.
3. Otherwise, press BACK/HOLD key twice and it dials out along with the long distance code.
4. If a PABX code has been set in advance, and the number is of 7-digits or more, it is dialled out along with
the PABX code;
5. Otherwise, press BACK/HOLD key twice to dial out along with PABX code, pause time and long distance
code.
Calling back outgoing call numbers
1. In on-hook state, review outgoing call number to find a desired number,
2. Press
key, BACK/HOLD key or pick up the handset, to dial out the number.
3. Otherwise in off-hook state, review and find a desired outgoing number and press BACK/HOLD key to
dial it the number.

17
CHECKING, DIAL OUT AND DELETE PHONEBOOK
¾ Checking phonebook entries
1. While on on-hook state, press the
BOOK/÷ key and “INPUT PREFIX“ will be displayed. Input the first
character of the desired phonebook entry.
2. The screen then displays the relevant phone book entries. Press the UP/+ or DOWN/- keys to scroll
through the relevant phonebook entries.
3. While the screen shows “INPUT PREFIX“, you can also press the UP/+ or DOWN/- keys to access the
phonebook entries.
4. Press
BOOK/÷ key to exit the phonebook entry list option.
Dial out a phonebook number
While reviewing and selecting a phonebook entry, press the “
BACK/HOLD” key, key or pick up the
handset to dial out the phonebook number.
Delete phonebook entries
While reviewing and selecting a phonebook entry, press the “
DEL/MUTE” key. The screen then displays
“DEL?”. To confirm the deletion of the phonebook entry, press the “
DEL/MUTE” key again. The next number
will display.
ONE-TOUCH MEMORY
Storing a number into one-touch memory
While the unit is on on-hook state, pre-dial the desired number, press SET/ST key and then press M1 or M2
key to store the number.
Making a call from one-touch memory
There are 3 options to make a call from one-touch memory key as shown below:
1. On on-hook state, press the M1 or M2 key, the stored number will be displayed. Press the “BACK/HOLD”
key
and the phone will enter in off-hook mode to dial out the number automatically.
2. Press the
key and press M1 or M2 key to dial the stored number.
3. Press the M1 or M2 key and pick up the handset.
In off-hook state, press M1 or M2 key, the relevant number will be dialled out.
STORE INCOMING NUMBERS TO PHONEBOOK/ONE - TOUCH/TWO-TOUCH MEMORIES
Store to phonebook
On On-hook mode, while reviewing an incoming call number, press SET/ST key. The screen will show
“STORE” on the top left corner. Press “
BOOK/÷” key and the screen will show “INPUT NUMBER”. The cursor
will flash at the end of the incoming call number to indicate you to modify the number (if necessary). Press the
“SET/ST” key to confirm the number. The cursor will flash on the top left corner to allow name entry. Press the
“SET/ST” key again to confirm the entry.
Store to one-touch memory
It is also possible to store an incoming call in one-touch memory key M1 or M2

18
On On-hook mode, while reviewing an incoming call number, press the “SET/ST” key. The screen will display
“STORE” on the top left corner. Press M1 or M2 keys to save the number accordingly.
Store to two-touch memory
You also can store an incoming call in two-touch memory key 1 to 9.
On On-hook mode, while reviewing an incoming call number, press the “SET/ST” key. The display will show
“STORE” on the top left corner. Press numeric key to directly store the incoming call number into the numeric
key(1 to 9).
Make a call from two-touch memory
There are 4 different options for making a two touch memory phone call.
1. On On-hook mode, press the “RECALL” key and the screen shows “PICK-UP “. Press the numerical key
in which the two-touch memory number is stored. Then press
key, “BACK/HOLD” key or pick up the
handset to dial out the number directly.
2. On On-hook mode, press and hold the FLASH key for 3 seconds until “PICK-UP “ is displayed. Press the
numerical key in which the two-touch memory number is stored. Then press
key, “BACK/HOLD” key
or pick up the handset to dial out the number directly.
3. On Off-hook mode, press the “RECALL” key and the screen shows “PICK-UP “. Press the numerical key
in which the two-touch memory number is stored. The number will be dialled out direclty.
4. On Off-hook mode, press and hold the FLASH key for 3 seconds until “PICK-UP “ is displayed. Press the
numerical key in which the two-touch memory number is stored. The number will be dialled out direclty.
LOCKING THE PHONE
When turning the key to the yellow point: All numbers will be locked .
When turning the key to the green point: All numbers starting with “0” will be locked. (If PABX code is set to
(0-9), the “0” locked function is invalid)
When turning the key to the red point: All numbers are allowed to be dialled out.
MUTE FUNCTION
During the conversation, you can at any time use the mute function. Press the “DEL/MUTE” key to disable the
microphone. Press the “DEL/MUTE” key again to return to normal conversation mode.
DO NOT DISTURB FUNCTION
1. While on on-hook state, press the “BRI/DND” key. The LCD will display SLEEP 00-00
2. Press the UP/+ or DOWN/- keys to adjust DND “Do Not Disturb” time by every half an hour.
3. Press the BOOK/÷ key to confirm the “DND” mode. When the phone returns to standby mode, the LCD
will display the “DND” time remaining.
For example, when the unit is on “DND” state, the LCD will display SLEEP 02-41. This means the DND time
remaining is 2 hours and 41 minutes. During DND time, the unit and alarm will not ring.

19
NOTE: The unit will exit the DND mode once the DND time has reached to 00-00. If the DND time has not
finished and you want to exit the DND mode, you will need to reset the DND time to 00-00. Press the BOOK/÷
key to confirm.
HOLD ON MUSIC
The unit includes 10 different kinds of hold music for your selection.
When talking over the handset, press the “BACK/HOLD” key to enter the hold music mode function. The
other end will hear the selected hold music. Press the UP/+ or DOWN/- key to select the hold music tone.
While on hold mode:
1. Press the “BACK/HOLD” key to release the hold music mode and continue to talk over the handset.
2. Or place back the handset on the base to enter into hands free hold mode.
Note: When talking on hands free mode, press the “BACK/HOLD” key to enter the hold mode and the hold
music is sent out. Press UP/+ or DOWN/-keys to select the hold music.
1. Pick up the handset to talk,
2. Or press the “BACK/HOLD” key or
key to quit the hold mode and talk on hands free mode.
RINGER VOLUME CONTROL
While on on-hook state, press the “VOLUME” key to adjust the ringing melody volume. The unit includes 3
volume levels for selection.
HANDSFREE VOLUME CONTROL
While In hands free mode, press the “VOLUME” key to adjust the hands free volume. The unit includes 4
volume levels for selection.
FLASH FUNCTION
The Flash function allows you to access to different services operated by your provider. You will be able to put
a call on hold, transfer a call, or use the automatic answer machine option. The flash time is usually 100ms,
which is value valid for Spain.
PAUSE FUNCTION
When dialling, press REDIAL/P key to insert a 1.0~4.0s pause time.
CHECK TEMPERATURE RECORD
While on on-hook state, press and hold the CAL/℃ key for 3 seconds. The LCD will display the Highest and
lowest temperature value of the current day. Press the UP/+ and DOWN/- key to check the temperature record
for the last 30 days.
CALCULATOR FUNCTION
While on on-hook or off hook state, press the CAL/℃ key. The LCD will displays “0” and the unit will enter to

20
calculator mode. The following functions can be used “+,-,×,÷”. In calculator mode, use the UP/+,
DOWN/-, OUT/× and BOOK/÷ keys for the desired function. Press the */. to use decimals and the #/= to know
the result. Press the SET/ST key to clear. Press the DEL/MUTE key to delete the incorrect inputs one by one.
Eg.1 (10+26) ÷2
1 While on on-hook or off hook state, press the CAL/℃ key
2 Press (1, 0, +, 2, 6), ÷, 2, #/= keys
3 Press the CAL/℃ key to quit.
Eg.2 0.5 × 0.6-1
1 While on on-hook or off hook state, press the CAL/℃ key
2 Press 0, */., 5, ×, 0, */., 6, -, 1, #/= keys
3 Press the CAL/℃ key to quit.
TROUBLE SHOOTING
Trouble Check Solution
Not receiving
Incoming calls
Check if the handset is well
placed on the base.
Check you telephone line.
Connect the cable lines properly.
Contact your operator.
Outgoing calls
do not work
Check if P/T mode is
properly set
Check if the lock is set to
Green or Yellow position.
Set the correct dialling mode Pulse or
Tone.
Turn the Lock to RED position.
Battery
problems.
Check if the batteries are
not worn out, rusted or
leaking.
Replace the batteries.
Clean the battery compartment in
case of leakage.

21
LCD light is dim
Check if the LCD contrast is
properly set or battery level
is low.
Adjust LCD contrast, if the LCD is still
dim, replace the batteries.
Telephone
does not ring.
Check if the unit is in DND
state.
Reset the DND time to 00-00
NOTE: Due to continuous product development, all features and specifications are subject to change without
prior notice.

22
DECLARATION OF COMPLIANCE
SATYATRADE S.L Representative:
Polígono Industrial "La Raya". Ajeet Nebhwani Utamchandani
P.A.E. II Sole Administrator
CAMARMA DE ESTERUELAS
28816.- Madrid, Spain
Tax Reg. No.: B 83254763
Tel: 91 886 53 21
Fax: 91 886 42 85
We declare under our sole responsibility the compliance of the product:
SYTECH brand telephone, model SY-1490, manufactured by the company SATYATRADE S.L. in
China to which this declaration refers, with the standard(s) and other regulatory document(s):
- EN 55022: 2006.
- EN 55024: 1998+A1:2001+A2:2003
- EN 60950-1:2006
according to the provisions of
- Directive 2004/108/EC of the European Parliament and the Council of 15 December 2004,
transposed to Spanish legislation by Royal Decree 1580/2006 of 22 December 2007, and,
- Council Directive 73/23/CEE of 19 February 1973, transposed to Spanish legislation by Royal
Decree 7/1988 of 8 January and Royal Decree 154/1995 of 3 February, included with
subsequent modifications in Directive 2006/95/EC of the European Parliament and the Council
of 12 December 2006.
In Camarma de Esteruelas, Madrid, Spain, on 30 September 2010.
Signed: Ajeet Nebhwani Utamchandani
Sole Administrator

TELÉFONO DE MESA CON IDENTIFICADOR DE LLAMADA Y FUNCIÓN DE MANOS LIBRES
MODELO: SY-1490
1

2
INTRODUCCIÓN
Gracias por comprar el nuevo teléfono con Identificador de llamadas SYTECH SY-1490. Este manual está
diseñado para que se familiarice con este teléfono. Para obtener lo mejor de su nuevo teléfono, le sugerimos
que lea este Manual de Instrucciones cuidadosamente antes de utilizarlo.
INSTRUCCIONES DE SEGURIDAD
Cuando utilice su equipo de teléfono, se deben seguir siempre unas precauciones de seguridad para reducir
el riesgo de incendio, corto circuito o daños personales:
1. Lea y comprenda todas las instrucciones
2. Siga todas las advertencias e instrucciones.
3. No instale la unidad cerca de: temperaturas extremas, luz solar directa, zonas polvorientas.
4. No desmonte la unidad. Por favor, contacte con la línea de atención del Centro de Servicio de Sytech para
reparar o reemplazar el producto.
5. Nunca instale la unidad durante una tormenta eléctrica.
6. No obstruya la línea de cable ni la pise.
7. No instale su teléfono en zonas húmedas.
8. Desconecte su teléfono de la toma de pared antes de limpiarlo. Utilice sólo un paño suave para limpiar.
9. No coloque este producto sobre una mesa, estante o soporte no estable. El producto se puede caer,
dañándose gravemente.
10. No sobrecargue las tomas de corriente y los cables extensores ya que puede provocar un incendio o
electroshock
11. No introduzca objetos a través de las ranuras de la carcasa ya que pueden tocar puntos con voltaje
peligroso y pueden provocar electroshock.
12 Nunca vierta líquido de tipo alguno en el producto.
Precauciones con las pilas
Para evitar cualquier riesgo de electroshock o lesión, lea y siga las siguientes instrucciones.
. No tire las pilas defectuosas al fuego. Pueden explotar. Infórmese con su distribuidor de dónde se pueden
reciclar.
. No abra ni dañe las pilas. El electrolito interno es corrosivo y puede dañar los ojos o piel. Es tóxico por
ingestión.
. No intente recargar las pilas. Puede haber fugas de electrolito corrosivo y arder.
. Cuando introduzca pilas en la unidad, compruebe la polaridad. La polaridad inversa puede provocar que la
pila se descargue y se salga el electrolito.
. Quite las pilas de la unidad cuando no vaya a utilizar el equipo durante un período de tiempo largo. (unos
meses o más) ya que pueden provocar una fuga interna.
NOTA: Guarde este manual con cuidado para futuras consultas.
CONDICIONES DE SEGURIDAD
• El dispositivo no se puede conectar a un suministro de pilas IT.

3
•
La conexión de la línea de teléfono y de la combinada responden al nivel de seguridad TRT-3
•
La seguridad eléctrica corresponde a las verificaciones de NF EN 60950 y a las correcciones A1,
A2, A3 y A4.
•
La temperatura de uso máxima es de 35ºC
•
Asegúrese de que el cable de teléfono está desconectado antes de abrir la cubierta de las pilas,
situada bajo la base.
•
El certificado de conformidad de la marca del terminal está situado bajo la base.
CARACTERÍSTICAS
¾ Sistema FSK/DTMF compatible con autodetección.
¾ Idioma de interfaz en inglés/español elegible.
¾ Pantalla LCD de 16 dígitos con reloj real y termómetro.
¾ Comprobación de registro de temperatura
¾ Almacenamiento dinámico: Máximo de 80 llamadas entrantes con números de 12 dígitos y nombres de 8
caracteres cada una
¾ Almacenamiento de 50 números salientes
¾ Se pueden revisar, volver a llamar y borrar los números entrantes y salientes
¾ 2 memorias de un toque y 10 de dos toques
¾ Configuración de 5 grupos de rechazo de números
¾ Máximo de 99 registros en la agenda
¾ 8 tonos de llamada normales y 10 tonos de llamada musicales para elegir
¾ 10 tipos de música en espera para elegir
¾ Función No molestar
¾ 5 configuraciones de reloj de alarma
¾ Función de bloqueo en 3 pasos
¾ Configuración de código de área local de 5 dígitos y configuración de código de larga distancia de 5
dígitos
¾ 5 niveles de contraste de LCD para elegir
¾ Función de predializado y edición de 32 dígitos
¾ Función de silencio
¾ Función de calculadora
¾ Volumen de llamada. Ajustable a 3 niveles
¾ Volumen de manos libres. Ajustable a 4 niveles
¾ Funciones de parpadeo, pausa y rellamada
¾ Encendido/apagado de luz de fondo a elegir
¾ Función de resistencia a rayos y contra llamadas de teléfonos paralelos
¾ Se puede seleccionar el modo de marcación por Pulsos y por Tono
¾ Indicador LED de uso

4
DESCRIPCIÓN Y VISTAS

5
1) LCD EN USO - Muestra una llamada entrante actual
2) LCD – Muestra las funciones del teléfono
3) BRI/DND – Ajusta el brillo de la pantalla LCD/entra en el modo de configuración DND
4) DEL/MUTE – Borra errores de escritura / Desactiva el micrófono
5) BOOK/÷ - Acceso a la agenda
6) VOLUMEN – Durante el modo de habla, presione el botón para ajustar el volumen del altavoz
7) Cal/ºC – Acceso a la Calculadora / Medición de temperatura
8) BACK/HOLD – Permite volver a la pantalla anterior o poner una llamada en espera.
9) DOWN/- - Permite bajar en un menú
10) H.F – Permite activar o desactivar la función de manos libres
11) M2 – Acceso directo a la memoria M2
12) M1 – Acceso directo a la memoria M1
13) UP/+ - Permite subir en un menú
14) SET/ST – Permite ajustar la configuración de la pantalla del teléfono, p. ej. Hora/Fecha
15) OUT/X – Sale de la pantalla de un menú
16) RECALL-Recupera el número de la memoria de dos toques
17) TECLADO NUMÉRICO – Números en el teclado
18) REDIAL/P – Vuelve a marcar el ultimo número /Pausa
19) FLASH – utilizado para la función de llamada en espera
20) EXT – Conexión para la línea de extensión
21) LINE – Conexión para el cable de teléfono
22) LOCK- Restringe el uso del teléfono.

6
PANTALLA LCD
Muestra el estado del menú y de la
memoria
Muestra los números de teléfono y el
año
Muestra el reloj y el termómetro
Muestra los estados de una llamada,
mes y día
Muestra el día de la semana
Icono Descripción Función
Entrante
Indica la secuencia de números de la llamada entrante revisada
Saliente
Indica la secuencia de números de la llamada saliente revisada
Nuevo CID
Aparecerá cuando haya una nueva entrada de CID
Repite CID
Aparecerá cuando el mismo llamante haya llamado más de una vez.
Temperatura
Muestra la temperatura actual.
Hora
Aparece cuando se configura la fecha y hora.
Muestra la hora de llamada cuando se revisan números llamantes.
Reloj
Muestra la hora actual.
Mes/Día
Muestra el día y el mes
Buzón de voz
Aparecerá cuando haya recibido un nuevo mensaje de voz (Es un
servicio de identificación de llamante y no suele estar disponible en
los proveedores de servicio.)
Batería baja
Siempre que aparece, las pilas están casi “vacías”
Altavoz
Aparece cuando está activada la función de altavoz.

7
INSTRUCCIONES DE INSTALACIÓN
Coloque el dispositivo sobre una superficie estable y firme que proporcione espacio suficiente a cada lado
para la ventilación.
Instalación de pilas
La unidad necesita 3 pilas AA de 1,5V (no incluidas). Son necesarias para las funciones de la pantalla del
teléfono.
NOTA: Antes de abrir el compartimento para introducir las pilas, asegúrese de que el cable está desconectado.
Abra el compartimento para pilas e introduzca las pilas con la polaridad correcta. Cuando haya
introducido las pilas, aparecerá la hora en la pantalla.
Conexión del cable
Conecte el auricular y la unidad con el cable en espiral.
Introduzca un extremo del cable en la clavija de la base y el otro extremo en la ranura de línea del teléfono o
ranura PABX.
A clavija de
pared modular
FUNCIONES DEL TELÉFONO
Uso del menú

8
Ajuste del contraste de la pantalla LCD
Selección de idioma
Marcación de un número
Manos libres
Recibir una llamada
Utilizar el teclado de llamada
Memorizar números de teléfono en el dispositivo
Guardar nombres y números en la agenda
Marcar un número de la agenda
Acceso a la agenda
Borrar datos de la agenda
Editar datos en la agenda
Ajustar la Hora/Fecha
Ajustar el volumen del tono de llamada
Poner una llamada en espera
Consultar uno de los 16 últimos números llamados
Llamar a uno de los 16 últimos números llamados
Borrar uno de los 16 últimos números llamados
Función de pausa
Uso del menú
La mayoría de las funciones tiene fácil acceso a través del menú. El menú incluye varios submenús en los que
se encuentran las diferentes funciones.
Configuración de menú:
1.
Con el teléfono colgado o descolgado, presione el botón SET/ST para acceder al modo de
configuración.
2. Utilice los botones UP/+ o DOWN/- para seleccionar la opción deseada del menú.
3. Cuando haya seleccionado la opción, vuelva a presionar SET/ST para confirmar esta configuración.
4. Para cambiar los parámetros, utilice los botones UP/+ o DOWN/-. Si desea salir de la configuración

9
en cualquier momento, presione el botón BOOK/÷.
Ajuste del contraste de la pantalla LCD
Consulte “Ajuste del contraste de LCD” en la opción de CONFIGURACIÓN DE MENÚ.
Selección de idioma
Hay 2 idiomas programados en este dispositivo. El idioma por defecto es ESPAÑOL.
Para cambiar el idioma, siga estos pasos:
1. Con el teléfono colgado o descolgado, presione el botón SET/ST.
2. Presione el botón UP/+ una vez para que la pantalla LCD muestre SELECCION IDIOMA.
3. Presione el botón SET/ST. Las opciones de idioma parpadearán en la pantalla LCD.
4. Utilice los botones UP/+ o DOWN/-para cambiar de idioma.
5. Finalmente, presione el botón SET/ST de nuevo para confirmar su selección.
Marcación de un número
Tiene 3 formas de marcar un número.
Marcación básica
1. Descuelgue el teléfono o presione el icono
.
2. Espere a que suene el tono y marque el número deseado.
Pre-marcación
1. Marque el número.
2. Descuelgue el teléfono o presione el icono
.
3. El número introducido previamente se marcará automáticamente en un par de segundos.
Volver a marcar el último número
1. Descuelgue el teléfono y presione el botón REDIAL.
2. El teléfono volverá a marcar el último número automáticamente.
3. Si utiliza la función de manos libres, presione el icono
seguido del botón REDIAL.
Manos libres

10
Esta función permite al usuario hablar sin necesidad de descolgar el teléfono:
Llamar usando el Manos libres
1. Simplemente presione el botón
.
2. Espere a que se escuche el tono de marcación
3. Marque el número.
4. Al final de la llamada, presione
para colgar.
5. Utilice el botón de VOLUMEN para ajustar el volumen del altavoz.
Cambiar del Manos libres a llamada por auricular
1. Mientras habla con el manos libres, simplemente descuelgue el auricular.
2. Utilice el botón de volumen para ajustar el nivel de volumen.
3. Para colgar, simplemente vuelva a colocar el auricular en su soporte.
Recibir una llamada
1. Cuando reciba una llamada, descuelgue el auricular o presione
2. Cuando haya terminado la conversación, simplemente cuelgue el auricular en el soporte o presione el
botón
para colgar.
Utilizar el teclado de llamada

11
Caracteres del teclado para introducir el nombre en la agenda
Botones de
marcación
1ª
Presión
2ª
Presión
3ª
Presión
4ª
Presión
5ª
Presión
1 1
2
ABC
A B C
2
3
DEF
D E F
3
4
GHI
G H I
4
5
JKL
J K L
5
6
MNO
M N O
6
7
PORS
P Q R S
7
8
TUV
T U V
8
9
WXYZ
W X Y Z
9
*/. *
0
Espacio
0 – ‘
#/= #
ANTES DE EMPEZAR
1. Configure el modo de marcación según las direcciones de su red de comunicaciones local.
2. Solicite el servicio de ID de llamada a su operador local.
3. Conecte el auricular y la unidad con el cable en espiral.
4. La unidad necesita 3 pilas AA de 1,5V (no incluidas). Abra el compartimento para pilas e introduzca las
pilas con la polaridad correcta. (utilice pilas alcalinas). La hora aparecerá automáticamente en la pantalla
LCD.
5. Introduzca un extremo del cable en la clavija de la base y el otro extremo en el teléfono.
DESCRIPCIÓN DE FUNCIONES Y FUNCIONAMIENTO
Configuración de menú
Con el teléfono colgado o descolgado, presione el botón SET/ST para entrar en el modo de configuración. La
pantalla LCD mostrará: VER MENÚ↓↑. Utilice los botones UP/+ o DOWN/- para seleccionar entre las
diferentes opciones. Cuando haya seleccionado la opción, vuelva a presionar SET/ST para entrar en esta
configuración. Tras terminar de ajustar la opción deseada, vuelva a presionar el botón SET/ST para confirmar
e ir a otra opción. Para cambiar los parámetros, utilice siempre los botones UP/+ o DOWN/-. Si desea salir
de la configuración en cualquier momento, presione el botón BOOK/÷.
La configuración de las diferentes opciones se muestra detallada a continuación:
Configuración de idioma
Cuando la unidad esté colgada o descolgada, presione el botón SET/ST y después, presione el botón UP/+
una vez. La pantalla LCD mostrará SELECCIÓN IDIOMA. Presione el botón SET/ST y verá ESPAÑOL
parpadeando en la pantalla LCD. Utilice los botones UP/+ o DOWN/- para modificar la opción de idioma a
“English” y después vuelva a presionar el botón SET/ST para confirmar.
Configuración del código de área

12
Cuando la unidad esté colgada o descolgada, presione el botón SET/ST y después, presione el botón UP/+
dos veces. La pantalla LCD mostrará CÓDIGO DE ÁREA Presione el botón SET/ST y aparecerá “-----“ en la
pantalla LCD. Parpadeará el primer guión “-”. Si ya ha establecido el código de área, la pantalla LCD mostrará
el código de área que ha establecido y el primer dígito parpadeará. Utilice los botones UP/+ o DOWN/- para
editar del 0~9 o – y después vuelva a presionar el botón SET/ST para confirmar. Siga los pasos anteriores
para configurar el resto. Se puede configurar un máximo de 5 dígitos.
Configuración de código de larga distancia
Cuando la unidad esté colgada o descolgada, presione el botón SET/ST y después, presione el botón UP/+
tres veces. La pantalla LCD mostrará ACCESO LARGA DIS. Presione el botón SET/ST y aparecerá “0----“ en
la pantalla LCD. Parpadeará el primer guión “0”. Si ya ha establecido el código de larga distancia, la pantalla
LCD mostrará el dígito que ha establecido y el primer dígito parpadeará. Utilice los botones UP/+ o DOWN/-
para editar del 0~9 o – y después vuelva a presionar el botón SET/ST para confirmar. Siga los pasos
anteriores para configurar el resto. Se puede configurar un máximo de 5 dígitos.
Configuración del código PABX
Cuando la unidad esté colgada o descolgada, presione el botón SET/ST y después, presione el botón UP/+
cuatro veces. La pantalla LCD mostrará PREFIJO PABX. Presione el botón SET/ST y verá “-“ parpadeando
en la pantalla LCD. Utilice los botones UP/+ o DOWN/- para editar del 0~9 o – y después vuelva a presionar el
botón SET/ST para confirmar.
Nota: Si la unidad está en modo bloqueado, no se mostrará la opción "PREFIJO PABX."
Configuración de Hora/Fecha
Cuando la unidad esté colgada o descolgada, presione el botón SET/ST y después, presione el botón UP/+
cinco veces. La pantalla LCD mostrará HORA/FECHA. Presione el botón SET/ST para que parpadeen los
dígitos del año. Utilice los botones UP/+ o DOWN/- para cambiar el año, después presione el botón SET/ST
para entrar en la configuración del mes. Repita la operación para establecer el mes, día, hora y minutos por
turnos. La pantalla LCD mostrará, automáticamente, la semana del día correspondiente. La fecha y hora
actual serán actualizadas por la señal de ID de Llamador FSK mientras que la configuración del año
permanece sin cambios.
Configuración del reloj de alarma
Cuando la unidad esté colgada o descolgada, presione el botón SET/ST para entrar en la configuración de
menú. Presione el botón UP/+ seis veces para que la pantalla muestre ALARMA. Presione el botón SET/ST
para confirmar. La pantalla mostrará “APAGADO” en la línea superior, ”-1- 12-00” y “1” parpadearán en la
pantalla.
”-1-“ indica ALARMA1. El teléfono puede configurar 5 alarmas diferentes
“APAGADO” indica que la alarma está apagada.
“12-00” indica la hora de la alarma

13
Presione los botones UP/+ o DOWN/-para seleccionar el grupo de alarma de 1 a 5. Presione el botón
SET/ST y parpadeará “APAGADO”. Utilice los botones UP/+ o DOWN/-para seleccionar “UNA VEZ” (Suena
solo una vez) o “CADA DIA” (Repite cada día). Cuando se seleccione “UNA VEZ” o “CADA DIA”, presione
SET/ST y parpadeará “12”. Presione los botones UP/+ o DOWN/-para ajustar la “hora” de la alarma.
Presione el botón SET/ST para confirmar y configurar los “minutos” de la alarma del mismo modo.
Configure el resto de alarmas utilizando el mismo método. Si desea apagar la alarma, configúrela en “OFF”.
Cuando se haya configurado la alarma y se haya seleccionado, (“UNA VEZ” o “CADA DIA”), la alarma
sonará durante 50 segundos y se puede detener en cualquier momento presionando cualquier botón. Cuando
se produce una llamada entrante durante la alarma, la unidad apagará el tono de alarma y dará preferencia a
la llamada.
Configuración de función Flash
Cuando la unidad esté colgada o descolgada, presione el botón SET/ST y después, presione el botón UP/+
siete veces. La pantalla LCD mostrará “FLASH”. Presione el botón SET/ST y verá “100” parpadeando en la
pantalla LCD. Utilice los botones UP/+ o DOWN/- para seleccionar el tiempo de parpadeo en 100, 120, 180,
270, 300, 600 o 1000ms. Presione el botón SET/ST para confirmar.
Configuración de tiempo de pausa
Cuando la unidad esté colgada o descolgada, presione el botón SET/ST y después, presione el botón UP/+
ocho veces. La pantalla LCD mostrará “PAUSA”. Presione el botón SET/ST y verá “3.0” parpadeando en la
pantalla LCD. Utilice los botones UP/+ o DOWN/- para seleccionar el tiempo de parpadeo en 1.0s, 2.0s, 3.0s
ó 4.0s. Presione el botón SET/ST para confirmar.
Ajuste del contraste de la pantalla LCD
Cuando la unidad esté colgada o descolgada, presione el botón SET/ST y después, presione el botón UP/+
nueve veces. La pantalla LCD mostrará “AJUSTE CONTRASTE”. Presione el botón SET/ST y “CONTRASTE
3” aparecerá en la pantalla LCD indicando que el contraste por defecto está en el nivel 3. Utilice los botones
UP/+ o DOWN/- para seleccionar entre los 5 niveles.
También puede ajustar el contraste mientras tiene el teléfono colgado. Presione el botón BRI/DND durante 3
segundos para entrar directamente en el ajuste de contraste de la pantalla LCD.
Configuración de encendido/apagado de la luz de fondo de la pantalla LCD
Cuando la unidad esté colgada o descolgada, presione el botón SET/ST y después, presione el botón
DOWN/- nueve veces. La pantalla LCD mostrará “LUZ”. Presione el botón SET/ST y verá “LUZ
ENCENDIDA“parpadeando en la pantalla LCD. Utilice los botones UP/+ o DOWN/- para seleccionar “LUZ
ENCENDIDA” o “LUZ APAGADA” para configurar la luz de fondo de la pantalla LCD a su elección.

14
Cuando seleccione “LUZ ENCENDIDA”, la luz de fondo se encenderá cuando se reciba una llamada
entrante, cuando se marque, se presione cualquier botón o en el modo de música de espera. Si no se produce
actividad durante 10 segundos, la luz se apagará automáticamente.
Cuando seleccione “LUZ APAGADA”, la luz de fondo no se encenderá en ningún momento.
NOTA: La función de luz de fondo sólo funciona cuando se introducen pilas nuevas.
Configuración de la melodía de llamada
Cuando la unidad esté colgada o descolgada, presione el botón SET/ST y después, presione el botón
DOWN/- ocho veces. La pantalla mostrará “MELODÍA TIMBRE”. Presione el botón SET/ST y aparecerá
“MELODÍA TIMBRE” en la pantalla. Utilice los botones UP/+ o DOWN/- para seleccionar la melodía de
llamada deseada y presione el botón SET/ST para confirmar.
NOTA: 1~8 son tonos de llamada normales. 9~18 son tonos musicales con acordes. El tono 1 está activado
por defecto
Configurar el modo de marcación
Cuando la unidad esté colgada o descolgada, presione el botón SET/ST y después, presione el botón
DOWN/- siete veces. La pantalla LCD mostrará “MODO MARCACION”. Presione el botón SET/ST y verá
“TONO” parpadeando en la pantalla LCD. Utilice los botones UP/+ o DOWN/- para seleccionar el modo de
marcación a tono o a pulsos. Presione el botón SET/ST para confirmar.
Configuración de prohibición de llamadas desde teléfonos paralelos
Cuando la unidad esté colgada o descolgada, presione el botón SET/ST y después, presione el botón
DOWN/- seis veces. La pantalla LCD mostrará “PARALELO”. Presione el botón SET/ST y verá “PERMITIR”
parpadeando en la pantalla LCD. Utilice los botones UP/+ o DOWN/- para seleccionar “PROHIBIR” o
“PERMITIR”. Presione el botón SET/ST para confirmar.
Cuando seleccione “PERMITIR”, podrá conectar teléfonos paralelos a través de la misma línea de teléfono. Si
selecciona “PROHIBIR”, no podrá conectar teléfonos paralelos a través de la misma línea de teléfono. En el
modo “PROHIBIR”, escuchará un tono “DI-Du” indicando que la configuración está en “PROHIBIR”.
Configuración de número OGM
Esta función aparecerá en el menú, pero no está activada en el SY-1490.
Configuración de anuncio de pre-llamada
Esta función aparecerá en el menú, pero no está activada en el SY-1490.
Configuración de rechazo de llamada
Cuando la unidad esté colgada o descolgada, presione el botón SET/ST y después, presione el botón
DOWN/- tres veces. La LCD mostrará “RECHAZAR”. Presione el botón SET/ST y aparecerá “-“ en la pantalla

15
LCD. Presione los botones UP/+ o DOWN/-para seleccionar la secuencia de 01~05 e introducir el número
rechazado utilizando los botones numéricos. Presione el botón SET/ST para confirmar. Configure otros
números rechazados utilizando el mismo método. Puede utilizar los botones UP/+ o DOWN/- para revisar
los 5 números rechazados que ha seleccionado.
Cuando reciba una llamada de uno de los números rechazados, la unidad no sonará, pero mostrará el número
y colgará la llamada.
NOTA: Si se ha configurado el código PABX y el primer dígito del número de llamada entrante es el mismo
que el PABX y el resto de dígitos es el mismo que uno de los números rechazados, el número entrante
también se verá como número rechazado.
Configuración de la agenda
Cuando la unidad esté colgada o descolgada, presione el botón SET/ST y después presione el botón DOWN/-
dos veces. La pantalla LCD mostrará “ENTRADA AGENDA”. Presione el botón SET/ST y se mostrará
“INTRO NUMERO”. Parpadeará un guión como el siguiente "-". Utilice los botones numéricos para introducir
el número de teléfono. Una vez hecho, presione el botón SET/ST para introducir el nombre utilizando los
botones numéricos. El botón numérico “0” es el botón de espacio. Una vez terminado, presione el botón
SET/ST para confirmar. Utilice el mismo método para introducir nuevos números de teléfono y nombres. Si el
número y el nombre ya existen en la agenda, la pantalla LCD mostrará “YA EXISTE”. Mientras introduce un
número y nombre, utilice los botones UP/+ o DOWN/- para mover el cursor y presione el botón DEL/MUTE
para corregir. Presione el botón BOOK/÷ para salir. La agenda permite un máximo de 99 entradas
.
Edición de la agenda
Cuando la unidad esté colgada o descolgada, presione el botón SET/ST y después, presione el botón
DOWN/- una vez. La pantalla LCD mostrará “EDITAR AGENDA”. Presione el botón SET/ST y la pantalla
mostrará “INTRO PREFIJO”. Introduzca el nombre que desea revisar o introduzca el primer carácter del
nombre. Presione el botón SET/ST y la pantalla LCD mostrará el nombre y número correspondientes. Si no
introduce el carácter del nombre, puede presionar el botón SET/ST directamente, después, presione los
botones UP/+ o DOWN/- para revisar las entradas de la agenda una a una. El modo de edición es el mismo
que el de configuración de la agenda.
NOTA: El alfabeto de los botones numéricos se dispone del siguiente modo:
1 2ABC 3DEF
4GHI 5JKL 6MNO
7PQRS 8TUV 9WXYZ
*/. 0 #/=
USO DE LAS FUNCIONES
Mensaje de ID de llamada
La característica de ID de llamada sólo está disponible si ha suscrito un servicio de Identificación de Línea de
Llamada con su operador de red. Su teléfono puede guardar hasta 80 llamadas entrantes incluyendo
información de fecha/hora en la Lista de Llamadas. El número se mostrará en la pantalla LCD cuando el

16
teléfono suene. Si el número coincide con una de las entradas de su agenda, el nombre del llamante
guardado en la agenda se mostrará junto con el número.
Cuando reciba llamadas nuevas, "NEW" parpadeará en la pantalla. La pantalla mostrará “TOD 000” y “NUE
000” para indicar todas las llamadas recibidas de ID de llamada y de nuevas ID de llamada. Si la llamada
entrante nueva es un número repetido, se mostrará “REP” debajo de “NEW”.
Puede aparecer “NUMERO PRIVADO”, “FUERA DE ÁREA” y “ERROR” en los casos siguientes:
“NUMERO PRIVADO” se mostrará cuando la llamada provenga de un número oculto.
“FUERA DE ÁREA” indica que la llamada proviene de un área donde no se suministra el servicio de ID de
llamada.
“ERROR” representa una señal de entrada incorrecta.
La fecha y hora actual serán actualizadas por la señal de ID de Llamador FSK mientras que la configuración
del año permanece sin cambios. La señal de ID de Llamador DTMF no cambiará la configuración de fecha y
hora, ya que sólo contiene el número de la llamada.
Recibir una llamada
Desde el auricular
1. Descuelgue el auricular y hable a la otra parte.
2. Cuando termine, devuelva el auricular a la base.
Cambiar al altavoz
1. Cuando utilice el auricular, presione el botón
y devuelva el auricular a la base.
2. Cuando termine, vuelva a presionar el botón
.
Desde el altavoz
1. Cuando el teléfono suene, presione el botón
para hablar con el llamante. Para que la otra parte
escuche su voz claramente, hable al altavoz a una distancia de 32 cm o menos.
2. Cuando termine, vuelva a presionar el botón
.
NOTA: Generalmente, los operadores de telecomunicaciones transmiten la ID del llamante entre el primer y
segundo tono. Por tanto, para ver el número, conteste el teléfono tras el segundo tono.
Realizar una llamada
Desde el auricular
1. Descuelgue el auricular.
2. Cuando escuche el tono de llamada, marque el número deseado.
3. La unidad contará la conversación automáticamente tras 6 segundos.
4. Cuando termine, devuelva el auricular a la base.
Desde el altavoz
1. Presione el botón
.
2. Cuando escuche el tono de llamada, marque el número deseado.
3. La unidad contará la conversación automáticamente tras 6 segundos.

17
4. Cuando termine, vuelva a presionar el botón
.
Función de rellamada
1. Descuelgue el auricular o presione el botón
,
2. Presione el botón REDIAL/P para volver a marcar el ultimo número marcado.
Función de pre-llamada
1. Con el teléfono colgado
2. Marque el número deseado, si comete errores, presione el botón DEL/MUTE para editar.
3. Descuelgue el auricular o presione el botón
para marcar el número.
REVISAR NÚMEROS DE LLAMADA ENTRANTE Y SALIENTE
Revisar números de llamadas entrantes
Con el teléfono colgado o descolgado, presione los botones UP/+ o DOWN/- para revisar los numeros de las
llamadas entrantes uno a uno. Tras revisar todos los números entrantes, la pantalla LCD mostrará: ---FIN DE
LISTA---,
Revisar números de llamadas salientes
1. Con el teléfono colgado o descolgado, presione el botón OUT/× para revisar los números de llamadas
salientes y el tiempo de conversación desde la última llamada hasta la primera. Mientras revisa,
presione el botón UP/+ para comprobar las llamadas salientes de por encima.
2. Tras revisar todos los números salientes, la pantalla LCD mostrará: ---FIN DE LISTA---,
3. Si desea borrar un número, presione el botón DEL/MUTE una vez. La pantalla LCD mostrará BORRAR
UNO?. Presione el botón DEL/MUTE otra vez para confirmar y borrar el número. Para borrar todos los
números, mantenga presionado el botón DEL/MUTE durante 3 segundos. La pantalla LCD mostrará
BORRAR TODO? .Presione el botón DEL/MUTE para confirmar y se borrarán todos los números.
VOLVER A LLAMAR A NÚMEROS ENTRANTES Y SALIENTES
Devolver una llamada entrante
1. Con el teléfono colgado, revise los números de llamadas entrantes para encontrar el número deseado.
2. Presione el botón
, el botón BACK/HOLD o descuelgue el auricular, para marcar el número.
3. De lo contrario, presione el botón BACK/HOLD dos veces y se marcará junto con el código de larga
distancia.
4. Si se ha configurado un código PABX anteriormente, y el número es de 7 dígitos o más, se marcará junto
con el código PABX;
5. De lo contrario, presione el botón BACK/HOLD dos veces y se marcará junto con el código PABX, un
tiempo de pausa y el código de larga distancia.
Volver a llamar a números salientes
1. Con el teléfono colgado, revise los números de llamadas salientes para encontrar el número deseado.
2. Presione el botón
, el botón BACK/HOLD o descuelgue el auricular, para marcar el número.

18
3. Si tiene el teléfono descolgado, revise y encuentre un número saliente y presione el botón BACK/HOLD
para marcar el número.
COMPROBAR, MARCAR Y BORRAR DE LA AGENDA
¾ Comprobar entradas de la agenda
1. Con el teléfono colgado, presione el botón
BOOK/÷ y se mostrará “INTRO PREFIJO“. Introduzca el primer
carácter de la entrada de agenda deseada.
2. La agenda mostrará las entradas de agenda correspondientes. Presione los botones UP/+ o DOWN/-
para navegar por las entradas de agenda correspondientes.
3. Mientras la pantalla muestra “INTRO PREFIJO“, también puede presionar los botones UP/+ o DOWN/-
para acceder a las entradas de la agenda.
4. Presione el botón
BOOK/÷ para salir de la opción de lista de agenda.
Marcar un número de la agenda
Mientras revisa y selecciona una entrada de la agenda, presione el botón “
BACK/HOLD”, el botón o
descuelgue el auricular para marcar el número de la agenda.
Borrar entradas de la agenda
Mientras revisa y selecciona una entrada de la agenda, presione el botón “
DEL/MUTE”. La pantalla mostrará
“BORRAR UNO?”. Para confirmar el borrado de la entrada de agenda, vuelva a presionar el botón
“
DEL/MUTE”. Se mostrará el número siguiente.
MEMORIA DE UN TOQUE
Guardar un número en la memoria de un toque
Con el teléfono colgado, marque el número deseado, presione el botón SET/ST y, después, presione el botón
M1 o M2 para guardar el número.
Realizar una llamada desde la memoria de un toque
Tiene 3 opciones para realizar una llamada desde la memoria de un toque:
1. Con el teléfono colgado, presione el botón M1 o M2, se mostrará el número guardado. Presione el botón
“BACK/HOLD” y el teléfono se descolgará para marcar el número automáticamente.
2. Presione el botón
y presione el botón M1 o M2 para marcar el número guardado.
3. Presione el botón M1 o M2 y descuelgue el auricular.
Con el teléfono descolgado, presione el botón M1 o M2, se marcará el número correspondiente.
GUARDAR NÚMEROS ENTRANTES EN LAS MEMORIAS DE AGENDA / UN TOQUE / DOS
TOQUES
Guardar en la agenda
Con el teléfono colgado, mientras revisa una llamada entrante, presione el botón SET/ST. La pantalla
mostrará “MEMORIZAR” en la esquina superior izquierda. Presione el botón “
BOOK/÷” y la pantalla mostrará
“INTRO NÚMERO”. El cursor parpadeará al final del número entrante para indicarle que modifique el número
(si es necesario). Presione el botón “SET/ST” para confirmar el número. El cursor parpadeará en la esquina

19
superior izquierda para permitir la introducción del nombre. Vuelva a presionar el botón “SET/ST” para
confirmar la entrada.
Guardar en la memoria de un toque
También se puede guardar una llamada entrante en el botón de memoria de un toque M1 o M2
Con el teléfono colgado, mientras revisa una llamada entrante, presione el botón “SET/ST”. La pantalla
mostrará “MEMORIZAR” en la esquina superior izquierda. Presione los botones M1 o M2 para guardar el
número donde corresponda.
Guardar en la memoria de dos toques
También puede guardar una llamada entrante en la memoria de dos toques de los botones 1 a 9.
Con el teléfono colgado, mientras revisa una llamada entrante, presione el botón “SET/ST”. La pantalla
mostrará “MEMORIZAR” en la esquina superior izquierda. Presione los botones numéricos para guardar
directamente el número de llamada entrante en los botones numéricos (1 a 9)
Realizar una llamada desde la memoria de dos toques
Existen 4 opciones diferentes para realizar una llamada desde la memoria de dos toques.
1. Con el teléfono colgado, presione el botón “RECALL” y la pantalla mostrará “DESCOLGAR”. Presione el
botón numérico en el que está guardado el número de la memoria. Presione el botón
, el botón
“BACK/HOLD” o descuelgue el auricular, para marcar el número directamente.
2. Con el teléfono colgado, mantenga presionado el botón FLASH durante 3 segundos hasta que se muestre
“DESCOLGAR”. Presione el botón numérico en el que está guardado el número de la memoria. Presione
el botón
, el botón “BACK/HOLD” o descuelgue el auricular, para marcar el número directamente.
3. Con el teléfono descolgado, presione el botón “RECALL” y la pantalla mostrará “DESCOLGAR”.
Presione el botón numérico en el que está guardado el número de la memoria. El número se marcará
directamente.
4. Con el teléfono descolgado, mantenga presionado el botón FLASH durante 3 segundos hasta que se
muestre “DESCOLGAR”. Presione el botón numérico en el que está guardado el número de la memoria.
El número se marcará directamente.
BLOQUEAR EL TELÉFONO
Cuando se gira el botón al punto amarillo: Se bloquearán todos los números.
Cuando se gira el botón al punto verde: Se bloquearán todos los números que comiencen por “0”. (Si el código
PABX está configurado en (0-9), la función de bloqueo de "0" no está permitida)
Cuando se gira el botón al punto rojo: Se activan todos los números.
FUNCIÓN DE SILENCIO
Durante la conversación, puede utilizar la función de silencio en cualquier momento. Presione el botón
“DEL/MUTE” para desactivar el micrófono. Vuelva a presionar el botón “DEL/MUTE” para volver al modo de
conversación normal.

20
FUNCIÓN NO MOLESTAR
1. Con el teléfono colgado, presione el botón “BRI/DND”. La pantalla LCD mostrará SIESTA 00-00
2. Presione los botones UP/+ o DOWN/- para ajustar el tiempo de No molestar (DND) de media en media
hora.
3. Presione el botón BOOK/÷ para confirmar el modo “DND”. Cuando el teléfono vuelva al modo de standby,
la pantalla LCD mostrará el tiempo de “DND” restante.
Por ejemplo, cuando la unidad esté en estado “DND”, la pantalla LCD mostrára SIESTA 02-41. Esto significa
que el tiempo de DND restante es de 2 horas y 41 minutos. Durante el tiempo de DND, no sonarán ni la
unidad ni la alarma.
NOTA: La unidad saldrá del modo DND cuando el tiempo de DND llegue a 00-00. Si aún no ha terminado el
tiempo de DND y desea salir de este modo, tendrá que reiniciar el tiempo de DND a 00-00. Presione el botón
BOOK/÷ para confirmar.
MÚSICA DE ESPERA
La unidad incluye 10 tipos diferentes de música en espera para elegir.
Cuando hable por el auricular, presione el botón “BACK/HOLD” para entrar en la función de modo de música
en espera. El interlocutor escuchará la música de espera seleccionada. Presione los botones UP/+ o DOWN/
- para seleccionar el tono de música en espera. Mientras está en modo de espera:
1. Presione el botón “BACK/HOLD” para salir del modo de música en espera y continuar hablando por el
auricular.
2. O vuelva a colocar el auricular en la base para entrar en el modo de manos libres.
Nota: Cuando hable por el manos libres, presione el botón “BACK/HOLD” para entrar en el modo de espera
y se escuchará la música de espera. Presione los botones UP/+ o DOWN/- para seleccionar la música en
espera.
1. Descuelgue el teléfono para hablar,
2. O presione el botón “BACK/HOLD” o el botón
para salir del modo de espera y hablar por el manos
libres.
CONTROL DE VOLUMEN DE LLAMADA
Con el teléfono colgado, presione el botón “VOLUMEN” para ajustar el volumen de la melodía del timbre de
llamada. La unidad incluye 3 niveles de volumen.
CONTROL DEL VOLUMEN DEL MANOS LIBRES
Cuando esté en el modo de manos libres, presione el botón “VOLUMEN” para ajustar el volumen del manos
libres. La unidad incluye 4 niveles de volumen.
FUNCIÓN DE PARPADEO
La función de Parpadeo le permite acceder a diferentes servicios operados por su proveedor. Podrá poner

21
una llamada en espera, transferir una llamada o utilizar la opción de contestador automático. El tiempo de
parpadeo suele se de 100ms, valor válido para España.
FUNCIÓN DE PAUSA
Cuando marque, presione el botón REDIAL/P para introducir un tiempo de pausa de 1,0~4,0s.
COMPROBACIÓN DE REGISTRO DE TEMPERATURA
Con el teléfono colgado, mantenga presionado el botón CAL/℃ durante 3 segundos. La pantalla LCD
mostrará el valor de temperatura más alto y más bajo para el día actual. Presione los botones UP/+ y DOWN/-
para comprobar el registro de temperatura de los últimos 30 días.
FUNCIÓN DE CALCULADORA
Con el teléfono colgado, presione el botón CAL/℃. La pantalla LCD mostrará “0” y la unidad entrará en el
modo de calculadora. Se pueden utilizar las siguientes funciones “+, -, ×, ÷”. En el modo de calculadora,
utilice los botones UP/+, DOWN/-, OUT/× y BOOK/÷ para realizar la función deseada. Presione el botón */.
Para utilizar decimales y el botón #/= para conocer el resultado. Presione el botón SET/ST para limpiar.
Presione el botón DEL/MUTE para borrar las entradas incorrectas una a una.
Ej.1 (10+26) ÷2
1 Con el teléfono colgado o descolgado, presione el botón CAL/℃.
2 Presione los botones (1, 0, +, 2, 6), ÷, 2, #/=
3 Presione el botón CAL/℃ para salir.
Ej.2 0.5 × 0.6-1
1 Con el teléfono colgado o descolgado, presione el botón CAL/℃.
2 Presione los botones 0, */., 5, ×, 0, */., 6, -, 1, #/=
3 Presione el botón CAL/℃ para salir.

22
RESOLUCIÓN DE PROBLEMAS
Problema Comprobar Solución
Sin recepción
de llamadas
entrantes
Compruebe si el auricular
está bien colocado en la
base.
Compruebe la línea de
teléfono.
Conecte las líneas del cable
adecuadamente. Contacte con su
operador.
No se pueden
realizar
llamadas
salientes
Compruebe si el modo P/T
está bien configurado
Compruebe si el bloqueo
está en posición Verde o
Amarilla.
Compruebe el modo de marcación
correcto, Pulso o Tono.
Gire el Bloqueo a la posición ROJA.
Problemas con
las pilas
Compruebe que las pilas no
están gastadas, oxidadas o
con fugas.
Cambie las pilas.
Limpie el compartimento para pilas en
caso de fuga.
La luz de la
pantalla LCD es
muy tenue
Compruebe si el contraste
de la pantalla LCD está bien
configurado o si el nivel de
las pilas es bajo.
Ajuste el contraste de la pantalla LCD,
si la pantalla LCD sigue tenue, cambie
las pilas.
El teléfono no
suena.
Compruebe si la unidad
está en modo DND.
Reinicie el tiempo de DND a 00-00
NOTA: Debido al continuo desarrollo del producto, todas las características y especificaciones están sujetas a
cambios sin notificación previa.

23
DECLARACIÓN DE CONFORMIDAD
SATYATRADE S.L Representante:
Polígono Industrial "La Raya". Ajeet Nebhwani Utamchandani
P.A.E. II Único Administrador
CAMARMA DE ESTERUELAS
28816,- Madrid, España
Nº Fiscal: B 83254763
Tel: 91 886 53 21
Fax: 91 886 42 85
Declaramos bajo nuestra única responsabilidad la conformidad del producto:
Teléfono de la marca SYTECH, modelo SY-1490, fabricado por la empresa SATYATRADE S.L.
en China al que se refiere la presente declaración, con los estándares y otros documentos
normativos:
- EN 55022: 2006.
- EN 55024: 1998+A1:2001+A2:2003
- EN 60950-1:2006
según las provisiones de la
- Directiva 2004/108/EC del Parlamento Europeo y del Consejo del 15 de diciembre de 2004,
transpuesta a la legislación española mediante Real Decreto 1580/2006 de 22 de diciembre de
2007, y,
- Directiva del Consejo 73/23/CEE de 19 de febrero de 1973, transpuesta a la legislación
española mediante Real Decreto 7/1988 de 8 de enero y Real Decreto 154/1995 de 3 de
febrero, incluido con las modificaciones subsecuentes en la Directiva 2006/95/EC del
Parlamento Europeo y del Consejo de 12 de diciembre de 2006.
En Camarma de Esteruelas, Madrid, España, el 30 de septiembre de 2010.
Firmado: Ajeet Nebhwani Utamchandani
Único Administrador
-
 1
1
-
 2
2
-
 3
3
-
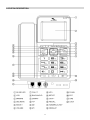 4
4
-
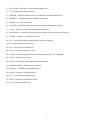 5
5
-
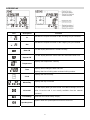 6
6
-
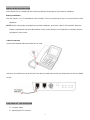 7
7
-
 8
8
-
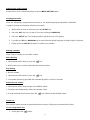 9
9
-
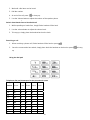 10
10
-
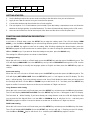 11
11
-
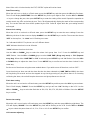 12
12
-
 13
13
-
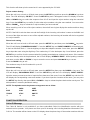 14
14
-
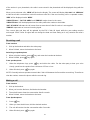 15
15
-
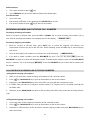 16
16
-
 17
17
-
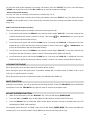 18
18
-
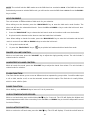 19
19
-
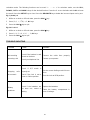 20
20
-
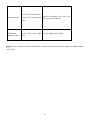 21
21
-
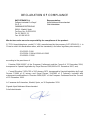 22
22
-
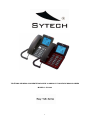 23
23
-
 24
24
-
 25
25
-
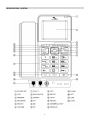 26
26
-
 27
27
-
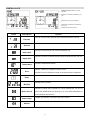 28
28
-
 29
29
-
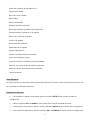 30
30
-
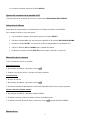 31
31
-
 32
32
-
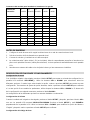 33
33
-
 34
34
-
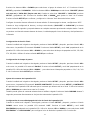 35
35
-
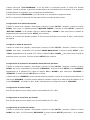 36
36
-
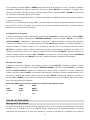 37
37
-
 38
38
-
 39
39
-
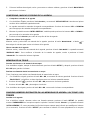 40
40
-
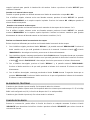 41
41
-
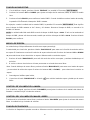 42
42
-
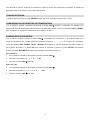 43
43
-
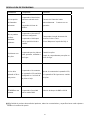 44
44
-
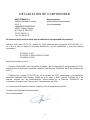 45
45


Sytech SY1490N El manual del propietario
- Categoría
- Microteléfonos
- Tipo
- El manual del propietario
- Este manual también es adecuado para
en otros idiomas
- English: Sytech SY1490N Owner's manual
Artículos relacionados
Otros documentos
-
Daewoo DTC-21 V1 Manual de usuario
-
Amplicomms BigTel 280 Manual de usuario
-
 BigTel 200 Manual de usuario
-
LG G7050 Manual de usuario
-
LG G5500 Manual de usuario
-
RCA 25250 Manual de usuario
-
-
-
Amplicomms PowerTel 2880 Manual de usuario
-
