Conair GS59 El manual del propietario
- Categoría
- Limpiadores a vapor de ropa
- Tipo
- El manual del propietario
Este manual también es adecuado para

21. Never steam clothes you, or someone else,
are wearing.
22. When emitting steam, this appliance may
cause burns if it is used too close to the skin
or eyes, or if it is used incorrectly. To reduce
the risk of contact with hot water emitting from
the steam vents, test appliance before use by
holding it away from the body.
SAVE THESE
INSTRUCTIONS
IMPORTANT SAFETY
INSTRUCTIONS
When using electric appliances, especially when
children are present, basic safety precautions
should always be taken, including the following:
READ ALL INSTRUCTIONS
BEFORE USING
DANGER – Any appliance is electrically
live even when the switch is off.
To reduce the risk of death by electric shock:
1. Always unplug appliance immediately
after use and before cleaning.
2. Do not place or store appliance where it can
fall or be pulled into a tub or sink.
3. Do not place in, or drop into water or
other liquids.
4. Do not reach for an appliance that has fallen
into water. Unplug immediately.
5. Use only in a dry area.
WARNING – To reduce the risk of
burns, electrocution, fire, or injury to persons:
1. This appliance should never be left
unattended when plugged in.
2. This appliance is not a toy and is not to be
used by children.
3. Close supervision is necessary when this
appliance is used near children or individuals
with certain disabilities. Unsupervised use could
result in fire or personal injury.
4. Use this appliance only for its intended
use as described in this manual. Do not
use attachments not recommended by the
manufacturer.
5. Rest the appliance on a stable surface when
placing on its base.
6. Never operate this appliance if it has a
damaged cord or plug, if it is not working
properly, if it has been dropped or damaged,
or dropped into water. Do not attempt to
repair the appliance. Incorrect reassembly
or repair could cause a risk of fire, electric
shock, or injury to persons when the
appliance is used. Return the appliance to
an authorized service center for examination
and repair.
7. Keep the cord away from heated surfaces.
Do not allow cord to contact heated surfaces.
Do not pull or twist cord. Let appliance cool
completely before putting away. Loop cord
loosely around appliance when storing.
8. To reduce the risk of electric shock, this
appliance has a polarized plug (one blade is
wider than the other). As a safety feature, this
plug will fit in a polarized outlet only one way. If
the plug does not fit fully in the outlet, reverse
the plug. If it still does not fit, contact a qualified
electrician. Do not attempt to defeat this safety
feature.
9. Never drop or insert any object into
any opening.
10. Do not use outdoors or operate where
aerosol (spray) products are being used or
where oxygen is being administered.
11. If an extension cord is absolutely necessary,
a 15 ampere-rated cord should be used. Cords
rated for less amperage may overheat. Care
should be taken to arrange the cord so that the
cord cannot be pulled or tripped over.
12. Surfaces of this appliance are hot when
in use. Do not let heated surfaces touch eyes
or skin.
13. Do not place the steam nozzle directly on
any surface or on the appliance power cord
while it is hot or plugged in.
14. Unplug this appliance before filling or
emptying the water container and when not in
use.
15. Do not operate steamer without properly
filling the water container with distilled water.
16. Never yank cord to disconnect from
outlet; instead, grasp plug and pull
to disconnect.
17. Burns could occur from touching hot parts,
hot water, or steam. Use care when removing
water reservoir or when you turn a steam
appliance upside down – there may be hot
water in reservoir. Always position steamer
with head away from you and any other person
when turning on.
18. Do not hold hand in front of steam.
19. To reduce likelihood of circuit overload, do
not operate another high-wattage appliance on
the same circuit.
20. Use caution when installing or removing
an attachment as it may contain hot water
from condensation. Ensure that the unit is off,
attachment is dry or cooled off to avoid contact
with hot water.
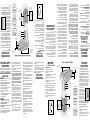
GETTING TO KNOW YOUR STEAMER
Setting button
Steam nozzles
Steam button
Water reservoir
release switch
Easy-to-fill
water reservoir
Built-in creaser clip
with garment guides
3-in-1 Attachment
Silicone Band
Pulls fabric taut for
easier steaming.
Bristle Brush
Loosens fibers for better
steam penetration.
Delicate Fabric
Spacer
Helps protect delicate
fabric and trims.
IMPORTANT
FOR HOUSEHOLD USE ONLY
FILLING INSTRUCTIONS
1. Make sure the unit is unplugged.
2. Stand the unit on a table and grasp
with one hand.
3. With other hand, move the release switch up
toward the STEAM button.
4. Pull the reservoir out, away from the steamer
body.
5. The rubber inlet cover is located on the top
of the water reservoir.
6. Open the inlet cover and fill the reservoir with
distilled water (which can be found in grocery
stores).
We recommend that you use distilled water
only, as this will prevent mineral deposits in the
boiler that can reduce performance or clog the
water system.
7. Close the inlet cover and return the reservoir
to its place, making sure that it snaps in place
and is secure.
Rubber Inlet Cover
ON/OFF
button and 9 ft.
power cord
Ready light - Blue
Ceramic-coated
soleplate
Steam setting indicator lights
OPERATING
INSTRUCTIONS
1. Fill water reservoir with distilled water.
2. Plug the unit into the electrical outlet.
3. Press the ON/OFF button to turn steamer ON.
4. The blue READY light will illuminate and
begin blinking. Allow 40 seconds for the unit to
warm up. The appliance is ready to use when
the READY light stops blinking and remains
solid. NOTE: Before first use or when the unit
has not been used for a long period of time, it
will be necessary to prime (i.e., fill with water)
the internal tank while the steamer prepares
to steam. You may hear a small tapping noise
during the heat-up process; this is normal.
5. Your steamer has 5
steam settings. Press the
SETTING button repeatedly
until you reach your desired
setting. One red light
indicates the minimum
steam rate for use on
delicate fabrics, while 5
red lights indicate TURBO
BOOST setting for use on
thicker fabrics and heavily wrinkled articles.
Always have the steam facing away from
you or anyone else in the room.
6. Press STEAM button to release the flow of
steam.
7. To stop the flow of steam, depress the
STEAM button.
8. When first using the device, test on an old
cloth, as there may be sediment left from the
manufacturing process or transportation.
18. No ponga la mano frente al vapor.
19. Para evitar las sobrecargas eléctricas, no
conecte otro aparato de alta potencia al mismo
circuito eléctrico.
20. Tenga cuidado al instalar/sacar accesorios,
puesto que pueden estar calientes o contener
agua caliente. Cerciórese de que el aparato está
apagado y de que los accesorios están secos y
fríos antes de manipularlos.
21. Nunca use el aparato en prendas que usted
o alguien lleven puestas.
22. El vapor que sale de la boquilla durante el
uso puede causar quemaduras si usa la unidad
muy cerca de la piel, del cuero cabelludo o
de los ojos, o si la usa en forma incorrecta.
Para reducir el riesgo de quemaduras, pruebe
el vapor lejos de su cuerpo antes de usar el
aparato.
GUARDE ESTAS
INSTRUCCIONES
MEDIDAS DE
SEGURIDAD
IMPORTANTES
Al usar aparatos eléctricos, especialmente
en presencia de niños, siempre debe tomar
precauciones básicas de seguridad, entre ellas
las siguientes:
LEA TODAS LAS
INSTRUCCIONES
ANTES DE USARLO
PELIGRO – Cualquier aparato
enchufado permanece bajo tensión, aunque
esté apagado.
Para reducir el riesgo de electrocución:
1. Siempre desenchufe el aparato
inmediatamente después del uso y antes
de limpiarlo.
2. No coloque ni guarde el aparato donde pueda
caerse o ser empujado a una bañera o un
lavabo.
3. No coloque el aparato ni lo deje caer al agua
u otro líquido.
4. No trate de alcanzar el aparato después
de que se haya caído al agua; desenchúfelo
inmediatamente.
5. Utilícelo solamente en un lugar seco.
ADVERTENCIA – Para reducir el
riesgo de quemaduras, electrocución, incendio
o heridas:
1. Nunca descuide/deje el aparato sin
vigilancia mientras está conectado.
2. Este aparato no es un juguete; no debe
ser usado por niños.
3. Supervise el uso de este aparato
cuidadosamente cuando sea usado cerca de
niños o personas con ciertas discapacidades.
El uso sin supervisión de este aparato puede
causar un incendio o una herida.
4. Utilice este aparato únicamente con el
propósito para el cual fue diseñado y solamente
según las instrucciones. Solo use accesorios
recomendados por el fabricante.
5. Ponga la base del aparato sobre una
superficie llana y segura.
6. No utilice este aparato si el cable o el
enchufe están dañados, si no funciona
correctamente, si está dañado, o después
de que se haya caído, incluso en el agua;
No intente reparar el aparato. El ensamblar
las partes de manera incorrecta aumenta
los riesgos de incendio, descarga eléctrica
y heridas. regréselo a un centro de servicio
autorizado para su revisión y reparación.
7. Mantenga el cable alejado de superficies
calientes. No permita que el cable tenga
contacto con superficies calientes. No jale ni
retuerza el cable. Permita que el aparato se
enfríe completamente antes de guardarlo.
Enrolle el cable sin apretar alrededor del
aparato para guardarlo.
8. Para reducir el riesgo de descarga eléctrica,
el cable de este aparato está dotado de un
enchufe polarizado (una pata es más ancha
que la otra). Como medida de seguridad, se
podrá enchufar de una sola manera en la
toma de corriente polarizada. Si no entra en
la toma de corriente, inviértalo. Si aun así no
entra completamente, comuníquese con un
electricista. No intente ir en contra de esta
función de seguridad.
9. Nunca deje caer ni inserte ningún objeto en
ninguna de las aberturas.
10. No utilice el aparato en exteriores, ni
lo haga funcionar donde se estén usando
productos en aerosol (spray) o donde se esté
administrando oxígeno.
11. Si debe usar el aparato con una extensión,
utilice una extensión de 15 amperios. Una
extensión de menor amperaje podría calentar
excesivamente. Coloque la extensión de manera
que nadie la pueda jalar o tropezar con ella.
12. Las superficies de este aparato se ponen
muy calientes durante el uso; mantenga los ojos
y la piel alejados de las superficies calientes.
13. No coloque la boquilla sobre ninguna
superficie mientras está caliente o mientras el
aparato está conectado, y manténgala alejada
del cable eléctrico.
14. Siempre desenchufe el aparato antes de
llenar o vaciar el depósito de agua, y cuando
no lo usa.
15. Siempre llene el depósito de agua con agua
destilada antes de encender el aparato.
16. Nunca jale el cable para desconectar el
aparato; agárrelo por la clavija.
17. Las piezas calientes, el agua caliente y
el vapor pueden causar quemaduras. Tenga
cuidado al vaciar el depósito de agua o al
voltear el aparato, puesto que el depósito
puede contener agua caliente. Siempre oriente
la boquilla de tal manera que el vapor no esté
dirigido a nadie, incluso al encender el aparato.
FAMILIARÍCESE CON SU VAPORIZADOR DE PRENDAS
Botón SETTING
Boquillas de
vaporización
Botón STEAM
Botón de liberación
del depósito de agua
Depósito de agua
fácil de llenar
Accesorio integrado
para pliegues con
guías para las
prendas
Accesorio 3 en 1
Accesorio con
tira de silicona
Estira la tela para un
desarrugado más fácil.
Cepillo duro
Suelta las fibras para
una mejor penetración
del vapor.
Separador para
telas delicadas
Ayuda a proteger las
telas delicadas y los
apliques/bordados/
adornos.
IMPORTANTE
PARA USO DOMÉSTICO
SOLAMENTE
LLENADO DEL DEPÓSITO
1. Cerciórese de que el aparato está
desenchufado.
2. Coloque la unidad sobre una mesa y agárrela
con una mano.
3. Con la otra mano, deslice el botón de
liberación del depósito de agua hacia el botón
STEAM.
4. Saque el depósito de agua.
5. Localice el tapón de caucho ubicado arriba
del depósito de agua.
6. Abra el tapón de caucho y llene el depósito
con agua destilada (disponible en la mayoría de
los supermercados).
Nota: a fin de evitar los depósitos minerales,
los cuales pueden perjudicar el rendimiento
del aparato o tapar el sistema de vaporización,
le aconsejamos que use agua destilada
solamente.
7. Cierre el tapón y vuelva a instalar el depósito
de manera segura.
Cubierta del tapón
de caucho
Botón de
encendido/apagado
y cable de 2.75 m
Luz de listo (azul)
Indicadores luminosos
INSTRUCCIONES
DE OPERACIÓN
1. Llene el depósito de agua con agua
destilada.
2. Enchufe el aparato en una toma de corriente.
3. Oprima el botón de encendido/apagado para
encender el aparato.
4. La luz azul “READY” se encenderá y
empezará a parpadear. Permita que la unidad
se caliente por 40 segundos. El aparato está
listo cuando la luz “READY” deja de parpadear y
permanece encendida. NOTA: antes del primer
uso o cuando la unidad no haya sido usada
por un tiempo prolongado, el depósito interno
se cebará (se llenará con agua) durante el
calentamiento. Escuchará un pequeño golpeteo;
esto es normal.
5. Su vaporizador de
prendas tiene 5 ajustes
de vaporización. Oprima
repetidamente el botón
SETTING para elegir el nivel
de vaporización deseado.
Una luz roja corresponde
al nivel de vaporización
mínimo, para uso en telas
delicadas, mientras 5 luces
rojas corresponden a la función “turbo” para
uso en telas gruesas y artículos arrugados.
Siempre oriente la boquilla de tal manera
que el vapor no esté dirigido a nadie.
6. Oprima el botón STEAM para producir vapor.
7. Suelte el botón STEAM para detener el flujo
de vapor.
Suela con revestimiento
de cerámica

7. When steaming, always keep the unit in
motion. Do not continuously hold steamer over
an area or touch steamer jets directly to fabric
for more than a few seconds, as this can cause
damage, including shrinkage, melting, or color
shift on certain types of material.
8. In the case of heavier, durable fabrics such
as wool coats or bedding, the TURBO BOOST
setting (5 red indicator lights) and slower
passes with the steamer may be necessary
to achieve desired results. As always, start by
testing on an inconspicuous area of the item to
be steamed, using the regular Steam setting to
ensure fabric can tolerate the effects of steam,
and adjust your technique as needed to obtain
the results desired.
LIMITED ONE-YEAR WARRANTY
(U.S. AND CANADA ONLY)
Conair will repair or replace (at our option)
your unit free of charge for 12 months from the
date of purchase if the appliance is defective in
workmanship or materials.
To obtain service under this warranty, return the
defective product to either service center listed
below, together with your purchase receipt and
$12.00 for postage and handling.
California residents need only provide proof of
purchase and should call 1-800-3-CONAIR
for shipping instructions. In the absence of a
purchase receipt, the warranty period shall be
12 months from the date of manufacture.
ANY IMPLIED WARRANTIES, INCLUDING BUT
NOT LIMITED TO THE IMPLIED WARRANTY
OF MERCHANTABILITY AND FITNESS FOR A
PARTICULAR PURPOSE, SHALL BE LIMITED IN
DURATION TO THE 12-MONTH DURATION OF
THIS WRITTEN, LIMITED WARRANTY. Some
states do not allow limitations on how long an
implied warranty lasts, so the above limitations
may not apply to you.
IN NO EVENT SHALL CONAIR BE LIABLE
FOR ANY SPECIAL, INCIDENTAL, OR
CONSEQUENTIAL DAMAGES FOR BREACH OF
THIS OR ANY OTHER WARRANTY, EXPRESS
OR IMPLIED, WHATSOEVER. Some states do
not allow the exclusion or limitation of special,
incidental, or consequential damages, so the
above limitation may not apply to you. This
warranty gives you specific legal rights, and you
may also have other rights, which vary from
state to state.
18PA053085
IB-15663A
Service Centers
Conair Corporation Conair Corporation
Service Department Service Department
150 Milford Road 7475 N. Glen Harbor Blvd.
East Windsor, NJ 08520 Glendale, AZ 85307
For information on any Conair product, call
1-800-3-CONAIR or visit us on the web at
www.conair.com
Please register this product at
www.conair.com/registration
©2019 Conair Corporation
East Windsor, NJ 08520
Glendale, AZ 85307
Made in China
All GS59 Models
9. Press ON/OFF button to turn unit OFF.
10. Unplug the device when it is not in use.
USING CREASER
This garment steamer has
a built-in creaser on the top
of the unit. To use, slide
garment under the clip and
align edge with the pattern
as marked on the creaser.
Press the STEAM button
and steam will issue from
the port on the top of the
unit. Slide the steamer along
the edge of the garment to
create a sharp crease. NOTE:
Steam will continue to emit
from the steam nozzle on the front of the unit
during creaser use.
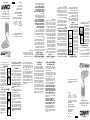
USING 3-IN-1 ATTACHMENT
With the garment steamer
off and cool, snap the
Silicone Band attachment
(Fig. 1) over the steam
head, ensuring it is firmly
affixed. At this point the
Silicone Band can be used
or you can choose to affix
either the Bristle Brush (Fig.
2) or Delicate Fabric Spacer
(Fig. 3) inserts into the
channel on the top of the
Silicone Band attachment
as desired. NOTE: Only
one function of the 3-In-1
attachment can be used at
a time.
Instruction Booklet
For your safety and continued enjoyment
of this product, always read the instruction
book carefully before using.
CAUTION: Use extreme care when changing
the attachments after the unit has been in
use, as the steam head will continue to be
hot.
STEAMING TIPS
1. First, test unit on an inconspicuous area of
the item to be steamed using the lowest Steam
setting to ensure fabric can tolerate the effects
of steam. If there is no evidence of damage, you
can proceed to use the steamer on that item.
2. To prepare your fabric for steaming, brush it
with the brush attachment. This will loosen the
fibers and allow better steam penetration.
3. Hang your garment or fabric. NOTE: Avoid
using metal clothes hangers, if possible.
CAUTION: If hanging garment on a door while
steaming, be careful not to damage the door
with steam.
4. Pass the steam jets just above the fabric
where the wrinkles are. It may take a few passes
to remove the wrinkles completely.
5. For heavier fabrics or severely wrinkled
fabrics, you may position the steamer head
directly on the fabric for a few seconds to
remove wrinkles. Be cautious when working with
delicate fabrics.
6. After use, turn unit OFF by depressing the
STEAM button. Then press the ON/OFF button
to the OFF position. With dry hands, unplug your
garment steamer from the outlet. Empty any
remaining water from the tank to avoid leakage.
BE SURE TO PRESS THE ON/OFF BUTTON TO
THE OFF POSITION PRIOR TO UNPLUGGING
THE UNIT.
EXTREME
STEAM
®
Fig. 1
Fig. 3
Fig. 2
HANDHELD FABRIC STEAMER
TO KILL BEDBUGS
OR DUST MITES
Steam is a contact killer that can kill dust
mites, bedbugs and eggs. It must hit bugs
directly. When steaming to kill bedbugs, areas
to concentrate on are seams, edges, and folds
in the fabric. Direct the steamer nozzle about
half of an inch from the fabric to be steamed.
Hold the steamer head at a minor angle up off
of the surface. Do not hold flush against the
surface. Move at about an inch per second and
steam the entire area that is infested. Check
the surface behind the steamed section after
steaming. The surface should be warm to
the touch. If it’s cool, you’re moving too fast.
Move the steamer head from top to bottom of
the object you’re steaming. (Steam rises!) Be
cautious of surfaces that you can’t steam, such
as finishes on furniture, leather, certain paints.
Test on an inconspicuous area before steaming
the entire object. Please note: You may have to
repeat the process for best results.
Due to continuing product improvements, the
actual product purchased may differ slightly
from the one shown.
Debido a las mejoras continuas en nuestros
productos, el producto comprado puede diferir
ligeramente del producto ilustrado.
PRECAUCIÓN: si cuelga las prendas atrás
de una puerta para desarrugarlas, tenga
cuidado de no dañar la puerta con el vapor.
4. Pase la boquilla lentamente por encima de
las arrugas. Puede que sea necesario dar varias
pasadas para desarrugar completamente la
tela.
5. Para desarrugar las telas gruesas o muy
arrugadas, deje la boquilla por unos segundos
directamente contra la tela. Nota: tenga cuidado
al desarrugar telas delicadas.
6. Después del uso, suelte el botón STEAM
para detener el flujo de vapor. Luego, presione
el botón de encendido/apagado para apagar
el aparato. Con las manos secas, desenchufe
el aparato de la toma de corriente. Vacíe el
depósito de agua para evitar las pérdidas.
CERCIÓRESE DE APAGAR LA UNIDAD,
PRESIONANDO EL BOTÓN DE ENCENDIDO/
APAGADO, ANTES DE DESENCHUFAR LA
UNIDAD.
7. Mueva constantemente la unidad durante el
uso. No sostenga la unidad en el mismo sitio
por un tiempo prolongado y no permita que la
boquilla haga contacto con la tela; esto podría
encoger, desteñir o derretir algunos tipos de
material.
8. Al desarrugar telas gruesas tales como
abrigos de lana o sábanas de algodón pesado,
puede que sea necesario usar la función
“turbo” (5 luces rojas) y usar pasadas más
lentas para conseguir los resultados deseados.
Como siempre, haga una prueba preliminar en
un área discreta de la tela, usando la función
“STEAM”, para cerciorarse de que la tela
soporta el vapor.
PARA MATAR LAS CHINCHES
Y LOS ÁCAROS
El vapor caliente puede matar por contacto los
ácaros, las chinches y sus huevos, siempre
que haga contacto directo con ellos. Al aplicar
vapor en una tela para matar chinches,
concentre el vapor hacia las costuras, los
bordes y los pliegues. Coloque la boquilla
a aproximadamente ½ pulgada (1.5 cm)
de la tela. Sostenga el vaporizador en un
leve ángulo. no lo sostenga directamente
contra la superficie. Trate con vapor toda
el área infestado, moviendo el vaporizador
aproximadamente 1 pulgada (2.5 cm) por
segundo. Toque la parte de atrás de la tela
después de haber aplicado vapor; debería estar
ligeramente caliente. Si no lo está, esto significa
que está moviendo el vaporizador demasiado
rápido. Siempre mueva el vaporizador desde
arriba hasta abajo, ya que el vapor sube. Tenga
un cuidado especial con las superficies que
puedan ser sensibles al vapor, tales como el
acabado de los muebles, el cuero y algunas
pinturas. Pruebe el vapor en un área discreta
antes de vaporizar el objeto entero. Nota: puede
que tenga que repetir el proceso para obtener
resultados óptimos.
18PA053085
IB-15663A
Centros de servicio
Conair Corporation Conair Corporation
Service Department Service Department
150 Milford Road 7475 N. Glen Harbor Blvd.
East Windsor, NJ 08520 Glendale, AZ 85307
Para más información sobre los productos
Conair, llame al 1-800-3-CONAIR o visítenos en
www.conair.com
Para registrar su producto, visítenos en:
www.conair.com/registration
©2019 Conair Corporation
East Windsor, NJ 08520
Glendale, AZ 85307
Hecho en China
Modelos GS59
8. Antes del primer uso, haga una prueba
en un trapo para eliminar el polvo y otros
residuos acumulados durante la fabricación y el
transporte.
9. Oprima el botón de encendido/apagado para
apagar el aparato.
10. Desenchufe la unidad cuando no está en uso.
MODO DE EMPLEO DEL
ACCESORIO PARA PLIEGUES
Su vaporizador de prendas
cuenta con un accesorio
para pliegues integrado.
Para usarlo, deslice la
prenda por debajo del clip,
alineando el borde con el
estampado según se indica
en la unidad. Presione el
botón STEAM; el vapor
saldrá por el puerto arriba
de la unidad. Deslice el
vaporizador a lo largo del
borde de la prenda para
crear un pliegue preciso. NOTA: durante este
proceso, el vapor seguirá saliendo por la
boquilla.
Manual de instrucciones
Para su seguridad y para disfrutar
plenamente de este producto,
siempre lea cuidadosamente las
instrucciones antes de usarlo.
MODO DE EMPLEO DEL
ACCESORIO 3 EN 1
Primero, cerciórese
de que el aparato está
apagado y frío. Instale el
cepillo con tira de silicona
sobre la boquilla (Fig. 1),
cerciorándose de que está
firmemente sujetado. Puede
usar el cepillo con tira de
silicona solo o instalar
por encima el cepillo duro
(Fig. 2) o el separador para
tejidos delicados (Fig. 3),
introduciendo el accesorio
deseado en la ranura arriba
del cepillo con tira de
silicona. NOTA: solamente
puede usar una función del
accesorio 3 en 1 a la vez.
PRECAUCIÓN: tenga sumo cuidado al
cambiar los accesorios durante el uso, ya
que la boquilla estará muy caliente.
CONSEJOS
1. Haga una prueba en un área discreta de la
tela antes de desarrugar la prenda, usando el
nivel de vaporización más bajo, para asegurarse
de que la tela soporta el vapor. En caso de
daño, NO utilice el vaporizador.
2. Cepille las prendas con el cepillo antes de
desarrugarlas; esto soltará las fibras del tejido
para una mejor penetración del vapor.
3. Cuelgue la prenda o la tela. NOTA: evite, en
lo posible, usar perchas/ganchos de metal.
EXTREME
STEAM
®
Fig. 1
Fig. 3
Fig. 2
VAPORIZADOR DE PRENDAS PORTÁTIL
GARANTÍA LIMITADA DE UN AÑO
(VÁLIDA EN LOS EE.UU. Y EN
CANADÁ SOLAMENTE)
Conair reparará o remplazará (a su opción) este
producto sin cargo por un período de 12 meses
a partir de la fecha de compra si resulta ser
defectuoso en materiales o mano de obra.
Para obtener servicio técnico bajo esta garantía,
regrese el producto defectuoso al Centro de
Servicio indicado a continuación, junto con su
recibo de compra y un cheque o giro postal de
US$12.00 para cubrir los gastos de manejo y
envío.
Los residentes de California solo necesitan
dar una prueba de compra y deben llamar al
1-800-3-CONAIR para recibir instrucciones de
envío. En ausencia del recibo de compra, el
período de garantía será de 12 meses a partir
de la fecha de fabricación.
CUALQUIER GARANTÍA, OBLIGACIÓN
O RESPONSABILIDAD IMPLÍCITAS,
INCLUYENDO, PERO NO LIMITADAS, A LA
GARANTÍA IMPLÍCITA DE COMERCIABILIDAD
Y APTITUD PARA UN PROPÓSITO ESPECÍFICO,
ESTARÁN LIMITADAS POR LOS 12 MESES DE
LA PRESENTE GARANTÍA ESCRITA. Algunos
Estados no permiten limitaciones sobre la
duración de una garantía implícita, de modo
que las limitaciones mencionadas pueden no
regir para usted.
CONAIR NO SERÁ RESPONSABLE, EN NINGÚN
CASO, POR NINGÚN DAÑO ESPECIAL,
INCIDENTAL O CONSECUENTE DEBIDO AL
INCUMPLIMIENTO DE ESTA O CUALQUIER
OTRA GARANTÍA, EXPRESA O IMPLÍCITA.
Algunos Estados no permiten la exclusión o
limitación de daños especiales, incidentales o
consecuentes, de modo que las limitaciones
mencionadas pueden no regir para usted. Esta
garantía le otorga derechos legales específicos
y usted puede tener otros derechos que varían
de un Estado a otro.
-
 1
1
-
 2
2


Conair GS59 El manual del propietario
- Categoría
- Limpiadores a vapor de ropa
- Tipo
- El manual del propietario
- Este manual también es adecuado para
en otros idiomas
- English: Conair GS59 Owner's manual
Artículos relacionados
-
Conair GS39 Manual de usuario
-
Conair GS32 Manual de usuario
-
-
-
-
-
-
Conair GS15RN Manual de usuario
-
-