Alto Clarke Summit Parts And Service Manual
- Categoría
- Aspiradoras
- Tipo
- Parts And Service Manual
Este manual también es adecuado para

Summit
Wet/Dry Vacuum
Section II
Parts and Service Manual
(78495B)
Order Parts Here:
www.ivie-ent.com/parts
Ph:(918)254-5161

Page -18- CLARKE TECHNOLOGY Summit Operator's Manual
CLARKE TECHNOLOGY
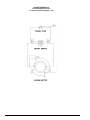
Summit Wet/Dry Vacuum
115 Volt Connection Diagram 1/98

Page -19-
CLARKE TECHNOLOGY Summit Operator's Manual
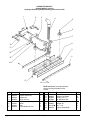
CLARKE TECHNOLOGY
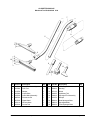
Wand and Tool Kit #16414A 8-94
Ref. Part No. Description Qty
1 19200A Carpet Tool Assembly 1
2 39200A Floor Tool 1
3 31207A Bumper 1
4 38500A Carpet Shoe 1
5 19501A Lower Wand Assembly 1
6 636706 Disconnect Pin 1
7 68701A Upper Wand 1
8 674114 Vacuum Hose 1
9 39201A Crevice Tool 1
Ref. Part No. Description Qty
10 19203A 3" Dusting Tool 1
11 35206A Housing 1
12 60713A Bristle 1
13 39202B Upholstery Tool 1
14 19202A Squeegee Tool Assembly 1
15 31207A Bumper 1
16 38503A Rear Squeegee Shoe 1
17 30901A Squeegee Blade 1
18 38502A Front Squeegee Shoe 1
7
8
5
1
2
3
4
6
14
2
15
16
17
18
9
10
11
12
13

Page -20- CLARKE TECHNOLOGY Summit Operator's Manual
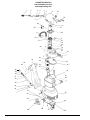
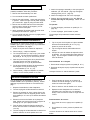
Summit Wet/Dry Vacuum
Assembly Drawing 9/00
50
41
49
40
39
38
37
36
35
36
34
33
32
30
29
28
27
26
25
24
23
7
22
21
46
20
47
48
7
45
43
42
7
19
18
17
16
15
14
44
13
52
5
51
53
8
55
54
56
12
11
10
9
6
5
4
7
3
21
CLARKE TECHNOLOGY

Page -21-
CLARKE TECHNOLOGY Summit Operator's Manual
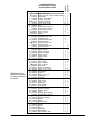
Ref. Part No. Description
1u 42186B Power Cord 115V 1 1
11675A Power Cord Asm. 230V Includes/w Item2) 1 1
2 58013A Strain Relief 1 1
3 66966A Retainer, Strain Relief 1 1
4 170686 Locknut, ½ Conduit 1 1
5u 47711A Terminal, .25 FIFQD 4 4
6 911933 Terminal, #10 Ring 1 1
7 85397A Screw, 10-24 x
3
/8 SS 13 13
8 674110 Hose 1 1
9 32381C Cover, Motor Summit 12 1 1
30004A Cover, Motor Summit 16 1 1
10 47316B Switch, Rocker On/Off 1 1
11 962950 Screw, ¼-20 x 3 3
85728A Screw, ¼-20 x 4 3
12 653407 Gasket 1
54359A Gasket 1
13 44906A Vac Motor 2 STG. 115V 1
51401A Carbon Brushes 2
13 44907A Vac Motor 2 STG. 230V 1
40813A Carbon Brushes 2
13u 44911A Vac Motor 3 STG. 115V 1
40812A Carbon Brushes 2
13 44914A Vac Motor 3 STG. 230V 1
40813A Carbon Brushes 2
14 58534A Spacer, 2 STG. 3
58533A Spacer, 3 STG. 3
15 34208B Gasket, Vac Motor 1 2
16 628520 Screen, Vac Motor 1 1
17 85600A Screw, ¼-20 x
3
/4 33
18 693406 Gasket, Intake 1 1
19 690212 Adapter, Intake 1 1
20 673416 Gasket 1 1
21u 63055B Filter, Bag Asm. 1 1
22 55713A Latch, Spring 2 2
23 38973C Tank, 12 Gallon 1 1
38976D Tank, 16 Gallon 1 1
24 68664A Plate, Base 1 1
25 692472 Caster, Front Swivel 1 1
26 85737A Screw, ¼-20 x
5
/8 S.S. 4 4
27 85738A Screw,
5
/16-18 x
5
/8 S.S. 6 6
28 69433A Bracket, Axle 2 2
29 920346 Palnut, ½" 2 2
30 59947A Wheel, 10" x 1.75 2 2
32 167308 Snap Ring ½" 2 2
33 60506A Axle, Shaft 1 1
34 85702A Screw, ¼-20 x 1
3
/4 44
35 30423A Drain Hose 1 1
36 832002 Clamp, Hose 2 2
37 839401 Drain Valve 1 1
38 833407 Drain Gasket 1 1
39 833901 Drain Handle 1 1
40 692409 Chain 1 1
41 34807C Handle, Transport 1 1
42 66969A Retainer, Float 1 1
43 33804A Float 1 1
44 35230C Housing, Motor Support 1
35234C Housing, Motor Support 1
45 69087A Screen, Filter 1 1
46 69517A Support, Filter Bag 1 1
47 34274A Gasket 1 1
48 733442 Gasket 1 1
49 73713B Warning Plate 1 1
50 930093 Rivet 4 4
51 980646 Washer 7 7
52 818180 Sleeve 1 1
53 699202 Wire Tie 1 1
54 46739A Filter 230V 1 1
55 69894A Bracket 230V 1 1
56 49310A Wire Assembly 230V 2 2
Standard
Highpower
Summit Wet/Dry Vacuum
Assembly Parts List 9/00
CLARKE TECHNOLOGY
u
u
u
NOTE: uindicates a
change has taken place
since last publication of
this manual

Page -22- CLARKE TECHNOLOGY Summit Operator's Manual
CLARKE TECHNOLOGY
Summit Wet/Dry Vacuum
Squeegee Assembly (14605A) Drawing and Parts List 9\00
Ref. Part No. Description Qty
1 66407A Pedal, SQ. Lift 1
2 69513A Support, Pedal Left 1
3 69514A Support, Lift 1
4 30424A Hose, Vac SQ. 1
5 960953 Bolt, Shoulder
3
/8 x1 2
6 419702 Wheel 2
7 55535A Knob 2
8 63425A Frame Weldment, SQ. 1
Ref. Part No. Description Qty
9 30940A Blade, SQ. 2
11 66963A Retainer, SQ. Blade 2
12 85383A Screw 10-32 x
3
/4 16
14 65434A Lift, Weldment SQ. 1
15 960952 Bolt, Shoulder
3
/8 x
3
/8 6
16 980645 Washer SS 6
17 81112Au Nut,
5
/16-18 8
18 69512A Support, Pedal Right 1
(Instruction Sheet 78552A Rev.A)
1
2
3
4
5
6
7
8
9
11
12
17
14
15
16
17
18
NOTE: uindicates a change has taken
place since last publication of this
manual

Page -23-
CLARKE TECHNOLOGY Summit Operator's Manual
SQUEEGEE ASSEMBLY INSTALLATION
For Summit Wet/Dry Vacuum squeegee assembly
(14605A) installation follow this procedure:
1. Remove the head assembly from tank.
2. Turn the handle and tank upside down.
3. Remove the axle brackets. Leave axle and wheels
in position. Attach the right and left pedal supports,
(ref. #18 and #2 - page 18) using the same bolts.
4. Remove the two bolts that secure the base plate.
Use the bolts to secure the lift support, (ref. #3 -
page 18) and the base plate.
5. Attach squeegee lift weldment with shoulder bolts
provided (ref. #14 and #15 - page 18).
6. Turn the handle and tank over to the upright position
with the wheels on the floor.
SUJECION DEL CONJUNTO DE LA BAYETA
Para colocar el conjunto de la bayeta en el modelo
SUMMIT agua y polvo (14615A), siga el procedimiento
siguiente, refiriéndose a la página ... :
1. Saque el conjunto de la cabeza de aspiración.
2. Gire el mango y vuelque el depósito.
3. Tire los soportes del eje. Deje el eje y las ruedas
en su sitio. Fije los soportes izquierdo y derecho
del pedal (N ref. 18 y 2) con los mismos pernos.
4. Quite los pernos de sujeción de la placa de base.
Use estos pernos para fijar el soporte de
levantamiento (N ref. 3) en la placa de base.
5. Fije la placa soldada del brazo de levantamiento
de la bayeta con los pernos de apoyo
suministrados (N ref. 14 y 15).
6. Gire el mando y vuelque el depósito en posición
vertical, con las ruedas puestas en el suelo.
7. Attach the squeegee assembly to the squeegee lift
weldment, (ref. #14 and #8 - page 18) and tighten
clamping knobs (ref. #7 - page 18).
8. Attach the straight hose cuff to the squeegee.
9. Replace the head assembly on the tank (Do not
use the filter bag for wet pickup). Attach 90° cuff
to inlet.
To Operate:
1. To raise squeegee, push down on pedal (ref. # 1 -
page 18)
2. To lower squeegee, push forward on pedal.
The squeegee will operate both forward and back-
wards.
7. Fije el conjunto de la bayeta en la placa soldada
del brazo de levantamiento (N ref. 14 y 8) y
aprete los pernos de las uñas.
8. Fije el manguito derecho del flexible sobre la
bayeta.
9. Coloque de nuevo la cabeza de aspiración sobre
el depósito. (No use la bolsa-filtro para aspirar el
agua). Fije el manguito acodado en ángulo recto
sobre la abertura.
Funcionamiento de la bayeta:
1. Para levantar la bayeta, presione el pedal (N ref. 1)
2. Para bajar la bayeta, empuje el pedal hacia la parte
delantera.
La bayeta funciona en marcha adelante y atrás.
FIXATION DE L'ENSEMBLE DU SUCEUR
Pour le placement de l'ensemble du suceur sur le
modèle SUMMIT eau et poussières (14615A), veuillez
appliquer la procédure suivante en vous référant à la
page ...:
1. Déposez l'ensemble de la tête d'aspiration.
2. Tournez la poignée et faites basculer le réservoir.
3. Enlevez les supports de l'axe. Laissez l'axe et les
roues en place. Fixez les supports gauche et droit
de la pédale (N réf. 18 et 2) en utilisant les mêmes
boulons.
4. Enlevez les boulons de fixation de la plaque de
base. Utilisez ces boulons pour fixer le support de
relevage (N réf. 3) à la plaque de base.
5. Fixez la plaque soudée du bras de relevage du
suceur avec les boulons à embase fournis (N réf.
14 et 15).
6. Tournez la poignée et faites basculer le réservoir en
position verticale, les roues posées sur le sol.
7. Fixez l'ensemble du suceur sur la plaque de
soudure du bras de relevage. (N réf. 14 et 8) et
serrez les boutons des griffes.
8. Fixez le manchon droit du flexible sur le suceur.
9. Replacez la tête d'aspiration sur le réservoir.
(N'utilisez pas le sac-filtre pour une aspiration
d'eau). Fixez le manchon coudé en angle droit sur
l'orifice.
Fonctionnement du suceur:
1. Pour relever le suceur, appuyer sur la pédale (N
réf.1)
2. Pour abaisser le suceur, pousser la pédale vers
l'avant.
Le suceur fonctionne en marche avant et en marche
arrière.

Page -24- CLARKE TECHNOLOGY Summit Operator's Manual
CLARKE TECHNOLOGY
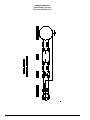
Summit Wet/Dry Vacuum
Electrical Schematic 1/98

Page -25-
CLARKE TECHNOLOGY Summit Operator's Manual
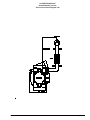
Summit Wet/Dry Vacuum
230 Volt Connection Diagram 1/98
CLARKE TECHNOLOGY
Transcripción de documentos
Summit Wet/Dry Vacuum Section II Parts and Service Manual Order Parts Here: www.ivie-ent.com/parts Ph:(918)254-5161 (78495B) CLARKE TECHNOLOGY Summit Wet/Dry Vacuum 115 Volt Connection Diagram 1/98 Page -18- CLARKE TECHNOLOGY Summit Operator's Manual CLARKE TECHNOLOGY Wand and Tool Kit #16414A 8-94 7 8 5 2 1 3 4 6 2 15 14 16 17 18 9 13 11 10 12 Ref. 1 2 3 4 5 6 7 8 9 Part No. 19200A 39200A 31207A 38500A 19501A 636706 68701A 674114 39201A Description Carpet Tool Assembly Floor Tool Bumper Carpet Shoe Lower Wand Assembly Disconnect Pin Upper Wand Vacuum Hose Crevice Tool CLARKE TECHNOLOGY Summit Operator's Manual Qty 1 1 1 1 1 1 1 1 1 Ref. 10 11 12 13 14 15 16 17 18 Part No. 19203A 35206A 60713A 39202B 19202A 31207A 38503A 30901A 38502A Description 3" Dusting Tool Housing Bristle Upholstery Tool Squeegee Tool Assembly Bumper Rear Squeegee Shoe Squeegee Blade Front Squeegee Shoe Qty 1 1 1 1 1 1 1 1 1 Page -19- CLARKE TECHNOLOGY Summit Wet/Dry Vacuum Assembly Drawing 9/00 1 2 3 4 5 6 9 10 56 7 11 54 12 8 55 53 5 52 13 14 15 16 17 18 51 44 19 7 48 41 50 45 47 43 49 20 42 7 40 46 39 38 21 22 37 36 7 35 36 34 33 23 32 30 29 Page -20- 24 28 27 26 25 CLARKE TECHNOLOGY Summit Operator's Manual 1u u 2 3 4 5u 6 7 8 9 10 11 u 12 13 13 13u 13 14 NOTE: uindicates a change has taken place since last publication of this manual 15 16 17 18 19 20 21u 22 23 u 24 25 26 27 28 29 30 32 33 34 35 36 37 38 39 40 41 42 43 44 45 46 47 48 49 50 51 52 53 54 55 56 Part No. 42186B 11675A 58013A 66966A 170686 47711A 911933 85397A 674110 32381C 30004A 47316B 962950 85728A 653407 54359A 44906A 51401A 44907A 40813A 44911A 40812A 44914A 40813A 58534A 58533A 34208B 628520 85600A 693406 690212 673416 63055B 55713A 38973C 38976D 68664A 692472 85737A 85738A 69433A 920346 59947A 167308 60506A 85702A 30423A 832002 839401 833407 833901 692409 34807C 66969A 33804A 35230C 35234C 69087A 69517A 34274A 733442 73713B 930093 980646 818180 699202 46739A 69894A 49310A Description Power Cord 115V 1 Power Cord Asm. 230V Includes/w Item2) 1 Strain Relief 1 Retainer, Strain Relief 1 Locknut, ½ Conduit 1 Terminal, .25 FIFQD 4 Terminal, #10 Ring 1 Screw, 10-24 x 3/8 SS 13 Hose 1 Cover, Motor Summit 12 1 Cover, Motor Summit 16 1 Switch, Rocker On/Off 1 Screw, ¼-20 x 3 3 Screw, ¼-20 x 4 Gasket 1 Gasket 1 Vac Motor 2 STG. 115V 1 Carbon Brushes 2 Vac Motor 2 STG. 230V 1 Carbon Brushes 2 Vac Motor 3 STG. 115V Carbon Brushes Vac Motor 3 STG. 230V Carbon Brushes Spacer, 2 STG. 3 Spacer, 3 STG. Gasket, Vac Motor 1 Screen, Vac Motor 1 Screw, ¼-20 x 3/4 3 Gasket, Intake 1 Adapter, Intake 1 Gasket 1 Filter, Bag Asm. 1 Latch, Spring 2 Tank, 12 Gallon 1 Tank, 16 Gallon 1 Plate, Base 1 Caster, Front Swivel 1 Screw, ¼-20 x 5/8 S.S. 4 Screw, 5/16-18 x 5/8 S.S. 6 Bracket, Axle 2 Palnut, ½" 2 Wheel, 10" x 1.75 2 Snap Ring ½" 2 Axle, Shaft 1 Screw, ¼-20 x 13/4 4 Drain Hose 1 Clamp, Hose 2 Drain Valve 1 Drain Gasket 1 Drain Handle 1 Chain 1 Handle, Transport 1 Retainer, Float 1 Float 1 Housing, Motor Support 1 Housing, Motor Support Screen, Filter 1 Support, Filter Bag 1 Gasket 1 Gasket 1 Warning Plate 1 Rivet 4 Washer 7 Sleeve 1 Wire Tie 1 Filter 230V 1 Bracket 230V 1 Wire Assembly 230V 2 CLARKE TECHNOLOGY Summit Operator's Manual Highpower Ref. Standard CLARKE TECHNOLOGY Summit Wet/Dry Vacuum Assembly Parts List 9/00 1 1 1 1 1 4 1 13 1 1 1 1 3 1 2 1 2 3 2 1 3 1 1 1 1 2 1 1 1 1 4 6 2 2 2 2 1 4 1 2 1 1 1 1 1 1 1 1 1 1 1 1 1 4 7 1 1 1 1 2 Page -21- CLARKE TECHNOLOGY Summit Wet/Dry Vacuum Squeegee Assembly (14605A) Drawing and Parts List 9\00 1 2 3 4 5 6 7 8 18 17 9 16 11 15 14 17 12 NOTE: uindicates a change has taken place since last publication of this manual Ref. 1 2 3 4 5 6 7 8 Page -22- Part No. 66407A 69513A 69514A 30424A 960953 419702 55535A 63425A Description Pedal, SQ. Lift Support, Pedal Left Support, Lift Hose, Vac SQ. Bolt, Shoulder 3/8 x1 Wheel Knob Frame Weldment, SQ. Qty 1 1 1 1 2 2 2 1 (Instruction Sheet 78552A Rev.A) Ref. 9 11 12 14 15 16 17 18 Part No. 30940A 66963A 85383A 65434A 960952 980645 81112Au 69512A Description Blade, SQ. Retainer, SQ. Blade Screw 10-32 x 3/4 Lift, Weldment SQ. Bolt, Shoulder 3/8 x 3/8 Washer SS Nut, 5/16-18 Support, Pedal Right Qty 2 2 16 1 6 6 8 1 CLARKE TECHNOLOGY Summit Operator's Manual SQUEEGEE ASSEMBLY INSTALLATION For Summit Wet/Dry Vacuum squeegee assembly (14605A) installation follow this procedure: 1. Remove the head assembly from tank. 2. Turn the handle and tank upside down. 3. Remove the axle brackets. Leave axle and wheels in position. Attach the right and left pedal supports, (ref. #18 and #2 - page 18) using the same bolts. 4. Remove the two bolts that secure the base plate. Use the bolts to secure the lift support, (ref. #3 page 18) and the base plate. 5. Attach squeegee lift weldment with shoulder bolts provided (ref. #14 and #15 - page 18). 6. Turn the handle and tank over to the upright position with the wheels on the floor. 7. Attach the squeegee assembly to the squeegee lift weldment, (ref. #14 and #8 - page 18) and tighten clamping knobs (ref. #7 - page 18). 8. Attach the straight hose cuff to the squeegee. 9. Replace the head assembly on the tank (Do not use the filter bag for wet pickup). Attach 90° cuff to inlet. To Operate: 1. To raise squeegee, push down on pedal (ref. # 1 page 18) 2. To lower squeegee, push forward on pedal. The squeegee will operate both forward and backwards. SUJECION DEL CONJUNTO DE LA BAYETA Para colocar el conjunto de la bayeta en el modelo SUMMIT agua y polvo (14615A), siga el procedimiento siguiente, refiriéndose a la página ... : 7. Fije el conjunto de la bayeta en la placa soldada del brazo de levantamiento (N ref. 14 y 8) y aprete los pernos de las uñas. 1. Saque el conjunto de la cabeza de aspiración. 8. 2. Gire el mango y vuelque el depósito. Fije el manguito derecho del flexible sobre la bayeta. 3. Tire los soportes del eje. Deje el eje y las ruedas en su sitio. Fije los soportes izquierdo y derecho del pedal (N ref. 18 y 2) con los mismos pernos. 9. Coloque de nuevo la cabeza de aspiración sobre el depósito. (No use la bolsa-filtro para aspirar el agua). Fije el manguito acodado en ángulo recto sobre la abertura. 4. Quite los pernos de sujeción de la placa de base. Use estos pernos para fijar el soporte de levantamiento (N ref. 3) en la placa de base. 5. 6. Fije la placa soldada del brazo de levantamiento de la bayeta con los pernos de apoyo suministrados (N ref. 14 y 15). Gire el mando y vuelque el depósito en posición vertical, con las ruedas puestas en el suelo. Funcionamiento de la bayeta: 1. Para levantar la bayeta, presione el pedal (N ref. 1) 2. Para bajar la bayeta, empuje el pedal hacia la parte delantera. La bayeta funciona en marcha adelante y atrás. FIXATION DE L'ENSEMBLE DU SUCEUR Pour le placement de l'ensemble du suceur sur le modèle SUMMIT eau et poussières (14615A), veuillez appliquer la procédure suivante en vous référant à la page ...: 1. Déposez l'ensemble de la tête d'aspiration. 2. Tournez la poignée et faites basculer le réservoir. 3. Enlevez les supports de l'axe. Laissez l'axe et les roues en place. Fixez les supports gauche et droit de la pédale (N réf. 18 et 2) en utilisant les mêmes boulons. 4. Enlevez les boulons de fixation de la plaque de base. Utilisez ces boulons pour fixer le support de relevage (N réf. 3) à la plaque de base. 5. 6. Fixez la plaque soudée du bras de relevage du suceur avec les boulons à embase fournis (N réf. 14 et 15). Tournez la poignée et faites basculer le réservoir en position verticale, les roues posées sur le sol. CLARKE TECHNOLOGY Summit Operator's Manual 7. Fixez l'ensemble du suceur sur la plaque de soudure du bras de relevage. (N réf. 14 et 8) et serrez les boutons des griffes. 8. Fixez le manchon droit du flexible sur le suceur. 9. Replacez la tête d'aspiration sur le réservoir. (N'utilisez pas le sac-filtre pour une aspiration d'eau). Fixez le manchon coudé en angle droit sur l'orifice. Fonctionnement du suceur: 1. Pour relever le suceur, appuyer sur la pédale (N réf.1) 2. Pour abaisser le suceur, pousser la pédale vers l'avant. Le suceur fonctionne en marche avant et en marche arrière. Page -23- CLARKE TECHNOLOGY Summit Wet/Dry Vacuum Electrical Schematic 1/98 Page -24- CLARKE TECHNOLOGY Summit Operator's Manual CLARKE TECHNOLOGY Summit Wet/Dry Vacuum 230 Volt Connection Diagram 1/98 CLARKE TECHNOLOGY Summit Operator's Manual Page -25--
 1
1
-
 2
2
-
 3
3
-
 4
4
-
 5
5
-
 6
6
-
 7
7
-
 8
8
-
 9
9


Alto Clarke Summit Parts And Service Manual
- Categoría
- Aspiradoras
- Tipo
- Parts And Service Manual
- Este manual también es adecuado para
en otros idiomas
- français: Alto Clarke Summit
- English: Alto Clarke Summit
Otros documentos
-
Nilfisk-ALTO Summit 16 Manual de usuario
-
Clarke Summit Manual de usuario
-
-
-
-
-
-
Clarke 00311C Manual de usuario
-