La página se está cargando...

BBQ PRO Deluxe Charcoal Grill
Product code: 47208 / 0-08432489-6
Item: 146. 47208610
UPC code: 182995001672
Date of purchase: / /
OWNER’S
MANUAL

DANGER: Indicates an imminently hazardous situation
which, if not avoided, will result in death or serious injury.
WARNING: Indicates an potentially hazardous situation
which, if not avoided, could result in death or serious in
j
ur
y
.
CARBON MONOXIDE HAZARD
Burning Charcoal gives off carbon monoxide
which has no odor and cause death.
Do not burn charcoal inside homes, vehicles,
tents, garages or any enclosed areas.
Use outdoors only, where it is well ventilated.
Installation Safety Precautions
• Please read this User’s Manual in its entirety before using the
grill.
• Failure to follow the provided instruction can result in
seriously bodily injury and/or property damage.
• Some parts of this grill may have sharp edges. Please wear
suitable protective gloves.
• Never use the grill with its back and side closer than 36
inches to any combustible wall or surface.
• Place your grill outdoors on a firm, level surface. Do not use
this grill on a surface that will burn or melt, such as a plastic
or artificial surface or wood table. Keep grill away from
wooden fences, overhanging trees, or other flammable
objects before adding and lighting charcoal.
• DO NOT USE GASLINE, ALCOHOL OR KEROSENE IN THIS
GRILL. Use only commercial lighter fluid with charcoal
briquettes or pre-soaked charcoal briquettes. Prepare
charcoal according to the product’s instructions. Do not
exceed 5 lbs of charcoal briquettes in this grill per use.
• After lighting charcoal, do not leave grill unattended.
• Remember to keep children and pets away from lit grill at all
times.To avoid harm to people, pets, or property, do not
move the grill once the charcoal has been lit.
• Once coals are lit, the grill and surrounding surfaces become
very hot.
• To extinguish charcoal after cooking, dowse coals with sand
or spray with a fine mist of water.
• After your grill has cooled, remove ashes from the catcher
and cover, store the grill when not in use.
IMPORTANT: This grill is intended for outdoor use only and is not
intended to be installed in or on recreational vehicles or boats.
NOTE TO INSTALLER: Leave this User’s Manual with the
customer after delivery and/or installation.
NOTE TO CONSUMER: Leave this User’s Manual in a
convenient place for future reference.
WARNING
Read and follow all Safety, Assembly,
and Use and Care Instructions in this
Guide before assembling and cooking
with this grill.
Call Grill Service Center For Help And Parts
If you have questions or need assistance during assembly,
p
lease call
1-888-287-0735. You will be speaking to a
representative of the grill manufacturer. To order new parts
call
at 1-800-4-MY-HOME
®
.
Safety Symbols
The symbols and boxes shown below explain what each heading
means. Read and follow all of the messages found throughout
the manual.
Product Record
IMPORTANT: Fill out the product record information below.
DANGE
R
Model Numbe
r
Serial Numbe
r
See ratin
g
label on
g
rill for serial number.
W
ARNING
Date Purchased
CAUTION
CAUTION
For residential use only. Do not use for commercial
cooking.
2. 146. 47208610
CAUTION: Indicates a potentially hazardous situation or
unsafe practice which, if not avoided, may result in minor
or moderate injury.

TABLE OF CONTENTS WARRANTY
For Your Safety . . . . . 2
BBQ PRO GRILL WARRANTY
Grill Service Center. . .
. . 2
Product Record Information . . . . 2
One Year Full Warranty on BBQ PRO Grill
If this grill fails due to a defect in material or workmanship
Installation Safety Precautions . . .
. . 2
within one year from the date of purchase, call 1-800-4-MY
HOME
®
to arrange for free repair (or replacement if repair
proves impossible).
Limited Warranty on Burners
For three year from the date of purchase, any burner that
rusts through will be replaced free of charge. After the third
year from the date of purchase, you pay for labor if you wish
to have it installed.
All warranty coverage excludes ignitor batteries and grill part
paint loss, discoloration or rusting, which are either
expendable parts that can wear out from normal use within
the warranty period, or are conditions that can be the result
of normal use, accident or improper maintenance.
All warranty coverage is void if this grill is ever used for
commercial or rental purposes.
All warranty coverage applies only if this grill is used in the
United States.
This warranty gives you specific legal rights, and you may
also have other rights which vary from state to state.
Kmart Corporation
Hoffman Estates, IL 60179
Safety Symbols . . . . . 2
BBQ PRO Grill Warranty . . . . 3
Parts List . . .
. . . 4
Parts Diagram. . . . . . 5
Hardware Pack List. . .
. . . . . .6
146. 47208610.3
Assembly Instructions. . .
. . . 7-21
BBQ PRO CHARCOAL GRILL WARRANTY
90 Days Full Warranty on BBQ Pro Grill
If this grill fails due to a defect in material
or workmanship within 90 days from the
date of purchase, call 1-800-4-MY-HOME®
to arrange for free parts replacement (if
repair proves impossible).
All warranty coverage excludes grill part
paint loss, discoloration or rusting, which
are either expendable parts that can wear
out from normal use within the warranty
period, or are conditions that can be the
result of normal use, accident or improper
maintenance.
All warranty coverage is void if this grill is
ever used for commercial or rental purposes.
All warranty coverage applies only if this
grill is used in the United States.
This warranty gives you specific legal rights,
and you may also have other rights which
vary from state to state.
Kmart Corporation
Hoffman Estates, IL 60179
Installation Service
For professional installation of home appliances, garage
door openers, water heaters, and other major home items,
in the U.S.A. call 1-800-4-MY-HOME
®
.
CALIFORNIA PROPOSITION 65
1. Combustion by-products produced when using
this product contain chemicals known to the State
of California to cause cancer, birth defects, and
other reproductive harm.
2. This product contains chemicals, including lead
and lead compounds, known to the State of
California to cause cancer, birth defects or other
reproductive harm.
Wash your hands after handling this product.
WARNING

Parts List
Key Description Qty Part Number
1 Hood assembly with BBQ pro brand 1 CG004-B002
2 Temperature gauge 1 WDJ17-00
3 Hood handle with spring 1 CG004-B006
4 Hinge assembly 2 CG004-B008
5 Left panel of firebox 1 CG004-B016
6 Rear panel of firebox 1 CG004-B014
7 Right panel of firebox 1 CG004-B018
8 Front panel of firebox 1 CG004-B012
9 Damper 2 CG004-L006-04
10 Damper handle 2 FMB01-00
11 Charcoal door U-bracket 2 CG004-L047-04
12 Charcoal door adjustment components 1 CG004-B028-04
13 Crank handle assembly 1 CG004-B034
14 Ash tray 1 CG004-L056-04
15 Ash tray handle with spring 1 CG004-B046
16 Charcoal door handle 1 CG004-B032-04
17 Charcoal door handle spring 1 BSH02-00-04
18 Cooking grate 2 KJA78-00-06
19 Charcoal tray 1 TJA01-00-04
20 Charcoal tray arm assembly 1 CG004-B020
21 Cart brace-rear 1 CG004-L072-04
22 Cart brace-left 1 CG004-B051
23 Cart brace-right 1 CG004-B053
24 Cart brace-front 1 CG004-L070-04
25 Left leg-front 1 CG004-B060
26 Left leg -rear 1 CG004-B064
27 Right leg-front 1 CG004-B068
28 Right leg-rear 1 CG004-B072
29 Wheel 2 CLA22-00
30 Wheel axle with nuts and washers 1 CLZ05-00-04
31 Base panel 1 CG004-L085-04
32 Side table 2 CG004-B040-04
33 Warming rack 1 CG004-B035
Not Pictured
Hardware Pack 1 CG004141
Manual 1 CG004145
4. 146. 47208610

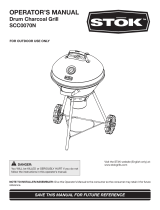
Parts Diagram
NOTE: Some grill parts shown in the assembly steps may differ slightly in appearance from. Those
on your particular grill model. However, the method of assembly remains the same.
146. 47208610.5

M4X7 Screw
(LDM04-07-00)
QTY:2
M4X10 Screw
(LDM04-10-07)
QTY:4
M4 Nut
(LMM04-32-00)
QTY:2
M5X10 Step Screw
(TJM06-10-00)
QTY:4
M5X12 Screw
(LDM05-12-02)
QTY:10
M5 Nut
(LMM05-38-00)
QTY:4
M6X13 Screw
(LDM06-13-00)
QTY:63
M6 Nut
(LMM06-50-00)
QTY:1
M6 Flat Washer
(PDQ19-00-04)
QTY:20
Small Cotter Pin
(SXV02-00)
QTY:1
Cotter Pin
(SXV04-00)
QTY:1
Hardware Pack List
6. 146. 47208610

Before assembly read instructions carefully. Assemble grill on a clean, flat surface. This unit is heavy.
DO NOT ASSEMBLE WITHOUT ASSISTANCE. GET A HELPER!
Tools needed for assembly:
Adjustable Wrench Philips Head Screwdriver
STEP 1
Do not tighten screws all the way. Legs
may need to be adjusted later.
1. Attach left leg-rear, left leg-front to
cart brace-left using 4) M6x13screws
and 4) M6 flat washers as A shown.
2. Repeat step on right leg-rear, right
leg-front and cart brace-right as B
shown.
M6X13 Screw QTY:8PCS
M6 Flat Washer QTY:8PCS
BBQ-PRO Deluxe Charcoal Grill
Assembly Instructions
146. 47208610.7

STEP 2
Do not tighten screws all the way.
1. Attach cart brace-front into the
cart assembly using 6) M6 x13
screw as A shown.
2. Attach cart brace-rear into the
cart assembly using 6) M6 x13
screw and 6) M6 Flat washers as B
shown.
M6X13 Screw QTY:12PCS
M6 Flat Washer QTY:6PCS
BBQ-PRO Deluxe Charcoal Grill
Assembly Instructions
8.146. 47208610

STEP 3
1. Attach base panel into the cart assembly using 8) M5x12 screw as A shown.
2. Attach wheel axle and wheels using 1)M6 flat washers, 1)Cotter Pin and 1)M6 nut as B shown.
TIGHTEN ALL HARDWARE AT THIS TIME.
M5X12 Screw QTY:8PCS
M6 Flat Washer QTY:1PC
M6 Nut QTY:1PC
Small Cotter Pin QTY:1PC
BBQ-PRO Deluxe Charcoal Grill
Assembly Instructions
146. 47208610.9

STEP 4
1. Attach left panel of firebox into front panel of firebox using 2)M6 x13 screw as A shown. Repeat step on right
panel of firebox into the firebox assembly.
2. Repeat step on rear panel of firebox into the firebox using 4)M6 x13 screw as B shown.
M6X13 Screw QTY:8PCS
BBQ-PRO Deluxe Charcoal Grill
Assembly Instructions
10.146. 47208610

STEP 5
1. Insert the 2) U-bracket into the Charcoal door adjustment components in right hole. Attach the Charcoal door
adjustment components to the Charcoal door using 4)M4X10 screws as A shown.
2. Attach charcoal door spring to Charcoal door handle using 1)M6X13 screw and 1)M6 flat washer as B shown.
3. Insert charcoal door assembly into the front panel of firebox using 2) M5X12 screw as C shown.
M4X10 Screw QTY:4PCS
M6X13 Screw QTY:1PC
M6 Flat Washer QTY:1PC
M5X12 Screw QTY:2PCS
BBQ-PRO Deluxe Charcoal Grill
Assembly Instructions
146. 47208610.11

STEP 6
1. Attach the damper into the front panel of firebox using 2)M5x10 step screws and 2)M5 nuts as A shown.
2. Attach the damper handle into the damper using 1)M4x7 screw and 1)M4 nut as B shown.
M5X10 Step Screw QTY:2PCS
M5 Nut QTY:2PCS
M4X7 Screw QTY:1PC
M4 Nut QTY:1PC
BBQ-PRO Deluxe Charcoal Grill
Assembly Instructions
12.146. 47208610

STEP 7
Attach the firebox into the cart assembly using 4)M6 x13 screws and 4)M6 flat washers as shown.
M6X13 Screw QTY:4PCS M6 Flat Washer QTY:4PCS
BBQ-PRO Deluxe Charcoal Grill
Assembly Instructions
146. 4720861.13

STEP 8
1. Attach charcoal tray arm assembly into the front panel of firebox using 4)M6x13 screws as A shown.
2. Thread crank handle assembly through hole on the front panel of firebox using 1)cotter pin as B shown.
M6X13 Screw QTY:4PCS
Cotter Pin QTY:1PC
BBQ-PRO Deluxe Charcoal Grill
Assembly Instructions
14.146. 47208610

STEP 9
Attach the charcoal tray into the charcoal tray arm assembly using 4)M6 x13 screws as shown.
M6X13 Screw QTY:4PCS
BBQ-PRO Deluxe Charcoal Grill
Assembly Instructions
146. 47208610.15

STEP 10
1.Attach the hinge assemble into rear panel of firebox using 2)M6 x13 screws as shown.
2.Repeat step on the opposite side.
M6X13 Screw QTY:4PCS
BBQ-PRO Deluxe Charcoal Grill
Assembly Instructions
16.146. 47208610

STEP 11
1. Attach the hood handle into the hood using 2)M6x13 screws as A shown.
2. Attach temperature gauge into the hood as shown. Note: the temperature gauge is supplied with one wing nut.
Be careful not to over tighten the wing nut. See B.
3. Attach the damper into the hood using 2)M5x10 step screws and 2)M5 nuts as C shown.
4. Attach the damper handle into the damper using 1)M4x7 screw and 1)M4 nut as D shown. Do tighten all
screws.
M6X13 Screw QTY:2PCS M4X7 Screw QTY:1PC M4 Nut QTY:1PC
M5X10 Step Screw QTY:2PCS M5 Nut QTY:2PCS
BBQ-PRO Deluxe Charcoal Grill
Assembly Instructions
146. 47208610.17

STEP12
Attach the hood assembly into the firebox using 4)M6x13 screws as shown.
M6X13 Screw QTY:4PCS
BBQ-PRO Deluxe Charcoal Grill
Assembly Instructions
18.146. 47208610

STEP 13
1. Attach left side table into the firebox using 5)M6 x13 screws as A shown.
2. Repeat step on opposite side for remaining side shelf as B shown.
M6X13 Screw QTY:10PCS
BBQ-PRO Deluxe Charcoal Grill
Assembly Instructions
146. 47208610.19

STEP 14
1. Attach ash tray handle into the ash tray using 2)M6x13 screws as shown. See A.
2. Insert the ash tray assembly into the bottom of firebox as shown. See B.
M6X13 Screw QTY:2PCS
STEP 15
Insert the cooking grates and warming rack into the cart as shown.
BBQ-PRO Deluxe Charcoal Grill
Assembly Instructions
20.146. 47208610

146. 47208610.21
SafeStorageAndMaintenance:
Inspect hardware tightness on a regular basis to insure grill is in safe working condition.
ALWAYS allow grill to cool completely before handling.
ALWAYS empty charcoal pan after use only when ashes have completely cooled.
This will help prolong charcoal pan life.
Clean grill, including special surfaces such as cooking grates with mild cleaning agents.
Wipe out side of grill with damp rag. DO NOT use oven cleaner.
ALWAYS cover and store cold grill in a protected area.
Indoor storage of grill is permissible only if the charcoal has burned to a complete ash AND is cold. Remember to
remove cold ashes before storing.
Grill is made of steel and may rust over time. If rusting occurs on outside surfaces, clean are a with sand paper or steel
wool, then cover with heat resistant paint.
If rusting occurs on the inside surface of grill, clean area with sandpaper or steel wool, then coat with cooking oil.
NEVER USE PAINT ON INSIDE SURFACES OFGRILL.
GrillingInstructionsandTips:
1. Preheat the cooking grid foe 5-10 minutes.
2. Before heating grid, lightly coat cooking grid with cooking oil to prevent food from sticking.
3. Your grill is equipped with a lid vent to vary the cooing heat. Grasp vent lever with gloved hand or metal pliers and rotate vent
to increase opening to raise heat. Decrease vent opening to lower heat.
4. The ash catcher on this grill is equipped with a damper door on each side to vary cooking heat. Use metal pliers to grasp
damper door tab and slide the door to increase hole opening to raise heat. Decrease opening to lower heat.
WARING
: To avoid injury, DO NOT touch lid vent or damper with bare hands unless grill is completely cool. Use gloved hand or
metal pliers to adjust lid vent openings. Use metal pliers to adjust damper openings.
MaintenanceandStorage:
Allow ashes and coals to completely cool before moving your grill. Always empty ashes and charcoal before storing. Allow grill to
cool completely before cleaning. Clean with hot, soapy water and rinse completely. Use a wire brush if necessary on cooking grid.
WARING: To ensure that it is safe to eat, food must be cooked to the minimum internal temperatures listed in the table below.
USDA*Recommended Safe Minimum Internal Temperatures
Beef, Veal, Lamb and Pork: Whole Cuts** 145°F
Fish 145°F
Beef, Veal, Lamb and Pork: Ground 160°F
Egg Dishes 160°F
Turkey, Chicken& Duck: Whole, Pieces& Ground 165°F
* United States Department of Agriculture
**Allow meat to rest three minutes before carving or consuming.

BBQ parrilla al carbón Deluxe PRO
Código de producto: 47208 / 0-08432489-6
Artículo: 146. 47208610
UPC Código : 182995001672
Fecha de compra: / /
OWNER’S
MANUAL

PELIGRO: Indica una situación de peligro inminente que, si
no se evita, provocará la muerte o lesiones graves.
ADVERTENCIA: Indica una situación potencialmente peligrosa
que, si no se evita, podría causar la muerte o lesiones graves.
MONÓXIDO DE CARBONO HAZAR
La quema de carbón produce monóxido de
carbono, que no tiene olor y causa la
muerte.
No queme carbón dentro de las casas,
vehículos, tiendas, garajes o cualquier áreas
cerradas.
Usar sólo al aire libre, en el que esté bien
ventilado.
Medidas de seguridad de instalación
z Por favor, lea este manual del usuario en su totalidad antes de
usar la parrilla.
z Si no se siguen las instrucciones indicadas puede provocar
lesiones graves corporales y / o daños materiales.
z Algunas partes de esta parrilla pueden tener bordes afilados.
Por favor, use guantes de protección adecuados.
z Nunca use la parrilla con su espalda y el costado cerca de 36
pulgadas de cualquier pared o superficie combustible.
z Coloque la parrilla al aire libre en una superficie firme y
nivelada. No utilice esta parrilla sobre una superficie que va a
quemar o derretir, tal como un plástico o superficie artificial o
mesa de madera. Mantenga la parrilla lejos de vallas de
madera, árboles colgantes u otros objetos inflamables antes de
añadir y encender el carbón.
z NO USE gasoducto, ALCOHOL O KEROSENE EN ESTA
PARRILLA.
z Utilice solamente líquido de comercial ligero con briquetas de
carbón o briquetas de carbón pre-empapados. Preparar carbón
vegetal de acuerdo con las instrucciones del producto. No
exceda de 5 libras de briquetas de carbón en esta parrilla por
uso.
z Después de encender el carbón, no deje la parrilla desatendida.
z Recuerde que debe mantener a los niños y mascotas lejos de la
parrilla encendida en todo times.To evitar daños a las personas,
animales o propiedades, no mueva la parrilla una vez que el
carbón ha sido iluminado
z Una vez que el carbón se encienden, la parrilla y las superficies
circundantes se calientan mucho.
z Para extinguir el carbón después de la cocción, carbones dowse
con arena o aerosol con una fina niebla de agua.
z Después de que su parrilla se haya enfriado, quite las cenizas
del colector y la cubierta, almacenar la parrilla cuando no esté
en uso.
IMPORTANTE: Esta parrilla es sólo para uso al aire libre y no está
destinado a ser instalado en o sobre vehículos de recreo o
embarcaciones.
NOTA PARA EL INSTALADOR: Deje este manual del usuario con el
cliente después de la entrega y / o instalación.
Nota para el consumidor: Deje este manual del usuario en un lugar
conveniente para referencia futura.
ADVERTENCIA
Lea y siga todas Seguridad, la
Asamblea y Uso y Cuidado
instrucciones de esta guía antes de
montar y cocinar con esta parrilla..
Llame al Centro de servicio para parrillas para
solicitar ayuda o piezas
Si tiene preguntas o necesita ayuda durante el
armado,
por favor llame al 1-888-287-0735. Se le habla a un
representante del fabricante parrilla. Para pedir
piezas nuevas
Registro del producto
IMPORTANTE: Llene la siguiente información
PELIGRO
Número de
Numero de
Ver etiqueta de clasificación en la parrilla para el número de serie.
ADVERTENCI
A
fecha de compra
PRECAUCIÓN
PRECAUCIÓN
Sólo para uso residencial. No utilice para cocinar comercial.
146. 47208610.23
PRECAUCIÓN: Indica una situación potencialmente
peligrosa o una práctica insegura que, de no evitarse,
puede provocar lesiones leves o moderadas.

TABLE OF CONTENTS WARRANTY
For Your Safety . . . . . 23
BBQ PRO GRILL WARRANTY
Grill Service Center. . .
. . 23
Product Record Information . . . . 23
One Year Full Warranty on BBQ PRO Grill
If this grill fails due to a defect in material or workmanship
Installation Safety Precautions . . .
. . 23
within one year from the date of purchase, call 1-800-4-MY
HOME
®
to arrange for free repair (or replacement if repair
proves impossible).
Limited Warranty on Burners
For three year from the date of purchase, any burner that
rusts through will be replaced free of charge. After the third
year from the date of purchase, you pay for labor if you wish
to have it installed.
All warranty coverage excludes ignitor batteries and grill part
paint loss, discoloration or rusting, which are either
expendable parts that can wear out from normal use within
the warranty period, or are conditions that can be the result
of normal use, accident or improper maintenance.
All warranty coverage is void if this grill is ever used for
commercial or rental purposes.
All warranty coverage applies only if this grill is used in the
United States.
This warranty gives you specific legal rights, and you may
also have other rights which vary from state to state.
Kmart Corporation
Hoffman Estates, IL 60179
Safety Symbols . . . . . 23
BBQ PRO Grill Warranty . . . . 24
Parts List . . .
. . . 25
Parts Diagram. . . . . . 26
Hardware Pack List. . .
. . . . . .27
24.146. 47208610
Assembly Instructions. . .
. . . 28-42
BBQ PRO Parrilla de carbón GARANTÍA
90 Days Full Warranty on BBQ Pro Grill
Si esta parrilla falla debido a un defecto en el
material o mano de obra dentro de los 90 días a
partir de la fecha de compra, llame al
1-800-4-MY-HOME® para hacer arreglos para
sustitución de piezas libre (si la reparación resulta
imposible).
Toda la cobertura de garantía excluye pérdida
de pintura parte de la parrilla, decoloración u
oxidación, que son o bien piezas fungibles que se
desgastan por el uso normal dentro del periodo
de garantía, o que son condiciones que pueden
ser el resultado de un uso normal, accidente o
mantenimiento inadecuado.
Toda la cobertura de garantía no es válida si la
parrilla se haya usado con fines comerciales o de
alquiler. Toda la cobertura de la garantía se
aplica únicamente si la parrilla se usa en los
Estados Unidos.
Esta garantía le otorga derechos legales
específicos, y usted también puede tener otros
derechos que varían de estado a estado.
Kmart Corporation
Hoffman Estates, IL 60179
Servicio de instalación
Para la instalación profesional de electrodomésticos,
abridores de puertas de garaje, calentadores de agua y
otros importantes, en la llamada de
EE.UU.1-800-4-MY-HOME
®
.
PROPUESTA 65 DE CALIFORNIA
1. combustión, que se producen al usar este
producto contienen sustancias químicas que el
Estadode California como causantes de cáncer,
defectos de nacimiento y otros daños
reproductivos.
2. Este producto contiene productos químicos,
incluidos los compuestos leadand plomo, conocidos
en el Estado de California como causante de
cáncer, defectos de nacimiento y otros daños
reproductivos.
Wash your hands after handling this product.
ADVERTEN

. 2
. 3
Lista de piezas
Key Description Qty Part Number
1 Hood assembly with BBQ pro brand 1 CG004-B002
2 Temperature gauge 1 WDJ17-00
3 Hood handle with spring 1 CG004-B006
4 Hinge assembly 2 CG004-B008
5 Left panel of firebox 1 CG004-B016
6 Rear panel of firebox 1 CG004-B014
7 Right panel of firebox 1 CG004-B018
8 Front panel of firebox 1 CG004-B012
9 Damper 2 CG004-L006-04
10 Damper handle 2 FMB01-00
11 Charcoal door U-bracket 2 CG004-L047-04
12 Charcoal door adjustment components 1 CG004-B028-04
13 Crank handle assembly 1 CG004-B034
14 Ash tray 1 CG004-L056-04
15 Ash tray handle with spring 1 CG004-B046
16 Charcoal door handle 1 CG004-B032-04
17 Charcoal door handle spring 1 BSH02-00-04
18 Cooking grate 2 KJA78-00-06
19 Charcoal tray 1 TJA01-00-04
20 Charcoal tray arm assembly 1 CG004-B020
21 Cart brace-rear 1 CG004-L072-04
22 Cart brace-left 1 CG004-B051
23 Cart brace-right 1 CG004-B053
24 Cart brace-front 1 CG004-L070-04
25 Left leg-front 1 CG004-B060
26 Left leg -rear 1 CG004-B064
27 Right leg-front 1 CG004-B068
28 Right leg-rear 1 CG004-B072
29 Wheel 2 CLA22-00
30 Wheel axle with nuts and washers 1 CLZ05-00-04
31 Base panel 1 CG004-L085-04
32 Side table 2 CG004-B040-04
33 Warming rack 1 CG004-B035
Not Pictured
Hardware Pack 1 CG004141
Manual 1 CG004145
146. 47208610.25

Parts Diagram
NOTA: algunos Grill piezas representadas en la Asamblea pasos pueden variar ligeramente en
apariencia.Esos en tu particular Grill modelo.Sin embargo, el método de reunión sigue siendo el
mismo.
26. 146. 47208610

M4X7 Screw
(LDM04-07-00)
QTY:2
M4X10 Screw
(LDM04-10-07)
QTY:4
M4 Nut
(LMM04-32-00)
QTY:2
M5X10 Step Screw
(TJM06-10-00)
QTY:4
M5X12 Screw
(LDM05-12-02)
QTY:10
M5 Nut
(LMM05-38-00)
QTY:4
M6X13 Screw
(LDM06-13-00)
QTY:63
M6 Nut
(LMM06-50-00)
QTY:1
M6 Flat Washer
(PDQ19-00-04)
QTY:20
Small Cotter Pin
(SXV02-00)
QTY:1
Cotter Pin
(SXV04-00)
QTY:1
Lista de hardware Pack
146. 47208610.27

Antes de leer cuidadosamente las instrucciones de la Asamblea.Montar la parrilla sobre una
superficie plana y limpia.Esta unidad es pesado.
No montar sin asistencia.¡Conseguir un ayudante!
Herramientas necesarias para el montaje:
Llave ajustable destornillador de estrella
Paso 1
No apriete los tornillos todo el camino.Las
piernas pueden necesitar ser ajustado más
tarde.
1. Adjuntar pierna izquierda trasera, pierna
izquierda frente al carro abrazadera
izquierda utilizando 4) m6x13screws y 4) M6
arandelas planas como se muestra.
2.Repita el paso en pata derecha trasera,
pierna derecha delantera y carro
abrazadera derecha como B se muestra.
M6X13 tornillo QTY:8PCS
M6 Flat Washer QTY:8PCS
Bbq-pro Deluxe Charcoal Grill instrucciones de montaje
28. 146. 47208610

Paso 2
No apriete los tornillos todo el
camino.
1.Adjuntar hoja de frente en la
hoja de abrazadera de montaje
mediante 6) M6 X13 tornillo como
se muestra.
2.Adjuntar hoja de trasera del
carro abrazadera de montaje
mediante 6) M6 X13 tornillo y 6)
M6 arandelas planas como B se
muestra.
M6X13 tornillo QTY:12PCS
M6 Flat Washer QTY:6PCS
Bbq-pro Deluxe Charcoal Grill instrucciones de montaje
146. 47208610.29

Paso 3
1.Adjuntar en la hoja de panel base de montaje mediante 8) m5x12 tornillo como se muestra.
2.Adjuntar eje de ruedas y ruedas utilizando 1) M6 arandelas planas, 1) Cotter PIN y 1) Tuerca M6 como B se
muestra.
TIGHTEN ALL HARDWARE AT THIS TIME.
M5X12 tornillo QTY:8PCS
M6 arandelas planas QTY:1PC
M6 Nut QTY:1PC
Small Cotter Pin QTY:1PC
Bbq-pro Deluxe Charcoal Grill instrucciones de montaje
30. 146. 47208610

Paso 4
1. Unir panel izquierdo de Firebox en panel frontal de Firebox usando 2) M6 X13 tornillo como se muestra.Repita
el paso en el panel derecho de Firebox en el Firebox Asamblea.
2. Repita el paso en panel trasero de caja de fuego en el hogar usando 4) M6 X13 tornillo como B se muestra.
M6X13 tornillo QTY:8PCS
Bbq-pro Deluxe Charcoal Grill instrucciones de montaje
146. 47208610.31

Paso 5
1. Inserte el 2) soporte en "U" en el carbón de ajuste para la puerta componentes en el agujero correcto.Adjuntar
el palmito puerta ajuste componentes para el carbón puerta usando 4) m4x10 tornillos como se muestra.
2. Adjuntar carbón carbón manija de puerta a puerta la primavera usando 1) m6x13 tornillo y arandela plana 1)
M6 como B se muestra.
3. Insertar palmito puerta Asamblea en el panel frontal de Firebox usando 2) m5x12 tornillo como se muestra.
M4X10 tornillo QTY:4PCS
M6X13 tornillo QTY:1PC
M6 arandelas planas QTY:1PC
M5X12 tornillo QTY:2PCS
Bbq-pro Deluxe Charcoal Grill instrucciones de montaje
32. 146. 47208610

Paso 6
1.Sujetar el amortiguador en el panel frontal de Firebox usando 2) M5x10 paso tornillos y 2) M5 loco como se
muestra.
2.Sujetar el amortiguador manejar en el amortiguador usando 1) m4x7 tornillo y Tuerca M4 1) como B se
muestra.
M5X10 Step Screw QTY:2PCS
M5 Nut QTY:2PCS
M4X7 tornillo QTY:1PC
M4 Nut QTY:1PC
Bbq-pro Deluxe Charcoal Grill instrucciones de montaje
146. 47208610.33

Paso 7
Adjuntar el Firebox en el carro de montaje mediante 4 tornillos M6 X13 y 4) M6 arandelas planas como se
muestra.
M6X13 tornillo QTY:4PCS M6 Flat Washer QTY:4PCS
Bbq-pro Deluxe Charcoal Grill instrucciones de montaje
34. 146. 47208610

Paso 8
1. Adjuntar bandeja de carbón brazo de la Asamblea en el panel frontal de Firebox usando 4) m6x13 tornillos
como se muestra.
2. Hilo manivela Assembly a través de agujero en el panel frontal de la caja de fuego utilizando 1) Cotter pin
como B se muestra.
M6X13 tornillo QTY:4PCS
Cotter Pin QTY:1PC
Bbq-pro Deluxe Charcoal Grill instrucciones de montaje
146. 47208610. 35

Paso 9
Coloque la bandeja de carbón en la bandeja de carbón brazo de montaje mediante 4 tornillos M6 X13 como se
muestra.
M6X13 tornillo QTY:4PCS
Bbq-pro Deluxe Charcoal Grill instrucciones de montaje
36. 146. 47208610

Paso 10
1. Adjuntar la bisagra montar en panel trasero de Firebox usando 2 tornillos M6 X13 como se muestra.
2. Repita el paso en el lado opuesto.
M6X13 tornillos QTY:4PCS
Bbq-pro Deluxe Charcoal Grill instrucciones de montaje
146. 47208610.37

Paso 11
1.Coloque la capucha manejar en la capucha con 2 tornillos de m6x13 como se muestra.
2.Adjuntar medidor de temperatura en el capó como se muestra.NOTA: el medidor de temperatura es
suministrada con una tuerca de mariposa.Tenga cuidado de no apretar sobre la tuerca de mariposa.Véase B.
3.Sujetar el amortiguador en el hood usando 2) M5x10 paso tornillos y 2) M5 loco como C muestra.
4.Sujetar el amortiguador manejar en el amortiguador usando 1) m4x7 tornillo y Tuerca M4 1) D se
muestra.Hacer apretar todos los tornillos.
M6X13 tornillo QTY:2PCS M4X7 tornillo QTY:1PC M4 Nut QTY:1PC
M5X10 paso tornillo QTY:2PCS M5 Nut QTY:2PCS
Bbq-pro Deluxe Charcoal Grill instrucciones de montaje
38. 146. 47208610

Paso 12
Adjuntar el conjunto de campana, en la Cámara de combustión utilizando 4) m6x13 tornillos como se muestra.
M6X13 tornillo QTY:4PCS
Bbq-pro Deluxe Charcoal Grill instrucciones de montaje
146. 47208610.39

Paso 13
1.Adjuntar el lado izquierdo el cuadro en el fuego utilizando 5) M6 X13 tornillos como se muestra.
2.Repita el paso en el lado opuesto para lado restante shelf como B se muestra.
M6X13 tornillo QTY:10PCS
Bbq-pro Deluxe Charcoal Grill instrucciones de montaje
40. 146. 47208610

Paso 14
1.Una bandeja de ceniza manija en el cenicero usando 2) m6x13 tornillos como se muestra.Véase A.
2.Inserte la bandeja de ceniza el montaje en la parte inferior de fuego como se muestra.Véase B.
M6X13 tornillo QTY:2PCS
Paso 15
Insertar las parrillas de cocción y calentamiento rack en el carro como se muestra.
Bbq-pro Deluxe Charcoal Grill instrucciones de montaje
146. 47208610.41

42.146. 47208610
AlmacenamientoseguroyMantenimiento:
Inspeccione la estanqueidad de hardware de forma regular para asegurar la parrilla está en buenas condiciones de
funcionamiento.
SIEMPRE permita que la parrilla se enfríe por completo antes de su uso.
SIEMPRE bandeja de carbón vacío después de utilizar sólo cuando las cenizas se hayan enfriado.
Esto ayudará a prolongar la vida de la bandeja para carbón.
Limpie la parrilla, incluyendo superficies especiales tales como parrillas de cocción con productos de limpieza suaves.
Limpie lado de la parrilla con un trapo húmedo. NO use limpiador de hornos.
SIEMPRE cubrir y almacenar la parrilla fría en un área protegida.
El almacenamiento interno de la parrilla sólo será admisible cuando el carbón se ha quemado a una ceniza completa Y
es frío. Recuerde retirar cenizas frías antes de guardarla.
Grill está hecha de acero y puede oxidarse con el tiempo. Si la oxidación se produce en las superficies exteriores, limpio
son una con papel de lija o lana de acero, luego cubrir con pintura resistente al calor.
Si se produce oxidación en la superficie interior de la parrilla, limpie el área con papel de lija o lana de acero, a
continuación, cubrir con aceite de cocina.
NUNCA USE LA PINTURA EN EL INTERIOR DE SUPERFICIES OFGRILL.
AsaralaparrillaInstruccionesyConsejos:
1. Precaliente el enemigo rejilla de cocción 5-10 minutos.
2. Antes de la rejilla de calefacción, la ligera capa de rejilla de cocción con aceite de cocina para evitar que los alimentos se
peguen.
3. Su parrilla está equipada con un respiradero tapa para variar el calor arrullo. Sujete la palanca de ventilación con unos alicates
de mano o de metal con guantes y rotar rienda suelta a aumentar la apertura para aumentar el calor. Disminuir abertura de
ventilación para reducir el calor.
4. El recogedor de ceniza en esta parrilla está equipada con una puerta de amortiguador a cada lado para variar la cocción de
calor. Utilice pinzas de metal para captar pestaña compuertas y deslice la puerta para aumentar la apertura del agujero de
aumentar el calor. Disminuir la apertura de calor más bajo.
WARING: Para evitar lesiones, NO toque respiradero tapa o amortiguador con las manos desnudas a menos parrilla se enfríe por
completo. Utilice los alicates de la mano o de metal con guantes para ajustar aberturas de ventilación de la tapa. Utilice pinzas de
metal para ajustar las aberturas de los amortiguadores.
Mantenimientoyalmacenamiento:
Permitir cenizas y carbones se enfríe completamente antes de mover su parrilla. Siempre cenizas vacías y el carbón antes de
guardarla. Deje que la parrilla se enfríe completamente antes de limpiarlo. Limpie con agua caliente y jabón y enjuague
completamente. Use un cepillo de alambre si es necesario en la parrilla de cocción.
WARING: Para asegurarse de que es seguro para comer, los alimentos deben cocinarse a las temperaturas internas mínimas
que figuran en la siguiente tabla.
USDA*Recommended Safe Minimum Internal Temperatures
Beef, Veal, Lamb and Pork: Whole Cuts** 145°F
Fish 145°F
Beef, Veal, Lamb and Pork: Ground 160°F
Egg Dishes 160°F
Turkey, Chicken& Duck: Whole, Pieces& Ground 165°F
* United States Department of Agriculture
**Allow meat to rest three minutes before carving or consuming.
Bbq-pro Deluxe Charcoal Grill instrucciones de montaje

/