
MWG 746 H
Bedienungsanleitung/Garantie
Instruction Manual/Guarantee
Gebruiksaanwijzing/Garantie
Mode d’emploi/Garantie
Instrucciones de servicio/Garantía
Manual de instruções/Garantia
Istruzioni per l’uso/Garanzia
Instrukcja obsługi/Gwarancja
Mikrowelle mit Grill und Heißluftfunktion
Combined Microwave Oven with Grill and Hot Air
Magnetron met grill en heteluchtfunctie
Four à micro-ondes avec gril et chaleur traditionnelle
Microonda combinada con grill y aire caliente
Combi-microondas com grelha e ar quente
Microonde con griglia e funzione con aria calda
Uniwersalna kuchenka mikrofalowa z grillem i obiegiem gorącego powietrza
05-MWG 746 H EST 1 13.07.2005, 14:26:52 Uhr

2
DEUTSCH
Inhalt
Übersicht Bedienelemente ............................ Seite 3
Bedienungsanleitung..................................... Seite 4
Übersicht der Bedientasten ........................... Seite 5, 78
Technische Daten.......................................... Seite 11
Garantie......................................................... Seite 11
ENGLISH
Contents
Control element overview .............................. Page 3
Instruction Manual ......................................... Page 13
Controls ......................................................... Page 14, 78
Technical Data............................................... Page 20
Guarantee...................................................... Page 20
NEDERLANDS
Inhoud
Overzicht van de bedieningselementen..........Pagina 3
Gebruiksaanwijzing .....................................Pagina 22
Overzicht van de bedieningstoetsen............Pagina 23, 79
Technische gegevens...................................Pagina 29
Garantie.......................................................Pagina 29
FRANÇAIS
Sommaire
Liste des différents éléments de commande..... Page 3
Mode d’emploi ............................................... Page 31
Aperçu des touches de commande............... Page 32, 79
Données techniques...................................... Page 38
Garantie......................................................... Page 39
ESPAÑOL
Indice
Vista de conjunto Elementos de mando......Página 3
Instrucciones de servicio .............................Página 40
Vista general de las teclas de manejo.........Página 41, 80
Datos técnicos.............................................Página 48
Garantia.......................................................Página 48
PORTUGUÊS
Índice
Vista geral dos elemntos de comando ........Página 3
Manual de instruções ..................................Página 49
Vista geral das teclas de funcionamento.....Página 50, 80
Características técnicas ..............................Página 57
Garantía.......................................................Página 57
ITALIANO
Indice
Elementi di comando....................................Pagina 3
Istruzioni per l’uso........................................Pagina 58
Tabella dei tasti di controllo .........................Pagina 59, 81
Dati tecnici...................................................Pagina 65
Garanzia......................................................Pagina 65
JE˛ ZYK POLSKI
Spis tres´ci
Przegląd elemetów obsługi.......................... Strona 3
Instrukcja obsługi......................................... Strona 67
Przegląd przycisków obsługowych ..............Strona 68, 81
Dane techniczne..........................................Strona 75
Gwarancja ................................................... Strona 75
05-MWG 746 H EST 2 13.07.2005, 14:26:56 Uhr

3
Übersicht der Bedienelemente
Overview of the Components • Overzicht van de bedieningselementen
Liste des différents éléments de commande • Indicación de los elementos de manejo
Descrição dos elementos • Elementi di comando
Przegląd elementów obsługi
*) Achtung: Entfernen Sie keine montierten Teile aus
dem Garraum und von der Innenseite der Tür!
Bitte entfernen Sie in keinem Fall Folien auf der
Innenseite der Tür!
*) Caution: Do not remove any installed parts from in-
side the oven or anything from the inside of the door!
The foils on the inside of the door must not be
removed!
*) Let op: Verwijder géén vast gemonteerde onderde-
len uit de gaarruimte en niets van de binnenzijde van
de deur!
Verwijder in géén geval folie die op de binnenzij-
de van de deur is aangebracht!
*) Attention: Ne démontez jamais aucun pièce de
l’intérieur de l’appareil ni de l’intérieur de la porte!
N’enlevez en aucun cas les feuilles du côté intéri-
eur de la porte!
*) Atención: ¡No retire ningunas piezas montadas del
espacio interior de cocción o de la parte interior de la
puerta!
Se ruega no retirar de ninguna manera la hoja de
plástico que hay en la parte interior de la puerta.
*) Atenção: Não retire objectos montados no sítio para
cozer e na parte interior da porta!
Por favor não retire de qualquer maneira folhas
que se encontrem pegadas ao interior da porta!
*) Attenzione: non togliere pezzi montati nella camera
di cottura e dal lato interno dello sportello!
Non togliere mai pellicole dall’interno dello
sportello!
*) Uwaga: Proszę nie usuwać żadnych zamontowanych
części z komory kuchenki i niczego z wewnętrznej
strony drzwiczek!
W żadnym wypadku proszę nie usuwać folii na
wewnętrznej stronie drzwiczek!
05-MWG 746 H EST 3 13.07.2005, 14:26:57 Uhr

4
DEUTSCH
Allgemeine Sicherheitshinweise
• Lesen Sie vor Inbetriebnahme dieses Gerätes die Be-
dienungsanleitung sehr sorgfältig durch und bewahren
Sie diese inkl. Garantieschein, Kassenbon und nach
Möglichkeit den Karton mit Innenverpackung gut auf.
• Benutzen Sie das Gerät ausschließlich für den privaten
und den dafür vorgesehenen Zweck. Dieses Gerät
ist nicht für den gewerblichen Gebrauch bestimmt.
Benutzen Sie es nicht im Freien (außer es ist für den
bedingten Einsatz im Freien vorgesehen). Halten Sie
es vor Hitze, direkter Sonneneinstrahlung, Feuchtigkeit
(auf keinen Fall in Flüssigkeiten tauchen) und scharfen
Kanten fern. Benutzen Sie das Gerät nicht mit feuchten
Händen. Bei feucht oder nass gewordenem Gerät so-
fort den Netzstecker ziehen. Nicht ins Wasser greifen.
• Schalten Sie das Gerät aus und ziehen Sie immer den
Stecker aus der Steckdose (ziehen Sie am Stecker,
nicht am Kabel) wenn Sie das Gerät nicht benutzen,
Zubehörteile anbringen, zur Reinigung oder bei Stö-
rung.
• Betreiben Sie das Gerät nicht unbeaufsichtigt. Sollten
Sie den Arbeitsplatz verlassen, schalten Sie das Gerät
bitte immer aus, bzw. ziehen Sie den Stecker aus der
Steckdose (ziehen Sie am Stecker, nicht am Kabel).
• Um Kinder vor Gefahren elektrischer Geräte zu
schützen, sorgen Sie bitte dafür, dass das Kabel nicht
herunter hängt und Kinder keinen Zugriff auf das Gerät
haben.
• Prüfen Sie Gerät und Kabel regelmäßig auf Schäden.
Ein beschädigtes Gerät bitte nicht in Betrieb nehmen.
• Reparieren Sie das Gerät nicht selbst, sondern suchen
Sie bitte einen autorisierten Fachmann auf. Um Ge-
fährdungen zu vermeiden, ein defektes Netzkabel bitte
nur vom Hersteller, unserem Kundendienst oder einer
ähnlich qualifi zierten Person durch ein gleichwertiges
Kabel ersetzen lassen.
• Verwenden Sie nur Original-Zubehör.
• Beachten Sie bitte die nachfolgenden „Speziellen
Sicherheitshinweise...“.
Wichtige Sicherheitsanweisungen!
Bitte sorgfältig lesen und für den
weiteren Gebrauch aufbewahren.
• Warnung: Wenn die Tür oder die Türdichtungen
beschädigt sind, darf das Kochgerät nicht betrieben
werden, bevor es von einer dafür ausgebildeten Per-
son repariert worden ist.
• Warnung: Bitte reparieren Sie das Gerät auf keinen
Fall selbst, sondern suchen Sie einen autorisierten
Fachmann auf. Es ist für alle anderen, außer für einen
Fachmann, gefährlich, irgendwelche Wartungs- oder
Reparaturarbeiten auszuführen, die die Entfernung
einer Abdeckung erfordern, die den Schutz gegen
Strahlenbelastung durch Mikrowellenenergie sicher-
stellt.
• Warnung: Erwärmen Sie Flüssigkeiten oder andere
Speisen nicht in geschlossenen Behältern. Explosions-
gefahr!
• Warnung: Wenn das Gerät im Kombibetrieb betrieben
wird, dürfen Kinder wegen der vorkommenden Tempe-
raturen, das Gerät nur unter Aufsicht von Erwachse-
nen benutzen.
• Hinweis: Das Mikrowellengerät ist nicht zum Er-
wärmen/Erhitzen von lebenden Tieren vorgesehen.
• Warnung: Kindern und gebrechlichen Personen
dürfen die Benutzung des Kochgerätes ohne Aufsicht
nur erlaubt werden, wenn eine angemessene Anwei-
sung gegeben wurde, die die Personen in die Lage
versetzt, das Kochgerät in sicherer Weise zu benutzen
und die Gefahren falscher Bedienung zu verstehen.
• Möchten Sie Ihre Mikrowelle in einem Schrank, Regal
o. ä. unterbringen, achten Sie bitte darauf, dass Sie an
allen Seiten des Gerätes mindestens 10 cm Ventilati-
onsabstand zu Schränken, Wänden u.a. einhalten.
• Verwenden Sie nur geeignetes Geschirr wie:
Glas, Porzellan, Keramik, hitzebeständiges Kunststoff-
oder spezielles Mikrowellengeschirr.
• Beim Erwärmen oder Kochen von Speisen in brenn-
baren Materialien, wie Kunststoff- oder Papierbehäl-
ter, muss das Mikrowellenkochgerät häufi g wegen der
Möglichkeit einer Entzündung überwacht werden.
• Bei Rauchentwicklung ist das Gerät abzuschalten
und der Netzstecker zu ziehen. Halten Sie die Tür ge-
schlossen, um evtl. auftretende Flammen zu ersticken.
• Achtung Siedeverzug: Beim Kochen, insbesondere
beim Nacherhitzen von Flüssigkeiten (Wasser) kann es
vorkommen, das die Siedetemperatur zwar erreicht ist,
die typischen Dampfblasen aber noch nicht aufstei-
gen. Die Flüssigkeit siedet nicht gleichmäßig. Dieser
sogenannte Siedeverzug kann beim Entnehmen des
Gefäßes durch leichte Erschütterung zu einer plötzli-
chen Dampfblasenbildung und damit zum Überkochen
führen. Verbrennungsgefahr! Um ein gleichmäßiges
Sieden zu erreichen, stellen Sie bitte einen Glasstab
oder etwas Ähnliches, nichtmetallisches in das Gefäß.
• Der Inhalt von Babyfl äschchen und Gläsern mit Kin-
dernahrung muss umgerührt oder geschüttelt und die
Temperatur vor dem Verbrauch überprüft werden. Es
besteht Verbrennungsgefahr.
• Speisen mit Schale oder Haut, wie Eier, Würste,
geschlossene Glaskonserven usw. dürfen nicht in
Mikrowellenkochgeräten erwärmt werden, da diese
explodieren können, selbst wenn die Erwärmung durch
Mikrowellen beendet ist.
• Türrahmen/Türdichtung und benachbarte Teile müssen
bei Verschmutzung sorgfältig mit einem feuchten Tuch
gereinigt werden.
• Reinigen Sie das Mikrowellenkochgerät regelmäßig
und entfernen Sie Nahrungsmittelreste aus dem Innen-
raum.
• Bei mangelhafter Sauberkeit des Gerätes, kann es zu
einer Zerstörung der Oberfl äche kommen, welches die
Lebensdauer des Gerätes beeinfl usst und möglicher-
weise zu gefährlichen Situationen führt.
Beschreibung der Bedienelemente
1 Türverschluss
2 Sichtfenster*
3 Abdeckung*
4 Antriebsachse
5 Gleitring
6 Drehteller
7 Bedienblende
8 Grillheizung
9 Grillrost
Achtung: Entfernen Sie keine montierten Teile aus dem
Garraum und von der Innenseite der Tür!
Bitte entfernen Sie in keinem Fall Folien auf der
Innenseite der Tür!
05-MWG 746 H EST 4 13.07.2005, 14:26:58 Uhr

5
DEUTSCH
Übersicht der Bedientasten
Ziffern-Tasten
Zum Einstellen von Uhrzeit, Gardauer,
Temperatur und Gewicht
Taste Mikrowelle
Wahl der Leistungsstufen
Taste Grill
Zum Grillen und Überbacken
Taste Heißluft
Reiner Heißluftbetrieb,
Thermostat gesteuert
Taste Mikrowelle/Grill Kombibetrieb
Mikrowelle und Grill arbeiten abwechselnd
Taste Mikrowelle/Heißluft Kombibetrieb
Mikrowelle und Heißluft
arbeiten abwechselnd
Taste Auftauen
Aktiviert die Auftaufunktion
in Verbindung mit einer Zeiteinstellung
Taste Uhr
In Verbindung mit den Ziffern-Tasten
zum Einstellen der Uhrzeit
Programmtaste Kuchen
Taste Timer (Countdown)
Programmtaste Kartoffel
Programmtaste Popkorn
Programmtaste Getränke
Programmtaste Pizza
Programmtaste Fleischspieße
Programmtaste Aufwärmen
Taste Start
Start des Programms
Taste Express
Start des Expressprogramms –
Setzen der Express-Kochzeit
Taste Stopp
• Einmal drücken zum Stoppen des
Garvorgangs oder zum Löschen einer
falschen Eingabe.
• Zweimal drücken zum Löschen des
Programms.
• 3 Sekunden halten zum Sperren/
Entsperren des Gerätes
Hinweise zum Grill- und Kombibetrieb
• Da im Grill- und Kombibetrieb Strahlungshitze benutzt
wird, benutzen Sie bitte nur hitzebeständiges Ge-
schirr.
• Im reinen Grillbetrieb dürfen Sie auch Metall- oder
Alugeschirr benutzen – nicht jedoch bei Kombi- oder
Mikrowellenbetrieb.
• Für die Betriebsarten Grill, Pizza, Backen und Kombi
ist nur der Grillrost geeignet.
• Stellen Sie nichts auf die Oberseite des Gehäuses.
Diese wird heiß. Lassen Sie die Lüftungsschlitze
immer frei.
• Verwenden Sie bitte den Grillrost, um das Gargut
näher an das Heizelement heranzuführen.
Inbetriebnahme
• Entnehmen Sie alles im Garraum befi ndliche Zube-
hör, packen Sie es aus und legen Sie den Gleitring in
die Mitte. Positionieren Sie den Glasteller so auf der
Antriebsachse, das dieser in die Ausbuchtungen der
Antriebswelle einrastet und gerade aufl iegt.
• Kontrollieren Sie das Gerät auf sichtbare Schäden,
besonders im Bereich der Tür. Bei Schäden jeglicher
Art darf das Gerät auf keinen Fall in Betrieb genom-
men werden.
• Um beim Betrieb Störungen anderer Geräte zu
vermeiden, stellen Sie Ihr Gerät nicht in unmittelbarer
Nähe von anderen elektronischen Geräten auf.
• Entfernen Sie evtl. auf dem Gehäuse haftende
Schutzfolien.
• Bitte entfernen Sie in keinem Fall Folien auf der
Innenseite der Tür!
• Stecken Sie den Netzstecker in eine korrekt installier-
te Schutzkontaktsteckdose 230 V, 50 Hz.
• Entfernen Sie keine montierten Teile aus dem Gar-
raum und von der Innenseite der Tür!
Benutzung des Gerätes
Wissenswertes zum Mikrowellenbetrieb
• Ihr Gerät arbeitet mit Mikrowellenstrahlung, welche
Wasserteilchen in Speisen in sehr kurzer Zeit erhitzt.
Hier gibt es keine Wärmestrahlung und somit auch
kaum Bräunung.
• Erwärmen Sie mit diesem Gerät nur Lebensmittel.
• Das Gerät ist nicht zum Backen in schwimmendem
Fett geeignet.
• Erhitzen Sie nur 1-2 Portionen auf einmal. Das Gerät
verliert sonst an Effi zienz.
• Zur Unterbrechung des Garvorgangs drücken Sie die
Stopp-Taste.
• Mikrowellen liefern sofort volle Energie. Ein Vorheizen
ist somit nicht erforderlich.
• Betreiben Sie das Gerät im Mikrowellen- oder Kombi-
betrieb niemals leer.
• Der Mikrowellenherd ersetzt nicht Ihren herkömmli-
chen Herd. Er dient hauptsächlich zum:
• Auftauen von Tiefgekühltem/Gefrorenem
• Schnellen Erhitzen/Aufwärmen von Speisen oder
Getränken
• Garen von Speisen
• Bitte benutzen Sie kein Plastik- bzw. Papier-Geschirr.
05-MWG 746 H EST 5 13.07.2005, 14:26:59 Uhr

6
DEUTSCH
Bestätigungston
Ihre Eingaben am Gerät werden durch einen Signalton
bestätigt.
• Ein Signalton nach dem Drücken einer Taste:
Ihre Eingabe wird angenommen.
• Zwei Signaltöne nach dem Drücken einer Taste:
Die Eingabe wird verweigert.
Bitte nehmen Sie eine Korrektur der Einstellung vor.
Einstellen der Uhrzeit
Hinweis: Beim ersten Einschalten erscheint ein Doppel-
punkt blinkend.
1. Drücken Sie die Uhr-Taste.
Die Anzeige wechselt auf „:“.
2. Mit Hilfe der Ziffern-Tasten tragen Sie die gewünsch-
ten Stunden und die Minuten ein.
3. Drücken Sie erneut die Uhr-Taste. Die neue Uhrzeit
wird aktiviert.
Bedienung Mikrowelle
Geben Sie die zu erhitzende Speise in ein geeignetes
Geschirr. Öffnen Sie die Tür und stellen Sie das Gefäß
mittig auf den Glasteller. Türe bitte schließen. (Das Gerät
arbeitet aus Sicherheitsgründen nur mit fest geschlosse-
ner Tür).
1. Drücken Sie die Stopp-Taste.
2. Wählen Sie durch ein-/mehrmaliges Drücken der
Mikrowelle-Taste die gewünschte Mikrowellenleistung.
Drücken Sie, zum Auswählen der Prozentwerte,
die Mikrowelle-Taste
Drücken Sie: Leistung Beschreibung
1x 100% (P-HI) Volle Leistung
2x 90% (P-90)
3x 80% (P-80)
4x 70% (P-70) Hoch
5x 60% (P-60)
6x 50% (P-50) Mittel
7x 40% (P-40)
8x 30% (P-30) Niedrig
9x 20 % (P-20)
10x 10 % (P-10) Sehr niedrig
11x 0% (P-00)
100% entspricht 900 W
3. Mit Hilfe der Ziffern-Tasten tragen Sie die gewünschte
Gardauer ein.
Zum Beispiel:
10:30Min Gardauer auf 100% Leistung
Schritt Taste Anzeige
1 Stopp
2 Mikrowelle
P- HI
3 1 0 3 0
10:30
4Start
4. Drücken Sie zum Starten die Start-Taste. Die Gar-
dauer richtet sich nach Menge und Beschaffenheit
des Inhaltes. Bei etwas Übung lernen Sie schnell, die
Gardauer einzuschätzen.
Bitte beachten Sie:
Das Garen im Mikrowellenherd geschieht sehr viel
schneller als in einem Backofen. Stellen Sie die Gardau-
er, wenn Sie sich nicht sicher sind, gering ein und garen
Sie ggf. nach. Nach Ablauf der Zeit schaltet sich das
Gerät aus und im Display erscheint „END”. Entnehmen
Sie dann die Speise.
Schnelles Auftauen von Gefriergut
Bitte beachten Sie:
• Als Faustregel gilt, 500g Gefriergut benötigt ca.
5 Minuten zum Auftauen.
• Sollte innerhalb dieser Zeit das Gefriergut nicht
vollständig aufgetaut sein, stellen Sie die Zeit in 1-
Min.-Schritte ein.
Angenommen, Sie möchten gefrorene Lebensmittel
auftauen und die Zeit auf 5 Minuten einstellen:
1. Drücken Sie die Stopp-Taste.
2. Drücken Sie die Auftauen-Taste.
3. Mit Hilfe der Ziffern-Tasten tragen Sie die gewünschte
Gardauer ein.
Schritt Taste Anzeige
1 Stopp
2 Auftauen
:
3 5 0 0
5:00
4Start
4. Drücken Sie zum Starten die Start-Taste.
Falls das Gefriergut in einem Kunststoffbehälter einge-
froren war, empfehlen wir das Gefriergut kurz anzu-
tauen und dann in ein mikrowellengeeignetes Geschirr
umzufüllen.
Sie können zum Auftauen bis zu 99 Minuten plus 99 Se-
kunden einstellen. Nachdem die Zeit abgelaufen ist, ertö-
nen akustische Signale und das Wort „END“ erscheint im
Display. Drücken Sie die Stopp-Taste oder öffnen Sie die
Tür. Das Wort „END“ erlischt.
In der nachfolgenden Tabelle erhalten Sie Informationen
zum manuellen Auftauen.
Tabelle Auftauen
Lebensmittel/Speise Menge
Leistung
Watt
Zeit
ca. Min.
Nachtau-
zeit Min.
Fleisch, Wurstwaren
Fleisch (Rind, Kalb,
Schwein) am Stück
500 g
1000 g
180
180
14 – 18
25 - 30
10 – 15
20 - 25
Schnitzel, Kotelett 200 g 180 4 - 6 5 - 10
Hackfl eisch 250 g 180 6 - 8 5 - 10
Bratwurst, Bockwurst 200 g 180 4 - 6 5 - 10
Aufschnitt 300 g 180 4 - 6 5 - 10
Tipp: Nach halber Zeit Fleisch wenden, empfi ndliche Teile abdecken; Hack-
fl eisch zerteilen, bereits aufgetaute Teile entfernen; Wurstscheiben trennen
Gefl ügel
Hähnchen 1000 g 180 20 - 25 10 - 15
Hähnchenteile 500 g 180 12 - 15 5 - 10
Ente 1700 g 180 25 - 40 20 - 25
Gans-, Putenteile 500 g 180 12 - 18 10 - 15
Tipp: Gefl ügel nach halber Zeit wenden, Flügel und Keulen abdecken.
Achtung: Auftaufl üssigkeit wegschütten und nicht mit anderen Speisen in
Berührung bringen.
05-MWG 746 H EST 6 13.07.2005, 14:27:12 Uhr

7
DEUTSCH
Lebensmittel/Speise Menge
Leistung
Watt
Zeit
ca. Min.
Nachtau-
zeit Min.
Wild
Rehrücken 1000 g 180 20 - 35 20 - 30
Hasenrücken 500 g 180 12 - 13 10 - 20
Tipp: Einmal wenden, Randteile abdecken
Fisch
Krabben, Shrimps 250 g 180 5 - 7 5 - 10
Forelle 340 g 180 4 - 6 5 - 10
Fisch im Ganzen 500 g 180 7 - 10 10 - 15
Fischfi let 250 g 180 5 - 7 5 - 10
Tipp: Mehrmals wenden.
Obst
Himbeeren, Erdbeeren 250 g 180 4 - 6 5 - 10
Kirschen, Pfl aumen 250 g 180 5 - 7 5 - 10
Apfelmus 500 g 180 9 - 12 5 - 10
Tipp: Vorsichtig umrühren, bzw. zerteilen.
Gemüse: Siehe „Tabelle Garen“, „Gemüse auftauen und garen“
Brot und Gebäck
Brötchen 4 Stück 180 ca. 1-3 5
Brot 1000 g 180 13 - 15 8 - 10
Toastbrot 500 g 180 5 - 6 5 - 10
Rührkuchen 500 g 180 6 - 8 5 - 10
Obstkuchen 1 Stück 180 2 - 3 2 - 3
Torte
1 Stück 180 0,5 - 1 3 - 5
1200 g 180 10 - 12 30 - 60
Tipp: Brot und Gebäck auf Küchenkrepppapier legen, das die Feuchtigkeit
aufnimmt; empfi ndliches Gebäck nur antauen.
Milchprodukte
Butter 250 g 180 5 - 7 10 - 15
Quark 250 g 180 6 - 8 5 - 10
Sahne 200 g 180 3 - 5 2 - 3
Tipp: Alufolie entfernen, nach halber Zeit umrühren; Sahne noch halb
gefroren schlagen.
Erwärmen
Das Erwärmen und Erhitzen ist eine besondere Stärke
der Mikrowelle. Kühlschrankkalte Flüssigkeiten und Spei-
sen lassen sich sehr leicht auf Zimmertemperatur oder
Verzehrtemperatur bringen, ohne viele Töpfe benutzen
zu müssen.
Die in der folgenden Tabelle angegebenen Erhitzungs-
zeiten können nur Richtwerte sein, da die Zeit sehr stark
von der Ausgangstemperatur und der Zusammensetzung
der Speise abhängt. Es empfi ehlt sich deshalb, ab und zu
nachzusehen, ob das Gericht schon heiß genug ist.
Tabelle Erwärmen
Lebensmittel/Speise Menge
Leistung
Watt
Zeit
ca. Min.
Abdecken
Flüssigkeiten
Wasser, 1 Tasse 150 g 900 0,5 - 1 nein
Wasser, 0,5 l 500 g 900 3,5 - 5 nein
Wasser, 0,75 l 750 g 900 5 - 7 nein
Kaffee, 1 Tasse 150 g 900 0,5 - 1 nein
Milch, 1 Tasse 150 g 900 0,5 - 1 nein
Achtung: Einen Glasstab o. ä. (nichts metallisches) gegen Siedeverzug in
das Gefäß geben, vor dem Trinken gut umrühren.
Tellergerichte
Schnitzel + Kartoffeln und
Gemüse
450 g 900 2,5 - 3,5 ja
Gulasch mit Nudeln 450 g 900 2 - 2,5 ja
Fleisch + Kloß + Soße 450 g 900 2,5 - 3,5 ja
Tipp: Vorher leicht anfeuchten, zwischendurch umrühren.
Lebensmittel/Speise Menge
Leistung
Watt
Zeit
ca. Min.
Abdecken
Fleisch
Schnitzel, paniert 200 g 900 1 - 2 nein
Frikadellen, 4 Stück 500 g 900 3 - 4 nein
Bratenstück 250 g 900 2 - 3 nein
Tipp: Mit Öl bepinseln, damit die Panade bzw. die Kruste nicht aufweicht.
Gefl ügel
1/2 Hähnchen 450 g 900 3,5 - 5 nein
Hühnerfrikassee 400 g 900 3 - 4,5 ja
Tipp: Mit Öl bepinseln, zwischendurch umrühren.
Beilagen
Nudeln, Reis
1 Port. 150 g 900 1 - 2 ja
2 Port. 300 g 900 2,5 - 3,5 ja
Kartoffeln 500 g 900 3 - 4 ja
Tipp: Vorher leicht anfeuchten.
Suppen / Soßen
Klare Brühe, 1 Teller 250 g 900 1 - 1,5 ja
Suppe mit Einlagen 250 g 900 1,5 - 2 ja
Soße 250 g 900 1 - 2 ja
Babykost
Milch 100 ml 540 0,5 - 1 nein
Brei 200 g 540 1 - 1,5 nein
Tipp: Gut durchschütteln oder umrühren. Temperatur überprüfen!
Garen
Praktische Tipps zum Garen
Halten Sie sich an die Richtwerte in der Gartabelle und
den Rezepten. Beobachten Sie den Kochvorgang, solan-
ge Sie noch nicht soviel Übung haben.
Die Tür des Gerätes können Sie jederzeit öffnen. Das
Gerät schaltet automatisch ab.
Es arbeitet erst wieder, wenn die Tür geschlossen ist.
Lebensmittel aus dem Kühlschrank, benötigen eine etwas
längere Garzeit als solche mit Raumtemperatur.
Je kompakter eine Speise ist, desto länger ist die Garzeit.
So benötigt z.B. ein größeres Stück Fleisch eine längere
Garzeit als geschnetzeltes Fleisch gleicher Menge. Es
empfi ehlt sich, größere Mengen bei maximaler Leistung
anzukochen und für ein gleichmäßiges Garen auf mittle-
rer Leistung fortzukochen.
Flache Speisen und kleinere Mengen garen schneller
als hohe und große Mengen, die Lebensmittel daher
möglichst fl ach verteilen. Dünnere Teile, z.B. Hähn-
chenschenkel oder Fischfi let, nach innen legen oder
überlappen lassen.
Es gilt die Faustregel:
Doppelte Menge = fast doppelte Zeit
Halbe Menge = halbe Zeit
Wenn Sie für ein Gericht keine passende Zeitangabe
fi nden können, gilt die Regel:
pro 100 g ca. 1 Minute Garzeit
Alle Speisen, die Sie am Herd abdecken, sollten Sie auch
im Mikrowellengerät abdecken.
Ein Deckel verhindert, dass die Speisen austrocknen.
Zum Abdecken eignen sich ein umgedrehter Teller,
Pergamentpapier oder Mikrowellenfolie. Speisen, die eine
Kruste erhalten sollen, offen garen.
05-MWG 746 H EST 7 13.07.2005, 14:27:14 Uhr

8
DEUTSCH
Tabelle Garen
Lebensmittel/Speise Menge
Leistung
Watt
Zeit ca.
Min.
Abdecken
Gemüse
Auberginen 500 g 720 7 - 10 ja
Blumenkohl 500 g 720 8 - 11 ja
Brokkoli 500 g 720 6 - 9 ja
Chicoree 500 g 720 6 - 7 ja
Erbsen 500 g 720 6 - 7 ja
Fenchel 500 g 720 8 - 11 ja
Grüne Bohnen 300 g 720 13 - 15 ja
Kartoffeln 500 g 720 9 - 12 ja
Kohlrabi 500 g 720 8 - 10 ja
Lauch 500 g 720 7 - 9 ja
Maiskolben 250 g 720 7 - 9 ja
Möhren 500 g 720 8 - 10 ja
Paprika 500 g 720 6 - 9 ja
Rosenkohl 300 g 720 7 - 10 ja
Spargel 300 g 720 6 - 9 ja
Tomaten 500 g 720 6 - 7 ja
Zucchini 500 g 720 9 - 10 ja
Tipp: Gemüse kleinschneiden und mit 2 - 3 El Flüssigkeit garen, zwischen-
durch umrühren, 3 - 5 Min. nachgaren lassen, erst vor dem Servieren würzen.
Obst
Apfel-, Birnenkompott 500 g 720 5 - 8 ja
Pfl aumenmus 250 g 720 4 - 6 nein
Rhabarberkompott 250 g 720 5 - 8 ja
Bratäpfel, 4 Stück 500 g 720 7 - 9 ja
Tipp: 125 ml Wasser zufügen. Zitronensaft verhindert, dass das Obst sich
verfärbt, 3 - 5 Min. nachgaren lassen.
Fleisch (Bereits vorgefertigte Speisen)
Fleisch mit Soße 400 g 720 10 - 12 ja
Gulasch, Geschnetzeltes 500 g 720 10 - 15 ja
Rindsrouladen 250 g 720 7 - 8 ja
Tipp: Zwischendurch umrühren, 3 - 5 Min. ruhen lassen.
Gefl ügel (Bereits vorgefertigte Speisen)
Hühnerfrikassee 250 g 720 6 - 7 ja
Gefl ügelsuppe 200 g 720 5 - 6 ja
Tipp: Zwischendurch umrühren, 3 - 5 Min. ruhen lassen.
Fisch
Fischfi let
300 g 720 7 - 8 ja
400 g 720 8 - 9 ja
Tipp: Nach der Hälfte der Zeit wenden, 3 - 5 Min. nachgaren lassen.
Gemüse auftauen und garen
Apfelrotkohl 450 g 720 14 -16 ja
Blattspinat 300 g 720 11 - 13 ja
Blumenkohl 200 g 720 7 - 9 ja
Brechbohnen 200 g 720 8 - 10 ja
Brokkoli 300 g 720 8 - 9 ja
Erbsen 300 g 720 7 - 8 ja
Kohlrabi 300 g 720 13 -15 ja
Lauch 200 g 720 10 - 11 ja
Mais 200 g 720 4 - 6 ja
Möhren 200 g 720 5 - 6 ja
Rosenkohl 300 g 720 7 - 8 ja
Spinat
450 g 720 12 - 13 ja
600 g 720 15 - 17 ja
Tipp: Mit 1 -2 El Flüssigkeit garen, zwischendurch umrühren bzw. vorsichtig
zerteilen, 2 - 3 Min. nachgaren lassen, erst vor dem Servieren würzen.
Suppen / Eintöpfe (Bereits vorgefertigte Speisen)
Eintopf 500 g 720 13 - 15 ja
Suppe mit Einlage 300 g 720 7 - 8 ja
Crèmesuppe 500 g 720 13 - 15 ja
Tipp: Zwischendurch umrühren, 3 - 5 Min. nachgaren lassen.
Express Kochen
Zum Starten des Express-Kochens drücken Sie die
Express-Taste wiederholt. Der Garvorgang beginnt sofort,
wobei jedes weitere Drücken der Taste die Garzeit erst
um 30 Sekunden verlängert, ab einer Minute wird die
Gardauer um jeweils eine Minute verlängert.
Die Leistung der Mikrowelle beträgt dabei 100%.
Automatik-Programme
Mit Hilfe der Automatik können Sie bestimmte Mengen
von Speisen automatisch garen. Gardauer und Mikrowel-
lenleistung sind im Programm hinterlegt.
Gehen Sie dazu wie folgt vor:
a) Kartoffeln
1. Drücken Sie die Stopp-Taste.
2. Drücken Sie Taste „Kartoffel“ 1x für die Zubereitung
von 120-170g oder drücken Sie Taste „Kartoffel“
2x für die Zubereitung von 140-200g.
3. Drücken Sie eine Ziffern-Taste von 1-4, um eine
Gardauer auszuwählen.
Taste
“Kartoffel”
Ziffern-Taste Gardauer
1x 1 3min 50sek.
1x 2 7min 10sek
1x 3 11min
1x 4 14min
Taste
“Kartoffel”
Ziffern-Taste Gardauer
2x 1 5min 40sek.
2x 2 9min
2x 3 13min
2x 4 17min
4. Drücken Sie zum Starten die Start-Taste.
Nach Ablauf der Zeit schaltet sich das Gerät aus und
im Display erscheint „END“.
Tipp: Lassen Sie die Speise zum Nachgaren noch
5-10min im Ofen stehen.
b) Popkorn
Bitte nur Mikrowellen-Popcorn im Beutel verwenden!
1. Drücken Sie die Stopp-Taste.
2. Drücken Sie Taste „Popkorn“. Im Display erscheint
„2:30“.
3. Drücken Sie zum Starten die Start-Taste.
Nach Ablauf der Zeit schaltet sich das Gerät aus und
im Display erscheint „END“. Entnehmen Sie dann die
Speise.
Hinweis: Sie können die Gardauer ändern.
• Drücken Sie die Taste „Popkorn“ 2x.
• Tragen Sie mit den Ziffern-Tasten die neue Gardauer
ein.
• Drücken Sie die Start-Taste.
Die neue Gardauer bleibt gespeichert, bis sie erneut
geändert wird.
05-MWG 746 H EST 8 13.07.2005, 14:27:16 Uhr

9
DEUTSCH
c) Pizza
1. Drücken Sie die Stopp-Taste.
2. Drücken Sie Taste „Pizza“ 1x für das Aufwärmen
eines Stücks von 120-140g oder drücken Sie Taste
„Pizza“ 2x für das Aufwärmen eines größeren Stücks.
3. Drücken Sie zum Starten die Start-Taste.
Nach Ablauf der Zeit schaltet sich das Gerät aus und
im Display erscheint „END”. Entnehmen Sie dann die
Speise.
d) Fleischspieß
1. Drücken Sie die Stopp-Taste.
2. Drücken Sie Taste „Fleischspieße“ 1x für die Zuberei-
tung von kleineren Mengen oder drücken Sie Taste
„Fleischspieße“ 2x für die Zubereitung von größeren
Mengen.
3. Drücken Sie eine Ziffern-Taste von 1-4, um ein Garge-
wicht zu wählen.
(Taste „Fleischspieße“ 1x gedrückt)
Ziffern-Taste Gewicht Gardauer
1 120g 10min
2 200g 13min
3 400g 17min
4 600g 23min
(Taste „Fleischspieße“ 2x gedrückt)
Ziffern-Taste Gewicht Gardauer
1 170g 12min
2 310g 15min
3 540g 23min
4 800g 30min
4. Drücken Sie zum Starten die Start-Taste.
Nach Ablauf der Zeit schaltet sich das Gerät aus und
im Display erscheint „END“. Entnehmen Sie dann die
Speise.
e) Getränke
1. Drücken Sie die Stopp-Taste.
2. Drücken Sie Taste „Getränke“ 1x für die Erhitzung von
140-200g. Drücken Sie Taste „Getränke“ 2x für die
Erhitzung von 250-310g.
3. Drücken Sie eine Ziffern-Taste von 1-4, um eine
Aufwärmzeit auszuwählen.
Taste
“Getränke”
Ziffern-Taste Aufwärmzeit
1x 1 1min 20sek
1x 2 2min 30sek
1x 3 3min 40sek
1x 4 4min 50sek
Taste
“Getränke”
Ziffern-Taste Aufwärmzeit
2x 1 2min 20sek.
2x 2 4min
2x 3 5min 40sek
2x 4 7min 20sek
4. Drücken Sie zum Starten die Start-Taste.
Nach Ablauf der Zeit schaltet sich das Gerät aus und im
Display erscheint „END“. Entnehmen Sie dann die Speise.
f) Aufwärmen
1. Drücken Sie die Stopp-Taste.
2. Drücken Sie Taste „Aufwärmen“. Im Display erscheint
„3:40“.
3. Drücken Sie zum Starten die Start-Taste.
Nach Ablauf der Zeit schaltet sich das Gerät aus und im
Display erscheint „END“. Entnehmen Sie dann die Speise.
g) Kuchen
1. Drücken Sie die Stopp-Taste.
2. Drücken Sie Taste „Kuchen“. Im Display erscheint
„40:00“.
3. Drücken Sie zum Starten die Start-Taste.
Nach Ablauf der Zeit schaltet sich das Gerät aus und
im Display erscheint „END“. Entnehmen Sie dann die
Speise.
Hinweis: Sie können die Gardauer ändern.
• Drücken Sie die Taste „Kuchen“ 2x.
• Tragen Sie mit den Ziffern-Tasten die neue Gardauer
(bis 99:99) ein.
• Drücken Sie die Start-Taste.
Die neue Gardauer bleibt gespeichert, bis sie erneut
geändert wird.
Grill
Zum Grillen benutzen Sie bitte den Grillrost, um eine
schnelle und gleichmäßige Bräunung zu erzielen.
Verwenden Sie ein geeignetes hitzebeständiges Geschirr
oder legen Sie das Grillgut direkt auf den Grillrost.
Große, dicke Lebensmittel werden direkt auf dem Dreh-
teller gegrillt!
Zum Grillen und Überbacken gehen Sie wie folgt vor:
1. Drücken Sie die Stopp-Taste.
2. Drücken Sie die Grill-Taste 1x.
3. Mit Hilfe der Ziffern-Tasten tragen Sie die gewünschte
Grilldauer ein.
4. Drücken Sie zum Starten die Start-Taste.
Nach Ablauf der Zeit schaltet sich das Gerät aus und
im Display erscheint „END“. Entnehmen Sie dann die
Speise.
Mikrowelle/Grill-Kombibetrieb
In diesen Einstellungen arbeiten Mikrowelle und Grill
abwechselnd innerhalb der vorgewählten Zeit nach dem
Verhältnis:
Kombination 1
30% der Garzeit
Mikrowelle
70% der Garzeit
Grill
Kombination 2
55% der Garzeit
Mikrowelle
45% der Garzeit
Grill
Wenn Sie Speisen im Kombibetrieb Mikrowelle-Grill zube-
reiten, sollten Sie folgendes beachten:
Für große, dicke Lebensmittel, wie z.B. Schweinebraten,
ist die Mikrowellenzeit entsprechend länger als für kleine,
fl ache Lebensmittel. Beim Grill verhält es sich jedoch um-
gekehrt. Je näher das Lebensmittel an den Grill gelangt,
desto schneller wird es braun. Das heißt, wenn Sie große
Bratenstücke im Kombibetrieb zubereiten, ist die Grillzeit
gegebenenfalls kürzer als für kleinere Bratenstücke.
05-MWG 746 H EST 9 13.07.2005, 14:27:18 Uhr

10
DEUTSCH
Gehen Sie dazu wie folgt vor:
1. Drücken Sie die Stopp-Taste.
2. Drücken Sie Taste „Mikrowelle/Grill“ 1x für den Kombi-
nationsbetrieb 1. Drücken Sie Taste „Mikrowelle/Grill“
2x für den Kombinationsbetrieb 2.
3. Mit Hilfe den Ziffern-Tasten geben Sie die gewünschte
Gardauer ein.
4. Drücken Sie zum Starten die Start-Taste.
Nach Ablauf der Zeit schaltet sich das Gerät aus und
im Display erscheint „END“. Entnehmen Sie dann die
Speise.
Tabelle Mikrowelle/Grill-Kombibetrieb
Lebensmittel/Speise Menge
Zeit ca.
Min.
Ab-
decken
Fleisch, Wurstwaren
Rind-, Schwein oder
Kalbfl eisch im Stück
500 g
750 g
10 - 12
12 - 15
nein
nein
Kasseler 500 g 12 - 14 nein
Hackbraten 500 g 13 - 15 nein
Wiener Würstchen 200 g 2 - 3 nein
Bockwurst 200 g 2 - 3 nein
Tipp: Fleisch nach der Hälfte der Zeit wenden, 5 – 10 Min. nachgaren
lassen; Hackbraten mit Eiklar bestreichen; Würstchen mit einer Gabel
anstechen.
Gefl ügel
Suppenhuhn 1000 g 13 - 15 nein
Hähnchenteile 250 g 4 - 5 nein
Tipp: Ohne Flüssigkeit im eigenen Saft garen lassen, einmal wenden,
4 - 5 Min. nachgaren lassen.
Fisch
Forelle, blau 300 g 5 - 6 nein
Fischfi let 300 g 3 - 4 nein
Tipp: Nach der Hälfte der Zeit wenden, 3 - 5 Min. nachgaren lassen.
Bedienung im reinen Heißluft Betrieb
Während des Kochens mit Heißluft zirkuliert die heiße
Luft im Garraum. Dadurch werden die Speisen schneller
gebräunt und knuspriger. Im Heißluftbetrieb können Sie
bis zu 10 unterschiedliche Temperaturen wählen.
Kochen mit Heißluft
Angenommen, Sie möchten bei 180°C, 40 Minuten
garen, dann gehen Sie wie folgt vor:
1. Drücken Sie die Stopp-Taste.
2. Drücken Sie die Taste „Heißluft“.
3. Mit einer der Ziffern-Tasten (z. B. 8) wählen Sie die
gewünschte Gartemperatur aus.
4. Mit Hilfe der Ziffern-Tasten tragen Sie die gewünschte
Gardauer (z. B. 40min) ein.
Schritt Taste Anzeige
1 Stopp
2 Heißluft
38
1 80
44 0
H:40
5Start
5. Drücken Sie zum Starten die Start-Taste.
Bitte beachten Sie:
• Maximal können 9 Stunden, 99 Minuten programmiert
werden. Nachdem die Zeit abgelaufen ist, ertönen
akustische Signale und das Wort „END“ erscheint im
Display. Drücken Sie die Stopp-Taste oder öffnen Sie
die Tür. Das Wort „END“ erlischt.
• Sie können während des Kochens mit Heißluft die
Temperatur kontrollieren, indem Sie die Heißluft-Taste
drücken.
Vorheizen und Kochen mit Heißluft
Sie können Ihr Mikrowellengerät im Heißluftbetrieb vor-
heizen und dann die Heißluft einsetzen.
Angenommen Sie möchten das Gerät auf 170°C vorhei-
zen und anschließend für 35 Minuten garen:
1. Drücken Sie die Stopp-Taste.
2. Drücken Sie die Heißluft-Taste.
3. Mit einer der Ziffern-Tasten (z. B. 7) wählen Sie die
gewünschte Vorheiztemperatur aus.
4. Drücken Sie die Start-Taste. Im Display blinkt die
Anzeige „PREH“ (Vorheizen). Erreicht der Ofen die
programmierte Temperatur, leuchtet die Anzeige
„PREH“ kontinuierlich.
5. Öffnen Sie bitte die Tür und stellen Sie Ihr Gargut auf
die Mitte des Drehtellers.
6. Mit Hilfe der Ziffern-Tasten tragen Sie die gewünschte
Gardauer (z. B. 35min) ein.
7. Drücken Sie zum Starten die Start-Taste.
Nach Ablauf der Zeit schaltet sich das Gerät aus und
im Display erscheint „END”. Entnehmen Sie dann die
Speise.
Kombiniertes Nutzen
von Heißluft und Mikrowelle
Das Gerät hat hierzu vier vorprogrammierte Einstellun-
gen. Dies vereinfacht es Ihnen, sowohl mit Heißluft als
auch mit der Mikrowellenfunktion zu arbeiten.
Drücken Sie bitte die Mikrowelle/Heißluft-Taste und dann
eine Ziffern-Taste von 1-4, um die Heißlufttemperatur
auszuwählen.
Taste
Ziffern-
Taste
Temperatur (°C)
Mikrowelle/Heißluft 1 150
Mikrowelle/Heißluft 2 180
Mikrowelle/Heißluft 3 200
Mikrowelle/Heißluft 4 230
Möchten Sie, um einen Kuchen auf 200°C zu backen,
eine Zeit von 25 Minuten einstellen:
1. Drücken Sie die Stopp-Taste.
2. Drücken Sie bitte die Mikrowelle/Heißluft-Taste.
3. Mit einer der Ziffern-Tasten (z. B. 3) wählen Sie die
gewünschte Temperatur (200°C) aus.
4. Mit Hilfe der Ziffern-Tasten tragen Sie die gewünschte
Gardauer (z. B. 25min) ein.
5. Drücken Sie zum Starten die Start-Taste.
Bitte beachten Sie:
Maximal können 9 Stunden, 99 Minuten programmiert
werden. Nachdem die Zeit abgelaufen ist, ertönen akus-
tische Signale und das Wort „END“ erscheint im Display.
05-MWG 746 H EST 10 13.07.2005, 14:27:19 Uhr

11
DEUTSCH
Drücken Sie die Stopp-Taste oder öffnen Sie die Tür. Das
Wort „END“ erlischt.
Sie können während des Kochens mit Heißluft die Tem-
peratur kontrollieren, indem Sie die Mikrowelle/Heißluft-
Taste drücken.
Kochen in mehreren Schritten
Sie können die Programme so einstellen, dass Sie die
Möglichkeit haben 3 verschiedene Funktionen zu wählen.
Nehmen wir an Sie wählen das folgende Programm zum
Kochen:
Schnelles Auftauen
쒆
Zubereiten in der Mikrowelle
쒆
Kochen mit Heißluft (ohne Vorheizen)
1. Drücken Sie die Stopp-Taste.
2. Drücken Sie die Auftauen-Taste.
3. Mit Hilfe der Ziffern-Tasten tragen Sie die gewünschte
Auftaudauer ein.
4. Drücken Sie die Mikrowelle-Taste.
5. Mit Hilfe der Ziffern-Tasten tragen Sie die gewünschte
Mikrowellen-Gardauer ein.
6. Drücken Sie die Heißluft-Taste.
7. Mit einer der Ziffern-Tasten wählen Sie die gewünsch-
te Gartemperatur aus.
8. Mit Hilfe den Ziffern-Tasten tragen Sie die gewünschte
Heißluft-Gardauer ein.
9. Drücken Sie zum Starten die Start-Taste.
Nach Ablauf der Zeit schaltet sich das Gerät aus und
im Display erscheint „END“. Entnehmen Sie dann die
Speise.
Sonderfunktionen
Automatische Erinnerung
Nach Beenden eines Garvorgangs werden Sie alle 2
Minuten durch einen Signalton aufgefordert, die Speise
zu entnehmen.
Durch Öffnen der Tür oder Drücken der Stopp-Taste wird
diese Erinnerung ausgeschaltet.
Sperren
Drücken Sie die Stopp-Taste länger als 3 Sek., um
das Gerät zu sperren. Die Sperrung wird im Display
angezeigt. Die Funktion der Bedienelemente ist blockiert.
Drücken Sie die Stopp-Taste erneut länger als 3 Sek., um
die Sperrung aufzuheben.
Timer (Count down)
Das Gerät verfügt über eine Timer-Funktion:
1. Drücken Sie die Stopp-Taste.
2. Drücken Sie die Timer-Taste.
3. Mit Hilfe der Ziffern-Tasten tragen Sie die gewünschte
Zeit ein.
4. Drücken Sie zum Starten die Start-Taste.
Die eingestellte Zeit wird zurückgezählt und das Ende
durch einen Ton signalisiert.
Hinweis: Diese Funktion können Sie auch während des
Betriebes des Gerätes nutzen.
Reinigung
Ziehen Sie vor der Reinigung immer den Netzstecker.
• Reinigen Sie den Garraum nach der Benutzung mit
einem leicht feuchten Tuch.
• Reinigen Sie die Mikrowelle von außen mit einem
leicht feuchten Tuch.
• Reinigen Sie das Zubehör in gewohnter Weise mit
warmem Wasser und Spülmittel.
• Türrahmen/Türdichtung und benachbarte Teile müs-
sen bei Verschmutzung sorgfältig mit einem feuchten
Tuch gereinigt werden.
Technische Daten
Modell: ...........................................................MWG 746 H
Spannungsversorgung: .................................230 V, 50 Hz
Leistungsaufnahme: ..............................................1400 W
Leistungsaufnahme Heißluft:.................................1400 W
Leistungsaufnahme Grill:.......................................1200 W
Bemessungs-Mikrowellenausgangsleistung:...........900 W
Garraumvolumen:.................................................. 25 Liter
Schutzklasse: ................................................................... Ι
Dieses Gerät wurde nach allen zutreffenden, aktuellen
CE-Richtlinien geprüft, wie z.B. elektromagnetische
Verträglichkeit und Niederspannungsdirektive und wurde
nach den neuesten sicherheitstechnischen Vorschriften
gebaut.
Technische Änderungen vorbehalten!
Garantie
Wir übernehmen für das von uns vertriebene Gerät eine
Garantie von 24 Monaten ab Kaufdatum (Kassenbon).
Innerhalb der Garantiezeit beseitigen wir unentgeltlich
die Mängel des Gerätes oder des Zubehörs, die auf
Material- oder Herstellungsfehler beruhen, durch Repa-
ratur oder, nach unserem Ermessen, durch Umtausch.
Garantieleistungen bewirken weder eine Verlängerung
der Garantiefrist, noch beginnt dadurch ein Anspruch auf
eine neue Garantie!
Als Garantienachweis gilt der Kaufbeleg. Ohne diesen
Nachweis kann ein kostenloser Austausch oder eine
kostenlose Reparatur nicht erfolgen.
Im Garantiefall geben Sie bitte das Grundgerät in der
Originalverpackung zusammen mit dem Kassenbon an
Ihren Händler.
Sowohl Defekte an Verbrauchszubehör bzw. Verschleiß-
teilen
, als auch Reinigung, Wartung oder der Austausch
05-MWG 746 H EST 11 13.07.2005, 14:27:20 Uhr
12
von Verschleißteilen, fallen nicht unter die Garantie und
sind deshalb kostenpfl ichtig!
Die Garantie erlischt bei Fremdeingriff.

12
DEUTSCH
Nach der Garantie
Nach Ablauf der Garantiezeit können Reparaturen
kostenpfl ichtig vom entsprechenden Fachhandel oder
Reparaturservice ausgeführt werden.
Bedeutung des Symbols „Mülltonne“
Schonen Sie unsere Umwelt, Elektrogeräte gehören nicht
in den Hausmüll.
Nutzen Sie die für die Entsorgung von Elektrogeräten
vorgesehenen Sammelstellen und geben dort Ihre Elek-
trogeräte ab die Sie nicht mehr benutzen werden.
Sie helfen damit die potenziellen Auswirkungen, durch
falsche Entsorgung, auf die Umwelt und die menschliche
Gesundheit zu vermeiden.
Sie leisten damit Ihren Beitrag zur Wiederverwertung,
zum Recycling und zu anderen Formen der Verwertung
von Elektro- und Elektronik-Altgeräten.
Informationen, wo die Geräte zu entsorgen sind, erhalten
Sie über Ihre Kommunen oder die Gemeindeverwaltun-
gen.
Kostenlose Hotline*
Haben Sie Fragen zu Ihrem Gerät? Unser Serviceteam
steht gerne für Sie bereit. Kleinere Probleme lassen sich
oft schon telefonisch lösen.
Rufen Sie deshalb bitte zunächst unsere Hotline an.
Hotline 02152/2006-888
Mo. - Do. 8.30 - 17.00 Uhr
Fr.
8.30 - 14.00 Uhr
oder per E-Mail:
Service Anschrift
Industriering Ost 40
D-47906 Kempen/Germany
Clatronic International GmbH
(*bei entsprechendem Telekommunikationstarif.)
05-MWG 746 H EST 12 13.07.2005, 14:27:21 Uhr

ENGLISH
13
General Safety Instructions
• Read the operating instructions carefully before
putting the appliance into operation and keep the
instructions including the warranty, the receipt and, if
possible, the box with the internal packing.
• The appliance is designed exclusively for private use
and for the envisaged purpose. This appliance is not
fi t for commercial use. Do not use it outdoors (except
if it is designed to be used outdoors). Keep it away
from sources of heat, direct sunlight, humidity (never
dip it into any liquid) and sharp edges. Do not use the
appliance with wet hands. If the appliance is humid or
wet, unplug it immediately. Do not put it in water.
• When cleaning or putting it away, switch off the ap-
pliance and always pull out the plug from the socket
(pull on the plug, not the cable) if the appliance is not
being used and remove the attached accessories.
• Do not operate the machine without supervision. If
you should leave the workplace, always switch the
machine off or remove the plug from the socket (pull
the plug itself, not the lead).
• To protect children from the dangers posed by
electrical appliances, make sure that the cable is
hanging low and that children do not have access to
the appliance.
• Check the appliance and the cable for damage on a
regular basis. Do not use the appliance if it is dama-
ged.
• Do not try to repair the appliance on your own. Always
contact an authorized technician. To avoid the expos-
ure to danger, always have a faulty cable be replaced
only by the manufacturer, by our customer service or
by a qualifi ed person and with a cable of the same
type.
• Use only original spare parts.
• Pay careful attention to the following “Special Safety
Instructions“.
Important Safety Information!
Please read carefully
and keep for future use.
• Warning: When the door or the door seals are dama-
ged, the microwave oven must not be used until it has
been repaired by a qualifi ed specialist.
• Warning: Please do not repair the device yourself,
but have it repaired by an authorised specialist. Car-
rying out maintenance or repair work which involves
removal of the cover that protects the surroundings
from microwave radiation is dangerous unless carried
out by an expert.
• Warning: Do not heat liquids in closed containers.
Danger of explosion!
• Warning: If the device is operated using combi-
ned mode children may use the device only when
supervised by adults due to the temperatures that are
produced.
• Note: The microwave oven is not suitable for
warming/heating up living animals.
• Warning: Children and frail individuals may only
use the oven without supervision if they have been
instructed in its use in such a way that they are able to
use the device safely and understand the dangers of
incorrect operation.
• If you would like to use your microwave in a cupboard,
on a shelf or similar item, please ensure that you
maintain a space of at least 10 cm to cupboards, walls
etc for ventilation purposes on all sides of the machine.
• Only suitable tableware should be used such as:
glass, porcelain, ceramics, heat-resistant plastic or
special microwave tableware.
• If food is being heated or cooked in combustible
materials, such as plastic or paper containers, the
microwave oven should be checked frequently due to
the risk of fi re.
• If smoke is produced, turn the device off and remove
the plug. Keep the door closed in order to suffocate
any fl ames.
• Delay in boiling: During boiling, particularly during
the reheating of liquids (water), it may happen that the
boiling temperature has been reached but the typical
bubbles have not yet started to rise. The liquid does not
boil evenly. When the vessel is removed this so-called
delay in boiling may result in the sudden formation of
bubbles when the vessel is knocked, causing the water
to boil over. There is a serious danger of burns! In
order to achieve even boiling, please place a glass rod
or similar item, but nothing metallic, in the vessel.
• The contents of babies‘ bottles and jars of baby
food must be stirred or shaken and the temperature
checked before use. There is a danger of burns.
• Food with a shell or skin, such as eggs, sausages,
sealed jars etc. must not be heated up in the micro-
wave as they may explode even when heating by the
microwaves is fi nished.
• Any dirt on the door frame/door seal and neighbou-
ring parts must be carefully cleaned with a damp
cloth.
• Clean the microwave oven regularly and remove any
food residues from the interior.
• If the machine is not clean the surface may be
damaged, affecting its serviceable life and possibly
resulting in hazardous situations.
Description of the Operating Controls
1 Door lock
2 Viewing window*
3 Cover*
4 Drive axle
5 Sliding ring
6 Rotating plate
7 Operating panel
8 Grill heating
9 Grilling grid
Caution: Do not remove any installed parts from inside
the oven or anything from the inside of the door!
The foils on the inside of the door must not be
removed!
05-MWG 746 H EST 13 13.07.2005, 14:27:21 Uhr

ENGLISH
14
Controls
Number Buttons
For setting the clock, cooking time,
temperature and weight
Microwave Button
For selecting the power level
Grill Button
For grilling and browning
Hot Air Button
Hot air operation, thermostat controlled
Microwave/Grill
Combined Operation Button
Microwave and grill alternate
Microwave/Hot Air
Combined Operation Button
Microwave and hot air alternate
Defrost Button
Activates the defrost function in
conjunction with a time setting
Clock Button
For setting the clock in conjunction with the
number buttons
Cake Programme Button
Timer Button (Countdown)
Potato Programme Button
Popcorn Programme Button
Drinks Programme Button
Pizza Programme Button
Meat Spit Programme Button
Warming Programme Button
Start Button
Start of the programme
Express Button
Start of the express programme –
setting the express cooking time
Stop Button
• Press once to stop the cooking process
or cancel an incorrect entry.
• Press twice to delete the programme.
• Hold down for three seconds to block/
unblock the device.
Information on Grilling and
Combined Operation
• As heat radiation is used during grilling and combined
operation, please use only heat-resistant tableware.
• When food is only being grilled, metal or aluminium
tableware may also be used -but not during combined
or microwave operation.
• For grilling, pizza, baking and combined operation
only the grilling grid is suitable.
• Do not place anything on top of the housing as this
becomes hot. Always leave the ventilation slits unco-
vered.
• Please use the grilling grid to move the food to be
cooked nearer to the heating element.
Initial Operation
• After removing all the accessories from inside the
oven, unpack them and place the sliding ring in the
middle. Position the glass plate on the drive axle in
such a way that it locks into the dents of the drive
shafts and is lying fl at.
• Check the device for any visible damage, particularly
in the area of the door. If any damage is found, the
machine must not be used.
• In order to avoid interference to other machines when
the microwave oven is operated, do not place it in the
direct vicinity of other electronic devices.
• Remove any protective foils that may be adhered to
the housing.
• The foils on the inside of the door must not be
removed!
• Insert the mains plug into a properly installed
230 V, 50 Hz power socket.
• Do not remove any installed parts from inside the
oven or from inside the door!
Using the Device
What you should know about microwave operation:
• Your device works with microwave radiation, which
heats up water particles in food in a very short time.
There is no heat radiation and therefore hardly any
browning.
• Only food should be heated up with this device.
• The device is not suitable for baking in fl oating fat.
• Only 1-2 portions should be heated up at the same
time. Otherwise the microwave will become less
effi cient.
• If you want to interrupt the cooking process, press the
Stop button.
• Microwaves provide their full energy levels immediate-
ly. Pre-heating is therefore not necessary.
• Never operate the machine in microwave or combined
mode if it is empty.
• The microwave oven does not replace your traditional
cooker. It is used mainly for:
• defrosting deep-frozen food
• rapid warming/heating of food or drinks
• cooking meals
• Please do not use any plastic or paper tableware.
05-MWG 746 H EST 14 13.07.2005, 14:27:22 Uhr

ENGLISH
15
Confi rmation Signal
The information you put into the device is confi rmed by
an audible signal.
• One beep after a button has been pressed: the infor-
mation entered has been accepted.
• Two beeps after a button has been pressed:
the information has been refused.
Please correct the information you have entered.
Setting the Time
Note: When the device is switched on for the fi rst time a
fl ashing colon appears.
1. Press the clock button. The display changes to „:“.
2. Enter the desired hours and minutes using the num-
ber buttons.
3. Press the clock button again. The new time is activa-
ted.
Operating the Microwave
Place the food to be heated up into suitable tableware.
Open the door and place the vessel in the middle of the
glass plate. Then close the door. (For safety reasons the
device only works when the door is fi rmly closed.)
1. Press the Stop button.
2. Select the desired microwave power by pressing the
microwave button once or several times.
Press the microwave button to select
the percentage values
Press: Power Description
1x 100% (P-HI) Full power
2x 90% (P-90)
3x 80% (P-80)
4x 70% (P-70) High
5x 60% (P-60)
6x 50% (P-50) Medium
7x 40% (P-40)
8x 30% (P-30) Low
9x 20 % (P-20)
10x 10 % (P-10) Very low
11x 0% (P-00)
100% corresponds to 900 W
3. Enter the desired cooking time using the number
buttons.
For example:
10:30min cooking time at 100% power
Step Button Display
1Stop
2 Microwave
P- HI
3 1 0 3 0
10:30
4Start
4. Press the Start button to start the machine. The
length of cooking depends on the quantity and con-
sistency of the contents. With a little practice you will
soon learn to estimate the cooking time.
Please note: cooking in the microwave oven is very
much faster than in a standard cooker. If you are not sure,
set the cooking time to low and continue cooking after-
wards if necessary. After the time has elapsed, the device
switches off and the word „END“ appears in the display.
Then you can remove the food.
Rapid Defrosting of Frozen Food
Please note:
• As a rule of thumb, 500g of frozen food needs approx.
fi ve minutes to defrost.
• If the frozen food has not fully defrosted within this
time, set the time in 1-minute steps.
Assuming you would like to defrost frozen food and set
the time to fi ve minutes:
1. Press the Stop button.
2. Press the Defrosting button.
3. Enter the desired cooking time using the number
buttons.
Step Button Display
1Stop
2 Defrosting
:
3 5 0 0
5:00
4Start
4. Press the Start button to start the machine.
If the food was frozen in a plastic container, we
recommend that it be briefl y defrosted and then
transferred to a vessel that is suitable for placing in the
microwave oven.
A time of up to 99 minutes and 99 seconds can be set for
defrosting. After the time has elapsed beeps are heard
and the word „END“ appears in the display. Press the stop
button or open the door. The word „END“ goes off.
The following table provides information on manual
defrosting.
Defrosting Table
Food/dish Quantity
Power
in watts
Approx.
time in
minutes
Additional
thawing
time in
minutes
Meat, Sausages
Meat (beef, veal, pork)
in pieces
500 g
1000 g
180
180
14 – 18
25 - 30
10 – 15
20 - 25
Schnitzel, cutlet 200 g 180 4 - 6 5 - 10
Minced meat 250 g 180 6 - 8 5 - 10
Frying sausage,
Frankfurter
200 g 180 4 - 6 5 - 10
Slices of cold meat 300 g 180 4 - 6 5 - 10
Tip: turn the meat halfway through and cover sensitive pieces; break up
the minced meat and remove pieces that have already thawed; separate
sausage slices.
Poultry
Chicken 1000 g 180 20 - 25 10 - 15
Chicken pieces 500 g 180 12 - 15 5 - 10
Duck 1700 g 180 25 - 40 20 - 25
Goose and turkey pieces 500 g 180 12 - 18 10 - 15
Tip: turn poultry halfway through, cover wings and legs, throw away thawed
liquid and do not allow to come into contact with other foods.
Game
Saddle of venison 1000 g 180 20 - 35 20 - 30
Saddle of hare 500 g 180 12 - 13 10 - 20
Tip: turn once and cover edges.
Fish
Prawns, shrimps 250 g 180 5 - 7 5 - 10
Trout 340 g 180 4 - 6 5 - 10
Whole fi sh 500 g 180 7 - 10 10 - 15
05-MWG 746 H EST 15 13.07.2005, 14:27:32 Uhr

ENGLISH
16
Food/dish Quantity
Power
in watts
Approx.
time in
minutes
Additional
thawing
time in
minutes
Fish fi llet 250 g 180 5 - 7 5 - 10
Tip: stir several times and turn frequently.
Fruit
Raspberries, strawberries 250 g 180 4 - 6 5 - 10
Cherries, plums 250 g 180 5 - 7 5 - 10
Stewed apple 500 g 180 9 - 12 5 - 10
Tip: stir carefully or break up into pieces.
Vegetables: see „Cooking Table“, „Defrosting and Cooking Vegetables“
Bread and Pastries
Rolls 4 pieces 180 ca. 1-3 5
Bread 1000 g 180 13 - 15 8 - 10
Bread for toasting 500 g 180 5 - 6 5 - 10
Stirred cake 500 g 180 6 - 8 5 - 10
Fruit cake 1 piece 180 2 - 3 2 - 3
Flan
1 piece 180 0,5 - 1 3 - 5
1200 g 180 10 - 12 30 - 60
Tip: place the bread and pastries on kitchen crepe paper to take up the
moisture; only defrost sensitive pastry slightly.
Milk Products
Butter 250 g 180 5 - 7 10 - 15
Curds 250 g 180 6 - 8 5 - 10
Cream 200 g 180 3 - 5 2 - 3
Tip: remove the aluminium foil and stir halfway through; whip the cream
until it is semisolid.
Warming
The warming and heating of food is a particular strength
of the microwave. Liquids and foods that are in the
refrigerator can be easily brought up to room temperature
or the right temperature for consumption without the need
for many pots.
The heating times contained in the following table are
only rough guides as the time depends very much on the
starting temperature and the composition of the food. You
are therefore advised to check from time to time whether
the dish is already hot enough.
Heating Table
Food/dish Quantity
Power
in watts
Approx.
time in
minutes
Cover
Liquids
Water, 1 cup 150 g 900 0,5 - 1 no
Water, 0.5 l 500 g 900 3,5 - 5 no
Water, 0.75 l 750 g 900 5 - 7 no
Coffee, 1 cup 150 g 900 0,5 - 1 no
Milk, 1 cup 150 g 900 0,5 - 1 no
Note: Place a glass rod or similar item (nothing metal) into the vessel in
order to prevent delayed boiling. Stir well before drinking.
One-Course Meals
Schnitzel, potatoes
and vegetables
450 g 900 2,5 - 3,5 yes
Goulash with noodles 450 g 900 2 - 2,5 yes
Meat, dumpling
and sauce
450 g 900 2,5 - 3,5 yes
Tip: moisten slightly beforehand, stir from time to time.
Food/dish Quantity
Power
in watts
Approx.
time in
minutes
Cover
Meat
Schnitzel, coated
with breadcrumbs
200 g 900 1 - 2 no
Meatballs, 4 in total 500 g 900 3 - 4 no
Joint 250 g 900 2 - 3 no
Tip: brush with oil so that the breadcrumbs or crust do not become soft.
Poultry
Half a chicken 450 g 900 3,5 - 5 no
Chicken fricassee 400 g 900 3 - 4,5 yes
Tip: brush with oil, stir from time to time.
Extras
Noodles, rice
1 portion 150 g 900 1 - 2 yes
2 portions 300 g 900 2,5 - 3,5 yes
Potatoes 500 g 900 3 - 4 yes
Tip: moisten slightly beforehand.
Soups/Sauces
Clear soup, 1 plate 250 g 900 1 - 1,5 yes
Soup with garnish 250 g 900 1,5 - 2 yes
Sauce 250 g 900 1 - 2 yes
Baby Food
Milk 100 ml 540 0,5 - 1 no
Mash 200 g 540 1 - 1,5 no
Tip: shake well or stir. Check the temperature!
Cooking
Practical Cooking Tips
Please keep to the recommended values in the cooking
table and the recipes. Keep an eye on the cooking pro-
cess until you have more experience.
The door of the microwave can be opened at any time.
The machine switches off automatically.
It starts again when the door is closed.
Foods taken directly from the refrigerator require a slightly
longer cooking time than those at room temperature.
The more compact a food is, the longer is the cooking
time. For example, a large piece of meat has to be
cooked longer than the same quantity of sliced meat.
It is advisable to start cooking sizeable quantities on
maximum power and then to continue cooking evenly on
medium power.
Flat dishes cook faster than thick ones. Therefore it is ad-
visable to spread the food as thinly as possible. Thinner
pieces, e.g. chicken legs or fi sh fi llets should be placed
towards the inside or allowed to overlap.
The following rule of thumb applies:
Double the quantity = almost double the time
Half the quantity = half the time
If you are not able to fi nd a suitable time for a dish, the
following rule applies:
approx. 1 minute cooking time for each 100 g.
All dishes which are covered up on a normal cooker
should also be covered in the microwave oven.
A lid prevents the food from drying out. Suitable covers
are an inverted plate, parchment paper or microwave
foil. Dishes which are to be given a crust should not be
covered when cooked.
05-MWG 746 H EST 16 13.07.2005, 14:27:34 Uhr

ENGLISH
17
Cooking Table
Food/dish Quantity
Power
in watts
Approx.
time in
minutes
Cover
Vegetables
Aubergines 500 g 720 7 - 10 yes
Caulifl ower 500 g 720 8 - 11 yes
Broccoli 500 g 720 6 - 9 yes
Chicory 500 g 720 6 - 7 yes
Peas 500 g 720 6 - 7 yes
Fennel 500 g 720 8 - 11 yes
Green beans 300 g 720 13 - 15 yes
Potatoes 500 g 720 9 - 12 yes
Turnip cabbage 500 g 720 8 - 10 yes
Leek 500 g 720 7 - 9 yes
Maize cob 250 g 720 7 - 9 yes
Carrots 500 g 720 8 - 10 yes
Paprika 500 g 720 6 - 9 yes
Sprouts 300 g 720 7 - 10 yes
Asparagus 300 g 720 6 - 9 yes
Tomatoes 500 g 720 6 - 7 yes
Courgettes 500 g 720 9 - 10 yes
Tip: Cut the vegetables into small pieces and cook with 2 - 3 tablespoons of
liquid, stir from time to time, continue cooking for 3 - 5 minutes, season just
before serving.
Fruit
Stewed apple, pear 500 g 720 5 - 8 yes
Plum jam 250 g 720 4 - 6 no
Stewed rhubarb 250 g 720 5 - 8 yes
4 baked apples 500 g 720 7 - 9 yes
Tip: add 125 ml water. Lemon juice prevents the fruit from changing colour.
Cook for a further 3 - 5 minutes.
Meat (Ready-made meals)
Meat with sauce 400 g 720 10 - 12 yes
Goulash, stewed strips
of meat
500 g 720 10 - 15 yes
Roulade of beef 250 g 720 7 - 8 yes
Tip: stir from time to time, allow to stand for 3 - 5 minutes.
Poultry (Ready-made meals)
Chicken fricassee 250 g 720 6 - 7 yes
Poultry soup 200 g 720 5 - 6 yes
Tip: stir from time to time, allow to stand for 3 - 5 minutes.
Fish
Fish fi llet
300 g 720 7 - 8 yes
400 g 720 8 - 9 yes
Tip: turn halfway through, continue cooking for 3 - 5 minutes.
Defrosting and Cooking Vegetables
Apple and red cabbage 450 g 720 14 -16 yes
Leaf spinach 300 g 720 11 - 13 yes
Caulifl ower 200 g 720 7 - 9 yes
French beans 200 g 720 8 - 10 yes
Broccoli 300 g 720 8 - 9 yes
Peas 300 g 720 7 - 8 yes
Turnip cabbage 300 g 720 13 -15 yes
Leek 200 g 720 10 - 11 yes
Corn 200 g 720 4 - 6 yes
Carrots 200 g 720 5 - 6 yes
Sprouts 300 g 720 7 - 8 yes
Spinach
450 g 720 12 - 13 yes
600 g 720 15 - 17 yes
Tip: cook in 1 - 2 tablespoons of liquid, stir from time to time or divide
carefully into pieces. Continue cooking for 2 - 3 minutes and season just
before serving.
Food/dish Quantity
Power
in watts
Approx.
time in
minutes
Cover
Soups / Stews (Ready-made meals)
Stew 500 g 720 13 - 15 yes
Soup with garnish 300 g 720 7 - 8 yes
Crème soup 500 g 720 13 - 15 yes
Tip: stir from time to time and continue cooking for 3 - 5 minutes.
Express Cooking
To start express cooking press the express button
repeatedly. The cooking process begins immediately, with
each press of the button increasing the cooking time by 30
seconds. From a time of one minute and up the cooking
time is prolonged by one minute in each case.
The power of the microwave is then 100%.
Automatic-Programmes
With the help of the automatic control it is possible
to cook defi ned quantities of food automatically. The
cooking time and microwave power level are stored in the
programme.
Please proceed as follows:
a) Potatoes
1. Press the Stop button.
2. Press the „Potato“ button once for preparing 120-170g
for press the „Potato“ button twice for the preparation
of 140-200g.
3. Press a number button between 1 and 4 to select a
cooking time.
Button
“Potatoes”
Number Button Cooking Time
1x 1 3min 50sek.
1x 2 7min 10sek
1x 3 11min
1x 4 14min
Button
“Potatoes”
Number Button Cooking Time
2x 1 5min 40sek.
2x 2 9min
2x 3 13min
2x 4 17min
4. Press the Start button to start the machine.
After the time has elapsed, the device switches off
and the word „END“ appears in the display.
Tip: Leave the food in the oven to continue cooking
for 5-10 min.
b) Popcorn
Please only use microwave popcorn in a bag!
1. Press the Stop button.
2. Press the „Popcorn“ button. „2:30“ appears in the
display.
3. Press the Start button to start the machine.
After the time has elapsed, the device switches off and
the word „END“ appears in the display. Then you can
remove the food.
Note: It is possible to change the cooking time.
05-MWG 746 H EST 17 13.07.2005, 14:27:36 Uhr

ENGLISH
18
• Press the „Popcorn“ button twice.
• Enter the new cooking time with the number buttons.
• Press the Start button.
The new cooking time remains stored in the memory until
it is changed.
c) Pizza
1. Press the Stop button.
2. Press the „Pizza“ button once to heat up a piece of
120-140g, or press the „Pizza“ button twice to heat up
a larger piece.
3. Press the Start button to start the machine.
After the time has elapsed, the device switches off and
the word „END“ appears in the display. Then you can
remove the food.
d) Meat Spit
1. Press the Stop button.
2. Press the „Meat Spit“ button once to prepare small
quantities, or press it twice for the preparation of
larger quantities.
3. Press a number button from 1 to 4 to select a cooking
time.
(„Meat Spit“ button pressed once)
Number Button Weight Cooking Time
1 120g 10min
2 200g 13min
3 400g 17min
4 600g 23min
(„Meat Spit“ button pressed twice)
Number Button Weight Cooking Time
1 170g 12min
2 310g 15min
3 540g 23min
4 800g 30min
4. Press the Start button to start the machine.
After the time has elapsed, the device switches off and
the word „END“ appears in the display. Then you can
remove the food.
e) Drinks
1. Press the Stop button.
2. Press the „Drinks“ button once for heating up 140-
200g. Press the „Drinks“ button twice for heating up
250-310g.
3. Press a number button from 1 to 4 to select a war-
ming-up time.
Button
“Drinks”
Number Button
Warming-up
Time
1x 1 1min 20sek
1x 2 2min 30sek
1x 3 3min 40sek
1x 4 4min 50sek
Button
“Drinks”
Number Button
Warming-up
Time
2x 1 2min 20sek.
2x 2 4min
2x 3 5min 40sek
2x 4 7min 20sek
4. Press the Start button to start the machine.
After the time has elapsed, the device switches off and
the word „END“ appears in the display. Then you can
remove the food.
f) Warming up
1. Press the Stop button.
2. Press the „Warming“ button. „3:40“ appears in the
display.
3. Press the Start button to start the machine.
After the time has elapsed, the device switches off and
the word „END“ appears in the display. Then you can
remove the food.
g) Cake
1. Press the Stop button.
2. Press the „Cake“ button. „40:00“ appears in the
display.
3. Press the Start button to start the machine.
After the time has elapsed, the device switches off and
the word „END“ appears in the display. Then you can
remove the food.
Note: The cooking time can be changed.
• Press the „Cake“ button twice.
• Enter the new cooking time (up to 99:99) using the
number buttons.
• Press the start button.
The new cooking time remains in the memory until it is
changed.
Grill
Please use the grilling grid for grilling in order to achieve
rapid and even browning. Please use suitable heat-re-
sistant crockery or place the food to be grilled directly on
the grid.
Large or thick pieces of food are grilled directly on the
rotating plate!
To grill and gratinate food, proceed as follows:
1. Press the Stop button.
2. Press the grill button once.
3. Enter the desired grilling time using the number
buttons.
4. Press the Start button to start the machine.
After the time has elapsed, the device switches off and
the word „END“ appears in the display. Then you can
remove the food.
Combined Microwave/Grill Operation
When these settings are used the microwave and grill
alternate within the preselected time in the ratio:
Combination1
30% of the
cooking time
is with the
microwave
70% of the
cooking time is
with the grill
Combination2
55% of the
cooking time
is with the
microwave
45% of the
cooking time is
with the grill
05-MWG 746 H EST 18 13.07.2005, 14:27:38 Uhr

ENGLISH
19
If you prepare food using the combined microwave-grill
functions you should note the following:
For large, thick foods such as roast pork the microwave
time is correspondingly longer than for small, fl at foods.
However, in the case of the grill it is the other way round.
The closer the food is to the grill, the faster it turns brown.
This means that when large joints are prepared using
combined operation the grilling time may be shorter than
for smaller joints.
Please proceed as follows:
1. Press the Stop button.
2. Press the „Microwave/Grill“ button once for combined
operation 1. Press the „Microwave/Grill“ twice for
combined operation 2.
3. Enter the desired cooking time using the number
buttons.
4. Press the Start button to start the machine.
After the time has elapsed, the device switches off and
the word „END“ appears in the display. Then you can
remove the food.
Microwave/Grill
Combined Operation Table
Food/dish Quantity
Approx.
time in
minutes
Cover
Meat, Sausages
Beef, pork or veal in pieces
500 g
750 g
10 - 12
12 - 15
no
no
Smoked pork loin 500 g 12 - 14 no
Meat loaf 500 g 13 - 15 no
Wienerwurst 200 g 2 - 3 no
Frankfurter 200 g 2 - 3 no
Tip: turn the meat halfway through and continue cooking for 3 - 5 minutes;
coat the meat loaf with egg white; prick the sausages with a fork.
Poultry
Boiling fowl 1000 g 13 - 15 no
Chicken pieces 250 g 4 - 5 no
Tip: allow to cook without liquid in its own juice, turn once and continue
cooking for 4 - 5 minutes.
Fish
Trout, blue 300 g 5 - 6 no
Fish fi llet 300 g 3 - 4 no
Tip: turn halfway through and continue cooking for 3 - 5 minutes.
Hot Air Only Operation
During cooking with hot air the hot air circulates inside
the oven. This makes the food brown and crispy faster.
In hot air operation it is possible to select 10 different
temperatures.
Cooking with Hot Air
Assuming you would like to cook at a temperature of
180°C for 40 minutes, please proceed as follows:
1. Press the Stop button.
2. Press the „Hot Air“ button.
3. Select the desired cooking temperature with one of
the number buttons (e.g. 8).
4. Enter the desired cooking time (e.g. 40 min) using the
number buttons.
Step Button Display
1Stop
2 Hot Air
38
1 80
44 0
H:40
5Start
5. Press the Start button to start the machine.
Please note:
• A maximum of 9 hours and 99 minutes can be
programmed. After the time has elapsed beeps are
heard and the word „END“ appears in the display.
Press the stop button or open the door. The word
„END“ goes off.
• When cooking with hot air it is possible to check the
temperature by pressing the hot air button.
Preheating and Cooking with Hot Air
It is possible to preheat the microwave oven using hot air
operation and then use hot air to cook with.
Assuming you would like to preheat the device to 170°C
and then cook for 35 minutes:
1. Press the Stop button.
2. Press the „Hot Air“ button.
3. Select the desired preheating temperature using one
of the number buttons (e.g. 7).
4. Press the start button. The word „PREH“ (preheat)
fl ashes in the display. Once the oven has reached the
pre-programmed temperature the „PREH“ symbols
stops fl ashing and appears continuously.
5. Please open the door and place the food to be
cooked on the middle of the rotating plate.
6. Enter the desired cooking time (e.g. 35 min.) using
the number buttons.
7. Press the Start button to start the machine.
After the time has elapsed, the device switches off and
the word „END“ appears in the display. Then you can
remove the food.
Combined Use of Hot Air and Microwave
For this the device has four pre-programmed settings,
making it easier for you to work with both the hot air and
the microwave function.
Please press the microwave/hot air button and then one
of the number buttons from 1 to 4 to select the hot air
temperature.
Button
Number
Button
Temperature(°C)
Microwave/Hot Air 1 150
Microwave/Hot Air 2 180
Microwave/Hot Air 3 200
Microwave/Hot Air 4 230
If you would like to set a time of 25 minutes, for example
to bake a cake at 200°C:
1. Press the Stop button.
2. Please press the microwave/hot air button.
3. Select the desired temperature (200°C) with one of
the number buttons (e.g. 3).
4. Enter the desired cooking time (e.g. 25 min) using the
number buttons.
5. Press the Start button to start the machine.
05-MWG 746 H EST 19 13.07.2005, 14:27:39 Uhr

ENGLISH
20
Please note:
A maximum of 9 hours and 99 minutes can be
programmed. After the time has elapsed beeps are heard
and the word “END” appears in the display. Press the
stop button or open the door. The word “END” goes off.
When cooking with hot air it is possible to check the
temperature by pressing the microwave/hot air button.
Cooking in Several Steps
It is possible to set the programmes in such a way that
three different functions can be selected.
Assuming you select the following programme for
cooking:
Rapid Defrosting
쒆
Preparation in the Microwave
쒆
Cooking with Hot Air (without Preheating)
1. Press the Stop button.
2. Press the defrost button.
3. Enter the desired defrost time using the number
buttons.
4. Press the microwave button.
5. Enter the desired microwave cooking time using the
number buttons.
6. Press the hot air button.
7. Select the desired cooking temperature using the
number buttons.
8. Enter the desired hot air cooking time with the number
buttons.
9. Press the Start button to start the machine.
After the time has elapsed, the device switches off and
the word „END“ appears in the display. Then you can
remove the food.
Special Functions
Automatic Reminder:
After cooking has fi nished you are reminded every
2 minutes by a beep to remove the food.
This reminder is switched off by opening the door or
pressing the Stop button.
Disabling:
Press the Stop button for more than 3 seconds to disable
the machine. The fact that the machine is disabled is
then shown in the display. The function of the operating
controls is now blocked. Press the Stop button again for
more than 3 seconds to reactivate the machine.
Timer (Countdown)
The device has a timer function:
1. Press the Stop button.
2. Press the timer button.
3. Enter the desired time using the number buttons.
4. Press the Start button to start the machine.
The set time is counted backwards. When the time has
elapsed a beep is heard.
Note: This function can also be used during operation of
the device.
Cleaning
Always remove the mains plug before cleaning the
machine.
• Clean the inside of the oven after use with a slightly
damp cloth.
• Please clean the microwave from the outside with a
slightly damp cloth.
• Clean the accessories in the usual manner in soapy
water.
• The door frame/door seal and neighbouring parts
must be carefully cleaned when dirty with a damp
cloth.
Technical Data
Model: ............................................................MWG 746 H
Power supply: ................................................230 V, 50 Hz
Power consumption: ..............................................1400 W
Power consumption - hot air:.................................1400 W
Power consumption - grill: .....................................1200 W
Rated microwave power output: ..............................900 W
Cavity volume: ....................................................... 25 Liter
Protection class: ...............................................................Ι
This device has been tested according to all relevant cur-
rent CE guidelines, such as electromagnetic compatibility
and low voltage directives, and has been constructed in
accordance with the latest safety regulations.
Subject to technical changes without prior notice!
Guarantee
The device supplied by our Company is covered by a
24 month guarantee starting on the date of purchase
(receipt).
During the life of the guarantee any fault of the device or
its accessories ascribable to material or manufacturing
defects will be eliminated free of charge by repairing or, at
our discretion, by replacing it. The guarantee services do
not entail an extension of the life of the guarantee nor do
they give rise to any right to a new guarantee!
Proof of the guarantee is provided by the proof of
purchase. Without proof of purchase no free replacement
or repair will be carried out.
If you wish to make a claim under the guarantee please
return the entire machine in the original packaging to your
dealer together with the receipt.
Defects to consumables or parts subject to wearing
as
05-MWG 746 H EST 20 13.07.2005, 14:27:40 Uhr

ENGLISH
21
well as cleaning, maintenance or the replacement of said
parts are not covered by the guarantee and hence are to
be paid!
The guarantee lapses in case of unauthorized tampering.
After the expiry of the guarantee
After the expiry of the guarantee repairs can be carried
by the competent dealer or repair service against the
payment of the ensuing costs.
Meaning of the “Dustbin” Symbol
Protect our environment: do not dispose of electrical
equipment in the domestic waste.
Please return any electrical equipment that you will no
longer use to the collection points provided for their
disposal.
This helps avoid the potential effects of incorrect disposal
on the environment and human health.
This will contribute to the recycling and other forms of
reutilisation of electrical and electronic equipment.
Information concerning where the equipment can be
disposed of can be obtained from your local authority.
05-MWG 746 H EST 21 13.07.2005, 14:27:41 Uhr

22
NEDERLANDS
Algemene veiligheidsinstructies
• Lees vóór de ingebruikname van dit apparaat de
handleiding uiterst zorgvuldig door en bewaar deze
goed, samen met het garantiebewijs, de kassabon en
zo mogelijk de doos met de binnenverpakking.
• Gebruik het apparaat uitsluitend privé en uitsluitend
voor de voorgeschreven toepassing. Dit apparaat is
niet geschikt voor commercieel gebruik (tenzij het
bedoeld is voor beperkt gebruik in de buitenlucht).
Bescherm het tegen hitte, directe zonnestralen, vocht
(i geen geval in vloeistoffen dompelen) en scherpe
kanten. Gebruik het apparaat niet met vochtige han-
den. Bij vochtig of nat geworden apparaat onmiddellijk
de stroomtoevoer onderbreken. Niet in het water
grijpen.
• Schakel het apparaat uit en onderbreek altijd de
stroomtoevoer (trek aan de steker, nooit aan de kabel)
wanneer u het apparaat niet gebruikt, hulpstukken
aanbrengt, reinigt of wanneer storingen optreden.
• Laat het ingeschakelde apparaat niet zonder toezicht
werken. Schakel het apparaat altijd uit of trek de
steker uit de contactdoos (trek aan de steker, niet aan
de kabel) voordat u de werkplek verlaat.
• Bescherm kinderen tegen gevaren en zorg ervoor dat
kabels nooit los omlaag hangen en dat het apparaat
buiten het bereik van kinderen blijft.
• Controleer regelmatig of het apparaat beschadigin-
gen vertoont. Een beschadigd apparaat mag niet in
gebruik worden genomen.
• Repareer het apparaat nooit zelf, maar breng het naar
een geautoriseerde vakman. Voorkom gevaren en
laat een defecte kabel altijd alleen door de fabrikant,
onze technische dienst of een eender gekwalifi ceerde
persoon vervangen door een soortgelijke kabel.
• Gebruik alleen originele reserveonderdelen.
• Neem de onderstaande “Speciale veiligheidsinstruc-
ties“ in acht.
Belangrijke veiligheidsinstructies!
A.u.b. zorgvuldig doorlezen en voor
verder gebruik bewaren.
• Waarschuwing: wanneer de deur of de deurafdich-
tingen zijn beschadigd, mag het kookapparaat niet
worden bediend voordat het door daarvoor opgeleid
persoon is gerepareerd.
• Waarschuwing: repareer het apparaat in géén geval
zelf, maar neem contact op met een geautoriseerde
vakman. Het is voor iedereen, behalve voor de
vakman, gevaarlijk onderhouds- en reparatiewerk-
zaamheden uit te voeren die een verwijdering van
de afdekking vereisen. De afdekking waarborgt de
bescherming tegen stralenbelasting door magnetron-
energie.
• Waarschuwing: Verhit de vloeistoffen niet in gesloten
kommen of glazen. Explosiegevaar!
• Waarschuwing: wanneer het apparaat in combibe-
drijf wordt bediend, mogen kinderen het apparaat
wegens de optredende temperaturen het apparaat
alléén onder toezicht van volwassenen gebruiken.
• Opmerking: de magnetron is niet bedoeld voor het
verwarmen/verhitten van levende dieren.
• Waarschuwing: kinderen en gebrekkige personen
mogen het kookapparaat alleen zonder toezicht
gebruiken wanneer een voldoende duidelijke instruc-
tie werd gegeven die de persoon in staat stelt, het
kookapparaat op een veilige manier te gebruiken en
de gevaren van een verkeerde bediening te begrijpen.
• Wanneer u uw magnetron in een kas of op een schap
of iets dergelijks wilt plaatsen, dient u erop te letten
dat aan alle zijden van het apparaat een minimale
ventilatieafstand van 10 cm tot kasten, wanden enz.
wordt aangehouden.
• Gebruik alléén geschikt serviesgoed zoals:
glas, porselein, keramiek, hittebestendig kunststof- of
speciaal magnetronserviesgoed.
• Bij het opwarmen of koken van maaltijden in brand-
bare materialen zoals kunststof- of papierbakjes
moet de magnetron vaak worden gecontroleerd
vanwege een mogelijk brandgevaar.
• In geval van rookontwikkeling dient het apparaat
uitgeschakeld en de netsteker uit de contactdoos
getrokken te worden. Houd de deur gesloten om
eventueel optredende vlammen te verstikken.
• Opgelet -Kookvertraging: bij het koken en vooral
bij het naverwarmen van vloeistoffen (water) kan het
gebeuren dat de kooktemperatuur weliswaar bereikt
is, maar de daarvoor karakteristieke stoombellen
nog niet opstijgen. De vloeistof kookt niet gelijkmatig.
Deze zogenaamde kookvertraging kan bij het ver-
wijderen van de beker of kom door een lichte trilling
tot een plotselinge stoombelvorming en daarmee tot
overkoken leiden. Gevaar voor verbranding! Om een
gelijkmatig koken te bereiken dient u een glasstaaf of
een soortgelijk, niet-metalen voorwerp in de beker of
kom te plaatsen.
• De inhoud van babyfl esjes en potjes met kindervo-
eding moet worden omgeroerd of geschud en de
temperatuur moet voor gebruik worden gecontroleerd.
Er bestaat gevaar voor verbranding!
• Maaltijden met schil of huid zoals eieren, worstjes,
gesloten conserveren in een glas enz. mogen niet
in magnetronapparaten worden verwarmd omdat ze
kunnen exploderen – zelfs als de verwarming door de
magnetron al is beëindigd.
• Wanneer het/de deurframe/deurafdichtingen en aan-
grenzende delen verontreinigd zijn, dienen deze met
een vochtige doek te worden gereinigd.
• Reinig de magnetron regelmatig en verwijder de
levensmiddelresten uit de binnenruimte.
• Wanneer het apparaat niet regelmatig wordt
gereinigd, kan het oppervlak onherstelbaar worden
beschadigd, hetgeen de levensduur van het apparaat
kan verkorten en tot gevaarlijke situaties kan leiden.
Beschrijving van de bedieningselementen
1 Deursluiting
2 Kijkraam**
3 Afdekking**
4 Aandrijfas
5 Glijring
6 Draaiplateau
7 Bedieningselement
8 Grillverwarming
9 Grillrooster
Let op: Verwijder géén vast gemonteerde onderdelen uit
de gaarruimte en niets van de binnenzijde van de deur!
Verwijder in géén geval folie die op de binnenzijde
van de deur is aangebracht!
05-MWG 746 H EST 22 13.07.2005, 14:27:42 Uhr

23
NEDERLANDS
Overzicht van de bedieningstoetsen
Cijfertoetsen
Voor het instellen van tijd, gaarduur, tem-
peratuur en gewicht
Toets magnetron
Keuze van de vermogensstanden
Toets grill
Voor het grillen en gratineren
Toets hete lucht
Alleen heteluchtfunctie,
gestuurd via thermostaat
Toets magnetron/grill combibedrijf
Magnetron en grill werken afwisselend
Toets magnetron/hete lucht combibedrijf
Magnetron en hete lucht werken
afwisselend
Toets ontdooien
Activeert de ontdooifunctie in combinatie
met een tijdinstelling
Toets klok
Voor het instellen van de tijd in combinatie
met de cijfertoetsen
Programmatoets gebak
Toets timer (countdown)
Programmatoets aardappel
Programmatoets popcorn
Programmatoets dranken
Programmatoets pizza
Programmatoets vleesspiesen
Programmatoets opwarmen
Toets start
Start van het programma
Toets expresse
Start van het expresprogramma - instellen
van de expreskooktijd
Toets stop
• Een keer indrukken om het gaarproces
te stoppen of om een verkeerde invoer
te wissen
• Twee keer indrukken om het program-
ma te wissen
• 3 seconden ingedrukt houden om het
apparaat te blokkeren/deblokkeren
Aanwijzingen voor het grill- en
combibedrijf
• Omdat voor het grill- en combibedrijf met stralingshitte
wordt gewerkt, mag u alléén hittebestendig serviesgo-
ed gebruiken.
• Bij het gebruik van alléén de grillfunctie kunt u ook
metalen of aluminium serviesgoed gebruiken - dit is
echter niet toegestaan bij combi- of magnetronbedrijf.
• Voor de bedrijfsmodi grill, pizza, bakken en combi is
alléén het grillrooster geschikt.
• Plaats géén voorwerpen op de bovenzijde van de
behuizing. Deze wordt heet. Laat de ventilatieopenin-
gen altijd vrij.
• Gebruik het grillrooster om het te grillen product
dichter bij het verwarmingselement te plaatsen.
Ingebruikname
• Verwijder alle toebehoren uit de gaarruimte, pak dit uit
en plaats de glijring in het midden. Plaats het glazen
draaiplateau zodanig op de aandrijfas dat het in de
uitsparingen van de aandrijfas klikt en recht ligt.
• Controleer het apparaat op zichtbare schade, let
hierbij in het bijzonder op het bereik van de deur.
Wanneer u een schade vaststelt, mag het apparaat in
géén geval in gebruik worden genomen.
• Voorkom storingen tijdens het bedrijf door andere
apparatuur en plaats de magnetron niet in de buurt
van andere elektrische apparaten.
• Verwijder eventueel op de behuizing aangebrachte
beschermfolie.
• Verwijder in géén geval de folie die op de binnen-
zijde van de deur is aangebracht!
• Sluit de netsteker aan op een correct geïnstalleerde
en geaarde contactdoos 230 V / 50 Hz.
• Verwijder géén vast gemonteerde onderdelen uit de
gaarruimte en van de binnenzijde van de deur!
Gebruik van het apparaat
Wetenswaardigheden over het magnetronbedrijf
• Uw apparaat werkt met microgolven die de water-
deeltjes in gerechten binnen zeer korte tijd verhitten.
Hier ontstaat géén warmtestraling en dus ook nauwe-
lijks bruinering.
• Verwarm alléén levensmiddelen met dit apparaat!
• Het apparaat is niet geschikt voor het bakken in
overvloedig vet.
• Verwarm slechts 1-2 porties in één keer, anders
verliest het apparaat aan effi ciëntie.
• Druk voor de onderbreking van het gaarproces op de
stoptoets.
• Magnetrons werken direct met volle energie. Daarom
komt het voorverwarmen te vervallen.
• Schakel het apparaat in het magnetron- of combibe-
drijf nooit in als het leeg is.
• De magnetron is geen vervanging voor uw normale
fornuis. De magnetron is uitsluitend bestemd voor:
• het ontdooien van diepgevroren/bevroren levens-
middelen
• het snel verhitten/verwarmen van gerechten of
dranken
• het garen van gerechten
• Gebruik géén plastic of papieren serviesgoed.
05-MWG 746 H EST 23 13.07.2005, 14:27:43 Uhr

24
NEDERLANDS
Bevestigingsgeluid
Uw invoer aan het apparaat wordt bevestigd door middel
van een geluidssignaal.
• Een geluidssignaal na het indrukken van een toets:
uw invoer wordt overgenomen.
• Twee geluidssignalen na het drukken van een toets:
de invoer wordt geweigerd.
Corrigeer a.u.b. uw instellingen.
De kloktijd instellen
Opmerking: bij het inschakelen verschijnt een knipperen-
de dubbele punt.
1. Druk op de kloktoets. De weergave schakelt om naar “:”.
2. Met behulp van de cijfertoetsen voert u de gewenste
uren en minuten in.
3. Druk opnieuw op de kloktoets. De nieuwe tijd wordt
geactiveerd.
Bediening magnetron
Plaats het te verwarmen gerecht op een daarvoor geschi-
kt bord. Open de deur en plaats het in het midden op het
glazen draaiplateau. Sluit de deuren. (Het apparaat werkt
om veiligheidsredenen alléén met correct gesloten deur).
1. Druk op de stoptoets.
2. Kies het gewenste magnetronvermogen door dienove-
reenkomstig vaak op de magnetrontoets te drukken.
Druk op de magnetrontoets om de procentwaarden
te selecteren
Druk Vermogen Beschrijving
1x 100% (P-HI) vol vermogen
2x 90% (P-90)
3x 80% (P-80)
4x 70% (P-70) hoog
5x 60% (P-60)
6x 50% (P-50) gemiddeld
7x 40% (P-40)
8x 30% (P-30) laag
9x 20 % (P-20)
10x 10 % (P-10) zeer laag
11x 0% (P-00)
100% komt overeen met 900 W
3. Met behulp van de cijfertoetsen voert u de gewenste
gaarduur in.
Bijvoorbeeld:
10:30 min gaarduur bij 100% vermogen
Stap Toets Weergave
1Stop
2 Magnetron
P- HI
3 1 0 3 0
10:30
4Start
4. Druk op de starttoets om de magnetron te starten. De
gaartijd is afhankelijk van de hoeveelheid en de aard
van de inhoud. Met een beetje oefening leert u snel
de gaartijd goed in te schatten.
Let op!
Het garen in de magnetron gaat veel sneller dan in een
bakoven. Stel de gaarduur - wanneer u niet zeker bent
- in op een lagere stand en gaar eventueel na. Na afl oop
van de tijd schakelt het apparaat uit en op het display
verschijnt “END”. Verwijder dan het gerecht.
Snel ontdooien van
diepgevroren levensmiddelen
Let op!
• Als vuistregel geldt: 500 g diepgevroren levensmidde-
len hebben ca. 5 minuten nodig om te ontdooien.
• Indien de diepgevroren levensmiddelen binnen deze
tijd niet volledig zijn ontdooid, stelt u de tijd in 1-minu-
ut-stappen in.
Wanneer u diepgevroren levensmiddelen wilt ontdooien
en de tijd op 5 minuten wilt instellen, volgt u de onder-
staande stappen.
1. Druk op de stoptoets.
2. Druk op de ontdooitoets.
3. Met behulp van de cijfertoetsen voert u de gewenste
gaarduur in.
Stap Toets Weergave
1Stop
2 Ontdooien
:
3 5 0 0
5:00
4Start
4. Druk op de starttoets om de magnetron te starten.
Wanneer diepgevroren levensmiddelen in een kunststof-
schaal ingevroren zijn, adviseren wij, de diepgevroren
levensmiddelen te ontdooien en vervolgens in een voor
magnetrons geschikt servies te vullen.
Voor het ontdooien kunt u maximaal 99 minuten en 99
seconden instellen. Nadat de tijd is verstreken, klinkt een
signaal en het woord “END” verschijnt op het display.
Druk op de stoptoets of open de deur. Het woord “END”
dooft.
In de onderstaande tabel vindt u informatie over het
handmatig ontdooien.
Tabel ontdooien
Levensmiddelen/
gerechten
Hoeveel-
heid
Vermogen
ca.
Watt
Tijd
ca. min.
Ontdooitijd
min.
Vlees, worstwaren
Vlees (rund, kalf, varken)
aan het stuk
500 g
1000 g
180
180
14 – 18
25 - 30
10 – 15
20 - 25
Schnitzel, karbonade 200 g 180 4 - 6 5 - 10
Gehakt 250 g 180 6 - 8 5 - 10
Braadworst, kookworst 200 g 180 4 - 6 5 - 10
Beleg (vleeswaren) 300 g 180 4 - 6 5 - 10
Tip: nadat de helft van de tijd verstreken is: vlees omdraaien, kwetsbare delen afdek-
ken; gehakt kleinmaken, reeds ontdooide delen verwijderen; worstplaatjes scheiden.
Gevogelte
Kip 1000 g 180 20 - 25 10 - 15
Kipdelen 500 g 180 12 - 15 5 - 10
Eend 1700 g 180 25 - 40 20 - 25
Gans-, kalkoendelen 500 g 180 12 - 18 10 - 15
Tip: gevogelte na het verstrijken van de helft van de tijd: omdraaien,
vleugels en bouten afdekken.
Let op: Dooiwater verwijderen en niet met andere gerechten in contact
laten komen.
Wild
Reerug 1000 g 180 20 - 35 20 - 30
Hazenrug 500 g 180 12 - 13 10 - 20
Tip: een keer omdraaien, randdelen afdekken.
05-MWG 746 H EST 24 13.07.2005, 14:27:52 Uhr

25
NEDERLANDS
Levensmiddelen/
gerechten
Hoeveel-
heid
Vermogen
ca.
Watt
Tijd
ca. min.
Ontdooitijd
min.
Vis
Garnalen, shrimps 250 g 180 5 - 7 5 - 10
Forel 340 g 180 4 - 6 5 - 10
Vis aan het stuk 500 g 180 7 - 10 10 - 15
Visfi let 250 g 180 5 - 7 5 - 10
Tip: meerdere keren omroeren, vaker omdraaien.
Fruit
Frambozen, aardbeien 250 g 180 4 - 6 5 - 10
Kersen, pruimen 250 g 180 5 - 7 5 - 10
Appelmoes 500 g 180 9 - 12 5 - 10
Tip: voorzichtig omdraaien of kleinmaken.
Groenten: Zie „Tabel garen“, „Groenten ontdooien en garen“
Brood en gebak
Broodjes 4 stuks 180 ca. 1-3 5
Brood 1000 g 180 13 - 15 8 - 10
Toastbrood 500 g 180 5 - 6 5 - 10
Cake 500 g 180 6 - 8 5 - 10
Fruitcake 1 stuk 180 2 - 3 2 - 3
Taart
1 stuk 180 0,5 - 1 3 - 5
1200 g 180 10 - 12 30 - 60
Tip: brood en gebak op absorberend keukencrêpepapier plaatsen dat het
vocht opneemt; kwetsbaar gebak slechts heel even laten dooien.
Melkproducten
Boter 250 g 180 5 - 7 10 - 15
Kwark 250 g 180 6 - 8 5 - 10
Slagroom 200 g 180 3 - 5 2 - 3
Tip: aluminiumfolie verwijderen, na de helft van de tijd omroeren; slagroom
nog half bevroren kloppen.
Verwarmen
Het verwarmen en verhitten is een bijzonder sterk punt
van de magnetron. Koelkastkoude vloeistoffen en gerech-
ten kunnen heel eenvoudig op kamer- of consumptietem-
peratuur worden gebracht zonder dat u daarvoor veel
potjes en pannetjes nodig hebt.
De in onderstaande tabel aangegeven verwarmingstijden
zijn slechts richtwaarden omdat de tijd in grote mate af-
hankelijk is van de uitgangstemperatuur en de samenstel-
ling van het gerecht. Het is dan ook raadzaam, af en toe
te controleren of het gerecht al heet genoeg is.
Tabel verwarming
Levensmiddelen/
gerechten
Hoeveel-
heid
Vermogen
Watt
Tijd
ca. min.
afdekken
Vloeistoffen
Water, 1 kop 150 g 900 0,5 - 1 nee
Water 0,5 l 500 g 900 3,5 - 5 nee
Water 0,75 l 750 g 900 5 - 7 nee
Koffi e, 1 kop 150 g 900 0,5 - 1 nee
Melk, 1 kop 150 g 900 0,5 - 1 nee
Let op: Doe geen glazen of metalen staven of andere voorwerpen die het
koken vertragen in de beker. Goed roeren voor gebruik.
Bordgerechten
Schnitzel, aardappelen
en groenten
450 g 900 2,5 - 3,5 ja
Goulash met macaroni 450 g 900 2 - 2,5 ja
Vlees, knoedels en saus 450 g 900 2,5 - 3,5 ja
Tip: eerst iets bevochtigen, tussendoor omroeren.
Levensmiddelen/
gerechten
Hoeveel-
heid
Vermogen
Watt
Tijd
ca. min.
afdekken
Vlees
Schnitzel, gepaneerd 200 g 900 1 - 2 nee
Gehaktballen, 4 stuks 500 g 900 3 - 4 nee
Braadvlees 250 g 900 2 - 3 nee
Tip: met olie bestrijken, zodat de panade of de korst niet zacht wordt.
Gevogelte
1/2 haan 450 g 900 3,5 - 5 nee
Kipfricassee 400 g 900 3 - 4,5 ja
Tip: met olie bestrijken, tussendoor omroeren.
Bijlagen
Macaroni, rijst 1 portie
2 porties.
150 g 900 1 - 2 ja
300 g 900 2,5 - 3,5 ja
Aardappelen 500 g 900 3 - 4 ja
Tip: eerst iets bevochtigen.
Soepen / sauzen
Heldere bouillon, 1 bord 250 g 900 1 - 1,5 ja
Soep met ingrediënten 250 g 900 1,5 - 2 ja
Saus 250 g 900 1 - 2 ja
Babyvoeding
Melk 100 ml 540 0,5 - 1 nee
Pap 200 g 540 1 - 1,5 nee
Tip: goed schudden of omroeren. Temperatuur controleren!
Garen
Handige tips voor het garen
Volg de richtwaarden in de gaartabel en de recepten op.
Controleer het kookproces zolang u nog niet over voldo-
ende ervaring beschikt.
U kunt de deur van het apparaat te allen tijde openen.
Het apparaat schakelt dan automatisch uit.
Het apparaat functioneert pas weer nadat u de deur hebt
gesloten.
Levensmiddelen uit de koelkast hebben een iets langere
gaartijd dan die op kamertemperatuur.
Hoe compacter een gerecht, hoe langer de gaartijd. Een
groot stuk vlees heeft bijvoorbeeld een langere gaartijd
dan dezelfde hoeveelheid in reepjes gesneden vlees. Het
is raadzaam, grotere hoeveelheden bij maximaal vermo-
gen even te koken en voor een gelijkmatig gaarproces op
de middelste stand door te koken.
“Lage” gerechten en kleinere hoeveelheden garen sneller
dan hoge en grote hoeveelheden. Verdeel daarom de
levensmiddelen zo gelijkmatig mogelijk. Dunnere delen
zoals bijv. kippenboutjes of visfi let kunt u het best naar
binnen plaatsen of laten overlappen.
Hier geldt de vuistregel:
dubbele hoeveelheid = ongeveer twee keer de tijd
halve hoeveelheid = helft van de tijd
Wanneer u voor een gerecht geen passende tijdsaandui-
ding kunt vinden, geldt de regel:
per 100 g ongeveer 1 minuut gaartijd
Alle gerechten die u op het fornuis afdekt, dient u ook in
de magnetron af te dekken.
Een deksel voorkomt dat de gerechten uitdrogen. U kunt
voor het afdekken een omgedraaid bord, perkament-
papier of magnetronfolie gebruiken. Gerechten die een
korstje moeten krijgen, moet u open garen.
05-MWG 746 H EST 25 13.07.2005, 14:27:54 Uhr

26
NEDERLANDS
Tabel garen
Levensmiddelen/
gerechten
Hoeveel-
heid
Vermogen
Watt
Tijd
ca. min.
afdekken
Groenten
Aubergines 500 g 720 7 - 10 ja
Bloemkool 500 g 720 8 - 11 ja
Broccoli 500 g 720 6 - 9 ja
Witlof 500 g 720 6 - 7 ja
Erwten 500 g 720 6 - 7 ja
Venkel 500 g 720 8 - 11 ja
Groene bonen 300 g 720 13 - 15 ja
Aardappelen 500 g 720 9 - 12 ja
Koolrabi 500 g 720 8 - 10 ja
Prei 500 g 720 7 - 9 ja
Maïskolven 250 g 720 7 - 9 ja
Wortels 500 g 720 8 - 10 ja
Paprika 500 g 720 6 - 9 ja
Spruitjes 300 g 720 7 - 10 ja
Asperges 300 g 720 6 - 9 ja
Tomaten 500 g 720 6 - 7 ja
Courgettes 500 g 720 9 - 10 ja
Tip: groenten klein snijden en met 2-3 eetlepels vloeistof garen, tussendoor
omroeren, 3-5 min laten nagaren, pas kort vóór het serveren kruiden
Fruit
Appel-, perencompote 500 g 720 5 - 8 ja
Pruimenmoes 250 g 720 4 - 6 nee
Rabarbercompote 250 g 720 5 - 8 ja
Gebraden appels, 4 stuks 500 g 720 7 - 9 ja
Tip: 125 ml water toevoegen (een beetje citroensap voorkomt dat het fruit
verkleurt), 3 – 5 minuten laten nagaren.
Vlees (reeds voorbereide gerechten)
Vlees met saus 400 g 720 10 - 12 ja
Goulash, in reepjes
gesneden vlees
500 g 720 10 - 15 ja
Runderrollade 250 g 720 7 - 8 ja
Tip: tussendoor omroeren, 3 – 5 minuten laten rusten.
Gevogelte (reeds voorbereide gerechten)
Kipfricassee 250 g 720 6 - 7 ja
Kippensoep 200 g 720 5 - 6 ja
Tip: tussendoor omroeren, 3 – 5 minuten laten rusten.
Vis
Visfi let
300 g 720 7 - 8 ja
400 g 720 8 - 9 ja
Tip: na de helft van de tijd omdraaien, 3- 5 minuten laten nagaren.
Groenten ontdooien en garen
Rode kool met appel 450 g 720 14 -16 ja
Bladspinazie 300 g 720 11 - 13 ja
Bloemkool 200 g 720 7 - 9 ja
Sperziebonen 200 g 720 8 - 10 ja
Broccoli 300 g 720 8 - 9 ja
Erwten 300 g 720 7 - 8 ja
Koolrabi 300 g 720 13 -15 ja
Prei 200 g 720 10 - 11 ja
Maïs 200 g 720 4 - 6 ja
Wortels 200 g 720 5 - 6 ja
Spruitjes 300 g 720 7 - 8 ja
Spinazie
450 g 720 12 - 13 ja
600 g 720 15 - 17 ja
Tip: met 1 – 2 eeltlepels vloeistof garen, tussendoor omroeren of voorzichtig
kleinmaken, 2-3 minuten laten nagaren, pas kort vóór het serveren kruiden.
Soepen / eenpansgerechten (reeds voorbereide gerechten)
Eenpansgerecht 500 g 720 13 - 15 ja
Soep met ingrediënten 300 g 720 7 - 8 ja
Crèmesoep 500 g 720 13 - 15 ja
Tip: tussendoor omroeren, 3 – 5 minuten laten nagaren.
Expreskoken
Voor het starten van het expreskoken drukt u meerdere
malen op de exprestoets. Het gaarproces begint on-
middellijk waarbij door iedere druk op de toets de gaartijd
met 30 seconden wordt verlengd, vanaf een minuut wordt
de gaartijd telkens met 1 minuut verlengd.
Het vermogen van de magnetron bedraagt daarbij 100%.
Automatische programma’s
Met behulp van de automaat kunt u bepaalde hoeveel-
heden gerechten automatisch laten garen. Gaarduur en
magnetronvermogen zijn in het programma opgeslagen.
Doe dit als volgt:
a) Aardappelen
1. Druk op de stoptoets.
2. Druk 1x op de toets “Aardappel” voor de bereiding
van 120 - 170 g of druk 2x op de toets “Aardappel”
voor de bereiding van 140 – 200 g.
3. Druk op een cijfertoets van 1 - 4 om een gaartijd te
selecteren.
Toets
“Aardappel”
Cijfertoets Gaarduur
1x 1 3min 50sec.
1x 2 7min 10sec
1x 3 11min
1x 4 14min
Toets
“Aardappel”
Cijfertoets Gaarduur
2x 1 5min 40sec.
2x 2 9min
2x 3 13min
2x 4 17min
4. Druk op de starttoets om de magnetron te starten.
Na afl oop van de tijd schakelt het apparaat uit en op
het display verschijnt “END”.
Tip: laat het gerecht noch 5 – 10 min in de oven
staan, zodat het nog verder kan garen.
b) Popcorn
A.u.b. alléén magnetron-popcorn in een zakje gebruiken!
1. Druk op de stoptoets.
2. Druk op de toets “Popcorn”. Op het display verschijnt
“2:30”.
3. Druk op de starttoets om de magnetron te starten.
Na afl oop van de tijd schakelt het apparaat uit en op het
display verschijnt “END”. Verwijder dan het popcorn.
Opmerking: u kunt de gaarduur wijzigen.
• Druk 2x op de toets “Popcorn”.
• Geef met behulp van de cijfertoetsen de nieuwe
gaarduur aan.
• Druk op de starttoets.
De nieuwe gaarduur blijft opgeslagen totdat deze opni-
euw wordt gewijzigd.
05-MWG 746 H EST 26 13.07.2005, 14:27:56 Uhr

27
NEDERLANDS
c) Pizza
1. Druk op de stoptoets.
2. Druk 1x op de toets “Pizza” om een stuk van 120
– 140 g te verwarmen of druk 2x op de toets “Pizza”
om een groter stuk te verwarmen.
3. Druk op de starttoets om de magnetron te starten.
Na afl oop van de tijd schakelt het apparaat uit en op het
display verschijnt “END”. Verwijder dan de pizza.
d) Vleesspies
1. Druk op de stoptoets.
2. Druk 1x op de toets “Vleesspies” voor de bereiding
van kleinere hoeveelheden of druk 2x op de toets
“Vleesspies” voor de bereiding van grotere hoeveel-
heden.
3. Druk op een cijfertoets van 1 - 4 om een gaargewicht
te selecteren.
(Toets “Vleesspies” 1x ingedrukt)
Cijfertoets Gewicht Gaarduur
1 120g 10min
2 200g 13min
3 400g 17min
4 600g 23min
(Toets “Vleesspies” 2x ingedrukt)
Cijfertoets Gewicht Gaarduur
1 170g 12min
2 310g 15min
3 540g 23min
4 800g 30min
4. Druk op de starttoets om de magnetron te starten.
Na afl oop van de tijd schakelt het apparaat uit en op het
display verschijnt “END”. Verwijder dan het gerecht.
e) Dranken
1. Druk op de stoptoets.
2. Druk 1x op de toets “Dranken” voor der verwarming
van 140 – 200 g. Druk 2x op de toets “Dranken” voor
de verwarming van 250 – 310 g.
3. Druk op een cijfertoets van 1 - 4 om een verwar-
mingstijd te selecteren.
Toets
“Dranken”
Cijfertoets
Verwarmings-
tijd
1x 1 1min 20sec
1x 2 2min 30sec
1x 3 3min 40sec
1x 4 4min 50sec
Toets
“Dranken”
Cijfertoets
Verwarmings-
tijd
2x 1 2min 20sec.
2x 2 4min
2x 3 5min 40sec
2x 4 7min 20sec
4. Druk op de starttoets om de magnetron te starten.
Na afl oop van de tijd schakelt het apparaat uit en op het
display verschijnt “END”. Verwijder dan het gerecht.
f) Verwarmen
1. Druk op de stoptoets.
2. Druk op de toets “Opwarmen”. Op het display ver-
schijnt “3:40”.
3. Druk op de starttoets om de magnetron te starten.
Na afl oop van de tijd schakelt het apparaat uit en op het
display verschijnt “END”. Verwijder dan het gerecht.
g) Gebak
1. Druk op de stoptoets.
2. Druk op de toets “Gebak”. Op het display verschijnt
“40:00”.
3. Druk op de starttoets om de magnetron te starten.
Na afl oop van de tijd schakelt het apparaat uit en op het
display verschijnt “END”. Verwijder dan het gebak.
Opmerking: u kunt de gaarduur wijzigen.
• Druk 2x op de toets “Gebak”.
• Geef met behulp van de cijfertoetsen de nieuwe
gaarduur (tot 99:99) aan.
• Druk op de starttoets.
De nieuwe gaarduur blijft opgeslagen totdat deze opni-
euw wordt gewijzigd.
Grill
Gebruik bij het grillen het grillrooster om een snelle en
gelijkmatige bruinering te verkrijgen. Gebruik daarvoor
geschikt hittebestendig serviesgoed of plaats het grillpro-
duct direct op het grillrooster.
Grote, dikke levensmiddelen worden direct op het draai-
plateau gegrild!
Bij het grillen en gratineren gaat u als volgt te werk
1. Druk op de stoptoets.
2. Druk 1x op de grilltoets.
3. Met behulp van de cijfertoetsen voert u de gewenste
grillduur in.
4. Druk op de starttoets om de magnetron te starten.
Na afl oop van de tijd schakelt het apparaat uit en op het
display verschijnt “END”. Verwijder dan het gerecht.
Magnetron/grill combibedrijf
In deze instelling werken magnetron en grill afwisse-
lend binnen de voorgeselecteerde tijd in onderstaande
verhouding:
Combinatie1
30% van de gaar-
tijd magnetron
70% van de
gaartijd grill
Combinatie2
55% van de gaar-
tijd magnetron
45% van de
gaartijd grill
Wanneer u gerechten in het combibedrijf magnetron-grill
wilt toebereiden, dient u op het volgende te letten:
voor grote, dikke levensmiddelen, zoals bijv. varkensfri-
candeau is de magnetrontijd dienovereenkomstig langer
dan voor kleine, vlakke levensmiddelen. Bij het grillen
is dit echter omgekeerd. Hoe dichter het levensmiddel
tegen de grill ligt, hoe sneller het bruin wordt. Dat wil
zeggen wanneer u grote braadstukken in combibedrijf
toebereidt, is de grilltijd eventueel korter dan voor kleinere
braadstukken.
05-MWG 746 H EST 27 13.07.2005, 14:27:58 Uhr

28
NEDERLANDS
Doe dit als volgt:
1. Druk op de stoptoets.
2. Druk 1x op de toets “Magnetron/grill” voor het com-
bibedrijf 1. Druk 2x op de toets “Magnetron/grill” voor
het combibedrijf 2.
3. Met behulp van de cijfertoetsen voert u de gewenste
gaarduur in.
4. Druk op de starttoets om de magnetron te starten.
Na afl oop van de tijd schakelt het apparaat uit en op het
display verschijnt “END”. Verwijder dan het gerecht.
Tabel magnetron/grill combibedrijf
Levensmiddelen/gerechten
Hoeveel-
heid
Tijd
ca. min.
afdekken
Vlees, worstwaren
Rund-, varkens-,
of kalfsvlees aan het stuk
500 g
750 g
10 - 12
12 - 15
nee
nee
Casselerrib
500 g 12 - 14 nee
Gehakt
500 g 13 - 15 nee
Weense worstjes
200 g 2 - 3 nee
Kookworst
200 g 2 - 3 nee
Tip: na de helft van de tijd: omdraaien, 3- 5 minuten laten nagaren; gehakt
met eiwit bestrijken; met een vork in de worstjes prikken.
Gevogelte
Soepkip
1000 g 13 - 15 nee
Kipdelen
250 g 4 - 5 nee
Tip: zonder vloeistof in eigen jus laten garen, een keer omdraaien,
4 – 5 minuten laten nagaren.
Vis
Forel, blauw
300 g 5 - 6 nee
Visfi let
300 g 3 - 4 nee
Tip: na de helft van de tijd omdraaien, 3- 5 minuten laten nagaren.
Bediening van alléén de heteluchtfunctie
Tijdens het kookproces met hete lucht circuleert de hete
lucht in de gaarruimte. Daardoor worden de gerechten
sneller bruin en knapperig. In het heteluchtbedrijf kan
uit maximaal 10 verschillende temperaturen worden
gekozen.
Koken met hete lucht
Wanneer u bij 180°C 40 minuten wilt garen, volgt u de
onderstaande punten op.
1. Druk op de stoptoets.
2. Druk op de toets “Hete lucht”.
3. Met een van de cijfertoetsen (bijv. 8) kiest u de ge-
wenste gaartemperatuur.
4. Met behulp van de cijfertoetsen voert u de gewenste
gaarduur (bijv. 40 min) in.
Stap Toets Weergave
1Stop
2 Hete lucht
38
1 80
44 0
H:40
5Start
5. Druk op de starttoets om de magnetron te starten.
Let op!
• U kunt maximaal 9 uur en 99 minuten programmeren.
Nadat de tijd is verstreken, klinkt een signaal en het
woord “END” verschijnt op het display. Druk op de
stoptoets of open de deur. Het woord “END” dooft.
• Tijdens het koken met hete lucht kunt u de temperatu-
ur controleren door op de heteluchttoets te drukken.
Voorverwarmen en koken met hete lucht
U kunt uw magnetron in het heteluchtbedrijf voorverwar-
men en dan de heteluchtfunctie gebruiken.
Wanneer u het apparaat op 170°C wilt voorverwarmen
en vervolgens 35 minuten wilt garen, volgt u de onder-
staande punten op.
1. Druk op de stoptoets.
2. Druk op de heteluchttoets.
3. Met een van de cijfertoetsen (bijv. 7) kiest u de ge-
wenste voorverwarmingstemperatuur.
4. Druk op de starttoets. Op het display knippert de
weergave “PREH” (voorverwarmen). Wanneer de
oven de geprogrammeerde temperatuur heeft bereikt,
brandt de weergave “PREH” constant.
5. Open de deur en plaats het te garen product in het
midden van het draaiplateau.
6. Met behulp van de cijfertoetsen voert u de gewenste
gaarduur (bijv. 35 min) in.
7. Druk op de starttoets om de magnetron te starten.
Na afl oop van de tijd schakelt het apparaat uit en op het
display verschijnt “END”. Verwijder dan het gerecht.
Gecombineerd gebruik
van hete lucht en magnetron
Hiervoor beschikt het apparaat over vier voorgeprogram-
meerde instellingen. Hierdoor wordt het eenvoudiger
zowel met hete lucht als met de magnetronfunctie te
werken.
Druk op de toets magnetron/hete lucht en selecteer
vervolgens met behulp van de cijfertoetsen een cijfer
1 - 4 om de heteluchttemperatuur in
te stellen.
Toets
Cijfer-
toets
Temperatuur(°C)
Magnetron/hete lucht 1 150
Magnetron/hete lucht 2 180
Magnetron/hete lucht 3 200
Magnetron/hete lucht 4 230
Wanneer u een tijd wilt instellen van 25 minuten om
een taart bij 200°C te bakken, volgt u de onderstaande
punten op.
1. Druk op de stoptoets.
2. Druk op de magnetron/heteluchttoets.
3. Met een van de cijfertoetsen (bijv. 3) kiest u de ge-
wenste temperatuur (200°C).
4. Met behulp van de cijfertoetsen voert u de gewenste
gaarduur (bijv. 25 min) in.
5. Druk op de starttoets om de magnetron te starten.
Let op!
U kunt maximaal 9 uur en 99 minuten programmeren.
Nadat de tijd is verstreken, klinkt een signaal en het
woord “END” verschijnt op het display. Druk op de stopto-
ets of open de deur. Het woord “END” dooft.
Tijdens het koken met hete lucht kunt u de temperatuur
controleren door op de magnetron/heteluchttoets te
drukken.
05-MWG 746 H EST 28 13.07.2005, 14:27:59 Uhr

29
NEDERLANDS
Koken in meerdere stappen
U kunt de programma’s zo instellen dat u uit 3 verschil-
lende functie kunt kiezen.
Bijvoorbeeld: u kiest het volgende programma om te
koken:
Snel ontdooien
쒆
Bereiding in de magnetron
쒆
Koken met hete lucht (zonder voorverwarmen)
1. Druk op de stoptoets.
2. Druk op de ontdooitoets.
3. Met behulp van de cijfertoetsen voert u de gewenste
ontdooiduur in.
4. Druk op de magnetrontoets.
5. Met behulp van de cijfertoetsen voert u de gewenste
magnetron-gaarduur in.
6. Druk op de heteluchttoets.
7. Met een van de cijfertoetsen kiest u de gewenste
gaartemperatuur.
8. Met behulp van de cijfertoetsen voert u de gewenste
hetelucht-gaarduur in.
9. Druk op de starttoets om de magnetron te starten.
Na afl oop van de tijd schakelt het apparaat uit en op het
display verschijnt “END”. Verwijder dan het gerecht.
Speciale functies
Automatische herinnering
Na afl oop van een gaarproces wordt u om de 2 minuten
door middel van een geluidssignaal gewaarschuwd dat
het gerecht uit de magnetron kan worden genomen.
U kunt de herinnering uitschakelen door de deur te ope-
nen of op de stoptoets te drukken.
Blokkeren
Druk langer dan 3 seconden op de stoptoets om het
apparaat te blokkeren. De blokkade wordt op het display
weergegeven. De functie van de bedieningselementen is
geblokkeerd. Druk opnieuw langer dan 3 seconden op de
stoptoets om de blokkade op te heffen.
Timer (Count down)
Het apparaat beschikt over een timerfunctie.
1. Druk op de stoptoets.
2. Druk op de timertoets.
3. Met behulp van de cijfertoetsen voert u de gewenste
tijd in.
4. Druk op de starttoets om de magnetron te starten.
De ingestelde tijd wordt teruggeteld en het einde wordt
gesignaleerd door middel van een geluid.
Opmerking: deze functie kan ook tijdens het bedrijf van
het apparaat worden gebruikt.
Reiniging
Trek vóór de reiniging van het apparaat altijd de steker uit
de contactdoos.
• Reinig de gaarruimte na gebruik met een iets vochtige
doek.
• Reinig de magnetron van buiten met een enigszins
vochtige doek.
• Reinig het toebehoren zoals gewoonlijk met warm
water en afwasmiddel.
• Wanneer het/de deurframe/deurafdichtingen en aan-
grenzende delen verontreinigd zijn, dienen deze met
een vochtige doek te worden gereinigd.
Technische gegevens
Model: ............................................................MWG 746 H
Spanningstoevoer:.........................................230 V, 50 Hz
Opgenomen vermogen:.........................................1400 W
Opgenomen vermogen hete lucht: ........................1400 W
Opgenomen vermogen grill: ..................................1200 W
Gemeten uitgangsvermogen magnetron: ................900 W
Volume gaarruimte: .................................................25 liter
Beschermingsklasse:........................................................ Ι
Dit apparaat is gekeurd conform de op dit moment
van toepassing zijnde CE-richtlijnen zoals bijvoorbeeld
elektromagnetische compatibiliteit en laagspannings-
voorschriften en is geconstrueerd volgens de nieuwste
veiligheidstechnische voorschriften.
Technische wijzigingen voorbehouden!
Garantie
Voor het door ons geleverde apparaat verlenen wij een
garantie van 24 maanden vanaf koopdatum (kassabon).
Eventuele gebreken aan het apparaat of aan het toe-
behoren die zijn ontstaan door productie- of materi-
aalfouten verhelpen wij binnen deze periode kosteloos
door middel van reparatie of, naar ons oordeel, door ver-
vanging. Eventuele garantiegevallen verlengen noch de
geldigheidsduur van de garantie, noch begint daardoor
een nieuwe garantieperiode!
Het koopbewijs geldt als garantiebewijs. Zonder dit bewijs
kan geen kosteloze reparatie of vervanging plaatsvinden.
Geef in garantiegevallen het complete apparaat in de
originele verpakking samen met de kassabon af bij uw
handelaar.
Niet defecten aan de hulpstukken of aan de slijtende
onderdelen
, maar ook reiniging, onderhoud of de ver-
vanging van slijtende delen vallen niet onder de garantie
en geschieden altijd tegen berekening!
05-MWG 746 H EST 29 13.07.2005, 14:28:00 Uhr

30
NEDERLANDS
Bij ingrepen door derden komt de garantieverlening te
vervallen.
Na de garantieperiode
Na afl oop van de garantieperiode kunnen reparaties
tegen berekening worden uitgevoerd door de betreffende
vakhandelaar of de technische dienst.
Betekenis van het symbool
“Vuilnisemmer”
Bescherm ons milieu, elektrische apparaten horen niet in
het huisafval.
Maak voor het afvoeren van elektrische apparaten gebru-
ik van de voorgeschreven verzamelpunten en geef daar
de elektrische apparaten af die u niet meer gebruikt.
Daardoor helpt u de potentiële effecten te voorkomen
die een verkeerde afvoer op het milieu en de menselijke
gezondheid kunnen inwerken.
Op deze wijze levert u uw bijdrage aan het hergebruik,
de recycling en andere verwerkingsvormen voor oude
elektronische en elektrische apparaten.
Voor informatie over verzamelpunten voor uw apparaten
kunt u contact opnemen met uw gemeente of gemeente-
administratie.
05-MWG 746 H EST 30 13.07.2005, 14:28:01 Uhr

31
FRANÇAIS
Conseils généraux de sécurité
• Lisez attentivement ce mode d’emploi avant de mettre
l’appareil en marche pour la première fois. Conser-
vez le mode d’emploi ainsi que le bon de garantie,
votre ticket de caisse et si possible, le carton avec
l’emballage se trouvant à l’intérieur.
• N’utilisez cet appareil que pour un usage privé et
pour les taches auxquelles il est destiné. Cet appareil
n’est pas prévu pour une utilisation professionnelle.
Ne l’utilisez pas en plein air (sauf s’il est indiqué que
vous pouvez le faire). Protégez-le de la chaleur, des
rayons directs du soleil, de l’humidité (ne le plongez
en aucun cas dans l’eau) et des objets tranchants.
N’utilisez pas cet appareil avec des mains humides.
S’il arrive que de l’humidité ou de l’eau atteignent
l’appareil, débranchez aussitôt le câble d’alimentation.
Ne touchez pas les parties mouillées.
• Arrêtez l’appareil et débranchez toujours le câble
d’alimentation de la prise de courant (tirez sur la
fi che, pas sur le câble) si vous n’utilisez pas l’appareil,
si vous installez les accessoires, pour le nettoyage ou
en cas de panne.
• Ne laissez ouimais fonctionner l’appareil sans sur-
veillance. Arrêtez toujours l’appareil ou débranchez le
câble d’alimentation (en tirant sur la fi che et non pas
sur le câble) si vous devez vous absenter.
• Pour protéger les enfants des risques engendrés par
les appareils électriques , veillez à ce que le câble ne
pende pas de l’appareil et que l’appareil ne soit pas à
portée des enfants.
• Contrôlez régulièrement l’appareil et le câble. Ne
mettez pas l’appareil en marche s’il est endommagé.
• Ne réparez pas l’appareil vous-même. Contactez
plutôt un technicien qualifi é. Pour éviter toute mise en
danger, ne faites remplacer le câble défectueux que
par un câble équivalent et que par le fabricant, notre
service après-vente ou toute personne de qualifi cati-
on similaire.
• N’utilisez que les accessoires d’origine.
• Respectez les „conseils de sécurité spécifi ques à cet
appareil“ ci-dessous ...
Importantes mesures de sécurité!
A lire avec attention et à conserver.
• Attention: l’appareil ne doit en aucun cas être utilisé
lorsque la porte ou le joint de la porte sont détériorés.
L’appareil doit alors impérativement être réparé par
une personne qualifi ée.
• Attention: ne réparez ouimais l’appareil vous-même.
Adressez-vous plutôt à un spécialiste. Il est dange-
reux pour toute personne non qualifi ée d’effectuer
des travaux d’entretien ou des réparations nécessitant
le démontage du cache de l’appareil qui lui-même est
une protection contre les irradiations des micro-on-
des.
• Attention: Ne réchauffez pas les liquides dans des
récipients fermés. Risque d’explosion!
• Attention: Les enfants ne peuvent utiliser l’appareil
que sous la surveillance d’un adulte, en raison des
fortes températures produites, si l’appareil est utilisé
en fonction combinée.
• Remarque: Le four à micro-ondes n’est pas prévu
pour chauffer/réchauffer des animaux vivants.
• Attention: Les enfants ainsi que les personnes
séniles ne sont autorisés à utiliser cet appareil sans
surveillance que s’ils ont été correctement informés
sur une utilisation sûre de l’appareil et s’ils sont
capables de comprendre les risques d’une mauvaise
utilisation.
• Si vous souhaitez placer votre micro-ondes dans une
armoire, sur une étagère ou dans un meuble similai-
re, veillez à laisser de tous les côtés de l’appareil au
moins 10 cm de ventilation par rapport aux armoires,
murs et autres meubles.
• N’utiliser que de la vaisselle appropriée comme:
la vaisselle en verre, porcelaine, céramique, plastique
résistant à la chaleur ou la vaisselle spéciale micro-
ondes.
• Cet appareil à micro-ondes doit souvent être surveillé
pendant le réchauffement ou la cuisson de nourritures
dans des récipients infl ammables, comme le plas-
tique ou le carton, en raison du risque d’infl ammation.
• En cas de formation de fumée, éteindre l’appareil et
retirez la prise. Laissez la porte fermée afi n d’étouffer
les éventuelles fl ammes.
• Attention aux risques de surchauffe: lors de la
cuisson, en particulier lors de la chauffe de liquides
(eau), il peut arriver que la température d’ébullition
soit atteinte, mais que les bulles de vapeur typiques
ne remontent pas encore à la surface. Le liquide
n’arrive pas à ébullition régulièrement. Ce décalage
d’ébullition peut lors du retrait du récipient entraîner
une formation soudaine de bulles de vapeur en raison
d’une légère secousse et ainsi un débordement en
bouillant. Risque de brûlure! Afi n de parvenir à une
ébullition régulière, placez un bâton en verre ou un
objet similaire non métallique dans le récipient.
• Le contenu des petits biberons et petits pots de bébé
avec des aliments pour bébé doit être mélangé et
secoué et leur température doit être contrôlée avant
qu’ils soient consommés. Risque de brûlure.
• Il est interdit de réchauffer des aliments avec une
coque ou une peau comme des œufs, des saucisses,
des bocaux fermés, etc. car ils risquent d’exploser,
même après avoir été réchauffés dans l’appareil.
• L’encadrement, le joint de la porte et toute pièce
avoisinante doivent, s’ils sont sales, être nettoyés
soigneusement avec un torchon humide.
• Nettoyez régulièrement l’appareil et retirez les dépôts
de nourriture se trouvant à l’intérieur de l’appareil.
• Un mauvais entretien de l’appareil peut endommager
la surface des parois, ce qui peut avoir une incidence
sur la durée de vie de l’appareil et éventuellement
être dangereux.
Description des éléments de commande
1 Verrouillage de la porte
2 Vitre de contrôle*
3 Cache*
4 Axe d’entraînement
5 Anneau de guidage
6 Plateau tournant
7 Tableau de commande
8 Gril
9 Grille à grillade
Attention: Ne démontez ouimais aucun pièce de
l’intérieur de l’appareil ni de l’intérieur de la porte!
N’enlevez en aucun cas les feuilles du côté intérieur
de la porte!
05-MWG 746 H EST 31 13.07.2005, 14:28:01 Uhr

32
FRANÇAIS
Aperçu des touches de commande
Touches numérotées
Pour régler l’heure, la durée de cuisson,
la température et le poids
Touche micro-ondes
Sélection des différentes positions
Touche gril
Pour griller et gratiner
Touche chaleur traditionnelle
Fonction chaleur traditionnelle unique-
ment, réglage par le thermostat
Touche micro-ondes/
gril en mode combiné
Le four à micro-ondes et le gril fonction-
nent en alternance
Touche micro-ondes/
chaleur traditionnelle en mode combiné
Le four à micro-ondes et la chaleur traditi-
onnelle fonctionnent en alternance
Touche décongélation
Active la fonction décongélation après
programmation du minuteur
Touche horloge
Pour régler l’heure à l’aide des touches
numérotées
Touche de programmation Gâteau
Touche minuteur (compte à rebours)
Touche de programmation
Pommes de terre
Touche de programmation Pop-corn
Touche de programmation Boissons
Touche de programmation Pizzas
Touche de programmation
Brochettes de viande
Touche de programmation Réchauffer
Touche Start
Début du programme
Touche Express
Début du programme express.
Activer le temps de cuisson express
Touche Stop
• Appuyez une fois pour arrêter la cuis-
son ou pour effacer une erreur.
• Appuyez deus fois pour effacer un
programme.
• Maintenez enfoncé 3 secondes pour
verrouiller/ déverrouiller l’appareil.
Indications pour le mode gril et combiné
• Une chaleur par rayonnement étant utilisée pour
les fonctions gril et combinées, n’utilisez que de la
vaisselle résistant à la chaleur.
• En simple fonctionnement gril, vous pouvez égale-
ment utiliser de la vaisselle en métal ou en alumini-
um. Pas en mode combiné ni micro-ondes.
• Seule la grille à grillade convient pour les modes de
cuisson gril, pizza, gâteau et combiné.
• Ne posez rien sur l’appareil. La partie supérieure
de l’appareil devient chaude. Maintenez toujours les
fentes de ventilation libres.
• Utilisez la grille à grillade pour rapprocher les ali-
ments de la résistance du four.
Avant la première utilisation
• Retirez tous les accessoires se trouvant à l’intérieur
du four, déballez l’appareil puis installez l’anneau de
guidage au milieu. Placez le plateau en verre sur l’axe
d’entraînement de manière à ce qu’il soit fermement
fi xé dans les encoches de l’arbre d’entraînement et
soit bien posé à plat.
• Vérifi ez que l’appareil n’est pas endommagé, en
particulier au niveau de la porte. En cas de défauts
apparents quels qu’ils soient, ne mettez ouimais
l’appareil en marche.
• Pour éviter tout dysfonctionnement de vos autres
appareils pendant l’utilisation du four, ne le placez
pas à proximité d’appareils électroniques.
• Retirez éventuellement tout fi lm de protection collé
sur les parois de l’appareil.
• Ne retirez en aucun cas les fi lms collés à
l’intérieur de la porte!
• Branchez le câble d’alimentation dans une prise
de courant en bon état de fonctionnement de 230 V,
50 Hz.
• Ne retirez aucune des pièces fi xées à l’intérieur de
l’appareil ni à l’intérieur de la porte!
Utilisation de l’appareil
Information sur la fonction micro-ondes
• Votre appareil fonctionne avec un rayonnement à
micro-ondes qui réchauffe rapidement les particules
d’eau des aliments. Il n’y a alors aucun rayonnement
de chaleur et donc quasiment aucun brunissage.
• Ne réchauffez avec cet appareil que des aliments.
• Cet appareil ne convient pas pour les fritures.
• Ne réchauffez que 1 à 2 portions à la fois. L’appareil
perd sinon de son effi cience.
• Pour arrêter la cuisson, enfoncez la touche Stop.
• Les micro-ondes fournissent aussitôt toute leur éner-
gie. Tout préchauffage est donc inutile.
• Ne laissez ouimais fonctionner l’appareil à vide en
mode micro-ondes ou combiné.
• Le four à micro-ondes ne remplace pas votre four
traditionnel. Il sert essentiellement à:
• décongeler des produits congelés/surgelés
• chauffer/réchauffer rapidement des aliments ou
boissons
• cuire des aliments
• N’utilisez en aucun cas de la vaisselle en plastique ou
en carton.
05-MWG 746 H EST 32 13.07.2005, 14:28:02 Uhr

33
FRANÇAIS
Signal sonore de validation
Les informations programmées sur le four sont validées
par un signal sonore.
• Un signal sonore après avoir appuyé sur une touche:
votre information est enregistrée.
• Deux signaux sonores après avoir appuyé sur une
touche: votre information est refusée.
Il vous faut corriger votre information.
Programmation de l’horloge
Remarque: deux points clignotent lors de la première
mise en marche.
1. Enfoncez la touche Horloge.
L’affi chage passe à „:“.
2. Vous pouvez régler l’heure et les minutes désirées,
grâce aux touches numérotées.
3. Enfoncez à nouveau la touche Horloge. La nouvelle
heure est activée.
Fonction micro-ondes
Placez les aliments à réchauffer dans un plat approprié.
Ouvrez la porte et posez le plat au milieu du plateau en
verre. Fermez la porte (Pour des raisons de sécurité,
l’appareil ne fonctionne que lorsque la porte est fermée).
1. Enfoncez la touche Stop.
2. Sélectionnez la puissance désirée en appuyant une
ou plusieurs fois sur la touche micro-ondes.
Pour sélectionner le pourcentage, enfoncez la
touche Micro-ondes
Appuyez: Puissance Description
1x 100% (P-HI)
Puissance
maximale
2x 90% (P-90)
3x 80% (P-80)
4x 70% (P-70) Fort
5x 60% (P-60)
6x 50% (P-50) Moyen
7x 40% (P-40)
8x 30% (P-30) Faible
9x 20 % (P-20)
10x 10 % (P-10) Très faible
11x 0% (P-00)
100% correspond à 900 W
3. Vous pouvez programmer le temps de cuisson désiré
grâce aux touches numérotées.
Par exemple: 10:30 min. de temps de cuisson sur
une puissance de 100%
Etape Touche Affi chage
1Stop
2 Micro-ondes
P- HI
3 1 0 3 0
10:30
4Start
4. Enfoncez la touche Start pour commencer. Le temps
de cuisson dépend de la quantité et de la nature
des aliments. Avec le temps vous apprendrez vite à
évaluer le temps de cuisson.
Attention:
La cuisson en four à micro-ondes est beaucoup plus
rapide qu’en four traditionnel. En cas d’incertitude, réglez
un temps de cuisson inférieur pour éventuellement pro-
longer la cuisson si nécessaire. L’appareil s’arrête à la fi n
du temps programmé et „END” apparaît sur l’affi chage.
Retirez alors les aliments du four.
Décongélation rapide
Attention:
• La règle est la suivante: env. 5 minutes de décongéla-
tion pour 500 g d’aliments.
• Si les aliments ne sont pas complètement déconge-
lés à la fi n du temps programmé, mettez à nouveau
l’appareil en marche, à chaque fois pour une minute.
Si vous souhaitez décongeler des aliments et program-
mer l’appareil pour 5 minutes:
1. Enfoncez la touche Stop.
2. Enfoncez la touche Décongélation.
3. Programmez le temps désiré à l’aide des touches
numérotées.
Etape Touche Affi chage
1Stop
2 Décongélation
:
3 5 0 0
5:00
4Start
4. Enfoncez la touche Start pour commencer.
Si les aliments ont été congelés dans un récipient en
plastique, nous vous conseillons de légèrement décon-
geler les aliments afi n de les verser dans un récipient
approprié pour le four à micro-ondes.
Pour la décongélation, vous pouvez programmer jusqu’à
99 minutes et 99 secondes. A la fi n du temps program-
mé, un signal sonore retentit et le mot „END“ apparaît sur
l’affi chage. Enfoncez la touche Stop ou ouvrez la porte.
Le mot „END“ disparaît.
Le tableau suivant fournit des informations sur la décon-
gélation manuelle.
Tableau décongélation
Aliments/mets Quantité
Puissance
approx. en
Watt
Durée
approx.
en min.
Durée de
décon-
gélation
ultérieure
Viande, charcuterie
Viande (bœuf, veau, porc)
en morceau
500 g
1000 g
180
180
14 – 18
25 - 30
10 – 15
20 - 25
Escalope, côtelette 200 g 180 4 - 6 5 - 10
Viande hachée 250 g 180 6 - 8 5 - 10
Saucisses grillées et
saucisses de Francfort
200 g 180 4 - 6 5 - 10
Charcuterie en tranches 300 g 180 4 - 6 5 - 10
Conseil: tourner la viande à la mi-temps, recouvrir les morceaux plus
délicats; répartir la viande hachée, enlever les morceaux décongelés;
séparer les rondelles de saucisse
Volaille
Poulet 1000 g 180 20 - 25 10 - 15
Morceaux de poulet 500 g 180 12 - 15 5 - 10
Canard 1700 g 180 25 - 40 20 - 25
Morceaux d’oie, de dinde 500 g 180 12 - 18 10 - 15
Conseil: tourner la volaille à la mi-temps, recouvrir les ailes et les cuisses.
Attention: Jetez le liquide de décongélation sans qu’il n’entre en
contact avec d’autres aliments.
05-MWG 746 H EST 33 13.07.2005, 14:28:13 Uhr

34
FRANÇAIS
Aliments/mets Quantité
Puissance
approx. en
Watt
Durée
approx.
en min.
Durée de
décon-
gélation
ultérieure
Gibier
Selle de chevreuil 1000 g 180 20 - 35 20 - 30
Râble de lièvre 500 g 180 12 - 13 10 - 20
Conseil: tourner une fois, recouvrir les parties au bord
Poisson
Crevettes 250 g 180 5 - 7 5 - 10
Truite 340 g 180 4 - 6 5 - 10
Poisson complet 500 g 180 7 - 10 10 - 15
Filet de poisson 250 g 180 5 - 7 5 - 10
Conseil: tourner plusieurs fois.
Fruits
Framboises, fraises 250 g 180 4 - 6 5 - 10
Cerises, prunes 250 g 180 5 - 7 5 - 10
Compote de pommes 500 g 180 9 - 12 5 - 10
Conseil: remuer avec précaution voire répartir.
Légumes: voir „Tableau de cuisson“, „Décongélation et cuisson des légumes“
Pain et pâtisseries
Pains 4 petits 180 ca. 1-3 5
Pain 1000 g 180 13 - 15 8 - 10
Pain de mie 500 g 180 5 - 6 5 - 10
Gâteau à pâte mélangée 500 g 180 6 - 8 5 - 10
Gâteau aux fruits 1 petit 180 2 - 3 2 - 3
Tarte
1 petit 180 0,5 - 1 3 - 5
1200 g 180 10 - 12 30 - 60
Conseil: placer le pain et les pâtisseries sur du papier crêpé de cuisine qui
absorbe l’humidité; seulement décongeler les pâtisseries délicates.
Produits laitiers
Beurre 250 g 180 5 - 7 10 - 15
Fromage blanc 250 g 180 6 - 8 5 - 10
Crème 200 g 180 3 - 5 2 - 3
Conseil: retirer le papier alu, remuer à la mi-temps; fouetter la crème
quand elle est encore semi-congelée.
Réchauffer
Le four à micro-ondes est particulièrement approprié pour
chauffer/réchauffer. Il est très facile de chauffer à tempé-
rature ambiante ou température de dégustation tous les
liquides et aliments sortant du réfrigérateur, sans devoir
utiliser beaucoup de récipients.
Les temps de chauffage fi gurant dans le tableau suivant
ne sont donnés qu’à titre d’indication car ils peuvent
varier fortement selon la température initiale et la nature
des aliments. Il est donc conseillé de vérifi er, en cours de
fonctionnement, si les aliments sont déjà suffi samment
chauds.
Tableau Réchauffer
Aliments/mets Quantité
Puissance
Watt
Durée
approx.
en min.
Recouvrir
Liquides
Eau, 1 tasse 150 g 900 0,5 - 1 non
Eau, 0,5 l 500 g 900 3,5 - 5 non
Eau, 0,75 l 750 g 900 5 - 7 non
Café, 1 tasse 150 g 900 0,5 - 1 non
Lait, 1 tasse 150 g 900 0,5 - 1 non
Attention: Placez une baguette en verre ou autre. (pas d’ustensile
métallique) dans le récipient pour éviter une surchauffe. Mélangez avant
de boire.
Aliments/mets Quantité
Puissance
Watt
Durée
approx.
en min.
Recouvrir
Mets
Escalopes, pommes de
terre et légumes
450 g 900 2,5 - 3,5 oui
Goulache avec nouilles 450 g 900 2 - 2,5 oui
Viande, boulette et sauce 450 g 900 2,5 - 3,5 oui
Conseil: humidifi er légèrement auparavant, tourner de temps à autre.
Viande
Escalope, panée 200 g 900 1 - 2 non
Fricadelles, 4 500 g 900 3 - 4 non
Rôti 250 g 900 2 - 3 non
Conseil: enduire d’huile au pinceau, afi n que la panure ou la croûte ne
s’amollisse pas.
Volaille
1/2 poulet 450 g 900 3,5 - 5 non
Fricassée de poulet 400 g 900 3 - 4,5 oui
Conseil: enduire d’huile au pinceau, tourner de temps en temps.
Accompagnements
Pâtes, riz, 1 portion
2 portions
150 g 900 1 - 2 oui
300 g 900 2,5 - 3,5 oui
Pommes de terre 500 g 900 3 - 4 oui
Conseil: humidifi er légèrement auparavant.
Soupes / sauces
Bouillon, 1 assiette 250 g 900 1 - 1,5 oui
Soupe épaisses 250 g 900 1,5 - 2 oui
Sauce 250 g 900 1 - 2 oui
Aliments pour bébé
Lait 100 ml 540 0,5 - 1 non
Bouillie 200 g 540 1 - 1,5 non
Conseil : bien secouer ou remuer. Contrôler la température!
Cuisson
Conseils pratiques de cuisson
Respectez les indications données dans le tableau de
cuisson et les recettes. Surveillez la cuisson tant que
vous n’avez pas suffi samment l’habitude.
Vous pouvez ouvrir à tout moment la porte de l’appareil.
L’appareil s’arrête automatiquement.
Il ne se remet en marche que lorsque la porte est fermée.
Les aliments sortant du réfrigérateur ont un temps de
cuisson légèrement supérieur aux aliments à température
ambiante.
Plus les aliments sont compacts, plus le temps de
cuisson est long. Un gros morceau de viande par ex. a un
temps de cuisson supérieur à des dés de viande dans la
même quantité. Il est conseillé de commencer la cuisson
des grosses quantités de viande avec la puissance maxi-
male et de poursuivre avec une puissance moyenne afi n
d’obtenir une cuisson uniforme.
Les aliments fi ns et en petites quantités cuisent plus vite
que les aliments épais et en grandes quantités. Répartis-
sez donc autant que possible les aliments. Il est conseillé
de plier les morceaux fi ns comme les cuisses de poulet
ou les fi lets de poisson ou d’en poser un sur l’autre.
En général, la règle est la suivante:
Double de quantité = doublez le temps
Moitié de quantité = divisez le temps par 2
05-MWG 746 H EST 34 13.07.2005, 14:28:14 Uhr

35
FRANÇAIS
Si vous ne trouvez par le temps de cuisson approprié
pour un aliment spécifi que, la règle est la suivante:
Env. 1 minute pour 100 g
Tous les aliments que vous couvrez dans un four tradi-
tionnel doivent également être couverts dans le four à
micro-ondes.
Un couvercle empêche que les aliments ne sèchent. En
guise de couvercle, vous pouvez également utiliser une
assiette retournée, du papier parcheminé ou un fi lm pour
four à micro-ondes. Ne couvrez pas les aliments qui
doivent conserver leur croustillant.
Tableau de cuisson
Aliments/mets Quantité
Puissance
Watt
Durée
approx.
en min.
Recouvrir
Légumes
Aubergines 500 g 720 7 - 10 oui
Chou-fl eur 500 g 720 8 - 11 oui
Brocoli 500 g 720 6 - 9 oui
Endives 500 g 720 6 - 7 oui
Petits poix 500 g 720 6 - 7 oui
Fenouil 500 g 720 8 - 11 oui
Haricots verts 300 g 720 13 - 15 oui
Pommes de terre 500 g 720 9 - 12 oui
Chou-rave 500 g 720 8 - 10 oui
Poireau 500 g 720 7 - 9 oui
Epis de maïs 250 g 720 7 - 9 oui
Carottes 500 g 720 8 - 10 oui
Poivrons 500 g 720 6 - 9 oui
Choux de Bruxelles 300 g 720 7 - 10 oui
Asperges 300 g 720 6 - 9 oui
Tomates 500 g 720 6 - 7 oui
Courgettes 500 g 720 9 - 10 oui
Conseil: couper les légumes en petits morceaux et faire cuire avec
2 à 3 cuillers à soupe d’eau, tourner de temps en temps, faire cuire ensuite
3 à 5 minutes, n’épicer qu’avant de servir.
Fruits
Compote de pommes,
poires
500 g 720 5 - 8 oui
Compote de prunes 250 g 720 4 - 6 non
Compote de rhubarbe 250 g 720 5 - 8 oui
Pommes cuites, 4 500 g 720 7 - 9 oui
Conseil: ajouter 125 ml d’eau, le jus de citron empêche que les fruits se
décolorent, poursuivre la cuisson pendant 3 à 5 min.
Viande (Mets déjà précuits)
Viande avec de la sauce 400 g 720 10 - 12 oui
Goulache,
viande en lamelles
500 g 720 10 - 15 oui
Rouleaux de bœuf 250 g 720 7 - 8 oui
Conseil: tourner de temps en temps, laisser reposer 3 à 5 min.
Volaille (Mets déjà précuits)
Fricassée de poulet 250 g 720 6 - 7 oui
Soupe de volaille 200 g 720 5 - 6 oui
Conseil: tourner de temps en temps, laisser reposer 3 à 5 min.
Poisson
Filet de poisson
300 g 720 7 - 8 oui
400 g 720 8 - 9 oui
Conseil: tourner après la moitié du temps, poursuivre la cuisson pendant
3 à 5 minutes.
Décongélation et cuisson des légumes
Chou rouge 450 g 720 14 -16 oui
Epinards en feuilles 300 g 720 11 - 13 oui
Chou-fl eur 200 g 720 7 - 9 oui
Aliments/mets Quantité
Puissance
Watt
Durée
approx.
en min.
Recouvrir
Haricots verts 200 g 720 8 - 10 oui
Brocoli 300 g 720 8 - 9 oui
Petits poix 300 g 720 7 - 8 oui
Chou-rave 300 g 720 13 -15 oui
Poireau 200 g 720 10 - 11 oui
Maïs 200 g 720 4 - 6 oui
Carottes 200 g 720 5 - 6 oui
Choux de Bruxelles 300 g 720 7 - 8 oui
Épinards
450 g 720 12 - 13 oui
600 g 720 15 - 17 oui
Conseil: faire cuire avec 1 à 2 cuillers à soupe de liquide, tourner de
temps à autre ou répartir avec précaution, poursuivre la cuisson pendant
2 à 3 min., n’épicer qu’avant de servir.
Soupes / plats uniques composés de viande et de légumes
(Mets déjà précuits)
Plats composés 500 g 720 13 - 15 oui
Soupes légumes
et viandes
300 g 720 7 - 8 oui
Potages 500 g 720 13 - 15 oui
Conseil : remuer de temps à autre, poursuivre la cuisson pendant
3 à 5 minutes.
Cuisson express
Pour commencer la cuisson express, enfoncez à nou-
veau la touche Express. La cuisson commence aussitôt.
A chaque pression sur la touche, le temps de cuisson
est prolongé de 30 secondes et à partir d’une minute, à
chaque fois d’une minute supplémentaire.
La puissance des micro-ondes est alors de 100%.
Programme automatique
Grâce au programme automatique, vous pouvez cuire
certaines quantités d’aliments automatiquement. Le
temps de cuisson et la puissance du four sont program-
més dans l’appareil.
Procédez alors de la manière suivante:
a) Pommes de terre
1. Enfoncez la touche Stop.
2. Enfoncez la touche „Pommes de terre“ 1x pour la
préparation de 120-170 g ou 2x pour 140-200 g.
3. Enfoncez une touche numérotée de 1 à 4 pour pro-
grammer le temps de cuisson.
Touche
“Pommes de terre”
Touches
numérotées
Temps de
cuisson
1x 1 3min 50sec.
1x 2 7min 10sec.
1x 3 11min
1x 4 14min
Touche
“Pommes de terre”
Touches
numérotées
Temps de
cuisson
2x 1 5min 40sec.
2x 2 9min
2x 3 13min
2x 4 17min
4. Enfoncez la touche Start pour commencer.
L’appareil s’arrête à la fi n du temps programmé et le
mot „END“ apparaît sur l’affi chage.
05-MWG 746 H EST 35 13.07.2005, 14:28:16 Uhr

36
FRANÇAIS
Conseil: laissez les aliments 5 à 10 min. dans le four,
pour qu’ils fi nissent de cuire.
b) Pop-corn
N’utilisez que des pop-corn en sachet pour four à micro-
ondes!
1. Enfoncez la touche Stop.
2. Enfoncez la touche „Pop-corn“. Sur l’affi chage appa-
raît „2:30“.
3. Enfoncez la touche Start pour commencer.
L’appareil s’arrête à la fi n du temps programmé et le mot
„END“ apparaît sur l’affi chage. Retirez alors les pop-corn.
Remarque: vous pouvez modifi er le temps de préparation.
• Enfoncez la touche „Pop-corn“ 2x.
• Indiquez le nouveau temps de préparation à l’aide
des touches numérotées.
• Enfoncez la touche Start.
Le nouveau temps de préparation est sauvegardé jusqu’à
nouveau changement.
c) Pizza
1. Enfoncez la touche Stop.
2. Enfoncez la touche „Pizza“ 1x pour réchauffer un
morceau de 120-140 g ou 2x pour réchauffer un gros
morceau.
3. Enfoncez la touche Start pour commencer.
L’appareil s’arrête à la fi n du temps programmé et le mot
„END“ apparaît sur l’affi chage. Retirez alors votre pizza.
d) Brochettes de viande
1. Enfoncez la touche Stop.
2. Enfoncez la touche „Brochettes de viande“ 1x pour la
préparation de petites quantités ou 2x pour de plus
grandes quantités.
3. Enfoncez une touche numérotée de 1 à 4 pour pro-
grammer le poids de cuisson.
(Touche „Brochettes de viande“ enfoncée 1x)
Touche
numérotée
Poids
Temps de
cuisson
1 120g 10min
2 200g 13min
3 400g 17min
4 600g 23min
(Touche „Brochettes de viande“ enfoncée 2x)
Touche
numérotée
Poids
Temps de
cuisson
1 170g 12min
2 310g 15min
3 540g 23min
4 800g 30min
4. Enfoncez la touche Start pour commencer.
L’appareil s’arrête à la fi n du temps programmé et le mot
„END“ apparaît sur l’affi chage. Retirez alors votre viande.
e) Boissons
1. Enfoncez la touche Stop.
2. Enfoncez la touche „Boissons“ 1x pour réchauffer
140-200 g, 2x pour 250-310 g.
3. Pour programmer la durée de fonctionnement, enfon-
cez une touche numérotée de 1 à 4.
Touche
“Boissons”
Touche numé-
rotée
Durée de fonc-
tionnement
1x 1 1min 20sec.
1x 2 2min 30sec.
1x 3 3min 40sec.
1x 4 4min 50sec.
Touche
“Boissons”
Touche numé-
rotée
Durée de fonc-
tionnement
2x 1 2min 20sec.
2x 2 4min
2x 3 5min 40sec.
2x 4 7min 20sec.
4. Enfoncez la touche Start pour commencer.
L’appareil s’arrête à la fi n du temps programmé et le
mot „END“ apparaît sur l’affi chage. Retirez alors votre
boisson.
f) Réchauffer
1. Enfoncez la touche Stop.
2. Enfoncez la touche „Réchauffer“. Sur l’affi chage
apparaît „3:40“.
3. Enfoncez la touche Start pour commencer.
L’appareil s’arrête à la fi n du temps programmé et le mot
„END“ apparaît sur l’affi chage. Retirez alors ce que vous
avez placé dans le four.
g) Gâteau
1. Enfoncez la touche Stop.
2. Enfoncez la touche „Gâteau“. Sur l’affi chage apparaît
„40:00“.
3. Enfoncez la touche Start pour commencer.
L’appareil s’arrête à la fi n du temps programmé et le mot
„END“ apparaît sur l’affi chage. Retirez alors votre gâteau.
Remarque: vous pouvez modifi er le temps de cuisson.
• Enfoncez la touche „Gâteau“ 2x.
• Programmez le nouveau temps de cuisson (jusqu’à
99:99) à l’aide des touches numérotées.
• Enfoncez la touche Start.
Le nouveau temps de préparation est sauvegardé jusqu’à
nouveau changement.
Gril
Pour vos grillades, utilisez la grille prévue à cet effet
qui permet d’obtenir un brunissage rapide et uniforme.
Utilisez de la vaisselle résistant à la chaleur appropriée
ou posez vos grillades directement sur la grille.
Les aliments gros et épais peuvent être grillés directe-
ment sur le plateau tournant!
Pour griller et gratiner, procédez de la manière suivante:
1. Enfoncez la touche Stop.
2. Enfoncez la touche Gril 1x.
3. Programmez le temps de grillade désiré à l’aide des
touches numérotées.
4. Enfoncez la touche Start pour commencer.
L’appareil s’arrête à la fi n du temps programmé et le mot
„END“ apparaît sur l’affi chage. Retirez alors vos grillades.
05-MWG 746 H EST 36 13.07.2005, 14:28:18 Uhr

37
FRANÇAIS
Fonctionnement
combiné micro-ondes/gril
Pour ce réglage, les micro-ondes et le gril fonctionnent en
alternance pendant le temps programmé à raison de:
Mode combiné1
Micro-ondes
30% du temps de
cuisson
Gril 70% du
temps de cuisson
Mode combiné2
Micro-ondes
55% du temps de
cuisson
Gril 45% du
temps de cuisson
Si vous préparez vos aliments en mode combiné micro-
ondes/gril, veillez à respecter les indications suivantes:
La durée de fonctionnement des micro-ondes est plus
longue pour les gros aliments épais (par ex. rôti de porc)
que pour les aliments petits et fi ns. Le contraire est
cependant valable pour le gril. Plus les aliments sont
proches du gril, plus ils brunissent rapidement. Ce qui
signifi e que lorsque vous préparez un gros rôti en mode
combiné, le temps de fonctionnement du gril est éventu-
ellement plus court que pour de plus petits rôtis.
Procédez alors de la manière suivante:
1. Enfoncez la touche Stop.
2. Enfoncez la touche „Micro-ondes/Gril“ 1x pour le
mode combiné 1. Enfoncez la touche „Micro-ondes/
Gril“ 2x pour le mode combiné 2.
3. Programmez le temps de cuisson désiré à l’aide des
touches numérotées.
4. Enfoncez la touche Start pour commencer.
L’appareil s’arrête à la fi n du temps programmé et le mot
„END“ apparaît sur l’affi chage. Retirez alors les aliments
du four.
Tableau fonctionnement
combiné micro-ondes/gril
Aliments/mets Quantité
Durée
approx.
en min.
Recouvrir
Viande, charcuterie
Bœuf, porc ou Veau en morceau
500 g
750 g
10 - 12
12 - 15
non
non
Côtelette de porc fumée et salée 500 g 12 - 14 non
Rôti de viande hachée 500 g 13 - 15 non
Saucisse viennoises 200 g 2 - 3 non
Saucisses de Francfort 200 g 2 - 3 non
Conseil: tourner la viande à la mi-temps, poursuivre la cuisson pendant 3
à 5 minutes; Enduire le rôti de viande hachée de blanc d’œuf; piquer les
saucisses avec une fourchette.
Volaille
Bouillon de volaille 1000 g 13 - 15 non
Morceaux de poulet 250 g 4 - 5 non
Conseil: faire cuire dans le propre jus sans liquide, tourner une fois,
poursuivre la cuisson pendant 4 à 5 minutes.
Poisson
Truite, bleue 300 g 5 - 6 non
Filet de poisson 300 g 3 - 4 non
Conseil: tourner à la mi-temps de cuisson, poursuivre la cuisson pendant
3 à 5 minutes.
Utilisation avec
chaleur traditionnelle seulement
Pendant la cuisson, de l’air chaud circule à l’intérieur de
l’appareil. Les aliments brunissent ainsi plus rapidement
et sont plus croustillants. En mode de chaleur traditi-
onnelle, vous pouvez choisir jusqu’à 10 températures
différentes.
Cuisson avec chaleur traditionnelle
Si vous souhaitez par ex. cuire pendant 40 minutes à
180°C, procédez alors de la manière suivante:
1. Enfoncez la touche Stop.
2. Enfoncez la touche „Chaleur traditionnelle“.
3. Choisissez la température de cuisson désirée à l’aide
d’une des touches numérotées (par ex. 8).
4. Programmez le temps de cuisson à l’aide des touches
numérotées (par ex. 40 min.).
Etape Touche Affi chage
1Stop
2
Chaleur
traditionnelle
38
1 80
44 0
H:40
5Start
5. Enfoncez la touche Start pour commencer.
Attention:
• Vous pouvez programmer au maximum 9 heures
et 99 minutes. A la fi n du temps programmé un
signal sonore retentit et le mot „END“ apparaît sur
l’affi chage. Enfoncez la touche Stop ou ouvrez la
porte. Le mot „END“ disparaît.
• Pendant la cuisson en chaleur traditionnelle, vous
pouvez contrôler la température en appuyant sur la
touche Chaleur traditionnelle.
Préchauffage et cuisson
avec chaleur traditionnelle
Vous pouvez préchauffer votre four à micro-ondes avec la
fonction chaleur traditionnelle et cuire ensuite en chaleur
traditionnelle.
Si vous souhaitez par ex. préchauffer votre four à 170°C
puis cuire pendant 35 minutes:
1. Enfoncez la touche Stop.
2. Enfoncez la touche Chaleur traditionnelle.
3. Sélectionnez la température de préchauffage désirée
à l’aide d’une des touches numérotées (par ex. 7).
4. Enfoncez la touche Start. L’indication „PREH“ (pré-
chauffer) clignote sur l’affi chage. L’indication „PREH“
reste allumée lorsque le four a atteint la température
programmée.
5. Ouvrez la porte et placez vos aliments au milieu du
plateau.
6. Programmez le temps de cuisson désiré (par ex. 35
min.) à l’aide des touches numérotées.
7. Enfoncez la touche Start pour commencer.
L’appareil s’arrête à la fi n du temps programmé et le mot
„END“ apparaît sur l’affi chage. Retirez alors les aliments
du four.
05-MWG 746 H EST 37 13.07.2005, 14:28:19 Uhr

38
FRANÇAIS
Utilisation combinée de la
chaleur traditionnelle et des micro-ondes
L’appareil dispose pour cela de 4 réglages préprogram-
més. Cela rend l’utilisation de la chaleur traditionnelle
ainsi que des micro-ondes plus aisé.
Pour programmer la température de chaleur traditionnel-
le, enfoncez la touche Micro-ondes/Chaleur traditionnelle
puis une des touches numérotées de 1 à 4.
Touche
Touche
numérotée
Température (°C)
Micro-ondes/
Chaleur traditionnelle
1 150
Micro-ondes/
Chaleur traditionnelle
2 180
Micro-ondes/
Chaleur traditionnelle
3 200
Micro-ondes/
Chaleur traditionnelle
4 230
Si vous souhaitez programmer un temps de 25 minutes
pour cuire un gâteau à 200°C:
1. Enfoncez la touche Stop.
2. Enfoncez la touche Micro-ondes/Chaleur traditionnel-
le.
3. Choisissez la température désirée (200°C) à l’aide
d’une des touches numérotées (par ex. 3).
4. Programmez le temps de cuisson désiré (par ex. 25
min.) à l’aide des touches numérotées.
5. Enfoncez la touche Start pour commencer.
Attention:
Vous pouvez programmer au maximum 9 heures et 99
minutes. A la fi n du temps programmé un signal sonore
retentit et le mot „END“ apparaît sur l’affi chage. Enfoncez
la touche Stop ou ouvrez la porte. Le mot „END“ dispa-
raît.
Pendant la cuisson en chaleur traditionnelle, vous pouvez
contrôler la température en appuyant sur la touche Micro-
ondes/Chaleur traditionnelle.
Cuisson en plusieurs étapes
Vous pouvez régler les programmes de manière à pou-
voir choisir entre 3 fonctions différentes.
Si vous choisissez par ex. le programme suivant:
Décongélation rapide
쒆
Préparation micro-ondes
쒆
Cuisson chaleur traditionnelle (sans préchauffage)
1. Enfoncez la touche Stop.
2. Enfoncez la touche Décongélation.
3. Programmez le temps de décongélation désiré à
l’aide des touches numérotées.
4. Enfoncez la touche Micro-ondes.
5. Programmez le temps de cuisson micro-ondes désiré
à l’aide des touches numérotées.
6. Enfoncez la touche Chaleur traditionnelle.
7. Choisissez la température de cuisson désirée à l’aide
d’une des touches numérotées.
8. Programmez le temps de cuisson en chaleur traditi-
onnelle désiré à l’aide des touches numérotées.
9. Enfoncez la touche Start pour commencer.
L’appareil s’arrête à la fi n du temps programmé et le mot
„END“ apparaît sur l’affi chage. Retirez alors les aliments
du four.
Fonctions spéciales
Rappel automatique
A la fi n du temps de cuisson, un signal sonore retentit
toutes les 2 minutes pour vous rappeler de retirer les
aliments du four.
Ce signal de rappel s’arrête si vous ouvrez la porte ou
enfoncez la touche Stop.
Verrouillage
Pour verrouiller l’appareil, enfoncez la touche Stop
pendant plus de 3 secondes. Le verrouillage est indiqué
sur l’affi chage. Les éléments de commande sont alors
bloqués. Enfoncez la touche Stop à nouveau pendant
plus de 3 sec. pour déverrouiller l’appareil.
Minuteur (compte à rebours)
L’appareil dispose d’une fonction minuteur:
1. Enfoncez la touche Stop.
2. Enfoncez la touche Minuteur.
3. Programmez le temps désiré à l’aide des touches
numérotées.
4. Enfoncez la touche Start pour commencer.
Le temps programmé est décompté à rebours et un
signal sonore retentit à la fi n du temps programmé.
Remarque: vous pouvez également utiliser cette fonction
en cours de fonctionnement de l’appareil.
Nettoyage
Débranchez toujours le câble d’alimentation avant le
nettoyage.
• Nettoyez l’intérieur du four après utilisation, à l’aide
d’un torchon légèrement humide.
• Nettoyez les parois extérieures de l’appareil à l’aide
d’un torchon légèrement humide.
• Lavez les accessoires de façon habituelle à l’eau
savonneuse chaude.
• En cas de salissures, lavez soigneusement le cadre
et le joint de la porte et autres parties adjacentes à
l’aide d’un torchon humide.
Données techniques
Modèle: ..........................................................MWG 746 H
Alimentation:..................................................230 V, 50 Hz
Consommation: .....................................................1400 W
Consommation chaleur traditionnelle: ...................1400 W
Consommation gril:................................................1200 W
Puissance micro-ondes: ..........................................900 W
Volume du four: .....................................................25 litres
Classe de protection:........................................................Ι
05-MWG 746 H EST 38 13.07.2005, 14:28:20 Uhr

39
FRANÇAIS
Cet appareil a été contrôlé d’après toutes les directives
européennes actuelles applicables, comme par exemple
concernant la compatibilité électromagnétique et la basse
tension. Cet appareil a été fabriqué en respect des régle-
mentations techniques de sécurité les plus récentes.
Sous réserve de modifi cations techniques.
Garantie
Nous accordons une garantie de 24 mois à dater de la
date d’achat (ticket de caisse) pour l’appareil que nous
vendons.
Pendant la durée de la garantie, nous éliminons gratuite-
ment les défauts de l’appa reil ou des accessoires dé-
coulant d’un vice de matériau ou de fabrication au moyen
d’une réparation ou, selon notre estimation, au moyen
d’un remplacement. Les prestations dans le cadre de la
garantie n’entraînent aucune prorogation de la durée de
garantie et ne donnent pas droit à une nouvelle garantie!
Le justifi catif de garantie est le reçu. Sans ce justifi catif,
aucun remplacement gratuit ni aucune réparation gratuite
ne peuvent être effectués.
En cas de recours à la garantie, ramenez votre appareil
complet, dans son emballage d‘origine, accompagné
de votre preuve d‘achat, à votre revendeur.
Les défauts sur les accessoires ou les pièces d’usure
ainsi que le net
toyage, l’entretien ou le remplacement
de pièces d’usure
ne sont pas garantis et sont donc
payants!
En cas d’intervention étrangère, la garantie devient
caduque.
Après la garantie
Après écoulement de la durée de garantie, les répara-
tions peuvent être effectuées, contre paiement, par le
commerce spécialisé ou le service de réparation.
Signifi cation du symbole „Elimination“
Protégez votre environnement, ne jetez pas vos appareils
électriques avec les ordures ménagères.
Utilisez, pour l’élimination de vos appareils électriques,
les bornes de collecte prévues à cet effet où vous pouvez
vous débarrasser des appareils que vous n’utilisez plus.
Vous contribuez ainsi à éviter les impacts potentiels dans
l’environnement et sur la santé de chacun, causés par
une mauvaise élimination de ces déchets.
Vous contribuez aussi au recyclage sous toutes ses
formes des appareils électriques et électroniques usagés.
Vous trouverez toutes les informations sur les bornes
d’élimination des appareils auprès de votre commune ou
de l’administration de votre communauté.
05-MWG 746 H EST 39 13.07.2005, 14:28:21 Uhr

40
ESPAÑOL
Indicaciones generales de seguridad
• Antes de la puesta en servicio de este aparato lea
detenidamente el manual de instrucciones y guarde
este bien incluido la garantía, el recibo de pago y si es
posible también el cartón de embalaje con el embalaje
interior.
• Solamente utilice el aparato para el uso privado y para
el fi n previsto. Este aparato no está destinado para el
uso profesional. No lo utilice al aire libre (en excepto
que esté destinado para el uso limitado al aire libre).
No lo exponga al calor, a la entrada directa de rayos de
sol, a la humedad ( en ningún caso sumerja el aparato
en agua) y a los cantos agudos. No utilice el aparato
con las manos húmedas. En caso de que el aparato
esté húmedo o mojado retire de momento la clavija de
la caja de enchufe. No tocar el agua.
• Desconecte el aparato y siempre retire la clavija de la
caja de enchufe (tire de la clavija no del cable), cuando
no quiera utilizar el aparato, montar piezas o en caso
de limpieza o defectos.
• No utilice el aparato sin vigilancia. En caso de que ten-
ga que dejar su lugar de trabajo, desconecte siempre
el aparato o retire la clavija de la caja de enchufe (por
favor tire de la clavija y no del cable).
• Para evitar que los niños se hagan daños eléctricos,
siempre tenga atención, que el cable no cuelgue hacia
abajo y que los niños no tengan acceso al aparato.
• Controle regularmente si el aparato o el cable tiene
defectos. No ponga en servicio un aparato defecto.
• No repare el aparato por su cuenta, sino vaya a un
establecimiento autorizado. Para evitar peligros, deje
sustituir un cable defecto por uno de la misma calidad
solamente por el fabricante, nuestro servicio al cliente
o una similar persona cualifi cada.
• Solamente utilice accesorios originales.
• Por favor tenga atención a las “Indicaciones especiales
de seguridad…“ indicadas a continuación.
¡Importantes indicaciones de seguridad!
Se ruega leer estas indicaciones
cuidadosamente y guardarlas bien para
su posterior utilización.
• Aviso: En caso de que la puerta o la obturación de
goma de la puerta estén dañadas, no se puede poner
en marcha el aparato, hasta que una persona especia-
lizada no lo haya reparado.
• Aviso: En ningún caso repare el aparato por su
cuenta, sino contacte a un servicio autorizado. Excepto
para la persona especializada, para los demás signifi -
ca un peligro realizar trabajos de mantenimiento o de
reparación, que exijan descubrir la cubierta que nor-
malmente asegura la protección contra la exposición a
la radiación de la energía por microondas.
• Aviso: Se ruega no calentar líquidos en recipientes
cerrados. ¡Existe peligro de explosión!
• Aviso: Si se hace uso del aparato en el modo de
funcionamiento combinado, los niños deberán usar el
aparato sólo bajo la vigilancia de una persona adulta.
Esto se debe a las altas temperaturas que origina el
aparato.
• Nota: El microondas no está previsto para calentar/
cocer a animales vivos.
• Aviso: Niños y personas decrépitas solamente po-
drán utilizar el aparato de cocción sin vigilancia, si se
ha realizado una instrucción adecuada por la persona
que normalmente vigila el proceso. La instrucción
debe hacer posible que las personas puedan utilizar el
aparato de cocción de forma segura y que entiendan
los peligros del uso incorrecto.
• Si desea colocar su microondas en un armario, una
estantería o algo similar, asegúrese que el microondas
tenga por todos los lados una mínima distancia de
ventilación de 10cm entre otras cosas a los armarios o
a la pared.
• Solamente utilice vajilla apropiada como:
Vidrio, porcelana, cerámica, vajilla de plástico resisten-
te al calor o vajilla especial para microondas.
• Al calentar o al cocinar alimentos en materiales infl a-
mables, como pueden ser recipientes de plástico o de
papel, se tiene que observar con frecuencia el aparato
de microondas para cocinar, causado por la posibilidad
de una infl amación.
• En caso de emisión de humos se ruega desconectar el
aparato y retirar la clavija de la caja de enchufe. Man-
tenga la puerta cerrada, para apagar posible llamas
que aparezcan.
• Atension demora en la ebullicion: En la ebullición,
sobre todo al recalentar líquidos (agua) puede ocurrir,
que la temperatura de ebullición se haya alcanzado;
pero que las típicas burbujas de vapor todavía no
suban. El líquido no hierve de forma uniforme. Esta
llamada demora en la ebullición puede, al apartar el
recipiente con una leve vibración, causar una repentina
formación de burbujas de vapor y originar que rebase
el agua. ¡Existe peligro de quemarse! Para conseguir
una ebullición uniforme, se ruega colocar una varilla de
vidrio o algo similar, no metálico, en el recipiente.
• Se ruega no calentar líquidos en recipientes cerrados.
¡Existe peligro de explosión!
• El contenido de biberones y tarros con alimentación in-
fantil se debe remover o agitar y revisar la temperatura
antes de su uso. Existe peligro de quemarse.
• Alimentos con cáscara o piel, como huevos, sal-
chichas, conservas de vidrio cerradas, etc., no se
deben calentar en el microondas, ya que podrían
explotar, aunque el calentamiento haya sido fi nalizado
por microondas.
• El marco de la puerta y la obturación, así como piezas
vecinas, en caso de que estén sucias, deben ser
limpiadas cuidadosamente con un paño húmedo.
• Limpie el microondas con regularidad y retire restos de
alimentos del interior.
• Si se ha limpiado mal el aparato puede destruirse
su superfi cie, lo cual acortaría su duración y podría
originar situaciones peligrosas.
Indicación de los elementos de mando
1 Cerradura de puerta
2 Ventana del microondas*
3 Cubierta*
4 Eje de mando
5 Anillo de rozamiento
6 Plato giratorio
7 Panel de mando
8 Calefacción de parrilla
9 Parrilla
Atención: ¡No retire ningunas piezas montadas del espa-
cio interior de cocción o de la parte interior de la puerta!
Se ruega no retirar de ninguna manera la hoja de
plástico que hay en la parte interior de la puerta.
05-MWG 746 H EST 40 13.07.2005, 14:28:22 Uhr

41
ESPAÑOL
Vista general de las teclas de manejo
Teclas numéricas
Para ajustar la hora, el tiempo de cocción,
la temperatura y el peso
Tecla microondas
Selección de las etapas de potencia
Tecla parrilla
Para asar a la parrilla y para gratinar
Tecla aire caliente
Funcionamiento exclusivo de aire caliente
Termostato controlado
Tecla microondas /
parrilla funcionamiento combinado
El microondas y la parrilla trabajan alter-
nativamente
Tecla microondas / aire caliente
funcionamiento combinado
El microondas y el aire caliente trabajan
alternativamente
Tecla descongelación
Activa la función de descongelación junto
con un ajuste de tiempo
Tecla reloj
Junto con las teclas numéricas para la
puesta en hora
Tecla de programa pastel
Tecla timer / temporizador (Countdown)
Tecla de programa patata
Tecla de programa palomitas
Tecla de programa bebidas
Tecla de programa pizza
Tecla de programa pinchos de carne
Tecla de programa calentar
Tecla inicio
inicio del programa
Tecla expres
inicio del programa expres –
Ajuste del tiempo de cocción expres
Tecla de parada
• Al presionar una vez se parará el
proceso de cocción o se borrará una
insertación errónea.
• Al presionar dos veces se borrará el
programa.
• Mantega la tecla 3 segundos presionada
para bloquear / desbloquear el aparato.
Indicaciones para el funcionamiento
de asar a la parrilla y el funcionamiento
combinado
• Como en el funcionamiento de asar a la parrilla y el
funcionamiento combinado se utiliza calor radiante,
se ruega usar solamente vajilla resistente al calor.
• Si solamente utiliza el funcionamiento de asar a la
parrilla, también puede utilizar vajilla de metal o de
aluminio – pero no al utilizar el funcionamiento com-
binado o de microondas.
• Para las modos de operación Parrilla, Pizza, Hornear
y Kombi (Combinado) solamente es apropiada la
parrilla.
• No coloque nada sobre la parte superior de la
carcasa. Está se calentará. Deje las rejillas de ventila-
ción siempre libres.
• Se ruega utilizar la parrilla para acercar el alimento
que se quiera asar al elemento calorífi co.
Puesta en marcha
• Retire todo el accesorio que se encuentre en el es-
pacio interior de cocción, desempaquételo y coloque
el anillo de rozamiento en el centro. Coloque de tal
manera el plato de vidrio sobre el eje de mando que
éste encaje en las hendiduras del eje conductor y de
esta forma poder conseguir una colocación fi ja.
• Supervise el aparato si tiene algunos defectos visib-
les, sobre todo en la zona de la puerta. Si hubiera
defectos de cualquier tipo, de ninguna forma se
deberá poner en marcha el aparato.
• Para evitar perturbaciones de otros aparatos al poner
en marcha el microondas, no coloque su aparato
cerca de otros aparatos electrónicos.
• Si hubiera, retire el fi lm de plástico de la carcasa.
• Se ruega no retirar de ninguna manera la hoja de
plástico que hay en la parte interior de la puerta.
• Introduzca la clavija en una caja de enchufe con
tomatierra 230V, 50 Hz y correctamente instalada.
• ¡No retire ningunas piezas montadas del e
Uso del aparato
Indicaciones de interés en el funcionamiento del
microondas:
• Su aparato trabaja con radiación de microondas que
calienta en muy corto tiempo las partículas de agua
en los alimentos. En este proceso no hay radiación
calorífi ca y por ello casi nada de tostado en los
alimentos.
• Caliente con este aparato solamente alimentos.
• Este aparato no está apropiado para la cocción de
alimentos bañados en aceite.
• Solamente caliente de 1-2 raciones a la vez. Si no
pierde el aparato en efi cacia.
• Para interrumpir el proceso de cocción presione la
tecla parada.
• Microondas suministran directamente energía. Por
ello no es necesario precalentar los alimentos.
• Nunca use el aparato en el funcionamiento de
microondas o combinado de forma vacía, es decir sin
alimentos.
05-MWG 746 H EST 41 13.07.2005, 14:28:23 Uhr

42
ESPAÑOL
• El horno tradicional no se puede reemplazar por el
microondas. El microondas sirve principalmente para:
• Descongelación de productos congelados
• Calentamiento rápido de alimentos o bebidas
• Cocción de comidas
• Se ruega no utilizar vajilla de plástico o de papel.
Tono de confi rmación
Su datos de entrada serán confi rmados con un tono de
señal.
• Un tono de señal después de haber presionado una
tecla:
Su insertación ha sido aceptada.
• Dos tonos de señal después de haber presionado
una tecla :
La insertación ha sido rechazada.
Por favor realice una corrección del ajuste.
Ajuste de la hora
Nota: En la primera conexión aparecen dos puntos
parpadeando.
1. Presione la tecla-reloj.
La indicación cambia a “:”.
2. Mediante las teclas numéricas introduzca las horas y
los minutos deseados.
3. Presione de nuevo la tecla-reloj. La hora nueva se
activará.
Manejo del microondas
Coloque la comida que quiera calentar en la vajilla apro-
piada. Abra la puerta y ponga la vajilla en el centro del
plato de vidrio. Se ruega cerrar la puerta. (Por razones
de seguridad, el aparato sólo se activará al estar cerrada
la puerta).
1. Presione la tecla parada.
2. Presionando una o varias veces la tecla microondas,
podrá regular la potencia del microondas.
Presione, para seleccionar los valores en por ciento,
la tecla-microondas
Presione: Potencia Descripción
1x 100% (P-HI) Plena potencia
2x 90% (P-90)
3x 80% (P-80)
4x 70% (P-70) Alto
5x 60% (P-60)
6x 50% (P-50) Medio
7x 40% (P-40)
8x 30% (P-30) Bajo
9x 20 % (P-20)
10x 10 % (P-10) Muy bajo
11x 0% (P-00)
100% corresponde a 900 W
3. Mediante las teclas-numéricas introduzca el tiempo
de cocción deseado.
Por ejemplo: 10:30 minutos tiempo de cocción con
100% de potencia
Paso Tecla Indicación
1 parada
2 microondas
P- HI
3 1 0 3 0
10:30
4 inicio
4. Para iniciar el proceso presione la tecla inicio. El tiem-
po de cocción se orienta según la cantidad y el tipo
del contenido. Con un poco de práctica aprenderá
rápido cuanto tiempo supone el tiempo de cocción de
los distintos alimentos.
Por favor preste atención:
La cocción en un microondas es mucho más rápida que
en un horno convencional. Si no está seguro, es preferib-
le ajustar el tiempo de cocción más bajo y si es necesario
aumentarla. Después de haber transcurrido el tiempo
se apagará el aparato y en el display aparecerá „END“.
Ahora puede apartar la comida.
Descongelación rápida
de artículos congelados
Por favor tenga en cuenta:
• Como regla general es válida, 500 gramos de artículo
congelado necesitan aprox. unos 5 minutos para la
descongelación.
• En caso de que durante este tiempo el artículo
congelado no estuviese descongelado por completo,
ajuste el tiempo en pasos de un minuto.
Suponiendo que desee descongelar alimentos congela-
dos y ajustar el tiempo a 5 minutos:
1. Presione la tecla parada.
2. Presione la tecla descongelación.
3. Mediante las teclas-numéricas introduzca el tiempo
de cocción deseado.
Paso Tecla Indicación
1 parada
2 descongelación
:
3 5 0 0
5:00
4 inicio
4. Para iniciar el proceso presione la tecla inicio.
Si el artículo congelado ha sido congelado en un
recipiente de plástico, recomendamos descongelar éste
brevemente, para cambiarlo a continuación a una vajilla
apropiada para microondas.
Para la descongelación puede ajustar hasta 99 minutos
más 99 segundos. Después de haber transcurrido el
tiempo, sonarán señales acústicas y la palabra „END“
aparecerá en el display. Presione la tecla de parada o
abra la puerta. La palabra “END” desaparecerá.
En la tabla a continuación recibirá información referente a
la descongelación manual.
05-MWG 746 H EST 42 13.07.2005, 14:28:33 Uhr

43
ESPAÑOL
Tabla descongelación
Alimento/plato Cantidad
Potencia
en vatios
Tiempo
aprox. en
minutos
Tiempo
de
descon-
gelación
Carne, embutidos
Carne (de vaca,
de ternera, de cerdo)
500 g
1000 g
180
180
14 – 18
25 - 30
10 – 15
20 - 25
Escalope, chuleta 200 g 180 4 - 6 5 - 10
Carne picada 250 g 180 6 - 8 5 - 10
Salchicha frita,
salchicha cocida
200 g 180 4 - 6 5 - 10
Fiambre 300 g 180 4 - 6 5 - 10
Consejo: Dar la vuelta a la carne después de haber transcurrido la mitad
de tiempo, tapar piezas delicadas, trocear la carne picada, retirar piezas ya
descongeladas, separar rodajas de embutido
Carne de ave
Pollo 1000 g 180 20 - 25 10 - 15
Trozos de pollo 500 g 180 12 - 15 5 - 10
Pato 1700 g 180 25 - 40 20 - 25
Trozos de ganso,
trozos de pavo
500 g 180 12 - 18 10 - 15
Consejo: Dar la vuelta a la carne de ave después de haber transcurrido la mitad
de tiempo, tapar las alas y los muslos, retirar el líquido que salga de la descon-
gelación y tener cuidado que no entre en contacto con los demás alimentos.
Carne de caza
Lomo de corzo 1000 g 180 20 - 35 20 - 30
Lomo de liebre 500 g 180 12 - 13 10 - 20
Consejo: Dar la vuelta una vez, cubrir los lados
Pescado
Cangrejos de mar,
gambas
250 g 180 5 - 7 5 - 10
Trucha 340 g 180 4 - 6 5 - 10
Pescado entero 500 g 180 7 - 10 10 - 15
Filete de pescado 250 g 180 5 - 7 5 - 10
Consejo: Remover repetidas veces, dar la vuelta con frecuencia.
Fruta
Frambuesas, fresas 250 g 180 4 - 6 5 - 10
Cerezas, ciruelas 250 g 180 5 - 7 5 - 10
Compota de manzana 500 g 180 9 - 12 5 - 10
Consejo: Remover con cuidado es decir trocear con cuidado
Verduras: vea „Tabla Cocción“, „Descongelación y cocción de verdura“
Pan y repostería
Panecillos 4 piezas 180 ca. 1-3 5
Pan 1000 g 180 13 - 15 8 - 10
Pan de molde 500 g 180 5 - 6 5 - 10
Bizcocho 500 g 180 6 - 8 5 - 10
Bizcocho de fruta 1 pieza 180 2 - 3 2 - 3
Tarta
1 pieza 180 0,5 - 1 3 - 5
1200 g 180 10 - 12 30 - 60
Consejo: Colocar el pan y la repostería sobre papel de crespón de cocina
para que absorba la humedad, repostería delicada descongelar muy breve.
Productos lácteos
Mantequilla 250 g 180 5 - 7 10 - 15
Requesón 250 g 180 6 - 8 5 - 10
Nata 200 g 180 3 - 5 2 - 3
Consejo: Apartar el papel de aluminio, remover después de haber transcur-
rido la mitad de tiempo, batir la nata cuando esté todavía media congelada.
Calentamiento
El calentamiento de alimentos es un punto fuerte del mic-
roondas. Líquidos o comidas con temperatura de frigorífi -
co se pueden calentar rápidamente a una temperatura de
ambiente o de consumo, sin haber utilizado muchas ollas.
Los tiempos indicados para calentar las comidas son
solamente valores indicativos, ya que el tiempo depende
fundamentalmente de la temperatura de partida y de la
composición de la comida. Por ello se recomienda revisar
de vez en cuando si la comida ya está sufi cientemente
caliente.
Tabla – Calentamiento
Alimento/plato Cantidad
Potencia
en vatios
Tiempo
aprox. en
minutos
Cubrir
Líquidos
Agua, 1 taza 150 g 900 0,5 - 1 no
Agua, 0,5 l 500 g 900 3,5 - 5 no
Agua, 0,75 l 750 g 900 5 - 7 no
Café, 1 taza 150 g 900 0,5 - 1 no
Leche, 1 taza 150 g 900 0,5 - 1 no
Atención: Para evitar el retardo de ebuIlición, introduzca una varilla de vid-
rio o algo similar (nada metálico) en el recipiente. Remueva bien la bebida.
Platos combinados
Escalope, patatas
y verduras
450 g 900 2,5 - 3,5 si
Estofado de carne
con pasta
450 g 900 2 - 2,5 si
Carne, albóndiga de masa
de patata y salsa
450 g 900 2,5 - 3,5 si
Consejo: Humedecer anteriormente un poco y remover entremedias.
Carne
Escalope, empanado 200 g 900 1 - 2 no
Albóndigas, 4 piezas 500 g 900 3 - 4 no
Trozo de carne asada 250 g 900 2 - 3 no
Consejo: Dar unas pinceladas con aceite, para que el empanado no se
reblandezca.
Carne de ave
1/2 pollo 450 g 900 3,5 - 5 no
Fricasé de gallina 400 g 900 3 - 4,5 si
Consejo: Dar unas pinceladas con aceite y remover entremedias.
Guarnición
Pasta, arroz
1 ración 150 g 900 1 - 2 si
2 raciones 300 g 900 2,5 - 3,5 si
Patatas 500 g 900 3 - 4 si
Consejo: Humedecer anteriormente un poco.
Sopas / salsas
Caldo claro, 1 plato 250 g 900 1 - 1,5 si
Sopa con trozitos de otros
alimentos
250 g 900 1,5 - 2 si
Salsa 250 g 900 1 - 2 si
Alimentación para bebés
Leche 100 ml 540 0,5 - 1 no
Papilla 200 g 540 1 - 1,5 no
Consejo: Agitar o remover bien. ¡Comprobar la temperatura!
Cocción
Consejos útiles para la cocción
Oriéntese en los valores indicativos de la tabla de
cocción y de las recetas. Observe el proceso de cocción,
hasta que vaya tomando práctica.
Puede abrir en cada momento la puerta del aparato. El
aparato se desconectará de forma automática. Se conec-
tará de nuevo al cerrar la puerta.
Alimentos del frigorífi co, necesitan un poco más de
tiempo para la cocción que aquellos con temperatura de
ambiente.
05-MWG 746 H EST 43 13.07.2005, 14:28:34 Uhr

44
ESPAÑOL
Cuanto más compacta sea una comida, más tiempo
necesita para su cocción. Por ello un trozo de carne
más bien grande necesita más tiempo de cocción que
un asado de carne trozeada, aunque tengan el mismo
peso. Para grandes cantidades se recomienda iniciar la
cocción con la potencia máxima y después seguir con la
potencia media conseguiendo de esta forma una cocción
uniforme.
Comidas planas cuecen antes que comidas altas, por
ello se debería repartir los alimentos en el plato de forma
plana. Piezas más fi nas, p.ej, muslos de pollo o fi letes de
pescado, se deberían colocar hacia el interior y dejar que
se solapen.
Es válida siguiente regla general:
Cantidad doble = casi el doble de tiempo
Mitad de cantidad = mitad de tiempo
Si para un plato no encuentra la indicación de horario
adecuada, es válida siguiente regla:
cada 100 g aprox. 1 minuto de tiempo de cocción
Todos los alimentos que tape en el horno, también
debería tapar en el microondas.
Una tapadera evita que se sequen los alimentos. Para ta-
par los alimentos puede utilizar un plato dado de vuelta,
papel de pergamino o láminas para microondas.
Tabla Cocción
Alimento/plato Cantidad
Potencia
en vatios
Tiempo
aprox. en
minutos
Cubrir
Verduras
Berenjenas 500 g 720 7 - 10 si
Colifl or 500 g 720 8 - 11 si
Brécol 500 g 720 6 - 9 si
Achicoria 500 g 720 6 - 7 si
Guisantes 500 g 720 6 - 7 si
Hinojo 500 g 720 8 - 11 si
Alubias verdes 300 g 720 13 - 15 si
Patatas 500 g 720 9 - 12 si
Colinabo 500 g 720 8 - 10 si
Puerro 500 g 720 7 - 9 si
Mozarca 250 g 720 7 - 9 si
Zanahorias 500 g 720 8 - 10 si
Pimiento 500 g 720 6 - 9 si
Col de Bruselas 300 g 720 7 - 10 si
Espárrago 300 g 720 6 - 9 si
Tomates 500 g 720 6 - 7 si
Zucchini 500 g 720 9 - 10 si
Consejo: Cortar la verdura en trozos pequeños y cocer con 2-3 cucharas so-
peras de líquido. Entremedias remover, recocinar de 3-5 minutos, condimentar
primero al servir la comida.
Fruta
Compota de manzana,
compota de pera
500 g 720 5 - 8 si
Mermelada de ciruela 250 g 720 4 - 6 no
Compota de ruibarbo 250 g 720 5 - 8 si
Manzanas asadas,
4 piezas
500 g 720 7 - 9 si
Consejo: Añadir 125 ml de agua, zumo de limón evita el cambio de color
de la fruta, recocinar de 3-5 minutos.
Alimento/plato Cantidad
Potencia
en vatios
Tiempo
aprox. en
minutos
Cubrir
Carne (Alimentos precocinados )
Carne con salsa 400 g 720 10 - 12 si
Estofado de carne, asado
de carne trozeada
500 g 720 10 - 15 si
Filetes de vaca rellenos 250 g 720 7 - 8 si
Consejo: Remover entremedias, reposar de 3-5 minutos.
Carne de ave (Alimentos precocinados )
Fricasé de gallina 250 g 720 6 - 7 si
Sopa de gallina 200 g 720 5 - 6 si
Consejo: Remover entremedias, reposar de 3-5 minutos.
Pescado
Filete de pescado
300 g 720 7 - 8 si
400 g 720 8 - 9 si
Consejo: Después de haber pasado la mitad de tiempo dar la vuelta al
pescado, recocinar de 3-5 minutos.
Descongelación y cocción de verdura
Col lombarda 450 g 720 14 -16 si
Espinacas de hoja 300 g 720 11 - 13 si
Colifl or 200 g 720 7 - 9 si
Alubias verdes cortadas 200 g 720 8 - 10 si
Brécol 300 g 720 8 - 9 si
Guisantes 300 g 720 7 - 8 si
Colinabo 300 g 720 13 -15 si
Puerro 200 g 720 10 - 11 si
Maíz 200 g 720 4 - 6 si
Zanahorias 200 g 720 5 - 6 si
Col de Bruselas 300 g 720 7 - 8 si
Espinacas
450 g 720 12 - 13 si
600 g 720 15 - 17 si
Consejo: Cocer con 1-2 cucharas soperas de líquido, remover entreme-
dias es decir trozear con cuidado, recocinar de 2-3 minutos, condimentar
primero al servir la comida.
Sopas / potajese (Alimentos precocinados )
Potaje 500 g 720 13 - 15 si
Sopa con trocitos de otros
alimentos
300 g 720 7 - 8 si
Sopa de crema 500 g 720 13 - 15 si
Consejo: Remover entremedias, recocinar de 3-5 minutos.
Cocción-Express
Para iniciar el programa-expres, presione repetidamente
la tecla-expres. El proceso de cocción comenzará al
instante y se prolongará unos 30 segundos cada vez que
realice otra pulsación de tecla. A partir de un minuto se
prolongará el tiempo de cocción por un minuto respecti-
vamente.
En este proceso la potencia del microondas es del 100%.
Programas Automáticos
Con ayuda de la automática puede dejar que ciertas
cantidades de alimentos se terminen de cocer de forma
automática.
Para ello proceda de la siguiente manera:
a) Patatas
1. Presione la tecla parada.
2. Presione la tecla “Patata” 1x para la preparación
de 120-170g o presione la tecla “Patata” 2x para la
preparación de 140-200g.
05-MWG 746 H EST 44 13.07.2005, 14:28:36 Uhr

45
ESPAÑOL
3. Para seleccionar un tiempo de cocción, presione las
teclas numéricas de 1-4.
Tecla
“patata”
Teclas
numéricas
Tiempo de
cocción
1x 1 3min 50sek.
1x 2 7min 10sek
1x 3 11min
1x 4 14min
Tecla
“patata”
Teclas
numéricas
Tiempo de
cocción
2x 1 5min 40sek.
2x 2 9min
2x 3 13min
2x 4 17min
4. Para iniciar el proceso presione la tecla inicio.
Después de haber transcurrido el tiempo se apagará
el aparato y en el display aparecerá „END“.
Consejo: Todavía deje reposar el alimento de 5 a 10
minutos en el horno.
b) Palomitas
¡Se ruega utilizar exclusivamente palomitas en bolsas
para microondas !
1. Presione la tecla parada.
2. Presione la tecla „Palomitas”. En el display aparecerá
“2:30”.
3. Para iniciar el proceso presione la tecla inicio.
Después de haber transcurrido el tiempo se apagará el
aparato y en el display aparecerá „END“. Ahora puede
apartar la comida.
Nota: Puede cambiar el tiempo de cocción.
• Presione la tecla “Palomitas” 2x.
• Introduzca con las teclas-numéricas el nuevo tiempo
de cocción.
• Presione la tecla inicio.
El nuevo tiempo de cocción se quedará programado,
hasta que se vuelva a cambiar.
c) Pizza
1. Presione la tecla parada.
2. Presione la tecla “Pizza” 1x para calentar un trozo de
120-140g o presione la tecla “Pizza” 2x para calentar
un trozo más grande.
3. Para iniciar el proceso presione la tecla inicio.
Después de haber transcurrido el tiempo se apagará el
aparato y en el display aparecerá „END“. Ahora puede
apartar la comida.
d) Pinchos de carne
1. Presione la tecla parada.
2. Presione la tecla „Pinchos de carne” 1x para la prepa-
ración de cantidades más bien pequeñas o presione
la tecla “Pinchos de carne” 2x para la preparación de
cantidades más bien grandes.
3. Presione las teclas-numéricas de 1-4, para seleccio-
nar el peso de cocción.
(Tecla “Pinchos de carne” 1x presionado)
Teclas
numéricas
Peso
Tiempo de
cocción
1 120g 10min
2 200g 13min
3 400g 17min
4 600g 23min
(Tecla “Pinchos de carne” 2 presionado)
Teclas
numéricas
Peso
Tiempo de
cocción
1 170g 12min
2 310g 15min
3 540g 23min
4 800g 30min
4. Para iniciar el proceso presione la tecla inicio.
Después de haber transcurrido el tiempo se apagará el
aparato y en el display aparecerá „END“. Ahora puede
apartar la comida.
e) Bebidas
1. Presione la tecla parada.
2. Presione la tecla “Bebidas” 1x para el calentamiento
de 140-200g. Presione la tecla “Bebidas” 2x para el
calentamiento de 250-310g.
3. Presione una tecla de 1-4, para seleccionar un tiem-
po de calentamiento.
Tecla
“bebidas”
Teclas
numéricas
Tiempo de
calentamiento
1x 1 1min 20sek
1x 2 2min 30sek
1x 3 3min 40sek
1x 4 4min 50sek
Tecla
“bebidas”
Teclas
numéricas
Tiempo de
calentamiento
2x 1 2min 20sek.
2x 2 4min
2x 3 5min 40sek
2x 4 7min 20sek
4. Para iniciar el proceso presione la tecla inicio.
Después de haber transcurrido el tiempo se apagará el
aparato y en el display aparecerá „END“. Ahora puede
apartar la comida.
f) Calentamiento
1. Presione la tecla parada.
2. Presione la tecla “Calentamiento”. En el display
aparece “3:40”.
3. Para iniciar el proceso presione la tecla inicio.
Después de haber transcurrido el tiempo se apagará el
aparato y en el display aparecerá „END“. Ahora puede
apartar la comida.
g) Pastel
1. Presione la tecla parada.
2. Presione la tecla “Pastel”. En el display aparece
“40:00”.
3. Para iniciar el proceso presione la tecla inicio.
05-MWG 746 H EST 45 13.07.2005, 14:28:38 Uhr

46
ESPAÑOL
Después de haber transcurrido el tiempo se apagará el
aparato y en el display aparecerá „END“. Ahora puede
apartar la comida.
Nota: Puede cambiar el tiempo de cocción.
• Presione la tecla “Pastel” 2x.
• Introduzca con las teclas-numéricas el nuevo tiempo
de cocción (hasta 99:99).
• Presione la tecla-inicio.
El nuevo tiempo de cocción se quedará programado
hasta que sea cambiado de nuevo.
Parrilla
Para asar a la parrilla utilice por favor la parrilla y de esta
forma conseguirá un asado homogéneo y rápido. Utilice
una vajilla apropiada y resistente al calor o coloque los
alimentos a asar directamente sobre la parrilla.
Alimentos grandes y gruesos se asarán directamente
sobre el plato giratorio!
Para asar a la parrilla y gratinar proceda de siguiente
manera:
1. Presione la tecla parada.
2. Presione la tecla-grill 1x.
3. Mediante las teclas-numéricas introduzca la duración
deseada de asado a la parrilla.
4. Para iniciar el proceso presione la tecla inicio.
Después de haber transcurrido el tiempo se apagará el
aparato y en el display aparecerá „END“. Ahora puede
apartar la comida.
Microondas / Parrilla –
Funcionamiento combinado
En este ajuste trabajan el microondas y la parrilla
alternativamente dentro del tiempo ajustado en siguiente
proporción:
Combinación 1
30% del tiempo
de cocción
microondas
70% del tiempo
de cocción parrilla
Combinación 2
55% del tiempo
de cocción
microondas
45% del tiempo
de cocción parrilla
Al preparar comida en el funcionamiento combinado mic-
roondas-parrilla debería prestar atención a lo siguiente:
Para alimentos grandes y gruesos, como p.ej. asado de
cerdo, el tiempo de cocción en el microondas es más lar-
go que para alimentos pequeños y planos. Sin embargo
en el funcionamiento de parrilla es al contrario. Cuanto
más cerca esté el alimento de la parrilla, más rápido
se asa. Esto signifi ca que si prepara trozos grandes de
carne con el funcionamiento combinado, puede ocurrir
que el tiempo de cocción sea más corto que para trozos
pequeños de carne asada.
Para ello, proceda como indicado a continuación:
1. Presione la tecla parada.
2. Presione la tecla “microondas/grill” 1x para el funcion-
amiento combinado 1. Presione la tecla “microondas/
grill” 2x para el funcionamiento combinado 2.
3. Mediante las teclas-numéricas introduzca la duración
deseada de cocción.
4. Para iniciar el proceso presione la tecla inicio.
Después de haber transcurrido el tiempo se apagará el
aparato y en el display aparecerá „END“. Ahora puede
apartar la comida.
Tabla Microondas / Parrilla –
Funcionamiento combinado
Alimento/plato Cantidad
Tiempo
aprox. en
minutos
Cubrir
Carne, embutidos
Carne de vaca, de cerdo o de ternera
en una pieza
500 g
750 g
10 - 12
12 - 15
no
no
Carne de cerdo cocida y ahumada 500 g 12 - 14 no
Asado de carne picada 500 g 13 - 15 no
Salchicha de Viena 200 g 2 - 3 no
Salchicha cocida 200 g 2 - 3 no
Consejo: Dar la vuelta a la carne después de haber transcurrido la mitad
de tiempo, recocinar de 3-5 minutos, untar clara de huevo sobre el asado
de carne picada, pinchar la salchicha con un tenedor.
Carne de ave
Pollo para hacer sopa 1000 g 13 - 15 no
Trozos de pollo 250 g 4 - 5 no
Consejo: Dejar cocinar sin líquido en su propio jugo, dar la vuelta una vez,
recocinar de 4-5 minutos.
Pescado
Trucha, azul 300 g 5 - 6 no
Filete
de pescado
300 g 3 - 4 no
Consejo: Dar la vuelta al pescado después de haber transcurrido la mitad
de tiempo, recocinar de 3-5 minutos.
Manejo en el funcionamiento
exclusivo de aire caliente
Durante el proceso de cocción con aire caliente circula
el aire caliente en el espacio para calentar la comida. De
esta forma los alimentos se doran más rápido y son más
crujientes. En el modo de operación aire caliente puede
seleccionar hasta 10 temperaturas diferentes.
Cocinar con aire caliente
Suponiendo que quiera cocinar con 180°C, 40 minutos,
entonces proceda de siguiente manera:
1. Presione la tecla parada.
2. Presione la tecla “aire caliente”.
3. Con una de las teclas-numéricas (p.ej. 8) seleccione
la temperatura de cocción deseada.
4. Mediante las teclas-numéricas introduzca la duración
de cocción deseada (p.ej. 40 minutos).
Paso Tecla Indicación
1 parada
2 aire caliente
38
1 80
44 0
H:40
5 inicio
5. Para iniciar el proceso presione la tecla inicio.
Por favor tenga atención :
• Se pueden programar máximamente 9 horas, 99
minutos. Después de haber transcurrido el tiempo,
sonarán señales acústicas y la palabra „END“ apare-
05-MWG 746 H EST 46 13.07.2005, 14:28:40 Uhr

47
ESPAÑOL
cerá en el display. Presione la tecla de parada o abra
la puerta. La palabra “END” desaparecerá.
• Durante la cocción con aire caliente puede controlar
la temperatura, presionando la tecla-aire caliente.
Precalentamiento y cocción
con aire caliente
Puede precalentar su microondas con aire caliente y a
continuación aplicar el aire caliente.
Suponiendo que quiera precalentar su aparato hasta
170°C y a continuación cocinar por 35 minutos:
1. Presione la tecla parada.
2. Presione la tecla-aire caliente.
3. Con una de las teclas-numéricas (p.ej. 7) seleccione
la temperatura de precalentamiento deseada.
4. Presione la tecla-inicio. En el display parpadea la indi-
cación “PREH” (Precalentar). Cuando el horno haya
alcanzado la temperatura programada, la indicación
“PREH” se iluminará de forma continua.
5. Abra por favor la puerta y coloque su alimento a
cocinar en el centro del plato giratorio.
6. Mediante las teclas-numéricas introduzca el tiempo
de cocción deseado (p.ej. 35 minutos).
7. Para iniciar el proceso presione la tecla inicio.
Después de haber transcurrido el tiempo se apagará el
aparato y en el display aparecerá „END“. Ahora puede
apartar la comida.
Uso combinado de
aire caliente y microondas
El aparato tiene para ello cuatro ajustes preprogamados.
Esto le facilitará, trabajar con aire caliente así como con
la función de microondas.
Presione por favor la tecla microondas / aire caliente y a
continuación una tecla-numérica de 1-4, para seleccionar
la temperatura de aire caliente.
Tecla
Teclas
numéricas
Temperatura
(°C)
Microondas / aire caliente 1 150
Microondas / aire caliente 2 180
Microondas / aire caliente 3 200
Microondas / aire caliente 4 230
Si desea para hacer un pastel con 200°C de
temperatura, ajustar un tiempo de 25 minutos:
1. Presione la tecla parada.
2. Presione por favor la tecla microondas / aire caliente.
3. Con una de las teclas-numéricas (p.ej. 3) elija la
temperatura deseada (200°C).
4. Mediante las teclas-numéricas introduzca la duración
de cocción deseada (p.ej. 25 minutos).
5. Para iniciar el proceso presione la tecla inicio.
Por favor tenga atención:
Máximamente se pueden programar 9 horas, 99 minutos.
Después de haber transcurrido el tiempo, sonarán
señales acústicas y la palabra „END“ aparecerá en el
display. Presione la tecla de parada o abra la puerta. La
palabra “END” desaparecerá.
Durante la cocción con aire caliente puede controlar
la temperatura, presionando la tecla-microondas / aire
caliente.
Cocinar en varios pasos
Puede ajustar los programas de manera que tenga 3
funciones diferentes.
Vamos a suponer que quiera seleccionar para cocinar el
programa siguiente:
Descongelación rápida
쒆
Preparación en el microondas
쒆
Cocinar con aire caliente (sin precalientamiento)
1. Presione la tecla parada.
2. Presione la tecla-descongelación.
3. Mediante las teclas-numéricas introduzca la duración
de descongelación deseada.
4. Presione la tecla-microondas.
5. Con ayuda de las teclas-numéricas introduzca el
tiempo de cocción de microondas deseado.
6. Presione la tecla-aire caliente.
7. Con una de las teclas-numéricas seleccione la tem-
peratura de cocción deseada.
8. Mediante las teclas-numéricas introduzca la deseada
duracíon de cocción de aire caliente.
9. Para iniciar el proceso presione la tecla inicio.
Después de haber transcurrido el tiempo se apagará el
aparato y en el display aparecerá „END“. Ahora puede
apartar la comida.
Funciones especiales
Memoria automática
Después de haber fi nalizado el proceso de cocción, cada
2 minutos le recordará un tono de piar que debe apartar
su plato del microondas.
Dicha memoria se desconectará al abrir la puerta o al
presionar la tecla parada.
Bloqueo
Para bloquear el aparato, presione más de 3 segundos la
tecla parada. El bloqueo se indicará en el visualizador. La
función de los elementos de mando está bloqueada. Para
el desbloqueo del aparato, presione de nuevo la tecla
parada más de 3 segundos.
Timer (Count down)
El aparato dispone de una función-timer:
1. Presione la tecla parada.
2. Presione la tecla-timer.
3. Mediante las teclas-numéricas introduzca la hora
deseada.
4. Para iniciar el proceso presione la tecla inicio.
En respecto al tiempo ajustado comenzará una cuenta
atrás y la fi nalización será señalada con un tono.
Nota: Esta función también se puede utilizar durante la
puesta en marcha del aparato.
05-MWG 746 H EST 47 13.07.2005, 14:28:41 Uhr

48
ESPAÑOL
Limpieza
Antes de la limpieza retire siempre la clavija de red de la
caja de enchufe.
• Después del uso limpie con un paño levemente
humedecido el espacio interior de cocción.
• Limpie el microondas por afuera con un paño leve-
mente humedecido
• Limpie el accesorio de forma habitual en un baño
jabonoso.
• Marco de la puerta / junta de la puerta y piezas
vecinas deberían, al estar sucias, ser limpiadas
cuidadosamente con un paño húmedo.
Datos técnicos
Modelo: ..........................................................MWG 746 H
Suministro de tensión:...................................230 V, 50 Hz
Consumo de energía:............................................1400 W
Consumo de energía aire caliente:........................1400 W
Consumo de energía parrilla: ................................1200 W
Potencia asignada de salida de microondas: ..........900 W
Volumen espacio de cocción:.............................. 25 Litros
Clase de protección:.........................................................Ι
Este aparato se ha examinado según las normativas
actuales y vigentes de la Comunidad Europea, como
p.ej. compatibilidad electromagnética y directiva de baja
tensión y se ha construido según las más nuevas especi-
fi caciones en razón de la seguridad.
No reservamos el derecho de efectuar modifi caciones
técnicas.
Garantía
Para el aparato comercializado por nosotros nos respon-
sabilizamos con una garantía de 24 meses a partir de la
fecha de compra (factura de compra).
Durante el período de garantía nos encargamos gratuíta-
mente de los defectos del aparato y de los accesorios,
que se hayan originado por defectos del material o de
la fabricación. Dependiendo de nuestra estimación se
realizará una reparación o un cambio. ¡Los servicios de
garantía no prolangan la garantía, ni se incia por ello un
período nuevo de garantía!
Como comprobante para la garantía es válido la factura
de compra. Sin este comprobante no se podrá realizar un
cambio o una reparación gratuíta.
En el caso de garantía lleve el aparato base en el emba-
laje original y la factura de compra a su concesionario.
Defectos en los accesorios de uso o en las piezas de
desgaste
, como también la limpieza, mantenimiento o el
recambio de piezas de desgaste no recaen en la garantía
e irán al cargo del cliente!
En caso de intervención ajena se expira la garantía.
Después de la garantía
Después de haber expirado la garantía se pueden reali-
zar las reparaciones por el concesionario o por el servicio
de reparaciones. Los gastos irán al cargo del cliente.
Signifi cado del símbolo
„Cubo de basura“
Proteja nuestro medio ambiente, aparatos eléctricos no
forman parte de la basura doméstica.
Haga uso de los centros de recogida previstos para la
eliminación de aparatos eléctricos y entregue allí sus
aparatos eléctricos que no vaya a utilizar más.
Ayudará en evitar las potenciales consecuencias, a
causa de una erronéa eliminación de desechos, para el
medio ambiente y la salud humana.
Con ello, contribuirá a la recuperación, al reciclado y
a otras formas de reutilización de los aparatos viejos
eléctricos y electrónicos.
La información cómo se debe eliminar los aparatos,
se obtiene en su ayuntamiento o su administración
municipal.
05-MWG 746 H EST 48 13.07.2005, 14:28:41 Uhr

49
PORTUGUÊS
Instruções gerais de segurança
• Antes de pôr este aparelho a funcionar, leia muito
atentamente as instruções de emprego e guarde-as
muito bem, juntamente com o talão de garantia, o
talão de compra e, tanto quanto possível, a embala-
gem com os elementos interiores.
• Utilize o aparelho exclusivamente para fi ns privados e
para a fi nalidade para a qual o mesmo foi concebido.
Este aparelho não se destina a fi ns comerciais. Não
o utilize ao ar livre (a não ser que o mesmo possa
ser usado ao ar livre sob determinadas condições).
Mantenha-o protegido do calor, de irradiação solar
directa, da humidade (não o imergir de forma alguma
em quaisquer líquidos) e de arestas aguçadas. Não
utilize o aparelho com as mãos molhadas. No caso
de o aparelho fi car húmido ou molhado, retire imedia-
tamente a fi cha da tomada. Não tocar na água.
• Sempre que não utilizar o aparelho, ou desejar
montar acessórios, ou queira limpá-lo, ou ainda em
caso de avarias, deverá desligá-lo e retirar a fi cha da
tomada (puxe pela fi cha e não pelo fi o).
• O aparelho não deverá funcionar sem vigilância. No
caso de ter de se ausentar do local onde o aparelho
estiver a funcionar, desligue-o sempre ou retire a
fi cha da tomada (puxe pela fi cha e não pelo fi o).
• Para proteger as crianças dos perigos relaciona-
dos com aparelhos eléctricos, nunca deixe os fi os
pendurados e atente em que as crianças não possam
chegar a tais aparelhos.
• Verifi que regularmente se o aparelho ou o fi o têm
alguns danos. Nunca ponha a funcionar um aparelho
com quaisquer danos.
• Não tente reparar o aparelho, dirija-se a um técnico
da especialidade, devidamente autorizado. Para
evitar quaisquer perigos, é favor substituir um fi o da-
nifi cado por um fi o da mesma qualidade. Tal deverá
ser efectuado pelo fabricante, pelos nossos serviços
de assistência ou por outra pessoa com as mesmas
qualifi cações.
• Utilize apenas acessórios de origem.
• É favor observar as seguintes „Instruções especiais
de segurança...“.
Instruções de segurança importantes!
É favor ler com toda a atenção e guardar
para futuras consultas.
• Advertência: se a porta ou as juntas da mesma
apresentarem danos, o aparelho não poderá ser posto a
funcionar antes de ter sido reparado por um técnico da
especialidade.
• Advertência: não proceda, de modo nenhum, à repa-
ração do aparelho por si próprio. Contacte um técnico
da especialidade. Para qualquer outra pessoa, será
altamente perigoso executar trabalhos de reparação
ou de manutenção que exijam a remoção de qualquer
cobertura que assegure a protecção contra radiações
provenientes da energia de microondas.
• Advertência: Não aqueça liquidos em recepientes
fechados. Perigo de explosão!
• Aviso: Sempre que o aparelho trabalhe no modo de
funcionamento combinado e tendo-se em conta as
temperaturas que persistirão, o mesmo não poderá ser
utilizado por crianças, excepto se estiverem sob vigilân-
cia de pessoas adultas.
• Nota: O microondas não se destina a aquecer animais
vivos.
• Aviso: O aparelho só poderá ser usado sem vigilância
(e apenas com a função de cozedura) por crianças e
pessoas enfraquecidas, depois de se ter instruído as
mesmas de maneira a fi carem aptas a utilizá-lo de forma
segura e a compreenderem os perigos de um manusea-
mento incorrecto.
• No caso de desejar colocar a sua micro-ondas num ar-
mário, prateleira etc. faça atenção de que todos os lados
do aparelho estejam pelo menos a 10 cm de distância
dos armários, paredes etc.
• Utilize sómente louças adequadas como:
Vidro, porcelana, cerâmica, plásticos resistentes ao calor
e louças especiais para a micro-ondas.
• Quando se aquecerem ou cozinharem comidas em
materiais infl amáveis, tais como recipientes de plástico
ou de papel, o microondas terá de ser vigiado frequente-
mente, pois tais materiais poderão incendiar-se.
• Em caso de formação de fumo deve-se desligar o
aparelho e retirar a fi cha de corrente. Conserve a porta
fechada para extinguir a chama que possa surgir.
• Atenção retardamento da ebulição: Ao cozinhar, espe-
cialmente ao aquecer mais uma vez os liquidos (água)
pode acontecer que a temperatura de ebulição seja
atingida, mas que as bolhas tipicas de vapor ainda não
tenham subido. Os liquidos não fervem regularmente.
Este chamado retardamento de ebulição pode ser ori-
ginado por uma leve vibração ao se retirar o recipiente,
o que leva uma repentina formação de bolhas de vapor
e com isso poderá transbordar o liquido. Perigo de
queimadura! Para se conseguir um fervimento regular
coloque por favor no recipiente uma vareta de vidro ou
semelhante mas que não seja metálico.
• O conteúdo das garrafi nhas para bebés e os frascos
com comida de bebés terá de ser remexido ou agitado e
a temperatura terá de ser verifi cada antes de utilizar. Há
perigo de queimadura.
• Alimentos com casca ou pele, como ovos, salsichas,
assim como conservas em boiões fechados, etc. não
podem ser aquecidos no microondas, pois poderão
explodir mesmo depois de ter terminado o aquecimento.
• O caixilho/a junta da porta e as suas proximidades de-
verão ser limpas cuidadosamente com um pano húmido,
no caso de estarem sujas.
• Limpe regularmente o microondas e remova restos de
alimentos do seu interior.
• No caso de se limpar mal o aparelho poderá isto originar
o estrago da superfi cie deste e assim infl uênciar a dura-
bilidade do aparelho bem como possivelmente também
poderá levar a situações perigosas.
Descrição dos elementos de manejo
1 Fechadura da porta
2 Janela visual*
3 Coberta*
4 Eixo de accionamento
5 Anel escorregadio
6 Prato girador
7 Viseira de serviço
8 Aquecimento da grelha
9 Grade da grelha
Atenção: Não retire objectos montados no sítio para
cozer e na parte interior da porta!
Por favor não retire de qualquer maneira folhas que
se encontrem pegadas ao interior da porta!
05-MWG 746 H EST 49 13.07.2005, 14:28:42 Uhr

50
PORTUGUÊS
Vista geral das teclas de funcionamento
Teclas com números
Para regular a hora, o tempo de
cozimento, a temperatura e o peso
Tecla de micro-ondas
Escolha dos graus de funcionamento
Tecla de grilhar
Para grilhar e para gratinar
Tecla de ar quente
Sómente para funcionamento de ar quente
- Comando a termostato
Tecla para funcionamento combinado
de micro-ondas / grelha
A micro-ondas e a grelha trabalham
alternadamente
Tecla de funcionamento combinado de
micro-ondas / ar quente
A micro-ondas e o ar quente trabalham
alternadamente
Tecla de descongelar
Activa a função de descongelamento em
relação com a regulação do tempo
Tecla de relógio
Em relação com as teclas de números
para regular a hora
Tecla de programa para fazer bolos
Tecla Timer (Countdown)
Tecla de programa para batatas
Tecla de programa para Popcorn
Tecla de programa para bebidas
Tecla de programa para Pizza
Tecla de programa
para espetos de carne
Tecla de programa para aquecer
Tecla para iniciar
Inicio do programa
Tecla expresso
Inicia o programa expresso -
Indica o tempo de cozinhar expresso
Tecla de Stopp
• Carregar uma vez para parar o progra-
ma de cozimento ou para anular uma
indicação falsa
• Carregar duas vezes para anular o
programa.
• Para bloquear ou desbloquear o apa-
relho segurar por 3 segundos.
Indicações para utilização de grelhas e
de aparelhos combinados
• Uma vez que na utilização de grelhas e de aparelhos
combinados é utilzado aquecimento de irradiação,
utilize sómente louças resistentes ao calor.
• Em caso de utilização só para grelhar poderá
também utilizar louças de metal e de aluminio – mas
nunca no caso da utilização de aparelhos combina-
dos ou de micro-ondas.
• Para o funcionamento de grilhar, de Pizza, de cozer
no forno ou funcionamentos combinados só è ade-
quada a grade da grelha.
• Não coloque nada em cima da carcaça. Esta fi ca
muito quente! Deixe as fendas de ventilação sempre
livres.
• Utilize a grade da grelha para aproximar mais a
comida a cozinhar do elemento de aquecimento.
Modo de pôr em funcionamento
• Retire todas as partes acessórias fornecidas que se
encontrem no sitio de cozimento, desembrulhe-as
e coloque o anel escorregadio no meio. Coloque o
prato de vidro sobre o eixo de accionamento de tal
maneira que este encaixe no empeno da arvore de
accionamnto e que assente bem sobre esta.
• Controle o aparelho com respeito a estragos visiveis,
especialmente na parte da porta. No caso de
estragos não se deverá de qualquer forma pôr em
funcionamento o aparelho.
• Para evitar avarias em outros aparelhos existentes,
não coloque o seu aparelho muito perto dos outros
aparelhos eléctricos.
• Retire todas as folhas de protecção que eventualmen-
te estejam pegadas à carcaça.
• Por favor não retire de qualquer maneira folhas
que se encontrem pegadas ao interior da porta!
• Meta a fi cha de corrente numa tomada de contacto
de protecção para 230 V, 50 Hz (ciclos por segundo)
que esteja instalada correctamente.
• Não retire qualquer parte que esteja montada dentro
do sitio de cozimento ou na parte interior da porta!
Utilização do aparelho
Curiosidades sobre o funcionamento de micro-ondas
• O seu aparelho trabalha com irradiação de micro-on-
das, a qual aquece em muito pouco tempo particulas
de água que se encontram nas comidas. Aqui não
existe qualquer irradiação de calor e por isso quase
que nenhuma “tostadela”.
• Aqueça só alimentos neste aparelho.
• Este aparelho não é a utilizar para fritar com gorduras
liquidas.
• Aqueça só 1-2 porções de cada vez. De outra forma
o aparelho perderá em efi ciência.
• Para parar o processo de cozimento carregue no
botão de Stopp.
• A micro-ondas fornece imediatamente toda a energia.
Assim não é necessário um aquecimento antecipado.
• Não ponha nunca a funcionar o aparelho no funciona-
mento a micro-ondas ou combinado quando este está
vazio.
05-MWG 746 H EST 50 13.07.2005, 14:28:44 Uhr

51
PORTUGUÊS
• O forno de micro-ondas não poderá substituir o seu
forno normal. Este serve principalmente para:
• Descongelar productos congelados / gelados
• Aquecimento ou fervimento rápido de comidas e
bebidas
• Cozimento de comidas.
• Por favor não utilize louças de plástico ou de papel.
Sinal de confi rmação
As suas instruções ao aparelho são confi rmadas por um
sinal acustico.
• Um sinal acustico depois de se carregar numa tecla:
As suas instrucções foram aceites.
• Dois sinais acusticos depois de se carregar numa
tecla:
As suas instrucções foram recusadas.
Por favor corrija a indicação.
Ajustamento do tempo
Informação: A primeira vez que se ligar o aparelho apa-
rece um ponto duplo piscando.
1. Carregue a tecla do relógio.
A indicação muda para “:”..
2. Com a ajuda da tecla de números indique as horas e
os minutos desejados.
3. Carregue mais uma vez na tecla do relógio. A nova
hora será activada.
Manejo da micro-ondas
Coloque a comida a aquecer numa louça adequada.
Abra a porta e coloque o recipiente no centro do prato
de vidro. Fechar a porta. (Por motivos de segurança o
aparelho só funciona com a porta fechada).
1. Carregue na tecla Stopp.
2. Escolha por meio do carregar uma ou muitas vezes a
tecla de micro-ondas a capacidade desejada para a
micro-ondas.
Para escolher o valor prozentual deverá carregar
na tecla de micro-ondas.
Carregue: Capacidade Descrição
1x 100% (P-HI)
Capacidade
completa
2x 90% (P-90)
3x 80% (P-80)
4x 70% (P-70) Alta
5x 60% (P-60)
6x 50% (P-50) Média
7x 40% (P-40)
8x 30% (P-30) Baixa
9x 20 % (P-20)
10x 10 % (P-10) Muito baixa
11x 0% (P-00)
100% signifi ca 900 W
3. Com a ajuda das teclas de números indique o tempo
de cozimento desejado.
Por exemplo:
10.30 minutos de cozimento à capacidade de 100%
Passo Tecla Indicação
1 Stopp
2 Micro-onda
P- HI
3 1 0 3 0
10:30
4 Iniciar
4. Para iniciar carregue na tecla Iniciar. O tempo de
cozimento está relacionado com a quantidade e a
natureza do conteúdo. Com um pouco de prática
aprende depressa a calcular o tempo de cozimento.
Faça atenção:
O cozimento na micro-ondas faz-se muito mais rapida-
mente do que num forno. Se não está bem seguro, ajuste
o tempo de cozimento mais curto e depois se necessário
continue a cozer. Quando o tempo terminar o aparelho
desliga-se e no display aparece a palavra « END ».
Retire então a comida.
Descongelamento rápido de
produtos congelados
Por favor faça atenção:
• Como regra diz-se que 500 gr. de produtos congela-
dos precisam cerca de 5 minutos para descongelar.
• No caso que durante este tempo o produto congelado
não esteja completamente descongelado, regule o
tempo de cada vez 1 minuto a mais.
No caso de desejar descongelar um alimento congelado
e põe o tempo para isso em 5 minutos:
1. Carregue na tecla Stopp.
2. Carregue na tecla Descongelar.
3. Com a ajuda da tecla de números indique o tempo de
cozimento desejado.
Passo Tecla Indicação
1 Stopp
2 Descongelar
:
3 5 0 0
5:00
4 Iniciar
4. Para iniciar carregue na tecla Iniciar.
No caso que o produto congelado tenha estado num re-
cipiente de plástico, aconselhamos de descongelar este
só um pouco e depois mudar este para um recipiente
adequado para a micro-ondas.
Para descongelar poderá regular o tempo até 99 minutos
mais 99 segundos. Depois do tempo terminar ouve-se
um sinal acustico e a palavra “END”aparece no Display.
Carregue então na tecla Stopp ou abra a porta. A palavra
“END” desaparece.
Na tabela seguinte recebe algumas informações sobre
um descongelamento manual.
05-MWG 746 H EST 51 13.07.2005, 14:28:53 Uhr

52
PORTUGUÊS
Tabela de descongelamento
Productos alimenticios /
Comidas
Quanti-
dade
Capacida-
de vátio
Tempo
cerca em
minutos
Tempo de
descon-
gelamento
posterior
Carne e salsichas
Carne (Vaca, vitela, porco)
em pedaço
500 g
1000 g
180
180
14 – 18
25 - 30
10 – 15
20 - 25
Escalopes, Costeletas 200 g 180 4 - 6 5 - 10
Carne picada 250 g 180 6 - 8 5 - 10
Salsichas para fritar,
Salsicha (Bockwurst)
200 g 180 4 - 6 5 - 10
Carnes frias 300 g 180 4 - 6 5 - 10
Conselho: Depois de meio tempo virar a carne, partes sensiveis devem-se
cobrir. Dividir a carne picada, as partes que já estão congeladas devem-se
retirar; Separar as fatias das carnes frias.
Aves
Frango 1000 g 180 20 - 25 10 - 15
Partes de frango 500 g 180 12 - 15 5 - 10
Pato 1700 g 180 25 - 40 20 - 25
Partes de ganso e de
perua
500 g 180 12 - 18 10 - 15
Conselho: Virar a ave depois de meio tempo, as asas e as pernas devem-
se cobrir, deitar fora o liquido de descongelamento e não pôr em contacto
com outras comidas.
Animais de caça
Costeletas de veado 1000 g 180 20 - 35 20 - 30
Lombo de lebre 500 g 180 12 - 13 10 - 20
Conselho: Virar uma vez e cobrir as bordas.
Peixe
Camarões, Shrimps 250 g 180 5 - 7 5 - 10
Trutas 340 g 180 4 - 6 5 - 10
Peixe completo 500 g 180 7 - 10 10 - 15
Filetes de peixe 250 g 180 5 - 7 5 - 10
Conselho: Remexer muitas vezes, virar muitas vezes.
Frutas
Framboesa, Morangos 250 g 180 4 - 6 5 - 10
Cerejas, Ameixas 250 g 180 5 - 7 5 - 10
Compota de maça 500 g 180 9 - 12 5 - 10
Conselho: Remexer cuidadosamente ou dividir.
Legumes: Veja „Tabela de cozimento“, „Descongelar e cozer de legumes“
Pão e Pasteis
Pãezinhos 4 peças 180 ca. 1-3 5
Pão 1000 g 180 13 - 15 8 - 10
Pão de torrada 500 g 180 5 - 6 5 - 10
Bolos secos 500 g 180 6 - 8 5 - 10
Bolo de frutas 1 peça 180 2 - 3 2 - 3
Torta
1 peça 180 0,5 - 1 3 - 5
1200 g 180 10 - 12 30 - 60
Conselho: Colocar o pão e os biscoitos sobre papel vegetal de cozinha o qual
absorve a humidade. Pastéis sensiveis só se dvem descongelar um pouco.
Productos de leite
Manteiga 250 g 180 5 - 7 10 - 15
Queijo mole 250 g 180 6 - 8 5 - 10
Natas 200 g 180 3 - 5 2 - 3
Conselho: retirar a folha de aluminio, remexer após meio tempo; as natas
devem-se bater ainda meio congeladas.
Aquecimento
O reaquecimento e o aquecimento é a maior qualidade
da micro-ondas. Liquidos e comidas que estão frias no
frigorifi co podem-se levar muito fácilmente a tempera-
turas do ambiente ou de comer sem se ter de utilizar
muitos tachos e panelas.
Os tempos de aquecimento indicado na tabela seguinte
só poderão ser valores aproximados, uma vez que o
tempo necessário varia muito e depende da temperatura
original e da constituição das comidas. Por isso recomen-
damos verifi car de vez em quando se a comida já está
sufi cientemente quente.
Tabela de aquecimento
Productos alimenticios /
Comidas
Quanti-
dade
Capacida-
de vátio
Tempo
cerca em
minutos
Cobrir
Liquidos
Água, 1 chávena 150 g 900 0,5 - 1 não
Água, 0,5 l 500 g 900 3,5 - 5 não
Água, 0,75 l 750 g 900 5 - 7 não
Café, 1 chávena 150 g 900 0,5 - 1 não
Leite, 1 chávena 150 g 900 0,5 - 1 não
Atenção: Contra retardo de ebulição deverá colocar uma vara de vidro ou
semelhante (nada metálico) no recipiente e mexer bem antes de beber.
Pratos completos
Escalopes, batatas
e legumes
450 g 900 2,5 - 3,5 sim
Guisado com massa 450 g 900 2 - 2,5 sim
Carne, bolinho de
batata e molho
450 g 900 2,5 - 3,5 sim
Conselho: molhar levemente antes e mexer de vez em quando.
Carne
Escalopes panados 200 g 900 1 - 2 não
Almôndegas, 4 peças 500 g 900 3 - 4 não
Carne assada 250 g 900 2 - 3 não
Conselho: pinselar com óleo afi m de que a cobertura panada ou a crosta
não fi quem moles.
Aves
1/2 frango 450 g 900 3,5 - 5 não
Fricassé de galinha 400 g 900 3 - 4,5 sim
Conselho: pinselar com óleo e mexer de vez em quando.
Acompanhamentos
Massa, arroz
1 porção 150 g 900 1 - 2 sim
2 porções 300 g 900 2,5 - 3,5 sim
Batatas 500 g 900 3 - 4 sim
Conselho: molhar levemente antes.
Sopas / Molhos
Caldo 1 prato 250 g 900 1 - 1,5 sim
Sopa com
acompanhamento
250 g 900 1,5 - 2 sim
Molho 250 g 900 1 - 2 sim
Comida de crianças
Leite 100 ml 540 0,5 - 1 não
Puré, papa 200 g 540 1 - 1,5 não
Conselho: Agitar bem ou remexer. Verifi car a temperatura!
Cozimento
Conselhos práticos para o cozimento
Siga os valores de orientação da tabela de cozimento
bem como das receitas. Observe o decorrimento do
cozimento enquanto não tiver muita prática.
Poderá sempre abrir a porta do aparelho. Este desliga-se
automáticamente.
Ele continuará a trabalhar logo que se feche outra vez a
porta.
Os productos alimenticios que sairem do frigorifi co
precisam de mais tempo para cozer do que aqueles que
estão a uma temperatura de ambiente.
05-MWG 746 H EST 52 13.07.2005, 14:28:54 Uhr

53
PORTUGUÊS
Quanto mais compacta è a comida, quanto mais tempo
leva a cozer. Por exemplo necessita um grande pedaço
de carne um tempo de cozimento maior do que carne
cortada em pequenos pedaços na mesma quantidade.
Recomenda-se começar a cozer grandes quantidades
com uma capacidade máxima e depois continuar a meia
capacidade para um cozimento regular.
Comidas chatas cozem mais rapidamente que comidas
altas. Por isso devem-se cortar os alimentos se possivel
em fatias chatas. Partes magras como por exemplo per-
nas de galinha ou fi letes de peixe devem-se colocar mais
no meio ou até sobrepôr.
Deve-se seguir a regra de experiência:
Quantidade dupla = quase o dobro do tempo
Meia quantidade = meio tempo
Se não encontrar um tempo certo para uma comida, aqui
tem a regra:
Para 100 gramas cerca de 1 minuto de cozimento
Todas as comidas que se cobrem no forno também se
deverão cobrir na micro-ondas.
Uma tampa evita que as comidas sequem. Para cobrir è
adequado um prato virado ao contrário, papel vegetal ou
uma folha para a micro-ondas. Comidas que devam criar
uma crosta devem-se cozinhar destapadas.
Tabela de cozimento
Productos alimenticios /
Comidas
Quanti-
dade
Capacida-
de vátio
Tempo
cerca em
minutos
Cobrir
Legumes
Beringela 500 g 720 7 - 10 sim
Couve fl ôr 500 g 720 8 - 11 sim
Bróculos 500 g 720 6 - 9 sim
Endivias 500 g 720 6 - 7 sim
Ervilhas 500 g 720 6 - 7 sim
Funcho 500 g 720 8 - 11 sim
Feijão verde 300 g 720 13 - 15 sim
Batatas 500 g 720 9 - 12 sim
Rábano 500 g 720 8 - 10 sim
Alho-porro 500 g 720 7 - 9 sim
Espiga de milho 250 g 720 7 - 9 sim
Cenouras 500 g 720 8 - 10 sim
Pimento 500 g 720 6 - 9 sim
Couve de Bruxelas 300 g 720 7 - 10 sim
Espargos 300 g 720 6 - 9 sim
Tomate 500 g 720 6 - 7 sim
Zucchini 500 g 720 9 - 10 sim
Conselho: Cortar os legumes em partes e deixar cozer lentamente com 2-3
colheres de sopa de liquido. Remexer de vez em quando, deixar cozer mais
3-5 minutos e só temperar antes de servir.
Frutas
Compota de maça
ou de pera
500 g 720 5 - 8 sim
Doce de ameixa 250 g 720 4 - 6 não
Compota de ruibarbo 250 g 720 5 - 8 sim
Maça assada, 4 peças 500 g 720 7 - 9 sim
Conselho: juntar 125 ml de água, o sumo de limão evita que a fruta se
tinja, deixar cozer mais 3-5 minutos.
Carne (Comidas já prontas antes)
Carne com molho 400 g 720 10 - 12 sim
Guisado 500 g 720 10 - 15 sim
Productos alimenticios /
Comidas
Quanti-
dade
Capacida-
de vátio
Tempo
cerca em
minutos
Cobrir
Rolo de carne de vaca 250 g 720 7 - 8 sim
Conselho: Mexer de vez em quando, deixar fi car 3 – 5 minutos.
Aves (Comidas já prontas antes)
Fricassé de galinha 250 g 720 6 - 7 sim
Sopa de aves 200 g 720 5 - 6 sim
Conselho: Mexer de vez em quando, deixar fi car 3-5 minutos.
Peixe
Filetes de peixe
300 g 720 7 - 8 sim
400 g 720 8 - 9 sim
Conselho: Virar depois de meio tempo, deixar cozinhar 3-5 minutos.
Descongelar e cozer de legumes
Couve roxa com maça 450 g 720 14 -16 sim
Espinafre de folhas 300 g 720 11 - 13 sim
Couve de Bruxelas 200 g 720 7 - 9 sim
Feijão verde 200 g 720 8 - 10 sim
Bróculos 300 g 720 8 - 9 sim
Ervilhas 300 g 720 7 - 8 sim
Rábano 300 g 720 13 -15 sim
Alho-porro 200 g 720 10 - 11 sim
Milho 200 g 720 4 - 6 sim
Cenouras 200 g 720 5 - 6 sim
Couve fl or 300 g 720 7 - 8 sim
Espinafre
450 g 720 12 - 13 sim
600 g 720 15 - 17 sim
Conselho: Cozinhar com 1-2 colheres de sopa de liquido, remexer de vez
em quando ou separar com cuidado, deixar cozer mais 2-3 minutos e só
temperar antes de servir.
Sopas / Prato único (Comidas já prontas antes)
Refeição de um só prato 500 g 720 13 - 15 sim
Sopa com acompan-
hamento de carne ou
verduras
300 g 720 7 - 8 sim
Sopa de creme 500 g 720 13 - 15 sim
Conselho: Remexer de vez em quando, deixar cozer ainda 3-5 minutos.
Cozinhar rápido
Para iniciar a cozinhar expresso carregue mais que
uma vez a tecla de expresso. O processo de cozimento
começa imediatamente. Todas as vezes que carregar na
tecla o tempo de cozimento prelonga-se primeiro por 30
seg. e depois de 1 minuto será o tempo de cozimento de
cada vez prolongado por mais um minuto.
A capacidade da micro-ondas è então de 100%.
Programas automáticos
Com a ajuda do automático poderá deixar cozinhar com-
pletamente certas quantidades de comidas.
Siga como indicado:
a) Batatas
1. Carregue na tecla Stopp.
2. Carregue na tecla “Batatas” 1 x para preparar
120-170 gr. ou carregue na tecla “batatas” 2 x para
preparar 140-200 gr.
3. Carregue numa tecla de números de 1 a 4 para
escolher o tempo de cozimento.
05-MWG 746 H EST 53 13.07.2005, 14:28:57 Uhr

54
PORTUGUÊS
Tecla
“Batatas”
Teclas com
números
Tempo de
cozimento
1x 1 3min 50sek.
1x 2 7min 10sek
1x 3 11min
1x 4 14min
Tecla
“Batatas”
Teclas com
números
Tempo de
cozimento
2x 1 5min 40sek.
2x 2 9min
2x 3 13min
2x 4 17min
4. Para iniciar carregue na tecla Iniciar.
Quando o tempo terminar o aparelho desliga-se e no
display aparece a palavra « END ».
Conselho: Para que as comidas continuem a cozedu-
ra deixe fi car estas ainda 5-10 min. no fogão.
b) Popcorn
Por favor só utilize o popcorn na micro-ondas dentro dum
saquinho!
1. Carregue na tecla Stopp.
2. Carregue na tecla “Popcorn”.
No display aparece “2:30”.
3. Para iniciar carregue na tecla Iniciar.
Quando o tempo terminar o aparelho desliga-se e no dis-
play aparece a palavra « END ». Retire então a comida.
Indicação: Poderá se quiser modifi car o tempo de
cozimento.
• Carregue 2 x na tecla “Popcorn”.
• Com a tecla de números marque o novo tempo de
cozimento.
• Carregue na tecla iniciar.
O novo tempo de cozimento fi cará memorizado até que o
mude outra vez.
c) Pizza
1. Carregue na tecla Stopp.
2. Carregue na tecla “Pizza” 1 x para aquecer um boca-
do de 120-140 gr. ou carregue a tecla de “Pizza” 2 x
para aquecer um bocado maior.
3. Para iniciar carregue na tecla Iniciar.
Quando o tempo terminar o aparelho desliga-se e no dis-
play aparece a palavra « END ». Retire então a comida.
d) Espeto de carne
1. Carregue na tecla Stopp.
2. Carregue na tecla “Espeto de carne” 1 x para prepa-
rar uma pequena porção ou carregue na tecla “Espe-
to de carne” 2 x para preparar uma porção maior.
3. Carregue uma tecla de números de 1-4 para escolher
o peso de cozimento.
(Carregar na tecla “Espeto de carne” 1 x)
Teclas com
números
Peso
Tempo de
cozimento
1 120g 10min
2 200g 13min
3 400g 17min
4 600g 23min
(Carregar 2 x na tecla “Espeto de carne)
Teclas com
números
Peso
Tempo de
cozimento
1 170g 12min
2 310g 15min
3 540g 23min
4 800g 30min
4. Para iniciar carregue na tecla Iniciar.
Quando o tempo terminar o aparelho desliga-se e no dis-
play aparece a palavra « END ». Retire então a comida.
e) Bebidas
1. Carregue na tecla Stopp.
2. Carregue na tecla “Bebidas” 1x para aquecer 140-
200 gr. Carregue na tecla “Bebidas” 2 x para aquecer
de 250-310 gr.
3. Carregue numa tecla de números de 1-4 para escol-
her o tempo de aquecimento.
Tecla
“Bebidas”
Teclas com
números
Tempo de
aquecimento
1x 1 1min 20sek
1x 2 2min 30sek
1x 3 3min 40sek
1x 4 4min 50sek
Tecla
“Bebidas”
Teclas com
números
Tempo de
aquecimento
2x 1 2min 20sek.
2x 2 4min
2x 3 5min 40sek
2x 4 7min 20sek
4. Para iniciar carregue na tecla Iniciar.
Quando o tempo terminar o aparelho desliga-se e no dis-
play aparece a palavra « END ». Retire então a comida.
f) Aquecimento
1. Carregue na tecla Stopp.
2. Carregue na tecla “Aquecimento”. No Display aparece
“3:40”.
3. Para iniciar carregue na tecla Iniciar.
Quando o tempo terminar o aparelho desliga-se e no dis-
play aparece a palavra « END ». Retire então a comida.
g) Bolos
1. Carregue na tecla Stopp.
2. Carregue na tecla “bolos”.
No Display aparece “40:00”.
3. Para iniciar carregue na tecla Iniciar.
05-MWG 746 H EST 54 13.07.2005, 14:28:59 Uhr

55
PORTUGUÊS
Quando o tempo terminar o aparelho desliga-se e no dis-
play aparece a palavra « END ». Retire então a comida.
Indicação: Poderá modifi car o tempo de cozimento.
• Carregue 2 x na tecla “bolos”.
• Indique o novo tempo de cozimento com as teclas de
números até (99:99).
• Carregue na tecla “Start”.
O novo tempo de cozimento fi cará memorizado até que o
mude novamente.
Grelha
Para grilhar utilize por favor a grade de grelhar para
conseguir um tostado rápido e homogéneo. Utilize louças
resistentes ao calor ou coloque a comida a grilhar direc-
tamente sobre a grelha.
No caso de peças grandes e grossas estas devem ser
grelhadas diretamente sobre o prato giratório.
Para grelhar ou para gratinar siga o seguinte:
1. Carregue na tecla Stopp.
2. Carregue 1 x na tecla “Grelhar”.
3. Com a ajuda das teclas de números poderá escolher
o tempo de grlhar desejado.
4. Para iniciar carregue na tecla Iniciar.
Quando o tempo terminar o aparelho desliga-se e no dis-
play aparece a palavra « END ». Retire então a comida.
Funcionamento combinado
Micro-ondas/Grill
Nesta regulação trabalham a micro-ondas e a grelha
alternadamente dentro do tempo escolhido numa relação
de:
Combinação 1
30% do tempo
de cozimento na
micro-ondas
70% do tempo
de cozimento na
grelha
Combinação 2
55% do tempo
de cozimento na
micro-ondas
45% do tempo
de cozimento na
grelha
Quando preparar comidas num funcionamento combina-
do micro-ondas/grelha deverá fazer atenção ao seguinte:
No caso de comidas grandes e grossas como por exemplo
assado de porco, será o tempo na micro-ondas muito mais
longo do que se forem peças pequenas e chatas. No caso
de grelhar é porém o contrário. Quanto mais perto estiver
o alimento da grelha, mais rapidamente este fi cará tosta-
do. Quer dizer, se preparar um grande pedaço de assado
em funcionamento combinado será o tempo de grelhar
mais curto do que se fôr uma peça pequena.
Faça como se segue:
1. Carregue na tecla Stopp.
2. Carregue 1 x na tecla “Micro-ondas/ Grelha” para o
funcionamento combinado 1. Carregue 2 x na tecla
“Micro-ondas/Grelha” para o funcionamento combina-
do 2.
3. Com a ajuda das teclas de números poderá indicar o
tempo de cozimento desejado.
4. Para iniciar carregue na tecla Iniciar.
Quando o tempo terminar o aparelho desliga-se e no dis-
play aparece a palavra « END ». Retire então a comida.
Tabela de funcionamento combinado
Micro-ondas / Grelha
Productos alimenticios / Comidas
Quanti-
dade
Tempo
cerca em
minutos
Cobrir
Carne, Salsichas
Carne de vaca, de porco ou de vitela
numa peça
500 g
750 g
10 - 12
12 - 15
não
não
Carne de porco fumada 500 g 12 - 14 não
Assado de carne picada 500 g 13 - 15 não
Salsichas de Viena 200 g 2 - 3 não
Salsichas 200 g 2 - 3 não
Conselho: Virar a carne depois de meio tempo e continuar a cozinhar
mais 3-5 minutos. Pinselar a carne assada picada com clara de ovo; as
salsichas devem-se picar com um garfo.
Aves
Canja 1000 g 13 - 15 não
Partes de frango 250 g 4 - 5 não
Conselho: Cozinhar sem outros liquidos além do molho próprio, virar uma
vez, continuar a cozinhar mais 4-5 minutos.
Peixe
Truta ao natural 300 g 5 - 6 não
Filetes de peixe 300 g 3 - 4 não
Conselho: Virar depois de meio tempo, continuar a cozinhar mais 3-5
minutos.
Serviço em funcionamento
com ar quente puro
Durante o cozinhar com ar quente circula ar quente circu-
la no sitio de cozimento. Desta forma as comidas fi carão
mais rápidamente tostadas e apetitosas. No funciona-
mento a ar quente poderá escolher até
10 temperaturas diferentes.
Cozinhar com ar quente
No caso de querer cozinhar a 180° durante 40 min.
poderá fazer como segue:
1. Carregue na tecla Stopp.
2. Carregue na tecla “Ar quente”
3. Com uma das teclas de números (p.ex. 8) poderá
escolher a temperatura de cozimento desejada.
4. Com a ajuda das teclas de números indique o tempo
desejado de cozimento (p.ex. 40 min.).
Passo Tecla Indicação
1 Stopp
2 Ar quente
38
1 80
44 0
H:40
5 Iniciar
5. Para iniciar carregue na tecla Iniciar.
Por favor faça atenção:
• Ao máximo poderá programar 9 horas e 99 minutos.
Logo que o tempo terminar, ouve-se um sinal acústi-
co e a palavra “END” aparece no Display. Carregue
na tecla Stopp ou abra a porta. A palavra “END”
desaparece.
• Durante o cozinhar com ar quente poderá controlar a
temperatura logo que carregue na tecla de ar quente.
05-MWG 746 H EST 55 13.07.2005, 14:29:00 Uhr

56
PORTUGUÊS
Preaquecer e cozinhar com ar quente
Poderá aquecer previamente a sua micro-ondas utilizan-
do o funcionamento a ar quente e em seguida continuar
a empregar o ar quente.
No caso de querer aquecer préviamente o seu aparelho
a 170°C e depois cozinhar por 35 min.:
1. Carregue na tecla Stopp.
2. Carregue na tecla ar quente.
3. Com uma das teclas de números (p.ex. 7) escolha a
temperatura de aquecimento prévio desejada.
4. Carregue na tecla Start. No display a indicação
“PREH” (preaquecimento) pisca. Quando o forno atin-
ge a temperatura programada, a indicação “PREH”
acende continuamente.
5. Abra a porta por favor e coloque os seus alimentos
no meio do prato giratório.
6. Com a ajuda das teclas de números indique o tempo
de cozimento desejado (p.ex. 35 min.).
7. Para iniciar carregue na tecla Iniciar.
Quando o tempo terminar o aparelho desliga-se e no dis-
play aparece a palavra « END ». Retire então a comida.
Emprego combinado
de ar quente e de micro-ondas
Para isso o aparelho tem 4 regulações já programadas.
Isto facilita-lhe o trabalho tanto com o ar quente como
com a micro-ondas.
Carregue por favor na tecla micro-ondas / ar quente e
depois carregue numa tecla de números de 1-4 para
escolher a temperatura de ar quente.
Tecla
Teclas com
números
Temperatura (°C)
Micro-ondas / Ar quente 1 150
Micro-ondas / Ar quente 2 180
Micro-ondas / Ar quente 3 200
Micro-ondas / Ar quente 4 230
Deseja fazer um bolo a uma temperatura de 200 °C
deseja regular um tempo de 25 minutos:
1. Carregue na tecla Stopp.
2. Carregue na tecla de micro-ondas/Ar quente.
3. Com uma das teclas de números (p.ex. 3) escolha a
temperatura desejada (200°C).
4. Com a ajuda das teclas de números indique o tempo
desejado de cozimento (p.ex. 25 min.).
5. Para iniciar carregue na tecla Iniciar.
Por favor faça atenção:
Ao máximo só se poderá programar 9 horas e 99
minutos. Logo que o tempo terminar ouve-se um sinal
acústico e a palavra “END” aparece no Display. Carregue
na tecla Stopp ou abra a porta. A palavra “END” desa-
parece.
Durante o cozer com ar quente poderá controlar a
temperatura, logo que carreguar na tecla micro-ondas/ar
quente.
Cozinhar a vários passos
Poderá regular os programas de tal maneira que possa
ter a possibilidade de escolher entre 3 funções diferen-
tes.
No caso de escolher um destes programas para cozin-
har:
Descongelar rapidamente
쒆
Preparar na micro-ondas
쒆
Cozinhar com ar quente (sem aquecimento prévio)
1. Carregue na tecla Stopp.
2. Carregue na tecla descongelar
3. Com a ajuda das teclas de números indique o tempo
de descongelamento desejado.
4. Carregue na tecla de micro-ondas
5. Com a ajuda das teclas de números indique o tempo
de cozimento na micro-ondas desejado
6. Carregue na tecla de ar quente.
7. Com uma das teclas de números escolha a tempera-
tura de cozimento desejada
8. Com a ajuda das teclas de números indique o tempo
de cozimento a ar quente desejado.
9. Para iniciar carregue na tecla Iniciar.
Quando o tempo terminar o aparelho desliga-se e no dis-
play aparece a palavra « END ». Retire então a comida.
Funções especiais
Advertência automática
Depois de terminar um processo de cozimento será
avisado todos os 2 minutos por sinal acústico que deverá
retirar as comidas do aparelho.
Ao abrir a porta ou ao carregar na tecla Stopp este aviso
será desligado.
Bloqueamento
Carregue na tecla Stopp mais de 3 segundos para
bloquear o aparelho. O bloqueamento será indicado no
mostrador. A função dos elementos de serviço estão blo-
queados. Carregue na tecla Stopp mais uma vez durante
mais do que 3 segundos para retirar o bloqueio.
Timer (Count-down)
O aparelho possui uma função de Timer (tempo)
1. Carregue na tecla Stopp.
2. Carregue na tecla Timer.
3. Com a ajuda das teclas de números indique o tempo
desejado.
4. Para iniciar carregue na tecla Iniciar.
O tempo indicado é contado para trás e quando chegar
ao fi m é sinalizado por um sinal acústico.
Atenção: Também poderá utilizar esta função durante o
tempo de funcionamento do aparelho.
05-MWG 746 H EST 56 13.07.2005, 14:29:01 Uhr

57
PORTUGUÊS
Limpeza
Antes de limpar o aparelho retire sempre a fi cha de
corrente.
• Limpe o lugar de cozimento após a utilização com um
pano um pouco humido.
• Limpe a micro-ondas por fora com um pano um
pouco humido.
• As peças acessórias deverão ser limpas como habi-
tualmente com água quente e detergentes.
• O caixilho da porta / vedação da porta e as peças
perto dela terão de ser limpos cuidadosamente com
um pano húmido quando estejam sujos.
Características técnicas
Modelo:...........................................................MWG 746 H
Alimentação da corrente:...............................230 V, 50 Hz
Consumo de energia: ............................................1400 W
Consumo de energia ar quente:............................1400 W
Consumo de energia grelhador: ............................1200 W
Potência de saída dimensional do microondas: ......900 W
Capacidade do forno: ............................................25 litros
Categoria de protecção: ...................................................Ι
Este aparelho foi controlado nos termos das actuais
directivas da CEE aplicáveis, tais como inocuidade elec-
tromagnética e directiva sobre baixa tensão, e fabricado
de acordo com as mais novas prescrições da segurança
técnica.
Reserva-se o direito de alterações!
Garantia
O aparelho vendido pela nossa empresa tem uma garan-
tia de 24 meses a partir da data da compra (talão).
Durante o período de garantia, procederemos à remoção
grátis - por reparação, ou, segundo a nossa decisão,
por substituição - das defi ciências do aparelho ou dos
acessórios que provenham de erros de material ou de
fabricação. A prestação de serviços relacionados com
a garantia não prolongarão a mesma, nem iniciarão um
novo prazo de garantia!
O talão de compra consistirá prova desta garantia. Sem o
mesmo, não será possível proceder-se a qualquer troca
ou reparação grátis.
Em caso de garantia, entregue o aparelho completo, jun-
tamente com o talão de compra, na loja onde o mesmo
foi comprado.
Não estão incluídos na garantia quaisquer defeitos de
acessórios ou de peças que se desgastem
, nem
a limpeza, a manutenção ou a substituição de peças que
se desgastem, devendo tais despesas ser reembolsadas!
A garantia terminará sempre que tenha havido interven-
ção alheia nos aparelhos.
Após a garantia
Após a expiração do prazo de garantia, poderão ser
efectuados arranjos por pessoal especializado, ou pelos
nossos serviços de reparações, contra reembolso.
Signifi cado do símbolo
„contentor do lixo“
Poupe o nosso meio ambiente, não deite aparelhos
eléctricos para o lixo doméstico.
Dirija-se ao locais destinados à recolha especial de
aparelhos eléctricos e entregue aí os aparelhos que não
pretende continuar a utilizar.
Desta forma, contribuirá para ajudar a evitar os poten-
ciais efeitos perniciosos que um falso depósito de objec-
tos usados terão, tanto no que diz respeito ao ambiente,
como à saúde humana.
Dará igualmente a sua contribuição para o reaproveita-
mento de materiais, para a reciclagem e outras formas
de aproveitamento de aparelhos eléctricos e electrónicos
usados.
Receberá, nas autarquias e juntas de freguesia,
informações sobre os locais onde poderá entregar tais
aparelhos.
05-MWG 746 H EST 57 13.07.2005, 14:29:02 Uhr

58
ITALIANO
Norme di sicurezza generali
• Prima di mettere in funzione questo apparecchio,
leggere molto attentamente le istruzioni per l’uso e con-
servarle con cura unitamente al certifi cato di garanzia,
allo scontrino e, se possibile, alla scatola di cartone con
la confezione interna.
• Utilizzare l’apparecchio esclusivamente per scopi privati
e conformemente al tipo di applicazione previsto. Ques-
to prodotto non è stato concepito ai fi ni di un impiego
in ambito industriale. Non utilizzarlo all’aperto (a meno
che non sia contemplato un particolare tipo di uso
all’aperto nel rispetto di specifi che condizioni). Proteg-
gerlo dal calore, nonché dall’esposizione diretta ai raggi
solari e dall’umidità (non immergerlo mai in sostanze
liquide) e tenerlo a distanza da oggetti con spigoli
affi lati. Non utilizzare l’apparecchio con le mani umide.
Nel caso in cui si bagni o si inumidisca l’apparecchio,
staccare immediatamente la spina. Evitare il contatto
con l’acqua.
• Disattivare l’apparecchio e staccare sempre la spina
dalla relativa presa
(si raccomanda di afferrare il connettore e non il cavo
quando si effettua questa operazione) allorché non si
utilizza l’apparecchio, quando si applicano degli acces-
sori oppure nel caso in cui lo si debba pulire o si siano
manifestate anomalie.
• Non mettere in funzione l’ apparecchio senza sorvegli-
anza. Se si dovesse assentarsi dal posto di lavoro,
spegnere e disconnettere sempre l’ apparecchio,
(prendendo in mano la spina, non tirando il cavo).
• Allo scopo di proteggere i bambini contro i pericoli che
possono derivare dagli apparecchi elettrici, accertarsi
che non vi siano cavi pendenti e che i bambini non pos-
sano accedere in alcun modo all’apparecchio stesso.
• Controllare periodicamente l’apparecchio per verifi care
che non vi siano danni. Non mettere in funzione
l’apparecchio nel caso in cui sia guasto.
• Non tentare di riparare l’apparecchio, bensì rivolgersi
a un tecnico autorizzato. Al fi ne di evitare l’insorgere
di situazioni di pericolo, si raccomanda di contattare il
costruttore, il nostro servizio di assistenza tecnica o un
tecnico ugualmente qualifi cato per la sostituzione del
cavo di alimentazione difettoso con un cavo equivalen-
te.
• Utilizzare esclusivamente accessori originali.
• Rispettare le seguenti “Speciali norme di sicurezza...“.
Importanti avvertenze di sicurezza!
Leggere attentamente e conservare
per l’uso futuro.
• Attenzione: se lo sportello o le guarnizioni dello spor-
tello sono danneggiate, il forno non può essere usato
prima che siano state effettuate riparazioni da una
persona addestrata allo scopo.
• Attenzione: non riparare mai il forno direttamente,
contattare un esperto autorizzato. Tranne che per
l’esperto, per tutti è pericoloso eseguire lavori di ma-
nutenzione o riparazione che richiedano la rimozione
di un coperchio che garantisce la protezione contro le
radiazioni dell’energia microonde.
• Attenzione: Non riscaldare liquidi in recipienti chiusi.
Pericolo di esplosione!
• Attenzione: Se il funzionamento dell’ apparecchio è
impostato in modo combinato, è consigliabile lasciare
usare l’ apparecchio ai bambini solo sotto sorveglianza
di adulti, a causa delle temperature che persistono.
• Nota: La microonde non è adatta per riscaldare ani-
mali vivi.
• Attenzione: Ai bambini e a persone fragili è permes-
so l’ uso dell’ apparecchio senza sorveglianza solo se
dapprima sia stata data un’ informazione adeguata che
consenta a questo gruppo di persone di maneggiare l’
apparecchio in modo sicuro e capire i pericoli di un uso
sbagliato.
• Se desiderate alloggiare il vostro microonde in un
armadio, scaffale o simili, fate attenzione che su ogni
lato dell’apparecchio ci sia una distanza di ventilazione
di almeno 10 cm da armadi, pareti ecc.
• Utilizzare solo stoviglie idonee come:
vetro, porcellana, ceramica, materiale sintetico resis-
tente al calore o stoviglie speciali per microonde.
• Se si desidera riscaldare o cuocere cibi in contenitori
combustibili come di carta o di materia plastica, è
necessario sorvegliare la microonde per evitare la
possibilità di combustione.
• Se si sviluppa fumo, spegnere l’apparecchio e staccare
la spina. Tenere chiuso lo sportello per soffocare
eventuali fi amme.
• Attenzione ebollizione rallentata: durante la cottura,
soprattutto quando si riscaldano liquidi (acqua) può
accadere che la temperatura di ebollizione sia raggi-
unta ma che le tipiche bollicine di vapore ancora non
salgano. L’ebollizione non è uniforme. Quando si toglie
il recipiente, questo fenomeno tramite una scossa
leggera può dar luogo ad un’ebollizione rallentata, pro-
vocando quindi una formazione improvvisa di bollicine
di vapore, perciò il liquido può traboccare. Pericolo di
ustione! Per ottenere un’ebollizione uniforme, mettere
nel recipiente una barra di vetro o qualcosa di simile,
ma non metallo.
• L’apparecchio non deve essere assolutamente riparato
dall’utente. Dopo aver tolto il coperchio c’è pericolo di
radiazioni provenienti dall’energia microonde.
• Alimenti con guscio o scorza, come uova, salami,
conserve sottovetro chiuse ecc. non possono essere
riscaldati nel forno microonde perché possono esplo-
dere anche quando il riscaldamento da parte delle
microonde è terminato.
• In presenza di sporco il telaio dello sportello, la
guarnizione e le parti limitrofe devono essere ripuliti
accuratamente con un panno umido.
• Pulire accuratamente il forno microonde e togliere
residui di sporco dall’interno.
• La mancanza di suffi ciente pulizia dell’ apparecchio ha
come conseguenza la distruzione della superfi cie, ciò
che può infl uenzare la durata di vita dell’ apparecchio e
causare eventualmente situazioni pericolose.
Descrizione degli elementi di comando
1 Chiusura porta
2 Finestrino*
3 Copertura*
4 Asse motore
5 Anello scorrevole
6 Piatto girevole
7 Pannello di controllo
8 Riscaldamento griglia
9 Griglia
Attenzione:
non togliere pezzi montati nella camera di
cottura e dal lato interno dello sportello!
Non togliere mai pellicole dall’interno dello sportello!
05-MWG 746 H EST 58 13.07.2005, 14:29:03 Uhr

59
ITALIANO
Tabella dei tasti di controllo
Tasti numerici
Per impostare l’ora, il tempo di cottura, la
temperatura e il peso
Tasto microonde
Scelta delle posizioni
Tasto griglia
Per cuocere al grill e gratinare
Tasto aria calda
Funzionamento possibile solo con aria
calda, mediante termostato
Tasto microonde/
griglia modalità combinata
Lavoro alternato di microonda e griglia
Tasto microonda/
aria calda modalità combinata
Lavoro alternato di microonda ed aria calda
Tasto per scongelamento
Attiva la funzione di scongelamento unita-
mente all’ impostazione dell’ ora
Tasto orologio
Unitamente all’ impostazione dell’ ora
tramite i tasti numerici
Tasto per programma torte
Tasto Timer (Countdown)
Tasto per programma patate
Tasto per programma popcorn
Tasto per programma bibite
Tasto per programma pizze
Tasto per programma spiedini
Tasto per programma riscaldamento
Tasto start
Avviare il programma
Tasto Express
Iniziare il programa Express –
Impostare il tempo di cottura express
Tasto stop
• Premere una volta per fermare il
procedimento di cottura oppure per
cancellare un’ impostazione sbagliata.
• Premere due volte per cancellare il
programma.
• Premere per 3 secondi per bloccare/
sbloccare l’ apparecchio
Avvertenze per il funzionamento grill
e modalità alternata
• Visto che per il funzionamento grill con modalità alter-
nata viene usato calore radiante, è necessario usare
stoviglie resistenti al calore.#
• Se si desidera usare unicamente il funzionamento
grill, si possono utilizzare stoviglie di metallo o allu-
minio - ciò che non è possibile con il funzionamento
microonde con modalità alternata.
• Per le opzioni grill, pizza, cottura nel forno e modalità
combinata è consentito solo l’ uso della griglia.
• Non appoggiare niente sulla parte superiore della
custodia. Questa si riscalda. Lasciare libere le fessure
della ventilazione.
• Usare la griglia per appoggiare i cibi da cuocere sull’
elemento termico.
Messa in funzione
• Estrarre tutti gli accessori che si trovano nel vano
cottura, prelevarli dall’ imballaggio ed inserire l’ anello
scorrevole in mezzo. Posizionare il piatto di vetro sull’
asse di comando in modo che si incastri e si trovi in
rettilinea.
• Controllare l’ apparecchio per controllare eventuali
danni visibili, soprattutto intorno alla porta. In caso di
danni di ogni tipo, si raccomanda di non mettere in
funzione l’ apparecchio in nessun caso.
• Per evitare, durante il funzionamento, difetti causati
da altri apparecchi, non appoggiare l’ apparecchio
nelle immediate vicinanze di altri apparecchi elettrici.
• Allontanare eventualmente dalla custodia qualsiasi
pellicola di protezione.
• In nessun caso allontanare pellicole che si trova-
no nella parte interna della porta!
• Inserire la spina in una presa di protezione 230 V,
50 Hz montata secondo le norme.
• Non togliere alcun oggetto montato dal vano cottura e
dalla parte interiore della porta!
Nozioni importanti sul funzionamento
della microonde
• L’ apparecchio funziona grazie a radiazione a micro-
onde, in grado di riscaldare cibi in brevissimo tempo.
Quindi non è possibile avere irraggiamento di calore e
perciò neanche una doratura dei cibi.
• In questo apparecchio è possibile riscaldare solo cibi.
• L’ apparecchio non è adatto per cuocere in grassi
liquidit.
• Riscaldare 1-2 porzioni alla volta. Altrimenti l’ appa-
recchio perde la sua effi cienza.
• Per interrompere il procedimento di cottura premere il
tasto stop.
• Le microonde forniscono immediatamente energia.
Non è necessario riscaldarle prima.
• Non mettere mai in funzione l’ apparecchio se questo
è vuoto.
• La microonde non è una sostuzione per un forno
tradizionale. Serve soprattutto a:
• Scongelare prodotti congelati o ghiacciati
• Riscladamento veloce di cibi e bibite
• Cottura di cibi
• Non usare stoviglie di plastica o carta
05-MWG 746 H EST 59 13.07.2005, 14:29:04 Uhr

60
ITALIANO
Segnale di conferma
Le impostazioni sull’ apprecchio vengono confermati con
un segnale.
• Un segnale dopo aver premuto un tasto:
L’ impostazione viene accettata.
• Due segnali dopo aver premuto un tasto:
L’ impostazione viene rifi utata.
Correggere l’ impostazione.
Impostare l’ ora
Nota: dopo aver acceso l’ apparecchio si visualizza un
punto doppio che lampeggia.
1. Premere il tasto per l’ orologio.
L’ indicatore cambia su „:“.
2. Tramite i tasti numerici impostare l’ ora ed i minuti
desiderati.
3. Premere nuovamente il tasto orologio. Si attiva così il
nuovo orario.
Uso della microonde
Mettere il cibo da riscaldare in un recipiente adatto. Aprire
la porta e inserire il recipiente nel mezzo sul piatto di
vetro. Chiudere la porta. (Dovuto a motivi di sicurezza, l’
apparecchio lavora unicamente se la porta è ben chiusa.
1. Premere il tasto stop.
2. Selezionare la potenza microonde desiderata pre-
mendo una/più volte il tasto microonde.
Premere il tasto microonde per scegliere la
percentuale desiderata
Premere: Potenza Descrizione
1x 100% (P-HI) A piena potenza
2x 90% (P-90)
3x 80% (P-80)
4x 70% (P-70) alta
5x 60% (P-60)
6x 50% (P-50) media
7x 40% (P-40)
8x 30% (P-30) bassa
9x 20 % (P-20)
10x 10 % (P-10) Molto bassa
11x 0% (P-00)
100% corrispondono a 900 W
3. Impostare la durata di cottura desiderata usando i
tasti numerici.
Per esempio: 10:30min di cottura desiderata con
100% di potenza
Stadio Tasto Indicatore
1Stop
2 Microonde
P- HI
3 1 0 3 0
10:30
4Start
4. Per avviare premere il tasto start. Il tempo di cottura
dipende dalla quantità e dal tipo del contenuto. Con
un pò di pratica si impara presto a decidere il tempo
di cottura.
Osservare:
Cuocere con la microonde è un procedimento molto più
veloce che con il forno. Se non si è sicuri si consiglia di
scegliere il tempo di cottura impostandolo basso ed even-
tualmente prolungare inseguito la cottura. Alla fi ne del
tempo impostato, l’ apparecchio si spegne e sul display
appare „END”. Estrarre i cibi.
Scongelamento veloce di cibi congelati
Osservare:
• Una regola da osservare è la seguente:
per 500g di cibi congelati è necessario ca. scongelare
per 5 minuti.
• Se durante questo tempo il cibo non è completamente
scongelato, procedere impostando l`’ ora ad intervalli
di un minuto.
Se si desidera, p.e., scongelare cibi ed impostare l’ ora
su 5 min.:
1. Premere il tasto stop.
2. Premere il tasto per scongelare.
3. Impostare il tempo di cottura desiderato tramite i tasti
numerici.
Stadio Tasto Indicatore
1Stop
2 Scongelare
:
3 5 0 0
5:00
4Start
4. Per avviare premere il tasto start.
Se il cibo congelato è stato conservato in un contenitore
di plastica, si consiglia di scongelare brevemente il cibo
ed in seguito di versarlo poi in un contentore adatto alla
microonde.
Per scongelare si possono impostare 99 min più 99 se-
condi. Trascorso questo tempo vengono emessi segnali
acustici ed appare nel display la parola „END“ . Premere
il tasto stop oppure aprire la porta. La parola „END“ si
spegne.
Nella tabella seguente si possono avere informazioni
come scongelare manualmente.
Tabella di scongelamento
Generi alimentari/Cibo Quantità
Potenza
ca. Watt
Tempo
ca. min.
Tempo
di riposo
min.
Carne, salumi
Carne (manzo, vitello,
maiale) in un pezzo
500 g
1000 g
180
180
14 – 18
25 - 30
10 – 15
20 - 25
Bistecche, costolette 200 g 180 4 - 6 5 - 10
Carne macinata 250 g 180 6 - 8 5 - 10
Salsiccia arrostita, wurstel 200 g 180 4 - 6 5 - 10
Affettato 300 g 180 4 - 6 5 - 10
Consiglio: a metà cottura girare la carne, coprire parti sensibili; dividere
la carne macinata, rimuovere le parti già scongelate; Separare le fette di
salame
Volatili
Pollo 1000 g 180 20 - 25 10 - 15
Pollo in pezzi 500 g 180 12 - 15 5 - 10
Anatra 1700 g 180 25 - 40 20 - 25
Pezzi di oca e tacchina 500 g 180 12 - 18 10 - 15
Consiglio: a metà cottura girare la carne, coprire ali e cosce
Attenzione: buttare via il liquido dello scongelamento e non portarlo
in contatto con altri alimenti.
05-MWG 746 H EST 60 13.07.2005, 14:29:13 Uhr

61
ITALIANO
Generi alimentari/Cibo Quantità
Potenza
ca. Watt
Tempo
ca. min.
Tempo
di riposo
min.
Selvaggina
Lombo di capriolo 1000 g 180 20 - 35 20 - 30
Lombo di leprecken 500 g 180 12 - 13 10 - 20
Consiglio: girare una volta, coprire i pezzi ai margini
Pesce
Granchi, gamberetti 250 g 180 5 - 7 5 - 10
Trota 340 g 180 4 - 6 5 - 10
Pesce intero 500 g 180 7 - 10 10 - 15
Filetto di pesce 250 g 180 5 - 7 5 - 10
Consiglio: mescolare più volte, girare spesso.
Frutta
Lamponi, fragole 250 g 180 4 - 6 5 - 10
Ciliegie, prugne 250 g 180 5 - 7 5 - 10
Marmellata di mele 500 g 180 9 - 12 5 - 10
Consiglio: girare con cautela o distribuire.
Verdura: Veda „Tabella di cottura“, „Scongelare e cuocere verdura“
Pane e dolci
Panini 4 pezzo 180 ca. 1-3 5
Pane 1000 g 180 13 - 15 8 - 10
Pane da toast 500 g 180 5 - 6 5 - 10
Torta 500 g 180 6 - 8 5 - 10
Torta alla frutta 1 pezzo 180 2 - 3 2 - 3
Torta
1 pezzo 180 0,5 - 1 3 - 5
1200 g 180 10 - 12 30 - 60
Consiglio: porre pane e dolci su carta per forno che assorba l’umidità, per dolci
delicati fare solo uno scongelamento brevissimo.
Prodotti caseari
Burro 250 g 180 5 - 7 10 - 15
Ricotta 250 g 180 6 - 8 5 - 10
Panna 200 g 180 3 - 5 2 - 3
Consiglio: togliere la pellicola di alluminio, a metà cottura mescolare,
montare la panna quando è ancora per metà congelata.
Riscaldare
Riscaldare è sicuramente una delle virtù particolari della
microonde. Liquidi e cibi che escono dal frigorifero possono
essere portati facilmente a temperature ambiente o sono
subito commestibili senza dover far uso di molte pentole.
I tempi di riscaldamento indicati nella tabella servono solo
da riferimento, visto che la durata dipende molto dalla tem-
peratura iniziale dei cibi e la loro consistenza. Si consiglia di
verifi care di tanto in tanto se la pietanza sia già abbastanza
calda.
Tabella per riscaldare
Generi alimentari/Cibo Quantità
Potenza
ca. Watt
Tempo
ca. min.
Coprire
Liquidi
Acqua, 1 tazza 150 g 900 0,5 - 1 no
Acqua, 0,5 l 500 g 900 3,5 - 5 no
Acqua, 0,75 l 750 g 900 5 - 7 no
Caffè, 1 tazza 150 g 900 0,5 - 1 no
Latte, 1 tazza 150 g 900 0,5 - 1 no
Attenzione: Mettere nel contenitore una bacchetta di vetro o simile (non
utilizzare a tale scopo oggetti in metallo) al fi ne di evitare che si verifi chino
ritardi di ebollizione. Successivamente, mescolare prima di bere.
Pietanze
Bistecche, patate e verdura 450 g 900 2,5 - 3,5 sì
Gulasch con pasta 450 g 900 2 - 2,5 sì
Carne, gnocchi e salsa 450 g 900 2,5 - 3,5 sì
Consiglio: prima inumidire leggermente, ogni tanto mescolare.
Generi alimentari/Cibo Quantità
Potenza
ca. Watt
Tempo
ca. min.
Coprire
Carne
Cotolette 200 g 900 1 - 2 no
Polpette, 4 pz. 500 g 900 3 - 4 no
Arrosto, un pezzo 250 g 900 2 - 3 no
Consiglio: spennellare con olio affi nché la panata o la crosta non si
ammorbidiscano.
Volatili
1/2 pollo 450 g 900 3,5 - 5 no
Fricassea di pollo 400 g 900 3 - 4,5 sì
Consiglio: spennellare con olio, ogni tanto girare.
Contorni
Pasta, riso 1 porzione 150 g 900 1 - 2 sì
2 porzioni 300 g 900 2,5 - 3,5 sì
Patate 500 g 900 3 - 4 sì
Consiglio: prima inumidire leggermente.
Minestre / Salse
Brodo, 1 piatto 250 g 900 1 - 1,5 sì
Minestra con pastina
o simili
250 g 900 1,5 - 2 sì
Salsa 250 g 900 1 - 2 sì
Latte e pappe
Latte 100 ml 540 0,5 - 1 no
Pappa 200 g 540 1 - 1,5 no
Consiglio: scuotere o mescolare bene. Controllare la temperatura!
Cottura
Consigli pratici per la cottura
Regolarsi a seconda dei punti di riferimento indicati nelle
ricette e nella tabella per cottura. Osservare il procedi-
mento di cottura in caso di mancanza di pratica.
La porta dell’ apparecchio é sempre apribile. L’ apparec-
chio si spegne automaticamente.
La funzione ricomincia non appena la porta è chiusa.
Cibi estratti dal refrigeratore necessitano un periodo di
cottura pù prolungato di quelli con temperatura ambien-
tale.
Se i cibi sono più compatti, necessitano un periodo
di cottura più prolungato. Un pezzo di carne piuttosto
grosso necessita di un periodo di cottura più lungo dello
spezzatino. Si consiglia di iniziare la cottura di quantità
maggiori a potenza massima e continuarla con un grado
di potenza uniforme.
Cibi a taglio sottile e quantità minori cuociono più
facilmente di quantità maggiori accumulate, si consiglia
perciò di distribuire gli alimenti spianandoli leggermente.
Porre pezzi più sottili p.e. cosce di pollo oppure fi letti di
pesce all’ interno oppure sovrapporli.
Esiste una regola:
Quantità doppia = durata quasi doppia
Mezza quantità = mezza durata
Se per caso, per una pietanza non c’ è l’ indicazione della
durata dei tempi, esiste la regola:
per 100 g ca. 1 min di cottura
Tutti i cibi che vengono coperti normalmente sul fornello
tradizionale, devono essere coperti anche nella micro-
onde.
05-MWG 746 H EST 61 13.07.2005, 14:29:15 Uhr

62
ITALIANO
Il coperchio impedisce che i cibi si si secchino. Per cop-
rire si può anche usare un piatto rovesciato, pergamenta
oppure una pellicola adatta alla microonde. Se si deside-
ra ottenere una crosta, cuocere senza coperchio.
Tabella di cottura
Generi alimentari/Cibo Quantità
Potenza
ca. Watt
Tempo
ca. min.
Coprire
Verdura
Melanzane 500 g 720 7 - 10 sì
Cavolo 500 g 720 8 - 11 sì
Broccoli 500 g 720 6 - 9 sì
Cicoria 500 g 720 6 - 7 sì
Piselli 500 g 720 6 - 7 sì
Finocchio 500 g 720 8 - 11 sì
Fagiolini 300 g 720 13 - 15 sì
Patate 500 g 720 9 - 12 sì
Cavolo rapa 500 g 720 8 - 10 sì
Porro 500 g 720 7 - 9 sì
Pannocchie di mais 250 g 720 7 - 9 sì
Carote 500 g 720 8 - 10 sì
Peperoni 500 g 720 6 - 9 sì
Cavolini di Bruxelles 300 g 720 7 - 10 sì
Asparagi 300 g 720 6 - 9 sì
Pomodori 500 g 720 6 - 7 sì
Zucchini 500 g 720 9 - 10 sì
Consiglio: tagliare la verdura a pezzi e cuocere con 2 - 3 cucchiai di
liquido, ogni tanto mescolare, lasciar cuocere 3 - 5 min., insaporire solo
prima di servire.
Frutta
Composta di mele, pere 500 g 720 5 - 8 sì
Marmellata di prugne 250 g 720 4 - 6 no
Composta di rabarbaro 250 g 720 5 - 8 sì
Mele al forno, 4 pz. 500 g 720 7 - 9 sì
Consiglio: aggiungere 125 ml di acqua, il succo di limone impedisce che la
frutta perda il suo colore, lasciar cuocere altri 3 - 5 min.
Carne (Alimenti precotti)
Carne con salsa 400 g 720 10 - 12 sì
Gulasch, spezzatino 500 g 720 10 - 15 sì
Involtini di manzo 250 g 720 7 - 8 sì
Consiglio: di tanto in tanto girare, lasciar riposare 3 - 5 min.
Volatili (Alimenti precotti)
Fricassea di pollo 250 g 720 6 - 7 sì
Brodo con carni bianche 200 g 720 5 - 6 sì
Consiglio: di tanto in tanto girare, lasciar riposare 3 - 5 min.
Pesce
Filetto di pesce
300 g 720 7 - 8 sì
400 g 720 8 - 9 sì
Consiglio: trascorsa la metà del tempo girare, lasciar cuocere altri,
3 - 5 min.
Scongelare e cuocere verdura
Cavolo rosso-mela 450 g 720 14 -16 sì
Spinaci in foglia 300 g 720 11 - 13 sì
Cavolo 200 g 720 7 - 9 sì
Fagiolini 200 g 720 8 - 10 sì
Broccoli 300 g 720 8 - 9 sì
Piselli 300 g 720 7 - 8 sì
Cavolo rapa 300 g 720 13 -15 sì
Porri 200 g 720 10 - 11 sì
Mais 200 g 720 4 - 6 sì
Carote 200 g 720 5 - 6 sì
Cavolini di Bruxelles 300 g 720 7 - 8 sì
Generi alimentari/Cibo Quantità
Potenza
ca. Watt
Tempo
ca. min.
Coprire
Spinaci
450 g 720 12 - 13 sì
600 g 720 15 - 17 sì
Consiglio: cuocere con 1 -2 cucchiai di liquido, di tanto in tanto girare o
dividere con cautela, lasciar cuocere altri 2 - 3 min. insaporire prima di
servire.
Minestre / Piatti unici (Alimenti precotti)
Piatto unico 500 g 720 13 - 15 sì
Minestra con pastina
o simili
300 g 720 7 - 8 sì
Vellutata 500 g 720 13 - 15 sì
Consiglio: di tanto in tanto mescolare, lasciar cuocere altri 3 - 5 min.
Cottura express
Per avviare la cottura express, premere ripetutamente
il tasto express. Il procedimento di cottura inizia subito,
ogni volta che il tasto è premuto il procedimento di cottura
viene prolungato di 30 secondi, e dopo un minuto il tem-
po di cottura si prolunga ancora di un minuto.
La potenza della microonde è del 100%.
Programmi automatici
Grazie al meccanismo automatico è possibile cuoce-
re certe quantità di cibo automaticamente. Il tempo di
cottura e la potenza della microonde sono indicate nel
programma.
Procedere come descritto:
a) Patate
1. Premere il tasto stop.
2. Premere 1 x il tasto „Patate“ per la preparazione di
120-170g oppure premere il tasto „Patate“ 2x per la
preparazione di 140-200g.
3. Per scegliere la durata della cottura premere un tasto
numerico da 1-4.
Tasto“Patate” Tasti numerici
Durata della
cottura
1x 1 3min 50sec.
1x 2 7min 10sec.
1x 3 11min
1x 4 14min
Tasto“Patate” Tasti numerici
Durata della
cottura
2x 1 5min 40sec.
2x 2 9min
2x 3 13min
2x 4 17min
4. Per avviare premere il tasto start.
L‘ apparecchio si spegne alla fi ne del tempo pro-
grammato e nel display appare „END“.
Si consiglia: per continuare la cottura lasciare riposa-
re le pietanze per ancora 5 o 10 min. nel forno.
b) Popcorn
Usare unicamente popcorn in sacchetti adatto per microonde
1. Premere il tasto stop.
2. Premere il tasto „Popcorn“. Nel display appare „2:30“.
3. Per avviare premere il tasto start.
05-MWG 746 H EST 62 13.07.2005, 14:29:17 Uhr

63
ITALIANO
L‘ apparecchio si spegne alla fi ne del tempo programma-
to e nel display appare „END“. Estrarre i cibi.
Nota: È possibile modifi care la durata della cottura.
• Premere 2 x il tasto „Popcorn“.
• Tramite i tasti numerici impostare la durata nuova
della cottura
• Premere il tasto start.
La durata di cottura nuova rimane memorizzata fi no a che
viene nuovamente moderata.
c) Pizza
1. Premere il tasto stop.
2. Premere il tasto „Pizza“ 1x per riscaldare un pezzo
di 120-140g oppure premere il tasto „Pizza“ 2x per
riscaldare un pezzo più grande.
3. Per avviare premere il tasto start.
L’ apparecchio si spegnealla fi ne del tempo programmato
e nel display appare „END”. Estrarre i cibi.
d) Spiedini
1. Premere il tasto stop.
2. Premere il tasto „Spiedini” 1x per la preparazione di
piccole quantità oppure premere il tasto „Spiedini“ 2x
per la preparazione di quantità maggiori.
3. Premere il tasto numerico da 1-4, per scegliere una
pietanza da cuocere.
(Tenere premuto il tasto „Spiedini“ 1x)
Tasto numerico Peso
Durata della
cottura
1 120g 10min
2 200g 13min
3 400g 17min
4 600g 23min
(Tenere premuto il tasto „Spiedini“ 2x )
Tasto numerico Peso
Durata della
cottura
1 170g 12min
2 310g 15min
3 540g 23min
4 800g 30min
4. Per avviare premere il tasto start.
L’ apparecchio si spegne alla fi ne del tempo programmato
e nel display appare „END“. Estrarre i cibi.
e) Bevande
1. Premere il tasto stop.
2. Premere 1 x il tasto “Bevande” per riscaldare 140-
200g. Premere 2 x il tasto „Bevande” per riscaldare
250-310g.
3. Per scegliere il tempo di riscaldamento premere un
tasto numerico da 1-4.
Tasto
“Bevande”
Tasto numerico
Tempo di
riscaldamento
1x 1 1min 20sec
1x 2 2min 30sec
1x 3 3min 40sec
1x 4 4min 50sec
Tasto
“Bevande”
Tasto numerico
Tempo di
riscaldamento
2x 1 2min 20sec
2x 2 4min
2x 3 5min 40sec
2x 4 7min 20sec
4. Per avviare premere il tasto start.
L’ apparecchio si spegne alla fi ne del tempo programmato
e nel display appare „END“. Estrarre i cibi.
f) Riscaldare
1. Premere il tasto stop.
2. Premere il tasto „Riscaldare“. Nel display appare
„3:40“.
3. Per avviare premere il tasto start.
L’ apparecchio si spegne alla fi ne del tempo programmato
e nel display appare „END“. Estrarre i cibi.
g) Torta
1. Premere il tasto stop.
2. Premere il tasto „Torta“. Nel display appare „40:00“.
3. Per avviare premere il tasto start.
L’ apparecchio si spegne alla fi ne del tempo programmato
e nel display appare „END“. Estrarre i cibi.
Nota: è possibile modifi care la durata della cottura.
• Premere 2 x il tasto „Torta”.
• Tramite i tasti numerici impostare la nuova durata
della cottura (fi no a 99:99) .
• Premere il tasto start.
La durata della cottura nuovamente impostata rimane
memorizzata fi no ad una nuova impostazione.
Griglia
Per cuocere sul grill bisogna utilizzare una griglia, se si
vuole ottenere una doratura uniforme. Utilizzare stoviglie
resistenti al calore oppure mettere i cibi da grigliare diret-
tamente sulla griglia.
Cibi a taglio grosso e spessi vengono cotti direttamente
sul piatto di vetro!
Per cuocere sulla griglia o gratinare proseguire come
descritto:
1. Premere il tasto stop.
2. Premere 1 x il tasto griglia.
3. Tramite i tasti numerici impostare la durata della
cottura ulla griglia.
4. Per avviare premere il tasto start.
L’ apparecchio si spegne alla fi ne del tempo programmato
e nel display appare „END“. Estrarre i cibi.
Microonde/Grill-modalità combinata
Le opzioni microonde e griglia entrano in funzione alter-
natamente entro un tempo desiderato e in rapporto con:
Combinazione 1
30% del tempo di
cottura Microonde
70% del tempo di
cottura Griglia
Combinazione 2
55% del tempo di
cottura Microonde
45% del tempo di
cottura Griglia
05-MWG 746 H EST 63 13.07.2005, 14:29:19 Uhr

64
ITALIANO
Se si desidera una preparazione dei cibi in un apparec-
chio micoonde con modalità alternata griglia, si prega di
osservare le seguenti indicazioni:
Per alimenti spessi e a taglio grosso, p.e. arrosto di mai-
ale, il tempo di cottura nella microonde è di conseguenza
più lungo che quello per alimenti più piccoli e a taglio fi ne.
Questo procedimento è opposto se si usa la griglia. Av-
vicinando il più possibile il cibo alla griglia, si ottiene una
doratura più intensa. Questo signifi ca che preparando i
pezzi di arrosto più grandi in modaità combinata, il tempo
di grigliare è probabilmente più corto di quello necessario
per pezzi più piccoli.
Procedere come seguente:
1. Premere il tasto stop.
2. Premere 1 x il tasto „microonde / Griglia per la
modalità combinata1. Premere 2 x il tasto „Microonde/
Griglia“ per la modalità combinata 2.
3. Usando i tasti numerici si può impostare la durata
della cottura.
4. Per avviare premere il tasto start.
L’ apparecchio si spegne alla fi ne del tempo programmato
e nel display appare „END“. Estrarre i cibi.
Tabella microonde/
modalità grill combinata
Generi alimentari/Cibo Quantità
Tempo
ca. min.
Coprire
Carne, salumi
Carne di manzo, maiale o vitello in un
unico pezzo
500 g
750 g
10 - 12
12 - 15
no
no
Cotoletta di maiale
in salamoia
500 g 12 - 14 no
Arrosto di carne tritata 500 g 13 - 15 no
Salsiccia 200 g 2 - 3 no
Wurstel 200 g 2 - 3 no
Consiglio: a metà cottura girare la carne, lasciar cuocere altri 3 – 5 min.;
spennellare la carne macinata con albume, pungere la salsiccia con una
forchetta.
Volatili
Polo per brodo 1000 g 13 - 15 no
Pezzi di pollo 250 g 4 - 5 no
Consiglio: lasciar cuocere senza liquidi nel proprio brodo, girare una volta,
lasciar cuocere altri 4 – 5 min.
Pesce
Trota al blu 300 g 5 - 6 no
Filetto di pesce 300 g 3 - 4 no
Consiglio: a metà cottura girare, lasciar cuocere altri 3 - 5 min.
Funzione con aria calda
Durante la cottura, l’ aria calda circola nell’ intero vano
cottura.In questo modo i cibi prendono una doratura più
intensa e sono più croccanti. Con il funzionamento con
aria calda, si possono scegliere 10 temperature differenti.
Cucinare con aria calda
Se si desidera cuocere a 180°C, 40 minuti, procedere
come segue.
1. Premere il tasto stop.
2. Premere il tasto “aria calda”.
3. Tramite un tasto numerico (p.e. 8) scegliere la tempe-
ratura di cottura desiderata.
4. Tramite i tasti numerici impostare la durata di cottura
desiderata (p.e. 40min).
Posizione Tasto Indicatore
1Stop
2 Aria calda
38
1 80
44 0
H:40
5Start
5. Per avviare premere il tasto start.
Osservare:
• Si possono programmare al massimo 9 ore, 99 minu-
ti. A fi ne tempo, si sentono segnali acustici e appare
la parola „END“ nel display. Premere il tasto stop per
aprire la porta. La parola „END“ si spegne.
• Durante il procedimento di cottura con aria calda, si
può controllare la temperatura, tenendo premuto il
tasto per aria calda.
Preriscaldare e cuocere con aria calda
È possibile riscaldare in anticipo la microonde tramite il
funzionamento con aria calda ed in seguito fare uso dell’
aria calda.
Se si desidera preriscaldare l’ apparecchio a 170°C ed in
seguito cuocere per 35 min.
1. Premere il tasto stop.
2. Premere il tasto per l’ aria calda.
3. Tramite un tasto numerico (p.e. 7) scegliere la tempe-
ratura desidera per preriscaldare.
4. Premere il tasto start. Nel display lampeggia l’
indicatore „PREH“ (preriscaldare). Quando il forno ha
raggiunto la temperatura programmata, si illumina di
continuo l’ indicatore „PREH“.
5. Aprire la porta e poggiare i cibi da cuocere nel mezzo
del piatto di vetro.
6. Tramite i tasti numerici impostare il tempo di cottura
desiderato (p.e. 35min).
7. Per avviare premere il tasto start.
L’ apparecchio si spegne alla fi ne del tempo programmato
e nel display appare „END”. Estrarre i cibi.
Uso combinato di aria calda e microonde
Per questo sistema l’ apparecchio ha 4 impostazioni
programmate. Questo facilita sia l’ uso di aria calda che
la funzione microonde.
Premere il tasto microonde/aria calda e poi un tasto
numerico da 1-4, per scegliere la temperatura per l’ aria
calda.
Tasto
Tasti
numerici
Temperatura (°C)
Microonde/aria calda 1 150
Microonde/aria calda 2 180
Microonde/aria calda 3 200
Microonde/aria calda 4 230
Se si desidera fare cuocere una torta a 200°C impostare
una durata di 25 min:
1. Premere il tasto stop.
2. Premere il tasto microonde/aria calda.
3. Tramite il tasto numerico (p.e. 3) scegliere la tempera-
tura desiderata (200°C).
05-MWG 746 H EST 64 13.07.2005, 14:29:21 Uhr

65
ITALIANO
4. Tramite i tasti numerici scegliere la durata di cottura
desiderata (p.e. 25min) .
5. Per avviare premere il tasto start.
Osservare:
Si possono programmare al massimo 9 ore, 99 min. Alla
fi ne del tempo impostato vengono emessi segnali acustici
ed appare nel display la parola „END“ . Premere il tasto
stop oppure aprire la porta. La parola „END“ si spegne.
Durante la cottura con aria calda è possibile controllare la
temperatura, premendo il tasto microonde/aria calda.
Cuocere a più passi
Si possono impostare i programmi in modo di scegliere
tra 3 possibili funzioni.
Supponiamo di scegliere il seguente programma per
cucinare:
Scongelamento veloce
쒆
Preparazione nella microonde
쒆
Cuocere con aria calda (senza preriscaldare)
1. Premere il tasto stop.
2. Premere il tasto per scongelare.
3. Tramite i tasti numerici impostare la durata dello
scongelamento desiderata.
4. Premere il tasto microonde.
5. Tramite i tasti numerici impostare la durata della
cottura desiderata con la microonde.
6. Premere il tasto aria calda.
7. Tramite un tasto numerico impostare la temperatura di
cottura desiderata.
8. Tramite i tasti numerici impostare la durata di cottura
desiderata con aria calda.
9. Per avviare, premere il tasto start.
L’ apparecchio si spegne alla fi ne del tempo programmato
e nel display appare „END“ . Estrarre i cibi.
Funzioni particolari
Ricordo automatico
A termine del procedimento di cottura un segnale emesso
ricordadi estrarre i cibi ogni 2 minuti .
Aprendo la porta o premendo il tasto stop si cancella
questa funzione.
Bloccare
Premere il tasto stop per più di 3 sec., se si desidera
bloccare l’ apparecchio. Il bloccaggio viene indicato nel
display. La funzione dei comandi controllo è bloccata.
Per sbloccarla premere nuovamente per più di 3 sec. Il
tasto stop.
Timer (Count down)
L’ apparecchio dispone di una funzione timer:
1. Premere il tasto stop.
2. Premere il tasto timer.
3. Tramite i tasti numerici impostare il tempo desiderato.
4. Per avviare premere il tasto start.
Il tempo programmato viene detratto e la fi ne viene seg-
nalizzata con un segnale sonoro.
Nota: Si può fare uso di questa funzione anche durante il
funzionamento dell’ apparecchio.
Pulizia
Prima di pulire estrarre sempre la spina.
• Dopo l’ uso pulire il vano cottura con un panno legger-
mente umido.
• Pulire la microonde all’ esterno con un panno legger-
mente umido.
• Pulire gli accessori come d’ abitudine con acqua
calda e detergente.
• In caso di sporcizie pulire accuratamente le guarnizi-
oni, le bordature della porta, ed altre parti adiacenti
con un panno umido.
Dati tecnici
Modello: .........................................................MWG 746 H
Alimentazione rete:........................................230 V, 50 Hz
Consumo di energia: .............................................1400 W
Consumo di energia aria calda:.............................1400 W
Consumo di energia griglia:...................................1200 W
Potenza di uscita dimensionale della microonde:....900 W
Volume dello spazio di cottura:.................................25 litri
Classe di protezione: ........................................................Ι
Questo apparecchio è stato controllato sulla base di tutte
le direttive CE attuali in vigore in questo settore, quali per
esempio la normativa in materia di compatibilità elettro-
magnetica e la direttiva in materia di bassa tensione, ed
è stato costruito conformemente alle norme di sicurezza
più moderne.
Con riserva di apportare modifi che tecniche.
Garanzia
Per l’apparecchio da noi messo in commercio ci assu-
miamo una garanzia di 24 mesi dalla data di acquisto
(scontrino).
Durante la garanzia noi ci impegniamo ad eliminare gra-
tuitamente i guasti dell’apparecchio o degli accessori,
dovuti a difetti di materiale o di fabbricazione, riparandoli
o, a nostra discrezione, sostituendoli. Le prestazioni in
garanzia danno luogo a una proroga della garanzia né
danno diritto ad una nuova garanzia!
Per la garanzia è suffi ciente lo scontrino di acquisto.
Senza questo scontrino non sussiste il diritto né ad una
sostituzione né ad una riparazione gratuita.
Nel caso si ricorra alla garanzia, restituire al riven-
ditore l’apparecchio completo in ogni sua parte,
nell’imballaggio originale unitamente allo scontrino.
05-MWG 746 H EST 65 13.07.2005, 14:29:22 Uhr

66
ITALIANO
La riparazione di pezzi d’uso ovvero soggetti a logora-
mento
come anche operazioni di pulizia e manuten-
zione o la sostituzione di pezzi soggetti a logoramento
non rientrano nella garanzia e quindi sono a pagamento!
La garanzia si annulla nel caso di intervento da parte di
terzi.
Dopo la garanzia
Al termine della garanzia le riparazioni possono essere
eseguite dietro pagamento dal corrispettivo negozio
specializzato o servizio riparazioni.
Signifi cato del simbolo „Eliminazione“
Salvaguardare l’ ambiente, gli elettrodomestici non vanno
eliminati come rifi uti domestici.
Per l’ eliminazione degli elettrodomestici, fare uso die
posti di raccolta previsti per questo tipo e porre quegli
elettrodomestici che non sono più in uso.
Si contribuisce così ad evitare un effetto potenziale sull’
ambiente e sulla salute, dovuto magari ad una eliminazi-
one sbagliata.
Questo signifi ca un contributo personale alla riutilizza-
zione, al riciclaggio e altre forme di utilizzazione di elettro-
domestici ed apparecchi elettronici usati.
Si possono trovare le corrispondenti informazioni sugli
appositi luoghi di raccolta, nelle amministrazioni die
comuni.
05-MWG 746 H EST 66 13.07.2005, 14:29:23 Uhr

67
JE˛ ZYK POLSKI
Ogólne wskazówki bezpieczeństwa
• Przed uruchomieniem urządzenia proszę bardzo dokładnie
przeczytać instrukcję obsługi.Proszę zachować ją wraz
z kartą gwarancyjną, paragonem i w miarę możliwości
również kartonem z opakowaniem wewnętrznym.
• Proszę wykorzystywać urządzenie jedynie dla prywatnego
celu,jaki został przewidziany dla urządzenia.Urządzenie to
nie zostało przewidziane do użytku w ramach działalności
gospodarczej.Proszę nie korzystać z urządzenia na
zewnątrz (chyba że w określonych warunkach).Proszę
trzymać urządzenie z daleka od ciepła,bezpośredniego
promieniowania słonecznego,wilgoci (w żadnym wypadku
nie zanurzać w substancjach płynnych)oraz ostrych
krawędzi.Proszę nie obsługiwać urządzenia wilgotnymi
dłońmi.Jeżeli urządzenie jest wilgotne lub mokre,proszę
natychmiast wyciągnąć wtyczkę.
• Jeżeli nie korzystacie Państwo z urządzenia,jeżeli chcecie
Państwo zamontować jakieś akcesoria,w celu wyczyszcze-
nia lub w przypadku jakichkolwiek zakłóceń,proszę zawsze
wyłączyć urządzenie i wyjąć wtyczkę z gniazdka (proszę
pociągnąć za wtyczkę,nie za przewód zasilający).
• Pracującego urządzenia nie należy pozostawiać bez
nadzoru. Jeżeli opuszczają Państwo miejsce pracy, należy
zawsze pamiętać o wyłączeniu urządzenia, wzgl. wyjęciu
wtyczki z gniazda (należy ciągnąć za wtyczkę, nie za
przewód).
• Aby uchronić dzieci przed niebezpieczeństwem
związanym z elektrycznymi urządzeniami,proszę zadbać
o to,aby przewód zasilający nigdy nie wisiał luźno,oraz aby
dzieci nie miały dostępu do urządzenia.
• Proszę regularnie kontrolować urządzenie pod kątem
uszkodzeń.Proszę nie uruchamiać uszkodzonego
urządzenia.
• W razie awarii proszę nie naprawiać urządzenia samemu
lecz skorzystać z pomocy autoryzowanego specjalisty.
Jeżeli przewód zasilający nieodłączalny ulegnie usz-
kodzeniu, to powinien on być wymieniony u producenta
lub w specjalnym zakładzie naprawczym albo przez
wykwalifi kowaną osobę w celu uniknięcia zagrożenia.
• Proszę stosować tylko oryginalne akcesoria.
• Prosimy pamiętać o podanych dalej „Specjalnych wska-
zówkach dotyczących bezpiecznego użytkowania“.
Ważne wskazówki dotyczące
bezpieczeństwa!
Proszę dokładnie przeczytać i zachować
do dalszego wykorzystania.
• Ostrzeżenie: Jeżeli drzwiczki lub uszczelki drzwiczek są
uszkodzone, to urządzenia nie wolno używać, póki nie
zostanie ono naprawione przez wyszkolony personel.
• Ostrzeżenie: Proszę w żadnym wypadku nie naprawiać
urządzenia samemu, lecz zwrócić się z tym do autory-
zowanego specjalisty. Wykonywanie jakichkolwiek prac
konserwacyjnych lub naprawczych, wymagających zdjęcia
osłony urządzenia, która gwarantuje ochronę przed pro-
mieniowaniem pochodzącym z energii mikrofalowej, jest
niebezpieczne dla wszystkich, oprócz fachowca.
• Ostrzeżenie: Proszę nie podgrzewać płynów w
zamkniętych naczyniach. Niebezpieczeństwo wybuchu!
• Ostrzeżenie: Gdy urządzenie pracuje w trybie kombino-
wanym, dzieciom wolno używać go tylko pod nadzorem
dorosłych ze względu na występujące temperatury.
• Wskazówka: Kuchenka mikrofalowa nie jest przewidziana
do ogrzewania/ rozgrzewania żywych zwierząt.
• Ostrzeżenie: Dzieciom i osobom ułomnym zezwala
się na używanie kuchenki bez nadzoru tylko po udzieleniu
im odpowiedniej instrukcji, która osobom tym umożliwia
korzystanie z kuchenki w sposób bezpieczny i pozwala
zrozumieć niebezpieczeństwa niewłaściwej obsługi.
• Jeżeli kuchenkę mikrofalową chcą Państwo umieścić w
szafce, na półce itp., to proszę pamiętać o tym, by ze ws-
zystkich stron urządzenia zachować odstęp wentylacyjny
od szafek, ścian itp. na co najmniej 10 cm.
• Proszę używać tylko odpowiednich naczyń, takich jak:
szkło, porcelana, ceramika, żaroodporne naczynia z
tworzyw sztucznych lub specjalne naczynia do kuchenek
mikrofalowych.
• Podczas podgrzewania lub gotowania potraw w nac-
zyniach z materiałów palnych, takich jak pojemniki z
tworzyw sztucznych czy pojemniki papierowe, kuchenki
mikrofalowej należy często doglądać z powodu możliwości
zapalenia.
• W przypadku powstawania dymu należy wyłączyć
urządzenie i wyciągnąć wtyczkę z gniazdka. Drzwiczki
proszę zostawić zamknięte, by zdusić ewentualnie
powstające płomienie.
• Uwaga zahamowanie wrzenia: podczas gotowania, a
szczególnie podczas odgrzewania płynów (wody) może
się zdarzyć, że wprawdzie temperatura wrzenia została
osiągnięta, jednak typowe pęcherzyki pary jeszcze nie
unoszą się. Płyn nie wrze równomiernie. To tak zwane
zahamowanie wrzenia może prowadzić w wyniku lekkiego
wstrząśnięcia podczas wyjmowania naczynia do nagłego
tworzenia się pęcherzyków pary i w ten sposób do prze-
grzania cieczy. Niebezpieczeństwo oparzenia! By uzyskać
równomiernie wrzenie, proszę wstawić do naczynia
pałeczkę szklaną lub podobny przedmiot niemetalowy.
• Zawartość butelek dla niemowląt i słoiczków z
pożywieniem dla dzieci należy wymieszać lub wstrząsnąć,
a temperaturę przed użyciem sprawdzić. Występuje
niebezpieczeństwo poparzenia.
• Potraw ze skorupą lub skórką, takich jak jajka czy wędliny,
oraz zamkniętych szklanych konserw itd., nie wolno
podgrzewać w kuchenkach mikrofalowych, gdyż mogą
eksplodować, nawet gdy podgrzewanie mikrofalami
zostało już zakończone.
• W razie zabrudzenia ramy (uszczelnienie) drzwiczek oraz
części sąsiadujące z nimi należy czyścić starannie wilgotną
ściereczką.
• Kuchenkę mikrofalową proszę czyścić regularnie i usuwać
resztki środków spożywczych z wnętrza.
• W przypadku niedostatecznej czystości urządzenia
może dojść do zniszczenia powierzchni, co ma wpływ na
żywotność sprzętu i ewentualnie prowadzi do niebezpiecz-
nych sytuacji.
Opis elementów obsługi
1 Zamek drzwiczek
2 Wziernik*
3 Osłona*
4 Oś napędowa
5 Pierścień ślizgowy
6 Talerz obrotowy
7 Maskownica z elementami obsługowymi
8 Ogrzewanie grilla
9 Ruszt grilla
Uwaga: Proszę nie usuwać żadnych zamontowanych części
z komory kuchenki i niczego z wewnętrznej strony drzwiczek!
W żadnym wypadku proszę nie usuwać folii na
wewnętrznej stronie drzwiczek!
05-MWG 746 H EST 67 13.07.2005, 14:29:23 Uhr

68
JE˛ ZYK POLSKI
Przegląd przycisków obsługowych
Przyciski numeryczne
Do ustawiania czasu zegarowego, czasu
gotowania, temperatury i ciężaru
Przycisk mikrofal
Wybór stopnia mocy mikrofal
Przycisk opiekacza
Do opiekania i zrumieniania
Przycisk termoobiegu
Sam termoobieg, sterowany termostatem
Przycisk trybu mikrofala
z opiekaczem
Na przemian pracują mikrofale i opiekacz
Przycisk trybu mikrofala
z termoobiegiem
Na przemian pracują mikrofale i termoobieg
Przycisk rozmrażania
Uruchamia funkcję rozmrażaniaz ustawia-
niem czasu
Przycisk zegara
W połączeniu z przyciskami cyfrowymi, do
ustawiania czasu zegarowego
Przycisk programu „Ciasto“
Przycisk wyłącznika czasowego
(Countdown)
Przycisk programu „Ziemniaki“
Przycisk programu „Popcorn“
(kukurydza prażona)
Przycisk programu „Napoje“
Przycisk programu „Pizza“
Przycisk programu „Szaszłyki“
Przycisk programu „Odgrzewanie“
Przycisk Start
Start programu
Przycisk Express
Start programu Express – ustawianie
czasu gotowania w trybie Express
Przycisk Stop
• Nacisnąć jeden raz, aby przerwać
gotowanie lub skasować błędne wpro-
wadzenie.
• Nacisnąć dwa razy, aby skasować
program.
• Trzymać wciśnięty przez 3 sekun-
dy, aby zablokować/odblokować
urządzenie.
Wskazówki dotyczące gotowania w
trybie Grill i w trybie kombinowanym
• Ponieważ podczas gotowania w trybie Grill i w trybie
kombinowanym wykorzystywane jest promieniowanie
cieplne, proszę używać tylko naczyń żaroodpornych.
• Podczas gotowania w samym trybie Grill mogą
Państwo używać także naczyń metalowych lub
aluminiowych – czego nie można czynić w trybie kom-
binowanym lub podczas gotowania w trybie Mikrofale.
• Do trybów pracy „opiekacz“, „pizza“, „pieczenie“ i
„kombinowany“ może być używany tylko ruszt grilla.
• Proszę nie stawiać niczego na wierzchu obudowy,
gdyż staje się ona gorąca. Proszę zawsze zostawiać
wolne szczeliny wentylacyjne.
• Proszę używać rusztu grilla, by potrawy przeznaczone
do gotowania przybliżyć do elementu grzejnego.
Uruchomienie
• Proszę wyjąć wszystkie akcesoria znajdujące się w
komorze kuchenki, rozpakować je i pośrodku położyć
pierścień ślizgowy. Szklany talerz proszę tak umieścić
na osi napędowej, by wszedł on w zagłębienia wałka
napędowego i leżał prosto.
• Proszę sprawdzić urządzenie pod względem widocz-
nych uszkodzeń, szczególnie w okolicy drzwiczek.
W przypadku jakichkolwiek uszkodzeń w żadnym
wypadku nie wolno włączać urządzenia.
• Dla uniknięcia zakłóceń innych urządzeń podczas
pracy kuchenki proszę nie stawiać jej bezpośrednio w
pobliżu innego sprzętu elektronicznego.
• Ewentualnie proszę usunąć folię ochronną, przywartą
do obudowy.
• W żadnym wypadku proszę nie usuwać folii na
wewnętrznej stronie drzwiczek!
• Proszę włożyć wtyczkę do zainstalowanego właściwie
gniazdka wtykowego ze zestykiem uziemiającym
230 V, 50 Hz.
• Proszę nie usuwać żadnych zamontowanych ele-
mentów z komory kuchenki i z wewnętrznej strony
drzwiczek!
Użycie urządzenia
Pożyteczne informacje dotyczące trybu Mikrofale
• Kuchenka pracuje z wykorzystaniem promieni mikro-
falowych, które w bardzo krótkim czasie rozgrzewają
cząsteczki wody w potrawach. W tym przypadku
nie ma promieniowania cieplnego, a tym samym też
prawie żadnego zarumienienia.
• Urządzeniem tym proszę podgrzewać tylko środki
spożywcze.
• Urządzenie nie nadaje się do pieczenia w płynnym
tłuszczu.
• Proszę podgrzewać tylko 1-2 porcje na raz. W prze-
ciwnym razie kuchenka traci na skuteczności.
• W celu przerwania procesu gotowania proszę
wcisnąć przycisk Stop.
• Mikrofale dają natychmiast pełną energię. Tak więc
podgrzewanie wstępne nie jest potrzebne.
• Proszę nigdy nie włączać urządzenia pustego, ustawi-
onego na tryb Mikrofale lub w trybie kombinowanym.
05-MWG 746 H EST 68 13.07.2005, 14:29:25 Uhr

69
JE˛ ZYK POLSKI
• Kuchenka mikrofalowa nie zastępuje konwencjonalnej
kuchenki. Służy ona głównie do:
• rozmrażania mrożonek
• szybkiego podgrzewania/ odgrzewania potraw lub
napojów
• przyrządzania potraw
• Proszę nie używać naczyń plastykowych czy papie-
rowych.
Potwierdzający sygnał dźwiękowy
Wprowadzane dane są potwierdzane sygnałem dźwiękowym.
• Pojedynczy sygnał dźwiękowy po naciśnięciu przycis-
ku: wprowadzenie zostało przyjęte.
• Podwójny sygnał dźwiękowy po naciśnięciu przycisku:
wprowadzenie zostało odrzucone.
Należy skorygować ustawienie.
Ustawienie godziny
Uwaga: po włączeniu urządzenia po raz pierwszy ukazuje
się migający dwukropek.
1. Naciśnij przycisk zegara.
Wskaźnik zmieni się na „:“.
2. Przyciskami cyfrowymi wprowadź odpowiednią
godzinę i minutę.
3. Naciśnij jeszcze raz przycisk zegara. Nowy czas
zegarowy zostanie uaktywniony.
Obsługa Mikrofale
Potrawę przeznaczoną do podgrzania proszę włożyć do
odpowiedniego naczynia. Proszę otworzyć drzwiczki i
postawić naczynie pośrodku na szklanym talerzu. Proszę
zamknąć drzwiczki (ze względu na bezpieczeństwo
urządzenie pracuje tylko przy zamkniętych drzwiczkach.)
1. Proszę wcisnąć przycisk Stop.
2. Naciskając raz lub kilka razy przycisk mikrofal, wy-
bierz odpowiednią moc mikrofal.
Aby wybrać odpowiedni wskaźnik procentowy,
naciskaj przycisk mikrofal
Naciśnij: Moc Opis
1x 100% (P-HI)
Pełna moc
2x 90% (P-90)
3x 80% (P-80)
4x 70% (P-70)
Duża moc
5x 60% (P-60)
6x 50% (P-50)
Średnia moc
7x 40% (P-40)
8x 30% (P-30)
Mała moc
9x 20 % (P-20)
10x 10 % (P-10)
Bardzo mała moc
11x 0% (P-00)
100% odpowiada mocy 900 W
3. Przyciskami cyfrowymi można zaprogramować
pożądany czas gotowania.
Na przykład:
10:30 min. czas gotowania na 100% mocy
Krok Przycisk Wskaźnik
1Stop
2 Mikrofale
P- HI
3 1 0 3 0
10:30
4Start
4. Aby rozpocząć gotowanie, naciśnij przycisk Start.
Czas gotowania zależny jest od ilości i rodzaju
potrawy. Po niedługiej praktyce szybko się Państwo
nauczą szacować czas gotowania.
Proszę pamiętać o jednym:
gotowanie w kuchence mikrofalowej odbywa się o wiele
szybciej niż na kuchence konwencjonalnej. Jeżeli nie są
Państwo pewni, to proszę ustawić krótki czas gotowania i
ewentualnie potrawę dogotować. Po upływie ustawionego
czasu urządzenie wyłączy się a na wyświetlaczu zostanie
wyświetlony komunikat „END”. Wyjmij potrawę.
Szybkie rozmrażanie mrożonek
Pamiętaj:
• Obowiązuje żelazna zasada: na rozmrożenie 500g
mrożonki potrzeba ok. 5 minut.
• Jeżeli w tym czasie mrożonka całkowicie się nie
rozmrozi, przedłużaj czas w krokach po 1 minucie.
Jeżeli chcesz rozmrozić zamrożone produkty spożywcze i
ustawić czas na 5 minut:
1. Proszę wcisnąć przycisk Stop.
2. Naciśnij przycisk rozmrażania.
3. Przyciskami cyfrowymi wprowadź pożądany czas
gotowania.
Krok Przycisk Wskaźnik
1Stop
2 Rozmrażanie
:
3 5 0 0
5:00
4Start
4. Aby rozpocząć gotowanie, naciśnij przycisk Start.
Jeżeli produkt był zamrożony w pojemniku z tworzy-
wa sztucznego, radzimy rozmrażać go przez chwilę a
następnie przełożyć do naczynia przystosowanego do
stosowania w kuchenkach mikrofalowych.
Maksymalny czas rozmrażania, jaki można ustawić, wy-
nosi 99 minut i 99 sekund. Po upływie tego czasu zosta-
nie wygenerowany sygnał dźwiękowy a na wyświetlaczu
ukaże się słowo „END“. Naciśnij przycisk Stop lub otwórz
drzwiczki. komunikat „END“ zgaśnie.
W poniższej tabeli zawarte są wskazówki dotyczące
ręcznego rozmrażania.
Tabela Rozmrażanie
Żywność/Potrawa Ilość
Moc w
watach
Przybliżony
czas w
minutach
Czas
dokończenia
rozmrażania
Mięso, wędliny
Mięso (wołowina, cielęcina,
wieprzowina) w kawałku
500 g
1000 g
180
180
14 – 18
25 - 30
10 – 15
20 - 25
Sznycel, kotlet 200 g 180 4 - 6 5 - 10
Mięso siekane 250 g 180 6 - 8 5 - 10
Smażona kiełbasa,
serdelek
200 g 180 4 - 6 5 - 10
Wędlina różnego rodzaju,
krojona w plasterki
300 g 180 4 - 6 5 - 10
Wskazówka: po upływie połowy czasu mięso odwrócić, delikatne części
przykryć; mięso siekane rozdrobnić, części już rozmrożone usunąć;
plasterki wędliny rozdzielić.
05-MWG 746 H EST 69 13.07.2005, 14:29:34 Uhr

70
JE˛ ZYK POLSKI
Żywność/Potrawa Ilość
Moc w
watach
Przybliżony
czas w
minutach
Czas
dokończenia
rozmrażania
Drób
Kurczak 1000 g 180 20 - 25 10 - 15
Części kurczaka 500 g 180 12 - 15 5 - 10
Kaczka 1700 g 180 25 - 40 20 - 25
Części gęsi,
indyczki
500 g 180 12 - 18 10 - 15
Wskazówka: po upływie połowy czasu drób odwrócić, skrzydełka i udka
przykryć, płyn powstający przy rozmrażaniu wylać i uważać, by nie miał
styczności z innymi potrawami.
Dziczyzna
Comber sarni 1000 g 180 20 - 35 20 - 30
Comber zajęczy 500 g 180 12 - 13 10 - 20
Wskazówka: odwrócić raz, przykryć części na brzegach.
Ryba
Kraby, małe krewetki 250 g 180 5 - 7 5 - 10
Pstrągi 340 g 180 4 - 6 5 - 10
Ryby całe 500 g 180 7 - 10 10 - 15
Filety rybne 250 g 180 5 - 7 5 - 10
Wskazówka: mieszać wielokrotnie, częściej odwracać.
Owoce
Maliny, truskawki 250 g 180 4 - 6 5 - 10
Wiśnie, śliwki 250 g 180 5 - 7 5 - 10
Przecier jabłeczny 500 g 180 9 - 12 5 - 10
Wskazówka: mieszać ostrożnie, wzgl. rozdrobnić.
Warzywa: patrz „Tabela Gotowanie“, „Rozmrażanie i gotowanie warzyw“
Chleb i pieczywo
Bułki 4 sztuki 180 ca. 1-3 5
Chleb 1000 g 180 13 - 15 8 - 10
Chleb tostowy 500 g 180 5 - 6 5 - 10
Ciasto ucierane 500 g 180 6 - 8 5 - 10
Ciasto owocowe 1 sztuka 180 2 - 3 2 - 3
Tort
1 sztuka 180 0,5 - 1 3 - 5
1200 g 180 10 - 12 30 - 60
Wskazówka: chleb i pieczywo położyć na kuchennym papierze krepowym,
wchłaniającym wilgoć; delikatne pieczywo tylko lekko rozmrozić.
Produkty mleczne
Masło 250 g 180 5 - 7 10 - 15
Twaróg 250 g 180 6 - 8 5 - 10
Śmietana 200 g 180 3 - 5 2 - 3
Wskazówka: usunąć folię aluminiową, po upływie połowy czasu
zamieszać; śmietanę ubijać jeszcze na wpół zamrożoną.
Podgrzewanie
Odgrzewanie i podgrzewanie to szczególna zaleta
kuchenki mikrofalowej. Zimne płyny i potrawy z lodówki
dają się bardzo łatwo podgrzać do temperatury pokojowej
lub do temperatury spożycia bez konieczności używania
wielu garnków.
Podane w poniższej tabeli czasy podgrzewania mogą
mieć tylko charakter orientacyjny, ponieważ czas ten
w wysokim stopniu zależy od temperatury wyjściowej i
składu potrawy. Z tego względu zaleca się sprawdzać od
czasu do czasu, czy danie jest już wystarczająco gorące.
Tabela Podgrzewanie
Żywność/Potrawa Ilość
Moc w
watach
Przybliżony
czas w
minutach
Przykrycie
Płyny
Woda, 1 fi liżanka
150 g 900 0,5 - 1
nie
Woda, 0,5 l
500 g 900 3,5 - 5
nie
Żywność/Potrawa Ilość
Moc w
watach
Przybliżony
czas w
minutach
Przykrycie
Woda, 0,75 l
750 g 900 5 - 7
nie
Kawa, 1 fi liżanka
150 g 900 0,5 - 1
nie
Mleko, 1 fi liżanka
150 g 900 0,5 - 1
nie
Uwaga: w naczyniu umieścić pręcik szklany lub inny (nie metalowy) przedmi-
ot, zapobiegający przegrzaniu cieczy, a przed wypiciem dobrze wymieszać.
Potrawy na talerz
Sznycel, ziemniaki i
warzywa
450 g 900 2,5 - 3,5
tak
Gulasz z kluskami
450 g 900 2 - 2,5
tak
Mięso, kluska i sos
450 g 900 2,5 - 3,5
tak
Wskazówka: wcześniej lekko nawilżyć, od czasu do czasu zamieszać.
Mięso
Sznycel, panierowany
200 g 900 1 - 2
nie
Zrazy pieczone, 4 sztuki
500 g 900 3 - 4
nie
Kawałek pieczeni
250 g 900 2 - 3
nie
Wskazówka: posmarować olejem używając pędzelka, by panierka, wzgl.
skorupka nie zmiękła.
Drób
1/2 kurczaka
450 g 900 3,5 - 5
nie
Potrawka z kury
400 g 900 3 - 4,5
tak
Wskazówka: posmarować olejem używając pędzelka, od czasu do czasu
zamieszać.
Przystawki
Kluski, ryż 1 porcja
150 g 900 1 - 2
tak
2 porcje.
300 g 900 2,5 - 3,5
tak
Ziemniaki
500 g 900 3 - 4
tak
Wskazówka: wcześniej lekko nawilżyć
Zupy / Sosy
Rosół klarowny, 1 talerz
250 g 900 1 - 1,5
tak
Zupa z dodatkami
250 g 900 1,5 - 2
tak
Sos
250 g 900 1 - 2
tak
Pożywienie dla niemowląt
Mleko
100 ml 540 0,5 - 1
nie
Papka
200 g 540 1 - 1,5
nie
Wskazówka: dobrze wstrząsnąć lub wymieszać. Sprawdzić temperaturę!
Gotowanie
Praktyczne wskazówki dotyczące gotowania
Proszę przestrzegać danych orientacyjnych, zawartych
z tabeli gotowania i w przepisach. Proszę obserwować
proces gotowania, dopóki nie mają Państwo jeszcze
wystarczającej praktyki.
Drzwiczki kuchenki mogą Państwo otwierać w każdej
chwili. Urządzenie wyłącza się automatycznie.
Zaczyna ono pracować ponownie dopiero wtedy, gdy
drzwiczki są zamknięte.
Środki spożywcze z lodówki potrzebują trochę dłuższego
czasu gotowania niż żywność o temperaturze pokojowej.
Im bardziej masywna jest potrawa, tym dłuższy jest czas
gotowania. Tak więc np. większy kawałek mięsa potrze-
buje dłuższego czasu gotowania niż mięso w tej samej
ilości, pokrojone w cienkie małe plasterki. Zaleca się, by
większe ilości podgotować przy maksymalnej mocy i dla
równomiernego ugotowania potraw kontynuować program
na średniej mocy.
Płaskie potrawy gotują się szybciej niż wysokie. Dlatego
też żywność proszę rozkładać możliwie płasko. Części
cieńsze, np. udka kurczaka lub fi lety z ryby, proszę kłaść
do wewnątrz lub przysłonić innymi częściami potrawy.
05-MWG 746 H EST 70 13.07.2005, 14:29:37 Uhr

71
JE˛ ZYK POLSKI
Obowiązuje żelazna reguła:
Podwójna ilość = prawie podwójny czas.
Pół ilości = pół czasu.
Jeżeli dla jakiegoś dania nie mogą Państwo znaleźć
odpowiedniego czasu, to obowiązuje zasada:
na 100 g ok. 1 minuta czasu gotowania
Wszystkie potrawy, które przykrywają Państwo na zwykłej
kuchence, powinny być przykryte także w kuchence
mikrofalowej.
Pokrywka zapobiega wyschnięciu potraw. Do przykrywa-
nia nadaje się odwrócony talerz, papier pergaminowy lub
folia do kuchenki mikrofalowej. Potrawy, które mają mieć
skorupkę, gotować bez przykrycia.
Tabela Gotowanie
Żywność/Potrawa Ilość
Moc w
watach
Przybliżony
czas w
minutach
Przykrycie
Warzywa
Bakłażany
500 g 720 7 - 10
tak
Kalafi or
500 g 720 8 - 11
tak
Brokuły
500 g 720 6 - 9
tak
Cykoria
500 g 720 6 - 7
tak
Groszek
500 g 720 6 - 7
tak
Koper włoski
500 g 720 8 - 11
tak
Zielona fasolka
300 g 720 13 - 15
tak
Ziemniaki
500 g 720 9 - 12
tak
Kalarepa
500 g 720 8 - 10
tak
Szczypiorek
500 g 720 7 - 9
tak
Kolby kukurydzy
250 g 720 7 - 9
tak
Marchew
500 g 720 8 - 10
tak
Papryka
500 g 720 6 - 9
tak
Bruksela
300 g 720 7 - 10
tak
Szparagi
300 g 720 6 - 9
tak
Pomidory
500 g 720 6 - 7
tak
Cukinia
500 g 720 9 - 10
tak
Wskazówka: warzywa pokroić drobno i gotować z dodatkiem 2-3 łyżek
stołowych płynu, od czasu do czasu mieszać, dogotować 3-5 minut,
przyprawiać dopiero przed serwowaniem.
Owoce
Kompot z jabłek, gruszek
500 g 720 5 - 8
tak
Powidła
250 g 720 4 - 6
nie
Kompot rabarbarowy
250 g 720 5 - 8
tak
Pieczone jabłka, 4 sztuki
500 g 720 7 - 9
tak
Wskazówka: dodać 125 ml wody, sok z cytryny zapobiega zmianie
zabarwienia owoców, dogotować 3-5 minut.
Mięso (Potrawy wstępnie przyrządzone)
Mięso z sosem
400 g 720 10 - 12
tak
Gulasz, mięso pokrojone
w cienkie małe plasterki
500 g 720 10 - 15
tak
Rolada wołowa
250 g 720 7 - 8
tak
Wskazówka: od czasu do czasu zamieszać, zostawić na 3-5 minut.
Drób (Potrawy wstępnie przyrządzone)
Potrawka z kury
250 g 720 6 - 7
tak
Zupa z drobiu
200 g 720 5 - 6
tak
Wskazówka: od czasu do czasu zamieszać, zostawić na 3-5 minut.
Ryba
Filet z ryby
300 g 720 7 - 8
tak
400 g 720 8 - 9
tak
Wskazówka: po upływie połowy czasu odwrócić, dogotować 3-5 minut.
Żywność/Potrawa Ilość
Moc w
watach
Przybliżony
czas w
minutach
Przykrycie
Rozmrażanie i gotowanie warzyw
Czerwona kapusta
z jabłkiem
450 g 720 14 -16
tak
Szpinak liściasty
300 g 720 11 - 13
tak
Kalafi or
200 g 720 7 - 9
tak
Fasola szparagowa
200 g 720 8 - 10
tak
Brokuły
300 g 720 8 - 9
tak
Groszek
300 g 720 7 - 8
tak
Kalarepa
300 g 720 13 -15
tak
Szczypiorek
200 g 720 10 - 11
tak
Kukurydza
200 g 720 4 - 6
tak
Marchew
200 g 720 5 - 6
tak
Bruksela
300 g 720 7 - 8
tak
Szpinak
450 g 720 12 - 13
tak
600 g 720 15 - 17
tak
Wskazówka: gotować z dodatkiem 1-2 łyżek stołowych płynu, od czasu
do czasu mieszać, względnie rozdrobnić ostrożnie, dogotować 2-3 minuty,
przyprawiać dopiero przed serwowaniem.
Zupy/ Potrawy jednogarnkowe (Potrawy wstępnie przyrządzone)
Potrawa jednogarnkowa 500 g 720 13 - 15 tak
Zupa z dodatkiem 300 g 720 7 - 8 tak
Zupa kremowa 500 g 720 13 - 15 tak
Wskazówka: od czasu do czasu zamieszać, dogotować 3-5 minut.
Gotowanie ekspresowe
Aby uruchomić gotowanie w trybie Express, naciskaj
wiele razy przycisk Express. Gotowanie zacznie się od
razu, z tym że każde kolejne naciśnięcie przedłuża czas
gotowania początkowo o 30 sekund, a powyżej jednej
minuty - o minutę.
Moc mikrofal wynosi przy tym 100%.
Programy automatyczne
Przy pomocy automatyki pewne ilości potraw mogą
Państwo gotować automatycznie. Czas gotowania i moc
mikrofal są zapisane w programie.
W tym celu proszę postępować następująco:
a) Ziemniaki
1. Proszę wcisnąć przycisk Stop.
2. Naciśnij przycisk „Ziemniaki“ 1 raz, aby ugotować
120-170 g ziemniaków, lub 2 razy, aby ugotować 140-
200 g ziemniaków.
3. Naciśnij jeden z przycisków cyfrowych 1-4, aby
wybrać czas gotowania.
Przycisk
“Ziemniaki”
Przycisk
cyfrowy
Czas
gotowania
1x 1 3min 50sek.
1x 2 7min 10sek
1x 3 11min
1x 4 14min
Przycisk
“Ziemniaki”
Przycisk
cyfrowy
Czas
gotowania
2x 1 5min 40sek.
2x 2 9min
2x 3 13min
2x 4 17min
4. Aby rozpocząć gotowanie, naciśnij przycisk Start.
05-MWG 746 H EST 71 13.07.2005, 14:29:39 Uhr

72
JE˛ ZYK POLSKI
Po upływie ustawionego czasu urządzenie wyłączy się a
na wyświetlaczu zostanie wyświetlony komunikat „END”.
Rada: pozostaw potrawę jeszcze przez 5-10 minut w
kuchence, aby się dogotowała.
b) Kukurydza prażona (popcorn)
Używaj wyłącznie kukurydzy w torebkach przeznaczonej
do prażenia w kuchence mikrofalowej!
1. Proszę wcisnąć przycisk Stop.
2. Naciśnij przycisk „Popcorn“. Na wyświetlaczu ukaże
się „2:30“.
3. Aby rozpocząć gotowanie, naciśnij przycisk Start.
Po upływie ustawionego czasu der urządzenie wyłączy
się a na wyświetlaczu ukaże się komunikat „END“. Wyjmij
potrawę.
Uwaga: czas prażenia można zmienić.
• Naciśnij dwa razy przycisk „Popcorn“.
• Przyciskami cyfrowymi wprowadź nowy czas prażenia.
• Naciśnij przycisk Start.
Nowy czas prażenia jest zapamiętywany do momentu
jego ponownej zmiany.
c) Pizza
1. Proszę wcisnąć przycisk Stop.
2. Naciśnij raz przycisk „Pizza“, aby podgrzać porcję
o wadze 120-140 g lub dwa razy , aby podgrzać
większą porcję.
3. Aby rozpocząć gotowanie, naciśnij przycisk Start.
Po upływie ustawionego czasu der urządzenie wyłączy
się a na wyświetlaczu ukaże się komunikat „END“. Wyjmij
potrawę.
d) Szaszłyki
1. Proszę wcisnąć przycisk Stop.
2. Naciśnij przycisk „Szaszłyki“ raz, aby przygotować
mniejszą porcję i dwa razy, aby przygotować większą
porcję
3. Aby wybrać wagę przyrządzanej potrawy, naciśnij
jeden z przycisków cyfrowych 1-4.
(Przycisk „Szaszłyki“ wciśnięty raz)
Przycisk
cyfrowy
Ciężar
Czas
przyrządzania
1 120g 10min
2 200g 13min
3 400g 17min
4 600g 23min
(Przycisk „Szaszłyki“ wciśnięty dwa razy)
Przycisk
cyfrowy
Ciężar
Czas
przyrządzania
1 170g 12min
2 310g 15min
3 540g 23min
4 800g 30min
4. Aby rozpocząć gotowanie, naciśnij przycisk Start.
Po upływie ustawionego czasu der urządzenie wyłączy
się a na wyświetlaczu ukaże się komunikat „END“. Wyjmij
potrawę.
e) Napoje
1. Proszę wcisnąć przycisk Stop.
2. Naciśnij raz przycisk „Napoje“, aby podgrzać 140-
200 g. Naciśnij przycisk „Napoje“ 2 razy, aby
podgrzać 250-310 g.
3. Naciśnij jeden z przycisków cyfrowych 1-4, aby
wybrać czas podgrzewania.
Przycisk
“Napoje”
Przycisk
cyfrowy
Czas
podgrzewania
1x 1 1min 20sek
1x 2 2min 30sek
1x 3 3min 40sek
1x 4 4min 50sek
Przycisk
“Napoje”
Przycisk
cyfrowy
Czas
podgrzewania
2x 1 2min 20sek.
2x 2 4min
2x 3 5min 40sek
2x 4 7min 20sek
4. Aby rozpocząć gotowanie, naciśnij przycisk Start.
Po upływie ustawionego czasu der urządzenie wyłączy
się a na wyświetlaczu ukaże się komunikat „END“. Wyjmij
potrawę.
f) Odgrzewanie
1. Proszę wcisnąć przycisk Stop.
2. Naciśnij przycisk „Odgrzewanie“. Na wyświetlaczu
ukaże się „3:40“.
3. Aby rozpocząć gotowanie, naciśnij przycisk Start.
Po upływie ustawionego czasu der urządzenie wyłączy
się a na wyświetlaczu ukaże się komunikat „END“. Wyjmij
potrawę.
g) Ciasto
1. Proszę wcisnąć przycisk Stop.
2. Naciśnij przycisk „Ciasto“. Na wyświetlaczu ukaże się
„40:00“.
3. Aby rozpocząć gotowanie, naciśnij przycisk Start.
Po upływie ustawionego czasu der urządzenie wyłączy
się a na wyświetlaczu ukaże się komunikat „END“. Wyjmij
potrawę.
Uwaga: czas pieczenia można zmienić.
• Naciśnij dwa razy przycisk „Ciasto“.
• Przyciskami cyfrowymi ustaw nowy czas pieczenia
(do 99:99).
• Naciśnij przycisk Start.
Nowy czas pieczenia jest zapamiętywany do momentu
jego ponownej zmiany.
Grill
Do opiekania należy używać specjalnego rusztu, aby
szybko uzyskać równomierne przyrumienienie. Proszę
używać odpowiednich naczyń żaroodpornych lub
opiekaną żywność położyć bezpośrednio na ruszcie.
Duże, grube kawałki żywności należy opiekać
bezpośrednio na talerzu obrotowym!
W celu grillowania i opiekania proszę postępować
następująco:
05-MWG 746 H EST 72 13.07.2005, 14:29:42 Uhr

73
JE˛ ZYK POLSKI
1. Proszę wcisnąć przycisk Stop.
2. Naciśnij raz przycisk opiekacza.
3. Przyciskami cyfrowymi ustaw pożądany czas opieka-
nia.
4. Aby rozpocząć gotowanie, naciśnij przycisk Start.
Po upływie ustawionego czasu der urządzenie wyłączy
się a na wyświetlaczu ukaże się komunikat „END“. Wyjmij
potrawę.
Tryb kombinowany mikrofale+opiekacz
W tym ustawieniu mikrofale i grill pracują na zmianę w
ciągu wybranego czasu według proporcji:
Kombinacja 1
30% czasu
przyrządzania
mikrofale
70% czasu
przyrządzania
opiekacz
Kombinacja 2
55% czasu
przyrządzania
mikrofale
45% czasu
przyrządzania
opiekacz
Jeżeli potrawy przyrządzają Państwo w trybie kombi-
nowanym Mikrofale – Grill, to powinni Państwo zwrócić
uwagę na rzeczy następujące:
Dla dużych, grubych środków spożywczych, jak np.
pieczeń wieprzowa, potrzebny jest odpowiednio dłuższy
czas działania mikrofal, niż dla potraw małych i płaskich.
W przypadku grilla jest jednak na odwrót. Im bliżej grilla
żywność się znajduje, tym szybciej się ona zarumienia.
Oznacza to, że jeżeli przyrządzają Państwo duże kawałki
pieczeni w trybie kombi nowa nym, to czas grillowania jest
ewentualnie krótszy niż dla małych kawałków pieczeni.
Procedura jest następująca:
1. Proszę wcisnąć przycisk Stop.
2. Naciśnij raz przycisk „Mikrofale/Opiekacz“, aby
włączyć tryb kombinowany 1. Naciśnij dwa razy
przycisk „Mikrofale/Opiekacz“, aby włączyć tryb
kombinowany 2.
3. Przyciskami cyfrowymi ustaw pożądany czas
przyrządzania.
4. Aby rozpocząć gotowanie, naciśnij przycisk Start.
Po upływie ustawionego czasu der urządzenie wyłączy
się a na wyświetlaczu ukaże się komunikat „END“. Wyjmij
potrawę.
Tabela trybu kombinowanego
Mikrofale/Opiekacz
Żywność/Potrawa Ilość
Przybliżony
czas w
minutach
Przykrycie
Mięso, wędliny
Wołowina, wieprzowina lub
cielęcina w kawałku
500 g
750 g
10 - 12
12 - 15
nie
nie
Wieprzowina peklowana i
wędzona (tzw. „Kasseler”)
500 g 12 - 14 nie
Pieczeń rzymska 500 g 13 - 15 nie
Kiełbaski
wiedeńskie
200 g 2 - 3 nie
Serdelek 200 g 2 - 3 nie
Wskazówka: po upływie połowy czasu mięso odwrócić, dogotować 3-5
minut; pieczeń rzymską posmarować białkiem; kiełbaski nakłuć widelcem.
Żywność/Potrawa Ilość
Przybliżony
czas w
minutach
Przykrycie
Drób
Kura na zupę 1000 g 13 - 15 nie
Części kurczaka 250 g 4 - 5 nie
Wskazówka: gotować bez płynu we własnym sosie, odwrócić jeden raz,
dogotować 4-5 minut.
Ryba
Pstrąg, błękitny 300 g 5 - 6 nie
Filet rybny 300 g 3 - 4 nie
Wskazówka: odwrócić po upływie połowy czasu, dogotować 3-5 minut.
Obsługa w trybie termoobiegu
Podczas gotowania w trybie termoobiegu, gorące
powietrze cyrkuluje w komorze kuchenki. Dzięki temu
potraw szybciej się przyrumieniają i są bardziej chrupkie.
W trybie termoobiegu można wybrać jedną z 10 różnych
temperatur.
Gotowanie z termoobiegiem
Aby gotować z termoobiegiem przez 40 minut w tempera-
turze 180°C, wykonaj następujące czynności:
1. Proszę wcisnąć przycisk Stop.
2. Naciśnij przycisk „Termoobieg“.
3. Jednym z przycisków cyfrowych (np. 8) wybierz
pożądaną temperaturę gotowania.
4. Przyciskami cyfrowymi wprowadź pożądany czas
gotowania (np. 40 min.).
Krok Przycisk Wskaźnik
1Stop
2 Termoobieg
38
1 80
44 0
H:40
5Start
5. Aby rozpocząć gotowanie, naciśnij przycisk Start.
Pamiętaj:
• Można zaprogramować maksymalnie 9 godzin, 99
minut. Po upływie ustawionego czasu generowane
są sygnały dźwiękowe i na wyświetlaczu ukazuje się
komunikat „END“. Naciśnij przycisk Stop lub otwórz
drzwiczki. Komunikat „END“ zgaśnie.
• W czasie gotowania z termoobiegiem można
kontrolować temperaturę, naciskając przycisk termoo-
biegu.
Rozgrzewanie i gotowanie
z termoobiegiem
Kuchenkę mikrofalową można rozgrzać w trybie termoo-
biegu a następnie gotować z termoobiegiem.
Aby rozgrzać kuchenkę do temperatury 170°C a
następnie gotować przez 35 minut:
1. Proszę wcisnąć przycisk Stop.
2. Naciśnij przycisk termoobiegu.
3. Jednym z przycisków cyfrowych (np. 7) wybierz
pożądaną temperaturę rozgrzania.
4. Naciśnij przycisk Start. Na wyświetlaczu zacz-
nie migać wskaźnik „PREH“ (Rozgrzewanie).
Po osiągnięciu zaprogramowanej temperatury w
kuchence , wskaźnik „PREH“ świeci bez przerwy.
05-MWG 746 H EST 73 13.07.2005, 14:29:44 Uhr

74
JE˛ ZYK POLSKI
5. Otwórz drzwiczki i ustaw gotowaną potrawę na środku
talerza obrotowego.
6. Za pomocą przycisków cyfrowych ustaw pożądany
czas gotowania (np. 35 min.).
7. Aby rozpocząć gotowanie, naciśnij przycisk Start.
Po upływie ustawionego czasu der urządzenie wyłączy
się a na wyświetlaczu ukaże się komunikat „END“. Wyjmij
potrawę.
Kombinowane wykorzystanie
termoobiegu i mikrofal
Kuchenka ma cztery zaprogramowane zestawy ustawień
do tego trybu pracy. Ułatwia to jednoczesne wykorzysta-
nie termoobiegu i mikrofal.
Naciśnij przycisk Mikrofale/Termoobieg a następnie jeden
z przycisków cyfrowych 1-4, aby wybrać temperaturę
termoobiegu.
Przycisk
Przycisk
cyfrowy
Temperatura (°C)
Mikrofale/Termoobieg 1 150
Mikrofale/Termoobieg 2 180
Mikrofale/Termoobieg 3 200
Mikrofale/Termoobieg 4 230
Aby ustawić 25 minut pieczenia ciasta w temperaturze
200°C:
1. Proszę wcisnąć przycisk Stop.
2. Naciśnij przycisk Mikrofale/Termoobieg.
3. Jednym z przycisków cyfrowych (np. 3) wybierz
pożądaną temperaturę (200°C).
4. Za pomocą przycisków cyfrowych ustaw pożądany
czas gotowania (np. 25 min.).
5. Aby rozpocząć gotowanie, naciśnij przycisk Start.
Pamiętaj:
Można zaprogramować maksymalnie 9 godzin, 99 minut.
Po upływie ustawionego czasu generowane są sygnały
dźwiękowe i na wyświetlaczu ukazuje się komunikat
„END“. Naciśnij przycisk Stop lub otwórz drzwiczki.
Komunikat „END“ zgaśnie.
W czasie gotowania z termoobiegiem można kontrolować
temperaturę, naciskając przycisk termoobiegu.
Gotowanie wielostopniowe
W jednym programie można połączyć 3 różne funkcje.
Na przykład można wybrać następujący program:
Szybkie rozmrażanie
쒆
Przygotowanie w mikrofalach
쒆
Gotowanie z termoobiegiem (bez rozgrzewania)
1. Proszę wcisnąć przycisk Stop.
2. Naciśnij przycisk rozmrażania.
3. Przyciskami cyfrowymi wprowadź pożądany czas
rozmrażania.
4. Naciśnij przycisk mikrofal.
5. Przyciskami cyfrowymi wprowadź pożądany czas
gotowania w mikrofalach.
6. Naciśnij przycisk termoobiegu.
7. Jednym z przycisków cyfrowych wybierz pożądany
czas gotowania.
8. Przyciskami cyfrowymi wprowadź pożądany czas z
termoobiegiem.
9. Aby rozpocząć gotowanie, naciśnij przycisk Start.
Po upływie ustawionego czasu der urządzenie wyłączy
się a na wyświetlaczu ukaże się komunikat „END“. Wyjmij
potrawę.
Funkcje specjalne
Automatyczne przypomnienie
Po zakończeniu procesu przyrządzania potrawy wysoki
ton przypomina Państwu co 2 minuty, by wyjąć danie.
Przez otworzenie drzwiczek lub naciśnięcie przycisku
Stop funkcja przypomnienia wyłącza się.
Blokada
Proszę wcisnąć przycisk Stop na dłużej niż 3 sekundy,
by zablokować urządzenie. Blokada pokazywana jest w
wyświetlaczu. Funkcje elementów obsługi są zablokowa-
ne. Proszę ponownie wcisnąć przycisk Stop na dłużej niż
3 sekundy, by skasować blokadę.
Wyłącznik czasowy (Countdown)
Urządzenie jest wyposażone w funkcję wyłącznika
czasowego:
1. Proszę wcisnąć przycisk Stop.
2. Naciśnij przycisk wyłącznika czasowego (Timer).
3. Przyciskami cyfrowymi wprowadź pożądany czas.
4. Aby rozpocząć gotowanie, naciśnij przycisk Start.
Ustawiony czas będzie odliczany a po jego upływie
zostanie wygenerowany sygnał dźwiękowy.
Uwaga: ta funkcja może być użyta także w czasie pracy
urządzenia.
Czyszczenie
Proszę przed każdym czyszczeniem wyciągać wtyczkę z
gniazdka.
• Komorę kuchenki po użyciu proszę czyścić lekko
nawilżoną ściereczką.
• Od zewnątrz kuchenkę mikrofalową należy czyścić
lekko zwilżoną szmatką.
• Akcesoria należy czyścić tak jak inne naczynia, w
ciepłej wodzie z dodatkiem płynu do zmywania.
• Ramy/uszczelki drzwiczek i części sąsiadujące
po zabrudzeniu muszą być czyszczone dokładnie
wilgotną ściereczką.
05-MWG 746 H EST 74 13.07.2005, 14:29:45 Uhr

75
JE˛ ZYK POLSKI
Dane techniczne
Model: ............................................................MWG 746 H
Napięcie zasilające:.......................................230 V, 50 Hz
Pobór mocy: ..........................................................1400 W
Pobór mocy termoobieg: .......................................1400 W
Pobór mocy opiekacza: .........................................1200 W
Nominalna moc wyjściowa mikrofal:........................900 W
Objętość komory roboczej:.......................................... 25 l
Stopień ochrony:............................................................... Ι
Niniejsze urządzenie odpowiada wymaganiom normy
bezpieczeństwa użytkowania oraz spełnia wymagania
dyrektywy niskonapięciowej i kompatybilności elektroma-
gnetycznej.
Zastrzega się prawo do zmian technicznych!
WARUNKI GWARANCJI
Przyznajemy 24 miesiące gwarancji na produkt licząc od
daty zakupu.
W tym okresie będziemy bezpłatnie usuwać w terminie
14 dni od daty dostarczenia wadliwego sprzętu z kartą
gwarancyjną do miejsca zakupu wszystkie uszkodzenia
powstałe w tym urządzeniu na skutek wady materiałów
lub wadliwego wykonania, naprawiając oraz wymieniając
wadliwe części lub (jeśli uznamy za stosowne)
wymieniając całe urządzenie na nowe.
Sprzęt do naprawy powinien być dostarczony w
komplecie wraz z dowodem zakupu oraz z ważną
kartą gwarancyjną do sprzedawcy w miarę możliwości
w oryginalnym opakowaniu lub innym odpowiednim dla
zabezpieczenia przed uszkodzeniem. W razie braku kom-
pletnego opakowania fabrycznego, ryzyko uszkodzenia
sprzętu podczas transportu do i z miejsca zakupu ponosi
reklamujący.
Naprawa gwarancyjna nie dotyczy czynności prze-
widzianych w instrukcji obsługi, do wykonania których
zobowiązany jest użytkownik we własnym zakresie i na
własny koszt.
Gwarancja nie obejmuje:
• mechanicznych, termicznych, chemicznych
uszkodzeń sprzętu i wywołanych nimi wad,
• uszkodzeń powstałych w wyniku działania sił
zewnętrznych takich jak wyładowania atmosferyczne,
zmiana napięcia zasilania i innych zdarzeń losowych,
• nieprawidłowego ustawienia wartości napięcia
elektrycznego, zasilanie z nieodpowiedniego gniazda
zasilania,
• sznurów połączeniowych, sieciowych, żarówek, bate-
rii, akumulatorów,
• uszkodzeń wyrobu powstałych w wyniku
niewłaściwego lub niezgodnego z instrukcją jego
użytkowania, przechowywania, konserwacji,
samowolnego zrywania plomb oraz wszelkich
przeróbek i zmian konstrukcyjnych dokonanych przez
użytkownika lub osoby niepowołane,
• roszczeń z tytułu parametrów technicznych wyrobu, o
ile są one zgodne z podanymi przez producenta,
• prawidłowego zużycia i uszkodzeń, które mają nieis-
totny wpływ na wartość lub działanie tego urządzenia.
Karta gwarancyjna bez pieczątki sklepu, daty sprzedaży,
nie wypełniona, źle wypełniona, ze śladami poprawek,
nieczytelna wskutek zniszczenia, bez możliwości ustale-
nia miejsca sprzedaży oraz dołączonego dowodu zakupu
jest nieważna.
Korzystanie z usług gwarancyjnych nie jest możliwe po
upływie daty ważności gwarancji. Gwarancja na części
lub całe urządzenie, które są wymieniane kończy się,
wraz z końcem gwarancji na to urządzenie.
Wszystkie inne roszczenia, wliczając w to odszkodowania
są wykluczone chyba, że prawo przewiduje inaczej. Rosz-
czenia wykraczające poza tą umowę nie są uwzględniane
przez tą gwarancję.
Gwarancja na sprzedany towar konsumpcyjny nie
wyłącza, nie ogranicza ani nie zawiesza uprawnień
kupującego wynikających z niezgodności towaru z
umową.
Gwarancja oraz zawarte w niej warunki obowiązują na
terenie Rzeczpospolitej Polskiej.
Znaczenie symbolu „Pojemnik na śmieci“
Proszę oszczędzać nasze środowisko, sprzęt elektryczny
nie należy do śmieci domowych.
Proszę korzystać z punktów zbiorczych, przewidzia-
nych do zdawania sprzętu elektrycznego, i tam proszę
oddawać sprzęt elektryczny, którego już nie będą
Państwo używać.
Tym sposobem pomagają Państwo unikać potencjalnych
następstw niewłaściwego usuwania odpadów, mających
wpływ na środowisko i zdrowie ludzi.
Tą drogą przyczyniają się Państwo do ponownego użycia,
do recyklingu i do innych form wykorzystania starego
sprzętu elektrycznego i elektronicznego.
Informacje, gdzie można zdać sprzęt, otrzymają Państwo
w swoich urzędach komunalnych lub w administracji
gminy.
05-MWG 746 H EST 75 13.07.2005, 14:29:47 Uhr

78
Übersicht der Bedientasten
Ziffern-Tasten
Zum Einstellen von Uhrzeit, Gardauer,
Temperatur und Gewicht
Taste Mikrowelle
Wahl der Leistungsstufen
Taste Grill
Zum Grillen und Überbacken
Taste Heißluft
Reiner Heißluftbetrieb,
Thermostat gesteuert
Taste Mikrowelle/Grill Kombibetrieb
Mikrowelle und Grill arbeiten abwechselnd
Taste Mikrowelle/Heißluft Kombibetrieb
Mikrowelle und Heißluft
arbeiten abwechselnd
Taste Auftauen
Aktiviert die Auftaufunktion
in Verbindung mit einer Zeiteinstellung
Taste Uhr
In Verbindung mit den Ziffern-Tasten
zum Einstellen der Uhrzeit
Programmtaste Kuchen
Taste Timer (Countdown)
Programmtaste Kartoffel
Programmtaste Popkorn
Programmtaste Getränke
Programmtaste Pizza
Programmtaste Fleischspieße
Programmtaste Aufwärmen
Taste Start
Start des Programms
Taste Express
Start des Expressprogramms –
Setzen der Express-Kochzeit
Taste Stopp
• Einmal drücken zum Stoppen des
Garvorgangs oder zum Löschen einer
falschen Eingabe.
• Zweimal drücken zum Löschen des
Programms.
• 3 Sekunden halten zum Sperren/
Entsperren des Gerätes
Controls
Number Buttons
For setting the clock, cooking time,
temperature and weight
Microwave Button
For selecting the power level
Grill Button
For grilling and browning
Hot Air Button
Hot air operation, thermostat controlled
Microwave/Grill
Combined Operation Button
Microwave and grill alternate
Microwave/Hot Air
Combined Operation Button
Microwave and hot air alternate
Defrost Button
Activates the defrost function in
conjunction with a time setting
Clock Button
For setting the clock in conjunction with the
number buttons
Cake Programme Button
Timer Button (Countdown)
Potato Programme Button
Popcorn Programme Button
Drinks Programme Button
Pizza Programme Button
Meat Spit Programme Button
Warming Programme Button
Start Button
Start of the programme
Express Button
Start of the express programme –
setting the express cooking time
Stop Button
• Press once to stop the cooking process
or cancel an incorrect entry.
• Press twice to delete the programme.
• Hold down for three seconds to block/
unblock the device.
쒆 HIER ABTRENNEN • HERE SEPARATING 쒆
05-MWG 746 H EST 78 13.07.2005, 14:29:48 Uhr

79
Overzicht van de bedieningstoetsen
Cijfertoetsen
Voor het instellen van tijd, gaarduur, tem-
peratuur en gewicht
Toets magnetron
Keuze van de vermogensstanden
Toets grill
Voor het grillen en gratineren
Toets hete lucht
Alleen heteluchtfunctie,
gestuurd via thermostaat
Toets magnetron/grill combibedrijf
Magnetron en grill werken afwisselend
Toets magnetron/hete lucht combibedrijf
Magnetron en hete lucht werken
afwisselend
Toets ontdooien
Activeert de ontdooifunctie in combinatie
met een tijdinstelling
Toets klok
Voor het instellen van de tijd in combinatie
met de cijfertoetsen
Programmatoets gebak
Toets timer (countdown)
Programmatoets aardappel
Programmatoets popcorn
Programmatoets dranken
Programmatoets pizza
Programmatoets vleesspiesen
Programmatoets opwarmen
Toets start
Start van het programma
Toets expresse
Start van het expresprogramma - instellen
van de expreskooktijd
Toets stop
• Een keer indrukken om het gaarproces
te stoppen of om een verkeerde invoer
te wissen
• Twee keer indrukken om het program-
ma te wissen
• 3 seconden ingedrukt houden om het
apparaat te blokkeren/deblokkeren
Aperçu des touches de commande
Touches numérotées
Pour régler l’heure, la durée de cuisson,
la température et le poids
Touche micro-ondes
Sélection des différentes positions
Touche gril
Pour griller et gratiner
Touche chaleur traditionnelle
Fonction chaleur traditionnelle unique-
ment, réglage par le thermostat
Touche micro-ondes/
gril en mode combiné
Le four à micro-ondes et le gril fonction-
nent en alternance
Touche micro-ondes/
chaleur traditionnelle en mode combiné
Le four à micro-ondes et la chaleur traditi-
onnelle fonctionnent en alternance
Touche décongélation
Active la fonction décongélation après
programmation du minuteur
Touche horloge
Pour régler l’heure à l’aide des touches
numérotées
Touche de programmation Gâteau
Touche minuteur (compte à rebours)
Touche de programmation
Pommes de terre
Touche de programmation Pop-corn
Touche de programmation Boissons
Touche de programmation Pizzas
Touche de programmation
Brochettes de viande
Touche de programmation Réchauffer
Touche Start
Début du programme
Touche Express
Début du programme express.
Activer le temps de cuisson express
Touche Stop
• Appuyez une fois pour arrêter la cuis-
son ou pour effacer une erreur.
• Appuyez deus fois pour effacer un
programme.
• Maintenez enfoncé 3 secondes pour
verrouiller/ déverrouiller l’appareil.
쒆 HIER SCHEIDEND • ICI SÉPARATION 쒆
05-MWG 746 H EST 79 13.07.2005, 14:30:01 Uhr

80
쒆 AQUÍ SEPARÁNDOSE • AQUI SEPARANDO 쒆
Vista general de las teclas de manejo
Teclas numéricas
Para ajustar la hora, el tiempo de cocción,
la temperatura y el peso
Tecla microondas
Selección de las etapas de potencia
Tecla parrilla
Para asar a la parrilla y para gratinar
Tecla aire caliente
Funcionamiento exclusivo de aire caliente
Termostato controlado
Tecla microondas /
parrilla funcionamiento combinado
El microondas y la parrilla trabajan alter-
nativamente
Tecla microondas / aire caliente
funcionamiento combinado
El microondas y el aire caliente trabajan
alternativamente
Tecla descongelación
Activa la función de descongelación junto
con un ajuste de tiempo
Tecla reloj
Junto con las teclas numéricas para la
puesta en hora
Tecla de programa pastel
Tecla timer / temporizador (Countdown)
Tecla de programa patata
Tecla de programa palomitas
Tecla de programa bebidas
Tecla de programa pizza
Tecla de programa pinchos de carne
Tecla de programa calentar
Tecla inicio
inicio del programa
Tecla expres
inicio del programa expres –
Ajuste del tiempo de cocción expres
Tecla de parada
• Al presionar una vez se parará el
proceso de cocción o se borrará una
insertación errónea.
• Al presionar dos veces se borrará el
programa.
• Mantega la tecla 3 segundos presionada
para bloquear / desbloquear el aparato.
Vista geral das teclas de funcionamento
Teclas com números
Para regular a hora, o tempo de
cozimento, a temperatura e o peso
Tecla de micro-ondas
Escolha dos graus de funcionamento
Tecla de grilhar
Para grilhar e para gratinar
Tecla de ar quente
Sómente para funcionamento de ar quente
- Comando a termostato
Tecla para funcionamento combinado
de micro-ondas / grelha
A micro-ondas e a grelha trabalham
alternadamente
Tecla de funcionamento combinado de
micro-ondas / ar quente
A micro-ondas e o ar quente trabalham
alternadamente
Tecla de descongelar
Activa a função de descongelamento em
relação com a regulação do tempo
Tecla de relógio
Em relação com as teclas de números
para regular a hora
Tecla de programa para fazer bolos
Tecla Timer (Countdown)
Tecla de programa para batatas
Tecla de programa para Popcorn
Tecla de programa para bebidas
Tecla de programa para Pizza
Tecla de programa
para espetos de carne
Tecla de programa para aquecer
Tecla para iniciar
Inicio do programa
Tecla expresso
Inicia o programa expresso -
Indica o tempo de cozinhar expresso
Tecla de Stopp
• Carregar uma vez para parar o progra-
ma de cozimento ou para anular uma
indicação falsa
• Carregar duas vezes para anular o
programa.
• Para bloquear ou desbloquear o apa-
relho segurar por 3 segundos.
05-MWG 746 H EST 80 13.07.2005, 14:30:19 Uhr

81
Tabella dei tasti di controllo
Tasti numerici
Per impostare l’ora, il tempo di cottura, la
temperatura e il peso
Tasto microonde
Scelta delle posizioni
Tasto griglia
Per cuocere al grill e gratinare
Tasto aria calda
Funzionamento possibile solo con aria
calda, mediante termostato
Tasto microonde/
griglia modalità combinata
Lavoro alternato di microonda e griglia
Tasto microonda/
aria calda modalità combinata
Lavoro alternato di microonda ed aria calda
Tasto per scongelamento
Attiva la funzione di scongelamento unita-
mente all’ impostazione dell’ ora
Tasto orologio
Unitamente all’ impostazione dell’ ora
tramite i tasti numerici
Tasto per programma torte
Tasto Timer (Countdown)
Tasto per programma patate
Tasto per programma popcorn
Tasto per programma bibite
Tasto per programma pizze
Tasto per programma spiedini
Tasto per programma riscaldamento
Tasto start
Avviare il programma
Tasto Express
Iniziare il programa Express –
Impostare il tempo di cottura express
Tasto stop
• Premere una volta per fermare il
procedimento di cottura oppure per
cancellare un’ impostazione sbagliata.
• Premere due volte per cancellare il
programma.
• Premere per 3 secondi per bloccare/
sbloccare l’ apparecchio
Przegląd przycisków obsługowych
Przyciski numeryczne
Do ustawiania czasu zegarowego, czasu
gotowania, temperatury i ciężaru
Przycisk mikrofal
Wybór stopnia mocy mikrofal
Przycisk opiekacza
Do opiekania i zrumieniania
Przycisk termoobiegu
Sam termoobieg, sterowany termostatem
Przycisk trybu mikrofala
z opiekaczem
Na przemian pracują mikrofale i opiekacz
Przycisk trybu mikrofala
z termoobiegiem
Na przemian pracują mikrofale i termoobieg
Przycisk rozmrażania
Uruchamia funkcję rozmrażaniaz ustawia-
niem czasu
Przycisk zegara
W połączeniu z przyciskami cyfrowymi, do
ustawiania czasu zegarowego
Przycisk programu „Ciasto“
Przycisk wyłącznika czasowego
(Countdown)
Przycisk programu „Ziemniaki“
Przycisk programu „Popcorn“
(kukurydza prażona)
Przycisk programu „Napoje“
Przycisk programu „Pizza“
Przycisk programu „Szaszłyki“
Przycisk programu „Odgrzewanie“
Przycisk Start
Start programu
Przycisk Express
Start programu Express – ustawianie
czasu gotowania w trybie Express
Przycisk Stop
• Nacisnąć jeden raz, aby przerwać
gotowanie lub skasować błędne wpro-
wadzenie.
• Nacisnąć dwa razy, aby skasować
program.
• Trzymać wciśnięty przez 3 sekun-
dy, aby zablokować/odblokować
urządzenie.
쒆 QUI SEPARANDO • TUTAJ OBCIĄĆ 쒆
05-MWG 746 H EST 81 13.07.2005, 14:30:37 Uhr

Stünings Medien, Krefeld • 07/05
05-MWG 746 H EST 82 13.07.2005, 14:30:49 Uhr
D-47906 Kempen/Germany · Industriering Ost 40
Internet: http://www.clatronic.de · email: [email protected]
-
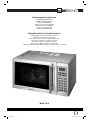 1
1
-
 2
2
-
 3
3
-
 4
4
-
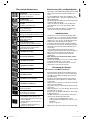 5
5
-
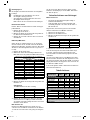 6
6
-
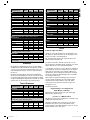 7
7
-
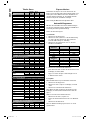 8
8
-
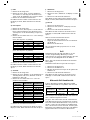 9
9
-
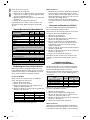 10
10
-
 11
11
-
 12
12
-
 13
13
-
 14
14
-
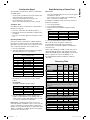 15
15
-
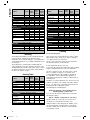 16
16
-
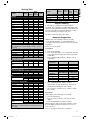 17
17
-
 18
18
-
 19
19
-
 20
20
-
 21
21
-
 22
22
-
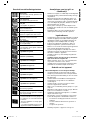 23
23
-
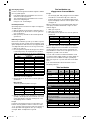 24
24
-
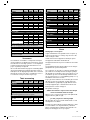 25
25
-
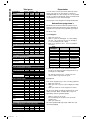 26
26
-
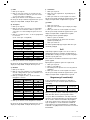 27
27
-
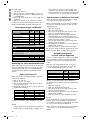 28
28
-
 29
29
-
 30
30
-
 31
31
-
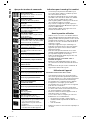 32
32
-
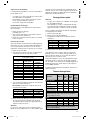 33
33
-
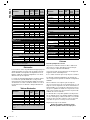 34
34
-
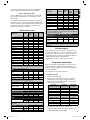 35
35
-
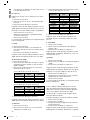 36
36
-
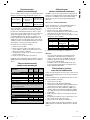 37
37
-
 38
38
-
 39
39
-
 40
40
-
 41
41
-
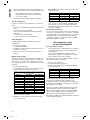 42
42
-
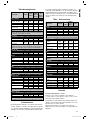 43
43
-
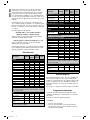 44
44
-
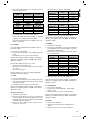 45
45
-
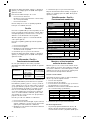 46
46
-
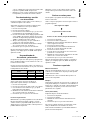 47
47
-
 48
48
-
 49
49
-
 50
50
-
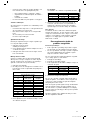 51
51
-
 52
52
-
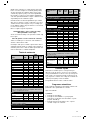 53
53
-
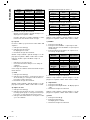 54
54
-
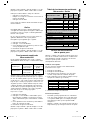 55
55
-
 56
56
-
 57
57
-
 58
58
-
 59
59
-
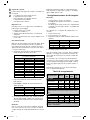 60
60
-
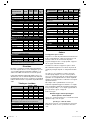 61
61
-
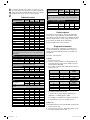 62
62
-
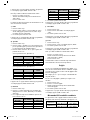 63
63
-
 64
64
-
 65
65
-
 66
66
-
 67
67
-
 68
68
-
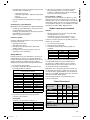 69
69
-
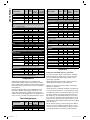 70
70
-
 71
71
-
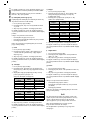 72
72
-
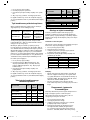 73
73
-
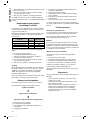 74
74
-
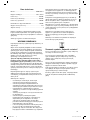 75
75
-
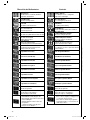 76
76
-
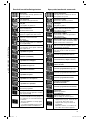 77
77
-
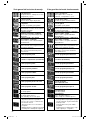 78
78
-
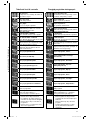 79
79
-
 80
80


En otros idiomas
- français: Clatronic mwg 746 h Manuel utilisateur
- italiano: Clatronic mwg 746 h Manuale utente
- Deutsch: Clatronic mwg 746 h Benutzerhandbuch
- Nederlands: Clatronic mwg 746 h Handleiding
- português: Clatronic mwg 746 h Manual do usuário
- polski: Clatronic mwg 746 h Instrukcja obsługi
Documentos relacionados
Otros documentos
-
Profi Cook PC-MWG 1117 Manual de usuario
-
BOMANN MWG 2285 H CB Instrucciones de operación
-
BOMANN MWG 2270 CB El manual del propietario
-
-
BOMANN MWG 6016 CB El manual del propietario
-
Sharp R-74ST El manual del propietario
-
Medion Microwave MD 11711 Manual de usuario
-
HAEGER MW-70W.006A Manual de usuario
-