
LED 300A/300CA Marine
Copyright © 2018 Pahlén AB, Box 728, SE-194 27 Upplands Väsby, Sweden
Tel. +46 8 594 110 50, Fax +46 8 590 868 80, e-mail: [email protected], www.pahlen.com
Manual
User manual
Gebrauchsanleitung
Инструкция
Manuiale d’usa
Manual de instrucciones
MA50-09 rev.3
2018-05
Swedish design
and manufacture
since 1967

SVENSKA 3
ENGLISH 9
DEUTCH 15
РУССКИЙ 21
ESPAÑOL 27
ITALIANO 33

3
Circuit diagram for LED-lamps
L1
TR1 60W alt. 300W
N
E10016-0
2007-07-11ASA
IN
230V AC
OUT
12V AC LA1
LA2
LA3
LA6
50W
50W
50W
50W
50W
alt.alt.
Circuit diagram for LED-lamps 28W
L1
TR1 60W alt. 300W
N
E10077-0
2010-06-03 ASA
IN
230V AC
OUT
12V AC LA1
LA2
LA3
LA10
28W
28W
28W
28W
alt. alt.
Art.no.
Rev.no.
Scale
Designed by: Approved by:
Revised by: Date
Drawn by: Date
Drawing number
Assembly drawing no.
Surface treatment
part of ISO 2768
The tolerance class in accordance with this
E
Box 728, SE-194 27 Upplands Väsby, Sweden
Phone +46 8 59411050, Fax +46 8 59086880
1:2
OA 2006-04-26
OA 2007-09-20
belysning typ 300 CA vinyl
Håltagningsmall för
M10112 2
This documentanditscontents aretheexclusive
property ofPahlénsandmaynotbecopied,
reproduced,transmittedorcommunicatedtoathird
party,orusedforanypurposewithoutwrittenpermission.
n240
45°
22,5°
22,5°
22,5°
45°
45°
22,5°
22,5°
22,5°
45°
45°
n12(3x) n14(8x)
UP
Ø257
UPP
Ø240
Ø12(3x) Ø14(8x)
Ø257
This document and its contents are the exclusive
property of Pahléns and may not be copied,
reproduced, transmitted or communicated to a third
party, or used for any purpose without written permission.
Art.no.
Rev.no.
Scale
Designed by: Approved by:
Revised by: Date
Drawn by: Date
Drawing number
Assembly drawing no.
Surface treatment
part of ISO 2768-1
The toleran ce class in accordan ce with this
E
Box 728, SE-194 27 Upplands Väsby, Sweden
Phone +46 8 59411050, Fax +46 8 59086880
124X9Y
ASA 2011-09-29
Belysning 300CA LED
M11446 0
Ø170
Ø160
140 25
282
Ø
288
Ø
Art.no.
Rev.no.
Scale
Designed by: Approved by:
Revised by: Date
Drawn by: Date
Drawing number
Assembly drawing no.
Surface treatment
part of ISO 2768-1
The tolera nce class i n accordance with t his
E
Box 728, SE-194 27 Upplands Väsby, Sweden
Phone +46 8 59411050, Fax +46 8 59086880
124X81
ASA 2011-11-03
TS 2012-03-19
Marine
Belysning 300A LED
M11562 1
Ø172
Ø160
304
288
22
36
140
Ø288
Ø170
22
140
Ø288
Ø304
Ø160
Ø282
Ø160
25
140 36
Belysning LED typ 300 Marine SVENSKA
MA50-09S
2015-11
Typ 300A, för ingjutning Typ 300CA, poolstomme med liner
Art.nr 124281 Röd/grön/blå LED-lampa Art.nr 124291 Röd/grön/blå LED-lampa
Art.nr 124381 Vit LED-lampa Art.nr 124391 Vit LED-lampa
Endast för användning under vatten.
Belysningen skall anslutas via skyddstransformator 12V AC 60W alternativt 300W.
Om er än en lampa installeras i poolen, skall dessa kopplas till samma transformator och via gemensam strömbrytare,
se elschema nedan.
Beakta lokala elföreskrifter beträande kopplingsdosans placering.
OBS! Belysningen måste vara helt täckt av vatten innan den tänds.
Om belysningens utvändiga kabelisolering eller innerledare är skadad skall den bytas ut av servicetekniker eller annan
behörig person.
Kopplingsschema Håltagningsmått typ 300CA
Exempel 1: Lampans eekt 50W Exempel 2: Lampans eekt 28W
Allmän info
Rekommenderade värden beträande vattenkvalitet:
Total klorhalt: max 3,5 mg/liter (ppm)*
Klorid(salt)halt: max 250 mg/liter
pH-värde: 7,2–7,6
Alkalinitet: 60–120 mg/liter (ppm)
Kalciumhårdhet: 100–300 mg/liter (ppm)
Järn: max 0,1 mg/l *
Koppar: max 0,2 mg/l *
Mangan: max 0,05 mg/l *
Fosfor: max 0,01 mg/l *
Nitrat: max 50 mg/l *
* Enligt EN 16713-3
Utanför dessa värden gäller ej produktgarantin.
Dimensioner Typ 300CA Typ 300A

4
300–800 mm
Belysning LED typ 300 Marine SVENSKA
MA50-09S
2015-11
Typ 300A - för ingjutning i poolstomme av betong Art.nr 124381: LED vit
Art.nr 124281: LED röd/grön/blå
Montera så här:
OBS! Minsta avstånd mellan rostfritt material och ej rostfritt (t.ex. armeringsjärn) skall vara 50 mm.
Belysningsnischens framkant skall ligga i liv med färdig betongvägg (A), se skiss.
1. Fixera nischen med kabelutgången riktad uppåt.
2. Applicera lite vattenfast fett i nischens gängor.
3. Gänga i kabelröret i nischen och den andra änden i kopplingsboxen. Gängan skall tätas med t.ex. gängtape.
Kabelröret skall förläggas så att böjningsradien ej understiger 100 mm.
4. Medföljande hylsa ska placeras på kabeln vid nischens kabelförskruvning. Dra sedan åt förskruvningen i lampnischen för att
täta kabeln. För in belysningsinsatsens kabel i kabelröret och anslut i kopplingsboxen.
Överödig kabel lindas bakom lampan och därefter monteras belysningsinsatsen i nischen.
5. Montera frontringen.
- för poolstomme av betong
Kakel
Kakex
Betong
Kabeldistans
Kakel
Nisch
Kabelrör
Tätring
Front Marine
Bricka (6x)
Försänkt skruv
M5x10 (6x)
Kakelx
Skruv (2x)
M5x50
Belysnings-
insats
Betong

5
300–800 mm
Belysning LED typ 300 Marine SVENSKA
MA50-09S
2015-11
Typ 300CA - för pool med liner Art.nr 124291: LED röd/grön/blå
Art.nr 124391: LED vit
Montera så här:
1. Gör hål i stommen, se måttskiss för håltagning.
2. Applicera lite vattenfast fett i nischens gängor.
3. Fixera nischen med kabelutgången uppåt.
4. Gänga i kabelröret i nischen och den andra änden i kopplingsboxen.
Gängorna skall tätas med t.ex. gängtape. Kabelröret skall förläggas så att böjningsradien ej understiger 100 mm.
5. Fäst den självhäftande packningen på nischens kant.
6. Lägg i linern.
7. Fyll poolen till ca 10 cm under belysningsnischen. Gör ett litet snitt i linern, mitt i nischen (ej för nära kanten).
8. Montera tätringen med packningen under.
9. Skär rent linern efter tätringens innerkant.
10. Medföljande hylsa ska placeras på kabeln vid nischens kabelförskruvning. Dra sedan åt förskruvningen i lampnischen för att
täta kabeln. För in belysningsinsatsens kabel i kabelröret och anslut i kopplingsboxen.
Överödig kabel lindas bakom lampan och därefter monteras belysningsinsatsen i nischen.
11. Montera frontringen.
- för poolstomme
av trä, plåt eller plast
Fäst nischen i poolstommen
med medföljande skruv och
bricka.
Liner
Plywood
Kabeldistans
Väggmatta
Bricka (3x)
Kabelrör
Tätring
Front Marine
Bricka (6x)
Försänkt skruv M5x10 (6x)
Packning 3 mm
Skruv (2x) M5x20
Belysningsinsats
Liner
Nisch
Väggmatta
Mutter M6 (3x)
Poolstomme plywood/plåt
Packning 1,5 mm självhäftande
Försänkt skruv
M6x20 (8x)

6
300–800 mm
Belysning LED typ 300 Marine SVENSKA
MA50-09S
2015-11
- för poolstomme av mursten
Nischen xeras i poolstommen med fogskum.
OBS! Minsta avstånd mellan rostfritt material och ej rostfritt (t.ex. armeringsjärn) skall vara 50 mm.
Liner
Mursten
Kabeldistans
Väggmatta
Puts
Bricka (3x)
Kabelrör
Tätring
Front Marine
Bricka (6x)
Försänkt skruv M5x10 (6x)
Självhäftande packning 1,5 mm
Skruv (2x)
M5x20
Belysningsinsats
Liner
Nisch Väggmatta
Mutter M6 (3x)
Ingjutningsfäste (3x)
Försänkt skruv
M6x20 (8x)
Packning 3 mm
Polstomme
(mursten med puts)

7
This document and its contents are the exclusive
property of Pahléns and may not be copied,
reproduced, transmitted or communicated to a third
party, or used for any purpose without written permission.
Sid 1(2)
300–800 mm
This document and its contents are the exclusive
property of Pahléns and may not be copied,
reproduced, transmitted or communicated to a third
party, or used for any purpose without written permission.
Sid 1(2)
Belysning LED typ 300 Marine SVENSKA
MA50-09S
2015-11
- för poolstomme av Thermoblock (cellplast)
Nischen xeras i poolstommens cellplastblock med fogskum före gjutning.
OBS! Minsta avstånd mellan rostfritt material och ej rostfritt (t.ex. armeringsjärn) skall vara 50 mm.
Liner
Thermoblock
Kabeldistans
Väggmatta
Armeringsjärn
Betong
Bricka (3x)
Kabelrör
Tätring
Front Marine
Bricka (6x)
Försänkt skruv M5x10 (6x)
Självhäftande packning 1,5 mm
Skruv (2x)
M5x20
Belysningsinsats
Liner
Nisch
Väggmatta
Mutter M6 (3x)
Ingjutningsfäste (3x)
Försänkt skruv
M6x20 (8x)
Packning 3 mm
Thermopoolstomme

8
Art.no.
Rev.no.
Scale
Designed by: Approved by:
Revised by: Date
Drawn by: Date
Drawing number
Assembly dr awing no.
Surface treatment
part of ISO 2768-1
The tolerance class in accordance with this
E
Box 728, SE-194 27 Upplands Väsby, Sweden
Phone +46 8 59411050, Fax +46 8 59086880
ASA 2012-02-07
för MA50-09
Installationsbild
M11604
Låsbricka (6x)
Belysningsinsats Marine
Fästskruv M5x20 (2x)
Front Marine
Skruv M5x10 (6x)
Art.no.
Rev.no.
Scale
Designed by: Approved by:
Revised by: Date
Drawn by: Date
Drawing number
Assembly dr awing no.
Surface treatment
part of ISO 2768-1
The tolerance class in accordance with this
E
Box 728, SE-194 27 Upplands Väsby, Sweden
Phone +46 8 59411050, Fax +46 8 59086880
ASA 2012-02-07
för MA50-09
Installationsbild
M11605
Art.no.
Rev.no.
Scale
Designed by: Approved by:
Revised by: Date
Drawn by: Date
Drawing number
Assembly drawing no.
Surface treatment
part of ISO 2768-1
The tolerance class in accordance with this
E
Box 728, SE-194 27 Upplands Väsby, Sweden
Phone +46 8 59411050, Fax +46 8 59086880
1553002X
ASA 2009-05-26
ASA 2018-08-16
Typ 300-lampa
Belysningsinsats LED Marine
M11563 3
This document and its contents are the exclusive
property of Pahléns and may not be copied,
reproduced, transmitted or communicated to a third
party, or used for any purpose without written permission.
M1271315530260RubberTätningshylsa18
DIN 933 - M5 x 2519901225
A4
Skruv M6S M5x252
7
1246112461
POMKnopp räfflad SR6127 typ 1
26
Pan head Torx 4x1019922115A4
Skruv MRT A4 M4x10
2
5
M12906123402EN 1.4404 (SS2348)Bygel till LED-lampa14
LED
123241 alt. 123341
LED lampa Spectravision 700, multi alt. vit13
U-list12272
PVCU-list PVC GV-1-5, L=550mm
12
M1144515530021 Fästram 300- och LED-lampa11
Drawing.no:Art_nrMaterialTitle/ NameQty.Item.
1,5m
(3m)
Art.nr
Belysningsinsats
Pos 3
LED-lampa Anm
15530025 123241 röd/grön/blå
15530026 123341 vit
8
2
3
5
7
6
1
REVISION HISTORY
ZONE REV DESCRIPTION DATE APPROVED
3Pos 8 var bipackad lampan från lev. 2017-09-27
3Pos 4 var 123401, pos 5 var 19922115, pos 7 var 19909225, se ÄO-00109 2018-08-16 ASA
4
Belysning LED typ 300 Marine SVENSKA
MA50-09S
2015-11
Sprängskiss belysningsinsats
1. Fästram
2. (U-list )
3. Utbyteslampa
4. Bygel
5. Skruv M4
6. Plastfot
7. Skruv M5
8. Kabeldistans-
/hylsa
Art.nr 123261 Utbyteslampa LED röd/grön/blå
Art.nr 123361 Utbyteslampa LED vit
Teknisk specikation Spänning: 12V AC
Eekt: Se lampans typskylt (max 50W)
Dessa LED-lampor passar till de esta belysningsinsatser för pooler där en standard
PAR56-glödlampa används. De passar alla Pahléns belysningar typ 300, både standard
och Marine design.
Lamporna skall endast användas under vatten.
Lamporna skall anslutas via skyddstransformator 12V 60W/300W.
Om er än en LED-lampa installeras i poolen, skall dessa kopplas till samma
transformator och via gemensam strömbrytare.
De båda lamptyperna kopplas in på samma sätt, se kopplingsschema.
Om belysningens utvändiga kabel eller kord är skadad skall den bytas ut av en
servicetekniker eller annan behörig person.
Montera så här:
1. Stäng av strömmen.
2. Lossa bentlig belysningsinsats.
3. Lossa den gamla lampan från belysningsinsatsens fästram.
4. Sätt dit utbyteslampan. Hylsan (pos 8) skall placeras där kabeln
går igenom nischens kabelförskruvning.
5. Anslut kabeln.
6. Skruva fast belysningsinsatsen mot poolväggen.
7. Skruva fast Marine fronten.
Uppstart
Kontrollera att lamporna är korrekt installerade.
Synkronisering av era erfärgade lampor:
1. Aktivera synkroniseringen av de erfärgade lampornas program
genom att slå på lamporna, vänta några sekunder.
2. Slå av lamporna och vänta minst 12 sekunder, slå sedan på dem igen.
3. Byt färg/program två gånger. Nu är alla lampor i samma programläge.
När lamporna väl är synkroniserade behåller de sin inställning tills en
lampa byts ut eller stängs av separat.
Att byta färg/program: Slå av lamporna och slå på dem igen inom 10 sekunder.
Lagra senaste färg/program:
1. Välj önskad färg/program.
2. Stäng av lamporna minst 12 sekunder. Det valda programmet är nu lagrat.
Den erfärgade lampan
LED-lampan är en avancerad elektroniskt kontrollerad lampa baserad på lys-
dioder i tre färger: röd, grön samt blå. Dessa tre kulörer kan tillsammans skapa
många andra kulörer. Med hjälp av på/av strömbrytaren för poolbelysningen kan
en av de 16 olika förprogrammerade belysningseekterna väljas.
16 program
1. Vitt Fast varmt vitt sken
2. Rött Fast rött sken
3. Grönt Fast grönt sken
4. Blått Fast blått sken
5. Grönt/blått Fast grönt/blått sken
6. Rött/grönt Fast rött/grönt sken
7. Blått/rött Fast blått/rött sken
8. Evening sea Långsam växling mellan rött och blått sken
9. Evening river Långsam växling mellan rött och grönt sken
10. Riviera Långsam växling mellan grönt och blått sken
11. Vitt Fast neutralt sken
12. Regnbåge Långsamt växlande mellan blått, rött, grönt
13. Färgödemix Program 12 följt av program 15
14. Disco Livligt växlande mellan olika färger
15. Four seasons Långsamt växlande mellan rött, blått, grönt och violett sken
16. Party Livligt växlande mellan alla färger
Lås-
bricka (6x)
Belysningsinsats Marine
Fästskruv M5x20 (2x)
Front Marine
Försänkt skruv
M5x10 (6x)
Låsbricka
(6x)
Belysningsinsats Marine
Fästskruv M5x50 (2x)
Front Marine
Försänkt skruv
M5x10 (6x)

9
Circuit diagram for LED-lamps
L1
TR1 60W alt. 300W
N
E10016-0
2007-07-11ASA
IN
230V AC
OUT
12V AC LA1
LA2
LA3
LA6
50W
50W
50W
50W
50W
alt.alt.
Circuit diagram for LED-lamps 28W
L1
TR1 60W alt. 300W
N
E10077-0
2010-06-03 ASA
IN
230V AC
OUT
12V AC LA1
LA2
LA3
LA10
28W
28W
28W
28W
alt. alt.
Art.no.
Rev.no.
Scale
Designed by: Approved by:
Revised by: Date
Drawn by: Date
Drawing number
Assembly drawing no.
Surface treatment
part of ISO 2768
The tolerance class in accordance with this
E
Box 728, SE-194 27 Upplands Väsby, Sweden
Phone +46 8 59411050, Fax +46 8 59086880
1:2
OA 2006-04-26
OA 2007-09-20
belysning typ 300 CA vinyl
Håltagningsmall för
M10112 2
This documentanditscontents aretheexclusive
property ofPahlénsandmaynotbecopied,
reproduced,transmittedorcommunicatedtoathird
party,orusedforanypurposewithoutwrittenpermission.
n240
45°
22,5°
22,5°
22,5°
45°
45°
22,5°
22,5°
22,5°
45°
45°
n12(3x) n14(8x)
UP
Ø257
UP
Ø240
Ø12(3x) Ø14(8x)
Ø257
This document and its contents are the exclusive
property of Pahléns and may not be copied,
reproduced, transmitted or communicated to a third
party, or used for any purpose without written permission.
Art.no.
Rev.no.
Scale
Designed by: Approved by:
Revised by: Date
Drawn by: Date
Drawing number
Assembly drawing no.
Surface treatment
part of ISO 2768-1
The toleran ce class in accordan ce with this
E
Box 728, SE-194 27 Upplands Väsby, Sweden
Phone +46 8 59411050, Fax +46 8 59086880
124X9Y
ASA 2011-09-29
Belysning 300CA LED
M11446 0
Ø170
Ø160
140 25
282
Ø
288
Ø
Art.no.
Rev.no.
Scale
Designed by: Approved by:
Revised by: Date
Drawn by: Date
Drawing number
Assembly drawing no.
Surface treatment
part of ISO 2768-1
The tolera nce class i n accordance with t his
E
Box 728, SE-194 27 Upplands Väsby, Sweden
Phone +46 8 59411050, Fax +46 8 59086880
124X81
ASA 2011-11-03
TS 2012-03-19
Marine
Belysning 300A LED
M11562 1
Ø172
Ø160
304
288
22
36
140
Ø288
Ø170
22
140
Ø288
Ø304
Ø160
Ø282
Ø160
25
140 36
Dimensions Type 300CA Type 300A
LED light type 300 Marine ENGLISH
MA50-09 GB
2018
Type 300A, for concrete pools: Type 300CA, for pools with liner
Item no 124281 LED light red/green/blue Item no 124291 LED light red/green/blue-lampa
Item no 124381 LED light white Item no 124391 LED light white
Only for use under water.
The pool light shall be connected through an isolation transformer 12V AC 60W alt. 300W.
If several lamps are to be installed, these should all connect to the same transformer and switch, see circuit diagram below.
Pay attention to local electric directions, as to the placing of the junction box.
The light must be completely covered with water before lighting.
If the external cable or cord is damaged, it should be replaced by a service agent or a qualied person.
Circuit diagram Measurements for hole type 300CA
Example 1: Example 2:
Lamp - eective output 50W Lamp - eective output 28W
General information
Recommended values for water quality:
Total chlorine content: max 3.5 mg/liter (ppm)*
Chloride (salt) content: max 250 mg/liter
pH-value: 7.2–7.6
Alkalinity: 60–120 mg/liter (ppm)
Calcium hardness: 100–300 mg/liter (ppm)
Iron: max 0.1 mg/l *
Copper: max 0.2 mg/l *
Manganese: max 0.05 mg/l *
Phosphorus: max 0.01 mg/l *
Nitrate: max 50 mg/l *
* Complies to EN 16713-3
Outside these values the product warranty does not apply.

10
300–800 mm
LED light type 300 Marine ENGLISH
MA50-09 GB
2018
Type 300A - for concrete pools Item no 124381: LED white
Item no 124281: LED red/green/blue
Mounting instructions:
NOTE! Minimum distance between stainless steel material and non-stainless (e.g. Concrete-reinforcing bars) will be 50 mm.
The front edge of the niche shall be in line with the concrete wall (see A in sketch below).
1. Attach and secure the niche to the pool frame with the cable outlet pointing upwards.
2. Apply some water-resistant grease in the threads of the niche.
3. Thread the cable conduit in the niche and in the junction box. The thread shall be sealed with e.g. thread tape.
The cable conduit shall be placed so that the bend radius is not below 100 mm.
4. Place the supplied spacer on the cable of the lamp where it runs through the cable gland of the niche.
Tighten the cable gland in the niche to seal the cable. Insert the cable in the conduit and connect to the junction box.
Wrap excess cable behind the lamp and assemble the lighting unit in the niche.
5. Mount the front ring.
- for concrete pools
Tile
Tile x
Concrete
Spacer
Tile
Niche
Conduit
Sealing ring
Front Marine
Washer (6x)
Countersunk screw
M5x10 (6x)
Tile x
Screw M5x50 (2x)
Lamp unit
Concrete

11
300-800 mm
Liner
Plywood
Kabeldistans
Väggmatta
LED light type 300 Marine ENGLISH
MA50-09 GB
2018
Type 300CA - for pool with liner Item no 124291: LED red/green/blue
Item no 124391: LED white
Mounting instructions:
1. Make a hole in the framework, see a cross-section for making holes.
2. Apply some water-resistant grease in the threads of the niche.
3. Attach and secure the niche to the pool frame with the cable outlet pointing upwards.
4. Thread the cable conduit in the niche and in the junction box. The thread shall be sealed with e.g. thread tape.
The cable conduit shall be placed so that the bend radius is not below 100 mm.
5. Fixate the self-adhesive packing on the brim of the niche.
6. Insert the liner.
7. Fill the pool with water up to about 10 cm below the niche, make a small cut in the liner in the center of the niche
(not to close to the edge).
8. Mount the sealing ring with the packing under.
9. Cut the liner clean around the inside of the sealing ring.
10. Place the supplied spacer on the cable of the lamp where it runs through the cable gland of the niche.
Tighten the cable gland in the niche to seal the cable. Insert the cable in the conduit and connect to the junction box.
Wrap excess cable behind the lamp and assemble the lighting unit in the niche.
11. Mount the front ring.
- for pool walls of
wood, sheet or plastic
Fix and secure the niche into
the pool framework with the
supplied screws and washers.
Liner
Plywood
Spacer
Wall mat
Washer (3x)
Conduit
Sealing ring
Front Marine
Washer (6x)
Countersunk screw
M5x10 (6x)
Gasket 3mm
Screw (2x) M5x20
Lamp unit
Liner
Niche
Wall mat
Nut M6 (3x)
Pool frame work
plywood/sheet
Gasket 1.5 mm self-adhesive
Countersunk
screw M6x20 (8x)

12
300–800 mm
LED light type 300 Marine ENGLISH
MA50-09 GB
2018
- for pool walls made of building blocks
The niches are xed in the pool frame with joint foam ller.
NOTE! Minimum distance between stainless steel material and non-stainless (e.g. Concrete-reinforcing bars) will be 50 mm.
Liner
Building blocks
Spacer
Wall mat
Plaster
Washer (3x)
Conduit
Sealing ring
Front Marine
Washer (6x)
Countersunk screw M5x10 (6x)
Gasket 1.5 mm (self-adhesive)
Screw (2x)
M5x20
Lamp unit
Liner
Niche Wall mat
Nut M6 (3x)
Casting bracket (3x)
Countersunk screw
M6x20 (8x)
Gasket 3mm
Pool frame work
(building blocks with plaster)

13
This document and its contents are the exclusive
property of Pahléns and may not be copied,
reproduced, transmitted or communicated to a third
party, or used for any purpose without written permission.
Sid 1(2)
300–800 mm
This document and its contents are the exclusive
property of Pahléns and may not be copied,
reproduced, transmitted or communicated to a third
party, or used for any purpose without written permission.
Sid 1(2)
LED light type 300 Marine ENGLISH
MA50-09 GB
2018
- For the pool framework of Thermoblock (foam plastic)
The niches are secured in the pool framework’s cellular plastic block block with joint foam ller before casting.
NOTE! Minimum distance between stainless steel material and non-stainless (e.g. Concrete-reinforcing bars) will be 50 mm.
Liner
Thermopool wall
Spacer
Wall mat
Reinforcement
bar
Concrete
Washer (3x)
Conduit
Sealing ring
Front Marine
Washer (6x)
Countersunk screw M5x10 (6x)
Gasket 1.5 mm (self-adhesive)
Screw (2x)
M5x20
Lamp unit
Liner
Niche
Wall mat
Nut M6 (3x)
Casting bracket (3x)
Countersunk
screw M6x20 (8x)
Gasket 3 mm
Thermopool wall

14
Art.no.
Rev.no.
Scale
Designed by: Approved by:
Revised by: Date
Drawn by: Date
Drawing number
Assembly dr awing no.
Surface treatment
part of ISO 2768-1
The tolerance class in accordance with this
E
Box 728, SE-194 27 Upplands Väsby, Sweden
Phone +46 8 59411050, Fax +46 8 59086880
ASA 2012-02-07
för MA50-09
Installationsbild
M11604
Låsbricka (6x)
Belysningsinsats Marine
Fästskruv M5x20 (2x)
Front Marine
Skruv M5x10 (6x)
Art.no.
Rev.no.
Scale
Designed by: Approved by:
Revised by: Date
Drawn by: Date
Drawing number
Assembly dr awing no.
Surface treatment
part of ISO 2768-1
The tolerance class in accordance with this
E
Box 728, SE-194 27 Upplands Väsby, Sweden
Phone +46 8 59411050, Fax +46 8 59086880
ASA 2012-02-07
för MA50-09
Installationsbild
M11605
Art.no.
Rev.no.
Scale
Designed by: Approved by:
Revised by: Date
Drawn by: Date
Drawing number
Assembly drawing no.
Surface treatment
part of ISO 2768-1
The tolerance class in accordance with this
E
Box 728, SE-194 27 Upplands Väsby, Sweden
Phone +46 8 59411050, Fax +46 8 59086880
1553002X
ASA 2009-05-26
ASA 2018-08-16
Typ 300-lampa
Belysningsinsats LED Marine
M11563 3
This document and its contents are the exclusive
property of Pahléns and may not be copied,
reproduced, transmitted or communicated to a third
party, or used for any purpose without written permission.
M1271315530260RubberTätningshylsa18
DIN 933 - M5 x 2519901225
A4
Skruv M6S M5x252
7
1246112461
POMKnopp räfflad SR6127 typ 1
26
Pan head Torx 4x1019922115A4
Skruv MRT A4 M4x10
2
5
M12906123402EN 1.4404 (SS2348)Bygel till LED-lampa14
LED
123241 alt. 123341
LED lampa Spectravision 700, multi alt. vit13
U-list12272
PVCU-list PVC GV-1-5, L=550mm
12
M1144515530021 Fästram 300- och LED-lampa11
Drawing.no:Art_nrMaterialTitle/ NameQty.Item.
1,5m
(3m)
Art.nr
Belysningsinsats
Pos 3
LED-lampa Anm
15530025 123241 röd/grön/blå
15530026 123341 vit
8
2
3
5
7
6
1
REVISION HISTORY
ZONE REV DESCRIPTION DATE APPROVED
3Pos 8 var bipackad lampan från lev. 2017-09-27
3Pos 4 var 123401, pos 5 var 19922115, pos 7 var 19909225, se ÄO-00109 2018-08-16 ASA
4
LED light type 300 Marine ENGLISH
MA50-09 GB
2018
Assembly order LED light unit
1. Mounting frame ring
2. U-list (optional)
3. Lamp
4. Bracket
5. Screw M4
6. Foot
7. Screw M5
8. Spacer
Item no 123261 Exchange LED lamp unit, red/green/blue
Item no 123361 Exchange LED lamp unit, white
Technical specication Standard input voltage: 12V AC
Standard input watt: See rating plate on the lamp
(max 50W)
This LED-light is suited for most PAR56 standard pool lights. Suits all Pahlén
lighting type 300, both standard and Marine design.
For under water use only.
The pool light should be connected through an isolation transformer 12V 60W alt.
300W. If you have more than one LED light in your pool, make sure all the lights
are installed on the same transformer and switch.
Both types of lights are connected the same way.
If the external cable or cord of the light is damaged, it should be replaced by a
service agent or other qualied person.
Installation
1. Remove the front ring.
2. Remove the existing lamp unit.
3. Dismantle the old light from the lamp unit frame.
4. Mount the replacement bulb. The spacer (pos 8) shall be placed
where the cable meets the cable gland.
5. Connect the cable.
6. Mount the lamp unit to the poolwall.
7. Mount the Marine front ring.
Start-up
Make sure that each light is installed correctly.
Synchronizing multiple lights
1. To synchronize the lights to the same program, turn the lights on,
wait for a few seconds.
2. Turn o the lights and wait for a minimum of 12 seconds, then switch back on.
3. Change the colour/program 2 times. Now they are synchronized.
Once the lights are synchronized, they will stay that way until one of the LED
lights is replaced or one light is switched on separately from the others.
Changing colour/program: Turn the lamps o and quickly back on (max 10 sec. o).
Memorizing the last colour/program:
1. Select the desired colour/program.
2. Turn the lamps o for minimum 12 seconds. The chosen program has now
been memorized.
The red/green/blue light
The LED light PAR56 is a very advanced electronic controlled light based on
LED’s in three colours: red, green and blue. Together these three colours can
produce several other colours. With the on/o switch for your pool lights, one of
the 16 pre-programmed light eects can be selected.
The 16 programs of the red/green/blue light:
1 Warm white Fixed colour warm white
2 Red Fixed colour red
3 Green Fixed colour green
4 Blue Fixed colour blue
5 Green-blue Fixed colour green/blue
6 Red-green Fixed colour red/green
7 Blue-red Fixed colour blue/red
8 Evening sea Slow change of colour red/blue
9 Evening river Slow change of colour red/green
10 Riviera Slow change of colour green/blue
11 White Fixed colour neutral white
12 Rainbow Slow change of colour blue/red/green
13 River of colours Program 12 followed by program 15
14 Disco Rapid change of colour
15 Four seasons Slow change of colour red/
16 Party Rapid change of colour
Washer (6x)
Lamp unit Marine
Screw M5x20 (2x)
Front Marine
Countersunk screw
M5x10 (6x)
Washer (6x)
Lamp unit Marine
Screw M5x50 (2x)
Front Marine
Countersunk
screw
M5x10 (6x)

15
Circuit diagram for LED-lamps
L1
TR1 60W alt. 300W
N
E10016-0
2007-07-11ASA
IN
230V AC
OUT
12V AC LA1
LA2
LA3
LA6
50W
50W
50W
50W
50W
alt.alt.
Circuit diagram for LED-lamps 28W
L1
TR1 60W alt. 300W
N
E10077-0
2010-06-03 ASA
IN
230V AC
OUT
12V AC LA1
LA2
LA3
LA10
28W
28W
28W
28W
alt. alt.
Art.no.
Rev.no.
Scale
Designed by: Approved by:
Revised by: Date
Drawn by: Date
Drawing number
Assembly drawing no.
Surface treatment
part of ISO 2768
The tolerance class in accordance with this
E
Box 728, SE-194 27 Upplands Väsby, Sweden
Phone +46 8 59411050, Fax +46 8 59086880
1:2
OA 2006-04-26
OA 2007-09-20
belysning typ 300 CA vinyl
Håltagningsmall för
M10112 2
This documentanditscontents aretheexclusive
property ofPahlénsandmaynotbecopied,
reproduced,transmittedorcommunicatedtoathird
party,orusedforanypurposewithoutwrittenpermission.
n240
45°
22,5°
22,5°
22,5°
45°
45°
22,5°
22,5°
22,5°
45°
45°
n12(3x) n14(8x)
UP
Ø257
OBEN
Ø240
Ø12(3x) Ø14(8x)
Ø257
This document and its contents are the exclusive
property of Pahléns and may not be copied,
reproduced, transmitted or communicated to a third
party, or used for any purpose without written permission.
Art.no.
Rev.no.
Scale
Designed by: Approved by:
Revised by: Date
Drawn by: Date
Drawing number
Assembly drawing no.
Surface treatment
part of ISO 2768-1
The toleran ce class in accordan ce with this
E
Box 728, SE-194 27 Upplands Väsby, Sweden
Phone +46 8 59411050, Fax +46 8 59086880
124X9Y
ASA 2011-09-29
Belysning 300CA LED
M11446 0
Ø170
Ø160
140 25
282
Ø
288
Ø
Art.no.
Rev.no.
Scale
Designed by: Approved by:
Revised by: Date
Drawn by: Date
Drawing number
Assembly drawing no.
Surface treatment
part of ISO 2768-1
The tolera nce class i n accordance with t his
E
Box 728, SE-194 27 Upplands Väsby, Sweden
Phone +46 8 59411050, Fax +46 8 59086880
124X81
ASA 2011-11-03
TS 2012-03-19
Marine
Belysning 300A LED
M11562 1
Ø172
Ø160
304
288
22
36
140
Ø288
Ø170
22
140
Ø288
Ø304
Ø160
Ø282
Ø160
25
140 36
LED Beleuchtung Typ 300 Marine
MA50-09 DE
2018
DEUTSCH
Typ 300A, für Betonpools Typ 300CA, für Pools mit Auskleidung:
Art.Nr 124281 LED Beleuchtung rot/grün/blau Art.Nr 124291 LED Beleuchtung rot/grün/blau
Art.Nr 124381 LED Beleuchtung weiss Art.Nr 124391 LED Beleuchtung weiss
Nur für den Gebrauch unter Wasser bestimmt.
Das Pool-Licht ist über einen Trenntransformator (12 VAC/60 W alt. 300W) anzuschließen.
Sollen mehrere Lampen installiert werden, so sind diese alle an den gleichen Transformator und Schalter anzuschließen
(siehe untenstehenden Schaltplan).
Achten Sie bei der Platzierung der Anschlussdose auf die Einhaltung der örtlich geltenden Sicherheitsvorschriften
für den Umgang mit Elektrizität.
Das Licht muss komplett mit Wasser bedeckt sein, bevor es eingeschaltet wird.
Sollten die externen Kabel oder Litzen beschädigt sein, so müssen diese vom Kundendienst oder einer qualizierten Person
ersetzt werden.
Abmessungen der Lochausführung
Schaltplan für Typ 300CA
Beispiel 1: Lampenleistung 50W Beispiel 2: Lampenleistung 28W
Allgemeine Informationen
Empfohlene Werte für die Wasserqualität:
Gesamter Chlorgehalt: max 3.5 mg/Liter (ppm) *
Chlor (Salz) Gehalt: max 250 mg/Liter
pH-Wert: 7.2–7.6
Alkalität: 60–120 mg/Liter (ppm)
Kalziumhärte: 100–300 mg/Liter (ppm)
Eisen: max 0.1 mg/l *
Kupfer: max 0.2 mg/l *
Mangan: max 0.05 mg/l *
Phosphor: max 0.01 mg/l *
Nitrat: max 50 mg/l * * Gemäß EN 16713-3
Bei Nichteinhaltung dieser Werte erlischt die Produktgarantie.
Zeichnung Typ 300CA Typ 300A

16
300–800 mm
LED Beleuchtung Typ 300 Marine
MA50-09 DE
2018
DEUTSCH
Typ 300A - in Beton eingebettet werden Art.Nr 124381: LED Beleuchtung, weiß
Art.Nr 124281: LED Beleuchtung, rot/grün/blau
Montageanleitung:
ACHTUNG!
Der Abstand zwischen Edelstahl und nicht rostfreiem Stahl (z. B. Bewehrungseisen) muss mindestens 50 mm betragen.
Die Vorderkante der Einbaunische muss auf einer Linie mit der Betonwand liegen (siehe A in der untenstehenden Abbildung).
1. Befestigen Sie die Nische mit den Kabelausgängen nach oben am Poolkörper.
2. Tragen Sie wasserbeständiges Fett auf die Gewinde der Einbaunische auf.
3. Fädeln Sie den Kabelkanal in die Einbaunische und die Anschlussdose ein. Das Gewinde muss abgedichtet werden,
z. B. mit Gewindeband.
Der Kabelkanal ist so zu platzieren, dass der Biegeradius nicht weniger als 100 mm beträgt.
4. Bringen Sie das mitgelieferte Distanzstück an der Stelle der Leuchtenzuleitung an, an dem diese durch die Kabel-
verschraubung der Einbaunische verläuft. Ziehen Sie die Kabelverschraubung in der Einbaunische an, um das Kabel
abzudichten. Führen Sie das Kabel in den Kanal ein und schließen Sie es an die Anschlussdose an. Verstauen Sie
Kabelüberlängen hinter der Leuchte und bauen Sie die Beleuchtungseinheit in der Einbaunische zusammen.
5. Montieren Sie den vorderen Ring.
- für Betonpools Fliese
Fliesen-
halterung
Betong
Distanzstück
Fliese
Einbaunische
Kanal
Dichtungsring
Frontstück Marine
Unterleg-
scheibe (6x)
Senkschraube M5x10 (6x)
Fliesenhalterung
Schraube M5x50 (2x)
Leuchteneinheit
Beton

17
300–800 mm
LED Beleuchtung Typ 300 Marine
MA50-09 DE
2018
DEUTSCH
Typ 300CA - für Swimmingpools mit Auskleidung Art.Nr 124291: LED Beleuchtung, rot/grün/blau
Art.Nr 124391: LED Beleuchtung, weiss
Montageanleitung:
1. Machen Sie ein Loch in den Poolkörper, siehe Maßskizze für die Locherstellung.
2. Tragen Sie wasserbeständiges Fett auf die Gewinde der Einbaunische auf.
3. Befestigen Sie die Nische mit den Kabelausgängen nach oben am Poolkörper.
4. Fädeln Sie den Kabelkanal in die Einbaunische und die Anschlussdose ein. Das Gewinde muss abgedichtet werden,
z. B. mit Gewindeband. Der Kabelkanal ist so zu platzieren, dass der Biegeradius nicht weniger als 100 mm beträgt.
5. Befestigen Sie die selbstklebende Abdichtung am Rand der Einbaunische.
6. Verlegen Sie die Auskleidung.
7. Füllen Sie den Pool bis ca. 10 cm unterhalb der Einbaunische mit Wasser. Führen Sie in der Mitte der Einbaunische einen
kleinen Schnitt durch die Auskleidung durch (nicht zu nah am Rand).
8. Montieren Sie den Dichtungsring auf die darunterliegende Abdichtung.
9. Führen Sie einen passgenauen Schnitt auf der Innenseite des Dichtungsringes durch, um überschüssige Auskleidung zu
entfernen.
10. Bringen Sie das mitgelieferte Distanzstück an der Stelle der Leuchtenzuleitung an, an dem diese durch die Kabel-
verschraubung der Einbaunische verläuft.
Ziehen Sie die Kabelver-
schraubung in der Einbaunische
an, um das Kabel abzudichten.
Führen Sie das Kabel in den
Kanal ein und schließen Sie es
an die Anschlussdose an.
Verstauen Sie Kabelüberlängen
hinter der Leuchte und bauen
Sie die Beleuchtungseinheit in
der Einbaunische zusammen.
11. Montieren Sie den vorderen Ring.
- für Poolwände aus
Holz, Blech oder
Kunststo
Fixieren Sie die Nische am Poolkörper
mit der mitgelieferten Schrauben samt
Scheiben.
Aus-
kleidung
Sperrholz
Distanzstück
Wand-
bekleidung
Unterlegscheibe (3x)
Kanal
Dichtungsring
Frontstück Marine
Unterlegscheibe (6x)
Senkschraube M5x10 (6x)
Abdichtung 3 mm
Schraube (2x)
M5x20
Leuchteneinheit
Auskleidung
Einbaunische
Wandbekleidung
Nuss M6 (3x)
Poolrahmen Sperrholz/Blech
Abdichtung 1.5 mm selbstklebend
Senkschraube
M6x20 (8x)

18
300–800 mm
LED Beleuchtung Typ 300 Marine
MA50-09 DE
2018
DEUTSCH
- für aus Bausteinen bestehende Poolwände
Die Nische wird mit Fugenschaum am Poolkörper xiert.
ACHTUNG!
Der Abstand zwischen Edelstahl und nicht rostfreiem Stahl (z. B. Bewehrungseisen) muss mindestens 50 mm betragen.
Auskleidung
Bausteine
Distanzstück
Wandbekleidung
Putz
Unterleg-
scheibe (3x)
Kanal
Dichtungsring
Frontstück Marine
Unterleg-
scheibe (6x)
Senkschraube M5x10 (6x)
Abdichtung 1.5 mm (selbstklebend)
Schraube (2x)
M5x20
Leuchteneinheit
Auskleidung
Einbaunische Wandbekleidung
Nuss M6 (3x)
Gusshalterung (3x)
Senkschraube
M6x20 (8x)
Abdichtung 3 mm
Poolrahmen
(Bausteine mit Putz)

19
This document and its contents are the exclusive
property of Pahléns and may not be copied,
reproduced, transmitted or communicated to a third
party, or used for any purpose without written permission.
Sid 1(2)
300–800 mm
This document and its contents are the exclusive
property of Pahléns and may not be copied,
reproduced, transmitted or communicated to a third
party, or used for any purpose without written permission.
Sid 1(2)
LED Beleuchtung Typ 300 Marine
MA50-09 DE
2018
DEUTSCH
- für Poolkörper aus Dämmblöcken (Schaumsto)
Die Nische wird vor dem Gießen mit Fugenschaum am Schaumstoblock des Poolkörpers xiert.
ACHTUNG!
Der Abstand zwischen Edelstahl und nicht rostfreiem Stahl (z. B. Bewehrungseisen) muss mindestens 50 mm betragen.
Auskleidung
Thermopool-Wand
Distanzstück
Wandbekleidung
Bewehrungsstab
Beton
Unter-
legscheibe (3x)
Kanal
Dichtungsring
Frontstück Marine
Unterlegscheibe (6x)
Senkschraube (6x) M5x10
Abdichtung 1.5 mm (selbstklebend)
Schraube (2x)
M5x20
Leuchteneinheit
Auskleidung
Einbaunische
Wandbekleidung
Nuss M6 (3x)
Gusshalterung (3x)
Senkschraube
M6x20 (8x)
Abdichtung 3 mm
Thermopool-Wand

20
Art.no.
Rev.no.
Scale
Designed by: Approved by:
Revised by: Date
Drawn by: Date
Drawing number
Assembly dr awing no.
Surface treatment
part of ISO 2768-1
The tolerance class in accordance with this
E
Box 728, SE-194 27 Upplands Väsby, Sweden
Phone +46 8 59411050, Fax +46 8 59086880
ASA 2012-02-07
för MA50-09
Installationsbild
M11604
Låsbricka (6x)
Belysningsinsats Marine
Fästskruv M5x20 (2x)
Front Marine
Skruv M5x10 (6x)
Art.no.
Rev.no.
Scale
Designed by: Approved by:
Revised by: Date
Drawn by: Date
Drawing number
Assembly dr awing no.
Surface treatment
part of ISO 2768-1
The tolerance class in accordance with this
E
Box 728, SE-194 27 Upplands Väsby, Sweden
Phone +46 8 59411050, Fax +46 8 59086880
ASA 2012-02-07
för MA50-09
Installationsbild
M11605
Art.no.
Rev.no.
Scale
Designed by: Approved by:
Revised by: Date
Drawn by: Date
Drawing number
Assembly drawing no.
Surface treatment
part of ISO 2768-1
The tolerance class in accordance with this
E
Box 728, SE-194 27 Upplands Väsby, Sweden
Phone +46 8 59411050, Fax +46 8 59086880
1553002X
ASA 2009-05-26
ASA 2018-08-16
Typ 300-lampa
Belysningsinsats LED Marine
M11563 3
This document and its contents are the exclusive
property of Pahléns and may not be copied,
reproduced, transmitted or communicated to a third
party, or used for any purpose without written permission.
M1271315530260RubberTätningshylsa18
DIN 933 - M5 x 2519901225
A4
Skruv M6S M5x252
7
1246112461
POMKnopp räfflad SR6127 typ 1
26
Pan head Torx 4x1019922115A4
Skruv MRT A4 M4x10
2
5
M12906123402EN 1.4404 (SS2348)Bygel till LED-lampa14
LED
123241 alt. 123341
LED lampa Spectravision 700, multi alt. vit13
U-list12272
PVCU-list PVC GV-1-5, L=550mm
12
M1144515530021 Fästram 300- och LED-lampa11
Drawing.no:Art_nrMaterialTitle/ NameQty.Item.
1,5m
(3m)
Art.nr
Belysningsinsats
Pos 3
LED-lampa Anm
15530025 123241 röd/grön/blå
15530026 123341 vit
8
2
3
5
7
6
1
REVISION HISTORY
ZONE REV DESCRIPTION DATE APPROVED
3Pos 8 var bipackad lampan från lev. 2017-09-27
3Pos 4 var 123401, pos 5 var 19922115, pos 7 var 19909225, se ÄO-00109 2018-08-16 ASA
4
LED Beleuchtung Typ 300 Marine
MA50-09 DE
2018
DEUTSCH
Montagereihenfolge der LED-Beleuchtungseinheit
1 Marin-Einbaurahmen)
2 U-Einfassung (optional)
3 Leuchte
4 Halterung
5 Schraube (M4)
6 Fuss
7 Schraube (M5)
8 Distanzstück
Art.Nr 123261 Ersatz-LED-Leuchte, rot/grün/blau
Art.Nr 123361 Ersatz-LED-Leuchte, weiss
Technische Spezikationen Spannung: 12V AC
Leistung: Siehe Typenschild der Lampe (Max 50W)
Dieses LED-Licht ist für die meisten PAR56-Standard-Pool-Lichter geeignet.
Es kann mit allen Pahlén-Beleuchtungseinheiten des Typs 300 verwendet werden,
sowohl mit der Standard- als auch der Marin-Ausführung.
Nur für den Gebrauch unter Wasser bestimmt.
Das Pool-Licht ist über einen Trenntransformator (12 VAC/60 W alt. 300W) anzu-schließen.
Sollte Ihr Pool mit mehr als einem LED-Licht ausgestattet sein, stellen Sie sicher,
dass alle Lichter an den gleichen Transformator und Schalter angeschlossen sind.
Beide Licht-Typen werden auf die gleiche Weise angeschlossen.
Sollten die externen Kabel oder Litzen der Leuchte beschädigt sein, so müssen
diese vom Kundendienst oder einer anderen qualizierten Person ersetzt werden.
Installation
1. Entfernen Sie den vorderen Ring.
2. Bauen Sie die vorhandene Leuchteneinheit aus.
3. Demontieren Sie das alte Licht vom Rahmen der Leuchteneinheit.
4. Montieren Sie die Ersatzbirne. Das Distanzstück (Pos. 8) ist dort zu platzieren,
wo das Kabel auf die Kabelverschraubung trit.
5. Schließen Sie das Kabel an.
6. Montieren Sie die Leuchteneinheit an der Poolwand.
7. Montieren Sie den vorderen Frontstück Marine.
Inbetriebnahme
Vergewissern Sie sich, dass jedes Licht korrekt installiert wurde.
Synchronisierung mehrerer Lichter
1. Um die Lichter auf das gleiche Programm zu synchronisieren,
schalten Sie die Lichter an, ein paar Sekunden warten.
2. Schalten Sie die Lichter aus, und warten Sie mindestens 12
Sekunden, dann wieder einschalten.
3. Ändern Sie die Farbe/Programm 2 mal. Jetzt sind die Lichter synchronisiert.
Sobald die Lichter synchronisiert sind, werden sie auch so bleiben, bis eine der LED
Lichter ersetzt wird oder ein Licht an getrennt von den anderen umgeschaltet wird.
Programm/Farbwechsel: Schalten Sie die Lampen aus und schnell wieder ein
(maximal 10 Sekunden ausgeschaltet).
Speicherung der letzten Farbe/Programm:
1. Wählen Sie die gewünschte Farbe/Programm.
2. Schalten Sie die Lampen mindestens 12 Sekunden aus.
Die gewählte Farbe ist nun gespeichert.
Das Rot/Grün/Blau-Licht
Bei dem LED-Licht PAR56 handelt es sich um äußerst fortschrittliches, elektronisch
gesteuertes Licht, das auf LEDs in drei Farben zurückgreift: rot, grün und blau.
Im Zusammenspiel können diese drei Farben mehrere andere Farben produzieren.
Über den Ein/Aus-Schalter Ihrer Pool-Beleuchtung können Sie eines der 16 vor-
programmierten Lichtprogramme auswählen.
16 program
1 Warmes Weiß Festgelegte Farbe ist warmes Weiß
2 Rot Festgelegte Farbe ist Rot
3 Grün Festgelegte Farbe ist Grün
4 Blau Festgelegte Farbe ist Blau
5 Grün-Blau Festgelegte Farbe ist Grün/Blau
6 Rot-Grün Festgelegte Farbe ist Rot/Grün
7 Blau-Rot Festgelegte Farbe ist Blau/Rot
8 Abendliches Meer Langsamer Wechsel der Farben Rot/Blau
9 Abendlicher Fluss Langsamer Wechsel der Farben Rot/Grün
10 Riviera Langsamer Wechsel der Farben Grün/Blau
11 Weiß Festgelegte Farbe ist neutrales Weiß
12 Regenbogen Langsamer Wechsel der Farben Blau/Rot/Grün
13 Fluss der Farben Programm 12 gefolgt von Programm 15
14 Disco Schneller Farbenwechsel
15 Vier Jahreszeiten Langsamer Wechsel der Farben Rot/Blau/Grün/Violett
16 Party Schneller Farbenwechsel
Unterleg-
scheibe (6x)
Leuchteneinheit Marine
Schraube M5x20 (2x)
Frontstück Marine
Senkschraube
M5x10 (6x)
Unterleg-
scheibe (6x)
Leuchteneinheit Marine
Schraube M5x50 (2x)
Frontstück Marine
Senkschraube
M5x10 (6x)

21
Art.no.
Rev.no.
Scale
Designed by: Approved by:
Revised by: Date
Drawn by: Date
Drawing number
Assembly drawing no.
Surface treatment
part of ISO 2768
The tolerance class in accordance with this
E
Box 728, SE-194 27 Upplands Väsby, Sweden
Phone +46 8 59411050, Fax +46 8 59086880
1:2
OA 2006-04-26
OA 2007-09-20
belysning typ 300 CA vinyl
Håltagningsmall för
M10112 2
This documentanditscontents aretheexclusive
property ofPahlénsandmaynotbecopied,
reproduced,transmittedorcommunicatedtoathird
party,orusedforanypurposewithoutwrittenpermission.
n240
45°
22,5°
22,5°
22,5°
45°
45°
22,5°
22,5°
22,5°
45°
45°
n12(3x) n14(8x)
UP
Ø257
Верх
Ø240
Ø12(3x) Ø14(8x)
Ø257
This document and its contents are the exclusive
property of Pahléns and may not be copied,
reproduced, transmitted or communicated to a third
party, or used for any purpose without written permission.
Art.no.
Rev.no.
Scale
Designed by: Approved by:
Revised by: Date
Drawn by: Date
Drawing number
Assembly drawing no.
Surface treatment
part of ISO 2768-1
The toleran ce class in accordan ce with this
E
Box 728, SE-194 27 Upplands Väsby, Sweden
Phone +46 8 59411050, Fax +46 8 59086880
124X9Y
ASA 2011-09-29
Belysning 300CA LED
M11446 0
Ø170
Ø160
140 25
282
Ø
288
Ø
Art.no.
Rev.no.
Scale
Designed by: Approved by:
Revised by: Date
Drawn by: Date
Drawing number
Assembly drawing no.
Surface treatment
part of ISO 2768-1
The tolera nce class i n accordance with t his
E
Box 728, SE-194 27 Upplands Väsby, Sweden
Phone +46 8 59411050, Fax +46 8 59086880
124X81
ASA 2011-11-03
TS 2012-03-19
Marine
Belysning 300A LED
M11562 1
Ø172
Ø160
304
288
22
36
140
Ø288
Ø170
22
140
Ø288
Ø304
Ø160
Ø282
Ø160
25
140 36
Circuit diagram for LED-lamps 28W
L1
TR1 60W alt. 300W
N
E10077-0
2010-06-03 ASA
IN
230V AC
OUT
12V AC LA1
LA2
LA3
LA10
28W
28W
28W
28W
alt. alt.
Circuit diagram for LED-lamps
L1
TR1 60W alt. 300W
N
E10016-0
2007-07-11ASA
IN
230V AC
OUT
12V AC LA1
LA2
LA3
LA6
50W
50W
50W
50W
50W
alt.alt.
РУССКИЙ
Светодиодный светильник типа 300 Marine
MA50-09 RU
2018
Тип 300A, для бетонных бассейнов Тип 300CA, для бассейна с лайнером
Арт. №124281 Светодиодная лампа,
Красный/зеленый/синий
Арт. № 124291 Светодиодная лампа,
Красный/зеленый/синий
Арт. № 124381 Светодиодная лампа, Белый Арт. № 124391 Светодиодная лампа, Белый
Только для использования под водой.
Светильник должен подключаться через разделительный трансформатор 12B AC 60Вт alt. 300Вт.
Если должно быть установлено несколько светильников, они все должны подключаться к одному трансформатору и
выключателю, см. ниже электрическую схему.
Обратите внимание на направление электрического тока во время установки распределительной коробки.
Перед включением светильников убедитесь, что они полностью находятся под водой.
При повреждении внешнего кабеля или шнура, его замену должен выполнять персонал по обслуживанию оборудования
или другой квалифицированный специалист.
Схема соединения
Размеры для отверстия типа 300CA
Пример 1: мощность лампы 50 Вт Пример 2: мощность лампы 28 Вт
Bх. 230В
перем тока
50Вт
50Вт
50Вт
50Вт
Bых. 230В
перем тока
TP1. 60Вт или 300Bт
альт.альт.
Bх. 230В
перем тока
28Вт
28Вт
28Вт
28Вт
Bых. 230В
перем тока
TP1. 60Вт или 300Bт
альт.альт.
Общие сведения
Рекомендуемые параметры качества воды:
Общее содержание хлора: не более 3.5 мг/л (ppm)*
Содержание солей-хлоридов: не более 250 мг/л
Значение рН: 7.2–7.6
Щелочность: 60–120 мг/л (ppm)
Кальциевая жесткость: 100–300 мг/л (ppm)
Железа: не более 0.1 мг/л*
Меди: не более 0.2 мг/л*
Марганца: не более 0.05 мг/л*
Фосфорa: не более 0.01 мг/л*
Нитратов: не более 50 мг/л* * Согласно EN 16713-3
Если вода не соответствует этим ограничениям, действие гарантии прекращается.
Чертеж Тип 300CA Тип 300A

22
300–800 мм
РУССКИЙ
Светодиодный светильник типа 300 Marine
MA50-09 RU
2018
Тип 300A - для бетонных бассейнов
Арт. № 124381: Светодиодная лампа, Белый
Арт. № 124281: Светодиодная лампа, Красный/зеленый/синий
Инструкция по монтажу:
Внимание! Расстояние между материалом из нержавеющей стали и другими видами металла (например,
с армирующим чугуном) должно составлять не менее 50 мм.
Передний край ниши должен устанавливаться заподлицо с бетонной стеной (см. A на схеме ниже).
1. Закрепите нишу в корпусе бассейна так, чтобы кабельные вводы находились вверху.
2. Нанесите небольшое количество герметика на резьбу ниши.
3. Пропустите кабелепровод через нишу и распределительную коробку. Резьба должна быть герметизирована,
например, лентой для уплотнения резьбовых соединений. Кабелепровод должен располагаться так,
чтобы радиус изгиба был не менее 100 мм.
4. Вставьте кабель в трубопровод и подключите к распределительной коробке.
Затяните соединительные элементы ниши для герметизации кабеля.
Оберните лишний кабель вокруг лампы и установите осветительный блок в нише.
5. Установите переднее кольцо.
- для бетонных
бассейнов Плитка
Крепление плиткиl
Бетон
Прокладка
Плитка
Ниша
Кабелепровод
Уплотнительное
кольцо
Переднее кольцо
Шайбa ( (6x)
Винт M5x10 (6x)
Крепление плитки
Винт (2x) M5x50
Осветительный
блок
Бетон

23
300–800 mm
РУССКИЙ
Светодиодный светильник типа 300 Marine
MA50-09 RU
2018
Тип 300CA - Для бассейна с лайнером Арт. № 124291: Светодиодная лампа, Красный/зеленый/синий
Арт. № 124391: Светодиодная лампа, Белый
Инструкция по монтажу:
1. Проделайте отверстия в корпусе, см. рисунок в поперечном сечении.
2. Нанесите небольшое количество герметика на резьбу ниши.
3. Закрепите нишу в корпусе бассейна так, чтобы кабельные вводы находились вверху.
4. Пропустите кабелепровод через нишу и распределительную коробку. Резьба должна быть герметизирована,
например, лентой для уплотнения резьбовых соединений. Кабелепровод должен располагаться так, чтобы радиус
изгиба был не менее 100 мм.
5. Закрепите самоклеящееся уплотнение по краю ниши.
6. Вставьте лайнер.
7. Наполните бассейн водой до уровня на 10 см ниже ниши. Сделайте небольшой надрез в лайнере в центре ниши
(не слишком близко к краю).
8. Установите уплотнительное кольцо, самоклеющееся уплотнение – под ним.
9. Аккуратно обрежьте лайнер по кругу внутри уплотнительного кольца.
10. Наденьте прокладку на кабель от лампы, в том месте, где он проходит через кабельную прокладку ниши. Затяните
соединительные элементы ниши для герметизации кабеля. Оберните лишний кабель вокруг лампы и установите
осветительный блок в нише.
11. Установите переднее
кольцо.
- для бассейнов со
стенками из дерева,
листового материала
или пластика
Закрепите нишу в корпусе
бассейна с помощью
прилагающихся винта и шайбы.
Лайнер
Фанера
Прокладка
Настенная
прокладка
Шайбa (3x)
Кабелепровод
Уплотнительное
кольцо
Переднее кольцо
Шайбa (6x)
Винт M5x10 (6x)
Уплотнение 3 мм
Винт (2x) M5x20
Осветительный блок
Лайнер
Ниша
Настенная
прокладка
Гайка M6 (3x)
Каркас бассейна фанера/листмвой материал
Уплотнение 1.5 мм самоклeящeecя
Винт (8x)
M6x20

24
300–800 мм
РУССКИЙ
Светодиодный светильник типа 300 Marine
MA50-09 RU
2018
- для бассейнов со стенками из строительных блоков
Ниша закрепляется в корпусе бассейна на монтажной пене.
Внимание!
Расстояние между материалом из нержавеющей стали и другими видами металла (например, с армирующим
чугуном) должно составлять не менее 50 мм.
Лайнер
Строительные блоки
Прокладка
Настенная
прокладка
Штукатурка
Шайбa M6 (3x)
Кабелепровод
Уплотнительное кольцо
Переднее кольцо
Шайбa (6x)
Винт (6x)
M5x10
Уплотнение 1.5 мм самоклeящeecя
Винт (2x)
M5x20
Осветительный блок
Лайнер
Ниша Настенная
прокладка
Гайка M6 (3x)
Кронштейн для
заливки (3x)
Винт (8x)
M6x20
Уплотнение 3 мм
Каркаc
бассейна
(оштукатyренные
строительные блоки)

25
This document and its contents are the exclusive
property of Pahléns and may not be copied,
reproduced, transmitted or communicated to a third
party, or used for any purpose without written permission.
Sid 1(2)
300-800 mm
This document and its contents are the exclusive
property of Pahléns and may not be copied,
reproduced, transmitted or communicated to a third
party, or used for any purpose without written permission.
Sid 1(2)
РУССКИЙ
Светодиодный светильник типа 300 Marine
MA50-09 RU
2018
- для корпуса из термоблока (ячеистый пластик)
В полистирольном ячеистопластиковом блоке ниша фиксируется монтажной пеной перед термоплавкой.
Внимание! Расстояние между материалом из нержавеющей стали и другими видами металла (например, с
армирующим чугуном) должно составлять не менее 50 мм.
Лайнер
Стенка Thermopool
Прокладка
Настенная
прокладка
Aрматyрный
стержень
Бетон
Шайбa (3x)
Кабелепровод
Уплотнительное
кольцо
Переднее кольцо Marine
Шайбa (6x)
Винт (6x) M5x10
Уплотнение 1.5 мм самоклeящeecя
Винт (2x)
M5x20
Осветительный
блок
Лайнер
Ниша
Настенная
прокладка
Гайка M6 (3x)
Кронштейн для заливки (3x)
Винт (8x)
M6x20
Уплотнение 3 мм
Стенка Thermopool

26
Art.no.
Rev.no.
Scale
Designed by: Approved by:
Revised by: Date
Drawn by: Date
Drawing number
Assembly dr awing no.
Surface treatment
part of ISO 2768-1
The tolerance class in accordance with this
E
Box 728, SE-194 27 Upplands Väsby, Sweden
Phone +46 8 59411050, Fax +46 8 59086880
ASA 2012-02-07
för MA50-09
Installationsbild
M11604
Låsbricka (6x)
Belysningsinsats Marine
Fästskruv M5x20 (2x)
Front Marine
Skruv M5x10 (6x)
Art.no.
Rev.no.
Scale
Designed by: Approved by:
Revised by: Date
Drawn by: Date
Drawing number
Assembly dr awing no.
Surface treatment
part of ISO 2768-1
The tolerance class in accordance with this
E
Box 728, SE-194 27 Upplands Väsby, Sweden
Phone +46 8 59411050, Fax +46 8 59086880
ASA 2012-02-07
för MA50-09
Installationsbild
M11605
Art.no.
Rev.no.
Scale
Designed by: Approved by:
Revised by: Date
Drawn by: Date
Drawing number
Assembly drawing no.
Surface treatment
part of ISO 2768-1
The tolerance class in accordance with this
E
Box 728, SE-194 27 Upplands Väsby, Sweden
Phone +46 8 59411050, Fax +46 8 59086880
1553002X
ASA 2009-05-26
ASA 2018-08-16
Typ 300-lampa
Belysningsinsats LED Marine
M11563 3
This document and its contents are the exclusive
property of Pahléns and may not be copied,
reproduced, transmitted or communicated to a third
party, or used for any purpose without written permission.
M1271315530260RubberTätningshylsa18
DIN 933 - M5 x 2519901225
A4
Skruv M6S M5x252
7
1246112461
POMKnopp räfflad SR6127 typ 1
26
Pan head Torx 4x1019922115A4
Skruv MRT A4 M4x10
2
5
M12906123402EN 1.4404 (SS2348)Bygel till LED-lampa14
LED
123241 alt. 123341
LED lampa Spectravision 700, multi alt. vit13
U-list12272
PVCU-list PVC GV-1-5, L=550mm
12
M1144515530021 Fästram 300- och LED-lampa11
Drawing.no:Art_nrMaterialTitle/ NameQty.Item.
1,5m
(3m)
Art.nr
Belysningsinsats
Pos 3
LED-lampa Anm
15530025 123241 röd/grön/blå
15530026 123341 vit
8
2
3
5
7
6
1
REVISION HISTORY
ZONE REV DESCRIPTION DATE APPROVED
3Pos 8 var bipackad lampan från lev. 2017-09-27
3Pos 4 var 123401, pos 5 var 19922115, pos 7 var 19909225, se ÄO-00109 2018-08-16 ASA
4
РУССКИЙ
Светодиодный светильник типа 300 Marine
MA50-09 RU
2018
Порядок сборки светодиодного осветительного блока
1. Переднее кольцо
2. U-образное кольцо
(необязательный)
3. Лампа
4. Скоба
5. Винт M4
6. Наконечник
7. Винт M5
8. Прокладка
Арт. № 123261 Светодиодный светильник, красный/зеленый/синий
Арт. № 123361 Светодиодный светильник, белый
Технические характеристики
Стандартное напряжение питания: 12В AC
См. заводскую табличку на лампе (макс. 50 Вт)
Настоящий светодиодный светильник подходит для большей части стандартных
светильников типа PAR56. Подходит для всех светильников компании Pahlén типа 300,
как стандартного исполнения, так и типа Marine. Только для использования под водой.
Светильник должен подключаться через разделительный трансформатор 12V
60W alt.300W. Если в бассейне должно быть установлено несколько светодиодных
светильников, убедитесь, что они все подключены к одному трансформатору и
выключателю.
Оба типа светильников подключаются одинаково.
При повреждении внешнего кабеля или шнура, его замену должен выполнять персонал
по обслуживанию оборудования или другой квалифицированный специалист.
Установка
1. Снимите переднее кольцо.
2. Вытащите осветительный блок.
3. Демонтируйте старый светильник из каркаса осветительного блока.
4. Установите новую лампу. Установите прокладку (поз.8) в том
месте, где кабель проходит через кабельное уплотнение.
5. Подсоедините кабель.
6. Установите осветительный блок в стене бассейна.
7. Установите переднее кольцо Marine.
Включение в работу
Запуск светильников
Убедитесь, что каждый светильник установлен правильно.
Синхронизация нескольких светильников
1. Для синхронизации светильников на одну и ту же программу,
включите напряжение и подождите несколько секунд.
2. Выключите напряжение и подождите мин. 12 сек, затем снова
включите.
3. Смените программу 2 раза. Теперь светильники будут
синхронизированы.
Светильники будут находится в синхронизированном состоянии,
пока один из них не будет заменен или не включен отдельно от
других.
Смена программы: Выключите напряжение на короткое время и быстро включите
(макс. 10 сек выкл.).
Запоминание последней программы
1. Выберите нужную программу.
2. Выключите напряжение мин. на 12 сек. Выбранная программа будет
запомнена.
Красный/зеленый/синий светильник
Светодиодный светильник PAR56 создан на основе передовых технологий
электронного управления светодиодами трех цветов: красного, зеленого и синего.
Кроме того, используя эти три базовых цвета, можно получить еще несколько
цветов. Пользуясь выключателем, вы можете выбрать одну из 16 предварительно
запрограммированных программ световых эффектов
16 программ для цветных светильников (красный/зеленый/синий):
1. Теплый белый Постоянное свечение теплого белого цвета
2. Красный Постоянное свечение красного цвета
3. Зеленый Постоянное свечение зеленого цвета
4. Синий Постоянное свечение синего цвета
5. Сине-зеленый Постоянное свечение сине-зеленого цвета
6. Красно- зеленый Постоянное свечение красно-зеленого цвета
7. Сине-красный Постоянное свечение сине-красного цвета
8. Вечернее море Медленная смена цветов - синий/красный
9. Вечерняя река Медленная смена цветов - красный/зеленый
10. Ривьера Медленная смена цветов - зеленый/синий
11. Белый Постоянное свечение нейтрального белого цвета
12. Радуга Медленная смена цветов - синий/красный/зеленый
13. Река цвета Программа 12 сменяется программой 15
14. Диско Быстрая смена цветов
15. Четыре сезона Медленная смена цветов - красный/синий/зеленый/фиолетовый
16. Вечеринка Быстрая смена цветов
Шайба
(6x)
Осветительный блок Marine
Винт M5x20 (2x)
Передняя панель Marine
Винт M5x10 (6x)
Шайба
(6x)
Осветительный блок
Marine
Передняя панель Marine
Винт M5x10 (6x)
Винт M5x50 (2x)

27
Art.no.
Rev.no.
Scale
Designed by: Approved by:
Revised by: Date
Drawn by: Date
Drawing number
Assembly drawing no.
Surface treatment
part of ISO 2768
The tolerance class in accordance with this
E
Box 728, SE-194 27 Upplands Väsby, Sweden
Phone +46 8 59411050, Fax +46 8 59086880
1:2
OA 2006-04-26
OA 2007-09-20
belysning typ 300 CA vinyl
Håltagningsmall för
M10112 2
This documentanditscontents aretheexclusive
property ofPahlénsandmaynotbecopied,
reproduced,transmittedorcommunicatedtoathird
party,orusedforanypurposewithoutwrittenpermission.
n240
45°
22,5°
22,5°
22,5°
45°
45°
22,5°
22,5°
22,5°
45°
45°
n12(3x) n14(8x)
UP
Ø257
Ø240
Ø12(3x) Ø14(8x)
Ø257
This document and its contents are the exclusive
property of Pahléns and may not be copied,
reproduced, transmitted or communicated to a third
party, or used for any purpose without written permission.
Art.no.
Rev.no.
Scale
Designed by: Approved by:
Revised by: Date
Drawn by: Date
Drawing number
Assembly drawing no.
Surface treatment
part of ISO 2768-1
The toleran ce class in accordan ce with this
E
Box 728, SE-194 27 Upplands Väsby, Sweden
Phone +46 8 59411050, Fax +46 8 59086880
124X9Y
ASA 2011-09-29
Belysning 300CA LED
M11446 0
Ø170
Ø160
140 25
282
Ø
288
Ø
Art.no.
Rev.no.
Scale
Designed by: Approved by:
Revised by: Date
Drawn by: Date
Drawing number
Assembly drawing no.
Surface treatment
part of ISO 2768-1
The tolera nce class i n accordance with t his
E
Box 728, SE-194 27 Upplands Väsby, Sweden
Phone +46 8 59411050, Fax +46 8 59086880
124X81
ASA 2011-11-03
TS 2012-03-19
Marine
Belysning 300A LED
M11562 1
Ø172
Ø160
304
288
22
36
140
Ø288
Ø170
22
140
Ø288
Ø304
Ø160
Ø282
Ø160
25
140 36
Lámpara LED de piscina tipo 300 Marine
MA50-09 ES
2018
ESPAÑOL
Tipo 300A, para piscinas de hormigón: Tipo 300CA, para piscinas con revestimiento
Nº de parte 124281 Lámpara LED roja/verde/azul Nº de parte 124291 Lámpara LED roja/verde/azul
Nº de parte 124381 Lámpara LED blanca Nº de parte 124391 Lámpara LED blanca
Únicamente para uso bajo agua.
La lámpara de piscina se deberá conectar mediante un transformador de aislamiento de 12V CA, 60W alt. 300W.
Si se instalarán varias lámparas, estas se deberán conectar todas al mismo transformador e interruptor, vea el siguiente
diagrama de circuito.
Respete las directivas eléctricas locales al instalar la caja de conexiones.
La lámpara debe quedar completamente cubierta de agua antes de encenderla.
Si el cable o cordón externo se daña, deberá reemplazarlo un agente de servicio u otra persona calicada.
Diagrama de circuito Medidas para el oricio tipo 300CA
Ejemplo 1: Ejemplo 2:
Lámpara - potencia efectiva 50W Lámpara - potencia efectiva 28W
ARRIBA
Circuit diagram for LED-lamps
L1
TR1 60W alt. 300W
N
E10016-0
2007-07-11ASA
IN
230V AC
OUT
12V AC LA1
LA2
LA3
LA6
50W
50W
50W
50W
50W
alt.alt.
Circuit diagram for LED-lamps 28W
L1
TR1 60W alt. 300W
N
E10077-0
2010-06-03 ASA
IN
230V AC
OUT
12V AC LA1
LA2
LA3
LA10
28W
28W
28W
28W
alt. alt.
ENTRADA SALIDA ENTRADA SALIDA
Información general
Valores recomendados referente a la calidad del agua:
Contenido total de cloruros: máx. 3.5 mg/l (ppm)*
Contenido de cloruro (sal): máx. 250 mg/l
Valor pH: 7.2–7.6
Alcalinidad: 60–120 mg/l (ppm)
Dureza de calcio: 100–300 mg/l (ppm)
Hierro: máx. 0.1 mg/l *
Cobre: máx. 0.2 mg/l *
Manganeso: máx. 0.05 mg/l *
Fósforo: máx. 0.01 mg/l *
Nitrato: máx. 50 mg/l * * Según EN 16713-3
La garantía no cubre valores que están fuera de estos límites.
Dimensionador Tipo 300CA Tipo 300A

28
Lámpara LED de piscina tipo 300 Marine
MA50-09 ES
2018
ESPAÑOL
Tipo 300A - para piscinas de hormigón Nº de parte 124381: LED blanca
Nº de parte 124281: LED roja/verde/azul
Instrucciones de montaje:
¡ATENCIÓN! La separación mínima entre el material inoxidable y el no inoxidable (por ejemplo, el hierro del armazón)
debe ser de 50 mm.
El borde frontal del nicho deberá alinearse con la pared de hormigón (ver A en el esquema a continuación).
1. Fijar el nicho en el armazón de la piscina con la salida de cables hacia arriba.
2. Aplique grasa impermeabilizante en las roscas del nicho.
3. Enrosque el conducto para cables en el nicho y en la caja de conexiones. Deberá sellar la rosca con, por ejemplo, cinta de
sellado. El conducto para cables se deberá colocar de forma que el radio de curvatura no sea inferior a 100 mm.
4. Coloque el espaciador provisto del cable de la lámpara donde pasa a través del prensacables del nicho. Ajuste el prensa-
cables en el nicho para sellar el cable. Inserte el cable en el conducto y conéctelo a la caja de conexiones.
Enrolle el cable excedente detrás de la lámpara y monte la unidad de lámpara en el nicho.
5. Monte el aro frontal.
- para piscinas de hormigón
Baldosa
Aplique para baldosa
Hormigón
Espaciador
Baldosa
Nicho
Conducto
Aro de
sellado
Careta Marine
Arandela (6x
Tornillo avellanado M5x10 (6x)
Aplique para baldosa
Tornillo (2x)
M5x50
Unidad de
lámpara
Hormigón
300–800 mm

29
300–800 mm
Lámpara LED de piscina tipo 300 Marine
MA50-09 ES
2018
ESPAÑOL
Tipo 300CA - para piscina con revestimiento Nº de parte 124291: LED roja/verde/azul
Nº de parte 124391: LED blanca
Instrucciones de montaje:
1. Practicar oricios en el armazón. Ver croquis de apertura de oricios.
2. Aplique grasa impermeabilizante en las roscas del nicho.
3. Fijar el nicho en el armazón de la piscina con la salida de cables hacia arriba.
4. Enrosque el conducto para cables en el nicho y en la caja de conexiones. Deberá sellar la rosca con, por ejemplo, cinta de
sellado. El conducto para cables se deberá colocar de forma que el radio de curvatura no sea inferior a 100 mm.
5. Fije el sellador autoadhesivo en el borde del nicho.
6. Inserte el revestimiento.
7. Llene la piscina con agua hasta unos 10cm por debajo del nicho, haga un pequeño corte en el revestimiento en el centro del
nicho (no demasiado cerca del borde).
8. Monte el aro de sellado con el sellador debajo.
9. Corte el revestimiento limpiamente alrededor del interior del aro de sellado.
10. Coloque el espaciador provisto del cable de la lámpara donde pasa a través del prensacables del nicho. Ajuste el prensa-
cables en el nicho para sellar el cable. Inserte el cable en el conducto y conéctelo a la caja de conexiones.
Enrolle el cable excedente detrás de la lámpara y monte la unidad de lámpara en el nicho.
11. Monte el aro frontal.
- para paredes de
piscina de madera,
lámina o plástico
Fijar el nicho en el armazón de
la piscina con el tornillo y la
arandela que vienen incluidos.
Revesti-
mient
Madera
contrachapada
Espaciador
Cobertura
de pared
Arandela (3x)
Conducto del nicho
Aro de sellado
Careta Marine
Arandela (6x)
Tornillo avellanado
M5x10 (6x)
Junta 3 mm
Tornillo M5x20 (2x)
Unidad de lámpara
Revestimiento
Nicho
Cobertura de pared
Tuerca M6 (3x)
Paredes de piscina de madera
contrachapada / chapa
Junta autoadhesiva 1.5 mm
Tornillo
avellanado (8x)
M6x20

30
300–800 mm
Lámpara LED de piscina tipo 300 Marine
MA50-09 ES
2018
ESPAÑOL
- para paredes de piscina hechas de bloques de construcción
El nicho se ja en el armazón de la piscina con espuma para relleno de juntas.
¡ATENCIÓN! La separación mínima entre el material inoxidable y el no inoxidable (por ejemplo, el hierro del armazón)
debe ser de 50 mm.
Revestimiento
Bloques de construcción
Espaciador
Cobertura de pared
Yeso
Arandela (3x)
Conducto
Aro de sellado
Careta Marine
Arandela (6x)
Tornillo avellanado M5x10 (6x)
Junta 1.5 mm (autoadhesiva)
Tornillo (2x)
M5x20
Unidad de lámpara
Revestimiento
Nicho Cobertura de pared
Tuerca M6 (3x)
Soporte (3x)
Tornillo
avellanado (8x)
M6x20
Junta 3 mm
Marco
de la piscina
(bloques de construcción
con yeso)

31
This document and its contents are the exclusive
property of Pahléns and may not be copied,
reproduced, transmitted or communicated to a third
party, or used for any purpose without written permission.
Sid 1(2)
300–800 mm
This document and its contents are the exclusive
property of Pahléns and may not be copied,
reproduced, transmitted or communicated to a third
party, or used for any purpose without written permission.
Sid 1(2)
Lámpara LED de piscina tipo 300 Marine
MA50-09 ES
2018
ESPAÑOL
- para armazón de piscina de bloque Thermoblock (espuma plástica)
El nicho se ja en el bloque de espuma plástica del armazón de la piscina con espuma para relleno de juntas, antes de efectuar
el encapsulado.
¡ATENCIÓN! La separación mínima entre el material inoxidable y el no inoxidable (por ejemplo, el hierro del armazón)
debe ser de 50 mm.
Revesti-
miento
Cobertura de pared
Espaciador
Pared de Thermopool
Barra de
refuerzo
Hormigón
Arandela (3x)
Conducto
Aro de sellado
Careta Marine
Arandela (6x)
Tornillo avellanado
M5x10 (6x)
Junta 1.5mm (autoadhesiva)
Tornillo (2x)
M5x20
Unidad de
lámpara
Revestimiento
Nicho
Tuerca M6 (3x)
Soporte para pared (3x)
Tornillo
avellanado (8x)
M6x20
Junta 3 mm
Pared de Thermopool
Cobertura de pared

32
Art.no.
Rev.no.
Scale
Designed by: Approved by:
Revised by: Date
Drawn by: Date
Drawing number
Assembly dr awing no.
Surface treatment
part of ISO 2768-1
The tolerance class in accordance with this
E
Box 728, SE-194 27 Upplands Väsby, Sweden
Phone +46 8 59411050, Fax +46 8 59086880
ASA 2012-02-07
för MA50-09
Installationsbild
M11604
Låsbricka (6x)
Belysningsinsats Marine
Fästskruv M5x20 (2x)
Front Marine
Skruv M5x10 (6x)
Art.no.
Rev.no.
Scale
Designed by: Approved by:
Revised by: Date
Drawn by: Date
Drawing number
Assembly dr awing no.
Surface treatment
part of ISO 2768-1
The tolerance class in accordance with this
E
Box 728, SE-194 27 Upplands Väsby, Sweden
Phone +46 8 59411050, Fax +46 8 59086880
ASA 2012-02-07
för MA50-09
Installationsbild
M11605
Art.no.
Rev.no.
Scale
Designed by: Approved by:
Revised by: Date
Drawn by: Date
Drawing number
Assembly drawing no.
Surface treatment
part of ISO 2768-1
The tolerance class in accordance with this
E
Box 728, SE-194 27 Upplands Väsby, Sweden
Phone +46 8 59411050, Fax +46 8 59086880
1553002X
ASA 2009-05-26
ASA 2018-08-16
Typ 300-lampa
Belysningsinsats LED Marine
M11563 3
This document and its contents are the exclusive
property of Pahléns and may not be copied,
reproduced, transmitted or communicated to a third
party, or used for any purpose without written permission.
M1271315530260RubberTätningshylsa18
DIN 933 - M5 x 2519901225
A4
Skruv M6S M5x252
7
1246112461
POMKnopp räfflad SR6127 typ 1
26
Pan head Torx 4x1019922115A4
Skruv MRT A4 M4x10
2
5
M12906123402EN 1.4404 (SS2348)Bygel till LED-lampa14
LED
123241 alt. 123341
LED lampa Spectravision 700, multi alt. vit13
U-list12272
PVCU-list PVC GV-1-5, L=550mm
12
M1144515530021 Fästram 300- och LED-lampa11
Drawing.no:Art_nrMaterialTitle/ NameQty.Item.
1,5m
(3m)
Art.nr
Belysningsinsats
Pos 3
LED-lampa Anm
15530025 123241 röd/grön/blå
15530026 123341 vit
8
2
3
5
7
6
1
REVISION HISTORY
ZONE REV DESCRIPTION DATE APPROVED
3Pos 8 var bipackad lampan från lev. 2017-09-27
3Pos 4 var 123401, pos 5 var 19922115, pos 7 var 19909225, se ÄO-00109 2018-08-16 ASA
4
Lámpara LED de piscina tipo 300 Marine
MA50-09 ES
2018
ESPAÑOL
Orden de montaje de unidad de lámpara LED
1. Anillo de marco de montaje
2. Acople perl U (opcional)
3. Lámpara
4. Soporte
5. Tornillo M4
6. Pie de montaje
7. Tornillo M5
8. Espaciador
Nº de parte 123261 Repuesto de unidad de lámpara LED,
roja/verde/azul
Nº de parte 123361 Repuesto de unidad de lámpara LED,
blanca
Especicación técnica
Tensión de entrada estándar: 12V CA
Potencia de entrada estándar: Vea la placa de especicaciones en la lámpara
(máx. 50W).
Esta lámpara LED es adecuada para la mayoría de las lámparas de piscina de estándar
PAR56. Compatible con todas las lámparas Pahlén tipo 300, de diseño estándar o Marine.
Únicamente para uso bajo agua.
La lámpara de piscina se deberá conectar mediante un transformador de aislamiento de
12V, 60W alt. 300W. Si su piscina tiene más de una lámpara LED, asegúrese de que
todas las lámparas estén instaladas en el mismo transformador y llave.
Ambos tipos de lámparas se conectan de la misma forma.
Si se dañara el prensacables externo o el cable de la lámpara, lo deberá sustituir
un agente de servicio u otro personal calicado.
Instalación
1. Retire el aro frontal.
2. Retire la unidad de lámpara existente.
3. Extraiga la lámpara vieja del marco de la unidad de lámpara.
4. Monte la nueva lámpara. El espaciador (pos. 8) se deberá colocar
en la posición en la que el cable se encuentra con el prensacables.
5. Conecte el cable.
6. Monte la unidad de lámpara en la pared de la piscina.
7. Monte el aro frontal marino.
Encendido
Asegúrese de que cada lámpara esté correctamente instalada.
Sincronización de varias lámparas:
1. Para sincronizar las lámparas al mismo programa, encienda las
lámparas y espere algunos segundos.
2. Apague las lámparas y espere un mínimo de 12 segundos, y luego
vuelva a encenderlas.
3. Cambie el color/programa 2 veces. Ahora están sincronizadas.
Una vez que las lámparas se sincronicen, quedarán así hasta que una de las lámparas
LED se sustituya o una de las lámparas se encienda independientemente de las otras.
Cambio de color/programa: Apague las lámparas y luego vuelva a encenderlas
rápidamente (máximo 10 seg. apagadas).
Memorización del último color/programa:
1. Seleccione el color/programa deseado.
2. Apague las lámparas por un mínimo de 12 segundos.
El programa seleccionado quedó memorizado.
La lámpara roja/verde/azul
La lámpara LED PAR56 es una lámpara muy avanzada controlada electrónicmente,
basada en los tres colores del LED: rojo, verde y azul. Juntos, estos tres colores pueden
producir muchos otros colores. Con el interruptor de encendido/apagado para sus luces
de piscina, podrá seleccionar uno de 16 efectos de luz preprogramados.
Los 16 programas de la lámpara roja/verde/azul:
1. Blanco cálido Color jo blanco cálido
2. Rojo Color jo rojo
3. Verde Color jo verde
4. Azul Color jo azul
5. Verde-azul Color jo verde/azul
6. Rojo-verde Color jo rojo/verde
7. Azul-rojo Color jo azul/rojo
8. Mar de noche Cambio lento de color rojo/azul
9. Río de noche Cambio lento de color rojo/verde
10. Riviera Cambio lento de color verde/azul
11. Blanco Color jo blanco neutro
12 Arcoíris Cambio lento de color azul/rojo/verde
13 Río de colores Programa 12 seguido del programa 15
14 Disco Cambio rápido de colores
15 Cuatro estaciones Cambio lento de color rojo/azul/verde/violeta
16 Fiesta Cambio rápido de todos colores
Arandela
(6x)
Unidad de lámpara Marine
Tornillo de montaje M5x20 (2x)
Careta Marine
Tornillo avellanado
M5x10 (6x)
Arandela
(6x)
Unidad de lámpara Marine
Tornillo de montaje M5x50 (2x)
Careta Marine
Tornillo
avellanado
M5x10 (6x)

33
Circuit diagram for LED-lamps
L1
TR1 60W alt. 300W
N
E10016-0
2007-07-11ASA
IN
230V AC
OUT
12V AC LA1
LA2
LA3
LA6
50W
50W
50W
50W
50W
alt.alt.
Circuit diagram for LED-lamps 28W
L1
TR1 60W alt. 300W
N
E10077-0
2010-06-03 ASA
IN
230V AC
OUT
12V AC LA1
LA2
LA3
LA10
28W
28W
28W
28W
alt. alt.
Art.no.
Rev.no.
Scale
Designed by: Approved by:
Revised by: Date
Drawn by: Date
Drawing number
Assembly drawing no.
Surface treatment
part of ISO 2768
The tolerance class in accordance with this
E
Box 728, SE-194 27 Upplands Väsby, Sweden
Phone +46 8 59411050, Fax +46 8 59086880
1:2
OA 2006-04-26
OA 2007-09-20
belysning typ 300 CA vinyl
Håltagningsmall för
M10112 2
This documentanditscontents aretheexclusive
property ofPahlénsandmaynotbecopied,
reproduced,transmittedorcommunicatedtoathird
party,orusedforanypurposewithoutwrittenpermission.
n240
45°
22,5°
22,5°
22,5°
45°
45°
22,5°
22,5°
22,5°
45°
45°
n12(3x) n14(8x)
UP
Ø257
SU
Ø240
Ø12(3x) Ø14(8x)
Ø257
This document and its contents are the exclusive
property of Pahléns and may not be copied,
reproduced, transmitted or communicated to a third
party, or used for any purpose without written permission.
Art.no.
Rev.no.
Scale
Designed by: Approved by:
Revised by: Date
Drawn by: Date
Drawing number
Assembly drawing no.
Surface treatment
part of ISO 2768-1
The toleran ce class in accordan ce with this
E
Box 728, SE-194 27 Upplands Väsby, Sweden
Phone +46 8 59411050, Fax +46 8 59086880
124X9Y
ASA 2011-09-29
Belysning 300CA LED
M11446 0
Ø170
Ø160
140 25
282
Ø
288
Ø
Art.no.
Rev.no.
Scale
Designed by: Approved by:
Revised by: Date
Drawn by: Date
Drawing number
Assembly drawing no.
Surface treatment
part of ISO 2768-1
The tolera nce class i n accordance with t his
E
Box 728, SE-194 27 Upplands Väsby, Sweden
Phone +46 8 59411050, Fax +46 8 59086880
124X81
ASA 2011-11-03
TS 2012-03-19
Marine
Belysning 300A LED
M11562 1
Ø172
Ø160
304
288
22
36
140
Ø288
Ø170
22
140
Ø288
Ø304
Ø160
Ø282
Ø160
25
140 36
Luci piscina LED tipo 300 Marine
MA50-09 IT
2018
ITALIANO
Tipo 300A, per piscine in cemento: Tipo 300CA, per piscine con rivestimento
N. articolo 124281 Luci a LED rosse/verdi/blu N. articolo 124291 Luci a LED rosse/verdi/blu
N. articolo 124381 Luci a LED bianche N. articolo 124391 Luci a LED bianche
Da utilizzare esclusivamente sott’acqua.
Le luci della piscina devono essere collegate tramite un trasformatore di isolamento a 12 V CA 60 W alt. 300 W.
Se devono essere installate varie lampade, collegarle tutte allo stesso trasformatore e interruttore. Vedere lo schema del circuito
di seguito.
Prestare attenzione alle indicazioni elettriche locali per quanto riguarda la collocazione della scatola di derivazione.
Le luci devono essere completamente coperte di acqua prima dell’illuminazione.
Se il cavo esterno dell’illuminazione è danneggiato, deve essere sostituito da un addetto alla manutenzione o personale qualicato.
Schema del circuito Misurazione per foro tipo 300CA
Esempio 1: Esempio 2:
Lampada - potenza eettiva 50W Lampada - potenza eettiva 28W
IN USCITA IN USCITA
Dati generali
Valori consigliati per la qualità dell’acqua:
Contenuto totale di cloro: max 3.5 mg/litro (ppm)*
Contenuto cloruro (sale): max 250 mg/litro
pH: 7.2–7.6
Alcalinità: 60–120 mg/litro (ppm)
Durezza del calcio: 100–300 mg/litro (ppm)
Ferro: max 0.1 mg/l *
Rame: max 0.2 mg/l *
Manganese: max 0.05 mg/l *
Fosforo: max 0.01 mg/l *
Nitrati: max 50 mg/l *
* Conforme a EN 16713-3
Se i valori non rientrano in questi parametri, la garanzia del prodotto decade.
Dimensioni Tipo 300CA Tipo 300A

34
Luci piscina LED tipo 300 Marine
MA50-09 IT
2018
ITALIANO
Tipo 300A - per piscine in cemento N. articolo 124381: LED bianco
N. articolo 124281: Luci a LED rosse/verdi/blu
Istruzioni di montaggio:
NOTA! La distanza minima tra i materiali antiossidanti e i materiali non antiossidanti (come il ferro per armature) deve
essere 50mm.
Il bordo anteriore della nicchia deve essere allineato alla parete in cemento (vedere A nel disegno di seguito).
1. Fixera nischen med kabelutgången riktad uppåt.
2. Applicare un velo di grasso resistente all’acqua nelle lettature della nicchia.
3. Far passare la canalina del cavo nella nicchia e nella scatola di derivazione. La lettatura deve essere sigillata, ad esempio
con nastro in teon. La canalina del cavo deve essere collocata in modo che il raggio di curvatura non sia inferiore a 100 mm.
4. Collocare il distanziatore in dotazione sul cavo della lampada che attraversa il passacavo della nicchia.
Stringere il passacavo nella nicchia per sigillare il cavo. Inserire il cavo nella canalina e collegarlo alla scatola di derivazione.
Avvolgere il cavo in eccesso dietro la lampada e montare l’unità di illuminazione nella nicchia.
5. Montare l’anello anteriore.
- Per piscine in cemento
Piastrella
Fissaggio piastrelle
Cemento
Distanziatore
Piastrella
Nicchia
Canalina
Anello di
tenuta
Anteriore rondella Marine
Rondella (6x)
Vite con testa svasata
M5x10 (6x)
Fissaggio piastrelle
Vite (2x)
M5x50
Unità lampada
Cemento
300–800 mm

35
300–800 mm
Luci piscina LED tipo 300 Marine
MA50-09 IT
2018
ITALIANO
Tipo 300CA - per piscine con rivestimento N. articolo 124291: Luci a LED rosse/verdi/blu
N. articolo 124391: LED bianco
Istruzioni di montaggio:
1. Praticare un foro nella struttura, vedere lo schizzo dimensionale.
2. Applicare un velo di grasso resistente all’acqua nelle lettature della nicchia.
3. Montare la nicchia nella struttura della piscina, con l’uscita cavi verso l’alto.
4. Far passare la canalina del cavo nella nicchia e nella scatola di derivazione. La lettatura deve essere sigillata, ad esempio
con nastro in teon. La canalina del cavo deve essere collocata in modo che il raggio di curvatura non sia inferiore a 100 mm.
5. Fissare la guarnizione autoadesiva sul bordo della nicchia.
6. Inserire il rivestimento.
7. Riempire di acqua la piscina no a circa 10 cm sotto la nicchia. Eettuare un piccolo taglio nel centro della nicchia
(non accanto al bordo).
8. Montare l’anello di tenuta con la guarnizione sotto.
9. Eettuare un taglio pulito del rivestimento all’interno dell’anello di tenuta.
10. Collocare il distanziatore in dotazione sul cavo della lampada che attraversa il passacavo della nicchia.
Stringere il passacavo nella nicchia per sigillare il cavo. Inserire il cavo nella canalina e collegarlo alla scatola di derivazione.
Avvolgere il cavo in eccesso dietro la lampada e montare l’unità di illuminazione nella nicchia.
11. Montare l’anello anteriore
- Per pareti di piscina
in legno, lamiera o
plastica
Fissare la nicchia nella struttura
della piscina con le viti e le
rondelle in dotazione.
Liner
Compensato
Distanziatore
Parete
Rondella (3x)
Canalina
Anello di tenuta
Anteriore rondella Marine
Rondella (6x)
Vite con testa svasata (6x) M5x10
Guarnizione da 3mm
Vite M5x20 (2x)
Unità lampada
Liner
Nicchia
Parete
Dado M6 (3x)
Struttura piscina compensato/lamiera
Guarnizione autoadesiva da 1.5 mm
Vite con testa
svasata (8x)
M6x20

36
300–800 mm
Luci piscina LED tipo 300 Marine
MA50-09 IT
2018
ITALIANO
- Per pareti di piscina in mattone
Fissare la nicchia nella struttura della piscina con schiuma per giunti.
NOTA! La distanza minima tra i materiali antiossidanti e i materiali non antiossidanti (come il ferro per armature)
deve essere 50mm.
Liner
Mattoni
Distanziatore
Parete
Intonaco
Rondella (3x)
Canalina
Anello di tenuta
Anteriore rondella Marine
Rondella (6x)
Vite con testa svasata M5x10 (6x)
Guarnizione autoadesiva da 1.5 mm
Vite M5x20
(2x)
Unità lampada
Liner
Nicchia Parete
Dado M6 (3x)
Staa di montajo (3x)
Vite con testa
svasata (8x)
M6x20
Guarnizione da 3 mm
Struttura piscina
(mattoni con intonaco)

37
This document and its contents are the exclusive
property of Pahléns and may not be copied,
reproduced, transmitted or communicated to a third
party, or used for any purpose without written permission.
Sid 1(2)
300–800 mm
This document and its contents are the exclusive
property of Pahléns and may not be copied,
reproduced, transmitted or communicated to a third
party, or used for any purpose without written permission.
Sid 1(2)
Luci piscina LED tipo 300 Marine
MA50-09 IT
2018
ITALIANO
- per struttura in Thermoblock (plastica cellulare estrusa)
Fissare la nicchia nella struttura di blocchi in plastica cellulare estrusa prima della colata di cemento.
NOTA! La distanza minima tra i materiali antiossidanti e i materiali non antiossidanti (come il ferro per armature)
deve essere 50mm.
Liner
Thermoblock
Distanziatore
Parete
Barra di rinforzo
Cemento
Rondella (3x)
Canalina
Anello di tenuta
Anteriore rondella Marine
Rondella (6x)
Vite con testa svasata M5x10 (6x)
Guarnizione autoadesiva da 1.5 mm
Vite M5x20 (2x)
Unità lampada
Liner
Nicchia
Parete
Dado M6 (3x)
Staa di montajo (3x)
Vite con testa
svasata (8x)
M6x20
Guarnizione da 3 mm
Struttura in Thermoblock

38
Art.no.
Rev.no.
Scale
Designed by: Approved by:
Revised by: Date
Drawn by: Date
Drawing number
Assembly dr awing no.
Surface treatment
part of ISO 2768-1
The tolerance class in accordance with this
E
Box 728, SE-194 27 Upplands Väsby, Sweden
Phone +46 8 59411050, Fax +46 8 59086880
ASA 2012-02-07
för MA50-09
Installationsbild
M11604
Låsbricka (6x)
Belysningsinsats Marine
Fästskruv M5x20 (2x)
Front Marine
Skruv M5x10 (6x)
Art.no.
Rev.no.
Scale
Designed by: Approved by:
Revised by: Date
Drawn by: Date
Drawing number
Assembly dr awing no.
Surface treatment
part of ISO 2768-1
The tolerance class in accordance with this
E
Box 728, SE-194 27 Upplands Väsby, Sweden
Phone +46 8 59411050, Fax +46 8 59086880
ASA 2012-02-07
för MA50-09
Installationsbild
M11605
Art.no.
Rev.no.
Scale
Designed by: Approved by:
Revised by: Date
Drawn by: Date
Drawing number
Assembly drawing no.
Surface treatment
part of ISO 2768-1
The tolerance class in accordance with this
E
Box 728, SE-194 27 Upplands Väsby, Sweden
Phone +46 8 59411050, Fax +46 8 59086880
1553002X
ASA 2009-05-26
ASA 2018-08-16
Typ 300-lampa
Belysningsinsats LED Marine
M11563 3
This document and its contents are the exclusive
property of Pahléns and may not be copied,
reproduced, transmitted or communicated to a third
party, or used for any purpose without written permission.
M1271315530260RubberTätningshylsa18
DIN 933 - M5 x 2519901225
A4
Skruv M6S M5x252
7
1246112461
POMKnopp räfflad SR6127 typ 1
26
Pan head Torx 4x1019922115A4
Skruv MRT A4 M4x10
2
5
M12906123402EN 1.4404 (SS2348)Bygel till LED-lampa14
LED
123241 alt. 123341
LED lampa Spectravision 700, multi alt. vit13
U-list12272
PVCU-list PVC GV-1-5, L=550mm
12
M1144515530021 Fästram 300- och LED-lampa11
Drawing.no:Art_nrMaterialTitle/ NameQty.Item.
1,5m
(3m)
Art.nr
Belysningsinsats
Pos 3
LED-lampa Anm
15530025 123241 röd/grön/blå
15530026 123341 vit
8
2
3
5
7
6
1
REVISION HISTORY
ZONE REV DESCRIPTION DATE APPROVED
3Pos 8 var bipackad lampan från lev. 2017-09-27
3Pos 4 var 123401, pos 5 var 19922115, pos 7 var 19909225, se ÄO-00109 2018-08-16 ASA
4
Luci piscina LED tipo 300 Marine
MA50-09 IT
2018
ITALIANO
Ordine di montaggio dell’unità luci a LED
1. Anello telaio di montaggio
2. U-list (opzionale)
3. Lampada
4. Staa
5. Vite M4
6. Piedi
7. Vite M5
8. Distanziatore
N. articolo 123261 Ricambio unità lampada a LED,
rossa/verde/blu
N. articolo 123361 Ricambio unità lampada a LED, bianca
Speciche tecniche
Tensione di ingresso standard: 12 V CA
Watt in ingresso standard: Vedere la targhetta sulla lampada (max 50 W)
Queste luci a LED sono adatte per la maggior parte di luci di piscina standard PAR56.
Adette per tutte le illuminazioni Pahlén tipo 300, design standard e Marine.
Da utilizzare esclusivamente sott’acqua.
Le luci della piscina devono essere collegate tramite un trasformatore di isolamento
a 12 V 60 W alt. 300 W. Se si dispone di più di una luce a LED in piscina, assicurarsi
che tutte le luci siano installate sullo stesso trasformatore, circuito e interruttore.
Entrambi i tipi di luci sono collegati allo stesso modo.
Se il cavo esterno dell’illuminazione è danneggiato, deve essere sostituito da un
addetto alla manutenzione o personale qualicato.
Installazione
1. Rimuovere l’anello anteriore.
2. Rimuovere l’unità lampada esistente.
3. Smontare le vecchie luci dal telaio dell’unità lampada.
4. Montare la lampadina di ricambio. Il distanziatore (pos. 8) deve essere
collocato nel punto in cui il cavo entra nel passacavo.
5. Collegare il cavo.
6. Montare l’unità lampada sulla parete della piscina.
7. Montare l’anello anteriore Marine.
Avvio
Assicurarsi che ogni luce sia installata correttamente.
Sincronizzazione di varie luci:
1. Per sincronizzare le luci sullo stesso programma, accendere le
luci e attendere qualche secondo.
2.
Spegnere le luci e attendere un minimo di 12 secondi, quindi riaccenderle.
3. Modicare il colore/il programma 2 volte. Ora sono sincronizzate.
Una volta sincronizzate le luci, rimangono così nché non si sostituisce una
delle luci a LED o si accende una luce separatamente dalle altre.
Cambio di colore/programma:
Spegnere e riaccendere rapidamente le luci (max 10 sec. spente).
Memorizzazione dell’ultimo colore/programma:
1. Selezionare il colore/programma desiderato.
2. Spegnere le lampade per un minimo di 12 secondi.
Il programma selezionato viene quindi memorizzato.
Luci rosse/verdi/blu
Le luci a LED PAR56 sono luci avanzate regolate elettronicamente basate su LED
in tre colori: rosso, verde e blu. Oltre a quiesti tre colori può produrre molti altri colori.
Con l’interruttore di accensione/spegnimento delle luci per piscina, è possibile
selezionare uno dei 16 eetti di luce preprogrammati.
16 programmi delle luci rosse/verdi/blu:
1. Bianco caldo Colore sso bianco caldo
2. Rosso Colore sso rosso
3. Verde Colore sso verde
4. Blu Colore sso blu
5. Verde/blu Colore sso verde/blu
6. Rosso/verde Colore sso rosso/verde
7. Blu/rosso Colore sso blu/rosso
8. Mare di sera Cambio lento di colore rosso/blu
9. Fiume di sera Cambio lento di colore rosso/verde
10. Riviera Cambio lento di colore verde/blu
11. Bianco Colore sso bianco neutro
12. Arcobaleno Cambio lento di colore blu/rosso/verde
13. Fiume di colori Programma 12 seguito dal programma 15
14. Discoteca Cambio rapido di colori
15. Quattro stagioni Cambio lento di colore rosso/verde
16 Party Cambio rapido di colori
Rondella
(6x)
Unità lampada Marine
Vite montajo M5x20 (2x)
Anteriore rondella Marine
Vite con testa
svasata
M5x10 (6x)
Rondella
(6x)
Unità lampada Marine
Vite montajo M5x50 (2x)
Anteriore rondella Marine
Vite con testa
svasata
M5x10 (6x)
-
 1
1
-
 2
2
-
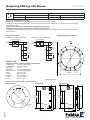 3
3
-
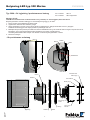 4
4
-
 5
5
-
 6
6
-
 7
7
-
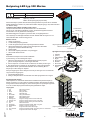 8
8
-
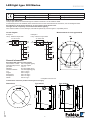 9
9
-
 10
10
-
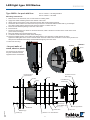 11
11
-
 12
12
-
 13
13
-
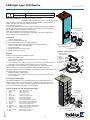 14
14
-
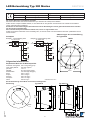 15
15
-
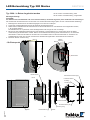 16
16
-
 17
17
-
 18
18
-
 19
19
-
 20
20
-
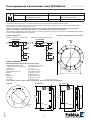 21
21
-
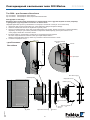 22
22
-
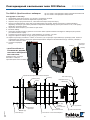 23
23
-
 24
24
-
 25
25
-
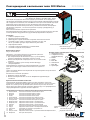 26
26
-
 27
27
-
 28
28
-
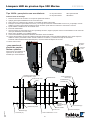 29
29
-
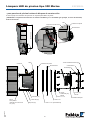 30
30
-
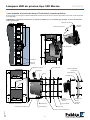 31
31
-
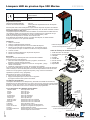 32
32
-
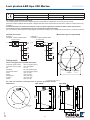 33
33
-
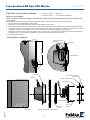 34
34
-
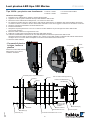 35
35
-
 36
36
-
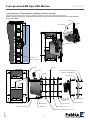 37
37
-
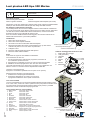 38
38


en otros idiomas
- italiano: Pahlen MA50-09 Manuale del proprietario
- English: Pahlen MA50-09 Owner's manual
Artículos relacionados
-
Pahlen Swimming pool light Marine LED 170 El manual del propietario
-
-
-
-
-
-
-
-
-