
LAVADORA
WASHING MACHINE
ZWH 5105
ZWH 5105A
ZWH 5125
O
N
/
O
F
F
H
YDRO
S
YSTEM
T
E
J
I
D
O
S
C
E
N
T
R
I
F
U
G
A
D
O
T
E
M
P
E
R
A
T
U
R
A
SINTÉTICOS
DELICADOS
ALGODÓN
LANA
60°C
40°C
90°C
30°C
1000
900
700
500
FRÍO
WET ANTI-
ARRUGAS
ACLARADO
ADICIONAL
LAVADO
A MANO
CON PRELAV.
FUNCI
Ó
N
EXPRESS
ECONOMY
40
° AA
O
P
C
I
O
N
E
S
G
R
A
D
O
S
U
C
I
E
D
A
D
REMOJO
IN
IC
IO
/
P
A
U
S
A
A
N
U
L
A
R
E
X
C
L
U
IR
FA
S
E
INICIO
DIFERIDO
ZWH 5105
X
T
R
A
C
A
P
A
C
I
T
Y
7
MANUAL DE USO
USER MANUAL
132 982 330
GB
E

Consejos para el lavado 14
Selección de las prendas 14
Temperaturas 14
Antes de cargar la ropa 14
Carga máxima de ropa 14
Pesos de la ropa 14
Eliminación de las manchas 14-15
Detergentes y aditivos 15
Símbolos internacionales
para el tratamiento de los tejidos 16
Secuencia de las operaciones 17-19
Programas de lavado 20
Mantenimiento 21
Puerta 21
Exterior del aparato 21
Cubeta detergente 21
Limpieza de la zona de descarga 21-22
Filtro del tubo de carga de agua 22
Vaciado de emergencia 22
Precauciones contra el hielo 22
Anomalías de funcionamiento
23-24
Advertencias y consejos 3-4
Eliminación 4
Consejos para la protección del
ambiente 4
Características técnicas 5
Instalación 6
Dispositivos de seguridad para el transporte 6
Colocación 6
Carga de agua 6-7
Descarga de agua 7
Conexión eléctrica 7
Su nueva lavadora 8
Descripción del aparato 8
Luz piloto de la puerta 8
Cubeta detergente 8
Uso 9
Panel de mandos 9
Mandos 9-13
2
Estimado cliente,
Le rogamos leer atentamente estas instrucciones de uso y prestar particular atención a las normas de
seguridad escritas en las primeras páginas. Le aconsejamos conservar estas instrucciones para consultas
futuras y darlas al nuevo usuario en caso de venta del aparato.
Daños de transporte
Al momento del desembalaje, controle que el aparato no esté dañado. Si tiene dudas no lo ponga en
funcionamiento y consulte la asistencia técnica.
Índice
Algunos párrafos de este libro de instrucciones han sido identificados con símbolos que tienen el siguiente
significado:
El triángulo de advertencia y/o los términos de señal (¡Atención!, ¡Advertencia!), subrayan instrucciones
muy importantes para Su seguridad o para el buen funcionamiento del aparato. Le rogamos respetarlas.
Las informaciones precedidas por este símbolo completan las instrucciones de uso y de utilización
práctica del aparato.
Este símbolo indica consejos e instrucciones para un empleo económico del aparato que respete el
ambiente.
Nuestra contribución al ambiente:
utilizamos papel reciclado.

ESPAÑOL
3
Instalación
• Antes del uso, hay que quitar todas las piezas de
embalaje y de transporte; de no hacerlo así, tanto
el aparato como los muebles podrían sufrir graves
daños. Consulte las instrucciones.
• Cualquier trabajo de tipo eléctrico necesario para
la instalación del aparato tendrá que ser realizado
por un electricista especializado o por una persona
competente.
• Cualquier trabajo de tipo hidráulico tendrá que ser
realizado por un fontanero especializado o por una
persona competente.
• Hay que tener cuidado de que el aparato no esté
apoyado sobre el cable de alimentación eléctrica.
• Si la máquina está colocada sobre piso de
alfombra asegúrese de que haya circulación de
aire entre las patas de apoyo y el piso.
Uso
• Este aparato ha sido proyectado para uso
doméstico. No lo use con finalidades diferentes a
aquellas para las cuales ha sido proyectado.
• Lave sólo aquellos tejidos que se pueden lavar en
la lavadora. En caso de dudas siga las
instrucciones que aparecen en la etiqueta del
artículo.
• No sobrecargue el aparato. Siga las instrucciones
contenidas en este manual.
• Las monedas, los imperdibles, los alfileres, los
tornillos, etc. que han quedado en la ropa pueden
provocar graves daños.
• No ponga en el aparato prendas manchadas con
gasolina, alcohol, aguarrás, etc. Si usa estos
productos, antes de introducir las prendas en el
aparato para lavarlas, espere que el producto se
haya evaporado.
• Agrupe las prendas pequeñas como calcetines,
cinturones, etc. en un bolso de tela o en una
funda. Evitará que esta ropa termine entre el cesto
y el tambor.
Advertencias y consejos
• Use solamente la cantidad de suavizante indicada
por el productor. Una cantidad excesiva de
producto podría arruinar la ropa.
• Deje la puerta entreabierta cuando no se usa el
aparato. Esto permite una mejor conservación de
la guarnición de la puerta y previene los olores de
moho.
• Antes de abrir la puerta, controle siempre que el
agua haya sido descargada. De lo contrario,
descárguela siguiendo las instrucciones dadas en
el manual de uso.
• Después del uso desenchufe siempre el aparato y
cierre el grifo del agua.
Seguridad en general
• Las reparaciones deben ser efectuadas sólo por
personal especializado. Las reparaciones
inadecuadas pueden causar peligros notables.
Para eventuales reparaciones diríjase a un centro
de asistencia técnica autorizado.
• Nunca desenchufe el aparato tirando del cable de
alimentación, tire directamente del enchufe.
• Durante el lavado a altas temperaturas el vidrio de
la puerta está caliente. ¡No lo toque!
Seguridad para los niños
• Los niños no se dan cuenta de los peligros de los
aparatos eléctricos. Cuando el aparato está
funcionando vigile atentamente a los niños y no los
deje jugar con el aparato.
• Las piezas de embalaje (por ej. películas,
poliestireno), pueden ser peligrosas para los niños.
¡Peligro de sofocación! Tenga las piezas fuera del
alcance de los niños.
• Conserve los detergentes en un lugar seguro fuera
del alcance de los niños.
• Asegúrese de que los niños o los pequeños
animales domésticos no entren en el tambor de la
máquina.
Para evitar esto, es posible impedir el cierre de la
puerta actuando sobre el pequeño botón situado
en el lado interior de la puerta, girándolo hacia la
derecha de modo que la muesca se encuentre en
posición horizontal. Si es necesario, ayúdese con
una moneda.
Estas advertencias han sido redactadas para su seguridad y la de todas las personas. Por lo tanto le rogamos
leerlas atentamente antes de instalar y utilizar el aparato.

Eliminación
Consejos para la protección del ambiente
Materiales de embalaje
Los materiales que incluyen el símbolo pueden
ser reciclados.
>PE<= polietileno
>PS<=poliestireno
>PP<=polipropileno
Para poder recuperarlos se deben depositar en los
espacios apropiados (o contenedores).
Aparato
Para una correcta eliminación de su viejo aparato,
Le aconsejamos utilizar las escombreras
autorizadas. ¡Ayúdenos a mantener limpia Su
ciudad!
El símbolo en el producto o en su empaque
indica que este producto no se puede tratar como
desperdicios normales del hogar.
Este producto se debe entregar al punto de
recolección de equipos eléctricos y electrónicos para
reciclaje. Al asegurarse de que este producto se
deseche correctamente, usted ayudará a evitar
posibles consecuencias negativas para el ambiente
y la salud pública, lo cual podría ocurrir si este
producto no se manipula de forma adecuada. Para
obtener información más detallada sobre el reciclaje
de este producto, póngase en contacto con la
administración de su ciudad, con su servicio de
desechos del hogar o con la tienda donde compró el
producto.
Para ahorrar agua y energía y contribuir a la
protección del ambiente, aconsejamos atenerse a lo
siguiente:
• Para ropa normalmente sucia es suficiente un
programa sin prelavado; de esta manera se ahorra
detergente, agua y tiempo (¡y se protege al
ambiente!).
• Para un consumo moderado de energía, agua y
detergente no deberá sobrepasarse nunca la
máxima carga de ropa admisible (ver
“características técnicas, página 6).
• Con un tratamiento apropiado se pueden eliminar
las manchas y las zonas sucias limitadas; después
se puede efectuar un lavado a baja temperatura.
• Adapte la dosis de detergente a la dureza del
agua, a la cantidad de ropa y al grado de suciedad
de la misma.
4
P1131
• Para desactivar el dispositivo y poder cerrar la
puerta, gire el pequeño botón hacia la izquierda de
modo que la muesca se encuentre en posición
vertical.
• Cuando quiera destruir el aparato, desenchúfelo,
corte el cable de alimentación y elimine el enchufe
con el cable restante. Inutilice el cierre de la
puerta: de esta manera los niños que están
jugando no se quedarán atrapados en el aparato.

ESPAÑOL
5
DIMENSIONES Altura 85.0 cm
Anchura 60.0 cm
Profundidad 62.5 cm
CAPACIDAD DE CARGA Algodón 7,kg
Sintéticos 3 kg
Delicados 3 kg
Lana, Lavado a mano 2,kg
VELOCIDAD CENTRIFUGADO 1000 rpm máx. (ZWH 5105 - 5105 A)
1200 rpm máx. (ZWH 5125)
VOLTAJE/FRECUENCIA 220-230V/50 Hz
POTENCIA MAXIMA ABSORBIDA 2200 W
POTENCIA MINIMA DEL FUSIBLE 10 A
PRESION DEL AGUA mín. 0.05 MPa
máx. 0.80 MPa
Este aparato es conforme a las siguientes normas CEE:
73/23/CEE del 19/02/73 relativa al bajo voltaje
89/336/CEE del 03/05/89 relativa a la compatibilidad electromagnética.
Características técnicas

Dispositivos de seguridad para el
transporte
Antes de poner en marcha el aparato,
controle que se hayan quitado todos los
dispositivos previstos para el transporte.
Conserve todos los elementos usados para el
transporte para poderlos volver a usar en caso
de mudanza.
Proceda de la siguiente manera:
1. Quitar el embalaje externo y depositar el equipo
sobre la parte posterior con precaución para
retirar la base de poliestireno que protege la
parte inferior.
2. Desenganchar el cable de alimentación y el tubo
de desagüe de los soportes que hay en la parte
posterior del equipo.
3. Aflojar y quitar (con una llave adecuada) el
tornillo superior central A de la parte posterior del
equipo. Extraer el perno de plástico.
4. Aflojar y quitar los dos tornillos grandes B y los
seis tornillos laterales más pequeños C que hay
en la parte posterior del equipo.
5. Extraer la barra de acero D con cuidado y atornillar
los seis tornillos laterales más pequeños C.
C
C
HEC0014
HEC0011S
D
C
C
B
HEC0003S
B
HEC0002S
A
HEC0001
HEC0008
6. Abrir la puerta, extraer el tubo de entrada del
agua y liberar el bloque de poliestireno que está
fijado a la junta de la puerta con cinta adhesiva.
7. Tapar el orificio superior pequeño y los dos
orificios inferiores laterales más grandes con los
tapones de plástico que hay dentro de la bolsa
del manual de instrucciones.
8. Conecte el tubo de carga
siguiendo las
instrucciones del
capítulo
“Carga de agua”.
Colocación
Coloque la lavadora sobre un piso plano y rígido.
Controle que la circulación del aire alrededor del
aparato no sea impedida por alfombras, moquetas,
etc. Controle también que el aparato no toque la
pared u otros muebles de la cocina.
Nivele el aparato cuidadosamente enroscando o
desenroscando las patas de apoyo. Nunca ponga
cartón, madera o materiales similares debajo del
aparato para compensar los eventuales desniveles
del piso.
Carga de agua
Se suministra un tubo de entrada de agua posterior,
que hallará en el interior del tambor de la máquina.
No utilice el tubo de la máquina antigua para
conectar el suministro de agua.
1. Abra el orificio y extraiga el tubo de entrada de
agua.
2.Conecte el tubo a la máquina mediante la
conexión en ángulo.
P1051
HEC0005
HEC0010
6
Instalación

ESPAÑOL
¡Importante!
No coloque el tubo hacia abajo. Sitúelo a
izquierda o derecha en función de la posición del
grifo.
3. Afloje la abrazadera para colocar el tubo
correctamente. Después de situar el tubo, vuelva a
apretar la abrazadera para evitar fugas.
4. Conecte el tubo de carga a un grifo roscado de
3/4". Debe utilizar siempre el tubo suministrado
con la máquina.
Si el tubo es demasiado corto y no se desea
desplazar el grifo, es necesario comprar un tubo
más largo, adecuado para este tipo de uso existente
en el servicio técnico autorizado.
Descarga de agua
Se puede instalar el recodo del tubo de desagüe en
tres modos diferentes:
En el borde de un lavabo usando el recodo de
plástico suministrado con el aparato. En este
caso es necesario verificar que el recodo no se
mueva del borde cuando el aparato descarga el
agua. Por ejemplo, se lo puede fijar al grifo o a la
pared con una cuerda.
P0022
P1088
HEC0006
En una derivación del desagüe del lavabo. Esta
derivación debe estar arriba del sifón, de modo tal
que el recodo del tubo esté como mínimo a 60 cm
del suelo.
En un conducto de desagüe situado a una altura
no inferior a 60 cm y no superior a 90 cm.
La extremidad del tubo de desagüe debe ser
siempre ventilada, o sea el diámetro interno del
conducto de desagüe debe ser más ancho que el
diámetro externo del tubo de desagüe.
El tubo de desagüe no debe estar retorcido.
Conexión eléctrica
El aparato funciona con una tensión de 220-230 V,
monofásica, 50 Hz.
Controle que la instalación doméstica pueda
soportar la carga máxima requerida (2,2 kW),
considerando también los otros aparatos en
funcionamiento.
Conecte el aparato a una toma de tierra y según
las normas en vigor.
El fabricante declina cualquier
responsabilidad por los daños o las lesiones
provocadas por el incumplimiento de las
normas de seguridad antedichas.
Si se debe sustituir el cable de alimentación,
diríjase a nuestro Centro de Asistencia
técnica.
Una vez que se haya instalado la máquina,
asegurarse de que se pueda acceder fácilmente
al cable de alimentación.
P1118
7

8
Este nuevo aparato, patentado por Zanussi, afronta todas las exigencias de un moderno tratamiento de la ropa
con ahorro de agua, energía y detergente.
También las pequeñas cantidades de ropa se lavan “económicamente”, porque la cantidad de agua se regula
automáticamente en función del peso de la ropa y del tipo de tejidos.
• La posibilidad de seleccionar la temperatura, la velocidad de centrifugado y todas las opciones que la
lavadora les ofrece, permite “personalizar” el lavado.
• La opción INICIO DIFERIDO permite retardar el arranque de los programas de lavado en un momento
cualquiera de la jornada.
• El display fases programa da informaciones sobre el desarrollo del programa.
• El programa especial para lana trata la ropa con suma delicadeza, sin apelmazarla, gracias al sistema
delicado de lavado.
• El sistema de control de centrífuga asegura la posición del aparato y su funcionamiento silencioso.
• La válvula ECO consigue un aprovechamiento óptimo del detergente y reduce el consumo de agua,
ahorrando como consecuencia energía.
1 Cubeta del detergente
2 Panel de mandos
3 Luz piloto de la puerta
4 Zona de descarga
5 Patas regulables
Luz piloto de la puerta
Esta luz está encendida para indicar que la puerta
está bloqueada.
Se puede abrir la puerta cuando se apaga (ver
página 19).
Cubeta del detergente
Prelavado
Lavado
Suavizante, almidón
Blanqueante
Su nueva lavadora
Descripción del aparato
O
N
/
O
F
F
H
YDRO
S
YSTEM
T
E
J
I
D
O
S
C
E
N
T
R
I
F
U
G
A
D
O
T
E
M
P
E
R
A
T
U
R
A
SINTÉTICOS
DELICADOS
ALGODÓN
LANA
60°C
40°C
90°C
30°C
1000
900
700
500
FRÍO
WET ANTI-
ARRUGAS
ACLARADO
ADICIONAL
LAVADO
A MANO
CON PRELAV.
FUNCI
Ó
N
EXPRESS
ECONOMY
40
° AA
O
P
C
I
O
N
E
S
G
R
A
D
O
S
U
C
I
E
D
A
D
REMOJO
I
N
I
C
I
O
/
P
A
U
S
A
A
N
U
L
A
R
E
X
C
L
U
I
R
F
A
S
E
INICIO
DIFERIDO
ZWH 5105
X
TR
A
C
A
PA
C
IT
Y
7
C0074
Cl

ESPAÑOL
Uso
9
1 Tecla “MARCHA/PARADA” (ON/OFF)
Pulse esta tecla para encender la lavadora. En el
display (8) aparecerán tres guiones o un cero
parpadeantes. En página 11 (véase “DISPLAY”)
encontrará explicaciones más detalladas.
Pulse la tecla ON/OFF otra vez para apagar la
máquina.
2 Luz piloto de funcionamiento
Esta luz está conectada a la tecla ON/OFF. Se
enciende al pulsar la tecla y se apaga al pulsarla
otra vez.
3 Tecla “TEJIDOS”
Pulse esta tecla repetidas veces para seleccionar el
programa según el tipo de ropa que se debe lavar.
La luz correspondiente al programa seleccionado se
encenderá. La lavadora propondrá una temperatura
y seleccionará automáticamente el valor de
centrifugado máximo admitido para el programa
escogido. Por medio de las teclas 4 y 5 es posible
cambiar estos valores. En el display aparece la
duración del programa de lavado y el piloto de la
tecla está parpadeante.
Lavado a mano
Cuando seleccione este programa, obtendrá un
lavado particularmente delicado, adecuado para las
prendas de vestir provistas de etiquetas en que se
indica que deben lavarse a mano .
4 Tecla TEMPERATURA
Pulse esta tecla repetidas veces para aumentar o
disminuir la temperatura, en caso de que quiera
lavar la ropa a una temperatura diferente a la que se
ha propuesto por la lavadora. La luz correspondiente
se encenderá. Las temperaturas máximas son 90°C
para el ALGODON, 60°C para los tejidos SINTÉTICOS,
40°C para los tejidos DELICADOS, la LANA y los tejidos
que deben lavarse a mano (programa de LAVADO A
MANO).
Seleccionando la posición FRIO, la máquina lavará
con agua fría. Debe utilizarse para prendas
extremadamente delicadas, como por ejemplo las
cortinas.
¡Importante!
Pulsando simultáneamente las teclas
TEMPERATURA y CENTRIFUGADO, se apaga la
señal acústica a la selección del programa, si se
selecciona una opción no compatible con el programa
de lavado seleccionado y al término del ciclo.
5 Tecla “CENTRIFUGADO”
Se esta tecla repetidas veces para cambiar la
velocidad de centrifugado, en caso de que quiera
centrifugar la ropa a una temperatura diferente a la
que se ha propuesto por la lavadora. La luz
correspondiente se encenderá.
Las velocidades máximas son:
• para el algodón: 1200 rpm (ZWH 5125) o 1000 rpm
(ZWH 5105 - A).
• para los tejidos sintéticos, la lana y los tejidos que
deben lavarse a mano: 900 rpm.
• para los tejidos delicados: 700 rpm.
1
2345
6
7
8129
10
11
O
N
/
O
F
F
H
YDRO
S
YSTEM
T
E
J
I
D
O
S
C
E
N
T
R
I
F
U
G
A
D
O
T
E
M
P
E
R
A
T
U
R
A
SINTÉTICOS
DELICADOS
ALGODÓN
LANA
60°C
40°C
90°C
30°C
1000
900
700
500
FRÍO
WET ANTI-
ARRUGAS
ACLARADO
ADICIONAL
LAVADO
A MANO
CON PRELAV.
FUNCI
Ó
N
EXPRESS
ECONOMY
40
° AA
O
P
C
I
O
N
E
S
G
R
A
D
O
S
U
C
I
E
D
A
D
REMOJO
INICIO/PAUSA
ANULAR
EXCLUIR
FASE
INICIO
DIFERIDO
ZWH 5105
Panel de mandos

Opción WET ANTI-ARRUGAS (Rinse Hold)
seleccionando esta opción, el agua del último
aclarado no se descarga para evitar la formación de
pliegues en los tejidos.
Al final del programa, la luz de la puerta está
encendida, el piloto de la tecla “INICIO/PAUSA” se
apaga. En el display aparece un cero parpadeante.y
el piloto de la tecla “WET ANTI-ARRUGAS” está
encendido para indicar que el agua debe ser
descargada.
Pulse una vez la tecla “ANULAR”, todos los pilotos
está apagados, en el display aparecerán tres
guiones parpadeantes.
Para completar el ciclo, elija una de las opciones
siguientes:
• DESCARGA
:
seleccione el programa de lavado previamente
seleccionado mediante la tecla TEJIDOS. Pulse
tres veces la tecla “ANULAR”. El piloto se
encende.
• DESCARGA y CENTRIFUGADO
seleccione el programa de lavado previamente
seleccionado mediante la tecla TEJIDOS.
Seleccionar la velocidad de centrifugado mediante
el pulsador correspondiente. El piloto se
encende, luego pulsar la tecla “INICIO/PAUSA”.
¡Importante! De pulsar la tecla ANULAR
accidentalmente más de una vez, en el display
aparecerán tres guiones parpadeantes. Para
descargar el agua de la lavadora, seleccione un
programa de lavado cualquiera mediante la tecla
TEJIDOS, luego pulse ANULAR tres veces para
seleccionar la posición de DESCARGA (sólo la luz
DESCARGA quedará encendida).
6 Teclas “GRADO SUCIEDAD”
Pulse estas teclas para seleccionar las opciones
siguientes:
• CON PRELAV. (PRELAVADO): seleccione esta
opción en caso de que quiera prelavar la ropa antes
del lavado principal (no disponible para el ciclo de
LAVADO A MANO y LANA ).
El prelavado termina con un breve centrifugado a
650 rpm en los programas para el algodón y los
tejidos sintéticos, mientras que en el programa para
los tejidos delicados el agua se descarga solamente.
• REMOJO: seleccione esta opción si desea
remojar la ropa durante unos 30 minutos a 30°C.
Pulsando la tecla INICIO DIFERIDO, se puede
prolongar el tiempo de remojo hasta un máximo de
10 horas. Tras este tiempo, el ciclo de lavado
iniciará automáticamente. Esta función no está
disponible para el ciclo lana y lavado a mano.
El remojo finaliza con un breve centrifugado a 650
rpm en los programas para algodón y tejidos
sintéticos, mientras que en el programa para
tejidos delicados el agua es descargada
solamente.
• FUNCION EXPRESS: seleccione esta función para
ropa ligeramente sucia (no para el programa
LAVADO A MANO y LANA) Esta opción y la
ECONOMY 40°AA no pueden ser seleccionadas
juntas.
El tiempo de lavado disminuirá según el tipo de
tejido y la temperatura seleccionada.
Las opciones PRELAVADO, REMOJO y FUNCION
EXPRESS no pueden ser seleccionadas juntas.
7 Teclas “OPCIONES”
Pulse estas teclas para seleccionar las opciones
siguientes:
• ACLARADO ADICIONAL: se puede seleccionar
esta opción con todos los programas hecha
excepción del programa LANA y LAVADO A
MANO. La máquina efectúa 5 aclarados en lugar
de 3. Esta opción se aconseja para las personas
alérgicas a los detergentes y en las zonas donde el
agua es muy blanda.
ECONOMY 40°AA: se puede seleccionar esta
opción para algodón y tejidos sintéticos poco o
normalmente sucios con una temperatura de 40°C
o superior. Esta opción y la FUNCION EXPRESS
no pueden ser seleccionadas juntas.
Si se selecciona 40°C, la máquina prolongará el
tiempo a 40°C en la fase de lavado, permitiendo
alcanzar un rendimiento energético y prestaciones
de lavado de clase AA.
Si se selecciona 90°C o 60°C y se pulsa la tecla
ECONOMY 40° AA, se reduce la temperatura de
lavado. En ambos casos el tiempo de lavado será
prolongado.
Las opciones ACLARADO ADICIONAL y
ECONOMY 40° AA no pueden ser seleccionadas
juntas.
10

ESPAÑOL
8 Display
En el display aparece la información siguiente:
• Tres guiones parpadeantes, cuando se anula un
programa mediante la tecla ANULAR.
Los tres guiones parpadeantes aparecerán también
cuando presione la tecla ON/OFF para encender la
máquina, si se ha borrado el ciclo seleccionado
previamente.
• Duración del programa de lavado en horas y
minutos, tras haber seleccionado un programa.
Cuando el programa está marchando (tras haber
pulsado la tecla INICIO/PAUSA), el valor de tiempo
visualizado disminuye en una unidad cada minuto.
• La lavadora se ha parado con agua en la cuba,
al término de un programa con la opción WET
ANTI-ARRUGAS: esto se indica por un cero
parpadeante, la luz de la puerta está encendida
(no se puede abrir la puerta).
• La lavadora ha completado el programa: esto se
indica por un cero parpadeante. Al mismo tiempo
se apaga la luz piloto de la puerta. El cero
aparecerá otra vez cuando se encienda la
máquina, a condición de que no se haya borrado
el programa precedente mediante la tecla
ANULAR.
¡Importante!
La primera vez que se usa la lavadora, al
encenderla puede aparecer un cero parpadeante y
oírse una señal acústica. Esto se debe al hecho de
que la lavadora ha ejecutado un ciclo de lavado
durante las pruebas de inspección del fabricante, y
este ciclo no ha sido borrado tras haber finalizado.
• Inicio diferido, un valor de tiempo indicado en
horas y seleccionado mediante la tecla
correspondiente.
El tiempo de retardo se visualiza por 3 segundos,
luego reaparece la duración del programa
seleccionado.
Al presionar la tecla INICIO/PAUSA, inicia la cuenta
atrás y el valor del tiempo de retardo disminuye en
una unidad cada hora hasta 2 horas y luego cada 30
minutos.
El inicio del programa seleccionado puede ser
retrasado de hasta 23 horas en intervalos de una
hora.
• La selección de la opción se ha efectuado de
manera incorrecta: esto se indica por el mensaje
Err cuando se selecciona una función
incompatible con el programa actual.
11

La selección incorrecta se indica también por una
señal de alarma acústica.
• Un código de alarma indica una avería en el
funcionamiento de la máquina (véase el capítulo
correspondiente).
9 Tecla INICIO/PAUSA
A esta tecla están asociadas dos funciones:
• Inicio: tras haber seleccionado el programa y las
opciones deseadas, pulse esta tecla para poner en
marcha la lavadora. La luz sobre la tecla dejará de
parpadear y quedará encendida.
Si se ha seleccionado un tiempo de retardo con la
tecla INICIO DIFERIDO, la cuenta atrás iniciará y
aparecerá en el display.
• Pausa: pulsando esta tecla otra vez, se interrumpe
el programa en curso. La luz sobre la tecla
empezará a parpadear. Para reiniciar el programa,
pulse otra vez la tecla.
Cuando se pone en PAUSA el ciclo, la luz piloto de
la puerta se apaga y es posible abrir la puerta, a
condición de que:
• la lavadora no esté en la fase de calentamiento;
• el nivel del agua no sea alto;
• el tambor no esté girando.
¡Importante! Antes de efectuar cualquier
modificación en el programa en curso, se debe
poner la lavadora en PAUSA.
10 Tecla “EXCLUIR FASE / ANULAR”
Al término del programa, se debe pulsar esta tecla
una o repetidas veces para borrar el contenido de la
memoria (en el display aparecerán tres guiones
parpadeantes); de lo contrario, la próxima vez que
se encienda la lavadora, el cero parpadeante
reaparecerá y se oirán las señales de alarma
acústicas correspondientes al término del ciclo
precedente.
Esta tecla sirve también para seleccionar programas
especiales, como aclarados, centrifugado y
descarga.
• Si la lavadora está encendida, porque ha
acabado de ejecutar un programa de lavado:
- pulse la tecla ANULAR una o más veces, hasta
que en el display aparezcan tres guiones
parpadeantes, para anular el programa que
acaba de terminar;
- elija el tipo de tejido con la tecla correspondiente;
- seleccione el programa “especial” según se indica
a continuación:
• Aclarados: pulse una vez la tecla ANULAR, se
apaga la luz piloto LAVADO .
• Centrifugado: pulse dos veces la tecla, se
apagan las luces piloto LAVADO y
ACLARADOS .
• Descarga: pulse tres veces la tecla, se apagan
las luces piloto LAVADO , ACLARADOS y
CENTRIFUGADO .
Solamente la luz piloto DESCARGA quedará
encendida.
Ejemplo:
En este caso se
efectuarán los aclarados y
el centrifugado.
• Si la máquina está apagada, se deberá
encenderla pulsando ON/OFF, elegir el tejido con
la tecla correspondiente y luego actuar sobre
ANULAR según se describe arriba, de modo que la
máquina ejecute el ciclo deseado.
La tecla ANULAR permite, además, excluir una fase
del ciclo que la máquina está ejecutando:
- ponga la máquina en pausa (pulse
INICIO/PAUSA, la luz piloto correspondiente
parpadea)
- pulse la tecla una o más veces hasta anular la
fase o las fases deseadas (la luz piloto al lado de
la fase se apaga).
PRELAVADO
LAVADO
ACLARADOS
CENTRIFUGADO
DESCARGA
12

ESPAÑOL
Ejemplo:
En este caso se efectuará
solamente el centrifugado
a las revoluciones
previstas para el tipo de
tejido seleccionado.
11 Tecla “INICIO DIFERIDO”
Esta tecla permite retrasar el inicio del programa de
un programa de 30 minutos hasta 2 horas, y luego
desde 1 hora hasta un máximo de 23 horas
El retardo seleccionado aparece en el display para
unos 3 segundos; luego, reaparece la duración del
programa. Si ya ha pulsado la tecla REMOJO, el
tiempo deferido visualizado indica el tiempo del
remojo (máx 10 horas).
Se debe seleccionar esta opción tras haber definido
el programa y antes de pulsar la tecla
INICIO/PAUSA.
El valor de tiempo visualizado en el display
disminuirá en una unidad cada hora.
El tiempo de retardo puede ser cambiado en
cualquier momento, antes de pulsar la tecla
INICIO/PAUSA.
Si ya ha pulsado la tecla INICIO/PAUSA y quiere
cancelar el tiempo de retardo, actúe del modo
siguiente:
• ponga la lavadora en PAUSA pulsando la tecla
INICIO/PAUSA;
• pulse la tecla “INICIO DIFERIDO” hasta que en el
display aparezca
0’ y pulse otra vez la tecla
INICIO/PAUSA.
Para cambiar el tiempo de retardo, tras haber
pulsado la tecla INICIO/PAUSA, definir otra vez el
programa.
¡Importante!
La puerta estará cerrada durante todo el tiempo de
retardo (luz de la puerta encendida).
De necesitar abrir la puerta, antes de todo debe
poner la lavadora en PAUSA pulsando la tecla
INICIO/PAUSA. Tras haber cerrado la puerta, pulse
otra vez la tecla INICIO/PAUSA.
PRELAVADO
ACLARADOS
CENTRIFUGADO
DESCARGA
PRELAVADO
13
12 Luces indicadoras de la fase del
programa
Cuando se selecciona un programa, las luces
correspondientes a las fases que forman el
programa se encienden.
Tras haber iniciado el programa, sólo la luz
correspondiente a la fase actualmente en curso
quedará encendida.
PRELAVADO
ACLARADOS
CENTRIFUGADO
DESCARGA
LAVADO

Consejos para el lavado
Selección de las prendas
Respete los símbolos para el tratamiento de los
tejidos en las etiquetas de cada una de las prendas
y las instrucciones para el lavado aconsejadas por el
fabricante.
Divida la ropa de esta manera:
ropa blanca, de color, sintéticos, delicados, lana.
Temperaturas
90°
para prendas blancas de lino o algodón
normalmente sucias (por ej. paños de
cocina, toallas, manteles, sábanas, etc.)
60° para prendas de color que no destiñen,
normalmente sucias (por ej. camisas,
camisones, pijamas, etc.) de lino, algodón
o fibras sintéticas y para prendas blancas
en algodón levemente sucias (por ej.
prendas íntimas).
FRIO
para ropa delicada (por ej. cortinas), ropa
30°-40°mixta con mezcla de fibras sintéticas y
lana.
EI ciclo lana de esta máquina ha sido
aprobado por la Woolmark para el lavado
de productos Woolmark lavables en
lavadora, siempre que las prendas sean
tratadas de acuerdo con las indicaciones
de cuidado de la respectiva etiqueta cosida
y con las instrucciones de uso del
fabricante de la máquina. M9605.
Antes de cargar la ropa
La ropa blanca y de color no se deben lavar juntas.
La ropa blanca puede alterar el color con el lavado.
La ropa de color nueva puede desteñir al primer
lavado; la primera vez se aconseja lavarla a parte.
Controle que en la ropa no hayan quedado
objetos metálicos (por ej. hebillas, imperdibles,
alfileres).
Abotone las fundas, cierre las cremalleras, los
ganchos y los ojales. Ate los cinturones y las cintas
largas.
Elimine las manchas persistentes antes del lavado.
Eventualmente friegue los puntos particularmente
sucios con un detergente especial o con un jabón
detergente.
Trate las cortinas con mucho cuidado. Quite los
ganchos de las cortinas o átelos en una red o en una
bolsa.
Carga máxima de ropa
Las informaciones sobre las cargas de ropa se
encuentran en las tablas de programas.
Reglas generales:
Algodón y lino: llene el tambor sin recargarlo.
Sintéticos: no más de la mitad del tambor.
Tejidos delicados, lana y programa “Lavado a
mano”: no más de un tercio del tambor.
Con una carga máxima se aprovecha óptimamente
el agua y la energía.
Tratándose de ropa muy sucia, reduzca la cantidad.
Pesos de la ropa
Los pesos que se indican a continuación tienen un
valor indicativo:
albornoz de baño 1200 g
servilletas 100 g
funda plumón 700 g
sábanas 500 g
fundas 200 g
manteles 250 g
toallas de felpa 200 g
paños de cocina 100 g
camisones 200 g
slip de señora 100 g
mamelucos de hombre 600 g
camisas 200 g
pijamas de hombre 500 g
blusas 100 g
calzoncillos 100 g
Eliminación de las manchas
Es posible que ciertas manchas particulares no se
eliminen solamente con agua y detergente. Por lo
tanto se aconseja tratarlas antes del lavado.
Sangre: las manchas todavía frescas se deben
tratar con agua fría. Tratándose de manchas ya
secas, deje la ropa en remojo por una noche con un
detergente especial y luego frótela en agua y jabón.
Pintura al aceite: humedezca con gasolina
detergente, haga presión sobre las manchas
después de haber colocado la prenda sobre un trapo
blando, trátelas varias veces con el detergente.
Manchas secas de grasa: humedezca con
trementina (aguarrás), haga presión sobre las
manchas con la punta de los dedos usando un trapo
de algodón, después de haber apoyado la prenda
sobre una superficie blanda.
14

ESPAÑOL
El detergente y el eventual aditivo deben ser
echados en los compartimientos apropiados antes
de iniciar el programa de lavado.
Si se usan detergentes concentrados en polvo o
líquidos, seleccione un programa sin prelavado o
sin remojo.
Eche el detergente líquido inmediatamente antes
del inicio del programa en el compartimiento de
la cubeta detergente.
Los eventuales aditivos líquidos para suavizar o
almidonar la ropa deben ser echados en el
compartimiento con el símbolo y el blanqueante
en el compartimiento antes de iniciar el programa
de lavado.
Para las dosis, siga las indicaciones de los
productores.
Cantidad de detergente por usar
El tipo y la cantidad de detergente dependen del tipo
de tejido, de la carga, del grado de suciedad y de la
dureza del agua usada.
La dureza del agua se clasifica en niveles de dureza.
Las informaciones sobre dichos niveles se pueden
obtener de la compañía distribuidora competente o
de la administración municipal.
Siga las instrucciones para la dosificación indicadas
por el productor.
Use una cantidad menor de detergente si:
– se lava poca ropa,
– si la ropa no está muy sucia,
– si se forma mucha espuma durante el lavado.
Grados de dureza del agua
Orín: sal oxálico disuelto en caliente o un producto
antiorín en frío. Preste atención a las manchas de
orín viejas porque la estructura de celulosa ha sido
ya dañada y el tejido tiende a agujerearse.
Manchas de moho: trátelas con blanqueador,
aclare bien (solamente las prendas blancas o de
color resistentes al cloro).
Hierba: enjabone levemente y trate con blanqueador
diluido (prendas blancas, resistentes al cloro).
Birome y cola: humedezca con acetona (*), haga
presión sobre las manchas después de haber
apoyado la prenda sobre un trapo blando.
Lápiz de labios: humedezca con acetona como
arriba indicado, luego trate las manchas con alcohol.
Elimine el color en los tejidos blancos con
blanqueador.
Vino tinto: deje en remojo con detergente, aclare y
trate con ácido acético o ácido cítrico, luego aclare.
Trate eventuales residuos con blanqueador.
Tinta: según la composición de la tinta, humedezca
el tejido primero con acetona (*), luego con ácido
acético; trate los eventuales residuos en las prendas
blancas con blanqueador y luego aclare bien.
Manchas de alquitrán: primero trate con
quitamanchas, alcohol o gasolina, luego frote con
pasta detergente.
(*) no use la acetona en la seda artificial.
Detergentes y aditivos
Un buen resultado de lavado depende de la
selección del detergente y del uso en dosis
correctas. Dosificar correctamente significa evitar
despilfarros y proteger el ambiente. No obstante se
trate de productos biodegradables, los detergentes
contienen elementos que dañan el delicado
equilibrio ecológico de la naturaleza.
La elección del detergente depende del tipo de tejido
(delicados, lana, algodón, etc.), del color, de la
temperatura de lavado y del grado de suciedad.
En esta lavadora se pueden usar todos los
detergentes para lavadoras normalmente fácil de
adquirir en comercio:
– detergentes en polvo para todo tipo de tejidos,
– detergentes en polvo para tejidos delicados
(máximo 60°C) y lana,
– detergentes líquidos, preferiblemente para
programas de lavado a baja temperatura (máximo
60°C) para todo tipo de tejidos o especiales
solamente para lana.
15
Nivel Característica
Grados
Alemanes
°dH
Franceses
°T.H.
dulce
media
dura
muy dura
0- 7
8-14
15-21
más de
21
0-15
16-25
26-37
más de
37
1
2
3
4

16
Símbolos internacionales para el tratamiento de los tejidos
Las etiquetas con los símbolos que están pegadas en las prendas son muy útiles para el tratamiento de
las prendas.
Acción fuerte
Acción delicada
Lavado
a 95°C
Lavado
a 60°C
Lavado
a 40°C
Lavado
a 30°C
Lavado
delicado
a mano
No
lavar
Blanqueo Se puede blanquear en agua fría No blanquear
Planchado Plancha fuerte
máx 200°C
Plancha media
máx 150°C
Plancha floja
máx 110°C
No planchar
Limpieza
en seco
Limpieza en seco
con cualquier solvente
Limpieza en seco
con percloro, gasolina,
alcohol puro,
R111y R113
Limpieza en seco
con gasolina,
alcohol puro y R113
No limpiar
en seco
Secado Secar
extendido
Secar
colgado
Secar
en perchas
Puede secarse
en secadoras
Temperatura
normal
Temperatura
reducida
No secar
en secadoras
95
60
60
40
40
40
30
30

ESPAÑOL
17
¡Importante!
De introducir una dosis excesiva de suavizante o
cerrar la cubeta con demasiada fuerza, se podría
causar la entrada inmediata del suavizante en la
máquina y, por consiguiente, la pérdida de efecto
sobre la ropa.
4. Encienda el aparato
Pulse la tecla ON/OFF para encender el aparato.
La luz piloto de funcionamiento se enciende.
En el display aparecerán tres guiones o un cero
parpadeantes.
5. Seleccione el programa/tejido
deseado
Pulse la tecla TEJIDOS repetidas veces para
seleccionar el programa/tejido deseado. La luz
correspondiente se encenderá.
Las luces correspondientes a las fases que forman
el programa se encenderán.
En el display aparecerá la duración del programa
seleccionado, calculada según la carga máxima para
cada tipo de tejido. La luz de la tecla INICIO/PAUSA
empezará a parpadear.
Si se debe lavar una carga reducida de ropa, al
inicio del ciclo el display indicará todavía la duración
correspondiente a la carga máxima. El valor de la
duración se ajustará gradualmente durante la
ejecución del ciclo.
PRELAVADO
ACLARADOS
CENTRIFUGADO
DESCARGA
LAVADO
DELICADOS
LANA
ALGODON
SINTETICOS
TEJIDOS
LAVADO
A MANO
------
0
O
N
/
O
F
F
Secuencia de las
operaciones
Antes del primer lavado recomendamos poner 2
litros de agua en el compartimiento de lavado
de la cubeta para activar la válvula
ECO. A continuación realice un programa de
algodón a 90°C, sin ropa, para eliminar los
eventuales residuos de elaboración del tambor y de
la cuba. Eche media medida de detergente en el
compartimiento de lavado y ponga en
funcionamiento el aparato.
1. Introduzca la ropa
Abra la puerta.
Introduzca la ropa en el tambor, una por una,
desplegándola lo más posible. Cierre la puerta.
2. Dosifique el detergente
Extraiga la cubeta toda hacia afuera.
Use un dosificador para echar la cantidad
aconsejada de detergente en el compartimiento de
lavado .
Si desea efectuar el remojo o el prelavado, vierta el
detergente en el respectivo compartimiento .
3. Dosifique los aditivos
Si lo desea, vierta el suavizante en el
compartimiento y el blanqueante en el
compartimiento sin superar el nivel “MAX” de
referencia.
Cierre la cubeta “con delicadeza”.
C0076
C0075
P0004

9. Seleccione ACLARADO ADICIONAL
y/o ECONOMY 40° AA opción
Si quiere efectuar un aclarado extra de la ropa,
seleccione la opción ACLARADO ADICIONAL.
Si la ropa está poco o normalmente sucia y es
necesario prolongar el tiempo de lavado, seleccione
la opción ECONOMY 40° AA.
Pulse esta tecla de modo que una luz se encienda.
10. Seleccione el INICIO DIFERIDO
Antes de iniciar el programa, si quiere retrasar el
inicio pulse repetidas veces la tecla INICIO
DIFERIDO, o manténgala presionada para
seleccionar el retardo deseado. El valor del tiempo
de retardo seleccionado (hasta 23 horas) aparecerá
en el display por 3 segundos, luego reaparecerá la
duración del programa.
11. Inicie el programa
Pulse la tecla INICIO/PAUSA. La luz
correspondiente dejará de parpadear, la luz de la
puerta se encenderá y sólo la luz que se refiere a la
fase en curso quedará encendida.
Si ha elegido un inicio diferido, la lavadora empezará
la cuenta atrás. En el display aparecerá la duración
del programa o el retardo seleccionado.
INICIO/PAUSA
INICIO
DIFERIDO
ACLARADO
ADICIONAL
ECONOMY
40° AA
18
6. Seleccione la temperatura
Pulse la tecla TEMPERATURA si desea seleccionar
un valor de temperatura diferente al que se ha
propuesto por la lavadora.
La luz correspondiente se encenderá.
7. Seleccione la velocidad de centrifugado
o la opción WET ANTI-ARRUGAS
Pulse repetidas veces la tecla CENTRIFUGADO
para seleccionar la velocidad de centrifugado
deseada o la opción WET ANTI-ARRUGAS
(exclusión centrifugado). La luz correspondiente se
encenderá.
ZHWH 5105 - A ZWH 5125
8. Seleccione las opciones deseadas
Si la ropa está muy sucia, se aconseja que se
seleccione la opción PRELAVADO.
Para ropa con manchas difíciles, seleccione la
opción REMOJO.
Si la ropa está ligeramente sucia seleccione la
opción FUNCIÓN EXPRESS.
La luz correspondiente se enciende.
REMOJO
CON PRELAV.
FUNCION
EXPRESS
1200
900
700
500
CENTRIFUGADO
WET ANTI-
ARRUGAS
1000
900
700
500
CENTRIFUGADO
WET ANTI-
ARRUGAS
60°C
40°C
90°C
30°C
TEMPERATUR
A
FRIO

ESPAÑOL
19
12. Cómo se cambia un programa
durante su ciclo
Antes de cualquier cambio se debe poner la
lavadora en pausa pulsando la tecla INICIO/PAUSA.
Se puede cambiar cualquier fase antes de que el
programa la ejecute.
Cambiar el tipo de tejido o la temperatura es posible,
obviamente, sólo durante la fase de lavado. Cuando
se modifiquen estos dos parámetros, la lavadora
reanudará el ciclo desde el comienzo sin
descargar el agua.
Si es necesario descargar el agua para cambiar el
programa en curso, actúe del modo siguiente:
• Ponga en PAUSA la máquina pulsando la tecla
INICIO/PAUSA;
• pulse repetidas veces la tecla ANULAR hasta que
sólo quede encendida la luz DESCARGA ;
• pulse otra vez la tecla INICIO/PAUSA.
Una vez descargada el agua, en el display aparece
un cero parpadeante. Ahora puede seleccionar un
nuevo programa y pulsar la tecla INICIO/PAUSA
para iniciarlo.
13. Cómo se borra un programa durante
su ciclo
Para borrar un programa en curso de ejecución,
antes de todo ponga la lavadora en pausa pulsando
la tecla INICIO/PAUSA, luego pulse repetidas veces
la tecla ANULAR, hasta que en el display aparezcan
tres guiones parpadeantes.
14. Cómo se abre la puerta durante
un programa
Se puede abrir la puerta, tras haber puesto la
lavadora en PAUSA, si existen las condiciones
siguientes:
• la lavadora no está en la fase de calentamiento
más allá de 55°C;
• el nivel del agua no es alto;
• el tambor no está girando.
Si estos requisitos están cumplidos, cuando ponga
la lavadora en pausa, la luz de la puerta se apagará
y se podrá abrir la puerta.
En caso de que la puerta no se abra y necesite
absolutamente abrirla, apague la máquina pulsando
la tecla ON/OFF.
Tras aproximadamente 3 minutos, puede abrir la puerta.
¡Preste atención al nivel y a la temperatura del
agua en la lavadora!
Cuando cierre la puerta y pulse otra vez la tecla
ON/OFF, la lavadora reanudará el programa desde
el punto en que había sido interrumpido.
15. Término del programa
Al término del programa, la lavadora se para
automáticamente, emite una señal acústica y
muestra un cero parpadeante. La luz piloto de la
puerta y el piloto de la tecla INICIO/PAUSA se
apagan y se puede abrir la puerta.
Si se ha seleccionado la opción WET ANTI-
ARRUGAS, el piloto de la tecla INICIO/PAUSA se
apaga, la luz piloto de la puerta y el piloto de la tecla
WET ANTI-ARRUGAS están encendidos para
indicar que se debe descargar el agua. En el display
aparece un cero parpadeante.
Al término del programa, en el display aparece un
cero parpadeante y se oye una señal acústica.
La luz de la puerta se apaga de inmediato.
Pulse repetidas veces la tecla EXCLUIR FASE /
ANULAR para borrar el programa que se acaba
de ejecutar. De no hacerlo, la próxima vez que
encenderá la lavadora, el cero parpadeante
aparecerá en el display y se oirá una señal
acústica.
Nota: cuando enciende la máquina, si debe borrar el
programa previamente ejecutado es suficiente que
pulse la tecla TEJIDOS y seleccione un nuevo
programa.
Pulse la tecla ON/OFF para apagar la máquina. La
luz correspondiente se apagará.
Saque la ropa de la lavadora.
Asegúrese de que el tambor esté completamente
vacío, haciéndolo girar con las manos. De este
modo se evita que prendas de vestir queden
accidentalmente en el tambor, donde podrían
dañarse durante un lavado posterior (p.ej.
encogiéndose) o desteñirse en otra carga de ropa.
Le aconsejamos que cierre el grifo del agua y
desenchufe el aparato.
Deje la puerta entreabierta para airear la lavadora.

20
Ficha programas
Programas de lavado
* Estos datos tienen un valor solamente indicativo y pueden variar según el tipo y la cantidad de ropa, la temperatura
del agua y del ambiente. Los valores se refieren a la temperatura más alta prevista para cada programa.
Conforme a la normativa CEE 92/75, los consumos indicados en la etiqueta energía se refieren al programa
para “Algodón colorado ” a 60°C seleccionado con la opción “Economy 40°AA”: kWh 1.19, litros 56, h/min.
2.30.
Tipo de ropa
y símbolos en
las etiquetas
CENTRIF./WET ANTI-ARR
CON PRELAV.
REMOJO
FUNCIÓN EXPRESS
ACLARADO ADICIONAL
ECONOMY
40° AA
CENTRIF./WET ANTI-ARR
CON PRELAV.
REMOJO
FUNCIÓN EXPRESS
ACLARADO ADICIONAL
ECONOMY
40° AA
CENTRIF./WET ANTI-ARR.
CON PRELAV.
REMOJO
FUNCIÓN EXPRESS
ACLARADO ADICIONAL
ECONOMY
40° AA
CENTRIF./WET ANTI-ARR.
CON PRELAV.
REMOJO
FUNCIÓN EXPRESS
ACLARADO ADICIONAL
ECONOMY
40° AA
ENTRIF./WET ANTI-ARR
ENTRIF./WET ANTI-ARR
Algodón
blanco: p.ej.
sábanas,
manteles, ropa
blanca
Algodón
colorado: p.ej.
camisas,
blusas, ropa
interior,
toallas, trapos
de cocina
Sintéticos:
p.ej. camisas,
blusas, ropa
interior
Tejidos
delicados:
p.ej. tejidos
acrílicos,
viscosilla,
poliéster,
mezclas
acrílicas
Lana
30
40
30
40
30
40
60
30
40
60
95
60
7 kg
7 kg
3 kg
3 kg
2 kg
2 kg
Carga
Programa /
temperatura
Opciones
posibles
2.06
1.5
0.95
0.55
0.35
0.35
68
65
55
57
55
55
Consumo*
Energía
kWh
Agua
litros
Algodón
60° - 90°C
Algodón
60° - 40°- 30°C
FRIO
Sintéticos
60°- 40°- 30°C
FRIO
Delicados
40°- 30°C
FRIO
Lana
40°-30°C
FRIO
Lavado a mano
40°-30°C
FRIO
Descripción
del programa
Lavado a
60° - 90°C
3 aclarados
Centrifugado
largo
Lavado a
60°- 40°- 30°C
o frío
3 aclarados
Centrifugado
largo
Lavado a
60°- 40°- 30°C
o frío
3 aclarados
Centrifugado
breve
Lavado a
40°-30°C o frío
3 aclarados
Centrifugado
breve
Lavado a
40°-30°C o frío
3 aclarados
Centrifugado
breve
Lavado a
40°-30°C o frío
3 aclarados
Centrifugado
breve

ESPAÑOL
Mantenimiento
21
1. Puerta
Controle periódicamente que no haya cuerpos
extraños como grapas, botones, mondadientes en la
junta de la puerta.
2. Exterior del aparato
Limpie la parte externa del aparato con agua tibia y
un producto neutro no abrasivo. Aclare con agua
limpia y seque con un trapo suave.
Importante: no use alcohol, disolventes o productos
similares para la limpieza.
3. Cubeta detergente
Los detergentes y el suavizante, con el tiempo, forman
incrustaciones.
De vez en cuando limpie la cubeta del detergente
pasándola debajo del grifo del agua. Para extraer
completamente la cubeta del aparato, apriete el botón
en fondo a la izquierda.
Para poder limpiar la cubeta más fácilmente, es posible
quitar la parte alta de la misma reservada a los aditivos.
Con el pasar del tiempo, el detergente puede formar
incrustaciones en la parte interna de la cubeta:
límpiela con un cepillo de dientes. Vuelva a colocar
la cubeta en su lugar.
P0038
C0078
C0077
P1050
4. Limpieza da la zona de descarga
La limpieza de la zona de descarga de agua es
necesaria en caso de que la bomba haya quedado
bloqueada por cuerpos extraños ( por ejemplo
botones, grapas, clips, etc) o en caso de que la
máquina no descargue y/o no centrifugue.
• Desconecte el cable de alimentación.
• Si es necesario espere a que el agua de lavado se
enfríe.
• Abra la puerta de la zona de descarga.
• Coloque un recipiente para recoger el agua.
• Tire del pequeño tubo de descarga, colóquelo en
el recipiente y quite el tapón, cuando el recipiente
esté lleno, ponga el tapón al pequeño tubo de
descarga.
• Vacíe el recipiente y repita la secuencia de
operaciones anteriores hasta vaciar por completo
la lavadora. Tenga a mano un trapo para secar el
agua que se derrama cuando se quita el
filtro/diafragma.
• A continuación desenrosque la tapa del
filtro/diafragma girándola en sentido anti-horario y
tire de ella.
• Retire los cuerpos extraños como botones,
monedas y las pelusas que se han acumulado en
la zona de las aspas de la bomba. Para facilitar la
limpieza gire las aspas de la bomba.
P1115
P1114

22
• Enrosque la tapa del filtro/diafragma en sentido
horario asegurándose que queda bien apretada.
• Coloque el pequeño tubo en su posición inicial y
cierre la puerta de la zona de descarga.
5. Filtro del tubo de carga del agua
Si se observa que el aparato necesita más tiempo
para llenarse, es necesario controlar que el filtro del
tubo de carga del agua no esté atascado.
Cierre el grifo del agua.
Desenrosque el tubo de carga del grifo.
Límpie el filtro con un cepillo.
Vuelva a enroscar el tubo teniendo sumo cuidado en
no pasar de rosca.
6. Vaciado de emergencia
Si el aparato no descarga (bomba desagüe
bloqueada o tubo desagüe obstruido), para vaciar el
agua proceda de la siguiente manera:
• desenchufe el aparato;
• cierre el grifo del agua;
• espere que el agua se enfríe (si es necesario);
P1090
P1098
• abra la puerta de la zona de descarga;
• coloque un recipiente para recoger el agua que
saldrá de la lavadora;
• tire del pequeño tubo de descarga, colóquelo en el
recipiente y quite el tapón;
• cuando el recipiente esté lleno, ponga el tapón al
pequeño tubo de descarga;
• vacíe el recipiente y repita la secuencia de
operaciones anteriores hasta vaciar por completo
la lavadora;
• limpie el filtro/diafragma si es necesario, como
descrito anteriormente;
• coloque el pequeño tubo de descarga en su
posición inicial y cierre la puerta de la zona de
descarga.
7. Precauciones contra el hielo
Si el aparato se instala en un cuarto donde la
temperatura podría descender por debajo de 0°C,
proceda como sigue:
• desenchufe el aparato;
• cierre el grifo del agua y desenrosque el tubo de
carga del grifo;
• abra la puerta de la zona de descarga;
• coloque un recipiente para recoger el agua que
saldrá de la lavadora;
• ponga la extremidad del tubo de carga en un
recipiente;
• tire del pequeño tubo de descarga, colóquelo en el
recipiente y quite el tapón;
• cuando termine de salir el agua, ponga el tapón al
pequeño tubo de descarga, colóquelo en su
posición inicial y cierre la puerta de la zona de
descarga;
• vuelva a enroscar el tubo de carga.
Efectuando estas operaciones el agua que ha
quedado en el aparato será evacuada, evitando la
formación de hielo y de consecuencia la rotura de
las partes afectadas.
Cuando haga funcionar nuevamente el aparato,
asegúrese de que la temperatura del ambiente sea
superior a los 0°C.
¡Importante¡
Cada vez que se descarga el agua a través del
pequeño tubo de descarga, se deben añadir 2 litros
de agua en el compartimento de lavado de la
cubeta, y a continuación realizar un programa de
descarga. Con esto se vuelve a activar la válvula
ECO, impidiendo que parte del detergente quede sin
usar en el siguiente lavado.

ESPAÑOL
23
Anomalías de funcionamiento
Defectos que pueden resolver sin la ayuda de un técnico.
Durante el funcionamiento de la máquina, puede suceder que oírse una señal acústica y en el display aparezca
uno de los códigos de alarma siguientes:
-
EE1100
: anomalía en la carga del agua
-
EE2200
: anomalía en la descarga del agua
-
EE4400
: puerta abierta
Una vez solucionado el inconveniente, pulse la tecla INICIO/PAUSA para hacer partir nuevamente el
programa interrumpido. Si no se llega a solucionar el inconveniente, consulte al Centro de Asistencia técnica
más cercano a su domicilio.
Anomalías Causas posibles
• El aparato no se pone en marcha:
• La puerta no está bien cerrada. (
EE4400
)
• El fusible de la instalación doméstica está dañado.
• Se ha seleccionado la opción INICIO DIFERIDO.
• La tecla INICIO/PAUSA no ha sido pulsada.
• El aparato no carga agua:
• El grifo del agua está cerrado. (
EE1100
)
• El tubo de carga está bloqueado o doblado. (
EE1100
)
• El filtro del tubo de carga está obstruido. (
EE1100
)
• La puerta no está cerrada. (
EE4400
)
• El aparato carga agua y la descarga
inmediatamente:
• La extremidad del tubo de desagüe se encuentra
demasiado bajo respecto al aparato. Véase el
párrafo correspondiente en el capítulo “descarga”.
• El aparato no descarga y/o no
centrifuga:
• El tubo de desagüe está bloqueado o doblado. (
EE2200
)
• El filtro de desagüe obstruido. Límpielo. (
EE2200
)
• Se ha seleccionado la opción WET ANTI-
ARRUGAS.
• Hay agua en el suelo:
• Hay demasiado detergente o se ha usado un
detergente inadecuado (hace demasiada espuma).
• Verifique si hay pérdidas de una de las roscas del
tubo de carga. Es difícil ver el agua pasar a lo
largo del tubo, controle si está húmedo.
• La bomba de desagüe no está bien enroscada
después de la limpieza.
• El tubo de desagüe está deñado.
• El resultado del lavado no es
satisfactorio:
• Se ha usado poco detergente o un detergente
inadecuado.
• Las manchas “difíciles” no se han sometido a un
tratamiento preliminar.
• No se ha elegido la temperatura justa, combinada
con el programa correcto.
• Se ha cargado demasiada ropa.
• El aparato vibra o hace ruido:
• No se han quitado todas las protecciones que
sirven para el transporte.
• No se han regulado las patas de sostén.
• La ropa no está bien distribuida en el tambor.
• Quizás hay poca ropa en el tambor.
• La puerta no se abre (la luz
correspondiente está encendida):
• El programa está todavía en curso y el tambor
está en movimiento.
• La puerta todavía no se ha desbloqueado.
• El nivel del agua en la máquina supera la parte
inferior de la puerta.
• El aparato está calentando el agua.

24
Anomalías Causas posibles
• El centrifugado inicia en retardo o la
ropa no está centrifugada bien:
• Esta lavadora incorpora el sistema "control de
centrífuga" (o centrífuga controlada) que evita
vibraciones excesivas durante la centrifugación y
asegura su estabilidad.
Si al inicio de la fase de centrifugación, la ropa no
está distribuida uniformemente dentro del tambor,
la lavadora intentará distribuirla de manera
homogenea, mediante algunas vueltas del tambor
y solo cuando la colada se ha distribuido
correctamente se realizará la centrifugación.
Si después de algunos minutos, la ropa
permanece apelotonada, la lavadora efectuará el
centrifugado a una velocidad reducida o no
efectuará el centrifugado.
Por ello, si observa que al finalizar el ciclo la ropa
está empapada, le aconsejamos redistribuirla
manualmente en el interior del tambor y poner el
programa de centrífuga.
Atención: Puede ocurrir que el tipo y la cantidad
de ropa (p.ej. 2 toallas unicamente) impidan su
distribución, por ello aconsejamos lavar, con las
toallas, otras prendas.
Si no se soluciona el problema o no se lo localiza,
diríjase al centro de asistencia después de haber
tomado nota del modelo, del número de serie y de la
fecha de compra del aparato; es necesario conocer
estos datos pues serán solicitados.
Mod. ..........
Prod. No. ...........
Ser. No. .........
M
od
. ..........
Pr
od. N
o. ...........
S
er
. N
o
. .........
P0042 BD
P1035E
No se ve
agua en el aparato. Los aparatos,
fruto de la tecnología moderna, trabajan en
modo muy económico con consumo reducido
de agua. De todos modos las prestaciones
son excelentes
El aparato
hace un ruido insólito. El aparato está
dotado de un motor a colector que mejora la
prestación del aparato.
P1034E
Para España
Puede comprar recambios y accesorios on-line:
entre en http://www.service.electrolux.com y seleccione “Tienda Virtual”.

ENGLISH
Contents
Washing hints 36-37
Sorting the laundry 36
Temperatures 36
Before loading the laundry 36
Maximum loads 36
Laundry weights 36
Removing stains 36-37
Detergents and additives 37
International wash code symbols 38
Operating sequence 39-41
Washing programmes 42
Maintenance 43
Bodywork 43-44
Door seal 44
Detergent dispenser drawer 44
Drain pump 43-44
Water inlet filter 44
Emergency emptying out 44
Frost precautions 44
Something not working? 45-46
Warnings 26-27
Disposal 27
Tips for environmental protection 27
Technical specifications 28
Installation 29
Unpacking 29
Positioning 29
Water inlet 29-30
Water drainage 30
Electrical connection 30
Your new washing machine 31
Description of the appliance 31
Door locked pilot light 31
Detergent dispenser drawer 31
Use 32
Control panel 32
Controls 32-35
25
Dear customer,
Please read these operating instructions carefully and pay particular attention to the safety notes indicated in
the first pages. We recommend that you keep this instruction booklet for future reference and pass it on to any
future owners.
Transport damages
When unpacking the appliance, check that it is not damaged. If in doubt, do not use it and contact the Service
Centre.
The symbols you will see on some paragraphs of this booklet have the following meaning:
The warning triangle and/or the key words (Warning!, Caution!) emphasize information that is particularly
important for your safety or correct functioning of the appliance.
The information marked with this symbol provides additional instructions and practical tips on the use of
the appliance.
Tips and information about economical and ecological use of the machine are marked with this symbol.
Our contribution to the protection of the
environment: we use recycled paper.

Warnings
26
Installation
• All internal packing must be removed before using
the appliance. Serious damage may be caused to
the machine or adjacent furniture if the protective
transit devices are not removed or are not
completely removed. Refer to the relevant
paragraph in the instruction book.
• Any electrical work required to install this appliance
must be carried out by a qualified electrician.
• Any plumbing work required to install this
appliance must be carried out by a qualified
plumber.
• After having installed the machine, check that it is
not standing on its electrical supply cable.
• If the appliance is placed on a carpeted floor,
ensure that air can circulate freely between the
feet and the floor.
Use
• This appliance is designed for domestic use. It
must not be used for purposes other than those for
which it was designed.
• Only wash fabrics which are designed to be
machine washed. Follow the instructions on each
garment label.
• Do not overload the appliance. Follow the
instructions in the instruction book.
• Make sure that all pockets are empty. Objects such
as coins, safety pins, pins and screws can cause
extensive damage.
• Do not machine wash garments saturated with
petroleum, methylated spirits, trichlorethylene, etc.
If such fluids have been used to remove stains
prior to washing, wait until they have completely
evaporated from the fabric before placing
garments in the appliance.
• Place small items such as socks, belts, etc. in a
cloth bag or pillowcase to prevent them getting
trapped between the drum and the tub.
• Use only the recommended quantities of fabric
softener. An excessive amount could damage the
laundry.
• Leave the porthole door slightly ajar when the
appliance is not in use. This preserves the door
seal and prevents the formation of musty smells.
• Always check that water has emptied out before
opening the door. If not, drain the water following
the instructions in the instruction book.
• Always unplug the appliance and shut the water
tap after use.
General safety
• Repairs to the machine must be carried out only by
qualified personnel. Repairs carried out by
inexperienced persons could cause serious
danger. Contact your local Service Centre.
• Never pull the power supply cable to remove the
plug from the socket; always take hold of the plug
itself.
• During high temperature wash programmes the
door glass may get hot. Do not touch it!
Child safety
• Children are often not aware of how dangerous
electrical appliances can be. When the machine is
working, children should be carefully supervised
and not be allowed to play with the appliance.
• The packaging components (e.g. plastic film,
polystyrene) can be dangerous to children - danger
of suffocation! Keep them out of children’s reach.
• Keep all detergents in a safe place out of children’s
reach.
• Make sure that children or pets do not climb into
the drum. To avoid this the machine incorporates a
special feature. To activate this device, rotate the
button (without pressing it) inside the door
clockwise until the groove is horizontal. If
necessary use a coin.
To disable this device and restore the possibility of
closing the door, rotate the button anti-clockwise
until the groove is vertical.
The following warnings are provided in the interests of overall safety. You must read them carefully before
installing or using the appliance.

ENGLISH
27
Disposal
Tips for environmental protection
Packaging materials
The materials marked with the symbol are
recyclable.
>PE<=polyethylene
>PS<=polystyrene
>PP<=polypropylene
This means that they can be recycled by disposing of
them properly in appropriate collection containers.
Machine
Use authorised disposal sites for your old appliance.
Help to keep your country tidy!
The symbol on the product or on its packaging
indicates that this product may not be treated as
household waste. Instead it shall be handed over to
the applicable collection point for the recycling of
electrical and electronic equipment. By ensuring this
product is disposed of correctly, you will help prevent
potential negative consequences for the environment
and human health, which could otherwise be caused
by inappropriate waste handling of this product. For
more detailed information about recycling of this
product, please contact your local city office, your
household waste disposal service or the shop where
you purchased the product.
To save water, energy and to help protect the
environment, we recommend that you follow these
tips:
• Normally soiled laundry may be washed without
prewashing in order to save detergent, water and
time (the environment is protected too!).
• The machine works more economically if it is fully
loaded, but do not overload it (see maximum load
on page 28).
• With adequate pre-treatment, stains and limited
soiling can be removed; the laundry can then be
washed at a lower temperature, so saving energy.
• Measure out detergent according to the water
hardness, the degree of soiling and the quantity of
laundry being washed.
P1131
• When the appliance is to be scrapped, cut off the
electrical supply cable and destroy the plug with
the remaining cable. Disable the door catch in
order to prevent children from becoming trapped
inside while playing.

28
Technical specifications
DIMENSIONS Height 85.0 cm
Width 60.0 cm
Depth 62.5 cm
WASH LOAD Cotton 7.kg
Synthetics 3 kg
Delicates 3 kg
Woolens, Hand wash 2.kg
SPIN SPEED 1000 rpm max. (ZWH 5105 - 5105 A)
1200 rpm max. (ZWH 5125)
POWER SUPPLY VOLTAGE/FREQUENCY 220-230 V/50 Hz
TOTAL POWER ABSORBED 2200 W
MINIMUM FUSE PROTECTION 10 A
WATER PRESSURE Minimum 0,05 MPa
Maximum 0,80 MPa
This appliance complies with the following EEC Directives:
73/23/EEC of 19/02/73 relating to low voltage
89/336/EEC of 03/05/89 relating to electromagnetic compatibility.

ENGLISH
ENGLISH
Installation
29
Unpacking
All transit bolts and packing must be removed
before using the appliance.
You are advised to keep all transit devices so
that they can be refitted if the machine ever has
to be transported again.
1. After removing all the packaging, carefully lay
machine on it’s back to remove the polystyrene
base from the bottom.
2. Remove the power supply cable and the draining
hose from the hose holders on the rear of the
appliance.
3. With a suitable spanner unscrew and remove the
central rear bolt A. Slide out the relevant plastic
spacer.
4. Unscrew and remove the two large rear bolts B
and the six smaller bolts C.
5. Remove the bracket D and tighten up the six
smaller bolts C.
C
C
HEC0014
HEC0011S
D
C
C
B
HEC0003S
B
HEC0002S
A
HEC0001
HEC0008
6. Open the porthole, take out the inlet hose from
the drum and remove the polystyrene block fitted
with the adhesive tape on the door seal.
7. Fill the smaller upper hole and the two large ones
with the corresponding plastic plug caps supplied
in the bag containing the instruction booklet.
8. Connect the inlet hose as described under the
paragraph “Water Inlet”.
Positioning
Install the machine on a flat hard floor.
Make sure that air circulation around the machine is
not impeded by carpets, rugs etc. Check that the
machine does not touch the wall or other kitchen
units.
Carefully level by screwing the adjustable feet in or
out. Never place cardboard, wood or similar
materials under the machine to compensate for any
unevenness in the floor.
Water inlet
An inlet hose is supplied and can been found inside
the machine drum.
Do not use the hose from your previous machine
to connect to the water supply.
1. Open the porthole and extract the inlet hose .
2. Connect the hose with the angled connection to
the machine.
Important!
Do not place the inlet hose downwards. Angle
the hose to the left or right depending on the
position of your water tap.
P1051
HEC0005
HEC0010

30
3. Set the hose correctly by loosening the ring nut.
After positioning the inlet hose, be sure to tighten
the ring nut again to prevent leaks.
4. Connect the hose to a tap with a 3/4” thread.
Always use the hose supplied with the appliance.
The inlet hose must not be lengthened. If it is too
short and you do not wish to move the tap, you will
have to purchase a new, longer hose specially
designed for this type of use.
Water drainage
The end of the drain hose can be positioned in three
ways:
Hooked over the edge of a sink using the plastic
hose guide supplied with the machine. In this
case, make sure the end cannot come unhooked
when the machine is emptying.
This could be done by tying it to the tap with a piece
of string or attaching it to the wall.
P0022
P1088
HEC0006
In a sink drain pipe branch. This branch must be
above the trap so that the bend is at least 60 cm
above the ground.
Directly into a drain pipe at a height of not less
than 60 cm and not more than 90 cm.
The end of the drain hose must always be
ventilated, i.e. the inside diameter of the drain pipe
must be larger than the outside diameter of the drain
hose.
The drain hose must not be kinked.
Electrical connection
This machine is designed to operate on a 220-230 V,
single-phase, 50 Hz supply.
Check that your domestic electrical installation can
take the maximum load required (2.2 kW), also
taking into account any other appliances in use.
Connect the machine to an earthed socket.
The manufacturer declines any responsibility
for damage or injury through failure to comply
with the above safety precaution.
Should the appliance power supply cable
need to be replaced, this must be carried out
by our Service Centre.
Please ensure that when the appliance is
installed the power supply cable is easily
accessible.
P1118

ENGLISH
ENGLISH
Your new washing machine
31
This new washing machine, patented Zanussi, meets all modern needs for effective treatment of laundry with
low water, energy and detergent consumption.
Further savings are achieved by washing small loads of laundry, since water and electricity consumption is
proportional to the quantity and type of laundry being washed.
• The possibility of selecting the temperature, spin speed and all the options offered by this washing machine
gives you truly “customised” washing.
• The DELAY START (INICIO DIFERIDO) option allows you to delay starting of the wash programme to any
time of day, so allowing you for instance to make use of overnight economy electricity tariffs.
• The programme progress display shows the programme steps selected and the programme phase which
is running.
• The special wool programme with its new delicate wash system treats your woolens with extreme care.
• The balance control device ensures the machine is stable during the spin.
• The ECO valve allows total use of detergent and reduces water consumption so saving energy.
1 Detergent dispenser drawer
2 Control panel
3 Door locked pilot light
4 Drain pump
5 Adjustable feet
Door locked pilot light
It stays on during the whole programme indicating
that the door is locked.
When the light goes out, the door can be opened
(see page 41).
Detergent dispenser drawer
Prewash
Main wash
Fabric softener, starch
Bleaching agent
Description of the appliance
O
N
/
O
F
F
H
YDRO
S
YSTEM
T
E
J
I
D
O
S
C
E
N
T
R
I
F
U
G
A
D
O
T
E
M
P
E
R
A
T
U
R
A
SINTÉTICOS
DELICADOS
ALGODÓN
LANA
60°C
40°C
90°C
30°C
1000
900
700
500
FRÍO
WET ANTI-
ARRUGAS
ACLARADO
ADICIONAL
LAVADO
A MANO
CON PRELAV.
FUNCI
Ó
N
EXPRESS
ECONOMY
40
° AA
O
P
C
I
O
N
E
S
G
R
A
D
O
S
U
C
I
E
D
A
D
REMOJO
I
N
IC
I
O
/
P
A
U
S
A
A
N
U
L
A
R
E
X
C
L
U
IR
F
A
S
E
INICIO
DIFERIDO
ZWH 5105
X
T
RA
C
A
PA
C
ITY
7
C0074
Cl

32
Use
1
2345
6
7
8129
10
11
O
N
/
O
F
F
HYDROSYSTEM
T
E
J
I
D
O
S
C
E
N
T
R
I
F
U
G
A
D
O
T
E
M
P
E
R
A
T
U
R
A
SINTÉTICOS
DELICADOS
ALGODÓN
LANA
60°C
40°C
90°C
30°C
1000
900
700
500
FRÍO
WET ANTI-
ARRUGAS
ACLARADO
ADICIONAL
LAVADO
A MANO
CON PRELAV.
FUNCI
Ó
N
EXPRESS
ECONOMY
40
° AA
O
P
C
I
O
N
E
S
G
R
A
D
O
S
U
C
I
E
D
A
D
REMOJO
INICIO/PAUSA
ANULAR
EXCLUIR
FASE
INICIO
DIFERIDO
ZWH 5105
Control panel
1 ON/OFF button
Press this button to switch the washing machine on.
The display (8) will show three blinking dashes or a
blinking zero. You will find more detailed
explanations on page 33-34 (see “DISPLAY”).
Press the ON/OFF button again to switch the
machine off.
2 MAINS-ON light
This light is connected to the ON/OFF button. It lights
up when you press the button, and goes out when
you press it again.
3 FABRIC button (TEJIDOS)
Press this button repeatedly to select the programme
on the basis of the type of laundry to be washed. The
light relevant to the selected programme will light up.
The washing machine will propose a temperature
and automatically select the maximum spin value
provided for the programme you have chosen. You
can change these values by operating buttons 4 and
5. The display will show the duration of the
programme and the light of the START/PAUSE
(INICIO/PAUSA) button starts blinking.
Hand wash (Lavado a mano)
When you select this programme, you obtain a
particularly delicate washing, suitable for articles of
clothing whose label indicates that they must be
hand-washed .
4 TEMPERATURE button (TEMPERATURA)
Maximum temperatures are 90°C for cotton, 60°C for
synthetic fabrics, 40°C for delicate fabrics, wool and
fabrics to be hand-washed (LAVADO A MANO
programme).
By selecting position COLD (FRIO) the machine will
wash with cold water. To be used for extremely delicate
items, such as curtains.
Important!
By depressing TEMPERATURE (TEMPERATURA)
and SPIN SPEED (CENTRIFUGADO) buttons
simultaneously, the acoustic signal is suppressed
when selecting the programmes, in case of incorrect
option selection and at the end of the cycle.
5 SPIN SPEED button (CENTRIFUGADO)
Press this button repeatedly to change the spin
speed, if you want your laundry to be spun at a
speed different from the one proposed by the
washing machine. The relevant light will light up.
Maximum speeds are:
• for cotton: 1200 rpm (ZWH 5125) or 1000 rpm
(ZWH 5105 - A).
• for synthetic fabrics, wool, and fabrics to be hand-
washed: 900 rpm;
• for delicate fabrics: 700 rpm.
WET ANTI-ARRUGAS (RINSE HOLD) option:
when you choose this option, the machine will not
drain the water of the last rinse, so as not to wrinkle
the laundry.
At the end of the cycle, the DOOR LOCKED pilot
light is on, the light of the START/PAUSE button
goes out, a blinking zero appears on the display, the
pilot light of RINSE HOLD position remains lit, to
indicate that the water must be drained.

ENGLISH
ENGLISH
To complete the cycle, press SKIP RESET button
once, all the leds are off, the display will show three
blinking dashes, then press FABRIC button in order
to select the previously selected programme.
If you wish to drain or spin press the SKIP RESET
button until only the led of the desired function or
illuminates.
You can change the spin speed by means of SPIN
(CENTRIFUGADO) button and then depress
START/PAUSE.
Important!
If you accidentally press the SKIP RESET button
more than once, the display will show three blinking
dashes. To drain the water, select any washing
programme by means of the FABRIC button, then
press SKIP RESET three times in order to select the
drain (only the “drain” light will remain lit).
6 SOIL LEVEL (GRADO SUCIEDAD)
button
Press this button to select the following options:
• PREWASH ( CON PRELAV.): select this option if
you wish your laundry to be prewashed before the
main wash (not available for wool and hand-
wash cycle).
The prewash ends with a short spin at 650 rpm in
programmes for cotton and synthetic fabrics,
whereas in the programme for delicate fabrics the
water is only drained.
• SOAK (REMOJO): select this option if you wish to
perform a soak of about 30 minutes at 30°C to
your laundry. By pressing the DELAY START
(INICIO DIFERIDO) button the soak time can be
prolonged up to 10 hours max. After this time the
wash cycle will automatically start.
This function is not available for Wool and Hand-
wash cycles .
The soak ends with a short spin at 650 rpm in
programmes for cotton and synthetic fabrics,
whereas in the programme for delicate fabrics the
water is only drained.
•The same button allows you to select the QUICK
function (FUNCIÓN EXPRESS), for laundry that is
only slightly soiled (not for Wool and Handwash
programmes and not in combination with the
ECONOMY 40°AA option).
The washing time will be reduced according to the
type of fabric and the selected temperature.
The PREWASH, SOAK and QUICK options
cannot be selected together.
7 OPTIONS (OPCIONES) button
Press this button to select the following options:
• SUPER RINSE (ACLARADO ADICIONAL): this
option can be selected with all programmes
except the Wool and Handwash programme.
The machine will add 2 rinses to the selected
programme. This option is recommended for
people who are allergic to detergents, and in areas
where the water is very soft.
• ECONOMY 40°AA: this option can be selected for
cottons and synthetics lightly or normally soiled
with a temperature of 40°C or higher.
If you select 40°C , the machine will prolong the
time at 40°C in the washing phase, this will allow
an AA class in energy efficiency and washing
performance to be achieved.
If you select 90°C or 60°C and press the
ECONOMY 40°AA button, the washing
temperature will be reduced. In both cases the
washing time will be prolonged.
This option is not available in combination with
the QUICK (FUNCIÓN EXPRESS) option.
The SUPER RINSE and the ECONOMY 40°AA
options cannot be selected together.
8 Display
The following pieces of information are shown on the
display:
• Three blinking dashes, when a programme is
cancelled by means of the RESET (ANULAR)
button.
The three blinking dashes will also appear when you
press the ON/OFF button to switch the machine on,
if the previously selected cycle has been erased.
•
Duration of washing programme in hours and
minutes, after you have selected a programme.
33

. While the programme is running (after you have
pressed the START/PAUSE button), the displayed
time value decreases by one unit every minute.
• The washing machine has stopped with water in
the tub, at the end of a programme with the
RINSE HOLD (WET ANTI-ARRUGAS) option: this
is indicated by a blinking zero and the door
locked light is on (the door cannot be opened).
• The washing machine has completed the
programme: this is indicated by a blinking zero.
At the same time, the door locked light goes out.
The zero will reappear when you switch the
washing machine on, unless the previous
programme has been erased by means of the
RESET (ANULAR) button.
Important!
The first time you use the washing machine,
when you switch it on, it may display a blinking zero
and give an audible warning signal. This is due to the
fact that the washing machine has performed a
washing cycle during the manufacturer’s inspection
tests, and this cycle has not been erased after its
completion.
• Delay start (Inicio diferido), a time value
indicated in hours and selected by means of the
relevant button.
The delay time is displayed for 3 seconds, then the
duration of the selected programme reappears.
After you have pressed the START/PAUSE button,
the countdown begins, and the delay time value
decreases by one unit every hour.
You can delay the start of the selected programme
by up to 23 hours in one hour intervals and then,
when 2 hours remain, the time decreases in 30
minutes intervals.
• An incorrect option selection has been made:
this is indicated by the message Err when a
function incompatible with the current programme
is selected.
The incorrect selection is also indicated by an
audible warning signal.
• An alarm code indicates a fault in the machine
operation (see the relevant chapter on page 45).
9 START/PAUSE button (INICIO/PAUSA)
This button has two functions:
• Start: after you have selected the desired
programme and options, press this button to start
the washing machine. The light above the button
will stop flashing and remain lit.
If you have selected a delay time by means of
button 11, the countdown will begin and will be
shown on the display.
• Pause: when you press this button again, the
programme in progress is interrupted. The light
above the button will start flashing. To restart the
programme, press the button again.
When you PAUSE the cycle, the DOOR LOCKED
light goes out, and it becomes possible to open the
door, provided:
• the washing machine is not in the heating phase;
• the level of the water is not high;
• the drum is not turning.
Important! You must set the washing machine to
PAUSE before you make any change in the
programme in progress.
10 RESET (
EXCLUIR FASE/ANULAR) button
At the end of a programme, you must press this
button once or repeatedly, in order to clear the
contents of the memory (the display will show three
blinking dashes); otherwise, the next time you switch
the washing machine on, the blinking zero will
reappear and the audible warning signals relevant to
the end of the previous cycle will be given.
34

ENGLISH
ENGLISH
You can also press the RESET (ANULAR) button to
exclude one or several phases of the programme
which is running, as indicated below:
- set the washing machine to PAUSE by pressing the
START/PAUSE button (the relevant light will flash);
- press the RESET (ANULAR) button once or several
times, until the required phase(s) is(are) cancelled
(the light next to the phase(s) will go out).
Example:
In this case, the spin
(at the speed provided
for the selected type of
fabric) will be
performed.
This button allows you also to select special
programmes, such as RINSES, SPIN and DRAIN.
• If the machine is already switched on because it
has just performed a washing programme, proceed
as follows:
- depress RESET (ANULAR) once or repeatedly to
cancel the previously performed programme (three
blinking dashes will appear on the display);
- select the type of fabric by means of button
TEJIDOS;
- select the special programme:
• RINSES
Depress RESET (ANULAR) once, the pilot light
WASH goes out.
• SPIN
Depress RESET (ANULAR) twice, the pilot lights
WASH and RINSES go out.
• DRAIN
Depress RESET (ANULAR) three times, the
pilot lights WASH , RINSES and SPIN
go out. The only DRAIN pilot light will
remain lit.
Example:
In this case the
machine will perform
the rinses and spin.
• If the machine is switched off:
- depress ON/OFF button to switch it on;
- select the type of fabric by means of button
TEJIDOS:
PREWASH
PRELAVADO
WASH
LAVADO
RINSES
ACLARADOS
SPIN
CENTRIFUGADO
DRAIN
DESCARGA
PREWASH
PRELAVADO
WASH
LAVADO
RINSES
ACLARADOS
SPIN
CENTRIFUGADO
DRAIN
DESCARGA
- select the special programme as previously
described.
11 DELAY (INICIO DIFERIDO) button
This button makes it possible to delay the starting of
the programme from 30 - 60 - 90 minutes, 2 hours
and then by 1 hour up to 23 hours. The delay you
have selected is shown on the display for about 3
seconds; afterwards, the duration of the programme
reappears.
If the SOAK button has been pressed the selected
delay will correspond to the soak time (up to a max
of 10 hours). If no delay time is selected the SOAK
programme will last about 30 minutes.
You must select this option after you have set the
programme and before you press the
START/PAUSE button.
The time value shown on the display will decrease
by one unit every hour.
You can change the delay time at any moment,
before you press the START/PAUSE button.
If you have already pressed the START/PAUSE
button, and you wish to cancel the delay time,
proceed as follows:
• set the washing machine to PAUSE by pressing the
START/PAUSE button;
• press twice the DELAY button until the display
shows
o’ and then press the START/PAUSE again.
To change the delay time, after the programme had
started, you have to set the programme again.
Important!
The door will be locked throughout the delay time
(DOOR LOCKED light lit).
If you need to open the door, you must first set the
washing machine to PAUSE by pressing the
START/PAUSE button. After you have closed the
door, press the START/PAUSE button again.
12 Programme phase indicator lights
When you select a programme, the lights relevant to
the phases that form the programme light up.
After you have started the programme, only the light
relevant to the phase that is currently being carried
out will remain lit.
PREW
ASH
WASH
RINSES
SPIN
DRAIN
35

36
Washing hints
Sorting the laundry
Follow the wash code symbols on each garment
label and the manufacturer’s washing instructions.
Sort the laundry as follows:
whites, coloureds, synthetics, delicates, woollens.
Temperatures
90°
for normally soiled white cottons and linen
(e.g. tea cloths, towels, tablecloths,
sheets...)
60° for normally soiled, colour fast garments
(e.g. shirts, night dresses, pyjamas....) in
linen, cotton or synthetic fibres and for
lightly soiled white cotton (e.g. underwear).
Frio (cold) for delicate items (e.g. net curtains),
30°-40° mixed laundry including synthetic fibres
and woollens.
The wool wash cycle of this machine has
been approved by Woolmark for the
washing of machine washable Woolmark
products provided that the garments are
washed according to the instructions on
the garment label and those issued by
the manufacturer of this washing
machine. M9605.
Before loading the laundry
Never wash whites and coloureds together. Whites
may lose their “whiteness” in the wash.
New coloured items may run in the first wash; they
should therefore be washed separately the first time.
Make sure that no metal objects are left in the
laundry (e.g. hair clips, safety pins, pins).
Button up pillowcases, close zip fasteners, hooks
and poppers. Tie any belts or long tapes.
Remove persistent stains before washing. Rub
particularly soiled areas with a special detergent or
detergent paste.
Treat curtains with special care. Remove hooks or tie
them up in a bag or net.
Maximum loads
Recommended loads are indicated in the
programme charts.
General rules:
Cotton, linen: drum full but not too tightly packed;
Synthetics: drum no more than half full;
Delicate fabrics, woollens and hand wash
programme: drum no more than one third full.
Washing a maximum load makes the most efficient
use of water and energy.
For heavily soiled laundry, reduce the load size.
Laundry weights
The following weights are indicative:
bathrobe 1200 g
napkin 100 g
quilt cover 700 g
sheet 500 g
pillow case 200 g
tablecloth 250 g
towelling towel 200 g
tea cloth 100 g
night dress 200 g
ladies’ briefs 100 g
man’s work shirt 600 g
man’s shirt 200 g
man’s pyjamas 500 g
blouse 100 g
men’s underpants 100 g
Removing stains
Stubborn stains may not be removed by just water
and detergent. It is therefore advisable to treat them
prior to washing.
Blood: treat fresh stains with cold water. For dried
stains, soak overnight in water with a special
detergent then rub in the soap and water.
Oil based paint: moisten with benzine stain
remover, lay the garment on a soft cloth and dab the
stain; treat several times.
Dried grease stains: moisten with turpentine, lay
the garment on a soft surface and dab the stain with
the fingertips and a cotton cloth.
Rust: oxalic acid dissolved in hot water or a rust
removing product used cold. Be careful with rust
stains which are not recent since the cellulose
structure will already have been damaged and the
fabric tends to hole.
Mould stains: treat with bleach, rinse well (whites
and fast coloureds only).
Grass: soap lightly and treat with bleach (whites and
fast coloureds only).
Ball point pen and glue: moisten with acetone (*),
lay the garment on a soft cloth and dab the stain.

ENGLISH
The bleaching agent (chlorine) can be used only for
white or fast coloured cotton and linen items.
Pour it into the compartment marked .
Follow the product manufacturer’s recommendations
on quantities to use and do not exceed the «MAX»
mark in the detergent dispenser drawer.
Quantity of detergent to be used
The type and quantity of detergent will depend on
the type of fabric, load size, degree of soiling and
hardness of the water used.
Water hardness is classified in so-called “degrees” of
hardness. Information on hardness of the water in
your area can be obtained from the relevant water
supply company, or from your local authority.
Follow the product manufacturers’ instructions on
quantities to use.
Use less detergent if:
– you are washing a small load,
– the laundry is lightly soiled,
– large amounts of foam form during washing.
Degrees of water hardness
Lipstick: moisten with acetone as above, then treat
stains with methylated spirits. Remove any residual
marks from white fabrics with bleach.
Red wine: soak in water and detergent, rinse and
treat with acetic or citric acid, then rinse. Treat any
residual marks with bleach.
Ink: depending on the type of ink, moisten the fabric
first with acetone (*), then with acetic acid; treat any
residual marks on white fabrics with bleach and then
rinse thoroughly.
Tar stains: first treat with stain remover, methylated
spirits or benzine, then rub with detergent paste.
(*) do not use acetone on artificial silk.
Detergents and additives
Good washing results also depend on the choice of
detergent and use of the correct quantities to avoid
waste and protect the environment. Although
biodegradable, detergents contain substances
which, in large quantities, can upset the delicate
balance of nature.
The choice of detergent will depend on the type of
fabric (delicates, woollens, cottons, etc.), the colour,
washing temperature and degree of soiling.
All commonly available washing machine detergents
may be used in this appliance:
– powder detergents for all types of fabric,
– powder detergents for delicate fabrics (60°C max)
and woollens,
– liquid detergents, preferably for low temperature
wash programmes (60°C max) for all types of
fabric, or special for woollens only.
The detergent and any additives must be placed in
the appropriate compartments of the dispenser
drawer before starting the wash programme.
If using concentrated powder or liquid detergents, a
programme without prewash or soak must be
selected.
The washing machine incorporates a recirculation
system which allows an optimal use of the
concentrated detergent.
Pour liquid detergent into the dispenser drawer
compartment marked just before starting the
programme.
Any fabric softener or starching additives must be
poured into the compartment marked before
starting the wash programme.
37
Level Characteristic
Degrees
German
°dH
French
°T.H.
soft
medium
hard
very hard
0- 7
8-14
15-21
more than
21
0-15
16-25
26-37
more than
37
1
2
3
4

38
International wash code symbols
These symbols appear on fabric labels, in order to help you choose the best way to treat your laundry.
Energetic wash
Delicate wash
Max. wash
temperature
95°C
Max. wash
temperature
60°C
Max. wash
temperature
40°C
Max. wash
temperature
30°C
Hand wash Do not
wash
at all
Bleaching Bleach in cold water Do not bleach
Ironing Hot iron
max 200°C
Warm iron
max 150°C
Lukewarm iron
max 110°C
Do not iron
Dry cleaning Dry cleaning
in all solvents
Dry cleaning in
perchlorethylene,
petrol, pure alcohol,
R 111 & R 113
Dry cleaning
in petrol,
pure alcohol
and R 113
Do not
dry clean
Drying Flat On the line On clothes
hanger
Tumble dry
high
temperature
low
temperature
Do not
tumble dry
95
60
60
40
40
40
30
30

ENGLISH
39
4. Switch the machine on
To switch the machine on, press the ON/OFF button
: the mains-on light comes on.
The display will show three blinking dashes or a
blinking zero.
5. Select the desired programme / fabric
Press the FABRIC (TEJIDOS) button repeatedly, in
order to select the desired programme/fabric. The
relevant light will light up.
The lights relevant to the phases that form the
programme will light up.
The display will show the duration of the selected
programme, calculated on the basis of the maximum
load for each type of fabric. The START/PAUSE
(INICIO/PAUSA) button light will start flashing.
If the load of laundry to be washed is small, at the
beginning of the cycle the display will still indicate the
duration relevant to the maximum load. The duration
value will be gradually adjusted during the execution
of the cycle.
PREW
ASH
WASH
RINSES
SPIN
DRAIN
DELICADOS
LANA
ALGODON
SINTETICOS
TEJIDOS
LAVADO
A MANO
------
0
O
N
/
O
F
F
Operating sequence
Before the first wash we recommend that you pour 2
litres of water into the main wash compartment
of the detergent drawer in order to activate the ECO
valve. Then run a cotton cycle at 90°C, with the
machine empty, in order to remove any
manufacturing residue from the drum and tub.
Pour half a measure of detergent into the main wash
compartment and start up the machine.
1. Place the laundry in the drum
Open the door.
Place the laundry in the drum, one item at a time,
shaking them out as much as possible.
Close the door.
2. Measure out the detergent
Pull out the dispenser drawer until it stops. Measure
out the amount of detergent recommended by the
manufacturer in a graduated cup and pour it into the
main wash compartment .
If you wish to carry out a soak or a prewash option,
pour detergent into the appropriate compartment
marked .
3. Measure out the additive
If required, pour fabric softener into the compartment
marked , and bleach into the compartment
marked without exceeding the «MAX» mark.
Close the drawer gently. This is particularly important
if you are using a fabric conditioner because if the
drawer is slammed it will cause the conditioner to
enter the machine prematurely.
C0076
C0075
P0004

9. Select the SUPER RINSE (ACLARADO
ADICIONAL) and/or ECONOMY 40° AA
option
If you wish the laundry to undergo an extra rinse,
select the SUPER RINSE (ACLARADO ADICIONAL)
option.
If your laundry is lightly or normally soiled and it is
necessary to prolong the washing time, select the
ECONOMY 40° AA option.
Press this button so as to cause one of both lights to
light up.
10. Select the DELAY TIME (INICIO
DIFERIDO)
Before you start the programme, if you wish the
starting to be delayed, press the DELAY (INICIO
DIFERIDO) button repeatedly, or keep it pressed, to
select the desired delay. The selected delay time
value (up to 23 hours) will appear on the display for 3
seconds, then the duration of the programme will
appear again.
11. Start the programme
Press the START/PAUSE button. The relevant light
will stop flashing, the DOOR LOCKED light will light
up, and only the light relevant to the phase that is in
progress will remain lit.
If you have chosen a delayed start, the washing
machine will begin the countdown.
The display will show the duration of the programme
or the selected delay.
INICIO
DIFERIDO
ACLARADO
ADICIONAL
ECONOMY
40° AA
40
6. Select the temperature
Press the TEMPERATURE button if you wish to
select a temperature value different from the one
proposed by the washing machine.
The relevant light will light up.
7. Select the spin speed or WET ANTI-
ARRUGAS (RINSE HOLD) option
Press the SPIN SPEED (CENTRIFUGADO) button
repeatedly, in order to select the desired spin speed
or the WET ANTI-ARRUGAS option. The relevant
light will light up.
ZWH 5105 - A ZWH 5125
8. Select the desired options
If your laundry is very dirty, it may be advisable to
select the PREWASH (CON PRELAV.) option.
If you wish the laundry to undergo a soak, select the
SOAK (REMOJO) option.
If your laundry is only slightly soiled, select the
QUICK (FUNCION EXPRESS) option.
REMOJO
CON PRELAV.
FUNCION
EXPRESS
1200
900
700
500
CENTRIFUGADO
WET ANTI-
ARRUGAS
1000
900
700
500
CENTRIFUGADO
WET ANTI-
ARRUGAS
60°C
40°C
90°C
30°C
TEMPERATUR
A
FRIO

ENGLISH
41
12. How to change a programme
during its cycle
Before you make any change, you must pause the
washing machine by pressing the START/PAUSE
button.
It is possible to change any phase before the
programme carries it out.
Changing the type of fabric or temperature is
possible, obviously, only during the washing phase.
When you make a change in these two parameters,
the washing machine will resume the cycle from the
beginning maintening the water in the tub.
If it is necessary to drain the water in order to change
the programme in progress, proceed as follows:
• PAUSE the machine by pressing the
START/PAUSE button;
• press the RESET (ANULAR) button repeatedly,
until only the DRAIN light remains lit;
• press the START/PAUSE button again.
When the water has been drained, the display shows
a blinking zero. You may now select a new
programme and press the START/PAUSE button to
start it.
13. How to cancel a programme
during its cycle
To cancel a programme that is being carried out, first
pause the washing machine by pressing the
START/PAUSE button, then press the RESET
(ANULAR) button repeatedly, until the display shows
three blinking dashes.
14. How to open the door during
a programme
You can open the door, after having set the washing
machine to PAUSE, provided the following
conditions exist:
• the washing machine is not in the heating phase
beyond 55°C;
• the level of the water is not high;
• the drum is not turning.
If these requirements are met, when you pause the
washing machine, the DOOR LOCKED light goes
out and the door can be opened.
Should it not be possible to open the door, and
should it be absolutely necessary to do so, switch
the machine off by pressing the ON/OFF button.
After approximately 3 minutes, you can open the
door.
Pay attention to the level and temperature of the
water in the washing machine!
When you close the door and press the ON/OFF
button again, the washing machine will resume the
programme from the point where it had been
interrupted.
15. End of programme
At the end of the programme, the washing machine
stops automatically, gives an audible signal, and
displays a blinking zero. The START/PAUSE button
light and the DOOR LOCKED light go off and the
door can be opened.
If you had selected the RINSE HOLD (WET ANTI-
ARRUGAS) option, the START/PAUSE button light
goes off, the light of the RINSE HOLD button light
and the DOOR LOCKED light remain lit to indicate
that the water must be drained. The display shows a
blinking zero.
When the programme has been completed, a
blinking zero appears on the display and the audible
signal is given. The DOOR LOCKED light goes out
at once.
Press the RESET (ANULAR) button repeatedly to
erase the programme that has just been carried
out. If you omit to do this, the next time you
switch the washing machine on, the blinking zero
will appear on the display and you will hear the
audible signal.
Note: when you switch the machine on, if you must
erase the previously performed programme, it is also
sufficient to press the FABRIC (TEJIDOS) button
and select a new programme.
Press the ON/OFF button to switch the machine off.
The relevant light will go out.
Remove the laundry from the washing machine.
Check whether the drum is completely empty, by
rotating it with your hand. The purpose of this is to
prevent any items of laundry from remaining
accidentally in the drum, where they might get
damaged in a subsequent wash (e.g. by shrinking) or
bleed colour into another load of laundry.
We advise you to close the water supply tap and
disconnect the plug from the socket.
Leave the door ajar in order to air the washing
machine.

42
Programme chart
Washing programmes
The “Coloured cotton” programme at 60°C with the “Economy 40°AA” option selected is the reference
programme for the data entered in the energy label, in compliance with EEC 92/75 standards: kWh 1.19, litres
56, h/min 2.30.
* This data is given purely as an indication: the consumption values may vary in relation to the quantity and
type of laundry, the temperature of the water supply and the ambient temperature. The data refers to the
highest temperature provided for each programme.
Type of
laundry and
symbols on
labels
CENTRIF. / WET ANTI-ARR.
CON PRELAV.
REMOJO
FUNCIÓN EXPRESS
ACLARADO ADICIONAL
ECONOMY
40° AA
CENTRIF. / WET ANTI-ARR.
CON PRELAV.
REMOJO
FUNCIÓN EXPRESS
ACLARADO ADICIONAL
ECONOMY
40° AA
CENTRIF. / WET ANTI-ARR.
CON PRELAV.
REMOJO
FUNCIÓN EXPRESS
ACLARADO ADICIONAL
ECONOMY
40° AA
CENTRIF. / WET ANTI-ARR.
CON PRELAV.
REMOJO
FUNCIÓN EXPRESS
ACLARADO ADICIONAL
CENTRIF. / WET ANTI-ARR.
CENTRIF. / WET ANTI-ARR.
White cotton:
e.g. sheets,
tablecloths,
household
linen
Coloured
cotton: e.g.
shirts,
blouses,
underwear,
towels, house-
hold linen
Synthetic
fabrics and
blends: e.g.
shirts,
blouses,
underwear
Delicate fab-
rics: e.g.
acrylic fabrics,
viscose, poly-
ester,
synthetic
blends
Wool
30
40
30
40
30
40
60
30
40
60
95
60
7 kg
7 kg
3 kg
3 kg
2 kg
2 kg
Load
Programme/
temperature
Available options
2.6
1.5
0.95
0.55
0.35
0.35
68
65
55
57
55
55
Consumption*
Energy kWh
Water
litres
Cottons
A
LGODON
60°-90°C
Cottons
A
LGODON
60°-40°-30°C
FRIO (COLD)
Synthetics
S
INTÉTICOS
60°-40°-30°C
FRIO (COLD)
Delicates
DELICADOS
40°-30°C
FRIO (COLD)
Wool
L
ANA
40°-30°C
FRIO (COLD)
Handwash
L
AVADO A MANO
40°-30°C
FRIO (COLD)
Description of
programme
Wash at
60° - 90°C
3 rinses
Long spin
Wash at
60° - 40° -
30°C or cold
3 rinses
Long spin
Wash at
60° - 40° -
30°C or cold
3 rinses
Short spin
Wash at
40° - 30°C
or cold
3 rinses
Short spin
Wash at
40° - 30°C
or cold
3 rinses
Short spin
Wash at
40° - 30°C
or cold
3 rinses
Short spin

ENGLISH
Maintenance
43
Bodywork
Clean the outside of the machine with soap and
water only. Rinse with clean water and dry with a soft
cloth.
Important: do not use methylated spirits, solvents or
similar products to clean the bodywork.
Door seal
Check from time to time the door seal and eliminate
eventual possible objects that could be trapped in
the fold.
Detergent dispenser drawer
After a while, detergents and fabric softeners leave
deposits in the drawer.
Clean the drawer from time to time by rinsing it under
a running tap. To remove the drawer from the
machine, press the button in the rear left-hand
corner.
To facilitate cleaning, the top part of the additive
compartments can be removed.
C0078
C0077
P1050
Detergent can also accumulate inside the drawer
recess: clean it with an old toothbrush. Refit the
drawer after cleaning.
Drain pump
The pump should be inspected if
• the machine does not empty and/or spin
• the machine makes an unusual noise during
draining due to objects such as safety pins, coins
etc. blocking the pump.
Proceed as follows:
• Disconnect the appliance.
• If necessary wait until the water has cooled down.
• Open the pump door.
• Place a container close to the pump to collect any
spillage.
• Release the emergency emptying hose, place it in
the container and remove its cap.
• When no more water comes out, unscrew the
pump and remove it. Always keep a rag nearby to
dry up spillage of water when removing the pump.
P1115
P1114
P0038

• Remove any objects from the pump impeller by
rotating it.
• Put the cap back on the emergency emptying hose
and place the latter back in its seat.
• Screw the pump fully in.
• Close the pump door.
Water inlet filter
If you notice that the machine is taking longer to fill,
check that the filter in the water inlet hose is not
blocked.
Turn off the water tap.
Unscrew the hose from the tap.
Clean the filter with a stiff brush.
Screw the hose back onto the tap.
P1090
P1117
44
Emergency emptying out
If the water is not discharged, proceed as follows to
empty out the machine:
• pull out the plug from the power socket;
• close the water tap;
• if necessary, wait until the water has cooled down;
• open the the pump door;
• place a bowl on the floor and place the end of the
emergency emptying hose into the bowl. Remove
its cap. The water should drain by gravity into the
bowl. Whe the bowl is full, put the cap back on the
hose. Empty the bowl. Repeat the procedure until
water stops flowing out;
• clean the pump if necessary as previously
described;
• replace the emergency emptying hose in its seat
after having plugged it;
• screw the pump again and close the door.
Frost precautions
If the machine is installed in a place where the
temperature could drop below 0°C, proceed as
follows:
• Remove the plug from the socket.
• Close the water tap and unscrew the water inlet
hose from the tap.
• Place the end of the emergency emptying hose
and that of the inlet hose in a bowl placed on the
floor and let water drain out.
• Screw the water inlet hose back on and reposition
the emergency emptying hose after having put the
cap on again.
By doing this, any water remaining in the machine is
removed, avoiding the formation of ice and,
consequently, breakage of the affected parts.
When you use the machine again, make sure that
the ambient temperature is above 0°C.
Important!
Every time you drain the water through the
emergency emptying hose you must pour 2 litres of
water into the main wash compartment of the
detergent drawer and then run the drain programme.
This will activate the ECO valve avoiding that part of
the detergent remains unused at next washing.

ENGLISH
45
Something not working?
Problem Possible causes
• The machine does not start up:
• The door is not firmly closed. (
EE4400
)
• The machine is not plugged in or there is no power
at the socket.
• The main fuse has blown.
• The START/PAUSE (INICIO/PAUSA) button has
not been depressed.
• The DELAY START (INICIO DIFERIDO) option
has been selected.
• The machine does not fill:
• The water tap is closed. (
EE1100
)
• The inlet hose is squashed or kinked. (
EE1100
)
• The filter in the inlet hose is blocked. (
EE1100
)
• The door is not properly closed. (
EE4400
)
• The machine fills then empties
immediately:
• The end of the drain hose is too low. Refer to
relevant paragraph in “water drainage” section.
• The machine does not empty and/or
does not spin:
• The drain hose is squashed or kinked. (
EE2200
)
• The RINSE HOLD option has been selected.
• The drain pump is clogged. (
EE2200
)
• There is water on the floor:
• Too much detergent or unsuitable detergent
(creates too much foam) has been used.
• Check whether there are any leaks from one of the
inlet hose fittings. It is not always easy to see this
as the water runs down the hose; check to see if it
is damp.
• The drain hose is damaged.
• The cap on the emergency emptying hose has not
been replaced after cleaning the filter.
• Unsatisfactory washing results:
• Too little detergent or unsuitable detergent has
been used.
• Stubborn stains have not been treated prior to
washing.
• The correct temperature/fabric was not selected.
• Excessive laundry load.
• The machine vibrates or is noisy:
• The transit bolts and packing have not been
removed.
• The support feet have not been adjusted.
• The laundry is not evenly distributed in the drum.
• Maybe there is very little laundry in the drum.
• The door will not open (the relevant
light is on):
• The programme is still running, the drum is turning.
• The door lock has not yet released.
• The water level is above the bottom edge of the door.
• The machine is heating the water.
Problems which you can resolve yourself.
During machine operation it is possible that one of the following alarm codes appears on the display:
-
EE1100
: problem with the water supply
-
EE2200
: problem with water draining
-
EE4400
: door open
Some audible warning signals can also be heard.
Once the problem has been eliminated, press the START/PAUSE button to restart the programme. If after
all checks, the problem persists, contact your local Service Centre.

46
If you are unable to identify or solve the problem,
contact our service centre. Before telephoning, make
a note of the model, serial number and purchase
date of your machine: the Service Centre will require
this information.
Mod. ..........
Prod. No. ...........
Ser. No. .........
M
od
. ..........
Pr
od
. N
o
. ...........
S
er
. N
o
. .........
P0042 BD
P1035UK
Water is not
visible in the machine. The machine,
which is the result of modern technology, runs
in a very economical way with low water
consumption. Performance is
nevertheless excellent.
The machine makes an unusual
noise. The machine is fitted with a commutator
motor which improves machine
performance.
P1034UK
Problem Possible cause
• Spinning starts late or the laundry is
not spun enough:
• The electronic unbalance detection device has cut
in because the laundry is not evenly distributed in
the drum. The laundry is redistributed by reverse
rotation of the drum. This may happen several
times before the unbalance disappears and normal
spinning can resume. If, after few minutes, the
laundry is still not evenly distributed in the drum,
the machine will spin at a lower speed or will not
spin. If at the end of the programme the laundry is
not spun enough, redistribute the load manually
and select the spin programme.

From the Electrolux Group. The world’s No. 1 choice
.
The Electrolux Group is the world's largest producer of powered appliances for kitchen, cleaning and outdoor
use. More than 55 million Electrolux Group products (such as refrigerators, cookers, washing machines,
vacuum cleaners, chain saws and lawn mowers) are sold each year to a value of approx. USD 14 billion in
more than 150 countries around the world.
-
 1
1
-
 2
2
-
 3
3
-
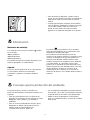 4
4
-
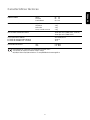 5
5
-
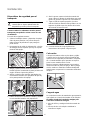 6
6
-
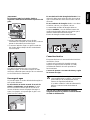 7
7
-
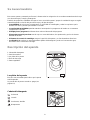 8
8
-
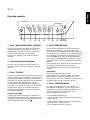 9
9
-
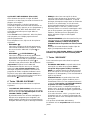 10
10
-
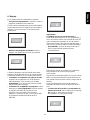 11
11
-
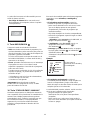 12
12
-
 13
13
-
 14
14
-
 15
15
-
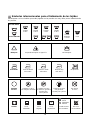 16
16
-
 17
17
-
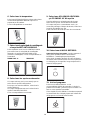 18
18
-
 19
19
-
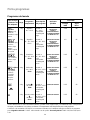 20
20
-
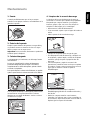 21
21
-
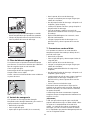 22
22
-
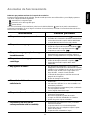 23
23
-
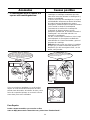 24
24
-
 25
25
-
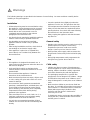 26
26
-
 27
27
-
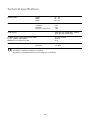 28
28
-
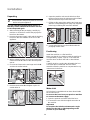 29
29
-
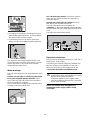 30
30
-
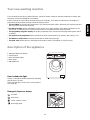 31
31
-
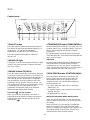 32
32
-
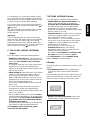 33
33
-
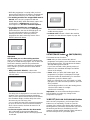 34
34
-
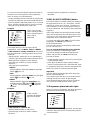 35
35
-
 36
36
-
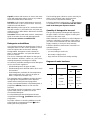 37
37
-
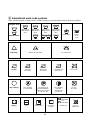 38
38
-
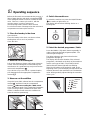 39
39
-
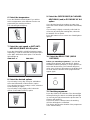 40
40
-
 41
41
-
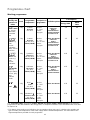 42
42
-
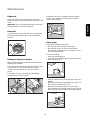 43
43
-
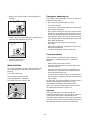 44
44
-
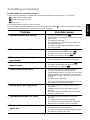 45
45
-
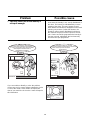 46
46
-
 47
47


Zanussi ZWH5105 Manual de usuario
- Categoría
- Lavadoras
- Tipo
- Manual de usuario
En otros idiomas
- English: Zanussi ZWH5105 User manual