
P/No. MFL65001403
OWNER’S MANUAL
TOP MOUNT
REFRIGERATOR
Please read this manual carefully before operating your set and retain it
for future reference.
INGLES
www.lg.com
MANUAL DE USUARIO
REFRIGERADOR CON
CONGELADOR SUPERIOR
Lea detenidamente este manual antes de empezar a utilizar el
refrigerador y guárdelo como referencia para el futuro.
THIS IS THE SAFETY ALERT SYMBOL. IT WILL INDICATE WHEN CERTAIN ACTIONS MUST NOT BE
DONE
DANGER
If you fail to follow these instructions you will be killed or seriously injured.
WARNING Misuses of the product will cause you physical damage or personal wounds.
CAUTION Inadequate use and installation will cause damage to your property.
All safety labels will inform you of potential danger, ways to reduce chance of injury and what can happen if instructions are not followed.
WARNINGS AND IMPORTANT SAFETY MEASURES
Read all instructions before using the product
CAUTION
This appliance is not intended for use by children, persons with physical or mental disabilities, persons with reduced sensory or mental
capacity, or persons with lack of experience or know-how, unless they have supervision or instruction in relation to the use of the
appliance by the person responsible for their safety. Children should be supervised to assure that they do not play with the appliance.
NEVER USE EXTENSION CORDS
Never connect multiple machines to same socket; this can cause wiring to overcharge, warming, cause voltage
vibrations and bad functioning.
ELECTRICAL CORD REPLACEMENT
If feed cable gets damaged it must be replaced by the manufacturer, our service center or qualified LG
Electronics personnel to minimize risks.
GROUND CONNECTION
In case of electrical surge, connection to ground will reduce risks of electric shock hazard. This
unit must be grounded/landed. Consult a qualified electrician. When moving your refrigerator, be
careful not to step on the feed cable with the machine’s keepers.
NEVER KEEP EXPLOSIVES INSIDE
Never store explosive substances or chemicals in your refrigerator such as benzene, alcohol etc. It is DANGEROUS!
DANGEROUS FUN
An empty refrigerator can be very dangerous for children. Remove doors or magnetic packaging when not in use
or secure it in a way to make it impossible to open and allow a child to go in as this can lead to suffocation. Never
allow a child to climb, hang or play with the refrigerator racks. They can get hurt and damage the refrigerator.
PLUG ACCESS
The refrigerator-freezer must be placed in a way that the Power cord can be pulled easily in case of emergency.
WHAT TO DO WITH YOUR OLD REFRIGERATOR
Your refrigerator contains liquids (refrigerant, lubricant) made of recyclable materials. All these materials must be sent to
a recycling waste disposal site as they can be reused after a specific recycling process. Contact local authorities.
WHEN CLOSING REFRIGERATOR DOOR
Never place your thumb or fingers on the superior part of the handle, as it can be pressed against the lower
part of the freezer handle. Keep away all fingers from injury prone areas such as where doors close cabinets and
hinges, etc. Be careful when closing doors if children are nearby.
NEVER USE MECHANICAL DEVICES
Never use mechanical devices or any other means to accelerate the thawing process, use only those which
are approved by the manufacturer.
NEVER STORE ELECTRONIC DEVICES
Never use electronic equipment to store food unless they are specific models approved by the manufacturer.
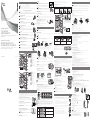
WARNING
The maintenance of the lower area from the refrigerator’s back side (see image) only must be done by
qualified personal, do it by non qualified technician can produce risk of electric shock.
Temperature Control (Freezer)
Freezer Shelf (Rack)
Temperature Control (Refrigerator) *
Fresh Meat Tray
Lamp
Refrigerator Shelves
(Glass, plastic
or steel)
Magic Crisper
Cover for vegetable shelf it controls
humidity
Vegetable Drawer
Keeps fruits and vegetables fresh
Base Grille *
Ice Drawer
Freezer Door Racks
Multi Flow Air Duct
Distributes air to all refrigerator
compartments
Door Cooling
Cold air flow from door
Large Refrigerator Door Rack
Small Refrigerator Door Rack
Leveling Screws
* In some models
Freezer Lamp
Temperature Control (Freezer)
Freezer Shelf
Refrigerator Lamp
Temperature Control
(Refrigerator) *
Fresh Meat Tray
Refrigerator Shelves
(Glass, plastic
or steel)
Vegetable Drawers
Keeps fruits and vegetables fresh
Base Grille *
Ice Drawer
Freezer Door Racks
Multi- Flow Air Duct
Distributes air to all refrigerator
compartments
Door Cooling
Cold air flow from door
Large Refrigerator Door Rack
Small Refrigerator Door Rack
Leveling Screws
* En algunos modelos
1. UNPACKING
Before installing your refrigerator, remove any tape or temporary stickers. Do not remove any stickers that feature warnings, the model
serial number or the technical label of the product located on the back of the refrigerator. To remove adhesive tape residue, rub it well
with your fingers and a little liquid detergent. Clean with warm water and let dry.
Do not use sharp instruments, rubbing alcohol, flammable liquids or abrasive cleaning products to remove the adhesive tape or glue.
These products can damage the surface of your refrigerator. The shelves come already installed in their factory position. Remove the
shelves and replace them according to your spacing needs.
2. INSTALL IT AWAY FROM HEAT SOURCES AND HUMID AREAS
In places with high temperatures, freezing capacity can be affected and cause high consumption of
electrical energy. Never install in places with high humidity as this can cause oxidation and electric shock
hazard.
3. THOUGH AND EVEN FLOOR
Your refrigerator must be leveled and placed on a strong floor. An unstable installation can
produce noise and vibrations. If the floor is uneven, level the unit by twisting the height adjusting
screw, this will eliminate unwanted sounds and vibrations.
4. AMBIENT TEMPERATURE
The refrigerator will work efficiently if room temperature is between 10 °C and 43 °C (50 °F and
109,4 °F).
5. A PROPER DISTANCE FROM ADJACENT ITEMS
Adequate air flow is needed for an efficient operation. Keep your refrigerator at a relative distance
from other objects. Reduces distance between the unit and other nearby objects can diminish
freezing capacity and rise consumption of electrical energy.
WARNING
EXCESSIVE WEIGHT HAZARD. Use the assistance of two or more persons to move or
install the refrigerator. Not following these instructions may cause injury to the back and
other parts of the body.
6. WAITING PERIOD
Wait at least an hour before connecting, after installation was completed.
1
OPERATIONS AND FUNCTIONS
SAFETY MEASURES
Lower Area
(Back of
Refrigerator)
7. CONNECTION
DANGER
FOR YOUR PERSONAL SAFETY, this device must be properly landed. Connect to a single
undamaged socket. Not having proper installation will require you to call qualified personnel
to achieve it.
Do not, under any circumstance, cut or extract the third prong from the plug. It is your responsibility
and obligation to replace two-prong outlets with that of an adequately grounded three-prong outlet.
WARNING
REPLACING ELECTRICAL CABLE; if the power cord is damaged, it must be replaced by our
service center or qualified LG technician to avoid any risk. NEVER disconnect the refrigerator
by pulling the power cord, always grip the plug firmly and disconnect it directly from the outlet.
8. BEFORE STORING FOOD
Leave it working from 2 h to 3 h before storing food. If operation were to be interrupted wait 5 min before trying again.
9. IN CASE OF UNINSTALLING
If you wish to dispose of your refrigerator, keep in mind the following Warning.
WARNING
If the use of this unit is no longer needed, please contact local authorities to dispose of this product in a safely manner; as is
Pentane-cycle or pentane like gas for insulation. Insulation gases require a special elimination process. This product contains
flammable insulation.
10. INSTALLATION OF BASE GRILLE (in some models)
Installing or Replacing the Base Grille:
1. Remove the 2 screws from the bottom front part of your refrigerator (in front).
2. Place base grille into position and insert and tighten screws.
To remove the Base Grille:
1. Open the refrigerator’s door.
2. Once the door is open, remove screws from base grille and remove.
3. Remove the base grille.
4. Reattach screws to the base of refrigerator.
1. CONNECTION
Remember that your refrigerator must be landed.
CAUTION
If operation were to be interrupted, wait 5 min before restarting it.
2. ICE MAKER OPERATION
“Ice @ Door”
• To make ice cubes, pull out the ice drawer and pour water on the shelves (Fig. 1.) Then place in their original position until you hear
a “click” sound.
WARNING
Fill only with potable water.
WARNING
Make sure the level of water in the shelf is even on the entire surface, guiding yourself with pointing arrows on Fig. 2. Water must
not surpass this level as it can get spilled when opening or closing door.
• The Ice maker takes around 4 hours to produce ice cubes. Check the ice status through the transparent panel.
• To remove ice cubes, carefully pull the drawer lever (Fig. 3). The ice cubes will fall into the ice container (Fig. 4).
WARNING
Refrain from pulling the lever before ice cubes have been completely made, as this can cause water to spill, freeze, and cause
the container to stick to the Ice maker Fig. 5. If water spills, immediately wipe it off with a cloth. Avoid heavy ice accumulation in
the container as this can cause problems to move the lever and/or container.
3. THAWING
• Thawing occurs automatically, you do not need to worry about this. Thawed water will flow into the evaporation shelf at the back of
the refrigerator.
4. MEAT TRAY
• The air which comes in when the door is opened, will not affect your meat due to the position of
the shelf. It is important not to switch places so this function persists.
NOTE: Door should not be kept open for long periods of time.
5. VEGETABLE DRAWER (in some models)
Magic Crisper
• The magic crisper allows a better preservation of your fruits
and vegetables allowing to easily control the level if humidity
inside.
• It has a vent located in the inner wall of the lid to let humidity
in or out.
6. HUMIDITY CONTROLS (in some models)
If you slide the humidity control to the left, you will keep the fruits crispy.
If you slide the humidity control to the right, you will keep the vegetables crispy.
7. TEMPERATURE CONTROL SETTINGS
• Refrigerator temperature will always be the same, despite ambient temperature changes.
• We recommend not to change the temperature adjustments after they have been set unless it is necessary.
• This refrigerator contains a button which controls the refrigerator’s temperature and a knob to control the freezer’s temperature.
• The correct temperature configuration for the refrigerator compartment should be 37,4 °F (3 °C).
• The correct temperature configuration for the freezer compartment should be -2,2 °F (-19 °C).
• The refrigerator compartment contains a temperature sensor which will automatically start and stop the compressor functions as
needed.
7.1 External Temperature Control
• Refrigerator: Monitors the refrigerator temperature. External temperature control, Fig. 6, (certain models).
ENERGY SAVE: By pressing this button the refrigerator will work with minimal power, reducing the time it is spent used and energy
consumption. This feature will not activate if “EXPRESS FREEZING” is on.
DOOR ALARM: You will hear an alarm when the refrigerator or freezer door stays open for over a minute. The alarm will continue to
sound every 30 seconds. Alarm will stop once both doors have been shut. By pressing the button, the alarm can be deactivated.
EXPRESS FRZ: Once this button is pressed, the refrigerator will begin to cool at full power to a maximum of two 2 hours. Pressing
the button a second time will deactivate the mechanism. This feature will not be available if “ENERGY SAVE” is on.
REFRIGERATOR: This feature allows you to adjust the refrigerator temperature. The number appearing on the screen will match
the degrees of the inside of the refrigerator. You can choose from 5 different settings, from 0 °C to 6 °C (32 °F to 42,8 °F).
Temperature Configuration
HOW TO ADJUST
COLDER
Press the “REFRIGERATOR” button until the bars reach the
maximum limit and the temperature indicator reads 32 °F (0 °C).
RECOMMENDED
Press the “REFRIGERATOR” button until the indicator reads 37,4 °F
(3 °C). This is the desired temperature for best performance of this
unit (Up to the third bar will be lighted).
LESS COLD
Press the “REFRIGERATOR” button until the bars reach the
minimum level. The indicator will reads 42,8 °F (6 °C).
2 3
• Freezer: Controls the flow of cold air that goes from the freezer into the refrigerator.
NOTE: To check functions of the freezer temperature control, please look for Internal Temperature Control Function.
7.2 Internal Temperature Control
• Freezer: Controls the air flow from the freezer to the refrigerator, Fig 7.
HOW TO ADJUST COLDER RECOMMENDED LESS COLD
To adjust the position knob
turn to either side to make
it turn. The arrow will set the
temperature in your freezer.
• Refrigerator: Controls the temperature of the refrigerator Control the internal temperature, Fig. 8 (according to every model).
HOW TO ADJUST
COLDER RECOMMENDED LESS COLD
Press the button until the maximum level
lights are on.
Press the button until the third light is on.
This temperature is the recommended
one for the optimum refrigerator
performance.
Press the button until the first light in on.
The temperature is the minimum.
8. AUTO CHECKING
Your refrigerator has the capacity of auto checking. If any failure comes to
happen a code will be displayed to help the technician for it repairing. While
this code in on display, the rest of the functions of control a visualizing will
not be functioning.
NOTE: In the temperature controls, the code is represented with a no
consecutive blinking of the LED (left to right/down to up) as would be in the
normal mode.
Example:
1. SHELVES
The shelves of your refrigerator can be adjusted to comply with your storage necessities; depending on the model you have it can
include glass shelves or wired shelves. Storing your foods together and adjusting the shelves to different heights will ease to help you
locate what you need. This also helps your refrigerator to stay shut longer which will save you energy.
IMPORTANT: While your refrigerator glass shelves are cold do not clean with hot or warm water. The glass shelves may break if exposed
to rapid temperature changes or hard impacts. For your safety the glass shelves are made out of tempered glass so when at breaking
they will fracture into tiny fragments.
NOTE: Be careful while moving or relocating the shelves, they are heavy. If moving the shelves is required keep in mind to locate them
in a safe environment to prevent them from breaking.
Shelf (Refrigerator and Freezer)
To remove the shelves of your refrigerator as of the freezer, follow these instructions.
1. Pull the shelf from the front Fig 9. 2. Pull the shelf outside raising it until the lock Fig. 10.
Frozen Meat Compartment
Pull the frozen meat compartment forward while holding it with your other hand, slightly lift and pull.
NOTE: DO NOT store lettuce or other leafy produce in this drawer.
Removing the Vegetable Drawer
To remove the vegetable drawer, follow the next instructions:
1. Slip out the drawer towards the outside until it stops.
2. Slightly lift the front part and pull the rest, in order to completely remove the drawer.
3. To relocate the drawer slip out towards the front until it stops.
Door Racks
Door racks can be taken off in order to clean them better.
1. To remove the rack, raise it and pull it.
2. To replace the rack again slide it on the desirable guide and push it down until it is tighten (you will listen
a “tick”).
WARNING
Someone could get hurt if the racks are not well assembled.
NOTE: Empty the food charge before you move the containers.
CAUTION
DO NOT allow children play with baskets. Sharp corners on basket could cause injury.
• Keep fresh food in the refrigerator.
• Freeze only small amounts of food.
• After you freeze some food, once you thaw it do not freeze them again, they loose their taste and nutritional value;
after thawing them, you might keep them in the refrigerator up to 48 hours.
• Do not store food that might get decomposed under low temperatures (like pineapple, bananas and cantaloupe).
• Do not store garlic in the refrigerator.
• When storing food in the refrigerator use closed containers to avoid odor mixing and loosing of humidity.
• Always clean the food before placing them in the refrigerator. Wash and dry the fruits and vegetables.
• It is recommendable to store onion in plastic bags to avoid other food odor to get mixed with it odor.
• If your are going to store ice cream for a long period of time, place it on the freezer grid and not on the freezer
door.
• When storing eggs always place them in the highest shelf or in the first grid in order to keep them fresh for
a longer period of time.
• Throw away any food that is being decomposed; it may contaminate other foods.
• Store cold cuts, cheese and sausages in bags or plastic sealed containers.
• Do not store glass bottles in the freezer because they can break when they freeze.
• Do not store hot food inside the refrigerator they might decrease the refrigerator’s efficiency.
• In the models with water dispenser it is recommended that you change the water at least every 7 days.
In order to avoid bad or unwanted odors, is important to keep the refrigerator clean. Any spilled food must be cleaned immediately;
they can stain and/or acidify the plastic parts of the refrigerator if they are let to get dry.
WARNING
Unplug the power plug always before cleaning around the electrical parts (lamps, switches, etc.) Clean any humidity to avoid any
liquid might get into any electrical part. Do not touch the frozen part with wet hands, humid or wet object stick to frozen surfaces.
Exterior
Use a warm mixture of mild detergent or soap to clean the refrigerator’s surface. Clean with a damp cloth and dry immediately.
Interior
It is recommended to clean the interior often. Wash all the bins and drawers with a mixture of bicarbonate or mild detergent with water.
Clean and dry. Using other kinds of products might damage your refrigerator.
After Cleaning
Check that the plug is not damaged or overheated and it is properly plugged.
Ice Tray Kit
Indoor Ice Maker
• Remove the ice tray from the kit. Fig. 11.
• Clean the inside and the outside of the tray with a mild soap, rinse with tap water. Fig. 12.
• Pass a damp piece of cloth, dry Fig. 13.
CAUTION
Do not immerse the ice tray in water. If done, completely dry the tray.
Door lining and gaskets
Use only a mild detergent (such as dish soap).
Plastic Parts
Do not use abrasive, paper or rough products. These could damage the product.
Back Cover
In order to get an efficient performance of your refrigerator, clean the rear part of it at least twice a year.
The refrigerator does not work
• Check if any fuse is broken in the electric facility.
• Check if the power cord is correctly plugged.
• Check if the power outlet is not damaged.
• Identify if there are any high consume electrical appliances working at the same time, unplug the one that are not necessary.
The temperature of the refrigerator or the freezer is too warm or hot
• Check that the temperature control is in the right position.
• Place the refrigerator away from any heat sources or direct sunlight.
• Open the doors only when necessary.
• There are too many food that block the air vents.
• Don’t let the doors open for too long.
I can hear some weird or abnormal sounds
• Check that the refrigerator is placed over an even leveled surface, if not, adjust the refrigerator using the leveling height adjusting
screws.
• Remove the unnecessary object from the back or top of the refrigerator.
• Check that the voltage is the correct one, if not call your electric company.
There are some odors in the refrigerator
• Store all food in sealed containers.
• Frequently clean the refrigerator inside.
Some humidity is formed in the cabinet’s surface
• When the weather is humid is normal.
• The door might be opened, check that is properly closed.
The front part of the refrigerator is getting warm
• Do not worry, is part of the normal functioning of the refrigerator, and this happens in order to avoid condensation or “sweat”.
• If this comes to happen, just clean with a dry piece of cloth.
The compressor works too frequently and for extended periods of time
• Check if the temperature controls are place in the maximum, if so, place then in the middle.
• Check that the doors are properly closed.
• Do not store over heated products.
• Do not let the doors open for too long. Move away from any heat sources the refrigerator.
There is a power interruption
• Check that no fuse is burned.
• Check if the power cord is plugged.
• Check that the outlet is not damaged.
• Identify weather you have different high consumption equipment plugged at the same time, unplug the one you do not use.
In case of a black out, call your electric company and ask how long it will last.
• In case of a 24 hour or less black out, do not open the refrigerator; this will keep the food fresh.
•
In case of a longer black out, do one of the following options:
1. Pull out all of the frozen food and keep them in an ice chest.
2. Put 2 lbs (0, 907 Kg) of frozen ice (make sure you use gloves) for each square foot (28 L) inside the freezer. This task will preserve
the food for 2 to 4 days. While handling dry ice (CO
2
), wear gloves to protect your hands from frostbite.
3. In case you do not possess neither ice chest or dry ice (CO
2
), consume your food as soon as possible.
REMEMBER: In a power failure, a full freezer stays cold longer than a partially filled one. A freezer full of meat stays cold longer than a
freezer full of baked goods. If you see that food contains ice crystals, it may be safely refrozen, although the quality and flavor may be
affected. If the condition of the food is poor or if you feel it unsafe, dispose of it.
1. THE OVERALL PERFORMANCE OR EFFICIENCY OF YOUR REFRIGERATOR MIGHT BE AFFECTED
IF:
• It is place near a heat source or humid area.
• You open the door frequently.
• If you introduce water or any object in the cold air vents.
• You block the air vents with food.
• You store hot food.
2. DURING VACATIONS WE RECOMMENDED YOU THE FOLLOWING:
• If the vacations are for a short period of time place the freezable food in the refrigerator.
• If you are going to be outside or away for a longer period of time, do the following:
Take out all food.
Unplug the power cord.
Leave the doors open to avoid bad odors.
Thoroughly clean the refrigerator.
Empty and clean the water bin not forgetting to purge the system (turning on the switch).
3. IF YOU ARE PLANNING TO MOVE OR TO CHANGE YOUR REFRIGERATOR FROM IT CURRENT
POSITION:
• Remove and secure all attachments inside the refrigerator.
• To avoid any damage to the leveling height adjusting screws, turn then completely until the base.
• Place the power cord in the hook located in the upper left side.
• Clean and empty the water container and do not forget to purge the system (turning on the switch).
• After these procedures, you will be able to move your refrigerator.
• When you move your refrigerator, place a protection sheet, such as packing cartoon under the refrigerator to avoid floor damage.
• Always pull your refrigerator straight out. Do not shift from side to side or “walk” the refrigerator when you are moving it.
4. LAMP REPLACEMENT
4.1 Freezer Lamp
• Unplug the power cord from the outlet.
• Remove the lamp lid, pulling it from behind down and to the front.
• Screw out the lamp clockwise, remove it and replace.
• Assembly in the inverse order.
4.2 Refrigerator Lamp (Identify your type)
Type 1
• Unplug the power cord from the outlet.
• Remove the shelves and the lid of the vegetable container.
• To remove the lamp cover, pull with your hand or with a tool from the bottom.
• Turn the lamps clock wise, remove ( ).
• Assembly in the inverse order.
Type 2
• Unplug the refrigerator from the power outlet.
• Remove the shelves.
• Remove the lamp lid by pushing in the center and removing it carefully.
• Turn the lamp clock wise and remove it.
• Assembly in the inverse order.
Type 3 (LED)
For this type of lamp, it is necessary to call you Service Center, the LED replacement only must be done by qualified technician
.
WARNING
The replacing lamp must be the same specification as the original.
5. THE FRONT AREA WARMS UP
The front wall of the cabinet of the refrigerator might warm up sometimes specially during
installation. DO NOT ALARM! It’s normal due to avoid humidity or “sweat”.
6. THE BACK OF THE REFRIGERATOR WARMS UP (some models)
The warming up is normal because from behind passes the cooling coil.
4
ESPAÑOL
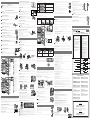
IDENTIFICATION OF PARTS
Duplex Outlet
Three
terminal
plug
Make sure
the connection
is grounded
Ice Container
Ice Shelves
Water Level Indicators
Water Level
must be even
Fig. 2
Ice Maker Lever
Ice Maker
Fig. 3
Ice
Container
Fig. 4
FREEZER / CONGELADOR
TEMP CONTROL
LESS COLD/MENOS FRIO
NORMAL
COLDER/MAS FRIO
1
5
9
FREEZER / CONGELADOR
TEMP CONTROL
LESS COLD/MENOS FRIO
NORMAL
COLDER/MAS FRIO
1
5
9
FREEZER / CONGELADOR
TEMP CONTROL
LESS COLD/MENOS FRIO
NORMAL
COLDER/MAS FRIO
1
5
9
FREEZER / CONGELADOR
TEMP CONTROL
LESS COLD/MENOS FRIO
NORMAL
COLDER/MAS FRIO
1
5
9
55
4
3
6
7
E R / C ELA ORF RE ZE
ONG D
M C N
TE P O TROL
LESS COLD/MENOS
O
FR
I
NORMAL
OLDER/ AS OC M FRI
1
5
9
Menos
Frío
Mas
Frío
Control de Temperatura
Refrigerador
NOTE: Be careful of not blocking or moving with
food packages the temperature controls, you might
change or not recognize the temperature in which your
refrigerator is set.
Fig. 7 Freezer Internal Temperature Control. Turning
knob (all models)
Fig. 8 Refrigerator Internal Temperature
Control (certain models)
Menos
Frío
Mas
Frío
Control de Temperatura
Refrigerador
Menos
Frío
Mas
Frío
Control de Temperatura
Refrigerador
Menos
Frío
Mas
Frío
Control de Temperatura
Refrigerador
The error is represented with letters
The first LED is off
Menos
Frío
Mas
Frío
Control de Temperatura
Refrigerador
CLEANING
Ice Maker
Fig. 11
Fig. 12
Fig. 13
Ice Tray
Fig. 1
Fig. 5
Absorb
Moisture
Too much
Humidity
Release
Moisture
Low
Humidity
Lattice
USING YOUR REFRIGERATOR
WHAT TO DO WHEN..
Humidity Controls
Fig. 9
Shelf
Bracket
Holder
Fig. 10
WHAT YOU HAVE TO KNOW ABOUT YOUR REFRIGERATOR
INSTALLATION
FRONT
Turn the leveling screws
to height
4,5 cm
10 cm
10 cm
3 cm
1
2
3
4
1
2
3
4
STORING FOOD SUGESTIONS
FRONT
TURN THE LEVELING
SCREWS UP TO
REFRIGERATOR BASE
1 2 3 4
1 2 3 4
1 2 3 4
Type 1 Type 2
Front
Back
A
B
C
I
F
E
F
K
L
M
J
N
N
N
O
P
Control de
Temperatura al
Frente de la Puerta
C
C
F
D
E
F
G
H
I
A
B
C
D
E
F
G
H
I
J
K
L
M
N
O
P
A
B
C
D
E
F
G
H
I
J
K
L
M
N
O
P
A
B
C
G
I
F
E
D
H
F
K
L
M
J
N
N
N
O
P
Control de
Temperatura al
Frente de la Puerta
C

6 7
CERTIFICADO DE GARANTÍA LG
12 Meses
CONDICIONES DE LA GARANTÍA CASOS QUE LA GARANTÍA NO CUBRE
LG Electronics garantiza una asistencia
gratuita a sus productos dentro del período de
garantía a través de sus centros de servicio
autorizados.
1. LG Electronics Inc., garantiza servicio
técnico contra cualquier defecto de fábrica
durante el período de cobertura de
garantía.
2 .El servicio de garantía sólo será efectuado
en los centros de servicio autorizados.
3. El certificado de garantía deberá ser
presentado junto con la factura del
producto.
4. El certificado de garantía deberá ser
completado debidamente por el vendedor
al momento de la compra.
5. Todo certificado de garantía deberá ser
sellado por el almacén.
1. Daños causados por accidentes, transporte
uso inadecuado del equipo, uso en
condiciones ambientales deficientes o por
agentes naturales (humedad, fuego, rayos,
etc.)
2. Daños causados por oscilaciones excesivas
en la red eléctrica.
3. Equipos que presenten alteraciones en el
número de serie.
4. Equipos expuestos a modificaciones internas
o externas.
5. Se suspenderá el derecho a la garantía a aquel
equipo que haya sido revisado por un centro
de servicio no autorizado por LGEPS.
6. Partes consumibles o accesorios adicionales
7. Desgaste o deterioro natural.
•
En el caso de que la fecha de compra del
aparato sea dudosa, el criterio a utilizar
para determinar la duración de la garantía
será 15 meses a partir de la fecha de
fabricación (Verificado con base en el
número de serie).
•
El reemplazo de bombillas, filtros o cualquier
otra parte consumible.
•
Las bandejas, repisas, gavetas o cajones,
agarraderas y cualquier otro accesorio del
producto. También se excluyen las partes que
no fueron incluidas originalmente con el producto.
•
En el caso en que no se pueda aplicar el
servicio de garantía, el técnico autorizado
deberá aclarar el por qué, analizando y
verificando el caso.
Modelo:
Serie:
Fecha de Compra:
Distribuidor:
Nombre del Cliente:
Dirección:
Tel.:
Modelo:
Serie:
Fecha de Compra:
Taller:
Recibido:
Modelo:
Serie:
Fecha de Compra:
Taller:
Recibido:
Modelo:
Serie:
Fecha de Compra:
Taller:
Recibido:
1
2
3
/
/
/
/
/
/
/
/
/
/
/
/
Centros de Información LG
Línea Telefónica: 0 - 800 - 507 - 5454
Línea : 00 - 800 - 6309Telefónica
EL SALVADOR
Línea : 1 - 801 - 422 - 5454Telefónica
Línea : 1 - 800 - 2342675Telefónica
GUATEMALA
JAMAICA
Línea : 0 - 800 - 5424477Telefónica
VENEZUELA
Línea : 001 - 800 - 507 - 0007Telefónica
NICARAGUA
COSTA RICA
Línea : 001 - 800 - 510 - 9564Telefónica
PUERTO RICO
Línea : 800 - 5454Telefónica
Línea : 1 - 877 - 4909112Telefónica
PANAMÁ
TRINIDAD & TOBAGO
Línea : 1 - 800 - 101092Telefónica
ECUADOR
REP. DOMINICA
Línea : 1 - 800 - 751 - 5454Telefónica
Para mayor información sobre productos, repuestos, accesorios o servicios, contacte a nuestro
departamento de Atención al Cliente a los números asignados para cada país o escríbanos a:
LG Electronics Panamá S. A.
Departamento de Atención al Cliente
LG Electronics Panamá S. A.
Departamento de Atención al Cliente
For more information about products, parts, accessories or services, please contact our
Customer Care department at the assigned numbers for each country or email us to:
)
GARANTÍA PARA SUDAMÉRICA (WARRANTY FOR SOUTHAMERICA)
8 9
5. A UNA DISTANCIA ADECUADA DE ELEMENTOS CERCANOS
La circulación de aire debe ser adecuada para una operación eficiente. Mantén el refrigerador a
una distancia prudente de otros objetos. Una distancia demasiado reducida entre la unidad y los
elementos cercanos podría conllevar a una aumento del consumo de electricidad.
NOTA: Tenga cuidado al abrir las puertas, ya que una puede abrir más que la otra. Evite golpear
las puertas con objetos cercanos a su alrededor.
6. PERIODO DE ESPERA
Espera al menos una hora Wait at least an hour before connecting, after installation was completed.
7. CONEXIÓN
PELIGRO
PARA SU SEGURIDAD PERSONAL, este aparato debe estar aterrizado apropiadamente.
Conéctalo a un tomacorriente EXCLUSIVO y que no esté dañado. Si no cuentas con la instalación
correcta, llama al personal calificado para que la realice.
Bajo ninguna circunstancia cortes la tercera terminal (tierra) del enchufe. Es tu responsabilidad y
obligación reemplazar aquellos receptáculos de 2 terminales por uno de 3 terminales conectado
debidamente a tierra.
ADVERTENCIA
REEMPLAZO DEL CABLE DE CORRIENTE. Si el cordón de alimentación se daña, éste debe
ser reemplazado por el fabricante, por nuestro centro de servicio o personal calificado por LG
para evitar algún riesgo. NUNCA desconectes tu refrigerador jalando del enchufe. Siempre toma
firmemente el enchufe y desconéctalo.
8. ANTES DE INTRODUCIR ALIMENTOS
Déjalo funcionando de 2 a 3 horas antes de introducir alimentos. Si la operación llegara a interrumpirse espera 5 minutos antes de
volver a iniciarlo.
9. EN CASO DE DESINSTALACIÓN
Si deseas desechar tu refrigerador, toma en cuenta la siguiente ADVERTENCIA.
ADVERTENCIA
Si ya no requieres del uso de esta unidad, pónte en contacto con las autoridades locales para deshacerse de este producto de
forma segura ya que usa Ciclo-Pentano o Pentano como gas de soplado aislante. Los gases del material de aislamiento requieren
un procedimiento especial de eliminación. Este producto contiene gas aislante inflamable.
10. INSTALACIÓN DE LA CUBIERTA INFERIOR (algunos
modelos)
Instalación o reemplazo de la Cubierta Inferior:
1. Remueve los 2 tornillos de la parte inferior de tu refrigerador (al frente).
2. Coloca la cubierta inferior en su posición correcta e instala los tornillos
nuevamente.
Desinstalación de la Cubierta Inferior:
1. Abre la puerta del refrigerador.
2. Una vez que esté abierta la puerta, extrae los tornillos que sujetan la cubierta.
3. Retira la cubierta inferior.
4. Coloca nuevamente los tornillos en la parte inferior del refrigerador.
1. CONEXIÓN
Recuerda que tu refrigerador debe estar aterrizado.
PRECAUCIÓN
Si la operación es interrumpida, espera 5 minutos antes de restaurarla.
2. MÉTODO PARA HACER HIELO
“Ice @ Door”
•Parahacercubosdehielo,sacalabandejaparahielosyvierteaguaenlascharolasFig.1.Despuéscolócalaensuposiciónoriginal
hasta que escuches un “clic”.
ADVERTENCIA
Llenar con agua potable solamente.
ADVERTENCIA
Asegúrate que el nivel del agua en la charola sea uniforme en toda la superficie, guiándote por las flechas posicionadas en la
parte interior de la misma Fig. 2. El agua no debe sobrepasar este nivel ya que puede derramarse al abrir o cerrar la puerta.
• La fábrica de hielos tarda alrededor de 4 horas en hacer cubos de hielos. Comprueba el estado del hielo a través de la ventana
transparente.
• Para retirar los cubos de hielo, sujeta la palanca de la bandeja y tira de ella con cuidado Fig. 3. Los cubos caerán a la caja para
hielos Fig. 4.
ADVERTENCIA
No acciones la palanca si no se han formado los hielos, ya que puede derramarse agua y congelarse, provocando que se pegue
la caja a la fábrica de hielos Fig. 5. Si se derrama agua, inmediatamente límpiala con un trapo. Evita la acumulación de hielos
en la caja ya que la palanca puede obstruirse y/o impedir la salida de la misma.
3. DESHIELO
El deshielo se realiza automáticamente, por lo que no tienes que preocuparte por ésto; el agua de deshielo fluye hacia la charola (caja)
de evaporación en la parte trasera del refrigerador.
4. CAJÓN DE CARNES FRIAS
• El aire que se introduce en el refrigerador cuando la puerta es abierta no afecta a
las carnes frías debido a la posición de esta charola (caja); sin embargo, no debe cambiarse de
lugar para que pueda realizar su función.
NOTA: No debes mantener la puerta abierta por períodos de tiempo prolongados.
5. CAJÓN PARA VERDURAS (algunos modelos)
Mágica Frescura (Magic Crisper)
•Elcajónmágicopermiteunamejorconservacióndelasfrutasyverduras,ayudándoteamantenerlahumedaddelinteriorfácilmente.
6. CONTROLES DE HUMEDAD (algunos modelos)
•Sidesplazaselcontroldehumedadhacialaizquierda,conservarásfrescaslasfrutas.
•Sidesplazaselcontroldehumedadhacialaderecha,conservarásfrescaslasverduras.
7. FUNCIONES DEL CONTROL DE TEMPERATURA
• La temperatura del refrigerador se mantendrá constante independientemente de los
cambios en la temperatura ambiente.
• Recomendamos que, una vez fijados, no cambies los ajustes de temperatura a menos que
sea necesario.
• Este refrigerador tiene un botón de control de temperatura para el compartimento del refrigerador y una perilla de control de
temperatura para el compartimento del congelador.
• La configuración adecuada del control de temperatura en el compartimento del refrigerador es de 3 °C (37,4 °F).
• La configuración adecuada del control de temperatura en el compartimento del congelador es de -19 °C (-2,2 °F).
• Este refrigerador cuenta con un sensor de temperatura en el compartimento del refrigerador. El funcionamiento del compresor
iniciará y cesará automáticamente según sea necesario.
7.1 Funciones del Control de Temperatura Externo (aplica a algunos modelos)
• Refrigerador: Controla la temperatura del refrigerador. Control de temperatura externo, Fig. 6, (algunos modelos).
ENERGY SAVE (Ahorro de energía): Presionando este botón, el refrigerador se mantendrá a su mínima potencia, reduciendo
el consumo de energía al estar funcionando menos tiempo el compresor. Esta función no se activará si “EXPRESS FREEZING”
está en operación.
DOOR ALARM (Alarma de la puerta): Con esta función escucharás una alarma cuando la puerta del refrigerador o congelador
permanezcan abiertas después de 1 min. Esta alarma sonará cada 30 segundos, dejará de sonar cuando las puertas estén
cerradas correctamente. Esta función se puede desactivar-activar presionando el botón.
REFRIGERATOR (Refrigerador): Esta función te permite ajustar la temperatura del refrigerador. El número que aparece te indica
los grados a los que se encuentra el interior de tu refrigerador. Puedes seleccionar 5 posiciones diferentes, de 0 °C a 6 °C (32
°F to 42,8 °F).
EXPRESS FREEZING (Enfriamiento rápido): Una vez que presionas este botón, el refrigerador empezará a enfriar a su máxima
potencia, teniendo una duración máxima de 2 horas. Si este botón se presiona una segunda vez, ésta función será desactivada.
Esta función no se activará si “ENERGY SAVE” está en operación.
Configuración de la Temperatura
COMO AJUSTAR
MAS FRIO Presiona el botón “REFRIGERATOR” hasta que las líneas lleguen al
nivel máximo y el indicador de temperatura marque 0 °C (32 °F).
RECOMENDABLE
Presiona el botón “REFRIGERATOR” hasta que el indicador
marque 3 °C (37,4 °F) (se iluminará hasta la tercer línea). Esta es
la temperatura recomendada para el óptimo funcionamiento del
refrigerador.
MENOS FRIO
Presiona el botón “REFRIGERATOR” hasta que las líneas lleguen al
nivel mínimo. El indicador marcará 6 °C (42,8 °F).
• Congelador: Controla el paso de aire frío que va del congelador al refrigerador.
NOTA: Para ver el funcionamiento del Control de Temperatura del congelador, refíerete al tema Funciones del Control de Temperatura
Interno.
7.2 Funciones del Control de Temperatura Interno
• Congelador: Controla el paso de aire frío que va del congelador al refrigerador, Fig. 7.
COMO AJUSTAR MAS FRIO RECOMENDABLE MENOS FRIO
Para cambiar de posición
el control, impúlsalo hacia
los lados para que gire.
La flecha te indica el nivel
de temperatura en que se
encuentra tu Congelador.
• Refrigerador: Controla la temperatura del refrigerador. Control de temperatura interno, Fig. 8 (según el modelo).
COMO AJUSTAR
MAS FRIO RECOMENDABLE MENOS FRIO
Presiona el botón hasta que enciendan
todas las luces indicando el máximo nivel.
Presiona el botón hasta que encienda
la tercer luz. Esta es la temperatura
recomendada para el funcionamiento
óptimo de tu refrigerador.
Presiona el botón hasta que quede sólo
la primer luz encendida. Su temperatura
será la mínima.
8. AUTO CHEQUEO
Tu refrigerador tiene incorporada una capacidad de diagnóstico. Si se
desarrolla una falla, mostrará un código de error para ayudar al técnico de
reparación. Mientras se muestre este código, las demás funciones de control
y visualización no funcionarán.
NOTA: En los controles de temperatura, el código de error es representado
mediante letras y/o el encendido no consecutivo de leds (izquierda a derecha/
abajo hacia arriba) como en el modo normal de cambio de temperatura.
Ejemplo:
1. ESTANTERÍA
Los estantes de tu refrigerador se ajustan para cumplir con tus necesidades de almacenamiento. Almacenar apropiadamente los
alimentos en tu refrigerador, y ajustando los estantes para que tengan distintas alturas, hará más fácil la búsqueda de los artículos que
necesitas. Esto también reducirá el tiempo en el que se encuentran abiertas la puertas, lo que ahorrará energía.
IMPORTANTE: No limpies los estantes de vidrio con agua caliente o tibia cuando se encuentren fríos. Los estantes se pueden quebrar
si se exponen a cambios bruscos de temperatura o impactos fuertes. Para tu seguridad, los estantes están fabricados con vidrio
templado para que al romperse se fracturen en muchos pedazos pequeños, esto es normal.
NOTA: Los estantes de vidrio son pesados. Ten especial cuidado cuando los muevas de lugar para evitar impactos por caída.
Parrilla (Refrigerador y Congelador)
Para retirar la parrilla del refrigerador lleva a cabo las siguientes instrucciones.
NOTA: Ten cuidado al sacar la parrilla, ya que ésta se sujeta de las paredes de refrigerador.
1. Sujeta la parrilla por la parte del frente Fig. 9.
2.
3. Jala la parrilla hacia afuera levantándola levemente hasta que
salga el seguro de la guía Fig. 10.
Charola de Carnes Frías
Jala hacia ti la charola de carnes frescas mientras la sostienes con una mano. Levántala un poco y jala.
NOTA: No guardes lechuga ni otros productos bromosos en este cajón.
Cajón de Vegetales
Para quitar el cajón de vegetales lleva a cabo las siguientes instrucciones:
1. Desliza el cajón hacia afuera hasta que tope.
2. Levanta la parte frontal del cajón, jala para sacarlo.
3. Vuelve a colocar el cajón, deslizándolo hacia adentro hasta pasar los topes.
Compartimento en Puerta
Las compartimentos se pueden quitar para una mejor limpieza y ajuste.
1. Para quitar el compartimento, levántalo y jala hacia afuera.
2. Para sustituir el compartimento, deslízalo sobre la guía y empújalo hacia abajo hasta que tope.
ADVERTENCIA
Alguien puede resultar herido si los recipientes no están firmemente ensamblados.
NOTA: No ajustes el recipiente si está cargado de alimentos.
PRECAUCIÓN
NO permitas que los niños jueguen con los compartimentos. Las esquinas filosas podrían lesionarlos.
•
•
• Guarda los alimentos frescos en el compartimento refrigerador.
• Congela los alimentos en porciones pequeñas.
• Cuando congeles alimentos, una vez que los descongeles, no los vuelvas a congelar, ya que pierden su valor
nutricional y su sabor puede cambiar; después de descongelarlos pueden guardarse en el refrigerador hasta
48 horas.
• No almacenes alimentos que puedan descomponerse a bajas temperaturas (por ejemplo: piñas, plátanos, y
melones).
• No guardes ajo dentro del refrigerador.
• Cuando almacenes alimentos utiliza recipientes cerrados, para evitar que pierdan la humedad y se mezclen
olores.
ESTA SIMBOLOGÍA SERÁ UTILIZADA EN ESTE MANUAL PARA INDICAR ACCIONES QUE NO
DEBEN REALIZARSE
PELIGRO Si no sigues las instrucciones de inmediato puedes morir o sufrir una lesión grave.
ADVERTENCIA El uso inadecuado puede provocarte daño físico o heridas personales.
ATENCIÓN El uso inadecuado puede dañar la vivienda.
Todos los mensajes de seguridad te dirán el peligro potencial, te dirán como reducir las posibilidades de sufrir una lesión y lo que
puede suceder si no se siguen las instrucciones.
PRECAUCIONES Y ADVERTENCIAS IMPORTANTES
Lee todas las instrucciones antes de utilizar el producto.
PRECAUCIÓN
Este aparato no está destinado para su uso por las personas (incluidos niños) con capacidad física, sensorial o mental reducida, falta
de experiencia y conocimientos, a menos que se les haya dado la supervisión o instrucción en relación con el uso del aparato por la
persona responsable de su seguridad. Los niños deben ser supervisados para asegurar que no jueguen con el aparato.
NO UTILICES CABLES DE EXTENSIÓN
No conectes varios aparatos a un mismo tomacorriente, puede sobrecargarse el cableado, calentarse puede
causar variaciones de voltaje y un mal funcionamiento.
REEMPLAZO DE CABLE DE CORRIENTE
Si el cordón de alimentación se daña, éste debe ser reemplazado por el fabricante, por nuestro centro de servicio o por el personal
avalado por LG Electronics, para evitar algún riesgo.
CONEXIÓN A TIERRA
En caso de un corto circuito eléctrico, la conexión a tierra reduce el riesgo de choque eléctrico.
Este electrodoméstico debe ser aterrizado. Consulta a un técnico calificado. Cuando muevas tu
refrigerador, ten cuidado de no pisar el cable de alimentación con los rodillos del aparato.
¡¡¡NO GUARDES SUSTANCIAS EXPLOSIVAS!!!
Nunca guardes sustancias explosivas ni químicos en tu refrigerador, tales como benceno, alcohol etc. ¡¡ES PELIGROSO!!
DIVERSIÓN MUY PELIGROSA
Un refrigerador vacío representa un gran peligro para los niños. Quita las puertas o los empaques magnéticos al
momento en que ya no lo uses, asegúralo de tal manera que no se pueda abrir e introducir un niño.
ACCESIBILIDAD DEL ENCHUFE (Cable de Alimentación)
El refrigerador-congelador debe ser colocado de manera que el enchufe (cable de alimentación) esté accesible
para desconectarlo rápidamente en caso de presentarse un accidente.
QUE DEBES HACER CON TU REFRIGERADOR ANTERIOR
Tu refrigerador contiene líquidos (refrigerante, lubricante) y está hecho de partes y materiales los cuales son reutilizables
y/o reciclables. Todos estos materiales deben ser enviados a un centro de recolección de material de desecho, ya que
puede ser utilizado después de un proceso de reciclaje. Para realizar ésto, contacta a la agencia de tu localidad.
AL CERRAR LA PUERTA DEL REFRIGERADOR
No apoyes el dedo superior en la parte de la manija, ya que éste podría ser presionado contra la parte inferior
de la manija del congelador. Mantenga sus dedos alejados de aquellas áreas en las que se puede lesionar tales
como las áreas de cierres de puertas, bisagras, gabinete. Tenga cuidado al cerrar las puertas cuando los niños
se encuentren cerca.
NO USAR DISPOSITIVOS MECÁNICOS
No uses dispositivos mecánicos u otros medios para acelerar el proceso de descongelamiento, solo aquellos recomendados por el
fabricante.
NO GUARDAR APARATOS ELÉCTRICOS
No uses aparatos eléctricos en el interior del compartimento para almacenar comida, al menos que éstos
sean del tipo recomendado por el fabricante.
ADVERTENCIA
El mantenimiento del área inferior de la parte trasera de tu refrigerador (ver imagen) solamente debe ser
realizado por personal técnico calificado, el realizarlo por personal no capacitado puede provocar riesgo de
choque eléctrico.
Control de Temperatura
(Congelador)
Parrilla (Bandeja) del Congelador
Control de Temperatura
(Refrigerador) *
Charola (Caja) de Carnes Frías
Lámpara del Refrigerador
Parrillas del Refrigerador
(Vidrio, plástico o alambre)
Magic Crisper
Tapa de charola de Vegetales que
controla la humedad
Charola (Caja) de Vegetales
Mantiene frescos frutas y vegetales
Cubierta Inferior *
Charola (Cubetera) para hielos
Charolas (Estantería) del
Congelador
Ducto multiflujo de aire
Distribuye el aire a todos los
compartimentos del refrigerador
“Door Cooling”
Flujo de aire frío desde la puerta
Charolas (Estantería Grande) del
Refrigerador
Charolas (Estantería Pequeña) del
Refrigerador
Tornillos Niveladores
Lampara del Congelador
Control de Temperatura
(Congelador)
Parrilla (Bandeja) del Congelador
Lámpara del Refrigerador
Control de Temperatura
(Refrigerador) *
Charola (Caja) de Carnes Frías
Parrillas del Refrigerador
(Vidrio, plástico o alambre)
Charola (Caja) de Vegetales
Mantiene frescos frutas y vegetales
Cubierta Inferior *
Charola (Cubetera) para hielos
Charolas (Estantería) del
Congelador
Ducto multiflujo de aire
Distribuye el aire a todos los
compartimentos del refrigerador
“Door Cooling”
Flujo de aire frío desde la puerta
Charolas (Estantería Grande) del
Refrigerador
Charolas (Estantería Pequeña) del
Refrigerador
Tornillos Niveladores
1. DESEMPAQUE
Despega de tu refrigerador las cintas y etiquetas temporales antes de instalarlo. No retires aquellas etiquetas que muestran
advertencias, el modelo y número de serie, o la ficha técnica del producto (algunos modelos) que se encuentran en la pared posterior
del refrigerador. Para quitar los residuos de cinta o adhesivo, frota bien con tus dedos un poco de detergente líquido para vajillas
encima del adhesivo. Limpia con agua tibia y seca.
No utilices instrumentos filosos, alcohol para fricciones, líquidos inflamables o productos de limpieza abrasivos para quitar la cinta
adhesiva o goma. Estos productos pueden dañar la superficie de tu refrigerador. Los estantes vienen instalados en su posición de
fábrica. Instala los estantes de acuerdo a tus necesidades de espacio.
2. LEJOS DE FUENTE DE HUMEDAD Y CALOR
En lugares con altas temperaturas, la capacidad de congelación puede verse afectada, al mismo tiempo
que aumenta la carga eléctrica. No instales en lugares de alta humedad ya que puede causar oxidación
y riesgo eléctrico.
3. SUELO NIVELADO Y RESISTENTE
Tu refrigerador debe estar nivelado y sobre piso firme. Si su refrigerador parece inestable o
quiere que las puertas cierren mas fácilmente, incline ligeramente su refrigerador hacia atrás
girando los tornillos de nivelación.
4. TEMPERATURA AMBIENTE
El refrigerador trabajará eficientemente si la temperatura de la habitación se encuentra entre 10
°C y 43 °C (50 °F y 109,4 °F).
PRECAUCIONES DE SEGURIDAD
5
• Siempre limpia los alimentos antes de refrigerarlos. Lava las frutas y verduras y siempre sécalas.
• Es recomendable guardar la cebolla en bolsas plásticas, para evitar que otros alimentos se contaminen con
el olor.
• Si almacenas nieve por períodos de tiempo largos, colócala en la parrilla del congelador, no en el estante
de la puerta.
• Cuando almacenes huevos, colócalos en el estante más alto de la puerta o en la primer parrilla del refrigerador
para mantenerlos frescos durante más tiempo.
• Desecha toda la comida que comienza a descomponerse; puede contaminar otros alimentos.
• Guarda las carnes frías, quesos y embutidos en bolsas o recipientes de plástico con sello hermético.
• No almacenes envases de vidrio en el congelador, pueden quebrarse.
• No guardes alimentos calientes dentro del refrigerador, disminuye la eficiencia.
• En los modelos con dispensador de agua se recomienda cambiar el agua almacenada al menos cada 7
días.
Es importante conservar el refrigerador limpio para evitar olores no deseados. Los alimentos derramados se deben limpiar
inmediatamente, ya que pueden acidificar y manchar las superficies de plástico si se dejan secar.
ADVERTENCIA
• Retira siempre el cable de alimentación de la toma de corriente antes de limpiar alrededor de los componentes eléctricos (lámparas,
interruptores, etc.).
• Limpia el exceso de humedad para evitar que se introduzcan líquidos en algunas piezas eléctricas.
• No toques las superficies congeladas con las manos mojadas, ya que los objetos húmedos se adhieren a las superficies muy frías.
Exterior
Utiliza una solución tibia de detergente o jabón suave para limpiar la superficie del refrigerador. Retírala con un trapo mojado y a
continuación sécalo.
Interior
Es recomendable limpiar con regularidad. Lava todos los compartimentos con una solución de bicarbonato o detergente suave y agua
caliente. Enjuágalos y sécalos. El uso de otro tipo de sustancias puede dañar tu refrigerador.
Después de la Limpieza
Verifica que la conexión no está dañada o sobrecalentada y que se encuentra conectada apropiadamente.
Kit de Bandeja para Hielos “Indoor Ice Maker” (Fábrica de Hielos)
• Saca la bandeja para hielos y retírala del kit Fig. 11. Limpia el interior y el exterior de la bandeja para hielos con detergente y enjuágalo
con abundante agua de uso Fig. 12.
• Pasa un paño húmedo y limpio, después seca Figura 13.
• No introduzcas el kit de la bandeja de hielo en agua. Si lo haces, será necesario secar completamente
PRECAUCIÓN
No introduzcas el kit de la bandeja de hielo en agua. Si lo haces, será necesario secar completamente.
Puertas y Sellos
Para las partes plásticas, no utilices limpiadores, detergentes concentrados, blanqueadores o limpiadores a base de petróleo.
Partes Plásticas (Cubiertas y Paneles)
No utilices toallas de papel, aspersores para vidrio, limpiadores abrasivos, o fluidos inflamables. Estos pueden rayar o dañar el material.
Cubierta Trasera
Limpia la cubierta trasera por lo menos dos veces al año, para que tu refrigerador trabaje eficientemente. Comprueba que el cable
de alimentación no está dañado y que el enchufe no se ha sobrecalentado y está bien introducido en la toma de corriente.
El refrigerador no funciona
• Verifica si no se fundió algún fusible en la instalación eléctrica.
• Revisa si el cable de corriente está conectado.
• Comprueba que el contacto eléctrico no esté dañado.
• Identifica si tienes varios aparatos eléctricos de alto consumo de energía trabajando al mismo tiempo, desconecta los que no
necesites.
La temperatura del refrigerador o del congelador es muy caliente
• Verifica que el control de temperatura esté en posición correcta.
• Retíralo de fuentes de calor o de la luz directa del sol.
• Abre las puertas sólo lo necesario.
• Tiene demasiados alimentos que obstruyen la salida del aire.
• No dejes abiertas las puertas por mucho tiempo.
Se escuchan ruidos anormales
• Revisa que el refrigerador esté sobre una superficie uniforme, si no es así, realiza el ajuste apropiado de los tornillos niveladores.
• Retira los objetos innecesarios en la parte posterior del refrigerador.
• Verifica que no haya una baja de voltaje, si es así, llama a la compañía de luz.
El refrigerador guarda olores
• Guarda los alimentos en recipientes tapados.
• Limpia frecuentemente el interior de tu refrigerador.
Se forma humedad en la superficie del gabinete
• Es normal en período de humedad alta.
• La puerta se pudo haber quedado abierta, revisa que esté cerrada.
• Se calienta la parte frontal del refrigerador.
• No te preocupes, es parte normal del funcionamiento del refrigerador, y esto sucede para evitar la formación de condensación o
de “sudor”.
• Si esto pasa, limpia con un paño seco.
El compresor trabaja muy frecuentemente y por períodos muy largos
• Verifica si los controles de temperatura están al máximo, si es así posiciónalos a la mitad.
• Revisa que las puertas estén bien cerradas.
• No almacenes alimentos muy calientes.
• No dejes las puertas abiertas por períodos muy largos.
• Retira el refrigerador de las fuentes de calor.
Hay una interrupción de energía
• Verifica si no se fundió algún fusible en la instalación eléctrica.
• Revisa si el cable de corriente está conectado.
• Comprueba que el contacto eléctrico no esté dañado.
• Identifica si tienes varios aparatos eléctricos de alto consumo de energía trabajando al mismo tiempo, desconecta los que no
necesites.
Si se desconecta la energía de tu hogar, llama a tu compañía de energía y pregunta cuánto tiempo durará sin suministro eléctrico.
• Si no habrá energía en las próximas 24 horas o menos, mantén las puertas del refrigerador cerradas, para que los alimentos se
conserven fríos y congelados.
• Si no habrá energía por más de 24 horas, usa alguna de las siguientes opciones:
1. Saca todos los alimentos congelados y guárdalos en una hielera.
2. Coloca en el congelador 0,907 Kg (2 lbs) de hielo seco por cada pie cúbico (28 L) del espacio del congelador. Esto ayudará a que
los alimentos congelados duren así de 2 a 4 días. Utiliza guantes para manejar hielo seco (CO2), ya que puedes sufrir quemaduras.
3.
Si no cuentas con hielo seco (CO2) o hielera, consume lo antes posible los alimentos perecederos.
RECUERDA: Un congelador lleno se mantiene más tiempo frío que uno parcialmente lleno. Un congelador lleno de carne se mantiene
más tiempo frío que uno que contenga pastelillos u otros alimentos horneados.
1. EL DESEMPEÑO O EFICIENCIA DE TU REFRIGERADOR PUEDE VERSE AFECTADO
• Si está colocado en un lugar caliente o húmedo.
• Si abres frecuentemente la puerta.
• Si introduces agua u objetos extraños en las áreas de salida de aire frío.
• Si obstruyes las salidas de aire frío con alimentos.
• Si introduces alimentos calientes.
2. EN PERIODO DE VACACIONES TE RECOMENDAMOS LO SIGUIENTE
• Si las vacaciones son por un período de tiempo corto, coloca los alimentos congelables en el congelador.
• Si vas a estar fuera de casa por un período de tiempo largo, haz lo siguiente:
• Saca toda la comida.
• Desconecta el cable de corriente.
• Deja abiertas las puertas para evitar formación de olores.
• Limpia completamente el interior.
• Vacía y limpia el contenedor de agua y no olvides purgar el sistema (accionando el interruptor).
3. SI PIENSAS CAMBIARTE O CAMBIAR DE POSICION TU REFRIGERADOR
• Remueve o asegura todos los aditamentos dentro del refrigerador.
• Para evitar daños en los tornillos niveladores, gíralos totalmente hasta la base.
• Coloca el cable de alimentación de corriente en el gancho de la esquina posterior izquierda.
• Vacía y limpia el contenedor de agua y no olvides purgar el sistema (accionando el interruptor).
• Después de esto puedes mover tu refrigerador.
• Cubra el suelo con un pedazo de cartón para evitar que este se dañe o maltrate.
• Siempre tire directamente hacia afuera. No mueva el refrigerador de lado a lado ni lo arrastre cuando lo trate de mover.
• Mueva o instale el refrigerador entre dos o más personas. No seguir estas instrucciones puede ocasionar una lesión en la espalda
u otro tipo de lesiones.
4. REEMPLAZO DE LÁMPARA
4.1 Lámpara del Congelador
•Desconectaelrefrigeradordeltomacorriente.
•Remuevelacubiertadelalámpara,jalándoladelaparteposteriorhaciaabajoyhaciaelfrente.
•Giralalámpara(ampolleta)ensentidocontrarioaldelasmanecillasdelreloj,retíralayreemplázalaporuna
nueva.
Parte
Inferior
Trasera
DIAGRAMA DE COMPONENTES
INSTALACIÓN DEL REFRIGERADOR
FRENTE
Gira los tornillos para
ajustar la altura
4,5 cm
10 cm
10 cm
3 cm
Receptáculo de pared
aterrizado para tres
terminales
Clavija de 3
terminales
Asegúrate de que
exista la conexión a
tierra
Fechas Indicadoras del
Nivel de Agua
El nivel del
agua debe de
estar uniforme
Fig. 2
OPERACIÓN Y FUNCIONAMIENTO
Bandeja para Hielos
Charola para Hielos
Fig. 1
Palanca
Fábrica de
Hielos
Fig. 3
Caja para
Hielos
Fig. 4
Fig. 5
Controles de Humedad
Absorción de
la Humedad
Demasiada
Humedad
Salida de la
Humedad
Escasez de
Humidad
Rejilla
1
2
3
4
1
2
3
4
1 2 3 4
1 2 3 4
1 2 3 4
FREEZER / CONGELADOR
TEMP CONTROL
LESS COLD/MENOS FRIO
NORMAL
COLDER/MAS FRIO
1
5
9
FREEZER / CONGELADOR
TEMP CONTROL
LESS COLD/MENOS FRIO
NORMAL
COLDER/MAS FRIO
1
5
9
FREEZER / CONGELADOR
TEMP CONTROL
LESS COLD/MENOS FRIO
NORMAL
COLDER/MAS FRIO
1
5
9
Menos
Frío
Mas
Frío
Control de Temperatura
Refrigerador
Menos
Frío
Mas
Frío
Control de Temperatura
Refrigerador
Menos
Frío
Mas
Frío
Control de Temperatura
Refrigerador
FREEZER / CONGELADOR
TEMP CONTROL
LESS COLD/MENOS FRIO
NORMAL
COLDER/MAS FRIO
1
5
9
55
4
3
6
7
E R / C ELA ORF RE ZE
ONG D
M C N
TE P O TROL
LESS COLD/MENOS
O
FR
I
NORMAL
OLDER/ AS OC M FRI
1
5
9
Menos
Frío
Mas
Frío
Control de Temperatura
Refrigerador
NOTA: Ten cuidado de no obstruir o mover con los
alimentos los controles de temperatura, ya que podrías
cambiar o desconocer el nivel de temperatura al cual
se encuentra tu refrigerador.
Fig. 7 Control Interno de Temperatura del Congelador,
perilla giratoria (Todos los Modelos)
Fig. 8 Control Interno de Temperatura del
Refrigerador (algunos modelos)
El error es representado mediante letras
El primer LED
está apagado
Menos
Frío
Mas
Frío
Control de Temperatura
Refrigerador
USO DEL REFRIGERADOR
Fig. 9
Parrilla
Guía
Seguro de la Guía
Fig. 10
SUGERENCIAS PARA ALMACENAR COMIDA
LIMPIEZA
Fábrica de
Hielos
Fig. 11
Fig. 12
Fig. 13
Bandeja para
Hielos
QUE HACER CUANDO...
LO QUE NECESITAS CONOCER ACERCA DE TU REFRIGERADOR
FRENTE
GIRA LOS TORNILLOS
HASTA LA BASE DEL
REFRIGERADOR
Frente
Atrás
4.2 Lámpara del Refrigerador (Identifica tu Tipo de Lampara)
Tipo 1
• Desconecta el refrigerador del tomacorrinte.
• Quita las parrillas (bandeja) y la tapa del compartimento de vegetales.
• Para remover la cubierta de la lámpara, jala con la mano o con una herramienta desde la
parte inferior.
• Gira las lámparas (ampolletas) en sentido de las manecillas del reloj, retíralas ( ).
• El ensamble realízalo en orden inverso al desensamble (desmontaje).
Tipo 2
• Desconecta el refrigerador del tomacorriente.
• Quita las parrillas (bandejas).
• Desensambla la cubierta de la lámpara, presionando al centro y retírala con cuidado.
• Gira la lámpara (ampolleta) en sentido contrario al de las manecillas del reloj y retírala.
• El ensamble realízalo en orden inverso al desensamble (desmontaje).
Tipo 3 (LED)
Para este tipo de lámpara es necesario llamar a su Centro de Servicio, el cambio solo debe ser realizado por personal calificado.
ADVERTENCIA
En cualquier caso, el foco (ampolleta) de reemplazo debe ser de la misma especificación que el original. En los modelos que
cuentan con LED, cuando presente problemas, avisa a personal técnico calificado para su reemplazo.
6. EL ÁREA FRONTAL SE CALIENTA
La pared frontal del gabinete del refrigerador se podrá calentar algunas veces, sobre todo después de la instalación.
¡NO TE ALARMES! es parte del funcionamiento normal para evitar condensación o “sudor”.
7. LA PARTE POSTERIOR SE CALIENTA
¡NO TE ALARMES! Es normal el calentamiento, ya que por la parte posterior pasa la tubería del sistema de
funcionamiento.
Tipo 1 Tipo 2
A
B
C
I
F
E
F
K
L
M
J
N
N
N
O
P
Control de
Temperatura al
Frente de la Puerta
C
C
F
D
E
F
G
H
I
A
B
C
D
E
F
G
H
I
J
K
L
M
N
O
P
A
B
C
D
E
F
G
H
I
J
K
L
M
N
O
P
A
B
C
G
I
F
E
D
H
F
K
L
M
J
N
N
N
O
P
Control de
Temperatura al
Frente de la Puerta
C
-
 1
1
-
 2
2


en otros idiomas
- English: LG GM-B473UQA Owner's manual
Artículos relacionados
-
LG GM-T472UVT Manual de usuario
-
LG MB-482UWV-G El manual del propietario
-
-
-
-
-
-
-
-
LG LFC25765SB El manual del propietario