
THIS INSTRUCTION BOOKLET CONTAINS IMPORTANT SAFETY INFORMATION.
PLEASE READ AND KEEP FOR FUTURE REFERENCE.
Date 2018-03-08 Rev. 0001-A Factory: CHEGRE
New Industrial Daybed
Stock # BH18-084-097-29
ADULT ASSEMBLY REQUIRED
If you have any questions regarding assembly or if parts are missing, DO NOT return this item to the
store where it was purchased. Please call our customer service number and have your instructions
and parts list ready to provide the model name, part name or factory number:
866-942-5362
Pacific Standard Time: 8:30 a.m. - 4:30 p.m., Monday - Friday
Or visit our web site 24 hours a day, 7 days a week for product assistance at
www.whalenstyle.com
Or e-mail your request to parts@whalenfurniture.com
LOT NUMBER:
DATE OF PURCHASE: / /

2
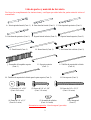
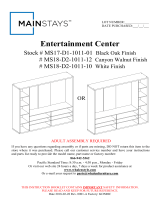
Parts and Hardware List
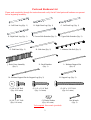
Please read completely through the instructions and verify that all listed parts and hardware are present
before beginning assembly.
A- Left Front Leg (Qty. 1) B- Right Front Leg (Qty. 1) C- Left Back Leg (Qty. 1)
D- Right Back Leg (Qty. 1) E- Lower Side Stretcher (Qty. 2) F- Upper Side Stretcher (Qty. 2)
G- Side Panel (Qty. 2) H- Side Arm (Qty. 2) I- Mattress Side Rail (Qty. 2)
J- Back Cross Assembly K- Back Stretcher L- Mattress Support Slat
(Qty. 1) (Qty. 1) (Qty. 4)
M- Mattress Support Slat for Support Leg (Qty. 3) N- Support Leg (Qty. 3)
(1) 1/4" x 5/8” Bolt (2) 1/4" x 1-1/4” Bolt (3) 1/4" x 2-1/2” Bolt
(Qty. 42+2 extra)
(Qty. 3+1 extra) (Qty. 6+1 extra)
(4) 1/4" x 1/2” Bolt (5) Plastic Washer Hex Wrench
(Qty. 8+1 extra) (Qty. 4+1 extra) (Qty. 2)
Tools required: Hex wrench (provided).

3
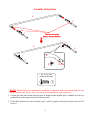
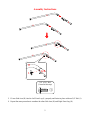
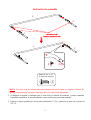
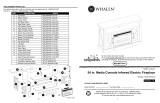
Assembly Instructions
NOTE: Please follow the instructions carefully to ensure a safe and sturdy bed. Do not
fully tighten the bolts until all rails and guardrails are attached.
1. Unpack the units and confirm that you have all hardware and required parts. Assemble the unit on a
carpeted floor or the empty carton to avoid any scratch.
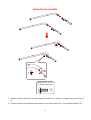
2. Fit the Back Stretcher (K) onto the Back Legs (C and D) properly and fasten into place with two 5/8”
Bolts (1).
C
D
K
C
D
K
K
C/D
1
1/4" x 5/8” Bolt
(2 used in this step)
①

4
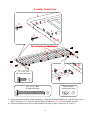
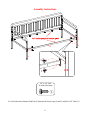
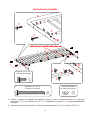
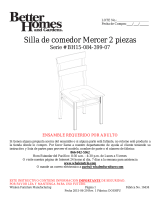
Assembly Instructions
3. Align and attach the Back Cross Assembly (J) between the Back Stretcher (K) and the Back Legs (C
and D) with four 2-1/2” Bolts (3) and four Plastic Washers (5). DO NOT fully tighten the bolts.
4. Attach one Mattress Side Rail (I) between the Back Legs (C and D) with four 5/8” Bolts (1).
1
1
K
C
D
I
J
C/D
I
C/D
K
J
3
3
5
5
1/4" x 5/8” Bolt
(4 used in this step)
①
1/4" x 2-1/2” Bolt
(4 used in this step)
③
Plastic Washer
(4 used in this step)
⑤

5
Assembly Instructions
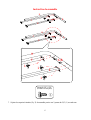
5. Fit one Side Arm (H) into the Left Front Leg (A) properly and fasten in place with one 5/8” Bolt (1).
6. Repeat the same procedure to combine the other Side Arm (H) and Right Front Leg (B).
A
B
A
B
H
H
H
H
A/B
1
H
1/4" x 5/8” Bolt
(2 used in this step)
①

6
Assembly Instructions
7. Fasten the Side Stretchers (E and F) to the previous assembly with two 5/8” Bolts (1) in each.
1/4" x 5/8” Bolt
(8 used in this step)
①
A
B
H
H
E
E
F
F
1
1
1
A/B
H
F
E

7
Assembly Instructions
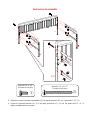
8. Attach the assembled Side Arms (H) to the Back Stretcher (K) with two 2-1/2” Bolts (3).
9. Fasten the Side Stretchers (E and F) to the Back Legs (C and D) with the 5/8” Bolts (1). DO NOT fully
tighten the bolts.
1/4" x 5/8” Bolt
(8 used in this step)
①
1/4" x 2-1/2” Bolt
(2 used in this step)
③
H
H
F
E
F
E
C
D
K
C/D
H
H
F
E
1
1
1
3

8
Assembly Instructions
10. Attach the other Mattress Side Rail (I) between the Front Legs (A and B) with four 5/8” Bolts (1).
A/B
I
1
1
A
B
I
1/4" x 5/8” Bolt
(4 used in this step)
①

9
Assembly Instructions
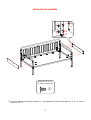
11. Align and attach the Side Panels (G) to the metal tabs on Legs (A, B, C and D) with the 1/2” Bolts (1).
B
A
C
D
G
G
G
A/B
C/D
4
4
1/4" x 1/2” Bolt
(8 used in this step)
④

10
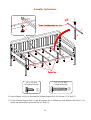
Assembly Instructions
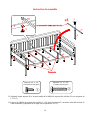
12. Attach Support Leg (N) to the middle of Mattress Support Slat (M) with one 1-1/4” Bolt (2).
13. Fit the Mattress Support Slats (L and M) between the U-brackets on both Mattress Side Rails (I) as
shown and fasten them in place with the 5/8” Bolts (1).
M
L
L
L
M
M
M
N
2
L/M
I
1
1/4" x 5/8” Bolt
(14 used in this step)
①
1/4" x 1-1/4” Bolt
(3 used in this step)
②

11
Care and Maintenance
For everyday cleaning, chrome, brass, aluminum, and painted metal surfaces can be kept looking their best
by wiping with a slightly damp, soft cotton cloth or vacuum cleaner brush.
If soiled, wipe with clean sponge or cloth wrung out of water. Wipe dry with cloth or paper towel to avoid
water spots.
Do not use any harsh abrasives or chemicals to clean any metal surfaces as it may damage the protective
coating.
Metal will rust if the finish is scratched or if your furniture is exposed to excessive humidity, particularly in
salt water locations.
Most metal furniture has a protective coating to prevent rust, however rust may occur if the finish is marred
or wears away over time.
In the event that your furniture is stained or otherwise damaged during use, we recommend that you call a
professional to repair your furniture.
Check bolts/screws periodically and tighten them if necessary.
Further Advice about Metal Furniture Care
It is best to keep your furniture in a climate controlled environment. Continual exposure to damp and wet
environment can cause corrosion. It is advised to keep furniture away from direct sunlight as it may damage the
finish. Indoor furniture is not recommended for outdoor use.
Proper care and cleaning at home will extend the life of your purchase. Following these important and helpful
tips will enhance your furniture as it ages.
We hope you enjoy your purchase for many years.
Thank you for your purchase!
QUALITY GUARANTEE
We are confident that you will be delighted with your Whalen Furniture purchase.
Should this product be defective in workmanship or materials or fail under normal use, we will repair
or replace it for up to one (1) year from date of purchase. Every Whalen Furniture product is designed
to meet your highest expectations. We guarantee that you will immediately see the value of our fine
furniture.
This warranty gives you specific legal rights and you may also have other rights which vary from State
to State.
Customer Service: 866-942-5362
8:30 a.m. - 4:30 p.m., PST, Monday to Friday
www.whalenstyle.com


ESTE INSTRUCTIVO CONTIENE INFORMACION IMPORTANTE DE SEGURIDAD.
POR FAVOR LEA Y MANTENGA PARA USO FUTURO.
Fecha 2018-03-08 Rev. 0001-A Fábrica: CHEGRE
Cama New Industrial
Serie # BH18-084-097-29
ENSAMBLE REQUERIDO POR ADULTO
Si tienen alguna pregunta acerca del ensamble o si alguna parte está faltante, no retorne esté producto
a la tienda donde lo compró. Por favor llame a nuestro departamento de ayuda al cliente teniendo su
instructivo y lista de partes para proveer el modelo, nombre de parte o el número de fábrica:
866-942-5362
Hora estándar del Pacífico: 8:30 a.m. - 4:30 p.m., de Lunes a Viernes
O visite nuestra página de Internet 24 horas al día, 7 días a la semana para asistencia
www.whalenstyle.com
O mande un correo electrónico a parts@whalenfurniture.com
NÚMERO de LOTE:
FECHA de COMPRA: / /

2
Lista de partes y material de ferretería
Por favor lea completamente las instrucciones y verifique que estén todas las partes antes de iniciar el
ensamblado.
A- Pata izquierda frontal (Cant. 1) B- Pata derecha frontal (Cant. 1) C- Pata izquierda posterior (Cant. 1)
D- Pata derecha posterior (Cant. 1) E- Soporte lateral inferior (Cant. 2) F- Soporte lateral superior (Cant. 2)
G- Panel lateral (Cant. 2) H- Brazo lateral (Cant. 2) I- Riel lateral del colchón (Cant. 2)
J- Ensamble del respaldo soporte K- Soporte posterior L- Tablilla de soporte del colchón
(Cant. 1) (Cant. 1) (Cant. 4)
M- Tablillas de soporte del colchón para la pata soporte (Cant. 3) N- Pata soporte (Cant. 3)
(1) Perno de 1/4" x 5/8” (2) Perno de 1/4" x 1-1/4” (3) Perno de 1/4" x 2-1/2”
(Cant. 42+2 extra)
(Cant. 3+1 extra) (Cant. 6+1 extra)
(4) Perno de 1/4" x 1/2” (5) Arandela de plástico Llave hexagonal
(Cant. 8+1 extra) (Cant. 4+1 extra) (Cant. 2)
Herramientas requeridas: Llave hexagonal (proveida).

3
Instructivo de ensamble
NOTA: Por favor siga las instrucciones para asegurar de que la cama sea segura y robusta. No
apretar completamente los pernos hasta que todos los rieles estén adjuntados
.
1. Desempacar la unidad y confirmar que se tiene todo el material de ferretería y partes requeridas.
Ensamblar la unidad en un piso alfombrado o en un cartón vacío para evitar rasguños.
2. Encajar el soporte posterior (K) en las patas posteriores (C y D) y sujetar en su lugar con 2 pernos de
5/8” (1).
C
D
K
C
D
K
K
C/D
1
Perno de 1/4" x 5/8”
(2
usados en este paso
)
①

4
Instructivo de ensamble
3. Alinear y adjuntar el ensamble del respaldo soporte (J) entre el soporte posterior (K) y las patas
posteriores (C y D) con 4 pernos de 2-1/2” (3) y 4 arandelas de plástico (5). No apretar completamente
los pernos.
4. Adjuntar un riel lateral del colchón (I) entre las patas posteriores (C y D) con 4 pernos de 5/8” (1).
1
1
K
C
D
I
J
C/D
I
C/D
K
J
3
3
5
5
Perno de 1/4" x 5/8”
(4
usados en este paso
)
①
Perno de 1/4" x 2-1/2”
(4
usados en este paso
)
③
Arandela de plástico
(4
usados en este paso
)
⑤

5
Instructivo de ensamble
5. Encajar un brazo lateral (H) en la pata izquierda frontal (A) y sujetar en su lugar con un perno de 5/8”
(1).
6. Repetir el mismo procedimiento para combinar el otro brazo lateral (H) y la pata derecha frontal (B).
A
B
A
B
H
H
H
H
A/B
1
H
Perno de 1/4" x 5/8”
(2
usados en este paso
)
①

6
Instructivo de ensamble
7. Sujetar los soportes laterales (E y F) al ensamble previo con 2 pernos de 5/8” (1) en cada uno.
Perno de 1/4" x 5/8”
(8
usados en este paso
)
①
A
B
H
H
E
E
F
F
1
1
1
A/B
H
F
E

7
Instructivo de ensamble
8. Adjuntar los brazos laterales ensamblados (H) al soporte posterior (K) con 2 pernos de 2-1/2” (3).
9. Sujetar los soportes laterales (E y F) a las patas posteriores (C y D) con los pernos de 5/8” (1). No
apretar completamente los pernos.
Perno de 1/4" x 5/8”
(8
usados en este paso
)
①
Perno de 1/4" x 2-1/2”
(2
usados en este paso
)
③
H
H
F
E
F
E
C
D
K
C/D
H
H
F
E
1
1
1
3

8
Instructivo de ensamble
10. Adjuntar el otro riel lateral del colchón (I) entre las patas frontales (A y B) con 4 pernos de 5/8” (1).
A/B
I
1
1
A
B
I
Perno de 1/4" x 5/8”
(4
usados en este paso
)
①

9
Instructivo de ensamble
11. Alinear y adjuntar los paneles laterales (G) a los resguardos de metal en las patas (A, B, C y D) con los
pernos de 1/2” (1).
B
A
C
D
G
G
G
A/B
C/D
4
4
Perno de 1/4" x 1/2”
(8
usados en este paso
)
④

10
Instructivo de ensamble
12. Adjuntar la pata soporte (N) a la parte media de la tablilla de soporte del colchón (M) con un perno de
1-1/4” (2).
13. Encajar las tablillas de soporte del colchón (L y M) entre los soportes U en ambos rieles del colchón (I)
como se muestra y sujetarlos en su lugar con los pernos de 5/8” (1).
M
L
L
L
M
M
M
N
2
L/M
I
1
Perno de 1/4" x 5/8”
(14
usados en este paso
)
①
Perno de 1/4" x 1-1/4”
(3
usados en este paso
)
②

11
Mantenimiento y Cuidados
Para limpieza diaria, superficies de cromo, de cobre, de aluminio, y de metal pintados se pueden mantener
viéndose bien limpiando con un patio de algodón suave y húmedo o con un cepillo de aspiradora.
Si mojado, limpiar con una esponja limpia o con un paño sacada del agua. Secar con un paño o un papel de
cocina para evitar puntos causados por agua.
No usar abrasivos duros o químicos para limpiar las superficies de metal porque puede dañar la capa
protectora.
El metal se oxidará si el acabado es rayado o si el mueble se expone a humedad excesiva, particularmente
en lugares de agua salada.
La mayoría de los muebles de metal tienen una capa protectora que evita el óxido, de cualquier forma, el
óxido puede aparecer si el acabado se estropea o si se desvanece con el tiempo.
En caso que su unidad sea manchada o dañado durante el uso le recomendamos hablar a un profesional
para que le ayude.
Revisar los pernos y tornillos periódicamente y ajustarlos en caso que sea necesario.
Más recomendaciones para el cuidado de su Mueble
Es mejor mantener la unidad en un área de clima controlado. Temperatura extrema y cambios de humedad
pueden causar cambios como partes pandas, molduras que se contraigan o que la madera se raje. Es
recomendable mantener la unidad lejos del sol directo ya que puede dañar el acabado.
Cuidados adecuados y limpieza pueden extender la vida útil de su unidad. Siga estas recomendaciones y
mantendrá su mueble en buenas condiciones de uso por muchos años.
Esperamos que disfrute su mueble por muchos años.
¡Gracias por su compra!
GARANTÍA DE CALIDAD
Nosotros estamos seguros que usted se encontrará feliz con la compra de esté producto de Whalen Furniture.
Si esté producto tiene algun defecto de ensamble o material, o si tiene alguna falla en uso normal, nosotros lo
repararemos o lo remplazaremos hasta por un año a partir de la fecha de compra. Todo producto de Whalen
Furniture es diseñado para alcanzar sus expectativas más altas. Nosotros le garantizamos que inmediatamente
podrá ver el valor de nuestra mercancía de la más alta calidad.
Está garantía le proporciona derechos legales específicos y tal vez tenga otros derechos que varían de estado a
estado.
Servicio al cliente: 866-942-5362
Hora estándar del Pacífico: 8:30 a.m. - 4:30 p.m., de Lunes a Viernes
www.whalenstyle.com

-
 1
1
-
 2
2
-
 3
3
-
 4
4
-
 5
5
-
 6
6
-
 7
7
-
 8
8
-
 9
9
-
 10
10
-
 11
11
-
 12
12
-
 13
13
-
 14
14
-
 15
15
-
 16
16
-
 17
17
-
 18
18
-
 19
19
-
 20
20
-
 21
21
-
 22
22
-
 23
23
-
 24
24


Better Homes and Gardens BH18-084-097-29 Manual de usuario
- Tipo
- Manual de usuario
- Este manual también es adecuado para
En otros idiomas
Documentos relacionados
Otros documentos
-
 Whalen BH18-084-097-48 Manual de usuario
-
 Whalen WMFP68EC-24WH Manual de usuario
-
 Whalen WMFP48EC-22 Manual de usuario
-
 Whalen BH48-084-099-05 Manual de usuario
-
 Mainstays MS18-D2-1011-12 Manual de usuario
-
 Whalen WSLWFP54-6/1031287 Manual de usuario
-
Whalen MARTOFBB Manual de usuario
-
 Whalen BH15-084-399-07 Manual de usuario


