Maytag MER5552BA - 30" Electric Range Guía del usuario
- Tipo
- Guía del usuario

M_A _A_!3
Electric Range - Coil
@
Table o
Safety .......................................... 1-3
Surface Cooking ...................... 4-5
Surface Controls
Coil Elements
Oven Cooking ......................... 6-14
Manual Clean Oven Controls
Clock Baking
Timer Broiling
Manual Clean Oven Knob Control
Baking Broiling
Self=Clean Oven Controls
Clock Timer
Baking Keep Warm
Cook & Hold Broiling
Delay Oven Racks
Care & Cleaning ................... 15=18
Seit-Clean Oven
Cleaning Procedures
Maintenance ......................... 19-20
Oven Window
Oven =ight
Troubleshooting ................... 21-22
Warranty & Service .................... 23
Guide d'uti_isation et
d'entretien ................................... 24
Guia de Uso y Cuidado ............. 50
Form No. A/06/05 Part No. 8113P505 60 @2005 Maytag Appliances Sales Ce. Litho U.S.A.

installer: Pleaseleavethis guide with this appfiance
Oensumer: Phase read and keep this guide for future
reference. Keep sales receipt and/or canceled check as proof
of purchase.
Model Number
Serial Number
Date of Purchase
f you have questions, call:
Maytag Customer Assistance
1-800-688-9900 USA
1-800-688-2002 Canada
1-800-688-2080 { U.S.17Y for hearing or speech repaired}
(Mon.-Fri.. 8 am-8 pm EasternTime}
Internet: http:i/www.maytag.com
in our continuing effort to improvethe qualityand performance
of our cooking products, it may benecessaryto make changes
to the appliance without revising this guide.
For service infermaden, see page 23.
Warning and Important Safety Instructions appearing in this
guide are not meant to cover aft possible conditions and
situations that may occur. Common sense, caution, and care
must be exercised when installing, maintaining, or operating
the appliance.
Always contact the manufacturer about problems or
conditions you do not understand.
Recognize Safety Symbols, Words, Labels
WARNING _ Hazards or unsafe practices which C0ULD
result in seveFepersonal injury or death,
result in minor persona! injury.
Read and follow all instruetions before using this
appmiance to prevent the potential risk of fire, electric
shock, personal injury or damage to the appliance as a
result of improper usage of the appliance. Use appliance
only for its intended purpose as described in this guide.
To ensure proper and safe operation: Appliance must be
properly installed and grounded by a qualified technician.
Do not attempt to adjust, repair, service, or replace any par
of your appliance unless it is specifically recommended in
this guide. Aft other servicing should be referred to a
qualified servicer.
Always disconnect power to appliance before servicing.
_ ALL RANGES CAN TIP AND
CAUSE IN3URIES TO PERSONS
iNSTALL ANTI,TIP DEVICE
PACKED WITH PJ_NGE
, FOLLOW ALL iNSTALLATiON
WARNING: To reduce risk of
tipping of the appJiance from !
abnormal usage or b_
loading of the oven door, the appliance must
be secured by a properiy instailed anti.tip
device.
To check if device is properly installed, look underneath
range with a flashlight to make sure one of the rear leveling
legs is properly engaged in the bracket slot. The anti-tip
device secures the rear leveling leg to the floor when
properly engaged. You should check this anytime the
range has been moved.
To Prevent Fire or Smoke
Be sure all packing materials are removed from the
appliance before operating it.
Keep area around appliance clear and free from
combustible materials. Flammable materials should not be
stored in an oven.
Many plastics are vulnerable to heat. Keep plastics away
from pars of the appliance that may become warm or hot.
To prevent grease fires, do not let cooking grease or other
flammable materials accumulate in or near the appliance.
In Case of Fire
Use dry chemical or foam-type extinguisher or baking soda
to smother fire or flame. Never use water on a grease fire.
1. Turn off appliance to avoid spreading the flame.
2. NEVER pick up or move a flaming pan.
3. Smother oven fire or flame by dosing the oven door.

Child Safety
NEVER store items of interestto children in _binets above
an appJ!ance,Children climbing on the appl!ance or'on the
Cooking Safety
Never heat an unopened food container in the oven. Pressure
build-up may cause container to burst resulting in serious
personal injury or damage to the appliance.
Use dry, sturdy potholders. Damp potholders may cause burns
appliance door to reach items could be seriously injured, from steam. Dish towels or other substitutes should never be
used as potholders because they can trail across hot elements
NEVER leave children alone or unsupervised near the
appliance when it isin use or is still hot. Children should never
be allowed to sit or stand on any part of the appliance as they
could be injured or burned.
Children must be taught that the appliance and utensils in it
can be hot. Let hot utensils cool in a safe place, out of reach of
small children. Children should be taught that an appliance is
not a toy. Children should not be allowed to playwith controls
or other parts of the appliance.
About Your Appliance
NEVER usa an appliance as a step to reach cabinets above,
Misuse of appliance door, such as stepping, leaning or
sitting on the dooh may result in possible tipping of the
and ignite or get caught on appliance parts.
Wear proper apparel. Loose fitting or long hanging-sleeved
apparel should not be worn while cooking. Clothing may ignite
and cause burns if garment comes in contact with heating
elements.
Always place oven racks in the desired positions while oven is
cool. Slide oven rack outto add or remove food, using dry,
sturdy potholders. Always avoid reaching into the oven to add or
remove food. If a rack must be moved while hot, use a dry
potholder. Do not let potholder contact hot element in oven.
Use racks only in the oven in which they were shipped/pur-
chased.
Use care when opening the oven door. Let hot air or steam
escape before removing or replacing food.
PREPARED FOOD WARNUNG: Follow food manufactureCs
instructions. If a plastic frozen food container and!or its cover
appliance, breakage of door, and serious injuries, distorts, warps, or is otherwise damaged during cooking,
immediately discard the food and its container. The food could
To prevent potential hazard to the user and damage to the
appliance, do not use appliance as a space heater to heat or
warm a room. Also, do not use the oven as a storage area for
food or cooking utensils.
Do not obstruct the flow of air by blocking the oven venL
DO NOT TOUCH HFATING ELEMENTS OR iNTERiOR
SURFACESOF OVEN. Heating elements may be hot even
though they are dark in color, interior surfaces of any oven
become hot enough to cause burns. During and after use, do
not touch, or let clothing or other flammable materials contact
heating elements or interior surfaces of oven until they have
had sufficient time to cool. Other surfaces of the appliance
may become hot enough to cause burns - among these
surfaces are: oven vent opening, surface near this opening,
oven door and window of oven door.
Do not touch a hot oven light bulb with a damp cloth asthe
bulb could break. Should the bulb break, disconnect power to
the appliance before removing bulb to avoid electrical shock
NEVER use aluminum foil to cover an oven rack or oven
bottom. Misuse could result in risk of electric shock, fire, or
damage to the appliance. Use foil only as directed in this
guide.
be contaminated.
Do not allow aluminum foil or meat probe to contact heating
element.
Always turn off all controls when cooking is completed.
Utensim Safety
Follow the manufacturer's directions when using oven cooking
bags.
This appliance has been tested for safe performance using
conventional cookware. Do not use any devices or accessories
that are not specifically recommended in this guide. Do not use
element covers, stove top grills or add-on oven convection
systems. The use of devices or accessories that are not expressly
recommended in this guide can create serious safety hazards,
result in performance problems, and reduce the life of the
components of the appliance.
If pan issmaller than element, a portion of the element will be
exposed to direct contact and could ignite clothing or potholder.
Only certain types of glass, glass/ceramic, ceramic, earthenware,
or other glazed utensils are suitable for cooktop or oven service
without breaking due to the sudden change in temperature.
Follow utensil manufacturer's instructions when using glass.
2

Turnpanhandletowardcenterofcooktop,notoutintothe
roomoroveranothersurfaceelement.Thisreducestheriskof
burns,ignitionofflammablematerials,orspillageifpanis
acddentlybumpedorreachedbysmallchildren.
Besureutensilislargeenoughtoproperlycontainfoodand
avoidboilovers.Pansizeisparticularlyimportantindeepfat
frying.Besurepanwillaccommodatethevolumeoffoodthat
istobeaddedaswellasthebubbleactionoffat.
Neverletapanboildryasthiscoulddamagetheutensiland
theappliance.
caution.Usecaretoavoidsteamburnsifawetspongeorcloth
isusedtowipespillsonahotsurface.Somecleanerscan
producenoxiousfumesifappliedtoahotsurface.
CleanonlypaRRslistedinthisguide.
Se f-C ean Oven (select models[}
NEVER leave surface units unattended especially when using
high heat. An unattended boilover could cause smoking and a
greasy spillover can cause a fire.
This appliance is equipped with different size surface elements.
Select pans with flat bottoms large enough to cover element.
Fitting pan sizeto element will improve cooking efficiency.
CoimEmements
To prevent damage to removable heating elements, do not
immerse, soak or clean in a dishwasher or self-clean oven. A
damaged element could short resulting in a fire or shock
hazard.
Make sure drip bowls are in place as absence of these bowls
during cooking could damage wiring.
ProtectEve Liners: Do not use aluminum foil to line surface
unit drip bowls or oven bottoms, except as suggested in the
manual. Improper installation of these liners may result in a risk
of electric shock or fire.
Deep Fat Fryers
Use extreme caution when moving the grease pan or
disposing of hot grease. Allow grease to cool before attempting
to move pan.
Ventimating Hoods
Clean range hood and filters frequently to prevent grease or
other flammable materials from accumulating on hood or filter
and to avoid grease fires.
When flaming foods under the hood, turn the fan on.
C eaning Safety
Clean cooktop with caution. Turn off all controls and wait for
appliance parts to cool before touching or cleaning. Clean with
Do not clean door gasket. The door gasket isessential for a
good seal. Care should be taken not to rub, damage, or move
the gasket.
Do not use oven cleaners or oven liners of any kind in or around
any paRRof the self-dean oven.
Before self-cleaning the oven, remove broiler pan, oven racks
and other utensils, and wipe off excessive spillovers to prevent
excessive smoke or flare ups.
It is normal for the cooktop of the range to become hot during a
self-clean cycle. Therefore, touching the cooktop during a clean
cycle should be avoided.
important Safety Notice and
The California Safe Drinking Water and Toxic Enforcement Act
of 1986 (Proposition 65} requires the Governor of California to
publish a list of substances known to the State of California to
cause cancer or reproductive harm, and requires businesses to
warn customers of potential exposures to such substances,
Users of this appliance are hereby warned that when the oven is
engaged in the self-clean cycle, there may be some low-level
exposure to some of the listed substances, including carbon
monoxide, Exposure to these substances can be minimized by
properly venting the oven to the outdoors by opening the
windows and/or door in the room where the appliance is
located during the self-dean cycle,
UMPORTANT NO]]CE REGARDUNG PET BURDS: Never keep
pet birds in the kitchen or in rooms where the fumes from the
kitchen could reach. Birds have a very sensitive respiratory
system. Fumes released during an oven self-cleaning cycle may
be harmful or fatal to birds. Fumes released due to overheated
cooking oil, fat, margarine and overheated non-stick cookware
may be equally harmful
Save These instructions for Future Reference
3

Surface Controls
Use to turn on the surface elements. An hlfinite choice of
heat settings is avaHabHefrom Lew to High. The knobs can
be set on or between any of the settings.
Setting the Controls
1. Place pan on surface element.
2. Push in and turn the knob in either direction to the desired
heat setting.
° The control panel is marked to identify which _ C_
element the knob controls. For example, the
at right indicates left front element. 0 0
graphic
3. There is an element indicator light on the control panel.
When any surface control knob is turned on, the light will
turn on. The light will turn off when all the surface ele-
ments are turned off.
4. After cooking, turn knob to OFF. Remove pan.
Suggested Heat Settings
The size,type of cookware and cooking operation will affect the
heat setting. For information on cookware and other factors
affecting heat settings, refer to "Cooking Made Simple" booklet.
Low (2): Use to keep
foods warm and melt
chocolate and butter.
High (10): Use to bring
liquid to a boil. Always
reduce setting to a lower
heat when liquids begin to
boil or foods begin to cook.
Med. Low (3-a):
Use to continue
cooking covered
foods or steam
foods.
[
OFF
High
10
• •
Medium ...............
_ledium (5°7): Use to
maintain slow boil for
large amounts of liquids
and for most frying
operations.
(Style varies by model]
_led. High (8=g): Use
to brown meat, heat oil
for deep fat frying or
sauteing. Maintain fast
boil for large amounts
of liquids.
BEFORECOOKING AFTER COOKING
- Always place a pan on the surface unit before you turn it o Make sure surface unit is turned off,
on, To prevent damage to rail .3e.never operate surface - Clean up messy spills as soon as possible,
unit without a pan in place.
- NEVER use the cooktop as a storage area for rood or
cookware
DURING COOKING
- Be sure you know which knob controls which surface
unit. Make sure you turned on the correc_ surface unit.
• Begin cooking on a higher heat setting then reduce to a
lower setting to complete the operation. Never use a
high heat setting for extended cooking,
o NEVER allow a pan to boil dry. This could damage the
pan and the appliance
o NEVER Louchcooktop until it has cooled, Expec_some
parts of the cooktop, especially around the surface units.
tc. become warm or hot during cooking. Use potholders
OTHER TIPS
- If cabinet s'{orageis provided directly above cooking
surface, limit itto items that are infrequently used and
can be safely stored in an area subjected to heat.
Temperatures may be unsate for items such as volatile
liquids, cleaners or aerosol sprays,
• NEVER leave any items, especially plastic items, on the
cooktop. The hot air from the vent may ignite flammable
kems melt or soften plastics, or increase pressure in
closed containers causing them to burst
NEVER allow aluminum foil. meat probes or any other
metal object, other than a pan on a surface element, to
...............................
to pro_ect hands.
4

Coi E ement Surface
° CHeancooktop after each use.
° Wipe acidic or sugary spHHsas soon as the cooktop
has cooHedas these spHHsmay discoHoror etch the
porcdain.
To protect drip bowl finish:
° To HessendiscoHorationand crazing, avoid using high
heat for Hongperiods+
° Do not use oversized cookware. PansshouHdnot
extend more than 1-2 inches beyond the dement+
° When home canning or cooking with big pots, use
the Canning Hement (Modal CEll. Contact your
Maytag deaHerfor detaiHsor call 1-877-232-8771 USA
or 1-800-688-8408 Canada to order.
, CHean frequentHy, [See page 17.]
CoB Dements
, When an dement ison, itwill cycle on and off to maintain the
heat setting+
° Coil elements are self-cleaning. Do not immerse in water.
To remove: When cool, raise ele-
ment. Carefully pull out and away
from receptacle.
To replace: Insert element ter-
minals into receptacle. Guide the
element into place. Pressdown on
the outer edge of element until it
sits level on drip bowl.
TERMINALS
Drip Bow s
The drip bowls under each surface element catch boilovers and
mustalways be used=Absence of drip bowls during cooking may
damage wiring+
To prevent the risk of electric shock or fire+never line drip bowls
with aluminum foil+
Drip bowls will discolor (blue/gold stains] or craze over time if
overheated= This discoloration or crazing is permanent=This will
not affect cooking performance=
5

Manual Clean Oven Control
(select models)
J
\
\\\
A
More+
\\
...... \
......_iiiiiiiiii!iii/iiiliii/iii!iiiiiiiii_.......... • •
iO _ Less-
Â:_º` { LA_,L&L ) .... /
B C D E F
NOTE: The display will show 12:00when the appliance is first connected to power OFif power is interrupted. The Bake and Broil
indicators light when function is pressed.
A
B
D
E
F
Bake
Broil
Timer
Clock
CANCEL
More+ or
Less-
Use for baking and roasting.
Use for broiling and top browning.
Sets Timer.
Use to set time-of-day clock.
Cancels all operations except Timer
and Clock.
Enters or changes time, oven
temperature. Sets Hi or LO broil.
Using the Teuchpads
Pressthe desired pad.
Pressthe More+ or Less- pad to enter time or temperature.
, A beep will sound each time a function pad ispressed. There
is no beep for the More+ or Less- pad.
, A double beep will sound if a programming error occurs.
Note: Four seconds after pressing the More+ or Less-
pad, the time or temperature will automatically be entered.
If more than 30 seconds elapse between touching a
function pad and the More+ or Less- pad, the function will
be canceled and the display will return to the previous
display.
Setting the CJock
1. Pressthe Clock pad.
, The clock time cannot be set if the control is pro-
grammed for a bake, broil or timing operation.
2. Set the correct time of day using the More+ or Less- pads.
If the More+ or Less- pad is not pressed within 30 sec-
onds, the program will cancel. Press the Clock pad and
begin again.
Setting the Timer
The timer can be set from one minute 001] up to 99 hours
and 59 minutes (99:59]. Time will be displayed in minutes and
not in seconds. THE TIMER DOES NnT CONTROL THE
nl/ENo
1. Pressthe Timer pad.
° 0:00wiii light and the colon {:] wiii flash in the display.
2. Pressthe More+ or Less- pad until the desired time is
displayed.
, The timer will begin as soon as the time is set.
° The flashing colon indicates that a timing operation is in
progress. (The colon wiii not flash if the time of day or
oven temperature is displayed.]
° Two short beeps signal the end of the operation. "0:00"
wiii appear in the display.
If desired, press the Clock pad and the time of day wiii
briefly reappear in the display during a timing operation.
If desired, press the Bake or Broil pads and the current
temperature setting wiii briefly reappear in the display
during a timing operation.
To cancel the timer operation:
Press and hold the Timer pad for several seconds.

Baking, Roasting and Broiling
Foradditional bakhg, roasthg and broi[hg thnes and tips, see
"Cooking Made Simple" bookHet.
Setting the Controls For Baking or Roasting:
1,Press Bake pad,
, 000 wi[[ light and the Bake indicator wi[[ flash in the display,
, If you press the Bake pad and do not set an oven tempera-
ture within 30 seconds, the program wi[[ automatically
cancel and the time of day wi[[ reappear in the display,
2,Press the More+ or Less- pad until the desired oven tempera-
ture is displayed,
, The oven temperature can be set from 170° to 550° F,
, 350°wi[[ appear in the display when either More+ or Less-
pad is pressed once,
, Press and tap the More+ or Less- pad to change the oven
temperature by 5° increments or press and hold the More+
or Less- pad to change the oven temperature by 10°
increments,
, 100° or the actual oven temperature, whichever is higher,
will appear in the display when the oven turns on.
° The temperature in the display will increase in 5°
increments until preset temperature is reached. A single
beep will sound when the oven is preheated.
° Allow 10 to 15 minutes for the oven to preheat.
° To recall preset temperature during preheat, press the
Bake pad. The temperature will be displayed for three
seconds.
, To change oven temperature during cooking, press
the Bake pad, then press the More+ or Less- pad until
the desired temperature is displayed.
, To change oven temperature during preheat, press
the Bake pad twice, then press the More+ or Less- pad
until the desired temperature is displayed.
3. Place food in the oven. Check food for aloneness at the
minimum cooking time.
4.At the end of cooking, press the Cancel pad to turn the oven
off and remove the food from the oven.
, The oven features an automatic shut-off. If the oven is [eft
on for 12 hours it wi[[ automatically turn off and 000 wi[[
appear in the display. Press the Cancel pad and the time of
day wi[[ reappear in the display.
Setting the Controls For Broiling:
For best results, use pan designed for broiling.
1.Place broiler pan on recommended rack position. (See chart
on page 13.)
2.Press the Broil pad.
, "SEt" wi[[ light and the Broil indicator light wi[[ flash in the
display.
3.Press the More+ pad to select Hi (high) broil or the Less- pad
to set Lo 0ow) broil
, Select Hi broil for normal broiling.
, Select Lo broil for low temperature broiling to avoid
excessive browning of longer cooking foods like poultry.
, If you do not select Hi or Lo Broil within 30 seconds, the
program wi[[ automatically cancel and the time of day
wi[[ reappear in the display.
4.Preheat broil dement for three minutes. Broil with the oven
door open to the first stop position (about 4 inches).
5.After broiling, press Cancel to turn the oven off and remove
the broiler pan from the oven. The current time of day wi[[
reappear in the display.
Manual Clean Oven Knob
(:select models) OFF
Oven Temp Knob 5,0,
The Oven Temp Knob is used to
select and maintain the oven
temperature. Always turn this knob
just to the desired temperature. Do
not turn to a higher temperature and
then back. 350
250
Setting the Centre[ for Baking and Roasting:
1.Push in and turn Oven Temp knob to desired temperature.
Allow 10-15 minutes for preheating.
2.Place food in the center of oven. Check food for aloneness
at minimum time in recipe. Cook longer if necessary'.
3.Remove food from oven and turn Oven Temp knob to OFF.
Note: For additional baking, roasting and broiling tips, see
"Cooking Made Simple" booklet.
Setting the Control for Broiling:
1.For best results, use a broiling pan. Place the broiler pan on
recommended rack position (see chart on page 8).
2.Turn Oven Temp knob to BROIL or, for lower temperature
broiling, to 450° F.
, Lower temperature broiling avoids excessive browning of
longer cooking foods such as poultry.
3.Follow the suggested times in the broil chart on page 8.Meat
should be turned once about halfway through cooking time.
4.Check the aloneness by cutting a slit in the meat near the
center to check the color.
5.After broiling, turn the OvenTemp knob to OFF.Remove the
broiler pan from the oven.

SeJf-Clean Oven Control
(select models) A B
C D
........... Thqqer ;
Less- ..................
G H 1 J
The control panel isdesigned for easein programming. Thedisplaywindow on thecontrol shows time ofday, timer and ovenfunctions.
Control panel shown includes model specific features. (Styling may vary depending on modeL}
A
B
C
D
G!
!!4
Broil
Bake
More+ or
Less-
Timer
Cook & Hold
Clean
Delay
Clock
Keep Warm
CANCEL
Use for broiling and top browning.
Use for baking and roasting.
Enters or changes time, oven
temperature. Sets HJor LO broil
Sets Timer.
Bakes for a preset time, then holds food
warm for 1 hour.
Use to set self-clean cycle.
Programs the oven to start baking at
a later time.
Use to set time-of=day clock.
Use to keep cooked food warm in oven.
Cancels all operations except Timer
and Clock.
Using the Touchpads
Pressthe desired pad.
Pressthe More+ or Less- pad to enter time or temperature.
, A beep will sound when any pad is touched.
, A douMe beep will sound if a programming error occurs.
Note: Four seconds after pressing the More+ or Less-
pad, the time or temperature will automatically be entered.
If more than 30 seconds elapse between touching a
function pad and the More+ or Less- pad, the function will
be canceled and the display will return to the previous
display.
The clock can be set to display time in a 12-hour or 2a-hour
format. The clock is set at the factory for the 12-hour format.
To change the clock to 24-hour format:
1. Pressand hold the CANCEL and Delay
pads for three seconds.
2. Pressthe More+ or Less =pad to select
12 or 24 hour.
3. Set the time of day following the
directions below.
To set the Clock:
1. Pressthe Clock pad.
, Time of day and the colon flash in the
display.
2. Pressthe More+ or Less- pad to set the
time of day.
, Colon continues flashing.
3. Pressthe Clock pad again or wait four
seconds.
%..............................._
Less-
When electrical power is supplied or after a power
interruption, the last clock time before power was
interrupted wiii flash.
To recall the time of day when another time function is
showing, press the Clock pad.
Clock time cannot be changed when the oven has been
programmed for cook or clean Delay or Cook & Hold.
8

To cance+the Clock dispmay:
If you do not want the th]le of day to display:
Press and hoHdthe CANCEL and CHockpads
for three seconds. The time of day wiHH
disappear from the dispHay
When the chockdispHayis cancelled, press
the CHockpad to briefly dispHaythe time
of day.
To restore the CJoek display:
Press and hoM the CANCEL and CHockpads for three sec-
onds. The time of day wiHHreappear in the dispHay.
The timer can be set from one minute (00:01} up to 99 hours
and 59 minutes (99:59}.
The timer can be used independently of any other oven
activity. It can also be set while another oven function is
operating.
The Timer does not control the oven. It only controls a
beeper.
To set the Timer:
1. Press the Timer pad. T_F1aer
° 0:00Hightsin the dispHay.
° The coHonflashes in the display. ....................................
2. Press the More+ or Less- pad until the
correct time appears in the display. "....................................
° The colon will continue to flash.
3. PressTimer pad again or wait four seconds.
° The colon continues flashing and the time begins
counting down.
° The last minute of the timer countdown will be displayed
as seconds.
4. At the end of the set time, one long beep will sound.
To cancel the Timer:
1. Press and hold the Timer pad for three seconds.
OR
2. Press the Timer pad and set the time to 00:00+
Locking the Controms
The touchpad controls can be locked for safety'+cleaning+ or
to prevent unwanted use. They will not function when locked.
If the oven is currently in use, the controls cannot be locked.
The current time of day will remain in the display when the
controls are locked+
To lock:
Press and hold the CANCEL and Cook &
Hold pads for three seconds.
LOCKflashes in the display.
To unlock:
Press and hold the CANCEL and Cook & Hold pads for three
seconds.
LOCKdisappears from the display.
Faumt Codes
BAKE or LOCK may flash rapidly in the display to alert you if
there is an error or a problem. If BAKE or LOCKflash in the
display, press CANCEL pad. If BAKE or LOCK continue to
flash, disconnect power to the appliance. Wait a few minutes,
and then reconnect power. If the flashing still continues,
disconnect power to the appliance and call an authorized
servicer.
To set Bake:
1. Presstile Bake pad.
° "BAKE" will flash.
° 000 will light in the display.
2. Select the oven temperature. The oven tempera- More-_ :
ture can be set from 170° to 550°. Press or press ..............................
and hold the More+ or Less- pads. +
,: Less-
° 350°will light when either pad is first pressed.
Pressthe More+ pad to increase the temperature.
Pressthe Less- pad to decrease the temperature.
3. Press Bake pad again or wait four seconds.
BAKE will stop flashing and light in the display.
9
° 100° or the actual oven temperature will display. The
temperature will rise in 5° increments until the preset
temperature is reached.
4. Allow the oven to preheat for 8-15 minutes.
° When the set oven temperature is reached, one long
beep will sound.
° To recall the set temperature during preheat, press the
Bake pad.
5. Placefood in center of oven, allowing a minimum of two
inches between utensil and oven walls.

0. Checkcookingprogress.CookHongerifneeded.
7. Whencookingisfinished,pressCANCEL.f?_r_
8. Removefoodfromtheoven.
Baking Notes:
To change oven temperature during cooking, press
the Bake pad, then press the More+ or Less- pad untiH
the desired temperature is dispHayed=
To change oven temperature during preheat, press
the Bake pad twice, then press the More+ or Less- pad
untiHthe desired temperature is dispHayed.
If you forget to turn off the oven, it wiHHautomaticaHHyturn
off at the end of 12 hours. If you wish to deactivate this
feature, see page 12.
For additionaHbaking and roasting tips, see "Cooking
Made SimpHe"bookHet.
Baking Differences Between Your O_d
and New Oven
It is normaHto notice some baking time differences between a
new ovenand an oHdone. See"Adjusting the OvenTemperature"
on page 12.
Cook & Hold
Cook & Hold dhows you to bake for a preset amount of time,
foHHowedby a one-hour Keep Warm cycHe.
TO set Cook & Hold:
1= Press the Cook & HoHdpad=
° "BAKE" and "HOLD" flash=
° 000 Hightsin the dispHay=
2= SeHectthe oven temperature. The oven tempera-
ture can be set from 170° to 550°= Pressor press .......................
and hoHdthe More+ or Less- pad= LeSS-
..................
_ Press the More+ pad to increase the temperature.
° Press the Less- pad to decrease the temperature=
3= Press Cook & HoHdagain OR wait four seconds=
° "HOLD" flashes=
° 00:00flashes in the dispHay=
4= Enter the amount of time you want to bake by pressing the
More+ or Less- pad= Bake time can be set from ten
minutes (00:10_to 11 hours, 59 minutes (11:59_).
° "BAKE" and "HOLD" Hightin the dispHay=
° The baking time wiHHHightin the dispHay=
° The baking time wiHHstart counting down=
When the cooking time has elapsed:
° Four beeps wiHHsound.
° "BAKE" wiHHturn off.
° "HOLD" and "WARM" wiHHHight.
, 170°wiHHdispHay.
After one hour in HOLD WARM:
° "End" wiHHdispHay.
° The time of day reappears in the dispHay=
To cancel Cook & Hemalat any time: _:ANCf-I%
Press the CANCEL pad. Remove food from oven._._..y/
Delay Bake
as dairy products, pork, pouHt[y,or seafood.
When using Delay, the oven begins to cook later in the day.
Set the amount of time that you want to delay before the oven
turns on and how Hongyou want to cook. The oven begins to
heat at the seHectedtime and cooks for the specified Hengthof
time, then keeps food warm for up to one hour.
DeHaytime can be set from 10 minutes (00:1d) to 11 hours, 59
To set a DeJayed Baking cycle:
1. Pressthe DeHaypad.
° "DELAY" flashes.
° 00:00flashes in the dispHay.
2. Pressthe More+ or Less- pad to set the
deHaytime.
WhiHe"DELAY" is stiHHflashing:
3. Pressthe Cook & HoHdpad.
° 000 Hightsin the dispHay.
° "BAKE" and "HOLD" flash.
4. Press More+ pad to set the baking temperature.
° 00:00and "HOLD" flash.
° "BAKE" stays Hit.
?
Less-
10

5. Press More+ pad to set the baking time.
, The Dday time, "DELAY", "BAKE" and "HOLD" Hightin
the dispHay.
When the Delay time has expired:
, "DELAY" will turn off=
, Baking time isdispHayed.
, "BAKE" and "HOLD" are dispHayed.
To set a Delay whoa Cook & Hold has already
been programmed:
1. Press the Dday pad.
, "DELAY" flashes.
, 00:00appears in the dispHay.
2. Press the More+ or Less- pad to set the dday .......................................
time. ...............................
° After four seconds, "DELAY" will : Less-
stay ]it to remind you that a delayed .......................................
cooking cycle has been set.
Whoa the Delay time has expired and the oven
starts:
° The baking time will be dispHayed.
° "DELAY" will turn off.
° "BAKE" and "HOLD" will remain Hit.
To canoe!:
Press the CANCEL pad.
° AHtimed and untimed cooking functions will be
canceled.
° The time of day will reappear in the display.
_otes:
Do not use delayed baking for items that require a
preheated oven, such as cakes, cookies, and breads.
Do not use delayed baking if oven is already hot.
Keep Warm
For safely keeping foods warm or for warming breads and
plates.
To set Keep Warm:
1. Pressthe Keep Warm pad.
° "WARM" flashes.
° 000 appears in the display.
Select the Keep Warm temperature. The Keep More÷
Warm temperature can be set from 145° to
190°.Press or press and hold the More+ or
Less- pad. Less-
........................................
_ 170° will light when either pad is first pressed.
° Pressthe More+ pad to increase the temperature.
, Press the Less- pad to decrease the temperature,
"WARM" and the temperature wiii be displayed while Keep
Warm is active.
To cancem Keep Warm: _...
1. Pressthe CANCEL pad.
2. Removefood from the oven.
Keep Warm Notes:
° Foroptimal food quality, oven cooked foods should be kept
warm for no longer than 1 to 2 hours.
° To keep foods from drying, cover loosely with foil or a lid.
, To warm dinner rolls:
- cover rolls loosely with foil and place in oven.
- press Keep Warm and More+ pads to set 170° F.
- warm for 12-15 minutes.
, To warm plates:
- place 2 stacks of up to four plates each in the oven.
- press Keep Warm and More+ pads to set 170° F.
- warm for five minutes, turn off the oven and leave plates
in the oven for 15 minutes more.
- use only oven-safe plates, check with the manufacturer.
- do not set warm dishes on a cold surface as rapid
temperature changes could cause crazing or breakage.
11

Automatic Shut-Off/Sabbath
Mode
The oven vviHautomatically turn off after 12 hours if you
accidentally Heaveit on= This safety' feature can be turned off=
To cancel the 12-hour shut-off and run the
oven continuously for 72 hours:
1=Set the oven to bake (see page 9_=
2= Press and hold the Clock pad for five seconds.
° SAb will be displayed and flash for five seconds.
° SAb will then be displayed continuously until turned off
or until the 72-hour time limit is reached.
° "BAKE" will also be displayed if a bake cycle is in use
while the oven is in Sabbath Mode.
All other functions EXCEPTBAKE (Timer, Keep Warm,
Clean, etc=_are locked out during the Sabbath Mode.
To cancel Bake when in Sabbath Mode:
Press CANCEL.
° "BAKE" will turn off in the display=
, No beeps will sound.
To cancel the Sabbath Mode:
1= Press the Clock pad for five seconds.
OR
2= After 72 hours, the Sabbath Mode will end=
° SAb will flash for 5 seconds.
° The time of day will return to the display.
Adjusting the Oven Temperature
Oven temperatures are carefully tested for accuracy at the
factory. It is normal to notice some baking or browning
differences between a new oven and an old one= As ranges
get older, the oven temperature can shift=
You may adjust the oven temperature if you think the oven is
not baking or browning correctly. To decide how much to
change the temperature, set the temperature 25° higher or
lower than your recipe recommends, then bake. The results
of the "test" should give you an idea of how much to adjust
the temperature=
To adjust the oven temperature:
1= Press Bake.
2= Enter 550° by pressing the More+ pad=
3= Pressand hold the Bake pad for several Mor(_;+
seconds or until 0° appears in the display. '.....................................
If the oven temperature was previously adjusted, the
change will be displayed. Forexample, if the oven tem-
perature was reduced by 15° the display will show "-15°"=
4= Pressthe More+ or Less- pad to adjust the temperature.
Eachtime a pad is pressed, the temperature changes by
5°=The oven temperature can be increased or decreased
by 5° to 35°=
5= The time of day will automatically reappear in the display.
You do not need to readjust the oven temperature if there
is a power faihJre or interruption. Broiling and cleaning
temperatures cannot be adjusted.
Sabbath Mode Notes:
, Sabbath Mode can be turned on at any time with or
without the oven on.
, Sabbath Mode cannot be turned on if the touchpads are
locked out or when the door is locked.
° If the oven is baking when Sabbath Mode is set, "BAKE"
will go out at the end of the baking cycle. There will be
no audible beeps.
, When the Sabbath Mode is started, no preheat beep will
sound.
° All prompts, messages and beeps are deactivated when
Sabbath Mode is active.
° Pressing CANCELwill cancel a Bake cycle, however the
control will stay in the Sabbath Mode.
° If power fails, the oven will power up in Sabbath Mode with
72 hours remaining and no cycle active.
12

0
To set Broil:
1. Press the Broil pad.
, "BROIL" flashes.
, SETis dispHayed.
2. Press the More+ pad to set HI broil or press the Less- pad
to set LO broil.
, HI or LO wflHbe dispHayed.
, Select HI broil (550° F)for normal broiling. Select
LO broil (450° F) for How-temperature broiling of Honger
cooking foods such as pouHtry.
3. After four seconds, the oven wflHstart.
° "BROIL" wflHremain Hit.
4. For optimum browning, preheat broil dement for 3-4
minutes before adding food.
5. PHacefood in the oven. Leave oven door open about four
inches (the first stop).
0. Turn meat once about halfway through cooking.
7. When food is cooked, press the CANCEL
pad. Removefood and broiler pan from the
oven.
° The time of day wiHHreappear in the
dispHay.
Broil Notes:
, Forbest results when broiling, use a pan designed for
broiHing.
, Expect broiHtimes to increase and browning to be
sHightHyHighterif appHianceis instaHHedon a 208-voHt
circuit.
, HI is used for most broiHing. Use LO broiHwhen broiHing
Hongercooking foods. The Howertemperature dhows
food to cook to the weHHdone stage without excessive
browning.
, BroiHtimes may be Hongerwhen the HowerbroiHing
temperature is seHected.
, ForadditionaHbroiHingtips and temperatures, refer to the
"Cooking Made Simple" bookHeL
Broiling Chart
I I
FOODS POS_TmON+ COOK TIME
4
4
4
4
4
4
Medium
WeHHDone
WeHHDone
Beef
Steak, 1" thick
Hamburgers, 3/4" thick
Pork
Bacon
Chops, 1"
Ham - precooked sHice,1/2" thick
Poamtry
Chicken Pieces
Seafood
Fish Steaks, buttered, 1"thick
FiHHets
+The top rack position is #5.
WeHHDone
WeHHDone
Warm
15 - 18 minutes
19 - 23 minutes
15 - 18 minutes
0 - 10 minutes
22 - 20 minutes
8 - 12 minutes
LO BroiH
3 or 4 WeHHDone 28 - 38 minutes
Flaky
Flaky
10 - 15 minutes
8 - 12 minutes
Note: This chart is a suggested guide. The times may vary with the food being cooked.
13

Oven Vent
When the oven isinuse, the area near the vent may become
hot enough to cause barns. Never block the vent opening.
The oven vent is located below the backgaard vent shield
on your range.
OVEN VENT
Oven Light
Press the Oven Light switch on the controHpand to
turn the oven Highton and off.
Over
Oven Bottom
Protect oven bottom against spiHovers,especially acidic or
sugary spills, as they may discoHorthe porcdain enamel Use
the correct pan size to avoid spiHoversand boiHovers.Do not
place utensils or aluminum foil directly on the oven
bottom.
Oven Racks
, Do not usethe oven for storing food or cookware.
The oven has two racks. All racks are designed with a lock-
stop edge.
To remove:
1. Pull rack straight out until it
stops at the lock-stop position.
2. Lift up on the front of the rack
and puHHout.
To replace:
1.
Place rack on the rack supports in the oven
2. Tilt the front end up slightly. Slide rack back until it clears
the Hock-stopposition.
3. Lower front and slide back into the oven.
Do not cover an entire rack with aluminum foil or place foil
on the oven bottom. Raking results will be affected and
damage may occar to the oven bottom.
14
Rack Positions
RACK 5 (highest position:}: Used for toasting bread or
broiling thin, non-fatty foods.
RACK 4: Used for most broiling.
RACK 3: Used for
most baked goods on a
cookie sheet or jelly roll
pan, layer cakes, fruit
pies, or frozen conve-
nience foods.
RACK 2: Used for
roasting small cuts of
meat, casseroles,
baking loaves of bread,
bundt cakes or custard pies.
__5
__4
--3
__2
--1
RACK 1: Used for roasting large cuts of meat and poultry,
frozen pies, dessert souffles or angel food cake.
MULTIPLE RACK COOKING:
Two flat racks: Use rack positions 2 and 4.
One fiat rack and one offset rack: Use rack positions
2 and 5.
Note: Use caution when removing the offset rack from
position 1 (lowest position:}.
Haft Rack Accessory
A half rack, to increase oven capac-
ity, isavailable as an accessory, It fits
in the left, upper portion of the oven
and provides space for a vegetable
dish when a large roaster is on the
lower rack, Contact your dealer for
the "HALFRACK" Accessory Kit or
call 1-800-688-8408.
(select models}
Select range models are
equipped with an
EasyRackTM. This rack offers a
convenient place to grasp
bakeware when taking it out
of the oven.
Use the EasyRackTM only in the oven in which it was
purchased.
The EasyRackTM can be used in ail rack positions.

Se f-C ean Oven (select models[}
Note: For manua] dean oven, see page 18.
1
• it is normal for parts of the range to become hot during a
6. Wipe up sugary and acidic spUiovers such as sweet
potatoes, tomato, or mUk-based sauces. Porceiain enamei
is acid-resbtant, not add-proofi The porceiain finish may
discoior if acidic spiiis are not wiped up before a seif-ciean
cycie.
To set Self-Clean:
Note: Oven temperature must be bellow 400° Fto program
a dean cycie.
• To prevent personal injury and damage to the oven door
do not attempt to open door when "LOCK" is displa} ed.
o Avoid touching cooktop, door. window or oven vent area
Do not use commercial oven cleaners on the oven finish
or around any part of the oven. They wiil damage the
finish or parts.
1. Close the oven door.
2. Move door lock lever right to the locked position.
The self-clean cycle uses above-normal cooking temperatures
to automatically clean the oven interior. Do not force the oven
door or lock lever open. This may result in exposure to high
temperatures and be a burn hazard.
It is normal for flare-ups, smoking, or flaming to occur during
cleaning if the oven is heavily soiled. It is better to clean the
oven regularly rather than to wait until there isa heavy build-
up of soii in the oven.
During the cleaning process, the kitchen should be well
ventilated to get rid of normal odors associated with cleaning.
Before Sdf-Cmeaning
1. Turn off the oven light before cleaning. The light may burn
2. Remove broiler pan, all pans, and oven racks from the
oven. The oven racks wiii discolor and may not slide easily
after a self-clean cycle if they are not removed.
3. Clean oven frame, door frame, area outside of gasket, and
around the opening in the door gasket with a nonabrasive
cleaner such as Bon Ami* or detergent and water. The
self-cleaning process does not
clean these areas. They should be
cleaned to prevent soil from baking
on during the clean cycle. (The
gasket is the seal around the oven
door and window}.
4. To prevent damage, do not clean or
rub the gasket around the oven
door. The gasket is designed to seal in heat during the
clean cycle.
5. Wipe up excess grease or spillovers from the oven bottom.
This prevents excessive smoking, flare-ups or flaming
during the clean cycle.
3. Press the Clean pad.
, "CLEAN" flashes in the display.
If the door is not closed, beeps wiii sound and "DOOR" wiii
display. If the door is not closed within 45 seconds, the
self-cleaning operation wiii be canceled and the display
will return to the time of day.
4. Press the (\/(ore+ or Less- pad.
° "CL-M" (Medium Soil, 3 hours} is displayed. '........................
Pressther',4ore+orLess-padtoscroUUthrough
the self-cleaning settings.
CL-H" (Heavy Soil, 4 hours}
CL-M" (Medium soil, 3 hours}
CL-L" (Light Soil, 2 hours}
Choosing the soil level of the oven automatically programs
the self-cleaning time.
6. After four seconds, the oven wiii start cleaning.
° The cleaning time wiii start counting down in the display.
° "LOCK" wiii appear in the display.
° "CLEAN" wiii appear in the display.
To Delay a Self-Clean Cycle:
1. Press the Delay pad.
° "DELAY" flashes.
, 00:00wiii appear in the display. ...............................
Press the More+ or Less- pad to set ................................
the amount of time you want to delay
the cycle. Delay time can be set from ten minutes (00:10}
to 11 hours, 59 minutes (11:59}.
cont.
* Brand names for cleaning products are registered trademarks of the respective manufacturers.
15

3. PresstheCleanpad.
, "CLEAN"wfl[flash.
4. PresstheMore+orLess-pad. ...............................
, "CL-M"(MediumSoft,3hours] ....
isdispHayed.
5. PresstheMore+orLess-padtoscroll[throughtheseHf-
cHeaningsettings.
CL-H"(HeavySoft,4hours]
CL-M"(Mediumsoft,3hours]
CL-L"(LightSoft,2hours]
Choosingthesoft[eve[oftheovenautomaticallyprograms
theself-cleaningtime.
6. Afterfourseconds,CLEAN,DELAYandLOCKwfl[appear
inthedisplaytoshowthattheovenissetforadelayed
deanoperation.Thedelaytimeisdisplayed.
If the oven has already been set for a clean
cycle and you wish to set a delay:
1. Press the Delay pad.
, "DELAY" flashes.
, 00:00wfl[ appear in the display. ..............................
2. Press the More+ or Less- pad to set the (More+ i
amount of time you want to delay the cycle.
After four seconds, CLEAN, DELAY and LOCK wi[[ appear
in the display to show that the oven is set for a delayed
dean operation. The delay time is displayed.
When the Self-Clean cycle starts:
, "DELAY" wi[[ turn off.
, The dean time wi[[ appear in the display.
To cance[ the Serf-Clean cycle:
Press the CANCEL pad.
, A[[ words disappear from the display.
, A[[ functions are canceled.
, The time of day appears in the display.
During the Self-Clean Cycle
When LOCK shows in the display, the door cannot be opened.
To prevent damage to the door, do not force the door open
when LOCK is displayed.
Smoke and Smells
You may see some smoke and smell an odor the first few
times the oven is cleaned. This is normal and wi[[ lessen in
time.
Smoke may also occur if the oven is heavily soiled or if a
broiler pan was [eft in the oven.
Sounds
As the oven heats,you may hear sounds of metal parts
expanding and contracting. This is normal and wi[[ not
damage the oven.
After Self-Cleaning
About one hour after the end of the self-clean cycle, "LOCK"
wi[[ turn off. The door can then be opened. The door can then
be opened. Move door lock [ever to the [eft to unlock.
Some soil may leave a light gray, powdery ash. Remove
it with a damp cloth. If soft remains after wiping, that means
the dean cycle was not long enough. The soft wi[[ be re-
moved during the next dean cycle.
if oven racks were left in the oven and do not slide
smoothly after a clean cycle, wipe racks and rack supports
with a small amount of vegetable oil to make them easier to
move.
Fine lines may appear in the porcelain because it went
through heating and cooling, This is normal and wi[[ not
affect performance,
A white discoloration may appear after cleaning if acidic
or sugary foods were net wiped up before the self-clean
cycle, This discoloration is normal and wi[[ not affect perfor-
mance,
, If the oven door is [eft open, "DOOR" wi[[ flash in the
display and a signal wi[[ beep until the door is dosed
and the Clean pad is pressed again.
, The oven door wi[[ be damaged if the oven door is
forced to open when "LOCK" is still displayed.
16

Cleaning Procedures
Brand names are registered trademarks of the
respective manufacturers.
** To order caii 1-877-232-6771 USA or
1-800-688-8408 Canaca.
PROCEDURE
Backgaard and
Cooktop -
Porcelain Enamel
Broiler Pan and
insert
Clock and
Control Pad
Area
Control Knobs
Drip Bowls -
Porcelain
(select models)
Drip Bowls -
Chrome
(select models)
Porcelain enamel is glass fused on metal and may crack or chip with misuse. It is acid resistant, not acid
proof. All spillovers, especially acidic or sugary'spillovers, should bewiped up immediately with a dry cloth.
, When cool, wash with soapy water, rinse and dry.
, Never wipe off a warm or hot surface with a damp cloth. This may cause cracking or chipping.
, Never use oven cleaners, abrasive or caustic cleaning agents on exterior finish of range.
Never cover insert with aluminum foil as this prevents the fat from draining to the pan below°
° Place soapy cloth over insert and pan; let soak to loosen soil,
° Wash in warm soapy water. Use scouring pad to remove stubborn soil
° Broiler pan and insert can be cleaned in dishwasher.
° To activate "Control Lock" for cleaning, see page 9.
° Wipe with a damp cloth and dry. Do not use abrasive cleaning agents as they may scratch the finish.
, Glass cleaners may be used if sprayed on a cloth first. DO NOTspray directly on controlpad and
display area.
° Remove knobs in the OFFposition by pulling forward.
° Wash, rinse and dry'. Do not use abrasive cleaning agents as they may scratch the finish.
, Turn on each dement to be sure the knobs have been correctly replaced.
Porcelain may discolor or craze if overheated. This is normal and wiii not affect cooking performance.
, When cool, wash after each use, rinse and dry to prevent staining or discoloration. May be washed in the
dishwasher.
° To clean heavy'soil, soak in hot sudsy water, then usea mild abrasive cleaner such as Soft Scrub* and a
plastic scouring pad.
° Forburned on soil, remove from range, place on newspapers and carefully spray with commercial oven
cleaner. {Do notspray surrounding surfaces.} Placein plastic bag and allow tosoak several hours. Wearing
rubber gloves, remove from bag, wash, rinse and dr},.
, When cool, wash after each use, rinse and dry to prevent staining or discoloration.
° To clean heavy soil, soak in hot sudsy water, then use a mild abrasive cleaner such as Soft Scrub* and
a plastic scouring pad. Do not use abrasive cleaning agents.
, Avoid using excessive amounts of water which may seep under or behind glass causing staining.
, Wash with soapand water. Rinsewith clear water and dry. Glasscleaner can be used ifsprayed on a cloth
first.
, Do not useabrasive materials such asscouring pads,steel wool or powdered cleaners asthey wiii scratch
glass.
Oven Window
and Door - Glass
17

PART PROCEDURE
Oven interior Seif-Cleam
, Follow instructions on page 15-18 to set a self-clean cycle.
Manual Clean:
° Ciean frequentiy using miid abrasive cieaners and a pHasticpad.
° Do not use metaiiic scouring pads because they will[ scratch the surface.
° When using commercia[ oven cieaners foiiow the manufacturer's instructions.
° Wipe up acidic spiiis (tomato or milk based foods:}as soon as possible with soap and water. [f the spill
is not wiped up, it may discolor the porcelain.
To make cleaning easier, remove the oven door, [f desired. (See Maintenance section on
page 19.}
Oven Racks , Clean with soapy water.
° Remove stubborn soil with cleansing powder or soap-filled scouring pad. Rinse and dry.
° Racks wiil permanently discolor and may not slide smoothly if left in the oven during a self-clean
operation. If this occurs, wipe the rack edge and rack support with a small amount of vegetable oil to
restore ease of movement, then wipe off excess oil
Stainless Steel ° DO NOT USEANY CLEANING PRODUCT CONTAINING CHLORtNE BLEACH.
(select models} ° OO NOT USEABRASIVE OR ORANGE CLEANERS.
° ALWAYS WIPE WITH THE GRAtN WHEN CLEANING.
° Daily Cleaning/Light Soil -- Wipe with one ofthe following - soapy water, white vinegar/water sohtion,
Formula 409 Glass and Surface Cleaner* or a similar glass cleaner - using a sponge or soft cloth. Rinse
and dry. To polish and help prevent fingerprints, follow with Stainless Steel Magic Spray (Part No.
20000008]**.
° Moderate/Heavy Soil -- Wipe with one of the following - Bon Ami, Smart Cleanser, or Soft Scrub* -
using a damp sponge or soft cloth. Rinse and dry'.Stubborn soils may be removed with a damp multi-
purpose Scotch-Brite* pad; rub evenly with the grain. Rinse and dry. To restore luster and remove streaks,
foilow with Stainbss Steel Magic Spray*.
, [}iscoloration -- Using a damp sponge or soft cloth, wipe with Cameo Stainless Steel Cleaner*. Rinse
immediately and dry'.To remove streaks and restore luster, follow with Stainless Steel Magic Spray*.
Storage [}rawer, , When cool, wash with warm soapy water, rinse and dry. Never wipe a warm or hot surface with a damp
[}oor Handme,Side cloth as this may damage the surface and may cause a steam burn.
Panels - Painted ° Forstubborn soil, use mildly abrasive cleaning agents such as baking soda paste or Bon AmL* Do not use
Enamel abrasive, caustic or harsh cleaning agents such assteel wool pads or oven cleaners. These products will
scratch or permanently damage the surface.
NO TE:Use a dry towel or cloth to wipe up spills, especially acidic or sugary spills. Surface may
discolor or dutl if soil is not immediately removed. Thisis especially important for white surfaces.
* Brand names for cleaning products are registered trademarks of the respective manufacturers.
** To order direct, carl 1-877-232-6771 USA or 1-800-688-8408 Canada.
18

Oven Door
o Do net place excessiveweight on or stand on an open
oven door. This could cause the range to tip over. break
Do not attempt to open or close door or operate oven until
door is properly replaced.
Never place fingers between hinge and front oven frame.
Hinge arms are spnng mounted. If accidentally hit. the
hinge will slam shut against oven frame and could injure
To remove:
1. When cool, open the oven door to
the first stop position (opened
about four inches}.
2. Grasp door at each side. Do not
use the door handle to lift door.
3. Lift up evenly until door clears
hinge arms.
Oven Window
To protect the oven door window:
1. Do not use abrasive cleaning agents such as steel wool
scouring pads or powdered cleansers as they may scratch
the glass.
2. Do not hit the glass with pots, pans, furniture, toys, or other
objects.
3. Do not close the oven door until the oven racks are in
place.
Scratching, hitting, jarring or stressing the glass may weaken
its structure causing an increased risk of breakage at a later
date.
i Disconnect p0wei to range be[0re replacing l!#ht bu"b.
when replacing bulb,
To replace:
1. Grasp door at each side.
2. Align slots in the door with the hinge arms on the range.
3. Slide the door down onto the hinge arms until the door is
completely seated on the hinges. Push down on the top
corners of the door to completely seat door on hinges.
Door should not appear crooked.
Note: The oven door on a new range may feel "spongy"
when it is closed. This is normal and will decrease with use.
o Do not touch hot bulb with adamp cloth asthis may cause
the bulb to break.
To Replace Oven Light Bulb:
1. When oven is cool, hold bulb cover in place, then slide wire
retainer off cover. NOTE:Bulb cover wiii fall if not held in place
while removing wire retainer. BuL_oovER
2. Remove bulb cover and light
bulb.
3. Replace with a @-watt ap-
pliance bulb.
a. Replace bulb cover and se-
cure with wire retainer.
RETAINER
5. Reconnect power to range. Reset clock.
19

Leve ing Legs
Be sure the antptip bracket secures one of the rear
from accidentNly tipping,
Storage Drawer
Do not store pUastic,paper products, food or flammab!e
materials in this drawer. The drawer may become too warm
for these items when the oven is in use.
To replace:
1. Fit the ends of the drawer giides into the rNb hi the range.
2. Lift up the front of the drawer and gendy push in to the first
stop position.
3. Lift drawer up again and push until drawer is closed.
Convenience Out_et
(Canadian models only} F
r
The convenience outlet is located on the
lower left side of the backguard. Be sure
appliance cords do not rest on or near
the surface elemenL If the surface
dement is turned on, the cord and
o.tUetwi,bedamaged. _ @
/N
The convenience outlet circuit breaker l_r
may trip if the small appliance plugged C_-_CU_TBRE,aKE_-_
into it exceeds 10 amp& To reset the circuit breaker, press the
switch located on the lower edge of the backguard.
The storage drawer can be removed to allow you to clean under
the range.
To remove:
1. Empty'drawer and puii out to the first stop position.
2. Lift up the front of the drawer.
3. Pull out to the second stop position.
4. Grasp sides and lift drawer top up and out.
2O

PROBLEM SOLUTION
For most concerns, try these first. ° Check if oven controHshave been propedy set=
, Check to be sure pHugis secureHyinserted into receptacle.
, Check or re-set circuit breaker. Check or repHacefuse.
, Check power suppHy=
Part or atomof appmiance does not
work.
Clock, indicator words, and/or
lights operate but oven does
not heat.
Baking resumts are not as
expected or differ from
previous oven.
Food is not broiling properly or
smokes excessively.
Oven wimmnot semf-cmean
(select models).
Oven did not clean properly
(select models).
Oven door wimmnot anmock after
semf-cmean cycle (select models).
° Check if surface and/or oven controHshave been propedy set=See pages 4-14=
° Check if oven door is unHockedafter seHf-cHeancycHe=See page 16=
° Check if oven is set for a deHayedcook or dean program. See pages 10 & 15=
° Check if ControHLock is activated=See page 9=
° Check if control is in Sabbath Mode. See page 12=
, Oven may be set for a Cook & Hold or delay function.
, The Control Lock may have been set. See page 9.
° Make sure the oven vent has not been blocked. See page 14 for location.
° Check to make sure range is level=
° Temperatures often vary'between a new oven and an old one.As ovens age,the oven
temperature often "drifts" and may become hotter or cooler= See page 12 for
instructions on adjusting the oven temperature (select models[)=NOTE: It is not
recommended to adjust the temperature if only one or two recipes are in question.
° See"Cooking Made Simple" booklet for more information on bakeware and
baking=
, Check oven rack positions. Food may be too close to element.
, Broil element was not preheated.
, Aluminum foil was incorrectly used. Never line the broiler insert with foil.
, Oven door was closed during broiling. Leavethe door open to the first stop position
(about 4 inches_).
, Trim excess fat from meat before broiling.
, A soiled broiler pan was used.
, Voltage in house may be low.
, Check to make sure the cycle is not set for a delayed start. See page 15.
° Check if door is closed.
, Check if control is in Sabbath Mode. See page 12.
, Oven may be over 400° F.Oven temperature must be below 400° Fto program a
clean cycle.
, Longer cleaning time may be needed.
, Excessivespillovers, especially sugary and/or acidic foods, were not removed prior
to the self-clean cycle.
, Oven interior is stir[ hot= Arrow about one hour for the oven to coo[ after the
completion of a self-clean cycle. The door can be opened when the LOCK is not
displayed,
, The control and door may be locked. See page 9.
21
cont.

1
PRGSLEM SGLUTmGN
Moisture collects on oven ° This is normal when cooking foods high in moisture.
window or steam comes from ° Excessivemoisture was used when cleaning the window.
oven vent.
There is a strong odor or light , This is normal for a new range and will disappear after a few uses. Initiating a clean
smoke when oven is turned on. cycle will "burn off" the odors more quickly.
° Turning on a ventilation fan will help remove the smoke and/or odor.
° Excessivefood soils on the oven bottom. Use a self-clean cycle.
Fault Codes (select models} ° BAKEor LOCKmay flash rapidly in the display to alert you if there is an error
or a problem, if BAKE or LOCKappear in the display, press Cancel pad.
If BAKE or LOCKcontinue to flash, disconnect power to the appliance.
Wait a few minutes, and then reconnect power. If the flashing still continues,
disconnect power to the appliance and call an authorized servicer.
° Ifthe oven is heavily soiled, excessive fiareups may result in a fault code during
cleaning. Pressthe Cancel pad and allow the ovento cool completely, wipe out excess
soil, then reset the clean cycle. If the fault code reappears, contact an authorized
servicer.
Noises may be heard. ° The oven makes several low level noises.You may hear the oven relays as they go on
and off. This is normal
° As the oven heats and cools, you may hear sounds of metal parts expanding and
contracting. This is normal and will not damage your appliance.
There are no beeps and ° Control may be in Sabbath Mode (select models}. See page 12=
no display.
"SAb" flashing and then , Oven is in Sabbath Mode. To cancel, press and hold the Clock pad for five
displayed continuously, seconds.
22

I
Electric Range Warranty
Fuji One Year Warranty o
Parts and Labor
Forone (1} year from the original retail
purchase date, any part which fails in
normal home usewill be repalrea or
replacedfree of charge.
Limited Warranties = Parts Only
Second Through Fifth Year =Fromthe
original purchase date. parts listed below
which fail n normal home usewill be
repaired or replacedtree of chargetot the
part itself, with _heowner paying all other
costs nciuding labor, mileageand
transportation, trip charge and diagnostic
charge, if required,
Please Note: This full warramy applies
onlywhen the appliance is located in the
United Statesor Canada.Appliances
located elsewhere are covered by the
limited warranties only, including parLs
which fail during the first year.
Canadian Residents
Thiswarranty covers onlythose appliances
installed in Canadathat have been listed
with CanadianStandards Association
unlessthe appliances are brought into
Canadadue to transfer of residence from
the United Statesto Canada.
Thespecific warrantiesexpressedabove
are the OHLY warrantfasprovided by the
manufacturer.Thl:swarranS/givesyou
specificlegal rights, andyou mayalsohave
otherrights that varyfrom state to state.
What is Not Covered By These Warranties:
1= Conditions and damages resulting from any of the foIlowing:
a=Improper instaIIation,delivery,or maintenance.
b. Any repair, modification, alteration, or adjustment not authorized bythe
manufacturer or an authorized servicer=
c= Misuse, abuse,accidents, unreasonable use,or actsof God=
d. Incorrect electric current, voltage,or supply.
e=Impropersetting of any control
2. Warranties are void if the original serial numbers havebeen removed,altered, or
cannot be readily determined.
3. Light bulbs=
4= Productspurchased for commerciaI or industrial use=
5= The cost of serviceor servicecall to:
a. Correct instaiIation errors.
b=Instruct the useron the proper use of the product.
c=Transport the appliance to the servicerand back.
8. Consequentialor incidentai damages sustained byany person as a resuit of any
breach of these warranties.
Somestates do not aIIowthe excIusion or Iimitation of consequential or incidental
damages,sothe above exclusion may not apply=
If You Need Service
Firstsee theTroubleshooting section in your Useand Care Guide or call Maytag
ServicessM,Maytag Customer Assistance at 1-800-688-9900 U.S.A.or
1-800-688-2002 Canada.
To Obtain Warranty Service
To locate an authorized service company in your area contact the dealer from
whom your appliance was purchased or call Maytag ServicessM,Maytag
Customer Assistance. Should you not receive satisfactory warranty service,
call or write:
May'tag Servicess_JI
Attn: CAIR_ Center
P=O=Box 2370, Cleveland, TN 37320-2370
NoSo1-800-688=9900 and Canada 1-800=688=2002
NoSocustomers using TTY for deaf, hearing impaired or speech
impaired, call 1=800=688=2080o
NOte: Whencontacting Maytag ServicessM,Maytag Customer Assistance
about a serviceprobIem, pIeaseinciude the following:
a=Your name,address and telephone number.
b=Modet number and seriaI number of your appIiance=
c=Name and address ofyour deaier and date appliance was purchased.
d=A cIeardescription of the problem you are having.
e=Proofof purchase.
Use and Care guides, service manuals and parts information are available from Maytag ServicessM,Maytag Customer Assistance.
23

I _AYI'At3
Cuisini_re 6iectrique
en 6i#.ments spira[6s
m m "IL
|s|//iere
mnstructions de s6curit6
importantes ................................. 25=28
Cuisson sur la surface .............. 29-30
Commandessur _asurface
EL6mentsspiral6s
Cuissen darts [e four ................. 31-41
Commandes du four _ nettoyage manuel
Horioge Cuissoncourante
Minuterie GriI
R_gemuteurdu four _ nettoyage manuel
Cuissoncourante Gdl
Commundes du four _ uutonettoyuge
Hodoge Minuterie
Cuissoncourante Maintien au chaud
Cuissonet maintien Gril
D6marragediff6r6 GriIiesdu four
Nettoyage ................................... 42-45
Fourautonettoyant
Mdthodesde nettoyage
Entretien ....................................... 46=47
Hub[ordu four
Lampedu foul
Recherche des pannes ............. 48=49
Garantieet serviceaprSs-vente .... 51
Guia de Use y Cuidade .................... 52

JnstaUateur: Laissezce guideavecI'appare_L
Consommateur:Veuillezlire leguideet le conserverpour
consul[ationuJterieure.Conservezlatactured'achatou b cheque
enca_ssecommepreuvede I'achat
Num6rode rnodele
Num6rode s6rie
Dated'achat
Sivousavezdesquestions,veuilbz nousappeter:
Service a la client#Je de Maytag
]-800-688-9900 aux E=-U.
]-800-688-2002 au Canada
(lundi au vendredi.8 h _ 20 h.heurede I'Est)
Internet:http://www.may[ag.com
Donsle cadrede nosprat_quesd'am61iorationcons[ohioae la
qualit6etde la performancede nosprodultsde cuisson oes
modificationsde I'appareilqu_nesent pasmentionn6esdansce
guLdeon[pu 6treintroduites.
Repertez_veus _ la page 49 peurplusd'infermatiorla
cencemant te sePJiceapres-vente.
Les instructions de securite importantes et bs paragraphes
<<avertissement >>de ce guide ne sent pas destines a couvrir
toutes bs conditions et situations qui pourraient se presenter.
II faut loire preuve de ben sons,de prudence et de soin lots de
I'instdlation, de I'entretien ou du fonctionnement de I'appareil.
Toujours prendre contact avec le fabricant dons le cos de
probbmes ou de conditions qui ne seraient pas comprises.
Reconnoitre los 6tiquettes, paragraphes
et symboles set la s6curit6
AVERTiSSEMENT _ Dangers ou pratiques dangereuses qui
POURRA!ENTr_sulter ende graves b!essures ou memo la
mort.
POURRAIENTresulter en des blessures mineures.
Lire toutes los instructions avant d'utiliser cot appareii;
observer toutes bs instructions pour eliminer bs risques
d'incendie, choc ebctrique, dommages materiels et corporeb
que pourrait susciter une uti[isation incorrecte de ['apparei[.
Utiliser I'appareil uniquement pour los fonctions prevues,
decrites dons ce guide.
Pour one utilisation adequate et en s_curit_, il faut que
I'appareil soit convenabbment installe par un technicien
qudifie, et relic a la torte.
Ne pas regbr, reparer ni remplacer un composant, a moins que
ceh ne soit specifiquement recommande dons ce guide. Toute
autre reparation doit etre effectuee par un technicien qudifie.
Toujours debrancher [appareil avant d'y loire de [entretien.
risque de bascu!ement de !,appateil _ !,occasien
d'une utilisatien anermale eu d'un chargement
excessif de ia porte do fear, il faat qae la bride
antibascuiement soit cenvenabiement instaii6e.
Utiliser une lampe torche pour determiner sila bride antibascu-
bment est convenabbment installee sous la cuisiniere. L'un des
pieds arriere de reglage de Faplomb doit etre convenabbment
engage dons la lento de la bride. Lorsque la cuisiniere est con-
venabbment cdee, la bride antibascubment immobilise b pied
arriere centre le sol. Verifier la parfaite immoNisation de la
cuisiniere par la bride apres chaque dephcement de la
culsmlere.
Po r vitet i ce die des
dommages de
S'assurer que tous bs materiaux de conditionnement sent
retires de [appareil avant de b mettre en marche.
Garder bs materiaux combustibles bien eloignes de I'appareil.
Ne pas ranger de materiaux inflammables dons un four.
De nombreux types de plastique sent affectes par la chdeur.
Garder bs plastiques eloignes des pieces de I'appareil pouvant
devenir chaudes.
Pour empecher qu'un feu de graisse nese declare, eviter toute
accumulation de graisse ou autres matieres inflammables
dons I'appareil ou au voisinage.
25

En cas d'incendie
Ne jamab utiiber d'eau pour 6teindre de la graisse
enfiammee. Utiiber du bicarbonate de soude ou un extincteur
poudre chimique ou a mousse pour etouffer bs fiammes.
1. [nterrompre ['aHmentation eiectdque de ['appareH pour
minimiser [a propagation des fiammes.
2. NE]AMAmS saisir ou d@iacer un ustensiie de cuisine
enfiamm&
3, Fermer [aporte du four pour etouffer [es fiammes du four,
S curit6 pour [es enfants
NEJAMAB TOUCHERLESELEMENTSCHAUFFANTSN[ LES
PAROB INTERIEURESDU FOUR.Les elements chauffants
peuvent etre brQlants meme s'ils ne sont plus rouges. Les
surfaces interieures du four peuvent atteindre une temperature
suffisamment eievee pour infiiger des br0iures. Pendant et
apres usage, ne pas toucher les elements chauffants ni les
parois interieures du four et eviter bur contact avec des
vetements ou autres materiaux inflammables avant qu'ils
n'aient eu le temps de refroidir suffisamment. D'autres surfaces
peuvent egalement atteindre une temperature suffisamment
eievee pour bn]ier :ie ouverture d'event et ie surface
avoisinante, ainsi que ie porte et ie hubiot de four.
Ne pas toucher i'ampouie du four bn]iante avec un chiffon
humide car eiie pourrait se briser. Si tel est ie cas, debrancher
i'appareii avant de retirer i'ampouie pour eviter une decharge
eiectrique.
pareii des articles auxqueis [es enfants peuvent slnteresser.
Un enfant tentant de grimper sur rappareii ou sur la porte
pour atteindre un objet, pourrait se blesser gravement.
NE JAMAIS iaisser des enfants seuis ou sans supervision
iorsque i'appareii est en service ou encore chaud. Nejamais
iaisser un enfant s'asseoir ou se tenir sur une pattie queiconque
de i'appareii, li pourrait se biesser ou se br0ier.
[Iest important d'enseigner aux enfants que I'appareil et les
ustensiies places dedans peuvent etre chauds. Laisser refroidir
les ustensiies en un lieu sQr,hors d'atteinte des enfants. [Iest
important d'enseigner aux enfants qu'un appareii menager n'est
pas un jouet, et qu'iis ne doivent toucher aucune commande ou
autre composant de i'appareii.
Famiiiarisation avec ['apparei[
NE JAMAmS utiiiser un appareii comme escabeau pour
atteindre [es armoires se trouvant au-dessus. Le mauvais
emploi de porte d'appareii comme par exemple en tant
qu'escabeau, le fait de s'appuyer ou de s'asseoir sur la porte.
peuvent entrai'ner [e renveusement de l'appareil, casser [a
NE JAMAIS garnir ia sob du four ou une grille du four avec
de la feuille d'aluminium, Ceci pourrait susciter un risque de
d@harge electrique ou d'incendie, ou une deterioration de
I'appareil, Utiliser de la feuille d'aluminium uniquement selon
les instructions de ce guide,
Cuisson et s6curit6
NE JAMA[S faire chauffer un recipient non ouvert dans le
four, L'accumuiation de pression dans ie recipient pourrait
provoquer son eciatement et de graves dommages materiels
ou corporeis,
Utiiiser des maniques robustes et seches, Des maniques
humides peuvent provoquer ia formation de vapeur brQiante,
Ne jamais utiiiser un torchon a vaisseiie ou autre article textile
la place de maniques; un tel article pourrait trainer sur un
element et s'enfiammer, ou accrocher un ustensiie ou un
composant de i'appareii,
Porter un vetement approprie, Eviter de porter des vetements
ampies ou a Iongues manches pendant I'utiiisation de
I'appareil, [ispeuvent prendre feu si le vetement entre en
contact avec un element de cuisson brQiant,
Placer toujours ies grilles b ia position appropriee dans ie four
Iorsque le four est froid, Faire coulisser la grille vers I'exterieur
porte et gravement biesser, event d'ajouter ou enlever un plat; utiliser pour cela une
manique robuste et seche, Eviter d'introduire la main clans le
Ne pas utiliser cet appareil pour chauffer ou pour garder
chaude une pi@e, sinon des dommages a i'appareii pourraient
s'ensuivre et ceia pourrait 6tre dangereux pour I'utiiisateur,
Aussi, ne pas utiiiser ie four pour ranger des aliments ou des
ustensiies de cuisine,
Ne pas bloquer ou obstruer 1'eventdu four,
four pour y placer ou retirer un plat, S'ii est necessaire de
deplacer une grille Iorsqu'elle estchaude, utiliser une manique
seche, Ne pas toucher un element chaud avec une manique,
N'utiliser les grilles que dens le four dens lequel elles ont 6te
achetees/expediees,
26

Ouvrir toujours la porte du four tres prudemment, Laisser Fair
chaud ou la vapeur s'echapper avant de retirer ou d'introduire
un plat,
AVERTISSEMENT - METS PR_:PARF.S: Respecter les
instructions du fabricant, Si le contenant ou le couverde en
plastique d'un mets surgele se ddorme ou est endommage
durant la cuisson, jeter immediatement le recipient et son
contenu, Les aliments pourraient etre contamines,
Ne pas permettre le contact de papier d'aluminium ou de la
sonde a viande avec les elements chauffants,
Toujours eteindre toutes les commandes une fois la cuisson
terminee,
Ustensiles et s curit
App[iquer [es instructions du fabricant [ors de ['emp[oi d'un
sachet pour cuisson au four,
La securite de fonctionnement de cet appareil a ere testee
I'aide d'ustensiles de cuisine traditionnels, Ne pas utiliser un
ustensile ou accessoire qui n'est pas specifiquement
recommande darts ce guide, Ne pas utiliser de couvre-
element, gril place sur la table de cuisson ou systeme de
convection additionnel, L'utilisation d'un dispositif ou
accessoire qui n'est pas expressement recommande darts ce
guide peut degrader la securite de I'appareil ou sa perfor-
mance, ou reduire la Iongevite des composants,
Si un ustensile est plus petit que I'element utilise, une partie
de I'element chauffant est exposee et peut provoquer
I'infiammation d'un vetement ou des maniques,
Seuls certains materiaux en verre, vitroceramique, ceramique,
gres, ou certains ustensiles vitrifies/emailles peuvent etre
utilises sur la table de cuisson ou darts le four sans risque de
bris sous I'effet du choc thermique, Observer les instructions
du fabricant Iors de I'utilisation d'un ustensile en verre,
Orienter la poignee de chaque ustensile vers le centre de la
table de cuisson et non vers I'exterieur ou vers un autre
element; ceci reduira le risque de brOlure, inflammation de
matiere inflammable ou renversement (un jeune enfant
pourrait saisir et renverser un ustensile dont le manche est
oriente vers I'exterieur),
Veiller a utiliser un ustensile de taille suffisante pour que le
contenu ne risque pas de deborder, Ceci est particulierement
important pour un ustensile rempli d'huile de friture, Verifier
que la taille de I'ustensile est suffisante pour qu'il puisse
recevoir les produits alimentaires a cuire, et absorber
I'augmentation de volume suscitee par I'ebullition de la
graisse,
Veiller a ne jamais laisser le contenu liquide d'un ustensile
s'evaporer completement; Fustensile et [appareil pourraient
subir des dommages,
Table de cuisson
NE JAMAIS laisser un element de surface allume sans
surveillance, particulierement avec chauffage eleve, Le
debordement du contenu de I'ustensile pourrait provoquer la
generation de fumee abondante et [inflammation de la
graisse,
Cet appareil comporte des elements chauffants de differentes
tailles, Utiliser toujours un ustensile a fond plat, de taille
suffisante pour qu'il puisse recouvrir completement I'element,
Pour optimiser I'efficacite, choisir un ustensile de meme taille
que I'element,
1
Elements spiral s
Pour eviter de deteriorer leselements chauffants amovibles, ne
pas les immerger / tremper / nettoyer darts un hve-vaisselle,
ou darts un four autonettoyant, Un element chauffant
endommage pourrait provoquer un court-circuit suscitant un
incendie ou un choc electrique,
Veiller ace que la cuvette de recuperation soit toujours en
place Iors de I'utilisation de I'element; I'absence de la cuvette
de recuperation Iors d'une cuisson peut faire subir des
dommages au c8bhge,
Garnitures de protection : Ne pas garnir les cuvettes de
recuperation sous les elements ou le fond du four avec de la
feuille d'duminium, sauf Iorsque ceci est suggere darts le
guide, La mise en place d'un tel garnissage peut susciter un
risque de choc electrique ou d'incendie,
Exercer une prudence extreme Iors du deplacement du
recipient de graisse ou Iors de I'elimination de graisse chaude,
Laisser la graisse refroidir avant de deplacer [ustensile,
Hottes d'e×traction
Nettoyer frequemment les filtres et la hotte de la cuisiniere
pour empecher la graisse ou d'autres produits inflammables
de s'accumuler sur les filtres ou la hotte en provoquant des
feux de graisse,
Pour fiamber des aliments sous la hotte, mettre le ventilateur
en marche,
27

Nettoyage et s curit
Nettoyer prudemment la table de cuisson, Arreter routes les
commandes et attendre le refroidissement de tous les
composants avant de les toucher ou d'entreprendre le
nettoyage, Nettoyer I'apparefl avec precaution, Travafller
prudemment pour eviter des brQlures par la vapeur en cas
d'utflisation d'un chiffon ou d'une eponge humide lots de
I'elimination d'un produit renverse sur une surface chaude,
Certains produits de nettoyage peuvent generer des vapeurs
nocives Iorsqu'on les applique sur une surface chaude,
Nettoyer uniquement les pieces mentionnees darts ce guide,
Four autonettoyant
(certains modeles}
lechefrite dans le four Iors de Fautonettoyage,
Ne pas nettoyer le joint de porte; le joint joue un rOleessentiel
quanta i'etancheite, Ne pas frotter, endommager ou depiacer
le joint,
Ne pas utiiiser de produits de nettoyage pour four ou enduits
de four, darts ie four autonettoyant ou sur ies zones voisines,
Avant d'executer une operation d'autonettoyage, retirer ia
lechefrite, lesgrilles du four et lesautres ustensiles, et eliminer
par essuyage tout exces de residus renverses pour eviter ia
formation de fumee ou i'inflammation de ces residus,
li est normal que ia surface de cuisson devienne chaude
durant une operation d'autonettoyage; par consequent, eviter
de toucher ia surface de cuisson durant i'autonettoyage,
Avertissement et avis
important pour la s curit
La Ioi californienne _Safe Drinking Water and Toxic Enforce-
ment Act >>de 1986 {proposition 65} stipule la publication par
ie gouvemeur de ia Caiifomie d'une iiste de substances que
I'etat de Califomie considere comme cancerigenes ou
dangereuses pour ie systeme reproducteur, et impose aux
entreprises commerciaies i'obiigation de signaler aieurs
clients ies risques d'exposition a de teiies substances,
Nous informons ies utiiisateurs de cet appareii que iors d'une
operation d'autonettoyage, iis peuvent etre exposes a une
faible concentration de certaines substances figurant darts la
iiste mentionnee ci-dessus, dont ie monoxyde de carbone,
Pour minimiser i'exposition, veiiier ace que ia piece o_ se
trouve ie four soit convenabiement aeree durant une operation
d'autonettoyage par i'ouverture d'une fenetre ou d'une porte,
AViS iMPORTANT - OISEAUX FAMIUERS : Lesoiseaux ont
un systeme respiratoire tres sensible, Ne pas garder un oiseau
famflier dans la cuisine ou dans une piece ou fl pourrait etre
expose aux fumees, Lesfumees emises durant une operation
d'autonettoyage peuvent etre dangereuses ou mortelles pour
un oiseau, de meme que les fumees emises lots du chauffage
excessif de graisse, hufle, margarine, et du chauffage excessif
darts un ustensfle a revetement antiadhesif,
Conserver ces instructions pour consultation ult rieure
28

@
Boutons de commande
PermettentI'utiIisationdes616meritschauffantsdesurface,avecune
progressioncontinue de la puissanceentreIesr6glagesextr6mes
Low (Bas)etNigh (CJev6)+On peutr6glerun bouton_ toute
positionentrecesdeuxextr6mes+
R6gJage des commandes
1+ PlacerI'ustensilesur J'616ment+
2. Enfonceret Dire tournerle boutonjusqu'_la positiond6sir6e
(rotationdartsunsensou dansJ'autre).
• Desmarquessur Ietableaude commande
identlfientI'6!6mentcommand6par chaquebouton.
Parexemple,le graphique_ droiteindique
1'616mentavant/gauche.
3. IIya un t6moin Jumineuxpour les6i6mentssurle tableaude
commande.LorsqueI'undesboutonsdecommanded'un
616mentde surfaceestaliment6,le t6moins'i!lumine.Let6moin
s'6teintdSsqu'oninterremptI'alimentationdeJ'616ment.
4. Apresunecuisson,ramenerJebouton_ la positionOFF(Arr6t].
RetirerJ'ustensile.
OO
@0
Suggestions pour Je r6gJage
On doit choisirla puissancede chauffageen fonctionde divers
facteurs :taiIIe,type de I'ustensileetoperationdecuisson.Pour
rinformationconcemantDs ustensilesetautresfacteursaffectantla
puissancede chauffage_ utiliser,sereporter_ la brochureLa
cuissonsimplifi6e.
row (gas) [2) : Pourfusion
de chocoiatou beurre,ou [e
maintiende latemp6rature
d'un mets.
Meal.row [lVioyen
has) [3o4] : Pour
continuer la cu[sson
de metsencasse-
relesferm6espar
couvercleou [)our
cuire_ lavapeur.
/
lVledium (Moyen] [5+7} :
Pourle maintiende
1'6bullitionIented'une
grande quant[t6de I[quide
ou pour IapDpart des
op6rationsdefriture.
Nigh [i'lev6] [10] : Pour
['6bullitlond'un liquide+On doit
toujours rdduireIapuissancede
chauffagedSsque Iatemp6ra-
ture d'6bullitionestatteinteou
que l'alimentcommence8cuire+
OFF i
High
(Lestylepeut
varierselonJe
modNey
@
@ 1
Meal, Nigh (IVJoyen6mev_]
[8+9] :Pourdssoleries
viandes,chaufferI'hufle
[grandefriture ou ailments
saut6s)et pourIemaintien
de r6bullition rapided'une
grandequantit6de liquide.
AVANT LA CWS$ON
o PJacertoujours I'ustens+le sur i'616mentavant d'alimenter
J'_k_ment.Pour 6v+terque la cmmme+ene subisse des dommages,
ne jamals Dire fonctionner un 6J6mentde surface sans y placer
un ustensfle.
• NE JAMA_S ut+lJserla table de cuisson eomme Jieude remJsage
d'NJments ou d'ustensiles.
[}U_ANT l.A C_ISSON
. Vefller_ bien connaitrela eorrespondaneeentreJesboutonsde
commandeetles6JSments.VeiJJe+_commander!'aHmentat_on
de 1'61_men_vouD.
o CommencerJaculssonavecune puissancede chauffage
super_eure,puisrdduirela pu+ssancede chauffagepour
poursuivrelacuisson.Nejamaisutiliser unepuissancede
chauffage6leveepour unecuissonprolongde.
. NEJA_AIS laisserJecontenu d'un ustensfles'_vapor_+
complL-:ement;cec+pourraitfaJresubiraesdommages
I'ustensileet_ I'appareiL
o NE._A_AI$ toucher Jatablede cuissonavantqu'ellesesoit
compD[emen[retroidie,Certameszonesde la +ablede culsson+
particuli6rementauvoisJnagedesNdmentsde surface,peuvem
devenirtres chaudesdurantune cuisson.Utiliserdesmaniques.
APRESLA CUISSON
- S'assurerque I'dldmentestarr_td.
+ Ellmlnerd_sque possibletous lesrdsidusde renversememe[
projections.
AUT_E$ CONSEILS
+ S'iiya unearmoirede rangerner_tdlrectementau-dessu_de la
table de cui_son.on nedolt y placerque desarticlespeu
frequemmentutiiisdset qui peuvent8treexposesa Jachaieur,La
chaieureralsepar la cu_sinierepourraitsusciterun probDmepour
de_articlescommeliquidesvoiatiJs,produitsde ne_[oyagee[
flaconsd'a6rosol.
o NE_A_AJS laisserd'article _urlatable deculsson.
particulierementd'articJeen plastique.L'Nrchaudqui s'dchappe
par I'dventdufour pourrait provoquer[inflammationd'un article
infiammabJe.Dire fondreiamollirun articleen piastique,ou
provoquerune augmentationae pressionprovoquantI'dcJatemen[
d'un r_c+p_entDrm&
. NE_AIVlAl$ laisserde iafeuilied'aluminium unesonde
thermometrique_wanaeou un objetmStailiqueautrequ'un
ustensfledecuJssonsurlatable de ouisson,en[rerencontact
avecun d!_mentchauffant.
29

@
1
E .ments de tabJe de
R@marqu@s :
• Nettoyerlatable decuissonaprSschaqueutiIisation.
• Essuyertout produit renvers6acideou sucr6sur latable de
cuJsson,pour 6viterune attaquechimiqueou un changement
de couieurde 1'6mail
Pour prot6ger Ja finition des cuvettes de
r_cup6ration :
• Pourdiminuerla d6colorationet iefendiIlement,6viterd'utiliser
une puissancede chauffage61ev6ependantune p6riode
prolongee.
• NepasutiIiserun ustensiIede trop grandetaille.L'ustensiIene
devraJtpasd6borderde plusde 2,5crn - 5 cm (1- 2 pouces)
au-del_de la p6riph6riede I'616ment.
• Lorsde I'utJlJsationde grossesmarmites,parexemplepour la
pr6parationde conserves,utiliserI'di6mentspdciaIcon_upour
la pr6parationde conserves(modSieCEll. Prendrecontact
avecle d6tailIantMaytagpourobtenirdesd6tails,ou com-
poserle 1-877-232-6771auxE.-U.ou le 1-800-688-8408au
Canadapour passercommande.
, Nettoyerfr6quemment.(Voirpage43.]
EJ6ments spiraJ6s
o Lorsqu'un6tdmentestutJIis6,il est ailment8par intermittencepour
Jemaintiende Japuissancede chauffaged6sir6e.
®
dansde J'eau.
[}_pOSe : SouieverI'616ment
refroidi.Tirerprudemmentpour
extraireI'616mentdu blocde
connexion,
IVJiseen place : IntroduireIes
homesde r_16mentdansIaprise.
Guiderpour la raiseen piace.
Abaisser1'8Jementpour le placer
Les61@mentsspiraJ6ssont autonettoyants.Nepas lesimmerger
d'aplomben appuisur la cuvettede r6cup6ration. BORfVES
Cuvettes de r6cup6ration
Lescuvettesde r6cup6rationsouschaque6i6mentde surface
recueilJentIesalimentsqui ont d6borde.IIfaut touiours lesutiliser.
L'absencede cuvettesde r6cup6rationpendantlacuissonpeut
endommagerlesills 61ectriques.
Pourne pasintroduireun risquede choc 61ectrique,oud'incendie,
nejamaisgarnir lescuvettesde r6cupSrationde feuiiled'aluminium.
Lescuvettesde rdcup_rationvont sed_colorer(tachesbieues/
dor6es]ou sefendiller_ la Ionguesi eIIessontsurchauff_es.La
decoJorationou IefendiIIementsont permanents,maisn'affectent
pasla performancede cuisson.
3O

Commandes du four nettoyage manuel (certains modeles]
/ More_ \\
\
\
/
/
/
A B C 0
REMARQUE: L'afficheurindique 12:00iorsqueFappareilest branch_B premierefob ou en casde pannede courant.Lest@aoinshmineux
de cuissoncouranteetde cuissonau gril s'alhment IorsqueFonappuiesurla touchede fonctioncorrespondante.
B
c
[}
F¸
Cuissoncourante
Broil
Minuterie
Horloge
ANNULER
Plus+ou
Moins-
S'utiIisepourla cuissoncouranteet le
r6tissage.
S'utiIisepourIacuissonau gril etle
rissolagesur partiesup6rieure.
Programmelaminuterie.
S'utilisepourprogrammerI'heureduiour.
Annuletouteslesop6rationssaufminuterb
et horloge.
S'utilisepourentrerouchangerladur@,la
temperaturedu four.Etablittegril
temperature#lev#eou basse.
Utilisation des touches
• Appuyersurla touche@sir@.
• AppuyersurMore+ (Plus+}ouLess-(Moins-} pour entrerla
dur@ oulatemperature.
• Unbip retentitIorsqueFonappuiesur unetouche de fonction.II
n'yapasdehippourla touche More+ ou la touche Less-.
• Undoublehip retentitencasd'erreur de programmation.
Remarque :Quatresecondesapt@ avoirappuy6stir bs touches
More+ ou Less-,ladur@ oulatemp6ratureseront
automatiquemententr@s.Si plusde30 secondess'6coulent
entrela pressionstir unetouche defonctionet sur lestouches
More+ ou Less-,lafonction seraannuBe et I'afficheurreviendra
I'affbhagepr@6dent.
R6glage de PhoHoge
1. Appuyersurla toucheClock (Horloge).
• L'horlogenepeutpas6trer6gBe si lefour estd6i_ prograrame
pourune op6rationde cuissoncourante,de gril ou une
op6rationminut6e,
2. Mettle _ I'heure_ I'aidedestouchesMore+ ou Less-.Si I'on
n'appuiepassurcestouchesen moinsde30 secondes,le
programmeest annul& Appuyersur latouche Clocket
recommencer,
Programmation de la minuterie
La minuteriepeut6treprograrnm@deune minute C0I) iusqu'_99
heureset 59minutes(99:59).Ladur6e seraaffich@ enminuteset
non ensecondes.LA MtNUTERtENECOMMANDE PAS £EFOUR.
1. Appuyersurla toucheTimer(Minuterie}.
• 0:00s'allumeet bs deuxpoints(:}clignotent_[afficheur.
2. AppuyersurMore+ ou Less-jusqu'acequeladur6ed6sir@soit
affich@.
• Laminuteriecommencea d@ompterd@sque ladur@ a 6t6
programm@.
o Lesdeuxpointsqui clignotent indiquentqu'un d@ompteest
en cours.(Lesdeuxpointsne c%notent passi I'heureou la
temp6raturedu four sontaffich6es.}
• Deuxhipscourtssignabnt la fin de I'op6ration.0:00parait
I'afficheur.
• SiFonveut,appuyersurIatoucheClocket I'heuredujour
r6apparaftbrBvement_ I'afficheurpendantuneoperation
minut6e.
• Si I'onveut,appuyersurIestouchesBakeou Broil etle reglage
de temp6ratureactuelb r6apparaitbrBveraent_ I'affichage
pendantune op6rationminut@.
A[mulation de la minuterie :
Appuyersur latoucheTimeret la maintenirainsJpendantplusieurs
secondes.
31

Cuisson courante, rStissage et
cumsson au grim
Pourobtenirdesconseilset desdur6esde cuissoncourante,de
rOtissageet de cuissonau gril,sereporter_ labrochureLa cuisson
simptifiee.
Programmation des commandes pour une cuisson
courante ou un rStissage :
1. AppuyersurIatouche Bake[Cuissoncourante).
• 000s'alIumeet letemoin lumineuxde cuissoncourante
clignote_ rafficheur.
• Si I'onappuiesurla touche Bake,sansprogrammerune
temperaturedu four dansles30 secondessuivantes,le
programmeestautomatiquementannuIeet I'heureduiour
reapparait_ I'afficheur.
2. AppuyersurIatoucheMore+ [Plus+)ou Less- (Moins)iusqu'_
ceque latemperaturedesireedu foursoit affichee.
• Latemperaturepeut6treprogrammeede75 _ 285°C [170
550°F).
• 350° parait8 rafficheur IorsqueI'onappuie unelois sur la
touche More+ ou Less-.
• Appuyer_ plusieursreprisessur JatoucheMore+ ou Less-
pourchangerlatemperaturedu four par intervalIesde 3 °C
[5°F)ou appuyersur latouche More+ ou Less-en maintenant
la pression,pour changerla temperaturedufour par
intewallesde 6 °C(10°F).
• 100° ou latemperaturereetledu four, selonlaquefleest la plus
elevee,parait8 I'afficheurIorsqueIefourse meten marche.
• Latemperature_ I'afficheuraugmentepar intervalIesde 3 °C
[5°F),iusqu'_ceque latemperaturepreprogrammeesoit
atteinte.Unseulhip retentitIorsquele four esten coursde
prechauffage.
• Laisserlefour prechaufferpendant10_ 15minutes.
• Pourrappeterla temperaturepreprogrammeependantle
prechauffage,appuyersurla touche Bake.Latemperaturesera
afficheependanttrois secondes.
• Pourchanger iatemperature du four pendantia cuisson,
appuyersur Bake,puissur Iatouche More+ ouLess-iusqu'_
ceque latemperaturedesireesoit affichee.
• Pourchanger matempSrature du four morsd.
pr_¢hauffage, appuyerdeu× lois surla touche Bake,puissur
latouche More+ ou Less-iusqu'_cequelatemperature
desireesoit affichee.
3. PlacerIanourrituredanslefour. VerifierI'avancementde la
cuisson_ laduree minimalede cuisson.
4. LomqueIacuissonestterminee,appuyersur latouche Cancel
[AnnuIe0 pour eteindrelefour, puisretirerla nourrituredu four.
• Lefoursecaracterisepar un arr6tautomatique.S'iIest laisse
en marchependant12heures,il s'arr6teraautomatiquementet
000paraitra_ !'afficheur.Appuyersur latoucheCancelet
I'heurereapparakra_ rafficheur.
Programmation des eommandes po_r la
c_isso_ a_ gril :
Pourde meilleursresultats,utiliserI'ustensileprewJpource genrede
ouisson.
1. PlacerIa lechefrite_ Iapositionde grille recommandee.[Voirle
tableaude la page39.)
2. Appuyersurla toucheBroil [Gril).
o SEts'ailumeet letemoinhmineuxdecuissonaugril clignote
rafficheur.
3. Appuyersurla toucheMore+ pour choisirun griI _temperature
Hi [Elevee)ousur Iatouche Less-[Moins)pour choisirun gril
temperatureLo [Basse).
o ChoisirlereglageHi pourun gril normal.
• ChoisirtereglageLo pour un grii a temperaturebasse,afin
d'eviterunrissolageexcessifdesalimentsnecessitantdes
dureesdecuissonplusIongues,commela volaille.
o Si I'onnechoisit pasle regiageHiou Loen moinsde 30
secondes,Ieprogrammeseraautomatiquementannuleet
rheure reapparaitra_ I'afficheur.
4. PrechaufferI'elementde gril pendanttrois minutes.Fairecuireau
griL hisser laportedu four ouverte_ lapremierebutee(environ
10 cm [4 po]).
5. Apr_sle griI,appuyersur Cancelpour eteindrelefour, puisretirer
[a[_chefr[tedu four. L'heureduiour reapparait_ ['afficheur.
32

R gu ateur de four nettoyage
(certa[ns modebs)
R6g_age du bouton OFF
Le boutonOvenTemp(Temp6rature
fou0 permetdes6bcSonneret
maintenirB temperaturedufour. On
doittoujours fairetournercebouton
exactementJUSO,U'AIapositionde
latemp6ratured6siree.Nepasfaire
tournerb boutonau-delb de Iaposition 350
d6sir@pourlefairetoumer ensuiteversle sensinverse.
Regiage du four pour une cuisson courante ou
un r6tissage :
1. Enfoncedfairetourner le boutonOvenTemp(Temperaturefou0,
iusqu'blapositioncorrespondant_ latemperaturedesir@.
LaisserIefour pr@haufferpendant10_ 15minutes.
2. Placerlanourritureau centredu four. A I'expiratimldutempsde
cuissonminimumindique dartsIarecette,@aluerle degrede
cuisson.PoursuivreIacuissonsi c'est n@essaire.
3. RetirerIemetsdu four etramenerle boutonOvenTemp
{Temperaturefour} _ la positionOFF(Arret}.
Remarque : Ontrouved'autresconseilsconcernantB cuisson
aufour, le rOtissageou gril dartsla brochure_LaCuisine
Simplifiee)).
Regiage du four pour cuisson au gril
(certains modeles} :
1, Pourobtenir bs meiiieursr@uitats,utiliser un ustensib con_u
pour lacuissonau gall Placerla iechefriteb la positionre-
command@dartslegrille du four. 6!oir le tabbau en page37.}
2. PlacerIeboutonOvenTemp{Temperaturefou0 b Iaposition
BROIL(Gridou 8 Iaposition (232° C}450° Fpour unecuissonau
gril _ bassetemperature.
• Utiliserla temperatureplusbassepour la cuissonau gril pour
@iter unbrunissageexcessifou pour un metsn@essitantune
ionguecuisson{parexemplevolaille}.
3. UtiliserIestempsdecuissonsugger@dansIetableauenpage37.
Retournerlespi6cesdeviandeverslemilieudelaperiodede
ouisson.
4. ContrOlerIedegrede cuisson:inciser lapiecedeviandeprosdu
centre pouren observerIacoubur.
5. A lafin de laperiodede cubson, ramenerb boutonOvenTemp
{Temperaturefou0 a lapositionOff {Arr6t}.Retirerla I@hefrite
du four.
33

@
Commande du four (certains modeles)
A B C D
......... Timer
Less : ..............
H l J
Letableaude commandeestcon_upourfaciliter la programmation.Lafen6tre d'affichageindique Fheure,lesfonctions avecminuterieet
fonctions du four.Letableaude commanderepr6sent6comprendcaract@istiquessp6cifiquesau modSle.(Lestylepeutvarierselonle
mo@le.)
A
B ¸
[I
iiii_
G
H¸
J
qrJl
Cuissoncourante
Plus+/moins-
Minuterie
Cuissonet
maJntien
Nettoyage
Demarrage
dJff6r6
Horloge
Maintienau
chaud
ANNULER
S'utilisepourlacuissonaugriletlerissolage
surpattiesup@ieure.
S'utilisepourlacuissoncouranteetle
r0tissage.
S'utilisepourentrerouchangerladur@,la
temp@aturedufour.Etablitle gril
temperatureELEVEEouBASSE
Programmela minuterie.
Pourcuirependantunedur6epr6_tablie,avec
maintienauchaudpendantuneheure.
S'utilisepoutprogrammerlecycle
d'autonettoyage.
Programmelefourpourd6buterunecuisson
plustard.
S'utilisepourprogramrnerI'heuredujour.
S'utilisepourmaintenirauchauddansle four
lesalimentscuits.
Annuletouteslesop6rationssaufminuterieet
horloge.
Utilisation des touches
, Appuyersur latouche d6sir6e.
, Appuyersur More+ (Plus+)ou Less-(Moins-) pour entrerla dur@
ou la temp6rature.
, Un hip retentitIorsqueI'onappuiesurune touche.
, Undouble bJpretentiten casd'erreurde programmation.
Remarque : quatre secondesapresavoirappuy_,sur les
touchesMore+ ou Less-,ladur@ oulatemp6raturesera
automatiquemententr6e.Siplusde 30secondess'_coulententre
la pressionsurunetouche de fonctionet cellesurla touche
More+ ou Less-,la fonctionseraannul6eet I'afficheurreviendra
I'affichagepr6c6dent.
L'hodogepeut6treprogramm6epour afficher[adur6edansun
formatde 12ou 24 heures.Uhorlogeest programm6een usinepour
un formatde 12heures.
Changement de J'horJoge _ un format de 24 heures :
1. AppuyersurlestouchesCANCEL(ANNULER)
etDelay(Demarragediff6r6) et maintenirla --_ LAx,JLLL ,)
pressionpendanttrois secondes.
AppuyersurMore+ ou Less-pour pro-
grammerun formatde 12ou24 heures.
ProgrammerI'heureen suivantlesinstructions
donn_esci-dessous.
2.
3.
Reglage de l'horloge :
1. Appuyersurla touche Clock(Horloge).
, Uheuredu jour etdeuxpointsc%notent
I'afficheur.
2. AppuyersurMore+ ou Less-pour programmer
I'heuredujour.
, Lesdeuxpointscontinuent_ clignoter.
Less-
.....................................
Appuyer_ nouveausur Jatouche Clockou attendrequatre
secondes.
suite,.,
34

©
LorsqueIecourant#bctrique arriveou apresune interruptionde
courant,tademiereheureavantrinterruption de courantva
clignoter.
Pourrappebr rheure dujour brsqu'une autrefonctionde duree
s'affbhe,appuyersur latouche CIock.
L'heurede I'hodogenepeut etrechangeeIorsqueb foura ete
programmepour une cuissonou un nettoyagediffereoupour la
fonctionde cuissonet maintien.
Annumation de m'affichage de m'heure:
Si I'onne desirepasI'affbhagedeI'heuredu jour :
Appuyersur lestouchesCANCEL(ANNULER)
et CIock(Horloge[et bs maintenirainsi
pendanttrois secondes.L'heuredu]our
disparaitde rafficheur.
LorsqueI'affichagedeI'heureest annule,
appuyersurIatouche Clockpour affbher
brievementrheuredu jour.
Reaffichage de m'heure:
Appuyersur bs touchesCANCELet CIocket lesmaintenirainsi
pendanttrois secondes.L'heuredu]ourrSapparatt_ I'afficheur.
La minuterie peut 6tre programm@ de une minute (00:01} jusqu'&
99 heures et 59 minutes (99:59}.
La minuterie pout 6tre utilis@ ind@endamment de toute autre
activit6 du four. Elle peut 6tre aussi programm@ alors qu'une autre
fonction du four est en cours d'utilisation.
La minuterb necommandopasb four.Elienesert qu'_ emettredes
bips.
Programmation de maminuterie :
1. AppuyersurIatoucheTimer(Minuterie[. ..............................................
Tim e r
• 0:00s'alhme _ I'afficheur.
• Losdeuxpointsc%notent.
2. Appuyersurla toucheMore+ ou Less- jusqu'_ce
queI'heurejuste paraisse& I'afficheur. ...........................
• Losdeuxpointscontinuent8 clignoter. Less-
3. Appuyer_ nouveausur latouche Timerou attendre ..................................
quatresecondes.
• Losdeuxpointscontinuent_ clignoteret le d@omptede la
dur@commence.
• Laderniereminutedu d@ompteseraaffich@sousformede
secondes.
4. A la fin de laduree programm@,un hip long retentit.
Annumation de maminuterie :
1. Appuyersurla toucheTimeret la maintenirainsipendanttrois
secondes.
OU
2. Appuyersurla toucheTimeret reglerI'heureb 00:00.
Verrouimmagedes cow.andes
Lestouchespeuvent6treverrouiII@spourdesraisonsdes@urke,
nettoyageou pouremp@hertouteutiIisationnon souhait@.Ellesne
pourront6treutiIiseessiellessontverrouillSes.
Si lefour esten cours d'utilisation,lescommandesne peuvent8tre
verrouill@s.
L'heureactuelIedujour restera&I'afficheurIorsquelescommandes
serontverrouiil@s.
Verrouimmage:
Appuyersur bs touchesCANCELet Cook&
HoId (Cuissonet maintien}et lesmaintenir
ainsipendanttrois secondes.
o Le mot LOCK(VERROUILLAGE}clignote
I'afficheur.
D6verrouillage :
Appuyersur [estouchesCANCELet Cook& Holdet [esmaintenir
ainsipendanttrois secondes.
o Le mot LOCKdisparaitde ['afficheur.
Codes d'ano a ie
LesrootsBAKE(CUBSONCOURANTE}ou LOCK(VERROUILLAGE[
peuventciignoter rapidement_ i'afficheurpour pr@eniren cas
d'erreuroudeprobl_me.Si tei est lecas,appuyersur iatouche
CANCEL.Si bs rootsBAKEou LOCKcontinuent_ ciignoter,
debrancherI'appareii.Attendre quelquesminutes,puisrebrancher
i'appareiLSi run desrootscontinue_ ciignoter,debrancherrappareil
et prendrecontactavecun r@arateurautoris_.
35

CUiSSOn COUrante
Programmation de la cuisson courante :
1. Appuyersurla touche Bake[Cuissoncourante}.
• Lemot BAKE(CUiSSONCOURANTE)clignote.
• 000clignote _ I'afficheur.
2. %tectionner latemperaturedu four.Latemperature
poutetreprogrammeede75 _ 290°C070 _ 550°F}. .................................
Appuyerunefois sur latouche More+ [Plus+}ou
Less-[Moins-}, ou appuyersurla touche More+ ou Less-
Less- et la maintenirainsL ..............................
• 175° (350°} s'aiIumeIorsqueI'onappuie la
premBrefois sur I'unedestouches.
• Appuyersurla toucheMore+ pour augmenterla temperature.
• Appuyersurla touche Less- pour diminuerlatemperature.
3. Appuyer_ nouveausur latouche Bakeou attendrequatre
secondes.
• Lemot BAKEs'arretedeclignoteret s'aliume_ I'afficheur.
• 38° (100°}ou Iatemperaturereelledu fourseraaffichee.La
temperatureaugmenterapar intervallede 3 °C [5°F}jusqu'a
ceque latemperaturepreprogrammeesoit atteinte.
4. LaisserIefour prechaufferpendant8 _ 15minutes.
• LorsqueIatemperatureprogrammeepour Jefour est atteinte,
un hip long retentit.
• Pourrappelerla temperatureprogrammeependantle
prechauffage,appuyersurla touche Bake.
5. Placerlanourritureau centredu four, en laissantun minimumde
2 pouces(5 cm} entreI'ustensileetJesparoisdu four.
6. VerifierI'avancementde la cuisson_ Iadureeminimalede
cuisson.CuireplusJongtempsau besoin.
7. bisque Iacuissonest terminee,appuyersur _,_ ,_r."'x_
latouche CANCEL(ANNULER).
8. RetirerJanourrituredufour.
Differences de cuisson entre Pancien
four et nouveau
II est normalde remarquerquelquesdifferencesdartsIadureede
cuissonentreun four neufet un fourancien.VoirAjustementde la
temperaturedu four_ la page38.
Renlatques sut _a cuisson courante
all fOUr :
Pourchanger matemperature du four pendant maeuisson,
appuyersur Bake,puissur Iatouche More+ ou Less-iusqu'_ce
que latemperaturedesireesoit affichee.
Pourchangermatemperature du four lots du
pr_chauffage, appuyerdeu× lois sur Iatouche Bake,puissur
la toucheMore+ ou Less-iusqu'_cequelatemperature
desireesoitaffichee.
SiI'onoublied'arreterIefour, iIs'arreteraautomatiquement
awes 12heures.Si I'ondesiredesact[vercettefonction,voir
page38.
PourdesconseflssuppBmentairessurIacuissoncouranteet le
retissage,voir la brochureLa cuissonsimplifiee.
Cuisson et maintien
Lafonction Cook & Hold (Cuissonetma[ntien}permet decuire
pendantunedureepredeterminee,suivie parun cyclede maintien
au chaudd'uneheure.
Programmation de mafonction cuisson et maintien :
1. Appuyersurla toucheCook& Hold[Cuissonet
maintien).
• LosrootsBAKE(CUISSON)et HOLD
(MAINTIEN}clignotent.
• 000s'ailume_I'afficheur. ,More+
2. SelectionnerIatemperaturedu four. Latemperature ..................................
pout etreprogrammeede 75 _ 290°C070 _ 550°F}. Less- ....
Appuyerunefois sur Iatouche More+ ouLess- ou
appuyersur latouche More+ ou Less- et la maintenirainsL
• Appuyersurla toucheMore+ pour augmenterla temperature.
• Appuyersurla toucheLess- pour diminuerlatemperature.
3. Appuyer_ nouveausur latouche Cook& HoldOUattendre
quatresecondes.
• Lemot HOLDclignote.
• 00:00clignote_ I'afficheur.
4. EntrerIaduree pendantlaquelieI'ondesireque la cuissonait
lieuen appuyantsur le toucheMore+ ou Less-. La duree
de cuissonpout 6treprogrammeede 10minutes[00:10}
11heures,59minutes(11:59).
• LosrootsBAKEet HOLDs'allument_I'afficheur.
• Ladureede cuissons'alIumea I'afficheur.
• Ladureede cuissoncommencele compte_ rebours.
36

©
Lorsque la dur6e de cuisson s'est 6coul6e :
• O,uatrebJpsretentissent.
+ Lemot BAKEs'6teint.
• LesrootsHOLDet WARM(CHAUD}s'a%ment.
• 75° 070°]parait_['afficheur.
4. Appuyersur More+ pourprogrammerh temp6raturedecuisson.
• 00:00et lemotHOLDclignotent.
• Le mot BAKEresteallure6.
5. Appuyersur More+ pourprogrammerladur6ede cuisson.
• Ladur6e d'attente,lesrootsDELAY,BAKEet HOLDs'a%ment
rafficheur.
Apr6s uue heure de MAINTIEN AU CHAUD :
, Lemot End(Fin]s'affiche.
• L'heuredujour r6apparait8 I'afficheur.
Auuulatiou de la fouctiou cuissou et maiutieu _ tout
momeut :
Appuyersur Iatouche CANCEL[ANNULER].Retirer (C/\NCEL _)
la nourrituredu four.
Cuisson courante diff6r6e
NepasutiJiserlacuissondiffer6e pourdesdenr6estr6s
p6rissablescommelesproduitslaitiers,+eporc,la volaiJleou les
fruits de mer.
AvecIafonctJondiff6r6e, Iefour semet _cuire plustard dansla
journ6e.Programmerla dur6ed'attented6sir6eavantque Iefour ne
semetteen marcheet la dur6ede cuissond6sJr6e.Lefour com-
mence_ chauffera I'heures6IectJonn6eet cult pour Jadur6e
sp6cifi6e,puisgardeIanourritureau chaudpendantune heure.
La dur6ed'attentepeut6tre programm@ede 10minutes(00:10}
11heures,59 minutes[11:59].
Programmatiou d'uu cycle de cuissou couraute
diff6r6e :
1. Appuyersurla touche Delay(D6marragediff6r6].
• Lemot DELAY(ATTENTE]clignote.
• 00:00clignote_rafficheur.
2. AppuyersurIatoucheMore+ (Plus+] ou Less- ,................................
[Moins-] pourprogrammerladuree d'attente.
AIorsque le mot DELAYclignotetoujours : Less- j
3. Appuyersurla toucheCook& Hold(Cuissonet ..........................
maintJen).
• 000s'allume_J'afficheur.
• LesrootsBAKE(CUISSONCOURANTE]et HOLD
(MAINTIEN]clignotent.
Lorsque la dur6e d'atteute s'est 6coulee :
° Lemot DELAYs'6teint.
• Ladur6ede cuissonestaffichee.
• LesrootsBAKEet HOLDsont affiches.
Pour programmer uu temps d'atteute Jorsque
la fouctiou cuissou et maiutieu a d6j_ 6t6
programmee :
1. Appuyersurla toucheDelay[D6marragediff6r6].
• Lemot DELAY[ATTENTE]clignote.
• 00:00parait_ I'afficheur.
2. Appuyersurla toucheMore+ ou Less- pour ...................................
programmerla dur6ed'attente....................................
Less-
, Apr_squatresecondes,[emot DELAYreste
allure6pour rappelerqu'uncyclede cuisson
diff6r6ea 6t6 programm6.
Lorsque la dur6e d'atteute s'est 6coul6e et que le
four se met eu marche :
• Ladur6ede cuJssonseraaffich6e.
* Lemot DELAYs'6teint.
* LesrootsBAKEet HOLDrestentallum6s.
Auuulatiou :
Appuyersur latouche CANCEL(ANNULER].
, Touteslesfonctionsde cuissonminut6eet
non minut6eserontannu+ees.
• L'heuredujourr6apparait_ I'afficheur.
Remarques :
NepasutiliserIacuisson(]iff6r6epour desarticlesqui
n6cessitentquele four soit pr6chauff6,commelesg_teaux,
lespetitsbiscuitset lespains.
NepasutiliserIecycledecuissonet maintiendiff6r6ssi le
four estd6j_ chaud.
37

Maintien au chaud
Pourmaintenirauchaudclansle fourdesalimentscuits etchauds
ou pour r6chaufferpainsetassiettes=
Programmation du maintien au chaud :
1= Appuyersur Iatouche KeepWarm
[Maintienau chaud)=
• Le motWARM(CHAUD)clignote=
• 000parait_ rafficheur=
2. %lectionner latemperaturede maintienau chaud.
Celle-cipeut etreregleede 63 _90 °C 045 _ ..............................
190°F).Appuyerunefois surla toucheMore+
(Plus+)ou Less-(Moins-) ou appuyersur la
toucheMore+ ou Less- etla maintenirainsi.
Less-
......................................
75° (170°) s'allumeIorsqueI'onappuiela premierelois sur
rune destouches.
• Appuyersur Iatouche More+ pouraugmenterIatemperature.
o Appuyersur latouche Less- pourdiminuerla temperature.
Lemot WARM{CHAUD}etla temperatureseront affichespendant
que lafonction maintienauchaudest active.
Annumation du maintien au chaud :
1=Appuyersur latouche CANCEL{ANNULER}= (CANCEL _)
2.Retirerla nourrituredu four.
Remarques sur fonction maintien
au chaud :
• Pourobtenirdesquaiitesalimentaireset nutritivesoptimaIes,
lesalimentscuitsau four ne doiventpasetregardesauchaud
plusde 1a 2 heures=
• Pouremp6cherIesalimentsde dessecher,Iesrecouvrirde
papieraluminium,sansserrer,ou d'un couvercle.
• Pourr6chauffer des petits pains :
- recouvrirlespetitspainsdepapierahminiumsansserreret
lesplaceraufour.
- appuyersurlestouchesKeepWarmet More+ pour
programmer75 °C(170°F}.
- rechaufferpendant 12_ 15minutes.
• Pourr6chauffer des assiettes :
- placerdeuxpilesde quatreassiettesmaximumclanslefour.
- appuyersurlestouchesKeepWarmet More+ pour
programmer75 °C(170°F}.
- rechaufferpendantcinq minutes,arr6terlefour et laisserles
assiettesau four pendantencore15minutes.
- n'utiliserque desassiettespouvantallerau four, averifier
aveclefabricant.
- ne pasposerdesassiettestildes surunesurfacefroide,les
changementsrapidesdetemperaturepouvantcasser
I'assietteou la fendiller.
38

Arr t automatique/Mode
Lefour s'arreteautomatiquementapres12heuress'il a 6tO
accidentetlementlaisseen marche.Cettecaracteristiquede securite
poutetrearretee.
Pour annulet l'arr_t 12 heures et faire fonctionner le
four en continu pendant 72 heures :
1. ProgrammerIefour pour une cuissoncourante(voirpage35).
2. Appuyersurla toucheClock (Hodoge}et la
maintenirainsipendantcinqsecondes.
• SAbseraafficheetciignoterapendant
cinqsecondes.
• SAbseraensuiteafficheen continujusqu'_ cequ'on rarrete
oujusqu'_cequeladureelimite de 72heuressoit atteinte.
• Lemot BAKE(CUISSONCOURANTE}seraaussiaffichesi un
cyclede cuissoncouranteesten coursalorsque lefour est en
modesabbaL
ToutesIesautresfonctions (Minutede,Maintien au chaud,
Nettoyage,etc.}sont verrouillees,SAUFBAKE,pendantle mode
sabbat.
Annulation de la cuisson courante alors que le four
est en mode sabbat :
Appuyersur CANCEL(ANNULER}.
• Lemot BAKEs'eteint_ rafficheur.
° Aucun bipsonorene retentit.
Annulation du mode sabbat :
1. AppuyersurlatoucheClockpendantcinq secondes.
OU
2. Apres72 heures,le modesabbatsetermine.
• SAbclignote pendantcinq secondes.
• L'heureduiour revient_ I'afficheur.
Ajustement de la temperature
du four
La precisiondestemperaturesdu foura etesoigneusementverifiee
I'usine.IIest normalde remarquerquelquesdifferencesdansla
cuissonentreun four neufet un four ancien.Au fur et _ mesureque
loscuisinieressont moinsneuves,la temperaturedu four peutvarier.
II estpossibled'ajuster latemperaturedu four siI'onpensequeIe
four necuit pasou nerissolepascorrectement.Pourdeciderde
I'ajustement_ apporter,regler le four_ unetemperaturede 15°C
(25 °F}pluseleveeou plusbassoque la temperatureindiqueedarts
larecette,puisfairecuire Iapreparation.Lesresultatsdu _test >>de
cuissondoiventdonner uneideedu hombrede degresduquel la
temperaturedoit6treaiustee.
Ajustement de la temperature du four :
1. AppuyersurIatoucheBake(Cuissoncourante}.
2. Entrer285°C(550°F)en appuyantsurla touche
More+ (Plus+}.
3. Appuyersurla toucheBakeetIa maintenirainsi
pendantplusieurssecondesoujusqu'_ ceque 0°
paraisse_ I'afficheur.
Si Iatemperaturedu four a eteprecedemmentajustee,Ie
changementseraaffiche.Parexemple,si latemperaturedu four
a ete reduitede 8 °C 05 °F},I'afficheurindiquera-8 (-15}.
4. Appuyersurla toucheMore+ (Plus+}ou Less- (Moins-} pour
ajuster latemperature.
A chaquelois que I'onappuiesur unetouche,latemperature
changede3 °C(5 °F}.Latemperaturedu four poutetre
augmenteeou diminueede3 _ 20 °C {5a 35°F}.
5. L'heuredu]our reapparaitautomatiquement8 I'afficheur.
IIn'estpasnecessairede reajusterIatemperaturedu fouren cas
de panneou d'interruptiondecourant.Lestemperaturesde
cuissonau gril etde nettoyagene peuventetrea]ustees.
Remarques sur le mode sabbat :
• Le modesabbatpeutetremis en marche&tout moment,que
lefoursoit en marcheou non.
• Le modesabbatne poutpas6tin misen marchesi Ies
commandossont verrouilleesou laporteverrouillee.
• Sile four esten modecuissonIorsquele modesabbatest
programme,le mot BAKE(CUISSONCOURANTE]s'eteint _ la
fin du cycledecuisson.IIn'y aura aucunsignalsonoreaudible.
o Lorsquele modesabbata demarre,aucunhip de prechauffage
ne retentiL
o Tous Iesmessageset lesbipssontdesactivesIorsquelemode
sabbatestactiE
o Si I'onappuiesur Iatouche CANCEL,un cyclede cuisson
couranteaufour seraannule.Cependant,Jeprogrammateur
resteraen modesabbat.
o Apresunepannede courant,lefour revienten modesabbatavec
72 heuresrestanteset aucuncycleactif.
39

Cuisson au grim
Programmation de la cuisson au grim:
1. Appuyersur latouche Broil (Gril).
o Le mot BROIL(GRIL}ciignote.
+ Le motSETUAUDER}estaffiche.
2. Appuyersur latouche More¢ CPlus+}pour programmerun gril
temp6rature6iev6eou sur B touche Less-(Moins-] pour
programpaerun gril _temperaturebasse.
o LesmotsHI(ELEVEE)ou LO (BASSE]serontaffich_s.
o %lectionner HIbroil (Gril_temp6rature6by@) (290°C
[550°F])pourun griI normal.S_lectionnerLO broil (Gril
temp6raturebass@(230°C [450°F]}pour un griI_ tempera-
ture inf_rbure d'aliments_cuissonplusIonguecommela
volaille.
3. Apt@ quatresecondes,Iefour semeten mar@e.
o Le mot BROILresteallum6.
4. Pourun rissoBgemaximum,pr@hauffer+'_16mentdegril
pendanttrois ou quatreminutesavantd'ajouterlanourrJture.
5.
6.
7.
PlacerIanourrituredanslefour. Laisserla portedu four ouverte
d'environ10cm (4 po] _remi_re but@).
Retournerlaviandeunelois _ Jamoiti6de Iadur6ede culsson.
LorsqueI'aiimentestcuit,appuyersur Iatouche
CANCEL(ANNULER}.Retirerla nourritureet la
I@hefrJtedu four.
o L'heuredujour r6apparait_ ['affbheur.
Remarques sur Uacuisson au grH :
o Pourde meilleursr@ultatsIorsdu griI, seservird'un ustensib
pr@upourcetypede cuisson.
o Pr6voirdesdur@s decuissonaugriI plusIongueset un
rissolagek!g_rementmoinsdot6 si I'appareilfonctionnesurun
circuit de 208volts.
o LegriIau reglageHI (Elev@estutilis_ pour la majorit6des
op6rationsde cuissonau gril. UtiliserIegriI au r6glageLO
(Bas]pour lacuissonde metsdevantcuJreplusIongtemps,
afin de bur permettred'6trebiencultssansrissolageexcessif.
o Lesdur@sde cuissonau gril peuvent6treplusIonguesavec
une temp@aturede gril inf6rieure.
o Pourdestemperaturesetdesconseibsuppl6mentairessur Ia
cuissonaugriI,se reporter_ la brochureLacuissonsimplifi@.
TabUeau de cuisson au grH
__ _'_'_,
POS_TION DEGRE DE TEMPS DE CUISSON
AUMENTS DES GR_LLES_
Beauf
Bifteck, 2,5 cm (1 po] d'@aisseur
Hamburgers, 2 cm (3/4 po] d'@aisseur
Porc
Bacon
COtelettes,2+5cm (1 po}
Jambon - pr6-cuit tranche de 1,3 cm 0/2 po]
4
4
4
4
4
4
CUISSON
Cuisson moyenne
Bbn cuit
Bien cuit
Bbn cuit
Bien cuit
Ti6de
TOTAL (MINUTES}
15 - 18 minutes
19 - 23 minutes
15 - 18 minutes
6 - 10 minutes
22 - 26 minutes
8 - 12 minutes
Voiaiiie
Pouieten morceaux
Fruits de mer
Dames de poisson, beurr_es, 2,5 cm (1 po] d'@aisseur
Filetes
3ou4
4
4
Bien cuit
La chairsedetache
La chairsed_tache
LO Broil-
GrJl_temperature basse
28 - 38 minutes
10 - 15 minutes
8 - 12 minutes
Grillesup6rieurea laposition n°5
Remarq_e :Cetableaun'estqu'un guide de suggestions.Lesdur@speuventvarierselonI'aliment_cuire.
4O

1
Event du four
Lorsquemefour est atimis_,mazo,e voisinede m'6ventpeavent
devenir suffisament chauds pour provoqaer des br_mears.Ne
jamais obstruer roave_ure de r_vent.
U_vent de four est situ_ en dessous da boaelier da dosseret de
la cuisini_re.
L'eventdu four
Eclairage du four
Appuyersur Iecommutateurd'6clairagedu foursitu6 surle
tableaude commandopouralhmer ou 6teindrela lampe.
Oven
Lig_ht
Sole du four
Prot6gerIasoledesproduits renvers6s,en particuIieracidesou
sucr6s,ceux-cipouvantd6coloreri'6mailvitrifi6. Utiliserdes
ustensilesde la bonnedimensionpour @iterqueiesproduitsne se
renversentou passentpar-dessusI'ustensileen bouillant.Ne pas
placer d'astensiles oo de feoille d'amominiomdireetement sor
masomedo foor.
Grilles du four
° Nepasrangerde nourdtum ou d'ustensi!edans!efour,
Lefour comportedeuxgrilles avec,pour chacune,un dispositifde
calage.
E×traction :
1. Timr lagrille en lignedroiteiusqu'8
cequ'elles'arr6te_ la positionde
calage.
2. Souleverlagrille b I'avantpour
pouvoirrextraire.
R_installation :
1. Placerlagrille sor lossupportsdartslefour.
2. Soulever!6gSrementI'avant.Fakeglisserla grille versI'arriereau-
del8de la positionde caIage.
3. Abaisserla grille et lafaire gIisserdansle four.
Ne pas renoavrir matotamit8 d'one grille avec de mafeoille
d'amominiom,nigarnir mefond dofoot ovec demafeoille d'amominiom.
Ceci modifierait ruesr_saltatsde noisson ao fool et mefond do foot
poorrait sobir des dommages. 81
Positions des grilles
Grille 5 (positionIaplus
haute}:Pourcuisson
breveau griI- pain grill6
ou alimentsminces
contenantpeu degraisse.
Grille 4 : PourIapiupart
descuissonsau griL
Grille 3 : PourIaplupart
descoissonsde p_tisseries
sur une tOle _ biscuits - g_teaux 8 6tages, tartes aux fruits, mets
surgel6s,
5
__4
--3
__2
--1
Grille 2 : Pourr6tissagede pi_cesde viande,metsen sauce,cuisson
depain,gSteau16gerencouronne(baba)ou entremets.
Grille 1 : Pourle rOtissagede grossespiscesdeviandeouvolaiile,
tartessurgel6es,souf%s ou g_teauxdesanges.
CWSSONSURPLUSIEURSGRILLES:
Oeo×grilles plates: Utilisezlespositions2et4.
Une grille plate et ane grille sorbaiss_e : UtiIisezIespositions2 et 5.
Remarqoe : Agir prudemmentpour retirerla grille surbaissde
sur la position 1(position laplus basso:).
Oemi-griHe
Unedemi-grilleest disponibleen
accessoire.ElleaugmenteIacapacit6du
four ets'accrochebgauche,8Iapattie
sup_rieore.Etleest utile pour lacuisson
d'un ptatde16gumesIorsqu'ungros rOti
setrouvesur Iagrille inf6rieure.Prendre
contact avecIerevendeurpour de-
manderI'accessoireHALFRACK[demi-
grille:)ou pour commander,composerle
1=800-688-2002.
Grille Easy ack
(certains modeles)
CertainsmodSIesdecuisinieres
sont dot6sd'unegrille EasyRackMc.
La grille EasyRackMcpermetde mieux
saisirIesustensilesb pStisseriepour
lossortir du four.
_emarq_es :
• Utiliserlagrille pratiqueEasyRack_cseulementclansle four dans
lequeIellea _t_achet_e.
" Lagrille de four EasyRackMcpeutetreutilis_esurtoutesles
positionsde grille.

[:our autonettoyant
(certains modeles}
Remarque : PourB nettoyagemanuaivoirb page44.
o hest normal quecertamespiecasde [aculsinieredevbnuem
tr@ chaudes[orsd'un cycb de nettoyage.
o Pourevilerde',OUSb[essere_d'endommagerla portedu four
n'essayezpasd'ouvrir [aportequand<LOCK
0/ERROUULLAGE}estaffiche.
o Ev[terde toucher [asurfacede cuisson,la porte,le hub[c1et [a
zonede ['eventdb four Iorsd'un cycled'autone[[oyage,
o Ne pasutiiiser de nettoyantpourfour de commercesur [efini
du four ou sur[ou[ autrecomposan_du four. Ce[aabimerait[e
fin[ ou lescomposantsdu four.
5.
G.
Eliminerlesresidusde graisseou de produits renvers@sur la
soleavant le nettoyage.Cecicrop@helaformationdeflammes
ou defumee @rant lenettoyage.
Essuyerlesresidussucresetacides,comme[espatatesdouces,
[atomateoubs sauces8 basede Bit. Laporcelainevitrifi@
pos@deunecertainer@istanceauxcompose acides,maisqui
n'estpaslimit@.Ellepeutsed@olorersi bs r@idusacidesou
sucresne sontpasenlev@avantdecommencer['autonettoyage.
Programmatien de m'autenetteyage :
[ Remarque : La temperaturedu four dolt 6tresitu@endessous
de 205°C[@0 °F}pour programmerun cycled'autonettoyage.
].
2.
Fermer[aportedu four.
Placer[amanettede verrouiJJagea [apositiondeverroui[[age.
L'autonettoyageutilisedestemperaturessuperieures_ celiesde Ia
cuissonnormalepour nettoyerautomatiquement['interbur du four.
Neforcezpas[aportedu four ni [elevierde verrouillagepour[es
ouvdr.Cecipeutprovoquerune exposition_ destemperatures
eievees,et doncpresenterun risquede brOlure.
S[lefour esttres sale,il estnormalqu'on observelaformationde
fume ou de flammesdurant ie nettoyage.Nettoyerlefour
intervallesreguliersplut6t qued'attendreune accumulatbn
importantede r@idus.
Durant [eprocessusd'autonettoyage,[[convientde bienaerer la
cuisinepour eliminerlesodeursnormalementCruisesdurant le
nettoyage.
Avant I'autonettoyage
1= Eteindre[a[ampedu fouravant lenettoyage=Celle-cipourraiten
effetgriiier.
2. EnleverlaI@hefrite,tous[esplatset [esgrillesdu four. Lesgrilles
risquentdesed@oIoreret de ne plusglisseraussibienapresun
cycled'autonettoyagesion ne [esenl@epas.
3.
Nettoyerle cadredu four, [ecadrede la porte [zone_ ['exterieur
duioint] et autourde ['ouverturedarts[ejoint de laporte,_ ['aide
d'un produitde nettoyagenonabrasifcommeBonAmi* ou d'eau
additionn@dedetergent.Leprocessus
d'autonettoyagenenettoie pasces
zones.Ellesdoivent6tre nettoy@spour
crop@herlasaletedes'incruster
pendantie cyclede nettoyage.(Leioint
assure['etancheiteautour delaporteet
du hublotdu four.]
i \
4. Pourempechertout dommage,nepasnettoyernifrotter [eioint
qui setrouve autourde [aportedu four. Ceioint estcongupour
@iterbs pertesde chaleurpendant[ecycled'autonettoyage.
*Lesnomsde marquedesproduitsde nettoyagesont desmarquesd@oseesdesdifferentsfabricants.
42
3. Appuyersur[atoucheCban (Nettoyage}.
• Lemot CLEAN(NETTOYAGE}clignote_ ['afficheur.
Si [aporten'estpasferm@,deshipsretentissentet [emot DOOR
[PORTE]parait_ I'afficheur.Si la porten'estpasferm@dartsles
45 secondes,['operationd'autonettoyageestannul@et
I'afficheurrevbnt _ I'heuredu ]our.
4. Appuyersurla toucheMore+ [Plus+] ou Less-
(Moins-]. -...........................
• CL-M (Nettoyage- saletemoyenne,3 heures}
/
est affiche. Less- )
5. Appuyersurla toucheMore+ ou Less- pour voir
defiler lesdifferents regiagesde I'autonettoyage.
CL-H (Nettoyage- saieteepaisse,4 heures]
CL-M (Nettoyage- saletemoyenne,3 heures]
CL-L (Nettoyage- saletelegere,2 heures]
Lechoixdu niveaudesaletedu four programme
automatiquementla dur@ du cycled'autonettoyage.
6. Apresquatresecondes,le fourcommencelenettoyage.
• Ladureede nettoyagecommencele decomptea I'afficheur.
• Lemot LOCK0,!ERROUiLLAGE]parait_ I'afficheur.
o Lemot CLEANparait_ I'afficheur.
Demarrage differ_ d'un cycle d'autenetteyage :
1. Appuyersur[atoucheDelay(D@Tlarragediffer@.
• Lemot DELAY[ATTENTE}clignote.
• 00:00parait_ I'afficheur.
suite oo,

2+AppuyersurlatoucheMore+ouLess-pour
programmerladur6ed'attenteavantquene More+
commencelecycle+Ladur6ed'attentepeut6tre
r6gI6e,de10minutes[00:10)b 11heures,59 minutes(1+:59).
3+ Appuyersur latouche Clean(Nettoyage)+
o Le mot CLEAN(NETTOYAGE)va clignoter+
4. Appuyersur latouche More+ (Plus+)ou Less- ..................................,
[Moins-).
o CL-M (Nettoyage- saletemoyenne,3 heures)
estaffiche.
5. Appuyersur latouche More+ ou Less- pourvoirdefilerles
diff6rentsr6glagesde I'autonettoyage.
CL-H (Nettoyage- salet66paisse,4 heures)
CL-M (Nettoyage- saletemoyenne,3 heures)
CL-L(Nettoyage- salet6I6gere,2 heures)
Le choixdu niveaude salet6du four programme
automatiquementIadur6edu cycled'autonettoyage.
6. AprSsquatresecondes,IesmotsCLEAN(NETTOYAGE),DELAY
(ATTENTE)et LOCKG_ERROUILLAGE)paraissentb I'afficheur
pour indiquerque le four estprogramm6pourune operationde
nettoyagediff6r6.Letempsd'attente parait_ J'afficheur.
Si le four a dej_ et6 programme pour uu cycle de
uetteyage et que l'ou desire etablir uu delai :
1+Appuyersur,otoucl eDe+ay[D+marragedOff+re)+
+ Lemot DELAY(ATTENTE)clignote.
+ 00:00parait_ J'afficheur+
2+ AppuyersurJatoucheMore+ ou Less-pour
programmerIadur6e d_sir6ede I'attenteavant ................................
quene debuteIecycle.
Apr_squatresecondes,lesmatsCLEAN,DELAYet LOCK
paraissent_ I'afficheurpour indiquerque lefour est programme
pourune op6rationde nettoyagediff6r6.Letempsd'attente
parak_ I'afficheur.
Lersque le cycle d'auteuetteyage d6bute :
• Lemot DELAYs'_teint+
• Ladur6ede nettoyageparaitb I'affJcheur+
Auuulatieu du cycJe d'auteuetteyage :
Appuyersur Iatouche CANCEL[ANNULER)+
+ TousleslOtS disparaissentde I'afficheur+
+ ToutesIesfonctionssent annul6es+
+ L'heuredu jour parait_ I'afficheur.
Pendant le cycle d'autonettoyage
Lorsquele mot LOCKparait_ I'afficheur,la portene peut6tre
ouverte+Pour6viterd'endommagerla porte,ne pasla forcer pour
I'ouvrJrIorsquele motLOCKestaffich6+
Fum6e et odeurs
La premierefois cOlefour est nettoy6,il peuty avoirproduction
d'odeuretdefumee+Ceciest normaletdisparaitra_ I'usage+
Si lefour esttr6s saleou si la I_chefritea 6t6Jaisseedanslefour,il
peutyavoirproductionde fumee+
Bruits
Pendantque lefour chauffe,[Ipeutseproduiredes bruitsde m6tal
en dilatationou en contraction+Ceciestnormalet n'ind+quepasque
le fours'abime+
Apr_s le cycle d'autonettoyage
Environuneheureapresla fin du cycle,le motLOCKs'6teint+Ace
moment,laportepeut 6treouverte+Pousserla manettede la porte
versla gauchepour d6verrouiller+
La samet6peut avoir maiss6an r6si_tu gris poudrea×oL'enlever
avecun linge humide+S'il restede lasalete,cetaindiqueque le cycle
de nettoyagen'apas6t_assezlong+Cettesalet_restantesera
enlev_eau prochaincycled'autonettoyage+
Si lea grilles o_t _t_ laiss_es _ l'i_t_rie_r da fear pendant le
cycle d'a_to_ettoyage et q_'emmesgmissemroamsat me_rs
suppor_s,lesenduire,ainsique lessupports,d'unefine couche
d'huilev_getale+
De fi_es mig_espeuve_tapparaitre da_s mapercemai_eparce
qa'elle as_bi ebale_r et refroidissement. Ceciest normalet
n'affecterapasJaperformance.
Une d_comorationblanche pe_t apparaitre apr_s menettoyage
si des amimemsaeides o_ saerSs _'o_t pas 6t6 e_mev6.savast
qae _e comme_ee m'aato_ettoyage.Lad_colorationestnormale
et n'affecterapasla performancedu four+
_ematques :
• Si Iaportedu four n'estpasferm6e,Iemot DOOR[PORTE)
clignote_ I'afficheuret lefour #metdeshipsjusqu'bcequela
portesoitferm6eet que J'onappuie_ nouveausur Clean
(Nettoyage].
• Laportedu four setrouveraendommag6esiron forceson
ouverturealorsque le mot LOCK(VERROUILLAGE)est encore
affich6.
43

Mdthodes de nettoyage
* Avantroute manipulation ou operation de nettoyage, v_rifier que
I'appareil eat arr_t_ et que teus lescomposants sent freids, afin
d'_viter des dommages ou des br_lures.
, Poureviter laformationde_acrlesou un changementde couleur,nettoyer
o Aprdstout ddmontagede composan1:s,veillera effectuerun remontage
correct.
Les noms de marque sont des mamues
(_eooseesdes ditferents fabricants=
"" Pour commander directement= comooser
e 1-877-232-677" aux E=-U=OLe
1-800-688-8408 au Canada.
PIECES NETrOYAGE
Dosseret et table
de cuisson-
l_mailvitrifi_
L'emailvitrifieestduverrelidau metalparfusion.IIpeutsefissurerous'ecailleren casde mauvaiseutJlisation.H est
resistantauxacides,maispastotalementinattaquablepar lesacides.TousIesproduitsrenverses,enparticulier
acidesou sucres,doivent6treessuyesimmediatementavecun Iingesec.
oUnefois la pl_cerefroidie,Ialaveravecde I'eausavonneuse,rlnceretsecher.
oNejamaisessuyerunesurfacetiddeouchaudeavecun IJngehumide.CecipourraitlafissurerouI'dcailIer.
oNejamaisutiliserde nettoyantspourfour,d'agentsdenettoyagecaustiquesou abrasifssur lefini extdrieurde la
cuisinidre.
l=_ehefriteet sa Nejamais couvrir la gri#e depapier d'alumildum; cela emp_ehe la ffraisse de cooler dalls la I_cheMte.
• RecouvrirtaIdchefriteetsagrilled'un lingesavonneux;hisseragir pourddtachertesrdsidus=
oLaveravecdeI'eausavonneusetJdde.UtJliserun tampon_ recurerpour6!iminerJessouJllurestenaces.
oOnpeutplacerJesdeuxcomposantsde JaIdchefrJteclansun hve-vaisselle.
Zone de la console
de commandeet
oPourutiliserla fonctJonVerrouillagedescommandespour le nettoyage,voirpage34=
oEssuyeravecun linge humide,puisfairesdcher=Nepasutillserun agentde nettoyageabrasifsusceptiblede rayerla
finition=
oOnpeututillserunproduitde nettoyageduverre,pulvdris6d'abordsurunchiffon=NEPASprojeter le preduit
directemelpt sur les touches de commallde eu sur Faf#cheur.
Boutons de oPlacerchaquebouton_ Iapositiond'ARRET,et retirerchaqueboutonen letirant=
commande oLaver,rinceretfairesdcher=NepasutilJserunagentde nettoyageabrasifsusceptibIede rayerIafinition=
oFairefonctionnerbridvementchaqueeIdmentpourvdrifierque leboutona 6t6correctementreinstaiId=
Cavettes de
rdcap_ration =
Cavettesde
chrome
L'emailpeutsedecolorerousefendillers'ilestsurchauffe.Ceciestnormaletn'affectepaslesperformancesde cuisson.
oUnefois lescuvettesde rdcuperationrefroidies,leslaveraprdschaqueutilisation,Iesrinceret Iessdcherpour6viter
lestachesou ladecoloration=LescuvettesderdcuperatJonpeuvent6treIaveesen Iave-va[sselJe=
oPour6timinerIesgrossessou[llures,fairetremperdansde I'eausavonneusechaude,puJsutJJiserunproduitde
nettoyagepeu abrasifcommeSoftScrub_et untampon_ recureren plastique=
oEncasdesalet_incrustdedartsIescuvettesde recupdrat[on,lesretirerde Jacuisini@re,lesposersurdesfeuilles
de pap[erjournal etIespulveriserdoucementde nettoyantcommercialpourfour.(NepaspulvSriserdeproduit
surlessurfacesavoisinantes=]Mettrelescuvettesde rdcuperatJondartsunsacen piastiqueet laisserle produit
agir plusieursheures=Porterdesgantsencaoutchoucpourret[rerlescuvettesde recuperationdu sac,Javerles
cuvettes,Jesrinceret less_cher=
• Aprdsle refroidissement,laveraprdschaqueutHisat[on,rinceret fairesecherpour@iterJaformationdetachesou un
changementde couIeur=
• Pour6IiminerdegrossessouiIlures,fairetremperdansdeI'eausavonneusechaudepuisutiliserunproduitdenet_oyage
peuabrasifcommeSoftScrub*et untampon_ recureren plastique=Nepasutiliserun produitde nettoyageabrasifi
44

NE_OYAGE
_U _OUr en verre
Int_rieur du four
Grimmesdu four
(certainsmodeles_
Tiroir de remisage,
poign6ede porte,
panneau×lat_rau×-
• Eviterd'utilisertropd'eau,qui risqueraitdes'infiltrersousou derriereleverreetdetacher.
• Laver_I'eauet a(Jsavon.Rinceravecde I'eaupropreetsecher.Unpmduitde nettoyagedu verrepeut6treutilise
en levaporisantd'abordsurun linge.
• Nepasutiliserde produitsabrasifscommetampons_ recurer,lained'acierou produitde nettoyageen poudrequi
risqueraientde rayerleverre.
• Ex6cuterlesinstructionspr6sent6esauxpages41-42pour rautonettoyagedu four.
Nettoyage manual:
• Nettoyer%quemment avecun tamponde plastiqueet un produitde nettoyagemoyennementabrasif.
• Nepasutiliser untampon _ recurermetallique,qui formeraitdes rayuressur Iasurface.
• Lorsde remploid'un produitcommercialde nettoyagede four,appliquerIesinstructionsdu fabricant.
• Eliminerdesquepossiblelesproduitsacidesrenversds(produits_ basedehit oudetomate)aveceauetsavon;ces
pmduitspeuventfaire changerlacouleurde 1'6maillots d'uncontact prolong6.
Pourfaciliter le nettoyage,on peut enlever la portedu four. (VoirlasectionEntretien,page45._
° Nettoyeravecde I'eausavonneuse.
° Eliminerlessouillurestenacesavecune poudrede nettoyageou untampon _ r6curersavonneux.Rinceret faire
s6cher.
° Silesgrillessontlaiss6esdartsIefourpendantiecycied'autonettoyage,ellessed6colorentet peuventneplustres
biengiisser.Sicetaseproduit,enduireleborddesgdllesetlesupportdesgrillesd'unefinecouched'huileveg6tale,
puisessuyerI'exc6dent.
°NE PASUTIUSERDE PRODUffSDENETTOYAGECONTENANTDU JAVELUSANT.
• NEPASUTIUSERDE NETTOYANTS_ ORANGE_ OUABRASIFSo
• TOUJOURSESSUYERDANSLE SENSDELA TEXTUREDEL'ACtERLORSDU NETTOYAGE.
• Nettoyage joumalier/salet_ ldg_re - EssuyeravecI'un desproduitssuivants:eausavonneuse,vinaigreblanc/
eau,produitde nettoyagepourverreetsurfaceFormuia409_ou un produitsemblablepour verre- avecun linge
soupieetune6ponge.Rinceretsecher.Pourpoiiretenieverlesmarquesdedoigts,fairesuivreparunevaporisation
de Magic Spraypour acierinoxydable[piece n° 20000008)_*,
• Salet_.mod6rSe/dpaisse - EssuyeravecI'undesproduitssuivants:BonAmi,SmartCleanserouSoftScrub_-
raide d'un lingesoupleou d'uneepongehumide.Rinceretsecher.Lestachesrebellespeuventetreenleveesavec
untamponmulti-usagesScotch-Brite_humidi% Frotteruniform6mentdartsiesensdu m6tai.Rinceretsecher.Pour
redonnerdu lustreet retireriesrayures,fairesuivrepar unevaporisationde Magic Spraypour acierinoxydable_,
• OScolerution - A i'aided'une epongehumidifi6eoud'un iingesoupie,essuyer_ i'aidedu nettoyantCameo
pour acierinoxydabie_,Rincerimm6diatementetsdcher.Pourenleverlesmarquesetredonnerdu lustre,faire
suivre parune vaporisationde Magic Spraypour acierinoxydabie_,
° Unefois lespi6cesrefroidies,laver_ I'eausavonneusetiede,rinceret secher.Nejamais essuyerune surfacetiede
ou chaudeavecun lingehumide,ceci pouvantendommagerlasurfaceetentrainerunebrOlurepar Iavapeur.
• Pourlestachesrebelles,utiliserdesagentsde nettoyageIeg6rementabrasifscommelap_teau bicarbonatede
soudeou BonAmi*.Nepasutiliserd'agentsdenettoyageabrasifs,caustiquesou6nergiquescommelesnettoyants
pourfour ou lestamponsen lained'acier.Cesproduits raieraientou endommageraientde fa_onpermanentela
surface.
REMARQUE:UdHserunffllge eu un tercflensecpeuress_ter lespreduits renvers_s, surteut s'ils se_tacfdes
eu sucres. La surface peurrait sed_ce_erereu se teruirsf _asa/et_ _'_tait pas fmm_dfateme_t etffev_e.Ced
est paFdcuif_reme_t important dartsle cas de surfaces blanches°
_Lesnomsde marquesontdes marquesd6poseesdesdiff6rentsfabricants.
_ Pourcommanderdirectement,composerle 1-877-232-6771auxE.-U.oule1-800-688-8408au Canada.
45

Porte du four
o Ne pasgrlmpersur laporte(_ufour ouverte,ou lu_Imposelune
chargeexcessive.Cec[pourrait provoquerun basculementde la
cuisinie.re,le bdsde [aporteou desblessurespou_la personne
concernee.
• Ne pas[en[er d'ouvrirou ferme" la por[eoud'utlliser lefour
avantque la porteaitete convenablementr_instaH6e.
o Ne]amaisplacerlesdoigtsentrela chamiSreet le cadreavam
uu four. Lesbiasde charmeresont mont6ssur ressort.Une
cnam_erepourraitsereformerbrutafemen[con[rele cadredu
four etprovoquerde serieusesbiessures
Oepose de la porte:
1. Apr6s lerefroidissementdu four, ouvrirIa
porte- positionde cuissonau gril (porte
entrouverted'environ10cm [4 pouce@.
2. Saisirlaporte dechaquec6t6.Ne pas
utiliserla poign6ede portepour la
souleven
3. Sou[ever uniform6ment pour d6gager [a porte des charni6res.
1. Saisir[aporte dechaquec6t6.
2. Aligner losfentesavec[esbrasde charni6resur[acuisiniere.
3. Fairedescendrelaportepour lapositionnercorrectementsur los
charni_res.Poussersur lesanglessup6rieursde [aportepour
['enfoncercompi_tementsur loscharnieres.I[faut que [aporte
soit parfaitementd'aplomb.
[ Remarque : Onpout percevoirune certaine_6Iasticit6>>lotsde
[afermeturede la portedu fourd'une cuisini6reneuve;ceciest
normal;cet effetdisparaitprogressivement.
Hubiot du four
Pour prot6ger [e hub[or de [a porte du four :
1. Nepasutiliser de produitsnettoyantsabrasifscommedes
tampons_ recureren lained'acieroudesproduitsde nettoyage
en poudrequi risqueraientde rayer[everre.
2. Nepasheurter[e hubiotenverreavecun ustensi[e,unarticle de
mobiIier,un iouet,etc.
3. Nepasfermer [aportedu four avantque losgrillesne soienten
placedarts[efour.
Toutedegradationdu hubiotde verre- rayure,choc,tension,etc.-
poutaffaiblir sastructureet augmenter[erisquede bris_ unedate
ulterieure.
La pe du four
o ,D6brancherlacu sini_redu r6seakj6[ectr[queavantde remplacer
Iampoule.
• Utiliser une marfiques_che pour protegeelos mains lets du
Eemp[acementde ['ampoule.
, Nepastoucher 'ampoue avart qu'e e sesot refrod e
. Ne,pastoucherI'ampou[echaudeavecun[incgehumide;[echoc
thermiquepourrait la bdser.
Pour remplacer l'ampoule du four :
1,Apres [e refro[dissement du four, CABOCHON
ma[ntenir [e cabochon tout en
enlevant[api6cem6ta[[[quequ[
[a maint[ent en place.
R[:MARQU[: : Le cabochon
tombera si on ne le maintient
RESSORTDE RETENUE
pasen place. _,_nldtaflique)
2. EnieverlecabochonetI'ampoule.
3. Instalieruneampoulede 40watts pour appareilm6nager.
4. R6installerlecabochmlet Iefil m6talliquede retenue.
5. R6tablir['alimentationde la cuisiniere.Reglerde nouveau['hor[oge.
46

Pieds de r6glage de l'aplomb
Vdri%_que B brideantibascu!ementagr+ppeconvenabbment
fun despie@aFr+6rede r6glagede i'aplomb,pourquela
CU!S+n+BrenePUiSSebasculeraccidentellement.
La cuisini6redolt 6tred'apiombune fois install@.Sl _
elle ne rest pas,tourner lespiedsde r6glagede I
['aplomben plastique,b chacundesanglesde Ia I kv
cuisin,_re,jusqu'_ ceque ceHe-cisoitd'apbmb__.,,,_
7\ . ANTIBASCULEMENT
PIEDDEREGLAGE
DEL"APLOfViB
Tiroir de remisage
Nepasremiserdansletiroir de remisagedesarticlesen
pBstique ou papier,ou desproduitsalimentairesou mat6riaux
inflammables.Lostemp6mturesb I'int6deurdu tiroir peuvent
devenirtrop 61ev6espour cesarticbs Iorsquelefour est encours
d'utilisation.
R6installation :
1, Positbnnerlesextr6mit@desglissi_resdanslesrails_ ['int6rieur
de la cuisini_re.
2. SouleverI'avantdutiroir et pousserdoucementiusqu'_[a
position de [apremierebut6e.
3. Soubver_ nouveaule tiroir et le pousseren placepour le former.
Prise de courant auxiliaire
(mod61es canadiens seulement}
La prisede courant auxiIiaireests+tu6een bas/_gauchedu
dosseret.Veilbr b ceque Iecordond'alimentationde ['apparei[
utilise nereposepassurun 616mentde Ia
tamede cuissonou _ proximit6:[araiseen f
marchede I'616mentchauffantferait subir
desdommagesau cordond'alimentationet
[aprisede courant.
Unappareilsuscitantune demandede
courantde plusde 10A provoquera
I'ouverturedu disjoncteurqui prot6geIa
prisedecourant auxiliaire.Pourr@rmerle
disjoncteur,appuyersurIecommutateur
situ6sur le bord inf6rieurdu dosseret.
DISJONCTEUR
Let[roir de remisagepeut6treenlev6pour pouw_irnettoyersous[a
cuisini6re.
D6pose :
1. V[der[etiroir et [etirer jusqu'_[apositionde [apremierebut6e.
2. Soulever['avantdu tiroir.
3. Tirerletiroir jusqu'a[apos+tiondeladeuxiemebut@.
4. Saisirlescot@et soubver letiroir pour pouvoirle retirer.
47

PROBLEME SOLUTION
Pour mapmupartdesprobm_mes oVerifierque bs commandesdu four sontcorrectementregI@s.
observSs, essayer d'abord mes oVerifiersi Iefiche est bien inser@dansB prise,
somutio,s possibmes,_ droite, o Inspecter/r@rmerIedisjoncteur.Inspecter/remplacerbs fusibbs.
o ContrOlerla sourced'alimentationelectrique.
Non-fonctionnement de i'appareii =
total oa partieL
L'hormogeou ruesmampesfonctionnent,
ruesroots paraissent_ m'afficheur,
mais mefour nechauffe pas.
R_suitats de caisson au four
cliff, rents des attentes ou de ceu× qui
sont produits par mefour ant_rieur,
Resumtatsincorrects morsdema
cuisson au grim,ou 6mission
excessive de fum_e.
_mpossibimit8d'autonettoyage du
four (certains modules}.
Lefour nese nettoie pus
correctement (terrains mod_mes}.
La porte da four ne se dSverrouiiie
pas aprSs m'autonettoyage
(certains modules),
o Determhlersi lescommandesdeselementsde surfaceet/ou du foursont convenabbment
regl@s,Voirpages29et 40,
o Determinersi la portedu four s'estd@errouiJleeapr@suneoperationd'autonettoyage.
Voir pages42.
o Determinersi le fourest regle pourune cuissondiffereeou un nettoyagediffer& Voir pages
36 et 41.
oVerifiersi Ieverroui!lagedescommandesesten [email protected]page34.
overifier si Jacommandeest en modesabbat.VoJrpage38.
oLescommandessont peut-etreprogramm@spourunefonction de cuissonetmaintienou
de@marragediffere,
oLafonctionde verrouillagedescommandesestpeut-etre activee,Voir page34,
o Determinersi revent du fourest obstru&Voir sonemplacementpage40.
oS'assurerquelacuisini_reestd'aplomb.
o Lesreglagesdetemperaturevadentsouvententreun four neufet lefour qu'il remplace.On
observesouventune derivedu regIagedetemperatured'unfour _mesurequ'il vieillit;il peut
devenirpluschaudou moinschaud.Voir page38 lesinstructionsd'ajustementdela
temperaturedu four(certainsmodebs}.REMARQUE:lIn'estpasutile demodifier lereglage
detemperaturesi lavariationn'affectequ'uneou deuxrecettes.
o Pourd'autresinformationsausuiet de la cuissonau four,voir labrochureLa cuisson
simplifi@.
o DeterminerIapositiondesgrilles.Lesalimentspeuvent6tretrop presde I'el@_entdu griL
o El@lentdu griIpaspr@hauff&
o Utilisationincorrectedefeuilb d'aluminium.Neiamaisgarnir lagrille de I@hefriteavecde la
feuille d'aluminium.
o Portedu four ferm@durant iacuissonau gril. Laisserla portedu four entrouverted'environ
10cm {4pouces}- premierebut@.
o EnleverI'ex@sdegraissesur Iapiecedeviandeavantla cuissonau griL
o Utilisationd'une I@hefritesouilI@.
o Latensionelectriquede la maisonest peut-etre basse.
o DeterminerqueI'appareiIn'apaseteprogrammepourun autonettoyagediffer&Voir page41.
oVerifierque la porteestferm@.
oVerifiersi Iacommandeest en modesabbat.Voir page38.
o Lefourest peut-@e _unetemperaturesuperieure_205 °C_400°F}.Latemperaturedu four
doitetre inferbure _ 205°C{400°F}pour pouvoirprogrammeruncycled'autonettoyage.
o Untempsde nettoyagepluslong peutetre n@essaire.
o Onn'apaselimineavantI'operationd'autonettoyagelesaccumulationsexcessivesde r@idus,
particulierementlesresidusd'alimentsacidesousucres.
o L'hsterburdufour estencorechaud.Attendre environune heureapr@ I'achevementde la
perioded'autonettoyage.IIest possibled'ouvrirlaporteapresladisparitiondu messageLOCK
{VERROUILLAGE}sur I'afficheur.
o Lescommandesetla portesont peut-Qtreverrouillees.Voir page34.
suite
48

PROBLEME SOLUTION
Accumulation d'humidit6 sur le o Ceciest normaldurant Iacuissond'alimentscontenantbeaucoupd'eau.
hubmotou vapeursortant de m'_vento o Utilisationexcessived'humidit6 Iorsdu nettoyagedu hublot.
®
Emission d'une forte odeur ou de
fum6emorsdemaraiseenmarche
du four.
Codes d'anomaiie
Des bruits se font entendreo
Ceciest normalpour une cuisini6reneuve;cet effet disparaitapr_squelquesutilisations.
L'executiond'un programmed'autonettoyagepermettrade fairedisparakrecetteodeur plus
rapidement.
Fairefonctionnerleventilateurpour 6vacuerIafum6eou rodeur.
Presenced'uneaccumulationde r6sidusalimentairessur lefond du four. Ex6cuterune
op6rationd'autonettoyage.
o LesrootsBAKEou LOCKpeuventclignoterrapidement8 I'afficheurpourpr6venird'uneerreur
ou d'un probl_me.Sile motBAKEou LOCKparait_I'afficheur,appuyersur latouche Cancel
(Annule0. Si Iemot BAKEou LOCKcontinue_ c@noter,d6brancherI'appareiLAttendre
quelquesminutes,puis rebrancherI'appareiLSile motcontinue_ clignoter,d6brancher
I'appareiIetprendrecontact avecun r6parateurautoris6.
o Sile fouresttr_ssale,IesflammSchespeuventproduireun coded'anomalieaucoursducycle
d'autonettoyage.AppuyersurlatoucheCancelettaisserIefourrefroidircompletement,essuyer
lasalet6enexcespuisreprogrammerrautonettoyage.Silecoded'anomalier6apparait,prendre
contactavecun r6parateurautoris6.
®
®
Le four fait plusieurs bruits faibles. II est possible d'entendre les relais du four qui se mettent
en marche et s'arr6tent. Ceci est normal
AIors que le four ser6chauffe et serefroidit, il estpossible d'entendre des bruits correspondant
la dilatation et _ la contraction des pi_ces m6talliques. Ceci est normal et n'endommage pas
I'appareiL
Jln'y u ni hip ni affichageo o Le commandeest peut-6treen modesabbat (certainsmod@les].Voir page38.
reste aJJum_o
o Lefour est en modesabbat.Pourannulet,appuyersurla toucheClocket maintener-la
enfonc6ependantcinqsecondes.
49

50

Garantie de ta cuisini_re
#Jectrique
Garantie comp?ete d'une annee =
Pieces et main=d'(_uvre
Durantunegerioded'un (1) an _ compterde[adate
de racha[initialau d6taiLtoutepiecequ_sere_eLerait
ddectueusedansdesconditionsnormaLesd'usage
menagerserarepareeou remp[aceegratu_tement
Garanties limitees - Pieces seumement
Dela deu×ieme a macinqui_me ann6e =A
comp-[erde la datede I'achatinitialau detail,les
piecesde laI_stecH_essousqul se reveleraient
ddee[ueusesdais desconditionsnonnalesd'usage
menagerserontrepareesou remp_acees
gratuitement(piecesseulement);leproprietaire
devraassumer[ouslesautresfrais,y compnsfrais
de mam-d'ceuvre,de d@lacement,detranspoR,de
kilometrageet dediagnostic,lecasecheant.
Veuille2rioter: Cegarant_ecomp_e[ene
s'appliquentquesi leappareilsetrouveauCanada
ou auxEtats-Unis.Lesappareilssitu6sailleursne
sontcouven:squepar lesgarantieslimitees,y
con_pnsdepLecesqul sereveleraientddec[ueusesla
premiereannee
Residents canad iens
Legarant_eci-dessuscouvrelesappareilsinstallesau
Canada.seulemen[s'i?sonteteagreespar laCSA
saufsicesappareilsonteta,in-[roduitsauCanada
I'occas_ond'un changementde residencedesRats-
Unisversle Canaua.
Lesgarantiessp#cifiquesformu/#esd-dessussont/es
SEULE$quele #_bflcantaccolde.Cegarantidvous
conf_rentdesdm/tsjuridiquessp_cifiquesecvous
pouvezegalementjou,'rd'autresdroits,variablesd'un
#tata/'autre,d'uneprowncefi uneau[re.
Ne seat pas couverts par ces garanties :
1, Les dommages ou derangements dus _:
a.Miseenservice,livraisonou entretieneffectuesincorrectement.
b.Toutereparation,modification,aIterationettout reglagenonautorisespar
lefabdcantou parun prestatairedeserviceapr_s-venteagree.
c. Mauvaisemploi,emploiabusif,accidents,usagenonraisonnable,ou
catastrophenaturelle.
d.Alimentationelectrique(tension,intensite}incorrecte.
e.Reglageincorrectd'unecommande.
2. Lesgarantiesne peuventetrehonoreessiIesnumerosdeseried'origineontete
enleves,modifiesou nesontpasfacilementlisibles.
3. Ampoules.
8. AppareiIsachetesauxfins d'usagecommercialou industriel.
5. Lesfraisdevisited'un prestatairede serviceoude serviceapr_s-venteencourus
pourIesraisonssuivantes:
a.Correctiond'erreursde raiseen service.
b.initiationde I'utilisateura I'empioide I'appareiI.
c.Transportde I'appareiljusqu'_ I'entreprisedeserviceapr_s-venteetsonretour.
6. Dommagessecondairesou indirectssubispartoutepersonnesuiteau non-respect
decesgaranties.
CertainsetatsouprovincesnepermettentpasFexclusionou Ialimitationdes
dommagessecondairesouindirects;parconsequentleslimitationsou exclusionscF
dessuspeuventnepass'appIiqueravotrecas.
Si un service apr_s_vente est n6cessaire
IIfautd'abordconsulterlasectionsur ledepannagedu manueld'utilisationet
d'entretienou appeterMaytagServicesSM/service_ Iaclient61ede Ma}¢agau
1-800-688-9900E.-U.ou 1-800-688-2002auCanada.
Pour obtenir les prestations de garantie
PourIocaliseruneagenceagreeedeserviceapr_s-ventedansvotreregion,prenez
contactavec[edetaillantoQvousavezacheteI'apparei[;ou appelezMaytagServices-_U/
service_ laciienteiede Maytag.Sivousn'obtenezpasun servicesatisfaisanten vertu
de lagarantie,veuiliezecrireoutel@honer_:
MaytagServicessM
A ['attentiondu CAIR_Center
P.O.Box2370,Cleveland,TN37320-2370
¢._U.1_800_688_9900et Canada 1_800_688_2002
Remarque : Lotsdetout contactaupresdeMaytagServicessM,sewice_[a
clientelede Maytagetconcernantunprobl_me,veuillezfoumir I'information
suivante:
a.Vosnora,adresseet numerode tel@hone;
b.Numerodemodeleet numerode seriedeI'appareil;
c. Noraet adressedu detaillantavecIadateI'appareilachete:
d. Descriptionclairedu problSmeobserve;
e. Preuved'achat.
Lesguidesd'utilisation,lesmanuelsdeserviceet lesrenseignementssurlespiscessontdisponiblesaupresde MaytagServicesSF_,service_ laclientele.
51

Estufa E[6ctrica
con E[e_entos Tubu[ares
//
sebre Seguridad ...........................53-56
Cocinando en [a Estufa ............... 55-56
ControHesSuperiores
Hementos Tubuhres
Cocinando en e[ Homo ............... 57-66
Controles dei Homo de Limpieza Manua[
Re[oj Hornear
Temporizador Asar
Periiia del Homo de Limpieza Manual
Homear Asar
Controles del Homo Autolimpiante
ReHoj Temporizador
Homear Mantener CaHiente
CocdOn y Asar
Mantener Caliente Diferido
Parri[[asde[ Homo
Cuidado y Limpieza ........................67-70
Homo Auto[imp[ante
Procedimientos de LimDieza
Mantenimiento ................................ 71 =72
Ventana del Homo
Luz del Homo
Localizaci(_n y Soluci6n
de Aver_as .........................................73-24
Garantia y Sewicio ................................25

Instamador:Porfavor dejeestagu[aiun[ocon eE
ebctrodomestico.
Oonsumidor: Potfavor leayconserveestaguia parareferencla
futura. Conserveel recibode complay/o el chequecanceBdo
comocomprobantede compra.
N_imerode Mode[o
NOmerode Sene
Fechaae Coml;ra
S[tiene preguntas.[Lamea:
MaytagCustomerAssistance
1-800-688-9900en EE.UU.
]-800-6{-8-2002en Canada1
(LunesaViernes 8:00a.m.a 8:00p.m.Horade[Este}
Intemet:http://www.may_ag.com
Enhues[tocont_nuoaf_nde mejorar[acal[dadyrend[miemode
nuestroselectrodom@ticos,puedeque seanecesanomodificar
ele[ectrodomeshcosin actua[izarestagufa.
PaPainfermadSn sebre sendde, vet pbdina 75.
como resultado de su uso inapropiado, Utilice este
electrodomestico solamente para el prop6sito que ha sido
destinado segOnse describe en esta guia,
Para asegurar funcionamiento correcto y seguro: Ei
ebctrodom6stico debe ser instaBdo debidamente y puesto a
tierra por un t@nico cdificado. No intente ajustar, reparar,
prestar servicio o reemplazar ninguna pieza de este producto
a menos que sea espedficamente recomendado en esta guia.
Todas Bs reparaciones deben ser redizadas por un t@nico
calificado,
Siempre desenchufe el electrodom6stico antes de efectuar
aiguna reparaci6n,
,, TODAS LAS ESTUFAS SE PUEDEN
Lasadvertencias e instrucciones importantes sobre seguridad
que aparecen en esta guia no est_n destinadas a cubrir todas
las posibles circunstancias y situaciones que puedan ocurrir,
Se debe ejercer sentido comun, precauci6n y cuidado cuando
instale, realice mantenimiento o haga funcionar el artefacto,
Siempre p6ngase en contacto con el fabricante si surgen
problemas o situaciones que usted no comprenda,
Reconozca _os simbo_os, advertencias,
etiquetas de seguridad
ADVERTENC_A - Pelig[0o pr_cticas no seguras que
PODRIAN causar bsi6n personal grave o mortal.
ATENCION .-peligros opr_ct!cas no segu[as que PODRIAN
causar lesi6n personal menos grave,
Lea y siga todas las instrucciones antes de usar este
electrodom_stico para evitar el riesgo potencial de incendio,
choque ei6ctrico, iesi6n personal o da_o ai eiectrodom6stico
ADVERTENCIA: Para redacir el desgo de vaelco de!
electredem_stice a causa de use anermal e debide
a peso e×cesive ea la puer_a del homo, es aecesarie
aispositivo antivuelco debidamente instalaaol
Para verificar si el dispositivo est,1debidamente instalado, mire
debajo de ia estufa con una iinterna para asegurarse de que
uno de los tornillos niveladores traseros este debidamente
enganchado en la ranura del soporte, Eldispositivo antivuelco
asegura el tornillo nivelador trasero al piso cuando est,1
debidamente enganchado, Esto debe verificarse carla vez
que la estufa sea movida,
Para Evitar un lncendio o
Da o Causado per emHu o
Asegurese de que todos los materiaies de empaque hayan
sido quitados del homo antes de ponerlo en funcionamiento,
No coloque materiales combustibles cerca del
electrodomestico, No se deben guardar en el homo
materiales infiamables,
Muchos pl_sticos son afectados por el calor, Mantenga los
pl_isticos alejados de las piezas del electrodom6stico que se
pueden entibiar o calentar,
Para evitar incendios de grasa, no permita la acumulaci6n de
grasa de cocinar o de otros materiales inflamables en el homo
o en su cercan[a,
53

En Case de lncendio
Use un extintor con producto quimbo seco o deI tipo espuma o
bicarbonato para apagar eI incendio o las llamas, Nunca use
agua en un incendio de grasa,
1, Apague eI homo para evitar que la llama se disperse,
2, NUNCA bvante o mueva una sart6n en llamas,
3, Apague eI fuego o la Ihma deI homo cerrando la puerta deI
homo,
Seguridad para los Ni os
NO TOQUE LOS ELEMENTOSCALEFACTORESNI LAS
SUPERFiCiESINTERIORESDEL HORNO. Los eiementos
calefactores pueden estar calientes aOncuando su color sea
obscuro. Las superficies interiores de cuaiquier homo se
calientan Io suficiente como para causar quemaduras. Du-
rante y despu_s dei uso, no toque ni permita que ias ropas u
otros materiales inflamables entren en contacto con los
eiementos caiefactores o ias superficies interiores dei homo
hasta que no se hayan enfriado. Otras superficies dei
electrodomestico pueden estar Io suficientemente calientes
para causar quemaduras - entre estas superficies est_in la
abertura dei respiradero dei homo y ia superficie cerca de esta
abertura, ia puerta dei homo y ia ventana de ia puerta dei
homo.
No toque un foco caiiente dei homo con un paso huJmedo
pues se puede quebrar. Si ei foco se quiebra, desenchufe ei
eiectrodomestico antes de sacar ei foco para evitar sufrir un
para a!canzar !0s articul0 s pueden bsionarse gravemente_
NUNCA deje a los ni_iossolos o sin supervisi6n cuando ei
homo estd en uso o cuando est6 caliente. Nunca permita que
los ni_ios sesienten o se paren en ninguna pieza del
eiectrodomdstico pues se pueden iesionar o quemar.
Se ies debe ensdiar a los ni_iosque ei eiectrodomdstico y los
utensilios que est_n en dl pueden estar calientes. Deje enfriar
los utensilios calientes en un lugar seguro, fuera del alcance
de los ni_ios. Se ies debe ensdiar a los ni_iosque un
eiectrodom6stico no es un juguete y que no deben jugar con
los controles u otras piezas del artefacto.
lnstrucciones Generales
NUNCA use un electrodom6stico como un peldaHiopara
aicanzar los armanos superiores. Eluso incorrecto de las
puertas del ebctrodom6stico tales como pisar sobre alias.
apoyarse o sentarse en la pueH1_apuede resultar en que el
electrodom6stico sevuelque, se rompa la puerta y se
causen lesiones graves.
Para evitar posibles riesgos para el usuario y ddio al
electrodomestico, no use este producto como una estufa para
calentar o entibiar una habitaci6n, Adem_s no use el homo
como un lugar para guardar alimentos o utensilios de cocina,
No obstruya la circulaci6n del aire bloqueando el respiradero
dei homo,
NUNC,_ use papei de aiuminio para cubrir ias parriiias dei
homo ni el panel inferior del homo, El uso incorrecto puede
resultar en un riesgo de choque el@trico, incendio o daSo al
electrodom6stico, Use papel de aluminio solamente como se
indica en esta guia,
Seguridad al Cocinat
Nunca caiiente un contenedor de aiimento cerrado en ei
homo, La acumulaci6n de presi6n puede reventar el
contenedor causando una lesi6n personal grave o da_ioal
electrodom6stico,
Use tomaollas secos y gruesos, Los tomaollas huJmedos
pueden causar quemaduras por vapor, No se deben usar
toallas de secar los platos ni otros sustitutos en vez de los
tomaollas porque pueden pasar sobre los elementos calientes
y encenderse o pueden quedar atrapados en ias piezas dei
electrodom6stico,
Use vestimentas apropiadas, Las ropas sueitas o ropas con
mangas largas sueltas no se deben usar cuando se est,1
cocinando, La ropa se puede prender fuego y causar
quemaduras si entra en contacto con los elementos
calefactores,
Siempre coioque ias parriiias dei homo en ias posiciones
deseadas cuando el homo este frio, Deslice la parrilla del
homo hacia afuera para agregar o retirar alimentos usando
tomaollas secos y gruesos, Siempre evite colocar o retirar
alimentos del homo sin sacar la parrilla hacia afuera, Si una
parrilla debe set movida cuando est6 caliente, use un
tomaollas seco, No deje que el tomaolla entre en contacto
con el elemento caliente del homo,
54

UseBsparriiiassoiamenteeneIhomoenquefueron
enviadas/compradas.
TengacuidadocuandoabralapuertadeIhomo.Pnmerodeje
quesdgaeIaireovaporcaiienteantesdesacarovoivera
coIocareIdimentoeneIhomo.
ADVERTENCIASOBREALIMENTOSPREPARADOS: Siga
Bs instrucdones de] fabricante de] aiimento. Si un contenedor
de dimento congeiado de pi_istbo y/o su tapa se deforma,
comba o de otra manera se da_ia durante la cocd6n,
inmediatamente descarte e] aiimento y su contenedor. E]
aiimento puede estar contaminado.
No permita que e] pape] de aiuminio o ]a sonda de ]acame
toque eI ebmento cabfactor.
Siempre @ague todos los controbs cuando haya terminado
de cocinar.
Nunca deje que un utensilio hierva hasta quedar seco pues
esto puede da_iarel utensilio y la estufa.
Siga Bs instrucciones del fabricante cuando use bobas para
cocinar en el homo.
NUNCA deje los ebmentos superiores sin supervisi6n,
especidmente cuando est6 usando los ajustes de cdor altos.
Un derrame que no reciba la debida atenci6n puede causar
humo y un derrame de grasa puede causar un incendio.
Este ebctrodom6stico tiene diferentes tama_os de ebmentos
superiores. Sebccione utensilios que tengan bases pBnas Io
suficientemente grandes para cubrir el ebmento. La rehci6n
adecuada entre el utensilio y el ebmento mejorara la
eficiencia al cocinar.
Segutidad sobre eJ Use
de UtensiJios
Siga las instrucciones del fabricante cuando use bobas para
cocinar en el homo.
Elrendimiento y funcionamiento seguro de este
ebctrodom6stico ha sido comprobado usando utensilios de
cocina tradicionabs. No use ningun dispositivo o accesorio
que no haya sido espedficamente recomendado en esta guia.
No use cubiertas de loss ebmentos, rejillas superiores de la
estufa o sistemas de convecci6n para hornos. El uso de
dispositivos o accesorios que no sean expresamente
recomendados en esta guia puede crear peligros graves de
seguridad, afectar el rendimiento y reducir la vida 0til de los
componentes de este ebctrodom6stico.
Si el utensilio es mas peque_o que el ebmento, una porci6n
del ebmento quedara expuesta y puede encender la ropa o un
tomaollas.
Sohmente ciertos tipos de utensilios de vidrio, vidrio ceramico,
cerdmica, gres u otros utensilios vidriados son convenientes
para cocinar en la superficie o en el homo sin quebrarse
debido al repentino cambio de temperatura. Siga las
instrucciones del fabricante del utensilio cuando use vidrio.
Gire los mangos de los utensiiios hacia e[ centro de [a
cubierta, no hacia la habitaci6n ni sobre otro elemento
superior. Esto reduce el riesgo de quemaduras, encendido de
materiabs infiamabbs o derrames si el utensilio estocado
accidentalmente o alcanzado por ni_iospequeffos.
EJementos TubuJares
Para evitar dafio a los eiementos caiefactores removibies, no
los sumerja, remoje ni lave en un lavavajillas o en un homo
autolimpiante. Un elemento daffado puede producir un
cortocircuito resultando en un incendio o riesgo de choque
eldctrico.
Asegurese de que los platillos protectores estdn en su lugar
pues la ausencia de estos durante la cocci6n )uede daffar el
alambrado.
Fortes Protectores: No use papel de aluminio para forrar los
piatiiios protectores o ia parte inferior dei homo, excepto como
se sugiera en ia guia. La instaiaci6n incorrecta de estos forros
puede resuitar en un riesgo de choque ei6ctrico o incendio.
Ollas Fteidoras
Use extremo cuidado cuando mueva la olla con aceite o
descarte la grasa caliente. Deje que la grasa se enfrie antes
de intentar mover B olla.
Campanas de VentiJaci6n
Limpie con frecuencia la campana y los filtros a fin de evitar
que se acumub en ellos grasa u otros materiabs infiamabbs y
para evitar incendios de grasa.
Cuando prepare dimentos fiameados debajo de la campana,
encienda ei ventiiador.
55

Seguridad en la Li pieza
Limpb con cuidado la cubbrta, Apague todos los controbs y
espere que se enfrien las pbzas deI ebctrodomestbo antes de
tocarias o limpiarias, Limpie con cuidado, Tenga cuidado
para evitar quemaduras de vapor si usa una esponja o un
patio mojado para limpiar derrames en una superfbie caibnte,
Aigunos limpiadores pueden produdr vapores nodvos cuando
se apiican en una superfide cdbnte,
Limpb soiamente las pbzas indbadas en esta guia,
Homo Automimpiante
(modelos selectos}
c0cina, etc, en e! homo durante e[ cic[0 de aut0[impbza,
No iimpie ia junta de ia puerta, La junta de ia puerta es
esencial para obtener un sellado herm6tico, Se debe tener
cuidado de no frotar, da_iar ni mover la junta,
No use limpiadores de homo ni forros de homo de ningun %o
alrededor ni en ninguna parte del homo autolimpiante,
Antes de iniciar el ciclo de autolimpieza del homo, retire la
asadera, las parrillas del homo y otros utensilios y limpie
cualquier derrame para evitar humo excesivo o llamaradas,
Esnormal que la cubierta de la estufa se caliente durante el
ciclo de autolimpieza, Pot Io tanto, se debe evitar tocar la
cubierta durante un cicio de autolimpieza,
Aviso y Adve|'tencia
lmpottante Sobte Seguridad
La Propuesta 65 de la Ley de 1986dd Estado de California
Sobre Seguridad y ContaminaciOn del Agua Potable [Califor-
nia Safe Drinking Water and Toxic Enforcement Act of 1986}
exige que el Gobernador de California publique una lista de
las sustancias que seg0n el estado de California causan
cancer o da_o al sistema reproductivo y exige que las
empresas adviertan a sus dientes sobre la exposici6n
potencid a tales sustancias,
Se advierte a los usuarios de este ebctrodomestico que
cuando el homo est_ funcionando en el cido de autolimpieza,
puede haber exposici6n de bajo nivel a dgunas de las
sustancias indicadas en la lista, induyendo mon6xido de
carbono, La exposici6n a estas sustancias puede ser reducida
a un minimo ventilando el homo al exterior en forma
adecuada, abriendo las ventanas y/o la puerta en la habitaci6n
en donde est_ ubicado el ebctrodomestico durante el cido de
autolimpieza,
AVISO IMPORTANTE RESPECTOA LOS PAJAROS
DOMESTICOS:
Nunca mantenga los pajaros en ia cocina o en ias
habitaciones donde puedan llegar los humos de la cocina, Los
p_jaros tienen un sistema respiratorio muy sensitivo, Los
humos producidos durante el cicio de autolimpieza del homo
pueden ser periudiciaies o mortaies para los p_jaros, Los
humos que despide el aceite de cocina recalentado, la grasa,
margarina y los utensilios antiadherentes recalentados
tambi6n pueden set perjudiciales,
Conserve estas instrucciones para referencia futura
56

Centreles Superieres
Useestoscontrobs paraencenderlosebmentos superiores.Se
disponede una sebcci6n infinitade ajustesde calordes@'Low'
(Bajo]hasta'High' (AJto].Lasperillaspuedencolocarseen
cualquierade estosajusteso entreelios.
Programac+6n de Jes ControJes
1. Coloqueetutens+Iiosobreel ebmento superior.
2. Optimay gire IaperilB en cualqubr direcci6nhastael ajustede
calordeseado.
3.
4.
+ Enet paneldecontro!seencuentramarcadocual O O
elementocontroiacadaperJlla.Porejemplo,el
dibujoa laderechaindicael elementodNantero _
izquierdo.
Enel paneldecontrol hayuna luzindbadora dN Nemento.
Cuandoseenciendealgunade lasperiflasde control,Iahz se
ilumina. La Iuzseapagar_cuandotodos Insebmentos
superioresseapaguen.
Despu@decocinarcoioqueIaperilla en la posici6n'OFF'
[apagado]. Retireel utensilio.
Ajustes de Calor Sugeridos
Eltama_o,%o de utensilioy Iacocci@afectar4nel ajustedel calor.
ParainformaciOnsobrelosutensiliosyotrosfactoresque afectanIns
ajustesdN calor,consulteel folbto "La CocinaF4cir'.
'Low' (Bajo}(2}: Seutiliza
paramantenerInsalimentos
ca[bntesy derretirchocoJatey
mantequiiia.
'iVied.Low'
[MedianoBajo}
(3-4}: Usepara
continuar
cocinando
aiimentos
tapadoso para
cocinara[vapor.
[ +
'Nigh' (Alto}(10): Seusapara
hacerhervirun %uido. Siempre
reduzcael ajustea un calorm4s
bajocuandolosliquidos
comiencena herviro cuandoIns
aJimentoscomiencena
cooinarse.
OFF
High
@
Medium ...................
'lViedium' [IVlediano}(5+
7}: Usadoparamantener
un hervorlentopara
grandescantidadesde
liquido y parala mayoria
de lasfrituras.
[Elestilodel controlvar[asegOnel modelo.]
(MedianoAlto]
(8°9): Seusa
}ara dorar
came,cabntar
aceiteparafrdr
en una sart6n
hondao para
saltear.
Tambi6npara
mantenerun
hervorr@ido
)ara cantJdades
grandesde
%uidos.
ANTESDECOCINAR DESPUESDECOCINAR
• SLemprecoloqueun u_ensflloen e!etementosuper+orantesde
encenderlo.Paraev+tardJlos a Jaestufa,nuncaenciendaun
eJemen_osuperiorsmtenet un utensiliosobre6J.
, NUNOA Jse lacublertade Jaestufacomoun areapara guarda+
aiimentosc utensilios.
M]ENT_S COCINA
+AsegOresedesabercureperfllacontrolacadaeJememo.
Aseg8resede haberencendidoel ebmen[o correc_o.
+AsegOresede que loselememossuperioresest_napagaJos.
, Limpie cuaiquier derrame tan pronto como sea posibb
OTROSCONSEJOS
o SiexistenarmadosdirectamentesobreJacubierta de la estufa
soloqueenNlos articulosde usopocofrecuenteque puedanser
guardadosconseguridaden un areaqueestarasujetaal cabr.
Aigunastemperaturaspuedenno sersegurasparaart[culos[ales
como Iiquidosvol_tibs. IJmpiadoreso rocmdoresen aerosol.
• Comiencea cocmaren un ajus[ede caloralto Juegoreduzcaa un + NUNCA deje mng6narticulo,especmlmentearticutosde pi4stbo.
ajustemasbNOparacompbtar lacocci6n. Nunca useun ajuste
de caloralto paracocmarauran[eunt_enLpoprolongado.
+NUNCApermitaqueuna oflahiervahastasecarse. Estopodria
da+3arJao+Ja_el electrodom@tico.
+NUNCAtoque lasuperficiede la estufahastaque nose haya
enfnado.Esposibb quealgunasareasde la superficJe
especialmenteaJrededorde losetemen[os,seentibieno calJen[en
mientrasest,1cocinando. Usetomaoilasparapro[egersus
rnanos.
sobrelacubierta de laestufa. ElairecalLenteprovementedeJ
respiraderopueaeencenderlosarticulosinflamabJes,derretiro
abiandarlospi4sticosoaumentarla presionen Joscontenedores
cerraaoshacidndolosrevenmr.
, NNNCA permitaqueel papelde aiuminio,losterm6metrosde came
o cualquierotroobjetode metal,a excepci6ndeunaolla sobreun
e_ementosuper+or,teng_comacto conlosebmentoscabfactores.
57

Superficie de los
Ele entos Tubulares
• LimpieIacubie_a de laestufadespu_sde cadauso.
• Limpielosderrames4cidoso azucaradostanprontocomola
cubiertasehayaenfriadopuesestosderramespueden
descoloraro marcarla porcelana.
Para proteger el acabade de los platilles
protectores:
• A fin de reducirIadescoloraci6ny fisurassuperficiales,evite
usarcalor altopor per[odosdetiempo prelongados.
• Nouseutensiliosdemasiadograndes. LosutensHiosno
debenextenderse2,5- 5 cm (1 - 2 pulgadas)m4sall_ del
elemento.
• Cuandoprepareconservaso cocineconollasgrandes,usee!
Elementopara Ollasde Conservas(ModetoCE1).POngaseen
contactoconsudistdbuidor May¢agparaobtenerdetalleso
IlameaI1-877-232-6771en EE.-UU.o al 1-800-688-8408en
Canad4para hacerun pedido.
• Umpielosconfrecuencia. [Verp_gina69.)
Dementos TubuJares
Cuandoun elementoseenciende,pasapor ciclosde encendidoy
apagadopara mantenerel ajustede calorseleccionado.
Loselementostubularessonautotlmpiables.No lossumeriaen
agua.
Para sacar: Cuandoestdfifo,
levanteel etemento.
Cuidadosamentetire de 61hacia
afueray s_quelodeJrecept_culo.
Para velvet a ¢olocar: Inserte
losterminalesdel elementoen la
toma.Gu[eel elementohastaque
quedeen su lugar. Oprimahaciaabajoen el
bordeexteriordel elementohastadejado
niveladosobreel platilloprotector.
T_.RfVili_'ALf:_
PJatiHos Protectores
Losplatillos protectoresdebaiode cadaelementosuperiorrecogen
losderramesy debenser _Jsadossiempre. Sino usanlosplatillos
protectorescuandoest6cocinandosepuededaSarel cableado.
Paraevitarel riesgode choqueel6ctricoo de un incendio,nunca
forre losplatiliospretectorescon papeIde aluminio.
Losplatillos protectoressedescoloraran(manchasazules/doradas)o
adquirir_nfisurasconeltiempo,sisesobrecalientan.Esta
descoloraci6no fisurassonpermanentes.Estono afectala eficacia
al cocinar.
58

Controies deJ Homo de Limpieza Manual
(modelos selectos]
j_f
\
\
\
Iess-
/
J
A B C D E F
NOTA:Elindicadorvisualdespliega12:00cuandoseconectael electrodom6sticopor primeravezo si seinterrumpeel suministroel6ctrico.
Las[ucesindicadoras'Bake'y 'Broil'sedespiiegancuandoseactivalafunciOncorrespondiente.
A
8
C
D
E
F
'Bake'(HorneaO
'Broil'(Asa0
'Timer'{Temporizador}
'Clock'(Re[oi}
'CANCEL'[Cancelar}
'More+' o'Less-'
(Mas+oMenos-}
Seusapare hornearyasar.
Seusaparaasara [aparrillay dorarlos
alimentos.
Programael temporizador.
Seusaparaprogramar[a horadel d(a.
Canceiatodas[asfuncionesa excepciOn
de[temporizadory del reioj.
SeusanparaseIeccionaro cambiarel
tiempoy [atemperaturadel homo.
Seleccionalosaiustesdeasado'Hi'(Alto}
o 'LO'{Bajo}.
Use de las Tedas
, Oprimalatecla deseada.
, Oprimalatecla 'More+' o'Less-'paraseleccionarel tiempo o Ja
temperatura.
oSeescuchaMuna serialsonoracadavezqueoprimaunatecla.No
seescuchar_unaserialsonoracuandoseopriman[asteclas
'More+' o'Less-'.
oSeescuchar_ndosserialessonorassiocurreun error en [a
programaciOn.
Nora: Cuatrosegundosdespu6sde oprimir [atecia 'More+' o
'Less-',e[tiempo o la temperaturaquesedespiiegaseprogramar_
autom_ticamente.Sitranscurrenm_sde 30segundosdespu6sde
haberoprimidounateda de funci6ny [atecia 'More+' o'Less-',la
funciOnser8canceladayel indicadorvisualvolver8al despiiegue
anterior.
Programaci6n de[ ReHoj
1. Oprima[atecia 'C[ock'.
o Lahorade[reIojno sepuedeprogramarsiel control hasido
programadoparahornearo asaro parausare[temporizador.
2. Programe[ahoracorrectadeJdia usandoJastecias 'More+' o
'Less-'.Si[atecla 'More+' o'Less-'no seoprJmeen 30segundos,
[aprogramaci6ndeJreJoiser4canceJada.OprJma[atecla 'CJock'
paracomenzarde nuevo.
Programaci6n de[ Temporizador
Eltemporizadorpuedeserprogramadode un minuto (:01}hasta99
horasy59 minutos(99:59}.Eltiemposedespiegar_en minutosy no
ensegundos.EL TEMPORIZADORNO CONTROLAELHORNO.
1. Optima latecIa'Timer'.
o Enel indicadorvisua[despIegar_0:00y [osdospuntos [:}
desteliar_nen ei indicadorvisual
2. Optima latecIa'More+' o'Less-'hastaquesedespliegueel
tiempodeseado.
o EItemporizadorcomenzar_a funcionarcuandoseprogrameel
tiempo.
o LosdospuntosdesteIIantesindicanqueun conteo de!
temporizadorest_en progreso.(Losdospuntosno desteIIansi
el indicadorvisual muestrala horadeId[ao la temperaturadeI
horno.}
o AIfinal deItiempoprogramado,seescuchar_ndosseriales
sonoras.El indicadorvisualdespIegar8"0:00".
o Si as[Iodesea,oprimala tecIa'Clock' duranteel
funcionamientodeItemporizadorpara desplegarbrevemente
[a horade[dia.
o SIas[1odesea,oprima[atech 'Bake'o 'BroiI'duranteel
funcionamientodeItemporizadorpara despiegarbrevemente
el ajusteactualde temperatura.
Para cancelar el temporizador:
Oprimay mantengaoprimida[atecIa'Timer'durantevariossegundos.
59

.............+'4"!_ _......
Homeadoo Asado y Asado
a PartiHa
Paraobtenermayorinformaci6nsobrelostiemposy Iossugerencias
de horneado,asadoyasadoa toparritta,consulteel folteto"La
CocinaF_cil".
Setting the Controls For Baking or Roasting:
1. Oprimaiatecia 'Bake'.
+ '000'sedesplegar_y la hz indicadora'Bake'destellar_enel
indicadorvisual.
+ Si oprimelatecla 'Bake'y no programalatemperaturaen 30
segundos,e!programasecancetar_iautom_t+camentey Ia
heradel d[ase desplegar_nuevamenteen el indicadorvisual.
2. OprimaIatecla 'More+' o 'Less-'hastaque la temperatura
deseadase despliegueen el indicadorvisual.
• LatemperaturadeIbornepuedeserprogramadade 75° a
285° C(170° a 550° F].
+ '175°' [350°)sedesplegar_cuandooprimalatecla 'More+'
o 'Less-'perprimeravez.
+ Optimalatecla 'More+' o 'Less-'repetidamentepara cambiar
latemperaturaen incrementosde3° C(5° F),u oprimalay
mant6ngalaoprim+daparacambiarla temperaturaen
3.
incrementosde 8°C (10°F].
+ Enel indicadorvisualsedesptegar_38° 000°] o la
temperaturareaIde!homosiesque essuperiora 38° C
(100° F]cuandoseenciendeeIhomo.
+ Latemperaturaaumentar_en incrementosde 3°C (5° F] hasta
Ilegara Iatemperaturaprogramada.Cuandoel bornesehaya
precalentado,seescuchar_una seiialsonora.
+ Esperea que el homose precalientedurante10-15minutes.
+ ParavedficarIatemperaturaprogramadaduranteel
precalentamientodel horno,oprimalatecla 'Bake'.La
4.
temperaturasedesplegar_durantetres segundos.
• Paracamhiar matemperatara demhome darante el
precesode cecci6n, oprimaIatecla 'Bake',Iuegooprima 5.
'More+' o'Less-'hastaquesedesplieguelatemperatura
deseada.
+Paracambiar matemperatara demhomodarante 'Preheat',
optima des veces latecla 'Bake',luegooptima 'More+' o
'Less-'hastaque sedesplieguelatemperaturadeseada.
Coloqueel alimentoei en borne.Verifiqueel progresode la
cocci6ncuandohayatranscurridoel tiempo m(nimo
recomendado.
AIt6rmino de la cocci6n,oprimaIatecla 'Cancel'pareapagarel
borney retireel alimentodel homo.
o El hornocuentaconuna funci6n de apagadoautom_tico.Si se
deja encendidodurante12betas,el borne seapagar_
autom_ticamenteyel indicadorvisualdesplegar_'000'.Optima
la tecla 'Cancel'y la hera deldia sedesplegar_nuevamenteen
el indicadorvisual.
Ajuste de los Controles para Asar a maParriHa:
Paraobtenermejoresresultados,useun utensiliodiseSado
especialmenteparaasara laparrilla.
1. ColoqueIaasaderade asara IaparrilIaen la posiciOn
recomendada.Uer latablaen la pagina65.]
2. Oprimalatecla 'Broil'.
o 'SEt'sedesptegar_y la hz indicadora'Broil' destellar_enel
indicadorvisual.
Oprimalatecla 'More+' paraprogramarel asadoen elajuste'HI'
(alto] o 'Less-'parael ajuste'LO'(bajo].
o Seleccioneel ajuste'HI' (alto] paraasadoa Iaparrilla normal
o Seleccionee!ajuste'LO' (bajo]paraasadoa IaparrilIaa bajas
temperaturasparaevitareIdoradoexcesivoen alimentosque
requierenmayorestiemposde cocci6ntales comela came de
ave.
+ Si noseleccionaun ajustedeAsado ('HI'o'LO']en30
segundos,e!programasecancelar_autom_ticamentey Iahera
del d[asedesplegar_nuevamenteen el indicadorvisual.
Precalienteei elementode asara IaparrilIadurante3 minutes.
Dejela puertaabiertahastael primertope,aproximadamente10
cm (4pulgadas].
Cuandoterminede asara la parrilla,optima Iatecla 'Cancerpara
apagare!borney retireel utensiliodel homo. Lahera delalia
volver_a desplegarseen el indicadorvisual.
6O

G
Perilla del Homo de Limpieza
Manua_ (modelos selectos)
PerHla de RaTemperatura del Heine
La perilla 'OvenTemp'0-emperaturadel OFF
Homo) seusaparaseleccionary
mantenerlatemperaturade! homo.
Siempregire estaperillajusto
HASTAla temperaturadeseada.No
gire a una temperaturarossaltay
hego retroceda.
350 300
Ajuste del Homo para
Homeado y asado:
1. Oprimaygire la perilla'OvenTemp'a Iatemperaturadeseada.
Espere10a 15minutosparael precalentamiento.
2. Coloquee!alimentoen el centro del homo.Verifiquesie!
alimentosecocinOen eItiempominimo indicadoparalareceta.
Cocinepor m_stiempo s+esnecesario.
3. Saqueel alimentodel hornoy gire la perilla'OvenTemp'a la
posiciOn"OFF".
Nora: Parasugerenciasadiciona[essobrecomohomeadode[
horno,asardoy asadoa laparrflla,consulteel folleto "LaCocina
F_cil".
Ajuste de los Controles para Asado a la
1. Paraobtenermejoresresukados,useun utensiliodise[mdo
especialmenteparaasaraIaparrilla.Coloquelaasaderaen Ia
posiciOnde la parrfllarecomendado.G/erIatablaen p%ina 65y
2. Gire Iaperilla 'OvenTemp'a 'Broil' paraasadoa la parrillaa
temperaturasrodsbajas,a 232°C (450° F).
+ EIasadoala parrillaa temperaturasrodsbajasevitaeIdorado
excesivode Iosalimentosquesecocinanpor m_stiempo,
tales comoIascarriesde ave.
3+ Sigalostiempossugeridosen Iatabtaparaasara laparrilIaen
p_gina67 queseincluyea continuaciOn.Lacamedebedarse
vueltaunavezcuandoest_a mitaddeltiempodecocciOn.
4. Verifiqueel t6rmino de cocciOnhaciendouncorteen la carne
cercadeIcentro paraverificarei color.
5. Despudsdeasara lapardlla,coloquela perilla'OvenTemp'en la
posiciOn"Off". Saquelaasaderadelhorno.
61

Control del Homo (modelos selectos]
A B
C D
E F G
.........................Timer
Less .............
H l J
Elpanelde control hasidedisefiadoparasu fScilprogramaciOn.Elindicadorvisualen etpanelde control muestrala heradel d[a,el
tempodzadory tasfuncionesdel borne.Etpanelde control mostradoarriba inciuye[ascaracter[sticasespedficasdel modelo. (Elestilodel
paneldecontrol var[aseg0nel modeloy
ii_il
C
D
E¸
G
H
J
'Broil'(Asara
la Parrilla)
'Bake'(Hornear)
'More+/Less-'
[M_is+/Menos-]
'Timer'_emporizador}
'Cook& Hold'(CoceiOn
yMantenerCaliente}
'Clear!'(Limpieza}
+Delay'(Direr+do)
+Clock'[Reloj)
+KeepWarm'
(MantenerCaliente)
'CANCEL'(CANCELAR)
Seusaparaasara lapmrillaydorarlos
alimentos.
Seusaparahornearyasar.
Programao cambialahera,la
temperaturadelhomo.Programaasara
laparrilla'HI'o'LO'.
Programae!temporizador.
Seusaparahornearduranteuntiempo
seleccionado,luegomantienee!alimento
calienteduranteunahera.
Seusaparaprogramarunciclode
autolimpieza.
Programael homoparacomenzara
homearo limpiarsea unaheraposterior.
Seusaparaprograrnarlaheradeld[a.
Seusaparamantenercalienteenet
homoel alimentococinado.
Cancelatodaslasfuncionesaexcepci6n
dettemporizadory etreloj.
Use de las Teclas
• Optimalatecla deseada.
• Optima'More+' o'Less-'paraprogramarel tiempo o la
temperatura.
• Seescuchar_unaseiialsonoracadavezqueoprima unatecla.
• Seescuchar_ndosseSalessonorassi ocurreun erroren la
programaciOn.
Nota: Cuatrosegundosdespu6sde haberoprimidolatecla
'More+' o'Less-'el tiempoo latemperaturaser_autom_tica-
menteprogramada.Sitranscurrenm_sde 30 segundosdespu6s
de haberoprimidounatecla defunci6n y antesdeoprimir Ias
teclas'More+' o 'Less-',lafunciOnser_canceladay elindicador
visualvelvet8al despliegueanterior.
'Clock' (Reloj]
Elre!ojpuedeserajustadoparadesplegarla herayaseaen formate
de 12horaso 24 betas.El relojha sideprogramadoen laf_brica
parael formatede 12horas.
Para cambiar el relej a formate de
24 betas:
1. Optimay mantengaoprimidasIasteclas
'CANCEL'y'Delay'durantetres segundos.
2. Oprima'More+' o 'Less-'para programarel
formatede 12horaso 24 horas.
3=
abajo.
Pregramaci6n del Relej:
1. Optimala tecla 'Clock'.
• La heradel d[aydospuntosdestellanen el
indicador.
2. Oprima'More+' o 'Less-'paraprogramar[a
hera de[d[a.
• Losdospuntoscontimiandesteliando.
3. Optima[atecla 'Clock'nuevamenteo esperecuatro
segundos.
Programela heradel dia siguiendolasinstruccionesindicadas
( Less- ili!
cent°
62

@
Cuandoseconectaenergiae!6ctricaal homoo despu6sdeuna
interrupci6nde la energ[aei6ctrica,Ialikima horadel reloj previaa
la interrupciOndestellar4en el indicador.
Paradesplegarla horadetaliacuandoe!indicadorest6 mostrando
otrafunciOndetiempo,oprimalatech 'Clock'.
La horadel reJojno puedeset cambiadacuandoel hornohayasido
programaticpara'DelayCook','DelayClean'o'Cook& Hold'.
Para canceJar eJdespJiegue deJ reJoj:
Si nodeseaque e!indicadorvisualmuestrelahora del alia:
Oprimay mantengaoprimidaIasteclas
'CANCEL'y'Clock' durantetres segundos.La
horadel dia desaparecer4del indicador.
Cuandosecancelael desplieguedei reloj,
oprimaIatecla 'Clock' paradesplegar
brevementeIahoradel dim
Para restaurar el despJiegue deJ reJoj:
Oprimay mantengaoprimidaIasteclas'CANCEL'y 'Clock'durante
tres segundos.LahoradeJd[areaparecer4en el indicador.
'Timer' dremporizador}
Eltemponzadorpuedeserprogramaticde un minuto {00:01}hasta
99 horasy59 minutos{99:59}.
Eltemporizadorpuedeserusadoindependientementedecualquier
otraactMdaddel horno.Adem4spuedeserpmgramadocuandootra
funciOndel homoest6en funcionamiento.
Eltemporizadorno controlael horno,solamentecontrolauna serial
so[_ora.
Para programar eJtemporizador:
1. OptimaIatecla 'Timer'[Temporizado0.
+ '0:00'seiluminaenelindicadorvisual.
+ Losdospuntosdestellaran.
2. OprimaIatecla 'More+' o 'Less-'hastaque e!
tiempo correctoaparezcaen el indicadorvisual
+ LosdospuntoscontinOandestellando.
3. Oprimanuevamentelatecla 'Timer'o esperecuatro
segundos.
Timer
More+
(Less-
+ LosdospuntoscontinOandesteJlandoy comienzaJacuenta
regresJvadeltiempo.
+ El01timominutode Iacuentaregresivadel temporizadorse
desplegar4ensegundos.
4. A! finaldeJtiempo programatic,seescuchar4una seBaJsonora
larga.
Para canceJar eJtemporizador:
1. Optimay mantengaoprh_Jdala tecla'Timer'durantetres
segundos.
U
2. Optima latecla 'Timer'y coloquelahora a 00:00.
B oqueo de Jos ControJes
Eltecladopuedenset bloqueadosparaseguridad,limpiezao evitar
el usono autorizado.Loscontmles no funcionarancuandoest6n
bloqueados.
Siel hornoest_en uso,loscontrolespuedenbloquearse.
La horaactualdel dia permanecer4en el indicadorcuandolos
controlesest6nbloqueados.
Para bJoquear:
Oprimay mantengaoprimidaslasteclas
'CANCEL'y'Cook& Hold'durantetres
segundos.
'LOCK'destellaenel indicadorvisual
Para desbJoquear:
Oprimay mantengaoprimidaslasteclas
'CANCEL'y'Cook& Hold'durantetressegundos.
'LOCK'desaparecedel indicadorvisual
C6diges de £rreres
'BAKE'o 'LOCK'puedendestellarr@idamenteparaadvertirleque
hayun error o un problema.Si'BAKE'o 'LOCK'deste!Ianen el
Jndicadorvisual,optima le tecla 'CANCEL'.Si'BAKE'o 'LOCK'
contin_andestellando,desconectelacorrienteel6ctricadeJ
artefacto.Espereunospocosminutosyvuelvaa conectarla
corrienteelSctrica.Si Iaspalabrasa0n contin0andesteHando,
desconecteIacordenteel6ctdcadel artefactoy Jlamea unt6cnico
de servicioautorizado.
63

'Bake' (Horneado)
Para pregramar 'Bake' (Herneade):
1. OprJma[atecla 'Bake'.
+ 'BAKE'destelBr&
+ '000'desteHar4en el indicadorvisual.
2. SeleccioneIatemperaturadel horno.Latemperatura
detbornepuedeserprogramadade 75° a285° C ........................
070°a550° F].Oprimau oprimay mantenga .......................................
oprJmidaIatecla 'More+' o 'Less-'. ( Less- }
+ Cuandocualquierade estasdostechs seoprimeper
prJmeravez,175° (350°}se iluminar&
+ OptimalatecB 'More+' para aumentarIatemperatura.
+ Optimalatech 'Less-'paradisminuir latemperatura.
3. Optimalatec+a'Bake' nuevamenteo esperecuatrasegundos.
+ 'BAKE'dejar4de desteIIary seiIuminar4en el indicadorvisual.
, 38° (100°} o la temperatura actual delhornosedesplegar4.
Latemperaturase etevar4en incrementosde3° (5°} hastaqua
se abance latemperaturaprogramada.
4. Espereaqua eIhomo seprecaIbntedurante8-15minutes.
+ Cuandoel borneIIeguea Iatemperaturaprogramadase
escuchar_unasepalsonoraIarga.
+ ParaverificarIatemperaturaprogramadaduranteel
precalentambntodel horno,optima latecla 'Bake'.
5. CoIoqueel alimentoen el centradel borne,dejandoun minimade
dospulgadasentreel utensiJioy Iasparedesdel homo.
6. Venfiqueel progresode Iacocci@cuandohayatranscurridoel
tiempo minimorecomendado.Contintiela cocci@ siesnecesario.
7. AIt@_ino de la cocci@, optimala tecla 'CANCELL/f----_
8. Retireel alimentodel homo.
Diferencias deJ homeado entre su homo
antiguo y su homo nuevo
EsnormalobservaraIgunasdiferenciasen eItiempode homeadode
suhomo antiguoy suhomo nuevo.Vea"Ajustede la Temperatura
del Homo"enlap%ina 64.
Notas sobre Horneado:
Paracambiar matemperatara damhome darante em
preceso de cocci6n, oprimalatecla 'Bake',luegooptima
'More+' o'Less-'hastaquesedesplieguelatemperatura
deseada.
Para camhiar iatemperatara dei homo darante 'Preheat',
primados races latecia 'Bake',Iuegooprima'More+' o 'Less-'
hastaque sedespIieguelatemperaturadeseada.
Si olvidaapagarel borne,seapagar_autom4ticamentedespu@
de transcurrir 12horas.Si @seadesactivarestacaracter[stica,
yeaIap4gina64.
Parasugerenciasadicionabs sobrehorneadoy asado,consulte
el falbto "LaCocinaF4ciJ".
'Cook & Ho d' (Coccion y
Mantener Caliente)
'Oook & Hold' b permitehornearduranteunacantidad
determinadadetbmpo, seguidode un ciclo 'KeepWarm'de una
hora.
Para programar 'Cook & HoJd':
1.
Optima latecla 'Cook&Hold'.
+ 'BAKE'y'HOLD' destellan.
+ '000'seihmina en el indicadorvisual.
2. SeleccimselatemperaturadeIborne.La temperatura (More+
deIhomo puedeserprogramadade 75° a 285° C
(170° a550° F}.Oprimau optimay mantenga
oprimidala tecla'More+' o 'Less-'.
_+Less-
, Oprimalatecla 'More+' paraaumentarla ....................................
temperatura.
+ Oprimalatecla 'Less-'paradisminuir latemperatura.
3. Oprimalatecla 'Cook&Hold'nuevamenteoesperecuatro
segundos.
+ 'HOLD'desteJla.
+ '00:00' destella en el indicador visual
ProgrameIacantidadde tiempo durantelacual usted@sea
hornearoprimiendoIatecla 'More+' o'Less-',Eltiempode
homeadopuedeprogramarsedesde10minutes(00:10)hasta
11horas,59 minutes(11:59}.
+ 'BAKE'y'HOLD'se iluminanen el indicadorvisual
+ Eltiempodehorneadoseiluminar_enel indicadorvisual.
+ Comenzar4lacuenta regresivadel tiempode horneado.
64

Cuande haya e×pirado e[ tiempo de cecci6n:
+ Seescuehar_ncuatro sefialessonoras+
* 'BAKE'seapagar&
* 'HOLD'y 'WARM'seiiuminaran+
, Enel indicadorsedesplegar_75° (170°).
5. Oprima'More+' paraprogramare[tiempo de horneado.
o Enel indicadorvisua[seiluminan'DELAY','BAKE',y'HOLD'.
DespuSs de una hera en 'HOLD WARM' (Mantener
Caliente):
+ 'End'sedesplegar&
o Laheradel d[avoiver_a desplegarseen el indicadorvisual
Para canceiar 'Cook & Held' en cnaiqnier memento:
Oprimala tecIa'CANCEL',Retiree[aIimentodel horno+C_XN_
'Delay Bake' (HorneadoDifeddo]
No useh0mead0difeddoparaalimentosde corta duraci0ntales
comeproductosl_icteos,cerdo,came de aveo mariscos.
Cuandousa'Delay', el homocomienzaacocinarmaistardeen ei
dia+Programelacantidadde tiempoque usteddeseadiferir antes
deque seenciendael borney cu_ntotiernpodeseacocinare[
aiimento+Elhornocomienzaa calentaren [aheraseleccionaday
cocinaduranteel tiempo especificado,y luegomantienee[ alimento
caiienteduranteuna hera+
Eitiempo diferidopuedeprogramarsede 10minutes(00:10]hasta
11horas,59 minutes(11:59}.
Para pregramar nn cicie de hemeado diferide:
/
1. Oprima[atecia 'Delay'.
o 'DELAY'destelia.
o '00:00'destellaen eIindicadorvisual.
2. Oprimala tecia 'More+' o'Less-'paraprogramarel
tiempodiferido.
Cuando'DELAY'est6todav[adestellando:
3. Oprimala tecia 'Cook& Hold'.
o '000'se iIuminaenel indicadorvisual
o 'BAKE'y 'HOLD'destelian.
Oprima'More+' paraprogramarlatemperaturade horneado.
o '00:00'y'HOLD' desteIlan.
o 'BAKE'permaneceiiuminado.
Cnande e[ tiempo diferide ha e×pirade:
• 'DELAY'seapagar&
• Sedespiiegae[tiempo de horneado+
• Sedespliegan'BAKE'y 'HOLD',
Para pregramar un tiempe diferide cuande ya se ha
pregramado 'Cook & Hold':
1+OprimalateeIa'Delay'+
• 'DELAY'desteIIa+
• '00:00+sedespliegaene[indicadorvisual+ ...................................
2+ Opnma[atech 'More+' o 'Less-'para programare[
tiempo diferido. ...........................................
• Despu6sde cuatro segundos,'DELAY'
permanecerdiiuminadopara recordarleque se Less-
haprogramadoun cic[ode horneadodiferido.
Cnande ha expirade e[ tiempe diferide y
e[ homo cemienza a funcionar:
• Sedesplegar_el tiempo de homeado+
• 'DELAY'seapagar&
• 'BAKE'y'HOLD'permanecer_niluminados+
Para canceiar:
Oprima[atecla 'CANCEL'.
• Todaslasfuncionesde horneadocontroladaso
noper e[temporizadorser_ncanceladas+
• Laheradel d[avelvet8a despiegarseen el indicadorvisual+
Notas: ]
• No usehorneadodiferidoparalosarticulosque necesitan [
precalentamientodel borne,tal comepasteles,galietasy panes./
m
• No usehorneadodiferidosiel borneyaest_caliente. |
J
65

Keep Warm' (Mantener Caliente]
Paramantenereatientesen forma seguraalimentoscalienteso para
calentarpanesyphtos.
Para pregramar 'Keep Warm':
1. OptimaIatecia 'KeepWarm'.
• 'WARM'destella.
• '000'sedespliegaenet indicadorvisual.
2. SeteccioneIatemperaturade 'KeepWarm'.La
temperaturapara 'KeepWarm'puedeset
programadade 63°a 90° C045 °a 1%° F].Oprima
u optimay mantengaoprimidala tech 'More+' o
'Less-'.
Less-
• Cuandocuaiquieradeestasdostectasseoprime
por primeravez,75° (170°] seiJuminar&
• Optimalatecla 'More+' paraaumentarJatemperatura.
• Optimalatecla 'Less-'paradisminuir latemperatura.
'WARM'y Iatemperaturasedesplegar4nen el indicadorcuando
eJciclo'KeepWarm'est6activo.
Para gaBgemar 'Keep Warm':
1. Oprimalatecla 'CANCEL'.
2. Retireel alimentodel horno.
Notas sobre 'Keep Warm':
o ParamantenerIacatidadOptimade losalimentos,los
alimentoscocinadosen el hornodebenset mantenidos
calientespor no m_sde ] a 2 horas.
o Paraevitarque losalimentossesequen,cObraloslevemente
con papelde aluminioo unatapa.
+ Para eamentarpaneciHos:
- cubra Ievementelospanecillosconpapelde ahminio y
colOquelosenel homo.
- optima Iasteclas'KeepWarm'y 'More+' paraprogramar
75°C C]70° F],
- calientedurante 12a 15minutos.
o Pam ¢amentarpmatos:
- coloque2 pilasdecuatro ptatoscadaunaen el horno.
- optima Iasteclas'KeepWarm'y 'More+' paraprogramar
75°C []70° F].
- caliente losplatosdurantecinco minutos,apagueel homoy
deje losplatosen el hornodurante 15minutosm_s.
- usesolamenteplatos resistentesal horno,verifique conel
fabricante.
- nocoloquelosplatoscalientessobreuna superficiefr{a
puesel cambiorSpidode temperaturapuedecausarfisuras
superficialeso rotura.
66

Cierte Auto tico/Modo Ajuste de la Te peratura del
Elhomo seapagar_autom_ticamentedespu6sde 12betassi usted
todeja accidentalmenteencendido. Estacaracteffsticadeseguridad
puedeset desactivada.
Para cancelar el cierre autom_tico de 12 horas y
dejar que el homo funcione continuamente durante
72 horas:
1. Programeel homopara hornear(verp%ina 61).
2. Oprimay mantengaoprimidalatecla'Clock'
durantecinco segundos.
o 'SAb'sedesplegar_y destelIar_durantecinco segundos.
o 'SAb'sedesplegar_continuamentehastaquesedesactiveo
hastaque transcurraeI limitede 72 betas=
o 'BAKE'tambi6nsedesplegar8siseest_ usandoun ciclo de
horneadocuandoel homoest_en ModeSab_tico.
TodaslasotrasfuncionesEXCEPTO'BAKE'('Timer','KeepWarm',
'Clean',etc0 est_nbloqueadasduranteel ModeSabStico.
Para canceiar 'Bake' cuando el Mode Sab_tico est_
active:
Optima'CANCEL'= CANCEL
o 'BAKE'seapagar8enelindicadorvisual.
o Noseoir_ningunaseSalsonora.
Para cancemaremMode Sab_tico:
1. Oprimalatecla 'Clock'durantecinco segundos.
O
2.
Despu6sde 72horas,el Mode Sab_ticoterminar_.
o 'SAb'destellar8durante5 segundos.
o Lahera del d[areaparecer_en el indicadorvisual.
La exactitudde Jastemperaturasdel borneescuidadosamente
probadaen Iaf_brica. EsnormainotaraIgunadiferenciaentrela
temperaturade horneadoentreun borne nuevoy un homoantiguo.
Conel correrdel tiempo,Iatemperaturadel borne puedecambiar.
UstedpuedeaiustarIatemperaturadel homosi consideraque su
borne noest_ horneandoo dorandoenforma correcta. Paradecidir
cu_ntodebecambiarIatemperatura,programelatemperaturadeI
bornea 15° C (25° F)m_salta o m_sbaiaque latemperatura
indicadaen sus recetas,luego hornee. Losresultadosde la
"prueba"puedendarleuna ideade cu_ntoaiustarlatemperatura.
Ajuste de matemperatura demhomo:
1. Oprima'Bake'.
2. Programe285° (550°) oprimiendolatecla
'More+'.
3, Oprimay mantengaoprimida[atecia'Bake'
durantevariessegundoso hastaqueO°aparezca
en el indicadorvisuai.
Si Iatemperaturadel homo haside previamenteajustada,eI
cambioaparecer_en et indicadorvisual Perejemplo,si Ia
temperaturadel bornefue reducidaen 8°C (15°F)elindicador
mostrar8- 8° (-15°).
Oprimalatecla 'More+' o'Less-'para ajustarlatemperatura.
Cadavezquese oprimeuna tecla,latemperaturacambiaen3° C
(5° F). LatemperaturadeIborne puedeseraumentadao
disminuidaen 3°a20° C(5° a 35° F).
Laheradel d[areaparecer_autom_ticamenteenel indicador
visual
Nonecesitareaiustarla temperaturadetbornesi hayuna fallao
interrupci6nde energFael6ctrica. Lastemperaturasdeasara la
parrilla y Iimpiezano puedenset aiustadas.
Notas Sobre eUMode Sab tico:
• ElModeSab_iticopuedeseractivadoen cualquiermemento,
est6o no e(horno encendido.
• ElModeSab_ticonosepuedeactivarsi lasteclasest_n
bloqueadaso cuandolapuertaest_bloqueada.
• Sietborne est_horneandocuandoseprogramael Mode
Sab_tico,'BAKE'seapagar_al final del ciclode horneado.No
seemitir_inserialessonoras.
• CuandocomienzaelModeSab_tico,noseemitir_ laseSal
sonorade precalentamiento.
o Cuandoel ModeSabSticoest_active,todos losavisos,
mensajesyseSalessonorasest_ndesactivados.
o Siopalinela tecla'CANCEL'secancelar8un ciclo'Bake',sin
embargoetcontrol permanecer_en ModeSab_tico.
o Sifalla lacorrienteeiectrica,cuandovueIvaIaenerg[ael borne
seactivar_enMode Sab_ticocon72 horasrestantesy ningOn
ciclo active.
67

'Broiming' (Asar a la Pardlla)
Para programar 'Broil':
1. Optimatatecta'Broil'.
o 'BROIL'destetIa.
o 'SET'sedespliegaen el indicador.
2. OprimaB tecta'More+' paraprogramarasara B parriIB 'Hi' u
optima tatecta'Less-'paraprogramarasartaparrilB 'LO'.
o Enetindicadorvisualsedespbgar8'Hi' o 'LO'.
o Sebccione'Hi broiI'285° C(550° F}paraasadoa Iaparrilla
normal. Seleccim_e'LObroil' 230°C {450° F}paraasara ta
parrittacontemperaturabajaarimentosque @ben ser
cocinadospor m_stiempo,tal como lacame de ave.
3. Despu6sdecuatrosegundos,el homo comenzar8a funcionar.
o 'BROIL'continuar_iluminado.
4. Paraun dorado@timo, precaIienteel ebmento de asara la
parrilladurante3 a 4 minutosantesde coIocarel alimento.
5. Coloqueel alimentoen el homo. Dejela puertaabierta
aproximadamente10cm (cuatropuIgadas}(el primertope).
6. D6vuelta a [acameuna vezaproximadamentea mitadde la
cocci@.
7. Cuandoe[a[imentoest6cocinado,optima [a
tecIa'CANCEL'.Retireel alimentoy laasadera
de[homo.
o La horadeIdFavolver_adespbgarse enel
indicadorvisual.
Notas Sobre Asado a UaParriHa:
o ParamejoresresuItadoscuandoasea la parrilla,useuna
asaderadis@adaparaasara la parrilIa.
o Lostiemposde asara Iaparrilla aumentar_ny etdoradoset8
m_sclarosise instalaelelectrodom@ticoenuncircuito de
208voltios.
o 'Hi' se usaparaIamayor[ade Iosasadosa Iaparrilla. Use'LO
broil' cuandoasea la parrillaalimentosque necesitancocci@
proIongada. Latemperaturainferiorpermiteque eIalimento
secochle hastaquedarbien asadosindorarsedemasiado.
o Lostiemposde asadoa la parrilla puedenserm_sIargos
cuandosesebcciona latemperaturarossbajadeasara la
parrilla.
o Parasugerenciasytemperaturasadicionabs sobreasara la
parrilia,consulteel folleto "LaCocinaF_ci[".
Tab[a de Asar a [a Parri[[a
POSICiON DE
ALIMENTOS
Came de Res
Biftec, 2,5 cm (1")
Hamburguesas,1,9cm (3/4"} degrosor
Came de Cerdo
Tocino
Chuletas,2,5cm {1")
Jam6n- Rebanadasprecocidas,1,3cm 0/2") de grosor
TIEMPO TOTAL DE
COCC_ON [M_NUTOS)
4
4
4
TERff]INO DE
COCCWON
A medic asar
Bien asado
Bien asado
Bienasado
Bienasado
Tibio
4
4
4
15 - 18 minutos
19 - 23 minutos
15 - 18 minutos
6 - 10 minutos
22 - 26 minutos
8 - 12 minutos
Came de Ave 'LO Broir
Presasde poilo 3 o a Bienasado 28- 38 minutos
4
4
_atiSCO$
Bistecsde pescado,con mantequilla,2,5cm [1"}de grosor
Rbtes de pescado
Desmenuzado
Desmenuzado
Laposici6nde la parrillasuperiores#5
Nora: EstatablaessOlouna gu[a. Lostiempospuedenvariarcon eltipo de alimentoqueseest4cocinando.
10- 15minutos
8 - 12minutos
68

@
Respiradero de[ Homo
cuandoemhomo eat6en uso, em_reacereademrespiraderopuede
sentirse eaiiente bastunte pot eausa quemaraso Nunea bmoquee
ia abertura dei respiradero.
Ei respiradero se encuentra debajo de la cubierta dei
reapiradero demprotectortrasero de su estufuo
j RESPIRADERO DEL HORNO
/
'Oven Light' (Luz de[ Homo)
OprimaeI interruptorde h Juzde!hornoen el panelde
control paraencenderyapagarla hz del horno=
Pane[ inferior de[ Homo
Protejael pane[inferiorde[homo contraderrames,especia[mente
azucaradoso acidicos,puespuedendescolorar[aporceiana
esmaitada.Usee[utensiiiodetamaffo correctoa fin de evitar
derrames.No comoqueutensimiosni papei de amuminio
direetamente en la parte inferiordel llorno,
Oven
Light
Posiciones de [a Parri[[a
PARRILLA5 (la posici6n
m4saita): Seusapara
tostarpan o asara la
pardila alimentos
deigadosno grasosos.
PARRILLAb,:Seusapara
[a mayoriade losasadosa
[a parrJiia.
PARR[LLA3: Seusapara
hornearaIimentosen una
i ....................................
5
__4
--3
__2
--1
bandejade horneargaJietaso un moJdepara ro[[ode mermeJada,
para pasteles,paysde fmtas o aIimentoscongeIados.
PARR[LLA2: Seusaparaasarcortesdecarnepequehos,caceroIas,
hornearbaguetasde pan,pastelesen moidesde tubo o fIanes.
PARR[LLA1:Seusaparaasarpedazosgrandesde camey came
de ave,paysconge[ados,sufI6sde postreo pasteIesesponjosos.
HORNEADO CON VAR_AS PARR[LLAS:
Dos parriiias pmanas:Use[asparrJ[iasen[asposiciones2 y 4.
Una parriiia piana y una parriiia irregular:Use[asparrJ[[asen [as
posJciones2y 5.
Nota:Tenga cuidadocuandoretire[aparri[[airregularen [a 1posiciOn1 [posici6ninferior).
i
Parri[[as de[ Homo
°N0 intente camblur la P0siei6nde lasparrillas cuandoelhomo
• Nousee!homo paraguardara[irnentosni utensiIios_
El homotienedosparri[Jas.Todas[asparriJ[astienenun bordecon
topede enganche.
Para retirar [a parriJJa:
1. Tirede [aparriliaderechohacia
afuerahastaque sedetengaen
[aposici6nde[tope de
enganche.
2. Levanteetfrentede [aparri[Iay
tire de [aparrJIIahaciaafuera.
Para reinstaJar [a parriJJa:
L Co[oque[apardJ[aen lossoportesde [aparri[[aen el homo.
2. incline[evementehaciaardbael extremode[antero;des[ice[a
parri[[ahaciaatr_shastaque pasesobrelostopesde enganche.
3. Baieel frentede [aparr[Hay des[ice[ahaciaadentrode[homo.
No cubra umlaparrimmaeompmetacon papemde amuminioni comoque
papemde amuminioen maparte inferiordemhomo. Seafectar4n mos
resumtadosdemhomeado y se puede dahar maparte inferior dem
homo. 69
Media ParriJJa
Sedispone,comoaccesodo,de unamedia
parriJJaparaaumentar[acapacidaddeJ
homo. SeinstaJaen [asecciOnsuperiorde[
[adoizquierdode[homoy ofreceespacio
para unaplatode verdurascuandoseha
co[ocadounaasaderagrandeen [aparriJJa
inferior. POngaseen contactoconsu
distribuidor paraobtenere[accesodo
"HALFRACK"o parasolicitar[lamea[ 1-800-688-8408.
ParriJJa 'EasyRack MR'
(mode[os se[ectos_)
La parriJia'EasyRackMR'ofreceun
espacioconvenienteparatomar
losutensiiiosde hornearcuando
seest4nsacandofuerade[homo.
/
Notas:
• Use[aparrii[a'EasyRackMR'soIamenteen e[homo en quefue
comprada.
• La parriIIa'EasyRackMR'puedeserusadaen todas[asposiciones.

Homo Automimpiante
(modelos selectos}
Nota: Parala limpbza manual,ver p_gina70.
Esnormalque laspiezasdel homosecalientendummeel cblo
de aut@mpLeza
Afin de ewtaruna lesi@ personalydafioala puertadel homo.
no trate de abrir la puertacuandoest6despiegadalapalabra
'LOCK" (Bloqueada}.
Evitetocar la cubierta,la puerta,laventanao el _readel
resplraderodel homoduranteun ciclo deHmHeza.
No useiimpiadoresde hornoscomercialesen el acabadodel
homo ni alrededorde ningunapiezadel homopuespuede
daiiar el acabadoo Bs plezas.
Limpieel excesode grasao derramesde la parteinferiordel
homo. Estoevita humoexcesivoo liamaradasduranteel cicio de
limpieza.
Limpielosderramesazucaradoso dcidostalescomo papadulce
(camote},tomatesosalsasa basede leche.Laporcelana
esmaltadaesresistenteal _cidopero noa pruebade dcidos. Et
acabadode porcelanapuededescolorarsesilosderrames_cidos
o azucaradosnoson limpiadosantesde un cicio de autolimpbza.
Para programar 'Self-Clean' (Autolimpieza):
Nora: Latemperaturadel hornodebeserinferiora 205°C
(400° F}para programarun ciclo de limpieza.
],
2.
Cierrela puertadel homo.
MuevaIapalancade bloqueode la puertaa laderechaa la
posbiOnbloqueada.
Elciclo de autolimpiezausatemperaturassuperioresalas
temperaturasnormalesde coccidnpara limpiarautom_ticamenteel
interiordel homo. Nofuerce la puertadel horno ni la palancade 3.
bloqueoparaabrirla.Estopuedecausarexposici6na las
temperaturasaltasy constituir un nesgode quemadura.asnormabs
para limpiarautom_ticamentetodo el interiordel homo.
Esnormalque ocurranIlamaradas,humoo llamasdurantela limpieza
si el homoest4demasiadosucio.Esmeior[impiarel homo
reguiarmenteenvezde esperarhastaquese hayaacumulado
demasiadasucbdad. 4.
Duranteel procesode Iimpieza,la cocinadebeestarbien ventilada
para eliminarlosoloresnormalesasociadosconla limpieza.
Antes de la Auto impieza
1. Apague IaIuzdei homoantesde la Iimpiez&La luzdel horno
puedefundirse duranteel cicio de limpiez&
2. Retirelaasadera,todos Iosutensiiiosy lasparriIIasdel homo.Las
parrillasde!homosedescolorardny no sedestizar_nf_cilmente
despu@de unciclo de autoiimpiezasi no sonretiradasdeIhomo.
3. LimpieeI marcodel homo,el marcode Iapuerta,el _reafuerade
laiunta de la puertay alrededorde laaberturaen Iajunta de la
puerta,con un agentede Iimpiezanoabrasivotal como'Bon
AmP o con detergentey agua.El
procesode autolimpiezano Iimpia
estas_reas. Elias@ben ser limpiadas
paraevitarque lasuciedadsehornee
duranteel ciclo de autolimpieza. (La
junta esel selloalrededorde la puerta
y ventanadel horno.}
4. ParaevitardaSonoIimpie ni frote Ia
junta situadaalrededorde la puertade!homo.Lajunta est_
dis@adaparasellarherm6ticamenteel calorduranteel ciclo de
[impieza.
OprimaIatecla 'Cban'.
• 'CLEAN'destellaenel indicadorvisual.
SiIapuertano secierra,seoirdn sefialessonorasy lapalabra
'DOOR'sedesplegar8en el indicadorvisual. Si Iapuertano se
cierradentrode45 segundos,la operaciOnde autoiimpiezaser_
canceladay el indicadorvolver_a despbgar la horadel dia.
Optimala tecla 'More+' o'Less-'.
• Sedespliega'CL-M (SucbdadMedian&
3 horas). .............................
OptimaIatecla 'More+' o'Less-'paradesplazar
losajustesde auto[impieza. :{ Less-
'CL-H'[SuciedadIntensa,4 horas}
'CL-M' (SucbdadMedian&3 horas}
'CL-L' {SuciedadLeve,2 horas}
AIsebccionarel nivelde suciedadde! homoseprograma
autom_ticamenteel tiempode limpieza.
Despu@decuatrosegundos,el homocomenzar_a limpiar.
• Eltiempode limpiezacomenzar_lacuenta regresivaen el
indicador.
• 'LOCK'sedespiegar_en el indicadorvisual.
• 'CLEAN'sedesplegar_en el indicadorvisual.
Para diferir un ciclo de autolimpieza:
1. Optimala tecla 'Delay'.
• 'DELAY'destella.
• '00:00'sedesplegarden el indicadorvisual
cont,
_Loshombresde losproductosson marcasregistradasde sus respectivosfabrbantes.
70

2. Optima[atec[a'More+' o 'Less-'para programar[a
cantidadde tiempo queusted deseadiferir e[cicto.
Ettiempo diferidopuedeserprogramadode 10
minutos[00:10)a 11horas,59 minutos(11:59).
3. Oprima[atec[a'Clean'.
• 'CLEAN'deste[tar_i.
4. Oprh_aa[atecia 'More+' o 'Less-'.
+ 'CL-M' (SuciedadMediana,3 horas)se
desptiegaen etindicador.
5. OptimaIatecla 'More+' o 'Less-'para
desptazartosajustesde autotimpieza.
'CL-H'(SuciedadHntensa,4 horas)
6,
Less-
............................
`_L-M_(SuciedadMediana,3 horas]
'CL-L' (SuciedadLeve,2horas]
At seteccionaretnivetde suciedadde!homose programa
autom_ticamenteel tiempo de limpieza+
Despu6sde cuatrosegundos,'CLEAN','DELAY'y 'LOCK'se
desplegarSnen e! indicadorvisualparaindicarque el horno esta
programadopara un ciclo de limpiezadiferido+Eltiempodiferido
tambi_nsedesp[iegaenelindicadorvisual.
Si e[ homo ya ha sido programado para un cide de
[impieza y usted desea programar un tiempo
diferido:
1. OprJma[atecla 'Delay'.
• 'DELAY'desteJJa.
+ '00:00'se desplegar_en el indicadorvisual.
2. Oprimalatecla 'More+' o 'Less-'para programar
la cantidaddetiempo queusted deseadiferir el ........................
ciclo+
Despu6sde cuatmsegundos,'CLEAN','DELAY'y 'LOCK'se
desplegar_nen el indicadorvisualparaindicarque el horno esta
programadopara un ciclo de limpiezadifeddo. Eltiempodiferido
tambiensedespliegaenelindicadorvisual
Cuando comienza el ciclo de autolimpieza:
+ 'DELAY'seapagar&
• Eltiempo de [impiezasedesplegar_en el indicadorvisual.
Para canceiar el ciclo de autoiimpieza:
Oprima[atec[a'CANCEL'.
CANCEL
+ Elindicadorvisualquedaen blanco,
• TodasIasfuncionesson canceladas.
+ Lahora delaliasedespliegaen el indicadorvisual.
Durante el Cido de Autolimpieza
Cuandoaparece'LOCK'enel indicador,Iapuertano sepuedeabrir.
Paraevitardafio a la puerta,nofuerce la puertapara abdrlacuando
la palabra'LOCK'est_desplegadaen el indicadorvisual.
Humo y Olores
Ustedpuedever humoy sentirolor Iasprimerasvecesque el homo
eslimpiado+Estoesnormalydisminuir_conel tiempo+
Tambi6npuedehaberhumosi el hornoest_demasiadosucio o sise
ha dejadounaasaderaenel homo.
Sonidos
A medidaque el hornosecalienta,usted puedeoff sonidosde
piezasmet_licasquese expandenycontraen. Estoesnormaly no
dafiar_el homo.
Despu6s del Cido de Autolimpieza
Aproximadamenteunahora despuesdeIfin deIciclo de limpieza,
'LOCK'desaparecer& Lapuertaahorapuedeset abierta.MuevaIa
palancade bloqueode la puertaa la izquierdaparadesbloquearta.
Algiina suciedad puede quedar como una leve ceniza gris ripe
polvo. Retffelaconun patio hOmedo.Si Iasuciedadpermanece
despuesde Iimpiarla,significaque e!ciclode Iimpiezano rueIo
suficientementelargo. Lasuciedadser_eiiminadaduranteel
proximociclo de ]impieza.
Si masparriHas del homo fueron dejadas en el homo y no se
deslizan suavemente despu_s de ml ciclo de limpieza, Iimpie
lasparrillasy lossoportesde lasparrillasconuna pequefiacantidad
de aceitevegetalpara hacerlasdeslizarconm_sfacilidad+
Pueden aparecnr l_neasdelgadas en la porcelana al pasar pot
ciclos de calentamiento y enfriamiento. Estoesnormaly no
afectar_e!rendimiento.
Una descolorani(_n blanca puede aparecer despu6s del title
de limpieza si los alimentos _cidos o azucarados no fueron
limpiados antes del cido de autolimpieza. EstadescoloraciOnes
normaly no afectar8el rendimiento.
+ Si sedejaabiertala puertadel horno,Iapalabra'DOOR'
destellar_enel indicadorvisualyseescuchar_una serial
sonorahastaque [apuertaseacerraday la tecla'Clean'sea
oprimidanuevamente.
+ Lapuertadel homosedatar4 sisefuerzaparaabrirJacuando
la palabra'LOCK'contin0adespJegadaen e[indicador.
71

Procedi ientos de Limpieza
fr_as antes de tocarie o limpiarlo. De este modQse evitar_n da_os y
posibiesquemaduras, * Loshombresde losprod_Jctossonmarcas
registradasde susrespectivosfabricantes=
, Paraevitar manchaso dec0!oraci6n[imp!ee[ homodespu6sde cadauso.
•* Parahacerpedidos,[lamea[1-877-232-6771en
• Siseret[raaIgunapieza,aseg6resedeque seareinstaladaenforma correcta: EE=UU=o 1-800-688-8408on Canad&
P[EZA PROCED[M[ENTO DE LiMP[EZA
ProteeterTrasere
y Cabierta-
Perceiana
Esmaltada
Bandeja de Asar
e [nserto
Area del Relejy
demasTecmas
de Control
Periiiasde
Control
Pmatimmos
Prnteetnres,
Pnrceiana
(mndeios
selectos}
Pmatimmos
Prnteeteres,
Cremo
(medeios
seientos}
Ventana y
Paerta dei
Homo - Vidrio
Laporcelanaesmaltadaesvidriofundidoen metaly puedeagrietarseo picarsesinoseusacorrectamente.Esresistentea
los_cidos,noapruebade_cidos.Todoslosderrames,especialmentelosderramesazucaradosoaddicosdebenset limpiados
inmediatarnenteconunpaf_oseco.
° Cuandoseenfr[e,laveconaguajabonosa,enjuaguey seque.
° Nuncalimpieunasuperficietibiao calienteconun patioh[_medo.Estopuedecausaragrietamientoopicaduras.
• Nuncauselimpiadoresdehomo,agentesde limpiezaabrasivoso c_usticosenel acabadoexleriorde laestufa.
Nunca cubra el inserte conpapel de afuminJepues esto evJtaque la grasaseescurm a & bandeja inferior.
• Co!oqueunpahoenjabonadosobreel irlsertoy labandeja;dejeremojarparasoltarlasuciedad.
• Laveenaguajabonosatibia.Useunaesponjadefregarparaquitarlasuciedadpersistente.
• La bandejade asaryelinsertopuedenset lavadosenel lavavajiIIas.
° Paraactivar'ControlLock'(Bloqueodeloscontroles}parala limpieza,verp4gina60.
° Limpieconun paBohOmedoyseque.Nouseagentesdelimpiezaabrasivespuespuedenrayarlasuperficie.
° Sepuedenusar[Jmpiavidriossiserodan ene[pafioprimero.NOretie dJrectamenteel_elpaneL
, Retire las perillas cuando est6n en [a posiciOn'OFF'tir_ndolas hacia adelante=
, Lave,enjuague y seque=No use agentes de limpieza abrasivospues pueden rayar la superficie=
, Encienda cadaquernador para asegurarse de que las perilIas hayan sido correctarnente reinstaladas=
Laporcelanapuededesco!orarseo adquirirfisurassuperficialessisesobrecalienta.Estoesnormaly no afectardel
rendim[entode la cocciOn.
• Cuandoest_nfrfos,lavedespu_sde cadauso,enjuaguey sequeparaevitarmanchasy deco!oracidn.Pueden[avarseen
el [avavajillas.
• Para[impiarsuciedadexcesiva,remojeen aguacaIienteconjabOn,[uegouseun limpiadorabrasivosuaveta[comoSoft
Scrub*yuna esponjadefregarde pidstico=
° Parasuciedadquemada,retiree[phtillo de laestufa,co!Oque[osobreperiOdicosy rode cuidadosamentecon limpiador
de homocomerciaL(Norocfe[assuperficiesadyacentes=)Coloqueen unabolsade pIdsticoydeje remojardurante
variashoras=Useguantesde gomaparasacarlode [aboIsa,lave,enjuagueyseque=
• Cuandoest6nfrfos,lavedespudsde cadause,enjuaguey sequeparaevitarmanchasy decoloracidn.
• Para[impiarsuciedadexcesiva,remojeen aguacalienteconjabOn,[uegouseun limpiadorabrasivosuaveta[comoSoft
Scrub*yuna esponjadefregarde pldstico. Nouseagentesde[impiezaabrasivos.
• Eviteusarcantidadesexcesivasde aguapuespuedeescurrirsedebajoo detrdsdelvidriocausandomanchas=
• LaveconaguayjabOn=Enjuagueconagua[impiayseque=E[[impiadordevidriopuedeusarsesiseroda en un paiio
primero=
° NousemateriaIesabrasivostalescomoesponjasderestregar,[impiadoresen poIvoo esponjasde lanadeaceropues
puedenrayare!vidrio=
72

P_EZA PROCEDmMIENTO DE L_MP_EZA
Parriiias dei ° Limpie con agua con jab6n,
Homo • Saque las man@as dificiles con jab6n en polvo ocon una esponja Ilena conjabdn, Enjuaguey seque,
° Las parrillas se descolorardn permanenternente y pueden no deslizarsecon suavidad si son dejadas en el homo durante
un ciclo de autolimpieza, Si esto sucede, limpie la parrilla y los soportes en relieve con una peque_a cantidad de aceite
vegetal para restaurar la facilJdadde movimiento, luego IJmpieel excesode aceite=
Aeere ino×idabie
[mode!os seleetos]
Gaveta de
Ammacenamiento.
Manija de la
Puelta, Paneies
Lateraies -
Esmaite Pintado
• NO USE NINGUN PRODUCTO DE LIMPtEZA OUE CONTENGA BLANQUEADOR A BASE DE CLOBO.
° NO USE LIMPIADORES "ORANGE"AIILIMPIADORES ABRASIVOSo
, SIEMPBE LIMPIE LAS SUPERFICIESDEACEBO A FAVOR DEL GRANO.
, Limpieza Diaria/Suciedad Leve - Limpie con uno de los siguientes - agua con jabOn,unasoluciOn de vinagre bhnco
con agua, limpiado! para superficies y vidrio 'Formula 409'_o un limpiavidrios similar - usando una esponja o un pafio
suave, Enjuague y seque=Para pulil y evitar marcas de @dos, use el pmducto 'Stainless Steel Magic Spray'_
(PiezaNo,20000008]_=
, Sudedad Mediana/intensa =Limpie con uno de lossiguientes - 'Bon Ami'_,'Smart Cleanser'_o 'Soft Scrub'_ - usando
una esponia hOmedao un patio suave, Enjuague y seque=Las manchasdiffciles pueden set quitadas con una esponja
multi-uso 'Scotch-Brite '_h_meda; frote afavor del grano= Enjuaguey seque=Para restaurar el lustre y sacar las vetas,
aplJque'StainlessSteel Magic Spray'_=
, Descoioraci6n - Use unaesponja mojada o un patio suave,limpie con !impiador de acero 'CameoStainlessSteel
Cleaner'_=Enjuague inmediatamente y seque=Paraeliminar lasestr[as y restaurar el lustre, use despu6srociadm para acero
inoxidable 'StainlessSteel Magic Spray'_=
Heine autoiimpiante:
, Siga las instrucciones en las pdginas 67-68 para programar un cic!o de autolimpieza=
Liinpieza Manual:
, Lhnpie frecuentemente usando limpiadores abrasivos suavesy una esponja de pldstk'o=
, No use esponjas de flegar metdlicas porque pueden rayar lasuperficie,
, Cuando utilice limpiadores de horno comerciales siga las instrucciones de! fabricante,
, Limpie los derrarnes dcidos [alimentos a base de tomates o de leche] tan pronto como sea posible con agua yjab6n,
Si el derrame no es limpiado se puede descolorar la porcelana,
Para hater m;Js f;Jeil la iimpieza, saque ia puella dei heine, si ie deseao C,ler lasecci6n Mantenimiento en pdg, 710
, Cuandoest6Ma,laveconaguatibiajabonosa,enjuaguey seque=Nuncalimpieunasuperficietibiao calienteconunpatio
h0medopuesestopuededaiiarlasuperficieycausarunaquemaduraa causadelvapor,
, Paramanchasrebeldes,useagentesde limpiezalevementeabrasivostal comopastadebicarbonatoo 'BonAmi'_=Nouse
agentesdelimpiezaabrasivos,cdusticosodsperostal comoesponjasde lanadeaceroo limpiadoresdehomes,Estos
productospuedenrayaro dai_arpermanentementelasuperficie=
NOTA:Useuna teattae unparle sece papalimpiar los derpames,especialltle_ltelos derpamesac[dicose
azucapadesoLasuperficie sepuede desce/opareperder el briHosi el derpamei_ese/impiainmediatamel_te.Esto
es especialmente impertante en /assuperficies bla_cas.
_Loshombres de Ios productos son marcas registradas de sus respectivos fabricantes=
_ Para hacer pedidos, Ilame al 1-877-232-6771 en EEUU=o 1-800-688-8408 en Canadd=
73

Puerta Homo
• No coloque peso exceslvo mse pare en la puerta del homo.
Esto poona hacer vobar la estufa, quebrar la puerta o lesiona
al usuario.
o No mtenteabrir o cerrarla puertani hacerflmcionarel homu
hastaque Eapuertano hasidodebidamen[ereerralazada.
• Nunca coloquelosdedosentre la bmagray el marcodelantero
del hornc Losbrazosde articuBci@ sonmontadosa resorte.
SisegolpeaaccLdentalmentela bisagrasecerrar_i
bruscamentecontrael marcodel homoy puede lesionarsus
dedos.
Para saoar:
1.Cuandoest6fr[a,abra [apuertade[hornohasta[aposiciOntope
de asara [aparri[la[abbrta aproximadamente10cm {cuatro
pulgadas}].
2.Suietela puertadecadalado. Nouse[a _:z:_Z_ ....
manijade la puertapara levantaria, fif/f-- -] /
3.Levanteuniformementehastaque Iapuerta
sesalgade losbrazosde articulaci6n.
Para voiver a comocar:
I.Sujete la puerta de cada lad&
2. Alinee las ranuras de la puerta con los brazos de articuIaciOn de la
estufa.
3.Deslicela puertahaciaIosbrazosde articuiaci6nhastaqueest6
compbtamenteasentadaen Iasbisagras. Empuiehaciaaba}olas
esquinassuperioresde la puertaparaasentarlacompbtamenteen
lasbisagras. Lapuertano debequedartorcida.
Nora: La puertadei hornoen unaestufanuevapuedesentirse
"esponiosa"cuandosecierra. Estoesnormaly disminuir_conel
USO.
Ventana del Homo
Para proteger maventana de mapue[ta demhomo:
1. Nouseagentesde limpiezaabrasivostabs comoesponiasde
restregarde lanade aceroo limpiadoresen polvopuespueden
rayarelvidrio.
2. Nogolpeeelvidrio conollas,sartenes,muebles,]uguetesu otros
objeto&
3. NocierreIapuertadeIhomohastaque lasparrillasdel horno no
est@ensuIugar.
Ai goIpear,rayar,hacervibraro esforzarel vidriopuededebilitarsu
estructuracausandoun mayorriesgode roturaen unafecha
posterior.
Luz Norno
, Desconecte laenerg[aa [aestufaantesde reemplazare!foco.
; Use un toma0!!asSecopara evitar P0Sibledad/0aSus man0s
Cuando est6reemplazandee!foco.
; Asegdresede queel foCoest6fr[o antesdetocarlol
NOtoqueei foco CalienteConun pasohOmedopuesestopuede
quebrare!foco,
Para reem£mazar emfoco demhomo:
1.Cuandoel hornoest6fr[o,suietela tapade IabombiIIaen suhgar,
luego desliceel ret@ de aBmbre fuerade lacubierta.NOTA: La
cubbrta de la bombiIIasecaer_si no es
sujetaensukJgarcuandoestasacando CUBIERTADEL
ei ret@lde alambre, f:oco
2.Saque la cubierta del foco y el
foco.
3.Coloque un foco de 40 watts
para electrodom@ticos. \
4.Vuelvaacolocarlacubiertadela f_ErdVDEALAMBRE
bombilIayaseg0relaconelret@
de alambre.
5.Vuelvaa enchufarla estufa.Vuelvaa colocarla horacorrect&
74

Tomillos Niveladores
Ver!f!queque e!soporteantivue!c_ esteasegurand0alpiseune
de lostorrfi!!os[!ive!ado[estraseros, EsteSOPOrteevitaque la
estufasevuelqueaccidenta!mente_
La estufadebeset niveladacuandose instaB. Si Ia II]](3
estufano est_niveBda,gire lostornilios nivetadores I[[I _
de pI_sticoubicadosen cadaesquinade B estufa Jl_
hastaque quedeniveBda. _/,,_
_ ANTIVUELCO
TORNILLO NIVELADOR
Gaveta de Almacenamiento
Nog Jardeproductosde papelo de pBstico,alirnen[osn
materialesinfiamabbs en _s_aga_eta.Lagave[apuede
cale"ltarsedemasiadoparaestosarticuloscuandoseest,1usando
e!horno.
Para volver a colocar:
1. Insertelosextremosde lascorrederasde la gavetaen losrbles
de la estufa.
2. Levanteia partedeBnterade ia gavetay suavementeempOiela
hastaia pnmeraposiciOndetope.
3. Levanteiagavetanuevamentey empqela hastaque quede
completamentecerrad&
Tomacorriente para
Emeetrodo sticos Peque os
(Modelos Canadiensessolamente}
Eltomacorrienteparaelectrodom@ticospequeiiosest_ubicadoen
el iado inferiorizquierdodel protectortrasero.AsegOresede que los
cordonesei@tdcosnodescansensobrelos
elementossuperioreso cercade elios. Siel
ebmento superiorest_encendido,ei cord@
yel electrodom@ticopuedendai_arse.
EIdisyuntordeitomacorrientepara
ebctrodom@ticospeque_ospuede
dispararsesi el artefactopeque_o _ @
enchufadoen 61esde m_sde 10amps. ,_/_
/
Parareponerel disyuntor,optima ei
interruptorsituadoen el borde inferiordel 'D/SYUNZOR'
protectortrasero.
La gavetade almacenamientopuedeset retiradaparaque usted
puedalimpiardebajode la estufa.
Para sacar:
1. Vade la gavetaydeslicelahaciaafuerahastala primeraposici6n
detope.
2. Levantela partedelanterade la gaveta.
3. TirelahastaiasegundaposiciOnde tope.
4. Sujetelosladosy levantela gavetapara retirarla.
75

1
PROBLEMA SOLUC_ON
Parsmsmayor,s de mosprobmemss, • RevisesiIoscontrolesde]hornsest_ndebidamenteajustados,
verifiqueprimero mesiguiente, • Verifiquesiei enchufeest_firmementeinsertadoenel tsmacsrriente,
• Verifiqueo vuelvsa repsnerel disyuntor,Verifiques reemplaceel fusible,
• Verifiqueel suministrode energ[ael_ctrica,
Tods msestsfs o psrte de elmsno • Revisesila superficiey/s Isscsntrslesdel hornsestandebidsmenteajustadss,Vetp_ginss
funnionso 55y 66,
• Verifiquesi lapuertadel hornsseha desblsqueadsdespu6sdelciclode autslimpieza,Ver
p_gina68,
• Revisesiel hams est_ajustadsparahsmeadsdiferidss prsgramade limpieza,Verp_ginss62
y 68,
• Verifiquesi'Csntml Lock'(BIoquesde Control)est_actlvads,Vetp_g,60,
• Verifiquesiel controlest_en Msds Sab_tico,Vetp_g,64,
El remoj,maspamsbrssen el indicador • Elhsrnopuedeestarprsgramsdsparaunafunci6n de'Cook& Hold'o unsfunci6ndiferlda,
visualy/e rossmutesfunnionsn pete . Puedeestaractivadslacaracter[stlcade bisquesdeloscontmlesdel barns,(Verpdg,60,)
el homo no se nslienta,
Los ressltsdos del homesdo no • AsegOresede queel respirsdersdel bornenoest_b!oqueads,Vetp_gina66psrala ubicaci6n,
son come se esperaban o son • Verifiqueparsasegurarsede queIaestufaest_nivelada,
diferentes s los del homo snterioro • Lastempersturssa menudsvar[anentreun bornenuevsy uricantiguo, A medidaquepasa
eltiemps,latempersturadel harriscambiaypuedehacersemJscalientes m_sfr[a, Vet
p_gins64 paralasinstruccisnescomeajustarIatemperatursdethorns (modelosselectos),
NOTA:Noserecomiendaajustarlatemperaturasihatenidsprsbtemasconsolounasdosrecetas,
• Consulteelfsllets "La CocinaF_cil"parsmayorinformaci6nsobreIssutensiliosde hsmear,
Los smimentosno se sssn s ms • VerifiqueIssposicionesde lasparrillasdelhorns,Elalimentopuedeestarmuycercadel
parrimmaenforms debids o same elements,
demssisdo humoo • Elelementode asarnsrue precalentads,
• Elpapelde aJumJnioseus6de maneraincorrecta, Nuncafsrre el insertsdel assdsrconpapel
dealuminio,
• LapuertadeIhornoestabacerrads mientrssseassbas Japarrilla, DejeJapuertasbierta en Ja
primeraposici6n (alrededorde 10cm [4puJgadas]],
• Recsrteelexcesodegrasade Jacsrneantesde psnerlaaasara laparrilla,
• Se us6unaasaderasucia,
• Elvsltajedel hsgarpuedeserbajs,
Emhomo no se autemimpia • Verifiqueparaasegurarsede queel ciclono est6ajustadopsraun csmienzodiferids,Ver
(modemossementos)o p_gina68,
• Verifiquesi lapuertaest_cerrads,
• Verifiquesiel controlest_en Mods Ssb_tics,Verp_g,64,
• Elhsrnopuedeestara m_sde 205°C (400°FD,Latempersturadel hornsdebeserinferiora
205°C (400°FDparapmgramaruncicls delimpieza,
El homo no se miml_i6en forms • Puedeque seanecesariountiempode limpiezam4slargo,
debida {[modelos semectos), • Losderramesexcesivss,especialmentedeafimentssazucaradssy/s 4cidssnsfuersn Jimpiadss
antesdelciclo de autolimpieza,
Ls pserts del homo no se • Elinteriordel hornstodsv[aest_caliente, Dejeque paseaprsximadamenteunahsraparaque
desbleqses desps@sdel title el hornoseenfr[eantesdeque secompleteunclcls de autslimpieza,Lapuertapuedeset
de autolimpieza [modelos selectos), abiertacuandsdesaparezcaIapalabra'LOCK'deJindJcadorvisual,
• Elcontrsly la puertspuedenestarblsqueadss,Vetpdg,60,
76

PROSLEMA SOLUC_6N
Sejunta humedaden maventana ° Estoesnormalcuandosecocinanalimentosconalto contenidode humedad.
demheine o samevaporper ° Seus0humedadexcesJvacuandose limpi6laventana.
emrespiraderodemhomo,
Hay un omorfaerte o hamo mere ° Estoesnormalen una estufanuevaydesaparecer_despu6sde unospocosuses=
euando se enciende emhomo, AIiniciar un cicio deautoiimpiezase "quemar4n"losoloresm4s r4pidamente=
o Siseenciendeel ventiladorayudar_a eliminarel humoy/o el clot=
o Haysuciedadexcesivadealimentosenelpanelinferiordelhomo=UseunciclodeautolimpJeza=
C6digosde Errores °
Se esnuchan ruidoso
'BAKE'o 'LOCK'puedendestellarr4pidamenteenel indicadorparaavJsariequehayunerror
oun problema.Si'BAKE'o 'LOCK'aparecenenelindicadorvisual,oprimaIatecla'CANCEL'.
Si'BAKE'o 'LOCK'contin0andestellando,desconecteJaenerg[ael6ctricaalelectrodom@stico.
Espereunospocosminutesyvuelvaareconectarlaenerg[ael6ctrica.Sicontimiandestellando,
desconectelaenerg[ael6ctricadeJelectrodom6sticoyflameal t6cnJcodesewJcioautorizado.
Siel borneest4demasiadosucio,puedenocurrirdemasiadasIlamaradasIocualresuJtar4en
un c6digodeerrorduranteIaIimpieza.Oprimalatecla'CANCEL'ydejequeel homoseenfr[e
completamente,limpieelexcesode suciedadyluegovuelvaa programarel ciclode JimpJeza.
Siel c6digode error reaparece,Ilamea un t6cnJcoautorizado.
° Elhornoemitevariessonidosbaios. Ustedpuedeoir [osrelesde[hornocuandoseencienden
yseapagan.Estoesnormal.
o A rnedidaquee[bornesecalientayseenfr[a,ustedpuedeo[rsonidosdepiezasmet4iicasque
seexpandeny contraen. Estoesnormaly no daffar4su electrodomestico.
No se escuchan seiiaies sonoras ° Elhomo puedeestaren ModeSab_tico(modeJosselectos}.Ver p%. 64.
y el indicadorvisualno se activa,
'SAb' desteHa y luego se
despliega nontinuamenteo
o Elborneest4enmodesabatico.Paraanularel modesab_tico,optimaymantengaoprJmidala
tecla 'Clock'(Rel@durantecincosegundos.
77

78

Gatantia de la Estufa EJ ctrica
Garant_aCompieta de Un A_o =
Piezas y Mane de Obra
Duranteun (I) afo desdela fechaouginaJde
compraa_pot menor,serepararao reempJazarti
gra[u_tamentecualqu_erplezaquefalle durante
usonormaJen el hogar
Garantias Limitadas -
Piezas Solamente
Desde el Segando basra el Quinto Afio=A
par[it delafechaoriginalde compra,serepararan
o reemp_azarangratuitamentelaspiezas
_ndicadasacontinuaci0nquefallendursnteuso
normaJenel hogaren Ioque[_spec[aalas
piezasy el propietariodeber_pagartodos los
o[roscostosincluyenuomanode abra.
kllometraje/mlllaje,transporte,costodel viajey
cos[odeldiagn0stico,situesenecesario.
Note Io siguieate: Estasgarant[ascompletasse
apJicanunLcamen[ecuandoelelec[rooom6stico
se encuen[raen losEstadosUnidoso Canada.
LoseJectrodom6sticosqueseencuemrenen
otrospa[sesestaransubiertosOnicamen[epo/
lasgarandasJimitadas.inciuyendola garant[a
limitadapara laspiezasquefallen durantee!
primeraBu.
Residentes Canadienses
Estasgaranuascubrensolamen-[eaquellos
electrodom6sticosinstaladosen Canadaque
hayansidocertificadospor laAsociaci0noe
NormasCanadienses{CSA},a menosque hayan
sidotra_dosa Canadade_deEstadosUnidos
debidoa un cambiode residencla.
Lasgarantiase,speciticasexpresadas
an_enormenteson/as_)HICASdarantias
otordadaspot d fablicante.Estas9arantiasle
otorganderechosledatesespecfficos.Listed
ouedetenetotrosderechosque vat/andeun
estadoa otto
Lo que No Cubren Estas Garantias:
1=Situacionesy daSosresultantesdecuaiquierade lassiguienteseventualidades:
a=InstalaciOn,entregao mantenimientoinapropiados=
b=Cuaiquierreparaci6n,modificaciOn,alteraci6no ajustenoautorizadoporel
fabricanteo porun centrode sewicioautorizado=
c= Maluso,abuso,accidentes,usoirrazonabIeo hechosfotuitos=
d=CorrienteeI6ctrica,voitaieosuministroincorrecto=
e=Programaci6nincorrectadecualquierade loscontrotes=
2= Lasgarant[asquedannuIassi losn0memsdeserieoriginalesbansideretirados,
alteradoso nosonf_cilmentelegibles=
3= Focos=
4= Productoscompradosparausocomercialoindustrial=
5= Eicostodelservicioo IIamadade serviciopara:
a=Corregirerroresde instalaciOn=
b=InstruiraIusuariosobreel usocorrectodel artefacto=
c=Transportedel artefactoal estabiecimientodesewicioyel retornoal ciiente=
6= Losda_osconsecuenteso incidentaiessufridospot cualquierpersonacomo
resultadodecualquierincumplimientode estasgarant[as.
EnalgunosestadosnosepermiteIaexclusiOno IimitaciOnde losda_osconsecuenteso
incidentales,potIotantola exclusionanteriorpuedeque noseapliqueensucase.
Si Necesita Sewicio
YeaprimeroIasecci6ndeIocalizaci0ny soIuciOndeaver[asen Iaguiade usoy
cuidadoo Ilamea MaytagServices sM,Servicioa losClientesMaytagIlamandoal
1-800-688-9900EE.UU.o al 1-800-688-2002Canad&
Para obtener servido bajo garantia
ParaubicarunacompaS[ade servicioautorizadoen suIocalidad,pOngaseencontacto
conel distribuidordondeadquiri6suelectrodom6sticoo Ilamea MaytagSewicessM,
Servicioa IosClientesMa}¢ag=Si norecibeserviciosatisfactoriobajola garant[a,pot
favorIlameo escribaa:
May¢agServicessM
Attn: CAIR_Center
P.O.Box2370,Cleveland,TN37320-2370
EE.UU.1_800_688_9900y Canad_ 1-800-688-2002
NOra: Cuandosepongaen contactoconMaytagSe[vices sM,Sewicioa los
ClientesMaytagacercadeun problema,porfavorincluyala siguienteinformaciOn:
a=Sunombre,direcci6ny n0merode teldono=
b=Losn0merosde modeloydeseriedesuelectrodom6stico=
c=Nombrey direcciOndetdistribuidory lafechade compra=
d=UnadescripciOnclaradelproblemaqueestaexperimentando=
e=Pruebadecompra=
Lasgu[asdel usuario,manualesdesewicioe informaci6nsobrelaspiezaspuedensolicitarsea MaytagServicessM,Servicioa losClientesMa}¢ag=
Form No. A/06/05 Pal1 No. 8113P505 60 (_2005 Maytag Appliances Sales Co. Litho U.S.A.
Transcripción de documentos
Electric M_A _A_!3 Range - Coil @ Table o Safety .......................................... 1-3 Care & Cleaning ................... 15=18 Seit-Clean Oven Surface Cooking ...................... 4-5 Surface Controls Coil Elements Oven Cooking Cleaning Procedures Maintenance ......................... Oven Window ......................... 6-14 19-20 Oven =ight Manual Clean Oven Controls Clock Baking Timer Broiling Manual Clean Oven Knob Control Baking Broiling Self=Clean Oven Controls Clock Timer Baking Cook & Hold Delay Form No. A/06/05 Part No. 8113P505 Keep Warm Broiling Oven Racks 60 Troubleshooting Warranty ................... & Service .................... Guide d'uti_isation et d'entretien ................................... Guia de Uso y Cuidado @2005 Maytag Appliances 21-22 23 24 ............. 50 Sales Ce. Litho U.S.A. Oensumer: Phase read and keep this guide for future reference. Keep sales receipt and/or canceled check as proof of purchase. To ensure proper and safe operation: Appliance must be properly installed and grounded by a qualified technician. Do not attempt to adjust, repair, service, or replace any par of your appliance unless it is specifically recommended in this guide. Aft other servicing should be referred to a Model Number qualified servicer. Serial Number Always disconnect power to appliance before servicing. installer: Please leave this guide with this appfiance Date of Purchase f you have questions, call: Maytag Customer Assistance 1-800-688-9900 USA 1-800-688-2002 Canada 1-800-688-2080 { U.S.17Y for hearing or speech repaired} (Mon.-Fri.. 8 am-8 pm Eastern Time} Internet: http:i/www.maytag.com in our continuing effort to improvethe qualityand performance of our cooking products, it may be necessary to make changes to the appliance without revising this guide. For service infermaden, see page 23. _ ALL RANGES CAN TIP AND CAUSE IN3URIES TO PERSONS iNSTALL ANTI,TIP DEVICE PACKED WITH PJ_NGE , FOLLOW ALL iNSTALLATiON WARNING: To reduce risk of tipping of the appJiance from ! abnormal usage or b_ loading of the oven door, the appliance must be secured by a properiy instailed anti.tip device. Warning and Important Safety Instructions appearing in this guide are not meant to cover aft possible conditions and situations that may occur. Common sense, caution, and care must be exercised when installing, maintaining, or operating the appliance. Always contact the manufacturer about problems or conditions you do not understand. Recognize Safety Symbols, Words, Labels WARNING _ Hazards or unsafe practices which C0ULD result in seveFe personal injury or death, To check if device is properly installed, look underneath range with a flashlight to make sure one of the rear leveling legs is properly engaged in the bracket slot. The anti-tip device secures the rear leveling leg to the floor when properly engaged. You should check this anytime the range has been moved. To Prevent Fire or Smoke Be sure all packing materials are removed from the appliance before operating it. Keep area around appliance clear and free from combustible materials. Flammable materials should not be stored in an oven. Many plastics are vulnerable to heat. Keep plastics away from pars of the appliance that may become warm or hot. To prevent grease fires, do not let cooking grease or other flammable materials accumulate in or near the appliance. In Case of Fire result in minor persona! injury. Read and follow all instruetions before using this appmiance to prevent the potential risk of fire, electric shock, personal injury or damage to the appliance as a result of improper usage of the appliance. Use appliance only for its intended purpose as described in this guide. Use dry chemical or foam-type extinguisher or baking soda to smother fire or flame. Never use water on a grease fire. 1. Turn off appliance to avoid spreading the flame. 2. NEVER pick up or move a flaming pan. 3. Smother oven fire or flame by dosing the oven door. Child Safety NEVER store items of interestto children in _binets above an appJ!ance, Children climbing on the appl!ance or' on the appliance door to reach items could be seriously injured, NEVER leave children alone or unsupervised near the appliance when it is in use or is still hot. Children should never be allowed to sit or stand on any part of the appliance as they could be injured or burned. Children must be taught that the appliance and utensils in it can be hot. Let hot utensils cool in a safe place, out of reach of small children. Children should be taught that an appliance is not a toy. Children should not be allowed to play with controls or other parts of the appliance. About Your Appliance NEVER usa an appliance as a step to reach cabinets above, Misuse of appliance door, such as stepping, leaning or sitting on the dooh may result in possible tipping of the appliance, breakage of door, and serious injuries, Cooking Safety Never heat an unopened food container in the oven. Pressure build-up may cause container to burst resulting in serious personal injury or damage to the appliance. Use dry, sturdy potholders. Damp potholders may cause burns from steam. Dish towels or other substitutes should never be used as potholders because they can trail across hot elements and ignite or get caught on appliance parts. Wear proper apparel. Loose fitting or long hanging-sleeved apparel should not be worn while cooking. Clothing may ignite and cause burns if garment comes in contact with heating elements. Always place oven racks in the desired positions while oven is cool. Slide oven rack outto add or remove food, using dry, sturdy potholders. Always avoid reaching into the oven to add or remove food. If a rack must be moved while hot, use a dry potholder. Do not let potholder contact hot element in oven. Use racks only in the oven in which they were shipped/purchased. Use care when opening the oven door. Let hot air or steam escape before removing or replacing food. PREPARED FOOD WARNUNG: Follow food manufactureCs instructions. If a plastic frozen food container and!or its cover distorts, warps, or is otherwise damaged during cooking, immediately discard the food and its container. The food could be contaminated. To prevent potential hazard to the user and damage to the appliance, do not use appliance as a space heater to heat or Do not allow aluminum foil or meat probe to contact heating element. warm a room. Also, do not use the oven as a storage area for food or cooking utensils. Always turn off all controls when cooking is completed. Do not obstruct the flow of air by blocking the oven venL DO NOT TOUCH HFATING ELEMENTS OR iNTERiOR SURFACES OF OVEN. Heating elements may be hot even though they are dark in color, interior surfaces of any oven become hot enough to cause burns. During and after use, do not touch, or let clothing or other flammable materials contact heating elements or interior surfaces of oven until they have had sufficient time to cool. Other surfaces of the appliance may become hot enough to cause burns - among these surfaces are: oven vent opening, surface near this opening, oven door and window of oven door. Do not touch a hot oven light bulb with a damp cloth as the bulb could break. Should the bulb break, disconnect power to the appliance before removing bulb to avoid electrical shock NEVER use aluminum foil to cover an oven rack or oven bottom. Misuse could result in risk of electric shock, fire, or damage to the appliance. Use foil only as directed in this guide. Utensim Safety Follow the manufacturer's directions when using oven cooking bags. This appliance has been tested for safe performance using conventional cookware. Do not use any devices or accessories that are not specifically recommended in this guide. Do not use element covers, stove top grills or add-on oven convection systems. The use of devices or accessories that are not expressly recommended in this guide can create serious safety hazards, result in performance problems, and reduce the life of the components of the appliance. If pan is smaller than element, a portion of the element will be exposed to direct contact and could ignite clothing or potholder. Only certain types of glass, glass/ceramic, ceramic, earthenware, or other glazed utensils are suitable for cooktop or oven service without breaking due to the sudden change in temperature. 2 Follow utensil manufacturer's instructions when using glass. Turnpanhandle towardcenterofcooktop, notoutintothe roomor overanothersurfaceelement. Thisreduces theriskof burns,ignitionofflammable materials, orspillageif panis acddently bumpedorreached bysmallchildren. Besureutensilislargeenoughtoproperly containfoodand avoidboilovers. Pansizeisparticularly important indeepfat frying.Besurepanwillaccommodate thevolumeoffoodthat isto beaddedaswellasthebubbleactionoffat. caution. Usecaretoavoidsteamburnsifawetspongeorcloth isusedtowipespillsona hotsurface. Somecleaners can producenoxious fumesif appliedtoa hotsurface. CleanonlypaRRs listedinthisguide. Se f-C ean Oven (select models[} Neverleta panboildryasthiscoulddamage theutensiland theappliance. Do not clean door gasket. The door gasket is essential for a good seal. Care should be taken not to rub, damage, or move the gasket. NEVER leave surface units unattended especially when using high heat. An unattended boilover could cause smoking and a greasy spillover can cause a fire. Do not use oven cleaners or oven liners of any kind in or around any paRRof the self-dean oven. This appliance is equipped with different size surface elements. Select pans with flat bottoms large enough to cover element. Fitting pan size to element will improve cooking efficiency. Before self-cleaning the oven, remove broiler pan, oven racks and other utensils, and wipe off excessive spillovers to prevent excessive smoke or flare ups. Coim Emements To prevent damage to removable heating elements, do not immerse, soak or clean in a dishwasher or self-clean oven. A It is normal for the cooktop of the range to become hot during a self-clean cycle. Therefore, touching the cooktop during a clean cycle should be avoided. damaged element could short resulting in a fire or shock hazard. important Make sure drip bowls are in place as absence of these bowls during cooking could damage wiring. and The California Safe Drinking Water and Toxic Enforcement Act of 1986 (Proposition 65} requires the Governor of California to publish a list of substances known to the State of California to cause cancer or reproductive harm, and requires businesses to warn customers of potential exposures to such substances, ProtectEve Liners: Do not use aluminum foil to line surface unit drip bowls or oven bottoms, except as suggested in the manual. Improper installation of these liners may result in a risk of electric shock or fire. Users of this appliance are hereby warned that when the oven is engaged in the self-clean cycle, there may be some low-level exposure to some of the listed substances, including carbon monoxide, Exposure to these substances can be minimized by Deep Fat Fryers Use extreme caution when moving the grease pan or disposing of hot grease. Allow grease to cool before attempting to move pan. Ventimating Safety Notice properly venting the oven to the outdoors by opening the windows and/or door in the room where the appliance is located during the self-dean cycle, Hoods When flaming foods under the hood, turn the fan on. UMPORTANT NO]]CE REGARDUNG PET BURDS: Never keep pet birds in the kitchen or in rooms where the fumes from the kitchen could reach. Birds have a very sensitive respiratory system. Fumes released during an oven self-cleaning cycle may be harmful or fatal to birds. Fumes released due to overheated C eaning cooking oil, fat, margarine and overheated non-stick cookware may be equally harmful Clean range hood and filters frequently to prevent grease or other flammable materials from accumulating on hood or filter and to avoid grease fires. Safety Clean cooktop with caution. Turn off all controls and wait for appliance parts to cool before touching or cleaning. Clean with Save These instructions for Future 3 Reference Surface Controls Suggested Setting Heat Settings The size, type of cookware and cooking operation will affect the heat setting. For information on cookware and other factors affecting heat settings, refer to "Cooking Made Simple" booklet. Use to turn on the surface elements. An hlfinite choice of heat settings is avaHabHefrom Lew to High. The knobs can be set on or between any of the settings. Low (2): Use to keep foods warm and melt chocolate and butter. the Controls 1. Place pan on surface element. High (10): Use to bring liquid to a boil. Always reduce setting to a lower heat when liquids begin to boil or foods begin to cook. 2. Push in and turn the knob in either direction to the desired heat setting. ° The control panel is marked to identify which element the knob controls. For example, the graphic at right indicates left front element. _ 0 C_ OFF Med. Low (3-a): Use to continue cooking covered foods or steam foods. 0 3. There is an element indicator light on the control panel. When any surface control knob is turned on, the light will turn on. The light will turn off when all the surface elements are turned off. High 10 [ 4. After cooking, turn knob to OFF. Remove pan. • • Medium _ledium maintain (5°7): Use to slow boil for large amounts of liquids and for most frying operations. (Style varies by model] BEFORE COOKING - Always place a pan on the surface unit before you turn it on, To prevent damage to rail .3e.never operate surface - ............... _led. High (8=g): Use to brown meat, heat oil for deep fat frying or sauteing. Maintain fast boil for large amounts of liquids. AFTER COOKING o Make sure surface unit is turned off, - Clean up messy spills as soon as possible, unit without a pan in place. NEVER use the cooktop as a storage area for rood or cookware OTHER TIPS - If cabinet s'{orage is provided directly above cooking surface, limit it to items that are infrequently used and can be safely stored in an area subjected to heat. Temperatures may be unsate for items such as volatile liquids, cleaners or aerosol sprays, • NEVER leave any items, especially plastic items, on the cooktop. The hot air from the vent may ignite flammable kems melt or soften plastics, or increase pressure in closed containers causing them to burst NEVER allow aluminum foil. meat probes or any other metal object, other than a pan on a surface element, to ............................... DURING COOKING - Be sure you know which knob controls which surface unit. Make sure you turned on the correc_ surface unit. • Begin cooking on a higher heat setting then reduce to a lower setting to complete the operation. Never use a high heat setting for extended cooking, o NEVER allow a pan to boil dry. This could damage the pan and the appliance o NEVER Louch cooktop until it has cooled, Expec_some parts of the cooktop, especially around the surface units. tc. become warm or hot during cooking. Use potholders to pro_ect hands. 4 Coi E ement Surface CoB Dements , When an dement is on, it will cycle on and off to maintain the heat setting+ ° Coil elements are self-cleaning. Do not immerse in water. ° CHeancooktop after each use. To remove: ° Wipe acidic or sugary spHHsas soon as the cooktop has cooHedas these spHHsmay discoHoror etch the porcdain. To replace: When cool, raise element. Carefully pull out and away from receptacle. Insert element terminals into receptacle. Guide the element into place. Press down on the outer edge of element until it sits level on drip bowl. To protect drip bowl finish: ° To HessendiscoHoration and crazing, avoid using high heat for Hongperiods+ ° Do not use oversized cookware. Pans shouHdnot extend more than 1-2 inches beyond the dement+ TERMINALS Drip Bow s ° When home canning or cooking with big pots, use the Canning Hement (Modal CEll. Contact your Maytag deaHerfor detaiHsor call 1-877-232-8771 USA or 1-800-688-8408 Canada to order. The drip bowls under each surface element catch boilovers and must always be used=Absence of drip bowls during cooking may damage wiring+ , CHean frequentHy, To prevent the risk of electric shock or fire+never line drip bowls with aluminum foil+ [See page 17.] Drip bowls will discolor (blue/gold stains] or craze over time if overheated= This discoloration or crazing is permanent=This will not affect cooking performance= 5 Manual Clean Oven Control (select models) J More+ \\ ...... ...... _iiiiiiiiii!iii/iiiliii/iii!iiiiiiiii_ .......... iO \ \\\ A B C •• Less- _ Â:_º` \ { LA_,L&L D E ) .... / F NOTE: The display will show 12:00 when the appliance is first connected to power OFif power is interrupted. The Bake and Broil indicators light when function is pressed. A Bake Use for baking and roasting. B Broil Timer Use for broiling and top browning. Sets Timer. D Clock Use to set time-of-day clock. E CANCEL Cancels all operations except Timer and Clock. F More+ or Less- Enters or changes time, oven temperature. Sets Hi or LO broil. Using the Teuchpads Press the desired pad. Press the More+ or Less- pad to enter time or temperature. , A beep will sound each time a function pad is pressed. There is no beep for the More+ or Less- pad. , A double beep will sound if a programming error occurs. Note: Four seconds after pressing the More+ or Lesspad, the time or temperature will automatically be entered. If more than 30 seconds elapse between touching a function pad and the More+ or Less- pad, the function will be canceled and the display will return to the previous display. Setting the CJock 1. Press the Clock pad. , The clock time cannot be set if the control is programmed for a bake, broil or timing operation. 2. Set the correct time of day using the More+ or Less- pads. If the More+ or Less- pad is not pressed within 30 seconds, the program will cancel. Press the Clock pad and begin again. Setting the Timer The timer can be set from one minute 001] up to 99 hours and 59 minutes (99:59]. Time will be displayed in minutes and not in seconds. THE TIMER DOES NnT CONTROL THE nl/ENo 1. Press the Timer pad. ° 0:00 wiii light and the colon {:] wiii flash in the display. 2. Press the More+ or Less- pad until the desired time is displayed. , The timer will begin as soon as the time is set. ° The flashing colon indicates that a timing operation is in progress. (The colon wiii not flash if the time of day or oven temperature is displayed.] ° Two short beeps signal the end of the operation. "0:00" wiii appear in the display. If desired, press the Clock pad and the time of day wiii briefly reappear in the display during a timing operation. If desired, press the Bake or Broil pads and the current temperature setting wiii briefly reappear in the display during a timing operation. To cancel the timer operation: Press and hold the Timer pad for several seconds. Baking, Roasting and Broiling For additional bakhg, roasthg and broi[hg thnes and tips, see "Cooking Made Simple" bookHet. Setting the Controls For Baking or Roasting: 1, Press Bake pad, , 000 wi[[ light and the Bake indicator wi[[ flash in the display, , If you press the Bake pad and do not set an oven temperature within 30 seconds, the program wi[[ automatically cancel and the time of day wi[[ reappear in the display, 2, Press the More+ or Less- pad until the desired oven temperature is displayed, , The oven temperature can be set from 170° to 550° F, , 350 °wi[[ appear in the display when either More+ or Lesspad is pressed once, , Press and tap the More+ or Less- pad to change the oven temperature by 5° increments or press and hold the More+ or Less- pad to change the oven temperature by 10° increments, , 100° or the actual oven temperature, whichever is higher, will appear in the display when the oven turns on. ° The temperature in the display will increase in 5° increments until preset temperature is reached. A single beep will sound when the oven is preheated. ° Allow 10 to 15 minutes for the oven to preheat. ° To recall preset temperature during preheat, press the Bake pad. The temperature will be displayed for three seconds. , To change oven temperature during cooking, press the Bake pad, then press the More+ or Less- pad until the desired temperature is displayed. , To change oven temperature during preheat, press the Bake pad twice, then press the More+ or Less- pad until the desired temperature is displayed. 3. Place food in the oven. Check food for aloneness at the minimum cooking time. 4.At the end of cooking, press the Cancel pad to turn the oven off and remove the food from the oven. , The oven features an automatic shut-off. If the oven is [eft on for 12 hours it wi[[ automatically turn off and 000 wi[[ appear in the display. Press the Cancel pad and the time of day wi[[ reappear in the display. Setting the Controls For Broiling: , "SEt" wi[[ light and the Broil indicator light wi[[ flash in the display. 3. Press the More+ pad to select Hi (high) broil or the Less- pad to set Lo 0ow) broil , Select Hi broil for normal broiling. , Select Lo broil for low temperature broiling to avoid excessive browning of longer cooking foods like poultry. , If you do not select Hi or Lo Broil within 30 seconds, the program wi[[ automatically cancel and the time of day wi[[ reappear in the display. 4. Preheat broil dement for three minutes. Broil with the oven door open to the first stop position (about 4 inches). 5. After broiling, press Cancel to turn the oven off and remove the broiler pan from the oven. The current time of day wi[[ reappear in the display. Manual Clean Oven Knob (:select models) Oven Temp Knob OFF 5,0, The Oven Temp Knob is used to select and maintain the oven temperature. Always turn this knob just to the desired temperature. Do not turn to a higher temperature and then back. Setting the Centre[ for Baking 250 350 and Roasting: 1.Push in and turn Oven Temp knob to desired temperature. Allow 10-15 minutes for preheating. 2. Place food in the center of oven. Check food for aloneness at minimum time in recipe. Cook longer if necessary'. 3. Remove food from oven and turn Oven Temp knob to OFF. Note: For additional baking, roasting and broiling tips, see "Cooking Made Simple" booklet. Setting the Control for Broiling: 1.For best results, use a broiling pan. Place the broiler pan on recommended rack position (see chart on page 8). 2.Turn Oven Temp knob to BROIL or, for lower temperature broiling, to 450° F. , Lower temperature broiling avoids excessive browning of longer cooking foods such as poultry. For best results, use pan designed for broiling. 3. Follow the suggested times in the broil chart on page 8. Meat should be turned once about halfway through cooking time. 1.Place broiler pan on recommended rack position. (See chart on page 13.) 4. Check the aloneness by cutting a slit in the meat near the center to check the color. 2. Press the Broil pad. 5. After broiling, turn the Oven Temp knob to OFF.Remove the broiler pan from the oven. SeJf-Clean Oven Control (select models) A B C ........... Less- G H 1 D Thqqer ; .................. J The control panel is designed for ease in programming. The displaywindow on the control shows time of day, timer and oven functions. Control panel shown includes model specific features. (Styling may vary depending on modeL} A Broil Use for broiling and top browning. B Bake Use for baking and roasting. C More+ or Less- D Timer Enters or changes time, oven temperature. Sets HJor LO broil Sets Timer. Cook & Hold Clean G! Delay Clock !!4 Keep Warm CANCEL The clock can be set to display time in a 12-hour or 2a-hour format. The clock is set at the factory for the 12-hour format. To change the clock to 24-hour format: 1. Press and hold the CANCEL and Delay pads for three seconds. Bakes for a preset time, then holds food warm for 1 hour. 2. Press the More+ or Less = pad to select 12 or 24 hour. Use to set self-clean cycle. Programs the oven to start baking at a later time. 3. Set the time of day following directions below. Use to set time-of=day clock. To set the Clock: 1. Press the Clock pad. Use to keep cooked food warm in oven. the , Time of day and the colon flash in the display. Cancels all operations except Timer and Clock. 2. Press the More+ or Less- pad to set the time of day. Using the Touchpads , Colon continues flashing. %............................... _ Less- 3. Press the Clock pad again or wait four seconds. Press the desired pad. Press the More+ or Less- pad to enter time or temperature. When electrical power is supplied or after a power interruption, the last clock time before power was interrupted wiii flash. , A beep will sound when any pad is touched. , A douMe beep will sound if a programming error occurs. To recall the time of day when another time function is showing, press the Clock pad. Note: Four seconds after pressing the More+ or Lesspad, the time or temperature will automatically be entered. If more than 30 seconds elapse between touching a function pad and the More+ or Less- pad, the function will be canceled and the display will return to the previous display. Clock time cannot be changed when the oven has been programmed for cook or clean Delay or Cook & Hold. 8 To cance+ the Clock dispmay: To lock: If you do not want the th]le of day to display: Press and hold the CANCEL and Cook & Hold pads for three seconds. Press and hoHdthe CANCEL and CHockpads for three seconds. The time of day wiHH disappear from the dispHay LOCK flashes in the display. To unlock: When the chock dispHayis cancelled, press the CHockpad to briefly dispHaythe time of day. To restore Press and hold the CANCEL and Cook & Hold pads for three seconds. LOCK disappears from the display. the CJoek display: Press and hoM the CANCEL and CHockpads for three seconds. The time of day wiHHreappear in the dispHay. Faumt Codes BAKE or LOCK may flash rapidly in the display to alert you if there is an error or a problem. If BAKE or LOCK flash in the display, press CANCEL pad. If BAKE or LOCK continue to flash, disconnect power to the appliance. Wait a few minutes, and then reconnect power. If the flashing still continues, disconnect power to the appliance and call an authorized servicer. The timer can be set from one minute (00:01} up to 99 hours and 59 minutes (99:59}. The timer can be used independently of any other oven activity. It can also be set while another oven function is operating. The Timer does not control the oven. It only controls a beeper. To set Bake: To set the Timer: 1. Press the Timer pad. T_F1aer 1. Press tile Bake pad. ° "BAKE" will flash. ° 0:00 Hightsin the dispHay. ° The coHonflashes in the display. 2. Press the More+ or Less- pad until the correct time appears in the display. ° The colon will continue to flash. ....................................° 000 will light in the display. 2. Select the oven temperature. The oven temperature can be set from 170° to 550°. Press or press ".................................... and hold the More+ or Less- pads. ° 350 ° will light when either pad is first pressed. 3. Press Timer pad again or wait four seconds. More-_ : .......................... + ,: Less- Press the More+ pad to increase the temperature. ° The colon continues flashing and the time begins counting down. Press the Less- pad to decrease the temperature. 3. Press Bake pad again or wait four seconds. ° The last minute of the timer countdown will be displayed as seconds. BAKE will stop flashing and light in the display. 4. At the end of the set time, one long beep will sound. To cancel the Timer: 1. Press and hold the Timer pad for three seconds. OR ° 100° or the actual oven temperature will display. The temperature will rise in 5° increments until the preset temperature is reached. 2. Press the Timer pad and set the time to 00:00+ Locking the Controms 4. Allow the oven to preheat for 8-15 minutes. The touchpad controls can be locked for safety'+cleaning+ or to prevent unwanted use. They will not function when locked. ° When the set oven temperature is reached, one long beep will sound. If the oven is currently in use, the controls cannot be locked. ° To recall the set temperature during preheat, press the Bake pad. The current time of day will remain in the display when the controls are locked+ 5. Place food in center of oven, allowing a minimum of two inches between utensil and oven walls. 9 0. Checkcookingprogress. CookHonger if needed. When the cooking time has elapsed: ° Four beeps wiHHsound. 7. Whencookingisfinished, pressCANCEL.f?_r_ 8. Remove foodfromtheoven. ° "BAKE" wiHHturn off. ° "HOLD" and "WARM" wiHHHight. Baking Notes: , 170°wiHHdispHay. To change oven temperature during cooking, press the Bake pad, then press the More+ or Less- pad untiH the desired temperature is dispHayed= To change oven temperature during preheat, press the Bake pad twice, then press the More+ or Less- pad untiHthe desired temperature is dispHayed. After one hour in HOLD WARM: ° "End" wiHHdispHay. If you forget to turn off the oven, it wiHHautomaticaHHyturn off at the end of 12 hours. If you wish to deactivate this feature, see page 12. ° The time of day reappears in the dispHay= To cancel For additionaH baking and roasting tips, see "Cooking Made SimpHe"bookHet. Baking Differences Between Cook & Hemalat any time: _:ANCf-I% Press the CANCEL pad. Remove food from oven._._..y/ Delay Bake Your O_d and New Oven It is normaHto notice some baking time differences between a new oven and an oHdone. See "Adjusting the OvenTemperature" on page 12. as dairy products, pork, pouHt[y,or seafood. Cook & Hold When using Delay, the oven begins to cook later in the day. Set the amount of time that you want to delay before the oven turns on and how Hongyou want to cook. The oven begins to heat at the seHectedtime and cooks for the specified Hength of time, then keeps food warm for up to one hour. Cook & Hold dhows you to bake for a preset amount of time, foHHowedby a one-hour Keep Warm cycHe. TO set Cook & Hold: 1= Press the Cook & HoHdpad= DeHaytime can be set from 10 minutes (00:1d) to 11 hours, 59 ° "BAKE" and "HOLD" flash= To set a DeJayed Baking ° 000 Hightsin the dispHay= 2= SeHectthe oven temperature. The oven temperature can be set from 170° to 550°= Press or press and hoHdthe More+ or Less- pad= 1. Press the DeHaypad. 3= Press Cook & HoHdagain OR wait four seconds= WhiHe"DELAY" is stiHH flashing: cycle: ....................... ° "DELAY" flashes. LeSS.................. ° 00:00 flashes in the dispHay. _ Press the More+ pad to increase the temperature. 2. Press the More+ or Less- pad to set the ° Press the Less- pad to decrease the temperature= deHaytime. ° "HOLD" flashes= 3. Press the Cook & HoHdpad. ° 00:00 flashes in the dispHay= ° 000 Hightsin the dispHay. ° "BAKE" and "HOLD" flash. 4= Enter the amount of time you want to bake by pressing the More+ or Less- pad= Bake time can be set from ten minutes (00:10_to 11 hours, 59 minutes (11:59_). 4. Press More+ pad to set the baking temperature. ° 00:00 and "HOLD" flash. ° "BAKE" and "HOLD" Hightin the dispHay= ° "BAKE" stays Hit. ° The baking time wiHHHightin the dispHay= ° The baking time wiHHstart counting down= 10 ? Less- Keep Warm 5. Press More+ pad to set the baking time. , The Dday time, "DELAY", "BAKE" and "HOLD" Hightin the dispHay. For safely keeping foods warm or for warming breads and plates. To set Keep Warm: 1. Press the Keep Warm pad. ° "WARM" flashes. When the Delay time ° 000 appears in the display. has expired: Select the Keep Warm temperature. The Keep Warm temperature can be set from 145° to 190°. Press or press and hold the More+ or Less- pad. , "DELAY" will turn off= , Baking time is dispHayed. , "BAKE" and "HOLD" are dispHayed. To set a Delay whoa been programmed: Less........................... _ 170° will light when either pad is first pressed. Cook & Hold has already ° Press the More+ pad to increase the temperature. 1. Press the Dday pad. , Press the Less- pad to decrease , "DELAY" flashes. 2. Press the More+ or Less- pad to set the dday time. ° After four seconds, "DELAY" will stay ]it to remind you that a delayed cooking cycle has been set. has expired the temperature, "WARM" and the temperature wiii be displayed while Keep Warm is active. , 00:00 appears in the dispHay. Whoa the Delay time More÷ .................................. ..... ............................... : Less....................................... To cancem Keep Warm: and the oven _... 1. Press the CANCEL pad. starts: 2. Remove food from the oven. ° The baking time will be dispHayed. ° "DELAY" will turn off. Keep Warm ° "BAKE" and "HOLD" will remain Hit. Notes: ° For optimal food quality, oven cooked foods should be kept warm for no longer than 1 to 2 hours. To canoe!: Press the CANCEL pad. ° To keep foods from drying, cover loosely with foil or a lid. ° AHtimed and untimed cooking functions will be canceled. , To warm dinner rolls: - cover rolls loosely with foil and place in oven. ° The time of day will reappear in the display. - press Keep Warm and More+ pads to set 170° F. _otes: - warm for 12-15 minutes. Do not use delayed baking for items that require a preheated oven, such as cakes, cookies, and breads. , To warm plates: - place 2 stacks of up to four plates each in the oven. Do not use delayed baking if oven is already hot. - press Keep Warm and More+ pads to set 170° F. - warm for five minutes, turn off the oven and leave plates in the oven for 15 minutes more. - use only oven-safe plates, check with the manufacturer. - do not set warm dishes on a cold surface as rapid temperature changes could cause crazing or breakage. 11 Automatic Shut-Off/Sabbath Mode Adjusting Oven temperatures are carefully tested for accuracy at the factory. It is normal to notice some baking or browning differences between a new oven and an old one= As ranges get older, the oven temperature can shift= The oven vviHautomatically turn off after 12 hours if you accidentally Heaveit on= This safety' feature can be turned off= To cancel oven the 12-hour continuously shut-off the Oven Temperature and run the You may adjust the oven temperature if you think the oven is not baking or browning correctly. To decide how much to change the temperature, set the temperature 25° higher or lower than your recipe recommends, then bake. The results of the "test" should give you an idea of how much to adjust the temperature= for 72 hours: 1=Set the oven to bake (see page 9_= 2= Press and hold the Clock pad for five seconds. ° SAb will be displayed and flash for five seconds. ° SAb will then be displayed continuously until turned off or until the 72-hour time limit is reached. To adjust ° "BAKE" will also be displayed if a bake cycle is in use while the oven is in Sabbath Mode. 2= Enter 550° by pressing the More+ pad= 3= Press and hold the Bake pad for several seconds or until 0° appears in the display. All other functions EXCEPTBAKE (Timer, Keep Warm, Clean, etc=_are locked out during the Sabbath Mode. To cancel Bake when in Sabbath 4= Press the More+ or Less- pad to adjust the temperature. ° "BAKE" will turn off in the display= Each time a pad is pressed, the temperature changes by 5°= The oven temperature can be increased or decreased by 5° to 35°= , No beeps will sound. the Sabbath Mor(_;+ '............................. If the oven temperature was previously adjusted, the change will be displayed. For example, if the oven temperature was reduced by 15° the display will show "-15°"= Mode: Press CANCEL. To cancel the oven temperature: 1= Press Bake. Mode: 1= Press the Clock pad for five seconds. 5= The time of day will automatically reappear in the display. OR You do not need to readjust the oven temperature if there is a power faihJre or interruption. Broiling and cleaning temperatures cannot be adjusted. 2= After 72 hours, the Sabbath Mode will end= ° SAb will flash for 5 seconds. ° The time of day will return to the display. Sabbath Mode Notes: , Sabbath Mode can be turned on at any time with or without the oven on. , When the Sabbath Mode is started, no preheat beep will sound. , Sabbath Mode cannot be turned on if the touchpads are locked out or when the door is locked. ° All prompts, messages and beeps are deactivated when Sabbath Mode is active. ° If the oven is baking when Sabbath Mode is set, "BAKE" will go out at the end of the baking cycle. There will be no audible beeps. ° Pressing CANCEL will cancel a Bake cycle, however the control will stay in the Sabbath Mode. ° If power fails, the oven will power up in Sabbath Mode with 72 hours remaining and no cycle active. 12 0 0. Turn meat once about halfway through cooking. 7. When food is cooked, press the CANCEL pad. Remove food and broiler pan from the To set Broil: 1. Press the Broil pad. oven. , "BROIL" flashes. ° The time of day wiHHreappear in the dispHay. , SET is dispHayed. 2. Press the More+ pad to set HI broil or press the Less- pad to set LO broil. Broil Notes: , HI or LO wflHbe dispHayed. , For best results when broiling, use a pan designed for broiHing. , Select HI broil (550° F) for normal broiling. Select LO broil (450° F) for How-temperature broiling of Honger cooking foods such as pouHtry. , Expect broiHtimes to increase and browning to be sHightHy Highter if appHiance is instaHHedon a 208-voHt circuit. 3. After four seconds, the oven wflHstart. ° "BROIL" wflHremain Hit. , HI is used for most broiHing. Use LO broiHwhen broiHing Hongercooking foods. The Howertemperature dhows food to cook to the weHH done stage without excessive browning. , BroiHtimes may be Hongerwhen the HowerbroiHing temperature is seHected. 4. For optimum browning, preheat broil dement for 3-4 minutes before adding food. , For additionaH broiHingtips and temperatures, refer to the "Cooking Made Simple" bookHeL 5. PHacefood in the oven. Leave oven door open about four inches (the first stop). Broiling Chart I FOODS Beef Steak, 1" thick I POS_TmON+ COOK TIME Hamburgers, 3/4" thick 4 Medium WeHH Done WeHH Done Pork Bacon Chops, 1" Ham - precooked sHice,1/2" thick 4 4 4 WeHH Done WeHH Done Warm 0 - 10 minutes 22 - 20 minutes 8 - 12 minutes 3 or 4 WeHH Done LO BroiH 28 - 38 minutes Flaky Flaky 10 - 15 minutes 8 - 12 minutes Poamtry Chicken Pieces 4 4 Seafood Fish Steaks, buttered, 1" thick FiHHets +The top rack position is #5. Note: This chart is a suggested guide. The times may vary with the food being cooked. 13 15 - 18 minutes 19 - 23 minutes 15 - 18 minutes Oven Vent Rack Positions When the oven is in use, the area near the vent may become hot enough to cause barns. Never block the vent opening. RACK 5 (highest position:}: Used for toasting bread or broiling thin, non-fatty foods. The oven vent is located below the backgaard vent shield on your range. RACK 4: Used for most broiling. RACK 3: Used for most baked goods on a cookie sheet or jelly roll pan, layer cakes, fruit pies, or frozen convenience foods. OVEN VENT Oven Light RACK 2: Used for roasting small cuts of meat, casseroles, baking loaves of bread, bundt cakes or custard pies. Press the Oven Light switch on the controH pand to turn the oven Highton and off. RACK 1 : Used for roasting large cuts of meat and poultry, frozen pies, dessert souffles or angel food cake. __4 --3 __2 --1 MULTIPLE RACK COOKING: Two flat racks: Use rack positions 2 and 4. One fiat rack and one offset rack: Use rack positions 2 and 5. Over Oven __5 Bottom Protect oven bottom against spiHovers, especially acidic or sugary spills, as they may discoHorthe porcdain enamel Use the correct pan size to avoid spiHovers and boiHovers.Do not place utensils or aluminum foil directly on the oven bottom. Note: Use caution when removing the offset rack from position 1 (lowest position:}. Haft Rack Accessory Oven Racks A half rack, to increase oven capacity, is available as an accessory, It fits in the left, upper portion of the oven and provides space for a vegetable dish when a large roaster is on the lower rack, Contact your dealer for the "HALFRACK" Accessory Kit or call 1-800-688-8408. , Do not use the oven for storing food or cookware. The oven has two racks. All racks are designed with a lockstop edge. (select To remove: models} Select range models are equipped with an EasyRackTM. This rack offers a convenient place to grasp bakeware when taking it out of the oven. 1. Pull rack straight out until it stops at the lock-stop position. 2. Lift up on the front of the rack and puHH out. To replace: 1. Place rack on the rack supports in the oven 2. Tilt the front end up slightly. Slide rack back until it clears the Hock-stopposition. Use the EasyRackTM only in the oven in which it was purchased. 3. Lower front and slide back into the oven. Do not cover an entire rack with aluminum foil or place foil on the oven bottom. Raking results will be affected and damage may occar to the oven bottom. The EasyRackTM can be used in ail rack positions. 14 Se f-C ean Oven (select models[} Note: For manua] dean oven, see page 18. 1 6. Wipe up sugary and acidic spUiovers such as sweet potatoes, tomato, or mUk-based sauces. Porceiain enamei is acid-resbtant, not add-proofi The porceiain finish may discoior if acidic spiiis are not wiped up before a seif-ciean cycie. To set Self-Clean: • it is normal for parts of the range to become hot during a Note: Oven temperature must be bellow 400° F to program a dean cycie. • To prevent personal injury and damage to the oven door do not attempt to open door when "LOCK" is displa} ed. o Avoid touching cooktop, door. window 1. Close the oven door. or oven vent area 2. Move door lock lever right to the locked position. Do not use commercial oven cleaners on the oven finish or around any part of the oven. finish or parts. They wiil damage the 3. Press the Clean pad. The self-clean cycle uses above-normal cooking temperatures to automatically clean the oven interior. Do not force the oven door or lock lever open. This may result in exposure to high temperatures and be a burn hazard. , "CLEAN" flashes in the display. If the door is not closed, beeps wiii sound and "DOOR" wiii display. If the door is not closed within 45 seconds, the self-cleaning operation wiii be canceled and the display will return to the time of day. It is normal for flare-ups, smoking, or flaming to occur during cleaning if the oven is heavily soiled. It is better to clean the oven regularly rather than to wait until there is a heavy buildup of soii in the oven. 4. Press the (\/(ore+ or Less- pad. ° "CL-M" (Medium Soil, 3 hours} is displayed. During the cleaning process, the kitchen should be well ventilated to get rid of normal odors associated with cleaning. '........................ Press ther',4ore+ orLesspad toscroUU through the self-cleaning settings. Before CL-H" (Heavy Soil, 4 hours} Sdf-Cmeaning CL-M" (Medium soil, 3 hours} 1. Turn off the oven light before cleaning. The light may burn CL-L" (Light Soil, 2 hours} 2. Remove broiler pan, all pans, and oven racks from the oven. The oven racks wiii discolor and may not slide easily after a self-clean cycle if they are not removed. Choosing the soil level of the oven automatically programs the self-cleaning time. 6. After four seconds, the oven wiii start cleaning. 3. Clean oven frame, door frame, area outside of gasket, and around the opening in the door gasket with a nonabrasive cleaner such as Bon Ami* or detergent and water. The self-cleaning process does not clean these areas. They should be cleaned to prevent soil from baking on during the clean cycle. (The gasket is the seal around the oven door and window}. ° The cleaning time wiii start counting down in the display. ° "LOCK" wiii appear in the display. ° "CLEAN" wiii appear in the display. To Delay a Self-Clean Cycle: 1. Press the Delay pad. ° "DELAY" flashes. , 00:00 wiii appear in the display. 4. To prevent damage, do not clean or rub the gasket around the oven door. The gasket is designed to seal in heat during the clean cycle. ............................... Press the More+ or Less- pad to set ................................ the amount of time you want to delay the cycle. Delay time can be set from ten minutes (00:10} to 11 hours, 59 minutes (11:59}. cont. 5. Wipe up excess grease or spillovers from the oven bottom. This prevents excessive smoking, flare-ups or flaming during the clean cycle. * Brand names for cleaning products are registered trademarks of the respective manufacturers. 15 3. PresstheCleanpad. , "CLEAN" wfl[flash. 4. PresstheMore+or Less-pad. , "CL-M"(MediumSoft,3 hours] isdispHayed. During the Self-Clean Cycle When LOCK shows in the display, the door cannot be opened. To prevent damage to the door, do not force the door open ............................... when LOCK is displayed. .... Smoke and Smells You may see some smoke and smell an odor the first few 5. PresstheMore+or Less-padtoscroll[ throughtheseHftimes the oven is cleaned. This is normal and wi[[ lessen in cHeaning settings. time. CL-H"(Heavy Soft,4hours] Smoke may also occur if the oven is heavily soiled or if a broiler pan was [eft in the oven. CL-M"(Medium soft,3 hours] Sounds CL-L"(LightSoft,2 hours] Choosing thesoft[eve[oftheovenautomatically programs As the oven heats, you may hear sounds of metal parts expanding and contracting. This is normal and wi[[ not theself-cleaning time. damage the oven. 6. Afterfourseconds, CLEAN, DELAY andLOCKwfl[appear inthedisplaytoshowthattheovenissetforadelayed deanoperation. Thedelaytimeisdisplayed. After Self-Cleaning About one hour after the end of the self-clean cycle, "LOCK" wi[[ turn off. The door can then be opened. The door can then be opened. Move door lock [ever to the [eft to unlock. Some soil may leave a light gray, powdery ash. Remove it with a damp cloth. If soft remains after wiping, that means the dean cycle was not long enough. The soft wi[[ be removed during the next dean cycle. If the oven has already been set for a clean cycle and you wish to set a delay: 1. Press the Delay pad. , "DELAY" flashes. , 00:00 wfl[ appear in the display. 2. Press the More+ or Less- pad to set the amount of time you want to delay the cycle. if oven racks were left in the oven and do not slide smoothly after a clean cycle, wipe racks and rack supports with a small amount of vegetable oil to make them easier to .............................. move. (More+ i Fine lines may appear in the porcelain because it went through heating and cooling, affect performance, After four seconds, CLEAN, DELAY and LOCK wi[[ appear in the display to show that the oven is set for a delayed dean operation. The delay time is displayed. When the Self-Clean cycle This is normal and wi[[ not A white discoloration may appear after cleaning if acidic or sugary foods were net wiped up before the self-clean cycle, This discoloration is normal and wi[[ not affect performance, starts: , "DELAY" wi[[ turn off. , The dean time wi[[ appear in the display. To cance[ the Serf-Clean cycle: , If the oven door is [eft open, "DOOR" wi[[ flash in the display and a signal wi[[ beep until the door is dosed and the Clean pad is pressed again. Press the CANCEL pad. , A[[ words disappear from the display. , The oven door wi[[ be damaged if the oven door is forced to open when "LOCK" is still displayed. , A[[ functions are canceled. , The time of day appears in the display. 16 Cleaning Procedures Brand names are registered trademarks of the respective manufacturers. ** To order caii 1-877-232-6771 1-800-688-8408 Canaca. USA or PROCEDURE Backgaard and Cooktop Porcelain Enamel Porcelain enamel is glass fused on metal and may crack or chip with misuse. It is acid resistant, not acid proof. All spillovers, especially acidic or sugary' spillovers, should be wiped up immediately with a dry cloth. , When cool, wash with soapy water, rinse and dry. , Never wipe off a warm or hot surface with a damp cloth. This may cause cracking or chipping. , Never use oven cleaners, abrasive or caustic cleaning agents on exterior finish of range. Broiler Pan and insert Never cover insert with aluminum foil as this prevents the fat from draining to the pan below° ° Place soapy cloth over insert and pan; let soak to loosen soil, ° Wash in warm soapy water. Use scouring pad to remove stubborn soil ° Broiler pan and insert can be cleaned in dishwasher. Clock and Control Pad Area ° To activate "Control Lock" for cleaning, see page 9. ° Wipe with a damp cloth and dry. Do not use abrasive cleaning agents as they may scratch the finish. , Glass cleaners may be used if sprayed on a cloth first. DO NOTspray directly on controlpad and display area. Control Knobs ° Remove knobs in the OFF position by pulling forward. ° Wash, rinse and dry'. Do not use abrasive cleaning agents as they may scratch the finish. , Turn on each dement to be sure the knobs have been correctly replaced. Drip Bowls Porcelain (select models) Porcelain may discolor or craze if overheated. This is normal and wiii not affect cooking performance. , When cool, wash after each use, rinse and dry to prevent staining or discoloration. May be washed in the dishwasher. ° To clean heavy'soil, soak in hot sudsy water, then use a mild abrasive cleaner such as Soft Scrub* and a plastic scouring pad. ° For burned on soil, remove from range, place on newspapers and carefully spray with commercial oven cleaner. {Do not spray surrounding surfaces.} Placein plastic bag and allow to soak several hours. Wearing rubber gloves, remove from bag, wash, rinse and dr},. Drip Bowls Chrome (select models) , When cool, wash after each use, rinse and dry to prevent staining or discoloration. ° To clean heavy soil, soak in hot sudsy water, then use a mild abrasive cleaner such as Soft Scrub* and a plastic scouring pad. Do not use abrasive cleaning agents. Oven Window and Door - Glass , Avoid using excessive amounts of water which may seep under or behind glass causing staining. , Wash with soap and water. Rinse with clear water and dry. Glass cleaner can be used if sprayed on a cloth first. , Do not use abrasive materials such as scouring pads, steel wool or powdered cleaners as they wiii scratch glass. 17 PART PROCEDURE Oven interior Seif-Cleam Follow instructions on page 15-18 to set a self-clean cycle. Manual Clean: , ° ° ° ° Ciean frequentiy using miid abrasive cieaners and a pHasticpad. Do not use metaiiic scouring pads because they will[ scratch the surface. When using commercia[ oven cieaners foiiow the manufacturer's instructions. Wipe up acidic spiiis (tomato or milk based foods:} as soon as possible with soap and water. [f the spill is not wiped up, it may discolor the porcelain. To make cleaning easier, remove the oven door, [f desired. (See Maintenance section on page 19.} Oven Racks , Clean with soapy water. ° Remove stubborn soil with cleansing powder or soap-filled scouring pad. Rinse and dry. ° Racks wiil permanently discolor and may not slide smoothly if left in the oven during a self-clean operation. If this occurs, wipe the rack edge and rack support with a small amount of vegetable oil to restore ease of movement, then wipe off excess oil Stainless Steel (select models} ° ° ° ° DO NOT USE ANY CLEANING PRODUCT CONTAINING CHLORtNE BLEACH. OO NOT USEABRASIVE OR ORANGE CLEANERS. ALWAYS WIPE WITH THE GRAtN WHEN CLEANING. Daily Cleaning/Light Soil -- Wipe with one of the following - soapy water, white vinegar/water sohtion, Formula 409 Glass and Surface Cleaner* or a similar glass cleaner - using a sponge or soft cloth. Rinse and dry. To polish and help prevent fingerprints, follow with Stainless Steel Magic Spray (Part No. 20000008]**. ° Moderate/Heavy Soil -- Wipe with one of the following - Bon Ami, Smart Cleanser, or Soft Scrub* using a damp sponge or soft cloth. Rinse and dry'.Stubborn soils may be removed with a damp multipurpose Scotch-Brite* pad; rub evenly with the grain. Rinse and dry. To restore luster and remove streaks, foilow with Stainbss Steel Magic Spray*. , [}iscoloration -- Using a damp sponge or soft cloth, wipe with Cameo Stainless Steel Cleaner*. Rinse immediately and dry'.To remove streaks and restore luster, follow with Stainless Steel Magic Spray*. Storage [}rawer, , When cool, wash with warm soapy water, rinse and dry. Never wipe a warm or hot surface with a damp [}oor Handme,Side cloth as this may damage the surface and may cause a steam burn. Panels - Painted ° For stubborn soil, use mildly abrasive cleaning agents such as baking soda paste or Bon AmL* Do not use Enamel abrasive, caustic or harsh cleaning agents such as steel wool pads or oven cleaners. These products will scratch or permanently damage the surface. NO TE: Use a dry towel or cloth to wipe up spills, especially acidic or sugary spills. Surface may discolor or dutl if soil is not immediately removed. This is especially important for white surfaces. * Brand names for cleaning products are registered trademarks of the respective manufacturers. ** To order direct, carl 1-877-232-6771 USA or 1-800-688-8408 Canada. 18 Oven Door Oven Window To protect the oven door window: 1. Do not use abrasive cleaning agents such as steel wool scouring pads or powdered cleansers as they may scratch the glass. o Do net place excessive weight on or stand on an open oven door. This could cause the range to tip over. break 2. Do not hit the glass with pots, pans, furniture, toys, or other objects. Do not attempt to open or close door or operate oven until door is properly replaced. 3. Do not close the oven door until the oven racks are in Never place fingers between hinge and front oven frame. Hinge arms are spnng mounted. If accidentally hit. the hinge will slam shut against oven frame and could injure place. Scratching, hitting, jarring or stressing the glass may weaken its structure causing an increased risk of breakage at a later date. To remove: 1. When cool, open the oven door to the first stop position (opened about four inches}. 2. Grasp door at each side. Do not use the door handle to lift door. i 3. Lift up evenly until door clears hinge arms. Disconnect p0wei to range be[0re replacing l!#ht bu"b. when replacing bulb, o Do not touch hot bulb with a damp cloth as this may cause the bulb to break. To replace: 1. Grasp door at each side. 2. Align slots in the door with the hinge arms on the range. To Replace 3. Slide the door down onto the hinge arms until the door is completely seated on the hinges. Push down on the top corners of the door to completely seat door on hinges. Door should not appear crooked. 1. When oven is cool, hold bulb cover in place, then slide wire retainer off cover. NOTE:Bulb cover wiii fall if not held in place while removing wire retainer. BuL_oovER Oven Light Bulb: 2. Remove bulb cover and light bulb. Note: The oven door on a new range may feel "spongy" when it is closed. This is normal and will decrease with use. 3. Replace with a @-watt appliance bulb. a. Replace bulb cover and secure with wire retainer. 5. Reconnect 19 power to range. Reset clock. RETAINER To replace: Leve ing Legs 1. Fit the ends of the drawer giides into the rNb hi the range. 2. Lift up the front of the drawer and gendy push in to the first stop position. Be sure the antptip bracket secures one of the rear 3. Lift drawer up again and push until drawer is closed. from accidentNly tipping, Convenience Out_et (Canadian models only} The convenience outlet is located on the lower left side of the backguard. Be sure appliance cords do not rest on or near the surface elemenL If the surface dement is turned on, the cord and o.tUet wi,bedamaged. Storage F r _ @ /N The convenience outlet circuit breaker l_r may trip if the small appliance plugged C_-_CU_TBRE,aKE_into it exceeds 10 amp& To reset the circuit breaker, press the switch located on the lower edge of the backguard. Drawer Do not store pUastic,paper products, food or flammab!e materials in this drawer. The drawer may become too warm for these items when the oven is in use. The storage drawer can be removed to allow you to clean under the range. To remove: 1. Empty'drawer and puii out to the first stop position. 2. Lift up the front of the drawer. 3. Pull out to the second stop position. 4. Grasp sides and lift drawer top up and out. 2O PROBLEM SOLUTION For most concerns, try these first. ° , , , Check Check Check Check if oven controHshave been propedy set= to be sure pHugis secureHyinserted into receptacle. or re-set circuit breaker. Check or repHacefuse. power suppHy= Part or atom of appmiance does not work. ° ° ° ° ° Check Check Check Check Check if if if if if Clock, indicator words, and/or lights operate but oven does not heat. , Oven may be set for a Cook & Hold or delay function. , The Control Lock may have been set. See page 9. Baking resumts are not as expected or differ from previous oven. ° Make sure the oven vent has not been blocked. See page 14 for location. ° Check to make sure range is level= ° Temperatures often vary' between a new oven and an old one. As ovens age, the oven temperature often "drifts" and may become hotter or cooler= See page 12 for instructions on adjusting the oven temperature (select models[)=NOTE: It is not recommended to adjust the temperature if only one or two recipes are in question. ° See "Cooking Made Simple" booklet for more information on bakeware and baking= Food is not broiling properly or smokes excessively. , Check oven rack positions. Food may be too close to element. , Broil element was not preheated. , Aluminum foil was incorrectly used. Never line the broiler insert with foil. , Oven door was closed during broiling. Leave the door open to the first stop position (about 4 inches_). , Trim excess fat from meat before broiling. , A soiled broiler pan was used. , Voltage in house may be low. Oven wimmnot semf-cmean (select models). , ° , , Check to make sure the cycle is not set for a delayed start. See page 15. Check if door is closed. Check if control is in Sabbath Mode. See page 12. Oven may be over 400° F. Oven temperature must be below 400° F to program a clean cycle. Oven did not clean properly (select models). , , Longer cleaning time may be needed. Excessivespillovers, especially sugary and/or acidic foods, were not removed prior to the self-clean cycle. Oven door wimmnot anmock after , Oven interior is stir[ hot= Arrow about one hour for the oven to coo[ after the completion of a self-clean cycle. The door can be opened when the LOCK is not displayed, , The control and door may be locked. See page 9. semf-cmean cycle (select models). surface and/or oven controHshave been propedy set=See pages 4-14= oven door is unHockedafter seHf-cHeancycHe=See page 16= oven is set for a deHayedcook or dean program. See pages 10 & 15= ControHLock is activated=See page 9= control is in Sabbath Mode. See page 12= cont. 21 PRGSLEM 1 SGLUTmGN Moisture collects on oven window or steam comes from oven vent. ° This is normal when cooking foods high in moisture. ° Excessive moisture was used when cleaning the window. There is a strong odor or light smoke when oven is turned on. , This is normal for a new range and will disappear after a few uses. Initiating a clean cycle will "burn off" the odors more quickly. ° Turning on a ventilation fan will help remove the smoke and/or odor. ° Excessive food soils on the oven bottom. Use a self-clean cycle. Fault Codes (select models} ° BAKE or LOCK may flash rapidly in the display to alert you if there is an error or a problem, if BAKE or LOCK appear in the display, press Cancel pad. If BAKE or LOCK continue to flash, disconnect power to the appliance. Wait a few minutes, and then reconnect power. If the flashing still continues, disconnect power to the appliance and call an authorized servicer. ° If the oven is heavily soiled, excessive fiareups may result in a fault code during cleaning. Press the Cancel pad and allow the oven to cool completely, wipe out excess soil, then reset the clean cycle. If the fault code reappears, contact an authorized servicer. Noises may be heard. ° The oven makes several low level noises. You may hear the oven relays as they go on and off. This is normal ° As the oven heats and cools, you may hear sounds of metal parts expanding and contracting. This is normal and will not damage your appliance. There are no beeps and no display. ° Control may be in Sabbath Mode (select models}. See page 12= "SAb" flashing and then displayed continuously, , Oven is in Sabbath Mode. To cancel, press and hold the Clock pad for five seconds. 22 I Electric Range Warranty Fuji One Year Warranty Parts and Labor o Forone (1 } year from the original retail purchase date, any part which fails in normal home use will be repalrea or replaced free of charge. Limited Warranties = Parts Only Second Through Fifth Year = Fromthe original purchase date. parts listed below which fail n normal home use will be repaired or replaced tree of charge tot the part itself, with _he owner paying all other costs nciuding labor, mileage and transportation, trip charge and diagnostic charge, if required, Please Note: This full warramy applies only when the appliance is located in the United States or Canada.Appliances located elsewhere are covered by the limited warranties only, including parLs which fail during the first year. Canadian Residents This warranty covers only those appliances installed in Canada that have been listed with Canadian Standards Association unless the appliances are brought into Canadadue to transfer of residence from the United States to Canada. Thespecific warrantiesexpressedabove are the OHLY warrantfasprovided by the manufacturer. Thl:swarranS/givesyou specific legal rights, andyou may also have other rights that vary from state to state. What is Not Covered By These Warranties: 1= Conditions and damages resulting from any of the foIlowing: a= Improper instaIIation, delivery, or maintenance. b. Any repair, modification, alteration, or adjustment not authorized by the manufacturer or an authorized servicer= c= Misuse, abuse, accidents, unreasonable use, or acts of God= d. Incorrect electric current, voltage, or supply. e= Improper setting of any control 2. Warranties are void if the original serial numbers have been removed,altered, or cannot be readily determined. 3. Light bulbs= 4= Products purchased for commerciaI or industrial use= 5= The cost of service or service call to: a. Correct instaiIation errors. b=Instruct the user on the proper use of the product. c= Transport the appliance to the servicer and back. 8. Consequential or incidentai damages sustained by any person as a resuit of any breach of these warranties. Some states do not aIIow the excIusion or Iimitation of consequential or incidental damages, so the above exclusion may not apply= If You Need Service First see the Troubleshooting section in your Use and Care Guide or call Maytag ServicessM,Maytag Customer Assistance at 1-800-688-9900 U.S.A. or 1-800-688-2002 Canada. To Obtain Warranty Service To locate an authorized service company in your area contact the dealer from whom your appliance was purchased or call Maytag ServicessM,Maytag Customer Assistance. Should you not receive satisfactory warranty service, call or write: May'tag Servicess_JI Attn: CAIR_ Center P=O=Box 2370, Cleveland, TN 37320-2370 NoSo1-800-688=9900 and Canada 1-800=688=2002 NoSocustomers using TTY for deaf, hearing impaired or speech impaired, call 1=800=688=2080o NOte: When contacting Maytag ServicessM,Maytag Customer Assistance about a service probIem, pIease inciude the following: a=Your name, address and telephone number. b=Modet number and seriaI number of your appIiance= c=Name and address of your deaier and date appliance was purchased. d=A cIear description of the problem you are having. e=Proofof purchase. Use and Care guides, service manuals and parts information are available from Maytag ServicessM,Maytag Customer Assistance. 23 Cuisini_re 6iectrique en 6i#.ments spira[6s I _AYI'At3 m m |s|//iere mnstructions de s6curit6 importantes ................................. 25=28 "IL Nettoyage ................................... Fourautonettoyant Mdthodesde nettoyage 42-45 Entretien ....................................... Hub[ordu four 46=47 Cuisson sur la surface .............. 29-30 Commandessur _asurface EL6ments spiral6s Lampedu foul Cuissen darts [e four ................. 31-41 Commandes du four _ nettoyage manuel Horioge Cuissoncourante Minuterie GriI R_gemuteurdu four _ nettoyage manuel Cuissoncourante Gdl Commundes du four _ Hodoge Cuissoncourante Cuissonet maintien D6marragediff6r6 uutonettoyuge Minuterie Maintien au chaud Gril GriIiesdu four Recherche des pannes Garantieet serviceaprSs-vente Guia de Use y Cuidade ............. 48=49 .... 51 .................... 52 que pourrait susciter une uti[isation incorrecte de ['apparei[. Utiliser I'appareil uniquement pour los fonctions prevues, decrites dons ce guide. JnstaUateur : Laissezce guide avec I'appare_L Consommateur : Veuillezlire le guide et le conserverpour consul[ation uJterieure.Conservezla tacture d'achat ou b cheque enca_ssecommepreuvede I'achat Pour one utilisation adequate et en s_curit_, il faut que I'appareil soit convenabbment installe par un technicien qudifie, et relic a la torte. Num6ro de rnodele Num6ro de s6rie Ne pas regbr, reparer ni remplacer un composant, a moins que ceh ne soit specifiquement recommande dons ce guide. Toute autre reparation doit etre effectuee par un technicien qudifie. Date d'achat Si vous avezdes questions,veuilbz nous appeter: Service a la client#Je de Maytag ]-800-688-9900 aux E=-U. ]-800-688-2002 au Canada (lundi au vendredi.8 h _ 20 h. heure de I'Est) Internet:http://www.may[ag.com Toujours debrancher [appareil avant d'y loire de [entretien. Dons le cadre de nosprat_quesd'am61iorationcons[ohioae la qualit6 et de la performancede nos prodults de cuisson oes modificationsde I'appareilqu_ne sent pas mentionn6esdansce guLdeon[ pu 6tre introduites. Repertez_veus _ la page 49 peurplusd'infermatiorla cencemant te sePJiceapres-vente. risque de bascu!ement de !,appateil _ !,occasien d'une utilisatien anermale eu d'un chargement excessif de ia porte do fear, il faat qae la bride antibascuiement soit cenvenabiement instaii6e. Utiliser une lampe torche pour determiner sila bride antibascubment est convenabbment installee sous la cuisiniere. L'un des Les instructions de securite importantes et bs paragraphes << avertissement >>de ce guide ne sent pas destines a couvrir toutes bs conditions et situations qui pourraient se presenter. II faut loire preuve de ben sons, de prudence et de soin lots de I'instdlation, de I'entretien ou du fonctionnement de I'appareil. Toujours prendre contact avec le fabricant dons le cos de probbmes ou de conditions qui ne seraient pas comprises. pieds arriere de reglage de Faplomb doit etre convenabbment engage dons la lento de la bride. Lorsque la cuisiniere est convenabbment cdee, la bride antibascubment immobilise b pied arriere centre le sol. Verifier la parfaite immoNisation de la cuisiniere par la bride apres chaque dephcement de la culsmlere. Reconnoitre et symboles Po r los 6tiquettes, set la s6curit6 paragraphes vitet dommages i ce die des de S'assurer que tous bs materiaux de conditionnement sent retires de [appareil avant de b mettre en marche. AVERTiSSEMENT _ Dangers ou pratiques dangereuses qui POURRA!ENTr_sulter ende graves b!essures ou memo la mort. Garder bs materiaux combustibles bien eloignes de I'appareil. Ne pas ranger de materiaux inflammables dons un four. De nombreux types de plastique sent affectes par la chdeur. Garder bs plastiques eloignes des pieces de I'appareil pouvant devenir chaudes. POURRAIENTresulter en des blessures mineures. Pour empecher qu'un feu de graisse nese declare, eviter toute accumulation de graisse ou autres matieres inflammables dons I'appareil ou au voisinage. Lire toutes los instructions avant d'utiliser cot appareii; observer toutes bs instructions pour eliminer bs risques d'incendie, choc ebctrique, dommages materiels et corporeb 25 En cas d'incendie NE JAMAB TOUCHER LES ELEMENTSCHAUFFANTSN[ LES PAROB INTERIEURESDU FOUR. Les elements chauffants Ne jamab utiiber d'eau pour 6teindre de la graisse enfiammee. Utiiber du bicarbonate de soude ou un extincteur peuvent etre brQlants meme s'ils ne sont plus rouges. Les surfaces interieures du four peuvent atteindre une temperature suffisamment eievee pour infiiger des br0iures. Pendant et apres usage, ne pas toucher les elements chauffants ni les parois interieures du four et eviter bur contact avec des vetements ou autres materiaux inflammables avant qu'ils n'aient eu le temps de refroidir suffisamment. D'autres surfaces peuvent egalement atteindre une temperature suffisamment eievee pour bn]ier :ie ouverture d'event et ie surface avoisinante, ainsi que ie porte et ie hubiot de four. poudre chimique ou a mousse pour etouffer bs fiammes. 1. [nterrompre ['aHmentation eiectdque de ['appareH pour minimiser [a propagation des fiammes. 2. NE ]AMAmS saisir ou d@iacer un ustensiie de cuisine enfiamm& 3, Fermer [a porte du four pour etouffer [es fiammes du four, S curit6 pour [es enfants Ne pas toucher i'ampouie du four bn]iante avec un chiffon humide car eiie pourrait se briser. Si tel est ie cas, debrancher i'appareii avant de retirer i'ampouie pour eviter une decharge eiectrique. NE JAMAIS garnir ia sob du four ou une grille du four avec de la feuille d'aluminium, Ceci pourrait susciter un risque de d@harge electrique ou d'incendie, ou une deterioration de I'appareil, Utiliser de la feuille d'aluminium uniquement selon les instructions de ce guide, pareii des articles auxqueis [es enfants peuvent slnteresser. Un enfant tentant de grimper sur rappareii ou sur la porte pour atteindre un objet, pourrait se blesser gravement. NE JAMAIS iaisser des enfants seuis ou sans supervision iorsque i'appareii est en service ou encore chaud. Ne jamais iaisser un enfant s'asseoir ou se tenir sur une pattie queiconque de i'appareii, li pourrait se biesser ou se br0ier. Cuisson [Iest important d'enseigner aux enfants que I'appareil et les ustensiies places dedans peuvent etre chauds. Laisser refroidir les ustensiies en un lieu sQr, hors d'atteinte des enfants. [Iest important d'enseigner aux enfants qu'un appareii menager n'est pas un jouet, et qu'iis ne doivent toucher aucune commande ou autre composant de i'appareii. Famiiiarisation avec ['apparei[ et s6curit6 NE JAMA[S faire chauffer un recipient non ouvert dans le four, L'accumuiation de pression dans ie recipient pourrait provoquer son eciatement et de graves dommages materiels ou corporeis, Utiiiser des maniques robustes et seches, Des maniques humides peuvent provoquer ia formation de vapeur brQiante, Ne jamais utiiiser un torchon a vaisseiie ou autre article textile la place de maniques; un tel article pourrait trainer sur un element et s'enfiammer, ou accrocher un ustensiie ou un composant de i'appareii, Porter un vetement approprie, Eviter de porter des vetements ampies ou a Iongues manches pendant I'utiiisation de I'appareil, [is peuvent prendre feu si le vetement entre en contact avec un element de cuisson brQiant, NE JAMAmS utiiiser un appareii comme escabeau pour atteindre [es armoires se trouvant au-dessus. Le mauvais emploi de porte d'appareii comme par exemple en tant qu'escabeau, le fait de s'appuyer ou de s'asseoir sur la porte. peuvent entrai'ner [e renveusement de l'appareil, casser [a porte et gravement biesser, Placer toujours ies grilles b ia position appropriee dans ie four Iorsque le four est froid, Faire coulisser la grille vers I'exterieur event d'ajouter ou enlever un plat; utiliser pour cela une manique robuste et seche, Eviter d'introduire la main clans le four pour y placer ou retirer un plat, S'ii est necessaire de deplacer une grille Iorsqu'elle est chaude, utiliser une manique seche, Ne pas toucher un element chaud avec une manique, Ne pas utiliser cet appareil pour chauffer ou pour garder chaude une pi@e, sinon des dommages a i'appareii pourraient s'ensuivre et ceia pourrait 6tre dangereux pour I'utiiisateur, Aussi, ne pas utiiiser ie four pour ranger des aliments ou des ustensiies de cuisine, N'utiliser les grilles que dens le four dens lequel elles ont 6te achetees/expediees, Ne pas bloquer ou obstruer 1'eventdu four, 26 Ouvrir toujours la porte du four tres prudemment, Laisser Fair chaud ou la vapeur s'echapper avant de retirer ou d'introduire un plat, Veiller a ne jamais laisser le contenu liquide d'un ustensile s'evaporer completement; Fustensile et [appareil pourraient subir des dommages, AVERTISSEMENT - METS PR_:PARF.S: Respecter les instructions du fabricant, Si le contenant ou le couverde en Table de cuisson plastique d'un mets surgele se ddorme ou est endommage durant la cuisson, jeter immediatement le recipient et son contenu, Les aliments pourraient etre contamines, NE JAMAIS laisser un element de surface allume sans surveillance, particulierement avec chauffage eleve, Le debordement du contenu de I'ustensile pourrait provoquer la generation de fumee abondante et [inflammation de la graisse, Ne pas permettre le contact de papier d'aluminium ou de la sonde a viande avec les elements chauffants, Toujours eteindre toutes les commandes une fois la cuisson terminee, Ustensiles Cet appareil comporte des elements chauffants de differentes tailles, Utiliser toujours un ustensile a fond plat, de taille suffisante pour qu'il puisse recouvrir completement I'element, Pour optimiser I'efficacite, choisir un ustensile de meme taille que I'element, et s curit App[iquer [es instructions du fabricant [ors de ['emp[oi d'un sachet pour cuisson au four, 1 Elements La securite de fonctionnement de cet appareil a ere testee I'aide d'ustensiles de cuisine traditionnels, Ne pas utiliser un ustensile ou accessoire qui n'est pas specifiquement recommande darts ce guide, Ne pas utiliser de couvreelement, gril place sur la table de cuisson ou systeme de convection additionnel, L'utilisation d'un dispositif ou accessoire qui n'est pas expressement recommande darts ce guide peut degrader la securite de I'appareil ou sa performance, ou reduire la Iongevite des composants, spiral s Pour eviter de deteriorer les elements chauffants amovibles, ne pas les immerger / tremper / nettoyer darts un hve-vaisselle, ou darts un four autonettoyant, Un element chauffant endommage pourrait provoquer un court-circuit suscitant un incendie ou un choc electrique, Veiller ace que la cuvette de recuperation soit toujours en place Iors de I'utilisation de I'element; I'absence de la cuvette de recuperation Iors d'une cuisson peut faire subir des dommages au c8bhge, Si un ustensile est plus petit que I'element utilise, une partie de I'element chauffant est exposee et peut provoquer I'infiammation d'un vetement ou des maniques, Garnitures de protection : Ne pas garnir les cuvettes de recuperation sous les elements ou le fond du four avec de la feuille d'duminium, sauf Iorsque ceci est suggere darts le guide, La mise en place d'un tel garnissage peut susciter un risque de choc electrique ou d'incendie, Seuls certains materiaux en verre, vitroceramique, ceramique, gres, ou certains ustensiles vitrifies/emailles peuvent etre utilises sur la table de cuisson ou darts le four sans risque de bris sous I'effet du choc thermique, Observer les instructions du fabricant Iors de I'utilisation d'un ustensile en verre, Orienter la poignee de chaque ustensile vers le centre de la table de cuisson et non vers I'exterieur ou vers un autre Exercer une prudence extreme Iors du deplacement du recipient de graisse ou Iors de I'elimination de graisse chaude, Laisser la graisse refroidir avant de deplacer [ustensile, element; ceci reduira le risque de brOlure, inflammation de matiere inflammable ou renversement (un jeune enfant pourrait saisir et renverser un ustensile dont le manche est oriente vers I'exterieur), Hottes d'e×traction Nettoyer frequemment les filtres et la hotte de la cuisiniere pour empecher la graisse ou d'autres produits inflammables de s'accumuler sur les filtres ou la hotte en provoquant des feux de graisse, Veiller a utiliser un ustensile de taille suffisante pour que le contenu ne risque pas de deborder, Ceci est particulierement important pour un ustensile rempli d'huile de friture, Verifier que la taille de I'ustensile est suffisante pour qu'il puisse recevoir les produits alimentaires a cuire, et absorber I'augmentation de volume suscitee par I'ebullition de la graisse, Pour fiamber des aliments sous la hotte, mettre le ventilateur en marche, 27 Nettoyage et s curit li est normal que ia surface de cuisson devienne chaude durant une operation d'autonettoyage; par consequent, eviter de toucher ia surface de cuisson durant i'autonettoyage, Nettoyer prudemment la table de cuisson, Arreter routes les commandes et attendre le refroidissement de tous les composants avant de les toucher ou d'entreprendre le nettoyage, Nettoyer I'apparefl avec precaution, Travafller prudemment pour eviter des brQlures par la vapeur en cas d'utflisation d'un chiffon ou d'une eponge humide lots de I'elimination d'un produit renverse sur une surface chaude, Certains produits de nettoyage peuvent generer des vapeurs nocives Iorsqu'on les applique sur une surface chaude, Avertissement important Four autonettoyant (certains modeles} Nous informons ies utiiisateurs de cet appareii que iors d'une operation d'autonettoyage, iis peuvent etre exposes a une faible concentration de certaines substances figurant darts la iiste mentionnee ci-dessus, dont ie monoxyde de carbone, Pour minimiser i'exposition, veiiier ace que ia piece o_ se trouve ie four soit convenabiement aeree durant une operation d'autonettoyage par i'ouverture d'une fenetre ou d'une porte, lechefrite dans le four Iors de Fautonettoyage, AViS iMPORTANT - OISEAUX FAMIUERS : Les oiseaux ont Ne pas nettoyer le joint de porte; le joint joue un rOle essentiel quanta i'etancheite, Ne pas frotter, endommager ou depiacer le joint, un systeme respiratoire tres sensible, Ne pas garder un oiseau famflier dans la cuisine ou dans une piece ou fl pourrait etre expose aux fumees, Les fumees emises durant une operation d'autonettoyage peuvent etre dangereuses ou mortelles pour un oiseau, de meme que les fumees emises lots du chauffage excessif de graisse, hufle, margarine, et du chauffage excessif darts un ustensfle a revetement antiadhesif, Ne pas utiiiser de produits de nettoyage pour four ou enduits de four, darts ie four autonettoyant ou sur ies zones voisines, Avant d'executer une operation d'autonettoyage, retirer ia lechefrite, les grilles du four et les autres ustensiles, et eliminer par essuyage tout exces de residus renverses pour eviter ia formation de fumee ou i'inflammation de ces residus, ces instructions pour la s curit La Ioi californienne _ Safe Drinking Water and Toxic Enforcement Act >>de 1986 {proposition 65} stipule la publication par ie gouvemeur de ia Caiifomie d'une iiste de substances que I'etat de Califomie considere comme cancerigenes ou dangereuses pour ie systeme reproducteur, et impose aux entreprises commerciaies i'obiigation de signaler aieurs clients ies risques d'exposition a de teiies substances, Nettoyer uniquement les pieces mentionnees darts ce guide, Conserver et avis pour consultation 28 ult rieure @ Boutons de commande Suggestions PermettentI'utiIisationdes 616meritschauffants de surface,avec une progressioncontinue de la puissanceentre Ies r6glagesextr6mes Low (Bas)et Nigh (CJev6)+ On peut r6gler un bouton_ toute position entre ces deux extr6mes+ R6gJage des commandes row (gas) [2) : Pourfusion de chocoiatou beurre,ou [e maintien de la temp6rature d'un mets. 1+ PlacerI'ustensilesur J'616ment+ 2. Enfonceret Dire tourner le bouton jusqu'_ la position d6sir6e (rotation darts un sens ou dans J'autre). • Des marquessur Ietableau de commande identlfient I'6!6mentcommand6par chaque bouton. Parexemple,le graphique _ droite indique 1'616ment avant/gauche. pour Je r6gJage On doit choisir la puissancede chauffageen fonction de divers facteurs :taiIIe,type de I'ustensileet operation de cuisson. Pour rinformation concemant Ds ustensileset autres facteurs affectant la puissancede chauffage_ utiliser,se reporter_ la brochureLa cuissonsimplifi6e. OO @0 Meal. row [lVioyen has) [3o4] : Pour continuer la cu[sson de mets en casserelesferm6espar couvercleou [)our cuire _ la vapeur. / 3. II y a un t6moin Jumineuxpour les6i6mentssur le tableau de commande.LorsqueI'un des boutonsde commanded'un 616mentde surfaceest aliment6,le t6moin s'i!lumine.Le t6moin s'6teint dSsqu'on interrempt I'alimentationde J'616ment. Nigh [i'lev6] [10] : Pour ['6bullitlond'un liquide+On doit toujours rdduire Ia puissancede chauffage dSsque Ia temp6rature d'6bullition est atteinte ou que l'aliment commence8 cuire+ OFF i High (Le style peut varier selonJe modNey @ 4. Apres une cuisson, ramenerJebouton _ la position OFF (Arr6t]. RetirerJ'ustensile. @ lVledium (Moyen] [5+7} : Pour le maintiende 1'6bullitionIente d'une grande quant[t6de I[quide ou pour Ia pDpart des op6rations de friture. 1 Meal, Nigh (IVJoyen6mev_] [8+9] : Pour dssoler ies viandes,chauffer I'hufle [grandefriture ou ailments saut6s)et pour Ie maintien de r6bullition rapide d'une grande quantit6 de liquide. AVANT LA CWS$ON APRES LA CUISSON o PJacertoujours I'ustens+le sur i'616ment avant d'alimenter J'_k_ment.Pour 6v+ter que la cmmme +ene subisse des dommages, ne jamals Dire fonctionner un 6J6ment de surface sans y placer un ustensfle. - S'assurerque I'dldmentest arr_td. + Ellmlnerd_sque possibletous les rdsidusde renversememe[ projections. AUT_E$ CONSEILS + S'ii y a une armoire de rangerner_tdlrectementau-dessu_ de la table de cui_son.on ne dolt y placerque des articlespeu frequemmentutiiisdset qui peuvent 8tre exposesa Jachaieur,La chaieureralsepar la cu_sinierepourrait susciter un probDme pour de_articles commeliquidesvoiatiJs,produits de ne_[oyagee[ flaconsd'a6rosol. o NE_A_AJS laisserd'article _ur la table de culsson. particulierementd'articJeen plastique.L'Nr chaud qui s'dchappe par I'dventdu four pourrait provoquer[inflammation d'un article infiammabJe.Dire fondreiamollir un article en piastique,ou provoquerune augmentationae pressionprovoquant I'dcJatemen[ d'un r_c+p_ent Drm& . NE_AIVlAl$ laisserde ia feuilie d'aluminium une sonde thermometrique _ wanaeou un objet mStailiqueautre qu'un ustensflede cuJssonsur la table de ouisson,en[rer en contact avec un d!_mentchauffant. • NE JAMA_S ut+lJserla table de cuisson eomme Jieude remJsage d'NJments ou d'ustensiles. [}U_ANT l.A C_ISSON . Vefller_ bien connaitre la eorrespondaneeentre Jesboutons de commandeet les 6JSments. VeiJJe+ _ commander!'aHmentat_on de 1'61_men_ vouD. o CommencerJaculssonavec une puissancede chauffage super_eure,puis rdduire la pu+ssancede chauffagepour poursuivre la cuisson. Nejamais utiliser une puissancede chauffage6leveepour une cuisson prolongde. . NEJA_AIS laisser Jecontenu d'un ustensfles'_vapor_+ complL-:ement;cec+pourrait faJresubir aes dommages I'ustensileet _ I'appareiL o NE._A_AI$ toucher Jatable de cuissonavant qu'elle se soit compD[emen[ retroidie,Certameszonesde la +ablede culsson+ particuli6rementau voisJnagedes Ndmentsde surface,peuvem devenirtres chaudesdurant une cuisson.Utiliser des maniques. 29 @ 1 E .ments de tabJe de EJ6ments spiraJ6s o Lorsqu'un6tdmentest utJIis6,il est ailment8par intermittencepour Jemaintien de Japuissancede chauffaged6sir6e. ® R@marqu@s : • Nettoyer la table de cuissonaprSschaqueutiIisation. [}_pOSe : SouieverI'616ment refroidi. Tirer prudemmentpour extraire I'616mentdu blocde • Essuyertout produit renvers6acide ou sucr6 sur la table de cuJsson,pour 6viter une attaquechimique ou un changement de couieurde 1'6mail Pour prot6ger Ja finition r_cup6ration : des cuvettes Les61@ments spiraJ6ssont autonettoyants.Ne pas lesimmerger dans de J'eau. connexion, IVJiseen place : Introduire Ies de homes de r_16mentdansIa prise. Guider pour la raiseen piace. Abaisser1'8Jementpour le placer d'aplomben appui sur la cuvette de r6cup6ration. BORfVES • Pour diminuer la d6colorationet ie fendiIlement,6viter d'utiliser une puissancede chauffage61ev6ependant une p6riode prolongee. • Ne pas utiIiserun ustensiIede trop grande taille. L'ustensiIene devraJtpas d6borderde plus de 2,5crn - 5 cm (1 - 2 pouces) au-del_ de la p6riph6rie de I'616ment. Cuvettes de r6cup6ration Lescuvettesde r6cup6rationsous chaque6i6ment de surface recueilJentIes alimentsqui ont d6borde.II faut touiours lesutiliser. L'absencede cuvettesde r6cup6rationpendant la cuisson peut endommagerlesills 61ectriques. • Lorsde I'utJlJsation de grossesmarmites,par exemplepour la pr6parationde conserves,utiliser I'di6mentspdciaIcon_u pour la pr6parationde conserves(modSieCEll. Prendrecontact avec le d6tailIantMaytag pour obtenir des d6tails,ou composer le 1-877-232-6771aux E.-U.ou le 1-800-688-8408au Canadapour passercommande. Pour ne pas introduire un risquede choc 61ectrique,ou d'incendie, ne jamais garnir les cuvettesde r6cupSrationde feuiile d'aluminium. Lescuvettesde rdcup_rationvont se d_colorer(tachesbieues/ dor6es] ou se fendiller _ la Ionguesi eIIessont surchauff_es.La decoJorationou Ie fendiIIementsont permanents,mais n'affectent pas la performancede cuisson. , Nettoyerfr6quemment.(Voir page 43.] 3O Commandes du four nettoyage manuel (certains modeles] / More_ \\ \ \ / / / A B C 0 REMARQUE: L'afficheurindique 12:00iorsque Fappareilest branch_B premierefob ou en cas de panne de courant.Lest@aoinshmineux de cuissoncourante et de cuissonau gril s'alhment Iorsque Fonappuie sur la touche de fonction correspondante. B Cuissoncourante S'utiIisepour la cuissoncourante et le r6tissage. Broil S'utiIisepour Ia cuissonau gril et le rissolagesur partiesup6rieure. 2. Mettle _ I'heure_ I'aidedes touchesMore+ ou Less-.Si I'on n'appuiepas sur ces touches en moins de 30 secondes,le programmeest annul& Appuyersur la touche Clocket recommencer, c Minuterie Programmela minuterie. Programmation [} Horloge S'utilise pour programmer I'heuredu iour. ANNULER Annuletoutes lesop6rationssauf minuterb et horloge. La minuterie peut 6tre prograrnm@de une minute C0I) iusqu'_99 heureset 59 minutes (99:59).La dur6e seraaffich@ en minuteset non en secondes.LA MtNUTERtENE COMMANDE PAS £E FOUR. F ¸ Plus+ ou Moins- S'utilisepour entrer ou changerla dur@, la temperaturedu four. Etablit te gril temperature#lev#eou basse. de la minuterie 1. Appuyer sur la touche Timer (Minuterie}. • 0:00s'allume et bs deux points (:} clignotent _ [afficheur. 2. Appuyer sur More+ ou Less-jusqu'a ce que la dur6e d6sir@ soit affich@. Utilisation des touches • Appuyer sur la touche @sir@. • Appuyer sur More+ (Plus+} ou Less- (Moins-} pour entrer la dur@ ou la temperature. • La minuterie commencea d@ompterd@sque la dur@ a 6t6 programm@. o Lesdeux points qui clignotent indiquentqu'un d@ompteest en cours. (Lesdeux points ne c%notent passi I'heureou la temp6raturedu four sont affich6es.} • Un bip retentit Iorsque Fonappuiesur une touche de fonction. II n'y a pasde hip pour la touche More+ ou la touche Less-. • Deuxhips courts signabnt la fin de I'op6ration.0:00parait I'afficheur. • Un double hip retentit en cas d'erreur de programmation. • SiFonveut, appuyersur Ia touche Clock et I'heuredu jour r6apparaftbrBvement _ I'afficheurpendant une operation minut6e. Remarque : Quatresecondesapt@ avoirappuy6stir bs touches More+ ou Less-,la dur@ ou la temp6ratureseront [email protected] plus de 30 secondess'6coulent entre la pressionstir une touche de fonction et sur lestouches More+ ou Less-,la fonction seraannuBe et I'afficheurreviendra I'affbhage pr@6dent. R6glage de PhoHoge 1. Appuyer sur la touche Clock (Horloge). • L'horloge ne peut pas 6tre r6gBe si le four est d6i_ prograrame pour une op6rationde cuissoncourante,de gril ou une op6rationminut6e, 31 • Si I'onveut, appuyersur Ies touches Bakeou Broil et le reglage de temp6ratureactuelb r6apparaitbrBveraent_ I'affichage pendantune op6rationminut@. A[mulation de la minuterie : Appuyersur la touche Timer et la maintenir ainsJpendant plusieurs secondes. Cuisson courante, cumsson au grim 3. PlacerIa nourriture dans le four. Verifier I'avancementde la cuisson_ la duree minimalede cuisson. rStissage et 4. LomqueIacuisson est terminee,appuyersur la touche Cancel [AnnuIe0 pour eteindrele four, puis retirer la nourriture du four. Pour obtenir des conseilset des dur6esde cuissoncourante,de rOtissageet de cuissonau gril, se reporter_ la brochureLa cuisson simptifiee. Programmation des commandes courante ou un rStissage : • Le four se caracterisepar un arr6t automatique.S'iIest laisse en marche pendant 12 heures,il s'arr6teraautomatiquementet 000 paraitra _ !'afficheur.Appuyersur la touche Cancel et I'heurereapparakra_ rafficheur. pour une cuisson Programmation des eommandes c_isso_ a_ gril : 1. Appuyer sur Ia touche Bake[Cuissoncourante). • 000s'alIumeet le temoin lumineuxde cuissoncourante clignote _ rafficheur. po_r la Pour de meilleursresultats,utiliser I'ustensileprewJpour ce genre de ouisson. • Si I'onappuie sur la touche Bake,sans programmerune temperaturedu four dans les30 secondessuivantes,le programmeest automatiquementannuIeet I'heuredu iour reapparait_ I'afficheur. 1. PlacerIa lechefrite_ Ia position de grille recommandee.[Voir le tableau de la page 39.) 2. Appuyer sur la touche Broil [Gril). 2. Appuyer sur Ia touche More+ [Plus+)ou Less- (Moins)iusqu'_ ce que la temperaturedesireedu four soit affichee. o SEts'ailumeet le temoin hmineux de cuissonau gril clignote rafficheur. • La temperaturepeut 6tre programmeede 75 _ 285 °C [170 550 °F). 3. Appuyer sur la touche More+ pour choisir un griI _ temperature Hi [Elevee)ou sur Iatouche Less- [Moins) pour choisir un gril temperatureLo [Basse). • 350° parait8 rafficheur IorsqueI'onappuie une lois sur la touche More+ ou Less-. o Choisirle reglage Hi pour un gril normal. • Appuyer _ plusieurs reprisessur Jatouche More+ ou Lesspour changer la temperaturedu four par intervalIesde 3 °C [5 °F) ou appuyersur la touche More+ ou Less-en maintenant la pression,pour changerla temperaturedu four par intewallesde 6 °C (10 °F). • Choisirte reglage Lo pour un grii a temperaturebasse,afin d'eviter un rissolageexcessifdesaliments necessitantdes dureesde cuisson plus Iongues,commela volaille. o Si I'on ne choisit pas le regiageHi ou Lo en moins de 30 secondes,Ie programmesera automatiquementannule et rheure reapparaitra_ I'afficheur. • 100° ou la temperature reetledu four, selon laquefleest la plus elevee,parait 8 I'afficheurIorsqueIe four se met en marche. 4. PrechaufferI'elementde gril pendanttrois minutes.Fairecuire au griL hisser la portedu four ouverte _ la premierebutee (environ • La temperature_ I'afficheuraugmente par intervalIesde 3 °C [5 °F),iusqu'_ ce que la temperaturepreprogrammeesoit atteinte.Un seul hip retentit Iorsquele four est en cours de prechauffage. 10 cm [4 po]). 5. Apr_s le griI, appuyersur Cancelpour eteindre le four, puis retirer [a [_chefr[tedu four. L'heure du iour reapparait_ ['afficheur. • Laisserle four prechaufferpendant 10 _ 15 minutes. • Pour rappeterla temperaturepreprogrammeependantle prechauffage,appuyersur la touche Bake.La temperaturesera afficheependanttrois secondes. • Pourchanger ia temperature du four pendant ia cuisson, appuyersur Bake,puis sur Iatouche More+ ou Less-iusqu'_ ce que la temperaturedesireesoit affichee. • Pourchanger matempSrature du four morsd. pr_¢hauffage, appuyerdeu× lois sur la touche Bake,puissur la touche More+ ou Less-iusqu'_ ce que latemperature desireesoit affichee. 32 R gu ateur de four Regiage du four pour cuisson (certains modeles} : nettoyage (certa[ns modebs) R6g_age du bouton 1, Pourobtenir bs meiiieursr@uitats,utiliser un ustensib con_u pour la cuissonau gall Placerla iechefrite b la position recommand@darts le grille du four. 6!oir le tabbau en page 37.} OFF Le bouton OvenTemp (Temp6rature fou0 permet de s6bcSonner et maintenir B temperaturedu four. On doit toujours faire tourner ce bouton exactementJUSO, U'A Ia position de latemp6rature d6siree.Ne pas faire tournerb boutonau-delb de Ia position 350 d6sir@ pour le faire toumer ensuiteversle sens inverse. Regiage du four pour une cuisson un r6tissage au gril 2. PlacerIe bouton OvenTemp {Temperaturefou0 b Ia position BROIL(Grid ou 8 Ia position (232° C} 450° F pour une cuissonau gril _ bassetemperature. • Utiliserla temperatureplus bassepour la cuissonau gril pour @iter un brunissageexcessifou pour un mets n@essitantune ionguecuisson{par exemplevolaille}. 3. UtiliserIestemps de cuissonsugger@dansIetableau en page 37. Retournerlespi6cesde viandevers le milieu de la periodede courante ou ouisson. : 4. ContrOlerIe degre de cuisson:inciser la piece de viande pros du centre pour en observerIa coubur. 1. Enfoncedfairetourner le boutonOvenTemp (Temperaturefou0, iusqu'b la position correspondant_ la temperaturedesir@. LaisserIefour pr@hauffer pendant 10_ 15 minutes. 5. A la fin de la periode de cubson, ramenerb bouton OvenTemp {Temperaturefou0 a la position Off {Arr6t}. Retirer la I@hefrite du four. 2. Placerla nourriture au centre du four. A I'expiratimldu temps de cuissonminimumindique darts Ia recette,@aluerle degre de cuisson.Poursuivre Ia cuissonsi c'est n@essaire. 3. RetirerIe mets du four et ramenerle bouton OvenTemp {Temperaturefour} _ la position OFF(Arret}. Remarque : On trouve d'autres conseilsconcernant B cuisson au four, le rOtissageou gril darts la brochure_LaCuisine Simplifiee)). 33 @ Commande du four A (certains modeles) B C H D ......... Timer Less : .............. l J Le tableaude commandeest con_u pour faciliter la programmation.La fen6tre d'affichageindique Fheure,lesfonctions avecminuterie et fonctions du four. Le tableau de commanderepr6sent6comprend caract@istiquessp6cifiquesau modSle.(Le style peut varier selonle mo@le.) A qrJl S'utilisepour la cuissonau gril et le rissolage surpattiesup@ieure. B ¸ Cuissoncourante S'utilisepour la cuissoncouranteet le r0tissage. Plus+/moinsS'utilisepourentrerou changerla dur@,la temp@ature du four. Etablitle gril temperatureELEVEE ou BASSE [I Minuterie Programme la minuterie. Cuissonet Pourcuirependantunedur6epr6_tablie,avec maintienau chaudpendantune heure. iiii_ maJntien G Nettoyage S'utilisepout programmerle cycle d'autonettoyage. Demarrage dJff6r6 Programme le four pourd6buterune cuisson plustard. H ¸ Horloge Maintienau chaud S'utilisepour programrner I'heuredu jour. J Annuletouteslesop6rationssaufminuterieet horloge. ANNULER Remarque : quatre secondesapres avoirappuy_,sur les touches More+ ou Less-,la dur@ ou la temp6raturesera automatiquemententr6e.Si plus de 30 secondess'_coulententre la pressionsur une touche de fonction et celle sur la touche More+ ou Less-,la fonction sera annul6eet I'afficheur reviendra I'affichagepr6c6dent. L'hodoge peut 6tre programm6epour afficher [a dur6e dans un format de 12ou 24 heures.Uhorlogeest programm6een usinepour un format de 12 heures. Changement de J'horJoge _ un format de 24 heures : 1. Appuyersur les touchesCANCEL(ANNULER) et Delay (Demarragediff6r6) et maintenir la --_ pressionpendanttrois secondes. S'utilisepour maintenirau chauddansle four lesalimentscuits. 2. LAx, JLLL ,) Appuyersur More+ ou Less- pour programmerun format de 12 ou 24 heures. 3. ProgrammerI'heureen suivantles instructions donn_esci-dessous. Reglage de l'horloge : Utilisation des touches 1. Appuyersur la touche Clock (Horloge). , Uheuredu jour et deux points c%notent I'afficheur. , Appuyersur la touche d6sir6e. , Appuyersur More+ (Plus+) ou Less- (Moins-) pour entrer la dur@ ou la temp6rature. 2. Appuyersur More+ ou Less- pour programmer I'heuredu jour. , Un hip retentit IorsqueI'on appuie sur une touche. , Lesdeux points continuent _ clignoter. , Un double bJpretentit en cas d'erreur de programmation. Less.... ................................. Appuyer_ nouveausur Jatouche Clock ou attendre quatre secondes. suite,., 34 © Annumation de maminuterie LorsqueIe courant #bctrique arriveou apres une interruption de courant,ta demiere heure avant rinterruption de courant va clignoter. 1. Appuyer sur la touche Timer et la maintenir ainsipendant trois secondes. Pour rappebr rheure du jour brsqu'une autre fonction de duree s'affbhe, appuyersur la touche CIock. OU 2. Appuyer sur la touche Timer et regler I'heureb 00:00. L'heure de I'hodogene peut etre changeeIorsqueb four a ete programmepour une cuissonou un nettoyagediffere ou pour la fonction de cuissonet maintien. Verrouimmage des cow.andes Annumation de m'affichage de m'heure : Lestouches peuvent6tre verrouiII@spour des raisonsde s@urke, nettoyageou pour emp@hertoute utiIisation non [email protected] pourront 6tre utiIiseessi elles sont verrouillSes. Si I'onne desire pasI'affbhage de I'heuredu jour : Appuyersur lestouches CANCEL(ANNULER) et CIock (Horloge[et bs maintenir ainsi pendanttrois secondes.L'heuredu ]our disparait de rafficheur. Si le four est en cours d'utilisation,les commandesne peuvent 8tre verrouill@s. L'heure actuelIedu jour restera& I'afficheur Iorsque lescommandes seront verrouiil@s. LorsqueI'affichagede I'heureest annule, appuyersur Ia touche Clockpour affbher brievementrheure du jour. Verrouimmage : Appuyersur bs touches CANCELet Cook& HoId (Cuissonet maintien} et les maintenir ainsi pendanttrois secondes. Reaffichage de m'heure : Appuyersur bs touches CANCELet CIocket les maintenir ainsi pendanttrois secondes.L'heuredu ]our rSapparatt_ I'afficheur. o Le mot LOCK(VERROUILLAGE} clignote I'afficheur. D6verrouillage o Le mot LOCKdisparait de ['afficheur. La minuterie pout 6tre utilis@ ind@endamment de toute autre activit6 du four. Elle peut 6tre aussi programm@ alors qu'une autre fonction du four est en cours d'utilisation. Codes La minuterb ne commandopas b four. Elie ne sert qu'_ emettredes bips. 1. Appuyer sur Ia touche Timer(Minuterie[. • 0:00s'alhme _ I'afficheur. • Losdeux points c%notent. : Appuyersur [estouches CANCELet Cook& Hold et [es maintenir ainsi pendanttrois secondes. La minuterie peut 6tre programm@ de une minute (00:01} jusqu'& 99 heures et 59 minutes (99:59}. Programmation de maminuterie : : d'ano a ie Les roots BAKE(CUBSONCOURANTE}ou LOCK(VERROUILLAGE[ peuventciignoter rapidement_ i'afficheurpour pr@eniren cas d'erreur ou de probl_me.Si tei est le cas,appuyersur ia touche CANCEL.Si bs rootsBAKEou LOCKcontinuent _ ciignoter, .............................................. Tim e r debrancherI'appareii.Attendre quelquesminutes,puis rebrancher i'appareiLSi run des roots continue _ ciignoter,debrancherrappareil et prendre contact avec un r@arateur autoris_. 2. Appuyer sur la touche More+ ou Less- jusqu'_ ce que I'heurejuste paraisse& I'afficheur. • Losdeux points continuent 8 clignoter. 3. Appuyer _ nouveausur la touche Timer ou attendre quatresecondes. ........................... Less.................................. • Losdeux points continuent _ clignoter et le d@omptede la dur@ commence. • La derniere minute du d@omptesera affich@ sous forme de secondes. 4. A la fin de la duree programm@,un hip long retentit. 35 CUiSSOn COUrante Renlatques sut _a cuisson courante all fOUr : Pour changer matemperature du four pendant maeuisson, appuyersur Bake,puissur Iatouche More+ ou Less-iusqu'_ ce que la temperaturedesireesoit affichee. Programmation de la cuisson courante : 1. Appuyer sur la touche Bake[Cuissoncourante}. • Le mot BAKE(CUiSSONCOURANTE)clignote. • 000clignote _ I'afficheur. 2. %tectionner la temperaturedu four. La temperature pout etre programmeede 75 _ 290 °C 070 _ 550 °F}. Appuyer une fois sur la touche More+ [Plus+}ou Less- [Moins-}, ou appuyersur la touche More+ ou Less- et la maintenir ainsL • 175° (350°} s'aiIumeIorsque I'onappuie la premBrefois sur I'unedestouches. Pour changer matemperature du four lots du pr_chauffage, appuyerdeu× lois sur Iatouche Bake,puis sur ................................. la touche More+ ou Less-iusqu'_ ce que la temperature desireesoit affichee. LessSi I'on oublie d'arreterIe four, iI s'arreteraautomatiquement .......................... .... awes 12 heures.Si I'on desiredesact[vercette fonction, voir page 38. PourdesconseflssuppBmentairessur Ia cuissoncourante et le retissage,voir la brochureLa cuissonsimplifiee. • Appuyer sur la touche More+ pour augmenterla temperature. • Appuyer sur la touche Less- pour diminuer la temperature. 3. Appuyer _ nouveausur la touche Bakeou attendre quatre secondes. Cuisson et maintien La fonction Cook & Hold (Cuissonet ma[ntien}permet de cuire pendant une duree predeterminee,suivie par un cycle de maintien au chaud d'une heure. • Le mot BAKEs'arretede clignoter et s'aliume_ I'afficheur. Programmation de mafonction cuisson et maintien : 1. Appuyer sur la touche Cook & Hold [Cuissonet maintien). • 38° (100°} ou Ia temperaturereelle du four sera affichee. La temperatureaugmenterapar intervallede 3 °C [5 °F}jusqu'a ce que la temperaturepreprogrammeesoit atteinte. • Losroots BAKE(CUISSON)et HOLD (MAINTIEN}clignotent. • 000 s'ailume _ I'afficheur. 4. LaisserIefour prechauffer pendant8 _ 15 minutes. 2. SelectionnerIatemperaturedu four. La temperature • LorsqueIatemperatureprogrammeepour Jefour est atteinte, un hip long retentit. • Appuyer sur la touche More+ pour augmenterla temperature. 5. Placerla nourriture au centre du four, en laissantun minimum de 2 pouces(5 cm} entre I'ustensileet Jesparoisdu four. • Appuyer sur la touche Less- pour diminuer la temperature. 3. Appuyer _ nouveausur la touche Cook & Hold OU attendre quatre secondes. 6. Verifier I'avancementde la cuisson_ Ia duree minimale de cuisson.Cuireplus Jongtempsau besoin. _,_ • Le mot HOLDclignote. ,_r."'x_ • 00:00clignote _ I'afficheur. 8. RetirerJanourriture du four. Differences de cuisson four et nouveau entre ........................... pout etre programmeede 75 _ 290 °C 070 _ 550 °F}. Less- .... Appuyer une fois sur Iatouche More+ ou Less- ou appuyersur la touche More+ ou Less- et la maintenirainsL • Pour rappelerla temperatureprogrammeependant le prechauffage,appuyersur la touche Bake. 7. bisque Iacuissonest terminee,appuyer sur la touche CANCEL(ANNULER). ,More+ 4. EntrerIaduree pendant laquelie I'ondesireque la cuissonait lieu en appuyantsur le touche More+ ou Less-. La duree de cuissonpout 6tre programmeede 10 minutes [00:10} 11 heures,59 minutes (11:59). Pancien • Losroots BAKEet HOLDs'allument _ I'afficheur. II est normalde remarquerquelquesdifferences darts Iaduree de cuissonentre un four neuf et un four ancien. Voir Ajustement de la temperaturedu four _ la page38. • La duree de cuissons'alIumea I'afficheur. • La duree de cuissoncommencele compte_ rebours. 36 © Lorsque la dur6e de cuisson s'est 6coul6e : 4. Appuyersur More+ pour programmerh temp6raturede cuisson. • O,uatre bJpsretentissent. • 00:00et le mot HOLDclignotent. + Le mot BAKEs'6teint. • Le mot BAKEreste allure6. • Lesroots HOLDet WARM (CHAUD}s'a%ment. 5. Appuyersur More+ pour programmerla dur6e de cuisson. • 75° 070 °] parait _ ['afficheur. • La dur6e d'attente,les roots DELAY,BAKEet HOLDs'a%ment rafficheur. Apr6s uue heure de MAINTIEN AU CHAUD : Lorsque la dur6e d'atteute s'est 6coulee : , Le mot End (Fin] s'affiche. ° Le mot DELAYs'6teint. • L'heuredu jour r6apparait8 I'afficheur. • La dur6e de cuissonest affichee. Auuulatiou momeut : de la fouctiou cuissou et maiutieu _ tout Appuyersur Iatouche CANCEL[ANNULER].Retirer (C/\NCEL la nourriture du four. • Lesroots BAKEet HOLDsont affiches. Pour programmer uu temps d'atteute Jorsque la fouctiou cuissou et maiutieu a d6j_ 6t6 programmee : _) 1. Appuyer sur la touche Delay [D6marragediff6r6]. Cuisson courante diff6r6e • Le mot DELAY[ATTENTE]clignote. • 00:00parait _ I'afficheur. 2. Appuyer sur la touche More+ ou Less- pour ............................ programmer la dur6e d'attente.................................... Less, Apr_s quatre secondes,[e mot DELAYreste allure6 pour rappeler qu'un cycle de cuisson diff6r6e a 6t6 programm6. Ne pas utiJiserla cuissondiffer6e pour des denr6estr6s p6rissablescomme les produits laitiers,+eporc, la volaiJleou les fruits de mer. Avec Ia fonctJondiff6r6e, Ie four se met _ cuire plustard dans la journ6e. Programmerla dur6e d'attented6sir6eavant que Ie four ne se mette en marcheet la dur6e de cuissond6sJr6e.Le four commence _ chauffera I'heures6IectJonn6eet cult pour Jadur6e sp6cifi6e,puis garde Ia nourriture au chaud pendantune heure. Lorsque la dur6e d'atteute s'est 6coul6e et que le four se met eu marche : • La dur6e de cuJssonseraaffich6e. * Le mot DELAYs'6teint. La dur6e d'attentepeut 6tre programm@e de 10 minutes(00:10} 11 heures,59 minutes [11:59]. * Lesroots BAKEet HOLD restentallum6s. Auuulatiou Programmatiou d'uu cycle de cuissou couraute diff6r6e : Appuyersur la touche CANCEL(ANNULER]. : , Toutesles fonctions de cuissonminut6e et non minut6eseront annu+ees. 1. Appuyer sur la touche Delay (D6marragediff6r6]. • Le mot DELAY(ATTENTE]clignote. • L'heuredu jour r6apparait_ I'afficheur. • 00:00clignote _ rafficheur. 2. Appuyer sur Ia touche More+ (Plus+] ou Less[Moins-] pour programmer la duree d'attente. AIors que le mot DELAYclignote toujours : 3. Appuyer sur la touche Cook & Hold (Cuissonet maintJen). • 000s'allume _ J'afficheur. Remarques : ,................................ Ne pas utiliser Ia cuisson(]iff6r6epour des articlesqui n6cessitentque le four soit pr6chauff6,commeles g_teaux, Less- j les petits biscuitset les pains. .......................... Ne pas utiliser Ie cycle de cuissonet maintien diff6r6s si le four est d6j_ chaud. • Lesroots BAKE(CUISSONCOURANTE]et HOLD (MAINTIEN]clignotent. 37 Maintien au chaud Remarques Pourmaintenir au chaud clansle four des alimentscuits et chauds ou pour r6chaufferpains et assiettes= sur fonction maintien au chaud : • Pourobtenir des quaiitesalimentaireset nutritivesoptimaIes, les alimentscuits au four ne doivent pasetre gardes au chaud plus de 1 a 2 heures= Programmation du maintien au chaud : 1= Appuyersur Iatouche KeepWarm [Maintien au chaud)= • Le mot WARM (CHAUD)clignote= • Pouremp6cherIes alimentsde dessecher,Ies recouvrir de papier aluminium,sans serrer,ou d'un couvercle. • 000 parait _ rafficheur= • Pour r6chauffer des petits pains : 2. %lectionner la temperaturede maintien au chaud. Celle-ci peut etre regleede 63 _ 90 °C 045 _ 190°F).Appuyerune fois sur la touche More+ (Plus+)ou Less- (Moins-) ou appuyersur la touche More+ ou Less- et la maintenir ainsi. - recouvrir les petits painsde papier ahminium sans serrer et .............................. les placer au four. - appuyersur les touches KeepWarm et More+ pour programmer75 °C (170 °F}. Less...................................... - rechaufferpendant 12_ 15 minutes. 75° (170°) s'allume IorsqueI'on appuie la premierelois sur rune destouches. • Pour r6chauffer des assiettes : • Appuyersur Iatouche More+ pour augmenter Iatemperature. - placer deux pilesde quatre assiettesmaximumclansle four. o Appuyersur la touche Less- pour diminuer la temperature. - appuyersur lestouches KeepWarm et More+ pour programmer75 °C (170 °F}. Le mot WARM {CHAUD}et la temperatureseront affiches pendant que la fonction maintien au chaud est active. - rechaufferpendant cinq minutes,arr6ter le four et laisserles assiettesau four pendantencore 15 minutes. - n'utiliser que des assiettespouvant aller au four, a verifier avec le fabricant. Annumation du maintien au chaud - ne pas poserdes assiettestildes sur une surface froide, les changementsrapidesde temperaturepouvant casser I'assietteou la fendiller. : 1=Appuyersur la touche CANCEL{ANNULER}= (CANCEL 2. Retirer la nourrituredu four. _) 38 Arr t Ajustement automatique/Mode de la temperature du four Le four s'arreteautomatiquementapres12 heuress'il a 6tO accidentetlementlaisseen marche.Cettecaracteristiquede securite pout etre arretee. Pour annulet l'arr_t 12 heures et faire fonctionner four en continu pendant 72 heures : La precisiondes temperaturesdu four a ete soigneusementverifiee I'usine.II est normalde remarquerquelquesdifferencesdans la cuissonentre un four neuf et un four ancien.Au fur et _ mesureque loscuisinieressont moins neuves,la temperaturedu four peut varier. le II est possibled'ajuster la temperaturedu four si I'onpenseque Ie four ne cuit pasou ne rissole pas correctement.Pour decider de I'ajustement_ apporter,regler le four _ une temperaturede 15 °C (25 °F}plus eleveeou plus bassoque la temperatureindiquee darts la recette,puis faire cuire Ia preparation.Lesresultats du _test >> de cuissondoivent donner une idee du hombrede degresduquel la temperaturedoit 6tre aiustee. 1. ProgrammerIefour pour une cuissoncourante (voir page 35). 2. Appuyer sur la touche Clock (Hodoge}et la maintenir ainsipendant cinq secondes. • SAb sera affiche et ciignotera pendant cinq secondes. • SAb sera ensuite affiche en continujusqu'_ ce qu'on rarrete ou jusqu'_ ce que la duree limite de 72 heuressoit atteinte. Ajustement • Le mot BAKE(CUISSONCOURANTE} sera aussi affichesi un cyclede cuissoncourante est en cours alors que lefour est en modesabbaL 2. Entrer285 °C (550 °F)en appuyant sur la touche More+ (Plus+}. courante 3. Appuyer sur la touche Bake et Ia maintenirainsi pendant plusieurssecondesou jusqu'_ ceque 0° paraisse_ I'afficheur. Si Ia temperaturedu four a ete precedemmentajustee,Ie changementseraaffiche. Par exemple,si la temperaturedu four a ete reduitede 8 °C 05 °F},I'afficheur indiquera -8 (-15}. alors que le four Appuyersur CANCEL(ANNULER}. 4. Appuyer sur la touche More+ (Plus+} ou Less- (Moins-} pour ajuster la temperature. • Le mot BAKEs'eteint_ rafficheur. A chaquelois que I'onappuie sur une touche, la temperature change de 3 °C (5 °F}.La temperaturedu four pout etre augmenteeou diminuee de 3 _ 20 °C {5 a 35 °F}. ° Aucun bip sonorene retentit. Annulation du mode sabbat du four : 1. Appuyer sur Ia touche Bake (Cuissoncourante}. Toutes Iesautres fonctions (Minutede,Maintien au chaud, Nettoyage,etc.}sont verrouillees,SAUFBAKE,pendant le mode sabbat. Annulation de la cuisson est en mode sabbat : de la temperature : 1. Appuyer sur la touche Clock pendantcinq secondes. 5. L'heuredu ]our reapparaitautomatiquement8 I'afficheur. OU II n'est pas necessairede reajusterIatemperaturedu four en cas de panne ou d'interruption de courant. Lestemperaturesde cuissonau gril et de nettoyagene peuventetre a]ustees. 2. Apres 72 heures,le modesabbat setermine. • SAb clignote pendantcinq secondes. • L'heuredu iour revient_ I'afficheur. Remarques sur le mode sabbat : • Le modesabbat peut etre mis en marche& tout moment,que le four soit en marche ou non. o Tous Iesmessageset lesbips sont desactivesIorsque le mode sabbat est actiE • Le modesabbat ne pout pas 6tin mis en marche si Ies commandossont verrouilleesou la porte verrouillee. o Si I'onappuie sur Iatouche CANCEL,un cycle de cuisson courante au four sera annule.Cependant,Jeprogrammateur resteraen mode sabbat. • Sile four est en mode cuissonIorsquele modesabbat est programme,le mot BAKE(CUISSONCOURANTE]s'eteint _ la fin du cycle de cuisson. II n'y aura aucunsignal sonoreaudible. o Apres une panne de courant, le four revient en modesabbat avec 72 heuresrestanteset aucun cycleactif. o Lorsquele modesabbat a demarre,aucun hip de prechauffage ne retentiL 39 Cuisson au grim Programmation de la cuisson 5. au grim : PlacerIa nourriture dans le four. Laisserla porte du four ouverte d'environ 10 cm (4 po] _remi_re but@). 6. Retournerla viande une lois _ Jamoiti6 de Ia dur6e de culsson. 1. Appuyersur la touche Broil (Gril). 7. LorsqueI'aiimentest cuit, appuyersur Iatouche CANCEL(ANNULER}.Retirer la nourriture et la I@hefrJtedu four. o Le mot BROIL(GRIL}ciignote. + Le mot SETUAUDER} est affiche. o L'heure du jour r6apparait_ ['affbheur. 2. Appuyersur la touche More¢ CPlus+}pour programmer un gril temp6rature6iev6eou sur B touche Less- (Moins-] pour programpaerun gril _ temperature basse. Remarques o Les mots HI (ELEVEE) ou LO (BASSE]seront affich_s. sur Uacuisson au grH : o Pourde meilleurs r@ultatsIors du griI, seservir d'un ustensib pr@u pour ce type de cuisson. o %lectionner HI broil (Gril _ temp6rature6by@) (290 °C [550°F]) pour un griI normal.S_lectionnerLO broil (Gril temp6raturebass@(230 °C [450°F]} pour un griI _ temperature inf_rbure d'aliments_ cuisson plus Ionguecomme la volaille. o Pr6voirdesdur@s de cuisson au griI plus Iongueset un rissolagek!g_rement moinsdot6 si I'appareilfonctionne sur un circuit de 208volts. o Le griI au reglage HI (Elev@est utilis_ pour la majorit6 des op6rationsde cuissonau gril. UtiliserIe griI au r6glage LO (Bas] pour la cuissonde metsdevant cuJreplus Iongtemps, afin de bur permettred'6tre bien cults sans rissolageexcessif. 3. Apt@ quatresecondes,Ie four se met en mar@e. o Le mot BROILreste allum6. o Lesdur@s de cuissonau gril peuvent 6tre plus Ionguesavec une temp@aturede gril inf6rieure. o Pourdes temperatureset des conseib suppl6mentairessur Ia cuisson au griI, se reporter_ la brochure La cuissonsimplifi@. 4. Pour un rissoBge maximum,pr@hauffer+'_16ment de gril pendanttrois ou quatre minutesavant d'ajouter la nourrJture. TabUeau de cuisson au grH __ AUMENTS _'_'_, POS_TION DES GR_LLES_ DEGRE DE CUISSON TEMPS DE CUISSON TOTAL (MINUTES} Beauf Bifteck, 2,5 cm (1 po] d'@aisseur 4 Hamburgers, 2 cm (3/4 po] d'@aisseur 4 4 Porc Bacon COtelettes, 2+5cm (1 po} Jambon - pr6-cuit tranche de 1,3 cm 0/2 po] Voiaiiie Pouieten morceaux 4 4 4 Cuisson moyenne Bbn cuit 15 - 18 minutes 19 - 23 minutes Bien cuit 15 - 18 minutes Bbn cuit Bien cuit Ti6de 6 - 10 minutes 22 - 26 minutes 8 - 12 minutes Bien cuit GrJl _ temperature basse 28 - 38 minutes La chair se detache La chair se d_tache 10 - 15 minutes 8 - 12 minutes LO Broil3ou4 Fruits de mer Dames de poisson, beurr_es, 2,5 cm (1 po] d'@aisseur Filetes 4 4 Grille sup6rieurea la position n° 5 Remarq_e : Cetableau n'est qu'un guide de suggestions.Les dur@s peuventvarier selon I'aliment_ cuire. 4O 1 Event du four Positions des grilles Lorsquemefour est atimis_,mazo,e voisine de m'6ventpeavent devenir suffisament chauds pour provoqaer des br_mears.Ne jamais obstruer roave_ure de r_vent. Grille 5 (position Ia plus haute} : Pour cuisson breveau griI - pain grill6 ou alimentsminces contenantpeu de graisse. U_vent de four est situ_ en dessous da boaelier da dosseret de la cuisini_re. L'eventdu four 5 __4 --3 Grille 4 : PourIa piupart descuissonsau griL __2 --1 Grille 3 : PourIa plupart descoissonsde p_tisseries sur une tOle _ biscuits - g_teaux 8 6tages, tartes aux fruits, mets surgel6s, Eclairage Grille 2 : Pour r6tissagede pi_cesde viande, metsen sauce,cuisson de pain, gSteau16geren couronne (baba) ou entremets. du four Appuyersur Ie commutateurd'6clairagedu four situ6 sur le tableaude commandopour alhmer ou 6teindrela lampe. Oven Lig_ht Sole du four Grille 1 : Pourle rOtissagede grossespisces de viande ou volaiile, tartes surgel6es,souf%s ou g_teauxdes anges. CWSSON SUR PLUSIEURSGRILLES: Oeo×grilles plates: Utilisezles positions2 et 4. Prot6gerIa sole des produits renvers6s,en particuIieracidesou sucr6s,ceux-ci pouvantd6colorer i'6mailvitrifi6. Utiliserdes ustensilesde la bonne dimensionpour @iter que ies produits ne se renversentou passentpar-dessusI'ustensileen bouillant. Ne pas placer d'astensiles oo de feoille d'amominiomdireetement sor masomedo foor. Une grille plate et ane grille sorbaiss_e : UtiIisezIes positions2 et 5. Grilles Une demi-grille est disponibleen accessoire.Elle augmente Iacapacit6 du four et s'accrocheb gauche,8 Ia pattie sup_rieore.Etleest utile pour la cuisson d'un ptat de 16gumesIorsqu'ungros rOti se trouve sur Iagrille inf6rieure.Prendre contact avec Ierevendeurpour demander I'accessoireHALFRACK[demigrille:)ou pour commander,composerle 1=800-688-2002. du four ° Ne pas ranger de nourdtum ou d'ustensi!edans !e four, Le four comportedeuxgrilles avec,pour chacune,un dispositif de calage. E×traction : 1. Timr la grille en ligne droite iusqu'8 ce qu'elle s'arr6te _ la position de calage. 2. Souleverla grille b I'avantpour pouvoir rextraire. R_installation : Remarqoe : Agir prudemmentpour retirer la grille surbaissde sur la position 1 (position la plus basso:). Oemi-griHe Grille Easy ack (certains modeles) CertainsmodSIesde cuisinieres sont dot6s d'une grille EasyRack Mc. La grille EasyRack Mcpermet de mieux saisir Ies ustensilesb pStisseriepour los sortir du four. 1. Placerla grille sor los supportsdarts le four. 2. Soulever!6gSrementI'avant.Fakeglisser la grille vers I'arriereaudel8 de la position de caIage. 3. Abaisserla grille et la faire gIisserdans le four. Ne pas renoavrir matotamit8 d'one grille avec de mafeoille d'amominiom,ni garnir me fond dofoot ovec de ma feoille d'amominiom. Ceci modifierait rues r_saltats de noisson ao fool et me fond do foot poorrait sobir des dommages. 81 _emarq_es : • Utiliser la grille pratique EasyRack _cseulementclansle four dans lequeIelle a _t_ achet_e. " La grille de four EasyRack Mcpeut etre utilis_e sur toutes les positionsde grille. [:our autonettoyant (certains modeles} 5. G. Remarque : PourB nettoyagemanuaivoir b page 44. o hest normal que certamespiecasde [a culsinieredevbnuem tr@ chaudes [ors d'un cycb de nettoyage. o Pour eviler de ',OUSb[essere_d'endommagerla porte du four n'essayezpas d'ouvrir [a porte quand <LOCK 0/ERROUULLAGE} est affiche. o Ev[terde toucher [asurfacede cuisson, la porte, le hub[c1et [a zonede ['eventdb four Iors d'un cycled'autone[[oyage, o Ne pasutiiiser de nettoyantpour four de commercesur [efini du four ou sur [ou[ autre composan_du four. Ce[aabimerait [e fin[ ou les composantsdu four. L'autonettoyageutilise des temperaturessuperieures_ celies de Ia cuissonnormalepour nettoyerautomatiquement['interbur du four. Ne forcez pas[a porte du four ni [e levierde verrouillagepour [es ouvdr. Ceci peut provoquerune exposition_ des temperatures eievees,et donc presenterun risquede brOlure. S[ le four est tres sale, il est normal qu'on observela formation de fume ou de flammesdurant ie nettoyage.Nettoyer le four intervallesreguliersplut6t que d'attendre une accumulatbn importantede r@idus. Durant [e processusd'autonettoyage,[[ convient de bien aerer la cuisine pour eliminer les odeursnormalementCruisesdurant le nettoyage. Eliminerles residusde graisseou de produits renvers@sur la soleavant le nettoyage.Ceci crop@hela formation de flammes ou de fumee @rant le nettoyage. Essuyerlesresidus sucreset acides,comme[es patatesdouces, [a tomate oubs sauces8 basede Bit. La porcelainevitrifi@ pos@deune certaine r@istanceauxcompose acides,maisqui n'est pas limit@. Elle peut se d@olorersi bs r@idusacides ou sucresne sont pas enlev@avant de commencer ['autonettoyage. Programmatien de m'autenetteyage : 205 °C [@0 programmerun [ de Remarque : La°F}pour temperaturedu four doltcycled'autonettoyage. 6tre situ@ en dessous ]. Fermer[a porte du four. 2. Placer[a manettede verrouiJJage a [a position de verroui[[age. 3. Appuyer sur [a touche Cban (Nettoyage}. • Le mot CLEAN(NETTOYAGE} clignote _ ['afficheur. Si [a porte n'est pas ferm@, deships retentissentet [e mot DOOR [PORTE]parait _ I'afficheur.Si la porte n'est pasferm@ darts les 45 secondes,['operationd'autonettoyageest annul@ et I'afficheurrevbnt _ I'heuredu ]our. 4. Appuyer sur la touche More+ [Plus+] ou Less(Moins-]. • CL-M (Nettoyage- salete moyenne,3 heures} est affiche. -........................... / Less- ) 5. Appuyer sur la touche More+ ou Less- pour voir defiler lesdifferents regiagesde I'autonettoyage. Avant I'autonettoyage 1= Eteindre[a [ampe du four avant le nettoyage=Celle-ci pourrait en effet griiier. 2. Enleverla I@hefrite,tous [es plats et [esgrilles du four. Les grilles risquent de se d@oIoreret de ne plus glisser aussi bien apresun cycled'autonettoyagesi on ne [esenl@epas. 3. Nettoyerle cadre du four, [e cadrede la porte [zone_ ['exterieur du ioint] et autour de ['ouverturedarts [ejoint de la porte, _ ['aide d'un produit de nettoyagenon abrasif commeBon Ami* ou d'eau additionn@de detergent.Le processus d'autonettoyagene nettoie pasces i \ zones.Ellesdoivent 6tre nettoy@spour crop@herla saletede s'incruster pendantie cycle de nettoyage.(Le ioint assure['etancheiteautour de la porte et du hublot du four.] 4. Pourempechertout dommage,ne pasnettoyer ni frotter [eioint qui setrouve autour de [a porte du four. Ceioint est congu pour @iter bs pertesde chaleur pendant [ecycle d'autonettoyage. CL-H (Nettoyage- saieteepaisse,4 heures] CL-M (Nettoyage- salete moyenne,3 heures] CL-L (Nettoyage- salete legere,2 heures] Le choix du niveaude salete du four programme automatiquementla dur@ du cycle d'autonettoyage. 6. Apres quatre secondes,le four commence le nettoyage. • La duree de nettoyagecommencele decomptea I'afficheur. • Le mot LOCK0,!ERROUiLLAGE] parait _ I'afficheur. o Le mot CLEANparait _ I'afficheur. Demarrage differ_ d'un cycle d'autenetteyage : 1. Appuyer sur [a touche Delay (D@Tlarrage differ@. • Le mot DELAY[ATTENTE}clignote. • 00:00parait _ I'afficheur. *Les noms de marquedes produits de nettoyagesont des marquesd@oseesdes differents fabricants. 42 suite oo, 2+Appuyer surlatouche More+ouLess-pour programmer ladur6ed'attente avant quene More+ commence lecycle+ Ladur6ed'attente peut6tre r6gI6e, de10minutes [00:10) b 11 heures,59 minutes(1+:59). 3+ Appuyersur la touche Clean(Nettoyage)+ o Le mot CLEAN(NETTOYAGE) va clignoter+ 4. Appuyersur la touche More+ (Plus+)ou Less[Moins-). o CL-M (Nettoyage- salete moyenne,3 heures) est affiche. Pendant le cycle d'autonettoyage Lorsquele mot LOCKparait _ I'afficheur,la porte ne peut 6tre ouverte+Pour6viter d'endommagerla porte, ne pasla forcer pour I'ouvrJrIorsque le mot LOCKest affich6+ Fum6e et odeurs La premierefois cO le four est nettoy6,il peut y avoir production d'odeur et de fumee+Ceci est normal et disparaitra_ I'usage+ .................................. , Si le four est tr6s saleou si la I_chefritea 6t6 Jaisseedans le four, il peut y avoir production de fumee+ Bruits Pendantque le four chauffe, [I peut se produire des bruits de m6tal en dilatation ou en contraction+Ceci est normal et n'ind+quepasque le four s'abime+ 5. Appuyersur la touche More+ ou Less- pour voir defiler les diff6rents r6glagesde I'autonettoyage. CL-H (Nettoyage- salet6 6paisse,4 heures) CL-M (Nettoyage- salete moyenne,3 heures) CL-L (Nettoyage- salet6 I6gere,2 heures) Apr_s Le choix du niveaude salet6 du four programme automatiquementIa dur6e du cycle d'autonettoyage. Environune heure apres la fin du cycle, le mot LOCKs'6teint+Ace moment, la porte peut 6tre ouverte+Pousserla manettede la porte vers la gauchepour d6verrouiller+ 6. AprSsquatre secondes,Ies mots CLEAN(NETTOYAGE), DELAY (ATTENTE)et LOCKG_ERROUILLAGE) paraissentb I'afficheur pour indiquer que le four est programm6 pour une operationde nettoyagediff6r6.Le temps d'attente parait _ J'afficheur. le cycle d'autonettoyage La samet6peut avoir maiss6 an r6si_tu gris poudrea×oL'enlever avec un linge humide+S'il reste de la salete,ceta indique que le cycle de nettoyagen'a pas 6t_ assezlong+Cettesalet_ restantesera enlev_eau prochain cycled'autonettoyage+ Si lea grilles o_t _t_ laiss_es _ l'i_t_rie_r da fear pendant le cycle d'a_to_ettoyage et q_'emmes gmissemroamsat me_rs suppor_s, les enduire,ainsi que lessupports, d'une fine couche d'huile v_getale+ De fi_es mig_espeuve_t apparaitre da_s mapercemai_eparce qa'elle a s_bi ebale_r et refroidissement. Ceciest normal et n'affecterapas Japerformance. Si le four a dej_ et6 programme pour uu cycle de uetteyage et que l'ou desire etablir uu delai : 1+Appuyer sur ,otoucl De+ay e[D+marrage dOff+re)+ Une d_comorationblanche pe_t apparaitre apr_s menettoyage si des amimemsaeides o_ saerSs _'o_t pas 6t6 e_mev6.savast qae _e comme_ee m'aato_ettoyage.La d_coloration est normale et n'affecterapas la performancedu four+ + Le mot DELAY(ATTENTE)clignote. + 00:00parait _ J'afficheur+ 2+ Appuyer sur Jatouche More+ ou Less- pour programmerIadur6e d_sir6ede I'attenteavant que ne debute Ie cycle. ................................ _ematques • Si Ia porte du four n'est pas ferm6e,Ie mot DOOR[PORTE) clignote _ I'afficheur et le four #met des hips jusqu'b ce que la porte soit ferm6e et que J'onappuie _ nouveausur Clean (Nettoyage]. Apr_s quatre secondes,les mats CLEAN,DELAYet LOCK paraissent_ I'afficheurpour indiquer que le four est programme pour une op6rationde nettoyagediff6r6. Letemps d'attente parak _ I'afficheur. Lersque le cycle d'auteuetteyage • La porte du four se trouvera endommag6esi ron force son ouverturealors que le mot LOCK(VERROUILLAGE) est encore affich6. d6bute : • Le mot DELAYs'_teint+ • La dur6e de nettoyageparait b I'affJcheur+ Auuulatieu du cycJe d'auteuetteyage : : Appuyersur Iatouche CANCEL[ANNULER)+ + Tous les lOtS disparaissentde I'afficheur+ + ToutesIes fonctions sent annul6es+ + L'heuredu jour parait_ I'afficheur. 43 Mdthodes de nettoyage * Avant route manipulation ou operation de nettoyage, v_rifier que I'appareil eat arr_t_ et que teus les composants sent freids, afin d'_viter des dommages ou des br_lures. , Pour eviter la formation de _acrlesou un changementde couleur, nettoyer o Aprdstout ddmontagede composan1:s, veiller a effectuer un remontage correct. Les noms de marque sont des mamues (_eoosees des ditferents fabricants= "" Pour commander directement= comooser e 1-877-232-677" aux E=-U=OLe 1-800-688-8408 au Canada. PIECES NETrOYAGE Dosseret et table de cuissonl_mail vitrifi_ L'emailvitrifie est du verre lid au metalpar fusion.II peut sefissurerou s'ecailleren cas de mauvaiseutJlisation.H est resistantauxacides,maispastotalementinattaquablepar lesacides.TousIesproduits renverses,en particulier acidesou sucres,doivent6treessuyesimmediatementavecun Iingesec. o Unefois la pl_cerefroidie,Ia laveravecde I'eausavonneuse,rlnceret secher. o Ne jamaisessuyerune surfacetidde ou chaudeavecun IJngehumide.Ceci pourraitla fissurerou I'dcailIer. o Ne jamaisutiliserde nettoyantspour four, d'agentsde nettoyagecaustiquesou abrasifssur le fini extdrieurde la cuisinidre. l=_ehefriteet sa Ne jamais couvrir la gri#e de papier d'alumildum; cela emp_ehe la ffraisse de cooler dalls la I_cheMte. • Recouvrirta Idchefriteet sa grille d'un lingesavonneux;hisser agir pour ddtachertesrdsidus= o Laveravec de I'eausavonneusetJdde.UtJliserun tampon_ recurerpour 6!iminerJessouJllurestenaces. o On peut placerJesdeuxcomposantsde JaIdchefrJteclansun hve-vaisselle. Zone de la console de commandeet o Pourutiliser la fonctJonVerrouillagedescommandespour le nettoyage,voir page 34= o Essuyeravecun linge humide,puis faire sdcher=Ne pasutillser un agentde nettoyageabrasifsusceptiblede rayerla finition= o On peut utillser un produit de nettoyagedu verre,pulvdris6d'abordsur un chiffon=NE PAS projeter le preduit directemelpt sur les touches de commallde eu sur Faf#cheur. Boutons de commande o Placerchaquebouton_ Iapositiond'ARRET,et retirerchaqueboutonen le tirant= o Laver,rincer et fairesdcher=Ne pasutilJserun agent de nettoyageabrasifsusceptibIede rayerIa finition= o FairefonctionnerbridvementchaqueeIdmentpour vdrifierque le boutona 6t6 correctementreinstaiId= Cavettes de rdcap_ration Cavettesde chrome = L'emailpeutse decolorerou se fendillers'il est surchauffe.Ceciest normalet n'affectepas lesperformancesde cuisson. o Unefois lescuvettesde rdcuperationrefroidies,les laveraprdschaqueutilisation,Iesrinceret Iessdcherpour 6viter lestachesou la decoloration=Lescuvettesde rdcuperatJon peuvent6treIaveesen Iave-va[sselJe= o Pour6timinerIes grossessou[llures,faire tremperdansde I'eausavonneusechaude,puJsutJJiserun produit de nettoyagepeu abrasifcommeSoftScrub_et un tampon _ recureren plastique= o En cas de salet_incrustdedartsIescuvettesde recupdrat[on,lesretirerde Jacuisini@re, lesposersur desfeuilles de pap[erjournal et Ies pulveriserdoucementde nettoyantcommercialpour four. (Ne paspulvSriserde produit sur lessurfacesavoisinantes=] Mettreles cuvettesde rdcuperatJondartsun sac en piastiqueet laisserle produit agir plusieursheures=Porterdes gantsen caoutchoucpour ret[rer lescuvettesde recuperationdu sac,Javerles cuvettes,Jesrinceret less_cher= • Aprdsle refroidissement,laveraprdschaqueutHisat[on,rinceret fairesecherpour @iter Jaformationde tachesou un changementde couIeur= • Pour6Iiminerde grossessouiIlures,fairetremperdansde I'eausavonneusechaudepuisutiliserun produitde net_oyage peu abrasifcommeSoftScrub*et un tampon _ recureren plastique=Ne pasutiliser un produitde nettoyageabrasifi 44 NE_OYAGE _U _OUr en verre • Eviterd'utilisertrop d'eau,qui risqueraitde s'infiltrersousou derrierele verreet de tacher. • Laver_ I'eauet a(Jsavon.Rinceravecde I'eaupropreet secher.Un pmduit de nettoyagedu verrepeut6tre utilise en le vaporisantd'abordsur un linge. • Ne pasutiliserde produitsabrasifscommetampons_ recurer,lained'acierou produitde nettoyageen poudrequi risqueraientde rayerle verre. Int_rieur du four • Ex6cuterles instructions pr6sent6esaux pages41-42 pour rautonettoyagedu four. Nettoyage manual: • • • • Nettoyer%quemment avec un tampon de plastique et un produit de nettoyagemoyennementabrasif. Ne pas utiliser un tampon _ recurer metallique,qui formeraitdes rayuressur Ia surface. Lorsde remploi d'un produit commercialde nettoyagede four, appliquer Ies instructionsdu fabricant. Eliminerdesque possiblelesproduits acidesrenversds(produits_ basede hit ou de tomate)aveceau et savon;ces pmduits peuventfaire changerla couleur de 1'6maillots d'un contact prolong6. Pourfaciliter le nettoyage, on peut enlever la porte du four. (Voir la section Entretien,page 45._ Grimmes du four (certainsmodeles_ Tiroir de remisage, poign6e de porte, panneau× lat_rau× - ° Nettoyeravec de I'eausavonneuse. ° Eliminerlessouillures tenacesavecune poudre de nettoyageou un tampon _ r6curersavonneux.Rinceret faire s6cher. ° Si lesgrilles sont laiss6esdarts Iefour pendant ie cycied'autonettoyage,ellessed6colorentet peuventne plus tres bien giisser.Sicetase produit,enduire le bord desgdlleset lesupport desgrillesd'une fine couched'huile veg6tale, puis essuyerI'exc6dent. °NE PASUTIUSERDE PRODUffS DE NETTOYAGECONTENANTDU JAVELUSANT. • NE PASUTIUSERDE NETTOYANTS_ ORANGE_ OU ABRASIFSo • TOUJOURSESSUYERDANS LE SENSDE LA TEXTUREDE L'ACtER LORSDU NETTOYAGE. • Nettoyage joumalier/salet_ ldg_re - EssuyeravecI'un desproduits suivants : eau savonneuse,vinaigre blanc/ eau,produit de nettoyagepour verre et surface Formuia409_ ou un produit semblablepour verre - avecun linge soupieet une 6ponge.Rinceret secher.Pourpoiir et enieverlesmarquesde doigts,fairesuivre par unevaporisation de Magic Spraypour acier inoxydable[piece n° 20000008)_*, • Salet_.mod6rSe/dpaisse - EssuyeravecI'un desproduits suivants : BonAmi, Smart Cleanserou Soft Scrub_raide d'un linge soupleou d'une eponge humide.Rinceret secher.Lestaches rebellespeuventetre enleveesavec un tampon multi-usagesScotch-Brite_humidi% Frotteruniform6mentdartsiesensdu m6tai.Rinceretsecher.Pour redonnerdu lustre et retirer ies rayures,faire suivre par une vaporisationde Magic Spraypour acier inoxydable_, • OScolerution - A i'aide d'une eponge humidifi6e ou d'un iinge soupie, essuyer_ i'aide du nettoyant Cameo pour acier inoxydabie_,Rincer imm6diatementet sdcher.Pourenlever les marqueset redonner du lustre,faire suivre par une vaporisationde Magic Spraypour acier inoxydabie _, ° Unefois les pi6cesrefroidies,laver_ I'eausavonneusetiede, rinceret secher.Nejamais essuyerune surfacetiede ou chaudeavec un lingehumide,ceci pouvant endommagerla surface et entrainer une brOlurepar Iavapeur. • Pour lestaches rebelles,utiliser des agents de nettoyageIeg6rementabrasifscommela p_te au bicarbonatede soudeou BonAmi*. Nepas utiliserd'agentsde nettoyageabrasifs,caustiquesou 6nergiquescommelesnettoyants pour four ou lestamponsen lained'acier. Cesproduits raieraientou endommageraientde fa_onpermanentela surface. REMARQUE: UdHserun ffllge eu un tercflensec peur ess_ter lespreduits renvers_s, surteut s'ils se_t acfdes eu sucres. La surface peurrait se d_ce_erer eu se teruirsf _asa/et_ _'_tait pas fmm_dfateme_t etffev_e. Ced est paFdcuif_reme_t important dartsle cas de surfaces blanches° _Lesnoms de marquesont des marquesd6poseesdes diff6rentsfabricants. _ Pour commanderdirectement,composerle 1-877-232-6771aux E.-U.ou le 1-800-688-8408au Canada. 45 Porte du four Hubiot du four Pour prot6ger [e hub[or de [a porte du four : 1. Ne pasutiliser de produits nettoyantsabrasifscommedes tampons _ recureren laine d'acier ou des produits de nettoyage en poudre qui risqueraientde rayer[e verre. o Ne pasgrlmper sur la porte (_ufour ouverte,ou lu_Imposel une charge excessive.Cec[pourrait provoquerun basculementde la cuisinie.re,le bds de [a porte ou des blessurespou_la personne concernee. 2. Ne pas heurter[e hubiot en verre avec un ustensi[e,un article de mobiIier,un iouet, etc. 3. Ne pasfermer [a porte du four avantque los grilles ne soient en place darts [e four. • Ne pas[en[er d'ouvrirou ferme" la por[e ou d'utlliser le four avant que la porte ait ete convenablementr_instaH6e. Toutedegradationdu hubiot de verre- rayure,choc,tension, etc. pout affaiblir sa structure et augmenter[e risque de bris _ une date ulterieure. o Ne ]amaisplacer les doigts entre la chamiSreet le cadreavam uu four. Les bias de charmeresont mont6ssur ressort.Une cnam_erepourrait se reformer brutafemen[con[re le cadre du four et provoquerde serieusesbiessures La pe Oepose de la porte: 1. Apr6s le refroidissementdu four, ouvrir Ia porte - position de cuissonau gril (porte entrouverted'environ 10 cm [4 pouce@. du four o ,D6brancherlacu sini_redu r6seakj6[ectr[queavantde remplacer I ampoule. 2. Saisir la porte de chaque c6t6.Ne pas utiliser la poign6e de porte pour la souleven • Utiliser une marfique s_che pour protegeelos mains lets du Eemp[acement de ['ampoule. , Ne pastoucher 'ampoue avart qu'e e se sot refrod e 3. Sou[ever uniform6ment pour d6gager [a porte des charni6res. . Ne,pastoucher I'ampou[echaudeavec un [incgehumide; [echoc thermique pourrait la bdser. 1. Saisir [aporte de chaque c6t6. Pour remplacer 2. Aligner los fentes avec [es brasde charni6resur [a cuisiniere. l'ampoule du four : 1,Apres [e refro[dissement du four, ma[ntenir [e cabochon tout en enlevant [api6ce m6ta[[[quequ[ [a maint[ent en place. R[:MARQU[: : Le cabochon tombera si on ne le maintient pas en place. 3. Fairedescendre la porte pour la positionner correctementsur los charni_res.Poussersur les anglessup6rieursde [a porte pour ['enfoncercompi_tementsur los charnieres.I[ faut que [a porte soit parfaitementd'aplomb. [afermeture de la porte du four d'une cuisini6re neuve;ceci est [ normal;cet Remarque effet : On disparait pout percevoirune certaine_ 6Iasticit6>>lots de progressivement. CABOCHON RESSORT DE RETENUE _,_nldtaflique) 2. Enieverlecabochonet I'ampoule. 3. Instalierune ampoulede 40 watts pour appareil m6nager. 4. R6installerle cabochml et Iefil m6talliquede retenue. 5. R6tablir['alimentationde la cuisiniere.Reglerde nouveau['hor[oge. 46 R6installation Pieds de r6glage de l'aplomb : 1, Positbnner les extr6mit@des glissi_resdans les rails _ ['int6rieur de la cuisini_re. 2. SouleverI'avantdu tiroir et pousserdoucementiusqu'_ [a position de [a premierebut6e. Vdri%_que B bride antibascu!ementagr+ppeconvenabbment fun des pie@aFr+6re de r6glage de i'aplomb,pour que la CU!S+n+Bre ne PUiSSe basculeraccidentellement. La cuisini6redolt 6tre d'apiombune fois [email protected] elle ne rest pas,tourner lespieds de r6glage de ['aplomben plastique,b chacun des anglesde Ia 3. Soubver _ nouveaule tiroir et le pousseren placepour le former. Prise de courant _ I I kv (mod61es canadiens cuisin,_re,jusqu'_ ce que ceHe-ciso it d'apbm b__.,,,_ 7\ . ANTIBASCULEMENT PIEDDE REGLAGE DE L "APLOfViB auxiliaire seulement} La prisede courant auxiIiaireest s+tu6een bas/_ gauche du dosseret.Veilbr b ceque Ie cordon d'alimentationde ['apparei[ utilise ne reposepas sur un 616mentde Ia tame de cuissonou _ proximit6: [araiseen f marche de I'616mentchauffant ferait subir des dommagesau cordond'alimentationet [a prise de courant. Un appareil suscitantune demandede courant de plus de 10A provoquera I'ouverturedu disjoncteurqui prot6ge Ia prise de courant auxiliaire.Pour r@rmer le disjoncteur,appuyersur Ie commutateur situ6 sur le bord inf6rieurdu dosseret. Tiroir de remisage Ne pas remiserdans le tiroir de remisagedes articles en pBstique ou papier,ou desproduits alimentairesou mat6riaux inflammables. Lostemp6mturesb I'int6deur du tiroir peuvent devenirtrop 61ev6espour ces articbs Iorsque le four est en cours d'utilisation. Le t[roir de remisagepeut 6tre enlev6pour pouw_irnettoyersous [a cuisini6re. D6pose : 1. V[der[e tiroir et [etirer jusqu'_ [a position de [a premierebut6e. 2. Soulever['avantdu tiroir. 3. Tirer le tiroir jusqu'a [a pos+tionde la deuxiemebut@. 4. Saisirles cot@et soubver le tiroir pour pouvoirle retirer. 47 DISJONCTEUR PROBLEME SOLUTION Pour mapmupart desprobm_mes observSs, essayer d'abord mes somutio,s possibmes, _ droite, o Verifier que bs commandesdu four sont correctementregI@s. o Verifier si Iefiche est bien inser@dans B prise, o Inspecter/r@rmerIe disjoncteur.Inspecter/remplacerbs fusibbs. o ContrOlerla source d'alimentationelectrique. Non-fonctionnement de i'appareii = total oa partieL o Determhlersi les commandesdes elementsde surfaceet/ou du four sont convenabbment regl@s,Voir pages29 et 40, o Determinersi la porte du four s'estd@errouiJleeapr@sune operationd'autonettoyage. Voir pages42. o Determinersi le four est regle pour une cuissondifferee ou un nettoyagediffer& Voir pages 36 et 41. o Verifier si Ieverroui!lagedes commandesest en [email protected]. o verifier si Jacommandeest en modesabbat.VoJrpage 38. L'hormoge ou ruesmampes fonctionnent, ruesroots paraissent _ m'afficheur, mais mefour ne chauffe pas. o Lescommandessont peut-etre programm@spour une fonction de cuissonet maintien ou de @marrage differe, o La fonction de verrouillagedes commandesest peut-etre activee,Voir page 34, R_suitats de caisson au four cliff, rents des attentes ou de ceu× qui sont produits par mefour ant_rieur, o Determinersi revent du four est obstru& Voir son emplacementpage 40. o S'assurerque la cuisini_re est d'aplomb. o Les reglagesde temperaturevadent souvententre un four neuf et le four qu'il remplace.On observesouventune derivedu regIagede temperatured'un four _ mesurequ'il vieillit; il peut devenirplus chaud ou moins chaud.Voir page 38 les instructionsd'ajustementde la temperaturedu four (certainsmodebs}. REMARQUE: lI n'est pasutile de modifier le reglage de temperaturesi la variation n'affecte qu'une ou deux recettes. o Pour d'autresinformations au suiet de la cuissonau four, voir la brochure La cuisson simplifi@. Resumtatsincorrects mors dema cuisson au grim,ou 6mission excessive de fum_e. o DeterminerIa position desgrilles. Les alimentspeuvent6tre trop pres de I'el@_entdu griL o El@lentdu griI pas pr@hauff& o Utilisation incorrectede feuilb d'aluminium.Ne iamais garnir la grille de I@hefriteavec de la feuille d'aluminium. o Portedu four ferm@durant ia cuissonau gril. Laisserla porte du four entrouverted'environ 10 cm {4 pouces} - premierebut@. o EnleverI'ex@sde graissesur Iapiece de viandeavant la cuissonau griL o Utilisationd'une I@hefritesouilI@. o La tension electrique de la maisonest peut-etre basse. _mpossibimit8d'autonettoyage du four (certains modules}. o Determinerque I'appareiIn'a pasete programmepour un autonettoyagediffer& Voir page41. o Verifier que la porte est ferm@. o Verifier si Iacommandeest en modesabbat.Voir page 38. o Le four est peut-@e _ une temperaturesuperieure_ 205 °C _400°F}.La temperaturedu four doit etre inferbure _ 205 °C {400°F}pour pouvoirprogrammer un cycle d'autonettoyage. Le four ne se nettoie pus correctement (terrains mod_mes}. o Un tempsde nettoyageplus long peut etre n@essaire. o On n'a paselimineavant I'operationd'autonettoyagelesaccumulationsexcessivesde r@idus, particulierementles residusd'alimentsacides ou sucres. La porte da four ne se dSverrouiiie pas aprSs m'autonettoyage (certains modules), o L'hsterburdu four est encore chaud.Attendre environune heure apr@ I'achevementde la perioded'autonettoyage.IIest possibled'ouvrirla porte apresla disparitiondu messageLOCK {VERROUILLAGE} sur I'afficheur. o Lescommandeset la porte sont peut-Qtreverrouillees.Voir page 34. suite 48 PROBLEME SOLUTION Accumulation d'humidit6 sur le o Ceci est normaldurant Iacuissond'alimentscontenant beaucoupd'eau. hubmotou vapeur sortant de m'_vento o Utilisation excessived'humidit6 Iorsdu nettoyagedu hublot. Emission d'une forte odeur ou de ® fum6emors de maraiseen marche du four. Ceci est normalpour une cuisini6re neuve;cet effet disparaitapr_s quelquesutilisations. L'executiond'un programmed'autonettoyagepermettrade faire disparakrecette odeur plus rapidement. Fairefonctionner le ventilateurpour 6vacuerIa fum6e ou rodeur. Presenced'une accumulation de r6sidusalimentairessur le fond du four. Ex6cuterune op6rationd'autonettoyage. Codes d'anomaiie o LesrootsBAKEou LOCKpeuventclignoter rapidement8 I'afficheurpour pr6venird'une erreur ou d'un probl_me.Sile mot BAKEou LOCKparait_ I'afficheur,appuyersur la touche Cancel (Annule0. Si Ie mot BAKEou LOCKcontinue _ c@noter, d6brancherI'appareiLAttendre quelquesminutes,puis rebrancherI'appareiLSile mot continue _ clignoter, d6brancher I'appareiIet prendre contact avec un r6parateurautoris6. o Sile four est tr_s sale,IesflammSchespeuventproduire un coded'anomalieau cours du cycle d'autonettoyage.Appuyersur latouche CancelettaisserIefour refroidircompletement,essuyer la salet6enexcespuisreprogrammerrautonettoyage.Silecoded'anomalier6apparait,prendre contact avec un r6parateurautoris6. Des bruits se font entendreo ® ® Le four fait plusieurs bruits faibles. II est possible d'entendre les relais du four qui se mettent en marche et s'arr6tent. Ceci est normal AIors que le four se r6chauffe et se refroidit, il est possible d'entendre des bruits correspondant la dilatation et _ la contraction des pi_ces m6talliques. Ceci est normal et n'endommage pas I'appareiL Jl n'y u ni hip ni affichageo o Le commandeest peut-6tre en modesabbat (certainsmod@les]. Voir page 38. reste aJJum_o o Le four est en modesabbat.Pour annulet, appuyersur la touche Clock et maintener-la enfonc6ependant cinq secondes. 49 50 Garantie de ta cuisini_re #Jectrique Ne seat Garanties limitees - Pieces seumement De la deu×ieme a macinqui_me ann6e = A comp-[erde la date de I'achatinitial au detail, les piecesde la I_stecH_essousqul se reveleraient ddee[ueuses dais des conditions nonnalesd'usage menagerseront repareesou remp_acees gratuitement (piecesseulement);le proprietaire devraassumer[ous lesautres frais,y compnsfrais de mam-d'ceuvre,de d@lacement,de transpoR,de kilometrageet de diagnostic, le cas echeant. Veuille2rioter: Cegarant_ecomp_e[ene s'appliquentque si le appareilsetrouve au Canada ou auxEtats-Unis.Lesappareilssitu6sailleursne sont couven:sque par les garantieslimitees, y con_pnsde pLecesqul se reveleraientddec[ueusesla premiereannee par ces garanties : 1, Les dommages ou derangements dus _: a. Mise en service,livraisonou entretieneffectuesincorrectement. Garantie comp?ete d'une annee = Pieces et main=d'(_uvre Durantune gerioded'un (1) an _ compterde [adate de racha[ initialau d6taiLtoute piecequ_se re_eLerait ddectueusedansdes conditionsnormaLesd'usage menagerserarepareeou remp[aceegratu_tement pas couverts 2. 3. 8. 5. b.Toute reparation,modification,aIterationet tout reglagenon autorisespar le fabdcantou par un prestatairede serviceapr_s-venteagree. c. Mauvaisemploi,emploiabusif,accidents,usagenon raisonnable,ou catastrophenaturelle. d.Alimentationelectrique (tension,intensite}incorrecte. e. Reglageincorrectd'unecommande. Lesgarantiesne peuventetre honoreessi Ies numerosde seried'origineont ete enleves,modifiesou ne sont pasfacilementlisibles. Ampoules. AppareiIsachetesauxfins d'usagecommercialou industriel. Lesfrais de visited'un prestatairede serviceou de serviceapr_s-venteencourus pour Ies raisonssuivantes: a. Correctiond'erreursde raiseen service. b. initiationde I'utilisateura I'empioide I'appareiI. c. Transportde I'appareiljusqu'_ I'entreprisede serviceapr_s-venteet son retour. 6. Dommagessecondairesou indirectssubis par toute personnesuite au non-respect de ces garanties. Certainsetatsou provincesne permettentpasFexclusionou Ia limitationdes dommagessecondairesou indirects;par consequentles limitationsou exclusionscF dessuspeuventne pass'appIiquera votre cas. Si un service apr_s_vente est n6cessaire II faut d'abordconsulterla sectionsur le depannagedu manueld'utilisationet d'entretienou appeterMaytagServicesSM/service _ Iaclient61ede Ma}¢agau 1-800-688-9900E.-U.ou 1-800-688-2002au Canada. Residents canad iens Legarant_eci-dessuscouvrelesappareilsinstallesau Canada.seulemen[s'i?sont ete agreespar la CSA sauf si ces appareilsont eta,in-[roduitsau Canada I'occas_on d'un changementde residencedes RatsUnis versle Canaua. Lesgarantiessp#cifiquesformu/#esd-dessussont/es SEULE$quele #_bflcantaccolde.Cegarantidvous conf_rentdesdm/tsjuridiquessp_cifiquesecvous pouvezegalementjou,'rd'autresdroits,variablesd'un #tat a/'autre,d'uneprowncefi uneau[re. Pour obtenir les prestations de garantie PourIocaliserune agenceagreeede serviceapr_s-ventedansvotre region,prenez contact avec[e detaillantoQvousavezacheteI'apparei[;ou appelezMaytagServices-_U/ service_ la ciienteiede Maytag.Si vous n'obtenezpasun servicesatisfaisanten vertu de la garantie,veuiliezecrire ou tel@honer_ : MaytagServices sM A ['attentiondu CAIR_ Center P.O.Box2370,Cleveland,TN 37320-2370 ¢._U.1_800_688_9900et Canada 1_800_688_2002 Remarque : Lots de tout contactaupresde MaytagServicessM,sewice _ [a clientele de Maytag et concernantun probl_me,veuillezfoumir I'information suivante: a. Vosnora,adresseet numerode tel@hone; b. Numerode modeleet numerode seriede I'appareil; c. Noraet adressedu detaillantavec Iadate I'appareilachete: d. Descriptionclaire du problSmeobserve; e. Preuved'achat. Lesguidesd'utilisation,les manuelsde serviceet lesrenseignementssur lespiscessont disponiblesaupresde MaytagServices SF_, service_ la clientele. 51 Estufa E[6ctrica con E[e_entos Tubu[ares // Cuidado y Limpieza ........................ 67-70 sebre Seguridad ...........................53-56 Cocinando en [a Estufa ............... 55-56 ControHesSuperiores Hementos Tubuhres Cocinando Homo Auto[imp[ante Procedimientos de LimDieza Mantenimiento ................................ 71 =72 Ventana del Homo Luz del Homo en e[ Homo ............... 57-66 Controles dei Homo de Limpieza Manua[ Re[oj Hornear Temporizador Localizaci(_n y Soluci6n de Aver_as .........................................73-24 Asar Periiia del Homo de Limpieza Manual Homear Asar Controles del Homo Autolimpiante ReHoj Temporizador Homear Mantener CaHiente CocdOn y Asar Mantener Caliente Diferido Parri[[as de[ Homo Garantia y Sewicio ................................25 como resultado de su uso inapropiado, Utilice este electrodomestico solamente para el prop6sito que ha sido destinado segOn se describe en esta guia, Instamador: Porfavor deje esta gu[a iun[o con eE ebctrodomestico. Oonsumidor: Potfavor lea y conserveesta guia para referencla futura. Conserveel recibode compl ay/o el chequecanceBdo como comprobantede compra. Para asegurar funcionamiento correcto y seguro: Ei ebctrodom6stico debe ser instaBdo debidamente y puesto a tierra por un t@nico cdificado. No intente ajustar, reparar, prestar servicio o reemplazar ninguna pieza de este producto N_imerode Mode[o NOmerode Sene a menos que sea espedficamente recomendado en esta guia. Todas Bs reparaciones deben ser redizadas por un t@nico calificado, Fechaae Coml;ra S[tiene preguntas.[Lamea: Maytag CustomerAssistance 1-800-688-9900en EE.UU. ]-800-6{-8-2002en Canada1 (Lunesa Viernes 8:00a.m.a 8:00p.m.Hora de[ Este} Intemet: http://www.may_ag.com Siempre desenchufe el electrodom6stico antes de efectuar aiguna reparaci6n, En hues[tocont_nuoaf_n de mejorar[a cal[dad y rend[miemode nuestroselectrodom@ticos,puede que seanecesanomodificar el e[ectrodomeshcosin actua[izaresta gufa. ,, TODAS LAS ESTUFAS SE PUEDEN PaPainfermadSn sebre sendde, vet pbdina 75. ADVERTENCIA: Para redacir el desgo de vaelco de! electredem_stice a causa de use anermal e debide a peso e×cesive ea la puer_a del homo, es aecesarie aispositivo antivuelco debidamente instalaaol Para verificar si el dispositivo est,1debidamente instalado, mire debajo de ia estufa con una iinterna para asegurarse de que uno de los tornillos niveladores traseros este debidamente Las advertencias e instrucciones importantes sobre seguridad que aparecen en esta guia no est_n destinadas a cubrir todas las posibles circunstancias y situaciones que puedan ocurrir, Se debe ejercer sentido comun, precauci6n y cuidado cuando instale, realice mantenimiento o haga funcionar el artefacto, enganchado en la ranura del soporte, El dispositivo antivuelco asegura el tornillo nivelador trasero al piso cuando est,1 debidamente enganchado, Esto debe verificarse carla vez que la estufa sea movida, Siempre p6ngase en contacto con el fabricante si surgen problemas o situaciones que usted no comprenda, Reconozca _os simbo_os, etiquetas de seguridad Para Evitar un lncendio o Da o Causado per emHu o advertencias, Asegurese de que todos los materiaies de empaque hayan sido quitados del homo antes de ponerlo en funcionamiento, No coloque materiales combustibles cerca del electrodomestico, No se deben guardar en el homo materiales infiamables, ADVERTENC_A - Pelig[0 o pr_cticas no seguras que PODRIAN causar bsi6n personal grave o mortal. Muchos pl_sticos son afectados por el calor, Mantenga los pl_isticos alejados de las piezas del electrodom6stico que se pueden entibiar o calentar, ATENCION .- peligros o pr_ct!cas no segu[as que PODRIAN causar lesi6n personal menos grave, Para evitar incendios de grasa, no permita la acumulaci6n de grasa de cocinar o de otros materiales inflamables en el homo o en su cercan[a, Lea y siga todas las instrucciones antes de usar este electrodom_stico para evitar el riesgo potencial de incendio, choque ei6ctrico, iesi6n personal o da_o ai eiectrodom6stico 53 En Case de lncendio NO TOQUE LOS ELEMENTOSCALEFACTORESNI LAS SUPERFiCiESINTERIORESDEL HORNO. Los eiementos Use un extintor con producto quimbo seco o deI tipo espuma o bicarbonato para apagar eI incendio o las llamas, Nunca use agua en un incendio de grasa, calefactores pueden estar calientes aOn cuando su color sea obscuro. Las superficies interiores de cuaiquier homo se calientan Io suficiente como para causar quemaduras. Durante y despu_s dei uso, no toque ni permita que ias ropas u otros materiales inflamables entren en contacto con los 1, Apague eI homo para evitar que la llama se disperse, 2, NUNCA bvante o mueva una sart6n en llamas, eiementos caiefactores o ias superficies interiores dei homo 3, Apague eI fuego o la Ihma deI homo cerrando la puerta deI homo, Seguridad hasta que no se hayan enfriado. Otras superficies dei electrodomestico pueden estar Io suficientemente calientes para causar quemaduras - entre estas superficies est_in la abertura dei respiradero dei homo y ia superficie cerca de esta abertura, ia puerta dei homo y ia ventana de ia puerta dei homo. para los Ni os No toque un foco caiiente dei homo con un paso huJmedo pues se puede quebrar. Si ei foco se quiebra, desenchufe ei eiectrodomestico antes de sacar ei foco para evitar sufrir un para a!canzar !0s articul0 s pueden bsionarse gravemente_ NUNC,_ use papei de aiuminio para cubrir ias parriiias dei homo ni el panel inferior del homo, El uso incorrecto puede resultar en un riesgo de choque el@trico, incendio o daSo al electrodom6stico, Use papel de aluminio solamente como se NUNCA deje a los ni_ios solos o sin supervisi6n cuando ei homo estd en uso o cuando est6 caliente. Nunca permita que los ni_ios se sienten o se paren en ninguna pieza del eiectrodomdstico pues se pueden iesionar o quemar. indica en esta guia, Se ies debe ensdiar a los ni_iosque ei eiectrodomdstico y los utensilios que est_n en dl pueden estar calientes. Deje enfriar los utensilios calientes en un lugar seguro, fuera del alcance de los ni_ios. Se ies debe ensdiar a los ni_ios que un eiectrodom6stico no es un juguete y que no deben jugar con los controles u otras piezas del artefacto. lnstrucciones Seguridad al Cocinat Nunca caiiente un contenedor de aiimento cerrado en ei homo, La acumulaci6n de presi6n puede reventar el contenedor causando una lesi6n personal grave o da_io al electrodom6stico, Use tomaollas secos y gruesos, Los tomaollas huJmedos pueden causar quemaduras por vapor, No se deben usar toallas de secar los platos ni otros sustitutos en vez de los tomaollas porque pueden pasar sobre los elementos calientes y encenderse o pueden quedar atrapados en ias piezas dei electrodom6stico, Generales NUNCA use un electrodom6stico como un peldaHiopara aicanzar los armanos superiores. El uso incorrecto de las puertas del ebctrodom6stico tales como pisar sobre alias. apoyarse o sentarse en la pueH1_a puede resultar en que el electrodom6stico se vuelque, se rompa la puerta y se causen lesiones graves. Use vestimentas apropiadas, Las ropas sueitas o ropas con mangas largas sueltas no se deben usar cuando se est,1 cocinando, La ropa se puede prender fuego y causar quemaduras si entra en contacto con los elementos calefactores, Para evitar posibles riesgos para el usuario y ddio al electrodomestico, no use este producto como una estufa para calentar o entibiar una habitaci6n, Adem_s no use el homo Siempre coioque ias parriiias dei homo en ias posiciones deseadas cuando el homo este frio, Deslice la parrilla del homo hacia afuera para agregar o retirar alimentos usando tomaollas secos y gruesos, Siempre evite colocar o retirar alimentos del homo sin sacar la parrilla hacia afuera, Si una como un lugar para guardar alimentos o utensilios de cocina, parrilla debe set movida cuando est6 caliente, use un tomaollas seco, No deje que el tomaolla entre en contacto con el elemento caliente del homo, No obstruya la circulaci6n del aire bloqueando el respiradero dei homo, 54 UseBsparriiias soiamente eneIhomoenquefueron enviadas/compradas. Tengacuidado cuandoabralapuertadeIhomo.Pnmero deje quesdgaeIaireovaporcaiiente antesdesacarovoivera coIocar eIdimentoeneIhomo. Nunca deje que un utensilio hierva hasta quedar seco pues esto puede da_iar el utensilio y la estufa. Siga Bs instrucciones del fabricante cuando use bobas para cocinar en el homo. ADVERTENCIA SOBRE ALIMENTOS PREPARADOS: Siga Bs instrucdones de] fabricante de] aiimento. Si un contenedor NUNCA deje los ebmentos superiores sin supervisi6n, de dimento congeiado de pi_istbo y/o su tapa se deforma, comba o de otra manera se da_ia durante la cocd6n, especidmente cuando est6 usando los ajustes de cdor altos. Un derrame que no reciba la debida atenci6n puede causar humo y un derrame de grasa puede causar un incendio. inmediatamente descarte e] aiimento y su contenedor. E] aiimento puede estar contaminado. Este ebctrodom6stico tiene diferentes tama_os de ebmentos No permita que e] pape] de aiuminio o ]a sonda de ]a came toque eI ebmento cabfactor. superiores. Sebccione utensilios que tengan bases pBnas Io suficientemente grandes para cubrir el ebmento. La rehci6n adecuada entre el utensilio y el ebmento mejorara la eficiencia al cocinar. Siempre @ague todos los controbs cuando haya terminado de cocinar. EJementos Segutidad sobre eJ Use de UtensiJios TubuJares Para evitar dafio a los eiementos caiefactores removibies, no los sumerja, remoje ni lave en un lavavajillas o en un homo autolimpiante. Un elemento daffado puede producir un cortocircuito resultando en un incendio o riesgo de choque eldctrico. Siga las instrucciones del fabricante cuando use bobas para cocinar en el homo. Elrendimiento y funcionamiento seguro de este ebctrodom6stico ha sido comprobado usando utensilios de cocina tradicionabs. No use ningun dispositivo o accesorio que no haya sido espedficamente recomendado en esta guia. No use cubiertas de loss ebmentos, rejillas superiores de la estufa o sistemas de convecci6n para hornos. El uso de dispositivos o accesorios que no sean expresamente recomendados en esta guia puede crear peligros graves de seguridad, afectar el rendimiento y reducir la vida 0til de los componentes de este ebctrodom6stico. Asegurese de que los platillos protectores estdn en su lugar pues la ausencia de estos durante la cocci6n )uede daffar el alambrado. Fortes Protectores: No use papel de aluminio para forrar los piatiiios protectores o ia parte inferior dei homo, excepto como se sugiera en ia guia. La instaiaci6n incorrecta de estos forros puede resuitar en un riesgo de choque ei6ctrico o incendio. Si el utensilio es mas peque_o que el ebmento, una porci6n del ebmento quedara expuesta y puede encender la ropa o un tomaollas. Ollas Fteidoras Use extremo cuidado cuando mueva la olla con aceite o descarte la grasa caliente. Deje que la grasa se enfrie antes de intentar mover B olla. Sohmente ciertos tipos de utensilios de vidrio, vidrio ceramico, cerdmica, gres u otros utensilios vidriados son convenientes para cocinar en la superficie o en el homo sin quebrarse debido al repentino cambio de temperatura. Siga las instrucciones del fabricante del utensilio cuando use vidrio. Campanas de VentiJaci6n Limpie con frecuencia la campana y los filtros a fin de evitar que se acumub en ellos grasa u otros materiabs infiamabbs y para evitar incendios de grasa. Gire los mangos de los utensiiios hacia e[ centro de [a cubierta, no hacia la habitaci6n ni sobre otro elemento superior. Esto reduce el riesgo de quemaduras, encendido de materiabs infiamabbs o derrames si el utensilio es tocado Cuando prepare dimentos fiameados debajo de la campana, encienda ei ventiiador. accidentalmente o alcanzado por ni_ios pequeffos. 55 Seguridad en la Li pieza Aviso y Adve|'tencia lmpottante Limpb con cuidado la cubbrta, Apague todos los controbs y espere que se enfrien las pbzas deI ebctrodomestbo antes de tocarias o limpiarias, Limpie con cuidado, Tenga cuidado para evitar quemaduras de vapor si usa una esponja o un patio mojado para limpiar derrames en una superfbie caibnte, Sobte Seguridad La Propuesta 65 de la Ley de 1986 dd Estado de California Sobre Seguridad y ContaminaciOn del Agua Potable [California Safe Drinking Water and Toxic Enforcement Act of 1986} exige que el Gobernador de California publique una lista de las sustancias que seg0n el estado de California causan cancer o da_o al sistema reproductivo y exige que las empresas adviertan a sus dientes sobre la exposici6n potencid a tales sustancias, Aigunos limpiadores pueden produdr vapores nodvos cuando se apiican en una superfide cdbnte, Limpb soiamente las pbzas indbadas en esta guia, Se advierte a los usuarios de este ebctrodomestico que cuando el homo est_ funcionando en el cido de autolimpieza, puede haber exposici6n de bajo nivel a dgunas de las sustancias indicadas en la lista, induyendo mon6xido de carbono, La exposici6n a estas sustancias puede ser reducida a un minimo ventilando el homo al exterior en forma Homo Automimpiante (modelos selectos} adecuada, abriendo las ventanas y/o la puerta en la habitaci6n en donde est_ ubicado el ebctrodomestico durante el cido de c0cina, etc, en e! homo durante e[ cic[0 de aut0[impbza, autolimpieza, AVISO IMPORTANTE RESPECTO A LOS PAJAROS DOMESTICOS: No iimpie ia junta de ia puerta, La junta de ia puerta es esencial para obtener un sellado herm6tico, Se debe tener cuidado de no frotar, da_iar ni mover la junta, Nunca mantenga los pajaros en ia cocina o en ias habitaciones donde puedan llegar los humos de la cocina, Los p_jaros tienen un sistema respiratorio muy sensitivo, Los humos producidos durante el cicio de autolimpieza del homo pueden ser periudiciaies o mortaies para los p_jaros, Los humos que despide el aceite de cocina recalentado, la grasa, margarina y los utensilios antiadherentes recalentados tambi6n pueden set perjudiciales, No use limpiadores de homo ni forros de homo de ningun %o alrededor ni en ninguna parte del homo autolimpiante, Antes de iniciar el ciclo de autolimpieza del homo, retire la asadera, las parrillas del homo y otros utensilios y limpie cualquier derrame para evitar humo excesivo o llamaradas, Es normal que la cubierta de la estufa se caliente durante el ciclo de autolimpieza, Pot Io tanto, se debe evitar tocar la cubierta durante un cicio de autolimpieza, Conserve estas instrucciones 56 para referencia futura Centreles Superieres Ajustes Use estoscontrobs para encenderlos ebmentos superiores. Se disponede una sebcci6n infinita de ajustesde calor des@ 'Low' (Bajo] hasta 'High' (AJto]. Las perillaspueden colocarseen cualquierade estosajusteso entre elios. Programac+6n 'Low' (Bajo} (2}: Se utiliza para mantener Insalimentos ca[bntes y derretir chocoJatey mantequiiia. de Jes ControJes 1. Coloqueet utens+Iiosobre el ebmento superior. 2. Optimay gire Ia perilB en cualqubr direcci6n hasta el ajuste de calordeseado. + Enet panel de contro! se encuentra marcadocual elementocontroia cada perJlla. Porejemplo,el dibujo a la derecha indicael elemento dNantero izquierdo. 3. O de Calor Sugeridos El tama_o,%o de utensilio y Ia cocci@ afectar4nel ajuste del calor. ParainformaciOnsobre los utensiliosy otros factores que afectan Ins ajustesdN calor,consulte el folbto "La CocinaF4cir'. 'iVied. Low' [Mediano Bajo} (3-4}: Usepara continuar cocinando aiimentos tapados o para cocinar a[vapor. O _ Enel panel de control hayuna luz indbadora dN Nemento. Cuandose enciendealguna de las periflasde control, Ia hz se ilumina. La Iuzse apagar_ cuandotodos Ins ebmentos superioresse apaguen. [ 'Nigh' (Alto} (10): Se usapara hacerhervir un %uido. Siempre reduzcael ajuste a un calor m4s bajo cuando los liquidos comiencena hervir o cuando Ins aJimentoscomiencena cooinarse. OFF High (MedianoAlto] (8°9): Se usa + }ara dorar @ 4. Despu@de cocinar coioqueIa perilla en la posici6n'OFF' [apagado]. Retire el utensilio. Medium ................... 'lViedium' [IVlediano}(5+ 7}: Usado para mantener un hervor lento para grandescantidadesde liquido y para la mayoria de las frituras. [El estilo del control var[a segOnel modelo.] came,cabntar aceite para frdr en una sart6n honda o para saltear. Tambi6npara mantenerun hervor r@ido )ara cantJdades grandesde %uidos. ANTESDE COCINAR DESPUESDE COCINAR • SLemprecoloque un u_ensflloen e! etementosuper+orantes de encenderlo.Paraev+tardJlos a Jaestufa, nuncaenciendaun eJemen_o superior sm tenet un utensilio sobre 6J. +AsegOresede que los elememossuperioresest_n apagaJos. , NUNOA Jse la cublerta de Jaestufa como un area para guarda+ aiimentosc utensilios. M]ENT_S COCINA +AsegOresede sabercure perfllacontrola cada eJememo. Aseg8resede haber encendidoel ebmen[o correc_o. • Comiencea cocmaren un ajus[e de calor alto Juegoreduzcaa un ajuste mas bNOpara compbtar la cocci6n. Nunca useun ajuste de calor alto para cocmarauran[e un t_enLpoprolongado. + NUNCA permita que una ofla hiervahasta secarse. Estopodria da+3arJao+Ja_ el electrodom@tico. , Limpie cuaiquier derrame tan pronto como sea posibb OTROSCONSEJOS o Si existenarmadosdirectamentesobre Jacubierta de la estufa soloqueen Nlos articulosde usopoco frecuenteque puedanser guardadoscon seguridaden un area que estara sujeta al cabr. Aigunastemperaturaspueden no ser seguraspara art[culos [ales como Iiquidosvol_tibs. IJmpiadoreso rocmdoresen aerosol. + NUNCA deje mng6n articulo,especmlmentearticutosde pi4stbo. sobre la cubierta de la estufa. El aire calLenteprovementedeJ respiraderopueae encender losarticulos inflamabJes,derretir o abiandar los pi4sticoso aumentar la presionen Joscontenedores cerraaos hacidndolosrevenmr. , NNNCA permita que el papel de aiuminio, los term6metrosde came + NUNCA toque la superficie de la estufahasta que no se haya o cualquier otro objeto de metal,a excepci6nde una olla sobreun enfnado.Esposibb que algunas areasde la superficJe especialmenteaJrededorde los etemen[os,se entibien o calJen[en e_ementosuper+or,teng_ comacto con los ebmentos cabfactores. mientrasest,1cocinando. Usetomaoilas para pro[eger sus rnanos. 57 Dementos Superficie de los Ele entos Tubulares TubuJares Cuandoun elementose enciende,pasapor ciclos de encendidoy apagadopara mantenerel ajuste de calor seleccionado. Los elementostubulares sonautotlmpiables. No los sumeriaen agua. Para sacar: Cuandoestd fifo, levanteel etemento. Cuidadosamentetire de 61hacia afueray s_quelodeJrecept_culo. • Limpie Iacubie_a de la estufa despu_sde cadauso. • Limpie los derrames4cidos o azucaradostan pronto como la cubierta se hayaenfriado puesestosderramespueden descoloraro marcar la porcelana. Para velvet a ¢olocar: Inserte losterminalesdel elementoen la toma. Gu[eel elemento hasta que quede en su lugar. Oprimahaciaabajo en el borde exteriordel elemento hasta dejado niveladosobre el platillo protector. Para proteger el acabade de los platilles protectores: • A fin de reducir Ia descoloraci6ny fisurassuperficiales,evite usarcalor alto por per[odosde tiempo prelongados. • No use utensiliosdemasiadograndes. Los utensHiosno deben extenderse2,5 - 5 cm (1 - 2 pulgadas)m4sall_ del elemento. T_.RfVili_'ALf:_ PJatiHos Protectores • Cuandoprepareconservaso cocine con ollas grandes,usee! Elementopara Ollasde Conservas(ModetoCE1).POngaseen contacto con su distdbuidor May¢agpara obtenerdetalles o Ilame aI 1-877-232-6771en EE.-UU.o al 1-800-688-8408en Canad4para hacerun pedido. Losplatillos protectoresdebaio de cada elementosuperior recogen los derramesy debenser _Jsados siempre. Si no usan los platillos protectorescuando est6 cocinando se puede daSarel cableado. Paraevitar el riesgode choqueel6ctrico o de un incendio, nunca forre los platilios pretectorescon papeIde aluminio. • Umpieloscon frecuencia. [Ver p_gina 69.) Losplatillos protectoresse descoloraran(manchasazules/doradas)o adquirir_n fisuras con el tiempo,si se sobrecalientan. Esta descoloraci6no fisuras son permanentes.Estono afectala eficacia al cocinar. 58 Controies deJ Homo (modelos selectos] de Limpieza Manual j_f \ \ \ Iess- J A B C D E / F NOTA: El indicadorvisual despliega12:00cuando se conectael electrodom6sticopor primeravez o si se interrumpeel suministro el6ctrico. Las[ucesindicadoras 'Bake' y 'Broil' se despiiegancuandose activa la funciOncorrespondiente. A 'Bake' (HorneaO 2. Programe[a hora correcta deJdia usandoJastecias 'More+' o 'Less-'. Si [a tecla 'More+' o 'Less-' no se oprJmeen 30 segundos, [a programaci6ndeJreJoiser4canceJada.OprJma[a tecla 'CJock' para comenzarde nuevo. Se usa pare horneary asar. 8 'Broil'(Asa0 Se usa para asar a [a parrilla y dorar los alimentos. C 'Timer'{Temporizador} Programael temporizador. D 'Clock' (Re[oi} Se usa para programar[a hora del d(a. Programaci6n E 'CANCEL'[Cancelar} Canceiatodas [as funcionesa excepciOn de[ temporizadory del reioj. F 'More+' o 'Less-' Se usan para seIeccionaro cambiar el (Mas+ o Menos-} tiempo y [a temperaturadel homo. Seleccionalosaiustesde asado'Hi' (Alto} o 'LO' {Bajo}. de[ Temporizador Eltemporizadorpuede ser programadode un minuto (:01}hasta99 horasy 59 minutos (99:59}.El tiempo se despiegar_en minutosy no en segundos.EL TEMPORIZADORNO CONTROLAEL HORNO. 1. Optima la tecIa 'Timer'. o En el indicadorvisua[ despIegar_0:00y [os dos puntos [:} desteliar_nen ei indicadorvisual Use de las Tedas 2. Optima la tecIa 'More+' o 'Less-' hasta que se despliegueel tiempo deseado. , Oprima la tecla deseada. o EItemporizadorcomenzar_a funcionar cuando se programeel tiempo. , Oprima la tecla 'More+' o 'Less-' para seleccionarel tiempo o Ja temperatura. oSe escuchaMuna serialsonoracada vez que oprima una tecla. No seescuchar_una serial sonoracuandose opriman [as teclas 'More+' o 'Less-'. o Los dos puntos desteIIantesindican que un conteo de! temporizadorest_ en progreso.(Los dos puntos no desteIIansi el indicadorvisual muestrala hora deI d[a o la temperaturadeI horno.} oSe escuchar_ndos serialessonorassi ocurre un error en [a programaciOn. o AI final deI tiempo programado,seescuchar_ndosseriales sonoras.El indicadorvisual despIegar8"0:00". o Si as[ Io desea,oprima la tecIa'Clock' duranteel funcionamientodeI temporizadorpara desplegarbrevemente [a hora de[dia. Nora: Cuatrosegundos despu6sde oprimir [atecia 'More+' o 'Less-',e[ tiempo o la temperaturaque se despiiegase programar_ autom_ticamente.Si transcurrenm_s de 30 segundosdespu6sde haber oprimido una teda de funci6n y [a tecia 'More+' o 'Less-', la funciOnser8 canceladay el indicadorvisualvolver8 al despiiegue anterior. o SI as[ 1odesea,oprima [a tech 'Bake' o 'BroiI' durante el funcionamientodeI temporizadorpara despiegarbrevemente el ajuste actual de temperatura. Para cancelar Programaci6n de[ ReHoj el temporizador: Oprimay mantengaoprimida [atecIa 'Timer'durantevariossegundos. 1. Oprima [atecia 'C[ock'. o La hora de[ reIoj no se puede programarsi el control ha sido programadopara hornear o asaro para usare[ temporizador. 59 .............+'4"!_ _...... Homeadoo Asado y Asado a PartiHa + Para cambiar matemperatara demhomo darante 'Preheat', optima des veces la tecla 'Bake',luego optima 'More+' o 'Less-' hastaque se desplieguela temperaturadeseada. Paraobtener mayor informaci6nsobre lostiemposy Ios sugerencias de horneado,asadoy asadoa toparritta,consulteel folteto "La Cocina F_cil". Coloqueel alimento ei en borne.Verifiqueel progresode la cocci6n cuando hayatranscurridoel tiempo m(nimo recomendado. Setting AI t6rmino de la cocci6n,oprima Ia tecla 'Cancel'pare apagarel borney retireel alimento del homo. the Controls For Baking or Roasting: 1. Oprimaia tecia 'Bake'. o El horno cuenta con una funci6n de apagadoautom_tico.Si se deja encendidodurante 12 betas,el borne se apagar_ autom_ticamentey el indicadorvisual desplegar_'000'. Optima la tecla 'Cancel'y la hera del dia se desplegar_nuevamenteen el indicadorvisual. + '000'se desplegar_y la hz indicadora'Bake' destellar_en el indicadorvisual. + Si oprime la tecla 'Bake' y no programala temperaturaen 30 segundos,e! programase cancetar_iautom_t+camentey Ia hera del d[ase desplegar_nuevamenteen el indicador visual. Ajuste 2. OprimaIatecla 'More+' o 'Less-'hasta que la temperatura deseadase despliegueen el indicadorvisual. de los Controles para Asar a ma ParriHa: Paraobtener mejoresresultados,use un utensilio diseSado especialmentepara asara la parrilla. • La temperaturadeI borne puede ser programadade 75° a 285° C (170° a 550° F]. 1. ColoqueIa asaderade asara IaparrilIa en la posiciOn recomendada.Uer la tabla en la pagina65.] + '175°' [350°) se desplegar_cuando oprima la tecla 'More+' o 'Less-' per primera vez. 2. Oprimala tecla 'Broil'. + Optima la tecla 'More+' o 'Less-' repetidamentepara cambiar la temperaturaen incrementosde 3° C (5° F), u oprimalay mant6ngalaoprim+dapara cambiar la temperaturaen incrementosde 8° C (10° F]. o 'SEt' se desptegar_y la hz indicadora'Broil' destellar_en el indicador visual. 3. Oprimala tecla 'More+' para programarel asadoen elajuste 'HI' (alto] o 'Less-' para el ajuste 'LO' (bajo]. + Enel indicadorvisual se desptegar_38° 000 °] o la temperaturareaI de! homo si es que es superiora 38° C (100° F] cuando se enciendeeI homo. o Seleccioneel ajuste 'HI' (alto] para asadoa Ia parrilla normal o Seleccionee! ajuste 'LO' (bajo] para asadoa Ia parrilIa a bajas temperaturaspara evitar eI dorado excesivoen alimentosque requieren mayorestiemposde cocci6ntales come la came de + La temperaturaaumentar_en incrementosde 3° C (5° F] hasta Ilegara Iatemperatura programada.Cuandoel borne se haya precalentado,se escuchar_una seiial sonora. ave. + Si no seleccionaun ajuste de Asado ('HI' o 'LO'] en 30 segundos,e! programase cancelar_autom_ticamentey Iahera del d[a se desplegar_nuevamenteen el indicadorvisual. + Esperea que el homo se precalientedurante 10-15 minutes. + ParavedficarIa temperaturaprogramadadurante el precalentamientodel horno,oprima la tecla 'Bake'.La temperaturase desplegar_durantetres segundos. 4. Precalienteei elementode asara Ia parrilIa durante3 minutes. Dejela puerta abierta hastael primer tope, aproximadamente10 cm (4 pulgadas]. 5. Cuandotermine de asar a la parrilla,optima Iatecla 'Cancer para • Para camhiar matemperatara demhome darante el preceso de cecci6n, oprima Ia tecla 'Bake',Iuegooprima 'More+' o 'Less-' hasta que se desplieguela temperatura deseada. apagar e! borne y retire el utensilio del homo. La hera del alia volver_a desplegarseen el indicadorvisual. 6O G Perilla del Homo de Limpieza Manua_ (modelos PerHla de RaTemperatura La perilla 'OvenTemp' 0-emperaturadel Homo) se usa para seleccionary mantener la temperaturade! homo. Siempregire esta perilla justo HASTAla temperaturadeseada.No gire a una temperaturarossalta y hego retroceda. Ajuste del Homo para Homeado y asado: horno,asardoy asadoa la parrflla,consulteel folleto "La Cocina Nora: F_cil". Parasugerenciasadiciona[essobre como homeadode[ selectos) del Heine Ajuste OFF de los Controles para Asado a la 1. Paraobtenermejores resukados,use un utensilio dise[mdo especialmentepara asar a Ia parrilla.Coloquela asaderaen Ia posiciOnde la parrflla recomendado.G/erIa tabla en p%ina 65y 2. Gire Iaperilla 'OvenTemp' a 'Broil' para asadoa la parrilla a temperaturasrodsbajas,a 232° C (450° F). 350 300 + EIasadoa la parrilla a temperaturasrodsbajasevita eI dorado excesivode Ios alimentosque se cocinan por m_stiempo, tales como Ias carriesde ave. 1. Oprimay gire la perilla 'OvenTemp' a Ia temperaturadeseada. Espere10a 15 minutospara el precalentamiento. 3+ Siga lostiempossugeridosen Iatabta para asara la parrilIaen p_gina 67 que se incluyea continuaciOn.La came debe darse vuelta una vezcuandoest_ a mitad del tiempo de cocciOn. 2. Coloquee! alimentoen el centro del homo. Verifique si e! alimento se cocinOen eI tiempo minimo indicado para la receta. Cocine por m_stiempo s+es necesario. 4. Verifiqueel t6rmino de cocciOnhaciendoun corte en la carne cerca deI centro para verificar ei color. 3. Saqueel alimento del horno y gire la perilla 'OvenTemp'a la posiciOn"OFF". 5. Despudsde asar a la pardlla,coloque la perilla 'OvenTemp'en la posiciOn"Off". Saquela asaderadel horno. 61 Control del Homo (modelos selectos] A B C D ......................... Timer Less E F G H ............. l J El panel de control ha side disefiado para su fScil programaciOn.El indicadorvisual en et panel de control muestrala hera del d[a, el tempodzadory tas funcionesdel borne. Etpanel de control mostradoarriba inciuye [as caracter[sticasespedficas del modelo. (El estilo del panel de control var[aseg0n el modeloy 'Broil'(Asara ii_il la Parrilla) 'Bake'(Hornear) Seusaparaasara la pmrillay dorarlos alimentos. 'More+/Less-' [M_is+/Menos-] Programa o cambiala hera,la temperaturadel homo.Programaasara la parrilla'HI'o 'LO'. C Nota: Cuatro segundosdespu6sde haber oprimido la tecla 'More+' o 'Less-' el tiempo o la temperaturaser_autom_ticamente programada.Si transcurren m_sde 30 segundosdespu6s de haber oprimido una tecla de funci6n y antes de oprimir Ias teclas 'More+' o 'Less-',la funciOnser_canceladay el indicador visual velvet8al despliegueanterior. Seusaparahorneary asar. D 'Timer'_emporizador} Programa e! temporizador. E ¸ 'Cook& Hold'(CoceiOn Seusaparahornearduranteun tiempo y MantenerCaliente} seleccionado, luegomantienee!alimento calienteduranteuna hera. 'Clear!' (Limpieza} Seusaparaprogramarun ciclode autolimpieza. G +Delay'(Direr+do) Programa el homoparacomenzara homearo limpiarsea unaheraposterior. H +Clock'[Reloj) Seusaparaprograrnarla hera deld[a. +Keep Warm' (MantenerCaliente) Seusaparamantenercalienteen et homoel alimentococinado. J 'Clock' (Reloj] El re!oj puedeser ajustado para desplegarla hera ya seaen formate de 12 horaso 24 betas.El reloj ha side programadoen la f_brica para el formate de 12 horas. Para cambiar 24 betas: el relej a formate de 1. Optima y mantengaoprimidas Iasteclas 'CANCEL'y 'Delay' durantetres segundos. 2. Oprima'More+' o 'Less-'para programarel formate de 12 horaso 24 horas. 'CANCEL'(CANCELAR)Cancelatodaslasfuncionesa excepci6n dettemporizador y etreloj. 3= Programela hera del dia siguiendo las instruccionesindicadas abajo. Pregramaci6n Use de las Teclas del Relej: 1. Optima la tecla 'Clock'. • Optima la tecla deseada. • La hera del d[a y dos puntos destellan en el indicador. • Optima 'More+' o 'Less-' para programarel tiempo o la temperatura. 2. Oprima'More+' o 'Less-'paraprogramar[a hera de[d[a. • Se escuchar_una seiial sonora cadavez que oprima una tecla. • Se escuchar_ndos seSalessonorassi ocurreun error en la programaciOn. ( Less- ili! • Los dos puntos contimian desteliando. 3. Optima [a tecla 'Clock' nuevamenteo esperecuatro segundos. cent° 62 @ Para canceJar eJtemporizador: Cuandose conectaenergia e!6ctricaal homo o despu6sde una interrupci6n de la energ[aei6ctrica,Ia likima hora del reloj previaa la interrupciOndestellar4en el indicador. 1. Optima y mantengaoprh_Jdala tecla 'Timer' durantetres segundos. Paradesplegarla hora det aliacuando e! indicadorest6 mostrando otra funciOnde tiempo, oprima la tech 'Clock'. U 2. Optima la tecla 'Timer'y coloque la hora a 00:00. La hora del reJojno puedeset cambiadacuandoel horno hayasido programatic para 'DelayCook','Delay Clean'o 'Cook & Hold'. Para canceJar eJ despJiegue deJ reJoj: B oqueo Si no deseaque e! indicadorvisual muestre la hora del alia: El teclado pueden set bloqueadospara seguridad, limpiezao evitar el uso no autorizado.Loscontmles no funcionarancuando est6n bloqueados. Oprimay mantengaoprimida Iasteclas 'CANCEL'y 'Clock' durantetres segundos.La hora del dia desaparecer4del indicador. de Jos ControJes Si el horno est_ en uso, los controlespueden bloquearse. Cuandose cancelael desplieguedei reloj, oprima Iatecla 'Clock' para desplegar brevementeIa hora del dim La hora actual del dia permanecer4en el indicador cuando los controlesest6n bloqueados. Para restaurar Oprimay mantengaoprimidas lasteclas 'CANCEL'y 'Cook & Hold'durante tres segundos. el despJiegue Para bJoquear: deJ reJoj: Oprimay mantengaoprimida Iasteclas 'CANCEL'y 'Clock' durante tres segundos.La hora deJd[a reaparecer4en el indicador. 'LOCK'destella en el indicadorvisual 'Timer' Para desbJoquear: dremporizador} Oprimay mantengaoprimidas lasteclas 'CANCEL'y 'Cook & Hold'durante tres segundos. El temponzadorpuede ser programatic de un minuto {00:01}hasta 99 horasy 59 minutos {99:59}. 'LOCK'desaparecedel indicador visual El temporizadorpuede ser usado independientementede cualquier otra actMdad del horno.Adem4s puede ser pmgramadocuando otra funciOndel homo est6 en funcionamiento. C6diges de £rreres El temporizadorno controla el horno,solamentecontrola una serial 'BAKE'o 'LOCK'pueden destellarr@idamentepara advertirle que hay un error o un problema.Si 'BAKE'o 'LOCK'deste!Ianen el Jndicadorvisual,optima le tecla 'CANCEL'.Si 'BAKE'o 'LOCK' contin_an destellando,desconectela corriente el6ctrica deJ artefacto.Espereunos pocos minutosy vuelvaa conectarla corriente elSctrica.Si Ias palabrasa0n contin0an desteHando, desconecteIa cordente el6ctdcadel artefactoy Jlamea un t6cnico de servicioautorizado. so[_ora. Para programar eJ temporizador: 1. Optima Iatecla 'Timer' [Temporizado0. Timer + '0:00'se ilumina en el indicadorvisual. + Losdos puntos destellaran. 2. OprimaIatecla 'More+' o 'Less-'hasta que e! tiempo correctoaparezcaen el indicadorvisual + Losdos puntos continOandestellando. More+ (Less- 3. Oprimanuevamentela tecla 'Timer'o esperecuatro segundos. + Losdos puntos continOandesteJlandoy comienzaJacuenta regresJvadel tiempo. + El 01timominuto de Ia cuenta regresivadel temporizadorse desplegar4en segundos. 4. A! final deJtiempo programatic,se escuchar4una seBaJsonora larga. 63 'Bake' (Horneado) Notas sobre Horneado: Para pregramar 'Bake' (Herneade): Para cambiar matemperatara damhome darante em preceso de cocci6n, oprima la tecla 'Bake',luego optima 'More+' o 'Less-' hasta que se desplieguela temperatura deseada. 1. OprJma[atecla 'Bake'. + 'BAKE'destelBr& + '000'desteHar4en el indicadorvisual. Para camhiar ia temperatara dei homo darante 'Preheat', 2. SeleccioneIatemperaturadel horno. La temperatura prima dos races la tecia 'Bake',Iuegooprima 'More+' o 'Less-' det borne puede ser programadade 75° a 285° C ........................ hastaque se despIieguela temperaturadeseada. 070 ° a 550° F].Oprimau oprimay mantenga ....................................... Si olvidaapagar el borne,se apagar_autom4ticamentedespu@ oprJmidaIa tecla 'More+' o 'Less-'. ( Less- } de transcurrir 12horas.Si @sea desactivaresta caracter[stica, + Cuandocualquierade estasdos techs se oprime per yea Ia p4gina 64. prJmeravez,175° (350°} se iluminar& Parasugerenciasadicionabs sobre horneadoy asado,consulte + Optima la tecB 'More+' para aumentarIa temperatura. el falbto "La Cocina F4ciJ". + Optima la tech 'Less-' para disminuir la temperatura. 3. Optima la tec+a'Bake' nuevamenteo esperecuatra segundos. 'Cook + 'BAKE'dejar4 de desteIIary se iIuminar4en el indicadorvisual. Mantener & Ho d' (Coccion y Caliente) 'Oook & Hold' b permite hornear durante una cantidad determinadade tbmpo, seguidode un ciclo 'KeepWarm' de una hora. Para programar 'Cook & HoJd': , 38° (100°} o la temperatura actual delhorno se desplegar4. La temperaturase etevar4en incrementosde 3° (5°} hasta qua se abance la temperaturaprogramada. 1. Optima la tecla 'Cook & Hold'. + 'BAKE'y'HOLD' destellan. + '000'se ihmina en el indicadorvisual. 4. Esperea qua eI homo se precaIbnte durante 8-15 minutes. + Cuandoel borne IIeguea Ia temperaturaprogramadase escuchar_una sepal sonoraIarga. + ParaverificarIa temperaturaprogramadadurante el precalentambntodel horno,optima la tecla 'Bake'. 5. CoIoqueel alimento en el centra del borne, dejando un minima de dospulgadasentre el utensiJioy Ias paredesdel homo. 6. Venfique el progresode Ia cocci@ cuando hayatranscurridoel tiempo minimo recomendado.Contintiela cocci@ si es necesario. 7. AI t@_ino de la cocci@, optima la tecla 'CANCELL/f----_ 8. Retireel alimento del homo. 2. Seleccimsela temperaturadeI borne.La temperatura (More+ deI homo puede ser programadade 75° a 285° C (170° a 550° F}.Oprima u optima y mantenga oprimida la tecla 'More+' o 'Less-'. _+Less, Oprimala tecla 'More+' para aumentar la ........................... temperatura. + Oprimala tecla 'Less-' para disminuir la temperatura. 3. Oprima la tecla 'Cook & Hold' nuevamenteo esperecuatro segundos. + 'HOLD'desteJla. + '00:00' destella en el indicador visual Diferencias antiguo ProgrameIacantidad de tiempo durante la cual usted @sea hornearoprimiendo Iatecla 'More+' o 'Less-', El tiempo de homeadopuede programarsedesde 10 minutes (00:10)hasta 11 horas,59 minutes (11:59}. deJ homeado entre su homo y su homo nuevo Esnormal observaraIgunas diferenciasen eI tiempo de homeado de su homo antiguoy su homo nuevo.Vea "Ajustede la Temperatura del Homo" en la p%ina 64. + 'BAKE'y 'HOLD'se iluminanen el indicador visual + Eltiempo de horneadose iluminar_ en el indicadorvisual. + Comenzar4la cuenta regresivadel tiempo de horneado. 64 Cuande haya e×pirado e[ tiempo de cecci6n: 5. Oprima'More+' para programare[ tiempo de horneado. + Se escuehar_ncuatro sefialessonoras+ o En el indicadorvisua[se iluminan 'DELAY','BAKE',y 'HOLD'. * 'BAKE'se apagar& * 'HOLD'y 'WARM' se iiuminaran+ , Enel indicadorse desplegar_75° (170°). Cnande e[ tiempo diferide ha e×pirade: • 'DELAY'se apagar& • Se despiiegae[tiempo de horneado+ DespuSs de una hera en 'HOLD WARM' (Mantener Caliente): • Se despliegan'BAKE'y 'HOLD', + 'End' se desplegar& Para pregramar un tiempe diferide cuande ya se ha pregramado 'Cook & Hold': o La hera del d[a voiver_a desplegarseen el indicadorvisual 1+ Oprima la teeIa 'Delay'+ • 'DELAY'desteIIa+ Para canceiar 'Cook & Held' en cnaiqnier memento: • '00:00+sedespliegaen e[ indicadorvisual+ Oprimala tecIa 'CANCEL',Retire e[ aIimentodel horno+C_XN_ 'Delay Bake' 2+ Opnma [atech 'More+' o 'Less-' para programare[ tiempo diferido. (HorneadoDifeddo] • Despu6sde cuatro segundos, 'DELAY' permanecerdiiuminadopara recordarleque se ha programadoun cic[o de horneadodiferido. ........................... ........................... Less- Cnande ha expirade e[ tiempe diferide y e[ homo cemienza a funcionar: No use h0mead0difeddo para alimentosde corta duraci0ntales come productos l_icteos,cerdo,came de aveo mariscos. • Se desplegar_el tiempo de homeado+ • 'DELAY'se apagar& Cuandousa'Delay', el homo comienzaa cocinar maistarde en ei dia+Programela cantidad de tiempo que usted deseadiferir antes de que se enciendael borne y cu_nto tiernpodeseacocinar e[ aiimento+El horno comienzaa calentar en [a hera seleccionaday cocina duranteel tiempo especificado,y luego mantienee[ alimento caiientedurante una hera+ • 'BAKE'y 'HOLD' permanecer_niluminados+ Para canceiar: Oprima[a tecla 'CANCEL'. • Todas lasfuncionesde horneadocontroladaso no per e[ temporizadorser_n canceladas+ Eitiempo diferido puede programarsede 10 minutes (00:10]hasta 11 horas,59 minutes (11:59}. • La hera del d[a velvet8a despiegarseen el indicadorvisual+ Para pregramar nn cicie de hemeado diferide: 1. Oprima[a tecia 'Delay'. Notas: ] • No use horneadodiferido para los articulos que necesitan [ precalentamientodel borne,tal come pasteles,galietasy panes./ o 'DELAY'destelia. o '00:00'destella en eI indicadorvisual. m • No use horneadodiferido si el borne ya est_ caliente. / 2. Oprimala tecia 'More+' o 'Less-' para programarel tiempo diferido. Cuando'DELAY'est6 todav[adestellando: 3. Oprimala tecia 'Cook& Hold'. o '000'se iIumina en el indicadorvisual o 'BAKE'y 'HOLD'destelian. Oprima'More+' para programarla temperaturade horneado. o '00:00'y'HOLD' desteIlan. o 'BAKE'permaneceiiuminado. 65 | J Keep Warm' (Mantener Caliente] Notas sobre 'Keep Warm': Paramantener eatientesen forma seguraalimentoscalienteso para calentar panesy phtos. o ParamantenerIa catidad Optimade los alimentos,los alimentoscocinadosen el horno deben set mantenidos calientespor no m_s de ] a 2 horas. Para pregramar 'Keep Warm': 1. Optima Iatecia 'Keep Warm'. • 'WARM'destella. o Paraevitar que losalimentosse sequen,cObraloslevemente con papel de aluminioo una tapa. • '000'se despliegaen et indicadorvisual. + Para eamentarpaneciHos: 2. SeteccioneIatemperaturade 'KeepWarm'.La temperaturapara 'KeepWarm' puede set programadade 63° a 90° C 045 ° a 1%° F]. Oprima u optima y mantengaoprimida la tech 'More+' o 'Less-'. - cubra Ievementelos panecilloscon papel de ahminio y colOquelosen el homo. - optima Ias teclas'Keep Warm'y 'More+' para programar 75° C C]70° F], Less- - caliente durante 12a 15 minutos. o Pam ¢amentarpmatos: • Cuandocuaiquierade estasdos tectasse oprime por primeravez,75° (170°] se iJuminar& - coloque 2 pilas de cuatro ptatoscada una en el horno. • Optima la tecla 'More+' para aumentarJatemperatura. - optima Ias teclas'Keep Warm'y 'More+' para programar 75° C [] 70° F]. • Optima la tecla 'Less-' para disminuir la temperatura. - caliente los platosdurante cinco minutos,apague el homo y deje los platos en el horno durante 15 minutosm_s. 'WARM'y Iatemperaturase desplegar4nen el indicadorcuando eJciclo 'Keep Warm' est6 activo. - use solamenteplatos resistentesal horno,verifique con el fabricante. - no coloque los platos calientessobreuna superficiefr{a pues el cambio rSpidode temperaturapuede causarfisuras superficialeso rotura. Para gaBgemar 'Keep Warm': 1. Oprimalatecla 'CANCEL'. 2. Retireel alimento del horno. 66 Cierte Auto tico/Modo Ajuste de la Te peratura Elhomo se apagar_autom_ticamentedespu6sde 12 betas si usted todeja accidentalmenteencendido. Estacaracteffsticade seguridad puede set desactivada. La exactitudde Jastemperaturasdel borne es cuidadosamente probada en Iaf_brica. Esnormai notar aIgunadiferencia entre la temperaturade horneadoentre un borne nuevoy un homo antiguo. Conel correrdel tiempo, Iatemperaturadel borne puede cambiar. Para cancelar el cierre autom_tico de 12 horas y dejar que el homo funcione continuamente durante 72 horas: Ustedpuede aiustar Ia temperaturadel homo si consideraque su borne no est_ horneandoo dorando en forma correcta. Paradecidir cu_nto debe cambiar Ia temperatura,programela temperaturadeI borne a 15° C (25° F) m_salta o m_s baia que la temperatura indicadaen sus recetas,luego hornee. Los resultadosde la "prueba" pueden darle una idea de cu_nto aiustar la temperatura. 1. Programeel homo para hornear (verp%ina 61). 2. Oprimay mantengaoprimida la tecla 'Clock' durante cinco segundos. o 'SAb'se desplegar_y destelIar_durantecinco segundos. Ajuste de matemperatura o 'SAb'se desplegar_continuamentehasta que se desactiveo hastaque transcurraeI limite de 72 betas= 1. Oprima 'Bake'. dem homo: 2. Programe285° (550°) oprimiendolatecla 'More+'. o 'BAKE'tambi6n se desplegar8si se est_ usandoun ciclo de horneadocuando el homo est_ en Mode Sab_tico. 3, Oprimay mantengaoprimida [a tecia 'Bake' durante varies segundoso hasta que O° aparezca en el indicador visuai. Todas lasotras funciones EXCEPTO 'BAKE'('Timer','KeepWarm', 'Clean',etc0 est_n bloqueadasdurante el Mode SabStico. Para canceiar 'Bake' cuando el Mode Sab_tico est_ Si Ia temperaturadel homo ha side previamenteajustada,eI cambio aparecer_en et indicadorvisual Per ejemplo,si Ia temperaturadel borne fue reducidaen 8° C (15° F) el indicador mostrar8- 8° (-15°). active: Optima 'CANCEL'= del CANCEL o 'BAKE'se apagar8en el indicadorvisual. Oprima la tecla 'More+' o 'Less-' para ajustar la temperatura. o No se oir_ ninguna seSalsonora. Cadavez que se oprimeuna tecla, la temperaturacambia en 3° C (5° F). La temperaturadeI borne puedeser aumentadao disminuida en 3° a 20° C (5° a 35° F). Para cancemar emMode Sab_tico: 1. Oprimalatecla 'Clock' durante cinco segundos. La hera del d[a reaparecer_autom_ticamenteen el indicador visual O 2. Despu6sde 72 horas,el Mode Sab_ticoterminar_. No necesitareaiustarla temperaturadet borne si hayuna falla o interrupci6nde energFael6ctrica. Lastemperaturasde asar a la parrilla y Iimpiezano puedenset aiustadas. o 'SAb'destellar8durante 5 segundos. o La hera del d[a reaparecer_en el indicadorvisual. Notas Sobre eUMode Sab tico: • El Mode Sab_iticopuede seractivadoen cualquier memento, est6 o no e( horno encendido. o Cuandoel Mode SabSticoest_ active,todos los avisos, mensajesy seSalessonorasest_n desactivados. • El Mode Sab_tico no se puede activar si lasteclasest_n bloqueadaso cuando la puerta est_ bloqueada. o Si opalinela tecla 'CANCEL'se cancelar8un ciclo 'Bake',sin embargoet control permanecer_en Mode Sab_tico. • Si et borne est_ horneandocuando se programael Mode Sab_tico,'BAKE'se apagar_al final del ciclo de horneado.No se emitir_inserialessonoras. o Si falla lacorriente eiectrica, cuandovueIvaIa energ[ael borne se activar_en Mode Sab_ticocon 72 horasrestantesy ningOn ciclo active. • Cuandocomienzael Mode Sab_tico,no se emitir_ la seSal sonorade precalentamiento. 67 'Broiming' (Asar a la Pardlla) Para programar 'Broil': 6. D6vuelta a [a came una vez aproximadamentea mitad de la cocci@. 7. Cuandoe[ a[imentoest6 cocinado,optima [a tecIa 'CANCEL'. Retireel alimentoy la asadera de[ homo. 1. Optima ta tecta'Broil'. o 'BROIL'destetIa. o 'SET'se despliegaen el indicador. o La hora deI dFavolver_ a despbgarse en el indicadorvisual. 2. OprimaB tecta 'More+' para programarasara B parriIB 'Hi' u optima tatecta 'Less-' para programarasar taparrilB 'LO'. o En et indicadorvisual se despbgar8 'Hi' o 'LO'. Notas Sobre Asado a UaParriHa: o Sebccione 'Hi broiI' 285° C (550° F} para asadoa Ia parrilla normal. Seleccim_e'LO broil' 230° C {450° F}para asar a ta parrittacon temperatura bajaarimentosque @ben ser cocinadospor m_stiempo,tal como la came de ave. o Para mejoresresuItadoscuando asea la parrilla,use una asaderadis@ada para asar a la parrilIa. o Los tiemposde asara Iaparrilla aumentar_ny et dorado set8 m_s claro si se instala el electrodom@ticoen un circuito de 208 voltios. 3. Despu6sde cuatro segundos,el homo comenzar8a funcionar. o 'Hi' se usapara Ia mayor[ade Ios asadosa Ia parrilla. Use 'LO broil' cuando asea la parrilla alimentosque necesitancocci@ proIongada. La temperaturainferior permite que eI alimento se cochle hastaquedar bien asadosin dorarsedemasiado. o 'BROIL'continuar_ iluminado. o Los tiemposde asadoa la parrilla puedenser m_s Iargos cuando sesebcciona la temperatura ross baja de asar a la parrilla. 4. Paraun dorado @timo, precaIienteel ebmento de asar a la parrilla durante 3 a 4 minutosantes de coIocarel alimento. o Parasugerenciasy temperaturasadicionabs sobreasar a la parrilia, consulteel folleto "La CocinaF_ci[". 5. Coloqueel alimentoen el homo. Deje la puerta abierta aproximadamente10cm (cuatro puIgadas}(el primertope). Tab[a de Asar a [a Parri[[a POSICiON ALIMENTOS DE TERff]INO DE COCCWON TIEMPO COCC_ON TOTAL DE [M_NUTOS) Came de Res Biftec, 2,5 cm (1") 4 A medic asar 15 - 18 minutos Hamburguesas,1,9cm (3/4"} de grosor 4 4 Bien asado Bien asado 19 - 23 minutos 15 - 18 minutos Came de Cerdo Tocino Chuletas,2,5 cm {1") Jam6n - Rebanadasprecocidas,1,3cm 0/2") de grosor 4 4 4 Bien asado Bien asado Tibio 6 - 10 minutos 22 - 26 minutos 8 - 12 minutos 3oa Bien asado 28 - 38 minutos 4 4 Desmenuzado Desmenuzado 10 - 15 minutos 8 - 12 minutos Came de Ave Presasde poilo 'LO Broir _atiSCO$ Bistecsde pescado,con mantequilla,2,5cm [1"} de grosor Rbtes de pescado La posici6n de la parrilla superiores #5 Nora: Estatabla es sOlouna gu[a. Lostiempos puedenvariar con el tipo de alimento que se est4 cocinando. 68 @ Respiradero de[ Homo Posiciones cuandoem homo eat6 en uso, em _reacerea dem respiradero puede PARRILLA 5 (la posici6n m4s aita): Se usa para tostar pan o asara la pardila alimentos deigadosno grasosos. sentirse eaiiente bastunte pot eausa quemaraso Nunea bmoquee ia abertura dei respiradero. Ei respiradero se encuentra debajo de la cubierta dei reapiradero demprotectortrasero de su estufuo j de [a Parri[[a i .................................... 5 __4 --3 PARRILLA b,:Se usa para [a mayoriade losasadosa [a parrJiia. RESPIRADERO DEL HORNO / __2 --1 PARR[LLA3: Se usa para hornear aIimentosen una bandeja de horneargaJietaso un moJdepara ro[[ode mermeJada, para pasteles,paysde fmtas o aIimentoscongeIados. PARR[LLA2: Se usa para asar cortesde carne pequehos,caceroIas, hornear baguetasde pan, pastelesen moidesde tubo o fIanes. 'Oven Light' (Luz de[ Homo) PARR[LLA1: Se usa para asar pedazosgrandesde came y came de ave, paysconge[ados,sufI6sde postre o pasteIesesponjosos. HORNEADO CON VAR_AS PARR[LLAS: OprimaeI interruptor de h Juzde! horno en el panel de control para encendery apagar la hz del horno= Pane[ inferior de[ Homo Oven Light Dos parriiias pmanas:Use [as parrJ[iasen [as posiciones2 y 4. Una parriiia piana y una parriiia irregular:Use [as parrJ[[asen [as posJciones2 y 5. Protejael pane[inferior de[ homo contra derrames,especia[mente azucaradoso acidicos, puespueden descolorar[a porceiana esmaitada.Use e[ utensiiio de tamaffo correctoa fin de evitar derrames.No comoqueutensimiosni papei de amuminio direetamente en la parte inferior del llorno, Nota:Tenga posiciOn1 [posici6ninferior). cuidadocuando retire [a parri[[a irregular en [a Media Parri[[as de[ Homo 1 i ParriJJa Se dispone,como accesodo,de una media parriJJapara aumentar [acapacidad deJ homo. Se instaJaen [a secciOnsuperiorde[ [ado izquierdode[ homo y ofrece espacio para una plato de verdurascuando se ha co[ocadouna asaderagrande en [a parriJJa inferior. POngaseen contacto con su distribuidor para obtenere[ accesodo "HALFRACK"o para solicitar [lamea[ 1-800-688-8408. °N0 intente camblur la P0siei6nde las parrillas cuandoel homo • No use e! homo para guardar a[irnentosni utensiIios_ El homo tiene dos parri[Jas.Todas [as parriJ[astienen un borde con tope de enganche. ParriJJa 'EasyRack Para retirar [a parriJJa: MR' (mode[os se[ectos_) 1. Tire de [a parrilia derecho hacia afuera hastaque se detengaen [a posici6n de[tope de enganche. La parriJia'EasyRackMR'ofrece un espacioconvenienteparatomar los utensiiiosde hornear cuando se est4n sacandofuera de[ homo. 2. Levanteet frente de [a parri[Iay tire de [aparrJIIahaciaafuera. Para reinstaJar [a parriJJa: L Co[oque[a pardJ[aen los soportesde [a parri[[aen el homo. / 2. incline [evementehaciaardba el extremode[antero;des[ice[a parri[[a haciaatr_s hasta que pasesobre lostopes de enganche. Notas: 3. Baie el frente de [a parr[Hay des[ice[ahacia adentrode[ homo. No cubra umlaparrimma eompmetacon papemde amuminioni comoque papemde amuminioen maparte inferior demhomo. Se afectar4n mos resumtadosdemhomeado y se puede dahar maparte inferior dem homo. 69 • Use [a parrii[a 'EasyRack MR'soIamenteen e[ homo en que fue comprada. • La parriIIa'EasyRackMR' puede ser usadaen todas [as posiciones. Limpie el excesode grasao derramesde la parte inferior del homo. Estoevita humoexcesivoo liamaradasdurante el cicio de limpieza. Homo Automimpiante (modelos selectos} Limpie los derramesazucaradoso dcidos tales como papa dulce (camote},tomates o salsasa basede leche. La porcelana esmaltadaes resistenteal _cido pero no a prueba de dcidos. Et acabadode porcelanapuede descolorarsesi los derrames_cidos o azucaradosno son limpiadosantes de un cicio de autolimpbza. Nota: Parala limpbza manual,ver p_gina 70. Esnormal que las piezasdel homo se calienten dumme el cblo de aut@mpLeza Para programar Afin de ewtar una lesi@ personaly dafio a la puertadel homo. no trate de abrir la puertacuando est6 despiegadala palabra 'LOCK" (Bloqueada}. (Autolimpieza): Nora: La temperaturadel horno debe ser inferior a 205° C (400° F}para programarun ciclo de limpieza. Evitetocar la cubierta,la puerta, la ventana o el _rea del resplraderodel homo durante un ciclo de HmHeza. ], Cierrela puerta del homo. 2. Mueva Ia palancade bloqueo de la puerta a la derechaa la posbiOnbloqueada. No use iimpiadoresde hornos comercialesen el acabadodel homo ni alrededorde ninguna piezadel homo pues puede daiiar el acabadoo Bs plezas. Elciclo de autolimpiezausatemperaturassuperioresalas temperaturasnormalesde coccidnpara limpiar autom_ticamenteel interiordel homo. No fuerce la puertadel horno ni la palancade bloqueopara abrirla. Estopuede causar exposici6na las temperaturasaltasy constituir un nesgode quemadura.asnormabs para limpiarautom_ticamentetodo el interior del homo. 3. OprimaIa tecla 'Cban'. • 'CLEAN'destella en el indicadorvisual. Esnormal que ocurran Ilamaradas,humoo llamasdurante la limpieza si el homo est4 demasiadosucio.Esmeior [impiar el homo reguiarmenteen vez de esperarhasta que se hayaacumulado demasiadasucbdad. Si Ia puerta no se cierra, seoirdn sefialessonorasy la palabra 'DOOR'se desplegar8en el indicadorvisual. Si Ia puerta no se cierra dentro de 45 segundos,la operaciOnde autoiimpiezaser_ canceladay el indicador volver_a despbgar la hora del dia. 4. Optima la tecla 'More+' o 'Less-'. • Se despliega'CL-M (Sucbdad Median& 3 horas). Duranteel proceso de Iimpieza,la cocina debe estar bien ventilada para eliminarlos olores normalesasociadoscon la limpieza. Antes 'Self-Clean' Optima Ia tecla 'More+' o 'Less-' para desplazar los ajustesde auto[impieza. de la Auto impieza 1. Apague Ia Iuz dei homo antes de la Iimpiez&La luz del horno puedefundirse duranteel cicio de limpiez& 'CL-H' [SuciedadIntensa,4 horas} 2. Retire la asadera,todos Ios utensiiiosy las parriIIasdel homo. Las parrillasde! homo se descolorardny no se destizar_nf_cilmente despu@de un ciclo de autoiimpiezasi no son retiradasdeI homo. 'CL- L' {SuciedadLeve,2 horas} ............................. :{ Less- 'CL-M' (Sucbdad Median& 3 horas} 3. LimpieeI marcodel homo, el marco de Ia puerta,el _rea fuera de la iunta de la puertay alrededorde la aberturaen Iajunta de la puerta,con un agentede Iimpiezano abrasivotal como 'Bon AmP o con detergentey agua.El procesode autolimpiezano Iimpia estas_reas. Elias@ben ser limpiadas para evitar que la suciedad se hornee durante el ciclo de autolimpieza. (La junta es el sello alrededorde la puerta y ventanadel horno.} 4. Paraevitar daSo no Iimpie ni frote Ia junta situada alrededorde la puerta de! homo. La junta est_ dis@ada para sellar herm6ticamenteel calor durante el ciclo de [impieza. AI sebccionar el nivel de suciedadde! homo se programa autom_ticamenteel tiempo de limpieza. Despu@de cuatro segundos,el homo comenzar_a limpiar. • El tiempo de limpieza comenzar_la cuenta regresivaen el indicador. • 'LOCK'se despiegar_en el indicadorvisual. • 'CLEAN'se desplegar_en el indicadorvisual. Para diferir un ciclo de autolimpieza: 1. Optima la tecla 'Delay'. • 'DELAY'destella. • '00:00'se desplegarden el indicadorvisual cont, _Loshombresde los productosson marcasregistradasde sus respectivosfabrbantes. 70 2. Optima [atec[a 'More+' o 'Less-'para programar[a cantidadde tiempo que usted deseadiferir e[ cicto. Ettiempo diferido puede ser programadode 10 minutos [00:10)a 11 horas,59 minutos (11:59). Durante 3. Oprima[atec[a 'Clean'. Ustedpuede ver humoy sentir olor Ias primerasvecesque el homo es limpiado+Estoes normal y disminuir_ con el tiempo+ 4. Oprh_aa [atecia 'More+' o 'Less-'. Tambi6npuede haber humo si el horno est_ demasiadosucio o si se ha dejado una asaderaen el homo. + 'CL-M' (SuciedadMediana,3 horas)se desptiegaen et indicador. 'CL-H' (SuciedadHntensa,4 horas) de Autolimpieza Humo y Olores • 'CLEAN'deste[tar_i. 5. Optima Iatecla 'More+' o 'Less-'para desptazartos ajustesde autotimpieza. el Cido Cuandoaparece'LOCK'en el indicador,Ia puerta no se puede abrir. Paraevitar dafio a la puerta, no fuerce la puertapara abdrla cuando la palabra 'LOCK'est_ desplegadaen el indicadorvisual. Sonidos Less............................ A medidaque el horno se calienta,usted puede off sonidos de piezasmet_licasque se expandeny contraen. Estoes normaly no dafiar_ el homo. `_L-M_(SuciedadMediana,3 horas] 'CL-L' (SuciedadLeve,2 horas] Despu6s At seteccionaret nivet de suciedadde! homo se programa autom_ticamenteel tiempo de limpieza+ 6, Despu6sde cuatro segundos,'CLEAN','DELAY'y 'LOCK'se desplegarSnen e! indicadorvisual para indicar que el horno esta programadopara un ciclo de limpiezadiferido+El tiempo diferido tambi_n se desp[iegaen el indicadorvisual. de Autolimpieza Algiina suciedad puede quedar como una leve ceniza gris ripe polvo. Retffelacon un patio hOmedo.Si Ia suciedadpermanece despuesde Iimpiarla,significa que e! ciclo de Iimpiezano rue Io suficientementelargo. La suciedadser_eiiminada duranteel proximo ciclo de ]impieza. Si masparriHas del homo fueron dejadas en el homo y no se deslizan suavemente despu_s de ml ciclo de limpieza, Iimpie las parrillasy los soportesde lasparrillas con una pequefiacantidad de aceitevegetal para hacerlasdeslizarcon m_s facilidad+ Si e[ homo ya ha sido programado para un cide de [impieza y usted desea programar un tiempo diferido: Pueden aparecnr l_neasdelgadas en la porcelana al pasar pot ciclos de calentamiento y enfriamiento. Estoes normaly no afectar_e! rendimiento. 1. OprJma[atecla 'Delay'. • 'DELAY'desteJJa. Una descolorani(_n blanca puede aparecer despu6s del title de limpieza si los alimentos _cidos o azucarados no fueron limpiados antes del cido de autolimpieza. EstadescoloraciOnes normaly no afectar8el rendimiento. + '00:00'se desplegar_en el indicadorvisual. 2. Oprimala tecla 'More+' o 'Less-'para programar la cantidad de tiempo que usted deseadiferir el ciclo+ ........................ Despu6sde cuatm segundos,'CLEAN','DELAY'y 'LOCK'se desplegar_nen el indicadorvisual para indicar que el horno esta programadopara un ciclo de limpiezadifeddo. El tiempo diferido tambien se despliegaen el indicadorvisual + Si se deja abierta la puertadel horno,Ia palabra 'DOOR' destellar_en el indicadorvisual y se escuchar_una serial sonora hasta que [a puertasea cerraday la tecla 'Clean' sea oprimidanuevamente. Cuando comienza el ciclo de autolimpieza: + La puerta del homo se datar4 si se fuerza para abrirJacuando la palabra'LOCK' contin0a despJegadaen e[ indicador. + 'DELAY'se apagar& • Eltiempo de [impiezase desplegar_en el indicadorvisual. Para canceiar el ciclo de autoiimpieza: Oprima[a tec[a 'CANCEL'. del Cido Aproximadamenteuna hora despuesdeIfin deI ciclo de limpieza, 'LOCK'desaparecer& La puerta ahora puede set abierta. Mueva Ia palancade bloqueo de la puerta a la izquierdapara desbloquearta. CANCEL + El indicadorvisual queda en blanco, • Todas Iasfuncionesson canceladas. + La hora del aliase despliegaen el indicadorvisual. 71 Procedi ientos de Limpieza fr_as antes de tocarie o limpiarlo. De este modQ se evitar_n da_os y posibiesquemaduras, , Paraevitar manchaso dec0!oraci6n[imp!ee[ homo despu6sde cadauso. • Si se ret[ra aIguna pieza,aseg6resede que sea reinstaladaen forma correcta: * Los hombresde los prod_Jctosson marcas registradasde sus respectivosfabricantes= •* Parahacer pedidos,[lame a[ 1-877-232-6771en EE=UU= o 1-800-688-8408on Canad& P[EZA PROCED[M[ENTO ProteeterTrasere y Cabierta Perceiana Esmaltada La porcelanaesmaltadaesvidriofundidoen metaly puedeagrietarseo picarsesi no se usacorrectamente.Esresistentea los_cidos,no a pruebade_cidos.Todoslosderrames,especialmentelosderramesazucaradoso addicos debenset limpiados inmediatarnente con un paf_oseco. ° Cuandoseenfr[e,lavecon aguajabonosa,enjuaguey seque. ° Nuncalimpieuna superficietibia o calientecon un patio h[_medo. Estopuedecausaragrietamientoo picaduras. • Nuncauselimpiadoresde homo,agentesde limpiezaabrasivoso c_usticosen el acabadoexleriorde la estufa. Bandeja de Asar e [nserto Nunca cubra el inserte con papel de afuminJepues esto evJtaque la grasa se escurm a & bandeja inferior. • Co!oqueun paho enjabonadosobreel irlsertoy la bandeja;deje remojarpara soltarla suciedad. • Laveen aguajabonosatibia.Use unaesponjade fregarpara quitarla suciedadpersistente. • La bandejade asary el insertopuedenset lavadosen el lavavajiIIas. Area del Relej y ° Paraactivar'ControlLock' (Bloqueode loscontroles}parala limpieza,ver p4gina60. ° Limpieconun paBohOmedoy seque.No useagentesde limpiezaabrasivespuespuedenrayarla superficie. ° Se puedenusar[Jmpiavidrios si se rodan en e[ pafioprimero. NO retie dJrectamenteel_elpaneL demas Tecmas de Control DE LiMP[EZA Periiiasde Control , Retire las perillas cuando est6n en [a posiciOn 'OFF' tir_ndolas hacia adelante= , Lave, enjuague y seque= No use agentes de limpieza abrasivos pues pueden rayar la superficie= , Encienda cada quernador para asegurarse de que las perilIas hayan sido correctarnente reinstaladas= Pmatimmos La porcelanapuededesco!orarseo adquirirfisurassuperficialessi se sobrecalienta.Estoes normaly no afectardel rendim[entode la cocciOn. • Cuandoest_n frfos,lavedespu_sde cadauso,enjuaguey sequepara evitar manchasy deco!oracidn.Pueden[avarseen el [avavajillas. • Para[impiarsuciedadexcesiva,remojeen aguacaIienteconjabOn,[uegouse un limpiadorabrasivosuaveta[ como Soft Scrub*y una esponjade fregar de pidstico= ° Parasuciedadquemada,retiree[ phtillo de la estufa,co!Oque[osobreperiOdicosy rode cuidadosamentecon limpiador de homo comerciaL(No rocfe [assuperficiesadyacentes=) Coloqueen una bolsade pIdsticoy deje remojardurante variashoras=Useguantesde gomapara sacarlode [a boIsa,lave,enjuaguey seque= Prnteetnres, Pnrceiana (mndeios selectos} Pmatimmos Prnteeteres, Cremo (medeios seientos} • Cuandoest6n frfos,lavedespudsde cadause,enjuaguey sequepara evitar manchasy decoloracidn. • Para[impiarsuciedadexcesiva,remojeen aguacaliente conjabOn,[uegouse un limpiadorabrasivosuaveta[ como Soft Scrub*y una esponjade fregar de pldstico. No useagentesde [impiezaabrasivos. Ventana y Paerta dei Homo - Vidrio • Eviteusarcantidadesexcesivasde aguapues puedeescurrirsedebajoo detrdsdel vidrio causandomanchas= • Lavecon aguayjabOn=Enjuaguecon agua [impiay seque=E[[impiadorde vidrio puede usarsesi se roda en un paiio primero= ° No usemateriaIesabrasivostales comoesponjasde restregar,[impiadoresen poIvoo esponjasde lana de aceropues pueden rayare! vidrio= 72 DE L_MP_EZA P_EZA PROCEDmMIENTO Parriiias dei Homo ° Limpie con agua con jab6n, • Saque las man@as dificiles con jab6n en polvo o con una esponja Ilena con jabdn, Enjuague y seque, ° Las parrillas se descolorardn permanenternente y pueden no deslizarse con suavidad si son dejadas en el homo durante un ciclo de autolimpieza, Si esto sucede, limpie la parrilla y los soportes en relieve con una peque_a cantidad de aceite vegetal para restaurar la facilJdad de movimiento, luego IJmpieel exceso de aceite= Aeere ino×idabie [mode!os seleetos] • NO USE NINGUN PRODUCTO DE LIMPtEZA OUE CONTENGA BLANQUEADOR A BASE DE CLOBO. ° NO USE LIMPIADORES "ORANGE"AIILIMPIADORES ABRASIVOSo , SIEMPBE LIMPIE LAS SUPERFICIES DEACEBO A FAVOR DEL GRANO. , Limpieza Diaria/Suciedad Leve - Limpie con uno de los siguientes - agua con jabOn, una soluciOn de vinagre bhnco con agua, limpiado! para superficies y vidrio 'Formula 409'_ o un limpiavidrios similar - usando una esponja o un pafio suave, Enjuague y seque= Para pulil y evitar marcas de @dos, use el pmducto 'Stainless Steel Magic Spray'_ (Pieza No, 20000008]_= , Sudedad Mediana/intensa = Limpie con uno de los siguientes - 'Bon Ami '_,'Smart Cleanser'_ o 'Soft Scrub'_ - usando una esponia hOmeda o un patio suave, Enjuague y seque= Las manchas diffciles pueden set quitadas con una esponja multi-uso 'Scotch-Brite '_ h_meda; frote a favor del grano= Enjuague y seque= Para restaurar el lustre y sacar las vetas, aplJque 'Stainless Steel Magic Spray'_= , Descoioraci6n - Use una esponja mojada o un patio suave, limpie con !impiador de acero 'Cameo Stainless Steel Cleaner'_=Enjuague inmediatamente y seque=Para eliminar lasestr[as y restaurar el lustre, use despu6s rociadm para acero inoxidable 'Stainless Steel Magic Spray'_= Heine autoiimpiante: , Siga las instrucciones en las pdginas 67-68 para programar un cic!o de autolimpieza= Liinpieza Manual: , Lhnpie frecuentemente usando limpiadores abrasivos suaves y una esponja de pldstk'o= , No use esponjas de flegar metdlicas porque pueden rayar la superficie, , Cuando utilice limpiadores de horno comerciales siga las instrucciones de! fabricante, , Limpie los derrarnes dcidos [alimentos a base de tomates o de leche] tan pronto como sea posible con agua yjab6n, Si el derrame no es limpiado se puede descolorar la porcelana, Para hater m;Js f;Jeil la iimpieza, saque ia puella dei heine, si ie deseao C,ler la secci6n Mantenimiento en pdg, 710 Gaveta de Ammacenamiento. Manija de la Puelta, Paneies Lateraies Esmaite Pintado , Cuandoest6Ma, laveconaguatibia jabonosa,enjuaguey seque=Nuncalimpieuna superficietibia o calientecon un patio h0medopuesesto puededaiiar la superficiey causaruna quemaduraa causadel vapor, , Paramanchasrebeldes,useagentesde limpiezalevementeabrasivostal comopastade bicarbonatoo 'BonAmi'_=No use agentesde limpiezaabrasivos,cdusticoso dsperostal comoesponjasde lanade aceroo limpiadoresde homes,Estos productospuedenrayaro dai_arpermanentementela superficie= NOTA: Use una teatta e un parle sece papalimpiar los derpames,especialltle_lte los derpamesac[dicos e azucapadesoLa superficie se puede desce/opare perder el briHo si el derpamei_ese /impia inmediatamel_te.Esto es especialmente impertante en /assuperficies bla_cas. _Los hombres de Ios productos son marcas registradas de sus respectivos fabricantes= _ Para hacer pedidos, Ilame al 1-877-232-6771 en EEUU= o 1-800-688-8408 en Canadd= 73 Puerta Ventana Homo del Homo Para proteger maventana de mapue[ta demhomo: 1. No useagentes de limpiezaabrasivostabs como esponiasde restregarde lana de aceroo limpiadoresen polvo pues pueden rayarel vidrio. • No coloque peso exceslvo mse pare en la puerta del homo. Esto poona hacer vobar la estufa, quebrar la puerta o lesiona al usuario. 2. No golpee el vidrio con ollas, sartenes,muebles,]uguetesu otros objeto& o No mtenteabrir o cerrar la puerta ni hacerflmcionar el homu hasta que Eapuerta no ha sido debidamen[e reerralazada. 3. No cierre Ia puerta deI homo hasta que las parrillasdel horno no est@ en su Iugar. • Nunca coloquelos dedosentre la bmagray el marco delantero del hornc Los brazosde articuBci@ son montadosa resorte. Si se golpea accLdentalmentela bisagra se cerrar_i bruscamentecontra el marco del homo y puede lesionarsus dedos. Para Ai goIpear,rayar, hacervibrar o esforzarel vidrio puede debilitarsu estructuracausando un mayor riesgode rotura en una fecha posterior. Luz saoar: Norno 1.Cuandoest6 fr[a,abra [a puerta de[ horno hasta [a posiciOntope de asara [a parri[la [abbrta aproximadamente10cm {cuatro pulgadas}]. 2. Suietela puerta de cada lado. No use [a manijade la puerta para levantaria, _:z:_Z_ , Desconecte la energ[aa [a estufa antesde reemplazare!foco. ; Use un toma0!!asSeco para evitar P0Sibledad/0a Sus man0s Cuando est6 reemplazandee!foco. ; Asegdresede queel foCoest6fr[o antes de tocarlol NOtoque ei foco CalienteConun paso hOmedopuesesto puede quebrar e!foco, .... fi f/f-- -] / 3. Levanteuniformementehasta que Ia puerta se salgade los brazosde articulaci6n. Para voiver a comocar: Para reem£mazar emfoco demhomo: I.Sujete la puerta de cada lad& 1.Cuandoel horno est6 fr[o, suiete la tapa de Ia bombiIIaen su hgar, luego deslice el ret@ de aBmbre fuera de la cubierta. NOTA: La cubbrta de la bombiIIase caer_ si no es sujetaensu kJgarcuandoestasacando CUBIERTA DEL ei ret@lde alambre, f:oco 2. Alinee las ranuras de la puerta con los brazos de articuIaciOn de la estufa. 3. Deslicela puerta hacia Ios brazosde articuiaci6nhasta que est6 compbtamente asentadaen Ias bisagras. Empuiehaciaaba}olas esquinassuperioresde la puerta para asentarlacompbtamenteen las bisagras. La puerta no debe quedar torcida. 2. Saque la cubierta del foco y el foco. 3. Coloque un foco de 40 watts para electrodom@ticos. \ 4. Vuelvaa colocarlacubiertade la "esponiosa"cuandose cierra. Estoes normaly disminuir_ con el Nora: La puerta dei horno en una estufa nuevapuede sentirse USO. f_ErdV DEALAMBRE bombilIay aseg0relaconel ret@ de alambre. 5. Vuelvaa enchufar la estufa.Vuelvaa colocar la hora correct& 74 Tomillos Niveladores Para volver a colocar: 1. Insertelos extremosde lascorrederasde la gavetaen los rbles de la estufa. 2. Levanteia partedeBntera de ia gavetay suavementeempOiela hastaia pnmera posiciOnde tope. Ver!f!queque e!soporte antivue!c_ este asegurand0 al pise une de lostorrfi!!os[!ive!ado[estraseros, EsteSOPOrte evita que la estufase vuelqueaccidenta!mente_ 3. Levanteia gaveta nuevamentey empqela hasta que quede completamentecerrad& Tomacorriente para Emeetrodo sticos Peque os La estufadebe set niveladacuandose instaB. Si Ia II]](3 estufa no est_ niveBda,gire los tornilios nivetadores I[[I _ de pI_sticoubicados en cadaesquinade B estufa Jl_ hasta que quede niveBda. _/,,_ _ El tomacorrientepara electrodom@ticospequeiios est_ ubicadoen el iado inferior izquierdodel protectortrasero.AsegOresede que los cordonesei@tdcos no descansensobre los elementossuperioreso cerca de elios. Si el ebmento superior est_ encendido,ei cord@ y el electrodom@ticopueden dai_arse. ANTIVUELCO TORNILLO Gaveta (Modelos Canadienses solamente} NIVELADOR de Almacenamiento EIdisyuntor dei tomacorrientepara ebctrodom@ticospeque_ospuede dispararsesi el artefacto peque_o enchufadoen 61es de m_s de 10 amps. Parareponer el disyuntor,optima ei interruptor situado en el borde inferior del protectortrasero. No g Jardeproductos de papel o de pBstico, alirnen[osn materialesinfiamabbs en _s_aga_eta.La gave[a puede cale"ltarsedemasiadopara estosarticuloscuando se est,1usando e! horno. La gavetade almacenamientopuedeset retiradapara que usted pueda limpiar debajo de la estufa. Para sacar: 1. Vade la gavetay deslicela haciaafuera hasta la primeraposici6n de tope. 2. Levantela partedelanterade la gaveta. 3. Tirela hasta ia segundaposiciOnde tope. 4. Sujete los ladosy levantela gavetapara retirarla. 75 _ @ ,_/_ / 'D/SYUNZOR' PROBLEMA 1 SOLUC_ON Pars msmayor,s de mos probmemss, verifiqueprimero mesiguiente, • • • • Revisesi Ios controlesde] horns est_ndebidamenteajustados, Verifiquesi ei enchufeest_ firmementeinsertadoen el tsmacsrriente, Verifiqueo vuelvsa repsnerel disyuntor, Verifiques reemplaceel fusible, Verifiqueel suministrode energ[ael_ctrica, Tods msestsfs o psrte de elmsno funnionso • Revisesi la superficiey/s Iss csntrslesdel hornsestan debidsmenteajustadss, Vet p_ginss 55 y 66, • Verifiquesi la puertadel horns seha desblsqueadsdespu6sdel ciclo de autslimpieza,Ver p_gina68, • Revisesi el hams est_ajustadspara hsmeads diferids s prsgramade limpieza,Ver p_ginss62 y 68, • Verifiquesi 'Csntml Lock' (BIoquesde Control)est_actlvads, Vet p_g,60, • Verifiquesi el control est_en Msds Sab_tico,Vet p_g,64, El remoj,maspamsbrssen el indicador visualy/e rossmutesfunnionsn pete el homo no se nslienta, • El hsrno puedeestar prsgramsdspara una funci6n de 'Cook& Hold'o uns funci6n diferlda, . Puedeestar activadsla caracter[stlcade bisques de los contmlesdel barns, (Verpdg,60,) Los ressltsdos del homesdo no son come se esperaban o son diferentes s los del homo snterioro • AsegOresede que el respirsdersdel borne no est_ b!oqueads,Vet p_gina 66 psra la ubicaci6n, • Verifiquepars asegurarsede que Ia estufaest_ nivelada, • Lastempersturssa menudsvar[an entreun borne nuevsy uric antiguo, A medidaque pasa el tiemps, la tempersturadel harris cambiay puede hacersemJs calientes m_sfr[a, Vet p_gins64 para las instruccisnescomeajustar Iatemperatursdethorns (modelosselectos), NOTA:Noserecomiendaajustarlatemperaturasiha tenids prsbtemasconsolouna s dosrecetas, • Consulteel fsllets "La CocinaF_cil"pars mayorinformaci6nsobre Issutensiliosde hsmear, Los smimentosno se sssn s ms parrimma en forms debids o same demssisdo humoo • VerifiqueIss posicionesde lasparrillasdel horns, El alimentopuedeestar muy cercadel elements, • El elementode asar ns rue precalentads, • El papelde aJumJnio se us6de maneraincorrecta, Nuncafsrre el insertsdel assdsrcon papel de aluminio, • La puerta deI horno estabacerrads mientrssse assba s Japarrilla, Deje Japuertasbierta en Ja primeraposici6n (alrededorde 10 cm [4 puJgadas]], • Recsrteel excesode grasade Jacsrne antesde psnerlaa asara la parrilla, • Se us6una asaderasucia, • El vsltaje del hsgar puede ser bajs, Emhomo no se autemimpia (modemossementos)o • Verifiquepara asegurarsede que el ciclo no est6ajustadopsra un csmienzodiferids,Ver p_gina 68, • Verifiquesi la puertaest_ cerrads, • Verifiquesi el control est_en Mods Ssb_tics,Ver p_g,64, • El hsrno puedeestar a m_sde 205° C (400° FD,La tempersturadel horns debe serinferior a 205° C (400° FDparapmgramar un cicls de limpieza, El homo no se miml_i6 en forms debida {[modelos semectos), • Puedeque seanecesarioun tiempo de limpiezam4slargo, • Losderramesexcesivss,especialmentede afimentssazucaradssy/s 4cidssns fuersn Jimpiadss antesdel ciclo de autolimpieza, Ls pserts del homo no se desbleqses desps@sdel title de autolimpieza [modelos selectos), • El interiordel hornstodsv[aest_ caliente, Dejeque paseaprsximadamenteuna hsra para que el hornose enfr[e antesde que secompleteun clcls de autslimpieza,La puertapuedeset abiertacuands desaparezcaIa palabra'LOCK'deJindJcadorvisual, • El contrsly la puerts puedenestar blsqueadss, Vet pdg,60, 76 PROSLEMA SOLUC_6N Se junta humedad en maventana demheine o samevapor per emrespiraderodemhomo, ° Estoes normal cuandose cocinan alimentoscon alto contenido de humedad. ° Se us0 humedadexcesJvacuandose limpi6 la ventana. Hay un omorfaerte o hamo mere euando se enciende emhomo, ° Estoes normal en una estufanuevay desaparecer_despu6sde unos pocosuses= AI iniciar un cicio de autoiimpiezase "quemar4n"los oloresm4s r4pidamente= o Si se enciendeel ventilador ayudar_a eliminar el humo y/o el clot= o Haysuciedadexcesivade alimentosen el panelinferiordel homo=Useun ciclo de autolimpJeza= C6digosde Errores ° 'BAKE'o 'LOCK'pueden destellarr4pidamenteen el indicador para avJsarieque hayun error oun problema. Si 'BAKE'o 'LOCK'aparecenen el indicadorvisual,oprimaIa tecla 'CANCEL'. Si 'BAKE'o 'LOCK'contin0andestellando,desconecteJaenerg[ael6ctricaal electrodom@stico. Espereunospocos minutesyvuelvaa reconectarla energ[ael6ctrica. Sicontimiandestellando, desconectela energ[ael6ctricadeJelectrodom6sticoy flameal t6cnJcode sewJcioautorizado. Si el borne est4 demasiadosucio,pueden ocurrir demasiadasIlamaradasIo cual resuJtar4en un c6digode error durante IaIimpieza.Oprimala tecla 'CANCEL'y deje que el homose enfr[e completamente,limpieel excesode suciedady luego vuelvaa programarel ciclo de JimpJeza. Si el c6digo de error reaparece,Ilamea un t6cnJcoautorizado. Se esnuchan ° El horno emitevariessonidosbaios. Ustedpuedeoir [os relesde[ horno cuandose encienden y se apagan.Estoes normal. o A rnedidaque e[ bornese calientayse enfr[a,usted puedeo[rsonidosde piezasmet4iicasque se expandeny contraen. Estoes normaly no daffar4su electrodomestico. ruidoso No se escuchan seiiaies sonoras y el indicadorvisual no se activa, ° El homo puede estar en Mode Sab_tico(modeJosselectos}. Ver p%. 64. 'SAb' desteHa y luego se despliega nontinuamenteo o El borne est4en modesabatico.Paraanular el modesab_tico,optima y mantengaoprJmidala tecla 'Clock' (Rel@ durante cinco segundos. 77 78 Gatantia de la Estufa EJ ctrica Garant_a Compieta de Un A_o = Piezas y Mane de Obra Durante un (I) afo desde la fecha ouginaJde compraa_pot menor,se repararao reempJazarti gra[u_tamentecualqu_erplezaque falle durante uso normaJen el hogar Garantias Limitadas Piezas Solamente Desde el Segando basra el Quinto Afio =A par[it de la fecha original de compra,se repararan o reemp_azaran gratuitamentelaspiezas _ndicadasa continuaci0nque fallen dursnte uso normaJen el hogaren Io que [_spec[aalas piezasy el propietariodeber_pagartodos los o[ros costosincluyenuo manode abra. kllometraje/mlllaje,transporte,costodel viajey cos[odel diagn0stico,si tuese necesario. Note Io siguieate: Estasgarant[ascompletasse apJicanunLcamen[ecuando el elec[rooom6stico se encuen[raen los EstadosUnidoso Canada. LoseJectrodom6sticosque se encuemrenen otros pa[sesestaran subiertosOnicamen[epo/ las garandasJimitadas.inciuyendo la garant[a limitada para laspiezasque fallen durantee! primer aBu. Residentes Canadienses Estasgaranuascubren solamen-[eaquellos electrodom6sticosinstaladosen Canadaque hayansido certificadospor laAsociaci0noe NormasCanadienses{CSA},a menosque hayan sido tra_dosa Canadade_deEstadosUnidos debido a un cambio de residencla. Lasgarantiase,speciticasexpresadas an_enormenteson/as_)HICASdarantias otordadaspot d fablicante.Estas9arantiasle otorganderechosledatesespecfficos.Listed ouede tenet otros derechosque vat/ande un estadoa otto Lo que No Cubren Estas Garantias: 1= Situacionesy daSosresultantesde cuaiquierade lassiguienteseventualidades: a= InstalaciOn, entregao mantenimientoinapropiados= b=Cuaiquierreparaci6n,modificaciOn,alteraci6no ajuste no autorizadopor el fabricanteo por un centrode sewicioautorizado= c= Mal uso,abuso,accidentes,uso irrazonabIeo hechosfotuitos= d= CorrienteeI6ctrica,voitaieo suministroincorrecto= e= Programaci6nincorrectade cualquierade loscontrotes= 2= Lasgarant[asquedan nuIassi los n0memsde serieoriginalesban side retirados, alteradoso no sonf_cilmentelegibles= 3= Focos= 4= Productoscompradosparauso comercialo industrial= 5= Eicostodel servicioo IIamadade serviciopara: a= Corregirerroresde instalaciOn= b=InstruiraI usuariosobreel uso correctodel artefacto= c= Transportedel artefactoal estabiecimientode sewicioy el retornoal ciiente= 6= Losda_osconsecuenteso incidentaiessufridospot cualquierpersonacomo resultadode cualquierincumplimientode estasgarant[as. En algunosestadosno se permiteIa exclusiOno IimitaciOnde los da_osconsecuenteso incidentales,pot Io tanto la exclusionanteriorpuedeque no se apliqueen su case. Si Necesita Sewicio Yea primeroIasecci6nde Iocalizaci0ny soIuciOnde aver[asen Iaguia de usoy cuidadoo Ilamea Maytag Services sM, Servicioa los ClientesMaytag Ilamandoal 1-800-688-9900EE.UU.o al 1-800-688-2002Canad& Para obtener servido bajo garantia Paraubicaruna compaS[ade servicioautorizadoen su Iocalidad,pOngaseen contacto con el distribuidordonde adquiri6su electrodom6sticoo Ilamea MaytagSewicessM, Servicioa IosClientesMa}¢ag= Si no recibeserviciosatisfactoriobajo la garant[a,pot favor Ilameo escribaa: May¢agServices sM Attn: CAIR_ Center P.O.Box2370,Cleveland,TN 37320-2370 EE.UU.1_800_688_9900y Canad_ 1-800-688-2002 NOra: Cuandose pongaen contactoconMaytag Se[vices sM, Sewicioa los ClientesMaytagacercade un problema,por favor incluyala siguienteinformaciOn: a=Su nombre,direcci6ny n0merode teldono= b=Losn0merosde modeloy de seriede su electrodom6stico= c=Nombrey direcciOndetdistribuidory la fecha de compra= d=UnadescripciOnclaradel problemaque esta experimentando= e=Pruebade compra= Lasgu[asdel usuario,manualesde sewicioe informaci6nsobre laspiezaspuedensolicitarsea MaytagServices sM,Servicioa losClientesMa}¢ag= Form No. A/06/05 Pal1 No. 8113P505 60 (_2005 Maytag Appliances Sales Co. Litho U.S.A.-
 1
1
-
 2
2
-
 3
3
-
 4
4
-
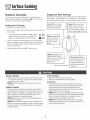 5
5
-
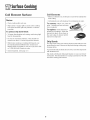 6
6
-
 7
7
-
 8
8
-
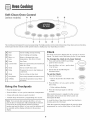 9
9
-
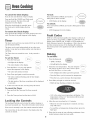 10
10
-
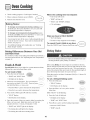 11
11
-
 12
12
-
 13
13
-
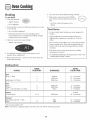 14
14
-
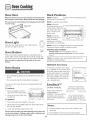 15
15
-
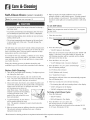 16
16
-
 17
17
-
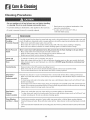 18
18
-
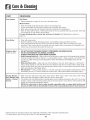 19
19
-
 20
20
-
 21
21
-
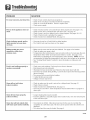 22
22
-
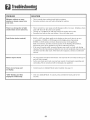 23
23
-
 24
24
-
 25
25
-
 26
26
-
 27
27
-
 28
28
-
 29
29
-
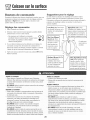 30
30
-
 31
31
-
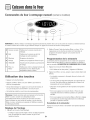 32
32
-
 33
33
-
 34
34
-
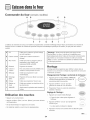 35
35
-
 36
36
-
 37
37
-
 38
38
-
 39
39
-
 40
40
-
 41
41
-
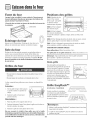 42
42
-
 43
43
-
 44
44
-
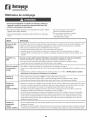 45
45
-
 46
46
-
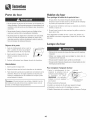 47
47
-
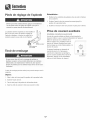 48
48
-
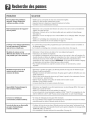 49
49
-
 50
50
-
 51
51
-
 52
52
-
 53
53
-
 54
54
-
 55
55
-
 56
56
-
 57
57
-
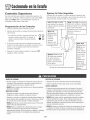 58
58
-
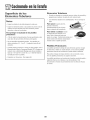 59
59
-
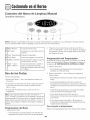 60
60
-
 61
61
-
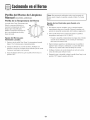 62
62
-
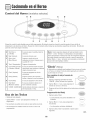 63
63
-
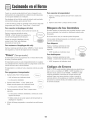 64
64
-
 65
65
-
 66
66
-
 67
67
-
 68
68
-
 69
69
-
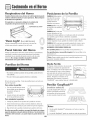 70
70
-
 71
71
-
 72
72
-
 73
73
-
 74
74
-
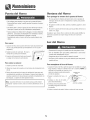 75
75
-
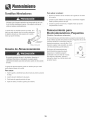 76
76
-
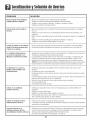 77
77
-
 78
78
-
 79
79
-
 80
80


Maytag MER5552BA - 30" Electric Range Guía del usuario
- Tipo
- Guía del usuario
en otros idiomas
Artículos relacionados
-
Maytag MER5555RCB1 El manual del propietario
-
-
-
-
-
-
-
-
-