
NOTE: If installing the DeckSeal MA NailBase
under the DeckSeal SA SBS Cap see the following
instructions for each of those components.
Owens Corning
®
DeckSeal
MA NailBase
This product is to be used under Owens Corning
®
DeckSeal SA SBS Cap and should not be left exposed.
Do not use DeckSeal MA NailBase in a
torch down application.
Storage
Owens Corning
®
DeckSeal MA NailBase should be
stored at room temperature whenever possible. Do
not store at temperatures above 90°F (32°C).
Precautionary Notes
Owens Corning Roofing recommends strict adherence
to OSHA safety regulations.
DeckSeal MA NailBase is designed to be installed
on roof slopes between 1/4:12 and 2:12 and is to
be applied directly to an exterior grade of Plywood
or OSB. Plywood must be minimum 15/32 inch and
OSB minimum 7/16 inch. Check local codes.
Owens Corning
®
DeckSeal SA SBS Cap is to be
applied directly to Owens Corning
®
DeckSeal MA
NailBase or DeckSeal SA Base/Ply.
• Apply only when the weather is dry and the ambient
temperature is 45°F (7°C) and rising. Do not
install when water in any form (i.e. rain, dew, ice,
frost, snow) exists. All roof deck application areas
must have positive drainage, continuous support,
and be structurally sound to support the dead load
requirements of the roofing system.
• Apply only over clean, dry, dust-free surfaces.
• Ensure installation of DeckSeal MA NailBase does
not prevent or interfere with ventilation of the
existing structure.
Failure to follow manufacturer’s application
instructions may void product warranty.
Plan the job so that the DeckSeal MA NailBase is
covered by the DeckSeal SA SBS Cap the same day.
Application
Step 1. Sweep the roof surface to remove any dust,
dirt, or debris prior to starting installation.
Step 2. Cut the DeckSeal MA NailBase to
manageable lengths. Allow the cut sheets to relax
prior to installation. Failure to allow the sheets to relax
may result in wrinkles in the finished surface.
Step 3. Initiate starter course:
– For a 2 ply (layer) system the starter course will
always be 1/2 of the roll width.
– For a 3 ply (layer) system the starter course will
always be a 1/3 of the roll width (approximately
12 inches) and cut from the DeckSeal MA
NailBase roll. (Cutting on one of the 12" lines is
approximately 1/3 of the roll width).
The side lap seams of any 2 or 3 ply system layer
should always be offset from the other layers.
Step 4. Lay the material flat on the roof aligned with
the eaves or at the lowest point of the roof.
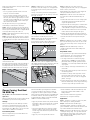
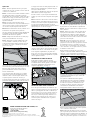
Step 5. Nail the starter course at 6 inches on center
across the center of the sheet using 1 inch diameter
metal cap nails. See Fig. 1
Fig. 1
Do not nail along the edges at this time (edge metal
will be added later), only in the center. If additional
pieces are needed to complete the starter course,
continue to install each piece overlapping the
preceding piece by 6 inches. Nail in the middle of the
6 inch end lap at 6 inches on center.
Step 6. When the eaves starter sections are
completed, position the next course (and all
subsequent courses) by overlapping the previous
course by 3 or 4 inches. Install metal cap nails at
6 inches on center in the 3 or 4 inch side lap.
All additional courses will require 2 rows of nails
at 6 inches on center, evenly spaced vertically, and
staggered down the center of the sheet. All end laps
should be overlapped a minimum 6 inches. See Fig. 1
When installing each course stagger the end laps by
36 inches between courses.
Edge Metal Install
For 2 ply systems, the edge metal is installed directly
over the base sheet. For a 3 ply system, the edge
metal is installed over the second ply (layer).
1. The edge metal must be minimum 24 gauge
galvanized steel or 0.040 inch formed aluminum,
primed with either an asphaltic primer that meets
ASTM D41 or a commercially available water-based
acrylic primer.
2. The roof flange of the edge metal should be 3 or 4
inches wide.
3. Primed edge metal must be dry to the touch before
membrane application.
4. Install the roof flange of the edge metal over the
base sheet at the lowest point on the roof. Nail
the edge metal 4 inches on center in a staggered
pattern. See Fig. 1
5. Install a minimum 8 inch wide strip of self-adhered
DeckSeal SA Base/Ply over the edge metal leaving
1/2 inch of edge metal exposed at the eaves.
NOTE: If installing the DeckSeal SA Base/
Ply under DeckSeal SA SBS Cap, see the
DeckSeal SA Base/Ply box for instructions
for that component.
SELF-ADHERED ROOFING SYSTEM COMPONENTS FOR RESIDENTIAL LOW SLOPE
INSTALL INSTRUCTIONS
Sistema de techado de 2 o 3 capas
Base para clavos sujetada
mecánicamente DeckSeal
Owens Corning
®
DeckSeal
SA Base/Ply
This product is to be used under Owens Corning
®
DeckSeal SA SBS Cap
Do not use Owens Corning
®
DeckSeal SA
Base/Ply in a torch down application.
Storage
Owens Corning
®
DeckSeal SA Base/Ply self-adhered
membrane should be stored at room temperature
whenever possible. Do not store out of the box for
prolonged periods, or in temperatures above 90°F
(32°C). Do not remove the roll from the box until it is to
be installed.
Precautionary Notes
Owens Corning Roofing recommends adherence to
OSHA safety regulations.
DeckSeal SA Base/Ply is designed to be installed
on roof slopes between 1/4:12 and 2:12 and is to be
applied directly to an exterior grade of Plywood or OSB
when used as a base sheet in a 2 ply system, or
Owens Corning
®
DeckSeal MA NailBase when used as
the second ply in a 3 ply system.
Note: When installing DeckSeal SA Base/Ply,
existing Plywood and/or OSB must be primed with
either an asphaltic primer that meets ASTM D41 or a
commercially available water-based acrylic primer. New
plywood and DeckSeal MA NailBase do not need to be
primed.
Note: Any primed substrate must be fully dry prior to
installation. Refer to manufacturer’s recommendations.
Plywood must be minimum 15/32 inch and OSB
minimum 7/16 inch. Check local codes.
• Apply only when the weather is dry and the ambient
temperature is 45°F (7°C) and rising. Do not install
when water in any form (i.e. rain, dew, ice, frost,
snow) exists. All roof deck application areas must
have positive drainage, continuous support, and
be structurally sound to support the dead load
requirements of the roofing system.
• Apply only over clean, dry, dust-free surfaces.
• Ensure installation of DeckSeal SA Base/Ply does
not prevent or interfere with ventilation of the
existing structure.
Failure to follow manufacturer’s application instructions
may void product warranty.
Plan the job so that the DeckSeal SA Base/Ply is
covered by the DeckSeal SA SBS Cap the same day.
Application
Step 1. Sweep the roof surface to remove any dust,
dirt, or debris prior to starting installation.
Step 2. Cut the DeckSeal SA Base/Ply to manageable
lengths. Allow the cut sheets to relax prior to installation.

Failure to allow the sheets to relax may result in wrinkles
in the finished surface.
Step 3. Initiate starter course:
– For a 2 ply (layer) system the starter course will
always be 1/2 of the roll width.
– For a 3 ply (layer) system the starter course will
always be 1/3 of the roll width. (Cutting on one of
the 12” lay lines will leave approximately 1/3 of the
roll width.) If using SA Base/Ply as a second layer
of a 3 ply system, the starter course for that layer
will be 2/3 of the roll width.
The side lap seams of any 2 or 3 ply system layer
should always be offset from the other layers.
Step 4. There are several ways to remove the release
liner from the DeckSeal SA Base/Ply. One method is as
follows: Lay the material flat on the roof aligned with the
eaves edge at the lowest point on the roof.
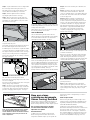
Step 5. Fold the aligned sheet back half way exposing
the release liner. See Fig. 1
Step 6. Peel release film at a 45° angle in a constant
motion, while firmly holding the half of the sheet that is
in contact with the roof in place as the liner is removed.
See Fig. 1
Fig. 1
Step 7. Use hand or foot pressure to bond that portion
of the sheet to the deck.
If the split release liner remains on the opposite half of
the sheet, flip the opposite half back and remove the
remaining release liner. Use hand or foot pressure to
bond that portion of the sheet to the deck. See Fig. 2
Fig. 2
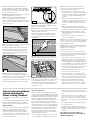
Step 8. If additional pieces are needed to complete
the starter course, the end lap to be overlapped must
be cut at 45° angles on the top and bottom corners.
See Fig. 3
The top corner on the piece that is overlapping the
previous piece must also be cut on the top corner at a
45° angle. See Fig. 3
1
2
1
2
Cut top
corner at
45° angle
Cut top
& bottom
corner at
45° angle
Overlap
6 inches
12
Fig. 3
The overlap is to be 6 inches. Remove the release
liner and adhere as with the previous sheet.
Step 9. Roll side laps and end laps firmly with a hand
roller to ensure full adhesion. See Fig. 4
If necessary, hot air weld or apply modified asphalt
flashing cement at 45° cuts or at end lap seams.
Fig. 4
Step 10. As each course is completed, roll the course
with an 80 pound linoleum roller. Start at the center and
work outward to remove trapped air. See Fig. 5
Fig. 5
Step 11. When the eaves edge sections are
completed, position the next course by overlapping the
starter course by 3 to 4 inches.
When installing each subsequent course stagger the
end laps by 36 inches between courses.
Step 12. One method to remove the release liner
from a full sheet of DeckSeal SA Base/Ply is as
follows:
a) Position the sheet on the 3 or 4 inch overlap lay line
and roll the bottom of the sheet half way back to
expose the split release liner.
b) Peel release film at a 45° angle in a constant motion,
while firmly holding the half of the sheet that is in
contact with the roof in place as the liner is removed.
c) When the release film has been removed, carefully
roll the sheet back down and press into place.
d) Roll the opposite half of the sheet back and remove
the release liner using the same method as in step “b”.
e) Roll the sheet back down and press firmly into
place.
Step 13. If additional pieces are needed to complete
the course, the end lap corners are to be cut at a 45°
angle as was done in Step 9. The overlaps are to be
6 inches.
Step 14. When the SA Base/Ply courses are
complete roll the entire surface with an 80 pound
linoleum roller.
Edge Metal Install
For 2 ply systems, the edge metal is installed directly
over the base sheet. For a 3 ply system, the edge
metal is installed over the second ply (layer).
1. The edge metal must be a minimum 24 gauge
galvanized steel or 0.040 inch formed aluminum,
primed with either an asphaltic primer that meets
ASTM D41 or a commercially available water-based
acrylic primer.
2. The roof flange of the edge metal should be 3 or 4
inches wide.
3. Primed edge metal must be dry to the touch before
membrane application.
4. Install the roof flange of the edge metal over the
base sheet at the lowest point on the roof. Nail
the edge metal 4 inches on center in a staggered
pattern. See Fig. 2
5. Install a minimum 8 inch wide strip of self-adhered
DeckSeal SA Base/Ply over the edge metal leaving
1/2 inch of edge metal exposed at the eaves.
Owens Corning
®
DeckSeal
SA SBS Cap
This product is not to be used in a torch down
application.
Owens Corning
®
DeckSeal Low Slope products should
be installed by a professional roofing contractor.
Storage
Owens Corning
®
DeckSeal SA SBS Cap should be
stored at room temperature whenever possible. Do
not store out of the box for prolonged periods, or in
temperatures above 90°F (32°C). Do not remove the
roll from the box until it is to be installed.
Precautionary Notes
Owens Corning Roofing recommends adherence to
OSHA safety regulations.
DeckSeal SA SBS Cap is designed to be installed
on roof slopes between 1/4:12 and 2:12 and is to
be applied to an exterior grade of Plywood or OSB.
Plywood must be minimum 15/32 inch and OSB must
be minimum 7/16 inch. DeckSeal SA SBS Cap is to
be applied directly to Owens Corning
®
DeckSeal MA
NailBase or DeckSeal SA Base/Ply.
• Apply only when the weather is dry and the ambient
temperature is 45°F (7°C) and rising. Do not install
when water in any form (i.e. rain, dew, ice, frost,
snow) exists.
• All roof deck application areas must have positive
drainage, continuous support, and be structurally
sound to support the dead load requirements of the
roofing system.
• Apply only over clean, dry, dust-free surfaces.
• Ensure installation of DeckSeal SA SBS Cap does
not prevent or interfere with ventilation of the
existing structure.
Failure to follow manufacturer’s application
instructions may void product warranty.
Application:
Step 1. Sweep the roof surface to remove any dust,
dirt, or debris prior to starting installation.
Step 2. Cut the DeckSeal SA SBS Cap to
manageable lengths. Allow the cut sheets to relax
prior to installation. Failure to allow the sheets to relax
may result in wrinkles in the finished surface.
Step 3. The DeckSeal SA SBS Cap has a release film
covering the selvage edge. The cap sheet should be
installed with the selvage edge away from the eaves
edge. The DeckSeal SA SBS Cap starter course is
always installed full width.

Step 4. Lay the material flat on the roof aligned with
the eaves edge at the lowest point on the roof.
One method to remove the release liner from the
sheet of DeckSeal SA SBS Cap is as follows:
Step 5. Fold the aligned sheet back half way,
exposing the split release liner. See Fig. 1
Step 6. Remove release liner at a 45° angle in a
constant motion, while firmly holding the half of the
sheet that is in contact with the roof in place as the
liner is removed. See Fig. 1
Fig. 1
Now that the release liner is removed, roll the sheet
and press firmly into place.
Now roll the opposite half of the sheet back and remove
the release liner using the same method as above.
If additional pieces are needed to complete the starter
course, the end lap to be overlapped must be cut at
45° angles on the top and bottom corners. See Fig. 2
The top corner on the piece that is overlapping the
previous piece must also be cut on the top corner at a
45° angle. See Fig. 2
1
2
1
2
Cut top
corner at
45° angle
Cut top
& bottom
corner at
45° angle
Overlap
6 inches
12
Fig. 2
The overlap is to be 6 inches. Remove the release
liner and adhere as with the previous sheet.
Remove the side lap selvage edge release film on the
area to be overlapped.
Do not remove the remaining release film covering the
side lap selvage edge at this time.
Step 7. The end of each roll of DeckSeal SA SBS
Cap has a factory end lap selvage edge covered with
a release film. Remove the end lap release film and
press the overlapping sheet into place. See Fig. 3
Fig. 3
If necessary, during cool weather, hot air weld or apply
modified asphalt flashing cement at all 45° cuts or at
end lap seams and T-joints.
Where there is no factory selvage edge for end laps,
the following methods can be used.
HOT AIR WELDING
The area between the granular surface and self-
adhesive backing can be heated with a hot air welding
tool and rolled with a hand roller. This will ensure a
water tight seal to the end laps. See Fig. 4
Fig. 4
MODIFIED ROOF CEMENT
In lieu of hot air welding, the top layer can be set in a thin
layer of modified asphalt flashing cement that is at least
6 inches wide and approximately 1/8 inch thick. Take
care to prevent roof cement from oozing onto exposed
area. If this should occur, sprinkle loose granules on the
exposed asphalt immediately. See Fig. 5
End laps must be a 6 inch minimum and fully adhered.
Fig. 5
Step 8. Press each sheet into place with firm, even
pressure.
Step 9. Roll edges and all lap seams firmly with
a hand roller to ensure full adhesion. After each
course is completed roll the course with an 80 pound
linoleum roller. Start at the center and work outward
to remove trapped air.
Step 10. Blind back-nailing of self-adhered cap
sheet membrane every twelve (12) inches at lap
location is required on all sloped greater than 1 inch
per foot (1:12). Use galvanized steel, stainless steel,
or aluminum nails with a min 12 gauge shank and
3/8" diameter head. Owens Corning recommends
that fasteners comply with ASTM F 1667. For the
succeeding course, position the next sheet by
completely overlapping the selvage edge of the
previous sheet. See Fig. 6
Fig. 6
Be sure to offset end laps on each subsequent course
a minimum of 36 inches.
Only remove enough of the selvage edge release film
on the preceding roll to complete each section of the
install. Removing more film than is necessary may
cause the exposed adhesive to stick to the release liner
of subsequent sheets during alignment. See Fig. 7
Fig. 7
Remove release liner on succeeding course as
previously described.
Step 11. After adhering rolls, it is required that
uniform pressure be applied to the entire deck area
using a 80 pound linoleum roller. Care must be taken
to prevent injury when rolling, especially on sloped
surfaces.
Sistema de techado de 2 o 3 capas
Base para clavos sujetada
mecánicamente DeckSeal
Nota: Si va a instalar la Base para clavos sujetada
mecánicamente DeckSeal debajo de la Cofia de
estireno-butadieno-estireno autoadhesivo DeckSeal,
lea las siguientes instrucciones para cada uno de
dichos componentes.
Base para clavos
sujetada mecánicamente
Owens Corning
®
DeckSeal
Este producto se debe usar únicamente debajo de la
Cofia de estireno-butadieno-estireno autoadhesivo
Owens Corning
®
DeckSeal y no debe dejarse expuesto.
No use la Base para clavos sujetada
mecánicamente DeckSeal en techos
aplicados con soplete.
Almacenamiento
La Base para clavos sujetada mecánicamente
Owens Corning
®
DeckSeal debe almacenarse a
temperatura ambiente siempre que sea posible. No
almacene el producto a temperaturas por sobre los
90 °F (32 °C).
Notas de precaución
Owens Corning Roofing recomienda cumplir con las
estrictas normas de seguridad de la Administración de
Seguridad y Salud Ocupacional (Occupational Safety
and Health Administration, OSHA).
La Base para clavos sujetada mecánicamente
DeckSeal fue diseñada para instalarse en inclinaciones
de techos de entre 1/4:12 y 2:12 y se debe aplicar
directamente sobre un contrachapado o tableros de
fibra orientada (OSB). El contrachapado debe ser de,
por lo menos, 15/32 pulg. (11.79 mm) y los tableros
de fibra orientada (OSB) de 7/16 pulg. (11.11 mm).

Consulte los códigos locales. La cofia de estireno-
butadieno-estireno autoadhesivo DeckSeal se debe
aplicar directamente sobre una base para clavos
sujetada mecánicamente Owens Corning
®
DeckSeal o
base/fieltro autoadhesivos DeckSeal.
• Aplique el producto únicamente cuando el clima esté
seco y la temperatura ambiente sea de 45 °F (7 °C)
y más. No instale el producto cuando haya agua
en cualquier forma (por ejemplo, lluvia, rocío, hielo,
escarcha, nieve). Todas las áreas de aplicación
de la plataforma del techo deben contar con un
sistema de desagüe pluvial, soporte continuo y una
estructura sólida que sirva de apoyo a los requisitos
de carga permanente del techo.
• Solo aplique el producto sobre superficies limpias,
secas y libres de polvo.
• Asegúrese de que la instalación de la Base para
clavos sujetada mecánicamente DeckSeal no impida
ni afecte la ventilación de la estructura existente.
No cumplir con las instrucciones de aplicación del
fabricante puede anular la garantía del producto.
Planifique el trabajo, de tal manera que la Base para
clavos sujetada mecánicamente DeckSeal quede
cubierta por la Cofia de estireno-butadieno-estireno
autoadhesivo DeckSeal el mismo día.
Aplicación
Paso 1. Barra la superficie del techo para quitar
cualquier resto de polvo, suciedad o desecho antes de
comenzar con la instalación.
Paso 2. Corte la Base para clavos sujetada
mecánicamente DeckSeal en segmentos fáciles de
manejar. Deje reposar las láminas cortadas antes de la
instalación. Si no deja que las láminas reposen antes
de la instalación, pueden producirse arrugas en la
superficie terminada.
Paso 3. Comience la hilera inicial:
– Si se trata de un sistema de 2 fieltros (capas), la
hilera inicial siempre será 1/2 del ancho del rollo
– Si se trata de un sistema de 3 fieltros (capas), la
hilera inicial siempre será 1/3 del ancho del rollo
(aproximadamente 12 pulg. [30.48 cm]) y deberá
cortarse del rollo de Base para clavos sujetada
mecánicamente DeckSeal. (El corte de una de
las líneas de 12 pulg. [30.48 cm] debe ser de
aproximadamente 1/3 del ancho del rollo.)
Las juntas de los empalmes laterales de cualquier
capa de un sistema de 2 o 3 fieltros siempre deben
estar desplazadas de las demás capas.
Paso 4. Estire el material sobre el techo y alinéelo
con los aleros o en el punto más bajo del techo.
Paso 5. Sujete con clavos la hilera inicial a 6 pulgadas
(15.24 cm) del centro, bajando por el centro de la lámina
y usando clavos metálicos con tope de 1 pulgada (2.54
cm) de diámetro. Ver la Fig. 1
Fig. 1
En este momento, no coloque clavos a lo largo de los
bordes (el borde de metal se colocará más adelante),
solo en el centro. Si se necesitan piezas adicionales
para completar la hilera inicial, siga instalando cada
pieza superponiéndola 6 pulgadas (12.24 cm) a la
pieza anterior. Coloque clavos en el centro de la
superposición final de 6 pulgadas, a 6 pulgadas
(12.24 cm) del centro.
Paso 6. Cuando haya terminado con los segmentos
de la hilera inicial del alero, coloque la próxima hilera (y
todas las demás hileras) superponiéndola con la hilera
anterior en 3 o 4 pulgadas (7.62 o 10.16 cm). Coloque
clavos metálicos con tope a 6 pulgadas (15.24 cm) del
centro en el empalme lateral de 3-4 pulgadas (7.62 o
10.16 cm).
Todas las hileras adicionales requerirán 2 hileras
de clavos a 6 pulgadas (12.24 cm) del centro, con
espaciado uniforme en línea vertical, y escalonados
en el centro de la lámina. Todos los empalmes
longitudinales deben realizarse a 6 pulgadas (12.24
cm), como mínimo. Ver la Fig. 1
Cuando instale cada hilera, vaya superponiendo los
empalmes finales en 36 pulgadas (91.44 cm) entre
una hilera y otra.
Instalación del borde de metal
En el caso de sistemas de 2 fieltros, el borde de metal
se instala directamente sobre la placa de base. En el
caso de sistemas de 3 fieltros, el borde de metal se
instala sobre el segundo fieltro (capa).
1. Como mínimo, el borde de metal debe ser de acero
galvanizado calibre 24 o de un perfil de aluminio de
0.040 pulgadas (1 mm), de un material preparado
con un imprimador asfáltico que satisfaga los
requisitos de la norma ASTM D41 o con un
preparador acrílico a base de agua disponible en el
mercado.
2. El ala del borde de metal del lado del techodebe
tener un ancho de 3 o 4 pulgadas (7.62 o 10.16 cm).
3. El borde de metal preparado debe estar seco al
tacto antes de la aplicación de la membrana.
4. Instale el ala del borde de metal del lado del techo
sobre la placa de base en el punto más bajo del techo.
Sujete con clavos el borde de metal a 4 pulg. (10.16
cm) del centro en forma escalonada.
Ver la Fig. 1
5. Instale una banda de Base/fieltro autoadhesivo
DeckSeal con un ancho de, por lo menos, 8 pulg.
(20.32 cm) sobre el borde de metal y deje 1/2
pulg. (1.27 cm) del borde de metal en el alero
expuestas.
NOTA: Si desea instalar la Base/fieltro
autoadhesivo DeckSeal debajo de la Cofia
de estireno-butadieno-estireno autoadhesivo
DeckSeal, lea las instrucciones de la caja
de la Base/fieltro autoadhesivo DeckSeal
correspondiente a ese componente.
Base/fieltro autoadhesivo
Owens Corning
®
DeckSeal
Este producto se debe usar debajo de la Cofia de
estireno-butadieno-estireno autoadhesivo Owens Corning
®
DeckSeal
No use la Base/fieltro autoadhesivo Owens Corning
®
DeckSeal en techos aplicados con soplete.
Almacenamiento
La membrana autoadhesiva de la Base/fieltro
autoadhesivo Owens Corning
®
DeckSeal debe
almacenarse a temperatura ambiente siempre que sea
posible. No almacene el producto fuera de la caja
durante períodos prolongados o a temperaturas por
sobre los 90 °F (32 °C). Saque el rollo de la caja recién
cuando vaya a realizar la instalación.
Notas de precaución
Owens Corning Roofing recomienda cumplir con las
normas de seguridad de la Administración de Seguridad
y Salud Ocupacional (Occupational Safety and Health
Administration, OSHA).
La Base/fieltro autoadhesivo DeckSeal es un producto
diseñado para instalarse en inclinaciones de techos de
entre 1/4:12 y 2:12 y se debe aplicar directamente sobre
un contrachapado o tableros de fibra orientada (OSB) para
uso exterior cuando se usa como placa de base en un
sistema de 2 fieltros o sobre la Base para clavos sujetada
mecánicamente Owens Corning
®
DeckSeal cuando se usa
como segundo fieltro en un sistema de 3 fieltros.
Nota: Cuando instale la Base/fieltro autoadhesivo
DeckSeal, el contrachapado y/o el tablero de fibra
orientada (OSB) que ya existan deben prepararse con
un imprimador asfáltico que satisfaga los requisitos de
la norma ASTM D41 o con un preparador de superficie
acrílico a base de agua disponible en el mercado. Si
se trata de un contrachapado nuevo o de la Base
para clavos sujetada mecánicamente DeckSeal, no es
necesario aplicar el producto preparador.
Nota:
T
odo sustrato preparado con un producto
preparador debe dejarse secar por completo antes de la
instalación. Consulte las recomendaciones del fabricante.
El contrachapado debe ser de, por lo menos, 15/32
pulgadas (11.79 mm) y los tableros de fibra orientada
(OSB) de 7/16 pulgadas (11.11 mm). Consulte los
códigos locales.
• Aplique el producto únicamente cuando el clima
esté seco y la temperatura ambiente sea de 45
°F (7 °C) y más. No instale el producto cuando
haya agua en cualquier forma (por ejemplo, lluvia,
rocío, hielo, escarcha, nieve). Todas las áreas de
aplicación de la plataforma del techo deben contar
con un sistema de desagüe pluvial, soporte continuo
y una estructura sólida que sirva de apoyo a los
requisitos de carga permanente del techo.
• Solo aplique el producto sobre superficies limpias,
secas y libres de polvo.
• Asegúrese de que la instalación de la Base/fieltro
autoadhesivo DeckSeal no impida ni afecte la
ventilación de la estructura existente.
No cumplir con las instrucciones de aplicación del
fabricante puede anular la garantía del producto.
Planifique el trabajo, de tal manera que la Base/fieltro
autoadhesivo DeckSeal quede cubierta por la Cofia de
estireno-butadieno-estireno autoadhesivo DeckSeal el
mismo día.
Aplicación
Paso 1. Barra la superficie del techo para quitar
cualquier resto de polvo, suciedad o desecho antes de la
comenzar con la instalación.
Paso 2. Corte la Base/fieltro autoadhesivo DeckSeal
en segmentos fáciles de manejar. Deje reposar las
láminas cortadas antes de la instalación. Si no deja
que las láminas reposen antes de la instalación,
pueden producirse arrugas en la superficie terminada.
Paso 3. Comience la hilera inicial:
– Si se trata de un sistema de 2 fieltros (capas), la
hilera inicial siempre será 1/2 del ancho del rollo
– Si se trata de un sistema de 3 fieltros (capas), la
hilera inicial siempre será 1/3 del ancho del rollo.
(El corte de una de las líneas de colocación de
12 pulgadas (30.48 cm) dejará aproximadamente
1/3 del ancho del rollo. Si se usa Base/fieltro
autoadhesivo como una segunda capa de un
sistema de 3 fieltros, la hilera inicial para esa capa
será de 2/3 del ancho del rollo.
Las juntas de los empalmes laterales de cualquier
capa de un sistema de 2 o 3 fieltros siempre deben
estar desplazadas de las demás capas.

Paso 4. Existen diferentes maneras de retirar la
película antiadherente de la Base/fieltro autoadhesivo
DeckSeal. Uno de los métodos es el siguiente: Estire el
material sobre el techo y alinéelo con el borde del alero
en el punto más bajo del techo.
Paso 5. Pliegue la lámina alineada a la mitad y deje ver
la película antiadherente. Ver la Fig. 1
Paso 6. Despegue la película antiadherente a 45
grados con un movimiento constante y, al mismo
tiempo, sostenga firmemente la mitad de la lámina que
está en contacto con el techo a medida que se retira la
película. Ver la Fig. 1
Fig. 1
Paso 7. Haga presión con la mano o el pie para pegar
esa parte de la lámina a la plataforma.
Si la película antiadherente permanece en la mitad
opuesta de la lámina, dé vuelta esa mitad y retire la
película antiadherente restante. Haga presión con la
mano o el pie para pegar esa parte de la lámina a la
plataforma. Ver la Fig. 2
Fig. 2
Paso 8. Si se requieren piezas adicionales para
completar la hilera inicial, el empalme longitudinal que
debe realizarse se debe cortar en ángulos de 45° en las
esquinas superiores e inferiores. Ver la Fig. 3
La esquina superior de la pieza que se superpone con la
pieza anterior también debe cortarse a 45°. Ver la Fig. 3
1
2
1
2
12
Corte la
esquina
superior
a 45°
Corte la
esquina
superior e
inferior a 45°
Superponga
6 pulgadas
Fig. 3
La superposición debe ser de 6 pulgadas (15.24 cm).
Retire la película antiadherente y adhiérala de igual
forma que la lámina anterior.
Paso 9. Aplane los empalmes laterales y longitudinales
firmemente con un rodillo manual para garantizar una
adhesión completa. Ver la Fig. 4
Si es necesario, suelde con aire caliente o aplique
adhesivo para tapajuntas de asfalto modificado en
los cortes de 45° o en las juntas de los empalmes
longitudinales.
Fig. 4
Paso 10. Al finalizar cada hilera, pase un rodillo de 80
libras por toda la hilera. Comience desde el centro hacia
afuera para sacar el aire atrapado. Ver la Fig. 5
Fig. 5
Paso 11. Cuando haya terminado con los segmentos del
borde del alero, coloque la próxima hilera superponiéndola
3 o 4 pulgadas (7.62 o 10.16 cm) con la hilera inicial.
Cuando instale las hileras siguientes, vaya superponiendo
los empalmes longitudinales en 36 pulgadas (91.44 cm)
entre una hilera y otra.
Paso 12. Uno de los métodos para retirar la película
antiadherente de una lámina completa de Base/fieltro
autoadhesivo DeckSeal es el siguiente:
a) Coloque la lámina en la línea de colocación de
superposición de 3 o 4 pulgadas (7.62 o 10.16 cm)
y enrolle la mitad de la parte inferior de la lámina
de modo que la película antiadherente quede
expuesta.
b) Despegue la película antiadherente a 45° con un
movimiento constante y, al mismo tiempo, sostenga
firmemente la mitad de la lámina que está en
contacto con el techo a medida que se retira la
película.
c) Una vez que se haya retirado toda la película
antiadherente, aplique la lámina cuidadosamente y
presione con firmeza para colocarla correctamente.
d) Enrolle la mitad opuesta de la lámina y retire la
película antiadherente usando el mismo método
que en el paso “b”.
e) Aplique la lámina y presione con firmeza para
colocarla correctamente.
Paso 13. Si se necesitan piezas adicionales para completar
la hilera, corte las esquinas de los empalmes longitudinales
a 45°, como se indica en el Paso 9. Los empalmes deben
ser de 6 pulgadas (15.24 cm).
Paso 14. Una vez que haya completado todas las hileras
de la Base/fieltro autoadhesivo, pase un rodillo de linóleo
de 80 libras por toda la superficie.
Instalación del borde de metal
En el caso de sistemas de 2 fieltros capas, el borde de
metal se instala directamente sobre la placa de base. En el
caso de sistemas de 3 fieltros capas, el borde de metal se
instala sobre el segundo fieltro.
1. Como mínimo, el borde de metal debe ser de acero
galvanizado calibre 24 o de un perfil de aluminio de
0.040 pulgadas (1 mm), de un material preparado con
un imprimador asfáltico que satisfaga los requisitos de
la norma ASTM D41 o con un preparador de superficie
acrílico a base de agua disponible en el mercado.
2. El ala del borde de metal del lado del techo debe tener
un ancho de 3 o 4 pulgadas (7.62 o 10.16 cm).
3. El borde de metal preparado debe estar seco al tacto
antes de la aplicación de la membrana.
4. Instale el ala del borde de metal del lado del techo
sobre la placa de base en el punto más bajo del techo.
Sujete con clavos el borde de metal a 4 pulg. (10.16
cm) del centro en forma escalonada. Ver la Fig. 2
5. Instale una banda de Base/fieltro autoadhesivo
DeckSeal con un ancho de, por lo menos, 8 pulg.
(20.32 cm) sobre el borde de metal y deje ½ pulg.
(1.27 cm) del borde de metal en el alero expuestas.
Cofia de estireno-butadieno-
estireno autoadhesivo
Owens Corning
®
DeckSeal
Este producto no se debe usar en techos aplicados
con soplete.
Los productos para pendientes bajas Owens Corning
®
DeckSeal deben ser instalados por un contratista
profesional especializado en la instalación de techos.
Almacenamiento
La Cofia de estireno-butadieno-estireno autoadhesivo
Owens Corning
®
DeckSeal debe almacenarse a
temperatura ambiente siempre que sea posible.
No almacene el producto fuera de la caja durante
períodos prolongados o a temperaturas por sobre los
90 °F (32 °C). Saque el rollo de la caja recién cuando
vaya a realizar la instalación.
Notas de precaución
Owens Corning Roofing recomienda cumplir con las
normas de seguridad de la Administración de Seguridad
y Salud Ocupacional (Occupational Safety and Health
Administration, OSHA). La Cofia de estireno-butadieno-
estireno autoadhesivo DeckSeal fue diseñada para
instalarse en inclinaciones de techos de entre 1/4:12
y 2:12 y se debe aplicar sobre un contrachapado o
tableros de fibra orientada (OSB) para uso exterior. El
contrachapado debe ser de, por lo menos, 15/32 pulg.
(11.79 mm) y los tableros de fibra orientada (OSB) de
7/16 pulg. (11.11 mm). La Cofia de estireno-butadieno-
estireno autoadhesivo DeckSeal se debe aplicar
directamente sobre una base para clavos sujetada
mecánicamente Owens Corning
®
DeckSeal o Base/
fieltro autoadhesivos DeckSeal.
• Aplique el producto únicamente cuando el clima esté
seco y la temperatura ambiente sea de 45 °F (7 °C)
y más. No instale el producto cuando haya agua en
cualquier forma (por ejemplo, lluvia, rocío, hielo, escarcha,
nieve).
• Todas las áreas de aplicación de la plataforma del
techo deben contar con un sistema de desagüe
pluvial, soporte continuo y una estructura sólida que
sirva de apoyo a los requisitos de carga permanente
del techo.
• Solo aplique el producto sobre superficies limpias,
secas y libres de polvo.
• Asegúrese de que la instalación de la Cofia de
estireno-butadieno-estireno autoadhesivo DeckSeal
no impida ni afecte la ventilación de la estructura
existente.
No cumplir con las instrucciones de
aplicación del fabricante puede anular la
garantía del producto.

OWENS CORNING ROOFING AND ASPHALT, LLC
ONE OWENS CORNING PARKWAY
TOLEDO, OHIO, USA 43659
1-800-GET-PINK
®
www.owenscorning.com/roofing
Pub. No. 10020140 -A. Printed in U.S.A. October 2016.
THE PINK PANTHER
™
& © 1964–2016 Metro-Goldwyn-Mayer Studios Inc. All Rights
Reserved. The color PINK is a registered trademark of Owens Corning. © 2016 Owens Corning.
All Rights Reserved.
Aplicación:
Paso 1. Barra la superficie del techo para quitar
cualquier resto de polvo, suciedad o desecho antes de
comenzar con la instalación.
Paso 2. Corte la Cofia de estireno-butadieno-estireno
autoadhesivo DeckSeal en segmentos fáciles de
manejar. Deje reposar las láminas cortadas antes de la
instalación. Si no deja que las láminas reposen antes
de la instalación, pueden producirse arrugas en la
superficie terminada.
Paso 3. La Cofia de estireno-butadieno-estireno
autoadhesivo DeckSeal tiene una película antiadherente que
cubre el borde de empalme. La lámina de debe instalarse
con el borde de empalme alejado del borde del alero.
Paso 4. Estire el material sobre el techo y alinéelo con el
borde del alero en el punto más bajo del techo.
Uno de los métodos para retirar la película antiadherente
de la lámina de Cofia de estireno-butadieno-estireno
autoadhesivo DeckSeal es el siguiente:
Paso 5. Pliegue la lámina alineada a la mitad y deje
ver la película antiadherente. Ver la Fig. 1
Paso 6. Despegue la película antiadherente a 45°
con un movimiento constante y, al mismo tiempo,
sostenga firmemente la mitad de la lámina que está
en contacto con el techo a medida que se retira la
película. Ver la Fig. 1
Fig. 1
Una vez que se haya retirado la película antiadherente,
enrolle la lámina y presione firmemente para colocarla.
Enrolle la mitad opuesta de la lámina y retire la
película antiadherente usando el mismo método
descrito anteriormente.
Si se requieren piezas adicionales para completar
la hilera inicial, el empalme longitudinal que debe
realizarse se debe cortar en ángulos de 45° en las
esquinas superiores e inferiores. Ver la Fig. 2
La esquina superior de la pieza que se superpone con la
pieza anterior también debe cortarse a 45°. Ver la Fig. 2
1
2
1
2
Corte la
esquina
superior
a 45°
Corte la
esquina
superior e
inferior a 45°
Superponga
6 pulgadas
12
Fig. 2
La superposición debe ser de 6 pulgadas (15.24 cm).
Retire la película antiadherente y adhiérala de igual
forma que la lámina anterior.
Quite la película antiadherente del borde de empalme
lateral del área que debe superponerse.
En este momento, no quite la película antiadherente
restante que cubre el borde de empalme del empalme
lateral.
Paso 7. El final de cada rollo de la Cofia de estireno-
butadieno-estireno autoadhesivo DeckSeal incorpora,
de fábrica, un borde de empalme longitudinal cubierto
por una película antiadherente. Retire la película
antiadherente del empalme lateral y presione la lámina
superpuesta para colocarla. Ver la Fig. 3
Fig. 3
Si es necesario, durante el clima frío, suelde con aire
caliente o aplique adhesivo para tapajuntas de asfalto
modificado en todos los cortes de 45°o en las juntas
de los empalmes longitudinales y las juntas en T.
En los casos en los que no haya un borde de empalme
de fábrica para los empalmes longitudinales, se podrán
usar los siguientes métodos.
SOLDADURA DE AIRE CALIENTE
El área entre la superficie granular y el reverso
autoadhesivo se puede calentar con una herramienta
de soldadura de aire caliente y aplanar con un rodillo
manual. Esto garantizará un sello hermético en los
empalmes longitudinales. Ver la Fig. 4
Fig. 4
ADHESIVO PARA TEJAS ASFÁLTICAS
En vez de aplicar soldadura de aire caliente, la capa
superior se puede asentar sobre una capa delgada de
adhesivo para tapajuntas de asfalto modificado que
tenga un ancho de, por lo menos, 6 pulg. (15.24 cm)
y aproximadamente 1/8 pulg. (0.31 cm) de grosor.
Procure que el adhesivo para tejas asfálticas no se
infiltre en el área expuesta. Si ello ocurriera, rocíe
el asfalto expuesto inmediatamente con gránulos
sueltos. Ver la Fig. 5
Fig. 5
Los empalmes longitudinales deben ser de, por lo menos,
6 pulg. (15.24 cm) y estar adheridos completamente.
Paso 8. Presione cada lámina en su lugar, en forma
firme y uniforme.
Paso 9. Aplane los bordes y todas las juntas de las
superposiciones firmemente con un rodillo manual
para garantizar una adhesión completa. Al finalizar
cada hilera, pase un rodillo de linóleo de 80 libras por
toda la hilera. Comience desde el centro hacia afuera
para sacar el aire atrapado.
Paso 10. Se requiere clavado inverso ciego de la
membrana de toldo autoadherible cada doce (12)
pulgadas en la ubicación de la superposición en todas
las pendientes mayores a 1 pulgada por pie (1:12).
Use clavos de acero galvanizado, acero inoxidable o
clavos de aluminio con una punta calibre 12 y cabeza
de diámetro de 3/8" mínimo.
Owens Corning recomienda que los remaches
cumplan con la norma ASTM F 1667. Para la siguiente
aplicación, coloque la siguiente hoja superpuesta
completamente en el borde de la unión. Ver Figura 6
Fig. 6
Asegúrese de desplazar los empalmes longitudinales
en cada hilera subsiguiente en, por lo menos, 36
pulgadas (91.44 cm).
Solo quite una cantidad suficiente de película
antiadherente del borde de empalme longitudinal
del rollo anterior para completar cada sección de
la instalación. Si quita una cantidad innecesaria
de película, el adhesivo expuesto podría pegarse
al revestimiento antiadherente de las láminas
subsiguientes durante la alineación. Ver la Fig. 7
Fig. 7
Retire la película antiadherente de la hilera siguiente,
como se describe anteriormente.
Paso 11. Después de adherir los rollos, es necesario
que se ejerza una presión uniforme a toda el área de la
plataforma usando un rodillo de linóleo de 80 libras. Se
debe tener cuidado y evitar lesiones cuando se use el
rodillo, en especial sobre superficies con inclinaciones.
-
 1
1
-
 2
2
-
 3
3
-
 4
4
-
 5
5
-
 6
6


en otros idiomas
Artículos relacionados
-
Owens Corning LB11 Guía de instalación
-
Owens Corning SA11 Guía de instalación
-
-
-
-
-
-
-
-
