KTM 46301996000 El manual del propietario
- Categoría
- Accesorios para motocicletas
- Tipo
- El manual del propietario

INFORMATION
KTM PowerParts, HUSQVARNA Motorcycles Accessories
KTM Sportmotorcycle GmbH
Stallhofnerstraße 3
A-5230 Mattighofen
www.ktm.com
Husqvarna Motorcycles GmbH
Stallhofnerstraße 3
A-5230 Mattighofen
www.husqvarna-motorcycles.com
FACTORY START 3.213.244
*3213244*
23301996000 47001996000
23501996000 80301996000
46301996000 SXS05540100
02.2017

Le agradecemos que se haya decidido por este producto.
Este producto de alta calidad está probado para la competición y se ha desarrollado específi camente para las exigencias de este deporte. Para poder garantizar
los máximos niveles de seguridad y funcionalidad, es imprescindible que el producto se monte correctamente. Por este motivo, es muy importante que siga las
instrucciones del manual de montaje o que se ponga en contacto con su concesionario autorizado.
El (cuasi) fabricante y el proveedor de este producto no se harán responsables del montaje y el uso incorrectos.
¡Muchas gracias!
Wir freuen uns, dass Sie sich für dieses Produkt entschieden haben.
Unser hochwertiges Qualitätsprodukt ist rennerprobt und wurde speziell für sportliche Herausforderungen entwickelt. Eine korrekte Montage des Produktes
ist unerlässlich, um ein Maximum an Sicherheit und Funktionalität gewährleisten zu können. Bitte befolgen Sie daher die Montageanleitung oder wenden Sie
sich an Ihren autorisierten Fachhändler.
Für falsche Montage oder Verwendung dieses Produktes kann der (Quasi-)Hersteller bzw. Lieferant nicht zur Verantwortung gezogen werden.
Vielen Dank.
Thank you for choosing this product.
Our high quality product has been tested under racing conditions and was developed specifi cally for use in sports activities. Correct installation of the product
is essential to ensure that a maximum degree of safety and functionality is achieved. Therefore, please follow the installation instructions or contact your
authorized dealer.
The (quasi) manufacturer or supplier cannot be held responsible for products that are incorrectly mounted or inappropriately used.
Thank you.
Grazie per aver scelto questo prodotto.
Questo nostro prodotto di pregiata qualità è collaudato nelle competizioni ed è stato sviluppato specifi camente per gare sportive. Il montaggio corretto del prodotto
è fondamentale per garantirne la massima sicurezza e funzionalità. Rispetti quindi le istruzioni di montaggio o rivolgersi al proprio concessionario autorizzato.
Il produttore (detentore del marchio)/fornitore non può essere considerato responsabile per un montaggio o impiego errato del presente prodotto.
Vi ringraziamo per l’attenzione!
Merci d‘avoir porté votre choix sur ce produit.
Notre produit de haute qualité est éprouvé pour les compétitions et a été conçu spécialement pour un usage sportif. Un montage approprié du produit est
indispensable pour garantir une sécurité et une fonctionnalité maximales du véhicule. C‘est pourquoi nous vous invitons à suivre scrupuleusement le manuel
de montage ou à vous adresser à votre revendeur agréé.
En cas de montage ou d‘utilisation non conformes de ce produit, le (quasi) constructeur ou le fournisseur déclinent toute responsabilité.
Merci !
4 ENGLISH
5 ITALIANO
6 FRANÇAIS
7 ESPAÑOL
3 DEUTSCH

5
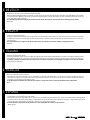
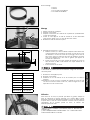
Lieferumfang: 1 x Einrastring
1 x Einrastbutton
1 x Innensechskantschraube M4x12
2 x Senkschraube M5x5
6 Montage des Einrastbuttons auf die Gabelabdeckung.
a Als Mittelwert von der oberen Kante Mass „X“ aus Tabelle nach
unten messen und ein Loch mit Durchmesser 13,5 mm bohren.
Im Abstand von 15 mm nach oben und unten 2 weitere Löcher
mit Durchmesser 5mm bohren. Für die seitliche Ausrichtung
misst man 5 mm von der Schattenkante an der Vorderseite nach
links.
b Die beiden 5 mm Bohrungen von der Rückseite ansenken und
zwar so weit das der Kopf der beiden M5 Senkkopfschrauben
verschwindet. Die M5 Senkkopfschrauben mit Loctite sichern.
c Den Einrastbutton auf die Gabelabdeckung aufschrauben.
Montage
1 Motorrad aufbocken.
2 Das Vorderrad ausbauen.
3Das rechte Gabelbein und den Gabelschutz demontieren (In
Fahrtrichtung gesehen).
4Den Einrastring [1] auf das Gabelbein aufstecken, bis ganz nach
unten schieben und anschrauben. Der Einrastbereich muss nach
vorne zeigen.
5 Das Gabelbein wieder einbauen.
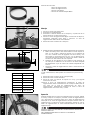
Bedienung
Sitzend auf dem Motorrad über den Lenker beugen, an die Felge greifen
und die Gabel einfedern, den Einrastbutton [2] drücken und langsam
ausfedern, bis der Einrastbutton im Einrastring fixiert ist. Danach den
Einrastbutton loslassen. Beim erstmaligen Einfedern im Fahrbetrieb löst
sich der Einrastbutton automatisch vom Einrastring.
VOR JEDER BENUTZUNG DEN EINRASTKNOPF AUF LEICHT-
GÄNGIGKEIT PRÜFEN.
BEI TEMPERATUREN UNTER 0° BESTEHT FESTFRIERGEFAHR.
7 Den Gabelschutz [3] wieder montieren.
8 Das Vorderrad wieder einbauen.
9 Die Befestigungsschrauben an der Gabelbrücke noch einmal lösen
und anschließend wieder fest schrauben.
10 Den Einrastring noch einmal lockern. Der Einrastbutton auf der
Gabelabdeckung muss mit dem Einrastbereich des Einrastringes in
einer Linie sein. Anschließend den Einrastring mit Loctite 243 und
1,5 Nm wieder festschrauben.
1
2
3
2
15 15
X
DEUTSCH
3
Modell „X“
KTM 65 SX 45 ± 10 mm
KTM 85 SX 70 ± 10 mm
KTM USD 48 70 ± 10 mm
KTM 4860 MXMA SM 90 ± 10 mm
HQV TC 65 45 ± 10 mm
HQV TC 85 70 ± 10 mm
HQV USD 48 90 ± 10 mm
Das Dekor, falls vorhanden, muss im Bereich der Factory Start-Befesti-
gung entfernt werden.

5
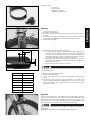
Scope of supply:
1 x latch ring
1 x latch button
1 x M5x12 AH screw
2 x M5x5 flat-head screw
6 Mounting the latch button on the fork cover.
a As a mean value, measure down from the upper edge the "X"
distance listed in the table and drill a hole with a diameter of
13.5 mm. Drill 2 additional holes 15 mm above and below the
hole with a diameter of 5mm. For the lateral alignment, measure
5 mm from the shadow edge on the front to the left.
b Countersink the two 5 mm holes from the rear until the head on
the two M5 flat-head screws disappears. Secure the M5 flat-
head screw with Loctite.
c Screw the latch button onto the fork cover.
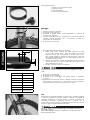
Mounting
1 Jack up the motorcycle.
2 Dismount the front wheel.
3 Dismount the right fork leg and the fork protector (in the direction
of travel).
4 Slip the latch ring [1] on the fork leg, push all the way down and
screw tight. The engaging area should point towards the front.
5 Remount the fork leg.
Operation
Sitting on the motorcycle, lean forward over the handlebar, reach for
the rim and compress the fork, press the latch button [2] and slowly
rebound until the latch button engages in the latch ring. Let go of the
latch button. The latch button will automatically be released from the
latch ring when you compress for the first time while driving.
CHECK THE LATCH BUTTON FOR SMOOTH OPERATION BEFORE
EACH USE.
DANGER OF FREEZING UP AT TEMPERATURES BELOW 0°.
7 Remount the fork protection [3] .
8 Remount the front wheel.
9 Loosen the fixing screws on the triple clamp again and then screw
tight.
10 Loosen the latch ring again. The latch button on the fork cover
should be aligned with the engaging area of the latch ring. Screw
the latch ring tight again. Apply Loctite 243 to the latch ring and
tighten to 1.5 Nm.
15 15
X
ENGLISH
4
1
2
3
2
Modell „X“
KTM 65 SX 45 ± 10 mm
KTM 85 SX 70 ± 10 mm
KTM USD 48 70 ± 10 mm
KTM 4860 MXMA SM 90 ± 10 mm
HQV TC 65 45 ± 10 mm
HQV TC 85 70 ± 10 mm
HQV USD 48 90 ± 10 mm
The graphics sticker (if present) must be removed in the area of the
Factory Start mount.

5
Volume della fornitura:
1 x anello con meccanismo a scatto
1 x bottone a scatto
1 x vite TCEI M5x12
2 x vite a testa svasata M5x5
6 Montaggio del bottone a scatto sul copristelo.
a Come valore medio misurare dal bordo superiore la quota
„X“ mm della tabella verso il basso ed eseguire un foro dal
diametro di 13,5 mm. Alla distanza di 15 mm verso l'alto e
verso il basso eseguire 2 ulteriori fori dal diametro di 5 mm. Per
l'allineamento laterale misurare 5 mm dallo spigolo centrale sul
lato anteriore verso sinistra.
b Svasare i due fori da 5 mm dal lato posteriore così da far sparire
le teste delle due viti a testa svasata M5. Assicurare le viti a
testa svasata M5 con Loctite.
c Avvitare il bottone a scatto sul copristelo.
Montaggio
1 Mettere la moto sul cavalletto.
2 Smontare la ruota anteriore.
3 Smontare la gamba forcella destra (guardando in direzione di
marcia) ed il copristelo.
4 Infilare l'anello [1] sullo stelo, spingerlo fino in fondo allo stelo ed
avvitarlo facendo attenzione che il meccanismo a scatto sia
posizionato sul lato anteriore.
5 Rimontare lo stelo forcella.
Uso
Stando seduti sulla moto sporgetevi in avanti oltre il manubrio, afferrate
il cerchio e comprimete la forcella, premete il bottone a scatto [2] ed
estendete lentamente la forcella finché il bottone è scattato nel
meccanismo dell'anello. Dopodiché rilasciare il bottone. Con la
motocicletta in marcia, alla prima compressione della forcella il bottone
a scatto si sgancia automaticamente dall'anello.
PRIMA DI OGNI UTILIZZO VERIFICARE LA SCORREVOLEZZA DEL
BOTTONE A SCATTO.
CON TEMPERATURE SOTTO 0° SUSSISTE IL PERICOLO CHE SI
BLOCCHI PER IL GELO.
7 Rimontare il copristelo [3].
8 Rimontare la ruota anteriore.
9 Allentare le viti di serraggio alla piastra forcella e dopodiché
riserrarle.
10 Allentare ancora una volta l'anello. Il bottone a scatto sul copristelo
deve trovarsi in una linea con il meccanismo a scatto dell'anello.
Dopodiché serrare l'anello con Loctite 243 e 1,5 Nm.
15 15
X
ITALIANO
5
1
2
3
22
Modell „X“
KTM 65 SX 45 ± 10 mm
KTM 85 SX 70 ± 10 mm
KTM USD 48 70 ± 10 mm
KTM 4860 MXMA SM 90 ± 10 mm
HQV TC 65 45 ± 10 mm
HQV TC 85 70 ± 10 mm
HQV USD 48 90 ± 10 mm
L`adesivo (se presente) va rimosso nell´area del fissaggio del Factory
Start.

5
Kit de montage:1 x collier
1 x bouton
1 x vis six pans creux M5x12
2 x vis à tête fraisée M5x5
6 Montage du bouton sur le cache.
a Relever la valeur „X“ dans le tableau. Reporter cette valeur sous
le bord supérieur de la protection et percer un trou de 13,5 mm
de diamètre. A 15 mm du centre de ce perçage, vers le haut et
vers le bas, percer un autre trou de 5 mm de diamètre. Ces deux
trous sont déportés de 5 mm vers la gauche par rapport au
sommet de la protection.
b Fraiser les trous de 5 mm par l’arrière de manière à ce que la
tête des deux vis M5 à tête fraisée soit noyée. Mettre de la
loctite sur ces vis.
c Fixer le bouton sur le cache.
Montage
1 Mettre la moto sur la béquille.
2 Déposer la roue avant.
3 Déposer le bras droit de la fourche et la protection (considéré dans
le sens de la marche).
4 Enfiler le collier [1] sur le bras de fourche et le faire descendre
jusqu’en bas. Serrer la vis. Le cran doit être vers l’avant.
5 Remettre le bras de fourche en place.
Utilisation
Etant assis sur la moto, se pencher par dessus le guidon, attraper la
jante et comprimer la fourche. Appuyer sur le bouton [2] et laisser
lentement la fourche se détendre de manière à ce que le bouton prenne
sa place dans le cran du collier. Relâcher le bouton. Dès la première
compression de la fourche quand on roule, le bouton sort
automatiquement du cran.
VÉRIFIER AVANT CHAQUE UTILISATION QUE LE BOUTON NE
COINCE PAS.
A DES TEMPÉRATURES INFÉRIEURES À 0° LE BOUTON PEUT
ÊTRE COINCÉ PAR DE LA GLACE.
7 Remettre la cache [3] en place.
8 Reposer la roue avant.
9 Desserrer les vis de fixation du té de fourche puis les serrer à
nouveau.
10 Desserrer la vis du collier et l’orienter de manière à ce que le cran
soit bien en face du bouton. Pour finir, serrer la bague à 1,5 Nm
après avoir mis de la loctite 243.
15 15
X
FRANÇAIS
6
1
2
3
2
Modell „X“
KTM 65 SX 45 ± 10 mm
KTM 85 SX 70 ± 10 mm
KTM USD 48 70 ± 10 mm
KTM 4860 MXMA SM 90 ± 10 mm
HQV TC 65 45 ± 10 mm
HQV TC 85 70 ± 10 mm
HQV USD 48 90 ± 10 mm
L’autocollant (si présent) doit être enlevé dans la région de la fixation
du Factory Start.

5
Volumen de suministro:
1 anillo de engatillamiento
1 botón de engatillamiento
1 tornillo allen M4x12
2 tornillos de cabeza rebajada M5x5
6 Montaje del botón de engatillamiento sobre el revestimiento de la horquilla.
a Medir hacia abajo como valor medio desde el borde superior el
valor „X“ de la tabla y perforar un agujero con un diámetro de
13,5 mm. Perforar otros dos agujeros uno hacia arriba y otro
hacia abajo, a una distancia de 15 mm, con un diámetro de 5
mm. Para la alineación lateral se miden 5 mm desde el borde de
sombra en el lado anterior hacia la izquierda.
b Avellanar los dos agujeros de 5 mm desde el lado posterior de
tal modo que la cabeza de los dos tornillos de cabeza rebajada
M5 desaparezca. Fijar los tornillos de cabeza rebajada M5 con
Loctite.
c Atornillar el botón de engatillamiento sobre el revestimiento de
la horquilla.
Montaje
1 Colocar la motocicleta sobre tacos.
2 Desmontar la rueda delantera.
3 Desmontar la botella derecha de la horquilla y la protección de la
horquilla(visto en la dirección de viaje).
4 Colocar el anillo de engatillamiento [1] en la botella de la horquilla,
desplazarlo totalmente hacia abajo y atornillar. La zona de
engatillamiento debe indicar hacia adelante.
5 Montar de nuevo la botella de la horquilla.
Operación
Estando sentado sobre la motocicleta doblarse sobre el manillar, agarrar
la llanta y comprimir la horquilla, presionar el botón de engatillamiento
[2] y descomprimir lentamente hasta que el botón de engatillamiento
esté fijado en el anillo de engatillamiento. Después soltar el botón de
engatillamiento. Al realizar la primera compresión; durante el viaje el
botón de engatillamiento se suelta automáticamente del anilllo de
engatillamiento.
ANTES DE CADA USO CONTROLAR LA FACILIDAD DEL BOTÓN DE
ENGATILLAMIENTO.
CON TEMPERATURAS BAJO 0° EXISTE EL PELIGRO DE
CONGELAMIENTO.
7 Montar de nuevo la protección de la horquilla [3].
8 Montar de nuevo la rueda delantera.
9 Soltar de nuevo los tornillos de fijación en la tija y en seguida
atornillarlos de nuevo.
10 Soltar el anillo de engatillamiento nuevamente. El botón de
engatillamiento sobre el revestimiento de la horquilla debe estar en
una línea con la zona de engatillamiento del anillo de
engatillamiento. Seguidamente atornillar de nuevo el anillo de
engatillamiento con Loctite 243 y 1,5Nm.
15 15
X
ESPAÑOL
7
1
2
3
2
Modell „X“
KTM 65 SX 45 ± 10 mm
KTM 85 SX 70 ± 10 mm
KTM USD 48 70 ± 10 mm
KTM 4860 MXMA SM 90 ± 10 mm
HQV TC 65 45 ± 10 mm
HQV TC 85 70 ± 10 mm
HQV USD 48 90 ± 10 mm
Si hay una decoración, debe quitarse en el área de la fijación Factory
Start.
-
 1
1
-
 2
2
-
 3
3
-
 4
4
-
 5
5
-
 6
6
-
 7
7


KTM 46301996000 El manual del propietario
- Categoría
- Accesorios para motocicletas
- Tipo
- El manual del propietario
en otros idiomas
- français: KTM 46301996000 Le manuel du propriétaire
- italiano: KTM 46301996000 Manuale del proprietario
- English: KTM 46301996000 Owner's manual
- Deutsch: KTM 46301996000 Bedienungsanleitung
Artículos relacionados
-
KTM SXS13540100 El manual del propietario
-
-
-
-
-
-
-
-
-