SingingMachine SML625BT Manual de usuario
- Categoría
- Sistemas de karaoke
- Tipo
- Manual de usuario

TM
SML625BTBK / SML625BTW
INSTRUCTION MANUAL /
MANUAL DE INSTRUCCIONES /
MODE D’EMPLOI
www.singingmachine.com
The Singing Machine® is a registered trademark of The Singing Machine Co., Inc.
The Singing Machine® es una marca registrada de The Singing Machine Co., Inc.
The Singing Machine® est une marque déposée de The Singing Machine Co., Inc.

— E1 —
Warnings
CAUTION: TO REDUCE THE RISK OF ELECTRIC SHOCK, DO NOT
REMOVE COVER (OR BACK). NO USER-SERVICEABLE PARTS
INSIDE. REFER SERVICING TO QUALIFIED SERVICE PERSONNEL.
The Caution marking is located on the bottom panel.
DANGEROUS VOLTAGE: The lightning flash with arrowhead
symbol within an equilateral triangle is intended to alert the
user to the presence of uninsulated dangerous voltage within
the product’s enclosure that may be of sufficient magnitude to
constitute a risk of electric shock to persons.
WARNING: TO PREVENT FIRE OR SHOCK HAZARD, DO NOT EXPOSE
THIS UNIT TO RAIN OR MOISTURE.
ATTENTION: The exclamation point within an equilateral
triangle is intended to alert the user to the presence of
important operating and maintenance (servicing) instructions
in the literature accompanying this product.
FCC WARNING: This equipment may generate or use radio frequency
energy. Changes or modifications to this equipment may cause harmful
interference unless the modifications are expressly approved in the
instruction manual. The user could lose the authority to operate this
equipment if an unauthorized change or modification is made.
This device complies with part 15 of the FCC Rules. Operation is subject
to the following two conditions: (1) This device may not cause harmful
interference, and (2) this device must accept any interference received,
including interference that may cause undesired operation.
INDUSTRY CANADA NOTICE:
This device complies with Industry Canada Iicense-exempt RSS standard(s).
Operation is subject to the following two conditions:
1. This device may not cause interference, and
2. This device must accept any interference, including interference that
may cause undesired operation of the device.
DRIPPING WARNING: This product shall not be exposed to dripping or
splashing, and no objects filled with liquids, such as vases, shall be placed
on the product.
VENTILATION WARNING: The normal ventilation of the product shall not be
impeded for intended use.
SAFETY VERIFICATION: This device is made and tested to meet safety
standards of the FCC, requirements and compliance with safety
performance of the U.S. Department of Health and Human Services and
also with FDA Radiation Performance Standards 21 CFR Subchapter.
Warnings:
• This CD player employs a laser light beam. Only a qualified service person
should remove the cover or attempt to service this device, due to
possible eye injury.
• The use of controls, adjustments, or procedures other than those
specified herein might result in hazardous radiation exposure.
• The apparatus shall be used in an open area.
CAUTION!
Invisible laser radiation when open and interlocks defeated. Avoid exposure
to beam.
NOTE: This equipment has been tested and found to comply with the
limits for a Class B digital device, pursuant to part 15 of the FCC Rules.
These limits are designed to provide reasonable protection against harmful
interference in a residential installation. This equipment generates, uses
and can radiate radio frequency energy and, if not installed and used in
accordance with the instructions, may cause harmful interference to radio
communications. However, there is no guarantee that interference will
not occur in a particular installation. If this equipment does cause harmful
interference to radio or television reception, which can be determined by
turning the equipment off and on, the user is encouraged to try to correct
the interference by one or more of the following measures:
• Reorient or relocate the receiving antenna.
• Increase the separation between the equipment and receiver.
• Connect the equipment into an outlet on a circuit different from that to
which the receiver is connected.
• Consult the dealer or an experienced radio/TV technician for help.
The rating information is located at the rear of the unit.
Important Safety Information
1. Read these Instructions.
2. Keep these Instructions.
3. Heed all Warnings.
4. Follow all Instructions.
5. Do not use this apparatus near water.
6. Clean only with a dry cloth.
7. Do not block any of the ventilation openings. Install in
accordance with the Manufacturer’s instructions.
8. Do not install near any heat sources such as radiators, heat
registers, stoves, or other apparatus (including amplifiers) that
produce heat.
9. Do not defeat the safety purpose of the polarized or grounding-
type plug. A polarized plug has two blades with one wider than
the other. A grounding type plug has two blades and a third
grounding prong. The wide blade or the third prong are provided
for your safety. When the provided plug does not fit into your
outlet, consult an electrician for replacement of the obsolete
outlet.
10. Protect the power cord from being walked on or pinched
particularly at plugs, convenience receptacles, and the point
where they exit from the apparatus.
11. Only use attachments/accessories specified by the
manufacturer.
12. Use only with a cart, stand, tripod, bracket,
or table specified by the manufacturer, or
sold with the apparatus. When a cart is
used, use caution when moving the cart/
apparatus combination to avoid injury
from tip-over.
13. Unplug this apparatus during lightning
storms or when unused for long periods of
time.
14. Refer all servicing to qualified service personnel. Servicing is
required when the apparatus has been damaged in any way,
such as power-supply cord or plug is damaged, liquid has been
spilled or objects have fallen into the apparatus, the apparatus
has been exposed to rain or moisture, does not operate
normally, or has been dropped.
15. WARNING: To reduce the risk of fire or electric shock, do not
expose this apparatus to rain or moisture. Do not place objects
filled with water, such as a vase, on the apparatus.
16. The AC mains plug is used as the power disconnect device
and it should remain readily accessible and operable during
intended use. In order to completely disconnect the apparatus
from power, the mains plug should be completely removed
from the AC outlet socket.
17. CAUTION: To reduce the risk of fire or explosion, do not expose
batteries to excessive heat such as sunshine, fire or other
heat sources.
CAN ICES-3(B)/NMB-3(B)
CAUTION
RISK OF ELECTRIC SHOCK
DO NOT OPEN

— E2 —
Included
What’s in the box.
Wired Microphone
Main Unit
Audio/Video Cables
AC Adapter
Manual Welcome Kit

— E3 —
Location of Controls (Front)
1. CDG/USB/BT Button
2. PROGRAM/REPEAT
Button
3.
Skip Back
9 Button
4. AUTO VOICE CONTROL
Button
5. BLUETOOTH PAIRING
Button
6. BLUETOOTH indicator
7. ON/OFF Button
8. SKIP 10- Button (MP3)
9. BALANCE Control
10. USB Port
11. LINE IN Jack
12. MASTER VOLUME
Control
13. Play/Pause Button
14. Stop < Button
15.
Skip Forward
: Button
16. MIC VOLUME control
17. RECORD Button
18. Record Indicator
19. DISCO LIGHT Button
20. Skip10+ Button (MP3)
21. ECHO Control
22. Mic Holder
23. Mic 2 jack
24. Mic 1 jack
25. Speaker
26. CDG Indicator
27. Play/Pause Indicator
28. Program Indicator
29. Repeat Indicator
w
v
x
y
U
V
u
X
WW
at
ak
al
am
an
ao
ap
aq
ar
as
bt
bk
bl
bm
bo
bn
bp bq
br bs
Display
Lense

— E4 —
Location of Controls (Top/Rear)
REAR VIEW
3. VIDEO OUT Jack
4. AUDIO OUT Jack (R)
5. AUDIO OUT Jack (L)
6. DC IN Jack (5.8V)
TOP VIEW
1. CD Door
2. CD open
u
v
w
x
y
U

— E5 —
Connection
Connecting the Microphone(s)
Microphones:
Connect a microphone into MIC jack 1 as
well as MIC jack 2 (when desired).
Note: Do not drop or tap the Mic as
damage to the Mic or speakers may occur.
Do not twirl the microphone cord as it will
cause damage to the encased wiring.
Connecting the Unit to a TV
VIDEO
INPUT
AUDIO
INPUT
R L
RCA cables
VIDEO OUT
(yellow)
AUDIO OUT
(white - L
red - R)
REAR VIEW OF TV
To output the video, lyrics and
audio to your TV, perform the
following steps:
Connect the RCA video cable
(Yellow) to the VIDEO OUT jack
and the audio cables (White
and Red) to the AUDIO OUT
jacks located on the back of the
Singing Machine.
Connect the opposite end of
the RCA video cable (Yellow) to
the VIDEO IN jack and the audio
cables (White and Red) to the
AUDIO IN on your TV.
Notes:
• This unit can be used with or without a TV, but it is highly recommended to use a TV in
order to utilize all the features.
• Also refer to the TV’s User Guide.
• To see the lyrics on the screen, you must use a CD+G disc.
u
v

— E6 —
Connection
Connecting to AC Power
Connecting to LINE IN Jack
Insert the AC power cord into a
conveniently located AC outlet
having 120V AC, 60Hz.
Note:
Make all connections before
connecting to AC power.
Connect an external device
by using an appropriate cable
(3.5mm audio cable not included)
as shown.
Note:
See page 17 to select and use the
LINE IN function.
LINE IN
To External Unit
AUDIO OUTPUT
/ HEADPHONE JACK
Disco Lights
1
Press the LIGHT button to switch
on the lighting effect, press again to
switch off.
u

— E7 —
Operation
Playing a CDG
1
Connect the unit as described
previously; if using a CD+G, it is
recommended to connect to a TV
(see page 5). Press the power ON/
OFF button to turn the unit on.
2
Lift open the CD door and insert a
CD or a CD+G by gently pressing it
on the center spindle. Then close the
CD door.
Note:
• What is a CD+G?
A CD+G (CD+Graphics) is the
standard format for most karaoke
discs that will display the words on
the screen.
• Never place anything other than a
CD in the compartment, as foreign
objects can damage the unit.
• If no disc is inserted, “NO” will appear
on the display.
• If connected to a TV and/or other
audio source, adjust the volume of
the external unit using its own volume
control.
3
Repeatedly press the CDG/USB/
BT button to select the CDG mode;
“---” will appear when searching the
disc and then the total number of
tracks will appear. When a CDG disc
is inserted, the CDG indicator will
light.
4
Press the PLAY/PAUSE button
to start playback; if listening to
a CD+G file, the image and lyrics
will appear on the TV screen (if
connected) and the PLAY/PAUSE
Indicator will light.
u
v
w
x

— E8 —
Operation
Playing a CDG (Continued)
5
Adjust the volume to a
comfortable level using the
MASTER VOLUME control.
6
Connect microphone(s) and
slide the ON/OFF switch on the
microphone to the ON position.
7
Adjust the MIC VOLUME control
as desired. Increasing this control
will increase the volume of both
microphones.
8
Rotate the ECHO control to add an
echo effect to your voice. Rotate
towards MAX to increase the echo
effect.
9
AUTO VOICE CONTROL can be
activated by rotating the AVC
control. The higher this control is
set to, the more the vocals on the
multiplex recording will be muted
when the singer starts to sing
through the microphone. When
the singer stops singing, the
recorded vocals on the multiplex
recording will resume to normal.
10
Rotate the BALANCE control
clockwise to hear the music and
recorded vocals from a multiplex
recording or counterclockwise
to hear the music only from a
multiplex recording.
Note: To use the BALANCE control,
a CD+G disc must be used,
otherwise it will operate as a
standard Balance control.
y
U
W
V
X
at

— E9 —
Operation
Playing a CDG (Continued)
11
SKIP: Advance or go back one
track by pressing the Skip Back
9/Skip Forward : buttons.
12
REPEAT: During playback, press
the PROG/REP button once to
repeatedly play the selected song;
the Repeat indicator will blink.
Press the PROG/REP button
a second time to repeatedly
play the whole CD; the Repeat
indicator will light solid. Press it
again to cancel Repeat function,
the PROG/REP indicator turns
off.
13
PROGRAM: You can program
up to 20 tracks on any disc for
playback in any desired order.
While in the Stop mode, press
the PROG /REP button; the
Program indicator will blink and
“P00” will appear. Select the first
track using the Skip Back 9/
Skip Forward : buttons. Press
the PROG/REP button again to
confirm the entry. After selecting
the desired tracks the display will
show P01, P02, etc. recognizing
the tracks selected have been
programmed and the program
indicator will illuminate solid red.
Repeat to set up to 20 tracks
into memory. When done, press
the PLAY/PAUSE button to
start playback.
Note:
• Press the STOP < button TWICE to
stop and clear the program.
ak
al
am
am
ak

— E10 —
Operation
Playing a CDG (Continued)
14
PAUSE: During playback, if
you wish to pause the disc
momentarily, press the PLAY/
PAUSE button; the PLAY/
PAUSE indicator will blink. Press
again to resume normal playback.
15
Press the STOP < button to stop
playback.
16
Press the power ON/OFF button
to turn the unit off.
an
ao
ap

— E11 —
Operation
Playing Songs from the USB
1
Connect the unit as described
previously. Press the power ON/
OFF button to turn the unit on.
2
Insert a USB flash drive into the
USB port on the unit so it faces
upward.
Make sure to download music from
the Karaoke store, see page 21.
3
Repeatedly press the CDG/USB/
BT button to select the USB mode;
“usb” will appear when searching
the drive and then the total number
of files will appear.
Note: The USB mode cannot be accessed
until a flash drive is inserted.
4
Press the PLAY/PAUSE
button to start playback; if listening
to an MP3+G file, the image and
lyrics will appear on the TV screen
(if connected).
5
Adjust the volume to a comfortable
level using the MASTER VOLUME
control.
Note: If connected to a TV or other audio
source, adjust the volume of the TV
using its own volume control.
u
v
w
x
y

— E12 —
Operation
Playing Songs from the USB (Continued)
6
Connect microphone(s) and
slide the ON/OFF switch on the
microphone to the ON position.
7
Adjust the MIC VOLUME control
as desired. Increasing this control
will increase the volume of both
microphones.
8
Rotate the ECHO control to add an
echo effect to your voice. Rotate
towards MAX to increase the echo
effect.
9
AUTO VOICE CONTROL can be
activated by rotating the AVC
control. The higher this control is
set to, the more the vocals on the
multiplex recording will be muted
when the singer starts to sing
through the microphone. When the
singer stops singing, the recorded
vocals on the multiplex recording
will resume to normal.
10
Rotate the BALANCE control
clockwise to hear the music and
recorded vocals from a multiplex
recording or counterclockwise
to hear the music only from a
multiplex recording.
V
W
X
at
U

— E13 —
Operation
Playing Songs from the USB (Continued)
11
SKIP: Advance or go back one track
by pressing the 9 or :
buttons
.
You can also skip ahead 10 files/
tracks using the Skip10+ button
and skip back 10 files/tracks by
Skip 10- button.
SEARCH: When playing any audio
from the USB, press and hold the
9 or :
buttons
. The USB will
search at high speed in the forward
or backward direction. Normal play
will continue when you release the
button.
During Stop mode you can also
select a file using the
9 or :
buttons
to scroll right/left.
12
REPEAT
:
During playback, press
the
REP/PROG
button once during
playback, the REP indicator will
blink and the current track will be
repeated. Press the
REP/PROG
button twice, the REP indicator
will blink, all MP3 tracks inside the
current folder will be repeated
continuously. Press the
REP/
PROG
button three time, the REP
indicator will light solid, all MP3
tracks will be repeatedly. To stop
repeat function by press the button
again, the REP indicator will turns
off.
al
ak
ak

— E14 —
Operation
Playing Songs from the USB (Continued)
13
PROGRAM: You can program
up to 20 tracks for playback in
any desired order. While in Stop
mode, press the REP/PROG
button; PROG indicator will blink
and “P00”appear. Select the first
track using 9 or : buttons, then
press the REP/PROG button.
Repeat to set up to 20 tracks into
memory. When done, press the
PLAY/PAUSE button to start
playback.
Note: Press the STOP < button TWICE
to stop and clear the program.
14
PAUSE: During playback, if
you wish to pause the music
momentarily, press the PLAY/
PAUSE /ENTER button. Press
again to resume normal playback.
15
Press the STOP < button to stop
playback.
16
Press the ON/OFF button to turn
the unit off.
an
ao
am
ap

— E15 —
Operation
Using a Bluetooth Device
1
Connect the unit as described
previously. Press the power ON/OFF
button to turn the unit on.
2
Repeatedly press the CDG/USB/BT
button to select the Bluetooth mode;
“bt” will blink in the display as the unit
automatically searches for and pairs
a previously paired Bluetooth device
(if previously paired). If no previously
paired devices are present, connect as
shown in the next step.
Note: You can also press the PAIR button to
disconnect any paired devices in order
to pair another device.
3
Turn on your device’s Bluetooth
option in settings to search for a
discoverable device with a Bluetooth
signal. Select “Singing Machine” from
the device results on the Bluetooth
menu, “bt” will light solid in the display.
The Bluetooth indicator will light and a
successful pairing sound will be heard.
Note: Also refer to the user manual of
your Bluetooth device for detailed
instructions.
4
The Bluetooth indicator will light and a
successful pairing sound will be heard.
Notes:
• If your Bluetooth prompts you for a
passcode during the pairing process, please
enter “0000” to connect.
• On some Bluetooth devices, once pairing is
complete, select your Bluetooth device as
“Use as Audio Device” or similar.
• If connection is lost after successful pairing,
check to make sure the distance between
speaker and Bluetooth-enabled device does
not exceed 30 feet/10 meters.
•“Bluetooth” will blink on TV screen, and will
stop blinking after successful connection.
Please connect your Music Device
Your Music Device is connected
3
4
Please connect your Music Device
Your Music Device is connected
u
v
v

— E16 —
Operation
Using a Bluetooth Device (Continued)
5
To control your Bluetooth device
from this unit, press the PLAY/
PAUSE button to start playback.
Press the PLAY/PAUSE button
during playback to pause the song.
6
Adjust the volume to a comfortable
level using the MASTER VOLUME
control on this unit as well as the
volume on your Bluetooth device.
7
Connect microphone(s) and slide the
ON/OFF switch on the microphone
to the ON position.
8
Adjust the MIC VOLUME control
as desired. Increasing this control
will increase the volume of both
microphones.
9
Rotate the ECHO control to add an
echo effect to your voice. Rotate
towards MAX to increase the echo
effect.
10
Adjust the balance between the
speakers using the BALANCE
control.
11
SKIP: Advance or go back one track
by pressing the Skip Back 9/Skip
Forward : buttons.
12
Press the power ON/OFF button to
turn the unit off.
y
U
V
W
Xat
ak
al
ak

— E17 —
Operation
Using the LINE IN Jack
1
Connect the unit as described
previously. Press the power ON/
OFF button to turn the unit on.
2
Connect the external unit to the
LINE IN Jack on the front of this
unit. Connecting an external unit
will allow the audio to be played
through your Singing Machine.
LINE IN function is automatically
selected once the audio cable is
plugged in.
Notes:
• It is highly recommended to set the
volume on the auxiliary unit to 1/3 or
lower to avoid distortion.
• Skipping files/tracks is not possible on
this unit when using an external device.
3
Adjust the volume using the
MASTER VOLUME control on
this unit or your external device’s
volume control.
4
Connect microphone(s) and
slide the ON/OFF switch on the
microphone to the ON position.
v
w
x
u

— E18 —
Operation
Using the LINE IN Jack (Continued)
5
Adjust the MIC VOLUME control
as desired. Increasing this control
will increase the volume of both
microphones.
6
Rotate the ECHO control to add an
echo effect to your voice. Rotate
towards MAX to increase the echo
effect.
7
Adjust the balance between the
speakers using the BALANCE
control.
8
Press the power ON/OFF button
to turn the unit off.
y
U
WV

— E19 —
Operation
Recording Singing to the USB
u
1
Connect the unit as described
previously. Press the power ON/
OFF button to turn the unit on.
RECORD CDG/CD MUSIC TO THE USB
2
Follow the “Playing a CDG”
instruction described on page
7 - page 8 to start the CDG/CD
music playback.
3
Insert a USB flash drive into the
USB port on the unit, press the
REC button; the REC indicator
will light up, the song will start
over and recording begin. When
recording is finished, press the
REC button again to stop.
RECORD BLUETOOTH MUSIC TO THE
USB
4
Follow the “Using a Bluetooth
Device” instruction described on
page 15 - page 16 to start the
Bluetooth music playback.
5
Insert a USB flash drive into the
USB port on the unit, press the
REC button; the REC indicator
will light up, the song will be
recording right the way. When
recording is finished, press the
REC button again to stop.
w
w
y
y

— E20 —
RECORDING YOUR SINGING TO THE
USB
6
Connect microphone(s) and
slide the ON/OFF switch on the
microphone to the ON position.
7
Adjust the MIC VOLUME control
as desired. Increasing this control
will increase the volume of both
microphones.
8
Insert a USB flash drive into the
USB port on the unit, press the
REC button; the REC indicator
will light up, the song will be
recording right the way. When
recording is finished, press the
REC button again to stop.
9
All recorded music or recorded
singing will be in the folder
labelled REC. CDG/CD music or
singing recording will be started
naming from TRK01. (If CDG
music is recorded, the graphic file
will also be recorded.) Bluetooth
music or singing recording will be
started naming from BT and then
BT~0.
Note: You cannot record from the USB
or Line in, only from a CD, CDG or
Bluetooth.
Operation
Recording Singing to the USB
U
W
W

— E21 —
Operation
Where to Download MP3+G Files
Helpful Hints:
The .mp3 and .cdg files are delivered for
download in a single, compressed MP3+G.zip
file. The MP3+G file cannot be played as a .zip
file on a USB flash drive. To play karaoke songs
using a USB flash drive, the MP3+G.zip file must
be unzipped as follow:
• Connect a USB flash drive to your computer.
• Download the MP3+G file from your Digital
Locker and save the .zip file to a folder on
your computer.
• Double click the .zip file to open the .zip (you
will see the .mp3 .cdg files to USB flash drive.
• Remove (eject) the USB flash drive from your
computer.
Turn on the Singing Machine and connect the
USB flash drive.
FAQ
• Where can I get additional help with the
file formats?
While on the Singing Machine Store’s web
page, simply click FILE FORMATS at the
lower left.
To purchase and download karaoke music,
please visit http://store.singingmachine.com to
access over 12,000 of your favourite karaoke
songs. You will need a USB flash drive (not in
-
cluded) to transfer the downloads to this unit.
Follow these easy steps:
1
Go to http://store.singmachine.com
using your internet browser, and then
register.
2
Select and purchase your favorite ka-
raoke music from the Singing Machine
Download Store.
3
Download your selected purchase(s)
from the Singing Machine Digital Locker
to your USB flash drive.
4
Insert the USB flash drive as shown on
page 11 and have fun singing!
Note: Your downloaded songs can also be
burned to a blank CDR/CDRW.

— E22 —
Troubleshooting Guide
Should this unit exhibit a problem, check the following before seeking service:
No Power
• Power is not on; press the
power
ON/OFF button to turn power on.
• Confirm that the AC adapter is connected securely to the back of the unit.
• Connect the unit to a different outlet.
No Sound – General
• Master Volume is set to minimum; raise volume.
• Correct Function was not selected; select using the CDG/USB/BT button.
• If using an external device, raise the volume.
• Check if the LINE IN jack is still connected by a cable.
.
No Sound – If connected to a TV
• Volume on the TV is muted or too low.
• Correct source (usually AV) was not selected on the TV’s menu.
Lyrics do not appear on the TV screen
• If connected to a TV, Video plug is not connected properly; see page 5.
• If connected to a TV, select the correct source on the TV (usually AV).
• The file/track being played is not a track recording with lyrics. These are the only files
that allow you to view the lyrics on the TV screen.
• Nothing will appear on the TV screen when using LINE IN or Bluetooth.
File(s) on USB Jack not playing
• The file is corrupted; replace the file.
• The file is not in a format this unit will play.
• The connected USB device is not supported by the product.
No sound from the microphone
• Make sure the microphone is firmly connected to the MIC 1 or MIC 2 jack.
• Make sure the ON/OFF switch on the microphone is set to the ON position.
• Make sure the MIC VOLUME setting is not set too low.
• MASTER VOLUME is set to minimum; raise volume.
• Adjust The ECHO control past the mid point on the Singing Machine.
The Bluetooth device cannot be paired or connected with the unit
• You have not activated the Bluetooth function of your device; see page 15 or refer to
the Bluetooth device user’s manual.
• The system is not in pairing mode; press the Pair button to restart pairing.
The Music is not available on the unit after successfully connecting the Bluetooth
• Ensure your Bluetooth device can support the A2DP Bluetooth profile.
• The volume on the external Bluetooth device is set to low or muted; raise as desired.

— E23 —
Specifications
AUDIO
OUTPUT POWER (MAXIMUM) ................................................................................3.5 Watts (RMS)
OUTPUT IMPEDANCE ..................................................................................................................3 Ohms
CD PLAYER SECTION
FREQUENCY RESPONSE .............................................................................................. 100Hz - 20kHz
SIGNAL-TO-NOISE RATIO ............................................................................................................... 50dB
NUMBER OF PROGRAMS ...................................................20 Step Random Access Programming
SAMPLING SYSTEM.........................................................................................8 Times Over Sampling
BLUETOOTH
Bluetooth Version .....................................................................................................................V2.1+EDR
Working Distance ...........................................Up to 30 feet/10 meters measured in open space
USB
Format .................................................................................................................................................FAT32
Maximum Compatibility ..................................................................................................................32GB
AUX IN SECTION ...........................................................................3.5 mm Stereo Headphone Jack
MICROPHONE ....................-74db 600 Ohm Impedance with 6.3 mm Dynamic Microphone
POWER SECTION ............................................................................................................ DC 5.8V 1.5A
POWER CONSUMPTION .............................................................................................................. 8.7 W
DIMENSIONS (HxWxD) .............................12.8 x 7.8 x 8.5 inches / 32.5 x 19.8 x 21.5 cm
WEIGHT ...........................................................................................................................5.0 lbs / 2.2 kgs
Specifications are subject to change without notice.
The Bluetooth® word mark and logos are registered trademarks owned by Bluetooth SIG,
Inc. and any use of such marks and logos by The Singing Machine Company, Inc. is under
license. Other trademarks and trade names are those of their respective owners.

— S1 —
AVISO DE LA FCC:: Este equipo puede generar o usar energía de radio
frecuencia. Los cambios o modificaciones realizados en el aparato pueden
provocar interferencia perjudicial, a menos que dichas modificaciones
estén autorizadas en el manual de instrucciones. El usuario puede perder
toda autoridad para operar el equipo si realiza cambios o modificaciones
sin autorización.
Este aparato cumple con la parte 15 de las Normas de la FCC. El
funcionamiento está sujeto a las dos condiciones que figuran a
continuación: (1) Es probable que no cause interferencia perjudicial y (2)
deberá aceptar cualquier interferencia recibida, incluyendo la interferencia
que pueda llegar a causar un funcionamiento indeseado.
NOTA: Este equipo fue probado y se concluyó que cumple con los límites
establecidos para los dispositivos digitales Clase B, de acuerdo con el
Apartado 15 de las normas de la FCC. Estos límites fueron pensados para
proporcionar protección razonable ante la interferencia perjudicial en una
instalación residencial. Este equipo genera, usa y puede emitir energía
de radio frecuencia y, si no se lo instala y utiliza de conformidad con las
instrucciones, puede causar interferencia perjudicial a las comunicaciones
radiales. No obstante, no existe ninguna garantía de que no se produzca
interferencia en una instalación en particular. Si este equipo provoca
interferencia perjudicial a la recepción de radio o televisión, lo cual puede
determinarse apagando y encendiendo el equipo, el usuario puede intentar
corregir la interferencia de alguna/s de las siguientes maneras:
• Reoriente la antena receptora o ubíquela en otro lugar.
• Aumente la distancia entre el equipo y el receptor.
• Conecte el equipo a un tomacorriente de un circuito distinto al que está
conectado el receptor.
• Consulte al distribuidor o a un técnico experimentado de radio y televisión
para que lo asesore.
• La información de clasificación está ubicada en la parte inferior de la
unidad.
AVISO A LA INDUSTRIA CANADIENSE:
Este dispositivo cumple con las normas industriales RSS exentas de licencia
de Canadá. La operación está sujeta a las dos condiciones siguientes:
1. Este dispositivo no puede causar interferencias perjudiciales y
2. Este dispositivo debe aceptar cualquier interferencia recibida, incluidas
aquellas que puedan provocar un funcionamiento no deseado.
Advertencias
PRECAUCIÓN: PARA REDUCIR EL RIESGO DE DESCARGAS ELÉCTRICAS, NO
QUITE LA CUBIERTA (NI LA TAPA POSTERIOR) NO HAY PIEZAS REPARABLES
POR EL USUARIO DENTRO. DERIVE LAS REPARACIONES A PERSONAL DE
SERVICIO CALIFICADO.
Las marcas de Precaución se ubican en el panel inferior.
TENSIÓN PELIGROSA: La luz intermitente con símbolo de
flecha dentro de un triángulo pretende alertar al usuario de la
presencia de tensión peligrosa no aislada, dentro del paquete
del producto, que puede ser de magnitud suficiente para
constituir un riesgo de descarga eléctrica para las personas.
ADVERTENCIA: PARA EVITAR INCENDIOS O PELIGROS DE DESCARGA,
NO EXPONGA ESTA UNIDAD A LA LLUVIA O HUMEDAD.
ATENCIÓN: El signo de exclamación dentro de un triángulo
pretende alertar al usuario de la presencia de instrucciones
importantes de operación y mantenimiento (reparaciones) en
el material que acompaña a este producto.
ADVERTENCIA DE GOTEO:Este producto no se podrá exponer a goteo
o salpicaduras, y no se colocará ningún objeto lleno con líquidos, como
jarrones, encima del producto.
ADVERTENCIA DE VENTILACIÓN: La ventilación normal del producto no se
bloqueará si se le da el uso previsto.
VERIFICACIÓN DE SEGURIDAD: Este dispositivo está fabricado y evaluado
en cumplimiento de los estándares de seguridad de la FCC, requisitos y
cumplimiento de rendimiento de seguridad del Departamento de Salud y
Servicios Humanos de EE.UU. y también la FDA. Subcapítulo 21 del Código
de reglamentos federales, Estándares de rendimiento de radiación.
Advertencias:
• Este reproductor de CD utiliza un haz de luz láser. Solo la persona de
reparaciones calificada es quien puede retirar la cubierta y reparar este
dispositivo debido a posibles lesiones en la vista.
• El uso de controles, ajustes o la realización de procedimientos que no sean
los especificados en el presente pueden producir exposición a radiación
peligrosa.
• El artefacto deberá utilizarse en un espacio abierto.
PRECAUCIÓN!
Si la caja se abre o el dispositivo de seguridad se destruye, puede producirse
la emisión invisible de radiación láser. Evite la exposición al haz de luz.
Información importante sobre seguridad
1. Lea estas instrucciones.
2. Conserve estas instrucciones.
3. Preste atención a todas las advertencias.
4. Siga todas las instrucciones.
5. No utilice este artefacto cerca del agua.
6. Límpielo únicamente con un paño seco.
7. No obstruya las aberturas para ventilación. Instálelo de acuerdo con
las instrucciones del fabricante.
8. No instale cerca de fuentes de calor, como radiadores, rejillas de
calefacción, estufas u otros aparatos (incluso amplificadores) que
produzcan calor.
9. No desafíe el fin de seguridad del enchufe polarizado o de conexión
a tierra. Un enchufe polarizado tiene dos clavijas y una es más
ancha que la otra. El enchufe de conexión a tierra tiene dos clavijas,
y una tercera punta a tierra. La clavija ancha o la tercera punta se
suministran para su seguridad. Si el enchufe suministrado no coincide
con su tomacorriente, consulte con un electricista para reemplazar el
tomacorriente obsoleto.
10. Evite pisar o apretar el cable de alimentación, especialmente en los
enchufes, tomacorrientes y en el punto por donde salen del artefacto.
11. Utilice sólo los complementos y accesorios especificados por el
fabricante.
12. Utilice la unidad sólo con el carro, soporte, trípode, repisa mesa
recomendados por el fabricante, o que se vendan junto con el
producto Cuando se utiliza un carro, tenga
cuidado cuando mueva el carro y artefacto
junto a para evitar lesiones producidas por la
caída del producto.
13. Desenchufe este artefacto durante las
tormentas eléctricas o cuando no se lo utilice
durante períodos prolongados.
14. Derive todas las reparacbiones al personal de
reparaciones calificado. Es necesario reparar
el artefacto cuando se encuentra dañado; por ejemplo, cuando el
cable de suministro de energía o el enchufe están dañados, cuando
se derrama líquido sobre la unidad o caen objetos dentro del mismo,
cuando el producto ha estado expuesto a la lluvia o a la humedad,
cuando no funciona con normalidad o cuando se ha caído.
15. ADVERTENCIA: Para reducir el riesgo de incendio o descarga eléctrica,
no exponga este artefacto a la lluvia o la humedad. No coloque
objetos llenos de agua, como jarrones, sobre el aparato.
16. El enchufe de conexión de CA se utiliza como dispositivo de
desconexión eléctrica y deberá estar siempre accesible y en
funcionamiento durante el uso previsto. Para desconectar
completamente el aparato de la electricidad, el enchufe de conexión
deberá quitarse por completo del tomacorriente de CA.
17. PRECAUCIÓN: Para reducir el riesgo de incendio o explosión no
exponga las baterías al calor excesivo, como al rayo del sol, fuego u
otras fuentes de calor.
ADVERTENCIA SOBRE
EL CARRO PORTÁTIL
(símbolo provisto por RETAC)
CAN ICES-3(B)/NMB-3(B)
PRECAUCIÓN
RIESGO DE DESCARGA ELÉCTRICA
NO ABRIR

— S2 —
Se incluyen
Contenido de la caja.
Micrófono con cable
Unidad principal
Cables de Audio/Video
Adaptador de CA
Manual Kit de bienvenida

— S3 —
Ubicación de controles (delantero)
1. Botón CDG/USB/BT
2. BOTÓN DE PROGRAMAR/
REPETIR (PROGRAM/REPEAT)
3. Botón de Saltar anterior (Skip
Back) 9
4. BOTÓN CONTROL DE VOZ
AUTOMÁTICO (AUTO VOICE
CONTROL)
5. BOTÓN DE
EMPAREJAMIENTO DE
BLUETOOTH
6. INDICADOR DE BLUETOOTH
7. Botón de ENCENDIDO/
APAGADO (ON/OFF)
8. Botón de SALTAR 10- (MP3)
9. Control de BALANCE
10. Puerto USB
11. Conector de ENTRADA DE
LÍNEA
12. Control de VOLUMEN
PRINCIPAL (MASTER
VOLUME)
13. Botón Reproducir/Pausar
(Play/Pause)
14. Botón de Detener (Stop) <
15. Botón Salto hacia adelante :
(Skip Forward)
16. Control de VOLUMEN DEL
MICRÓFONO (MIC VOLUME)
17. Botón de GRABAR (RECORD)
18. Indicador de grabación
19. Botón LUZ DE DISCO
20. Botón de Saltar 10+ (MP3)
21. Control de ECO (ECHO)
22. Porta micrófono
23. Conector para micrófono 2
24. Conector para micrófono 1
25. Altavoz
26. Indicador CDG
27. Indicador de Reproducir/
Pausar (Play/Pause)
28. Indicador de PROGRAMA
(PROGRAM)
29. Indicador de REPETICIÓN
(REPEAT)
w
v
x
y
U
V
u
X
WW
at
ak
al
am
an
ao
ap
aq
ar
as
bt
bk
bl
bm
bo
bn
bp bq
br bs
Pantalla

— S4 —
Ubicación de los controles (Superior/reverso)
Reverso
3. SALIDA DE VIDEO
4. SALIDA DE AUDIO (R)
5. SALIDA DE AUDIO (L)
6. Conector de entrada de CC
(5.8V)
VISTA SUPERIOR
1. Tapa del CD
2. CD abierto
u
v
w
x
y
U

— S5 —
Conexión
Conexión de micrófono(s)
Micrófonos:
Conecte un micrófono en la entrada para
micrófono 1 y el otro micrófono en la
entrada para micrófono (si lo desea).
Nota: No arroje o dé golpecitos al
micrófono, puede dañar el micrófono o los
parlantes. No gire el micrófono por el cable
porque causará daños al cable interno.
Conexión de la unidad a un televisor
ENTRADA
DE VIDEO
SALIDA DE
AUDIO
R L
Cable de video RCA
SALIDA DE VIDEO
(Amarillo)
SALIDA DE AUDIO
(Blanco-L
rojo-R)
Parte posterior del televisor externo
Para que se reproduzca el video,
las letras y el audio en su televisor,
siga los siguientes pasos:
Conecte el cable de video RCA
(amarillo) a la SALIDA DE VIDEO
(VIDEO OUT) y los cables de audio
(blanco y rojo) a las SALIDAS DE
AUDIO (AUDIO OUT) ubicadas
en la parte trasera de la máquina
Singing Machine.
Conecte el otro extremo del
cable de video RCA (amarillo) a la
ENTRADA DE VIDEO (VIDEO IN) y
los cables de audio (blanco y rojo) a
la ENTRADA DE AUDIO (AUDIO IN)
de su televisor.
Notas:
• Esta unidad puede utilizarse con o sin televisor, pero es altamente recomendable usar
uno para aprovechar todas las funciones.
• También consulte la Guía de usuario del televisor.
• Para ver las letras de canciones en la pantalla, debe usar un disco CD+G.
u
v

— S6 —
Conexión
Conexión de corriente
Conexión a entrada de línea
Introduzca el cable de corriente
de CA en un tomacorriente de CA
con 120V de CA, 60 Hz.
Nota:
Haga todas las conexiones antes
de enchufar a la corriente de CA.
Conecte su dispositivo externo
utilizando un cable adecuado (no
se incluye el cable de audio de
3,5mm) como se muestra.
Nota:
Consulte la página S17 para
seleccionar y utilizar la función de
entrada de línea.
LINE IN
A Unidad Externa
SALIDA DE AUDIO
/AURICULARES
Luces de disco
1
Oprima el botón LUZ (LIGHT) para
encender el efecto de luz, oprímalo
nuevamente para apagarlo.
u

— S7 —
Funcionamiento
Reproducción de un CDG
1
Conecte la unidad como se describió
antes; si utiliza CD+G, se recomienda
que conecte un televisor (consulte
la página S5). Oprima el botón de
ENCENDIDO/APAGADO (ON/
OFF) para encender la unidad.
2
Abra el compartimiento de CD
e introduzca un CD o un CD+G
presionándolo cuidadosamente en el
husillo central. Cierre la tapa del CD.
Nota:
• ¿Qué es un CD+G?
Un CD+G (CD+ Graphics), es el
formato estándar para la mayoría de
los discos de karaoke que mostrarán
las letras de canciones en pantalla.
• Nunca coloque nada que no sea un
CD en el compartimiento, como por
ejemplo objetos extraños que puedan
dañar la unidad.
• Si no introdujo un disco, “NO DISC”
aparecerá en la pantalla de LCD.
• Si se conecta a un televisor u otra
fuente de audio, ajuste el volumen
del televisor con su propio control de
volumen.
3
Presione varias veces el botón CDG/
USB/BT para seleccionar el modo
CDG/CD; aparecerá “--” cuando
busque el disco. Luego, aparecerá
la cantidad total de pistas. Cuando
se introduce un disco CDG, la luz
indicadora de CDG se iluminará.
4
Presione REPRODUCIR/PAUSAR
(PLAY/PAUSE ) para comenzar
la reproducción; si está escuchando
un archivo CD+G, en la pantalla
del televisor aparecerá la imagen
y la letra (si está conectado) y
se encenderá la luz indicadora de
REPRODUCIR/PAUSAR (PLAY/
PAUSE).
u
v
w
x

— S8 —
Funcionamiento
Reproducción de un CDG (Continuación)
5
Ajuste el volumen a un nivel
conveniente, usando el control de
VOLUMEN PRINCIPAL.
6
Conecte los micrófonos y ubique
el interruptor de ENCENDIDO/
APAGADO (ON/OFF) del
micrófono en la posición de
ENCENDIDO (ON).
7
Ajuste el control de VOLUMEN
DEL MICRÓFONO (MIC
VOLUME) hasta el nivel deseado.
Al aumentar el nivel de este
control se incrementará el
volumen de los dos micrófonos.
8
Gire el control de ECO (ECHO) para
darle un efecto de eco a su voz. Gire
hacia MAX para aumentar el efecto
de eco.
9
Puede activarse el control de
AVC (Control Automático de
Voz) girando este control. Cuanto
más alto se ajuste este control,
más se silenciarán las voces de
la grabación multiplex cuando el
cantante comience a cantar ante
el micrófono. Cuando el cantante
deje de cantar, las voces grabadas
en la grabación multiplex volverán
a la normalidad.
10
Gire el control BALANCE hacia la
derecha para escuchar la música
y las voces grabadas en una
grabación multiplex o hacia la
izquierda para escuchar solamente
la música en una grabación
multiplex.
Nota: Para usar el control BALANCE,
debe utilizarse un disco CD+G, de
lo contrario funcionará como un
control de balance estándar.
y
U
W
V
X
at

— S9 —
Funcionamiento
Reproducción de un CDG (Continuación)
11
SALTO: Avance o retroceda una
pista oprimiendo los botones de
Salto
9
/
:.
12
FUNCIÓN REPETIR: Durantela
reproducción, presione REPETIR/
PROGRAMAR (REPEAT/
PROGRAM) una vez para que
se reproduzca varias veces la
canción seleccionada; el indicador
Repetir (Repeat) parpadeará.
Presione el botón REPETIR/
PROGRAMAR (REPEAT/
PROGRAM) una segunda vez para
que se reproduzca varias veces el
CD completo; el indicador Repetir
(Repeat) quedará encendido y
fijo. Presiónelo nuevamente para
cancelar la función Repetir, el
indicador REPETIR/PROGRAMAR
(REPEAT/PROGRAM) se
apagará.
13
PROGRAMAR: Puede programar
hasta 20 pistas de cualquier
disco para reproducir en el
orden deseado. Mientras se
encuentre en el modo Detener
(Stop), presione REPETIR/
PROGRAMAR (REPEAT/
PROGRAM); el indicador
Programar (Program) parpadeará
y aparecerá “P00”. Seleccione
la primera pista con los botones
Salto hacia atrás/adelante
9
/
:
. Presione REPETIR/
PROGRAMAR (REPEAT/
PROGRAM) nuevamente para
confirmar la entrada. Después de
seleccionar las pistas deseadas,
la pantalla mostrará P01, P02,
etc. reconociendo que las pistas
seleccionadas se han programado
y el indicador de programa se
iluminará con luz roja fija. Repita
ak
al
am
am
ak

— S10 —
Funcionamiento
Reproducción de un CDG (Continuación)
hasta agregar un máximo de 20
pistas a la memoria. Al finalizar,
presione el botón REPRODUCIR/
PAUSAR (PLAY/PAUSE
)
para comenzar la reproducción.
Nota:
• Oprima DOS VECES DETENER (STOP
<
) para detener y eliminar el programa.
14
PAUSAR (PAUSE): Durante la
reproducción, si desea pausar
momentáneamente el disco,
oprima REPRODUCIR/ PAUSAR
(PLAY/PAUSE
); el indicador
REPRODUCIR/PAUSAR (PLAY/
PAUSE) parpadeará. Oprima
nuevamente para reanudar la
reproducción normal.
15
Oprima DETENER (STOP
<
) para
detener la reproducción.
16
Oprima ENCENDIDO/APAGADO
(ON/OFF) para apagar la unidad.
an
ao
ap

— S11 —
Funcionamiento
Reproducir canciones desde el USB
1
Conecte la unidad como se describió
previamente. Oprima ENCENDIDO/
APAGADO (ON/OFF) para
encender la unidad.
2
Introduzca un dispositivo flash USB
en el puerto USB de la unidad de
forma tal que esté hacia arriba.
Asegúrese de descargar música de
la tienda de karaoke; consulte la
página S21.
3
Presione varias veces el botón
CDG/USB/BT para seleccionar el
modo USB; aparecerá “LEER USB”
(READ USB) cuando busque el
dispositivo y después aparecerá la
cantidad total de archivos.
Nota: No se puede acceder al modo
USB hasta que no se introduce un
dispositivo flash.
4
Presione el botón REPRODUCIR/
PAUSA (PLAY/PAUSE ) para
comenzar la reproducción. Si está
escuchando un archivo MP3+G,
la imagen y la letra aparecerán en
la pantalla del televisor (si está
conectado).
5
Ajuste el volumen a un nivel
conveniente, usando el control de
VOLUMEN PRINCIPAL (MASTER
VOLUME).
Nota: Si se conecta a un televisor u otra
fuente de audio, ajuste el volumen
del televisor con su propio control
de volumen.
u
v
w
x
y

— S12 —
Funcionamiento
Reproducir canciones desde el USB (Continuación)
6
Conecte los micrófonos y ubique
el interruptor de ENCENDIDO/
APAGADO (ON/OFF) del
micrófono en la posición de
ENCENDIDO (ON).
7
Ajuste el control de VOLUMEN
DEL MICRÓFONO (MIC
VOLUME) hasta el nivel deseado.
Al aumentar el nivel de este control
se incrementará el volumen de los
dos micrófonos.
8
Gire el control de ECO (ECHO) para
darle un efecto de eco a su voz. Gire
hacia MAX para aumentar el efecto de
eco.
9
Puede activarse el control de
AVC girando este control. Cuanto
más alto se ajuste este control,
más se silenciarán las voces de
la grabación multiplex cuando el
cantante comience a cantar ante el
micrófono. Cuando el cantante deje
de cantar, las voces grabadas en la
grabación multiplex volverán a la
normalidad.
10
Gire el control BALANCE hacia la
derecha para escuchar la música y
las voces grabadas en una grabación
multiplex o hacia la izquierda para
escuchar solamente la música en
una grabación multiplex.
V
W
X
at
U

— S13 —
Funcionamiento
Reproducir canciones desde el USB (Continuación)
11
SALTO (SKIP): AAvance o retroceda
una pista presionando los botones
9 o :. También puede saltar 10
archivos/pistas hacia adelante con
el botón Salto 10+ (Skip10+) y
hacia atrás con el botón Salto10-
(Skip10-).
BÚSQUEDA (SEARCH): Cuando
reproduzca cualquier audio
del dispositivo USB, mantenga
oprimidos los botones 9 o :. El
puerto USB buscará a alta velocidad
en dirección hacia adelante o hacia
atrás. La reproducción normal
continuará cuando suelte el botón.
Durante el modo Detener (Stop)
puede seleccionar también un
archivo usando los botones
9
o
:
para desplazarse a la derecha/
izquierda.
12
REPETIR (REPEAT): Durante la
reproducción, presione el botón
REPETIR/PROGRAMAR (REP/
PROG) una vez, el indicador de
REPETIR (REP) parpadeará y se
repetirá la pista actual. Oprima
dos veces el botón REPETIR/
PROGRAMAR (REP/PROG),
el indicador de REPETIR (REP)
parpadeará y todas las pistas MP3
se repetirán de forma continua
dentro de la carpeta actual. Presione
el botón REPETIR/PROGRAMAR
(REP/PROG) tres veces, el
indicador de REPETIR (REP)
quedará encendido y todas las pistas
de MP3 se repetirán. Para detener
la función de repetir, presione
nuevamente el botón; se apagará el
indicador de REPETIR (REP).
al
ak
ak

— S14 —
Funcionamiento
Reproducir canciones desde el USB (Continuación)
13
PROGRAMAR (PROGRAM):
Puede programar hasta 20 pistas
para reproducir en cualquier orden
deseado. Mientras se encuentre en
el modo Detener (Stop), presione
REPETIR/PROGRAMAR (REP/
PROG); el indicador PROGRAMAR
(PROG) parpadeará y aparecerá
“P00”. Seleccione la primera pista
con los botones
9
o
:
, luego
presione PROGRAMAR/REPETIR
(REP/PROG). Repita hasta
agregar un máximo de 20 pistas
a la memoria. Al finalizar, presione
el botón REPRODUCIR/PAUSAR
(PLAY/PAUSE ) para comenzar
la reproducción.
Nota: Oprima DOS VECES el botón de
DETENER (STOP
<
) para detener
y eliminar el programa.
14
PAUSAR (PAUSE): Durante la
reproducción, si desea pausar
momentáneamente el disco,
oprima REPRODUCIR/ PAUSAR
(PLAY/PAUSE); el indicador
REPRODUCIR/PAUSAR (PLAY/
PAUSE) parpadeará. Oprima
nuevamente para reanudar la
reproducción normal.
15
Oprima DETENER (STOP
<
) para
detener la reproducción.
16
Oprima ENCENDIDO/APAGADO
(ON/OFF) para apagar la unidad.
an
ao
am
ap

— S15 —
Funcionamiento
Utilizar un dispositivo Bluetooth
1
Conecte la unidad como se describió
previamente. Oprima ENCENDIDO/
APAGADO (ON/OFF) para encender la
unidad.
2
Oprima varias veces CDG/USB/BT para
seleccionar Bluetooth; “bt” parpadeará
en la pantalla mientras la unidad busca
automáticamente y empareja un dispositivo
Bluetooth previamente sincronizado (si
ya se realizó esta acción antes). Si no hay
dispositivos previamente sincronizados,
realice la conexión como se muestra en el
siguiente paso.
Nota: También puede oprimir SINCRONIZAR
(PAIR) para desconectar los dispositivos
sincronizados y sincronizar uno nuevo.
3
Encienda la opción Bluetooth en su
dispositivo, desde el menú de configuración,
para buscar un dispositivo reconocible
con señal Bluetooth. Seleccione “Singing
Machine” en los resultados del dispositivo
en el menú de Bluetooth, quedará encendido
“bt” en la pantalla.
Nota: También consulte el manual de usuario
de su dispositivo con Bluetooth para más
instrucciones.
4
El indicador de Bluetooth se encenderá y se
oirá un sonido que indicará emparejamiento
exitoso.
Notas:
• Si su dispositivo con Bluetooth le pide un código
durante el proceso de emparejamiento, ingrese
“0000” para conectarse.
• En algunos dispositivos con Bluetooth, una vez
finalizado el emparejamiento, elija su dispositivo
con Bluetooth como “Usar como dispositivo de
audio” o similar.
• Si la conexión se pierde luego de un
emparejamiento exitoso, verifique que la
distancia entre el altavoz y el dispositivo con
Bluetooth no supera los 30 pies/10 metros.
• “Bluetooth” parpadeará en la pantalla del
televisor, y dejará de hacerlo después de haberse
conectado con éxito.
Please connect your Music Device
Your Music Device is connected
3
4
Please connect your Music Device
Your Music Device is connected
u
v
v

— S16 —
Funcionamiento
Utilizar un dispositivo Bluetooth (Continuación)
5
Para controlar su dispositivo
Bluetooth desde esta unidad,
oprima REPRODUCIR/PAUSAR
(PLAY/PAUSE ) para
comenzar la reproducción. Presione
REPRODUCIR/PAUSAR (Play/
Pause ) durante la reproducción
para pausar la canción.
6
Ajuste el volumen a un nivel
conveniente usando el control de
VOLUMEN PRINCIPAL (MASTER
VOLUME) de esta unidad así como
también el Volumen de su dispositivo
Bluetooth.
7
Conecte los micrófonos y ubique
el interruptor de ENCENDIDO/
APAGADO (ON/OFF) del micrófono
en la posición de ENCENDIDO (ON).
8
Ajuste el control de VOLUMEN DEL
MICRÓFONO (MIC VOLUME) hasta
el nivel deseado. Al aumentar el nivel
de este control se incrementará el
volumen de los dos micrófonos.
9
Gire el control de ECO (ECHO) para
darle un efecto de eco a su voz. Gire hacia
MAX para aumentar el efecto de eco.
10
Para regular el balance entre los
altavoces, utilice el control BALANCE.
11
SALTO: Avance o retroceda una
pista oprimiendo los botones de Salto
9
/
:
.
12
Oprima ENCENDIDO/APAGADO
(ON/OFF) para apagar la unidad.
y
U
V
W
Xat
ak
al
ak

— S17 —
Funcionamiento
Uso del conector de ENTRADA de línea
1
Conecte la unidad como se describió
antes (consulte la página S6). Oprima
el botón de ENCENDIDO/APAGADO
(ON/OFF) para encender la unidad.
2
Conecte la unidad externa al conector
de ENTRADA DE LÍNEA (LINE IN)
en la parte trasera de esta unidad.
La conexión a una unidad externa
permitirá reproducir audio a través
de su Singing Machine. La función
ENTRADA DE LÍNEA (LINE IN) se
selecciona automáticamente una vez
que el cable de audio se enchufe.
Notas:
• Se recomienda que configure el volumen
en la unidad auxiliar a 1/3 o menos para
evitar distorsiones.
• No es posible saltar archivos o pistas
cuando se usa un dispositivo externo.
3
Ajuste el volumen con el control de
VOLUMEN PRINCIPAL (MASTER
VOLUME) de esta unidad o con el
control de volumen del dispositivo
externo.
4
Conecte los micrófonos y ubique
el interruptor de ENCENDIDO/
APAGADO (ON/OFF) del micrófono
en la posición de ENCENDIDO (ON).
v
w
x
u

— S18 —
Funcionamiento
Uso del conector de ENTRADA de línea (Continuación)
5
Ajuste el control de VOLUMEN DEL
MICRÓFONO (MIC VOLUME) hasta
el nivel deseado. Al aumentar el nivel
de este control se incrementará el
volumen de los dos micrófonos.
6
Gire el control de ECO (ECHO) para darle
un efecto de eco a su voz. Gire hacia MAX
para aumentar el efecto de eco.
7
Para regular el balance entre los
altavoces, utilice el control BALANCE.
8
Oprima ENCENDIDO/APAGADO
(ON/OFF) para apagar la unidad.
y
U
WV

— S19 —
Funcionamiento
Grabar lo que canta en el USB
u
1
Conecte la unidad como se
describió antes. Oprima el botón de
ENCENDIDO/APAGADO (ON/OFF)
para encender la unidad.
GRABAR MÚSICA DE CDG/CD EN EL
DISPOSITIVO USB
2
Siga las instruccones de
“Reproducción de CDG” que
aparecen en las páginas S7 y S8 para
comenzar la reproducción de música
en CDG/CD.
3
Inserte un dispositivo flash USB en
el puerto USB de la unidad, presione
el botón GRABACIÓN (REC); el
indicador REC se encenderá, la
canción comenzará a reproducirse
y se iniciará la grabación. Cuando
se finalice de grabar, oprima
nuevamente GRABACIÓN (REC)
para detener la grabación.
GRABAR MÚSICA DE BLUETOOTH EN
EL DISPOSITIVO USB
4
Siga las instrucciones de “Utilizar un
dispositivo Bluetooth” que aparecen
en las páginas S15 y S16 para
comenzar la reproducción de música
de Bluetooth.
5
Inserte un dispositivo flash USB en
el puerto USB de la unidad, presione
el botón GRABACIÓN (REC); el
indicador REC se encenderá, la
canción comenzará a grabarse
de inmediato. Cuando se finalice
de grabar, oprima nuevamente
GRABACIÓN (REC) para detener la
grabación.
w
w
y
y

— S20 —
CÓMO GRABAR LO QUE CANTA EN EL
DISPOSITIVO USB
6
Conecte los micrófonos y ubique
el interruptor de ENCENDIDO/
APAGADO (ON/OFF) del micrófono
en la posición de ENCENDIDO (ON).
7
Ajuste el control de VOLUMEN DEL
MICRÓFONO (MIC VOLUME) hasta
el nivel deseado. Al aumentar el nivel
de este control se incrementará el
volumen de los dos micrófonos.
8
Inserte un dispositivo flash USB en
el puerto USB de la unidad, presione
el botón GRABACIÓN (REC); el
indicador REC se encenderá, la
grabación comenzará de inmediato.
Cuando finalice la grabación, oprima
nuevamente GRABACIÓN (REC)
para detener la misma.
9
La música grabada o las canciones
que haya grabado estarán en la
carpeta con la etiqueta REC. La
música o canciones de CDG/CD que
se hayan grabado se guardarán en
orden comenzando por TRK01. (Si
se graba música de CDG, el archivo
gráfico también se grabará). La
música o canciones de Bluetooth
que se hayan grabado se guardarán
en orden comenzando en BT y luego
BT~0.
Nota: No puede grabar desde el
dispositivo USB o la entrada de línea,
solamente podrá hacerlo desde un CD,
CDG o Bluetooth.
Funcionamiento
Grabar lo que canta en el dispositivo USB
U
W
W

— S21 —
Funcionamiento
Dónde descargar archivos MP3+G
PREGUNTAS FRECUENTES
• ¿Dónde puedo obtener ayuda adicional con
los formatos de archivo?
En la página web de Singing Machine Store,
haga clic en FORMATOS DE ARCHIVO
(FILE FORMATS) en el extremo inferior
izquierdo.
Para adquirir y descargar música de Kara-
oke visite http://store.singingmachine.com
y obtendré acceso a más de 12000 de sus
canciones favoritas para karaoke. Necesitará un
dispositivo flash USB (no incluido) para trans
-
ferir las descargas a esta unidad.
Siga estos sencillos pasos:
1
Ingrese http://store.singingmachine.com
en su navegador de Internet y regístrese.
2
Seleccione y adquiera su música de kara-
oke favorita de la Tienda de descargas de
Singing Machine.
3
Descargue su compra seleccionada del
Singing Machine Digital Locker a su dis
-
positivo flash USB.
4
Introduzca el dispositivo flash USB como
se muestra en la página S11 y ¡disfrute!
Nota: Sus canciones descargadas también se
pueden grabar en un CDR/CDRW.
Recomendaciones útiles :
Los archivos .mp3 y .cdg. están disponibles para
descargarse en un único archivo, comprimido
MP3 +G.zip. El archivo MP3+G no se puede
reproducir como un archivo .zip en un dispositivo
flash USB. Para reproducir canciones de karaoke
utilizando un dispositivo flash USB, el archivo
MP3+G.zip se debe descomprimir de la siguiente
manera:
•Conecte un dispositivo flash USB a su
computdora.
•Descargue el archivo MP3+G de su casillero
digital y guarde el archivo .zip* en una carpeta
en su computadora.
•Haga doble clic en el archivo .zip para abrirlo
(visualizará los archivos .mp3 y .cdg en el
dispositivo USB).
•Remueva (expulse) el dispositivo flash USB de
su computadora.
Encienda la máquina Singing Machine y conecte
el dispositivo flash USB.

— S22 —
Guía de Resolución de Problemas
Si esta unidad presentara un problema, lea lo siguiente antes de llamar al servicio técnico:
No hay energía
• La unidad no está encendida; oprima Encendido/Apagado (ON/OFF) para encenderla.
• Verifique que el adaptador de CA esté conectado de forma segura en la parte trasera de la
unidad.
• Conecte la unidad a otro tomacorriente.
No hay sonido (General)
• Volumen principal (Master Volume) está en mínimo: suba el volumen.
• No se seleccionó la Función correcta, seleccione con el botón CDG/USB/BT.
• Si utiliza un dispositivo externo, suba el volumen.
• Verifique si el conector de ENTRADA DE LÍNEA (LINE IN) sigue conectado por un cable.
No hay sonido – si está conectado a un televisor
• El volumen del televisor está silenciado o demasiado bajo.
• No se seleccionó la fuente correcta (generalmente AV) en el menú del televisor.
La letra de la canción no aparece en la pantalla
• Si está conectado a un televisor externo, no se conectó correctamente el cable amarillo de video;
consulte las página S5.
• Si está conectado a un televisor externo, no se seleccionó la fuente correcta (generalmente AV)
en el menú del televisor.
• El archivo o pista que se reproduce no es una grabación de pista con letra. Estos son los únicos
archivos que le permiten ver las letras de las canciones en la pantalla del televisor.
• No aparecerá nada en la pantalla del televisor cuando utilice Entrada de línea (Line In) o Bluetooth.
No se reproducen los archivos en la entrada USB
• El archivo está dañado; reemplácelo.
• El archivo no está en un formato que esta unidad pueda reproducir.
• El producto no admite el dispositivo de USB conectado.
No hay sonido desde el micrófono
• Asegúrese de que está firmemente conectado a la entrada para el MICRÓFONO 1 o 2.
• Asegúrese de que el interruptor de ENCENDIDO/APAGADO (ON/OFF) del micrófono se
encuentre en la posición ENCENDIDO (ON).
• Asegúrese de que el control de VOLUMEN DEL MICRÓFONO (MIC VOLUME) no esté en su
configuración más baja.
• El VOLUMEN PRINCIPAL está fijado en mínimo: suba el volumen.
• Ajuste el control de Eco (Echo) pasado el punto medio en la máquina Singing Machine.
El dispositivo Bluetooth no se puede configurar o conectar con la unidad
• No ha activado la función Bluetooth de su dispositivo; ver la página S15 o consultar el manual de
usuario del dispositivo Bluetooth.
• La unidad no está en modo de emparejamiento; presione el botón Sincronizar (Pair) para
reiniciar el emparejamiento.
La reproducción de la música no está disponible en la unidad luego de conectar de manera
exitosa el Bluetooth
• Asegúrese de que su dispositivo Bluetooth es compatible con el perfil Bluetooth A2DP.
• El volumen del dispositivo externo con Bluetooth está bajo o en silencio; súbalo según lo deseado.

— S23 —
Especificaciones
Audio
Potencia De Salida (Max) ...........................................................................................3.5 Watts (RMS)
Impedancia De Salida ...................................................................................................................3 Ohms
Reproductor De Cd
Respuesta De Frecuencia ............................................................................................ 100Hz - 20kHz
Proporción De Señal Y Ruido ..........................................................................................................50Db
Cantidad de programas ....................................... Programación de acceso aleatorio de 20 pasos
Sistema De Muestreo ......................................................................................... Sobremuestreo Por 8
Bluetooth
Version Bluetooth .....................................................................................................................V2.1+EDR
Distancia De Trabajo ..............................................Hasta 10 Metros Medidos En Espacio Abierto
USB
Formato ...............................................................................................................................................FAT32
Compatibilidad máxima ..................................................................................................................32GB
Sección de entrada auxiliar (aux in): .........................Entradas Para Micrófono De 3.5 mm
Micrófono ....................Impedancia Con Micrófono Dinámico -74 dB 600 Ohm Con 6.3 mm
Energía ................................................................................................................................ DC 5.8V 1.5A
Consumo de energía .................................................................................................................... 8.7 W
Dimensiones (HxWxD) ..............................12.8 x 7.8 x 8.5 inches / 32.5 x 19.8 x 21.5 cm
Peso ..................................................................................................................................5.0 lbs / 2.2 kgs
Las Especificaciones Están Sujetas A Cambios Sin Previo Aviso.
El nombre de la marca Bluetooth® y los logotipos son marcas registradas propiedad de
Bluetooth SIG, Inc., y todo uso que The Singing Machine Company, Inc haga de dichas
marcases en virtud de una licencia. Otras marcas registradas y comerciales pertenecen a sus
respectivos titulares.

— F1 —
Mises en Garde
MISE EN GARDE: AFIN DE RÉDUIRE LE RISQUE D’ÉLECTROCUTION, NE PAS
RETIRER LE COUVERCLE (OU LE DOS DU BOÎTIER). AUCUNE PIÈCE POUVANT
ÊTRE RÉPARÉE PAR L’UTILISATEUR NE SE TROUVE À L’INTÉRIEUR. POUR
TOUTE RÉPARATION, CONTACTER UN TECHNICIEN COMPÉTENT.
La mention Mise en garde se trouve sur le panneau inférieur.
TENSION DANGEREUSE: Le symbole de l’éclair dans un triangle
équilatéral a pour but d’avertir l’utilisateur du danger présenté par
des pièces non isolées à l’intérieur de l’appareil, dont la tension est
suffisante pour provoquer des décharges électriques dangereuses.
AVERTISSEMENT: POUR RÉDUIRE LES RISQUES D’INCENDIE OU
D’ÉLECTROCUTION, N’EXPOSEZ PAS CET APPAREIL À LA PLUIE OU À
L’HUMIDITÉ.
ATTENTION: Le point d’exclamation à l’intérieur d’un triangle
équilatéral a pour but d’avertir l’utilisateur de la présence de
consignes importantes sur le fonctionnement et l’entretien
(réparation) de l’appareil dans la documentation accompagnant
ce produit.
MISE EN GARDE DE LA FCC: Cet appareil peut générer ou utiliser
des fréquences radio. Les modifications ou changements peuvent
causer des interférences nuisibles, à moins que ces modifications ne
soient approuvées expressément dans ce mode d’emploi. L’utilisateur
pourrait perdre l’autorité de faire fonctionner cet équipement en cas de
modification non autorisée.
Cet appareil répond aux exigences de l’alinéa 15 des règlementations FCC.
Son utilisation est soumise aux deux conditions suivantes : 1) Cet appareil
ne peut pas causer d’interférence nuisible et 2), Cet appareil doit accepter
toute interférence reçue, incluant les interférences qui pourraient affecter
son fonctionnement.
REMARQUE: Suite aux tests effectués, il est établi que cet appareil
numérique de Classe B répond aux exigences de l’alinéa 15 des
réglementations FCC. Ces normes sont élaborées pour vous protéger
contre toute interférence nuisible en installation résidentielle. Cet appareil
génère, utilise et peut émettre des fréquences radio. Par conséquent, s’il
n’est pas installé et utilisé en suivant les instructions, il peut causer des
interférences nuisibles aux communications radio. Cependant, aucune
garantie n’est donnée concernant la possibilité d’interférence avec une
installation spécifique. Si une interférence se produisait en réception radio
et/ou de télédiffusion, lors de l’activation et la désactivation de l’appareil,
nous vous recommandons.
• Réorientez ou déplacez l’antenne de réception.
• Éloignez l’appareil du récepteur.
• Branchez l’appareil à une prise de courant différente de celle utilisée
par le récepteur.
• En cas de problème, contactez le vendeur ou un technicien spécialisé
en réception radio/TV.
Le régime nominal est indiqué dans la partie inférieure de l’appareil.
INDUSTRIE CANADA REMARQUE:
Cet appareil est conforme avec Industrie Canada exempts de licence
standard RSS (s). Son fonctionnement est soumis aux deux conditions
suivantes:
1. Cet appareil ne doit pas provoquer d’interférences.
2. Cet appareil doit accepter toute interférence, y compris celles pouvant
causer un mauvais fonctionnement de l’appareil.
AVERTISSEMENT D’ÉGOUTTEMENT: Ce produit ne doit pas être exposé à
l’égouttement ni aux éclaboussures et aucun objet rempli de liquide, tel qu’un
vase, ne doit être placé sur le produit.
AVERTISSEMENT D’AÉRATION: L’aération normale du produit ne doit pas être
entravée pour l’usage prévu..
VÉRIFICATION DE SÉCURIT: Cet appareil est fabriqué et mis à l’essai selon
les normes de sécurité de la FCC, ainsi que les exigences et la conformité du
rendement en matière de sécurité du ministère de la santé et des services
sociaux des États-Unis, et des normes de rendement de radiation dans le sous-
chapitre du 21 CFR .
Mise en garde:
• Ce lecteur de CD est muni d’un faisceau de lumière au laser. Seul un technicien
qualifié devrait retirer le couvercle et tenter toute réparation ou entretien sur
cet appareil afin d’éviter tout risque de blessure aux yeux.
• L’utilisation de commandes, de réglages ou de procédures autre que ceux
spécifiés dans le présent document peut causer un risque d’exposition aux
radiations.
• Cet appareil doit être utilisé dans un endroit aéré.
ATTENTION!
Vous risquez d’être exposé à un rayonnement laser dangereux et invisible
en ouvrant ce produit et en désactivant ou rendant inopérant le dispositif de
verrouillage. Évitez toute exposition directe au faisceau.
Renseignements Importants de Sécurité
1. Lisez ces instructions.
2. Conservez ces instructions.
3. Respectez toutes les mises en garde.
4. Suivez toutes les consignes.
5. N’utilisez pas cet appareil à proximité de l’eau.
6. Nettoyez l’appareil uniquement avec un chiffon sec.
7. Ne bloquez pas les ouvertures d’aération. Installez
conformément selon les consignes du fabricant.
8. N’installez pas à proximité de sources de chaleur telles que les
radiateurs, registres d’air chaud, cuisinières, ou autres appareils
(notamment des amplificateurs) produisant de la chaleur.
9. Ne nuisez pas à la fonction de sécurité de la fiche polarisée ou
de mise à la terre. Une fiche polarisée est dotée de deux broches
dont l’une est plus large que l’autre. Une fiche de mise à la terre
est dotée de deux broches et d’une troisième broche de mise à
la terre. La broche la plus large ou la troisième broche est conçue
pour votre sécurité. Lorsque la broche fournie ne convient pas
à la prise, consultez un électricien afin de remplacer la prise
désuète.
10. Protégez le cordon d’alimentation afin que personne ne marche
dessus ou le pince, particulièrement au niveau des broches, de
la prise et du point où ils sortent de l’appareil.
11. Utilisez seulement les accessoires spécifiés par le fabricant.
12. Utilisez seulement avec un chariot, une
sellette, un trépied, un support ou une
table. Lorsqu’un chariot est utilisé, prenez
garde de ne pas déplacer la combinaison
chariot/appareil pour éviter toute
blessure causée par un renversement.
13. Débranchez cet appareil durant un orage
ou lorsqu’il n’est pas utilisé pendant de
longues périodes.
14. Confiez toutes les réparations à un technicien compétent.
La réparation s’avère nécessaire lorsque l’appareil a été
endommagé, par exemple, si le cordon d’alimentation ou la fiche
a été endommagé, du liquide a été renversé ou des objets sont
tombés dans l’appareil, ou si l’appareil a été exposé à la pluie ou
à l’humidité, ne fonctionne pas normalement, ou a été échappé.
15. AVERTISSEMENT : Pour réduire le risque d’électrocution, évitez
d’exposer l’appareil à la pluie ou à l’humidité. Ne déposez pas
d’objets remplis d’eau, tels qu’un vase, sur l’appareil.
16. La fiche de secteur c.a. est utilisée pour débrancher l’appareil
et doit être facilement accessible et utilisable durant l’usage
prévu. Afin de couper complètement l’alimentation de l’appareil,
la fiche de secteur doit être complètement débranchée de la
prise c.a.
17. MISE EN GARDE : Afin de réduire le risque d’incendie ou
d’explosion, n’exposez pas les piles à une source de chaleur
excessive telle que le soleil, le feu ou autre.
AVERTISSEMENT RELATIF
AU CHARIOT PORTATIF
(Symbol fourni par RETAC)
CAN ICES-3(B)/NMB-3(B)
MISE EN GARDE
RISQUE DE CHOC ÉLECTRIQUE
NE PAS OUVRIR

— F2 —
Contenu
Qu’y a-t-il dans la boîte ?
Microphone câblé
Unité principale
Câbles audio/vidéo
Adaptateur CA
Manuel Ensemble de bienvenue

— F3 —
Emplacement des commandes (dessus)
1. Bouton CDG/USB/BT
2. Bouton PROGRAM/
REPEAT
3. Bouton Skip Back 9 saut
arrière
4. Bouton Commande Vocale
Automatique
5. Bouton d’appairage
BLUETOOTH
6. Voyant BLUETOOTH
7. Bouton MARCHE/ARRÊT
8. SAUT 10- bouton (MP3)
9. Commande d’équilibrage
10. Port USB
11. Prise de la LIGNE de sortie
12. COMMANDE DE VOLUME
MAITRE
13. Bouton Lecture/Pause
14. Bouton Arrêt <
15. Saut avant : bouton
16. Contrôle du VOLUME du
micro
17. Bouton
d’ENREGISTREMENT
18. Indicateur
d’enregistrement
19. Bouton de la lumière
DISCO
20. SAUT 10+bouton (MP3)
21. Contrôle ECHO
22. Support du MIC
23. Prise MIC 2
24. Prise MIC 1
25. Haut-parleur
26. Indicateur CDG
27. Indicateur Lecture/Pause
28. Indicateur de programmes
29. Indicateur de répétition
w
v
x
y
U
V
u
X
WW
at
ak
al
am
an
ao
ap
aq
ar
as
bt
bk
bl
bm
bo
bn
bp bq
br bs
Écran

— F4 —
Emplacement des commandes (arrière/devant)
RÉTROVISEUR
3. Prise de SORTIE vidéo
4. Prise de SORTIE Audio (D)
5. Prise de SORTIE Audio (G)
6. Prise de sortie DC (5.8V)
VUE D’ENSEMBLE
1. Porte du CD
2. CD ouvert
u
v
w
x
y
U

— F5 —
Branchement
Connexion des microphones
Microphones:
Connectez le microphone à une prise
MIC 1 et à une prise MIC jack 2 (lorsque
souhaité).
Remarque: Ne pas échapper le
microphone car cela peut causer des
dommages ainsi qu’aux haut-parleurs.
Ne pas faire virevolter le microphone par
la cordon car cela peut endommager le
câblage encastré.
Connexion de l’unité à un téléviseur
VIDEO
INPUT
AUDIO
INPUT
R L
Câbles RCA
SORTIE VIDÉO
(jaune)
SORTIE AUDIO
(blanc - G
rouge - D)
VUE ARRIÈRE DE LA TV
Pour sortir des données vidéo,
des paroles de chansons et le
son de votre téléviseur, veuillez
suivre les étapes suivantes :
Connectez le câble vidéo RCA
(jaune) à la prise VIDÉO OUT et
les câbles audio (blanc et rouge)
aux prises AUDIO OUT situés à
l’arrière du Singing Machine.
Connectez l’autre extrémité
du câble vidéo RCA (jaune) à
la prise VIDÉO IN et les câbles
audio (blanc et rouge) aux
prises AUDIO IN situés sur votre
téléviseur.
Remarques:
• Cet appareil peut être utilisé avec ou sans un téléviseur, par contre, il est fortement
recommandé d’utiliser un téléviseur afin de pouvoir accéder aux fonctionnalités.
• Référez-vous également au guide de l’utilisateur de votre téléviseur.
• Pour voir les paroles à l’écran, vous devez utiliser le disque CD+G.
u
v

— F6 —
Branchement
Raccordement à l’alimentation CA
Connexion à une prise LINE IN
Insérez le cordon d’alimentation
c.a. dans une prise c.a. située à
proximité et dotée de 120 V c.a.
et 60 Hz.
Remarque:
Effectuer toutes les connexions
avant de brancher le cordon
d’alimentation.
Raccordez simplement votre
appareil externe en utilisant un
câble audio approprié (câble audio
3,5 mm non inclus) tel qu’illustré.
Remarque:
Voir la page F17 pour
sélectionner et utiliser la fonction
LINE IN.
LINE IN
Vers l'unité externe
SORTIE AUDIO
/ PRISE DU CASQUE
Lumières Disco
1
Appuyer le bouton LIGHT pour
allumer l’effet de luminosité, appuyer
de nouveau pour l’éteindre.
u

— F7 —
Utilisation
Lecture d’un CDG
1
Connectez-vous à l’appareil tel que
décrit précédemment; si vous utilisez
un disque CD+G, il devrait être
branché à un téléviseur (voir page F5).
Appuyez sur la touche d’alimentation
MARCHE/ARRÊT (ON/OFF) pour
allumer l’appareil.
2
Soulevez la porte de CD et insérez
un CD ou un CD+G en appuyant
doucement sur l’axe central. Fermez
ensuite la porte du CD.
Remarques:
• Qu’est-ce que le CD+G?
A CD+G (CD graphiques) est le
format standard pour la plupart des
disques de karaoké qui affichent les
paroles à l’écran.
• Ne placer aucun objet autre qu’un CD
dans le compartiment car les objets
étrangers peuvent endommager
l’appareil.
• S’il n’y a aucun disque d’inséré, la
mention « Non » s’affiche à l’écran.
• Si connecté à un téléviseur ou à une
autre source audio, réglez le volume
du téléviseur en utilisant sa propre
commande de volume.
3
Appuyez plusieurs fois sur la touche
CDG/USB/BT pour sélectionner
le mode CDG/CD; la mention “--”
s’affiche lors de la recherche sur le
disque et ensuite, le nombre de pistes
s’affichera. Lorsqu’un disque CDG est
inséré, l’indicateur CDG s’allume.
4
Appuyez sur la touche LECTURE/
PAUSE (PLAY/PAUSE ) pour
débuter la lecture; si vous écoutez un
fichier CD+G, l’image et les paroles
apparaîtront sur l’écran du téléviseur
(si celui-ci est connecté) et
l’indicateur LECTURE/PAUSE (PLAY/
PAUSE) s’allumera.
u
v
w
x

— F8 —
Utilisation
Lecture d’un CDG (suite)
5
Ajustez le volume à un niveau
confortable en utilisant la
commande de VOLUME
PRINCIPAL (MASTER VOLUME).
6
Connectez le ou les micro(s) de la
manière indiquée à la page F5, puis
glissez l’interrupteur MARCHE/
ARRÊT (ON/OFF) à la position
MARCHE.
7
Réglez le volume du microphone
(MIC VOLUME) au niveau
souhaité. Le fait de croître ce
réglage augmente le volume des
deux microphones.
8
Réglez la commande ÉCHO
(ECHO) pour appliquer un effet
d’écho à votre voix. Tourner dans le
sens horaire pour augmenter l’effet
écho.
9
L’option CONTRÔLE
AUTOMATIQUE DE LA VOIX
peut être activé en tournant le
A.V.C. Plus le contrôle est réglé
à un haut niveau, plus les voix
sur l’enregistrement multiplex
seront mis en sourdine lorsque
le chanteur commence à chanter
dans le microphone. Lorsque le
chanteur arrête de chanter, les voix
enregistrés sur l’enregistrement
multiplex se nivelleront en mode
normal.
10
Faire pivoter la commande
BALANCE dans le sens horaire
pour écouter les voix enregistrés à
partir de l’enregistrement multiplex
ou dans le sens antihoraire pour
écouter seulement la musique à
partir de l’enregistrement multiplex.
Remarque:
Pour utiliser la commande
BALANCE, le disque CD+G doit être
utilisé ou il fonctionnera comme un
contrôle standard BALANCE.
y
U
W
V
X
at

— F9 —
Utilisation
Lecture d’un CDG (suite)
11
PASSER: Avancer ou retourner
d’une piste à l’autre en appuyant
sur les touches de PASSER 9/
PASSER :.
12
REPEAT (RÉPÉTITION) : Au
cours de la lecture, appuyez sur la
touche RÉPÉTER/PROGRAMME
(REPEAT/PROGRAM) une fois
pour une lecture répétée de la
chanson sélectionnée; l’indicateur
Répéter clignotera. Appuyez sur la
touche RÉPÉTER/PROGRAMME
(REPEAT/PROGRAM) une
seconde fois pour une lecture
répétée de toutes les pistes du
CD; l’indicateur Répéter s’allume
de couleur clair. Appuyez de
nouveau pour annuler la fonction
Répéter, l’indicateur RÉPÉTER/
PROGRAMME s’éteint.
13
PROGRAMME: Vous pouvez
programmer jusqu’à 20 pistes
sur n’importe quel disque pour
la lecture dans n’importe quel
ordre souhaité. En mode arrêt,
appuyer sur le bouton PROG/
REP; l’indicateur de programmes
clignotera et apparaîtra «P00».
Sélectionner la première piste
utilisant les boutons Skip Back
9/ Skip Forward :. Appuyer
le bouton PROG/REP pour
confirmer l’entrée. Après avoir
sélectionné les pistes désirées,
l’écran affichera P01, P02,
etc. reconnaissant les pistes
sélectionnées qui ont été
programmées et l’indicateur de
programmes s’allumera plein
rouge. Répéter pour définir jusqu’à
20 pistes dans la mémoire. Une
fois terminé, appuyez le bouton
PLAY/PAUSE pour lancer la
lecture.
ak
al
am
am
ak

— F10 —
Utilisation
Lecture d’un CDG (suite)
Remarque:
• Appuyez sur la touche ARRÊT (STOP
<) DEUX FOIS pour arrêter et
supprimer le programme.
14
PAUSE: Durant la lecture, si
vous désirez arrêter le disque
momentanément, appuyez sur
LECTURE/PAUSE (PLAY/
PAUSE ); l’indicateur clignote.
Appuyez à nouveau pour reprendre
la lecture normale.
15
Appuyez sur la touche ARRÊT
(STOP <) pour arrêter
l’enregistrement.
16
Appuyez sur la touche MARCHE/
ARRÊT (ON/OFF) pour éteindre
l’appareil.
an
ao
ap

— F11 —
Utilisation
Lecture de chansons à partir de la clé USB
1
Connectez-vous à l’appareil tel que
décrit précédemment. Appuyez sur
la touche d’alimentation MARCHE/
ARRÊT (ON/OFF) pour allumer
l’appareil.
2
Insérez une clé USB dans le port USB
de l’appareil, face vers le haut.
Assurez-vous de télécharer de la
musique de la boutique Karaoké, voir
page F21.
3
Appuyer plusieurs fois le bouton CDG
/ USB / BT pour sélectionner le mode
USB; « USB » apparaîtra lors de la
recherche du lecteur et alors le nombre
total de fichiers apparaîtra.
Remarque:
Le mode USB n’est pas accessible
tant qu’une carte mémoire n’est pas
insérée.
4
Appuyer le bouton LECTURE / PAUSE
pour lancer la lecture; si vous
écoutez un fichier MP3 + G, l’image et
les paroles apparaîtront sur l’écran du
téléviseur (si connecté).
5
Ajustez le volume à un niveau
confortable en utilisant la commande
de VOLUME PRINCIPAL (MASTER
VOLUME).
Remarque:
Si connecté à un téléviseur ou à une
autre source audio, réglez le volume
du téléviseur en utilisant sa propre
commande de volume.
u
v
w
x
y

— F12 —
Utilisation
Lecture de chansons à partir de la clé USB (suite)
6
Connectez le ou les micro(s) de la
manière indiquée à la page F5, puis
glissez l’interrupteur MARCHE/
ARRÊT (ON/OFF) à la position
MARCHE.
7
Réglez le VOLUME DU
MICROPHONE (MIC VOLUME) au
niveau souhaité. Le fait de croître
ce réglage augmente le volume des
deux microphones.
8
Réglez la commande ÉCHO
(ECHO) pour appliquer un effet
d’écho à votre voix. Tourner dans le
sens horaire pour augmenter l’effet
écho.
9
L’option CONTRÔLE
AUTOMATIQUE DE LA VOIX peut
être activé en tournant le A.V.C.
(Contrôle automatique de la
voix). Plus le contrôle est réglé
à un haut niveau, plus les voix
sur l’enregistrement multiplex
seront mis en sourdine lorsque
le chanteur commence à chanter
dans le microphone. Lorsque le
chanteur arrête de chanter, les voix
enregistrés sur l’enregistrement
multiplex se nivelleront en mode
normal.
10
Faire pivoter la commande
BALANCE dans le sens horaire
pour écouter les voix enregistrés à
partir de l’enregistrement multiplex
ou dans le sens antihoraire pour
écouter seulement la musique à
partir de l’enregistrement multiplex.
V
W
X
at
U

— F13 —
Utilisation
Lecture de chansons à partir de la clé USB (suite)
11
PASSER: Avancer ou revenir une
piste en arrière en appuyant sur le
9 ou : les boutons. Vous pouvez
également passer vers l’avant de
10 fichiers/pistes en utilisant le
bouton SKIP10 + et revenir en
arrière 10 fichiers / pistes avec le
bouton SKIP 10-.
RECHERCHE: Lors de la lecture
de n’importe quel audio sur l’USB,
maintenir enfoncés les boutons 9
ou :. La clé USB recherchera à
grande vitesse en direction avant
ou arrière. La lecture normale
continuera lorsque vous relâcherez
le bouton.
Durant le mode arrêt vous pouvez
également sélectionner un fichier
utilisant le 9 ou : les boutons
pour faire défiler droite/gauche.
12
RÉPÉTER: Pendant la lecture,
appuyer le bouton REP/PROG une
fois pendant la lecture, l’indicateur
REP clignotera et la piste en cours
sera répétée. Appuyer deux fois sur
le bouton REP/PROG, l’indicateur
REP clignotera, toutes les pistes
MP3 sur le présent dossier seront
répétées en continu. Appuyer
trois fois le bouton REP/PROG,
l’indicateur REP s’allumera pleine
couleur, toutes les pistes MP3
joueront à plusieurs reprises. Pour
arrêter la fonction de répétition,
appuyer à nouveau le bouton;
l’indicateur REP s’éteindra.
al
ak
ak

— F14 —
Utilisation
Lecture de chansons à partir de la clé USB (suite)
13
PROGRAMME: Vous pouvez
programmer jusqu’à 20 pistes pour
la lecture dans n’importe quel ordre
souhaité. Pendant le mode arrêt,
appuyer le bouton PROG /REP;
l’indicateur de PROG clignotera
et apparaîtra «P00». Sélectionner
la première piste en utilisant le 9
ou : les boutons, puis appuyer
le bouton REP/PROG. Répéter
pour définir jusqu’à 20 pistes dans
la mémoire. Une fois terminé,
appuyez le bouton PLAY/PAUSE
pour lancer la lecture.
Remarque:
Appuyez sur la touche ARRÊT
(STOP <) DEUX FOIS pour arrêter
et supprimer le programme.
14
PAUSE: Durant la lecture, si
vous désirez arrêter le disque
momentanément, appuyez sur
LECTURE/PAUSE (PLAY/PAUSE
) l’indicateur clignote. Appuyez
à nouveau pour reprendre la lecture
normale.
15
Appuyez sur la touche ARRÊT
(STOP <) pour arrêter
l’enregistrement.
16
Appuyez sur la touche MARCHE/
ARRÊT (ON/OFF) pour éteindre
l’appareil.
an
ao
am
ap

— F15 —
Utilisation
Utilisation d’un appareil Bluetooth
1
Raccordez l’appareil de la manière décrite
précédemment. Appuyez sur la touche
MARCHE/ARRÊT (ON\OFF) pour allumer
l’appareil.
2
Appuyez plusieurs fois sur la touche CDG/
USB/BT pour sélectionner l’option Bluetooth;
la mention « bt » clignote à l’écran pendant
l’appareil recherche automatiquement un
dispositif Bluetooth jumelé précédemment
(s’il y a lieu). S’il n’y a eu aucun jumelage
précédemment, connectez-vous tel
qu’indiqué à la prochaine étape.
Remarque: Vous pouvez également appuyer sur
la touche JUMELER (PAIR) pour déconnecter
tout appareil jumelé afin de le jumeler à un autre
appareil.
3
Activer dans les paramètres l’option
Bluetooth de votre appareil pour rechercher
un périphérique détectable avec un signal
Bluetooth. Sélectionner « Singing Machine »
à partir des résultats de l’appareil sur le menu
Bluetooth, « bt » s’allumera pleine couleur sur
l’écran.
Remarque: Aussi se référer au manuel
d’utilisation de votre appareil Bluetooth pour des
instructions détaillées.
4
L’indicateur Bluetooth s’allumera et un son
d’appairage réussi sera entendu.
Remarque:
• Si votre dispositif Bluetooth vous demande
d’inscrire un mot de passe au cours du
processus de jumelage, veuillez inscrire “0000”
pour vous connecter.
• Sur certains dispositifs Bluetooth, lorsque le
jumelage est terminé, vous devez sélectionner
l’appareil à l’aide de l’option « Utiliser comme
périphérique audio » ou d’une option semblable.
• Si la connexion est perdue après un jumelage
réussi, assurez-vous que la distance entre
les haut-parleurs et le dispositif Bluetooth
n’excède pas 30 pi/10 mètres.
• «Bluetooth» clignotera sur l’écran du téléviseur
et cessera de clignoter après une connexion
réussie.
Please connect your Music Device
Your Music Device is connected
3
4
Please connect your Music Device
Your Music Device is connected
u
v
v

— F16 —
Utilisation
Utilisation d’un appareil Bluetooth (Suite)
5
Pour contrôler le dispositif Bluetooth
à partir de cet appareil, appuyez sur
la touche LECTURE/PAUSE (PLAY/
PAUSE ) pour débuter la lecture.
Appuyez sur la touche LECTURE/
PAUSE (PLAY/PAUSE ) au
cours de la lecture pour interrompre
la chanson.
6
Ajustez le volume à un niveau
confortable en utilisant la commande
du VOLUME PRINCIPAL (MASTER
VOLUME) sur cet appareil ou
le volume sur votre dispositif
Bluetooth.
7
Connectez le(s) micro(s), puis glissez
l’interrupteur MARCHE/ARRÊT sur le
micro à la position MARCHE.
8
Réglez le VOLUME DU
MICROPHONE (MIC VOLUME) au
niveau souhaité. Le fait de monter ce
réglage augmente le volume du/des
microphone(s) connecté(s).
9
Réglez la commande ÉCHO (ECHO)
pour appliquer un effet d’écho à votre
voix. Tourner vers la mention MAX pour
augmenter l’effet écho.
10
Ajustez la balance entre les haut-
parleurs en utilisant les commandes
BALANCE.
11
SAUT: Avancer ou retourner d’une
piste à l’autre en appuyant sur les
touches PASSER 9/PASSER :.
12
Appuyez sur la touche MARCHE/
ARRÊT (ON\OFF) pour éteindre
l’appareil.
y
U
V
W
Xat
ak
al
ak

— F17 —
Utilisation
En utilisant l’entrée LINE IN
1
Raccordez l’appareil de la manière
décrite précédemment (voir page F6).
Appuyez sur la touche d’alimentation
MARCHE/ARRÊT (ON/OFF) pour
allumer l’appareil.
2
Connectez l’appareil audio externe à
l’entrée LINE IN située à l’arrière de cet
appareil. La connexion avec l’appareil
externe permettra au son audio d’être
en lecture sur le Singing Machine. La
fonction LINE IN est automatiquement
sélectionnée une fois que le câble audio
est connecté.
Remarques:
• Il est fortement recommandé de régler
le volume de l’appareil auxiliaire à 1/3
du niveau ou plus bas pour éviter toute
distorsion.
• Il n’est pas possible de passer des
fichiers/pistes lorsque vous utiliser un
appareil externe.
3
Réglez le volume en utilisant la
commande de VOLUME PRINCIPAL
(MASTER VOLUME) de cet appareil
ou à partir de la commande de volume
de votre dispositif externe.
4
Connectez le(s) micro(s), puis glissez
l’interrupteur MARCHE/ARRÊT sur le
micro à la position MARCHE.
v
w
x
u

— F18 —
Utilisation
En utilisant l’entrée LINE IN
5
Réglez le Commande VOLUME DU
MICROPHONE (MIC VOLUME) au
niveau souhaité. Le fait de monter ce
réglage augmente le volume du micro.
6
Réglez la commande ÉCHO (ECHO)
pour appliquer un effet d’écho à votre
voix. Tourner vers la mention MAX
pour augmenter l’effet écho.
7
Ajustez la balance entre les haut-
parleurs en utilisant les commandes
BALANCE.
8
Appuyez sur la touche MARCHE/
ARRÊT (ON\OFF) pour éteindre
l’appareil.
y
U
WV

— F19 —
Utilisation
Enregistrement chantant vers l’USB
u
1
Connecter l’appareil comme décrit
plus haut. Appuyer le bouton
MARCHE/ARRÊT pour allumer
l’appareil.
ENREGISTRER LA MUSIQUE CDG/CD
AU PORT USB
2
Suivre les instructions pour «Jouer un
CDG» décrites aux pages 7 et 8 pour
débuter la lecture de musique CDG/
CD.
3
Insérer une clé USB dans le port
USB de l’appareil, appuyer le bouton
REC; l’indicateur REC s’allumera,
la chanson recommencera et
l’enregistrement débutera. Lorsque
l’enregistrement est terminé,
appuyer encore le bouton REC pour
arrêter.
ENREGISTRER LA MUSIQUE
BLUETOOTH AU PORT USB
4
Suivre les instructions du paragraphe
«utilisation d’un périphérique
Bluetooth» décrite aux pages 15 et
16 pour commencer la lecture de la
musique Bluetooth.
5
Insérer une clé USB dans le port
USB de l’appareil, appuyer le bouton
REC; l’indicateur REC s’allumera, la
chanson s’enregistrera tout de suite.
Lorsque l’enregistrement est terminé,
appuyer encore le bouton REC pour
arrêter.
w
w
y
y

— F20 —
Enregistrement de votre chanson sur
l’USB
6
Connectez le(s) micro(s), puis glissez
l’interrupteur MARCHE/ARRÊT sur le
micro à la position MARCHE.
7
Régler le VOLUME du MICRO
comme vous le souhaitez. Augmenter
ce contrôle accroîtra le volume de
deux microphones.
8
Insérer une clé USB dans le port
USB de l’appareil, appuyer le
bouton REC; l’indicateur REC
s’allumera, l’enregistrement
débutera immédiatement. Lorsque
l’enregistrement est terminé,
appuyer encore le bouton REC pour
arrêter.
9
Toute musique enregistrée ou
chanson enregistrée seront dans le
fichier étiqueté REC. La musique ou
enregistrement de chanson CDG/
CD seront sauvegardés dans l’ordre
en commençant avec TRK01. (Si
la musique CDG est enregistrée,
le fichier graphique est également
enregistré.) La musique Bluetooth
ou l’enregistrement d’une chanson
seront sauvegardés dans l’ordre à
partir de BT, puis BT-0.
Remarques:
Vous ne pouvez pas enregistrer
à partir de l’USB ou le Line In,
seulement à partir du CD, CDG ou
Bluetooth.
Utilisation
Enregistrement chantant vers l’USB
U
W
W

— F21 —
Utilisation
Où télécharger des fichiers MP3+G
FAQ
• Où puis-je obtenir de l’aide supplémentaire
concernant les formats de fichiers?
Lorsque vous êtes sur la page Internet de
la boutique Singing Machine, simplement
cliquer sur format de fichiers (FILE
FORMATS) au bas à gauche.
Pour acheter ou télécharger des chansons de
karaoké, veuillez s’il vous plaît, visiter le http://
store.singingmachine.com pour accéder à plus
de 12 000 de vos chansons de karaoké favor-
ites. Vous aurez besoin d’un disque USB flash
(non inclus) pour transférer les téléchargements
vers l’unité.Veuillez suivre les étapes simples:
1
Rendez-vous au site http://store.singing-
machine.com à partir de votre navigateur
Internet et ensuite, enregistrez-vous.
2
Sélectionnez et achetez vos chansons de
karaoké préférées à partir de la boutique
Singing Machine Download.
3
Téléchargez vos achats sélectionnés à
partir du casier Singing Machine Digital
vers disque USB flash.
4
Insérez le lecteur USB flash comme
démontré à la page F11 et amusez-vous!
Remarques:
Vos chansons téléchargées peuvent aussi être
gravées sur un disque compact (CDR-CDRW).
Conseils pratiques :
Les fichiers .mp3 et .cdg sont fournis en
téléchargement dans un seul fichier .zip MP3+G
compressé. Il n’est pas possible d’effectuer la lecture
du fichier MP3+G en tant que fichier .zip sur une
mémoire flash USB. Pour effectuer la lecture de
chansons de karaoké à l’aide d’une mémoire flash USB,
le fichier .zip MP3+G doit être décompressé comme
suit :
• Connectez une mémoire flash USB à votre ordinateur
• Téléchargez le fichier MP3+G à partir de votre
section numérique Digital Locker et enregistrez le
fichier.zip* dans un dossier de votre ordinateur
• Double-cliquez sur le fichier .zip pour l’ouvrir (vous
pourrez voir les fichiers .mp3 et .cdg)
• Faites glisser les fichiers .mp3 et .cdg vers la mémoire
flash USB
• Retirez (éjectez) la mémoire flash USB de votre
ordinateur
Allumez le karaoké Singing Machine et connectez la
mémoire flash USB

— F22 —
Guide de dépannage
En cas de problème avec cet appareil, vérifiez les points suivants avant de le faire réparer:
Aucune alimentation
• L’appareil n’est pas sous tension; appuyez sur la touche MARCHE/ARRÊT (ON\OFF)
pour allumer l’appareil.
• Assurez-vous que l’adaptateur AC est bien connecté à l’arrière de l’appareil.
• Connectez l’appareil à un autre périphérique.
Aucun son - général
• Le volume principal est réglé au minimum : augmenter le volume.
• Si la fonction sélectionnée est incorrecte, appuyez sur la touche CDG/USB/BT pour
changer de fonction.
• Si vous utilisez un dispositif externe, augmenter le volume.
• Vérifier si la prise LINE IN est toujours connectée par un câble.
Aucun son - si connecté à votre téléviseur
• Le volume du téléviseur est en mode silence ou trop faible.
• La source appropriée (habituellement AV) n’est pas sélectionnée dans le menu du
téléviseur.
Les paroles n’apparaissent pas sur le téléviseur
• Si connecté au téléviseur, la prise Vidéo n’est pas connectée correctement; voir page F5.
• Si connecté au téléviseur, sélectionnez la bonne source sur votre téléviseur
(habituellement AV).
• Le fichier/piste en lecture n’est pas un enregistrement avec paroles. Ce sont uniquement
ces fichiers qui peuvent vous permettre de voir les paroles sur l’écran de votre téléviseur.
• Rien ne s’affiche à l’écran du téléviseur lorsque vous utilisez LINE IN ou Bluetooth.
Les fichiers sur la clé USB ne s’ouvrent pas
• Le fichier est corrompu; remplacez le fichier.
• Le fichier n’est pas dans un format de lecture compatible.
• Le dispositif USB n’est pas compatible à l’appareil.
Aucun son provenant du microphone
• Assurez-vous que le microphone est connecté fermement à la prise MIC 1 ou MIC 2.
• Assurez-vous que le commutateur MARCHE/ARRÊT (ON\OFF) du microphone soit en
position MARCHE.
• Assurez-vous que le niveau du MIC VOLUME n’est pas trop faible.
• Le volume principal est réglé au minimum : augmenter le volume.
• Augmentez le contrôle ÉCHO au-dessus du milieu.
L’appareil Bluetooth ne peut pas être jumelé ou connecté avec l’appareil
• Vous n’avez pas activé la fonction Bluetooth de votre appareil; consultez la page F20 ou
reportez-vous au mode d’emploi de l’appareil Bluetooth.
• Le système n’est pas en mode de jumelage : appuyez sur la touche JUMELER (PAIR)
pour redémarrer le jumelage.
La lecture musicale n’est pas disponible sur l’appareil après l’établissement de la
connexion Bluetooth
• Assurez-vous que l’appareil Bluetooth est compatible avec le profil Bluetooth A2DP.
• Le volume du dispositif externe Bluetooth est en mode silence ou trop faible; augmenter
le volume.
• Assurez-vous que l’application de la musique est ouverte.

— F23 —
Caractéristiques techniques
AUDIO
Alimentation de sortie (MAX) ...................................................................................3.5 Watts (RMS)
Impédance de sortie .....................................................................................................................3 Ohms
SECTION DU LECTEUR DE CD
RÉPONSE EN FRÉQUENCE .......................................................................................... 100Hz - 20kHz
RATIO DU SIGNAL-BRUIT ................................................................................................................ 50dB
NOMBRE DE PROGRAMMES .......................... 20 étapes de programmation d’accès aléatoires
SYSTÈME D’ÉCHANTILLONNAGE .............................................................8 fois sur échantillonnage
BLUETOOTH
Bluetooth Version .....................................................................................................................V2.1+EDR
Distance de travail ...................................jusqu’à 30 pieds/10 mètres mesuré en espace ouvert
USB
Format .................................................................................................................................................FAT32
Compatibilité maximale ...................................................................................................................32GB
SECTION AUX IN .........................................................................3,5 mm prise d’écouteurs stéréo
MICROPHONE ..........-74db 600 Ohm impédance avec microphone dynamique de 6,3 mm
SECTION PUISSANCE .................................................................................................... DC 5.8V 1.5A
CONSOMMATION D’ÉNERGIE...................................................................................................8,7 W
DIMENSIONS (H x L x P) ......................... 12,8 x 7,8 x 8,5 inches / 32,5 x 19,8 x 21,5 cm
Poids ................................................................................................................................5,0 lbs / 2,2 kgs
Caractéristiques sujettes à modifications sans préavis.
Le nom de marque et les logos Bluetooth® sont des marques déposées de Bluetooth
SIG. Inc. et toute utilisation de ces marques et logos par The Singing Machine Company,
Inc. s’effectue sous licence. Les autres marques de commerce et noms de commerce
appartiennent à leurs propriétaires respectifs.

Visit Our Website: www.singingmachine.com
Visite nuestro sitio web: www.singingmachine.com
Visitez notre site Internet au: www.singingmachine.com
The Singing Machine Company, Inc.
4060 E Jurupa Street, Unit B
Ontario, CA 91761-1413 USA
Copyright © 2018 All Rights Reserved.
Derechos de autor © 2018 Todos los derechos reservados.
Droit d’auteur © 2018 Tous Droits Réservés.
PRINTED IN CHINA
IMPRESO EN CHINA
IMPRIMÉ EN CHINE
625BT-1801-ESF01-US
-
 1
1
-
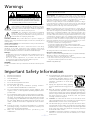 2
2
-
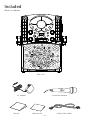 3
3
-
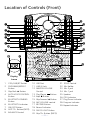 4
4
-
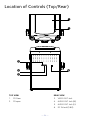 5
5
-
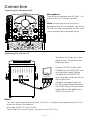 6
6
-
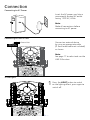 7
7
-
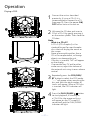 8
8
-
 9
9
-
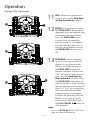 10
10
-
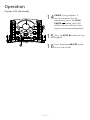 11
11
-
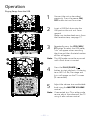 12
12
-
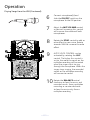 13
13
-
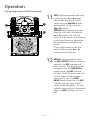 14
14
-
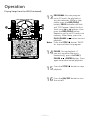 15
15
-
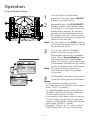 16
16
-
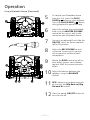 17
17
-
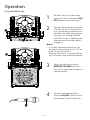 18
18
-
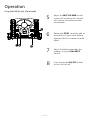 19
19
-
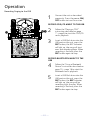 20
20
-
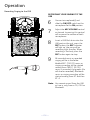 21
21
-
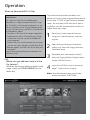 22
22
-
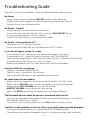 23
23
-
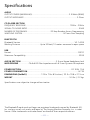 24
24
-
 25
25
-
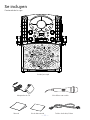 26
26
-
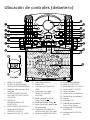 27
27
-
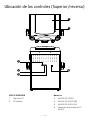 28
28
-
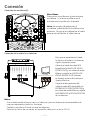 29
29
-
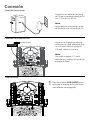 30
30
-
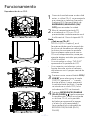 31
31
-
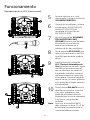 32
32
-
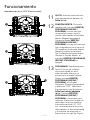 33
33
-
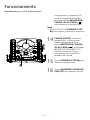 34
34
-
 35
35
-
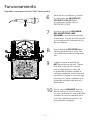 36
36
-
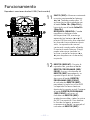 37
37
-
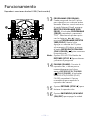 38
38
-
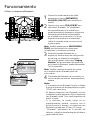 39
39
-
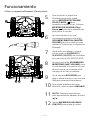 40
40
-
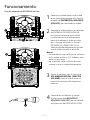 41
41
-
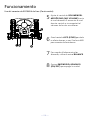 42
42
-
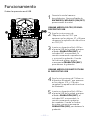 43
43
-
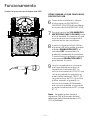 44
44
-
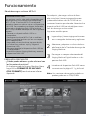 45
45
-
 46
46
-
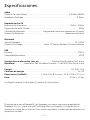 47
47
-
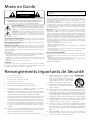 48
48
-
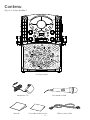 49
49
-
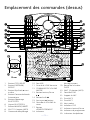 50
50
-
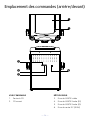 51
51
-
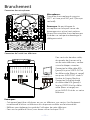 52
52
-
 53
53
-
 54
54
-
 55
55
-
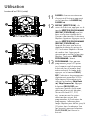 56
56
-
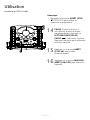 57
57
-
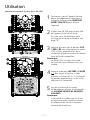 58
58
-
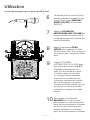 59
59
-
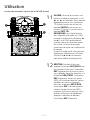 60
60
-
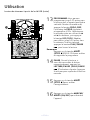 61
61
-
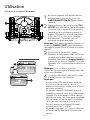 62
62
-
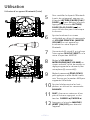 63
63
-
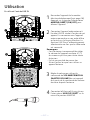 64
64
-
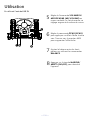 65
65
-
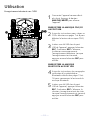 66
66
-
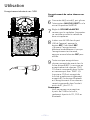 67
67
-
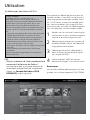 68
68
-
 69
69
-
 70
70
-
 71
71


SingingMachine SML625BT Manual de usuario
- Categoría
- Sistemas de karaoke
- Tipo
- Manual de usuario
en otros idiomas
- français: SingingMachine SML625BT Manuel utilisateur
- English: SingingMachine SML625BT User manual
Artículos relacionados
-
SingingMachine SML418 Manual de usuario
-
-
SingingMachine Bluetooth Karaoke Machine Manual de usuario
-
-
-
SingingMachine ISM1030 Manual de usuario
-
-
-
SingingMachine Fiesta Go Manual de usuario
-
Otros documentos
-
Singing Machine SML385UZZ Guía del usuario
-
The Singing Machine STVG785BTBK Manual de usuario
-
Memorex .MKS2422 Manual de usuario
-
Singing Machine SMM548 Manual de usuario
-
-
-
-
-
GPX BCD1806 Manual de usuario
-
Singing Machine SML668G Manual de usuario