
SMARTHOME
WHOLE HOME TANKLESS WATER HEATER
INSTALLATION, USE AND CARE MANUAL
INSTALLATION, USE AND CARE MANUAL
HEATING WATER SMARTER
SMARTHOME
Mini Tank Water Heater
HEATING WATER SMARTER
PHONE: 1-866-356-1992 EMAIL: SUPPORT@ECCOTEMP.COM ADDRESS: 315-A INDUSTRIAL ROAD, SUMMERVILLE, SC 29483
PHONE: 1-866-356-1992 EMAIL: SUPPORT@ECCOTEMP.COM ADDRESS: 315-A INDUSTRIAL ROAD, SUMMERVILLE, SC 29483
THE FUTURE OF EFFICIENCY
SMARTHOME
Mini Tank Water Heater
HEATING WATER SMARTER
PHONE: 1-866-356-1992 EMAIL: SUPPORT@ECCOTEMP.COM ADDRESS: 315-A INDUSTRIAL ROAD, SUMMERVILLE, SC 29483
ESH
4.0
THE FUTURE OF EFFICIENCYTHE FUTURE OF EFFICIENCY
SH12
ESH 2.5/4.0
THE FUTURE OF EFFICIENCY

Support: Support.Eccotemp.com Shop Online: Eccotemp.com Store Locator: Eccotemp.com/locator
2
ENGLISH
PLEASE NOTE: MINI TANKS ARE FOR INDOOR PERMANENT INSTALLATIONS ONLY. BEFORE POWERING THE WATER HEATER, BE SURE THAT THE SYSTEM IS COMPLETELY FILLED WITH WATER
AND ALL AIR IS REMOVED.THIS MANUAL AND ALL ECCOTEMP CONTENT IS SUBJECT TO CHANGE WITHOUT NOTICE. PLEASE VISIT SUPPORT.ECCOTEMP.COM FOR MORE INFORMATION.
MODEL /
le modèle
:
ESH-2.5
RATED POWER
/
Puissance nominale:
RATED VOLTAGE /
Tension Nominale:
TANK CAPACITY /
Capacitè du rèservoir:
MAX RATED PRESSURE /
Pression Maximale Nominale:
Conforms To UL STD. 174
Certified To CSA STD. C22.2 NO. 110
SERIAL NO /
Numèro de
Sèrie
:
1440W
120V ~ 60Hz
150 psi
MODEL
/
le modèle
:
RATED POWER
/
Puissance nominale:
RATED VOLTAGE
/
Tension Nominale:
TANK CAPACITY /
Capacitè du rèservoir
:
ESH-4.0
MAX RATED PRESSURE /
Pression Maximale Nominale:
Conforms To UL STD. 174
Certified To CSA STD. C22.2 NO. 110
SERIAL NO /
Numèro de
Sèrie
:
1440W
120V ~ 60Hz
150 psi
HOT
BURN
Water temperature over 125 F (52 C)
can cause severe burns instantly or
death scalds. Children, disabled and
elderly are at the highest risk of being
scalded. See instruction manual
before setting temperature at water
heater. Feel water before bathing or
showering. Temperature limiting
values are available, see manual.
DANGER
2.5 gal
4.0 gal
SMARTHOME Mini Tank WATER HEATER
SMARTHOME MINI RESERVOIR CHAUFFE-EAU
SMARTHOME Mini Tank WATER HEATER
SMARTHOME MINI RESERVOIR CHAUFFE-EAU
315-A Industrial Road
Summerville, SC 29483
1-866-356-1992
SAFETY
The Future of Eciency

3
ENGLISH
Support: Support.Eccotemp.com Shop Online: Eccotemp.com Store Locator: Eccotemp.com/locator
PLEASE NOTE: MINI TANKS ARE FOR INDOOR PERMANENT INSTALLATIONS ONLY. BEFORE POWERING THE WATER HEATER, BE SURE THAT THE SYSTEM IS COMPLETELY FILLED WITH WATER
AND ALL AIR IS REMOVED.THIS MANUAL AND ALL ECCOTEMP CONTENT IS SUBJECT TO CHANGE WITHOUT NOTICE. PLEASE VISIT SUPPORT.ECCOTEMP.COM FOR MORE INFORMATION.
CAUTION! When a supplemental heat source is connected to the Certied
Household Electric Storage Tank Water Heater, provisions must be made to limit the
heat source temperature not to exceed that of the water heater thermostat setting.
CAUTION! If the water heater has been retrotted with supplemental heating
equipment, you must adjust both the thermostat controlling the supplemental heat
source located in the water piping and the thermostat on the water heater behind
the access panel to the same temperature. Failure to adjust both thermostats to the
same temperature can cause loss of proper temperature control.
CAUTION! To reduce the risk of electric shock or re, use only on a utility supply
having a maximum 125/250 volt, three wire system.
CAUTION! To reduce the risk of electrical shock, connect ground to water heater.
For detailed information refer to instructions.
CAUTION! Install temperature and pressure protective equipment required by
local codes, but no less than a combination temperature and pressure relief valve
certied as meeting the requirements for relief valves, ANSI 21.22, by a nationally
recognized testing laboratory that maintains periodic inspection of production of
listed equipment or materials. The valve must be oriented, provided with tubing, or
otherwise installed so that discharge can exit only within 6 inches above, or at any
distance below, the structural oor, and cannot contact any live electrical part.
DANGER! To reduce the risk of electric shock, disconnect from power supply
before replacing temperature-limiting device.
CAUTION! To reduce the risk of excessive pressures and temperatures in this water
heater, install temperature and pressure protective equipment required by local
codes and no less than a combination temperature and pressure relief valve certied
by a nationally recognized testing laboratory that manintains periodic inspection
of production of listed equipment or materials, as meeting the requirements for
Relief Valves and Automatic Gas Shuto Devices for Hot Water Supply Systems,
ANSIZ21.22. This valve must be marked with a maximum set pressure not to exceed
the marked maximum working pressure of the water heater. Install the valve into
an opening provided and marked for this purpose in the water heater, and orient
it or provide tubing so that any discharge from the valve exits only within 6 inches
above, or at any distance below, the structural oor, and does not contact any live
electrical part. The disharge opening must not be blocked or reduced in size under
any circumstances.
SAFETY

Support: Support.Eccotemp.com Shop Online: Eccotemp.com Store Locator: Eccotemp.com/locator
4
ENGLISH
PLEASE NOTE: MINI TANKS ARE FOR INDOOR PERMANENT INSTALLATIONS ONLY. BEFORE POWERING THE WATER HEATER, BE SURE THAT THE SYSTEM IS COMPLETELY FILLED WITH WATER
AND ALL AIR IS REMOVED.THIS MANUAL AND ALL ECCOTEMP CONTENT IS SUBJECT TO CHANGE WITHOUT NOTICE. PLEASE VISIT SUPPORT.ECCOTEMP.COM FOR MORE INFORMATION.
Use & Care Manual
With Installation Instructions for the Installer
APPLICATION
Point Of Use
INSTALLATION
Indoor
CAPACITY
2.5 gal / 4 gal
ECCOTEMP SMARTHOME MINI TANK WATER HEATER
Safety Information
Safety Precautions
General Information
Introduction
Technical Specications
Model Specic information
Wiring Diagram
Installation Instructions
Water Connections
Pressure Relief Valve
Getting Started
Filling the Water Heater
Using the Mobile App
Setting the Temperature
Voice Commands
Maintenance
Housekeeping
Blow Out Diagram
Troubleshooting
Warranty Information
Warranty
Product Comparison
5
6
7
8
9
10
13
16
20
19
27
11-12
14-15
23-24
21-22
25-26
SAFETY
CONGRATULATIONS!
You have just purchased a new Eccotemp Mini Tank Water
Heater. This will open a world of possibilites where you can enjoy
hot water!
We highly suggest you take the time to read through all of
the safety and installation procedures in this manual before
attempting to install your new Mini Tank Water Heater.
Should you have any questions, please feel free to visit our
helpdesk located at: support.eccotemp.com
READ THE SAFETY INFORMATION
Your safety and the safety of others are very important. There are many important safety
messages in this manual and on your water heater. Always read and obey all safety messages.
This is the safety alert symbol. Recognize this symbol as an indication of Important Safety
Information! This symbol alerts you to potential hazards that can kill or hurt you and others.
All safety messages will follow the safety alert symbol and the words: “DANGER”, “WARNING”,
“CAUTION” or “NOTICE”. These words mean:
WARNING! A potentially hazardous situation that could result in death or serious injury and/or
damage to property.
DANGER! An imminently hazardous situation that will result in death or serious injury.
CAUTION! A potentially hazardous situation that may result in minor or moderate injury.
NOTICE! Attention is called to observe a specied procedure or maintain a specic
condition.
FOR YOUR RECORDS
Write your serial number here: #________________________
You can nd your serial number on a label located on the side
of the appliance or box. Staple your proof of purchase here.
Proof of original purchase date is needed to obtain service
under the warranty.
PLEASE RETAIN THE INSTRUCTION MANUAL FOR FUTURE REFERENCE
READ THIS MANUAL
Inside you will nd many helpful hints on how to use and maintain your water heater properly.
A little preventive care on your part can save you time and money over the life of your water
heater. You will nd many answers to common problems in the Troubleshooting Guide. If you
review the chart of Troubleshooting Tips rst, you may not need to call for service.

5
ENGLISH
Support: Support.Eccotemp.com Shop Online: Eccotemp.com Store Locator: Eccotemp.com/locator
PLEASE NOTE: MINI TANKS ARE FOR INDOOR PERMANENT INSTALLATIONS ONLY. BEFORE POWERING THE WATER HEATER, BE SURE THAT THE SYSTEM IS COMPLETELY FILLED WITH WATER
AND ALL AIR IS REMOVED.THIS MANUAL AND ALL ECCOTEMP CONTENT IS SUBJECT TO CHANGE WITHOUT NOTICE. PLEASE VISIT SUPPORT.ECCOTEMP.COM FOR MORE INFORMATION.
SAFETY
IMPORTANT SAFETY INSTRUCTIONS
WARNING! When using electrical appliances, safety precautions to reduce the
risk of re, electric shock or injury to persons should be followed, including:
The manufacturer and/or distributor is not responsible for damages caused by
improper installation, or failure to follow the instructions in this manual.
A QUALIFIED, LICENSED TECHNICIAN IS RECOMMENDED TO INSTALL THE WATER
HEATER AND CONDUCT ALL SUBSEQUENT SERVICE WORK AND/OR MAINTENANCE.
KEEP THESE INSTRUCTIONS
FILL THE TANK COMPLETELY FULL WITH WATER AND HAVE WATER FLOWING
FROM THE HOT WATER FAUCET BEFORE ACTIVATING POWER TO THE HEATER
FOR THE FIRST TIME OR DAMAGE WILL RESULT.
IMPORTANT!
CAUTION!
Hydrogen gas can be produced in a hot water system served by this heater
that has not been used for a long period of time (generally 2 weeks or more).
Hydrogen gas is extremely ammable. To reduce the risk of injury under these
conditions, it is recommended that the hot water faucet be opened for several
minutes at the nearest and most distant sink being served by this water heater
before using any electrical appliance connected to the hot water system {i.e.
Dishwasher). If hydrogen gas is present, there will probably be an unusual
sound such as air escaping through the faucet as the water begins to ow.
There should be no smoking or open ame near the faucet at this time.
1. READ ALL INSTRUCTIONS BEFORE USING THIS WATER HEATER.
2. This water heater must be grounded. Connect only to properly grounded outlet.
See POWERING THE WATER HEATER found on page 13.
3. Install or locate this water heater only in accordance with the provided
installation instructions.
4. Use this water heater only for its intended use as described in this manual.
5. Do not use an extension cord with this water heater. If power is not available
adjacent to the water heater, contact a qualied electrician to have a receptacle
properly installed.
6. As with any appliance, close supervision is necessary when used by children.
7. Do not operate this water heater if it has a damaged cord or plug, if it is not
working properly, or if it has been damaged or dropped.
8. Only qualied service personnel should service this water heater. Contact
nearest authorized service facility when questions arise or service is required.

Support: Support.Eccotemp.com Shop Online: Eccotemp.com Store Locator: Eccotemp.com/locator
6
ENGLISH
PLEASE NOTE: MINI TANKS ARE FOR INDOOR PERMANENT INSTALLATIONS ONLY. BEFORE POWERING THE WATER HEATER, BE SURE THAT THE SYSTEM IS COMPLETELY FILLED WITH WATER
AND ALL AIR IS REMOVED.THIS MANUAL AND ALL ECCOTEMP CONTENT IS SUBJECT TO CHANGE WITHOUT NOTICE. PLEASE VISIT SUPPORT.ECCOTEMP.COM FOR MORE INFORMATION.
General Information
The Eccotemp SMARTHOME Mini Tank Water
Heater can be used in most boats, campers,
tiny homes, RV’s, homes, under the sink, oces,
cottages, kitchens, utility rooms, apartments, and
food trucks. Eccotemp SMARTHOME Mini Tank
models are designed to supply hot water for
all hand wash and kitchen sinks in a residential
environment.
Eccotemp SMARTHOME Mini Tank models can
replace traditional central water heaters, thereby
conserving water and reducing energy waste.
The Eccotemp SMARTHOME Mini Tank
Water Heaters are lightweight, compact, and
manufactured for easy installation. Eccotemp
SMARTHOME Mini Tank models can be mounted on the wall with included hardware,
or they can be placed freestanding.
Eccotemp SMARTHOME Mini Tank models are designed to operate at 150-psi
maximum water pressure. Install a pressure-reducing valve if your water pressure is
greater than 150-psi.
Eccotemp SMARTHOME Mini Tank Water Heaters also come with an app for your
mobile device that can be downloaded from the Apple App Store and the Google Play
Store. Search for “Eccotemp” to easily nd the app, download it, install it, and begin
using the app to complete your setup. Once you have the app set up, you can use it
to adjust the temperature through your smart phone, or SMARTHOME devices, to
increase the energy eciency of your home.
CAUTION! The manufacturer cannot be responsible for the damage caused by
improper installation or by failure to follow instructions in this manual. Comply
with the Installation Instructions before connecting to electrical outlet.
CAUTION! The thermostat has been pre-set at the factory to 125°F (51.7°C) or
lower to reduce the risk of scalding injuries.
WARNING! Installer should review the contents of this manual with the owner
upon completion of the installation, and the manual should remain with the
owner and placed in a location close to the water heater.
THE FUTURE OF EFFICIENCY
GENERAL

7
ENGLISH
Support: Support.Eccotemp.com Shop Online: Eccotemp.com Store Locator: Eccotemp.com/locator
PLEASE NOTE: MINI TANKS ARE FOR INDOOR PERMANENT INSTALLATIONS ONLY. BEFORE POWERING THE WATER HEATER, BE SURE THAT THE SYSTEM IS COMPLETELY FILLED WITH WATER
AND ALL AIR IS REMOVED.THIS MANUAL AND ALL ECCOTEMP CONTENT IS SUBJECT TO CHANGE WITHOUT NOTICE. PLEASE VISIT SUPPORT.ECCOTEMP.COM FOR MORE INFORMATION.
TECHNICAL
There are currently two Eccotemp SMARTHOME Mini Tank models, a 2.5-gallon and
4-gallon. The pressure vessel (water tank) is welded, glass-lined steel and is equipped
with an anode rod. Water is supplied by standard 1/2 Inch NPT connections.
The water heater is equipped with a thermostat and a high limit temperature switch
that can be controlled by the Eccotemp SMARTHOME app or by the manual controls.
Also, a pressure relief valve is supplied with your water heater.
Technical Specications
Models: Eccotemp SMARTHOME Mini Tank ESH 2.5 and ESH 4.0
NOTICE! To use WIFI settings you must ensure the manual temperature control
knob is in WIFI mode.
THE FUTURE OF EFFICIENCY
ESH 2.5
10.9”
15”
THE FUTURE OF EFFICIENCY
ESH 4.0
12.5”
16.5”
INCLUDED ACCESSORIES
3/4 inch Temperature and
Pressure Relief Valve
Mounting Anchors
Mounting Plate

Support: Support.Eccotemp.com Shop Online: Eccotemp.com Store Locator: Eccotemp.com/locator
8
ENGLISH
PLEASE NOTE: MINI TANKS ARE FOR INDOOR PERMANENT INSTALLATIONS ONLY. BEFORE POWERING THE WATER HEATER, BE SURE THAT THE SYSTEM IS COMPLETELY FILLED WITH WATER
AND ALL AIR IS REMOVED.THIS MANUAL AND ALL ECCOTEMP CONTENT IS SUBJECT TO CHANGE WITHOUT NOTICE. PLEASE VISIT SUPPORT.ECCOTEMP.COM FOR MORE INFORMATION.
Wiring Diagram
Electrical, Pressure and Recovery Specications
Technical Specications
yaleR
Transformer
ACL2-OUT
ACL1
ACN1
ACN2
WiFi Board
Thermostat Board
Thermal
Cutout
N
L
E
tnemelE gnitaeH
Control Board
Temp.Sensor
TECHNICAL
Technical Data
MODEL
Capacity
Voltage
Power @ 120 VAC
Max. Water Pressure
Weight (empty)
Amperage
Phases
Pipe Fittings
Unit
Gallons
VAC
Watts
Psi
Lbs.
Amps
Inches
ESH-2.5
2.5
110-120
1440
150
20
12
1
1/2 Inch NPT
ESH-4.0
4.0
110-120
1440
150
25
12
1
1/2 Inch NPT

9
ENGLISH
Support: Support.Eccotemp.com Shop Online: Eccotemp.com Store Locator: Eccotemp.com/locator
PLEASE NOTE: MINI TANKS ARE FOR INDOOR PERMANENT INSTALLATIONS ONLY. BEFORE POWERING THE WATER HEATER, BE SURE THAT THE SYSTEM IS COMPLETELY FILLED WITH WATER
AND ALL AIR IS REMOVED.THIS MANUAL AND ALL ECCOTEMP CONTENT IS SUBJECT TO CHANGE WITHOUT NOTICE. PLEASE VISIT SUPPORT.ECCOTEMP.COM FOR MORE INFORMATION.
INSTALLATION
Installation Instructions
CHOOSE A LOCATION
Select a location that allows ease of access for maintenance, ideally with at
least 9 inches of clearance at the top from any ceiling or cabinet interior.
Note: Only install in a vertical position.
A licensed professional should complete the installation adhering to all state
and local codes. The manufacturer will not be liable for any damages because
of failure to comply with these installation instructions or because of improper
installation performed by an qualied installer.
Wall Mounted
Fasten the supplied mounting bracket
to the wall. Use screws that are
suitable for the wall material and the
weight of the water heater lled to
capacity (ESH-2.5-41 lbs.; ESH-4.0-
57 lbs.). Hang the water heater on
the bracket and pull downwards on
the water heater to ensure that both
ngers of the bracket are seated in
the mounting slots.
Note: Conrm your water piping
orientation (hot and cold) before
wall mounting.
Free Standing
Sit on the oor under a sink or in a
cabinet, upright, as pictured in the
diagram below and on the front cover
of this manual.
Note: Make sure to leave at least nine
(9) inches of clearance above your
water heater.
THE FUTURE OF EFFICIENCY
Wall MountedFree Standing on Floor
Wall
Anchor
Temperature
Control
Do Not Block
ESH 2.5 = 10.9 Inch
ESH 4.0 = 12.5 Inch

Support: Support.Eccotemp.com Shop Online: Eccotemp.com Store Locator: Eccotemp.com/locator
10
ENGLISH
PLEASE NOTE: MINI TANKS ARE FOR INDOOR PERMANENT INSTALLATIONS ONLY. BEFORE POWERING THE WATER HEATER, BE SURE THAT THE SYSTEM IS COMPLETELY FILLED WITH WATER
AND ALL AIR IS REMOVED.THIS MANUAL AND ALL ECCOTEMP CONTENT IS SUBJECT TO CHANGE WITHOUT NOTICE. PLEASE VISIT SUPPORT.ECCOTEMP.COM FOR MORE INFORMATION.
Installation Instructions
Water connections should be in close orientation to the install site. Conrm there is
enough allowance for the water intake and outake hoses to reach the water heater.
Note: If your water pipes are copper or bronze be sure to use dielectric
connections to prevent corrosion. Failure to do so may cause damage to your
tank and void your warranty. In order to protect the water heater from heat
damage due to soldering, solder a piece of tubing to a threaded union tting
before screwing the union to the tank.
1. Install a shut o valve in line with the cold-water pipe.
2. Connect the cold water pipe to the inlet nipple, marked with a blue label.
3. Connect the hot water pipe to the outlet nipple, marked with a red label.
WATER CONNECTIONS
View of the Top
Cold Water Connection
1/2 Inch NPT
Hot Water Connection
1/2 Inch NPT
NOTICE: Do not attempt to remove rubber washer.
Temperature & Pressure
Relief Valve 3/4 Inch
IMPORTANT: Failure to provide dielectric insulation may result in premature tank
or nipple failure and may void your warranty. The Temperature & Pressure Relief
valve (T&P valve) is for servicing and the valve should be in the open position
when the water heater is in operation. DO NOT APPLY HEAT DIRECTLY TO INLET
OR OUTLET CONNECTIONS.
Front
INSTALLATION

11
ENGLISH
Support: Support.Eccotemp.com Shop Online: Eccotemp.com Store Locator: Eccotemp.com/locator
PLEASE NOTE: MINI TANKS ARE FOR INDOOR PERMANENT INSTALLATIONS ONLY. BEFORE POWERING THE WATER HEATER, BE SURE THAT THE SYSTEM IS COMPLETELY FILLED WITH WATER
AND ALL AIR IS REMOVED.THIS MANUAL AND ALL ECCOTEMP CONTENT IS SUBJECT TO CHANGE WITHOUT NOTICE. PLEASE VISIT SUPPORT.ECCOTEMP.COM FOR MORE INFORMATION.
INSTALLATION
CLOSED SYSTEM THERMAL EXPANSION: Periodic discharge of the relief valve or
failure of the element gasket may be due to thermal expansion in a closed water
supply system. The water utility supply meter may contain a check valve, backow
preventer or water pressure-reducing valve that will create a closed water system.
During the heating cycle of the water heater, the heated water expands causing
pressure inside the water heater to increase. The T&P relief valve may discharge
hot water under these conditions that result in a loss of energy and a build up
of lime on the relief valve seat. To prevent this from happening, there are two
recommendations:
1. Install a diaphragm-type domestic hot water expansion tank (suitable for
potable water) on the cold water supply line. The expansion tank must have a
minimum capacity of 1.5 U.S. gallons for every 50 gallons of stored water.
2. Install a 125-PSI pressure relief valve in the cold water supply line. Make sure
the discharge of this valve is directed to an open drain and protected from
freezing.
Included with your water heater is a 3/4 inch temperature and pressure relief
(T&P valve) valve that is certied by a nationally recognized laboratory. This
is designed to reduce the risk of excessive pressures and temperatures in this
water heater and should be installed as directed by local codes. The T&P valve is
marked with a maximum pressure, which does not exceed the maximum working
pressure of the water heater (150 psi).
Note: If using a dierent temperature and pressure relief valve other than
the one provided with your purchase, please ensure that the maximum PSI
marking on the valve DOES NOT exceed the marked maximum working
pressure of the water heater.
1. Install the 3/4 inch T&P valve supplied with the water heater into the large
threaded opening located at the top of the water heater.
2. Attach a discharge pipe from the T&P valve terminating at a sink or drain. Do
not cap or plug the end of the dischage pipe.
Installation Instructions
TEMPERATURE & PRESSURE RELIEF VALVE
Installed T&P Valve
(3/4 Inch)
T&P Discharge Pipe
THE FUTURE OF EFFICIENCY
Wall MountedFree Standing on Floor
Wall
Anchor
Temperature
Control
Do Not Block
ESH 2.5 = 10.9 Inch
ESH 4.0 = 12.5 Inch

Support: Support.Eccotemp.com Shop Online: Eccotemp.com Store Locator: Eccotemp.com/locator
12
ENGLISH
PLEASE NOTE: MINI TANKS ARE FOR INDOOR PERMANENT INSTALLATIONS ONLY. BEFORE POWERING THE WATER HEATER, BE SURE THAT THE SYSTEM IS COMPLETELY FILLED WITH WATER
AND ALL AIR IS REMOVED.THIS MANUAL AND ALL ECCOTEMP CONTENT IS SUBJECT TO CHANGE WITHOUT NOTICE. PLEASE VISIT SUPPORT.ECCOTEMP.COM FOR MORE INFORMATION.
Installation Instructions
TEMPERATURE & PRESSURE RELIEF VALVE
No more than 15 inches
combined length.
No more than 2
elbows.
Installing the T&P Valve Discharge Pipe:
1. Must NOT be smaller in diameter than the outlet diameter of the valve, or have
any reducing couplings.
2. Must NOT be plugged or blocked.
3. Must be made of suitable material for hot water.
4. Must not be over 15 inches in length.
5. Must not have more than two elbows.
6. Must terminate at an adequate drain.
7. Must not have a shut o valve between relief valve and tank or relief valve and
termination of discharge.
A discharge line should be installed and exit only 6 inches above, or at any
distance below, and should not come in contact with any live electrical part.
The T&P discharge opening must not be blocked or reduced in size under any
circumstances.
IMPORTANT: Failure to provide dielectric insulation may result in premature
tank or nipple failure and may void your warranty. The T&P valve is for
servicing and the valve should be in the open position when the water
heater is in operation. DO NOT APPLY HEAT DIRECTLY TO INLET OR OUTLET
CONNECTIONS.
Installed
3/4 Inch
T&P Valve
INSTALLATION
THE FUTURE OF EFFICIENCY
Wall MountedFree Standing on Floor
Wall
Anchor
Temperature
Control
Do Not Block
ESH 2.5 = 10.9 Inch
ESH 4.0 = 12.5 Inch
THE FUTURE OF EFFICIENCY
ESH 2.5
10.9”
15”

13
ENGLISH
Support: Support.Eccotemp.com Shop Online: Eccotemp.com Store Locator: Eccotemp.com/locator
PLEASE NOTE: MINI TANKS ARE FOR INDOOR PERMANENT INSTALLATIONS ONLY. BEFORE POWERING THE WATER HEATER, BE SURE THAT THE SYSTEM IS COMPLETELY FILLED WITH WATER
AND ALL AIR IS REMOVED.THIS MANUAL AND ALL ECCOTEMP CONTENT IS SUBJECT TO CHANGE WITHOUT NOTICE. PLEASE VISIT SUPPORT.ECCOTEMP.COM FOR MORE INFORMATION.
GETTING STARTED
Getting Started
FILLING THE WATER HEATER
POWERING THE WATER HEATER
Before connecting the power, ll
the tank and system with water and
check for leaks. To be sure that all
remaining air is out of the water
system, open the hot water faucets
on your xtures until constant water
ows. Any air remaining in the tank
will cause the water heater element
to fail.
1. Open the hot water faucet.
2. Open the cold water supply valve.
3. When continuous water ows out
of the faucet, the tank is lled.
4. Close the hot water faucet.
5. Check entire system for leaks.
T&P Relief
Valve
Manual
Control
Knob
Power
Cord
CAUTION! Before powering the water heater, be sure that the system is
completely lled with water and ALL AIR IS REMOVED.
To be certain that all of the air is out of the water heater, open the HOT water
faucet on the xtures until constant water ows from them. If air remains in the
tank, the element will be damaged when the electric cord is plugged in.
The Eccotemp SMARTHOME Mini Tank water heater comes equipped with
a power cord that is intended to plug into a standard 110/120v receptacle.
Adhere to all pertinent state and local codes. The Eccotemp SMARTHOME Mini
Tank was manufactured and wired in accordance with ETL requirements.
Powering Your Eccotemp SMARTHOME Water Heater:
1. Plug your Mini Tank to a grounded outlet.
2. Adjust the temperature of the water heater either by the manual temperature
controls or the SMARTHOME app. Manual temperature controls are located
towards the back on the right side.
3. Allow up to 25 minutes to achieve desired set temperature.
The Eccotemp SMARTHOME Mini Tank Water Heater comes equipped with an
overheat sensor with a manual reset; also known as the temperature high limit.
This device has been factory installed to interrupt the power suppy in the event
of a thermostat failure. The manual reset is located on the back of the mini in
the middle at the bottom. If you have wall mounted your water heater, you may
need to unmount it to reach the reset switch.

Support: Support.Eccotemp.com Shop Online: Eccotemp.com Store Locator: Eccotemp.com/locator
14
ENGLISH
PLEASE NOTE: MINI TANKS ARE FOR INDOOR PERMANENT INSTALLATIONS ONLY. BEFORE POWERING THE WATER HEATER, BE SURE THAT THE SYSTEM IS COMPLETELY FILLED WITH WATER
AND ALL AIR IS REMOVED.THIS MANUAL AND ALL ECCOTEMP CONTENT IS SUBJECT TO CHANGE WITHOUT NOTICE. PLEASE VISIT SUPPORT.ECCOTEMP.COM FOR MORE INFORMATION.
GETTING STARTED
Connect your Water Heater to your Smart Devices
The Eccotemp SMARTHOME Mini Tank Water Heater has an easy to use mobile
app that will allow you to control functions such as ON/OFF and temperature
adjustments. Our mobile app is compatible with SMARTHOME devices, such as
Amazon Alexa and Google Home, giving you voice command capability. Let the
SMARTHOME app tell you exactly how much money you spend heating water.
Eccotemp SMARTHOME Mobile App
The temperature of the ESH can be remotely changed from Eccotemp app.
Temperature
The Eccotemp app allows you to have a record of all device
statisitics.
Statistics

15
ENGLISH
Support: Support.Eccotemp.com Shop Online: Eccotemp.com Store Locator: Eccotemp.com/locator
PLEASE NOTE: MINI TANKS ARE FOR INDOOR PERMANENT INSTALLATIONS ONLY. BEFORE POWERING THE WATER HEATER, BE SURE THAT THE SYSTEM IS COMPLETELY FILLED WITH WATER
AND ALL AIR IS REMOVED.THIS MANUAL AND ALL ECCOTEMP CONTENT IS SUBJECT TO CHANGE WITHOUT NOTICE. PLEASE VISIT SUPPORT.ECCOTEMP.COM FOR MORE INFORMATION.
GETTING STARTED
Have a problem with your Eccotemp ESH? Our SMARTHOME app
can tell you exactly what the problem is. Download it today to unlock
your Eccotemp SMARTHOME ESH’s full capabilities. Simply search for
“Eccotemp” on the Apple App Store or Google Play.
Eccotemp SMARTHOME Mobile App Continued...
The built in network troubleshooter will tell you if there is a WIFI
problem.
Network Error
The Eccotemp app has a troubleshooter to diagnose any device errors.
Error Codes

Support: Support.Eccotemp.com Shop Online: Eccotemp.com Store Locator: Eccotemp.com/locator
16
ENGLISH
PLEASE NOTE: MINI TANKS ARE FOR INDOOR PERMANENT INSTALLATIONS ONLY. BEFORE POWERING THE WATER HEATER, BE SURE THAT THE SYSTEM IS COMPLETELY FILLED WITH WATER
AND ALL AIR IS REMOVED.THIS MANUAL AND ALL ECCOTEMP CONTENT IS SUBJECT TO CHANGE WITHOUT NOTICE. PLEASE VISIT SUPPORT.ECCOTEMP.COM FOR MORE INFORMATION.
GETTING STARTED
SETTING TEMPERATURE
ADJUSTING YOUR THERMOSTAT
Congratulations! You are now ready to use your water heater. Run the hot
water at a nearby sink and evaluate the hot water temperature. Make any
temperature adjustments using the section below.
Getting Started
140°F
130°F
110°F
90°F
WIFI
Power
Cord
Temperature Dial
*Right Rear of Water Heater
Manual Mode: Turn the dial in either direction to adjust your temperature up
or down. Turn clockwise to increase temperature and turn counterclockwise
to decrease temperature. Repeat this step until you achieve your desired
temperature.
Using the App: When your Mini Tank temperature dial is set to WIFI, it will
connect to your smart devices and smart phone to allow you to change the
temperature and access the app’s other features.
Note: When in manual mode you WILL NOT be able to control the Mini Tank
remotely through the SMARTHOME app.
WARNING! This water heater is designed for 110/120v service - DO
NOT CONNECT TO ANY OTHER VOLTAGE. Failure to use proper voltage
may result in personal injury and/or property damage. If the supplied
electrical power cord is either damaged or not long enough, do NOT use an
extension cord. Have a licensed electrician replace the power cord.

17
ENGLISH
Support: Support.Eccotemp.com Shop Online: Eccotemp.com Store Locator: Eccotemp.com/locator
PLEASE NOTE: MINI TANKS ARE FOR INDOOR PERMANENT INSTALLATIONS ONLY. BEFORE POWERING THE WATER HEATER, BE SURE THAT THE SYSTEM IS COMPLETELY FILLED WITH WATER
AND ALL AIR IS REMOVED.THIS MANUAL AND ALL ECCOTEMP CONTENT IS SUBJECT TO CHANGE WITHOUT NOTICE. PLEASE VISIT SUPPORT.ECCOTEMP.COM FOR MORE INFORMATION.
USING THE APP
1. Dowload the App to get Started
Find and download the Eccotemp smart phone app on the Apple App Store or the
Google Play Store by typing “Eccotemp” into the search panel.
2. Setup and Login
Once the app is installed, create a login and connect the app to the water heater.
Follow the directions on screen and make sure the temperature knob, located
on the back right side of the water heater, is set to WIFI mode to complete the
process.
Current Temperature
Device Name
Temperature Slider
Quick Set Buttons
GETTING STARTED
Unit of Measure (Degrees)
Getting Started

Support: Support.Eccotemp.com Shop Online: Eccotemp.com Store Locator: Eccotemp.com/locator
18
ENGLISH
PLEASE NOTE: MINI TANKS ARE FOR INDOOR PERMANENT INSTALLATIONS ONLY. BEFORE POWERING THE WATER HEATER, BE SURE THAT THE SYSTEM IS COMPLETELY FILLED WITH WATER
AND ALL AIR IS REMOVED.THIS MANUAL AND ALL ECCOTEMP CONTENT IS SUBJECT TO CHANGE WITHOUT NOTICE. PLEASE VISIT SUPPORT.ECCOTEMP.COM FOR MORE INFORMATION.
GETTING STARTED
Getting Started
Using the App
3. Using the App
After connecting the SMARTHOME app to the Mini Tank, you will be able to
remotely control the temperature and on/o status of the Mini Tank water heater.
There is an energy statistics screen that will allow you to track your usage and
help you manage your water heater’s energy consumption. Regularly using and
reviewing the app will help you ne tune your water heating needs, while helping
you use less resources to do so, ultimately saving you money.
4. Getting Connected
Connect your Eccotemp SMARTHOME Mini Tank to other SMARTHOME devices
like Amazon Alexa and Google Home. Once connected, the Eccotemp SMARTHOME
Mini Tank can accept voice commands such as, “Ok Google, turn my mini o.”
5. Other Button Functions
• Button blinking rapidly for 120 seconds: This is when the mini is in WIFI
connection mode. To start or repeat connection mode hold down the on/o
button for 10 seconds.
• Solid blue power button means the mini is o.
• When using the manual mode dial, the Eccotemp smart app will not work.
• The Mini Tank water heater will default to 118 degrees farenheit if a temperature
is not set with the app or the knob.
Current Monthly Cost
Visual History of Cost
Yearly Breakdown
Monthly Breakdown
(Daily Breakdown shows when selected)

19
ENGLISH
Support: Support.Eccotemp.com Shop Online: Eccotemp.com Store Locator: Eccotemp.com/locator
PLEASE NOTE: MINI TANKS ARE FOR INDOOR PERMANENT INSTALLATIONS ONLY. BEFORE POWERING THE WATER HEATER, BE SURE THAT THE SYSTEM IS COMPLETELY FILLED WITH WATER
AND ALL AIR IS REMOVED.THIS MANUAL AND ALL ECCOTEMP CONTENT IS SUBJECT TO CHANGE WITHOUT NOTICE. PLEASE VISIT SUPPORT.ECCOTEMP.COM FOR MORE INFORMATION.
The Eccotemp ESH Mini Tank Water Heater is the rst SMARTHOME water heater of
its kind to work with a mobile app and voice control. Once you open your Google
Home or Amazon Alexa App simply add your SMARTHOME Mini Tank by adding a
new device. Once added to either app you will then be able to use voice commands.
Note: All commands begin with “Alexa,” or “Ok, Google,” before issuing a
command to the respective device.
Note: This chart is for demonstration purposes only and available voice commands
may vary based on model, updates and location availability.
Getting Started
Using Voice Commands
Purpose Command
Switch On/ O Turn on <device name>
Turn o <device name>
Set Temperature Set <device name> to <X> degrees.
Decrease <device name>
Increase <device name>
Querying the Set
Temperature
What’s my <device name> set to?
Purpose Command
Switch On/O Turn on <device name>
Turn o <device name>
Setting theTemperature Set the <device name> to <X>
Make <device name> warmer/cooler
Querying the Set
Temperature
What’s the <device name> set to?
GETTING STARTED
(Daily Breakdown shows when selected)
Google Home
Amazon Alexa

Support: Support.Eccotemp.com Shop Online: Eccotemp.com Store Locator: Eccotemp.com/locator
20
ENGLISH
PLEASE NOTE: MINI TANKS ARE FOR INDOOR PERMANENT INSTALLATIONS ONLY. BEFORE POWERING THE WATER HEATER, BE SURE THAT THE SYSTEM IS COMPLETELY FILLED WITH WATER
AND ALL AIR IS REMOVED.THIS MANUAL AND ALL ECCOTEMP CONTENT IS SUBJECT TO CHANGE WITHOUT NOTICE. PLEASE VISIT SUPPORT.ECCOTEMP.COM FOR MORE INFORMATION.
MAINTENANCE
HOUSEKEEPING
When properly maintained, your water heater will provide years of dependable
trouble-free service. It is recommended that a periodic inspection of the pipe
connections be done every 6 months.
At least once a year, lift and release the lever handle on the pressure relief valve.
It is located between the hot and cold water lines and make certain the valve
operates freely. Allow several gallons to ush through the discharge line to an
open drain.
Inspect the area around the water heater to ensure a safe operating
environment. Keep the water heater area clear and free from any objects that
could damage the water heater. If damage or denting is present, contact a
service personnel to verify proper operation.
DO NOT operate the water heater if you feel something is wrong.
DO NOT allow children to operate or otherwise handle the water heater.
NOTICE! If the pressure relief valve on the hot water heater discharges
periodically, this may be due to a problem in the water system. Contact
the water supplier or your plumbing contractor on how to correct this. DO
NOT plug the relief valve outlet.
Maintenance
DRAINING AND STORAGE
Draining your water heater:
1. Unplug the water heater.
2. Open a hot water faucet to let hot water run out. Allow water to ow until
water is no longer hot.
3. Turn o the cold water supply to the water heater.
4. Close the hot water faucet.
5. Disconnect the water heater from both the hot and cold water connections.
6. If possible, siphon out any remaining water.
7. Carefully detach the water heater from the wall (if applicable).
8. Tilt the water heater to drain remaining water out of the heater.
NOTICE! When not being used for a lengthy period of time, you can
conserve energy by reducing the temperature setting either manually or
through the Eccotemp App.
Protect against freeze damage if you plan on not using the water heater for an
extended period of time. Unplug your water heater and drain.

21
ENGLISH
Support: Support.Eccotemp.com Shop Online: Eccotemp.com Store Locator: Eccotemp.com/locator
PLEASE NOTE: MINI TANKS ARE FOR INDOOR PERMANENT INSTALLATIONS ONLY. BEFORE POWERING THE WATER HEATER, BE SURE THAT THE SYSTEM IS COMPLETELY FILLED WITH WATER
AND ALL AIR IS REMOVED.THIS MANUAL AND ALL ECCOTEMP CONTENT IS SUBJECT TO CHANGE WITHOUT NOTICE. PLEASE VISIT SUPPORT.ECCOTEMP.COM FOR MORE INFORMATION.
MAINTENANCE
BLOW OUT DIAGRAM
Numbers correspond with chart on page 22
Maintenance

Support: Support.Eccotemp.com Shop Online: Eccotemp.com Store Locator: Eccotemp.com/locator
22
ENGLISH
PLEASE NOTE: MINI TANKS ARE FOR INDOOR PERMANENT INSTALLATIONS ONLY. BEFORE POWERING THE WATER HEATER, BE SURE THAT THE SYSTEM IS COMPLETELY FILLED WITH WATER
AND ALL AIR IS REMOVED.THIS MANUAL AND ALL ECCOTEMP CONTENT IS SUBJECT TO CHANGE WITHOUT NOTICE. PLEASE VISIT SUPPORT.ECCOTEMP.COM FOR MORE INFORMATION.
MAINTENANCE
Maintenance
*Chart corresponds with
diagram on page 21

23
ENGLISH
Support: Support.Eccotemp.com Shop Online: Eccotemp.com Store Locator: Eccotemp.com/locator
PLEASE NOTE: MINI TANKS ARE FOR INDOOR PERMANENT INSTALLATIONS ONLY. BEFORE POWERING THE WATER HEATER, BE SURE THAT THE SYSTEM IS COMPLETELY FILLED WITH WATER
AND ALL AIR IS REMOVED.THIS MANUAL AND ALL ECCOTEMP CONTENT IS SUBJECT TO CHANGE WITHOUT NOTICE. PLEASE VISIT SUPPORT.ECCOTEMP.COM FOR MORE INFORMATION.
TROUBLESHOOT
BEFORE YOU CALL FOR SERVICE
Troubleshooting
Save time and money! Review the troubleshooting tips below rst and you may not
need to call for service.
1. Water does not get hot:
• Make sure the power supply is on and working.
• If the light does not come on, check to see if the reset button has been
toggled into the reset position. The reset button can be found on the
back of your Mini Tank towards the bottom.
• If the power button is illuminated, but water temperature does not get hot
at the sink, test for a plumbing crossover by shutting o the cold water supply
to the water heater and opening the hot water tap (there should be no water
owing). Any continuous ow indicates a cross over which will eect the
temperature and will need to be corrected.
• If you are unable to determine a plumbing crossover by this method,
replacing the heating element may be needed.
2. Power Button not on:
• If the power indicator button light does not come on but the water gets hot,
check for faulty power indicator button bulb.
• Check reset button.
3. Brown Water:
Brown or rusty water indicates a spent anode rod. Replace anode rod.
4. Odor in Water:
Smelly water could be due to an unusual reaction between local water and
the heater’s anode rod. Check anode rod.
5. Water is too hot:
Turn the temperature knob to a lower temperature setting, or use the app
to set the temperature to a lower setting. If the water temperature does not
lower within 60 minutes, then the thermostat may need to be replaced.
6. Water is not hot enough:
See “Adjusting your Thermostat:” on page 16.
7. Water is leaking:
• Unplug water heater from 110/120v outlet.
• Check and tighten any loose water ttings and/or T&P tting on the top of
the tank as needed.
• Remove cover and inspect heating element gasket to see if it is loose or for
any visible damage.

Support: Support.Eccotemp.com Shop Online: Eccotemp.com Store Locator: Eccotemp.com/locator
24
ENGLISH
PLEASE NOTE: MINI TANKS ARE FOR INDOOR PERMANENT INSTALLATIONS ONLY. BEFORE POWERING THE WATER HEATER, BE SURE THAT THE SYSTEM IS COMPLETELY FILLED WITH WATER
AND ALL AIR IS REMOVED.THIS MANUAL AND ALL ECCOTEMP CONTENT IS SUBJECT TO CHANGE WITHOUT NOTICE. PLEASE VISIT SUPPORT.ECCOTEMP.COM FOR MORE INFORMATION.
TROUBLESHOOT
Error Codes on the Front Panel and the App
Troubleshooting
Your Eccotemp SMARTHOME Mini Tank can
report 2 dierent errors. If you are using the
app, it will explain how you can interact with the
water heater itself to diagnose and x some of
the problems. You can also look at the power
button and it will blink in a sequence based on
the error it is reporting.
Error Code 1:
Thermostat Malfunction
When the Mini reports an E1 Error, the power
button will blink blue once (1 time) every three
(3) seconds until the issue is xed.
If you have an E1 Error, please contact customer
service.
Error Code 2:
Rapid Temperature Increase
When the Mini reports an E2 Error, the power
button will blink blue twice (2 times) and then
pause for three (3) seconds before repeating
until the issue is xed.
A rapid temperature increase is typically caused
by the Mini not being full with water. Disconnect
the Mini from power, ll the Mini with water,
and reconnect the Mini to power to resolve
this issue. If the E2 error code does not resolve,
please reach out to customer service for further
assistance.
No Power:
If the Mini does not seem to have power even
though it is plugged in, check the reset button
on the back of the Mini to make sure it is not
toggled into the reset postition. If the reset
button is not toggled to the reset position,
please contact customer service for further
assistance.
WIFI Connectivity:
When your Eccotemp SMARTHOME
Mini Tank is connecting to WIFI,
you will see the power button on
the front of the Mini Tank blinking
red for up to 60 seconds while it
connects. If it is unable to connect
during that time, it will try again
periodically for up to 15 minutes.
In the event that your water
heater does not connect to your
WIFI, it will automatically set
the temperature to the default
temperature of 118° Farenheit. Your
app will be able to tell you if your
heater has connected successfully.

25
ENGLISH
Support: Support.Eccotemp.com Shop Online: Eccotemp.com Store Locator: Eccotemp.com/locator
PLEASE NOTE: MINI TANKS ARE FOR INDOOR PERMANENT INSTALLATIONS ONLY. BEFORE POWERING THE WATER HEATER, BE SURE THAT THE SYSTEM IS COMPLETELY FILLED WITH WATER
AND ALL AIR IS REMOVED.THIS MANUAL AND ALL ECCOTEMP CONTENT IS SUBJECT TO CHANGE WITHOUT NOTICE. PLEASE VISIT SUPPORT.ECCOTEMP.COM FOR MORE INFORMATION.
MODEL(S): ESH-2.5, ESH-4.0
Eccotemp hereby warrants this product to be free of material defects in materials and workmanship when
installed and operated according to Eccotemp’s installation and operating instructions. This Limited Warranty
extends to the original purchaser and subsequent owners, but only while the product remains as the site of the
original installation. This Limited Warranty terminates if moved or reinstalled at a new location. There are no
warranties, express or implied made or given other than contained in this Limited Warranty. No agent, employee
or representative of Eccotemp has any authority to bind Eccotemp to any representation or warranty concerning
the Product not contained in this Limited Warranty. Eccotemp reserves the right and authority to change, modify
or alter this warranty at any given time.
Except as expressly set forth herein, THERE ARE NO REPRESENTATIONS OR WARRANTIES, EXPRESS OR IMPLIED,
INCLUDING, WITHOUT LIMITATION, AS TO MERCHANTABILITY OR FITNESS FOR A PARTICULAR PURPOSE WITH
RESPECT TO ANY GOODS SOLD HEREUNDER. BUYER’S EXCLUSIVE REMEDY IS LIMITED TO REPAIR OR REPLACE-
MENT OF THE GOODS SOLD, AT ECCOTEMP’S DISCRETION. ECCOTEMP SHALL NOT BE LIABLE FOR INCIDENTAL
OR CONSEQUENTIAL DAMAGES.
Limited Warranty Period
This Warranty is extended by Eccotemp Systems to the Owner. This warranty takes eect on the date of in-
stallation of the Product or 30 days after the date of purchase, whichever occurs rst, and is eective until the
specied anniversary of such date as follows:
Item Period of Coverage
5 Years limited on Leaks
2 Years Defects
Free Accessories (accessories, hardware pack, etc.) 30 days
Coverages are void if the unit is used in a hot water circulation loop, in series with a circulation system or where
an on-demand recirculation system is not incorporated. The EM Mini Tank series is approved for commercial use.
Eccotemp will provide 1 round of parts per incident (deemed by Eccotemp Support Team) under the warranty
prior to requesting the shipment of any item to our warehouse for repair/inspection.
For Customers With a Home Warranty
Often your home warranty will assist in covering some of the fees related to your home appliances, such as
your water heater. Be sure to check with your home warranty company for assistance prior to reaching out to
Eccotemp.
Shipping Related Costs:
US ORDERS
Within the rst 45 days of purchase, Eccotemp will cover all ground shipping costs for warranty related issues,
excluding AK, HI and any location outside of the continental US. After the rst 45 days of purchase, the customer
is responsible for all shipping to Eccotemp, regardless of reason or circumstance. Eccotemp will cover the
warranty related shipping costs when returning a product to a customer after repair/inspection. The method for
warranty related shipping will be Ground equivalent with the provider of Eccotemp’s choosing.
CANADA ORDERS
Within the rst 45 days of purchase, Eccotemp will cover all ground shipping costs for warranty related issues.
After the rst 45 days of purchase, the customer is responsible for all shipping to Eccotemp, regardless of
reason or circumstance. Eccotemp will cover the warranty related shipping costs when returning a product to a
customer. The method for warranty related shipping will be Ground equivalent with the provider of Eccotemp’s
choosing.
All shipments of any type of product coming to Eccotemp for any reason must have an RGA for any repairs to
be made. Please contact Eccotemp to obtain an RGA number prior to shipping anything to Eccotemp. Failure to
do so could result in loss of product. Eccotemp will not be responsible for replacement due to loss or damage if
these steps are not properly followed.
ECCOTEMP SYSTEMS, LLC
LIMITED WARRANTY INFORMATION
WARRANTY
CANADA
Eccotemp Systems/Returns Department
CO Eccotemp Canada
Ottawa Logistics
1270 Humber Place
Ottawa Ontario K1B 3W3
US
Eccotemp Systems/Returns Department
315-A Industrial Rd.
Summerville, SC 29483

Support: Support.Eccotemp.com Shop Online: Eccotemp.com Store Locator: Eccotemp.com/locator
26
ENGLISH
PLEASE NOTE: MINI TANKS ARE FOR INDOOR PERMANENT INSTALLATIONS ONLY. BEFORE POWERING THE WATER HEATER, BE SURE THAT THE SYSTEM IS COMPLETELY FILLED WITH WATER
AND ALL AIR IS REMOVED.THIS MANUAL AND ALL ECCOTEMP CONTENT IS SUBJECT TO CHANGE WITHOUT NOTICE. PLEASE VISIT SUPPORT.ECCOTEMP.COM FOR MORE INFORMATION.
WARRANTY
Exclusions
Please refer to the Installation Manual and Use & Care Manual supplied with your new Eccotemp
Systems product. This Limited Warranty becomes null and void if any of the following are
determined to be a contributing factor by Eccotemp to the failure of the product: `
1. Abuse, misuse, alteration, neglect or misapplication.
2. Improper, dangerous, destructive maintenance procedures or inadequate maintenance.
3. Damages caused by services performed by servicers other than Eccotemp Systems.
4. Installation in a corrosive or otherwise destructive environment.
5. Damage as a result of freezing within the unit or surrounding piping.
6. Scale buildup.
7. Incorrect gas or water pressure.
8. Acts of force Majeure.
9. Damage as a result of use with non-potable, untreated or poorly treated well water, or water
with high PH levels or hardness levels in excess of 12 grains per gallon (200mg/L).
10. Incorrect sizing for the application.
11. Products with original serial numbers that have been removed or altered and cannot be readily
determined.
12. Acts of God including, but not limited to; re, ood, or natural disaster.
This Product is not to be used as a pool or spa heater.
In the event of an Eccotemp Systems recognized defect, malfunction, or failure to conform to this
Warranty and based upon Eccotemp approval of warranty claim, Eccotemp Systems, at its sole and
absolute discretion, will settle the warrant claim of such defect, malfunction, or failure to conform
to this Warranty. In order to make a claim under this Warranty, The Owner must notify Eccotemp of
the failure of the Product to conform to this Warranty.
Under this Warranty, Eccotemp Systems will only provide replacement parts as described in the
“Limited Warranty Period”. The Owner will be responsible for any cost incurred including labor
costs for servicing the unit, shipping, delivery, and handling of the replacement part, cost for
permits or materials necessary for the repair, or incidental costs resulting from damage external to
the unit resulting from the failure.
NOTWITHSTANDING ANYTHING IN THIS WARRANTY TO THE CONTRARY, EXCEPT FOR ECCOTEMP
SYSTEMS’ AFFIRMATIVE OBLIGATIONS EXPRESSLY SET FORTH IN THIS WARRANTY, ECCOTEMP
SYSTEMS DISCLAIMS ANY AND ALL WARRANTIES, EITHER EXRESS OR IMPLIED, REGARDING
THE PRODUCT AND ITS FUNCTIONALITY, PERFORMANCE, MERCHANTABILITY, FITNESS FOR
PARTICULAR PURPOSE OR INTELLECTUAL PROPERTY RIGHTS. ECCOTEMP SYSTEMS DISCLAIMS ALL
OTHER OBLIGATIONS OR LIABILITIES ON ITS PART AND NEITHER ASSUMES NOR AUTHORIZES ANY
OTHER PERSON TO ASSUME FOR ECCOTEMP SYSTEMS ANY OTHER LIABILITIES IN CONNECTION
WITH THE PERFORMANCE OF THE PRODUCT. THIS WARRANTY ONLY COVERS REPLACEMENT
PARTS AND DOES NOT COVER COST OF LABOR OR SERVICES UNDER ANY CIRCUMSTANCES.
This warranty only applies to the 50 states of the U.S.A and Territories of Canada. Eccotemp
Systems shall not be liable for any claim or demand against Eccotemp Systems by any other part
for damages of any kind, including, but not limited to incidental and consequential damages,
arising out of the subject matter of this Agreement. Some States do not allow exclusion or
limitation of incidental or consequential damages, so the above limitation or exclusion may not
apply to you. This warranty gives you specic legal rights. You may also have other rights that vary
from State to State.
Please Note: This warranty and all Eccotemp content is subject to change. Please refer to
support.eccotemp.com for the most updated version. For further questions, please email our
support team at suppor[email protected].

27
ENGLISH
Support: Support.Eccotemp.com Shop Online: Eccotemp.com Store Locator: Eccotemp.com/locator
PLEASE NOTE: MINI TANKS ARE FOR INDOOR PERMANENT INSTALLATIONS ONLY. BEFORE POWERING THE WATER HEATER, BE SURE THAT THE SYSTEM IS COMPLETELY FILLED WITH WATER
AND ALL AIR IS REMOVED.THIS MANUAL AND ALL ECCOTEMP CONTENT IS SUBJECT TO CHANGE WITHOUT NOTICE. PLEASE VISIT SUPPORT.ECCOTEMP.COM FOR MORE INFORMATION.
Product Comparison
If you like the Eccotemp SMARTHOME Mini Tank, you’ll also like our EM
Series Mini Tanks! You can get more information about these miniature tanks
and Eccotemp’s Tankless Water Heaters at www.Eccotemp.com
Tank Volume
Voltage
AMPS
Phase
Temperatures
Heating Capacity
Max Operating Pressure
Fittings
Warranty
Suggested Uses
2.5 Gallon and 4 Gallon Models
110/120
12
Single
50-140 F
1400 Watts
150 psi
1/2 NPT Connections
SmartHome
Mobile App
Outer Case Plastic Tempered Glass / Plastic
Voice Commands
Smart ON/OFF
Advanced Error Detection
5 years Limited on Leaks
2 years Defects
Boats, Campers, Tiny Homes, Food Carts, RV’s
Homes, Under the Sink. Oces, Cottages,
Kitchens, Utility Rooms, Apartments, Food Trucks
Boats, Campers, Tiny Homes, Food Carts, RV’s
Homes, Under the Sink. Oces, Cottages,
Kitchens, Utility Rooms, Apartments, Food Trucks
2.5 Gallon, 4 Gallon, and 7 Gallon Models
INDOOR ONLY
EM Series Mini Tank ESH Series Mini Tank
INSTALLATION
INDOOR ONLY
110/120
12
Single
50-140 F
1440 Watts
150 psi
1/2 NPT Connections
5 years Limited on Leaks
2 years Defects
Manual Mode
THE FUTURE OF EFFICIENCY
THE FUTURE OF EFFICIENCY
COMPARISON

MANUAL DE INSTALACIÓN, USO Y CUIDADO
HOGARINTELIGENTE
MINI TANQUE CALENTADOR DE AGUA
BOTÓN
INTELIGENTE
COMANDOS DE
VOZ INTELIGENTES
SMARTHOME LISTO
DETECCIÓN DE
ERROR AVANZADA
CALEFACCIÓN DIGITAL
DE PRECISIÓN
TABLERO DE CONTROL
INTELIGENTE
CALENTANDO EL AGUA MÁS INTELIGENTE
"Alexa,
Enciende mi mini calentador
de agua”
"Ok Google,
Ajuste mi mini calentador
de agua a 110 "
TELÉFONO: 1-866-356-1992 CORREO ELECTRÓNICO: SUPPORT@ECCOTEMP.COM HABLA A: 315-A INDUSTRIAL ROAD, SUMMERVILLE, SC 29483
ESH 2.5/4.0
THE FUTURE OF EFFICIENCY

Soporte: Support.Eccotemp.com Tienda en Linea: Eccotemp.com Localizador de Tiendas: Eccotemp.com/locator
29
ESPAÑOL
TENGA EN CUENTA: LOS MINI TANQUES SON SOLO PARA INSTALACIONES PERMANENTES INTERIORES. ANTES DE ENCENDER EL CALENTADOR DE AGUA, ASEGÚRESE DE QUE EL
SISTEMA SE LLENE COMPLETAMENTE DE AGUA Y QUE SE QUITE TODO EL AIRE. ESTE MANUAL Y TODO EL CONTENIDO DE ECCOTEMP ESTÁ SUJETO A CAMBIOS SIN PREVIO AVISO.
VISITE SUPPORT.ECCOTEMP.COM PARA MÁS INFORMACIÓN.
ESH-2.5
1440W
120V ~ 60Hz
150 psi
ESH-4.0
1440W
120V ~ 60Hz
150 psi
CALIENTE
QUEMAR
Temperatura del agua superior a 125 F (52 C)
puede causar quemaduras graves al instante o
escaldaduras de muerte. Los niños,
discapacitados y ancianos corren el mayor
riesgo de ser escaldado Ver manual de
instrucciones antes de ajustar la temperatura en
el calentador de agua. Siente agua antes de
bañarte o ducharse Limitación de temperatura
valores disponibles, ver manual.
PELIGRO
2.5 gal
4.0 gal
CALENTADOR DE AGUA MINI TANQUE HOGAR
INTELIGENTE
MODELO
MODELO
VOLTAJE CLASIFICADO
VOLTAJE CLASIFICADO
POTENCIA NOMINAL
POTENCIA NOMINAL
CAPACIDAD DEL TANQUE
CAPACIDAD DEL TANQUE
PRESIÓN MÁXIMA CLASIFICADA
PRESIÓN MÁXIMA CLASIFICADA
CALENTADOR DE AGUA MINI TANQUE HOGAR
INTELIGENTE
315-A Industrial Road
Summerville, SC 29483
1-866-356-1992
SEGURIDAD
Cumple con UL STD. 174 Certificado
para CSA STD. C22.2 NO. 110
Cumple con UL STD. 174 Certificado
para CSA STD. C22.2 NO. 110
NÚMERO
DE SERIE
NÚMERO
DE SERIE
The Future of Eciency

Soporte: Support.Eccotemp.com Tienda en Linea: Eccotemp.com Localizador de Tiendas: Eccotemp.com/locator
30
ESPAÑOL
TENGA EN CUENTA: LOS MINI TANQUES SON SOLO PARA INSTALACIONES PERMANENTES INTERIORES. ANTES DE ENCENDER EL CALENTADOR DE AGUA, ASEGÚRESE DE QUE EL
SISTEMA SE LLENE COMPLETAMENTE DE AGUA Y QUE SE QUITE TODO EL AIRE. ESTE MANUAL Y TODO EL CONTENIDO DE ECCOTEMP ESTÁ SUJETO A CAMBIOS SIN PREVIO AVISO.
VISITE SUPPORT.ECCOTEMP.COM PARA MÁS INFORMACIÓN.
¡PRECAUCIÓN! Cuando se conecte una fuente de calor suplementaria al calentador
de agua eléctrico con tanque de almacenamiento certicado para uso domestico,
se deben tomar las previsiones necesarias para evitar que la temperatura de dicha
fuente exceda la congurada en el termostato del calentador.
¡PRECAUCIÓN! En caso de que el calentador de agua se conecte a un equipo de
calentamiento suplementario, será necesario ajustar ambos termostatos (tanto el
del calentador como el de la fuente suplementaria) a la misma temperaturatura. De
no hacerlo se podría perder el control apropiado de la temperatura.
¡PRECAUCIÓN! Para reducir el riesgo de descargas eléctricas o incendios, solo utilice
con un voltaje de alimentación trifásico máximo de 125/250 voltios.
¡PRECAUCIÓN! Para reducir el riesgo de descargas eléctricas, conecte debidamente
el aterramiento del calentador de agua. Para información detallada consulte las
instrucciones.
¡PRECAUCIÓN! Instale los equipos de protección contra temperatura y presión
requeridos por los códigos locales, pero nunca con prestaciones menores a las de
una válvula de alivio combinada para presión y temperatura certicada de acuerdo
al estándar ANSI 21.22 por parte de un laboratorio de pruebas reconocido que
mantenga inspecciones períodicas de la producción de los equipos o materiales
listados bajo dicho estándar. La válvula antes mencionada debe ser orientada,
suministrada con sus respectivas tuberías o de alguna otra manera instalada
de forma que la descarga solo pueda salir a seis pulgadas por encima del suelo
estructural, o a cualquier distancia por debajo del mismo, sin posibilidad de
contacto con ningún elemento eléctrico energizado.
¡PELIGRO! Para reducir el riesgo de descargas eléctricas, desconecte la fuente de
poder antes de reemplazar el dispositivo limitador de temperatura.
¡PRECAUCIÓN! Para reducir el riesgo de presiones y temperaturas excesivas en
este calentador de agua, instale el equipo de protección de temperatura y presión
requerido por los códigos locales y no menos que una válvula combinada de aliv-
io de temperatura y presión certicada por un laboratorio de pruebas reconocido
a nivel nacional que realice inspecciones periódicas de la producción de equipos o
materiales, que cumplan los requisitos para válvulas de alivio y dispositivos de cierre
automático de gas para sistemas de suministro de agua caliente, ANSIZ21.22. Esta
válvula debe estar marcada con una presión de ajuste máxima que no exceda la
presión de trabajo máxima marcada del calentador de agua. Instale la válvula en una
abertura provista y marcada para este propósito en el calentador de agua, y oriéntela
o provea un tubo para que cualquier descarga de la válvula alcance solo 6 pulgadas
arriba, o a cualquier distancia debajo del piso estructural, y no contacte cualquier
parte eléctrica con corriente. La abertura de descarga no debe bloquearse ni redu-
cirse de tamaño bajo ninguna circunstancia.
SEGURIDAD

Soporte: Support.Eccotemp.com Tienda en Linea: Eccotemp.com Localizador de Tiendas: Eccotemp.com/locator
31
ESPAÑOL
TENGA EN CUENTA: LOS MINI TANQUES SON SOLO PARA INSTALACIONES PERMANENTES INTERIORES. ANTES DE ENCENDER EL CALENTADOR DE AGUA, ASEGÚRESE DE QUE EL
SISTEMA SE LLENE COMPLETAMENTE DE AGUA Y QUE SE QUITE TODO EL AIRE. ESTE MANUAL Y TODO EL CONTENIDO DE ECCOTEMP ESTÁ SUJETO A CAMBIOS SIN PREVIO AVISO.
VISITE SUPPORT.ECCOTEMP.COM PARA MÁS INFORMACIÓN.
SEGURIDAD
Manual de Uso y Cuidado
Con instrucciones de instalación para el instalador
APLICACIÓN
Punto de Uso
INSTALACIÓN
En Interiores
CAPACIDAD
2.5 gal / 4 gal
CALENTADOR DE AGUA CON MINI TANQUE ECCOTEMP
HOGARINTELIGENTE
Información de seguridad
Precauciones de Seguridad
Información General
Introducción
Especicaciones Técnicas
Información Especíca del Modelo
Diagrama de Cableado
Instrucciones de Instalación
Conexiones de Agua
Válvula de Alivio de Presión
Empezando
Llenando el Calentador de Agua
Usando la Aplicación Móvil
Ajuste de la Temperatura
Comandos de Voz
Mantenimiento
Limpieza Interna
Diagrama de Soplado
Solución de Problemas
Información de Garantía
Garantía
Comparación de Productos
30
31
32
33
34
35
38
41
45
44
52
36-37
39-40
48-49
46-47
50-51
¡
FELICITACIONES!
Ha adquirido un calentador de agua con mini tanque Eccotemp
nuevo. ¡Esto le abrirá un mundo de posibilidades para el uso y
disfrute del agua caliente!
Le recomendamos encarecidamente tomarse el tiempo de
leer todos los procedimientos de seguridad y de instalación
contenidos en el presente manual antes de intentar instalar su
nuevo calentador de agua con mini tanque.
En caso de tener dudas, por favor consúltenos a través de
nuestro centro de servicio al cliente en support.eccotemp.com.
LEA LA INFORMACIÓN DE SEGURIDAD
Su seguridad y la de los demás es muy importante. En este manual y en su calentador de
agua hay muchos mensajes de seguridad importantes. Lea y obedezca en todo momento
los mensajes de seguridad. Este es el símbolo de alerta de seguridad. Reconózcalo como un
indicador de información importante de seguridad. Este símbolo le alertará acerca de peligros
potenciales que podrían tener consecuencias fatales para usted u otros.
Todos los mensajes de seguridad seguirán al símbolo de alerta de seguridad y a las palabras:
“PELIGRO”, “ADVERTENCIA”, “PRECAUCIÓN” o “AVISO”. Estas palabras signican:
¡ADVERTENCIA! - Una situación potencialmente peligrosa que podría ocasionar la muerte,
heridas graves o daños a la propiedad.
¡PELIGRO! - Una situación peligrosa que denitivamente resultaría en heridas graves o
inclusive la muerte.
¡PRECAUCIÓN! - Una situación potencialmente peligrosa que podría ocasionar heridas
menores o moderadas.
¡AVISO! - Se llama la atención para ejecutar un procedimiento especíco o para mantener
una condición especíca.
PARA SUS ARCHIVOS
Escriba su número de serie aquí: #________________________
Podrá encontrarlo en una etiqueta sobre el aparato o en el
empaque. Engrape la factura o el recibo de compra aquí. Se
necesitará una prueba de la fecha de compra para obtener
servicio de acuerdo a la garantía.
POR FAVOR CONSERVE EL MANUAL DE INSTRUCCIONES PARA CONSULTAR EN
EL FUTURO
LEA ESTE MANUAL
En el mismo encontrará muchos consejos acerca del uso y cuidado apropiado de su calentador
de agua. Unos pocos cuidados preventivos de su parte le ayudarán a ahorrar tiempo y dinero
durante la vida de su calentador de agua. Encontrará muchas respuestas a problemas comunes
en la guía de resolución de fallas. Si revisa la tabla de resolución de fallas con antelación, quizá
no necesite llamar a servicio.

Soporte: Support.Eccotemp.com Tienda en Linea: Eccotemp.com Localizador de Tiendas: Eccotemp.com/locator
32
ESPAÑOL
TENGA EN CUENTA: LOS MINI TANQUES SON SOLO PARA INSTALACIONES PERMANENTES INTERIORES. ANTES DE ENCENDER EL CALENTADOR DE AGUA, ASEGÚRESE DE QUE EL
SISTEMA SE LLENE COMPLETAMENTE DE AGUA Y QUE SE QUITE TODO EL AIRE. ESTE MANUAL Y TODO EL CONTENIDO DE ECCOTEMP ESTÁ SUJETO A CAMBIOS SIN PREVIO AVISO.
VISITE SUPPORT.ECCOTEMP.COM PARA MÁS INFORMACIÓN.
INSTRUCCIONES DE SEGURIDAD IMPORTANTES
¡ADVERTENCIA! Cuando se utilicen aparatos eléctricos, se deben tomar las
correspondientes precauciones de seguridad a n de reducir los riesgos de
incedio, de descargas eléctricas o de heridas a personas.
El fabricante y/o distribuidor no es responsable por daños producto de
una instalación inapropiada o de no seguir las instrucciones indicadas en el
presente manual.
SE RECOMIENDA QUE UN TÉCNICO CALIFICADO Y CON LICENCIA SEA EL QUE
INSTALE EL CALENTADOR DE AGUA Y REALICE TODOS LOS TRABAJOS DE
SERVICIO Y/O MANTENIMIENTO.
MANTENGA ESTAS INSTRUCCIONES
LLENE COMPLETAMENTE EL TANQUE CON AGUA Y DEJE CORRER LA
MISMA A TRAVÉS DEL GRIFO DE AGUA CALIENTE ANTES DE ENERGIZAR
EL CALENTADOR POR PRIMERA VEZ, DE LO CONTRARIO SE PODRÍAN
OCASIONAR DAÑOS.
¡IMPORTANTE!
¡PRECAUCIÓN!
Se puede producir gas de hidrógeno en un sistema de agua caliente servido
por este calentador que no se mantenga en uso por un largo intervalo
de tiempo (por lo general de 2 semanas o más) El gas hidrógeno es
extremadamente inamable. Para reducir el riesgo bajo esas condiciones,
se recomienda que el grifo de agua caliente se abra por varios minutos en
los lavabos más cercanos y más lejanos servidos desde este calentador de
agua antes de usar algún aparato eléctrico conectado al sistema de agua
caliente (como por ejemplo un lavavajillas). Si hay gas hidrógeno presente,
probablemente se podrá oír un sonido inusual de aire escapando a través
del grifo a medida que el agua comience a uir. No debería haber nadie
fumando o ninguna llama cerca del grifo en este momento.
1. LEA TODAS LAS INSTRUCCIONES ANTES DE UTILIZAR ESTE CALENTADOR DE AGUA.
2. Este calentador de agua debe estar aterrado. Conéctelo solamente a un tomacorriente
aterrado de forma correcta. Consulte la sección ENERGIZAR EL CALENTADOR DE AGUA en
la página 13.
3. Instale o ubique este calentador de agua solo en lugares donde se puedan cumplir las
instrucciones de instalación.
4. Utilice este calentador de agua solo para los usos especícos descritos en este manual.
5. No utilice un cable de extensión con este calentador de agua. Si no hay una fuente de
energía disponible cerca del calentador de agua de agua, contacte a un electricista
calicado para que instale un receptáculo debidamente.
6. Como con todo otro aparato, se necesita una supervisión cuidadosa cuando sea utilizado
por niños.
7. No opere este calentador de agua si tiene un cable o conector eléctrico dañado, si no está
funcionando adecuadamente, si se ha dañado, o se ha caído.
8. Solo personal de servicio calicado debe intervenir este calentador de agua. Contacte el
centro de servicios más cercano cuando surjan dudas o se requieran servicios.
SEGURIDAD

Soporte: Support.Eccotemp.com Tienda en Linea: Eccotemp.com Localizador de Tiendas: Eccotemp.com/locator
33
ESPAÑOL
TENGA EN CUENTA: LOS MINI TANQUES SON SOLO PARA INSTALACIONES PERMANENTES INTERIORES. ANTES DE ENCENDER EL CALENTADOR DE AGUA, ASEGÚRESE DE QUE EL
SISTEMA SE LLENE COMPLETAMENTE DE AGUA Y QUE SE QUITE TODO EL AIRE. ESTE MANUAL Y TODO EL CONTENIDO DE ECCOTEMP ESTÁ SUJETO A CAMBIOS SIN PREVIO AVISO.
VISITE SUPPORT.ECCOTEMP.COM PARA MÁS INFORMACIÓN.
El calentador de agua con mini tanque Eccotemp
HOGARINTELIGENTE puede usarse en la mayoría
de los botes, casas, hogares pequeños, vehículos
recreativos, bajo el fregadero, en ocinas, casas de
campo, cuartos de servicios, apartamentos y camiones
de comida rápida. Los modelos mini tanques Eccotemp
HOGARINTELIGENTE están diseñados para suministrar
agua caliente a todos los lavamos y lavaplatos de cocina
en un ambiente residencial.
Los modelos mini tanques Eccotemp
HOGARINTELIGENTE pueden reemplazar a los
calentadores de agua centralizados tradicionales,
conservando el agua y reduciendo los desperdicios de
energía.
Los calentadores de agua con mini tanque Eccotemp HOGARINTELIGENTE son
ligeros, compactos y fabricados para fácil instalación. Los modelos de mini tanques
Eccotemp HOGARINTELIGENTE pueden montarse en la pared usando los accesorios
proporcionados o pueden sostenerse sobre su propio pie.
Los modelos de mini tanques Eccotemp HOGARINTELIGENTE están diseñados para
operar a un valor de presión máxima de 150 psi. Si su presión de agua es mayor a 150
psi, deberá instalar una válvula reductora de presión.
Los calentadores de agua con mini tanque Eccotemp HOGARINTELIGENTE también
son compatibles con una aplicación para dispositivos móviles que puede descargarse
desde el Apple App Store y la Google Play Store. Busque la palabra “Eccotemp” para
encontrar la app de manera sencilla, bajarla, instalarla y comenzar a utilizarla a n de
congurar su instalación. Una vez que tenga la app instalada, podrá utilizarla para
ajustar la temperatura a través de su teléfono inteligente o cualquier otro dispositivo
HOGARINTELIGENTE, a n de mejorar la eciencia energética de su hogar.
¡PRECAUCIÓN! El fabricante no puede ser responsable por daños producto
de una instalación inapropiada o de no seguir las instrucciones indicadas en
el presente manual. Siga las instrucciones de instalación antes de conectar el
equipo a una toma eléctrica.
¡PRECAUCIÓN! El termostato se ha preajustado en la fábrica a 125 ° F (51.7 ° C) o
menos para reducir el riesgo de lesiones por escaldadura.
¡ADVERTENCIA! El instalador debe revisar los contenidos de este manual
junto con el propietario en lo que se termine la instalación. El manual debería
permanecer con el propietario, para ser guardado en algún sitio cercano al
calentador de agua.
GENERAL
Información General
THE FUTURE OF EFFICIENCY

Soporte: Support.Eccotemp.com Tienda en Linea: Eccotemp.com Localizador de Tiendas: Eccotemp.com/locator
34
ESPAÑOL
TENGA EN CUENTA: LOS MINI TANQUES SON SOLO PARA INSTALACIONES PERMANENTES INTERIORES. ANTES DE ENCENDER EL CALENTADOR DE AGUA, ASEGÚRESE DE QUE EL
SISTEMA SE LLENE COMPLETAMENTE DE AGUA Y QUE SE QUITE TODO EL AIRE. ESTE MANUAL Y TODO EL CONTENIDO DE ECCOTEMP ESTÁ SUJETO A CAMBIOS SIN PREVIO AVISO.
VISITE SUPPORT.ECCOTEMP.COM PARA MÁS INFORMACIÓN.
Actualmente existen dos modelos de mini tanques Eccotemp HOGARINTELIGENTE,
uno de 2.5 galones y otro de 4 galones. El recipiente de presión (tanque de agua)
viene soldado, es hecho con acero revestido de vidrio, y está equipado con una
varilla de ánodo. El agua se suministra mediante conexiones NPT estándar de 1/2
pulgada.
El calentador de agua de agua está equipado con un termostato y un interruptor
de temperatura de alto límite que puede controlarse desde la aplicación Eccotemp
HOGARINTELIGENTE o mediante controles manuales. También se suministra una
válvula de alivio de presión con su calentador de agua.
Especicaciones Técnicas
Modelos: Mini tanques Eccotemp HOGARINTELIGENTE ESH 2.5 y ESH 4.0
¡AVISO! Para usar las conguraciones WIFI debe asegurarse de que la perilla
manual de temperatura esté en la opción del modo.
THE FUTURE OF EFFICIENCY
ESH 2.5
10.9”
15”
THE FUTURE OF EFFICIENCY
ESH 4.0
12.5”
16.5”
ACCESORIOS INCLUIDOS
Válvula de Alivio de
Presión y Temperatura
Anclajes Para
montaje
Placa de Montaje
TÉCNICO
THE FUTURE OF EFFICIENCY
ESH 4.0
12.5”
16.5”

Soporte: Support.Eccotemp.com Tienda en Linea: Eccotemp.com Localizador de Tiendas: Eccotemp.com/locator
35
ESPAÑOL
TENGA EN CUENTA: LOS MINI TANQUES SON SOLO PARA INSTALACIONES PERMANENTES INTERIORES. ANTES DE ENCENDER EL CALENTADOR DE AGUA, ASEGÚRESE DE QUE EL
SISTEMA SE LLENE COMPLETAMENTE DE AGUA Y QUE SE QUITE TODO EL AIRE. ESTE MANUAL Y TODO EL CONTENIDO DE ECCOTEMP ESTÁ SUJETO A CAMBIOS SIN PREVIO AVISO.
VISITE SUPPORT.ECCOTEMP.COM PARA MÁS INFORMACIÓN.
TÉCNICO
Diagrama de Cableado
Especicaciones eléctricas, de presión y de recuperación
Especicaciones Técnicas
yaleR
Transformer
ACL2-OUT
ACL1
ACN1
ACN2
WiFi Board
Thermostat Board
Thermal
Cutout
N
L
E
tnemelE gnitaeH
Control Board
Temp.Sensor
Datos Técnicos
MODELO
Capacidad
Voltaje
Potencia @ 120 VAC
Máx. Presión de Agua
Peso (vacío)
Amperaje
Fases
Instalación de Tuberías
Unidad
Galones
VAC
Vatios
Psi
Lb.
Amperios
Pulgadas
ESH-2.5
2.5
110-120
1440
150
20
12
1
1/2 pulgada NPT
ESH-4.0
4.0
110-120
1440
150
25
12
1
1/2 pulgada NPT
Transformador
Tabla De
Control
Temperatura Sensor
Tablero
WIFI
Tablero del
Termostato
Elemento de
Calefacción
Relé
Recorte
Térmico

Soporte: Support.Eccotemp.com Tienda en Linea: Eccotemp.com Localizador de Tiendas: Eccotemp.com/locator
36
ESPAÑOL
TENGA EN CUENTA: LOS MINI TANQUES SON SOLO PARA INSTALACIONES PERMANENTES INTERIORES. ANTES DE ENCENDER EL CALENTADOR DE AGUA, ASEGÚRESE DE QUE EL
SISTEMA SE LLENE COMPLETAMENTE DE AGUA Y QUE SE QUITE TODO EL AIRE. ESTE MANUAL Y TODO EL CONTENIDO DE ECCOTEMP ESTÁ SUJETO A CAMBIOS SIN PREVIO AVISO.
VISITE SUPPORT.ECCOTEMP.COM PARA MÁS INFORMACIÓN.
Instrucciones de Instalación
ESCOJA UNA UBICACIÓN
Seleccione una ubicación que permita fácil acceso para mantenimiento,
idealmente con unas 9 pulgadas de espacio libre hacia arriba del equipo.
Nota: Solo instale el equipo en posición vertical.
Un profesional con licencia debe realizar la instalación apegándose a todos
los códigos estadales y locales. El fabricante no podrá hacerse responsable de
ningún daño en el caso de que no se hayan cumplido las presentes instrucciones
de instalación o en el caso de una instalación mal ejecutada por parte de un
instalador no calicado.
Montaje en pared
Instale el soporte de montaje
proporcionado en la pared. Utilice
tornillos adecuados para el material
de la pared y que puedan soportar
el peso del calentador de agua lleno
a su capacidad total (ESH-2.5-41
libras.; ESH-4.0- 57 libras.). Cuelgue
el calentador de agua en el soporte y
hale hacia abajo para asegurarse de
que quede bien jado.
Nota: conrme la orientación de las
tuberías de agua (caliente y fría) antes
de realizar el montaje en la pared.
Soporte libre Sobre el Suelo
Colóquelo de pie en el suelo bajo el
lavabo o en un gabinete, tal como se
muestra en el diagrama de abajo o en la
cubierta frontal de este manual.
Nota: asegúrese de dejar por lo menos
nueve (9) pulgadas de espacio libre
sobre el calentador de agua.
THE FUTURE OF EFFICIENCY
Wall MountedFree Standing on Floor
Wall
Anchor
Temperature
Control
Do Not Block
ESH 2.5 = 10.9 Inch
ESH 4.0 = 12.5 Inch
INSTALACIÓN
Ancla de Pared
Control de
Temperatura
No Bloquees
pulgadas
pulgadas
Montado en la Pared
Independiente en el Piso

Soporte: Support.Eccotemp.com Tienda en Linea: Eccotemp.com Localizador de Tiendas: Eccotemp.com/locator
37
ESPAÑOL
TENGA EN CUENTA: LOS MINI TANQUES SON SOLO PARA INSTALACIONES PERMANENTES INTERIORES. ANTES DE ENCENDER EL CALENTADOR DE AGUA, ASEGÚRESE DE QUE EL
SISTEMA SE LLENE COMPLETAMENTE DE AGUA Y QUE SE QUITE TODO EL AIRE. ESTE MANUAL Y TODO EL CONTENIDO DE ECCOTEMP ESTÁ SUJETO A CAMBIOS SIN PREVIO AVISO.
VISITE SUPPORT.ECCOTEMP.COM PARA MÁS INFORMACIÓN.
INSTALACIÓN
Instrucciones de Instalación
Las conexiones de agua deben coincidir con la orientación de las tuberías en
el sitio de la instalación. Conrme que haya suciente espacio para colocar las
mangueras de las tomas de entrada y salida del calentador de agua.
Nota: Si sus tuberías de agua son de cobre o de bronce, asegúrese de usar
conexiones dieléctricas para prevenir la corrosión. De no hacerlo podría causar
daños a su tanque e invalidar la garantía. A n de proteger el calentador de agua
de posibles daños por el calor resultante de una soldadura, realice las soldaduras
que sean necesarias lejos del equipo, usando conexiones roscadas para conectarse
al tanque.
1. Instale una válvula de corte en línea con la tubería de agua fría.
2. Conecte la tubería de agua fría al niple de entrada, marcado con un anillo azul.
3. Conecte la tubería de agua caliente al niple de salida, marcado con un anillo rojo.
CONEXIONES DE AGUA
Vista Desde Arriba
Conexión De Agua Fría
1/2 Pulgada NPT
Conexión de Agua Caliente
1/2 Pulgada NPT
AVISO: No intente remover la arandela de goma.
Válvula de Alivio de Presión
y Temperatura
IMPORTANTE: De no proveer aislamiento dieléctrico se podrían ocasionar fallas
prematuras en el tanque o niples, anulando su garantía. La válvula de alivio
de presión y temperatura (válvula T&P) se usa para mantenimiento; la misma
debería permanecer abierta cuando el calentador de agua está en operación.
NO APLIQUE CALOR DIRECTAMENTE SOBRE LAS CONEXIONES DE ENTRADA O
SALIDA.
Frente

Soporte: Support.Eccotemp.com Tienda en Linea: Eccotemp.com Localizador de Tiendas: Eccotemp.com/locator
38
ESPAÑOL
TENGA EN CUENTA: LOS MINI TANQUES SON SOLO PARA INSTALACIONES PERMANENTES INTERIORES. ANTES DE ENCENDER EL CALENTADOR DE AGUA, ASEGÚRESE DE QUE EL
SISTEMA SE LLENE COMPLETAMENTE DE AGUA Y QUE SE QUITE TODO EL AIRE. ESTE MANUAL Y TODO EL CONTENIDO DE ECCOTEMP ESTÁ SUJETO A CAMBIOS SIN PREVIO AVISO.
VISITE SUPPORT.ECCOTEMP.COM PARA MÁS INFORMACIÓN.
EXPANSIÓN TÉRMICA EN SISTEMAS CERRADOS: la descarga periódica de la
válvula de alivio o la falla del elemento de la empaquetadura puede deberse a
la expansión térmica en un sistema cerrado de suministro de agua. El medidor
de suministro de agua de la empresa de servicios puede contener una válvula
anti retorno, desconector de retorno o válvula reductora de presión que
creará un sistema de agua cerrado. Durante el ciclo de calentamiento del
calentador de agua, el agua caliente se expande causando un incremento de
presión dentro del calentador de agua. La válvula T&P podría descargar agua
caliente en estas condiciones, lo que resulta en una pérdida de energía y la
acumulación de cal en el asiento de la válvula de alivio. Para evitar que esto
suceda, se dan dos recomendaciones:
1. Instale un tanque de expansión para agua caliente doméstico tipo diafragma
(que sea adecuado para agua potable) en la línea de suministro de agua
fría. El tanque de expansión debe tener una capacidad mínima de 1.5 galones.
americanos por cada 50 galones de agua almacenada.
2. Instale una válvula de alivio de presión de 125-PSI en la línea de suministro
de agua fría. Asegúrese de que la descarga de esta válvula se dirija a un
drenaje abierto y se proteja de la congelación.
Una válvula de alivio de presión y temperatura (T&P) certicada por un
laboratorio reconocido nacionalmente se incluye con su calentador de agua.
Está diseñada para reducir el riesgo de acumular presiones y temperaturas
excesivas en el calentador de agua y debe ser instalada de acuerdo con los
códigos locales. La válvula T&P está marcada con una presión máxima, que no
excede la presión máxima de trabajo del calentador de agua (150 psi).
Nota: en caso de usar una válvula de alivio de presión y temperatura diferente
de la suministrada con la compra, por favor asegúrese que la presión máxima
marcada en la misma no exceda la presión máxima del calentador de agua.
1. Instale la válvula T&P suministrada con el calentador de agua en la abertura
roscada de arriba del calentador de agua.
2. Coloque un tubo de descarga desde la válvula T&P hasta un lavabo o
drenaje. No selle o tape el nal de las tuberías de descarga.
Instrucciones de Instalación
VÁLVULA DE ALIVIO DE PRESIÓN Y TEMPERATURA
Válvula T&P Instalada
Tubería de descarga de T&P
THE FUTURE OF EFFICIENCY
Wall MountedFree Standing on Floor
Wall
Anchor
Temperature
Control
Do Not Block
ESH 2.5 = 10.9 Inch
ESH 4.0 = 12.5 Inch
INSTALACIÓN

Soporte: Support.Eccotemp.com Tienda en Linea: Eccotemp.com Localizador de Tiendas: Eccotemp.com/locator
39
ESPAÑOL
TENGA EN CUENTA: LOS MINI TANQUES SON SOLO PARA INSTALACIONES PERMANENTES INTERIORES. ANTES DE ENCENDER EL CALENTADOR DE AGUA, ASEGÚRESE DE QUE EL
SISTEMA SE LLENE COMPLETAMENTE DE AGUA Y QUE SE QUITE TODO EL AIRE. ESTE MANUAL Y TODO EL CONTENIDO DE ECCOTEMP ESTÁ SUJETO A CAMBIOS SIN PREVIO AVISO.
VISITE SUPPORT.ECCOTEMP.COM PARA MÁS INFORMACIÓN.
Se debe instalar una línea de descarga a más de 6 pulgadas hacia arriba o a cual-
quier distancia hacia abajo, y no esta no debe entrar en contacto con ninguna
parte eléctrica energizada. La abertura de descarga de la T&P no debe ser blo-
queada ni su tamaño reducido bajo ninguna circunstancia.
IMPORTANTE: De no proveer aislamiento dieléctrico se podrían ocasionar fallas
prematuras en el tanque o niples, anulando su garantía. La válvula T&P se usa
para mantenimiento; la misma debería permanecer abierta cuando el calentador
de agua está en operación. NO APLIQUE CALOR DIRECTAMENTE SOBRE LAS
CONEXIONES DE ENTRADA O SALIDA.
INSTALACIÓN
Instrucciones de Instalación
TEMPERATURE & PRESSURE RELIEF VALVE
Longitud combinada no
mayor de 15 pulgadas.
No más de 2
codos.
Instalación de la tubería de descarga de la válvula T&P:
1. No debe ser de diámetro menor que la salida de la válvula, ni tener acoples
reductores de ningún tipo.
2. No debe ser taponada o bloqueada.
3. Debe ser de un material apropiado para agua caliente.
4. No debe tener una longitud mayor a 15 pulgadas.
5. No debe tener más de 2 codos.
6. Debe terminar en un drenaje adecuado.
7. No debe tener una válvula de corte entre la válvula de alivio y el tanque o la
válvula de alivio y el nal de la descarga.
Válvula T&P
Instalada
THE FUTURE OF EFFICIENCY
Wall MountedFree Standing on Floor
Wall
Anchor
Temperature
Control
Do Not Block
ESH 2.5 = 10.9 Inch
ESH 4.0 = 12.5 Inch
THE FUTURE OF EFFICIENCY
ESH 2.5
10.9”
15”

Soporte: Support.Eccotemp.com Tienda en Linea: Eccotemp.com Localizador de Tiendas: Eccotemp.com/locator
40
ESPAÑOL
TENGA EN CUENTA: LOS MINI TANQUES SON SOLO PARA INSTALACIONES PERMANENTES INTERIORES. ANTES DE ENCENDER EL CALENTADOR DE AGUA, ASEGÚRESE DE QUE EL
SISTEMA SE LLENE COMPLETAMENTE DE AGUA Y QUE SE QUITE TODO EL AIRE. ESTE MANUAL Y TODO EL CONTENIDO DE ECCOTEMP ESTÁ SUJETO A CAMBIOS SIN PREVIO AVISO.
VISITE SUPPORT.ECCOTEMP.COM PARA MÁS INFORMACIÓN.
Antes de conectar la alimentación, llene
el tanque y todo el sistema con agua, a
n de chequear fugas. Para asegurarse de
que todo el aire restante salga del sistema
de agua, abra el grifo de agua caliente
hasta que se produzca un ujo constante
de agua. De quedar alguna burbuja de
aire en el tanque el elemento calentador
de agua fallará.
1. Abra el grifo de agua caliente.
2. Abra la válvula de suministro de agua
fría.
3. Cuando haya un ujo continuo de agua
desde el grifo, se puede considerar que
el tanque está lleno.
4. Cierre el grifo de agua caliente.
5. Verique fugas en todo el sistema.
Puesta en Marcha
LLENADO DEL CALENTADOR DE AGUA
ENCENDIDO DEL CALENTADOR DE AGUA
Alivio de T&P
Válvula
Manual
Controlar
Mando
Poder
Cable
¡PRECAUCIÓN! Antes de conectar la alimentación del calentador de agua, asegúrese
que todo el sistema se llene con agua y de purgar todo el aire.
Para asegurarse de que todo el aire restante salga del sistema de agua, abra el grifo de agua
caliente hasta que se produzca un ujo constante de agua. De quedar alguna burbuja de aire
en el tanque, el elemento se dañará en lo que se conecte el conector eléctrico.
El calentador de agua con mini tanque Eccotemp HOGARINTELIGENTE viene equipado con
un cable de alimentación diseñado para conectarse a un receptáculo 110/120v estándar. Se
deben respetar todos los códigos estatales y locales pertinentes. El mini tanque Eccotemp
HOGARINTELIGENTE se fabrica y cablea de acuerdo con los requerimientos ETL.
Encendido de su calentador de agua Eccotemp HOGARINTELIGENTE:
1. Enchufe su mini tanque a un tomacorriente aterrado.
2. Ajuste la temperatura del calentador de agua, ya sea mediante los controles manuales
o a través de la app HOGARINTELIGENTE. Los controles manuales de temperatura se
ubican en la parte trasera, del lado derecho.
3. Espere aproximadamente 25 minutos a que se alcance la temperatura deseada. El
calentador de agua con mini tanque Eccotemp HOGARINTELIGENTE viene equipado
con El calentador de agua con mini tanque Eccotemp HOGARINTELIGENTE viene equipado
con un sensor de sobrecalentamiento de reinicio anual; también se le conoce como el
límite alto de temperatura. Este dispositivo viene instalado de fábrica con la nalidad de
d e s c o n e c t a r l a f u e n t e d e p o d e r e n c a s o d e f a l l a e n e l t e r m o s t a t o . E l b o t ó n d e r e i n i c i o
manual se ubica en la parte trasera del mini, justo en el medio, por debajo. Si tiene
equipo montado en una pared, puede ser necesario que lo desmonte a n de alcanzar el
interruptor.
Getting Started
EMPEZANDO

Soporte: Support.Eccotemp.com Tienda en Linea: Eccotemp.com Localizador de Tiendas: Eccotemp.com/locator
41
ESPAÑOL
TENGA EN CUENTA: LOS MINI TANQUES SON SOLO PARA INSTALACIONES PERMANENTES INTERIORES. ANTES DE ENCENDER EL CALENTADOR DE AGUA, ASEGÚRESE DE QUE EL
SISTEMA SE LLENE COMPLETAMENTE DE AGUA Y QUE SE QUITE TODO EL AIRE. ESTE MANUAL Y TODO EL CONTENIDO DE ECCOTEMP ESTÁ SUJETO A CAMBIOS SIN PREVIO AVISO.
VISITE SUPPORT.ECCOTEMP.COM PARA MÁS INFORMACIÓN.
EMPEZANDO
Conecte su Calentador de Agua con sus Dispositivos Inteligentes
El calentador de agua con mini tanque Eccotemp HOGARINTELIGENTE posee
una aplicación móvil fácil de usar, que le permite controlar funciones tales como
encendido/apagado y ajustes de temperatura. Nuestra aplicación móvil es
compatible con dispositivos HOGARINTELIGENTE, tales como Amazon Alexa y
Google Home, brindándole al usuario la capacidad de dictar comandos de voz.
Permítale a nuestra app SMARTHOME decirle con exactitud cuánto dinero gasta
calentando agua.
Aplicación móvil Eccotemp HOGARINTELIGENTE
La temperatura del ESH se puede cambiar de manera remota desde la
app de Eccotemp.
Temperatura
La app de Eccotemp le permite llevar un registro de las estadísticas de
todos los dispositivos.
Estadísticas
Diciembre Enero Febrero Marzo Abril
Costo Mensual
Junio Julio
Mayo
Mayo
Junio
Julio
Noviembre
Costo Anual
Seleccione Año Aquí
Electricidad
Calefacción
BAJO
ALTO
COMODIDAD
COMERCIAL

Soporte: Support.Eccotemp.com Tienda en Linea: Eccotemp.com Localizador de Tiendas: Eccotemp.com/locator
42
ESPAÑOL
TENGA EN CUENTA: LOS MINI TANQUES SON SOLO PARA INSTALACIONES PERMANENTES INTERIORES. ANTES DE ENCENDER EL CALENTADOR DE AGUA, ASEGÚRESE DE QUE EL
SISTEMA SE LLENE COMPLETAMENTE DE AGUA Y QUE SE QUITE TODO EL AIRE. ESTE MANUAL Y TODO EL CONTENIDO DE ECCOTEMP ESTÁ SUJETO A CAMBIOS SIN PREVIO AVISO.
VISITE SUPPORT.ECCOTEMP.COM PARA MÁS INFORMACIÓN.
¿Tiene algún problema con su Eccotemp ESH? Nuestra app
HOGARINTELIGENTE le puede decir con exactitud cuál es el problema.
Descárguela hoy para desbloquear todas las posibilidades de su Eccotemp
HOGARINTELIGENTE ESH. Solo necesita buscar la palabra “Eccotemp” en Apple
App Store o Google Play.
El solucionador de problemas de redes incorporado le indicará si existe
algún problema con su WIFI.
Error de Red
La aplicación Eccotemp posee una guía de resolución de fallas que le
ayuda a diagnosticar cualquier error en el equipo.
Códigos de Error
1. Asegúrese de que el calentador de agua de su
mini tanque esté encendido
2. Compruebe que su calentador de agua de
tanque mini no está en modo manual. El dial
de modo manual se encuentra en la parte in
ferior derecha de su calentador de agua mini
tanque.
3. Compruebe que su red funciona correctamente.
4. Asegúrese de que su enrutador esté lo sucien
temente cerca del calentador de agua del mini
tanque.
5. Si sus problemas persisten, comuníquese con
Eccotemp al 1-866-356-1992 o visite www.ecco
temp.com.
Error De Red
Oops! Il semble y avoir un problème avec le
composants électriques dans votre mini
chaue-eau à réservoir Smart Home. Veuillez
contacter Eccotemp au 1-886-356-1992 ou visitez
support.eccotemp.com pour obtenir de l'aide.
Getting Started
EMPEZANDO
Aplicación móvil Eccotemp HOGARINTELIGENTE
ENTRAR EN
DISPONIBLE EN

Soporte: Support.Eccotemp.com Tienda en Linea: Eccotemp.com Localizador de Tiendas: Eccotemp.com/locator
43
ESPAÑOL
TENGA EN CUENTA: LOS MINI TANQUES SON SOLO PARA INSTALACIONES PERMANENTES INTERIORES. ANTES DE ENCENDER EL CALENTADOR DE AGUA, ASEGÚRESE DE QUE EL
SISTEMA SE LLENE COMPLETAMENTE DE AGUA Y QUE SE QUITE TODO EL AIRE. ESTE MANUAL Y TODO EL CONTENIDO DE ECCOTEMP ESTÁ SUJETO A CAMBIOS SIN PREVIO AVISO.
VISITE SUPPORT.ECCOTEMP.COM PARA MÁS INFORMACIÓN.
Getting Started
Contents
EMPEZANDO
CONFIGURACIÓN DE LA TEMPERATURA
AJUSTE DEL TERMOSTATO
¡Felicitaciones! Ya está listo para utilizar su calentador de agua. Deje salir el
agua caliente en un lavabo cercano y evalué la temperatura. Haga cualquier
ajuste de temperatura utilizando la sección de abajo.
¡ADVERTENCIA! Este calentador de agua está diseñado para operar en
110/120v – NO LO CONECTE A NINGÚN OTRO VOLTAJE. De no usar
un nivel de voltaje apropiado se podrían ocasionar heridas personales
y/o daños a la propiedad. Si el cable de alimentación proporcionado se
encuentra averiado o no es lo sucientemente largo, no utilice un cable de
extensión. Pídale a un electricista con licencia que le reemplace el cable de
alimentación.
Puesta en Marcha
140°F
130°F
110°F
90°F
WIFI
Poder
Cable
Dial de Temperatura
* Parte Posterior Derecha Del Calentador De Agua
Modo Manual: Gire el dial en cualquier dirección para subir o bajar la
temperatura. Si lo gira en el sentido de las agujas del reloj la temperatura
aumentará y si lo gira al contrario disminuirá. Repita la operación hasta que
alcance la temperatura deseada.
Utilizando la App: Su mini tanque se conectará a sus dispositivos inteligentes
para permitirle cambiar la temperatura.
Nota: Cuando el equipo está en modo manual, NO PODRÁ controlar el mini
tanque de manera remota a través de la app HOGARINTELIGENTE.
Calefacción
BAJO
ALTO
COMODIDAD
COMERCIAL

Soporte: Support.Eccotemp.com Tienda en Linea: Eccotemp.com Localizador de Tiendas: Eccotemp.com/locator
44
ESPAÑOL
TENGA EN CUENTA: LOS MINI TANQUES SON SOLO PARA INSTALACIONES PERMANENTES INTERIORES. ANTES DE ENCENDER EL CALENTADOR DE AGUA, ASEGÚRESE DE QUE EL
SISTEMA SE LLENE COMPLETAMENTE DE AGUA Y QUE SE QUITE TODO EL AIRE. ESTE MANUAL Y TODO EL CONTENIDO DE ECCOTEMP ESTÁ SUJETO A CAMBIOS SIN PREVIO AVISO.
VISITE SUPPORT.ECCOTEMP.COM PARA MÁS INFORMACIÓN.
USO DE LA APP
1. Como Primer Paso, Descargue la Aplicación.
Encuentre y descargue la aplicación colocando la palabra “Eccotemp” en el panel
de búsqueda del Apple App Store o Google Play.
2. Congure la App e Ingrese
Una vez que sea instalada, genere su usuario y conecte la app con el calentador
de agua. Siga las instrucciones en pantalla y asegúrese de que la perilla de
temperatura, ubicada en la parte trasera derecha del calentador de agua, tenga
seleccionado el modo WIFI para completar el proceso.
Calefacción
BAJO
ALTO
COMODIDAD
COMERCIAL
Temperatura Actual
Nombre del Dispositivo
Control Deslizante de
Temperatura
Botones de Conguración
Rápida
Unidad de Medida (Grados)
Puesta en Marcha
EMPEZANDO

Soporte: Support.Eccotemp.com Tienda en Linea: Eccotemp.com Localizador de Tiendas: Eccotemp.com/locator
45
ESPAÑOL
TENGA EN CUENTA: LOS MINI TANQUES SON SOLO PARA INSTALACIONES PERMANENTES INTERIORES. ANTES DE ENCENDER EL CALENTADOR DE AGUA, ASEGÚRESE DE QUE EL
SISTEMA SE LLENE COMPLETAMENTE DE AGUA Y QUE SE QUITE TODO EL AIRE. ESTE MANUAL Y TODO EL CONTENIDO DE ECCOTEMP ESTÁ SUJETO A CAMBIOS SIN PREVIO AVISO.
VISITE SUPPORT.ECCOTEMP.COM PARA MÁS INFORMACIÓN.
Getting Started
EMPEZANDO
Diciembre Enero Febrero Marzo Abril
Costo Mensual
Junio Julio
Mayo
Mayo
Junio
Julio
Noviembre
Costo Anual
Seleccione Año Aquí
Electricidad
Puesta en Marcha
USO DE LA APP
3. Uso de la app
Después de conectar la HOGARINTELIGENTE app al mini tanque, podrá controlar
remotamente la temperatura y el estado de encendido/apagado del calentador de
agua con mini tanque. La app cuenta con una pantalla de estadísticas de energía
que le permitirá hacer seguimiento al uso de su calentador de agua a n de
ayudarle a manejar su consumo energético. Usar y revisar la app le ayudará a anar
sus necesidades de calentamiento de agua, permitiéndole utilizar menos recursos y
al nal del día, ahorrar dinero.
4. Como conectarse
Conecte su mini tanque Eccotemp HOGARINTELIGENTE a otro dispositivo
HOGARINTELIGENTE como por ejemplo Amazon Alexa o Google Home. Una vez
que se conecte, el mini tanque Eccotemp HOGARINTELIGENTE podrá aceptar
comandos de voz tales como” Ok Google, apaga mi mini”.
5. Otras funciones de los botones
• El botón titila rápidamente por 120 segundos: sucede cuando el mini está
en modo de conexión WIFI. Para iniciar o repetir el modo de conexión mantenga
presionado el botón de encendido/apagado por 10 segundos.
• El color azul sólido del botón de encendido indica que el mini está apagado.
• Cuando se esté usando el dial de modo manual, la aplicación inteligente
de
• El calentador de agua con mini tanque quedará congurado por defecto en 118
grados Fahrenheit si no se le congura desde la app o mediante la perilla.
Costo Mensual Actual
Historia Visual del Costo
Desglose Anual
Desglose Mensual
(El desglose diario se muestra
cuando se selecciona)
E c c o t e m p n o f u n c i o n a r á .

Soporte: Support.Eccotemp.com Tienda en Linea: Eccotemp.com Localizador de Tiendas: Eccotemp.com/locator
46
ESPAÑOL
TENGA EN CUENTA: LOS MINI TANQUES SON SOLO PARA INSTALACIONES PERMANENTES INTERIORES. ANTES DE ENCENDER EL CALENTADOR DE AGUA, ASEGÚRESE DE QUE EL
SISTEMA SE LLENE COMPLETAMENTE DE AGUA Y QUE SE QUITE TODO EL AIRE. ESTE MANUAL Y TODO EL CONTENIDO DE ECCOTEMP ESTÁ SUJETO A CAMBIOS SIN PREVIO AVISO.
VISITE SUPPORT.ECCOTEMP.COM PARA MÁS INFORMACIÓN.
El calentador de agua Eccotemp ESH Mini Tank es el primer calentador de agua
HOGARINTELIGENTE de su tipo que funciona con una aplicación móvil y control de
voz. Una vez que abra su aplicación Google Home o Amazon Alexa, simplemente
agregue su Mini Tank HOGARINTELIGENTE agregando un nuevo dispositivo. Una
vez agregado a cualquiera de las aplicaciones, podrá usar comandos de voz.
Nota: Todos los comandos comienzan con “Alexa” o “Ok, Google” antes de emitir
un comando al dispositivo respectivo.
Nota: Este cuadro solo tiene propósitos demostrativos y los comandos de voz reales
pueden variar dependiendo del modelo, actualizaciones y de la disponibilidad en su
ubicación.
Empezando
Uso de Comandos de Voz
EMPEZANDO
Propósito Comando
Encender/ Apagar Encender <nombre de dispositivo>
Apagar <nombre de dispositivo>
Ajustar temperatura Ajustar <device name> a <X> gra-
dos
Bajar <nombre de dispositivo>
Subir <nombre de dispositivo>
Consultando el con-
junto
temperatura
¿En qué está congurado mi
<nombre de dispositivo>?
Propósito Comando
Encender/ Apagar Encender <nombre de dispositivo>
Apagar <nombre de dispositivo>
Congurar la tempera-
tura
Ajusta <nombre de dispositivo> a
<X>
Haz que <nombre de dispositivo>
caliente/enfríe
Consulta el ajuste
temperatura
En cuanto está congurado <nom-
bre de dispositivo>?
Google Home
Amazon Alexa

Soporte: Support.Eccotemp.com Tienda en Linea: Eccotemp.com Localizador de Tiendas: Eccotemp.com/locator
47
ESPAÑOL
TENGA EN CUENTA: LOS MINI TANQUES SON SOLO PARA INSTALACIONES PERMANENTES INTERIORES. ANTES DE ENCENDER EL CALENTADOR DE AGUA, ASEGÚRESE DE QUE EL
SISTEMA SE LLENE COMPLETAMENTE DE AGUA Y QUE SE QUITE TODO EL AIRE. ESTE MANUAL Y TODO EL CONTENIDO DE ECCOTEMP ESTÁ SUJETO A CAMBIOS SIN PREVIO AVISO.
VISITE SUPPORT.ECCOTEMP.COM PARA MÁS INFORMACIÓN.
MANTENIMIENTO
LIMPIEZA INTERNA
De recibir el mantenimiento apropiado, su calentador de agua le entregará
años de servicio sin problemas. Se recomienda realizar cada 6 meses una
inspección periódica de la plomería.
Al menos una vez al año, levante y libere la palanca de la válvula de alivio
de presión. Está se encuentra entre las líneas de agua caliente y agua fría;
asegúrese que la válvula opere libremente. Deje uir varios galones a de la línea
de descarga hacia un drenaje abierto.
Inspeccione el área alrededor del calentador de agua para asegurar un
ambiente de operación seguro. Mantenga el área del calentador de agua
despejada y libre de cualquier objetivo que pudiese dañarlo. Si tiene algún
daño o algún golpe, contacte al personal de servicio para vericar la correcta
operación.
NO opere el calentador de agua si siente que algo no anda bien con la unidad.
NO permita a los niños operar o manipular la unidad.
¡AVISO! Si la válvula de alivio de presión del calentador de agua descarga
periódicamente, puede ser debido a un problema con en el sistema de
agua. Contacte al proveedor de agua o a su contratista de plomería para
reparar el problema. NO tapone la salida de la válvula de alivio.
Mantenimiento
DRENAJE Y ALMACENAMIENTO
Purga de su calentador de agua:
1. Desconecte el calentador de agua.
2. Abra el grifo de agua caliente y deje el agua correr. Déjela correr hasta que ya
no esté caliente.
3. Apague el suministro de agua fría al calentador de agua.
4. Cierre el grifo de agua caliente.
5. Desconecte las conexiones de agua fría y caliente del calentador.
6. Si es posible vacíe el agua restante.
7. Retire con cuidado el calentador de agua de la pared (si aplica).
8. Incline el calentador de agua para drenar el agua que aún quede dentro.
¡AVISO! Cuando no vaya a usarlo por un largo tiempo, puede ahorrar
energía reduciendo el ajuste de temperatura ya sea manualmente o
mediante la app de Eccotemp.
Si planea no usarlo por un tiempo, proteja el equipo contra la congelación.
Desconecte el calentador de agua y drénelo.

Soporte: Support.Eccotemp.com Tienda en Linea: Eccotemp.com Localizador de Tiendas: Eccotemp.com/locator
48
ESPAÑOL
TENGA EN CUENTA: LOS MINI TANQUES SON SOLO PARA INSTALACIONES PERMANENTES INTERIORES. ANTES DE ENCENDER EL CALENTADOR DE AGUA, ASEGÚRESE DE QUE EL
SISTEMA SE LLENE COMPLETAMENTE DE AGUA Y QUE SE QUITE TODO EL AIRE. ESTE MANUAL Y TODO EL CONTENIDO DE ECCOTEMP ESTÁ SUJETO A CAMBIOS SIN PREVIO AVISO.
VISITE SUPPORT.ECCOTEMP.COM PARA MÁS INFORMACIÓN.
DIAGRAMA DE DESPIECE
Descripción de los números en la tabla de la página siguiente
Mantenimiento
MANTENIMIENTO

Soporte: Support.Eccotemp.com Tienda en Linea: Eccotemp.com Localizador de Tiendas: Eccotemp.com/locator
49
ESPAÑOL
TENGA EN CUENTA: LOS MINI TANQUES SON SOLO PARA INSTALACIONES PERMANENTES INTERIORES. ANTES DE ENCENDER EL CALENTADOR DE AGUA, ASEGÚRESE DE QUE EL
SISTEMA SE LLENE COMPLETAMENTE DE AGUA Y QUE SE QUITE TODO EL AIRE. ESTE MANUAL Y TODO EL CONTENIDO DE ECCOTEMP ESTÁ SUJETO A CAMBIOS SIN PREVIO AVISO.
VISITE SUPPORT.ECCOTEMP.COM PARA MÁS INFORMACIÓN.
MANTENIMIENTO
Mantenimiento
No.
1
2
3
4
5
6
7
8
9
10
11
12
13
14
15
16
17
18
19
20
21
22
24
25
26
27
28
29
30
31
32
33
34
35
36
37
38
39
23
Nombre de partes
Panel frontal (vidrio templado)
Portada
Almohadillas para los pies
Control de pedidos
Tornillos autoadhesivos C
Control frontal
Si ordeno control
Anillo de sello de elemento
Elemento de calefacción
Cubierta de la brida
Soporte en forma de L
Tuerca M8
Perno de cabeza cuadrada M8
Tuerca de ánodo de magnesio M6
Tuerca de ánodo de magnesio
Base de plástico
Botón de reinicio
Primavera
Botón de reinicio externo
Cable de alimentación
Abrazadera de cable de alimentación
Base de plástico
Manija de control
Perno hexagonal externo (adhesivo)
Soporte de montaje
Boulon d’expansion M6
Cables internos
Contraportada
Tornillo para la instalación de la cubierta
Tanque interno
Funda de goma (en)
Tubo de entrada
Funda de goma (fuera)
Tubo de salida
Manga de goma (válvula T&P)
Válvula T&P
Cubierta de goma (válvula T&P)
Limitador de temperatura
Control de controles de temperatura
QNT.
1
1
2
1
11
1
1
1
1
1
2
4
4
1
1
1
1
1
1
1
1
1
1
2
1
2
1
1
6
1
1
1
1
1
1
1
1
1
40
41
Limitador de temperatura de apoyo
Tornillos autoadhesivos (3.5 x 16)
1
2
1
Los números de tabla
corresponden al diagrama
de despiece de la página
anterior.

Soporte: Support.Eccotemp.com Tienda en Linea: Eccotemp.com Localizador de Tiendas: Eccotemp.com/locator
50
ESPAÑOL
TENGA EN CUENTA: LOS MINI TANQUES SON SOLO PARA INSTALACIONES PERMANENTES INTERIORES. ANTES DE ENCENDER EL CALENTADOR DE AGUA, ASEGÚRESE DE QUE EL
SISTEMA SE LLENE COMPLETAMENTE DE AGUA Y QUE SE QUITE TODO EL AIRE. ESTE MANUAL Y TODO EL CONTENIDO DE ECCOTEMP ESTÁ SUJETO A CAMBIOS SIN PREVIO AVISO.
VISITE SUPPORT.ECCOTEMP.COM PARA MÁS INFORMACIÓN.
ANTES DE LLAMAR A SERVICIO
Guía de Resolución de Fallas
¡Ahorre tiempo y dinero! Revise las indicaciones para resolución de fallas primero
que todo, quizá no necesite llamar a servicio.
1. El agua no se calienta:
• Asegúrese que la unidad esté encendida y funcionando.
• Si la luz no enciende, revise para ver si el botón de reinicio se ha activado.
El botón de reinicio se ubica en la parte trasera del mini, por la parte de abajo.
• Si el botón de encendido está iluminado pero la temperatura del agua en el
lavabo no aumenta, descarte un cruce de tuberías cerrando el suministro
de agua fría al calentador y abriendo el grifo de agua caliente (no debería
haber ujo de agua). En caso de que exista un ujo continuo, puede indicar
un cruce de tuberías, lo cual afecta la temperatura del agua, por lo que debe
ser corregido.
• Si no existe tal cruce de tuberías, es probable que el elemento de
calentamiento deba ser reemplazado.
2. El botón de encendido permanece apagado:
• Si la luz piloto del botón de encendido no se ilumina, pero el agua si calienta,
revise el bombillo, puede estar dañado.
• Verique el botón de reinicio. El agua marrón u oxidada indica una varilla
anódica gastada. Reemplace la barra del ánodo.
3. Agua de color marrón:
Si el agua sale marrón o con óxido, la varilla de ánodo puede tener un desgaste
considerable. Reemplace la varilla de ánodo.
4. Olor en el agua:
Si el agua huele mal puede deberse a una reacción inusual entre el agua local y
la varilla de ánodo del calentador. Verique la varilla de ánodo.6. Water is not hot
enough:
5. El agua está muy caliente:
Ajuste la perilla de temperatura para reducir la temperatura, o use la app para
congurar un valor más bajo. Si la temperatura del agua no baja en 60 minutos, es
posible que se haya dañado el termostato y deba reemplazarlo.
6. El agua no se calienta lo suciente.
Consulte “Ajuste del termostato:” en la página 16.
7. Hay fugas de agua:
• Desconecte el calentador de agua del tomacorriente 110/120v.
• Verique y apriete cualquier conexión de agua oja, así como los accesorios de
la T&P arriba del tanque.
• Retire la cubierta e inspeccione el elemento de calentamiento para determinar
si esta ojo o tiene algún daño visible.
SOLUCIÓN

Soporte: Support.Eccotemp.com Tienda en Linea: Eccotemp.com Localizador de Tiendas: Eccotemp.com/locator
51
ESPAÑOL
TENGA EN CUENTA: LOS MINI TANQUES SON SOLO PARA INSTALACIONES PERMANENTES INTERIORES. ANTES DE ENCENDER EL CALENTADOR DE AGUA, ASEGÚRESE DE QUE EL
SISTEMA SE LLENE COMPLETAMENTE DE AGUA Y QUE SE QUITE TODO EL AIRE. ESTE MANUAL Y TODO EL CONTENIDO DE ECCOTEMP ESTÁ SUJETO A CAMBIOS SIN PREVIO AVISO.
VISITE SUPPORT.ECCOTEMP.COM PARA MÁS INFORMACIÓN.
Maintenance
SOLUCIÓN
Códigos de error en el panel frontal y
en la app
Guía de Resolución de Fallas
Su mini tanque Eccotemp HOGARINTELIGENTE
puede reportar 2 tipos de errores. Si está
utilizando la aplicación, esta le explicará
como interactuar con el calentador de agua
a n de diagnosticar y reparar algunos de los
problemas. Si se ja en el botón de encendido,
este parpadea de acuerdo a una secuencia
basada en el error que está reportando.
Código de error 1:
Avería del termostato
Cuando el mini reporta un error E1, el botón
de encendido parpadea una (01) vez cada tres
(03) segundos hasta que se repare la falla. Si
tiene un error E1, por favor contacte a servicio
al cliente.
Código de error 2:
Incremento rápido en la temperatura
Cuando el mini reporta un error E2, el botón de
encendido parpadea dos (02) veces cada tres
(03) segundos, antes de repetir, hasta que se
repare la falla.
Un incremento rápido en la temperatura
ocurre por lo general cuando el mini no está
completamente lleno de agua. Desconecte el
mini de la alimentación eléctrica, complete su
nivel de agua y reconéctelo para resolver el
problema. En caso de que el error E2 continúe,
por favor contacte a servicio al cliente.
No enciende:
Si el mini está enchufado, pero no enciende,
verique el botón de reinicio que está en la
parte de atrás para asegurarse de que no
esté activado. Si el botón de reinicio no está
activado, por favor contacte a servicio al cliente
para mayor asistencia.
Conectividad WIFI:
Cuando el mini tanque Eccotemp
HOGARINTELIGENTE se está
conectando al WIFI, el botón de
encendido en su parte frontal
parpadeará en rojo durante 60
segundos hasta que conecte. Si no
puede conectarse en ese tiempo,
volverá a intentarlo periódicamente
durante unos 15 minutos.
En caso de poder conectarse
al WIFI, el calentador de agua
ajustará su temperatura a 118°
Fahrenheit de forma automática
por defecto. La app podrá
informarle si el calentador se ha
conectado exitosamente.
¡Uy! Parece que hay un problema con el
componentes eléctricos en su calentador de agua
de tanque mini Smart Home. Por favor, póngase
en contacto con Eccotemp en 1-886-356-1992 o
visite support.eccotemp.com para asistencia.

Soporte: Support.Eccotemp.com Tienda en Linea: Eccotemp.com Localizador de Tiendas: Eccotemp.com/locator
52
ESPAÑOL
TENGA EN CUENTA: LOS MINI TANQUES SON SOLO PARA INSTALACIONES PERMANENTES INTERIORES. ANTES DE ENCENDER EL CALENTADOR DE AGUA, ASEGÚRESE DE QUE EL
SISTEMA SE LLENE COMPLETAMENTE DE AGUA Y QUE SE QUITE TODO EL AIRE. ESTE MANUAL Y TODO EL CONTENIDO DE ECCOTEMP ESTÁ SUJETO A CAMBIOS SIN PREVIO AVISO.
VISITE SUPPORT.ECCOTEMP.COM PARA MÁS INFORMACIÓN.
MODELO(S): ESH-2.5, ESH-4.0
Eccotemp por medio de la presente garantiza que este producto estará libre de defectos materiales y de mano
de obra siempre y cuando sea instalado y operado de acuerdo con las instrucciones de instalación y operación
de Eccotemp. Esta garantía limitada se extiende al comprador original y a los dueños subsecuentes, solo si el
producto permanece en el mismo sitio de la instalación original. Esta garantía limitada termina en caso de que
se mueva o reinstale el equipo en una nueva ubicación. No existen más garantías, explicitas o implícitas, que
las contenidas en esta garantía limitada. Ningún agente, empleado o representante de Eccotemp tiene ninguna
autoridad para obligar a Eccotemp a alguna representación o garantía en lo concerniente al producto contenido
en esta garantía limitada. Eccotemp se reserva el derecho y autoridad de cambiar, modicar o alterar esta
garantía en cualquier momento.
A excepción de que esté expresamente establecido en el presente documento, NO EXISTEN REPRESENTA-
CIONES O GARANTÍAS, EXPLÍCITAS O IMPLÍCITAS, INCLUYENDO, SIN LIMITACIONES, LA COMERCIABILIDAD O
ADECUACIÓN PARA UN PROPÓSITO PARTICULAR CON RESPECTO A CUALQUIER BIEN QUE SEA VENDIDO A
CONTINUACIÓN. EL RECURSO EXCLUSIVO DEL COMPRADOR ESTÁ LIMITADO A REPARAR O REEMPLAZAR LOS
BIENES VENDIDOS, A DISCRECIÓN DE ECCOTEMP. ECCOTEMP NO SERÁ RESPONSABLE POR DAÑOS INCIDEN-
TALES O CONSECUENCIALES.
Periodo de Garantía Limitada
Esta garantía se extiende de parte de Eccotemp Systems a el Dueño. Esta garantía toma efecto el día de la insta-
lación del producto o 30 días después de la fecha de compra, cualquiera que ocurra primero, y es efectiva hasta
el aniversario especicado de dicha fecha, de acuerdo a lo siguiente:
Ítem Periodo de Cobertura
Limitado a 5 años por fugas
2 Años por defectos
Accesorios libres (conectores, paquete de accesorios, etc.) 30 días
La cobertura se considerará sin valor en caso de que la unidad se utilice en un lazo de circulación de agua cali-
ente, en serie con un sistema de circulación o donde no sea incorporado un sistema de recirculación a pedido.
La serie de mini tanques EM está aprobada para uso comercial.
Eccotemp suministrará 1 ronda de partes por incidente (de acuerdo a la consideración del equipo de soporte de
Eccotemp) por concepto de la garantía, previa solicitud del embarque de cualquier ítem a nuestros almacenes
para revisión/inspección.
Para Clientes con Garantía de Hogar
A menudo su garantía de hogar le asistirá para cubrir algunos de los costos relacionados con sus electro-
domésticos, tales como su calentador de agua. Asegúrese de vericar con su compañía de garantía de hogar si
es posible recibir asistencia antes de contactar a Eccotemp.
Costos Relacionados Con El Transporte:
Órdenes a Estados Unidos
Durante los primeros 30 días después de la compra, Eccotemp cubrirá todos los gastos de transporte terrestre
relacionados con asuntos de garantía, excluyendo a AK, HI, Canadá, y cualquier otra localidad fuera de los Esta-
dos Unidos continentales. Después de los primeros 45 días después de la compra, el cliente es responsable de
todos los gastos de transporte a Eccotemp, sin importar la razón o circunstancia. Eccotemp cubrirá los costos de
transporte para retornar el producto al cliente después de una reparación o inspección por garantía. El método
de transporte por garantía será un ete equivalente por tierra con un proveedor escogido por Eccotemp.
Órdenes a Canadá
Durante los primeros 45 días después de la compra, Eccotemp cubrirá todos los gastos de transporte terrestre
relacionados con asuntos de garantía. Después de los primeros 45 días después de la compra, el cliente es
responsable de todos los gastos de transporte a Eccotemp, sin importar la razón o circunstancia. Eccotemp
cubrirá los costos de transporte para retornar el producto al cliente después de una reparación o inspección por
garantía. El método de transporte por garantía será un ete equivalente por tierra con un proveedor escogido
por Eccotemp.
Todos los paquetes de cualquier tipo que lleguen a Eccotemp por cualquier razón deben tener una RGA a n de
realizar cualquier reparación. Por favor contacte a Eccotemp para obtener un número de RGA antes de enviar
cualquier producto a Eccotemp. De no hacerlo, se podría perder el producto. Eccotemp no se hará responsable
de los reemplazos por pérdida o daños se estos pasos.
ECCOTEMP SYSTEMS, LLC
INFORMACIÓN DE GARANTÍA LIMITADA
CANADA
Eccotemp Systems/Returns Department
CO Eccotemp Canada
Ottawa Logistics
1270 Humber Place Ottawa
Ontario K1B 3W3
ESTADOS UNIDOS
Eccotemp Systems/Returns Department
315-A Industrial Rd.
Summerville, SC 29483
GARANTÍA

Soporte: Support.Eccotemp.com Tienda en Linea: Eccotemp.com Localizador de Tiendas: Eccotemp.com/locator
53
ESPAÑOL
TENGA EN CUENTA: LOS MINI TANQUES SON SOLO PARA INSTALACIONES PERMANENTES INTERIORES. ANTES DE ENCENDER EL CALENTADOR DE AGUA, ASEGÚRESE DE QUE EL
SISTEMA SE LLENE COMPLETAMENTE DE AGUA Y QUE SE QUITE TODO EL AIRE. ESTE MANUAL Y TODO EL CONTENIDO DE ECCOTEMP ESTÁ SUJETO A CAMBIOS SIN PREVIO AVISO.
VISITE SUPPORT.ECCOTEMP.COM PARA MÁS INFORMACIÓN.
GARANTÍA
Exclusiones
Por favor consulte el Manual de Instalación y el Manual de Uso y Cuidado suministrado con su
producto nuevo de Eccotemp Systems. Esta garantía limitada se hace nula y sin valor en caso de
que alguno de los siguientes factores se determine como contribuyentes a la falla del producto:
1. Abuso, mal uso, alteración, negligencia o mala aplicación;
2. Procedimientos de mantenimiento incorrectos, peligrosos y destructivo, así como
mantenimientos inadecuados.
3. Daños causados por servicios ejecutados por técnicos ajenos a Eccotemp Systems.
4. Instalación en un ambiente corrosivo o de alguna manera destructivo.
5. Daños resultantes de congelación dentro de la unidad o de las tuberías circundantes.
6. Acumulación de sarro de agua.
7. Presión de gas o de agua incorrecta.
8. Hechos de fuerza mayor.
9. Daños resultantes de usar el equipo con agua de pozo no potable, no tratada o pobremente
tratada, así como de agua con alto nivel de PH o niveles de dureza sobre los 12 granos por
galón (200mg/L).
10. Dimensionado incorrecto para la aplicación.
11. Productos con números de serie originales que hayan sido retirados o alterados y que no
puedan ser determinados con propiedad.
12. Actos de Dios incluyendo, pero sin limitarse a incendios, inundaciones o desastres naturales.
Este producto no es para ser utilizado como calentador de piscina o spa.
En el evento de que exista un defecto, mal funcionamiento o falla para conformar a esta
garantía y basándose en una aprobación de la solicitud de garantía por parte de Eccotemp,
Eccotemp Systems, a su única y absoluta discreción, acordará la reparación de este defecto, mal
funcionamiento o falla para conformar a esta garantía. Para poder solicitar el cumplimiento de la
presente garantía, el Dueño debe noticar a Eccotemp de la falla del producto a conformidad de la
presente garantía.
Bajo esta garantía, Eccotemp Systems solo proporcionará partes de repuesto de acuerdo a lo
descrito en el “Periodo de Garantía Limitada”. El Dueño será responsable de cualquier costo
incurrido incluyendo los costos de mano de obra para reparar la unidad, transporte, entrega y
manejo de las partes de repuesto, costos de permisos o materiales necesarios para la reparación, o
costos incidentales resultantes de daños externos a la unidad a consecuencia de la falla.
A PESAR DE CUALQUIER COSA EN ESTA GARANTÍA QUE DIGA LO CONTRARIO, EXCEPTO LAS
OBLIGACIONES AFIRMATIVAS DE ECCOTEMP EXPRESAMENTE ENUNCIADAS EN ESTA GARANTÍA,
ECCOTEMP SYSTEMS SE DESCARGA DE CUALQUIER GARANTÍA, YA SEA EXPLÍCITA O IMPLÍCITA,
EN LO CONCERNIENTE AL PRODUCTO Y SU FUNCIONALIDAD, DESEMPEÑO, COMERCIABILIDAD,
ADECUACIÓN PARA UN PROPÓSITO PARTICULAR O DERECHOS DE PROPIEDAD
INTELECTUAL. ECCOTEMP SYSTEMS SE DESCARGA DE TODAS LAS DEMAS OBLIGACIONES O
RESPONSABILIDADES Y NO ASUME NI AUTORIZA A NINGUNA OTRA PERSONA PARA QUE ASUMA
EN LUGAR DE ECCOTEMP ALGUN TIPO DE RESPONSABILIDAD EN CONEXIÓN CON EL DESEMPEÑO
DEL PRODUCTO. ESTA GARANTÍA SOLO CUBRE LAS PARTES DE REPUESTO Y NO INCLUYE LOS
COSTOS DE MANO DE OBRA O SERVICIOS BAJO NINGUNA CIRCUNSTANCIA.
Esta garantía solo aplica para los 50 estados de los EEUU y los Territorios de Canadá. Eccotemp
Systems no se hará responsable de ningún reclamo o demanda en contra de Eccotemp Systems
por cualquier otra parte en lo relacionado a daños de ningún tipo, incluyendo, pero sin limitarse
a daños incidentales y consecuenciales, que surjan de la materia tratada en este acuerdo. Algunos
estados no permiten la exclusión o limitación de daños incidentales o consecuenciales, por lo que
las limitaciones o exclusiones indicadas arriba podrían no aplicar para su caso. Esta garantía le
brinda derechos legales especícos. También podría tener otros derechos que varían de Estado a
Estado.
Por favor tenga en cuenta: esta garantía y todos los contenidos de Eccotemp están sujetos a
cambios. Por favor consulte esta garantía para obtener la versión más actualizada. Para más
consultas, por favor envíe un correo electrónico a servicio al cliente a la dirección support.
eccotemp.com

Soporte: Support.Eccotemp.com Tienda en Linea: Eccotemp.com Localizador de Tiendas: Eccotemp.com/locator
54
ESPAÑOL
TENGA EN CUENTA: LOS MINI TANQUES SON SOLO PARA INSTALACIONES PERMANENTES INTERIORES. ANTES DE ENCENDER EL CALENTADOR DE AGUA, ASEGÚRESE DE QUE EL
SISTEMA SE LLENE COMPLETAMENTE DE AGUA Y QUE SE QUITE TODO EL AIRE. ESTE MANUAL Y TODO EL CONTENIDO DE ECCOTEMP ESTÁ SUJETO A CAMBIOS SIN PREVIO AVISO.
VISITE SUPPORT.ECCOTEMP.COM PARA MÁS INFORMACIÓN.
Comparación de Productos
Si le gusta el mini tanque Eccotemp HOGARINTELIGENTE, ¡también le
agradarán los de la serie EM! Puede obtener más información acerca
de estos tanques miniatura y de los calentadores de agua sin tanque de
Eccotemp visitando la página www.Eccotemp.com
Volumen del tanque
voltaje
AMPS
Fase
Temperaturas
Capacidad de calentamiento
Presión máxima
de funcionamiento
Guarniciones
Garantía
Usos Sugeridos
Modelos de 2.5 galones y 4 galones
110/120
12
Soltero
50-140 F
1400 Vatios
150 psi
1/2 NPT Conexiones
Casa inteligente
Aplicación movil
Caja exterior Plástico Vidrio Templado / Plástico
Comandos de voz
Encendido / apagado
inteligente
Detección avanzada
de errores
5 años limitada en fugas
2 años de defectos
Modelos de 2.5 galones, 4 galones y 7 galones
SOLO EN INTERIORES
Mini Tanque Serie EM Mini Tanque Serie ESH
INSTALACIÓN
SOLO EN INTERIORES
110/120
12
Soltero
50-140 F
1440 Vatios
150 psi
1/2 NPT Conexiones
5 años limitada en fugas
2 años de defectos
Modo manual
Barcos, campistas, casas pequeñas, carritos de
comida, vehículos recreativos
Casas, debajo del fregadero. Oficinas, cabañas,
Cocinas, cuartos de servicio, apartamentos, camiones
de comida
Barcos, campistas, casas pequeñas, carritos de
comida, vehículos recreativos
Casas, debajo del fregadero. Oficinas, cabañas,
Cocinas, cuartos de servicio, apartamentos, camiones
de comida
THE FUTURE OF EFFICIENCY
THE FUTURE OF EFFICIENCY
COMPARACIÓN

MANUEL D'INSTALLATION, D'UTILISATION ET D'ENTRETIEN
MAISON INTELLIGENTE
MINI RÉSERVOIR DE CHAUFFAGE À L'EAU
BOUTON
INTELLIGENT
COMMANDES DE
VOIX INTELLIGENTE
SMARTHOME
READY
MARCHE AVEC MARCHE AVEC
DÉTECTION DE
ERREUR AVANCÉE
CHAUFFAGE NUMÉRIQUE
DE PRÉCISION
CONSEIL INTELLIGENT
CHAUFFER L'EAU PLUS INTELLIGENTE
"Alexa,
Allumez mon mini radiateur
d'eau"
"Ok Google,
Régler mon mini radiateur
eau à 110"
TÉLÉPHONE: 1-866-356-1992 COURRIEL: SUPPORT@ECCOTEMP.COM PARLEZ À: 315-A INDUSTRIAL ROAD, SUMMERVILLE, SC 29483
ESH 2.5/4.0
THE FUTURE OF EFFICIENCY

Soutien: Support.Eccotemp.com Achetez en Ligne: Eccotemp.com Localisateur de Magasin: Eccotemp.com/locator
56
FRANÇAIS
VEUILLEZ NOTER: LES MINI RÉSERVOIRS SONT UNIQUEMENT POUR DES INSTALLATIONS PERMANENTES INTÉRIEURES. AVANT D’ALLUMER LE CHAUFFE
-
EAU, ASSUREZ
-
VOUS QUE LE
SYSTÈME EST COMPLÈTEMENT REMPLI D’EAU ET QUE TOUT L’AIR EST ÉLIMINÉ. CE MANUEL ET TOUT LE CONTENU ECCOTEMP PEUVENT CHANGER SANS PRÉAVIS. VEUILLEZ VISITER
SUPPORT.ECCOTEMP.COM POUR PLUS D’INFORMATIONS.
MODEL /
le modèle
:
ESH-2.5
RATED POWER
/
Puissance nominale:
RATED VOLTAGE /
Tension Nominale:
TANK CAPACITY /
Capacitè du rèservoir:
MAX RATED PRESSURE /
Pression Maximale Nominale:
Conforms To UL STD. 174
Certified To CSA STD. C22.2 NO. 110
SERIAL NO /
Numèro de
Sèrie
:
1440W
120V ~ 60Hz
150 psi
MODEL
/
le modèle
:
RATED POWER
/
Puissance nominale:
RATED VOLTAGE
/
Tension Nominale:
TANK CAPACITY /
Capacitè du rèservoir
:
ESH-4.0
MAX RATED PRESSURE /
Pression Maximale Nominale:
Conforms To UL STD. 174
Certified To CSA STD. C22.2 NO. 110
SERIAL NO /
Numèro de
Sèrie
:
1440W
120V ~ 60Hz
150 psi
CHAUD
BRÛLER
Température de l'eau supérieure à 125 F (52
C) peut provoquer de graves brûlures
instantanément ou la mort brûle. Les
enfants, les handicapés et les personnes
âgées sont les plus à risque d'être échaudé.
Voir le manuel d'instructions avant de régler
la température au chaue-eau. Sentez-vous
l'eau avant le bain ou douche. Limitation de
température
DANGER
2.5 gal
4.0 gal
MAISONINTELLIGENTE
MINI RESERVOIR CHAUFFE-EAU
MAISONINTELLIGENTE
MINI RESERVOIR CHAUFFE-EAU
315-A Industrial Road
Summerville, SC 29483
1-866-356-1992
SÉCURITÉ
Conforme à UL STD. 174
Certié CSA STD. C22.2 NO. 110
Conforme à UL STD. 174
Certié CSA STD. C22.2 NO. 110
The Future of Eciency

Soutien: Support.Eccotemp.com Achetez en Ligne: Eccotemp.com Localisateur de Magasin: Eccotemp.com/locator
57
FRANÇAIS
VEUILLEZ NOTER: LES MINI RÉSERVOIRS SONT UNIQUEMENT POUR DES INSTALLATIONS PERMANENTES INTÉRIEURES. AVANT D’ALLUMER LE CHAUFFE
-
EAU, ASSUREZ
-
VOUS QUE LE
SYSTÈME EST COMPLÈTEMENT REMPLI D’EAU ET QUE TOUT L’AIR EST ÉLIMINÉ. CE MANUEL ET TOUT LE CONTENU ECCOTEMP PEUVENT CHANGER SANS PRÉAVIS. VEUILLEZ VISITER
SUPPORT.ECCOTEMP.COM POUR PLUS D’INFORMATIONS.
ATTENTION ! Il faut prendre des dispositions an de limiter la température de la
source de chaleur pour qu’elle n’excède pas le réglage du thermostat du chaue-
eau lorsqu’elle est branchée à celui-ci.
SAFETY
ATTENTION ! Vous devez ajuster le thermostat qui contrôle la source de chaleur
supplémentaire située dans le conduit d’eau et celui du chaue-eau situé en arrière
du panneau d’accès pour qu’ils soient à la même température, si l’appareil a été
réaménagé avec de l’équipement de chauage supplémentaire. Ne pas ajuster les
deux thermostats à la même température peut causer la perte de contrôle de cette
température.
ATTENTION ! N’utilisez l’appareil que sur une source ayant un maximum de 125/250
v et trois systèmes de câble an de réduire le risque d’électrocution et d’incendie.
ATTENTION ! Reliez le chaue-eau à la terre an de réduire le risque
d’électrocution. Référez-vous aux instructions pour des informations détaillées.
ATTENTION ! Installez l’équipement de protection requis pour la température et la
pression selon les normes. Il doit comporter au moins une combinaison de vannes
certiées de température et une de réduction de pression comme requise par la
norme ANSI 21.22. Ces vannes doivent aussi être reconnues par un laboratoire
national qui fait des inspections ponctuelles de matériels. La vanne doit bien être
orientée, fournie avec un tube ou encore installée an que le déversement puisse
sortir six pouces au-dessus, ou à toute autre distance sous la structure du plancher
et ne puisse toucher aucune partie électrique allumée.
DANGER ! Vous devez débrancher l’appareil de la source d’alimentation an
de remplacer le dispositif de limitation de température pour réduire le risque
d’électrocution.
MISE EN GARDE! Pour réduire le risque de pressions et de températures excessives
dans ce chaue-eau, installez un équipement de protection contre la température
et la pression requis par les codes locaux et pas moins qu’une soupape de décharge
combinée de température et de pression certiée par un laboratoire d’essai
reconnu au niveau national qui contrôle périodiquement la production des produits
répertoriés. l’équipement ou les matériaux, comme répondant aux exigences
des soupapes de décharge et des dispositifs d’arrêt automatique de gaz pour les
systèmes d’alimentation en eau chaude, ANSIZ21.22. Cette vanne doit être marquée
avec une pression de réglage maximale ne dépassant pas la pression de service
maximale marquée du chaue-eau. Installez la soupape dans une ouverture prévue
et marquée à cet eet dans le chaue-eau, et orientez-la ou fournissez des tuyaux
de sorte que toute décharge de la soupape ne s’écoule que dans les 6 pouces au-
dessus ou à n’importe quelle distance en dessous du plancher de la structure, et ne
contacter toute pièce électrique sous tension. L’ouverture de décharge ne doit en
aucun cas être bloquée ou réduite.
SÉCURITÉ

Soutien: Support.Eccotemp.com Achetez en Ligne: Eccotemp.com Localisateur de Magasin: Eccotemp.com/locator
58
FRANÇAIS
VEUILLEZ NOTER: LES MINI RÉSERVOIRS SONT UNIQUEMENT POUR DES INSTALLATIONS PERMANENTES INTÉRIEURES. AVANT D’ALLUMER LE CHAUFFE
-
EAU, ASSUREZ
-
VOUS QUE LE
SYSTÈME EST COMPLÈTEMENT REMPLI D’EAU ET QUE TOUT L’AIR EST ÉLIMINÉ. CE MANUEL ET TOUT LE CONTENU ECCOTEMP PEUVENT CHANGER SANS PRÉAVIS. VEUILLEZ VISITER
SUPPORT.ECCOTEMP.COM POUR PLUS D’INFORMATIONS.
Manuel d’utilisation et d’entretien
Avec Les Instructions De Mises En Place Pour L’installateur
UTILISATION
Lieu d’utilisation
INSTALLATION
À l’intérieur
CAPACITÉ
2,5 gal / 4 gal
CHAUFFE-EAU AVEC MINI RÉSERVOIR
MAISONINTELLIGENTE ECCOTEMP
Information pour la Sécurité
Précautions Pour Votre Sécurité
Information Générale
Introduction
Spécications Techniques
Spéciques au Modèle
Schéma de Câblage
Instructions D’installation
Connexions D’eau
Soupape de Pression
Commencer
Remplissage du Chaue-Eau
Utilisation de L’application
Réglage de la Température
Commandes Vocales
Entretien
Entretien Ménager
Schéma de Souage
Dépannage
Informations de Garantie
Garantie
Comparaison de Produits
59
60
61
62
63
64
67
70
74
73
81
65-66
68-69
77-78
75-76
79-80
SÉCURITÉ
FÉLICITATIONS !
Vous venez tout juste d’acheter un nouveau chaue-eau
avec mini réservoir Eccotemp. Plusieurs possibilités s’orent
maintenant à vous.
Nous vous suggérons fortement de prendre le temps de lire tout
le processus d’installation et de sécurité dans ce manuel avant
d’essayer d’installer votre nouveau chaue-eau sans réservoir.
Pour toute question, bien vouloir visiter notre assistance en ligne
à support.eccotemp.com.
LISEZ L’INFORMATION RELATIVE À LA SÉCURITÉ
Votre sécurité et celle des autres sont très importantes. Il y a plusieurs messages de sécurité
dans ce manuel et sur votre chaue-eau. Lisez et respectez toujours ces messages de sécurité.
Ceci est le symbole d’alerte de sécurité. Repérez-le comme une indication importante à propos
de la sécurité ! Ce symbole vous alerte à propos de risques pouvant causer votre mort ou celle
des autres. Tous les messages de sécurité suivront le symbole d’alerte et les mots suivants :
“DANGER” ,”MISE EN GARDE” ,”ATTENTION” ou “AVIS”. Ces mots signient:
MISE EN GARDE! Une situation potentiellement dangereuse pouvant causer un décès, de
blessures graves ou des dommages.
DANGER! Une situation de danger imminent pouvant causer un décès ou de graves blessures.
ATTENTION! Une situation de danger imminent pouvant causer des blessures mineures ou
modérées.
AVIS! Votre attention est nécessaire pour observer un processus spécique ou maintenir une
condition spécique.
POUR VOS DOSSIERS
Inscrivez votre numéro de série ici #:_____________________________
You can nd them on a label on the appliance and/or
packaging. Staple sales slip or canceled check here. Proof of the
original purchase date is needed to obtain service under the
warranty.
SVP CONSERVER CE MANUEL POUR UN USAGE FUTUR
LISEZ CE MANUEL
Vous trouverez à l’intérieur de ce manuel plusieurs astuces utiles sur la façon d’utiliser et de
maintenir adéquatement votre chaue-eau. Des soins préventifs pourront vous faire épargner
du temps et de l’argent sur la durée de vie de votre appareil. Vous trouverez également
plusieurs réponses à des problèmes communs dans le Guide de dépannage. Il ne sera pas
peut-être pas nécessaire de contacter notre service de soutien si vous prenez connaissance du
tableau de dépannage en premier lieu.

Soutien: Support.Eccotemp.com Achetez en Ligne: Eccotemp.com Localisateur de Magasin: Eccotemp.com/locator
59
FRANÇAIS
VEUILLEZ NOTER: LES MINI RÉSERVOIRS SONT UNIQUEMENT POUR DES INSTALLATIONS PERMANENTES INTÉRIEURES. AVANT D’ALLUMER LE CHAUFFE
-
EAU, ASSUREZ
-
VOUS QUE LE
SYSTÈME EST COMPLÈTEMENT REMPLI D’EAU ET QUE TOUT L’AIR EST ÉLIMINÉ. CE MANUEL ET TOUT LE CONTENU ECCOTEMP PEUVENT CHANGER SANS PRÉAVIS. VEUILLEZ VISITER
SUPPORT.ECCOTEMP.COM POUR PLUS D’INFORMATIONS.
SÉCURITÉ
INFORMATIONS IMPORTANTES SUR LA SÉCURITÉ
MISE EN GARDE ! Vous devez suivre les mesures de sécurité an de réduire
les risques d’incendie, d’électrocution ou de blessures lorsque vous utilisez
des appareils électriques.
Le manufacturier ou le distributeur n’est pas responsable pour les dommages
causés par une installation défectueuse ou parce que les instructions de ce
manuel n’ont pas été respectées.
UN TECHNICIEN QUALIFIÉ ET AUTORISÉ EST RECOMMANDÉ POUR
L’INSTALLATION DE CE CHAUFFE-EAU ET POUR EFFECTUER TOUS LES
TRAVAUX ET TOUT L’ENTRETIEN ULTÉRIEURS.
CONSERVEZ CES INSTRUCTIONS
REMPLISSEZ LE RÉSERVOIR COMPLÈTEMENT AVEC DE L’EAU ET ASSUREZ-
VOUS QU’ELLE COULE DU ROBINET D’EAU CHAUDE AVANT DE METTRE
EN MARCHE LE CHAUFFE-EAU POUR LA PREMIÈRE FOIS OÙ L’APPAREIL
POURRAIT ÊTRE ENDOMMAGÉ.
IMPORTANT!
ATTENTION !
L’hydrogène gazeux peut être produit dans un système d’eau chaude
alimenté par un chaue-eau qui n’a pas été utilisé pendant une longue
période (en général, deux semaines ou plus). L’hydrogène gazeux est très
inammable. An de réduire le risque de blessure, il est recommandé que
le robinet d’eau chaude soit ouvert au moins pendant plusieurs minutes
dans le lavabo le plus près desservi par l’appareil avant que tout autre
appareil électrique branché à l’eau chaude ne soit utilisé (le lave-vaisselle
par exemple). Il y aura probablement un son inhabituel, comme celui de
l’air sortant du robinet, lorsque l’eau coulera s’il y a présence d’hydrogène
gazeux. Il faut éviter de fumer ou toute amme nue près du robinet à ce
moment.
1. LISEZ BIEN TOUTES LES INSTRUCTIONS AVANT D’UTILISER LE CHAUFFE-EAU.
2. Ce chaue-eau doit être mis à terre. Branchez-le correctement à une prise mise
à terre.Référez-vous à la section METTRE EN MARCHE LE CHAUFFE-EAU située à
la page 13 .
3. Installez ou placez ce chaue-eau seulement selon les instructions d’installation
fournies.
4. Utilisez uniquement ce chaue-eau pour l’utilisation prévue qui est décrite dans
ce manuel.
5. N’utilisez pas une rallonge électrique avec cet appareil. Contactez un électricien
qualié an qu’il installe un réceptacle si le courant n’est pas disponible près du
chaue-eau.
6. Comme avec tout appareil, une supervision rapprochée est nécessaire lorsqu’il
est utilisé par un enfant.
7. N’utilisez pas ce chaue-eau s’il a une corde ou prise en mauvais état, s’il ne
fonctionne pas bien ou s’il a été endommagé ou s’il est tombé.
8. Seuls des techniciens qualiés devraient eectuer l’entretien de cet appareil.
Contactez une entreprise certiée près de chez vous si vous avez des questions
concernant son fonctionnement ou pour l’entretien.

Soutien: Support.Eccotemp.com Achetez en Ligne: Eccotemp.com Localisateur de Magasin: Eccotemp.com/locator
60
FRANÇAIS
VEUILLEZ NOTER: LES MINI RÉSERVOIRS SONT UNIQUEMENT POUR DES INSTALLATIONS PERMANENTES INTÉRIEURES. AVANT D’ALLUMER LE CHAUFFE
-
EAU, ASSUREZ
-
VOUS QUE LE
SYSTÈME EST COMPLÈTEMENT REMPLI D’EAU ET QUE TOUT L’AIR EST ÉLIMINÉ. CE MANUEL ET TOUT LE CONTENU ECCOTEMP PEUVENT CHANGER SANS PRÉAVIS. VEUILLEZ VISITER
SUPPORT.ECCOTEMP.COM POUR PLUS D’INFORMATIONS.
Information Générale
Le chaue-eau avec mini réservoir
MAISONINTELLIGENTE Eccotemp peut être utilisé
dans la plupart des bateaux, des caravanes, des
mini maisons, des motorisés, à la maison sous
l’évier, dans les bureaux, dans les chalets, dans les
cuisines, dans appartements et dans les camions
alimentaires. Les modèles de chaue-eau avec
mini réservoir MAISONINTELLIGENTE Eccotemp
sont conçus pour fournir de l’eau chaude pour le
lavage à la main et pour les éviers de cuisine dans
un environnement résidentiel.
Les modèles de chaue-eau avec mini réservoir
MAISONINTELLIGENTE Eccotemp peuvent
remplacer les chaue-eau centraux traditionnels et
ainsi conserver l’eau réduire l’utilisation d’énergie.
Les modèles de chaue-eau avec mini réservoir MAISONINTELLIGENTE Eccotemp
sont de poids léger, sont compacts et sont conçus pour une installation facile. Ils
peuvent être montés sur le mur avec les pièces incluses ou peuvent être placés debout
de façon autonome.
Les modèles de chaue-eau avec mini réservoir MAISONINTELLIGENTE Eccotemp
sont conçus pour fonctionner avec une pression d’eau maximale de150-psi. Vous
devez installer une vanne de réduction de pression si la pression de l’eau dépasse
150-psi.
Les chaue-eau avec mini réservoir MAISONINTELLIGENTE Eccotemp viennent
aussi avec une application pour votre téléphone pouvant être téléchargée à partir de
l’App Store d’Apple et de Google Play Store. Recherchez “Eccotemp” an de trouver
facilement l’application, téléchargez et installez-la an de compléter votre mise en
place. Vous pouvez également utiliser cette application pour ajuster la température
avec votre téléphone ou vos appareils MAISONINTELLIGENTE an d’augmenter
l’ecacité énergétique de votre maison.
ATTENTION ! Le manufacturier n’est pas responsable pour les dommages causés
par une installation inadéquate ou parce que les instructions de ce manuel n’ont
pas été respectées. Conformez-vous bien aux instructions d’installation avant de
brancher l’appareil à une prise électrique.
MISE EN GARDE! Le thermostat a été préréglé en usine à 125 ° F (51,7 ° C) ou
abaisser pour réduire le risque de brûlures.
MISE EN GARDE ! L’installateur devrait revoir le contenu de ce manuel avec le
propriétaire de l’appareil avant de terminer son installation. Ce manuel devrait
rester avec le propriétaire et être placé près du chaue-eau.
THE FUTURE OF EFFICIENCY
GÉNÉRAL

Soutien: Support.Eccotemp.com Achetez en Ligne: Eccotemp.com Localisateur de Magasin: Eccotemp.com/locator
61
FRANÇAIS
VEUILLEZ NOTER: LES MINI RÉSERVOIRS SONT UNIQUEMENT POUR DES INSTALLATIONS PERMANENTES INTÉRIEURES. AVANT D’ALLUMER LE CHAUFFE
-
EAU, ASSUREZ
-
VOUS QUE LE
SYSTÈME EST COMPLÈTEMENT REMPLI D’EAU ET QUE TOUT L’AIR EST ÉLIMINÉ. CE MANUEL ET TOUT LE CONTENU ECCOTEMP PEUVENT CHANGER SANS PRÉAVIS. VEUILLEZ VISITER
SUPPORT.ECCOTEMP.COM POUR PLUS D’INFORMATIONS.
TECHNIQUE
Il y a maintenant deux modèles de chaue-eau avec mini réservoir
MAISONINTELLIGENTE : un de 2,5 gallons et un de 4 gallons. Le récipient pressurisé
(le réservoir d’eau) est soudé, comporte de l’acier vitrié et est équipé avec une
anode. L’eau est fournie par des connexions NPT standard de 1/2 pouce.
Le chaue-eau comprend un thermostat et un interrupteur pour température élevée
pouvant être contrôlés par l’application MAISONINTELLIGENTE Eccotemp ou par
un contrôle manuel. Également, une vanne de limitation de pression est fournie avec
votre chaue-eau.
Spécications Techniques
Modèles:Mini Réservoir MAISONINTELLIGENTE Eccotemp Esh 2.5 Et Esh 4.0
PRENDRE NOTE! Vous devez vous assurer que la poignée de contrôle manuelle
pour la température est en mode WIFI avant de pouvoir utiliser les paramètres
WIFI.
THE FUTURE OF EFFICIENCY
ESH 2.5
10.9”
15”
THE FUTURE OF EFFICIENCY
ESH 4.0
12.5”
16.5”
ACCESSOIRES INCLUS
Vanne De Réduction De
Température Et De Pression
Ancrages pour
montage
Plaque Pour Montage
THE FUTURE OF EFFICIENCY
ESH 4.0
12.5”
16.5”

Soutien: Support.Eccotemp.com Achetez en Ligne: Eccotemp.com Localisateur de Magasin: Eccotemp.com/locator
62
FRANÇAIS
VEUILLEZ NOTER: LES MINI RÉSERVOIRS SONT UNIQUEMENT POUR DES INSTALLATIONS PERMANENTES INTÉRIEURES. AVANT D’ALLUMER LE CHAUFFE
-
EAU, ASSUREZ
-
VOUS QUE LE
SYSTÈME EST COMPLÈTEMENT REMPLI D’EAU ET QUE TOUT L’AIR EST ÉLIMINÉ. CE MANUEL ET TOUT LE CONTENU ECCOTEMP PEUVENT CHANGER SANS PRÉAVIS. VEUILLEZ VISITER
SUPPORT.ECCOTEMP.COM POUR PLUS D’INFORMATIONS.
Schéma De Câblage
Spécications pour l’électricité, la pression et la récupération
Spécications Techniques
yaleR
Transformer
ACL2-OUT
ACL1
ACN1
ACN2
WiFi Board
Thermostat Board
Thermal
Cutout
N
L
E
tnemelE gnitaeH
Control Board
Temp.Sensor
TECHNIQUE
Données Techniques
MODÈLE
Capacité
Voltage
Puissance @ 120 VCA
Pression eau max.
Poids (vide)
Ampérage
Phases
Raccord de Tuyau
Appareil
Gallons
VAC
Watts
Psi
Lb.
Ampères
Pouces
ESH-2.5
2,5
110-120
1440
150
20
12
1
1/2 Pouce NPT
ESH-4.0
4,0
110-120
1440
150
25
12
1
1/2 Pouce NPT
Temp Capteur
Tableau
De Contrôle
Panneau de
thermostat
Transformateur
Coupure
Thermique
Relais
Élément Chauant
Carte WIFI

Soutien: Support.Eccotemp.com Achetez en Ligne: Eccotemp.com Localisateur de Magasin: Eccotemp.com/locator
63
FRANÇAIS
VEUILLEZ NOTER: LES MINI RÉSERVOIRS SONT UNIQUEMENT POUR DES INSTALLATIONS PERMANENTES INTÉRIEURES. AVANT D’ALLUMER LE CHAUFFE
-
EAU, ASSUREZ
-
VOUS QUE LE
SYSTÈME EST COMPLÈTEMENT REMPLI D’EAU ET QUE TOUT L’AIR EST ÉLIMINÉ. CE MANUEL ET TOUT LE CONTENU ECCOTEMP PEUVENT CHANGER SANS PRÉAVIS. VEUILLEZ VISITER
SUPPORT.ECCOTEMP.COM POUR PLUS D’INFORMATIONS.
INSTALLATION
Instructions Pour Installation
CHOISISSEZ UN ENPLACEMENT
Choisissez un endroit qui permet un accès facile pour l’entretien et avec
idéalement une distance de 9 pi avec le plafond ou l’intérieur d’une
armoire.
Remarque: N’installez l’appareil qu’en position verticale.
Un professionnel certié devrait compléter l’installation en respectant toutes
les normes et tous les codes en vigueur. Le manufacturier ne sera pas tenu
responsable pour tout dommage causé parce que les instructions d’installation
n’ont pas été suivies ou à cause d’une installation inadéquate faite par un
installateur qualié
Fixé Au Mur
Fixez le support de montage qui
est fourni au mur. Utilisez des vis
convenant à votre type de mur et
pouvant soutenir le poids du chaue-
eau lorsqu’il est rempli au maximum
de sa capacité (ESH-2.5-41 lb. et
ESH-4.0-57 lb.). Accrochez l’appareil
sur le support de montage et tirez
vers le bas du chaue-eau an de
vous assurer que les deux doigts du
support sont bien insérés dans les
trous de montage
Remarque: Conrmez l’orientation
des conduits d’eau (chaude et froide)
avant le montage au mur.
Autonome
Placez l’appareil sur le sol, sous un
lavabo ou dans un cabinet, comme
illustré dans le diagramme plus bas et
sur la couverture de ce manuel.
Remarque: Assurez-vous de laisser
au moins 9 pi d’espace au-dessus du
chaue-eau.
THE FUTURE OF EFFICIENCY
Wall MountedFree Standing on Floor
Wall
Anchor
Temperature
Control
Do Not Block
ESH 2.5 = 10.9 Inch
ESH 4.0 = 12.5 Inch
Ancrage Mural
Vontrôle de la
Température
Ne Pas Bloquer
Mural
Debout Sur le Sol
Pouce
Pouce

Soutien: Support.Eccotemp.com Achetez en Ligne: Eccotemp.com Localisateur de Magasin: Eccotemp.com/locator
64
FRANÇAIS
VEUILLEZ NOTER: LES MINI RÉSERVOIRS SONT UNIQUEMENT POUR DES INSTALLATIONS PERMANENTES INTÉRIEURES. AVANT D’ALLUMER LE CHAUFFE
-
EAU, ASSUREZ
-
VOUS QUE LE
SYSTÈME EST COMPLÈTEMENT REMPLI D’EAU ET QUE TOUT L’AIR EST ÉLIMINÉ. CE MANUEL ET TOUT LE CONTENU ECCOTEMP PEUVENT CHANGER SANS PRÉAVIS. VEUILLEZ VISITER
SUPPORT.ECCOTEMP.COM POUR PLUS D’INFORMATIONS.
Instructions Pour Installation
Ils devraient être orientés près du lieu d’installation. Assurez-vous qu’il y ait assez
d’espace pour les tuyaux d’entrée et de sortie d’eau an qu’ils puissent atteindre
l’appareil.
Remarque: Utilisez des branchements diélectriques pour empêcher la corrosion
si vos conduits d’eau sont en bronze et en cuivre. Ne pas le faire pourrait causer
des dommages à votre chaue-eau et annuler votre garantie. Soudez une pièce du
tuyau à un raccord leté avant de visser ce raccord au réservoir an de protéger
votre chaue-eau contre les dommages pouvant être causés par la soudure.
1. Installez une vanne de fermeture alignée avec le tuyau d’eau froide.
2. Branchez le tuyau d’eau froide avec le raccord d’entrée marqué avec un anneau
bleu.
3. Branchez le tuyau d’eau chaude avec le raccord de sortie marqué avec un anneau
rouge.
BRANCHEMENTS D’EAU
Vue Du Dessus
Branchement
pour eau froide
1/2 Pouce NPT
Branchement pour
eau chaude
1/2 Pouce NPT
AVIS : N’essayez pas de retirer la rondelle en caoutchouc.
Valve de réduction
de température et de
pression
IMPORTANT: Ne pas fournir d’isolation diélectrique pourrait causer des
défectuosités prématurées du réservoir et du raccord et pourrait annuler votre
garantie. La vanne de réduction de température et de pression (vanne t&p)
est pour l’entretien et elle devrait toujours être en position ouverte lorsque
le chaue-eau fonctionne. NE PAS METTRE DE LA CHALEUR SUR CONDUITS
D’ENTRÉE OU DE SORTIE.
Devant
INSTALLATION

Soutien: Support.Eccotemp.com Achetez en Ligne: Eccotemp.com Localisateur de Magasin: Eccotemp.com/locator
65
FRANÇAIS
VEUILLEZ NOTER: LES MINI RÉSERVOIRS SONT UNIQUEMENT POUR DES INSTALLATIONS PERMANENTES INTÉRIEURES. AVANT D’ALLUMER LE CHAUFFE
-
EAU, ASSUREZ
-
VOUS QUE LE
SYSTÈME EST COMPLÈTEMENT REMPLI D’EAU ET QUE TOUT L’AIR EST ÉLIMINÉ. CE MANUEL ET TOUT LE CONTENU ECCOTEMP PEUVENT CHANGER SANS PRÉAVIS. VEUILLEZ VISITER
SUPPORT.ECCOTEMP.COM POUR PLUS D’INFORMATIONS.
INSTALLATION
EXPANSION DU SYSTÈME THERMIQUE FERMÉ : un déversement périodique de
la vanne de réduction ou une défaillance du joint peut être causé par l’expansion
thermique du système d’approvisionnement d’eau fermé. Le compteur du
système peut contenir un clapet de retenue, un disconnecteur hydraulique ou
une vanne de réduction de pression qui créera un système d’eau fermé. Pendant
le cycle de réchauement du chaue-eau, l’eau chauée prend de l’ampleur et
augmente ainsi la pression à l’intérieur de l’appareil. La vanne de réduction t&p
pourrait déverser de l’eau chaude sous ces conditions. Cela pourrait résulter dans
une perte d’énergie et dans un dépôt de chaux sur la vanne de réduction. Voici
deux recommandations pour vous aider à prévenir ce phénomène :
1.Installez un diaphragme de type domestique pour eau chaude dans le réservoir
de dilatation (il convient pour de l’eau potable) sur le conduit d’eau froide.
Ce réservoir doit avoir une capacité minimale de 1,5 gallon américain pour 50
gallons d’eau emmagasinés.
2. Installez une vanne de réduction de pression de 125 PSI dans le conduit d’eau
froide. Assurez-vous que le déversement de cette vanne est dirigé vers un
drain ouvert et protégé du gel.
Une vanne de réduction de température et de pression (vanne t&p) est incluse
avec le chaue-eau et est certiée par un laboratoire national reconnu. Elle est
conçue an de réduire le risque de pression et de température excessives dans
l’appareil et elle devrait être installée selon les normes en vigueur. La vanne
t&p est dotée d’une pression maximale, laquelle ne doit pas excéder la pression
maximale du chaue-eau en marche (150 psi).
Remarque: Assurez-vous bien que le nombre de PSI maximal indiqué sur le
vanne
NE DÉPASSE PAS la pression maximale indiquée lorsque le chaue-eau est en
marche, si vous utilisez une vanne de réduction de température et de pression
diérente que celle fournie avec l’achat de l’appareil.
1. Installez la vanne t&p fournie avec le chaue-eau dans l’ouverture letée au-
dessus de l’appareil.
2. Attachez un conduit de déversement à partir de la vanne t&p et se terminant
dans un lavabo ou dans un drain. Ne bouchez pas ou ne fermez pas le bout du
conduit de déversement.
Instructions Pour Installation
VANNE DE RÉDUCTION DE TEMPÉRATURE ET DE PRESSION
Vanne T&P Installée
Conduit De
Déversement
De T&P
THE FUTURE OF EFFICIENCY
Wall MountedFree Standing on Floor
Wall
Anchor
Temperature
Control
Do Not Block
ESH 2.5 = 10.9 Inch
ESH 4.0 = 12.5 Inch

Soutien: Support.Eccotemp.com Achetez en Ligne: Eccotemp.com Localisateur de Magasin: Eccotemp.com/locator
66
FRANÇAIS
VEUILLEZ NOTER: LES MINI RÉSERVOIRS SONT UNIQUEMENT POUR DES INSTALLATIONS PERMANENTES INTÉRIEURES. AVANT D’ALLUMER LE CHAUFFE
-
EAU, ASSUREZ
-
VOUS QUE LE
SYSTÈME EST COMPLÈTEMENT REMPLI D’EAU ET QUE TOUT L’AIR EST ÉLIMINÉ. CE MANUEL ET TOUT LE CONTENU ECCOTEMP PEUVENT CHANGER SANS PRÉAVIS. VEUILLEZ VISITER
SUPPORT.ECCOTEMP.COM POUR PLUS D’INFORMATIONS.
Instructions Pour Installation
VANNE DE RÉDUCTION DE TEMPÉRATURE ET DE PRESSION
Longueur Combinée
N’excédant Pas 15 Po
Pas Plus De
Deux Coudes.
Installation Du Conduit De Déversement De La Vanne T&P
1. NE DOIT PAS avoir un diamètre plus petit que le diamètre de sortie de la vanne,
ou tout autre raccord de réduction.
2. NE DOIT PAS être bouché ou bloqué.
3. Doit être fait de matériaux résistant à l’eau chaude.
4. Ne doit pas avoir plus de 15 po de longueur.
5. Ne doit pas avoir plus de deux coudes.
6. Doit se terminer avec un drain adéquat.
7. Ne doit pas avoir une vanne de fermeture entre la vanne de réduction et le
réservoir ou de la vanne de réduction et de la n du conduit de déversement.
Installée
(Vanne T&P)
INSTALLATION
THE FUTURE OF EFFICIENCY
Wall MountedFree Standing on Floor
Wall
Anchor
Temperature
Control
Do Not Block
ESH 2.5 = 10.9 Inch
ESH 4.0 = 12.5 Inch
THE FUTURE OF EFFICIENCY
ESH 2.5
10.9”
15”
Un conduit de déversement devrait être installé avec une distance de six pieds
au-dessus, ou à n’importe quelle distance en dessous, et ne doit pas être en
contact avec aucune pièce électrique en marche. L’ouverture de déversement de
la t&p ne doit pas être bloquée ou réduite de grandeur en aucune circonstance.
IMPORTANT : Ne pas fournir d’isolation diélectrique pourrait causer des
défectuosités prématurées du réservoir et du raccord et pourrait annuler votre
garantie. La vanne de réduction de température et de pression (vanne t&p)
est pour l’entretien et elle devrait toujours être en position ouverte lorsque
le chaue-eau fonctionne. NE PAS METTRE DE LA CHALEUR SUR CONDUITS
D’ENTRÉE OU DE SORTIE.

Soutien: Support.Eccotemp.com Achetez en Ligne: Eccotemp.com Localisateur de Magasin: Eccotemp.com/locator
67
FRANÇAIS
VEUILLEZ NOTER: LES MINI RÉSERVOIRS SONT UNIQUEMENT POUR DES INSTALLATIONS PERMANENTES INTÉRIEURES. AVANT D’ALLUMER LE CHAUFFE
-
EAU, ASSUREZ
-
VOUS QUE LE
SYSTÈME EST COMPLÈTEMENT REMPLI D’EAU ET QUE TOUT L’AIR EST ÉLIMINÉ. CE MANUEL ET TOUT LE CONTENU ECCOTEMP PEUVENT CHANGER SANS PRÉAVIS. VEUILLEZ VISITER
SUPPORT.ECCOTEMP.COM POUR PLUS D’INFORMATIONS.
DÉMARRAGE
Démarrage
REMPLIR LE CHAUFFE-EAU
METTRE EN MARCHE LE CHAUFFE-EAU
Avant de brancher le courant, remplisser
le réservoir et le système avec de l’eau et
vériez pour des fuites.
An de bien vous assurer que tout l’air
qui reste ne soit plus dans l’eau, ouvrez le
robinet d’eau chaude sur votre appareil
jusqu’à ce qu’il y ait un ot continu d’eau.
Tout air restant dans le réservoir causera la
défaillance de l’élément du réservoir d’eau.
1. Ouvrez le robinet d’eau chaude.
2. Ouvrez la vanne d’approvisionnement
d’eau froide.
3. Le réservoir est rempli lorsqu’un ot
continu d’eau jaillit du robinet.
4. Fermez le robinet d’eau chaude.
5. Vériez tout le système pour repérer
des fuites.
Vanne De
Réduction T&P
Manuel
Contrôle
Bouton
Cordon
D’alimentation
ATTENTION ! Assurez-vous que l’appareil soit complètement rempli d’eau et que
TOUT L’AIR SOIT RETIRÉ avant de mettre en marche le chaue-eau.
Ouvrez le robinet d’eau CHAUDE sur l’installation jusqu’à ce qu’un ot constant en
jaillisse pour bien vous assurer qu’il n’y a plus d’air dans le chaue-eau. Si de l’air
demeure dans le réservoir, l’élément sera endommagé lorsque le l électrique sera
branché à celui-ci.
Le chaue-eau avec mini réservoir MAISONINTELLIGENTE Eccotemp est oert équipé
avec un câble d’alimentation conçu pour être branché dans une prise standard de
110/120 v. Respectez toutes les normes et tous les codes en vigueur. Le chaue-eau
avec mini réservoir MAISONINTELLIGENTE Eccotemp est conçu et câblé selon les
exigences ETL.
Mettre en marche votre chaue-eau avec mini réservoir MAISONINTELLIGENTE
Eccotemp :
1. Branchez-le à une prise de courant mise à la terre.
2. Ajustez la température du chaue-eau soit avec les contrôles manuels
ou avec l’application MAISONINTELLIGENTE. Les contrôles manuels de
température sont situés vers l’arrière du côté droit.
3. Vous devez compter jusqu’à 25 minutes an d’atteindre la température
souhaitée.
Le chaue-eau avec mini réservoir MAISONINTELLIGENTE Eccotemp est oert
équipé avec un senseur pour surchaue doté d’une réinitialisation manuelle aussi
connue sous le nom de température limite. Ce dispositif a été installé en usine
an d’interrompre le courant dans le cas d’une défaillance du thermostat. La
réinitialisation manuelle est située à l’arrière du midi et au milieu du fond. Il est
possible que vous deviez démonter l’appareil, s’il est xé au mur, an d’atteindre l
l’interrupteur de réinitialisation.

Soutien: Support.Eccotemp.com Achetez en Ligne: Eccotemp.com Localisateur de Magasin: Eccotemp.com/locator
68
FRANÇAIS
VEUILLEZ NOTER: LES MINI RÉSERVOIRS SONT UNIQUEMENT POUR DES INSTALLATIONS PERMANENTES INTÉRIEURES. AVANT D’ALLUMER LE CHAUFFE
-
EAU, ASSUREZ
-
VOUS QUE LE
SYSTÈME EST COMPLÈTEMENT REMPLI D’EAU ET QUE TOUT L’AIR EST ÉLIMINÉ. CE MANUEL ET TOUT LE CONTENU ECCOTEMP PEUVENT CHANGER SANS PRÉAVIS. VEUILLEZ VISITER
SUPPORT.ECCOTEMP.COM POUR PLUS D’INFORMATIONS.
DÉMARRAGE
Branchez votre chaue-eau à vos appareils intelligents
Le chaue-eau avec mini réservoir MAISONINTELLIGENTE Eccotemp est
doté d’une application mobile facile à utiliser. Cette dernière vous permettra
de contrôler des fonctions comme ARRÊT et MARCHE et les ajustements
de température. Notre application mobile est compatible avec les appareils
MAISONINTELLIGENTE comme Alexa d’Amazon et Google Home, ce qui vous
permet d’eectuer des commandes avec votre voix. Laissez notre application
vous dire exactement combien vous avez dépensé pour chauer l’eau.
La température du ESH peut être changée à distance avec l’application
Eccotemp.
Température
L’application Eccotemp vous permet d’enregistrer toutes les
statistiques pour votre appareil.
Statistiques
Décembre Janvier Fevrier Mars Avril
Coût Mensuel
Juin Juillet
Mai
Mai
Juin
Juillet
Novembre
Costo Anual
Sélectionnez L'année Ici
Électricité
Année 2020
Le Chauage
FAIBLE
HAUT
CONFORT
COMMERCIAL
App Mobile Eccotemp MAISONINTELLIGENTE

Soutien: Support.Eccotemp.com Achetez en Ligne: Eccotemp.com Localisateur de Magasin: Eccotemp.com/locator
69
FRANÇAIS
VEUILLEZ NOTER: LES MINI RÉSERVOIRS SONT UNIQUEMENT POUR DES INSTALLATIONS PERMANENTES INTÉRIEURES. AVANT D’ALLUMER LE CHAUFFE
-
EAU, ASSUREZ
-
VOUS QUE LE
SYSTÈME EST COMPLÈTEMENT REMPLI D’EAU ET QUE TOUT L’AIR EST ÉLIMINÉ. CE MANUEL ET TOUT LE CONTENU ECCOTEMP PEUVENT CHANGER SANS PRÉAVIS. VEUILLEZ VISITER
SUPPORT.ECCOTEMP.COM POUR PLUS D’INFORMATIONS.
DÉMARRAGE
Vous avez un problème avec votre ESH Eccotemp ESH ? Notre
application MAISONINTELLIGENTE vous dira exactement de quoi il
s’agit. Téléchargez-la dès aujourd’hui an de pouvoir utiliser toutes les
capacités de votre ESH MAISONINTELLIGENTE Eccotemp. Vous n’avez
qu’à rechercher « Eccotemp » sur l’App Store d’Apple ou sur Google Play.
App Mobile Eccotemp MAISONINTELLIGENTE
Le système de dépannage intégré vous dira s’il y a un problème avec le
WIFI.
Erreur De Réseau
L’application Eccotemp est dotée d’un système de dépannage pour
diagnostiquer toute erreur avec le système.
Codes D’erreur
1. Assurez-vous que le chaue-eau de votre
mini-réservoir est allumé
2. Vériez que votre mini chaue-eau à réservoir
n'est pas en mode manuel. Le cadran de mode
manuel est situé en bas à droite de votre mini
chaue-eau à réservoir.
3. Vériez que votre réseau fonctionne correctement.
4. Assurez-vous que votre toupie est susamment
proche du mini chaue-eau du réservoir.
5. Si vos problèmes persistent, contactez Eccotemp au
1-866-356-1992 ou visitez www.eccotemp.com.
Erreur Réseau
Disponible Sur LeOBTENEZ-LE SUR

Soutien: Support.Eccotemp.com Achetez en Ligne: Eccotemp.com Localisateur de Magasin: Eccotemp.com/locator
70
FRANÇAIS
VEUILLEZ NOTER: LES MINI RÉSERVOIRS SONT UNIQUEMENT POUR DES INSTALLATIONS PERMANENTES INTÉRIEURES. AVANT D’ALLUMER LE CHAUFFE
-
EAU, ASSUREZ
-
VOUS QUE LE
SYSTÈME EST COMPLÈTEMENT REMPLI D’EAU ET QUE TOUT L’AIR EST ÉLIMINÉ. CE MANUEL ET TOUT LE CONTENU ECCOTEMP PEUVENT CHANGER SANS PRÉAVIS. VEUILLEZ VISITER
SUPPORT.ECCOTEMP.COM POUR PLUS D’INFORMATIONS.
DÉMARRAGE
RÉGLER LA TEMPÉRATURE
AJUSTER VOTRE THERMOSTAT
Félicitations ! Vous êtes maintenant prêt à utiliser votre chaue-eau. Faites
couler l’eau chaude dans un robinet à proximité et évaluez sa température.
Faites tous les ajustements de température selon la section plus bas.
Démarrage
140°F
130°F
110°F
90°F
WIFI
Pouvoir
Câble
Cadran de Température
* Arrière Droit Du Chaue-eau
Mode Manuel: Tournez le cadran dans une des deux directions an d’ajuster
votre température à la hausse ou à la baisse. Tournez dans le sens des aiguilles
d’une montre pour augmenter la température ou dans le sens contraire pour la
diminuer. Répétez cette étape jusqu’à ce que vous ayez atteint la température
désirée.
Utilisation de l’application: votre mini réservoir se connectera à vos appareils
intelligents et à votre téléphone intelligent pour vous permettre de modier la
température.
Remarque: Lorsque vous êtes en mode manuel, vous NE POURREZ PAS contrôler
le mini réservoir à distance avec l’application MAISONINTELLIGENTE.
Le Chauage
FAIBLE
HAUT
CONFORT
COMMERCIAL
MISE EN GARDE ! Ce chaue-eau est conçu pour une prise standard de
110/120 v. NE LE BRANCHEZ PAS AVEC AUCUN AUTRE VOLTAGE. Ne pas
utiliser le voltage adéquat pourrait causer des blessures ou des dommages
à votre propriété. Si le câblage électrique fourni est endommagé ou s’il
n’est pas assez long, n’utilisez PAS un câble d’extension. Vous devez de-
mander à un électricien certié de remplacer le câblage électrique.

Soutien: Support.Eccotemp.com Achetez en Ligne: Eccotemp.com Localisateur de Magasin: Eccotemp.com/locator
71
FRANÇAIS
VEUILLEZ NOTER: LES MINI RÉSERVOIRS SONT UNIQUEMENT POUR DES INSTALLATIONS PERMANENTES INTÉRIEURES. AVANT D’ALLUMER LE CHAUFFE
-
EAU, ASSUREZ
-
VOUS QUE LE
SYSTÈME EST COMPLÈTEMENT REMPLI D’EAU ET QUE TOUT L’AIR EST ÉLIMINÉ. CE MANUEL ET TOUT LE CONTENU ECCOTEMP PEUVENT CHANGER SANS PRÉAVIS. VEUILLEZ VISITER
SUPPORT.ECCOTEMP.COM POUR PLUS D’INFORMATIONS.
UTILISER L’APPLICATION
1. Téléchargez L’application Pour Débuter
Trouvez et téléchargez l’application Eccotemp pour téléphones intelligents sur
l’App Store d’Apple ou sur Google Play en inscrivant « Eccotemp » dans le panneau
de recherche.
2. Installation et Connexion
Once the app is installed, create a login and connect the app to the water heater.
Follow the directions on screen and make sure the temperature knob, located
on the back right side of the water heater, is set to WIFI mode to complete the
process.
Le Chauage
FAIBLE
HAUT
CONFORT
COMMERCIAL
Température Actuelle
Nom de l’appareil
Curseur De Température
Boutons Pour Réglage Rapide
DÉMARRAGE
Unités De Mesure (Degrés)
Démarrage

Soutien: Support.Eccotemp.com Achetez en Ligne: Eccotemp.com Localisateur de Magasin: Eccotemp.com/locator
72
FRANÇAIS
VEUILLEZ NOTER: LES MINI RÉSERVOIRS SONT UNIQUEMENT POUR DES INSTALLATIONS PERMANENTES INTÉRIEURES. AVANT D’ALLUMER LE CHAUFFE
-
EAU, ASSUREZ
-
VOUS QUE LE
SYSTÈME EST COMPLÈTEMENT REMPLI D’EAU ET QUE TOUT L’AIR EST ÉLIMINÉ. CE MANUEL ET TOUT LE CONTENU ECCOTEMP PEUVENT CHANGER SANS PRÉAVIS. VEUILLEZ VISITER
SUPPORT.ECCOTEMP.COM POUR PLUS D’INFORMATIONS.
Décembre Janvier Fevrier Mars Avril
Coût Mensuel
Juin Juillet
Mai
Mai
Juin
Juillet
Novembre
Costo Anual
Sélectionnez L'année Ici
Électricité
Année 2020
DÉMARRAGE
Démarrage
UTILISER L’APPLICATION
3. Utiliser L’application
Vous serez capable de contrôler la température à distance et les statuts Arrêt et de
votre chaue-eau avec mini réservoir lorsque l’application MAISONINTELLIGENTE
sera branchée. Il y a un écran avec les statistiques énergétiques qui vous permettra
de suivre votre utilisation et de gérer la consommation d’énergie de votre appareil.
Utilisez et revoir régulièrement votre application vous aidera à mieux cerner vos
besoins au niveau du réchauement de l’eau, vous aidera à utiliser les ressources
appropriées et vous aidera à économiser de l’argent.
4. Se Connecter
Notre application mobile est compatible avec les appareils MAISONINTELLIGENTE
comme Alexa d’Amazon et Google Home. Une fois branché, le chaue-eau avec
mini réservoir MAISONINTELLIGENTE Eccotemp reconnaîtra des commandes
vocales comme « Ok Google, tu peux arrêter ma mini
5. Autres Fonctions des Boutons
• Lorsqu’un bouton clignote rapidement pendant 120 secondes : c’est lorsque
l’appareil est branché en mode WIFI. Vous devez appuyer le bouton marche/
arrêt pendant dix secondes pour déclencher ou remettre en marche le mode de
connexion.
• Le bouton solide bleu d’alimentation veut dire que l’appareil est arrêté.
• L’application intelligente Eccotemp ne fonctionnera pas lorsque vous utilisez le
bouton de mode manuel.
• Le chaue-eau avec mini réservoir sera réglé par défaut à 48 degrés Celsius si la
température n’est pas réglée avec la poignée ou l’application.
Coût Pour Le Mois En Cours
Historique Visuelle Des Coûts
Ventilation Annuelle
Ventilation Quotidienne
(Peut Être Achée Lorsque Sélectionnée)
•

Soutien: Support.Eccotemp.com Achetez en Ligne: Eccotemp.com Localisateur de Magasin: Eccotemp.com/locator
73
FRANÇAIS
VEUILLEZ NOTER: LES MINI RÉSERVOIRS SONT UNIQUEMENT POUR DES INSTALLATIONS PERMANENTES INTÉRIEURES. AVANT D’ALLUMER LE CHAUFFE
-
EAU, ASSUREZ
-
VOUS QUE LE
SYSTÈME EST COMPLÈTEMENT REMPLI D’EAU ET QUE TOUT L’AIR EST ÉLIMINÉ. CE MANUEL ET TOUT LE CONTENU ECCOTEMP PEUVENT CHANGER SANS PRÉAVIS. VEUILLEZ VISITER
SUPPORT.ECCOTEMP.COM POUR PLUS D’INFORMATIONS.
(Peut Être Achée Lorsque Sélectionnée)
Le chaue-eau ESH avec mini réservoir Eccotemp est le premier chaue-eau
MAISONINTELLIGENTE de son genre à fonctionner avec une application
mobile et par contrôle vocal. Ajoutez tout simplement votre chaue-eau
MAISONINTELLIGENTE en insérant un nouvel appareil lorsque vous utiliserez
votre application Alexa Amazon ou Google Home. Vous pourrez alors utiliser les
commandes vocales lorsqu’il aura été ajouté à une de ces deux applications.
Remarque: Toutes les commandes doivent débuter avec “Alexa“ ou “OK, Google”
avant de faire une commande à l’appareil.
Note : Ce tableau est pour n de démonstration seulement et les commandes
vocales disponibles peuvent varier selon le type d’appareil, les mises à jour et les
disponibilités au niveau de l’emplacement.
Démarrage
Utilisation Des Commandes Vocales
DÉMARRAGE
Objet Commande
Changer À Marche/
Arrêt
Mettre en marche <nom appareil>
Arrêter <nom appareil>
Régler La Température Régler <nom appareil> à <X> de-
grés. Augmenter <nom appareil>
Diminuer <nom appareil>
Vérier le réglage de la
température
À quoi mon <nom appareil> est-il
réglé? Ame
Objet Commande
Changer À Marche/
Arrêt
Activez <nom appareil>
Désactivez <nom de l’appareil>
Régler La Température Régler <nom appareil> à <X>
degrés plus chaud/plus froid
Vérier le réglage de la
température
À quoi le <nom appareil> est-il
déni?
Google Home
Amazon Alexa

Soutien: Support.Eccotemp.com Achetez en Ligne: Eccotemp.com Localisateur de Magasin: Eccotemp.com/locator
74
FRANÇAIS
VEUILLEZ NOTER: LES MINI RÉSERVOIRS SONT UNIQUEMENT POUR DES INSTALLATIONS PERMANENTES INTÉRIEURES. AVANT D’ALLUMER LE CHAUFFE
-
EAU, ASSUREZ
-
VOUS QUE LE
SYSTÈME EST COMPLÈTEMENT REMPLI D’EAU ET QUE TOUT L’AIR EST ÉLIMINÉ. CE MANUEL ET TOUT LE CONTENU ECCOTEMP PEUVENT CHANGER SANS PRÉAVIS. VEUILLEZ VISITER
SUPPORT.ECCOTEMP.COM POUR PLUS D’INFORMATIONS.
Trouble Shooting
MAINTENANCE
NETTOYAGE
Votre chaue-eau vous servira pendant de nombreuses années s’il est bien
entretenu. Nous vous recommandons d’eectuer une inspection des conduits
tous les six mois.
Au moins une fois par année, soulevez et libérez la poignée du levier sur la
vanne de réduction de pression. Elle est située entre les conduits d’eau chaude
et d’eau froide. Assurez-vous que cette vanne fonctionne bien et de façon libre.
Également, laissez plusieurs gallons circuler à travers le conduit de déversement
jusqu’au drain ouvert.
Inspectez la zone autour du chaue-eau an de vous assurer que
l’environnement soit sécuritaire. Gardez cet endroit exempt de tout objet
pouvant endommager votre appareil. Contactez un technicien pour eectuer
une inspection en règle si vous constatez des dommages ou une déformation
sur votre chaue-eau.
NE PAS utiliser l’appareil si vous croyez qu’il est défectueux.
NE PAS permettre à des enfants d’utiliser ou de faire fonctionner l’appareil.
AVIS ! Il pourrait y avoir un problème avec votre système d’eau si la
vanne de réduction de pression sur le chaue-eau eectue souvent des
déversements. Contactez l’entreprise de distribution d’eau ou votre
plombier an de connaître comment vous pouvez corriger cette situation.
NE bloquez PAS la sortie de la vanne de réduction.
Entretien
DRAINAGE ET ENTREPOSAGE
Drainer votre chaue-eau:
1. Débranchez l’appareil.
2. Ouvrez un robinet d’eau chaude an de vider celle-ci. Laissez l’eau jaillir jusqu’à
ce qu’elle ne soit plus chaude.
3. Fermez le conduit d’eau froide du chaue-eau.
4. Fermez le robinet d’eau chaude.
5. Débranchez le chaue-eau des conduits d’eau chaude et d’eau froide.
6. Si possible, siphonnez tout ce qui reste d’eau.
7. Détachez soigneusement l’appareil du mur (le cas échéant).
8. Inclinez le chaue-eau an de drainer l’eau restante de l’appareil.
AVIS ! Vous pouvez économiser de l’énergie en réduisant les réglages
de température manuellement ou avec l’application Eccotemp lorsque
l’appareil n’est pas utilisé pendant une longue période.
Protégez le chaue-eau contre les dommages causés par le gel si vous ne
planiez pas l’utiliser pendant une longue période. Débranchez votre chaue-eau
et drainez-le.

Soutien: Support.Eccotemp.com Achetez en Ligne: Eccotemp.com Localisateur de Magasin: Eccotemp.com/locator
75
FRANÇAIS
VEUILLEZ NOTER: LES MINI RÉSERVOIRS SONT UNIQUEMENT POUR DES INSTALLATIONS PERMANENTES INTÉRIEURES. AVANT D’ALLUMER LE CHAUFFE
-
EAU, ASSUREZ
-
VOUS QUE LE
SYSTÈME EST COMPLÈTEMENT REMPLI D’EAU ET QUE TOUT L’AIR EST ÉLIMINÉ. CE MANUEL ET TOUT LE CONTENU ECCOTEMP PEUVENT CHANGER SANS PRÉAVIS. VEUILLEZ VISITER
SUPPORT.ECCOTEMP.COM POUR PLUS D’INFORMATIONS.
Trouble Shooting
MAINTENANCE
SCHÉMA DÉTAILLÉ
Les numéros correspondent au tableau de la page 76
Entretien

Soutien: Support.Eccotemp.com Achetez en Ligne: Eccotemp.com Localisateur de Magasin: Eccotemp.com/locator
76
FRANÇAIS
VEUILLEZ NOTER: LES MINI RÉSERVOIRS SONT UNIQUEMENT POUR DES INSTALLATIONS PERMANENTES INTÉRIEURES. AVANT D’ALLUMER LE CHAUFFE
-
EAU, ASSUREZ
-
VOUS QUE LE
SYSTÈME EST COMPLÈTEMENT REMPLI D’EAU ET QUE TOUT L’AIR EST ÉLIMINÉ. CE MANUEL ET TOUT LE CONTENU ECCOTEMP PEUVENT CHANGER SANS PRÉAVIS. VEUILLEZ VISITER
SUPPORT.ECCOTEMP.COM POUR PLUS D’INFORMATIONS.
Maintenance
MAINTENANCE
Entretien
No.
1
2
3
4
5
6
7
8
9
10
11
12
13
14
15
16
17
18
19
20
21
22
24
25
26
27
28
29
30
31
32
33
34
35
36
37
38
39
23
Nom des pièces
Panneau du devant (verre trempé)
Couvercle du devant
Coussinets de pied
Contrôle de commande
Vis C autocollantes
Contrôle de commande du devant
Contrôle de commande wif i
Anneau scellant de l’élément
Élément chauant
Couvercle de bride
Support en forme de L
Écrou M8
Boulon à tête carrée M8
Écrou d’anode de magnésium M6
Écrou d’anode de magnésium
Base de plastique
Bouton de réinitialisation
Ressort
Bouton de réinitialisation extérieur
Câble d’alimentation
Pince du câble d’alimentation
Base de plastique
Poignée de contrôle
Boulon hexagonal externe (autocollant)
Support de montage
Boulon d’expansion M6
Fils internes
Couvercle de l’arrière
Vis pour installation du couvercle
Réservoir interne
Manchon en caoutchouc (in)
Tuyau d’entrée
Manchon en caoutchouc (out)
Tuyau de sortie
Manchon en caoutchouc (vanne t&p)
Vanne T&P
Couvercle en caoutchouc (vanne t&p)
Limiteur de température
Contrôle des commandes de température
QTÉ
1
1
2
1
11
1
1
1
1
1
2
4
4
1
1
1
1
1
1
1
1
1
1
2
1
2
1
1
6
1
1
1
1
1
1
1
1
1
40
41
Support de limiteur de température
Vis autocollantes (3,5 x 16)
1
2
1
*Le tableau correspond au
schéma de la page 75.

Soutien: Support.Eccotemp.com Achetez en Ligne: Eccotemp.com Localisateur de Magasin: Eccotemp.com/locator
77
FRANÇAIS
VEUILLEZ NOTER: LES MINI RÉSERVOIRS SONT UNIQUEMENT POUR DES INSTALLATIONS PERMANENTES INTÉRIEURES. AVANT D’ALLUMER LE CHAUFFE
-
EAU, ASSUREZ
-
VOUS QUE LE
SYSTÈME EST COMPLÈTEMENT REMPLI D’EAU ET QUE TOUT L’AIR EST ÉLIMINÉ. CE MANUEL ET TOUT LE CONTENU ECCOTEMP PEUVENT CHANGER SANS PRÉAVIS. VEUILLEZ VISITER
SUPPORT.ECCOTEMP.COM POUR PLUS D’INFORMATIONS.
Maintenance
DÉPANNAGE
AVANT DE NOUS CONTACTER
Dépannage
Sauvez du temps et de l’argent ! Lisez bien les trucs de dépannage plus bas avant
de nous contacter et peut être qu’il ne sera pas nécessaire pour vous de nous
contacter.
1. L’eau ne se réchaue pas :
• Assurez-vous que le courant est allumé et qu’il fonctionne.
• Si la lumière ne s’allume pas, vériez si le bouton de réinitialisation a bien été
basculé dans la position pour réinitialisation. Ce bouton est situé à l’arrière de
votre chaue-eau, dans le fond.
• Si la lumière du bouton est allumée, mais que l’eau du robinet ne se réchaue
pas, testez le croisement de tuyauterie en fermant le conduit d’eau froide
du chaue-eau et ouvrez le robinet d’eau chaude (l’eau ne devrait pas
jaillir).Tout débit continu indique qu’il y a un croisement, ce qui aecte la
température et cela devra être corrigé.
• Si vous n’êtes pas capable de détecter un croisement de tuyauterie avec cette
méthode, il est possible que vous deviez remplacer l’élément de chauage.
2. Le bouton d’allumage ne s’allume pas:
• Vériez si l’ampoule du bouton est défectueuse s’il ne s’allume pas, mais que
l’eau devient quand même chaude.
• Vériez le bouton de réinitialisation.
3. Eau brune:
De l’eau odorante peut être causée par une réaction entre l’eau locale et l’anode
du chaue-eau. Remplacez l’anode.
4. Eau avec odeur:
Tournez la poignée de température à un réglage plus bas ou utilisez l’application
pour le faire. Si la température de l’eau ne diminue pas à l’intérieur des
60 prochaines minutes, le thermostat devra alors être remplacé.
5. L’eau est trop chaude:
Turn the temperature knob to a lower temperature setting, or use the app
to set the temperature to a lower setting. If the water temperature does not
lower within 60 minutes, then the thermostat may need to be replaced.
6. L’eau n’est pas assez chaude:
See “Adjusting your Thermostat:” on page 16.
7. Présence de fuites d’eau:
• Débranchez le chaue-eau de la prise de 110/120 v.
• Vériez et resserrez tout conduit d’eau ou la vanne t&p située sur le dessus de
l’appareil, au besoin.
• Retirez le couvercle et inspectez le joint de l’élément chauant pour vérier
s’il est relâché ou endommagé.

Soutien: Support.Eccotemp.com Achetez en Ligne: Eccotemp.com Localisateur de Magasin: Eccotemp.com/locator
78
FRANÇAIS
VEUILLEZ NOTER: LES MINI RÉSERVOIRS SONT UNIQUEMENT POUR DES INSTALLATIONS PERMANENTES INTÉRIEURES. AVANT D’ALLUMER LE CHAUFFE
-
EAU, ASSUREZ
-
VOUS QUE LE
SYSTÈME EST COMPLÈTEMENT REMPLI D’EAU ET QUE TOUT L’AIR EST ÉLIMINÉ. CE MANUEL ET TOUT LE CONTENU ECCOTEMP PEUVENT CHANGER SANS PRÉAVIS. VEUILLEZ VISITER
SUPPORT.ECCOTEMP.COM POUR PLUS D’INFORMATIONS.
DÉPANNAGE
Codes d’erreur sur le panneau du devant
et dans l’application
Troubleshooting
Votre mini réservoir Maison Intelligente
Eccotemp peut signaler deux types d’erreurs.
Si vous utilisez l’application, vous recevrez les
explications pour déterminer comment vous
pouvez interagir avec votre chaue-eau pour
diagnostiquer et résoudre les problèmes. Vous
pouvez aussi regarder le bouton d’alimentation
et il clignotera selon une séquence précise qui
vous informera de l’erreur reportée.
Code D’erreur 1:
Mauvais Fonctionnement Du Thermostat
Le bouton d’alimentation clignotera en bleu une
(1) fois à toutes les trois (3) secondes jusqu’à
ce que le problème soit résolu lorsque le mini
signale un code d’erreur 1.
Vous devez contacter le service à la clientèle si
vous avez un code d’erreur 1.
Code D’erreur 2:
Augmentation rapide de la température
Lorsque le mini signale un code d’erreur 2, le
bouton d’alimentation clignotera en bleu deux
(2) fois et s’arrêtera ensuite pendant trois (3)
secondes, et cela se répétera jusqu’à ce que le
problème soit résolu.
Une augmentation de température rapide
est habituellement observée si le mini n’est
pas complètement rempli d’eau. Débranchez
l’appareil, remplissez-le d’eau et rebranchez-le
pour corriger ce problème.
Si le code d’erreur 2 n’est toujours pas résolu,
vous devez alors contacter le service à la clientèle
pour de l’aide supplémentaire.
Pas de Courant:
Vériez le bouton de réinitialisation situé à
l’arrière de l’appareil pour être certain que ce
dernier est bien incliné dans la position adéquate
si votre chaue-eau ne semble pas avoir de
courant et ce, même s’il est bien branché. Si
c’est le cas, vous devez contacter le service à la
clientèle pour de l’aide supplémentaire.
Connectivité du WIFI:
Vous observerez le bouton
d’alimentation à l’avant du chaue-
eau clignoter jusqu’à 60 secondes
pendant le branchement lorsque
votre appareil est déjà relié au
réseau WIFI. S’il est incapable de se
brancher durant ce laps de temps,
il essaiera de le faire régulièrement
pendant une période de 15
minutes.
Votre chaue-eau réglera
automatiquement la température
à celle par défaut de 48° Celsius
si l’appareil est incapable de se
brancher au WIFI. Votre application
vous conrmera s’il a pu se
brancher avec succès.

Soutien: Support.Eccotemp.com Achetez en Ligne: Eccotemp.com Localisateur de Magasin: Eccotemp.com/locator
79
FRANÇAIS
VEUILLEZ NOTER: LES MINI RÉSERVOIRS SONT UNIQUEMENT POUR DES INSTALLATIONS PERMANENTES INTÉRIEURES. AVANT D’ALLUMER LE CHAUFFE
-
EAU, ASSUREZ
-
VOUS QUE LE
SYSTÈME EST COMPLÈTEMENT REMPLI D’EAU ET QUE TOUT L’AIR EST ÉLIMINÉ. CE MANUEL ET TOUT LE CONTENU ECCOTEMP PEUVENT CHANGER SANS PRÉAVIS. VEUILLEZ VISITER
SUPPORT.ECCOTEMP.COM POUR PLUS D’INFORMATIONS.
MODÈLE(S) : ESH-2.5, ESH-4.0
Eccotemp garantit par la présente que ce produit est exempt de tout défaut au niveau des matériaux ou de sa
fabrication lorsqu’il est installé ou utilisé, conformément aux instructions d’installation et d’utilisation d’Ecco-
temp. Cette garantie limitée s’applique à l’acheteur d’origine et aux propriétaires ultérieurs, mais uniquement
tant que le produit reste sur le site de son installation d’origine. Cette garantie limitée prend n s’il est déplacé
ou réinstallé à un nouvel emplacement. Il n’y a aucune garantie expresse ou implicite, faite ou donnée, autre que
celle contenue dans cette garantie limitée. Aucun agent, employé ou représentant d’Eccotemp n’a le pouvoir de
relier Eccotemp à toute autre représentation ou garantie concernant le produit qui n’est pas décrite dans cette
garantie limitée. Eccotemp se réserve le droit et a l’autorité de changer, modier ou transformer cette garantie
en tout temps.
Sauf indication expresse dans les présentes, IL N’EXISTE AUCUNE REPRÉSENTATION OU GARANTIE, EXPRESSE
OU IMPLICITE, INCLUANT, SANS S’Y LIMITER, LA VALEUR COMMERCIALE OU UNE CONFORMITÉ À UN USAGE
PARTICULIER EN CE QUI CONCERNE TOUT BIEN VENDU ICI. LE RECOURS EXCLUSIF DE L’ACHETEUR SE LIMITE À
LA RÉPARATION OU AU REMPLACEMENT DU BIEN VENDU, À LA DISCRÉTION D’ECCOTEMP. ECCOTEMP NE SAU-
RAIT ÊTRE TENU RESPONSABLE DES DOMMAGES INDIRECTS OU CONSÉQUENTS.
Période De Garantie Limitée
Cette garantie est oerte par Eccotemp à l’acheteur d’origine. Cette garantie prend eet à la date d’installation
du produit ou 30 jours après la date d’achat, selon la première éventualité, et est en vigueur jusqu’à l’anniver-
saire spécique de ces données, comme indiqué ci-après:
Période de Couverture
5 ans limitée pour les fuites
2 ans pour les défauts
30 jours pour les accessoires gratuits (accessoires, ensemble des pièces, etc.)
Les garanties sont annulées si l’appareil est utilisé dans une boucle de circulation d’eau chaude, en série avec un
autre système de circulation ou lorsqu’un système de recirculation sur demande n’est pas intégré. La série de
mini réservoirs EM est approuvée pour une utilisation commerciale.
Eccotemp fournira une série de pièces par incident (approuvé par l’équipe d’assistance Eccotemp) sous la garan-
tie avant de demander l’expédition de tout article à notre entrepôt pour réparation ou inspection.
Pour Les Clients Avec Une Garantie Habitation
Il arrive très souvent que votre garantie habitation vous aide à couvrir certains frais reliés à vos électroménagers,
par exemple votre chaue-eau. Vériez bien votre garantie pour toute assistance avant de contacter Eccotemp.
Coûts Reliés À La Livraison:
COMMANDES AUX ÉTATS-UNIS
Dans les 45 premiers jours suivant l’achat, Eccotemp couvrira tous les frais d’expédition de transport terrestre
pour les problèmes liés à la garantie, à l’exception de l’Alaska et d’Hawaï et de tout emplacement en dehors
des États-Unis continentaux. Après les 45 premiers jours d’achat, le client est responsable de tous les envois à
Eccotemp, quelles qu’en soient la raison ou les circonstances. Eccotemp couvrira les frais d’expédition liés à la
garantie lors du retour d’un produit à un client après réparation OU L’inspection. La méthode d’expédition liée à
la garantie sera équivalente en transport terrestre avec le fournisseur de choix d’Eccotemp.
COMMANDES AU CANADA
Dans les 45 premiers jours suivant l’achat, Eccotemp couvrira tous les frais d’expédition de transport terrestre
pour les problèmes liés à la garantie. Après les 45 premiers jours d’achat, le client est responsable de toutes les
expéditions vers Eccotemp, quelles qu’en soient la raison ou les circonstances. Eccotemp prendra en charge les
frais d’expédition liés à la garantie lors du retour d’un produit à un client. La méthode d’expédition sous garantie
sera équivalente en transport terrestre avec le choix du fournisseur d’Eccotemp.
Tous les envois pour tout type de produit venant à Eccotemp pour quelque raison que ce soit doivent avoir un
numéro RGA pour toute réparation à eectuer. Veuillez contacter Eccotemp an d’obtenir un numéro RGA avant
d’envoyer toute pièce à Eccotemp. Ne pas le faire pourrait entraîner la perte du produit. Eccotemp ne sera pas
responsable du remplacement en cas de perte ou de dommage si ces étapes n’ont pas été correctement suivies.
ECCOTEMP SYSTEMS, LLC WARRANTY
INFORMATION SUR GARANTIE LIMITÉE
GARANTIE
CANADA
Eccotemp Systems/Service des retours
CO Eccotemp Canada
Logistiques Ottawa
1270, place Humber Ottawa, Ontario K1B 3W3
É.-U.
Eccotemp Systems/Service des retours
315-A, route Industrielle
Summerville, SC 29483

Soutien: Support.Eccotemp.com Achetez en Ligne: Eccotemp.com Localisateur de Magasin: Eccotemp.com/locator
80
FRANÇAIS
VEUILLEZ NOTER: LES MINI RÉSERVOIRS SONT UNIQUEMENT POUR DES INSTALLATIONS PERMANENTES INTÉRIEURES. AVANT D’ALLUMER LE CHAUFFE
-
EAU, ASSUREZ
-
VOUS QUE LE
SYSTÈME EST COMPLÈTEMENT REMPLI D’EAU ET QUE TOUT L’AIR EST ÉLIMINÉ. CE MANUEL ET TOUT LE CONTENU ECCOTEMP PEUVENT CHANGER SANS PRÉAVIS. VEUILLEZ VISITER
SUPPORT.ECCOTEMP.COM POUR PLUS D’INFORMATIONS.
GARANTIE
Exclusions
Référez-vous au Manuel d’installation et au Manuel d’utilisation et d’entretien fournis avec votre
nouveau produit d’Eccotemp Systems. Cette garantie limitée est annulée s’il est déterminé que l’un
des facteurs suivants a contribué à la défaillance du produit :
1. Abus, modication, négligence ou mauvaise utilisation.
2. Entretien inadéquat, incorrect ou avec des processus destructifs ou dangereux.
3. Dommages causés par un entretien exécutés par des représentants autres que Eccotemp
Systems.
4. Installation dans un environnement corrosif ou toxique.
5. Dommage causé par du gel dans l’appareil ou autour des conduits.
6. Accumulation de calcaire.
7. Pression de l’eau ou de gaz inadéquat.
8. Actes de force majeure.
9. Dommages causés par une utilisation avec de l’eau de puits non potable, non traitée, ou
inadéquatement traitée ou encore avec un niveau de ph ou de calcaire très élevé excédant
12 grains par gallon (200 mg/l).
10. Calibrage inadéquat pour l’utilisation.
11. Produits dont les numéros de série originaux ont été retirés, modiés ou ne pouvant pas être lus.
12. Actes de forces majeures incluant, mais sans s’y limiter un feu, une inondation ou un désastre
naturel.
Ce produit ne doit pas être utilisé comme chaue-eau pour piscine ou spa.
En cas de défectuosité, de défaillance ou de défaut de conformité reconnu par Eccotemp Systems
et basée sur l’approbation de la réclamation de la garantie, Eccotemp Systems, à sa seule et
absolue discrétion, réglera la réclamation en garantie de ces défectuosité, défaillance ou défaut de
conformité à cette garantie. An de faire une réclamation en vertu de cette garantie, le propriétaire
doit informer Eccotemp de la non-conformité du produit à cette garantie.
En vertu de cette garantie, Eccotemp Systems fournira uniquement des pièces de rechange comme
décrit dans la « période de garantie limitée ». Le propriétaire de l’appareil sera responsable de tous
les coûts occasionnés, incluant les coûts de main-d’œuvre pour l’entretien, l’expédition, la livraison
et la manutention de la pièce de rechange, le coût des permis ou des matériaux nécessaires à la
réparation, ou les coûts indirects résultant de dommages extérieurs de l’appareil en raison de la
défaillance.
NONOBSTANT TOUTE DISPOSITION CONTRAIRE DANS CETTE GARANTIE, À L’EXCEPTION DES
DE CERTAINES OBLIGATIONS CONCRÈTES D’ECCOTEMP SYSTEMS EXPRESSÉMENT DÉFINIES
DANS LA PRÉSENTE GARANTIE, ECCOTEMP SYSTEMS DÉCLINE TOUTE GARANTIE, EXPRESSE OU
IMPLICITE, QUANT AU FONCTIONNEMENT, À LA PERFORMANCE, À L’UTILISATION, À LA VALEUR
COMMERCIALE, À L’ADAPTATION POUR UN USAGE PARTICULIER OU DES DROITS DE PROPRIÉTÉ
INTELLECTUELLE. ECCOTEMP SYSTEMS DÉCLINE TOUTE AUTRE OBLIGATION OU RESPONSABILITÉ DE
SA PART ET N’ASSUME NI N’AUTORISE AUCUNE AUTRE PERSONNE À ASSUMER POUR ECCOTEMP
SYSTEMS TOUTE AUTRE RESPONSABILITÉ EN LIEN AVEC LA PERFORMANCE DU PRODUIT. CETTE
GARANTIE NE COUVRE QUE LES PIÈCES DE REMPLACEMENT ET NE COUVRE PAS LE COÛT DU
TRAVAIL OU DE L’ENTRETIEN EN AUCUNE CIRCONSTANCE.
Cette garantie ne s’applique qu’aux 50 états des États-Unis et aux provinces et territoires du Canada.
Eccotemp Systems ne sera pas responsable de toute réclamation ou demande contre Eccotemp
Systems par toute autre partie pour des dommages de toute nature, y compris, mais sans s’y limiter,
les dommages accidentels et consécutifs, découlant du contenu de la présente entente. Certains
états n’autorisent pas l’exclusion ou la limitation des dommages accidentels ou consécutifs, de sorte
que la limitation ou l’exclusion ci-dessus peut ne pas s’appliquer à vous. Cette garantie vous confère
des droits légaux spéciques. Vous pouvez également avoir d’autres droits variant d’un état à l’autre.
Veuillez prendre note : cette garantie et tout le contenu d’Eccotemp est sujet à des
changements. Référez-vous à cette garantie pour la dernière version. Pour toute question,
écrivez à notre équipe de soutien à [email protected].

Soutien: Support.Eccotemp.com Achetez en Ligne: Eccotemp.com Localisateur de Magasin: Eccotemp.com/locator
81
FRANÇAIS
VEUILLEZ NOTER: LES MINI RÉSERVOIRS SONT UNIQUEMENT POUR DES INSTALLATIONS PERMANENTES INTÉRIEURES. AVANT D’ALLUMER LE CHAUFFE
-
EAU, ASSUREZ
-
VOUS QUE LE
SYSTÈME EST COMPLÈTEMENT REMPLI D’EAU ET QUE TOUT L’AIR EST ÉLIMINÉ. CE MANUEL ET TOUT LE CONTENU ECCOTEMP PEUVENT CHANGER SANS PRÉAVIS. VEUILLEZ VISITER
SUPPORT.ECCOTEMP.COM POUR PLUS D’INFORMATIONS.
Comparaison de Produits
Si vous aimez notre chaue-eau avec mini réservoir MAISONINTELLIGENTE,
vous aimerez aussi notre série mini réservoir EM ! Vous trouverez plus
d’informations à propos de ces mini réservoirs, mais aussi à propos des
chaue-eau sans réservoir miniature d’Eccotemp à www.Eccotemp.com.
Volume Du Réservoir
Tension
Ampères
Phase
Températures
Capacité de Chauage
Pression D’utilisation Max.
Raccords
Garantie
Utilisations Suggérées
Modèles De 2,5Gallons Et 4Gallons
110/120
12
Unique
10-60 F
1400 Watts
150 psi
Branchements NPT 1/2
Maison Intelligente
Application Mobile
Boîtier Extérieur Plastique Verre Trempé/Plastique
Commandes Vocales
Marche/Arrêt intelligent
Détection Avancée Pour Erreurs
5 Ans Limitée Pour Les Fuites
2 Ans Pour Les Défauts
Bateaux, caravanes, mini maisons, chariots de
service, motorisés, sous le lavabo, bureaux,
chalets, cuisines, pièces de rangement,
appartements, camions alimentaires
Bateaux, caravanes, mini maisons, chariots de
service, motorisés, sous le lavabo. bureaux,
chalets, cuisines, pièces de rangement,
appartements, camions alimentaires
Modèles De 2,5Gallons, 4Gallons Et 7Gallons
POUR INTÉRIEUR SEULEMENT
Série Mini Réservoir EM ESH Series Mini Tank
INSTALLATION
POUR INTÉRIEUR SEULEMENT
110/120
12
Unique
10-60 F
1440 Watts
150 psi
Branchements NPT 1/2
5 Ans Limitée Pour Les Fuites
2 Ans Pour Les Défauts
Mode Manuel
THE FUTURE OF EFFICIENCY
THE FUTURE OF EFFICIENCY
Notes
COMPARAISON

Notes

Notes

Support: Support.Eccotemp.com Shop Online: Eccotemp.com Store Locator: Eccotemp.com/locator
84
ENGLISH
PLEASE NOTE: MINI TANKS ARE FOR INDOOR PERMANENT INSTALLATIONS ONLY. BEFORE POWERING THE WATER HEATER, BE SURE THAT THE SYSTEM IS COMPLETELY FILLED WITH WATER
AND ALL AIR IS REMOVED.THIS MANUAL AND ALL ECCOTEMP CONTENT IS SUBJECT TO CHANGE WITHOUT NOTICE. PLEASE VISIT SUPPORT.ECCOTEMP.COM FOR MORE INFORMATION.
THE FUTURE OF EFFICIENCY
© Eccotemp 2020 All Rights Reserved | Printing Version 1.0
-
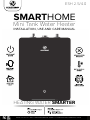 1
1
-
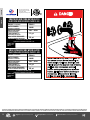 2
2
-
 3
3
-
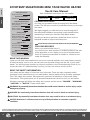 4
4
-
 5
5
-
 6
6
-
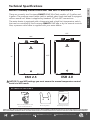 7
7
-
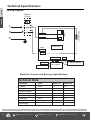 8
8
-
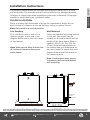 9
9
-
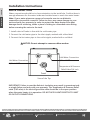 10
10
-
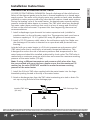 11
11
-
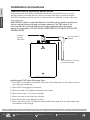 12
12
-
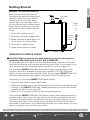 13
13
-
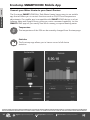 14
14
-
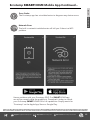 15
15
-
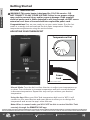 16
16
-
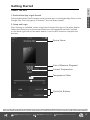 17
17
-
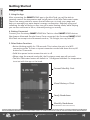 18
18
-
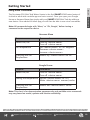 19
19
-
 20
20
-
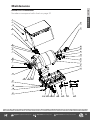 21
21
-
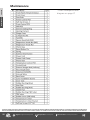 22
22
-
 23
23
-
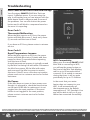 24
24
-
 25
25
-
 26
26
-
 27
27
-
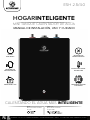 28
28
-
 29
29
-
 30
30
-
 31
31
-
 32
32
-
 33
33
-
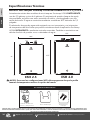 34
34
-
 35
35
-
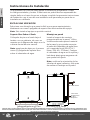 36
36
-
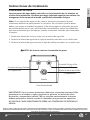 37
37
-
 38
38
-
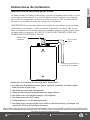 39
39
-
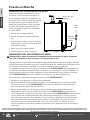 40
40
-
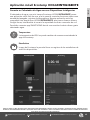 41
41
-
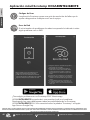 42
42
-
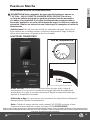 43
43
-
 44
44
-
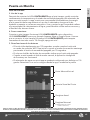 45
45
-
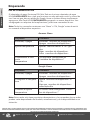 46
46
-
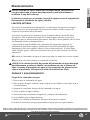 47
47
-
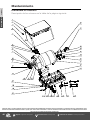 48
48
-
 49
49
-
 50
50
-
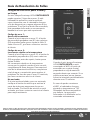 51
51
-
 52
52
-
 53
53
-
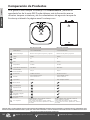 54
54
-
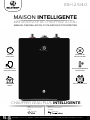 55
55
-
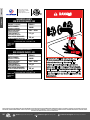 56
56
-
 57
57
-
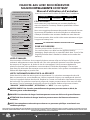 58
58
-
 59
59
-
 60
60
-
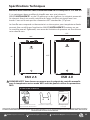 61
61
-
 62
62
-
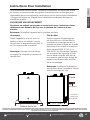 63
63
-
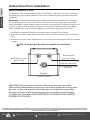 64
64
-
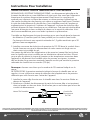 65
65
-
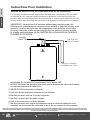 66
66
-
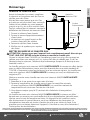 67
67
-
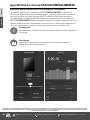 68
68
-
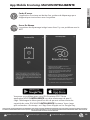 69
69
-
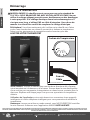 70
70
-
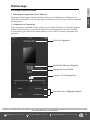 71
71
-
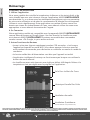 72
72
-
 73
73
-
 74
74
-
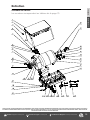 75
75
-
 76
76
-
 77
77
-
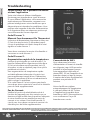 78
78
-
 79
79
-
 80
80
-
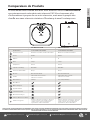 81
81
-
 82
82
-
 83
83
-
 84
84


Eccotemp ESH-2.5 Guía de instalación
- Tipo
- Guía de instalación
- Este manual también es adecuado para
en otros idiomas
- français: Eccotemp ESH-2.5 Guide d'installation
- English: Eccotemp ESH-2.5 Installation guide
Artículos relacionados
Otros documentos
-
A.O. Smith LET2 Manual de usuario
-
EcoSmart ECO MINI 2.5 Manual de usuario
-
EemaX ECO MINI 4 Manual de usuario
-
DeLOCK 18312 Ficha de datos
-
resideo Braukmann Guía del usuario
-
Huawei Mobile WiFi E5785 Guía de inicio rápido
-
HTP Everlast Electric Mini Tank Water Heater Manual de usuario
-
Ariston ANDRIS RS 2.5U 1.4KW Manual de usuario
-
Samsung WF45K6500AV/A2 Manual de usuario
-
Eurofase HD210769 Guía de instalación