
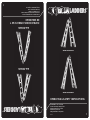
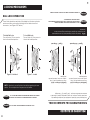
FAILURE TO READ AND FOLLOW ALL INSTRUCTIONS ON THIS
LADDER, INCLUDING THOSE UNDER THE STEPS, MAY RESULT IN
INJURIES OR DEATH.
OPERATING & SAFETY INSTRUCTIONS
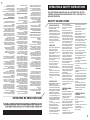
SAFETY INSTRUCTIONS
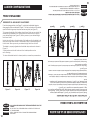
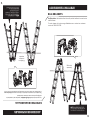
PROPER SELECTION
• Select ladder of proper length to
reach working height.
• IMPORTANT: Ladders are
designed to support one person
plus materials and tools per side
on 2-man stepladder positions
or only one person plus
materials and tools on all other
positions not more than the
working load on the notice sign
on this ladder.
INSPECTION
• Inspect upon receipt and before
each use. Never climb a
damaged, bent or broken
ladder. All parts must be in good
working order.
• Make sure all rivets, joints, nuts
and bolts are tight; feet, steps,
and rungs are secure; all hinges
function properly.
• Keep ladder clean, free from
grease, oil, mud, snow, wet
paint and other slippery
material. Keep your shoes
clean, leather soles should not
be used.
• Never make temporary repairs
of damaged or missing parts.
• Destroy ladder if broken, worn
or if exposed to fire or chemical
corrosion.
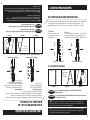
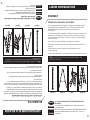
PROPER SET-UP
• DANGER! METAL CONDUCTS
ELECTRICITY! Do not let
ladders of any material come in
contact with live electrical wires.
• Upon receipt lubricate all hinges
with light machine oil or similar
substance per manufacturer
instructions and again at least
once a year depending on use.
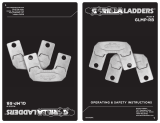
• Securely engage ladder hinges
and rail locks before climbing.
Proper operations of hinges is
as follows:
1) To Lock Hinge: Palm button
will engage to the locked
position when the ladder is in
the correct "use" position.
2) To Unlock Hinge: Press
palm button to disengage hinge
lock. Position ladder in the
correct use position and the
hinge lock will engage.
3) To Lock/Unlock Rail Locks:
Turn rail locks one at a time
as shown.
• NOTE: If there is pressure,
hinge will be difficult to unlock.
To relieve pressure, move half
the ladder back & forth until
hinge can be easily disengaged.
• Hinges will engage when in the
correct use position. Verify rail
locks are seated and no red is
showing. Adjust all hinges
before climbing or using ladder.
Never release hinge locks or
attempt to reposition hinges
while working on the ladder.
• Place on firm level surface with
a secure footing. Do not use on
slippery surfaces. Do not place
on boxes, unstable bases or
scaffolds to gain additional
height. Do not place in front of
door opening toward ladder.
• Where possible, use second
person to hold ladder.
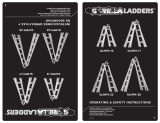
• Set single or extension ladder at
proper (75-1/2) degree angle by
placing ladder base a distance
equal to 1/4 total working length
of ladder away from base of
vertical support.
• When accessing elevated
surfaces, erect ladder so that
approximately 3 ft. extends
above roof line or working
surface: tie top at support points.
• If ladder has wheels, refer to the
danger label placed above
each wheel.
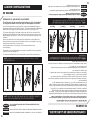
PROPER CLIMBING
AND USE
• DO NOT USE LADDERS if you
tire easily, or are subject to
fainting spells, or are using
medicine or alcohol or are
physically impaired.
• To protect children, do not leave
ladder set-up and unattended.
• Make sure all hinges and rail
locks are securely locked before
climbing. Check that top and
bottom ends of ladder rails are
firmly supported.
• CAUTION: A 2" x 10"
construction grade lumber plank
or better must be used in all
approved horizontal positions
where indicated.
• Face ladder when climbing up or
down; keep body centered
between side rails.
• Maintain a firm grip. Use both
hands in climbing.
• Never climb a ladder from the
side unless ladder is secured
against side-wise motion, or climb
from one ladder to another.
• Do not stand closer to the top
than 3 ft. from the top. Never
climb above the top support point.
• Do not use ladder in high winds
or storms.
• Never pull the hinge release
levers and operate hinges when
standing on the ladder.
• Cover up hinges during messy
work. Obstacles in hinge will
destroy its function.
• Do not over reach; move ladder
when needed.
• Do not “walk” or “jog” ladder when
standing on it.
• Do not overload.
• Keep ladder close to work: avoid
pushing or pulling off to the side
of ladders.
• Do not allow the wheels to make
contact to any surface while the
ladder is being used or while you
are adjusting the ladder. Ladder
may roll out and cause injury
or death.
• When using the ladder in the
extension position, the wheels
must be at the top of the ladder.
• Wheels must only be used to
transport the ladder.
PROPER CARE AND
STORAGE
• Keep hinges free of foreign
materials that could destroy its
function.
• Store ladder in safe and
dry place.
• Keep ladder clean and free of all
foreign materials.
• Lubricate mechanism of
hinges regularly.
NO LEER NI SEGUIR TODAS LAS INSTRUCCIONES SOBRE ESTA
ESCALERA, INCLUYENDO AQUELLAS QUE APARECEN DEBAJO
DE LOS PELDAÑOS, PUDIERA RESULTAR EN LESIONES O MUERTE.
INSTRUCCIONES OPERATIVAS Y DE SEGURIDAD
INSTRUCCIONES DE SEGURIDAD
SELECCIÓN
APROPIADA
• Selecciona una escalera del
largo adecuado para alcanzar la
altura
de trabajo.
• IMPORTANTE: Las escaleras
están diseñadas para soportar
una persona por cada lado,
además de los materiales y las
herramientas en la posición de
escalera de tijera para 2
personas, o sólo una persona
más materiales y herramientas
en todas las demás posiciones
cuando su peso sea menor a la
capacidad de carga de trabajo
que se muestra en el aviso
ubicado sobre esta escalera.
INSPECCIÓN
• Inspecciónala en el momento
en que la recibas y antes de
cada uso; nunca subas por una
escalera dañada, torcida o rota.
Todas las piezas tienen que
estar en buen estado de
funcionamiento.
• Asegúrate de que todos los
remaches, juntas, tuercas y
pernos estén ajustados; las
bases de las patas, peldaños y
travesaños estén asegurados y
todas las bisagras funcionen
correctamente.
• Mantén la escalera limpia, sin
suciedad, aceite, barro, pintura
húmeda y otros materiales
resbalosos. Mantén tu calzado
limpio, no se deben usar suelas
de cuero.
• No realices reparaciones
temporales de las piezas
dañadas
o faltantes.
• Destruye la escalera si está
rota, desgastada o si se expone
al fuego o la corrosión química.
INSTALACIÓN ADECUADA
• ¡PELIGRO! ¡EL METAL
CONDUCE ELECTRICIDAD!
No dejes que las escaleras de
cualquier material entren en
contacto con cables eléctricos
vivos.
• Cuando la recibas, lubrica todas
las bisagras con grasa o
sustancia
similar de acuerdo con las
instrucciones del fabricante, y
hazlo de nuevo al menos una
vez por año en función del uso.
• Acciona de manera segura
todas las bisagras y bloqueos
de riel antes de subir. El
funcionamiento correcto de las
bisagras es el siguiente:
1) Para bloquear la bisagra: El
botón engranará en la posición
de bloqueo cuando la escalera
esté en la posición correcta
de “uso”
2) Para desbloquear la bisagra:
Presiona el botón para
desbloquear la bisagra. Coloca
la escalera en la posición
correcta de “uso” y se activará el
bloqueo de la bisagra. Puede
ser difícil desbloquear las
bisagras si hay presión. Para
aliviar la presión, mueve la mitad
de la escalera hacia adelante y
hacia atrás hasta que la bisagra
pueda desbloquearse
fácilmente.
• NOTA: De haber presión, será
difícil desbloquear las bisagras.
Para aliviar la presión, sacude
media escalera hacia adelante y
hacia atrás hasta que la bisagra
pueda desactivarse fácilmente.
• Las bisagras se activarán
cuando estén en la posición
correcta de “uso”. Verifica que
los bloqueos del riel estén
acoplados y no se muestre rojo.
Ajusta todas las bisagras antes
de subir a la escalera o usarla.
Nunca liberes los bloqueos de
las bisagras ni intentes volver a
colocar las bisagras mientras te
encuentres trabajando sobre la
escalera.
• Colócala sobre una superficie
nivelada y firme con un apoyo
estable. No la uses sobre
superficies resbalosas. No la
coloques sobre cajas, bases
inestables o andamios para
lograr mayor altura. No
coloques la escalera frente a
una puerta que abra hacia ti.
• Donde sea posible, haz que otra
persona sostenga la escalera.
• Configura la escalera sencilla o
de extensión a un ángulo
adecuado (75 ½ grados),
colocando la base de la escalera
a una distancia igual a ¼ de la
longitud total de la escalera,
alejándose del soporte vertical
de la base.
• Al acceder a superficies
elevadas, levanta la escalera de
manera que aproximadamente 3
pies se extiendan sobre la línea
del techo o la superficie de
trabajo. Amarra la parte superior
en los puntos
de soporte.
• Si la escalera tiene ruedas,
consulta la etiqueta sobre
peligro colocada encima de
cada una.
CÓMO SUBIR Y USAR BIEN
• NO USES LA ESCALERA si te
cansas fácilmente, eres
propenso a desmayos o tomas
algún medicamento o alcohol o
estás
físicamente impedido.
• Para proteger a los niños, no
dejes la escalera instalada y sin
supervisión.
• Asegúrate de que todas las
bisagras y bloqueos de riel estén
firmemente bloqueados antes de
subirte. Revisa que los extremos
superior e inferior de los rieles de
la escalera estén respaldados
firmemente.
• PRECAUCIÓN: Un tablón de
madera de 2" x 10" con calidad
para construcción o mejor tiene
que usarse donde se indique en
todas las posiciones horizontales
aprobadas.
• Ubícate de frente a la escalera
cuando subas o bajes; mantén el
cuerpo centrado entre los
rieles laterales.
• Mantén un agarre firme. Usa las
dos manos al subir.
• Jamás subas por la escalera
desde la parte lateral, a menos
que esté asegurada para que no
se mueva hacia los lados; ni
tampoco subas a una escalera
desde otra.
• No te pares a menos de 3 pies de
la parte superior desde arriba.
Jamás subas más allá del punto
de
soporte superior.
• No uses la escalera durante
vientos fuertes o tormentas.
• No tires las palancas de
desbloqueo de las bisagras
cuando estés parado sobre la
escalera.
• Cubre las bisagras durante el
trabajo que produzca residuos.
Todo obstáculo en las bisagras
destruirá su funcionamiento.
• No te estires más allá de tu
alcance; mueve la escalera
cuando sea necesario.
• Nunca permitas que las ruedas
entren en contacto con ninguna
superficie al usar la escalera o
cuando estés ajustándola. De lo
contrario, la escalera pudieran
provocar lesiones o muerte.
• Al usar la escalera en la posición
de extensión, las ruedas tienen
que estar en la parte superior de
aquella.
• Las ruedas sólo pueden usarse
para transportar la escalera.
CUIDADO Y ALMACENAMIEN-
TO ADECUADOS
• Mantén las bisagras libres de
materiales extraños que puedan
averiar su funcionamiento.
• Almacena la escalera en un lugar
seguro y seco.
• Mantén la escalera limpia y sin
ningún material extraño.
• Lubrica el mecanismo de las
bisagras regularmente.
5
5


 1
1
 2
2
 3
3
 4
4
 5
5
 6
6
 7
7
 8
8
 9
9
 10
10
 11
11
 12
12
 13
13
 14
14


 Gorilla Ladders GLMPX-22 Instrucciones de operación
 Gorilla Ladders GLMPXA-22 RB-2 Instrucciones de operación
 Gorilla Ladders GLMPXT-19-COM Instrucciones de operación
 Gorilla Ladders GLMPXA Instrucciones de operación
 Gorilla Ladders GLMP-RB Instrucciones de operación
 Gorilla Ladders GLMP-WHL Instrucciones de operación
Cosco 20417T1ASE Instrucciones de operación
Little Giant Ladders 12026-801 Manual de usuario
Werner MT-22 Instrucciones de operación


